

Page 1
ins_uctions for use
_vox
Page 2

Once your PHILIPS MAGNAVOX purchase is registered, you're eligible to receive all the privileges of
owning a PHILIPS MAGNAVOX product. So complete and return the Warranty Registration Card
enclosed with your purchase at once. And take advantage of these important benefits.
Congratulationson your purchase,
and welcome to the "family!"
PHILIPS
Dear PHILIPS MAGNAVOX product owner:
Thank you for your confidencein PHILIPS MAGNAVOX. You'veselectedone of the best-built,best-
backed productsavailabletoday.Andwe'll do everythinginour powerto keep youhappy withyour
purchasefor many years to come.
As a member of the PHILIPS MAGNAVOX "family," you'reentitledto protectionbyone ofthe most
comprehensive warrantiesand outstandingservicenetworksinthe industry.
What's more,yourpurchaseguaranteesyou'llreceiveallthe informationandspecialoffersfor which
you qualify,pluseasy access to accessoriesfrom our convenient home shopping network.
And most importantlyyoucan counton our uncompromisingcommitment to yourtotalsatisfaction.
All of thisis ourway of sayingwelcome-and thanksfor investingin a PHIUPS MAGNAVOX product.
Sincerely,
Robert Minkhorst
President and Chief Executive Officer
P.S.Remember,to get the mostfromyour PHILIPS
MAGNAVOXproduct,youmustreturnyour
WarrantyRegistrationCardwithin10 days. So
pleasemailitto usrightnow!
Know ese
safetysymbols
,_, This "oolt of lightnk'_' indicates uninsulated matelial within your unit may cause an electrical
shock. For the safety of everyone inyour household, please do not remove product severing.
_.The "exclamation point" calls attention to features for which you should read the endseed lit-
erature closely to prevent operating and maintenance problems.
WARNING: TO PREVENT FIRE OR SHOCK HAZARD, DO NOT EXPOSE THIS EQUIPMENT
TO RAIN OR MOISTURE.
CAUTION: To prevent electric shock, match wide blade of plug to wide slot, and fully insed.
ATFENTION: Pour d_'iterles chess dlectriques, introduire la lame la plus large de la fiche dens la
home corresdendeste de la prise et pousser jusqu'au fond.
Page 3
SAFETYINSTRUCTIONS- Readbeforeoperatingequipment
Thisproductwasdesignedandmanufacturedto meetstrictqualityand 11. Power-CordProtection- Powersupplycordsshouldberoutedso
safetystandards.Thereare,however,someinstallationandopemetionpro- thattheyarenotlikelyto bewalkedonorpinchedbyitemsplaced
cautionswhichyoushouldbeparticularlyawareof. uponoragainstthem,payingparticularattentiontocordsandplugs,
conveniencereceptacles,andthe pointwheretheyexitfromthe
appliance.
1. ReadInstructions- Allthesafetyandoperatinginstructionsshould
bereadbeforetheapplianceis operated.
2. RetainInstructions- Thesafetyandoperatinginstructionsshould
beretainedforfuturereference.
3. HeedWarnings- Allwarningsontheapplianceandintheoperating
instructionsshouldbeadheredto.
4. FollowInstructions- Alloperatinganduseinstructionsshouldbe
followed.
5, WaterandMoisture-Theapplianceshouldnot beusednearwater
- for example,neara bathtub,washbowl,kitchensink,laundrytub,
inawetbasementornearaswimmingpool,etc.
6. CartsandSteods- Theapplianceshouldbeusedonlywithacartor
standthatis recommendedbythe manufacturer.
6A. A An applianceand cart combinationshould be moved
withcare.Quickstops,excessivetome,andunevensur-
facesmay causetheapplianceandcartcombinationto
overturn.
6BoTill/Stebility- Alltelevisionsmustcomplywithrecommendedinter-
nationalglobalsafetystandardsfor tilt andstabilitypropertiesof its
cabinetdesign.
Donot compromisethesedesignstandardsby applyingexces-
sivepull forceto thefront,ortop, ofthe cabinetwhichcould
ultimatelyoverturntheproduct.
Also,do notendangeryourself,orchildren,byplacingelec-
tronic equipment/toysonthetopofthe cabinet.Suchitems
couldunsuspe_inglyfallfromthetop ofthesetandcause
productdamageand/orpersonalinjury.
7. Wall orCeilingMounting- Theapplianceshouldbemountedto a
wal!orceilingonly asrecommendedbythemanufacturer.
8. Ventilation- Theapplianceshouldbesituatedsothatitslocationor
positiondoesnotinterferewithitsproperventilation.Forexample,
theapplianceshouldnot besituatedona bed,sofa,rug,orsimilar
surfacethatmayblocktheventilationopenings;or,placedinabuilt-
in installation,suchasa bookcaseor cabinetthatmay impedethe
flowofairthroughtheventilationopenings.
9. Heat - Theapplianceshouldbesituatedawayfromheatsources
suchasradiators,heatregisters,stoves,orotherappliances(includ-
ingamplifiers)thatproduceheat.
10. PowerSources- Theapplianceshouldbeconnectedtoa powersup-
ply onlyof thetype describedin the operatinginstructionsor as
markedontheappliance.
12. Cleaning- Theapplianceshouldbecleanedonlyasrecommended
bythemanufacturer.
13, PowerLines- Anoutdoorantennashouldbe locatedawayfrom
powerlines.
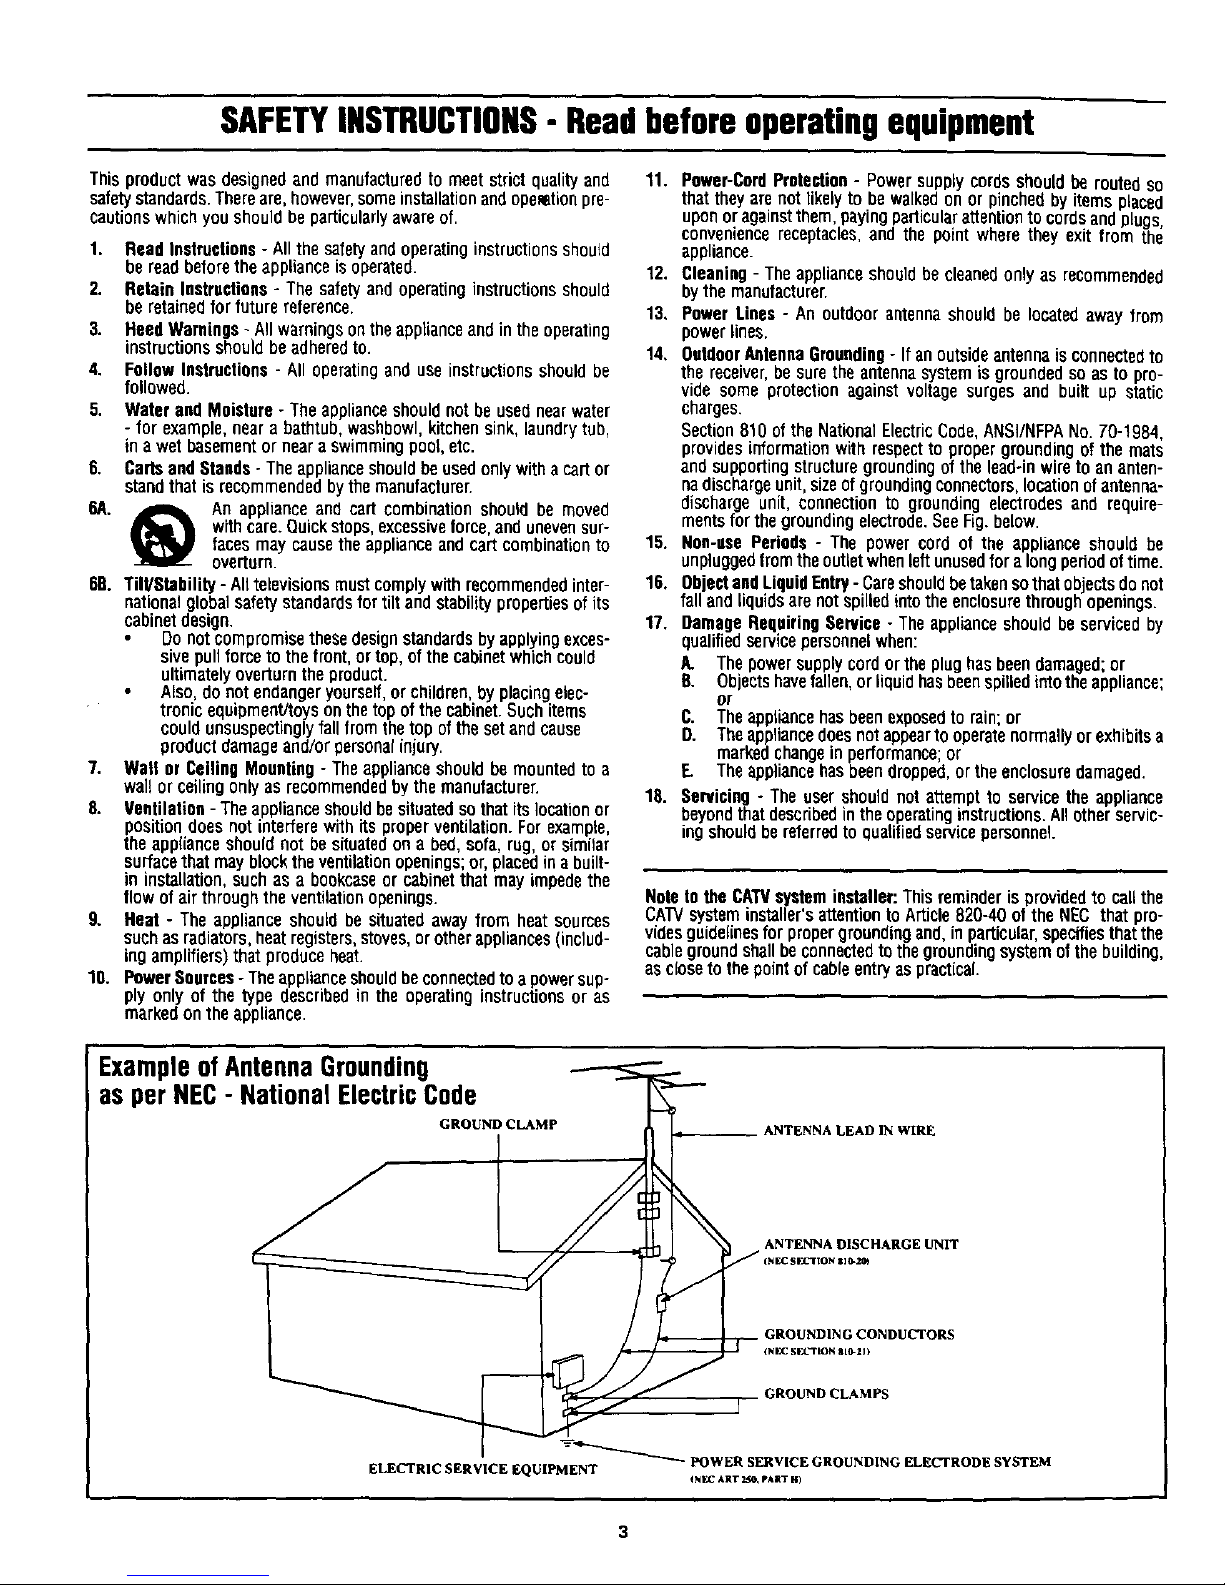
14, OutdoorAntennaGrounding- Ifanoutsideantennaisconnectedto
thereceiver,hesuretheantennasystemisgroundedsoastopro-
vide someprotectionagainstvoltagesurgesand builtup static
charges.
Section810oftheNationalElectricCode,ANSi/NFPANo.70-1984,
providesinformationwithrespectto propergroundingofthe mats
andsupportingstructuregroundingof thelead-inwiretoananten-
nadischargeunit,sizeofgroundingconnectors,locationofantenea-
dischargeunit,connectionto groundingelectrodesand require-
mentsforthegroundingelectrode.SeeFig.below.
15. Non-usePeriods- The powercordof the applianceshouldbe
unpluggedfromtheoutletwhenleftunusedforalongperiodoftime.
16. ObjectandLiquidEntry- Careshouldbetakensothatobectsdonot
fallandliquidsarenotspilled ritothe ericosurethroughopenrigs.
17. DamageRequiringService- Theapplianceshouldbeservicedby
qualifiedservicepersonnelwhen:
A. Thepowersupplycordortheplughasbeendamaged;or
B. Objectshavefallen,orliquidhasbeenspilledintotheappliance;
or
C. Theappliancehasbeenexposedtorain;or
O. Theappliancedoesnotappeartooperatenormallyorexhibitsa
markedchangeinperformance;or
F.. Theappliancehasbeendropped,ortheenclosuredamaged.
18. Servicing- Theusershouldnotattemptto servicethe appliance
beyondthatdescribedintheoperatinginstructions.Allotherservic-
ingshouldbereferredto qualifiedservicepersonnel.
NotetotheCAWsysteminstaller:Thisreminderisprovidedto callthe
cKrv systeminstaller'sattentiontoArticle820-40oftheNECthatpro-
videsguidelinesfor propergroundingand,inparticular,specifiesthatthe
cablegroundshallbeconnectedtothegroundingsystemof thebuilding,
asclosato thepointofcableentryaspract{cal.
ExampleofAntennaGrounding
as per NEC- National ElectricCode
GROUND CLAMP _ ANTENNA LEAD IN WIRE
ANTENNA DISCHARGE UNIT
GROUNDING CONDUCTORS
(N|_C S|_.'TION aL_-Zl )
GROUND CLAMPS
ELECTRIC SERVICE EQUIPMENT _ POWER SERVICE GROUND[NG ELECTRODE SYSTEM
_NEC ART 25_ pAIT II)
Page 4
Welcome/Registration of Your TV ................................ 2
Safety/Precautions ......................................................... .3
Table of Contents ............................................................ 4
Features ........................................................................... 5
'--7 On-Screen Menu
eictu
¢"Adjusting the TV Picture ....................................... 6
F mres
_-Setting the TV's Clock ........................................... 7
_-Activating the TV's On Timer Control.................. 8
_-Selecting the TV's On Timer Channel ................. .9
<'Setting the TV's On Timer StartTime................. 10
<'Turning on the On Timer Display ........................ 11
<"Understanding SmaxtLockTM ................................. 12
<'Using SmartLock - Setting Up the Access Code 13
<"Using SmartLock - Block Channels .................... 14
¢,Using SmartLock - Movie Rating ........................ 15
<'Using SmartLock - TV Rating ............................. 16
<'Using SmartLock - Blocking ............................... 17
<'Using SmartLock - Block Unrated...................... 18
<,Using SmaffJ.,ock- No Rating ............................. 19
<, Reviewing the SmartLock Set!hags...................... 20
<, Viewing Blocked Programming........................... 21
<,Turning On the Noise Reduction Control............22
<,Turning On the Contrast+ Control ...................... 23
<,Using the Closed Caption Control....................... 24
<,Using the Sleep Timer Control............................. 25
Sound
<, Adjusting the Treble, Bass, and Balance Sound
Controls ................................................................. 26
<, Setting the TV for Stereo and SAP Programs .....27
<,Using the Incredible Stereo Control .................... 28
<,Using the Volume Bar Control............................. 28
_Setfing the Audio Out Control.............................. 29
_"Using the TV Speaker Control and
Audio Output Jacks ............................................... 30
_'Using the Audio/Video Input Jacks................ 31-32
I_ Remote Control OperationUsing the SmartPietureTM Control ................ 33
Using the SmartSoundTM Control .................. 34
Using the AVL Control ............................................ 34
Using the Channel Surf Control .............................. 35
Setting the Remote Control to Operate
Accessory Devices ............................................ 36-38
Remote Control Direct Entry Codes .................. 39-40
Using the Remote's VCR Buttons .......................... 41
Picture-In-Picture (PIP)
_'PIP Connection ..................................................... 42
_-Choosing the PIP Source ...................................... 43
<"Remote Control Buttons....................................... 44
<, AdJustingthe PIP Color and Trot ......................... 45
_-More PIP Connections .................................... 46-47
I_l General Information
Tips if Something Isn't Working ............................. 48
Glossary of TV Terms.............................................. 49
Index ........................................................................ 49
Factory Service Locations .................................. 50-5 I
Warranty................................................................... 52
SmartClock, SmartLock, SmartPicture, and SmartSound are trademarks of
Philips Consumer Electronics Company.
Copyright © 1999 Philips Consumer Electronics Company. All fights reserved.
Page 5
Infrared Remote Control works your TV and other
remote controlled devices, including VCRs, DVD
Players, Cable Converters, and Satellite Receivers.
Standard broadcast (VHF/UHF) or Cable TV
(CATV) channel capability
Stereo-Ready TV with built-in audio amplifier and
twin speaker system for receiving TV programs
broadcast in stereo sound
Closed Captioning allows the viewer to read TV
program dialogue or voice conversations as on-screen
text.
Automatic Programming of Channels for quick
and easy selection of favorite stations available in
your area
On-Screen Menu (in English, French, or Spanish)
shows helpful messages and instructions for setting
TV features.
Audio/Video Jack Panel allows direct connections
with VCRs (or other video accessories), providing
quality TV picture and sound playback.
On Timer automatically turns the TV ON to a preset
channel at a preset time.
Sleep Timer automatically turns the 'IV OFF at a
preset time.
SmartLock allows you to block the viewing of cer-
tain channels or programs with certain ratings if you
do not want your children to view inappropriate
material.
Smaripicture allows you to change the picture set-
tings (color, tint, contrast, etc.) for various types of
programming, such as Sports, Movies, Multimedia
(Games), or Weak Signals, with the push of one but-
ton.
SmartSound controls the sudden volume changes
during program changes and commercials. It elimi-
nates the peaks and valleys in the TV's sound and
crea_s one pleasant listening level. You also may tai-
lor the SmartSound setting to the type of program
you are watching (Music, Theatre, etc.).
Picture-In-Picture (PIP) allows you to view two
different programs (or picture sources) on the TV
screen at the same time. PIP will also let you swap
the pictures, move the PIP window to any of the four
comers of the screen, or freeze the picture until you
shut it off.
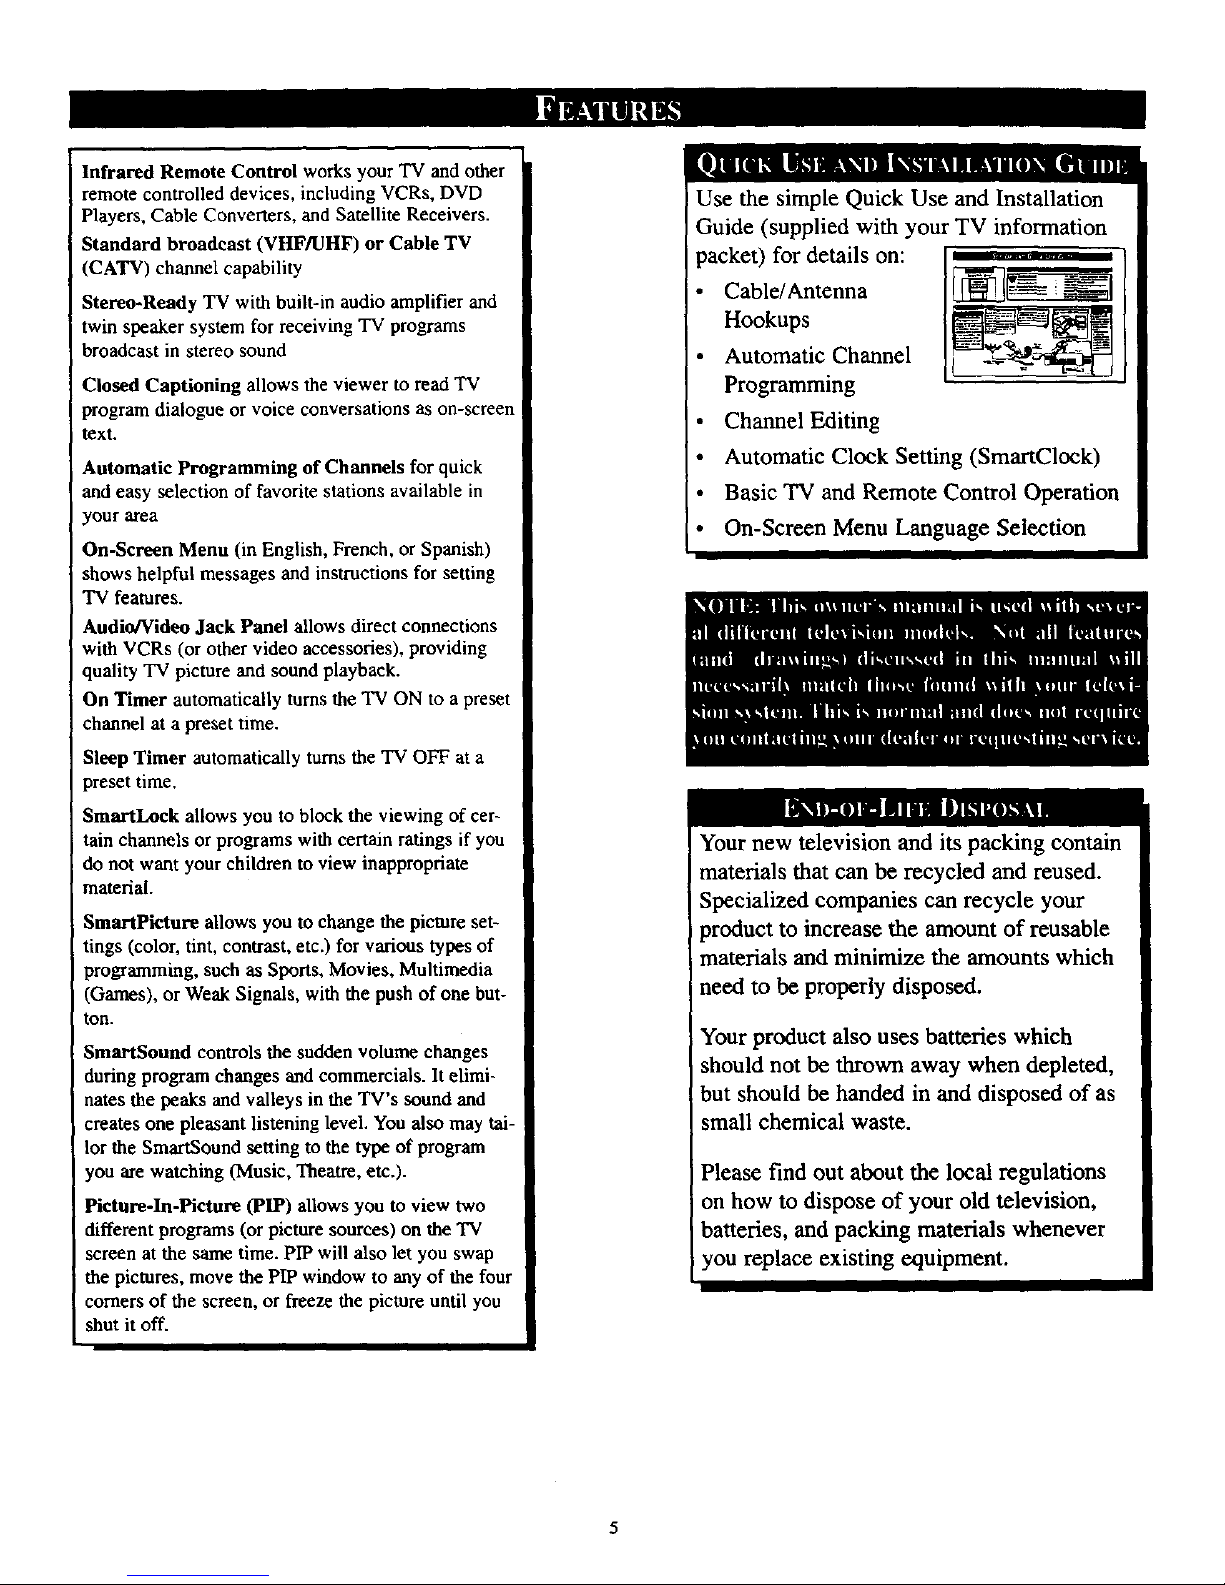
Use the simple Quick Use and Installation
Guide (supplied with your TV information
i packet) for details on:
Cable/Antenna
Hookups
Automatic Channel
Programming
Channel Editing
Automatic Clock Setting (SmartClock)
Basic TV and Remote Control Operation
On-Screen Menu Language Selection
Your new television and its packing contain
materials that can be recycled and reused.
Specialized companies can recycle your
product to increase the amount of reusable
materials and minimize the amounts which
need to be properly disposed.
Your product also uses batteries which
should not be thrown away when depleted,
but should be handed in and disposed of as
small chemical waste.
Please find out about the local regulations
on how to dispose of your old television,
batteries, and packing materials whenever
you replace existing equipment.
Page 6
[:2
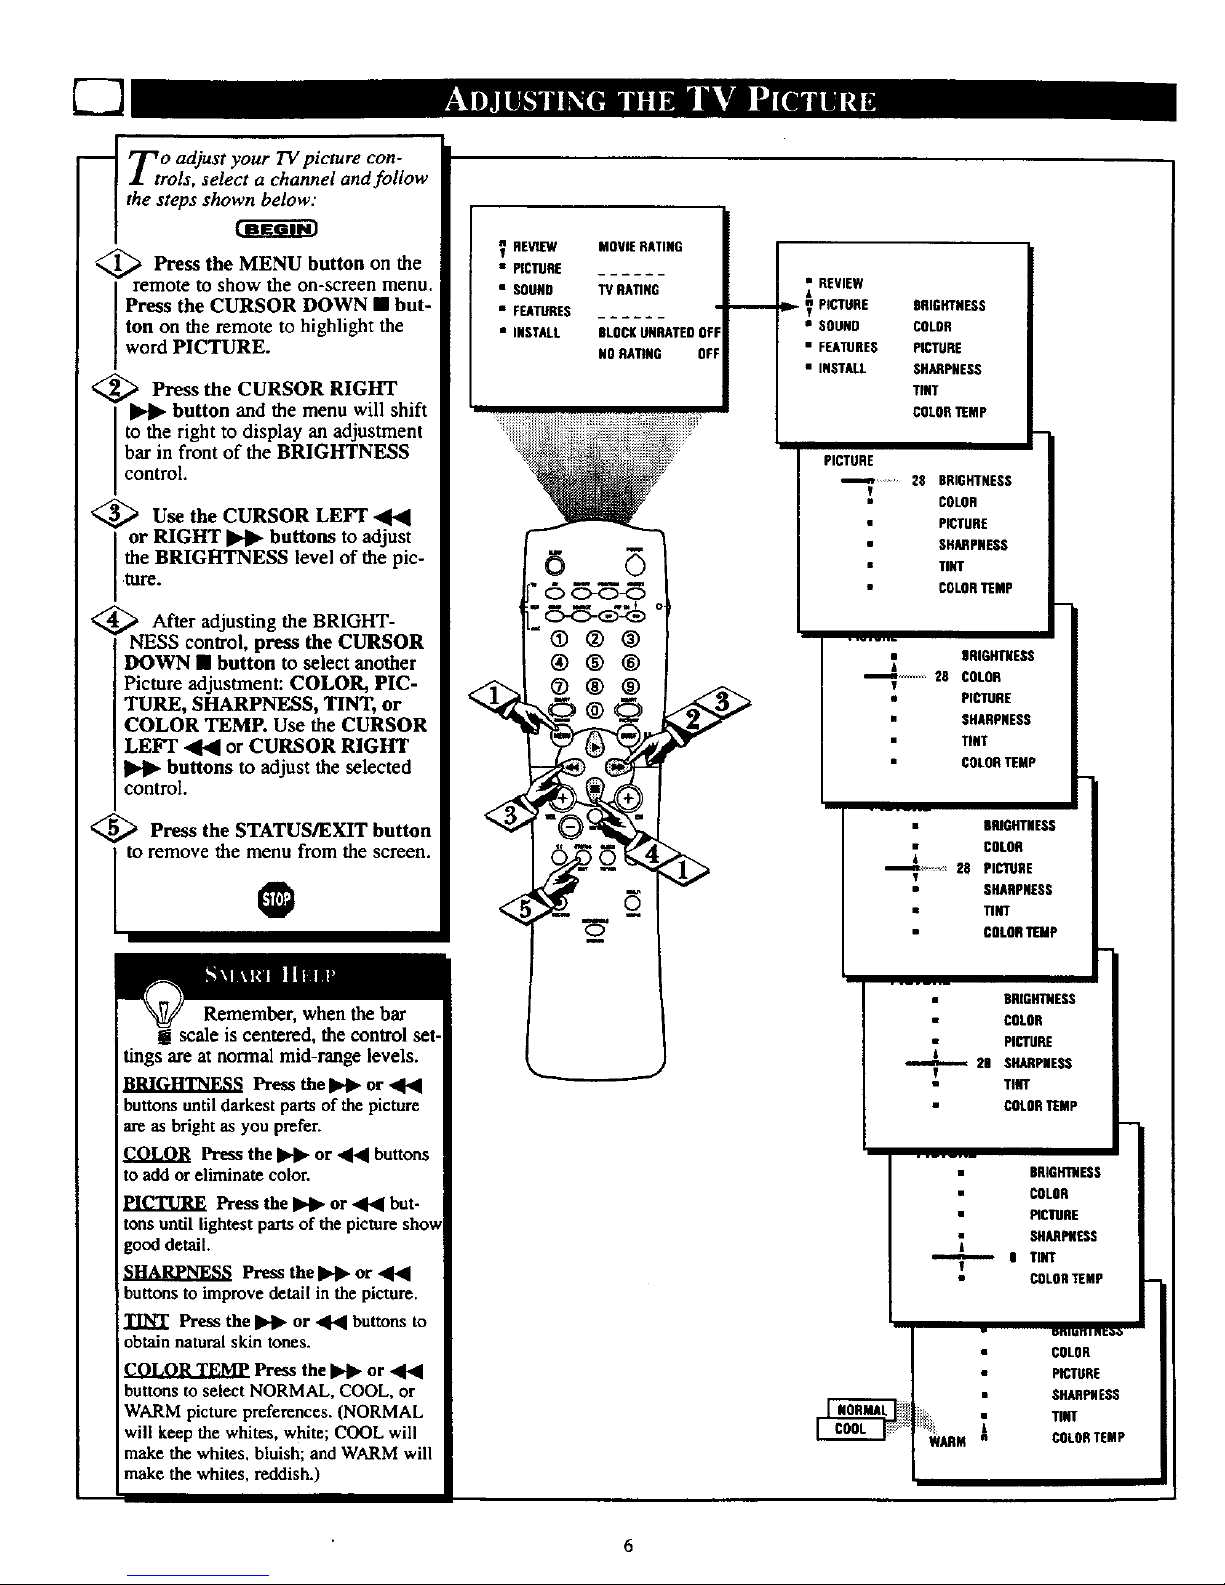
_ T o adjust your TV picture con-
trois, select a channel and follow
the steps shown below."
_ Press MENU button the
the on
remote to show the on-screen menu.
Press the CURSOR DOWN • but-
ton on the remote to highlight the
word PICTURE.
<.,
Press the CURSOR
RIGHT
button and the menu will shift
to the right to display an adjustment
bar in front of the BRIGHTNESS
control.
,_ Use the CURSOR LEFT
or RIGHT _ buttons to adjust
the BRIGHTNESS level of the pic-
ture.
After adjusting the BRIGHT-
NESS control, press the CURSOR
DOWN • button to select another
Picture adjustment: COLOR, PIC-
TURE, SHARPNESS, TINT, or
COLOR TEMP. Use the CURSOR
LEF'I"_ or CURSOR RIGHT
buttons to adjust the selected
control.
<_ Press the STATUS/EXIT button
to remove the menu from the screen.
O
Remember, when the bar
g scale is centered, the control set-
tings are at normal mid-range levels.
Press the I_1_ or _F_
buttons untildarkest partsofthe picture
are as bright as you prefer.
COLOR Press the _ or ,44 buttons
to add or eliminate color.
PICTURE Press the _ or _ but-
tons until lightest parts of the picture sho,,_
good detail.
Press the IP,_ or ,4_1
buttons to improve detail in the picture.
TINT Press the _ or ,4,4 buttons to
obtain natural skin tones.
CO1.OR TEMP Pre_ the _ or
buttons to select NORMAL, COOL, or
WARM picture preferences. (NORMAL
will keep the whites, white; COOL will
make the whites, bluish; and WARM will
make the whites, reddish.)
V REVIEW MOVIERATING
• PICTURE
• SOUND TV RATING
• FEATURES ...... '
• INSTALL BLOCKUNRATED0FI
N0 RATING OFF
o 8
[. C><D-_-_)
®®®
_ REVIEW
lie,.-_ PICTURE BRIGHTNESS
• SOUND COLOR
• FEATURES PICTURE
• INSTALL SHARPNESS
TINT
COLOR"r[MP
PICTURE
_-n .... 28 BRIGHTNESS
COLON
PICTURE
SHARPNESS
TINT
COLORTEMP
DRIGHTUESS
.......... 28 COLOR
T
• PICTURE
• SHARPNESS
TINT
COLORTEMP
BRIGHTNESS
COLOR
_ 28 PICTURE
T
• SHARPNESS
• TINT
COLORTEMP'
BRIGHTNESS
COLOR
PICTURE
29 SHARPNESS
Y
TiNT
COLORTEMP
BRIGHTNESS
COLOR
PICTURE
I TINT
!
COLORTEMP
COLOR
PICTURE
SHARPNESS
i TINT
COLORTEMP
6
Page 7
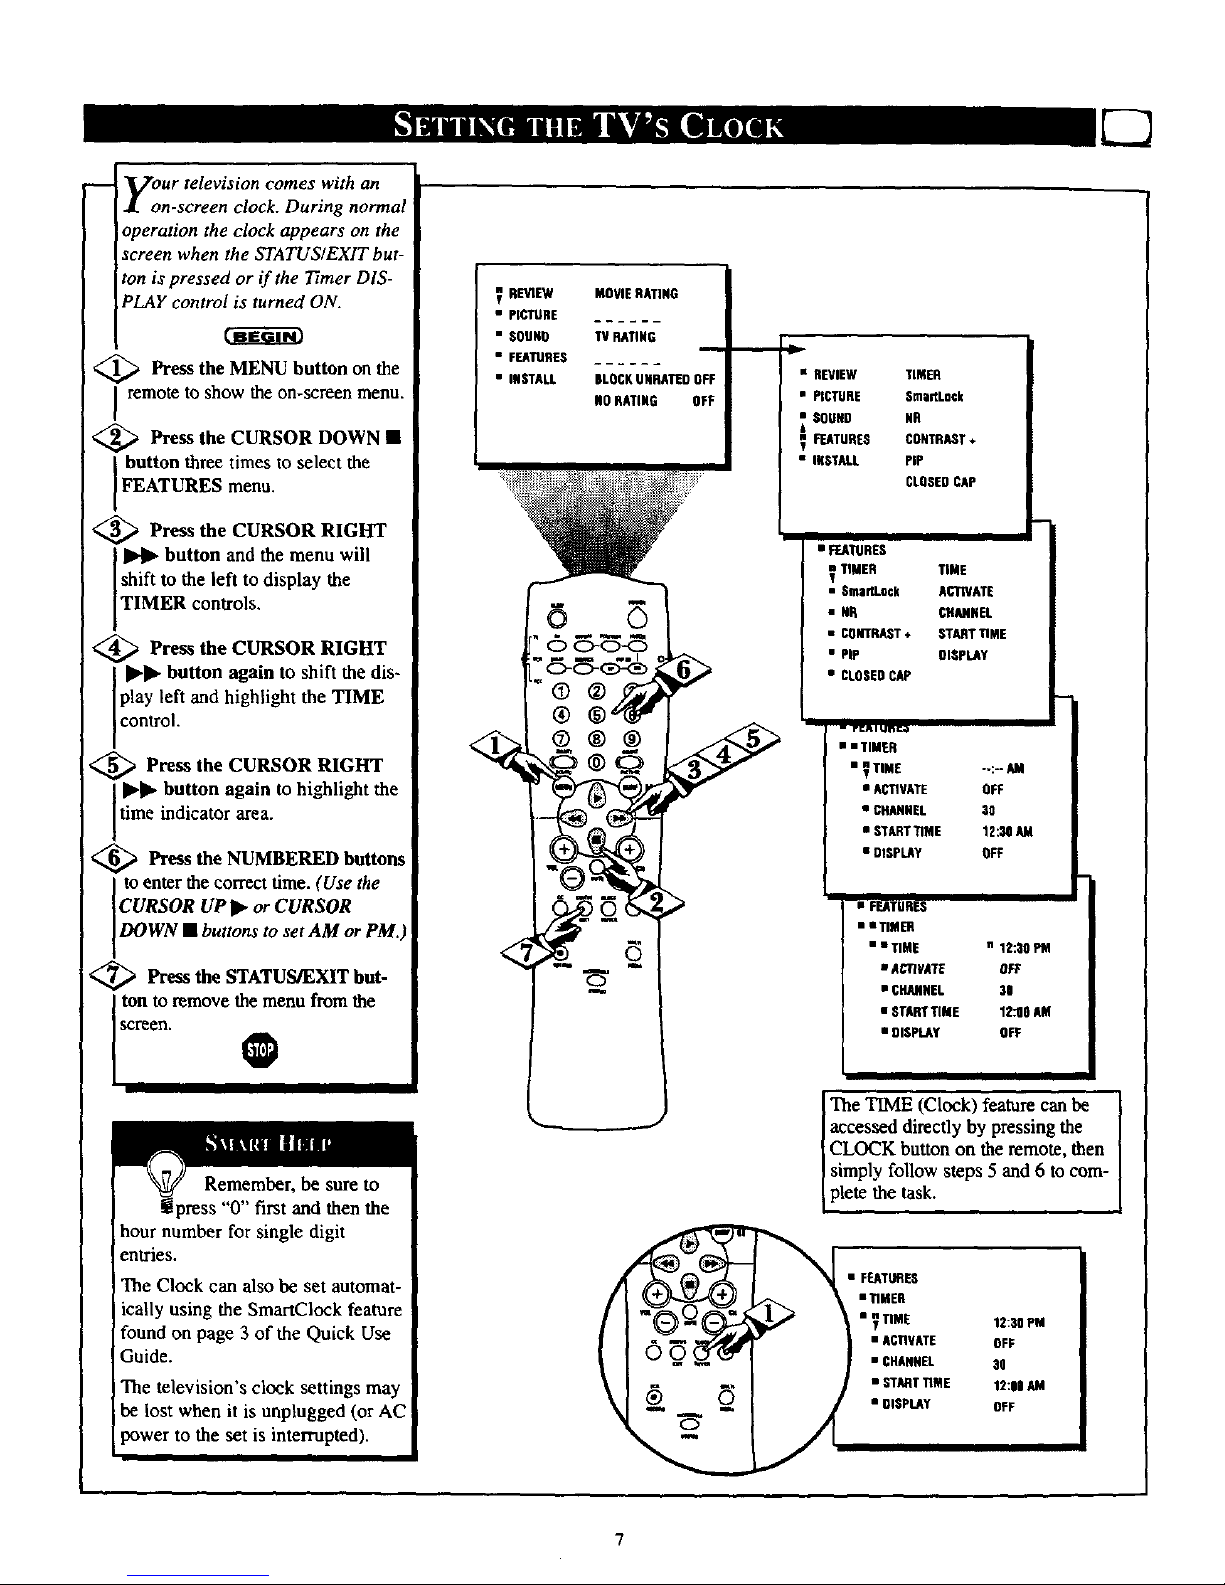
y:ur television comes with an
n-screen clock. During normal
operation the clock appears on the
screen when the STATUS/EXIT but-
ton is pressed or if the Timer DIS-
PLAY control is turned ON.
<_ Press the MENU button on the
remote to show the on-screen menu.
<_ Press the CURSOR DOWN •
button three times to select the
FEATURES menu.
<_ Press the CURSOR RIGHT
1_1_ button and the menu will
shift to the left to display the
TIMER controls.
_ Press the CURSOR RIGHT
I I>'l_ button again to shift the dis-
play left and highlight the TIME
control.
_ Press the CURSOR RIGHT
JII_l_ button again to highlight the
time indicator area.
<_ Press the NUMBERED buttons
to enter the correct time. (Use the
CURSOR UP _ orCURSOR
DOWN • buttons to set AM or PM.)
<_ Press the STATUS/EXIT but-
ton to remove the menu from the
Screen. @
Remember, be sure to
"0" first and then the
hour number for single digit
entries.
The Clock can also be set automat-
ically using the SmartCIock feature
found on page 3 of the Quick Use
Guide.
The television's clock settings may
be lost when it is unplugged (or AC
power to the set is interrupted).
REV1EW
• PICTURE
•SOUNO
• FEATURES
• INSTALL
MOVIERATING
TV RATING
BLOCKUNRATEDOFF
NO RATING OFF
6
• REVIEW TIMER
• PICTURE $martLock
_ SOUND NR
FEATURES coNmAST +
• INSTALL PiP
CLOSEDCAP
• FEATURES
V TIMER TiME
• Sma_Lock AI_ATE
• NR CHAHNEL
• CONTRAST+ START riME
• PiP OIGPLAY
• CLOSEDCAP
• • TIMER
• _ TIME --:-- AM
• ACTIVATE OFF
• CHANNEL 30
• STARTTIME 12:30 AM
• DISPLAY OFF
• FI_TU RF_
• • TIMER
• • TIME n 12:30 PM
• AGTIVATE OF_
• CHANNEL 30
• STARTTIME 12_0 AM
• 91SPLAY OFF
The TIME (Clock) featurecan be [
accessed directly by pressing the
i
CLOCK button on the remote, then
simply follow steps 5 and 6 to com-
plete the task.
• FEATURES
mTIMER
• _ TIME 12:30 PM
• ACnVATE OFF
• CHANNEL 30
• STARTTIME 12:1o AM
• DISPLAY OFF
Page 8
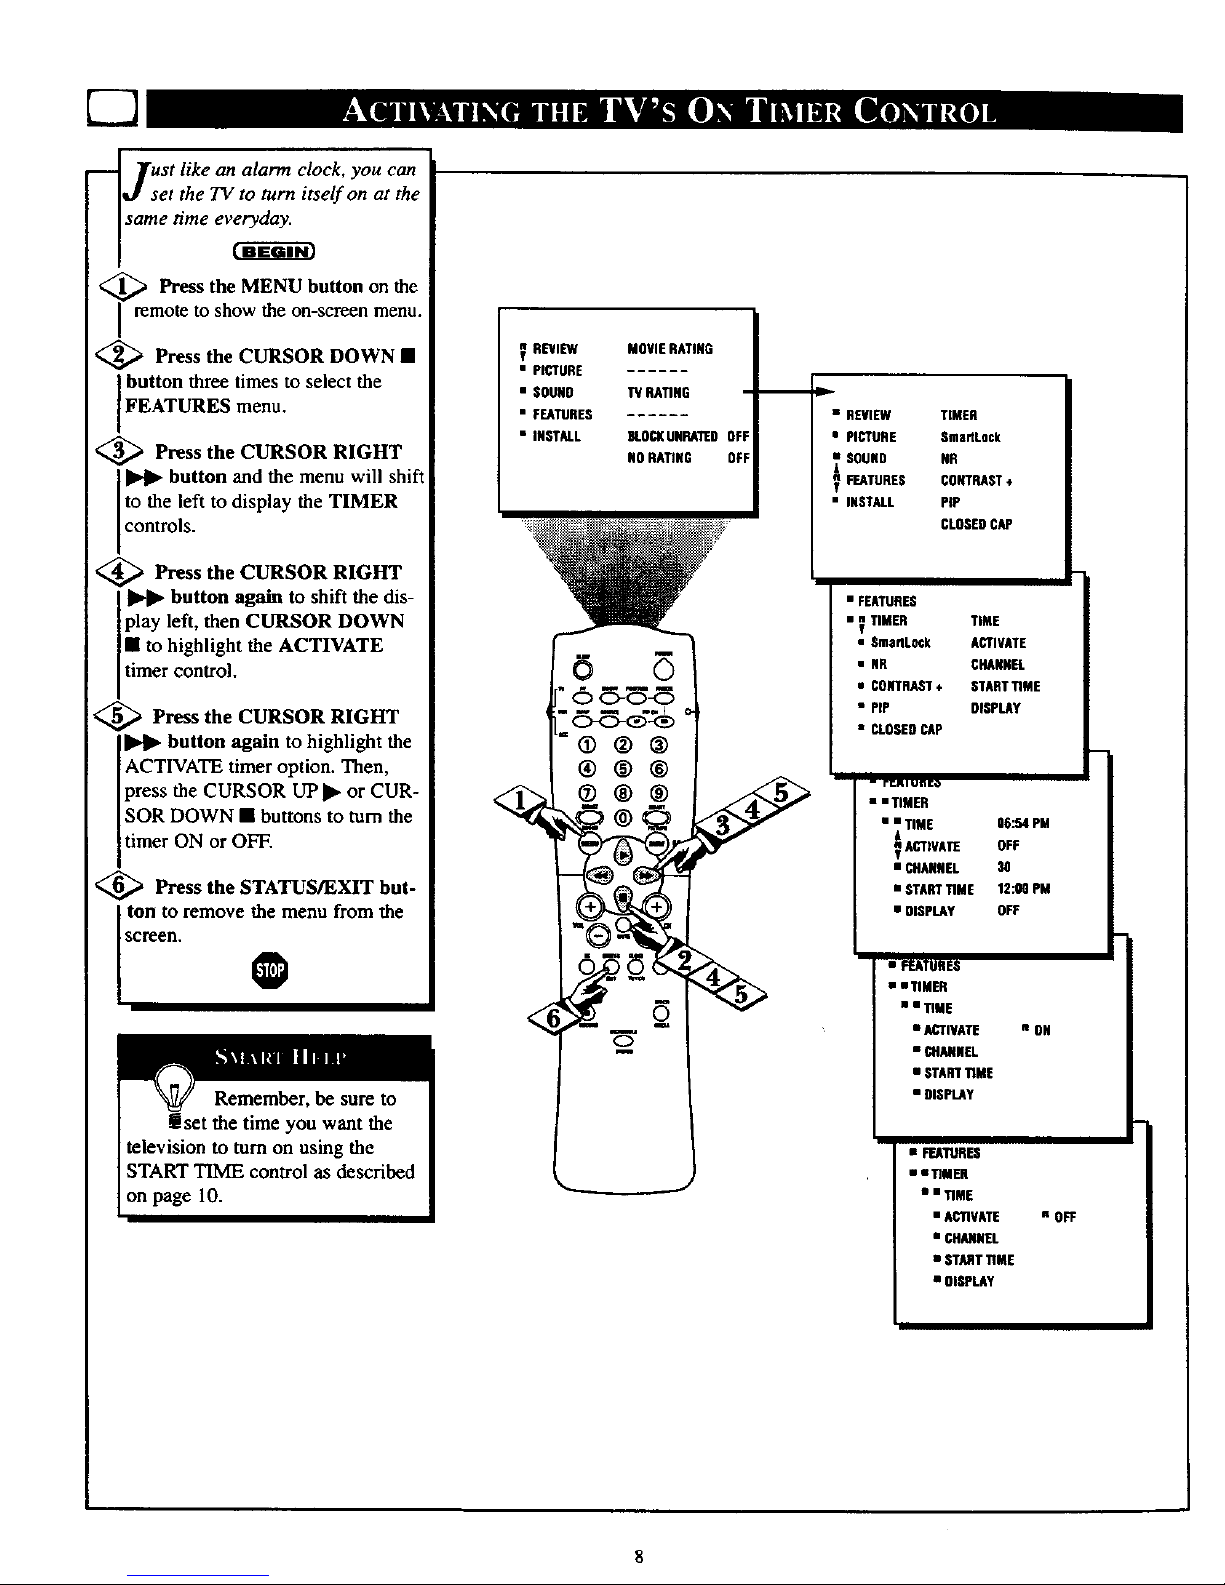
_ ]rust like an alarm clock, you can
J set the TV to turn itself on at the
same time ev_
<_ Press the MENU button on the
remote to show the on-screen menu.
<_ Press the CURSOR DOWN •
button three times to select the
FEATURES menu.
<_ Press the CURSOR RIGHT
button and the menu will shift
to the left to display the TIMER
contro s.
_ Press the CURSOR RIGHT
button again to shift the dis-
play left, then CURSOR DOWN
• to highlight the ACTIVATE
timer control.
<_ Press the CURSOR RIGHT
button again to highlight the
ACTIVATE timer option. Then,
press the CURSOR UPI_ or CUR-
SOR DOWN • buttons to turn the
timer ON or OFF.
€_ Press the STATUS/EXIT but-
ton to remove the menu from the
Screen.
V REVIEW
• PICTURE
• SOUND
• FEATURES
• INSTALL
<
MOVIE RATING
13/RATING
8LOCKUNRAllED
NORATING
6
®®®
o
v
• REVIEW TIMER
• PICTURE SnlaflLock
_SOUND NR
FEATURES CONTRAST*
• INSTALL PiP
CLOSEDCAP
• FEATURES
• n TIMER TiME
g
• SmarlLock ACTIVATE
• NR CHANNEL
• CONTRAST, START'tiME
• PIP DISPLAY
• CLOSEDCAP
- FOR i unit,t*
• • TIMER
• _ TIME 06:54 PM
ACTIVATE OFF
• CHANNEL 30
• STARTTIME 12:00 PM
• DISPLAY OFF
• _EATUR ES
• • TIMER
• i 11ME
• ACTIVATE
• CHANNEL
• START_ME
• DISPLAY
• FENTI_ES
• •TfiHEH
• iT•ME
• ACTIVATE
• CHANNEL
• STARTTIME
• OI_LA¥
n ON
i OFF
8
Page 9
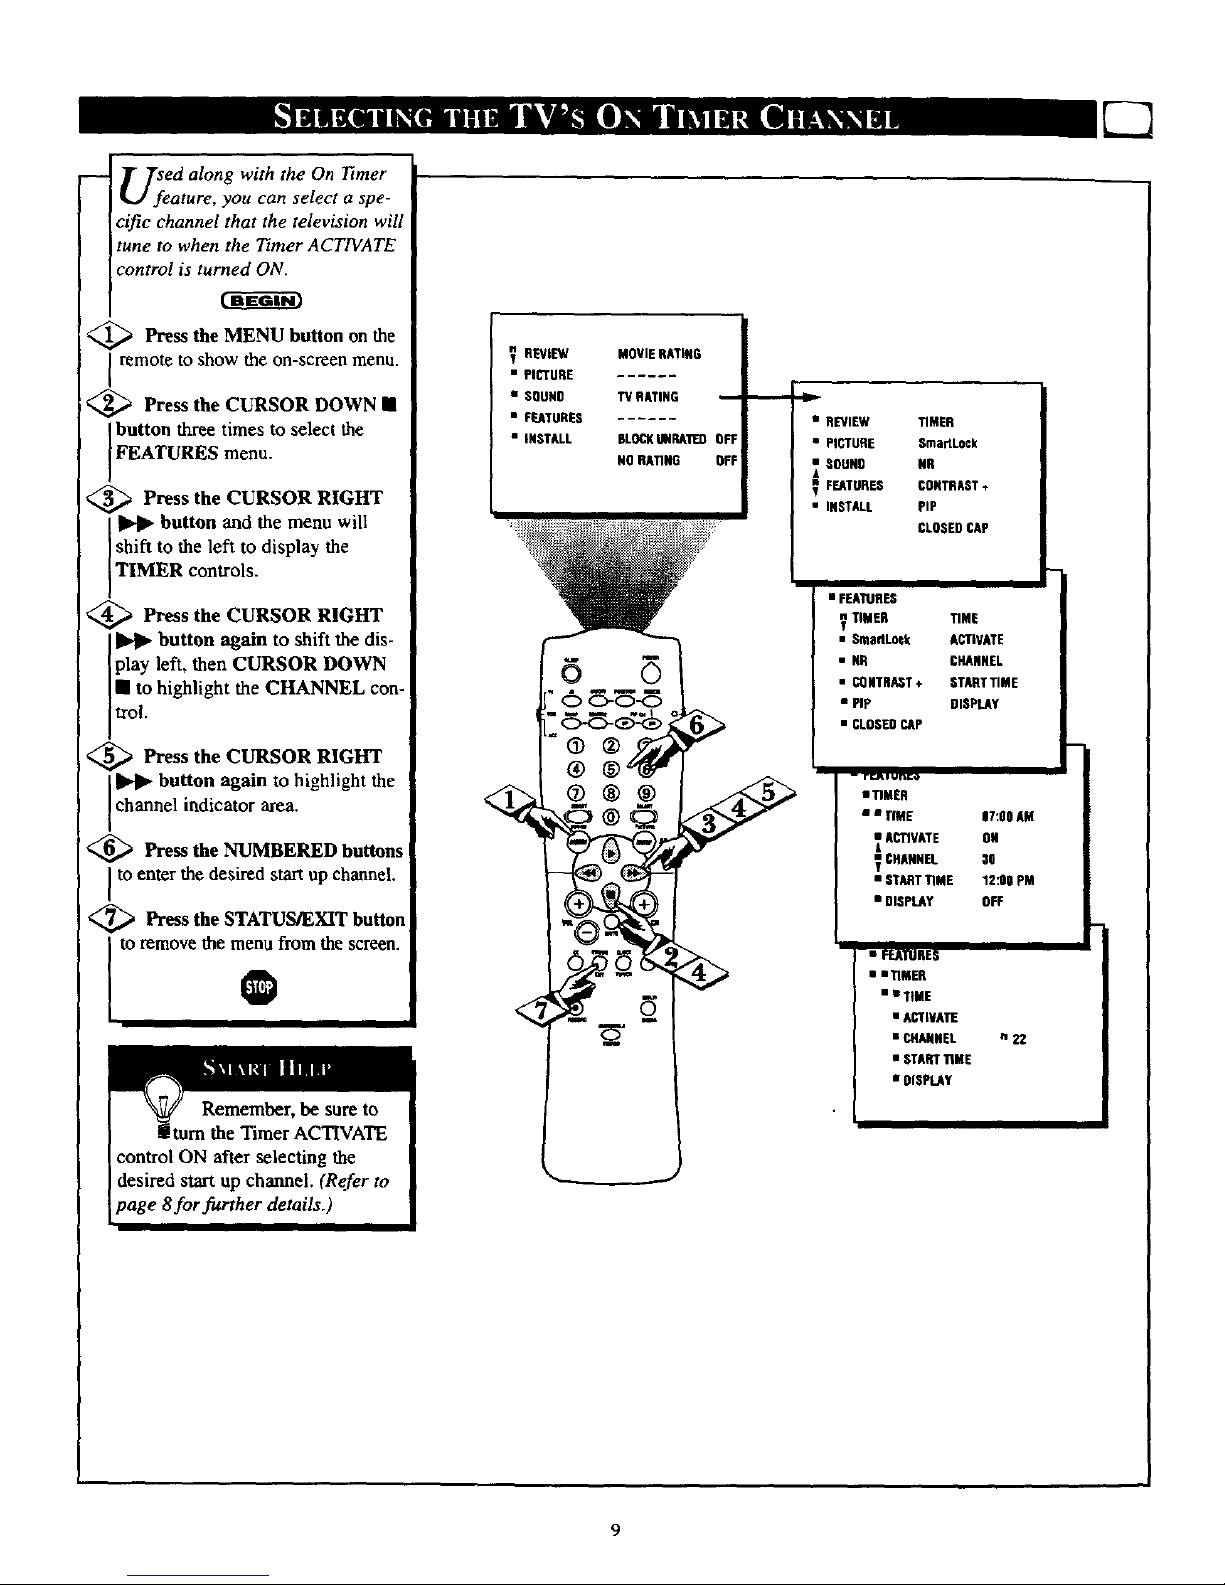
U;eed along with the On _rner
ature, you can select a spe-
cific channel that the television will
tune to when the Timer ACTIVATE
control is turned ON.
_ Press the MENU button on the
remote to show the on-screen menu.
<_ Press the CURSOR DOWN II
button three times to select the
FEATURES menu.
<_ Press the CURSOR RIGHT
button and the menu will
shift to the left to display the
TIMER controls.
<_ Press the CURSOR RIGHT
button again to shift the dis-
Iplay left, then CURSOR DOWN
lea to highlight the CHANNEL con-
trol.
<_ Press the CURSOR RIGHT
button again to highlight the
channe indicator area.
<_ Press the NUMBERED but_ns
to enter the desired start up channel.
<_ Press the STATUS/EXIT button
to remove the menu from the screen.
O
control ON after selecting the
desired start up channel. (Refer to
page 8for further details.)
REVIEW
• PICTURE
• SOUNO
• FEATURES
• INSTALL
MOVIE RATING
RATING m
NLOCKUNRAI1EDOFF
NORATING OFF
v
• REVIEW TIMER
• PICTURE SmanLock
SOUN9 NR
FEATURES CONTRAST+
• INSTALL PiP
CLOSEDCAP
i
• FEATURES
? TIMER TIME
• SrnaftLotk ACTIVATE
• N[_ CHANNEL
• CONTRAST+ STARTTIME
• PiP DISPLAY
• CLOSEDCAP
-- r [._ i un[ #
amI'IMER
• •flHE l/:OO AM
ACTIVATE ON
CHANNEL 30
• STARTTIME 12:00 PM
• DISPLAY OFF
• FEATURES
• mTIMER
• • TIME
• ACTIVATE
• CHANNEL
• STARTTIME
• DISPLAY
n22
Page 10
i
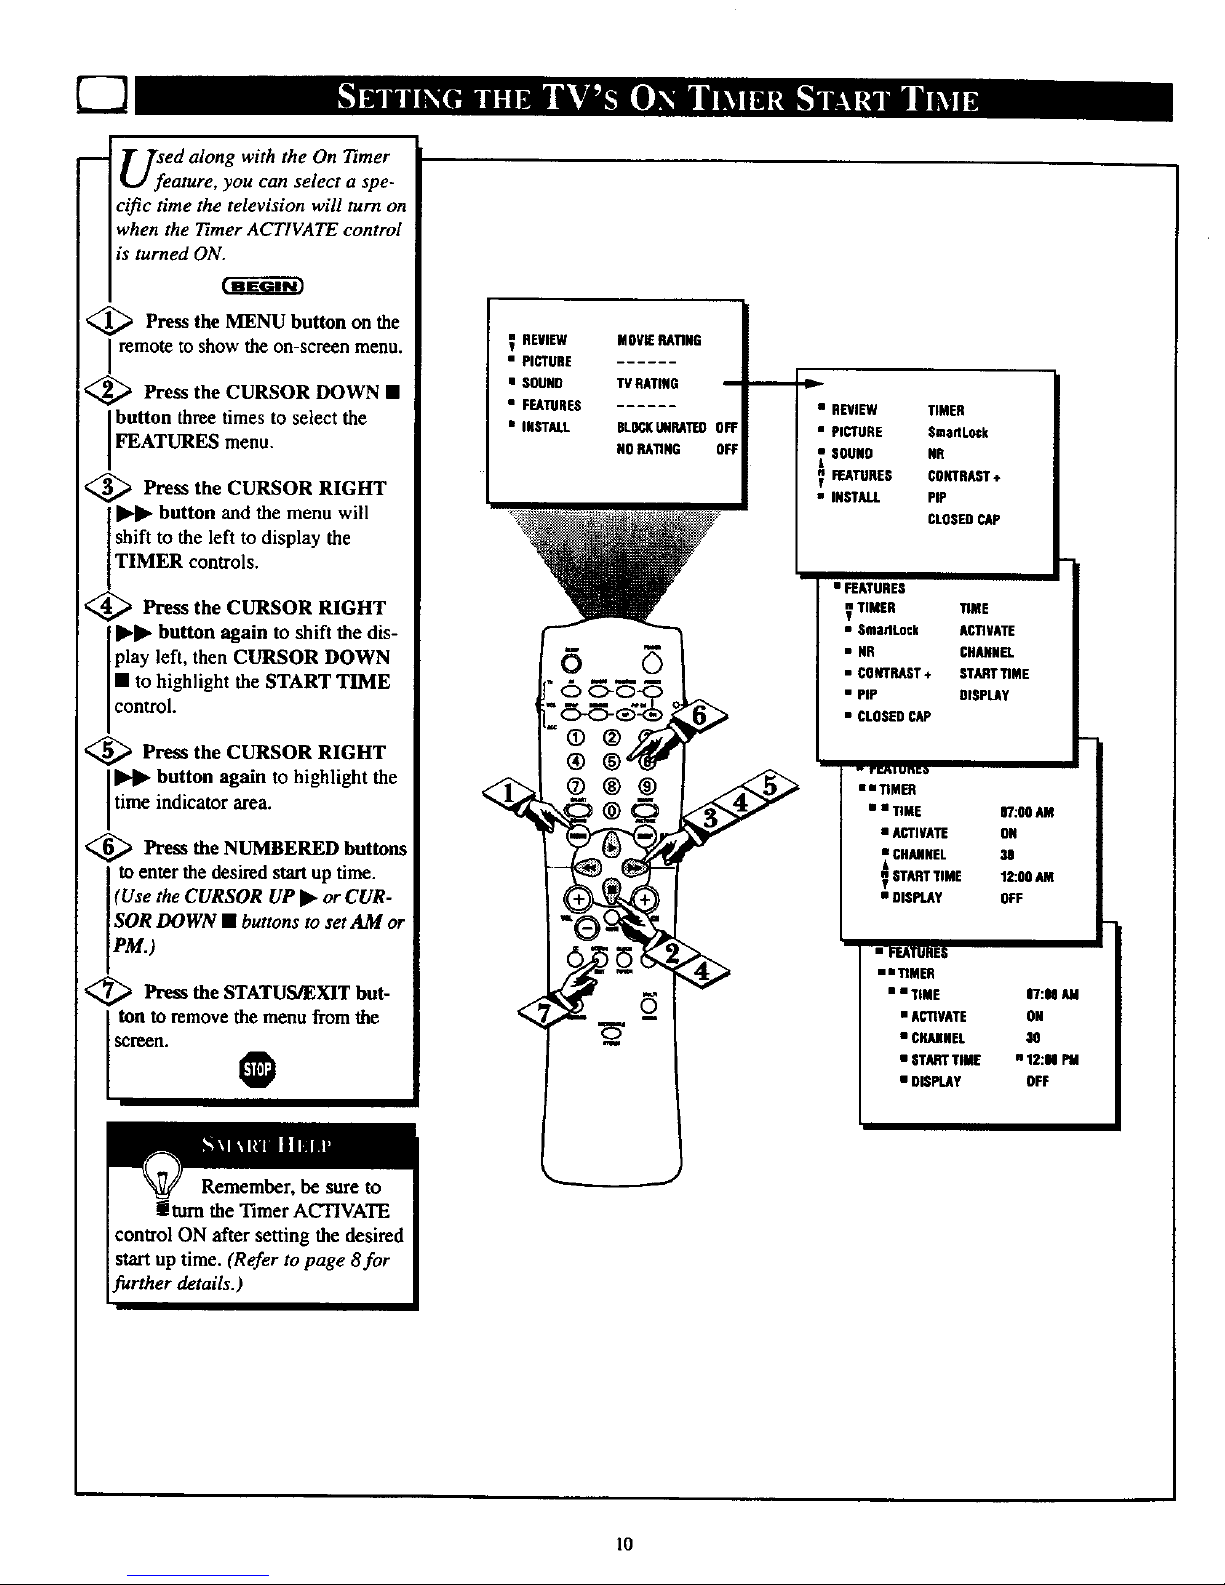
USfeed along with the On Timer
ature, you can select a spe-
cific time the television will turn on
when the Timer ACTIVATE control
is turned ON.
_ Press the MENU button on the
Iremote to show the on-screen menu.
_ Press the CURSOR DOWN •
button three times to select the
FEATURES menu.
<_ Press the CURSOR RIGHT
button and the menu will
shift to the left to display the
TIMER controls.
_ Press the CURSOR RIGHT
II"l_ button again to shift the dis-
play left, then CURSOR DOWN
• to highlight the START TIME
eontro.
'_ Press the CURSOR RIGHT
button again to highlight the
time indicator area.
<_ Press the NUMBERED buttons
to enter the desired start up time.
(Use the CURSOR UP II_or CUR-
SOR DOWN • buttons to set AM or
PAl.)
<_ Prt_ the STATUS/EXIT but-
ton to remove the menu from the
screen.
REVIEW MOVIERATING
• PICTURE
• SOUND T¥ RATING I
• FUTURES
• INSTALL BLSCKUNRATEOOFF
NORATING OFF
• REVIEW TIMER
• PICTURE SmartLock
_ SOUNO NR
_ W_TURES CONTRAST÷
m
• INSTALL PiP
CLOSEDCAp
• FEATURES
_ TIMER TIME
• SmadLock AI_IV_E
• NR CHANNEl.
• CO_rrRAST÷ STARTT1ME
• PiP DISPLAy
• CLOSEDCAP
. rr._t unto
u n'rIMER
• • TIME 07:00 AM
• ACTIVATE ON
CHANNEL 30
STARTTIME 12:00 AM
g
• DISPLAY OFF
• FEATURES
il_M_
• • TIME 07:00 AM
• AC_VATE ON
• CHANNEL 30
• STARTTIME n 12:00 PM
• DISPLAy OFF
10
Page 11
m
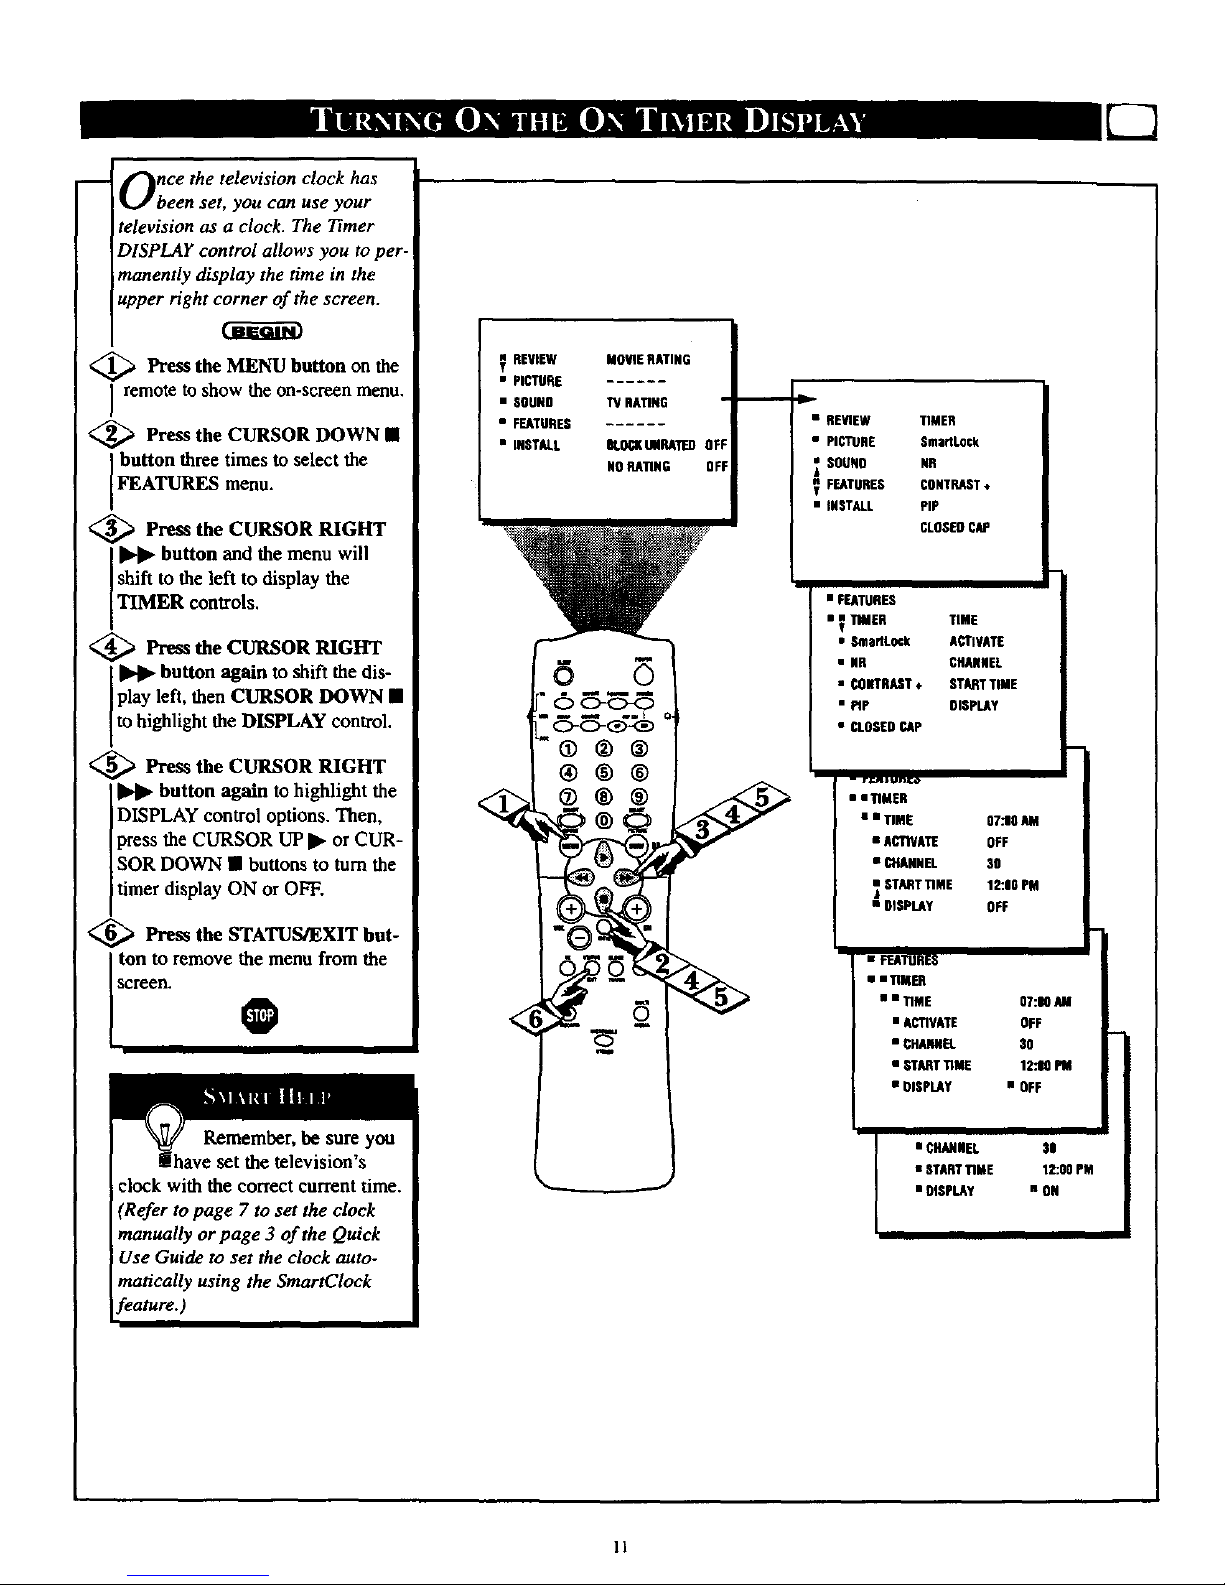
Once the television clock has
been set, you can use your
television as a clock. The Timer
DISPLAY control allows you to per-
manently display the time in the
upper right corner of the screen.
<_ Press the MENU button on the
remote to show the on-screen menu.
<_ Press the CURSOR DOWN •
button three times to select the
FEATURES menu.
<_ Press the CURSOR RIGHT
button and the menu will
shift to the left to display the
TIMER controls.
<_ Press the CURSOR RIGHT
button again to shift the dis-
play left, then CURSOR DOWN •
to highlight the DISPLAY control.
<_ Press the CURSOR RIGHT
button again to highlight the
DISPLAY control options. Then,
press the CURSOR UP I_ or CUR-
SOR DOWN • buttons to turn the
timer display ON or OFF.
<_ Press the STATUS/EXIT but-
ItscOnt:.remove the menu from the
O
Remember, be sure you
have set the television's
clock with the correct current time.
(Refer to page 7 to set the clock
manually or page 3 of the Quick
Use Guide to set the clock auto-
matically using the SmartCIock
feature.)
REVIEW MOVIE RATING
g
• PI_RE
• SNUNO _ RA_NG
• FEATURES
• INSTALL BLOCKUNRATEDOf
NN RATING OFF
6 5
®®®
• REVIEW TIMER
• PICTURE Sma_Lock
SOUND NR
FEATURES CONTRAST÷
• INSTALL PiP
CLOSERCAP
• FEATURES
• _ TIMER TIME
• SmartLock ACTIVATE
• NR CHANNEL
• CONTRAST÷ STARTTIME
• PIP NISPLAY
• CLOSEDCAP
- rr.M*u._o
• • TIMER
• • TIME 07.10AM
• ACTIVATE NFF
• CHANNEL 30
mASTART_ME 12:06 PM
i
• DISPLAY OFF
• _RES
• • nM_
• • TIME 0I:M AM
• ACTIVATE NFF
• C_H_ 30
• STARTTI_ 12.t9
• DISP_Y • NFF
• CHANNEL 31
• STARTTIME 12.10 PM
• OISP_Y • ON
11
Page 12
i
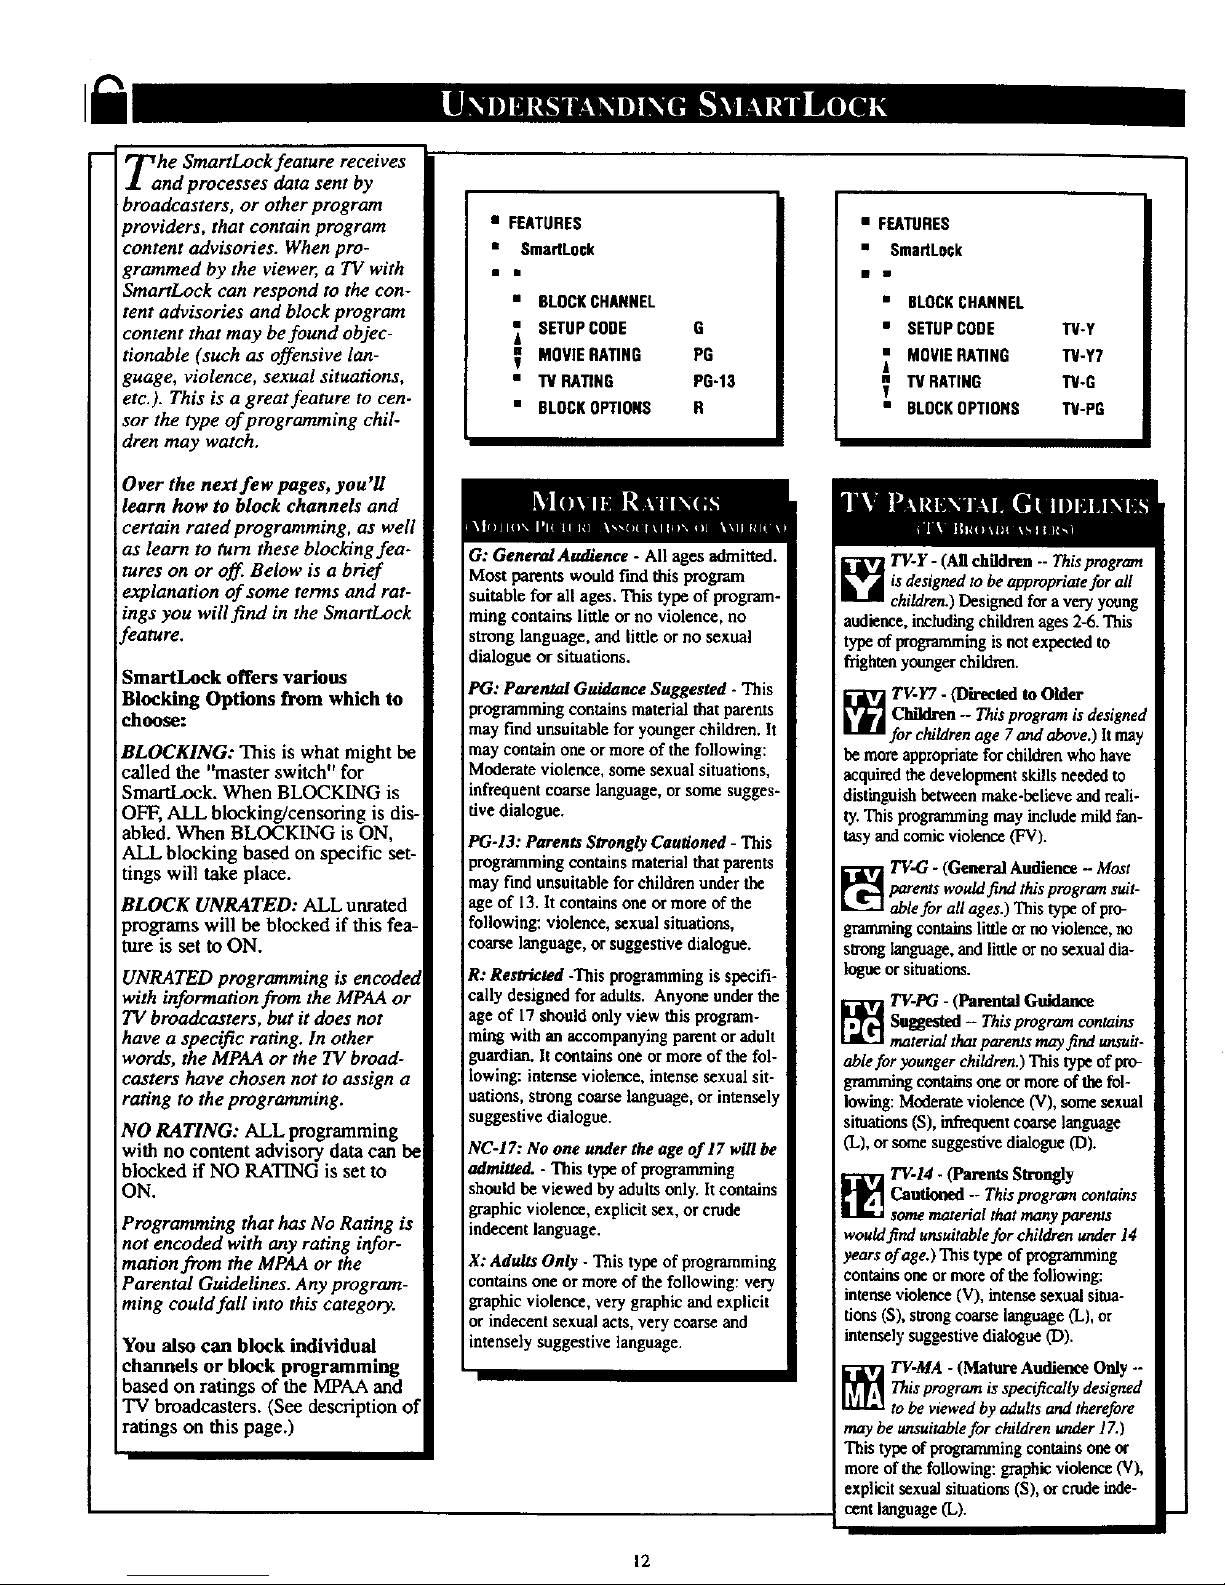
Tahe SmartLock feature receives
nd processes data sent by
broadcasters, or other program
providers, that contain program
content advisories. When pro-
grammed by the viewer, a TV with
SmartLoek can respond to the con-
tent advisories and block program
content that may be found objec-
tionable (such as offensive lan-
guage, violence, sexual situations,
etc.). This is a great feature to cen-
sor the type of programming chil-
dren may watch,
Over the next few pages, you'll
learn how to block channels and
certain rated programming, as well
as learn to turn these blocking fea.
tures on or off. Below is a brief
explanation of some terms and rat-
mgs you will find in the SmartLock
_eature.
SmartLock offers various
Blocking Options from which to
choose:
BLOCKING: This is what might be
called the "master switch" for
SmartLock. When BLOCKING is
OFF, ALL blocking/censoring is dis-
abled. When BLOCKING is ON,
ALL blocking based on specific set-
tings will take place.
BLOCK UNRATED: ALL urtrated
programs will be blocked if this fea-
ture is set to ON.
UNRATED programming is encoded
with information from the MPAA or
TV broadcasters, but it does not
have a specific rating. In other
words, the MPAA or the TV broad-
casters have chosen not to assign a
rating to the programming.
NO RATING: ALL programming
with no content advisory data can be
blocked if NO RATING is set to
ON.
Programming that has No Rating is
not encoded with any rating infor-
mation from the MPAA or the
Parental Guidelines. Any program-
ming could fall into this category.
You also can block individual
channels or block programming
based on ratings of the MPAA and
TV broadcasters. (See description of
ratings on this page.)
• FEATURES
• SmaflLock
nm
• BLOCKCHANNEL
SETUPCODE O
_ MOVIERATING PG
• TVRA_NG PG'13
• BLOCKOPTIONS R
G: General Andienee - All ages admitted.
Most parents would find this program
suitable for all ages. This type of program-
ming contains little or no violence, no
strong language, and little orno sexual
dialogue or situations.
PG: Parental Guidance Suggested- This
programmingcontains material that parents
may find unsuitable for youngerchildren. It
may contain one or more of the following:
Moderate violence, some sexual situations,
infrequentcoarse language, or some sugges-
five dialogue.
PG-13: Parents Strongly Cautioned - This
programming contains material that parents
may find unsuitable for childrenunder the
age of 13. Itcontains one or more of the
following: violence, sexual situations,
coarse language, or suggestive dialogue.
R: Restricted -This programmingis specifi-
cally designed for adults. Anyone underthe
age of 17 should only view this program-
ming with an accompanying parent or adult
guardian. Itcontains one or more of the fol-
lowing: intense violence, intense sexual sit-
uations, strong coarse language, or intensel)
suggestive dialogue.
NC-17: No one under the age of 17 will be
m/m/fled. - This type of programming
should be viewed by adults only. It contains
graphic violence, explicit sex, or crude
indecent language.
X: Adults Only - This type of programming
contains one or more of the following: very
graphic violence, very graphicand explicit
or indecent sexual acts, very coarse and
intensely suggestive language.
• FEATURES
• SmartLock
• BLOCKCHANNEL
• SETUPCODE TV-Y
== MOVIERATING TV-Y7
41
"IVRATING "FV-G
• BLOCKOPTIONS TV-PG
7V-Y- (Aftchildren --Thisprogrcan
is designed to be appropriate for all
children.) Designed for avery young
audience, includingchildrenages 2-6. This
: type of programming is notexpected to
frightenyounger children.
_ TV.Y7 - (Directed to Older
Children -- Thisprogram is designed
for children age 7and above.) It may
be more appropriate for children who have
acquired the development skills needed to
distinguishbetween make-believe and reali-
ty. This programming may include mild fan-
tusy and comic violence (FV).
[__ V-G - (General Audience - Most
parents would fiad this program suit-
ablefor all ages.) This type of pro-
gmmmiog contshas little or no violence, no
stronglanguage, and little or no sexual dia-
logan orsituations.
_ TV-PG - (Parental Guidance
Suggested -- Thisprogram contair_
material that parents may find unsuit-
ablefor younger children.) This type of pro-
gramming contains one or more oftbe fol-
lowing: Moderate violence (V),some sexual
situations(S), infrequent coarse language
(L), or some suggestive dialogue (D).
_ TV-14 - (Parents Strongly
Cautioned -- This program contains
some material that many parents
would find unsuitable for children under 14
years of age.) This type of programming
contains one or more of the following:
intense violence (V), intense sexual situa-
tions (S), strong coarse language (L), or
intensely suggestive dialogue (D).
TV-MA - (Mature Audienee Only --
Thisprogram isspecifically designed
to be viewed by adults and therefore
may be unsuitablefor children under 1Z)
This type of progratmningcontainsone or
more of the following: graphicviolence (V),
explicit sexual situations(S), or crude inde-
cent language (L).
12
Page 13
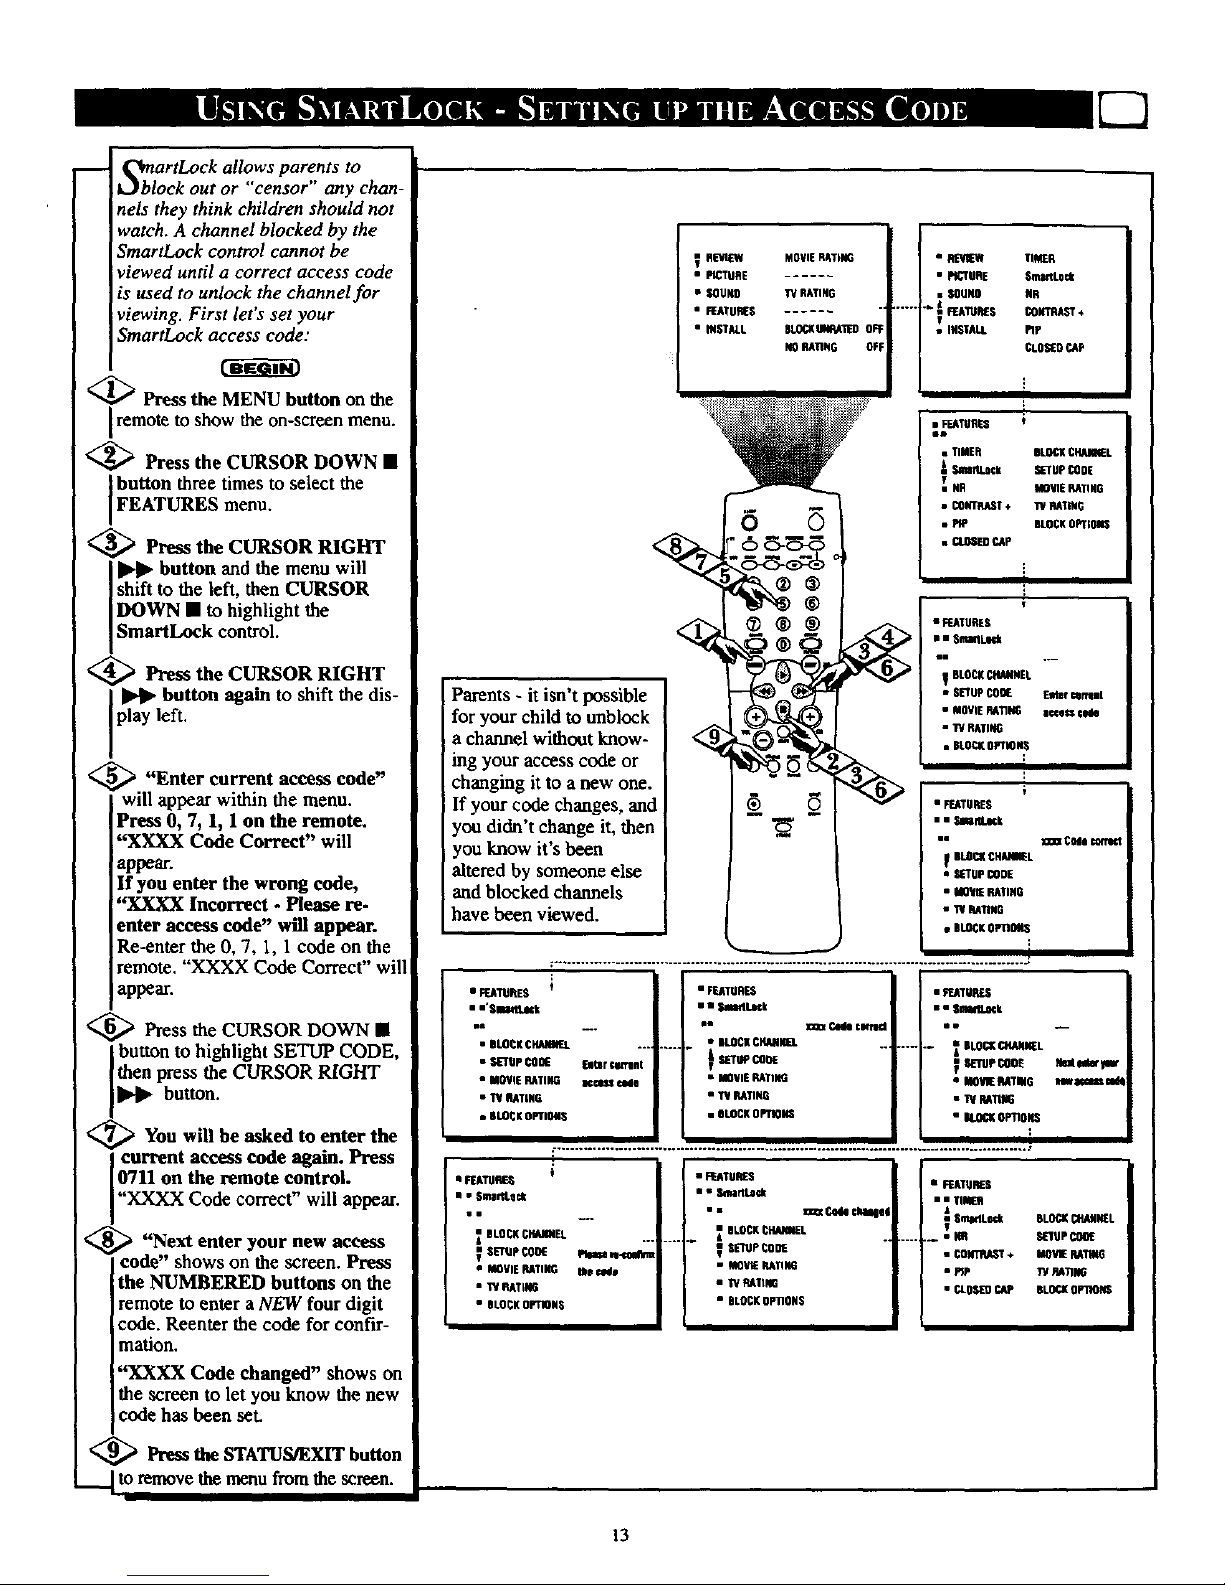
S_blortLock allows parents to
ck out or "censor any chan-
nels they think children should not
watch. A channel blocked by the
SmartLock control cannot be
viewed until a correct access code
is used to unlock the chaanel for
viewing. First let's set your
SmartLock access code:
<_ Press the MENU button on the
remote to show the on-screen menu.
<_ Press the CURSOR DOWN •
Ibutton three times to select the
FEATURES menu.
<_ Press the CURSOR RIGHT
II_ll_button and the menu will
shift to the left, then CURSOR
IDOWN • to highlight the
ISmartLock control.
<_ Press the CURSOR RIGHT
button again to shift the dis-
play left.
,_ "Enter current access code"
will appear within the menu.
Press 0, 7, 1, I on the remote.
"XXXX Code Correct" will
appear.
If you enter the wrong code,
"XXXX Incorrect - Please re.
enter access code" will appear.
Re-enter the 0, 7, 1, 1 code on the
remote. "XXXX Code Correct" will
appear.
<_ Press the CURSOR DOWN •
button to highlight SETUP CODE,
then press the CURSOR R[GHT
button.
_You will be asked to enter the
current access code again. Press
0711 on the remote control.
XXXX Code correct" will appear.
_ "Next enter your new access
code" shows on the screen.Press
the NUMBERED buttons on the
remote to enter a NEW four digit
code. Reenter the code for confir-
mation.
"XXXX Code changed" shows on
the screen to let you know the new
code has been set.
<_ Press the STATUS/EXIT button
__l to remove the menu from the screen.
R_/iOW MOVIER&TING
• PIC'_URE ......
• SOUND lrV RATING
• FEATURES ......
• INSTALL OL_OVRA'ilED OF
FiGRATING OFF
Parents - it isn't possible
fur your child to unblock
a channel without know-
ing your access code or
changing it to a new one.
If your code changes, and
you didn't change it, then
you know it's been
altered by someone else
and blocked channels
have been viewed.
I RESIk_iI TIMER
• PICTURE Smt_L0ck
• • SOUND #R
&
: I=_,TUIEEO COV'm,AST+
p_
T
• INSTALL PIP
cLO_o r_P
• _TUOES ;
• f $_mtLoCk
• 0 m.
• BLOCKCHANNEL
• SETUP CORE _lter genlnt
• MOVIE RATING aggescS_e
• 1'# RATING
• OLQCKOPTIO_
• FEATURES
lie
.... • ILOCK CHAflH[L
• MOVIERATING
• TURATING
• OLOCKO_IORE
• _.MuREs
Be
--- _ GLOCXCHArneL
i
_ SETUP_IIE
• I RATIO
_eawm_
m_ud_
i
• FEATURES
li
BLOCKCH_NEL
_ Sl_rUp OOOE
• MOVIERATING
• _ RATING
• BLOCKOPT_NS
twease_vlnn
me cede
• FTATURES
•" SmirtLHk
• • _ CESOckaEsei
BLOCKCH_NEL
SETUPCODE
• MQV_ RA_SO
• PCRATING
• BLOCKOPtiONS
• FEATURES
• a TIMEfl
..... _•NG
6LOCgCStANESL
SESUPCOO_
MOVIERATING
_/RATING
BL0CROPtiNG
13
Page 14
m
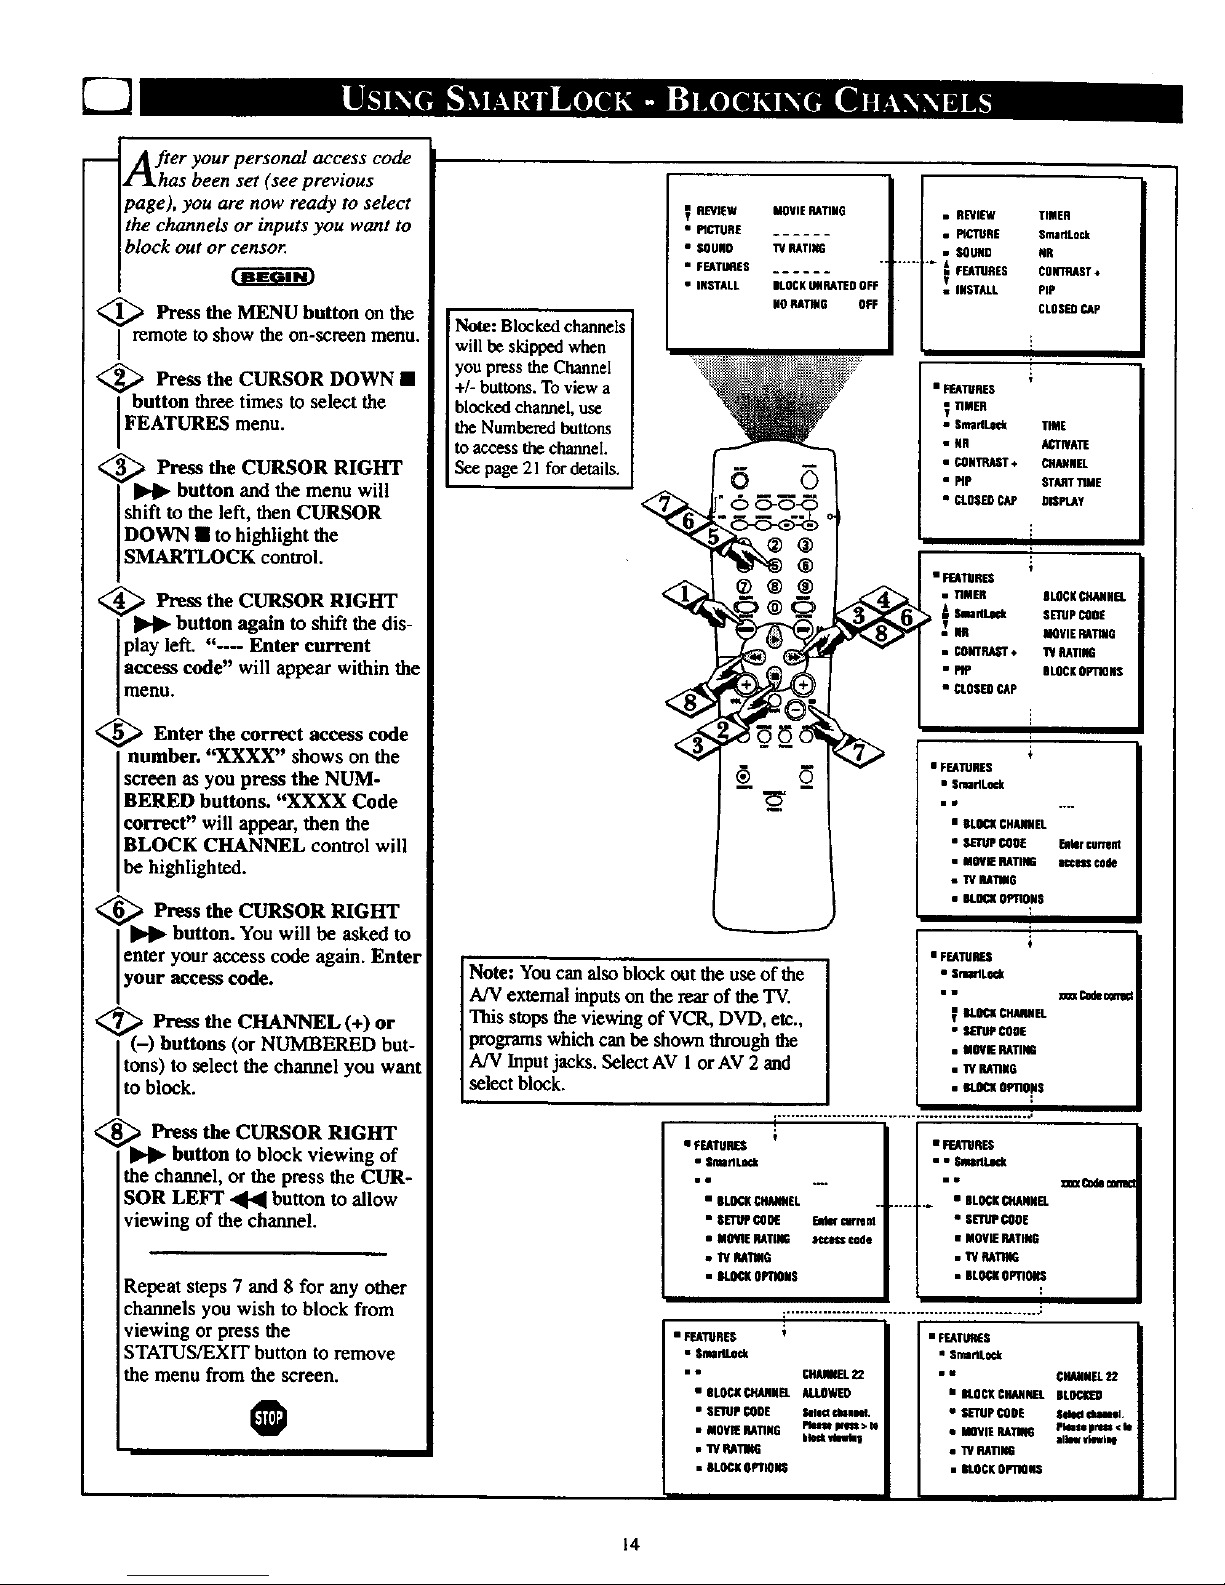
After your personal access code
as been set (see previous
page), you are now ready to select
the channels or inputs you want to
block out or censor.
<_ Press button on the
the MENU
remote to show the on-screen menu.
< Press the CURSOR DOWN •
button three times to select the
FEATURES menu.
< ,_ Press the CURSOR RIGHT
button and the menu will
shift to the left, then CURSOR
DOWN • to highlight the
SMARTLOCK control.
,_ Press the CURSOR RIGHT
button again to shift the dis-
play left. "--- Enter current
access code" will appear within the
menu.
<_ Enter the correct access code
<
<
number. "XXXX" shows on the
screen as you press the NUM-
BERED buttons. "XXXX Code
correct" will appear, then the
BLOCK CHANNEL control will
be highlighted.
Press the CURSOR RIGHT
button. You will be asked to
enter your access code again. Enter
rOUt access code.
Press the CHANNEL (+) or
(-) buttons (or NUMBERED but-
tons) to select the channel you want
to block.
Press the CURSOR RIGHT
button to block viewing of
the channel, or the press the CUR-
SOR LEFT .41.41button to allow
viewing of the channel.
Repeat steps 7 and 8 for any other
channels you wish to block from
viewing or press the
STATUS/EXIT button to remove
the menu from the screen.
@
Note: Blocked channels
will be skipped when
you press the Channel
+/- buttons. To view a
blocked channel, use
the Numbered buttons
to access the channel.
See page 21 for details.
REVIEW
• MCTURE
• $OUNO
• FEATURES
• IKSTALL
MOVIE RATING
11/_TI_
_OCO URM_D OFF
NORATING OFF
• REVIEW TIMER
• PICTURE SmaMLock
• SOUND NR
...... tmFEATURES CONTRAST*
_ INST_L PIP
CLOSEDCAp
]
• _TURER
_ TIMER
• Sm_Ll_ T_E
• MP ST_r 'rile
• Ct_.e CAP DIe'rAY
!
•nMER S_CK _t_IREI.
SmflLock SETUPCOOR
Nil MOVIERkIEV6
• CONTRAST* W RATING
• PIP BLOCKOPTmNS
• CLOSEOCAP
Note: You can also block out the use of the
A!V external inputson the rear of the"IV.
This stops the viewing of VCR, DVD, etc.,
programswhich canbe shown through the
A/V Input jacks. Select AV 1 orAV 2 and
select block.
• FEATURES
• Snl_lLnCk
Be
• |LOGK €I_EL
• MOVIE RATING
• I'/P.4111G
• _ OP_OiS
EM(_ cwrard
aCC_ Code
• FS_TURES
i is $i_
i•
....... • BLOCKn4ANilEL
• SETUPCOOE
• MOVIERATING
= ff RaTIUR
• DLO{KoPnois
_nnn(C_dehim
• F_ATU R _ i
• SmdLock
• • CFUUR[L22
• RLOCKCI_NNn _.OWED
• SETUP CODE Sele_ Q.eM.
• MOYRURnNG P_m m> _
|lock_eb I
• lV RAi
• BLOCK@PT_
• FEATURES
• SmartLo_k
• " CHANNEL22
• [OCI(COANNEL BLOC[D
• SETUPCOOE $ei_ dililel.
• MOVIE RAnt_ Pkmsepl_l¢ de
aliw viewing
• "iVRAT1N6
• BLOCKOPilONS
14
Page 15
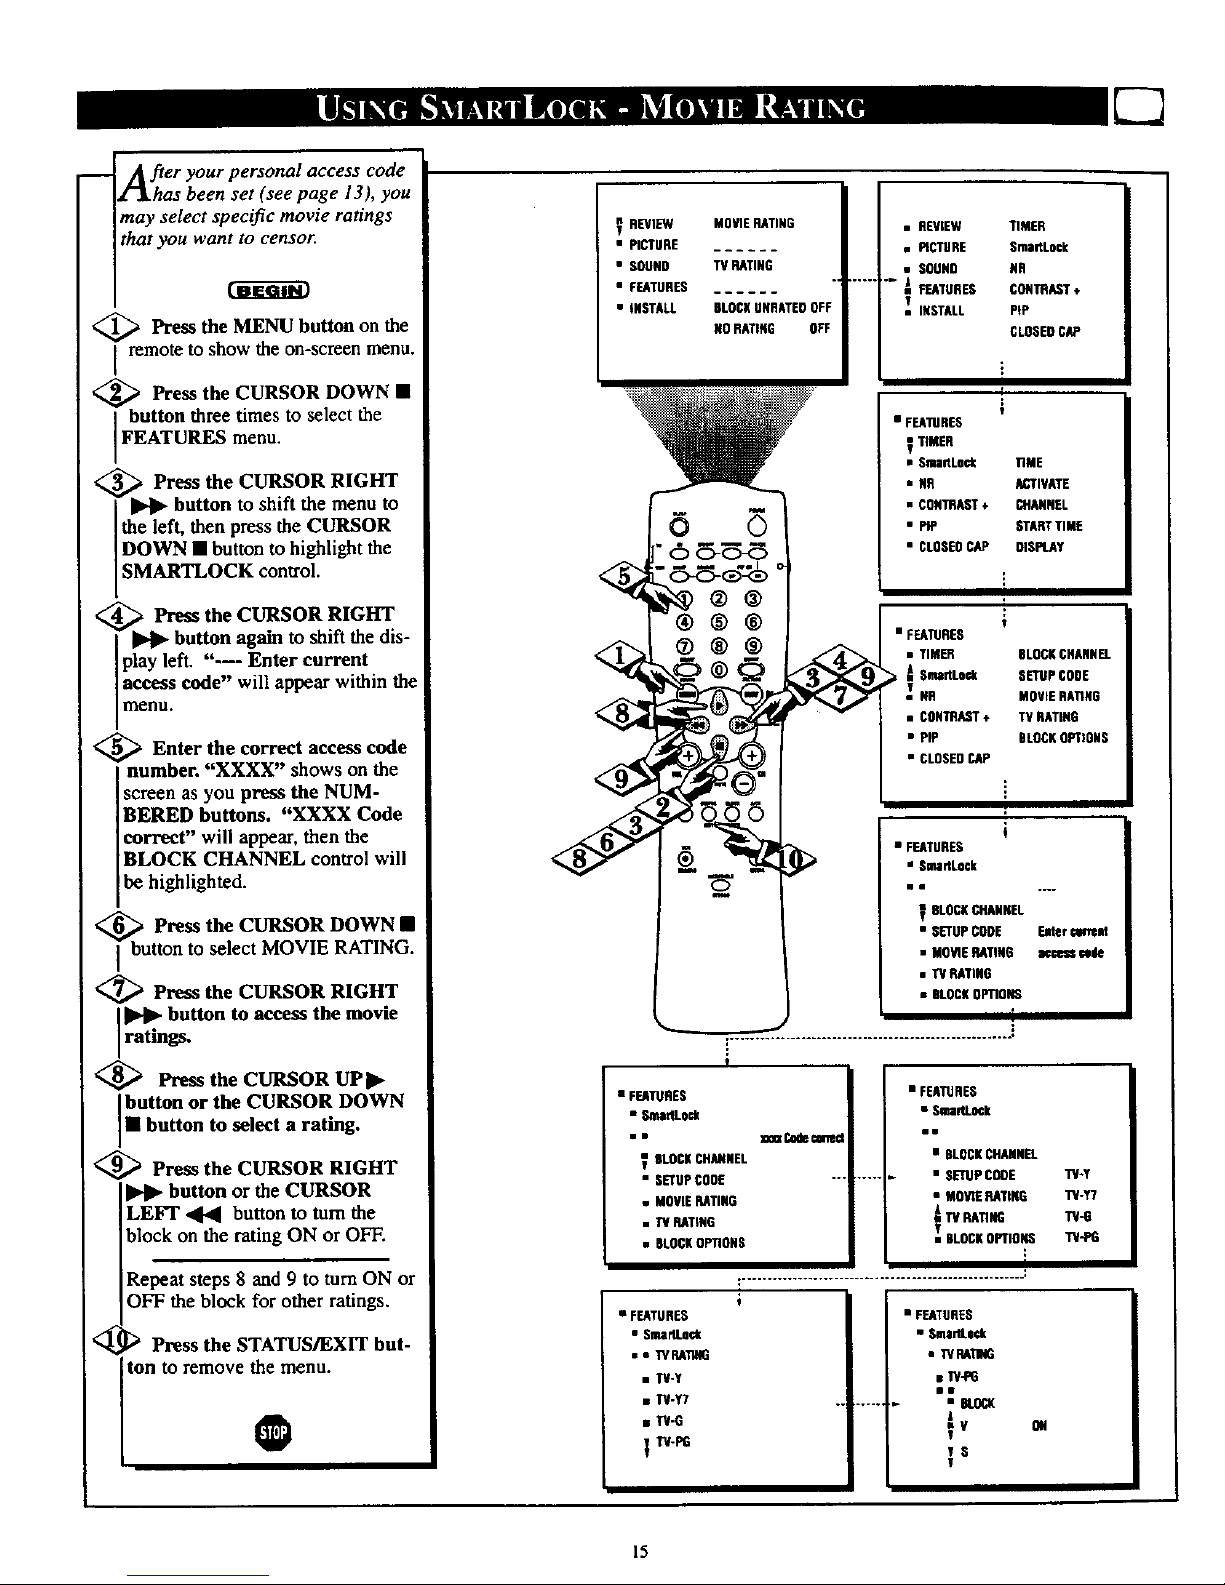
m _her your personal access code
as been set (see page 13), you
may select specific movie ratings
that you want to censor
<_ Press the MENU button on the
remote to show the on-screen menu.
,_ Press the CURSOR DOWN •
button three times to select the
FEATURES menu.
_ Press the CURSOR RIGHT
button to shift the menu to
the left, then press the CURSOR
DOWN • button to highlight the
SMARTLOCK control.
<_ Press the CURSOR RIGHT
I _ button again to shift the dis-
play left. "--- Enter current
access code" will appear within the
menu.
<_ Enter the correct access code
number. "XXXX" shows on the
screen as you press the NUM-
BERED buttons. "XXXX Code
correct" will appear, then the
BLOCK CHANNEL control will
be highlighted.
l_bu Press the CURSOR DOWN •
tton to select MOVIE RATING.
<_ Press the CURSOR RIGHT
button to access the movie
ratings.
<_ Press the CURSOR UPI_
button or the CURSOR DOWN
• button to select a rating.
<_ Press the CURSOR RIGHT
button or the CURSOR
LEFT ,41-41button to tum the
block on the rating ON or OFF.
Repeat steps 8 and 9 to mm ON or
OFF the block for other ratings.
<_ D Press the STATUS/EXIT but-
ton to remove the menu.
O
REVIEW
• PICTURE
• SOUND
• FEATURES
• INSTALL
MBVIEHATING
TV HATING
BLOCSUNDATEDOFF
NO RATING OFF
• REVIEW TIMER
• PICTURE SmartLock
• SOUND NR
........ _I FEATURES CONTRAST+
INSTALL PIP
CLOSEDCAP
I
• FEATURES
_ TIMER
• SmartLock riME
• NR ACTIVATE
• CONTRAST÷ CHANNEL
• PiP STARTTIME
• CLONEBCAP DISPLAY
÷
• FEATURES
• TIMER
ASm_L:_
_ NG
• CONTRAST+
• PIE
• CLOSEDCAP
BLOCKCHANNEL
SETUPCONE
MOVIERATING
TV RATING
BLOCKOPTIONS
"I"V-PG
15
• W4_G
lv CH
_S
I
• FEATURES
• SmariLock
• I'_ EAI1NG
• FEATURES
• SmaitLKk
• BLOCSCHANNEL
..... • SETUPCONE TV*Y
• MOVIERATING TY-¥7
TV RATING 71/-6
• FEATURES
• SmartLock
• • 1YHATING
• TV-Y
• TN-y7
• TV-G
TV-PG
• FEATURES
• SlnallLock
• • ]_a CodeCmllKI
BLOCSCHANNEL
• SETUPCODE "'"
• MOVIERATING
• TV RATING
• BLOCKOPTIONS '- BLOCKOPTIONS
I
!
!
[-]
t
• FEATURES
• SmaNLock
BLOCSCHANNEL
• SETUPCODE Eater mmsid
• MOVIERATING accessmule
• TVRATING
• BLOCSOPTIONS
Page 16
[22
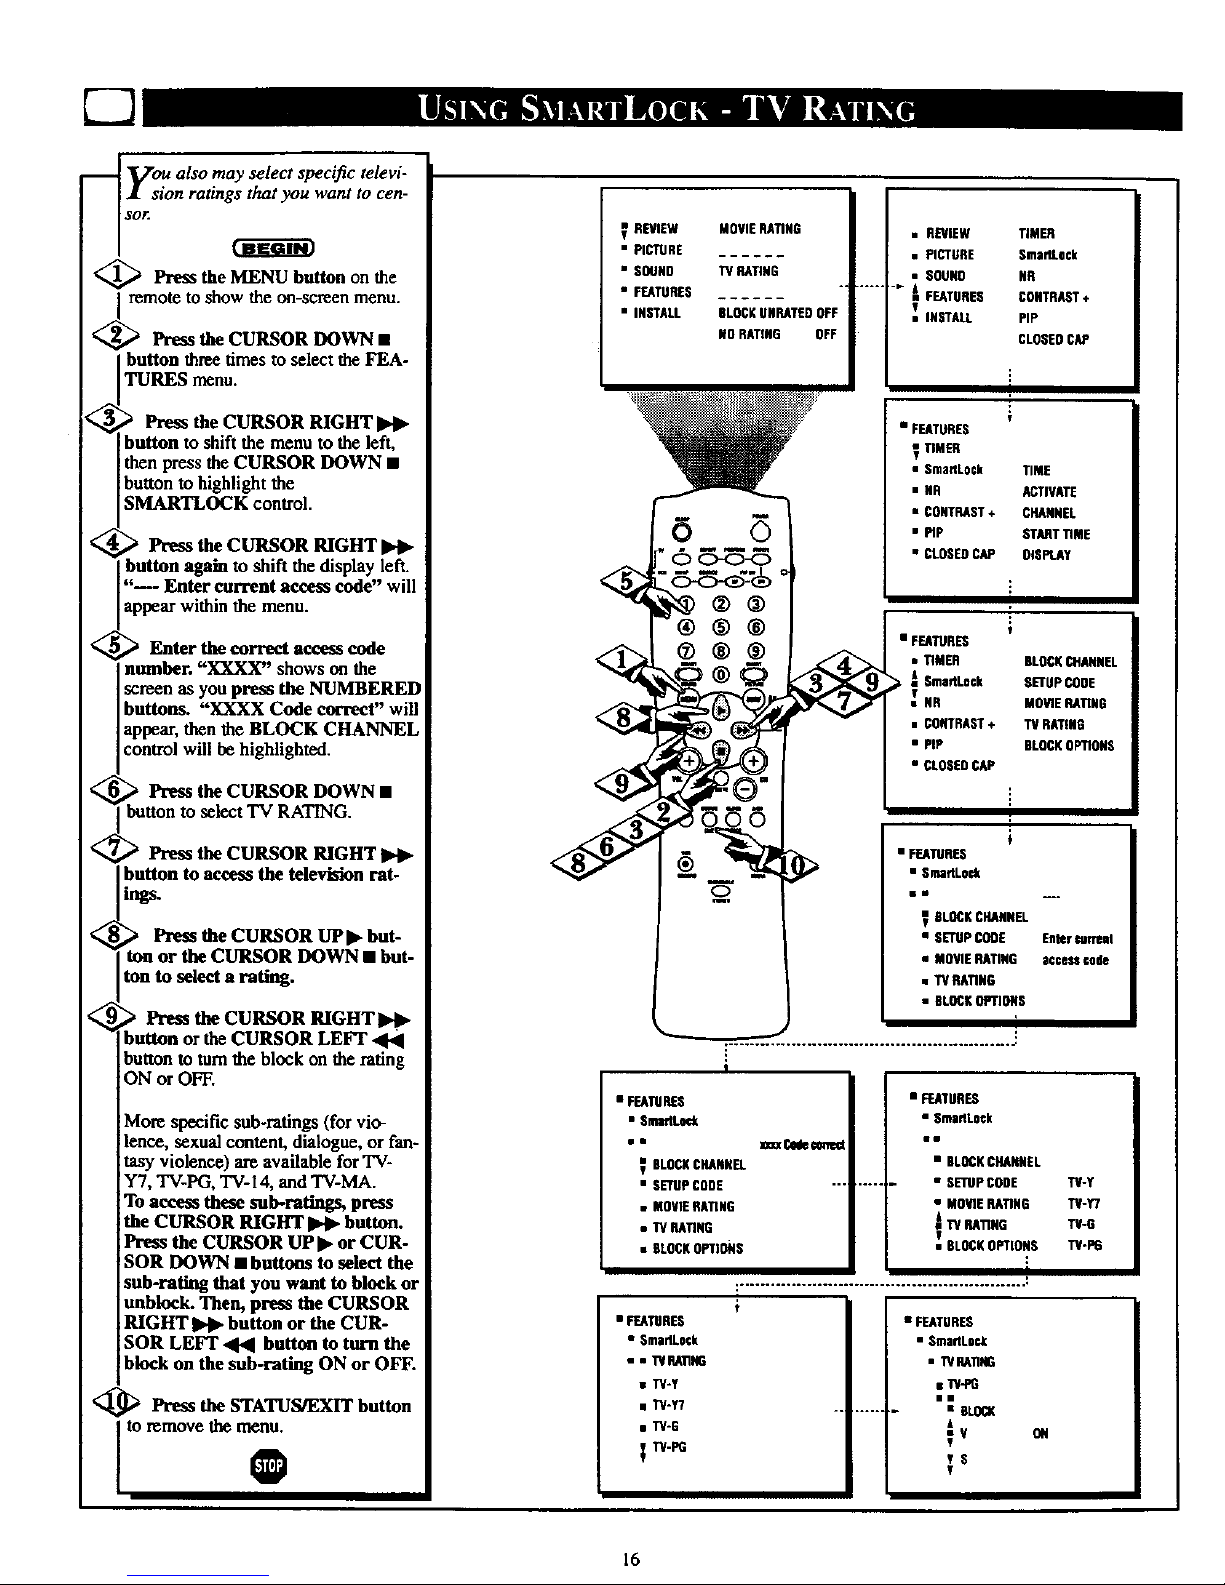
_ Vou also may select specific televi-
i sion ratings that you want to cen-
sor.
<_ Press the MENU button on the
<_remote to show the on-screenmenu.
Press the CURSOR DOWN •
button three times to select theFEA-
TURES menu.
Press the CURSOR RIGHT
button toshift the menu to the left,
then press the CURSOR DOWN •
buttonto highlight the
SMART]LOCK control.
Press the CURSOR RIGHT
button again to shift the display left.
"-- Enter current access code" will
appearwithinthe menu.
Enter thecorrect access code
number. "XXXX" shows on the
screenas you press the NUMBERED
buttons. "XXXX Code correct" will
appear, thenthe BLOCK CHANNEL
controlwill be highlighted.
Press the CURSOR DOWN •
Ibutton to select TV RATING.
Press the CURSOR RIGHT
button to access the television rat-
tags.
Press the CURSOR UP • but-
ton or the CURSOR DOWN • but-
ton to select a rating.
Press the CURSOR RIGHT•I_
button or the CURSOR LEFI" "41'4
buttonto turnthe block on the rating
ON orOFF.
More specific sub-ratings (for vio-
lence, sexual content, dialogue, or fan-
tasy violence) are available for'rV-
Y7, TV-PG, TV-14, and TV-MA.
To access these sub-ratings, press
the CURSOR RIGHT •_ button.
Press the CURSOR UP • or CUR-
SOR DOWN • buttons to select the
sub-rating that you want to block or
anblock. Then, press the CURSOR
RIGHT _ button or the CUR-
SOR LEFT ,4,4 button to turn the
block on the sub-rating ON or OFF.
@ Press the STATUS/EXIT button
to remove the me[_
REVIEW
• PICTURE
• SOUND
• FEATURES
• INSTALL
MOVIERATING
W RATING
BLOCSUNRATEDOFF
NO RATING OFF
• REVIEW TIMER
• PICTURE SmarlLock
• SOUND NR
J
S FEATURES CONTRAST+
IT INSTALL PIP
CLOSEDCAP
!
• FEATURES
_ TIMED
• Sma_Lock TIME
• MR ACTIVATE
• CONTRAST+ CHANNEL
• PIP STARTTIME
• CLOSEDCAP OISPLST
• FEATUOES
• TIMER BLOCKCHANNEL
A SmartLock SETUPCODE
NS MOVIEHATING
• CONTRAST+ TV RATING
• PiP BLOCKOPTIONS
• CLOSEDCAP
÷
• FEATIJRES
SLOESCHANNEL
• SETUPCOOE En_r guffeM
• MOVIERATING acceu code
• TV RATING
• BLOCKOPTIONS
16
!
t
• FEATURES
• SmaflLock
• W HA_NG
• W4_G
l•
.... • OLOCX
6
;v
;s
• FEATURES
• SmaflLock
im
• BLOCKCHANNEL
..... • SETUPCODE TU-Y
• MOVIERATING TU-Y7
13/RATING TV-G
I
-_BLOCKOPTIONS "iV-P6
• FEATURES
• SnmttL4_
no
_ BLOCNCHANNEL
• SETUpCODE
• MOVIERATING
• W RATING
• BLOCKOPTIONS
• FEATURES
• SmadLock
m. TVHATIHG
• TV-Y
• TU-T7
• TV'B
TU-PG
ON
v
I
Page 17

After you block specific channels
or ratings, you must set
BLOCKING to ON or OFF in order
to activate the blocking. To set
BLOCKING to ON or OFF, follow
these steps.
<_ Press the MENU button on the
remote to show the on-screen
imenu.
_ Press the CURSOR DOWN •
REVIEW MOVIERATING
• PICTURE
• SOUNG TV RATING
• FEATURES *
• iosrstt ,LO_U-_Tn------ore
NORATING OFF
<.,
<.,
<
<,,
button three times to select the
FEATURES menu.
Press the CURSOR RIGHT
I_l_ button to shift the menu to
the left, then _?ressthe CURSOR
DOWN • button to highlight the
SMARTLOCK control.
Press the CURSOR RIGHT
button again to shift the dis-
play left. "--- Enter current
access code" will appear within the
menu.
Enter the correct access code
number. "XXXX" shows on the
screen as you press the NUM-
BERED buttons. "XXXX Code
correct" will appear, then BLOCK
CHANNEL will be highlighted.
> Press the CURSOR DOWN •
button to select BLOCK
OPTIONS.
Press the CURSOR RIGHT
button to shift the menu to
the left and see the options.
BLOCKING will be highlighted.
> Press the CURSOR RIGHT
button or the CURSOR
LEFT _ button to set
BLOCKING to ON or OFF.
> Press the STATUS/EXIT but-
ton to remove the menu.
O
• I_.NTURED
• O_ck
• REVIEW TIMER
• PICTURE SmadLock
• SOUND NR
.... _ FENTUI_$ CONTRAST+
INSTALL PIP
CLOSEDCAP
J
?
• FEATURES
I _ED
• GmartLock TIME
• NR AcnONTE
• CONTRAST* CHANNEL
• PIP STAR]"lIME
• CLOSEDCAP COIPI.AY
• FEATURES
• TIMED BL_ ON_Nn.
v #R MOEII£RAriNG
• CONTRAST* IV RATING
• PiP BLOCKOPTIONS
• CLOSEDCAP
• Fr_IGRED
• SnuirtLoCk
• SImlP _OE hl_ _nl
• MOVIERATIOS a_4_s code
• IV RATING
• BLOCKOPTIONS
I_DLO_KlflG 014
• IBLOCKUN_TEO
• NO RATING
17
mm•
UOUNO O_
• BLOOSUNRATED
• NORATING
• Fr_TO_E_
• Sma_L_¢k
o • Ill_ OF'flOra
• F_T_E O
• Om|MLoek
,. OEDC_m
mR
BLOCKCHANNEL
• SEEDpCODE
• MOVIERATING
• TV RATING
• KOCKOPTIONS
• FEATURES
• OmartLOd(
shoo(Codecnnad ••
• Bt.OCKCIOSfl.
....... • SETUPCCOE
• MOVt_RATING DLOCiosG
• IV RATING DLOn( UNRATE©
e&OLOCKOPTIONSNoRAnNG
J
i
Page 18

rn addition to blocking specific
ratings or channels, you may
_oose to block all programming
that is unrated, (See explanation on
page 12.)
<_ Press the MENU button on the
remote to show the on-screen
I menu.
<_ Press the CURSOR DOWN •
button three times to select the
FEATURES menu,
_."> Press the CURSOR RIGHT
button to shift the menu to
the left, then press the CURSOR
DOWN • button to highlight the
SMARTLOCK control.
> Press the CURSOR RIGHT
_.ll_ button again to shift the dis-
play left. "---- Enter current
access code" will appear within the
menu.
<_ Enter the correct access code
number. "XXXX" shows on the
screen as you press the NUM-
BERED buttons. "XXXX Code
correct" will appear, then BLOCK
CHANNEL will be highlighted.
_ Press the CURSOR DOWN •
button to select BLOCK
OPTIONS.
_ Press the CURSOR RIGHT
_1_ button to shift the menu to
the left and see the options.
BLOCKING will be highlighted.
_: _ Press the CURSOR DOWN •
button to select BLOCK UNRAT-
ED.
--_ _ Press the CURSOR RIGHT
button or the CURSOR
LEFT ,404[ button to set
BLOCK UNRATED to ON or
OFF.
--<_[_ Press the STATUS/EXIT but-
ton tOremove the menu.
@
18
REVIEW
• PICTURE
• SOUND
• FEATURES
• INSTALL
MOVIE RATING
TV RATING
6LNSK UNRATES OFF
NORATING OFF
o
®®
®®
®®®
• REVIEW
• PICTURE
• SOUND
..... _ ESATURES
• INSTALL
• FEATURES
_ TIMER
• NR
• CONTRAST*
• PIp
• CLOSEDCAP
• FEATURES
• riMER
A Smaf'tLock
• CONTRAST,
• PIP
• CLOSED CAP
TIMED
Sma_LOCk
NR
CONTRAST*
PiP
CLOSEDCAP
I
TIME
ACTIVATE
CHANNEL
_nU_T TIME
DISPLAY
t
BLOCK CHANNEL
SETUP CODE
MOVIE RATING
TV RATISO
BLOCK OPTIONS
• FEATURES
• SmartLnck
BLOCKClUdINEL
• SETUP_DIE
• MOV1E RATING
• 1"4RATING
• BLOCKOPTIONS
[
!
• FUTURES
a EmartLock
•i
_ OLOCKURAN_L
• S_P CO_
• MOVIERATING
• "WRATING
• |L_IC OPTIONS
• FEATURES
• Smartl,o_
Hi
•BlcoN CHANNEL
--, • S_UP CCO_
• MOVIERAT1NS ELOCKING
• TV RATt#G ELOCKUNRATEO
-_lkOCKOVlIORANORATI
• _TUNES
in
ELOCKING ON
• |LOCK UNRATES
• NORAriNG
• FEATURES
• SmartLo_(
= = DI.OCK_PI1U_
l•
--- • BLOCKING
_ BLOCKUNRATEOON
• NORATING
Page 19

S_eme programming is not encod-
d with content advisory data by
the MPAA or the television broad-
casters. (See explanation on page
12.) To block such programming,
_llow these steps.
<_ Press the MENU button on the
remote to show the on-screen
I menu.
_ Press the CURSOR DOWN •
button three times to select the
FEATURES menu.
_,_> Press the CURSOR RIGHT
_. button to shift the menu to
the left, then press the CURSOR
DOWN • button to highlight the
SMARTLOCK control.
_ Press the CURSOR RIGHT
II_l_ button again to shift the dis-
play left. "--- Enter current
access code" will appear within the
menu.
_, _ Enter the correct access code
number. "XXXX" shows on the
screen as you press the NUM-
BERED buttons. "XXXX Code
correct" will appear, then BLOCK
CHANNEL will be highlighted.
_ Press the CURSOR DOWN •
button to select BLOCK
OPTIONS.
> Press the CURSOR RIGHT
I_ button to shift the menu to
,he left and see the options.
BLOCKING will be highlighted.
_ Press the CURSOR DOWN •
buRon to select NO RATING.
<_ Ih'ess the CURSOR RIGHT
button or the CURSOR
LEFT _ button to set NO
RATING to ON or OFF.
_ Press the STATUS_XIT but-
ton to remove the menu.
O
REVIEW MOVIERATING
• PL'TIJRE
• SOUNO TVRATING
• FEATURES
• INSTALL BLACKUNRATEOOFF
NORATING OFF
• REVIEW
• PiCT_E
• SOUND
.... A_FEATURES
INSTALL
I
• FEATURES
_ TIMER
• Omat_
• NR
• PiP
• FEATURES
• SmarlLnck
I
t
BLOCKCHANflEL
• SETUPCOOE
• MOVIE RATING
• 11/RATING
• BL_K OPTIONS
t
+............... . ..................... *2
i
I
TIMER
S.maaLock
I(R
CONTRAST,
PiP
CLOSEOCAP
• FEATURO$
• smartLock
•w
_ n.OCK ¢HNINEL
• SETUp_00
• MOVIERATING
• "WRATING
• BLOCKOPTIONS
• FEATIETES
• SmaTtLock
., m_K 0Pl10_
i•
TIME
ACTIVAIE
CHANNEL
START TIME
OISPLAY
19
• OLOCVJNG
• BLOCKUNRATED
NO RATING ON
• FEATURES
• Smat_Lock
ii
OLOCAING ON
• BLOCKUNRAI[EO
• NO RATING
• FF.iS _ EV
_u_ar,odemTe_
• $martLock
el
• BLOCKCHAINNOL
.... • SETUPCODE
• MOVIE RATING NLO_ING
• Ti/RATING BLOCKUItRATER
OLOCOOPTIONS NO RAriNG
l
Page 20

_A review screen is to
available
A'_akremind you which ratings you
have blocked and which Block
Options you have selected.
<_ Press the MENU button on the
remote to show the on-screen menu.
REVIEW should be highlighted.
The ratings that you have blocked
will appear on the right side of the
menu.
If you have blocked specific sub-rat-
ings, such as V for Violence in the
TV-PG category, these blocked sub-
ratings will not appear in the
review. However, the sub-ratings are
still blocked according to your
selections.
lf a sub-rating (such as V) is
blocked but the main category (such
as TV-PG) is not, the category will
not appear as a blocked rating in
the review. However, the sub-rating
is still blocked.
<_ Press the STATUS/EXIT but-
ton to remove the menu.
®
Example:Allratingsareblockedand
all BLOCKOPTIONSare ON.
REVIEW MOVIERATING
• PICTURE GPGPG13RNC17X
• SOUND TVRATING
• FEATURES Y Y7 GPS14MA
• INSTALL 8LOCKUNRATEDON
NORATING ON
®®®
--- ®®®
Example:Some ratings areblocked and
some BLOCKOPTIONS are ON.
V REVIEW MOVIERATING
• PICTURE - - _ R NC17 X
• SOUND TV RATING
• FF.ATUNES _ - - PG 14 MA
• INSTALL BLOCKUNRATEDON
NORATING OFF
Example:BLOCKING is set toOFF.
REVIEW SMARTLOCKDISASLEO
• PICTURE
• SOUND
• FEATURES
• INSTALL
20
Page 21

V:ppriOus on-screen messages will
ear when someone tries to
view blocked programming. Shown
here are examples of these mes-
sages. The message is determined
by how the current programmmg ts
blocked. You may view the blocked
programming and turn off the
SmartLock feature by entering your
access code.
_p Access a directly by
channel
ressing the Numbered buttons
on the remote control.
If the programming is blocked, a
message will appear on the screen,
indicating whether the program is
blocked because of its rating, the
channel, or your selected blocking
options.
_ Press the Numbered buttons
to enter your personal access
code.
If you do not know the code, you
must press the Channel +/- buttons
to select another channel, You can
not use the Numbered buttons to
select anotherchannel atthis time.
<_ Once you enter the correct
personal access code, all blocked
channels and programming will
be viewable until you turn off the
TV power.
When you turn on the TV again,
the SmartLock blockings will be
restored.
CFIANI_EI.22
IIIiched by Sm|rU,och
o
IS blect/ed.
CHANNEL22
IIIOch|d Iq'rl//MOVIE liars tlld
PleaSeenter e¢ctssce_e
orNild|MOthOfchw_tel
g
Alle_mmlsum N v_
Ills 'IV_ liPled ctl,
21
Page 22

[-7
-- r_ue to many reasons, such as
poor cable reception, the pic-
ture can sometimes appear slightly
"speckled" (signal noise in the pic-
ture), The NR (Noise Reduction)
control can help eliminate this type
of interference and improve the
quality of the picture.
<_ Press the MENU button on the
Iremote to show the on-screen menu.
_ Press the CURSOR DOWN •
button three times to select the
FEATURES menu.
<_ Press the CURSOR RIGHT
button and the menu will
shift to the left. TIMER will be
highlighted.
<_ Press the CURSOR DOWN •
Ito highlight the NR control.
<_ Press the CURSOR RIGHT
button again to highlight the
NR option area.
<_ Press the CURSOR UP I1_or
CURSOR DOWN • buttons to
turn the NR feature ON or OFF.
<_ Press the STATUS/EXIT but-
se_ remove the menu from the
0
REVIEW MOVIERATING
• PICTURE
• SOUND TV RATING n
• FEATURES
• INSTALL BLOCKIJHA11EOOFF
NORATING OFF
6
@®®
®®®
--.ll_
• REVIEW
• PICTURE TIMER
SOUND SrnartLock
FEATURES NR
• INSTALL CONTRAST*
PIP
CLOSERCAP
• FEATURES
u•
TIMER
• $martLcck
• NR
• CONTRAST+
• PiP
• CLOSERCAP
• FEATURES
ii•
• TIMER
_ SmartL_k
_ NR OFF
• CONTRAST+
• PIP
• CLOSER CAP
• FEATURES
•i
• TIMER
• SmartLock
• NR mON
• CORTRAST*
• PSp
• CI,OSEDCAP
• FEATURES
I1•
• TIMER
• Slnaf/Lock
• NR
• CONTRAST+
• PiP
• CLOSEDCAP
TIME
ACTIVATE
CHANNEL
STARTTIME
DISPLAY
•OFF
22
Page 23

iT h,eContrfs,÷Iea_ehelpsto
J. 'sharpen the picture quality.
iThe black portions of the picture
become richer in darkness and the
whites become brighte_
<_ Press the MENU button on the
remote to show the on-screen menu.
<_ Press the CURSOR DOWN •
button three times to select the
FEATURES menu.
<_ Press the CURSOR RIGHT
button and the menu will
shift to the left. TIMER will be
highlighted.
<_ Press the CURSOR DOWN •
button to highlight the CON-
TRAST + control.
Press the CURSOR RIGHT
button again to highlight the
CONTRAST + option area.
_ PresstheCURSORUPW
or
CURSOR DOWN • buttons to
turn the CONTRAST + feature ON
or OFF.
_ Press the STATUS/EXIT but-
]_:.remove the menu from the
O
REVIEW
• PICTURE
• SOUND
• FEATURES
• iNSTALL
MOVIERATING
TV RATING
_O_X UNSS'_D
NORATING
o
• REVIEW
• PICTURE TIMER
SOUND SmartLock
FEATURES MR
• INSTALL CONTRAST*
PiP
CLOSEDCAP
• FEATURES
II
_ "rIMER TIME
• Sm_d.O_k ACTIVATE
• CONTRAST÷ STMT I1ME
• PIP 91$PkAY
• CLOSEDCAP
• FEATURES
• m
• TIMER
• SmariLock
Nn
CONTPJ_ST* ON
• PiP
geCLOSe9CAR
• FEATURES
11
• TIMER
• $iteartLo©k
• NR
• CONTRAST, =ON
• Pip
• CLOSE9CAR
• FI':ATURE$
lie
I TIMER
• Snlar_ock
• NR
• CONTRAST+ mGFF
• Pip
• CLOSEDCAP
23
Page 24

[-7
ClyoOSed Captioning (CC) allows
u to read the voice content of
television programs on the TV
screen. Designed to help the hear-
ing impaired, this feature uses on-
screen "text boxes" to show dia-
logue and conversations while the
TV program is in progress.
<_ Press the MENU button the
on
remote to show [he on-screen menu.
_,' _ Press the CURSOR DOWN •
button three times to select the
FEATURES menu.
> Pressthe CURSOR RIGHT
button and the menu will
hilt to the left. TIMER will be
highlighted.
_ Press the CURSOR DOWN •
button to highlight the CLOSED
CAP control.
_1 _ Press the CURSOR RIGHT
button again. The menu will
shift to the left and CAPTION
MODE will be highlighted. Then
you could press the CURSOR
DOWN • button to select TEXT
MODE.
_ Press the CURSOR RIGHT
button again to highlight the
CAPTION MODE (or TEXT
MODE) options area.
<_ Press the CURSOR UP p_ or
CURSOR DOWN • buttons to
select the mode you want.
CAPTION MODE:CC1, CC2,
CC3,CC4, CC MUTE, or OFF
-dialogue and descriptions for the
action on the captioned TV program.
TEXT MODE: TXT1, TXT2,TXT3,
TXT4, or OFF - often used for chan-
nel guides, schedules, or bulletin
board information for CC programs.
<_ Pre._ the STATUS/EXIT but-
I ton to remove the menu from the
screen. @
NOTE: Not all TV programs and product commercials are broadcasted with
Closed Caption (CC) information. Neither are all Closed Caption modes (CAPTION
1-4 or TEXT 1-4) necessarily being used by broadcast stations daring the transmis-
sion of a closed caption program. Refer to your area's TV program listings for the
stations and times of Closed Caption shows.
REVIEW MOVIERATING
• PICTLmE
• SOUND TV RA_NG
• TEATURNS
• fNSTALL DIJ_UNRAT_ OFF
NORATIHG OFF
@®@
®®®
® ®
--.ei_
• REVIEW TIMER
• PICTURE SmaflLock
SOUND NR
FEATURES CONTRAST,,
g
• INSTALL PIP
CLOSEDCAP
• FEATURES
• SmanL_-k
• NR
• CONTRAST+
• PIP
• CLOSNOCAP
i _l vn_v
lilt
• TIMER
• SnaartLock
• NR
• CONTRAST+
n _.DSEDCAP
TIME
ACTIVATE
CHANNEL
STSRTTIME
DISPLAY
CAPTIONMOON
TEXTMCOE
The CC button on the
remo_e can also he magl
to enter the CLOSED
CAPTION menu
CAPTION mode
Example Display
NOTE: The CC MUTE
option can be used to set
tbe TV to tufa the
Closed Caption mode
*'ON" whenever the
MUTE button b
pressed.
TEXT mode Example Display
TV screen will be
blocked from viewing
• • CLOSEOCAP
HI
V CAPTIONMODE OFF
• TEXTMORE
• • CLOSEDCAP _ _'
• CAPTIONMODE n
• TEXTMODE
• • CLOSEDCAP
il _" 2
• C,,u'noNEOON XTS
£ "++_,XT4
• _ MODE n 1 m
24
Page 25

T.._ave you ever fallen asleep in
• l front of the TV only to have it
wak_ you up at two in the morning
with a test pattern screeching in
your ears? Well, your TV can save
lyou all that trouble by automatical-
ly turning itself off.
<_ Press the SLEEP button the
on
remote control. The SLEEP timer
on-screen display will appear in the
ower center of the display.
<_ Within five seconds, press
the
SLEEP button repeatedly to pick
the amount of time (15 minutes to 2
hours ahead) before the TV will turn
itself off.
An on-screen count down will
appear during the last minute before
the TV shuts itself off.
O
SLEEP 0
5
@®®
®®®
®®®
SLEEP15
STEEP30
SLEEP4S
SLFEPg
SLEEP7S
SLEEP90
SLEEP1
SLEEP120
down will be displayed. J
SLEEP 58
GOODBYE
SLEEP 8
During the last I0 seo0nds of a
-- SLEEP timer setting, an o=-scr -==n
display will read GOOD BYE,
25
Page 26

Besides the normal volume level
control, your TV also has indi-
vidual sound adjustment controls.
The TREBLE (high frequency),
BASS (low frequency), and Speaker
BALANCE may all be used to
adjust the sound playback of TV
programs.
t- gar
'_ Press the MENU button on the
remote to show the on-screen
mellU.
_ Press the CURSOR DOWN •
I button twice to select the SOUND
menu,
<_ Press the CURSOR RIGHT
button and the menu will
shift to the right to display an
adjustment bar in front of the TRE-
BLE control.
<_Use the CURSOR LEFT
or RIGHT _ buttons to adjust
the TREBLE (high frequency)
level of the television's sound.
<_ After adjusting the TREBLE
control, press the CURSOR
DOWN • button to select another
Sound adjustment: BASS or BAL-
ANCE. Use the CURSOR LEFT
or CURSOR RIGHT
buttons to adjust the selected con-
trol.
<_ Press the STATUS/EXIT but-
ton to remove the menu from the
Screen.
n REVIEW MOVIERATING
r
• PICTURE
• SOUND TV RATING
• FEATURES
• INSTALL BLGCI(UNRATEOOF
NORATING OFF
v
• REVIEW
PICTURE
SOUND TREBLE
• FEATURES BASS
m INSTALL BALANCE
AVL
STEREO
SAP
•SOUND
_ 28 TREBLE
T
BASS
RALANCE
AVI.
STEREO
•SOUND
-_,, TREBLE
_-- Eli BASS
AVL
STEREO
SAP
• SOUND
TRteLE
•--,m_ II BALANCE
7
• STEREO
26
Page 27

your TV can receive broadcast
tereo TV programs. The TV
has both an amplifier and twin
speakers through which the stereo
sound can be heard.
,_ Press the MENU button on
the remote to show the on-screen
menu.
<_ Press the CURSOR DOWN
• button twice to select the
SOUND menu.
<_ Press the CURSOR RIGHT
button and the menu will
shift to the right to display an
adjustment bar in front of the
TREBLE control.
<_ Press the CURSOR DOWN
• button to select the STEREO
control.
< _ Use the CURSOR LEFT
: or RIGHT _ buttons to select
STEREO or MONO. With
STEREO selected the television
will reproduce any stereo broad-
cast signal it receives.
@
SAP is an additional partof the
stereo broadcast system. Sent as a
third audio channel, SAP canbe
heard apartfrom the current TV
program sound. TV stations are
free to use SAP for any number of
purposes, but many experts believe
it will be used for foreign language
translations of TV shows (or for
weather and news bulletins).
If a SAP signal is not present with
a selected program, the SAP option
cannot be selected. Also, if SAP is
selected on a channel (with SAP)
and you select another channel,
when you return to the original
chatmel SAP will be OFF. You will
have to mselect the SAP feature.
REVIEW
• PICTURE
• SOUND
• FEATURES
• INSTALL
_ RklllEW
• PICIUflE
• SOtlNO
• FEATURES
• INSTALL
"m
• PaC'rURE
• _TES
• IN_'AIL
MOVIERATING
rv RATING I
BLlO_ UNRATEDOFF
NORATING OFF
_ REVIEW
• PICTURE
_ SOURO _BLE
• FEATURES Dills
• iNSTALL BALANCE
AVL
STBIEO
SAP
• $OURO
_ _ 28 TREB_
T
NASS
• AVL
_ STEREO
T SAP
• SOlmU
MONO i
ISOUND
STEREOi
f
T
MOVIERATING
1"4P_Tllt[;
W,OCXUf_AIEOOFF
NOflATING ORc
i
I
!
TREO_
DASS
BALANCE
AS"L
STEREO
wSOUNO
•_,, 28 TREBLE
T
SflREO
•SOUi(O
• • • • TREBLE
ST--
. A,,
STEREO
ON ! _
27
TREBLE
BASS
BALANCE
AVL
STER£O
TREBLE
BASS
BALAU_
AVI.
STEREO
SAP
Page 28

Zahe Incredible Stereo feature
dds greater depth and dimen-
sion to both monaural (MONO )
and stereo TV sound. With the con-
trol turned ON, the TV's speakers
can add even wider sound separa-
tion to normal broadcasts.
<_ Press the INCREDIBLE
STEREO button on the remote to
turn the Incredible Stereo feature
ON.
When the TV signal is being
received in STEREO, the on-screen
display will read INCR. SUR-
ROUND.
When the TV signal is in MONO,
the on-screen display will read SPA-
TIAL.
Both will give increased TV sound
_erformance when watching movies
or musical programs.
O
SPATIAL
When the TV signal is being
received in MONO, the on-
screen display will read SPA-
TIAL when the INCREDI-
BLE STEREO button is
pressed.
When the TV signal is being
received in STEREO, INCR.
SURROUND will appear on
the screen when the INCRED-
[IBLE STEREO button is
pressed.
U_h e the Volume Bar control to see
e TV's volume level settings
on the TV screen. The Volume Bar
will be seen each time the VOLUME
buttons (on the TV or remote) are
_ressed.
l_ Press the VOLUME (÷) or (-)
!buttons on the remote to show the
!VOLUME bar display on the screen.
]Press the VOLUME (+) or (-) but-
tons to adjust the television's sound
level.
0
tOtUfilE_r+,_--_- a
5
®_®
®®®
Try it out.
Press the VOL (+)
and (-) buttons. The
VOLUME BAR
should appear near
the bottom center of
the screen.
28
Page 29
i
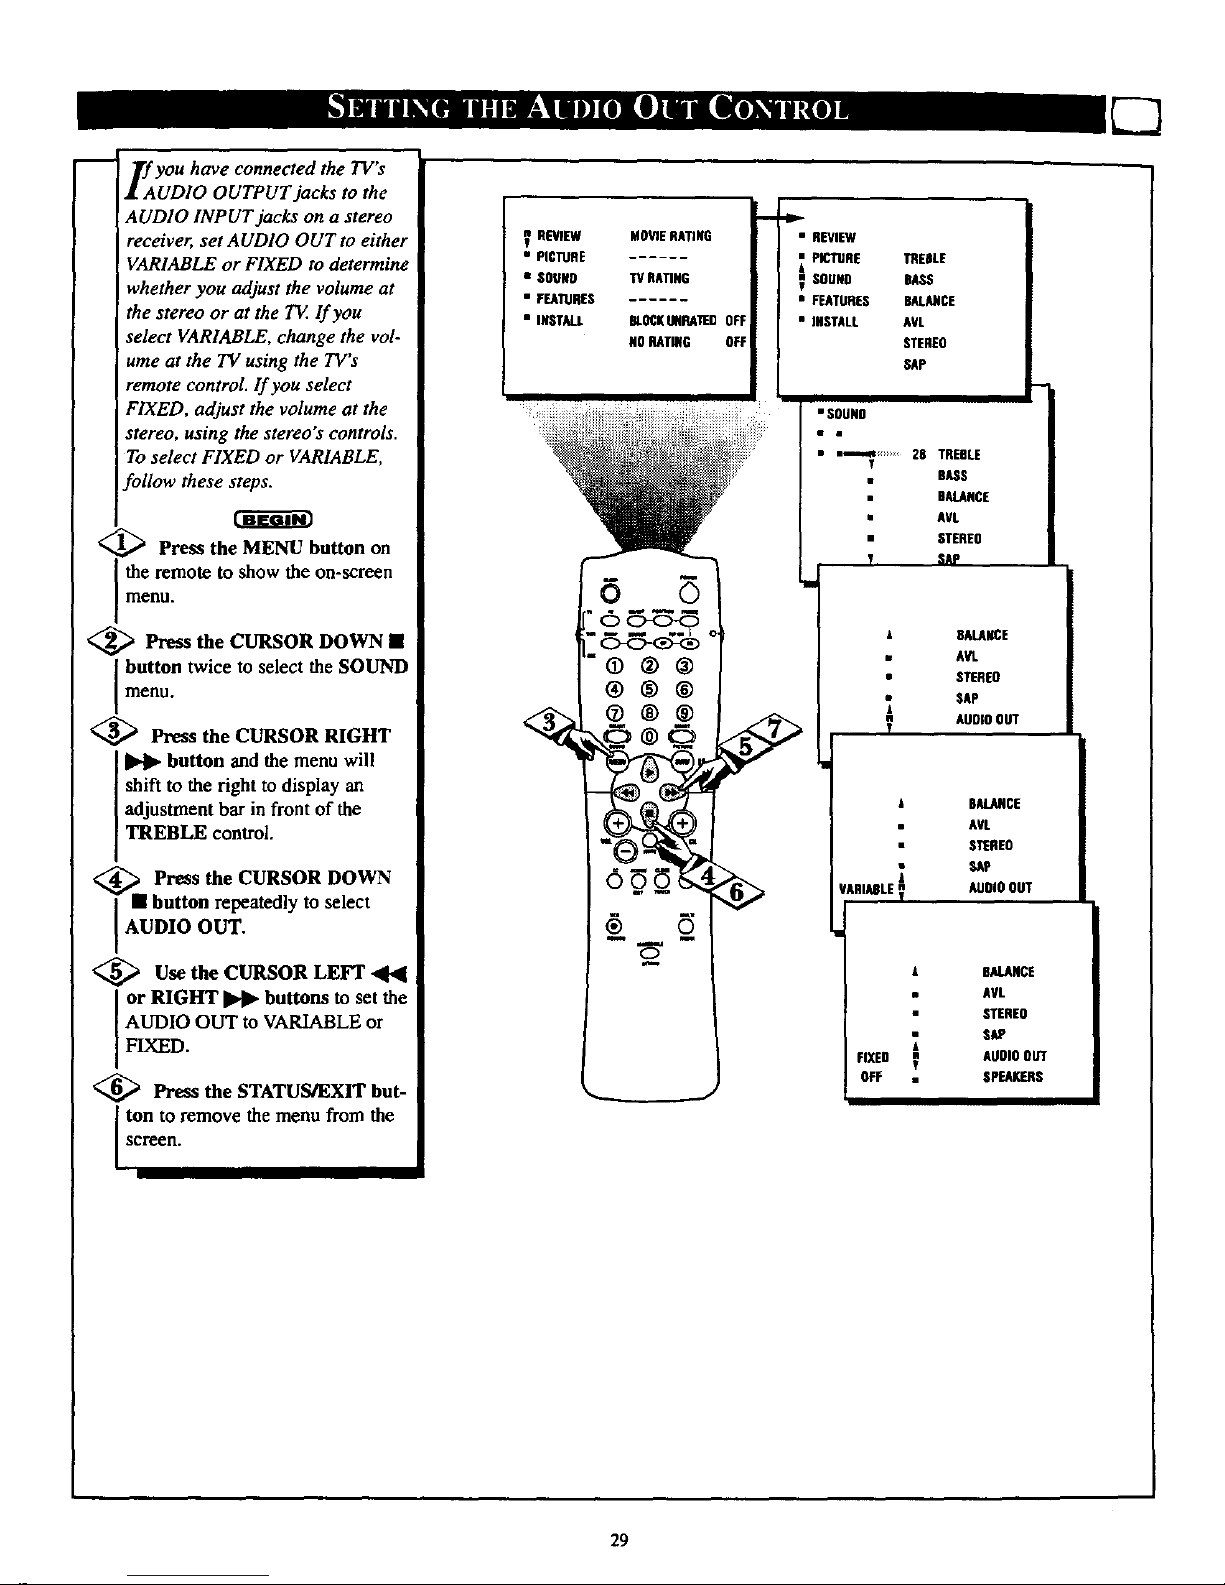
If you have connected the TV's
UDIO OUTPUT jacks to the
AUDIO INPUT jacks on a stereo
receiver, set AUDIO OUT to either
VARIABLE or FIXED to determine
whether you adjust the volume at
the stereo or at the TV lf you
select VARIABLE, change the vol-
ume at the TV using the TV's
remote control. If you select
FIXED, adjust the volume at the
stereo, using the stereo's controls.
To select FIXED or VARIABLE,
follow these steps.
[_ Press the MENU button on
the remote to show the on-screen
menu.
<_ Press the CURSOR DOWN •
button twice to select the SOUND
menu.
<_ Press the CURSOR RIGHT
I1_ button and the menu will
shift to the right to display an
adjustment bar in front of the
TREBLE control.
<__ Press the CURSOR DOWN
• button repeatedly to select
AUDIO OUT.
<_ Use the CURSOR LEFT
or RIGHT _ buttons to set the
AUDIO OUT to VARIABLE or
FIXED.
<_ Press the STATUS/EXIT but-
ton to remove the menu from the
screen.
V REVIEW MOVIERATING
• PICTURE
•SOUNO TV RATING
• FEATURES
• INSTALL BLOCKINmATiEDOFF
140BARING OFF
5
®®®
®®®
N
• REVIEW
PICTIJRE TREDLE
SOUND BASS
• FEATURES BALANCE
• INSTALL AVL
STEREO
SAP
• SOUND
• a_-,._ .............28 TREBLE
'r
BASS
DALARCE
• AVL
• STEREO
T SAP
FIXED
OFF
BALANCE
AVL
STEREO
SAP
AUDIOOUT
BALANCE
AVL
STEREO
SAP
AUDIOOUT
BALANCE
AVL
STEREO
SAP
AUDIO OUT
SPEAKERS
29
Page 30
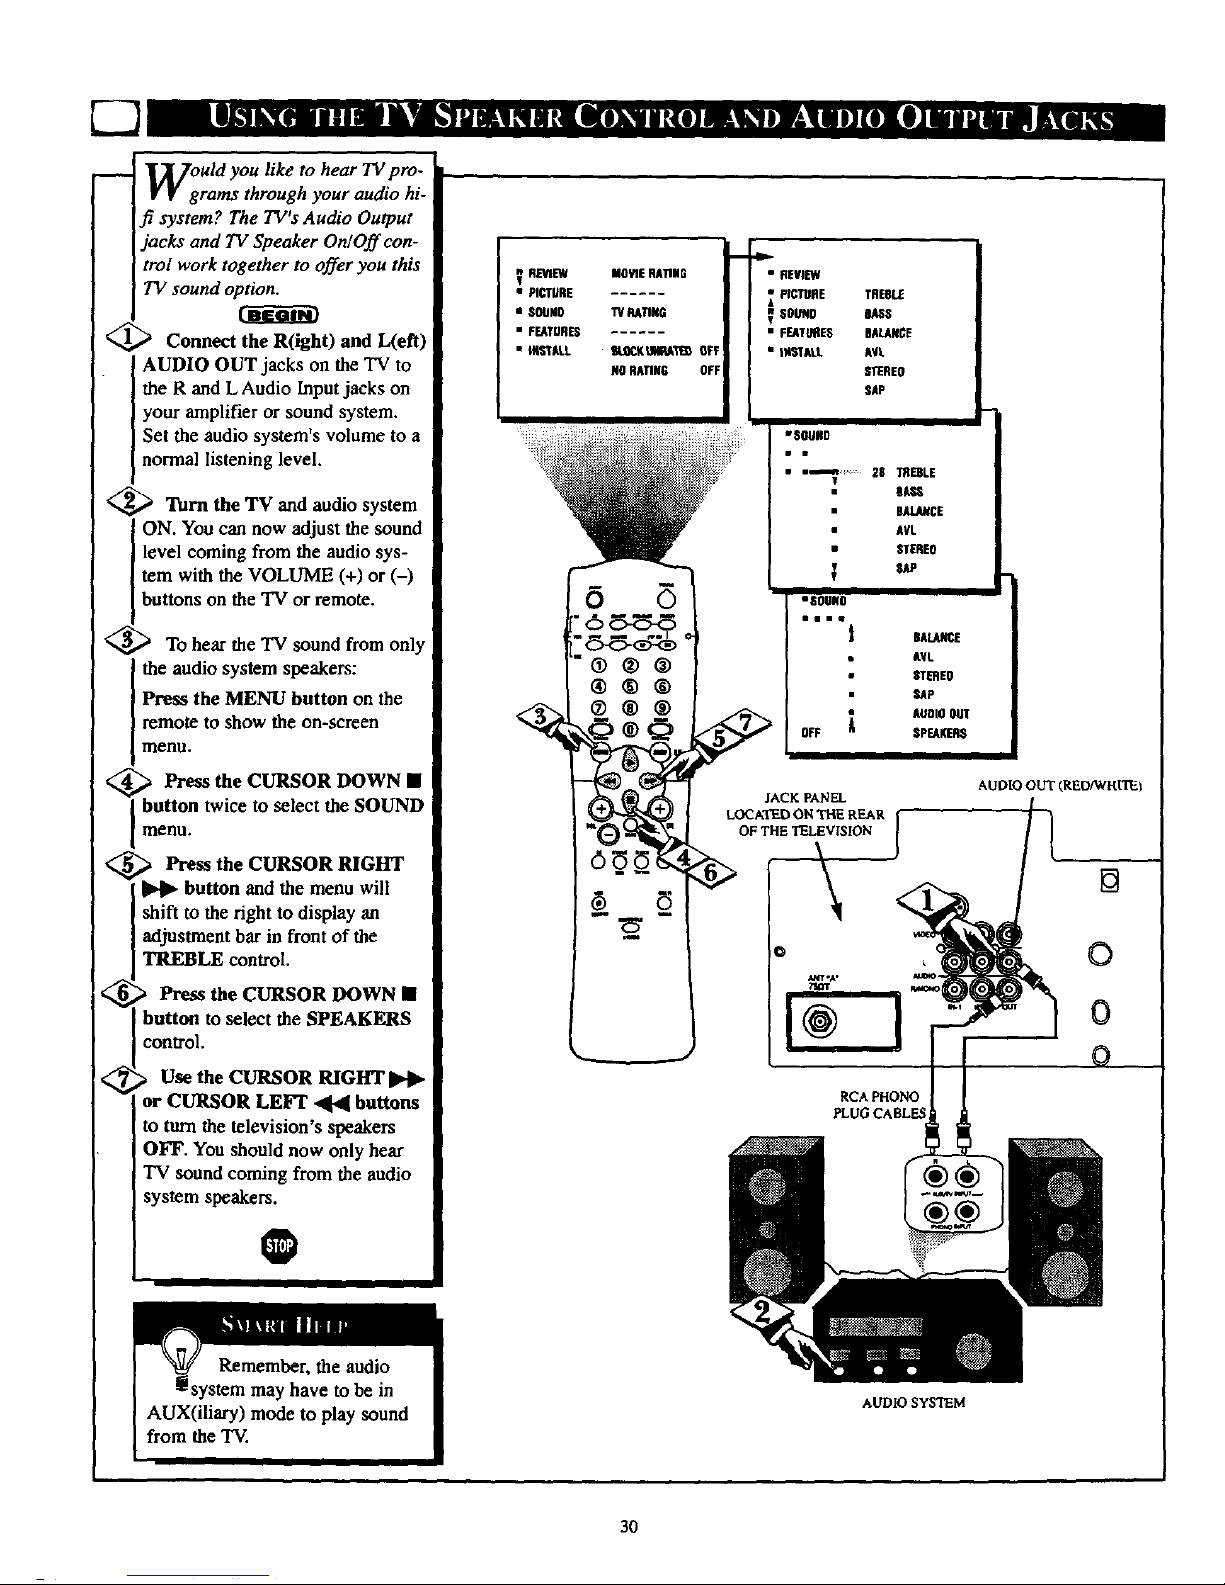
WgUtd you like to hear TV pro-
rams through your audio hi-
fi system? The TWs Audio Output
jacks and TV Speaker On/Off con-
trol work together to offer you this
TV sound option.
<_ Connect the R(ight) and L(efl)
AUDIO OUT jacks on the TV to
the R and L Audio Input jacks on
your amplifier or sound system.
Set the audio system's volume to a
normal listening level.
<_ Turn the TV and audio system
ON. You can now adjust the sound
level coming from the audio sys-
tem with the VOLUME (+) or (-)
buttons on the TV or remote.
To hear the TV sound from only
the audio system speakers:
Press the MENU button on the
remote to show the on-screen
menu.
> PresstheCURSORDOWN•
button twice to select the SOUND
menu.
> Press the CURSOR RIGHT
button and the menu will
shift to the fight to display an
adjustment bar in front of the
TREBLE control.
_ Press the CURSOR DOWN •
button to select the SPEAKERS
control.
Use the CURSOR RIGHT
or CURSOR LEFT ,4141buttons
to turn the television's speakers
OFF. You should now only hear
TV sound coming from the audio
system speakers.
O
REVIEW MOVIERATING
t
• PICTURE
• $OUNO "WSSTING
• FEATURES ......
• _STALL IAgC_LR4P_T_ OFF
NORATIN6 OFF
®®@
4_-
• REVIEW
FICTURE TREBLE
• F_TI_ES BALANCE
• |_IAI£ AYL
m'_EO
SAP
a'SOU#D
• m,_n: 28 TREBLE
el_s
DAL_CE
AVL
• STEREO
IS0SSO
miiw_
OFF
II
JACK PANEL
LOCATED ON THE REAR
OF THE TELEVISION
RCA PHONO
PLUG CABLES
BALAk'CE
&¥L
STI_EO
SAP
AUOIO
SPEAKERS
AUDIO OUT (RED/WHITE)
[]
0
0
0
AUDIO SYSTEM
30
Page 31
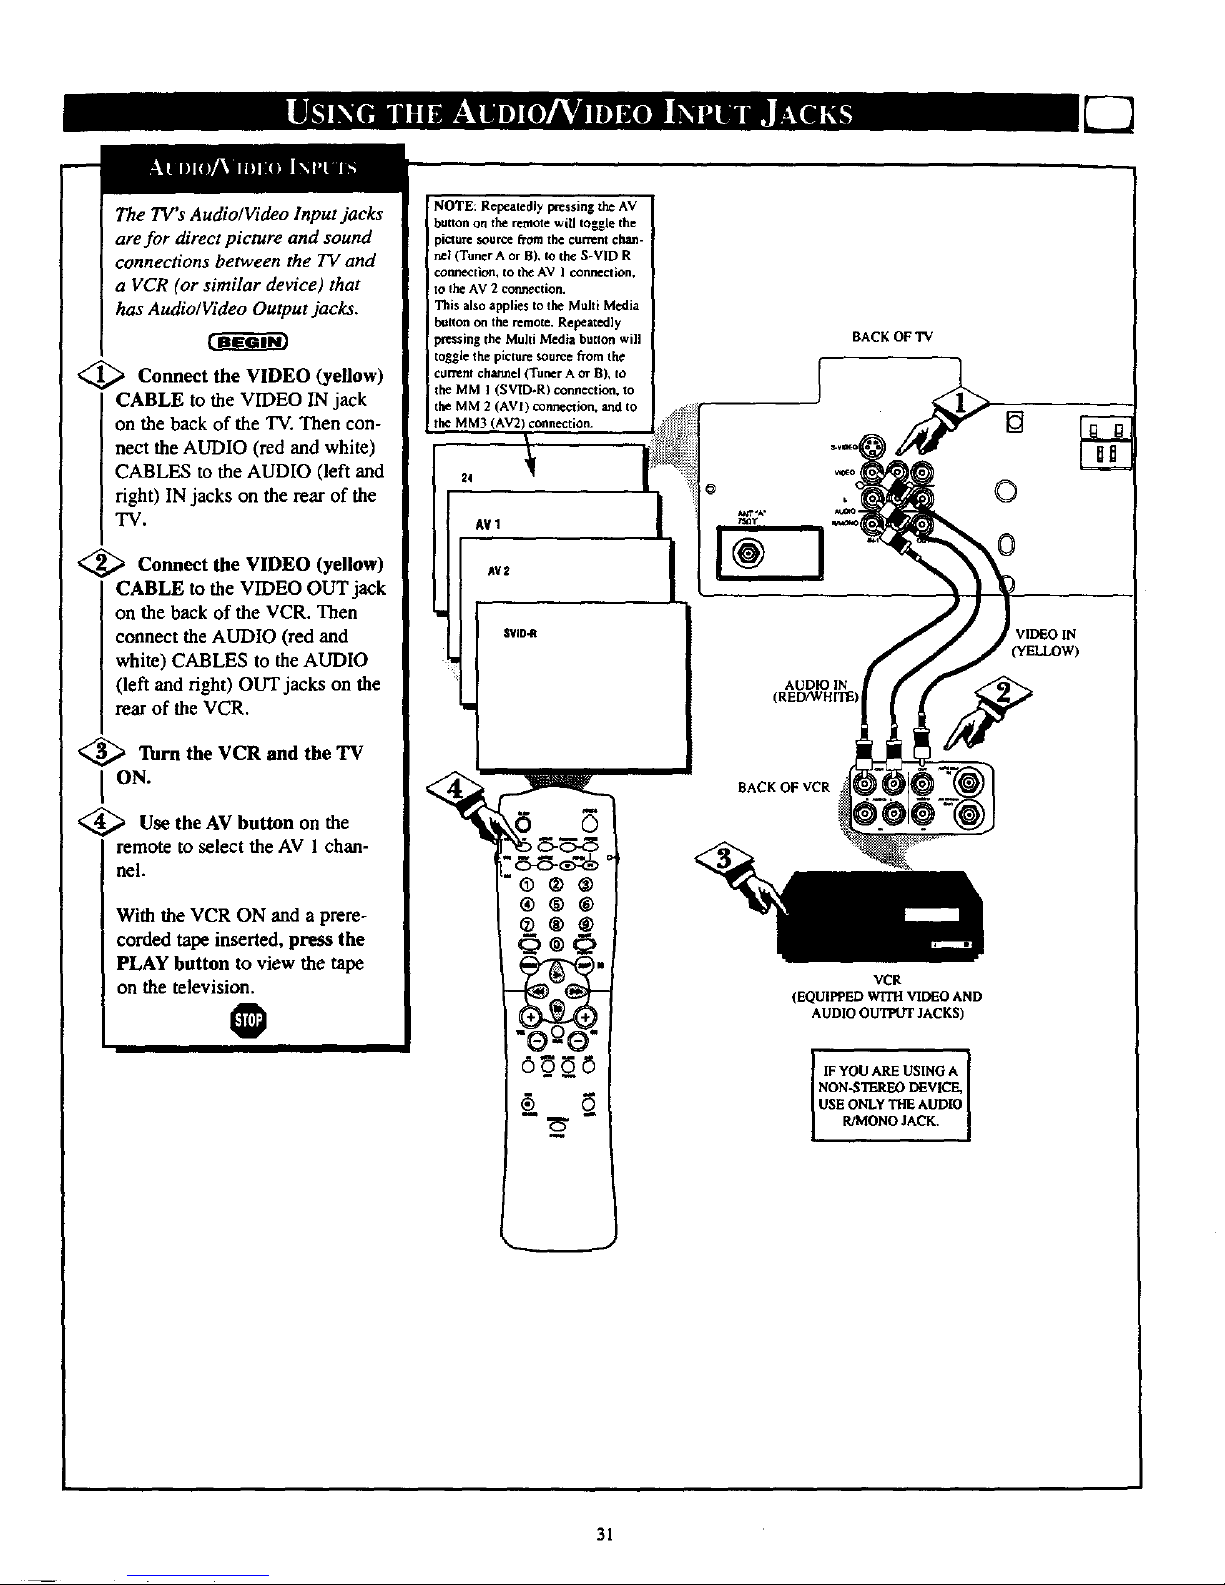
The TV's Audio/Video Input jacks
are for direct picture and sound
connections between the TV and
a VCR (or similar device) that
has Audio/Video Output jacks.
<_ Connect the VIDEO (yellow)
CABLE to the VIDEO IN jack
on the back of the TV. Then con-
nect the AUDIO (red and white)
CABLES to the AUDIO (left and
right) IN jacks on the rear of the
"IV.
<_ Connect the VIDEO (yellow)
CABLE to the VIDEO OUT jack
on the back of the VCR. Then
connect the AUDIO (red and
white) CABLES to the AUDIO
(left and right) OUT jacks on the
rear of the VCR.
_;_ Turn the VCR and the TV
ON.
<_ Use the AV button on the
remote to select the AV I chan-
nel.
With the VCR ON and a prere-
corded tape inserted, press the
PLAY button to view the tape
on the television.
O
NOTE: Repeatedly Ix,'essiog the AV
button on the remote wiU toggle the
picture souse from the current ehen-
rtel(Tuner A or B). to the S-VID R
comlectlon, to the AV I connection,
to the AV 2 connection.
This also applies to the Multi Media
button on the remote. Repeatedly
pt't-ssing the Multi Media button will
toggle the picture source from the
current ¢h_tmael (Tuner A or B), to
the MM I (SVID-R) connection, to
the MM 2 (AVI) connection, and to
the MM3 (AV2) cmlnection.
®®®
®®®
O,O
N
AUDIO IN
(REDAVHITE)
BACKOFVCR
YCR
(EQUIPPED WITH VIDEO AND
AUDIO O_ JACKS)
I IF YOU ARE USING A
NON-STEREO DEVICE,
USE ONLY THE AUDIO
R/MONO JACK.
VIDEO IN
(YELLOW)
31
Page 32

The S(uper)-Video connection on
the rear of the television can give
you better picture detail and
clarity for the playback of S-VHS
VCR tapes or Digital Video
Discs than the normal antenna
picture connections.
Note: The VCR (or Digital Video
Disc player) must have a S-
VIDEO OUT(puO jack in order
for you to complete the connec-
tions shown on this page.
<_ Connect the S-VIDEO
CABLE to the S-VIDEO input
jack on the rear of the television,
then connect theAUDIO (red
and white) cables to the AUDIO
IN (IN 2) jacks on the rearof the
TV.
_ Connect the S-VIDEO
CABLE to the S-VIDEO output
jack on the accessory device.
Then, connect the red and white
AUDIO CABLES to the AUDIO
(left and right) output jacks on
the rear of the accessory device.
<_ Turn the VCR (or Digital
Video Disc Player) ON.
<_ Press the AV button on the
I remote to tune to the SVID-R
channel. You are now ready to
view the tape or disc on the 'IV.
0
The S-VIDEO and
VIDEO IN-2 inputs are in
parallel. The S-VIDEO input is
dominate when in use. If separate
video signals are connected to the
S-VidEDand VIDEO IN-2 inputs,
the signal from the VIDEO IN-2
input will not be useable.
If yon have added SVID-R to the
TV's channel memory, just press
the CHANNEL + or- buttons unti
the S-VIDEO mode is selected.
NOTE: Re pe_ed[y pressing the AV
button on the retool€ will toggle the
picture source from the era'rent chan-
nel to the AV I connection, _othe
AV 2 _ction. to the SVID-R
connection.
This also appllcs Io the Multi Media
button on the remote. Repealedly
pressing the Multi Media Imlton will
Ioggle the picture sourcefrom the
current channel to the MM I (AV I)
¢omacaion, to the MM 2 (AV 2) con-
nection, to the MM 3 (SVID-R) con-
nection.
24
AY1
AV2
SVID-R
®®®
®®®
S-VIDEO CABLE
(NOT SUPPLIED)
0
BACK OF TV
VIDEOIN
(YELLOW)
DBS, DVD, Vkleo Game, etc.
(EQUIFPED WITH S-VIDEO AND
AUDIO O_ JACKS)
IF YOU ARE USING A
NON-STEREO DEVICE,
USE ONLY THE AUDIO
R/MONO JACK. IFA
DUMMY JACK IS
PLUGGED INTO TI_
AUDIO L, NO SOUND
WILL BE HEARD.
32
Page 33

-- l]_[hether you're watching a
V V movie or a video game, your
TV has automatic video control set-
tings matched for your current pro-
ram source or content. The
martPicture feature quickly resets
_our TV s video controls for a num-
ber of different types of programs
and viewing conditions you may
have in your home. Each
SmartPicture setting is preset at the
factory to automatically adjust the
TV's Brightness, Color, Picture,
Sharpness, Tint, and Color
Temperature levels.
€_ Press the SMART PICTURE
button on the remote control. The
current SmartPicture setting will
appear in the middle of the screen.
<_ Press the SMART PICTURE
button repeatedly to select either
PERSONAL, MOVIES, SPORTS,
WEAK SIGNAL, or MULTI
MEDIA picture settings.
Note: The PERSONAL setting and
the PICTURE options within the
on-screen menu are the same. This
is the only option in Smart Picture
that can be changed. To adjust these
settings, use the PICTURE options
within the on-screen menu. All
other settings are set up at the fac-
tory during production and cannot
be adjusted.
0
PERSONAL
6 5
*0®@
®@®
®@
O®
N
V
SPORTS
Vrr.AKSIGHAL
HOLT1MEDIA
33
Page 34

!
Tthhe SmartSound feature allows
e listener to select between
four different factory-set sound
options. Personal (which can be set
by the user), Theater (for movie
viewing), Music (for musical pro-
gramming) and Voice (when the
program is mainly dialogue). To
select any of the options, follow the
directions below.
<_ Press the SMART SOUND but-
ton on the remote control. The cur-
rent SmartSonnd setting will appear
in the middle of the screen.
_ Press the SMART SOUND
button repeatedly to toggle
between the four settings, PERSON-
AL, VOICE, MUSIC or THEATRE.
Remember, only the PERSONAL
control can be changed by the view-
er. This changes the settings in the
main co-screen menu's sound con-
trois.
0
Remember, SmartSonnd
only with the programs
coming through the
ANTENNA/CABLE (ANT A)
input on the rear of the "IV(RF
audio). It will not conWolthe sound
levels for the External connections.
PERSONAL
@®@
®®®
® ®
6b-' 6
Ittu81C
THEATRE
In most cases, the volume levels
coming from broadcast programming
or commercials are never the same.
With the AVL (Audio Volume
Leveler) control turned ON, you can
have the TV level out the sound
being heard. This makes for a more
consistent sound by reducing the
peaks and valleys that occur during
programchanges or commercial
breaks.
I
II_ JEW Md_lltRATING
• PIClWlE ......
• IOUIIO IV RAllllG
• F'EA'II_ES ......
• II$1"JlL_ OtOCxulqIIA'r'I_OF_
leoRA_IIG OFT
• liE'/lib/
Im
• FfATURI$
• Hff_i'ALL
lllll[
gllll
|_111
AIIL
|ll!lEO
-i
l
Ii OfF
TREIILE
II!.AliCIE
lit.
lilTiltO
AV!.
$'l_lO
34
PERSONAL - The settings that you make in
the sound menu.
VOICE - Voices are brought to the forefront
or emphasized. Music is in the background.
MUSIC - Music is emphasized and dominant
over voices.
THEATRE - A balance between voices and
music.
Page 35

a "list" or series of previously
.r'lviewed channels can be select-
;d with the SURF button on your
remote control With this feature
you can easily switch between dif-
ferent TV programs that currently
interest you. The SURF control
allows you to set up to ten channels
in its quick viewing "list."
<_ Press the CHANNEL (+) or (-)
buttons (or the NUMBERED but-
tons) to select a channel to add to the
SURF list.
'_ Press the SURF button on the
remote. The on-screen display may
read, "THE SURF LIST IS
EMPTY, Press > to add."
<_ While the Surf list message or
the Surf channel list appears on the
screen, press the CURSOR
RIGHT _ button to add the pre-
sent channel u_the SURF list.
€_ Press the CURSOR RIGHT
button again to delete the
)resent channel from the SURF list.
_epeat steps 1 through 3 to add
additional channels (up to 10) to
the SURF list.
O
button.
SURF
6
THESURFLIST
ISEMFTY
_ess >to add
I
SURF
5
8
m
FI"ess • to add
SURF 1
S
SURF
press • to delele
Pros • to delete
Along with regular programmed chan-
nels, the External Video Source connec-
tions can be added to the SURF list.
This means the AV 1, AV 2, SVID-R,
MM 1, MM 2, and MM3 channels can
be added to your SURF list. Just tune te
their channel and use the same proce-
dure described on this page.
35
Page 36

yOwUr remote control is set to
ork your TV and many
infrared (IR) remote control
VCRs, Cable Boxes, Satellite
Systems, DBS, DVD, etc.
However, an easy onetime step
may be necessary before the
remote will work your accessory
device.
Try this initial check to see if
going on to the following section
is necessary.
MPlace the TV/VCR]ACC
ode Switch in the proper posi-
tion.
<_ Point the remote control at
I the device and press the POWER
button.
Does the remote turn the
device ON?
If YES, stop and try other func-
tion buttons on the remote. If
they also work the device, then
the remote is ready and no fur-
ther steps are needed.
If NO, continue...
Satellite Receiver
Cable Converter
<_ First look up a THREE-DIGIT
remote control number for your
brand of Device before going
through the simple steps on the
following page.
Find your Three-Digit Code on
pages 39-40.
36
Page 37

!
Nth w that you have looked up
e three-digit Remote Code
Number for your brand of device,
you are ready to follow the five
simple steps below.
Please read through steps 1-5
before beginning.
i
<_ Place the TV/VCR/ACC
Mode Switch in the proper posi-
tion.
_ Press the VCR RECORD
button on the remote control and
release.
'_ Press the SMART SOUND
button on the remote within 30
seconds, then release.
_ Enter the THREE-DIGIT
REMOTE CODE NUMBER
for your desired device. The
remote is now ready to send
commands to the unit.
<_ remote at the
Point the
I Device. Press the POWER button
on the remote to turn the unit
ON.
Remember, if this doesn't
work the first time, repeat steps
1-5 using thesame remote code num-
ber.
After a second try and theremote
does not operate your device, see if
there is another three-digit code num-
ber (pages 39-40) listed for your
device. Repeat the steps above using
the new number.
If, afterrepeated attempts, the remote
does notwork your device, try the
SEARCH METHOD on page 38.
Some Cable Converters can not be
turned ON by a remote control.
VCR
Satellite Receiver
or DBS, DVD
Cable Converter
o.@o®o
RECOflO _DIA
INCREDIBLE
0
STEREO
37
Page 38

l
your TV remote can be set to
ork various accessory
devices such as VCRs, Cable
Boxes, Satellite Receivers, DBS,
DVD, etc. by using the search
method.
lf the Direct Access method
shown on page 37 did not set
your remote to work your acces-
sory device, follow the easy steps
listed below.
Please read steps 1-4 before
beginning.
Turn ON the device by press-
the POWER button on the
device you are attempting to pro-
gram.
@:_ Place the "IW/VCII/ACC
I Mode Switch in the proper posi-
tion.
<_ Preas and hold the VCR
RECORD and the SMART
SOUND buttons simultaneous-
ly.
The device will begin to
change channels after the remote
identifies the correct code. When
the channels start to change,
release the VCR RECORD and
SMART SOUND buttons. The
remote should be ready to oper-
ate the device.
O
This method can take upto
two minutes to perform.
Don't let the device change more
than five channels after the remote
identifies the code. If you do, the
remote may pass upthe right code;
another two minute search cycle will
have to be repeated.
If no channel change happens within
two minutes, repeat steps 1-4.
Should a channel change stil not
occur, the remote will not work the
desired device.
Satellite Receiver,
DBS, DVD,
or similar device
Cable Converter
VCR
38
Page 39

REMOTE
vCR
Admiral ........................ 048
Advantz ........................ 358
Adventure ...................... 000
Aiko .......................... 278
Aiwa ........... 000, 037, 307, 348, 352
Akai ....... 041,049, 053, 061, 106, 315
Alba ........................... 352
American High .................. 035
Amstrad .................... 325, 332
Asha .......................... 240
Audiovox ....................... 037
Baird .......................... 107
Beaumark ...................... 240
Bell & Howell ................... 104
Blaupunkt ............... 003,006, 154
Bran& ................. 187, 320, 321
Broksonic ....... 121, 184, 211,295, 361
Bush .......................... 352
CCE ...................... .072, 278
Calix .......................... 037
Canon ........................ .035
Capehart ....................... 020
Carver .................... .081, 146
Citizen ..................... 037, 278
Colt ........................... 072
Combitach ...................... 352
Craig .......... .037, 047, 072, 240, 271
Curtis Mathes ............ 035,041,060
Cyberrnax .................. 05 I, 240
Daewon ................ 020, 045,276
Daytron ....................... .020
Denon ......................... 042
Dynatech ....................... 000
Electrophonic .................... 037
Emerex ....................... .032
Emerson .... 000, 002, 036, 037, 043. 061
.......... 068, 088, 121, 164, 208, 209,
........... 211,212, 278, 295, 361,479
Ferguson ............... 107, 320, 321
Fisher .............. 047, 054, 066, 104
Fuji ...................... .033, 035
Punai .......................... 000
GE ................ 035, 060, 065, 202
Garrard ........................ 000
Go Video ............... 232, 279, 432
Gold Star .................. .037, 038
Gradionte ................... 000, 406
Grundig ............ 003, 007, 195, 347
HI--Q .......................... 047
Harley Davidson ................. 009
Harman/Kardon ............. .038, 075
Harwood ................... 068, 072
Headquarter ..................... 046
Hinari ..................... 004, 352
Himchi ............. 000, 004, 041,042,
................... 065, 105, 168, 235
lngersol ........................ 004
JVC ........ 008, 041. 067, 208, 384, 486
Jensen ......................... 041
KEC ....................... 037, 278
KLH .......................... 072
Kenwood ........... 038,041,067, 384
Kodak .................... .035,037
LXI ........................... 037
Lloyd's ..................... 000, 206
REMOTE
vcR
Loewe ......................... 004
Logik ...................... 004, 072
MEI ........................... 035
MGA ...................... 043, 061
MGN Technology ................ 240
MTC ...................... (X)0,240
Magnavox ....... 000, 035. 081. 146, 181
Marta .......................... 037
Matsui ................. 004. 348, 352
Matsushhn .............. 035, 162, 454
Memmorex ..................... 307
Memorax ....... 000, 035, 037,039, 046,
........... 047, 048, 104, 240, 266, 307
Metz ...................... 003, 347
Minolta .................... 042, 105
Mitsubishi ...043, 061,067, 075, 173,443
Motorola ................... 035, 048
Multitech ................... 000, 072
NAD .......................... 058
NEC ........... 036, 040, 04t, 067, 104
Nikko ......................... 037
Nikon ...................... 034, 253
Noblex ......................... 240
Nordmende .............. 297. 320, 321
Okano ......................... 346
Olympus ................... 035, 226
Optimus ............ 037,048,058, 104,
...................... 162, 432, 454
Optonica ....................... 062
Orion .......... 004, 295, 348, 352, 479
Panasonic .......... 035,077, 162, 225,
...................... 226, 378, 454
Penney ............. 035,037. 038, 040,
...................... 042, 065, 105
Pentax ................. 042, 065, 105
Phileo ......................... 035
Philips .......... 035, 062, 081, 110. 403
Pilot ........................... 037
Pioneer .................... .058, 067
Portland ........................ 020
Profax ......................... 322
Profitronic ...................... 240
Protec ......................... 072
Pulsar ...................... 039, 051
Quarter ....................... .046.
Quartz ......................... 046
Quasar ............. 035, 077, 162, 454
RCA ............. .042, 060, 065, 077,
................... 105, 106, 149, 202
Radio Shack ................. 000, 037
Radix ......................... .037
Randex ........................ 037
Realistic ........ 000, 035, 037, 045, 047
.................. 048, 062, 066, 104
Ricoh ..................... .034, 253
Runco ........................ .039
SEG ........................... 322
SEI ........................... 004
STS ........................... 042
Saba ................... 297, 320, 321
Saisho ......................... 004
Salora ........................ .075
Samsung ............ 045, 051,053, 240
Sank)' ..................... .039, 048
Sansui .............. 0O0. 041. 067, 271
REMOTE
-W,8
Sanyo .......... 046, 047, 104, 240, 268
Saville ......................... 352
Scott ....... 043, 045, 121, 164, 211,212
Sears .......... 000, 035, 037, 042. 046,
............... 047, 054, 066, 104, 105
Sharp ...................... 046, 062
Shintom ........................ 072
Shogun ..................... 051,240
Shoral ......................... 004
Siemens ........................ 003
Singer ......................... 072
Sinudyne ....................... 004
Sony .......... 0130,011,022, 032, 033,
................... 034, 035, 253,275
Sunkel ......................... 348
Sunpak ........................ 253
Sylvania .... 000, 035, 043, 081, 103, 110
Symphonic ...................... 000
TMK .................. 036, 20_, 240
Tatung ......................... 041
Teac ....................... 000, 041
Technics .................... 035, 162
Teknika ................ 000, 035, 037
Telefunken .............. 187, 320, 321
Tansal ......................... 322
Thomas ........................ 000
Thomson ....................... 320
Toshiba ......... 043, 045, 066, 212, 366
Totavision ................. .037, 240
Towada ........................ 322
Unitech ....................... .240
Universum ...................... 325
Vactor ......................... 045
Vactor Research .............. 038, 040
Video Concepts .......... 040, 045, 061
V'tdeosonic ..................... .240
Wards . .000, 035, 042, 047, 048, 060, 062,
........... 072, 081, 149, 161,212, 240
XR- 1000 ............... 000, 035, 072
Yamaha ........................ 038
Zenith .............. 000, 033, 034, 039
CABLE REMOTE
CODENO.
ABC .............. 001,003, 007, 008,
.................. .011,013, 014, 017
Alie_io ........................ 153
Andover ....................... .544
Antronix ....................... 022
Archer .................... .022, 153
Balcor ......................... 056
British Telecom .................. 105
Cable Star ..................... .056
Cableterma ...................... 022
Cabletime ........... 161,271,377, 448
Cableview ...................... 022
Century ........................ 153
Citizen ......................... 153
Clyde ......................... .086
Colour Voice ................ 025, 031
Comtec ........................ 274
Coma'onics ..................... 040
Contec ......................... 019
Cryptovision .................... 600
Deceat ......................... 423
39
Page 40

J
CABLE REMOTE
COOENO.
East_ra ..................... 002, 274
Everquest ................... 015,040
Hlranet ........................ 443
Focus .......................... 400
France Telocora .................. 451
GC Electronics .................. 056
GEC .......................... 086
Ganard ......................... 153
Gemini ................. 015,070, 242
General Instrument ........ 011,276, 476
Gold Star ...................... .040
Grundig ........................ 529
Haralin ............. 009, 020, 034, 259
Hitachi ......................... 011
Hytex .......................... 007
Jasco .......................... 153
Jerrold ............ .003, 01 I, 012, 014,
................... 015,024, 276, 476
M.N.E.T. ....................... 443
MNet .......................... 443
Macon ........................ .033
Magnavox .............. 027, 032, 334
Memorex ....................... 000
Movie Time ..................... 063
NSC ....................... 063, 070
Oak ....................... 007, 019
Optiraus ........................ 021
Panasonic ............... 000, 021,107
Paragon ........................ 000
Pbilips . .025,027, 031, 153, 242, 290, 334
Pioneer ..................... 533, 753
Popular Mechanics ................ 400
Pulsar ......................... 000
RCA ......................... .021
Radio Shack ................... .015
Recoton ........................ 400
Regal ...................... 020, 259
Regency ........................ 002
Rembrandt .................. 011,070
Ranco ......................... 000
SL Marx ....................... 040
Salora ......................... 382
Sarasung ....................... 040
Satbox ......................... 375
Scientific Atlanta ......... 008,017, 477
Signal .................... .015,040
Signature ....................... 011
Sprucer ........................ 021
Star Sight ....................... 542
Stareom .................... 003, 015
Stargate .................... 015, 040
Starquest ....................... 015
Sylvania ........................ 001
TV85 .......................... 063
Tandy ......................... 258
Tele+l ......................... 443
Teleservice ...................... 281
Teleview ....................... 040
Texsean ........................ 001
Timeless ....................... 274
Tocora ................. 012, 013, 059
Toshiba ........................ 000
Tudl ........................... 286
Tusa .......................... .015
Unike ...................... 022, 153
CABLE REMOTE
CONVERTER CODE NO.
United Artists .................... 007
United Cable .................... 003
Universal ........... 022, 056, 153, 191
Videoway ...................... 250
Viewstar ................ 027, 063, 258
Visi Cable+ ..................... 461
Westminster ..................... 105
Wolsey Gaine ................... 544
Zenith .................. 000, 054, 525
Zentek ......................... 400
REMOTE
COnENO.
Alpha Star ...................... 772
Echostar ........................ 775
HTS ........................... 775
Hitachi ......................... 819
Hughes Network System ........... 749
Jerrold ......................... 627
Magnavox .................. 722, 724
Memorax ....................... 724
Panaannic ...................... 70 I
Philips ..................... 722, 724
Primestar ...................... .627
RCA .......................... 566
Sony .......................... 639
Toshiba ........................ 790
Uniden ......................... 724
REMOTE
AST ........................... 351
Akai .......................... .515
Alba ................... 352, 515, 613
Aldea .......................... 288
Amstrad .... 080, 252, 345, 461,509, 689
Ankaro ................. 220, 288, 369
Anitron ........................ 183
Armstrong ...................... 243
Astra .......................... 108
Avalon ......................... 396
Axis ........................... 369
BT ........................ 515, 668
Beko .......................... 189
Best ........................... 369
Boca ...................... 243, 513
Bush .......................... 067
Cembridge .................. 344, 515
Channel Master .................. 362
Commlink ...................... 288
Connexions ..................... 396
Conrad ......................... 607
Crown ......................... 243
DDC .......................... 362
DNT .......................... 396
Echostar ........................ 396
Farguson ............ 067, 183, 189, 336
Fidelity ........................ 252
Finiux ..................... 108, 397
Fuba ....................... 369, 396
G-Bat .......................... 183
Galaxis ........................ 286
Gooding ........................ 571
Grundlg ............ 173, 189, 571,750
Hinari ......................... 183
REMOTE
CODENO.
Hirschraann ................. 397, 573
Houston ........................ 668
Huth ................... 220, 243, 268
ITr ........................... 108
Intervision ...................... 592
JVC ....................... 515, 571
Kathrein ............ 092, 504, 622, 658
La Sat ..................... 513,607
Lennox ........................ 592
Lupus ......................... 369
Luxor ...................... 108,573
Manhatl_n ...................... 592
Maspro ................. 092, 336, 750
Matsui ......................... 571
Mediamarkt ..................... 248
Minerva ........................ 571
Mintec ......................... 576
Morgan's ................... 243, 513
Newhaus ....................... 220
Nikko ...................... 360, 713
Nokia .................. 108, 397, 573
Nordraande ..................... 362
Orbitech ........................ 501
Pace ........... 067, 183, 336, 455,791
Palladium ...................... 571
Palsat .......................... 501
Philips ............. 200, 292, 571,750
Phonotrend .................. 288,592
Plasmatic ....................... 442
Proset ......................... 288
Quadral .................... 362, 628
RFF ....................... 220, 288
Radix .......................... 396
SAT ....................... 351,461
SEG ........................... 369
Saba ........................... 336
Salora ......................... 108
Satec .......................... 183
Schwaiger .................. 183,504
Scemann ................ 396, 578,626
Skymaster .................. 288,626
Sony .......................... 704
Star Trak ....................... 421
Strong ......................... 421
Sunstar ........................ 513
Tantec ......................... 336
Techni Sat .................. 262, 50I
Teleka ..................... 243,613
Tonaa ......................... 668
Triad .......................... 351
Universum ...................... 571
Vtech .......................... 351
Wisi ....................... 351,396
REMOTE
ova COaE NO.
Kenwood ....................... 534
Mitsubishi ...................... 521
Panasonlc ...................... 490
Philips ......................... 539
Pioneer ........................ 550
RCA .......................... 522
Sony .......................... 552
Toshiba ........................ 503
40
Page 41

W'hwen using the TV remote
ith a VCR, first make cer-
tain it is set to control your VCR
(using the Direct Access or
Search method).
_Set TV/VCR/ACC mode
the
I switch to VCR on the remote.
<_ Point the of the remote
top
toward the front of the VCR
(remote sensor window) when
pressing the buttons.
Y WT
Set in the VCR position to send
remote commands to the VCR.
PLAY BUTTON
Press to begin playback of a
video tape.
Press to rewind tapes. For some
VCRs, the STOP button may
have to be pressed first, then
REWIND. In playback mode,
press or press and hold the button
to view the picture moving rapid-
ly in reverse.
Press to stop the motion of a tape
during playback, rewinding, fast
forwarding, etc.
v N
Hold down the VCR/RECORD
button and the PLAY button to
begin a VCR recording.
Remember,the VCR but-
[ tons on the remotewill not
operateyour VCR if those features
are not foundon your VCR remote
control.
Note: All VCR functions (pataicularly
Search, Rewind, Fast Forward, etc.)
will operatethe same as with the orig-
inalVCR remote control provided
with the VCR,
SLEEP POWER
©
AV ONJO_T POSITION FRIJ_E
0 0-0-0
VCR SWAP SOURCE PiP CH ]
@ ® ®
® @ ®
® ® ®
SOUI_
o
CC STATUS CLOCK ArCH
O0
EXIT
VCR MULTI
0
RECORO MICRA
INCREDIBLE
0
STEREO
41
P
/
P
/
P
f
!
POWER BUTTON
Press to turn the VCR ON and
OFF.
M B
Press buttons for direct VCR
channel selections.
Press to temporarily stop the tape
during playback or recording.
Press again to release Pause.
FAST FORWARD BUTTON
Press to rapidly advance the tape.
For some VCRs, you may need
to press the STOP button first,
then the FAST FORWARD but-
ton. During playback, press or
press and hold the button to view
the picture moving rapidly in the
forward direction.
CHANNEL + & - BUTTONS
Press to scan up or down through
the VCR channel numbers.
(CLOCK'ITV/VCR BUTTON
Press to select VCR position
(VCR indicator on the front of
the unit will light), to view the
playback of a tape, to watch a
program while recording it, or to
watch a TV broadcast using the
VCR CH +, - or Numbered but-
tons. Press again to place in the
TV position (VCR indicator light
will go off) or to view one pro-
gram while recording another
program.
Page 42

picture in Picture (PIP) is the
showing of two pictures on
the screen at the same time (one
main screen picture and a small-
er inset picture, or PIP).
Note: The P1P picture must be
supplied by a VCR (or other
accessory device equipped with a
VIDEO OUTPUT jack).
The following is a basic PIP
hookup using a VCR to supply
the secondary picture.
<_ Cannect the VIDEO OUT
jack on the VCR to the VIDEO
IN (yellow) jack on the rearof
the TV.
Also connect the AUDIO OUT
(Right and Left) jacks from the
VCR to the AUDIO IN jacks (red
and white) on the TV.
,Also be sure that there is a nor-
mal Cable or Antenna signal con-
nection between the VCR and the
TV.
This completes the basic PIP
hookup. Refer to pages 46-47 for
"More PIP Connections."
<_ Move to the next page after
the VCR to TV PIP connections
have been completed.
MAIN SCREEN PICTURE P_ INSET PICI'URE
BACK OF 'IV
OUTDOOR
UHF/VHF
ANTENNA
[]
CABLE TV _
SIGNAL
©
©
©
Auo. ouT
VIDEO FROM VCR
OUT TO AUDIO IN
ON TV
Remember, for other pos-
li sible connections see pages
46-47 for the "More PIP
COBngctioIIS" Section.
If you have a single (Monaural)
Audio Output VCR, there are two
methods of connection. Use only
the Right Audio IN (RED) and
leave the Left Audio IN with NO
connection. Or, "Y" connectors are
available to complete your connec-
tion. Contact your dealer, or our
Parts Information Center,
1-800-851-8885, for details.
VCR
(OR SIMILARDEVICE)
42
Page 43

The picture for the PIP window
can come through either the
ANTICABLE or any of the exter-
nal Audio/Video connections at
the rear of the TV. PIP Source
simply tells the TV which one of
these sources it is to show in the
PIP window.
€_ Turn the TV and VCR (or
I other device hooked to the exter-
nal A/V connections) ON.
Press the PIP ON/OFF but-
I on on the remote control. The
PIP window should appear in the
upper right hand portion of the
screen.
€_ Press the PIP SOURCE but-
ton on the remote to toggle
between the different external
connections.
The PIP SOURCE may come
from the following:
AV 1, AV 2, SVID-R: for picture
signal coming from the external
Audio!Vidoo jacks on the TV.
(You must have an external
device hooked up at these loca-
tions.)
ANTENNA/CABLE: for a pic-
ture signal coming from the
ANT/CABLE Input on the back
of the TV.
MAIN SCREEN PICTURE
® ®
PIP INSET PICTURE
THE PIP SOURCE PICTURE
CAN COME FROM THE
ANT/CABLE INPUT, THE
AUDIO/VIDEO IN L THE
AUDIO/VIDEO IN2, OR THE
S-VIDEO INPUT JACKS AT
THE REAR OF THE T_
VCR
(OR SIMILARDEVICE)
43
Page 44
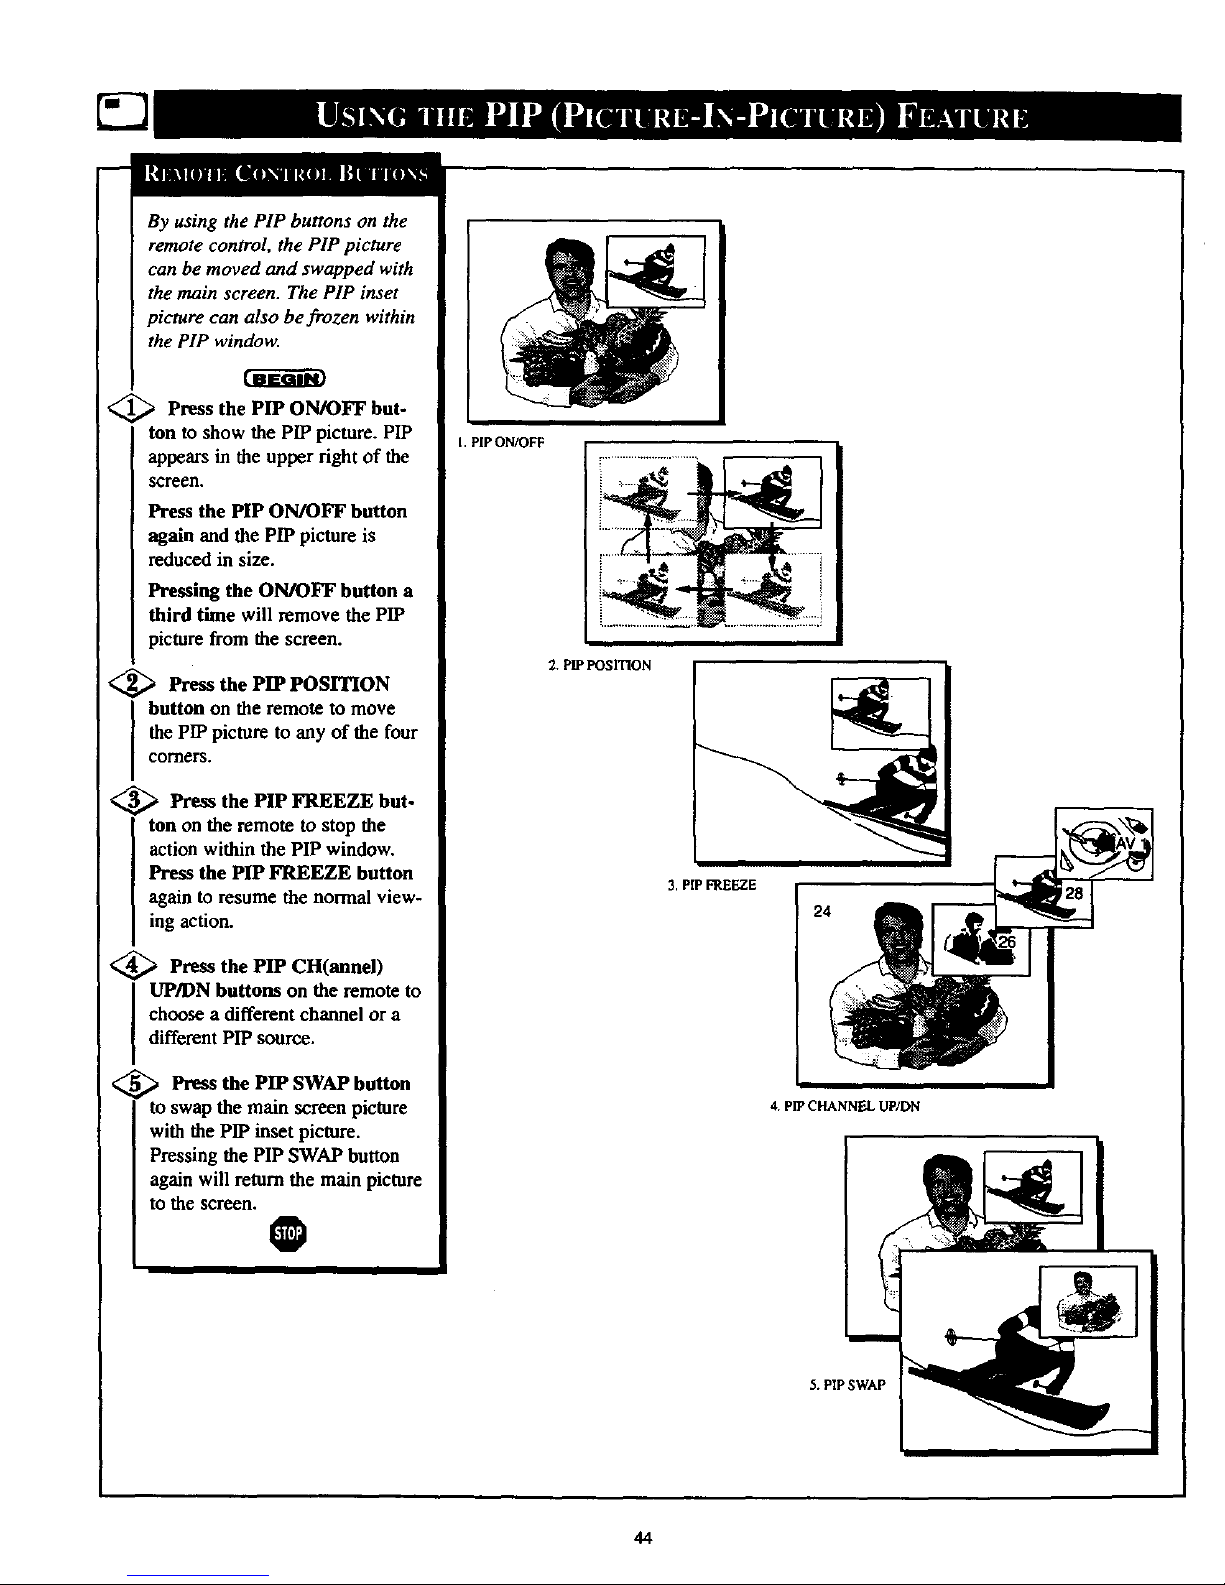
By using the PIP buttons on the
remote control, the PIP picture
can be moved and swapped with
the main screen. The PIP inset
picture can also be frozen within
the PIP window.
<_ Press the PIP ON/OFF but-
ton to show the PIP picture. PIP
appears in the upper right of the
Screen.
Press the PIP ON/OFF button
again and the PIP picture is
reduced in size.
Pressing the ON/OFF button a
third time will remove the PIP
picture from the screen.
<_ Press the PIP POSITION
I utton on the remote to move
the PIP picture to any of the four
comers.
<_ Press the PIP FREEZE but-
ton on the remote to stop the
action within the PIP window.
Press the PIP FREEZE button
again to resume the normal view-
ing action.
<_ Press the PIP CH(annel)
I P/DN buttons on the remote to
choose a different channel or a
different PIP source.
<_ Press the PIP SWAP button
to swap the main screen picture
with the PIP inset picture.
Pressing the PIP SWAP button
again will return the main picture
to the screen.
O
PIP ON/OFF
2. P_ POSITION
3. P[PFREEZE
24
4. PIP CHANNEL UP/DN
5. PIP SWAP
44
Page 45

_C e Picture-In-Picture (PIP)
Riot and Tint controls are
used to make fine tune adjustments
to the color settings for PIP (when
it is shown on the TV screen).
<_ Press the MENU button the
on
I remote to show the on-screen menu.
_ Press the DOWN •
CURSOR
button three times to select the
FEATURES menu.
_ Press the CURSOR RIGHT
button. The menu will shift
to the left and TIMER will be
highlighted.
<_ Press the CURSOR DOWN •
button to select the PIP menu.
<
_ Press the CURSOR RIGHT
button again to shift the dis-
play to the COLOR and TINT
adjustment bars.
Press the CURSOR DOWN •
or CURSOR I_ button to select
COLOR or TINT, then press the
CURSOR RIGHT _ and
CURSOR LEFT _ buttons to
adjust the COLOR and TINT bars
to the desired levels.
<_ Press the STATUS/EXIT but-
ton to remove the menu from the
screen.
separate COLOR
and TINT controls for PIP, the
adjustment levels for these controls
depend on the TV's main picture.
For example: If the main picture
screen is showing a black and
white picture, PIP would also be
seen in black and white (even
though the PIP picture source is in
color),
REVIEW
• PICTURE
• SOUND
• FEATURES
• INSTALL
6
MOVIERATING
W RATING m
DLO_ UNRATEOOFF
NORAllflG OFF
v
• REVIEW
• PICTURE TIMER
SOUND SmadLock
FEATURES NR
• INSTALL CONTRAST*
PiP
CLOSEOCAP
• FEATURES
_ TIMER "lIME
• SmarO.o_ ACTIVATE
• NR CHANNEL
• CONTRACT+ STARTTIME
• PiP DISPLAY
• CLOSEDCAP
• FEATL_E$
Ii
• TIMER
• SmadLock
• NN
CONTRAST+ COLOR
B
_ PIP TINT
• CLOSEDCAP
• tip
u•
T
• TINT
• PIP
• _ COLOR
• .--!,_ 2E TiNT
NOTE: If any SmanLock blocking options are set to ON, when this control is
accessed the screen will turn white, blocking the PIP picture.
When the PIP button is pushed and SmartLx_k blocking options are turned ON, enter
the access code you created in the SmartLock feature. This will allow the PIP COLOR
and TINT to be changed while the PIP picture is present. Entering your access code
will UNBLOCK ALL channels. To reset the blocking options, turn the TV off, then
turn the TV hack on. All previously blocked channels will be blocked again.
45
Page 46

DIP hookups are possible with a
ICable Bo_R.
_ First use an optional signal
splitter and connect the original
cable TV signal to both the CABLE
IN on the Cable Converter and the
IANTENNA plug on the rear of the
Itelevision.
<_ Connect the CABLE OUT on
the Converter to the ANT. IN on the
VCR.
_ Connect the VIDEO OUT jack
on the VCR to the VIDEO IN jack
on the TV.
Also connect the AUDIO OUT (right
and left) jacks from the VCR to the
AUDIO IN jacks on the television.
O
Cont_tct the parts
Information Center
at 1-800-851-8885
to order _my_ional
&_I_SSOFI¢$,
REAR OF TV
VIDEOCABLE
(YELLOW)
0
0
AUDIO CABLES
(RED AND WHITE)
VCR
CABLE "IVCONVERTER
46
Page 47

J
<
pip hookup is possible with a
VCR and a Digital Video Disc
Player (or similar device).
b First connect the cabh
original
TV signal orAntenna signal to the
ANT IN jack on the back of the
VCR.
<_ Connect OUT jack on
the ANT
the rear of the VCR to the ANT'A"
75 f2 input on the rear of the TV.
_ Connect the yellow Video
Cable from the VIDEO OUT jack
on the VCR to the VIDEO IN jack
on the TV (labeled VIDEO IN-2).
Then, connect the red and white
Audio Cables from the AUDIO OUT
jacks on the VCR to the AUDIO IN
jacks on the rear of the TV (labeled
AUDIO L & R/MONO IN-2).
<_ Connect a yellow Video
second
Cable from the VIDEO OUT jack
on the Video Disc Player to the
VIDEO IN jack on the TV (labeled
VIDEO IN-I). Then, connect a sec-
ond set of red and white Audio
Cables from the AUDIO OUT jacks
on the Digital Video Disc Player to
the AUDIO IN jacks on the rear of
the TV (labeled AUDIO L &
R!MONO IN -1).
Note: When selecting the PIP
SOURCE, the Digital Video Disc
Player will appear on the AV 1
channel, and the VCR will appear
on the AV 2 channel.
O
5OHM
)AXIAL
:ABE
REAR OF "IV
DVD (OR SIMILAR)
VCR
75 OHM
COAXIAL
CABLE
/
/
OUTSIDE UHF/VHF '" "_4
ANTENNAOR
CABLE TV SIGNAL
AUDIO
CABLES
(REDAND
WHITE)
47
Page 48

please make these simple
checks before calling for ser-
vice. These tips can save you
time and money since charges for
TV installation and adjustment of
customer controls are not cov-
ered under your warranty.
No Power
No Picture
No Sound
Remote Does Not
Work
Channel or No
Channels Above 13
CAUTION: A video source (such as a video game, Compact Disc Interactive - CDI, or
TV information channel) which shows a constant non-moving pattern on the TV screen
can cause picture tube damage. When your TV is continuously used with such a soure_
the pattern of the non-moving portion of the game (CDI, etc.) could leave an image
permanently on the picture tube. When not in use, turn the video source OFF.
Regular y alternate the use of such video sources with normal TV viewing.
• Check the TV power cord. Unplug the TV, wait 10 seconds, then reinsert plug into
outlet and push POWER button again.
Check that outlet is not on a wall switch. Be sure fuse is not blown on AC power strip.
Check to be sure the system mode switch (TV/VCR/ACC) is in the correct position
when using the remote control to power the set ON.
Check antenna connections. Are they properly secured to the TV's ANT/CABLE plug? [
Check the TUNER control for CABLE or ANTENNA setting.
!
Press the AV button on the remote to make sure the correct signal source is selected
(AV 1, AV 2, SVID-R or MM 1, MM 2, MM 3).
Check the VOLUME buttons.
Check the MUTE button on the remote control.
Cheek the SPEAKER on-screen control. OFF position will eliminate sound at the set.
If attempting auxiliary equipment hookups, check audio jack connections.
(If Applicable) Check Audio Receiver for correct operating mode.
Check TV/VCR/ACC "System" switch on the remote. Move the switch to the TV
position to operate the television.
Check batteries. Replace with AA Heavy Duty (Zinc Chloride) or Alkaline batteries
if necessary.
Clean the remote and the remote sensor window on the TV.
Check the "IVpower cord. Unplug the TV, wait 10 seconds, then reinsert plug into
outlet and push POWER button again. Be sure fuse is not blown on AC power strip.
Check to be sure "IV outlet is not on a wall switch.
i Repeat channel selection. I
Add desired channel numbers (CHANNEL EDIT control) into TV memory.
Check to be sure the TUNER control is set to the CABLE option.
Cleaning and Care
• To avoid possible shock hazard be sure the TV is unplugged from the electrical outlet before cleaning.
• When cleaning the TV screen take care not to scratch or damage the screen surface (avoid wearing jewelry or using
anything abrasive). Wipe the front screen with a clean cloth dampened with water. Use even, easy, vertical strokes when
cleaning.
• Gently wipe the cabinet surfaces with a clean cloth or sponge dampened in a solution of cool clear water. Use a clean
dry cloth to dry the wiped surfaces.
• Never use thinners, insecticide sprays, or other chemicals on or near the cabinet, as they might cause permanent marring
of the cabinet finish.
48
Page 49

AlternateChannel•Use the A/CH button on the remote control to toggle
between the last two channels viewed.
Auto Programming • When activated, this feature automatically scans for
all available channels from regular ,an,tanna or cable signals and stores only
active broadcast stations into the TV s memory.
Channel Edit • Add ordelete channels from the sequential tuning cycle to
develop a customized list of channels you want to watch. Editing makes it
easy to limit the number of channels when using the Channel +/- buttons or
to expand the number of channels available to suit your preference.
Closed Caption • Broadcast standard which allows you to readthe voice
content of television programs on the TV screen. Designed to help the
hearing impaired, this feature uses on-screon '_ext boxes" to show dialogue
and conversations while the TV program is in progress.
Coaxial Cable • A single solid antenna wire normally matched with a
metal plug (F-type) end connector thatscrews (or pushes) directly onto a
75 Ohm input found on the Television or VCR.
Dirt,ct Audio/Video Inputs • Located on the rear of the TV, these connec-
tors (RCA phono type plug) are used for the input of audio and video sig-
nals. Designed for use with VCRs (or other accessories) in order to receive
higher picture resolution and offer sound connection options.
Identify • Method by which a remote control searches and finds an operat-
ing code for another product (such us a VCR or Cable Converter). Once
thecode has been "identified," theTV remote can operate andsend com-
mands to the other product.
Incredible Stereo (or Surround) • Pseudo-acoustic management of the
audio signal produces a dramatic expansion of the wail of sound engulfing
the listener and heightens overall viewing pleasure.
Menu • An on-screen listing of feature controls that areavailable for user
adjustments.
Mullichannel Television Sound (iTS) • The broadcast standardthat
allows for stereo sound to be transmitted with the TV picture.
Accessories/Optional .............................. 42, 46, *Q/U- 1
On Screen Displays (OSD) •Refers to the wording or messages generat-
ed by the television (or VCR) to help the user with specific featurecon-
trois (color adjustment, programming, etc.).
Programming • The procedure of adding or deleting channel numbers
into theTelevision's memory circuits. In this way, the Television
"remembers" only the locally available or desired channel numbers and
skips over any unwanted channel numbers.
Remote Sensor Window • A window or opening found on the Television
control panel through which infrared remote control command signals are
received.
Second Audio Program (SAP) • Another or additional audio channel
provided for in the Multichannel Television Sound (MTS) broadcast stan-
dard. The most frequently proposed use for SAP is the simultaneous
bilingual broadcast of'IV program material.
Status/Exit • Allows the userto quickly confirm what channel number is
currently being viewed. Status can also be used to clear the Television of
on semen displays or information (ratber than waiting for the displays to
"time out" or automatically disappear from the screen).
Twin Lead Wire • The more commonly used name for the two strand
300 Ohm antenna wire used with many indoor and outdoor antenna sys-
tetus. In many cases this type of antenna wire requires an additional
adapter (or hal,.m) in order to connect to the 75 Ohm Input terminals
designed into the more recent Televisions and VCRs.
SmartLock • Allows you to block or censor channels or programming
that you may f'md objectionable. Program advisory content data (i.e.,
movie ratings, TV ratings) is supplied by broadcasters during the broad-
casting of programs. The TV cartdetect the data and block the programs
if desired.
SmartCIock • An accurate digital clOCk.By monitoring the vertical
blanking interval of PBS broadcasts, TVs equipped with SmartClock can
automatically set the right time of day and maintain it through brown-
outs, power failures, and even Daylight Savings Time adjustments.
Adapter Connector .................................. 42, *Q/U- 1
Add/Delete Channels ................................... *Q/U-3
Aadio/video Jack panel .......................... 30-32, 42, 46-47
AVL (Automatic Volume Leveler) .............................. 34
Balance Control ........................................... 26
Bass Control .............................................. 26
Battery Installation ..................................... *Q/U-4
Cable Converter Direct Entry Code List ...................... 39-40
Cable TV Connections/Settings ....................... 46, *Q/U- 1-2
Channel (Name) Display ................................ *Q/U-3
Channel Memory ...................................... *Q/U-2
Closed Captioning ......................................... 24
Contrast + Control ......................................... 23
Controls/Remote ................................. 33-41, *Q/U-4
Controls/TV .......................................... *Q/U-4
Features.................................................. 5
Glossat_"IV Terms ......................................... 49
Incredible Stereo Control .................................... 28
Inpats/Audio and Video ................................... 31-32
Language Option ...................................... *Q/U-2
Memoly/Program Channels .............................. *Q/U-2
Menu Button .......................................... *Q/U-4
Minus(-)/Plus (+) Buttons ................................ *Q/U-4
On Timer Channel Control .................................... 9
On Timer Control ........................................... 8
On Timer Display .......................................... 11
On Timer Start Time ........................................ 10
Picture Controls ............................................ 6
Picture Noise Reduction ..................................... 22
PrecauttonsiSafety ................................. 3, 48, *Q/U-I
Programming Channels .................................. *Q/U-2
Remote Control .................................. 33-41, *Q/U-4
Remote Control Direct Entry Code List ....................... 39-40
Remote Control with Accessory Equipment .................... 36-38
Requesting Service ................................... 48, 50-52
RF Coaxial Cable ...................................... *QAJ-1
Safety/Precautions ................................. 3, 48, *Q/U-I
Satellite Receiver Direct Entry Code List ........................ 40
Second Audio Program ...................................... 27
Sensor Remote ........................................ *Q/U-4
Set Up/First Time Use ............................. *Q/U-I, 2, 3, 4
Sleep Timer .............................................. 25
Sm_k Access Code .................................... 13
SmartLock Block Channel ................................... 14
SmartPicture Control ....................................... 33
Smartgoand Control ........................................ 34
Status/Exit Button ...................................... *Q/U-4
Stereo ................................................... 27
Surf .................................................... 35
Tips for Service ...................................... 48, 50-52
Treble Control ............................................ 26
Tuner Control ......................................... *Q/U-2
TV Speaker Control ........................................ 30
VCR Buttons ....................................... 41, Q/U-4
VCR/TV Connections ................... 31-32, 42-43, 46-47 *Q!U- 1
Volume Bar Control ........................................ 28
Warranty ................................................. 52
* Information contained in Quick-Use (Q/U) Guide-page listed.
,19
Page 50

Philips Consumer Electronics Company
Factory Service Center Locations
\
•k Indicates In-Home _rvice Only
1-800-242.9225
• Indicates m,-Home/Carrv-ln Service
Beaumont/Atmtin
San Antonio
Tampa/W Florida
NOTE:If youresideinoneofour PhilipsFactoryServiceBranchareas(seedirectoryonback),youcancontactthenearestServiceBranchto
obtainefficientandexpedientrepairforyourproduct.Ifyourproductis In-Warranty,youshouldhaveproof-of-purchasetoensureNoCharge
Service For0ut-of-Warrantyservice,callthelocationnearestyou.
NOTA:Sivousr6sidezdartsunedesr_gionsdesserviesparunesuccurseledeserviceapr_eventedutabricentPhilips(voirlisteci-dessous),
vouspourrezcontacterla branchede serviceapr_sverrtelaplusprosdechazvouspourobtenirunserviceaprbsventerapideetefficace.Sile
produitestsousgarantie,ilsuffiradepr_sentarunepreuved'achatpourh6n_ficierd'unservicesansfrais. Pourlesproduitsnoncouvertsparla
garantie,contactezlecentreleplusprosdechazvous.
NOTA:SiUd.resideenunadenuestraszonasparasucursalesPhilipsdeservicioaldef_ibdca(verdirectoriom_sabajo),Ud.puedecomunicarse
conlasucursaideserviciom;iscercanaparaobtenerunareparacidnoportunayeficazdesuproducto.Si suproduotoesbitodaviabajogaran-
tia,Ud.debepresentarcomprobantedecompraparanoocesionaroingunoscargospotservicio.Paraserviciodespu_sdelvencimientodela
garantia,Ilameal lugarm_lscercanodelosabajoindicados.
aJn___aad_a
Howyoucanobtainefficientandexpedientcarry-in,mail-in,orin-homeserviceforyourproduct
PleasecontactPhilipsat 1-800-661-6162(Frenchspeaking)
1-800-363-7278(Englishspeaking)
AuCaaada
Commentobtenirleserviceapr_s-ventepourlesproduitsapport6souenvoy6sparlapostebnotrecentredeserviceoule service_ domicile
Veuillezcontacterphilips_i: 1-800-661-6162(Francophone)
1-800-363-7278
C(_roorecihirservicioefficienteparasuproducto,enpersona,pot correooa domicillo
FavordecomunicarseconPhilipsal: 1-800-661-6162(francdfono)
1-800-363-7278(angldfono)
MAC2929 1_9
EL4482-3 Rev. AA
3135 015 07541
5O
Page 51

QUALITY SERVICE IS AS CLOSEAS YOUR TELEPHONE!SIMPLY LOOKOVERTHE LIST BELOW FORTHE NUMBEROF A F._n)RYSENVlCECENTER
NEARYOU. YOUR PRODUCT WILL RECEIVEEFFICIENTAND EXPEDIENTCARRY-IN, MAIL-IN, ORIN-HOME SERVICE, AND YOU WILL RECEIVEPEACEOF MIND,
KNOWINGYOUR PRODUCT IS BEING GIVENTHE EXPERTA13"ENT10NOF PHILIPS' FACTORYSERVICE. AND, IF THE PHONENUMBER USTEO FOR YOUR AREA
IS LONGDISTANCE,CAlL 1-800-242-9225FeeFACTO_SERtnsE.
COMMENTOBTONIRNOTRESERVICEAPRI_SVENTERAPIDEETEFRONCESOITpARCOtlRRIER,ADOMICILE,OUEllSEPR_SENTARTJ,URC_ENTREDESERVICEPHIUPS.PLUSDE600CONTRES
DERI_CEPTIONDEPRODUrrSAR_:PARER_ TRAVERSLEPAYS:CONTACnERLECENTREOESERVICEAUXCONSOMMATEUR$LIEPLUS[=ROCHEPOUR_VOIRL'EMPLACEMENTDECESDI_PBTS
DANSUNRAYONDE50._75MILES(80KM_120RM)DUCENTREDESERVICELOCAL
CI_MOOUTENERUNSERVICIOOPORTUNOYEFICIERT1EPORCORREO,ENONSAOENPERSONApARASOPRODUCTOATRA_SDEUNCERTROPRILEPSDE$ERVICIO.MASDE500SITIOSPeR
TOUOELPAlSPARALARECEPCIONDEPRODUCTOSNEUESITAROSDEREPARACIONES:COMURICARSECONELCI_MTRODESERVICI0DEFARRIUAMASCIERCAROPARAESTOSLUGARESGENTRO
DEUNRADIODEM A120KM(540A 75 MILLAS)DELCENTRODESERVICI0LOCAL.
GEORGIA
Pbilips FactoryServiceof Georgia
200 N. CobbPkwy., Suite120
Marietta,GA30062
(770) 795-0085
FLORIDA
PhilipsFactoryServiceof Florida
1911 US Highway301 North
Tampa,FL33619
(813) 621-8181
WESTERNU.S.A.
PhilipsFactoryServiceWesternRegion
681 EastBrokawRd.
SanJose,CA95112
(408) 436-6566
TEXAS
PhilipsFactoryServiceof Texas
1110 N.PostOakRd.,Suite 100
Houston,TX 77055
(713) 682-3990
CENTRALU.S.A.
PhilipsFactoryServiceCentralUS
950 KeynoteCircle
BrooklynHeights,OH44131
(216) 741-3334
MICHIGAN
PhilipsFactoryServiceof Michigan
25173 Dequindre
MadisonHeights,MI 48071
(248)544-2110
DALLASAREA
PhilipoFactoryServiceofDallas
415 N.MainStreet,#107
Euless,TX 76040
(713) 582-3990
ILLINOIS
PhilipsFactoryServiceof Illinois
1279 W. HamiltonPkwy.
Itasca,IL 60143
(630) 775-0990
TENNESSEE
PhilipsFactoryServiceof EastTennessee
6700 O PapermiURd.
Knoxville,TN37919
(423) 584-6614
MID-ATLANTIC
PhilipsFactoryServiceMid-Atlantic
352 DunksFerryRd,
8ensalem,PA19020
(215) 638-7500
MAC_ 1/99
51
Page 52

COLOR TELEVISION
90 Days Free Labor
One Year Free Replacement of Parts (Two Years Free Replacement on Color Picture Tube)
This product can be repaired in-home.
WHO IS COVERED?
Youmusthaveproofofpurchaseto receivewarrantyservice.A sales
receiptor otherdocumentshowingthat youpurchasedthe productis
consideredproofof purchase.
WHAT IS COVERED?
Warranty coveragebeginsthe day you buy your produc_ For 90 days
thereafter,all parts will be repaired or replaced free, and labor is free.
From 90 daysto one year from the dayof purchase,all partswill be
repaired or replaced free, but you payfor all labor charges. From one
to two yearsfrom the dayof purchase,youpayfor the replacement or
repair of all parts except the picture tube, and for all labor charges.
After two yearsfrom the dayof purchase,you pay for the replacement
or repair of all parts, andfor all labor charges.
All parts, includingrepaired and replaced parrs, are covered only for
the originalwarranty period. When the warranty on the product
expires, the warranty on all replaced and repaired partsalsoexpires,
WHAT IS EXCLUDED?
Your warranty does not cover:.
• laborchargesfor installationor setup of the product, adjustmentof
customer controlson the product, and installationor repair of
antennasystemsoutside of the product.
• product repair and/or part replacement becauseof misuse,acci-
dent,unauthorized repair or other causenot within the control of
PhilipsConsumer ElectronicsCompany.
• reception problems causedbysignalconditionsor cable or antenna
systemsoutsidethe unit_
• aproduCtthat requires modificadon or adaptationto enable it to
operate in anycountry other than the country for which it was
designed,manufactured,approvedand/or authorized,or repair of
productsdamagedbythese modit',:ations.
• incidentalor consequentialdamagesresulting from the product.
(Somestates do not allow the exclusionof incidentalor consequen-
tialdamages,sothe above exclusionmay not apply to you, This
includes,but is not limited to, prerecorded material,whether copy-
righted or not copyrighted.)
• a product usedfor commercialor institutionalpurposes.
WHERE IS SERVICE AVAILABLE?
Warranty serviceisavailableinall countrieswhere the product is ofli-
cially distributed byPhilipsConsumer ElectronicsCompany. In cOUn-
trieswhere Philips Consumer ElectronicsCompanydoes not distribute
the product,the local Philipsserviceorganizationwill attempt to pro-
videservice(althoughthere may be adelay if the appropriate spare
parts and technical manual(s)are not readily available).
MAKE SURE YOU KEEP...
Pleasekeep your salesreceipt or other document showingproofof
purchase. Attach it to this owner's manualand keep both nearby.
Also keepthe original box and packingmaterial in caseyou need to
return your product:
BEFORE REQUESTING SERVICE...
Pleasecheckyourowner'smanualbeforerequestingservice.
Adjustmentsofthe controlsdiscussedthere maysaveyouaservice
call.
TO GET WARRANTY SERVICE IN U.S.A.,
PUERTO RICO OR U.S. VIRGIN ISLANDS...
ContactaPhilipsfactoryservicecenter(seeenclosedlist)or autho-
rizedservicecenterto arrangerepair.
(in U.S.A.,Puerto Rico and U.S,Virgin Islands,all impliedwarranties,
includingimpliedwarranties of merchantability andfitnessfor a partic-
ubr purpose,are limited in duration to the durationof this express
warranty. But,becausesomestates do not allowlimitationson how
longan impliedwarranty may last, this limitation may not apply to
you.)
TO GET WARRANTY SERVICE IN CANADA.,,
PleasecontaCtPhilipsac
1-800-661-6162 (French Speaking)
1-800-363-7278 (EnglishSpeaking)
(In Canada,this warranty isgiven in lieuof all other warranties. No
other warranties are expressed or implied, includingany impliedwar-
randes of merchantabilityor fitnessfor a particular purpose. Philips is
not liableunder anycircumstancesfor any direct, indirect,special,inci-
dentalor consequentialdamages,howsoever incurred,even if notified
ofthe possibilityofsuch damages.)
REMEMBER...
Pleaserecord the model and serial numbers found on the produCt
below. Also, pleasefill out and mail your warranty registration card
promptly. It will be easierfor us to notify you if necessary.
MODEL #
SERIAL#
Philipa Service Company, P.O. Box 2976, Longview, Texas 75606, (902) 242-4800
_inU.S.A.
 Loading...