

Magnavox TP3273 Owner's Manual
..::::_:-_
Color Television
Owner's Manual
iii_.
Once your MAGNA VOX purchase is registered, you're eligible to receive all the privileges of owning a MAGNA VOX
product. So complete and return the Warranty Registration Card enclosed with your purchase at once. And take
advantage of these important benefits.
ion
as
in the
or loss.
=Model l
Registration
Returning your Warranty Registration
Card right awayguaranteesyou'll
receive allthe information andspecial
offers which you qualify for asthe
owner of your model.
Congratulations on your purchase, and
welcome to the "family!" _VOX
Smart. Verysmart.
Dear MAGNAVOX product owner:
Thank you for your confidence in MAGNAVOX. You've selected one of the best-builr_ best-backed products
available today, And we'll do everything in our power to keep you happy with your purchase for many years to come.
As a member of the MAGNAVOX "family," you're entided to protection by one of the most comprehensive warranties and outstanding
service networks in the industry.
What's more, your purchaseguaranteesyou'll receive all the information and specialoffers for which you qualify,pluseasy access to
accessories from our convenient home shoppingnetworl_
And most importantly you can count on our uncompromising commitment to your total satisfaction.
All of this is our way of sayingwelcome-and thanks for investingin a MAGNAVOX produc_
P.S. Remember, to get the most from your
MAGNAVOX product, you must return your
Eobe_LMinkhors t Warranty Registration Card within 10 days.
President and Chief ExecutiveOfficer So please mail it to us right now!
I
For Customer Use
Enter below the Serial No. which is located on the rear of the cabinet. Retain this information for future reference.
Model No. Serial No.
Know these
safetysymbols
CAUTION: TO REDUCE THE RISK 0f EUECTRICSHOCK, DO NOT
REk_QVE€OVER (O1111N:K). NO LiGER-SlERV1CEABUEPARTS
tlVSlOE.REFER 6EIWICING TO OUAUFIEO SlE_ PERSONNEL.
I
_1_ This "bolt of lightning"indicatesuninsulated material within your unit may causean electrical sho,
For the safetyof everyone inyour household, pleasedo not remove product covering.
_The "exclamation point" callsattention to features for whtch you should read the endosedJLterat_
closely to prevent operatingand maintenance problems.
WARNING: TO PREVENT FIREOR SHOCK HAZARD, DO NOT EXPOSETHIS EQUIPMEN1 , O R_
OR MOISTURE.
CAUTION: To prevent electric shock, match wide blade of plug to wide slot, andfully insert
ATTENTION: Pour _viter les chocs _lectriques, introduire la lame la plus large de la fiche dans la bo_
correspondantede la prise et pousser jusqu'aufond.

SAFETYINSTRUCTIONS- Readbeforeoperatingequipment
Thisproductwasdesignedandmanufacturedtomeetstrictqualityand
safetystandards.Thereare, however,someinstallationandoperation
precautionswhichyoushouldbeparticularlyawareof.
1. ReadInstructions- Allthesafetyandoperatinginstructionsshould
bereadbeforetheapplianceisoperated.
2. RetainInstructions- Thesafetyandoperatinginstructionsshould
beretainedfor futurereference.
3. HeedWarnings- Allwarningsontheapplianceandintheoperating
instructionsshouldbeadheredto.
4. FollowInstructions- All operatinganduseinstructionsshouldbe
followed.
5. WaterandMoisture- Tt=eapplianceshouldnotbeusednearwater
- forexample,nearabathtub,washbowl,kitchensink,laundrytub,
inawetbasementornearaswimmingpool,etc.
6. CartsandStands-Theapplianceshouldbeusedonlywithacartor
standthatisrecommendedbythemanufacturer.
6A. _ An applianceandcart combinationshouldbemoved
withcare. Quickstops,excessiveforce,anduneven
surfacesmaycausetheapplianceandcartcombination
tooverturn.
7. Wallor CeilingMounting- Theapplianceshouldbe mountedtoa
wallorceilingonlyasrecommendedbythemanufacturer.
8. Ventilation- Theapplianceshouldbesituatedsothatitslocationor
positiondoesnotinterferewithitsproperventilation.Forexample,
theapplianceshouldnotbesituatedona bed,sofa,rug,orsimilar
surfacethat mayblocktheventilationopenings;or, placedin a
built-ininstallation,suchasa bookcaseorcabinetthatmayimpede
theflowofairthroughtheventilationopenings.
9, Heat- Theapplianceshouldbesituatedawayfrom hearsources
suchas radiators, heat registers,stoves,or otherappliances
(includingamplifiers)thatproduceheat.
10. Power Sources- Theapplianceshouldbeconnectedto a power
supplyonlyofthetypedescribedintheoperatinginstructionsoras
markedontheappliance.
11. Power-CordProtection- Powersupplycordsshouldberoutedso
thattheyare notlikelyto bewalkedonorpinchedbyitemsplaced
uponor againstthem,payingparticularattentionto cordsand
plugs,conveniencereceptacles,andthepointwheretheyexitfrom
theappliance.
12. Cleaning- Theapplianceshouldbecleanedonlyas recommend_
bythemanufacturer.
13. Power Lines- Anoutdoor antennashouldbelocatedawayfrom
powerlines.
14. OutdoorAntennaGrounding- Ifanoutsideantennaisconnectedto
thereceiver,besurethe antennasystemis groundedsoasto
providesomeprotectionagainstvoltagesurgesand builtupstatic
charges.
Section810oftheNationalElectricCode,ANSI/NFPANo.70-1984,
providesinformationwith respectto propergroundingof the mats
and supporting structure grounding of the lead-in wire to an
antennadischargeunit, sizeof Groundingconnectors,locationof
antenna-dischargeunit, connectionto grounding electrodesand
requirementsfor thegroundingelectrode.SeeFig.below.
15. Non-usePeriods - The power cordof the applianceshould be
unpluggedfrom theoutletwhenleft unusedfor a longperiodof
time.
16. ObjectandLiquid Entry- Careshouldbetakensothatobjectsdo
not fall andliquidsare notspilledintothe enclosurethrough
openings.
17. DamageRequiringService- Theapplianceshouldbeservicedby
qualifiedservicepersonnelwhen:
A. Thepowersupplycordortheplughasbeendamaged;or
B. Objects have fallen, or liquid has been spilled into the
appliance;or
C. Theappliancehasbeenexposedto rain;or
D. Theappliancedoesnotappeartooperatenormallyorexhibits
amarkedchangeinperformance;or
E. Theappliancehasbeendropped,ortheenclosuredamaged.
18. Servicing- Theusershouldnotattemptto servicetheappliance
beyondthat describedin the operatinginstructions.Allother....
servicingshouldbereferredto qualifiedservicepersonnel.
Noteto theCATVsysteminstaller:Thisreminderis providedtocallthe
CATVsysteminstaller'sattentionto Article820-40 ofthe NEC that
providesguidelinesforpropergroundingand,inparticular,specifiesthat
the cablegroundshallbe connectedto the groundingsystemof the
building,asclosetothe pointofcableentryaspractical.
EXAMPLEOFANTENNAGROUNDINGAS PERNATIONALELECTRICALCODE(NEC)
ExampleofAntennaGrounding
as perNEC- NationalElectricCode
ANTENNALEADIN WIRE
ANTENNADISCHARGEUNIT(NECSECTION810-20)
GROUNDINGCONDUCTORS(N_CSECTION810-21)
GROUNDCLAMPS
-----_"'-'_ POWERSERVICEGROUNDINGELECTRODESYSTEM(_ECART250,PARTH)
ELECTRICSERVICEEQUIPMENT
MAC3964
Introduction
Welcome/Registration of Your TV ............................ 2
Safety/Precautions ..................................................... 3
Table of Contents ....................................................... 4
Features ...................................................................... 4
On-Screen (MENU) Features
Setting the TV for Cable TV Operation .............. 5
¢,Adding Channels in Memory (Automatically)...6
¢'Adding Channels in Memory (Manually) ........... 7
¢'How to Set the TV for Closed Captioning ......... 8
¢,Setting the TV for Stereo Programs .................... 9
¢, Using the Sound Image Control ........................ 10
_Using the TV Volume Bar Control ................... 10
_'Settjng the Surf/Smart Surf Control .................. 11
+Adjusting the TV Picture .................................. 12
,_ Adjusting the Set Clock Control ....................... 13
,_ Adjusting the Set Timer/Timer ON/OFF .......... 14
•ffSetting the TV Sleep Timer Control ................. 15
"ffUsing the TV Channel Reminder ...................... 16
Using the On-Screen Language Option ............ 16
+Using the Audio Out Jacks (with TV Speaker
On/Off Control) ................................................ 17
¢,Using Surround Sound External Speakers ........ 17
_-Using the TV°s Audio/Video Input Jacks .... 18-19
Remote Control
Qperation
Using the Remote Locator Feature ....... 20-21
Using the Smart Picture Control .............................. 22
Using the Smart Sound Control............................... 23
Setting the TV Remote to Work VCRs .............. 24-25
Setting the TV Remote to Work
Cable TV Converters .......................................... 26-27
Setting the .tTVRemote to Work VCRs or Cable
Converters - Search Method .................................... 28
Using the Remote's VCR Buttons ............................ 29
_--_ Picture-in-Picture (PIP)
Using the PIP Feature (Connections) ................. 30-31
Using PIP with the TV Remote ............................... 32
Selecting the PIP Picture Source ............................. 33
More PIP Connections (Cable Converter) ............... 34
U General Information
Tips if Something Isn't Working ............................. 35
Glossary of TV Terms ............................................. 36
Index ........................................................................ 36
Factory Service Locations .................................. 37-38
Warranty .................................................................. 39
Accessories .............................................................. 40
Use the simple Set-Up Guide (supplied with
your TV information packet) for details on:
• Antenna Hook-ups
• First Time Set-Up
(Automatic Settings)
• Basic TV and Remote
Control Operation
1_ "_-_-_ j
• On-Screen Menu Use
Infrared Remote Control works your TV set and a
variety of wireless remote control VCRs and Cable
Converters. A special "Locator" feature can also help
you find the remote when it has been stuck out of
sight or misplaced.
Standard broadcast (VHFAJHF) or Cable TV
(CATV) channel capability.
Stereo Ready TV with built-in audio amplifier and
twin speaker system for receiving TV programs
broadcast in stereo sound.
Picture-In-Picture feature can show a TV program
and the direct video output from an accessory (VCR,
etc.) on the TV screen at the same time.
Closed Captioning allows the viewer to read TV
program dialogue or voice conversations as on-screen
text.
Automatic Programming of Channels for quick
and easy selection of favorite stations available in
your area.
On-Screen Features (in either English, French, or
Spanish) show helpful messages for setting of TV
controls.
Audio/Video Jackpanel for direct connections with
VCRs (or other video accessories) providing quality
TV picture and sound playback.
Smart Button for the control of TV Sound and
Picture levels. Use the Smart Button on the remote to
quickly adjust Smart Sound (to keep volume levels
consistent during program changes or commercial
breaks), or Smart Picture (for automatic picture
adjustments on a variety of program sources).
Sleep-Timer automatically turns the TV OFF at
preset times.
Clock Timer featurecan turn ON the TV at any
preset time -just like an alarm clock.
I
Copyright © 1996 Philips Consumer Electronics Company. All rights reserved.
OTE: If you went through
• _l Setup (in your Quick Use
Guide), this task has already been
completed for you.
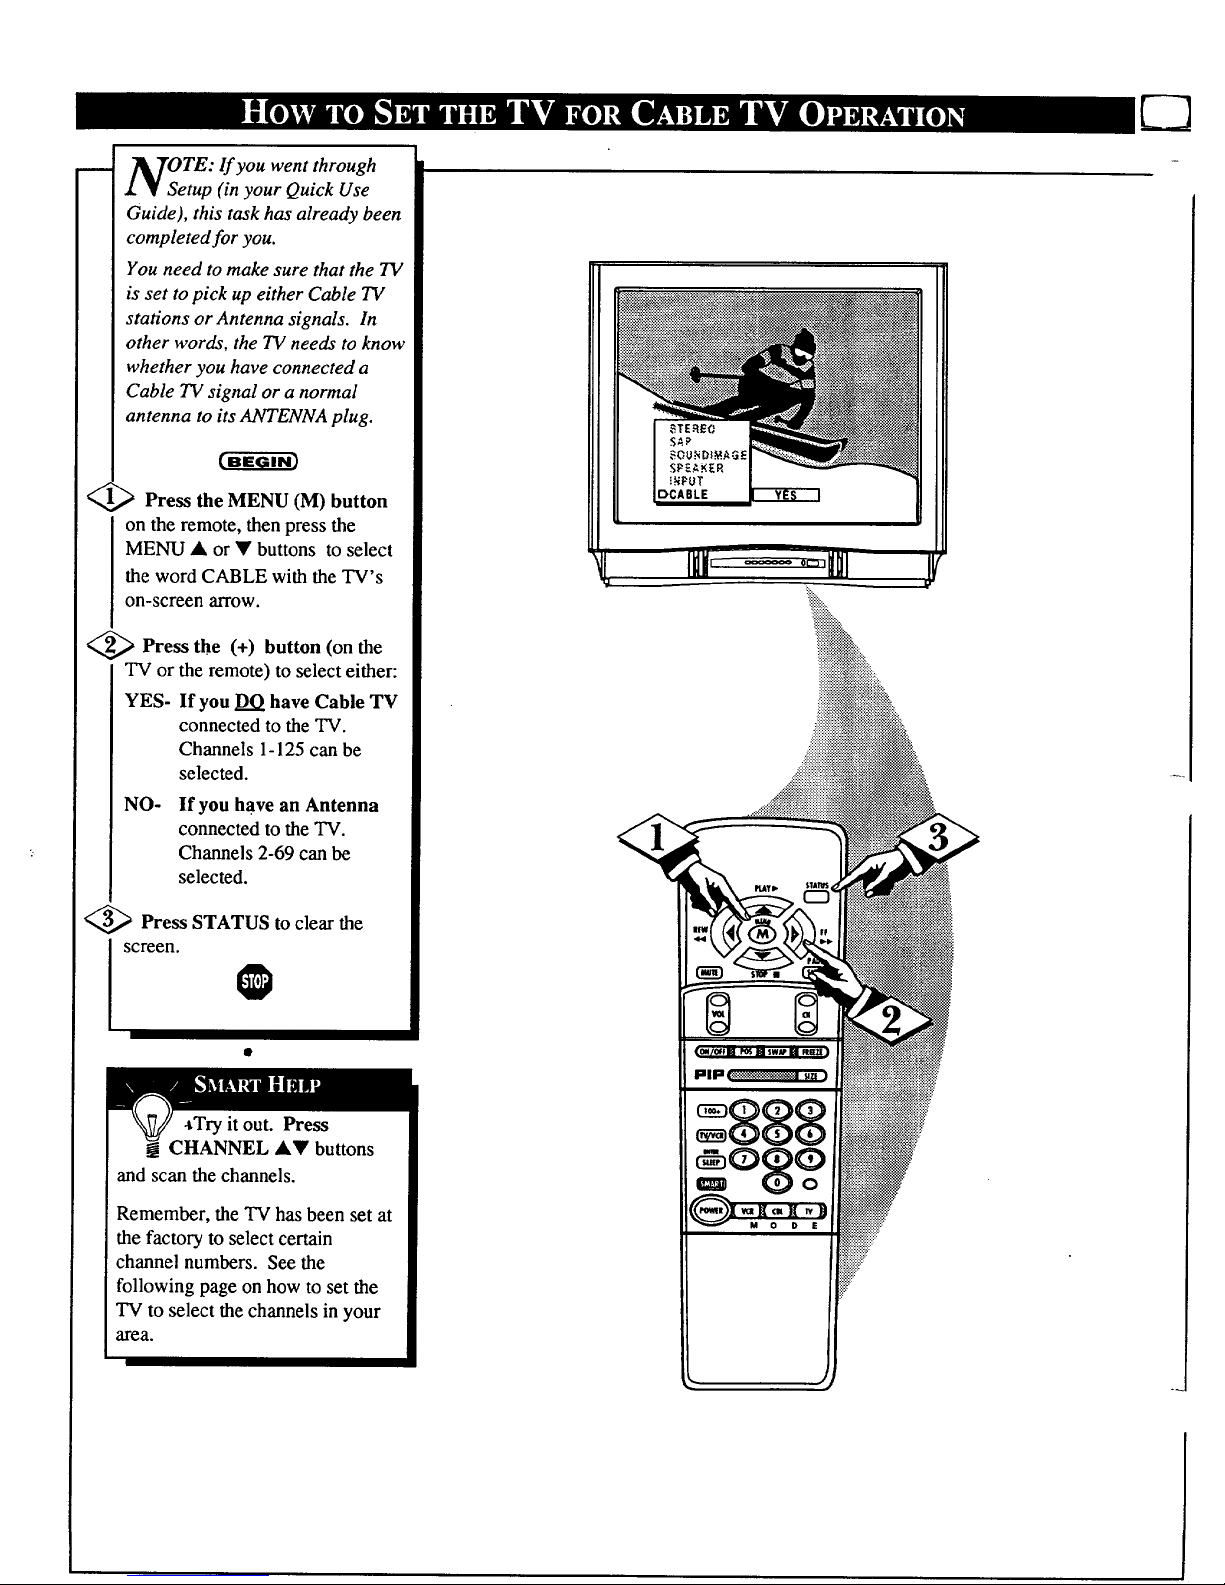
You need to make sure that the TV
is set to pick up either Cable TV
stations or Antenna signals. In
other words, the TV needs to know
whether you have connected a
Cable TV signal or a normal
antenna to its _ENNA plug.
Press the MENU (M) button
on the remote, then press the
MENU • or • buttons to select
the word CABLE with the TV's
on-screen arrow.
<_ Press the (+) button (on the
TV or the remote) to select either:
YES- If you DO have Cable TV
connected to the TV.
Channels 1-125 can be
selected.
NO- If you have an Antenna
connected to the TV.
Channels 2-69 can be
selected.
<_ Press STATUS to clear the
screen.
@
,Try it out. Press
CHANNEL •• buttons
and scan the channels.
Remember, the TV has been set at
the factory to select certain
channel numbers. See the
following page on how to set the
TV to select the channels in your
area.
U3
_TOTE: If you went through
1 • Setup (in your Quick Use
Guide), this task has already been
completed for you.
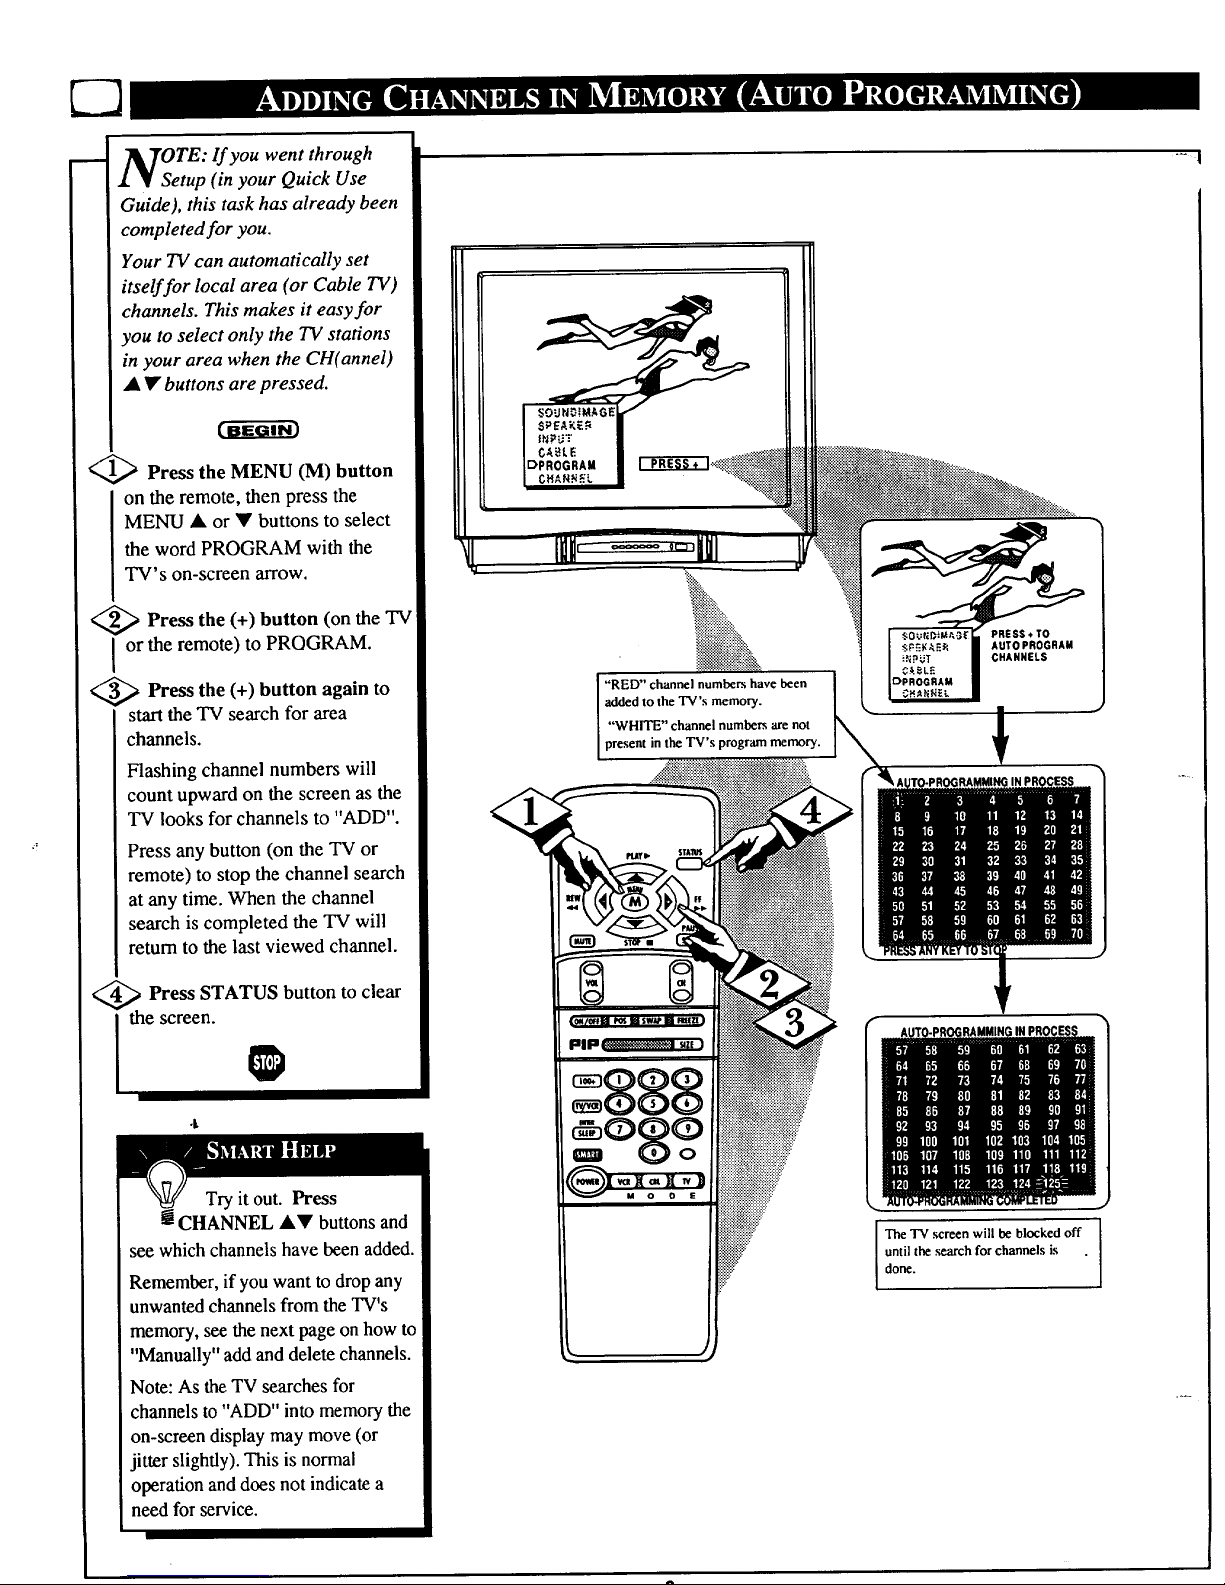
Your TV can automatically set
itself for local area (or Cable TV)
channels. This makes it easy for
you to select only the TV stations
in your area when the CH(annel)
• • buttons are pressed.
<_ Press the MENU (M) button
on the remote, then press the
MENU • or • buttons to select
the word PROGRAM with the
TV's on-screen arrow.
<_ Press the button (on the "IV
(+)
I or the remote) to PROGRAM.
<_ Press the (+) button again to
start the TV search for area
channels.
Flashing channel numbers will
count upward on the screen as the
TV looks for channels to "ADD".
Press any button (on the TV or
remote) to stop the channel search
at any time. When the channel
search is completed the TV will
return to the last viewed channel.
Press STATUS button to clear
the screen.
Try it out. Press
! CHANNEL &V buttons and
see which channels have been added.
Remember, if you want to drop any
unwanted channels from the TV's
memory, see the next page on how to
"Manually" add and delete channels.
Note: As the TV searches for
channels to "ADD" into memory the
on-screen display may move (or
jitter slightly). This is normal
operation and does not indicate a
need for service.
i
"RED" channel numbers have been
added to the TV's memory.
"WHITE" channel numbers are not
present in the TV's program memory.
PRESS¢TO
AUTOPROGRAM
CHANNELS
The TV screen will be blocked off
until the search for channels is
done.
-_ |
m
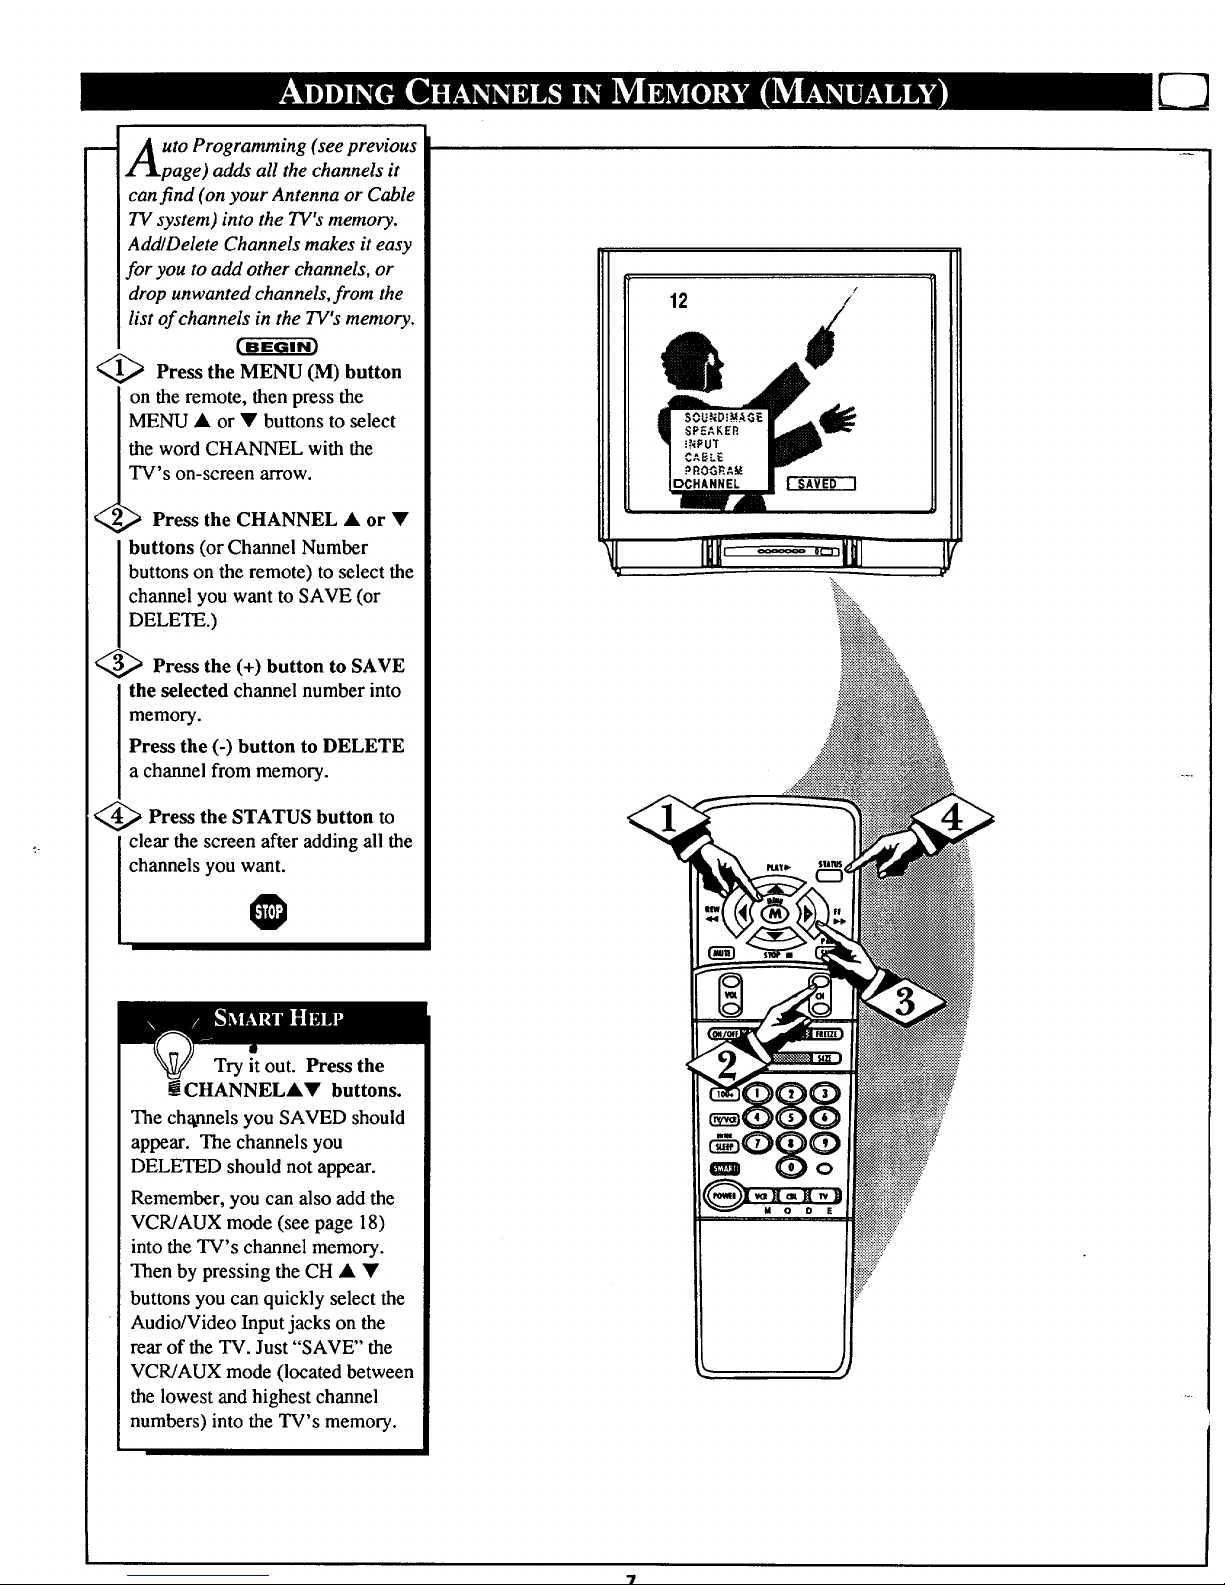
uto Programming (see previous
page) adds all the channels it
can find (on your Antenna or Cable
TV system) into the TV's memory.
AddlDelete Channels makes it easy
for you to add other channels, or
drop unwanted channels, from the
list of channels in the TV's memory.
<_ Press the MENU (M) button
on the remote, then press the
MENU • or • buttons to select
the word CHANNEL with the
TV's on-screen arrow.
_ Press the CHANNEL • or •
buttons (or Channel Number
buttons on the remote) to select the
channel you want to SAVE (or
DELETE.)
<_ Press the (+) button to SAVE
the selected channel number into
memory.
Press the (-) button to DELETE
a channel from memory.
<_ Press the STATUS button to
clear the screen after adding all the
channels you want.
Try it out. Press the
mCHANNEL•• buttons.
The channels you SAVED should
appear. The channels you
DELETED should not appear.
Remember, you can also add the
VCR/AUX mode (see page 18)
into the TV's channel memory.
Then by pressing the CH • •
buttons you can quickly select the
Audio/Video Input jacks on the
rear of the TV. Just "SAVE" the
VCR/AUX mode (located between
the lowest and highest channel
numbers) into the TV's memory.
12 /
losed Captioning allows you to
read the voice content of
television programs on the TV
screen. Designed to help the
hearing impaired this feature uses
on-screen "text boxes" to show
dialogue and conversations while
the TV program is in progress.
<_ Press the (M) on
MENU button
the remote, then press the MENU
• or • to select the word
CAPTION with the TV's on-screen
alTOW.
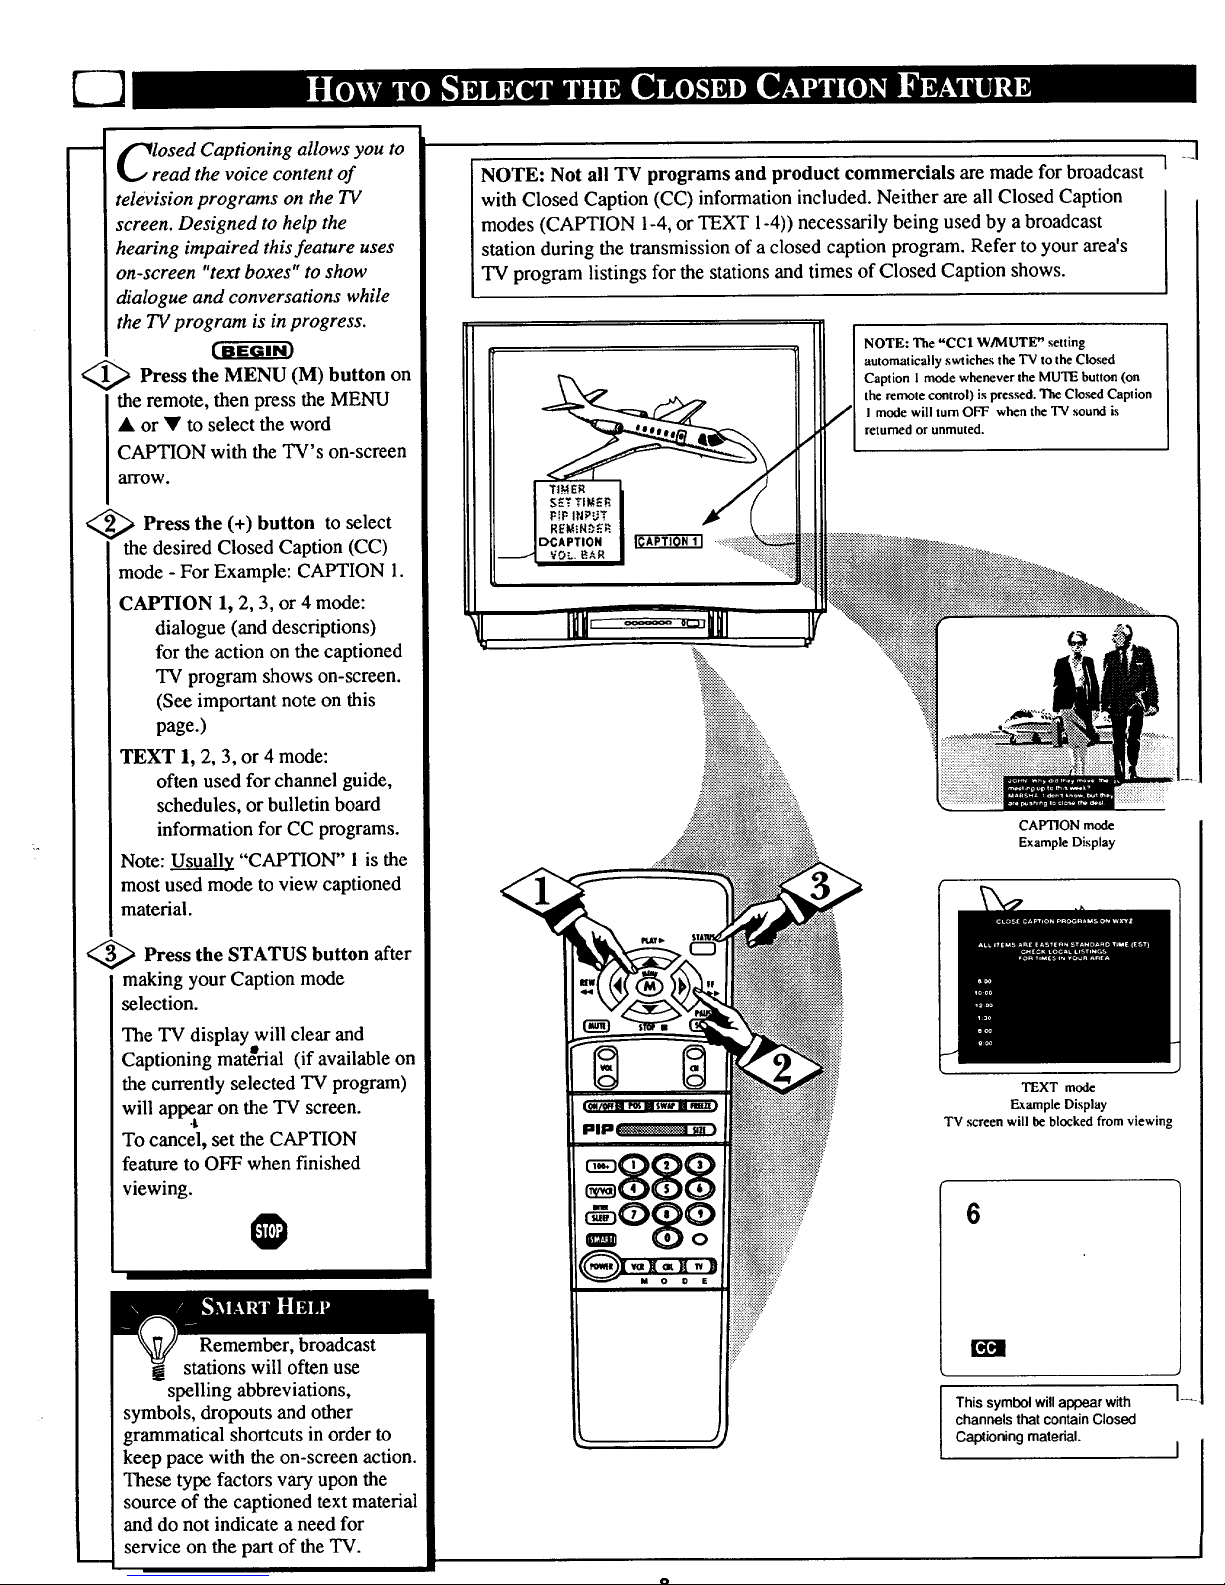
<_ Press the (+) button to select
the desired Closed Caption (CC)
mode - For Example: CAPTION 1.
CAPTION 1, 2, 3, or 4 mode:
dialogue (and descriptions)
for the action on the captioned
TV program shows on-screen.
(See important note on this
page.)
TEXT 1, 2, 3, or 4 mode:
often used for channel guide,
schedules, or bulletin board
information for CC programs.
Note: Usually "CAPTION" 1 is the
most used mode to view captioned
material.
<_ Press the STATUS button after
making your Caption mode
selection.
The TV display will clear and
. . B.
Capuomng matenal (if available on
the currently selected TV program)
will appear on the TV screen.
To cancel, set the CAPTION
feature to OFF when finished
viewing.
Remember, broadcast
stations will often use
spelling abbreviations,
symbols, dropouts and other
grammatical shortcuts in order to
keep pace with the on-screen action.
These type factors vary upon the
source of the captioned text material
and do not indicate a need for
service on the part of the TV.
NOTE: Not all TV programs and product commercials are made for broadcast
with Closed Caption (CC) information included. Neither are all Closed Caption
modes (CAPTION 1-4,or TEXT 1-4)) necessarily being used by a broadcast
station during the transmission of a closed caption program. Refer to your area's
TV program listings for the stations and times of Closed Caption shows.
DCAPTION
NOTE: The "CCI W/MUTE" setting
automatically swtiches the "IV to the Closed
Caption 1mode whenever the MUTE button (on
the remote control) is pressed. The Cloud Caption
I mode will turn OFF when the TV sound is
returned or unmuted.
,..........................,.
::::::::::::::::::::::::::::
iiiiiiiiiiiiiiiiiiii +:
iiiiiiiiiiiiiiii::
CAPTION mode
Example Display
TEXT mode
Example Display
TV screen will be blocked from viewing
6
This symbol will appear with
channels that contain Closed
Captioning material.
_J
I
I ....
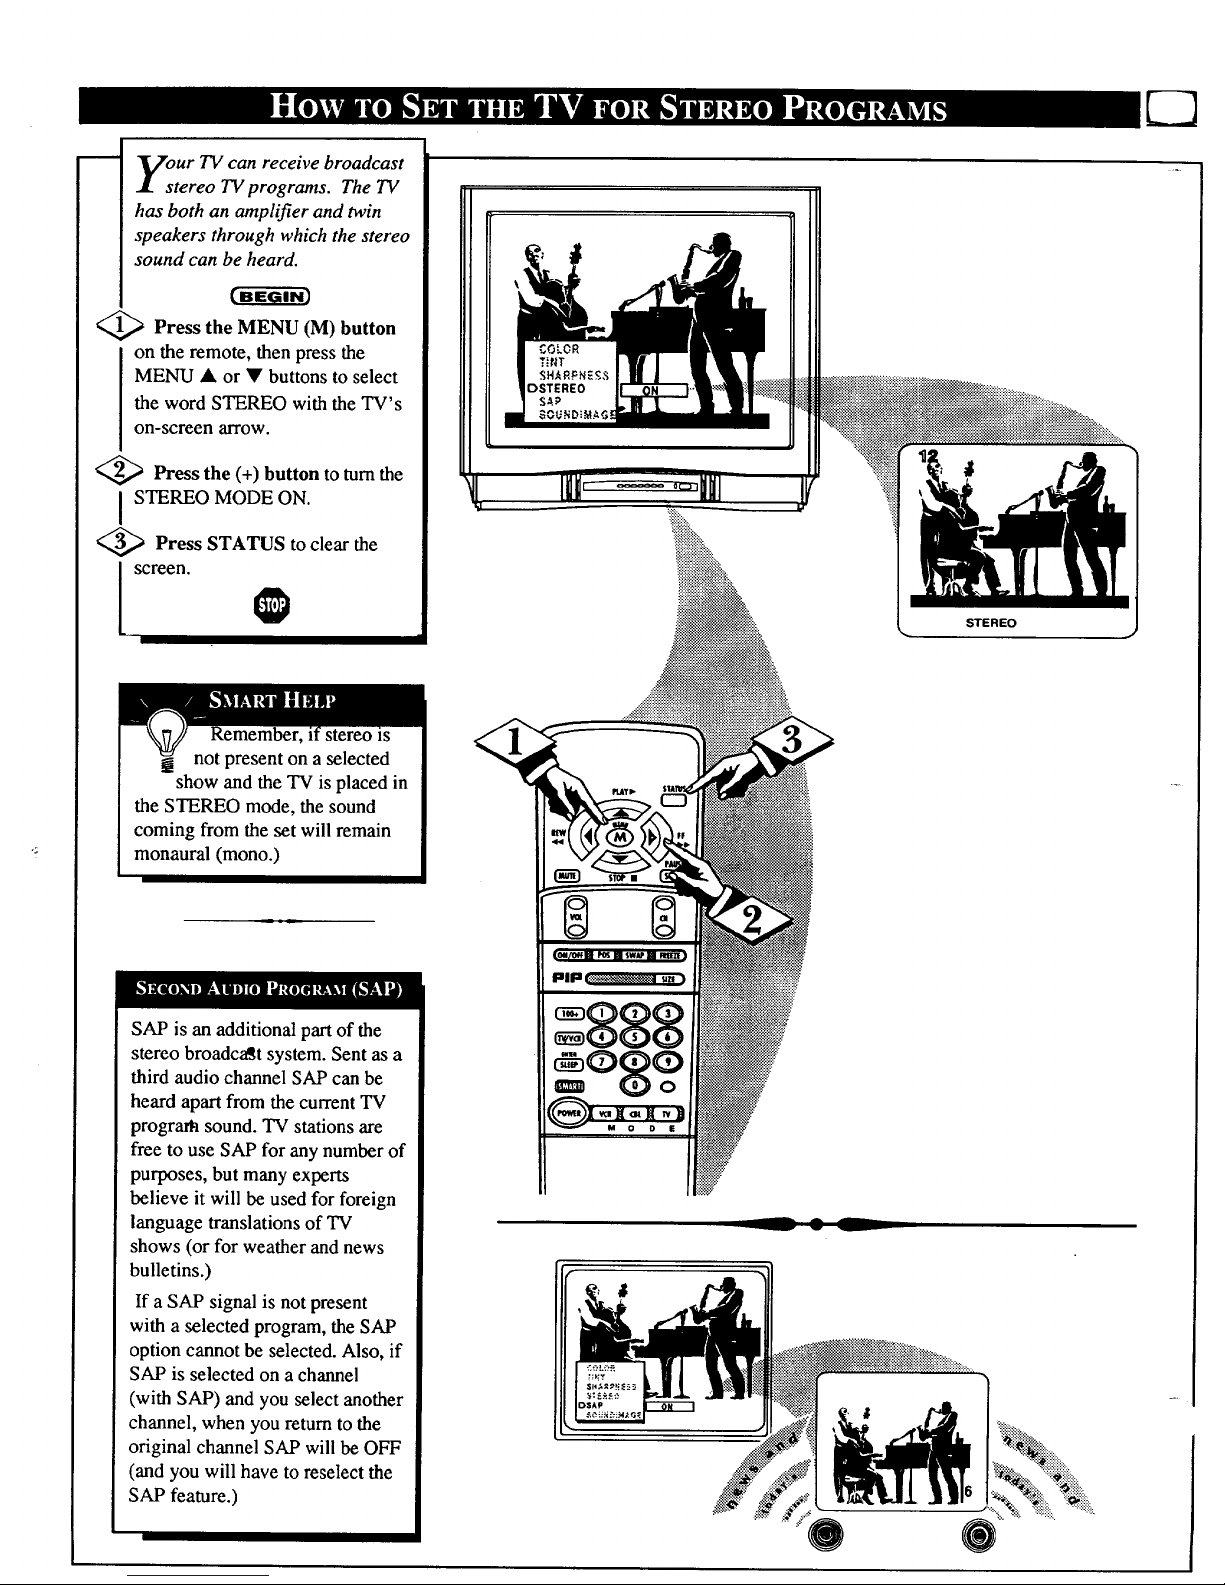
OteUrTV can receive broadcast
reo TV programs. The TV
has both an amplifier and twin
speakers through which the stereo
sound can be heard.
Press the MENU (M) button
on the remote, then press the
MENU • or • buttons to select
the word STEREO with the TV's
on-screen arrow.
<_ Press the (+) button to turn the
I STEREO MODE ON.
<_ Press STATUS to clear the
screeo@
STEREO
SAP is an additional part of the
stereo broadcast system. Sent as a
third audio channel SAP can be
heard apart from the current TV
program sound. TV stations are
free to use SAP for any number of
purposes, but many experts
believe it will be used for foreign
language translations of TV
shows (or for weather and news
bulletins.)
If a SAP signal is not present
with a selected program, the SAP
option cannot be selected. Also, if
SAP is selected on a channel
(with SAP) and you select another
channel, when you return to the
original channel SAP will be OFF
(and you will have to reselect the
SAP feature.)

UndImage can be used to add
reater depth and dimension to
both monaural (MONO) and stereo
TV sound. With the control turned
ON the TV's speakers can add even
wider sound separation to normal
broadcasts.
<_ Press the MENU (M) button
on the remote, then press the
MENU • or • buttons to select
the word SOUND IMAGE with the
TV's on-screen arrow.
<_ Press the (+) button to turn the
I SOUND IMAGE control ON.
<_ Press STATUS button to clear
l the screen. @
J
+
.:.:.:
+i
++++
+
+J
U_h e the Volume Bar control to see
e TV s volume level settings
on the TV screen. Once set the
Volume Bar will be seen each time
the VOLUME _uttons (on the TV or
remote) are pressed.
<_ Pre_ the MENU (M) button on
the remote, then press the MENU •
or • buttons to select the words
VOL. BAR with the TV's on-screen
Arrow.
<_> Press the (+) button to turn the
i VOL BAR control ON.
<_ Press STATUS button to clear
the screen.
VOLUME I_'''""
Try it out. _.
Press the VOL••
buttons. The
VOLUME BAR
should appear atthe
bottom of the
screen.
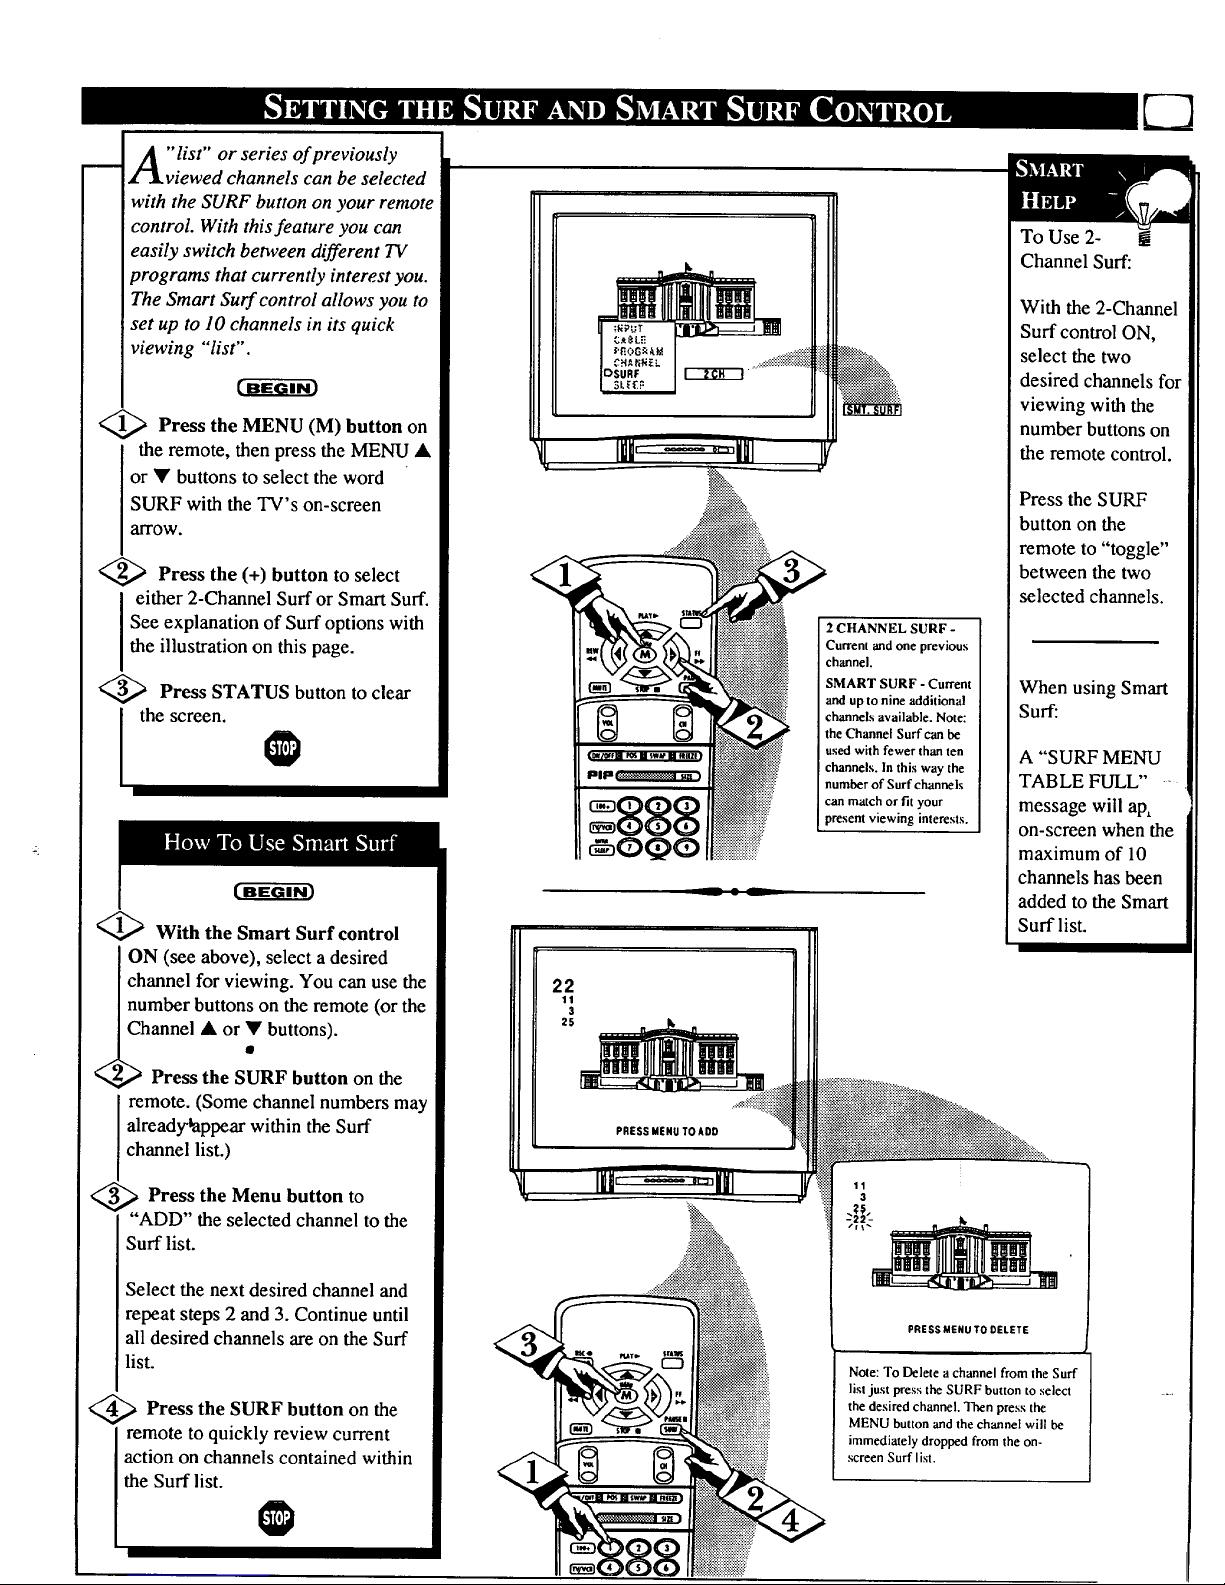
A " list" or series of previously
viewed channels can be selected
with the SURF button on your remote
control. With this feature you can
easily switch between different TV
programs that currently interest you.
The Smart Surf control allows you to
set up to 10 channels in its quick
viewing "list".
<_ Press the MENU (M) button on
i the remote, then press the MENU •
or • buttons to select the word
SURF with the TV s on-screen
alTOW.
<_ Press the (+) button to select
either 2-Channel Surf or Smart Surf.
See explanation of Surf options with
the illustration on this page.
<_ Press STATUS button to clear
the screen.
<_ With the Smart Surf control
ON (see above), select a desired
channel for viewing. You can use the
number buttons on the remote (or the
annel • or Y buttons).
Press the SURF button on the
remote. (Some channel numbers may
already'tappear within the Surf
channel list.)
_ Press the Menu button
to
"ADD" the selected channel to the
Surf list.
Select the next desired channel and
repeat steps 2 and 3. Continue until
all desired channels are on the Surf
list.
<_ Press the SURF button the
on
remote to quickly review current
action on channels contained within
the Surf list.
lullr " 1II1
- _:_!_
_.
o0oi
2 CHANNEL SURF -
Current and one previous
channel.
SMART SURF - Current
a_ up to nine additional
channels available. Note:
the Channel Surf can be
used with fewer than ten
c"hannels. In this way the
number of Surf channels
can match or fit your
present viewing interests.
To Use 2- !
Channel Surf:
With the 2-Channel
Surf control ON,
select the two
desired channels for
viewing with the
number buttons on
the remote control.
Press the SURF
button on the
remote to "toggle"
between the two
selected channels.
When using Smart
Surf:
A "SURF MENU
TABLE FULL ....
message will ap,
on-screen when the
maximum of 10
channels has been
added to the Smart
Surf list.
22
11
3
25
PRESS MENU TOADD
PRESS MENU TO DELETE
Note: To Delete a channel from the Surf
list just press the SURF button to select
the desired channel. Then press the
MENU button and the channel wilt be
immediately dropped from the on-
screen Surf list.
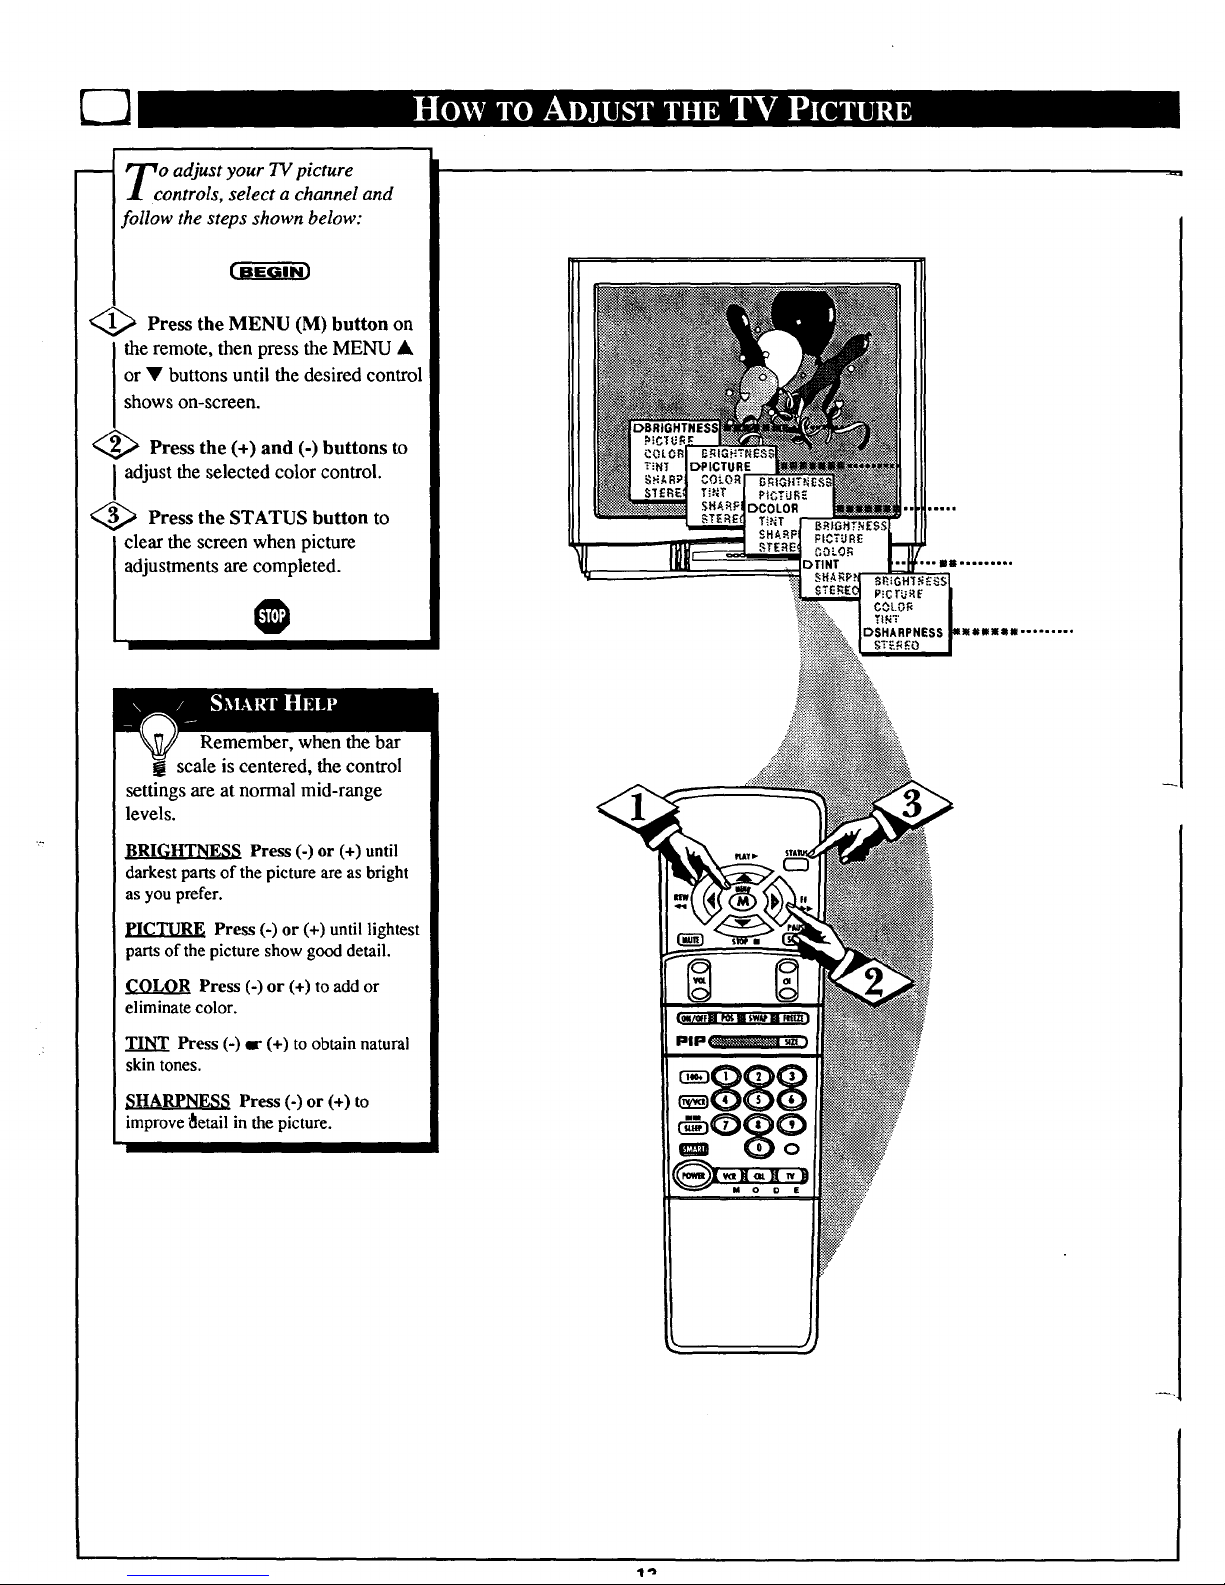
Zc o adjust your TV picture
ontrols, select a channel and
follow the steps shown below:
Press the MENU (M) button on
the remote, then press the MENU &
or • buttons until the desired control
shows on-screen.
<_ Press the (+) and (-) buttons to
I adjust the selected color control.
<_ Press the STATUS button to
clear the screen when picture
adjustments are completed.
Remember, when the bar
scale is centered, the control
settings are at normal mid-range
levels.
_t_[]I_[]_. Press (-) or (+) until
darkest parts of the picture are as bright
as you prefer.
PICTURE Press (-) or (+) until lightest
parts of the picture show good detail.
COLOR Press (-) or (+) to add or
eliminate color.
TINT Press (-) ir (+) to obtain natural
skin tones.
SHARPNESS Press (-) or (+) to
improve _etail in the picture.
 Loading...