

Page 1

Page 2
MAGNAVOX
Smart.Verysmart:
MAGNAVOX
Smart.Verysmart:
Congratulations on your purchas,
-and welcome to the "family!"
Dear MAGNAVOX product owner:
]-hank you for your confidence in MAGNAVOX. You've selected one of the
best-built, best-backed products available today. And we'll do everything in
our power to keep you happy with your purchase for many years to come.
As a member of the MAGNAVOX "family," you're entitled to protection by
one of the most comprehensive warranties and outstanding service
networks in the industry.
What's more, your purchase guarantees you'll receive all the information
and special offers which you quali_/for, plus easy access to accessories
from our convenient home shopping network.
And most important of all, you can count on our uncompromising
commitment to your total satisfaction.
All of this is our way of saying welcome-and thanks for investing in a
MAGNAVOX product.
,_lncerely,
Robert Minkhorst
President and Chief Executive Officer
P.S. Remember, to get the most from your MAGNAVOX product,
you must return your Warranty Registration
Card within 10 days. So please mail it to us right now."
Page 3
(_ Getting Started
Warning/Precautions ............................... 2-3
Antenna/Cable Connections ................... 4-5
VCR to "IV Antenna Connections ............................. 5
Basic TV and Remote Control Operation .............. 6-7
L._ On-Screen Features
How to Use On-Screen Feature Controls .8-9
+Setting the "IVfor Cable TV Operation............ 10
_Adding Channels in Memory (Automatically) A 1
"ffAdding Channels in Memory (Manually)......... 12
"ffHow to Set the TV for Closed Captioning ....... 13
_,Setting the TV for Stereo Programs.................. 14
_Using Smart Sound (Auto Volume Control) ....15
_'Using the "IV Volume Bar Control ................... 16
¢,Setting the TV Sleep Timer Control ................. 17
_'Using the TV Channel Reminder...................... 18
_-Adjusting the TV Color .................................... 18
_'Using the On-Screen Language Option ............ 19
_'Using the Audio Out Jacks (with TV Speaker
On/Off Switch) ................................................. 20
'_Using the TV's Audio/Video Input Jacks ......... 21
W Remote Control Operation
Using the Remote (TV/VCR Buttons) ..22-23
Using the Remote Locator Feature .................... 24-25
Setting the TV Remote to Work VCRs .............. 26-27
Setting the TV Remote to Work
Cable TV Converters .......................................... 28-29
Setting the TV Remote to Work VCRs - Search
Method ..................................................................... 30
Setting th_TV Remote to Work Cable
Converters - Search Method .................................... 31
-'_ Picture-in-Picture (PIP)
Using the PIP Feature (Connections)...32-33
Using PIP with the TV Remote .......................... 34-35
Selecting the PIP Picture Source ............................. 36
More PIP Connections (Cable Converter) ............... 37
_!1 General Information
Tips if Something Isn't Working ............... 38
Glossary of TV Terms ............................................. 39
Index ........................................................................ 39
Warranty .................................................................. 40
Infrared Remote Control which works your TV set
and a variety of wireless remote control VCRs and
Cable Converters. A special "Locator" feature can
also help you find the remote when it has been stuck
out of sight or misplaced.
Standard broadcast (VHF/UHF) or Cable TV
(CATV) channel capability.
Stereo Ready TV with built-in audio amplifier and
twin speaker system for receiving TV programs
broadcast in stereo sound.
Picture-In-Picture feature which can show a TV
program and the direct video output from an
accessory (VCR, etc.) on the TV screen at the same
time.
Closed Captioning which allows the viewer to read
TV program dialogue or voice conversations as on-
screen text.
Automatic Programming of channels for quick and
easy selection of favorite stations available in your
area.
On-Screen Features (in either English, French, or
Spanish) which show helpful messages for setting of
"IV controls.
Audio/Video jackpanel for direct connections with
VCRs (or other video accessories) for quality TV
picture and sound playback.
Smart Sound for the control of TV volume levels
during program changes or commercial breaks.
Sleep-Timer which automatically turns the TV OFF
at preset times.
WARNING: TO PREVENT FIRE OR SHOCK
HAZARD DO NOT EXPOSE THIS UNIT TO
RAIN OR EXCESSIVE MOISTURE.
The Model and Serial Numbers are found on the back
of this TV set. Please record these numbers and
purchase date in the space below. Refer to them
whenever you ask your dealer about this TV set.
Model No..
Serial No.
Purchase Date
Please attach your sales receipt to this book and keep
it for future reference.
Copyright © 1994 Philips Consumer Electronics Company. All rights reserved.
Page 4
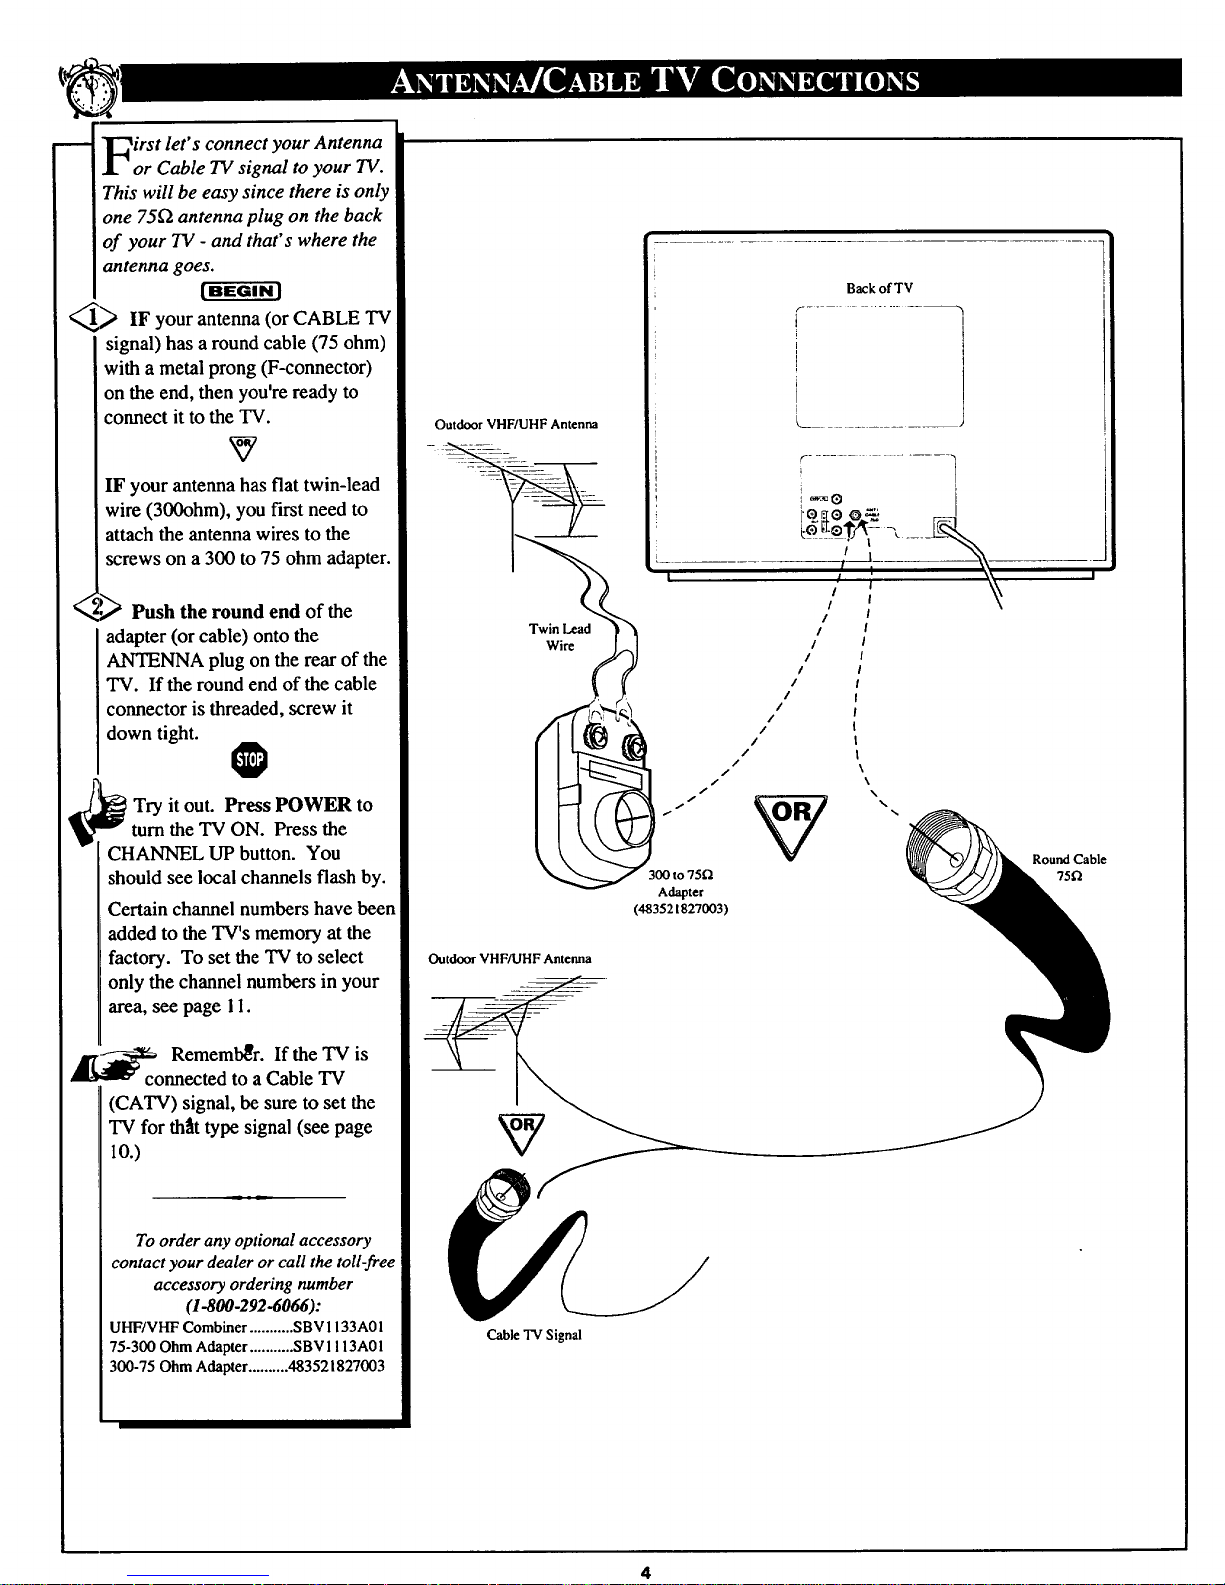
irst let's connect your Antenna
or Cable TV signal to your TV.
This will be easy since there is only
one 75_2 antenna plug on the back
of your TV - and that's where the
antenna goes.
f-a-wa-_q
_ IF your antenna (or CABLE TV
signal) has a round cable (75 ohm)
with a metal prong (F-connector)
on the end, then you're ready to
connect it to the TV.
v
IF your antenna has fiat twin-lead
wire (300ohm), you first need to
attach the antenna wires to the
screws on a 300 to 75 ohm adapter.
<
,P_ Push the round end of the
adapter (or cable) onto the
ANTENNA plug on the rear of the
TV. If the round end of the cable
connector is threaded, screw it
down tight.
@
Try it out. Press POWER to
turn the "IV ON. Press the
CHANNEL UP button. You
should see local channels flash by.
Certain channel numbers have been
added to the TV's memory at the
factory. To set the "IV to select
only the channel numbers in your
area, see page 1I.
Remember. If the TV is
connected to aCable TV
(CATV) signal, be sure to set the
TV for the,it type signal (see page
lO.)
To order any optional accessory
contact your dealer or call the toll-free
accessoryordering number
(1-800-292-6066):
UHF/VHF Combiner ........... SBV 1133A0 I
75-300 Ohm Adapter ........... SBV 1! 13A0 I
300-75 Ohm Adapter .......... 483521827003
Outdoor VHF/UHF Antenna
Twin Lead
Wire
I
Outdoor VHF/UHF Antenna
<--
Back of TV
I
I
Round Cable
75f_
Adapter
(483521827003)
Cable TV Signal
4
Page 5
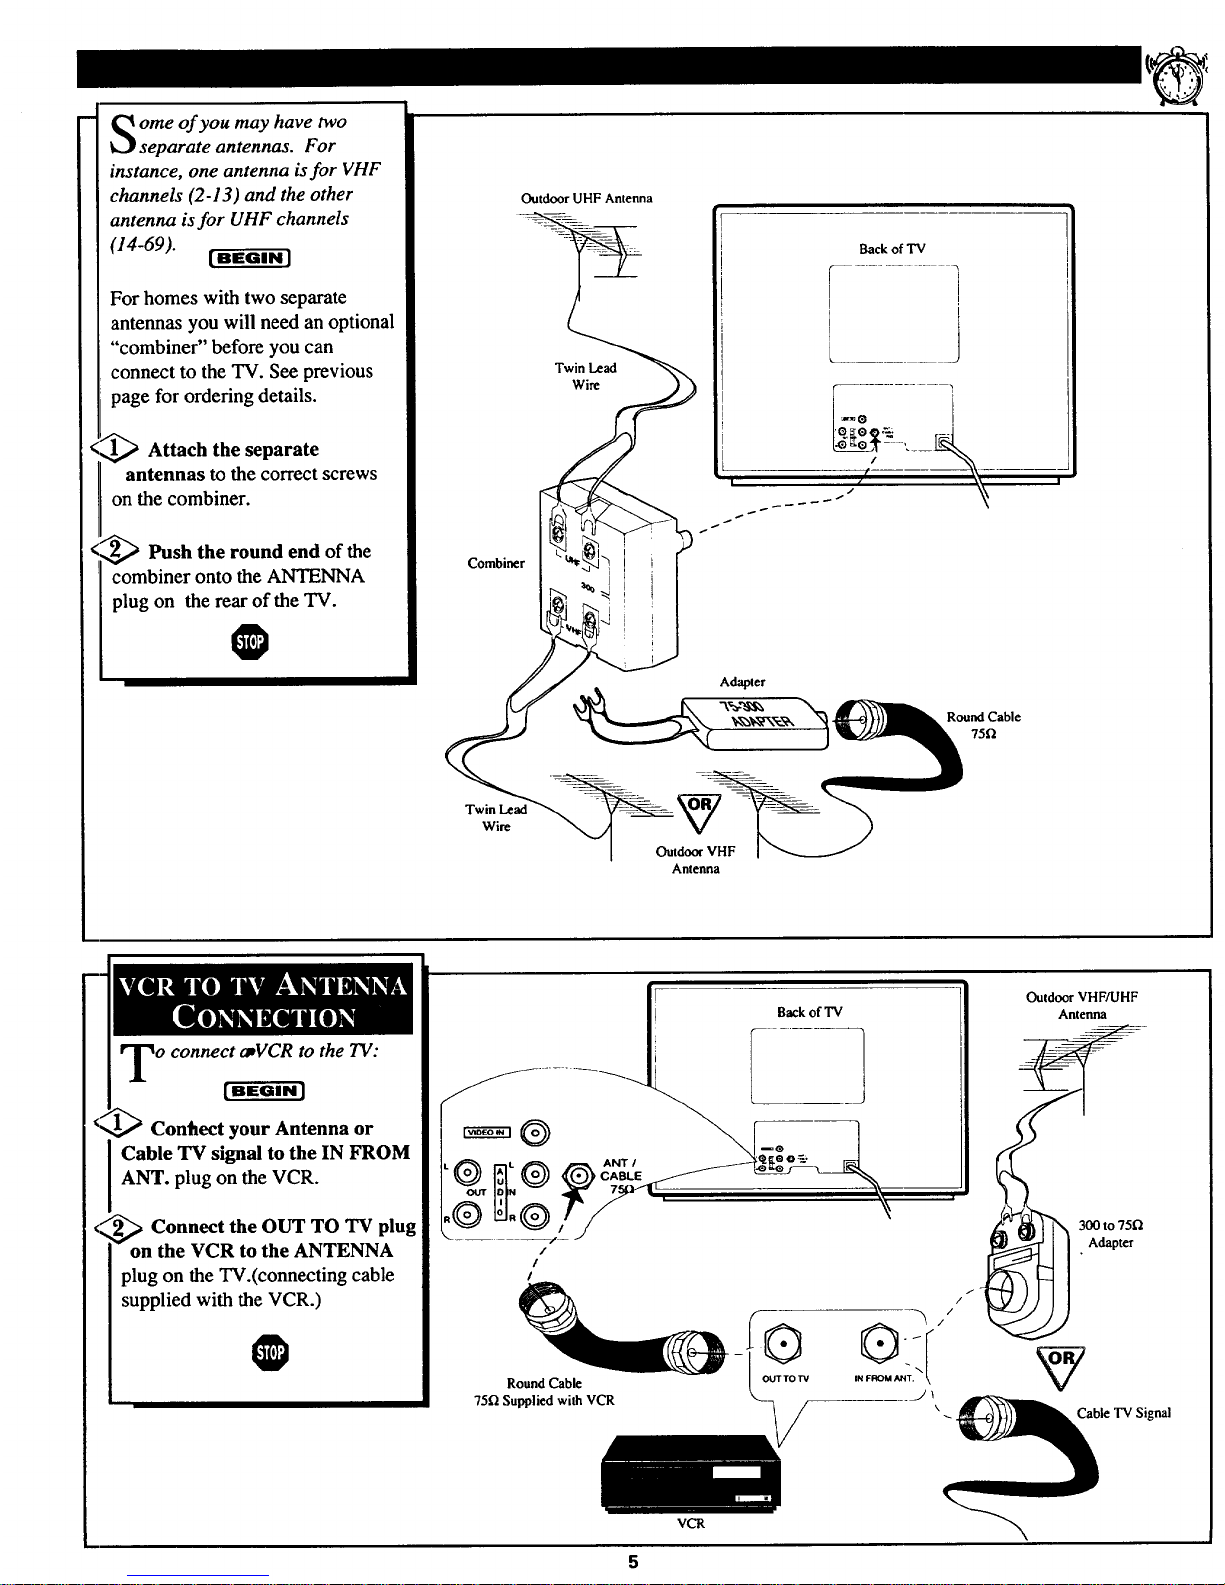
ome of you may have two
separate antennas. For
instance, one antenna is for VHF
channels (2-13) and the other
antenna is for UHF channels
(14-69).
[ BEGIN 1
For homes with two separate
antennas you will need an optional
"combiner" before you can
connect to the TV. See previous
page for ordering details.
_ Attach the separate
antennas to the correct screws
on the combiner.
_Push the round end of the
combiner onto the ANTENNA
plug on the rear of the TV.
O
Outdoor UHF Antenna
Twin Lead
Wire
Combiner
Back of "IV
Wire
Outdoor VHF
Antenna
1
o connect amVCRto the TV:
Conhect your Antenna or
Cable TV signal to the IN FROM
ANT. plug on the VCR.
_ Connect the OUT TO TV plug
I on the VCR to the ANTENNA
plug on the TV.(connecting cable
supplied with the VCR.)
O
LI ;
/
/
/
Round Cable
75f_ Supplied with VCR
VCR
Outdoor VHFAJHF
Antenna
300 to 75fl
Adapter
Cable TV Signal
Page 6
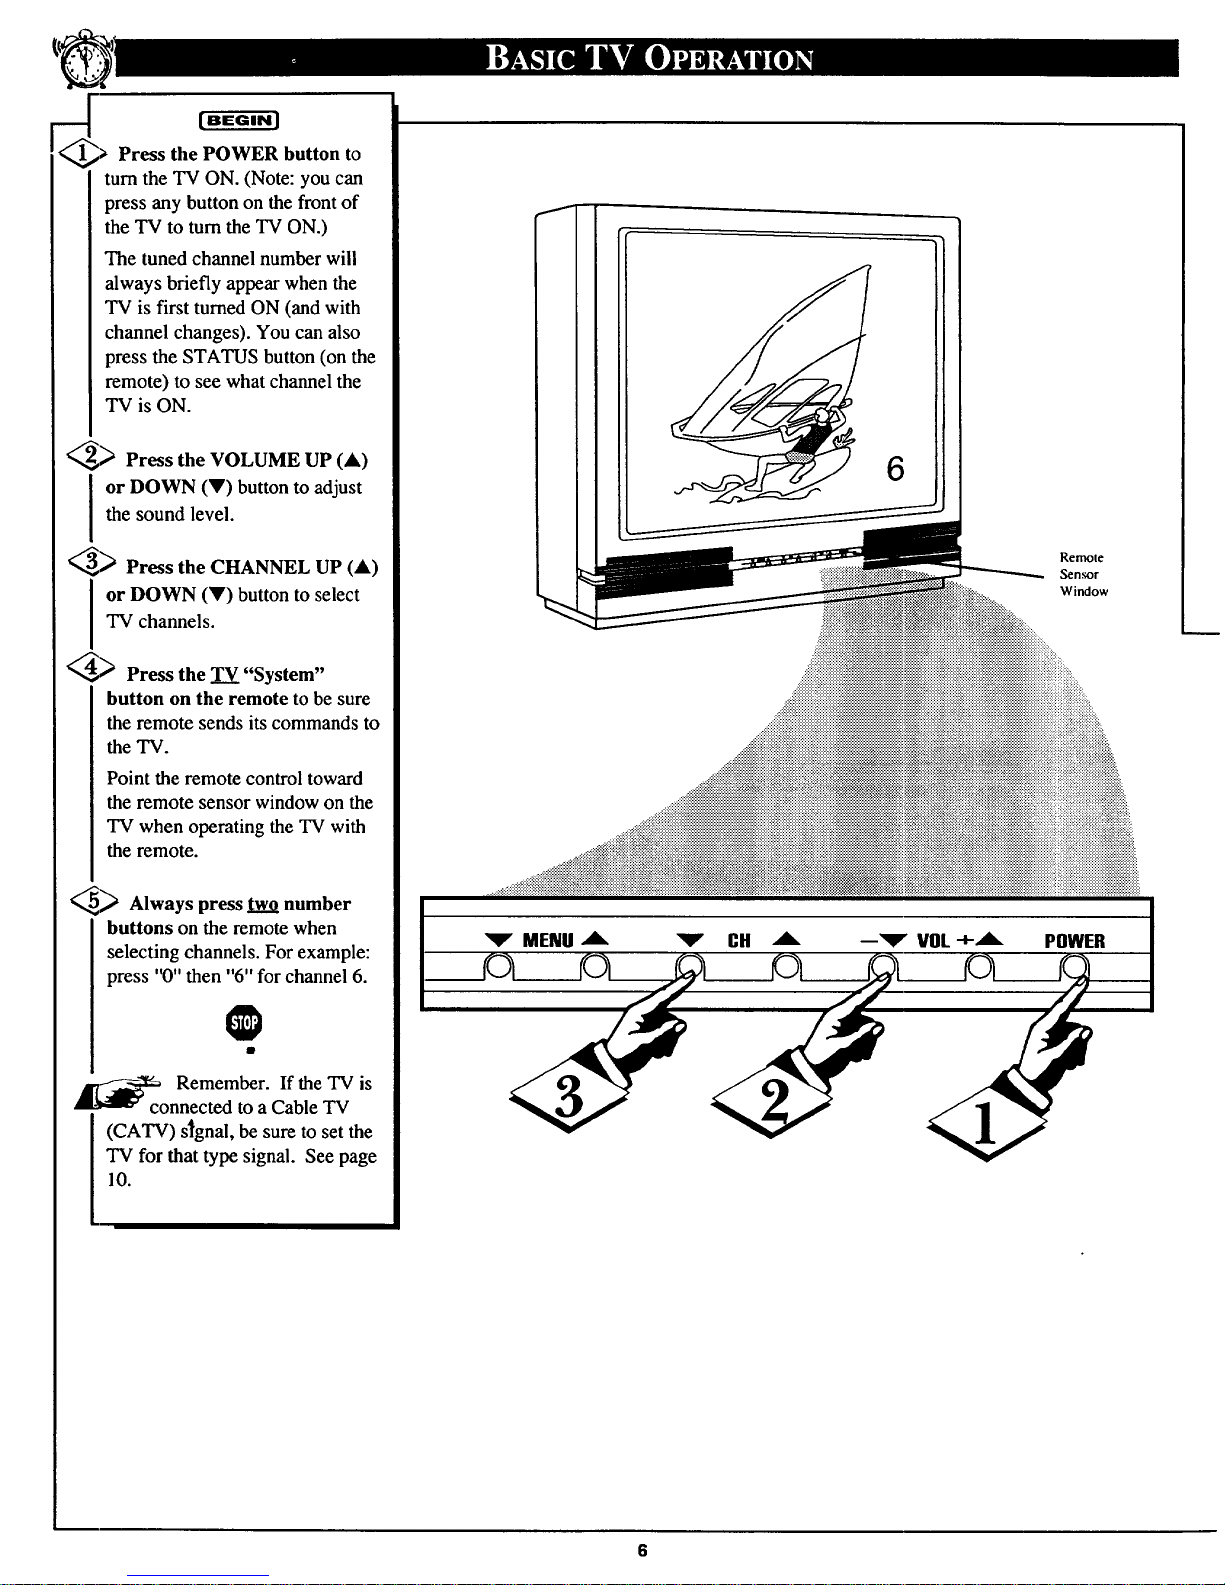
[BEGINI
> Press the POWER button to
turn the TV ON. (Note: you can
press any button on the front of
the TV to turn the TV ON.)
The tuned channel number will
always briefly appear when the
TV is first turned ON (and with
channel changes). You can also
press the STATUS button (on the
remote) to see what channel the
TV is ON.
_ Press the VOLUME UP (A)
I r DOWN (V) button to adjust
the sound level.
_ Press the CHANNEL UP (&)
I r DOWN (Y) button to select
TV channels.
4_ Press the TV "System"
button on the remote to be sure
the remote sends its commands to
the TV.
Point the remote control toward
the remote sensor window on the
TV when operating the TV with
the remote.
_ Always press two number
buttons on the remote when
selecting channels. For example:
press "0" then "6" for channel 6.
_co Remember. If the TV is
nnected to a Cable TV
(CATV) signal, be sure to set the
TV for that type signal. See page
10.
Remote
Sensor
Window
Page 7
<
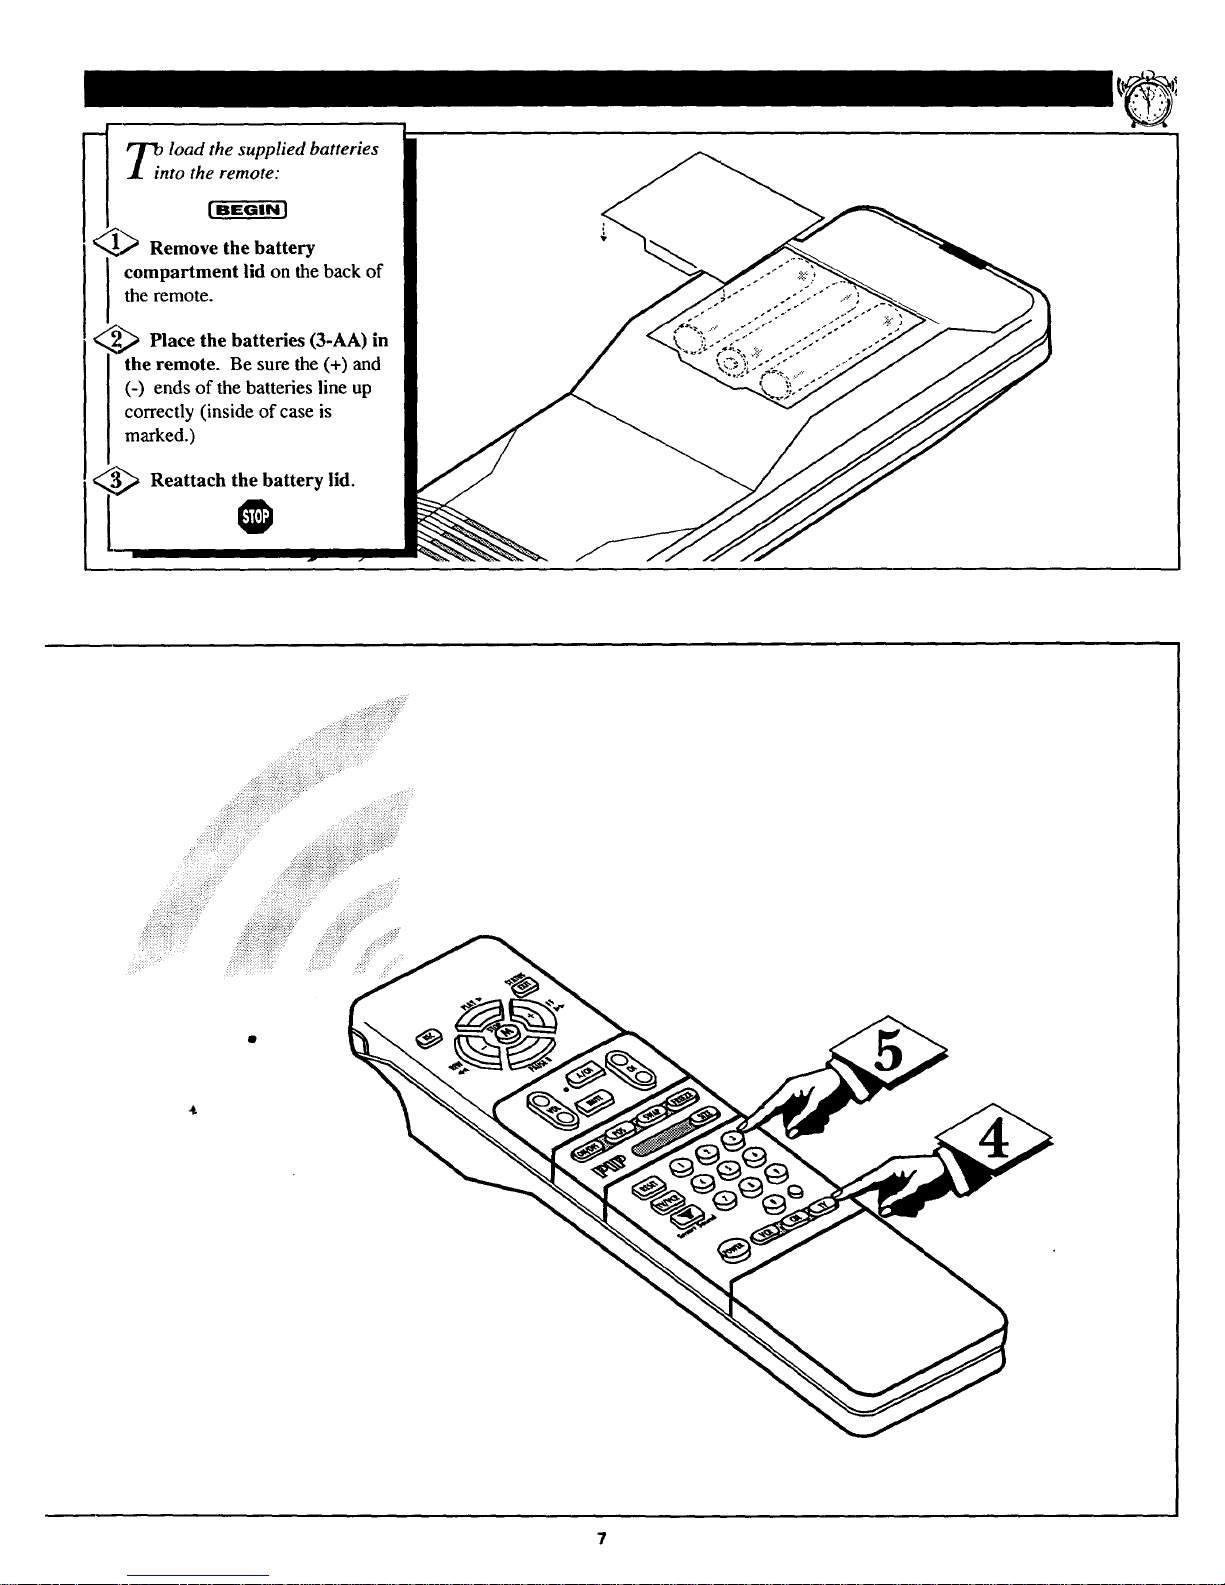
T_. load the supplied batteries
I into the remote:
[ BEGIN J
_ Remove the battery
compartment lid on the back of
the remote.
2_ Place the batteries (3-AA) in
I the remote. Be sure the (+) and
] (-) ends of the batteries line up
I correctly (inside of case is
I marked.)
_ Reattach the battery lid.
Page 8
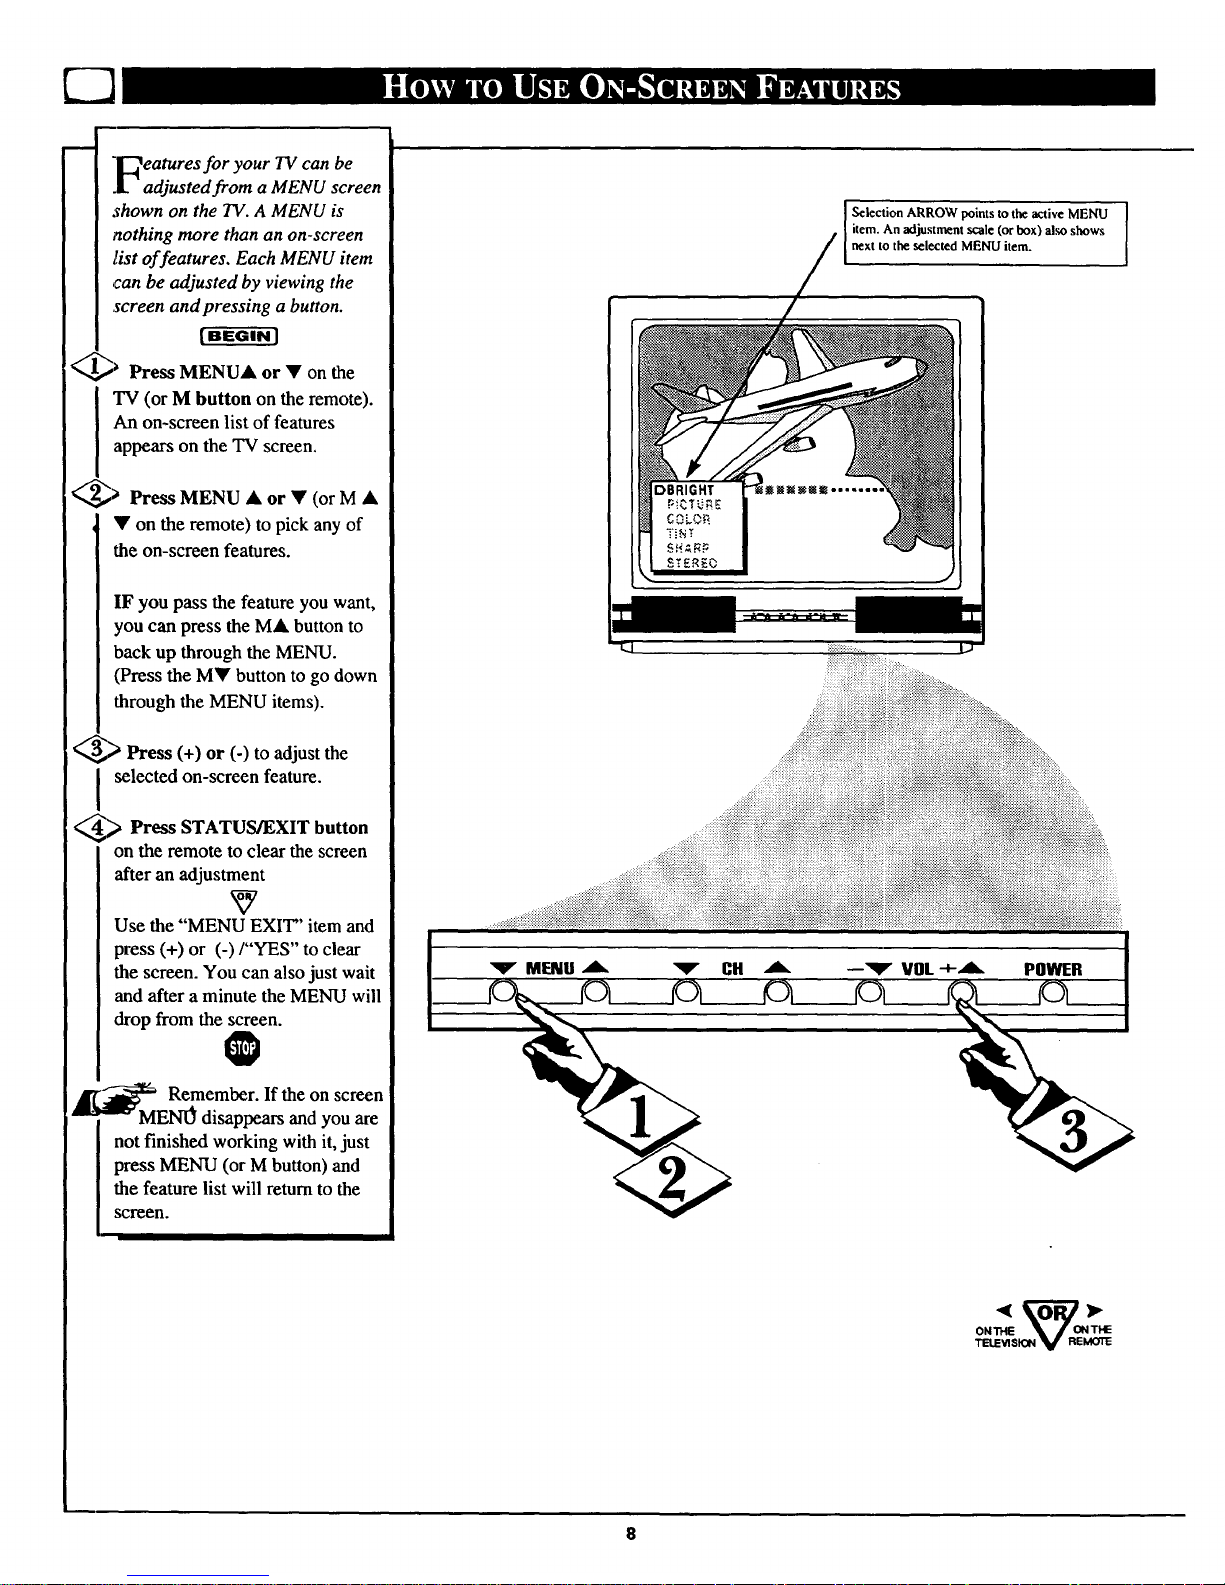
"_eatures for your TV can be
.Ladjusted from a MENU screen
shown on the TV. A MENU is
nothing more than an on-screen
list of features. Each MENU item
,can be adjusted by viewing the
screen and pressing a button.
_ Press MENU& or • on the
TV (or M button on the remote).
An on-screen list of features
appears on the TV screen.
_> Press MENU • or • (or M •
• on the remote) to pick any of
the on-screen features.
IF you pass the feature you want,
you can press the M• button to
back up through the MENU.
(Press the MY button to go down
through the MENU items).
<,,_> Press (+) or (-) to adjust the
selected on-screen feature.
_ Press STATUS/EXIT button
on the remote to clear the screen
after an adjustment
Use the "MENU EXIT' item and
press (+) or (-)/"YES" to clear
the screen. You can also just wait
and after a minute the MENU will
drop from the screen.
_ Remember. Ifthe on screen
MENO disappears and you are
not finished working with it, just
press MENU (or M button) and
the feature list will return to the
screen.
Selection ARROW points to the active MENU J
[ item. An adjustment scale (or box) aim shows
next to the selected MENU item.
TELE_nSK_ V REMOTE
8
Page 9
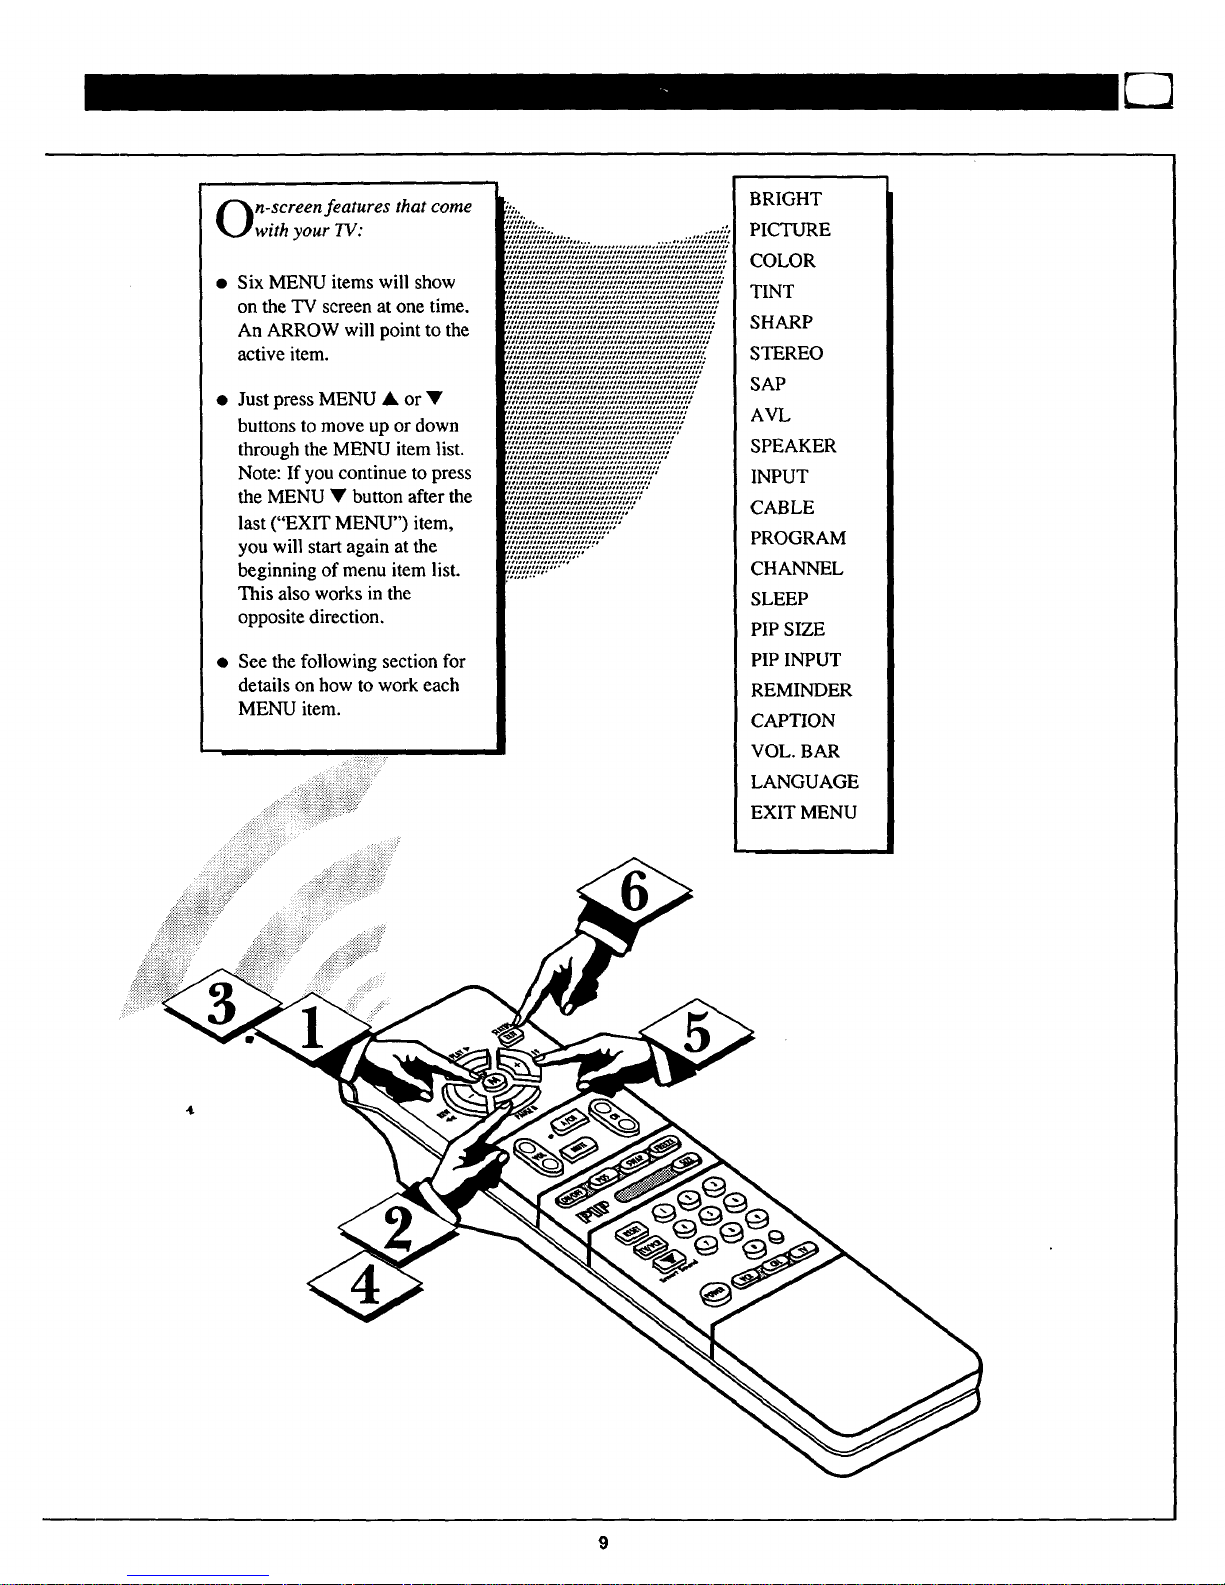
n-screen features that come
with your TV:
Six MENU items will show
on the TV screen at one time.
An ARROW will point to the
active item.
Just press MENU • or •
buttons to move up or down
through the MENU item list.
Note: If you continue to press
the MENU • button after the
last ("EXIT MENU") item,
you will start again at the
beginning of menu item list.
This also works in the
opposite direction.
See the following section for
details on how to work each
MENU item.
....._:::i:;"
BRIGHT
PICTURE
COLOR
TINT
SHARP
STEREO
SAP
AVL
SPEAKER
INPUT
CABLE
PROGRAM
CHANNEL
SLEEP
PIP SIZE
PIP INPUT
REMINDER
CAPTION
VOL. BAR
LANGUAGE
EXIT MENU
Page 10
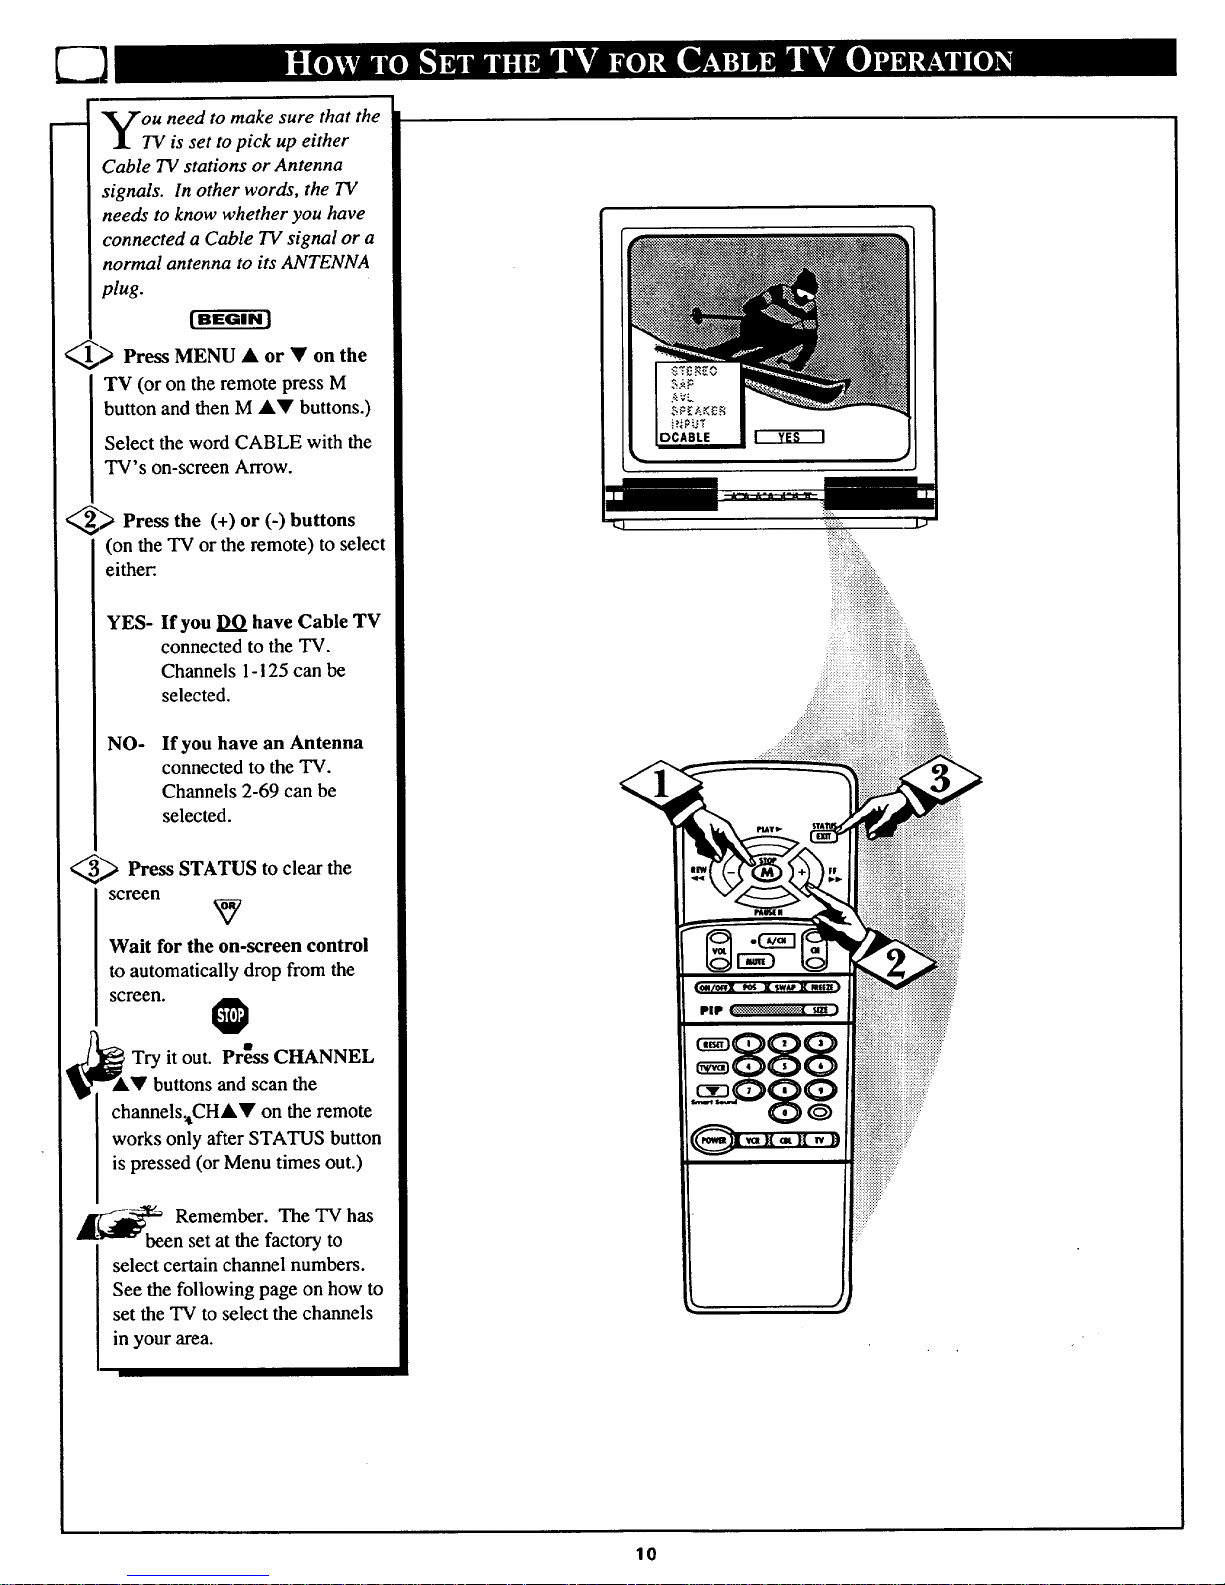
you need to make sure that the
TV is set to pick up either
Cable TV stations or Antenna
signals. In other words, the TV
needs to know whether you have
connected a Cable TV signal or a
normal antenna to its ANTENNA
plug.
lBEGIN l
<_> Press MENU • or on
the
TV (or on the remote press M
button and then M &• buttons.)
Select the word CABLE with the
TV's on-screen Arrow.
<_> Press the (+) or (-)
buttons
(on the TV or the remote) to select
either:.
YES-
If you DO have Cable TV
connected to the TV.
Channels 1-i 25 can be
selected.
NO-
If you have an Antenna
connected to the TV.
Channels 2-69 can be
selected.
_ Press STATUS clear the
to
screen
Wait for the on-screen control
to automatically drop from the
screen.
Try it out. Press CHANNEL
• buttons and scan the
channels_tCHA• on the remote
works only after STATUS button
is pressed (or Menu times out.)
_._1_ Remember. The TV has
n set at the factory to
select certain channel numbers.
See the following page on how to
set the TV to select the channels
in your area.
r.t
!iiiii i i iiii!iiiii!iiiiiiiiiiiiiiiiiiiiiiiiiii ,
888
_.,_..........
!!!!!!!!!!!!!!!!!!!!::
!:!!!!!!!!!!!!!!!!:
iiiiiiiiiiiiiii"
10
Page 11
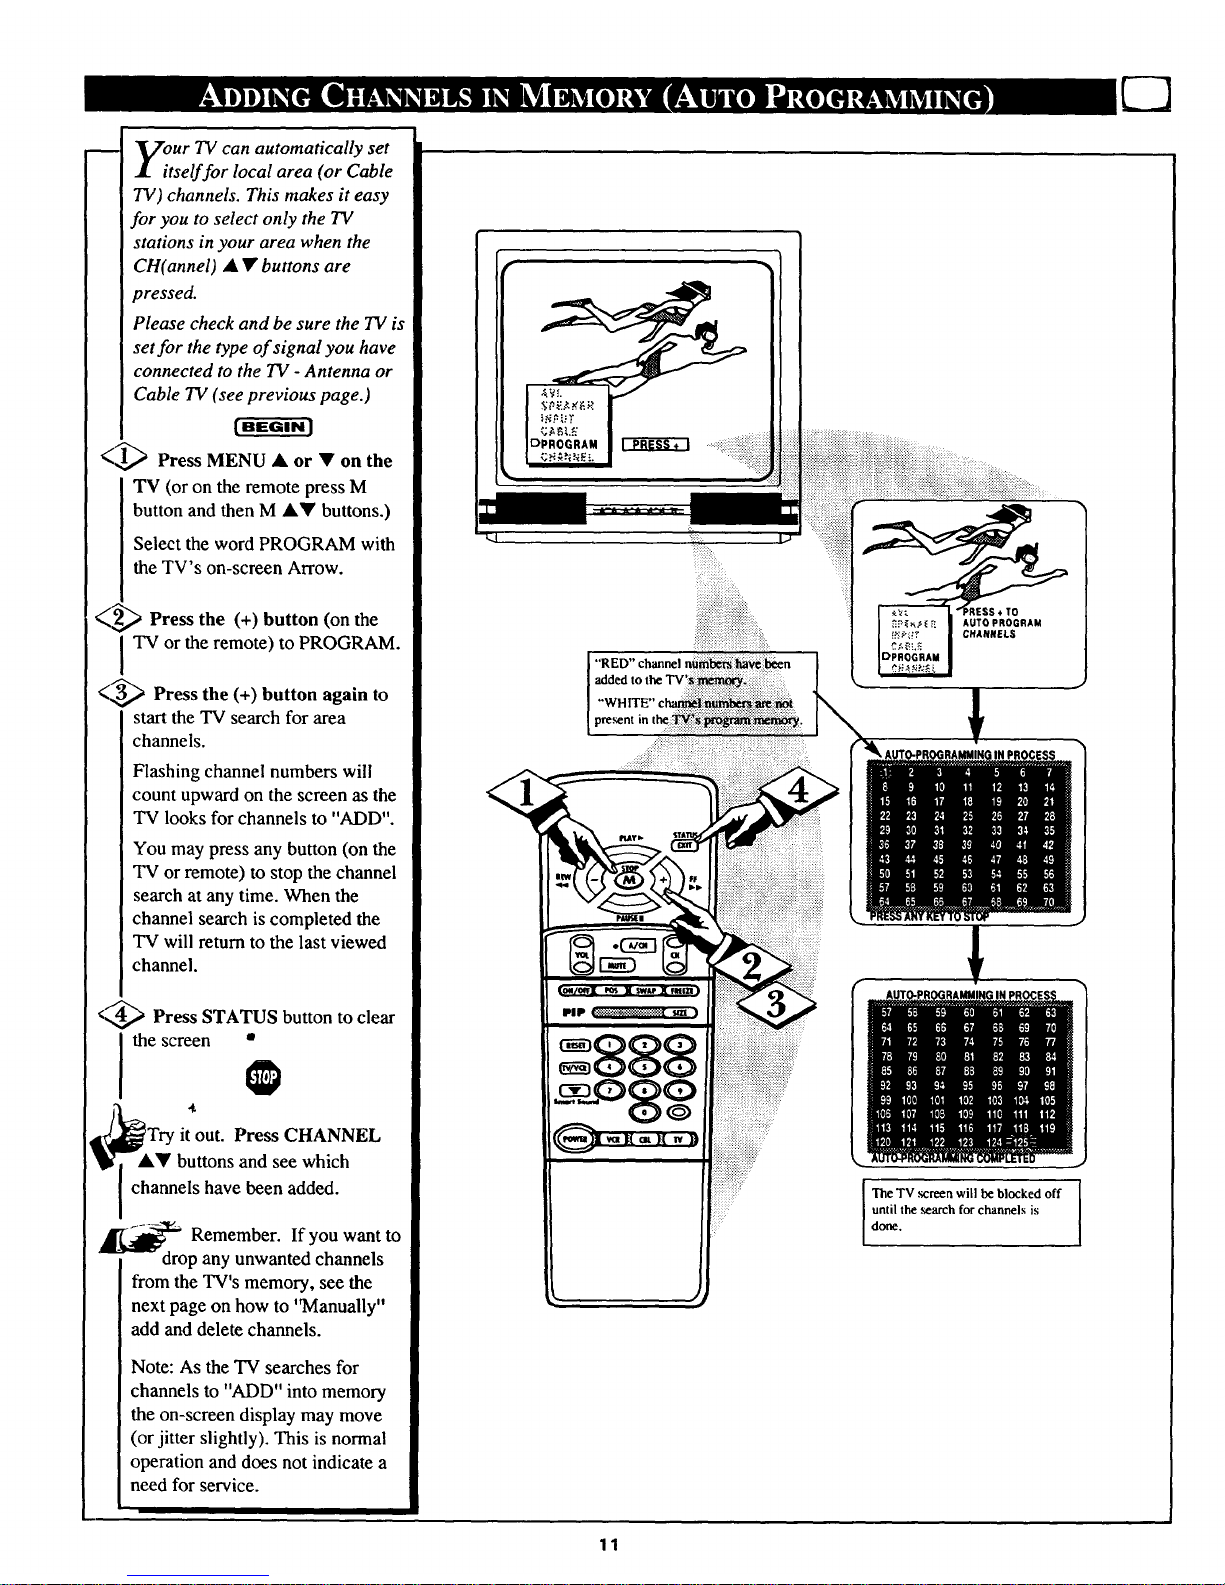
our TV can automatically set
tself for local area (or Cable
TV) channels. This makes it easy
for you to select only the TV
stations in your area when the
CH(annel) • • buttons are
pressed.
Please check and be sure the TV is
set for the type of signal you have
connected to the TV - Antenna or
Cable TV (see previous page.)
< t,,_ Press MENU • or • on the
TV (or on the remote press M
button and then M •Y buttons.)
Select the word PROGRAM with
the TV's on-screen Arrow.
_,,_ Press the (+) button (on the
I TV or the remote) to PROGRAM.
<_3,,_ Press the (+) button again to
start the TV search for area
channels.
Flashing channel numbers will
count upward on the screen as the
TV looks for channels to "ADD".
You may press any button (on the
TV or remote) to stop the channel
search at any time. When the
channel search is completed the
TV will return to the last viewed
channel.
<@ Press STATUS button to clear
I thescreen _
,t
ITry it out. Press CHANNEL
AY buttons and see which
channels have been added.
_ Remember. If want to
you
drop any unwanted channels
from the TV's memory, see the
next page on how to '"Manually"
add and delete channels.
Note: As the TV searches for
channels to "ADD" into memory
the on-screen display may move
(or jitter slightly). This is normal
operation and does not indicate a
need for service.
added
11
The TV .screen will be blocked off
until the .search for channels is
done.
Page 12
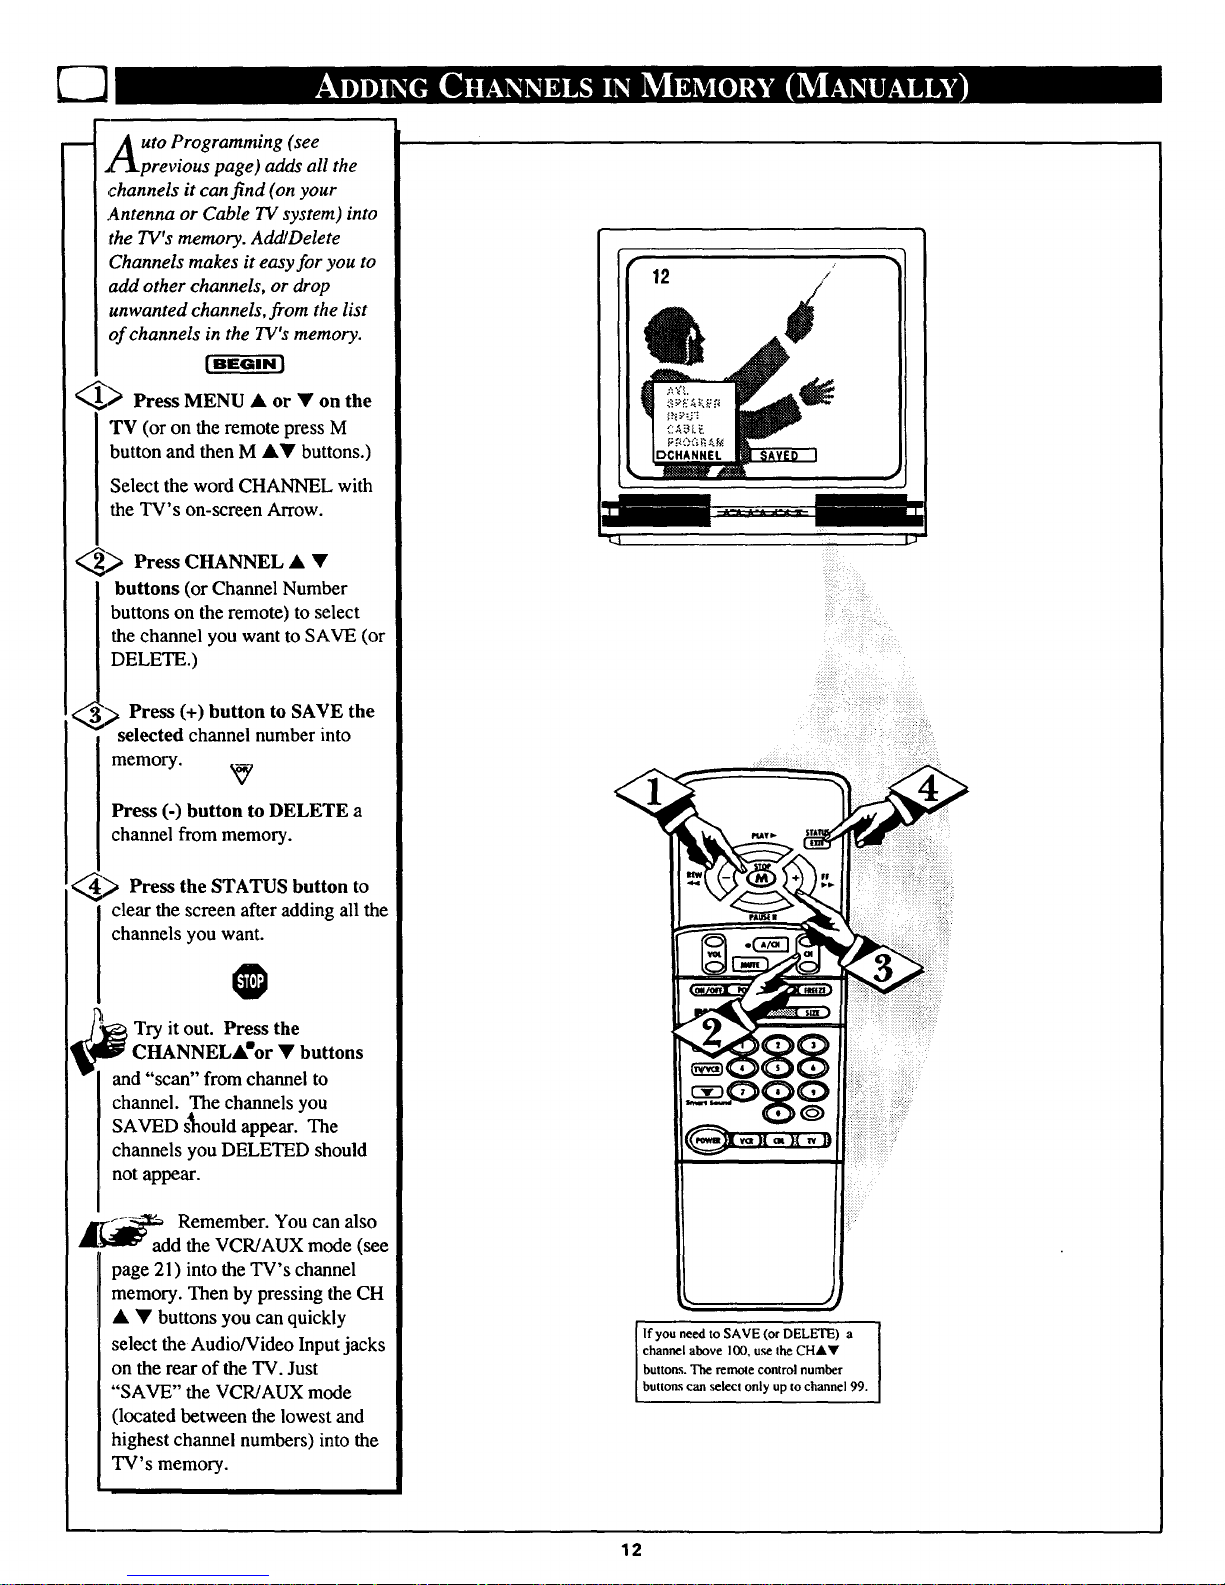
m Auto Programming (see
l_kprevious page) adds all the
,channels it can find (on your
.Antenna or Cable TV system) into
the TV's memory. AddlDelete
Channels makes it easy for you to
add other channels, or drop
unwanted channels, from the list
of channels in the TV's memory.
_> Press MENU • or • on the
TV (or on the remote press M
button and then M •• buttons.)
Select the word CHANNEL with
the TV's on-screen Arrow.
_,_ Press CHANNEL • •
buttons (or Channel Number
buttons on the remote) to select
the channel you want to SAVE (or
DELETE.)
_'.> Press (+) button to SAVE the
' selected channel number into
memory.
Press (-) button to DELETE a
channel from memory.
44_ Press the STATUS button
to
clear the screen after adding all the
channels you want.
@
_ Try it out. Press the
l[_ CHANNELA' or • buttons
and "scan" from channel to
channel. The channels you
SAVED _ould appear. The
channels you DELETED should
not appear.
_F_ Remember. You can also
add the VCR/AUX mode (see
page 21) into the TV's channel
memory. Then by pressing the CH
• • buttons you can quickly
select the Audio/Video Input jacks
on the rear of the TV. Just
"SAVE" the VCR/AUX mode
(located between the lowest and
highest channel numbers) into the
TV' s memory.
12
i..i-
i_i_ii_iiiiiiiiiiiiiiiiiiiiiiiiiiiiiiiiiiiiii!
_ii!_ii_iiii_i_iiiiiiiiiiiiiiii:iiiii_iiiiiiiiii_iiiiil
:_!iiiiiiiiii_ili_:i!i!i!iiiiiiiiiiii!_iiiiiiiiii!iiiiiii
If you need to SAVE (or DELETE) a
channel above 100, use the CHAY
buttons. The remote control number
buttons can ,select only up to channel 99.
12
Page 13

lrOSedCaptioning allows you to
ead the voice content of
television programs on the TV
screen. Designed to help the
hearing impaired this feature uses
on-screen "text boxes" to show
dialogue and conversations while
the TV program is in progress.
I BEGIN ]
¢,,1_ Press MENU • or • on the
TV (or on the remote press M
button and then M •• buttons.)
Select the word CAPTION with the
TV's on-screen Arrow.
_ Press (+) or (-) to
buttons select
the desired Closed Caption (CC)
mode - For Example: CAPTION 1.
CAPTION 1, 2, 3, or 4 mode:
dialogue (and descriptions)
for the action on the captioned
TV program shows on-screen.
(See important note on this
page.)
TEXT 1, 2, 3, or 4 mode:
often used for channel guide,
schedules, or bulletin board
information for CC programs.
Note: Usu_U.Lu.._]_"CAPTION" 1 is the
most used mode to view captioned
material.
'_ Press the STATUS button after
making your Caption mode
selection.
The TV display will clear and
Captioning material (if available on
the currently selected TV program)
will appear on the TV screen.
To can_el, set the CAPTION
feature to OFF when finished
viewing.
@
,_1_ Remember. Broadcast
stations will often use spelling
abbreviations, symbols, dropouts
and other grammatical shortcuts in
order to keep pace with the on-
screen action. These type factors
vary upon the source of the
captioned text material and do not
indicate a need for service on the
part of the TV.
NOTE: Not all TV programs and product commercials are made for broadcast
with Closed Caption (CC) information included. Neither are all Closed Caption
modes (CAPTION 1-4, or TEXT 1-4)) necessarily being used by a broadcast
station during the transmission of a closed caption program. Refer to your area's
TV program listings for the stations and times of Closed Caption shows.
CAPTION mode
Example Display
TEXT mode
Example Display
TV screen will be blocked from viewing
13
Page 14

our TV can receive
broadcast stereo TV
programs. The TV has both an
amplifier and twin speakers
through which the stereo sound
can be heard.
[ BEGIN ]
_ Press MENU • or • on the
TV (or on the remote press M
button and then M •• buttons.)
Select the word STEREO with the
TV's on-screen Arrow.
Press (+) button to turn the
STEREO MODE ON.
Press STATUS to clear the
screen
JK
_ Remember. If stereo is not
present on a selected TV show
and the TV is placed in the
STEREO mode, the sound
coming from the TV will remain
monaural (mono.)
I
SAP is an additional part of the
stereo broadcast system. Sent as a
third audio cha_nel SAP can be
heard apart from the current TV
program sound. TV stations are
free to u_e SAP for any number of
purposes, but many experts
believe it will be used for foreign
language translations of TV
shows (or for weather and news
bulletins.)
AI'C_ Remember. If a SAP signal
is not present with a selected
program, the SAP option cannot
be selected. Also, if SAP is
selected on a channel (with SAP)
and you select another channel,
when you return to the original
channel SAP will be OFF (and
you will have to reselect the SAP
feature.)
STEREO
•• .x.:>
iiiiiiiiiiiiiiiiiiiiiiiiii_iV
?
14
Page 15

mm
_Vo e Smart Sound (Automatic
lume Leveler - AVL) control
allows you to preset a certain
volume level beyond which the TV
sound will not exceed. This enables
you to hear a more consistent, even
sound level by reducing the peaks
and valleys that can occur during
program changes or commercial
breaks.
[ BEGIN l
,_1,,,,_ Press the Smart Sound button
on the remote.
"AUTO-VOLUME" shows on the
TV screen.
<_ Press the Smart Sound
button
repeatedly to turn the volume level
control ON (or OFF.)
_ Press the STATUS button to
clear the screen when completed.
O
A'_ Remember. The Smart
Sound control works only with
the programs coming through the
Antenna/Cable input on the rear of
the TV (RF audio). It will not
control the sound levels for the
Auxiliary (VCR/AUX IN) audio
inputs.
NOTE: AVL can also be _lected with I
the TV's on-screen Menu. Just press the
I
(+) or (-) buttons to turn the AVL
control ON or OFF.
15
Page 16

UTh e the Volume Bar control to see
e TV s volume level settings
on the TV screen. Once set the
Volume Bar will be seen each time
the VOLUME buttons (on the TV or
remote) are pressed.
_1_ Press MENU • or Y on the TV
(or on the remote press M button and
then M •Y buttons.)
Select the word VOL.BAR with the
TV's on-screen Arrow.
(2_ Press (+) or (-) buttons to turn
the VOL BAR control ON.
<_ Press STATUS button to clear
the screen.
,_Try it out. Press the VOLAY
buttons. The VOLUME BAR
should appear at the bottom of the
I screen.
::::::::::::::::::::
16
Page 17

mm
aVe you ever fallen asleep in
nt of the TV only to have
it wake you up at two in the
morning with a test pattern
screeching in your ears? Well,
your TV can save you all that
trouble by automatically turning
itself off.
[ BEGIN l
"_f Press MENU • or • on the
TV (or on the remote press M
button and then M •• buttons.)
[ Select the word SLEEP with the
] TV's on-screen Arrow.
I
"_ Press the (+) or (-) button
repeatedly to pick the amount of
time (15 minutes to 2 hours
ahead) before the TV will turn
itself off.
<_ Press the STATUS button to
clear the screen after you have
set the time for the TV to turn off.
O
Remember. If you ever
ant to see how many
minutes are left before the TV
shuts itself off, press the
STATUS button on the remote.
If you want to stop a SLEEP
TIMER setting, reset the timer
back to OFF. You could also turn
the TV off, an_l then back on
again, to cancel a setting.
A few seconds before the TV is to
shut off a message will come on
the screen telling you GOOD
NIGHT.
•
888 iiiiiiiiiiiiiiiii!iiiiiililili i iiii ii
iiiiii!iiiiiiii:iiii!iiil;i!!••
iiiiiiiiiiiiiiiii_iii_i_i_i_iii
:_i::ii:!i:ii!_i:!ii:i:ii_:
iiiiiiii:iiiiiiii_::
i_iiiiii:iiiii?"
iiiii?:
17
Page 18

_se e channel number for a
lected program can remain
on the TV screen by using the
REMINDER feature.
[ BEGI N ]
(,,,l_ Press MENU • or • on the
TV (or on the remote press M
button and then M •• buttons.)
Select the word REMINDER with
the TV's on-screen Arrow.
",<'-I" Press (+) or (-) button to turn
I REMINDER ON.
_'_,,'_ Press STATUS button to
clear the screen.
You should now see the channel
number atthe bottom of the
screen.
@
_ Remember. If Closed
I Captioning is ON, neither the
I Channel Reminder or the
I "MUTE" sound indicator will
show on the TV screen.
_1 TO adjust your TV color and
.Ik picture controls, select a channel
andfollow the steps shown below:
<_ Press MEN_J • or • on the TV
(or on the remote press M button and
then M _• buttons) until the
desired control shows on-screen.
<2,_ Press (+) and (-) to adjust the
I selected color control.
<_3._ Press STATUS button
A
(or
EXIT
Menu) to clear the screen when
picture adjustments are completed.
@
_1"_'_'_ Remember. When the bar
scale is centered, the control
I settings are at normal mid-range
I levels.
BRIGHTNFASS Press (-) or (+) until
•darkest parts of the picture are its
bright as you prefer.
Press (-) or (*) until
lightest parts of the picture show good
detail.
COLOR Press(-) or (+) to add or
eliminate color.
TINT Press (-) or (+) to obtain
natural skin tones.
SHARPNESS Press (-) or (+) to
improve detail in the picture.
18
Page 19

Or our French and Spanish
eaking TV owners an on-
screen LANGUAGE option is
present. With the LANGUAGE
control you can set the TV's on-
screen features to be shown in
either English, French, or Spanish
text.
[-wffgr
Press MENU • or • on the
TV (or on the remote press M
button and then M •W buttons.)
Select the word LANGUAGE
with the TV's on-screen Arrow.
<,_ Press (+) or (-) buttons to
select either the English, French
(FRANCAIS), or Spanish
(ESPANOL) language option.
Text for the on-screen Menu will
change to the selected language.
,_5-,,,_ Press STATUS to clear the
screen.
_ Remember. The Language
ntrol only makes the TV's
on-screen (MENU) items appear
in French or Spanish text. It does
not change the language of other
on-screen text features such as
Closed Captioned (CC) TV shows.
J
19
Page 20

OpUldyou like to hear TV
rograms through your audio
hi-fi system? The TV's Audio
Output jacks and TV Speaker
On/Off control work together to
offer you this TV sound option.
_.1_ Connect the R(ight) and L(efl)
AUDIO OUT jacks on the TV to
the R and L Audio Input jacks on
your amplifier or sound system.
Set the audio system's volume to
normal listening level.
<,_Z_,,_Turn the TV and audio system
ON. You can now adjust the sound
level coming from the audio
system with the Volume AY
buttons on the TV or remote.
_ To hear the TV sound from only
v
the audio system speakers, select
the TV's SPEAKER on-screen
control.
Press MENU A or • on the TV
(or on the remote press M button
and then M Ag buttons.)
Select the word SPEAKER with
the TV's on-screen Arrow.
_,_," Press the (+) or (-) buttons to
turn the TV's internal speakers
OFF.
You should now only hear TV
sound coming from the audio
system speaker_.
J_
<,55_ Press the STATUS button to
clear thatscreen.
@
__'_ Remember. The audio
system may have to be in
AUX(iliary) mode to play sound
from the TV.
®®
AUDIO IN
(RED/WHITE)
AUDIO SYSTEM
2O
Page 21

ou can view the playback of
VCR tapes (Video Disc
Players, camcorders, etc). by
using the AUDIO and VIDEO
INPUT jacks (on the rear of the
TV).
For example: to view the
playback of a VCR tape:
¢,,11_ Connect the AUDIO and
VIDEO INPUT jacks on the TV
to the AUDIO and VIDEO
OUTPUT jacks on the VCR.
I
(_,_ Press MENU • or • on the
TV (or on the remote press M
button and then M •• buttons.)
Select the word INPUT with the
TV's on-screen Arrow.
Note: You can press the
CHANNEL•• buttons to select
"VCR/AUX" (if it has been
added to the TV's channel
memory.) See page 12 for details.
(_ Press (+) or (-) button to
select the VCR/AUX(iliary)
INPUTS on the rear of the TV.
(4_ Turn the VCR ON and PLAY
the VCR tape to be viewed on the
TV.
roRemember!Whenyou're
ugh using the AJV INPUT
jacks, return th_INPUT display
screen on the TV to ANT(enna).
Then you will be ready to view
TV programs coming from the
normal antenna connections.
If you leave the TV in the
VCR/AUX INPUT mode and
there is no signal source
connected to the jacks, you will
be seeing only a blank screen on
the TV.
NOTE: If you have a mono
(single audio OUTPUT) VCR,
"Y" Connectors are available
(from your dealer or Parts
Information Center 1 800 292-
6066) to connect the mono audio
to both R and L audio inputs on
the TV.
VIDEO OUT
(YELLOW)
21
BACK OF TV
I 1
\
AUDIO OUT
(RED/WHITE)
VCR
,'5
.....,i_!i!ii!ii_i!!:i_:_!ii_....
UHF_HF
ANTENNA
CABLE TV
SIGNAL
PICTURE AND SOUND
FROM PLAYBACK OF
VCR TAPE
Page 22

After installing the batteries into
the remote, press the TV System
button to send remote commands
to the TV. Point the remote toward
the front of the TV (remote sensor
window) when pressing buttons.
%'_R Buttons
For use of VCR buttons see the "Using
the Remote With a VCR".
Menu (YA) Buttons
Press the M button to show on-screen
fi.-ature controls. Press • or • buttons
to move forward and backward
through the list of on-screen controls.
1-) and (+) Buttons
Press to adjust the selected on-screen
feature control.
.Volume Button
Press to adjust the "IV sound level.
Reset/Enter Button
Press to return the TV to factory preset
levels for picture controls. Also can
be used as an Enter button when
sending channel commands to remote
controlled cable converters or VCRs.
Smart Sound Button
Press to control TV sound levels. See
"Smart Sound/Auto Volume" section
for details.
/
m
I
Status/Exit Button
Press to see the current channel
number on the "IV screen. Also press
this button to clear the TV screen after
control adjustments.
Alternate Channel Button
Press to select the previously viewed
channel.
For example: You are watching
channel 4 and change to channel l0
(using the channel number buttons).
Press A/CH and your "IVwill returnto
channel 4. Press A/CH again and your
TV will return to channel 10.
Channel Scan Button
Press to scan up or down through
channel numbers.
Mute Button
Press to turn the sound OFF on the
TV. Press again to return the sound to
its previous level.
PIP Buttons
Press to operate Picture-In-Picture
features. See PIP section for details.
Number Buttons
Press the number buttons to select "IV
channels. Press two number buttons to
select single digit channels. For
example: to select channel 6...press
"0" first and then "6".
TV-VCR-CBL System
Buttons
Press to send remote control commands
to either the TV, VCRs, or accessory
Cable Converters. See the "How to
operate VCRs and Cable Converters"
section for further details.
The remote's TV-VCR-CBL System
buttons control how certain buttons on the
remote are used.
For example:
With the "TV" System button pressed:
the MENU, (M)AY, and (+,-)
buttons areused to select and
adjust on-screen TV features.
With the "VCR" System button pressed:
the same buttons on the remote
work playback, search, pause,
and other VCR features.
I•U!•
x-€ OI4.SOREI_4
_:a _vuaEs
_1 • j:
22
Page 23

hen using the TV remote
with a VCR, first make
certain it is set to control your
VCR ( by the REMOTE CODE or
SEARCH method - see following
section).
<l_ Press theVCR System
button on the remote.
_2_ Point the top of the remote
toward the front of the VCR
(remote sensor window) when
pressing buttons.
K z t.EuI!p_u_
Hold the RECORD button down, and
then press the PLAY button to begin
a VCR recording.
Rewind Buttpn
Press to rewind tapes. For some
VCRs you may need to press STOP
button first then REWIND. In
playback mode. hold button down to
view picture moving rapidly in
reverse.
Pause Button
Press to temporarily stop the tape dur-
ing a playback or recording. Press
again to release Pause.
TV-VCR ButtQn
Press to the VCR position ("VCR"
indicator on the V_R will light) to
view the playback of a tape. Press
again to place in the TV position
("VCR" indicator on the VCR will go
.4
OFF) to vnewone program while
recording another program.
PLAYI STA1US
PAUSEII
(ON/OFFX POS_ SWAPl(FREEZE)
PiP C_ SIZE)
23
•Play Buttgn
Press to playback a tape. Hold down
after pressing the RECORD buttonto
start a recording.
Press to stop the tape.
-Fast Forward Button
Press to rapidly advance the tape. For
some VCRs you may need to press
STOP first then FF. In Playback
mode hold button down to view the
picture moving rapidly in the forward
direction.
.Channel Scan Buttgn_
Press to scan up or down through
VCR channel numbers.
Number Buttons
Press buttons for direct VCR channel
selections.
VCR System Button
Press to send remote commands to
the VCR.
Power Button
Press to turn the VCR ON andOFF.
I
__bu Remember. The VCR
ttons on the remote will
not operate your VCR if those
features are not already'found on
your VCR remote control.
Note: All VCR functions
(particularly Search, Rewind, Fast
Forward, etc.) will operate the
same as with the original VCR
remote control provided with the
VCR.
Page 24

F ___Jraveyou ever played hide and
1 1 ! seek with your remote
| control? Are you tired of tearing
| the house apart trying tofind if
l someone has stuffed the remote
| under the couch, put it on the
| shelves, or hid it in the desk? Well,
[ your TV remote can save you all
| that looking by automatically
I signaling its location to you.
| Here's how it works:
l |REGUNI
i_ I [_ Press the POWER button on
I the set to turn the TV ON.
I Note: Normally you can press any
I button on the front of the TV to
I turn the set ON. But for the remote
I locator to work you need to be sure
I to use the Power button at the TV.
[ "LOCATING REMOTE" shows on
I the TV screen.
<_ Within a few seconds a
chirping or beeping sound will
begin to come from the remote
control hand unit.
The remote will continue to signal
its location for around 30 seconds.
Normal TV program sound will not
be heard while the remote locator is
working.
(5,_ Once you find the remote just
press any button on the remoteand
the beeping sound will stop.
The remote is mow ready for
normal TV feature use.
Remember. The remote
locator may not properly
receive its "homing" signal from
the TV if it has been placed on a
metal shelf or counter material.
Also, since there's a special type of
radio frequency 'qaoming" signal
receiver inside the remote we are
required to notify you that any
changes or modifications not
expressly approved by Philips
Consumer Electronics Company
could void the user's authority to
operate the remote equipment.
rangeis around50 Feet. ::_!++::: :+
i+iiiii!ii!!i!!! i!ii+i !i i!iiiii!!iiii!i!i!iii! J
Y MENU_ Y CH _ --'_P" CH +_A. POWER
24
Page 25

J
See the above information on
how to u_ the Locator Code
Button for Programming.
For most homes this step would
not be needed but for your
information:
Up to 9 different remote locator
address codes can be set on which the
TV can send out its "homing" signal.
This is done in case there is more than
one TV (with a remote locator)
present, and you want only one
specific remote to be signaled when the
TV is turned ON.*
To set a Locator Address Code:
<_ With TV turned ON, press the
LOCATOR CODE button on the
remote. (Also be sure the TV
SYSTEM button on the remote has
been pressed.)
You will need a pencil or pen to press
the recessed button.
The TV shows the present Remote
Locator Code.
< ,_ Press any number button (0-9) on
the remote to set or change the Locator
Code.
The remote will beep to let you know
it has received the new Locator Code
and then return to its normal operating
mode. O
_[_ Remember. If batteries
are
placed the l.,ocator Code#viii
need to be reentered.
When setting the Locator Code if any
button, other than the number buttons,
are pressed the remote will return to its
normal operation mode.
*For owners who live in an apartment
J (townhouse or condominium)
complex, this task may be necessary
since the remote locator's signal can be
sent and detected direcly through
adjoining walls.
2S
Page 26

Vour remote control is set to
• work your TV and many
infrared remote (IR ) control
VCRs. However, an easy one-
time step may be necessary
before the remote will work your
VCR.
Try this initial check to see if
going on to thefollowing section
is necessary.
[ BEGIN J
,_ Press the VCR System
I button on the remote.
<_ Point remote toward VCR
and press the POWER button.
<_ Does the remote turn the
VCR
ON?
IF YES, O and try the other
VCR buttons on the remote. If
they also work the VCR, then
the remote is ready and no
further steps are needed.
If NO, continue...
VCR
First look up a TWO-DIGIT
remote code number for your
brand VCR before going through
the simple "1,2,3" steps (on the
following page).
A,[_ Remember. If more than
one number is listed, you
may have to try more than the
first two-digg code given in order
to locate your VCR's remote
code.
continue to next page
26
_VCR REMOTE
BRAND CODENO.
Akai 24, 25, 36
Audio Dynamics 14, 21, 29
Broksonic 31
Cannon 01
Capehart 33
Craig 07, 30
Curtis Mathes 01,32, 42, 43
Daewoo 33
DBX 14, 21,29
Dynatech 27
Emerson 20, 31,34, 40
Fisher 06, 07, 08
Funai 27, 28
GE 01
Goldstar 23
Go Video 45, 46
Hitachi 03, 5!
Instant Replay 01
JC Penney 01,03, 23, 29
JVC 14, 47, 48
Kenwood 13, 14
Lloyds 27
Magnavox 00, 01,02, 05, 27, 28
Magnin 30
Marantz 29
Memorex 01, 07, 23, 27
Minolta 03
Mitsubishi 16, 17, 38, 39, 50
Montgomery Ward 12
VCR REMOTE "_
Multitech 27,28
NEC 14, 21, 29
Panasonic 01
Pentax 02, 03
Philco 01,02, 05, 27, 28
Philips 00, 01,05, 27, 28
Quasar 01
RCA 03, 04, 32, 42, 43, 44
Realistic 07,1 !, 12, 23, 27, 28
Samsung 22, 30
Sansui 49
Sanyo 07, 13
Scott 19
Sears 03, 08, 23
Sharp 11, 12
Shinton 35
Sony 09, 10,41
Sound Design 27
Sylvania 01, 02, 05
Symphonic 27
Tatung 14
Teac 14, 27
Teknika 26, 27
Thomas 27
TMK 20
Toshiba 18, 19
Video Concepts 28
Yamaha 14, 29
Zenith 15
J
Page 27

ow that you have looked up
the two-digit Remote Code
Number for your brand of VCR
(on previous page), you are
ready to follow thefour simple
steps below.
Please read through steps 1-4
before beginning.
_ Press and release the REC
(RECORD) button.
_,P Within thirty seconds
after
releasing the REC button, press
and release the VCR System
button.
_,'_ Within thirty seconds after
releasing the VCR System
button, ENTER THE TWO
DIGIT CODE NUMBER for
the desired VCR. The remote is
now ready to send commands to
the VCR.
_t_ Point the remote at the VCR.
Press the POWER button on the
remote to turn the VCR ON.
Try it out. The Channel and
VCR buttons on the remote
ould now operate the VCR.
_1(_ Remember. If this doesn't
work the firsT'time, repeat
steps using the same remote
code number.
If after a second try the remote
does not operate your VCR, and
there are more code numbers
listed for your brand VCR, use
the next listed code number.
If after repeated attempts the
code number method does not
work your VCR, try the "VCR
SEARCH" method on page 30.
VCR
PAllS[#
(oN/o_X ros }{$wuXmEu]
PIP (__ s_z_)
27
Page 28

<
our remote control is set to
work your TV and many
infrared remote (IR) control
Cable Converters. However, an
easy one-time step may be
necessary before the remote will
work your Converter.
Try this initial check to see if
going on to the following section
is necessary.
| BEGIN J
._ Press the CBL System
button on the remote.
_ Point toward Cable
remote
Converter and press the POWER
button.
,_ Does the remote turn the
Converter ON?
IF YES, _ and try the CH • •
and CH number buttons on the
remote. If they also work the
Converter then the remote is
ready and no further steps are
needed.
If NO, continue...
C 3(
Cable
Converter
I I
il
< First look up a TWO-DIGIT
remote code number for your
brandConverter before going
through the simple "1,2,3" steps
(on the following page).
_on Remember. If more than
e number is listed, you
may ha_e to try more than the
first two-digit code given in
order to locate your Converter's
remote code.
continue to next page
f
CONVERTER REMOTE CONVERTER REMOTE
BRAND CODENO. BRAND CODENO.
Archer 28 Rembrant 33
Diamond 23 Salora 52
Drake 37 Scientific Atlanta 08, 22, 47
Gemini 45 Sheritech 34
Hamlin 14, 15 Sylvania 16
Hitachi 25 Texscan 16, 48
Jerrold 01,02,03,04,05,30,46 Tocom 12,13, 53
Macom 29, 38 Toshiba 43
Magnavox 17,26, 31 Uniden Satellite 44, 54
NSC 49 Unika 50
Oak 06, 27, 39 Universal 36
Panasonic 18,35 Video Tech 40
Philips 19, 20, 21,24, 26 Video Way 51
Pioneer 09, 32 Viewstar 26
Regency 10, 11 Zenith 07, 41, 42
28
Page 29

ow that you have looked up
the two-digit Remote Code
Number for your brand of Cable
Converter (on previous page),
you are ready tofollow the four
simple steps below.
Please read through steps 1-4
before beginning.
I BEGIN 1
_ Press and release the REC
I (RECORD) button.
_,,_ Within thirty seconds after
releasing the REC button, press
and release the CBL System
button.
_'_ Within thirty seconds after
releasing the CBL System
button, ENTER THE TWO
DIGIT CODE NUMBER for
the desired Converter. The
remote is now ready to send
commands to the Converter.
_[_ Point the remote at
the
Converter. Press the POWER
button on the remote to turn the
Converter ON.
O
_, Try it out. The Channel and
POWER buttons on the remote
should now operate the
Converter. •
Ar_ Remember. If this doesn't
Al-_-I_r"_- work the first time, repeat
steps using the same remote
code number.
If after asecond try the remote
does not operate your Converter,
and there are more code numbers
listed for your brand Converter,
use the next listed code number.
If after repeated attempts the
code number method does not
work your Converter, try the
"CONVERTER SEARCH"
method on page 31.
Cable Converter
PAUSEII
PiP
29
Page 30

our TV remote can be set to
work your VCR by what is
called the SEARCH method.
If the "REMOTE CODE" number
method shown in the previous
section did not set your remote to
work your VCR, then follow the
easy steps listed below.
Please read through steps 1-4
before beginning.
_,l,,,, Press the POWER button on
the VCR to turn VCR ON.
<(2_ Stand at least six feet away
from the front of the VCR.
Point the remote toward the
VCR.
HOLD DOWN the A/CH and
VCR System buttons atthe same
time. KEEP HOLDING
BUTI'ONS DOWN.
(_,_ Watch the Channel Indicator
on the VCR.
Channel Numbers will SCAN UP
when the VCR has been
identified. This may take up to
two minutes.
Release the A/CH and VCR
System buttons as soon as
channel numbers start to scan up.
The VCR code has been identified
and the remote is ready to operate
the VCR. •
O
,t
_ Remember. A minute or
two can seem very long, but
the code should be located within
two minutes.
Don't let the VCR scan up more
than five channels. If you do the
remote may pass up the right code
and another two minute search
cycle will have to be repeated.
If no channel change happens
within two minutes, repeat steps
1-4. Should a channel change still
not occur, the remote will not
work with the desired VCR.
VCR
09
D_m't let I_ VCR _an up
more Ihan five channels
(in Search mode).
T
Six Feet
(minimum)
3O
Page 31

our TV remote can be set to
work your Cable Converter by
what is called the SEARCH
method.
If the "REMOTE CODE" number
method shown in the previous
section did not set your remote to
work your Converter, then follow
the easy steps listed below.
Please read through steps I-4
before beginning.
[ BEGIN l
Press the POWER button on
.Converter to turn Converter
_,_ Stand at least six feet away from
the front of the Converter.
Point the remote toward the
Converter.
HOLD DOWN the A/CH and
CBL System buttons at the same
time. KEEP HOLDING
BU'Iq'ONS DOWN.
_ Watch the Channel Indicator
on the Converter.
Channel Numbers will SCAN UP
when the Converter has been
identified. This may take upto two
minutes.
',,_,> Release the A/CI-I and CBL
System buttons as soon as Channel
numbers startto scan up. The
Converter code has been iden_tified
and the remote is ready to operate
the Converter. •
O
R:mem rAminot°o,
two can seem very long, but the
code should be located within two
minutes.
Don't let the Converter scan up
more than five channels. If you do
the remote may pass up the right
code and another two minute
search cycle will have to be
repeated.
If no channel change happens
within two minutes, repeat steps 1-
4. Should a channel change still
not occur, the remote will not work
with the desired Converter.
Cable Converter
09
Don'tlet the Converler ,scan
upmore thanfive channels
(inSearchmode).
_i:iii:
31
Six Feet
(minimum)
Page 32

icture in Picture (PIP) is the
showing of two pictures on the
TV screen at the same time. (One
main screen picture and one small
inset picture - or PIP).
Note: The PIP picture must be
supplied by a VCR (or other
accessory equipped with a VIDEO
OUTPUT jack). See the following
example on how a VCR can be
used to supply a PIP picture.
[ BEGIN ]
_> Connect the VIDEO OUT
jack on the VCR to the VIDEO
IN jack on the TV.
Also connect the AUDIO OUT
jack from the VCR to the AUDIO
IN jack on the TV. (See Reminder
note below.)
Also ensure the normal antenna
connection between the VCR and
TV is in place.
_ Move to the next page after
the VCR to TV PIP connections
are completed.
continue to next page
_ Remember. No sound will
heard with the PIP picture.
See page 34 on bow to 'SWAP"
the PIP picture with the main
screen picture so that sound can be
heard. ,
If you have a single (monaural)
Audio Output VCR, "Y"
connectors are available to
complete your connection to the
TV. Contact your dealer, or our
Parts Information Center (1-800-
292-6066), for details.
PIP
MAIN
SCREEN
BACK OF TV
VIDEO OUT
(YELLOW)
AUDIO OUT
(REDAVHITE)
VCR
OUTDOOR
UHF/VHF
ANTENNA
CABLE TV
SIGNAL
32
Page 33

Nth w that you have completed
e required connections on
the previous page you are ready to
follow the simple steps shown
below.
_Turn VCR and TV ON.
the
Place the VCR in the TV mode -
Use the TV/VCR button on
the 'IV remote (if the remote
has been set to work with your
VCR - see page 26.)
Place the TV in the ANTENNA
mode -
Press the M (Menu) button on
the remote until the word
INPUT shows on the screen.
Then press the (+) button to
select ANTENNA.
_ Select the channels on the TV
and VCR to be watched.
_ Press the PIP ON/OFF button
on the remote.
O
mr_ Remember. See the
m]_..IgY6. following page on how to
operate other PIP features with the
remote control.
12:00"" 06
VCR IN "IV MODE"
(VCR Indicator Light will go out)
VCR - PIP CHANNEL
VCR
SELECTED
CHANNEL
TV
SELECTED
CHANNEL
"IV INANTENNA
"IV -MAIN SCREEN CHANNEL
I e sure to point the remote
front of the VCR when pressing
VCR function buttons.
33
Page 34

y using the PIP buttons on the
remote the PIP picture can be
moved and swapped with the main
screen. The main screen picture can
also be frozen in the PIP window.
[BEGIN|
_ Press the PIP ON button to show
the PIP picture.
PIP appears in a corner of TV screen.
Press PIP ON again to remove PIP
from the main screen.
_,.)_ Press the PIP POSITION button
to move the PIP picture (from comer-
to-corner on the TV screen.)
This feature allows you to move PIP
and avoid blocking off any main
screen action.
%,__,,_ With PIP on the TV screen, press
the SWAP button to swap the main
screen picture with the PIP picture.
Press SWAP again to returnthe main
screen and PIP to their original
positions. See the important
reminder below.
continue to next page...
__.h Remember. If the TV is ,
s owing a_'VCR/AUX" supplied
picture on the main screen (when the
TV and VCR are turned OFF), a blank
screen will appear when the TV is
turned back ON again.
If this happens, just press the
CH(annel) • or _' buttons to select a
TV station for normal viewing.
3. PIP SWAP
2. PIP POSITION
I. PiP ON / OFF
34
Page 35

4. PIP FREEZE
5. PIPSIZE(Large or Small)
Press FREEZE to hold the current
MAIN screen picture in the PIP
window (Main picture is still active).
If PIP is currently OFF, the PIP
window will automatically appear.
Press FRZ repeatedly to update the
frozen PIP with current pictures from
the Main screen.
You cannot reposition or swap a
frozen PIP picture.
Press the PIP ON button to drop the
frozen PIP picture from the screen.
,....
Press the PIP SIZE button to
change the size of the PIP window
shown on the TV screen.
Press the PIP SIZE button again to see
and compare the large and small size
PIP windows.
Note: The PIP SIZE can also be
adjusted within the on-screen MENU.
35
Page 36

_c e picture for the PIP window
an come through the TV's
ANTENNA or VCR/AUX Inputs
(on the rear of the TV.) The PIP
INPUT control simply tells the TV
which one of these two sources it
is to show in the PIP window
[BEGIN ]
_1_ Press MENU • or • on the
'IV (or on the remote press M
button and then M •• buttons.)
Select the word PIP INPUT with
the TV's on-screen Arrow.
¢..Z..,) Press the (+) or (-) buttons to
select the source for the PIP
picture:
ANTENNA -
for a picture signal coming
from the ANTENNA input on
the rear of the TV.
VCR/AUX -
for a picture signal coming
from the Video Input jack on
the rear of the TV.
Used for VCR (or other direct
video accessory) connections.
..'R-..
<_,_,a Press the STATUS button to
clear the screen.
@
Remember. The PIP
screen will be blank unless a
signal is conne_ed to the selected
source (either ANTENNA or
VCR/AUX) on the rear of the TV.
With AI_TENNA selected (as the
PIP INPUT source), the main
screen and PIP window will show
the same video information.
OPIPINPUT
For details on how to view _parate i
programs on the PIP window and main
_reen, .,;eethe PIP connection _ction.
36
Page 37

.I
_] DIP hookup with Cable
1Converter Box and VCR.
_1_ First use an optional signal
_ splitter and connect the
original
/
[ cable TV signal to both the
I CABLE IN on the Cable Converter
I and the ANTENNA plug on the
I rear of the TV.
_ _ Connect the CABLE OUT
on
the Converter to the ANT. IN on
the VCR.
(i _ Connect the VIDEO OUT
jack on the VCR to the VIDEO IN
jack on the TV.
Also connect the AUDIO OUT (R
and L) jacks from the VCR to the
AUDIO IN jacks on the TV.
@
Remember to use the
Cable TV Converter Box to
select channels for PIP, the VCR
must be set to the same channel as
the channel selection switch on the
rear of the Cable Converter (either
channel 3 or 4).
Contact the Parts
Information Center
I 800 292-6066
to order any optional
acces_ries
®
ANT /
CABLE
REAR OFTV
® @;@@
VIDEO AUOIO
®
I IN
VCR
CABLETVCONVERTER
I I
37
Page 38

lease make these simple
checks before calling for
service. Theses tips can save you
time and money since charges for
TV installation and adjustment of
customer controls are not
covered under your warranty.
NO Power
No Picture
No Sound
Remote Does Not
Work
TV Disnlavs Wrong
Channel or No
m
Channels Above 13
CAUTION: A video source (such as a video game, Compact Disc Interactive - CDI, or
TV information channel) which shows a constant non.moving pattern on the TV screen,
can cause picture tube damage. When your TV is continuously used with such a source
the pattern of the non-moving portion of the game (CDI, etc.) could leave an image
permanently on the picture tube. When not in use, turn the video source OFF.
Regularly alternate the use of such video sources with normal TV viewing.
] Check the "IVpower cord. Unplug the TV, wait I0 seconds, then reinsert plug into
outlet and push POWER button again.
I
Check to be sure outlet is not on a wall switch.
i Check antenna connections on the rear of the TV. Are they properly secured to the
antenna plug on the TV?
Check the CABLE/YES NO control for correct position.
Check INPUT control for correct position. VCR-AUX position without a signal
source will result in a blank screen.
i Check the VOLUME buttons.
Check the MUTE button on the remote control.
If attempting auxiliary equipment hook-ups, check audio jack connections.
Check TV-VCR-CBL "System" buttons on the remote. Press the remote's TV System
button to send commands to the TV.
Check batteries. Replace with AA Heavy Duty (Zinc Chloride) or Alkaline batteries
if necessary.
Clean the remote and the remote sensor window on the TV.
i Repeat channel selection.
Add desired channel numbers (CHANNEL control) into TV memory.
Check CABLE/ YES NO control for correct position.
Cleaning and Care
IThis TV is equipped with protective circuitry that shuts the TV off in case of moderate
power surges. Should this occur turn the TV back on by pressing the POWER button
once or twice, or unplug (wait 10 seconds) and then replug the power cord at the AC
outlet. This feature is NOT designed to prevent damage due to high power surges such
as those caused by lightning, which is not covered by your warranty.
To avoid possible shock hazard be sure the TV is unplugged from the electrical outlet before cleaning.
When cleaning the TV screen take care not to scratch or damage the screen surface (avoid wearing jewelry or using
anything abrasive). Wipe the front screen with a clean cloth dampened with water. Use even, easy, vertical strokes when
cleaning.
Gently wipe the cabinet surfaces with a clean cloth or sponge dampened in a solution of cool clear water. Use a clean dry
cloth to dry the wiped surfaces.
Occasionally vacuum the ventilation holes or slots in the cabinet back.
Never use thinners, insecticide sprays, or other chemicals on or near the cabinet, as they might cause permanent marring
of the cabinet finish.
38
Page 39

Coaxial Cable * A single solid antenna wire normally matched with a
metal plug (F-type) end connector that screws (or pushes) directly onto
a 75 Ohm input found on the Television or VCR.
Display * An on screen message or graphics that help the useroperate
and adjust his Television feature controls. See On Screen Displays
(OSD).
Direct Audio/Video Inputs * Located on the rear of the TV these
connectors (RCA phono type plug) are used for the input of audio and
video signals. Designed for use with VCRs (or other accessories) in
order to receive higher picture resolution and offer sound connection
options.
Identify* Method by which a remote control searches and finds an
op_rating code for another product (such as a VCR or Cable Converter).
Once the code has been "identified" then the TV remote can operate
and send commands to the other product.
Multichannel Television Sound (MRS) * The broadcast standard that
allows for stereo sound to be transmitted with the TV picture.
On Screen Displays (OSD) * Refers to the wording or messages
generated by the television (or VCR) to help the user with specific
feature controls (color adjustment, programming, etc.).
Menu * An on-screen listing of feature controls shown on the
Television screen that are made available for user adjustments.
Picture -In-Picture (PIP) * Term used when two pictures are shown
on the TV screen at the same time. The smaller PIP picture is
supplied by a VCR (or other tuner/video playback source). The PIP
picture can also be moved and swapped with the TV's main screen
picture.
Programming * The procedure of adding or deleting channel
numbers into the Television's memory circuits. In this way the
Television "remembers" only the locally available or desired
channel numbers and skips over any unwanted channel numbers.
Remote Sensor Window * A window or opening found on the
Television control panel through which infrared remote control
command signals are received.
Second Audio Program (SAP) * Another or additional audio
channel provided for in the Multichannel Television Sound (MTS)
broadcast standard. The most frequently proposed use for SAP is the
simultaneous bilingual broadcast of TV program material.
Status * Allows the user to quickly confirm what channel number is
currently being viewed. Status can also be used to clear the
Television of on screen displays or information (rather than waiting
for the displays to "time out" or automatically disappear from the
screen).
Twin Lead Wire * The more commonly used name for the two
strand 300 Ohm antenna wire used with many indoor and outdoor
antenna systems. In many cases this type of antenna wire requires an
additional adapter (or balun) in order to connect to the 75 Ohm Input
terminals designed into the more recent Televisions and VCRs.
Accessories/Optional .................................... 4, 5, 20, 21, 32, 37
Adapter Connector .............................................. 4, 5, 21, 32, 37
Add/Delete Channels ........................................................ 11, 12
Audio/Video Input Jacks ........................................................ 21
Battery Installation .................................................................... 7
Cable TV Connectioffs/Settings .................... 4, 5, 10, 21, 32, 37
Channel Display ..... :........................................................... 6, 17
Channel Mero,ory .............................................................. 11, 12
Channel Reminder .................................................................. 17
Closed Captioning .................................................................. 13
Ccmtrois/TV .......................................................................... 6, 8
Controls/Remote ................................. 7, 9, 22-23, 24-25, 34-35
Display Button .......................................................................... 8
Features ..................................................................................... 3
Glossary TV Terms ................................................................. 39
Identify VCRs with TV Remote ........................................ 26-27
Identify Cable Converters with TV Remote ...................... 28-29
Inputs/Audio and Video .............................................. 21, 32, 37
Language Option .................................................................... 19
Memory/Program Channels .............................................. 11, 12
Menu Button ....................................................................... 8, 22
39
Minus(-)/Plus (+) Buttons ................................................... 8, 22
Power Light Indicator ............................................................... 6
Precautions/Safety .............................................................. 3, 38
Programming Channels .................................................... 11, 12
Remote Control ......................................................... 7, 9, 22-23
Reset ....................................................................................... 22
Requesting Service ........................................................... 38, 40
RF Coaxial Cable ................................................ 4, 5, 21, 32, 37
Remote Locator ................................................................. 24-25
Safety/Precautions .............................................................. 3, 38
Second Audio Program ........................................................... 14
Sensor Remote .................................................................... 6, 22
Set Up/First Time Use .................................................. 4, 5, 6, 8
Sleep Timer ............................................................................. 16
Status Button ....................................................................... 8, 22
Stereo ...................................................................................... 14
Tips for Service ....................................................................... 38
VCR Buttons ........................................................................... 23
VCR/TV Connections ............................................. 5, 21, 30, 35
Volume Bar Control ............................................................... 15
Warranty ................................................................................. 40
Page 40

LIMITED WARRANTY
Color Television
• 90 Day In-Home Service Labor Warranty
• One (1) Year Exchange On Warranty Parts
• Two (2) Year Exchange Warranty on Color Picture Tube
This warranty gives you specific legal rights and you may have other rights which vary from state/province to state/province.
Parts and Labor During First 90 Days
For Ninety (90) Days from the date of purchase, a Factory
Service Center or an Authorized Service Center will repair any
product defect and replace any defective part, including the
picture tube without charge to you for partsor labor.
Warranty service on your Color TV will be provided in the
home, and if required, in the Service Center as well.
Replacement Parts After 90 Days
If within one (i) year - two (2) years for a picture tube - after the
date of purchase, a partis found defective and needs to be
replaced, a Factory Service Center or an Authorized Service
Center will supply to you a new or, at our option, rebuilt part
without charge to you for the replacement part. After 90 days
fiom the date of purchase, you must pay for all labor,
transportation, and service charges. Replacement parts and
picture tubes installed during theTV warranty period are
warranted only for the balance of the original warrantyperiod.
What the Purchaser Must Do
Before you call for service, check your operating instruction
booklet. A slight adjustment of the customer controls discussed
in your instruction booklet may save you a service call.
If you require service during the warranty period, you must
contact a Factory Service Center or an Authorized Service Center
to arrange for repair. The Service Center must be allowed to
keep defective parts. After the first 90 days of the warranty
period, the cost of t_nsportation to and from the'Service Center
and service labor is your responsibility.
Warrantyseivice will be performed by a Factory Service Center
or an Authorized Service Center. If you reside in an area where
we have a Factory Service Center (see the Factory Service Center
address directory supplied with your product literature), you can
contact them to schedule a convenient time for an In-Home
service call.
YOU MUST PRESENT PROOF OF THE DATE ON WHICH
THE TV WAS FIRST PURCHASED (SALES RECEIPT OR
OTHER EVIDENCE) WHEN REQUESTING SERVICE OR
REPLACEMENT PART WARRANTY PERFORMANCE.
Warranty Exclusions
Your Warranty Does Not Cover:
Labor charges for set installation or set-up, adjustment of
customer or preference controls, and installation or repairof
antenna systems outside the TV set.
Product repairand/or partreplacemen! because of misuse,
accident, unauthorized repair, or other cause not within the
control of Philips Consumer Electronics Company.
Reception problems caused by signal conditions or cable or
antenna systems outside the TV.
A television purchased, used or serviced outside the U.S.A.,
Canada, Puerto Rico, and the Virgin Islands, or used for
commercial or institutional purposes.
Incidentalorconsequential damagesresultingfrom the product.
Some states/provincesdo not allow the exclusion of incidentalor
consequentialdamages, so theabove exclusion may notapply to you.
ALL IMPLIED WARRANTIES INCLUDING IMPLIED
WARRANTIES OF MERCHANTABILITY AND FITNESS
FOR A PARTICULAR PURPOSE, ARE LIMITED IN
DURATION TO THE DURATION OF THIS EXPRESS
WARRANTY. Some states/provinces do not allow
limitations on how long an implied warranty lasts, so the
above limitation may not apply to yon.
IMPORTANT REMINDER
PLEASE FILLOUT AND MALL.YOUR WARRANTY REGIS-
TRATION CARD PROMPTLY. IT WILL BE EASIER FOR US
TO NOTIFY YOU IF IT SHOULD EVER BE REQUIRED.
Please write your model and serial numbers below. The
numbers are located on the back of your unit. Please remember
to have these numbers on hand any time you call.
IN U.S.A.:
Philips Service Company
P.O. Box 555
Jefferson City, TN 37760
(615) 475-8869
MODEL NO.
SERIAL NO.
IN CANADA:
Montreal (514) 342-2043
5930 Cote de Liesse. Montreal, Quebec H4T IEI
Toronto (416) 754-6064
601 Milner Avenue. Scarborough, Ontario M I B IM8
Vancouver (604) 435-4411
3695 Grandview Hwy.. Vancouver, BC V5M 267
IB 6985-E001 40
 Loading...