

Page 1
_eo Disc
Player
Owner's Manual
MODEL SVD I_)I
Page 2
Once your purchase is registered, you're eligible to receive all the privileges of owning this prod-
uct. So complete and return the Warranty Registration Card enclosed with your purchase at once.
And take advantage of these important benefits,
Warranty
Verification
Registeringyourproduct within
10daysconfirmsyour right to
maximumprotectionunderthe
terms andconditionsofyour
warranty.
Owner
Confirmation
YourcompletedWarranty
RegistrationCard servesas
verificationof ownershipinthe
eventof producttheftor loss.
Model
Registration
ReturningyourWarranty
RegistrationCard right away
guaranteesyou'll receiveall
the information andspecial
offerswhich youqualifyfor
asthe owner of your model.
' 2000
Congratulations on your purchase, and
welcome to the "familyt"
Dear product owner:
Thank you for your confidenceinthis product.You've selected one of
the best-built,best-backedproductsavailabletoday.And we'll do
everythinginour power to keep you happy with your purchasefor
many yearsto come.
As a member of the SV2000"family:' you're entitledto protection by
one of the most comprehensivewarranties and outstandingservice
networks inthe industry.
What's more, your purchaseguaranteesyou'll receive allthe informa-
tion and specialoffersfor which you qualify,pluseasyaccessto
accessoriesfrom our convenienthome shoppingnetwork.
And most importantly,you cancount on our uncompromisingcom-
mitment to your total satisfaction.
All of this isour way of sayingwelcome - andthanks for investingin
anSV2000 product.
P.S. Remember, to get the most from your product,
you must return your Warranty Registration
Card within I 0 days. So please mail it to us right
now!
Know these
safetysymbols
bO&This "bolt of lightning"indi-
cates uninsulated material
within your unit which maycause
an electrical shock. For the safety
of everyone in your household,
please do not remove product
covering.
_The "exclamation point"
calls attention to features
for which you should read
the enclosed literature closely to
prevent operating and mainte-
nance problems.
WARNING: TO PREVENT
FIREOR SHOCK HAZARD, DO
NOT EXPOSE THIS EQUIP-
MENT TO RAIN OR MOIS-
TURE.
CAUTION: Toprevent electric
shock, match wide blade of plug
to wide slot, fully insert.
ATTENTION: Pour _viter les
choc (_lectriques, introduire la
lame la plus large de la fiche dans
la borne correspondante de la
prise et pousser lusqu'au fond.
For Customer Use
Below,enteryour product'smodel number andserial number,whichare locatedon the rear ofthe cabine_
Keepthis informationfor future reference.
Model No. Serial No.
MAC5097
Page 3
SafetyInformation3
Safety Precautions
Warning: To prevent fireor shockhazard,do not exposethis equipmentto rain or
moisture.
Federal Communications Commission (FCC) Warning: Any unauthorized
changesor modificationsto thisequipmentvoid the user'sauthorityto operate it.
Laser Safety
Thisunit employsa laser.Only aqualifiedservicepersonshouldremovethe coveror
attemptto servicethis device,due to possibleeye injury.
CAUTION: USEOF CONTROLS ORADJUSTMENTSOR PERFORMANCEOF PRO-
CEDURESOTHERTHAN THOSE SPECIFIEDHEREIN MAY RESULTIN HAZ-
ARDOUS RADIATION EXPOSURE.
CAUTION:VISIBLE AND INVISIBLELASERRADIATION WHEN OPENAND INTER-
LOCK DEFEATED.DO NOT STAREINTO BEAM.THE BEAM ISLOCATED INSIDE,
NEARTHE DECK MECHANISM.
Special Information for Canadian Users
This ClassB digitalapparatuscomplies with CanadianICES-O03.
Cet appareil num_rique de la classeBest conforme _ lanorme NMB-003 du Canada.
Radfo/TV Interference
Thisequipmenthasbeentestedandfoundto complywith the limitsfor aClassB digi-
tal device,pursuantto Part 15of the FCC Rules.Theselimitsare designedto provide
reasonableprotectionagainstharmfulinterferencein a residential installation.This
equipmentgenerates,uses,andcanradiate radio frequencyenergyand,ifnot installed
and usedinaccordancewith the instructions,may causeharmfulinterferenceto radio
communications.However,there isnoguaranteethat interferencewillnot occurin a
particularinstallation.If thisequipmentdoescauseharmfulinterferenceto radio or
television reception,whichcanbe determined by turningthe equipmentoffandon,the
user isencouragedto try to correct theinterferencebyone or moreof the following
measures:
I) Reorientor relocatethe receivingantenna.
2) Increasethe separationbetweenthe equipmentandthe receiver.
3) Connect the equipmentintoanoutleton a circuitdifferentfrom that to which
the receiver isconnected.
4) Consult the dealer or anexperienced radio/TV technicianfor help.
Copyright Protection
Unauthorized copying,broadcasting,publicperformance andlendingof Discsare pro-
hibited.
This product incorporatescopyright protection technology that is protected by
method claims of certain U.S.patentsand other intellectual property rights owned by
Macrovision Corporation andother rightsowners.
Use of this copyright protection technology mustbe authorized by Macrovision
Corporation and isintended for home and other limited viewing usesonly unlessoth-
erwise authorized by Macrovision Corporation. Reverseengineeringor disassemblyis
prohibited.
.__ As an ENERGYSTAR®Part_er,PhilipsConsumer Electronics hasdetermined that this product
meets the ENERGYSTARe guidelinesfor energy efficiency.ENERGYSTAR®isa U.S.registered
mark.Using productswith the ENERGYSTARelabel can saveenergy.Savingenergy reduces air
pollution and lowers utility bills.
Manufactured under licensefrom Dolby Laboratories."Dolby" and the double-D symbolare trademarks
of Dolby Laboratories. Confidential UnpublishedWorks. (© 1992-1997 Dolby Laboratories,Inc. All rights
reserved.)
DTS is atrademark of DigitalTheater SystemsInc.in the United StatesofAmerica.
Copyright 2000 Philips Consumer Electronics.All rights reserved.
Page 4
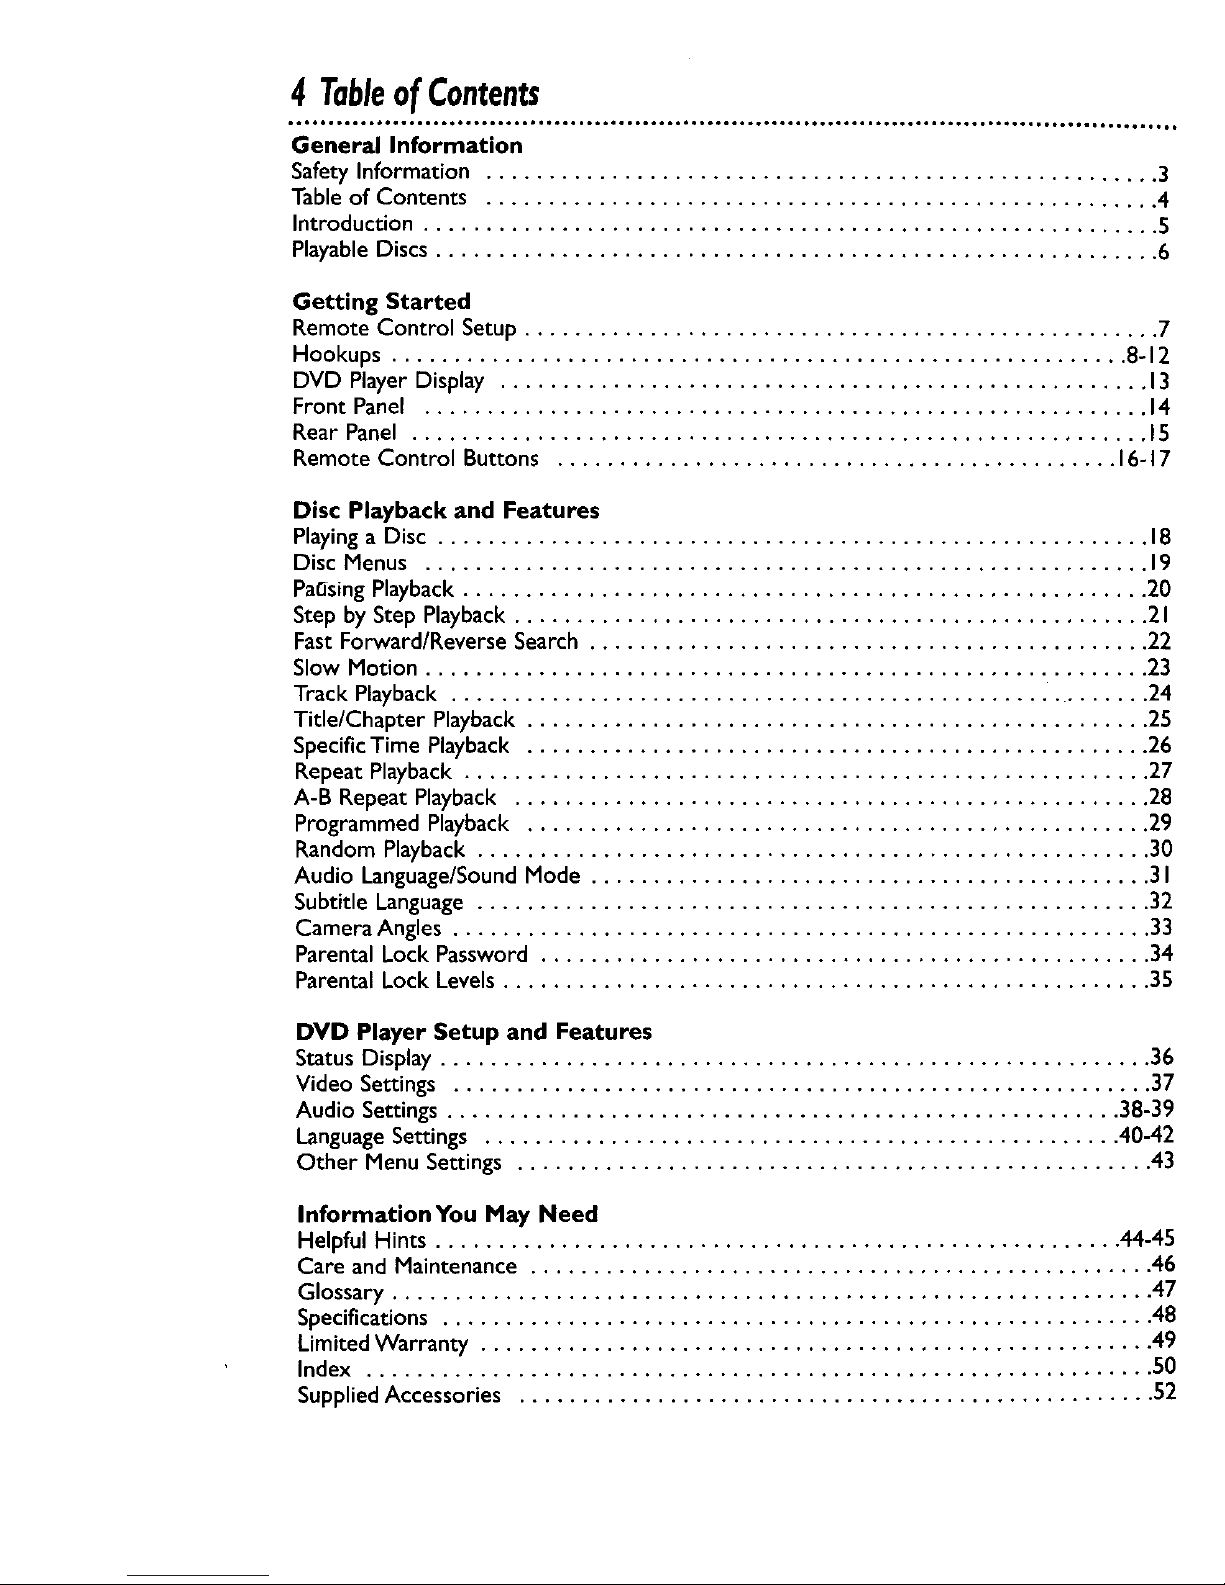
4 TableofContents
o*o,Qg leer ioogg oeQt io_g.oeo.tomt IoQo • to61g ooett iooll ooeto ittQo,I JJttQt_l • itooo_t • ootoo • tooQ_ • ,,,°,to • ,oQoo, • • o,
General Information
Safety Information ...................................................... 3
Table of Contents ...................................................... 4
Introduction ........................................................... S
Playable Discs .......................................................... 6
Getting Started
Remote Control Setup ................................................... 7
Hookups ........................................................... 8-12
DVD Player Display .................................................... 13
Front Panel .......................................................... 14
Rear Panel ........................................................... 15
Remote Control Buttons ............................................. 16-17
Disc Playback and Features
Playing a Disc ......................................................... 18
Disc Menus .......................................................... 19
PaC_singPlayback ....................................................... 20
Step by Step Playback ................................................... 21
Fast Forward/Reverse Search ............................................. 22
Slow Motion .......................................................... 23
Track Playback ........................................................ 24
Title/Chapter Playback .................................................. 25
Specific Time Playback .................................................. 26
Repeat Playback ....................................................... 27
A-B Repeat Playback ................................................... 28
Programmed Playback .................................................. 29
Random Playback ...................................................... 30
Audio Language/SoundMode ............................................. 31
Subtitle Language ...................................................... 32
Camera Angles ........................................................ 33
Parental Lock Password ................................................. 34
Parental Lock Levels .................................................... 35
DVD Player Setup and Features
Status Display ......................................................... 36
Video Settings ........................................................ 37
Audio Settings ...................................................... 38-39
Language Settings ................................................... 40-42
Other Menu Settings ................................................... 43
InformationYou May Need
Helpful Hints ....................................................... 44-45
Care and Maintenance .................................................. 46
Glossary ............................................................. 47
Specifications ......................................................... 48
Limited Warranty ...................................................... 49
Index ............................................................... 50
Supplied Accessories ................................................... 52
Page 5
Introduction5
Welcome!
This DigitalVideo Disc Playerwill allow youto enjoybetter picture quality,clearer
sound,and endlessplaybackfeaturesavailableon Digital Video Discs(DVDs).
Expandingtechnology allows youto addoptionsto your viewing- watcha direc-
tor's cut of a movie,listen to the producer'scomments,or playyour favorite scene
over and over again.Hear a movie in differentlanguages,or listenonlyto the
soundtrack.The possibilitiesare limited onlyby your choicesand the materialsavail-
able on the DVD.
Of course,you canlisten to your favorite Audio Compact Discson this DVD Player
aswell.Determine the order inwhichyou want to hearthe songs,or playthe Disc
repeatedly - allwhile seeingthe statusof the CD on your television.
We hopeyou enjoythis DVD Playerand learnto use all of its features.To get the
most out of the DVD Player,read this owner'smanualcarefully.It will describehow
you canaccessall the features listedbelow.
Features
• Audio Language/SoundMode Choices
•Automatic Detection of DiscType
(Audio CD or DVD)
• Do_oy Digital Sound
• DVD Menusin a Desired Language*
• On-Screen Displayfor DVD Player
• Parental Lock
• Paused/Fast/Slow/Step-by-StepPlayback
• Program Playback(Audio CD only)
• Random Playback(Audio CD only)
• ScreenSaver
• Selecting a CameraAngle *
• Subtitles in a Desired Language*
* If available on the Disc
When referring to this manual, remember...
[_ Indicatesthat the featuredescribed is availableon some DigitalVideo Discs.
IAUDIO (3D1Indicatesthat the feature described isavailableon someAudio Compact
JDiscs.
Disc Menus...
Someexplanationsinthismanualare intendedto describethe Disc Menus.These
menusare set by the movie producers or bythe music industry,and the menuswill
vary amongDiscs.Furthermore, not all Discs areguaranteed to havemenus.However,
if the Disc hasa menu,you can accessthe Disc Menubypressingthe MENU button
on the remote control,
DVD Player Menus...
Someinstructionsexplain how to usethe DVD Player'smenu to set upfeatures of
the DVD Playeror the Disc.Youget to the DVD PlayerMenu by pressingthe SETUP
buttonon the remote control when playbackisstopped.Evenif a feature isset up in
the DVD Player'smenu,it maynot be availableif the current Disc does not include
that feature.
_ Available Disc Features...
Not all of the featuresdescribedinthis manualmaybe availableon every
DVD or Audio CD.If the feature isnot availableon the Disc,you cannot
usethe DVD Playerto make these featuresavailable.The"No feature"
symbol will appearon the'IV screen if you try to set up a feature that is
not availableonthe current Discor not availableat the current time.
Page 6
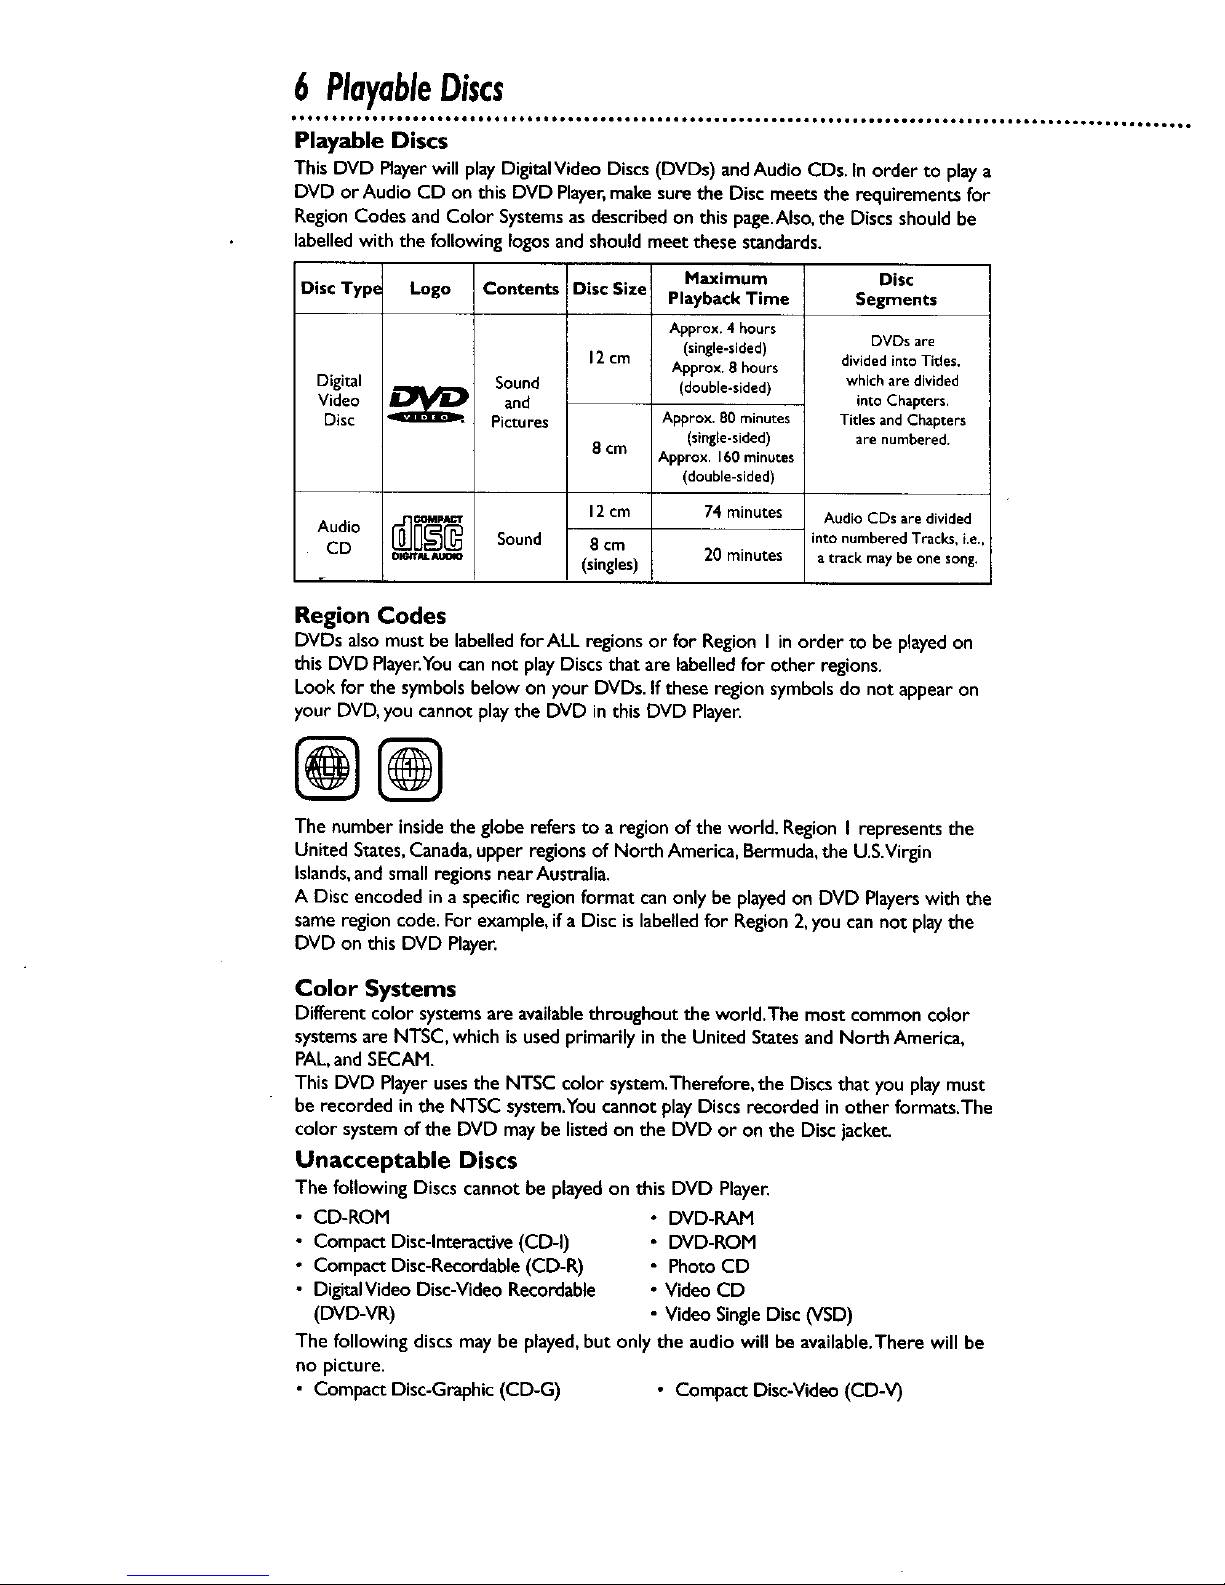
6 PlayableDiscs
Playable Discs
ThisDVD Playerwill playDigitalVideo Discs (DVDs) andAudio CDs. In order to playa
DVD or Audio CD on this DVD Player,make surethe Disc meetsthe requirements for
RegionCodes and Color Systemsasdescribedon this page.Also,the Discsshould be
labelledwith the following Iogosand should meet thesestandards.
Disc Type Logo
DISTAL AUmO
Contents
Sound
and
Pictures
Sound
Disc Size
12crn
8 ¢m
12cm
8 cm
(singles)
Digital
Video
Disc
Audio
CD
Maximum
Playback Time
Approx. 4 hours
(single-sided)
Approx. 8 hours
(double-sided)
Approx. 80 minutes
(single-sided)
Approx. 160minutes
(double-sided)
74minutes
20minutes
Disc
Segments
DVDs are
dividedinto Titles,
whichare divided
intoChapters.
Titles andChapters
are numbered.
Audio CDs are divided
into numbered Tracks, i.e.,
a track may be one song.
Region Codes
DVDs alsomust be labelledforALL regionsor for Region I inorder to be playedon
this DVD Player.Youcan not playDiscsthat arelabelledfor other regions.
Lookfor the symbols belowon your DVDs. If these region symbolsdo not appearon
your DVD,you cannot playthe DVD in this DVD Player.
@@
The number insidethe globe refers to a region ofthe world. Region I representsthe
United States,Canada,upper regionsof North America,Bermuda,the U.S.Virgin
Islands,and small regionsnearAustralia.
A Disc encoded in a specific region format canonly be playedon DVD Playerswith the
sameregion code.For example,if a Disc islabelledfor Region 2,you can not playthe
DVD on this DVD Player.
Color Systems
Different color systemsare availablethroughout the world.The most commoncolor
systemsare NTSC,which is usedprimarily in the United Statesand North America,
PAL,andSECAM.
This DVD Playerusesthe NTSC color system.Therefore, the Discsthat you play must
berecorded inthe NTSC system.Youcannot playDiscs recorded in other formats.The
color systemof the DVD maybe listed on the DVD or on the Disc jacke_
Unacceptable Discs
The followingDiscs cannot be playedonthis DVD Player.
• CD-ROM
• Compact Disc-Interactive(CD-I)
• Compact Disc-Recordable(CD-R)
• DigitaIVideo Disc-VideoRecordable
(DVD-VR)
• DVD-RAM
• DVD-ROM
• Photo CD
• Video CD
• Video Single Disc (VSD)
The following discs may be played,but onlythe audiowill be available.There will be
no picture.
• Compact Disc-Graphic (CD-G) • Compact Disc-Video (CD-V)
Page 7
RemoteControlSetup7
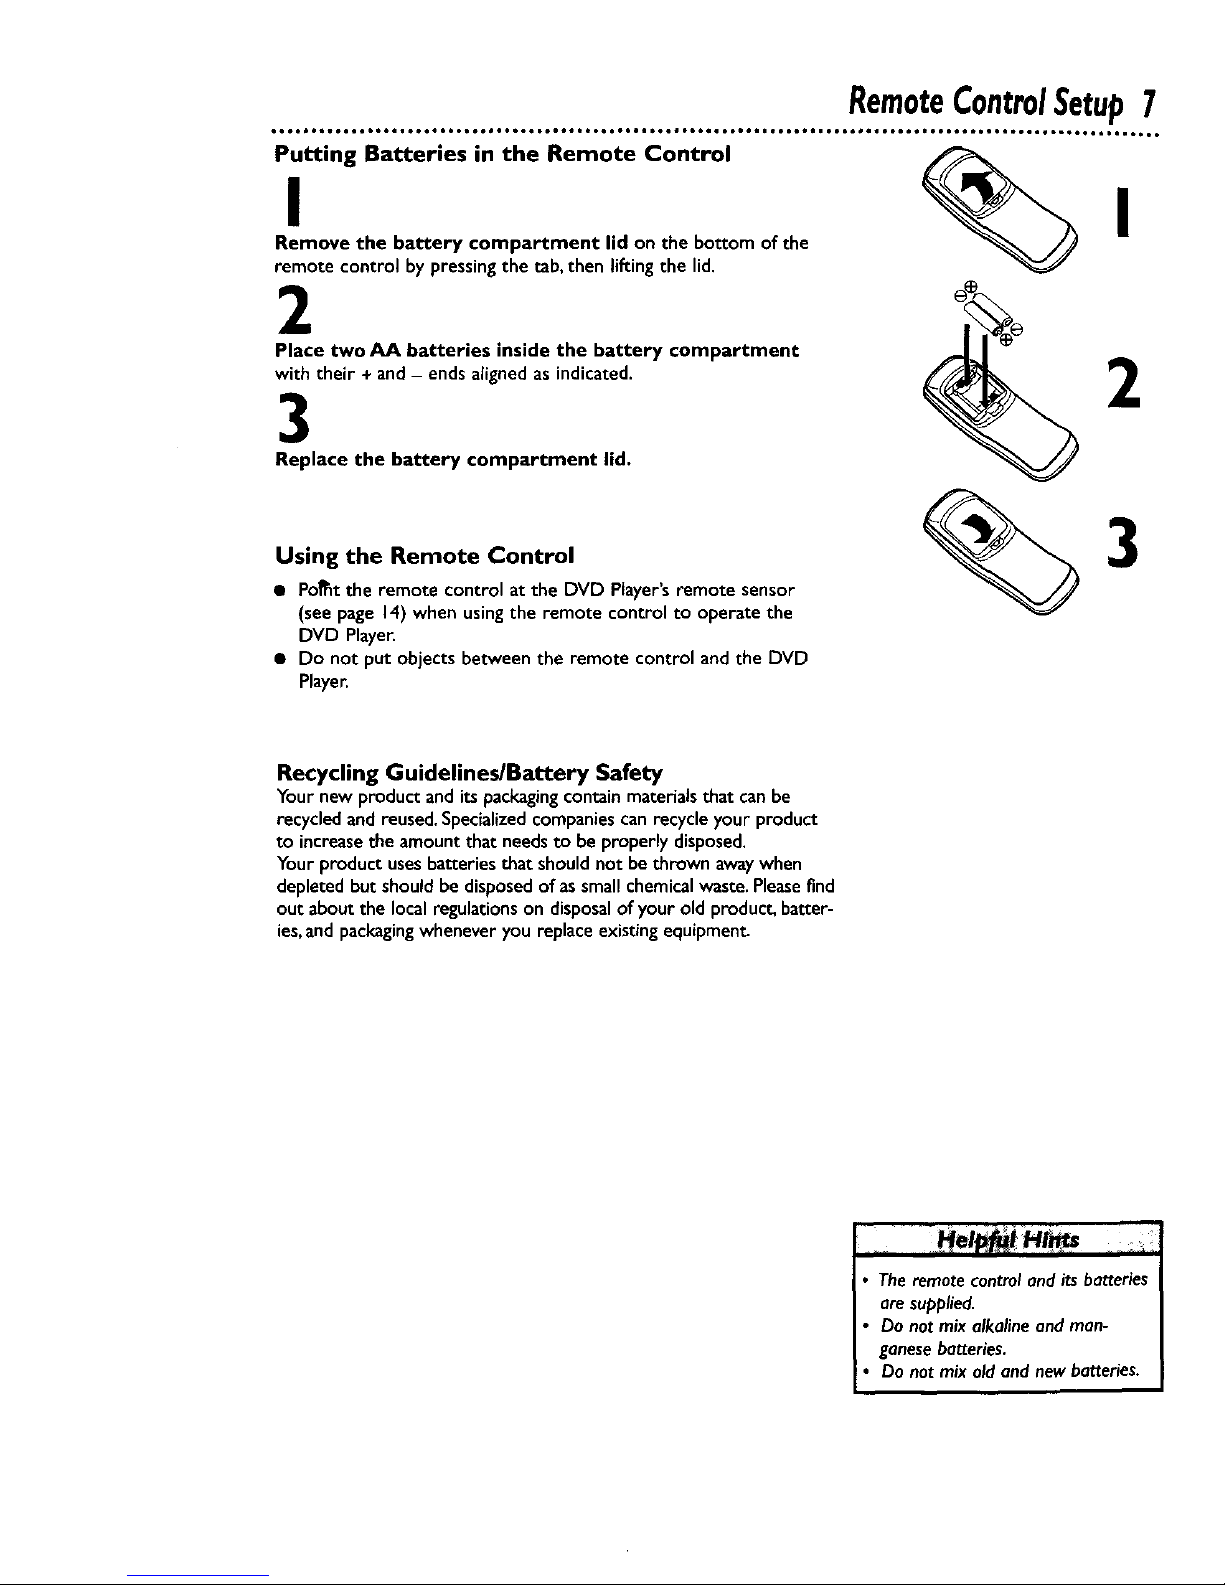
Puttingl Batteries in the Remote Control __ I
Remove the battery compartment lid on the bottom of the
remote control by pressingthe tab,then liftingthe lid.
2
Place two AA batteries inside the battery compartment
with their + and - ends aligned as indicated.
3
Replace the battery compartment lid.
Using the Remote Control
• PoRt the remote control at the DVD Player'sremote sensor
(see page 14) when usingthe remote control to operate the
DVD Player.
• Do not put objects between the remote control and the DVD
Player.
3
Recycling Guidelines/Battery Safety
Yournew productand itspackagingcontain materialsthat canbe
recycled and reused.Specializedcompaniescanrecycle your product
to increasetheamount that needsto be properly disposed.
Your product usesbatteries that shouldnot be thrown awaywhen
depleted but should be disposedof assmall chemicalwaste.Pleasefind
out about the local regulationson disposalof your old product, batter-
ies,and packagingwhenever you replace existing equipment
• Theremotecontroland its batteries
are supplied.
Do not mix alkalineand man-
ganesebatteries.
Do not mix old and newbatteries.
Page 8
8 Hookups
• • ootl idol, otQ• ,t6• ,,•••oo•, ,,Do • ,1•• • ••, • ,61 • °1• • •,tt • ,°1• • • ,,oo1, •o••_ • ,,o°, • ••too• •°1_ • ,°•_, •,°1_, •,,,•,••6
You may connectthe DVD Playerseveraldifferent ways,dependingon your existingequipmentandyour prefer-
encesfor soundand picture quality.Todetermine which hookup is best for you, examinethe options on the fol-
lowing pages,then seewhich best matchesyour situation. Before you hook up the DVD Player,remember:
• Connect the DVD Playerdirectly to aTV Ifyou connect the DVD Playerto aVCR,then connect theVCR to
the'r_, the picture may be distorted by the copyright protection system.
• Turn off the power of allequipment before makinganyconnections.
• Referto the owner's manualsof your other equipment for additional information.
• Depending on your connection,you mayneedto purchaseadditionalcables.
• If you do not connect the DVD Playerto a Dolby Digital or DTS Decoder,set DOLBY DIGITAL and DTS to
OFF on the DVD Player.Detailsareon pagesI I and38-39. If you playa DVD when the settingsare wrong,
the soundwill be distorted or you maydamagethe speakers.
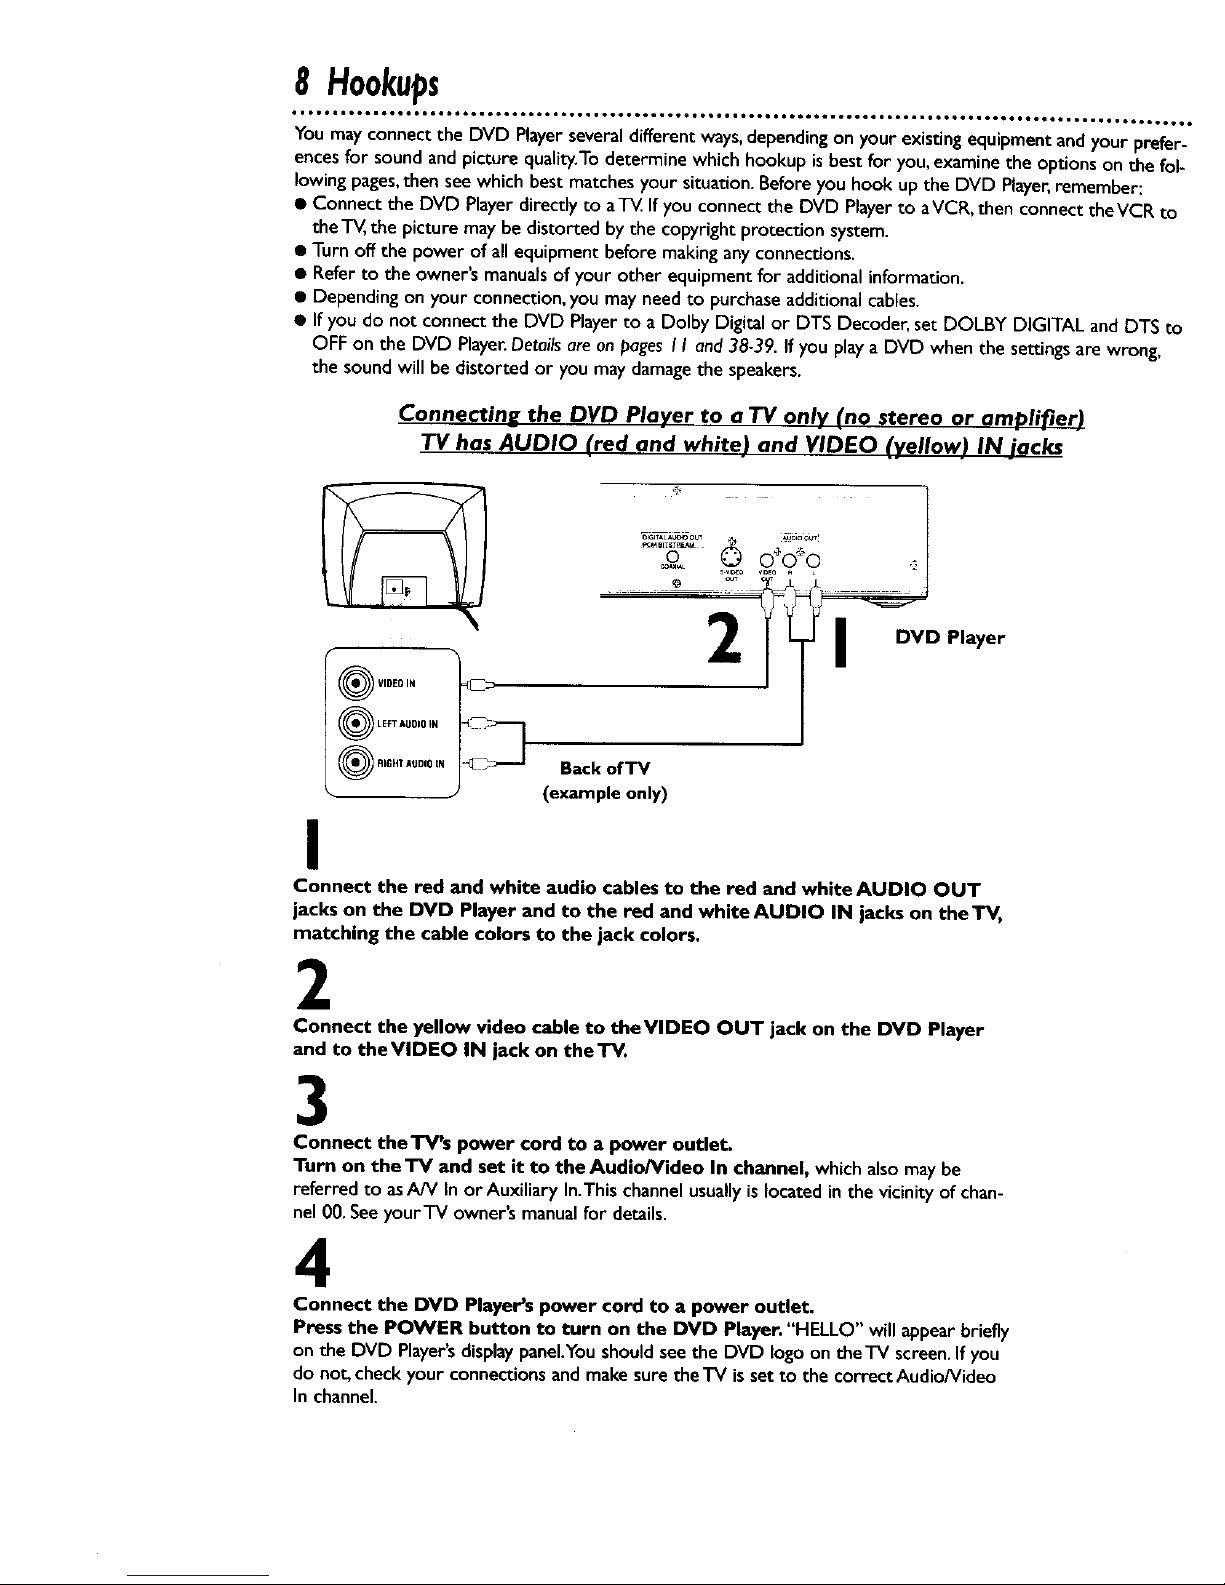
Connecting the DVD Player to a TV only (no stereo or amplifier)
TV has AUDIO (red and white) and VIDEO (yellow) IN jack_
2
OV,0ED,.
O LEFT AUDIO FN
O AIOHTAUDI0'N _ Back of TV
• (example only)
er
I
Connect the red and white audio cables to the red and white AUDIO OUT
jacks on the DVD Player and to the red and white AUDIO IN jacks on theTV,
matching the cable colors to the jack colors.
2
Connect the yellow video cable to theVIDEO OUT jack on the DVD Player
and to theVIDEO IN jack on theTV.
3
Connect theTV's power cord to a power outlet.
Turn on the'IV and set it to the Audio/Video In channel, whichalsomay be
referred to asAN In or Auxiliary In.Thischannelusuallyislocatedin the vicinity ofchan-
nel 00.Seeyour'iV owner'smanualfor details.
4
Connect the DVD Player's power cord to a power outlet,
Press the POWER button to turn on the DVD Player. "HELLO" will appear briefly
on the DVD Player's displaypanel.You should see the DVD logo on the'iV screen. If you
do not, check your connections and make sure the TV is set to the correct Audio/Video
In channel.
Page 9

Hookups(cont'd)9
too ,o,oo • ,60 toQo ,,61 • o,tl ,ooo ,,,ig ,,,o,, o,ooll oeeo.loeo* Qleeol po,o_oo,,oogg ,,6oeeooto,ee,i, • • ,,tQol_l • ,o,o,tf_Q
Connectine the DVD Player to a "IV on_ (no stereo or amplifier)
TV has audio (red and white) and S-Video In jacks
• For better picture quality,useanoptionalS-Videocableto connectthe S-VIDEO OUT jackon the DVD
Playerto the S-VIDEO IN jack on yourT_.You will not usetheVIDEO OUT jack on the DVD Player,andyou
will not needthe yellow video cable.
• Set DOLBY DIGITAL and DTS to OFF on the DVD Player.Detailsareonpages38-39.If youplaya DVD
when the settingsare wrong, the sound will be distorted or you maydamagethe speakers.
Q S-VIDEO IN
(_ LEFTAUDIOIN
0 R;GHTAUDIOIN
Back of'IV
(example only)
DVD Player
H
_T oJr _
I
Connect the red and white audio cables to the red and whiteAUDIO
OUT jacks on the DVD Player and to the red and white AUDIO IN jacks
on theTV, matching the cable colors to the jack colors.
2
Connect an S-Video cable (not supplied) to the S-VIDEO OUT jack on
the DVD Player and to the S-VIDEO IN jack on theTV.
3
Connect theTV's power cord to a power outlet.
Turn on theTV and set it to the S-VIDEO IN channel.This channel usually is
located near channel 00. See your'IV owner's manual for details.
4
Connect the DVD Player's power cord to a power outlet.
Press the POWER button to turn on the DVD Player. "HELLO" will appear
briefly on the DVD Player'sdisplaypanel.Youshouldsee the DVD logo on the'IV
screen.If you do not, check your connections andmake sure the "IV is on the cor-
rect Audio/Video In channel.
Page 10
I0 Hookups(cont'd)
°t'II°t°°I°e°°tetite°i°6ii°6°lj_tgq°°Q°e°eQi_°°°_i°6oIIIOOQog_Oee_iii_e_ee_tO6aiIIoot66oQ_'_tmto ° 6.o. ° •
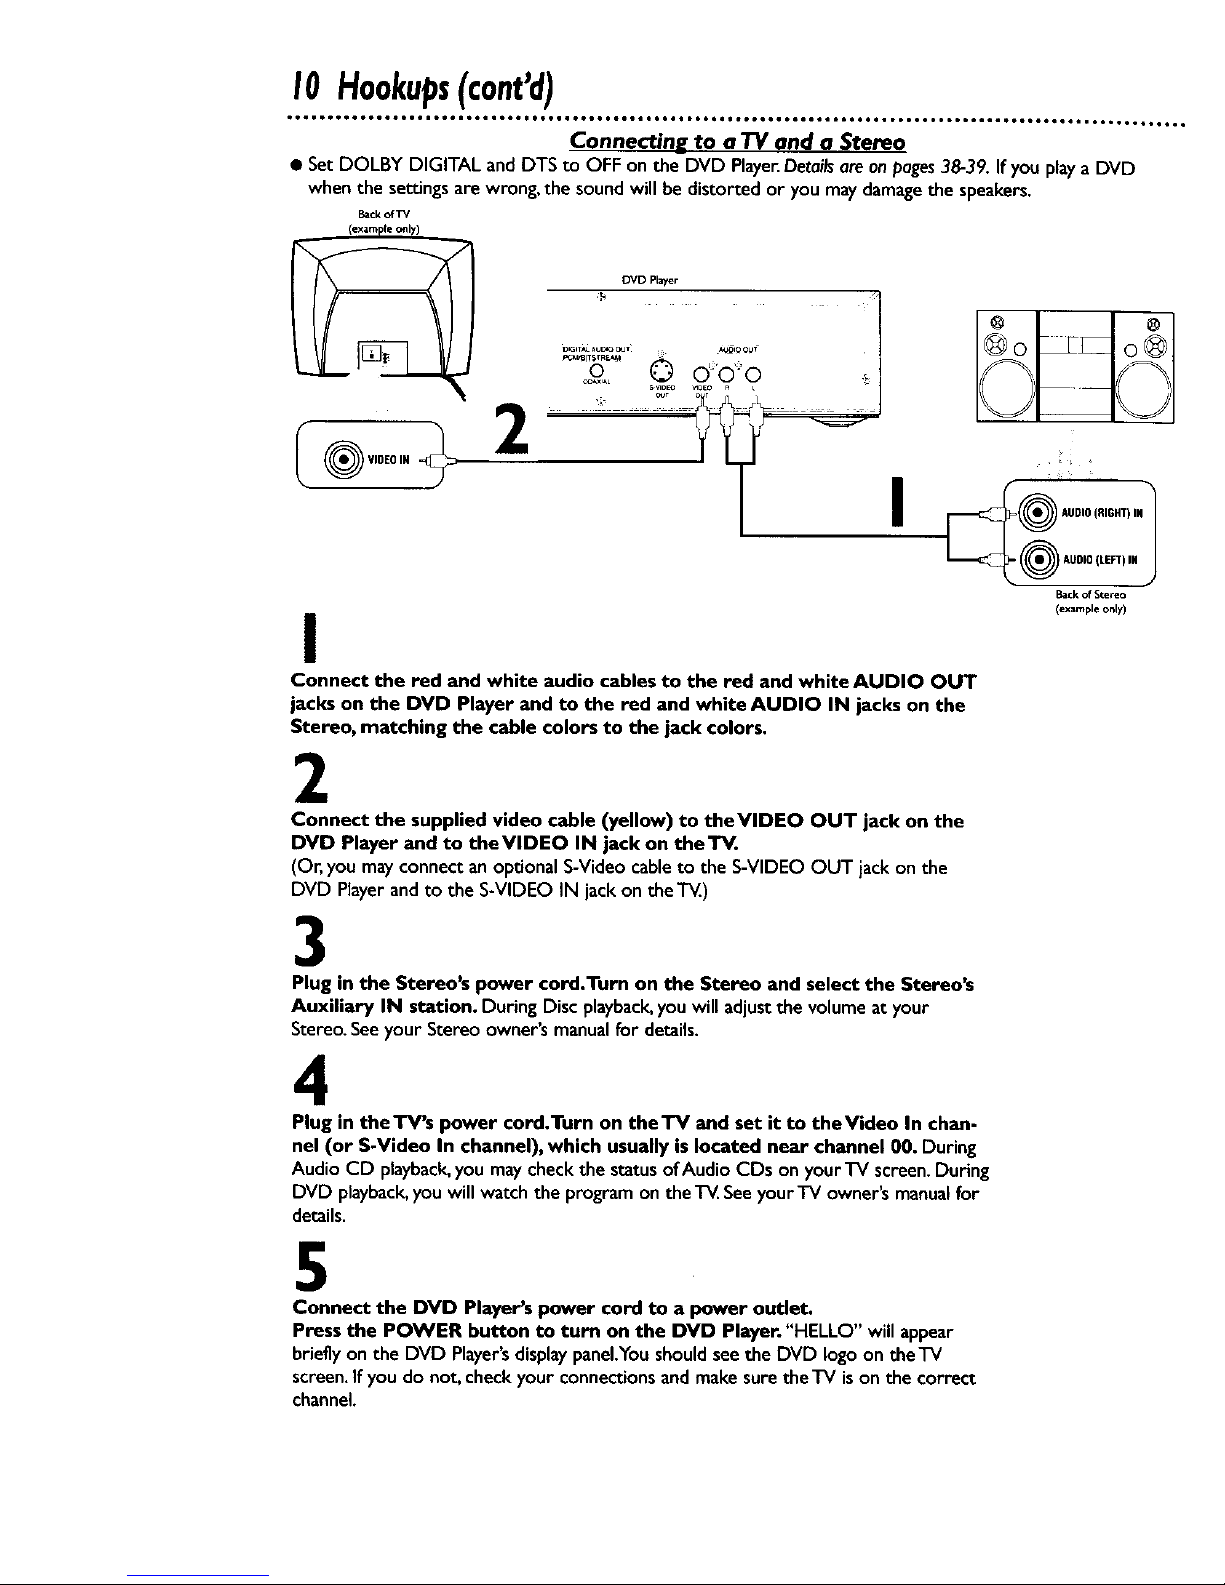
Connectin_g to a TV and a Stereo
• Set DOLBY DIGITAL and DTS to OFF on the DVD PlayerDetailsareon/)ages38-39. Ifyou playa DVD
whenthe secrJngsare wrong, the soundwillbe distorted or youmaydamagethe speakers.
Back of TV
I
I
1
j
Back of Stereo
(example only)
Connect the red and white audio cables to the red and white AUDIO OUT
jacks on the DVD Player and to the red and white AUDIO IN jacks on the
Stereo, matching the cable colors to the jack colors,
2
Connect the supplied video cable (yellow) to theVIDEO OUT jack on the
DVD Player and to theVIDEO IN jack on theTV.
(Or,you mayconnect an optionalS-Video cableto the S-VIDEO OUT jack on the
DVD Playerand to the S-VIDEO IN jack on the'i_..)
3
Plug in the Stereo's power cord.Turn on the Stereo and select the Stereo_
Auxiliary IN station. During Disc playback,you will adjust the volume at your
Stereo. See your Stereo owner's manual for details.
4
Plug in theTV's power cord,Turn on theTV and set it to theVideo In chan-
nel (or S-Video In channel), which usually islocated near channel 00. During
Audio CD playback,youmaycheckthe statusof Audio CDs on yourTV screen.During
DVD playback,youwill watchthe programontheT_. Seeyour-IV owner'smanualfor
details.
5
Connect the DVD Player's power cord to a power outlet.
Press the POWER button to turn on the DVD Player. "HELLO" will appear
briefly on the DVD Player's displaypanel.You should see the DVD logo on theTV
screen. If you do not. check your connections and make sure the TV is on the correct
channel.
Page 11
Hookups(cont'd)II
oQoo to,o • leo,i _D_Qll O,6a119QQO ,060at IOeO_ tO°J IOeel. OOQOOI • OOO0_ • _6_0,0 ,,°tOI • _06tO0 Or061 ,,Qt _lt_l • • 6trOD • • • lOrD
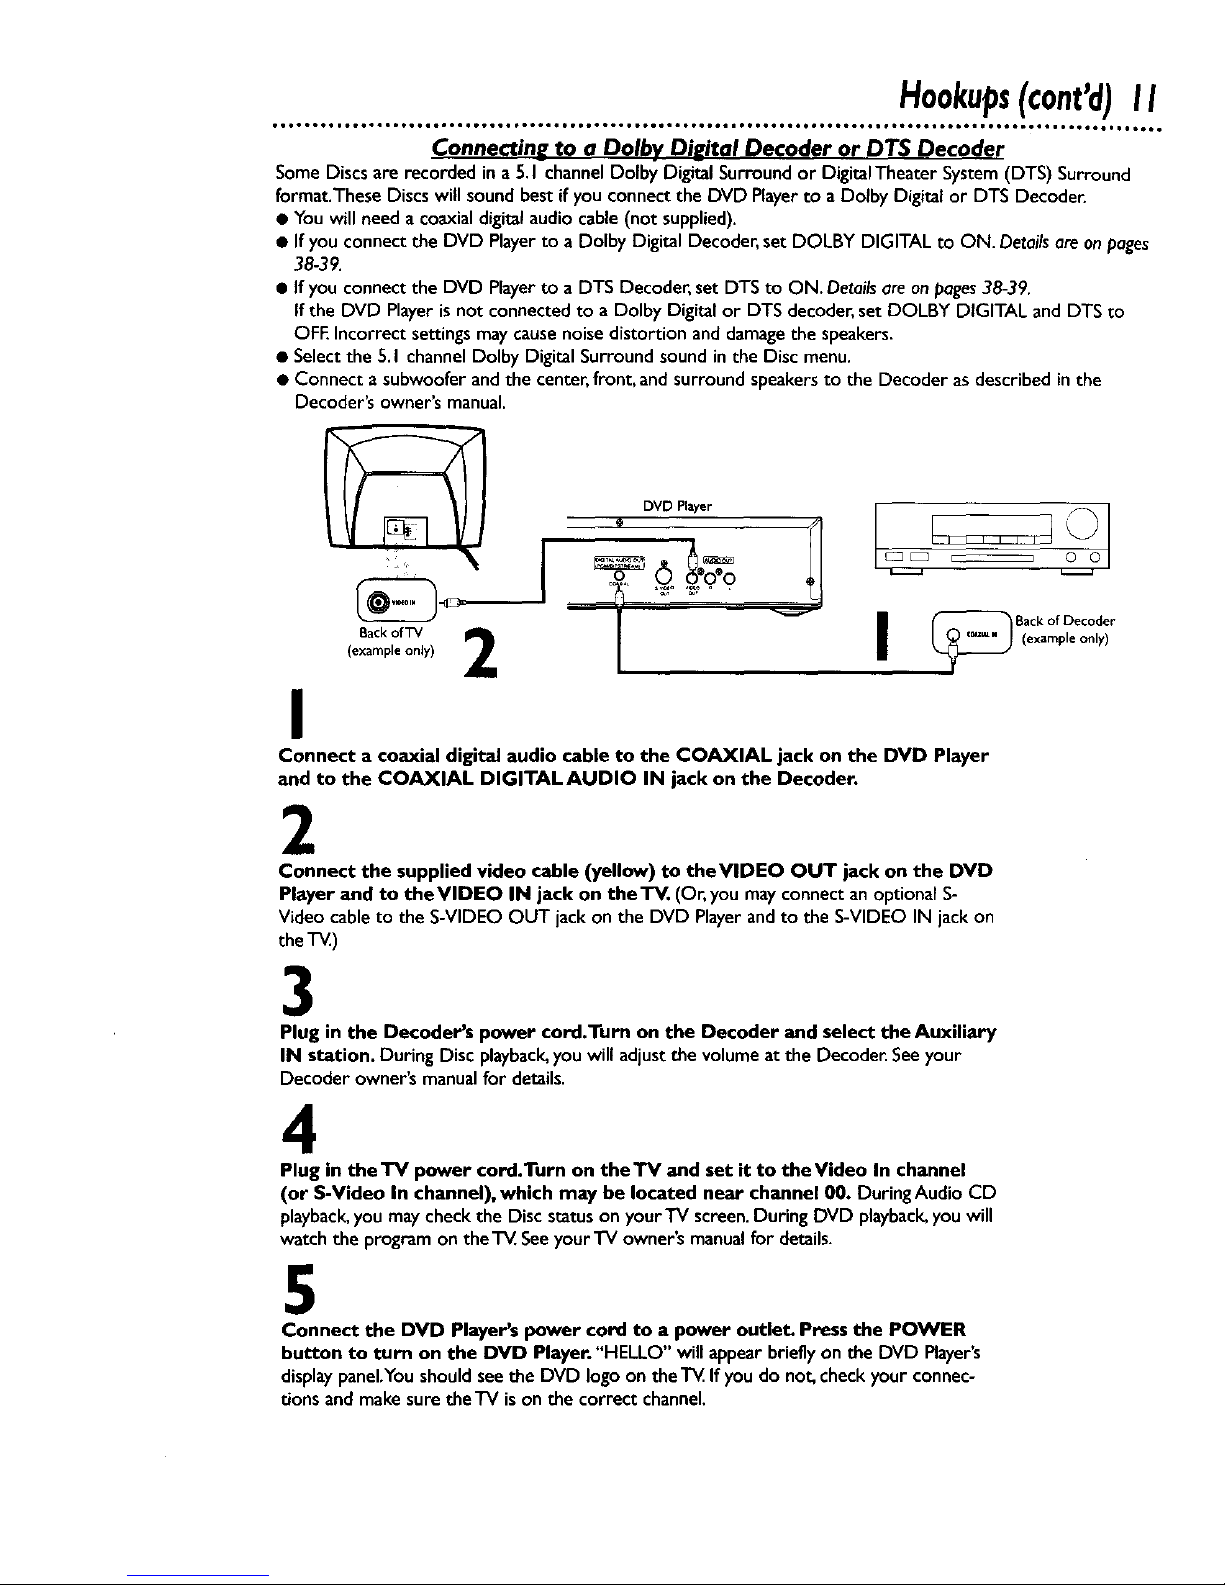
Connectin_ to a Dolbv Diuital Decoder or DTS Decoder
SomeDiscsare recorded ina 5.1channelDolby DigitalSurround or DigitalTheater System(DTS) Surround
format.These Discs willsound bestifyou connectthe DVD Playerto a Dolby Digital or DTS Decoder.
• Youwill needa coaxialdigitalaudiocable(notsupplied).
• If you connectthe DVD Playerto a Dolby Digital Decoder,set DOLBY DIGITAL to ON. Detailsereonpages
38-39.
• If you connectthe DVD Playerto a DTS Decoder,setDTS to ON. Detailsare onpages38-39.
Ifthe DVD Playeris not connectedto a Dolby Digital or DTS decoder,set DOLBY DIGITAL and DTS to
OFEIncorrectsettingsmaycausenoisedistortion anddamagethe speakers.
• Selectthe 5.1 channelDolby Digital Surround soundinthe Disc menu.
• Connect a subwoofer andthe center,front,and surroundspeakersto the Decoder as describedinthe
Decoder's owner's manual.
DVD Player
Back of TV 2 I
(example onJy)
I
© o
I
Connect a coaxial digital audio cable to the COAXIAL jack on the DVD Player
and to the COAXIAL DIGITALAUDIO IN jack on the Decoder.
2
Connect the supplied video cable (yellow) to theVIOEO OUT jack on the DVD
Player and to theVlDEO IN jack on theTV. (Or, youmay connect anoptional S-
Video cable to the S-VIDEO OUT jack on the DVD Playerandto the S-VIDEO IN jack on
the"1_.)
3
Plug in the Decoder's power cord.Turn on the Decoder and select the Auxiliary
IN station. During Disc playback,you will adjustthe volumeatthe Decoder.Seeyour
Decoder owner'smanualfor details.
4
Plug in thel"V power cord.Turn on theTV and set it to theVideo In channel
(or S-Video In channel), which may be located near channel 00. DuringAudio CD
playback,youmaycheckthe Disc statuson yourTV screen.During DVD playback,youwill
watch the program on the'r_. Seeyour'rV owner's manualfor details.
5
Connect the DVD Player's power cord to a power outlet. Pressthe POWER
button to turn on the DVD Player. "HELLO" willappearbrieflyon the DVD Player's
displaypanel.Youshouldseethe DVD logoon theT_ If youdo not, checkyourconnec-
tions andmake suretheTV ison the correct channel.
Page 12
12Hookups(cont'd)
ool to,Q.ooeot *oo61g ioeQ, ot6ool tB_tQ_ • _eeo. O_to • OeeOt_tO_OQO OteOOl, OOeeO_ • O,OQOO OtO6O_ J,,,_ _,6OJ OtOO_ • Ot6_OQO*I_
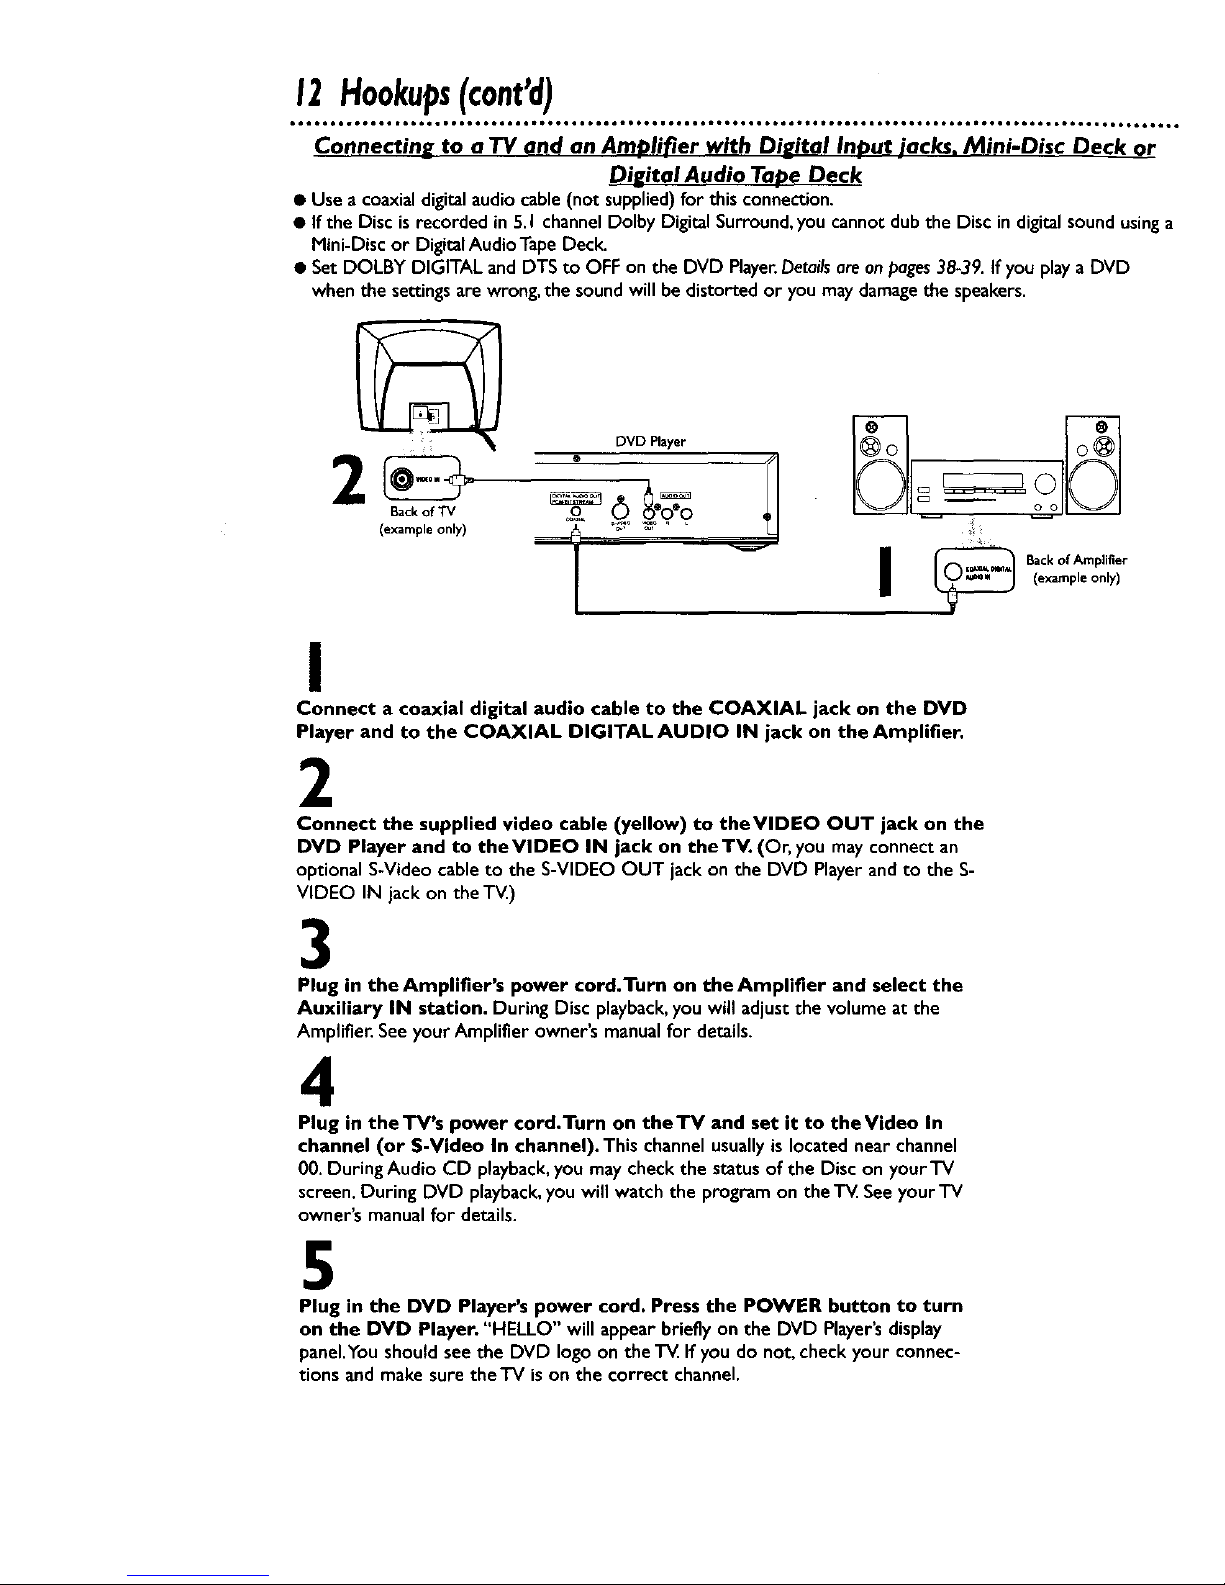
Connecting to a TV and an AmPlifier with Digital In._ut jacks. Mini-Disc Deck or
Digital Audio Ta_e Deck
• Use a coaxialdigitalaudiocable(not supplied)for this connection.
• If the Disc isrecorded in 5.1 channelDolby Digital Surround,you cannot dub the Disc in digitalsound usinga
Mini-Disc or Digital Audio Tape Deck.
• Set DOLBY DIGITAL and DTS to OFF on the DVD Player.Detailsareonpages38-39. If you playa DVD
when the settingsare wrong,the soundwill be distorted or you may damagethe speakers.
Back of TV
(example only)
_9. 0 _'o'o _,1 --
LJ
4
Backof Amplifier
(example only)
I
Connect a coaxial digital audio cable to the COAXIAL jack on the DVD
Player and to the COAXIAL DIGITAL AUDIO IN jack on the Amplifier.
2
Connect the supplied video cable (yellow) to theVIDEO OUT jack on the
DVD Player and to the VIDEO IN jack on the TV. (Or, you mayconnectan
optionalS-Video cable to the S-VIDEO OUT jack on the DVD Playerandto the S-
VIDEO IN jackon theT_)
3
Plug in the Amplifier's power cord.Turn on the Amplifier and select the
Auxiliary IN station. During Disc playback,you will adjustthe volumeat the
Amplifier. SeeyourAmplifier owner'smanual for details.
4
Plug in the TV's power cord.Turn on theTV and set it to theVideo In
channel (or S-Video In channel). Thischannelusually is locatednear channel
00. During Audio CD playback,you maycheck the status of the Disc on your'IV
screen.During DVD playback,you will watch the programonthe T_ Seeyour'iV
owner'smanualfor details.
5
Plug in the DVD Player's power cord. Press the POWER button to turn
on the DVD Player. "HELLO" will appear brieflyon the DVD Player'sdisplay
panel.Youshould see the DVD logoon the T_ Ifyou do not, checkyour connec-
tions and make surethe'IV ison the correct channel.
Page 13
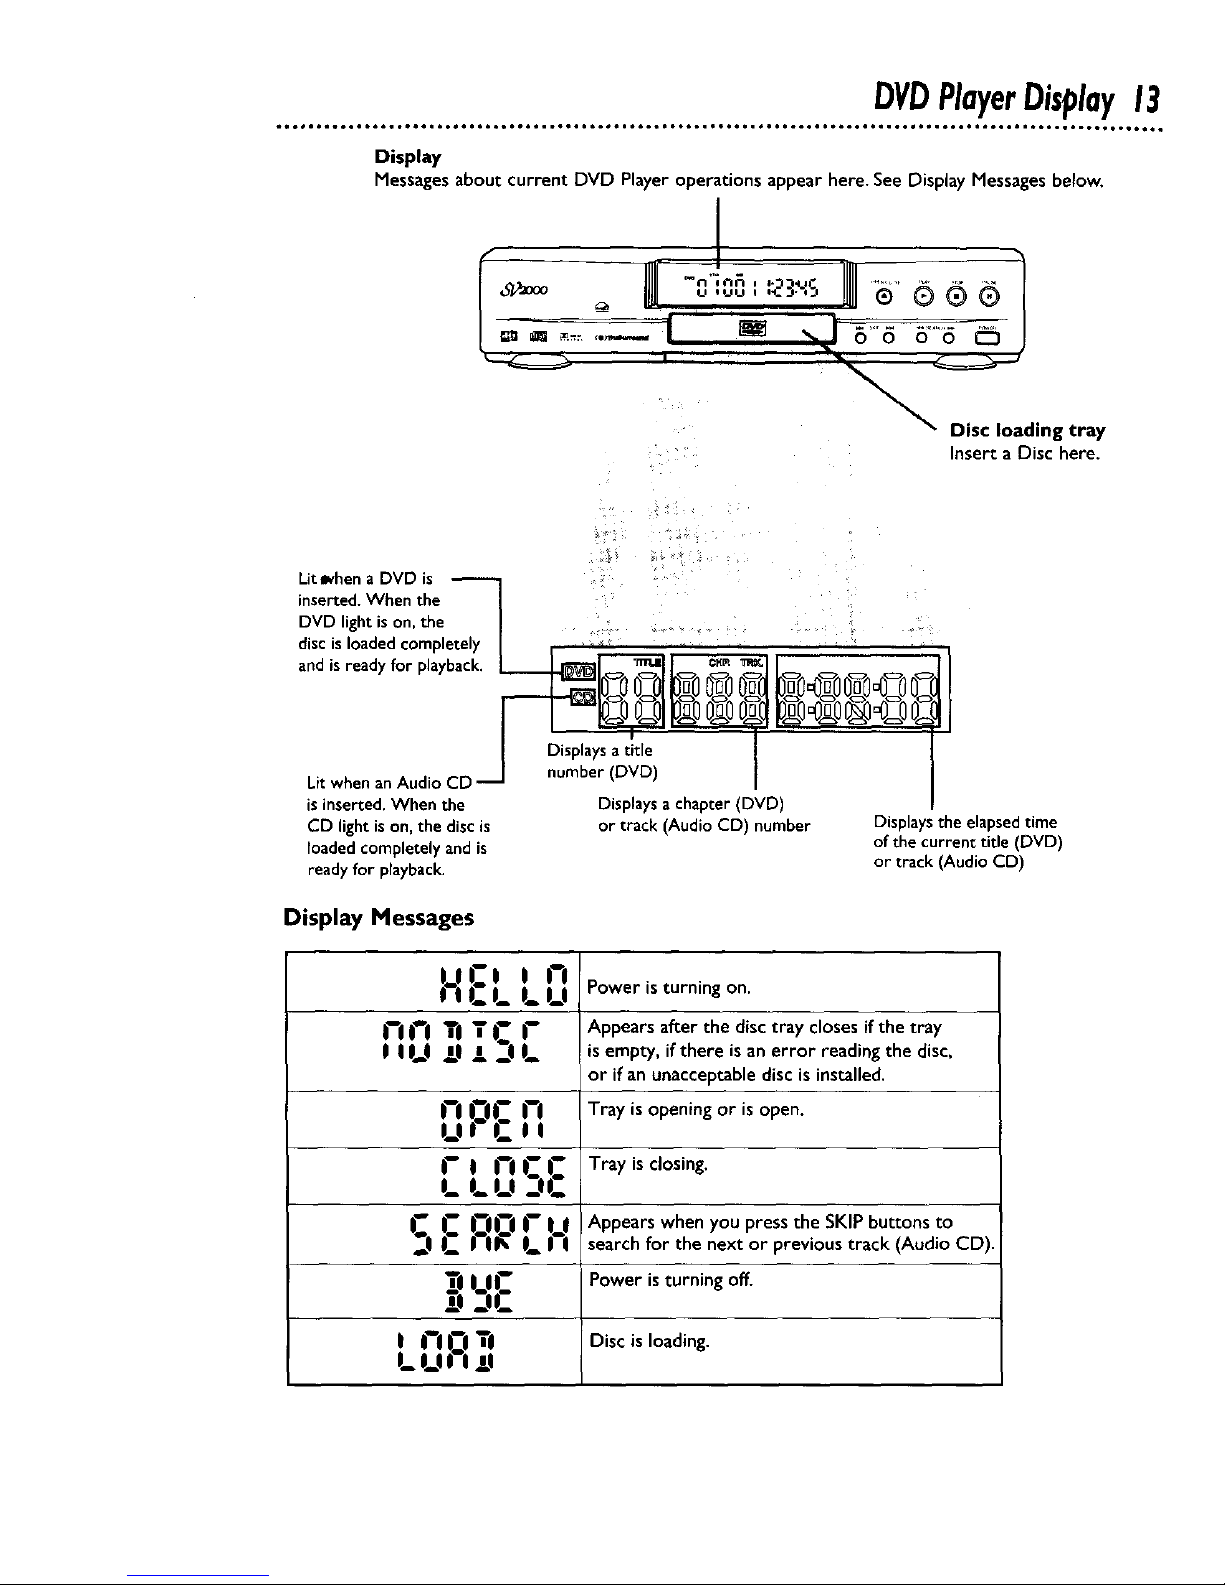
DVDPlayerDisplay13
Display
Messages about current DVD Player operations appear here. See Display Messages below.
I
o_ooo _ _ ,v,_, ,_3.,. o ® ® ®
Disc loading tray
Inserta Disc here.
Lit _hen a DVD is
inserted. When the |
DVD light ison, the |
discis loaded completely I ' '
and isready for playbacl_. | _1 _mAIJ _ _1 /
I cr_!_y_atitme
Litwhen an Audio CD -'_ number (DVD)
is inserted. When the Displays achapter (DVD)
CD light is on, the disc is or track (Audio CD) number Displays the elapsed time
loaded completely and is of the current title (DVD)
ready for playback, or track (Audio CD)
Display Messages
! I I_-.I_ l_ U Power is turning on.
I--ii°'l Ti "{I.-- l-- Appears after the disc tray closes if the tray
| | 1..1 !| _l _1 1_ fs empty, ifthere isan error reading the disc,
or if an unacceptable disc is installed.
1--1I_1C |--I Tray is opening or isopen.
U| L-|O
l--I l--OC !_ Tray is closing.
I_ I_ U _l|_-
I_-- C .I.'_.IC|I" |_1 Appears when you press the SKIP buttons to
1_! |1_ 1_ I ! search for the next or previous track (Audio CD).
_i l.l|_-- Power isturning off.
_,1_of_-
| 1"1|_--|"{1 Disc is loading.
m_U *'l _,I
Page 14
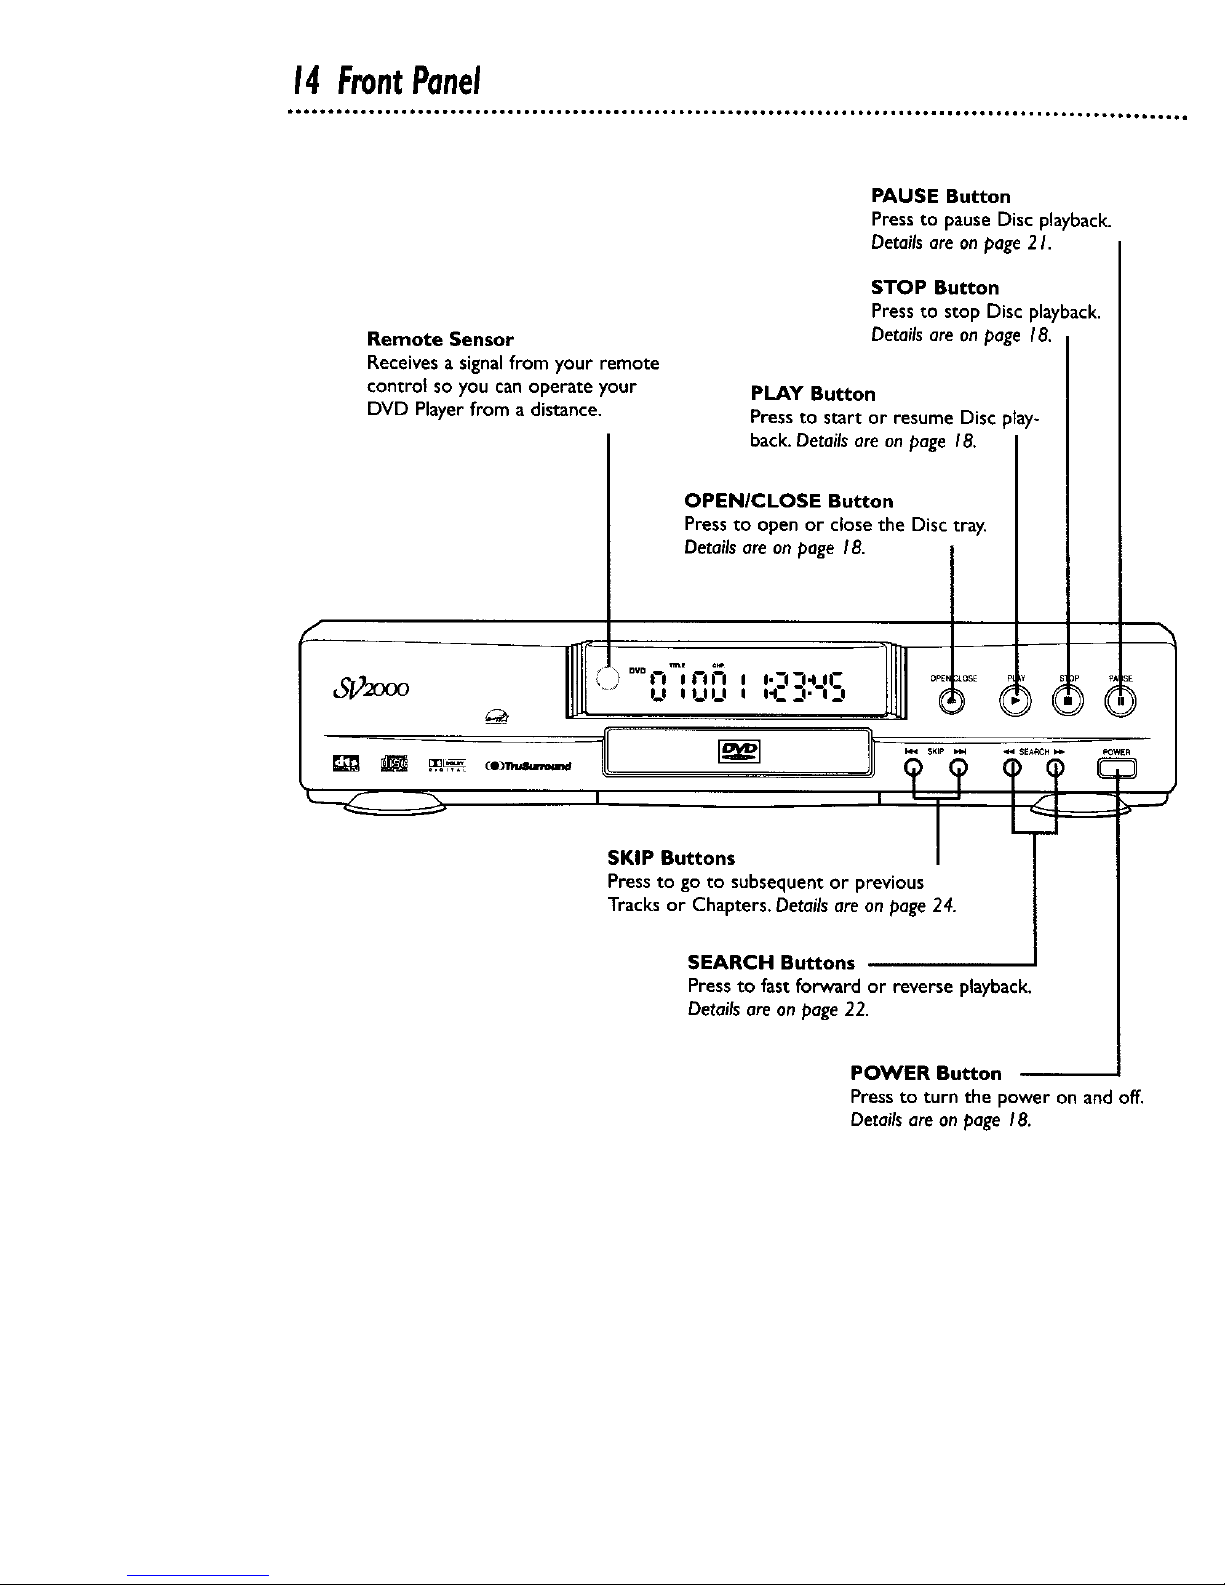
14FrontPanel
f
Remote Sensor
Receivesa signalfrom your remote
controt so you canoperate your
DVD Player from adistance.
PAUSE Button
Press to pause Disc playback.
Details are on page 2 h
CO3_
STOP Button
Pressto stop Disc playback.
Detailsare on page 18.
OPENICLOSE Button
Pressto openor closethe Disc tray.
Detailsare on page 18.
°v°|--I II"l_'l I I'--i--1411-- OPE._OSE _ _E
,_,,,_,,_,,.::,.-,:, }
SKIP Buttons
Press to go to subsequentor previous
Tracks or Chapters. Detailsare on page24.
SEARCH Buttons
Pressto fastforward or reverse playback.
Detailsare on page22.
POWER Button
Pressto turn the power on andoff.
Detailsare on page 18.
PLAY Button
Pressto start or resume Disc play-
back.Detailsare onpage 18.
Page 15
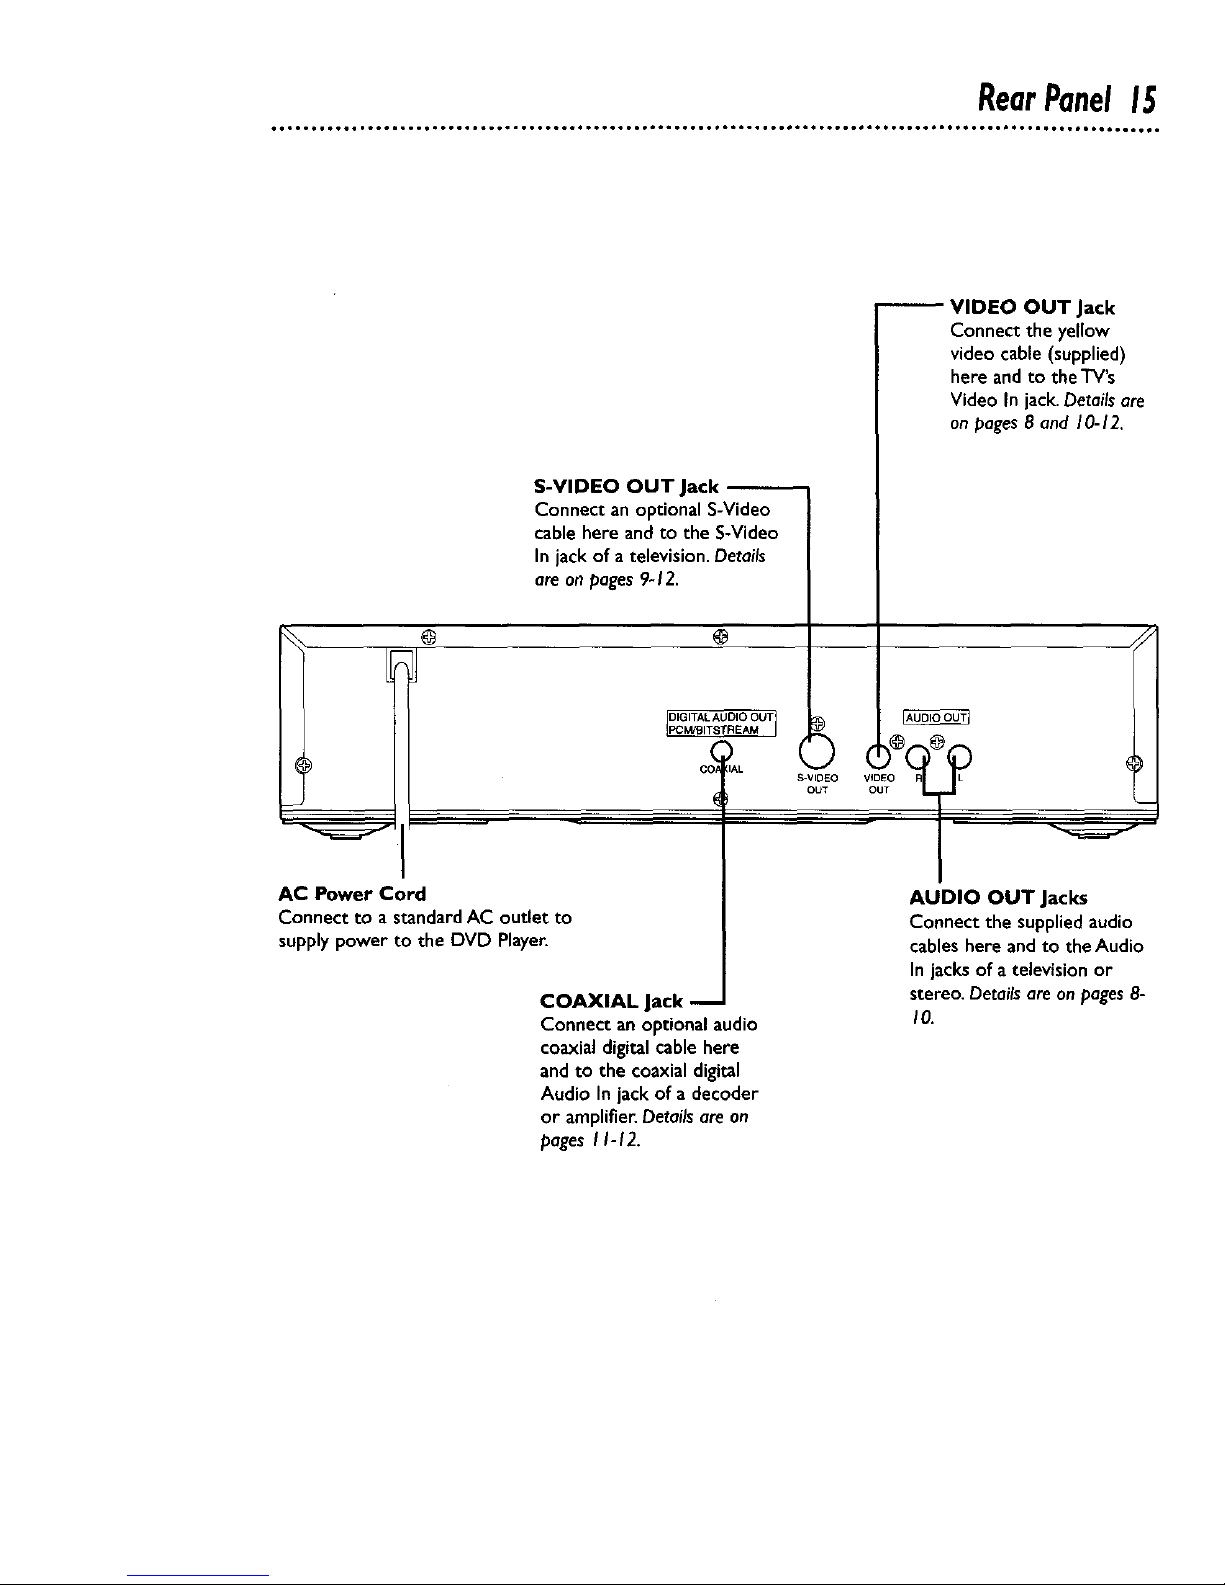
RearPanel15
S-VIDEO OUT Jack
Connect an optionalS-Video
cablehere and to the S-Video
In jack of a television. Details
are on pages9-12.
@
H
@
DIGITAL AUDIO OUT
AC Power Cord
Connect to a standardAC outlet to
supplypower to the DVD Player.
COAXIAL Jack
Connect an optionalaudio
coaxialdigitalcable here
andto the coaxialdigital
Audio In jackof a decoder
or amplifier.Detailsareon
pagesI 1-12.
VIDEO OUT Jack
Connect the yellow
videocable (supplied)
here andto the TV's
Video In jack.Detailsare
on pages8 and 10-12.
AUDIO OUT Jacks
Connect the suppliedaudio
cableshereand to the Audio
In jacks of a televisionor
stereo.Detailsare onpages8-
I0.
Page 16
16RemoteControlButtons
MENU Button
Pressto displaythe menu of the Disc.Detailsare onpages5 and 19.
POWER Button
Pressto turn the power on andoff."HELLO" appears
briefly on the display panel as the DVD Playerturns
on."BYE" appears briefly asthe DVD Playerturns off.
TITLE Button
Press to display theTitle menu of the
Disc, if available. Details are on page 19.
ENTER Button
Pressto select a setting in the Playermenu or
to select a feature in the Disc menu.
ARROW Buttons
Pressto selectan iteminthe DVD Playermenuor in the Disc menu.
REV (reverse) _ Button
Press to view the picture in fast reverse motion (DVD) or to
reverse playback of an Audio CD. Details are on page 22.
Number Buttons
Press to directly select aTrack (Audio CD) or a Chapter or Title
(DVD) for playback. Details are on pages 24-25. For single-digitTracks,
press a single number button. For example, to play Track three, press
the Number 3 button. FOr Tracks numbered !O and above, press the
+10 button as often as needed, then press the Number button of the
second digit. For example, to playTrack 12, press the + I0 button,
then press the Number 2 button. For Track 22, press the + I0 button
twice, then press the Number 2 button.
Pressto program Tracks (Audio CD) for playback.
Details are on page 29.
CLEAR Button-
Press to remove Track numbers from a Program. Details are on
page 29.
AUDIO Button_
Pressthe AUDIO button,then press the _/v buttons to choose
one of the audio languagesor sound modes availableon the Disc.
Detailsare on page31.
@
db
SKIP Buttons
Pressto skip Chapters orTracks. Details are on page24.
ANGLE Button
Pressto view the picturefrom a different angle(if available).Press
theANGLE button,then pressthe _/v buttonsto chooseone of
the availableangles.Detailsareon page33.
Page 17

RemoteControlButtons(cant'd)17
FWD (forward) IH_ Button
Pressto fast forward the Disc. Details are on page22.
Pressthe PAUSE/STILLbutton, then press the FWD button to
beginslow motion playback.Press the FWD button repeatedly to
changethe forward speed of slow motion.Detailsare onpage 23.
OPEN/CLOSE Button
Pressto open or closethe Disc tray.
RETURN Button
Press to return to the previousDVD PlayerSETUPmenuor to
remove the SETUPmenu from the "IV screen.
STOP Button_
Pressto stop Disc play.
PLAY Button_
Press to begin Disc play.
DISPLAY Button
Displaysthe current status ofthe Disc during playback.Pressagain
to remove the status display.Detailsare onpage36,
MODE Button
Pressto set up programmed or random playbackfor anAudio CD.
Detailsare on pages29-30.
SETUP Button _.,
When Disc playbackisstopped, press to accessor remove the
DVD Player'sSETUPmenu.Detailsareon pages34-43.
SUBTITLE Button
Pressto accessthe subtitlemenu,then pressthe A/_ buttons to
selecta languagefor the subtitles(amongthose available)or to
turn offthe subtitles.Detailsare on page32.
SEARCH MODE Button
Pressto accessor remove the SEARCHmenu,which allowsyou to
godirectlyto a specificTitle/Chapter/Treck/Time.Detailsare onpages
24-26.
PAUSE/STILL Button
Press to pause Disc playback. Details are on page 20. Press repeat-
edly to advance the DVD picture step by step (or one frame at a
time). Details are on page 2 I.
ENTER j STOP
C3C3C3
A-B REPEAT Button
Press to set upA-B Repeat Play,which repeatedly playsa specific
segment of a Disc. Details are on page 28.
REPEAT Button
Press to repeat playback of the current Disc or Track (Audio CD)
or aTitle or Chapter (DVD). Details are on page 27.
Page 18

18PlayingaDisc
IAUDIOCDI
Playing a DVD or an Audio CD
Before you begin.,.
Turn on the power of the TV, amplifier and any other equipment
connected to the DVD Player. Make sure the'IV and the stereo or
amplifier (if applicable) are set to the correct channel Details are
on pages 8-12.
I
Press the POWER button to turn on the DVD Player.
"HELLO" will appearbrieflyon the displaypanel.
2
Press the OPEN/CLOSE button to open the Disc tray.
3
Place a Disc into the tray. Make sure the Disc is sitting proper-
ly in the correct recess.
Some DVDs are recorded on both sides. Make sure the side you
want to play is facing up. Or, if the DVD is recorded on only one
side, place the Disc in the tray with the label facing up.
Insert a Disc.
4
Press the PLAY button. The tray will close automatically,and
playbackwill beginat the first Chapter or Track of the Disc.
Or, you may pressthe OPEN/CLOSE buttonto closethe tray, and
DVD playbackwill start automatically.(Youalsomay closethe tray
bygently pressingthe Disc tray toward the DVD Player.)
If the DVD in the tray hasa menu,the menu mayappearon the
screen instead.Detailsare on page 19.
With someAudio CDs, playbackwill not begin until you press the
PLAYbutton.
5
Press the STOP button to sto
Remember, this
will play only c
See page six l
playback.
DVD Player
•.rtain Discs.
for details.
A "No Feature"symbol _may
appear at the bottom right of the TV
screen.Thissymbol means crLherthe
feature you tried is not available on
the Disc,oi"the DVD Playercan not
accessthe feature at this time.This
does not indicate a problem with the
DVDP/ayer.
If a Disc is dirty or has scratches,the
pictures may appear distorted and
playback may stop. In such cases,
remove the Disc and turn off the
DVD Player.Disconnect the power
cord,then reconnect it. Clean the
Disc,then turn on the DVD P/ayer
again and reinsert the Disc for play-
back.
When the DVD or CD light appears
an the display panel,the Discis
loaded completely and is ready for
playback.
Page 19

DiscMenus19
Using the DVD Menus
Some DVDs containmenusthat describethe contentsof the Disc
or allow you to customize Disc playback.For example,the menu
may offer choices for subtitle languages,director's commentary, or
soundtrack playback.
To use the DVD menu and select playbackfeatures, follow these
steps.
I 2-
Press the MENU button. The DVD's main menu will appear.
2
Press the arrow buttons (_/v/_1/1_ ) to select an item,
then press the ENTER button, Continue this processto set up
all the featuresyou wish to seeon the Disc.
Toaccessthe DVD'sMain Menu...
Using theTitle Menu
Some DVDs have a Title Menu, which lists the Titles available on
the Disc. Use the Title Menu to start playback at a specific Title.
Some DVDs may allow you to choose Chapters from the Title
menu.
For example, if a DVD has IOTitLes and you want to go directly to
Title 5, follow these steps,
I
Press the TITLE button. The Title Menu will appean
If aTitle menuisnot available,the
symbol will appearon the TV screen.
NOTE: If the DVD only hasa main menu,the mainmenumay
appearwhen you presstheTITLE button.
2
Press the arrow buttons (A/v/_1/I_ ) to select the
desired Title, then press the ENTER button.
Playback will begin at the Title you selected.
Toaccessthe DVD'sTitleMenu...
Hel/p_l Hints
Menus may vary among Discs.
Refer to the manual accampanying
the Disc for details.
Not all DVDs haveTitle menus.
Some DVDs may refer to Chapters
as "scenes." Some DVDs may refer
to the Title Menu as the "scene
index,"
Page 20

20 PausingPlayback
Pausing Playback
I
During playback, press the PAUSE/STILL button on the
remote control (or press the PAUSE button on the DVD
Player). Playbackwill pause andthe sound will be muted.
PAUSE ]
2
Press the PLAY button to resume playback.
PLAy ]
PausingPlayback...
G_G
Memory On:
Resuming playback from the point
where playback stopped
I
Press the STOP button during playback. Playbackwill stop,
andSTOPwill appear at the top right corner of the TV screen.In a
few seconds,MEMO ON (Memory On) wi!l appearin the top left
corner of the TV screen.
I °11°/
2
Press the PLAY button. Playback will resume from the
point where playback stopped last.
Memory On...
_ !_nts _
Memory On canbe erasedby
pressingthe STOPbutton a second
time whileplaybackis stopped.
MEMO OFFwill appearbriefly at
the top left corner of theTVscreen.
Memory On isnot availablewith
Audio CDs.
TheDVD playerwill turn itself off
automaticallyafter beingin Pause
modefor 30 minutes.Thishelps
avoidthe possibleburningof the
still imageinto theTVscreen.
Page 21

StepbyStepPlayback21
I
Press the PAUSEISTILL button to pause playback. The
sound will be muted.
PAUSE )
2
Press the PAUSE/STILL button repeatedly to see the pic-
ture advance one frame (or step) at a time.
The soundwill remain muted. PAUSEwill appearbrieflyon the
screen each time you press the PAUSE/STILLbutton.
3
Press the PLAY button to resume playback.
PLAY will appear briefly on the screen.
Page 22

22 FastForwardlReverseSearch
• o. ..• ••. • • .• ..
• •••.pQ,.too,o•• •••go•,eJooooooog= =l•••le,ooJl•• • ••••_ooool ••••o•Qe_,,• ••eOOO_OT•Q_eO_•QTOtt••O
During playback, press the FWDt,-I_ button or the REV_I41
button on the remote control (or press the SEARCH buttons
on the DVD Player).
• On a DVD, pressingthe FWDI_I_ or REV_I_II button repeatedly
will forward or reverse the picture at twice, eight times, or 32
times the normal playback speed. Sound will be muted during
searching.
• Use the F'VVDI_- huron for a forward search. Pressthe
REV-4_I button for a reverse search.
PreTs _he REV _N b_4t_ Press th0 FWD _1_ huron
agai_
• On an Audio CD, you may search forward or backward at 16
times the normal playback speed (_I_IXI6 or P.4_X(6), Pressing
the FVVD _ or REV_I41 button repeatedly will not affect the
speed of the search. Sound will be intermittent during searching
on an Audio CD.
• Use the FVVD _ button for a forward search. Press the
REV,,4_I button for a reverse search.
c3
Pressthe REV _1 button during AudioCD playback.
f "x'°/
I I
Press the FWD _ button during Audio CD playback.
='_Xl61 /
2
Press the PLAY button to return to normal playback.
Page 23

SlowMotion23
I
Press the PAUSE/STILL button during playback.
Press the FWD button. Slow motion playback will begin.
Press the FVVD button repeatedly during slow motion playback to
vary the speed of slow motion playback.
You may play the DVD at I/ 16, I/8, or I/2 the normal playback
speed.
3
Press the PLAY button to return to normal playback.
The sound will be muted when
playback is paused and during
slow motion playback.
Youcan not play the DVD in
reverses|ow motion.
Page 24

24TrackPlayback
Starting Playback at a SpeciflcTrack
Thereare three waysto beginplaybackon anAudio CD ata specific
Track.Youmayusethe Number buttons, the SEARCHMODE but-
ton, or the SKIP_ I_ buttons. For details,readthe information
below.
A
Using the Number Buttons to Select aTtack
Pressthe Number buttons to enter the desired Track num-
ber. The selectedTrack will be located,and playbackwill start.You
may selectaTrack with the Number buttons during playbackor
when playbackis stopped.
For single-digitTracks,pressa singleNumber button. For example,to
playTrack three, press the Number 3 button.
ForTracks numbered 10and above,pressthe +10 button (repeated-
ly,ifnecessary),then pressthe Number button of the seconddigit
For e_ample,to playTrack 12,pressthe +10 button,then pressthe
Number 2 button. ForTrack 22, pressthe +10 button twice, then
pressthe Number 2 button.
If you enter aTrack number that isnot availableon the Disc,playback
will not begin (or the currentTrack will continue to play).
B
Using the SEARCH MODE Button to Select aTrack
Pressthe SEARCH MODE button once, then press the Ai_
buttons to select the Track number you desire. Finally, press
the PLAY button to begin playback at the selected Track.
If you pressthe SEARCHMODE button once during playback,the
currentTrack number will be displayedinsidethe brackets.
©
_EARCH_RACK 1
TOTAL TRACKS07
TRACK:[ _)
SI_ m Ex_
C
Using the SKIPI_IIH_I Buttons to Select aTrack
Press the SKIP _ button during playback to skip the cur-
rentTrack and move to the next Track. Press the SKIP
button repeatedly to skip subsequent Tracks. The Track number
will appear briefly on theTV screen.
Press the SKIPI_HI button during playback to return to the
beginning of the current Track. Press the SKIPt_HI button
repeatedly to go to previous Tracks. The Track number will
appear briefly on theTV screen.
If you pressa SKIP button when playback is paused,you must press
the PLAY button to resume playback.
If you pressa SKIP button when playbackis stopped, the selected
Track will beginplayingautomatically.
Page 25

Title/ChapterPlayback25
Starting Playback at a Specific Title/Chapter
There are two ways to beginDVD playbackat a specificTitle or
Chapter.You may use the Number buttons or the SEARCH MODE
button.
A
Using the Number Buttons to Select aTitle/Chapter
During playback, press the Number buttons to select a
Chapter. The Chapter will be located andplaybackwill start.
When playback is stopped, press the Number buttons to
select a Title. The Title will be locatedand playbackwill begin.
For single-digitChapters orTitles, pressa singleNumber button. For
example,to play Chapter three, pressthe Number 3 button during
playback.ToplayTitle two, press the Number 2 button while play-
back isstopped.
For C_apters/'i-itles numbered I0 and above,pressthe + I0 button
(repeatedly,if necessary),then press the Number button of the sec-
ond digit. For example,to play Chapter 12,pressthe + I0 button,
then pressthe Number 2 button during playback.ForTitle 22,press
the +10 button twice,then pressthe Number 2 button when play-
back is stopped.
B
Using the SEARCH MODE Button to Select aTitledChapter
To start playback at a specific Chapter, press the SEARCH
MODE button once, then press the Number buttons or the
A/_ buttons to enter the Chapter number. Press the PLAY
button to begin playback at the selected Chapter.
I SEARCH/GHAFTER 1
TOTAL CHAPTERS: 027
CHAPTER: I I_]
To start playback at a specificTitle, press the SEARCH MODE
button twice, then press the Number buttons or the _ but-
tons to enter theTitle number. Pressthe PLAY button to
begin playback at the selected Title.
SEARC_TITL E /
TOTAL TqTLES: O7
IS_M I E_L
®
Page 26

26 SpecificTimePlayback
Starting Playback at a Specific Disc Time
I
Press the SEARCH MODE button repeatedly (three times
for DVDs or two times for Audio CDs).
TOTAt. T_ME: lh23m45s
TIME [ h m s]
S_ _ Exi
2
Use the Number buttons to enter the Disc time at which
you want playback to begin.
• Example:I hour, 23 minutes and 30 seconds
I _ +10-* +10 _ 3 _ +10-* +10 _ +10 _ 0
• To enter zero, pressthe Number 0 (zero) button or pressthe
I_ button.
• Make sure the time you enter is within the total time of the
Disc.
• If you make amistake, pressthe I_ button repeatedly until you
reach the item you need to correct (hour, minute, or second),
then enter the correct information.
TOT*'_t. TrME: 1 _3_,4_
TIME [lh23m30s I
_ Sla_ _ Ex_l
3
Within 30 seconds, press the PLAY button. Playback will
start at the time that you specified.
O
Helpful Hint
Specifictimeplaybackis not avail-
able with somediscsor if MEMORY
OFFis activatedfor a DVD.Details
are on page20.
Page 27

RepeatPlayback27
I
Press the REPEAT button repeatedly until the repeat
mode you want appears in the top left corner of the "IV
screen.
• RepeatedLy pressing the REPEAT button during playback lets you
choose REPEAT CHAPTER, REPEATTITLE, or REPEAT OFE
• If a Chapter is playing repeatedly, then you press the Number
buttons to select a new Chapter, the new Chapter will play
repeatedly.
Pressthe REPEATbutton to select
REPEATCHAPTER.The current
Chapter playsover and over.
Pressthe REPEATbutton againto
select REPEATTITLE.The entire
Title plays over and over.
Pressthe REPEATbutton againto
select REPEATOFF.Regular play-
back will resume.
®
l AUDIO CD l
• Repeatedly pressingthe REPEATbutton during playbacklets you
choose REPEATTRACK, REPEATALL and REPEATOFE
• If aTrack is playing repeatedly,then you press the Number but-
tons to select a newTrack, the new Track will play repeatedly.
1
_cK] _ Pressthe REPEATbutton to select
REPEATTRACK.The current Track
"__ playsover and over.
R_PEAT Pressthe REPEATbutton againto
I__ select REPEATALL.The entire
Audio CD playsover and over.
J REPEAT I
iota _ Pressthe REPEATbutton againto
select REPEATOFE Regularplay-
J_J backwill resume.
I H pfulHi. I
J . Repeat playback is not available J
with same discs.
Page 28

28A.BRepeatPlayback
You can playa section of anAudio CD or DVD repeatedly.Follow
these steps to set up the section that you want to play over and
over.
I
Play the Disc to the point at which you want repeated
playback to begin.
2
Press the A-B REPEAT button to set the starting point
(A).
]
3
Play or fast forward the Disc to the point at which you
want repeated playback to end, then press the A-B
REPEAT button again.
The sectionwill beginto ptayimmediately,playingover and over
until you cancel the A-B Repeatfeature.
4
To cancel the A-B Repeat feature, press the A-B REPEAT
button so that REPEAT [OFF] appears on theTV screen.
Regular Disc playbackwill resume.
© O
A-BRepeatplaybackis not available
withsameDVDs.
With DVDs,the entireA-Brepeat
sectionmust be withina singleTitle.
With Audio CDs,theA-Brepeatsec-
tion can containmultipleTracks.
PointB mustbe later on the Disc
than PointA.
Page 29

ProgrammedPlayback29
You may determine the order in which Tracks will play,The order I_
that you set iscalled the Program,To set up programmed playback, I.
J
follow these steps.
I
While playback is stopped, press the MODE button. The
programscreen will appear.
PPO_nAM 1
T • i 14 _OTAL_
2
Pres_the Number buttons or the _/_ buttons to enter
the number of the first Track that you want to play.Then,
press the ENTER button to store the selected Track in the
Program.
• If you enter awrongTrack number, press the CLEAR button.The
lastTrack in the Program will be removed.
I 1....
3
Repeat step 2 until you have selected all the Tracks you
wish to play in the Program.
• Up to 20 Tracksmay be stored inthe Program.
• Make sure the Tracknumbers you enter are availableonthe
Audio CD.
4
Press the PLAY button. The Tracks will play in the order in
which you programmed them.The Program will play once.
• The contents of the program will be stored until you turn off
the DVD Player or open the Disc tray.
Helpful Hints
SpecificTrackand randomplayback
cannotbe combinedwith pro-
grammedplayback.
Youmay play a Programrepeatedly.
Duringprogrammedplayback,press
the REPEATbutton sothat REPEAT
[ON] appears.Theprogramwillplay
overand over.
ToseewhichTracksyou storedin
the Program,pressthe STOPbutton
to stop playback,thenpressthe
MODE button sothat thePRO-
GRAMscreenappears.
Page 30

30 RandomPlayback
16 ° I, lot Ig I,t J OOQ, e,eO, • t eO, t OOt,OOt,OOOt JOt t O0 IOQO,,t OeOt 1,060,tl IOOQOO0 e,t 06et t i,O,et,,,,,,t OO06000mO, 0, 0_ o ,0
IAUD,OCDI
Youmay play theTracks of anAudio CD in Random order instead
of the order in which they are recorded (I,2,3...).To set up
Random Playback,follow these steps.
I
While playback is stopped, press the MODE button
repeatedly so that the RANDOM screen appears.
2
Wl_le the RANDOM screen appears, press the PLAY but-
ton. The Trackswill playin random order.After allthe Trackson
the disc haveplayed once,playbackwill stop.
I
0
Page 31

AudioLanguagelSoundMode31
The DVD Player allows you to select a Language for DVDs or a
Sound Mode for Audio CDs.
_D_ Language
I
Press theAUDIO button during playback, then press the
_/_ buttons to select the desired language.
• The languagecanbe changedonly if multiple languagesare avail-
able on the DVD.
V
Pressthe _/v buttons.
Pressthe _/_ buttons again.
Pressthe A/v buttons again.
I
*
AUDIO I AUDIO 2
I AUDIO CDISound Mode
I
Press the AUDIO button during playback, then press the
_/_ buttons until the sound mode you want appears.
• When producers record anAudio CD, they record the sound
on two channels - the left and the right.You can choose to hear
the sound on the left channel,the sound on the right channel,or
the sound on both channels (Stereo).You will select L-CH, R-
CH, or STEREO.
I__ "('_- _B_retharitigvhet_rleeof_.charmels
Au_ __-,-,-- Only the ri_'h_channel is ;_¢tive.
"_ J Only the left channel is active.
If a desiredlanguageis not shown
after pressingthe_l'w buttonssev-
eraltimes,theDVDdoesnot have
that language.
Thedisplaywill disappearafterabout
15 seconds,
• SomeDVDsonlyallowyouto change
thelanguageinthe Discmenu.
• Whenyouusethe DIGITALAUDIO
OUT COAXIALjack,the soundmode
of audioCDscannotbe changed.
Page 32

32 SubtitleLanguage
I
Press the SUBTITLE button during
lu will appearon the TV screen. " playback. The subtitle 2
Within 15 seconds, press the A/v buttons to select a sub-
title language. Selecta languagefrom those availableon the
DVD.
I___'_ Press the A/V buttons.
Press the A/v buttons to
__ select another language.
Subtitle 2
To turn off subtitles, press the
__"_ _/_ buttons repeatedly until
OFF appears in the subtitle menu,
No subtitles
I
CDE3_
E3C_
_QG
PAU_SSrlLL _T_
SUBTITLE I SUBTITLE 2
3
The subtitle menu will disappear after about 15 seconds.
With sameDVDs,youmay selecta
subtitlelanguagein the Discmenu.
If the desiredlanguageis not shown
after pressingthe _,/v" buttonssev-
eraltimes,the Discdoesnot have
subtitlesin that language.
Thesubtitlesmay be delayedfor a
few seconds.
• Yoursubtitleselectionwill becan-
celledif you openthe Disctray or
turn off the power.Thedefault set-
ting of the DVD will beselected
again.
Page 33

CameraAngles33
Some DVDs contain scenesthat were recorded from different
angles.Youmay select a camera angle with the DVD Player.
I
Press the ANGLE button during playback.
2
Within 15 seconds, press the A/v buttons to select a dif-
ferent angle.
e__"" Angle I (default)
Press the AIr buttons to
_j _ select another angle.
Angle 2
__._ ress the A/v buttons again,
Angle 8
• If the Disc contains sequencesrecordedfrom differentcamera
angles,the angle symbol _ will appear at the bottom-right of
the screen.You can changethe camera anglewhen the symbol
appearson the screen.
• The camera anglecannot be changedif the Disc does not con-
tain sequencesrecorded from different camera angles.
®
GG3G
Auol_ scmT_T_E
2
I
TheANGLE ICON must be set to ON
in order for the angle symbol to
appear as described in step 2.To set
ANGLE ICON to ON,see page 43.
If the angle status appears on the
screen(for example,ANGLE [I]/8),
the angle symbol will not appear on
the screen.
Page 34

I
While playback is stopped, press the SETUP button. The
setup screenwill appear.
!_ SETUp
1 kI_IGUAG E
2 V_DEO
3 AUDIO
,_ LOIrlK
5 OTHERS
2
Press the Number 4 button to select LOCK.
The SETUP/LOCK menu will appear.
PASSWORO I - ]
1 I.EVEL [NONE]
2 CHANGE pASSWORr_
3
Press the Number buttons to enter the 4-digit password.
• When doing this for the first time, enter any 4 digits.That num-
ber will be the password until you change it.
1 LEVEL [NONE]
_ CHANGE PASSWORD
4
Press the Number 2 button to select CHANGE PASS-
WORD. The first spaceinthe PASSWORD will start flashing.
3,5
4
5
Press the Number buttons to enter your new password.
6
Press the RETURN button twice to remove the menu.
H_I Hints
Write downthe passwordincase
youforgeti_
Toerasethe old password,pressthe
POWERbutton to turn off the DVD
Player.Then,pressand hold the
STOPbutton on the DVDPlayer
whilepressingthe POWERbutton
on the DVD Playerto turn on the
poweragain.When "HELLO"
appearson the displaypanel,you
may releasethe STOPbutton. Follow
the stepson thispage to setthe
passwordthat youdesire.
Page 35

ParentalLockLevels35
I
While playback is stopped, press the SETUP button. The
setup screen will appear.
I LANGUAGE
2 VI_O
3 AUDIO
4 LOCK
5 OTHERS
2
Press the Number 4 button to select LOCK.
The SETUP/LOCK menuwill appear.
SETUP_OCK ]
PASSWORD [ l
1 LEVEL [NONE]
2 CHANGE PASSWOFID
3
Press the Number buttons to enter your 4-dlgit password.
SETUPfL(3CK !
_ASSWORO [**** ]
1 LEVEL [NCI'IE]
2 CHANGE PASSWO_IO
_En_r _=
4
Press the Number I button to select LEVEL.
l SETUp_OC K
PARENTAL LOCK
NONE Parenlal L_k is on
LEVEL 6 [PLAY ALLI _1 DYes _ _ay r_ga_l_ _ r_ting
L_VEL 7 [NC.17] _VOS r_led _C._7 _ _gner _t nc_pay
LEVEL 6 [R] OVD_ r_e_ _ _ _r_ _1 r_ p_y
LEVEL 5
LEVEL 4 [PG13] OVDS rea_ _GI3 _ _ w_ r_ _ay
LEVEL 3 [PG] OVOSrale__G _ _ige_[ _11n_ p_y
LEVEL 2
LEVEL _ [G] DVC_ _a_ G _ _ig_er _h n_ _aY C_y
E_ DVD_ _al a_ r_ ra_ _M _4ay
5
Press the &/_ buttons to select the level you desire, then
press the ENTER button. For example, if you want to play
Discs rated PG13,you must select LEVEL5 or higher.
The SETUP/LOCK menuwill reappear.The levelyou selected will
appearon the screenbesideLEVEL.
6
Press the RETURN button twice to remove the menu.
©©
i RATING EXPLANATIONS
• NC- 17 - Under 17 not admitted
R - Restricted; under 17 requires
accompanyingparent or adult
guardian
PG13 - Unsuitable for children
under 13
PG - Parental Guidance suggested
G - General Audience
SomeDVDsare not compatiblewith
ParentalLock.Make surethe DVD
playsaccordingto the ParentalLock
settingsyouhave made.
TheDVDPlayerwill not allowyou to
changeLEVELsettingsuntil you
enterthe correctpassword.
Whenyou try to playa Discthat
hasa ratingthat exceedsthe level
youset,a messagewill appearon
thescreen,indicatingthe Disccan-
not be played.If thishappens,eject
the Disc,thenselecta levelthat
allowsplayback.Or selectNONE to
turn off ParentalLock.Loadthe Disc
againand beginplaybackasusual
SomeDiscsmay allowyou to simply
enteryour 4-digitpassword,then
beginplaybackautomatically.Follow
the instructionsprovidedby the Disc
message.
Page 36

36 StatusDisplay
Accessing the Status Display
Youcancheck the informationaboutthe current Disc bypressing
the DISPLAYbutton on the remote control.
I
Press the DISPLAY button repeatedly to access or
remove the status displays.
I _ • Current Title number / total number of Titles
T,_e 0_o_ , _ • E apsedtime of the current Tibe
REMAI_ 0h0Sm2S_ I . .
• Remaining time of the current Tltle
cHTA_E R
i_i_i_"_ _j CurrentChapternumber, toninumber ofChapters
REMAI_
_'_ inthecurrentTitle
_. ElapsedtimeofthecurrentChapter
• Remaining time or"the current Cbe_te_
i _/, • Current languagefor the sound
Auo,o _ _ _ _.L--- • Current audioformat (DOLB¥ DIGITAL 5.I
S_DTmTL__%_NCH I Channel isdisplayed as DOLBY DIGITAL 6 CH.)
AN_LE a/e _
VIRTUALso • Currentlangu_eforthe5Mb_l_les
_, Selected angle/ total number of angles
_"_ • VIRTUAL 3D se_ing (ONIOFF)
"41-
1 No display
6
53 53
" LL@/I
J
-I
IAUDIO CD 1
.._ • Current Track number I total Tra¢k number
TR_CK 01_04 _ • "
r,M_ o_0_s, _ Ela sed t_me of the current Track
I • _.er_'alnlng _m_ _ l.he ¢'arr el_. Tt af.k
_o_*M _ • Current play mode
J
No disp|ay
Page 37

VideoSettings37
I
When playback is stopped, press the SETUP button. The
setup screen will appear.
_ L,_NGtlAGE
2 VIDEO
3 AUDIO
4 L_;K
5 OTHERS
2
Press the Number 2 button to selectVIDEO.
I_m]x_. SETUPNIDEO
i 7v MODE [4 3LB]
STILL MCOE IAUTO]
3
Press the corresponding Number button to select an
item:TV MODE or STILL MODE•
1 '_NO_,_AN ,Fu-heghtpcturesareshown, wthoneorbothsidestrimmed
i
J 2 4:3LEttERBOXm " Wide screen (full*width) pictures are shown, with black bars
Select if a wide screen TV is connected to the DVD Player.
2 FIELD _ • , . •
/
3 FRAME I Select If pictures are blurred In auto mode.
• Select to show Still pictures in high resolution.
4
Press the corresponding Number button to select a set-
ting.
5
Press the SETUP button to remove the menu.
®
C_C_C_
\© 0 O/
J
I _f_,_ _ I
|
• Youmay selecta differentTVMODE I
settingonlyif it isavailableon the I
Disc. I
Page 38

38AudioSettings
I
While playback is stopped, press the SETUP button. The
setupscreenwill appear.
SETU P
1 LANGUAGE
Z VIDEO
3 AUDIO
4 LOCK
S OTHERS
2
Press the Number 3 button to select AUDIO.
SETUP/AUDIO
I DIGITAL OUT
2 VlF_UAL3D (OFF]
Press the corresponding Number button to select an
item: DIGITAL OUT orVIRTUAL 3D.
I SETUPIAUO_O _. • Sets the sample rate for playing a disc recorded with high sound
pC_tTAL OU_4skHzl,_J quality
D_ay orGnr_ O_ -- • Select when a Do by D g tal decoder is connected
_ DTS [ON] I
[emD_, -_" SeJect when a DTS decoder is connected
Go to step 4 to change these settings.
_OWER
Q ®
/
I $ETUP/AUOIO !
VIRTUAL
_ OFF
oN -- • Select ON to activate the 3D effect.
This unit employs TruSurround system
(_O_)'_/_UrlfOUIld" of SRS Labs, Inc. as the
VIRTUAL 3D technology.
TruSurround and the(_O_" symbol are trademarks of
SRS Labs, Inc. in the United States and selected
foreign countries.
TruSurround technology is incorporated under
license from SRS Labs, Inc.
Details are on page I I.
Page 39

AudioSettings(cont'd)39
4
To change the PCM, DOLBY DIGITAL, or DTS settings,
press the corresponding Number button to select the
desired item, then press the Number button to choose
the setting (i.e. ON or OFF).
SETUp/AUOpO_ • A d_ _ n ' . ,
Pcu u "o s'g als are converted to 48 kHTJI 6 bit signals
48k_ / I when pay nga DVD recorded with h gh sound quality
2 _k_ _ I (48 kHz/20 bit/24 bit, 96 kHz).
| • Sound is reproduced at 96 kHz if a DVD is recorded
with high sound quality. If you are playing 48 kHz discs
_E_.aim_L-_J or if 4:3 LETTER BOX is selected sound is reproduced
at 48 kHz.
I SETUP/AU{_ ° 1
DOLB¥ DIGITAL
1 OFF
2 o_ -- -- • Select ON when a Dolby Digital decoder is used.
SETUP/AUD_ODT$ 1
1OFF
2 ON- • Select ON when a DTS decoder is used.
_{_BHRIE_tEi_m)_J
5
Press the SETUP button to remove the menu.
Page 40

40 LanguageSettings
I
While playback is stopped, press the SETUP button. The
setup screen appears.
I_ SETUP
I LANGUAGE
2 VIOEO
3 AUOIO
4 LOCK
S OTHERS
2
Press the Number I button to select LANGUAGE.
1 AUDIO {ORIG I
2 SUBTITLE [AUTO]
3 DISC MENU [AUTO I
4 pLAyERMENU [ENG]
3
Press a Number button to select an item:AUDIO, SUBTI-
TLE, DISC MENU, or PLAYER MENU.
SETUp__ANGUAGE _ , .
AUOIO _._- • The or g na anguage of each d_scwdl be selected
J OR G NAL
21EN_USH_ " Voice Isplayed back in English.
3 SPA_ISH-- • Voice is played back in Spanish.
4 FRENCH _1
_.O_HER_ " Voice is played back in French.
_ _0,_E,_) " You can select other languages for audio playback.
I ETUP__ANGUAGE _ .
I AUToSUSTI_E_ " .Subtitles are shown _n the automatically" selected language
! _ ENGUSH--'-------'--_" ° _ubtitles are shown in English.
SPANSH -- • Subtitles are shown in Spanish.
4 FRENCH _ . ,
S OTHER_--_.__ " Subtitles are shown _n French.
_m_" You can select other languages for subtitles.
SETUP_ANGUAGE
_sc ME__..___-_ • The disc menu isshown in the automatically se ected anguage
_GL=SH_ " The disc menu appears in English.
SPANISH_ • The disc menu appears in Spanish.
4 FRENCH
s OTHE__° The d_semenu appears in French.
.._. You can select other languagesfor the discmenu,
_ SPAN_sHENGUSH-- • The on-screen display and DVD Player menus appear in English
FRENCH_ " The on-screen display and DVD Player menus appear in Spanish.
• The on-screen displayand DVD Player menus appear in French.
Go to step 4 to change the settings within AUDIO, SUB-
TITLE, DISC MENU or PLAYER MENU.
Helpf_i Hints
If the automatic settings for AUDIO
and SUBTITLE are the same lan-
guage, the subtitleswill not be
shown.
Languagesettingsfor AUDIOand
SUBTITLE are not available with
somediscs.UsetheAUDIO and
SUBTITLE buttons instead to select
different languages for the audio
and subtit/es. Details are on pages
31 and 32.
Page 41

4
Press a Number button to select a setting.
• If OTHER is selected on the AUDIO, SUBTITLE or DISC MENU
screen, the COUNTRY CODE screen will appear. Press four
Number buttons to enter the country code you desire, then
press the ENTER button. Refer to the list on page 42.
• You can only select other languages for AUDIO, SUBTITLE, and
DISC MENU if the language is available on the Disc.
SETUPYLANGUAGE MI
COUNTRY ¢OOE
I I
5
Press the SETUP button to remove the menu.
Page 42

42 LanguageSettings(cont'd)
Country Code Lan ug__a_g_Country Code Lanu_,__ge
A-B
Abkhazian 4748 Icelandic
Afar 4747 Indonesian
Afrikaans 4752 Interlingua
Albanian 6563 Interlingue
Amharic 4759 Inupiak
Arabic 4764 Irish
Armenian 5471 Italian (ITA)
Assamese 4765 Japanese(JPN)
Aymara 4771 Javanese
Azerbaijani 4772 Kannada
Bangla 4860 Kashmiri
Bashkir 4847 Kazakh
Basque 5167 Kinyarwanda
Bengali 4860 Kirghiz
Bhutani 5072 Kirundi
Bih_i 4854 Korean (KOR)
Bislama 4855 Kurdish
Breton 4864 L-N
Bulgarian 4853 Laothian
Burmese 5971 Latin
Byelorussian 4851 Latvian
C-E Lettish
Cambodian 5759 Lingala
Catalan 4947 Lithuanian
Chinese (CHI) 7254 Macedonian
Corsican 4961 Malagasy
Croatian 5464 Malay
Czech 4965 Malayalam
Danish 5047 Maltese
Dutch (DUT) 6058 Maori
English(ENG) 5160 Marathi
Esperanto 5161 Moldavian
Estonian 5166 Mongolian
F-H Nauru
Faroese 5261 Nepali
Fiji 5256 Norwegian
Finnish 5255 O-R
French (FRE) 5264 Occitan
Frisian 5271 Oriya
Gaelic (Scots) 5350 Oromo (Alan)
Galician 5358 Panjabi
Georgian 5747 Pashto
German (GER) 5051 Persian
Greek 5158 Polish
Greenlandic 5758 Portugese
Guarani 5360 Pushto
Gujarati 5367 Quechua
Hausa 5447 Rhaeto-Romance
Hebrew 5569 Romanian
Hindi 5455 Russian
Hungarian 5467
C ou nt r_LC0de
I-K S
5565 Samoan 6559
5560 Sangho 6553
5547 Sanskrit 6457
5551 Serbian 6564
5557 Serbo-Croatian 6554
5347 Sesotho 6566
5566 Setswana 6660
5647 Shona 6560
5669 Sindhi 6550
5760 Singhalese 6555
5765 Sisw_ 6565
5757 SIovak 6557
6469 Slovenian 6558
5771 Somali 6561
6460 Spanish(SPA) 5165
5761 Sundanese 6567
5767 Swahili 6569
Swedish 6568
5861 T
5847 Tagalog 6658
5868 Tajik 6653
5868 Tamil 6647
5860 Tatar 6666
5866 Telugu 6652
5957 Thai 6654
5953 Tibetan 4861
5965 Tigrinya 6655
5958 Tonga 666!
5966 Tsonga 6665
5955 Turkish 6664
5964 Turkmen 6657
5961 Twi 6669
5960 U-Z
6047 Ukrainian 6757
6051 Urdu 6764
6061 Uzbek 6772
Vietnamese 6855
6149 Volapuk 6961
6164 Welsh 4971
6159 Wolof 6961
6247 Xhosa 7054
6265 Yiddish 5655
5247 Yoruba 7161
6258 Zulu 7267
6266
6265
6367
6459
6461
6467
Page 43

OtherMenuSettings43
I
Press the SETUP button. The setup screen will appear.
!_ SETUP
i LANGUAGE
2 VIDEO
3 AHDIO
,_ LOCK
5 OTHERS
2
Press the Number 5 button to select OTHERS.
[_ ETUP/°THERS
10SD MESSAGE[ONI
2ANGLEIGON [ON)
3 BACKGROUND [BLUE)
_mea_mE
3
Press the corresponding Number button to select an item:
OSD MESSAGE,ANGLE ICON, or BACKGROUND.
SETUP/OTHERS /
OSDMESSAGE
oN • Select ON to display messages on the screen,
2 oF_ such as PLAY, STOP, etc.
SETUP/OTHERS 1ANGLE ICON
ON • Select ON to display the angle icon.
z__J
I BLUE-- " Turns the menu background to blue
2 G_AY _-----.-.___J
qm_E_mm_E_ C!° Turns the menu background to gray
4
Press a Number button to select a setting,
_OO_
_l_--
- _©_
_,,_ _,
5
Press the SETUP button to remove the menu.
Page 44

44 HelpfulHints
• leo,o _eotl o6al Dtoo iooQo_tott tooa.ootl otoo • • oeeoto_oo,oooo otoottl JottQll oeeotl • otog • oeQ_ _,6,,t_ • itoQt*l •, • i_,t
If you are havingproblems with your product, checkthis list of problems and possi-
ble solutions before requesting service.You may be able to solve the problem your-
self.
If you need to call a customer service representative, please know the model num-
ber and serial number of your product before you call.This information is displayed
on the back of the product. Also, pleasetake a moment to identify the problemyou
are having,and be prepared to explain this to the representative. If you believe the
representative will need to help you with operations, pleasestay near the product.
Our representatives will be happyto assist you.
The DVD Player has no power,
• Make sure the power cord is connected completely to an AC (alternating current)
outlet.
• Press the POWER button to turn on the DVD Player,"HELLO" will appear briefly
on the display panel as the power is turning on.
The remote control will not operate the DVD Player.
• Aim the remote control directly at the DVD Player'sremote sensor.Details are on
page 14.
• Rt_nove all obstaclesbetween the remote control and the DVD Player.
• Inspect and/or replace the batteries in the remote control. Details are on page
seven,
• Use the remote control within 23 feet of the DVD Player.
No picture
• Make sure the video cable is connected correctly.You may connect either the yel-
low video cable (supplied) or an optional S-Video cable.Detailsare an pages8-12.
• Make sure theTV is set to the correctVideo or S-Video In channel (usuallythe
AUX IN,A/V IN,Auxiliary In, or S-Video In channel).Check yourTV owner's man-
ual for details.
• Insert a Disc that is playableon this DVD Player.Detailsare on pagesix.
Disc cannot be played.
• Insert a playableDisc. Details are on pagesix.
• Placethe Disc correctly in the recesses inthe Disc tray. Ifthe Disc is one-sided,
placethe Disc in the tray with the labelfacingup.If the Disc is two-sided, make
sure the side you want to playisfacing up.
• Clean the Disc.
• Cancel the parental lock,enter the password,or change the control level.Details
are on pages34-35.
• Make sure the Disc is labelled for use in Region I orALL regions.Detailsare on
pagesix.
No sound
• Connect the audio cablesfirmly. Make sure the cablesare connected to the
AUDIO IN jacks on theTV or audio equipment.Details are an pages8-12.
• Check the audio settingsof the DVD Player.Detailsare on pages38-39.
• Turn on the power of the audio equipmentand make sure it is set to the correct
channel,usuallyAuxiliary IN. Refer to the owner's manualof the audio equipment
for details.
• Check the audio settingsof the Disc. For example,you may have selected"sound-
track" playbackon aDVD. Only the music of the movie will play,not the charac-
ters' dialog;music might not be recorded throughout the entire DVD.
Page 45

HelpfulHints(cont'd)45
tooo.o,ll *,_QleD_gl • im°l • IOOQgeOQO • OOQ, ,OOQ, ,OeQ, • re, • tO,, ,O0,,, ,tOOl IOOO0,, ,O,,,, • tiff, tOOt,, • ,,,,, I O,O • OOtO,_
Distorted picture
• Connect the DVD Playerdirectlyto the'i_.
• There are some caseswhere the picturemay be distorted slightly;this isnot a
malfunction of the DVD Player.
The camera angle cannot be changed.
• The DVD might not contain segments recorded from different camera angles.See
if multiple angles are available. Details are onpage 33.
The audio or subtitle language cannot be changed.
• The DVD doesnot containaudioor subtitles in the desiredlanguage.Not all
DVDs containaudio or subtitles in multiple languages.Seeif other languagesare
available.Detailsareonpages31-32.
"No feature" symbol appears on the screen, prohibiting an operation.
• That operation isprohibited by the DVD Playeror is not availableon the Disc.
Detailsare on page five.
The DVD Player turns off after 30 minutes.
• TheI_)VD Playerturns off automatically if playbackis stopped for more than 30
minutes and no buttonsarepressed on the remote controlor the DVD Player.
A screen saver appears on theTV screen.
• The DVD whale will appear on theTV screen if Disc playbackis stopped for
more than one minute (andno buttons are pressed on the remote control or the
DVD Player).The DVD whale moves around on the screen to prevent damageto
your TV's picture tube.A prolonged still image,includingTV station identification
Iogos or video games,may damagethe picture tube.
Page 46

46 CareandMaintenance
• •OI••000.OQQ • OeQO ,oett toet. DooI.o°•gq OOO0 • OeQO_ tO60_OO•JttOg OOOQO • • 0601 I IO°00 • • O,OO0 OO0,1 I • • OO0,_Q • OO0_ • tot6t
Cleaning the DVD Player
• Wipe the front panel and other exterior surfaces of the DVD
Player with a soft, slightly damp cloth.
• Never use a solvent, thinner, benzene or alcohol to clean the
DVD Player. Do not spray insecticide liquid near the DVD Player.
Such chemicals may discolor the sun'ace or damage the DVD
Player.
Cleaning a Disc
• Use a soft, dry cloth to wipe the Disc.
• Wipe the Disc in a straight line from the center to the edge.
Never wipe the Disc in a circular motion.
• Do not use detergent or abrasive cleaning agents.
• Handle the Discs so that fingerprints and dust do not adhere to
the surfaces of the Discs.
• Always store the Disc in its protective case when it is not in use.
Don't use cleaners.
Wipe Discs from the
center to the edge.
Ch_cking the Laser
• If the DVD Player does not operate as described in this owner's
manual, the laser may be dirty. Consult an Authorized Service
Center for inspection and cleaning of the taser.
Handle Discs
bythe edges.
Keep the Disc in its case.
Page 47

Glossary47
Io iBoo • oeeo ooQo • ot,oteo, oQo • oQ_ • oetl toool toool Ijool OJQQg IOQOO tOOOt • to6ol tIOQQ • Oee_ OOOOtO ,,60t • ,,eO0°, • tmO06°,00
AUDIO OUT lacks: jacks located on the back of the DVD Player which are used
to send audio to another system ('i_, decoder, or amplifier).
Coaxial !ack: Used to send digital audio to a decoder or amplifier, allowing you to
adjust the volume at the decoder or amplifier.This connection provides the 5.1
channel surround sound as heard in movie theaters.
CD: Compact Disc (audio)
Dolby Digital: A surround soundsystemthat provides 5.1 channel sound asused
in movie theaters.
DTS: DigitaITheater Systems.This is a surround sound system,but it is different
from Dolby Digital.The formats were developed by different companies.
DVD: Digital Video Disc.
Remote Control: the smaal electronic unit that came with your DVD Player;
atlows you to operate your DVD Player from a distance.
S-Video: Produces a clearer picture by sending separate signals for the luminance
and the color. If you connect an optional S-Video cable, you will not need to use the
supplied yellow video cable.
VIDEO OUT Jack: jack located on the back of the DVD Playerwhich isusedto
sendvideo to aTe.
Page 48

48 Specifications
Playable Discs
DVD-Video
Audio CD
Color System
NTSC
Frequency Response
DVD (linear sound): 20 Hz to 22 kHz (sample rate: 48 kHz)
20 Hz to 44 kHz (sample rate: 96 kHz)
Audio CD: 20 Hz to 20 kHz
Signal-to-Noise Ratio (SIN Ratio)
Audio CD: II0 dB EIAJ(ElectronicIndustriesAssociation of Japan)
Dynamic Range
DVD (linear sound): 95 dB
Audio CD: 94 dB (EIAJ)
Total Distortion Factor
Audio CD: 0.007% (EIAJ)
Wow and Flutter
Below the measurement limitation (+0.001%W PEAK) (EIAJ)
Power Requirement
120VAC + 10%,60 Hz + 0.5%
Connections
S-Video output
Video output
Coaxial digital output
Analog audio output
Power Consumption
Power on:22 W
Standby (power off):2.7W
OperatingTemperature
41°F (5°C) to 104°F(40°C)
Relative Humidity
30% to 80%
Mini DIN 4-pin jack (75 _)
One pin jack, I Vpp (75 s_)
One pin jack, 500mVpp (75_)
Two pin jacks
(one left channel,one right channel)
2Vrms (47 I_)
Dimensions
14-3/16" (W) x 3-3/8" (H) x 11-5/8" (D)
(360ramx 85mm x 295mm)
Weight
5.29 Ibs.(2.4 kg.)
NOTE."Designs and specifications are subject to change without notice.
Page 49

LimitedWarranty49
DVD PLAYER
90 Days Free LaborlOne YearParts Exchange. This product must be carried in for repair.
WHO IS COVERED?
You must haveproof of purchaseto receive
warranty service.A sales receipt or other document
showing that you purchasedthe product is consid-
ered proof of purchase.
WHAT IS COVERED?
Warranty coverage begins the dayyou buy your
product.For90 daysthereafter,all parts will be
repaired or replaced, and labor is free. From90 days
to oneyearfrom the dayof purchase,all parts will be
repaired or replaced, but you payfor all labor
charges.After oneyear from the dayof purchase,you
payfor the replacement or repair of all parts,and
for all labor charges.
All parts, including repaired and replaced parts, are
covered only for the original warranty period.When
the warranty on the product expires, the warranty
on all _eplacedand repaired parts also expires.
WHAT IS EXCLUDED?
Your warranty does not cover:
• labor charges for installation or setup of the
product, adiustment of customer controls on the
product, and installation or repair of antenna
systems outside of the product.
• product repair and/or part replacement because
of misuse, accident, unauthorized repair or other
cause not within the control of Philips Consumer
Electronics.
• reception problems caused by signal conditions
or cable or antenna systems outside the unit.
• a product that requires modification or adapta-
tion to enable it to operate in any country other
than the country for which it was designed,man-
ufactured, approved and/or authorized, or repair
of products damaged by these modifications.
• incidental or consequential damages resulting
from the product. (Some states do not allow the
exclusion of incidental or consequential damages,
so the above exclusion may not apply to you.This
includes, but is not limited to, prerecorded mate-
rial, whether copyrighted or not copyrighted.)
damage caused by the use of non-VHS tapes or
tapes that have not been tested and labeled for
use intwo, four, six, and eight hourVHS
recorders.
• a product that is used for commercial or institu-
tional purposes (including but not limited to
rental purposes).
manual(s) are not readily available).
MAKE SURE YOU KEEP...
Pleasekeep your salesreceipt or other document
showing proof of purchase.Attach it to this owner's
manualand keep both nearby.Also keep the original
box and packing material in case you need to return
your product.
BEFORE REQUESTING SERVICE...
Pleasecheck your owner's manualbefore
requesting service.Adjustments of the controls
discussedthere may saveyou a service call.
TO GET WARRANTY SERVICE IN U.S.A.,
PUERTO RICO OR U.S. VIRGIN ISLANDS...
Takethe product to a Philipsfactory service center
(seeenclosed list) or authorized service center for
repair.When the product hasbeen repaired,you
must pick up the unit at the center. Centers may
keep defective parts.
(In U.S.A.,Puerto Rico andU.S.Virgin Islands,all
implied warranties, including implied warranties of
merchantability and fitnessfor a particular purpose,
are limited in duration to the duration of this
express warranty. Becausesome statesdo not allow
limitations on how longan implied warranty may
last,this limitation maynot applyto you.)
TO GET WARRANTY SERVICEIN CANADA...
PleasecontactPhilips at:
1-800-661-6162 (French Speaking)
1-800-363-7278 (EnglishSpeaking)
(In Canada,this warranty isgiven in lieu of all other
warranties. No other warranties are expressed or
implied, includingany implied warranties of mer-
chantability or fitness for a particular purpose.
Philipsis not liable under any circumstances for any
direct, indirect, special,incidental, or consequential
damages,howsoever incurred, even if notified of the
possibility of such damages.)
REMEMBER...
Please record below the model and serial numbers
found on the product.Also, please fill out and mail
your warranty registration card promptly. It will be
easier for us to notify you if necessary.
MODEL #
WHERE IS SERVICE AVAILABLE?
Warranty service is available in all countries where
the product is officially distributed by Philips
Consumer Electronics. In countries where Philips
Consumer Electronics does not distribute the prod-
uct, the local Philips service organization will
attempt to provide service (although there may be a
delay if the appropriate spare parts and technical
SERIAL#
This warranty givesyou specific legal rights.You may
have other rights which vary from state to state.
Philips Service Solutions Group, P.O. Box 2976, Longvlew, Texas 75606, (903) 242-4800
EL6235E004/ MACS183/ 3.00
Page 50

50 Index
ac power cord ..........................................................15
accessories.................................................................52
anglebutton........................................................16,33
arrow buttons ...........................................................16
audio button .......................................................16,3I
audio cd..................................................................6, 18
audio out jacks ...............................................8-12, 15
a-b repeat...................................................................28
a-b repeat button ..............................................17,28
batteries........................................................................7
bit rate..................................................................38-39
camera angle.............................................................33
chapters........................................................................6
clear button ...............................................................16
coaxial jack....................................................11-12, 15
connections ...........................................................8-12
col_ents, table of ........................................................4
controls, remote .................................................16-17
display button .....................................................17,36
display panel..............................................................13
dvd video......................................................................6
parental lock........................................................34-35
password....................................................................34
pausebutton .............................................................14
pause/still button ......................................................17
playbutton ..........................................................14,17
playing.........................................................................18
power
button ...............................................................14, 16
cord .........................................................................15
program......................................................................29
random .......................................................................30
rear panel ...................................................................15
remote
control
buttons .....................................................16-17
sensor.............................................................14
using ..................................................................7
repeat button .....................................................17,27
repeat playback .........................................................27
resuming play ............................................................20
return button ............................................................17
rev button ...........................................................16, 22
reverse ........................................................................22
enter button ..............................................................16
fast forward .........................................................17,22
front panel.................................................................14
fwd button .................................................................17
glossary.......................................................................47
helpfulhints .........................................................44-45
hookups
amplifier with digital in jacks/
md deck/dat deck ...............................................12
dolby digital decoder/
dts decoder ...........................................................I I
dolby surround
compatible amplifier.............................................II
s-video ......................................................................9
stereo......................................................................I0
tv ..........................................................................8-12
language................................................................31-32
safetyprecautions......................................................3
setup button ..............................................................17
search buttons ..........................................................14
searchmode button ................................................17
setting
audio.................................................................38-39
language............................................................40-42
other .......................................................................43
video .......................................................................37
skip buttons ..................................................14, 16,24
slow motion ..............................................................23
sound mode ..............................................................3I
still picture.................................................................20
stop button .........................................................14, 17
subtitle button ....................................................17,32
s-video out jack....................................................9, 15
table of contents........................................................4
titles ...............................................................................6
title button .................................................................16
tracks.............................................................................6
menus..........................................................................19
menu button ..............................................................16
modebutton .............:...............................................17
numberbuttons ........................................................16
video out jack ..........................................8, IO-12,15
warranty .....................................................................49
on-screendisplay......................................................36
open/closebutton.......................................14,17-18
Page 51

The following items are supplied with your DVD Player;
they are provided to help you use or set up your DVD Player.
Remote Control 4835 218 37267
TwoAA Batteries 4835 138 17012
Audio and Video Cables
4835 321 17148
RT_e_ em°_lrr_torem_m_u__ mide °f recyclable materiils"
.ks an ENERGySTA_"_rmer. Phllips Coosu_r Electro,its
hmsdetermined thlt this product rnee_ theENE_G, $1"_" guidellnes for eneq_ efficiency.
ENER_'_STAR"isaU.$. red, red mark.
IB_25r_002
pnmwd I_ China
0VMN02542 / F_I2BUD **H
 Loading...