

Page 1
CR188-RG15A(B)
16117000000934
REMOTE CONTROL MANUAL
MAGNAVOX and SMART. VERY SMART are registered
trademarks of Koninklijke Philips N.V. and are used under
license from Koninklijke Philips N.V.
Page 2
1
2
3
4
5
Using the remote control ..............................................................
Remote control specifications......................................................
Button functionality .................. ....................................................
How to use the buttons .................................................................
Auto mode................................................................................................................
Cooling/Fan mode...................................................................................................
Dehumidifying mode ..............................................................................................
Sleep mode...............................................................................................................
Timer ........................................................................................................................
Energy saving mode ...............................................................................................
CONTENTS
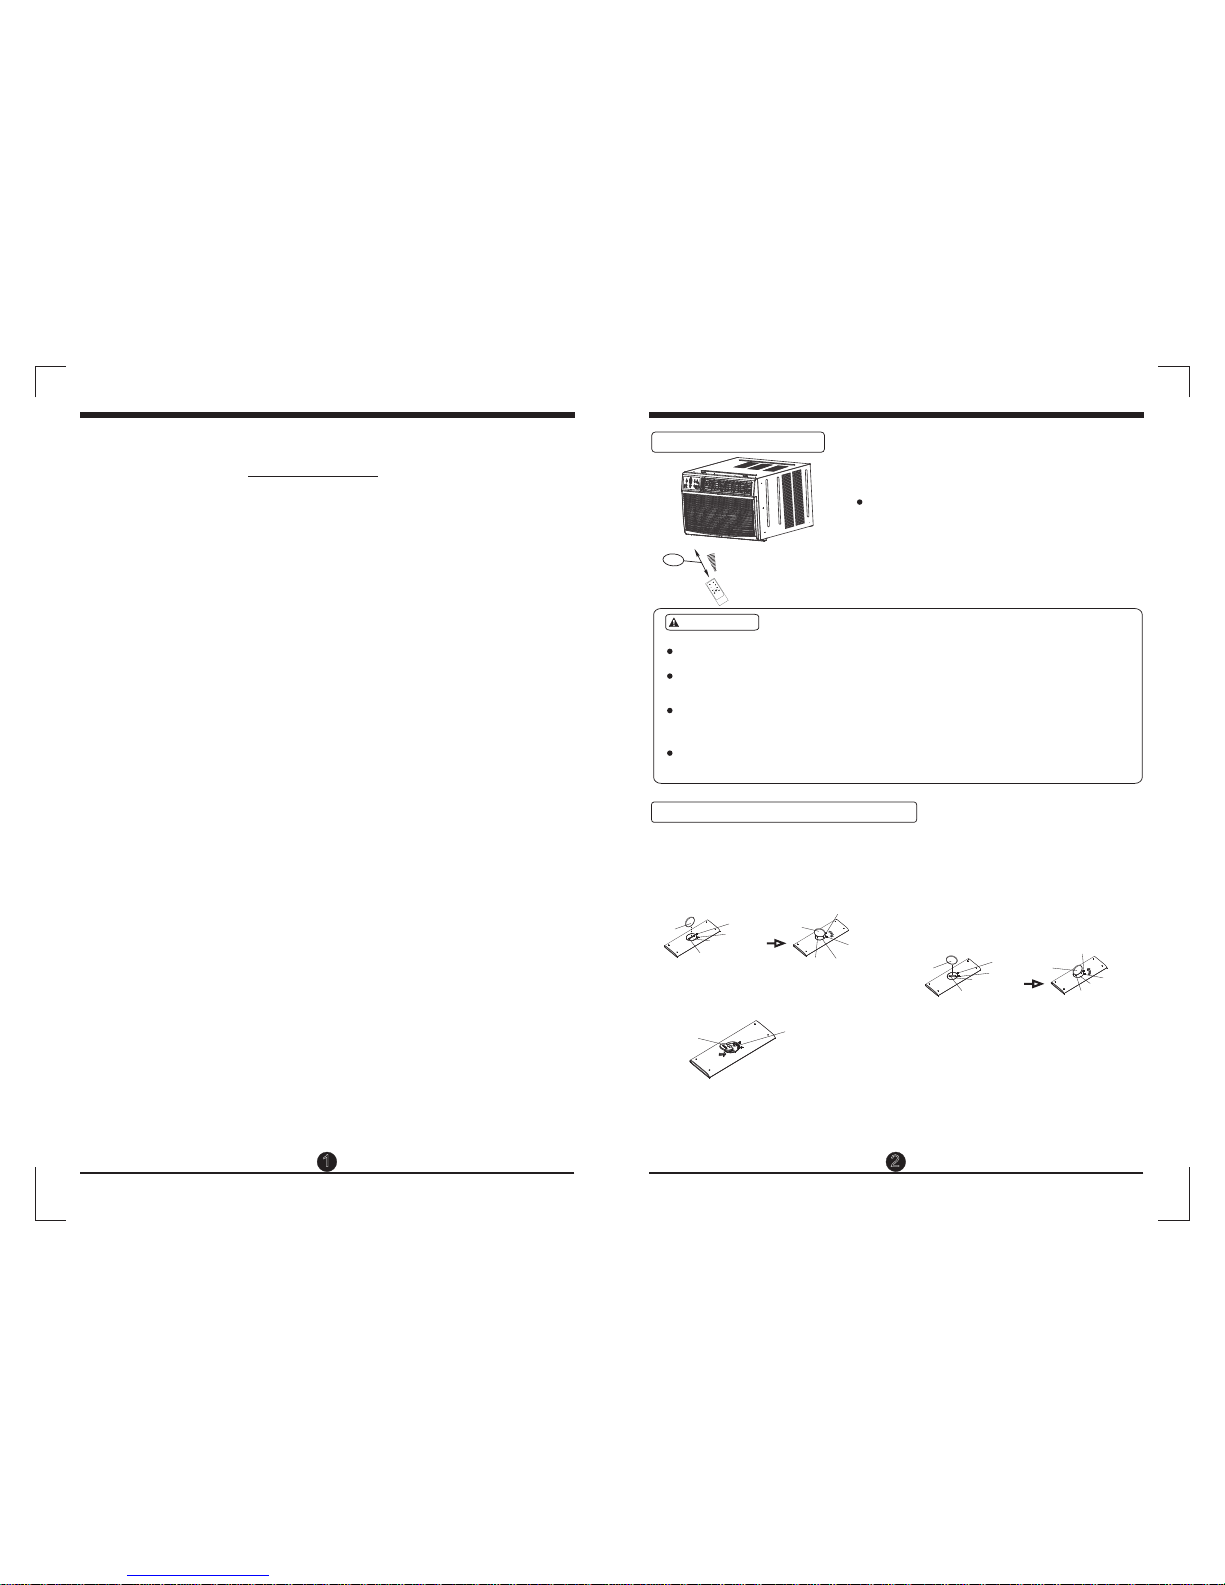
Use the remote control within 16.4 foot range
from the appliance, pointing it towards the
receiver. Reception is confirmed by a beep.
Range of the remote control
16.4ft
CAUTIONS
The air conditioner will not operate if curtains, doors or other materials block
the signals from the remote control to the AC unit.
Prevent any liquid from interfering into the remote control. Do not expose the
remote control to direct sunlight or heat.
If the infrared signal receiver on the AC unit is exposed to direct sunlight,
the air conditioner may not function properly. Use curtains to prevent the
sunlight from interfering on the receiver.
If other electrical appliances react to the remote control, either move these
appliances or consult your local dealer.
Using the remote control
2
Sleep
C
Fh
i
l
ete
c
rk
Fo
M
lleow
Au
t
o
On/off
F
an
H
i
gh
M
e
d
Low
E
S
n
a
e
v
regry
on
off
Ti
m
er
Auto
Fa
n
Cool
Dry
Mode
TEMP/TIMER
TEMP/
T
I
ME
R
Heat
5
5
6
6
7
Installation instructions of battery
Ste p 1: Inse rt a coin v ertic ally in t he groo ve
on th e batte ry cove r, clock wise ro tatio n of 45
deg rees, m ake sur e that th e groov e is alig ned
wit h the "un lock" s ign as sh own bel ow
and r emove t he batt ery cov er.
Ste p 2: Inst all bat tery in side th e remot e
con trol, th e posit ive (+) s ide up.
Ste p 3: Inst all the b atter y cover, m ake
sur e the bat tery co ver gro ove is al igned
wit h the "un lock" s ign. In sert a co in
ver tical ly in the g roove a nd pres s it
gen tly, the n counter c lockw ise rot ation
of 45 d egree s, make s ure the g roove i s
ali gned wi th the "l ock" si gn as sho wn
bel ow.
9
Coin
Batte ry cove r
Groov e
Lock si gn
Unloc k sign
Groov e
Unloc k sign
Batte ry cove r
Bat tery
Pos itive ( +) side u p
Coin
Groo ve
Batt ery cov er
Unlo ck sign
Lock s ign
Coin
Groo ve
Batt ery cov er
Unlo ck sign
Lock s ign
Lock si gn
Coin
WARN IN G
1. Battery must be disposed properly. Do not short
circuit or dispose in the fire.
2. Ke ep batt eries o ut of the r each of c hildr en.
3. Ca ution f or inge stion .
4. No n-rec harge able ba tteri es are no t to be
rec harge d.
5. Ex haust ed batt eries a re to be re moved f rom
the p roduc t.
Page 3

Button functionality
Push this button to
decrease the
temperature setting in
1 °C/1 °F increments
down to 17 °C/62 °F.
3 4
Press this button to
activate the Sleep mode.
This function is available
on COOL or AUTO mode
to maintain a comfortable
temperature.
Operation starts and stops when
the button is pressed again.
Used to select the fan
speed in four steps:
Auto, Low, Med, and
High.
ON/O FF b ut to n
MODE b ut to n
Press this button to
select the desired
operation mode from
AUT
and FAN.
O, COOL, DRY,
TEMP DO WN butt on
TEMP UP b ut to n
FAN but to n
TIME R bu tt on
Push t hi s bu tt on t o
acti va te t he " Au to
Star t" o r "A ut o St op"
prog ra m.
SLEE P butt on
Model
Lowest Voltage of
CPU Emitting Signal
Rated Voltage
RG15A(B)/E,
。 。
O O
-5 C 60 C(23 F~140 F)
16.4ft
3.0V
2.4V
( Dry batteries Lr03x2)
~
Remote Control Specifications
Environment
Signal Receiving Range
ONE TOU CH butt on
Push t hi s bu tt on , the
syst em w il l au to matic al ly
shif t to C OO L oper at io n
with a ut o fa n sp ee d, the
sett in g te mp er ature i s
O O
26 C/80 F. An d th e ti me r
sett in g pr og ra m wil l be
canc el le d. (on som e mo de ls )
NOT E: If the u nit has E NERGY
SAVE R fu nc ti on , it w il l in i ti at e
a utomatically th e En er gy S av er
fun ction u nder C ool, D ry, an d
Auto (only Au to-Cool in g an d
Auto -Fan) m odes.
NOTE :
-But to ns d es ig n is base d on t yp ic al mode l an d mi gh t be slig ht ly d if fe re nt
from the a ct ua l on e you pur ch as ed , the act ua l sh ap e shall p re va il .
-When there are wide differences between “Remote Control Illustration” and
“USER'S MANUAL” on function description, the description on “USER'S
MANUAL” shall prevail.
ENER GY SAVER b utton
Push this button to
increase the temper-
o O
ature setting in 1 C/1 F
increments up to 30 °C/86 °F
Press this button to
activate the Energysaving mode. Press
it again to stop the
function. (only on some
models)
RG15A1(B)/E,RG15A2(B)/E,RG15A3(B)/E,
RG15A(B)/E
RG15A1(B)/E RG15A2(B)/E RG15A3(B)/E
NOTE : On s om e mo de ls
SWING replaces ONE TOUC H.
Push S WI NG b ut to n,
the vertical louvers will
swin g au to ma ti cal ly f ro m
side t o si de . Pr es s it agai n
to dea ct iv at e th e "SWIN G"
feature. (only on some models)
( )
Page 4

5 6
Dehumidifying mode(only on
some models)
In the Dehumidifying mode, you cannot switch the
fan speed. It is automatically controlled in this mode.
NOTE
Ensu re t he u ni t is p lugge d in a nd p ow er is
avai la bl e.
1. Pre ss t he O N/ OF F but to n to s tart th e ai r
cond it io ne r.
2. Pre ss t he M OD E bu tton to s el ec t Dr y.
3. Pre ss t he T EM P UP /DOWN b ut to n to
set th e de si re d te mpe ra tu re . Th e te mp erat ur e ca n be s et w ithin a r an ge o f
o O o O o O
17 C/62 F~ 30 C /86 F in 1 C/1 F
incr em en ts .
Cooling/Fan mode
Ensu re t he u ni t is p lug ge d in a nd p ow er is
avai la bl e.
1. Pre ss t he O N/ OF F butto n to s ta rt t he a ir
cond it io ne r.
2. Pre ss t he M OD E bu tton to s el ec t Co ol, or
3. Pre ss t he T EM P UP /D OW N butto n to s et t he
desi re d te mp er ature . The te mp er at ure can
o O
be set w it hi n a ra ng e of 17 C/62 F~
o O o O
30 C/86 F in 1 C/1 F inc re me nt s.
4. Pre ss t he FA N bu tt on to sel ec t th e fa n
spee d in f ou r st ep s- Auto, Lo w, Me d, or High .
mode .Fan
In the Fan mode, the setting temperature is not
displayed in the remote control and you are not
able to control the room temperature either. In this
case, only step 1, 2 and 4 may be performed.
NOTE
How to use the buttons
Auto mode
Ensu re t he u ni t is p lug ge d in a nd p ow er is
avai la bl e.
1. Pre ss t he O N/ OF F b ut to n to star t th e ai r
cond it io ne r.
2. Pre ss t he M OD E bu tton to s el ec t Aut o.
3. Pre ss t he T EM P UP /DOWN b ut to n to s et
the de si re d te mp era tu re . Th e te mp er ature
o O
can be s et w it hi n a ra nge o f 17 C/ 62 F~
o O o O
30 C/86 F in 1 C/1 F inc re me nt s.
3
4
2
1. In Auto mode, the air conditioner will automatically
select the Cooling or Fan mode depending on the
difference between the actual room temperature
and the desired set temperature on the remote
control.
2. In Auto mode, the fan speed is controlled
automatically.
3. If the Auto mode is not comfortable for you , the
desired mode can be selected manually.
NOTE
1
3
1
Sleep mode
Press this button to activate the Sleep
mode. This function is available on COOL
or AUTO mode only and maintain the
most comfortable temperature for you.
In this mode the selected temperature will
O O
increase by 1 C/2 F 30 minutes after the
mode is selected. The temperature will
O O
then increase by another 1 C/2 F after an
additional 30 minutes. This new temperature
will be maintained for 6 hours before it
returns to the originally selected temperature.
This ends the Sleep mode and the unit will
continue to operate as originally programmed.
The Sleep mode program can be cancelled
when press the MODE, ON/OFF, FAN SPEED
and SLEEP button during operation.
3
2
1
3
3
2
1
3
Page 5

7
8
Timer
Press the TIMER button can initiate the
Auto-start and Auto-stop setting program
of the unit. The time can be set in range
of 0~24 hours.
To set the Auto-start/stop time.
1. Press the TIMER button, when the TIMER
ON indicator displayed on the LED window
of the air conditioner, it indicates the Auto
Start setting program is initiated. When the
TIMER OFF indicator displayed on the LED
window of the air conditioner, it indicates the
Auto Stop setting program is initiated.
2. Press or hold the UP( ) or DOWN( ) to
change the Auto time by 0.5 hour increments,
up to 10 hours, then at 1 hour increments up
to 24 hours. The control will count down the
time remaining until start/stop.
3. The selected time will register in 5 seconds
and the air conditioner will automatically
revert back to the previous temperature
setting.
4. Turning the unit ON or OFF at any time
will cancel the Auto Start/Stop function.
NOTE: To cancel the TIMER setting, push
the TIMER button and press or hold the UP
( ) or DOWN( ) until 0 hour is displayed
on the LED window of the air conditioner.
2
1
2
To stop the air conditioner 2 hours after setting
and start it again 10 hours after setting.
1. Press the TIMER button until the TIMER
OFF indicator is displayed on the LED display
of the air conditioner.
2. Use the UP/DOWN button to display "2.0" on
the LED display of the air conditioner.
3. Press the TIMER button again to display the
TIMER OFF on the LED display of the unit.
4. Use the UP/DOWN button to display "10" on
the LED display of the unit.
5. Wait for 5 seconds until the previous display
revert back to the LED window.
AUTO STOP → AUTO START
(On → Stop → Start operation)
This feature is useful when you want to program
the AC to automatically STOP and then START.
Example:
COMBINED TIMER
(S both ON and OFF )etting timers simultaneously
Example:
AUTO START→ ATUO STOP
(Off → Start → Stop operation)
This feature is useful when you want to program
the AC to automatically START and then STOP.
To start the air conditioner 5 hours after setting,
and stop it 8 hours after setting.
1. Press the TIMER button until the TIMER
ON indicator is displayed on the LED display
of the air conditioner.
2. Use the UP/DOWN button to display
"5.0" on the LED display of the air conditioner.
3. Press the TIMER button again to display
the TIMER OFF on the LED display of the unit.
4. Use the UP/DOWN button to display
"8.0" on the LED display of the unit.
5. Wait for 5 seconds until the previous display
revert back to the LED window.
2
1
2
+ -
+ -
Page 6

9
10
1
NOTE :
-The d ev ic e co ul d compl y wi th t he l ocal na ti on al r egula ti on s. I n Canad a,
it sho ul d co mp ly w ith CAN I CE S- 3( B)/NM B- 3( B) . In USA, t hi s de vi ce
comp li es w it h pa rt 15 of th e FC C Ru le s. Oper at io n is s ubjec t to t he
foll ow in g tw o co nditi on s: ( 1) T hi s de vice ma y no t ca us e harmf ul i nt er fe renc e, a nd ( 2) t hi s devic e mu st a cc ept any i nt er fe rence r ec ei ve d,
incl ud in g in te rfere nc e th at m ay caus e un de si red ope ra ti on .
-Thi s eq ui pm en t has bee n te st ed a nd foun d to c om pl y with th e li mi ts f or
a Clas s B di gi ta l de vice, p ur su an t to part 1 5 of t he F CC R ules. Th ese
limi ts a re d es ig ned t
o prov id e re as on abl e pr ot ec ti on ag ai ns t ha rm ful
inte rf er en ce i n a resid en ti al i nstal la ti on . Th is e quipm en t ge ne rates , us es
and ca n ra di at e ra dio fre qu en cy e nergy a nd , if n ot i nstal le d an d us ed in
acco rd an ce w it h the ins tr uc ti ons, ma y ca us e ha rmful i nt er fe re nce to ra di o
comm un ic at io ns. How ev er, t he re is no gu ar an te e that in te rf er en ce wi ll
not oc cu r in a p ar ti cular i ns ta ll ation . If t hi s eq uipme nt d oe s ca use har mf ul
inte rf er en ce t o radio o r te le vi sion re ce pt io n, whic h ca n be d et er min ed b y
turn in g th e eq ui pme nt o ff and o n, t he u se r is enco ur ag ed t o try to c
orre ct
the in te rf er en ce by one o r mo re o f th e follo wi ng m ea sures :
Reor ie nt o r re lo cate th e re ce iv ing ant en na .
Increa se t he s ep arati on b et we en the eq ui pm en t and rec ei ve r.
Conn ec t th e eq ui pment i nt o an o ut let on a ci rc ui t di ff er en t fro m th at t o
whic h th e re ce iv er is con ne ct ed .
Cons ul t th e de al er or a n ex pe ri en ced r ad io /T V te chnic ia n fo r he lp.
Chan ge s or m od if icati on s no t ap prove d by t he p ar ty resp on si bl e fo r
comp li an ce c ou ld vo id user s auth or it y to o pe rat e th e eq ui pm ent.
Energy saving mode
In thi s mode, t he fan wi ll cont inue to
run fo r 3 minut es afte r the com press or
shut s off. The fan th en cycl es on for 2
minu tes at 10 m inute i nterv als u nt il th e
room t emper ature i s abo ve t he se t
temp eratu re, at wh ich tim e the com pre ssor t urns ba ck on and c ool in g starts.
 Loading...