

Magnavox Rear-projection HDTV Monitor, 51MP392H, 51MP392H-17B, 51MP3964H, 51MP3964H-17B Setup Manual

3135 035 22994- English
VIDEO
S-VIDEO
L
Pb
Pr
VIDEO
S-VIDEO
L
AUDIO
L
R
AUDIO
L
R
G/Y
R/Pr
B/Pb
V
H
SYNC
L
R
AUDIO
HD INPUT-AV 4
INPUT-AV 2OUTPUT
INPUT-AV 1
ANTENNA IN 75Ω
Y
L
R
AUDIO
HD INPUT-AV 5
DVI
1
VIDEO
S-VIDEO
L
Pb
Pr
VIDEO
S-VIDEO
L
AUDIO
L
R
AUDIO
L
R
G/Y
R/Pr
B/Pb
V
H
SYNC
L
R
AUDIO
HD INPUT-AV 4
INPUT-AV 2OUTPUT
INPUT-AV 1
ANTENNA IN 75Ω
Y
L
R
AUDIO
HD INPUT-AV 5
DVI
TO TV
CABLE
IN
OUTPUT
CH
3 4
3
VIDEO
S-VIDEO
L
Pb
Pr
VIDEO
S-VIDEO
L
AUDIO
L
R
AUDIO
L
R
G/Y
R/Pr
B/Pb
V
H
SYNC
L
R
AUDIO
HD INPUT-AV 4
INPUT-AV 2OUTPUT
INPUT-AV 1
ANTENNA IN 75Ω
Y
L
R
AUDIO
HD INPUT-AV 5
DVI
2
1
VIDEO
S-VIDEO
L
Pb
Pr
VIDEO
S-VIDEO
L
AUDIO
L
R
AUDIO
L
R
G/Y
R/Pr
B/Pb
V
H
SYNC
L
R
AUDIO
HD INPUT-AV 4
INPUT-AV 2OUTPUT
INPUT-AV 1
ANTENNA IN 75Ω
Y
L
R
AUDIO
HD INPUT-AV 5
DVI
CABLE
IN
TO
TV
VIDEO
OUT
LR
AUDIO
OUT
3 4
OUTPUT
CH
1
2
3
Back of TV
Back of Cable Box
(example only)
Cable TV
Signal
Back of TV
Back of TV
Back of Cable Box
(example only)
HOOKING UP THE TV
CONTENTS
Important Notice/Warning............................................................1
Hooking up the TV ..................................................................1–2
Operating the Television and Remote Control ........................2–3
Using the Installation Features ................................................4–6
Adjusting the Manual Converge Controls....................................7
IMPORTANT
This owner's manual is used with several different television models.
Not all features (and drawings) discussed in this manual will necessarily match those found with your television set. This is normal and
does not require that you contact your dealer or request service.
BEST VIEWING
T
he major benefit of this projection television is its large view-
ing screen. To see this large screen at its best, test various
locations in the room to find the optimal spot for viewing.
NOTE: Be sure to allow a free flow of air to and from the perforated back cover of the set.
To avoid cabinet warping, cabinet color changes,
and increased chance of set failure, do not place
the TV where temperatures can become excessively
hot—for example, in direct sunlight or near a
heating appliance.
Magnetic fields, such as those of external speakers, may cause the picture to distort if the speakers are placed too close to the television. Move the
magnetic field source away from the TV until there
is no picture distortion.
As an Energy Star®
Partner, Magnavox has determined this product meets the
Energy Star® guidelines for
energy efficiency. Energy
Star® is a U.S. registered
mark. Using products with the
Energy Star® label can save
energy. Saving energy reduces
air pollution and lowers utility
bills.
WARNING: TO PREVENT FIRE OR SHOCK HAZARD DO NOT
EXPOSE THIS UNIT TO RAIN OR EXCESSIVE MOISTURE.
CABLE TV
CABLE BOX WITH RF IN/OUT
CABLE BOX WITH A/V OUTPUTS
T
his connection WILL supply Stereo sound to the TV.
1
Connect the cable TV signal to the ANTENNA IN 75Ω
jack on the back of the TV.
NOTE: Refer to the sections on TUNER MODE and AUTO
PROGRAM on page 4 of this guide. Set TUNER MODE to
the CABLE option. Run AUTO PROGRAM to store all
available cable channels in the TV’s memory.
T
his is for example purposes only. The back of your cable box
may be labeled somewhat differently.
This connection WILL NOT supply stereo sound to the TV.
1
Connect the cable TV signal to the CABLE IN jack on
the back of the cable box.
2
Connect a coaxial cable (not supplied) to the TO TV
jack on the back of the cable box and to the ANTENNA
IN 75Ω jack on the back of the TV.
3
Be sure to set the Output Channel switch on the back of
the cable box to CH 3 or 4, then tune the cable box on the
TV to the corresponding channel. Once tuned, change
channels at the cable box, not the TV.
NOTE: Refer to the sections on TUNER MODE and AUTO
PROGRAM on page 4 of this guide. Set TUNER MODE to
the CABLE option. Run AUTO PROGRAM to store all
available cable channels in the TV’s memory..
T
his is for example purposes only. The back of your cable box
may be labeled somewhat differently.
This connection MIGHT supply stereo sound to the TV. Check
with your cable TV company.
1
Connect the cable TV signal to the CABLE IN jack on
the back of the cable box.
2
Connect A/V cables to the VIDEO and AUDIO outputs
on the back of the cable box and to the corresponding
INPUT-AV 2 jacks on the back of the TV.
3
Be sure to set the Output Channel switch on the back of
the cable box to CH 3 or 4, then tune the cable box on the
TV to the corresponding channel. Once tuned, change
channels at the cable box, not the TV.
NOTE: Refer to the sections on TUNER MODE and AUTO
PROGRAM on page 4 of this guide. Set TUNER MODE to
the CABLE option. Run AUTO PROGRAM to store all
available cable channels in the TV’s memory.
Cable TV
Signal
Cable TV
Signal
SMARTS M A R T . VER V E R Y SMARTY S M A R T .
Quick-Use and Setup Guide
Rear-projection
HDTV Monitor
U
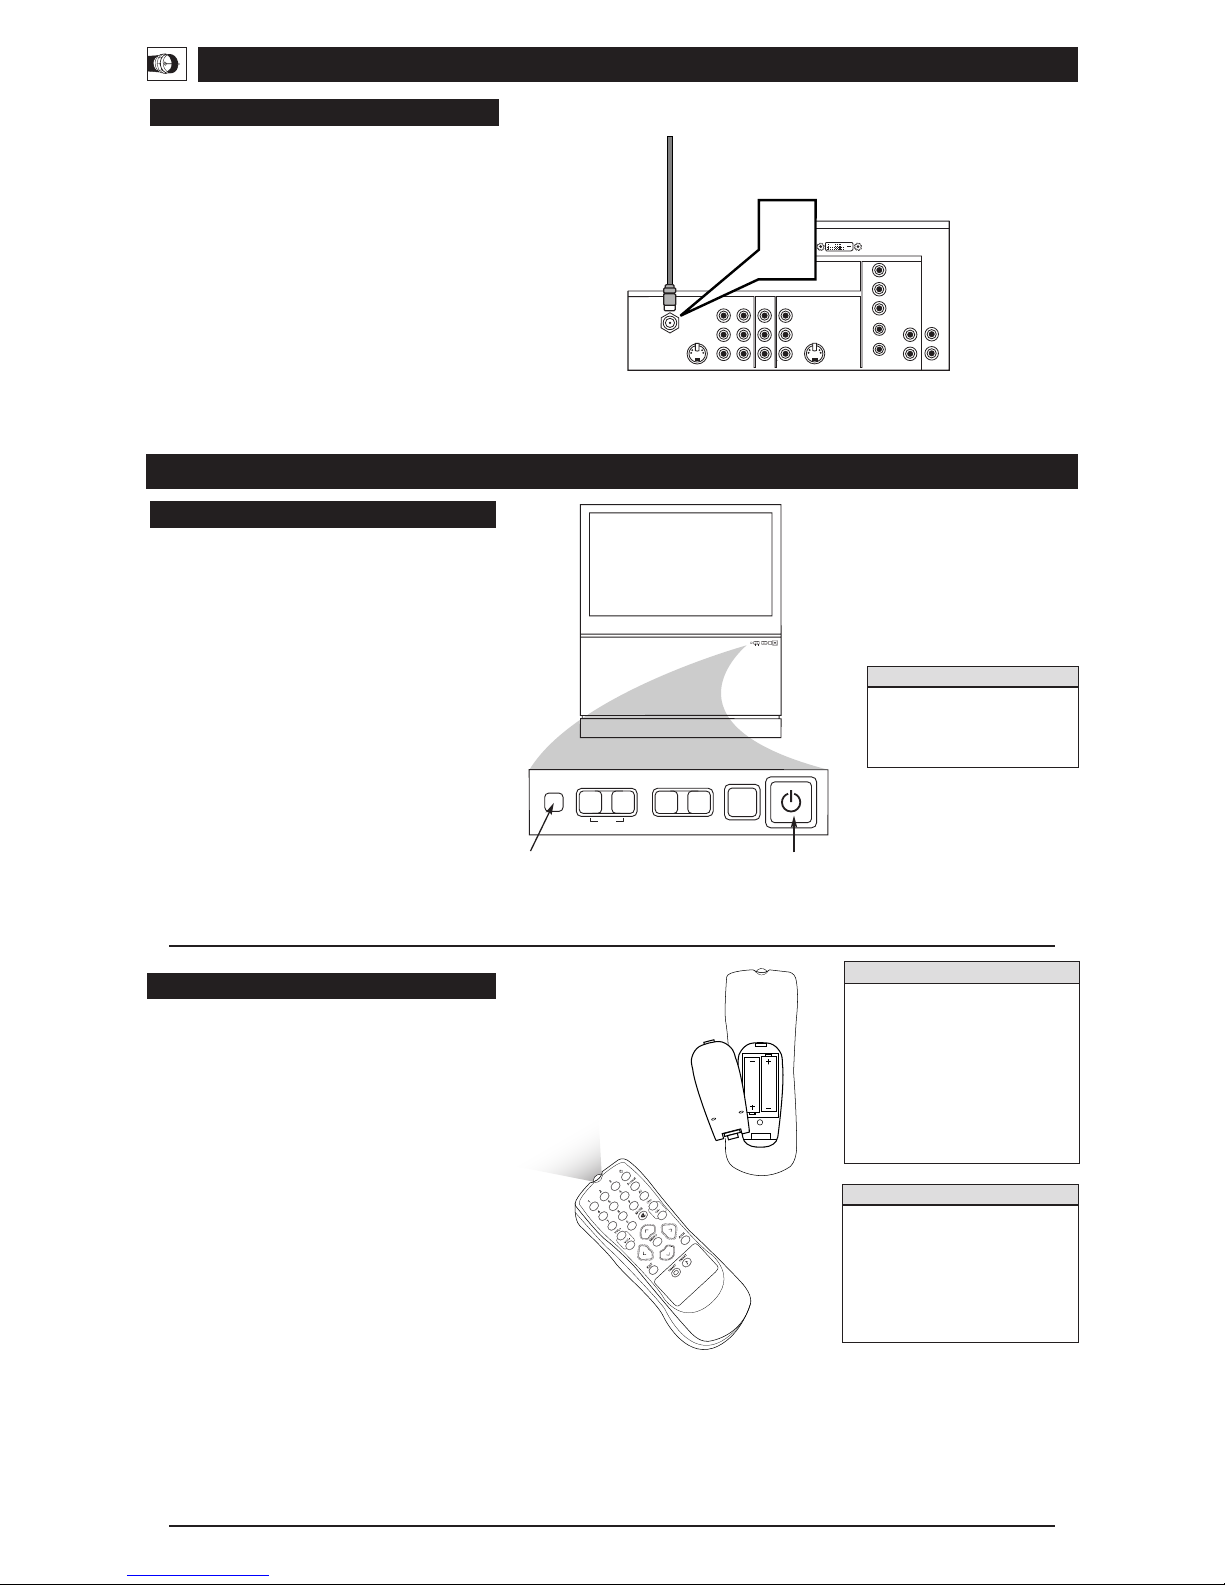
SING THE TV BUTTONS
S
hould your remote control be lost or broken, you can still
change some of the basic picture and sound settings with the
buttons on the TV. Follow the steps below to familiarize yourself
with the functions of the TV buttons.
1
Press POWER/STANDBY to turn the TV on (or off).
Allow about 10 seconds for the TV to power on.
2
Press the VOLUME + or – buttons to decrease or
increase the sound level.
Press the VOLUME + and – buttons simultaneously to display the onscreen menu. After the menu appears, use these
buttons to enter submenus and make selections or adjustments. (Use the CHANNEL buttons to move up and down
in the menu or submenus.) Press both VOLUME buttons
simultaneously to back out of the onscreen menus.
3
Press SOURCE SELECT to choose from among the signal inputs you have connected to the TV.
4
Press the CHANNEL buttons to select TV channels.
OPERATING THE TELEVISION AND REMOTE CONTROL
TELEVISION
REMOTE CONTROL
HOOKING UP THE TV
INSTALLING BATTERIES
T
o load batteries into the remote, follow these steps.
1
Gently press the tab on the battery cover on the back of
the remote and lift the battery cover off the remote.
2
Place the two “AA” size batteries in the remote’s battery case. Ensure that the (+) and (–) ends of the batteries
line up correctly with the (+) and (–) inside the case.
3
Press the battery cover back into place.
POINTING THE REMOTE
When operating the remote control, point the remote toward
the remote sensor window on the TV.
To prevent battery leakage that may
result in injury to you or damage to the
remote control:
• Install ALL batteries correctly, + and –,
as marked on the unit.
• Do not mix batteries (OLD and NEW or
CARBON and ALKALINE, etc.)
• Remove batteries when the remote control is not used for a long time.
Do not take apart, heat, or put batteries
in fire.
Remote Sensor
Window
2
BATTERY
USAGE CAUTION
• Be sure to point the remote toward the
sensor window on the TV.
• Be within about 30 feet (10 meters) of
the TV.
•Avoid dropping the remote on hard surfaces.
• Do not use harsh chemicals to clean the
remote. Use only a soft, lightly moistened cloth.
HELPFUL HINTS
SOURCE
SELECT
>
?
+
A
-
A
VOLUME
CHANNEL
MENU
SOURCE
SELECT
>
?
+
A
-
A
VOLUME
CHANNEL
MENU
Power Standby
Button
You can press any of the buttons on
the front of the TV to turn the TV on,
but you must press the
Power/Standby button to turn the set
off.
HELPFUL HINT
VIDEO
S-VIDEO
L
Pb
Pr
VIDEO
S-VIDEO
L
AUDIO
L
R
AUDIO
L
R
G/Y
R/Pr
B/Pb
V
H
SYNC
L
R
AUDIO
HD INPUT-AV 4
INPUT-AV 2OUTPUT
INPUT-AV 1
ANTENNA IN 75Ω
Y
Rear of TV
L
R
AUDIO
HD INPUT-AV 5
DVI
1
Back of TV
Antenna Signal
ANTENNA TV
T
his connection WILL supply stereo sound to the TV.
1
Connect the antenna signal to the ANTENNA IN 75Ω jack
on the back of the TV.
NOTE: Refer to the sections on TUNER MODE and AUTO
PROGRAM on page 4 of this guide. Set TUNER MODE to
the ANTENNA option. Run AUTO PROGRAM to store all
available cable channels in the TV’s memory.
MAGNAVOX
3
SON
BALANCE
AVL
INCR SURROUND
CASQUE
STEREO MONO
STEREO STEREO
IMAGE
SON
FONCTIONS
INSTALLATION
AIGUS
GRAVE
BALANCE
AVL
INCR SURROUND
AIGUS 30
GRAVE
BALANCE
AVL
INCR SURROUND
SON
OU
1
2
INSTALLATION
LANGUE
MODE SYNT.
PROGR. AUTO.
ÉDITER CANAL
AutoChron
INSTALLATION
LANGUE
MODE SYNT.
PROGR. AUTO.
ÉDITER CANAL
AutoChron
AV3
AV4
1
2
3
AV3
AV4
1
2
3
MINUTERIE
VERR. AUTO.
MÉDAILLON
SOUS-TITRE
FORMAT
HEURE
HEURE DÉBUT
HEURE ARRÊT
CANAL
ACTIVER
FONCTIONS
MINUTERIE
FONCTIONS
HEURE 8:06 PM
HEURE DÉBUT
HEURE ARRÊT
CANAL
ACTIVER
MENU
Faites vos réglages et
sélections à partir
d’un sous-menu
Vous pouvez également
accéder à une liste à partir
d’un sous-menu pour faire
vos sélections.
Passez d’un sous-menu
à l’autre et faites
des sélections ou
des réglages.
SOUS-MENU
MINUTERIE
SOUS-MENU
FONCTIONS
SOUS-MENU SON
SOUS-MENU
INSTALLATION
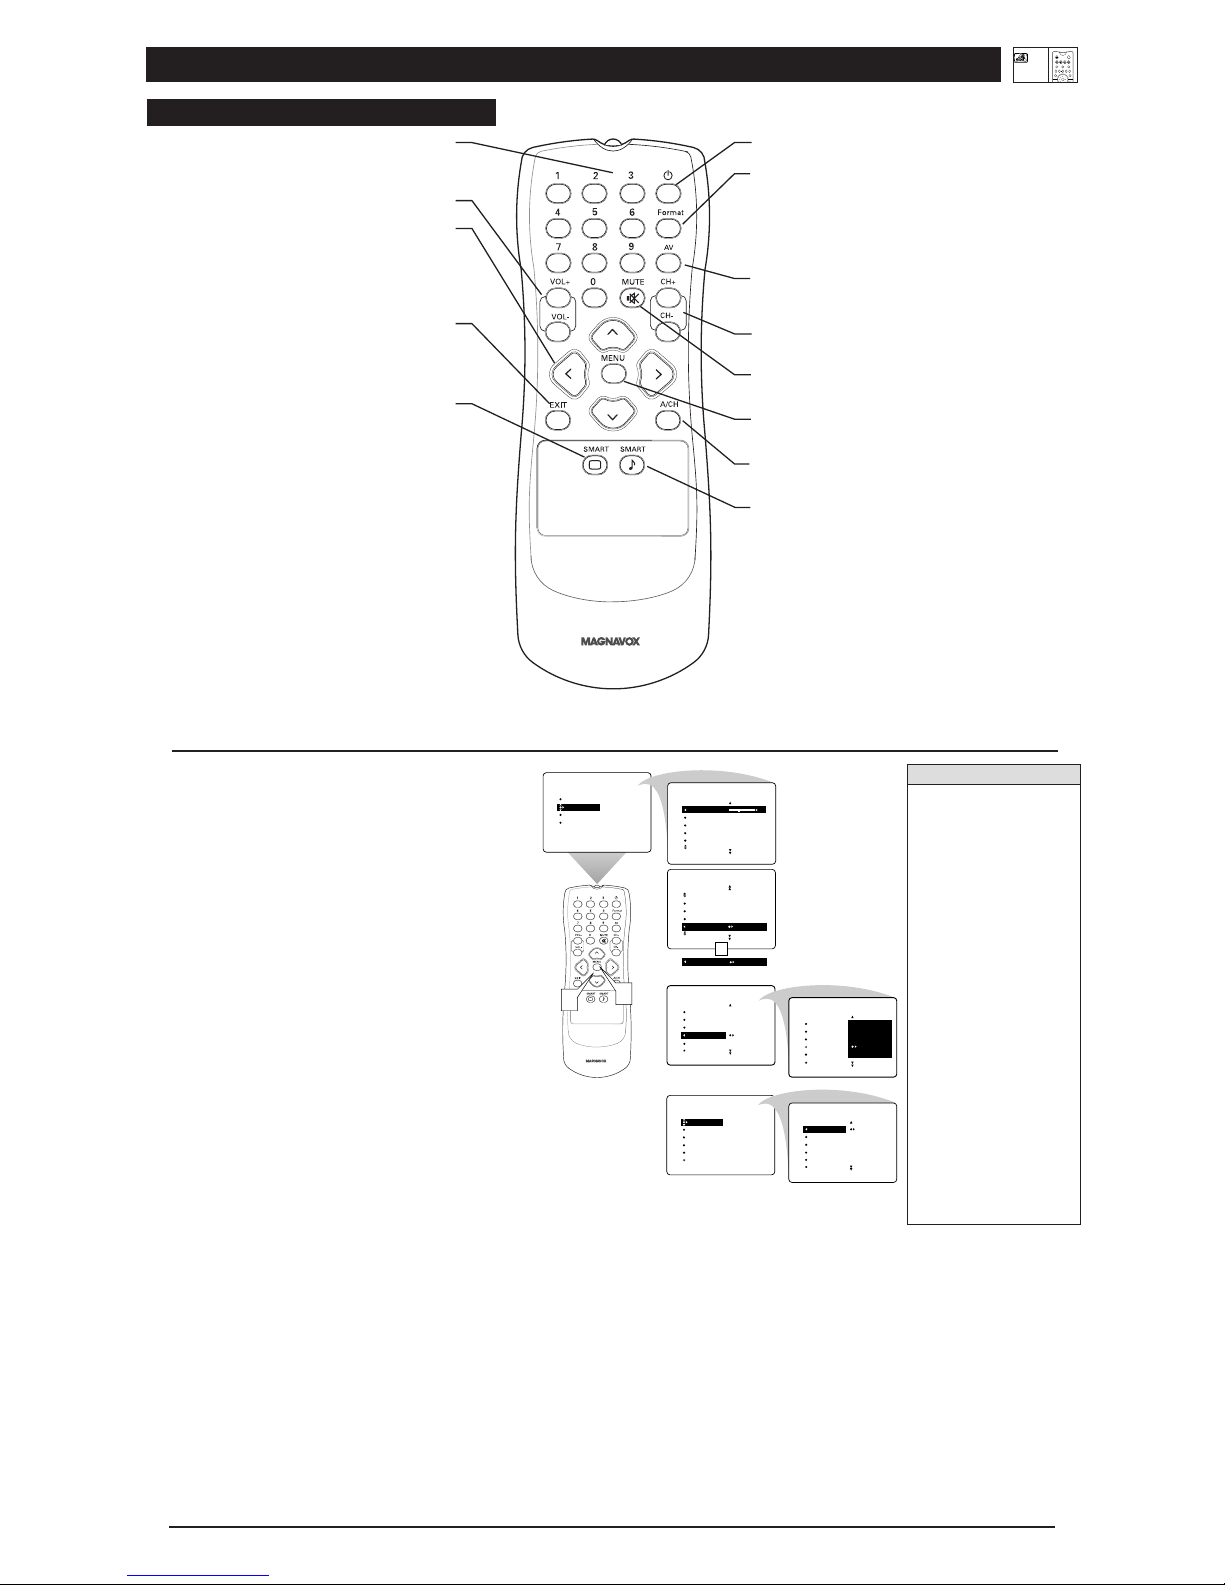
ADJUSTING OR SETTING MENU OPTIONS
A
menu is simply a list of options. You can adjust or set your
TV’s onscreen menu options by pressing buttons on the remote
control. The following steps will familiarize you with how to use
the remote control with the onscreen menu.
1
Press the MENU button to bring the menu to the screen.
Then, as necessary, press the CURSOR BUTTON DOWN
or UP to highlight a menu option. Press the CURSOR
BUTTON RIGHT to enter the submenu for the option.
2
Within the submenu, press the CURSOR BUTTON
DOWN or UP to highlight an option.
Based on the submenu you are in, you can press the CURSOR BUTTON RIGHT or LEFT to make an adjustment,
select a setting, or enter a list or another submenu.
You can return to the submenu from a list by pressing the
CURSOR BUTTON LEFT.
To go from a submenu to the previous menu, highlight the
option at the top of the screen and press the CURSOR
BUTTON UP. You can also press MENU to return to the
previous menu.
Press EXIT to exit the menu.
Pow er
Press to turn the TV on or off.
Format
Press to select a picture-format mode for a video source connected to
the ANTENNA, AV1, CVI, AV2, or AV3 (side panel) inputs. Each
press of the button selects a different mode—4:3, EXPAND 4:3,
PANORAMA, WIDE SCREEN, or AUTO. Control the picture format of a video source connected to the HD inputs (AV4) with the HD
set-top box or progressive-scan-capable DVD player providing the
video source.
AV
Press repeatedly to select the different signal sources connected to the
TV: TV, AV1, CVI, AV2,AV3 (side jack panel), and AV4. (See page
17 in the Directions for Use manual.)
Channel +/–
Press to select channels in ascending or descending order or cycle
through the signal inputs.
Mute
Press to turn the TV sound off. To restore the sound to its previous
level, press the button again.
MENU
Press to display the onscreen menu. Press to return to a higher menu
level.
A/CH
Press to alternate between the currently viewed channel and
the previously viewed channel.
SmartSound
Press to select an SmartSound™ control. (See page 18 in the
Directions for Use manual.) Choose from three factory-set controls—
Voice, Music, and Theatre—and a Personal control that you set
according to your own preferences through the onscreen Sound menu.
The three factory-set controls will tailor the TV sound so as to
enhance the type of program you are watching.
Number Buttons
Press to select TV channels. When selecting single-digit channels,
press the number of the desired channel. The TV will pause for a few
seconds and then tune to the selected channel.
Volume +/–
Press to adjust the TV sound level.
Cursor Buttons
Up/Down: allows you to select the next or previous menu item in the
menu. Left/Right: allows you to access the submenus and adjust the
settings. When no onscreen displays or menus are present, use the
Cursor Ring Left/Right to select a picture format for a video source
connected to the ANTENNA, AV1, CVI, AV2, or AV3 (side panel
inputs) on the TV.
Exit
Pressing the button once shows the current channel number, name (if
set), time (if set), and sound setting (stereo, mono, SAP, or mute).
Pressing the button twice shows the current AutoLock™ settings.
Pressing the button once when an onscreen display is showing
removes the onscreen display.
SmartPicture
Press to select a SmartPicture™ control. Choose from four factory-set
controls—Movies, Sports, Weak Signal, and Multimedia—and a
PERSONAL control that you set according to your own preferences
through the onscreen Picture menu. (See page 19 in the Directions for
Use manual.) The four factory-set controls will enhance the TV picture according to the particular type of program you are watching. It
may also be used to enhance pictures with weak signals.
• If you don’t press any
remote buttons, the menu
will automatically disappear after about 20 seconds.
To bring the menu back,
press MENU.
• Sometimes not all the menu
items are visible on the
screen. If more items exist in
the menu, a cursor arrow
will appear. Also, a bullet
will appear for each remaining item, up to a maximum
of three. This will help you
determine how many items
are left in the menu. Keep
pressing the CURSOR BUTTONDOWN until you display all items.
• Should your remote become
lost or otherwise unavailable
for use, you can use the buttons on the front of the TV
to access the onscreen menu
and make adjustments or settings. See page 2. A replacement remote can be ordered
by calling 1-800-705-2000.
HELPFUL HINTS
REMOTE CONTROL
OPERATING THE TELEVISION AND REMOTE CONTROL
TV
SWAP PIP CH
DN
UP
FREEZE
SOUND
POWER
PICTURE
STATUS/
EXIT
VCR
ACC
MENU/
SELECT
ACTIVE
CONTROL
 Loading...