

Magnavox PS1980 Owner's Manual

MAGNAVOX
Smart.Verysmart:
MAGNAVOX
Smart.Verysmart:
Congratulations on your purcha
-and welcome to the "family!"
Dear MAGNAVOX product owner:
Thank you for your confidence in MAGNAVOX. You've selected one of the
best-built, best-backed products available today. And we'll do everything in
our power to keep you happy with your purchase for many years to come.
As a member of the MAGNAVOX "family," you're entitled to protection by
one of the most comprehensive warranties and outstanding service
networks, in the industry.
What's more, your purchase guarantees you'll receive all the information
and special offers which you qualify for, plus easy access to accessories
from our convenient home shopping network.
And most important of all, you can count on our uncompromising
commitment to your total satisfaction.
All of this is our way of saying welcome-and thanks for investing in a
MAGNAVOX product.
Sincerely,
Robert Minkhorst
President and Chief Executive Officer
P.S. Remember, to get the most from your MAGNAVOX product,
you must return your Warranty Registration
Card within 10 days. So please mail it to us right now!

(t_i Getting Started
Warning/Precautions ............................... 2-3
Antenna/Cable Connections ................... 4-5
VCR to TV Antenna Connections ............................. 5
Basic TV and Remote Control Operation .............. 6-7
On-Screen Features
How to Use On-Screen Feature Controls .8-9
<>Setting the TV for Cable TV Operation............ 10
<>Adding Channels in Memory (Automatically). 11
<>Adding Channels in Memory (Manually) ......... 12
<>How to Set the TV for Closed Captioning ....... 13
<>Setting the TV for Stereo Programs.................. 14
<>Using Smart Sound (Auto Volume Control) .... !5
<>Using the TV Volume Bar Control ................... 16
<>Setting the TV Sleep Timer Control................. 17
<>Using the TV Channel Reminder ...................... 18
<>Adjusting the TV Color .................................... 18
<>Using the On-Screen Language Option ............ 19
<>Using the Audio Out Jacks (with TV Speaker
On/Off Switch) ................................................ 20
<>Using the TV's Audio/Video InputJacks .........21
Remote Control Ooeration
Using the Remote (TV/VCR Buttons) ..22-23
Setting the "IV Remote to Work VCRs..24-25
Setting the TV Remote to Work
Cable TV Converters .......................................... 26-27
Setting the TV Remote to Work VCRs -Search
Method ..................................................................... 28
Setting the TV Remote to Work Cable
Converters-,Search Method .................................... 29
[_l General Information
Tips if Something Isn't Working ............... 30
Glossary of TV Terms ............................................. 31
Index ........................................................................ 31
Warranty .................................................................. 32
Copyright © 1994 Philips Consumer Electronics Company. All rights reserved.
3
1
Infrared Remote Control which works your TV set [I
and a variety of wireless remote control VCRs and •
Cable Converters.
Standard broadcast (VHF/UHF) or Cable TV
(CATV) channel capability.
Stereo Ready TV with built-in audio amplifier and
twin speaker system for receiving TV programs
broadcast in stereo sound.
Closed Captioning which allows the viewer to read
TV program dialogue or voice conversations as on-
screen text.
Automatic Programming of channels for quick and
easy selection of favorite stations available in your
area.
On-Screen Features (in either English, French, or
Spanish) which show helpful messages for setting of
TV controls (such as color adjustment, timer settings,
and channel memory.)
Audio/Video jackpanel for direct connections with
VCRs (or other video accessories) for quality TV
picture and sound playback.
Sleep-Timer which automatically turns the "IV OFF
at preset times.
Smart Sound for the control of TV volume levels
during program changes or commercial breaks.
i
WARNING: TO PREVENT FIRE OR SHOCK
HAZARD DO NOT EXPOSE THIS UNIT TO
RAIN OR EXCESSIVE MOISTURE.
I
The Model and Serial Numbers are found on the back
of this TV set. Please record these numbers and
purchase date in the space below. Refer to them
whenever you ask your dealer about this TV set.
Model No.-
Serial No.
Purchase Date
Please attach your sales receipt to this book andkeel
itfor future reference.
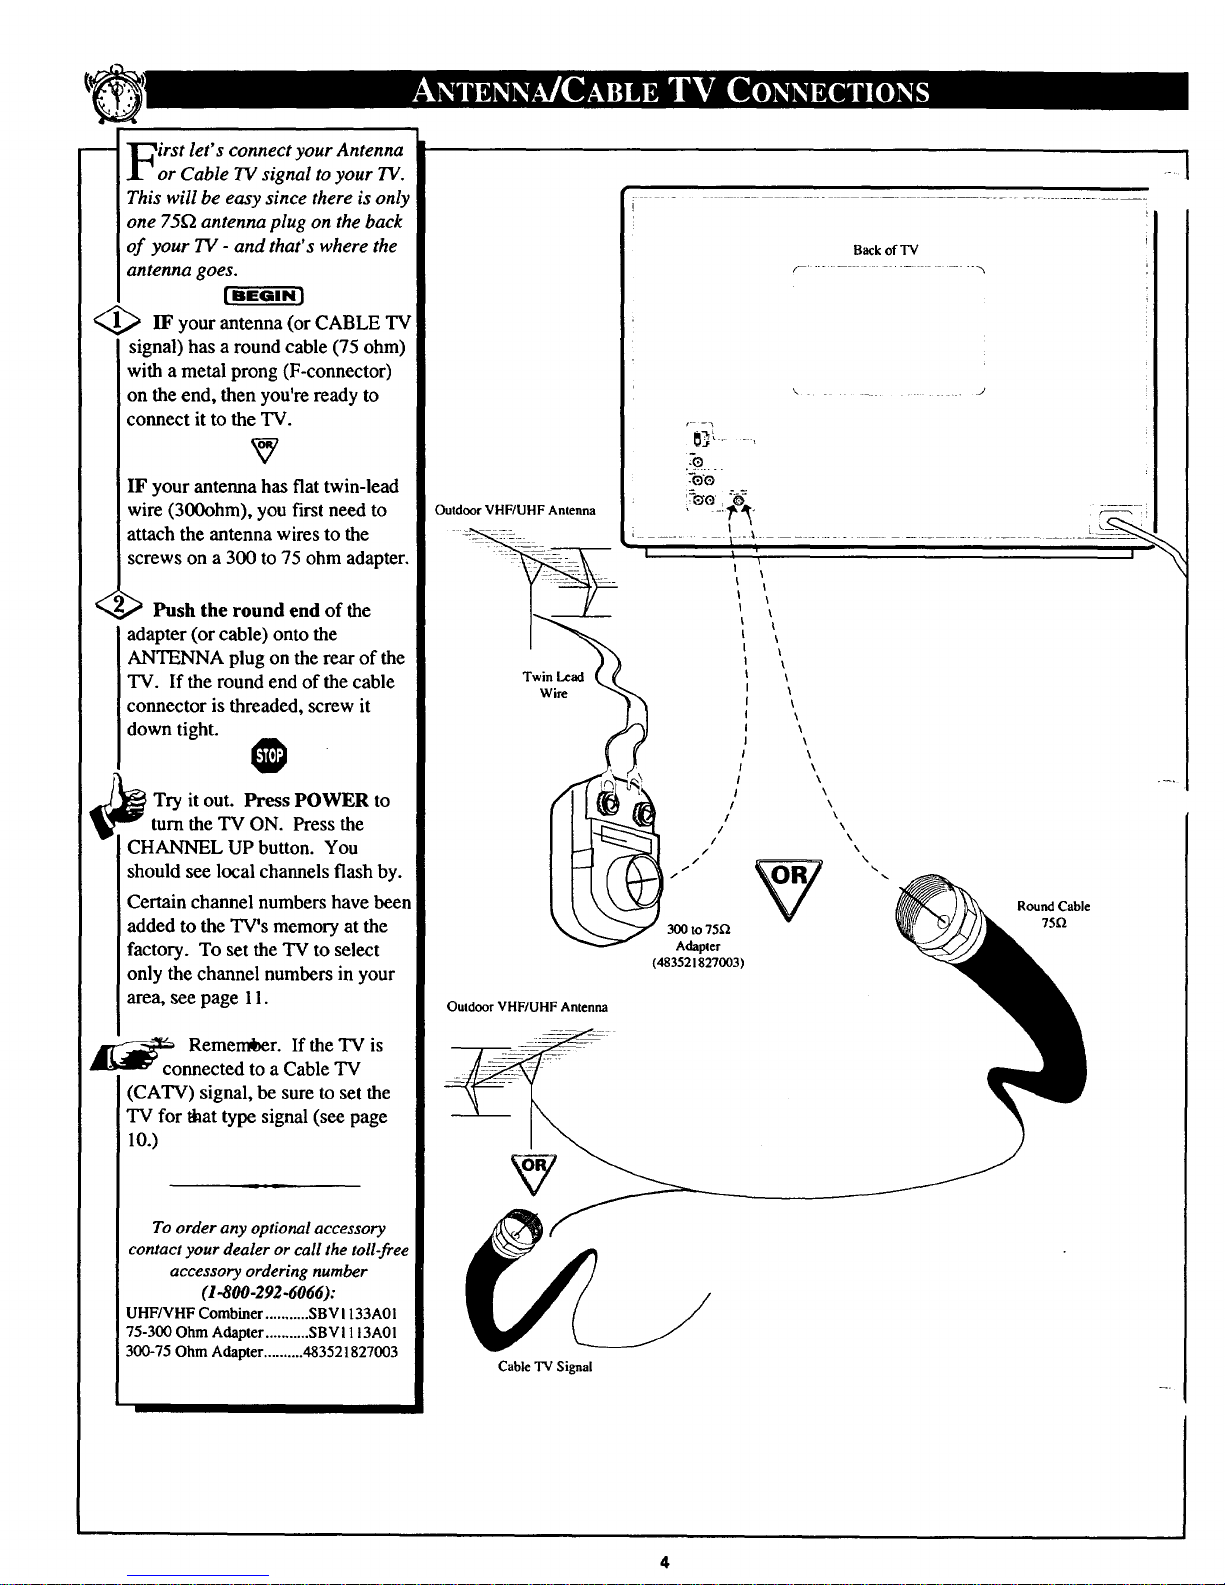
m T_irst let's connect your Antenna
JL or Cable TV signal to your TV.
This will be easy since there is only
one 751-2antenna plug on the back
of your TV - and that's where the
antenna goes.
[BEGIN]
<_IF your antenna (or CABLE TV
signal) has a round cable (75 ohm)
with a metal prong (F-connector)
on the end, then you're ready to
connect it to the TV.
IF your antenna has flat twin-lead
wire (300ohm), you first need to
attach the antenna wires to the
screws on a 300 to 75 ohm adapter.
<
,_ Push the round end of the
adapter (or cable) onto the
ANTENNA plug on the rearof the
TV. If the round end of the cable
connector is threaded, screw it
down tight.
0
Try it out. Press POWER to
turn the "IV ON. Press the
CHANNEL UP button. You
should see local channels flash by.
Certain channel numbers have been
added to the TV's memory atthe
factory. To set the "IV to select
only the channel numbers in your
area, see page 11.
_o Remem6er. If the TV is
nnected to a Cable TV
(CATV) signal, be sure to set the
TV for that type signal (see page
10.)
To order any optional accessory
contact your dealer or call the toll-free
accessory ordering number
(1-800-292-6066):
UHF/VHF Combiner ........... SBV 1133A01
75-300 Ohm Adapter ........... SBVI 113A01
300-75 Ohm Adapter .......... 483521827003
.... I
Back of TV
...... J
r- -.
-o
%o ,_
Outdoor VHF/UHF Antenna ' -: i" _:_-_-:
,, ,, ,
Wire _'<
\
\
\
\
\
\
\
Adapter
(483521827003 )
Outdoor VHF/UHF Antenna
Cable TV Signal
\
\
\
\
\
\
\
\
\
\
\
\
\
N
Round Cable
75_
4
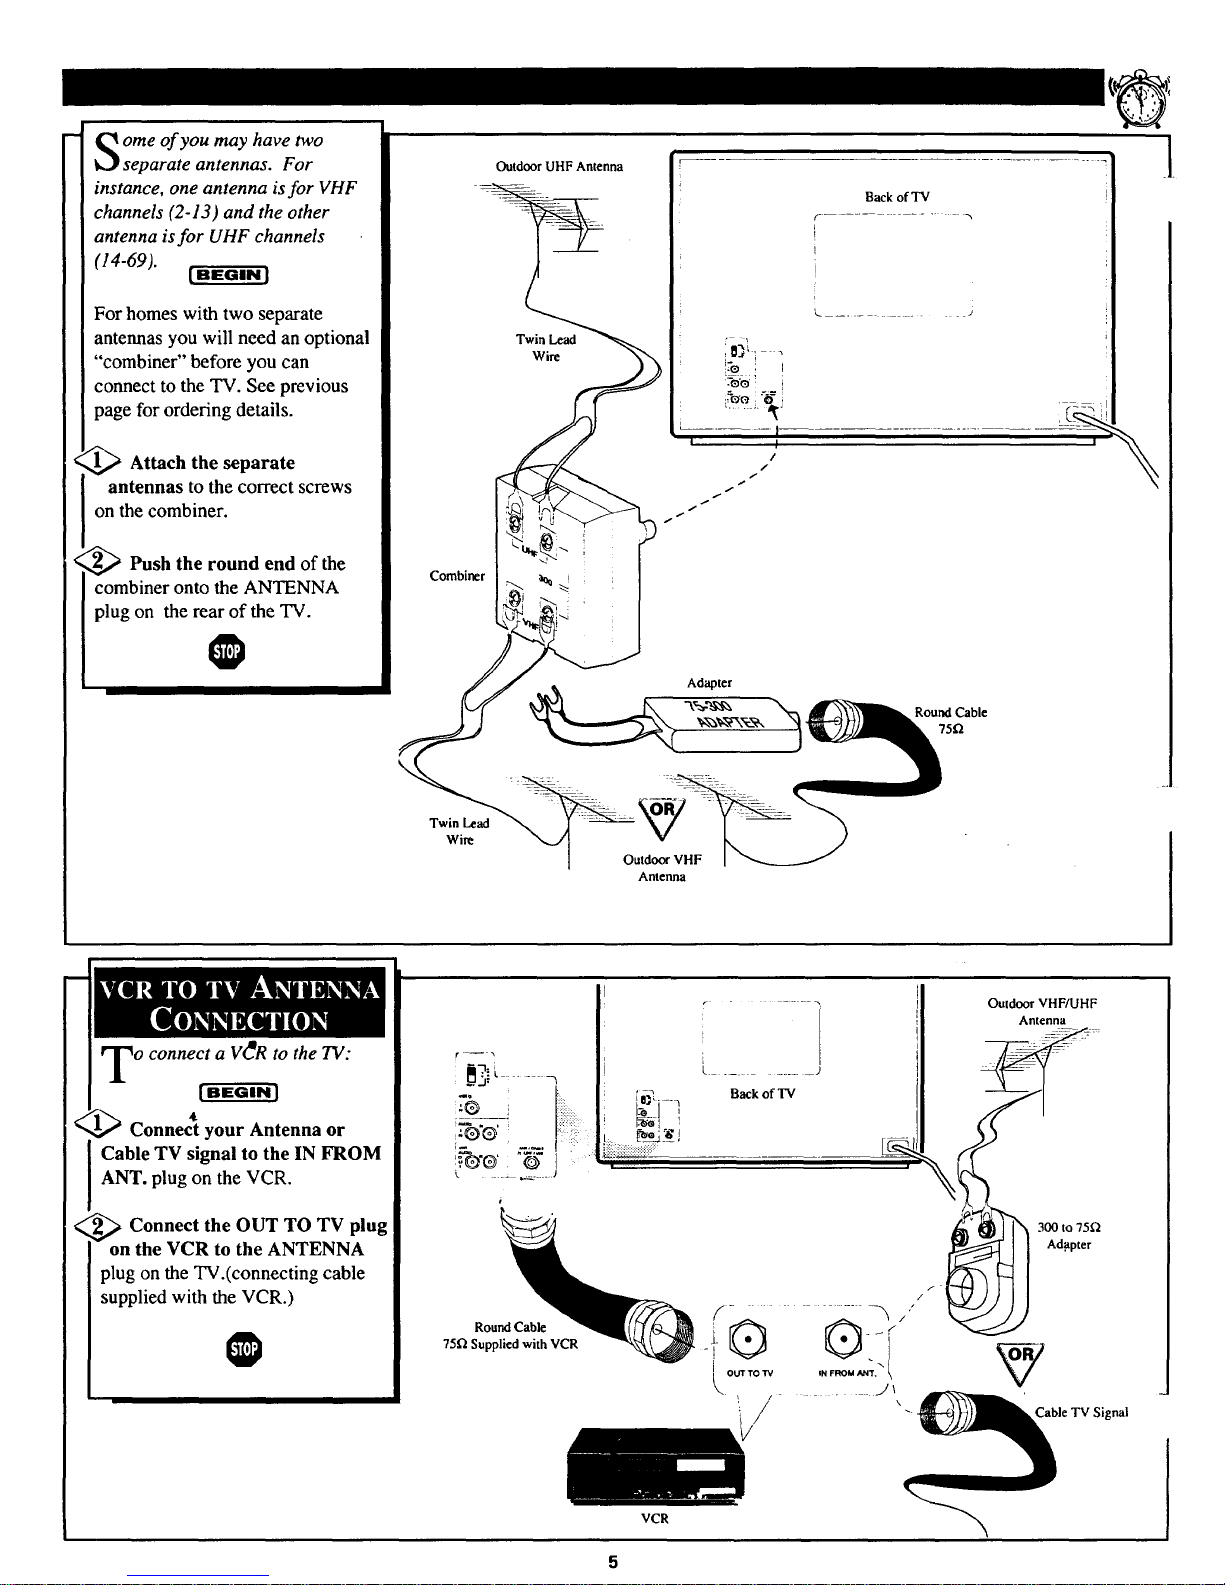
ome of you may have two
separate antennas. For
instance, one antenna is for VHF
channels (2-13) and the other
antenna isfor UHF channels
(14-69).
[ BEGIN l
For homes with two separate
antennas you will need an optional
"combiner" before you can
connect to the TV. See previous
page for ordering details.
_,_ Attach the separate
antennas to the correct screws
on the combiner.
_Push the round end of the
combiner onto the ANTENNA
plug on the rear of the TV.
@
Outdoor UHF Antenna
Twin Lead
Wire
Twin Lead
Wire
Adapter
Outdoor VHF
Antenna
Round Cable
75f_
<
o connect a V_R to the TV:
[ BEGIN ]
4k
Connect your Antenna or
Cable TV signal to the IN FROM
ANT. plug on the VCR.
_ Connect the OUT TO TV plug
on the VCR to the ANTENNA
plug on the TV.(connecting cable
supplied with the VCR.)
@
Round Cable
75f_ Supplied with VCR
VCR
Outdoor VHF/UHF
Antenna
300 to 75fl
Adopter
Ty
Cable TV Signal
[BEGIN J
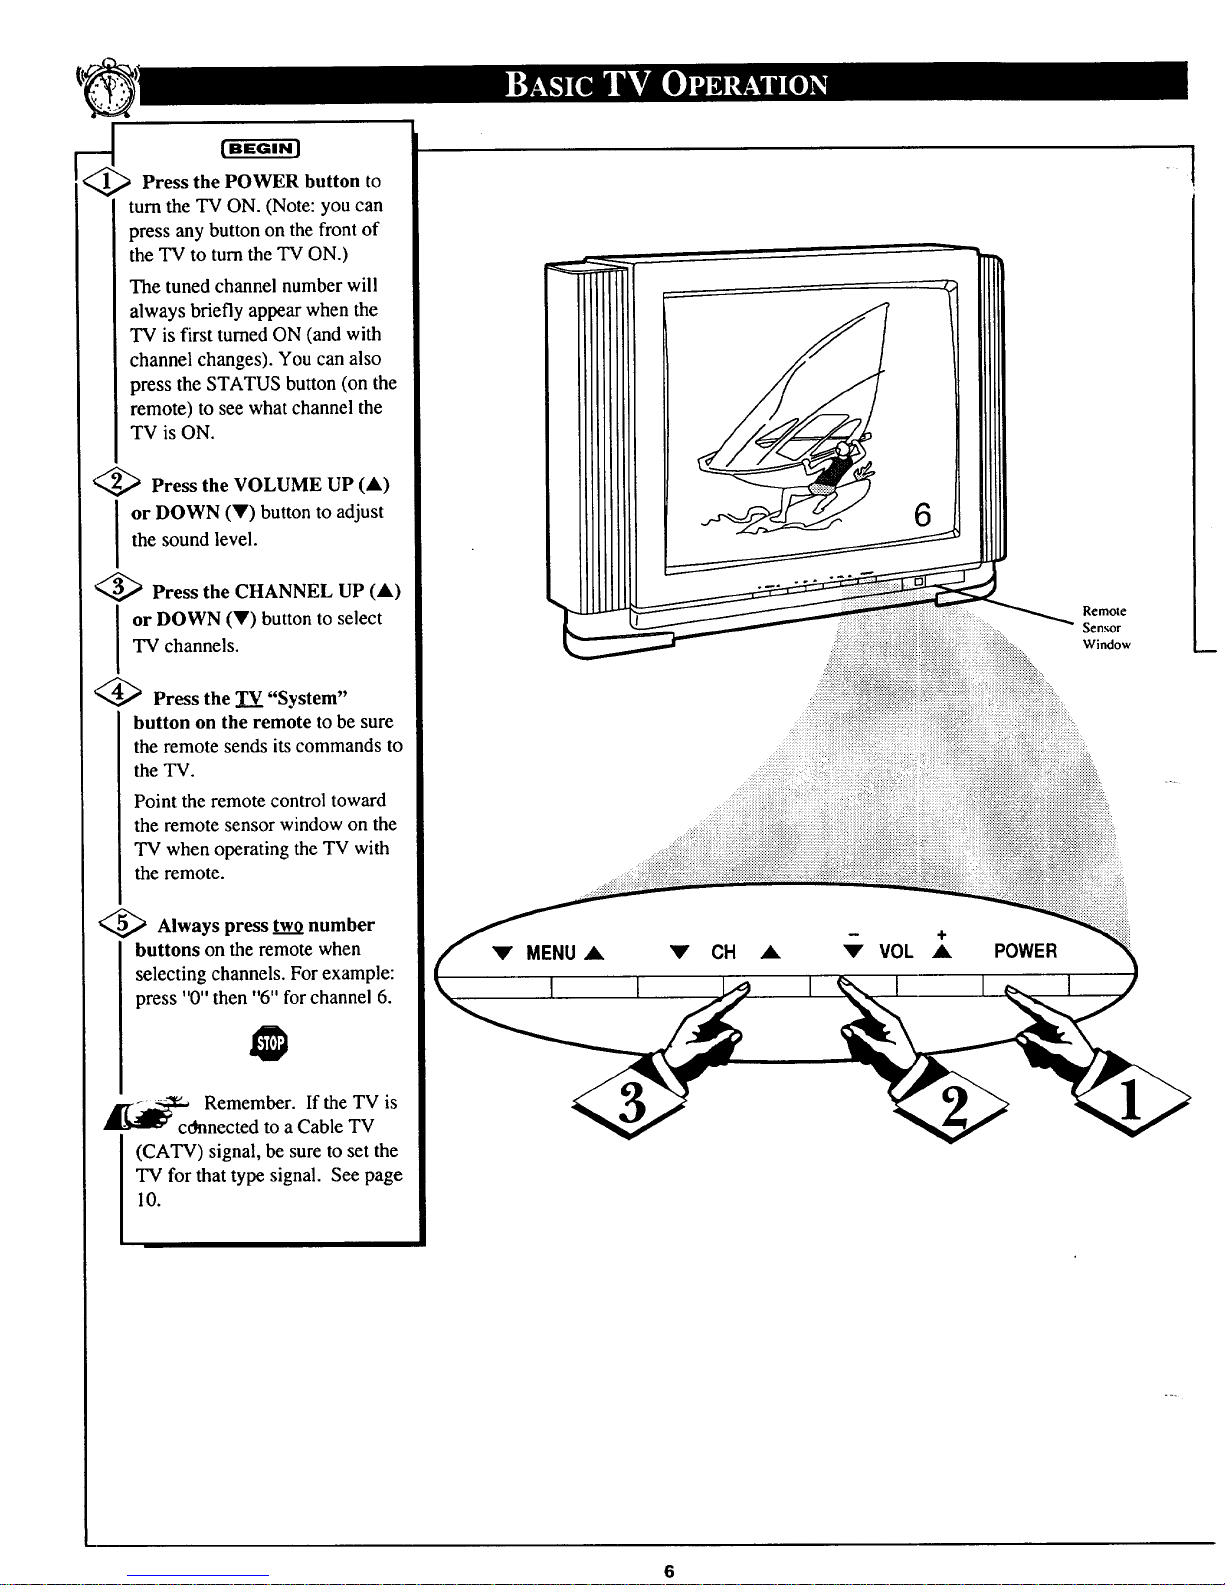
Press the POWER button to
turn the TV ON. (Note: you can
press any button on the front of
the TV to turn the TV ON.)
The tuned channel numberwill
always briefly appear when the
TV is first turnedON (and with
channel changes). You can also
press the STATUS button (on the
remote) to see what channel the
TV is ON.
"_ Press the VOLUME UP (A)
or DOWN (V) button to adjust
the sound level.
_ Press the CHANNEL UP (A)
or DOWN (V) button to select
TV channels.
@Press the TV "System"
button on the remote to be sure
the remote sends its commands to
the TV.
Point the remote control toward
the remote sensor window on the
TV when operating the TV with
the remote.
<_ Always press two number
buttons on the remote when
selecting channels. For example:
press "0" then "6" for channel 6.
Remember. If the TV is
cOnnected to a Cable TV
(CATV) signal, be sure to set the
TV for that type signal. See page
10.
6
Remote
Sensor
Window
POWER
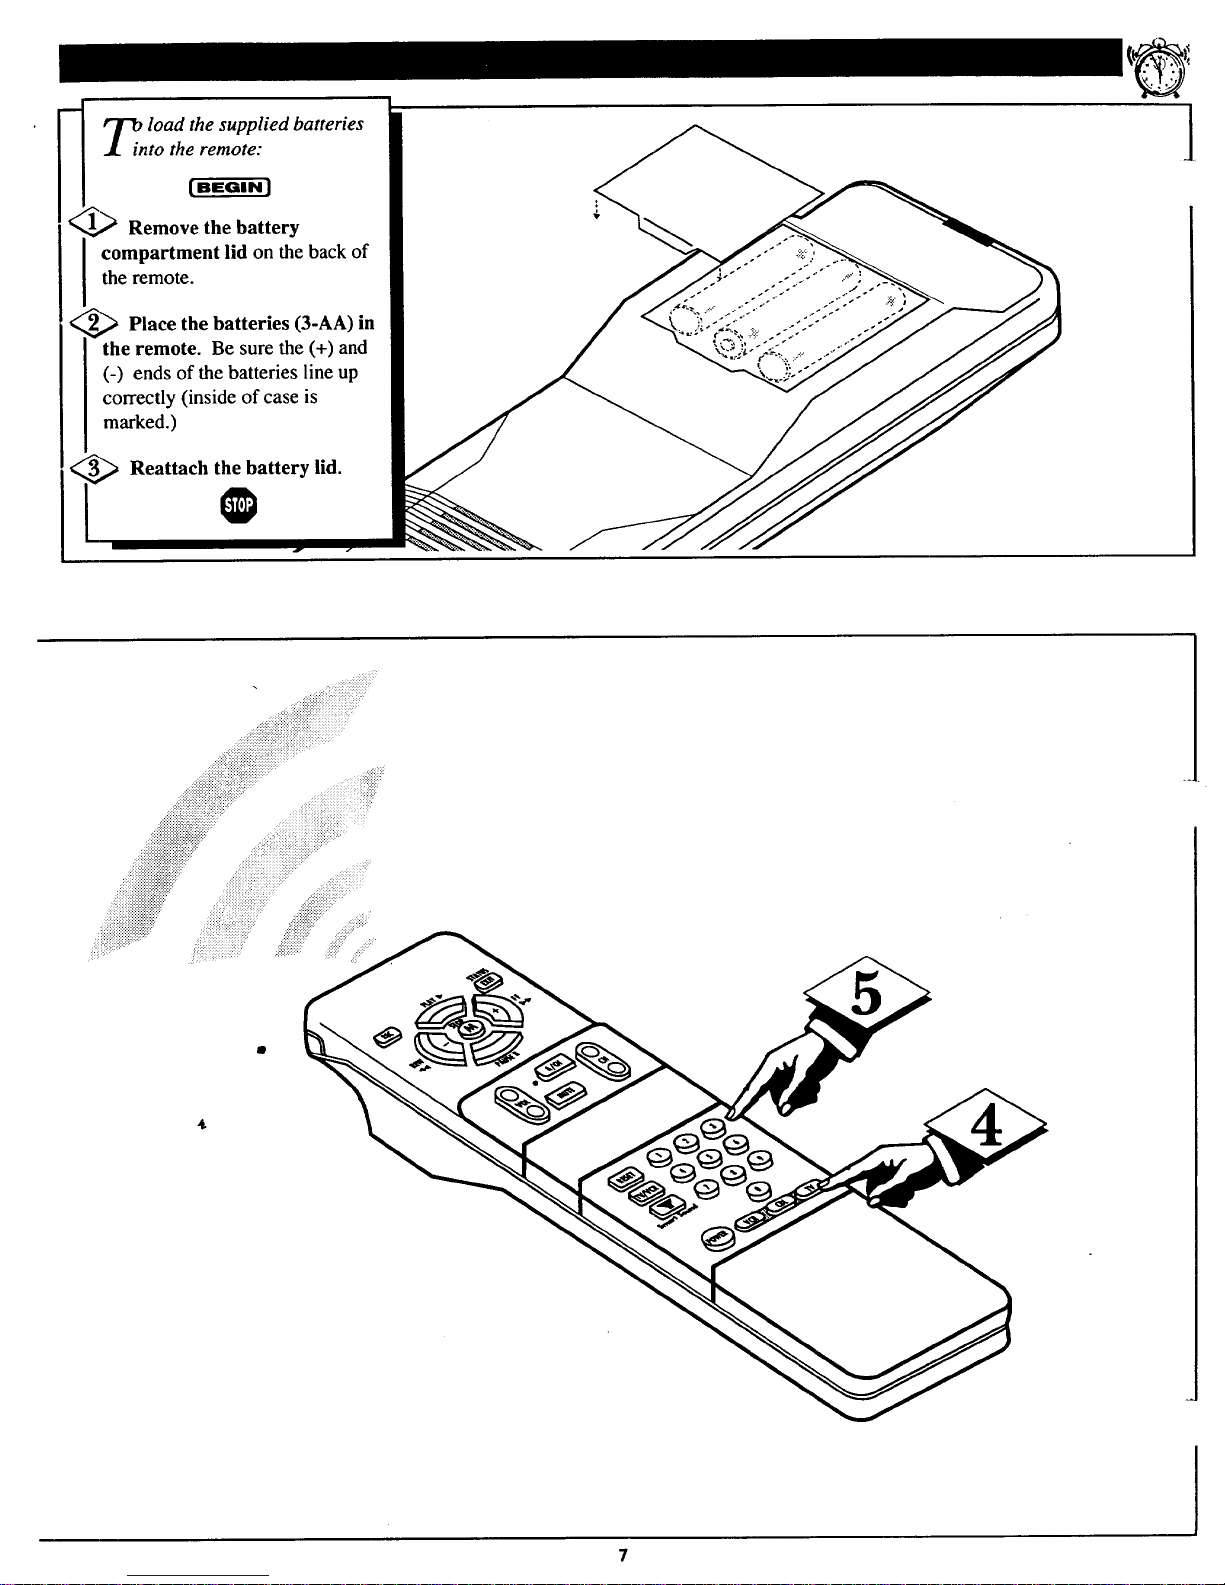
lOad the supplied batteries
to the remote:
Remove the battery
compartment lid on the back of
the remote.
<_ Place the batteries (3-AA) in
I the remote. Be sure the (+) and
[ (-) ends of the batteries line up
I correctly (inside of case is
I marked.)
_ Reattach the battery lid.
O
l
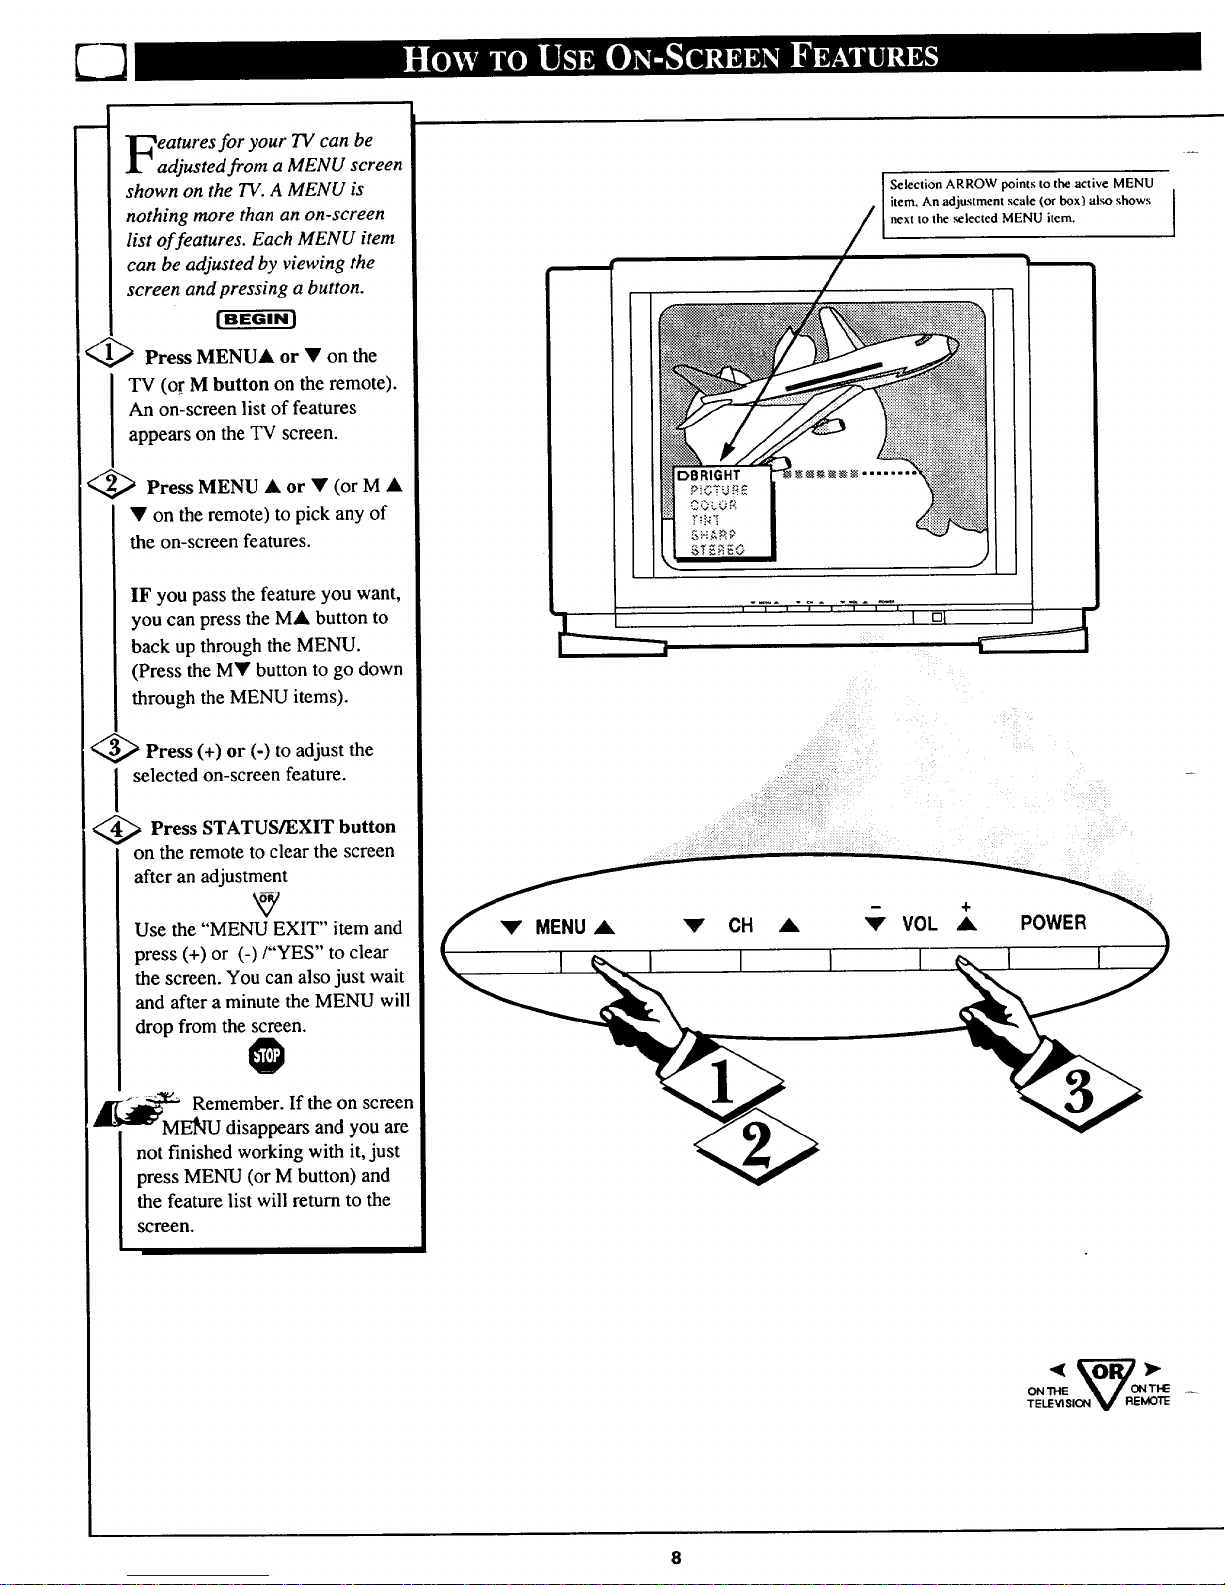
eatures for your TV can be
adjusted from a MENU screen
shown on the TV. A MENU is
nothing more than an on-screen
list of features. Each MENU item
can be adjusted by v&wing the
screen and pressing a button.
[BEGIN)
(-,,,_ Press MENUA or • on the
TV (or M button on the remote).
An on-screen list of features
appears on the TV screen.
<,,_ Press MENU • or • (or M •
• on the remote) to pick any of
the on-screen features.
IF you pass the feature you want,
you can press the MA button to
back up through the MENU.
(Press the M• button to go down
through the MENU items).
Press (+) or (-) to adjust the
I selected on-screen feature.
Press STATUS/EXIT button
on the remote to clear the screen
after an adjustment
Use the "MENU EXIT" item and
press (+) or (-)/"YES" to clear
the screen. You can also just wait
and after a minute the MENU will
drop from the screen.
k
_ Remember. If the on screen
MENU disappears and you are
not finished working with it, just
press MENU (or M button) and
the feature list will return to the
screen.
Selection ARROW points to the active MENU
item. An adjustment scale (or box) al.,;oshows I
next to the se ected MENU tern. I
I
V MENU A V CH A
-- +
V VOL A POWER
ON THE '_ _ON THE
TELEVISION V REMOTE
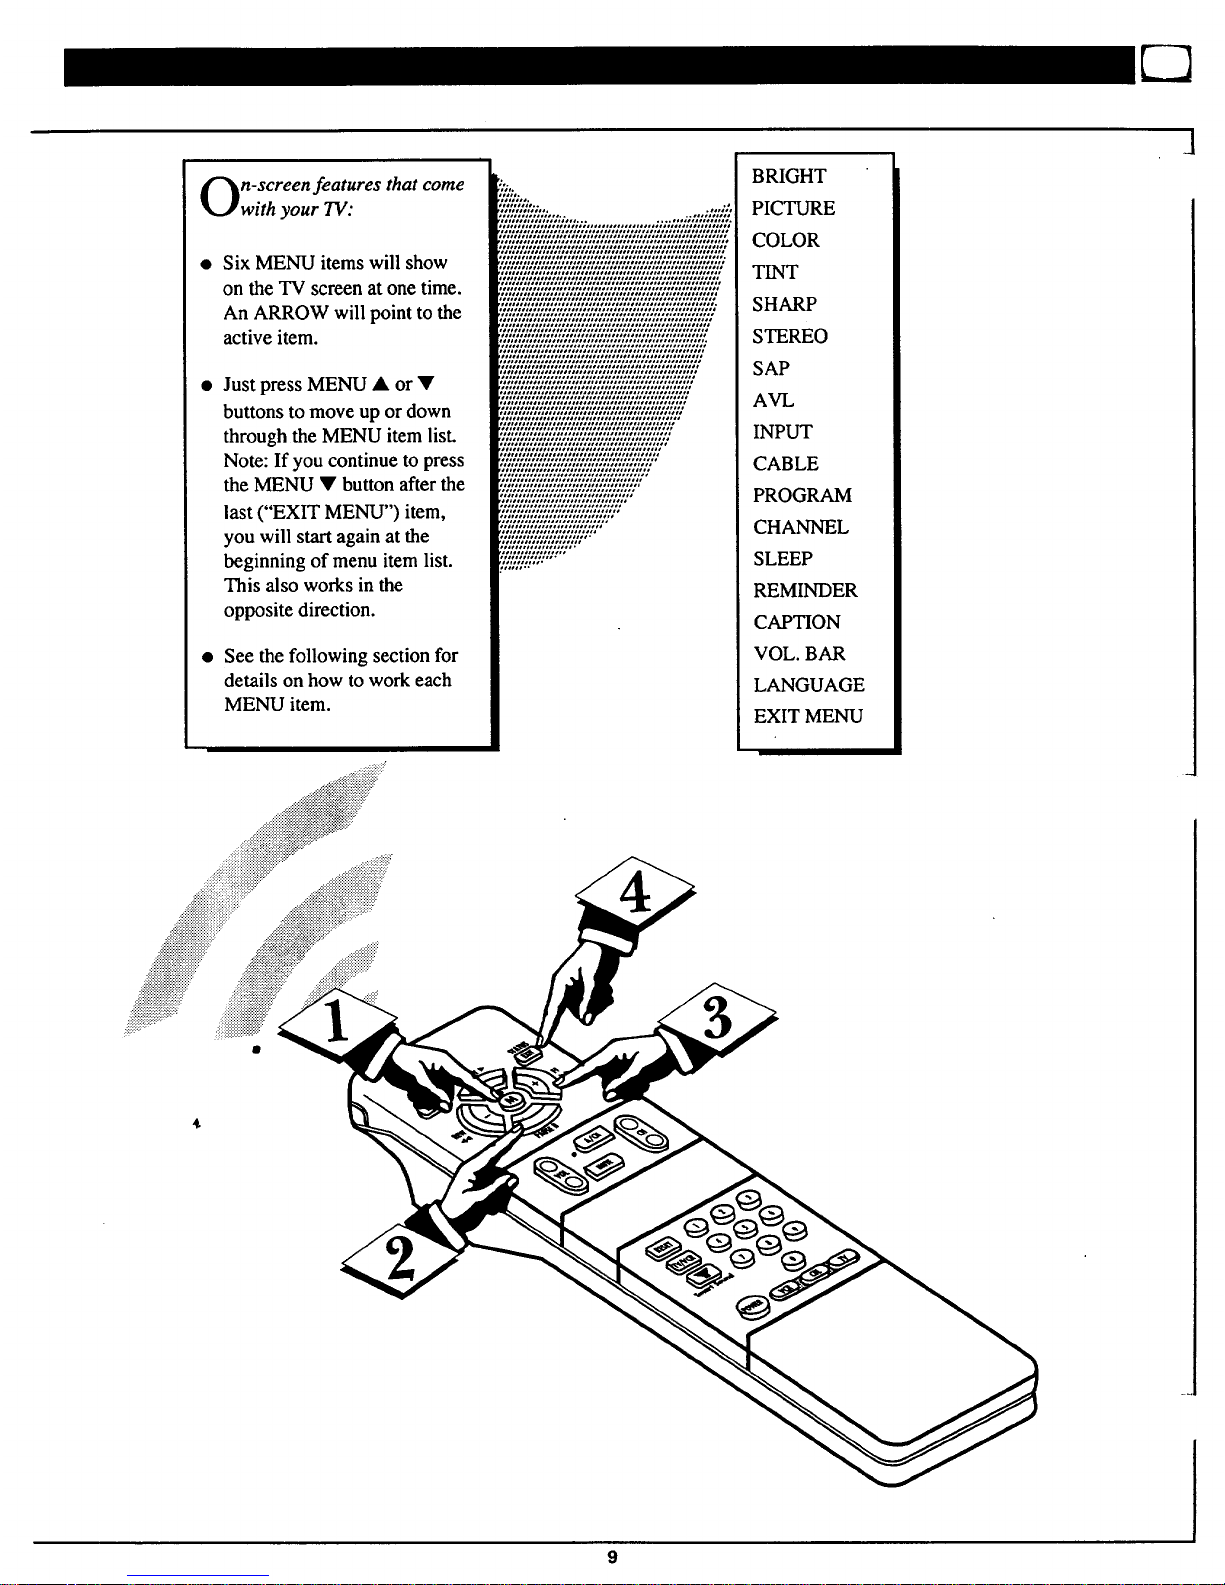
n-screen features that come
with your TV:
Six MENU items will show
on the TV screen at one time.
An ARROW will point to the
active item.
Just press MENU • or •
buttons to move up or down
through the MENU item list.
Note: If you continue to press
the MENU • button after the
last ("EXIT MENU") item,
you will start again at the
beginning of menu item list.
This also works in the
opposite direction.
See the following section for
details on how to work each
MENU item.
SAP
AVL
INPUT
CABLE
PROGRAM
CHANNEL
SLEEP
REMINDER
CAPTION
VOL. BAR
LANGUAGE
EXIT MENU
73
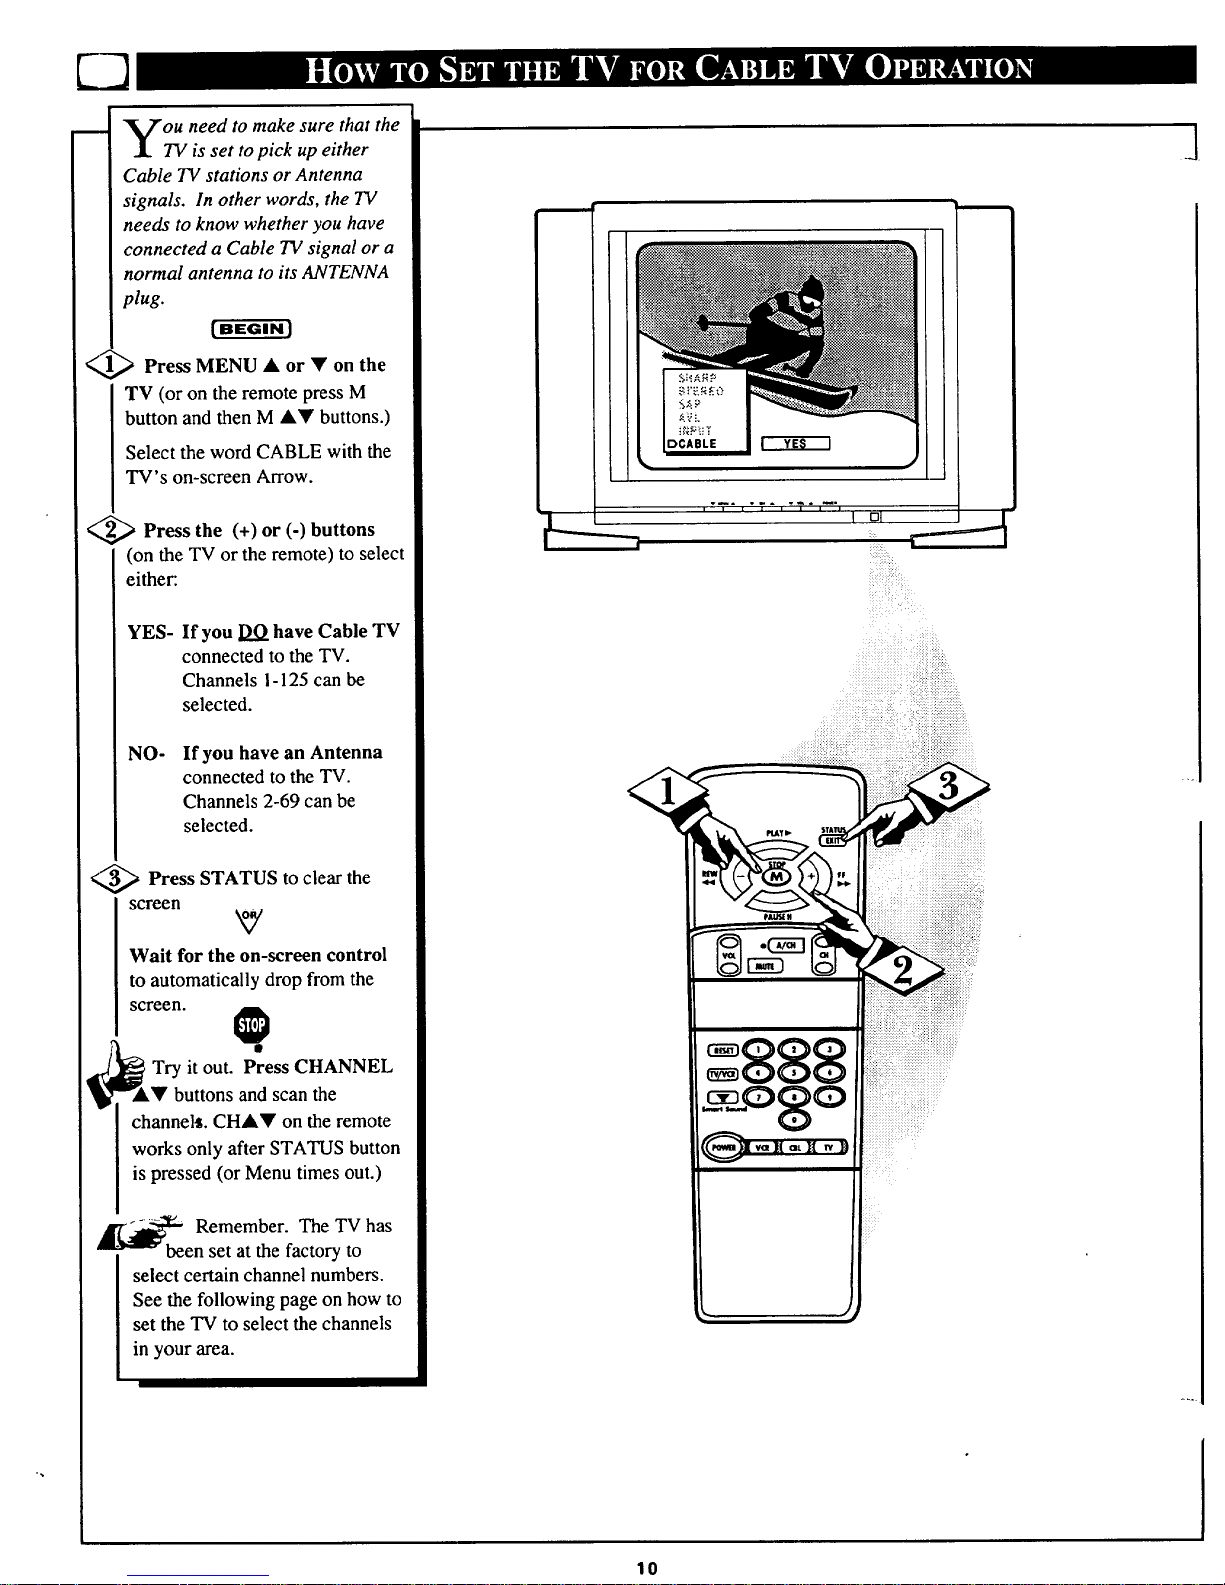
__ Vou need to make sure that the
.L TV is set to pick up either
Cable TV stations or Antenna
signals. In other words, the TV
needs to know whether you have
connected a Cable 73/signal or a
normal antenna to its ANTENNA
plug.
<_ Press MENU • or on
the
TV (or on the remote press M
button and then M •• buttons.)
Select the word CABLE with the
TV's on-screen Arrow.
<_ Press (+) or (-)
the buttons
(on the TV or the remote) to select
either:.
YES-
If you DO have Cable TV
connected to the TV.
Channels I-125 can be
selected.
NO-
If you have an Antenna
connected to the TV.
Channels 2-69 can be
selected.
€,_ Press STATUS to clear the
screen
Wait for the on-screen control
to automatically dropfrom the
screen.
Try it out. Press CHANNEL
r"A• buttons and scan the
channelt. CHAr on the remote
works only after STATUS button
is pressed (or Menu times out.)
_ Remember. The TV has
en set at the factory to
select certain channel numbers.
See the following page on how to
set the TV to select the channels
in your area.
i:i:iiiiii_iii_iiiiiii_ii_¸
?:ii: iiiiiiiiiiiiii iiiiiiiiiiiiiiiiiiiii
10
J
 Loading...