

Page 1
Instructions for use
M_._VOX
3135 015 10471
Page 2

Once your PHIL IPS MA GNA VOX purchase is registered, you're eligible to receive all the privileges of
owning a PHILIPS MAGNAVOX product. So complete and return the Warranty Registration Card
enclosed with your purchase at once. And take advantage of these important benefits.
Dear PHILIPS MAGNAVOX product owner:
Thank you for your confidence in PHILIPS MAGNAVOX. You've selected one of the best-built, best-
backed products available today. And we'll do everything in our power to keep you happy with your
purchase for many years to come.
As a member of the PHILIPS MAGNAVOX "family," you're entitled to protection by one of the most
comprehensive warranties and outstanding service networks in the industry.
What's more, your purchase guarantees you'll receive all the information and special offers for which
you qualify, plus easy access to accessories from our convenient home shopping network.
And most importantly you can count on our uncompromising commitment to your total satisfaction.
All of this is our way of saying welcome-and thanks for investing in a PHILIPS MAGNAVOX product.
Sincerely,
Robert Minkhorst
President and Chief Executive Officer
P.S. Remember, to get the most from your PHILIPS
MAGNAVOX product, you must return your
Warranty Registration Card within 10 days. So
please mail it to us right now!
Know these
safetysymbols
,_, This "bolt of lightning" indicates uninsulated material within your unit may cause an electrical
shock. For the safety of everyone in your household, please do not remove product covering.
,_The "exclamation point" calls attention to features for which you should read the enclosed lit-
erature closely to prevent operating and maintenance problems.
WARNING: TO PREVENT FIRE OR SHOCK HAZARD, DO NOT EXPOSE THIS EQUIPMENT
TO RAIN OR MOISTURE.
CAUTION: To prevent electric shock, match wide blade of plug to wide slot, and fully insert.
ATTENTION: Pour eviter les chocs electriques, introduire la lame la plus large de la fiche dans la
borne correspor_dente de la prise et p_usser iusqu'au fond.
Page 3
SAFETYINSTRUCTIONS-Readbeforeoperatingequipment
This product was designedand manufactured to meet strict quality and 11, Power-CordProtection- Power supplycords should be routed so
safetystandards.Thereare,however, someinstallationand operationpre- that theyare not likelyto bewalked on or pinchedby items placed
cautionswhichyou should be particularlyawareof. uponor againstthem, payingparticularattentiontocords and plugs,
conveniencereceptacles,and the point where they exit from the
1. Read Instructions- All the safetyand operating instructions should
be read before the appliance is operated.
2. Raisin Inctruclions - The safety and operating instructions should
be retained for futurereference.
3. Heed Warnings- All warnings on the appliance and in the operating
instructions should be adheredto.
4. Follow Instructions - All operating and use instructions should be
followed,
5. Water and Moisture - Theappliance shouldnot be used nearwater
- for example, near a bathtub, washbowl, kitchen sink, laundrytub,
in awet basement or near a swimming pool,etc.
6. Carts and Stands- Theappliance should beused only with a cart or
stand that is recommended by the manufacturer.
6A. A An appliance and cart combination should be moved
with care. Quick stops, excessiveforce, and uneven sur-
faces may cause the appliance and cart combination to
overturn
6B. Tilt/Stability - All televisionsmust comply with recommended inter-
national global safety standards for tilt and stability properties of its
cabinet design.
Do not compromise these design standards by applyingexces-
sive pull force to thefront, or top, of the cabinet which could
ultimately overturn the product.
Also, do not endanger yourself, or children,by placing elec-
tronic equipment/toys on the top of the cabinet. Such items
could unsuspectingly fail from the top of the set and cause
product damageand/or personal injury.
7. Wall or Ceiling Mounting - "_heappliance should be mounted to a
wall or ceiling only as recommended by the manufacturer,
8. Ventilation- Theappliance should be situated so that its location or
position does not interfere with its proper ventilation. For example,
the appliance should not be situated on a bed, sofa, rug, or similar
surface that may block the ventilation openings; or, placed in a builto
in installation, such as a bookcase or cabinet that may impede the
flowof air throughthe ventilationopenings.
9. Heat - The appliance should be situated away from heat sources
such as radiators, heatregisters,stoves, or other appliances (includ-
ing amplifiers) that produce heat.
10. Power Sources- Theappliance should beconnectedto a power sup-
ply only of the type described in the operating instructions or as
marked on the appliance.
appliance.
12. Cleaning - The appliance should be c_eanedon_yas recommended
bythe manufacturer.
13. Power Lines - An outdoor antenna should be locatedaway from
power lines.
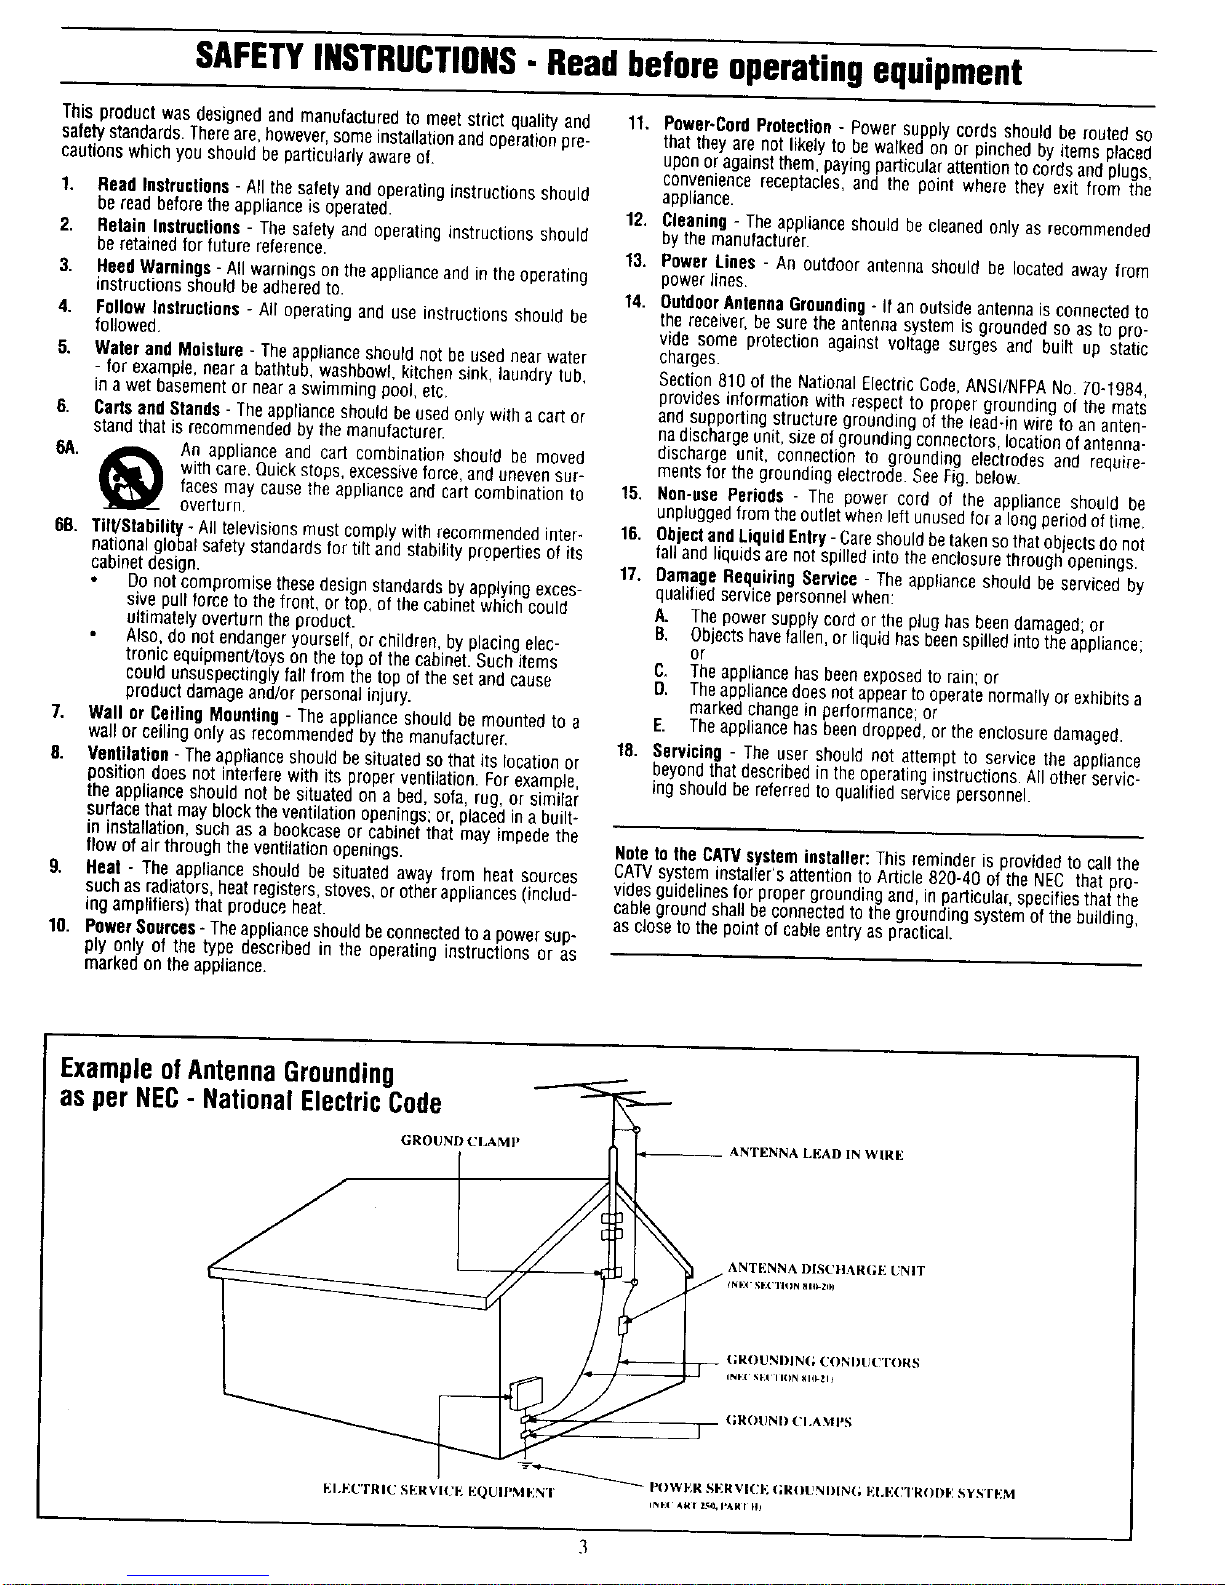
14. OutdoorAnlennaGrounding - If an outside antenna is connected to
the receiver, be sure the antenna system is grounded so as to pro-
vide some protection against voltage surges and built up static
charges.
Section 810 of the National Electric Code,ANSI/NFPANo. 70-t984,
provides information with respectto propergrounding of the mats
and supporting structure grounding of the lead-in wire to an anten-
nadischargeunit, sizeof grounding connectors, locationofantenna-
discharge unit, connection to grounding electrodes and require-
mentsfor the grounding electrode.SeeFig. below.
15. Non-use Periods o The power cord of the appliance should be
unpluggedfrom the outlet when left unused for along period of time.
16. 0biectandLiquidEntry-Careshould betaken sothatobjects do not
fall and liquids are not spilled into the enclosurethrough openings.
17. OamugeRequiring Service - The appliance should be serviced by
qualified service personnel when:
A. The power supply cord or the plug has beendamaged; or
B. Objectshavefallen, or liquid has beenspilled into the appliance;
or
C. Theappliance has beenexposedto rain; or
D. Theappliancedoesnot appearto operate normally or exhibits a
markedchange in performance; or
E. Theappliancehas been dropped, or the enclosure damaged.
18. Servicing- The user should not attempt to service the appliance
beyond thatdescribed in the operating instructions. All other servic-
ing should be referred to qualified service personnel
Note to the CATVsysteminstaller: This reminder is providedto call the
CATVsysteminstaller'sattentionto Article820-40 of the NEC thatpro-
vides guidelines for propergrounding and, inparticular_specifies that the
cable ground shall beconnected to the grounding system of the building,
as closeto the pointot cable entry as practical.
ExampleofAntennaGrounding
as perNEC- NationalElectricCode
GROUND (£UAM} _ ANTENNA LP:AD IN WIRF:
ANT[_:NNA I)[S(!]]AR(_', UNIT
_.;R|)UNDIN|; |'DNDU_'T|YRa
(;HOUND (!1.AMP_;
_-_ I'()WF_H ,%ER¥1(;I%(;R()t_t*n)l_(; ]*;LF]( TOODF, SYS'FF;M
[':I+_',(:TRIU SER%'I(_[': Iv:QUIPMI_:N'I '
Page 4

Welcome/Registration of Your TV ............................ 2
Safety/Precautions ..................................................... 3
Table of Contents ....................................................... 4
Features ...................................................................... 4
['_ Onscreen M_NU
_" Adjusting the TV Picture ......................... 5
"_ Activating Contrast Plus (Black Stretch) .......... 6
¢. Activating Noise Reduction (Picture) Control..7
_" Setting the TV's Clock ...................................... 8
•_ Activating the Timer Control ............................ 9
¢" Activating the Start-Up Channel ..................... 10
"_ Setting the TV's Start Time Control ................ I1
_" Setting the TV for Closed Caption .................. 12
"¢,Using the Sleep Timer Control ........................ 13
I_ SmartLockTM
_" Understanding the SmartLock Feature ....... 14
_" Setting the SmartLock Access Code ................ 15
Setting the SmartLock to Block Channels ....... 16
_" Setting SmartLock's Blocking Options ........... 17
<_ Blocking Using the Movie/TV Ratings .....18-19
_" Using the SmartLock Review Screen .............. 20
+ Setting the Treble, Bass and Balance
Controls ............................................................ 21
•0- Setting the TV for Stereo and SAP Programs .22
_" Setting the TV for lncrodible Surround ........... 23
+ Using the Volume Bar Control ........................ 24
+ Using the Volume Limiter Control .................. 24
+ Using the |nput control with the Audio/Video
Input Jacks ....................................................... 25
_" Using the Audio Video Output Jacks ............... 26
i Remote Control Ooeration
Using the SmartPictureTM Control .............. 27
Using the SmartSoundTM (AVL) Control ...28
Using SmartSurfTM (Alternate Channel) ................. 29
Setting the Remote Control to Operate Accessory
Devices (Code Entry) ......................................... 30-3 I
Setting the Remote Control to operate Accessory
Devices (Search Method) ........................................ 32
Remote Control Direct Entry Code List ............ 33-34
Using the Remote's VCR Buttons ........................... 35
Tips if Something Isn't Working ............... 36
Glossary of TV Terms .............................................. 37
Index ........................................................................ 37
Factory Service Locations .................................. 38-39
Warranty ................................................................... 40
Here are a few of the special features built into this
new Color Television:
SmartLock TM feature allows you to block the view-
ing of certain channel or external audio/video con-
nections where you might not want your children
viewing inappropriate material.
Infrared Remote Control works your TV set, VCR,
and a variety of wireless remote control Cable
Converters (Satellite Receivers, DVD, etc.).
Standard broadcast (VHF/UHF) or Cable TV
(CATV) channel capability.
Stereo TV with builtqn audio amplifier and twin
speaker system for receiving TV programs broadcast
in stereo sound. This TV can actually detect if the
signal being received is Stereo and adjust for it.
Closed Captioning allows the viewer to read TV
program dialogue or voice conversations as Onscreen
text.
Automatic Programming of Channels for quick
and easy selection of favorite stations available in
rOUt area.
Onsereen Features (in either English, French, or
Spanish) show helpful messages for setting of TV
controls.
Audio/Video Jackpanel for direct connections with
VCRs (or other video accessories) providing quality
TV picture and sound playback.
On Timer automatically turns the TV ON at a preset
time, and channel.
Sleep Timer automatically turns the TV OFF at pre-
set times.
SmartPicture TM allows you to set the picture color,
tint, contrast, etc. for various types of programming
such as Personal (picture controls the way you set
them), Sports, Movies, or Weak Signals with the push
of one button.
SmartSound TM controls allow you to set the sound
controls for various types of listening programs such
as Personal (sound controls the way you set them),
Theater, Music, or Voice with the push of one button.
SmartPictureTM, SmartSound TM, SmartSurf TM, and SmartLock TM are all
registered trademarks of Philips Consumer Electronics Company.
Copz_right © I999 Philips Consumer Electronics Company. All rights reserved.
Page 5
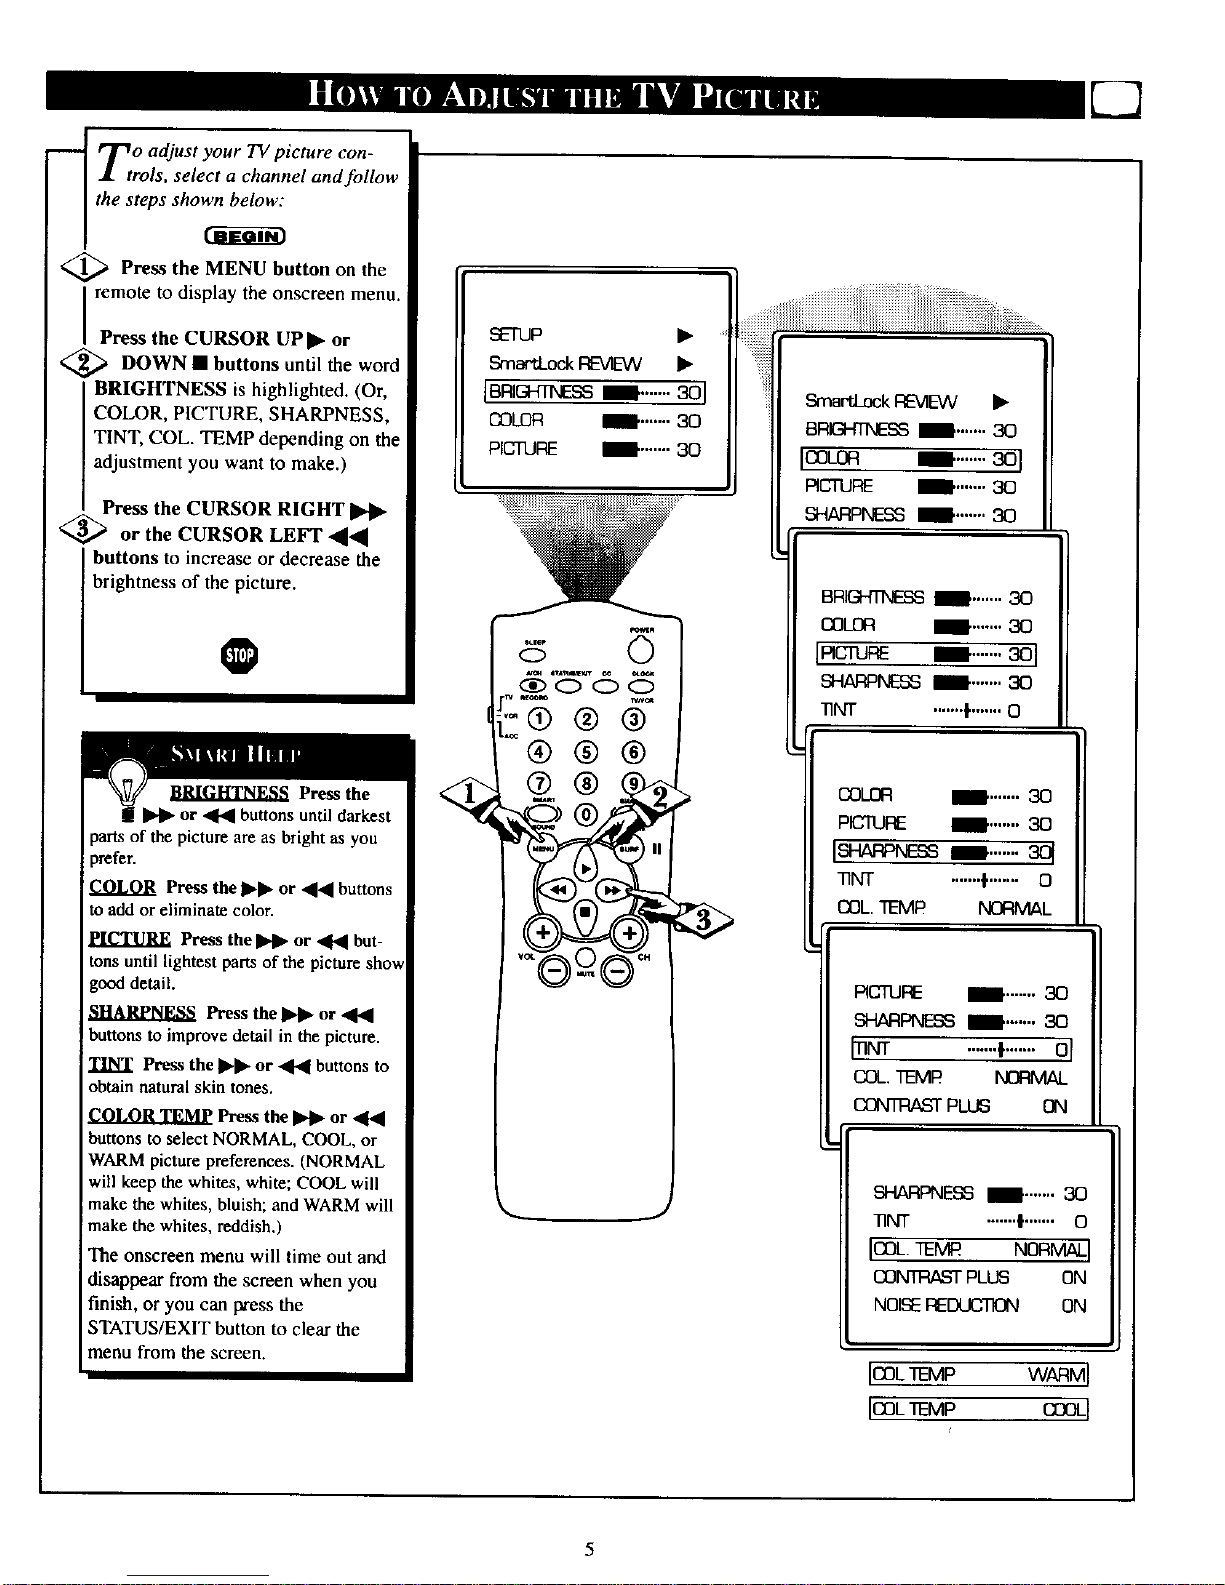
r.r_o adjust your TV picture con-
.L trois, select a channel and follow
the steps shown below:
<_ Press the MENU button the
on
remote to display the onscreen menu.
Press the CURSOR UP ]1_or
<_ DOWN • buttons until the word
BRIGHTNESS is highlighted. (Or,
COLOR, PICTURE, SHARPNESS,
TINT, COL. TEMP depending on the
adjustment you want to make.)
Press the CURSOR RIGHT
_, _ or the CURSOR LEFT _[_l
buttons to increase or decrease the
I br ghtness of the p cture.
@
to add or eliminate color.
tons until lightest parts of the
good detail.
buttons to improve detail in the picture.
TINT Press the I_1_ or _ buttons to
obtain natural skin tones.
Press the _ or _1_
buttons to select NORMAL, COOL, or
WARM picture preferences. (NORMAL
will keep the whites, white; COOL will
make the whites, bluish; and WARM will
make the whites, reddish.)
The onscreen menu will time out and
disappear from the screen when you
finish, or you can press the
STATUS/EXIT button to clear the
imenu from the screen.
SETUP •
,Srn_d_ockREVIEW
[BRI_ESS_ .......301
COLOR II' .......30
PICTURE l' ....... 30
0
.-®®@
®@®
Smar'tLockIRE-MEVV •
BRIGHTNESSi_. ....... 30
Ioa-oR '_ .......301
RCq'URE II' ....... 30
_r'IARPM_3 mE' ....... 30
BRIGH'ITd_ ill ....... 30
OOL£_ 1. ....... 30
IRCruRE m .......301
SHARPNESSI_' .......30
]]NT .......I'.......O
COLOR D ....... 30
PICTURE _1' .......30
LSH:a_e_sD....... 30t
TINT .......I'....... O
OL TEMR NORIV_L
RCTURE
SHARPNESSml_., 3Q
MNr .......*.......el
COL.TEMI_ NQRMAL
CQNTI:_,,STPLUS
SHARPNESSII' ....... 30
T_T .......t.......o
IOOL.TEMR NORMALI
CONTRASTPLUS ON
NOISEREDUCTION ON
I_L 1EMP WARMI
ICOL'fEMP COOL[
5
Page 6
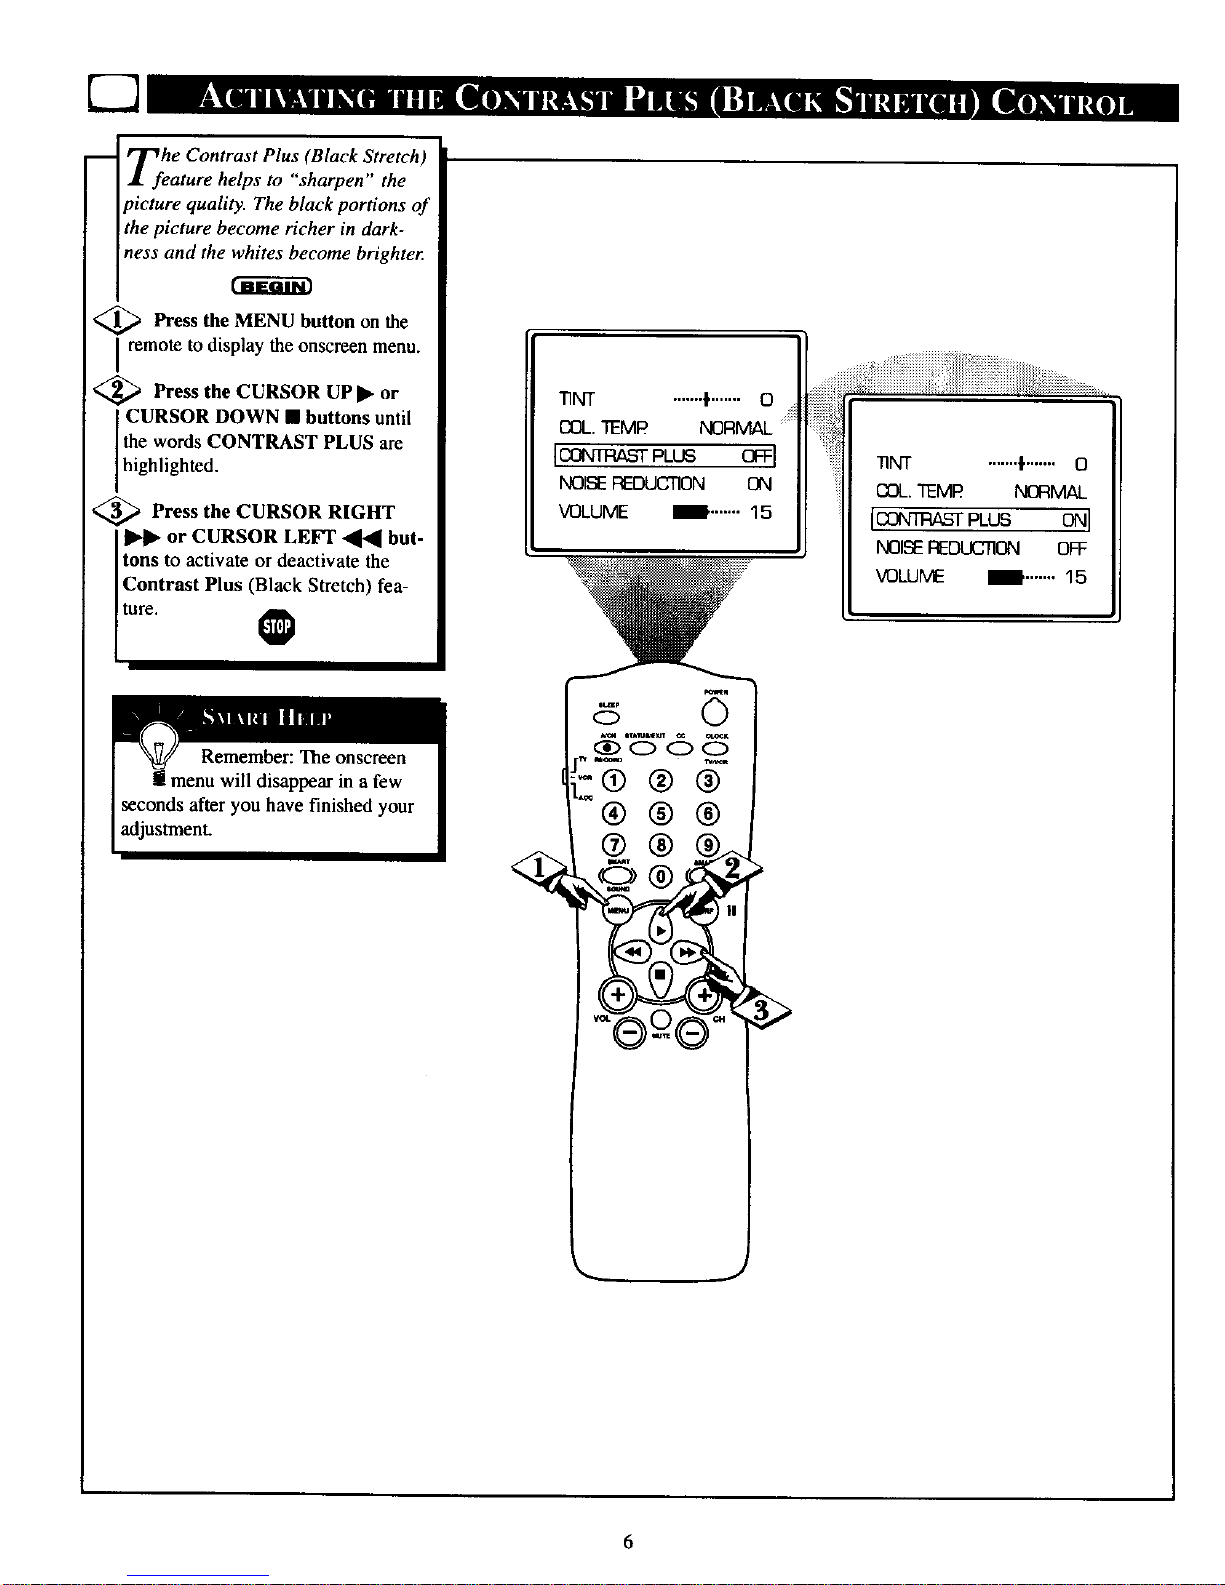
Tfehe Contrast Plus (Black Stretch)
ature helps to sharpen the
picture quality. The black portions of
the picture become richer in dark-
ness and the whites become brighte_
m-imm
,_ Press the MENU button on the
I remote to display the onscmen menu.
<_ Press the CURSOR UPI_ or
CURSOR DOWN • buttons until
the words CONTRAST PLUS are
h gh ghted.
<_ Press the CURSOR RIGHT
or CURSOR LEFT _l'_ but-
tons to activate or deactivate the
Contrast Plus (Black Stretch) fea-
ture. @
"iqNT .......I'.......O
COL.TEMR
IC_n_As'rPLUS OFFI
NOISEREDUCTION ON
VOLUME l" ....... 15
po._1
f At,_o
-O®®
®®®
o®®..
_NT .......I ....... 0
COL.TEMR NORMAL
I_ PLUS 0NI
NOISEREDUC_ OFF
VOLUME _' ....... 15
6
Page 7
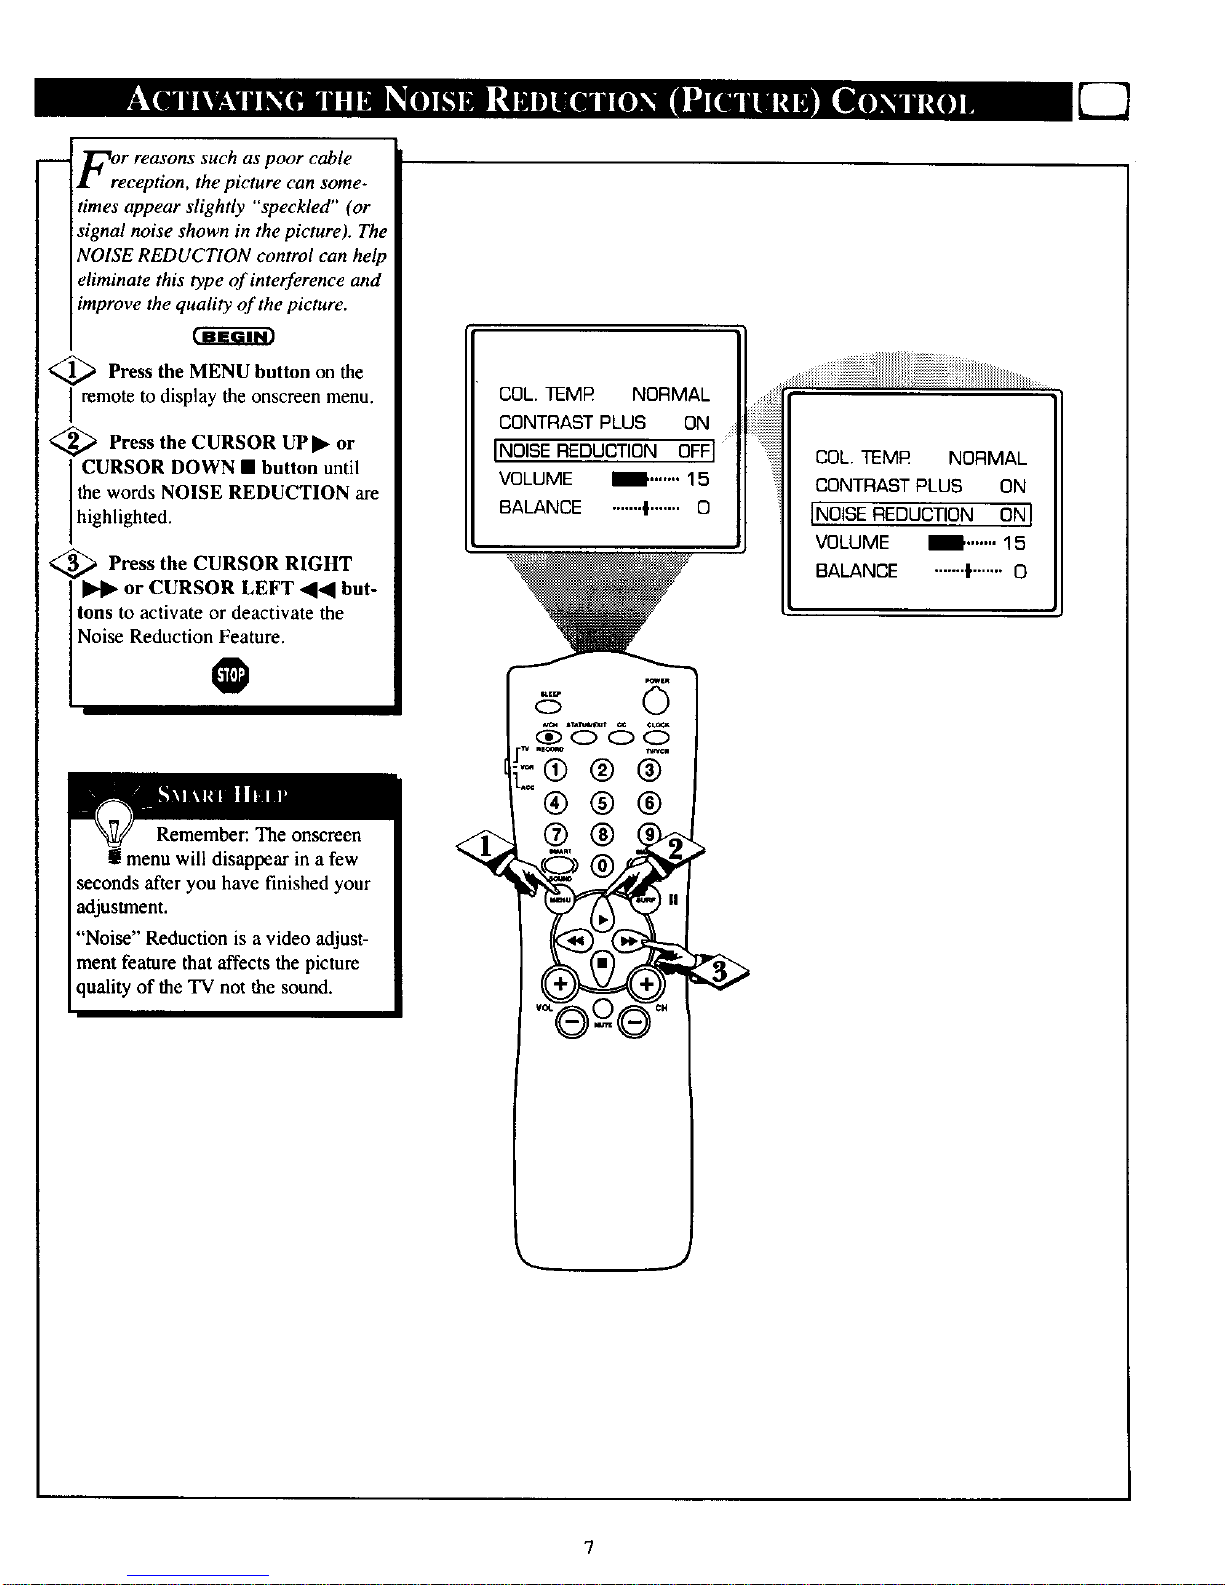
FOrer reasons such as poor cable
ception, the picture can some-
times appear slightly "speckled" (or
signal noise shown in the picture). Th,
NOISE REDUCTION control can help
eliminate this type of interference and
improve the quality of the picture.
<_ Press the MENU button on the
I remote to display the onscreen menu.
<_ Press the CURSOR UPI_ or
CURSOR DOWN • button until
the words NOISE REDUCTION are
h gh ghted.
<_ Press the CURSOR RIGHT
or CURSOR LEFT 414 but-
tons to activate or deactivate the
Noise Reduct on_ture.
Remember: The onscreen
imenu will disappear in a few
seconds after you have finished your
adjustment.
"Noise" Reduction is a video adjust-
ment feature that affects the picture
quality of the TV not the sound.
COL. TEMR NORMAL
CONTRAST PLUS ON
[NOISE OFF
VOLUME I1. ....... 15
BALANCE .......'1....... O
COL. TEMR NORMAL
CONTRAST PLUS ON
INOISEREDUCTION ONI
VOLUME _ ....... 15
BALANCE .......{....... 0
Page 8
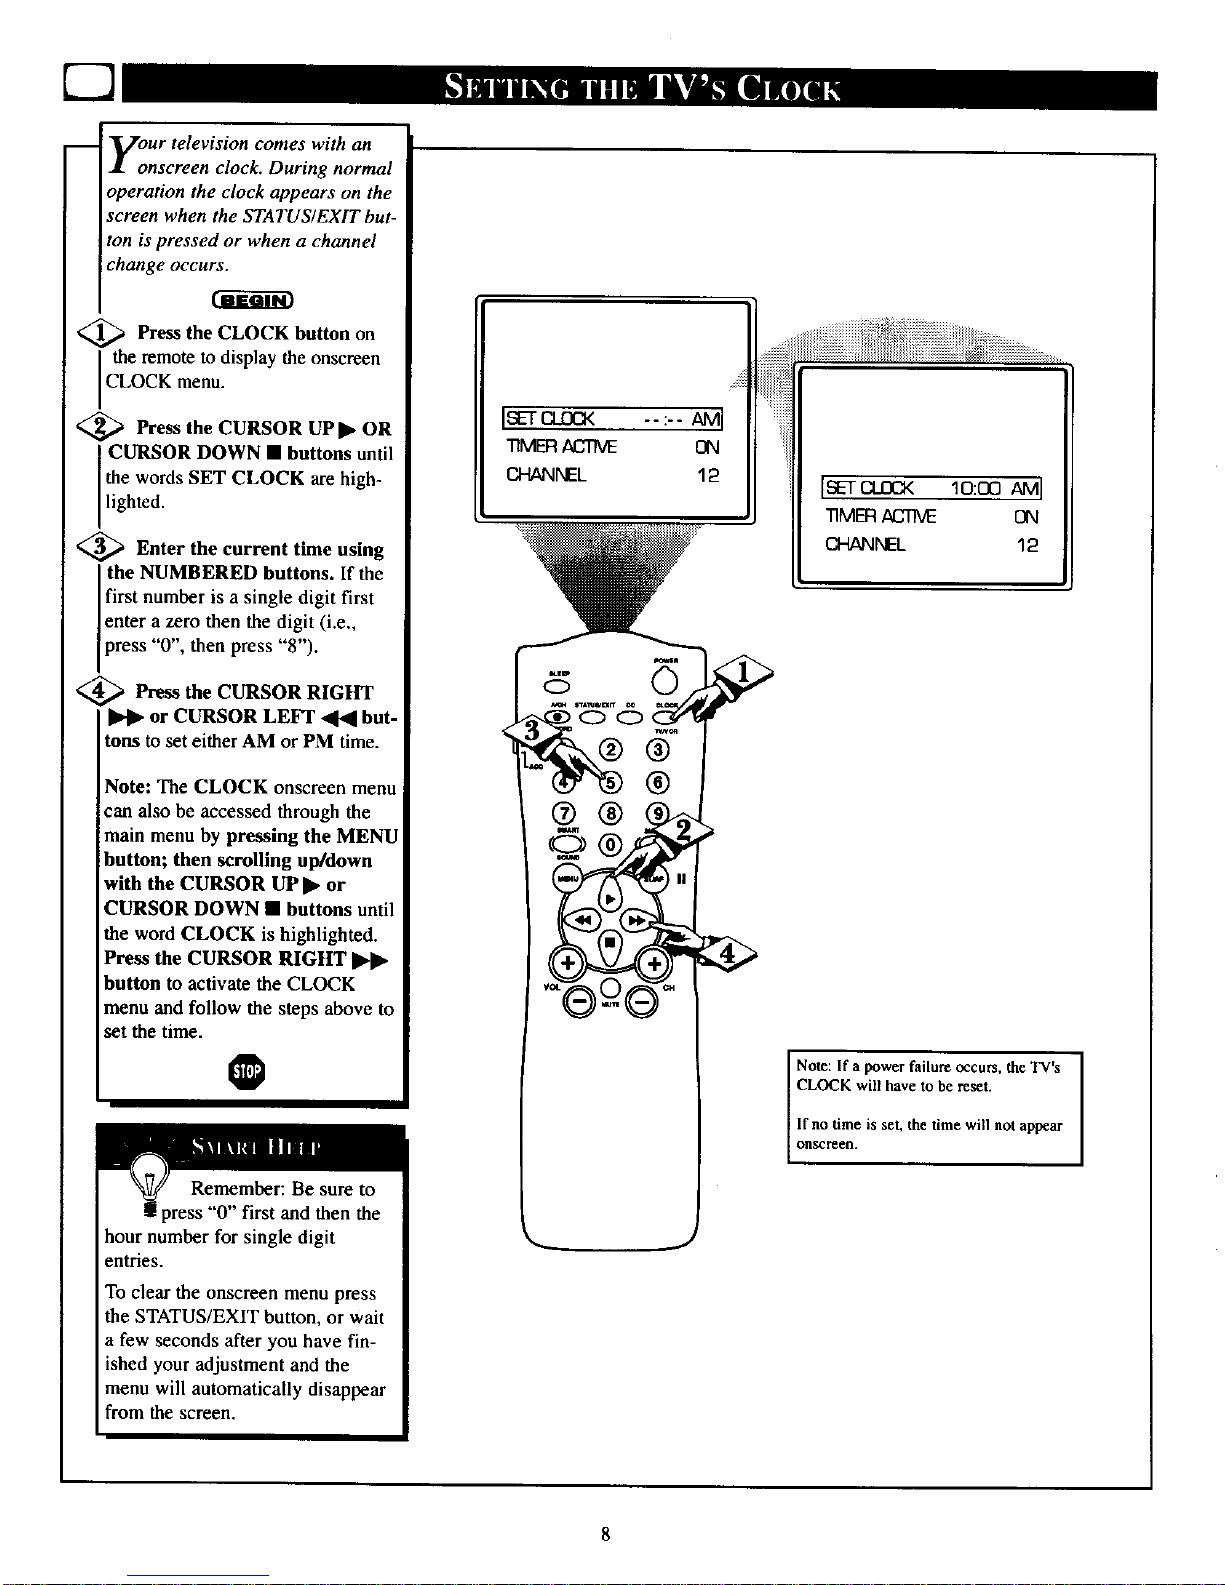
y:ur television comes with an
nscreen clock. During normal
operation the clock appears on the
screen when the STATUS/EXITbut-
ton is pressed or when a channel
change occurs.
<_ Press the CLOCK button on
e remote to display the onscreen
CLOCK menu.
_ Press the CURSOR UP• OR
I CURSOR DOWN • buttons until
the words SET CLOCK are high-
lighted.
_ Enter the current time using
the NUMBERED buttons. If the
Ifirst number is a single digit first
[enter a zero then the digit (i.e.,
press "0", then press "8").
<_ Press the CURSOR RIGHT
or CURSOR LEFF _ but-
tons to set either AM or PM time.
Note: The CLOCK onscreen menu
can also be accessed through the
main menu by pressing the MENU
button; then scrolling up/down
with the CURSOR UP • or
CURSOR DOWN • buttons until
the word CLOCK is highlighted.
Press the CURSOR RIGHT
button to activate the CLOCK
menu and follow the steps above to
set the time.
@
"'0" first and then the
hour number for single digit
entries,
To clear the onscreen menu press
the STATUS/EXIT button, or wait
a few seconds after you have fin-
ished your adjustment and the
menu will automatically disappear
from the screen.
®
[SEt £a_DCK 10:00 AMI
TIMER.a,Cf'NE ON
CHANNEL 12
I Note: If a power failure occurs, the TV's [
CLOCK will have to be reset.
If no time is set, the time will not appear
OllSCreelL
Page 9
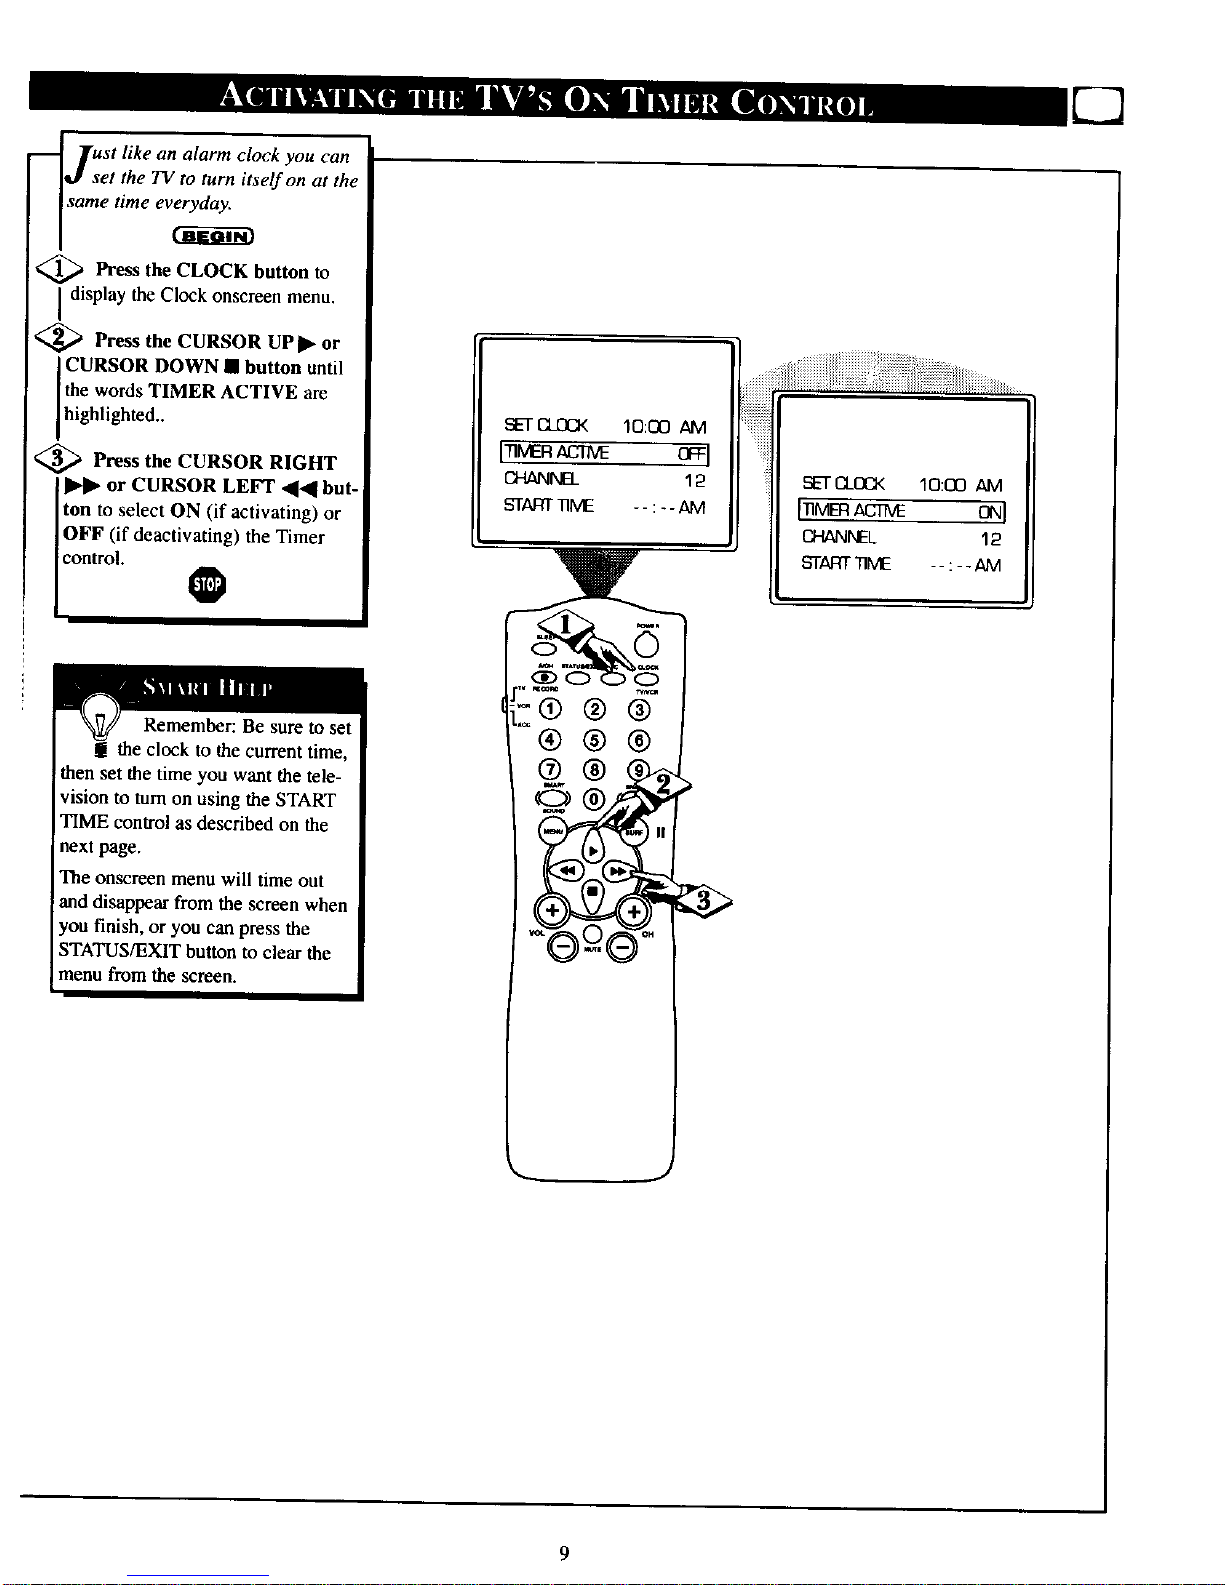
lust like an alarm clock you can
qJ set the TV to turn itself on at the
same lime ev_
_ Press the CLOCK button to
I display the Clock onscreen menu.
<_ Press the CURSOR UPII_ or
CURSOR DOWN • button until
the words TIMER ACTIVE are
highlighted..
,_ Press the CURSOR RIGHT
II_l_ or CURSOR LEFT _[,_ but-
Iton to select ON (if activating) or
IOFF (if deactivating) the Timer
control+
Remember: Be sure to set
the clock to the current time,
then set file time you want the tele-
vision to turn on using the START
TIME control as described on the
next page.
The onscreen menu will time out
!and disappear from the screen when
rou finish, or you can press the
STATUS/EXIT button to clear the
menu from the screen.
I crFI
CHANNEL 12
b_i'ARTqqME --:--AM
®
Sl_q-CLOCK 10:00 AM
CHANNEL 12
b-TART_ME -- :-- AM
9
Page 10
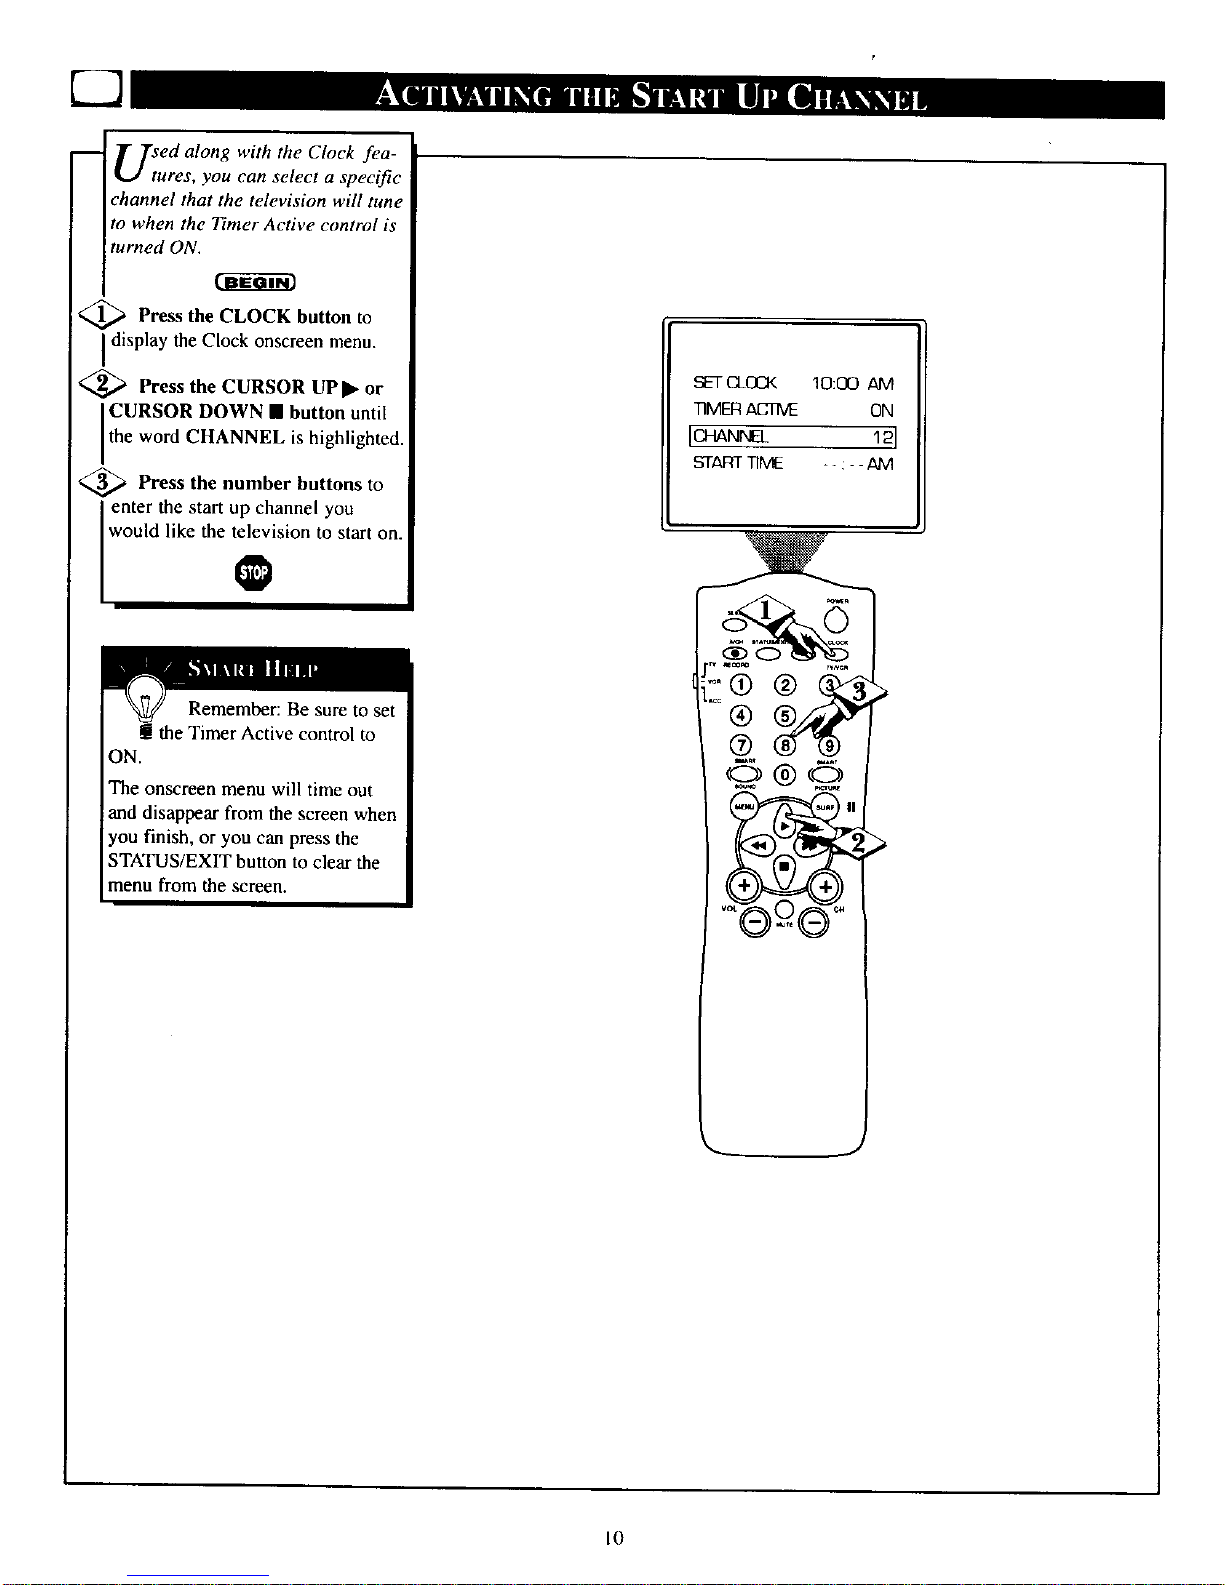
U_ed along with the Clock fea-
ures, you can select a specific
channel that the television will tune
to when the Timer Active control is
turned ON.
Press the CLOCK button to
Idisplay the Clock onscreen menu.
<_ Press the CURSOR UP • or
CURSOR DOWN • button until
the word CHANNEL s high ghted.
_ Press the number buttons to
enter the start up channel you
[ would like the television_ to start on.
Remember: Be sure to set
g the Timer Active control to
ON.
The onscreen menu will time out
and disappear from the screen when
you finish, or you can press the
STATUS/EXIT button to clear the
imenu from the screen,
SETCLOCK 10:00 AM
TIMERACTIVE ON
iCHAN_J_ 12J
START TIME -- : - - AM
rv _m_ Tv_m
©®©
®,®
I0
Page 11
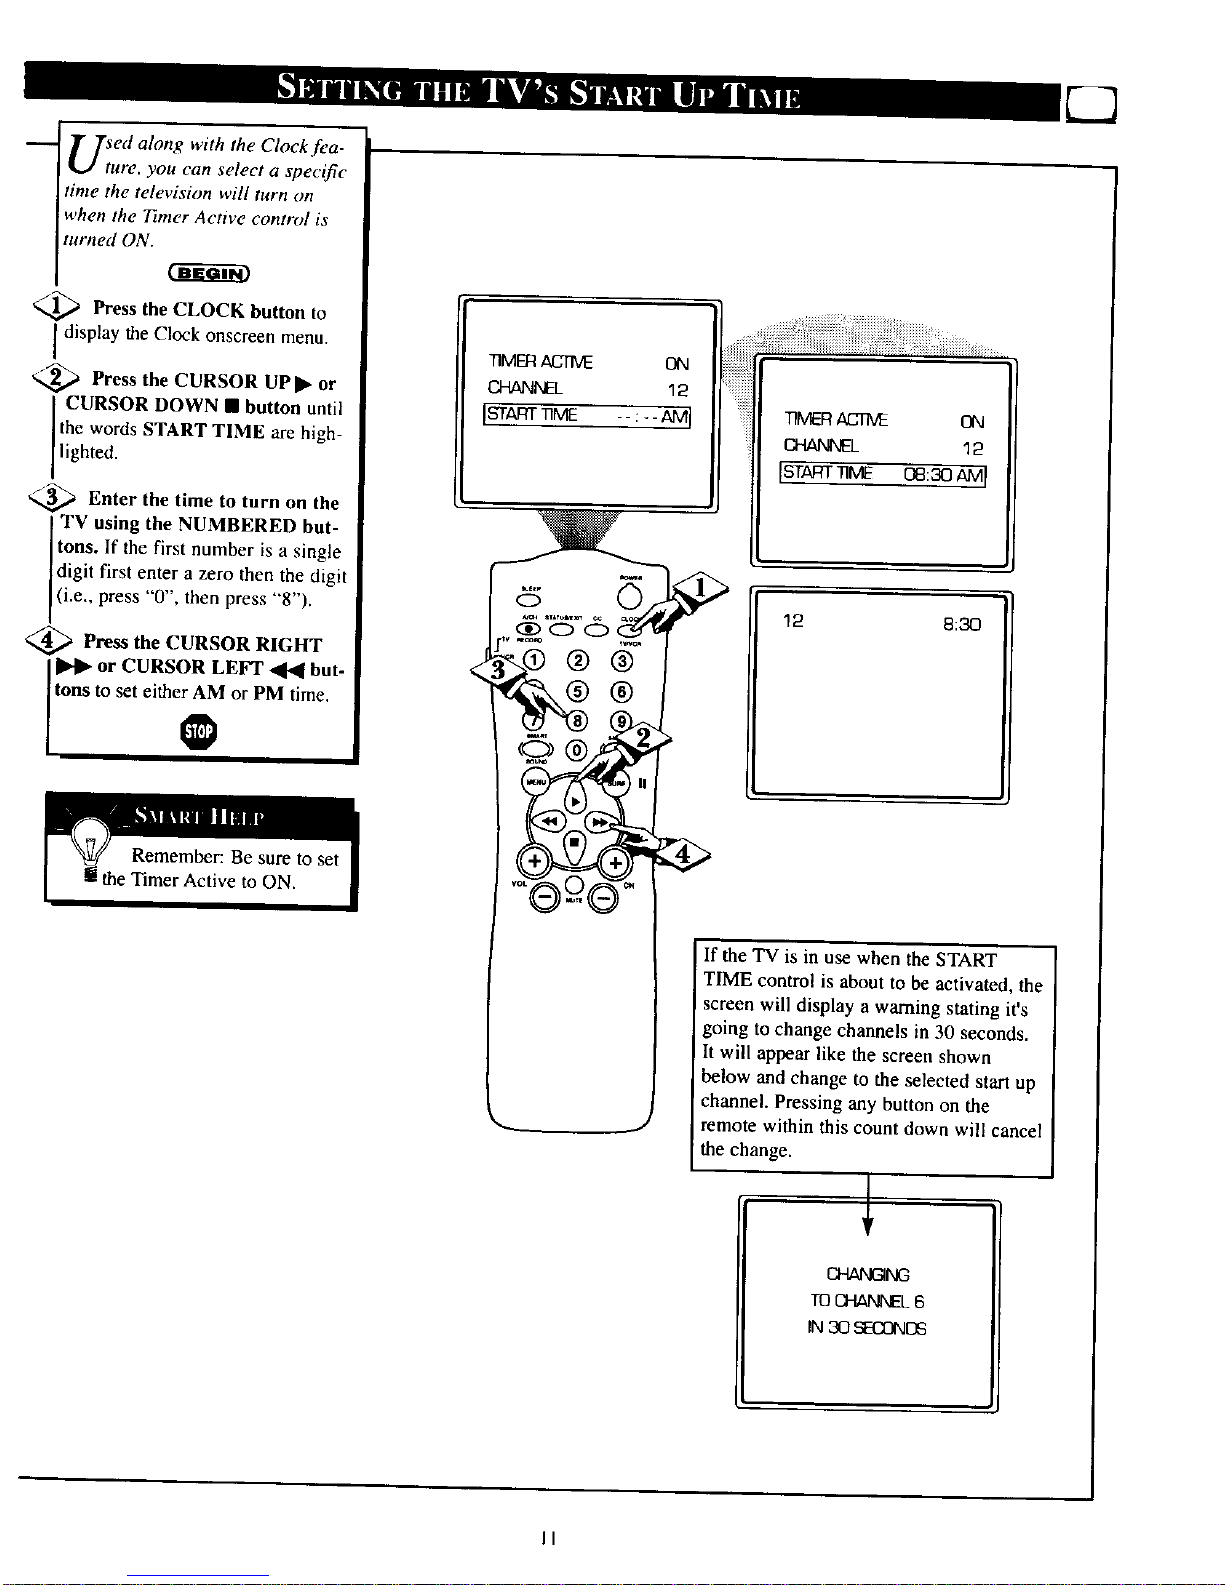
U_ed along with the Clock fea-
ure, you can select a specific
time the television will turn on
when the Ttmer Active control is
turned ON.
Press the CLOCK button to
Idisplay the Clock onscreen menu.
_,_ Press the CURSOR UPII_ or
CURSOR DOWN • button until
the words START TIME are high-
ghted.
,,_ Enter the time to turn on the
TV using the NUMBERED but-
tons. If the first number is a single
digit first enter a zero then the digit
(i.e., press "0 , then press "8").
,_ Press the CURSOR RIGHT
or CURSOR LEFT _ but-
tons to set either AM or PM time.
7]MERACTIVE ON
CHANNEL 12
IST qT ME
TIMERACrM: ON
CHANNEL 12
rST TriME
12 8:30
J
If the TV is in use when the START
TIME control is about to be activated, the
screen will display a warning stating it's
going to change channels in 30 seconds.
It will appear like the screen shown
below and change to the selected start up
channel. Pressing any button on the
remote within this count down will cancel
the change.
TOCHANNEL6
IN 30 _ONDS
II
Page 12
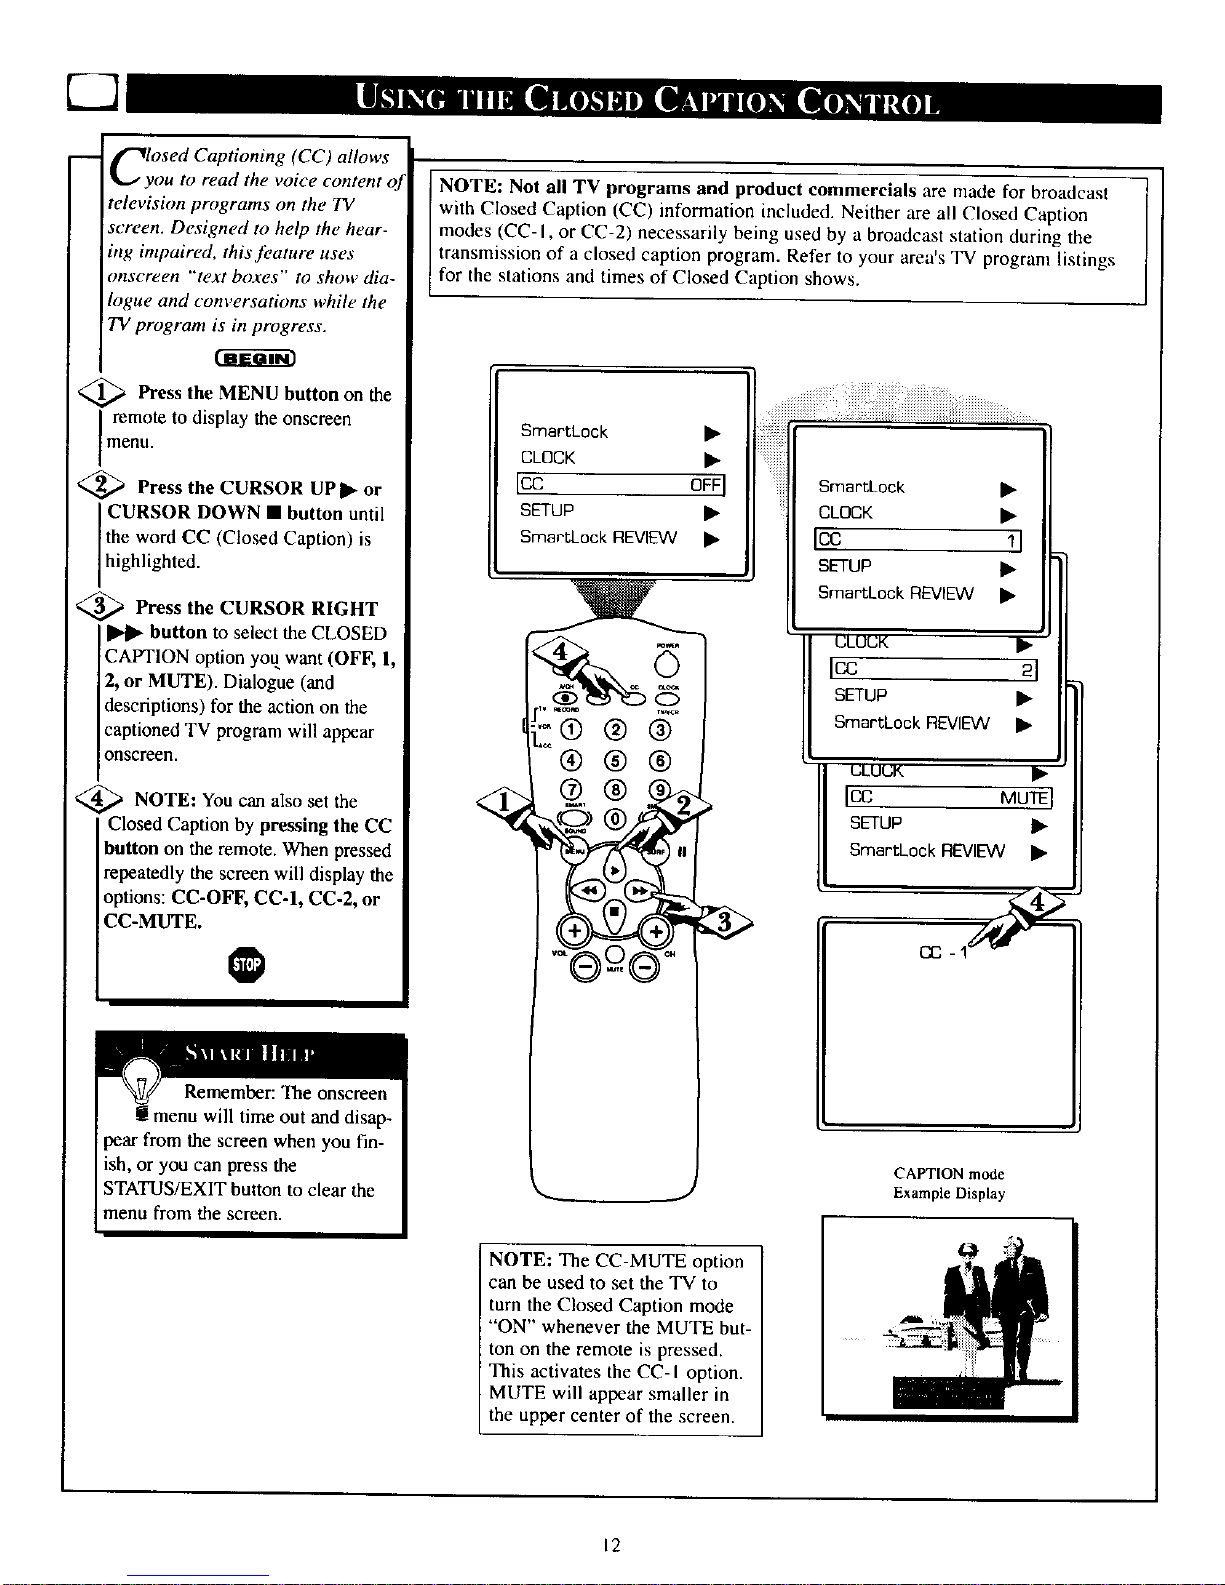
ClyOSed Captioning (CC) allows
ou to read the voice content o
television programs on the TV
screen. Designed to help the hear-
ing intpaired, this J_,ature uses
onscreen "text boxes" to show dia-
logue and conversations while the
TV program is in progress.
Press the MENU button on the
I remote to display the onscreen
menu.
'_ Press the CURSOR UP I_ or
CURSOR DOWN • button until
the word CC (Closed Caption) is
h ghlighted.
_;_ Press the CURSOR RIGHT
button to select the CLOSED
CAPTION option you want (OFF, I,
2, or MUTE). Dialogue (and
descriptions) for the action on the
captioned TV program will appear
onscreen.
NOTE: You also the
Can set
Closed Caption by pressing the CC
button on the remote. When pressed
repeatedly the screen will display the
options: CC-OFF, CC-I, CC-2, or
CC-MUTE.
NOTE: Not all TV programs and product commercials are made for broadcast
with Closed Caption (CC) information included. Neither are all Closed Caption
modes (CC- I, or CC-2) necessarily being used by a broadcast station during the
transmission of a closed caption program. Refer to your area's TV program listings
for the stations and times of Closed Caption shows.
SmartLock •
CLOCK •
Icc OFFI
SETUP •
SmartLock REVIEW •
@®
SmartLock •
CLOCK •
Icc 11
SETUP •
SmartLock REVIEW •
Icc 21
sETUP •
SmartLock REVIEW •
IcC MUTE I
SETUP •
SmartLock REVIEW •
CC
CAPTION mode
Example Display
NOTE: The CC-MUTE option
can be used to set the TV to
turn the Closed Caption mode
"ON" whenever the MUTE but-
ton on the remote is pressed.
This activates the CC- I option.
MUTE will appear smaller in
the upper center of the screen.
12
Page 13

H;roVe you ever fallen asleep in
nt of the TV only to have it
wake you up at two in the morning
with a test pattern screeching in
your ears? Well, your TV can save
you all that trouble by automatical-
ly turning itself off
_ Press the SLEEP button the
on
remote control and the SLEEP timer
wi appear on the screen,
_ Press the SLEEP button
repeatedly to pick the amount of
time (in 15 minute increments up to
60 minutes; then 30 minute incre-
ments up to 120; then 60 minute
increments up to 240) before the TV
will turn itself off.
An onscreen count down will appear
during the last minute before the TV
huts itself off.
Remember: The SLEEP-
'IMER control can also be set
within the TV's main menu
The onscreen menu will time out
and disappear from the screen when
you finish, or you can press the
STATUS/EXIT button to clear the
menu from the screen.
12
15 MIN
.o,® ® ®
®®®
@®®
©®©
®-®
12
240 blJN
During the last minute of a SLEEP
timer Selling, all onscreen count
down will be displayed
Ib,e SLEEP timer setling.
Pressing any button on the remote
during this count down will cancel
12
5OSEC
12
1OSEC
During the last J0 seconds of a |
SLEEP timer Selling, an onscreell
]
display will read GOOD BYE.
13
Page 14

The SmartLock,tOature is an inte-
rated circuit that receives attd
pracesses data sent by broadcast-
ers. or other pragr_ m provide -_,
that contain program content advi
sories. When programmed by the
viewer; a TV with SmartLock can
respond to the content advisories
and block program e'ontent that may
be found objeetionable (such as
oflOnsive language, violence, sexual
situations, etc.). This is a greatJ_'a
lure to censor the type of viewing
!children may watch.
0 ver the next few pages you'll
earn how to block channels and
I"
Icertatn rated programming. Below
is a britf e.tplanation of some ternts
and ratings you will find in the
SmartLock feature.
SmartLock offers various
BLOCKING OPTION contro s
from which to chooser
MASTER DISABLE: This is what
might be called the "master switch"
for SmartLock. When in the ON
position, ALL blocking/censoring is
turned off (or disabled). When in the
OFF position, ALL blocking based
on specifically blocked settings will
take place.
BLOCK UNRATED: ALL unrated
programs based on the Movie
Ratings or Parental (TV) Guidelines
can be blocked if this feature is set
to ON and the MASTER DISABLE
feature is set to OFF.
BLOCK NO RATINGS: ALL pro-
gramming with NO content advisor3,
data can be blocked if this feature is
set to ON and the MASTER DIS-
ABLE feature is set lo OFF.
After an access code has been pro.
grammed, you can block up to 5
individual channels. But more than
just blocking channels, certain
blocking options exist which will
block programming based on ratings
patterned by the Motion Pictures
Association of America and TV
broadcasters. (See description of rat-
ings on this page.)
G OFF
PG OFF
PG- 13 OFF
IR 0NI
NC-1 7 ON
x ON
G: GeneralAudience All ages admit-
ted. Most parents would find this pro-
gram suitable for all ages. This type of
programming contains little or no vio-
lence, no strong language, and little or no
sexual dialogue or situations.
PC,: Parental Guidance Suggested - This
programming contains material that parents
may find unsuitable for younger children.)
It may contain one or more of the follow-
ing: Moderate violence, some sexual situa-
tions, infrequent coarse bnguage, or some
suggestive dialogue.
PG-I3: Parents Strongly Cautioned - This
programming contains material that parents
may find unsuitable for children under the
age of 13. It contains one or more of the
fotlo',ving; violer_ce, sexual situations,
coarse language, or suggestive dialogue.
R: Restricted -This is programming is
specifically designed for adults. Anyone
under the age of 17 should only view this
programming with an accompanying parent
or adult guardian. It contains one or more
of the following: intense violence, intense
sexual situations, strong coarse language,
or intensely suggestive dialogue.
NC-17: No one under the age ofl7 will
be admitted. - This type of programming
should be viewed by adults only. It con-
rains graphic violence, explicit sex, or
crude indecent language.
X: Adults Only - This type of programming
contains one or more of the following: very
graphic violence, very graphic and explicit
or indecent sexual acts. very coarse and
intensely suggestive language.
TV-Y OFF
TV-Y7 I_
TV-G OFF
[TV-PG I_[
TV-14 •
TV-MA •
TV. Y - (All children -- This program
is designed to be appropriate for all
children.) Designed for a very young
audience, including children ages 2-6. This
type of programming is not expected to
frighten younger children.
TV-Y7 - (Directed to Older
Children -- This program ia designed
for children age 7 and above.) It may
be more appropriate for children who have
acquired the development skills needed to
distinguish between make-believe and reali-
ty. This programming may include mild fan-
tasy and comic violence (FV).
_ TV-G - (General Audience -- Most
parents wouldfind this program suit-
ablefor all ages.) This type of pro-
gramming contains little or no violence, no
strong language, and little or no sexual dia-
logue or situations.
TV.PG (Parental Guidance
Suggested -- This program contains
material that parents may find unsuit-
able for younger children.) This type of pro-
gramming contains one or more of the fol-
lowing: Moderate violence (V), some sexual
situations (S), infrequent coarse language
(L), or some suggestive dialogue (D).
_ TV-14 - (Paints Strongly
Cautioned -- This program contains
some material that many parents
wouldfind unsuitable for children under 14
years ofage.I This type of programming
contains one or more of the following:
intense violence (V), intense sexual situa-
tions (S), strong coarse language (L), or
intensely suggestive dialogue (D).
TV-MA - (Mature Audience Only --
Ibis program i._specifically destqned
to be viewed by adults and therefore
may be unsuitable for children under 17.)
This type of programming contains one or
more of the following: graphic violence (V),
explicit sexual situations (S), or crude inde-
cent language (L).
14
Page 15

Over the next few pages you'll
learn how to block channels
and get a better understanding of
the rating termsj_)r certain pro-
gramming.
First, let's start by learning how to
set a personal access code:
Press the MENU button the
on
remote to display the onscreen
uleuu.
,_ Press the CURSOR UP_ or
CURSOR DOWN • buttons
until the words SmartLock are
highlighted.
<
<
Press the CURSOR RIGHT
I_1_ button to display the
SmartLock Access Code screen.
Using the NUMBERED but-
tons, enter 0, 7, 1, 1. "XXXX"
appearson the Access Code screen
as you press the numbered buttons•
"INCORRECT CODE" will
appear on the screen, and you will
need to enter 0, 7, 1, 1 again.
_b Press the CURSOR DOWN •
utton until the words CHANGE
CODE are highlighted.
_ll_lPress the CURSOR
RIGHT
button to change your per-
sonal Access Code.
<_ "Next enter a "new" 4 digit
code using the NUMBERED
buttons. The screen will then ask
you to confirm the code you just
entered. Enter your new code
again. "XXXX" will appear when
you enter your new code.
INPUT
SLEEPTIMER
_martLock
CLOCK
CC
BLOCK •
IcHANGECOOE
<_ Press the STATUS/EXIT but-
ton after the new code has been
entered to set the code in the TV's
memory. I_
OFF
•1
OFF
/
/
/
[CONFIRM CODE X X X X[
SmartLock
ACCESS CODE
SmartLock
ACCESS CODE
XXXX
SmartLock
ACCESS CODE
INCORRECTCODE
[CHANGE CODE X X X X[
/
Parents - it isn't possible for your child
to unblock a channel without knowing
your access code or changing it to a new
one. If your code changes, and you did
n't change it, then you know it's been
altered by someone else and blocked
channels have been viewed.
15
Page 16

i
fter your personal access code
,has been set (see previous
page), you are now ready to select
the channeL_"yau want to black out
or censoE
Press the MENU button on the
remote to show the onscreen menu.
_ _ Press the CURSOR UP_ or
CURSOR DOWN • button until
the words SmartLock are highlight-
ed.
Press the CURSOR RIGHT
I_1_ button to display the
SmartLock Access screen.
4_'_nnumber. "XXXX" shows on the
4 Enter the correct access code
Access Code display as you press
the NUMBERED buttons.
i_ Press the CURSOR UPI_ or
DOWN • buttons until the word
BLOCK is highlighted. Press the
CURSOR RIGHT _ button then
highlight CHANNELS
BLOCKED.
_/_ _ Press the CURSOR
RIGHT
button. Three options will be
displayed; CHANNEL, LOCK or
CLEAR ALL.
@_ With CHANNEL highlighted,
use the NUMBERED buttons to
enter the channel numberyou wish
to block.
]_Use the CURSOR DOWN •
button to highlight the word
LOCK, then press the CURSOR
RIGHT _ button to select YES
(block) or NO (do not block). The
channel chosen is now blocked from
viewing.
Repeat steps 7 and 8 for any other
channels you wish to block from
viewing.
Press the CURSOR DOWN •
button until the words CLEAR
ALL are highlighted, then press the
CURSOR RIGHT _ button.
The screen will read "ALL
UNBLOCKED" for u moment. At
this point ALL the previously
blocked channels will be unblocked.
INPUT •
SLEEPTIMER OFF
ISmartLock
CLOCK •
CC OFF
®®
i
SmartLock
ACCESS CODE
SmartLock
ACCESS CODE
XXXX
IBLOCK •[
CHANGE CODE •
BLOCKING OPTIONS •
(CHANNELS BLOCKED lib I-
MOVIE RATINGS •
/
PARENTAL GUIDELINE •
ICHANNEL S l
LOCK NO
CLEAR ALL •
CHANNEL S
ILOCK YESI
CLEARALL •
CHANNEL 5 BLOCKED
BY CHANNEL BLOCKING
ENTERCODE TO VIEW
t
When a blocked channel is viewed, this is what the screen will display. To view the blocked channel, sire-/
ply enter the current access code. Note: Once the access code is entered ALL blocked channels will be
J
viewable until the TV is powered off. Once the set is turned offand then back on the previously blocked
channels will again be blocked.
CHANNEL 5
LOCK YES
ICLEAR ALL •1
,R
CHANNEL ALL option is selected, the
LOCK NO CHANNEL option will dis-
play ALL.
IALL UNSLOCKEG I , at this point if you change
the LOCK option to YES.
ALL channels will be blocked
from viewing.
16
Page 17

i
-- _martLock offers the vwwer other
blocking features as well. With
these Blocking Option .fOatures, the
I
censoring can be turned ON or
IOFF
Press the MENU button on the
I remote to display the onscreen
menn.
%_2_ Press the CURSOR UPI_ or
CURSOR DOWN • buttons until
the words SMART LOCK are
h gh ighted.
_ Press the CURSOR RIGHT
button to display the
SmartLock Access Code screen.
/4_ Using the NUMBERED but-
tons on the remote, enter your per-
sona Access Code.
/5.._ With the word BLOCK high-
lighted, Press the CURSOR
RIGHT _ button.
@ Scroll the menu using the
CURSOR UP I_ or CURSOR
DOWN • buttons until the words
BLOCKING OPTIONS are high-
ghted.
_ Press the CURSOR RIGHT
button to display the
Blocking Options (MASTER
DISABLE, BLOCK UNRATED,
or BLOCK NO RATING). When
highlighted, each feature can be
turned ON or OFF using the
CURSOR RIGHT _ or CUR-
SOR LEFT '4_1 buttons on the
remote,
INPUT •
BLEEPTIMER OFF
]SmartLock !l_l
CLOCK •
CC OFF
i!i Bmar,Loc,
ACCESS CODE
®®®
%
SmartLock
ACCESS CODE
XXXX
[BLOCK _1
CHANGE CODE
[BLOCKING OPTIONS _1_1
CHANNELS BLOCKED •
MOVIE RATINGS •
[MAS]ER DISABLE ONI
BLOCKUNRATED ON
BLOCKNORATING ON
OR IMASTER DISABLE DEEI
BLOCK UNRATED OFF
BLOCK NO RATING OFF
CHANNEL 20 BLOCKED
BY CONTENT ADVISORY
CANNOT DECODE RATING
ENTER CODE TO VIEW
If the BLOCK UNRATED or BLOCK NO RATINGS
controls are turned ON, all tmrated programs and pro
grams containing NO content advisory data will display
the screen shown 1o the left To watch the channel enter
your access code, or change the BLOCK UNRATED
and BLOCK NO RATINGS back to off.
BLOCKING OPTIONS:
MASTER DISABLE: This is what might be called the "master switch" for SmartLock. When in the ON position, ALL block-
ing/censoring is turned off (or disabled). When in the OFF position, ALL blocking based on specifically blocked ,settings will
take place.
BLOCK UNRATED: ALL unrated programs based on the Movie Ratings or Parental (TV) Guidelines can be blocked if this
feature is set to ON and the MASTER DISABLE feature is ,set to OFF.
BLOCK NO RATINGS: ALL programming with NO content advisory data can be blocked if this feature is set to ON and the
MASTER DISABLE feature is set to OFF.
17
Page 18

i
Zrhere are two types of program
atings within th_ SmartLoek
feature. One is based on the Movie
Industry ratings while the other is
based on the TV Industry ratings.
Both ean be used to block or censor
programming that has been rated in
either manner
Let's first look at the Movie Rating
options of SmartLock:
<_ Press the MENU button on the
remote to display the onscreen
menu.
<_ Press the CURSOR UPI_ or
CURSOR DOWN • buttons until
the words SMART LOCK are
h gh ghted.
'_ Press the CURSOR RIGHT
I_1_ button to display the
SmartLock Access Code screen.
<_ Using the NUMBERED but-
tons on the remote, enter your
Persona Access Code.
<_ With the word BLOCK high-
lighted, Press the CURSOR
RIGHT I_llb button.
_ Scroll the menu using the
CURSOR UP I_ or CURSOR
DOWN • buttons until the words
MOVIE RATINGS are highlight-
ed.
<_ Press the CURSOR RIGHT
button to display the MOVIE
RATINGS (G, PG, PG-13, R,
NCI7, or X).
When highlighted, all these options
can be turned ON (which will allow
blocking) or OFF (which will allow
viewing).
Use the CURSOR RIGHT I_1_ or
CURSOR LEFT <1<1 buttons on
the remote to turn the rating option
ON or OFF.
INPUT •
SIFFpTIMER OFF
I£mara-°ck •l
CLOCK •
CC OFF
Selecting to
block any rating
will cause all the
higher ratings to
SmartLock also be blocked
automatically.
ACCESS CODE
CHANNEL 5 BLOCKED
BY CONTENT ADVISORY
MOVIE RATING R
ENTER CODETO VIEVV
Screen will display a message when programming is
blocked by Ibe Movie Raling l_ature. To unhlock, lurn
the Movie Rating OFF, or enter your personal access
blocked ralings _ill be reset to ON
clxle. Enlering Ibe co_e will unblctck ALl, blockcd
Movie Ratings until lbe TV is turn oll "linen Ihe
BmartLock
ACCESSCODE
XXXX
IBLOCK _1
CHANGECODE •
BLOCKINGOPTIONS •
CHANNELS BLOCKED •
IM0VlE RATINGS •1
PARENTALGUIDB_iNE •
PG OFF
P_13 OFF
IR ONI
N_17 ON
X ON
NOTE: When a rating is turned ON, all ]
higher ratings _ill au;omatically be turned
1
ON. ]b turn them OFF, each will have to be
sel individualb (i.e.. R bl_cked manually,
N(" 17 and X _ill be blocked automatically)
18
Page 19

<
.%
.4
/
"4
T/his portion of the SmartLock
_atures cover program ratings
based on the TV Industry rating
system. This is know as Parental
Guideline within SmartLock.
After selecting the SmartLoek fea-
ture and entering your personal
access code, the BLOCK/C!IANGE
CODE screen appears:
._li With the word BLOCK
high-
ghted, Press the CURSOR
RIGHT I_1_ button.
Scroll the the
menu
using
CURSOR UPI_ or CURSOR
DOWN • buttons until the words
PARENTAL GUIDELINES are
highlighted.
_l_lPress the CURSOR RIGHT
button to display the
Parental (TV) Guidelines (TV-Y,
TV-Y7, TV-G, TV-PG, TV-14, or
TV-MA).
When highlighted, the TV-Y and
TV-G can be turned ON (which wih
allow blocking) or OFF (which will
allow viewing), of these rated pro
grams.
The ratings of TV-Y7, TV-PG,
TV-14, TV-MA can be customized
to block V (violence), FV (fantasy
violence), S (sexual situations), L
(coarse language), or D (suggestive
dialogue).
Use the CURSOR RIGHT _ or
CURSOR LEFT _ buttons on
the remote to turnthe rating option
ON or OFF.
IBL OCK •_
CHANGE CODE •
5
®@@
CHANNELS BLOCKEO •
MOVIE RATINGS •
IPARENTALGUlDEUNE 1_1
TV-Y7 •
TV-G OFF
[w-po _ I
TV14 _-
TV-MA I_
TV RATING SUB MENUS:
Remember:
Selecting to
block any rating
will cause all the
higher ratings to
also be blocked
automatically.
TV-Y OFF
ITv-Y7 • l
t TV-G OFF
TV-PG •
IY7 ONI
FV ON
TV-Y7 •
TV-G OFF
ITv-PG • l
'TV-14 •
PG ON
D ON
IL 0NI
S ON
V QN
14 ON
D ON
IL ON!
S ON
v ON
MA ON
L ON
Is 0ml
V ON
TV-¥ - tAll children - 7htl program i_ designed to be appropriate fiJr all _hildren )
Designed for a very young audience, includiBg children ages 2_5 This lype of pro-
gramming is not expected to frighten younger children¸
TV-¥7 - (Direcled to Older Children -- 7hb program _ designed for children age 7
und ubove.) II may be more appropriale for children who have acquired the develop-
ment skills needed to distinguish between make believe and realily. This program-
ming may include mild fanlasy and comic violence IFV)
TV-G - (General Audience -- Most parems _uld find th_ pmgrum _uitable fi*r oll
age_.) This type of programming conlains liltle or no violence, no strong language
altd lillle Or no sexual dialogue or silualions
TV-PG - (Parental Guidance Suggested -- Th_ program i_mtams malertal that par.
em_ mayfind unsuitable fi_r )_Jun_,r c'hiMren )Thi_ type of programming COnlams
one or more of Ihe filllowillg: _ome _uggc_tive dialogue ([)), in frequenl coals€ lan
guage (I.), ,mine sexual siluations (S), or moderate violence (V)
IV.14 . IParcnls Slrl_Ilgly ('attlioBed . Th_ p_hvrum _ml#inl _ome in_tll,rltd thllt
many pareat_ wouM jim unsuitable f!_r chiMren umler 14 yeur_ _j age ) ll_is type of
programming conlains one or more {if the following: intensely suggcslive dialoguc
(D), SlrOng coa_e language (I J, inlcn_c _e_ual situations I_;), fir intense viii]once (V)
TV-MA -(Malure Audience Only 7hL_ program L__peofil_lly d_sign_t t_ tw
v_wed hy a&d_ and Ibm,re]ore *nay h_ unsuitoMe fi_r _hiMn'n un&'r 17)Ihis type of
pl_gramming ¢oBlains one or more of Ihe _lhlwing: crude indeccnl langu _ge (I 3,
e_pllcil sexual siluations (_), or graphic violence (V;
TV_ OFF
_V-PG •
1w-14 •1
TV-PG •
TV-14 •
ITV-MA •l
19
Page 20

-- _Tow that you've learn how to
I ¥ block channels or censor your
viewing using the Movie Ratings or
Parental (TV) Guidelines let's
review what you've done. The
SmartLock Review feature allows
you to see what has been blocked.
Whenever the Menu button is
pressed the onscreen menu will be
displayed with the SmartLock
Review highlighted.
<_ Press the MENU button on the
remote to show the onscreen menu.
SmartLock REVIEW will be high-
ghted.
Press the CURSOR RIGHT
_'l_" button and the SmartLock
Review Menu will appear.
This menu will display what chaD-
nels have been blocked; what
Movie Ratings have been blocked;
what Parental (TV Ratings)
Guideline have been blocked. This
review screen will also display that
status of Unrated and No Rating
settings. If the Master Disable fea-
ture has been turned ON, the
SmartLock Review screen will dis-
play "SmartLock DISABLED."
CHANNEI.S BLOCKED - Shows all blocked channels thag where set with-
in the CHANNELS BLOCKED feature. Up to 5 channels may he blocked at
one lirn_.
MOVII_ RATINGS - Shows all blocked Movie Ra_ings that were set within
tbe MOVIE RATIbR3S fea|_e. A}I or some may he b_ocked at one time.
Note: Ita lower rating is blocked; Ibis will automatically cause the higher
r_iog_ to he bk>cked, also. fie.; if P. i_ set to be blocked, X _il[ att_icatly
be blocked also.)
PARENTAL GUIDELINE - Shows all blocked TV P,atiog_ that we_ set
within the PARENTAL GUIDELINES feature. All or some may he blocked
at one time. Note: If 8 lower rating is blocked; this will aulomahoally cause
the higher rat kngs to be blocked also. fie.; ifTV-14 is set to be blocked, TV-
MA will automalically he blOCked.) Parental Guidelines also have sub ratings
for Violence IV), Fantasy Violence (BV), Sexual Situations IS), Coarse
Language (L). and Suggestive Language (D). If the m_in rating is turned off
bul the sub rating is turned ON, Ihe program will he blocked but Ibe rating
will not appear within the SmarlLock Review menu.
BLOCK UNRATED - Shows ON or DI:_ depending on _be status of _he
BLOCK UNR,NFED feature. Based on Ihe Movie Ratings or Parental (TV)
G_fe_ines.
BLOCK NO RATING - Shows ON or OFF dependiag on Ihc status of the
_.LOCK bid RNrlblG feature. Ba._d en pr'3grarnraing '_ilb NC'_:e_v_
adviso U' data¸
OR=
BRIGH_ _ ....... 313
O3LOR ram...,..., 30
O
.-®®®
.*¢¢
®®®
@®®
N
CHANNELS BLOCKED
MOVIE RATINGS
PARENTAL GUIDELINE
BLOCK UNRATED OFF
BLOCK NO RATING OFF
SmartLock DISABLED
t
Smart Lock DISABLED will appear in The
Smart L_:k Review screen iftbe SmariLock
Disable feature is set to ON.
... CHANNELS BLOCKED
5 10 12 32 45
",.. MOVlE RATINGS
RX
",. PARENTAL GUIDELINE
14 MA
BLOCK UNRATED
BLOCK NO RATING
ON
ON
20
Page 21

Besides the normal volume level
eontrol, your TV also has a
BALANCE, BASS and TREBLE
controls for sound adjustments. The
BALANCE control allows the listen
er m adjust the sound being heard
between the right and left TV speak-
era'. The controls work just like the
BASS, TREBLE and BALANCE
controls on any hi-fi stereo audio
system.
<_ Press the MENU button on the
remote to show the onscreen menu.
._ Press the CURSOR UPII_ or
CURSOR DOWN • buttons to
select and highlight the name of the
control you wish to change (BAL-
ANCE, BASS or TREBLE).
_Use the CURSOR LEFT ,,
or RIGHT _ buttons to adjust
the levels of each highlighted con-
trol.
NOISE REDUCTION ON
VOLUME II ........... 15
[BALANCE .......I"....... 0 I
TREBLE I1. ........ 30
BASS II' ........ 30
0
0
.-®®@
"°°® ® ®
_i_iiiiiiiiiiiiiii_i_iii_iiiiiiiiiiiiiiiiiii_iiii!_!iii_i_= i_ii_iii_iiiiiiiiii_i_=
BALANCE .......L....... 0
[TREBLE
BASS I ........ 30
INCREDIBLE SURR ON
OR
[ BALANCE .......L....... 0
TREBLE 1 ......... 30
IBASS 1 .........3oI
INCREDIBLESUBR ON
_ SOUND STEREO
21
Page 22

your TV can detect a stereo sig-
al and will set itself automat-
ically so the stereo sound can be
heard. However, there may be
occasions when you might want to
set the TV to mono. The following
steps describe how to ehange the
SOUND control:
Press the MENU button
on
the remote to show the onscreenmenu.
<_ Press UP • or
the CURSOR
CURSOR DOWN • button
until the word SOUND is high-
lighted.
Press the CURSOR RIGHT
or CURSOR LEFT ,,
buttons to choose between
STEREO or MONO.
With STEREO selected, the tele-
vision will reproduce any stereo
broadcast signal it receives.
Please note that you can force a
stereo broadcast signal to MONO,
but you cannot force a mono
broadcast signal to stereo.
O
SAP is an additional part of the
stereo broadcast system. Sent as a
third audio channel SAP can be
heard apart from the current TV
program sound. TV stations are
free to use SAP for any number
of purposes, but many experts
believe it will be used for foreign
language translations of TV
shows (or for weather and news
bulletins.)
If a SAP signal is not present
with a selected program, the SAP
option cannot be selected, Also, if
SAP is selected on a channel
(with SAP) and you select anoth-
er channel, when you return to
the original channel SAP will be
OFF (and you will have to rese-
lect the SAP feature.)
BASS ! ......... 30
INCREDIBLESURR ON
ISOUND STEREOI
SAP OFF
AVL ON
BASS i ......... 30
INCREDIBLE SURR ON
[SOUND MONOI
SAP OFF
AVL ON
-- • L
INCREDIBLE SURR ON
SOUND STEREO
ISAP OFFI
AVL ON
VOLUME LIMITER ON
INCREDIBLE SURR ON
SOUND STEREO
iSAP 0NJ
AVL ON
VOLUME LIMITER ON
22
Page 23

Tahe Incredible Surround feature
dds greater depth and dimen-
sion to both monaural (MONO)
and stereo TV sound. With the con-
trol turned ON the TV's speakers
can add even wider sound separa
tion to normal broadcasts.
<_ Press the MENU button on the
I remote to display the onscreenmenu.
<_ Press the CURSOR UPI_ or
CURSOR DOWN • button until
the words INCREDIBLE SURR
are highlighted.
<_ Press the CURSOR RIGHT
or the CURSOR LEFT
buttons to turn the Incredible
Surround control ON or OFF.
Remember: The onscreer
a menu will time out and dis-
appear from the screen when you
finish, or you can press the STA-
TUS/EXIT button to clear the
menu from the screen.
TREBLE I ....... 30
BASS I ....... 30
IINCREDIBLE SURR OFFI
SOUND STEREO
SAP OFF
_m
3
-®®@
A_
®®®
@_®®
TREBLE I ....... 30
BASS I ....... 30
IINCREDIBLE SURR ON I
SOUND STEREO
SAP OFF
23
Page 24

i
U_e the Volume Bar control to see
he TV s volume level settings
on the TV screen. The Volume Bar
will be seen each time the VOLUME
buttons (on the TV or remote) are
pressed.
<_ Press the MENU button to dis-
I Play the onscreen menu.
<_ Press the CURSOR UP • or
CURSOR DOWN • buttons until
the word VOLUME ishighlighted.
'_ Press the CURSOR RIGHT
button to increase the TV's vol-
ume or the CURSOR LEFr
button to decrease the sound.
CONTRAST PLUS ON
NOISE REDUCTION ON
[VOLUME • ........... 15 I
BALANCE .......I*....... 0
TREBLE • ........... 30
®®
OR
IVOLUME • ........... 151
:.'B ®
®®®
@®®
N
Note: Pressing the VOL
(+) or ( ) buttons will
also allow you to adjusl
the sound level of the
"IV. A Volume Bar
adjustment will appear
onscreen. [hess the (+)
to increase the volume
and the (-) button to
decrease the volume.
lume level
the onscreen menu, the
Volume Limiter control, when turned
on, will not allow the TV sound to be
played louder than the maximum pre-
set level.
'_ Press the MENU button to dis-
I Play the onscreen menu.
<_ Press the CURSOR UP • or
CURSOR DOWN • buttons until
the words VOLUME LIMITER are
highlighted.
_ Press the CURSOR RIGHT •
or CURSOR LEFT • button to turn
the Volume Limiter control ON or
OFF.
@
SAP ON
AVL ON
IVOLUME LIMITER OFF I
INPUT •
SLEEPTIMER OFF
@®®
SAP ON
AVL ON
IVOLUME LIMITER ON[
INPUT •
SLEEPTIMER OFF
24
Page 25

The TV's AudiolVideo Input jacks
are for direct picture and sound
connections between the TV and
a VCR (or similar device) that
has Audio/Video Output jacks.
<_ Connect the (yellow)
VIDEO
CABLE to the VIDEO IN jack
on the back of the TV. Then con-
nect the AUDIO (red and white)
CABLES to the ALrDIO (left and
right) IN jacks on the rear of the
TV.
<_ Connect the VIDEO (yellow)
CABLE to the VIDEO OUT jack
on the back of the VCR. Then
connect the AUDIO (red add
white) CABLES to the AUDIO
(left and right) OUT jacks on the
rear of the VCR.
<_ Turn the VCR and the TV
ION.
<_ Press the MENU button on
I the remote to display the
onscreen menu,
'_ Press the CURSOR UP • or
I CURSOR DOWN • buttons
until the word INPUT is high-
lighted.
Press the CURSOR RIGHT
or CURSOR LEFT _ but-
ton to display the picture/sound
menu (ANTENNA, EXT 1, S-
VIDEO). Use the CURSOR UP
• or DOWN • buttons to select.
Now your ready to place a prere-
corded video tape in the VCR and
press the PLAY I_ button.
@
@
BACKOFTV
IF YOU ARE USING A
MONO DEVICE, USE
ONLY THE AUDIO
IJMONO JACK. IY A
DUMMY JACK IS
PLUGGED INTO THE
AUDIO R, NO SOUND
WILL BE HEARD
AUDIO IN
(RED/WHITE)
BACKOFVCR
AVL ON
VOLUME LIMITER ON
pNPUT I_1o
SLEEPTIMER OFF
SmartLock •
VIDEO IN
(VELLOW)
ANTENNA
IEXT1 I
VCR
(EQUIPPED WITH
VIDEO AND AUDIO
OUTPUT .lACKS)
25
Page 26

W;uld you like to hear TV
rograms through your
audio hi-fi system? The TV's
Audio output jacks can be used
to perform this TV sound option.
<_ R(ight) and
Connect the
L(eft) AUDIO OUT jacks on
the TV to the R and L Audio
Inputjacks on you amplifier or
sound system. Set the audios sys-
tem's volume to a normal listeD-
ing level.
<_ Turn the TV and
the audio
system ON.
<_ can now adjust the sound
You
level coming from the audio sys-
tem with the VOLUME (+) or
(-) buttons on the remote.
Note: The Video and Audio Output I
Jacks can be used as a direct con-
I
neetion to a VCR for the recording
of programs to video tapes.
MUTE
BACK OF TV
7fi [I
BACK OF ACCESSORY
AUDIO IN
S'I_REO AUDIO SYSTEM
(EQUIPPED WITH AUDIO
INPUT JACKS)
26
Page 27

i
Whmether you're watching a
ovie or a video game, your
TV has automatic video control set-
tings matched for your current pro-
gram source or content. The
SmartPicture feature quickly resets
your TV's video controls for a num-
ber of different types of programs
and viewing conditions you may
have in your home. Each
SmartPicture setting is preset at the
factory to automatically adjust the
TV's Brightness, Color, Picture,
Sharpness, Tint, and Color
Temperature levels.
<_ Press the SMART PICTURE
button on the remote control. The
current SmartPicture setting will
appear n the m ddle of the screen.
<_ Press the SmartPicture button
repeatedly to select either PER-
SONAL, MOVIES, SPORTS, or
WEAK SIGNAL picture settings.
Note: The PERSONAL setting is
the setting that you setup using the
PICTURE options within the
onscreen menu. This is the only
SmartPicture control setting that
can be changed. All other settings
are setup at the factory during the
time of production.
PERSONAL
_33_ @_::;,,@v_:::_::::::::::::::_ :::_:::3:
_n
O
°c5
rw _m _eR
o,@®®
6)@@
MOV1ES
J
27
Page 28

J
Tthe SmartSound feature allows
he listener to select between
four different factory set sound
options. Personal (which can be set
by the user), Theater (for movie
viewing), Music (for musical type
programming) and Voice (when the
program is mainly dialogue). To
select any of the options follow the
directions below.
,_ Press the SMART SOUND but-
ton on the remote control. The cur-
rent SmartSound setting will appear
in the middle of the screen.
<_ Press the SMART SOUND
button repeatedly to toggle
between the four settings.
Remember, only the PERSONAL
control can be changed by the view-
er. This changes the settings in the
main onscreen menu's sound con-
trois.
Remember, SmartSound
m works only with the pro-
grams coming through the 75 1)
inputjack on the rear of the TV
(RF audio). It will not control the
sound levels for the External con-
nections.
PERSONAL
®®
®®
®®
®c5
®-,®
THEATER
MUSIC
VOICE
NOTE: When the VOICE mode of
SmartSound is selected the AVL fea-
ture will be automatically turned ON.
In most cases the volume levels com-
ing from broadcast programming or
commercials are never the same.
With the AVL control turned ON,
you can have the TV level out the
sound being heard. This makes for a
more consistent sound by reducing
the peaks and valleys that occur dur-
ing program changes or commercial
breaks.
SOUND STEREO
SAP ON
IAVL OFFI
VOLUME LIMITER ON
INPUT EXT 1
SOUND STEREO
SAP ON
IAVL ONI
VOLUME LIMITER ON
INPUT EXT1
28
Page 29

A "list" or series of previously
viewed channels can be select-
ed with the SURF button on your
remote control. With this feature
you can easily swit_'h between dif-
ferent TV programs that currently
interest you. The SmartSurf control
allows you set up to eight channels
in its quick viewing "list".
<_ Press the CHANNEL (+) or (-)
buttons (or the NUMBER buttons)
to select a channel to add to the
SURF st.
Press the SURF button on the
remote while the channel number is
still displayed to ADD the channel to
the SURF Ist.
<_ Repeat steps 1 through 2 to add
additional channels (up to 8) to the
SURF list.
To remove a channel for the SURF
, I
5
ADDED
, l
8
ADOED
I
list, simply choose the channel with
the numbered buttons and press the
SURF button while the channel
number is still displayed and the
screen will read DELETED.
I1
10
10
ADDED
ii
8
\
SURF 10
SURF ir
i
J
Press the SURF button repeatedly to cycle or "loop"
through the channels saved in the SURF channel list.
29
Page 30

m
m
your rentote control is set to
ork your TV and many
infrared remote (IR ) control
VCRs. Cable Boxes. Satellite
Systems. DBS. DVD, etc.
However. on easy onetime step
may be necessary before the
remote will work your VCR,
Try this initial check to see if
going on to the following section
is necessary.
<_ Place the TV/VCR/ACC
I Mode Switch in the proper posi-
tion.
'_ Point the remote control at
the device and press the POWER
button.
<_ Does the remote turn
the
device ON?
If YES, stop and try other func-
tion buttons on the remote. If
they also work the device, then
the remote is ready and no fur-
ther steps are needed.
If NO, continue...
VCR
SatelliteReceiver
SLEEP
A/CH STATUS/EXIT CC
( )00
"TV RECORD
vco ®
.ACC
® ®
®
SMART
(2)
SOUND
Cable Converter
r
<_ First look THREE-DIGIT
up
a
remote control number for your
brand of Device before going
through the simple steps on the
following page.
Find your Three-Digit Code on
pages 33-34.
30
Page 31

N_h w that you have looked up
e three-digit Remote Code
Number for your brand of device,
you are ready tofollow the four
simple steps below.
Please read through steps I-4
before beginning.
<_ Place the TV/VCR/ACC
Mode Switch in the proper posi-
tion.
<_ Press the (A/CH) •
RECORD
button on the remote control and
release.
_> the SmartSound button
Press
on the remote within 30 seconds,
then release.
Enter the THREE-DIGIT
REMOTE CODE NUMBER
for your desired device. The
remote is now ready to send
commands to the unit.
<_ Point the remote at the
[ Device. Press the POWER button
I ONt.he rem°te _ m the unit
Remember, if this dccsn't
g work the first time, repeatsteps
using the same remotecode number.
After a second tryand the remote
does not operate your device, see if
here is another three-digit code num-
ber (pages 33-34) listed for your
device and repeat the steps above
using the new number.
If after repeated attempts the code
number method does not work you
device, try the SEARCH METHOD
on page 32.
VCR
Satellite Receiver
or DBS, DVD
Cable Converter
31
Page 32

m
your TV remote can be set to
ork various external devices
such as VCRs, Cable Boxes,
Satellite Receivers, DBS, DVD,
etc. by what is called the search
method of remote control pro-
gramming.
If the "Remote Code" number
method shown on pages 30, 31
did not set your remote to work
your external device, then follow
the easy steps listed below.
Please read steps 1-4 before
beginning.
<_ Press the POWER
button off
the device your are attempting toprogram to turn it ON.
<_ Place the TV/VCR/ACC
Mode Switch in the proper posi-
tion.
_ Press the (A/CH) • RECORD
and the SMART SOUND but-
tons simultaneously and hold
them down.
<_ The device will begin to
change channels after the remote
identifies the correct code. When
the channels start to change
release the VCR RECORD and
SMART SOUND buttons. The
remote should be ready to oper-
ate the device.
O
This method can take up to
g two minutes to perform.
Don't let the device scan up more
than five channels. If you do the
remote may pass up the right code
and another two minute search cycle
will have to be repeated.
If no channel change happens within
two minutes, repeat steps 1-4.
Should a channel change still not
occur, the remote will not work the
desired device.
Satellite Receiver
Cable Converter
VCR
32
Page 33

J
REMOTE
vcR CODENO.
Admiral ........................ 048
Advantz ........................ 358
Adventure ...................... 000
Aiko .......................... 278
Aiwa ........... 000.037,307,348,352
Akai ....... 041,049, 053,061, 106, 315
AIba ........................... 352
Amercian High ................. .035
Amstrad .................... 325, 332
Ashe .......................... 240
Audiovox ...................... .037
Baird .......................... 107
Beaumark ...................... 240
Bell & Howell ................... 104
Blaupunkt ............... 003, 006, 154
Brandt ................. 187, 320, 321
Broksonic ....... 121. 184, 21 I. 295,361
Bush .......................... 352
CCE ....................... 072, 278
Calix .......................... 037
Canon ......................... 035
Capehart ....................... 020
Carver ..................... 081,146
Citizen .................... ,037, 278
Colt ........................... 072
Combitach ...................... 352
Craig ........... 037. 047, 072, 240, 271
Curtis Mathes ............ 035,041,060
Cyhermax .................. 051,240
Daewoo ................ 020, 045. 276
Daytzon ........................ 020
Denon ......................... 042
Dynatech ....................... 000
Electrophonic .................... 037
Emerex ........................ 032
Emerson .... 000, 002, 036, 037, 043,061
.......... 068,088, 121,164, 208, 209,
........... 211,212, 278. 295, 361,479
Ferguson ............... 107, 320, 321
Fisher .............. 047, 054, 066, 104
Fuji ....................... 033, 035
Funai .......................... 000
GE ............... .035,060,065,202
Garrard ........................ 000
Go Video ............... 232, 279, 432
Gold Star .................. .037,038
Gmdien_ ................... 000, 406
Gmndig ............ 003, 007, 195, 347
m-Q .......................... o47
Harley Davidson ................. 000
Harman/Kardon .............. 038,075
Harwood ................... 068,072
Headquarter ..................... 046
Hinari ..................... 004, 352
Hitachi ............. IX)0, 004, 041,042,
................... 065, 105. 168, 235
lngersol ........................ 004
JVC ........ 008,041,067,208,384, 486
Jensen ......................... 041
KEC ....................... 037. 278
KLH .......................... 072
Kenwood ........... 038,041,067, 384
Kodak ..................... 035,037
LXI ........................... 037
Lloyd's ..................... 000. 206
REMOTE
Loewe ......................... 004
Logik ...................... 004, 072
MEI ........................... 035
MGA ...................... 043, 06 I
MGN Technology ................ 240
MTC ...................... 000, 240
Magnavox ....... 000, 035, 081, 146, 181
Marta ......................... .037
Matsui ................. 004, 348, 352
Matsushita .............. 035, 162, 454
Memmorex ..................... 307
Memorex ....... 0(30, 035,037, 039, 046,
........... 047, 048, 104, 240, 266, 307
Metz ...................... 003, 347
Minolta .................... 042, 105
Mitsubishi ...043, 061,067, 075, 173, 443
Motorola ................... 035, 048
Multitech ................... 000, 072
NAD .......................... 058
NEC ........... 036, 040, 041,067, 104
Nikko ......................... 037
Nikon ...................... 034, 253
Noblex ......................... 240
Nordmende .............. 297, 320, 32 I
Okano ......................... 346
Olympus ................... 035, 226
Optimus ............ 037,048,058, 104,
...................... 162, 432, 454
Optonica ....................... 062
Orion .......... 004, 295, 348, 352, 479
Panasonic .......... 035,077, 162, 225,
...................... 226, 378, 454
Penney ............ .035,037,038,040,
...................... 042, 065, 105
Peatax ................. 042, 065, 105
Philco ......................... 035
Philips .......... 035,062, 08 l, 110, 403
Pilot ........................... 037
Pioneer ..................... 058, 067
Portland ........................ 020
Profax ......................... 322
Profitronic ...................... 240
Protec ........................ .072
Pulsar ...................... 039, 051
Quarter ........................ 046
Quartz ........................ .046
Quasar ............. 035. 077, 162, 454
RCA .............. 042. 060, 065,077.
................... 105. 106, 149,202
Radio Shack ................. 000, 037
Radix .......................... 037
Randex ........................ 037
Realistic ........ 000, 035, 037, 045, 047
.................. 048, 062, 066, 104
Ricoh ..................... .034. 253
Runco ......................... 039
SEG ........................... 322
SEI ........................... 004
STS ........................... 042
Saba ................... 297, 320, 321
Saisho ......................... 004
Salora ......................... 075
Samsung ............ 045, 051,053, 240
Sanky ...................... 039, 048
Sansui .............. 000, 041,067, 271
REMOTE
VCR CODENO.
Sanyo .......... 046, 047, 104, 240, 268
Saville ......................... 352
Scott ....... 043,045, 121. 164, 21 I, 212
Sears .......... 000, 035, 037, 042, 046,
.............. .047,054, 066, 104, 105
Sharp ...................... 046, 062
Shintom ........................ 072
Shogun .................... .05 I, 240
Shoral ......................... 004
Siemens ........................ 003
Singer ........................ .072
Sinudyne ....................... 004
Sony .......... 000, 01 I, 022, 032,033,
.................. .034. 035,253.275
Sunkel ......................... 348
Sunpak ........................ 253
Sylvania .... 0130,035,043, 08 I, 103. 110
Symphonic ...................... 000
TMK .................. 036, 208,240
Tatting ......................... 041
Teac ....................... 000, 041
Technics .................... 035, 162
Teknika ................ 000, 035.037
Telefunken .............. 187, 320, 321
Tansal ......................... 322
Thomas ........................ 000
Thomson ....................... 320
Toshiba ......... 043, 045,066, 212, 366
Totavision .................. 037,240
Towada ........................ 322
Unitech ........................ 240
Universum ...................... 325
Vactor ......................... 045
Vactor Research .............. 038,040
Video Concepts .......... 040, 045,061
Videosonic ...................... 240
Wards . .000, 035,042, 047, 048, 060, 062,
........... 072, 081, 149, 16l, 212, 240
XR- 1000 ............... 000, 035.072
Yamaha ........................ 038
Zenith .............. 000, 033,034, 039
CABLE REMOTE
COD_NO.
ABC .............. 001,003, 007, 008,
.................. .011,013,014, 017
Aliegio ........................ 153
Andover ........................ 544
Antronix ...................... .022
Archer ..................... 022, 153
Balcor ........................ .056
British Telecom .................. 105
Cable Star ...................... 056
Cablatenna ...................... 022
Cahletime ........... 161, 2/1,377,448
Cableview ...................... 022
Century ........................ 153
Citizen ......................... 153
Clyde .......................... 086
Colour Voice ................ 025,031
Comtee ........................ 274
Comtronics ..................... 040
Contec ......................... 019
Cryptovision .................... 600
Deeaat ......................... 423
33
Page 34

!
CABLE REMOTE
CONVERTOR CODE NO.
Eastern ..................... 002, 274
Everquest ................... 015,040
Fdmnet ........................ 443
Focus .......................... 400
France Telecom .................. 45 I
GC Electronics .................. 056
GEC .......................... 086
Ganard ......................... 153
Gemini ................. 015,070, 242
General Instrument ........ 0i 1,276, 476
Gold Star ....................... 040
Grundig ........................ 529
Hamlin ............. 009, 020, 034, 259
Hitachi ......................... 011
Hytex .......................... 007
Jasco .......................... 153
Jerrold ............. 003, 01 I, 012, 014,
................... 015, 024, 276, 476
M.N.E.T. ....................... 443
MNet .......................... 443
Macon ......................... 033
Magnavox .............. 027, 032, 334
Memorex ....................... 000
Movie Time ..................... 063
NSC ....................... 063,070
Oak ....................... 007, 019
Optimus ........................ 02 I
Panasonic ............... 000, 02 I, 107
Paragon ........................ 000
Philips . .025,027, 031, 153, 242, 290, 334
Pioneer ..................... 533, 753
Popular Mechanics ................ 400
Pulsar ......................... 000
RCA .......................... 021
Radio Shack .................... 015
Recoton ........................ 400
Regal ..................... .020, 259
Regency ........................ 002
Rembrandt .................. 011,070
Runco ......................... 000
SL Marx ....................... 040
Salora ......................... 382
Samsung ....................... 040
Satbox ......................... 375
Scientific Atlanta ......... 008, 017, 477
Signal ..................... 015,040
Signature ....................... 011
Sprucer ....................... .021
Star Sight ....................... 542
Stareom .................... 003, 015
Stargate .................... 015,040
Starquest ....................... 015
Sylvania ...................... 001
TV85 ........................ 063
Tandy ....................... 258
Tele+ I ....................... 443
Teleservice .................... 281
Teleview ..................... 040
Texscan ...................... 001
Timeless ..................... 274
Tocom ................. 012,013,059
Toshiba ........................ 000
Tudl ........................... 286
Tusa ........................... 015
Unike ...................... 022, 153
CABLE REMOTE
CONVERTOR CODE NO.
United Artists .................... 007
United Cable .................... 003
Universal ........... 022, 056, 153, 191
Videoway ...................... 250
Viewstar ................ 027,063,258
Visi Cable+ ..................... 461
Westminster ..................... 105
Wolsey Gaine ................... 544
Zenith .................. 000, 054, 525
Zentek ......................... 400
REMOTE
DBS COOSNO.
Alpha Star ...................... 772
Echostar ........................ 775
HTS ........................... 775
Hitachi ......................... 819
Hughes Network System ........... 749
Jerrold ......................... 627
Magnavox .................. 722, 724
Memorex ....................... 724
Panasonic ...................... 70 I
Philips ..................... 722, 724
Primestar ....................... 627
RCA .......................... 566
Sony .......................... 639
Toshiba ........................ 790
Uniden ......................... 724
REMOTE
COOSNO.
AST ........................... 35 I
Akai ........................... 515
Alba ................... 352, 515,613
Aldea .......................... 288
Amstrad .... 080, 252, 345. 461,509, 689
Ankaro ................. 220, 288, 369
Anitron ........................ 183
Armstrong ...................... 243
Astra .......................... 108
Avalon ......................... 396
Axis ........................... 369
BT ........................ 515, 668
Beko .......................... 189
Best ........................... 369
Boca ...................... 243, 513
Bush .......................... 067
Cambridge .................. 344, 515
Channel Master .................. 362
Commlink ...................... 288
Connexions ..................... 396
Conrad ......................... 607
Crown ......................... 243
DDC .......................... 362
DNT .......................... 396
Echostar ........................ 396
Farguson ............ 067, 183, 189, 336
Fidelity ........................ 252
Finiux ..................... 108, 397
Fuba ....................... 369, 396
G-Bat .......................... 183
Galaxis ........................ 286
Gooding ........................ 57 I
Grundig ............ 173, 189, 571,750
Hinari ......................... 183
REMOTE
Hitschmann ................. 397. 573
Houston ........................ 668
Huth ................... 220, 243, 268
ITF ........................... 108
Intervision ...................... 592
JVC ....................... 515, 571
Kathrein ............ 092, 504, 622, 658
La Sat ..................... 513, 607
Lennox ........................ 592
Lupus ......................... 369
Luxor ...................... 108,573
Manhatten ...................... 592
Maspro ................. 092, 336, 750
Matsui ......................... 57 I
Mediamarkt ..................... 248
Minerva ........................ 57 I
Mintec ......................... 576
Morgan's ................... 243, 513
Newhaus ....................... 220
Nikko ...................... 360, 713
Nokia .................. I08, 397, 573
Nordmende ..................... 362
Orbitech ........................ 50 I
Pace ........... 067, 183, 336, 455, 791
Paliadium ...................... 57 I
Palsat .......................... 501
Philips ............. 200, 292, 571,750
Phonotrend .................. 288, 592
Plasmatic ....................... 442
Proset ......................... 288
Quadral .................... 362, 628
RFT ....................... 220, 288
Radix .......................... 396
SAT ....................... 35 I, 461
SEG ........................... 369
Saba ........................... 336
Salora ......................... 108
Satec .......................... 183
Schwaiger .................. 183, 504
Seemann ................ 396, 578, 626
Skymaster .................. 288, 626
Sony .......................... 704
Star Trak ....................... 421
Strong ......................... 42 I
Sunstar ........................ 513
Tantec ......................... 336
Techni Sat .................. 262, 501
Teleka ..................... 243, 613
Tonna ......................... 668
Triad .......................... 35 I
Universum ...................... 57 I
Vtech .......................... 35 I
Wisi ....................... 35 I, 396
REMOTE
DVD CODENO.
Kenwood ....................... 534
Mitsubishi ...................... 52 I
Panasonic ...................... 490
Philips ......................... 539
Pioneer ........................ 550
RCA .......................... 522
Sony .......................... 552
Toshiba ........................ 503
34
Page 35

Whwen using the TV remote
ith a VCR, first make cer-
tain it is set to control your VCR
(by the REMOTE CODE or
SEARCH method).
<_ Set the TV/VCR/ACC mode
i switch to VCR on the remote.
<_ Point the top of the remote
toward the front of the VCR
(remote sensor window) when
pressing the buttons.
Hold the (A/CH) • RECORD button
down to begin a VCR recording.
Set in the VCR position to send
remote commands to the VCR.
Press to begin playback of a
video tape.
",4"4
Press to rewind tapes. For some
VCR's the STOP button may
have to be pressed first, then
REWIND. In playback mode
hold down the button to view
picture moving rapidly in
I_verse.
Press to stop the motion of a tape
in playback, rewind, fast for-
ward, etc.
Remember, the VCR but-
g tons on the remote will not
operateyour VCR if those features
are not found on your VCR remote
control.
Note: All VCR functions (particularly
Search, Rewind, Fast Folward, etc.)
will operate the same as with the orig-
inal VCR remote control provided
with the VCR.
POWER BUTTON
Press to turnthe VCR ON and
OFF.
Press while in the VCR mode (VCR
indicator on the front of the unit
will light) to view the playback of a
tape. Press again to place in the TV
position (VCR indicator light will
go off) to view one program while
recording another program.
When used in the TV mode, the
TV/VCR/CLOCK button will
access the TV's Clock menu
options.
Press buttons for direct VCR
channel selections.
Press to temporarily stop the tape
during a playback or recording.
Press again to release Pause.
FAST FORWARD BUTTON
Press to rapidly advance the tape.
For some VCR's you may need
to press the STOP button first,
then the FAST FORWARD but-
ton. In playback mode hold the
button down to view the picture
moving rapidly in the forward
direction.
CHANNEL + & - BUTTONS
Press to scan up or down through
the VCR channel numbers.
35
Page 36

please make these simple
checks before calling for ser-
vice. These tips can save you time
and money since charges for TV
installation and adjustment of
customer controls are not cov-
ered under your warranty.
No Power
No Picture
No Sound
Work
TV Disnlavs Wronp
Channel or No
£haaa a2dn .
CAUTION: A video source (such as a video game, Compact Disc Interactive - CDI. or
TV information channel) which shows a constant non-moving pattern on the TV screen,
can cause picture tube damage. When your TV is continuously used with such a source
the pattern of the non-moving portion of the game (CDI, etc.) could leave an image
permanently on the picture tube. When not in use, turn the video source OFF.
Regularly alternate the use of such video sources with normal TV viewing.
i Check the TV power cord. Unplug the TV, wait 10 seconds, then reinsert plug into IR
outlet and push POWER button again, i
Check that outlet is not on a wall switch. Be sure fuse is not blown on AC Power strip.I
i Check antenna connections. Are they properly secured to the TV's 75_ plug? II
Check the TUNER control for CABLE or ANTENNA setting.
I
Check Audio/Video Input jack connections if using a VCR or other external device.
i Check the VOLUME buttons. ]
Check the MUTE button on the remote control.
Check Audio/Video Input jack connections if using a VCR or other external device.
Check batteries. Replace with AA Heavy Duty (Zinc Chloride) or Alkaline batteries
if necessary.
Clean the remote and the remote sensor window on the TV.
Check the TV power cord. Unplug the TV, wait 10 seconds, then reinsert plug into
outlet and push POWER button again. Be sure fuse is not blown on AC Power strip if
one is being used.
Check to be sure TV outlet is not on a wall switch.
i epeat channel selection.
Add desired channel numbers (CHANNEL control) into TV memory.
Check to be sure the TUNER control is set to the CABLE option.
i
Cleanin_ and Care
• To avoid possible shock hazard be sure the TV is unplugged from the electrical outlet before cleaning.
• When cleaning the TV screen take care not to scratch or damage the screen surface (avoid wearing jewelry or using
anything abrasive). Wipe the front screen with a clean cloth dampened with water. Use even, easy, vertical strokes when
cleaning.
• Gently wipe the cabinet surfaces with a clean cloth or sponge dampened in a solution of cool clear water. Use a clean
dry cloth to dry the wiped surfaces.
• Never use thinners, insecticide sprays, or other chemicals on or near the cabinet, as they might cause permanent marring
of the cabinet finish.
36
Page 37

Conxial Cable • A single solid antenna wire normally matched with a
metal plug (F-type) €id connector that screws (or pushes) di_ctly onto a
75 Ohm input found on the Television or VCR.
Closed Caption • Broadcast standard which allows you to read the
voice content of television programs on the 'IV screen. Designed to help
the hearing impaired this feature uses onscrenn "text boxes" to show dia-
logue and conversations while the TV program is in progress.
Direct Audio/Video Inputs • Located on the rear of the TVthese con-
nectors(RCAphono type plug) are used for the input of audio and
video signals. Designed foruse with VCRs (orotheraccessories) in
orderto receive higher pictureresolution andoffersoundconnection
options.
Identify • Method by which a remote control searches and finds an
operating code for another product (such as a VCR or Cable Converter).
Once the code has been "identified" then the "IV remote can operate and
send commands to the other product.
On Screen Displays (OSD) • Refers to the wording or messages gener-
ated by the television (or VCR) to help theuser with specific feature
controls (color adjustment, programming, etc.).
Menu • An onscreen listing of feature controls shown on the Television
screen that are made available for user adjustments.
Multiehannei Television Sound (MTS) • The broadcast standard that
allows for stereo sound to be transmitted with the TV picture.
Programming • The procedure of adding or deleting channel numbers
inU3the Television's memory circuits. In this way the Television
"remembers" only the locally available or desired channel numbers
and skips over any unwanted channel numbers,
Remote Sensor Window • A window oropening foundon the
Televisioncontrolpanelthrough which infrared remote control com-
mandsignalsarc received.
Setup Mode • Automatic feature control settings made by the TV.
Designed for first time setup and use. Settings for signal connections
(antenna or cable TV), plus channel program memory are held in the
TV's memory (even if the set is unplugged and moved to a new loca-
tion.)
Second Audio Program (SAP) • Another or additional audio channel
provided for in the Multichannel Television Sound (MTS) broadcast
standard. The most frequently proposed use for SAP is the simultane-
ous bilingual broadcast of TV program material.
Status • Allows the user to quickly confirm what channel number is
currently being viewed. Status can also be used to clear the Television
of on screen displays or information (rather than waiting for the dis-
plays to "time out" or automatically disappear from the screen).
Twin Lead Wire • The more commonly used name for the two strand
300 Ohm antenna wire used with many indoor and ou_loor antenna
systems. In many cases this type of antenna wire requires an additional
adapter (or balun) in order to connect to the 75 Ohm Input terminals
designed into the more recent Televisions and VCRs.
Accessories/Optional ............................... (*Q/U-I)
Adapter Connector ................................ (*Q/U- 1)
Add/Delete Channels ............................... (*Q/U-4)
Alternate Channel ...................................... 29
Audio/Video Input Jacks ................................ ,25
Aodio/Vrdeo Output Jacks ................................ 26
Balance Control ........................................ 21
Bass Control ........................................... 21
Battery Installation ................................. (*Q/U-2)
Cable TV Connecfions/SeRings ..................... ()Q/U-1, 3)
Channel Memory ................................. (*Q/U-4)
Clock Set Time ......................................... 8
Closed Captioning ...................................... 12
Contrast Plus (Black Stretch) Control ......................... 6
Controls/TV ...................................... (*Q/U-2)
Controls/Remote ............................. 27-35, (*Q/U-2)
External Control ................................. .(*Q/U-4)
Features ............................................... 4
Glossary TV Terms ..................................... 37
Incredible Surround ..................................... 23
Input Control .......................................... 25
Language Option .................................. (*Q/U-3)
Memory/Program Channels ......................... (*Q/U-4)
Menu Button .................................. 35, (*Q/U-2)
Minus(-)/Plus (+) Buttons ........................ 35, (*Q/U-2)
Picture Controls ........................................ .5
Picture Noise Reduction ................................... 7
Precautions/Safety ................................. 3, 36, 40
Programming Channels ............................. (*Q/U-4)
Remote Control .............................. 2"/-35, (*Q/U-2)
Requesting Service ................................ 38-39, 40
RF Coaxial Cable ................................. .(*Q/U- I)
Safety/precautions ................................. 3, 36, 40
Sensor Remote .................................... (*Q/U-2)
Set Up/First Time Use ........................ (*Q/U-I, 2, 3, 4)
Sleep Timer ........................................... 13
Sm_k - Understanding the SmartLock Feature ............. 14
SmartLock Access Code Feature ........................... 15
SmartLock Block Channel Feature .......................... 16
SmartLock Blocking Options .............................. 17
SmartLock Blocking using the Movie/TV Ratings ............ 18-19
SmartLock Review ...................................... 20
SmartPicture Control .................................... 27
Smartgonnd Control ..................................... 28
SmartSurf ............................................. 29
Start-up Channel Control ................................. 10
Start-up Time Control .................................... I1
Status/Exit Button ................................. (*Q/U-2)
Timer Control .......................................... 9
Tips for Service ................................ 36, 38-39, 40
VCR/TV Connections .......................... .25, (*Q/U- 1)
Volume Bar Control ..................................... 24
Volume Limiter Control .................................. 24
Warranty ............................................. 40
* Informationcontained in Quick-Use(Q/U)Guide-pagelisted.
37
Page 38

Philips Consumer Electronics Company
FactoryService Center Locations
Jersey
ir Indicates In-Home Service Only
1-800-242-9225
• Indicates In-Home/Carry-In Service
_ Beaumont/Austin
San Antonio
Tampa/W Florida
-k FL MyerldSW Florida
"_ Mlaml/SE Flodda
NOTE:Ifyouresideinoneofour PbitipsFactoryServiceBranchareas(seedirectoryonback),youcancontactthenearestServiceBranchto
obtainefficientandexpedientrepairfor yourproduct.IfyourproductisIn-Warranty,youshouldhaveproof-of-purohasetoensureNoCharge
Service.ForOut-of-Warrantyservice,callthelocationnearestyou.
NOTkSivousr6sidezdansunedesrdgionsdesserviesparunesuccuraaledeserviceapr_sventedutabricantPhilips(voirlisteci-dessous),
vouspourrezcontacterla branchedeserviceaprbsventelaplusprbsdechezvouspourobtenirunserviceapr_sventerapideetefficace.Sile
produitestsousgarantie,ilsuffiradeprdsenterunepreuved'achatpourb_n6ficierd'unservicesansfrais. Pourlesproduitsnoncouvertsparla
garantie,contactezlecentreleplusprosdechezvous.
NOTA:Si Ud.resideen unadenuestraszonasparasucursalesPhilipsdeservicioaldef_tbrica(vetdirectoriomdsabajo),Ud.puedecomunicarse
conlasucuraaldecarviciom_lscercanaparaobtenerunareparacl6noportunayeficazdesuproducto.Sisuproductoestdtodavfabajogaran-
tla,Ud.debepresentarcomprobantedecompraparanoocasionarningunoscargospor servicio.Paraserviciodespudsde!vencimientodela
garantla,llameallugarmdscercanodelosabajoindicados.
Howyoucanobtainefficientandexpedientcarry-in,mail-in,orin-homeserviceforyourproduct
PleasecontactPhilipsat 1-800-661-6162(Frenchspeaking)
1-800-363-7278(Englishspeaking)
AuCa.da
Commentobtenirleserviceaprbs-ventepourlesproduitsapport6souenvoy6sparlaposte_notrecentredeserviceouleservice_domicile
Veuillezcontacterphilipsd: 1-800-661-6162(Francophone)
1-800-363-7278
C6morecibirservicioeffficienteparasu producto,enpersona,porcorraoo a domicillo
FavordocomunicarseconPhilipsat: 1-800-661-6162(franc6fono)
1-800-363-7278(angl6fono)
MAC2929 1/99
EL4482-3 Rev. AA
3135 015 07541
38
Page 39

QUALITY SERVICEIS AS CLOSEAS YOUR TELEFflONE_SIMPLY LOOK OVER THE LIST BELOWFOR THE NUMBEROF A FACTORYSERVICECENTER
NEARYOU. YOURPRODUCT WiLt. RECEIVEEFFICIENTAND EXPEDIENTCARRY-IN, MAIL-IN, OR IN-ROME SERVICE,AND YOU WILL RECEIVEPEACEOF MINO,
KNOWINGYOUR PRODUCT IS 8EING GIVERTHE EXPERTATrENTIONOF PHIUPS' FACTORY SERVICE. ANO, IF THE PRONENUMBERUSTED FOR YOUR AREA
IS LONG DISTANCE,CALL1-800-242-9225 FORFACTORYSERVI_E.
COMMENTODTEfllRNOTRESERVICEAPR_ VENTERAPIDEETEFFICACESOITPARCOURRIER,A DOMICILE,OUEliSEPfl_CENTANTAUNCENTREDESERVICEPHILIPS.PLUSDE600CERTRES
OERECEPTIONOEWIOOUiTSARL_PARERATRAVERSLEPAYS:CONTACTERLECENTREOESERVICEAUXCONSOMMATEUUSLIEPLUSPROCHEPOORSAVOIRL'EMPLACEMERTDESESD_POTS
O/INSUNRAYONRE50A 75MILES(80KMA 120KM)OUCENTREDESERVICELOCAL.
CGMOONTENERUNSERVICIOOPORTRfNOY ERCIERTEPODCORREO,ENCASA0 ENPERSONAPAPA$UPRODUCTOATRAVtSDEUNCENTROPHILIPSDESERVIClO.M/kSDE600SITIUSPOR
TRO0ELPAlSPARALARECEPCIONDEPRODUCTUSNECESITADUSDEREPARACIONES:COMUNICARSECONELCERTRODESERVICIODEFABRICAMASCERCANOPARAESTR$LUGARESDENTRO
DEUNRAOIODE80A120KM(60A75 MILLAS)RELCERTRODESERVICIOLOCAL.
GEORGIA
PhilipsFactoryServiceofGeorgia
200 N. CobbPkwy.,Suite 120
Marietta,GA30062
(770) 795-0085
FLORIDA
PhilipsFactoryServiceofFlorida
1911 USHighway301 North
Tampa,FL33619
(813) 621-8181
WESTERNU.S.A.
PhilipsFactoryServiceWesternRegion
681 EastBrokawRd.
San Jose,CA95112
(408) 436-8566
TEXAS
PhilipsFactoryServiceof Texas
1110 N. PostOakRd., Suite100
Houston,TX 77055
(713) 682-3990
CENTRALU.S.A.
PhilipsFactoryServiceCentralUS
950 KeynoteCircle
BrooklynHeights,OH 44131
(216) 741-3334
MICHIGAN
PhilipsFactoryServiceofMichigan
25173 Dequindre
MadisonHeights,MI 48071
(248) 544-2110
DALLASAREA
PhilipsFactoryServiceof Dallas
415 N. MainStreet,#107
Euless,TX76040
(713) 682-3990
ILLINOIS
PhilipsFactoryServiceof Illinois
1279W+HamiltonPkwy.
Itasca,IL60143
(630) 776-0990
TENNESSEE
PhilipsFactory ServiceofEastTennessee
6700 D PapermillRd.
Knoxville,TN 37919
(423) 584-6614
MID-ATLANTIC
Pbilips FactoryServiceMid-Atlantic
352 DunksFerryRd.
Bensalem,PA 19020
(215) 638-7500
MAC29291/99
39
Page 40

COLOR TELEVISION
90 Days Free Labor
One Year Free Replacement of Parts (Two Years Free Replacement on Color Picture Tube)
This product must be carried in for repair.
WHO IS COVERED?
Youmusthaveproofofpurchaseto receivewarrantyservice,A sales
receiptor otherdocumentshowingthatyoupurchasedtheproductis
consideredproofofpurchase.
WHAT IS COVERED?
Warranty coveragebeginsthe dayyou buyyour product. For90 days
therea_er,all partswill be repaired or replaced free, and labor isfree.
From 90 daysto one year from the day of purchase,all partswill be
repaired or replaced free, but you payfor all laborcharges. From one
to two yearsfrom the day of purchase,you payfor the replacement or
repair of all parts except the picture tube, and for all laborcharges.
After two years from the dayof purchase,you payfor the replacement
or repair of all parts,and for all labor charges.
All parts, includingrepaired and replaced parts,are covered only for
the originalwarranty period. When the warranty on the product
expires, the warranty on all replaced and repaired partsalso expires.
WHAT IS EXCLUDED?
Your warranty does not cover:
• labor chargesfor instal!altonor setup of the product,adjustmentof
customer controlson the product, and installationor repair of
antennasystemsoutsideof the product.
• product repair and/or part replacement becauseof misuse,acci-
dent, unauthorizedrepair or other causenot within the control of
Philips Consumer ElectronicsCompany.
• reception problemscausedby signalconditionsor cable or antenna
systemsoutside the unit.
• a product that requires modification or adaptationto enableit to
operate in any countryother than the country for which it was
designed,manufactured,approvedand/or authorized,or repair of
products damagedby thesemodifications.
• incidentalor consequentialdamagesresulting from the product.
(Some statesdo not allow the exclusion of incidentalor consequen-
tial damages,sothe aboveexclusion may not applyto you. This
includes,but isnot limitedto, prerecorded material,whether copy-
righted or not copyrighted.)
• a product usedfor commercialor institutionalpurposes.
WHERE IS SERVICE AVAILABLE?
Warranty serviceisavailablein all countrieswhere the product is offi-
ciallydistributedby Philips Consumer ElectronicsCompany. In coun-
tries where P11ilipsConsumer ElectronicsCompanydoes not distribute
the product, the local Philips serviceorganizationwill attempt to pro-
vide service(althoughthere may be a delayif the appropriate spare
parts and technicalmanual(s) are not readily available).
MAKE SURE YOU KEEP...
Pleasekeepyour salesreceipt or other documentshowingproofof
purchase. Attach it to this owner's manual and keep both nearby.
Also keep the originalbox and packingmaterialin caseyou need to
return your product.
BEFORE REQUESTING SERVICE...
Pleasecheckyour owner's manualbefore requesting service.
Adjustmentsof the controls discussedthere may saveyou a service
call.
TO GET WARRANTY SERVICE IN U.S.A.,
PUERTO RICO OR U.S. VIRGIN ISLANDS...
Contacta Philipsfactoryservicecenter(seeenclosedlist)or autho-
rizedservicecenterto arrangerepair.
(In U.S.A.,Puerto Ricoand U.S. VirginIslands,allimpliedwarranties,
includingimpliedwarranties of merchantabilityandfitnessfor a partic-
ularpurpose, are limitedin duration to the duration of this express
warranty. But,becausesome statesdo not allow limitationson how
longan impliedwarranty may last,this limitation may not applyto
you.)
TO GET WARRANTY SERVICE IN CANADA...
PleasecontactPhilipsat:
1-800-894-5463
1-800-363-7278
(In Canada,this warranty isgivenin lieuof all other warranties. No
other warranties are expressedor implied,includinganyimpliedwar-
ranties of merchantabilityor fimessfor a particular purpose. Philipsis
not liableunder anycircumstancesfor anydirect, indirect,special,inci-
dentalor consequentialdamages,howsoeverincurred, evenif notheled
of the possibilityof suchdamages.)
REMEMBER...
Pleaserecord the model and serialnumbers found on the product
below. Also, pleasefill out and mailyour warranty registrationcard
promptly, it will be easierfor us to notify you ifnecessary.
MODEL#
SERIAL#
Philips Consumer Electronics Company, P.O. Box 2976, Longview, Texas 75606, (903) 242-4800
Printed in U,S.A.
 Loading...