

Page 1
0
C
0
L 0
R
T
E
L E V
I S
I 0
AL
N
,)o.o@a
P
Page 2
Once your PHILIPS MAGNAVOX purchase is registered, you're eligible to receive all the privileges of
owning a PHILIPS MAGNAVOX product. So complete and return the Warranty Registration Card
enclosed with your purchase at once. And take advantage of these important benefits.
Congratulationson your purchase,
and welcome to the "family!"
PHILIPS
Dear PHILIPS MAGNAVOX product owner:
Thank you for your confidence in PHILIPS MAGNAVOX. You've selected one of the best-built, best-
backed products
available today. And we'll do everything in our power to keep you happy with your purchase for many
years to come.
As a member of the PHILIPS MAGNAVOX ffamily," you're entitled to protection by one of the most
comprehensive warranties and outstanding service networks in the industry.
What's more, your purchase guarantees you'll receive all the information and special offers for which
you qualify, plus easy access to accessories from our convenient home shopping network.
And most importantly you can count on our uncompromising commitment to your total satisfaction.
All of this is our way of saying welcome-and thanks for investing in a PHILIPS MAGNAVOX product.
Sincerely.....
Robert Minkhorst
President and Chief Executive Officer
P.S.Remember,togetthe mostfromyourPHIUPS
MAGNAVOXproduct,youmustreturnyour
WarrantyRegistrationCardwithin10 days.So
pleasemailit to us rightnow!
Know ese
safetysymbols
_, This "bolt of lightning_indicates uninsulated material within your unit may cause an electrical
shock. For the safety of everyone in your household, please do not remove product covering.
_IL The =exclamation point" calls attention to features for which you should read the enclosed lit-
eraturecloselytopreventoperatingandmaintenanceproblems.
WARNING: TO PREVENT FIRE OR SHOCK HAZARD, DO NOT EXPOSE THIS EQUIPMENT
TO RAIN OR MOISTURE.
CAUTION: To prevent electric shock, match wide blade of plug to wide slot,and fully inserL
A'I-rENTION: Pour _vtter les chocs 61ectriques, introduire la lame la plus large de la fiche dens la
Ix)me corruspoodante de la prise et pousser jusqu'au fond.
2
Page 3
Introduction
Welcome/Registration of Your TV ............................ 2
Table of Contents ....................................................... 3
Features ...................................................................... 3
Ouick Use/Start Up Features
_Antenna Hookups ................................................ 4
_Cable Hookups ............... _.................................... 5
_'VCR to TV Hookups .................................... 5, 19
_Basic TV and Remote Operations ...................... 6
C-FirstTime Setup.................................................. 7
---'IOn-Screen (MENU) Features
_How to Set the TV for Closed Captioning ......... 8
_-How to Set the TV's Clock ................................. 9
C-Using the Surf Control ...................................... 10
_How to Set the Sleep Timer Control ................. 11
_Adjusting the TV Picture Controls ................... 11
_'Using the TV's Child Lock Control ........... 12, 13
_'How to Set the TV's Message Control ............. 14
¢'Using the Smart Picture Control ....................... 15
_'Using the Smart Sound Control (AVL) ............ 16
"_Using the TV's Volume Control ....................... 17
_'How to Set th_ TV's Volume Limit Control.....17
_Using the TV's Treble and Bass Control .......... 18
_'Using the Spatial Sound Control ...................... 19
_'How to Set the TV's Sound (Stereo/Mono)
Control .............................................................. 20
_'Using the TV's Audio Output Jacks ................. 21
¢'Using the TV's Audio/Video Input Jacks ......... 22
]_ General Information
Tips if Something Isn't Working ............................. 23
Glossary of TV Terms_ ............................................ 24
Index ........................................................................ 26
Factory Service Locations .................................. 26-27
Warranty ................................................................... 28
Infrared Remote Control works your TV set and all
on-screen features.
Standard broadcast (VHF/UHF) or Cable TV
(CATV) channel capability.
Stereo TV with built-in audio amplifier and twin
speaker system for receiving TV programs broadcast
in stereo sound.
Closed Captioning allows the viewer to read TV
program dialogue or voice conversations as on-
screen text.
Automatic Programming of Channels for quick
and easy selection of favorite stations available in
your area.
On-Screen Features (in either English, French, or
Spanish) show helpful messages for setting of TV
controls.
Audio/Video Jackpand for direct connections with
VCRs (or other video accessories) providing quality
"IVpicture and sound playback.
Sleep Timer automatically turns the TV OFF at pre-
set times.
Clock Timer feature can turn ON the TV at any pre-
set time -just like an alarm clock.
Copyright © 1997 Philips Consumer Electronics Company. All fights reserved.
Page 4
<
-<
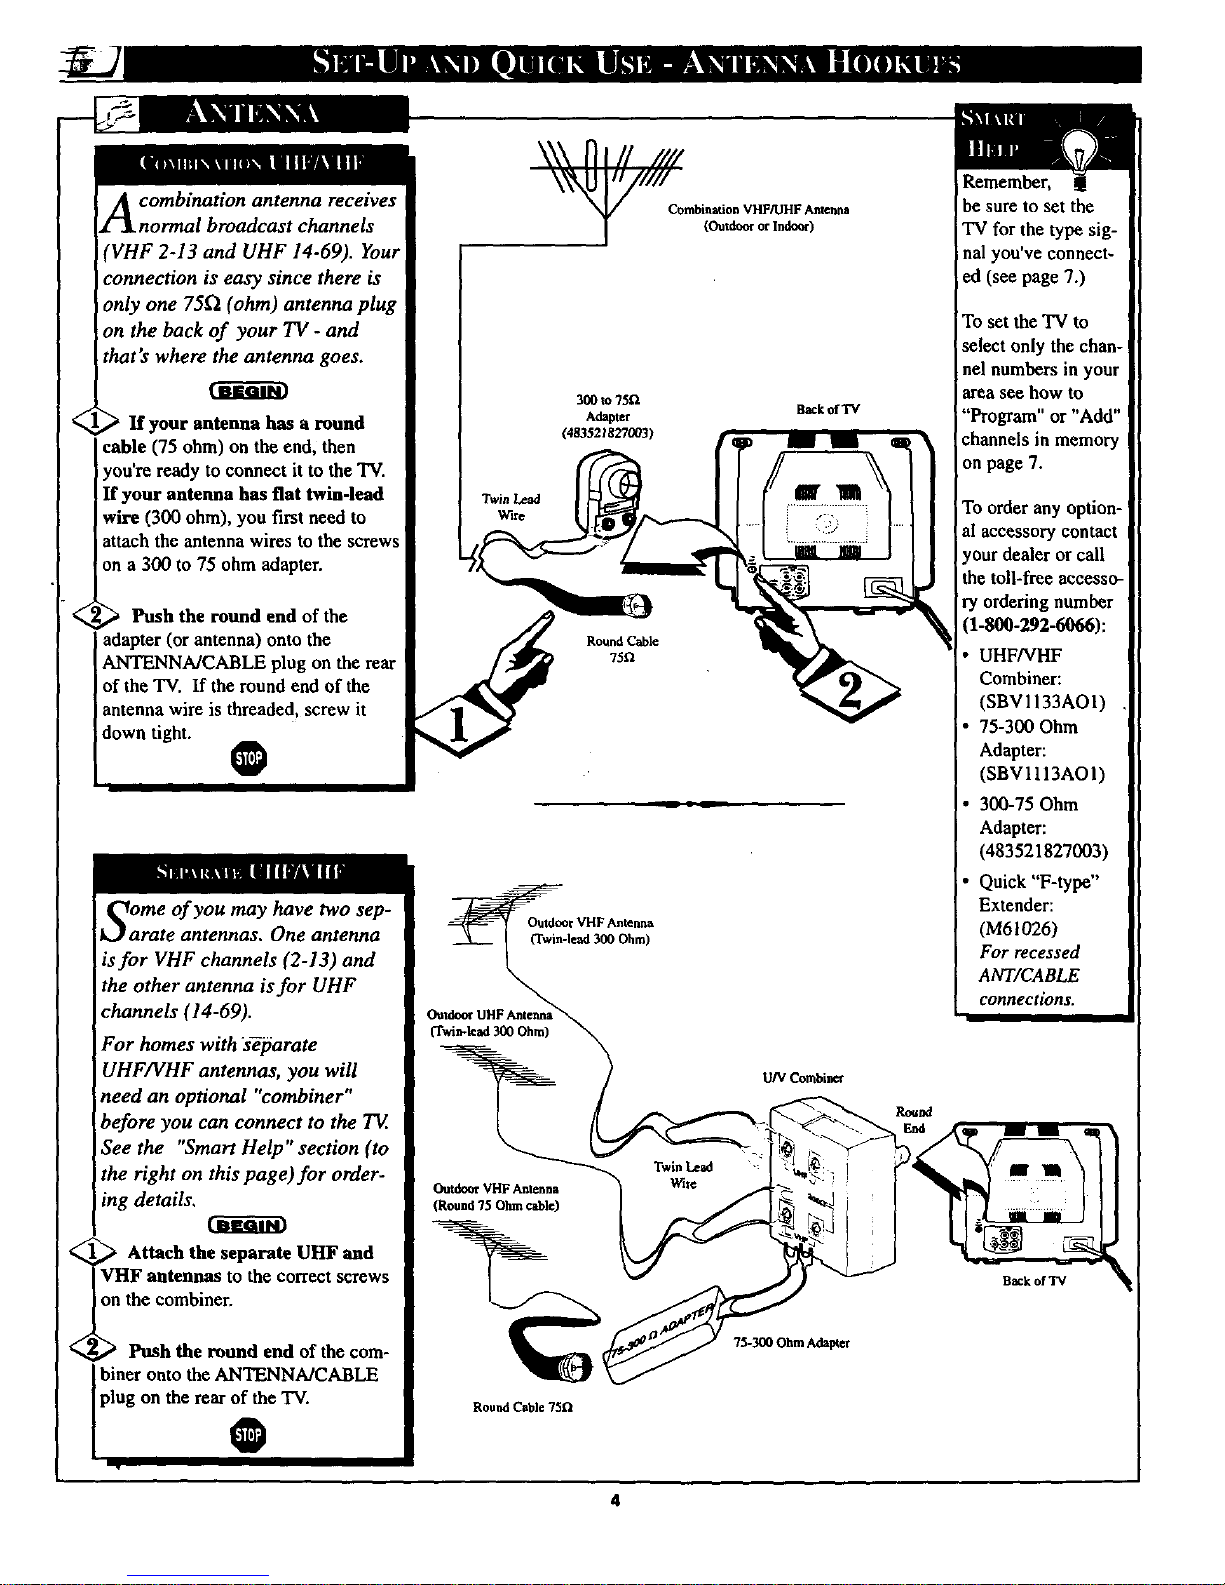
A combination antenna receives
normal broadcast channels
'VHF 2-13 and UHF 14-69). Your
:onnection is easy since there is
only one 75_ (ohm) antenna plug
on the back of your TV - and
that's where the antenna goes.
If your antenna has a round
cable (75 ohm) on the end, then
you're ready to connect it to the TV.
If your antenna has flat twin-lead
wire (300 ohm), you first need to
attach the antenna wires to the screws
on a 300 to 75 ohm adapter.
300 to?5tl
Adapttr
(483521827Q03)
Push the round end of the 1 /_
adapter (or antenna) onto the _ RoundCable
ANTENNA/CABLE plug on the rear 75u
of the TV. If the round end of the
antenna wire is threaded, screw it
down tight. _
Back_TV
_ome of you may have two sep-
arate antennas. One antenna
is for VHF channels (2-13) and
the other antenna is for UHF
channels (14-69).
For homes with s_arate
UHF/VHF antennas, you will
need an optional "combiner"
before you can connect to the TE.
See the "Smart Help" section (to
the right on this page)for order-
ing details.
Attach the separate UHF and
F antennas to the correct screws
he combiner.
Push the round end of the cora-
l biner onto the ANTENNA/CABLE
plug on the rearoftbe TV.
®
Outdoor VHF Antenna
(Round 75 Ohm cable)
Round Cable 75_
U/V Combiner
73-300 Ohm Adap_t
Remember,
be sure to set the
TV for the type sig-
nal you've connect-
ed (see page 7.)
To set the TV to
select only the chan-
nel numbers in your
area see how to
"Program" or "Add"
channels in memory
on page 7.
To order any option-
al accessory contact
your dealer or call
the toll-free accesso-
ry ordering number
1-800-292-6066):
UHFNHF
Combiner:
(SBV 1133AO 1)
75-300 Ohm
Adapter:
(SBV1 lI3AOI)
300-75 Ohm
Adapter:
(483521827003)
Quick "F-type"
Extender:
(M61026)
For recessed
ANT/CABLE
connections.
Back of TV
4
Page 5
JEGIm
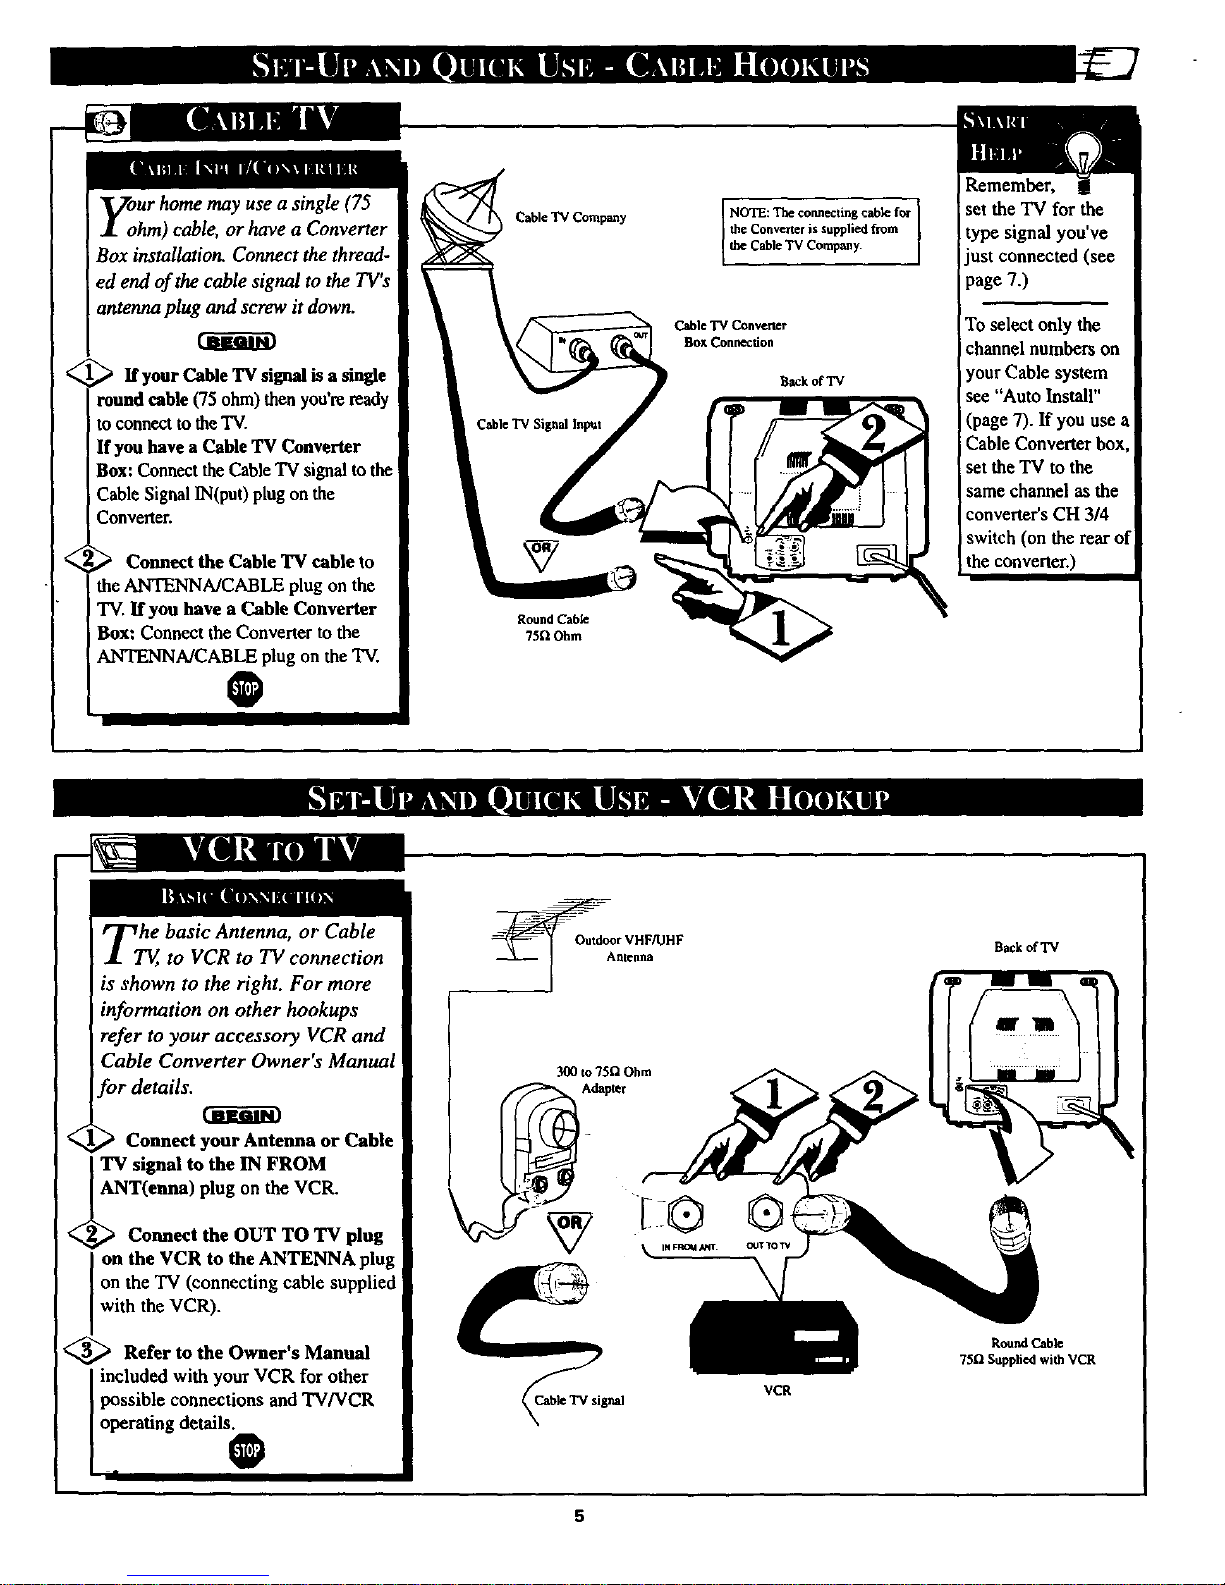
y:ur home may use a single (75
hm) cable, or have a Converter
Box installation. Connect the thread-
ed end of the cable signal to the TV's
antenna plug and screw it down.
_ If your Cable TV signal is a single
round cable (75 ohm) thenyou're ready
to connect to theTV.
If you have a Cable 'IV Converter
Box: Connect the Cable "IV signal to the
Cable Signal IN(put) plug on the
Converter.
,_ Connect the Cable TV cable to
the ANTENNA/CABLE plug on the
TV. If you have a Cable Converter
Box: Connect the Convener to the
ANTENNA/CABLE plug on the 'IV.
O
Round Cable
75ftOhm
I
NOTE: Tat connecting cable for I
the Converter is supplied from
I
the Cable "IVCompany.
Cable"IVConvem:r
Box Connection
B_k of "IV
Remember,
set the "IV for the
type signal you've
just connected (see
page 7.)
To select only the
channel numbers on
your Cable system
see "Auto Install"
(page 7). If you use a
Cable Converter box
set the TV to the
same channel as the
converter'sCH 3/4
switch (on the rear of
the convener.)
<
<
ZT_he basic Antenna, or Cable
to VCR to TV connection
is shown to the right. For more
information on other hookups
refer to your accessory VCR and
Cable Converter Owner's Manual
br details.
Connect your Antenna or Cable
TV signal to the IN FROM
ANT(euna) plug on the VCR.
Connect the OUT TO TV plug
on the VCR to theANTENNA plug
on the TV (connecting cable supplied
with the VCR).
<_ Refer to the Owner's Manual
included with your VCR for other
possible connections and TV/VCR
operating details.
, O
300 to 75[2 Ohm
v_
Back of "IV
RoundCable
75f1 Supplied with VCR
5
Page 6
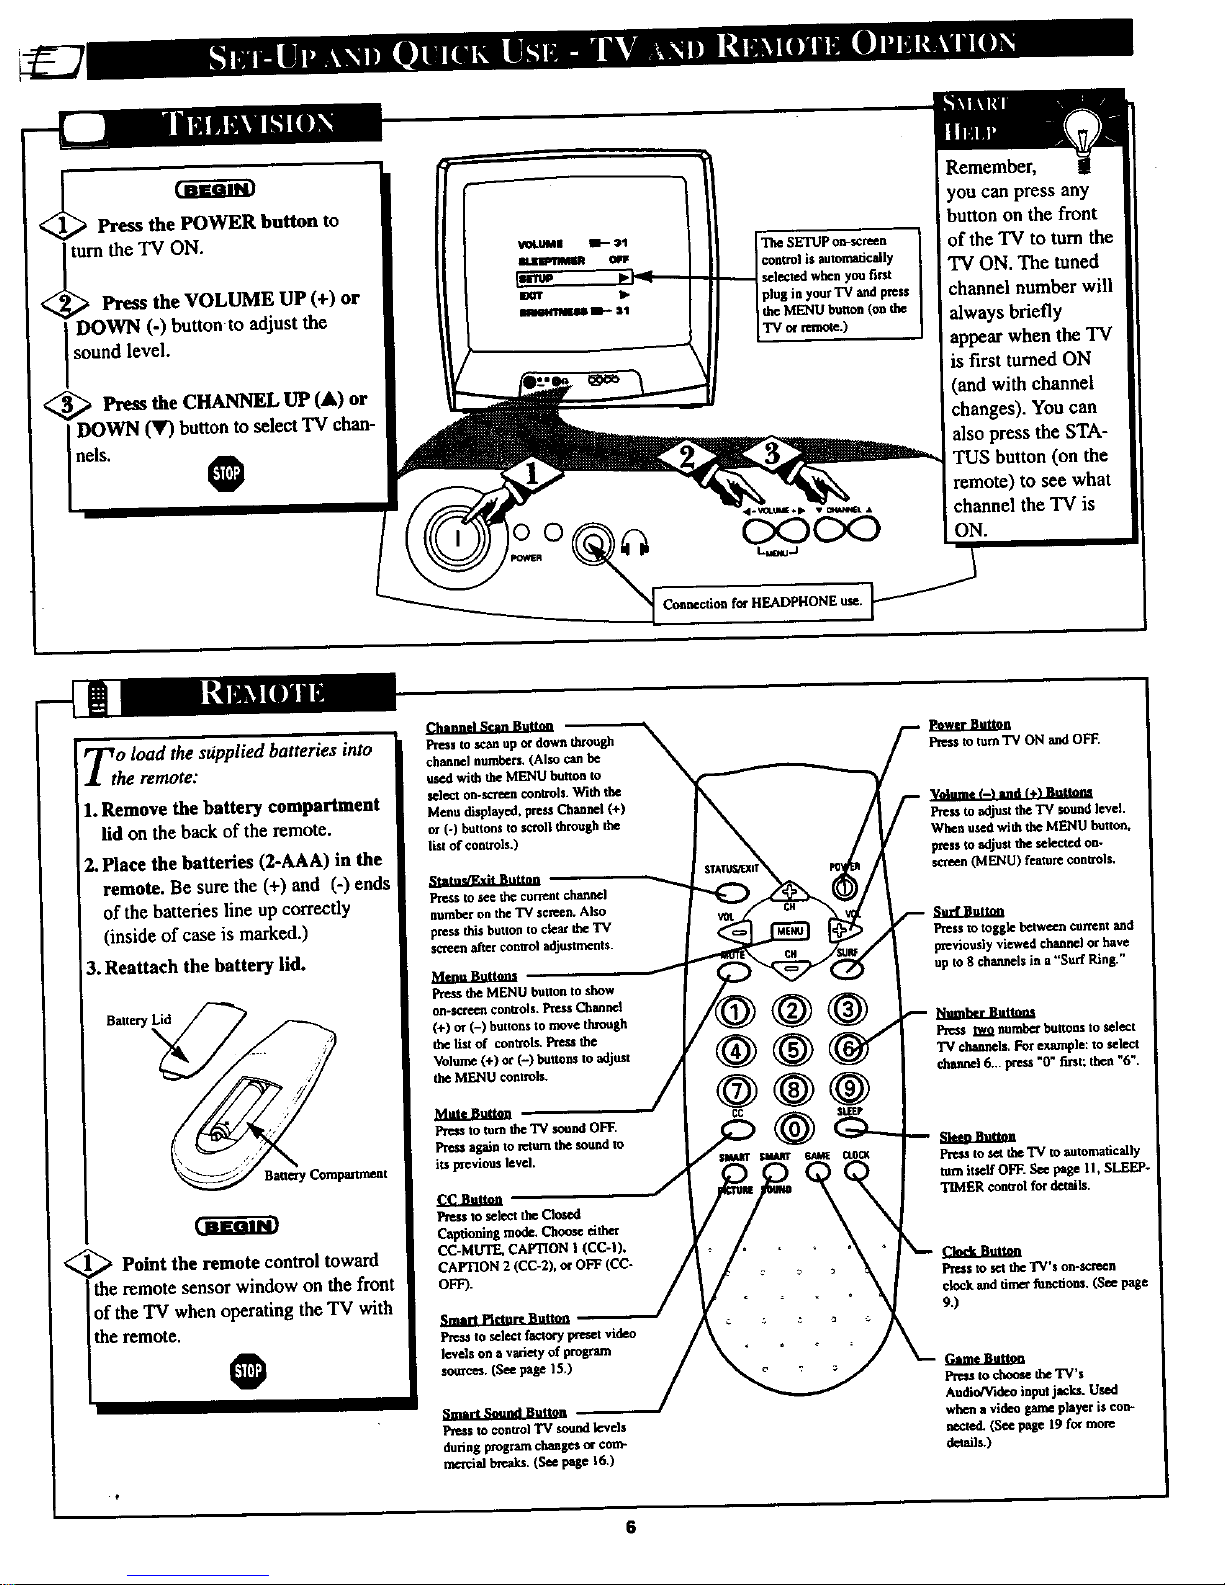
< Press the POWER button
to
turnthe 'IV ON.
Press the VOLUME UP (+) or
DOWN (-) button to adjust the
sound level.
_ Press the CHANNEL UP (&)
or
DOWN (V) buttonto select 'IV chan-
nels.
0
TheSETUP €_-_reen
conU'olis automatically
selected when youfirst
plus inyour 'IV andpress
theMENUbutton(on the
TV cqremote.)
CxDCx:)
Remember,
youcanpressany
buttononthefront
of the TV to turn the
TV ON. The tuned
channel number will
always briefly
appear when the TV
is first turned ON
(and with channel
changes). You can
also press the STA-
TUS button (on the
remote) to see what
channel the "IVis
ON.
<
Zo load the sopplied batteries into
he remote:
1. Remove the battery compartment
lid on theback of the remote.
2. Place the batteries (2-AAA) in the
remote. Be sure the (+) and (-) ends
of the batteries line up correctly
(inside of case is marked.)
3. Reattach the battery lid.
Battery Lid
Point the remote control toward
the remote sensor window on the front
of the "IV when operatingthe TV with
the remote,
O
CIH,rL_el_ Bmt_
Press to scan up or down through
channel numbers. (Also can be
used with the MENU button to
select on.scr_n controls. With the
Menu displayed, pres_ Channel (+)
or (-) buttons to scroll through the
list of controls.)
_ala.sl_tiL_tma
Press to tee the current channel
rtumbef on the "rv screen. Also
press this button to clear the "IV
screen after control adjustments.
Press the MENU button to show
on-screen coutzols. Press Channel
(+)or(-)Su.onsto movednxmgh
the list of controls. Press the
the MENU controls.
Frms to turn the TV sound OFF.
Press agein to return the sound to
its previous level.
f,.C,Jhttaa
Pmu to select the Closed
Captioning mode. Choose either
CC-MUTE. CAPTION I (CC-I),
CAPTION 2 (CC-2), o¢ OFF (CC-
OFF).
Smarl I_eltwenuttm*
Press to select factory preset video
levels on a variety of program
somct_. (See page 15.)
Smart _,nmnd Button
Press to con_o| TV sound levels
durins pxogram changes m corn-
rneTcial breaks. (See page I&)
Pressto mmTV ON andOFF.
Press to adjust the TV sound level.
When used with the MENU hottcm,
press to adjust the selected om
ua'een (MENU) feature controls.
Su_Sutt_
Press to tosgle between current and
previously viewed channel 0¢ have
up to 8 channels in a "Surf Ring."
hha_:r.r.._uUmm
Press _ Im_ buttons to select
TV channels,For example: to select
channel6... press "0" first; then "6".
Pre_s tosettheTV m automatically
tom itself OFF. _ puge II, SLEEP-
'rDdER ¢ontxol for details.
Cloeknut_
Pres$ to set the TV's on-screen
clock and timer functious. (See page
9.)
fa,me.aaUau
Pre*s to _ theTV*s
Audio/Video input jacla. Used
when a video game player is _on-
nected. (See page 19 for more
details.)
6
Page 7
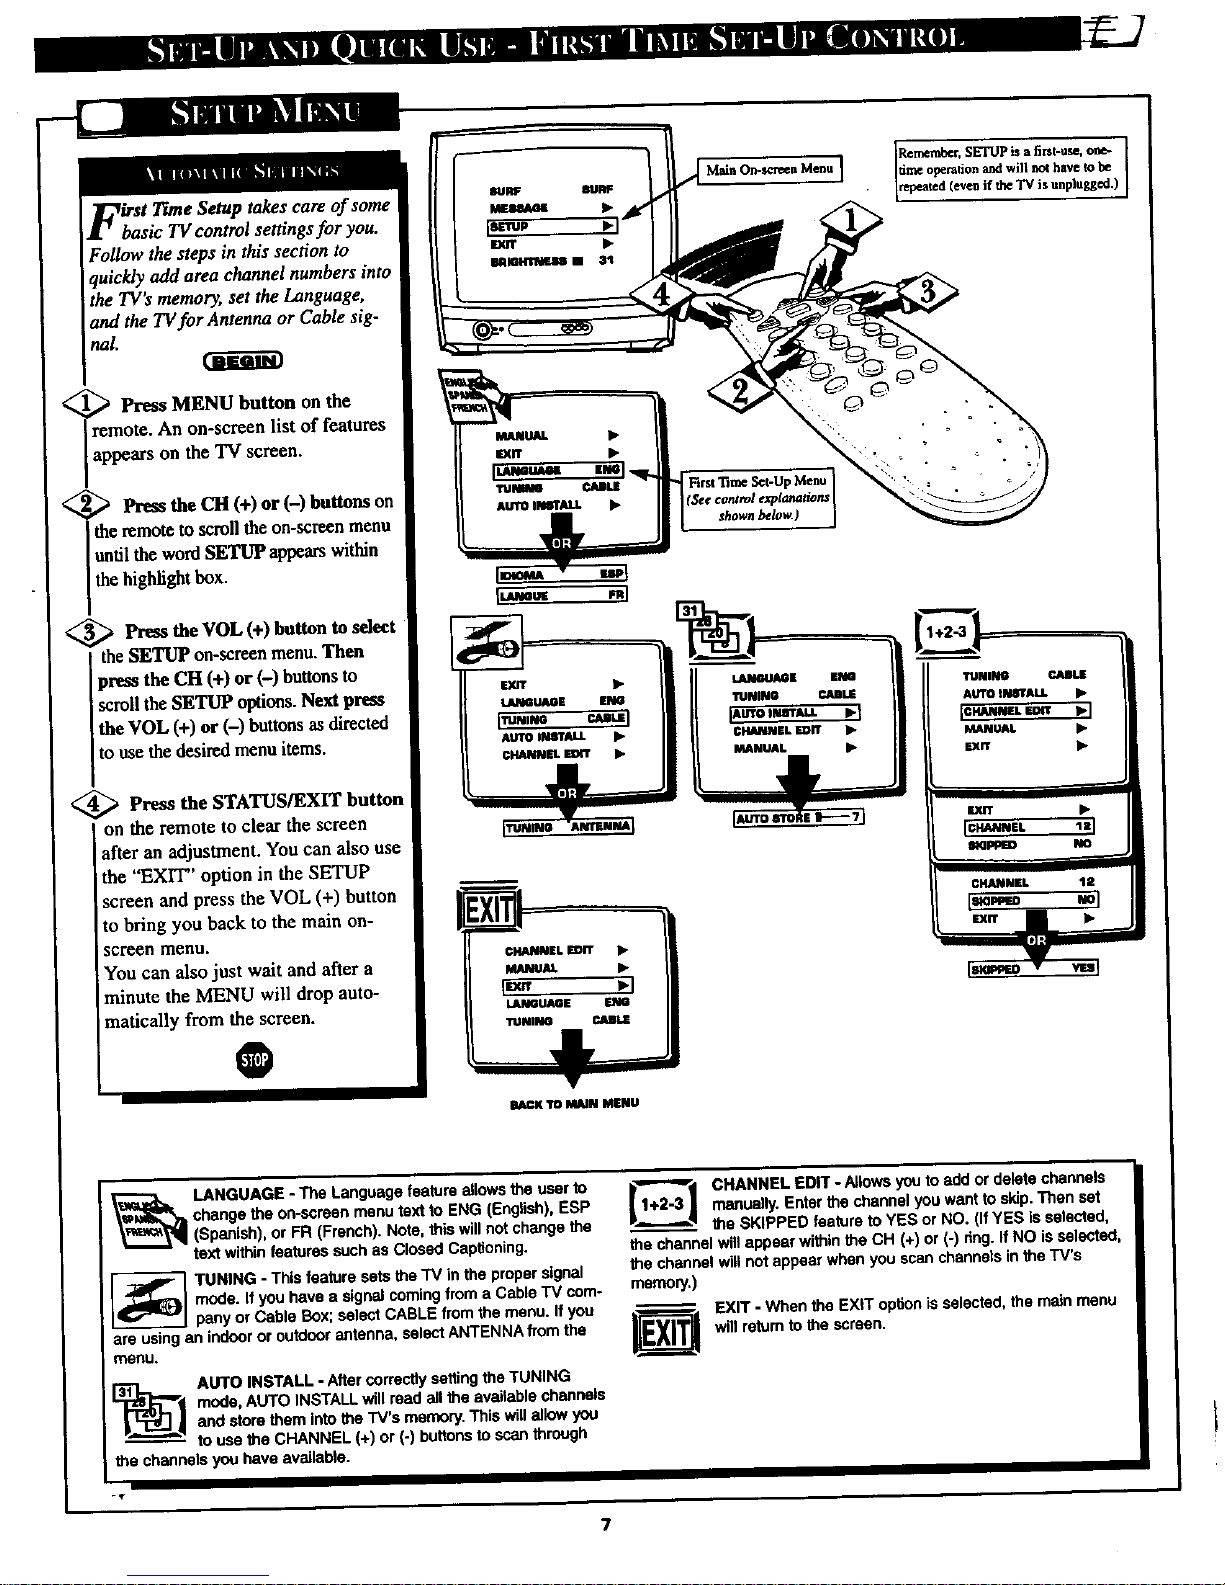
this section to
set the _nguage,
_ the _ for Antenna or Cable sig-
nal.
i
Pres* MENU button on the
ote. An on-screen list of features
pears on the TV screen.
Press the CH (+) or (-) buttons on
the remoteto scroll the on-screen menu
until the word SETUP appearswithin
the highlight box.
<_ Pr--,_,sthe VOL (+) button to select
I the SETUP on-screen menu.Then
prem the CH (+) or (-) buttons to
scroll the SETUP options. Next press
the VOL (+) or (-) buttons as directed
to use the desired menu items.
@Press the STATUS/EXIT button
on the remote to clear the screen
after an adjustment. You can also use
the "EXIT" option in the SETUP
screen and press the VOL (+) button
to bring you back to the main on-
screen menu.
You can also just wait and after a
minute the MENU will drop auto-
matically from the screen.
O
Rernembcr, SETUP is a first-use, one- I
tirr_ operation and wiS no( have _o
repeated (even if the TV is unplugged.)
BACKYO MAiN MENU
_ LANGUAGE - The Language feature allows _e user to
change the nn-screen menu text to ENG (English), ESP
(Spanish), or FR (French). Note, this will not change the
text within features such as ClOSed Cap(ioning.
--] UNING - This feature sets the TV in the proper signal
mode. If you have a signal coming from a Cable TV com-
pany or Cable Box; select CABLE from the menu. Ifyou
are using an indoor or outdoor antenna, select ANTENNA from the
meou,
[_! AUTO INSTALL - After correctly setting the TUNING
mode, AUTO INSTALL will mad all the available channels
and store them into the TV's memory. This will allow you
to use the CHANNEL (+) or (-) buttons to scan through
the channels you have available.
[1"_'_ _ CHANNEL EDIT - Allows you to add or delete channels
manuagy. Enter the channel you want toskJp. Then set
the SKIPPED feature to YES or NO. (If YES is selected,
the channel will appear within the CH (+) or (-) ring. If NO is selected,
the channel will not appear when you scan channels in the TV's
memory.)
EXIT - When the EXiT option is selected, the main menu
will return to the screen.
Page 8
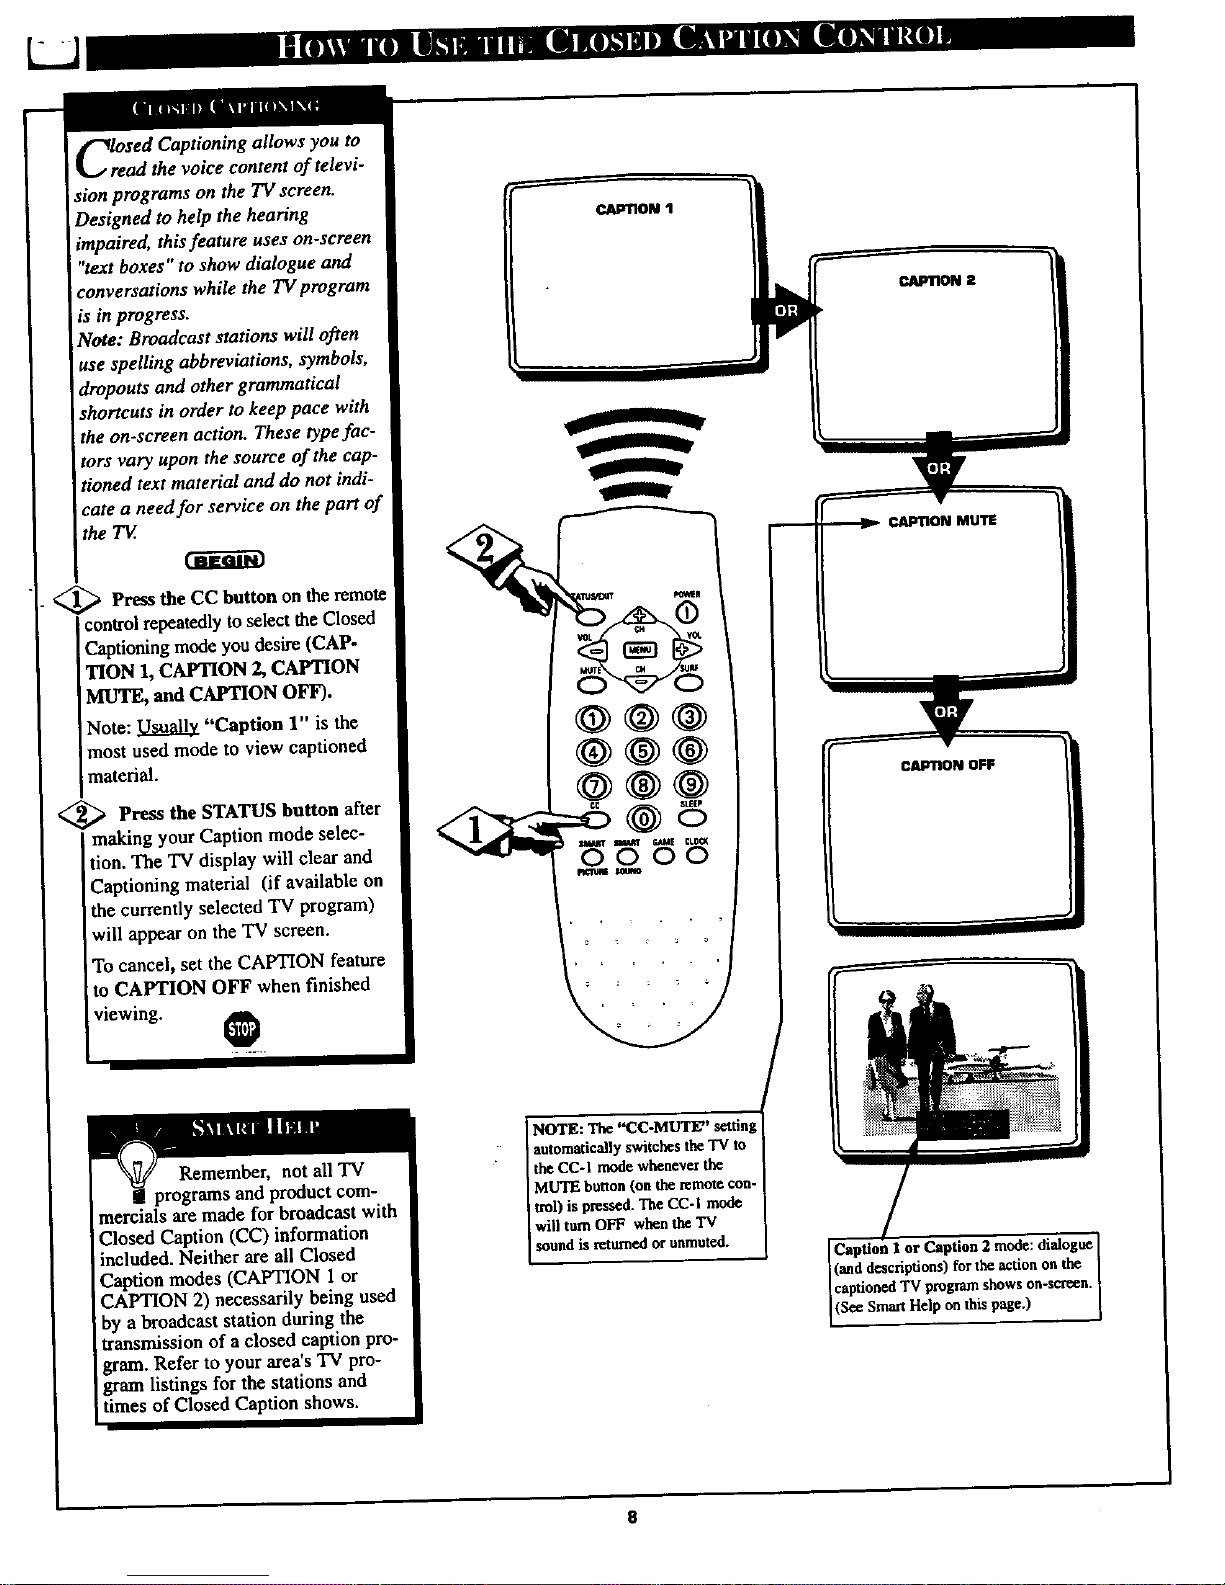
voice content of televi-
sion programs on the TV screen.
Designed to help the hearing
impaired, this feature uses on-screen
"text boxes" to show dialogue and
conversations while the TV pmgram
is in progress.
Note: Broadcast stations wilt often
use spelling abbreviations, symbols,
dropouts and other grammatical
shortcuts in order to keep pace with
the on-semen action. These typefac-
tors vary upon the source of the cap-
tioned text material and do not indi-
cate a need for service on the part of
the T_.
_ ]Fre_ the on remote
CC button the
controlrepeatedlyto select the Closed
Captioning mode you desire (CAP-
'lION 1, CAPTION 2, CAPTION
MUTE, and CAPTION OFF).
Note: _ "Caption 1" is the
most used mode to view captioned
material.
<_ Press the STATUS button after
making your Caption mode selec-
tion. The TV display will clear and
Captioning material (if available on
the currently selected TV program)
will appear on theTV screen.
To cancel, set the CAPTION feature
to CAPTION OFF when finished
viewing. @
%
CAPTION OFF
Remember, not all TV
programs and product com-
mercials are made for broadcast with
Closed Caption (CC) information
included. Neither are all Closed
Caption modes (CAPTION 1 or
CAPTION 2) necessarily being used
by a broadcast station during the
transmission of a closed caption pro-
gram. Refer to your area's TV pro-
gram listings for the stations and
times of Closed Caption shows.
NOTE: The "CC-MLWE" setting
automatically switches the 'IV to
the CC-I mode whenever the
MUTE button (on the remote con-
trnl) is pressed. The CC-I mode
will turn OFF when the "IV
sound is returned or unmuted.
ICaption I or Caption 2 mode:dialogue]
(anddeacriptions)forthe actionoa the I
captiortedTV program shows on-scr_n. [
(S¢€SmartHelpon this page.) I
8
Page 9
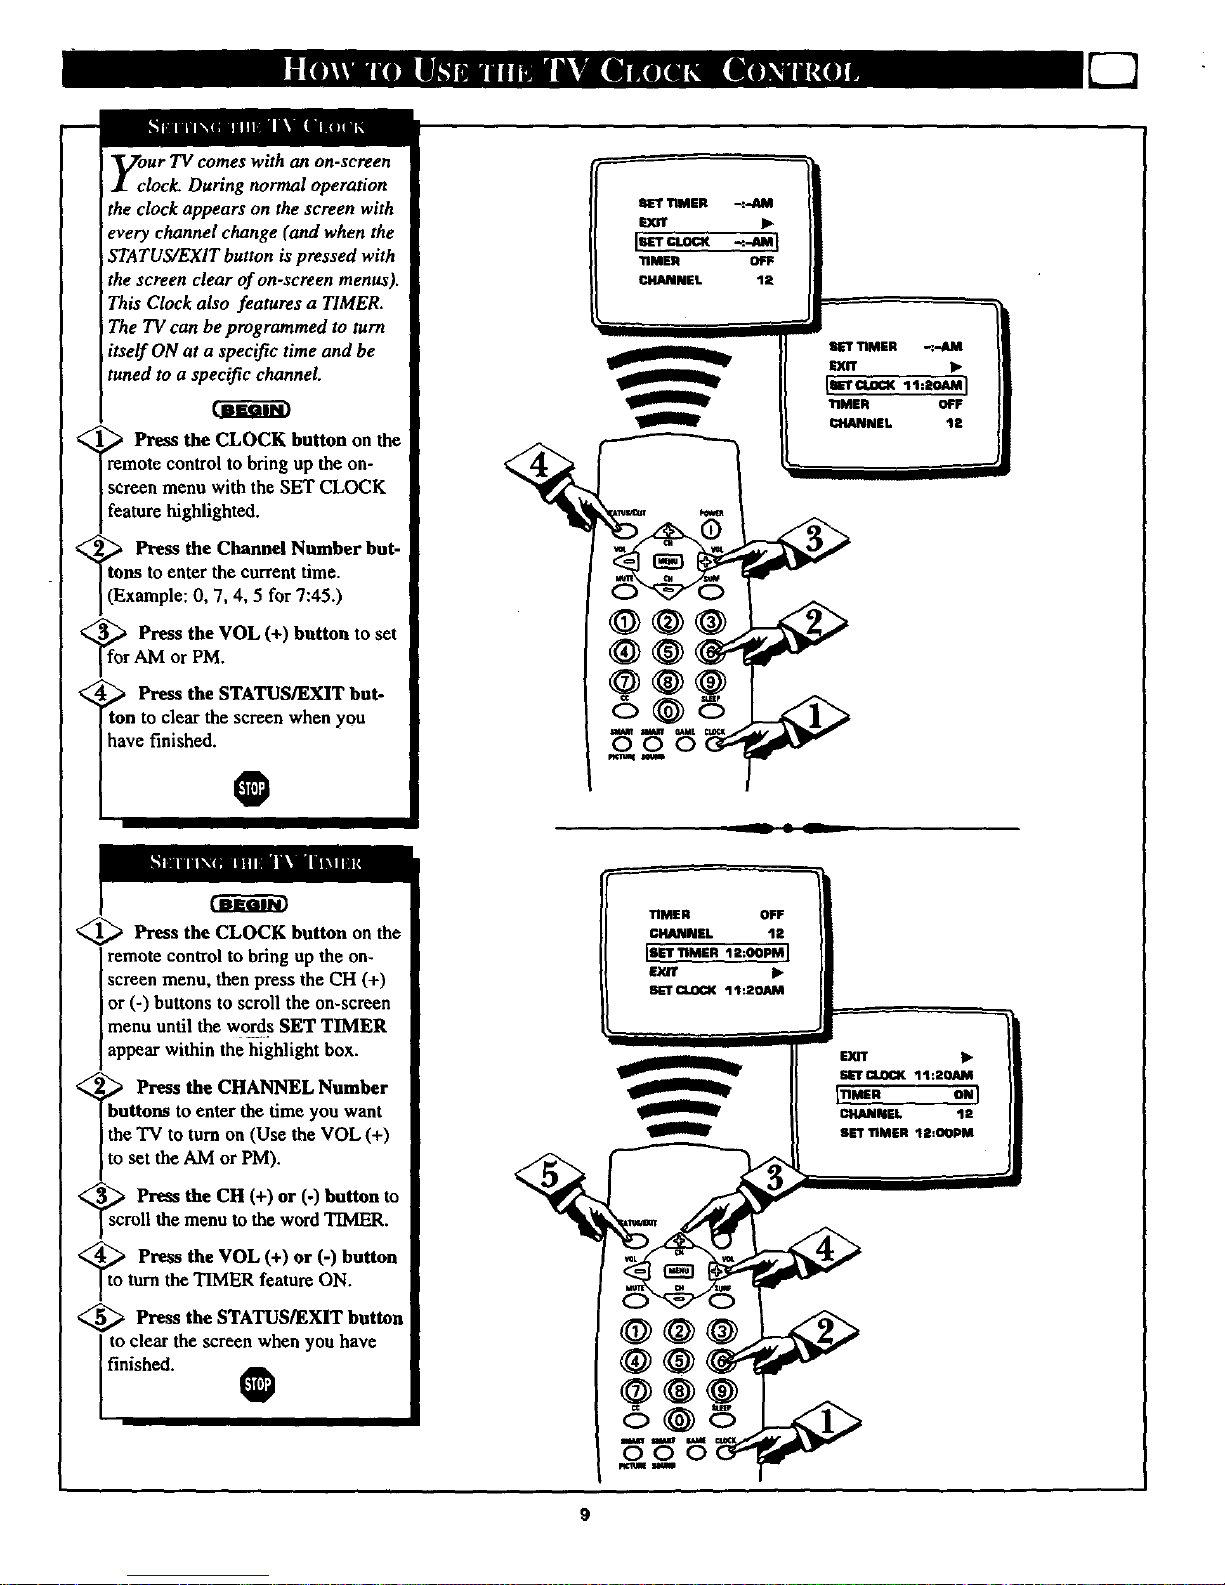
<
on-$cF_en
clock. During normal operation
the clock appears on the screen with
every channel change (and when the
STATUS/EXIT button is pressed with
the screen clear of on-screen menus).
This Clock also features a TIMER.
The TV can be programmed to turn
itself ON at a specific time and be
tuned to a specific channel.
Press the CLOCK button on the
remote control to bring up the on-
screen menu with the SET CLOCK
feature highlighted.
_+' _ Press the Channel Number but-
tons to enter the current time.
(Example: 0, 7, 4, 5 for 7:45.)
_for Press (+) to set
the VOL button
AM or PM.
_ Press the STATUS/EXIT but-
ton to clear the screen when you
have finished.
O
<_ Press the CLOCK button on the
remote control to bring up the on-
screen menu, then press the CH (+)
or (-) buttons to scroll the on-screen
menu until the words SET TIMER
appear within the highlight box.
_ Press the CHANNEL Number
buttons to enter the time you want
the TV to turn on (Use the VOL (+)
to set the AM or PM).
Press the CH (+) or (-) button to
11the menu to the word TIMER.
_to Press the VOL (+) or (-) button
turn the TIMER feature ON.
<_ Press the STATUS/EXIT button
to clear the screen when you have
finished. O
3_r TIMER -:-AM
r_T
I cL°
"riMER OFF
_IANNEL 12
SET TIMER -c-AM
_arr •
I oa< .:lOAMI
11MER OFF
q_IANNEL 12
Page 10

-l
J
viewed channels can beselected
with the SURF button on your remote
control With this feature you can
easily switch between different TV
programs that currently interest you.
The Surf control allows you to set up
to 8 channels in its quick viewing
"list".
<_ Press the MENU (M) button on
e remote, then press the CHANNEL
• or • buttons to select the word
SURF with the TV s on-screen arrow.
_ Press the (+) button to select
either A/CH (Alternate Channel) or
SURF. (See explanation of Surf
options with the illustration on this
page.)
<_ Press STATUS button to clear the
screen.
0
<_ With the SURF control ON (see
above), select a desired channel for
viewing. You can use the number
buttons on the remote (or the
Channel • or • buttons).
_Pr_s the SURF button on the
remote while the channel display is
still present on the "IV s screen.
<_ Press the SURF button on the
remote to quickly review current
action on channels contained within
the Surf list.
Repeat steps above to add up to eight
channels in the SURF channel mem-
ory ring.
0
--' II
With A/ell select_l, pl_sin$ tl_
SURF button will toggle baw_n the
cmnmt and one p_vlou$ chara_l
To Use
A/CH (Alternate
Channel):
With the A/CH con-
trol ON, select the
two desired chan-
nels for viewing
with the number
buttons on the
remote control.
Press the SURF
button on the
remote to "toggle"
between the two
selected channels.
When using SURF:
Remember, you can
add as many as
eight channels in
the SmartSurf
Memory.
A
0000
Wah SURF_lect_l, pnsah s the
IStrRF_to. wiU_ c*.re,nan4
upto seven additional channelsavail-
able.Note:tl_ _aannel Surfcanbc
usedwithfewexthan eight channels.
I ln thiswaythe aumtwtof Surfchain
ndiscanmatch€_fit yourprc_ent
viewinginterests.
10
Page 11

_ ] _i r
R_H
<
<
HfroaVe you ever fallen asleep in
nt of the TV only to have it
wake you up at two in the morning
with a test pattern screeching in your
ears? Well, your TV can save you all
that trouble by automatically turning
itself off.
_ Press the SLEEP button repeat-
edly to pick the amount of time (15
minutes to 2 hours ahead) before the
"IV will turn itself off.
The VOL (+) or (-) buttons can also
be used to set the amount of time
within the on-screen menu.
Press the STATUS/EXIT button
to clear the screen after you have set
the time for the TV to turn off.
An on-screen count down will appear
during the last minute before the 'IV
shuts itself off.
O
i ......
On-_n adjustment
58 alse,
Remember. If
,ou ever want to see how
many minutes are left
before the TV shuts itself
off, press the STATUS
button on the remote.
If you want to stop a
SLEEP TIMER setting,
reset the timer back to
OFF. You could also turn
the TV off, and then back
on again, to cancel a set-
ting.
Pressing any key on the
remote orTV in the last
60 seconds will cancel the
SLEEP TIMER setting.
An on-screen countdown will
appear dartingtim last minute of a
SLEEP TIMER setting,
_ '_o adjust your TV picture con-
! trois, select a channel and follow
the steps shown below:
<_ Press the MENU button on the
remote, then press the CH (+) or (-)
to scroll the on-screen menu until the
desired control appears within the
highlight box.
,_ Press the VOL (+) or (-) to
adjust the selected picture control
levels. (Refer to the Smart Help box
for more detail on each control.)
<:
<_ Press STATUS/EXIT button (or
use the EXIT control in the Menu) to
clear the screen when picture adjust-
ments are completed.
O
@@@
@@@
@@6
_w,s m---.is I
11
PressVOL(-) or (+) until
darkestpartsof the pictureare
asbrightas youprefer.
PressVOL (-)or
(4-)untillightestpartsofthe
pictureshowgood detail.
PressVOL(-) or
(4,)toaddoreliminatecolor.
Press VOL (-) or (+) to
obtainnaturalskin tones.
S_N]K_S Press VOL (-)
or (+) to improve detail in the
picture.
._ Press VOL
(-) or (+) to select NORMAL,
COOL,or WARM picture
preferences. (NORMALwill
keep the whites, whi_; COOL
will make the whites, bluish;
and WARM will make the
whites, reddish.)
PresstheVOL(-) or (+) to turn
AION or OFF,WhenON,AI
increasesthe picture'scontrast
makingthedarkareasmore
blackand thelight areasmore
white.Thisis especiallygood
for dark scenes or programs.
Page 12

! l_-br program broadcasts unsuitable
,.1_ for younger viewers, the Child
Lockfeature allows you to block out
certain channels from your viewing
choice. When a channel is "locked, " it
will be skipped or unavailable for
iselection when scanning or changing
channels.
iFollow the steps listed below tofirst
set a personal access code for your TV
<_ Press the MENU (M) button on
I the remote, then press the CH (+) or
I(-) to scroll the on-screen menu until
]the words CHILD LOCK appear
Iwithin the highlight box.
<_ Press the VOL (+) button to
" I select the CHILD LOCK feature.
<_ Enter the default code with the
Channel Number buttons (8888).
This will gain you access to the
CHILD LOCK menu.
The CHILD LOCK menu will
appear with "CODE .... "high-
lighted.
,_ Enter your NEW Code using
the Chaund Number buttons (dig-
its 0-9), Press the CH (-) button to
scroll to CONFIRM CODE and re-
enter the same NEW Code number.
After the new code is entered you
will have the option to EXIT the
CHILD LOCK feature or you can
re-enter your new code to gain access
to the menu again.
To lock out specific channels or make
changes to the CHILD LOCK menu
please continue to the next page.
ICH'LDLOCK I
EXIT
°'°" I
Icoof xxxxI
EXIT It-
J
CONFIRM (:ODE .... I1
J!
CHANNEL. 12
i
LOCK • NO
12
Page 13

After your personal access Code
number has been set (see previ-
ous page), you are now ready to
select the channels you want to block
OUt or cen$oY.
<_ Press the MENU (M) button on
the remote, then press the CH (+) or
(-) to scroll the on-screen menu until
the words CHILD LOCK appear
within the highlight box.
Press the VOL (+) button to
select the CHILD LOCK feature.
_ Enter the correct 4-digit access
Code. This will gain you access to
the CHILD LOCK menu.
The CHILD LOCK menu will
appear with CODE highlighted.
ENTER YOUR 4-DIGIT ACCF_S
CODE AGAIN.
<_ Press (-,-) or (-)
the CI', buttons
to scroll the menu to CHANNEL.
Using the Channel Number buttons
enter the channel you want to "lock/"
Then press the CH (+) or (-) but-
tons to scroll the menu to LOCK.
<_ Press the VOL (+) button to
choose YES or NO within the
LOCK control.
<_ IMPORTANT: Press the CH
(+) or (-) buttons to..scroll to CON-
FIRM CODE and you must enter
your 4-digit access Code to set or
save the changes into memory.
O
he access to
certain channels, you MUST re-enter
your access code within the CON-
FIRM CODE option. Not doing so
will allow viewers to change these
settings without having to use the
personal access CODE.
I
INPUT TUNER
OFF
ICHILD LOCK
CLOCK I_
SURF A/CH
[ODOE .... I
_rr •
Lcoot I
EXIT •
T
13
Page 14

I,
can program a two line mes-
sage (up to 40 characters in
length) to appear every time the TV
is powered on. Thisfeature can be
used as a reminder for yourself or
other family members.
_> Press the MENU (M) button on
the remote, then press the CH (+) or
I(-) to scroll the on-screen menu until
Jthe word MESSAGE appears within
the highlight box.
>Press the VOL (+) button to
access the MESSAGE feature.
Press the VOL (+) button again to
Iturn the MESSAGE feature ON.
p
I
"<_ Press the CH (+) or (-) buttons
to scroll the on-screen menu to LINE
1. Then, press the VOL (+) button
to access the LINE 1 menu.
Using the CH (+) or (-) buttons,
scroll through the list of characters.
Use the VOL (+) or (-) buttons to
move sideways from letter space to
letter space (LINE 1 holds up to 20
characters). If more space is required
repeat the process with the LINE 2
control.
The CLEAR on-screen control can
be used to remove a message that has
Jbeen entered into the TV's memory.
<_ Press the STATUS/EXIT button
when finished to cieiirth¢ screen of
the menu list.
up to 20 charac-
ters in memory.
When the MESSAGE control is
turned ON, the message you pro-
grammed will appear whenever the
TV is powered ON. (The message
will disappear as soon as a button on
the remote is touched.)
14
Page 15

W_aether you're watching amovie or
video game your TVhas auto.
matic video control settings matchedfor
your current program source or content.
TheSmart Picturefeature quickly resets
your TV's video controlsfor a number
ofdifferent types ofprograms and view-
ing conditions you may have inyour
home. Each Smart Picture setting is
preset at thefactory to automatically
adjnst the TV's Picture, Color, and
Sharpness viewing control levels.
BEGIH
<
Press the Smart Picture button
on
the remoteto activatethe SMART
PICT feature.
Press the Smart Picture button
] repeatedly to select between 5 &ffer-
Ientpicturepresets:Personal,Movies,
Sports,WeakSignal, orVideo Games.
<_ Press the STATUS/EXIT button to
clearthe screen when finishedwith
your selection.
Remember, the video con-
trol settings for the Smart
Picture categories are memorized
into the TV at the factory and can
only be reset by field and service
technicians.
With the PERSONAL setting chosen,
any adjustments made to the picture
controls will be held-in the TV's
memory.
' I
e =
MOVIES
SPORTS
WEAK I$1GNAL
VIDEO GAMES
15
Page 16

Are you tired of the sound of com-
mercials following you into the
next room or all through the house?
Smart Sound allows you to preset a
desired volume level that the TV
sound will not go above. This makes
for an even, mare consistent sound
by reducing the peaks and valleys
that can occur during program
changes or commercial breaks.
llm
<_ Press the Smart button on the
remote to activate the SMART
SND feature.
_ Press the Smart Sound button
repeatedly to toggle the SMART
SOUND control ON or OFF.
_ Press the STATUS/EXIT but-
ton to clear the screen when com-
pleted,
Remember, Smart Sound
vorks only with the programs
coming through the Antenna/Cable
input on the rear of the TV (RF
audio). It will not control the sound
levels for the Auxiliary (VCR/AUX
IN) audio inputs.
SMART _UND QN
SMART llOUN n OFF
PluJse note that SMART SOUND is the same felture as AVL within the on-screen
menu sys_m, When Smsrt Sound is changed the AVI. control will also chanKe (and
vtee versa).
16
Page 17

USTve theVolumecontroltosetthe
s volumelevelon theTV
screen.The Volumelevelorscale
willbeseeneachtimetheVOLUME
buttons(ontheTV orremote)are
pressed.(0beingthelowest,63
beingthehighest.)
<_ Press the MENU button the
on
remote, then press the CH (+) or (-)
to scroll the on-screen menu until the
word VOLUME appears within the
highlight box.
Press the VOL (+) or (-) buttons
to adjust the volume level.
<_ Press STATUS/EXIT button to
Jclear the screen.
0
COL TEMP COOL
AI ON
IVOLUME I--- 15]
"inEIIkE ON
llAIH$ DN
a_m mLw _ _,_'t
0000
nmll lelm
Try it out.
Press the VOL (+) or
(-) buttons. The
VOLUME indicator
should appear at the
bottom of the screen.
If the VOLUME
LIMIT control is
turned on (see
below), the "IV
sound cannot be
adjusted beyond its
current settings (for
example i--- 25).
y:u can limit the maximum vol-
me level of the TV set. Once the
Volume Limit control is set the TV
sound cannot be played louder than
the maximum preset level.
_ Press the MENU button on the
remote, then press the CH (+) or (-)
to scroll the on-screen menu until the
words VOLUME LIMIT appears
within the highlight box.
Press the VOLUME (+) or (-)
button to turn the VOLUME LIMIT
control ON.
<_ Press the STATUS/EXIT button
to clear the screen.
O
Remember,
the VOLUME
LIMIT control (when
ON) will not allow
I'V sound to exceed
the set VOLUME
level. (See VOL-
LIMEcontrol section
shown above.)
17
Page 18

Tthe TREBLE control increases
he high frequency audio range
while the BASS control increases the
low frequency audio range of the T_.
These functions create a deeper,
fuller, and crisper playback sound
which can be heard through the TV's
speakers.
<_ Press the MENU (M) button on
the remote, then press the CH (+) or
(-) buttons to scroll the on-screen
menu until the word TREBLE (or
BASS) appears within the highlight
box.
<_ With the TREBLE (or BASS)
control highlighted, press the VOL
(+) button to turn the feature ON or
OFF.
<_ Press the STATUS/EXIT button
I to clear the screen when finished.
0
AI ON
VOLUME _ 15
li' m DNI
BASS ON
SOUND 8TERED
AI ON
VOLUME _ 15
ITREBLE OFF]
BASS OFF
SOUND STEREO
SMAIIT _ GAME CLOCK
0000
18
Page 19

SPatial Sound adds greater depth
nd dimension to the stereo TV
sound. With the control turned ON
the TV's speakers can add even
wider sound separation to normal
broadcasts.
<_ Press the MENU (M) button
on
the remote, then press the CH (+) or
(-) buttons to scroll the on-screen
menu until the word SPATIAL
appears within the highlight box.
<_ With the SPATIAL control
highlighted, press the VOL (+) but-
ton to turn the feature ON or OFF.
Press the STATUS/EXIT button
.
to clear the screen when fimshed.
0
TREBLE ON
BA88 ON
[SPATIAL ON t
IOUND STEREO
AVI. ON
@@@
@@@
6@5
0000
TREBLE ON
BASS ON
]SPATIAL OFFI
BOUND STEREO
AVL ON
19
Page 20

your TV can receive broadcast
tereo TV programs. The TV has
both an amplifier and twin speakers
through which the stereo sound can
be heard.
Press the MENU (M) button on
theremote, then the CHANNEL• or
• buttons to scroll the on-screen
menu until the word SOUND appears
within the highlight box.
<_ Press the VOLUME (+) or (-)
buttons to set the SOUND control
to STEREO or MONO.
<_ Press STATUS button on the
the
remote control to clear the screen.
O
I I
[l[ll[] II|l I] [ll I [{lrm ti|| lk_| i
SAP is an additional partof the
stereo broadcast system. Sent as a
third audio channel SAP can be hean
apartfrom thecurrent "IVprogram
sound. TV stations are free to use
SAP for any number-of purposes, bul
many experts believe it will be used
for foreign language translations of
TV shows (or for weather and news
bulletins.)
If a SAP signal is not present with a
selected program, the SAP option
cannot be selected. Also, if SAP is
selected on a channel (with SAP) and
you select another channel, when you
return to the original channel SAP
will be OFF (and you will have to
resclect the SAP feature),
TREBLE ON
BASS ON
IsooNo srBnsoI
AVL ON
VOLUME UMIT ON
@@@
@@@
,::5@8
SMART $MAIIT GAME C).O_K
0000
_ICIIIAI iOU#D
TREBLE ON
BAOB ON
IBooNo I
AVL ON
VOLUMELIMIT ON
TREBLE ON
BASS ON
IBBUNO wml
AVL ON
VOLUME LIMIT ON
NOTE: The TV's on-screen "STEREO"
indicator appear* whenever the TV detects an
inconfing stereo signal. Be sure the TV's
for the stereo sound to he heard through the
STEREO control is also turned "ON" in order
TV's twin speaker _ystellX 1
2O
Page 21

WOgUld you like to hear TV pm-
rams through your audio hi-fi
system? Using the TV's Audio Output
Jacks (located on the rear of the TV)
offer you this option.
<_ Connect the R(ight) and L(eft)
AUDIO OUT jacks on the TV to the
R and L Audio Inputjacks on your
amplifieror sound system.
Set the audio system's volume to a
normal listening level.
<_ Turn the TV and the audio sys-
Item ON.
<_ Press the STATUS button on the
f'emote control to clear the screen.
O
Remember, to hear the TV
sound through your audio sys-
tem, simply connect the audio jacks.
There is no switch or control to turn
on Or off.
Set the TV's volume to minimum and
use the audio system's volume con-
trol to adjust sound levels.
@@@
@@@
@@@
0000
AUDIO OUT
(REDAVHrlE)
AUDIO SYSTEM
BACK OF TV
AUDIO SYSTEM
21
Page 22

yovu can view the playback of
CR tapes (Video Disc
Players, camcorders, etc). by
using the AUDIO and VIDEO
INPUT jacks (on the rear of the
TV).
For example: to view the play-
back of a VCR tape:
<_ Connect the VIDEO and :
AUDIO IN(put) jacks on the TV
to the AUDIO and VIDEO
OUT(put) jacks on the VCR.
<_ Press the MENU (M) button
on the remote, then press the CH
(+) or (-) buttons to scroll the on-
screen menu until the word
INPUT appears within the high-
light box.
Note: You can press the CHAN-
NEL A_' buttons to select
"EXTI,"
<_ Press the button select
(+)
to
the EXT1 inputs on the rear of
the 'IV.
<_ Turn the VCR and PLAY
ON
the VCR tape to be viewed on the
a-v
Remember; when you're
tgh using the EXTI
INPUT jacks, return the INPUT
to TUNER. If you leave the TV in
the EXTI INPUT mode and there
is no signal source connected to
the jacks, you will be seeing only
a blank screen on the T_.
NOTE: If you have a mono (sin-
gle audio OUTPUT) VCR, "Y"
Connectors are available (from
your dealer or Parts Information
Center 1 800 292-6066) to con-
nect to the audio inputs on the TV.
pICTURE AND SOUND FROM
PLAYBACK OF VCR TAPE
AVL ON
VOLUME LIMIT ON
[INPUT EXT 1 l
_:LEEPTIMER OFF
CHILD LOCK II_
_ SLEEP
VIDEO IN _ _ AUDIO IN
RCA PHONO
pLUG CABLES
(NOT SUPPLIED)
VCR
(EQUIPPED WITH VIDEO AND
AUDIO OUTPUT JACKS)
Pressing the GAME button on the remote will
switch to the Audio/Video Inputs at the back of the
'IV.
When the GAME button is pressed, a "GAMES 1"
on-screen display will appear to indicate the mode
has been selected.
NOTE: The GAME button on the remote will only
work with select models. Your model may or may
not contain this feature.
22
Page 23

please make these simple
checks before calling for ser-
vice. These tips can save you
time and money since charges for
TV installation and adjustment of
customer controls are not cov-
ered under your warranty.
NOPower
No Picture
No Sound
Remote Does Not
Wor____ k
TV Displays Wrong
Channel or No
Channels Above 13
CAUTION: A video source (such as a video game, Compact Disc Interactive - CDI, or
TV information channel) which shows a constant non-moving pattern on the TV screen,
can cause picture tube damage. When your 'IV is continuously used with such a source
the pattern of the non-moving portion of the game (CDI, etc.) could leave an image
permanently on the picture tube. When not in use, turn the video source OFF.
Regularly alternate the use of such video sources with normal TV viewing.
i Check the 'IV power cord. Unplug the TV, wait 10 seconds, then reinsert plug into
outlet and push POWER button again.
I
Check to be sure outlet is not on a wall switch.
i Check antenna connections. Are they properly secured to the TV's ANT/CABLE plug ?I
Check the TUNING ANTENNA/CABLE control for correct position. ]
Check INPUT control for correct position. The EXT I position with out a signal |
source will result in a blank screen.
I
Check the VOLUME buttons.
Check VOLUME LIMIT control.
Check the MUTE button on the remote control.
If attempting auxiliary equipment hook-ups, check audio jack connections.
I
Check batteries. Replace with AAA Heavy Duty (Zinc Chloride) orAlkaline batteries
if necessary.
Clean the remote and the remote sensor window on the TV.
Check the TV power cord. Unplug the TV, wait 10 seconds, then reinsert plug into
outlet and push POWER button again.
Check to be sureTV outlet is not on a wall switch.
i Repeat channel selection. [
Add desired channel numbers (CHANNEL EDIT control) into TV memory.
Check TUNING ANTENNA/CABLE control for correct position.
This TV is equipped with protective circuitry that shuts the 'IV off in case of moderate [
power surges. Should this occur turn the 'IV back on by pressing the POWER button
I
once or twice, or unplug (wait 10 seconds) and then replug the power cord at the AC
outlet. This feature is NOT designed to prevent damage due to high power surges such
as those caused by lightning, which is not covered by your warranty.
Cleaning and Care
• To avoid possible shock hazard be sure the TV is unplugged from the electrical outlet before cleaning.
• When cleaning the TV screen take care not to scratch or damage the screen surface (avoid wearing jewelry or using
anything abrasive). Wipe the front screen with a clean cloth dampened with water. Use even, easy, vertical strokes when
cleaning.
• Gently wipe the cabinet surfaces with a clean cloth or sponge dampened in a solution of cool clear water. Use a clean
dry cloth to dry the wiped surfaces.
• Occasionally vacuum the ventilation holes or slots in the cabinet back.
• Never use thinners, insecticide sprays, or other chemicals on or near the cabinet, as they might cause permanent marring
of the cabinet finish.
23
Page 24

Round Cable 75f_ * A single solid antenna wire normally
matched with a metal plug (F-type) end connector that screws (or
pushes) directly onto a 75 Ohm input found on the Television or
VCR. (Also known as Coaxial Cable,)
Closed Caption * Broadcast standard which allows you to read
the voice content of television programs on the TV screen.
Designed to help the hearing impaired this feature uses on-screen
"text boxes" to show dialogue and conversations while the 'IV pro-
gram is in progress.
Audio/Video Inputs * Located on the rear of the "IV these con-
nectors (RCA phono type plug) are used for the input of audio
and video signals. Designed for use with VCRs (or other acces-
sories) in order to receive higher picture resolution and offer sound
connection options.
On Screen Displays (OSD) * Refers to the wording or messages
generated by thetelevision (or VCR) to help the user with specific
feature controls (color adjustment, programming, etc.).
.
Menu * An on-screan listing of feature controls shown on the
Television screen that are made available for user adjustments.
Multichannel Television Sound (MTS) * The broadcast standard
that allows for stereo sound to be transmitted with the 'IV picture.
Programming * The procedure of adding or deleting channel
numbers into the Television's memory circuits. In this way the
Television "remembers" only the locally available or desired
channel numbers and skips over any unwanted channel numbers.
Remote Semor Window * A window or opening found on the
Television control panel through which infrared remote control
command signals are received.
Setup Mode * Automatic feature control settings made by the TV.
Designed for first time set-up and use. Settings for signal connec-
tions (antenna or cable TV), plus channel program memory are
held in the TV's memory (even if the set is unplugged andmoved
to a new location.)
Status/Exit * Allows the user to quickly confirm what channel
number is currently being viewed. Status can also be used to clear
the Television of on screen displays or information (rather than
waiting for the displays to "time out" or automatically disappear
from the screen).
Twin Lead Wire * The more commonly used name for the two
strand 300 Ohm antenna wire used with many indoor and outdoor
antenna systems. In many cases this type of antenna wire requires
an additional adapter (or balun) in order to connect to the 75 Ohm
Input terminals designed into the more recent Televisions and
VCRs.
24
Page 25

Accessories/Optional.............................................................................4, 5
Adapter Connector .................................................................................4, 5
Add/Delete Channels.................................................................................7
Alternate Channel ....................................................................................10
Artificial Intelligence (AI) .......................................................................11
Audio/Video InputJacks..........................................................................22
Audio Output Jacks..................................................................................21
BassControl.............................................................................................18
Battery Installation.....................................................................................6
Cable TV Connections...............................................................................5
Channel Memory.......................................................................................7
Child Lock Control............................................................................12, 13
Clock..........................................................................................................9
ClosedCaptioning......................................................................................g
Controls/TV ...............................................................................................6
Controls/Remote........................................................................................6
_Features......................................................................................................3
Glossary"IVTerms ..................................................................................24
Input Control............................................................................................22
Inputs/Audioand Video...........................................................................22
LanguageOption ........................................................................................7
Memory/ProgramChannels .......................................................................7
Menu Button ..............................................................................................6
MessageControl ......................................................................................14
Minus(-)/Plus (+) Buttons .......................................................................... 6
Outputs/Audio .......................................................................................... 21
Picture Controls ................................................................................. 11, 15
precantions/Safety ......................................................................... 2, 23, 28
Programming Channels .............................................................................. 7
Remote Control .......................................................................................... 6
Requesting Service ....................................................................... 23, 26-27
Round Cable 75_ .................................................................................. 4, 5
Safety/Procantions ......................................................................... 2, 23, 28
Set Up/First Time Use ............................................................................ 4-7
Sleep "Bmer.............................................................................................. 1l
Smart Picture ............................................................................................ 15
Smart Sound............................................................................................. 16
Spatial Sound ........................................................................................... 19
Surf. .......................................................................................................... I0
Status Button .............................................................................................. 6
Sound (Stcreo/Mnno) ............................................................................... 20
Tips for Service ...................................................................... 23, 26-27, 28
Treble Control .......................................................................................... 18
VCR/TV Connections .......................................................................... 5, 22
Volume Control ........................................................................................ 17
Volume Limit Control .............................................................................. 17
Warranty ................................................................................................... 28
* Information contained in Quick-Use (Q/U) Guide-page listed.
25
Page 26

Philips Consumer Electronics Company
Factory Service Center Locations
_'_ Houston/Gaivuton
Tampa/W Florida
NOTE:If youresideinoneof ourPhilipsFactoryServiceBranchareas(seedirectoryonback),youcancontactthenearestServiceBranchto
obtainefficientandexpedientrepairforyourproduct.Ifyourproductis In-Warranty,youshouldhaveproof-of-purchasetoensureNoCharge
Service.ForOut-of-Warrantyservice,callthetocationnearestyou.
NOTA:Sivousr_sidezdansunedesr_gionsdesserviesparunesuccursaledeserviceaprbsventsdufabricantPhilips(voirlistsci-dessous),
vouspourrezcontacterlabranchedeserviceaprbsventetaplusprbsdechezvouspourobtenirunserviceapr_sventerapidest efficace.Sile
produitestsousgarantie,il suffiradepresenterunepreuved'achatpourb_n6ficierd'unservicesansfrais.Pourlesproduitsnoncouvertsparla
garantie,contactezle centreIsplusprosdechezvous.
NOTA:SiUd.resideenunadenuestraszonasparasucursalesPhinpsdeservicioaldef,%rica(verdirectoriom_sabajo),Ud.puedecomunicarse
conla sucursaldeserviciom_scercanaparaobtenerunareparaci6noportunay eficazdesuproducto.Si suproductoest_todavlabajogaran-
tla,Ud.debepresentarcomprobantedecompraparanoocasionarningunoscargosporservicio.Paraserviciodespu(_sdelvencimientodela
garantfa,llameailugarm6scercanodelos abajoindicados.
Howyoucanobtainefficientandexpedientcarry-in,mail-in,orin-homeserviceforyourproduct
PleasecontactPhilipsat 1-800-661-6162(Frenchspeaking)
1-B00-363-7278(Englishspeaking)
AaCanada
Commentobtenirteserviceapr_s-ventepourlesproduitsapport6souenvoy_sparlaposteb notrecentredeserviceouteservice_tdomicile
Veuillezcontacterphilipe:_: 1-800-661-6162(Francophone)
1-800-363-7278
BL_
C6morecibirservicioefficienteparasuproducto,enpersona,porcorreooa domicilio
FavordecomunicarseconPhilipsal: 1-800-661-6162(franc6fono)
1-800-363-7278(angl6fono)
26
Page 27

QUAIJTY SERVICEIS AS CLOSEAS YOUR TELEPHONEISIMPLY LOOKOVER1HE LI_ OF.LOWFOR THE NUMBER OF A FACTORYSERVICE CENTER
NEARYOU. YOURPRODUCTWILL RECEIVEEFRCIEW[ AND E)O=EDIENTCARRY'IN, MAIL'IN, OR IN'HOME SERVICE,AND YOU WILL RECEIVEPEACEOF MIND,
KNOWING YOUR PRODUCTIS BEING GIVENTHE EXPERTAI1ENTlON OF PHILIPS' FACTORYSERWCE.ANt), iF THEPRONENUMBER LISTEOFOR YOUR AREA
ISLoHoOISTANCE,CALL1-800-242-9225Fe_FACrm_Saws=.
COMMENTONTER/RNOTRESERVICEAFROSVERTERAPIDEETEFRCACESOITPARCOUDOtER,ADOMICILE,OgENDEpI_DENTANTA UNCENTREDESERVICEPHILIPS.PLUSDE8DOCENTDES
RERI_CEPTIONDEPRODU|TSJ_RI_PADER_ TNAVERSLIEPAYS:CUNTACnERLECENTRERESERVICEAt))(CONDOMMATEUNALIEPLUSPROCDEPOURSAVOlflL'EMPLACEMEHTDEUESDtPOTS
NANSaNRAYONDE50A75 MILES(80 KidJ_120aM)aa CENTREDESERVICELOCAL.
C_MOCOTEUERUNSERVICK)OPORTUflOY EFICtENTEPORCORREO,ENCASA0 ENPERSONAPAPASUPReDUUTOATRAVI_SDEUNCENTROPHILIPSDESERVICiO.MA$DE600SITIOSPOR
TODOELpAlSPARA(.4RECEPCIONDEPROOUSTRSNEcEsn_DOSDEREPARACIODES:COMURICERSECONELCENTRODESERVICIODEFABRICAMASCERCANOPANAESTOSLURADESOERTRO
DEUNRADIODE80A120KM(50A75MiLLAS)_L CERTRORECERVICiDLOCAL,
AJlanta-Athens-.Macon-Chsttanooga,
TN-NorthGeorgiaArea
200 NorthCobbParkway
Building100, Suite120
Marietta,GA 30062
(770) 795-0085
Charlotte-WinstonSalem-
Greensboro
520-G ClantonRoad
Charlotte,NC 28217
(704) 529-6330
Chicago-GaryArea
1360 W. HamiltonParkway
Itasca,IL 60143
(630) 775-0990
Cleveland-Akron-YoungstownArea
950 KeynoteCircle
BrooklynHeights,OH 44131
(216) 741-3334
Detroit/ToledoArea
25173 Dequindre
MadisonHeights,MI 48071
(810) 544-2110
Knoxville-Greenevllie-
TriCities-EastTennesseeArea
6700 D. PapermillRoad
PapermillPlaza
Knoxville,TN 37919
(423) 584-6614
R. Myerz-Naples-
SouthwestFloditaArea
11601C)evelandAve.,Suite15
Ft.Myers,FL 33907
(941) 278-4242
Houston-Galveston-Beaumont-Austin-
SanAntonioArea
1110NorthPostOakRoad
Suite100
Houston,TX 77055
(713)682-3990
Miami-SoutheastFloridaArea
2099 W. AtlanticBlvd.
PompanoBeach,FL 33069
(954) 978-0467
NewYorkMetro Area
116 CharlotteAvenue
Hicksville,NY 11801
(516) 933-1780 NassauCounty
Phlladelphia/_.NewJerzeyArea
352 DunksFerryRoad
Bensalem,PA 19020
(215) 638-7500
Pittsburgh,PA-Steubenvitle,OH-
WheelingJMorgantown,WVArea
2891 BanksvilleRoad
Pittsburgh, PA 15216
(412) 563-8020
SanFrancisco-Oakland-SonJoseArea
681 East8rokawRd.
SanJose,CA 95131
(408) 436-8566
Seattle--Tacoma/OlympiaArea
1055AndoverParkEast
Tukwila,WA98188
(206) 575-6288
Tampa-St.Petersburg-SarasotaArea
CenterPoint BusinessPark,BuildingB-I,
Suite 100
1911 U.S. Hwy.301 North
Tampa,FL 33619
(813) 621-8181
27
Page 28

COLOR TELEVISION
90 Days Free Labor
One Year Free Replacement of Parts (Two Years Free Replacement on Color Picture Tube)
This product must be carried in for service.
WHO IS COVERED?
Youmusthaveproofofpurchaseto receivewarrantyservice.A sales
receiptor other documentshowingthatyoupurchasedthe productis
consideredproofofpurchase.
WHAT IS COVERED?
Warranty coveragebeginsthe dayyou buyyour product. For90 days
thereafter,all partswill be repaired or replaced free, and laboris free.
From 90 daysto one yearfrom the dayof purchase,all partswill be
repaired or replacedfree, but you pay for alllabor charges. Fromone
to two years from the day of purchase,you pay for the replacement or
repair of all parts except the picturetube, and for all laborcharges.
After two years from the day of purchase,you payfor the replacement
or repair of all parts,and for all laborcharges.
All parts,includingrepaired and replaced parts,are covered only for
the originalwarranty period. When thewarranty on the product
expires,the warranty on all replaced and repaired parts alsoexpires.
WHAT IS EXCLUDED?
Your warranty does not cover:
• labor chargesfor installationor setupof the product, adNstn_entof
customercontrols on the product, and installationor repairof
antenna systemsoutside of the product.
• product repair and/or part replacement because of misuse, acci-
dent, unauthorized repair or other causenot within the control of
PhilipsConsumer ElectronicsCompany.
• reception problemscausedby signalconditions or cable or antenna
systems outside the unit.
• a product that requiresmodificationor adaptation to enableit to
operate in any country other than the countryfor whichit was
designed,manufactured, approved and/or authorized, or repairof
products damagedbythese modifications.
• incidentalor consequentialdamagesresultingfrom the product.
(Somestatesdo notallow the exclusionof incidentalor consequen-
tialdamages,so the above exclusionmay not apply to you. This
includes,but is not limited to, prerecorded material, whether copy-
rightedor not copyrighted.)
• a product used for commercialor institutionalpurposes.
WHERE IS SERVICE AVAILABLE?
Warranty serviceis availablein allcountrieswhere the productis of_-
ciallydistributed by PhiSpaConsumer ElectronicsCompany. In coun-
tries where PhilipsConsumer ElectronicsCompanydoesnot distribute
the product, the localPhilips service organizationwill attempt to pro-
vide service (although there may be a delay ifthe appropriatespare
partsand technicalmanual(s) are not readily available).
MAKE SURE YOU KEEP...
Pleasekeep yoursalesreceipt or other documentshowingproof of
purchase. Attach it to this owner's manual and keep both nearby.
Also keep the originalbox andpackingmaterialin caseyouneed to
return your product.
BEFORE REQUESTING SERVICE...
Pleasecheck your owner'smanualbefore requestingservice.
Adjustmentsof the controlsdiscussedthere may saveyou a service
call.
TO GET WARRANTY SERVICE IN U.S.A.,
PUERTO RICO OR U.S. VIRGIN ISLANDS...
Contact a Philips factory service center (see enclosed list) or autho-
rized service center to arrange repair.
(In U,S.A,,Puerto Rico andU.S. Virgin islands, all impliedwarranties,
includingimpliedwarranties of merchantability andfitnessfor a partic-
ular purpose,are 5mited in durationto the duration ofthis express
warranty. But,becausesome statesdo not allow limitationson how
longan impliedwarranty maylast, this limitationmay not applyto
you.)
TO GET WARRANTY SERVICE IN CANADA...
Pleasecontact Philipsat:
[-800-661-6162 (FrenchSpeaking)
1-800-363-7278 (EnglishSpeaking)
(in Canada,this warranty isgivenin lieuof allother warranties. No
other warranties are expressed or implied,includingany impliedwar-
ranties of merchantability or fitnessfor a particular purpose. Philips is
not liable under any circumstancesfor anydirect, indirect,special,inci-
dentalor consequentialdamages,howsoeverincurred, evenif nOtified
of the possibilityof suchdamages.)
REMEMBER...
Pleaserecord themodelandserialnumbersfoundonthe product
below.Also.pleasefi, outandmailyourwarranty registrationcard
promptly.It willbeeasierforustonotify youifnecessary.
NOBEL #
SERIAL#
Philips Service Company, P.O. Box 55S, Jefferson City, Tennessee 37760, (4:7.3) 475-8869
IB7813-EO01
 Loading...