

Magnavox Projection Television Owner's Manual
m
Projection Television
Owner's Manual
...................................... ..:;s_ili
:::::::::::::::::::::::::::::::::::::::::::::::::::::::::::::::::::::::.... ..::::::;:_;;;;;;._;;;;;;
....:.:::::::::::::

Once your MAGNAVOX purchase is registered, you're eligible to receive all the privileges of owning a MAGNAVOX
product. So complete and return the Warranty Registration Card enclosed with your purc:hase at once. And take
advantage of these important benefits.
• V arrant
Verification
Registering your product within
10 days confirms your right to
maximum protection under the
terms and conditions of your
MAGNAVOX warranty.
.Owner[
Confirmation
Your completed Warranty
Registration Card serves as
verification of ownership in the
event of product theft or loss.
,Model j
Registration
Returning your Warranty Registration
Card right away guarantee:;you'll
receive all the information and special
offers which you quali_, for' as the
owner of your model.
Congratulations on your purchase, and MA_NAVOX
welcome to the "family!"
Dear MAGNAVOX product owner: Smart. Vet2 smart9
Thank you for your confidence in MAGNAVOX. You've selected one of the best-built, best-backed products
available today. And we'll do everything in our power to keep you happy with your purchase for many yea's to come.
A,_; a member of the MAGNAVOX "family," you're entitled to protection by one of the most comprehensive warranties and outstanding
service networks in the industry.
VVhat's more, your purchase guarantees you'll receive all the information and special offers for which you qualify, plus easy access to
accessories from our convenient home shopping network.
And most impo_cantly you can count on our uncompromising commitment to your total satisfaction.
All of this is our way of saying welcome-and thanks for investing in a MAGNAVOX product.
Sincerely,
Robert Minkhorst
President and Chief Executive Officer
P.S. Remember, to get the most from your
MAGNAVOX product, you must return your
Warranty Registration Card within 10 days.
So please mail it to us right now!
For Customer Use
Enter below the Serial No. which is located on the rear of the cabinet. Retain this information for future reference.
Model No. Serial No.
Know these
safetysymbols
RISK OF: ELECTRIC SHOCK
130 NOT OPEN
CAUTION: TO REDUCE THE RISK OF ELECTRIC SHOCK, DO NOT
REMOVE COVER [OR BACK). NO USEITSER_qCEABLE PARTS
_IL This "bolt of lightning" indicates uninsulated material within your unit may cause an electrical shock.
For the safety of everyone in your household, please do not rer_ove product covering.
_IL The "exclamation point" calls attention to features for which you should read the enclosed literature
closely to prevent operating and maintenance problems.
WARNING: TO PREVENT FIRE OR SHOCK HAZARD, D,D NOT EXPOSE THIS EQUIPMENT TO RAIN
OR MOISTURE.
CAUTION: To prevent electric shock, match wide blade of _lug to wide slot, and fully insert.
ATTENTION: Pour 6viter les chocs 61ectriques, introduire la lame la plus large de la fiche dans la borne
correspondante de la prise et pousser jusqu'au fond•
SAFETYINSTRUCTIONS- Readbeforeoperatingequipment
This productwasdesignedandmanufacturedto meetstrict qualityand
safetystandards.Thereare, however,someinstallationandoperation
precautionswhichyou shouldbeparticularlyawareof.
1. Read Instructions- All the safety andoperating instructions should
be readbeforethe appliance is operated.
2. Retain Instructions - The safety and operating instructions should
be retainedfor future reference.
3. HeedWarnings-:All warnings on the appliance_nd in the operating
instructions should be adheredto.
4. Follow Instructions - All operating and use instructions should be
followed.
5. Water and Moisture - Tl;e appliance should not be used near water
-.for example, near a bathtub, washbowl, kitchen sink, laundry tub,
in awet basementor neara swimming pool, etc.
6. Cartsand Stands - The applianceshould be usedonly with a cart or
stand that is re('ommended bythe manufacturer.
6A. _ An appliance and cart combination should be moved
with care. Quick stops, excessive force, and uneven
surfaces maycause the appliance and cart combination
to overturn.
7. Wall or Ceiling Mounting - The appliance should be mounted to a
wall or ceiling only as recommendedbythe manufacturer.
8. Ventilation - Tile appliance should besituated so that its location or
position does not interfere with its proper ventilation. For example,
the applianceshould not be situatedon a bed, sofa, rug, or similar
surface that may block the ventilation openings; or, placed in a
built-in installation, such as a bookcaseor cabinet that may impede
the flow of airt_rough theventilation openings.
9. Heat - The appliance should be situated away from hear sources
,.suchas radiators, heat registers, stoves, or other appliances
',includingamplifiers) that produce heat.
10. Power Sources- The appliance should be connected to a power
'.supplyonly of l:hetype described in the operating instructions or as
markedon the appliance.
11. Power-Cord Protection - Power supply cords should be routed so
•thatthey are not likely to be walked on or pinched by items placed
Jpon or against them, paying particular attention to cords and
Dlugs,convenience receptacles,and the point where they exit from
the appliance.
12. Cleaning- The appliance should L.ecleaned only as recommended
bythe manufacturer.
13. Power Lines - An outdoor antenna should be located away from
power lines.
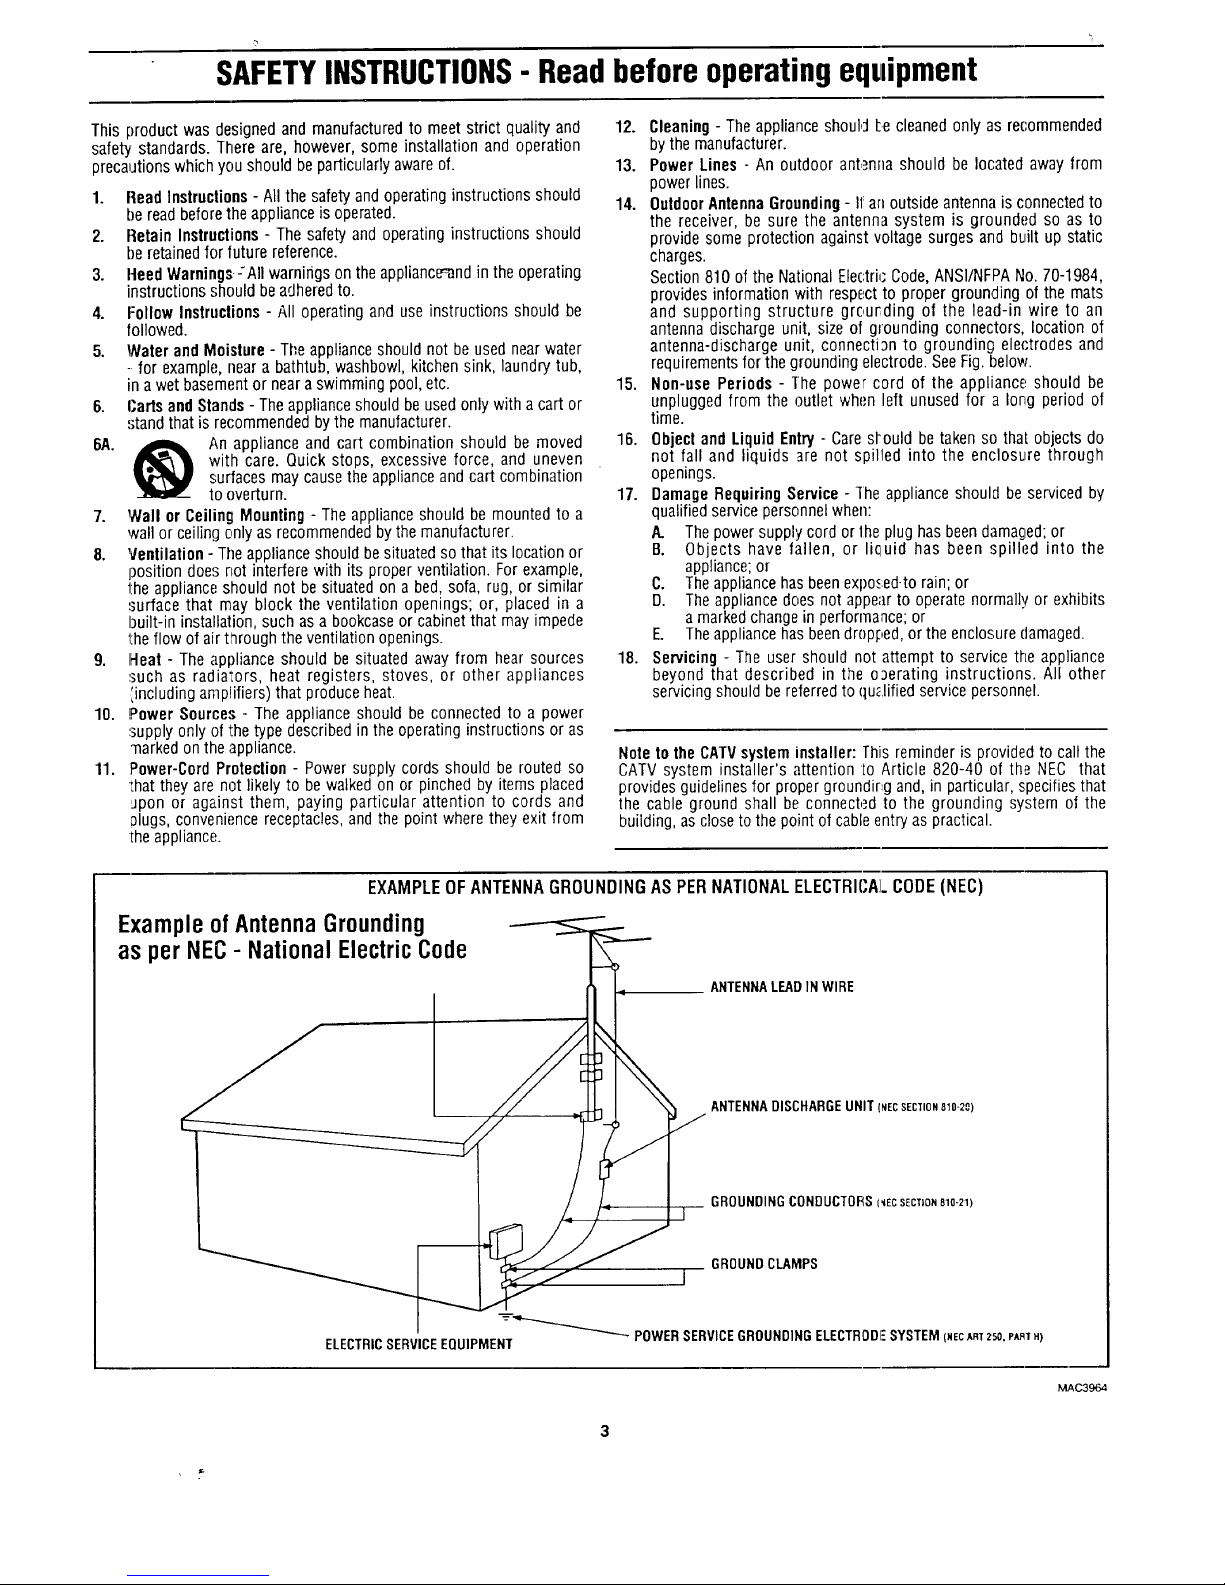
14. OutdoorAntennaGrounding- I1:arloutside antenna is connectedto
the receiver, be sure the antenna system is grounded so as to
provide some protection against voltage surges and built up static
charges.
Section 810 of the NationalElectri,"Code, ANSI/NFPANo. 70-1984,
provides information with respect to proper grounding of the mats
and supporting structure grourding of the lead-in wire to an
antenna discharge unit, size of grounding connectors, location of
antenna-discharge unit, connection to grounding ele('trodes and
requirementsfor the grounding electrode. SeeFig. below.
15. Non-use Periods - The power cord of the appliance should be
unplugged from the outlet when left unused for a long period of
time.
18. Object and Liquid Entry - Caresl'ould be taken so that objects do
not fall and liquids are not spilled into the enolosu,re through
openings.
17. Damage Requiring Service - ]he appliance should be serviced by
qualified service personnel when:
A. Thepower supply cord or 1heplug has beendamasked;or
B. Objects have fallen, or li(_uid has been spilled into the
appliance;or
C. Theappliance has beenexpo._;ed-torain; or
D. The appliance does not appe_rto operate normally or exhibits
a marked changein performance; or
E. Theappliance has beendropF,ed,or the enclosure damaged.
18. Servicing - The user should not attempt to service the appliance
beyond that described in the operating instructions. All other
servicing should be referredto qu_.lifiedservice personnel.
Noteto the CATVsystem installer: This reminder is provided to call the
CATV system installer's attention to Article 820-40 of the NEe that
provides guidelinesfor proper groundir,g and, in particular, specifiesthat
the cable ground shall be connected to the grounding system of the
building, asclose to the point of cable entryas practical.
EXAMPLE OF ANTENNA GROUNDING AS PER NATIONAL ELECTRICAL CODE (NEC)
Example of Antenna Grounding
as per NEC- National Electric Code
ANTENNALEADINWIRE
ANTENNADISCHARGEUNIT(NECSECTION810-20)
GROUNDINGCONDUCTORSI_ECSECTION810-21)
GROUNDCLAMPS
I
m
POWERSERVICEGROUNDINGELECTRODFSYSTEM(NECART250,PARIH)
ELECTRICSERVICEEQUIPMENT
MAC3964
3
_ Getting Started
'I
Welcome/Product Registration ................... 2
Safety/Precautions ..................................................... 3
Table of Contents ....................................................... 4
Features, Model and Cabinet Information ................. 5
_ On-_creen Feature_
PICTURE MENU
<>Adjusting Color, Brightness, Sharpness,
Tint, and Picture Controls ................................... 6
<>Using the Clearview Control ............................... 7
<>Adjusting the TV's Convergence Control ........... 8
<>Using the Flesh Correction Control .................... 9
<>Ghost Cancellation Feature Information ............. 9
FEATURES MENU
<>Selecting a Picture Source/RF Switch .............. 10
<>Setting the TV for Closed Captioning ............... 11
<>Setting the TV for Cable or Antenna Signals....12
<>Adding Channels in Memory (Automatically) .13
<>Adding Channels in Memory (Manually) ......... 14
<>Setting the TV (2lock ......................................... 15
<>Turn-On Timer .................................................. 16
<>Using the Sleep Timer Control ......................... 17
<>Adjusting the Channel Display Control ............ 18
<>Using the Time/Channel Reminder Control ...... 19
<>Using Parental Control to Censor Channels 20-21
<>Using the Channel Label Control ...................... 22
<>Using the Language Selection Control .............. 23
SOUND MENU
<>Adjusting Bass, Treble, and Balance Sound
Controls .............................................................. 24
<>Setting the Bass Boost Control ........................ 24
<>Setting the TV for Stereo and SAP Programs ..25
<>Using the Sound Image Control ........................ 26
<>Using the Volume Display Control ................... 26
<>Using the TV Speaker On/Off Control with
the Audio Output jacks ..................................... 27
<>Surround Sound Speaker Connections and
Variable Audio Output Control ................... 28-29
<>Using the TV's Audio/Video Input and
Output Jacks ............................................... 30-33
[_ Remote (7ontrol Operation
Using the Remote Locator Feature.........34-35
Setting the Smart Picture Control...........36-37
Using Smart Sound Control ..................................... 38
Using the Smart Surf Control .................................. 39
Setting the Remote to Work VCRs ..................... 40-41
Setting the Remote to Work
Cable TV Converters ........................................... 42-43
Setting the Remote to Work VCRs or Cable
Converters - "Search Method" ................................. 44
Using the Remote's VCR buttons ............................ 45
-"_ Picture-In-Picture (PIP)
How to Use PIP (Connections) .............. 46-47
How to Use PIP with the 'IV Remote ................. 48-49
Selecting the Picture Source for PIP........................ 50
Adjusting Picture-in-Pictttre Color and Tint ............ 51
More PIP Connections (Cable Converter) ............... 52
General Intbrmation
TV Help Menu ........................................... 53
Enhanced Screen Cleaning ...................................... 53
Tips if Something Isn't Working ............................. 54
Glossary of TV Terms ............................................. 55
Index ........................................................................ 56
Factory Service Location_.................................... 57-58
Warranty ................................................................... 59
Accessories ............................................................... 60
Use the simple Set--Up Guide (supplied with
your TV information packet) for details on:
• Antenna Hook-ups
• First Time Set-Up
(Automatic Settings)
• Basic TV and Ren:tote
Control Operation
• On-Screen Menu Use
Copyright © 1996 Philips Consumer Electronics Company. All rights reserved.
4
FiirstTimeSetUp-automaticallysetstheTVfor
localchannelsandthecorrectpicturesignal-(antenna
orcable).It evenhelpsyoumakethenecessary
connectionsforthePicture-ln-Picture(PIP)feature.
Infrared Remote Control - operates your TV set and
a variety of wireless remote control VCRs and Cable
TV Converters. A special "Locator" feature can also
help you find theremote When it has been sl'fick out of
sight or misplaced.
Standard TV broadcast (VHF/UHF) or Cable TV
(CATV) channel capability.
Closed Captioning - allows the viewer to read TV
program dialogue or voice conversations as on-screen
text.
Automatic Programming of channels - for quick and
easy selection of favorite stations available in your
area.
Picture-In-Picture (PIP) - can show a TV program
and the direct video output from an accessory (VCR,
ele.) onto the TV screen at the same time.
Parental Control for "Censoring" - this feature can
block out channels to keep children from watching
undesirable programming.
Stereo-Ready TV - with a built-in audio amplifier and
a twin speaker system, reception of TV programs in
both broadcast stereo sound or (SAP) bilingual
broadcast are available.
On-Screen Features - display helpful information for
the setting of TV controls (such as help messages,
operating tips and glossary).
Audio/Video Jacks - for direct connections with
VCRs (and other accessories) for quality TV picture
and sound playback.
Surround Sound - this TV set contains external;
audio speaker connections for a more dynamic sound
effect.
Sleep-Timer - automatically turns the TV OFF at
preset time intervals.
Smart Button - for the control of TV Sound and the
Picture levels. Use the Smart Button on the remote to
quickly adjust Smart Sound (to set TV Volume levels
during program changes or commercial breaks); Smart
Picture (for programmed video video level
adjustments on a variety of program sources); and
Smart Surf (for quick one button channel selection of
up to 10 of your favorite channels).
5
As you unpack your TV please note that the
following items have been included with your set:
• Owner's Man_ua]
Safety Tip Information
Factory Service Center Locations
• Warranty Registration Card
• Remote Control Transmitter
• Batteries for Remote Control Use
Please take a few minutes to complete your
registration card. The serial numb,er for the TV is
on the back of the set.
Refer to the back of this manual for instructions
on the cleaning and care of the TV.
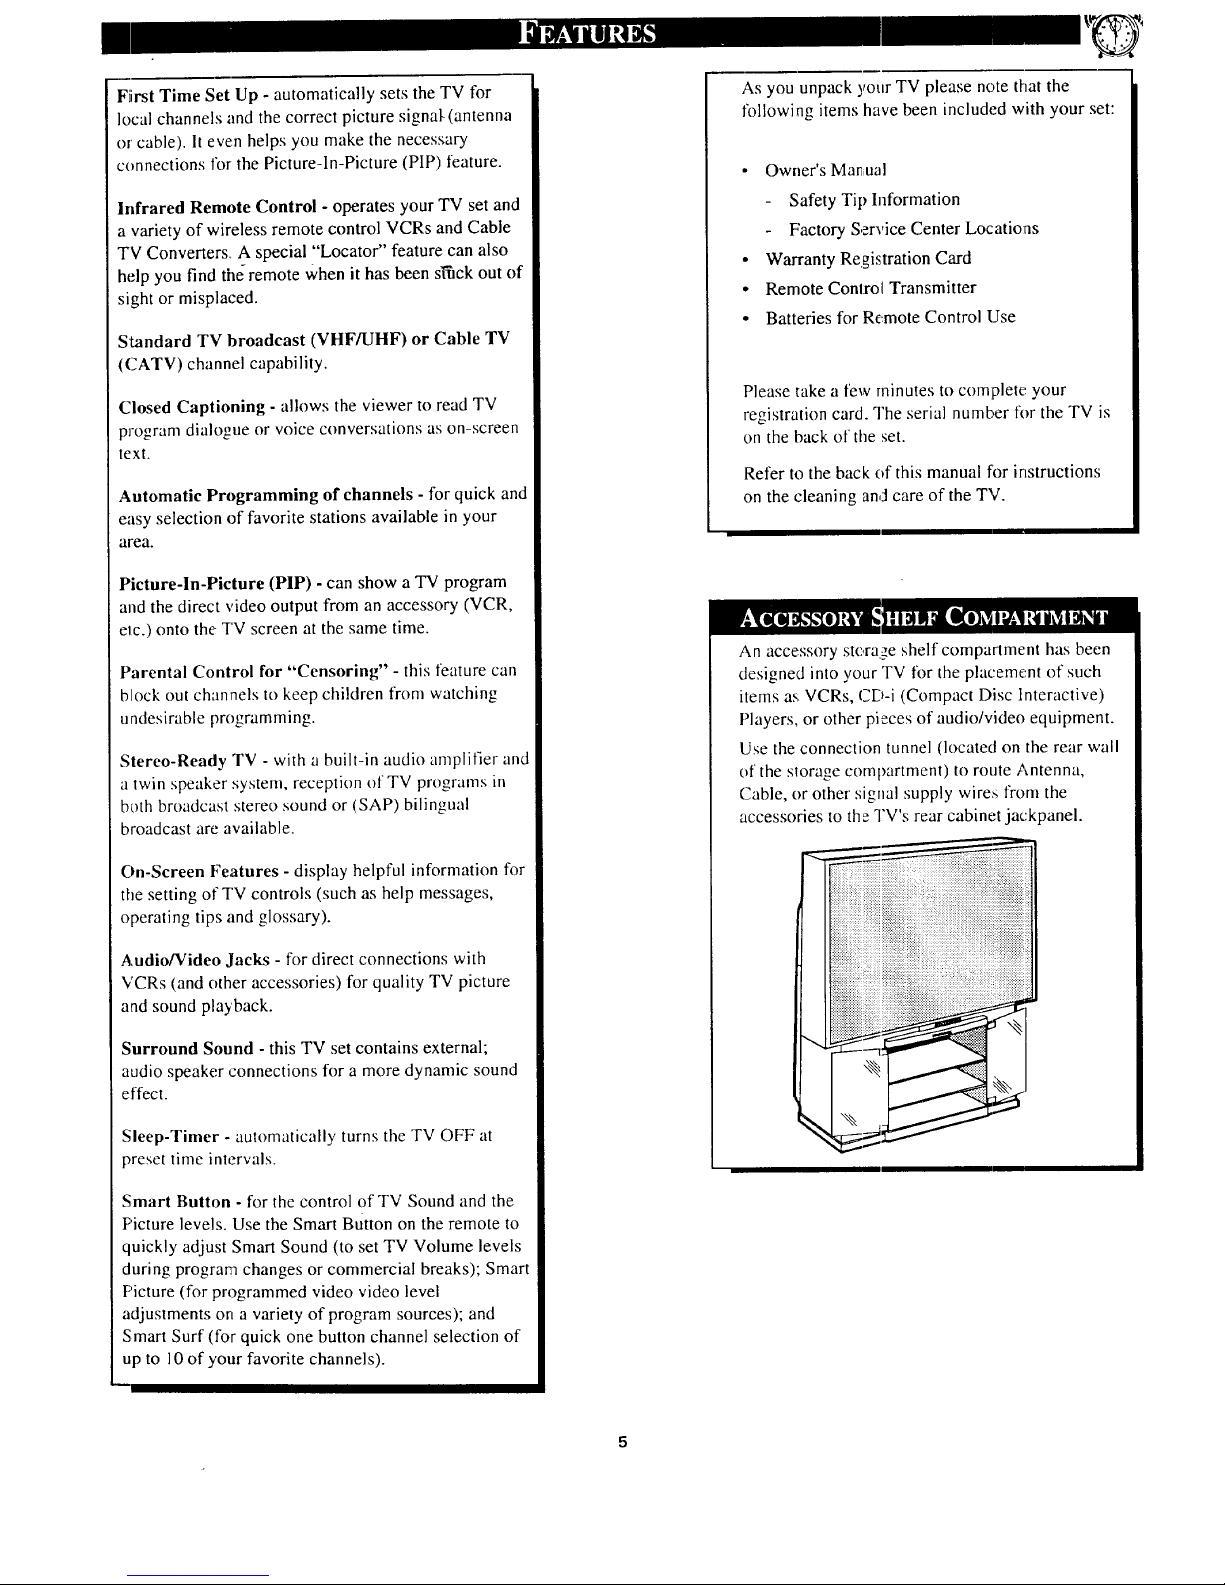
An accessory stora._,eshelf compartment has been
designed into your TV for the placement of such
items as VCRs, CD-i (Compact Disc Interactive)
Players, or other pieces of audio/video equipment.
Use the connection tunnel (located on the rear wall
of the slorage compartment) to route Antenna,
Cable, or other signal supply wires from the
accessories to the TV's rear cabinet jackpanel.

r_r-_o adjust your TV color and
J[ picmre cor_:trols, select a TV
channel and follow the steps shown
below:
Select BRIGHTNESS,
PICTURE, COLOR, TINT, or
SHARPNESS picture control.
With the PICTURE MENU on
screen, move the RED highlight
with the MENU (M) _ buttons.
Then press the MENU button.
<_ Press the (+) or (-) buttons to
adjust the selected control.
_' Press the STATUS button to
ciear the screen.
Remember. When the bar
scale is centered, control
settings are at normal mid-range
levels.
_BRIGHTNESS Press (-) or (+) until
dark parts of the picture show good
detail.
PICTURE Press (-) or (+) until
whitest parts of the picture are as
b::ight as you prefer.
COLOR Press (-) or (+) to add or
eliminate color.
TINT Press (-) or (+) to obtain
natural skin tones. (Also see Flesh
Correction on page 14 for more
irXormation).
_qHARPNES8 Press (-) or (+) to
iraprove detail in the picture.
.....:.:.::::i:?iiiii
, _ , _ , J........ _!_!_i!i:i_i_i_i_i!i_i_i_ili_ili_i_iiiii_i_i_i_i_iiiiiiiiiii_ii
i :T: P,I,,:T/REMENU
10F2=_
/ t
Select and Ihen press Select and then press MENU
]MENU (M) button to ] (M) button to view additional ]
]view an explanation of] controls grouped under same ]
[the selected feature. [ feature heading. For ]
Example: Tint, Brightness,
Pic ure, e c.
__ • L
HOW TO SELECT FEATURES
(WITH BUTFONS ON THE REMOTE)
Pre_,s MENU (M)'_I _"
to mo_e from Side-to-
Side within the Menu.
Press MENU (M)
to select RED
highlighted Press MENU (M)
• • to move Up
and Down within
the Menu.
6
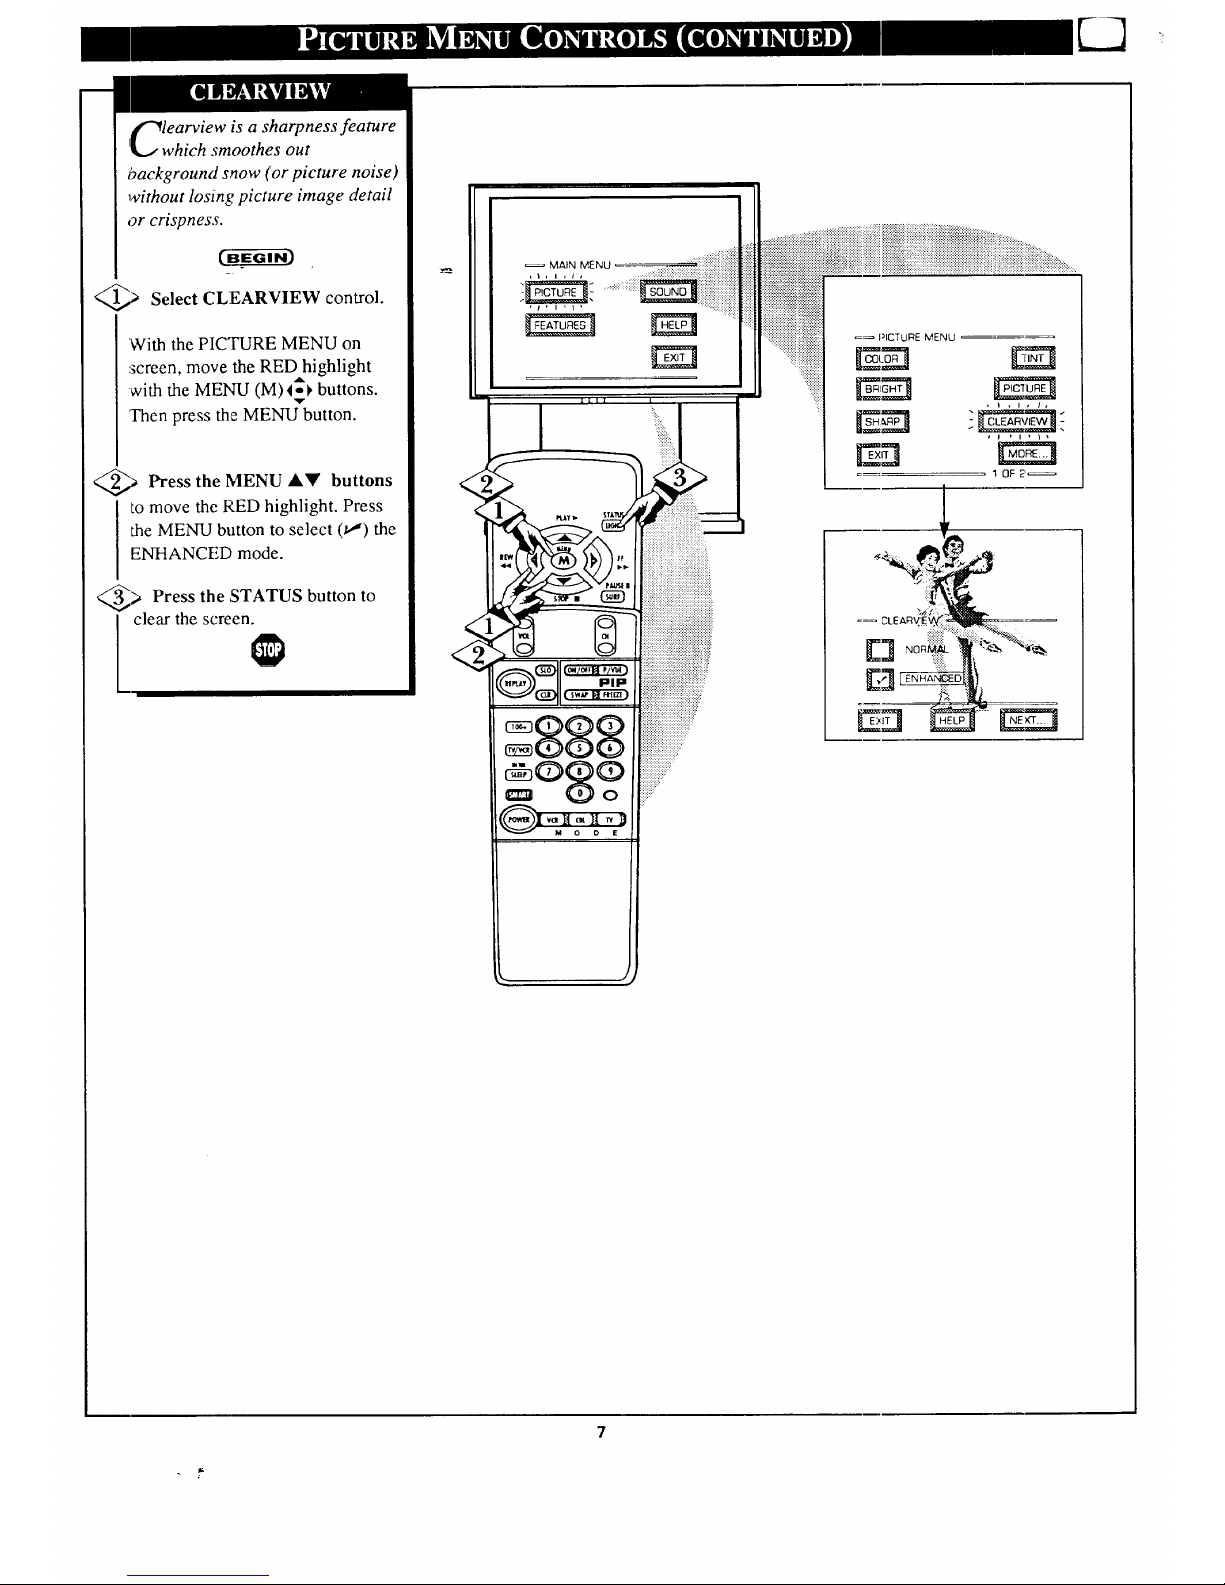
i¢_learview is a sharpness feature
I_, which smoothes out
background snow (or picture noise)
without losing picture image detail
or crispness.
@> Select CLEARVIEW control.
With the PICTURE MENU on
screen, move the RED highlight
with the MENU (M)I_1, buttons.
Then press the MENU_button.
a Press the MENU &Y buttons
to move the RED highlight. Press
the MENU button to select (t,,,") the
ENHANCED mode.
_> Press the ,STATUS button to
clear the screen.
/
=_ PICTURE MENU
I OF2'_
7
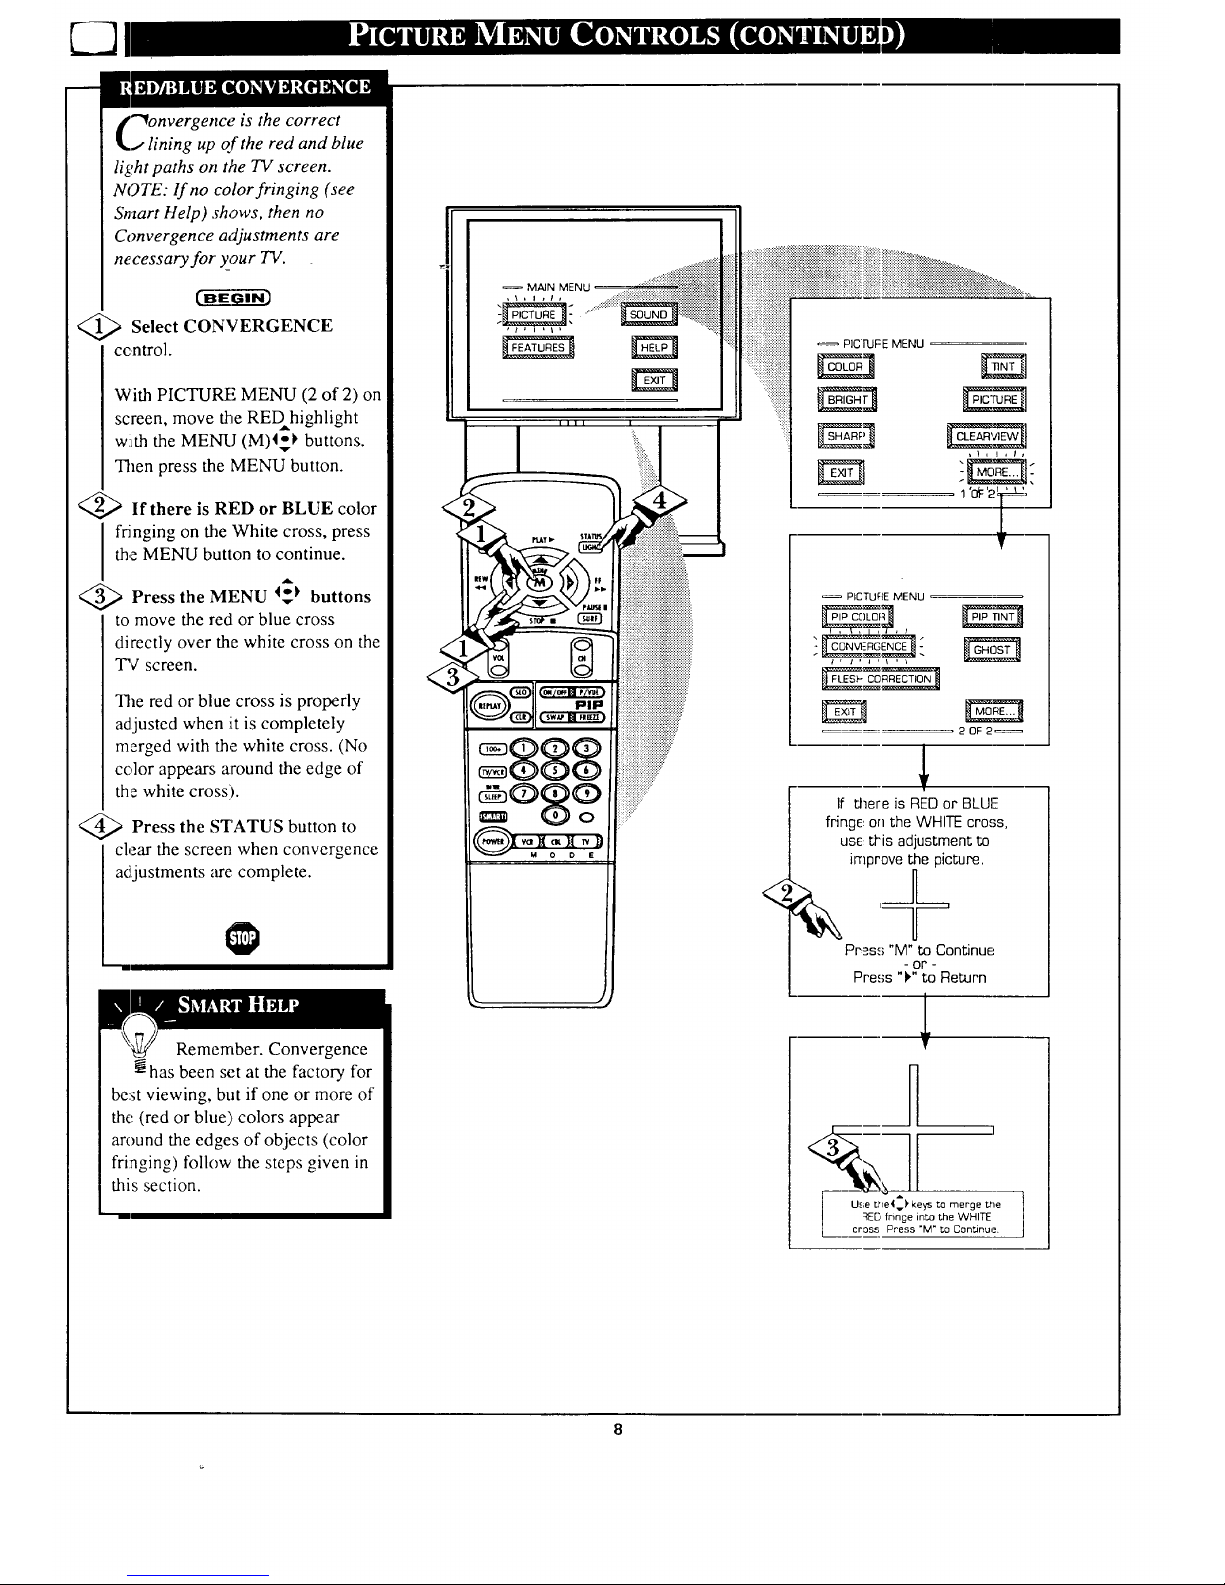
"_onvergenceis the correct
j lining up of the red and blue
light paths on the TV screen.
NOTE: If no color fringing (see
Smart Help) shows, then no
Convergence adjustments are
necessary for your TV.
<_ Select CONVERGENCE
ccntrol.
With PICTURE MENU (2 of 2) on
screen, move the REDhighlight
w!tththe MENU (M)4_ buttons.
Then press the MENU button.
<_ If there is RED or BLUE color
I ringing on the White cross, press
the MENU button to continue.
Press the MENU I_ buttons
to move the redLor blue cross
directly over the white cross on the
TV screen.
The red or blue cross is properly
adjusted when iLtis completely
merged with the white cross. (No
color appears around the edge of
the white cross).
<_ Press the STATUS button
to
clear the screen when convergence
adjustments are complete.
Remember. Convergence
has been set at the factory for
be:stviewing, but if one or more of
the (red or blue) colors appear
around the edges of objects (color
fri:aging) follow the steps given in
this section.
S®$?
iiiiiiiiiiiiiiiiiiiiiiiiiiiiiiiiiii _PIC'I'UFEMENU _='
iiiiii_iiiii!_iiiiiiiiiiiiiiiiii!
: " iiiiiiiiiliiiiiiii
1 '_: '2_L
<
PICTURE MENU
20F2_
If there is RED or BLUF
fringe., on the WHITE cross,
use: tl-is adjustment to
improve the picture.
Press "M"to Continue
or
Press "_" to Return
mr,
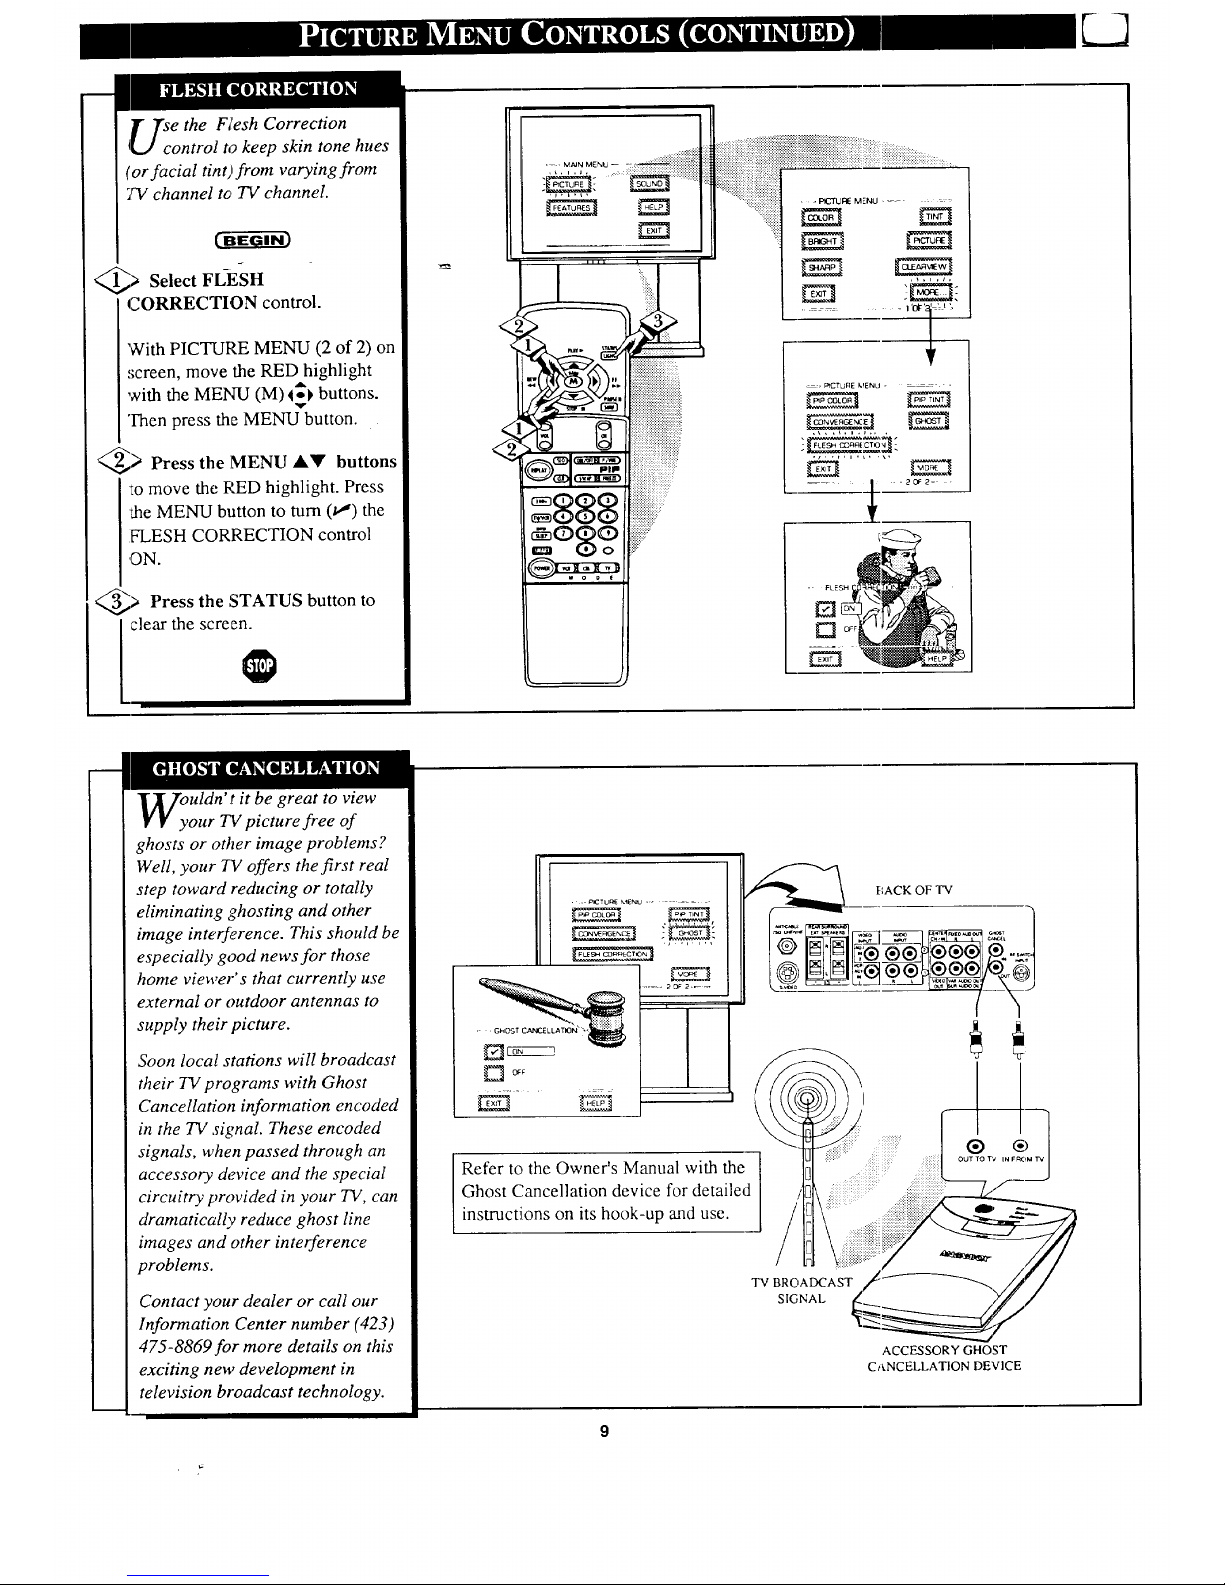
T Tse the Flesh Correction
4[,.J control to keep skin tone hues
(or facial tint)from varying from
7V channel to TV channel.
_> Select FL-ESH
CORRECTION control.
'With PICTURE MENU (2 of 2) on
screen, move the RED highlight
with the MENU (M) 4_1,buttons.
Then press the MENU button.
_> Press the MENU AV buttons
'tomove the RED highlight. Press
the MENU button to turn 0!) the
IH..ESH CORRECTION control
,ON.
_> Press the STATUS button to
clear the screen.
......... 1'Ol-'l': t '-
--_, PICTU[IE K_ENLJ "
--_ / .2o_2= .
uldn' t it be great to view
our TV picture free of
ghosts or other image problems?
Well, your 7V offers the first real
step toward reducing or totally
eliminating ghosting and other
image inte_erence. This should be
especially good news for those
home viewer's that currently use
external or outdoor antennas to
supply their picture.
Soon local stations will broadcast
their TV programs with Ghost
Cancellation information encoded
in the TV signal. These encoded
signals, when passed through an
accessory device and the special
circuitry provided in your TV, can
dramatically reduce ghost line
images and other interference
problems.
Contact your dealer or call our
Information Center number (423)
475-8869for more details on this
exciting new development in
television broadcast technology.
• ..P,CrU_E_IENU ......
• GHOST C,_'_E L LA TWIN" ""
Refer to the Owner's Manual with the
Ghost Cancellation device for detailed
instructions on its hook-up and use.
BACK OF TV
TV BROADCAST
SIGNAL
ACCESSORY GHOST
CANCELLATION DEVICE
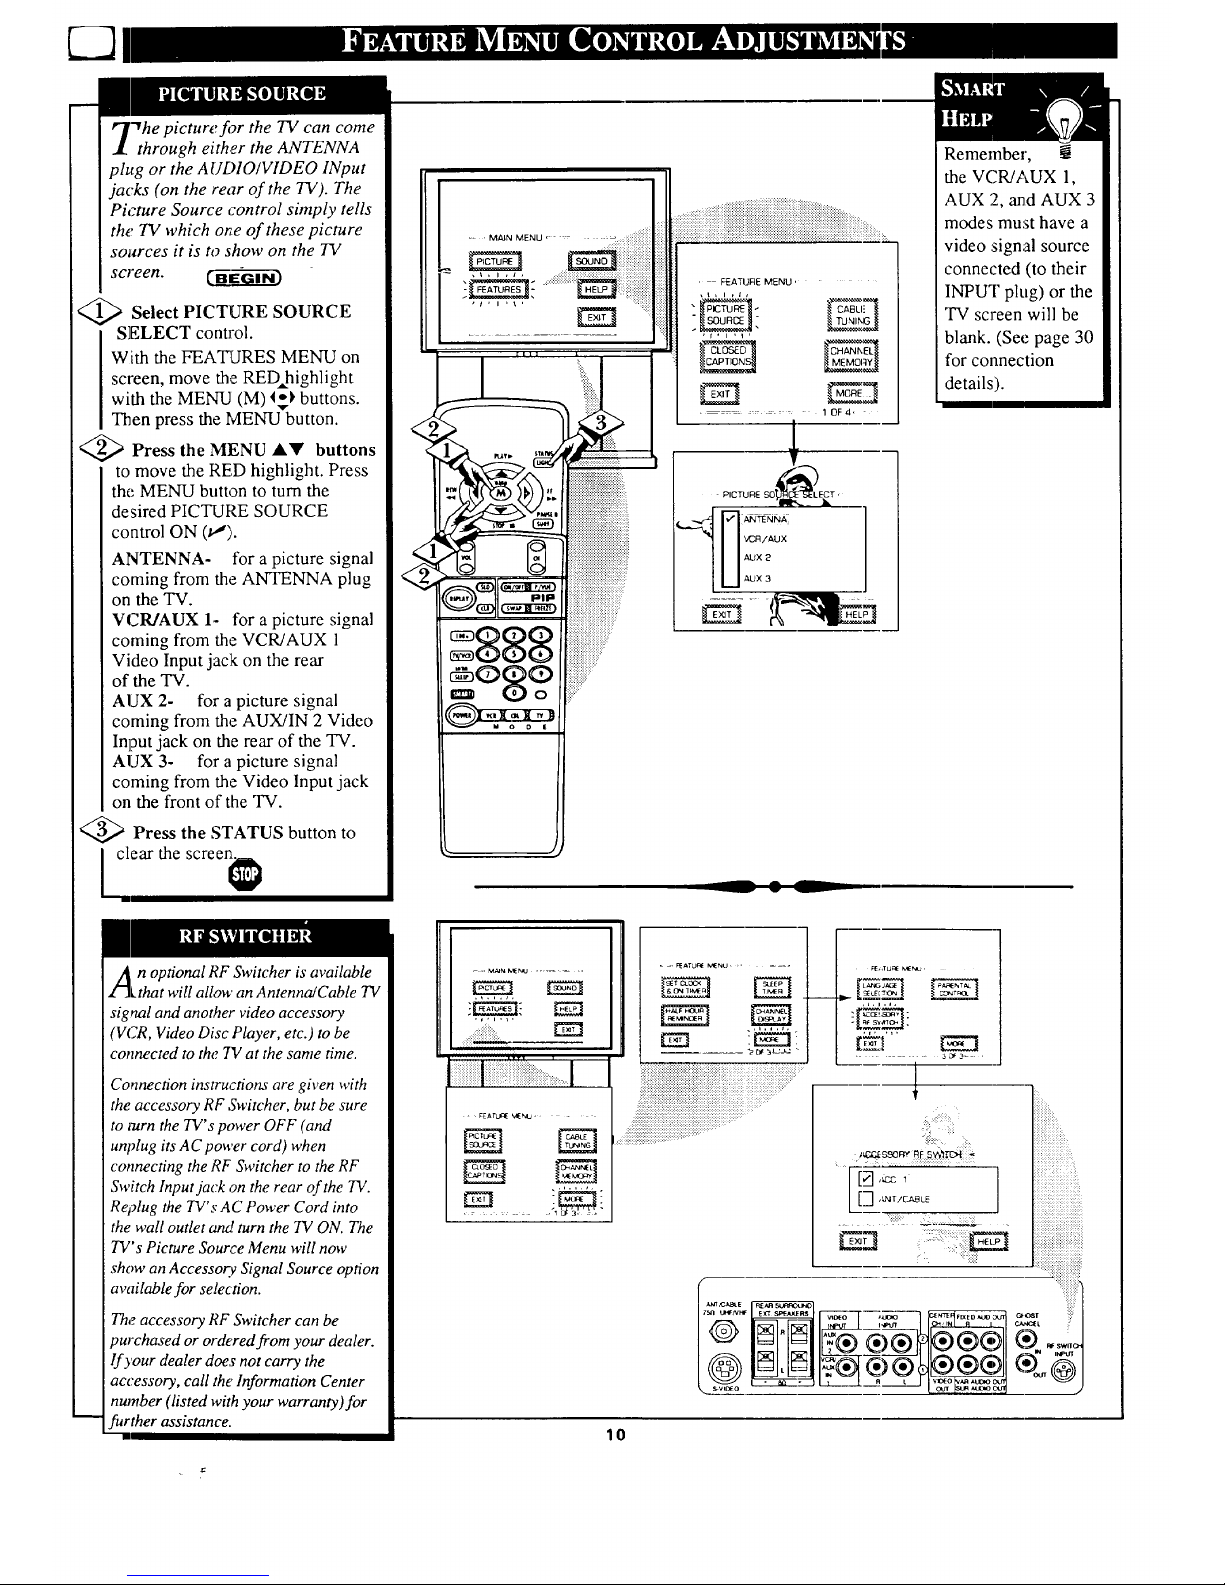
"Thepicture f!)r the TV can come
through either the ANTENNA
ph,g or the AUDIO/VIDEO INput
jacks (on the rear of the TV). The
Picture Source control simply tells
the TV which or,'eof these picture
sources it is to show on the 73/
screen. _-G----------G[_
Select PICTURE SOURCE
SELECT control.
With the FEATURES MENU on
screen, move the RED highlight
with the MENU (M) I_ buttons.
Then press the MENU button.
<_> Press the MENU A!!' buttons
to move the RED highlight. Press
the MENU button to turn the
desired PICTURE SOURCE
control ON (1.,").
ANTENNA- for a picture signal
coming from the ANTENNA plug
on the TV.
VCR/AUX 1- for a picture signal
coming from the VCR/AUX 1
Video Input jack on the rear
of the TV.
AUX 2- for a picture signal
coming from the AUX/IN 2 Video
Input jack on the rear of the TV.
AUX 3- for a picture signal
coming from the Video Input jack
on the front of the TV.
@>Press the STATUS button to
] clear the screen_
<
. iiii!!i!!!ii!!!!i!!!iiill
, FEATURE MENU,
Remember,
the VCR/AUX 1,
AUX 2, and AUX 3
modes must have a
video signal source
connected (to their
INPUT plug) or the
TV screen will be
blank. (See page 30
for connection
details).
An optional RF Switcher is available
Lthat will allow an Antenna/Cable TV
signal and another video accessory
'VCR, Video Disc Player, etc.) to be
connected to the 717 at the same time.
Connection instructions are given with
the accessory RF Switcher, but be sure
to mrn the TV's power OFF (and
unplug its A C power cord) when
connecting the RF Switcher to the RF
Switch Input jack on the rear of the 73/.
Re?lug the TV's AC Power Cord into
the wall outlet o_d turn the TV ON. The
TV's Picture Source Menu will now
show an Accessory Signal Source option
available for selection.
The accessory RF Switcher can be
9urchased or ordered from your dealer.
lf your dealer does not carry the
accessory, call the' Information Center
number (listed with your warranty)for
further assistance.
.... MAIN MEr,IJ ........
: . FEAIUClE VI[_ .....
- =, _ATU_ MENU.......
iiii!iiiiiiiiiiiiiiiiiiiiiiiiiiii_iiiiiii;_i_iii_iii_ii!i',!_..................i_:iii_i_*i_!ii;_....
" ":'-":"" • i ¸.:i:":¸::'': •
.... .... ..
_ b =N
_" _"_...mn*-
oLN
,,, ,,,
, 3_3- •
: :::::::
:::12
......
: ... [::
[gTt-- .......
i:)i::: il
lO
k_J
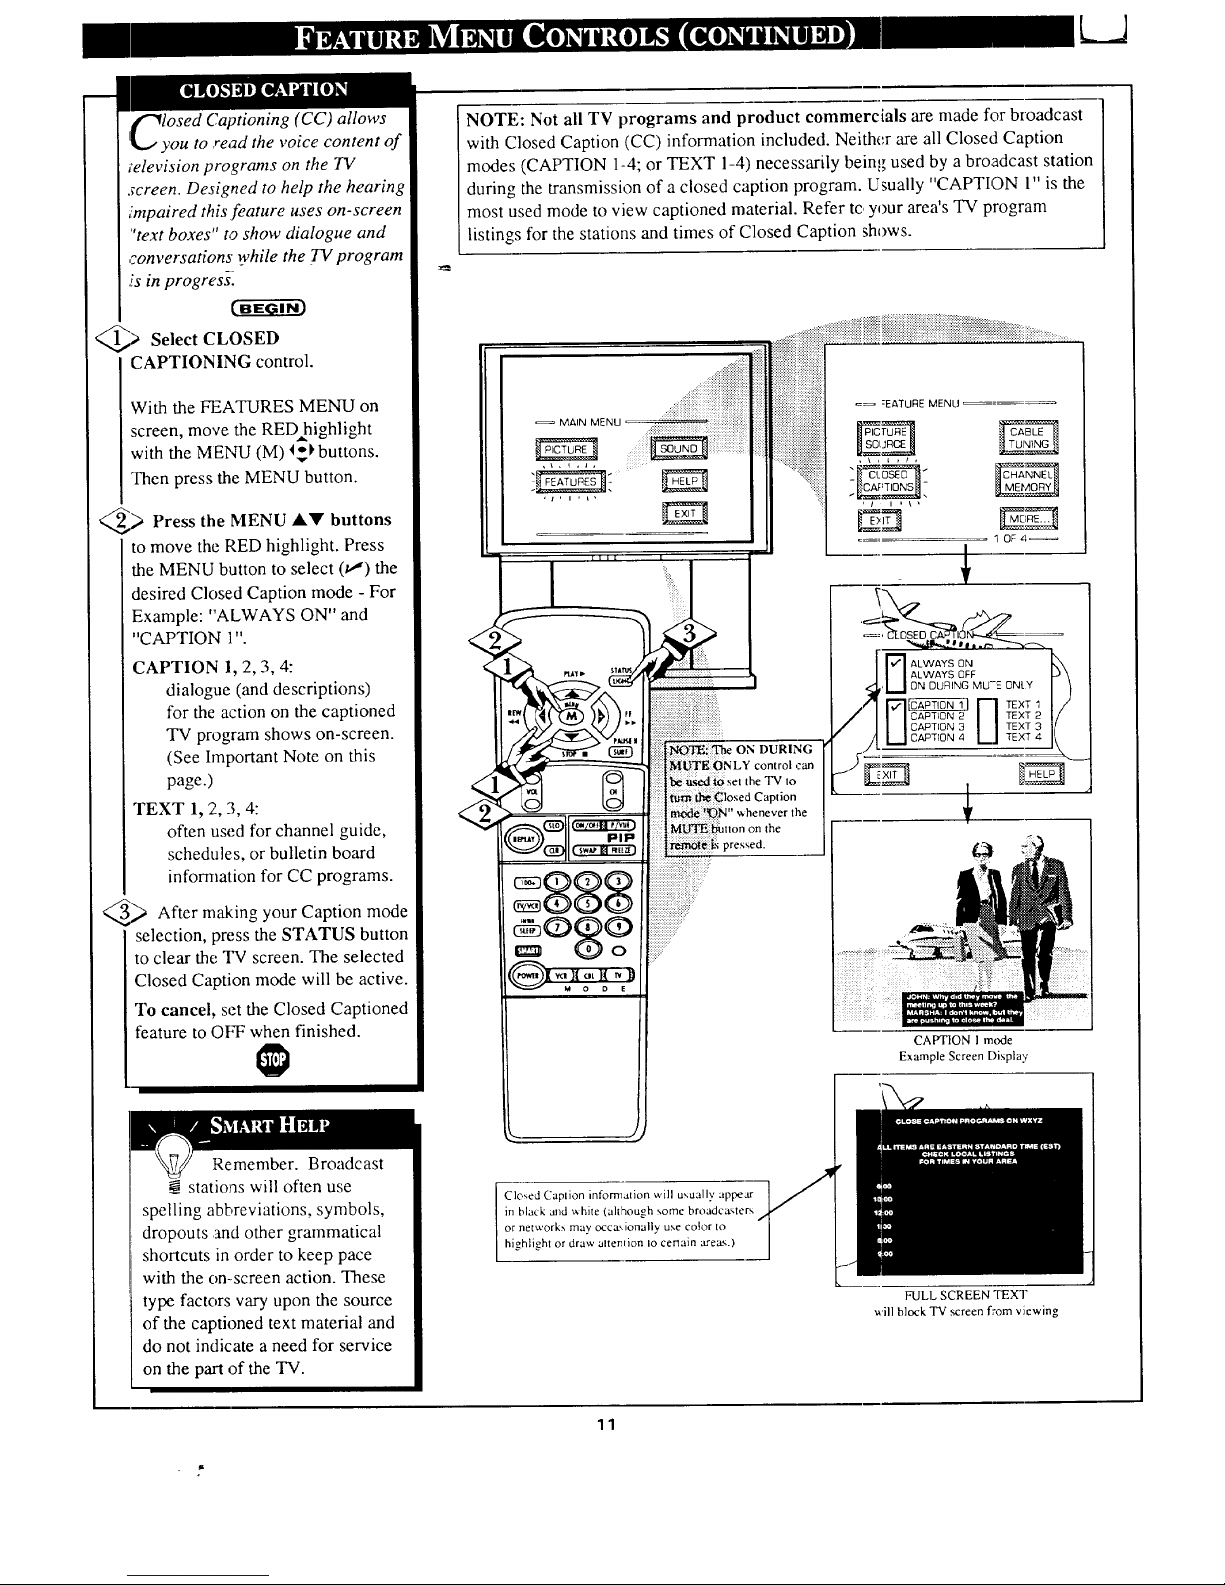
losed Captioning (CC) allows
ou to read the voice content of
;elevision programs on the 73/
screen. Designed to help the hearing
impaired this feature uses on-screen
"text boxes" to ShOW dialogue and
r.onversations while the TV program
.isin progress[
@;a Select CLOSED
CAPTIONING control.
With the FEATURES MENU on
screen, move the RED highlight
with the MENU (M) I_1,buttons.
Then press the MENU button.
_> Press the MENU lkV buttons
to move the RED highlight. Press
the MENU button to select 01) the
desired Closed Caption mode - For
Example: "ALWAYS ON" and
"CAPTION 1".
CAPTION 1, 2, 3, 4:
dialogue (and descriptions)
for the action on the captioned
TV program shows on-screen.
(See Important Note on this
page.)
TEXT 1, 2, 3, 4:
often used for channel guide,
schedules, or bulletin board
information for CC programs.
_ After m_:ing your Caption mode
selection, press the STATUS button
to clear the TV screen. The selected
Closed Caption mode will be active.
To cancel, set the Closed Captioned
feature to OFF when finished.
NOTE: Not all TV programs and product commercials are made for broadcast
with Closed Caption (CC) information included. Neither are all Closed Caption
modes (CAPTION 1-4; or TEXT 1-4) necessarily being used by a broadcast station
during the transmission of a closed caption program. Usually "CAPTION 1" is the
most used mode to view captioned material. Refer to your area's TV program
listings for the stations and times of Closed Caption shows.
I
DURING
|NLY control can
the TV to
tption
the
CAPTION I mode
Example Screen Displa,.
Remember. Broadcast
stations will often use
spelling abbreviations, symbols,
dropouts and other grammatical
shortcuts in order to keep pace
with the on-screen action. These
type factors vary upon the source
of the captioned text material and
do not indicate a need for service
on the part of the TV.
Closed Caplion informalion will usually appear
in black and white (although some broadca.,,lers
or networks may occa',ionally use color to
higblighl or draw altenlion Io certain ;treat.,.)
FULL SCREEN TEXT
will block TV screen from viewing
11
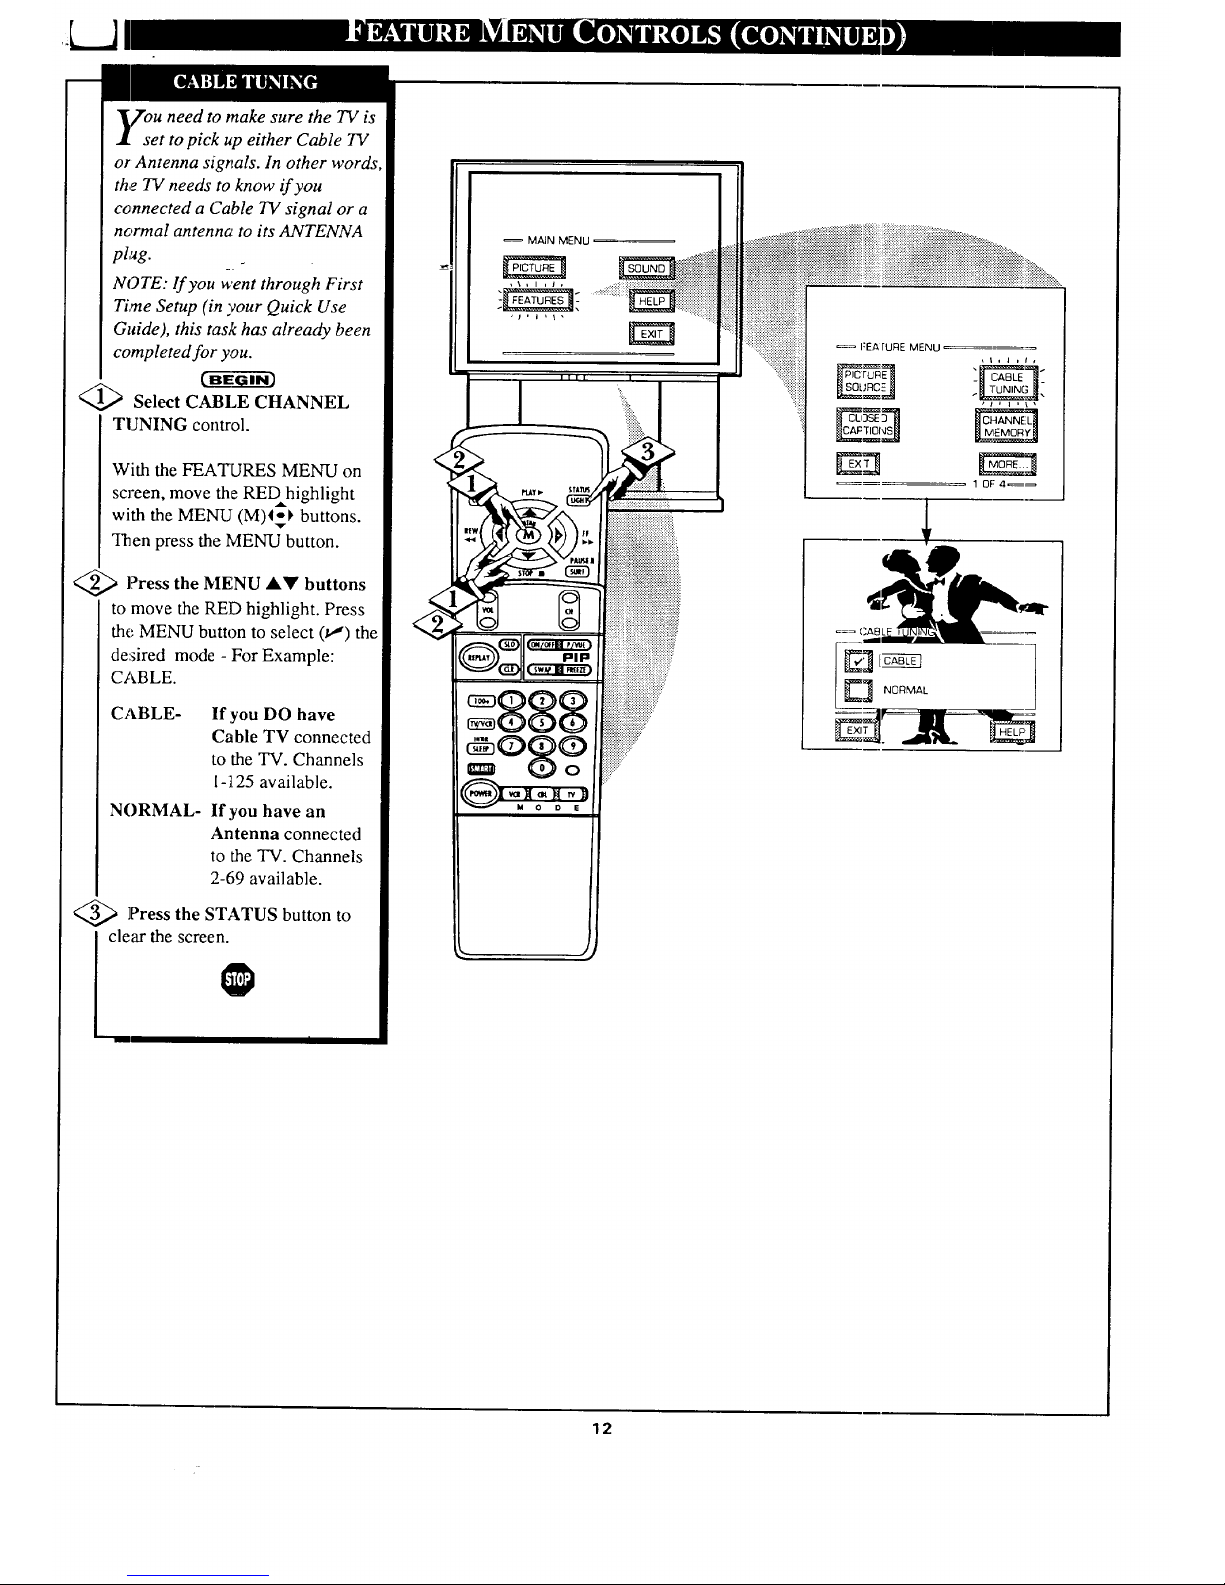
7ou need to make sure the TV is
set to pick up either Cable TV
or Antenna signals. In other words
the TV needs to know if you
connected a Cable TV signal or a
normal antenna to its ANTENNA
plug.
NOTE: lf you went through First
Time Setup (in your Quick Use
Guide), this task has already been
completed for you.
('-ff-E_ _-_i-_
Select CABLE CHANNEL
TUNING control.
With the FEATURES MENU on
screen, move the REDhighlight
with the MENU (M)4_ buttons.
Then press the MENU button.
<_ l?ress AY buttons
the
MENU
to move the RED highlight. Press
the MENU button to select (t_") the
de:fired mode - For Example:
CABLE.
CABLE- If you DO have
Cable TV connected
to the TV. Channels
1-;t25 available.
NORMAL- If you have an
Antenna connected
to the TV. Channels
2-69 available.
<_ Press the STATUS button to
clear the screen.
MAIN MENU
,\,l,I,
::::::::x::::
IZEA rURE MENU
ru=_
=== CABLE "
12
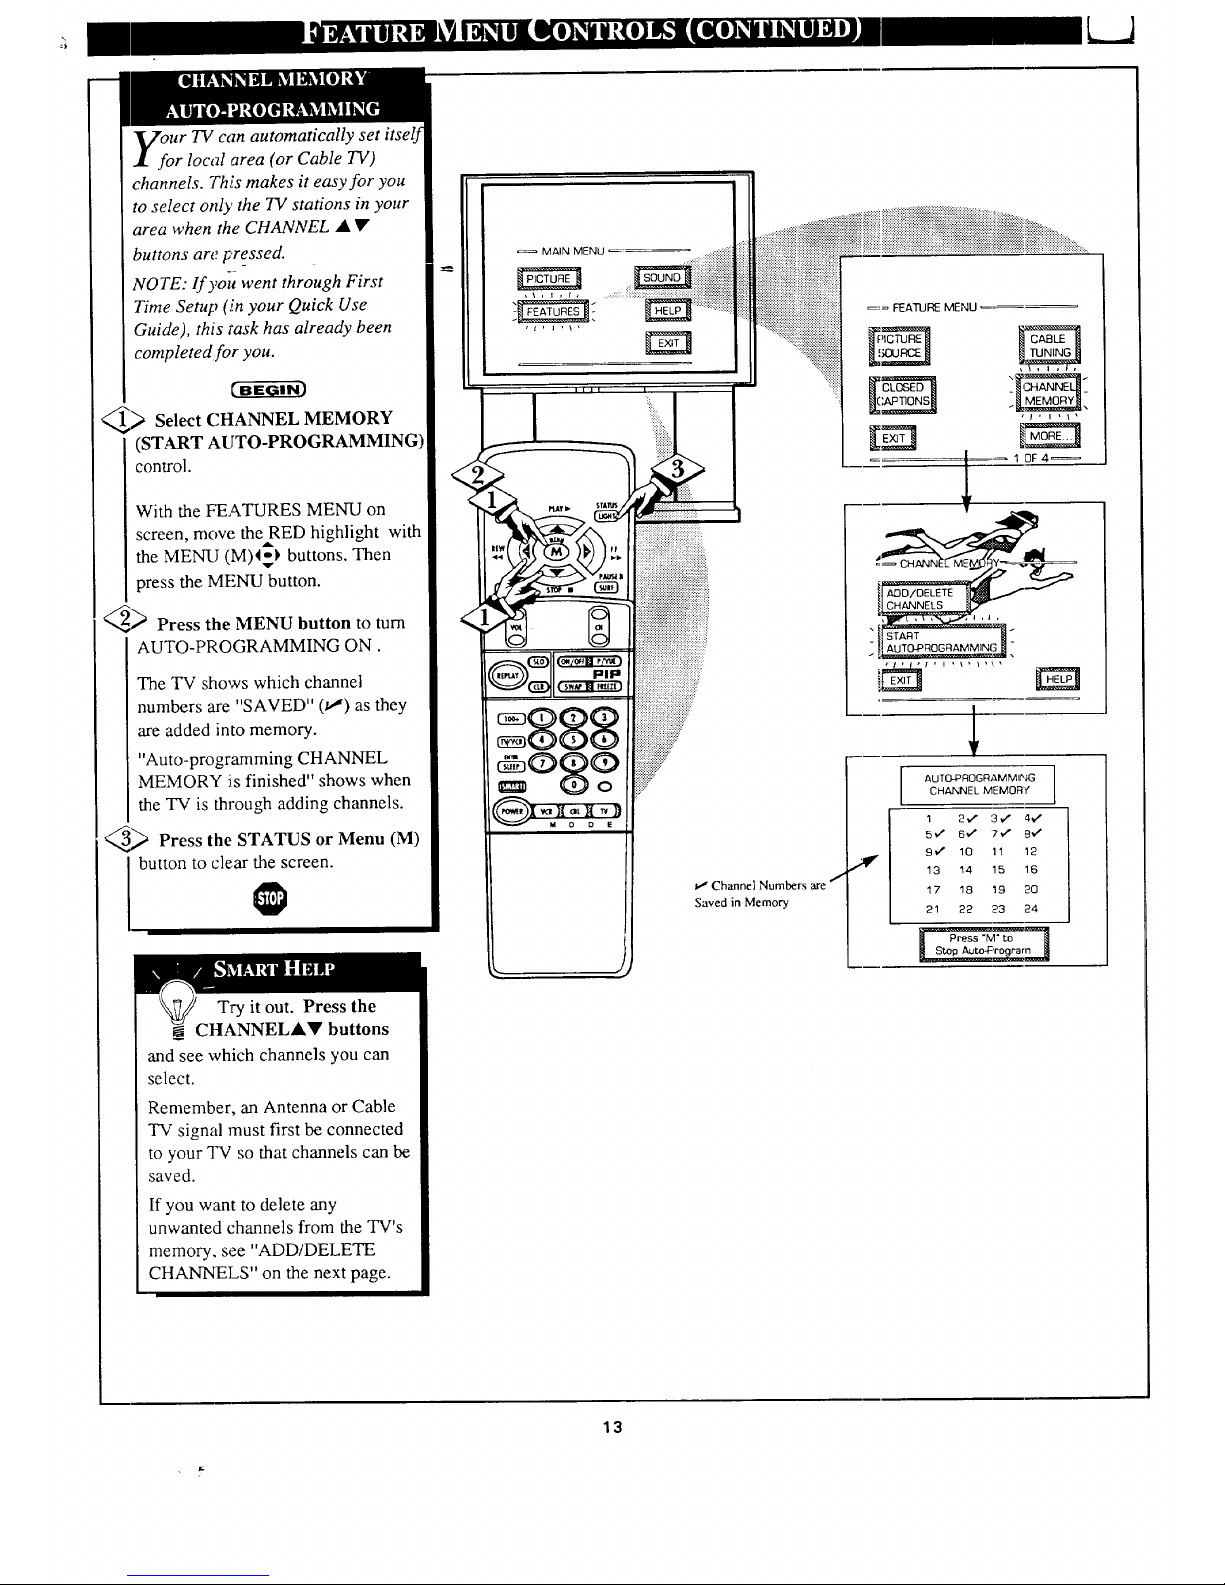
Ur TV can automatically set itself
r local area (or Cable TV)
channels. This makes it easy for you
to select only the 71,"stations in your
area when the CHANNEL • •
buttons are pre_ssed.
NOTE: If yoit went through First
Time Setup (.in your Quick Use
Guide), this task has already been
completed for you.
_) Select CHANNEL MEMORY
(START AUTO-PROGRAMMING
control.
With the FEATURES MENU on
screen, mow. theRED highlight with
the MENU (M)I=-} buttons. Then
press the MENU button.
_ Press the MENU button to turn
AUTO-PROGRAMMING ON.
The TV shows which channel
numbers are "SAVED" (_') as they
are added into memory.
"Auto-programming CHANNEL
MEMORY is finished" shows when
the TV is through adding channels.
_ Press the STATUS or Menu (M)
button to clear the screen.
Try it out. Press the
CHANNELA_' buttons
and see which channels you can
select.
Remember, an Antenna or Cable
TV signal must first be connected
to your TV so that channels can be
saved.
If you want to delete any
unwanted channels from the TV's
memory, see "ADD/DELETE
CHANNELS" on the next page.
_'_ Channel Numbers are f
Saved in Memory
AUTQ-PROGRAMMING
CHANNEL MEMORY
13
LJ
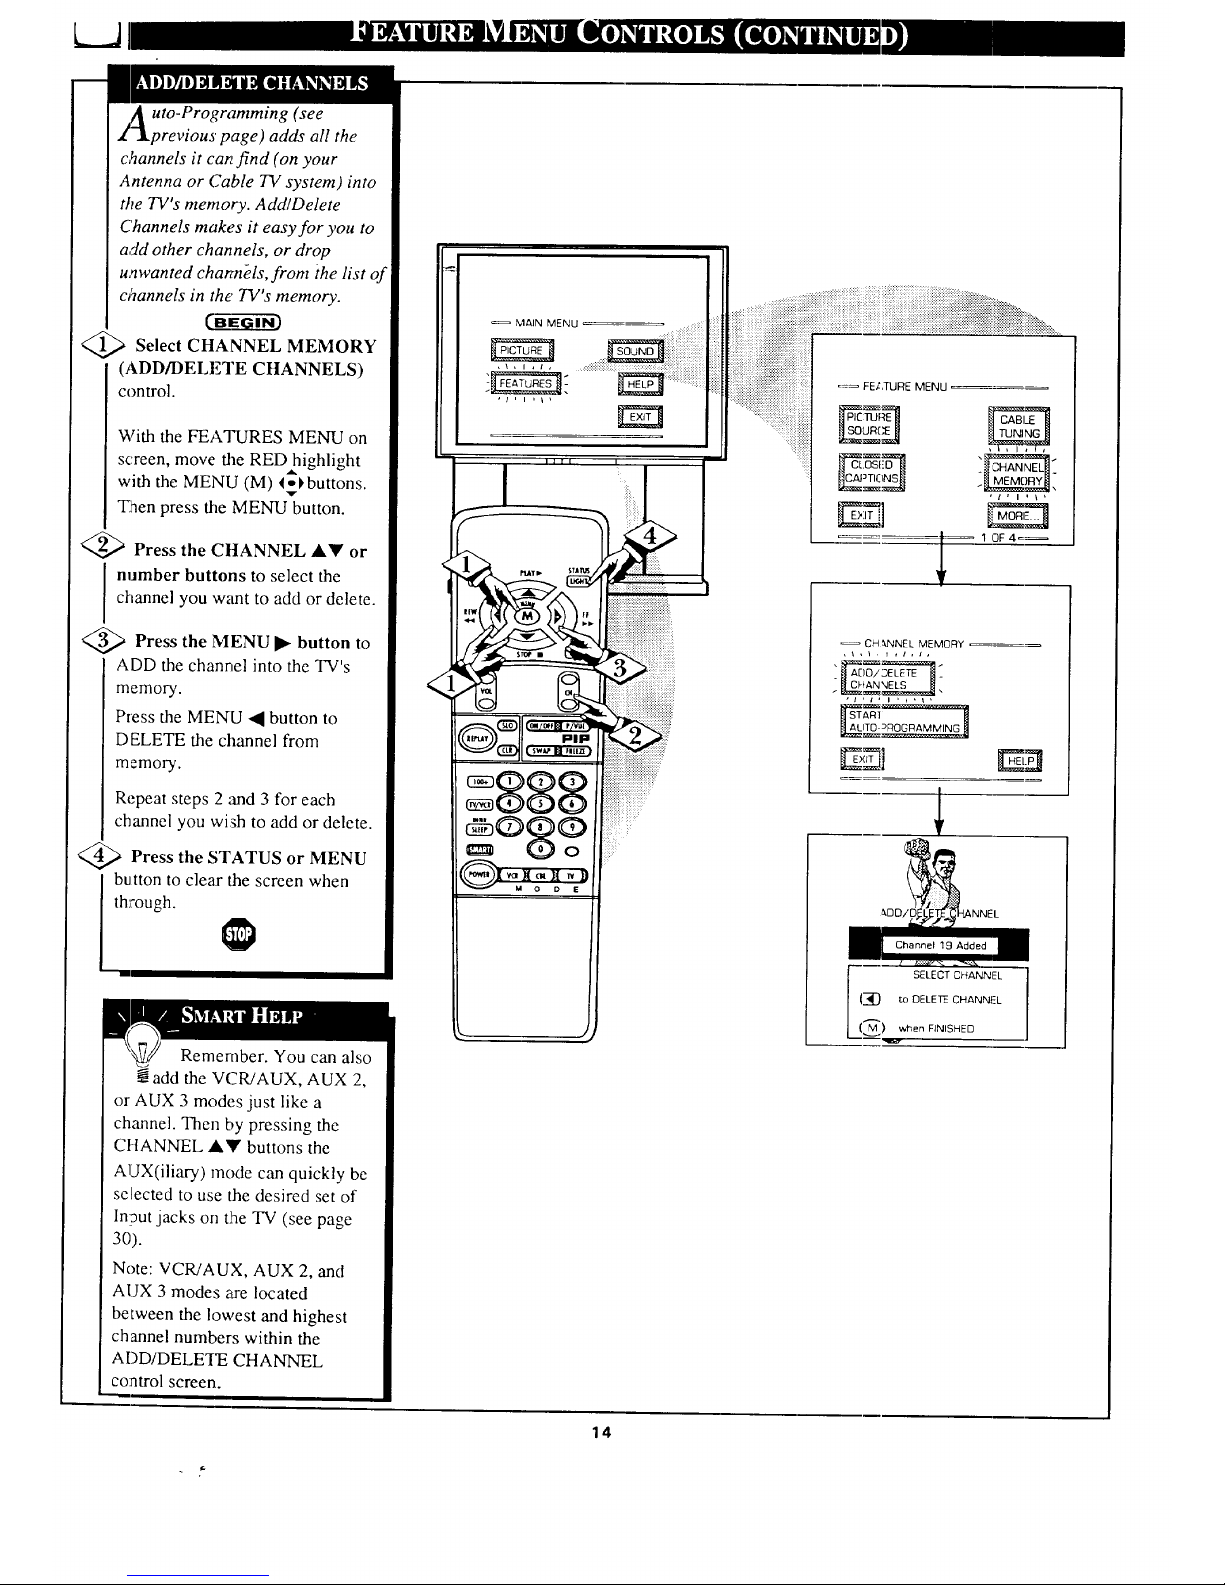
uto-Programming (see
previous page) adds all the
c,%nnels it can find (on your
Antenna or Cable TV system) into
the TV's memory. Add/Delete
Channels make.s it easy for you to
add other channels, or drop
unwanted channels, front the list of
channels in the' TV's memory.
<_ Select CHANNEL MEMORY
(ADD/DELETE CHANNELS)
control.
MAIN MENU
_== FELTURE MENU
With the FEATURES MENU on
screen, move the REDhighlight
with the MENU (M) l-_,buttons.
'T
"Eaen press the MENU button.
4_ Press the CHANNEL AY or
I number buttons to select the
channel you want to add or delete.
<_ Press the MENU button to
ADD the channel into the TV's
memory.
P_ess the MENU • button to
DELETE the channel from
CH _.NNEL MEMORY
An1
_l ALIT0-_ROG RAMMIN_
E3
memory.
Repeat steps 2 and 3 for each
channel you wish to add or delete.
<_ Press the STATUS MENU
or
button to clear the screen when
through.
Remember. You can also
add the VCR!AUX, AUX 2,
or AUX 3 modes just like a
channel. Then by pressing the
CHANNEL A'_' buttons the
AUX(iliary) mode can quickly be
selected to use the desired set of
ln?ut jacks on tlhe TV (see page
30).
Note: VCR/AUX, AUX 2, and
AUX 3 modes are located
between the lowest and highest
channel numbers within the
ADD/DELETE CHANNEL
co:afro] screen.
14
_DDiE XNNEL
Channel 19 Added
I SELECT CHANNI-L
I_ t.c, DELETE CHANN_-L
(,._) wlnen FINISHED
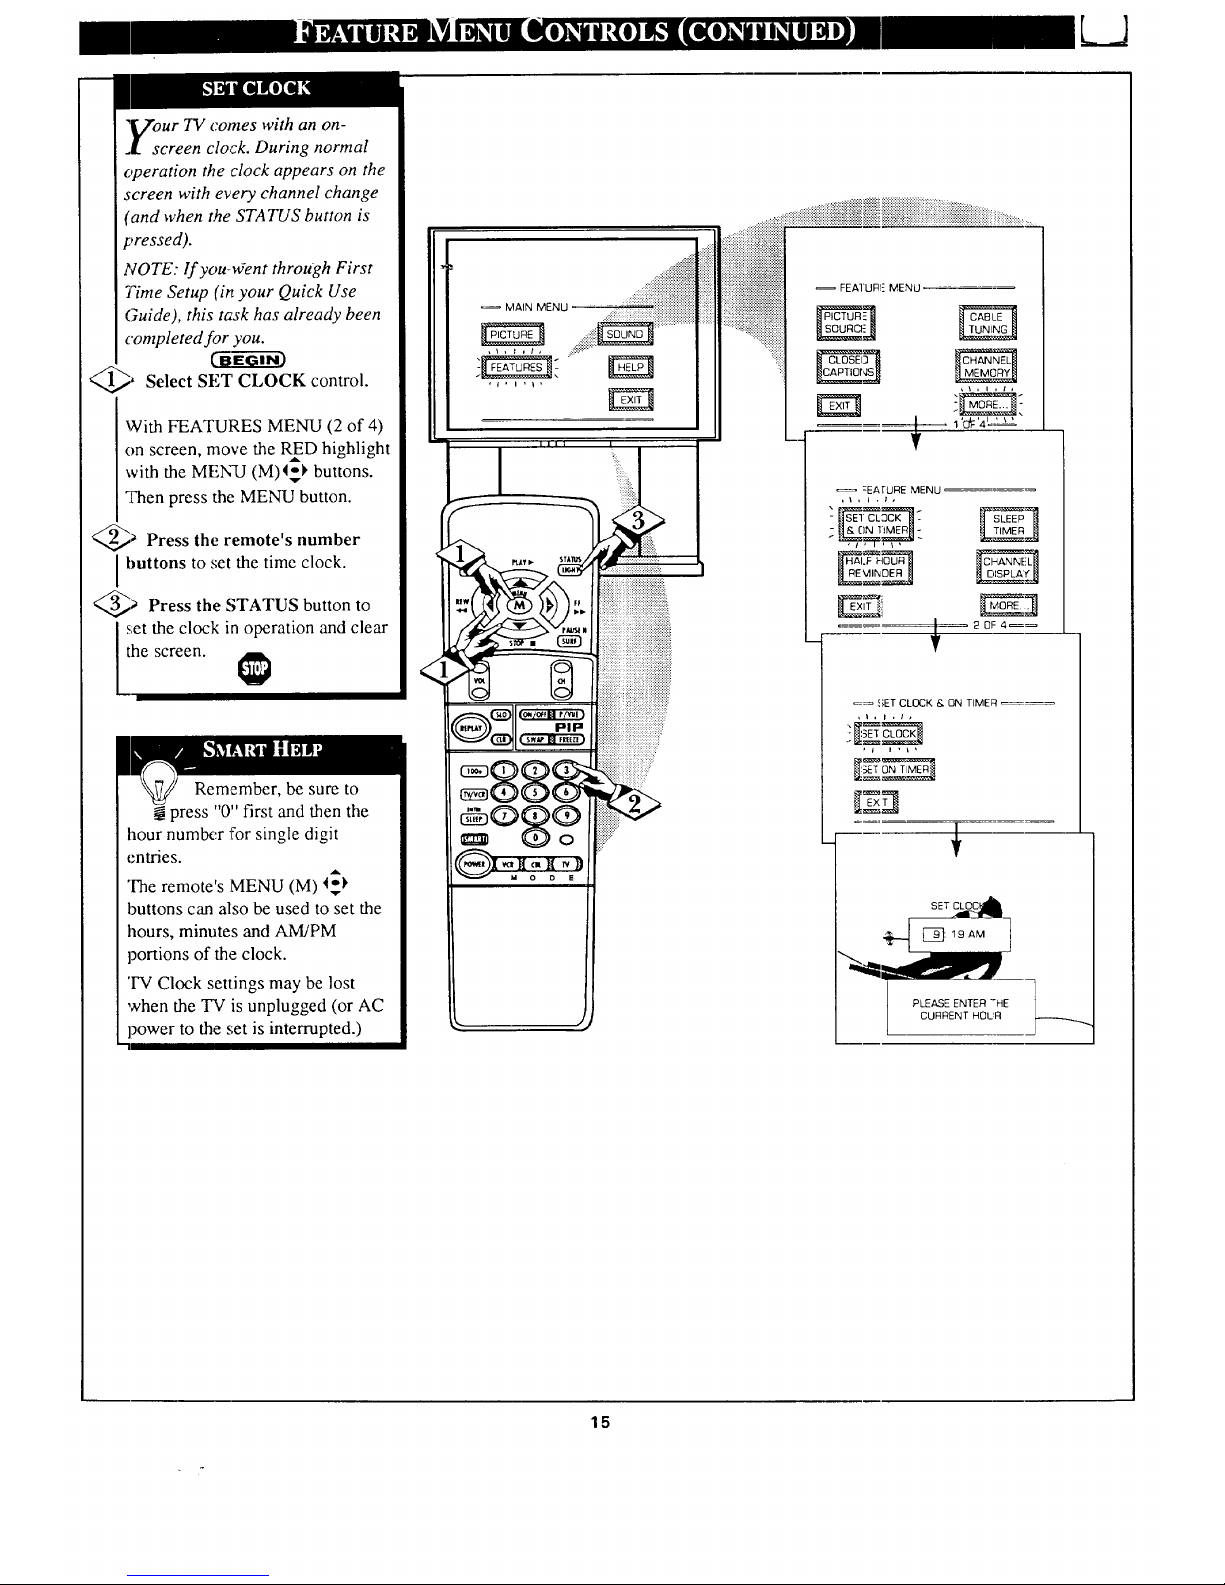
,Vour TV comes with an on-
.I. screen clock. During normal
operation the clock appears on the
screen with every channel change
(and when the STATUS button is
pressed).
NOTE: lf you-uYent through First
Time Setup (it, your Quick Use
Guide), this task has already been
completed for you.
CaEG---_3
_, Select SET CLOCK
control.
With FEATURES MENU (2 of 4)
on screen, move the RED highlight
with the MENU (M)l_ buttons.
:['hen press the MENU button.
_ Press the remote's number
buttons to set the time clock.
_ Press the STATUS button to
_;etthe clock in operation and clear
he screen.
Remember, be sure to
press "0" first and then the
hour numlx:r :['orsingle digit
entries.
The remote's MENU (M) l_
buttons can also be used to set the
hours, minutes and AM]PM
portions of the clock.
'IV Clock settings may be lost
when the TV is unplugged (or AC
power to the set is interrupted.)
.....,,..,............
......_iiiiiiiliii!i!!!!!!.....
. ............................
MAIN MENU"
!
till I
_ 0 ....................................
.....
7
FEAIURI E MENU
:EArURE MENU
-I_ _,_ _'_[_t
_ _;ET CLOCK & ON TIME_ _
_ I i I , I ,
-IN .
..
S=T_
_111___]: 19 AM
b CURRENT HOLA
15
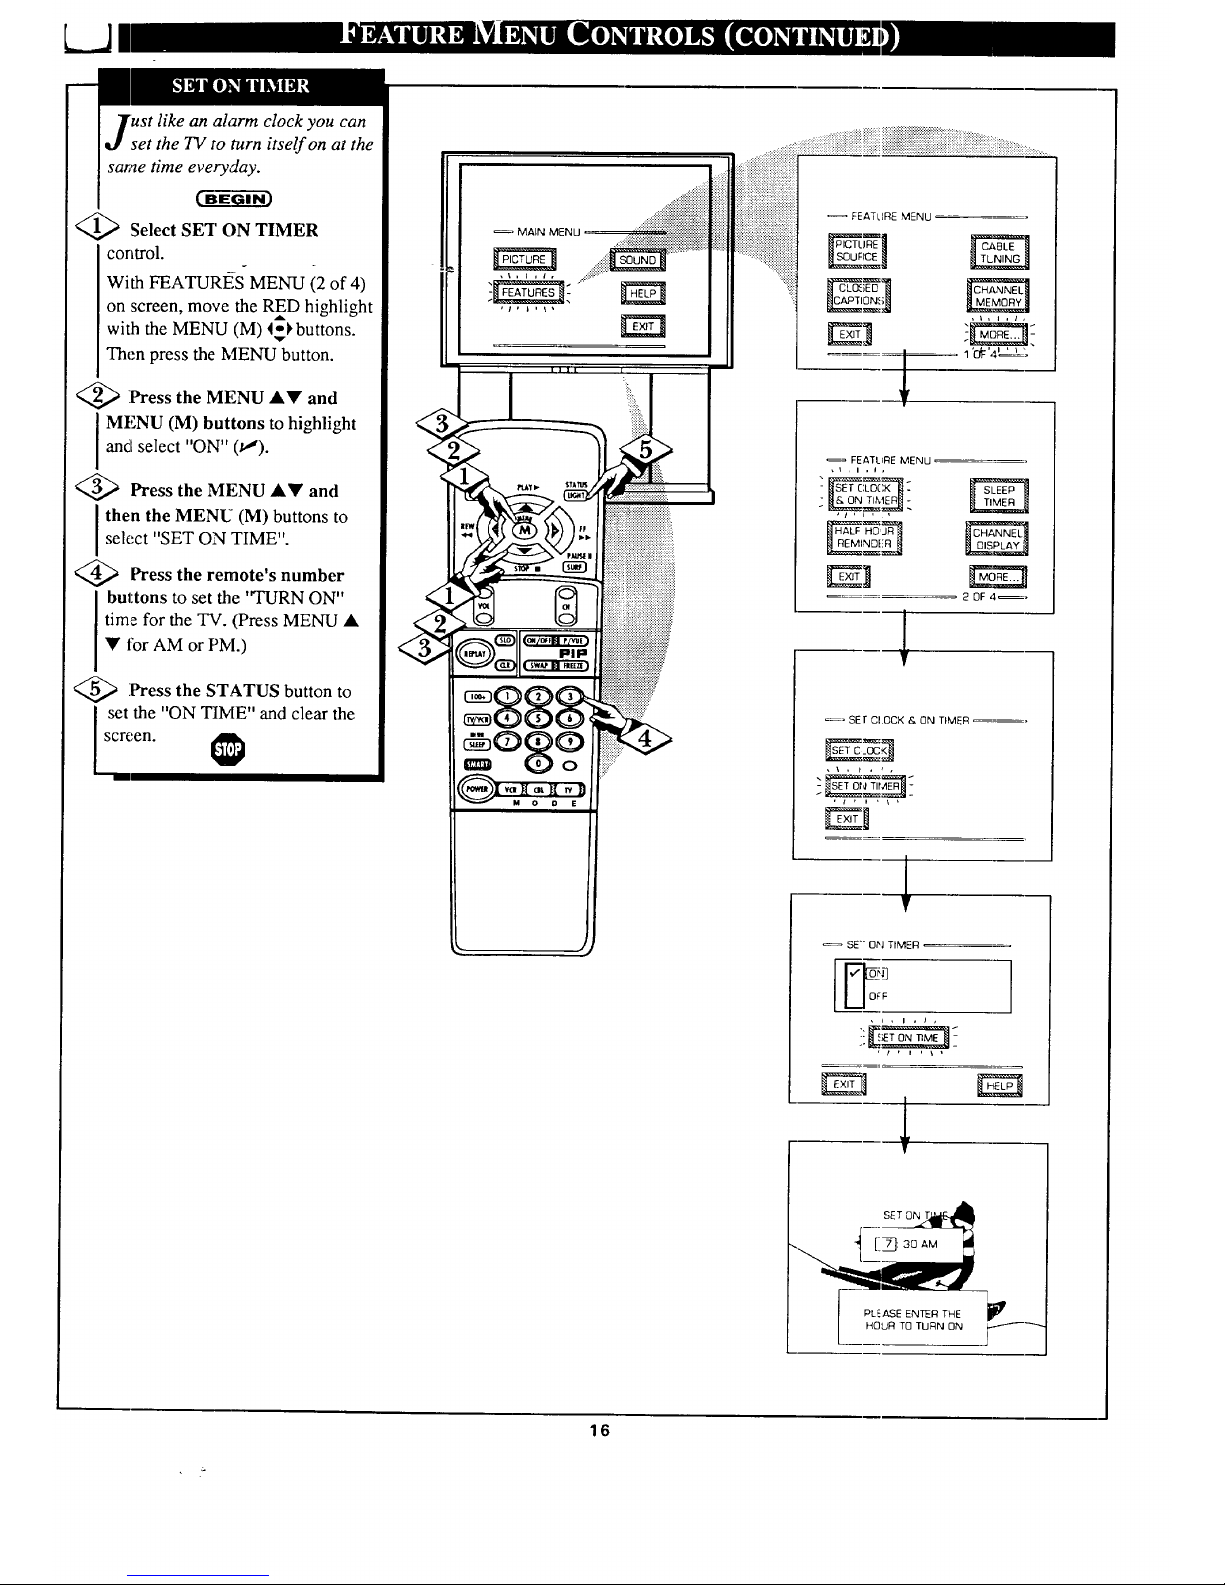
like an alarm clock you can
set the TV to turn itself on at the
same time everyday.
BC-fi-_GI--i-_
<_ Select SET ON TIMER
corttrol.
With FEATURI_iS MENU (2 of 4)
on screen, move the RED highlight
with the MENU (M) 4_l,buttons.
......_iliiiiiiiiiiiiiiiiiiiiiii
..:,::::::::::::::::::::::::::2::::::
_ MALNMENU....._::::ii_iii:::_:::!_:!!!!_:!_!_iiiiiiiiii_iiiiiiiiiiiiiiiii!
Then press the MENU button.
<_ Press the MENU
A• and
I MENU (M) buttons to highlight
and select "ON" (v").
'_ Press the MENU A• and
then the MENU (M) buttons to
select "SET ON TIME".
<_ Press remote's number
the
buttons to set the "TURN ON"
time for the TV. (Press MENU •
• for AM or PM.)
<_ Press the STATUS button
to
set the "ON TIME" and clear the
screen.
FEATLIRE MENU
"_: r_
2 0F 4 =,
_, SEt CI.OCK & ON TIMER _---,
, \ , t ,, ,
, t , t , _ , -
1
SE'" ON TIMER
[m
U °_ ]
I
P E RTH [
16
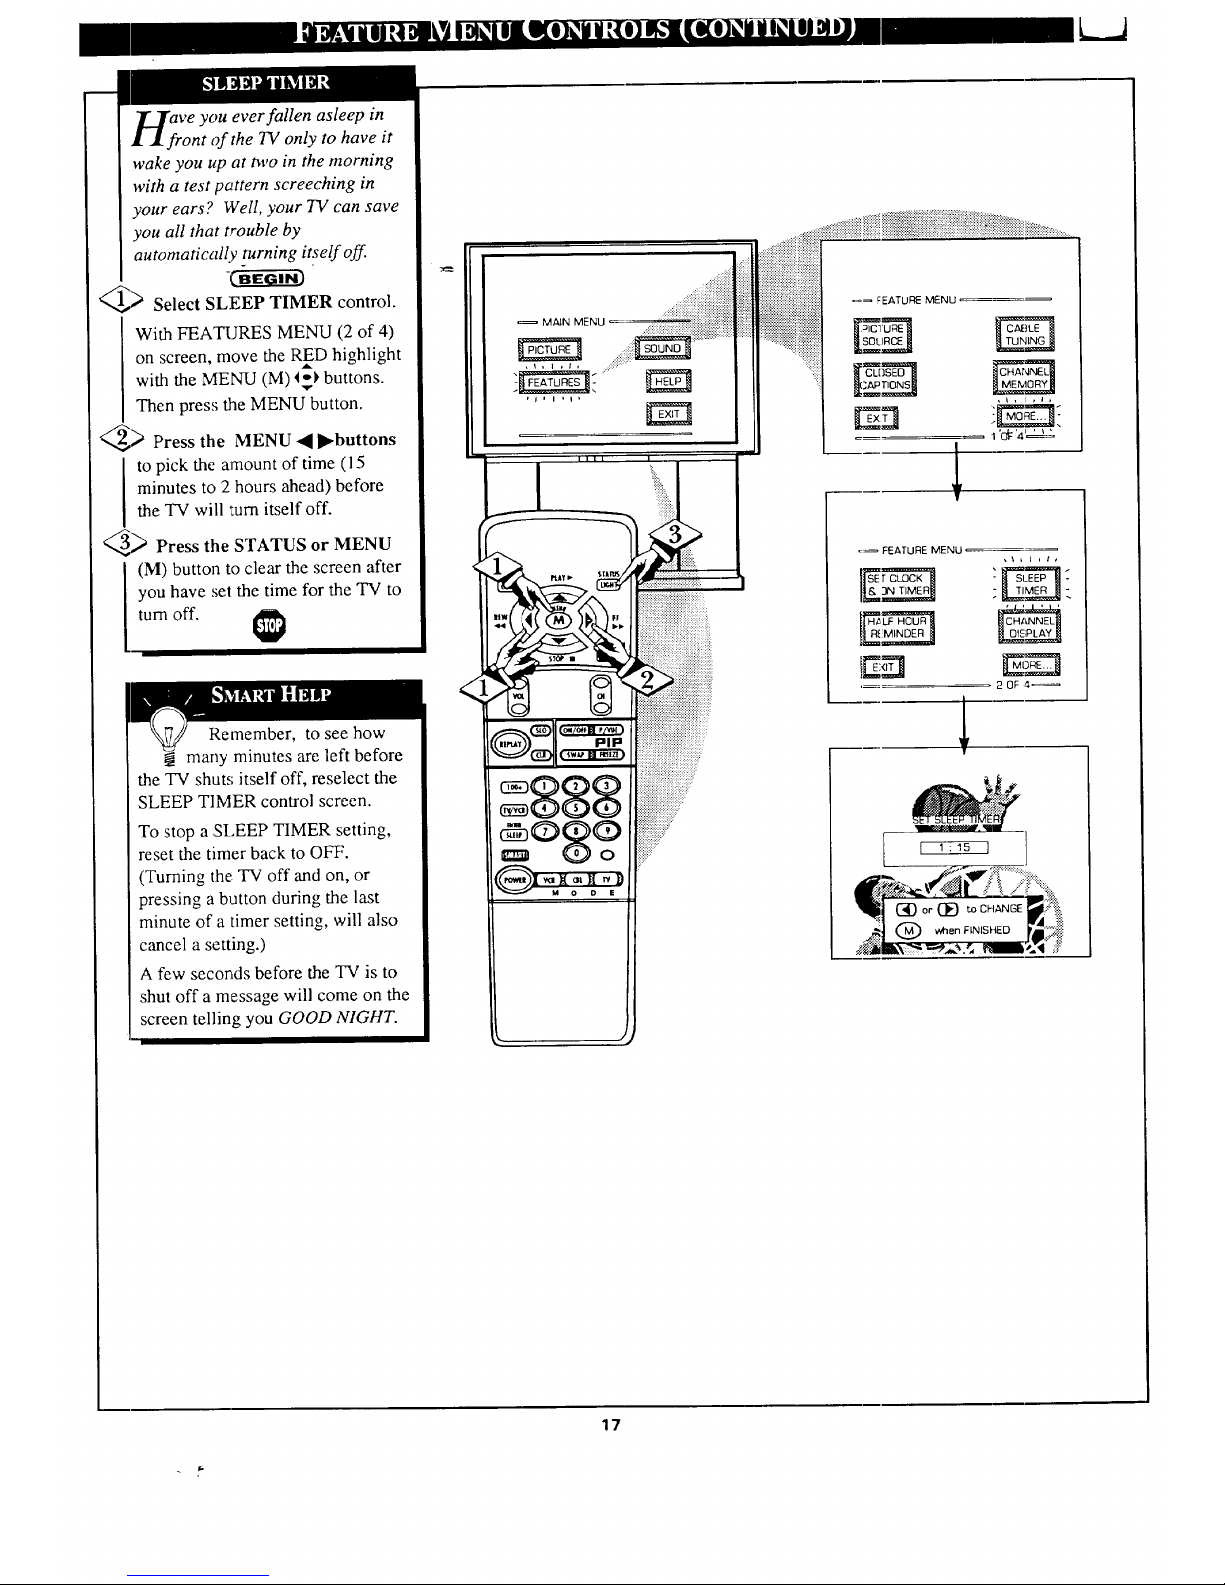
ve you ever fallen asleep in
ont of the TV only to have it
wake you up at m,o in the morning
with a test pattern screeching in
your ears? Well, your TV can save
you all that trouble by
automatically turning itself off.
_> Select SLEEP TIMER control.
With FEATURES MENU (2 of 4)
on screen, move the RED highlight
with the MENU (M) _I_ buttons.
Then press the MENU button.
_> Press the MENU 4 ]l_buttons
to pick the amount of time (15
minutes to 2 hours ahead) before
the TV will 'turn itself off.
_ Press the STATUS or MENU
(M) button to clear the screen after
you have set the time for the TV to
turn off.
Remember, to see how
_. many minutes are left before
the TV shuts; itself off, reselect the
SLEEP TIMER control screen.
To stop a SLEEP TIMER setting,
reset the timer back to OFF.
(Turning the: TV off and on, or
pressing a button during the last
minute of a timer setting, will also
cancel a setting.)
A few seconds before the TV is to
shut off a message will come on the
screen telling you GOOD NIGHT.
<
=_ MAIN MENU
=_ FEATURE MENU
,t, t ,t,
2 OF ,4_
17
LJ
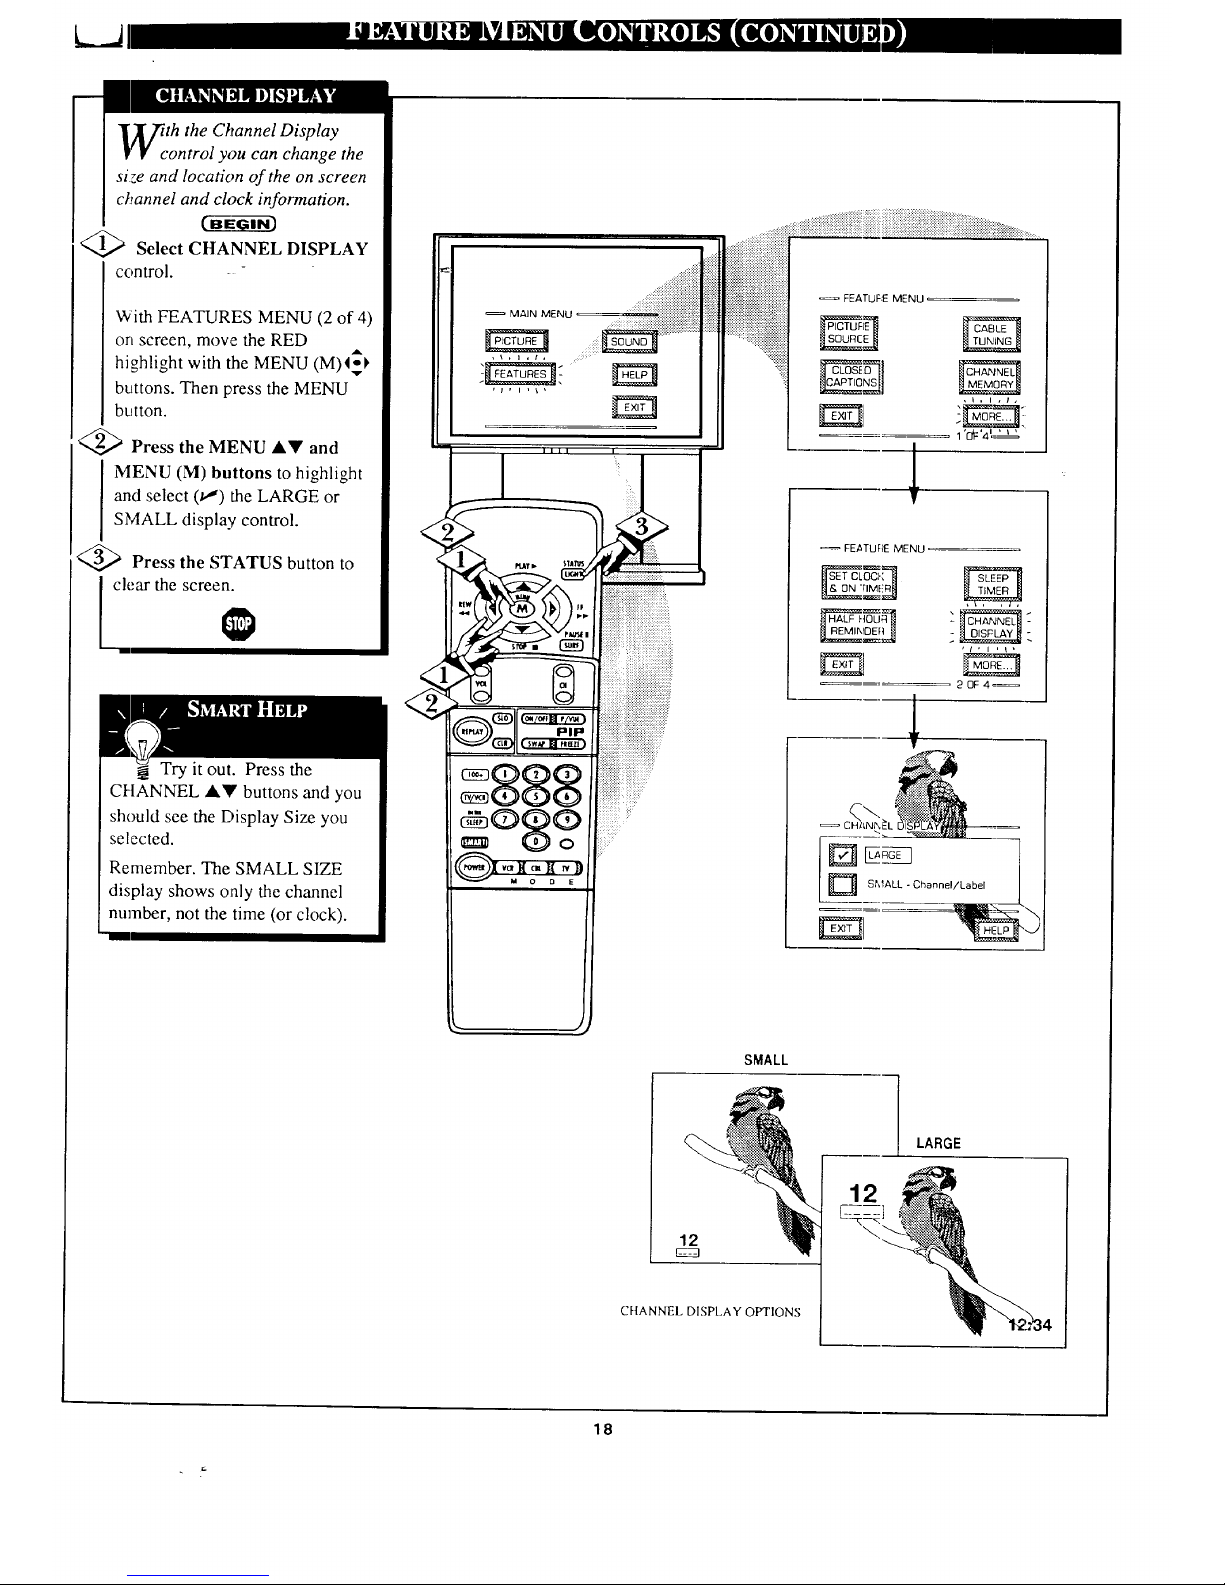
lith the Channel Display
• control you can change the
size and location of the on screen
channel and clock information.
Select CHANNEL DISPLAY
control. - -
With FEATURES MENU (2 of 4)
on screen, mowe the RED
highlight with the MENU (M)4-_
buttons. Then press the MENU
button.
@ Press the MENU ,itV and
MENU (M) buttons to highlight
and select (t,J) the LARGE or
SMALL display control.
<_ Press the STATUS button to
I ch;ar the screen.
Try it out. Press the
CHANNEL ,A.'IVbuttons and you
should see the Display Size you
selected.
Remember. The SMALL SIZE
display shows only the channel
number, not the time (or clock).
MAIN MENU. 17i:i ::ii::iii::i::iii::i::{_ii!_i:;:_i
_iiiiiiiiiiiiiiiiii:?:;?+:::
, \ + i , t,
FEATURE MENU
20F4,_
D SMALL oCh .... I/Label I
SMALL
LARGE
12
CHANNEL DISPLAY OPTIONS
12
18
 Loading...