

Page 1

Page 2
RETURN YOUR OWNER'S
REGISTRATION CARD WITHIN
10 DAYS
MAIL
U.S.
Re_stering your purchase is an essen-
tial step to guarantee you'll receive
all of the benefits you're entitled to as a
MAGNAVOX product owner. Con>
p]e_.e and mail your Owner's i:{egistra-
tion Card today to ensure your fight to
warranty verification, owner confirma-
tion, model registration, phts a wide
variety of special services and savings.
KNOW THESE SAFETY
SYMBOLS.
MAGNAVOX
Sm .Ve ysm t.
Congratulations On Your New
Purchase ... And Welcome 'To The
MAGNAVOX Family!
Dear MAGNAVOX Family Member:
Thank you for your confidence in MACNAVOX.
You've selected one of the best-built, best-backed
products available today
\Ve appreciam your SUl)port, and we'll do every-
thing we can to kee t) you happy with your tmrchase
for many years to come. After all, you're lhe reason
we're in business!
As a MAGNA\"OX family n:ember, you're entitled
to a world of speeial prMleges - and our uncompro-
mising conmtitment to your :oral satisfaet:ion. Your
MAGNAVOX product is prc,tected by one of the
most comprehensive warranties and outstanding
se_4ce networks in the industry.
,_ "l'his "bolt of lightning" indicates
nninsulated material within your unit
may cause an electrical shock. For the
safety of everTone in your household,
l)lease do not remove product covering.
,_k The "'exclanmtion point" calls atten-
tion to feature for which you should read
the enclosed literature closely to prevent
operating and maintenance problems.
READ OPERATING
INSTRUCTIONS CAREFULLY.
The information in this mamml can hel t)
you take full advantage of your product's
many features, and ensure years of safe,
reliable operation. So don't miss out. Read
the enclosed instructions, safety tips and
warranty information today.
\Vhat's more, your purchase qualifies you to receive
advance information on exciting new products from
MAGNAVOX, convenient access to our home
shopping network for special products mad aceesso-
ties, plus factory-direct rebates and discounts on
your future MAGNAV()X purchases.
All of this is cur way of saying "'thanks" for joining
the MAGNAV()X family.
To start taking advantage of _hese great benefits,
just rememb_r to return yolu MAGNAV()X
Owner's Re,._stration Card.
Simply complete, detach an(] mail us your Owner's
Registration Card today. An<;[enjoy your new pur-
chase with our best wishes!
Sincerely,
Donald F. Johnstone
President arid Chief Executive Officer
Page 3
_t_q_"_i Getting Started
_'_J Warning/Precautions ................................
Features and M_v3el Information ................. 4
How to Follow your Easy-to-Use Owner's Guide ..... 5
Antenna and Cable TV Connections ...................... 6-7
VCR to TV Ant_ma Connections ................. _ ......... 7
First Time Set-Up and Use of the TV ............... 8- I I
Basic TV and Remote Control Operation .......... 12-13
[7_ On-Screen Features
How to Use the On-Screen Feature Controls ..... 14-15
2-3
Remote Control Operation
Using the Remote (TV/VCR buttons)....38-39
Usin,, the Aut_,-Volume Leveler Control ....40
Using the Channel Gu:de Control ............................ 41
Setting the Personal Preference Control ............. 42-43
Setting the Remote lo Work Your VCR ............. 44-45
Setting the Remote Io Work Your
Cable Converter ................................................. 46-47
Setting the Remote I:o Work a VCR or Cable
Con verter- "Search Method". ............................. 48-49
How to Select Picture and Sound Controls ...... 16
+ Selecting a Picture Source ................................ 16
+Adjusting Brightness, Picture, Color,
Tint, and Sharpness Controls ............................ 17
+Using the Clearview Control ............................. 18
+Using the Flesh Correction Control .................. 19
+ Adjusting Bass, Treble, and Balance Sound
Controls ............................................................. 20
+ Using the Expander Sound Control .................. 20
+ Setting the TV for Stereo Programs ................. 21
How to Select Advanced Controls ..................... 22
+Setting the TV Clock ......................................... 22
+Setting the TV for Closed Captioning ............... 23
+Using the Sleep Timer Control ......................... 24
+Using the Time/Channel Reminder Controls ....25
+Adjusting the Size of Channel/Time Display ...26
+Setting the TV for Cable or Antenna Signals....27
+Adding Channels in Memory (Automatically) .28
+Adding Channels in Memory (Manually) ......... 29
+Adjusting the TV's Converoence_ Control ......... 30
+Usin,,_, the TV Speaker On/Off Switch with
the Audio Output jacks ..................................... 3 I
+How to Censor the Viewing of Channels .... 32-33
+Using the TV's Audio/Video Input and
Output Jacks ............................................... 34-36
+Surround Sound Speaker Connections .............. 37
Copyright © 1993 Philips Consumer Electronics Company. All righls reserved.
[y_] Picture-ln..Picture (PIP._)
How to Us,e PIP (Connections) ............ 50-5 I
How to Use PIP with the TV Remote ................ 52-53
Selecting the Picture Source for PIP ........................ 54
Adjusting Picture-it-Picture Color and Tint ............ 55
More PIP Connection., (Cable Converter) ............... 56
General Information
Tips it Something Isn't Working ............... 57
Accessory Shelf Installation .................................... 58
RF Switcher inl2_rmation ......................................... 58
GIo:;sary of TV Terns ............................................. 59
Index ......................................................................... 59
Warranty .................................................................. 60
The Model and Serial Numbers are found on the
back of this TV set. Please record these numbers and
purchase date in the space below. Refer to them
whenever you ask your dealer about this TV set.
Model No.-
Serial No.
Purchase Date
PDase attach your sales receipt to this book and keep
it ior future reference.
WARNING: TO PREVENT FIRE OR SHOCK
HAZARD DO NOT
EXPOSE THIS UNIT TO RAIN OR EXCESSIVE
MOISTURE.
Page 4
FirstTimeSetUpwhichautomaticallysetstheTV
forlocalchannelsandantennamode.Itevenhelpsyou
makethenecessaryconnectionsforthePicture-In-
Picture(PIP)feature(seepage8.)
Infrared Remote Control which operates your TV
set and a variety of wireless remote control VCRs and
Cable TV Conve_ei's. -
Standard TV broadcast (VHF/UHF) or Cable TV
(CATV) channel capability.
Closed Captioning which allows the viewer to read
TV program dialogue or voice conversations as on-
screen text.
As you unpack your IV please note that the
following items have been included with your set:
• Owner's Manual
• Warranty Registration Card
• Safety Tip Information Brochure
• Factory Service Address Directory
• Remote Comrol Transmitter
• Nine-Volt Battery for Remote Control Use
• Accessory Products Information Brochure
• Audio/Video Cables for Direct Input and
Output Connections.
Automatic Programming of channels for quick and
easy selection of favorite stations available in your
area.
Picture-In-Picture (PIP) which can show a TV
program and the direct video output from an accessory
(VCR, etc.) onto the TV screen at the same time.
Parental Control for "Censoring" or blanking out
channels and Audio/Video lnput jack connections to
prevent children from watching undesirable
programming.
Stereo-Ready TV with built-in audio amplifier and
twin speaker system. Receives TV programs in both
broadcast stereo sound or (SAP) bilingual broadcast.
On-l_creen Features which display helpful
information for setting of TV controls (such as color
adju:_tment, timer settings and channel programming).
Audio/Video jacks for direct connections with VCRs
(and other accessories) for quality TV picture and
sound playback.
Please take a few minutes to complete your
registration card. The serial number for the TV is
on the back of the set.
Please keep your packing material lbr any future
IlSe.
To ensure that pictme screen performance is of
lhe highest quality, please avoid rubbing any
object or material or the screen tha't could scratch
or damage its surIace.
Refer to the back of this manual for instructions
or: the cleaning ard ,:are of the TV.
Surround Sound external audio speaker connections.
Sleep-Timer which automatically turns the TV OFF at
preset time intervals.
Page 5
te style kind design of this
wner's Guide comes from
you the customer. We've asked
owners, such as yourself just what
it is they would #ke to see to make
our instructions more helpfid and
easier-to-follow. See below for the
results qf some of the simple and
ectsv-to-use suggestions that you
have given us.
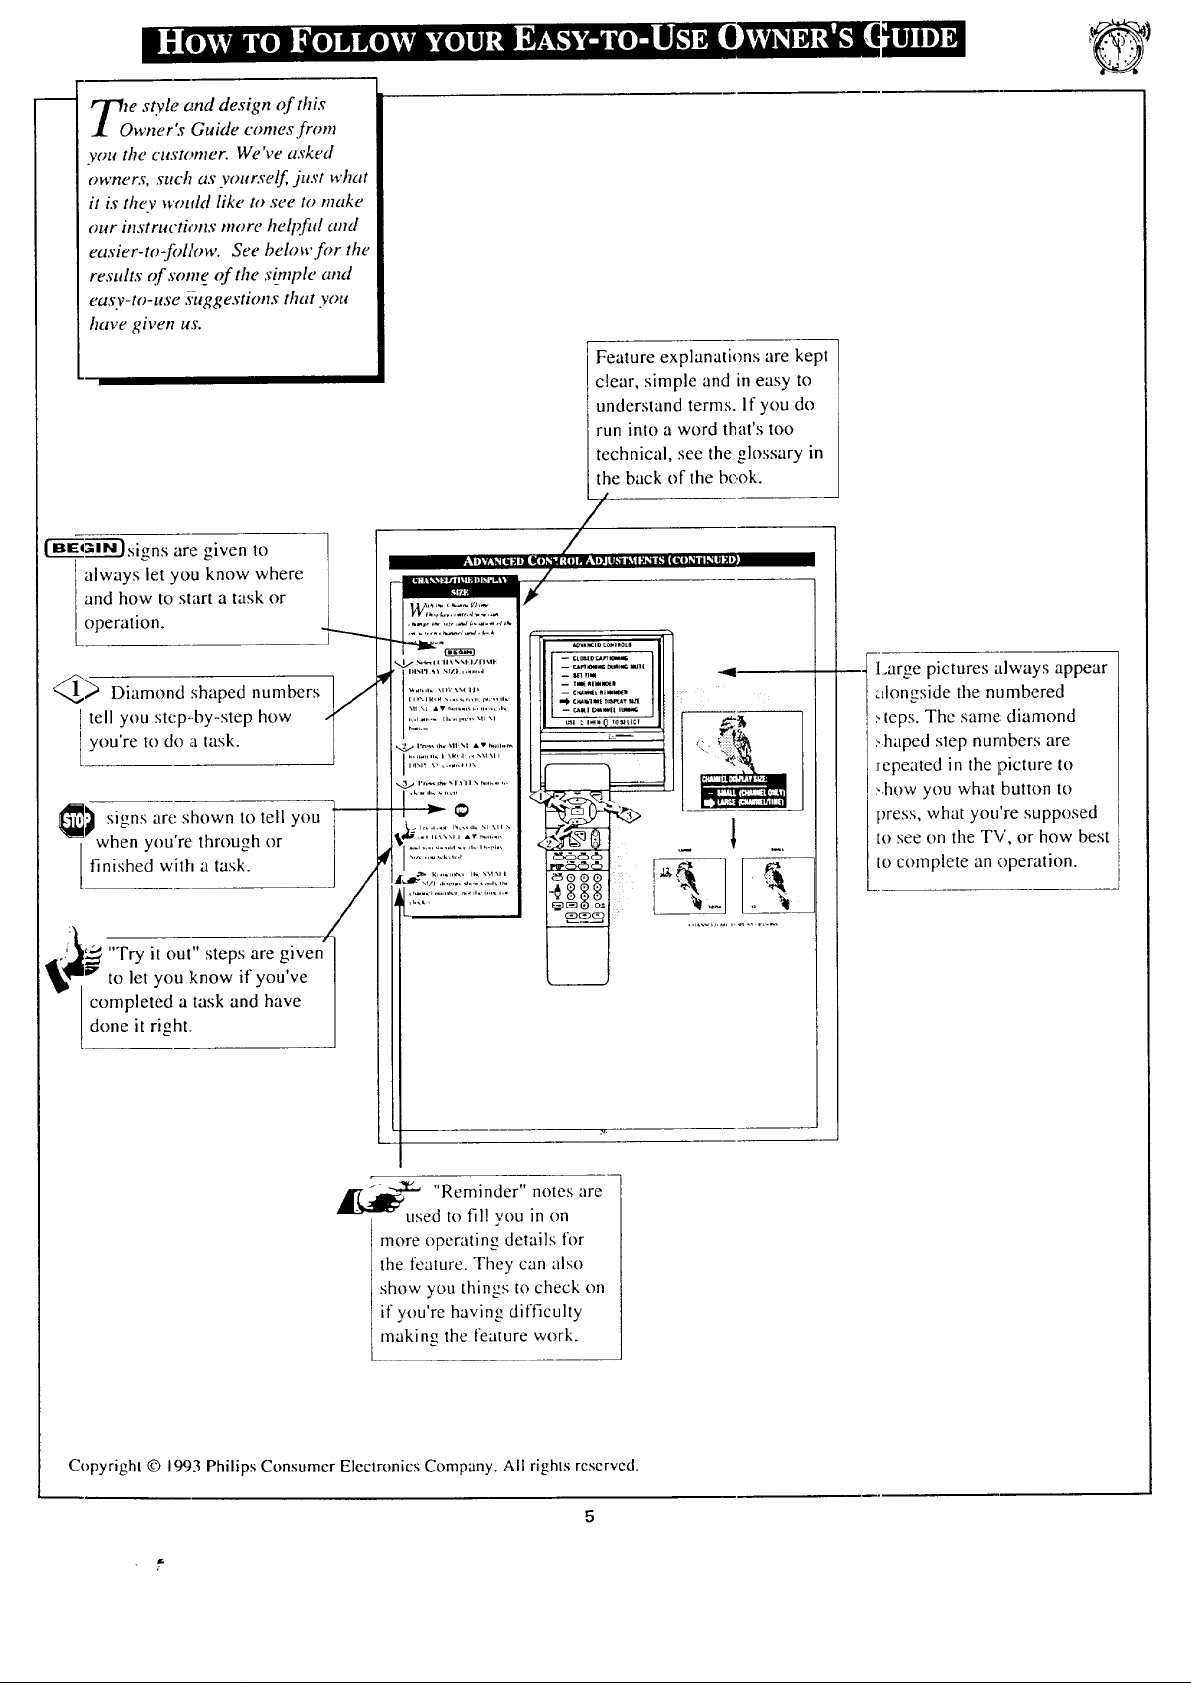
[ BEGIN ) signs are given to
always let you know where
and how to start a task or
operation.
Feature explanations are kept
clear, simple and in easy to
understand terms. If you do
run into a word that's too
technical, see the glossary in
the back of the be+ok.
tell you step-by-step how
_ Diamond shaped numbers,_
you're to do a task.
you're through or
finished with a task.
s,gnsat,:showntotenyou]I/
"Try it out" steps are given
to let you know if you've
completed a task and have
done it right,
q
17_ 1_ "Reminder" notes are
used to fil! you in on
more operating details for
the feature. They can also
show you things to check on
if you're having difficulty
making the feature work.
:tlongside the numbered
I .arge pictures always appear
!, teps. The same: diamond
>haped step numbers are
:repeated in the ]picture to
:,how you what button to
press, what you're supposed
to see on the TV, or how best
to colnplete an operation.
Copyright © 1993 Philips Consumcr Eleclronics Company. All rights rcscrvcd.
Page 6
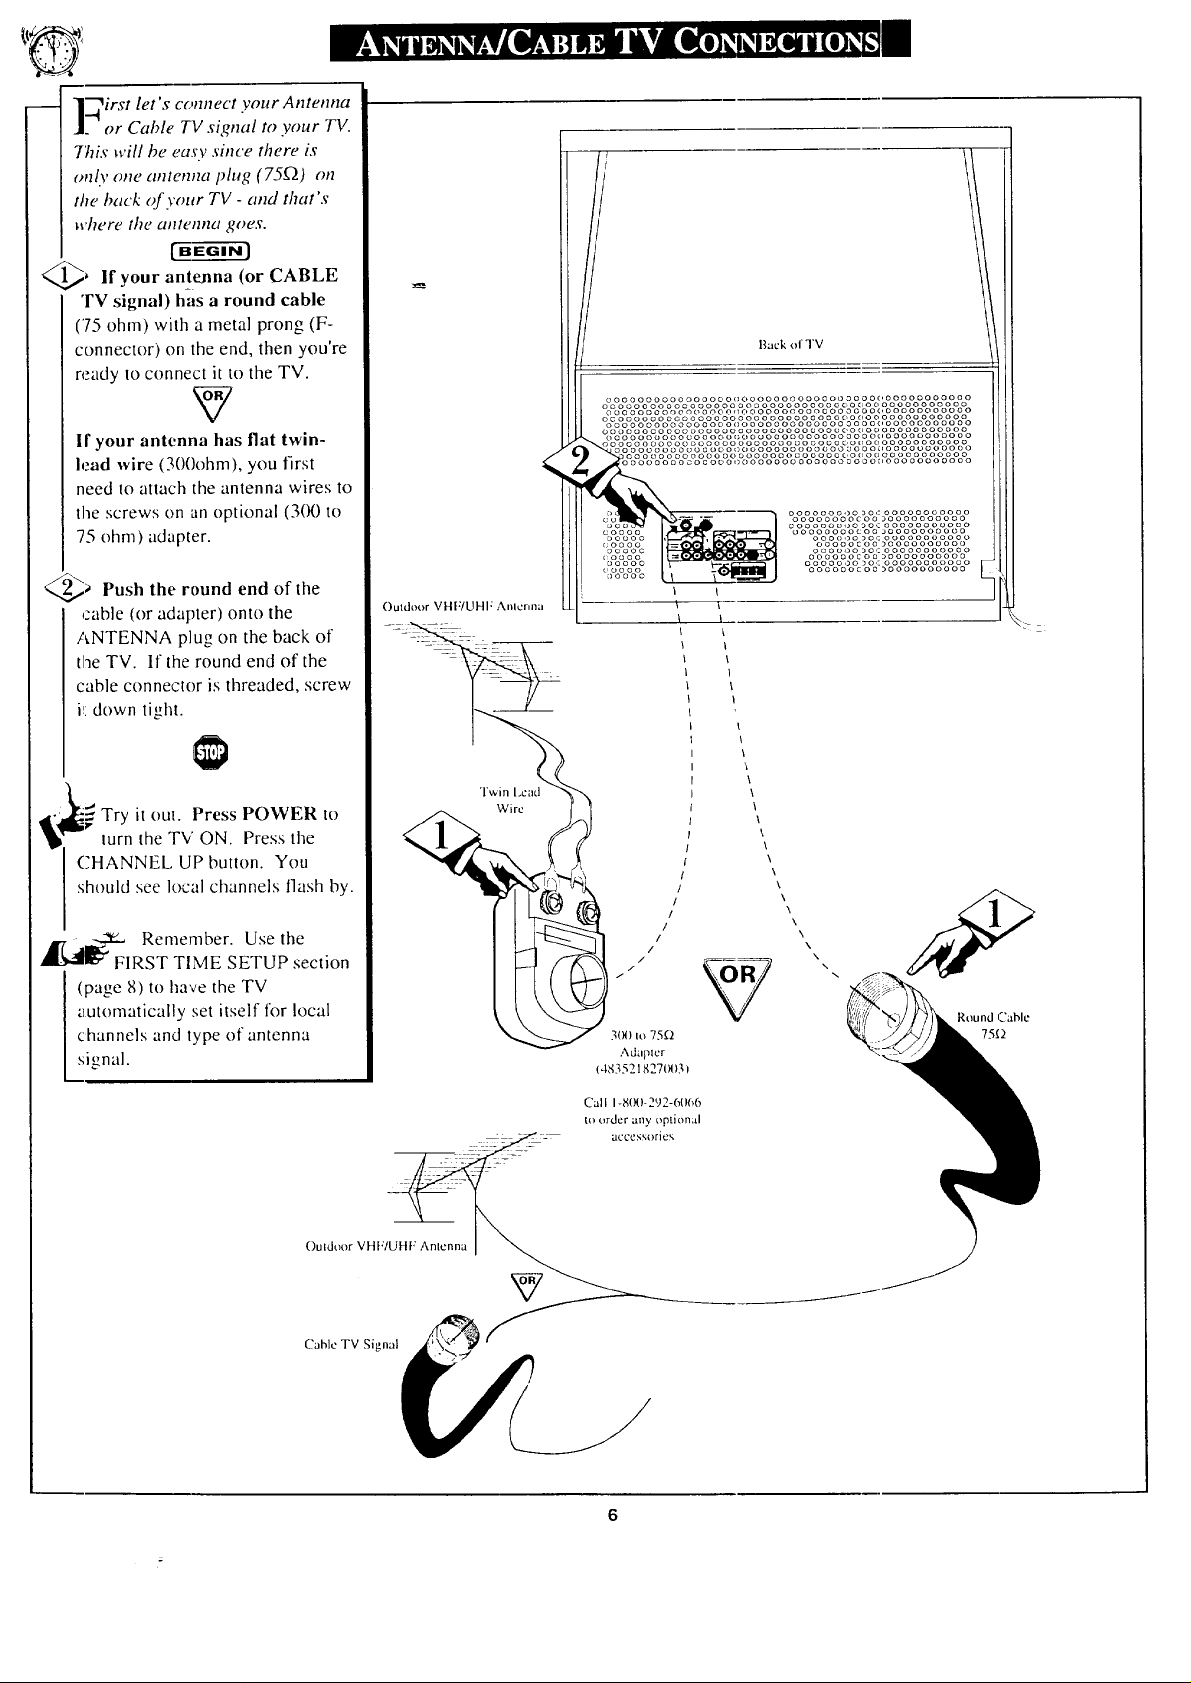
-- l"?irst let's connect your Antenna
---I
]. or Cable TV signal to .your TV.
7his will be easy since there is
only one antenna plug (75£"2) on
the back of your TV - and that's
where the a/lte/ma goes.
_ if your antenna (or CABLE
TV signal) has a round cable
(75 ohm) with a metal prong (F-
connector) on the end, then you're
ready to connect it to the TV.
V
If your antenna has flat twin-
lead wire (300ohm), you first
need to attach the antenna wires to
the screws on an optional (300 to
75 ohm) adapter.
_ Push the round end of the
cable (or adapter) onto the
ANTENNA plug on the back of
tlne TV. If the round end of the
cable connector is threaded, screw
i_:down tight.
Ouldo,,>r VHF/UHF Anlcrma
I
Back of TV
oooooooooooooooooooooooooooooo3ooooooooooooooo
oooooooooooooooooooaoooooooooocooooooooooooooo
oooooooooooooooo,,ooooooooooooooooooooooooooooo
ocoooooooooooooooooooooooooooooooooooooooooooo
ooooo oooooooooc, o(_ooooooooooooo 3ooooooooooooooo
oooooooooooooooooooooooooo_ooooooooooooooooooo
oooooooooo_ooooo,;ooooooooooooo oooooooooooooooo
oooooooooooooooooooooooouooooooooooooooooooooo
ooooooooooo_oc, oooooooooooooooaooooooooooooooo
ooooooooooooooooooooooooooooooooooooooooooo
oooooooooocooo,)ooooooooooooooooo_,ooooooooooo
c__----_ ooooooo,)o_o,:ooooooooooo
cocoo oooooooocoo_oooooooooo
ooooo , , oooo,)o_o,:ooooooooooo
coooo ooooocoo3oooooooooo
ooooc oooooo3o,:ooooooooooo
_:oooo oooooocoo_oooooooooo
ooooo ooooooooo,:ooooooooooo
_, oooo0oco0)oooooooooo
I
I
I
I
I
I
oooooooocoo_oooooooooo
........................
OUl.
_l_ _ it Press POWER to
Try
turn the TV ON. Press the
CHANNEL UP button. You
should see local channels flash by.
,_[_i1_=, Remember. Use the
_" FIRST TIME SETUP section
(page 8) to have the TV
g_utomatically set itself for local
channels and type of antenna
signal.
()uldoor VH[:_
Call I-8(X)-292-6(R_6
to order any optional
LtCCCs_.orie _.
V
\
\
\
\
Round (7able
75K)
Cable TV Signal __
Page 7
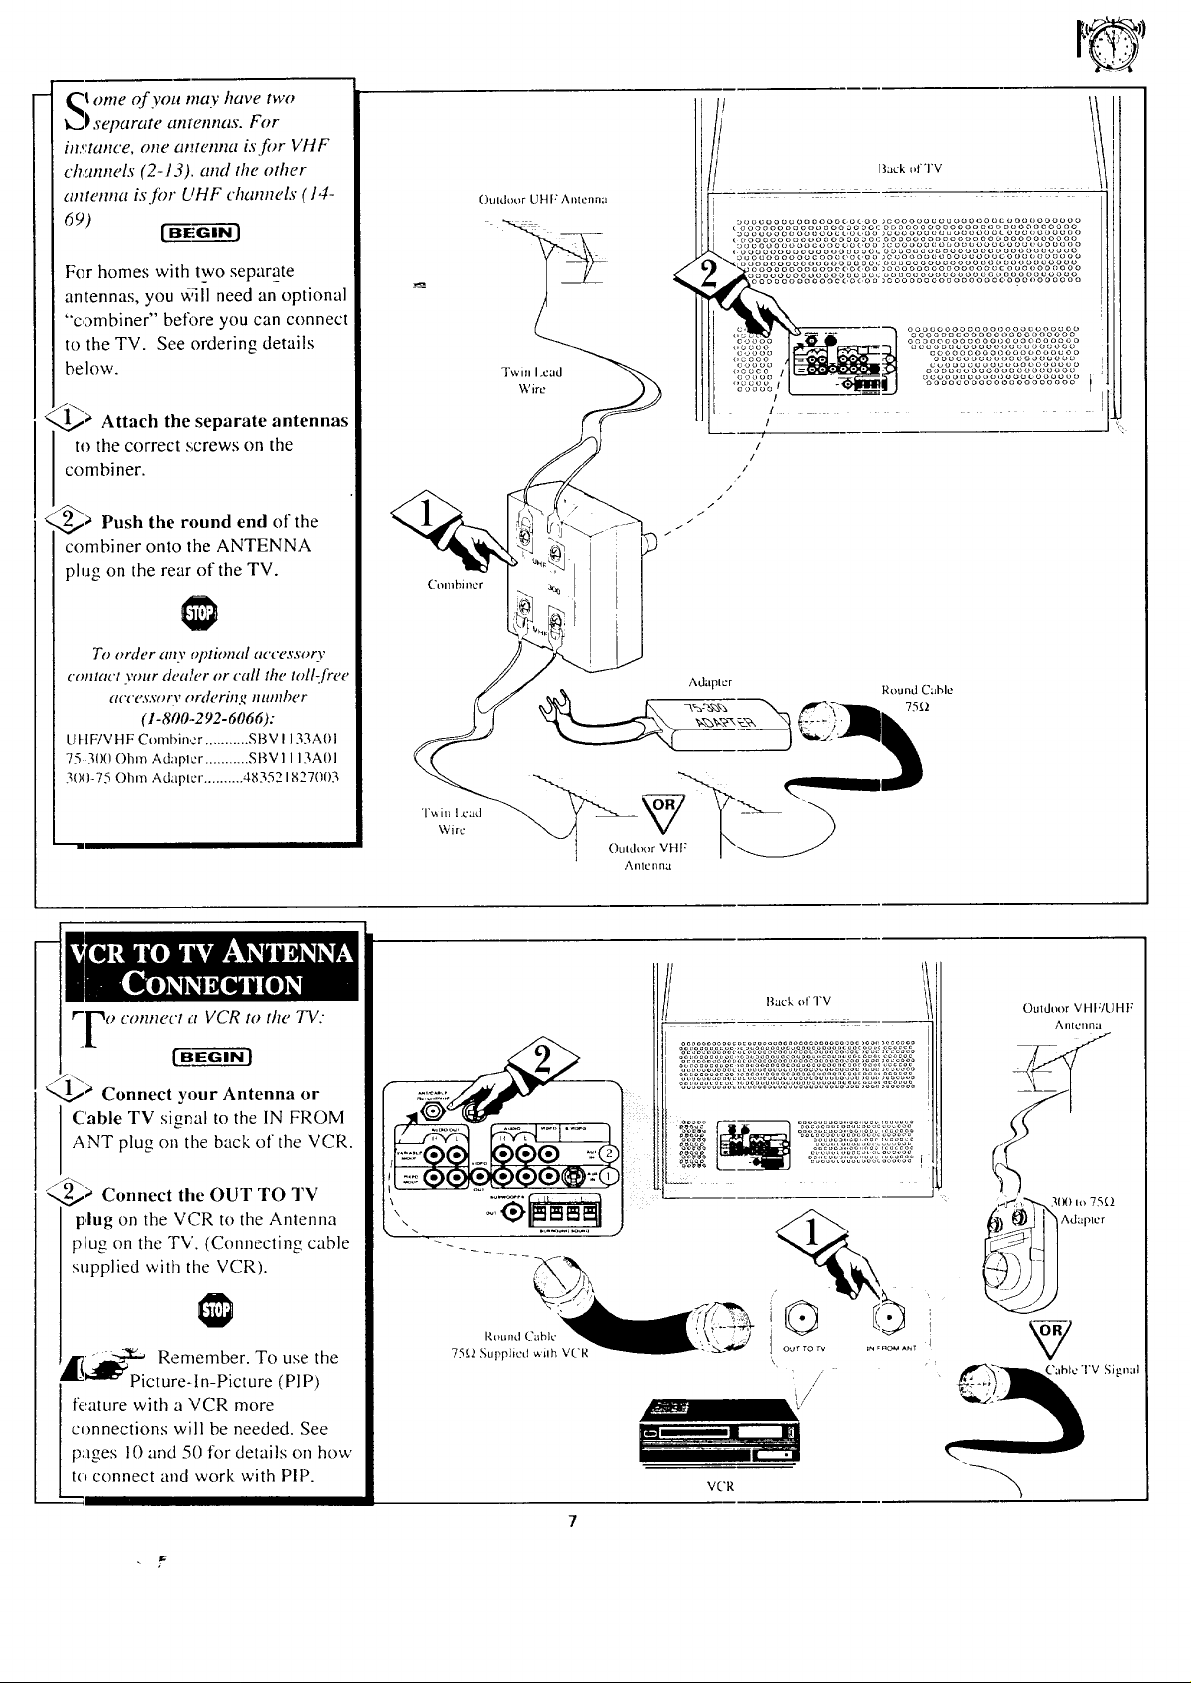
_ome of you may have two
)separate anmnnas. For
instance, one amenna is fi)r VHF
ch_4nneL_"(2-13). and the other
antenna is.[br UHF channels (14-
69) B_. G t"_i-_
Fer homes with two separate
antennas, you ,aqil need an optional
"combiner" betbre you can connect
to the TV. See ordering details
below.
/-.....
1.._ Attach the separate antennas
to the correct ,,;crews on the
combiner.
_,,_a Push the round end of the
combiner onto the ANTENNA
plug on the rear of the TV.
To order any optional accessory
contact your dealer or call the toll-free
(IC('eX_;,')/'V ord#rilT,t_ illtlllh_'r
(1-800..292-6066):
U HF!VHF Combin,er ........... SBV ! 133A01
75 300 Ohm Adapter ........... SBV1 113A01
30f)-75 Ohm Adapter .......... 483521827003
Combiocr
"1",,_in l.cad
kVirc
Outdoor UHF Antcnml
Twin I.ead
W ire
_uocoo_ooooooc_coo_cooooouo_ooo_oocoooooooooo
ooooooOoooooooaoaGco_ooooooooooooGooeooocoooo
a,_ooooooo_cooooo_,oo_cooooooooo_ooucoouooooooo
F °°°°°°°°°°°c°°¢'°°_°°°°°°°°°°°°°°°°°9°°°°°°°°
,,ccoo I - o_ooeoooooouoooooooo [
1
!
/
//
/
/
/
/
/
/
Cable TV signal to the IN FROM
ANT plug on the back of the VCR.
<
2,t> Connect the OUT TO TV
plug on the VCR to the Antenna
plug on the TV. (Connecting cable
supplied ,.viti_ the VCR).
,_i_'-0 Remember. To use the
Picture-ln-Picture (PlP)
feature with a VCR more
connections will be needed. See
Ipages 10 and 50 for details on hov/
to connect and work v,'ith PiP.
V('R
Back of TV
Outdoor VHF/UHF
AlllCllrl;|
/
/
Page 8
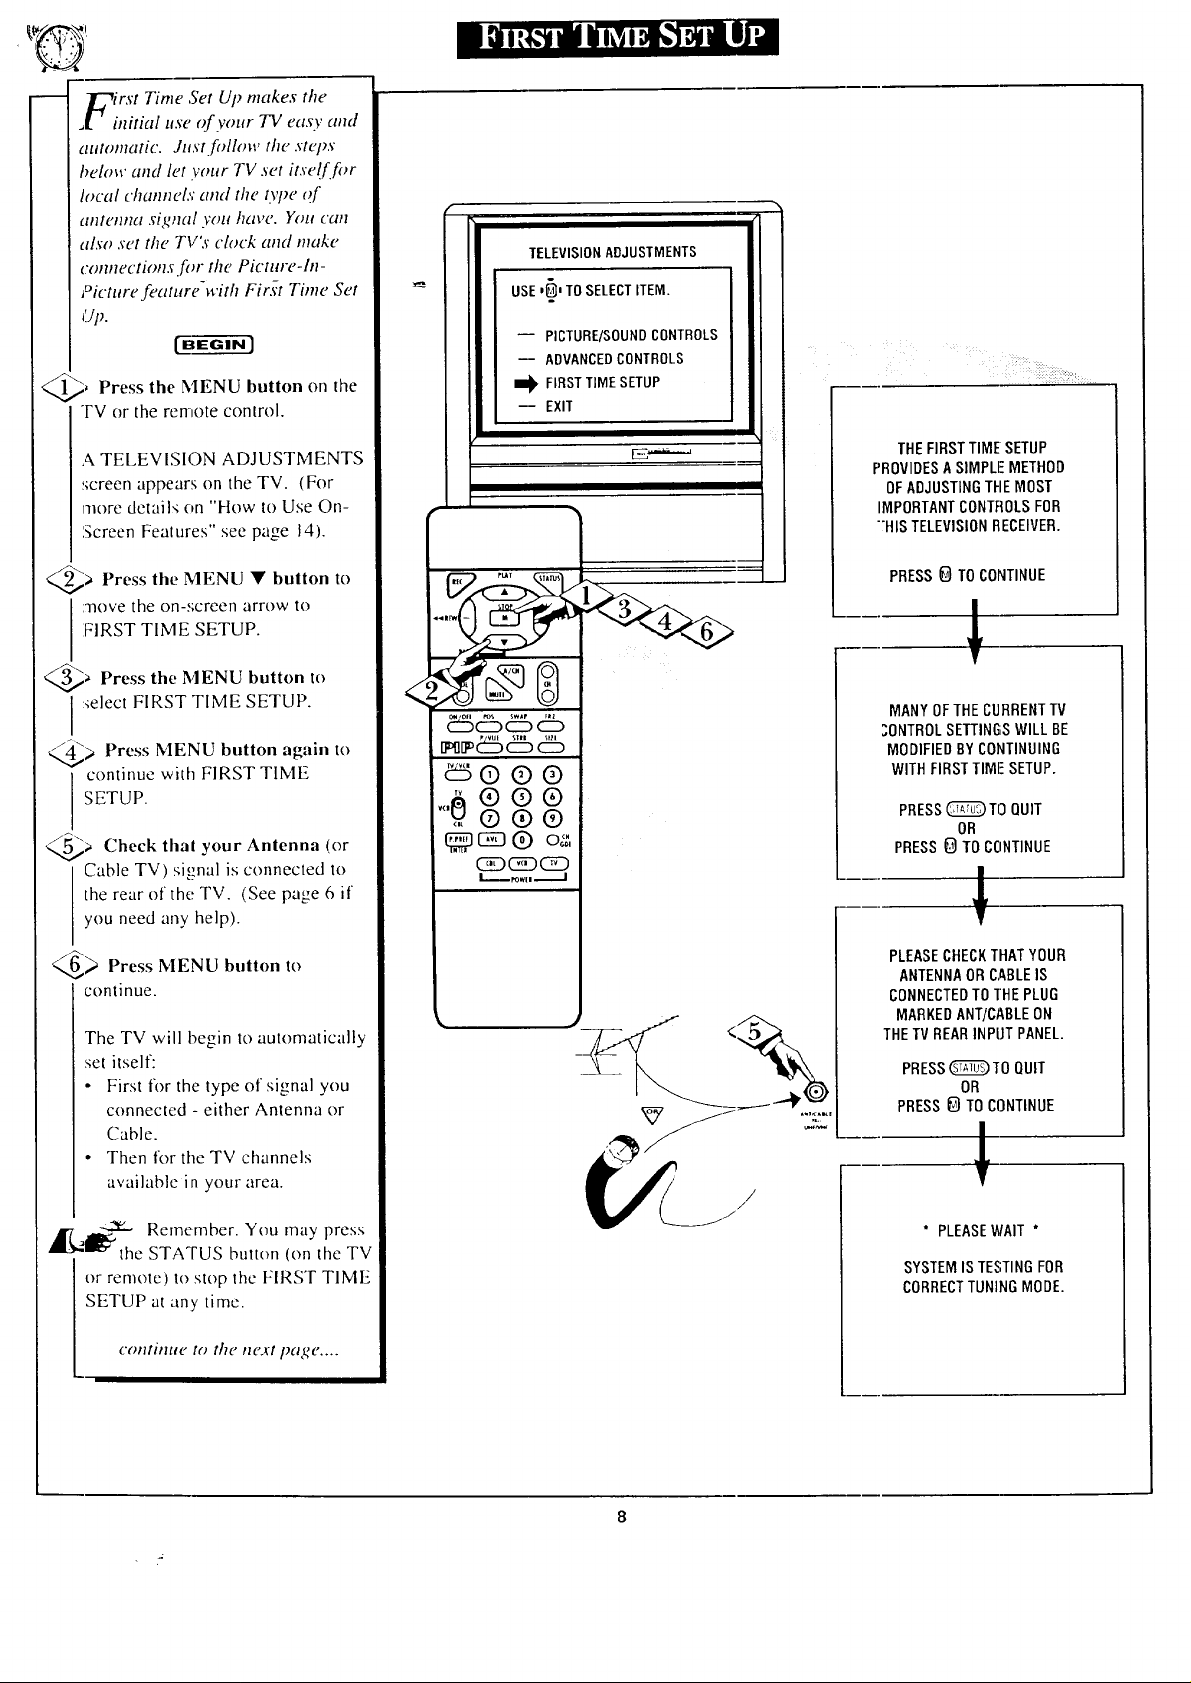
l_(rst Time Set Up makes the
_1 initial use of .vour TV easy and
autontatic. Jtl,s'tfollow the step.v
below and let your TV set itse!ffor
local cham_eh; and the t37_eof
£I/IIcI1H(I S@tlal yOt! ]1(l_( ". Yolt Call
also .vet the TV's clock attd make
ctmnectio#l._ fi_r the Picture-In-
Picture feature-with Fir._t Time Set
_ Press the MENU button on the
TV or the remote control.
A TELEVISION ADJUSTMENTS
:;creen appears on the TV. (For
more details on "How to Use On-
£creen Features" see page 14).
I TELEVISION ADJUSTMENTS
J USE ,_' TO SELECT ITEM.
PICTURE/SOUND CONTROLS
-- ADVANCED CONTROLS
I_ FIRST TIME SETUP
-- EXIT
_<u__ _::
< _i7%i(ii_iii!iii!:7::>_
THEFIRSTTIMESETUP
PROVIDESASIMPLIEMETHOD
OFADJUSTINGTHEMOST
IMPORTANTCONTROLSFOR
;HIS TELEVISIONRECEIVER.
_ Press the MENU • button to
move the on-:;creen arrow to
FIRST TIME SETUP.
Press
@a the MENU button
I :_elect FIRST TIME SETUP.
<@_ Press MENU button again to
continue with FIRST TIME
SETUP.
@_ Check that Antenna (or
Cable TV) signal is connected to
the rear of the TV. (See page 6 if
you need any help).
_> Press MENU button to
continue.
The TV will begin to automatically
set itself:
• First for the type of signal you
connected - either Antenna or
Cable.
• Then for the TV channels
available in your area.
'_'_the Remember. You may press
or remote) to stop the FIRST TIME
SETUP at any time.
your
STATUS button (on the TV
to
<
c:%d5 d5
tn d:Sd5 db
BO®O
<,,O®®
0
® ® ®
CDCDCED
PRESS_ TO CONTINUE
!
MANY OFTHECURRENTTV
;ONTROL SETTINGSWILL BE
MODIFIEDBY CONTINUING
WITH FIRSTTIMIESETUP.
PRESS_Ti3 QUIT
OR
PRESS_ TO CONTINUE
!
PLEASECHECKTHATYOUR
ANTENNAOR CABLEIS
CONNECTEDTOTHEPLUG
MARKEDANT]CABLEON
THETVREARINPUT PANEL.
PRESS_10 QUIT
PRESS_} TOCONTINUE
OR
!
/
/
" PLEASEWAIT *
SYSTEMIS TESTINGFOR
CORRECTTUNINGMODE.
crmtimte to the tte._t page ....
Page 9
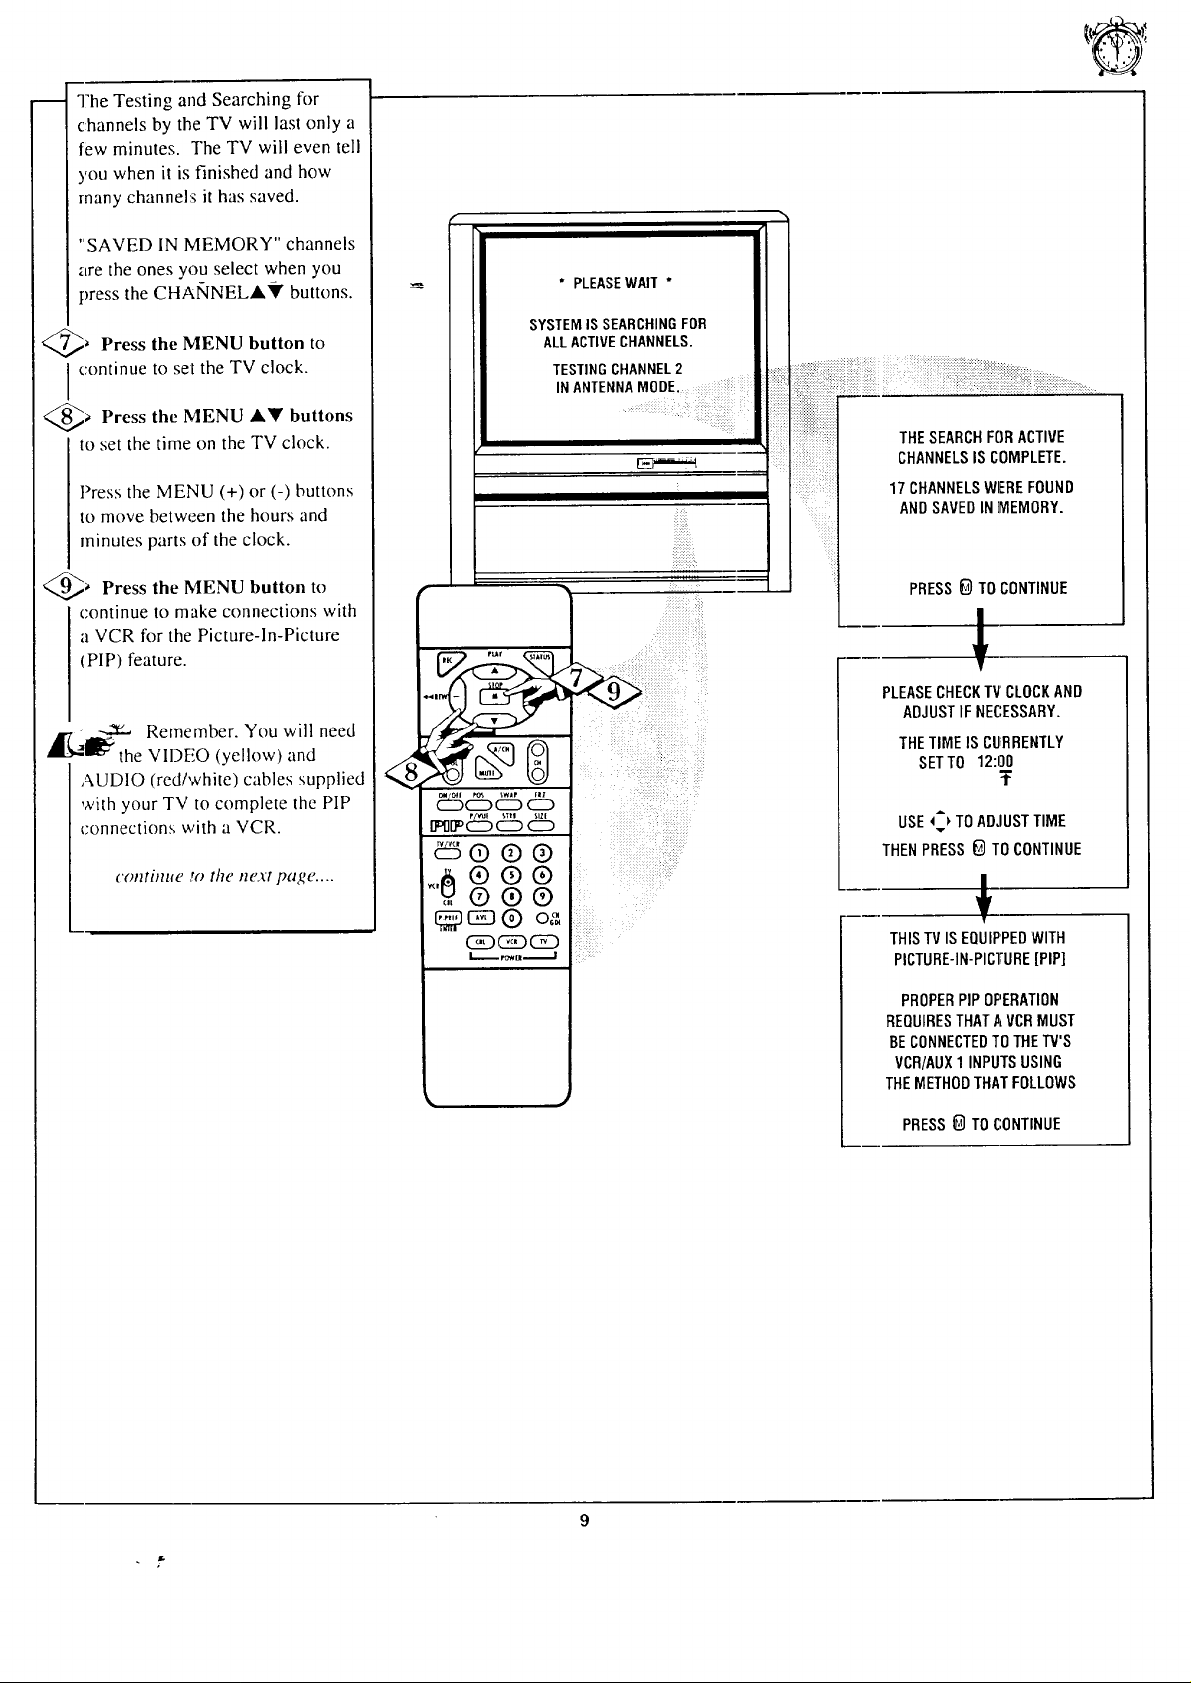
The Testing and Searching for
channels by the TV will last only a
few minutes. The TV will even tell
you when it is finished and how
many channels it has saved.
"SAVED IN MEMORY" channels
are the ones you select when you
press the CHANNELA_' buttons.
_ Press the MENU button to
I continue to set the TV clock.
a Press the MENU AY buttons
to set the time on the TV clock.
Press the MENU (+) or (-) buttons
to move between the hours and
minutes parts of the clock.
SYSTEMIS SEARCHINGFOR
* PLEASEWAIT*
ALLACTIVECHANNELS.
TESTNGCHANNEL2 ........ i _#:;i_ii:i_:ii
__ THESEARCHFORACTIVE
CHANNELSIS COMPLETE.
N ANTENNA MODE. : I [:_::::_::;::[I " ::::::::::::::::::::::::.....
17 CHANNELSWEREFOUND
ANDSAVEDIN]MEMORY.
_ Press the MENU button to
continue to make connections with
a VCR for the Picture-In-Picture
(PIP) feature.
AI'7 ,_,€.
At_l_:" the VII)EO (yellow) and
AUDIO (red/while) cables supplied
with your TV to complete the PIP
connections with a VCR.
Remember. You will need
c(mtim_e r'Othe next page ....
®®®
.,®®®
c :J® oa
(Sg)(Sg)CE3
• PRESS_) TO CONTINUE
1
PLEASECHECKTV CLOCKAND
ADJUSTIF NECESSARY.
THETIMEIS CURRENTLY
®
SETTO 12:00
USE_) TOADJUSTTIME
THENPRESS G TOCONTINUE
THISTVISEQUIPPEDWITH
PICTURE-IN-PICTURE[PIP]
PROPERPIPOPERATION
REQUIRESTHATAVCR MUST
BE CONNECTEDTO THETV'S
VCR/AUX1 INPUTSUSING
THEMETHODTHATFOLLOWS
PRESS_ TO CONTINUE
T
Page 10
r
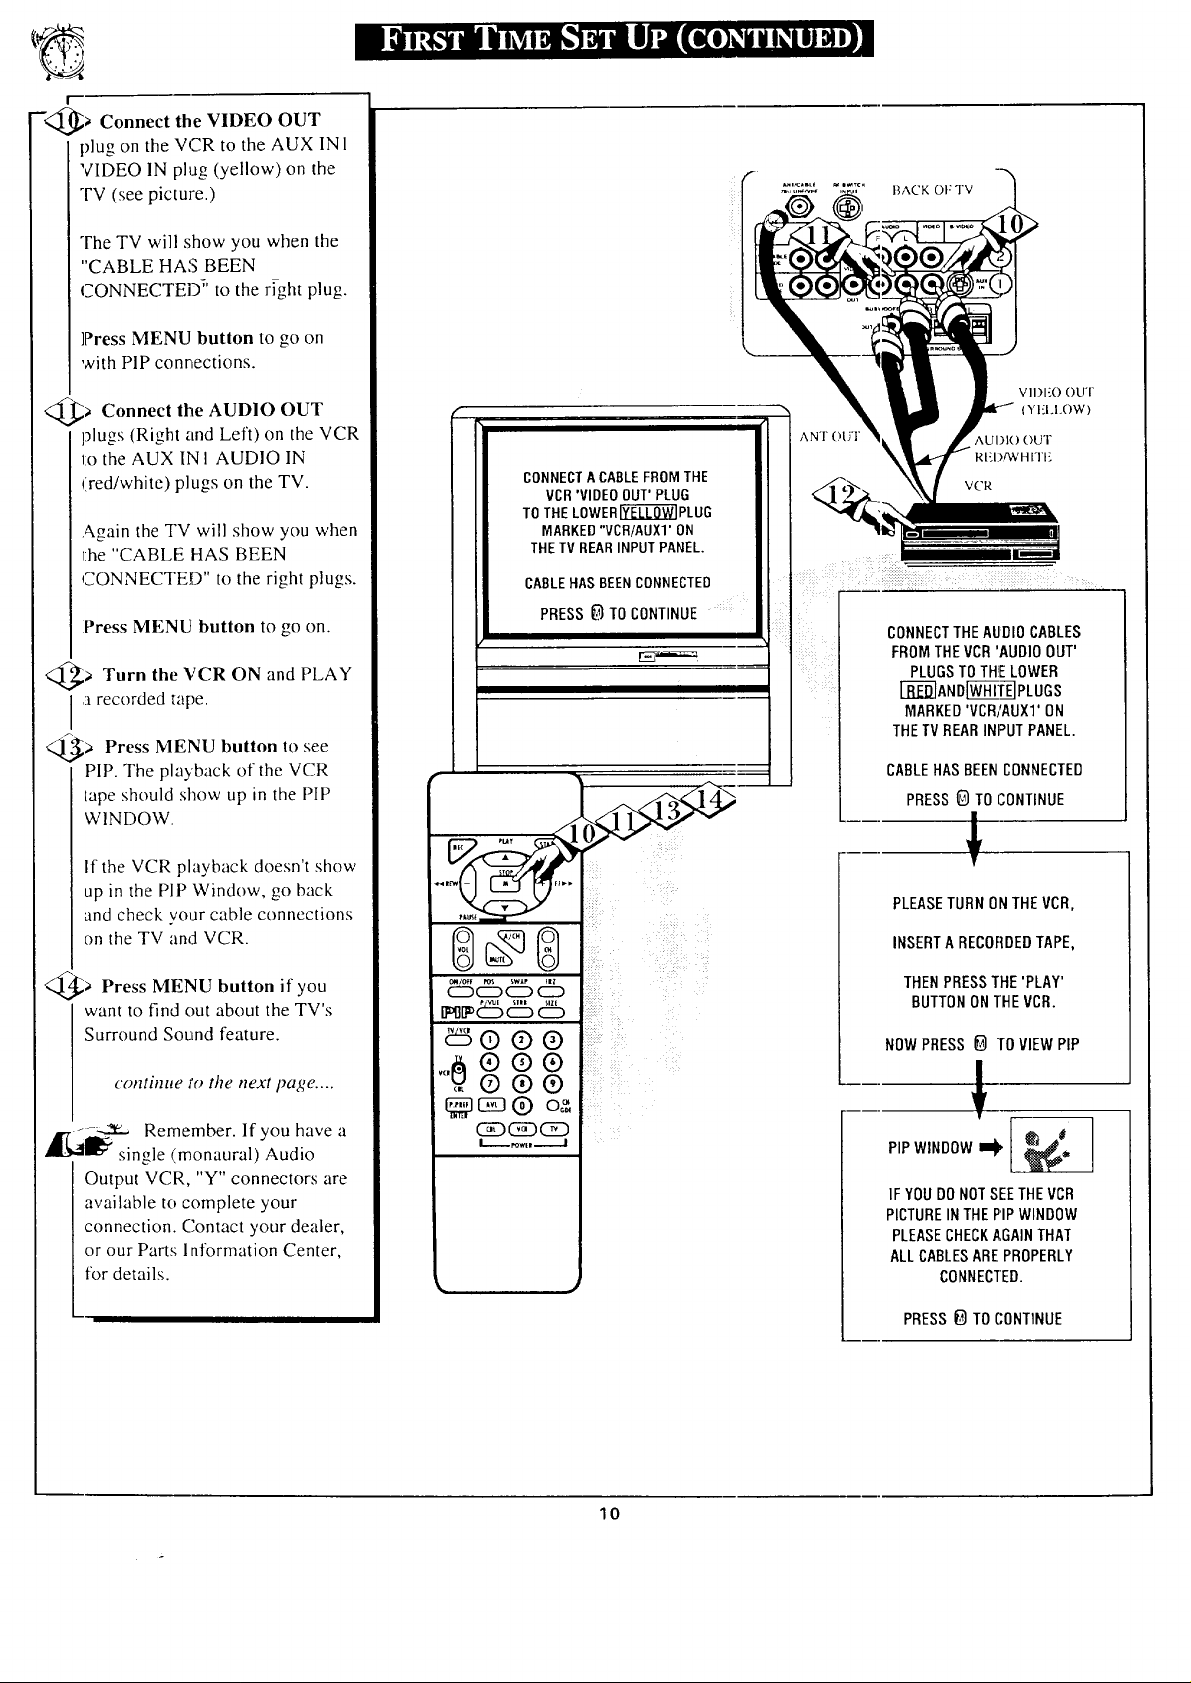
-<_> Connect the VIDEO OUT
plug on the VCR to the AUX INI
VIDEO IN plug (yellow) on the
TV (see picture.)
The TV will show you when the
"CABLE HAS BEEN
CONNECTED _' to the right plug.
]Press MENU button to go on
with PIP connections.
@> Connect the AUDIO OUT
plugs (Right and Left) on the VCR
to the AUX INI AUDIO IN
(red/white) plugs on the TV.
Again the TV will show you when
1:he"CABLE HAS BEEN
CONNECTED" to the right plugs.
Press MENU button to go on.
> Turn the VCR ON and PLAY
,arecorded tape.
> Press MENU button to see
PiP. The playback of the VCR
tape should show up in the PIP
WINDOW.
If the VCR playback doesn't show
up in the PIP Window, go back
and check your cable connections
on the TV and VCR.
@> Press MENU button if you
want to find out about the TV's
Surround Sound feature.
continue fo the next page ....
----._- Remember. If you have a
I_" single (monaural) Audio
Output VCR, "Y" connectors are
available to complete your
connection. Contact your dealer,
or our Parts Information Center,
for details.
CONNECT A CABLE FROM THE
VCR 'VIDEO OUT' PLUG
TO THE LOWERI_J_]PLUG
MARKED "VCR/AUXI' ON
THE TV REAR INPUT PANEL.
CABLEHAS BEEN CONNECTED
PRESS_ T0 CONTINUE .....
0o0
_::_@ ® ®
,,,_ ® ® ®
,,, O ®O
(SD_(2D
L-..- _m, --.--J
BACK OF TV
VII)I-OOUT
(YI'I+I.OW)
AN'I" Ot
AUI)IO OUT
RI{I)/W H FI'E
VCR
i !i_i__'?!ii_!+!i_i__,!_!_;,ii_iii •• •.....
CONNECTTHEAUDIOCABLES
FROMTHEVCR'AUDIOOUT'
PLUGSTOTHELOWER
[_AND W_-HF[-_PLUGS
MARKED'VCR]AUXI'ON
THETVREARINPUTPANEL.
CABLE HAS BEEN CONNECTED
PRESS @ TO CONTINUE
I
PLEASE TUBN ON THE VCR,
INSERTA RECOFIDEDTAPE,
THEN PRESS THE'PLAY'
BUTTON ONI'HEVCB.
NOWPRESS@ TOVIEWPIP
!
PiPWINDOW_I _i I
IFYOUDONOTSEETHEVCR
PICTUREINTHEPIPWINDOW
PLEASECHECKAGAINTHAT
ALLCABLESAREPROPERLY
CONNECIED.
10
PRESS _) TO CONTINUE
Page 11

_ The TV first tells you that for
-q
Surround Sound to work with the
set you will need an additional
pair of external speakers (8 ohm,
15 watt minimum).
'Press the MENU button to go
on.
THIS TV IS EQUIPPED WITH
A SURROUND-SOUND SYSTEM.
@_ Then the TV asks to read
_:heSurround Sound section in the
,:Owner's Guide (page 37) after
you're finished with First Time Set
Up.
Press the MFNU button to go
on.
> Press the MENU button again
to complete the FIRST TIME
SETUP and return to normal TV
viewing.
you
0o0
_568% d%
_,d:% d5 c%
_5000
,,,0 0 0 0
,,, 000
_c_O o_
(SDC_DCD
SURROUNDSOUNDREQUIRES
THEUSEOFADDITIONAL
SPEAKERSBEINGPLACED
AROUNDYOURROOM.
PRESS_ TOCONTINUE
E,,a==...,_
I
_LEASETHOROUGHLYREAD
THESECTIONIN YOUR
OWNERSMANUALWHICH
DETAILSTHEPROPERSETUP
ANDOPERATIONOFTHE
_',URROUNO-SOUNDSYSTEM.
PRESS_ TO CONTINUE
THISCOMPLETESTHE
FIRST-TIMESETUP.
PRESS0 TOEXITSETUP
!
11
Page 12
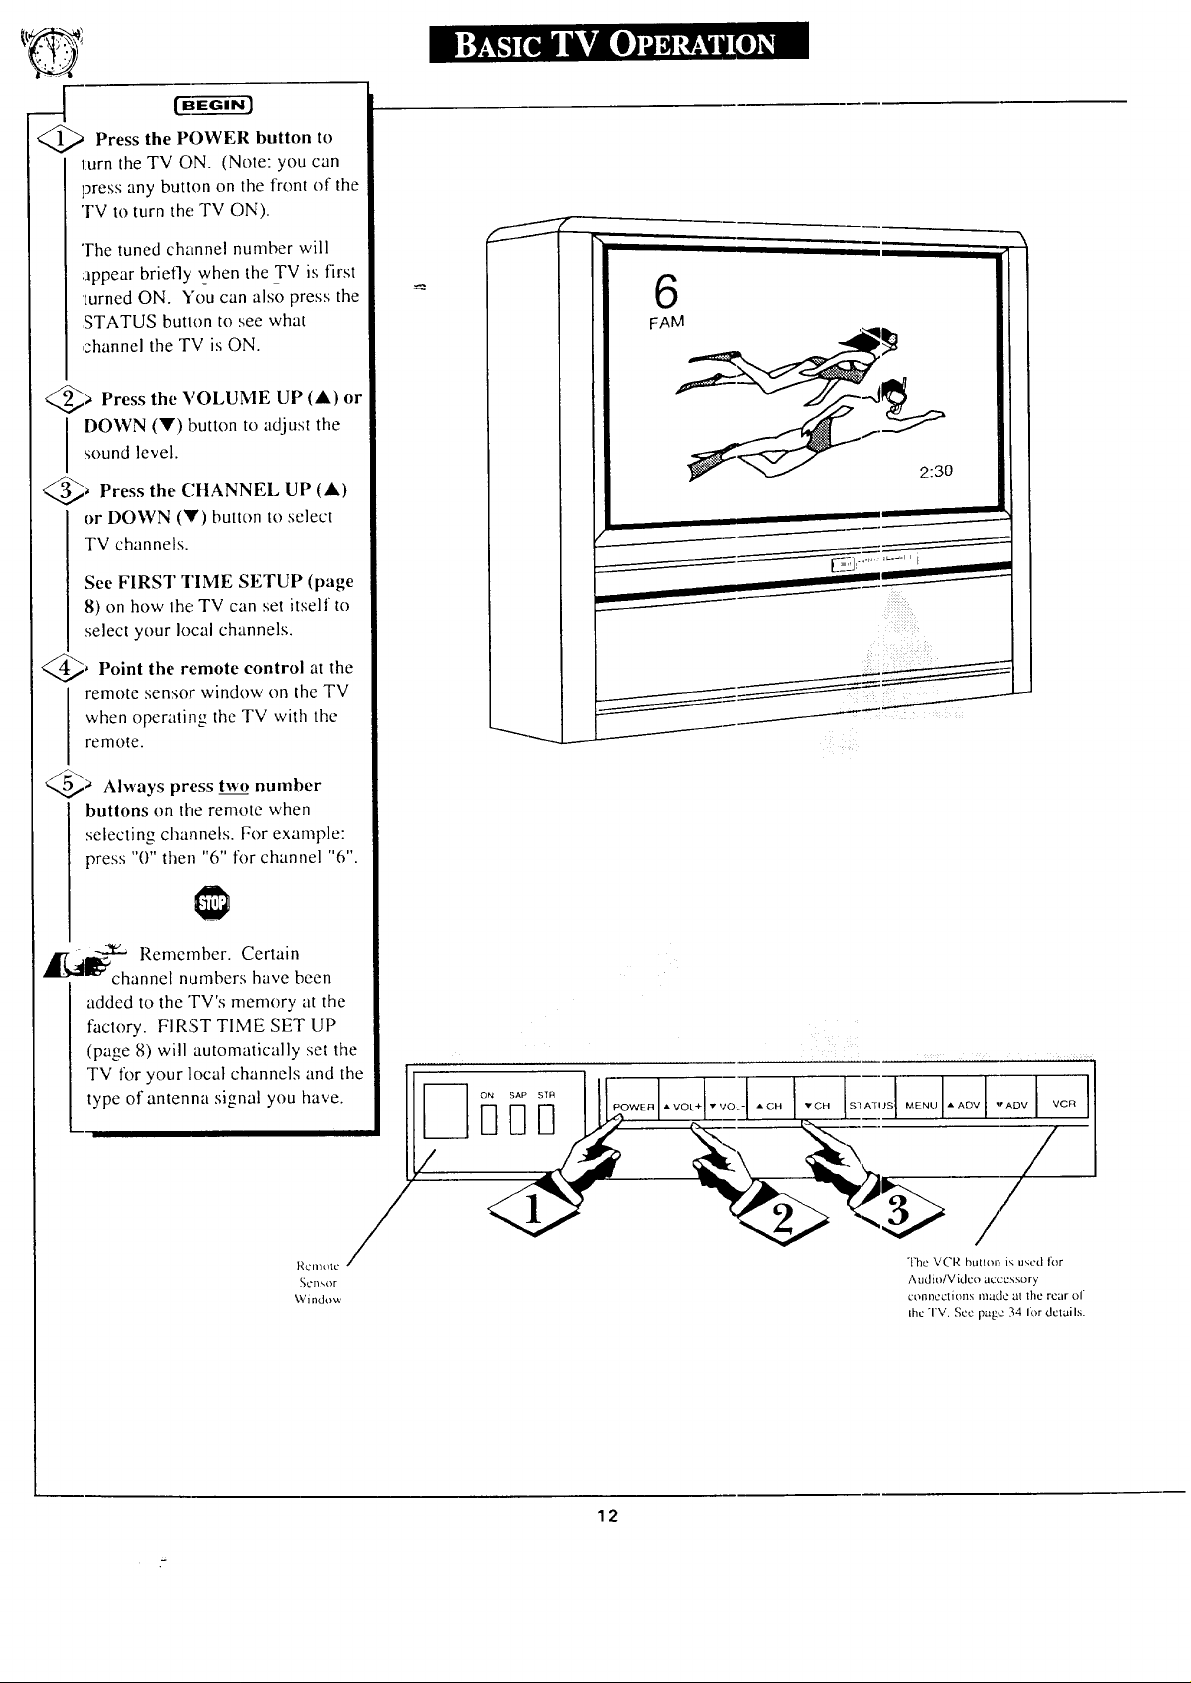
@a Press the POWER button to
turn the TV ON. (Note: you can
press any button on the front of the
'FV to turn the TV ON).
The tuned channel number will
;appear briefly when the TV is first
turned ON. You can also press the
STATUS butlon to see what
channel the TV is ON.
@_ Press the VOLUME UP
sound level.
I OWN (Y) button to adjust the
@a Press the CHANNEL UP (at)
or DOWN (V) button to select
TV channels.
See FIRST TIME SETUP (page
8) on how the. TV can set itself to
select your local channels.
, Point the remote control at the
remote sensor windov,, on the TV
when operating the TV with the
remote.
(A) or
@_ Always press two number
buttons on the remote when
selecting channels. For example:
press "0" [hen "6" for channel "6".
-._,_ Remember. Certain
.-I channel numbers have been
added to the TV's memory at the
factory. FIRST TIME SET UP
(page 8) will automatically set the
TV for your local channels and the [
" 2:3 *
_ _ ii:i+ :_x _:.
- F1 F1
/
type of antenna signal you have. I/ .......
RCIIlt!I
_cll_or
Window
/I
The VCR butl+>l:,is used liar
Audio/Video accessory
ct'ffll_t2ctions made at the rear of
the TV. See page 34 Ior dclails.
12
Page 13
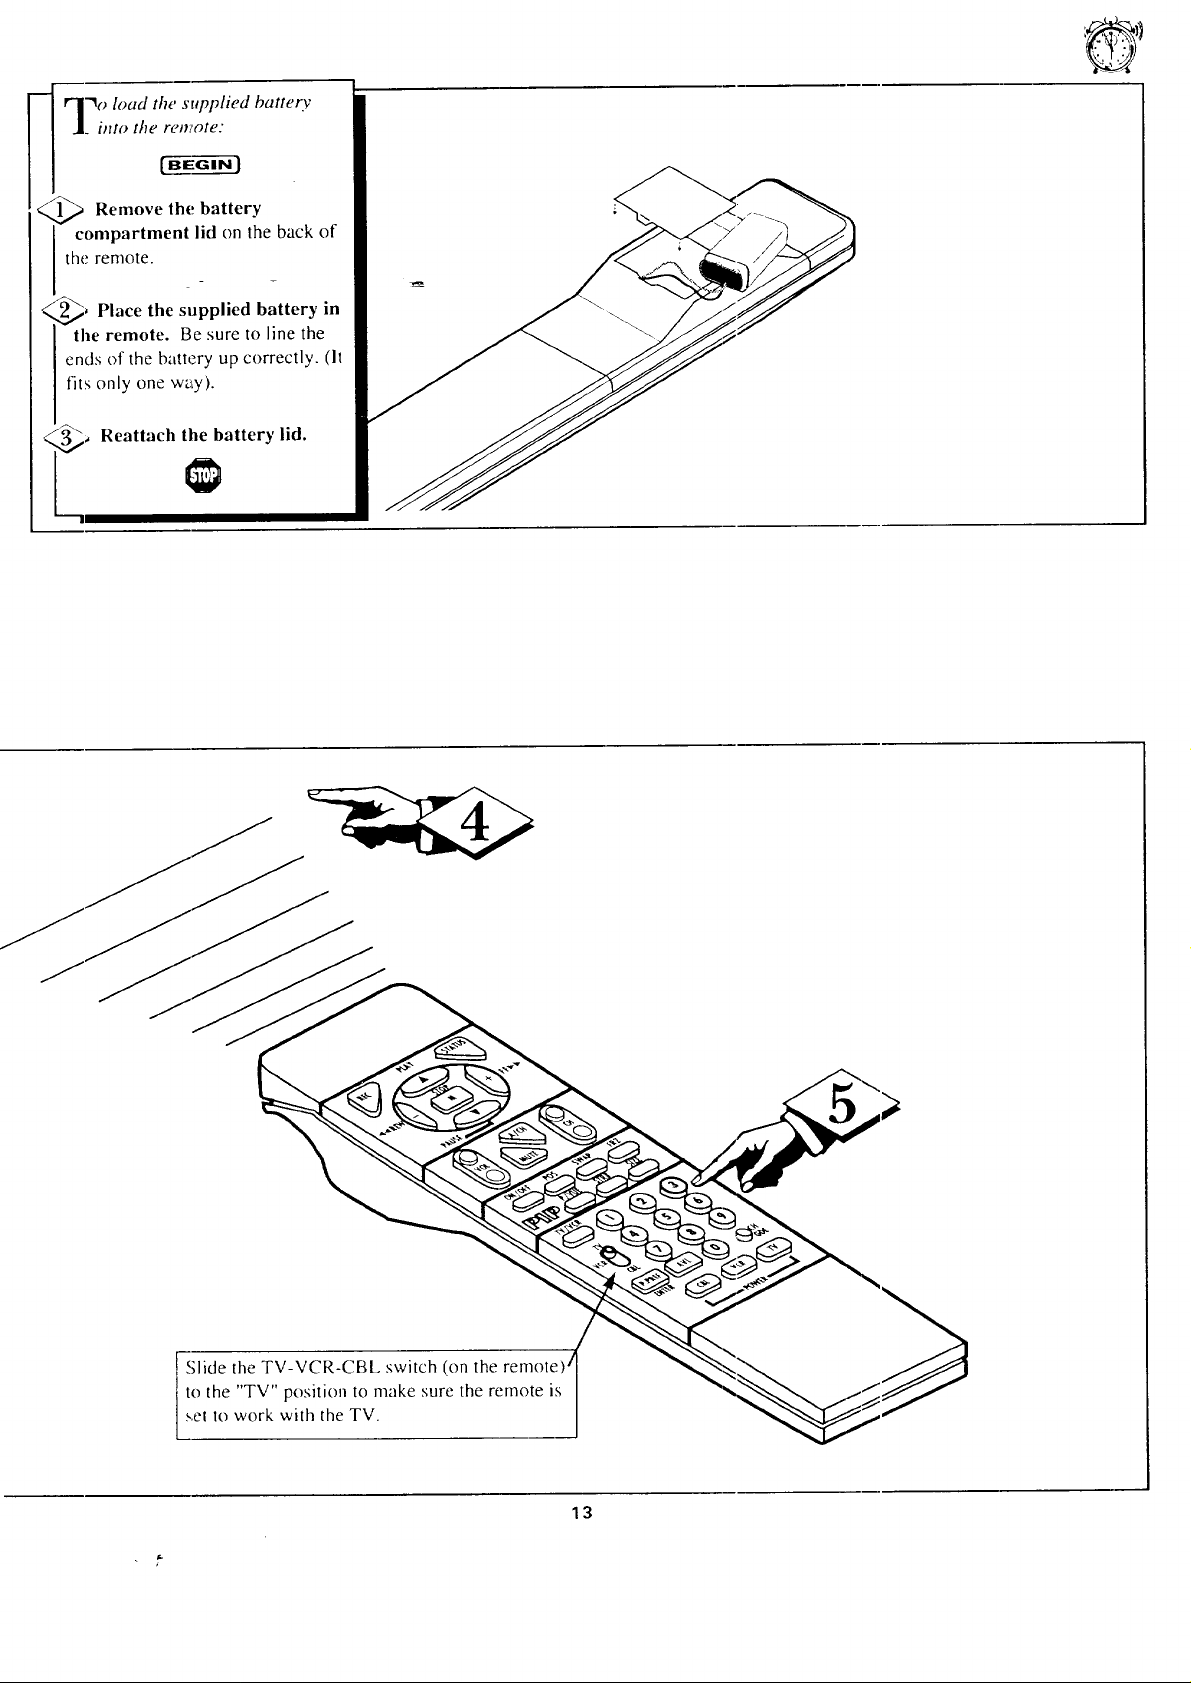
J. into tke reni,ote:
l -l'_oload the supplied battery
<Q_ Remove the battery
compartment lid on the back of
the
lemote.
Place the supplied battery in
the remote. Be sure to line the
ends of the battery up correctly. (It
fits only one way).
Reattach the battery lid.
Slide the TV-VCR-CBL switch (on the remote) j
to the "TV" position to make sure the remote is
s,et to work with the TV.
13
Page 14
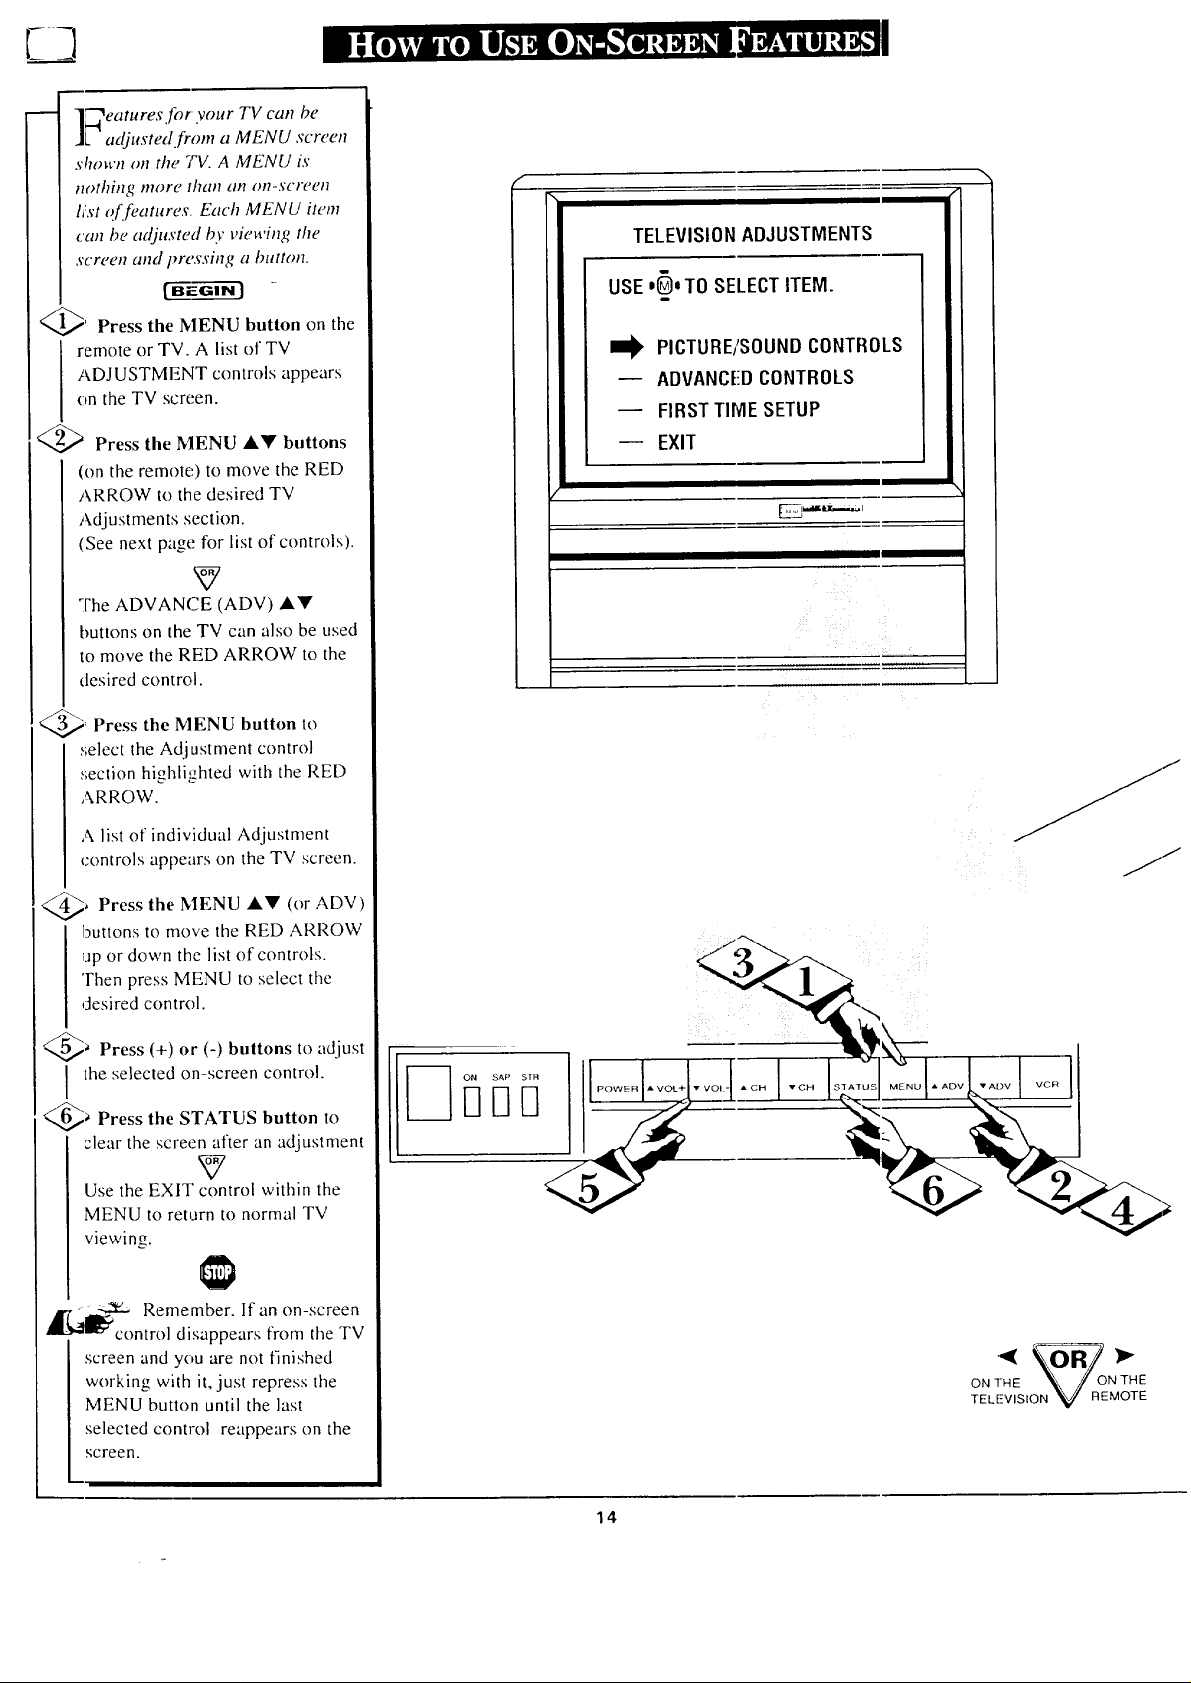
I l'-'_eaturesfor your TV can be
][-_ adjusted [rom a MENU screen
.drown on the TV. A MENU is
IlolhiH_ nlort" lha/10tl Ol?-,';cl('_/1
li:st of fi,atures Each MENU item
can be adjusted by viewing the
screen and i)re.Tsing a button.
I_' Press the MENU button on the
/1 remote or TV. A list of TV
|l ADJUSTMENT controls appears
I/,) on the TV screen.
I_ Press the MENU A_' buttons
(on the remote) to move the RED
ARROW to the desired TV
Adjustments section.
(See next page_r list of controls).
[ [ The ADVANCE (ADV) A'V'
I I buttons on the TV can also be used
[ ] to move the RED ARROW to the
f \
TELEVISION ADJUSTMENTS
USE =l_t TO SELECT ITEM.
PICTURE/SOUND CONTROLS
-- ADVANCED CONTROLS
FIRST TIME SETUP
EXIT
III I I
[ desired control.
_= Press the MENU button to
i I:;elect the Adjustment control
] I ,,;ection highliL_,hled with the RED
I IA ow
[ [ A list of individua! Adjustment
i j controls appears on the TV screen.
i @_ Press the MENU A'V (or ADV)
buttons to move the RED ARROW
I ijp or down the list of controls.
I I Then press MENU to select the
] I desired control.
[ @; Press (+) or (-) buttons to adjust
I I the selected on-screen control.
@_ Press the STATUS button to
::lear the scree_7fter an adjustment
I Use the EXIT control within the
MENU to retarn to normal TV
i viewio.+.
I = -_-,._- Remember. If an on-screen
._l_'_control
I'_ disappears from the TV
j screen and you are not finished
i working with it, just repress the
MENU button until the last
i selected control reappears on the
V
k77/O T E
TELE:-VISION V REMOTE
screen.
14
Page 15

TELEVISIONADJUSTMENTS
USEI_ITO SELECTITEM.
m
II_ PICTURE/SOUNDCONTROLS
-- ADVAI_CEDCONTROLS
FIRSTTIMESETUP
EXIT
PICTURE/ SOUNDCONTROLS
m EXIT
m PICTURESOURCESELECT
BRIGHTNESS
PICTURE
COLOR
'_COLOR
_'1111111111 IIEZ],
15
Page 16
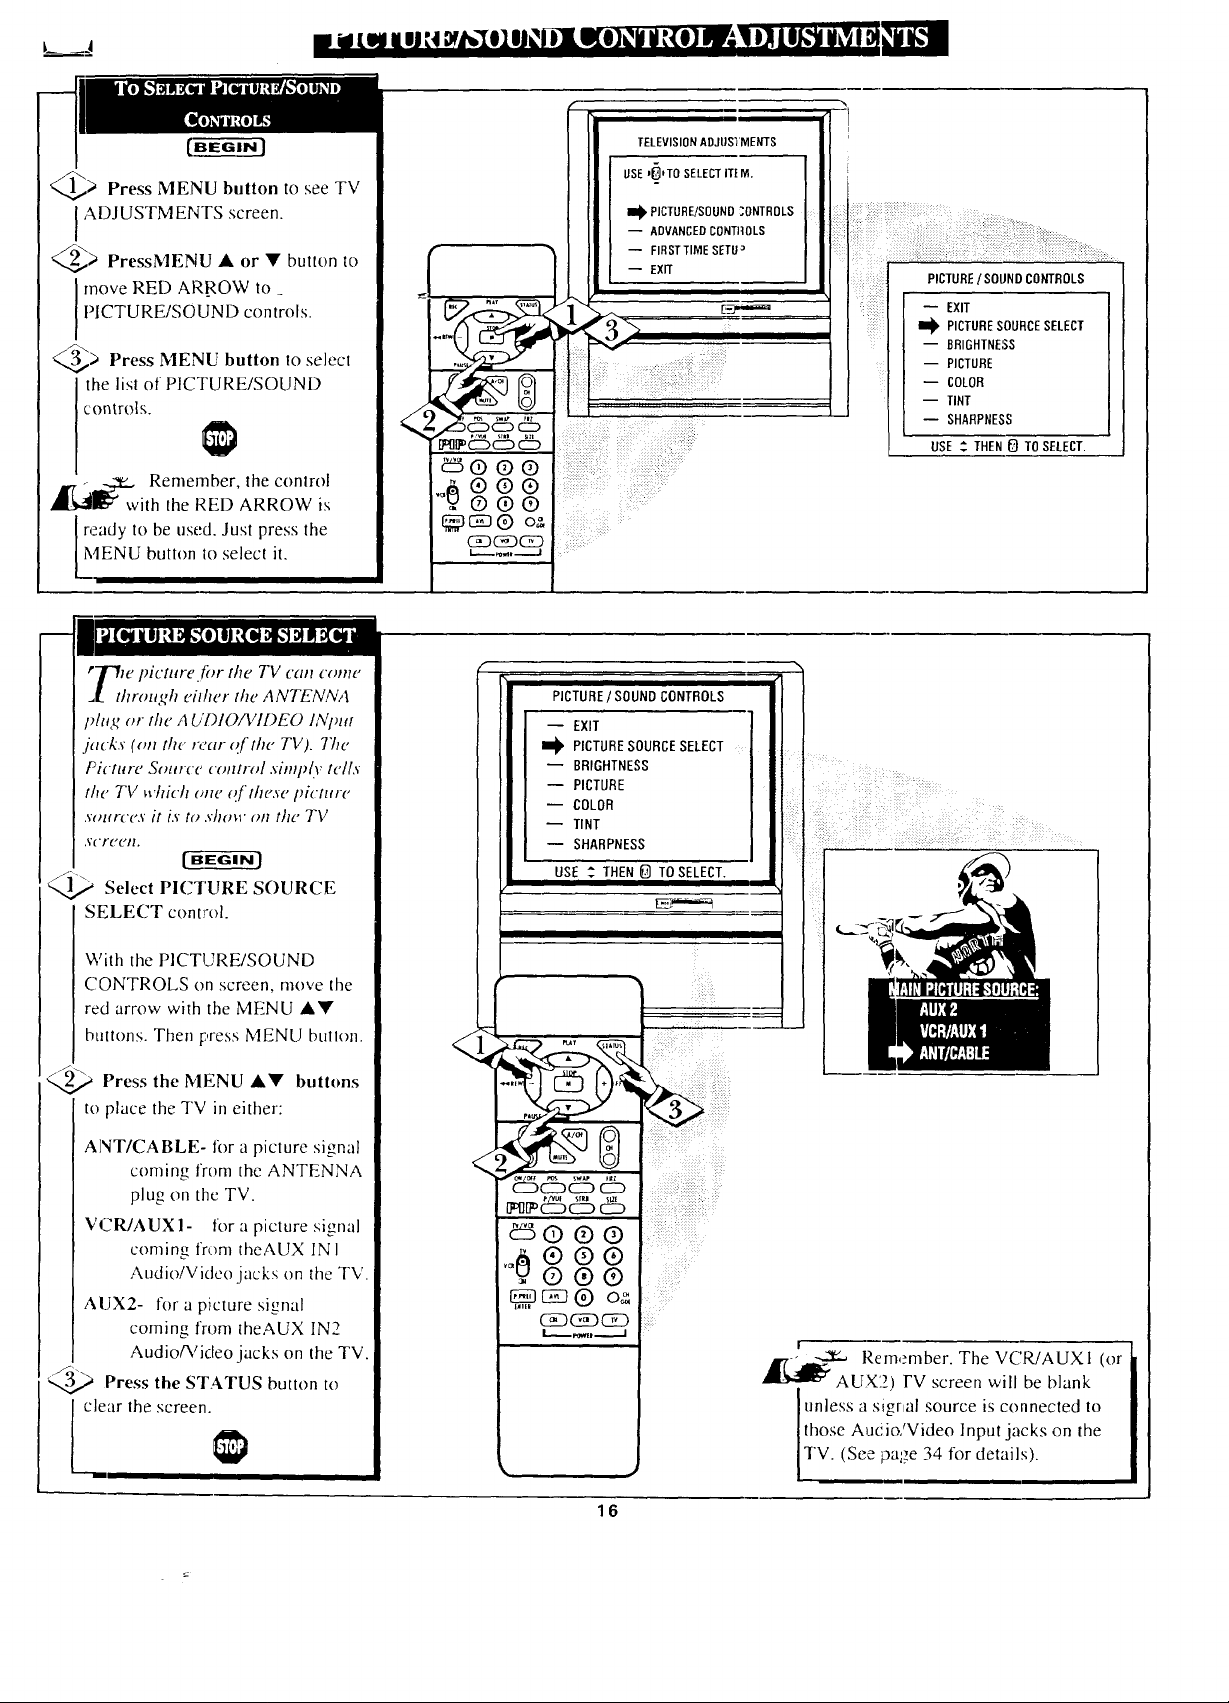
@> Press MENU button to see TV
IADJUSTMENTS screen.
_----_> PressMENU • or • button to
PICTURE/SOUND controls.
move RED AR_ROW to _
@> Press MENU button to select
the list of PICTURE/SOUND
controls.
TELEVISION AOJUS'_MENTS
USE J[_*TO SELECTITEM.
I_ PICTURE/SOUND ;ONTROLS
-- ADVANCEDCONTFIOLS
-- FIRSTTIME SErU ,_
-- EXIT
PICTURE/SOUNDCONTROLS
-- EXIT
II_ PICTURESOURCESELECT
-- BRIGHTNEI;S
-- PICTURE
I
-- COLOR
-- TINT
-- SHARPNESS
USE _ THEN_) TOSELECT.
,_[_'_u Remember, the control
with the RED ARROW is
ready to be used. Just press the
MENU burton to select it.
!
t_'Tw picture._r the TV can come
_[ through eidwr the ANTENNA
phtg or the AUDIO, AilDEO INImt
jacks (on the rear of the TV). 771e
Picture Source cont,wl .vimply tells
the TV which _me of these pictttre
.wmrce,v it i.v to .vhow on the TV
,v('rc{,/l.
Select PICTURE SOURCE
SELECT control.
With the PICTUREISOUND
CONTROLS on screen, move the
red arrow with the MENU ••
buttons. Then press MENU hutlon.
//-?\
Press the MENU •• buttons
to place the TV in either:
PICTURE/ SOUND CONTROLS
-- EXIT
I_ PICTURESOURCESELECT
-- PICTURE
-- COLOR
TINT
-- SHARPNESS
USE ,-. THEN E) TO SELECT.
I
BRIGHTNESS
iii!i
:iii: I
ANT/CABLE- lor a picture signal
coming from the ANTENNA
plug on the TV.
VCR/AUX1- lor a picture signal
coming from theAUX IN I
Audio/Video jacks on the TV.
AUX2- for a picture signal
coming from theAUX IN2
AudioP,/ideo jacks on the TV.
Press the STA.TUS button to
I cl arthescreen.t
!
ir-_-amr.,_ Remember. The VCWAUXI (or
AUX2) FV screen will be blank
is connected
those Aucio/Video Input jacks on the
unless a sigrtal source to
TV. (See page 34 for details).
16
Page 17
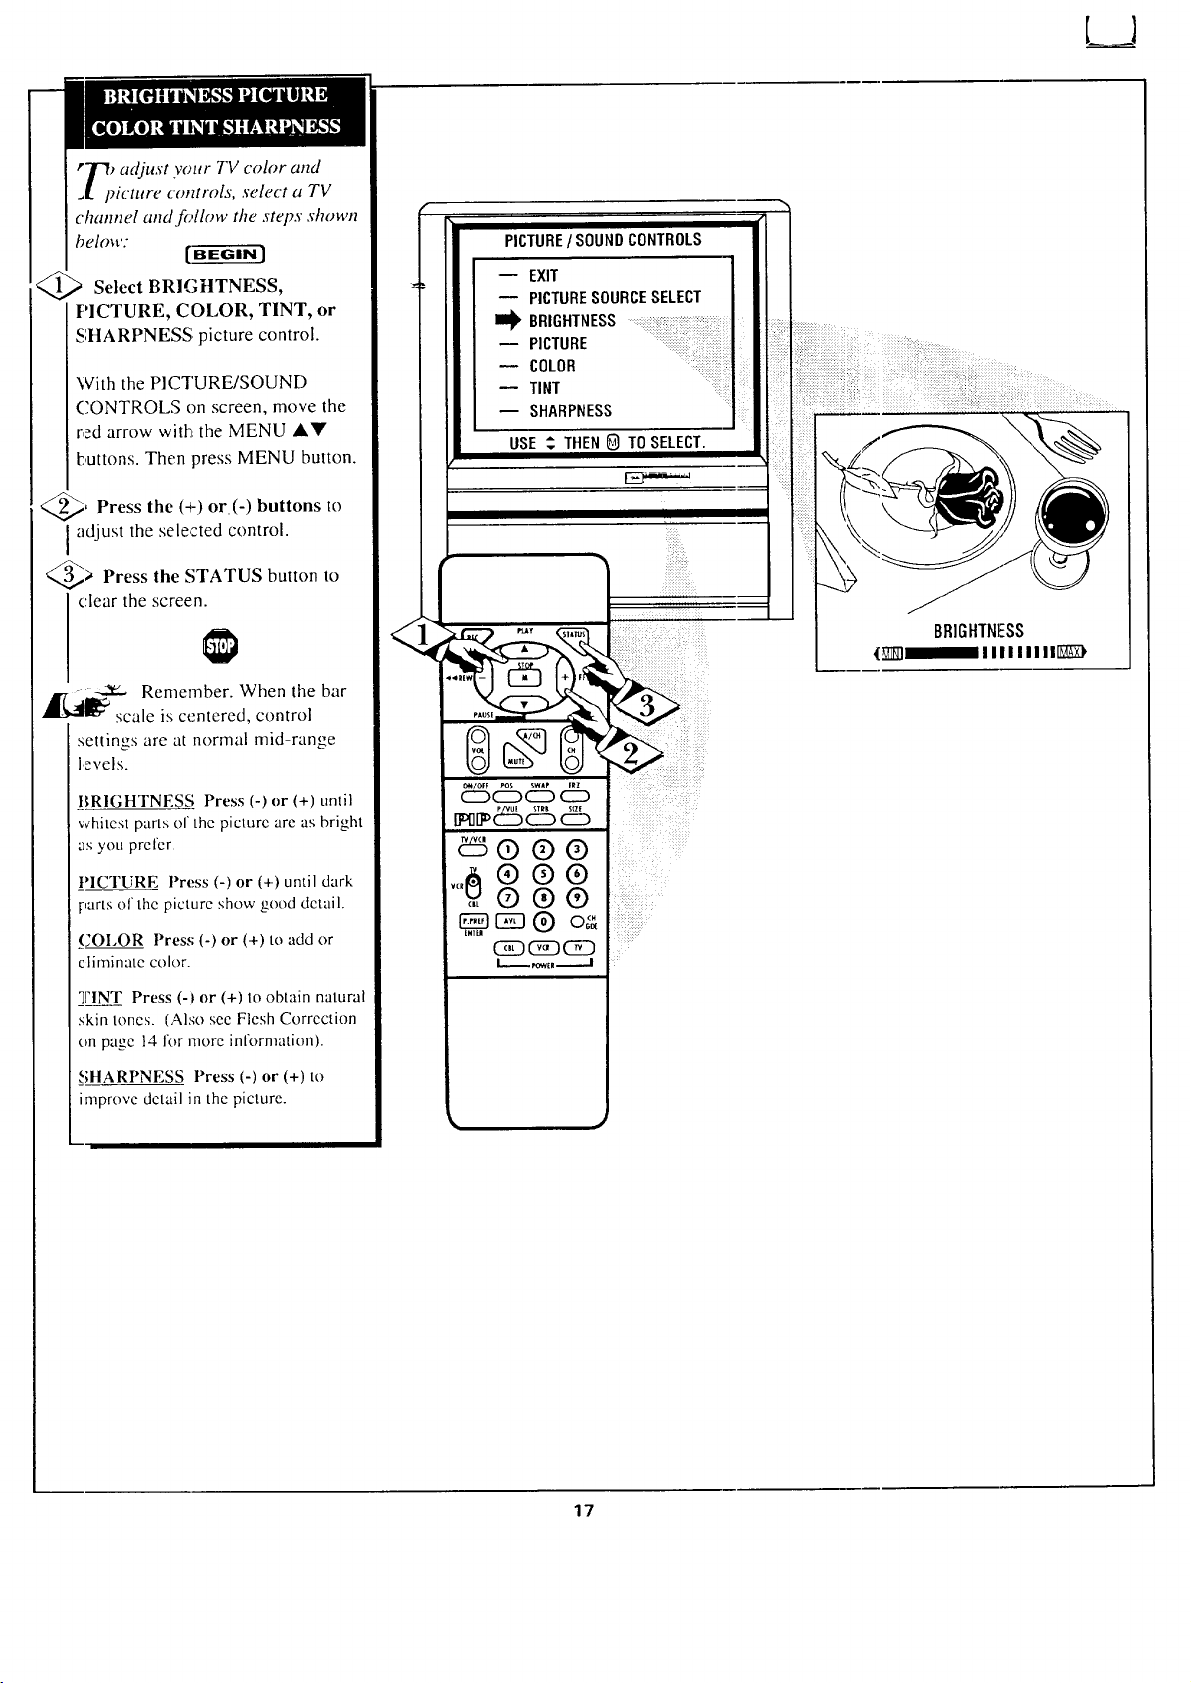
rF_ adjust your TV color and
=L picture controls, select a TV
channel and follow the steps shown
below:
Select BRIGHTNESS,
PICTURE, COLOR, TINT, or
SHARPNESS picture control.
With the PICTURE/SOUND
CONTROLS on screen, move the
red arrow with the MENU ,&V
buttons. Then press MENU button.
, Press the (+) or (-) buttons to
adjust the selected control.
@> Press the STATUS button to
clear the screen.
,_[_j ----_ Remember. When the bar
scale is centered, control
settin,,s are at normal mid-range
levels.
PICTURE/ SOUND CONTROLS
-- EXIT
-- PICTURESOURCESELECT
I_ BRIGHTNESS
-- PICTURE ::
- COLOR ....
-- TINT
-- SHARPNESS
USE " THEN _ TO SELECT.
lil
BRIGHTNESS
(7711111111111[_}
BRIGHTNESS Press (-) or (+) until
whitest parts of the picture are as bright
as you prefer
PICTURE Press (-) or (+) until dark
:,arts of the picture show good detail.
COI.OR Press (-) or (+) to add or
climinate color.
TINT Press 6) or (+) to obtain natural
skin tones. (Also see Flesh Correction
on page 14 for more information).
SHARPNESS Press (-) or (+) to
improve detail in the picture.
17
Page 18

LJ
learview is a sharpness feature
which sm,oothes out
background snow (or picture noise)
without losing picture image detail
or crislmess.
_> Select CLEARVIEW control.
With the PICTURE/SOUND
CONTROLS on screen, move the
:red arrow with the MENU AV
:mttons. Then press MENU button.
_> Press the MENU _k_l!' buttons
mode.
I :o place the TV in ENHANCED
PICTURE/ SOUND CONTROLS
-- SHARPNESS
m_ CLEARVIEW ........... • I
FLESHCORRECTION l:: ....
_ PIPTINT
----TREBLEBASS
USE_. THEN
_> Press the STATUS button
elear the screen,
to
Pt_
<
_d25_=_dS d5
_ P_25dS d5
_5® ®®
,,,@®®®
®®®
CB_D_3_DC_D
iiii_ii!__ i_i,_ i_ii(ii_
_i_ i'_? :_ i__=i
_ii_ " i_
18
Page 19

se the Flesh Correction
ontrol to keep skin tone hues
(or fiwial tiltt) front varying froth
TV channel to TV channel.
SelectvLESn
CORRECTION control.
With the PICTURE/SOUND
CONTROLS on screen, move the
red arrow wit:h the MENU AV
buttons. Then press MENU button.
> Press the MENU _V buttons
to turn the FLESH CORRECTION
control ON.
_> Press the STATUS button to
clear the screen.
PICTURE/ SOUNDCONTROLS
m SHARPNESS
CLEARVIEW
FLESHCORRECTION ......:_..........
PIP COLOR :
PIP TINT .....i I
-- TREBLE
USE _ THEN G TOSELECT.
i ii:iii m
i I
iii
19
Page 20

_mr TV also has individual
J[ sound adjustntent controls. The
BASS (low frequency),
TREBLE(high frequency), and
S?eaker BALANCE may all be
used to adjust zhe sound playback
of TV prog rams.
<_ Select BASS, or TREBLE, or
BALANCE sound control.
With the PICTURE/SOUND
CONTROLS on screen, move the
red arrow with the MENU _k_l'
buttons. Then press MENU button.
<_ Press the (+)or (-) buttons to
adjust the sound control to levels
you prefer.
3_ Press the STATUS button to
clear the screen.
PICTUREISOUND CONTROLS
-- FLESH CORHECTIDN
-- PIPCOLOR
-- PIPTINT
I_ BASS ..........
-- TREBLE ......
-- BALANCE
-- EXPANDER .......
USE .3 THEN _) TO SELECT. ::i_i
_i_iiiiii__:iiiiiiiiiiiiiiiiiiiiiiiiiiiii_i!iiii_iii_i
:iiiiiiiiiiii_i_il__i!!iiiiiiiiiiiiiiiiiiiiii!_ii::
_tr,g:Bek5 e_:,
egso o o
4)® ® ®
= 0 ® 0
_#i:]___]_#__]?i_]_]_]_]?];
C_]NNIIIIIIIII_
F_XPANDED sound can be used
_.,€to add greater depth attd
dimension to both monaural
(MONO) and STEREO TV sound.
EG---ffr
<_> Select EXPANDER sound
control.
With the PICTURE/SOUND
CONTROLS on screen, press the
MENU AY buttons to move the
red arrow. Then press MENU
button.
_ Press the MENU A'_' buttons
t(_ place the TV in the
EXPANDED sound mode.
__j Press the STATUS button to
CE3_ CD
PICTURE/SOUND CONTROLS
-- BASS
-- TREBLE
-- BALANCE
I_ EXPANDER
-- STERED/MONO
SAP2NDAUDIOPROGRAM!IIII!il
EXIT _:!{iiiii
USE ._THEN _) TO SELECT.
RelllclnbeF. Undar s.m]c :.,tcrco broadcast condilions the
EXI:'ANI)I':D mt_dc should nol I',csclccled Ior use.
For l-xumple: Wilh he EXPANI)I':I) mode ON. the
slerco external sl_'ukt2r conpectiorls necc,,sary Ior
Surround Sound pkg,'back v, ill nol work properly
[unless Ihc STERE( _control ix xel to "MONO AT ALl.
TIMES" - see page,, 21 and 37 lot more inlbrmation.}
Page 21

LJ
ur 73/is able to receive
roadcast stereo TV programs.
The TV is equil_ped with an
amplifier and twin speaker sy.vtem
through which the stereo sound
can be heard.
A RED stereo 7ight (on -the front of
the TV) will come on wtwn a
stereo broad,caxt is received.
_ Select STEREO sound control.
With the PICTURE/SOUND
CONTROLS; on screen, press the
MENU A_r buttons to move the
red arrow. Then press MENU
button.
_ Press the MENU AV buttons
to place the TV in the STEREO
sound mode.
Press the
_> STATUS button to
clear the screen.
_[_-_ _ Remember. lfa stereo
signal is not available and the
TV is placed in the STEREO
mode, sound coming from the TV
will remain monaural (mono).
PICTURE/ SOUNDCONTROLS
BASS
-- TREBLE
BALANCE
EXPANDER
I1_ STEREO/MONO
- SAP2NOAUmOPROGRAM
EXIT
USE $. THEN _ TOSELECT.
" c5c%d:5 db
T_
,,,0®®®
.,®(9(9
(_(_)(Z)
SECOND (2ND) AUDIO
PROGRAM (SAP) is pan of the
stereo broadcast system. SAP is
another audio channel that is
broadcast with the stereo sound.
Many expen:s believe it will be
used to broadcast tk)reign language
translations of TV programs.
A YELL()W SAP light (on the
front of the TV) will come on
when SAP i'._available with the
selected channel.
...._ Remember. Ira SAP
si,.znulis not available, with
the currently selected channel, the
SAP option can not be selected.
"SAP NOT AVAILABLE" will
appear on the TV screen.
, ,,d
PICTURE/ SOUND CONTROLS
-- TREBLE
-- BALANCE
-- EXPANDER
-- SIEREO/MONO
-- BASS ]
I_ SAP 2ND AUDIO PROGRAM
-- EXIT
USE ,2 THEN 0 TO SELECT.
21
"I'H S CONTROl. SCRH:N Wll.l. ONI.Y
AP 'I£AR ||: SAP IS AV/, ll.An[.l_. ON
]]dgCURRENT CHANNEL
I
®
/o .
,>
€.,
Page 22

LJ
l_@ Press button to see
MENU TV
ADJUSTMENTS screen.
_ PressMENU • or button to
move RED ARROW to
ADVANCED controls.
@>Press MENU button to select
the list of ADVANCED controls.
,_,t --,.,---,,_oRemember, the control
_:_ with the RED ARROW is
ready to be use(]. Just press the
._.MENU button to select it.
Four TV conws with an on-
screen clock. During normal
O];'CrLlliOl! l]l_" Cl'ock (l])])q2"(lt27 Oil [hU
screen with every channel change
(aqd when the STATUS button ix
pressed).
m-6-m3
Select SET TIME control.
.ELEV,S,0.ADJOS'
ADVANCED CONIBCLS ]
-- FIRSTTIME SETUP ]
ADVANCED CONTROLS
-- EXIT
I_ PIPPICTURESOURCE
-- CLOSEDCAPTIONING
-- CAPTIONINGDURING MUTE
-- SLEEPT!MER
-- SETTIME
-- TIME REMINDER
USE .2THEN _) TO SELECT.
ADVANCED CONTROLS
-- PIP PICTURE SOURCE
-- CLOSED CAPTIONING
-- CAPTIDNING DURING MUTE
-- SLEEPTINER
m_SET TIME
-- TIME REMINDER
-- CHANNELREMINDER
USE $ THEN _ TO SELECT.
With the ADVANCED
CONTROLS on screen, press the
MENU ,Ik• buttons to move the
red arrow. Then press MENU
button.
_ Press the MENU A• buttons
to set the minutes portion of the
clock.
the M
Press (+) or (-)
buttons
to move the selection arrow to the
hours portion of the clock.
//-.¸
'"4_.._ Press the M A• buttons to set
the hours portion of the clock.
Press the STATUS button to set
the clock in operation and clear the
screen.
'_"_e Remember. The time may also
set using the number buttons on
the remole. Be sure to press "0" first
and then the hour number for single
digit entries.
22
Page 23

With the ADVANCED
CONTROLS on screen, press the
MENU ,It!' buttons to move the red
arrow. Then press MENU button.
LJ
NOTE: Not all TV programs and product commercials are made lbr broadcast
with Closed Caption (CC) informaik,n included. Neither are all Closed Caption
modes (SECOND LANGUAGE, FULL SCREEN TEXT l, etc.) necessarily being
used by a broadcast station during the transmission of ;. closed caption program.
Refer to your area's TV program listings for the station; and times of Ch)sed
Caption shows.
ADVANCEDCONTROLS
-- PIP PICTURESOURCE
I_ CLOSEDCAPTIONING
-- CAPTIONINGDURINGMUTE
SLEEPTIMER
-- SETTIME
-- TIMEREMINDER
-- CHANNELREMINDER
1
Q,2j Press tile MENU ,IV buttons
to select the desired Closed Caption
rnode- For Example: STANDARD.
STANDARD (CCI) :
dialogue (and descriptions)
for the action on the captioned
TV program shows on-screen.
(See important note on this
page. ]
SECOND LANGUAGE (CC21 :
lbreiBn language translation of
dialogue (and descriptions)
for the action on the captioned
TV program shows on-screen.
FULL SCREEN TEXT ! or 2:
often used fl)r channel guide,
schedules, or bulletin board
informalion tbr CC programs.
_--3V_ After making your Caption mode
selection, press the STATUS button
to clear lhe TV screen. The selected
Closed Caption mode will be active.
To cancel, set the Closed Captioned
feature to OFF when finished
_iewing.
i,
<
d: b
@ @ ®
® ® ®
<, Off) O
ENifl
CTOG73CD
F=:-_ -
ST,\NI)ARI) mo,.Ic
t'xanlple 'l'Yl'a_' l)i:.;play
iF2 ,,==-,.
_ stations will often use spelling
abbreviations, syinbtfls, clr()pt>uts
and other b,rammatical shortcut'., in
order to keep pace wilh the on-
screen achon. These type factors
captioned texl material and do not
__ part of the TV.
Rcm :'tuber. P>roadcast
vary upon the source of lhe
indicate a need Ik_r service on the
('h_,cd ('<ipti,lll ii/h_rll_.lli_,n _il! tl'.uall} ;ipl_c'.lr
il! bladk and _ hilt (_i)tTl_,tl.,_'l] _E;Ic" t_rc_Lic]c_l!_lc
or ncl;_t,rk_ hi;i} t_cc_l\it_n_ll]} tlxc color to
hl,:li/li_hl c_r clr;t_ .lllt:l_I_t,ll Io ccrI;l{n _lrc;l_
FI.JIJ. S('RI-EN TEXTI & Tt'XT 2 mt_dc <,
will block '1"\" _,crccll trtllll viewing
23
Page 24

¥ ]rave you ever fallen asleep in
il......m
Zlfro,,t , rtheTVanJn,e.
have it wake you up at two in the
morning with a test pattern
s,o_reec'hing bz your ears? Well,
your TV can save you all that
trouble by auto__tatically turning
itself off.
<_ Select SLEEP TIMER control.
With the ADVANCED
CONTROLS on screen, press the
MENU J,_' buttons to move the
red arrow. Then press MENU
button.
_-.._ Press the (+) button
repeatedly to select the amount
of time before the TV will turn
OFF.
]'he TV can be set to cut itself off
anywhere from 15 minutes to 4
hours away.
Press the STATUS button to
clear the screen.
ADVANCEDCONTROLS
-- PIP PICTURESOURCE
CLOSEDCAPTIONING
-- CAPTIONINGDURING MUTE
I_ SLEEPTIMER _
SETTIME
-- TIME REMINDER
CHANNELREMINDER
USE _. THEN _ TOSELECT.
1
_1_ Remember. If you ever
,.gr'want to see how many minutes
are left before the TV shuts off,
select the SLEEP TIMER control
display.
IFyou ever want to stop a SLEEP
TIMER setting, reset the timer to
0:00. Turning the TV offand then
back on also cancels a setting.
A few seconds before the TV is to
slhut off a mes,;age will come on
the screen telling you GOOD
NIGHT.
24
Page 25

th tile TV Reminder controls
N, the TV automatically
shows you the current time and
channel ever_ thir O,mimaes.
_ Select TIM_E or CHANNEL
REMINDER control.
With the ADVANCED
CONTROLS on screen, press the
MENU AY' buttons to move the
red arrow. Then press MENU
button.
_ Press the MENU &_' buttons
to turn the Reminder controls ON.
i____) Press the STATUS button to
I clear the screen.
_[_-_ _ Remember. The TIME
and CHANNEL Reminders
appear on the hour and the half-
hour for about five seconds.
ADVANCEDCONTROLS
PIP PICTURESOURCE
CLOSEDCAPTIONING
CAPTIONINGDURING MUTE
-- SLEEPTIMER
SETTIME
I_ TIME REMINDER
CHANNELREMINDER
USE = THEN @ TO SELECT.
r_
! ! i i .....
I IJll
25
1,4 12:30
TIME %N ) CHANNEl. REMINDERS [)[SF'LAYI_I)
Page 26

_[_qtth the Channel/Time
' V Display controlyou can
ctiange the size and location qf the
ot;_screen chamTel and clock
information.
Select CHANNEL/TIME
DISPLAY SIZE control.
With the ADVANCED
CONTROLS on screen, press the
MENU ,IkY buttons to move the
red arrow. Then press MENU
button.
2_ Press the MENU A'T' buttons
to turn the LAIq:GE or SMALL
DISPLAY control ON.
,,._ Press the STATUS button to
c!ear the screen.
Try it out. Press the STATUS
or CHANNEL ,AV buttons
and you should see the Display
Size you selected.
ADVANCEDCONTROLS
-- CAPTIONINGDURINGMUTE
-- SLEEPTIMER
SETTIME
TIMEREMINDER
-- CHANNELREMINDER
I_ CHAN/TIMEDISPLAYSIZE
-- CABLECHANNELTUNING
USE_ THEN_ TOSELECT.
!
LARGE
_li _ Remember. The SMALL
"_"SIZE display shows only the
channel number, not the time (or
clock).
CHANP, I-IJT]M|- DISPI.AY OTYI'IONS
26
Page 27

]f you didn't go through the
I FIRST TIME SETUP (page 8),
you need to make sure the TV is set
to pick up eititer Cable TV or
Antemm signals. In other words,
the TV needs to know if you
connected a Cable TV signal or a
normal antemla to its ANTENNA
!_lug.
> Select CABLE CHANNEL
TUNING control.
Wilh the ADVANCED
CONTROLS on screen, press the
MENU ,k'V buttons to move the
red arrow. Then press MENU
button.
Press the
@) MENU AY buttons
to place the TV in either:
ADVANCEDCONTROLS
SLEEPTIMER
SETTIME
TIMEREMINDER
CHANNELREMINDER
CHANGIMEDISPLAYSIZE
CABLECHANNELTUNING ......
AUTO-PROGRAMMING
USE_ THEN_ TOSELECT.
ESI
i i
=
I11iiiii]
CABLE- ]fyou DO have
Cable TV connected
to the TV. Channels
I-125 (excluding 95-
97) available.
ANTENNA- If you have an
Antenna connected
to the TV. Channels
2-69 available.
_3j) Press the STATUS button to
clear the screen.
_1 -_ _ Remember. The FIRST
_:' TIME SETUP procedure (page
automatically.
8) does all this for you
27
Page 28

/_ uto-Programnfing is fi)r adding
• local area channel numbers into
the memory qf the TV. This makes it
eaa,vfor you to select only your area
'or Cable TV) channels" when the
CHANNEL A Y buttons are pressed.
If you already _'e#tt through FIRST
TIME SETUP (page 8). this task has
been conq_leted fi)r you.
ff. G--g ffl
Select AUTO PROGRAMMING
control.
With the ADVANCED CONTROLS
o_ screen, press the MENU A'_'
buttons to move the red arrow. Then
press MENU button.
_D Press the MENU A'V buttons to
turn AUTOPROGRAMMING ON.
The TV shows which channel
nLrnbers are "SAVED" as they are
added into memory.
"AUTO PROGRAMMING
COMPLETED" appears when the TV
is finished adding channels.
ADVANCEDCONTROLS
I _ CHAN/I'IME DISPLAYSIZE
CABLECHANNELTUNING
I1_ AUT0-PROGRAMMING :
ADD!DELETECHANNELS
REDCONVERGENCE
-- BLUE CONVERGENCE
-- TV SPEAKERSON/OFF
USE ._ THEN _ TOSELECT.
i
_._ Press the STATUS button to clear
I the screen.
Try, it out. Press the
CHANNELAV" buttons and see
which channels you can select.
-, Remember. An Antenna or
" Cable TV signal must first be
connected to your TV so that channels
can be saved.
If you want to delete any unwanted
channels from the TV's memory, see
"ADD/DELETE CHANNELS" on the
next page.
7
CI|AN NEI. N :JM P,I-RS
COUNT UF'_,_,ARD AS
THI-TV I.OOKS FOR
CHANNEI.S TO SAVE.
;Ull[ol;a;tq_l;!;_fih'Jll_[_¢'jl'a !;lta
28
Page 29

A toProgramming (see
previous page) adds all the
channels it can find (on your
Antenna or ,Cable 73/system) into
the TV's memo_. . Add/Delete
Channels makes it easy for you to
add other channels, or drop
unwanted chc_mels, from the list of
channels in the TV's memory.
_> Select ADD/DELETE
CHANNELS control.
With the ADVANCED
CONTROLS on screen, press the
MENU AY buttons to move the
red arrow. Then press MENU
button.
_._ Press the CHANNEL AY
buttons to select the channel you
want to add or delete.
You can also use the Channel
number buttons on the remote to
select channels.
ADVANCEDCONTROLS
-- CHAN/TIMEDISPLAY SIZE
-- CABLECHANNELTUNING
AUTO-PROGRAMMING
I_ ADD/DELETECHANNELS
FlEDCONVERGENCE
BLUECONVERGENCE
TV SPEAKERSON/OFF
_ Press the (+) button to ADD
the channel into the TV's memory.
Press the (-) button to DELETE
the channel from memory.
Repeat steps 2 and 3 for each
channel you wish to add or delete.
_ Press the STATUS button to
clear the screen when through.
,_-__ Remember. You can also
add the VCR/AUX I (or
AUX2 mode) just like a channel.
Then by pressing the CHANNEL
A'_' buttons the VCR/AUXI (or
AUX2) mode can quickly be
selected to use the Audio/Video
Input jacks on the rear of the TV
(see page 34).
Note: The "VCR/AUX 1 and
AUX2 modes are located between
the lowest and highest channel
numbers within the Favorite
Channel Memory control screen.
29
Page 30

"'_om,ergenc, "_is the correcl
_" lining u I, of the red and blue
/i_ht paths on the TV screen.
NOTE. If no c(:,lor fringing (see
sidehar note) shows, then no
Convergence _adjustments are
necessary for your TV.
Select RED BLUE
or
CONVERGENCE control.
With the ADVANCED
CONTROLS on screen, press the
MENU ,A.I!' buttons to move the
red arrow. Then press MENU
button.
4_ Press the MENU AY and (+)
(-) buttons to move the red or
blue cross directly over the white
cross on the TV screen.
The red or blue cross is properly
adjusted when it is completely
merged with the white cross. (No
color appears; around the edge of
the white cross).
!
AIT._ Remember. Convergence has be_:n set at the
factory for best vi,_'win,.z, but if one cr more of
the (red or blue) colors appear around :h{: edges of
objects (color fringing_ follow the steps _::iven in this
section.
m %
ADVANCEDCONTROLS
-- CHAN/TIME DISPLAY SIZE
CABLECHANNELTUNING
-- AUTO-PROGRAMMING
-- ADD/DELETECHANNELS
REDCONVERGENCE ....
-- BLUECONVERGENCE It
TV SPEAKERSON/OFF
USE _ THEN _] TO SELECT.
Press the STATUS button to
clear the screen when convergence
adjustments are complete.
3O
Page 31

c/uld you like to hear TV
_rograms through your audio
hi-fi system ? The TV's Variable
Audio Output flzcks and TV
Speaker On/Off contn_l work
together to q_er you this TV sound
IB
Connect the R(ight) and L(eft)
VARIABLE MODE Audio Out
jacks on the TV to the R and L
Audio Input jacks on your
amplifier or sound system.
Set the audio system's volume to
normal listening level.
_> Turn the TV and audio
ON. You can now adjust the sound
level coming from the audio
system with the Volume &V
buttons on the TV or remole.
Q,_3j' To hear the TV sound from only
the audio system speakers, select
TV SPEAKERS ON/OFF control.
system
ADVANCED CONTROLS
-- CABLECHANNELTUNING
-- AUTO-PROGRAMMING
ADD/DELETECHANNELS
-- REDCONVERGENCE
-- BLUECONVEBGENCE
m_TV SPEAKERSON/OFF
-- CENSORVIEWING
USE * THEN_TO SELECT.
|
BACK OF TV
AUDI() IN
(RI'I)/W_I!!
With the ADVANCED
CONTROLS on screen, press the
MENU AT buttons to move the
red arrow. Then press MENU
button.
_' Press the MENU ,A,Y buttons
to turn the TV Speakers OFF.
You should now only hear TV
sound coming from the audio
system speakers.
_> Press the STATUS button to
clear the screen.
,_--- _ Remember. The audio
system may have to be in
AUX(iliary) mode to play' sound
from the TV.
31
Page 32

ensorViewing allows parents to
block ()Ill, or "censor", any
channels they think children should
not watch. A channel plaeed under
Cenxor Viewing cannot be viewed
until a correct access code is used to
unlock the channel for viewitTg.
First' let's set your Censor Code:
@ S_lect the CHANGE CENSOR
CODE control.
With the ADVANCED CONTROLS
on screen, press the MENU _klP'
buttons to move the red arrow. Then
pres'.; MENU button.
"ENTER CURRENT CODE" shows
on the screen.
_ Press 0, 7, 1, 1 on the remote.
"XXXX" shows on the screen as
you press the number buttons.
ADVANCEDCONTROLS
AUTO-PROGRAMMING
ADD/DELETECHANNELS
REDCONVERGENCE
BLUECONVERGENCE
-- IV SPEAKERSON/OFF
-- CENSORVIEWING
I_,CHANGECENSORCODE
USE_ THEN_ TOSELECT.
"INCORRECT ACCESS CODE"
will also show on the screen,
!3.Q_ Press 0, 7, 1, 1 on the remote
again.
"ENTER NEW CODE" shows on
lhe ,,;creen.
Enter a new four digit number
code using the remote.
"ACCESS CODE REPROGRAMMED"
shows on the screen to let you know
the new code has been set.
Press the STATUS button
to
I clear the screen.
__ Remember. After set the
you
new Censor Code go on to the
next page to see how to place
channels under Censor Viewing
control.
)l=11;!:1;t;llltl;T:!_%'d:q
Parents - it isn't possible to unlock or
defeat your Censor Code without
changing to a new code number. So
if your Code number changes, and
you didn'! change it yourself, then
you will know that someone has
altered the code and the blanked out
channel has been viewed.
32
Page 33

After your personal Censor
2 _I- Code nunzber tzas been set (see
r)revious page), you are now ready
to select the channels you want to
censor or block out.
ADVANCEDCONTROLS
@> Select the CENSOR
VIEWING control.
With the ADVANCED
CONTROL,<_<;on screen, press the
MENU ,&Y buttons to move the
red arrow. Then press MENU
button.
"ENTER CURRENT CODE"
shows on the screen.
___ Enter the correct Censor Code
r number.
_'_ Press Channel ,Ik'_' or Channel
channel to be censored.
I umber bultons to select the
_[_ Press the (+) button to "BLOCK
VIEWING" on the selected
channel.
Press the (-) button to "ALLOW
VIEWING' on a blocked channel,
Repeat steps 4 and 5 for any other
channels you wish to block out.
ADD/DELETECHANNELS
REDCONVERGENCE
BLUECONVERGENCE
TV SPEAKERSON/OFF
CENSORVIEWING .......
-- CHANGECENSORCODE
EXIT
USE _ THEN _ TO SELECT.
.... Reraember You can
. also
block out the use of the
Audio/Video lnput jacks on the
TV. This stops the viewing of VCR
programs which can be shown
through the A/V IN jacks. Just
select VCR/AUX [ or AUX2
(located between the lowest and
highest channel numbers) on the
Censor Viewing screen, and select
Block Viewing.
Note: To make TV viewing easier
all channels (and Audio/Video
lnput jacks) will be unblocked,
once the correct Censor Code
number has been entered for one
blocked out channel.
When the TV is turned OFF and
then back ON again, Censor
Viewing is back in place for all
channels.
33
Page 34

e TV's Audio/Video Input
ticks are for direct picture and
sound connectiona between the TV
cmd a VCR (or Video Disc Player.
etc'.) that has Audio/Video Output
jack._.
To view the playbacTk of a VCR
tape by using the Audio/Video
lnput jack.v on the TV:
_..a Connect OUT jack
VIDEO IN jack on the TV.
fron_ the VCR to the VCR/AUX I
_ Connect the OUT
the VIDEO
AUDIO
jacks R(ight) and L(eft) from the
VCR to the VCR/AUXI AUDIO
IN jacks on the TV.
_._ Select the VCtUAUXI
PICTURE SOURCE control, on
the TV. Try any of the three
following ways:
An easy way to select VCR/AUX I
is to press the VCR button on the
fronl of the TV.
If yc,u have added VCR/AUXI to
the TV's channel memory (see
page 29), press the CHANNEL
&.V butlons to select it.
With the PICTURE/SOUND
CONTROLS (see page ]6), move
the red arrow with the MENU &IP'
buttons to PICTURE SOURCE.
Then select VCRs'AUX 1.
ANt' (.)tit
VIDF.D Ol.ff
f RIiIJlWH rll_i
VCR
(ILITI)OOR VHFIUHt
ANTENN:\
I.OW
CABLI'TV SIGNAl.
@ Turn the VCR ON and press
PLAY to view the tape on the TV,
__ Remember. Connections
and use of the TV's AUX2
Audio/Video Input jacks are the
same as lot the AUX1 jacks
(except "AUX2" isselected as the
Pictare Source -step 3).
If you have a sing.,le(monaural)
Audio Output VCR, "V"
connectors are available to
complete your connection. Contact
your dealer, or our Parts
Information Center, for details.
34
Page 35

ie S(uper)-Video conm, ction on
he rear (_f the TV can give .you
better picture detail and clari&, for
the playback of S- VHS VCR tapes
or Video Dixcs, titan the normal
antenna picture connections.
Note: The I/CR (or Video Disc
Player) mus; have a S-VIDEO
OUT(put) jack in order.fin you to
complete the connections shown on
this page.
BACK OF: TV
_> Connect the S-VIDEO (S-
VHS) OUT jack from the VCR to
the AUX INI S-VIDEO jack on the
TV.
_,_ Connect the AUDIO OUT
jacks R(ight) and L(eft) from the
VCR to the AUX INI jacks on the
TV.
_.'-_ Select the S-VIDEO 1
PICTURE SOURCE control. Try
any of the three following ways:
An easy way to select S VIDEO I
is to press the VCR button on the
front of the 'FV.
V
If you ha_e added VCR/AUXI to
the TV's channel memory (see page
29), press the CHANNEL A_'
buttons to select S VIDEO I.
With the PICTURE/SOUND
CONTROLS (see page 16), move
the red arrow with the MENU A'_'
buttons to PICTURE SOURCE.
Then select S VIDEO I.
ANT OUT
The S VII)EO I piclurc
St',LlrCC (_pliOll appezlrs only
when a S-VII)I-O cable ha'-,
[",'Cell C(_llneClcll Io 111,2 rv.
®®
S \"ITS V('R
OUTI)OOR VHF/UHF
ANTI'NNA
CAII.t.E TV SIGNAl.
"Q_ Turn the VCR ON and place it
in the S-VIDEO (or S-VHS)
playback mode. Insert S-VHS
cassette tape and playback in a
normal manner.
_'r'._ Remember. The S-VIDEO
connecting cable will be
supplied with the S-VHS VCR (or
Video Disc Player).
<
PICTURI- AND SOUNI) FROM
PI.AYBACK OF S VHS V('R "fAPI-
8oo
®®
35
Page 36

e A udio/Video Output jacks
,n the TV can be used to
record TV programs on VCRs
which have Audio!Video Input
jacks.
To record TV programs by using
the Audio/Video jacks on the TV:
_ Connect the VIDEO OUT jack
on the VCR.
from the TV to the VIDEO IN jack
<_ Connect the FIXED MODE
L(eft) from the TV to the AUDIO
I UDIO OUT jacks R(ight) and
IN jacks on the VCR.
®
Select the PICTURE
SO1JRCE control, on the TV.
With the PICTURE/SOUND
CONTROLS on screen, move the
red arrow with the MENU AV
butlons to PICTURE SOURCE.
The n select "ANT/CABLE".
Select the channel on the TV that
you want to record.
<_ Turn the VCR ON. Put a
cassette tape in the unit and place
the VCR in the PECORD mode.
_alg._ Remember. If the VCR has
an INPUT SELECTOR
switch, place it in the LINE or
CAMERA position.
Unattended Timer Recordings with
a VCR are possible, but not
recommended with this
connection, since the TV must be
left ON for the VCR to record.
AUDIO OUT
{R I-I)/WHITI"I
VCP
Pll _ ,URE AND SOUND BEING
- RECORDED ON VCR.
36
Page 37

adding external speakers to
the TV's sound system, you can
create the feeling of reflected
sound that surrounds you at a
movie thea;er or concert hall.
[_BEGIN ]
_1_ Connect both external
speakers to the speaker wire
terminals on the TV.
Recommended speakers: 8ohm, 10
watt minimum. Be sure the (+) and
(-) speaker wires are connected to
the correct R(ight) and L(eft)
speaker terminals on the TV.
Nolo: Surround Sound will not work ]
with monoaural audio material, or
with only one sp_akt',r conneclcd.
........... 7:.!: : ::: ........
I
k
BACK OF TV
<_2_ Place the speakers so the
viewing area is between the TV
and the rear surround speakers.
<_3_.._ Turn TV ON and place the
STEREO/MONO control to
STEREO position.
After setup whenever a stereo
signal is received the audio will be
heard in Surround Sound.
Note: The rear Surround Sound
speakers will not be heard at the
same volume level as the front TV
speakers, l[ is intended for the rear
speakers to give a background
noise effect: which requires a lower
volume level than the TV's front
speakers.
_l_,_l_ Remember, An optional
SUBWOOFER "Amplifier -
Speaker" can also be connected to
the TV. The Subwoofer jack on the
TV outputs a low level Bass signal.
When this !iack is connected to an
Amplifier Subwoofer speaker it
complements the sound coming
from the rear Surround speakers.
Contact yoar dealer for more
information if you would be
interested in adding such an
accessory, to your home audio
system.
For an added dimension of
Surround Sound you may also
want to place the TV in the
EXPANDED mode (see page 20).
_S U BWOOFER AM I LII:I ER
SPEA K ER (See Remi nder N_)Ie)
f:: !'i!i:i_; "
OPTIONAL SUBWOOFER
l.ocution is not swcific, just ............................
wilhin the li_,lening area.
] PRIMARY LISTENIN(; AND VIEWING AREA
N::!:!!:!:!:!:_:!:!i:i:i:::i:i:!:i:i:i:i:ii:F:!:i[i:i:Fii:ii!:iif_,,_
O,EAR SURROUND
:;OUND SPEAKERS
__ • L
37
Page 38

After installing the battery into
the remote, slide the TV-VCR-
CBL switch to the TV position.
Point tke remote toward the front
of the 7V (remote sensor window)
when pressing buttor_s.
VCR Buttons
For use of VCR button:_ see the "Using
the Remote With a VCR".
Menu (YA) Buttons
Press the M button to show on-screen
feature controls. Press • or • buttons
to move forward and backward
through the list ofon-s,creen controls.
(-) and (+) Buttons
Press to adjust the selected on-screen
feature control.
Volume Button
Press to adjust the TV sound level.
Number Buttons
Press the number buttons to select TV
channels. Press two number buttons to
select single digil cham_els. For
examph:: to select channel 6._.press
"0" first and then "6".
Personal Preference Button
Press te return the TV to specific
picture and sound settings you have
placed in the TV's memory. Also can
be used as an Enter button when
sending channel commands to remote
controlled cable converters or VCRs.
Auto-Volume Leveler Button
Press to control TV sound levels. See
"AVL" section for details.
r
_I4REW_ fFw_,"
PAUSE
ON/OFF POS SWAP FRZ
C_DCZ3 CZ) CZD
lY,rllP s, E
CZD
,,,8® ® ®
,,, ®®®
ENTER
POWERy
OGDE--
Status Button
Press to me the current channel
number on the TV screen. Also press
this button to clear the TV screen after
comrol adjustments.
Alternate Channel Button
Press to select the previously viewed
channel.
I
For exar'_ple: You are watching
chanrel 4 and change to channel 10
(using El-rechannel number buttons).
Pre_s A!Cti and your TV will return to
chant,el 4. Press A/CH again and your
I
!
TV will return to channel I0.
.Channel Scan Button
Press to scan up or down through
channel numbers,
Mute Button
Press to turn the sound OFF on the
TV. Prc_s again to return the sound to
its previous level.
-- -PIP lq,uttons
Press to operale Picture-In-Picture
features. See PIP section for details.
Channel Guide Button
Prcs,, to show a list of Captioned TV
than _els fi-om which to select. See
"CH GtJlDE" section for details.
TV.-V CR-CBL Power
Buttc,ns
Pres., to lunl the TV, accessory cable
conveners and VCRs ON and OFF. See
the "How to operate VCPs and Cable
Converters" section for flmher details.
The remote's TV..VCR-CBL slide
switch controls how certain
buttons on the remote are used.
For example:
In the "TV" position:
the MENU, (M)AY, and (+,-)
buttons are used to select and
adjust on-screen TV features.
In the "VCR" position:
the same buttons on the remote
work playback, search, pause,
and other VCR features.
38
Page 39

hen using the TV remote
with a VCR, first make
certain it is set to control your
VCR ( by the REMOTE CODE or
SEARCH method - see following
section).
> Slide the T_V-VCR-CBL on
the remote to the VCR position.
<._> Point the top of the remote
(remote sensor window) when
pressing buttons.
I oward the front of the VCR
PLAY
STOP
F'iay Button
P:ess to playback a tape. Hold down
altcr pressing the :RECORD button to
start a recording.
-S top Button
Press to stop the tape.
Record Button
Hold the RECORD button down, and
then press the PLAY button to begin
a VCR recording.
Rewind Button
Press to rewind tapes. For some
VCRs you may need to press STOP
button first then REWIND. In
playback mode, hold button down to
view picture moving rapidly in
reverse.
Pause Button
Press to temporarily stop the tape dur-
ing a playback or recording. Press
again to release Pause.
TV-VCR Button
Press to the VCR position ("VCR"
indicator on the VCR will light) to
view the playback o[ a tape. Press
again to place in the TV position
("VCR" indicator on the VCR will go
OFF) to view one program while
recording another program.
VCR8
(D ®@
lV
®®®
(2)®®
CBL
•Fast Forward Button
Press to rapidly advance the tape. For
some VCRs you may need to press
STOP first then FF. In Playback
rnodc hold button down to view the
picture moving rapidly in the forward
direction.
L
Channel Scan Buttons
Press to scan up or down through
VCR channel numbers.
Number Buttons
Fress buLtons for direct VCR channel
s zlections.
Power Button
Fress to turn the VCR ON and OFF.
I
,_._,_1-_0 Remember. TheVCR
buttons on the remote will
rot operate your VCR if those
features are not already found on
_our VCR remote control.
k. J
39
Note: All VCR functions
(particularly Search, Rewind, Fast
Forward, etc.) will operate the
same as with the original VCR
remote control provided with the
VCR.
Page 40

re you tired of hearing
commercials blaring at you
ever_ when you've gone into the
kitchen or down the hall? The
Automatic Volume Leveler (A VL)
comrol enables" you to hear a more
con:;istent, even sound level-by
reducing the peaks and valleys
that can occur during program
cha_yges or comrr,ereial breaks.
{-a-_c,-r_
<_ Press the AVL button on the
remote.
"AUTO VOLLIME LEVELER"
shows on the TV screen.
<_ 14eep pressing the AVL button
to turn the volume level control
ON (or OFF.)
_,' _ Press the STATUS button to
clear the screen.
,:ll
AUTO-VOLUMELEVELERON
---.._
--- Remember. The AVL
"works only with the programs
coming through the Anlenna/Cable
input on the rear of the TV. It will
not control the sound levels for the
Auxiliary (VCR/AUX IN) audio
inputs.
Go@
g:Sc%d5 db
_g::Sdb db
_BOO@
,,,_ ®®®
,,, @®®
_0 oa
_ Powtl ,,,_,,_,1
4O
Page 41

o yc,u ever have trouble
remembering on which
chamwl a particular station or
network is located? The Channel
Guide is a quick way to view and
select chamwls fmm a list of
Lztbelled ch_umels. _
A Label is a four letter callout you
can set to appear with the on
screen cha.,mel number. Exantp/e
l_tbel: WXYZ -for a TV station's
call lettetw.
To selecl channels.[kom the
Channel Guide:
f
_1"_ Press the CH GUIDE button
the remote
on
A "CHANNEL GUIDE" shows on
the screen with channel numbers
and capnons.
Keep pressing the CH GUIDE
button to see v,,hat other labelled
channels can be selected.
%z_ Press the number buttons on
the remote to select the desired
htbelled channel.
Remember to press "0" first and
then the number for single digit
channels.
<,,:.__.,,_Press the MENU button to pick
a Label for a channel from the
"LABEL, CHOICE" list, or write a
new caplion for a channel. (See
sidebar notes).
_,,di,_'a Press the STATUS button to
clear the screen.
To write your own Label for a
Channel:
With the double arrow poinlirg? to
"CUSTOM". press the MF.NU
button.
8
CURRI'N'I"
CH:\NNEI.
NUMBliR
7¸¸¸¸
To pick a Label from the
r r
'i_IBEL CHOICE' list:
Press the MENU &V buttons to
move the red arrow through the
Label Choice list.
8
t
A red arrow appears under tt.e
first letter space for the chann.-I
caption.
Press the MENU A'!!' buttons to
pick any of the letters or symbols
that are given for your use.
Press the (+) or (-) buuons to
move the red arrow to the olher
letter spaces and repeat.
Press the STATUS button to
clear the screen when finishec.
41
.lust stop the arrow on any label
you might want to use. The
selected label automatically
moves under the current channel
number.
You can also pick a "blank" space
(It,cared above the ABC label) it
you don't want any label to appear
with the channel
Page 42

the TV to preset channel, picture,
and sound level _'ettin_ you place
in the TV's memory.
Five different Pe,_#gnal Pre[erences
can be set so thai: more than one
per€on can prese! the TV fi)r his
(or her) pr<[_ren ce.
To ._'et Personal Preference:
_ l'ress the Personal Preference
(P.PREF.) button on the remote.
"PERSONAL PP,EFERENCES"
shows on the TV screen.
Press the MENU button to
EDIT or setup P PREF. tot your
own settings.
_ Press the number button on
the remote for the P. PREF. you
vcant to set. For example: press I
for AUX IN - PREFI.
MODIFY PREF I appears on the
screen with a list of picture and
sound control:<
_ Press the MFNU _kl!' buttons
to move the red arrow up and down
the list of controls. Press the
MENU button to select the control.
Adjust an3,,of the listed controls to
the settings you would prefer for
level PREF I.
If you want to setup P. PREF_ to
select a certain channel number for
you, use the Piclure Source Select
control to set the channel.
After all conl:rol settings are
finished, press the STATUS
button to clear the screen.
contitttt¢, to H{,._Ypgtq#
42
Page 43

To use tile Personal Preference
settings you placed in memorw
_1_ Press the P. PREF button
the remote.
"PERSONAI_ PREFERENCES"
shows on the TV screen.
(_ Press the number button on
the remote to select the P. PREF.
you desire. For example: press I to
select "AUX IN".
The channel, picture and sound
settings will1 change to the levels
you setup for that P. PREF.
_1,(.._._ Remember. If no settings
have been made for the
selected P. PREF., the TV screen
will show "PREFERENCE
NEVER SAVED".
on
8
12:30
i!iii!iiiiiiiiiiiiiiii_iiiiiiiiiiiii!iiiiiiii}!iiii
_ i i:ii_iiiii{i iiiii3iiili_iii_{iiiil
The "CHANGE P. PREF. LABEL"
control car, be used to change the
title of a P. PREF. into a name or
label that may be easier for you to
remember.
<1_ With the CHANGE P. PREF.
LABEL control on the screen,
press the MENU A'l? buttons to
spell out a new label or title for the
selected P. PREF.
_X._ Press the (+) and (-) buttons to
letter space.
I move the red arrow under each
_,_ Press the STATUS button to
clear the screen when the new label
is finished.
....,, iii!i!!i!!iii!i!!iiii!!iiiiiiiiiiiiiiiiiiiiii!iiiiiiiiiiiiiiiiiii i i s .
' iiiiiii!i iiiiiiiiiiiiiiiiiiiiiiiiiiiiiiiiiiiiiiiiiiiiiiii!iiiiiiiiiiiiiiiiiiiiiiiiiiiiiiiiiiiiiiiiiiiiiiiiiii_ii!iiii!iiiiiiiiiii_iiiiiiiiiii_iii......
43
Page 44

7"our remote control is set to
. work your TV and many
hTfirared remote (IR) control
VCRs. However, an easy one-
time step may be necessary
bqfi)re the remo;e will work your
VCR.
VCR
CBL ®®
Try this initial check to see if
going on to the following section
is necessary.
f-a- m-r -I
Slide the TV..VCR-CBL
j switch on the remote to VCR.
Point remote toward VCR
J and press the POWER button.
Does the remote turn the VCR
ON?
IF YES, !_ and try the other
VCR buttons on the remote. If
they also work l:he VCR, then
the remote is ready and no
further steps are needed.
If NO, continue...
r
l_ First look TWO-DIGITlip
remote code number for your
brand VCR before going through
the simple "1,2,3" steps (on the
following page).
-- Remember If more than
one number is listed, you
may have to try more than the
first two-digit code given in order
to locate your VCR's remote
code.
continue to next page
a
VCR
VCR REMOTE
BRAND CODE NO.
Akai 24, 25, 2;6
Audio Dynamics 14, 21,29
Broksonic 31
Cannon 01
Capehart 33
Craig 07, 30
Curtis Mathes 01, 32, 42, 4-3
Daewoo 2:;3
DBX 14, 21 ,29
Dynatech 2-_
Emerson 20, 31, 34, ,1()
Fisher 06, 07, 0g
Funai 27, 2g
GE 01
Goldstar 122,
Go Video 45, 4(,
Hitachi 03, 51
Instant Replay OI
JC Penney 01, 03, 23, 29
JVC 14, 47, 4g
Kenwood 13. 14
Lloyds 2"1
Magnavox 00, 01,02, 05, 27, 28
Magnin 30
Marantz 29
Memorex 01,07, 23, 2"7
Minolta 03
Mitsubishi 16, 17, 38, 39, 50
Montgomery Ward 12
%
44
VCR REMOTE%
BRANI) CODE NO.
Multi_ech 27,28
NEC 14, 2 I, 29
Panasonic 0 I
Pen:a,_ 02, 03
Philco 01,02, 05, 27, 28
Philips 00, 01,02, 05, 27, 28
Quasar 0 I
RCA 03, 04, 32, 42, 43, 44
Realistic 07,1 I, 12, 23, 27, 28
Samsang 22, 30
Sanst, i 49
Sanyo 07, 13
Scott 19
Sears 03, 08, 23
Sharp l I, 12
Shinton 35
Sony 09, 10,41
Sound Design 27
Sylv_mia 00, 01, 02, 05, 27, 28
Symphonic 27
Tatung 14
Teac 14, 27
Teknika 26, 27
Thomas; 27
TM K. 20
Toshiba 18, 19
Video Concepts 28, 29
Yamaha 14, 28, 29
Zenith 15
Page 45

m
ow that you have looked up
the two-digit Remote Code
Number for your brand of VCR
(on previous page), you are
ready to fc,l!ow the four simple
steps below.
Please read-through steps 1-4
before beginnhzg.
q_ Slide the TV-VCR-CBL
switch to VCR.
_,_ Press and release the
RECORD button, and then
press and release the VCR
POWER hutton.
<;_ Within thirty seconds after
releasing the VCR POWER
button, ENTER THE TWO
DIGIT CODE NUMBER for
the desired VCR. The remote is
now ready to send commands to
the VCR.
Q4_,_ Point Ihe remote at the VCR.
Press the VCR POWER button
on the remote to turn the VCR
()1].
_ T_Rt out- The Channel and
but,Ions on the remote
should now operate the VCR.
PU,Y
VCR
_ Remember. If this doesn't
work the first time, repeat
steps usin_ the same remote
code number.
If after a second try the remote
does not operate your VCR, and
there are more code numbers
listed tot your brand VCR, use
the next listed code number.
If after repeated attempts the
code number method does not
work your VCR, try the "VCR
SEARCH" method on page 48.
45
Page 46

P'our remote control is set to
work your TV and many
infiztred remote !IR) control
Cable Converters. However, an
ea.sy one-tinw Stel) may be
necessary before the remote will
work your Converter.
Try this initial check to see {f
going on to the fidlowing section
is necessary.
RC-ag6,--
<_ Slide the TV-VCR-CBL
switch on the remote to CBL.
2_ Point toward Cable
Converter and press the CBL
POWER button.
remote
C_{ble
Converter
! I
I
Does the remote the
Converter ON?
1F YES, 1_1 and try the CH A •
and CH number buttons on the
remote. If they also work the
Converter then the remote is
ready and no further steps are
needed.
If NO, continue...
1@ First look up a TWO-DIGIT
re,mote code number for your
brand Converter before going
through the simple "1,2,3" steps
(c_n the followi ag page).
,_._- Remember. If more than
one number is listed, you
turn
may have to try more than the
first two-digit code given in
order to locate your Converter's
remote code.
continue to next page
CONVERTER REMOTE
BRAND CODE NO.
Archer 28
Diamond 23
Drake 37
Gemini 45
Hamlin 14, 15
Hitachi 25
Jerrold 01,02,03,04,05,30,46
Macom 29, 38
Magnavox 17,26, 31
NSC 49
Oak 06, 27, 39
Panasonic 18, 35
Philips 19, 20, 21,24, 26
Pioneer 09, 32
Regency 1(), 11
%_
CONVERTER REMOTE
BRAND CODE NO,.
Rembrant 33
Salora 52
Scientific Atlanta 08, 22, 47
Sheritech 34
Sylvania 16
Texscan 16, 48
Tocom 12,13, 53
Toshiba 43
Uniden Satellite 44, 54
Unika 50
Universal 36
Video Tech 40
Video Way 5 I
Viewstar 26
Zenith 07, 41,42
46
Page 47

ow tlua you have looked up
the two-digit Remote Code
Number for your brand qf Cable
Converter (on previous page),
you are ready tofollow the fimr
simple st_7)v below.
Please read through steps 1-4
before beginnhlg.
_--___> Slide the TV-VCR-CBL
switchto CBL.
q,_ Press and release the
RECORD button, and then
press and release the CBL
POWER button.
_,_ Within thirty seconds
releasing the CBL POWER
button, ENTER THE TWO
DIGIT CODE NUMBER for
the desired Converter (see note).
The remote is now ready to send
commands to the Converter.
_4j Point the remote at the
Converter. Press the CBL
POWER button on the remote to
turn the Converter on.
Try it out. The Channel and
POWER buttons on the remote
should now operate the
Con verier.
PLAY
Cable Converter
I I
after
_ Remember. If this doesn't
work the first time, repeat
steps using the same remote
code number.
If after a second try the remote
does not operate your Converter,
and there are more code numbers
listed for your brand Converter,
use the next listed code number.
1tafter repeated attempts the
code number method does not
work your Converter, try the
"CONVERTER SEARCH"
method on page 49.
47
Page 48

/our TV remote can be set to
L work wmr VCR by what is
called the SEARCH method.
lf i'he "REMOTE CODE" number
method shown bz the previous
se,'tion did not :;et your renlote to
work your VCR then follow the
five easy steps listed below.
Please read through steps 1-5
before beginning.
ga- G,---ffl
Slide the TV-VCR-CBL
m
09
I switch to VCR
_--.._ Press the I'OWER button on
the VCR to turn VCR ON.
_ Stand at least six feet away from
the front of the VCR.
Point the remote toward the
VCR.
HOLD DOWN the AJCH and
VCR POWFR buttons at the
same time. KEFP HOLDING
BUTTONS DOWN.
Watch the Channel Indicator
on the VCR.
Channel Numbers will SCAN UP
when the VCR has been
identified. This may take up to
two minutes.
@ Release the A/CH and VCR
POWER buttons as soon as
channel numbers start to scan up.
The VCR code has been identified
and the remote is ready to operate
the VCR.
l)tlll'l ICl the VCR scan tip
iI1orc lharl five C}I_IIIlIClS
(in Search II/odc .
8
ON Off PO$ SWAP FRZ
P VUE STRB SIZE
_i_.,,--_ _ Remember. A minute or
--two can seem very long, but
tee code should be located within
two minutes.
Don't let the VCR scan up more
than five channels. If you do the
remote may pass up the right code
and another two minute search
cycle will have: to be repeated.
If no channel change happens
within two minutes, repeat steps
1-5. Should a channel change still
not occur, the remote will not
work with the desired VCR.
48
Page 49

m
our TV remote can be set to
work your Cable Converter by
what is called the SEARCH
method.
If the "REMOTE CODE" m.nber
method shown in the previous
section did not set your remote to
work your Converter, t-hen follow
the five ec_O' steps listed below.
Please read through steps 1-5
before beginning.
Q.]_ Slide the TV-VCR-CBL switch
to CBL.
<.)_ Press the POWER button on
the Converter to turn Converter
ON.
<_ Stand at iieast six feet away from
the front of the Converter.
Point the remote toward the
Converter.
HOLD DOWN the A/CI! and
CBL POWER buttons at the same
time. KEEP HOLDING
BUTTONS DOWN.
Cable Converter
O9
t
Six Feel
Iminmmml
r
pLAy
q[_ Watch the Channel Indicator
on the Converter.
Channel Numbers will SCAN UP
when the Converter has been
identified. This may take up to two
minutes.
,,_ Release the A/CH and CBL
POWER buttons as soon as
channel numbersstart to scan up.
The Converter code has been
identified and the remote is ready
to operate the Converter.
,_[_/_ Remember. A minute or
-- with the desired Converter.
two can seem very long, but
the code should be located within
two minules.
Don't let the Converter scan up
more than five channels, lfyou do
the remote may pass up the right
code and another two minute
search cycle will have to be
repeated.
If no channel change happens
within two minutes, repeat steps I-
5. Should a channel change still
not occur, the remote will not work
49
Page 50

_)icture in Picture (PIP) is the
.J[ showing of two pictures on the
TV screen at the same time. (One
main screen picture and one small
inset picture - or F'IP).
Note." The PIP picture mttsl be
supp:ied by a VCR Or other-
acce:;sorv equipped with a VIDEO
OUTPUT jack), lf you already
wen! through FIRST TIME SETUP
(page I0), then the connections for
PIP I)ave been cot qpleted.
To xee how channels seh'cted on a
VCR can be shown as PIP:
C,_)nnect the VIDEO OUT
jack on the VCR to the AUX IN ]
VIDEO IN jack on the TV.
Also connect the AUDIO OUT (R
and L)jacks from the VCR to the
AUX IN1 AUDIO IN ,jacks on the
TV.
F'IP
MAIN
SC R I:'I'.'N
Also ensure the normal antenna
confection between the VCR and
TV are in place.
Move to the next page after
the VCR to TV PIP connections
are completed.
• -z_ Remember. The AUX
INI or AUX IN2jacks can
be used for PIP connections.
Please be sure thal the PIP Picture
Source control (page 54) is set for
the correct set of Audio/Video
Inputs that are being used.
No sound will be heard with the
PIP picture. See page 52 on how
to "SWAP" the PiP picture with
the main screen picture so that
sound can be hea:d.
If you have a single (monaural)
Aucio Output VCR, "Y"
connectors are available to
corr,plele your connection. Contact
your dealer, or our Paris
Infc.rmation Center, for details.
ANT OLI'I'
AUI)IO OUT
(RI_D/\VHITI-)
VCR
ALIDIOIVII)E()
CABI.IZS SL PPLII{D
OUTI)OOR LJHF/VHF
ANTI!NNA
ANT IN
CA FH.I" rv
SI(;N:\I.
5O
Page 51

w that you have comph, ted
he reqidred connections on
the prePit;u.s page you are ready to
.follow the Stml_le steps shown
below.
Turn
_ the VCR and TV ON.
Place the VCR in the TV mode -
Use the TV/VCR button on
the TV remote (if the remote
has been set to work with
your VCR - see page 44.)
Place the TV in the
ANT/CABLE mode -
Use the MENU (and MAY)
bultor_s on the remote to sel
MAIN F'ICTURE SOURCE
control to ANT!CABLE.
12:00 ^"
06
VCR IN t'V MOI)F.
"FV IN ANT/('AI3I.I"
8
_----_ Select Ihe channels on the TV
and VCR to be watched.
_> Press lhe PIP ON/OFF
button on the remote.
_1_ _ Remember See the
followin-_ pa-e_ on how to
operate other PIP features with the
remote control.
12:00""
19
VCR- PIP CHANNEl.
12:34
TV - MAIN SCRliI'N C|I.\NNI-I.
V{'R
SKIJ ('TI'])
{_'HANNKI.
'4"V
SI LI{('ITI)
CItBNNIll.
Be surL' Io point Ih¢ rcnlolc al IhC
fronl oI the VCR when prcs_,ing
VCR lul]clion bull{re';.
51
_45_,45
:.@®®®
®®®
r:n® oa
(:D_)(:E)
Page 52

JLJ remote the PIP picture can be
moved and swapped with the main
l l_y using the t'IP buttons on the
scrc_L
,,_ [_ Press PIP ON button to show
! the PIP picture. - -
PIP screen appears in corner of TV
screen. Press PIP ON again to
remove PIP from the main screen.
Press PIP POSITION button
on the remote Io move the PIP
picture (from corr:er to corner on
the r_ain screen).
4. FREEZE
Press SWAP to the main
swap
screen picture with the PiP picture.
Press SWAP again to return the
main screen and PIP to their
origi nal positions. See the
important reminder below.
_-a Press FREEZE button to hold
the current Main picture in the PIP
window (Main picture is active).
If P]iP is currently OFF the PiP will
be automatically shown.
Press FRZ repeatedly to update the
frozen PIP with current pictures.
The frozen PIP cannot be swapped
with the main screen.
Press the PIP ON/OFF button to
drop the frozen PIP picture from
the screen.
continue to next page
3. PiP SWAP _[v
,__; Remember. If the PIP
picture is on the main screen
when the TV is turned OFF, a
blank screen will appear when the
TV is turned back ON again.
If this happen.,,, you can either:
Press the CHANNEL A or •
buttons to select a channel for
viewing (if the AUX 1 or AUX2
mode has been added to TV's
channel memory, - see page 29).
Use the Picture Source Select
control (see page 16) to return the
TV to the ANT/CABLE mode.
2. PIP POSITION
I. PIPON / OFF
52
Page 53

5.PiPSize 6.PIPSTROBE
7.PIPPREVIEW
@P :ess to change
the !.ize of the PIP window shown
on the TV screen.
Press the PIP SIZE button again to
see and compare the large and
sma :l size PIP windows.
SIZE button
Press STROBE; to see a series
of fl:mrfrozen scenes from the
ct,rr,.+ntlyselected channel. Press
S'FRB again and the series of
pictures will be updated.
Press PREVIEW button to see
,_hat is showing on four channels.
P,'VJE starts with the current
channel and shows the next three
channels in memory.
Every few seconds each P/VUE
picture ,,viii be updated with a
curr,_nt scene for that channel.
P;ess WVUE again to go to the
next four channels in memory and
so on. Just press the number
buttons to select any previewed
charlnel.
53
Page 54

"fiepicture fi_r the PIP window
can come d_rough either the
VCR/A UXI or A UX IN2
Audio/Video Input jacks (on the
rear t?fthe TV). PIP Picture Source
simply tells the TV which one of
these two source's-it is to st_m' on
the TV screen.
<_ Select PIP PICTURE
SOURCE control
With the ADVANCED
C()NTROLS on screen, move the
vet[ arrow with the MENU &_'
bu:tons. Then press MENU button.
Press the MENU A.Y buttons
to select the source for the PIP
)icture as either:
V (2R/A U X 1 -
AUX2- lk)r a picture signal
Press the STATUS button
clear the screen.
for a picture signal
coming from the
AUX IN I
Audio/Video .jacks
on the TV.
coming from the AUX1N2
Audio/Video jacks on the
TV.
ADVANCEDCONTROLS
EXIT
I_ PIPPICTURESOURCE
CLOSEDCAPTIONING
-- CAPTIONINGDURING MUTE
SLEEPTIMER
-- SETTIME
-- TIME REMINDER
USE _. THEN _ TO SELECT.
to
_lll_(v Remember. The PIP screen
ill be blank unless a signal
:source is connected Io either the
VCR/AUX 1 or AUX2 Audio/Video
Input jacks on lhe TV. (See page 50
ti)r details).
54
Page 55

TC w Pict_re-ln-Picture (PIP)
olor cnd Tint controls are
used to adiust the color settings for
PIP when it is shown on the TV
scr_gIL
[BEGIN]
_1_ Select PIP COLOR (or TINT)
control.
With the PICTURE/SOUND
CONTROLS on screen, move the
red arrow with the MENU ,AV
buttons. Then press MENU button.
<%_./_3"he PIP automatically comes
on to show the PIP window on the
TV screen.
If you used the First Time Setup
(page 10) lhe TV is ready to show
the playback of a VCR tape in the
PIP window.
If you wanl to see how channels
selected on the VCR can be
viewed in the PIP window, see
pages 50-5 I.
J_
"_._ Press the (+) and (-) buttons
PICTURE/ SOUNDCONTROLS
-- CLEARVIEW
FLESHCORRECTION
I_ PIP COLOR
PIP TINT .... II :
BASS
-- TREBLE ......
-- BALANCE
USE _ THEN_ TO SELECT.
---7--
COLOI
4-ffr_ll i i i i i
lo
levels you prefer.
I adjust the PIP for Color (or Tint)
_4_ Press the STATUS button to
clear the screen.
_[],-- _ Remember. Although there
'_" are separate COLOR and
TINT controls for PIP, the
adjustment levels for these controls
depend on Ihe TV's main picture.
For example: If the main screen is
showing a black and white picture,
PIP would also be in black and
white (eve_ though its source is in
color).
55
Page 56

,4 n Accessory She!f has been
,U]ksupplied m you that can be
,no,rated m the rear of the TV. This
xhe!f can give yott a wider, more
wable area on which to set
optiona[ accessories.
To attach the=shelf: -
_) Place the Shelf
Accessory
to
the top back of the TV cabinet.
Be sure the holes on the shell line
up with the predrilled holes on the
TV cabinet.
Q_ Screw the shelf into Be
place.
sure the shell's backstop edge is
pointing up.
Use the the same four screws that
came with the shelf for final
attachment.
_.._ Once in the
securely place
shelf is ready to be used as a
support for your most common
electronic accessories
I__I___
--_ ACCESSORY, SHEI.F
n optional AK9232 RF
Switcher is availat)h" that will
allow a:t .4r'temlcr/Cabh" TV ,vignal
input and a_:tother video ac(essorv
(VCR, Vide,') Disc Player. etc'.) to
be connected lo the TV a_ the .vame
time.
The accessory RF switcher can be
purchased or ordered from your
dealer. If you dealer does not carry
the accessory, call the toll free
Parts lnlorraation Center number:
/-800-292-6066
RF SWITCHER
ANTIN
_]]]]_ ANT OUT ANT OUT
ACC_
,., y
i
CASTE
QO
Re;it i)f TV
58
ANTffNN CABLE SIGNAL
VGFI
VIDEO DISC PLAYER
Page 57

Coa_dal Cable * A single solid antenna wire normally matched with a
metal plug (F-type) end connector that screws (or pushes) directly onto
a 75 Ohm inpul found on the Television or VCR.
Display * An on screen message or graphics that help the user operate
and adjust his Television ['eature controls. See On Screen Displays
(OSD).
Direct Audio/Video Inputs * _ocated on the rear c4 the TV these
connectors (RCA phono type plug) are used for the input of audio and
video signals. Designed for use with VCRs (or other accessories) in
order to receive higher picture resolution and offer sound connection
options.
Identify* Method by which a remote control searches and finds an
operating code for another product (such as a VCR or Cable Converter).
Once the code has keen "identified" then the TV remote can operate
and send command:; to the other product.
Mullichannel Television Sound (MTS) * The broadcast standard that
allows for stereo sound to be transmitted with the TV picture.
On Screen Displays (OSD) * Refers to the wording or messages
gene:'ated by the tel,zvision (or VCR) to help the user with specific
feature controls (color adjustment, programming, etc.).
Picture -In-Picture (PIP) * Terrl used when two pi,=turc:s are shown
on the TV screen at the same time. "]'he smaller PIP picture is
supplied by a VCR (or other tuner/;,ideo playback source). The PIP
picture can also be moved and s_apped with the TV's main screen
picture.
Programming * The procedure of ::dding or deleting channel
numbers inlo the Television's memory circuits. In this way the
Television "mmenlbers" only the locally available or desired
channel numbers and skips over any unwanted channe! numbers.
Remote Sensor Window * A window or opening Iound on the
Television control panel through which infrared remote control
command signals are received.
Second Audit) Program (SAP) * Another or additional audio
channel provided Ior in the Mu Ili,.:hannel Television Sotmd (MTS)
broadcast stand,'trd. The most frequently proposed use for SAP is the
simultaneous biingual broadcast of TV program malerial.
Status * Allow:. Ihe user to quickly confirm what channel number is
currently being _,iewed. Status can also be used to clear the
Television of or screen displays or information (rather than waiting
for the displays Io "'time out" or automatically disappear from the
screen).
Menu * An on-screen listing of feature controls shown on the
Television screen that are made available Ibr user adjustments.
Acc,zssories/Optitmal ......................................... 6, 7, 3 I, 34, 37, 56, 59
Accc'ssory Shelf Installation .............................................................. 59
Add/Delcte Channels ............................................................... 8, 28, 29
Advance Buttons ................................................................................ 12
Audio Controls ....................................................................... 20-22, 3I
Audio/Video Input ........................................................... 10, 34, 50, 56
Automatic Programming ................................................................ 8, 28
Batl,zry Installation ....................................................................... 12, 38
Cable TV Connections/Seltings ............................................. 6, 7, 8, 27
Censor Channels ................................................................................ 32
Channel Guide ................................................................................... 41
Channel/Time Display ........................................................... 25, 26, 41
Channel Memory ..................................................................... 8, 28, 29
Channel/Time Reminder .................................................................... 25
Clock Setting ...................................................................................... 22
Closed Captioning .............................................................................. 23
Convergence ...................................................................................... 30
Conlrols/TV ................................................................................... 8, 12
Conlrols/Remote .................................................................... 13, 15, 38
Exit ..................................................................................................... 14
Factory Reset ..................................................................................... 42
Feamres ................................................................................................ 4
First Time Set Up ................................................................................. 8
Twin Lead Wire * The more commonly used name for the two
strand 300 Ohm antcnna wire used with many indoor and outdoor
antenna system,',. In many case_, this type of antenna wire requires an
additional adapter (or balun) in order to connect to the 75 Ohm Input
terminals desigred into the more recent Televisions and VCRs.
GIossary/TV Te :ms ........................................................................... 58
Inputs/Audio anJ Video .............................................. 10, 34-37, 50, 56
Menu ................................................................................................. 14
Minus(-)/Plus (4) Buttons ................................................................. 14
Picture-ln-Piclure (PIP) ....................................................... 20, 50-56
Power Light Indicator ....................................................................... 12
Precautions/Safety ..................................................................... 2, 3, 57
Remote Control ..................................................... 13, 15, 38-49, 52-53
RF Coaxial Cabe .......................................................... 6, 7, 34, 50, 56
RF Switcher ....................................................................................... 59
Reminder/Time and Channel ............................................................ 25
Second Audio P_ogram (SAP) l,i_,ht .................................................. 23
Sensor Remote .................................................................................... 12
Sleep Timer ........................................................................................ 24
Status Button ............................................................................... 14, 38
Stereo Light Indicator ........................................................................ 21
Surround Sound .................................................................................. 37
Time/Channel Display ..................................................... 22, 25, 26, 41
VCR Button .................................................................................. 12, 34
VCR/TV Conne_.lions .................................................. 7, 10, 34, 50, 56
Tips for Service ................................................................................. 57
TV Speaker Switch ........................................................................... 31
Warranty ............................................................................................ 60
59
Page 58

PROJECTION TELEVISION i __
•One (1) Year In Home Service Labor Wa rranty
Thirty (30) Day Exchange Warranty Projection TV Screen
One (1) Year Exchange Warranty Parts,
Two (2) Year Exchange Warranty on Cathode Ray Tube
For purchasesoutside the U.S v see applicable warranty fro m country of purchase.
This warranty gives you specific legal' rights and you may also have other rights which ,ary from state to state.,,
Parts and Labor
For one year (30 clays for the Projection TV screen) after the date"
of purchase, an Authorized Service Center,,will repair any
product defectand replace any defective part, including the
cathode ray tubes and lens without charge to you for parts or
labor.
Replacement Cathode Ray Tubes
Except for return shipping cost, an Authorized Service Center
will, for two (21)years after installation of the TV, replace a
defective cathode ray tube without charge for the replacement
tube. If the tube replacement is made after one year, you must
pay for all labor and home service charges to replace it.
RepLacement parts and tubes installed during the warranty period
are warranted only for the balance of the original warranty
period.
Replacement "Clear-Vu" Lens
The "Clear-Vu" Lens is warranted against manufacturing defects,
to the original purchaser, for the lifetime of the product. If the
lens replacement is made after one year, you must pay for the
labor and home: service charges to replace it.
What the Purchaser Must Do
Befi)re you call for service, check your operating instruction
booklet. A slight adjustment of the customer controls discussed
in y3ur instruction booklet may save you a service call.
If you require service during the warranty period, you must
contact an Authorized Service Center to arrange for repair. The
Service Center must be allowed to keep defective parts.
Warranty service will be performed by an Authorized Service
Center. We suggest that you contact your dealer. If your dealer
does not operate an Authorized Service Center, he will direct you
to the Authorized. Service center engaged by him to service the
product he seller.
If you reside in an area where we have a Factory Service Center
(see the Factory ,Service Center address directory supplied with
your product literature), you can contact them to schedule a
convenient time for an In-Home service call.
YOU MUST PRESENT PROOF OF THE DATE (:IN
WHICH THE PROJECTION rv WAS FIRST
PURCHASED (SALES RECEIPT OR OTHER. EVIDENCE)
WHEN REQUI_STING SERVICE OR REPLACEMENT _
PART WARRANTY PERFOEI_'IANCE.
Warranty Exclusions
Your Warranty Does Not Cover:
Labor charges :or set installation or set-up, adjustment of
customer or prefl;rence controls, and installation or repair of
antenna systems outside the TV _elt.
Product repair ar,d/or part rep[aczn ent because of misase,
accident, unauthorized repair cr 3ther cause not withi_ the control
of Philips Consu-ner Electronics Company.
Reception problems caused by s]gr al conditions or cable or
antenna systems outside the TV.
A television purchased, used or ,;erviced outside the U.S.A.,
Puerto Rico anCl Ihe Virgin Islands. or used for commercial or
institutional purl:,oses.
Incidental or consequential damages resulting from the product.
Some states do not allow the exclu:don of incidental or
consequential damages, so the abo':e exclusion may not apply to
you.
ALL IMPLIED WARRANTIES INCLUDING IMPLIED
WARRANTIES OF MERCtlANTABILITY AND FITNESS
FOR A PARTICULAR PURPOS;E, ARE LIMI[TED IN
DURATION TO THE DURATION OF THIS I?XPRESS
WARRANTY. Some states do not allow limitations on how
long an implied warranty lasts, so the above limitation may
not apply to you.
IMPORTANT REMINDER
PLEASE FILL, OUT AND MAIL YOUR WARRANTY
REGISTRATION[ CARD PROMI::TLY. IT WILL BE EASIER
FOR US TO NOTIFY YOU I)? I[T SHOULD EVI_:,RBE
REQUIRED. PLEASE ALSO KEEP YOUR SALES RECEIPT
AND ANY OTHER PROOF OF FURCHASE INFORMATION.
Please write youJr model and Serial numbers below. The
numbers are located on the back of your unit. Please remember
to have these numbers on hand any time you call.
MODEL NO.
SERIAL NO.
I
Copydght O1992 Philips Consum'erElectronicSCompany'. AIFrights rescivcd.
IB,6644-EO01
I:'HILIPS SERVICE COMPANY
P.O. BOX 555 • JEFFERSON CITY, TENNESSEE.37760
(615) 475.8869
60 •
 Loading...