

Page 1

0
AL
C 0 L 0 R
T E L E V I $ I 0 N
oo
P
Page 2

Once your PHILIPS MAGNAVOX purchase is registered, you're eligible to receive all the privileges of
owning a PHILIPS MAGNAVOX product. So complete and return the Warranty Registration Card
enclosed with your purchase at once. And take advantage of these important benefits.
Congratulations on your purchase,
and welcome to the "family!"
PHILIPS
Dear PHILIPS MAGNAVOX product owner:
Thank you for your confidence in PHILIPS MAGNAVOX. You've selected one of the best-built, best-
backed products
available today. And we'll do everything in our power to keep you happy with your purchase for many
years to come.
As a member of the PHILIPS MAGNAVOX ffamily," you're entitled to protection by one of the most
comprehensive warranties and outstanding service networks in the industry.
What's more, your purchase guarantees you'll receive all the information and special offersfor which
you qualify, plus easy access to accessories from our convenient home shopping network.
And most importantly you can count on our uncompromising commitment to your total satisfaction.
All of this is our way of saying welcome-and thanks for investing in a PHILIPS MAGNAVOX product.
Sincerely,
Robert Minkhorst
President and Chief Executive Officer
P.S. Remember, to get the most from your PHILIPS
MAGNAVOX product, you must return your
Warranty Registration Card within 10 days. So
please mail it to us right nowt
Know these
safetysymbols
A This "bolt of lightning" indicates uninsulated material within your unit may cause an electrical
shock. For the safe_ of everyone in your household, please do not remove product covering.
_LThe "exclamation point" calls attention to features for which you should read the enclosed lit-
erature closely to prevent operating and maintenance problems.
WARNING: TO PREVENT FIRE OR SHOCK HAZARD, DO NOT EXPOSE THIS EQUIPMF" ....
TO RAIN OR MOISTURE.
CAUTION: To prevent electric shock, match wide blade of plug to wide slot, and fully insert.
ATTENTION: Pour eviter les chocs electriques, introduire la lame la plus large de la fiche dans la
borne correspondante de la prise et pousser jusqu'au fond.
MAGNAVOX
Page 3
Introduction
Welcome/Registration of YourTV ............................ 2
"['able of Contents ....................................................... 3
Features...................................................................... 3
-_ Quick Use/Start Up Features
_Antenna Hookups ................................................ 4
_Cable Hookups .................................................... 5
<_VCR to "IV Hookups .................................... 5, 19
_Basic TV and Remote Operations ...................... 6
_First Time Setup .................................................. 7
_ On-Screen (MENU) Features
<)>Howto Set the TV for Closed Captioning ......... 8
_How to Set the TV's Clock ................................. 9
_Using the Surf Control...................................... 10
+How to Set the Sleep Timer Control................. 11
_Adjusting the TV Picture Controls ................... 11
_'Using the Smart Picture Control....................... 12
+Using the Smart Sound Control (AVL) ............ 13
ffUsing the TV's Volume Control ....................... 14
M General Information
Tips if Something Isn't Working ............................. 15
Glossary of TV Terms .............................................. 16
Index ........................................................................ 17
F:actory Service Locations .................................. 18-19
Warranty ................................................................... 20
Infrared Remote Control works your "IVset and
on-screen features.
Standard broadcast (VHF/UHF) or Cable TV
(CATV) channel capability.
Closed Captioning allows the viewer to read TV
program dialogue or voice conversations as on-
screen text.
Automatic Programming of Channels for quick
and easy selection of favorite stations available in
your area.
On-Screen Features (in either English, French, or
Spanish) show helpful messages for setting of TV
controls.
Sleep Timer automatically turns the TV OFF at pre-
set times.
Clock Timer feature can turn ON the TV at any pre-
set time -just like an alarm clock.
Copyright © 1997 Philips Consumer Electronics Company. All rights reserved.
Page 4
<
<
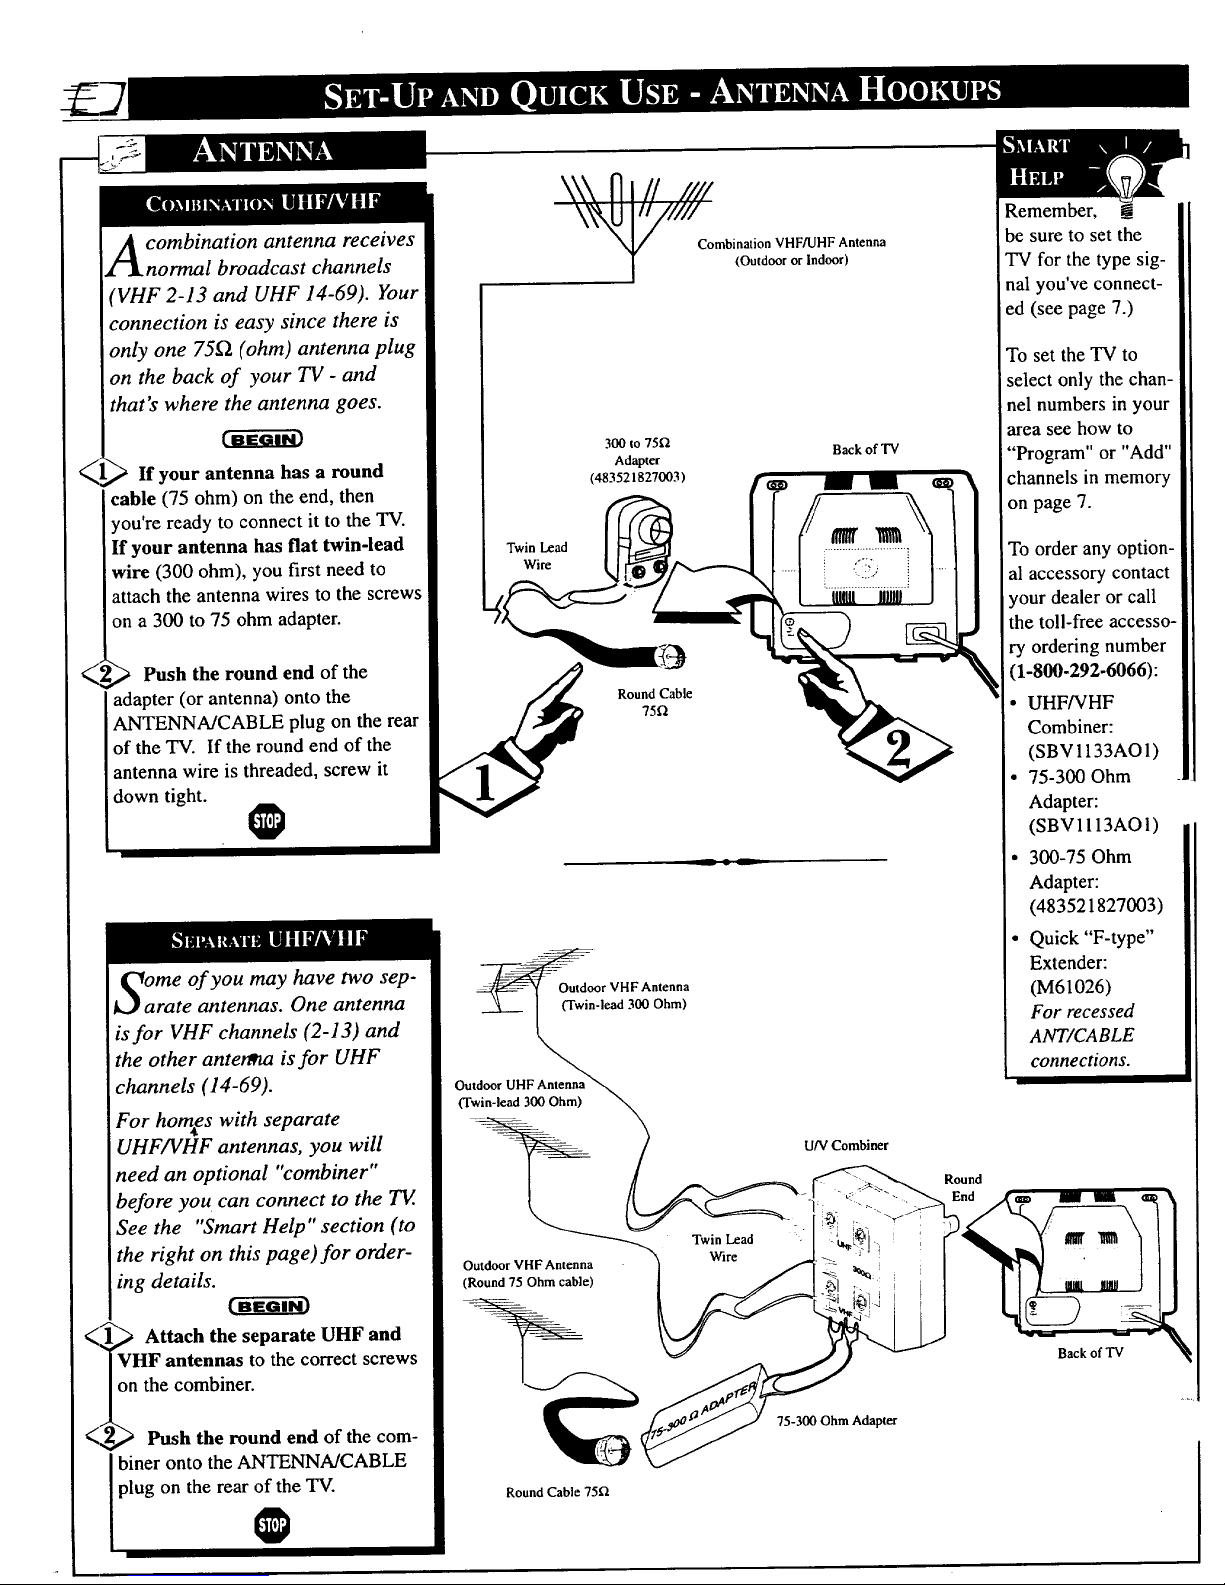
A ombination antenna receives
normal broadcast channels
(VHF 2-13 and UHF 14-69). Your
connection is easy since there is
only one 75_ (ohm) antenna plug
on the back of your TV - and
<hat's where the antenna goes.
) If your antenna has a round
cable (75 ohm) on the end, then
you're ready to connect it to the TV.
If your antenna has flat twin-lead
wire (300 ohm), you first need to
attach the antenna wires to the screws
on a 300 to 75 ohm adapter.
Push the round end of the
adapter (or antenna) onto the
ANTENNA/CABLE plug on the rear
of the "IV. If the round end of the
antenna wire is threaded, screw it
down tight.
@
me of you may have two sep-
rate antennas. One antenna
is for VHF channels (2-13) and
the other anter_t is for UHF
channels (14-69).
For horn,es with separate
UHF/VHF antennas, you will
need an optional "combiner"
before you can connect to the TV.
See the "Smart Help" section (to
the right on this page)for order-
ing details.
<_ Attach the separate UHF and
VHF antennas to the correct screws
on the combiner.
<2,g_ Push the round end of the com-
Ibiner onto the AN_NNA/CABLE
plug on the rear of the TV.
Twin Lead
Wire
Combination VHF/UHF Antenna
(Outdoor or Indoor)
300 to 75_
Adapter
(483521827003)
Back of "IV
Round Cable
75f_
Remember, !
be sure to set the
TV for the type sig-
nal you've connect-
ed (see page 7.)
To set the TV to
select only the chan-
nel numbers in your
_rea see how to
"Program" or "Add"
channels in memory
on page 7.
To order any option-
al accessory contact
your dealer or call
the toll-free accesso-
ry ordering number
(1-800-292-6066):
• UHFNHF
Combiner:
(SBV1133AO1)
• 75-300 Ohm
Adapter:
(SBV1113AOI)
• 300-75 Ohm
Adapter:
(483521827003)
• Quick "F-type"
---L--_ Extender:
Outdoor VHF Antenna (M61026)
[ (Twin-lead 300 Ohm) For recessed
k,,, ANT/CABLE
connections.
Outdoor UHF Antenna
° Qim'\
U/V Combiner
/
[ ]/ _ _ _ Round
J /[ _ _ "_-i "C _-i'"_ End _X,_, _ -- _ '
Outdoor VHF Antenna "_ Wire _"_ _ 2" I "_,r_l • I1
I , I FI 1
__ 75-300 Ohm Adapter
Round Cable 751_
Page 5
<
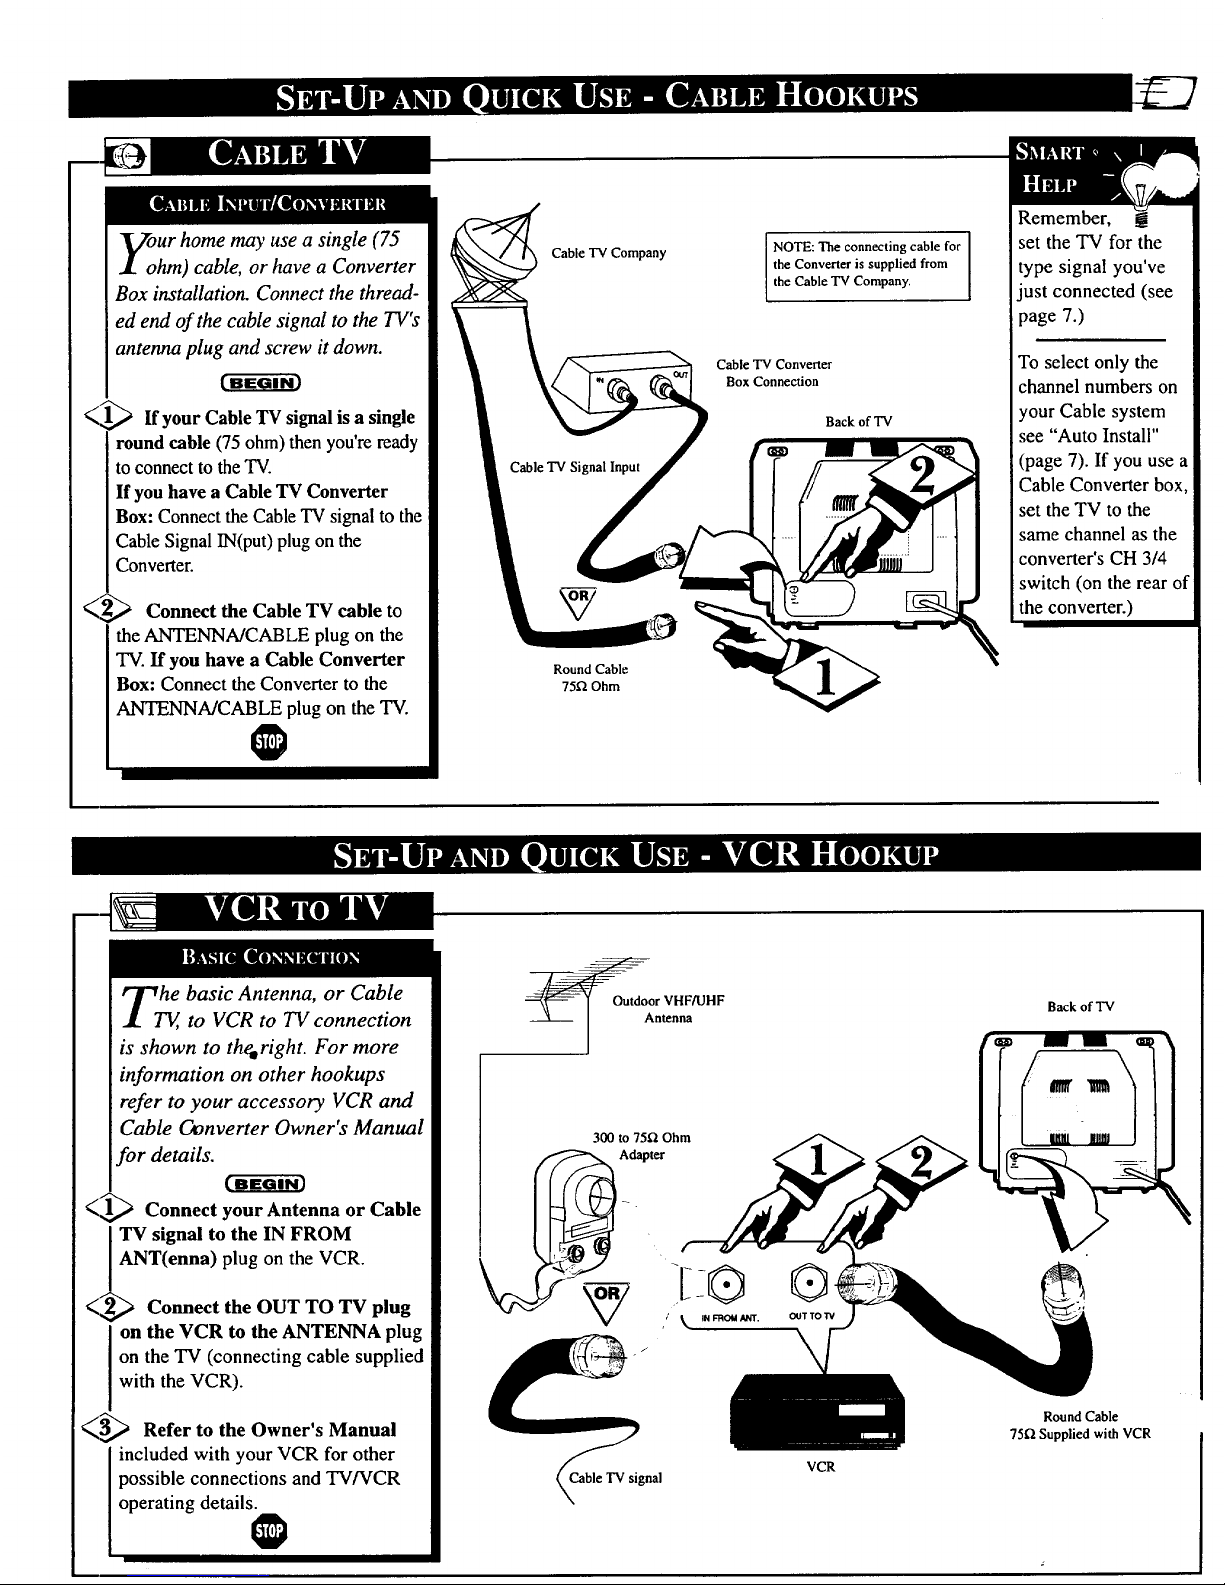
our home may use a single (75
hm) cable, or have a Converter
Box installation. Connect the thread-
ed end of the cable signal to the TV's
antenna plug and screw it down.
> If your Cable 'IV signal is a single
round cable (75ohm) then you're ready
to connect tothe TV.
If you have a Cable TV Converter
Box: Connect the Cable TV signal to the
Cable Signal IN(put) plug on the
Converter.
_Z_ Connect the Cable TV cable to
the ANTENNA/CABLE plug on the
TV. If you have a Cable Converter
Box: Connect the Converter to the
ANTENNA/CABLE plug on theTV.
O
Cable TV Company
Cable TV Signal Input
Round Cable
75_ Ohm
NOTE: The connecting cable for
the Converter is supplied from
the Cab e TV Company.
Cable TV Converter
Box Connection
Back of TV
ust connected (see
7.)
To select only the
channel numbers on
your Cable system
see "Auto Install"
(page 7). If you use a
Cable Converter box,
set the TV to the
same channel as the
converter's CH 3/4
switch (on the rear of
the converter.)
hrT_,basic Antenna, or Cable
to VCR to TV connection
is shown to theeright. For more
information on other hookups
refer to your accessory VCR and
Cable Oonverter Owner's Manual
for details.
<1_ Connect your Antenna or Cable
] TV signal to the IN FROM
. ANT(enna) plug on the VCR.
_2,_ Connect the OUT TO TV plug
on the VCR to the ANTENNA plug
on the TV (connecting cable supplied
with the VCR).
_5_ Refer to the Owner's Manual
included with your VCR for other
possible connections and TV/VCR
operating details.
r VHF/UHF
lltcana
x,xCable TV signal
VCR
Back of TV
Round Cable
7512 Supplied with VCR
Page 6
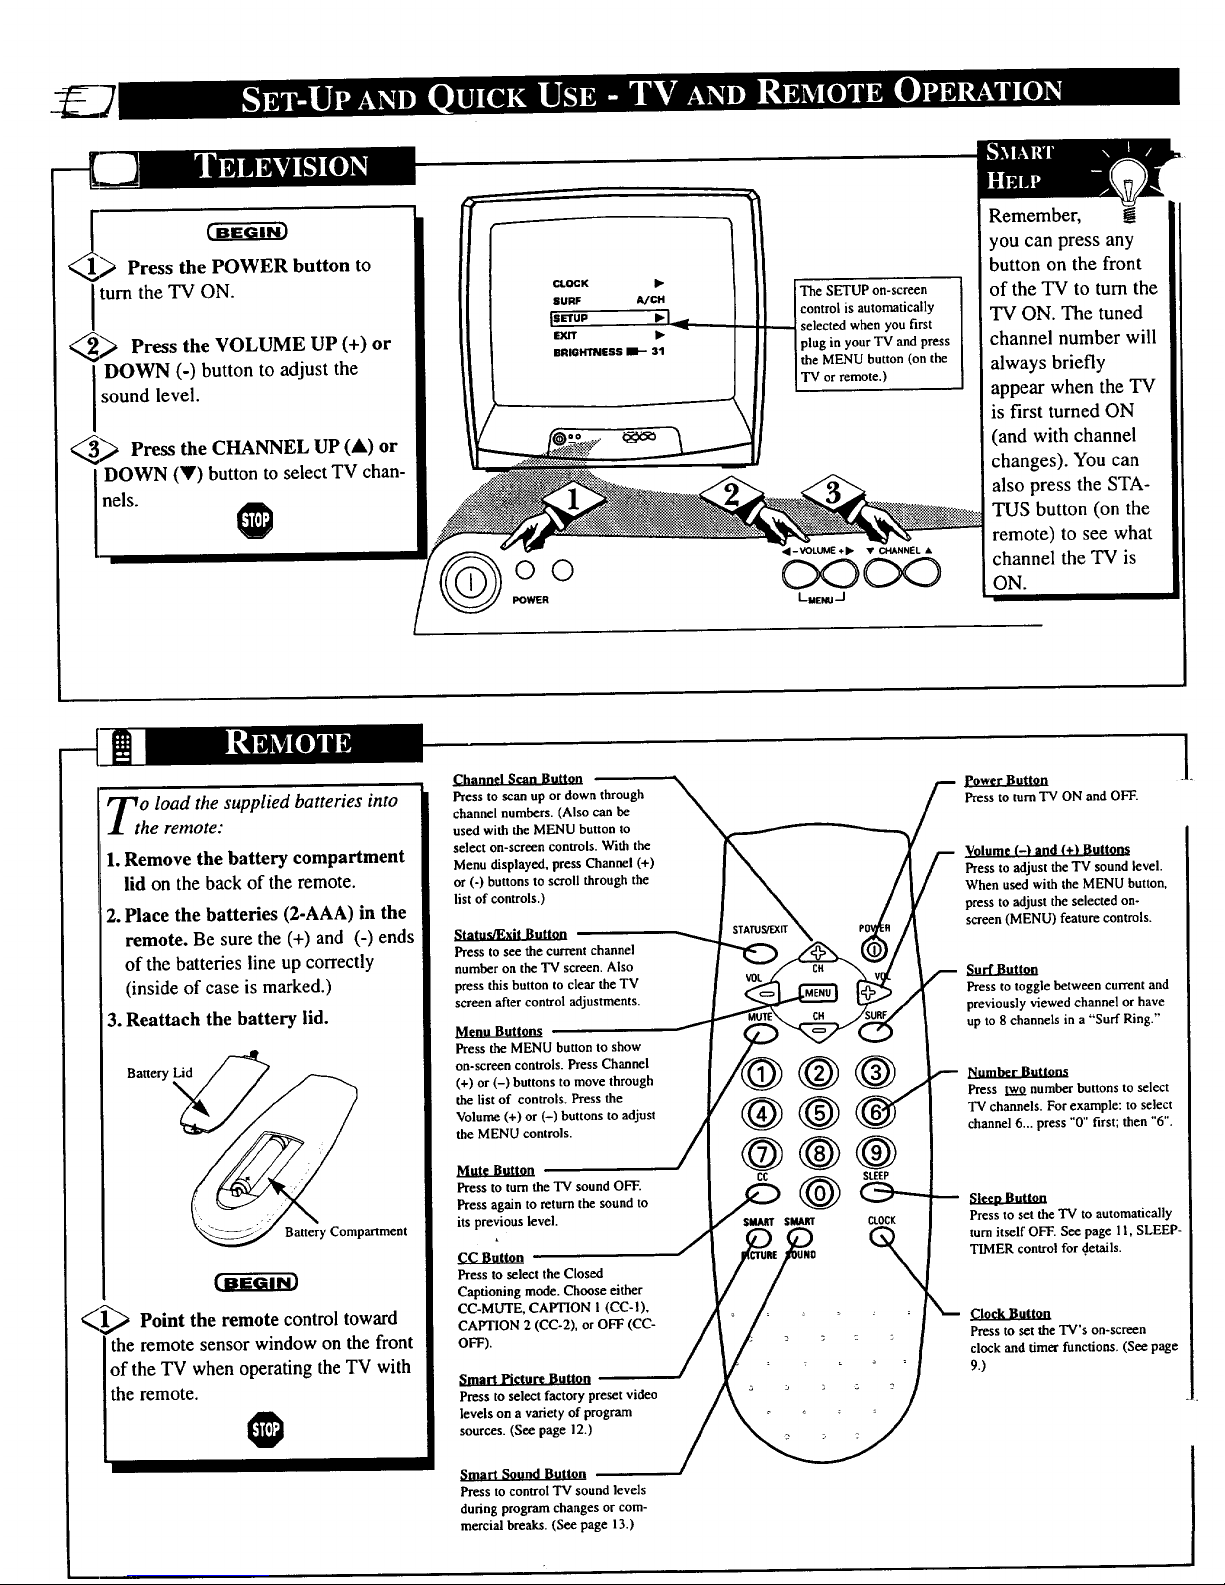
Press the POWER button to
Iturn the TV ON.
_ Press the VOLUME UP (+)
or
DOWN (-) button to adjust the
sound level.
_.> Press the CHANNEL UP (A)
or
DOWN (Y) button to select TV chan-
nels.
CLOCK •
SURF A/CH
_SETUP
EXIT )-
BRIGHTNESS liE-- 31
©©
POWER
The SETUP on-screen
control is automatically
selected when you first
plug in your TV and press
the MENU button (on the
TV or remote.)
• - VOLUME + II, • CHANNEL •
C:x3
LOtNU/
Remember, B
you can press any
button on the front
of the TV to turn the
TV ON. The tuned
channel number will
always briefly
appear when the TV
is first turned ON
(and with channel
changes). You can
also press the STA-
TUS button (on the
remote) to see what
channel the TV is
ON.
<
o load the supplied batteries into
he remote:
1.Remove the battery compartment
lid on the back of the remote.
2. Place the batteries (2-AAA) in the
remote. Be sure the (+) and (-) ends
of the batteries line up correctly
(inside of case is marked.)
3. Reattach the battery lid.
Battery Compartment
._ Point the remote control toward
the remote sensor window on the front
of the TV when operating the TV with
the remote.
Channel Scan Button
Press to scan up or down through
channel numbers. (Also can be
used with the MENU button to
select on-screen controls. With the
Menu displayed, press Channel (+)
or (-) buttons to scroll through the
list of controls.)
Press to see thecurrentchannel
number on the TV screen. Also
press this button to clear the TV
screen after control adjustments.
Menu Buttons
Press the MENUbutton to show
on-screen controls. PressChannel
(+) or (-) buttons to move through
the listof controls. Pressthe
Volume (+) or(-) buttonsto adjust
the MENUcontrols.
Mote Button
Press to turn the TV sound OFF.
Press again to return the sound to
its previous level,
cc auuon
Press to select the Closed
Captioning mode. Choose either
CC-MUTE, CAPTION I (CC-I),
CAPTION 2 (CC-2), or OFF (CC-
OFF).
Smart Picture Button
Press to select factory preset video
levels on a variety of program
sources. (See page 12.)
Smart Sound Button
Press to control "IVsound levels
during program changes or com-
mercial breaks. (See page 13.)
Power Button
Press to turn "IV ON and OFF.
Volume (-) and (+1 Buttons
Press to adjust the TV sound level.
When used with the MENU button,
press to adjust the selected on-
screen (MENU) feature controls.
Press to toggle between current and
previously viewed channel or have
up to 8 channels in a "Surf Ring."
_umber Buttons
Press two number buttons to select
"IVchannels. For example: to select
channel 6... press "0" first; then "6".
Sleep Button
Pressto settheTV to automatically
turn itself OFF.See page 11,SLEEP-
TIMERcontrol for.details.
Clock Button
Pressto set the TV'son-screen
clock and rimerfunctions.(See page
9.)
Page 7

Time Setup takes care of some
basic TV control settings for you.
Follow the steps in this section to
quickly add area channel numbers into
the TV's memor); set the Language,
and the TV for Antenna or Cable sig-
nal.
_1,,,_ Press MENU button on the
I remote. An on-screen list of features
I appears on the TV screen.
<_2_ Press the CH (+) or (-) buttons on
the remote toscroll the on-screen menu
until the word SETUP appears within
the highlight box.
<_-_ Press the VOL (+) button to select
Y
the SETUP on-screenmenu. Then
press the CH (+) or (-) buttons to
scroll the SETUP options.Next press
the VOL (+) or (-) buttonsas directed
to use the desiredmenu items.
_--_ Press the STATUS/EXIT button
on the remote to clear the screen
after an adjustment. You can also use
the "EXIT" option in the SETUP
screen and press the VOL (+) button
to bring you back to the main on-
screen menu.
You can also just wait and after a
minute the MEll/U will drop auto-
matically from the screen.
CLOCK •
SURF SURF
[SETUP
EXIT •
BRIGHTNESS l-- 31
MANUAL •
EXIT •
iLANOUASE ENSI .q
TUNING CABLE
AUTO INSTALL •
IIOIOMA -Y ESpl
II..o,WOUE FRI
EXIT •
LANGUAGE ENG
ITUNINS cAB,EI
AUTO INSTALL •
CHANNEL EDIT •
CHANNEL EDIT •
MANUAL •
IExIT •1
LANGUAGE ENG
TUNING CABLE
Main On-screen Menu ]
_'_ FirstTime Set-Up Menu
| (See control explanations
_Jl/ shown below.)
Remember, SETUP is a first-use, one-
time operation and will not have to be
repeated (even if the TV s unp urged.)
LANGUAGE ENG
TUNING CABLE
IAUTOINSTALl. •1
CHANNEL EDIT •
MANUAL •
TUNING CAB_
AUTO INSTALL
ICHANNELEDIT •1
MANUAL •
EXIT •
BACK TO MAIN MENU
_ LANGUAGE - The Language feature allows the user to
change the on-screen menu text to ENG (English), ESP
(Spanish), or FR (French). Note, this will not change the
text within features such as Closed Captioning.
_ UNING - This feature sets the TV in the proper signal
mode. If you have a signal coming from a Cable "IV com-
pany or Cable Box; select CABLE from the menu. If you
are using an indoor or outdoor antenna, select ANTENNA from the
menu.
I_1 AUTO INSTALL -After correctly setting the TUNING
mode, AUTO INSTALL will read all the available channels
and store them into the "l-V'smemory. This will allow you
-- to use the CHANNEL (+) or (-) buttons to scan through
the channels you have available.
I1"_'32-3 _ CHANNEL EDIT - Allows you to add or delete channels
manually. Enter the channel you want to skip. Then set
the SKIPPED feature to YES or NO. (If YES is selected,
the channel will appear within the CH (+) or (-) ring. If NO is selected,
the channel will not appear when you scan channels in the "rV's
memory.)
EXIT - When the EXIT option is selected, the main menu
!_! will return to the screen.
Page 8

OSed Captioning allows you to
ad the voice content of televi-
sion programs on the TV screen.
Designed to help the hearing
impaired, this feature uses on-screen
"text boxes" to show dialogue and
conversations while the TV program
is in progress.
Note: Broadcast stations will often
use spelling abbreviations, symbols,
dropouts and other grammatical
shortcuts in order to keep pace with
the on-screen action. These type fac-
tors vary upon the source of the cap-
tioned text material and do not indi-
cate a need for service on the part of
the TV.
_,,_ Press the CC button on the remote
control repeatedly to select the Closed
Captioning mode you desire (CAP-
TION 1, CAPTION 2, CAPTION
MUTE, and CAPTION OFF).
Note: Usuall2_ "Caption 1" is the
most used mode to view captioned
material.
<,-_ Press the STATUS button after
making your Caption mode selec-
tion. The TV display will clear and
Captioning material (if available on
the currently selected TV program)
will appear on the TV screen.
To cancel, set the CAPTION feature
to CAPTION O_F when finished
viewing.
Remember, not all TV
! programs and product com-
mercials are made for broadcast with
Closed Caption (CC) information
included. Neither are all Closed
Caption modes (CAPTION 1or
CAPTION 2) necessarily being used
by a broadcast station during the
transmission of a closed caption pro-
gram. Refer to your area's TV pro-
gram listings for the stations and
times of Closed Caption shows.
CAPTION 1
NOTE: The "CC-MUTE" setting
automatically switches the TV to
the CC- I mode whenever the
MUTE button (on the remote con-
trol) is pressed. The CC-1 mode
will turn OFF when the TV
sound is returned or unmuted.
/
CAPTION 2
CAPTION MUTE
CAPTION OFF
ICaption 1 or Caption 2 mode: dialogue [
(and descriptions) for the action on the I
captioned TV program shows on-screen. I
(See Smart Help on this page.) ]
Page 9

our TV comes with an on-screen
lock. During normal operation
the clock appears on the screen with
every channel change (and when the
STATUS/EXIT button is pressed with
the screen clear of on -screen menus).
This Clock also features a TIMER.
The TV can be programmed to turn
itself ON at a specific time and be
tuned to a specific channel.
_'_ Press the CLOCK button on the
Iremote control to bring up the on-
Iscreen menu with the SET CLOCK
feature highlighted.
_! _ Press the Channel Number but-
tons to enter the current time.
(Example: 0, 7, 4, 5 for 7:45.)
<_ Press the VOL (+) button to set
for AM or PM.
<_ ._ Press the STATUS/EXIT but-
ton to clear the screen when you
have finished.
<_ Press the CLOCK button on the
Iremote control to bring up the on-
screen menu, then press the CH (+)
or (-) buttons to-scroll the on-screen
menu until the words SET TIMER
appear within the highlight box.
<_ _ Press the CHANNEL Number
buttons to enter the time you want
the TV to turn on (Use the VOL (+)
to set the AM or PM).
<_.;_ Press the CH (+) or (-) button to
scroll the menu to the word TIMER.
<_ .._ Press the VOL (+) or (-) button
to turn the TIMER feature ON.
<-g"_ Press the STATUS/EXIT button
to clear the screen when you have
finished.
-:--AM
-:-AM I
OFF
12
@@@
@@
@@@
6@8
oo
__ • L
TIMER OFF
CHANNEL 12
ISETTIMER 12:00PM I
EXIT •
SET CLOCK 11:20AM
EXff •
_1' OLOCK 11:20AM
ITIMER o-I
CHANNEL 12
SET TIMER 12:00PM
@@@
@@
@@@
6@8
O0
Page 10

A list" or series of previously
viewed channels can be selected
with the SURF button on ),our remote
control. With this feature you can
easily switch between different TV
orograms that currently bzterest you.
The Surf control allows you to set up
to 8 channels in its quick viewing
"list".
_1_ Press the MENU (M) button on
I the remote, then press the CHANNEL
J• or • buttons to select the word
I SURF with the TV's on-screen arrow.
_2-"_ Press the (+) button to select
either A/CH (Alternate Channel) or
SURF. (See explanation of Surf
options with the illustration on this
page.)
_._ Press STATUS button to clear the
i screen"
J_
%1,_ With the SURF control ON (see
above), select a desired channel for
viewing. You cam use the number
buttons on the remote (or the
Channel • or • buttons).
_2_'_ Press the SURF button on the
I remote while the channel display is
still present on the TV's screen.
_ Press the SURF button on the
remote to quickly review current
action on channels contained within
the Surf list.
Repeat steps above to add up to eight
channels in the SURF channel mem-
ory ring.
O
SLEEP'rIMER OFF
CLOCK •
Is..F */c.I
SETUP •
EXIT •
..°--'--...
I
With AJCH selected, pressing the [
SURF button will toggle between the
I
current and one previous channel
To Use
A/CH (Alternate
Channel):
With the A/CH con-
trol ON, select the
two desired chan-
nels for viewing
with the number
buttons on the
remote control.
Press the SURF
button on the
remote to "toggle"
between the two
selected channels.
When using SURF:
Remember, you can
add as many as
eight channels in
the Smart Surf
Memory.
SLEEPTIMER OFF
CLOCK •
iSURF SURF I
SETUP •
EXIT •
@@@
@
@
@6
O0 0
With SURF selected, pressing the
SURF button will toggle current and
up to seven additional channels avail.
able. Note: the Channel Surf can be
used with fewer than eight channels.
In this way the number of Surf chan-
nels can match or fit your present
viewing interests.
Note: There are two methods to delete channels from the 8--chan-
nel SURF control ring:
To remove all channels from the SURF memory (with the
exception of one channel which will be left within the SURF
list):
• Select the SETUP conu'ol in the on-screen menu and press the
VOL (+) button. Selectthe TUNING control and press the VOL
(+) button twice changing CABLE to ANTENNA; then back to
CABLE (orANTENNA to CABLE; then back to ANTENNA).
• Or, with the SURF control selected press the VOL (+) button
twice changing SURF to A/CH; then back to SURF.
Page 11

aVe you ever fallen asleep in
nt of the TV only to have it
wake you up at two in the morning
with a test pattern screeching in your
ears? Well, your TV can save you all
that trouble by automatically turning
itselfoff
</1@ Press the SLEEP button repeat-
edly to pick the amount of time (I 5
minutes to 2 hours ahead) before the
TV will turn itself off.
The VOL (+) or (-) buttons can also
be used to set the amount of time
within the on-screen menu.
<X,,_ Press the STATUS/EXIT button
to clear the screen after you have set
the time for the TV to turn off.
An on-screen count down will appear
during the last minute before the TV
shuts itself off.
@
OFF
@@@
@@@
@@@
6@
O0 0
On-screen adjustment
30 MIN
45 MIN
60 MIN
75 MIN
iN
nN
Remember. If __
you ever want to see how
many minutes are left
before the TV shuts itself
off, press the STATUS
button on the remote.
If you want to stop a
SLEEP TIMER setting,
reset the timer back to
OFF. You could also turn
the TV off, and then back
on again, to cancel a set-
ting.
Pressing any key on the
remote or TV in the last
60 seconds will cancel the
SLEEP TIMER setting.
An on-screen count down will
appear during the last minute of a
SLEEP TIMER setting.
/
m.] To adjust your TV picture con-
I
J_ trois, select a channel and follow
the steps shown below:
_ Press the MENU button on the
remote, then prets the CH (+) or (-)
to scroll the on-screen menu until the
desired control appears within the
highlight,box.
J_
_2_ Press the VOL (+) or (-) to
adjust the selected picture control
levels. (Refer to the Smart Help box
for more detail on each control.)
_3_ Press STATUS/EXIT button
(or
use the EXIT control in the Menu) to
clear the screen when picture adjust-
ments are completed.
@
ISHARPNESSm_311
TINT -t--31
COL TEMP COOL
I_'_r --_311
COL TEMP COOL
AI ON
ICOLTEMP COOL[
AI ON
VOLUME 11----15
I*a oN]
VOLUME IF--- 15
AVL ON
BRIGHTNESS i_
Press VOL (-) or (+) until
darkestpartsof the pictureare
as bright as you prefer.
PICTURE Press VOL (-) or
(+) until lightest partsof the
picture show good detail.
COLOR Press VOL (-) or
(+) to add oreliminate color.
TINT Press VOL (-) or (+) to
obtain natural skin tones.
SHARPNESS Press VOL (-)
or (+) to improve detail in the
_icture.
COLOR TEMP Press VOL
(-) or (+) to select NORMAL,
COOL, or WARM picture
preferences. (NORMAL will
keep the whites, white; COOL
will make the whites, bluish;
and WARM will make the
whites, reddish.)
AI (Artificial Intelli_ence)
Press the VOL (-) or (+) to turn
AI ON or OFF. When ON, AI
increases the picture's contrast
making the dark areas more
black and the light areas more
white. This isespecially good
Page 12

ether you're watching a movie or
video game your TV has auto-
matic video control settings matched for
your current program source or content.
The Smart Picture feature quickly resets
your TV's video controls for a number
of different types of programs and view-
ing conditions you may have in )'our
home. Each Smart Picture setting is
preset at the factory to automatically
adjust the TV's Picture, Color, and
Sharpness viewing control levels.
t"ffffffi-fi)
_[_ Press the Smart Picture button on
i the remote toactivate theSMART
I PICT feature.
_2_ Press the Smart Picture button
repeatedly to select between 5 differ-
ent picture presets: Personal, Movies,
Sports, Weak Signal, or Video Games.
_: _ Press theSTATUS/EXIT button to
clear the screen when finished with
your selection.
Remember, the video con-
t trol settings for the Smart
Picture categories are memorized
into the TV at the factory and can
only be reset by field and service
technicians.
With the PERSQNAL setting chosen,
any adjustments made to the picture
controls will be held in the TV's
memory.,
PERSONAL
MOVIES
SPORTS
WEAK SIGNAL
VIDEO GAMES
Page 13

mm
reyou tired of the sound of com-
mercials following you into the
next room or all through the house?
Smart Sound allows you to preset a
desired volume level that the TV
sound will not go above. This makes
for an even, more consistent sound
by reducing the peaks and valleys
that can occur during program
changes or commercial breaks.
_ Press the Smart button on the
i remote to activate the SMART
SND feature.
,_ Press the Smart Sound button
I repeatedly to toggle the SMART
SOUND control ON or OFF.
_ Press the STATUS/EXIT but-
I ton to clear the screen when com-
pleted.
SMART SOUND ON
SMART SOUND OFF
Remember, Smart Sound
t works only with the programs
coming through the Antenna/Cable
input on the rear of the TV (RF
audio). It will not control the sound
levels for the Auxiliary (VCR/AUX
IN) audio inputs.
@@
@
AI ON
VOLUME _ 15
law omi
SLEEP'rIMER OFF
/ CLOCK I_ _--
,. AI ON
ll VOLUME _ 15
IAUt ONI
$LEEPTIMER OFF
CLOCK I_ ....
Please note that SMART SOUND is the same feature as AVL within the on-screen
menu system. When Smart Sound is changed the AVL control will also change (and
vice versa).
Page 14

STve!he Volume control to set the
s volume level on the TV
screen. The Volume level or scale
will be seen each time the VOLUME
buttons (on the TV or remote) are
pressed. (0 being the lowest, 63
being the highest.)
_l_ Press the MENU button on the
remote, then press the CH (+) or (-)
to scroll the on-screen menu until the
word VOLUME appears within the
highlight box.
_2_ Press the VOL (+) or (-) buttons
I to adjust the volume level.
_3_ Press STATUS/EXIT button to
I clear the screen.
@
COOL
ON
ON
OFF
Try it out. g
Press the VOL (+) or
(-) buttons. The
VOLUME indicator
should appear at the
bottom of the screen.
l When the Volume button is pressed
an on-screen display will appear.
tA
Page 15

lease make these simple
checks before calling for ser-
vice. These tips can save you
time and money since charges for
TV installation and adjustment of
customer controls are not cov-
ered under your warranty.
No Power
No Picture
No Sound
Remote Does Not
Work
TV Displays Wrong
Channel or No
Channels Above 13
CAUTION: A video source (such as a video game, Compact Disc Interactive - CDI, or
TV information channel) which shows a constant non-moving pattern on the TV scree_
can cause picture tube damage. When your TV is continuously used with such a source
the pattern of the non-moving portion of the game (CDI, etc.) could leave an image
permanently on the picture tube. When not in use, turn the video source OFE
Regularly alternate the use of such video sources with normal TV viewing.
i heck the TV power cord. Unplug the TV, wait 10 seconds, then reinsert plug into
outlet and push POWER button again.
I
Check to be sure outlet is not on a wall switch.
I_ heck antenna connections. Are they properly secured to the TV's ANT/CABLE plug ?
Check the TUNING ANTENNA/CABLE control for correct position.
I
li Check the VOLUME buttons.
Check the MUTE button on the remote control.
If attempting auxiliary equipment hook-ups, check audio jack connections.
Check batteries. Replace with AAA Heavy Duty (Zinc Chloride) or Alkaline batteri_
if necessary.
Clean the remote and the remote sensor window on the TV.
Check the TV power cord. Unplug the TV, wait I0 seconds, then reinsert plug into
outlet and push POWER button again.
Check to be sure TV outlet is not on a wall switch.
Repeat channel selection.
Add desired channel numbers (CHANNEL EDIT control) into TV memory.
Check TUNING ANTENNA/CABLE control for correct position.
This TV is equipped with protective circuitry that shuts the TV off in case of moderate
power surges. Should this occur turn the TV back on by pressing the POWER button
once or twice, or unplug (wait 10 seconds) and then replug the power cord at the AC
outlet. This feature is NOT designed to prevent damage due to high power surges such
as those caused by lightning, which is not covered by your warranty.
Cleaning and Care
• To avoid possible shock hazard be sure the TV is unplugged from the electrical outlet before cleaning.
• When cleaning the TV screen take care not to scratch or damage the screen surface (avoid wearing jewelry or using
anything abrasive). Wipe thefront screen with a clean cloth dampened with water. Use even, easy, vertical strokes when
cleaning.
• Gently wipe the cabinet surfaces with a clean cloth or sponge dampened in a solution of cool clear water. Use a clean
dry cloth to dry the wiped surfaces.
• Occasionally vacuum the ventilation holes or slots in the cabinet back.
• Never use thinners, insecticide sprays, or other chemicals on or near the cabinet, as they might cause permanent marring
of the cabinet finish.
I
Page 16

Round Cable 75f2 * A single solid antenna wire normally
matched with a metal plug (F-type) end connector that screws (or
pushes) directly onto a 75 Ohm input found on the Television or
VCR. (Also known as Coaxial Cable.)
Closed Caption * Broadcast standard which allows you to read
the voice content of television programs on the TV screen.
Designed to help the hearing impaired this feature uses on-screen
"text boxes" to show dialogue and conversations while the TV pro-
gram is in progress.
Audio/Video Inputs * Located on the rear of the TV these con-
nectors (RCA phono type plug) are used for the input of audio
and video signals. Designed for use with VCRs (or other acces-
sories) in order to receive higher picture resolution and offer sound
connection options.
On Screen Displays (OSD) * Refers to the wording or messages
generated by the television (or VCR) to help the user with specific
feature controls (color adjustment, programming, etc.).
Menu * An on-screen listing of feature controls shown on the
Television screen that are made available for user adjustments.
Multichannel Television Sound (MTS) * The broadcast standard
that allows for stereo sound to be transmitted with the TV picture.
Programming * The procedure of adding or deleting channel
numbers into the Television's memory circuits. In this way the
Television "remembers" only the locally available or desired
channel numbers and skips over any unwanted channel numbers.
Remote Sensor Window * A window or opening found on the
Television control panel through which infrared remote control
command signals are received.
Setup Mode * Automatic feature control settings made by the TV.
Designed for first time set-up and use. Settings for signal connec-
tions (antenna or cable TV), plus channel program memory are
held in the TV's memory (even if the set is unplugged and moved
to a new location.)
Status/Exit * Allows the user to quickly confirm what channel
number is currently being viewed. Status can also be used to clear
the Television of on screen displays or information (rather than
waiting for the displays to "time out" or automatically disappear
from the screen).
Twin Lead Wire * The more commonly used name for the two
strand 300 Ohm antenna wire used with many indoor and outdoor
antenna systems. In many cases this type of antenna wire requires
an additional adapter (or balun) in order to connect to the 75 Ohm
Input terminals designed into the more recent Televisions and
VCRs.
Page 17

Accessories/Optionai ................................................................. 4, 5
Adapter Connector ..................................................................... 4, 5
Add/Delete Channels ..................................................................... 7
Alternate Channel ........................................................................ I0
Artificial Intelligence (AI) ........................................................... 11
Battery Installation ......................................................................... 6
Cable TV Connections ................................................................... 5
Channel Memory ........................................................................... 7
Clock .............................................................................................. 9
Closed Captioning .......................................................................... 8
Controls/TV ................................................................................... 6
Controls/Remote ............................................................................ 6
Features .......................................................................................... 3
Glossary TV Terms ...................................................................... 16
Language Option ............................................................................ 7
Miemory/Program Channels ........................................................... 7
Menu Button .................................................................................. 6
Minus(-)/Ptus (+) Buttons .............................................................. 6
Picture Controls ...................................................................... 11, 12
Precautions/Safety .............................................................. 2, 15_
Programming Channels .................................................................. 7
Remote Control .............................................................................. 6
Requesting Service ..................................................... 15, 18-19, 20
Round Cable 75_ ...................................................................... 4, 5
Safety/Precautions .............................................................. 2, 15, 20
Set Up/First Time Use ................................................................ 4-7
Sleep Timer .................................................................................. 11
Smart Picture ................................................................................ 12
Smart Sound ................................................................................. 13
Surf ............................................................................................... 10
Status Button .................................................................................. 6
Tips for Service .......................................................... 15, 18-19, 20
VCR/TV Connections .................................................................... 5
Volume Control ............................................................................ 14
Warranty ....................................................................................... 20
* Information contained in Quick-Use (Q/U) Guide-page listed.
17
Page 18

Philips Consumer Electronics Company
Factory Service Center Locations
Seattle/Tacoma Area
San Francisco/Metro Area
• Cleveland/N Ohio
Charlotte lew York/Metro
• _ /; •Philadelphia/S New Jersey
Atlanta/N Georgia
'_ Houston/Galveston
Beaumont/Austin
San Antonio
Tampa/W Rorida
Florida
Rorida
NOTE:Ifyouresideinoneofour PhilipsFactoryServiceBranchareas(seedirectoryonback),youcancontactthenearestServiceBranchto
obtainefficientandexpedientrepairforyourproduct.If yourproductisIn-Warranty,youshouldhaveproof-of-purchasetoensureNo Charge
Service.For0ut-of-Warrantyservice,callthelocationnearestyou.
NOTA:Sivousrdsidezdansunedesr_gionsdesserviesparunesuccursaledeserviceapr_sventedufabri'cantPhilips(voirlisteci-dessous),
vouspourrezcontacterlabranchedeserviceapr_sventelaplusprosdechezvouspourobtenirunserviceapr_sventerapideetefficace.Sile
produitestsousgarantie,ilsuffiradepr6senterunepreuved'achatpourb6n6ficierd'unservicesansfrais. Pourlesproduitsnoncouvertsparla
garantie,contactezlecentreleplusprosdechezvous.
NOTA:Si Ud.resideenunadenuestraszonasparasucursalesPhilipsdeservicioaldef_brica(verdirectoriom_sabajo),Ud.puedecomunicarse
conlasucursaldeserviciom_scercanaparaobtenerunareparacibnoportunayeficazdesuproducto. Sisu productoest_todavfabajogaran-
tfa,Ud.debepresentarcomprobantedecompraparanoocasionarningunoscargospotservicio. Paraserviciodespu6sdelvencimientodela
garantia,Ilameallugarm,_scercanodelosabajoindicados.
InCanada
Howyoucanobtainefficientandexpedientcarry-in,mail-in,orin-homeservicefor yourproduct
PleasecontactPhilipsat 1-800-661-6162(Frenchspeaking)
1-800-363-7278(Englishspeaking)
AuCanada
Commentobtenirle service apr_s-vente pourles produits appo_6s ou envoy_sparla poste _ notrecentrede service oule service _domicile
Veuillezcontacterphilips _: 1-800-661-6162 (Francophone)
1-800-363-7278
Enel Canad_
C6mo recibirservicioefficientepara suproducto,en persona,por correoo a domicillo
Favorde comunicarsecon Philipsal: 1-800-661-6162 (franc6fono)
1-800-363-7278 (angl6fono)
18
Page 19

QUALm"SERVICE IS AS CLOSEAS YOUR TELEPHONE!SIMPLY LOOKOVER THE LIST BELOWFOR THENUMBER OF A FACTORYSERVICECENTER
NEARYOU. YOURPRODUCTWILL RECEIVEEFFICIENTAND EXPEDIENTCARRY-IN, MAIL-IN, OR IN-HOME SERVICE, AND YOU WILL RECEIVEPEACEOFMIND,
KNOWINGYOUR PRODUCT IS BEINGGIVENTHE EXPERT ATTENTIONOF PHILIPS' FACTORYSERVICE. AND, IF THEPHONE NUMBERLISTED FOR YOUR AREA
IS LONG DISTANCE,CALL1-800-242-9225 FOR FACTORYSERVICE.
COMMENTOBTENIRNOTRESERVICEAPRI:SVENTEPAPIDEETEFFICACESOITPARCOURRIER,/_OOMICILE,OUENSEpRItSENTANT_.UNCENTREDESERVICEPHILIPS.PLUSDE600CENT
DERI_CEPTIONDEPRODUITSA RItPARERATRAVERSLEPAYS:CONTACTERLECENTREDESERVICEAUXCONSQMMATEURSLEPLUSPROCHEPOURSAVOIRL'EMPLACEMENTDECESDEPI_'J,,
DANSUNRAYONDE50J_75MILES(80KM_ 120KM)DUCENTREDESERVICELOCAL.
C(_MOOBTENERUN SERVICIOOPORTUNOY EFICIENTEPOR CORREO,ENCASA0 ENPERSONAPAPASU PRODUCTOATRAVItSDEUN CENTROPHILIPSDE SERVICIO.MASDE600 SITIOSPOR
TODOELPAlSPARALARECEPCIONDE PRODUCTOSNECESITADOSDEREPAPACIONES:COMUNICARSECONELCENTRODESERVICIODEFABRICAMAS CERCANOPARAESTOSLUGARESDENTRQ
DEUNRADIODE80 A 120 KM(50 A75 MILLAS) DELCENTRODESERVICIOLOCAL.
Atlanta-Athens-Macon-Chattanooga,
TN-NorthGeorgiaArea
200 North CobbParkway
Building 100,Suite 120
Marietta, GA 30062
(770) 795-0085
Charlotte-WinstonSalem-
Greensboro
520-G ClantonRoad
Charlotte,NC 28217
(704) 529-6330
Chicago-GaryArea
1360 W.Hamilton Parkway
Itasca,IL 60143
(630) 775-0990
Cleveland-Akron-YoungstownArea
950 KeynoteCircle
Brooklyn Heights,OH 44131
(216) 741-3334
Detroit/ToledoArea
25173 Dequindre
Madison Heights,MI 48071
(810) 544-2110
Knoxville-Greeneville-
TriCities-EastTennesseeArea
6700 D. PapermillRoad
PapermillPlaza
Knoxville,TN 37919
(423) 584-6614
Ft. Myers-Naples-
SouthwestFloridaArea
11601ClevelandAve.,Suite 15
Ft. Myers, FL 33907
(941) 278-4242
Houston-Galveston-Beaumont-Austin-
SanAntonioArea
1110NorthPostOakRoad
Suite100
Houston,TX 77055
(713)682-3990
Miami-SoulheastFloridaArea
2099 W.Atlantic Blvd.
PompanoBeach,FL 33069
(954) 978-0467
NewYorkMetro Area
116 CharlotteAvenue
Hicksville,NY 11801
(516) 933-1780 NassauCounty
Philadelphia/S.NewJerseyArea
352 DunksFerry Road
Bensalem,PA 19020
(215) 638-7500
Pittsburgh,PA-Steubenville,OH-
Wheeling/Morgantown,WVArea
2891 BanksvilleRoad
Pittsburgh, PA15216
(412) 563-8020
SanFrancisco-Oakland-SanJoseArea
681 EastBrokaw Rd.
SanJose,CA 95131
(408) 436-8566
Seattle-Tacoma/OlympiaArea
1055 AndoverPark East
Tukwila,WA98188
(206) 575-6288
Tampa-St.Petersburg-SarasotaArea
CenterPointBusiness Park,Building B-l,
Suite100
1911 U.S.Hwy.301 North
Tampa,FL 33619
(813) 621-8181
19
Page 20

COLOR TELEVISION
90 Days Free Labor
One Year Free Replacement of Parts (Two Years Free Replacement on Color Picture Tube)
This product must be carried in for service.
WHO IS COVERED?
You must have proof of purchase to receive warranty service. A sales
receipt or other document showing that you purchased the product is
considered proof of purchase,
WHAT IS COVERED?
VVarranty coverage begins the day you buy your product. For 90 days
thereafter, all parts will be repaired or replaced free, and labor is free.
From 90 days to one year from the day of purchase, all parts will be
repaired or replaced free, but you pay for all labor charges. From one
to two years from the day of purchase, you pay for the replacement or
repair of all parts except the picture tube, and for all labor charges.
After two years from the day of purchase, you pay for the replacement
or repair of all parts, and for all labor charges.
AU parts, including repaired and replaced parts, are covered only for
the original warranty period. When the warranty on the product
expires, the warranty on all replaced and repaired parts also expires.
'WHAT IS EXCLUDED?
"Your warranty does not cover:
• labor charges for installation or setup of the product, adjustment of
customer controls on the product, and installation or repair of
antenna systems outside of the product.
• product repair and/or part replacement because of misuse, acci-
dent, unauthorized repair or other cause not within the control of
Philips Consumer Electronics Company.
• reception problems caused by signal conditions or cable or antenna
systems outside the unit.
• a product that requires modification or adaptation to enable it to
operate in any country other than the country for which it was
designed, manufactured, approved and/or authorized, or repair of
products damaged by these modifications.
• incidental or consequential damages resulting from the product.
(Some states do not allow the exclusion of incidental or consequen-
tial damages, so tl_e above exclusion may not apply to you. This
includes, but is not limited to, prerecorded material, whether copy-
righted or not copyrighted.)
• a product used for commercial or institutional purposes.
WHERE IS SERVICE AVAILABLE?
Warranty service is available in all countries where the product is offi-
cially distributed by Philips Consumer Electronics Company. In coun-
tries where Philips Consumer Electronics Company does not distribute
the product, the local Philips service organization will attempt to pro-
vide service (although there may be a delay if the appropriate spare
parts and technical manual(s) are not readily available).
MAKE SURE YOU KEEP...
Please keep your sales receipt or other document showing proof of
purchase. Attach it to this owner's manual and keep both nearby.
Also keep the original box and packing material in case you need to
return your product.
BEFORE REQUESTING SERVICE...
Please check your owner's manual before requesting service.
Adjustments of the controls discussed there may save you a service
call.
TO GET WARRANTY SERVICE IN U.S.A.,
PUERTO RICO OR U.S. VIRGIN ISLANDS...
Contact a Philips factory service center (see enclosed list) or autho-
rized service center to arrange repair.
(In U.S.A., Puerto Rico and U.S. Virgin Islands, all implied warranties,
including implied warranties of merchantability and fitness for a partic-
ular purpose, are limited in duration to the duration of this express
warranty. But, because some states do not allow limitations on how
long an implied warranty may last, this limitation may not apply to
you.)
TO GET WARRANTY SERVICE IN CANADA...
Please contact Philips at:
1-800-661-6162 (French Speaking)
1-800-363-7278 (English Speaking)
(In Canada,this warranty isgivenin lieu of all other warranties. No
other warranties are expressed or implied, including any impliedwar-
ranties of merchantability or fitness for aparticular purpose. Philips is
not liable under any circumstances for any direct, indirect, special,inci-
dental or consequential damages,howsoever incurred, even ifnotified
of the possibilityof suchdamages.)
REMEMBER..•
Please record the model and serial numbers found on the product
below. Also, please fill out and mail your warranty registration card
promptly. It will be easier for us to notify you if necessary.
MODEL #
SERIAL#
Philips Service Company, P.O. Box 555, Jefferson City, Tennessee 37760, (423) 475-8869
TR7R1 fi-FNN 1 20
 Loading...