

Magnavox PR1397X122 Owner's Manual
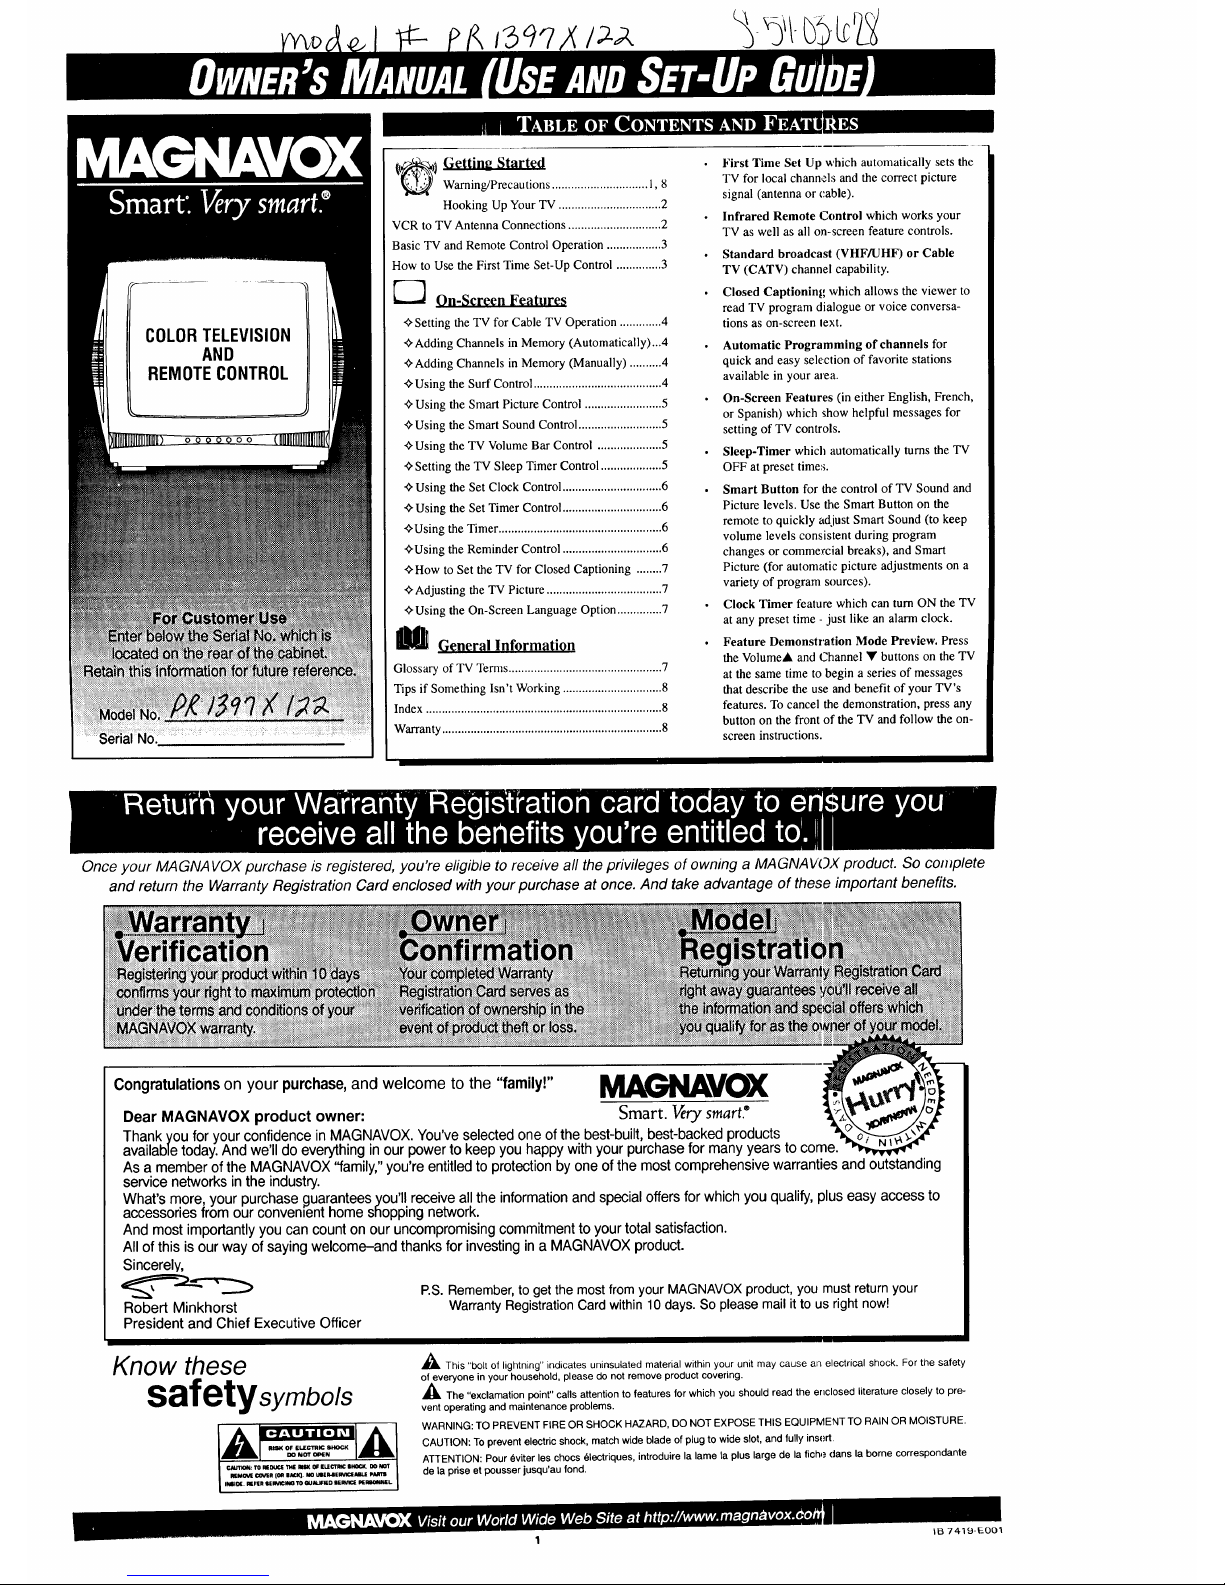
REMOTECONTROL
t[_1 Getting Started
Warning/Precautions .............................. 1,8
Hooking Up Your TV ................................ 2
VCR to TV Antenna Connections ............................. 2
Basic TV and Remote Control Operation ................. 3
How to Use the First Time Set-Up Control .............. 3
On-Screen Features
Setting the TV for Cable TV Operation ............. 4
<_Adding Channels in Memory (Automatically)...4
<_Adding Channels in Memory (Manually) .......... 4
<_Using the Surf Control ........................................ 4
Using the Smart Picture Control ........................ 5
<_Using the Smart Sound Control.......................... 5
<_Using the TV Volume Bar Control .................... 5
<_Setting the TV Sleep Timer Control ................... 5
Using the Set Clock Control ............................... 6
_"Using the Set Timer Control ............................... 6
<_Using the Timer................................................... 6
_'Using the Reminder Control ............................... 6
<_How to Set the TV for Closed Captioning ........ 7
_'Adjusting the TV Picture .................................... 7
<_Using the On-Screen Language Option.............. 7
General Information
Glossary of TV Terms ................................................ 7
Tips if Something Isn't Working ............................... 8
Index .......................................................................... 8
Warranty ..................................................................... 8
First Time Set Up which automatically sets the
TV for local channels and the correct picture
signal (antenna or cable).
Infrared Remote Control which works your
TV as well as all on-screen feature controls.
Standard broadcast (VHFAJHF) or Cable
TV (CATV) channel capability.
Closed Captioning which allows the viewer to
read TV program dialogue or voice conversa-
tions as on-screen text.
• Automatic Programming of channels for
quick and easy selection of favorite stations
available in your area.
• On-Screen Features (in either English, French,
or Spanish) which show helpful messages for
setting of TV controls.
• Sleep-Timer which automatically turns the TV
OFF at preset times.
• Smart Button for the control of TV Sound and
Picture levels. Use the Smart Button on the
remote to quickly adjust Smart Sound (to keep
volume levels consistent during program
changes or commercial breaks), and Smart
Picture (for automatic picture adjustments on a
variety of program sources).
• Clock Timer feature which can turn ON the TV
at any preset time - just like an alarm clock.
• Feature Demonstration Mode Preview. Press
the Volume& and Channel • buttons on the TV
at the same time to begin a series of messages
that describe the use and benefit of your TV's
features. To cancel the demonstration, press any
button on the front of the TV and follow the on-
screen instructions.
II
Once your MAGNA VOX purchase is registered, you're eligible to receive all the privileges of owning a MAGNAVOX product. So complete
and return the Warranty Registration Card enclosed with your purchase at once. And take advantage of these important benefits.
Congratulations on your purchase, and welcome to the "family!" _VOX
Dear MAGNAVOX product owner: Smart. Verysmart. ®
Thank you for your confidence in MAGNAVOX. You've selected one of the best-built, best-backed products
available today. And we'll do everything in our power to keep you happy with your purchase for many years to come.
As a member of the MAGNAVOX "family," you're entitled to protection by one of the most comprehensive warranties and outstanding
service networks in the industry.
What's more, your purchase guarantees you'll, receive all the information and special offers for which you qualify, plus easy access to
accessones from our convenient home shopp ng network.
And most importantly you can count on our uncompromising commitment to your total satisfaction.
All of this is our way of saying welcome-and thanks for investing in a MAGNAVOX product.
Sincerely,
'_=_'_"_ P.S. Remember, to get the most from your MAGNAVOX product, you must return your
Robert Minkhorst Warranty Registration Card within 10 days. So please mail it to us right now!
President and Chief Executive Officer
Know these
safetysymbo/s
A This "bolt of lightning" indicates uninsulated material within your unit may cause an electrical shock. For the safety
of everyone in your household, please do not remove product covering.
,_The "exclamation point" calls attention to features for which you should read the enclosed literature closely to pre-
vent operating and maintenance problems.
WARNING: TO PREVENT FIRE OR SHOCK HAZARD, DO NOT EXPOSE THIS EQUIPMENT TO RAIN OR MOISTURE.
CAUTION: To prevent electric shock, match wide blade of plug to wide slot, and fully insert.
ATTENTION: Pour 6viter les chocs 61ectriques, introduire la lame la plus large de la fiche clans la borne correspondante
de la prise et pousser jusqu'au fond.
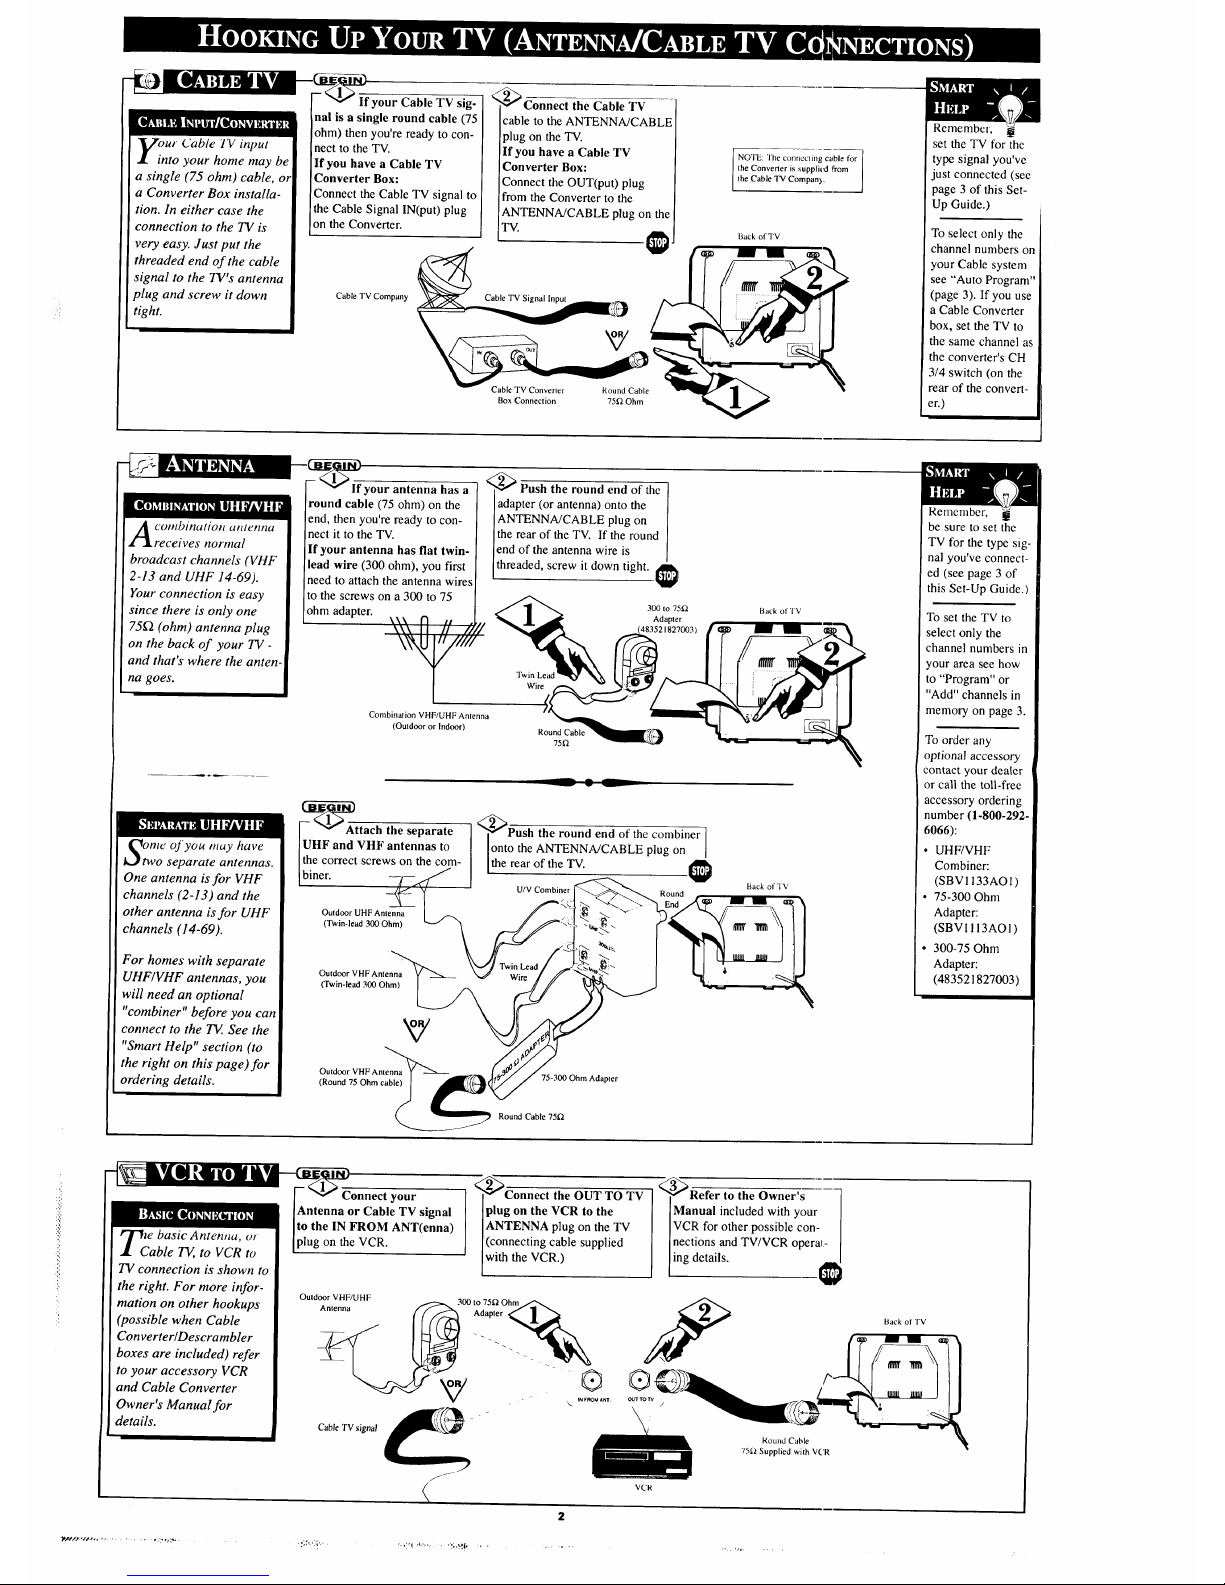
your Cable IV input
• into your home may be
a single (75 ohm) cable, or
a Converter Box installa-
tion. In either case the
connection to the TV is
very easy. Just put the
threaded end of the cable
signal to the TV's antenna
plug and screw it down
tight.
If your Cable TV sig-
nal is a single round cable (75
ohm) then you're ready to con-
nect to the TV.
If you have a Cable TV
Converter Box:
Connect the Cable TV signal to
the Cable Signal IN(put) plug
on the Converter.
plug on the TV.
If you have a Cable TV
Converter Box:
Connect the OUT(put) plug
from the Converter to the
IANTENNA/CABLE plug on the
TV.
NOTE: The connecting c_ble for
the Converter is suppli(_d from
the Cable TV Company.
Back of TV
Cable TV Company Cable TV Signal Input
Cable TV Converter Round Cable
Box Connection 75f2 Ohm
]
Remember,
set the TV for the
type signal you've
just connected (see
page 3 of this Set-
Up Guide.)
To select only the
channel numbers on
your Cable system
see "Auto Program"
(page 3). If you use
a Cable Converter
box, set the TV to
the same channel as
the converter's CH
3/4 switch (on the
rear of the convert-
er.)
A ombt'natiott atttenna
receives normal
broadcast channels (VHF
2-13 and UHF 14-69).
Your connection is easy
since there is only one
75_ (ohm) antenna plug
on the back of your TV-
and that's where the anten -_
na goes.
Otwmeof you muy have
o separate antennas.
One antenna is for VHF
channels (2-13) and the
other antenna is for UHF
channels (14-69).
For homes with separate
UHF/VHF antennas, you
will need an optional
"combiner" before you can
connect to the TE. See the
"Smart Help" section (to
the right on this page)for
ordering details.
your antenna has a
round cable (75 ohm) on the
end, then you're ready to con-
nect it to the TV.
If your antenna has fiat twin-
lead wire (300 ohm), you first
need to attach the antenna wires
to the screws on a 300 to 75
ohm adapter.
_Push the round end of the
adapter (or antenna) onto the
ANTENNA/CABLE plug on
the rear of the TV. If the round
end of the antenna wire is
threaded, screw it down tight.
Wire
300 to 750.
Adapter
483521827003)
Combination VHF/UHF Antenna
(Outdoor or Indoor)
Round Cable
75f_
-_AAttach the separate
f H_and tVHFan toennt_as to°m_
Outdoor UHF Antenna
(Twin-lead 300 Ohm)
Outdoor VHF Antenna
(Twin-lead 300 Ohm)
<_Push the round end of the combiner
I
onto the ANTENNA/CABLE plug on ]
the rear of the TV. I
U/V Combiner
Back of '|'V
Back of TV
Outdoor VHF Antenn
(Round 75 Ohm cable)
75-300 Ohm Adapter
Remember,
be sure to set the
TV for the type sig-
nal you've connect-
ed (see page 3 of
this Set-Up Guide.)
To set the TV to
select only the
channel numbers in
your area see how
to "Program" or
"Add" channels in
memory on page 3.
To order any
optional accessory
contact your dealer
or call the toll-free
accessory ordering
number (1-800-292-
6066):
• UHF/VHF
Combiner:
(SBV1133AO1)
• 75-300 Ohm
Adapter:
(SBVI !13AO1)
• 300-75 Ohm
Adapter:
(483521827003)
Round Cable 75[2
_C e basic Antemm, or
able TE to VCR to
TV connection is shown to
the right. For more infor-
mation on other hookups
(possible when Cable
Converter/Descrambler
boxes are included) refer
to your accessory VCR
and Cable Converter
Owner's Manual for
details.
Connect your
Antenna or Cable TV signal
to the IN FROM ANT(enna)
)lug on the VCR.
_Connect the OUT TO TV
plug on the VCR to the
ANTENNA plug on the TV
(connecting cable supplied
with the VCR.)
<
_Refer to the Owner's
Manual included with your
VCR for other possible con-
nections and TV/VCR operal:-
ing details.
Back of 'FV
Round Cable _1_
75_ Supplied with VCR
VCR
6
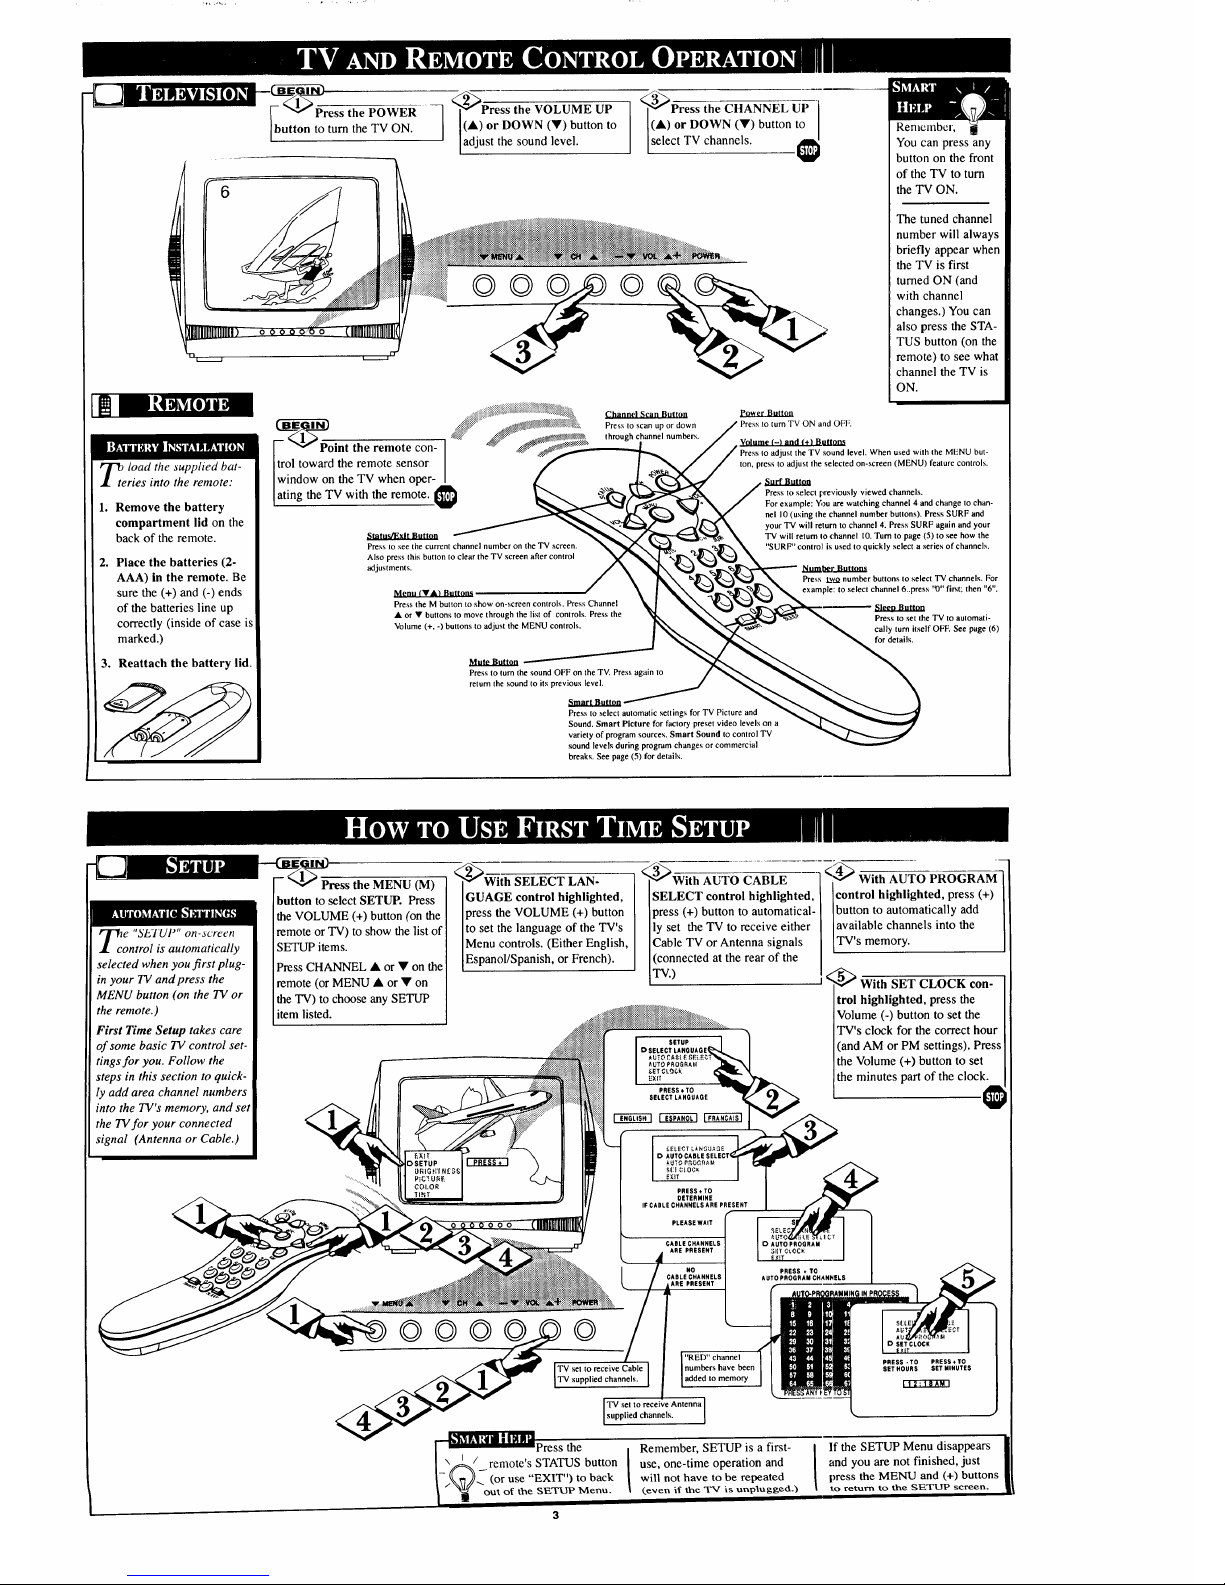
_Press the POWER
button to turn the TV ON.
_P-ress the VOLUME UP
_ I(A)or DOWN (V)button to
ladjust the sound level.
3_Press the CHANNEL UP
(k) or DOWN (Y) button to I
select TV channels, i_
Renlelnber,
You can press any
button on the front
of the TV to turn
the TV ON.
The tuned channel
number will always
briefly appear when
the TV is first
turned ON (and
with channel
changes.) You can
also press the STA-
TUS button (on the
remote) to see what
channel the TV is
ON.
lOad the supplied bat-
ries into the remote:
1. Remove the battery
compartment lid on the
back of the remote.
,
Place the batteries (2-
AAA) in the remote. Be
sure the (+) and (-) ends
of the batteries line up
correctly (inside of case is
marked.)
3. Reattach the battery lid.
F_PPoint the remote con
Press to see the current channel number on the TV screen.
Also press this button to clear the TV screen after control
adjustments.
Press the M button to show on-screen controls. Press Channel
• or • buttons to move through the list of controls. Press the
Volume (+, -) buttons to adjust the MENU controls.
Channel Scan Button
Press to scan up or down
through channel numbers.
Power Button
Press to turn TV ON and OFF.
Volume (-) and I'+_ BtlUl2._
Press to adjust the TV sound level. When used with the MENU but-
ton, press to adjust the selected on-screen (MENU) feature controls.
Press to select previously viewed channels.
For example: You are watching channel 4 and change to chan-
nel 10 (using the channel number buttons). Press SURF and
your TV will return to channel 4. Press SURF again and your
TV will return Io channel 10, Turn to page (5) to see how the
"SURF" control is used to quickly select a series of channels.
_Lulabel_
Press LW_.Onumber buttons to select TV channels. For
channel 6..press '_)" first; then "6".
Sleen Button
Press to set the TV to automati-
cally turn itself OFE See page (6)
for details,
_l%,lute Button
Press to turn the sound OFF on the TV. Press again to
return the sound to its previous level,
Smart Button
Press to select automatic settings for TV Picture and
Sound. Smart Picture for factory preset video levels on a
variety of program sources. Smart Sound to control TV
sound levels during program changes or commercial
breaks. See page (5) for details.
_c e "SEI'UI'" on-screen
ontrol is automatically
selected when you first plug-
in your TV and press the
MENU button (on the TV or
the remote.)
First Time Setup takes care
of some basic TV control set-
tings for you. Follow the
steps in this section to quick-
ly add area channel numbers
into the TV's memory, and set
the TV for your connected
signal (Antenna or Cable.)
Press the MENU (M)
button to select SETUP. Press
the VOLUME (+) button (on the
remote or TV) to show the list of
SETUP items.
Press CHANNEL • or • on the
remote (or MENU • or• on
the TV) to choose any SETUP
item listed.
_th SELECT LAN-
GUAGE control highlighted,
press the VOLUME (+) button
to set the language of the TV's
Menu controls. (Either English,
Espanol/Spanish, or French).
3_With AUTO CABLE
SELECT control highlighted,
press (+) button to automatical-
ly set the TV to receive either
Cable TV or Antenna signals
(connected at the rearof the
TV.)
<._ With AUTO PROGRAM
Icontrol highlighted, press (+)
Ibutton to automatically add
[available channels into the
[TV's memory.
]< _With SET CLOCK con-
trol highlighted, press the
Volume (-) button to set the
TV's clock for the correct hour
(and AM or PM settings). Press
the Volume (+) button to set
the minutes part of the clock.
PRESS + TO
OETERMINE
IF CABLE CHANHELS ARE PRESENT
PLEASE WAfT
CABLECHANNELS
ARE PRESENT
NO
CABLECHANNELS
ARE PRESENT
0 AUTOPROQRAM
PRESS + TO
AUTOPROURAMCHANNELS
 Loading...