

Page 1
Instructions for use
_vox
3135 015 104O1
Page 2

Once your PHILIPS MAGNAVOX purchase is registered, you're eligible to receive all the privileges of
owning a PHILIPS MAGNAVOX product. So complete and return the Warranty Registration Card
enclosed with your purchase at once. And take advantage of these important benefits.
Congratulations on your purchase,
and welcome to the "familyF'
PHILIPS
Dear PHILIPS MAGNAVOX product owner:
Thank you for your confidence in PHILIPS MAGNAVOX. You've selected one of the best-built, best-
backed products available today. And we'll do everything in our power to keep you happy with your
purchase for many years to come.
As a member of the PHILIPS MAGNAVOX "family," you're entitled to protection by one of the most
comprehensive warranties and outstanding service networks in the industry.
What's more, your purchase guarantees you'll receive all the information and special offers for which
you qualify, plus easy access to accessories from our convenient home shopping network.
And most importantly you can count ORour uncompromising commitment to your total satisfaction.
All of this is our way of saying welcome-and thanks for investing in a PHILIPS MAGNAVOX product.
Sincerely,
Robert Minkhorst
President and Chief Executive Officer
P,S, Remember, to get the most from your PHILIPS
MAGNAVOX product, you must return your
Warranty Registration Card within 10 days. So
please mail it to us right now!
Know these
safetysyrnbo/s
_. This "bolt of lightning"indicates uninsulated material within your unit may cause an electrical
shock. For the safety of everyone in your household, please do not remove product covering.
,_The "exclamation point" calls attention to features for which you should read the enclosed lit-
erature closely to prevent operating and maintenance problems.
WARNING: TO PREVENT FIRE OR SHOCK HAZARD, DO NOT EXPOSE THIS EQUIPMENT
TO RAIN OR MOISTURE.
CAUTION: To prevent electric shock, match wide blade of plug to wide slot, and fully insert.
ATTENTION: Pour eviter les cbocs electriques, introduire la lame la plus large de la fiche dans la
borne corresdondante de la prise et pousser jusqu'au fond.
Page 3
SAFETYINSTRUCTIONS- Readbeforeoperatingequipment
This product was designed and manufactured to meet strict quality and 11. Power-Cord Protection - Power supply cords should be routedso
safety standards. Thereare, however,some installation and operation pre- that they are not likely to be walked on or pinched by items placed
cautions which you should be particularly aware of. upon or againstthem, paying particular attention to cordsand plugs,
convenience receptacles, and the point where they exit from the
1. Read Instructions - All thesafety and operating instructionsshould
be read before the appliance is operated.
2. Retain Instructions - The safety and operating instructions should
be retained for future reference.
3. Reed Warnings - All warnings on the appliance and in the operating
instructions should be adhered to.
4. Follow Instruclions - All operating and use instructions should be
followed.
5. Water and Moisture - The appliance should not be used near water
- for example, near a bathtub, washbowl, kitchen sink, laundry tub,
in a wet basement or near a swimming pool, etc.
6. Cartsand Stands- The appliance should be used only with a cart or
stand that is recommended bythe manufacturer.
6A. A An appliance and cart combination should be moved
with care.Quick stops, excessiveforce, and uneven sur-
faces may cause the appliance and cart combination to
overturn.
66. Till/Stability - All televisions must comply with recommended inter-
national global safety standards for tilt and stability properties of its
cabinet design.
Do not compromise these design standards by applying exces-
sive pull forceto the front, ortop, of the cabLnetwhich could
ultimately overturn the product.
Also, do not endanger yourself, or children, by placing elec-
tronic equipment/toys on the top of the cabinet. Such items
could unsuspectingly fall from the top of the set and cause
product damage and/or personal injury.
7. Wall or Ceiling Mounting- The appliance should be mounted to a
wall or ceiling only as recommended by the manufacturer.
8. Ventilation - Theappliance should be situated so that its location or
position does not interfere with its properventilation. For example,
the appliance should not be situated on a bed, sofa, rug, or similar
surface that may block the ventilation openings; or, placedin abuilt-
in installation, such as a bookcase or cabinet that may impede the
flow of air through the ventilation openings.
9. Heat - The appliance should be situated away from heat sources
such as radiators, heatregisters, stoves, or other appliances (includ-
ing amplifiers) that produce heat.
10. Power Sources- The appliance should be connectedto a powersup-
ply only of the type described in the operating instructionsor as
marked on the appliance.
appliance.
12. Cleaning- The appliance should be cleaned only as recommended
bythe manufacturer.
13. Power Lines - An outdoor antenna should be located away from
power lines.
14. OutdoorAntennaGrounding- If an outside antennais connected to
the receiver, be sure the antenna system is grounded so as to pro-
vide some protectionagainst voltage surges and built up static
charges.
Section 810 of the National Electric Code,ANSI/NFPANo. 70-1984,
providesinformationwith respect to propergrounding of the mats
andsupporting structure grounding of the lead-inwire to an anten-
nadischarge unit, sizeof grounding connectors,locationofantenna-
discharge unit, connectionto grounding electrodesand require-
ments for the grounding electrode.SeeFig.below.
15. Non-use Periods - The power cord of the appliance should be
unpluggedfromtheoutlet whenleftunused for a longperiodoftime.
16. Objectand LiquidEntry- Careshouldbetakenso thatobjectsdo not
fall andliquidsare not spilled into theenclosurethroughopenings.
17. Damage Requiring Service - The applianceshould be serviced by
qualified service personnelwhen:
A. Thepower supply cordor the plughasbeen damaged; or
B. Objectshavefallen,or liquidhasbeenspilled intotheappliance;
or
C. Theappliance has beenexposedto rain;or
D. Theappliancedoes not appearto operatenormally or exhibitsa
marked changein performance;or
E. Theappliance has beendropped, or the enclosuredamaged.
18. Servicing - The user should not attempt to service the appliance
beyond thatdescribed in theoperatinginstructions.All other servic-
ingshould be referredto qualified servicepersonnel.
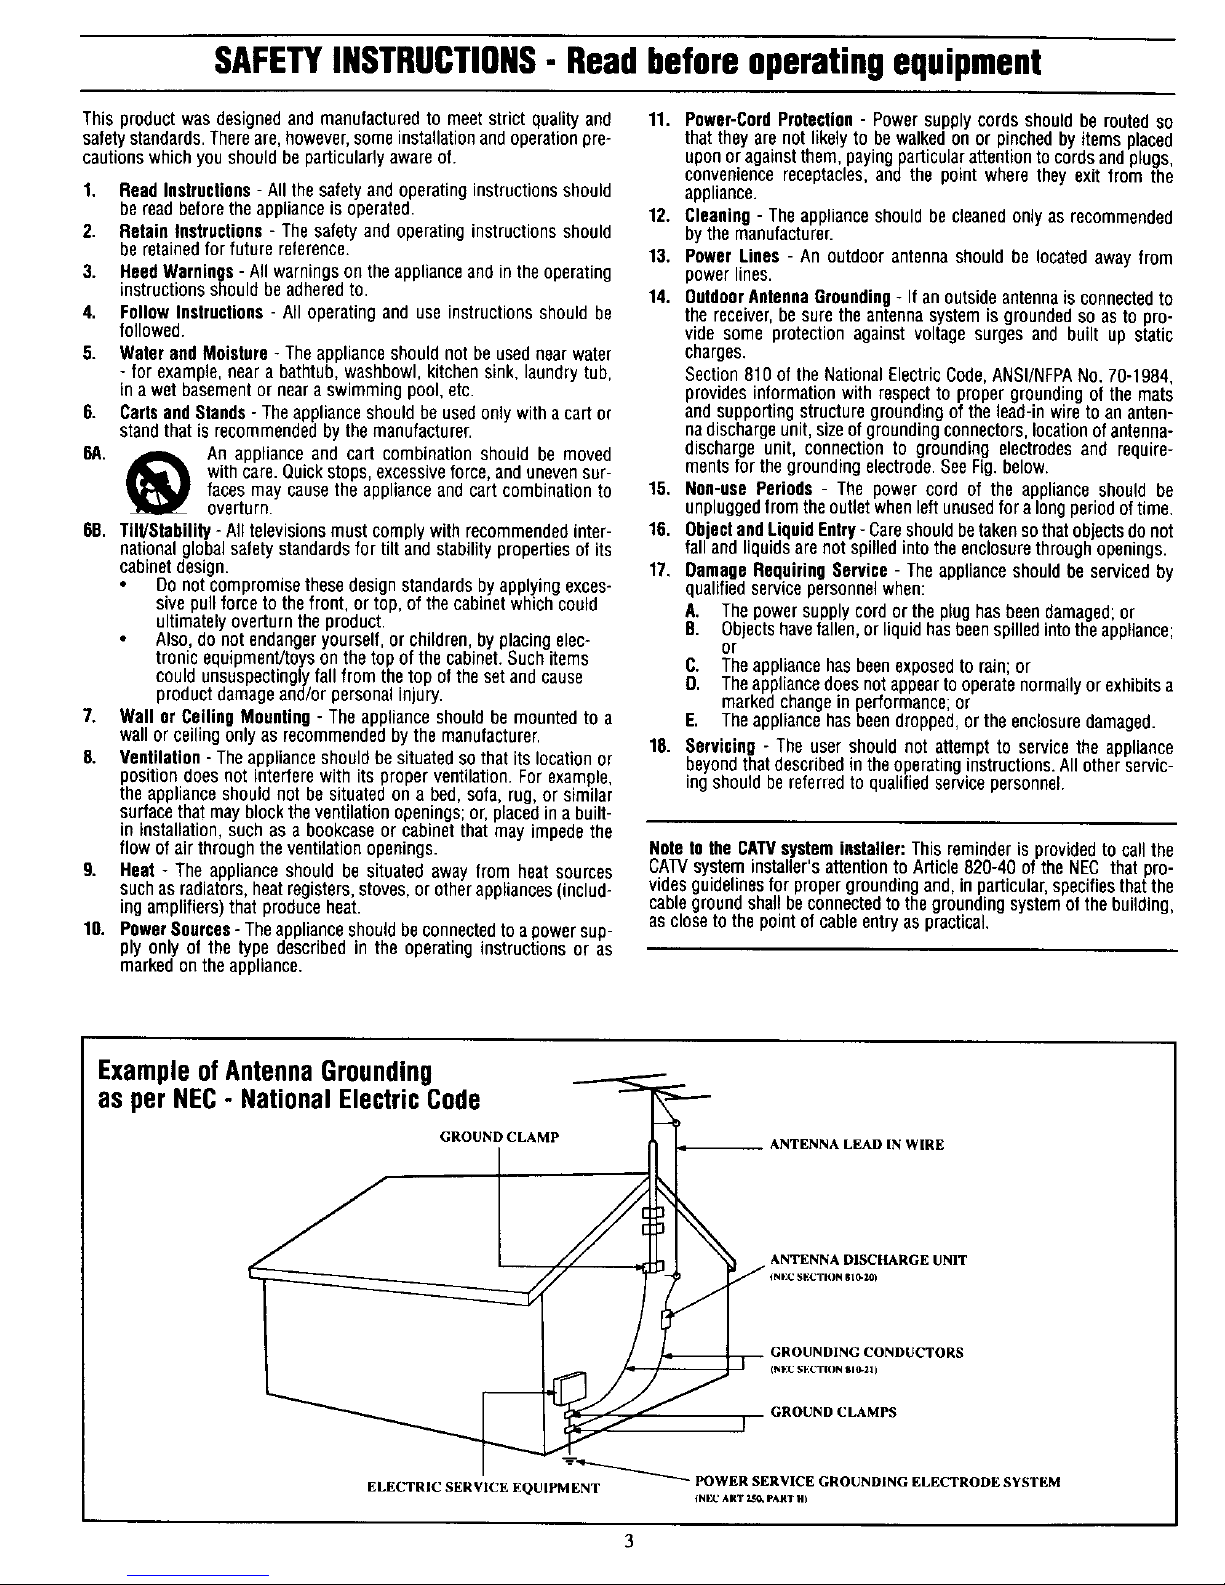
Note to the CATVsysteminstaller: This reminder is providedto callthe
CATVsysteminstaller'sattentionto Article 820-40 of the NEC that pro-
rides guidelines for propergrounding and, inparticular,specifies that the
cableground shallbeconnectedtothe grounding system of the building,
ascloseto the pointofcableentryaspractical.
ExampleofAntennaGrounding
as per NEC- NationalElectricCode
GROUND CLAMP ANTENNA LEAD IN WIRE
ANTENNA DISCHARGE UNIT
INEC SECTION eL0-10)
GROUNDING CONDUCTORS
(N I'_CSECTION 810-21)
GROUND CLAMPS
-----_-"_ POWER SERVICE GROUNDING ELECTRODE SYSTEM
ELECTRIC SERVICE EQUIPMENT
tN_(' ART _ PAl(3 H)
Page 4
Introduction
Welcome/Registration of Your TV ............................ 2
Safety/Precautions ..................................................... 3
Table of Contents ....................................................... 4
Features ...................................................................... 4
Basic Cable TV Hookups .......................................... 5
Basic Antenna Hookups ............................................. 6
Basic TV to VCR Hookup ......................................... 7
Basic TV and Remote Operations ............................. 8
TV Remote Buttons ................................................... 9
[] Onscreen MENU
¢, Setting the Language Control ................. 10
Using the Tuner Control ................................... I1
<_Using the Auto Program Control ..................... 12
How to Add and Delete Channels .................... 13
_" Setting the External Control (Input Naming)..14
_" Adjusting the TV Picture ................................. 15
Activating Contrast Plus (Black Stretch) ......... 16
_- Activating Noise Reduction (Picture) Control 17
_" Setting the TV's Clock ..................................... 18
Activating the Timer Control ........................... 19
¢, Activating the Start-Up Channel ...................... 20
<>Setting the TV's StartTime Control ................ 20
<_Setting the TV for Closed Caption .................. 21
<_Using the Sleep Timer Control ........................ 22
SmartLock TM
_ Understanding the SmartLock Feature......23
"0-Setting the SmartLock Access Code ................ 24
+ Setting the SmartLock to Block Channels ....... 25
¢, Setting SmartLock's Blocking Options ........... 26
_- Blocking Using the Movie/TV Ratings .....27-28
+ Using the SmartLock Review Screen ............... 29
+ Using the Bass & Treble Boost Controls..,30
+ Using the Volume Bar Control ......................... 31
_" Using the Volume Limiter Control .................. 31
+ Using the Input control with the Audio/Video
Input Jacks ....................................................... 32
Remote Cpntrol Operation
Using the SmartPicture TM Control ................ 33
Here are a few of the special features built into this
new Color Television:
SmartLock TM feature allows you to block the view-
ing of certain channel or external audio/video con-
nections where you might not want your children
viewing inappropriate material.
Infrared Remote Control works your TV set.
Standard broadcast (VItF/UHF) or Cable TV
CATV) channel capability.
Closed Captioning allows the viewer to read TV
program dialogue or voice conversations as onscreen
text.
Automatic Programming of Channels for quick
and easy selection of favorite stations available in
?our area.
Onscreen Features (in either English, French, or
Spanish) show helpful messages for setting of TV
controls.
Sleeptimer automatically turns the TV OFF at preset
times.
SmartPicture TM allows you to set the picture color,
tint, contrast, etc. for various types of programming
such as Personal (picture controls the way you set
them), Sports. Movies, or Weak Signals with the push
of one button.
SmartSound TM controls allow you to set the sound
controls for various types of listening programs such
as Personal (sound controls the way you set them),
Theater, Music, or Voice with the push of one button.
SmartPicture TM, SmartSound TM, SmanSurf TM, and SmaaLock TM are all
registered trademarks of Philips Consumer Electronics Company.
Copyright © 1999 Philips Consumer Electronics Company. All rights reserved.
4
Page 5

yhur Cable TV input into your
ome may be a single (75
ohm) cable, or a Converter Box
installation. In either case the
connection to the 71/is very easy.
Just put the threaded end of the
cable signal to the TV's antenna
plug and screw it down tight.
<_Ifyour Cable TV signal a
is sin-
gle round cable (75 ohm) then
you're ready to connect to the TV.
If you have a Cable Converter
Box:
Connect the Cable TV signal to the
Cable Signal IN(pu0 plug on the
Converter..
<_ the Cable TV cable the
Connect to
75_1plug on the TV.
If you have a Cable Converter Box:
Connect the OUT(pat) plug fromthe
Converter to the 75'_ plug on the TV.
O
i
I
Remember: !
Set the TV for the
type signal you've
just connected (see
the "Tuner section
on page 11 of this
manual.)
To select only the
channel numbers on
your Cable system
see "Auto Program"
(page 12). If you use
a Cable Converter
box, set the TV to the
same channel as the
converter's CH 3/4
switch (on the rear of
the converter.)
Cable TV Company
75,Q
75_) Ohm
Cable TV Converter
Box Connection
v,0E0
IN
Auolo _1
Page 6
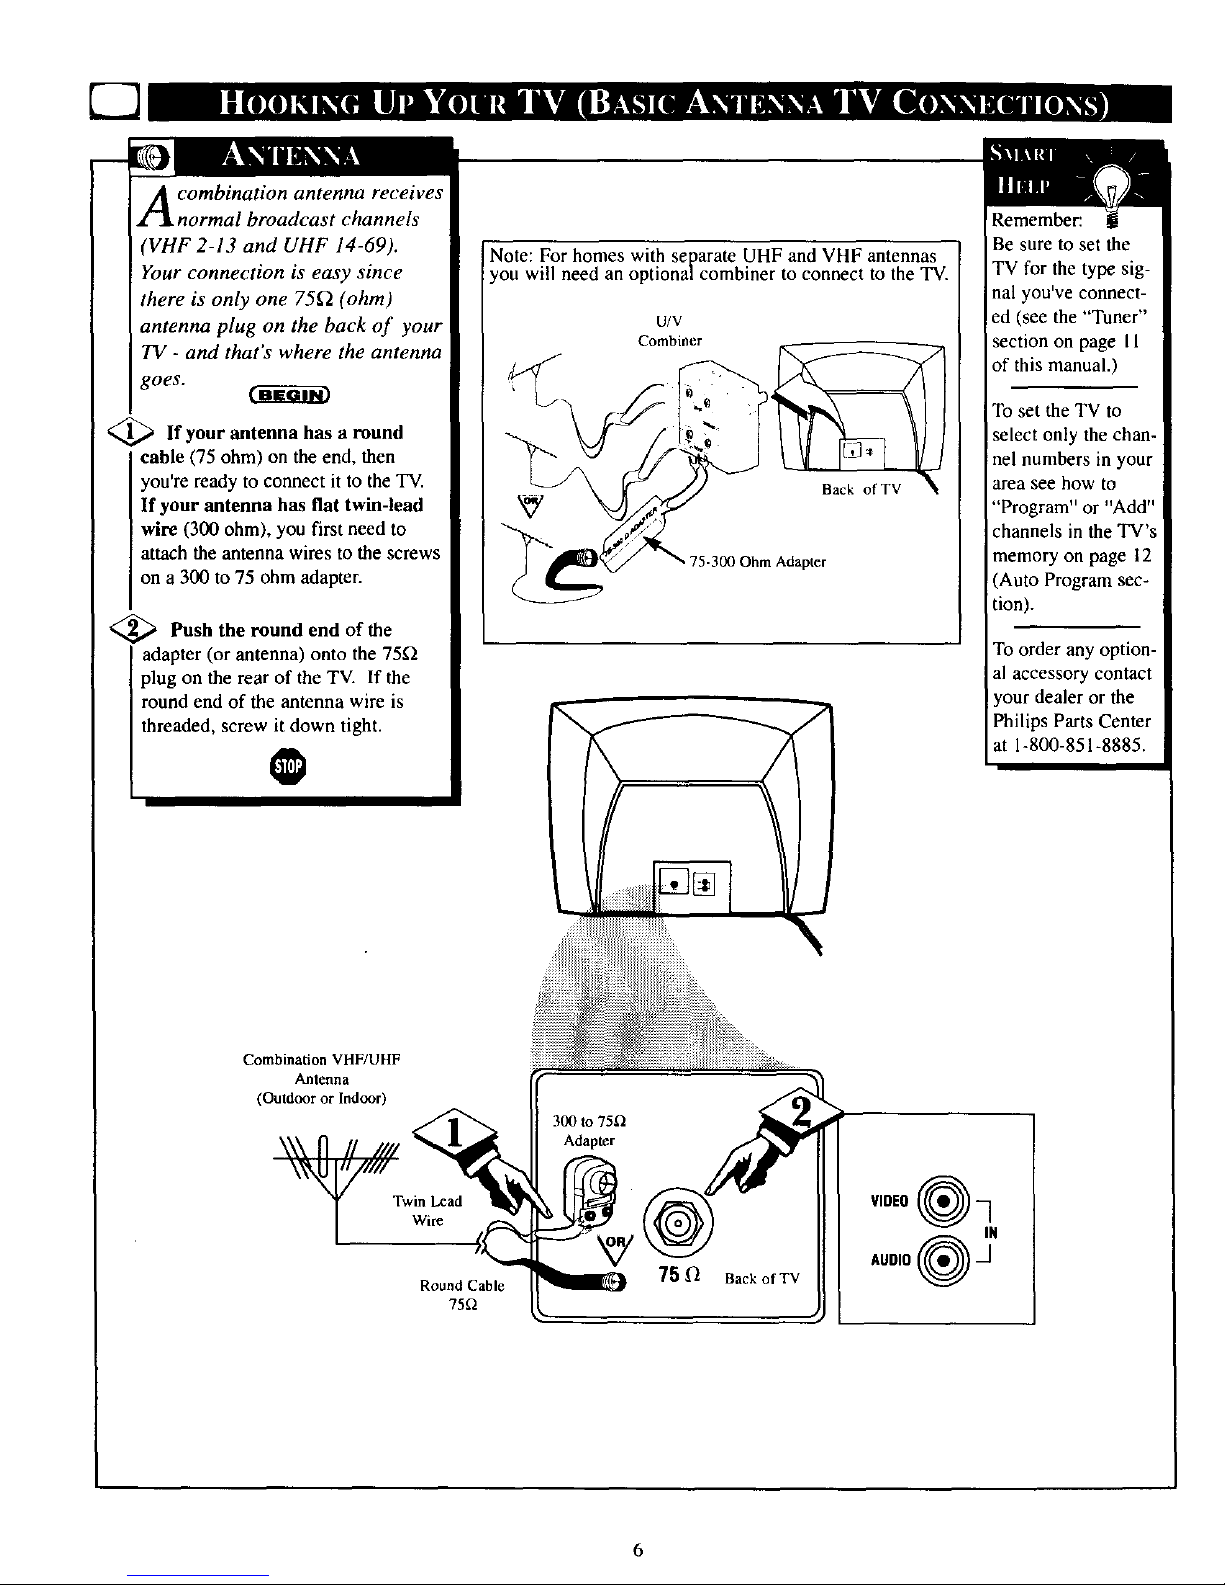
U-3
combination antenna receives
Lnormal broadcast channels
(VHF 2-13 and UHF 14-69).
Your connection is easy since
there is only one 75f2 (ohm)
antenna plug on the back of your
TV - and that's where the antenna
goes.
<_ lfyour antenna has a
round
cable (75 ohm) on the end, then
you're ready to connect it to the TV.
If your antenna has flat twin-lead
wire (300 ohm), you first need to
attach the antenna wires to the screws
on a 300 to 75 ohm adapter.
<_ Push the round end of the
adapter (or antenna) onto the 75sq
plug on the rear of the TV. If the
round end of the antenna wire is
threaded, screw it down tight.
@
Note: For homes with separate UHF and VHF antennas
you will need an optionalcombiner to connect to the TV.
u/v
Combiner
<.
Remember:
Be sure to set the
TV for the type sig-
nal you've connect-
ed (see the "Tuner"
section on page I1
of this manual.)
To set the TV to
Iselect only the chan-
nel numbers in your
area see how to
"Program" or "Add"
channels in the TV's
memory on page 12
(Auto Program sec-
tion).
To order any option-
al accessory contact
your dealer or the
Philips Parts Center
at 1-800-851-8885.
Combination VHF/UHF
Antenna
(Outdoor or Indoor)
Twin Lead
Wire
Round Cable
75f2
VIDEO_(_ _N
AUDIO
6
Page 7
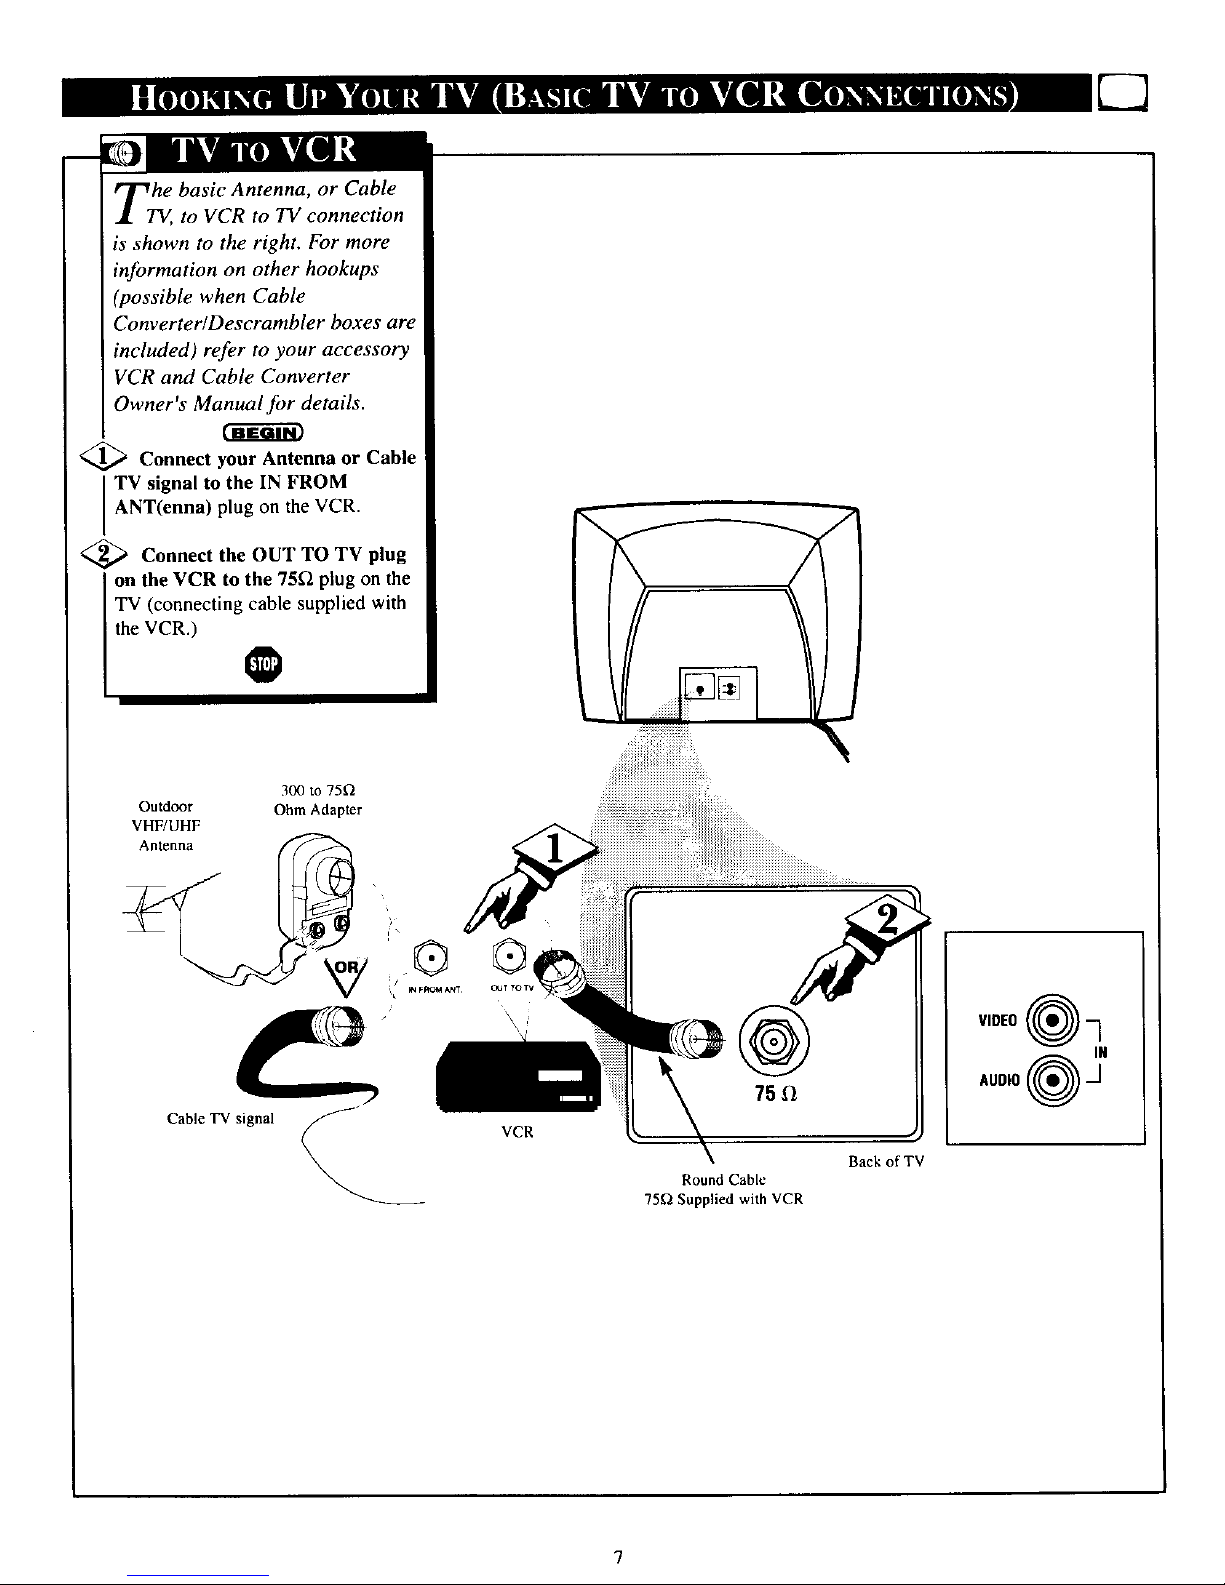
TTv,he basic Antenna, or Cable
to VCR to TV connection
is shown to the right. For more
information on other hookups
(possible when Cable
Converter/Descrambler boxes are
included) refer to your accessory
VCR and Cable Converter
Owner's Manual for details.
_ Connect your Antenna or Cable
TV signal to the IN FROM
ANT(enna) plug on the VCR.
<_ Connect the plug
OUT TO TV
on the VCR to the 75£2 plug on the
TV (connecting cable supplied with
the VCR.)
300 to 75f2
Outdoor Ohm Adapter
VHF/UHF
ix
Cable TV signal _"
VCR
! !i!i!i!i!i!i!i!i!i!i!i!i!i!i!iiiii!i!iii!i!iiii iiiii
Round Cable
75f2 Supplied with VCR
Back of TV
Page 8
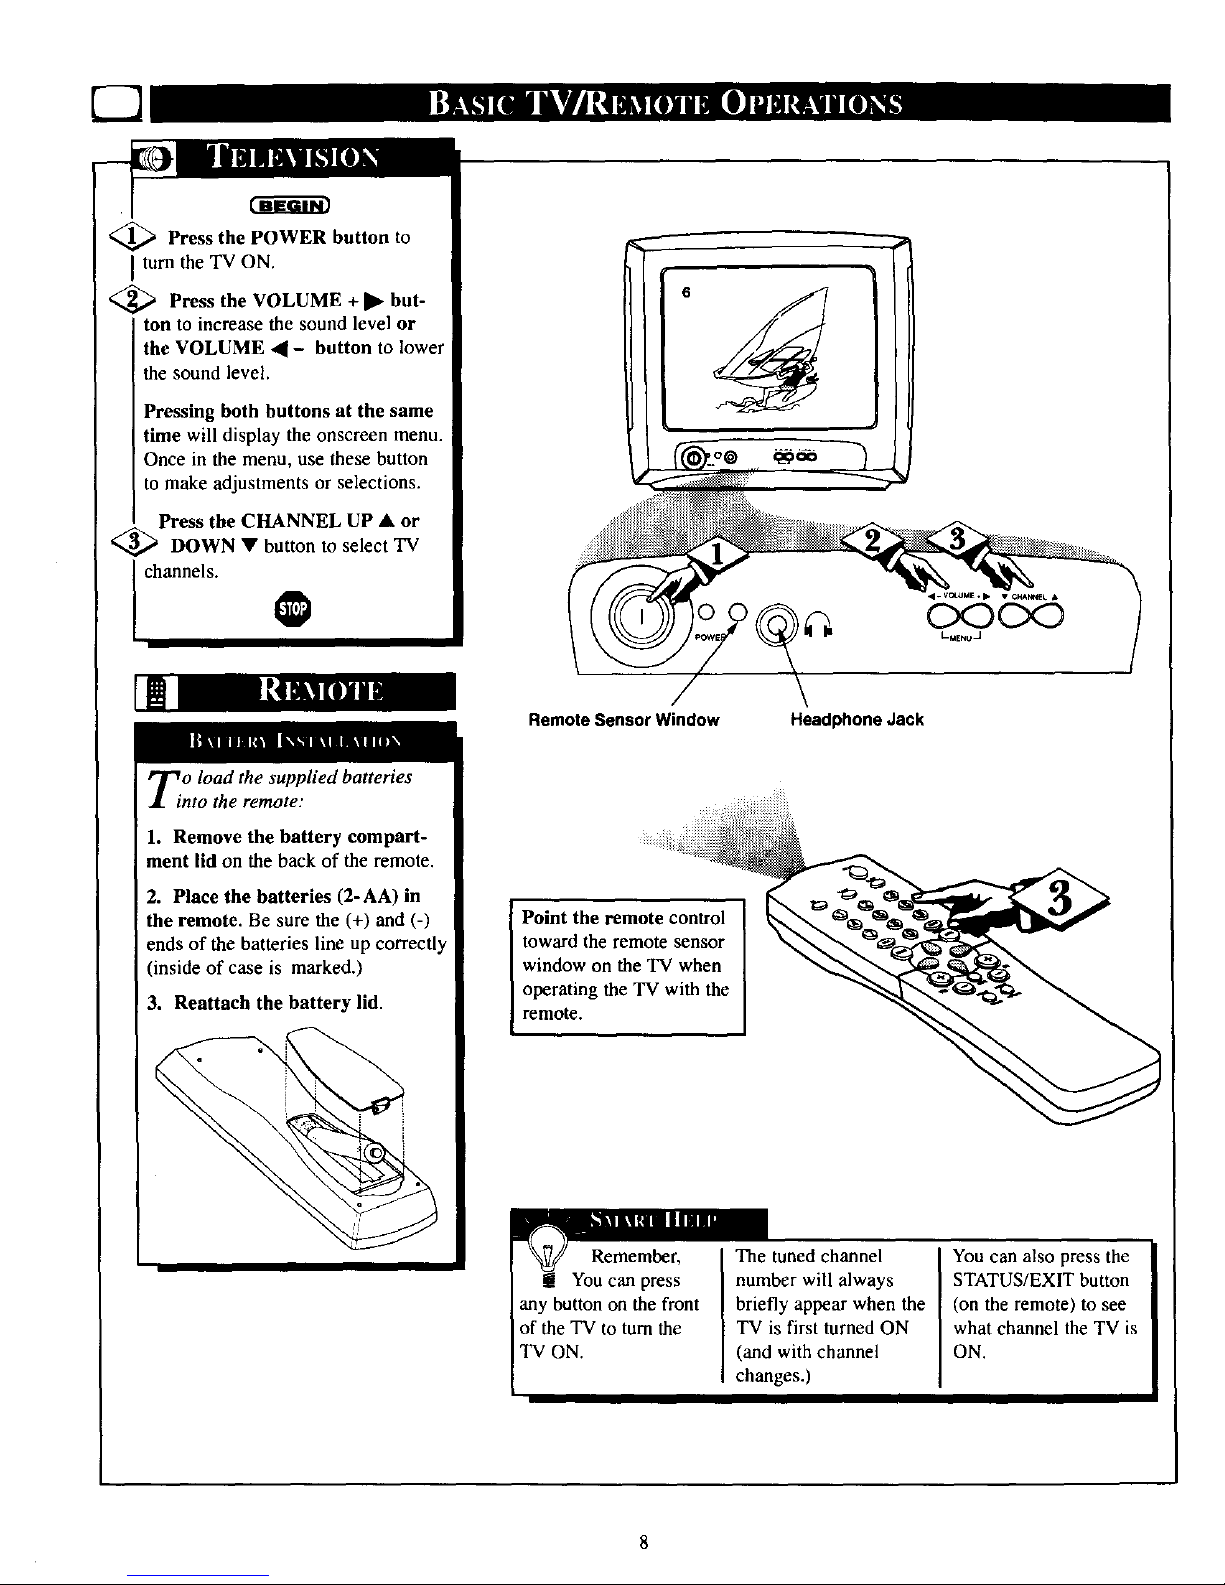
7-7
_ Press the POWER to
button
turn the TV ON.
Press the VOLUME + •
but-
ton to increase the sound level or
the VOLUME 41- button to lower
the sound level.
Pressing both buttons at the same
time will display the onscreen menu.
Once in the menu, use these button
to make adjustments or selections.
Press the CHANNEL UP • or
<
DOWN • button to select TV
channels.
@
Cx:3Cx3
LMENO_
Remote Sensor Window Headphone Jack
Ti o load the supplied batteries
nto the remote."
1. Remove the battery compart-
ment lid on the back of the remote.
2. Place the batteries (2-AA) in
the remote. Be sure the (+) and (-)
ends of the batteries line up correctly
(inside of case is marked.)
3. Reattach the battery lid.
Point the remote control
toward the remote sensor
window on the TV when
operating the TV with the
remote.
Remember,
You can press
any button on the front
of the TV to turn the
TV ON.
The tuned channel
number will always
briefly appear when the
TV is first turned ON
(and with channel
changes.)
I
You can also press the
STATUS/EXIT button
(on the remote) to see
what channel the TV is
ON.
Page 9
Power Button
Pressto turnthe TV ON and OFF.
Press to set the TV to automatically turn itself OFF.
cc Button
Press to select Closed Caption options within the menu.
Clock Button
Press for direct entry of the TIMER (Clock) features were you can set
the TV's clock, the Start Time, and the Start Channel Controls.
Number Buttons
Press the number buttons to select TV channels. For single digit entries,
)tess the number of the channel you desire. The TV will pause for a few
seconds, then change to the selected channel. For channels 100 and
above, press "l" then the next two numbers. (Example, Press "l ", then
"2", then "5" for channel 125.)
Press to toggle between the currently viewed channel and the previously
viewed channel.
Press to select previously viewed channels. You can place up to 8 channels
m memory. Then by pressing the SURF button you can quickly view the
select channels. See the "Surf' section to see how to select a series of
channels using the Surf button.
Menu Button
Press for the onscreen menu to appear. Pressing the menu button after
menu selections are made will eliminate the menu from the display.
Press to see the current channel number on the TV screen. Also press to
clear the TV screen after control adjustments.
Cursor Buttons
Use these button to select and adjust the TV's onscreen menu.
Volume (+L (-) Buttons
Press to adjust the TV sound level.
Mute Button
Press to turn the sound OFF on the TV. Press again to retum the
sound to its previous level.
Smart Sound Button
Press to select from a list of Smart Sound controls. (Factory preset
sound control levels set for different types of listening sources and
programs.)
Press to select from a list of Smart Picture controls. (Factory preset
_icture control levels set for different types of viewing sources and
programs.)
Channel (+L (-I Buttons
Press to change the tuned channel.
® ® @
® ® ®
SMART SMART
J
9
Page 10
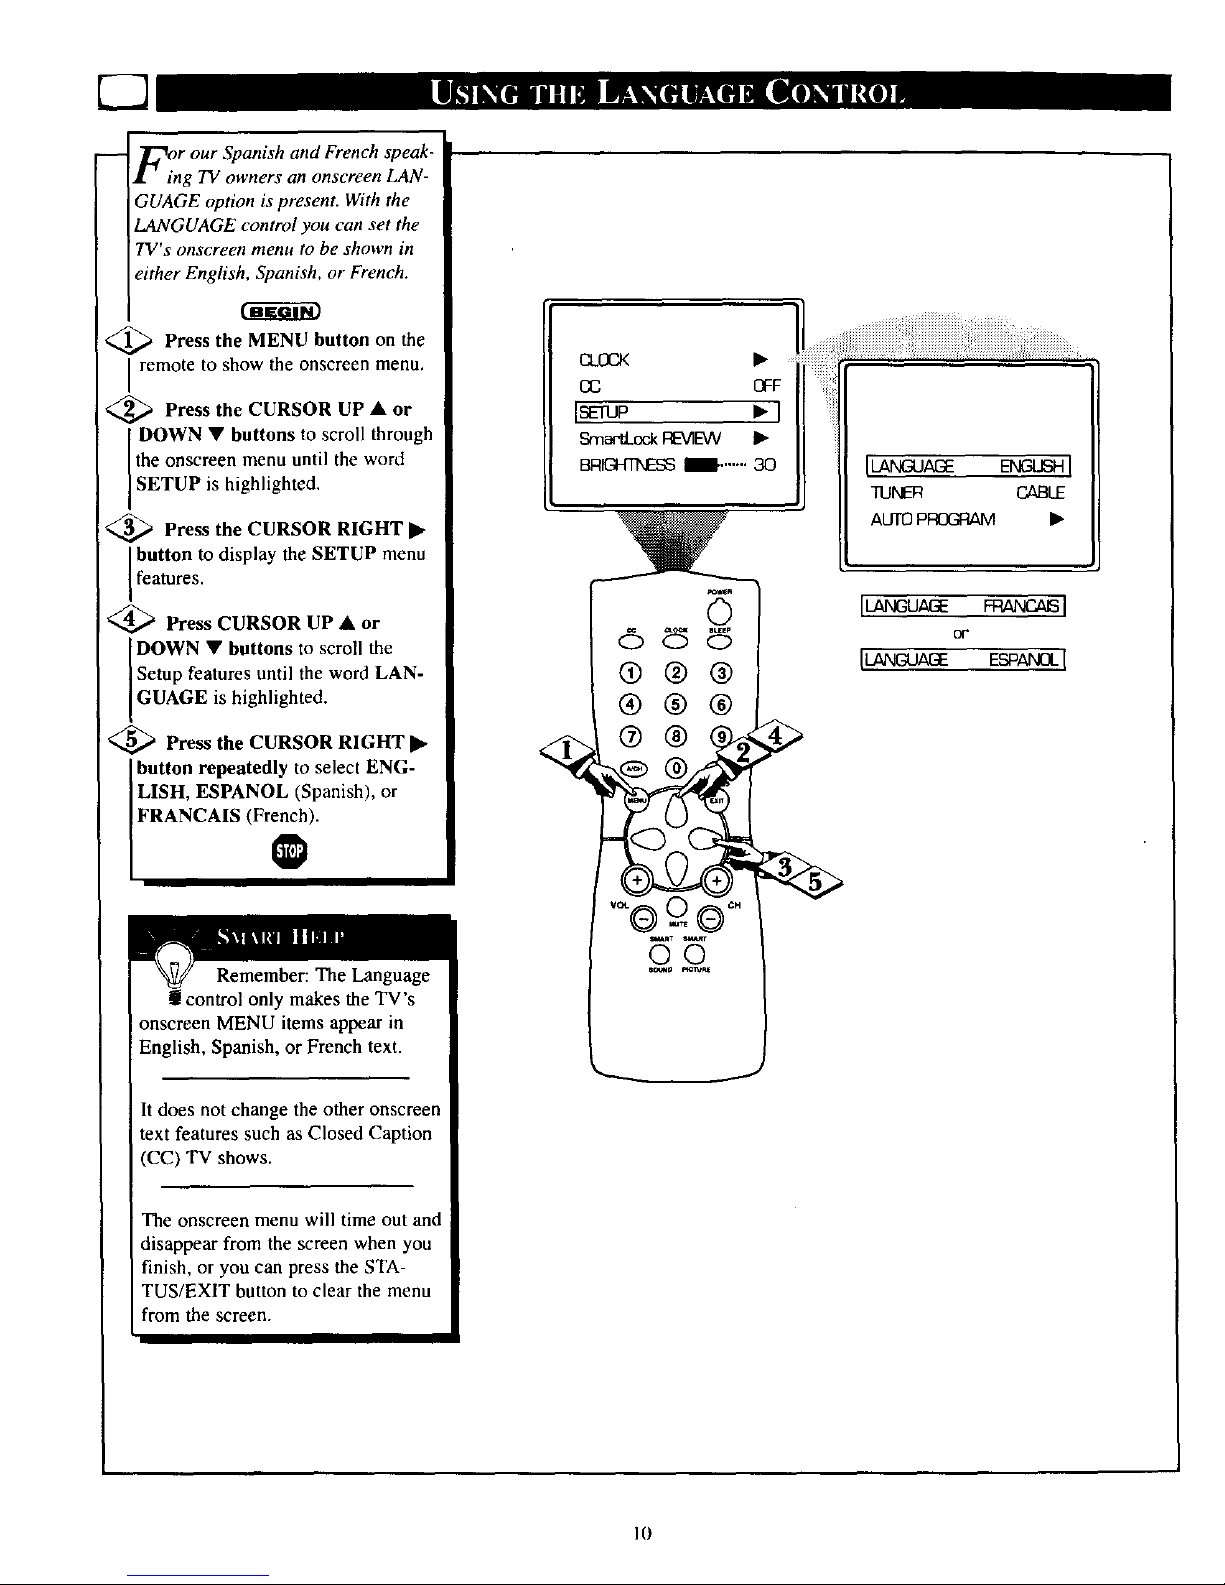
7q
F_n r our Spanish and French speak-
g TV owners an onscreen LAN-
GUAGE option is present. With the
LANGUAGE control you can set the
TV's onscreen menu to be shown in
either English, Spanish, or French.
<_ Press the MENU button on the
I remote to show the onscreen menu,
_ Press the CURSOR UP • or
DOWN • buttons to scroll through
the onscreen menu until the word
SETUP s high ghted.
_,_ Press the CURSOR RIGHT •
button to display the SETUP menu
features.
<_ Press CURSOR UP • or
DOWN • buttons to scroll the
Setup features until the word LAN-
GUAGE s high ghted.
<_ Press the CURSOR RIGHT •
button repeatedly to select ENG-
LISH, ESPANOL (Spanish), or
FRANCAIS (French).
Remember: The Language
!control only makes the TV's
onscreen MENU items appear in
English, Spanish, or French text.
It does not change the other onscreen
text features such as Closed Caption
(CC) TV shows.
I_uP • I
SmactLock[:_AEW •
BFIK:_Tf,ESS 1.....-. 30
168_
I®@@
I®®@
_®
TUNER CABLE
AUTOPROGRAM •
Iu_'u,_E F_V,r_SI
or
IL_GUAGE ESP_D-I
The ooscreen menu will time out and
disappear from the screen when you
finish, or you can press the STA-
TUS/EXIT button to clear the menu
from the screen.
I0
Page 11
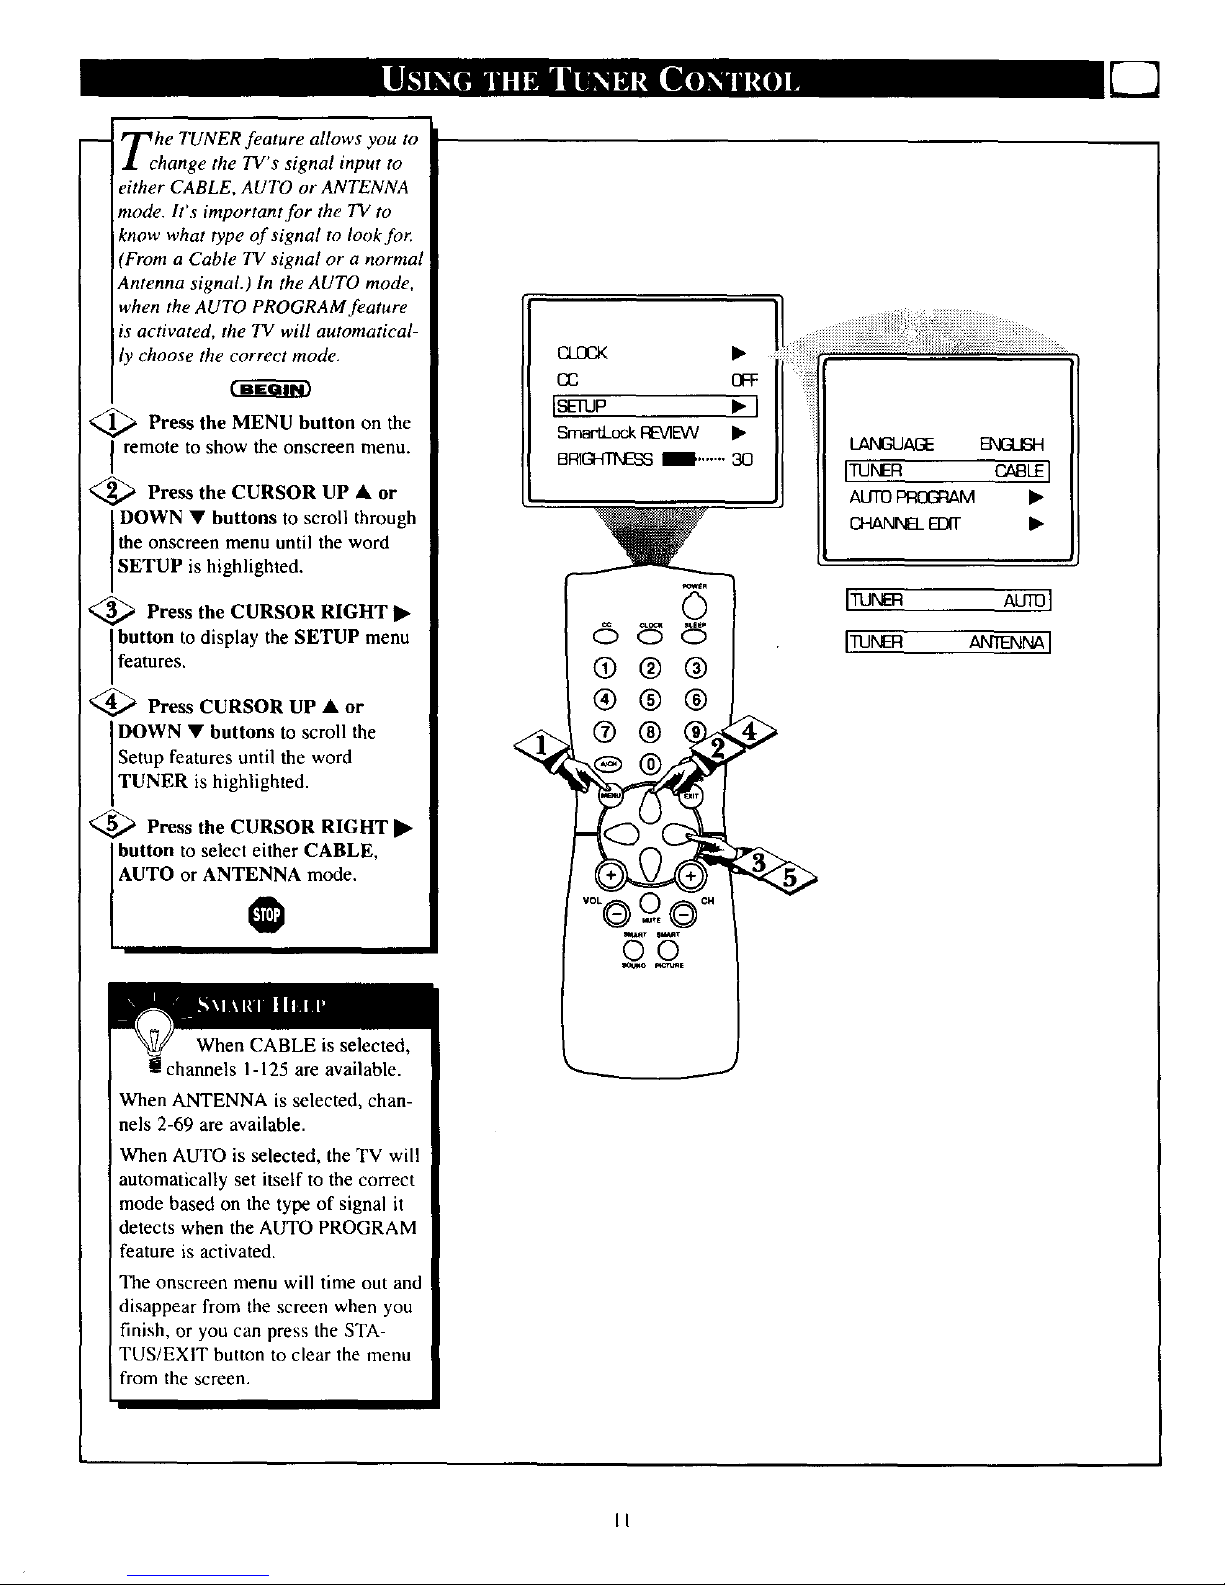
Tche TUNER feature allows you to
hange the TV s signal input to
either CABLE, AUTO or ANTENNA
mode. It's important for the TV to
know what type of signal to look for:
(From a Cable TV signal or a normal
Antenna signal.) In the AUTO mode,
when the AUTO PROGRAM feature
is activated, the TV will automatical-
ly choose the correct mode.
_ Press the MENU button the
on
remote to show the onscreen menu.
_ Press the CURSOR UP • or
DOWN • buttons to scroll through
the onscreen menu until the word
SETUP is highlighted.
_ Press the CURSOR RIGHT •
button to display the SETUP menu
features.
_ Press CURSOR UP • or
DOWN • buttons to scroll the
Setup features until the word
TUNER s h gh ghted.
_ Press the CURSOR RIGHT •
button to select either CABLE,
AUTO or ANTENNA_ mode.
When CABLE is selected,
hannels 1-125 are available.
When ANTENNA is selected, chan-
nels 2-69 are available.
When AUTO is selected, the TV will
automatically set itself to the correct
mode based on the type of signal it
detects when the AUTO PROGRAM
feature is activated.
The onscreen menu will time out and
disappear from the screen when you
finish, or you can press the STA-
TUS/EXIT button to clear the menu
i from the screen.
o_ OFF
IsEtup •1
Sma-t:LockREVIEW •
BIRIGHTNES8l'....... 30
LANGUAGE
ITUNm I
AUTOPROG_ •
GHANNS__ _-
ITUN AUT01
ITUNm AN NNAI
II
Page 12
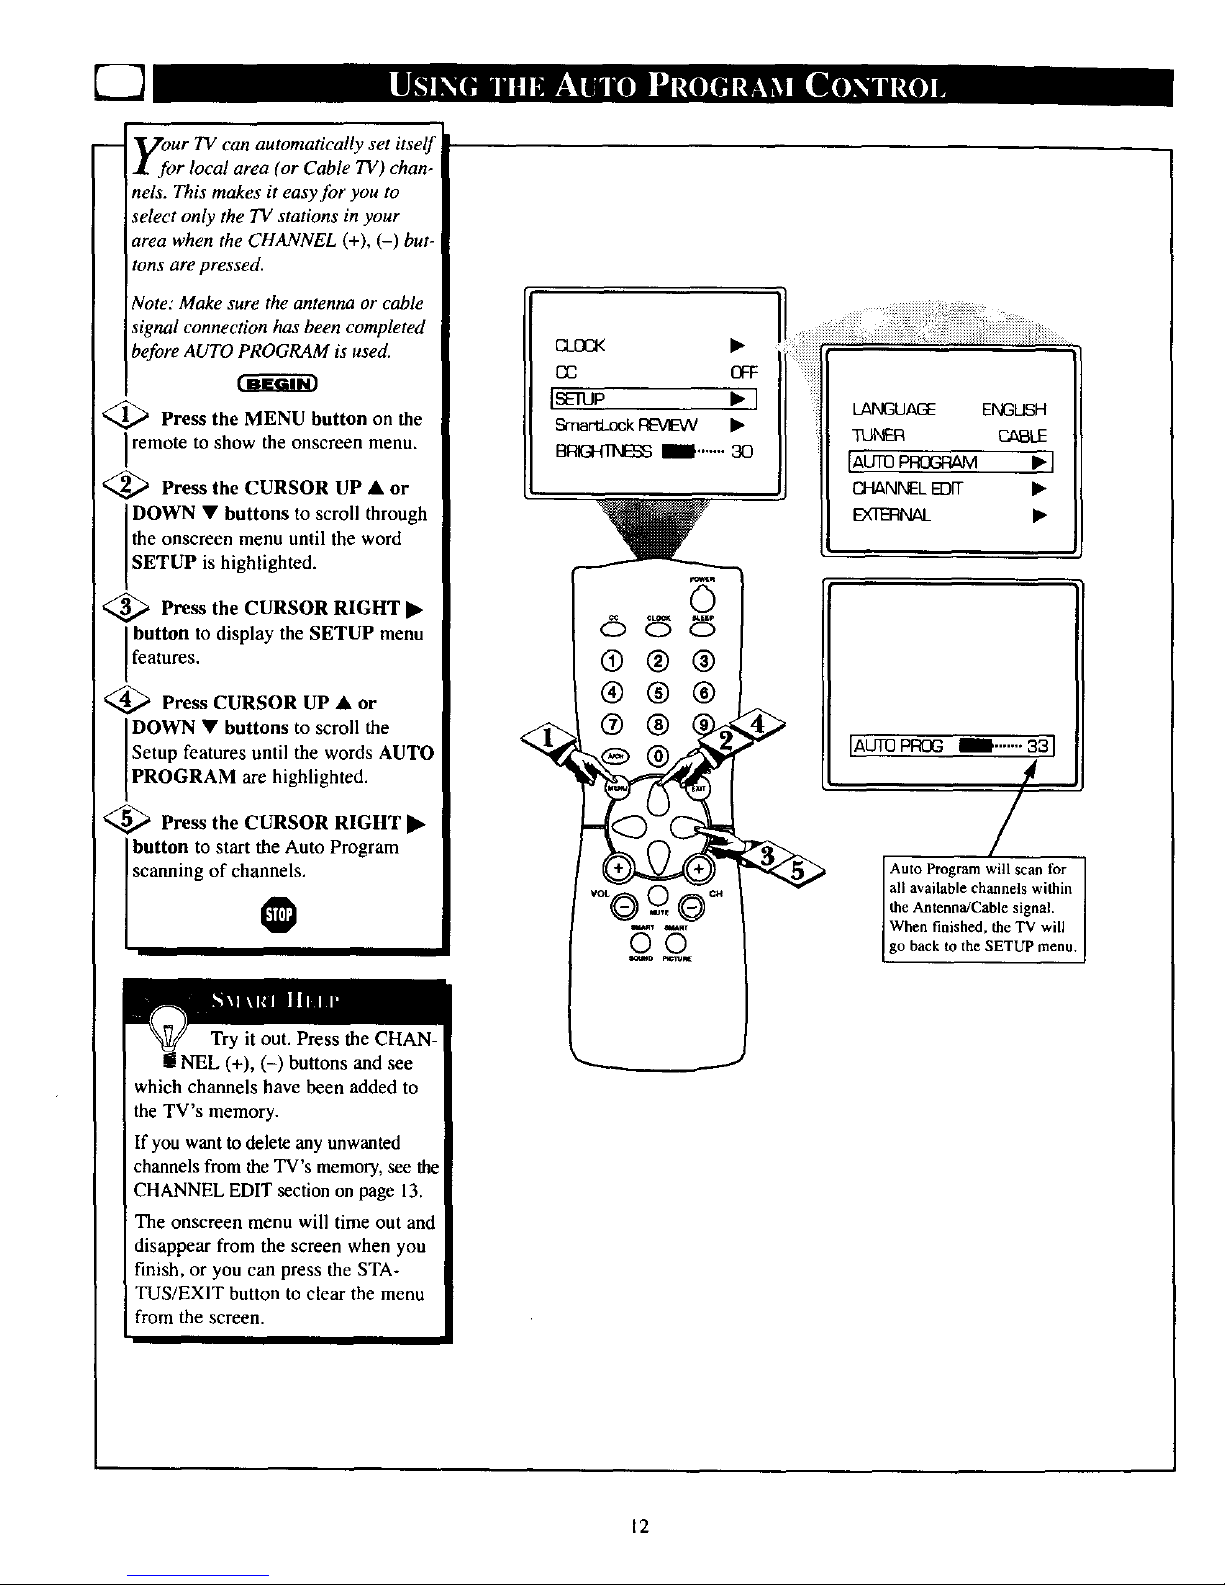
7-3
1.
-- Vour TV can automatically set itself|
for local area (or Cable TV) chan- |
nels. This makes it easy for you to I
select only the TV stations in your 1
area when the CHANNEL (+), (-) but- |
tons are pressed, l
Note: Make sure the antenna or cable I
signal connection has been completed [
before AUTO PROGRAM is used. I O_OOK •
I
cc Gq:
<_ Press the MENU button on the ] ]SEIUO • I
remote to show the onscreen menu. • SmartLock[:r_MIEVV •
I
I
13_ Ira-,,,,, 30
'_ Press the CURSOR UP • or I _ --
DOWN • buttons to scroll through |
the onscreen menu until the word |
[SETUP is highlighted. I
Press the CURSOR RIGHT • I
button to display the SETUP menu [
[features' I I 0 @ @
Press CURSOR UP•or I I (_) (_) (_
DOWN • buttons to scroll the I _"_ _ _(_) (_ _
Setup features until the words AUTO I __
[PROGRAM are highlighted. I
i_ Press the CURSOB RIGH'I |
button to start the Auto Program 1
scanning of cha_s. I voLQ=_) ,_ _
,_ Press the CURSOR RIGHT •
@ Press CURSOR UP • or
'_ Press the CURSOR RIGHT 1_
Try it out. Press the CHAN-
g NEL (+), (-) buttons and see
which channels have been added to
the TV's memory.
If you want to delete any unwanted
channels from the TV's memory, see the
CHANNEL EDIT section on page 13.
The onscreen menu will time out and
disappear from the screen when you
finish, or you can press the STA-
TUS/EXIT button to clear the menu
from the screen.
IAUTOPROG _i.,.,.,. 33 I
/
Auto Program will scan for
all available channels within
the Amenna!Cable signal.
When finished, the TV will ]
go back to the SETUP menu.
12
Page 13

i
Channel Edit makes it easy for you
to ADD or DELETE channels
from the list of channels stored in the
TV's memory.
<_ Press the MENU button on the
remote to show the onscreen menu.
<_ Press the CURSOR UP • or
DOWN • buttons to scroll through
the onscreen menu until the word
SETUP s h gh ghted.
<_ Press the CURSOR RIGHT •
button to display the SETUP menu
features.
<_ Press the CURSOR UP • or
DOWN • buttons to scroll the
Setup features until the words
CHANNEL EDIT are h ghlighted.
_ Press the CURSOR RIGHT •
button to display the CHANNEL
EDIT options.
<_ With the CHANNEL EDIT
options displayed, and the word
CHANNEL highlighted; enter the
channel number (with the NUM-
BERED or the CURSOR •
RIGHT or LEFT _l buttons) you
wish to ADD to, or DELETE from
the TV's memory.
_ Scroll down (using the CUR-
SOR UP • or DOWN • buttons)
to highlight the word SAVED.
Now use the CURSOR RIGHT •
button to toggle between YES or
NO,
If YES is selected the menu reads
"CHANNEL ADDED" and the
channel is added to the TV's memo-
ry. If NO is selected the menu reads
"CHANNEL DELETED" and the
channel is deleted from the TV's
memory.
CLOCK •
(_3 OFF
I -TUp • I
SmartLockREVIEW •
BRIGHTNESSl'""'"
<
TUNER r_BLE
AUTOPROGRAM •
tr- NEL •l
EXTERNAL •
CHANNEL 2
YESl
CHANNELAOOED
13
Page 14

you to
rename your input source selec-
tions. When the Input feature (refer to
Owner's Manual for details) is
accessed to change audio/video jacks,
your source selection will be called by
the name you choose. This name will
also appear onscreen when using the
audio/video inputs.
_ Press the MENU button on the
remote to show the onscreen menu.
<_ Press the CURSOR UP • or
DOWN • buttons to scroll through
the onscreen menu until the word
SETUP s high ghted.
<_ Press the CURSOR RIGHT •
button to display the SETUP menu
! Ifeatures.
<_ Press the CURSOR UP • or
DOWN • buttons to scroll the Setup
features until the word EXTERNAL
s h gh ghted.
<_ Press the CURSOR RIGHT •
button to activate the External fea-
ture.
<_ With the External options menu
displayed, press the CURSOR
RIGHT • button to select a name
from the list: EXT, GAM_ DVD,
VCD, VCR, LD, or SAT.
O
AUTO_ •
CHANNEL EDIT •
I •I
EXTI
]EXTI
[EXTI SAT]
your external signal
source and appear onscreen with the
new name but does not limit you to
the type of accessory device that you
may use.
The onscreen menu will time out and
disappear from the screen when you
finish, or you can press the STA-
!TUS/EXIT button to clear the menu
from the screen.
14
Page 15

--_ T o adjust your TV picture con-
I trois, select a channel and follow
the steps shown below:
¢-ffga_)
Press the on
MENU button the
I remote to display the onscreen menu.
'_ Press the CURSOR UP • or
DOWN • buttons until the word
BRIGHTNESS is highlighted. (Or,
COLOR, PICTURE, SHARPNESS,
TINT, COL. TEMP depending on
the adjustment you want to make.)
Press the CURSOR RIGHT I_ or
'_ the CURSOR LEFT • buttons
to increase or decrease the brightness
of the picture.
Press the •
IJ or • buttons until darkest parts of
the picture are as bright as you prefer.
COLOR Press the • or • buttons to
add or eliminate color.
PICTURE Press the • or • buttons
until lightest parts of the picture show
good detail.
Press the • or • buttons
to improve detail in the picture.
TINT Press the • or • buttons to
obtain natural skin tones.
COLOR TEMP Press the • or • but-
tons to select NORMAL, COOL, or
WARM picture preferences. (NORMAL
will keep the whites, white; COOL will
make the whites, bluish; and WARM will
make the whites, reddish.)
The onscreen menu will time out and dis-
appear from the screen when you finish, or
you can press the STATUS/EXIT button to
clear the menu from the screen.
_-rup •
SmaCk _ •
I_I_E_ m .......30I
COLOR 30
PICTURE 30
men
O
®®@
®®®
® ®
...._iiiiiiiiiiiiiiiiiiiiiii_ii_ii_i_iiiii!_iiii_i_iiiiiiiiiiiiiiiiiiiiiiiii_iii_i:iiii_i_i_iiiiiiiiiiiiiiiiiiiiiiiiiiiiiiiii_@iiiiiiiiiiiiiiiiiiiiiiiiii_i_!_:_iii_......
_a_ock REVIEW •
BRIGHTNESS I ....... 30
[cow. 1 .......sol
nc_ ! .......3o
SHARF_IESS U ....... 30
BRIGHTNESS _ ....... 30
coLOR _ ....... 30
[PlCrU_ '-- ....... 30]
SHARPNESS I ....... 30
_ .......t....... 0
coLOR _ ....... 30
PICTURE I_' ....... 30
[SHARPNESS _'"'"' 3oL
_ .......F....... 0
coL TEMP NOFIMAL
PICTURE IB ....... 30
SHARPNESS _, ....... 30
LnNT .......t.......ol
col TBMP NORMAL
CON]Tq.a.b_'1PLUS OFF
SHARPNESS 1 ....... 30
_Nr .......,.......o
[coL q_MP NORMAL]
CONTRAST PLUS OFF
NOISEREDUCTION OFF
ICOLTEMP WARMI
[COLTEMP COOLJ
15
Page 16

ES3
Tfehe Contrast Plus (Black
tretch
ature helps to "sharpen the
picture quality. The black portions of
the picture become richer in dark-
ness and the whites become brighter
,_ Press the MENU button on the
remote to display the onscreen menu.
'_ Press the CURSOR UP • or
CURSOR DOWN • buttons until
the words CONTRAST PLUS are
h gh ghted.
<_ Press the CURSOR RIGHT •
or CURSOR LEFT 41 buttons to
activate or deactivate the Contrast
Plus feature.
TINT .......I........ 0
COL."i_IVlP
I_ PLL_ 0FFI
NOISEREDUCrI'ION ON
VOLUME _. .......15
"RNT .......!....... 0
COL.TEMP NORMAL
lCONTRA,Sq"PLL_ 0Nl
NOISEFIED_ ON
VOLUME I ....... 15
0
6_
@®@
®®®
_®
16
Page 17

FOer reasons such as poor cable
ception, the picture can some-
times appear slightly "speckled" (or
signal noise shown in the picture). The
NOISE REDUCTION control can help
eliminate this type of interference and
improve the quality of the picture.
<_ Press the MENU button on the
Iremote to display the onscreen menu.
<_ Press the CURSOR UP • or
CURSOR DOWN • button until
the words NOISE REDUCTION are
h gh ighted.
<_ Press the CURSOR RIGHT •
or CURSOR LEFF • buttons to
activate or deactivate the Noise
Reduction Feature.
O
Remember: The onscreen
g menu will disappear in a few
seconds after you have finished your
adjustment.
"Noise" Reduction is a video adjust-
ment feature that affects the picture
quality of the TV not the sound.
©
®®@
®®®
_MP _
PL_
[NO
VOLUME i ....... 15
_B_ _ OFF
17
Page 18

C2
-- Vour television comes with an
I onscreen clock. During normal
operation the clock appears on the
screen when the STATUS/EXIT but-
ton is pressed or when channel
changes occur
<_ Press the CLOCK button on
the remote to display the onscreen
CLOCK menu.
<_;_ Press the CURSOR UP • OR
CURSOR DOWN • buttons until
the words SET CLOCK are high-
ghted,
<_ Enter the current time using
the NUMBERED buttons. If the
first number is a single digit first
enter a zero then the di,g,lt (i.e.,
press "0 , then press 8 ).
@Press the CURSOR RIGHT •
or CURSOR LEVI" • buttons to
set either AM or PM time.
Note: The CLOCK onscreen menu
can also be accessed through the
main menu by pressing the MENU
button; then scrolling up/down
with the CURSOR UP • or
CURSOR DOWN • buttons until
the word CLOCK is highlighted.
Press the CURSOR RIGHT •
button to activate the CLOCK
menu and follow the steps above to
set the time.
@
Remember: Be sure to
tli press "0" first and then the
hour number for single digit
entries.
To clear the onscreen menu press
the STATUS/EXIT button or wait a
few seconds after you have finished
your adjustment and the menu will
automatically disappear from the
screen.
[SETOJXX
qlMER ACTIVE ON
CHANNEL 12
ISETCt_0CK 10:00 AMI
TIMERACTME ON
CHANNEL 12
Note: If a power failure occurs, the
TVts CLOCK will have to be reset.
If no time is set, the time will not
appear oascreen.
•tram _m
©©
lotto _
Note: The CLOCK onscreen menu can
also be accessed throughthe main menu
by pressing the MENU button; then
scrolling up/down with the CURSOR
UP • or CURSOR DOWN • buttons
until theword CLOCK is highlighted.
Press the CURSOR RIGHT • button
to activatethe CLOCK menuand follow
the steps above to set the time.
18
Page 19

7ust like an alarm clock you can
LI set the TV to turn itself on at the
same time ev_
Press the CLOCK button to
I display the Clock onscreen menu.
<_ Press the CURSOR UP • or
CURSOR DOWN • button until
the words TIMER ACTIVE are
h gh ghted.
<_ Press the CURSOR RIGHT
I_ or CURSOR LEFT • button
to select ON (if activating) or OFF
if deactivating) the Timer control.
Remember: Be sure to set
the clock to the current time,
then set the time you want the tele-
vision to turn on using the START
TIME control as described on the
next page.
The onscreen menu will time out
and disappear from the screen
when you finish, or you can press
the STATUS/EXIT button to clear
the menu from the screen.
SETCLOCK 10:00 AM
I MERAC' OFFI
STAI=ff ]]ME -- : - - AM
<
_r u,_Ar
oo
*_D Mc_z
SETCLI(3CK 10:00 AM
FnMERACT_ oNI
CHANNEL 12
STARTTIME -- :- -AM
19
Page 20

E2
-- l" ped along with the Clock fea-
_" lures, you can select a specific
channel that the television will tune
to when the Tinter Active control is
turned ON.
<_ Press the CLOCK button to
display the Clock onscreen menu.
<_ Press the CURSOR UP • or
CURSOR DOWN • button until
the word CHANNEL is highlighted.
_ Press the number buttons to
enter the start up channel you
would like the television to start on.
@
<
S_T_ 10:00 AM
TIMER ACTM_ ON
[CHANNEL 12[
START TIM_ - : - - AM
®
®
l
Remember: Be sure to set
a the Timer Active control to
ON.
The onscreen menu will time out
and disappear from the screen when
you finish, or you can press the
STATUS/EXIT button to clear the
menu from the screen.
U_ed along with the Clock fea-
ure, you can select a specific
time the television will turn on
when the 7_mer Active control is
turned ON.
c-a-ff m
<_ Press the CLOCK button to
display the Clock onscreen menu.
_ Press the CURSOR UP • or
CURSOR DOWN • button until
the words START TIME arehigh-
ghted.
<_ Enter the time to turn on the
TV using the NUMBERED but-
tons. If the first number is a single
digit first enter a zero then _h,,edigit
( .e., press 0 , then press 8 ).
4_ Press the CURSOR RIGHT •
or CURSOR LEFT • buttons to
set ether AM orPM time.
TIMER _ ON
CHANNEL 12
ISTmT_ME --:--AMI
Remember: Be
g sure to set the Timer
Active to ON.
The onscreen menu will
time out and disappear
from the screen when you
finish, or you can press the
STATUS/EXIT button to
clear the menu from the
screen.
II'the TV is in use when the S'IART "rIME control is about I
to be activated, the screen will display a warning stating it's
I
going to change channels in 30 seconds. It will appear like
count down will cancel the change.
the screen shown below and change to the selected stari up
channel. Pressing any button on the remote within this
20
Page 21

-- f"_losed Captioning (CC) allows
you to read the voice content
television programs on the TV
screen. Designed to help the hear-
ing impaired, this feature uses
onscreen "text boxes" to show dia-
logue and conversations while the
TV program is in progress.
<_ Press the MENU button on the
remote to display the onscreen
menu.
<_ Press the CURSOR UP • or
CURSOR DOWN • button until
the word CC (Closed Caption) is
h ghl ghted.
<_ Press the CURSOR RIGHT
I_ button to select the CLOSED
CAPTION option you want (OFF, 1,
2, or MUTE). Dialogue (and
descriptions) for the action on the
captioned TV program will appear
onscreen.
<_ NOTE: You can set
also the
Closed Caption by pressing the CC
button on the remote. When pressed
repeatedly the screen will display the
options: CC-OFF, CC-I, CC-2, or
CC-MUTE.
@
NOTE: Not all TV programs and product commercials are made for broadcast
with Closed Caption (CC) information included. Neither are all Closed Caption
modes (CCq, or CC-2) necessarily being used by a broadcast station during the
transmission of a closed caption program. Refer to your area's TV program listings
for the stations and times of Closed Caption shows.
SmartLock •
CLOCK •
Icc OFFI
SETUP •
SmartLock REVlEVV •
®®@
®®®
iiiliiiiiiiiiiiiiiiiiiiiiiiiiiiiiiiiiiiiiiiiiiiiiiiiiiiiiiiiiiiiiiiiiiiii ......
SmartLock •
CLOCK •
ICC II
SETUP •
SmartLock REVlEVV •
CLUCK --•
ICC
SETUP
SmartLock REVIEW •
ULUUK "_
ICC MUTE
SETUP •
SmartLock REVIEW •zj_
I
NOTE: The CC-MUTE option
can be used to set the TV to
turn the Closed Caption mode
"ON" whenever the MUTE but-
ton on the remote is pressed.
This activates the CC-I option.
MUTE will appear smaller in
the upper center of the screen.
CAPTION mode
Example Display
21
Page 22

uq
-- _.._ave you ever fallen asleep in
• .l front of the TV only to have it
wake you up at two in the morning
with a test pattern screeching in
your ears? Well, your TV can save
you all that trouble by automatical-
ly turning itself off
_._ Press the SLEEP button on the
remote control and the SLEEP timer
onscreen display will appear in the
lower center of the display.
Press the SLEEP button
repeatedly to pick the amount of
time (in 15 minute increments up to
60 minutes; then 30 minute incre-
ments up to 120 minutes; then 60
minute increments up to 240 min-
utes) before the TV will turn itself
off.
An onscreen count down will appear
during the last minute before the TV
shuts itself off.
@
control can also be set
within the TV's main menu.
The onscreen menu will time out
and disappear from the screen when
you finish, or you can press the
STATUS/EXIT button to clear the
menu from the screen.
12
15 MIN
12
240 MIN
During lbe last rninule of a SI.EEP
timer selling, all onscrecn count
down will be displayed Pressing
a_y buuon during Ibe last minute
will cancel the SLEEP timer
12
5O
12
10,_zC
J
During Ibe last l0 seconds ola
SLEEP timer selling, all onscreen
display will re_d GOOD BYE
22
Page 23

Tghe SmartLoek feature is an inte-
rated circuit that receives and
processes data sent by broadcaster.
or other program providers, that
contain program content advisorie_
When programmed by the viewer, a
TV with SmartLock can respond to
the content advisories and block
program content that may be found
objectionable (such as ofJensive
language, violence, sexual situa-
tions, etc.). This is a great feature tc_
censor the type of viewing children
may watch.
Over the next few pages you'll
learn how to block channels and
certain rated programming. Below
is a brief e.wlanation of some terms
and ratings you will find in the
SmartLoek feature.
SmartLock offers various
BLOCKING OPTION controls
from which to choose:
MASTER DISABLE: This is what
might be called the "master switch"
for SmartLock. When in the ON
position, ALL blocking/censoring is
turned off (or disabled). When in the
OFF position, ALL blocking based
on specifically blocked settings will
take place.
BLOCK UNRATED: ALL unrated
programs based on the Movie
Ratings or Parental (TV) Guidelines
can be blocked if this feature is set
to ON and the MASTER DISABLE
feature is set to OFF.
BLOCK NO RATINGS: ALL pro-
gramming with NO content advisor)
data can be blocked if this feature is
set to ON and the MASTER DIS-
ABLE feature is set to OFF.
After an access code has been pro.
grammed, you can block up to 5
individual channels. But more than
just blocking channels, certain
blocking options exist which will
block programming based on ratings
patterned by the Motion Pictures
Association of America and TV
broadcasters. (See description of rat-
ings on this page.)
G OFF
PG OFF
PG-1 3 OFF
IR ON]
NC-1 7 ON
X ON
G: General Audience - All ages admitted.
Most parents would find this program
suitable for all ages. This type of pro-
gramming contains little or no violence,
no strong language, and little or no sexual
dialogue or situations.
PC,: Parental Guidance Suggested - This
programming contains material that parents
may find unsuitable for younger children.)
It may contain one or more of the follow-
ing: Moderate violence, some sexual situa-
tions, infrequent coarse language, or some
suggestive dialogue.
PG.13: Parents Strongly Cautioned - This
programming contains material that parents
may find unsuitable for children under the
age of 13. It contains one or more of the
following: violence, sexual situations,
coarse language, or suggestive dialogue.
R: Restricted -This is programming is
specifically designed for adults. Anyone
under the age of 17 should only view this
programming with an accompanying parent
or adult guardian. It contains one or more
of the following: intense violence, intense
sexual situations, strong coarse language,
or intensely suggestive dialogue.
N(7-17: No one under the age of 17 will
be admitted,. This type of programming
should be viewed by adults only. It con-
tains graphic violence, explicit sex, or
crude indecent language,
X: Adults Only - This type of programming
contains one or more of the following: very
graph c violence, very graphic and explicit
or indecent sexual acts, very coarse and
intensely suggestive language.
•l
TV. Y - (All children -- This program
is designed to be appropriate for all
children.) Designed for a very young
audience, including children ages 2-6. This
type of programming is not expected to
frighten younger children.
TV.Y7 - (Directed to OlderChildren -- This program is designed
for children age 7and above.) It may
bemore appropriate for children who have
acquired the development skills needed to
distinguish between make-believe and reali-
ty. This programming may include mild fan-
tasy and comic violence (FV).
_ TV-G - (General Audience -- Most
parents would find this program suit-
ablefor all ages.) This type of pro-
gramming contains littleor no violence, no
strong language, and littleor no sexual dia-
logue or situations.
_ TV-PG -(Parental Guidance
Suggested -- This program contains
material that parents may find unsuit-
ablefor younger children,) This type of pro-
grammingcontains one or more of the fol-
lowing: Moderateviolence (V), some sexual
situations(S), infrequentcoarse language
(L), or some suggestive dialogue (IS)),
TV-14. (Parents Strongly
Cautioned -- This program contains
some material that many parents
would find unsuitable for children under 14
years of age.) This type of programming
contains one or more of the following:
intense violence (V), intense sexual situa-
tions (S), strong coarse language (L), or
intensely suggestive dialogue (D).
TV-MA - (Mature Audience Only --
7hi.i program is specifically d_signed
to be viewed by adults and therefore
may be utt_uitable for children under 17.)
This type of programming contains one or
more of the following: graphic violence (V),
explicit sexual situations (S), or cnada inde-
cent language (L).
23
Page 24

Over the next few pages you'll
learn how to block channels
and get a better understanding of
the rating terms for certain pro-
gramming.
First, let's start by learning how to
set a personal access code:
Press the MENU button on
<_ . the
remote to thsplay the onscreen
menu.
<_ Press the CURSOR UP • or
CURSOR DOWN • buttons until
ethde.words Smartlamk are highlight-
<_ Press the CURSOR RIGHT
button to display the
SmartLock Access Code screen.
<_ Using the NUMBERED but-
tons, enter 0, 7, 1, 1. "XXXX"
appearson the Access Code screen
as you press the numbered buttons.
"INCORRECT CODE" will
appear on the screen, and you will
need to enter 0, 7, 1, I again.
_cb_)ttoEnPressthe CURSOR DOWN •
un t_i_hh_ig_[ddS"CHANGE
<_ Press the CURSOR RIGHT I_
button to change your personal
Access Code.
_ "Next enter a "new" 4 digit
code using the NUMBERED but-
tons. The screen will then ask you
to confirm the code you just
entered. Enter your new code
again. "XXXX" will appear when
you enter your new code.
<_l ouP_eo_sth edSTATUc_ XITbnt-
TV s memory.
INPUT •
SLEEPTIMER OFF
CLOCK •
CC OFF
BLOCK •
icHANGEcODE
J
iCONFIRMCODE X X X XI
SmartLock
ACCESS CODE
SmartLock
ACCE_CODE
XXXX
SmartLock
ACCESSCODE
INCORRECTCODE
]CHANGE CODE X X X XI
/
/
Parents - it isn't possible for your child
to unblock a channel without knowing
your access code or changing it to a new
one. If your code changes, and you did-
n't change it, then you know it's been
altered by someone else and blocked
channels have been viewed.
24
Page 25

_ A fter your personal access
l_[has been set (see previous
page), you are now ready to select
the channels you want to block out
or censo_
<_ Press the MENU button on the
[ remote to show the onscreen menu.
<_ Press the CURSOR UP • or
CURSOR DOWN • button until
the words SmartLock are highlight-
ed.
<_ Press the CURSOR RIGHT
• button to display the
SmartLock Access screen.
<_ Enter the correct access code
number. "XXXX" shows on the
Access Code display as you press
the NUMBERED buttons.
,_ Press the CURSOR UP • or
DOWN • buttons until the word
BLOCK is highlighted. Press the
CURSOR RIGHT • button then
highlight CHANNELS
BLOCKED.
,,_ _ Press the CURSOR RIGHT •
button. Three options will be dis-
played; CHANNEL, LOCK or
CLEAR ALL.
<_ With CHANNEL highlighted,
use the NUMBERED buttons to
enter the channel number you wish
to block.
_ Use the CURSOR.. DOWN •
button to hlghhght the word
LOCK, then press the CURSOR
RIGHT • button to select YES
(block) orNO (do notblock). The
channel chosen is now blocked from
viewing.
Repeat steps 7 and 8 for any other
channels you wish to block from
viewing.
INPUT •
SLEEPTIMER OFF
SmartLock
CLOCK •
CC OFF
SmartLock
ACCESSCODE
Smart.Lock
ACCESSCODE
XXXX
IBLOCK •1 ]
CHANGE CODE •
BLOCKING OPTIONS •
ICHANNELS BLOCKEDp,I-
MOVIE RA]]NGS •
PARENTAL GUIDELINE •
5[
LOCK NO
CLEAR ALL •
CHANNEL 5
ILOCK YESl
CLEAR ALL •
CHANNEL 5 BLOCKED
BY CHANNEL BLOCKING
ENTERCODE TO VIEW
4
l
When a blocked channel is viewed, this is what the screen will display. To view the blocked channel, sim- /
ply enter the current access code. No_: Once the access code is entered ALL blocked channels will be
1
viewable until the TV is powered off. Once the set is turned offand then back on the previously blocked
channels will again be blocked.
Press the CURSOR DOWN •
button until the words CLEAR
ALL are highlighted, then press the
CURSOR RIGHT • button.
The screen will read "ALL
UNBLOCKED" for a moment. At
this point ALL the previously
blocked channels will be unblocked.
CHANNEL 5
LOCK YES
ICLEARALL ,I
CHANNEL
LOCK
_LL UNBLOCKED
ALL
NO j -_
]
Note: When the CLEAR
ALL option is selected, the
CHANNEL option will dis-
play ALL.
If at this point if you change
the LOCK option to YES,
ALL channels will be blocked
from viewing.
25
Page 26

-- _nartLock offers the viewer other
k.J blocking ft, atures as well. With
these Blocking Option features, the
censoring can be turned ON or
OFE
';_ Press the MENU button on the
remote to display the onscreen
menu.
Press the CURSOR UP • or
CURSOR DOWN • buttons until
the words SMART LOCK are
h gh ghted.
<_ Press the CURSOR RIGHT
I_ button to display the SmartLock
Access Code screen.
<_ Using the NUMBERED but-
tons on the remote, enter your per-
sona Access Code.
<_ With the word BLOCK high-
lighted, Press the CURSOR
RIGHT I_ button.
_ Scroll the menu using the
CURSOR UP • or CURSOR
DOWN • buttons until the words
BLOCKING OPTIONS are high-
ghted.
<_ Press the CURSOR RIGHT I1"
button to display the Blocking
Options (MASTER DISABLE,
BLOCK UNRATED, or BLOCK
NO RATING). When highlighted,
each feature can be turned ON or
OFF using the CURSOR RIGHT
*-or CURSOR LEFT • buttons
_nthe remote.
INPUT •
BLEEPTIMER OFF
ISmartL°ck P'l
CLOCK •
CC OFF
SmartLock
ACCESSCODE
SmBrtLock
ACCESSCODE
XXXX
]BLOCK •l
CHANGE CODE •
IBLOCK_NGOPTIONS _l
CHANNELS BLOCKED •
MOVIERATINGS •
IMASTERDISABLE ONI O_ [MAST_:R DISABLE OFF I
BLOCK UNBATED ON BLOCK UNRATED OFF
BLOCK NO RATING ON BLOCK NO RATING OFF
CHANNEL 20 BLOCKED
BY CONTENT ADVISORY
CANNOT DECODE RATING
ENTER CODE TO VIEW
It"the BLOCK UNRATED or BLOCK NO RATINGS ]
colltrOlS are turned ON, all unrat_l programs and pro.
grams containing NO content advisory data will display
the screen shown [o the Iefl To watch tile channel enter
your access code, or _hange the BLOCK UNRATED
and BLOCK NO RATINGS back to off.
BLOCKING OPTIONS:
MASTER DISABLE: This is what might be called the "master switch" for SmartLock. When in the ON position, ALL block-
ing/censoring is turned off (or disabled). When in the OFF position, ALL blocking based on specifically blocked settings will
take place.
BLOCK UNRATED: ALL unrated programs based on the Movie Ratings or Parental (TV) Guidelines can be blocked if this
feature is set to ON and the MASTER DISABLE feature is set to OFtL
BLOCK NO RATINGS: ALL programming with NO content advisory data can be blocked if this feature is set to ON and the
MASTER DISABLE feature is set to OFF.
26
Page 27

Zrhere are two types of program
atings within the SmartLock
feature. One is based on the Movie
Industry ratings while the other is
based on the TV Industry ratings.
Both can be used to block or censor
programming that has been rated in
either manne!:
Let's first look at the Movie Rating
options of SmartLock.
<_ Press the MENU button on the
remote to display the onscreen
menu.
<_ Press the CURSOR UP • or
CURSOR DOWN • buttons until
the words SmartLock are highlight-
ed.
<_ Press the CURSOR RIGHT
• button to display the SmartLock
Access Code screen.
<_ Using the NUMBERED but-
tons on the remote, enter your
Personal Access Code.
_With the word BLOCK high-
lighted, Press the CURSOR
RIGHT • button.
@ Scroll the menu using the
CURSOR UP • or CURSOR
DOWN • buttons until the words
MOVIE RATINGS are highlight-
ed.
<_ Press the CURSOR RIGHT •
button to display the MOVIE
RATINGS (G, PG, PG-13, R,
NCI7, or X).
When highlighted, all these options
can be turned ON (which will allow
blocking) or OFF (which will allow
viewing).
Use the CURSOR RIGHT • or
CURSOR LEFT .q buttons on the
remote to turn the rating option ON
or OFF.
@
INF(ff •
_MER OFF
•1
CLOCK •
CC OFF
po,_tn
®
®®®
®-@
_elT _ART
©©
CHANNEL 5 BLOCKED
BY CONTENT ADVISORY
MOVIE RATING R
ENTER CODE TO VIEW
Screen will display a message when programming is
blocked by the Movie Rating feature To unblock, turn
the Movie Rating ()FI_ or enter your personal access
blocked ratings will be reset Io ON.
code. Entering the code will unblock ALl. blocked
Movie Ratings unlil Ihe TV is turn oft. qllen the
SmartLock
ACCESS CODE
Remember:
Selecting to
block any rating
will cause all the
higher ratings to
also be blocked
automatically.
SmartLock
ACCESS CODE
XXXX
IBLOCK •1
CHANGECODE •
BLOCKINGOPTIONS •
CHANNELSBLOCKED•
IMOVIERATINGS •1
PARENTALGUE3EUNE •
PG OFF
PG-13 OFF
IR ONI
NC-I 7 ON
X ON
NOTE: When a rating is turned ON, all I
higher ratings will automalically he turned
I
ON, "[b turn them OFF, you will have to set
aulomatically )
each rating individually (i.e,, R blocked
manually, NC-17 and X will be blocked
27
Page 28

i
__ r'_his portion of the SmartLock
I features cover program ratings
based on the TV Industry rating
system. This is known as Parental
Guideline within SmartLock.
After selecting the SmartLock fea-
lure and entering your personal
access code, the BLOCK/CHANGE
CODE screen appears;
_ With the word BLOCK high-
lighted, Press the CURSOR
RIGHT • button.
_ Scroll the menu using the
CURSOR UP • or CURSOR
DOWN • buttons until the words
PARENTAL GUIDELINES are
highlighted.
_' _ Press the CURSOR RIGHT •
button to display the Parental
(TV) Guidelines (TV-Y, TV-Y7,
TV-G, TV-PG, TV-14, or TV-MA).
When highlighted, the TV-Y and
TV-G can be turned ON (which will
allow blocking), or OFF (which
will allow viewing) of these rated
programs.
_ The ratings ofTV-Y7, TV-PG,
TV-14, TV-MA can be cus-
tomized to block V (violence), FV
(fantasy violence), S (sexual situa-
tions), L (coarse language), or D
(suggestive dialogue).
Use the CURSOR RIGHT • or
CURSOR LEFT • buttons on the
remote to turn the rating option ON
or OFF.
@
IBL°CK •I
CHANGECODE •
©
®®@
®®®
f,m_m _RT
oQo
TV-Y - (All ¢hlldlr_n-- This program isdesigned to be appropriate for all children. )
Designed for a very young audience, includingchildren ages 24. This lybe of pco-
gramming is no_ expected to frighten y_ngur children.
"IW-Y7 - (gg_tnd to Older Children -- Th# p_gram is de_ignedfor children age 7
and .bore.) IImay be more appeoprialefor children who have acquiredthe develop-
ment skills needed todislloguish between make-believe and realily. This program_
mlog may include mild fantasy and comic violence (FV).
TV-G - (General Audlo_e _- Most parents wouidfind this program suitable for all
ages.) This type of programming contains little or no violence, no SltOng language,
and litlle or no sexual dialogue or sitaations.
TV-PG -(Parental Guidance Suggested -- This ptr_gram contains material that par-
en_ may find unsuitable for younger children.) This type o[ programming coulains
one or more of the fol]owlog: some snggesliv_ dialogue (D>, lo[requent coarse lan-
guage (L), some sexual situations (S), or moderale violence (V)
TV-14 - (Parents Strongly Caudonnd This program _ntains s#me material Ihat
many paren_ w_Juldfind u_ldtuble for children under 14 year_ of uge ) This type of
pfogTamruingCOnlainsone or more of Ibe following: ialenseiy sngguslive dialogue
(D), strong coarse language (L), intense sexual siluallons (S), or intense violence (Vg
TV-MA - (Mature Audience Only Th_ pn_gram _ _pe_tfi_lly designed to be
viewed by adults and tbe_re may be unsuitaltl_ for children under IZ ) This lype of
ptogrammiag contains one or more of the following: crude lodecenl language (L),
explicit sexual siluations (S), or graphic violence (V),
CHANNELS BLOCKED •
MOVIERATINGS •
IPA_Z_TALGUlU_UN_•I
Remember:
Selecting to
block any rating
will cause all the
higher ratings to
also be blocked
automatically.
TV-Y7 •
l_/_ OFF
[TV-PG • I
TV-14 •
_/-MA •
TV RATING SUB MENUS:
TV-Y OFF
[TV-Y7 • I
_1TV-G OFF
TV-pG •
IY7 ONI
FV ON
TV-Y7
TV-G
ITV-P6
TV-14
TV-G
]3/-PG
IW-14
TV_G
TV-14
[TV-MA
OFF
•I
OFF
•1
•1
PG ON
O ON
IL ONI
S ON
V ON
14 ON
D ON
IL DNI
S ON
V ON
MA ON
L ON
Is ON[
V ON
28
Page 29

NObW that you've learned how to
lock channels or censor your
viewing, using the Movie Ratings or
Parental (TV) Guidelines, let's
review what you've done. The
SmartLock Review feature allows
you to see what has been blocked.
Whenever the Menu button is
pressed the onscreen menu will be
displayed with the SmartLock
Review highlighted.
i_sre Press the MENU button the
on
mote to show the onscreen menu.
martLock REVIEW will be high-
ghted.
_,_ _ Press the CURSOR RIGHT
• button and the SmartLock
Review Menu will appear.
This menu will display what chan-
nels have been blocked; what
Movie Ratings have been blocked;
what Parental (TV Ratings)
Guideline have been blocked. This
review screen will also display the
status of Urtrated and No Rating
settings. If the Master Disable fea-
ture has been turned ON, the
SmartLock Review screen will dis-
play "SmartLock DISABLED".
I3C OFF
SEIUp •
BR'GH1NIE[_ D ....... 30
C0t_011 i .......
-d
6_5
O®@
®®®
U-6
_r_ P,_tme
.....,_iiii_i_2_i_i_i_i_i_i_i_i_i_i_i_i_!iii!_!_!_i_!_!_!!ii___'_'
CHANNELS BLOCKED
MOVIE RATINGS
PARENTAL GUIGSLINE
BLOCK UNRATED OFF
BLOCK NO RATING OFF
SmartLock DISABLED
Smart Lock DISABLED will appear in the
Smat_Lock Review screen if the Sma_Lock
Disable feature is set to ON.
CHANNELS BLOCKED - Shows all blocked channels that where set with-
in Ihe CHANNELS BLOCKED feature. Up to 5 channels may be blocked at
ol_ llme.
MOVIE RATINGS - Shows all blocked Movie Ratings that were set within
the MOVIE RATINGS feature. All or some may be blocked at one time.
Note: Ira lower rating is blocked, this will automatically cause the higher
ratings to be blocked also. (i.e., if R is set to he blocked. X will automatically
he blocked also.)
PARENTAL GUIDELINE - Shows all blocked TV Ratings _hat were set
within the PARENTAL GUIDELINES feature. All or some may he blocked
atone time. Note: If a lower rating is blocked; this will automaticalty cause
the higher ratings to be blocked also. (i,e., if IV* 14 is set to he bl_cked, TV-
MA will automatically be blocked.) Parental Guidelines also have sub ratings
for Vinlenee (VI, Fantasy Violence (FVI. Sexual Situations (S), Coarse
Language (L), and Suggestive Language (D) If the main rating is _urn_d off
hut the sub rating is turned ON, the program will he blocked but the rating
will no_ appear within _he SmartLock Review menu.
BLOCK UNRATED Shows ON or OFF depeedfeg on the s_atus of the
BLOCK UNRATED feature. Based on the Movie Ratings or paternal ('I'V_
Guidelines.
BLOCK NO RATING - Shows ON or OFF depending on the status of the
BLCK_KNO RATING feature. Based on programming with NO content
advisory data.
5 10 12 32
MOVIE RATINGS
RX
45
_'_PARENTAL GUIDELINE
14 MA
--_ BLOCK UNRATED
=_BLOCK NO RATING
ON
ON
29
Page 30

-- Resides the normal volume level
L_ control, your TV also has Bass
and Treble Boost sound adjustment
controls. The TREBLE Boost effects
only the high frequency sound com-
ing from the TV enhancing the
highs; while the BASS Boost effects
only the low frequency sound com-
ing from the TV enhancing the lows.
<_ Press the MENU button the
on
remote to show the onscreen
menu.
'_ Press the CURSOR UP • or
CURSOR DOWN • buttons to
select and highlight the name of the
control you wish to change (TRE-
BLE BOOST, or BASS BOOST).
_ Use the CURSOR LEFT 'ql or
RIGHT • buttons to turn the
selected control ON or OFF.
@
NOISE REDUCTION ON
VOLUME mI ........ 15
ITREBLE BOOST OFF]
BASS BOOST ON
AVL ON
VOLUME ll ........ 15
ITREBLE BOOST ON]
BASS BOOST ON
AVL ON
_n
0 OR
6,55 ][
Q®@
(_ @ @ I TREBLEBOosTV0LUMEIlI ........ ON15
@ @
IBASSBOOST OFFI
_)_ AVL ON
VOLUME LIMITER OFF
VOLUME II ........ 15
_,unt
O O TREBLE BOOST ON
_mE
IBASSBOOST 0NI
AVL ON
VOLUME LIMITEB OFF
3O
Page 31

I
U_h e the Volume Bar control to see
e TV s volume level settings
on the TV screen. The Volume Bar
will be seen each time the VOLUME
buttons (on the TV or remote) are
pressed.
Press the MENU button to dis-
play the onscreen menu.
'_ Press the CURSOR UP • or
CURSOR DOWN • buttons until
the word VOLUME is highlighted.
Press the CURSOR RIGHT •
button to increase the TV's volume
orthe CURSOR LEFT • button to
decrease the sound.
CONTRAST PLUS ON
NOISE REDUCTION ON
IVOLUME • ........... 15 I
TREBLE 800ST ON
BASS BOOST ON
5
O®@
®®®
IVOLUME • ........... 151
OR
®®@
®®®
®®@
Note: Pressing the
VOL (+) or (-) but-
tons will also allow
you to adjust the
sound level of the
1_. A Volume Bar
adjustment will
appear On_i*l_n.
Press the (+) to
increase the volume
and the (-) button to
decrgase the vo]ume,
i
Once you've set the Volume level
within the on-screen menu, the
Volume Limiter control, when turned
on, will not allow the TV sound to be
played louder than the maximum pre-
set level.
'_ Press the MENU button to dis-
I Play the on-screen menu.
<_ Press the CURSOR UP • or
CURSOR DOWN • buttons until
the words VOLUME L1MITER are
h gh ghted.
<_ Press the CURSOR RIGHT •
or CURSOR LEFT • button to turn
BASS BOOST ON
AVL ON
IV0LUME LIMII_R OFFI
INPUT •
SLEEPTIMER OFF
O®@
® ® ®
®®® >
BASS BOOST ON
AVL ON
IVDLUME LIMITER ON I
INPUT •
SLEEPTIMER OFF
31
Page 32

The TV's Audio/Video Input jacks
are for direct picture and sound
connections between the TV and
a VCR (or similar device) that
has Audio/Video Output jacks.
<_ Connect the (yellow)
VIDEO
CABLE to the VIDEO IN jack
on the back of the "IV.Then con-
nect the AUDIO (red and white)
CABLES to the AUDIO (left and
right) IN jacks on the rear of the
"IV.
<_ Connect the VIDEO (yellow)
CABLE to the VIDEO OUT jack
on the back of the VCR. Then
connect the AUDIO (red and
white) CABLES to the AUDIO
(left and right) OUT jacks on the
rear of the VCR.
<_ Turn the VCR and the TV
I ON.
<_ Press the MENU button on
the remote to display the
onscreen menu.
<_ Press the CURSOR UP • or
CURSOR DOWN • buttons
until the word INPUT is high-
lighted.
<_ Press the CURSOR RIGHT
• or CURSOR LEFT • button
to display the picture/sound menu
(ANTENNA, EXT 1). Use the
CURSOR UP • or DOWN •
buttons to select.
Now your ready to place a prere-
corded video tape in the VCR and
press the PLAY • button.
O
@
BACK OF TV
AVL ON
VOLUME LIMITEF! ON
[INPUT I_ I
SLEEPTIMER OFF
Smart,Lock •
®®@
®@®
®®®
o o.
VIDEO IN
(YELLOW)
AUDIO IN
BACK OF VCR
ANTENNA
F xT1 1
VCR
(EQUIPPED WITH
VIDEO AND AUDIO
OUTPUT JACKS)
32
Page 33

Whmether you're watching a
ovie or a video game, your
TV has automatic video control set-
tings matched for your current pro-
gram source or content. The
SmartPicture feature quickly resets
your TV's video controls for a num-
ber of different types of programs
and viewing conditions you may
have in your home. Each
SmartPicture setting is preset at the
factory to automatically adjust the
TV' s Brightness, Color, Picture,
Sharpness, T_nt, and Color
Temperature levels.
_ Press the SMART PICTURE
button on the remote control. The
current SmartPicturesetting will
appearin the m ddle of the screen.
<_ Press the SmartPicture button
repeatedly to select either PER-
SONAL, MOVIES, SPORTS, or
WEAK SIGNAL picture settings.
Note: The PERSONAL control is
set using the PICTURE options
within the onscreen menu. This is
the only SmartPicture control set-
ting that can be changed. All other
settings are setup at the factory dur-
ing the time of production.
@
PERSONAL
MOVES
®®®
®®®
®®®
!
33
Page 34

!
Tthe SmartSound feature allows
he listener to select between
]'our different factory set sound
options. Personal (which can be set
by the user), Theater (for movie
viewing), Music (for musical type
programming) and Voice (when the
program is mainly dialogue). To
select any of the options follow the
directions below.
'_ Press the SMART SOUND but-
ton on the remote control. The cur-
rent SmartSound setting will appear
in the mdd e of the screen.
<_ Press the SMART SOUND
button repeatedly to toggle
between the four settings.
Remember, only the PERSONAL
control can be changed by the view-
er. This changes the settings in the
main onscreen menu's sound con-
trols.
0
PERSONAL
©
®®@
®@®
®@@
svAY
-'. d
THEATER
MUSIC
VOICE
NOTE: When the VOICE mode of
,$umartw_,_b_d_toS_mle_,tead,t__1rnAVe_L _N.
In most cases the volume levels com-
ing from broadcast programming or
commercials are never the same.
With the AVL control turned ON,
you can have the TV level out the
sound being heard. This makes for a
more consistent sound by reducing
the peaks and valleys that occur dur-
ing program changes or commercial
breaks.
TREBLE BOOST ON
BASS BOOST ON
lAVE OFFI
VOLUME LIMITER ON
INPUT •
TREBLE BOOST ON
BASS BOOST ON
lAVE ONI
VOLUME LIMITER ON
INPUT •
34
Page 35

A "list" or series of previously
viewed channels can be select-
ed with the SURF button on your
remote control. With this.fOature
you can easily switch between dif-
ferent TV programs that currently
interest you. The SmartSurf control
allows you set up to eight channels
in its quick viewing "list".
<_ Press the CHANNEL (+) or (-)
buttons (or the NUMBER buttons)
to select a channel to add to the
SURF st.
<_ Press the SURF button on the
remote while the channel number is
still displayed to ADD the channel to
the SURF I st.
_ Repeat steps 1 through 2 to add
additional channels (up to 8) to the
SURF list.
To remove a channel for the SURF
list, simply choose the channel with
the numbered buttons and press the
SURF button while the channel
number is still displayed and the
screen will read DELETED.
<
5
ADDED
1
N il
A
1
8
ADDED
I
lO
ADDED
' I1
SURF 10 '_
SURF !
Press the SURF button repeatedly to cycle or "loop"
through the channels saved in the SURF channel list.
35
Page 36

please make these simple
checks before calling for ser-
vice. These tips can save you time
and money since charges for TV
installation and adjustment of
customer controls are not covered
under your warranty.
No Power
No Picture
No Sound
Remote Does Not
Work
TV Disnlavs Wron
Channel or N9
FJzaaatl. d y.
CAUTION: A video source (such as a video game, Compact Disc Interactive - CDI, or
TV information channel) which shows a constant non-moving pattern on the TV screen,
can cause picture tube damage. When your TV is continuously used with such a source
the pattern of the non-moving portion of the game (CDI, etc.) could leave an image
permanently on the picture tube. When not in use, turn the video source OFF.
Regularly alternate the use of such video sources with normal TV viewing.
i Check the TV power cord. Unplug the TV, wait 10 seconds, then reinsert plug into _1outlet and push POWER button again. ]
Check that outlet is not on a wall switch. Be sure fuse is not blown on AC Power strip. ]
Check antenna connections. Are they properly secured to the TV's ANT/CABLE plug? i
Check the TUNER control for CABLE or ANTENNA setting.
I
_ Check the VOLUME buttons.
Check the MUTE button on the remote control.
i
Check batteries. Replace with AA Heavy Duty (Zinc Chloride) or Alkaline batteries
if necessary.
Clean the remote and the remote sensor window on the TV.
Check the TV power cord. Unplug the TV, wait 10 seconds, then reinsert plug into
outlet and push POWER button again. Be sure fuse is not blown on AC Power strip.
Check to be sure TV outlet is not on a wall switch.
i epeat channel selection.
Add desired channel numbers (CHANNEL control) into TV memory.
Check to be sure the TUNER control is set to the CABLE option.
i
Cleanin_ and Care
• To avoid possible shock hazard be sure the TV is unplugged from the electrical outlet before cleaning.
• When cleaning the TV screen take care not to scratch or damage the screen surface (avoid wearing jewelry or using
anything abrasive). Wipe the front screen with a clean cloth dampened with water. Use even, easy, vertical strokes when
cleaning.
• Gently wipe the cabinet surfaces with a clean cloth or sponge dampened in a solution of cool clear water. Use a clean
dry cloth to dry the wiped surfaces.
• Never use thinners, insecticide sprays, or other chemicals on or near the cabinet, as they might cause permanent marring
of the cabinet finish.
36
Page 37

Coaxial Cable • A single solid antenna wire normally matched with
a metal plug (F-type) end connector that screws (or pushes) directly
onto a 75 Ohm input found on the Television or VCR.
Closed Caption ° Broadcast standard which allows you to read the
voice content of television programs on the TV screen. Designed to
help the hearing impaired this feature uses onscreen "text boxes" to
show dialogue and conversations while the TV program is in
progress.
Direct Audio/Video Inputs • Located on the rear of the TV these
connectors (RCA phono type plug) are used for the input of audio
and video signals. Designed for use with VCRs (or other acces-
sories) in order to receive higher picture resolution and offer sound
connection options.
Identify • Method by which a remote control searches and finds an
operating code for another product (such as a VCR or Cable
Converter). Once the code has been "identified" then the TV remote
can operate and send commands to the other product.
Onscreen Displays (OSD) ° Refers to the wording or messages gen-
erated by the television (or VCR) to help the user with specific fea-
ture controls (color adjustment, programming, etc.).
Menu • An onscreen listing of feature controls shown on the
Television screen that are made available for user adjustments.
Multichannel Television Sound (MTS) • The broadcast standard
that allows for stereo sound to be transmitted with the TV picture.
Programming • The procedure of adding or deleting channel num-
bers into the Television's memory circuits. In this way the
Television "remembers" only the locally available or desired chan-
nel numbers and skips over any unwanted channel numbers.
Remote Sensor Window • A window or opening found on the
Television control panel through which infrared remote control
command signals are received.
Setup Mode • Automatic feature control settings made by the TV.
Designed for first time setup and use. Settings for signal connec-
tions (antenna or cable TV), plus channel program memory are
held in the TV's memory (even if the set is unplugged and moved
to a new location.)
Second Audio Program (SAP) • Another or additional audio
channel provided for in the Multichannel Television Sound (MTS)
broadcast standard. The most frequently proposed use for SAP is
the simultaneous bilingual broadcast of TV program material.
Status • Allows the user to quickly confirm what channel number
is currently being viewed. Status can also be used to clear the
Television of onscreen displays or information (rather than waiting
for the displays to "time out" or automatically disappear from the
screen).
Twin Lead Wire • The more commonly used name for the two
strand 300 Ohm antenna wire used with many indoor and outdoor
antenna systems. In many cases this type of antenna wire requires
an additional adapter (or balun) in order to connect to the 75 Ohm
Input terminals designed into the more recent Televisions and
VCRs.
Accessories/Optional ................................. 5-7
Adapter Connector .................................. 5-7
Add/Delete Channels ................................. 13
Alternate Channel .................................... 35
Audio/Video Inputs .................................. 32
Battery Installation .................................... 8
Cable TV Connections/Settings ........................ 5, II
Channel Memory ................................. 12, 13
Clock Set Time ...................................... 18
Closed Captioning ................................... 21
Contrast Plus (Black Stretch) Control ..................... 16
Controls/TV ......................................... 8
Controls/Remote .................................... 8, 9
Features ............................................ 4
Glossary TV Terms ................................... 37
Input Control ....................................... 32
Language Option .................................... 10
Memory/Program Channels ......................... 12, 13
Menu Button ........................................ 9
Minus(-)/Plus (+) Buttons ............................... 9
Picture Controls ..................................... 15
Picture Noise Reduction ............................... 17
Precautions/Safety .............................. 3, 36, 40
Programming Channels ............................... 12
Remote Control ..................................... 8-9
Requesting Service ............................. 38-39, 40
RF Coaxial Cable ................................... 5-7
Safety/Precautions .............................. 3, 36, 40
Sensor Remote ....................................... 8
Set Up/First Time Use ............................... 5-13
Sleep Timer ........................................ 22
SmartLock - Understanding the SmartLock Feature .......... 23
SmartLock Access Code Feature ......................... 24
SmartLock Block Channel Feature ....................... 25
SmartLock Blocking Options ........................... 26
SmartLock Blocking using the Movie/TV Ratings ......... 27-28
SmartLock Review ................................... 29
SmartPictare Control ................................. 33
SmartSound Control .................................. 34
SmartSurf .......................................... 35
Start-up Channel Control .............................. 20
Start-up Time Control ................................. 20
Status Button ........................................ 9
Timer Control ....................................... 19
Tips for Service ............................. 36, 38-39, 40
VCR/TV Connections .................................. 7
Volume Bar Control .................................. 31
Volume Limiter Control ............................... 31
Warranty ........................................... 40
37
Page 38

Philips Consumer Electronics Company
Factory Service Center Locations
__ Houston/Galveston"JrIndicates In-Home Service Only Beaumont/Austin
1-800-242-9225 San Antonio
• Indicates In.Home/Carry.In Service
\
l _ 3j_l_alsPl 8ia/alSNew Jersey
Tampa/W Florida
Yr Ft. Myers/SW Florida
Mlaml/SE Florida
NOTE:If youresideinoneof ourPhilipsFactoryServiceBranchareas(seedirectoryon back),youcancontactthenearestServiceBranchto
obtainefficientandexpedientrepairforyourproduct.I1your productisIn-Warranty,you shouldhaveproof-of-purchaseto ensureNoCharge
Service.ForOut-of-Warrantyservice,callthelocationnearestyou.
NOTA:Si vousr_sidezdansunedesr_gionsdesserviesparunesuccursaledeserviceapr_sventedufabricantPhilips(voirlisteci-dessous),
vouspourrezcontacterla branchedeserviceapr_sventela plusprosdechezvouspourobtenirunserviceapr_sventerapideetefficace.Sile
produitestsousgarantie,ilsufliradepresenterunepreuved'achatpourb_n_ficierd'unservicesansfrais. Pourlesproduitsnoncouvertsparla
garantie,contactezle centrele plusprosdechezvous.
NOTA:Si Ud.resideenunadenuestraszonasparasucursalesPhilipsdeservicioaldef_brica(vetdirectoriom_sabajo),Ud.puedecomunicarse
conla sucursaldeserviciom;_scercanaparaobtenerunareparaci6noportunayeficazdesu producto. Si suproductoest;ltodavfabajogaran-
tia, Ud.debepresentarcomprobantedecompraparanoocasionarningunoscargosporservicio. Paraserviciodespu_sdelvencimientodela
garantia,Ilameallugarm;iscercanodelosabajoindicados.
I. Ca.ada
Howyoucanobtainefficientandexpedientcarry-in,mail-in,orin-homeserviceforyourproduct
PleasecontactPhilipsat 1-800-661-6162(Frenchspeaking)
1-800-363-7278(Englishspeaking)
AuCa.da
Commentobtenirleserviceapr_s-ventepourles produitsapport_souenvoy_sparlaposte_notrecentredeserviceouleservice_domicile
Veuillezcontacterphilips_i: 1-800-661-6162(Francophone)
1-800-363-7278
C6morecibirservicioetlicienteparasuproducto,enpersona,pot correoo adomicillo
Favordecomunicarsecon Philipsal: 1-800-661-6162(franc6fono)
1-800-363-7278(angl6fono)
MAC_291/99
EL4482-3 Rev. AA
3135 015 07541
38
Page 39

QUALITY SERVICEIS AS CLOSEAS YOUR TELEPHONE!SIMPLY LOOKOVERTHE LIST BELOWFOR THE NUMBER OF A FACTORYSERVICE CENTER
NEARYOU. YOURPRODUCTWILL RECEIVEEFFICIENTAND EXPEDIENTCARRY'IN, MAIL'IN, OR IN'HOME SERVICE, AND YOU WILL RECEIVEPEACEOF MIND,
KNOWINGYOURPRODUCTISBEINGGIVENTHEEXPERTATrENTIONOFPHILIPS'FACTORYSERVICE.AND,IFTHEPHONENUMBERLISTEDFORYOURAREA
Is LONGGUSTANCE,CALL1-800-242-9225 FORFACTORYSENWCE,
COMMENT08TENIR NOTRESERVICEAPR_S VENTERAPIDEET EFEICACESOITPARCOURRIER,/_DOMICILE,OU EN SE PRI_SENTANTAUN CENTREDESERVICEPHILIPS. PLUSDE600 CENTRES
DE RI_CEPTIONDEPRODUITSA RI_PARERATRAVERSLEPAYS:CONTACTERLE CENTREDE SERVICEAUX CONSOMMATEURSLEPLUS PROCHEPOUR SAVOIRL'EMPLACEMENTDECES DI_pI_TS
OANSUNRAYONDE50 A75 MILES(80 KMA 120 NM) DU CENTREDE SERVICELOCAL.
COMOOBTENERUN SERVICIOOPORTUNOY EFICIENTEPOR CORREO,EN CASA0 ENPERSONAPARASU PRODUCTOA TRAV_SDEUN CENTROPHILIPSOESERVICIO.MASDE 600 SiTlOSPOR
TODOELPAlSPARALA RECEPCIDNDEPROOUCTOSNECESITADOSDE REPARACIONES:COMUNICARSECONELCENTRODE SERVICIODEFABOICAMASCEDCANOPARAESTOSLUGARE8DENTRO
DEUNRADIO DE80 A 120 KM (50 A 75 MiLLAS) DELCENTRODESERVICIOLOCAL.
GEORGIA
Philips FactoryServiceof Georgia
200 N. CobbPkwy.,Suite 120
Marietta,GA30062
(770) 795-0085
FLORIDA
Philips FactoryServiceof Florida
1911 USHighway301 North
Tampa,FL33619
(813) 621-8181
WESTERNU.S.A.
Philips FactoryServiceWesternRegion
68t EastBrokawRd.
SanJose, CA95112
(408) 436-8566
TEXAS
Philips FactoryServiceof Texas
1110 N. Post OakRd., Suite 100
Houston, TX77055
(713) 682-3990
CENTRALU.S.A.
Philips FactoryServiceCentralUS
950 KeynoteCircle
Brooklyn Heights,OH 44131
(216) 741-3334
MICHIGAN
Philips FactoryServiceof Michigan
25173 Dequindre
Madison Heights, MI 48071
(248) 544-2110
DALLASAREA
Philips FactoryService of Dallas
415 N. MainStreet,#107
Euless,TX 76040
(713) 682-3990
ILLINOIS
Philips FactoryServiceof Illinois
1279W. Hamilton Pkwy.
Itasca,IL 60143
(630) 775-0990
TENNESSEE
PhilipsFactoryServiceof EastTennessee
6700 D Papermill Rd.
Knoxville,TN37919
(423) 584-6614
MID-ATLANTIC
PhilipsFactoryService Mid-Atlantic
352 DunksFerryRd.
Bensalem,PA19020
(215) 638-7500
MAC_ 1_9
39
Page 40

Itill Illil;;I m]k'A'l_'1;I ;T'_Wittk'|
COLOR TELEVISION
90 Days Free Labor
One Year Free Replacement of Parts (Two Years Free Replacement on Color Picture Tube)
This product must be carried in for repair.
WHO IS COVERED?
Youmusthaveproofofpurchaseto receivewarrantyservice. A sales
receiptor otherdocumentshowingthat youpurchasedtheproductis
consideredproofofpurchase.
WHAT IS COVERED?
Warranty coverage beginsthe day you buy your product. For 90 days
thereafter,all parts will be repaired or replaced free, and labor is free.
From 90 days to one year from the day of purchase, all parts will be
repaired or replaced free, but you pay for all labor charges. From one
to two years from the day of purchase, you payfor the replacement or
repair of all parts except the picture tube, and for all labor charges.
After two years from the day of purchase, you payfor the replacement
or repair of all parts, and for all labor charges.
All parts, includingrepaired and replaced parts, are covered only for
the original warranty period. When the warranty on the product
expires, the warranty on all replaced and repaired parts also expires.
WHAT IS EXCLUDED?
Your warranty doesnot cover:
labor chargesfor installationor setup of the product,adjustment of
customer controls on the product,and installationor repair of
antennasystemsoutsideof the product.
product repair and/or part replacement becauseof misuse,acci-
dent, unauthorized repair or other causenot within the control of
Philips Consumer ElectronicsCompany.
reception problemscausedby signa1conditionsor cableor antenna
systemsoutsidethe unit.
a product that requires modification or adaptationto enable it to
operate in anycountry other than the country for whichit was
designed,manufactured, approvedand/or authorized,or repair of
products damagedby these modifications.
incidentalor consequentialdamagesresulting from the product.
(Somestatesdo not allow the exdusion of incidentalor consequen-
tial damages,so the above exclusionmay not applyto you. This
includes,but is not limited to, prerecorded material,whether copy-
righted or not copyrighted.)
• a product used for commercialor institutionalpurposes.
WHERE IS SERVICE AVAILABLE?
Warranty serviceis availablein all countrieswhere the product isoffi-
ciallydistributed by PhilipsConsumer ElectronicsCompany. In coun-
tries where Philips Consumer ElectronicsCompany doesnot distribute
the product, the local Philips service organizationwill attempt to pro-
vide service (althoughthere may be a delay ifthe appropriate spare
partsand technical manual(s) are not readily available).
MAKE SURE YOU KEEP...
Please keep your sales receipt or other document showing proof of
purchase. Attach it to this owner's manual and keep both nearby.
Also keep the original box and packing material in case you need to
return your product.
BEFORE REQUESTING SERVICE...
Pleasecheckyour owner's manualbefore requesting service.
Adjustments of the controlsdiscussedthere may saveyou a service
call.
TO GET WARRANTY SERVICE IN U.S.A.,
PUERTO RICO OR U.S. VIRGIN ISLANDS...
ContactaPhilipsfactoryservicecenter(seeenclosedlist)or autho-
rizedservicecenterto arrangerepair.
(In U.S.A.,Puerto Ricoand U.S.Virgin Islands, all impliedwarranties,
includingimpliedwarrantiesof merchantability and fitnessfor a partic-
ular purpose,are limitedin duration to the duration of this express
warranty. But,becausesome statesdo not allow limitationson how
longan impliedwarranty maylast,this limitationmay not applyto
you.)
TO GET WARRANTY SERVICE IN CANADA...
PleasecontactPhilips at:
1-800-661-6162 (FrenchSpeaking)
1-800-363-7278 (EnglishSpeaking)
(In Canada,this warranty isgiven in lieu of all other warranties. No
other warranties are expressed or implied, including anyimplied war-
ranties of merchantability or fitness for a particular purpose. Philipsis
not liable under any circumstances for any direct, indirect,special, inci-
dental or consequentialdamages,howsoever incurred, even if notified
of the possibility of such damages.)
REMEMBER...
Pleaserecord the modeland serialnumbersfound on the product
below. Also, pleasefill out and mail your warranty registration card
promptly. It will be easierfor usto notify you if necessary.
MODEL#
SERIAL#
Philips Consumer Electronics Company, P.O. Box 2976, Longview, Texas 75606, (903) 242-4800
Prinled in U.S.A.
 Loading...