

Page 1
0
AL
C 0 L 0 R
T E L E V I S I 0 N
P
Page 2
Once your PHILIPS MAGNA VOX purchase is registered, you're eligible to receive all the privileges of
owning a PHILIPS MAGNAVOX product. So complete and return the Warranty Registration Card
enclosed with your purchase at once. And take advantage of these important benefits.
Congratulationson your purchase,
and welcome to the "family!"
PHILIPS
Dear PHILIPS MAGNAVOX product owner:
Thank you for your confidence in PHILIPS MAGNAVOX. You've selected one of the best-built, best-
backed products
available today. And we'll do everything in our power to keep you happy with your purchase for many
years to come.
As a member of the PHILIPS MAGNAVOX "family,"you're entitled to protection by one of the most
comprehensive warranties and outstanding service networks in the industry.
What's more, your purchase guarantees you'll receive all the information and special offers for which
you qualify, plus easy access to accessories from our convenient home shopping network.
And most importantly you can count on our uncompromising commitment to your total satisfaction.
All of this is our way of saying welcome-and thanks for investing in a PHILIPS MAGNAVOX product.
Sincerely,
Robert Minkhorst
President and Chief Executive Officer
RS. Remember,toget themostfromyourPHILIPS
MAGNAVOXproduct,youmustreturnyour
WarrantyRegistmlJonCard within10days.So
pleasemailitto usrightnow!
Know these
safetysymbo/s
_k This"bOltoflightning" indicatesuninsulate_materialwithinyourunitmaycausean electrical
shock.Forthe safetyof everyonein yourhousehold,please do notremoveproductcovering.
_kThe "exclamationpoint"cansatten_onto featuresforwhichyou shouldreadthe enclosedlit-
eraturecloselyto preventoperatingand maintenanceproblems.
WARNING: TO PREVENT FIRE OR.SHOCK HAZARD, DO NOT EXPOSE THIS EQUIPMENT
TO RAIN OR MOISTURE.
CAUTION: To prevent electhc shock, match wide blade of plug to wide slot, and fully insert.
A'I-rENTION: Pour dVderles chocs q_k_'ldques, introduire la lame la plus large de la fiche dens la
borne correspond_nte de la prise et pousser jusqu'au fond.
2
Page 3
Welcome/Registration of Your TV ............................ 2
Table of Contents ....................................................... 3
Features ...................................................................... 3
_ Ouick Use/Start Us} Features
¢'Antenna Hookups....... ......................................... 4
¢.Cable Hookups .................................................... 5
¢'VCR to TV Hookups .................................... 5, 19
OBasic TV and Remote Operations ...................... 6
_First Time Setup.................................................. 7
[--'] On-Screen (MENU} Features
€.How to Set the TV for Closed Captioning ......... 8
€,How to Set the TV's Clock ................................. 9
,¢.Using the Surf Control...................................... l0
¢'How to Set the Sleep Timer Control ................. 1l
¢,Adjusting the TV Picture Controls ................... l 1
¢'Using the TV's Child Lock Control ........... 12, 13
€'How to Set the TV's Message Control ............. 14
mUsing the Smart Picture Control....................... 15
OUsing the Smart Sound Control (AVL) ............ 16
_>Using the TV's Volume Control ....................... 17
¢'How to Set the TV's Volume Limit Control.....17
C-Using the TV's Audio/Video Input Jacks ......... 18
M General Information
Tips if Something Isn't Working ............................. 19
Glossary of 'IV Terms.............................................. 20
Index ........................................................................ 21
Factory Service Locations .................................. 22-23
Warranty................................................................... 24
Infrared Remote Control works your "IVset and all
on-screen features.
Standard broadcast (VHF/UHF) or Cable 'IV
(CATV) channel capability.
Closed Captioning allows the viewer to read TV
>rogramdialogue or voice conversations as on-
screen text.
Automatic Programming of Channels for quick
and easy selection of favorite stations available in
your area.
On-Sereon Features (in either English, French, or
Spanish) show helpful messages for setting of TV
controls.
Audio/Vkleo Jackpand for direct connections with
VCRs (or other video accessories) providing quality
TV picture and sound playback,
Sleep Thner automatically turns the TV OFF at pre-
set times.
Clock Timer feature can turn ON the TV at any pre-
set time - just fike an alarm clock.
Copyright © 1997 Philips Consumer Electronics Company. All rights reserved.
3
Page 4
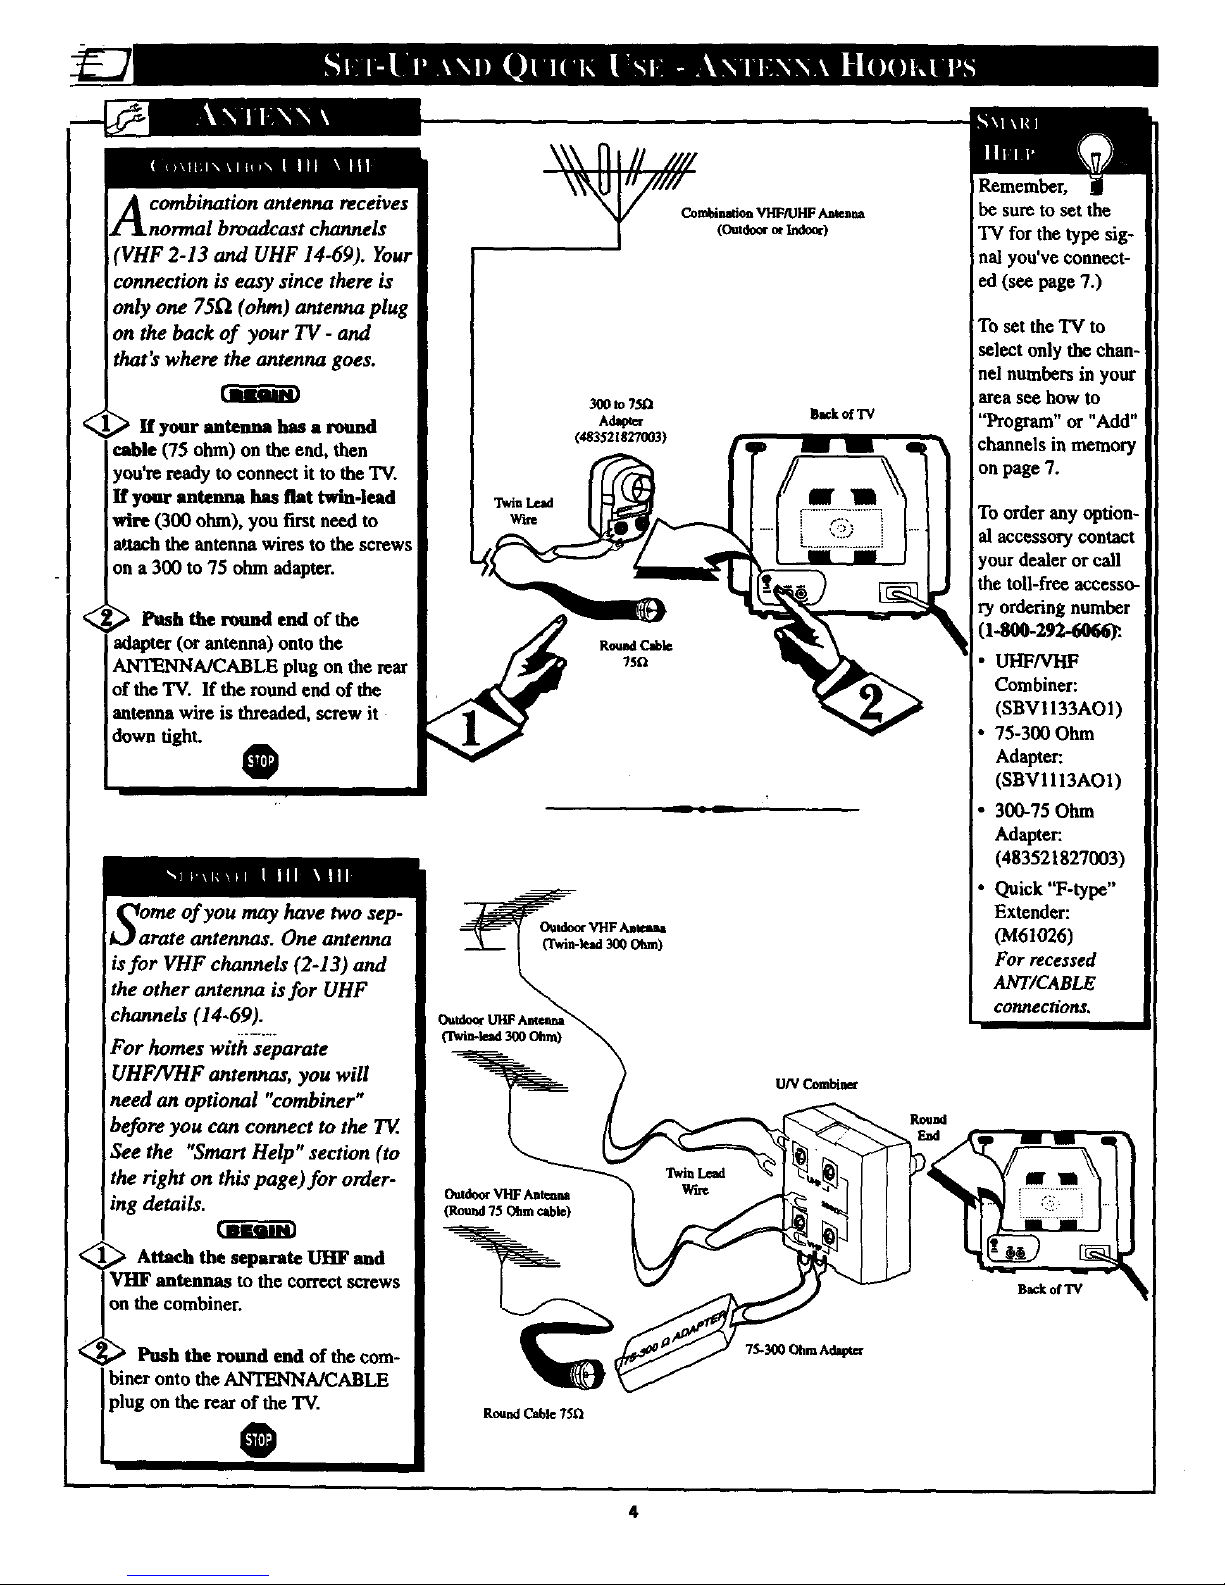
A combination antenna receives
normal broadcast channels
VHF 2-13 and UHF 14-69). Your
:onnection is easy since there is
only one 751_ (ohm) antenna plug
on the back of your TV - and
that's where the antenna goes.
If your antenna has a round
cable (75 ohm) on the end, then
you're ready to connect it to the TV.
If your antenna has flat twin-lead
wire (300 ohm), you first need to
a,.tachthe antenna wires to the screws
ion a 300 to 75 ohm adapter.
_ Push the round end of tbe
iadapter (or antenna) onto the
ANTENNA/CABLE plug on the rear
of tbe TV. If the round end of tbe
iantenna wire is threaded, screw it
down tight.
0
I
S:me of you may have two sep-
rate antennas. One antenna
is for VHF channels (2-13) and
the other antenna is for UHF
channels (14-69).
For homes with separate
UHF/VHF antennas, you will
need an optional "combiner"
before you can connect to the TV.
See the "Smart Help" section (to
the right on this page) for order-
ing details.
_onV Attach the separate UHF and
antennas to the correet screws
e combiner.
Push the round end of the cora-
lbiner onto the ANTENNA/CABLE
plug on the rear of the TV.
®
Ba_kofTV
iTch-lead 3_0 Ohm)
Omde_ VHFAateHa
(Round75 Ohmcable)
Round Cable 75_
Remember,
be sure to set the
"IVfor the type sig-
nal you've connect-
ed (see page 7.)
To set the T'Vto
select only the chan-
nel numbers in your
area see how to
"Program" or "Add"
channels in memory
on page 7.
To order any option-
al accessory contact
]-goo-292-6o .
UHF/VHF
Combiner:
(SBV1133AO1)
75-300 Ohm
Adapter:
(SBVIlI3AOI)
300-75 Ohm
Adapter:
(483521827003)
Quick "F-type"
Extender:
(M61026)
For recessed
ANT/CABLE
connections. I
I
B_k ofTV
4
Page 5

, use a single (75
ohm) cable, or have a Converter
Box installation. Connect the thread-
ed end of the cable signal to the TWs
antenna plug and screw it down.
If your Cable TV signal is n single
round cable (75 ohm) thenyou're ready
to connect to the "IV.
If you have a Cable TV Converter
Box: Connectthe CableTV signal to the
CableSignal IN(put)plug on the
Converter.
Connect the Cable 'IV cable to
the ANTENNA/CABLE plug on the
'IV. If you have a Cable Converter
Box: Connect the Convener to the
ANTENNA/CABLE plug on the TV.
O
I
NOT_ The connectingcablefor I
the Convener is supplied from
I
the Cable TV Company.
CableTV Conve_
Box Coaaeclien
BackofTV
Remember,
set the TV for the
type signal you've
just connected (see
page 7.)
To select only the
channel numbers on
your Cable system
see "Auto Install"
(page 7). If you use a
Cable Converterbox
set tbe TV to the
same channel as the
converter's CH 3/4
switch (on the mar o
the convener.)
<
<
hr'_hebasic Antenna, or Cable
to VCR to TV connection
is shown to the right. For more
information on other hookups
Irefer to your accessory VCR and
Cable Converter Owner's Manual
for demos.
Connect your Antenna or Cable
ITV signal to the IN FROM
ANT(enna) plug on the VCR.
_ Connect the OUT TO TV plug
on the VCR to the ANTENNA plug
on the TV (connecting cable supplied
with the VCR).
<_ Refer to the Owner's Manual
included with your VCR for other
possible connections and TV/VCR
operating details.
, 0
\
v_
_kof_
Round Cable
7SQ Supplied with VCR
Page 6
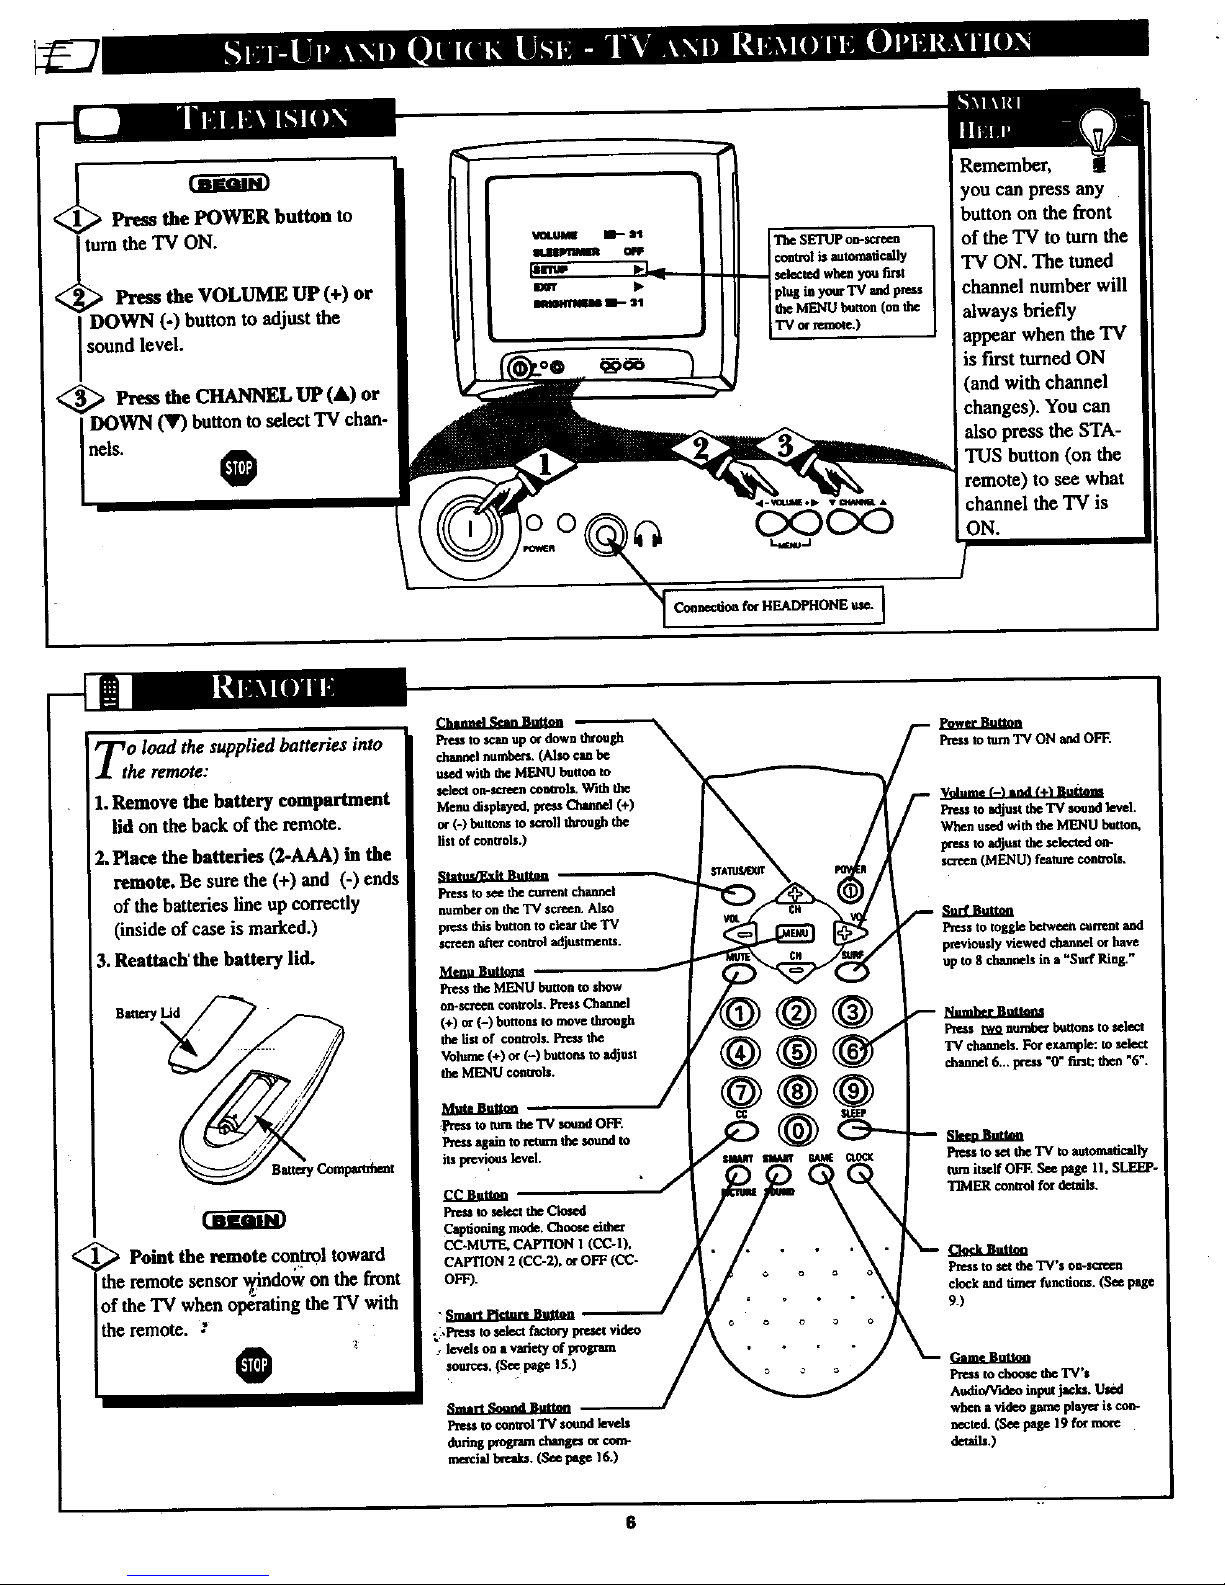
Press the POWER button
J turn the TV ON,
Press the VOLUME UP (+) or
DOWN (-) button to adjust the
sound level.
<_ Press the CHANNEL UP (&) or
DOWN (V) buttonto select TV chan-
nels. @
The SETUPon-sccee_ ]
controlis automatically
selected when you tint
p/ng ia yaer TV _d press
tbeMENUbetthn (onthe
TVorremote.)
Connectioafee HEADPHONEuse,J
ReIIlcfober,
you can press any
button on the front
of the TV to turn the
TV ON. The tuned
channel number will
always briefly
appear when the 'IV
is first turned ON
• You can
also press the STA-
TUS button (on the
remote) to see what
channel the TV is
ON.
msm_
Zo load the supplied batteries into
he remote:
1.Remove the battery compartment
lid on the back of the remote.
2. Pince the batteries (2-AAA) in the
remote. Be sure the (+) and (-) ends
of the batteriesline up correctly
(inside of case is marked.)
3. Reattach' the battery lid.
Point the remote control toward
the remote sensor x_dndowon the front
of the TV when opdratingthe TV with
the remote.
_ttatu._kU_tm _
Press to see the current channel
number on the 'IV screen. Also
press this bet[on to clear the TV
screen a_er ¢OlYxol adjttstments.
Menu Bmt_ ,-"_
Pre_ theMENU buuon m _w
on-screen conuols. Press Chapel
(+) c¢ (-) buttons to move through
tbe 5st of controls. Preu tbe
Volume(÷)o¢(-) buttonsto adjust
LheME_qUcontrail
cc ktt_
Pre-Jtosniect_e Clmed
Captioningmode.Cho_e nith_
CC-MUTE.CAFI'ION 1 (CC-I).
CAPTION 2 (CC-2). or OFF (CC-
OFF).
f_r_2_ttt_
Pre*s to mm TV ON aad OFF.
FOu_w adlus__e TV sorrel k-vni.
When usedwith theMENU betto_
Wets to adjust tbe _k_¢a_doa-
sc_eea(ME_qU)feature_aUols.
Su_ktt_
Press to tosgle between _atrtent and
previously viewed channel or have
up to 8 clumneb in a "Surf Ring. _
Pre_s eg_ numberbuttor_tosnie_t
"IVclmanels.Forexample: to select
channel 6... peess "0" finq tiwm =6".
Pressto u:ttbe TVtoamomadcany
mm iutelf OFF. Seepage II, SLEEP-
T_4ER control for detml_.
_Jt.anttm
I_e_s to set the TV'$ omsc_cn
dock and_aer function*.(See pa_e
_)
Preu 1ochoose _heTV'_
Au_io_ruleoinpmjach_ U_d
when avideo game playe_i$ cow
nected.(Seepage 19formoee
detnih.)
6
Page 7
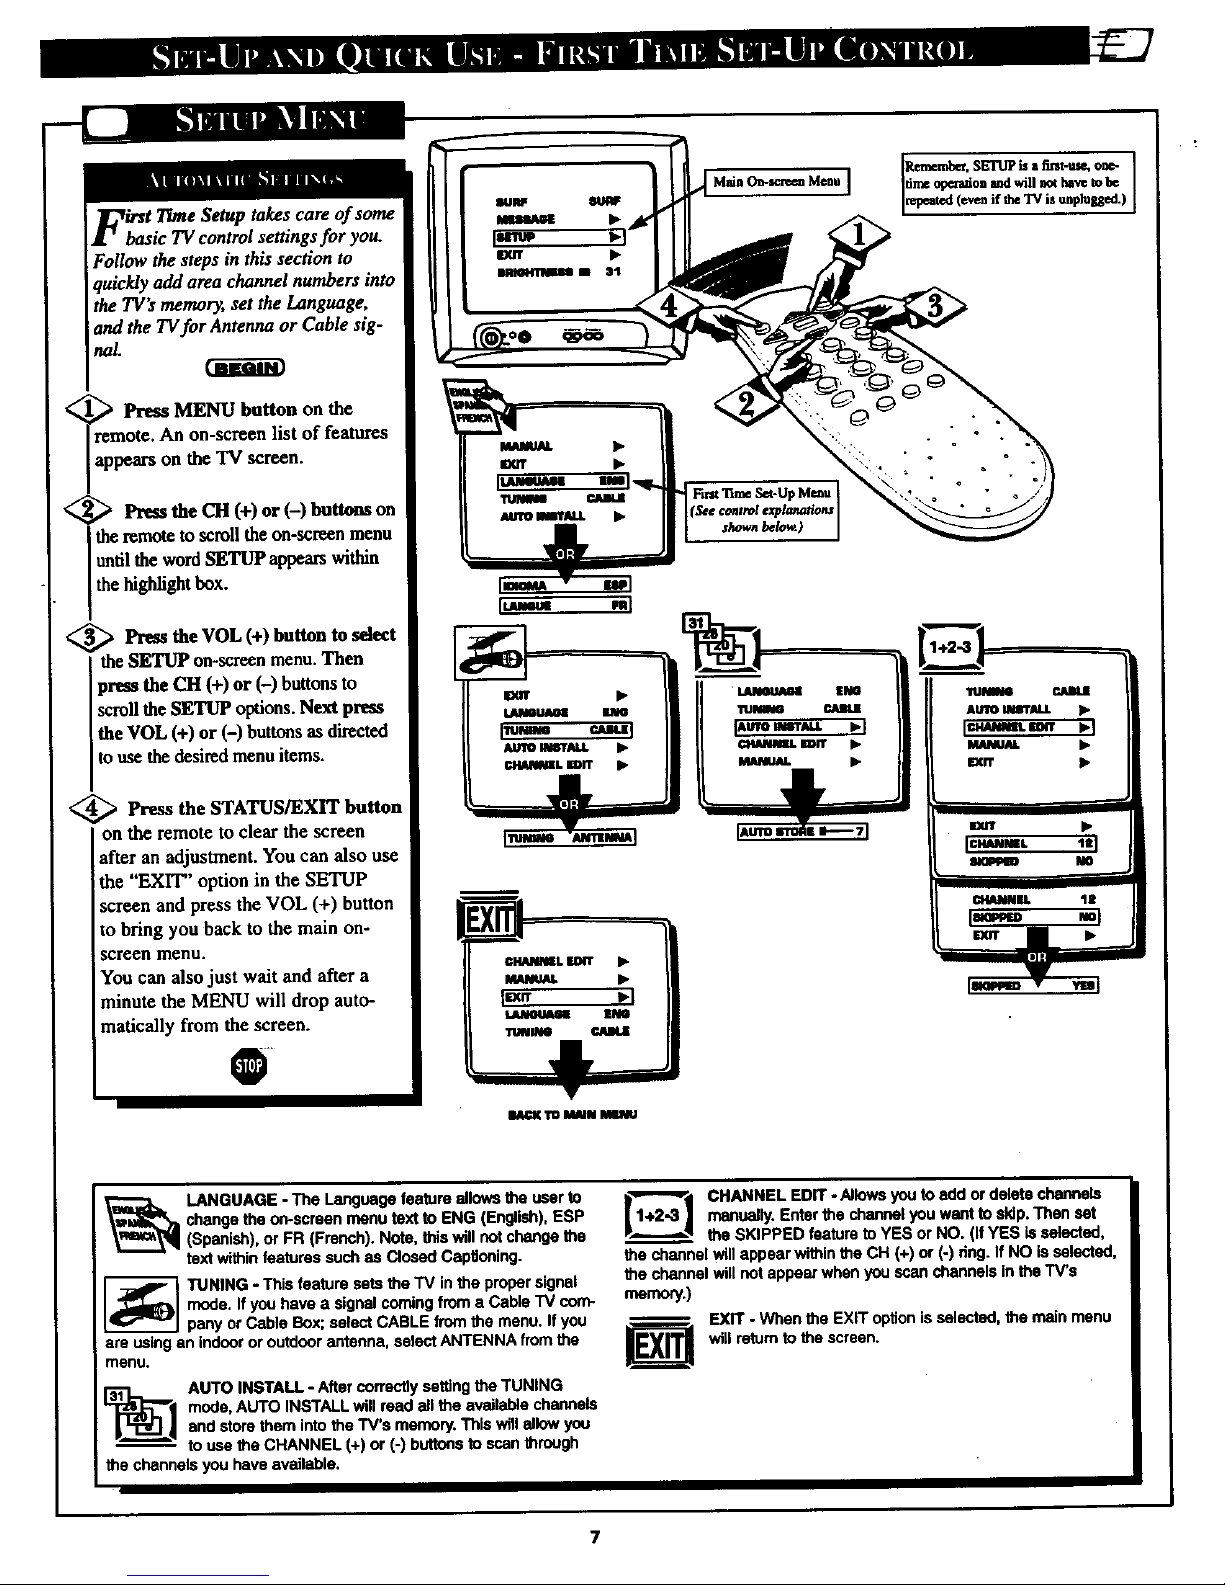
<
takes care of some
basic TV control settings for you.
Follow the steps in this section to
quickly add area channel numbers into
the "_"TVs memory, set the Language,
and the TVfor Antenna or Cable sig-
nal.
Press MENU button on the
remote. An on-semen list of features
appears on the TV screen.
<_ Press the CIt (+) or (-) Imttons on
the remoteto scroll the on-screenmenu
untilthe wordSETUP appearswithin
thehighlightbox.
_ Press the VOL (+) button to select
the SETUP un-screen menu.Then
press the CH (+) or (-) buttonsto
scroll the SETUP options.Next press
the VOL (+) or (-) buttons as directed
touse the desiredmenu items.
<_ Press the STATUS/EXIT button
on the remote to clear the screen
after an adjustment. You can also use
the "EXIT" option in the SETUP
screen and press the VOL (+) button
to bring you back to the main on-
screen menu.
You can also just wait and after a
minute the MENU will drop auto-
matically from the screen.
..
Main O_-_n_m Mcnu time ope_ion md will not lutve to be
(See contwl explanations
l_lNIml r.NN.IE
AUTOINeTALJ. •
Iram" _1
MANUAL •
EXIT /_
mar€ TOI MINU
LANGUAGE - The Languagefeatureallowsthe userto
changetheon-screenmenutext to ENG (English),ESP
(Spanish),or FR (French). Note,thiswillnotchangethe
textwithinfeaturessuchas ClosedCaptioning.
TUNING - This featuresetsthe TV inthe propersignal
mode.Ifyou have a signalcomingfrom a Cable TV com-
panyor Cable Box;selectCABLEfromthe menu.If you
are usinganindoororoutdoorantenna,selectANTENNA from the
menu.
[_1 AUTO INSTALL - After correctty setting the TUNING
mode, AUTO INSTALL will read all the available channels
and store them into the "TV'smemory. This tall allow you
-- to use the CHANNEL (+) or (-) buttons to scan through
the channels you have available.
[1"_2_ ] CHANNEL EDIT - Allowsyouto add ordeletechannels
manually.Enterthe channel youwantto skip.Then set
__ the SKIPPED feature to YES or NO. (IfYES isselected,
the channelwill appserwithintheCH (+) or (-) dng. If NO isselected,
the channelwill not appearwhenyou scanchannelsinthe TV's
memory.)
-- EXIT - When the EXIT optionisselected,the mainmenu
J_ willreturnto the screen.
Page 8
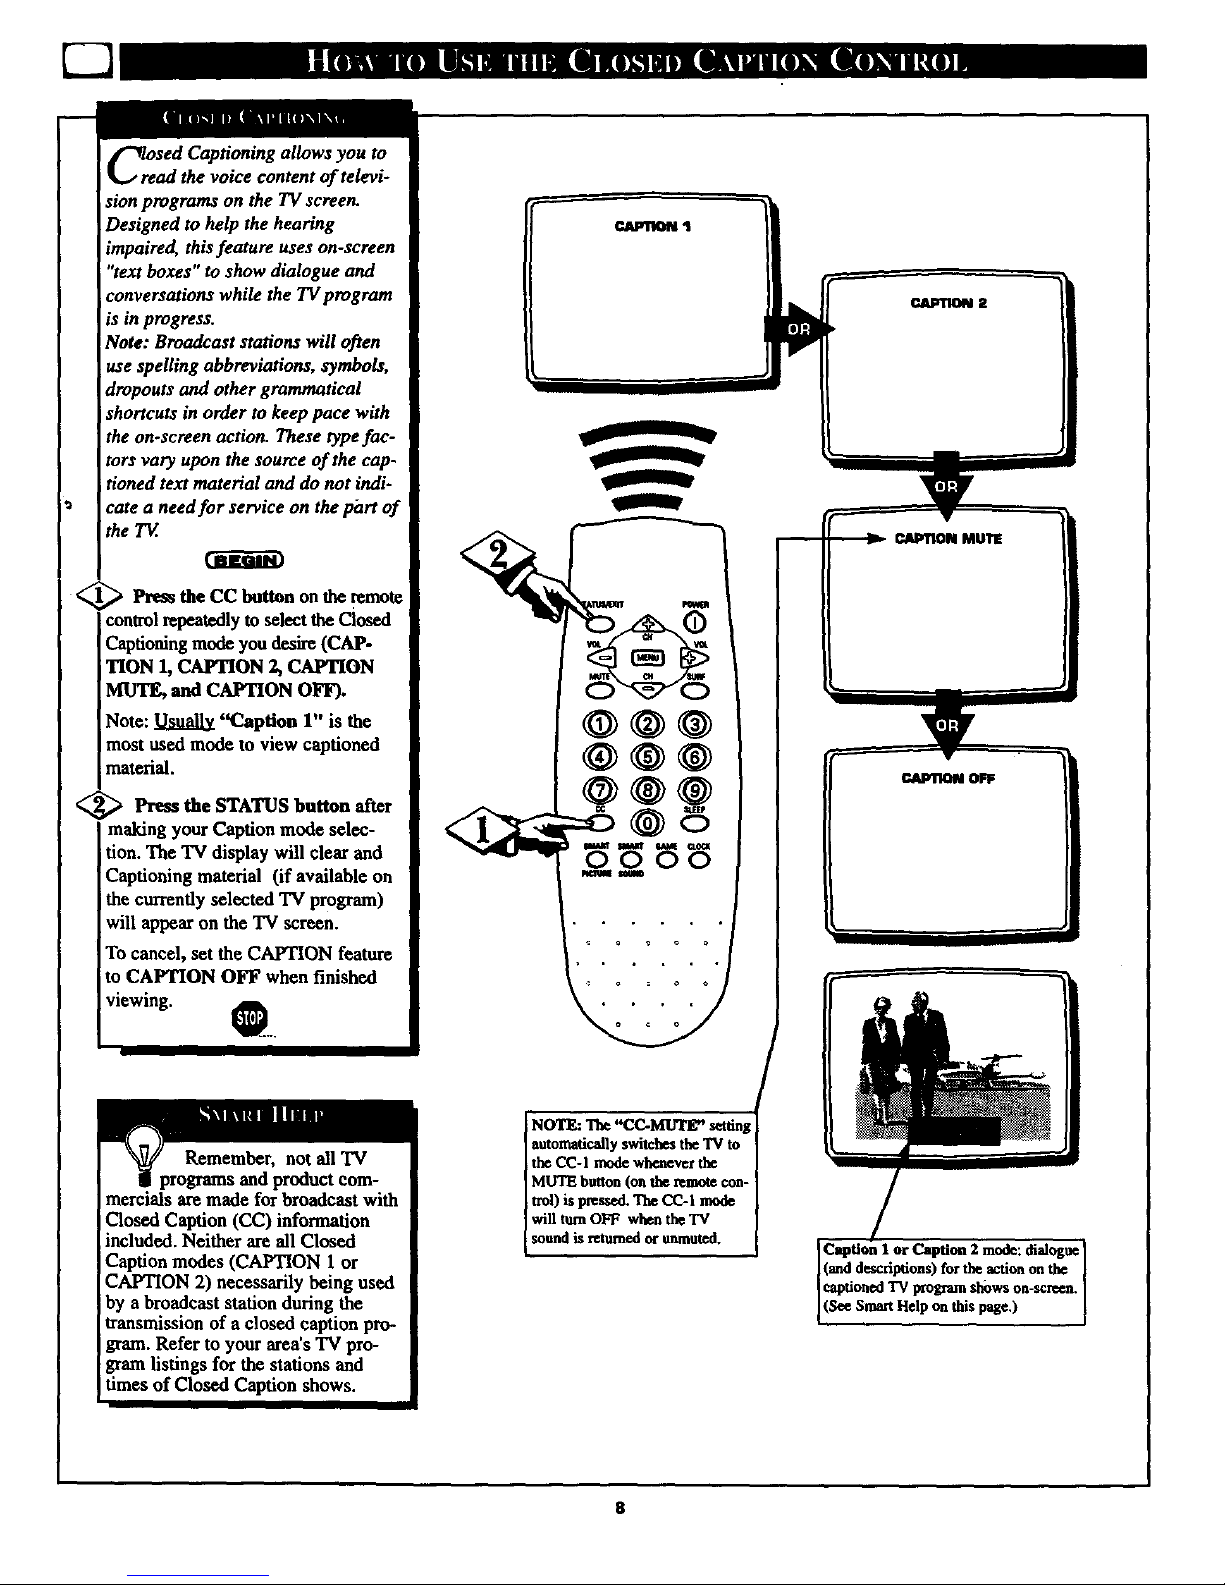
oftelevi-
sion programs on the TVscreen.
Designed to help the hearing
impaired, this feature uses on-screen
"text boxes" to show dialogue and
conversations while the TV program
_sin progress.
Note: Broadcast stations will often
use spelling abbreviations, symbols,
dropouts and other grammatical
shortcuts in order to keep pace with
the on-screen action. These type fac-
tors vary upon the source of the cap-
tioned text material and do not indi-
cate a needfor service on the phrt of
the T_.
<_ Press the CC button the
on remote
controlrepeatedlyto select the Closed
Captioningmode you desire (CAP-
"lION 1, CAPTION 2, CAPTION
MUTE, and CAPTION OFF).
Note: _ "Caption 1" is the
most used mode to view captioned
material.
<_ Pre_ the STATUS button
after
making your Caption mode selec-
tion. The TV display will clear and
Captioning material (if available on
the currently selected TV program)
will appear on the TV screen.
To cancel, set the CAPTION feature
to CAPTION OFF when finished
viewing. 0...
%
0000
Remember, not all "IV
?rograms and product com-
mercials are made for broadcast with
Closed Caption (CC) information
included. Neither are all Closed
Caption modes (CAPTION 1 or
CAPTION 2) necessarily being used
by a broadcast station during the
transmission of a closed caption pro-
gram. Refer to your area'sTV pro-
gramlistings for the stations and
times of Closed Caption shows.
d
NOTE: The "CC-MUTE" setting
automatically switches the "IV to [
the CC-I mode wheaever the
MUTE button (on the remote con- !
trod is pressed. The CC-I mode
will turn OFF when the TV
sound is mumcd or unmuted.
Caption I or Caption 2 mode: dialogue I
(and deacfiptions) for the action on the ]
captioned 'IV program shows on-screen.
(See Smart He p on th s page.)
Page 9

i
<
<
clock. During normal operation
the clock appears on the screen with
every channel change (and when the
STATUS/EXIT button is pressed with
the screen clear of on-screen menus).
This Clock also features a TIMER.
The TV can be programmed to turn
itself ON at a specific time and be
tuned to a specific channel.
Press the CLOCK button on the
remote control to bring up the on-
screen menu with the SET CLOCK
feature highlighted.
Press the Channel Number but-
tons to enter the current time.
(Example: 0, 7, 4, 5 for 7:45°)
_f ress the VOL (+) button to set
AM or PM.
ve finished. 0
<
Press the CLOCK button on the
remote control to bring up the on-
screen menu, then press the CH (+)
or (-) buttons to scroll the on-screen
menu until the words SET TIMER
appear within the highlight box.
Pr--_,sthe CHANNEL Number
ttons to enter the time you want
TV to turn on (Use the VOL (+)
set the AM or PM).
Press the CH (+) or (-) button to
Ithe menu to the word TIMER.
_to Press the VOL (+) or (-) button
turn the TIMER feature ON.
<_ Press the STATUS/EXIT button
to clear the screen when you have
finished. 0
I -:-_1
q2
81"f r_m
TIMEn _'F
€_UVNEL le
F_CTI8 _
n L
9
Page 10

A "list" or series ofpreviottsly
_e"JLviewed channel_ can be selected
with the SURF burton on your remote
control. With this feature you can
easily switch between different TV
programsthatcurrentlyinterestyou.
The Surfcontrolallowsyou tosetup
to8 channelsinitsquickviewing
"list".
(l[aPl
<_ Press the MENU (M) button on
the remote, then press the CHANNEL
[ • or • buttons to select the word
SURF with the TV's on-screen arrow.
<_ Press the (+) button to select
either/riCH (Alternate Channel) or
SURF. (See explanation of Surf
options with the illustration on this
page.)
Press STATUS button to clear the
I SCreen. I
0
<_ With the SURF control ON (see
above), select a desired channel for
viewing. You can use the number
buttons on the remote (or the
Channel • or V buttons).
<_ Press the SURF button on tbe
remote while the channel display is
stilt present on the TV s screen.
<_ Press the SURF button on the
remote to quickly review current
action on channels contained within
the Surf list.
Repeat steps above to add up to eigh
channels in the SURF channel mem-
ory ring.
O
To Use
A/CH (Alternate
Channel):
With the A/CH con-
trol ON, select the
two desired chan-
nels for viewing
with the number
buttons on the
remote control.
Press the SURF
button on the
remote to "toggle"
between the two
selected channels.
When using SURF:
Remember, you can
add as many as
eight channels in
i the Smal't Surf
Memory.
Nc_:"nl_e a_etw_methectstodektedx_vcts fi_mt_€8-cha_
_su_
e_el_a ef me dtmand wbkhwiltbeIdt wiS_a Ste SURF
u.,):
• Sekctd_eSETUPcmaolin_hem-sc._ maremdparethe
VOL(+)butte_ Selecte_ TUN1NGcem_ tad _ _e VOL
(*) Imttmtwicecha_ing CABLEt_ ANTI_NA__ bac__
CABLE(orANrEI_A to_.ASLE;len back_ _A).
• Or,wi_ theSUI_ ceeuel Ekcted prm _heVOL(÷)beuee
twk_ch_i_ SURFw hu_-l; _ h_k _ SURE
10
Page 11

"ave
the 71I only to have it
wake you up at two in the morning
with a test paffera screeching in your
ears? Well, your TV can save you all
that trouble by automatically turning
itself off.
< L_ Press the SLEEP buttm repeat.
Idly to pick the amount of rime (15
minutes to 2 hours ahead) before the
TV will turn itself off.
The VOL (+) or (-) buttons can also
be used to set the amount of time
within the on-screan menu.
<_ Pr"_ the STATUS/EXIT button
to clear the screen after you have set
the time for the TV to turn off.
An on-screen count down will appear
during the last minute before the "IV
shuts itself off.
O
Remember. If
rou ever want to see how
many minutes are left
before the TV shuts itself
off, press the STATUS
button on the remote.
If you want to stop a
SLEEP TIMER setting,
reset the timer back to
OFF. You could also turn
the TV off, and then back
on again, to cancel a set-
ring.
Pressing any key on the
remote or TV in the last
60 seconds will cancel the
s'e_ __Rs,_'_ins.setting'
An _n-ua'een t:otmt down will
appe._ during tl_ I_t w_. of i
[ I trois, select a channel and follow
Jthe steps show_
_ Press the MENU button on the
remote, then press the CH (+) or (-)
to scroll the on-scrnun menu until the
desired control appears within the
highlight box.
_ Prims the VOL (+) or (-) to
adjust the selected picture control
levels. (Refer to the Smart Help box
for more detail on each control.)
<_ Press STATUS/EXIT button (or
use the EXIT control in the Menu) to
clear the screen when picture adjust-
ments are comply.
oooo
11
PressVOL(-)or(+)until
darkestpartsofthepicture
asbrightasyouprefer.
PressVOL(-) or
(+)untillightestpartsofthe
pictt_¢showgooddetail.
COLOR PressVOL(-) or
(+)to addor _"luninatecolor.
TINT Prem VOL (-) or (+)to
obtainnatural£dn tones.
PressVOL(-)
or(+)to improvedetailin the
)ictore.
C_ORTEMP Press VOL
(-) or (+) to s¢l_c_NORMAl.
COOL,or WARM piem_
_referenees.(NORMAL will
keep the whites,white; COO1
will make the whites, bluish;
andWARM will make the
whites, reddish,)
• •
PresstheVOL(-)or (+)to turn
AION orOFF.WhenON,AI
inea'_ases the pictnee's contrast
makinglhedm'kareasn_re
blackandthelightareasmo_
white.Thisis especiallygood
fordark scenesorprograms.
Page 12

_ffo rprogram broadcasts unsuitable
r younger viewers, the Child
Lockfeature allows you to block out
certain channels from your viewing
choice. Whena channel is "/ocked," it
will be skipped or unavailable for
selection when scanning or changing
channels.
Follow the steps listed below tofirst
set a personal access code for your TY.
BEGIN
_w_i_ee ress the MENU (M) button on
remote, then press the CH (+) or
to scroll the on-screen menu until
words CHILD LOCK appear
n the highlight box.
<_ Press the VOL (+) button to
. [ select the CHILD LOCK feature.
i
<_ Enter the default code with the
Channel Number buttons (8888).
This will gain yon access to the
CHILD LOCK menu.
The CHILD LOCK menu will
appear with "CODE .... "high-
lighted.
@>Enter your NEW Code using
the Channel Number buttons (dig-
its 0-9). Press the CH (-) button to
scroll to CONFIRM CODE and re-
enter the same NEW Code number.
After the new code is entered you
will have the option to EXIT the
CHILD LOCK feature or you can
re-enter your new c6_le to gain access
to the menu again.
To lock out specific channels or make
changes to the CHILD LOCK menu
please continue to the next page.
INPUT TUNER
ELEEPTIMER OFF
) LOCK
CLOCK lib
SURF A/CH
IOODE .... I
lxrr )_
O00E XXXX
[I:QNFIRM COOEXXXX I
CHANNEL 12
LOCK NO
12
Page 13

After your personal access Code
number has been set (see previ-
ous page), you are now ready to
select the channels you want to block
out or censor.
K/_ Press the MENU (M) button on
the remote, then press the CH (+) or
(-) to scroll the on-screen menu until
the words CHILD LOCK appear
within the highlight box.
<_ Press the VOL button
(+)
to
select the CHILD LOCK feature.
<
Enter the correct 4-digit access
Code. This will gain you access to
the CHILD LOCK menu.
The CHILD LOCK menu will
appear with CODE highlighted.
ENTER YOUR 4-DIGIT ACCESS
CODE AGAIN.
<_ Press the CH (+) or (-) buttons
to scroll the menu to CHANNEL.
Using the Channel Number buttons
enter the channel you want to "lock."
Then press the CH (+) or (-) but-
tons to scroll the menu to LOCK.
<_ Press the VOL (+) button to
choose YES or NO within the
LOCK conlxol.
<_ IMPORTANT: Press the CH
(+) or (-) buttons to scroll to CON-
FIRM CODE and you must enter
your 4-digit access Code to set or
save the changes into memory.
O
Remember, to save the
changes and limit the access to
certain channels, you MUST re-enter
your access code within the CON-
FIRM CODE option. Not doing so
will allow viewers to change these
settings without having to use the
personal access CODE.
INPUT TUNER
8LEEPl"IMER OFF
[CHILD LOCK
CLOCK •
SURF A/CH
0000
0:
CHANNEL 111
ILOCX
EXiT I_
CODE XXXX
ImT
COOE ....
13
LOCK NO
zxrr •
Ico. xxxxI
CONFIRM COOE....
CHJUINEL 12
CODE XXXX
CONIqRMCOOE ....
Ic "m"
LOCK NO
EXiT •
I lcommcou x xl
LOCK RIO
Page 14

you can program a two line rues-
age (up to 40 characters in
length) to appear every time the TV
is powered on. This feature can be
used as a reminder for yourself or
other family members.
<_ Press the MENU (M) button on
the remote, then press the CH (+) or
] (-) to scroll the on-screen menu until
]the word MESSAGE appears within
the highlight box.
<_ Press the VOL (+) button to
access the MESSAGE feature.
Press the VOL (+) button again to
turn the MESSAGE feature ON.
-<_ Press the CH (+) or (-) buttons
to scroll the on-screen menu to LINE
I. Then, press the VOL (+) button
to access the LINE I menu•
Using the CH (+) or (-) buttons,
scroll through the list of characters.
Use the VOL (+) or (-) buttons to
move sideways from letter space to
letter space (LINE 1 holds up to 20
characters). If more space is required
repeat the process with the LINE 2
control.
The CLEAR on-screen control can
be used to remove a message that has
been entered into the TV's memory.
@ Press the STA'!_S/EXIT button
when finished to clear the screen of
the menu list. O
Remember, LIHE 1 and
_.hold up to 20 charac-
ters in memory.
When the MESSAGE control is
turned ON, the message you pro-
grammed will appear whenever the
TV is powered ON. (The message
will disappear as soon as a button on
the remote is touched.)
Itrrt_ •
= I
14
Page 15

W_eo vtheryou're watching a movie or
idea game your TVhas auto-
matic video control settings matched for
your currentprogram source or content.
TheSmart Picturefeature quickly resets
your TV'svideo controlsfor a number
of different types ofpmgram_ and view-
ing conditionsyou may have inyour
home. Each Smart Picture setting is
preset at thefactory to automatically
adjnst the TV'sPicture, Color,and
Sharpness viewing control levels.
_ Press the Smart Picture buttoa on
the remoteto activatethe SMART
PICT feature.
<_ Press the Start Picture button
I repeatedly toselect between 5 differ-
ent picturepresets:Personal,Movies,
Sports,WeakSignal, orVideo Games.
<_ Press the STATUS/EXIT button to
] clearthe screen when finished with
yourselection. O
Remember, the video con-
trol settings for the Smart
Picture categories are memorized
into the TV atthe factory and can
only be reset by field and service
technicians.
With the PERSONAL setting chosen,
any adjustments made to the picture
controls will be held in the TV's
memory.
15
Page 16

m
Are you tired of the sound of com-
mercial_ following you into the
next room or all through the house?
Smart Sound allows you to preset a
desired volume level that the TV
sound will not go above. This makes
for an even, more consistem sound
by reducing the peaks and valleys
that can occur during program
changes or commercial breaks.
_ Prem the Smart buttou on the
remote to activate the SMART
SND feature.
<_ Press lhe Smart Smu_ Imttola
repeatedly to toggle the SMART
SOUND control ON or OFF.
<_ Press the STATUS/EXIT but-
ton to clear the screen when com-
pleted. 0
SMART IOUND OFF
Remember, Smart Sound
works only with the programs
coming through the Antenna/Cable
input on the rearof the "IV (RF
audio). It win not control the sound
levels for the Auxiliary (VCR/AUX
IN) audio inputs.
AI ON
VOLUME HI----- 1S
taw *,,I
I
AI ON
VOLUME _ 15
I.w OF,;
IM_T TUNER
vke veto).
16
Page 17

USTVe !he Volume control to set the
s volume level on the TV
rcreen. The Volume level or scale
will be seen each time the VOLUME
buttons (on the TV or remote) are
pressed (0 being the lowest, 63
being the highest.)
_ Press the MENU button on the
mote, then press the CH (+) or (-)
to scroll the on-screen menu until the
word VOLUME appears within the
highlight box.
Press the VOL (+) or (-) buttons
to adjust the volume level.
_ Press STATUS/EXIT button to
clear the screen.
O
g:u can limit the maximum vol-
me level of the TV set. Once the
Volume Limit control is set the TV
sound cannot be played louder than
the maximum preset level.
<_ Press the MENU button the
on
remote, then press the CH (+) or (-)
to scroll the on-screen menu until the
words VOLUME LIMIT appears
within the highlight box.
<_ Press the VOLUME (+) or (-)
button to turn the VOLUME LIMIT
control ON.
<_ Pr--,_sthe STATUS/EXIT button
to clear the screen.
O
rarest,
17
Try it out.
Press the VOL (+) or
(-) buttons. The
VOLUME indicator
should appearat the
bottom of the screen.
If the VOLUME . o
LIMIT control is
turned on (see
below), the TV
sound cannot be
adjusted beyond its
currentsettings (for
example IS---- 25).
Remember,
the VOLUME
LIMIT control (when
ON) will not allow
TV sound _ exceed
the set VOLUME
level. (See VOL-
LIME control section
shown above.)
Page 18

m
Vou can view the playback of
J- VCR tapes (I,_deo Disc
Players, camcorders, etc). by
using the AUDIO and VIDEO
INPUTjack, s (on the rear of the
TV).
For example: to view the play-
back of a VCR tape:
<_ Connect the VIDEO and
AUDIO IN(put) jacks on the "IV
to the AUDIO and VIDEO
OUT(put) jacks on the VCR.
Press the MENU (M)
button
on the remote, then press the CH
(+) or (-) buttons to scroll the on-
screen menu until the word
INPUT appears within the high-
light box.
Note: You can press the CHAN-
NEL &V buttons to select
"EXTI."
<_ Press the button select
(+)
to
the EXTI inputs on the rear of
the TV.
<_ 'l'urn the VCR ON and PLAY
the VCR tape to be viewed on the
TV. _ •
the EXTI
INPUT jacks,returnthe INPUT
to TUNER. If you leave the TV in
the EXT1 INPUT mode and there
is no signal source connected to
the jacks, you will be seeing only
a blank screen on the TV.
NOTE: If you have a mono (sin-
gle audio OUTPUT) VCR, "Y"
Connectors are available (from
your dealer or Parts Information
Center 1 g00 292-6066) to con-
nect to the audio inputs on the TV.
PICTURE AND SOUND FROM
pLAYBACK OF VCR TAPE
AVL ON
VOLUMEUMIT ON
I,. rr m 11
8LIEEPTIMER OFF
calm tocg t,
_A_ fowls
CC SLEEP
O0
RCA PHONO
PLUGCABLES
(NOTSUPPLIED)
VCR
(EQUIPPED WITH VIDEO AND
AUDIO OUTPUT JACKS)
Pressing the GAME button on the remote will
switch to the Audio/Videe Inputs atthe back of the
TM.
When the GAME buttonis pressed, a"GAMES 1"
on-screen display will appearto indicate the mode
has been selected.
NOTE: The GAME button on the remote will only
work with select models. Your model may or may
not contain this feature.
18
Page 19

please make these simple
checks before calling for ser-
vice. These tips can save you
time and money since charges for
TV installation and adjustment of
customer controls are not cov-
ered under your warranty.
No Power
No Sound
Rem
Wor____k
TV Displays Wron2
Channel or No
Chann ! Abov 13
CAUTION: A video source (such as a video game, Compact Disc Interactive - CDI, or
TV information channel) which shows a constant non-moving pattern on the TV screen,
can cause picture tube damage. When your TV is continuously used with such a source
the pattern of the non-moving portion of the game (CDI, etc.) could leave an image
permanently on the picture tube. When not in use, turnthe video source OFF.
Regularly alternate the use of such video sources with normal 'IV viewing.
i Check the TV power cord. Unplug the TV, wait 10 seconds, then reinsert plug into ]
outlet and push POWER button again.
ICheck to be sure outlet is not on a wall switch,
• Check antenna connections. Are they properly secured to the TV's ANT/CABLE plug ?_
• Check the TUNING ANTENNA/CABLE control for correct position.
I
• Check INPUT control for correct position. The EXT 1 position without a signal
source will result in a blank screen.
]_ heck the VOLUME buttons.
Check VOLUME LIMIT control.
Check the MUTE button on the remote control.
If attempting auxiliary equipment hook-ups, check audio jack connections.
I
Check batteries. Replace with AAA Heavy Duty (Zinc Chloride) or Alkaline batteries
if necessary.
Clean the remote and the remote sensor window on the 'IV.
Check the TV power cord. Unplug the 'IV, wait 10 seconds, then reinsert plug into
outlet and push POWER button again.
Check to be sure TV outlet is not on a wall switch.
Repeat channel selection. ]
Add desired channel numbers (CHANNEL EDIT control) into "IVmemory.
Check TUNING ANTENNA/CABLE control for correct position.
This TV is equipped with protective circuitry that shuts the 'IV off in case of moderate
power surges. Should this occur turn the TV back on by pressing the POWER button
once ortwice, or unplug (wait 10 seconds) and then replug the power cord at the AC
Ioutlet. This feature is NOT designed to prevent damage due to high power surges such
as those caused by lightning, which is not covered by your warranty.
• To avoid possible shock hazard be sure the TV is unplugged from the electrical outlet before cleaning.
• When cleaning the TV screen take care not to scratch or damage the screen surface (avoid wearing jewelry or using
anything abrasive). Wipe the front screen with a clean cloth dampened with water. Use even, easy, vertical strokes when
cleaning.
• Gently wipe the cabinet surfaces with a clean cloth or sponge dampened in a solution of cool clear water. Use a clean
dry cloth to dry the wiped surfaces.
• Occasionally vacuum the ventilation holes or slots in the cabinet back.
• Never use thinners, insecticide sprays, or other chemicals on or near the cabinet, as they might cause permanent marring
of the cabinet finish.
19
Page 20

Round Cable 7512 * A single solid antenna wire normally
matched with a metal plug (F-type) end connector that screws (or
pushes) directly onto a 75 Ohm input found on the Television or
VCR. (Also known as Coaxial Cable.)
Closed Caption * Broadcast standard which allows you to read
the voice content of television programs on the TV screen.
Designed to help the hearing impaired this feature uses on-screen
"text boxes" to show dialogue and conversations while the TV pro-
gram is in progress.
Andio/V'gleo Inputs * Located on the rear of the 'IV these con-
nectors (RCA phono type plug) are used for the input of audio
and video signals. Designed for use with VCRs (or other acces-
sories) in order to receive higher picture resolution and offer sound
connection options.
On Screen Displays (OSD) * Refers to the wording or messages
generated by the television (or VCR) to help the user with specific
feature controls (color adjustment, programming, etc.).
Menu * An on-screen listing of feature controls shown on the
Television screen that are made available for user adjustments.
Multichannei Television Sound (MTS) * The broadcast standard
that allows for stereo sound to be transmitted with the TV picture.
Programming * The procedure of adding or deleting channel
numbers into the Television's memory circuits. In this way the
Television "remembers" only the locally available or desired
channel numbers and skips over any unwanted channel numbers.
Remote Sensor Window * A window or opening found on the
Television control panel through which infrared remote control
command signals are received.
Setup Mode * Automatic feature control settings made by the TV.
Designed for first time set-up and use. Settings for signal connec-
tions (antenna or cable 'IV), plus channel program memory are
held in the TV's memory (even if the set is unplugged and moved
to a new location.)
Status/Exit * Allows the user to quickly confirm what channel
number is currently being viewed. Status can also be used to clear
the Television of on screen displays or information (rather than
waiting for the displays to "time out" or automatically disappear
from the screen).
Twin Lead Wire * The more commonly used name for the two
strand 300 Ohm antenna wire used with many indoor and outdoor
antenna systems. In many eases this type of antenna wire requires
an additional adapter (or balun) in orderto connect to the 75 Ohm
Input terminals designed into the more recent Televisions and
VCRs.
211
Page 21

Accessories]Optional ............................................................................. 4, 5
Adapter Connector ................................................................................. 4, 5
Add/Delete Channels ................................................................................. 7
Alternate Channel .......................... :......................................................... l0
Artificial Intelligence (AI) ....................................................................... lI
Audio/Video Input Jacks .......................................................................... 18
Battery Installation ..................................................................................... 6
Cable TV Connections ............................................................................... 5
Channel Memory ....................................................................................... 7
Child Lock Control ............................................................................ 12, 13
Clock .......................................................................................................... 9
Closed Captioning. ..................................................................................... 8
Controls/IV ............................................................................................... 6
Controls]Remote ........................................................................................ 6
Features ...................................................................................................... 3
Glossary TV Terms .................................................................................. 20
. Input Control ............................................................................................ 18
inputs]Audio and Vidnn ........................................................................... 18
Language Option ........................................................................................ 7
Memory!i_"o_am Channels ....................................................................... 7
Menu Button .............................................................................................. 6
Message Control ...................................................................................... 14
Minns(-)/Plus (+) Buttons .......................................................................... 6
Picture Controls ................................................................................. 11, 15
Precautions/Safety ......................................................................... 2, 19, 24
Programming Channels .............................................................................. 7
Remote Control .......................................................................................... 6
Requesting Service ....................................................................... 19, 22-23
Round Cable 75fl .................................................................................. 4, 5
Safety/Precautions ......................................................................... 2, 19, 24
Set Up/First Time Use ........................................................................... 4-7
Sleep Timer ........................................................................... 2.................. 11
Smart Picture ............................................................................................ 15
Smart Sound ............................................................................................. 16
Surf........................................................................................................... 10
Status Button.............................................................................................. 6
'llps for Service ...................................................................... 19, 22-23, 24
VCPJTV Connections .......................................................................... 5, 18
Volume Control........................................................................................ 17
Volume Limit Control .............................................................................. 17
Warranty...................................................................................................24
Information contained in Quick-Use (Q/U) Guida-page listed.
21
Page 22

Philips Consumer Electronics Company
Factory Service Center Locations
• N..
NOTE:It you residein oneof our PhiiipsFactory ServiceBranchareas(seedirectoryonback),youcan contactthenearestServiceBranchto
obtainefficientandexpedientrepairforyour product.If yourproductis In-Warranty,you shouldhaveproof*of-purchaceto ensureNoCharge
Se,-vlca.ForOut-of-Warrantyservice,callthe locationnearestyou.
NOTA:Sivousr_sldezclansunedesr_gionsdosserviesparonesuccursaledeserviceaprelsventsdufabricautPhllips(volrlisteci-dessous),
voospourrezcontacterlabranchedeservicespr_sventelaplusprosdechezvouspourobtenirunserviceapr_svanterapideetefficaca.Sile
produitestsousparantie,ilsufflradepresenteruospreoved'achatpourb_n6ficierd'unservicesansfrais.Pourlesproduitsnor couvertsparla
garantie,contactez/ecentreleplusprosdechezvous.
NOTA:SiUd.resideanunadenoestraczonasparasucursalesPhillpsdeeervicioaldef_'tbrfca(vetdirecturiorn_saba'lo),Ud.puedecomunlcarse
conlasucursaldeservicion_s cereanaparaobtanerunareparaci6noportunay eficazdesuproducto.Sisuproductoest_todavlabajogaran-
tla,Ud.debepresentarcomprobantedecompraparanoocasionarningunoscargosporservicio.Pareserviciodespu_delvencimientodeta
garantia,JTameaJluoarrn_scarcanodelosab_loIndicados.
b_ramw
Howyoucanobtainefficientandexpedientcaay-ln,marl-in,orin-homeee_ca foryourproduct
PleasecontactPhilipsat 1-800-661-6162(Frenchspeaking)
1-800-363-7278(Englishspeaking)
/LGZWb
Commentobtanirleserviceapr_s-ventepourleaproduitsapport6souanvoy6sparlaposts:_notrecentredeserviceouleservice_ domicile
Veuillezcontacterphilips_: 1-800-661-6162(Francophone)
1-800-363-7278
C6rnorecibirservicioefficienteparasuproducto,enpersona,porcorreooa domidllo
FavordecomunicarseconPhilipsal: 1-800-661-6162(fmnc6fono)
1-800-363-7278(anglbfono)
22
Page 23

OLW.ilyCERVICEISASCL.O_EASYOUR11WEPlIO_!SmPLYLOOKOVIER1HEUSTBELOWFOR"IHENG_ @ AF_ S_ _
NEARYOU. YOURPRODUCTWILLRECEIVEEFFICIENTANDE)OI_])IENTCARRY-IN,MAR.-IN,ORIN-HOMESERVICE,ANDYOUWILLRECEIV!: PEACEOFMIND,
KNOWINGYOURPRODUCTISBEINGGIVENTHEE)ORERTAI"flENI"N)NOFPHlUPS' FACTORYSERVICE.AND, IFTIE PHONENUMBERLISTEDFORYOURAREA
ISLONGDISTANCE,CNJ.1-800-242-9225 FORFACTORYSERVICE.
COMMENTCOnENIRNOTRECERVIDEAPItS'#_NT1ENAPIOEET_FFICACEWITPARCOURRIER,ADOMICH.E,OUEllDEPP_SENTANTJ_UNCENTREDESERVICEPHIUPA.PLUSDEMOC_$
DEI_CEPTIONDEPROOUITSA RJ_ADERA TNAt_RSLIEPAYS:CONTACTIERLIECENTREDESERVICEAID(CONSOMMA1EODELEPLUSPROCDEPOURNAVOIRL'EMPLACEMENTDECESD_J_TS
DAN$ue NAYOMDE80A75MN.ES(M KMA120KM)eu CENTDEDEDEFIVICELOCAI-
C_IO COTEaERUNSERVICIOOPORTgNOY_ FORCORREO,ENCANA0 ENPERSONAPARASUPRCOUCTOATNA_$ DEUNCENTRePHILIPADESERV1CIO,MASDE600smos POR
TODOELPAlSPARALARECEPCIONDEPRODUCTOaSECESIIADO$DEDEPANACIONES:COMUNICARCECONELCENTRODEDERVICIODEFABPJCAMASCERCANOPAPAESTOSLUNARESDENTRO
DEUNNADIODEM A 12t I(M(M A 75MILLAS)DELCENTReSESERVICIOLDEAL
AHanth-AIImns-Macon-Chadlanonga,
TN--NorlhGeorgiaArea
200 NorthCobbParkway
Building100, Suite120
Marietta,GA 30062
(77O)795-0085
Chadotte.-WlnstonSalem-
Greensboro
520-G ClantonRoad
Charlotte,NC 28217
(704) 529-6330
Chicago-GaryArea
1360 W. HamiltonParkway
Itasca,IL 60143
(630) 775-0990
Cleveland-Akron-YoungstownAlto
950 KeynoteCircle
BrooklynHeights,OH 44131
(216) 741-3334
DetreitiToledoArea
25173 Dequindre
MadisonHeights,MI 48071
(810) 544-2110
Knoxvllle-Greenevllle-
TrlCHles-EastTennesseeArea
6700 D. PapermillRoad
PapermillPlaza
Knoxville,TN37919
(423) 584-6614
R. Myers-Naples-
SouthwestFloridaArea
11601 ClevelandAve.,Suite15
Ft.Myers,FL 33907
(941) 278-4242
Houstou-Galvsston-Beoumont-Anstln--
SanAntonioArea
1110NorthPostOakRoad
Suite100
Houston,TX 77055
(713)682-3990
MiamI-SouthoustFloridaArea
2099 W.AtlanticBlvd.
PompanoBeach,FL 33069
(954) 978-0467
NewYorkMetro Area
116 CharlotteAvenue
Hicksville,NY 11801
(516) 933-1780 NassauCounty
Phlladolphla/S.NewJerseyArea
352 DunksFerryRoad
Bensalem,PA 19020
(215) 638-7500
Pittsburgh,PA-Stoubenvllle,OH,,-
Whoullng/_rgantewn, WVArea
2891 BanksvilleRoad
Pittsburgh, PA15216
(412) 563-8020
SanFrenclsso-Oakland-SanJoseArea
681 EastBrokawRd.
SanJose,CA 95131
(408) 436-8566
Seattle-Tacoma/OlympiaArea
1055AndoverParkEast
Tukwila,WA98188
(206) 575-6288
Tampa-St.Petersburg-SamsotaArea
CenterPointBusinessPark,BuildingB-l,
Suite100
1911 U.S.Hwy.301 North
Tampa,FL 33619
(813) 621-8181
23
Page 24

COLOR TELEVISION
90 Days Free Labor
One Year Free Replacement of Parts (Two Years Free Replacement on Color Picture Tube)
This product must be carried in for service.
WHO IS COVERED?
You musthaveproof of purchaseto receivewarranty servic_ A seles
receipt or other document showingthat you purchasedthe product is
consideredproof of purchase_
WHAT IS COVERED?
Warranty coveragebeginsshe dayyou buyyour product. For90
thereafter,all parts will be repaired or replaced free, and labor isfree.
From 90 daysto one year from the day of purchase, all partswill be
repaired or replaced _ but you payfor all laborcharge_ From one
to two yearshorn the day of purchase, yon pay for the replacement or
repair ofall parts except the picturetube, and for all labor charges.
After two yearsfrom she day of purchase, you payfor the replacement
or repair of all parts, andfor all labor charges.
All par_, includingrepaired andreplaced parts._e covered only for
the originalwarranty period. When the warranty on the product
expires,the warranty on all replaced and repaired parts alsoexpires.
WHAT IS EXCLUDED?
Your warranty does not cover.
• labor chargesfor installationor setup of the product,ad{ustmentof
customercontrolson the product, and installationon repair of
antenna systems outsideof she product.
• product repair and/or pars replacement becauseof misuse,ace|-
dent, unauthorizedrepair or other causenot within the control of
PhilipsConsumer ElectronicsCompany.
• reception problems causedby tignal conditionsor cameor antenna
systemsontside the unit.
• a product that requires modificationor adaptationto enableit to
operate in anycountry other shanthe conntry for which it was
designed,manufactured, approvedand/or authorized, or repair of
productsdamagedbythese modifications.
• incidentalor consequentialdamagesresultingfrom the product.
(Somestatesdo not a,ow the exclusionof incidentalor consequen-
tial damages,so the above exclusion may not applyto yon. This
includes,but is not limited to, prerecorded material,whether copy-
righted or not copyrighted.)
• a product usedfor commercialor in_tutional purposes.
WHERE IS SERVICE AVAILABLE?
Warranty service is availableinallcountrieswhere the product is offi-
ciallydistributedbyPhilip,;Consumer Bectronics Company. In coun-
tries where PhilipsConsumer BectronicsCompany doesnot distribute
she product,the localPhilipsserviceOrganization will attempt to pro-
vide service(althoughthere maybe a delayif the appropriate spare
parts and technical mannal(s)are not readily available).
HAKE SURE YOU KEEP...
Pleasekeepyour salesreceipt or other documentshowing proof of
purchase. Attach it to this owner's manualand keep both nearby.
Also keep the originalbox and packingmaterial in caseyonneed to
return your product.
BEFORE REQUESTING SERVICE...
Pleasecheck your owner's mannal beforerequestingservice.
Adjustmentsof the controls discussedthere may saveyou a service
call.
TO GET WARRANTY SERVICE IN U.SJ_,,
PUERTO RICO OR U.S. VIRGIN ISLANDS...
Contact a Phillpsfactory servicecenter (see enclosedlist)or autho-
rized servicecenter to arrangerepair.
(In U,S_., Puerto Rico and U.S.Virgin Islands,all implied warranties,
includingimplied warranties of merchantabilityandfitnessfor a partic-
ular purpose,are limitedin durationto the durationof this express
warranty. But.becausesomestatesdo not allow limitations on how
longan implied warranty may last,this limitationmaynot applyto
yon.)
TO GET WARRANTY SERVICE IN CANADA...
I_easecontactPhilipsat:
1-800-661-6162(FrenchSpeaking)
1-800-363-7278(EnglishSpeaking)
(In Canada,this warranty is givenin lieu of allother warranties, No
other warrantiesare expresseder implied,Mcluding anyimplied war-
raotlesof merchantabilityor fitnessfor a particular purpose. Philipsis
not I'_oleunder anycircumstancesfor any direct, indirect,special,inci-
dentalor consequentialdamages,howsoeverincurred, even if notified
of the possibilityof such damages.)
REMEMBER...
Pleaserecordthemodelandserialnumbersfoundonthe product
below. Also.pleaseflHont andmailyourwarrantyregistra'_ouau'd
promptJy.It willbeeasierfor usto notifyyonif necessary.
MODEL #
SERIAL#
Philips Service Company, P.O. Box SSS, Jefferson City, Tennessee 37760,- (423) 475-8869
IB7875-EO01 24
 Loading...