

Page 1
Page 2

Smart.Verysmart:
MAGNAVOX
Smart.Verysmart:
Congratulations on your purchas,
-and welcome to the "family!"
Dear MAGNAVOX product owner:
Thank you for your confidence in MAGNAVOX. You've selected one of the
best-built, best-backed products available today. And we'll do everything in
our power to keep you happy with your purchase for many years to come.
As a member of_he MAGNAVOX "family," you're entitled to protection by
one of the most comprehensive warranties and outstanding service
networks in the industry.
VVhat's more, your purchase guarantees you'll receive all the information
and special offers which you qualify for, plus easy access to accessories
from our convenient home shopping network.
And most important of all, you can count on our uncompromising
commitment to your total satisfaction.
All of this is our way of saying welcome-and thanks for investing in a
MAGNAVOX product.
Sincerely,
Robert Minkhorst
President and Chief Executive Officer
P.S. Remember, to get the most from your MAGNAVOX product,
you must return your Warranty Registration
Card within 10 days. So please mail it to us right now!
Page 3
Getting Started
Warning/Precautions .............................. 2-3
Antenna/Cable Connections ................... 4-5
VCR to TV Antenna Connections ............................. 5
Basic TV and Remote Control Operation .............. 6-7
On-Screen Features
How to Use On-Screen Feature Controls .8-9
,_'Setting the TV for Cable TV Operation............ 10
,0,Adding Channels in Memory (Automatically). 11
•O,Adding Channels in Memory (Manually) ......... 12
-_How to Set the "IV for Closed Captioning ....... 13
•¢,Using the TV Channel Reminder ...................... 14
<_Adjusting the TV Color .................................... 15
<_Using the On-Screen Language Option ............ 16
<_Using the TV Volume Bar Control .................. 17
Remote Cgntrol Operation
Using the Remote with the TV .................. 18
Setting the TV Sleep Timer Control ........................ i9
Infrared Remote Control which works your TV as
well as all on-screen feature controls.
Standard broadcast (VHF/UHI0 or Cable TV
(CATV) channel capability.
Closed Captioning which allows the viewer to read
TV program dialogue or voice conversations as on-
screen text.
Automatic Programming of channels for quick and
easy selection of favorite stations available in your
area.
On-Screen Features (in either English, French or
Spanish) which show helpful messages for setting of
TV controls (such as color adjustment, timer settings,
and channel memory.)
Sleep-Timer which automatically turns the TV OFF
at preset times.
_ General Information
Tips if Something Isn't Working .............. 20
Glossary of TV Terms ............................................. 21
Index ........................................................................ 22
Warranty .................................................................. 23
WARNING: TO PREVENT FIRE OR SHOCK
HAZARD DO NOT EXPOSE THIS UNIT TO
RAIN OR EXCESSIVE MOISTURE.
The Model and Serial Numbers are found on the
back of this TV set. Please record these numbers
and purchase date in the space below. Refer to
them whenever you ask your dealer about this TV
set.
Model No.-
Serial No.
Purchase Date
Please attach your sales receipt to this book and
keep it for future reference.
Copyright © 1994 Philips Consumer Electronics Company. All rights reserved.
3
Page 4

irst let's connect your Antenna
or Cable TV signal to your TV.
This will be easy since there is only
one 75_ antenna plug on the back
of your 73/- and that's where the
antenna goes.
<,,1,1,1_IF your antenna (or CABLE TV
signal) has a round cable (75 ohm)
with a metal prong (F-connector)
on the end, then you're ready to
connect it to the TV.
IF your antenna has flat twin-lead
wire (300ohm), you first need to
attach the antenna wires to the
screws on a 300 to 75 ohm adapter.
_' ,_ Push the round end of the
adapter (or cable) onto the
ANTENNA plug on the rear of the
TV. If the round end of the cable
connector is threaded, screw it
down tight.
Outdoor VHF/UHF Antenna
Twin Lead
Wire
l
B_kofTV
IIIIIIIIIIIIIIIi11111111
/
lllllll JJJJJJJ
!
Try it out. Press POWER to
turn the TV ON. Press the
CHANNEL UP button. You
should see local channels flash by.
Certain channel numbers have been
added to the TV's memory at the
factory. To set the TV to select
only the channel numbers in your
area, see page 11.
ir _,a_ _--. Remember. If the TV is
m.'_..-,-,-,-,-,-,-,l_connected to a Cable TV
(CATV) signal, be sure to set the
TV for that type signal (see page
10.) '1
To order any optional accessory
contact your dealer or call the toll-free
accessory ordering number
(1-800-292-6066):
UHF/VHF Combiner ........... SBV1133A0 I
75-300 Ohm Adapter ........... SBVI 113A01
300-75 Ohm Adapter .......... 483521827003
Indoor Dipole Antenna ....... 483530337001
_ 300 to 75_
Adapter
(483521827003)
r VHF/UHF Antenna
vy
Cable TV Signal
I. Insert ba._ of dipole antenna
into socket on back of TV.
2. Attach antenna wires to screws
on the adapter (300 to 75 ohm.)
3. Push the round end of the
adapler onto the "IV Antenna.
Round Cable
75.Q
Page 5
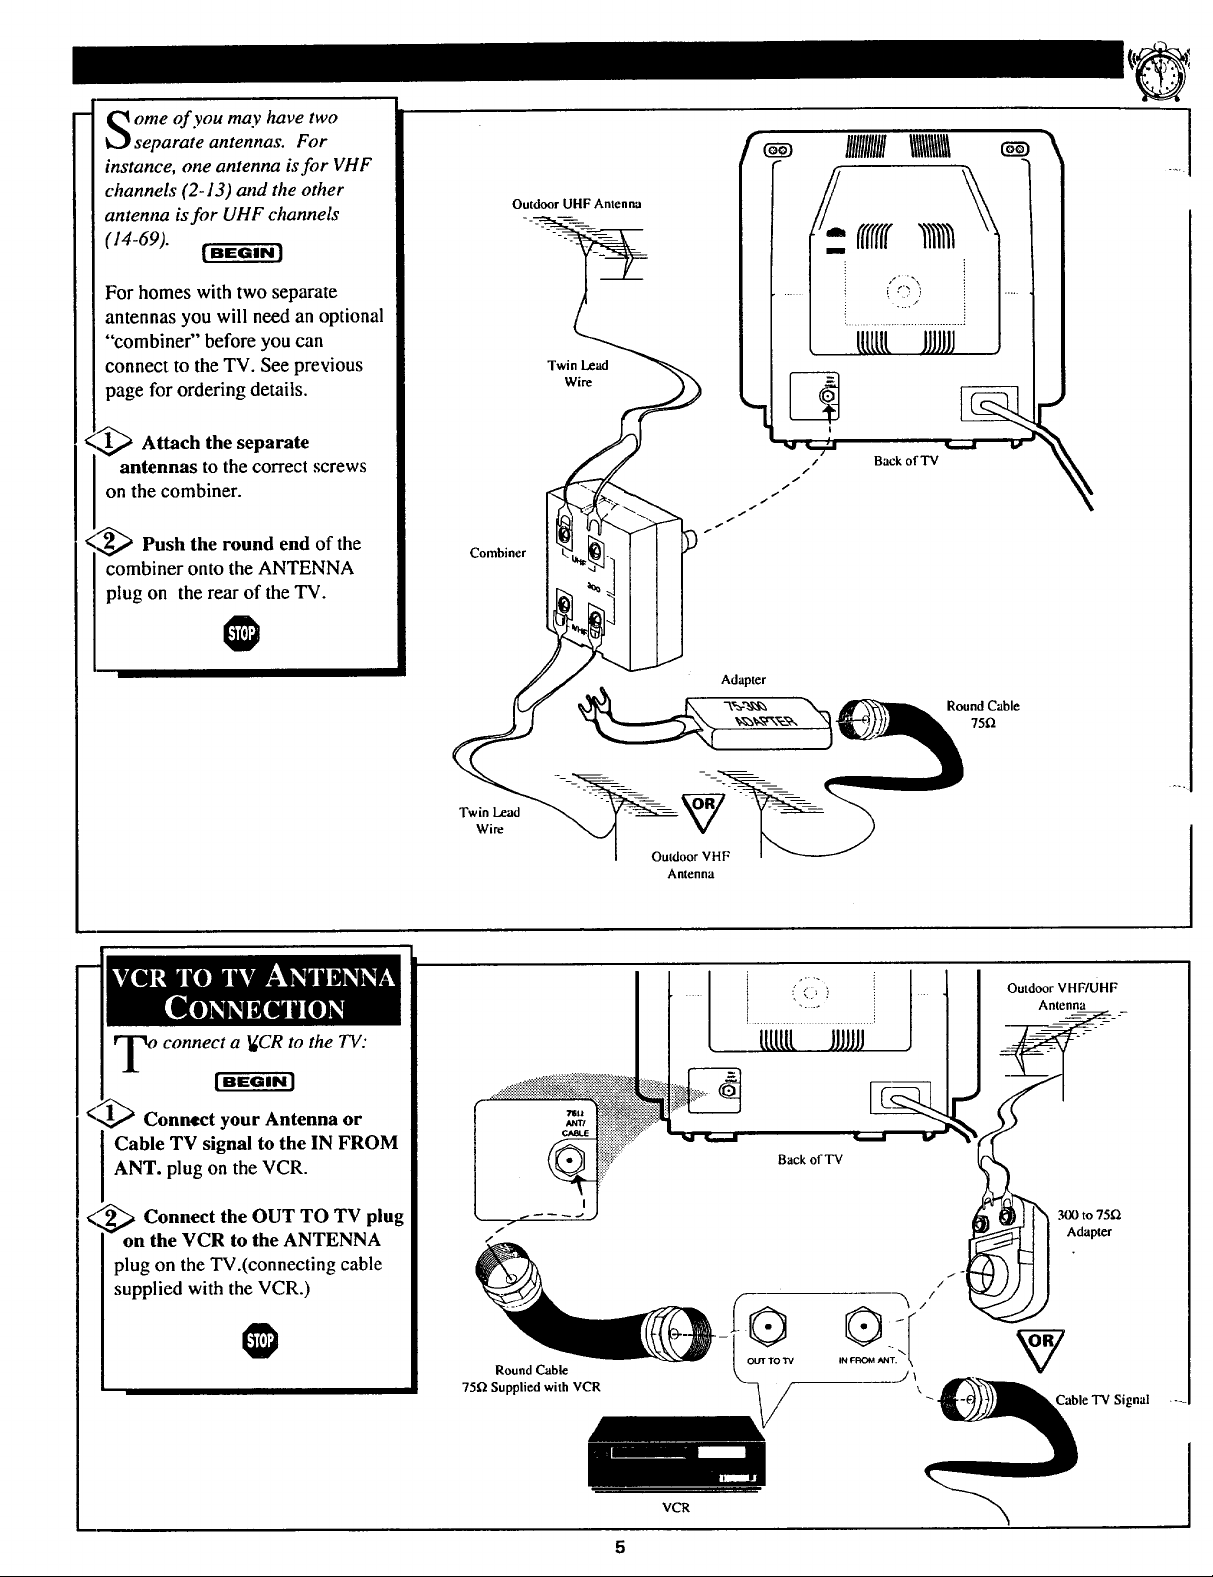
ome of you may have two
separate antennas. For
instance, one antenna is for VHF
channels (2-13) and the other
antenna is for UHF channels
(14-69).
|BEGIN|
For homes with two separate
antennas you will need an optional
"combiner" before you can
connect to the TV. See previous
page for ordering details.
_ Attach the separate
antennas to the correct screws
on the combiner.
Outdoor UHF Antenna
Twin Lead
Wire
_Push the round end of the
combiner onto the ANTENNA
plug on the rear of the TV.
o connect a _CR to the TV:
IBEGIN l
Connect your Antenna or
Cable TV signal to the IN FROM
ANT. plug on the VCR.
Combiner
Adapter
Round Cable
75f_
Twin Lead
Wire
Outdoor VHF
Antenna
Outdoor VHF/UHF
Antenna
Back of TV
<
2_ Connect the OUT TO TV plug
on the VCR to the ANTENNA
plug on the TV.(connecting cable
supplied with the VCR.)
Round Cable
75_ Supplied with VCR
to 75[2
Adapter
Cable TV Signal
VCR
Page 6
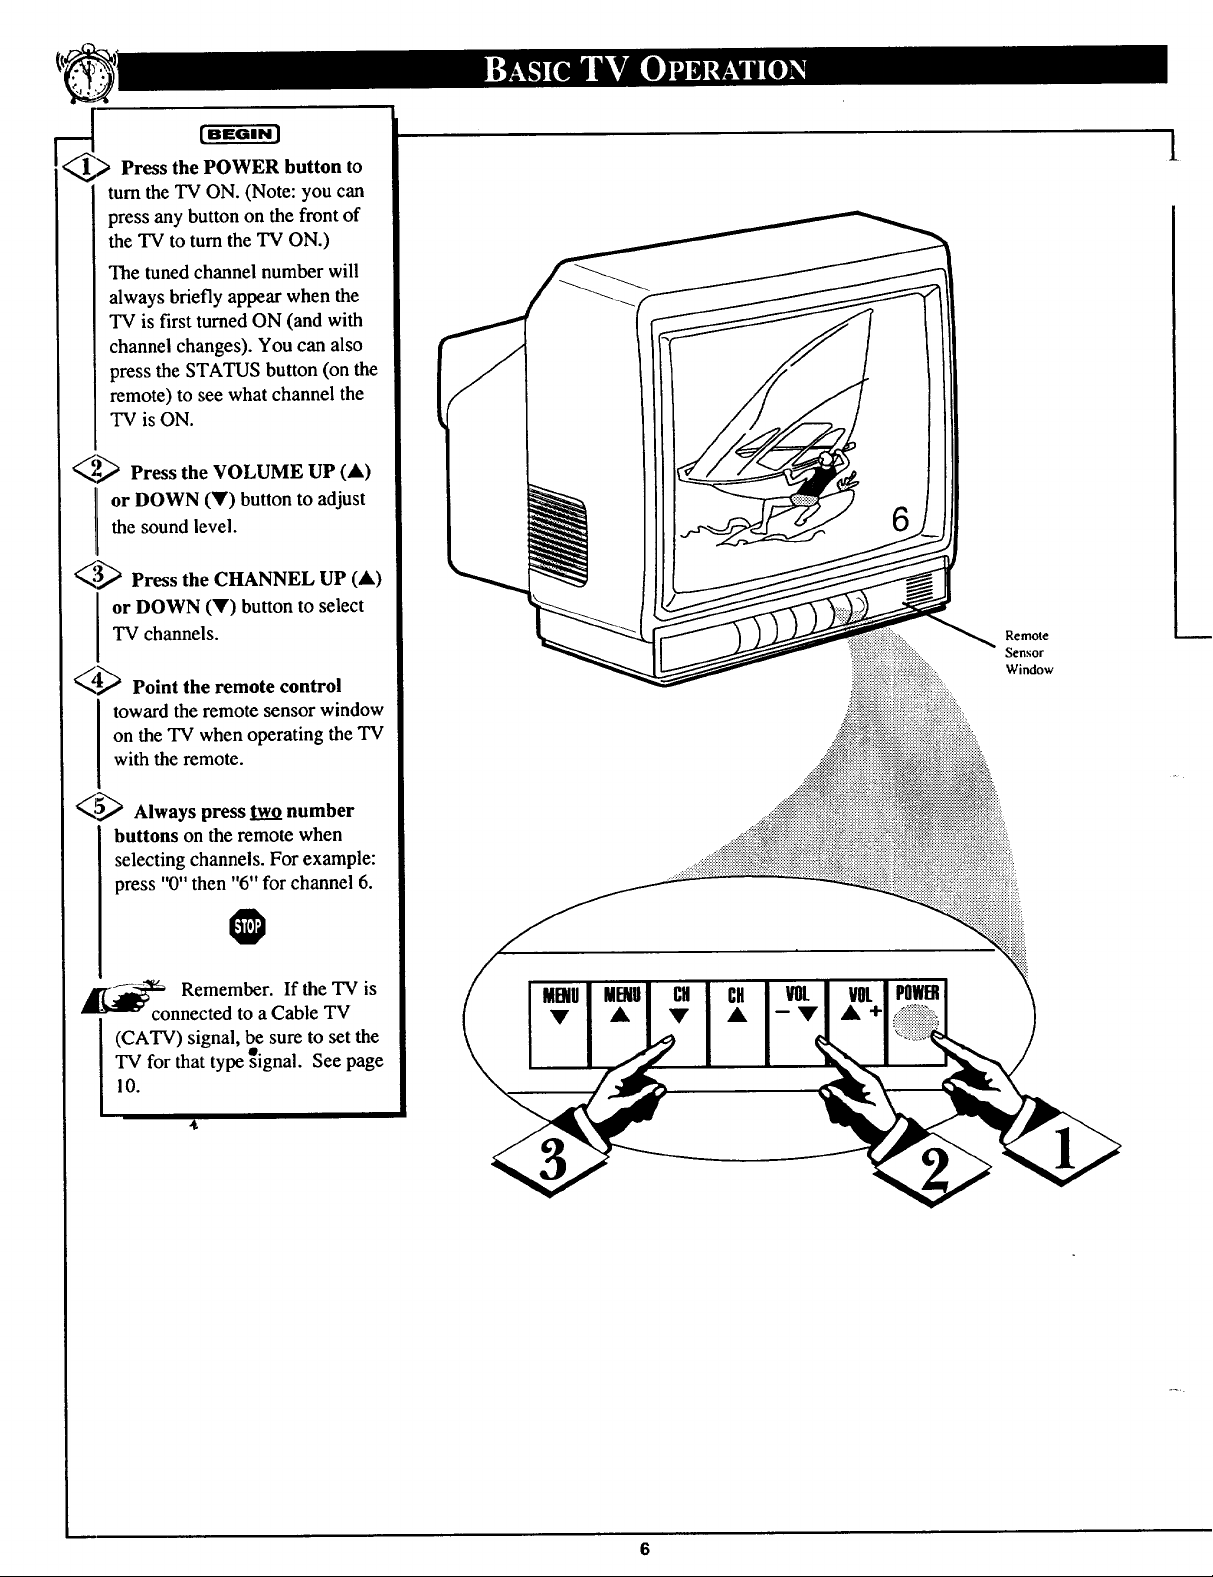
Press the POWER button to
turnthe TV ON. (Note: you can
press any button on the front of
the TV to turn the TV ON.)
The tuned channel number will
always briefly appear when the
TV is first turned ON (and with
channel changes). You can also
press the STATUS button (on the
remote) to see what channel the
TV is ON.
<,_._ Press the VOLUME UP (,it,)
or DOWN (Y) button to adjust
the sound level.
_.'},,,_ Press the CHANNEL UP (A)
or DOWN (Y) button to select
TV channels.
_t_ Point the remote control
toward the remote sensor window
on the "IV when operating the TV
with the remote.
1
Remote
Sensor
Window
_',.P_'_ Always press two number
buttons on the remote when
selecting channels. For example:
press "0" then "6" for channel 6.
O
_ Remember. If the TV is
nnected to a Cable TV
(CATV) signal, be sure to set the
TV for that type _ignal. See page
10.
6
Page 7
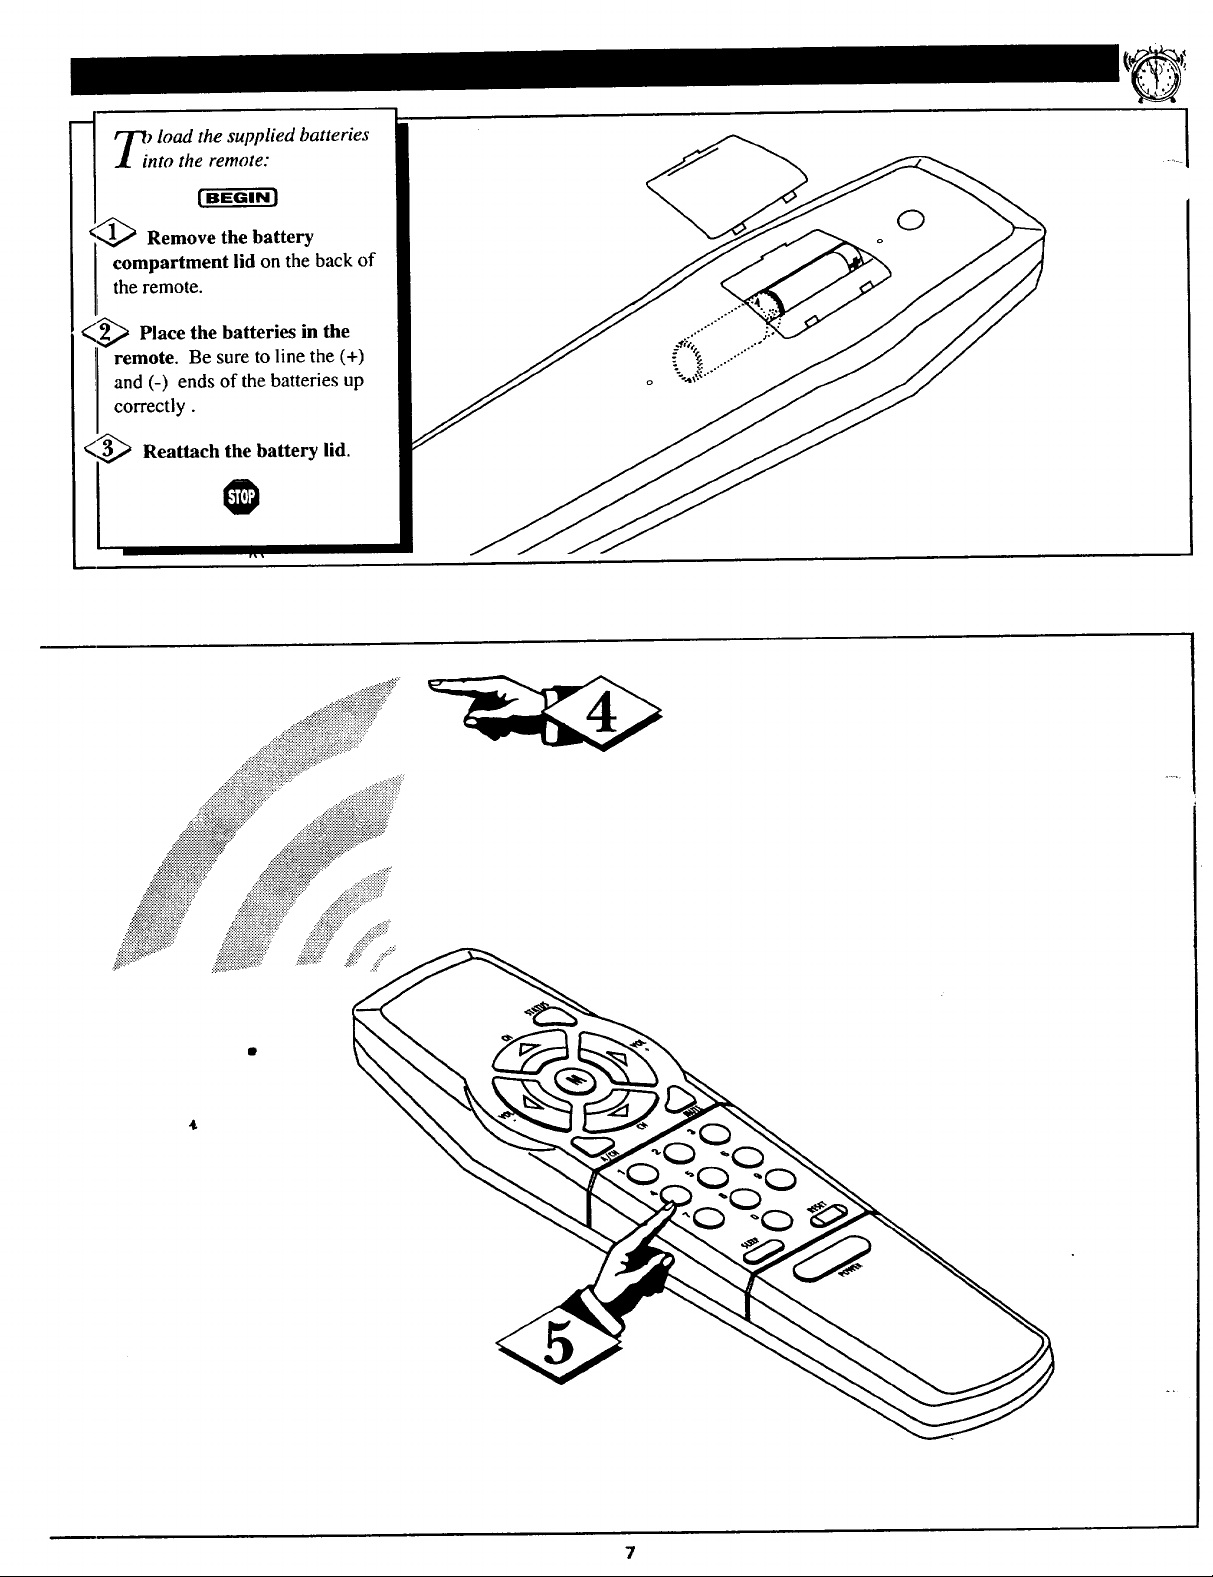
T._ load the supplied batteries
_J[ into the remote:
....... i
[ BEGIN J
_ Remove the battery
compartment lid on the back of
the remote.
,_ Place the batteries in the
remote. Be sure to line the (+)
and (-) ends of the batteries up
correctly.
,_ Reattach the battery lid.
.....:.::::i:i!:
......._:_i_iiii!iiiii!iiiiiii
\
©
===================================
Page 8

i
eatures for your TV can be
adjusted from a MENU screen
shown on the TV. A MENU is
nothing more than an on-screen
list of features. Each MENU item
can be adjusted by viewing the
screen and pressing a button.
_) Press MENU• or • on the
TV (or M button on the remote).
An on-screen list of features
appears on the TV screen.
_,) Press MENU • or • (or M •
• on the remote) to pick any of
the on-screen features.
IF you pass the feature you want,
you can press the M• button to
back up through the MENU.
(Press the Mg button to go down
through the MENU items).
Selection ARROW points to the active MENU I
item. An adjustment scale (or box) also shows
next to the _lected MENU item.
:, iiiiiiiiiiiiiiiiiiiiiiiiiiiiiiiii iiiiiiiiiiiiiiiiiiiiiii i T,,, ......
_:i_i_i_i_i_i;i_!_i_i_i!i_iiii!i!ii!ii_i_i_i_i_iii;;i_i!iii!i!_;_i_i_i_i_!;i_....
I
Press (+) or (-) to adjust the
selected on-screen feature.
4_ Press STATUS button on the
remote to clear the screen after an
adjustment
V
Use the "MENU EXIT" item and
press "+ - ON" to clear the screen.
You can also just wait and after a
minute the MENU will drop from
the screen.
_-_. Remember. If the on screen
k
MEN!3tdisappears and you are
not finished working with it, just
press MENU (or M button) and
the feature list will return to the
screen.
ON TI-IE _ONTHE
TELEVISION V FIEkN_E
8
Page 9

n-screen features that come
with your TV:
Six MENU items will show
on the TV screen at one time.
An ARROW will point to the
active item.
• Just press MENU • or•
buttons to move up or down
through the MENU item list.
Note: If you continue to press
the MENU • button after the
last ("EXIT MENU") item,
you will start again at the
beginning of menu item list.
This also works in the
opposite direction.
• See the following section for
details on how to work each
MENU item.
BRIGHT
PICTURE
COLOR
TINT
SHARP
CABLE
PROGRAM
CHANNEL
SLEEP
REMINDER
CAPTION
VOL. BAR
LANGUAGE
EXIT MENU
.,,:::.:.::.::
Page 10

_t TV is set to pick up either
Cable TV stations or Antenna
signals. In other words, the TV
needs to know whether you have
connected a Cable TV signal or a
normal antenna to its ANTENNA
)Vou need to make sure that the
plug.
[BEGIN I
Press MENU • or • on the
TV (or on the remote press M
button and then M AM buttons.)
Select the word CABLE with the
TV's on-screen Arrow.
K,_ Press the (+) or (-) buttons
(on the TV or the remote) to select
either:.
[
f
-,q
YES-
If you DO have Cable TV
connected to the TV.
Channels 1-125 can be
selected.
NO-
If you have an Antenna
connected to the TV.
Channels 2-69 can be
selected.
_,"i,_ Press STATUS to clear the
screen
V
Wait for the on-screen control
to automatically drop from the
screen.
Try it out. Pr(_ss CHANNEL
• buttons and scan the
n channels. CH•V on the remote
I works only after STATUS button
_iii!iiiiiiiiiiiiiiiiii!iiiiii!t
:.:.:.::::.:
::ii_ili_iii_!_!_i_iiiiiiiii_iiiiiii_iii_i!iiiiiii!i_i_iiiiiii!ii_.
.iiiiiiii)i!iii%iiiiiiiiiiiiiiiiiiiiiiiiiiiiiiiiii?iiii?iii
::!:i::::::i'ii:ii:ii:iiiililililili:isiss_i_i_i_i_i:i_ili_isi_ililili_
::_iiiiiiiiiii)iiiiiiiii}i_!:i_i_i_i_i_i_i_i_i_!_i!:_!:iiii!;iii_iiiiiiii!iiiiiiiiiiiiii_:
........ : :iiiiiiii%iiii iiii ii)iiiiiiiiiii iiii) iiiiiiii ii!i iiii i iii iiiiiiiiiiii iiiiiiiiiiiiiiiiiiiiiiiiiiiiiiiii
'o'ob
is pressed (or Menu times out.)
_ Remember. The TV has
n
bee set at the factory to
select certain channel numbers.
See the following page on how to
set the TV to select the channels
in your area.
10
Page 11

our TV can automatically set
tself for local area (or Cable
TV) channels. This makes it easy
for you to select only the TV
stations in your area when the
CH(annel) • • buttons are
Pressed.
Please check and be sure the TV is
set for the type of signal you have
connected to the TV - Antenna or
Cable TV (see previous page.)
[BEGIN]
<lx_ Press MENU • or • on the
TV (or on the remote press M
button and then M AY buttons.)
Select the word PROGRAM with
the TV's on-screen Arrow.
<2,_ Press the (+) button (on
the
I TV or the remote) to PROGRAM.
</3@ Press the (+) button again to
start the TV search for area
channels.
Flashing channel numbers will
count upward on the screen as the
TV looks for channels to "ADD".
You may press any button (on the
TV or remote) to stop the channel
search at any time. When the
channel search is completed the
TV will return to the last viewed
channel.
"RED" channe rmm_rs have been
added to the
"WHITE" ch_i humeri:are _t
present inthe _!_ progra_i_.
+TO
AUTO PROGRAM
CHARNELS
_]
<_ Press STATUS button to clear
the screen
_,_Try it_ut. Press CHANNEL
_k"t A• buttons and see which
I
I channels have been added.
_ Remember. If want to
you
dropany unwanted channels
from the TV's memory, see the
next page on how to "Manually"
add and delete channels.
Note: As the TV searches for
channels to "ADD" into memory
the on-screen display may move
(or jitter slightly). This is normal
operation and does not indicate a
need for service.
The "IV tureen will be blocked off
until the search for channels is
done.
11
Page 12

A uto Programming (see
l"-]kprevious page) adds all the
channels it can find (on your
Antenna or Cable TV system) into
the TV's memory. Add/Delete
,Channels makes it easy for you to
add other channels, or drop
unwanted channels, from the list
of channels in the TV's memory.
[BEGINI
Press MENU • or • on the
TV (or on the remote press M
button and then M •• buttons.)
Select the word CHANNEL with
the TV's on-screen Arrow.
,_ Press CHANNEL NUMBER
buttons on the remote (or CH •
• buttons on the TV) to select the
channel you want to SAVE (or
DELETE.)
_,' _ Press (+) button to SAVE the
selected channel number into
12
ii_iiiiiiiiiiiiiiiiiiiiiiiiiiiii:
:iiiiiiiiiiii!i!!;i!ilililiiiiiiiiiiiil)i ,
:,,iiiiiiiiiiiiiii;iiiii iiii',iiiiiiiiiiiiii?iiii!iiiiiiii ,
memory.
Press (-) button to DELETE a
channel from memory.
Press the STATUS to
clear the screen after adding all the
channels you want.
button
@
Try it out. Press the
CHANNEL• Or • buttons
and "scan" from channel to
channel. The channels you
SAVED sl_ould appear. The
channels you DELETED should
not appear.
_[_._ssARemember. If need to
channel above !00, use the
CHA• buttons at the TV. The
remote control number buttons can
select only up to channel 99.
VE (or DELETE) a
you
12
Page 13

m. f'_losed Captioning allows you to
read the voice content of
television programs on the TV
screen. Designed to help the
hearing impaired this feature uses
on-screen "text boxes" to show
dialogue and conversations while
the TV program is in progress.
( BEGIN l
_,_ Press MENU • or • on the
TV (or on the remote press M
button and then M A• buttons.)
Select the word CAPTION with the
TV's on-screen Arrow.
f
_ _ Press (+) or (-) buttons to select
the desired Closed Caption (CC)
mode - For Example: CAPTION !.
CAPTION 1, 2, 3, or 4 mode:
dialogue (and descriptions)
for the action on the captioned
TV program shows on-screen.
(See important note on this
page.)
TEXT 1, 2, 3, or 4 mode:
often used for channel guide,
schedules, or bulletin board
information for CC programs.
NOTE: Not all TV programs and product commercials are made for broadcast
with Closed Caption (CC) information included. Neither are all Closed Caption
modes (CAPTION 1-4, or TEXT 1-4)) necessarily being used by a broadcast
station during the transmission of aclosed caption program. Refer to your area's
TV program listings for the stations and times of Closed Caption shows.
CAPTION mode
Example Display
<,,_ Press the STATUS button
making your Caption mode
selection. The TV display will clear
and the selected Caption mode will
be active.
To cancel, set the CAPTION
feature to OFF when finished
viewing. •
O
4
_ta Remember. Broadcast
tions will often use spelling
abbreviations, symbols, dropouts
and other grammatical shortcuts in
order to keep pace with the on-
screen action. These type factors
vary upon the source of the
captioned text material anddo not
indicate a need for service on the
part of the TV.
after
TEXT mode
Example Di_lay
TV .screen will be blocked from viewing
13
Page 14

.t selected program can remain
on the TV screen by using the
REMINDER feature.
I r'_e channel number for a
L
1_ Press MENU • or on
TV (or on the remote press M
button and then M _kY buttons.)
Select the word REMINDER with
the TV's on-screen Arrow.
2_ Press (+) or (-) button to turn
I REMINDER ON.
$_,_ Press STATUS button to
clear the screen.
You should now see the channel
number at the bottom of the
screen.
Remember. If Closed
Captioning is ON, neither the
Channel Reminder or the
"MUTE" sound indicator will
show on the TV screen.
the
::::::+: :
14
Page 15

!
---_ r-_o adjust your TV color and
1 picture controls, select a channel
and follow the steps shown below:
[
<_-_ Press MENU • or • on the TV
(or on the remote press M button and
then M •• buttons) until the
desired control shows on-screen.
.....
<_ Press (+) and (-) to adjust
selected color control.
<_-_ Press STATUS button (or EXIT
v
Menu) to clear the screen when
picture adjustments are completed.
A_ _ Remember. When the bar
m scale is centered, the control
settings are at normal mid-range
levels.
I]]_I:II_LF._ Press (-) or (+)
until whitest parts of the picture are
as bright as you prefer.
PICTURE Press (-) or (+) until
darkparts of the picture show good
detail.
COLOR Press (-) or (+) to add or
eliminate color.
TINT Press (-) or (+) to obtain
natural skin tones.
the
Press (-) or (+) to
improve detail in the picture.
15
Page 16

Oprour French and Spanish
-I
i
eaking TV owners an on-
screen LANGUAGE option is
present. With the LANGUAGE
control you can set the TV's on-
screen features to be shown in
either English, French, or Spanish
text.
F-fiwar
Press MENU • or • on the
TV (or on the remote press M
button and then M •• buttons.)
Select the word LANGUAGE
with the TV's on-screen Arrow.
1
(_ Press (+) or (-)
select either the English, French
(FRANCAIS), or Spanish
(ESPANOL) language option.
Text for the on-screen Menu will
change to the selected language.
@ Press STATUS to
screen.
buttons to
clear the
0
_co Remember. The Language
ntrol only makes the TV's
on-screen (MENU) items appear
in French or Spanish text. It does
not change the language of other
on-screen text features such as
Closed Captioned (CC) TV shows.
iiiii!iiiiiiiii!_!iiiiii!,i_,_
_ii!iii!iiiiiiiiiiii!i!iiiiiiiiiiiiiii!iii_
ii iiiiiiiiiiiiiiii!iiii!iiiiii!i!iiiiii!iiiiiiiiiii
,,_ili!iiiiiii_iiiiiiiiiii!iiiiiiiiiiiii!iii!iiiiiiiii!iiiiiiiiiii_
....!iiii!!iiii!iiiiiiiiiii!iii!i!iiiiii!iiiiiiiii!!!i!ii!!!iiiiii!iii!!!ili!i_
4_
16
Page 17

U_h e the Volume Bar control to see
e TV's volume level settings
on the TV screen. Once set the
Volume Bar will be seen each time
the VOLUME buttons (on the TV or
remote) are pressed.
[-a-_aFa3
J_
_,1_ Press MENU • or • on the TV
(oron the remotepress M buttonand
then M •V buttons.)
Select the word VOL.BAR with the
TV's on-screen Arrow.
1
_._ Press (+) or (-) buttons to turn
I the VOL BAR control ON.
<_ Press STATUS button to clear
the screen.
@
,_Try it out. Press the VOL••
buttons. The VOLUME BAR
I should appear at the bottom of the
screen.
(1"1"1:1"1"1"t"13i]
"obb .......................
b b b
17
Page 18

fter installing the batteries
into the remote, point the
remote toward the front of the TV
(remote sensor window) when
pressing buttons.
Channel Scan Buttons
Press to scan up (•) or down (V)
th:rough channel numbers.
Vplume (-.+) Buttons
Press to increase (VOL+) or decrease
(VOL-) the "IV sound level.
Alternate Channel Button
Press to select the previously viewed
channel.
For example: You are watching
channel 4 and change to channel I0
(using the channel number buttons).
Press A/CH and your TV will return
tc channel 4. Press A/CH again and
your "IV will return to channel I0.
I STATUS
OI
CH
MUTt
St;_tus Button
Press to see the current channel
number on the "IV screen. Also press
:hisbutton to clear the screen after
control adjustments.
Menu (&V) Buttons
Press the M button to display on-
screen feature controls. Press • or •
buttons to move forward and
backward through the list of on-
screen controls.
I
-(+) _nd (-) Buttons
Press to adjust the selected on-screen
feature control.
Mute Button
Press to turn the sound OFF on the
TV. Press again to retum the sound
to its previous level.
Number Buttons
Press the number buttons to select TV
channels. Press two number buttons to
select channels. For example: to select
channel 6...press "0"first and then
"6".
Sleep Timer Button
Set the TV to automatically turn itself
OFF. See Sleep Timer section for
details.
4t
The Menu (M) button controls
how certain buttons on the remote
are used.
When the M button is pressed:
the MENU, (M)AV, and (+,-)
buttons are used to select and
adjust on-screen TV features.
During normal TV viewing :
the buttons that surround the
Menu button are used to select
CH(annels) and adjust the TV
VOL(ume.)
( )
POWER
i
:iiii!%iii!iiiiiiiiiiiiiiiiii!ili r_ c_-_nt_
Reset Button
, Press to return the TV to certain
factory set levels for picture and colo
controls.
Power Button
Press to turn the TV ON and OFF.
....._:_i_iiiiii::i:ii ++ ...........
18
Page 19

aVe you ever fallen asleep in
ont of the TV only to have
it wake you up at two in the
morning with a test pattern
screeching in your ears? Well,
your TV can save you all that
trouble by automatically turning
itself off.
_,,1_ Press the SLEEP button on
the remote (or MENUAV
button on the TV) to select the
SLEEP TIMER.
_--.._ Press the SLEEP button
repeatedly (or +, - buttons on the
TV) to pick the amount of time
(15 minutes to 2 hours ahead)
before the TV will turn itself off.
If you pass up the time setting
you want, just keep pressing the
SLEEP button and the desired
time will come around again.
",,_,_,_ Press the STATUS button to
clear the screen after you have set
the time for the TV to turn off.
:iiiiiiiiiiiiiiiiiiiiii!!iiiiiiiiiiii_i
....iiiiiiii%iii%!iiiii!iiiiiiiiiiiiiiiiiiiiiiiiiiiiiiiiiiiiiiiiiii_
......_;iiiiiiiiiiiiiii%iiiiiiiiiiiii!i_!i_iiiiiiiii%iiiiiiiii%iiiiiiiii_
......._,_iiiiiiiiiiiii_iiiiiii:_i_iiiiii_!iiii_ii_iii!;iii;iiiiii_iiiiiiiiii_iiiiii_ii_!_i_iii_i_iiii_i_i_ii_iiii_i:
0
Remember. If you ever
ant to see how many
minutes are left before the TV
shuts itself off, press the SLEEP
(or STATUS) button on the
remote.
If you want to st_p a SLEEP
TIMER setting, reset the timer
back to OFF. You could also turn
the TV off, and then back on
again, to cancel a setting.
A few seconds before the TV is to
shut off a message will come on
the screen telling you GOOD
NIGHT.
19
Page 20

lease make these simple
checks before calling for
service. These tips can save you
time and money since charges for
TV installation and adjustment of
customer controls are not
covered under your warranty.
CAUTION: A video source (such as a video game, Compact Disc Interactive - CDI, or I
TV information channel) which shows a constant non-moving pattern on the TV screen, 1
can cause picture tube damage. When your TV is continuously used with such a sourc
the pattern of the non-moving portion of the game (CDI, etc.) could leave an image
permanently on the picture tube. When not in use, turn the video source OFF. [
Regularly alternate the use of such video sources with normal TV viewing.
I
I
NOPower
No Picture
NO Sound
Remote Does Not
Work
and push POWER button again.
i heck the TV power cord. Unplug the TV, wait 1 minute, then reinsert plug into outlet
Check to be sure outlet is not on a wall switch.
antenna plug on the TV?
Check the CABLE/YES NO control for correct position.
Check antenna connections on the rear of the TV. Are they properly secured to the
Check the VOLUME buttons.
Check the MUTE button on the remote control.
Check batteries. Replace with two Heavy Duty (Zinc Chloride) or Alkaline AAA
batteries if necessary.
Clean the remote and the remote sensor window on the TV.
I
i
i
TV Displays Wrone
Channel QrNO
Add desired channel numbers (CHANNELS control) into TV memory.
i Repeat channel selection.
Check CABLE/ YES NO control for correct position.
Charmels Above 13
This TV is equipped with protective circuitry that shuts the TV off in case of moderate
power surges. Should this occur turn the TV back on by pressing the POWER button I
once or twice, or unplug and then replug the power cord at the AC outlet. I
This feature is NOT designed to prevent damage due to high power surges such as those
caused by lightning, which is not covered by your warranty.
Cleaning and Care
• To avoid possible shock hazard be sure the TV is unplugged from the electrical outlet before cleaning.
• When cleaning the TV screen take care not to scratch or damage the screen surface (avoid wearing jewelry or using
anything abrasive). Wipe the front screen with a clean cloth dampened with water. Use even, easy, vertical strokes when
cleaning.
• Gently wipe the cabinet surfaces with a clean cloth or sponge dampened in a solution of cool clear water and a mild soa"
or detergent. Use a clean dry cloth to dry the wiped surfaces.
• Occasionally vacuum the ventilation holes or slots in the cabinet back.
• Never use thinners, insecticide sprays, or other chemicals on or near the cabinet, as they might cause permanent marring
of the cabinet finish.
20
Page 21

Coaxial Cable * A single solid antenna wire normally matched
with a metal plug (F-type) end connector that screws (or pushes)
directly onto a 75 Ohm input found on the Television or VCR.
Remote Sensor Window * A window or opening found on
the Television control panel through which infrared remote
control command signals are received.
Display * An on screen message or graphics that help the user
operate and adjust his Television feature controls. See On
Screen Displays (OSD).
On Screen Displays (OSD) * Refers to the wording or
messages generated by the television (or VCR) to help the user
with specific feature controls (color adjustment, programming,
etc.).
Menu * An on-screen listing of feature controls shown on the
Television screen that are made available for user adjustments.
Programming * The procedure of adding or deleting channel
numbers into the Television's memory circuits. In this way the
Television "remembers" only the locally available or desired
channel numbers and skips over any unwanted channel numbers.
Status * Allows the user to quickly confirm what channel
number is currently being viewed. Status can also be used to
clear the Television of on screen displays or information
(rather than waiting for the displays to "time out" or
automatically disappear from the screen).
Twin Lead Wire * The more commonly used name for the
two strand 300 Ohm antenna wire used with many indoor and
outdoor antenna systems. In many cases this type of antenna
wire requires an additional adapter (or balun) in order to
connect to the 75 Ohm Input terminals designed into the more
recent Televisions and VCRs.
21
Page 22

Accessories/Optional ........................................... ,................ 4, 5
Adapter Connector ................................................................ 4, 5
Add/Delete Channels ........................................................ 11, 12
FlatteryInstallation .................................................................... 7
(;able TV Connections/Settings ...................................... 4, 5, 10
Channel Display ................................................................. 6, 14
Channel Memory .............................................................. 11, 12
Channel Reminder .................................................................. 14
Closed Captioning .................................................................. 13
ControlsiTV .......................................................................... 6, 8
Controls/Remote ........................................................ 7, 9, 18-19
Features .............. ....................................................................... 3
Glossary/TV Terms ................................................................ 2!
Language Option .................................................................... 16
Memory/Program Channels .............................................. 11, 12
Menu Button ....................................................................... 8, 18
Minus(-)/Plus (+) Buttons ................................................... 8, 18
Precautions/Safety .............................................................. 3, 20
Programming Channels .................................................... 11, 12
Remote Control ......................................................... 7, 9, 18-1
Reset ....................................................................................... 18
Requesting Service ........................................................... i 8, 20
RF Coaxial Cable.................................................................. 4, 5
Reminder Channel .................................................................. 15
Safety/Precautions .............................................................. 3, 20
Sensor Remote .................................................................... 6, 18
Set Up/First Time Use .................................................. 4, 5, 6, 8
Sleep Timer............................................................................. 19
Status Button....................................................................... 8, 18
VCR/TV Connections ............................................................... 5
Tips for Service ....................................................................... 20
Volume Bar............................................................................. 17
Warranty................................................................................. 23
22
Page 23

LIMITED WARRANTY
Color Television
• 90 Day Carry-In Service Labor Warranty
• One (1) Year Exchange On Warranty Parts
• Two (2) Year Exchange Warranty on Color Picture Tube
This warranty gives you specific legal rights and you may have other rights which vary from state/province to state/province.
Parts and Labor During First 90 Days
For Ninety (90) Days from the date of purchase, a Factory
Se:rvice Center or an Authorized Service Center will repair any
pr(xtuct defect and replace any defective part, including the
picture tube without charge to you for parts or labor.
Replacement Parts After 90 Days
If within one (1) year - two (2) years for a picture tube- after the
date of purchase, a part is found defective and needs to be
replaced, a Factory Service Center or an Authorized Service
Center will supply to you a new or, at our option, rebuilt part
without charge to you for the replacement part. After 90 days
from the date of purchase, you must pay for all labor,
transportation, and service charges. Replacement parts and picture
tubes installed during the TV warranty period are warranted only
for the balance of the original TV warranty period.
What the Purchaser Must Do
Before you call for service, check your operating instruction
booklet. A slight adjustment of the customer controls discussed
in your instruction booklet may save you a service call.
If you require service during the warranty period, you must take
your TV to a Factory Service Center or an Authorized Service
Center and pick it up after completion of service. The Service
Center must be allowed to keep defective parts. After the first 90
days of the warranty lleriod, the cost of service labor is your
responsibility.
YOU MUST PRESENT PROOF OF THE DATE ON WHICH
THE TV WAS FIRST PURCHASED (SALES RECEIPT OR
OTHER EVIDENCE) WHEN REQUESTING SERVICE OR
REPLACEMENT PART WARRANTY PERFORMANCE.
Warranty Exclusions
Your Warranty Does Not Cover:
Labor charges for set installation or set-up, adjustment of
customer or preference controls, and installation or repair of
antenna systems outside the TV set.
Product repair and/or part replacement because of misuse,
accident, unauthorized repair, or other cause not within the
control of Philips Consumer Electronics Company.
Reception problems caused by signal conditions or cable or
antenna systems outside the TV.
A television purchased, used or serviced outside the U.S.A.,
Canada, Puerto Rico, and the Virgin Islands, or used for
commercial or institutional purposes.
Incidental or consequential damages resulting from the product.
Some states/provinces do not allow the exclusion of incidental or
consequential damages, so the above exclusion may not apply to you.
ALL IMPLIED WARRANTIES INCLUDING IMPLIED
WARRANTIES OF MERCHANTABILITY AND FITNESS
FOR A PARTICULAR PURPOSE, ARE LIMITED IN
DURATION TO THE DURATION OF THIS EXPRESS
WARRANTY. Some states/provinces do not allow limitations
on how long an implied warranty lasts, so the above
limitation may not apply to you.
Warranty servj_cewill be performed by a Factory Service Center
or an Authorized Service Center. You may contact the nearest
Philips Factory Service Center (see the Factory Service Center
address directory supplied with your product literature) to obtain
both In and Out-of-Warranty repair for your product.
Pliease write your model and serial numbers below. The
numbers are located on the back of your unit. Please remember
to have these numbers on hand any time you call.
MODEL NO.
SERIAL NO.
IMPORTANT REMINDER
PLEASE FILL OUT AND MAIL YOUR WARRANTY REGIS-
TRATION CARD PROMPTLY. IT WILL BE EASIER FOR US
TO NOTIFY YOU IF IT SHOULD EVER BE REQUIRED.
IN U.S.A.:
IN CANADA:
23
Philips Service Company
P.O. Box 555
Jefferson City, TN 37760
(615) 475-8869
Montreal (514) 342-2043
5930 Cote de Liesse, Montreal, Quebec H4T I EI
Toronto (416) 754-6064
601 Milner Avenue, Scarborough, Ontario M 1B IM8
Vancouver (604) 435-4411
3695 Grandview Hwy., Vancouver, BC V5M 267
Page 24

"The Easy One"
"The Smart One"
Indoor Antenna _1
AK9000GY01
The Easy One:
The idcal sccondary rcmote for
your television. The Easy One is
preprogrammed to to operate
virtually all remote controlled TVs
and includes only the most u_d
commands: Volume Control,
Channel Change, ON/OFF, and
Mute.
AK9000GY01
Your Cost $16.95
Audio/Video Select
Power Switch
The Smart One:
Why use several mmotes when you
can have one remote that does il all?
The Smart One universal remote is
preprogrammed to operate most TVs,
VCRs, and cable boxes. It alsocan
"learn"to operate virtually any
infrared component suchasCD
Players, Audio Systems, and Satellite
Systems, etc. The Smart One allows
you to operate up to fivedifferent
components with one remote.
AK9033GY03
Your Cost $49.95
Two-Way Tape Rewinder
SBV2021A01
Indoor Color TV
Antenna with
Amplifier:
Solve your reception problems
with this Color TV Antenna with
built-in Amplifier. Features fully
directional telescoping VHF Rods
with 180 degree tilt, rotating UHF
Antenna, and 12 position Tuning
Control.
SBV2021A01
Your Cost $24.95
Surge Suppressor
I
SBA2010A01
Audio/Video Select
Switch Box:
With the convenience of the push
of a button, this Audio/Video
,,;electionallows you to choose
any one of Ibur diflk:rent
components without changing
complicated wires. It comes with
everything you need to get started
and has four .selector switches to
,selectthe desired viewing .source
(i.e., Television, VCR, Laser
Disc, or Satellite.)
SBA2010A01
Your Cost $39.95
Two-Way Tape
Rewinder and Fast
Forwarder:
Why wait to start the next
movie? This two-way, VHS tape
Rewinder/Fast Forwarder will
save you time as well as wear
and tearon your VCR. Features
a sec-thru, pop-up lid. built-in
tapecounter and power light to
indicate rewind or fast forward
function.
MAG9000
Your Cost $26.95
SRG9110 I
Surge Suppressor:
Protect your investment from
damaging power surges coming
through your cable or electrical
line. Features coaxial cable
input/output, six receptacles,
power light, and reset switch.
Plugs directly into wall outlet.
SRG9110
Your Cost $39.95
IB 6951-E001 24
MA02235
 Loading...