

Magnavox NP4620 Owner's Manual

NO
IMAGE
AVAI
SAFETYINSTRUCTIONS- Readbeforeoperatingequipment
Thisproductwasdesignedandmanufacturedtomeetstrictqualityand
safetystandards.Thereare,however,someinstallationandoperation
precautionswhichyoushouldbeparticularlyawareof.
1. ReadInstruction_- Allthesafetyandoperatinginstructionsshould
bereadbeforetheapplianceisoperated.
:_ Retain Instructions- Thesafetyandoperatinginstructionsshould
beretainedforfuturereference.
3. HeedWarnings- Allwarningsontheapplianceandintheoperating
instructionsshouldbeadheredto.
4. FollowInstructions- All operatinganduseinstructionsshouldbe
followed.
5. WaterandMoisture- Theapplianceshouldnotbeusednearwater
- for example,neara bathtub,washbowl,kitchensink,laundrytub,
ina wetbasementornearaswimmingpool,etc.
6. CartsandStands- Theapplianceshouldbeusedonlywitha cartor
standthatisrecommendedbythemanufacturer.
6A. _ Anapplianceandcartcombinationshouldbe moved
withcare.Quickstops, excessiveforce,and uneven
surfacesmaycausetheapplianceandcartcombination
tooverturn.
7. Wall or CeilingMounting- Theapplianceshouldbemountedtoa
wallorceilingonlyasrecommendedbythemanufacturer.
8. Ventilation- Theapplianceshouldbesituatedsothatitslocationor
positiondoesnotinterferewithitsproperventilation.Forexample,
theapplianceshouldnotbesituatedona bed,sofa,rug,or similar
surfacethatmay blocktheventilationopenings;or, placedina
built-ininstallation,suchasa bookcaseorcabinetthatmayimpede
theflowofairthroughtheventilationopenings.
9. Heat- Theapplianceshouldbesituatedawayfrom hearsources
suchas radiators,heat registers,stoves,or other appliances
(includingamplifiers)thatproduceheat.
10. PowerSources- Theapplianceshouldbe connectedto a power
supplyonlyofthetypedescribedintheoperatinginstructionsoras
markedontheappliance.
11. Power-CordProtection- Powersupplycordsshouldbe routedso
thattheyarenotlikelyto bewalkedonor pinchedbyitemsplaced
uponor againstthem,payingparticularattentionto cordsand
plugs,conveniencereceptacles,andthepointwheretheyexitfrom
theappliance.
12. Cleaning- Theapplianceshouldbecleanedonlyas recommen,'....
bythemanufacturer.
13. PowerLines- Anoutdoorantennashouldbelocatedawayfro,=
powerlines.
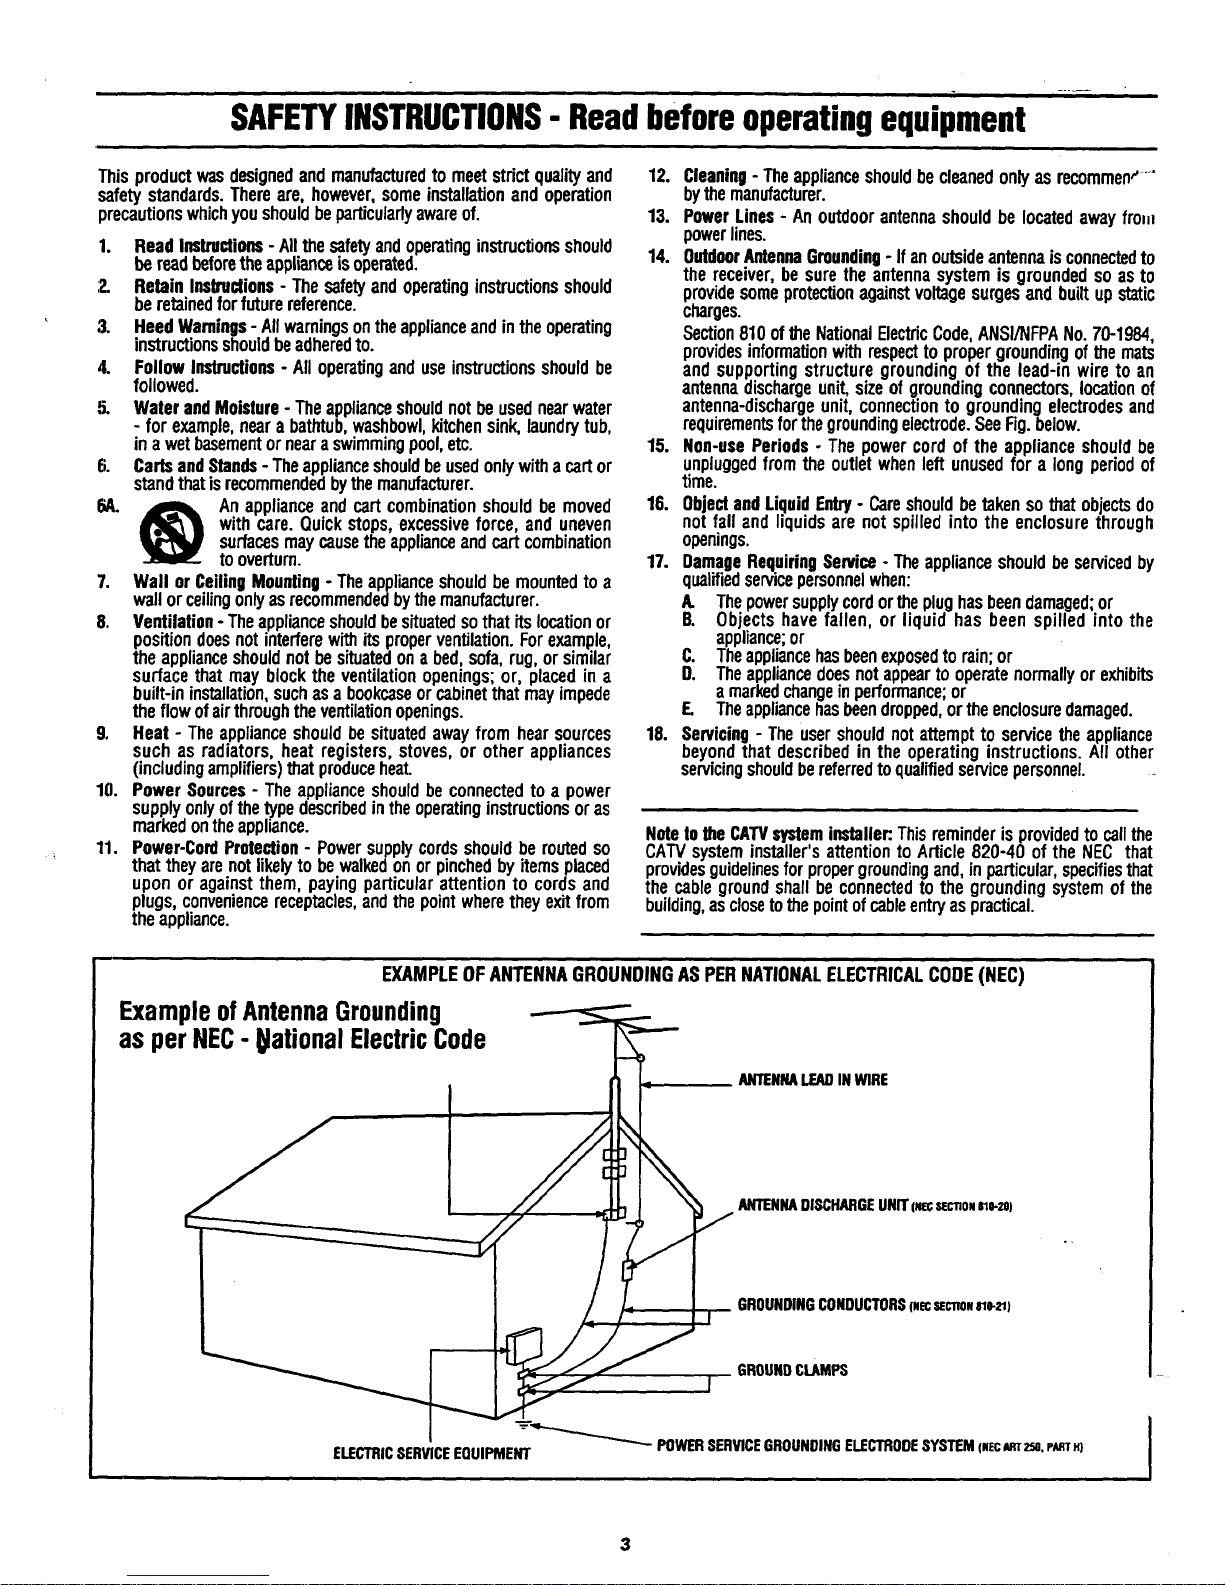
14. OutdoorAntennaGrounding- If anoutsideantennaisconnectedto
thereceiver,be suretheantennasystemis groundedso asto
providesomeprotectionagainstvoltagesurgesand builtupstatic
charges.
Section810oftheNationalElectricCode,ANSI/NFPANo.70-1984,
providesinformationwithrespectto propergroundingofthe mats
and supportingstructuregroundingof the lead-inwireto an
antennadischargeunit,sizeof groundingconnectors,locationof
antenna-dischargeunit,connectionto groundingelectrodesand
requirementsforthegroundingelectrode.SeeFig.below.
15. Non-usePeriods- Thepowercordof theapplianceshouldbe
unpluggedfrom theoutletwhenleftunusedfor a longperiodof
time.
16. ObjectandLiquid Entry- Careshouldbetakenso thatobjectsdo
not fall and liquidsarenotspilledinto the enclosurethrough
openings.
17. DamageRequiringService- Theapplianceshouldbe servicedby
qualifiedserwcepersonnelwhen:
A. Thepowersupplycordortheplughasbeendamaged;or
B. Objects have fallen, or liquid has been spilledinto the
appliance;or
C. Theappliancehasbeenexposedtorain;or
D. Theappliancedoesnotappearto operatenormallyorexhibits
amarkedchangeinperformance;or
E. Theappliancehasbeendropped,ortheenclosuredamaged.
18. Servicing- Theusershouldnotattemptto servicethe appliance
beyondthatdescribedin theoperatinginstructions.All other
servicingshouldbereferredtoqualifiedservicepersonnel....
NotetotheCATVsysteminstaller:.Thisreminderisprovidedto callthe
CAWsysteminstaller'sattentiontoArticle820-40 ofthe NEC that
providesguidelinesforpropergroundingand,inparticular,specifiesthat
thecable groundshallbe connectedto the groundingsystemof the
building,asclosetothepointofcableentryaspractical.
EXAMPLEOFANTENNAGROUNDINGASPERNATIONALELECTRICALCODE(NEC)
ExampleofAntennaGrounding
as perNEC- lational ElectricCode
ANTENNALEADINWIRE
ANTENNADISCHARGEUNIT(Ec sec'nol_o-2o)
GROUNDINGCONDUCTORS(leCsec'noN_e-_)
GROUNDCLAMPS
"--'-_'-'-_ POWERSERVICEGROUNDINGELECTRODESYSTEM(Nec_T 250,PART,)
ELECTRICSERVICEEQUIPMENT
I
_ Getting Started
Welcome/Product Registration ................... 2
Safety/Precautions ..................................................... 3
Table of Contents ....................................................... 4
Features and Model Information ................................ 5
["-_ On-Screen Features
PICTURE MENU
c-Adjusting Color, Brightness, Sharpness,
Tint, and Picture Controls ................................... 6
c-Using the Clearview Control ............................... 7
c-Adjnsting the TV's Convergence Control ........... 8
c-Using the Flesh Correction Control .................... 9
FEATURES MENU
c-Selecting a Picture Source ................................ I0
c-Setting the TV for Closed Captioning ............... 11
c-Setting the TV for Cable or Antenna Signals....12
c-Adding Channels in Memory (Automatically) .13
c-Adding Channels in Memory (Manually) ......... 14
c-Setting the TV Clock and Turn-On Timer ........ 15
c-Setting the Alternate Channel Control .............. 16
c-Using the Sleep Timer Control ......................... !6
c-Adjusting the Channel Display Control ............ 17
c-Using the Time/Channel Reminder Control......17
SOUND MENU
c-Adjusting Bass, Treble, and Balance Sound
Controls ............................................................. 18
c-Setting the Bass Boost Control ........................ 18
c-Setting the TV for Stereo and SAP Programs _19
c-Using the Sound Image Control ........................ 20
c-Using the Volume Display Control ................... 20
c-Using the TV Speaker On/Off Control with
the Audio Output jacks ..................................... 21
C-Surround Sound Speaker Connections and
Variable Audio Output Control ........................ 22
c-Using the TV's Audio/Video Input and
Output Jacks ............................................... 23-24
j Remote (_ontrol Operation
Using Smart Sound Control ...................
Using the Smart Picture Control ................. z5
Setting the Remote to Work VCRs .................... 26-27
Setting the Remote to Work
Cable TV Converters .......................................... 28-29
Setting the Remote to Work VCRs orCable
Converters - "Search Method" ................................. 30
Using the Remote's VCR buttons ............................ 31
p--'3 picture-In-Picture (PIP)
How to Use PIP (Connections) ............ 32-33
How to Use PIP with the TV Remote ...................... 34
Selecting the Picture Source for PIP........................ 35
Adjusting Picture-in-Picture Color andTint ............ 36
More PIP Connections (Cable Convener) ............... 37
_l General Information
Tips if Something Isn't Working .............. 38
TV Help Menu ......................................................... 39
Glossary of TV Terms ............................................. 39
Index ...................................................................
Factory Service Locations .................................. 41-42
Warranty .................................................................. 43
Accessories .............................................................. 44
Use the simple Set-Up Guide (supplied with
your TV information packet) for details on:
• Antenna Hook-ups
• First Time Set-Up
(Automatic Settings)
• Basic TV and Remote
Control Operation
• On-Screen Menu Use
Copyright © 1995 Philips Consumer Electronics Company. All rights reser,
4
First Time Set Up which automatically sets the TV
for local channels and the correct picture signal
(antenna or cable). It even helps you make the
necessary connections for the Picture-In-Picture (PIP)
feature.
Infrared Remote Control which operates your TV
set and a variety of wireless remote control VCRs and
Cable TV Converters.
Standard TV broadcast (VItF/UItF) or Cable TV
(CATV) channel capability.
Closed Captioning which allows the viewer to read
"IVprogram dialogue orvoice conversations as on-
screen text.
Automatic Programming of channels for quick and
easy selection of favorite stations available in your
area.
Picture-In-Picture (PIP) which can show a TV
program and the direct video output from an accessory
(VCR, etc.) onto the TV screen at the same time.
Stereo-Ready TV with built-in audio amplifier and
twin speaker system. Receives TV programs in both
broadcast stereo sound or (SAP) bilingual broadcast.
On-Screen Features which display helpful
information for the setting of "IV controls (such as
help messages, operating tips and glossaries).
Audio/Video jacks for direct connections with VCRs
(and other accessories) for quality TV picture and
:sound playback.
Surround Sound external audio speaker connections.
Sleep-Time*r which automatically turns the TV OFF at
preset time intervals.
Smart Sound for the control of TV volume levels
during program changes or commercial breaks.
Smart Picture allows you to choose from a list of TV
video control categories set for a variety of viewing
conditions and program sources.
Clock Timer feature which can turn ON the TV at
any preset time - just like an alarm clock.
As you unpack your TV please note that the
following items have been included with your o'-"
* Owner's Manual
• Warranty Registration Card
• Safety Tip Information
• Factory Service Center Address Listings
• Remote Control Transmitter
• Batteries for Remote Control Use
• Audio/Video Cables for Direct Inputand
Output Connections.
Please take a few minutes to complete your
registration card. The serial number for the TV is
on the back of the set.
To ensure that picture screen performance is of
the highest quality, please avoid rubbing any
object or material on the screen that could scratch
ordamage its surface.
Refer to the back of this manual for instructions
on the cleaning and care of the TV.
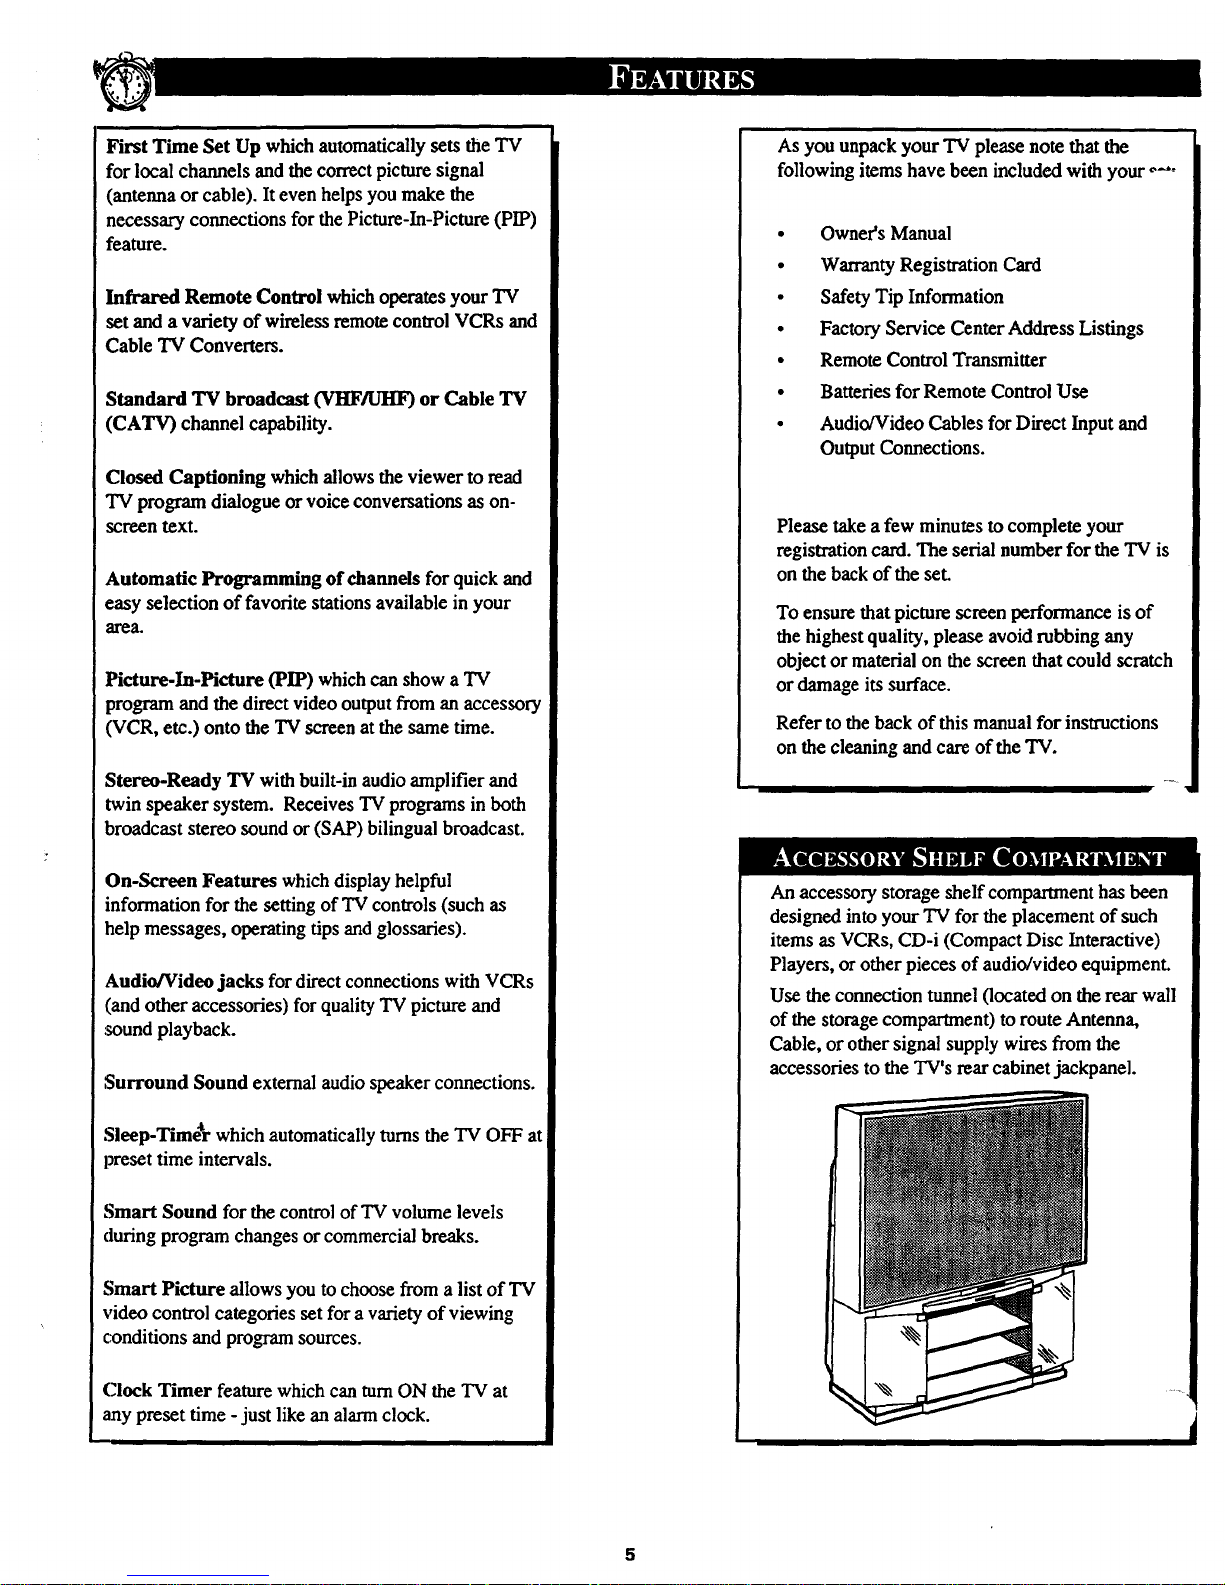
An accessory storage shelf compartment has been
designed into your "IV for the placement of such
items as VCRs, CD-i (Compact Disc Interactive)
Players, or other pieces of audio/video equipment.
Use the connection tunnel 0ocated on the rear wall
of the storage compartmen0 to route Antenna,
Cable, or other signal supply wires from the
accessories to the TV's rear cabinet jackpanel.
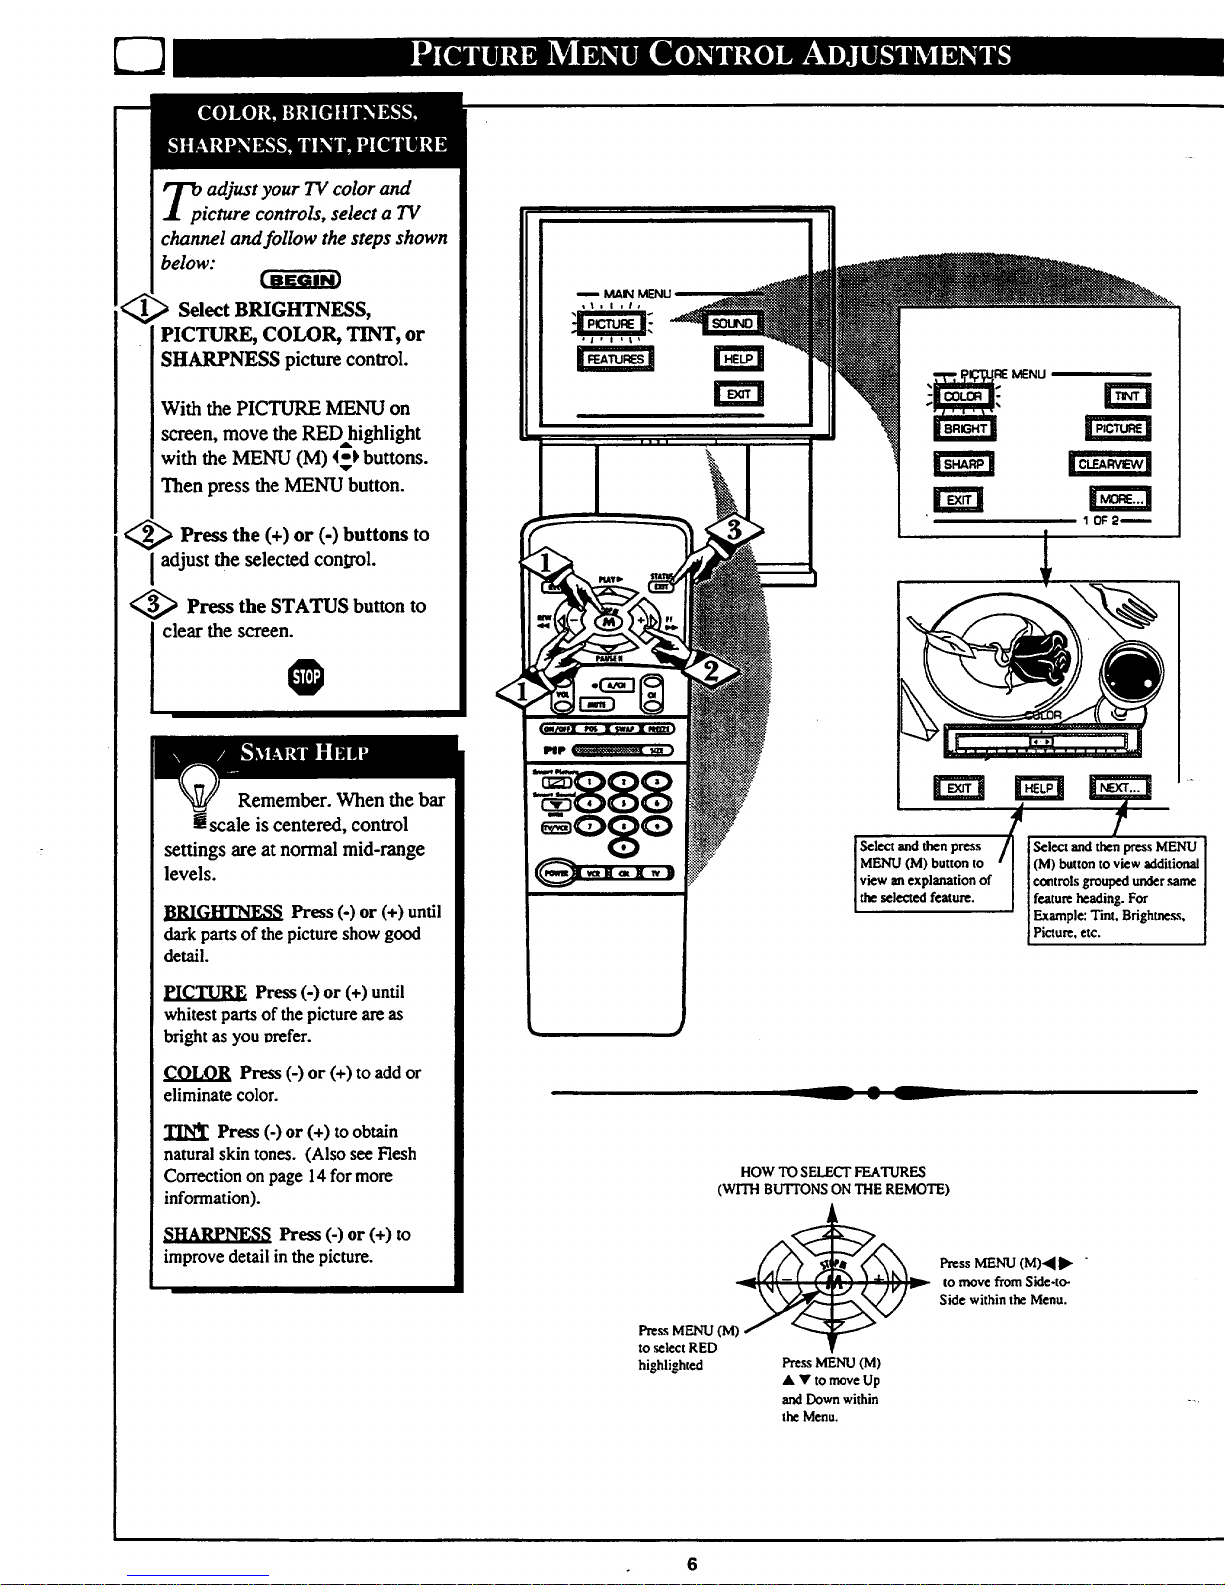
_p adjust your TV color and
icture controls, select a TV
channel and follow the steps shown
below:
m- mm
Select BRIGHTNESS,
PICTURE, COLOR, TINT, or
SHARPNESS picture control.
With the PICTURE MENU on
screen, move the REDhighlight
with the MENU (M) 4_ buttons.
Then press the MENU button.
< > Press the (+) or (-) buttons to
adjust the selected conl_ol.
<_ Press the STATUS button to
clear the screen.
@
Remember. When the bar
ggscale is centered, control
settings are at normal mid-range
levels.
]_ Press 6) or (+) until
dark parts of the picture show good
detail.
PICTURE Press (-) or (+) until
whitest parts of the picture are as
bright as you vrefer.
COLOR Press (-) or (+) to add or
eliminate color.
Press (-) or (+) to obtain
natural skin tones. (Also see Flesh
Correction on page 14 for more
information).
SHARPNESS Press 6) or(+) to
improve detail in the picture.
] Select and then press /I Select and then press MENU
] MENff (M) button to '[ (M) button to view additional
]view an explanation of controls grouped under _me
nthe selected feature, feature heading. For
Example: Tim. Brighmes.s.
Picture. etc.
__ • L
HOW TO SELECT FEATURES
(WITH BUTTONS ON THE REMOTE)
Press MENU (M)
to .select RED
highlighted
Prem MENU (M)
& Y to move Up
and Down within
the Menu.
Press MENU (M)',_IP," "
to move from Side-to-
Side within the Menu.
6
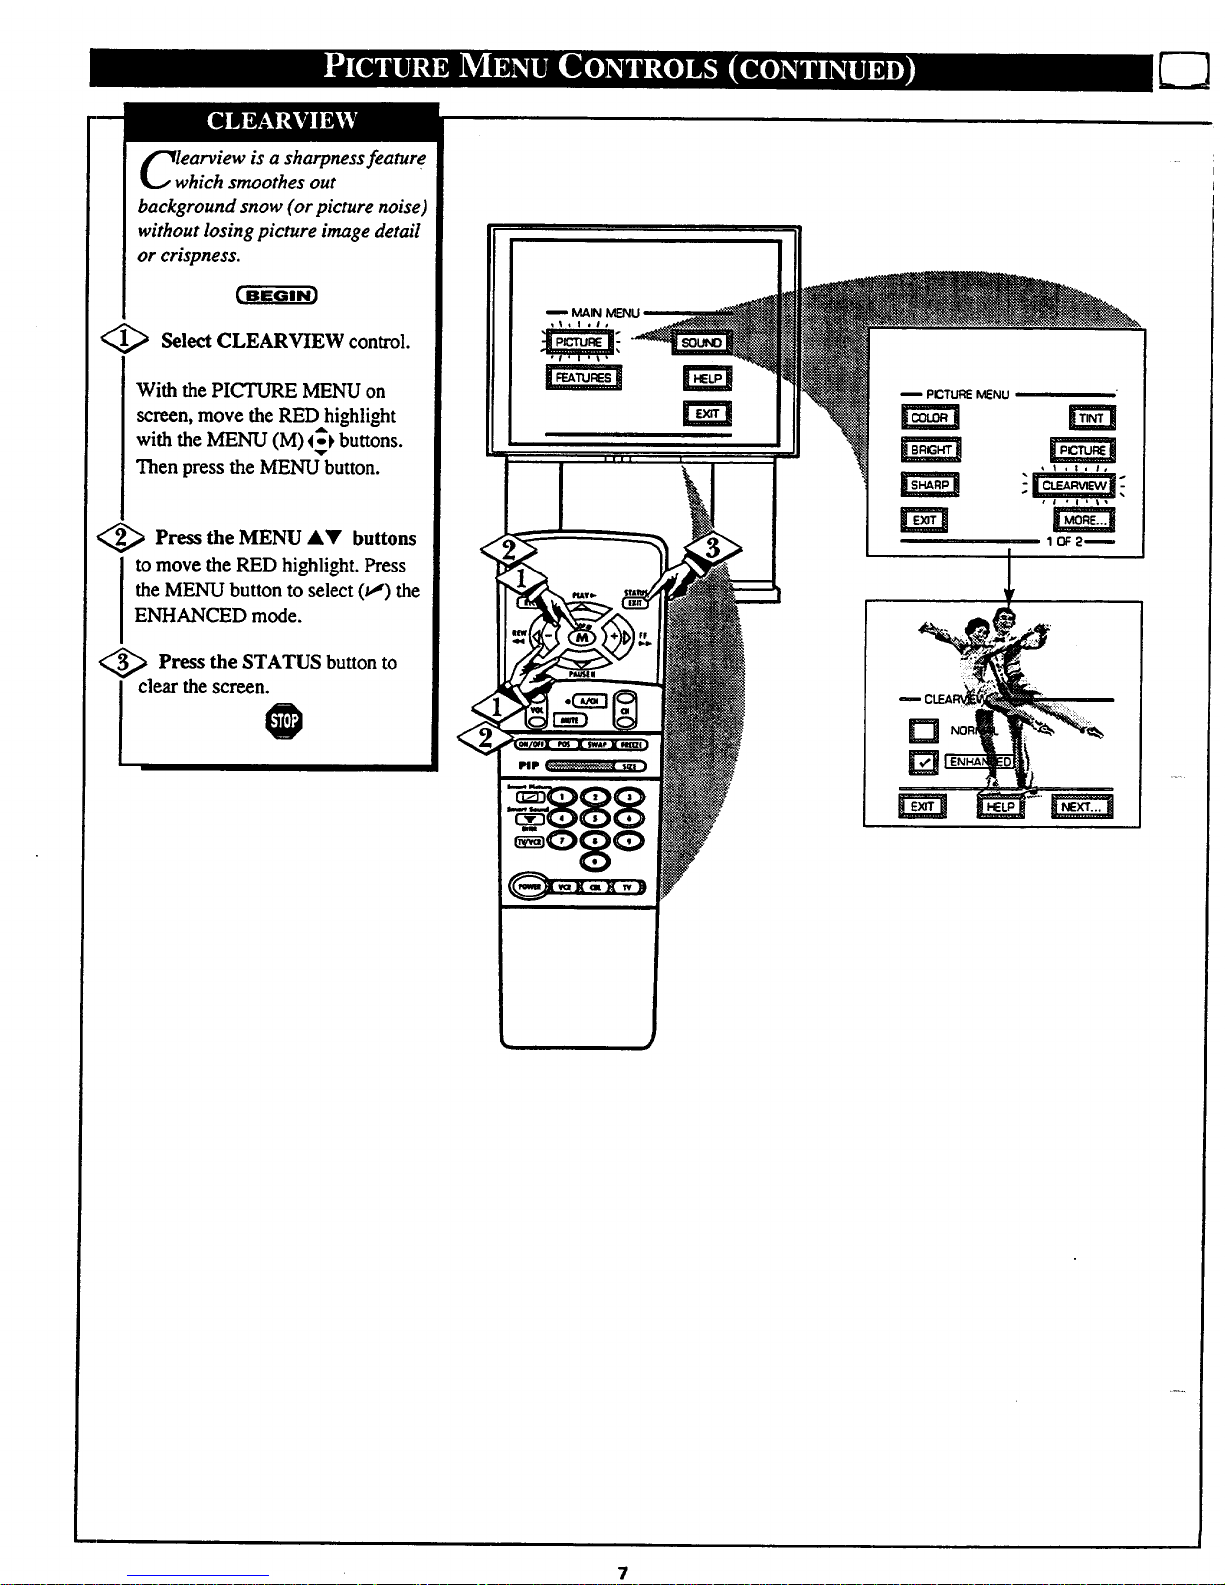
lewharviewis a sharpness feature
ich smoothes out
background snow (or picture noise)
without losing picture image detail
or crispness.
(BEGIN]
<_ Select CLEARVIEW control.
With the PICTURE MENU on
screen, move the RED highlight
,6.
with the MENU (M)4-_ buttons.
Then press the MENU button.
<_ Press the MENU AV
buttons
to move the RED highlight. Press
the MENU button to select (t,,') the
ENHANCED mode.
<_ Press the STATUS button to
clear the screen.
@
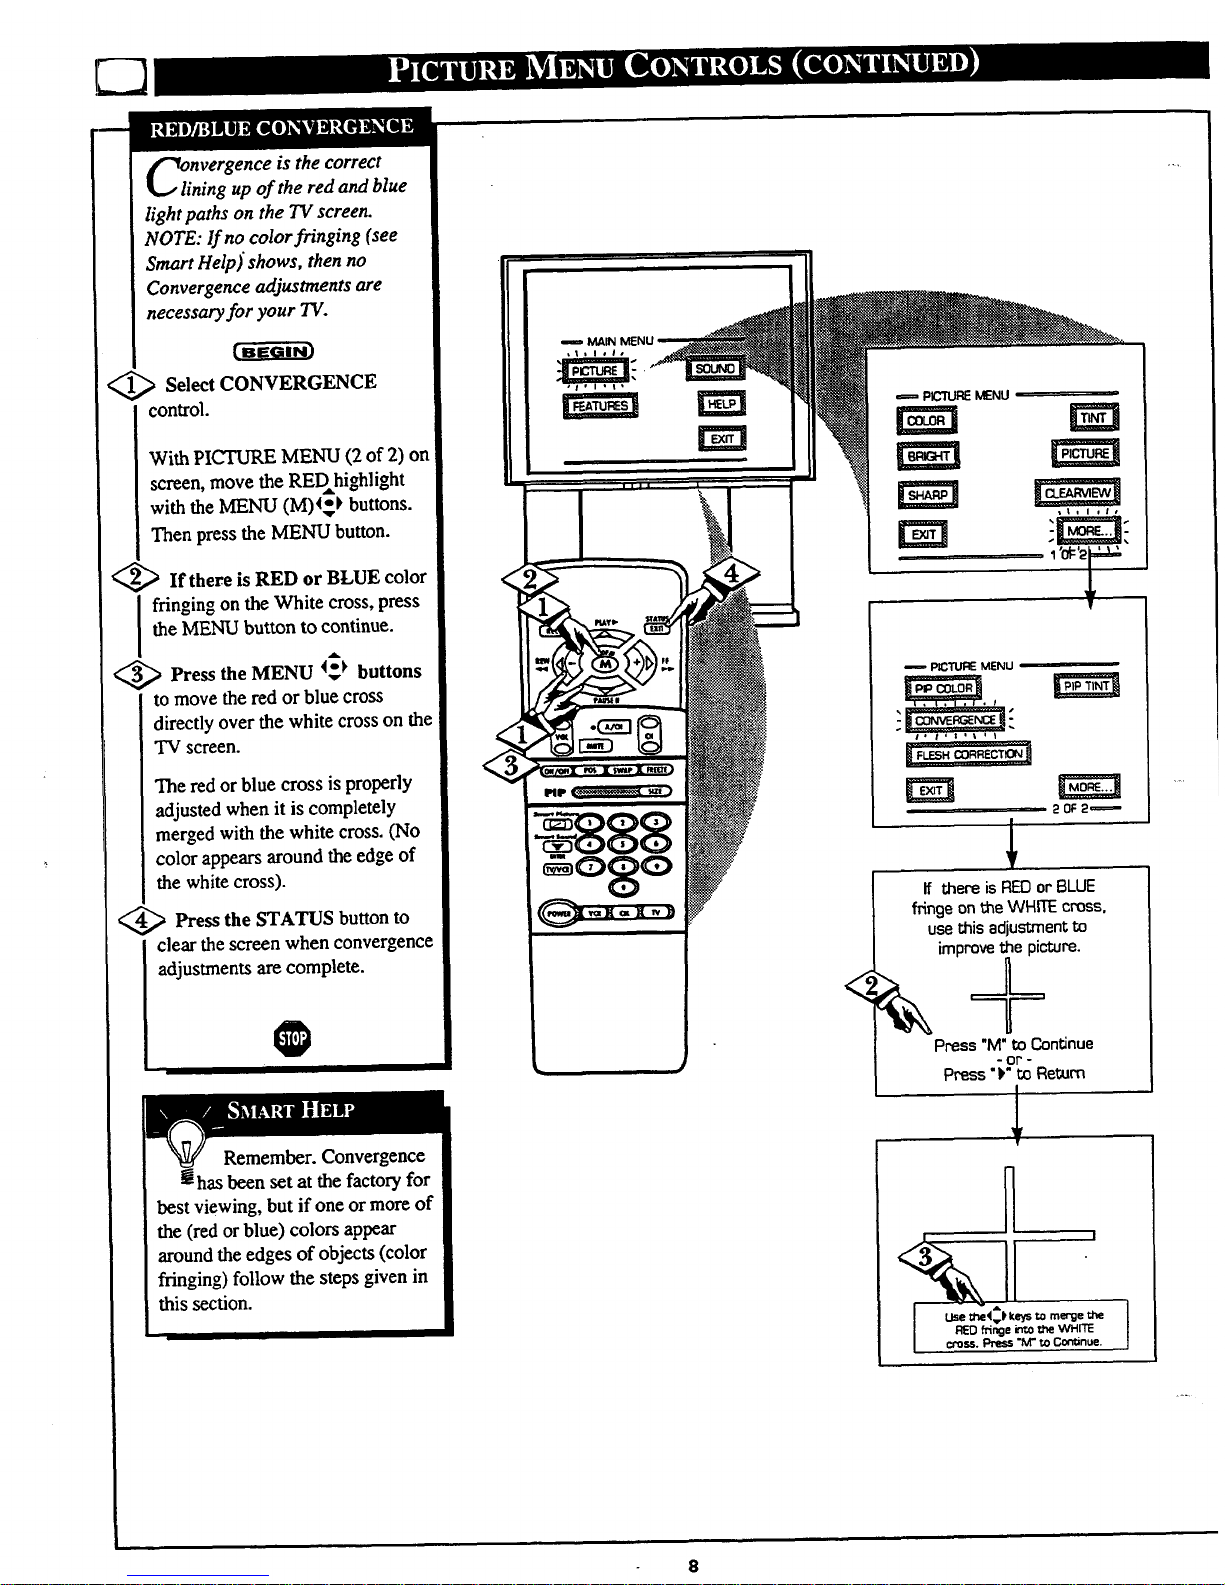
nvergence is the correct
ning up of the red and blue
light paths on the TV screen,
NOTE: If no color fringing (see
Smart Help) shows, then no
Convergence adjustments are
necessary for your TV.
<_ Select CONVERGENCE
control.
With PICTURE MENU (2 of 2) on
screen, move the REDhighlight
with the MENU (M)4*) buttons.
Then press the MENU button.
<_ If there is RED or BLUE color
I ringing on the White cross, press
the MENU button to continue.
Press the MENU I_ buttons
to move the red orblue cross
directly over the white cross on the
TV screen.
The red or blue cross is properly
adjusted when it is completely
merged with the white cross. (No
color appears around the edge of
the white cross).
<_ Press the STATUS button
to
clear the screen when convergence
adjustments arecomplete.
O
Remember. Convergence
thas been set at the factory for
best viewing, but if one or more of
the (red or blue) colors appear
around the edges of objects (color
fringing) follow the steps given in
this section.
<
==== PICTURE MENU
PICTURE MENU
1, /,s,t ii
If there isREDor BLUE
fringeonthe WHITEcross,
usethisadjustmentto
improvethe picture.
Press"M"to Continue
- or -
Press")" to Return
1
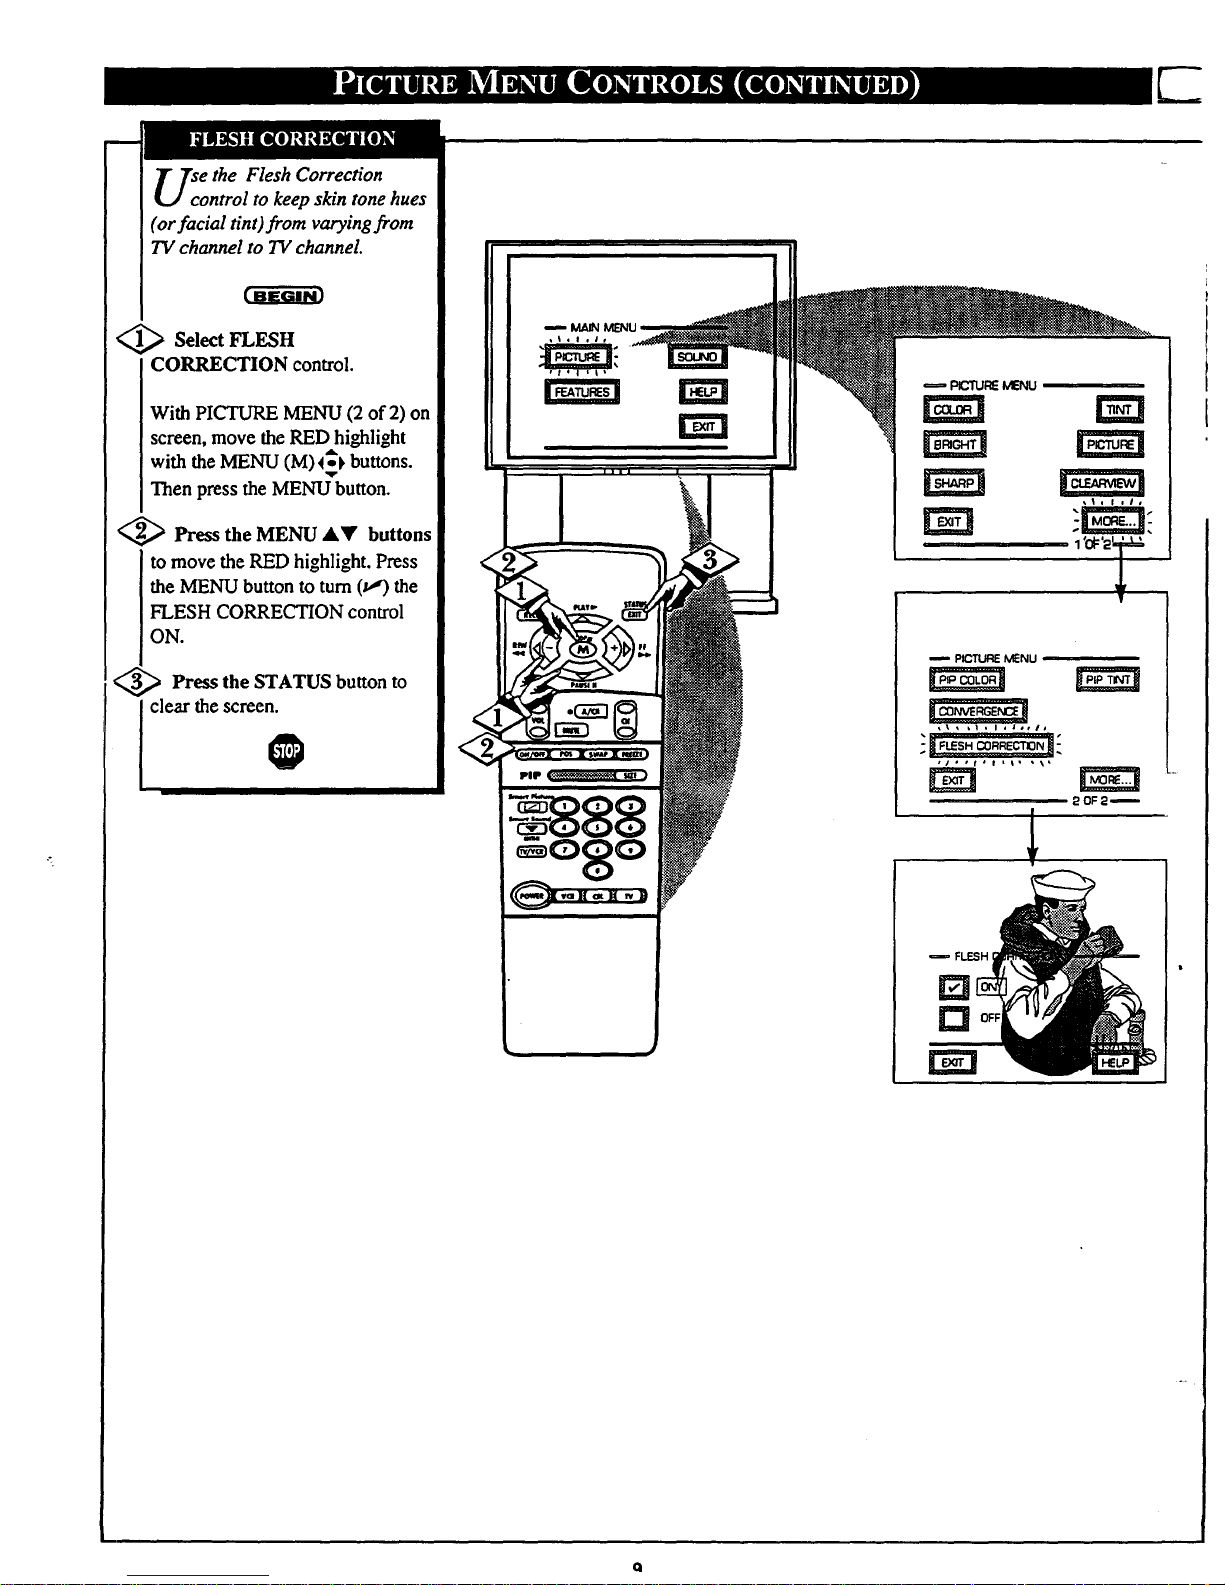
se the Flesh Correction
ontrol to keep skin tone hues
(or facial tint)from varying from
TV channel to TV channel.
<_ Select FLESH
CORRECTION control.
With PICTURE MENU (2 of 2) on
screen, move the RED highlight
with the MENU (M)4_ buttons.
Then press the MENU button.
<_ Press the MENU &Y buttons
to move the RED highlight. Press
the MENU button to turn (t,,') the
FLESH CORRECTION control
ON.
<_ Press the STATUS button
to
clear the screen.
@
pICTURE MENU
FLESH
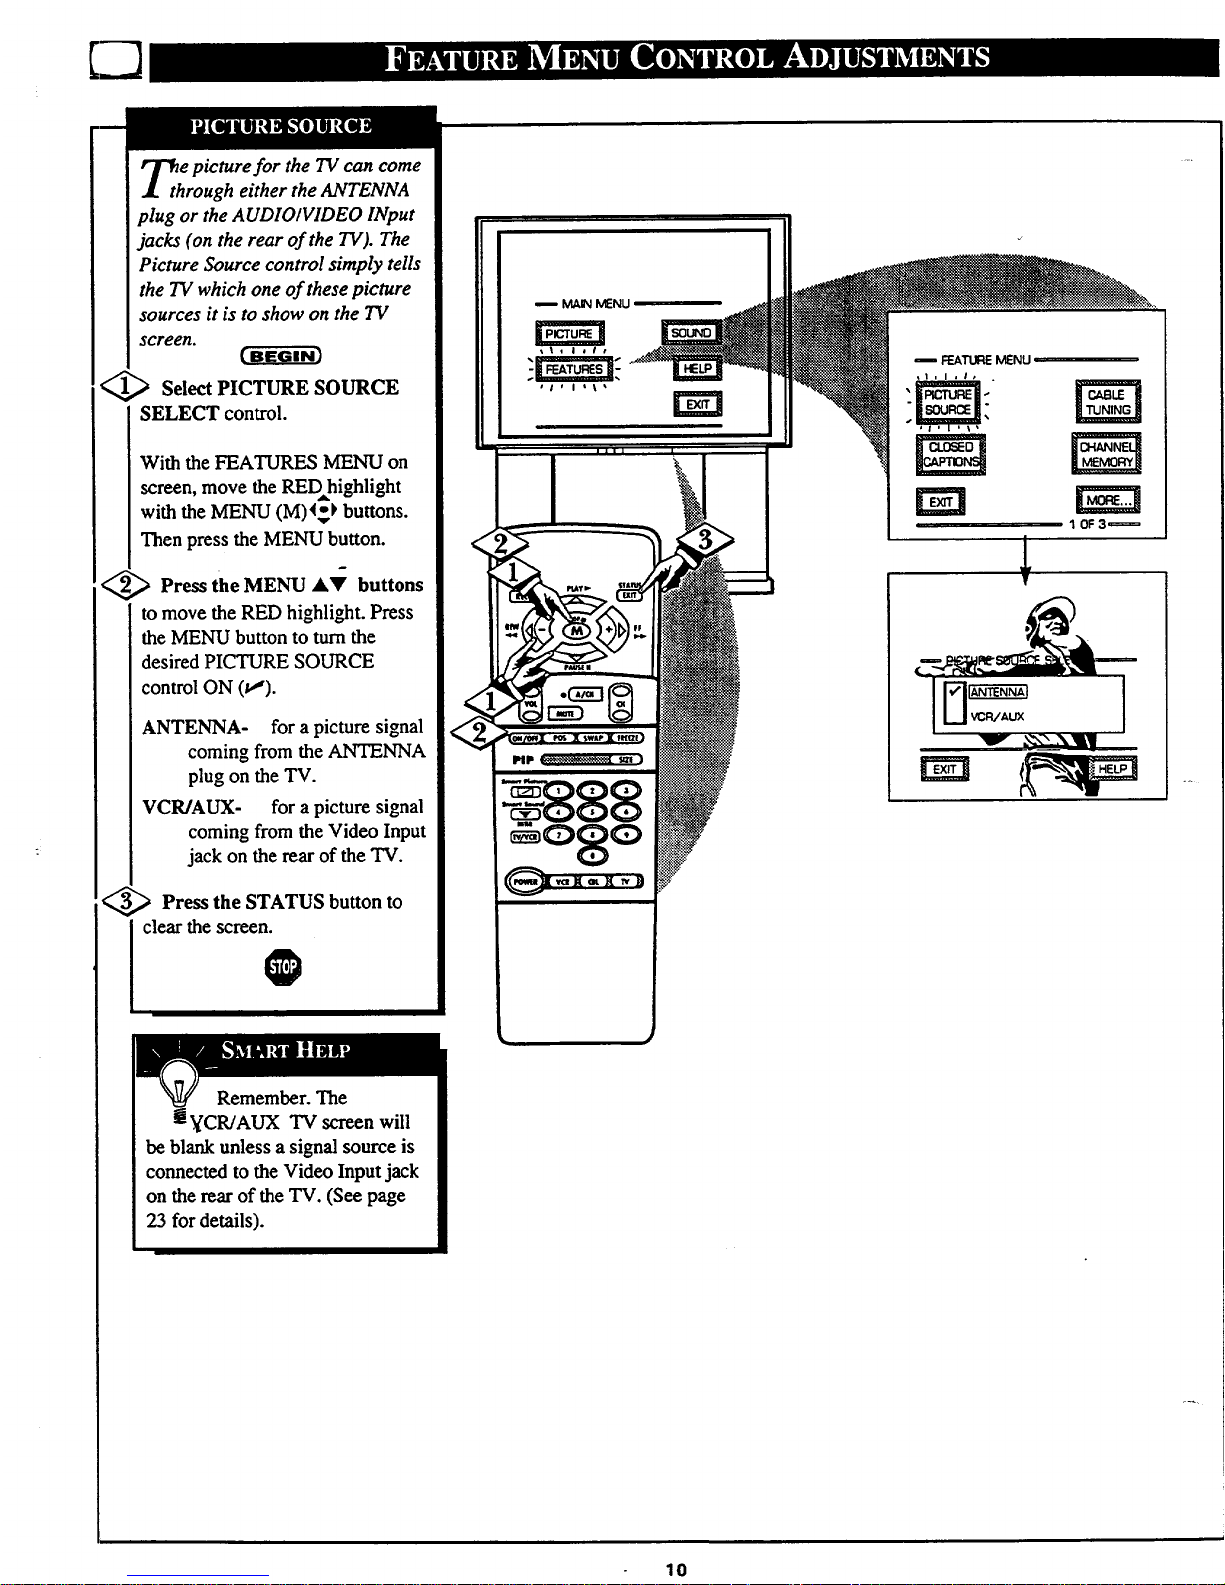
Th e picture for the TV can come
rough either the ANTENNA
plug or the AUDIOIVIDEO INput
jacks (on the rear of the TV). The
Picture Source control simply tells
the TV which one of these picture
sources it is to show on the TV
screen.
<_ Select PICTURE SOURCE
SELECT control.
With the FEATURES MENU on
screen, move the REDhighlight
with the MENU (M)4_ buttons.
Then press the MENU button.
<_ Press the MENU AV buttons
to move the RED highlight. Press
the MENU button to turn the
desired PICTURE SOURCE
control ON (t,,').
ANTENNA- for a picture signal
coming from the ANTENNA
plug on the TV.
VCR/AUX- for a picture signal
coming from the Video Input
jack on the rear of the TV.
<_3_ Press the to
STATUS button
clear the screen.
Remember. The
! ¥CR/AUX TV screen will
be blank unless a signal source is
connected to the Video Input jack
on the rear of the TV. (See page
23 for details).
MAINMENU
nail I
m FEATL.q_MENU
_1, I J I* .
a •
rm
10F3_
m
10
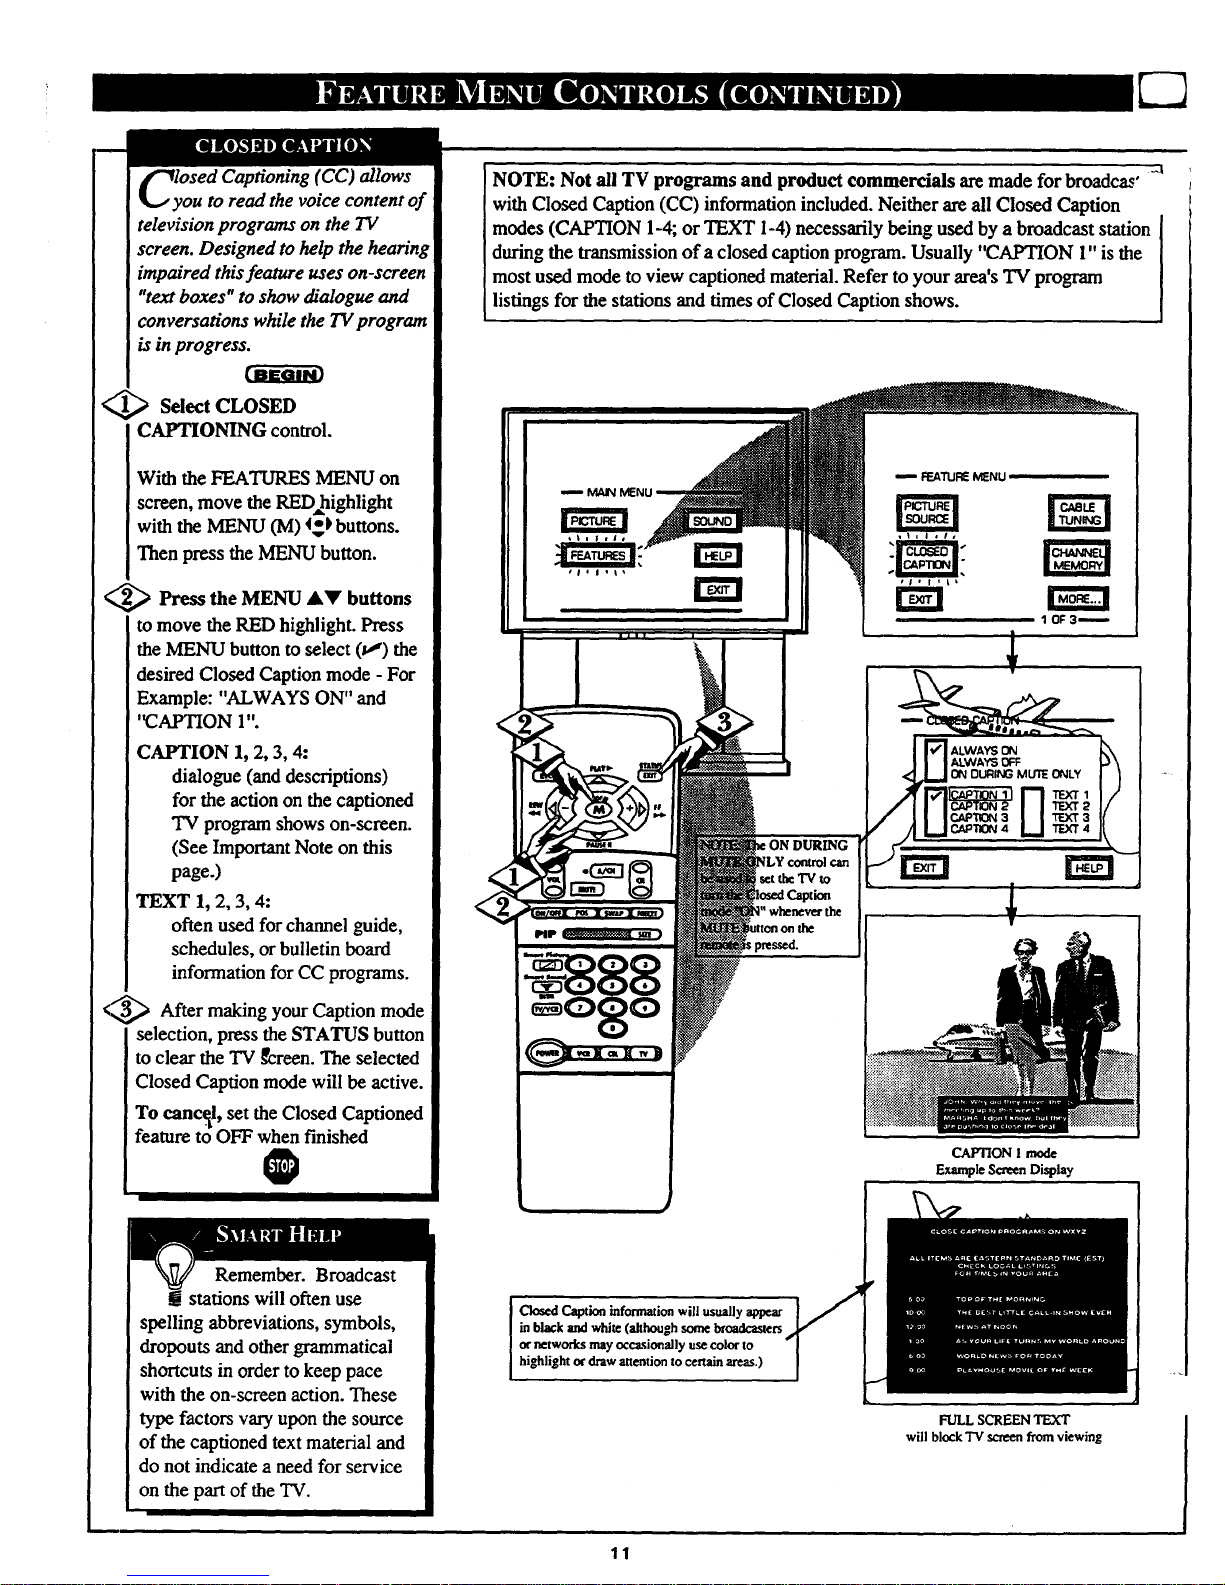
sed Captioning (CC) allows
ou to read the voice content of
television programs on the TV
screen. Designed to help the hearing
impaired this feature uses on-screen
"text boxes" to show dialogue and
conversations while the TV program
is in progress.
<_ Select CLOSED
CAPTIONING control.
With the FEATURES MENU on
screen, move the RED highlight
with the MENU (M) _t buttons.
Then press the MENU button.
<_ Press the MENU AY buttons
to move the RED highlight. Press
the MENU button to select (u,') the
desired Closed Caption mode - For
Example: "ALWAYS ON" and
"CAPTION 1".
CAPTION 1, 2, 3, 4:
dialogue (and descriptions)
for the action on the captioned
"IV program shows on-screen.
(See Important Note on this
page.)
TEXT 1, 2, 3, 4:
often used for channel guide,
schedules, or bulletin board
information for CC programs.
<_ After making your Caption mode
selection, press the STATUS button
to clear the "IV_creen. The selected
Closed Caption mode will be active.
To canc._l, set the Closed Captioned
feature to OFF when finished
0
I I
Remember. Broadcast
stations will often use
spelling abbreviations, symbols,
dropouts and other grammatical
shortcuts in order to keep pace
with the on-screen action. These
type factors vary upon the source
of the captioned text material and
do not indicate a need for service
on the part of the TV.
I
---71
NOTE: Not all TV programs and product commercials are made for broadcas'
with Closed Caption (CC) information included. Neither are all Closed Caption
modes (CAPTION 1-4; or TEXT 1-4) necessarily being used by a broadcast station
during the transmission of a closed caption program. Usually "CAPTION l" is the
most used mode to view captioned material. Refer to your area's"IV program
listings for the stations and times of Closed Caption shows.
DURING
_t thcTV to
Closed Caption information will usually appear
inblackand white(althoughsome broadcasters
ornetworks mayoccasionally usecolor to
highlightordrawatt©mionto certain areas.)
FEATUREMENU
CAPTION1 mode
ExampleSc_en Display
FULLSCREEN TEXT
will blockTV screen frontviewing
11
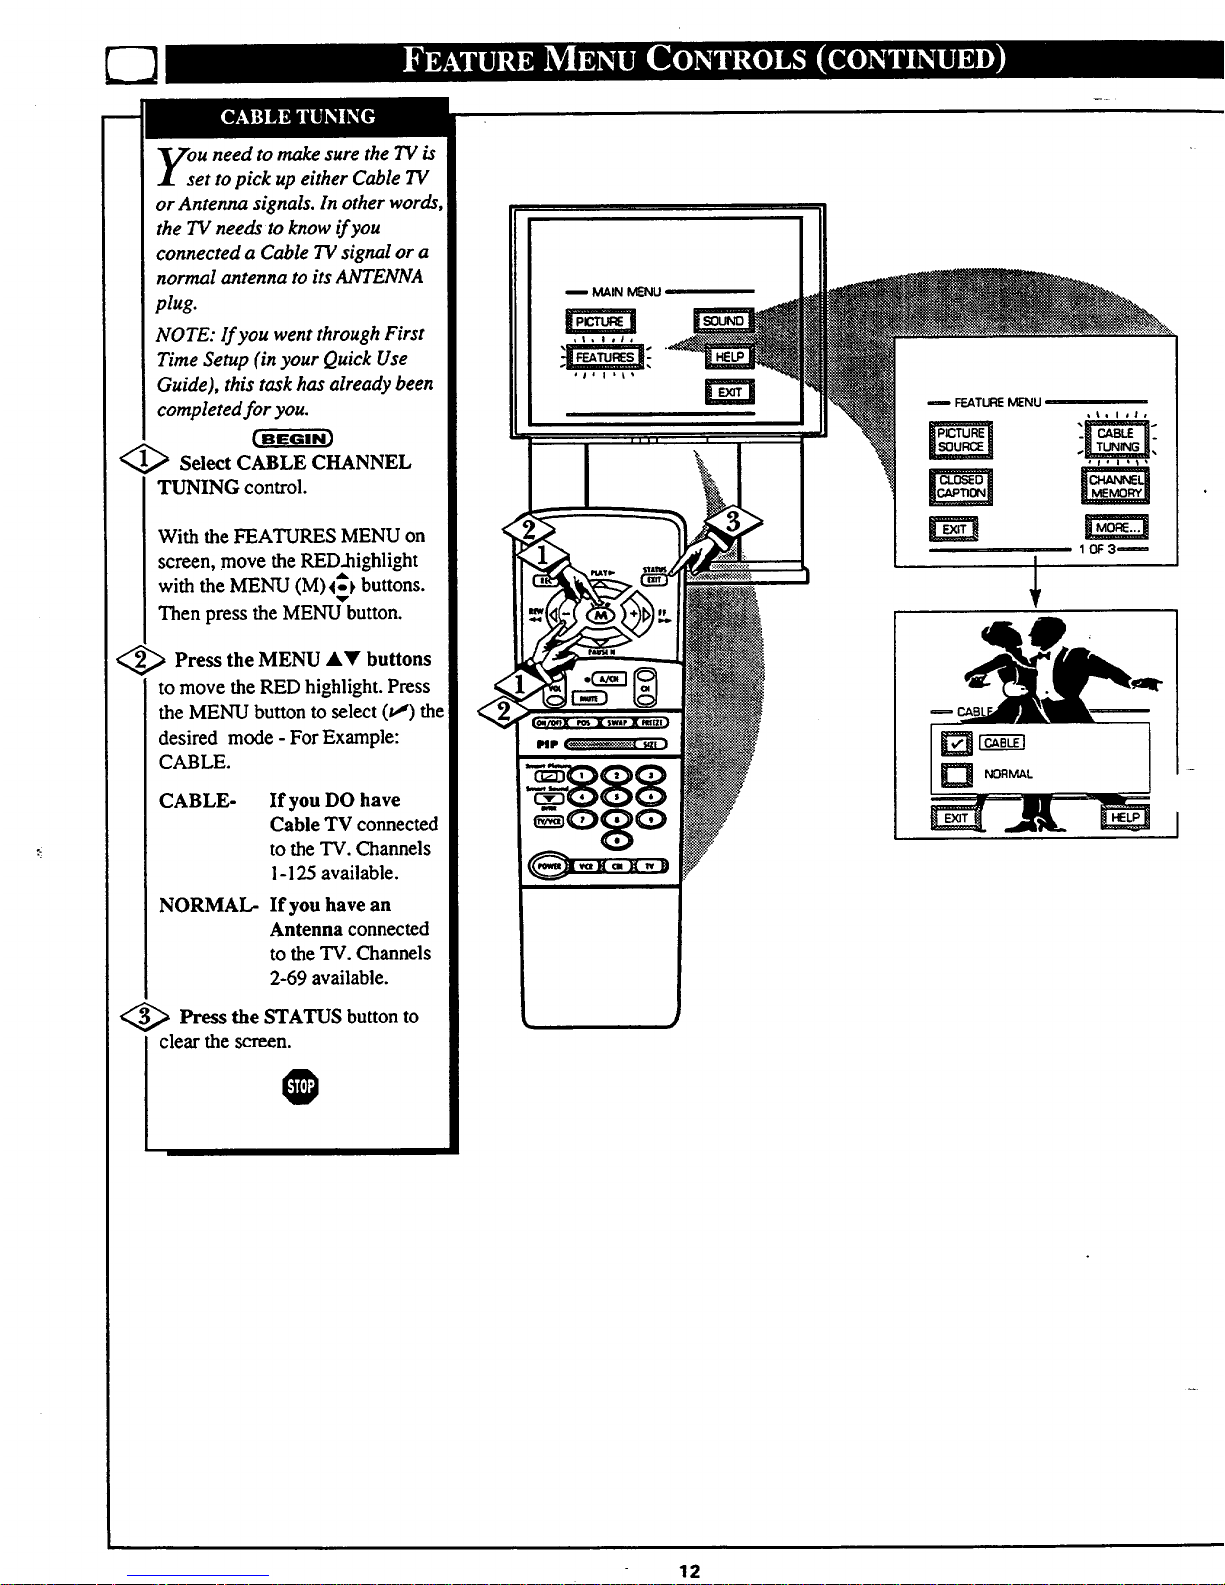
ou need to make sure the TV is
et to pick up either Cable TV
or Antenna signals. In other words,
the TV needs to know if you
connected a Cable TV signal or a
normal antenna to its ANTENNA
plug.
NOTE: If you went through First
Time Setup (in your Quick Use
Guide), this task has already been
completed for you.
@ Select CABLE CHANNEL
TUNING control.
With the FEATURES MENU on
screen, move the RED.highlight
with the MENU (M)4_ buttons.
Then press the MENU button.
<_ Press the MENU &_' buttons
to move the RED highlight. Press
the MENU button to select (va) the
desired mode - For Example:
CABLE.
CABLE- If you DO have
Cable TV connected
to the TV. Channels
1-125 available.
NORMAL- If you have an
Antenna connected
to the TV. Channels
2-69 available.
<_ Press the STATUS button
to
clear the screen.
@
i MAIN MENU
I
12
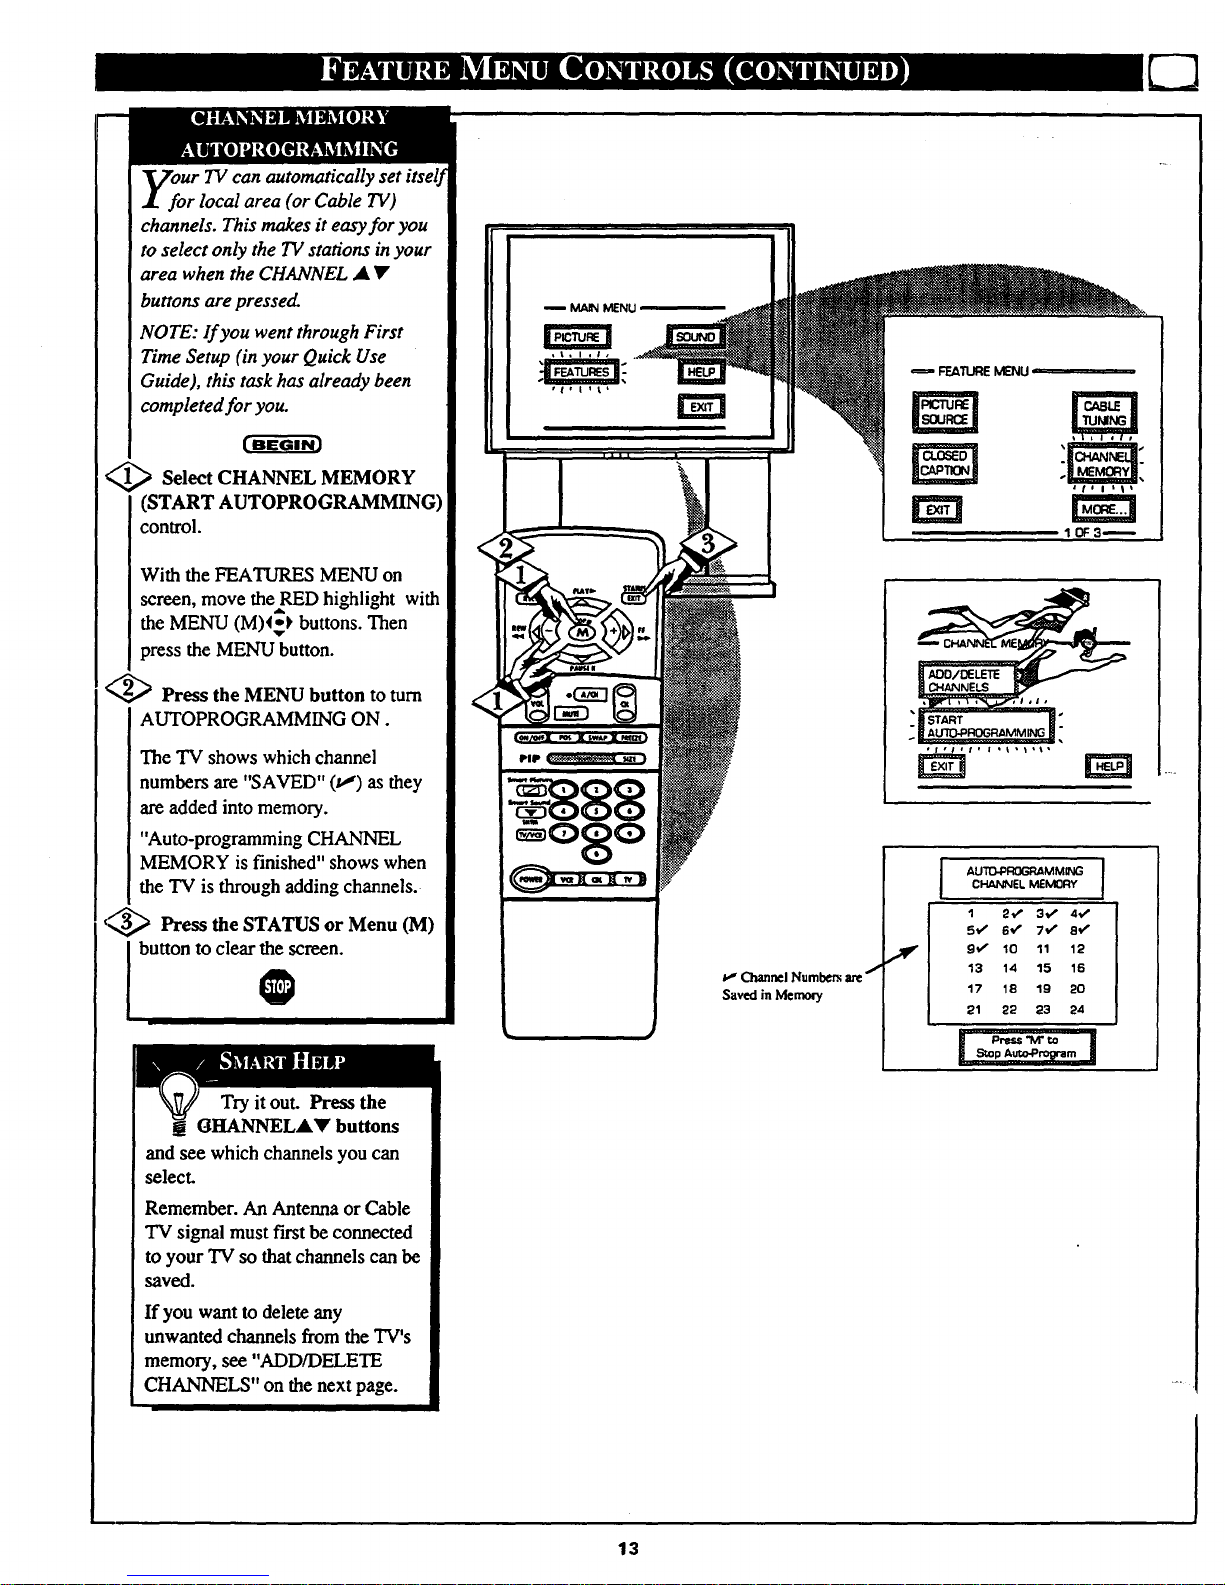
Ur TV can automatically set itself
r local area (or Cable TV)
channels. This makes it easy for you
to select only the TV stations in your
area when the CHANNEL at •
buttons are pressed.
NOTE: If you went through First
Time Setup (in your Quick Use
Guide), this task has already been
completed for you.
<_ Select CHANNEL MEMORY
(START AUTOPROGRAMMING)
control.
With the FEATURES MENU on
screen, move the RED highlight with
the MENU (M)_ buttons. Then
press the MENU button.
<_ Press the MENU button to turn
AUTOPROGRAMMING ON.
The TV shows which channel
numbers are "SAVED" (u,') as they
are added into memory.
"Auto-programming CHANNEL
MEMORY is finished" shows when
the TV is through adding channels.
_ Press the STATUS or Menu (M)
I buuon to clear the screen.
Try it out. Press the
OttANNELA• buttons
and see which channels you can
select.
Remember. An Antenna or Cable
TV signal must first be connected
to your TV so that channels can be
saved.
If you want to delete any
unwanted channels from the TV's
memory, see "ADD/DELETE
CHANNELS" on the next page.
FEATUREMENU
13
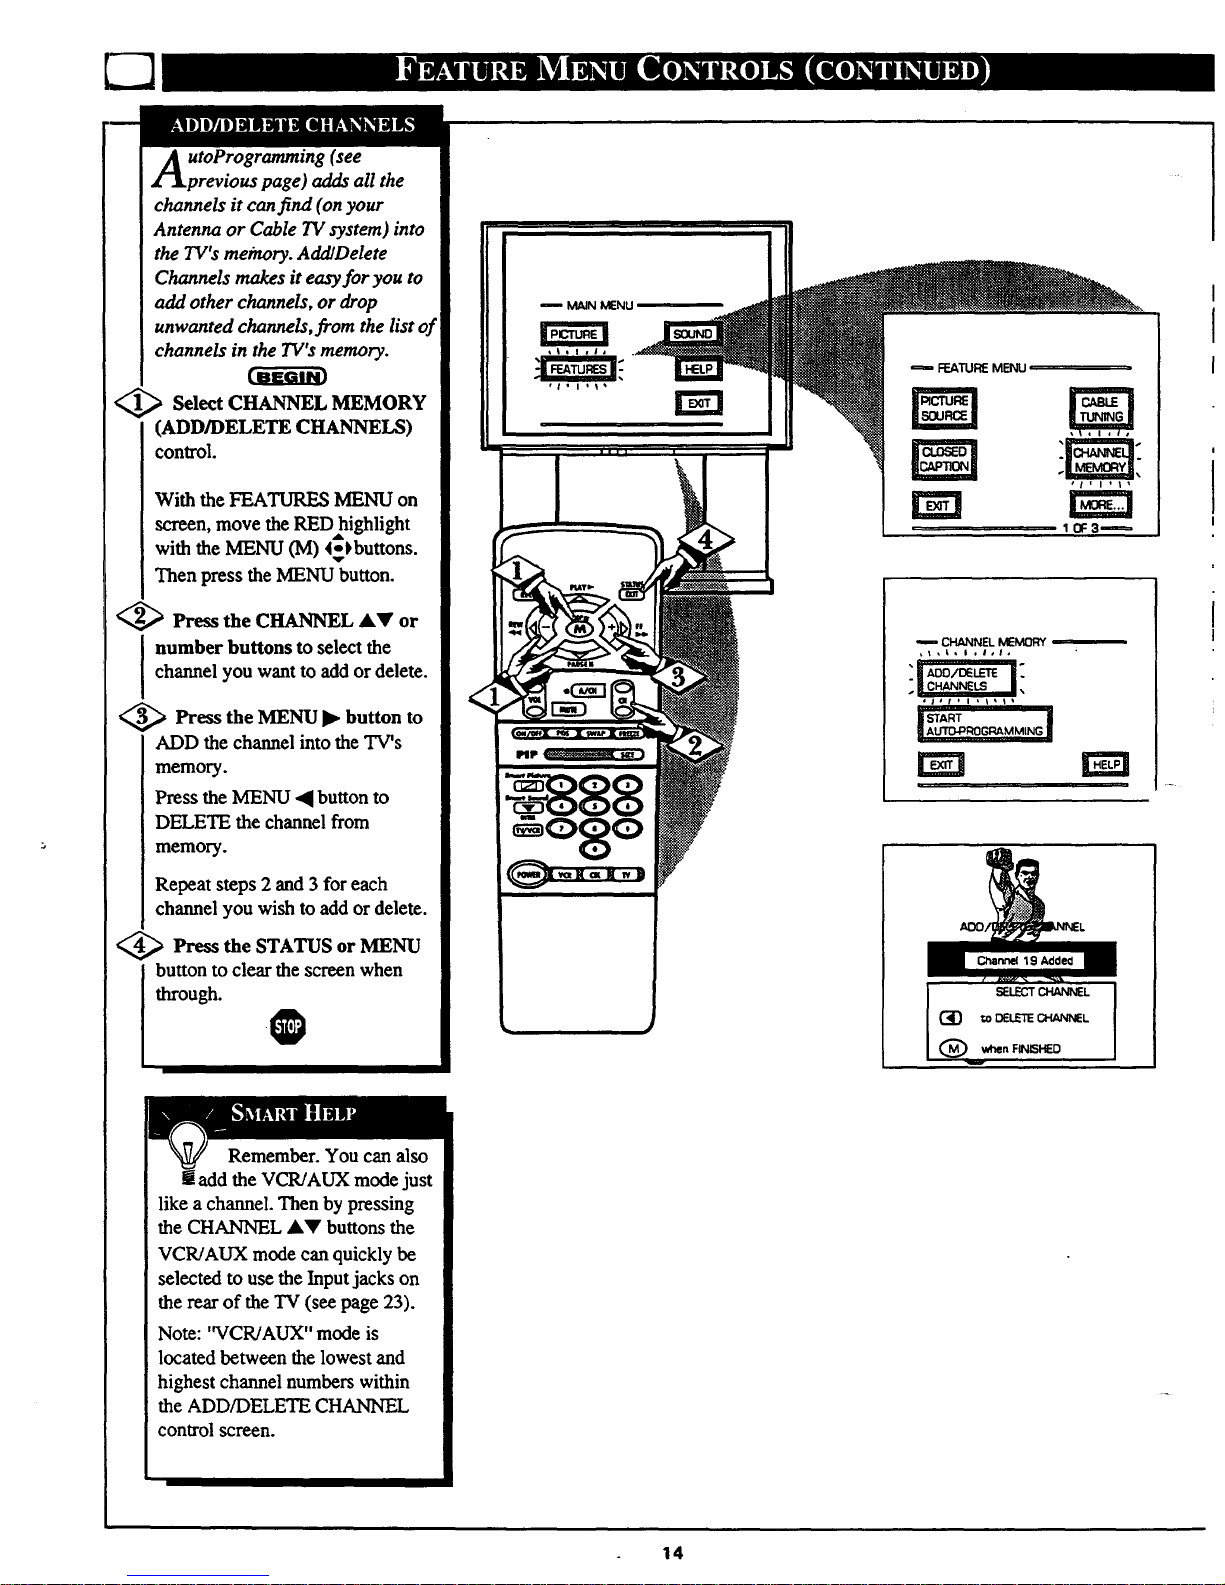
A toProgramming (see
previous page) adds all the
channels it can find (on your
Antenna or Cable TV system) into
the TV's meinory. Add/Delete
Channels makes it easy for you to
add other channels, or drop
unwanted channels,from the list of
channels in the TV's memory.
<_ Select CHANNEL MEMORY
(ADD/DELETE CHANNELS)
control.
With the FEATURES MENU on
screen, move the REDhighlight
with the MENU (M) 4-)buttons.
Then press the MENU button.
<_ Press the CHANNEL AV or
number buttons to select the
channel you want to add or delete.
<_ Press MENU • button to
the
ADD the channel into the TV's
memory.
Press the MENU ,q button to
DELETE the channel from
memory.
Repeat steps 2 and 3 for each
channel you wish to add or delete.
<_ Press the STATUS MENU
or
button to clear the screen when
through.
Remember. You can also
add the VCR/AUX mode just
like a channel. Then by pressing
the CHANNEL JkV buttons the
VCR/AUX mode can quickly be
selected to use the Input jacks on
the rear of the TV (see page 23).
Note: '_¢CR/AUX" mode is
located between the lowest and
highest channel numbers within
the ADD/DELETE CHANNEL
control screen.
MAIN MENU
FF.ATURE MENU
CHANNEL MEMORY
_t ,t, I , I,I,
rm
Channel 1ClAdded
SELECT _L
C_D to DELETE CHANNEL
(_ when FINISHED
14
 Loading...