

Page 1
Owner’s Manual
NB500MS9
Blu-ray Disc Player
Read your Owner’s Manual first for
quick tips that make using your
Magnavox product more enjoyable.
If you have read assistance,
you may access our online help at
http://www.funai-corp.com
or call
1-800-605-8610
while with your product
(and Model / Serial number)
Playback Function Setup OthersIntroduction Connections
© 2008 Funai Electric Co., Ltd.
Page 2

Blu-ray Disc Player
AUDIO IN
LR
VIDEO
OUT
VIDEO
IN
Quick Start Guide
Quick Start GuideQuick Start Guide
1. Connections
NB500MS9
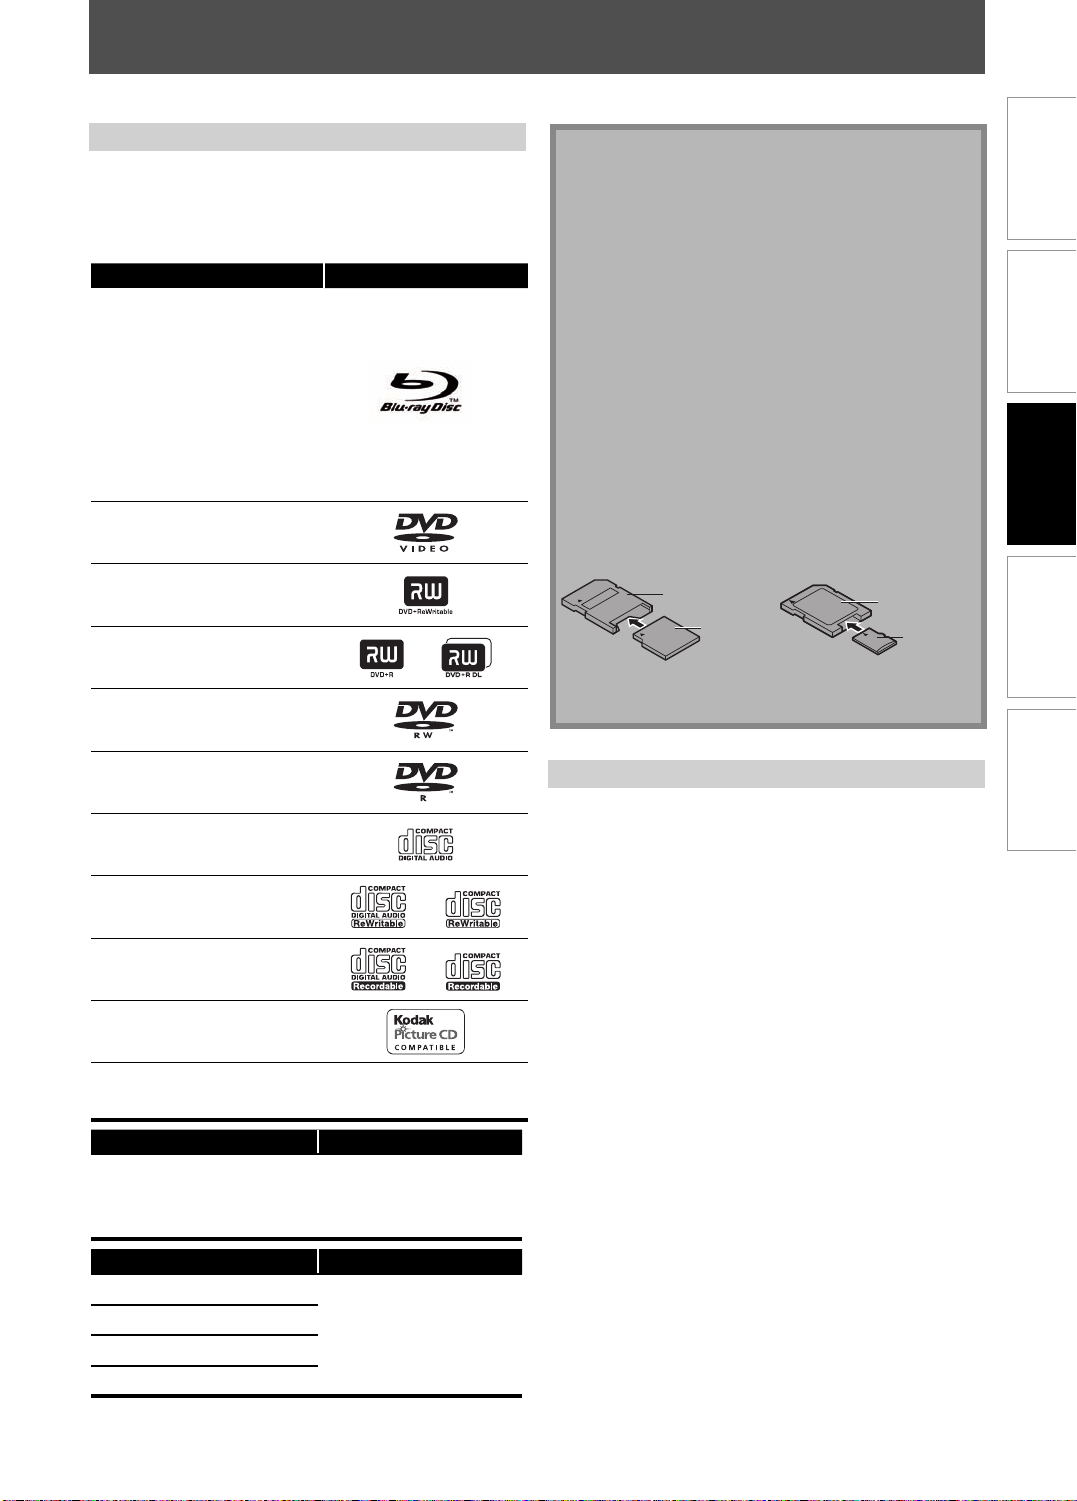
Playable Discs and Files
This unit is compatible to play back the following discs / files.
Playable discs Logos
Blu-ray Disc
- BD-video (single / double layer)
- BD-RE ver.2.1 (single / double layer)
(Recorded in BDMV format)
- BD-R (single / double layer)
(Recorded in BDMV format)
(Unclosed discs may not be played
back.)
DVD-video
DVD+RW (single layer)
DVD+R (single / double layer)
DVD-RW
(finalized video mode discs only)
DVD-R
(finalized video mode discs only)
CD-DA (audio CD)
CD-RW
CD-R
Kodak Picture CD
DTS-CD
Playable files Media
DVD, CD-RW/-R,
JPEG
Readable cards Playable files / data
SD Memory Card (8MB - 2GB)
SDHC Memory Card (4GB)
miniSD Card (8MB - 2GB)
microSD Card (8MB - 2GB)
For miniSD Card and microSD Card, the adapter is necessary.
•
“Blu-ray Disc“ and are trademarks.
is a trademark of DVD Format/Logo Licensing Corporation.
SD Memory Card
(including SDHC),
miniSD Card, microSD Card
JPEG, picture-in-picture
commentary, subtitles or
other extras for BD-ROM
Profile 1 ver.1.1
miniSD Card adapter
miniSD Card
microSD Card adapter
microSD Card
All devices should be turned off and
disconnected from the power outlet,
when you make the connections.
Basic Connections
Supplied cables used in this connection are as follows:
RCA audio cable (L/R) x 1
•
RCA video cable x 1
•
HDMI cable (High Speed HDMI Cable) x 1
•
Please purchase the rest of the necessary cables at your
local store.
Make one of the following connections, depending on the capabilities of your existing device.
AUDIO CONNECTION
TV
audio cable
this unit
RCA
STANDARD
AUDIO
and
Method 1
RCA
video cable
VIDEO OUTAUDIO OUT
STANDARD
PICTURE
OR
VIDEO CONNECTION
Method 2
(Green)
(Blue)
(Red)
(Blue)
BETTER
PICTURE
COMPONENT
VIDEO IN
Y
PB/CB
PR/CR
RCA component
video cable
or or
COMPONENT
VIDEO OUT
PR/CRY
PB/C
(Red)
B
(Green)
COMPONENT VIDEO OUT
Method 3
HDMI-DVI
cable
HDMI OUT
HDMI Connection
AUDIO/VIDEO CONNECTION
BEST
AUDIO /
PICTURE
Method 4
this unit TV
HDMI IN
HDMI cable
DVI I N
BEST
PICTURE
Region Codes
This unit has been designed to play back BD-video with region A and DVD-video with region
BD-videoDVD-video
Press [HDMI] to change the resolution of the video signal being output from HDMI OUT jack.
The video resolution changes as follows every time [HDMI] is pressed.
480p 720p 1080i 1080p 1080p24
“1” or “ALL“.
You cannot play back BD-video or DVD-video that are labeled for other regions. Look for the
symbols on the right on your BD-video or DVD-video. If these region symbols do not appear
on your BD-video or DVD-video, you cannot play back the disc in this unit. The letter or
number inside the globe refers to region of the world. A BD-video or DVD-video labeled for a
specific region can only play back on the unit with the same region code.
Printed in China
EN EN
1VMN25954 / ★★★★★
E5H21UD
Note :
• You cannot select the video resolutions which are not supported by the connected TV.
• In order to get natural and high quality film reproduction of 24-frame film material, use an HDMI cable (High Speed HDMI
Cable is recommended) and select “1080p24” if the connected TV is compatible with 1080p24 frame input.
Follow to the back side of this sheet.
Page 3
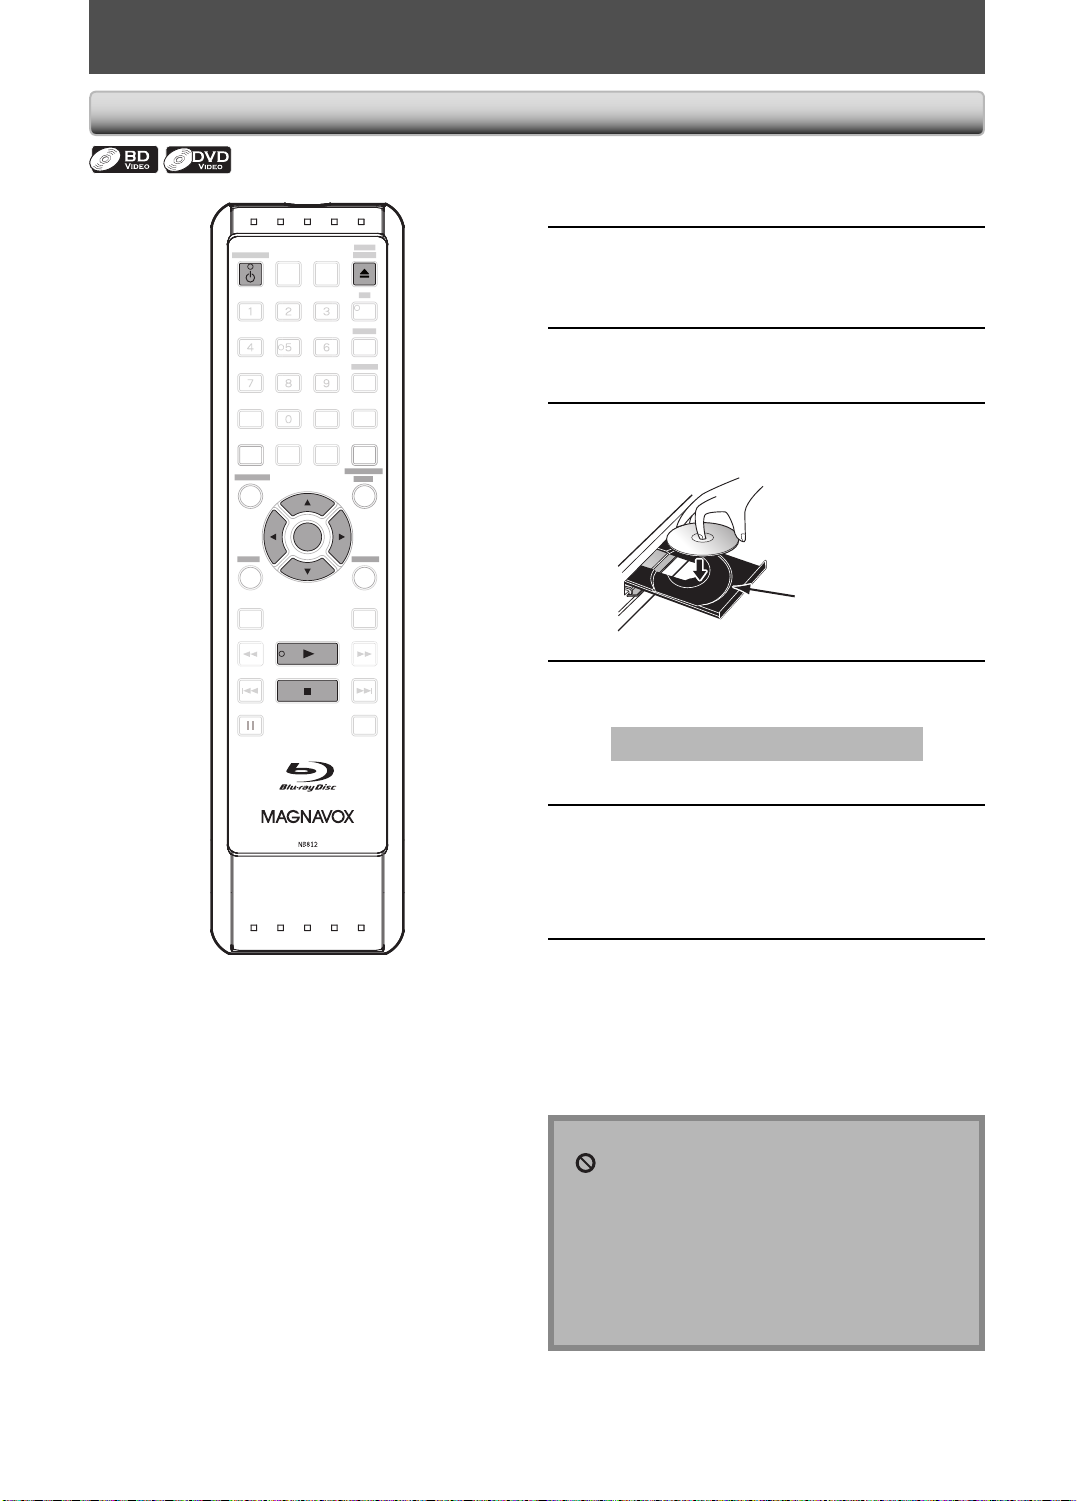
Align the disc to the
disc tray guide.
C
B
MODE
SU
E
S
CH
STANDBY-ON
Connection to an A udio System
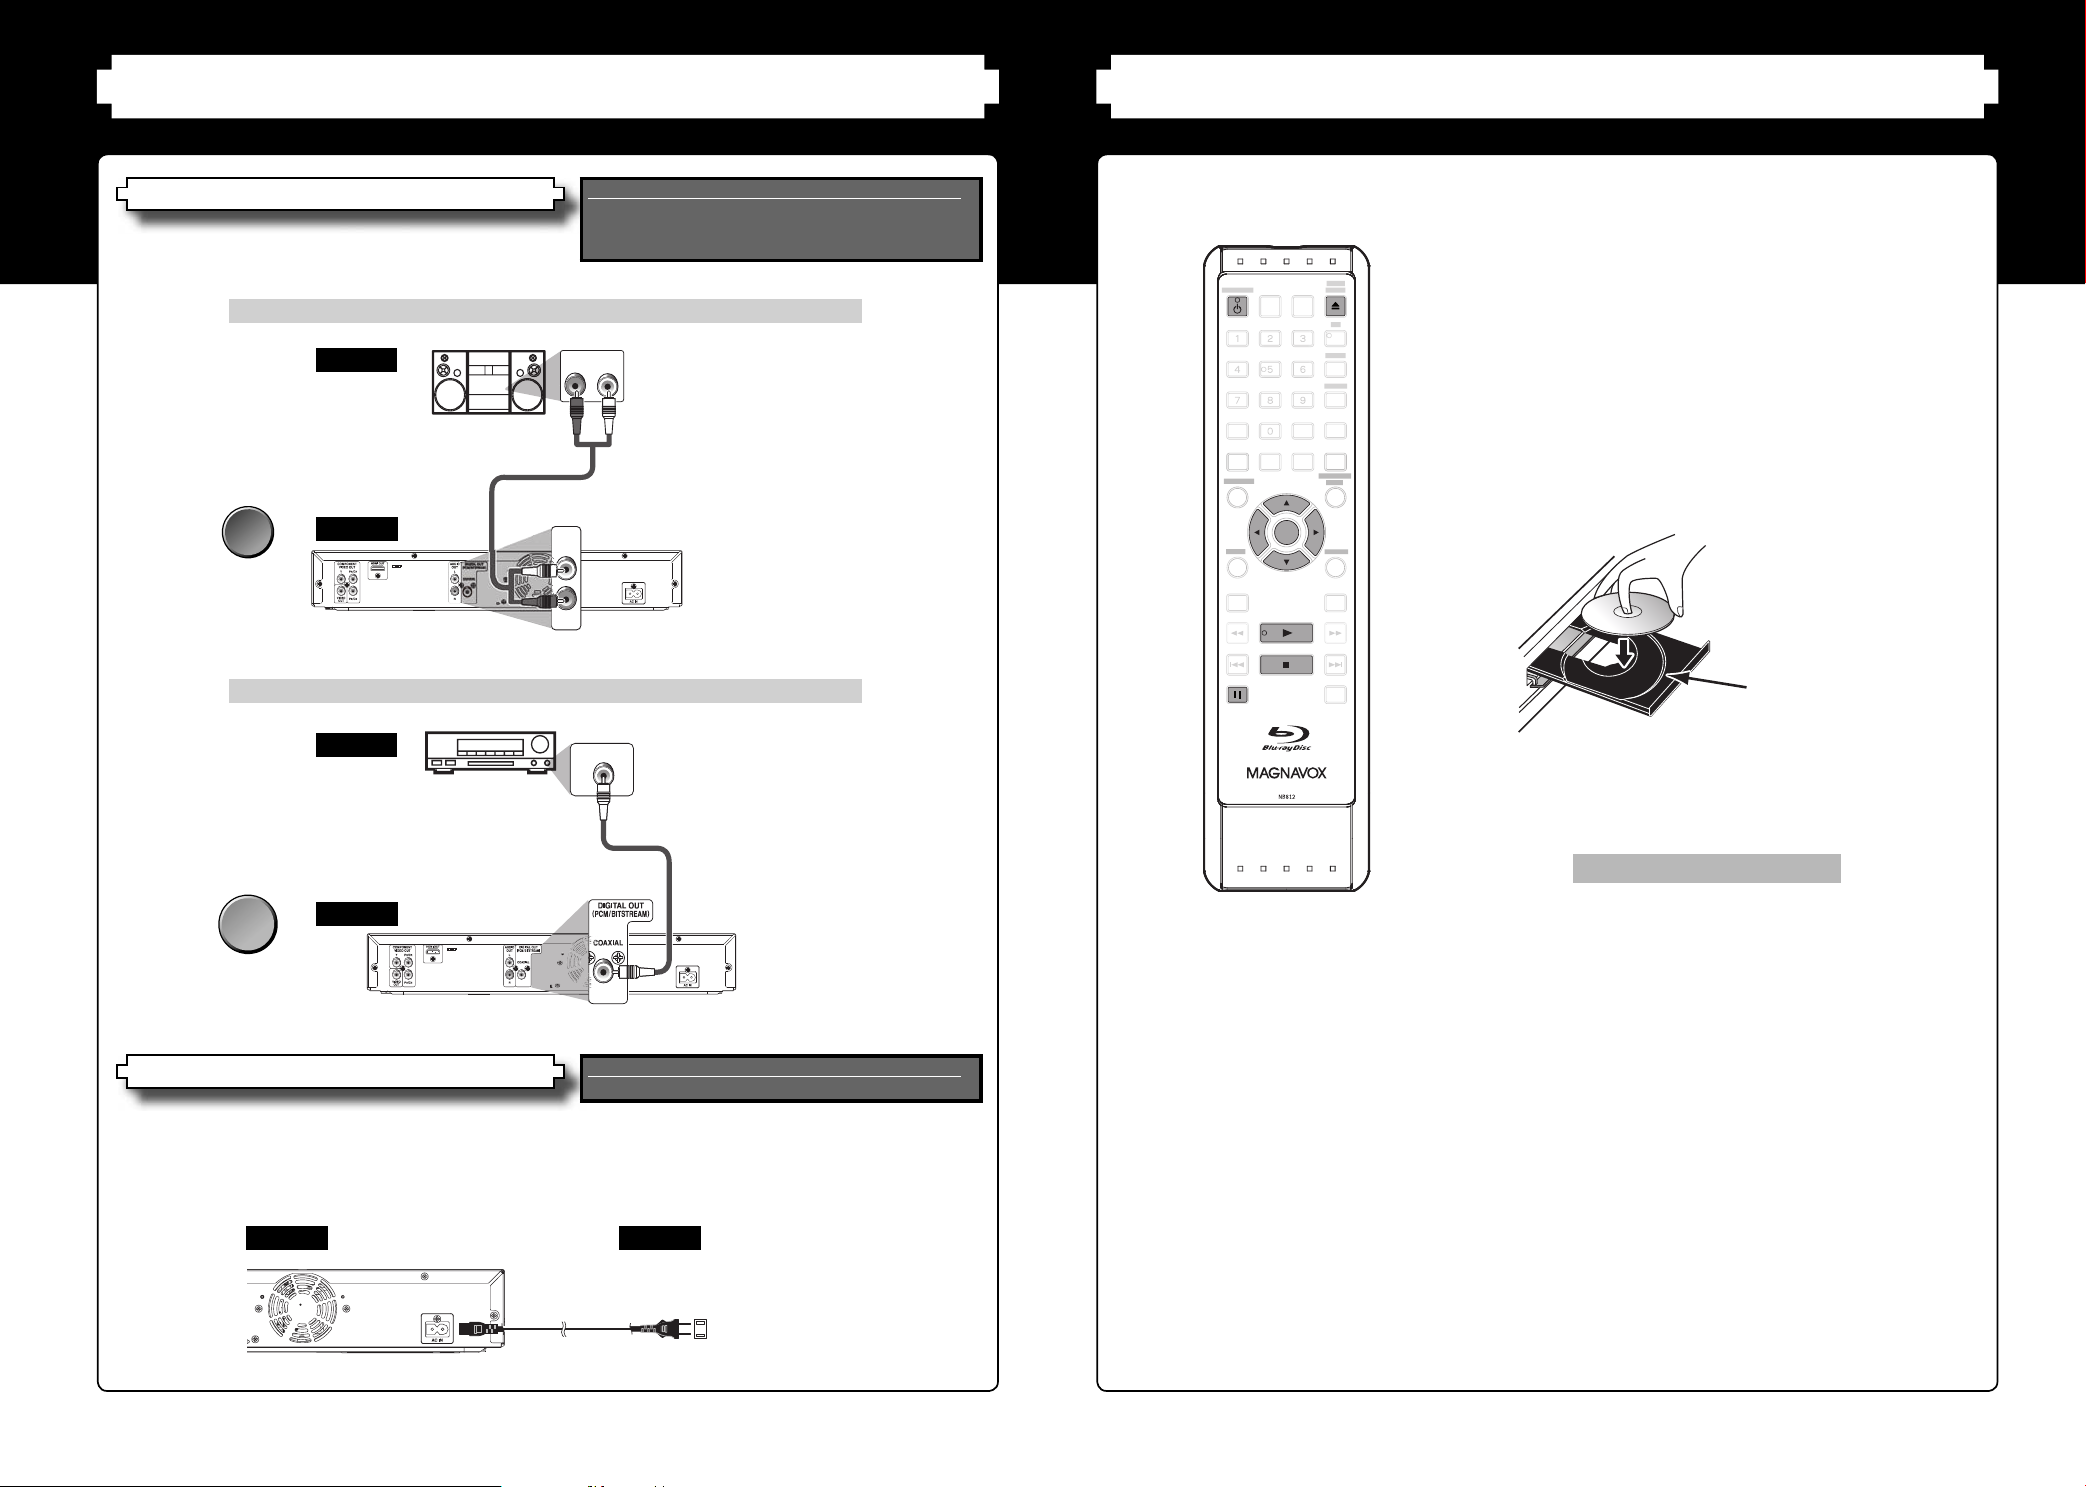
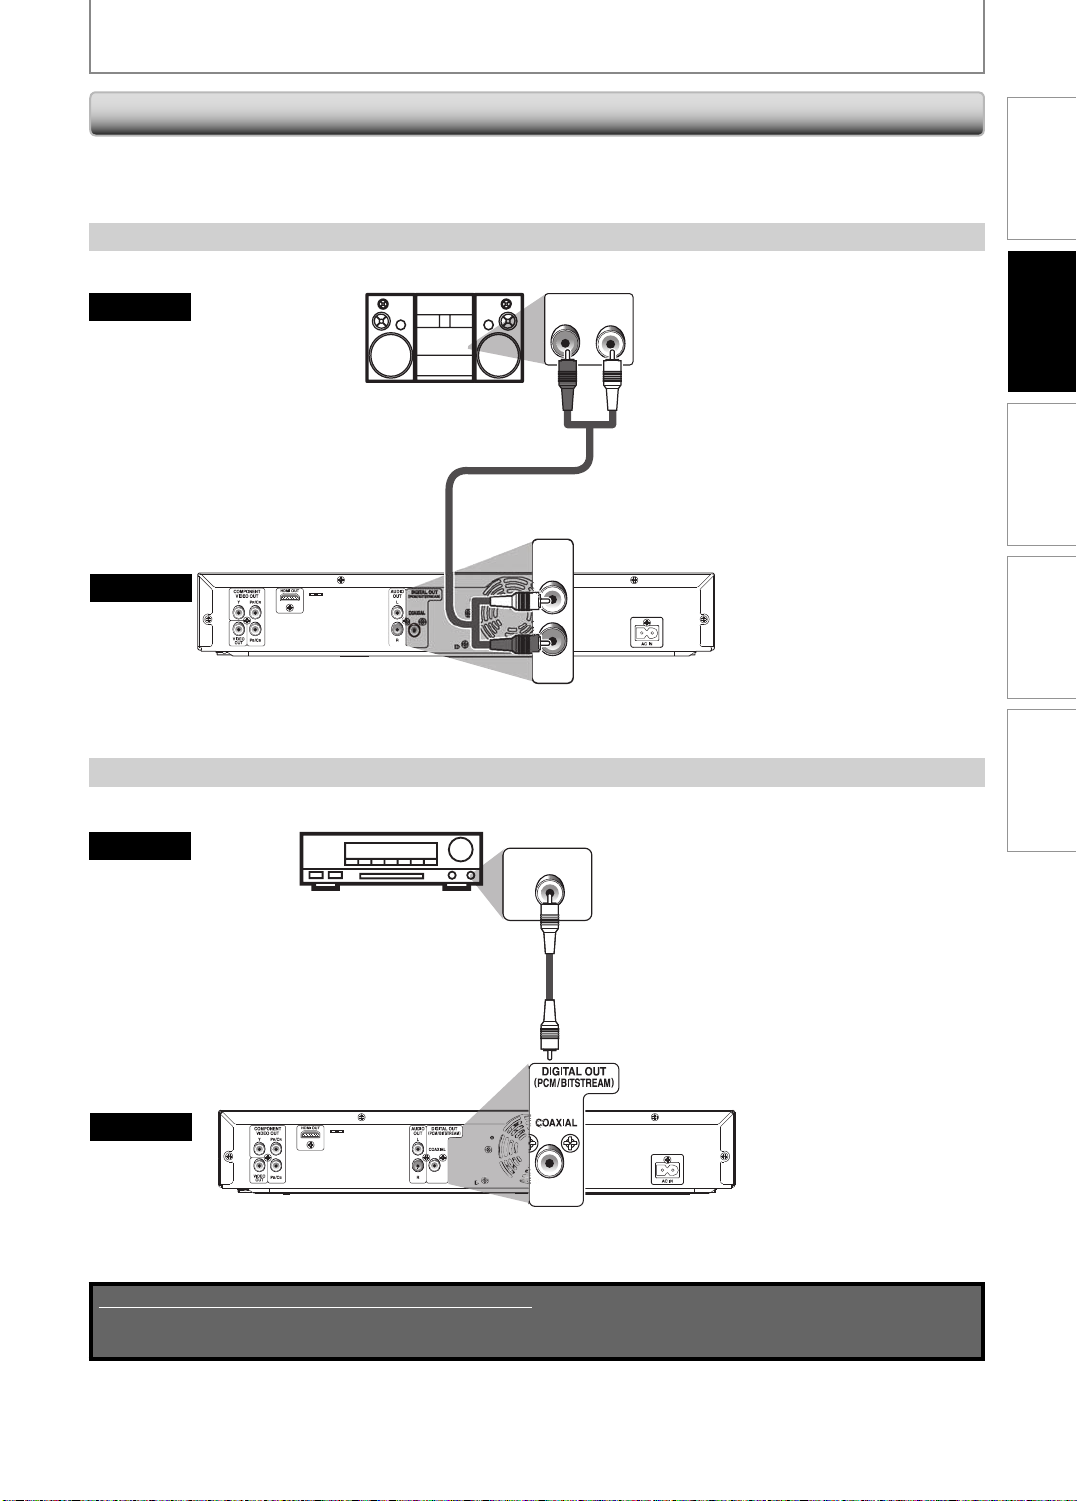
2-Channel Analog Audio Connection
stereo system
audio
STANDARD
AUDIO
this unit
Supplied cables used in this connection are as follows:
•
Please purchase the rest of the necessary cables at your
local store.
AUDIO IN
RCA audio cable
AUDIO
OUT
L
RCA audio cable (L/R) x 1
analog audio input jacks
LR
2. Playback1. Connections (cont'd)
1
Press [ y STANDBY-ON]
Turn on the TV and select the
OPEN/
DISPLAY
EAR
CLOSE
A-
LEAR
OK
2
appropriate input on the TV to which
the unit is connected.
Press [OPEN / CLOSE A ] to open
3
the disc tray.
Place the disc on the disc tray with
4
its label side facing up.
AUDIO OUT
Digital Audio Connection
AV receiver/ampli er
audio
digital audio coaxial cable
BETTER
AUDIO
this unit
DIGITAL OUT (COAXIAL)
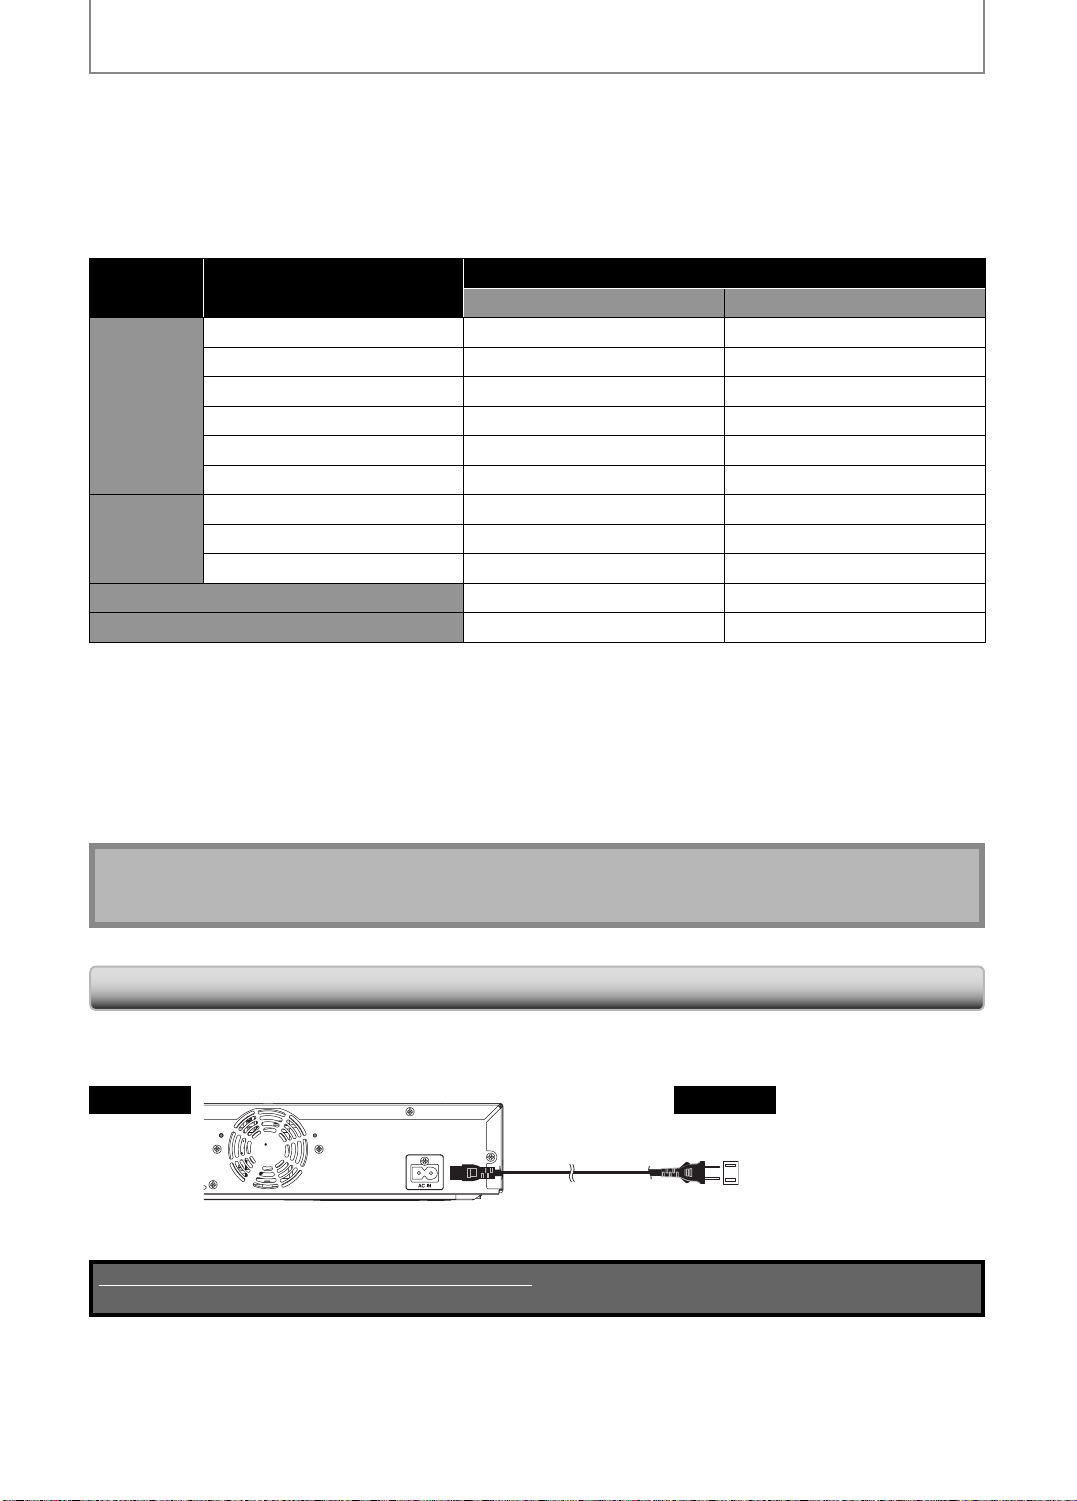
Connecting the AC Cord
After you made all necessary connections, connect the AC cord to the AC IN.
Then connect the AC cord to the AC outlet.
Insert the plugs securely. Incomplete connections will result in the generation of noise.
this unit
R
DIGITAL AUDIO INPUT
COAXIAL
digital audio coaxial input jack
Supplied cables used in this connection are as follows:
AC cord x 1•
AC outlet
BTITL
AUDIO
5
Press [OPEN / CLOSE A ] to close the
disc tray.
It may take a while to load the disc.
Some discs may start playback automatically.
6
Press [PLAY B] to start playback.
For many of BD-video and DVD-video, a menu screen
may appear.
In this case, use [K / L / s / B] to select the desired
item, then press [OK].
To pause playback:
Press [PAUSE F ].
To return to normal playback:
Press [PLAY B ].
To stop playback:
Press [STOP C ].
To eject the disc:
Press [OPEN / CLOSE A ] to open the disc tray, then
remove the disc before turning off the unit.
AC 120V, 60 Hz
AC cord
EN EN
Page 4
PRECAUTIONS
The model and serial numbers of this unit may be found on the cabinet.
You should record and retain those numbers for future reference.
Model No.:
Serial No.:
WARNING: TO REDUCE THE RISK OF FIRE OR ELECTRIC SHOCK, DO NOT EXPOSE THIS
APPARATUS TO RAIN OR MOISTURE.
CAUTION
RISK OF ELECTRIC SHOCK
DO NOT OPEN
CAUTION: TO REDUCE THE RISK OF ELECTRIC
SHOCK, DO NOT REMOVE COVER (OR BACK). NO USER
SERVICEABLE PARTS INSIDE. REFER SERVICING TO
QUALIFIED SERVICE PERSONNEL.
The caution marking is located on the rear or bottom of the cabinet.
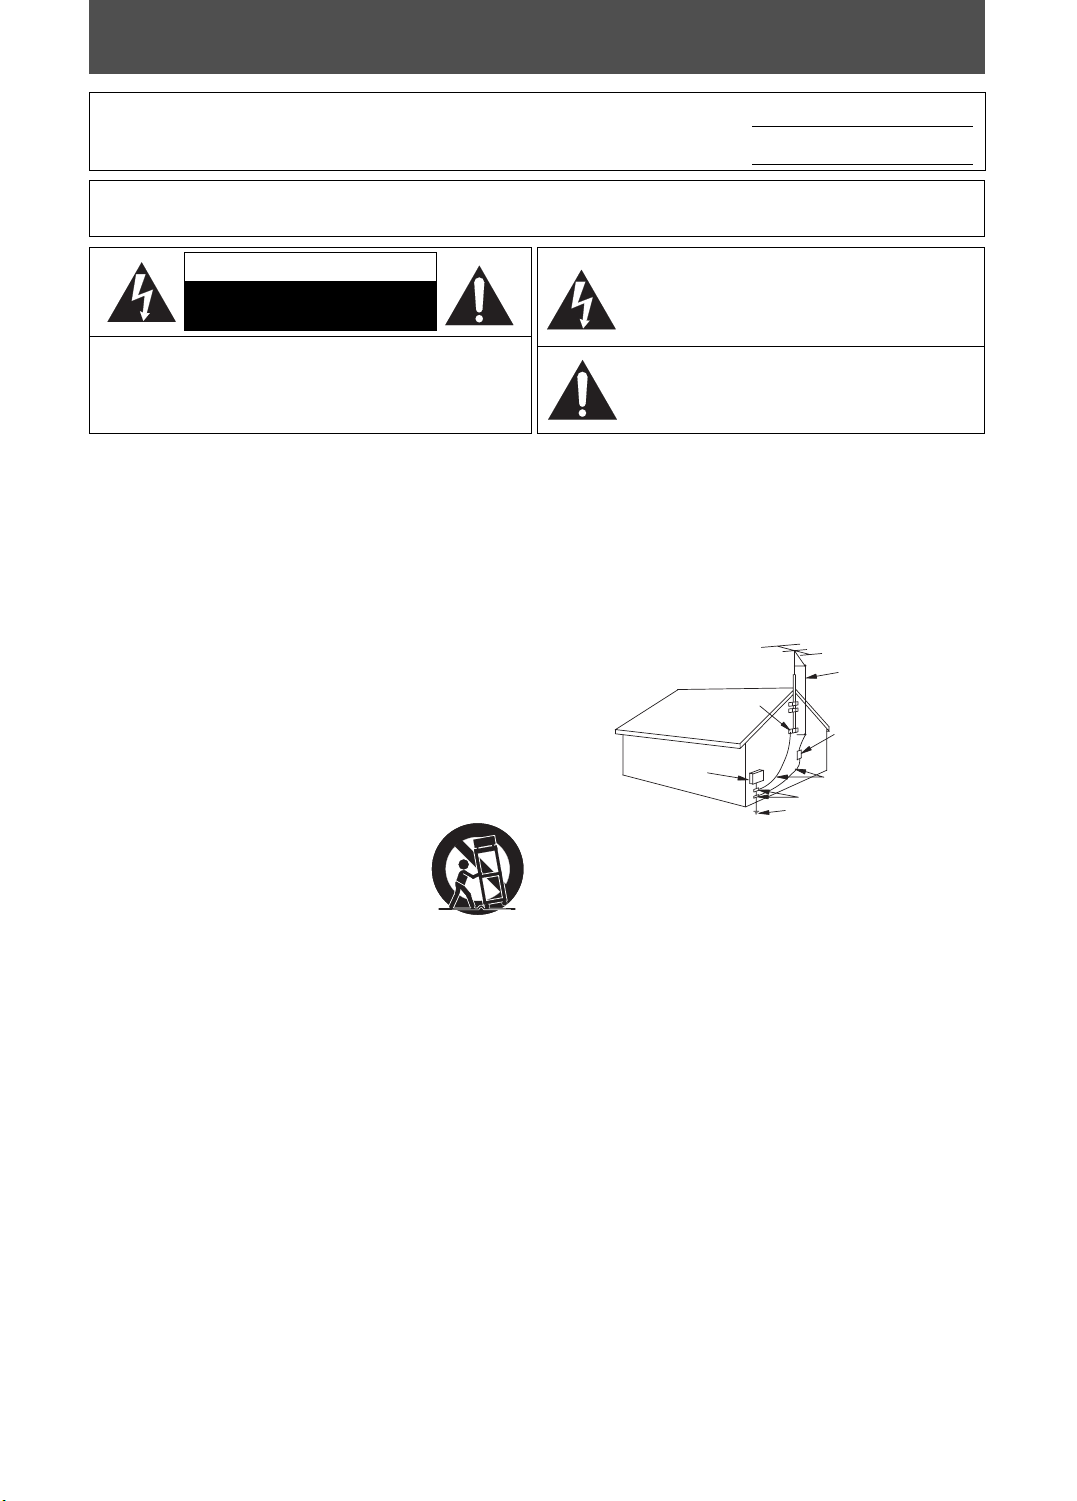
The lightning flash with arrowhead symbol, within an
equilateral triangle, is intended to alert the user to the
presence of uninsulated “dangerous voltage” within the
apparatus’s enclosure that may be of sufficient magnitude
to constitute a risk of electric shock to persons.
The exclamation point within an equilateral triangle is
intended to alert the user to the presence of important
operating and maintenance (servicing) instructions in
the literature accompanying the apparatus.
Important Safeguards
1. READ INSTRUCTIONS - All the safety and operating instructions should
be read before the apparatus is operated.
2. RETAIN INSTRUCTIONS - The safety and operating instructions should
be retained for future reference.
3. HEED WARNINGS - All warnings on the apparatus and in the operating
instructions should be adhered to.
4. FOLLOW INSTRUCTIONS - All operating and use instructions should be
followed.
5. CLEANING - Unplug this apparatus from the wall outlet before cleaning.
Do not use liquid cleaners or aerosol cleaners. Use a damp cloth for
cleaning.
EXCEPTION: An apparatus that is meant for uninterrupted service and,
that for some specific reason, such as the possibility of the loss of an
authorization code for a CATV converter, is not intended to be unplugged
by the user for cleaning or any other purpose, may exclude the reference
to unplugging the apparatus in the cleaning description otherwise
required in item 5.
6. ATTACHMENTS - Do not use attachments not recommended by the
apparatus manufacturer as they may cause hazards.
7. WATER AND MOISTURE - Do not use this apparatus near water, for
example, near a bath tub, wash bowl, kitchen sink, or laundry tub, in a
wet basement, or near a swimming pool, and the like.
8. ACCESSORIES - Do not place this apparatus on an
unstable cart, stand, tripod, bracket, or table. The
apparatus may fall, causing serious injury to someone,
and serious damage to the apparatus. Use only with a
cart, stand, tripod, bracket, or table recommended by the
manufacturer, or sold with the apparatus. Any mounting
of the apparatus should follow the manufacturer’
s instructions and should use a mounting accessory
recommended by the manufacturer. An apparatus and cart combination
should be moved with care. Quick stops, excessive force, and uneven
surfaces may cause the apparatus and cart combination to overturn.
9. VENTILATION - Slots and openings in the cabinet and the back or
bottom are provided for ventilation and to ensure reliable operation of
the apparatus and to protect it from overheating, these openings must
not be blocked or covered. The openings should never be blocked by
placing the apparatus on a bed, sofa, carpet, rug, or other similar surface.
This apparatus should never be placed near or over a radiator or heat
register. This apparatus should not be placed in a built-in installation
such as a bookcase or rack unless proper ventilation is provided or the
manufacturer’s instructions have been adhered to.
10. POWER SOURCES - This apparatus should be operated only from the
type of power source indicated on the marking label. If you are not sure
of the type of power supply to your home, consult your apparatus dealer
or local power company. For the apparatus’s intended to operate from
battery power, or other sources, refer to the operating instructions.
11. GROUNDING OR POLARIZATION - This apparatus is equipped with a
polarized alternating-current line plug (a plug having one blade wider
than the other). This plug will fit into the power outlet only one way.
This is a safety feature. If you are unable to insert the plug fully into the
outlet, try reversing the plug. If the plug should still fail to fit, contact
your electrician to replace your obsolete outlet. Do not defeat the safety
purpose of the polarized plug.
12. POWER-CORD PROTECTION - Power-supply cords should be routed
so that they are not likely to be walked on or pinched by items placed
upon or against them, paying particular attention to cords at plugs,
convenience receptacles, and the point where they exit from the
apparatus.
2
13. OUTDOOR ANTENNA GROUNDING - If an outside antenna or cable
system is connected to the apparatus, be sure the antenna or cable
system is grounded so as to provide some protection against voltage
surges and built-up static charges. Article 810 of the National Electrical
Code, ANSI/NFPA No. 70, provides information with respect to proper
grounding of the mast and supporting structure, grounding of the lead-in
wire to an antenna discharge unit, size of grounding conductors, location
of antenna-discharge unit, connection to grounding electrodes, and
requirements for the grounding electrode. (Fig. A)
EXAMPLE OF ANTENNA GROUNDING
AS PER NATIONAL ELECTRICAL CODE
NEC – NATIONAL ELECTRICAL CODE
14. LIGHTNING - For added protection for this apparatus receiver during a
lightning storm, or when it is left unattended and unused for long periods
of time, unplug it from the wall outlet and disconnect the antenna or
cable system. This will prevent damage to the apparatus due to lightning
and power-line surges.
15. POWER LINES - An outside antenna system should not be located in the
vicinity of overhead power lines or other electric light of power circuits,
or where it can fall into such power lines or circuits. When installing an
outside antenna system, extreme care should be taken to keep from
touching such power lines or circuits as contact with them might be fatal.
16. OVERLOADING - Do not overload wall outlets and extension cords as this
can result in a risk of fire or electric shock.
17. OBJECT AND LIQUID ENTRY - Never push objects of any kind into this
apparatus through openings as they may touch dangerous voltage points
or short out parts that could result in a fire or electric shock. Never spill
liquid of any kind on the apparatus.
18. SERVICING - Do not attempt to service this apparatus yourself as
opening or removing covers may expose you to dangerous voltage or
other hazards. Refer all servicing to qualified service personnel.
19. DAMAGE REQUIRING SERVICE - Unplug this apparatus from the wall
outlet and refer servicing to qualified service personnel under the
following conditions:
a. When the power supply cord or plug is damaged or frayed.
b. If liquid has been spilled, or objects have fallen into the apparatus.
c. If the apparatus has been exposed to rain or water.
d. If the apparatus does not operate normally by following the operating
instructions. Adjust only those controls that are covered by the
operating instructions, as improper adjustment of other controls may
result in damage and will often require extensive work by a qualified
technician to restore the apparatus to its normal operation.
e. If the apparatus has been dropped or damaged in any way.
f. When the apparatus exhibits a distinct change in performance, this
indicates a need for service.
20. REPLACEMENT PARTS - When replacement parts are required, be sure the
service technician uses replacement parts specified by the manufacturer that
have the same characteristics as the original part. Unauthorized substitutions
may result in fire, electric shock, injury to persons or other hazards.
21. SAFETY CHECK - Upon completion of any service or repairs to this
apparatus, ask the service technician to perform routine safety checks to
determine that the apparatus is in proper operating condition.
22. HEAT - This apparatus should be situated away from heat sources such as
radiators, heat registers, stoves, or other products (including amplifiers)
that produce heat.
FIGURE A
ELECTRIC
SERVICE
EQUIPMENT
GROUND
CLAMP
POWER SERVICE GROUNDING
ELECTRODE SYSTEM
(NEC ART 250, PART H)
ANTENNA
LEAD
WIRE
ANTENNA
DISCHARGE UNIT
(NEC SECTION 810-20)
GROUNDING CONDUCTORS
(NEC SECTION 810-21)
GROUND CLAMP
EN
Page 5

PRECAUTIONS
Do not place the unit on the furniture that is capable of being tilted by a child and an adult leaning, pulling, standing
or climbing on it. A falling unit can cause serious injury or even death.
CAUTION: To prevent electric shock, match wide blade of plug to wide slot, fully insert.
FCC WARNING
This apparatus may generate or use radio frequency energy. Changes or modifications to this apparatus may cause
harmful interference unless the modifications are expressly approved in the manual. The user could lose the authority
to operate this apparatus if an unauthorized change or modification is made.
RADIO-TV INTERFERENCE
This apparatus has been tested and found to comply with the limits for a Class B digital device, pursuant to Part 15 of
the FCC Rules. These limits are designed to provide reasonable protection against harmful interference in a
residential installation. This apparatus generates, uses, and can radiate radio frequency energy and, if not installed
and used in accordance with the instructions, may cause harmful interference to radio communications. However,
there is no guarantee that interference will not occur in a particular installation. If this apparatus does cause harmful
interference to radio or television reception, which can be determined by turning the apparatus off and on, the user
is encouraged to try to correct the interference by one or more of the following measures:
1) Reorient or relocate the receiving antenna.
2) Increase the separation between the apparatus and receiver.
3) Connect the apparatus into an outlet on a circuit different from that to which the receiver is connected.
4) Consult the dealer or an experienced radio/TV technician for help.
This Class B digital apparatus complies with Canadian ICES-003.
NOTE TO CATV SYSTEM INSTALLER
This reminder is provided to call the CATV system installer's attention to Article 820-40 of the NEC that provides
guidelines for proper grounding and, in particular, specifies that the cable ground should be connected to the
grounding system of the building as close to the point of cable entry as practical.
Introduction
Connections
Playback Function Setup Others
LASER SAFETY
This apparatus employs a laser. Only a qualified service person should remove the cover or attempt to service this
apparatus, due to possible eye injury.
CAUTION: Use of controls or adjustments or performance of procedures other than those specified herein may
CAUTION: Visible and invisible laser radiation when open and interlock defeated. Do not stare into beam.
LOCATION: Inside, near the deck mechanism.
ABOUT COPYRIGHT
Unauthorized copying, broadcasting, public performance and lending of discs are prohibited. This product
incorporates copyright protection technology that is protected by U.S. patents and other intellectual property rights.
Use of this copyright protection technology must be authorized by Macrovision, and is intended for home and other
limited viewing uses only unless otherwise authorized by Macrovision. Reverse engineering or disassembly is
prohibited.
result in hazardous radiation exposure.
EN
3
Page 6
PRECAUTIONS
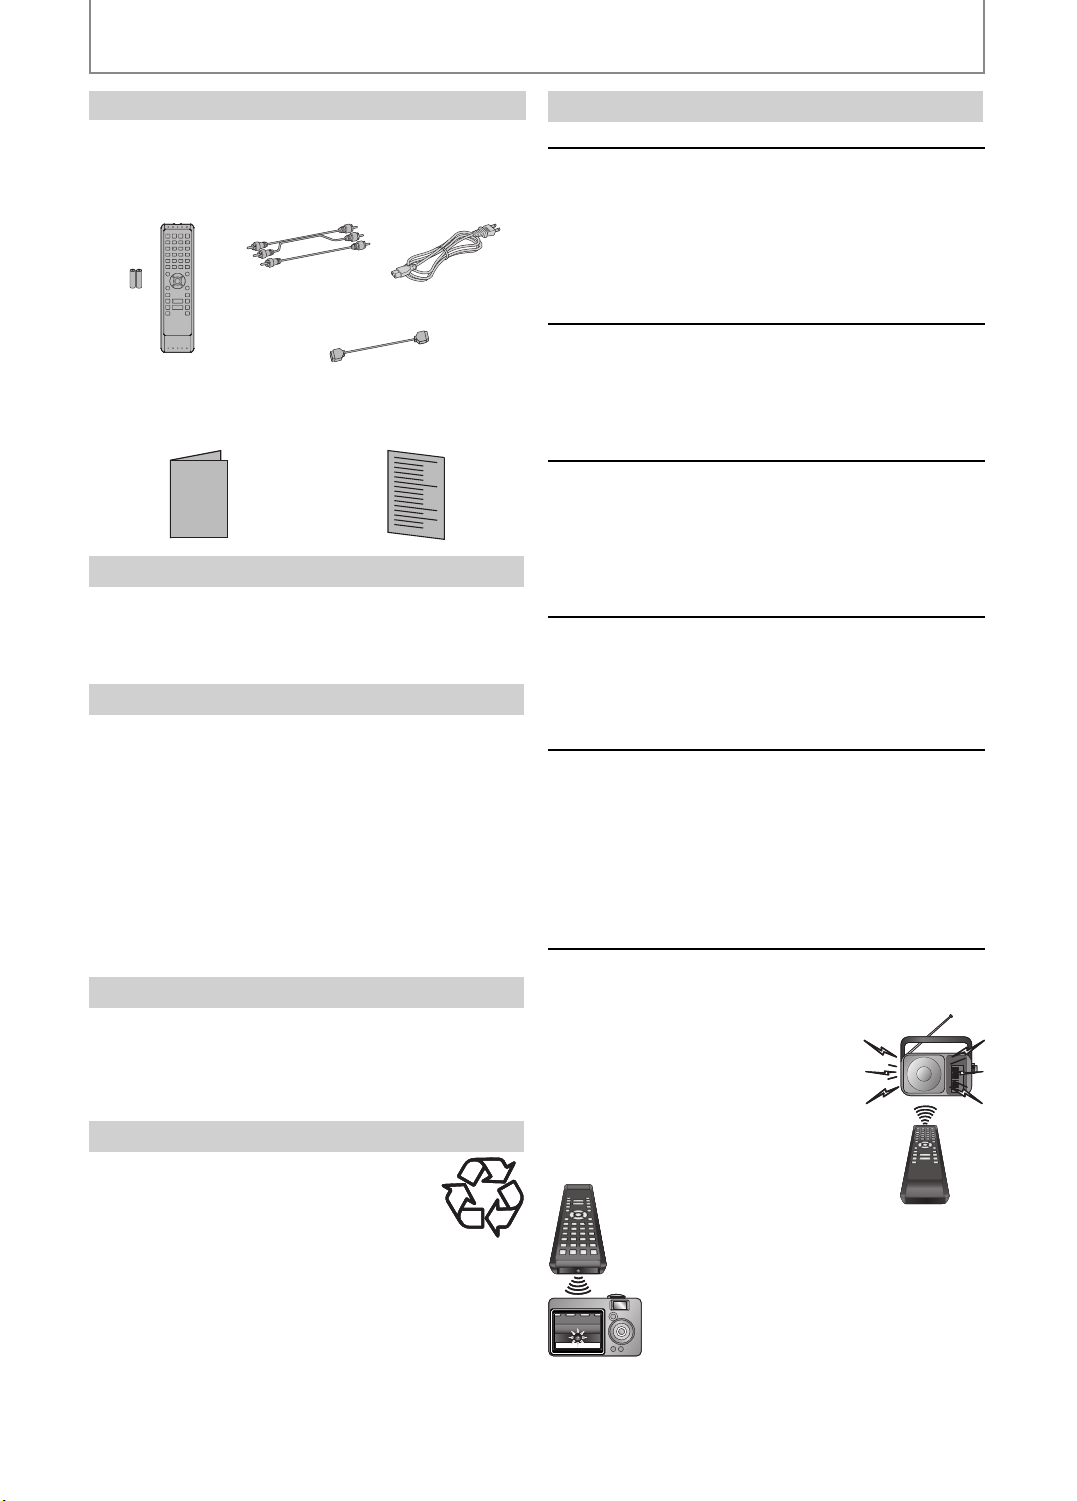
Supplied Accessories
remote control
with batteries
(AAx2) (NB812UD)
owner’s manual (EN/ES/FR)
(1VMN25953 / 1VMN25955
/ 1VMN25957)
Owner’s Manual
RCA audio / video
cables
(WPZ0102TM015 /
WPZ0102LTE01)
HDMI cable (High Speed HDMI Cable)
(WPZ0202AP001)
quick start guide (EN/ES/FR)
(1VMN25954 / 1VMN25956)
AC cord
(WAV0162LW001)
To Avoid the Hazards of Electrical Shock and Fire
Do not handle the power cord with wet hands.
•
Do not pull on the power cord when disconnecting it
•
from an AC outlet. Grasp it by the plug.
Do not put your fingers or objects into the unit.
•
Installation Location
For safety and optimum performance of this unit:
Install the unit in a horizontal and stable position. Do
•
not place anything directly on top of the unit. Do not
place the unit directly on top of the TV.
Shield it from direct sunlight and keep it away from
•
devices of intense heat. Avoid dusty or humid places.
Avoid places with insufficient ventilation for proper heat
dissipation. Do not block the ventilation holes on the
back and sides of the unit. Avoid locations subject to
strong vibration or strong magnetic fields.
Be sure to remove the disc and unplug the AC power
•
cord from the outlet before carrying the unit.
Moisture Condensation Warning
Moisture condensation may occur inside the unit when it
is moved from a cold place to a warm place or after
heating a cold room or under conditions of high
humidity. Do not use this unit at least for 2 hours until its
inside gets dry.
Note about Recycling
This unit’s packaging materials are recyclable
•
and can be reused. Please dispose of any
materials in accordance with your local
recycling regulations.
Batteries should never be thrown away or
•
incinerated but disposed of in accordance with your
local regulations concerning chemical wastes.
Maintenance
Servicing
•
Please refer to relevant topics on “TROUBLESHOOTING” on
page 43 before returning the product.
•
If this unit becomes inoperative, do not try to correct the
problem by yourself. There are no user-serviceable parts
inside. Turn off, unplug the power plug, and please call our
toll free customer support line found on the cover of this
manual to locate an authorized service center.
Cleaning the cabinet
•
Wipe the front panel and other exterior surfaces of the
unit with a soft, slightly damp cloth.
•
Never use a solvent, thinner, benzene or alcohol to clean
the unit. Do not spray insecticide liquid near the unit. Such
chemicals may discolor the surface or damage the unit.
Cleaning discs
•
When a disc becomes dirty, clean it with a cleaning
cloth. Wipe the disc from the center to out. Do not wipe
in a circular motion.
•
Do not use solvents such as benzine, thinner, commercially
available cleaners, detergent, abrasive cleaning agents or
antistatic spray intended for analog records.
Cleaning the disc lens
•
If this unit still does not perform properly although you
refer to the relevant sections and to “TROUBLESHOOTING”
in this user manual, the laser optical pickup unit may be
dirty. Consult your dealer or an authorized service center
for inspection and cleaning of the laser optical pickup unit.
Disc handling
•
Handle the discs so that fingerprints and dust do not
adhere to the surfaces of the discs.
•
Always store the disc in its protective case when it is not
used.
•
Note that discs with special shapes (heart-shaped discs,
octagonal discs, etc.) cannot be played back on this unit.
Do not attempt to playback such discs, as they may
damage the unit.
IR signal check
If the remote control is not working properly, you can
•
use an AM radio or digital camera (including a cellular
phone with built-in camera) to see if it is sending out an
infrared signal.
With an AM radio:
•
Tune the AM radio station to a nonbroadcasting frequency. Point the
remote control towards it, push any
button and listen. If the sound from
the radio flutters, it is receiving the
remote control’s infrared signal.
With a digital camera
•
(including built-in cell
phone cameras):
Point a digital camera towards the remote
control. Push any button on the remote
control and look through the digital
camera. If the infrared light appears
through the camera, the remote control is
working.
4
EN
Page 7
PRECAUTIONS
Trademark Information
HDMI, the HDMI logo and High-Definition Multimedia
Interface are trademarks or registered trademarks of
HDMI Licensing LLC.
Manufactured under license from Dolby Laboratories.
Dolby and the double-D symbol are trademarks of Dolby
Laboratories.
Manufactured under license under U.S. Patent #’s:
5,451,942; 5,956,674; 5,974,380; 5,978,762; 6,487,535 &
other U.S. and worldwide patents issued & pending. DTS
and DTS Digital Surround are registered trademarks and
the DTS logos and Symbol are trademarks of DTS, Inc.
© 1996-2007 DTS, Inc. All Rights Reserved.
“Blu-ray Disc“ and
is a trademark of DVD Format/Logo Licensing
Corporation.
are trademarks.
Introduction
Connections
Java and all other Java trademarks and logos are
trademarks or registered trademarks of Sun Microsystems,
Inc. in the United States and / or other countries.
Playback Function Setup Others
Products that have earned ENERGY STAR® are designed to
protect the environment through superior energy
efficiency.
is trademark of Eastman Kodak Company.
© 2008 Funai Electric Co., Ltd.
All rights reserved. No part of this manual may be reproduced, copied, transmitted, disseminated, transcribed,
downloaded or stored in any storage medium, in any form or for any purpose without the express prior written consent
of Funai. Furthermore, any unauthorized commercial distribution of this manual or any revision hereto is strictly
prohibited.
Information in this document is subject to change without notice. Funai reserves the right to change the content
herein without the obligation to notify any person or organization of such changes.
with the design is a registered trademark of Funai Electric Co., Ltd and may not be used in any way without
the express written consent of Funai. All other trademarks used herein remain the exclusive property of their
respective owners. Nothing contained in this manual should be construed as granting, by implication or otherwise, any
license or right to use any of the trademarks displayed herein. Misuse of any trademarks or any other content in this
manual is strictly prohibited. Funai shall aggressively enforce its intellectual property rights to the fullest extent of the
law.
EN
5
Page 8

CONTENTS
Introduction
PRECAUTIONS . . . . . . . . . . . . . . . . . . . . . . . . . . . . . . . . . . . 2
FEATURES . . . . . . . . . . . . . . . . . . . . . . . . . . . . . . . . . . . . . . . 7
Features . . . . . . . . . . . . . . . . . . . . . . . . . . . . . . . . . . . . . . . . . . . .7
Symbols Used in this Manual . . . . . . . . . . . . . . . . . . . . . . . .7
FUNCTIONAL OVERVIEW . . . . . . . . . . . . . . . . . . . . . . . . . 8
Front Panel . . . . . . . . . . . . . . . . . . . . . . . . . . . . . . . . . . . . . . . . .8
Rear Panel . . . . . . . . . . . . . . . . . . . . . . . . . . . . . . . . . . . . . . . . . .8
Remote Control . . . . . . . . . . . . . . . . . . . . . . . . . . . . . . . . . . . . .9
Front Panel Display. . . . . . . . . . . . . . . . . . . . . . . . . . . . . . . . 11
Connections
CONNECTIONS. . . . . . . . . . . . . . . . . . . . . . . . . . . . . . . . . . 12
Connection to the TV. . . . . . . . . . . . . . . . . . . . . . . . . . . . . . 12
Connection to an Audio System . . . . . . . . . . . . . . . . . . . 15
Connecting the AC Cord. . . . . . . . . . . . . . . . . . . . . . . . . . . 16
Playback
INFORMATION ON PLAYBACK . . . . . . . . . . . . . . . . . . . 17
BASIC PLAYBACK . . . . . . . . . . . . . . . . . . . . . . . . . . . . . . . 20
Playback . . . . . . . . . . . . . . . . . . . . . . . . . . . . . . . . . . . . . . . . . . 20
Operations Using Title Menu, Disc Menu,
and Pop-up Menu . . . . . . . . . . . . . . . . . . . . . . . . . . . . . . . . . 21
Pause . . . . . . . . . . . . . . . . . . . . . . . . . . . . . . . . . . . . . . . . . . . . . 21
Resume Playback . . . . . . . . . . . . . . . . . . . . . . . . . . . . . . . . . 21
Playing Back an audio CD and a Disc with
JPEG Files . . . . . . . . . . . . . . . . . . . . . . . . . . . . . . . . . . . . . . . . . 22
Reading the SD Memory Card . . . . . . . . . . . . . . . . . . . . . 23
SPECIAL PLAYBACK . . . . . . . . . . . . . . . . . . . . . . . . . . . . . 25
Fast Forward / Fast Reverse. . . . . . . . . . . . . . . . . . . . . . . . 25
Slow Forward Playback . . . . . . . . . . . . . . . . . . . . . . . . . . . . 25
Step by Step Playback . . . . . . . . . . . . . . . . . . . . . . . . . . . . . 25
Repeat Playback . . . . . . . . . . . . . . . . . . . . . . . . . . . . . . . . . . 25
A-B Repeat. . . . . . . . . . . . . . . . . . . . . . . . . . . . . . . . . . . . . . . . 26
PIP (Picture in Picture) Setting . . . . . . . . . . . . . . . . . . . . . 26
Program Playback . . . . . . . . . . . . . . . . . . . . . . . . . . . . . . . . . 26
Random Playback . . . . . . . . . . . . . . . . . . . . . . . . . . . . . . . . . 27
Camera Angle. . . . . . . . . . . . . . . . . . . . . . . . . . . . . . . . . . . . . 27
SEARCH . . . . . . . . . . . . . . . . . . . . . . . . . . . . . . . . . . . . . . . . 28
SPECIAL SETTINGS . . . . . . . . . . . . . . . . . . . . . . . . . . . . . . 29
Switching Subtitles. . . . . . . . . . . . . . . . . . . . . . . . . . . . . . . . 29
Switching Audio Soundtrack . . . . . . . . . . . . . . . . . . . . . . 29
Setting the BD Audio Mode . . . . . . . . . . . . . . . . . . . . . . . 30
Adjusting the Picture. . . . . . . . . . . . . . . . . . . . . . . . . . . . . . 30
Function Setup
FUNCTION SETUP . . . . . . . . . . . . . . . . . . . . . . . . . . . . . . . 31
Using the Setup Menu. . . . . . . . . . . . . . . . . . . . . . . . . . . . . 31
Others
TROUBLESHOOTING . . . . . . . . . . . . . . . . . . . . . . . . . . . . 43
GLOSSARY . . . . . . . . . . . . . . . . . . . . . . . . . . . . . . . . . . . . . 44
LANGUAGE CODE . . . . . . . . . . . . . . . . . . . . . . . . . . . . . . . 45
SPECIFICATIONS . . . . . . . . . . . . . . . . . . . . . . . . . . . . . . . . 46
LIMITED WARRANTY . . . . . . . . . . . . . . . . . . . . Back Cover
6
EN
Page 9
FEATURES
Features
Full high-definition video playback
Watch movies in the highest picture quality available for
your HDTV. This unit offers full high-definition video
playback up to 1080p resolution for an amazing viewing
experience. A highly detailed picture and increased
sharpness delivers a more true-to-life picture.
HDMI
1080p / fps output (BD only)
This unit is equipped with the feature which can provide
the smooth movement in the playback of film originated
material with the frame rate of 24 frames per second with
progressive. (Available only when the TV is connected by
an HDMI cable and compatible with 1080p24 frame
input.)
Refer to “HDMI Video Resolution” in “FUNCTION SETUP”
on page 34.
Introduction
Connections
Upconvert DVD for enhanced picture quality
Your current DVD will look even better than before
thanks to video upconversion. Upconversion will increase
the resolution of standard definition DVD to high
definition up to 1080p over an HDMI connection. The
picture will be less jagged and more realistic for a near
high-definition experience.
Enjoy your content on different kinds of media
Full backwards compatibility with DVD, CD ensures that
you can continue to enjoy your current audio-video
collection. Additionally, you can view JPEG.
Listen to the rich multi-channel surround sound
Multi-channel surround sound, which realizes real-to-life
sound and makes you feel that you are really there.
Easy and simple connection to your HDTV via HDMI
Connect this unit to your HDTV with one single HDMI
(high definition multimedia interface) cable. It is
recommended to use High Speed HDMI Cable for better
compatibility. The high definition video output signal will
be transferred to your HDTV without conversion to
analogue signals, so you will get an excellent picture and
sound quality, completely free from noise.
Thanks to other multiple outputs, you can also easily
connect to your home theater system or amplifier.
Playing back the contents in SD Memory Card
You can play back JPEG stored in an SD Memory Card.
You can store picture-in-picture commentary, subtitles or
other extras for BD-ROM Profile 1 ver.1.1 files in an SD
Memory Card and play back with the BD-video.
Playback Function Setup Others
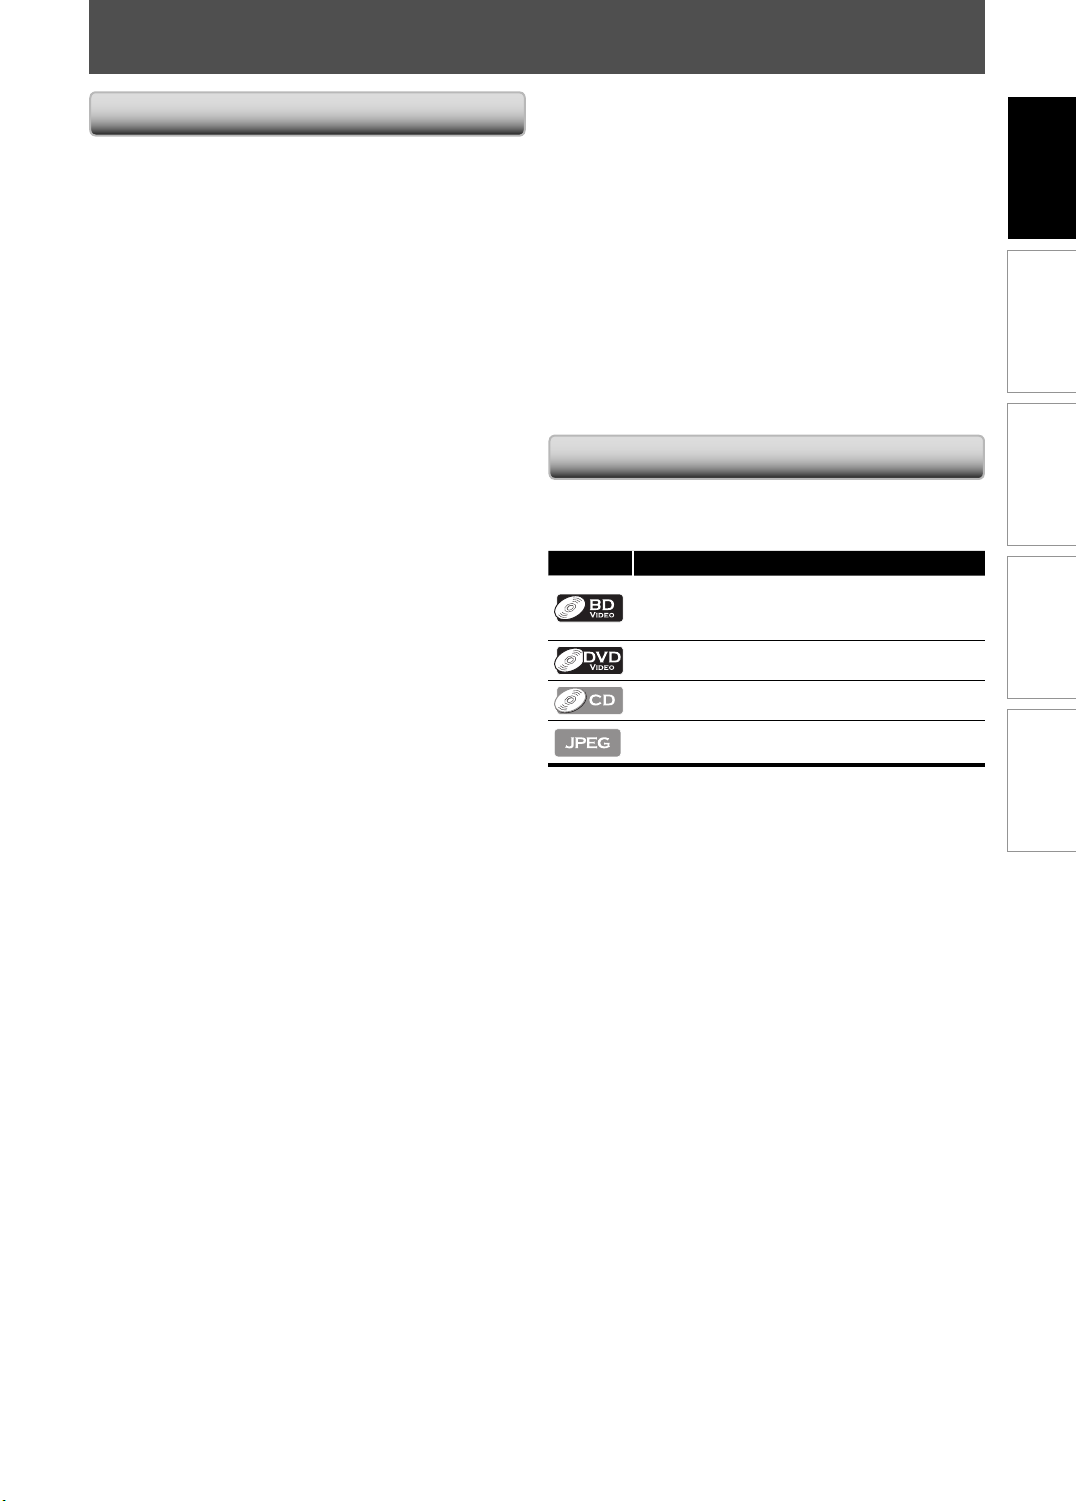
Symbols Used in this Manual
To specify for which media type each function is, we put
the following symbols at the beginning of each item to
operate.
Symbol Description
Description refers to BD-video and
BD-RE (ver. 2.1) / BD-R recorded in BDMV
format
Description refers to DVD-video
Description refers to audio CD / DTS-CD
Description refers to DVD, CD-RW/-R and
SD Memory Card with JPEG files
If you do not find any of the symbols listed above under
the function heading, the operation is applicable to all
media.
PIP
Some BD-video have the PIP (picture-in-picture) function
which enables you to display the secondary video in the
primary video. You can call up the secondary video by
pressing [PIP] whenever the scene contains the
secondary video.
Pop-up menu
Some BD-video have pop-up menu which is a navigation
menu that can be called up and be operated on the TV
screen without interrupting the playback. You can call up
the pop-up menu by pressing [POP MENU / MENU].
Contents in the pop-up menu vary depending on the
disc.
HDMI Deep Color
Deep Color reduces the posterization effect of the
playback image. Refer to “HDMI Deep Color” in
“FUNCTION SETUP” on page 34.
EN
7
Page 10
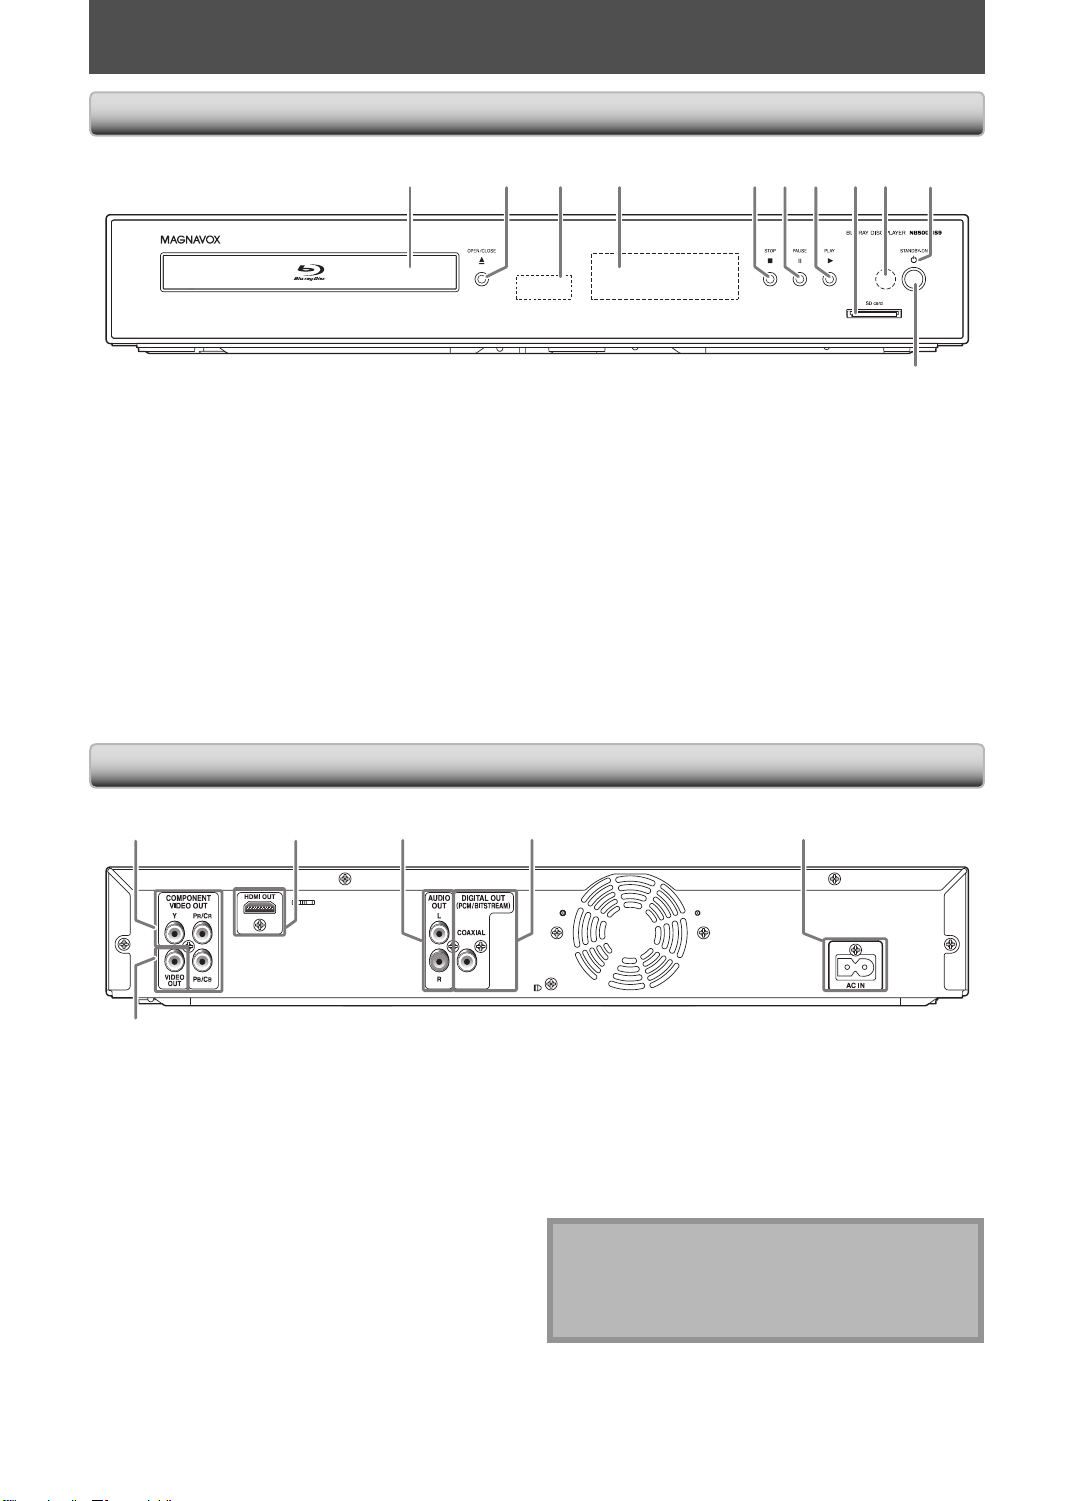
Front Panel
FUNCTIONAL OVERVIEW
12* 43567*8910
The unit can also be turned on by pressing these buttons.*
1. Disc tray
Place a disc when opening the disc tray.
•
2. A OPEN/CLOSE button*
Press to open or close the disc tray.
•
3. Disc indicator
This indicator lights up in blue when a disc is in this
•
unit.
4. Display
Refer to “Front Panel Display” on page 11.
•
5. C STOP button
Press to stop playback.
•
6. k PAUSE button
Press to pause playback.
•
Rear Panel
1
2
3 4 5
7. B PLAY button*
•
Press to start or resume playback.
8. SD card slot
•
Insert an SD Memory Card, and play back the
contents in it.
9. Infrared sensor window
•
Receive signals from your remote control so that
you can control the unit from a distance.
10. STANDBY-ON indicator
•
This indicator lights up in red when the power is on
and turns off when the power is off.
yySTANDBY-ON button
11.
Press to turn the unit on or off.
•
11
6
1. COMPONENT VIDEO OUT jacks
Use to connect a TV with component video inputs
•
with an RCA component video cable.
2. HDMI OUT jack
Use to connect a TV with an HDMI compatible port
•
with an HDMI cable.
3. AUDIO OUT jacks
Use to connect a TV, an AV receiver / amplifier or
•
other device with an RCA audio cable.
4. DIGITAL OUT (COAXIAL) jack
Use to connect an AV receiver / amplifier, Dolby
•
Digital / DTS decoder or other device with a digital
audio coaxial input jack with a digital audio coaxial
cable.
8
5. AC IN Terminal
•
Use to connect the AC outlet with the AC cord.
6. VIDEO OUT jack
•
Use to connect a TV, an AV receiver or other device
with an RCA video cable.
Note
Do not touch the inner pins of the jacks on the rear
•
panel. Electrostatic discharge may cause permanent
damage to the unit.
This unit does not have the RF modulator.
•
EN
Page 11
FUNCTIONAL OVERVIEW
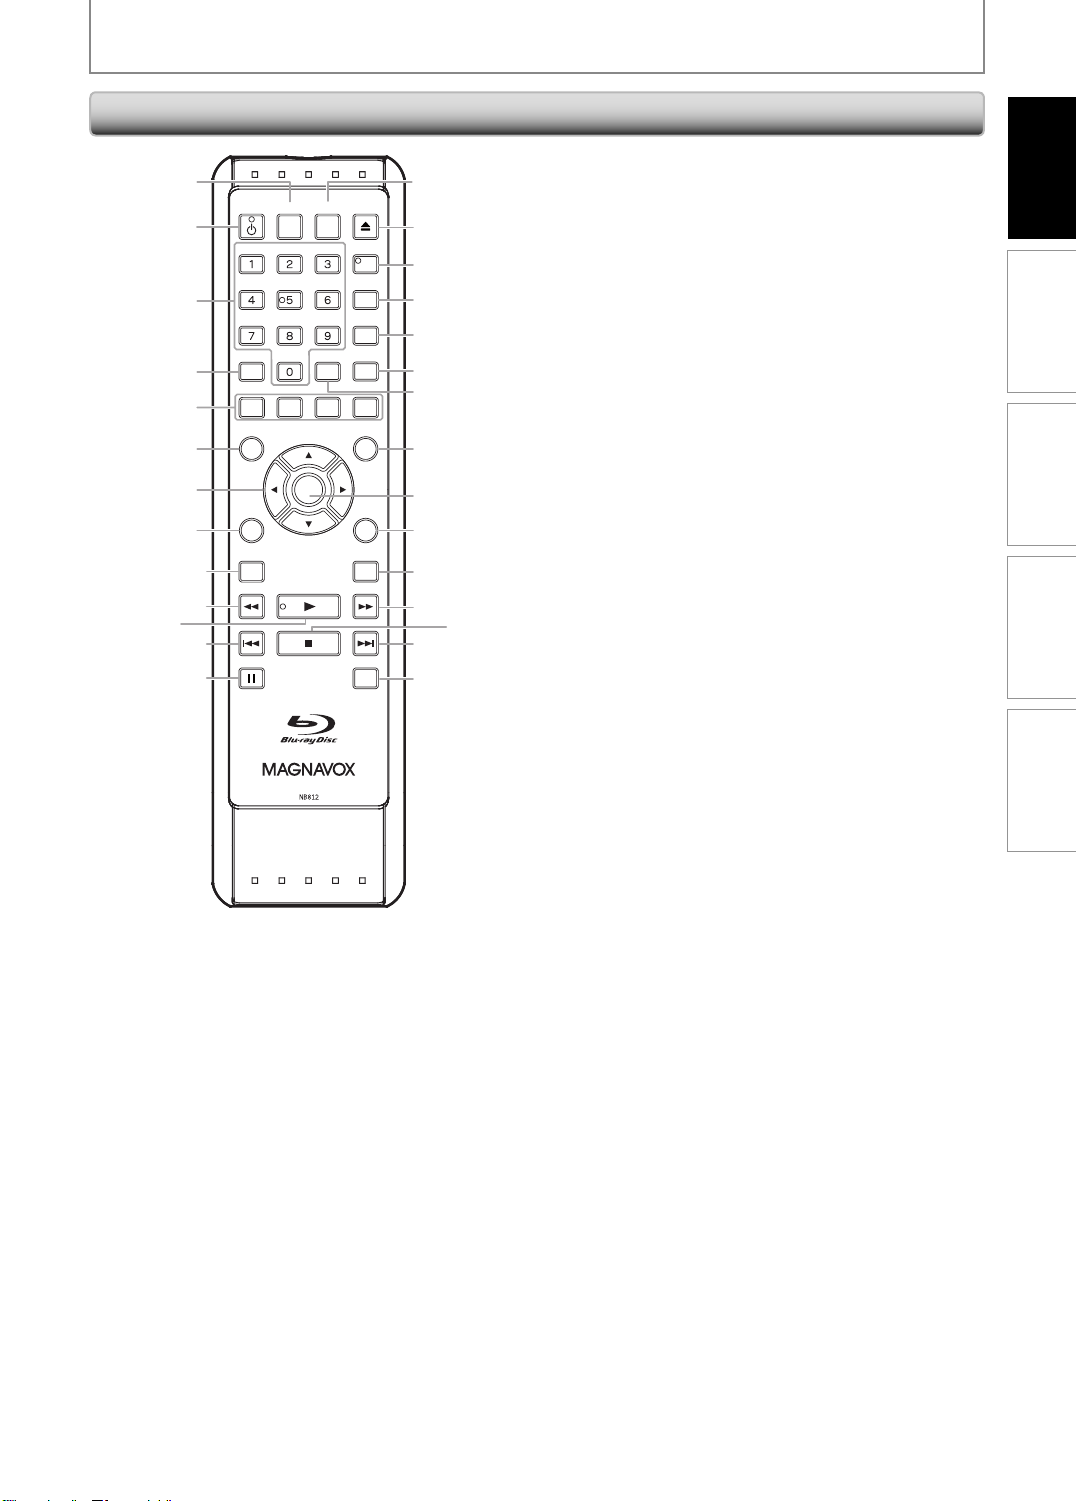
Remote Control
1
DISPLAY
STANDBY-ON
2
3
SEARCH
4
5
TOP MENU
6
7
SETUP
8
SUBTITLE
9
10
11*
12
13
The unit can also be turned on by pressing these
*
buttons.
1. DISPLAY button
Press to display the on-screen display menu.
•
2. STANDBY-ON
Press to turn the unit on or off.
•
3. Number buttons
Press to enter the title, chapter, track or file
•
number.
Press to enter values in the input field.
•
4. SEARCH button
Press to display the search menu.
•
5. Red / Green / Blue / Yellow button
Press to select items on some BD menus.
•
6. TOP MENU button
Press to display the top menu.
•
7. Cursor K / L / { / B buttons
Press to select items or settings.
•
8. SETUP button
Press to display the setup menu.
•
9. SUBTITLE button
Press to display the subtitle menu.
•
10. REV E button
•
During playback, press to fast reverse the playback.
EN
y y button
OPEN/
CLOSE
HDMI
PIP
ANGLE
REPEAT
A-B
CLEAR
POP MENU/
MENU
OK
RETURN
AUDIO
MODE
14
15*
16
17
18
19
20
21
22
23
24
25
27
28
26
11. PLAY B button*
Press to start playback or resume playback.
•
12. SKIP H button
During playback, press once to return to the
•
beginning of the current title, chapter or track.
During the JPEG playback, press to return to the
•
previous file.
During playback, press twice to return to the
•
previous title, chapter or track.
13. PAUSE F button
Press to pause playback.
•
When playback is in pause mode, press repeatedly
•
to forward the playback step by step.
14. HDMI button
Press to set the HDMI output mode.
•
15. OPEN/CLOSE A button*
Press to open or close the disc tray.
•
16. PIP button
Press to switch picture-in-picture feature on or off
•
(only applicable to BD-video which supports the
PIP function).
17. ANGLE button
Press to access various camera angles on the disc.
•
Press to rotate the JPEG files clockwise by 90 degrees.
•
18. REPEAT button
Press to toggle between various repeat modes.
•
19. A-B button
Press to play back a defined section between point
•
A and B repeatedly.
20. CLEAR button
Press to clear the information once entered, to
•
clear the marker settings, or to cancel the
programming for audio CD, etc.
21. POP MENU/MENU button
Press to display the pop-up menu / disc menu /
•
file list.
22. OK button
Press to confirm or select menu items.
•
23. RETURN button
Press to return to the previously displayed menu
•
screen.
24. AUDIO button
Press to display the audio menu.
•
25. FWD D button
During playback, press to fast forward the
•
playback.
In pause mode, press to slow forward the playback.
•
26. STOP C button
Press to stop playback.
•
27. SKIP G button
During playback, press to skip to the next title,
•
chapter, track or file.
28. MODE button
During playback, press to display the picture
•
adjustment menu.
During the JPEG playback, press to display menus
•
for changing the visual effect for switching the
image or changing the size of the image.
In stop mode with BD inserted, press to display a
•
menu for setting the BD audio mode.
In stop mode with audio CD, or JPEG files inserted,
•
press to display menus for program and random
playback.
Introduction
Connections
Playback Function Setup Others
9
Page 12

FUNCTIONAL OVERVIEW
Installing the Batteries in the Remote Control
Install the batteries (AAx2) matching the polarity
indicated inside battery compartment of the remote
control.
1 Open the cover.
2 Insert batteries.
Make sure to match + and - on the batteries to the
marks indicated in the battery compartment.
3 Close the cover.
Using a Remote Control
Keep in mind the following when using the remote
control:
Make sure that there are no obstacles between the
•
remote control and the infrared sensor window on the
unit.
Remote operation may become unreliable if strong
•
sunlight or fluorescent light is shining on the infrared
sensor window of the unit.
Remote control for different devices can interfere with
•
each other. Avoid using remote control for other device
located close to the unit.
•
Replace the batteries when you notice a fall off in the
operating range of the remote control.
The maximum operable ranges from the unit are as
•
follows.
Line of sight: approx. 23 feet (7m)
-
Either side of the center: approx. 16 feet (5m) within 30°
-
Above: approx. 16 feet (5m) within 15°
-
Below: approx. 10 feet (3m) within 30°
-
30˚30˚
16 feet
(5m)
23 feet
(7m)
16 feet
(5m)
Note
Incorrect use of batteries can result in hazards such as
leakage and bursting. Please observe the following:
Do not mix new and old batteries together.
•
Do not use different kinds of batteries together.
•
Although they may look similar, different batteries
may have different voltages.
Make sure that the + and - ends of each battery
•
match the indications in the battery compartment.
Remove batteries from battery compartment that is
•
not going to be used for a month or more.
When disposing of used batteries, please comply with
•
governmental regulations or environmental public
instruction’s rules that apply in your country or area.
Do not recharge, short-circuit, heat, burn or
•
disassemble batteries.
10
EN
Page 13
FUNCTIONAL OVERVIEW
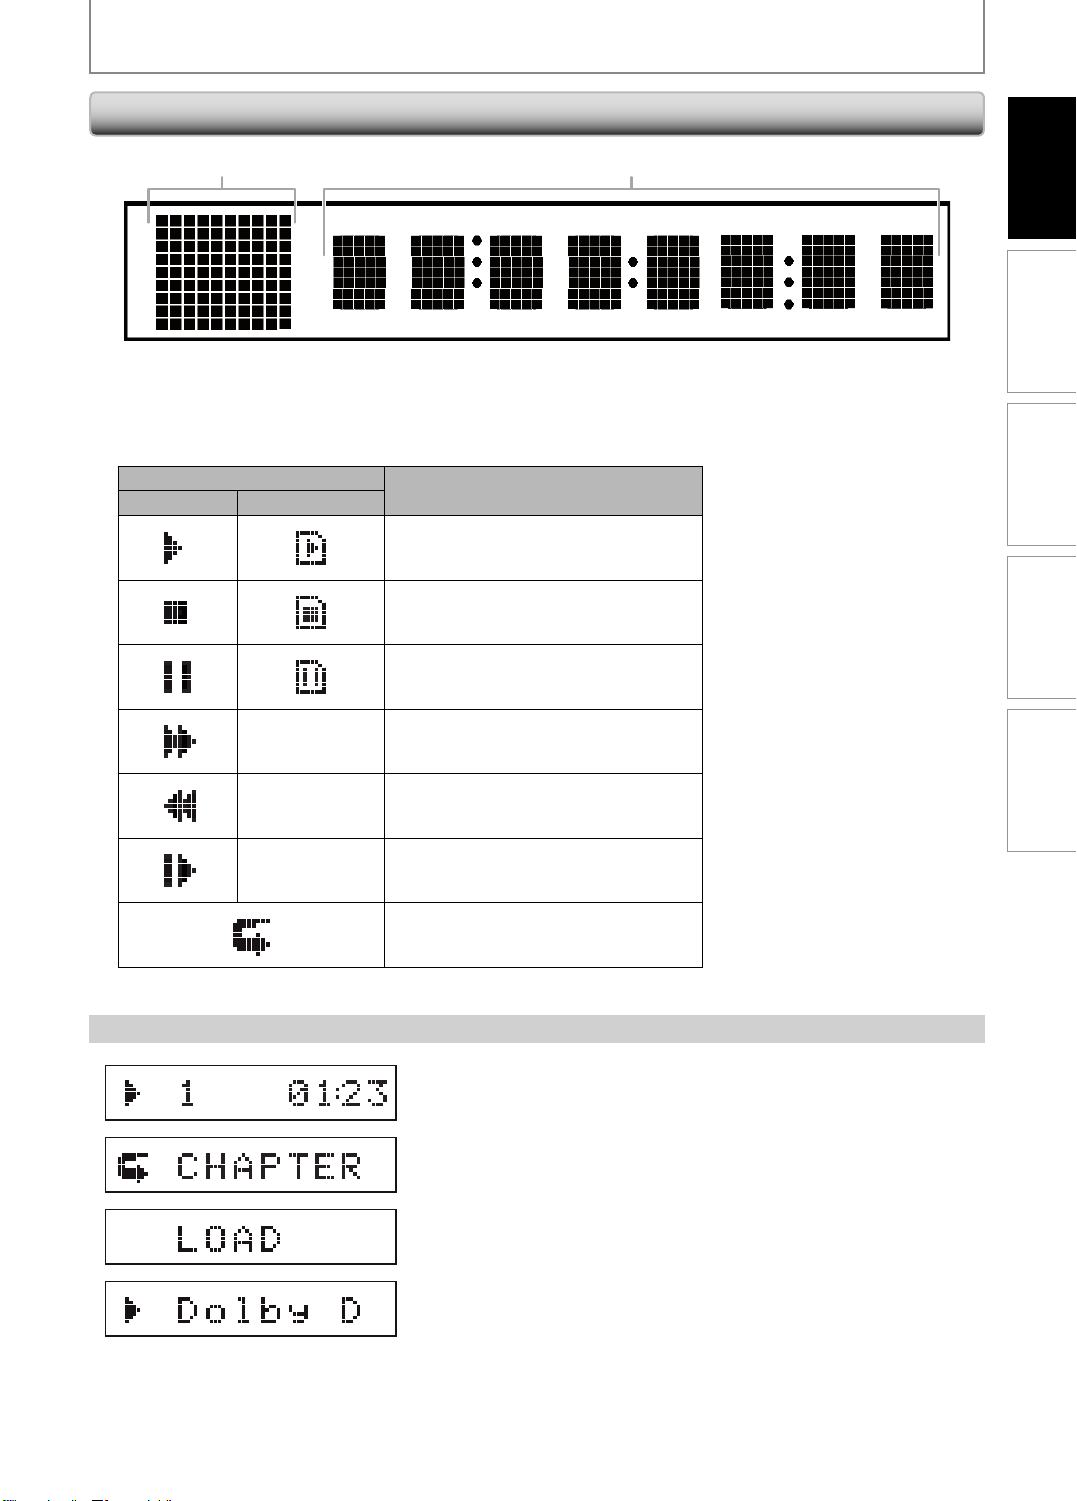
Front Panel Display
1 2
•
Brightness of the display can be adjusted. Refer to “Panel Display” in “FUNCTION SETUP” on page 41.
1. Displays playback status icon. Refer to the table below.
2. Displays various kinds of information such as title number, elapsed time, repeat mode, etc.
Playback status icon
Disc SD Memory Card
Playback is in progress
Stop mode
Pause mode
Mode
Introduction
Connections
Playback Function Setup Others
-
-
-
Example of Display Message
Fast forward mode
Fast reverse mode
Slow forward mode
Appears while repeat function is set
Title is being played back.
Indicating the current title number and the elapsed time.
Current chapter is in chapter repeat mode.
Loading a disc.
Dolby Digital audio is being played back.
EN
11
Page 14
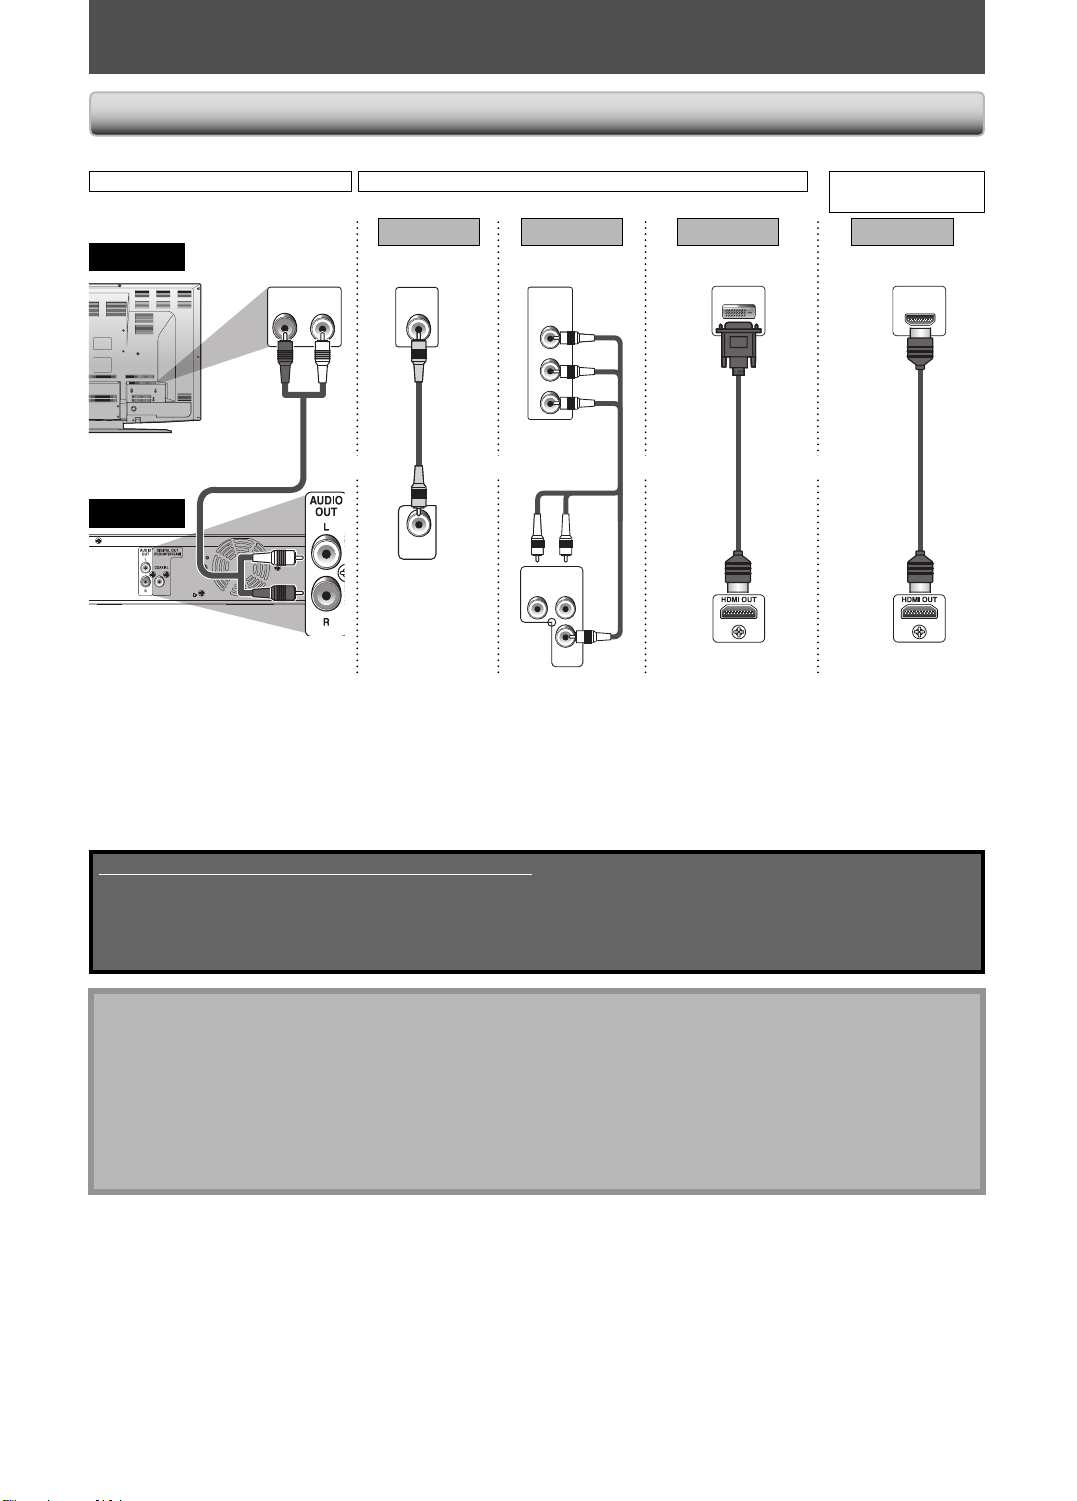
CONNECTIONS
Connection to the TV
•
Make one of the following connections, depending on the capabilities of your existing device.
AUDIO CONNECTION AUDIO / VIDEO
Method 1
TV
standard audio
AUDIO IN
LR
standard picture
VIDEO
IN
RCA
video
RCA
audio cable
and oror or
cable
this unit
VIDEO
OUT
VIDEO CONNECTION
1
Method 2
*
better picture
COMPONENT
VIDEO IN
Y
(Green)
PB/CB
(Blue)
PR/CR
(Red)
RCA
component
video cable
COMPONENT
VIDEO OUT
PR/CRY
(Red)
(Blue)
(Green)
Method 3
best picture
HDMI-DVI
cable
DVI IN
1
*
best audio / picture
CONNECTION
Method 4
HDMI IN
HDMI
cable
1, 2
*
PB/C
B
AUDIO OUT HDMI OUTVIDEO OUT COMPONENT
VIDEO OUT
*1 This unit is compatible with the progressive scan system. The feature provides you with the higher quality pictures
than traditional output system does. To utilize this feature, a component or an HDMI connection is required. Refer
to “HDMI Video Resolution” or “Component Output” setting on page 34 to set the video resolution.
2
Analog audio connection is not required for this connection.
*
Supplied cables used in this connection are as follows:
RCA audio cable (L/R) x 1
•
RCA video cable x 1
•
HDMI cable (High Speed HDMI Cable) x 1
•
Please purchase the rest of the necessary cables at your local store.
Note
Connect this unit directly to the TV. If the RCA audio / video cables are connected to a VCR, pictures may be
•
distorted due to the copy-protection system.
If the picture is not output properly to the TV because of “HDMI Video Resolution” or “Component Output” setting,
•
press and hold [ B PLAY] on the front panel for more than 5 seconds. “HDMI Video Resolution” and “Component
Output” setting will be reset to the default automatically. You cannot change the video resolution during Blu-ray
Disc playback. To change the resolution, stop playback.
A simple 1-cable connection with a device having an HDMI (high-definition multimedia interface) jack allows
•
digital transfer of both digital video signals and multi-channel audio signals.
12
EN
Page 15
CONNECTIONS
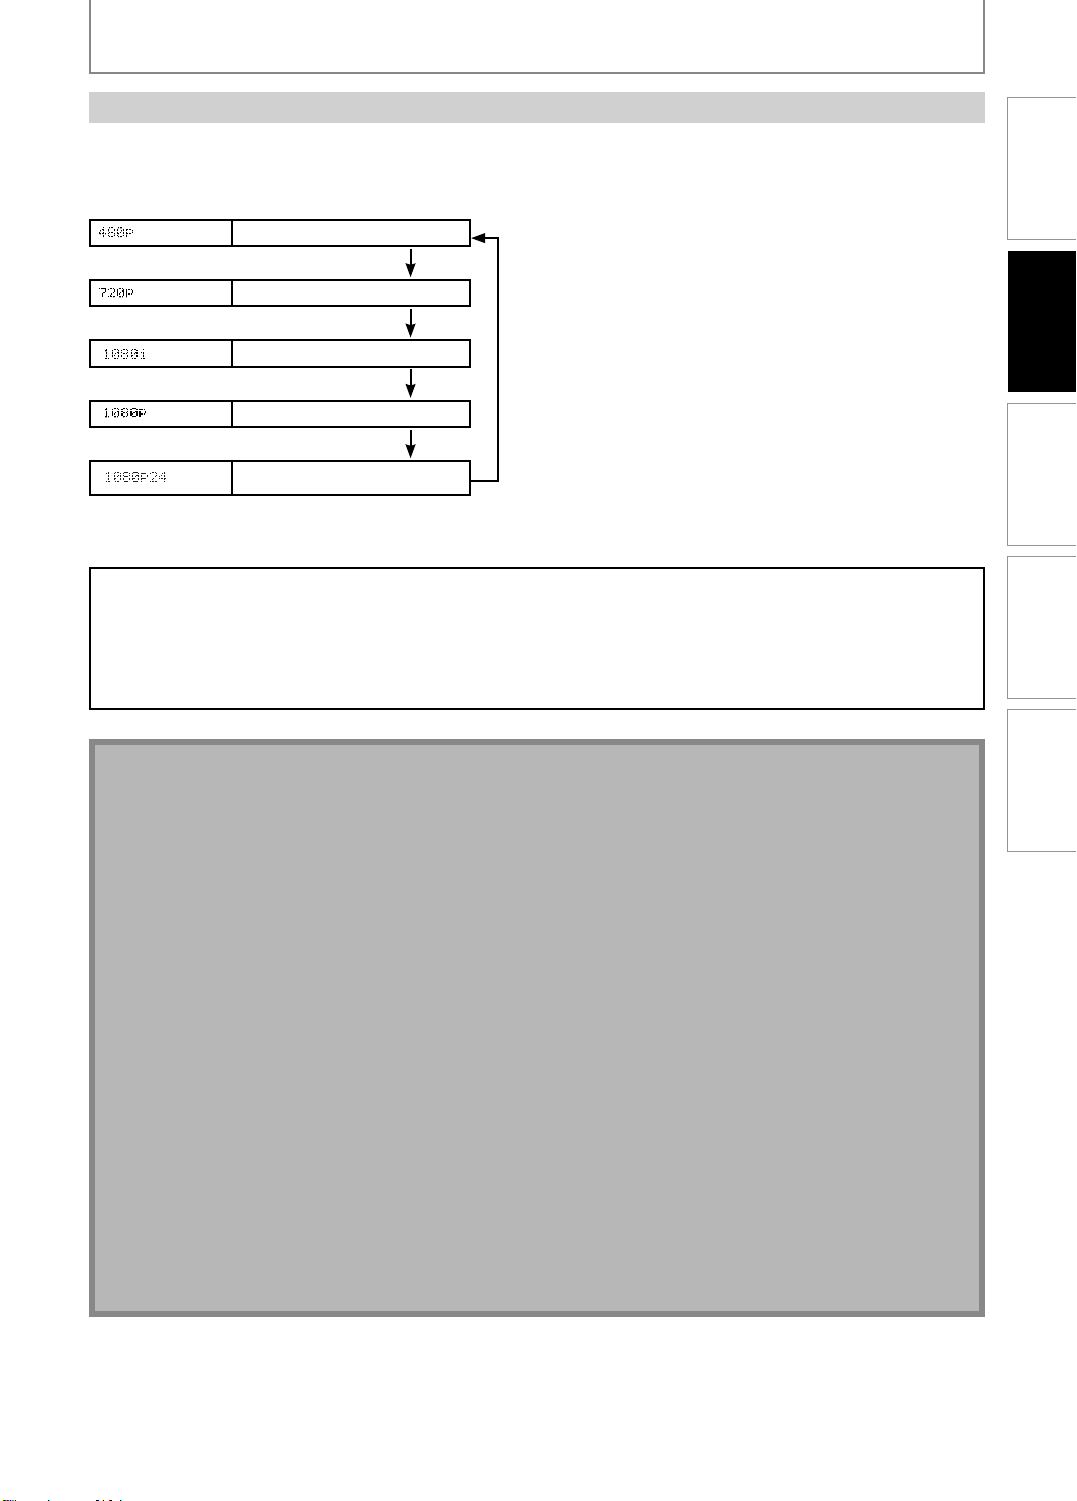
HDMI Output Mode and Actual Output Signals
Press [HDMI] to change the resolution of the video signal being output from HDMI OUT jack. The video resolution
changes as follows every time [HDMI] is pressed.
Front Panel
Display
Press [HDMI]
Press [HDMI]
Press [HDMI]
Press [HDMI]
Press [HDMI]
Copyright protection system
To play back the digital video images of a BD / DVD via an HDMI connection, it is necessary that both the unit and
the TV (or an AV amplifier) support a copyright protection system called HDCP (high-bandwidth digital content
protection system). HDCP is copy protection technology that comprises data encryption and authentication of the
connected AV device. This unit supports HDCP. Please read the operating instructions of your TV (or AV amplifier)
for more information.
HDMI Video Resolution
480 Progressive
720 Progressive
1080 Interlaced
1080 Progressive
1080 Progressive 24 24 frame
Connections
Playback Function Setup OthersIntroduction
Note
When using HDCP-incompatible TV, the image will not be viewed properly.
•
Among the devices that support HDMI, some devices can control other devices via the HDMI jack, this unit cannot
•
be controlled by another device via the HDMI jack.
The audio signals from HDMI OUT jack (including the sampling frequency, the number of channels and bit length)
•
maybe limited by the device that is connected.
Among the devices that support HDMI, some do not support audio output (e.g, projectors). In connections with
•
device such as this unit, audio signals are not output from HDMI OUT jack.
You cannot select the video resolutions which are not supported by the connected TV, except when this unit’s
•
HDMI OUT jack is connected to a DVI compatible display devices with an HDMI-DVI cable.
For HDMI OUT jack to DVI connection, after you select an HDMI output mode, corresponding HDMI video
•
resolution will be output. The HDMI video resolution you selected will be output even if the connected TV is not
compatible with the HDMI video resolution. If there is no image displayed on the connected TV, please select
another HDMI video resolution.
Video and audio signals may be distorted temporarily when switching to / from the HDMI output mode.
•
You cannot change the video resolution during Blu-ray Disc playback. To change the resolution, stop playback.
•
You can also change the HDMI output mode from “HDMI Video Resolution” setting in “Video” menu. In this menu,
•
you can confirm what HDMI video resolutions are supported by connected TV. Refer to page 34.
In order to get natural and high quality film reproduction of 24-frame film material, use an HDMI cable (High
•
Speed HDMI Cable is recommended) and select “1080p24” if the connected TV is compatible with 1080p24 frame
input.
Even if you set “HDMI Video Resolution” setting to “1080p24”, when the contents of the disc is not compatible for
•
1080p24 frame, 1080p60 frame will be output.
There is no output from VIDEO OUT and COMPONENT VIDEO OUT jacks when you play back a BD that recorded
•
24-frame film material by HDMI output mode of 1080p24.
It is recommended to use High Speed HDMI Cable (also known as HDMI category 2 cable) for better compatibility.
•
EN
13
Page 16
CONNECTIONS
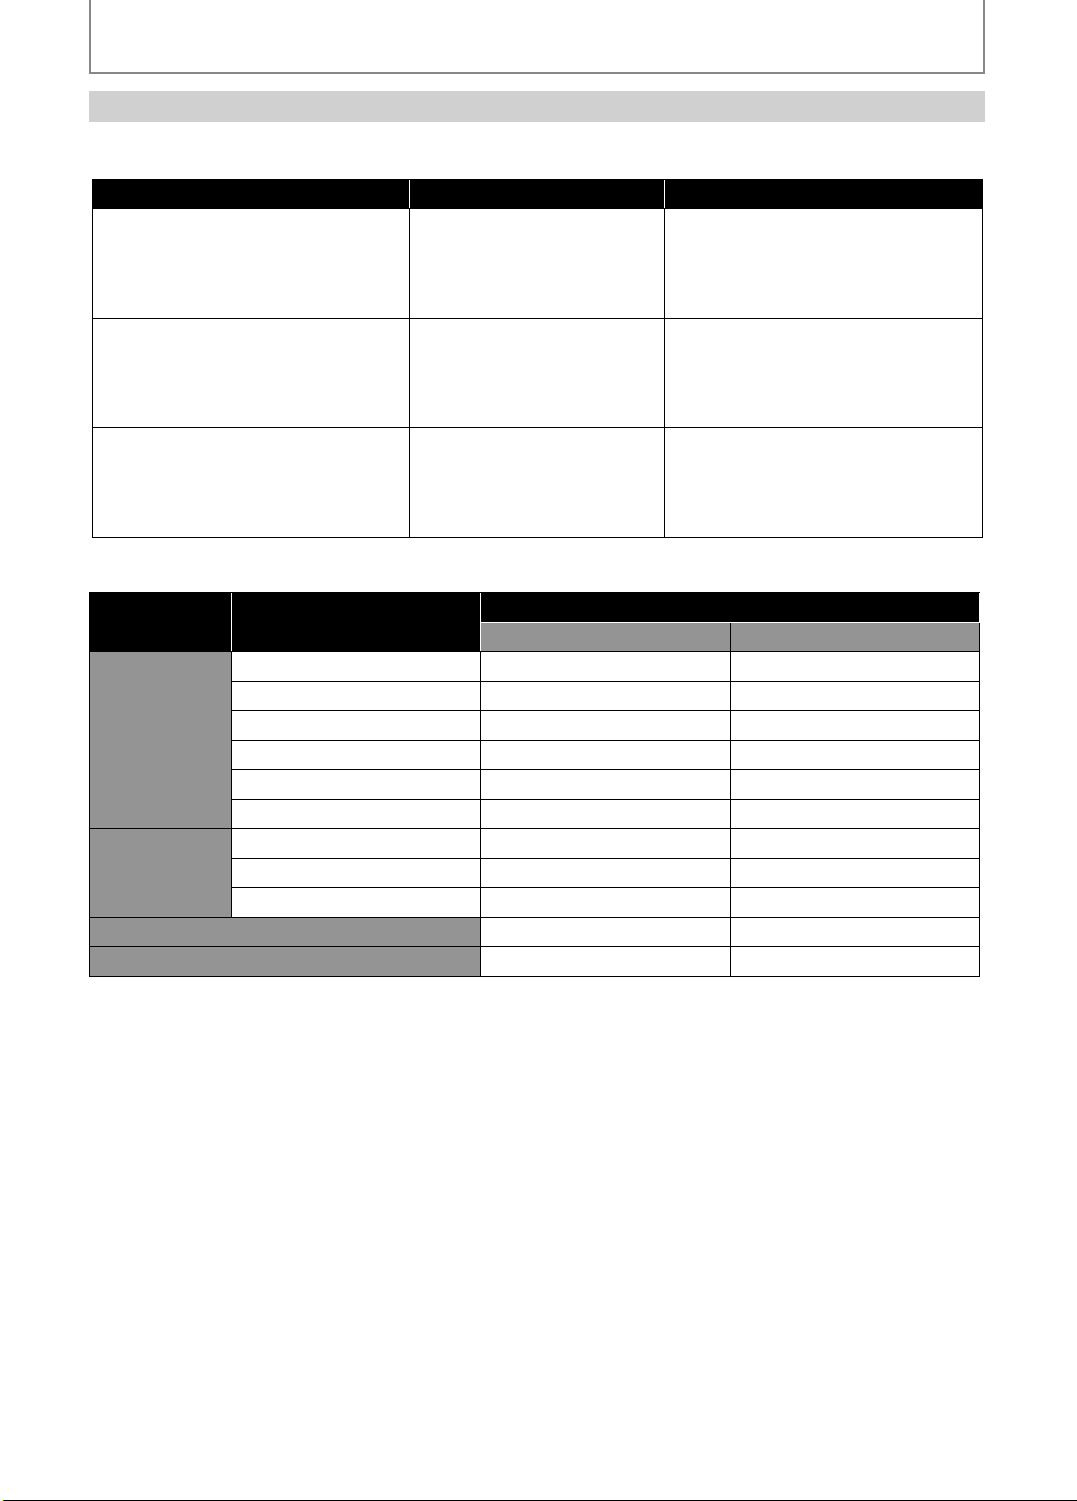
HDMI Audio Setting
When using HDMI connections make “HDMI Audio Out” setting in “Audio” menu according to the specifications of the
device to be connected.
Device to be connected “HDMI Audio Out” setting Output HDMI audio signal
Device compatible with Dolby Digital,
Dolby Digital Plus, Dolby TrueHD, DTS
or DTS-HD decoding
Device compatible with 3 or more
channels of audio inputs (not Dolby
Digital, Dolby Digital Plus, Dolby
TrueHD, DTS or DTS-HD compatible)
HDMI connection to a TV, and digital
audio connection (coaxial) to an AV
amplifier.
Audio signals output from HDMI OUT jack
■
Disc type Audio recording format
Dolby Digital Dolby Digital*
Dolby Digital Plus Dolby Digital Plus*
BD-video
Dolby TrueHD Dolby TrueHD*
DTS DTS*
DTS-HD DTS-HD*
LPCM Multi LPCM Multi LPCM
Dolby Digital Dolby Digital Multi LPCM
DVD-video
DTS DTS Multi LPCM
LPCM Multi LPCM Multi LPCM
audio CD 2ch LPCM 2ch LPCM
DTS-CD DTS Multi LPCM
HDMI Multi (Normal) Dolby Digital, Dolby Digital Plus, Dolby
TrueHD, DTS, or DTS-HD bitstream are
output from HDMI OUT jack. Make the
speaker settings on the connected AV
amplifier, etc.
HDMI Multi (LPCM) Multi-channel audio signals are output
from HDMI OUT jack. Make the speaker
settings with the speaker setting items
appear after you select “HDMI
Multi(LPCM)”. Refer to page 36.
Audio Mute HDMI audio will be muted, and Dolby
Digital / DTS bitstream or LPCM will be
output from DIGITAL OUT jack
depending on “Digital Out” setting.
Refer to page 37.
“HDMI Audio Out” setting
HDMI Multi(Normal) HDMI Multi(LPCM)
1
1
1
1
1
Multi LPCM
Multi LPCM*
Multi LPCM*
Multi LPCM
Multi LPCM*
2
3
4
1
If “BD Audio Mode” setting is set to “Mix Audio Output”, audio will be output as multi LPCM. Refer to page 36.
*
2
*
Outputs audio signals decoded from independent substream.
3
*
Outputs audio signals decoded from Dolby Digital stream.
*4 Outputs audio signals decoded from DTS core stream.
•
If the connected device is not compatible with the HDMI BITSTREAM, audio will be output as multi LPCM or 2-channel
down-mixed LPCM depending on the capability of the connected device even if you select “HDMI Multi(Normal)” in
“HDMI Audio Out” setting. Refer to page 36.
14
EN
Page 17
CONNECTIONS
Connection to an Audio System
When you change the connections, all devices should be turned off.
•
Refer to the manual accompanying external devices for more information.
•
2-Channel Analog Audio Connection
stereo system
AUDIO
OUT
L
AUDIO IN
LR
audio
analog audio input jacks
RCA audio cable
this unit
Connections
Playback Function Setup OthersIntroduction
Digital Audio Connection
AV receiver / amplifier
audio
this unit
AUDIO OUT
DIGITAL AUDIO INPUT
digital audio coaxial
input jack
DIGITAL OUT (COAXIAL)
R
COAXIAL
digital audio coaxial cable
Supplied cables used in this connection are as follows:
RCA audio cable (L/R) x 1
•
Please purchase the rest of the necessary cables at your local store.
EN
15
Page 18
CONNECTIONS
Audio signals output from DIGITAL OUT jack (COAXIAL)
■
The audio signals currently output from HDMI OUT jack will be output from DIGITAL OUT jack as well, except that
Dolby Digital signal will be output instead of Dolby Digital Plus and Dolby TrueHD, and DTS signal will be output
instead of DTS-HD.
When “Audio Mute” is selected in “HDMI Audio Out” setting, audio signals output from HDMI OUT jack will be muted
and the audio signals output from DIGITAL OUT jack changes depending on “Digital Out” setting.
To set “Digital Out” setting, select “Audio Mute” in “HDMI Audio Out” setting.
Disc type Audio recording format
Dolby Digital Dolby Digital 2ch Downmix LPCM
Dolby Digital Plus Dolby Digital 2ch Downmix LPCM
BD-video
DVD-video
audio CD 2ch LPCM 2ch LPCM
DTS-CD DTS 2ch Downmix LPCM
* For BD titles with secondary or interactive audio, these audio will be output as Dolby Digital when all the conditions
listed below are met:
•
When “BD Audio Mode” setting is set to “Mix Audio Output”.
•
When “HDMI Audio Out” setting is set to “Audio Mute”.
•
When “Digital Out” setting is set to “Bitstream”.
If BD titles do not have secondary or interactive audio, the audio will be output as shown in the table.
•
This table applies only when HDMI cable is not connected or “Audio Mute” is selected in “HDMI Audio Out” setting.
Dolby TrueHD Dolby Digital 2ch Downmix LPCM
DTS DTS* 2ch Downmix LPCM
DTS-HD DTS* 2ch Downmix LPCM
LPCM 2ch Downmix LPCM* 2ch Downmix LPCM
Dolby Digital Dolby Digital 2ch Downmix LPCM
DTS DTS 2ch Downmix LPCM
LPCM 2ch Downmix LPCM 2ch Downmix LPCM
Bitstream LPCM
“Digital Out” setting
Note
In order to output LPCM signal from DIGITAL OUT jack while outputting the HDMI audio signal, set “BD Audio
•
Mode” setting to “Mix Audio Output” and set “HDMI Audio Out” setting to “HDMI Multi(LPCM)”.
Connecting the AC Cord
After you made all necessary connections, connect the AC cord to the AC IN. Then connect the AC cord to the AC
outlet.
Insert the plugs securely. Incomplete connections will result in the generation of noise.
this unit
AC cord
Supplied cables used in this connection are as follows:
AC cord x 1•
AC outlet
AC 120V, 60 Hz
16
EN
Page 19
INFORMATION ON PLAYBACK
Before you start playing back a disc, read the following information.
Playable Discs and Files
This unit is compatible to play back the following discs / files.
To play back a disc / file, make sure that it meets the
requirements for region codes and color systems as described
below. You can play back discs that have the following logos.
Other disc types are not guaranteed to play back.
Playable discs Logos
Blu-ray Disc
- BD-video (single / double
layer)
- BD-RE ver.2.1 (single /
double layer)
(Recorded in BDMV format)
- BD-R (single / double layer)
(Recorded in BDMV format)
(Unclosed discs may not be
played back.)
DVD-video
DVD+RW (single layer)
DVD+R
(single / double layer)
DVD-RW (finalized video
mode discs only)
Note for SD Memory Cards
Do not remove the SD Memory Card or turn off the
•
unit while the contents of the card is in playback. It
may result in malfunction or loss of the card’s data.
Please keep the SD Memory Cards in their cases
•
when you are not using them.
Do not try to open or modify the card.
•
Do not touch the terminal surface with your fingers
•
or any metals.
Do not attach additional labels or stickers to cards.
•
Do not remove the label of the SD Memory Cards.
•
This unit supports SD Memory Card with FAT12/
•
FAT16 file system, and SDHC Memory Card with
FAT32 file system.
This unit may not read the SD Memory Cards
•
formatted on computer. If that is the case, please
reformat the SD Memory Cards in this unit and try
again.
This unit does not supports miniSDHC and
•
microSDHC Memory Card.
For miniSD Card and microSD Card, the adapter is
•
necessary.
Portions of this product are protected under
•
copyright law and are provided under license by
ARIS / SOLANA / 4C.
miniSD Card
adapter
miniSD Card
microSD Card
adapter
microSD Card
Introduction
Connections
Playback
Function Setup Others
DVD-R (finalized video mode
discs only)
CD-DA (audio CD)
CD-RW
CD-R
Kodak Picture CD
DTS-CD
Playable files Media
DVD, CD-RW/-R,
JPEG
Readable cards Playable files / data
SD Memory Card (8MB - 2GB)
SDHC Memory Card (4GB)
miniSD Card (8MB - 2GB)
microSD Card (8MB - 2GB)
SD Memory Card
(including SDHC), miniSD
Card, microSD Card
JPEG, picture-in-picture
commentary, subtitles or
other extras for BD-ROM
Profile 1 ver.1.1
Unplayable Discs and Files
The following discs will not be played back in this unit.
CD-ROM• CD-I (compact disc-interactive)•
DVD-RAM• VSD (video single disc)•
DVD-audio• BD-RE (ver.1 / ver.3)•
HD DVD• video CD•
unfinalized disc• SVCD•
BD-RE/-R recorded in BDAV format•
DVD / CD / SD Memory Card contains MP3,
•
Windows Media™ Audio files and DivX®
DVD-RW/-R recorded in VR mode or non compatible
•
recording format.
super audio CD - Only the sound on the CD layer can
•
be heard. The sound on the high-density super audio
CD layer cannot be heard.
Playability of dual discs are not guaranteed.•
EN
17
Page 20

INFORMATION ON PLAYBACK
Color Systems
BD-video and DVD-video are recorded in different color
systems throughout the world. The most common color
system is NTSC (which is used primarily in the United
States and Canada).
This unit employs NTSC color system, so the disc you play
back must be recorded in the NTSC system. You cannot
play back the disc recorded in other color systems.
Region Codes
BD-video
This unit has been designed to play back
BD-video with region A and DVD-video with
region “1” or “ALL“. You cannot play back
BD-video or DVD-video that are labeled for
other regions. Look for the symbols on the
right on your BD-video or DVD-video.
If these region symbols do not appear on
your BD-video or DVD-video, you cannot
play back the disc in this unit. The letter or
number inside the globe refers to region of
the world. A BD-video or DVD-video labeled
for a specific region can only be played back
in the unit with the same region code.
BD-video
DVD-video
DVD-video
Structure of Disc / SD Memory Card Contents
The contents of BD-video / DVD-video are generally
divided into titles. Titles may be further subdivided into
chapters.
title 1 title 2
chapter 1 chapter 2 chapter 1 chapter 2 chapter 3
BD-video / DVD-video
On-Screen Display
You can check information about the current disc by
pressing [DISPLAY].
To call the on-screen display menu, press [DISPLAY]
during playback. Every time you press [DISPLAY], the
information changes. Depending on the media, available
information varies.
off A Title / Chapter information
A Title information (elapsed time)
A Title information (remaining time)
A HDMI information A off
off A Chapter information (elapsed time)
A Chapter information (remaining time)
A Title information (elapsed time)
A Title information (remaining time)
A Bit rate information A HDMI information A off
off A Track information (elapsed time)
A Track information (remaining time)
A Disc information* (elapsed time)
A Disc information* (remaining time)
A HDMI information A off
(*not available during program / random playback)
off A File name information
A File information A HDMI information A off
audio CD are divided into tracks.
track 1 track 2 track 3 track 4 track 5
Data discs or SD Memory Cards containing JPEG are
divided into folders, and the folders are subdivided into
files.
folder (group) 1 folder (group) 2
group(folder)1 group(folder)2
le (track) 1 le (track) 2 le (track) 3 le (track) 4 le (track) 5
audio CD
audio CD
JPEG
For audio CD and JPEG, during program or random
•
playback, the indication will be displayed after the
track / file information.
18
EN
Page 21
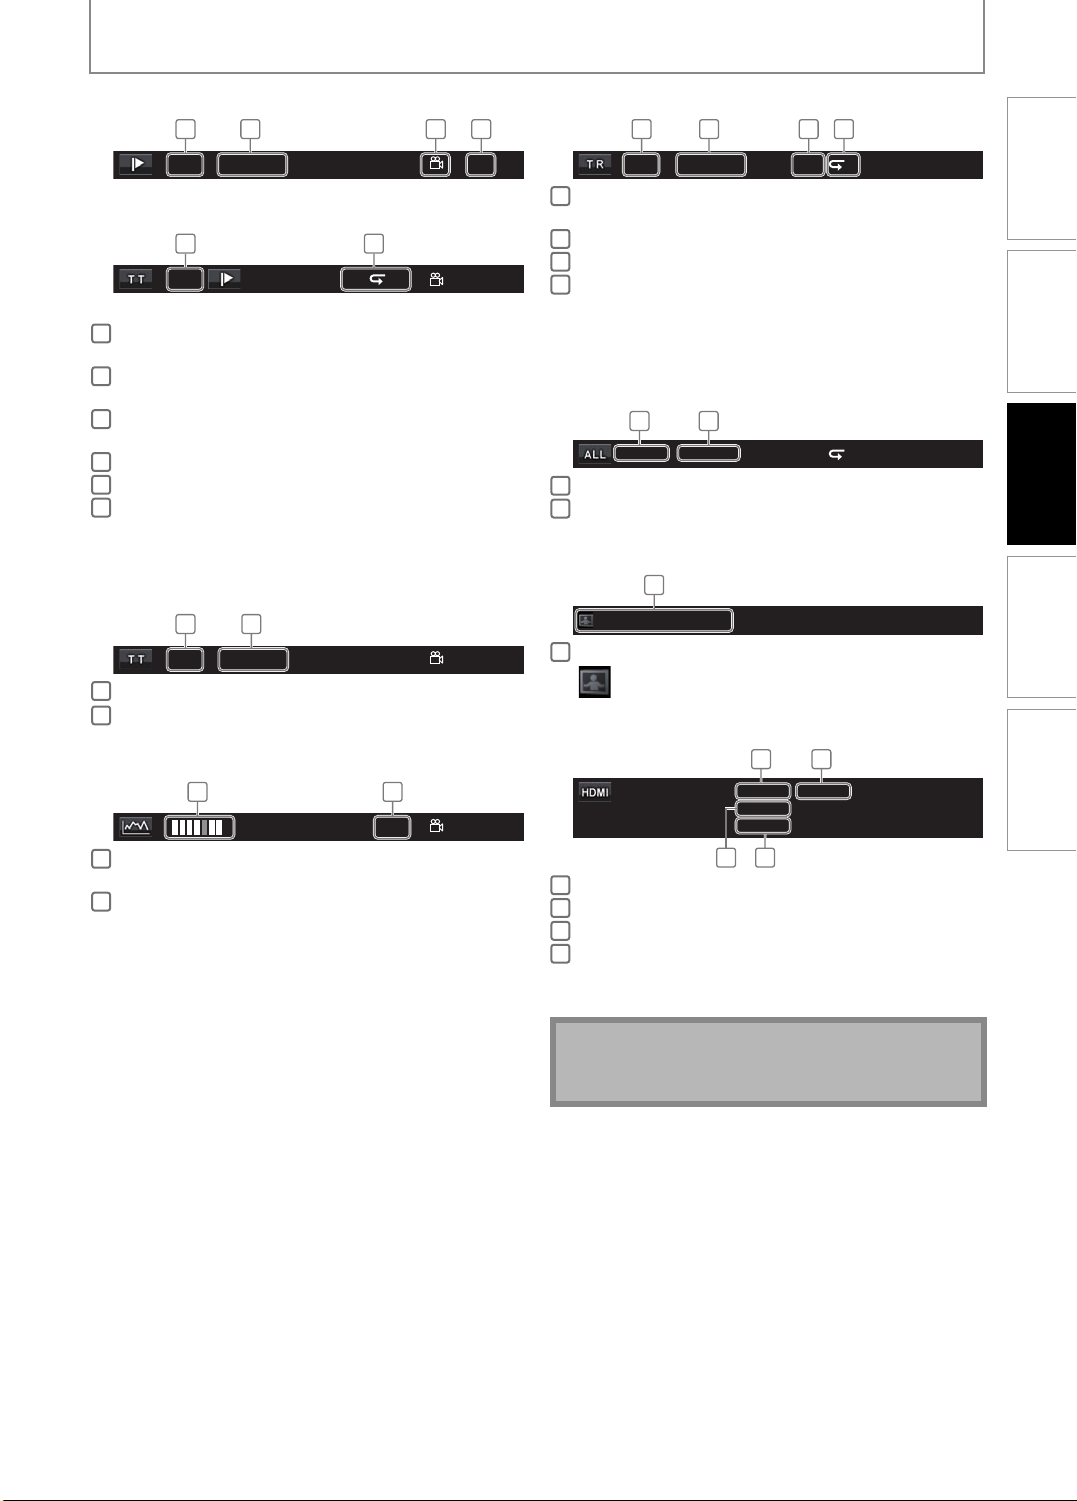
Chapter information
■
1 3 42
INFORMATION ON PLAYBACK
Track / File information
■
1 3 42
Introduction
3 / 5 0 : 01 : 02
<Title / Chapter information for BD>
5 6
1 1 / 10 A B
Current chapter number / Total number of
1
chapters
Elapsed time / Remaining time of the current
2
chapter
Indicates that the multi camera angle images are
3
available on the scene
Current playback status
4
Current title number
5
Current repeat setting (Only when repeat setting
6
is active)
(C: Chapter repeat, T: Title repeat, AB : A-B repeat)
■
Title information
1 2
3 / 5 0 : 01 : 02
Current title number / Total number of titles
1
Elapsed time / Remaining time of the current title
2
■
Bit rate information
21
L1
Bit rate (The amount of video data currently being
1
read)
Layer number (Only for 2-layered discs)
2
(L0: Layer 0 is played back. L1: Layer 1 is played
back)
F
Current track (file) number / Total number of track
1
SD1 / 14 0 : 00: 51
T
B
(file)
Elapsed time / Remaining time of the current track
2
Indication of SD Memory Card playback
B
3
Current repeat setting
4
(Only when repeat setting is
active)
Connections
(T: Track / File repeat, G: Group repeat,
A: All repeat, AB: A-B repeat)
■
Disc information
1 2
1 / 14 0 : 00: 51
Current track number / Total number of tracks
1
Elapsed time / Remaining time of the current disc
2
File name information
■
1
File_name_001
Media icon and file name
B
1
T
B
Playback
Function Setup Others
: JPEG file
HDMI information
■
1
Video Info
Audio Info
B
HDMI video format
1
Resolution of the HDMI output image
2
HDMI audio format
3
Maximum numbers of audio channels that can be
4
Max Channel
YCbCr
PCM
:
2 ch
:
2
/ 1080i:
43
accepted by the connected device
EN
Note
If the HDMI cable is not connected, “---” will be
•
displayed for HDMI information.
19
Page 22
C
MODE
SU
E
S
CH
Playback
BASIC PLAYBACK
Press [STANDBY-ON y ].
1
STANDBY-ON
EAR
BTITL
DISPLAY
OPEN/
CLOSE
A-
LEAR
OK
AUDIO
Turn on the TV and select the
2
appropriate input on the TV to which
the unit is connected.
Press [OPEN / CLOSE A ] to open the
3
disc tray.
Place the disc on the disc tray with its
4
label side facing up.
Align the disc to the
disc tray guide.
Press [OPEN / CLOSE A ] to close the
5
disc tray.
It may take a while to load the disc.
Some discs may start playback automatically.
Press [PLAY B] to start playback.
6
For many of BD-video and DVD-video, a menu
screen may appear.
In this case, use [K / L / s / B] to select the
desired item, then press [OK].
Press [STOP C ] once to stop
7
playback temporarily.
Refer to “Resume Playback” on page 21.
To eject the disc:
Press [OPEN / CLOSE A ] to open the disc tray,
then remove the disc before turning off the unit.
Note
may appear at the top-right on the TV screen
•
when the operation is prohibited by the disc or this
unit.
During the playback of 2-layered disc, pictures may
•
stop for a moment. This happens when the 1st layer
switches to the 2nd layer. This is not a malfunction.
The operation may vary when you play back
•
BD-video and DVD-video with disc menu. Refer to
the manual accompanying the disc for details.
20
EN
Page 23
BASIC PLAYBACK
Operations Using Title Menu,
Disc Menu, and Pop-up Menu
Many of BD-video and DVD-video disc contains title menu
(BD-video / DVD-video), disc menu (DVD-video) or popup menu (BD-video) which guides you through the
available functions in the disc. The contents of the menus
may differ depending on the discs.
Title menu (BD-video / DVD-video)
1 Press [TOP MENU].
The title menu will appear.
•
2 Use [K / L / s / B] to select an item, then
press [OK].
3 Press [TOP MENU] to exit.
Disc menu (DVD-video)
1 Press [POP MENU / MENU].
•
The disc menu will appear.
2 Use [K / L / s / B] to select an item, then
press [OK].
3 Press [POP MENU / MENU] to exit.
Pause
1 During playback, press [PAUSE F ].
Playback will be paused.
•
2 Press [PLAY B ] to return to normal
playback.
Note
For BD and DVD, set “Still Mode” setting to “Field” in
•
“Video” menu if pictures in the pause mode are
blurred (refer to page 35).
Resume Playback
1 During playback, press [STOP C ].
Resume message will appear on the TV screen.
•
Resume ON
Introduction
Connections
Playback
Function Setup Others
Pop-up menu (BD-video)
•
This is a special feature available for some BD-video.
When you press [POP MENU / MENU], a menu pops out
on the TV screen while the contents still play back.
1 During the playback of BD-video, press
[POP MENU / MENU].
The pop-up menu will appear.
•
2 Use [K / L / s / B] to select an item, then
press [OK].
3 Press [POP MENU/MENU] to exit.
Note
Contents of menus and corresponding menu
•
operations may vary among discs. Refer to the
manual accompanying the disc for details.
Press ‘PLAY’ to play from here. To play the beginning,
press ‘STOP’ first and then ‘PLAY’.
e.g.) BD
2 Press [PLAY B ].
In a few seconds, playback will resume from the
•
point at which it stopped last. To cancel the resume
playback and start playback the disc from the
beginning, press [STOP C ] again in stop mode.
Note
Resume playback may not available for the BD that
•
supports Java applications (BD-Java).
The resume information will be saved even when the
•
power is turned off.
If you open the disc tray or press [STOP C ] again in
•
stop mode, the resume information will be cleared.
If you switch between “Disc” mode and “SD Memory”
•
mode, the resume information will be cleared.
If you change “BD Rating Level” or “DVD Rating
•
Level” setting in “
information will be cleared.
For SD Memory Card, if you open the disc tray or
•
turned off the power, resume information will be
cleared.
Parental” menu, the resume
EN
21
Page 24
BASIC PLAYBACK
Playing Back an audio CD and a Disc
with JPEG Files
Insert an audio CD or a disc with JPEG
1
2
files.
•
The file list will appear on the TV screen.
•
If file list does not appear automatically, press
[POP MENU / MENU].
•
Press [POP MENU / MENU] to exit and resume
the file list.
Use [K / L] to select a desired folder
or file, then press [OK].
Use [ s / B ] to go back and forward
between the hierarchies.
If you press [OK] on the desired file, playback
•
will start.
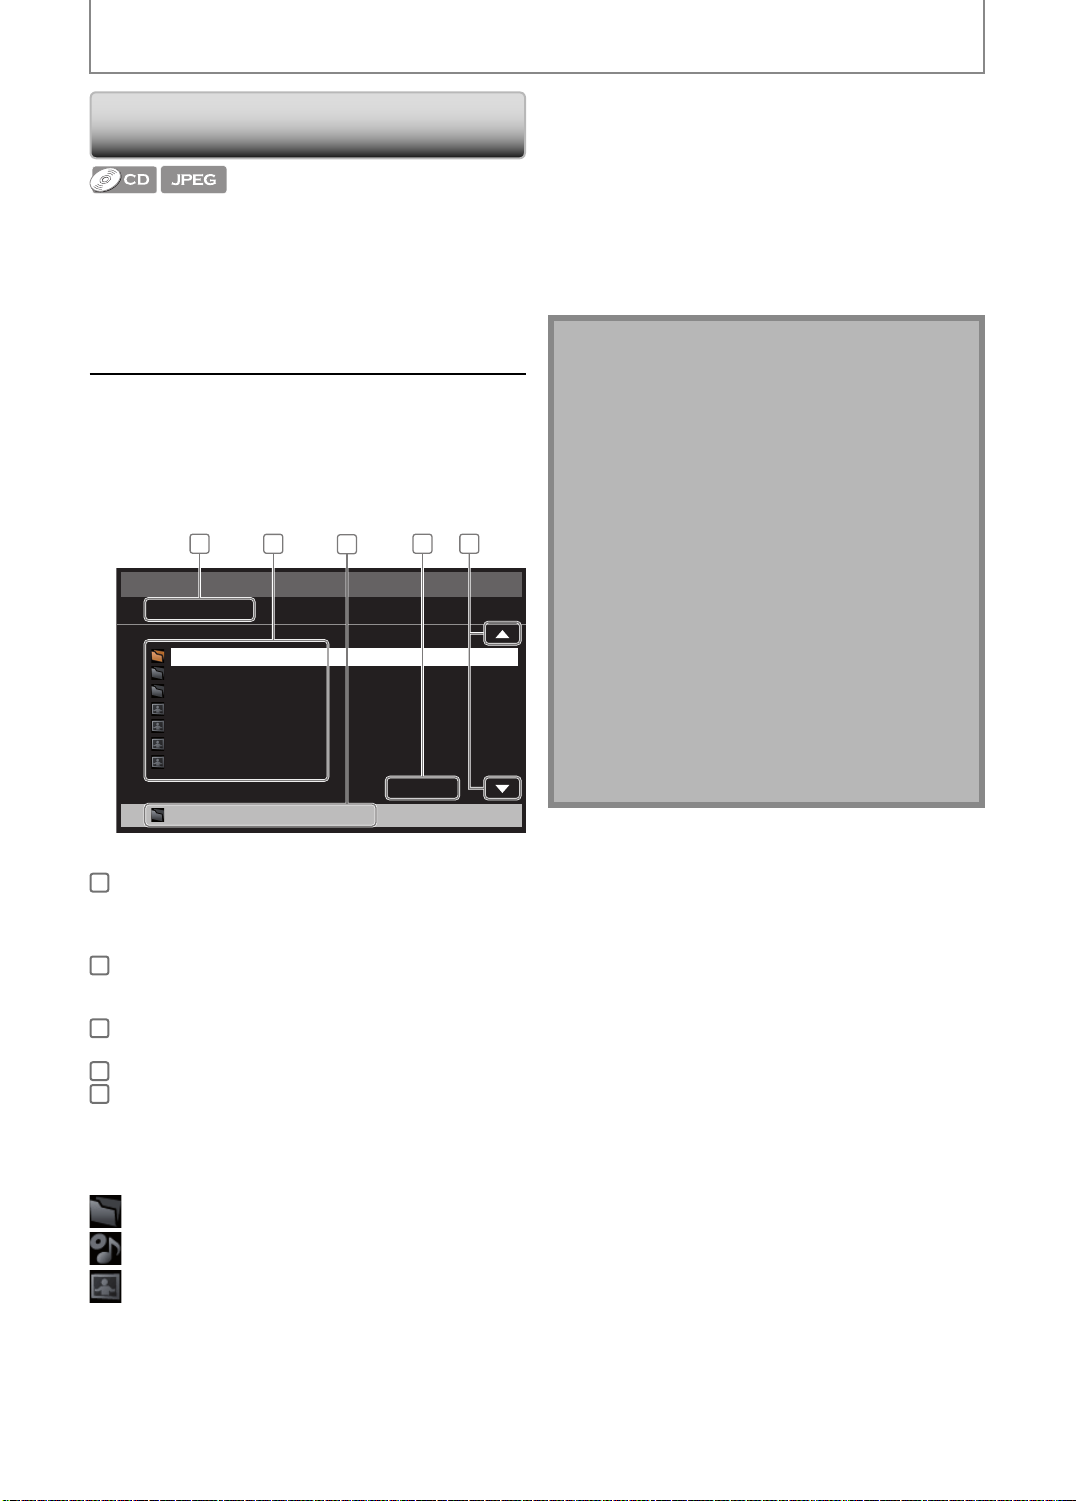
File List
JPEG_DISC
Folder_1
Folder_2
Folder_3
JPEG_A
JPEG_B
JPEG_C
JPEG_D
Folder_1
1
2
3
4 5
2 / 4
It is recommended that files to be played back in this
unit are recorded under the following specifications:
<JPEG>
Upper limit: 2,560 x 1,900 dots
•
Lower limit: 32 x 32 dots
•
File size of image maximum: 12 MB
•
(sub sampling is 4:4:4)
5,120 x 3,840 dots
(sub sampling is up to 4:2:2)
Note
The system can recognize up to 255 folders / 999 files
•
for CD, 999 folders / 9999 files for DVD and SD
Memory Card.
The name of folder and file can be displayed up to 28
•
characters. Unrecognizable characters will be
replaced with asterisks.
The 9th and deeper hierarchies cannot be displayed
•
for CD and the 10th and deeper hierarchies cannot
be displayed for DVD and SD Memory Card.
Files whose extension is other than “.jpg / .jpeg(JPEG)”
•
will not be listed.
Some unplayable folders or files may be listed due to
•
the recording status.
High-resolution JPEG files take longer to be displayed.
•
Progressive JPEG files (JPEG files saved in progressive
•
format) cannot be played back in this unit.
This unit recognize up to 8 characters of file name in
•
the SD Memory Card. Characters after 9th will not be
displayed.
For the SD Memory Card playback, refer to “Reading
•
the SD Memory Card” on pages 23-24.
e.g.) JPEG
audio CD: “CD-DA” will be displayed.
1
JPEG: Current folder name (Disc or SD
audio CD: List of the track number and time.
2
JPEG: List of the file / folder names in the
audio CD: Selected track number and time.
3
JPEG: Selected file / folder name
Current page / Total page number
4
Indication of previous / next page
5
•
Use [SKIP H / G ] to go back and forward
between the pages.
•
Press [TOP MENU] to return to the first item.
Icons:
: Folder
: audio CD track
: JPEG file
Memory Card name will be displayed
for the top of the hierarchies.)
current folder / disc
22
EN
Page 25
BASIC PLAYBACK
Kodak Picture CD
This unit can also run JPEG files stored on Kodak Picture
CD. You can enjoy picture images on the TV set by
playing back the Kodak Picture CD. This unit confirms to
ver.7.0 of Kodak Picture CD. For details of Kodak Picture
CD, contact a shop that provides developing service of
Kodak Inc.
When Kodak Picture CD is inserted in
1
this unit, Kodak Picture CD menu will
appear automatically on the TV
screen.
Photo A Photo B Photo C
Photo D Photo E Photo F
7 / 32HG
12 2
1. Current track number / The total number of tracks
2. Indication of previous / next page
•
In stop mode, press [POP MENU / MENU] to call
Kodak Picture CD menu.
Use [K / L / s / K] to select a desired
2
track to be played back, then press
[PLAY B ] or [OK].
•
An image will be played back from the
selected track and go to the next one in turn.
•
Use [SKIP H / G ] to go back and forward
between the pages.
Reading the SD Memory Card
You can play back the JPEG files in an SD Memory Card.
With the SD Memory Card, you can also enjoy the special
additional contents for BD-ROM Profile 1 ver.1.1 which
can be downloaded from the internet. You can store the
contents on an SD Memory Card via computer and play
them back with the BD-video. For more information
about the special additional contents, please refer to the
instruction book that came with the disc.
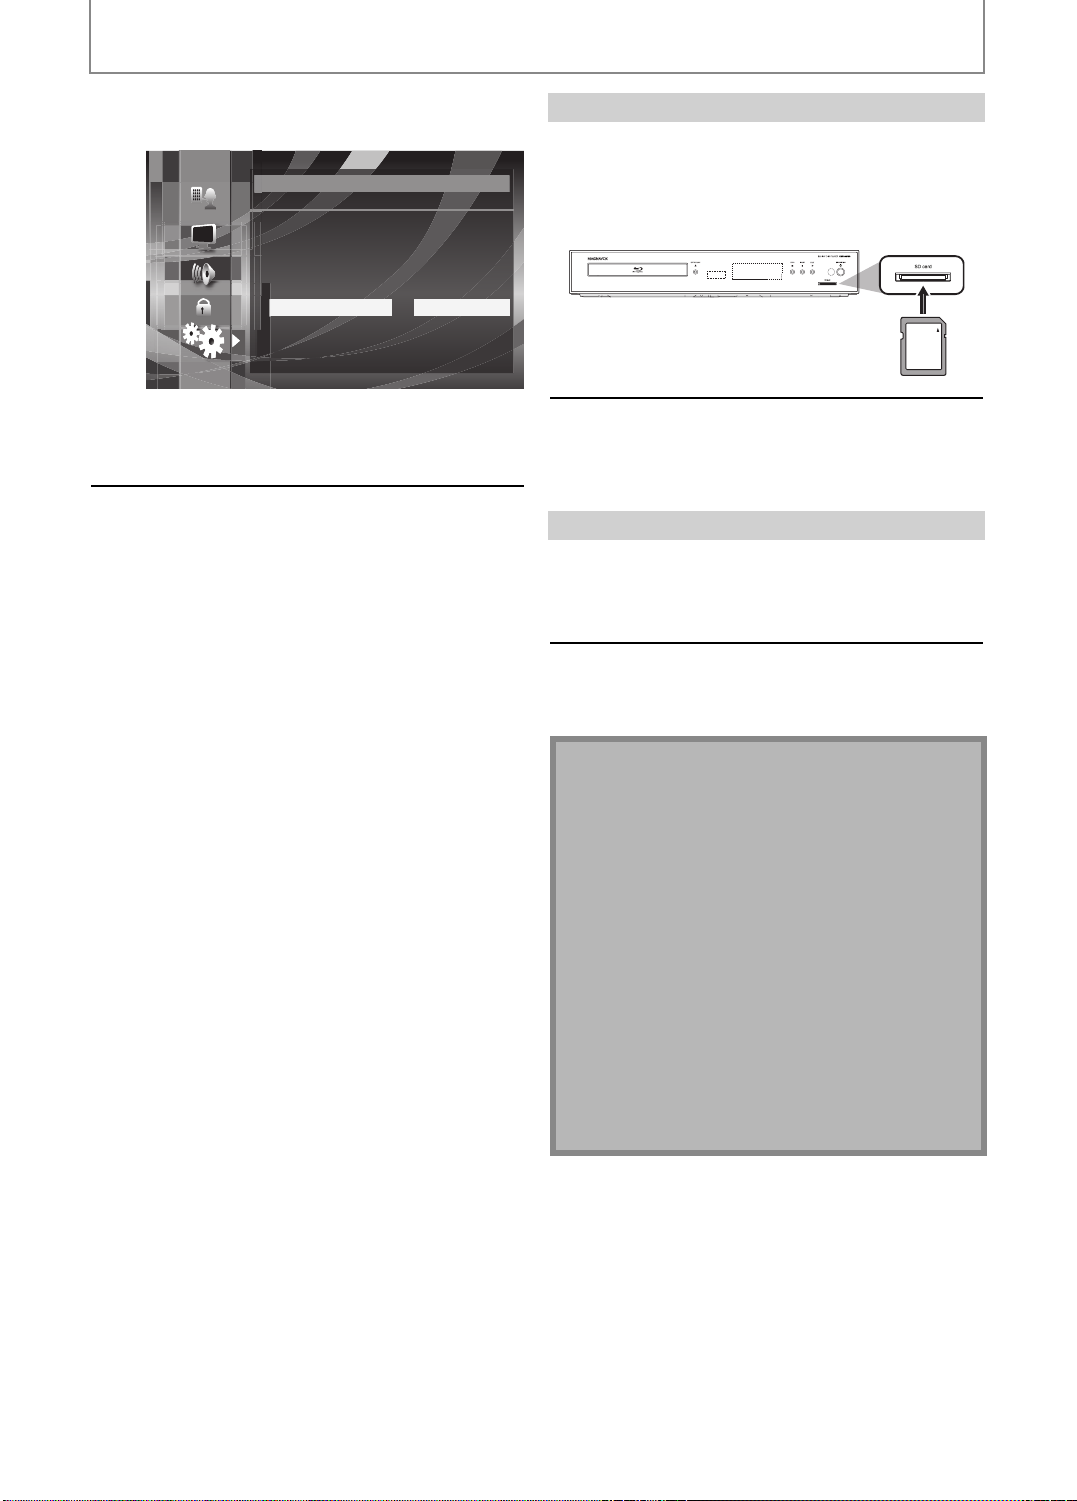
■
Setting the media mode
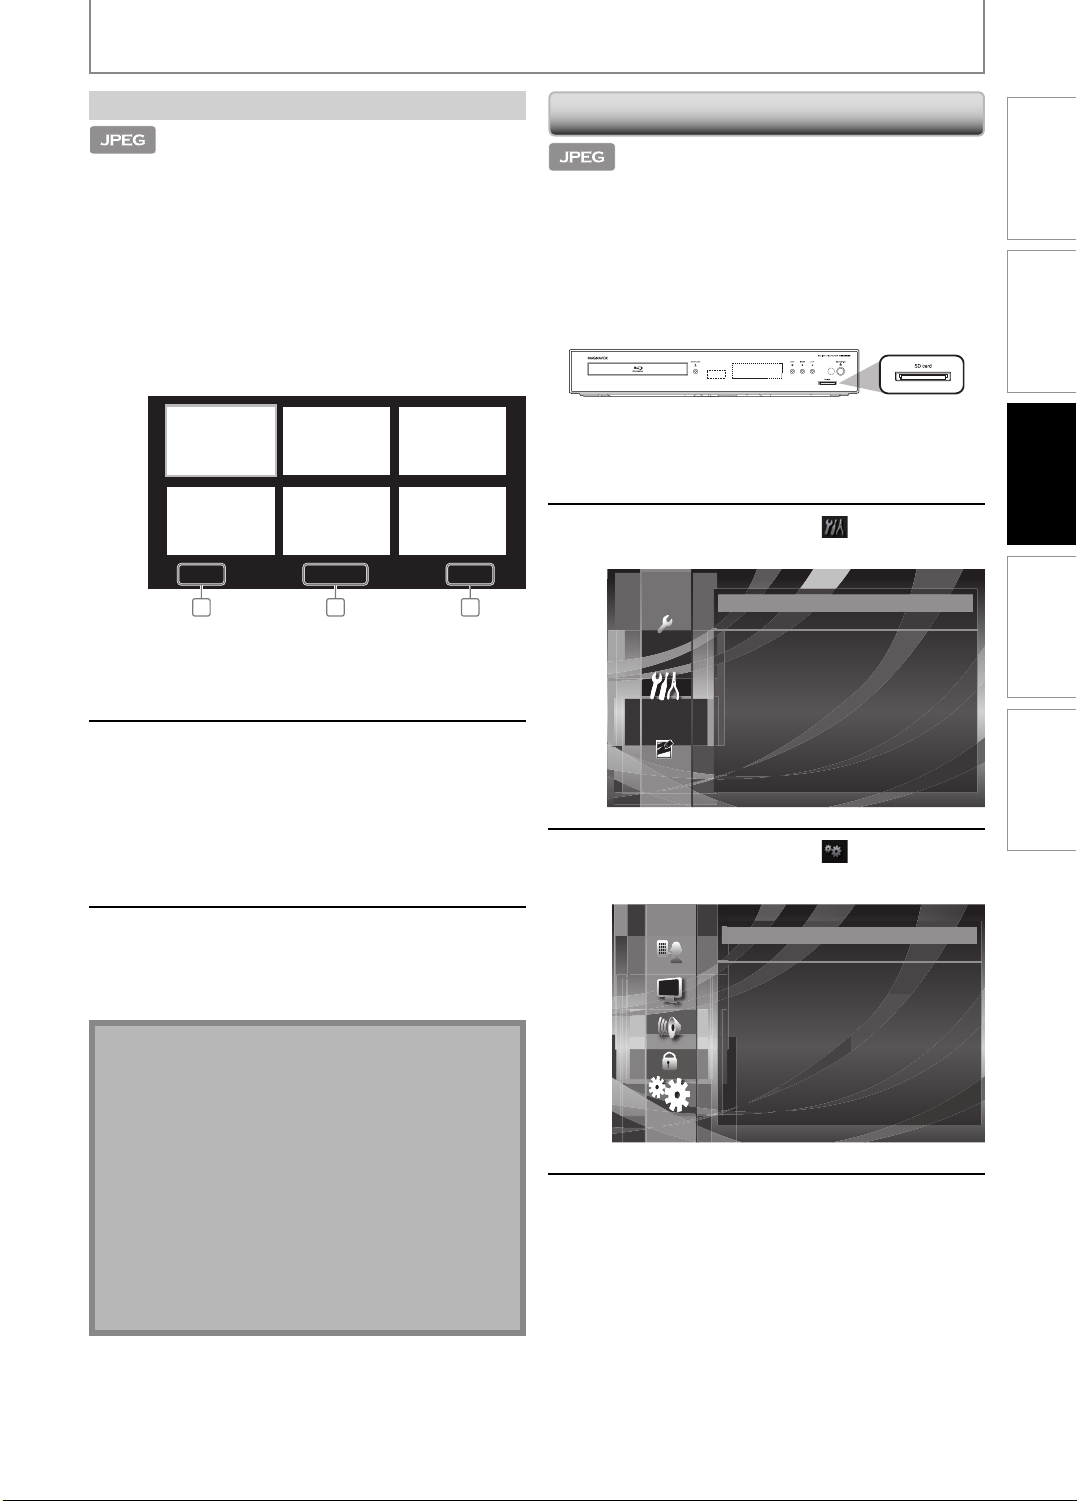
In stop mode, press [SETUP].
1
Use [ K / L ] to select
2
[OK].
Custom
Language
Video
Audio
Parental
Others
Use [ K / L ] to select
3
[OK].
, then press
, then press
Introduction
Connections
Playback
Function Setup Others
Press [STOP C] to stop playback.
3
Tips for JPEG / Kodak Picture CD Playback
Every press on [ANGLE] will turn the image clockwise
•
by 90 degrees when an image is displayed.
To change the visual effect for switching the playback
•
image, press [MODE] once, then use [s / B] or [OK] to
switch between “Cut In/Out” and “Fade In/Out”. The
size change may have no effect on some files (e.g. files
with a small picture size).
During JPEG / Kodak Picture CD playback, press
•
[MODE] twice to change the size of the playback
image, then use [ s / B] or [OK] to switch between
“Normal” (100%) and “Small” (95%). The size change
may have no effect on some files (e.g. files with a
small picture size).
EN
Others
Angle Icon
Auto Power Off
Panel Display
Slide Show
Media Select
On
On
Auto
5sec
Disc
Use [ K / L ] to select “Media Select”
4
setting.
23
Page 26
BASIC PLAYBACK
Press [OK] repeatedly to select “SD
5
Memory”.
Others
Angle Icon
Auto Power Off
Panel Display
Slide Show
Media Select
This will set the unit to “SD Memory” mode. To
•
play back the contents in any discs, exit “SD
Memory” mode by selecting “Disc”.
Press [SETUP] to exit.
On
On
Auto
5sec
SD Memory
6
Inserting the SD Memory Card and playback
Insert an SD Memory Card into the
1
2
Removing the SD Memory Card
1
2
SD card slot until it clicks with the
label facing up.
The file list will appear.
SD Memory Card
Follow the step 2 in “Playing Back an
audio CD and a Disc with JPEG Files”
on page 22.
In stop mode, push the SD Memory
Card and then slowly remove your
finger.
Grasp the card and pull it out from
the SD card slot.
Compatible Cards:
- SD Memory Card (8MB - 2GB)
- SDHC Memory Card (4GB)
- miniSD Card (8MB - 2GB)
- microSD Card (8MB - 2GB)
•
For miniSD Card and microSD Card, the adapter will
be required.
Note
Do not remove the card during its playback.
•
This unit supports SD Memory Card with FAT12 /
•
FAT16 file system, and SDHC Memory Card with
FAT32 file system.
Do not delete the folders or files in the SD Memory
•
Card with your computer. This unit might not read
the SD Memory Card.
This unit recognize up to 8 characters of file name in
•
the SD Memory Card. Characters after 9th will not be
displayed.
24
EN
Page 27
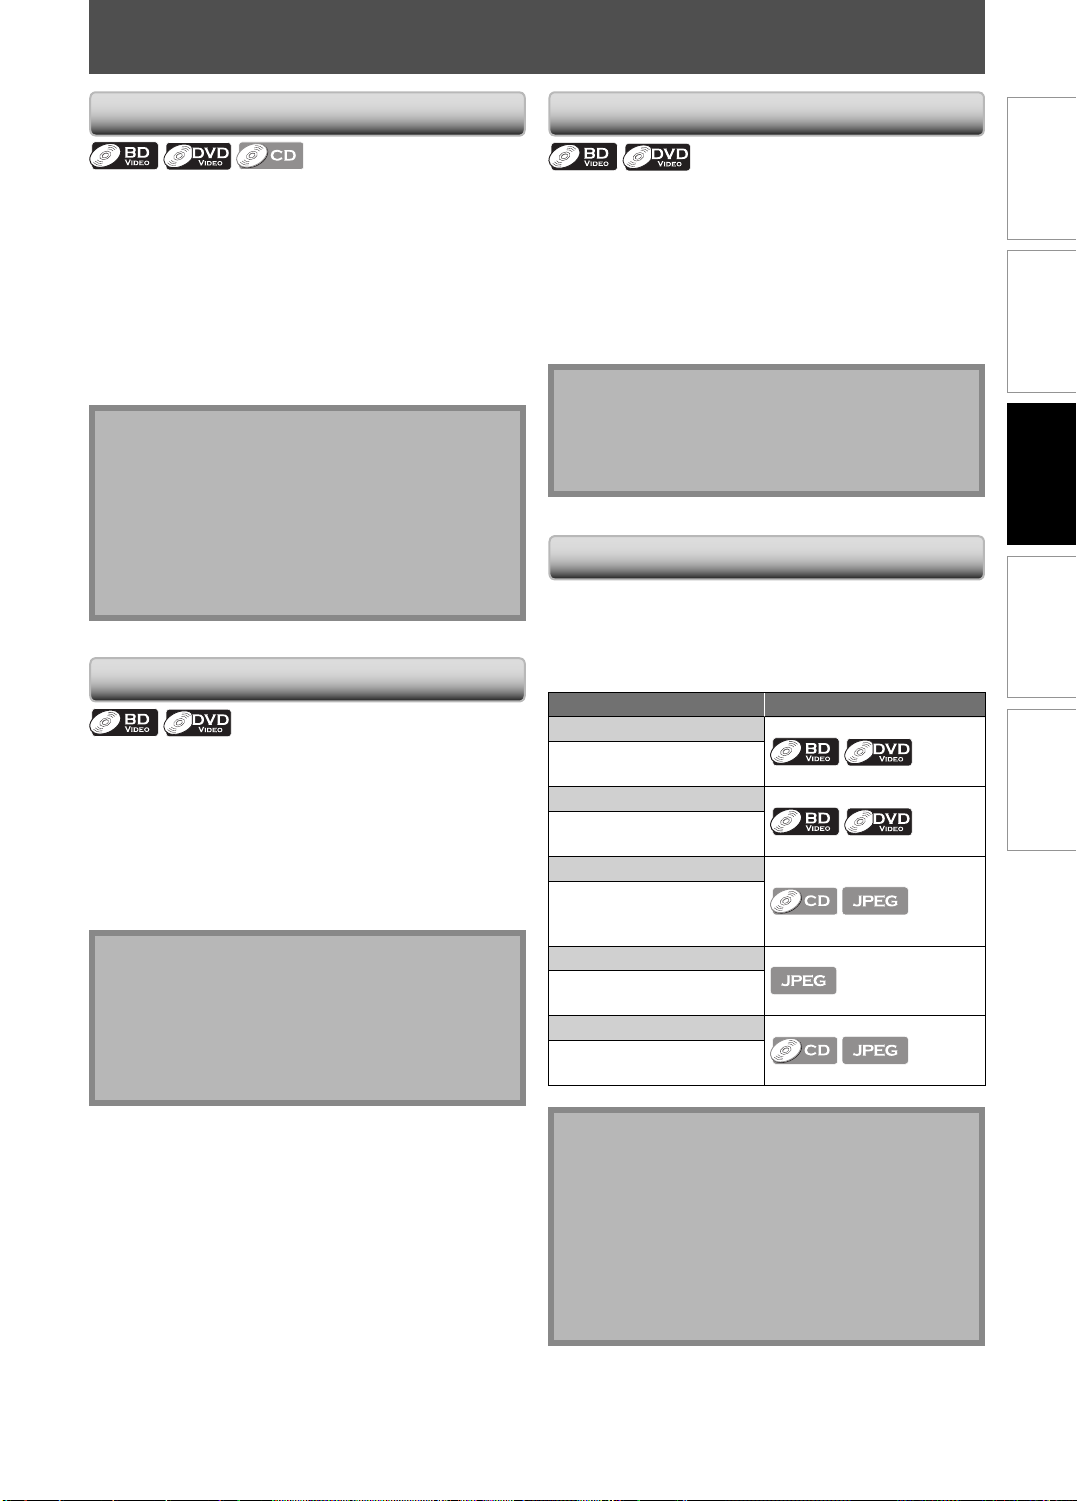
SPECIAL PLAYBACK
Fast Forward / Fast Reverse
1 During playback, press [FWD D]
repeatedly for fast forward.
During playback, press [REV E] repeatedly for fast
reverse.
Every time you press [FWD D] or [REV E], the
playback speed will change.
2 Press [PLAY B] to return to normal
playback.
Note
For BD and DVD, the approximate speed for the fast
•
forward or reverse playback is 1 (2x), 2(8x), 3 (20x),
4 (50x), and 5 (100x).
For audio CD, the approximate speed is 1 (2x), 2 (8x),
•
and 3 (30x).
For audio CD, fast forward / fast reverse search
•
between different tracks are not available during
program and random playback.
Slow Forward Playback
1 During playback, press [PAUSE F], then
press [FWD D].
Every time you press [FWD D], playback speed will
change.
2 Press [PLAY B] to return to normal
playback.
Note
The approximate speed for the slow forward
•
playback is 1(1/16x), 2(1/8x), 3(1/2x).
Only slow forward is available.
•
Set “Still Mode” setting to “Field” in “Video” menu if
•
pictures in the slow forward playback mode are
blurred (refer to page 35).
Step by Step Playback
1 In pause mode, press [PAUSE F]
repeatedly.
Every time you press [PAUSE F], playback will
advance one step at a time.
2 Press [PLAY B] to return to normal
playback.
Note
Only step by step forward is available.
•
Set “Still Mode” setting to “Field” in “Video” menu if
•
pictures in step by step playback mode are blurred
(refer to page 35).
Repeat Playback
Available repeat functions vary depending the discs.
1 During playback, press [REPEAT]
repeatedly to select the desired repeat
mode.
Repeat mode Available media
Chapter repeat
The current chapter will be
played back repeatedly.
Title repeat
The current title will be
played back repeatedly.
Track repeat
The current track or file
will be played back
repeatedly.
Group repeat
The current folder will be
played back repeatedly.
All repeat
All tracks in the media will
be played back repeatedly.
Introduction
Connections
Playback
Function Setup Others
EN
Note
The repeat setting will be canceled when you stop
•
playback.
The chapter, title, track or group repeat will be
•
cleared when moving to other chapter, title, track /
file or folder.
Repeat playback does not function during A-B repeat
•
playback.
Chapter and title repeat are not available with some
•
scenes.
25
Page 28

SPECIAL PLAYBACK
A-B Repeat
You can play back the specific part (between point A and
point B) repeatedly.
1 During playback, press [A-B] at the
desired starting point A.
2 During playback, press [A-B] at the
desired ending point B.
As soon as you set the point B, the part between point
A and point B will start playback repeatedly.
•
To cancel the A-B repeat, press [A-B] again.
Note
Point B should be set within the same title or track as
•
point A.
A-B repeat is not available with some scenes.
•
To cancel the A point which was set, press [CLEAR].
•
A-B repeat does not function during chapter, title,
•
track, group or all repeat playback.
PIP (Picture in Picture) Setting
Some BD-video have the PIP (picture-in-picture) function
which enables you to display the secondary video in the
primary video. You can call up the secondary video by
pressing [PIP] whenever the scene contains the
secondary video.
primary
video
Program Playback
You can play back the disc in your desired order.
1 In stop mode, press [MODE].
The program screen will appear.
•
2 Use [K / L] to select a track / file, then
press [OK].
Program
CD-DA Total 0:09:49
1
1
3:40
2
2:33
3
2:22
4
2:28
5
2:45
6
3:41
7
2:58
1 / 3
6 3:41
e.g.) audio CD
•
For JPEG files, use [K / L] to select a folder, then
press [OK] first, and then use [K / L] to select a file,
then press [OK].
•
Press [CLEAR] to erase the last file of the program.
•
Use [K / L] to select “All Clear” at the bottom of the
list to erase all the tracks / files in the program.
•
The programmed tracks / files is displayed in the
right hand screen.
•
If the entire program cannot be displayed on the TV
screen, “L” or “K” appears.
•
Use [s / B] to go back forward between the
hierarchy of folders.
•
If 8 or more tracks / files were set in a program, use
[SKIP H / G ] to see all the tracks / files.
3:40
4
2:28
6
3:41
1 / 1
3 Press [PLAY B ] to start program
playback.
Program playback will start.
•
secondary
video
1 During playback, press [PIP].
PIP information will appear.
2 Use [K / L] to select the secondary video
you want.
The secondary video will be displayed and the
•
secondary audio will be output.
3 Press [RETURN] or [PIP] to remove the PIP
information.
Note
The the secondary audio will not be output when the
•
secondary audio is set to “Off” or when “BD Audio
Mode” is set to “HD Audio Output”. Refer to
“Switching Audio Soundtrack” on page 29 and
“Setting the BD Audio Mode” on page 30.
26
Note
During program playback, press [STOP C ] once to
•
set the resume point, and then press [PLAY B ] to
resume program playback from where [STOP C ]
was pressed (audio CD) or from beginning of the file
where [STOP C ] was pressed (JPEG).
During program playback, press [STOP C ] twice to
•
display the program screen. To go back to the
normal program playback, press [RETURN] to exit
from the program screen, then press [PLAY B ].
If you open the disc tray, remove the SD Memory
•
Card or turned off the power, the program will be
cleared.
Up to 99 tracks / files can be entered.
•
To repeat the current track / file in the program,
•
press [REPEAT] repeatedly until “
appears during play back. To repeat the entire
program, press [REPEAT] repeatedly until “
appears during playback.
Playback from a desired track / file and random
•
playback are not available during program playback.
Track”
All”
EN
Page 29
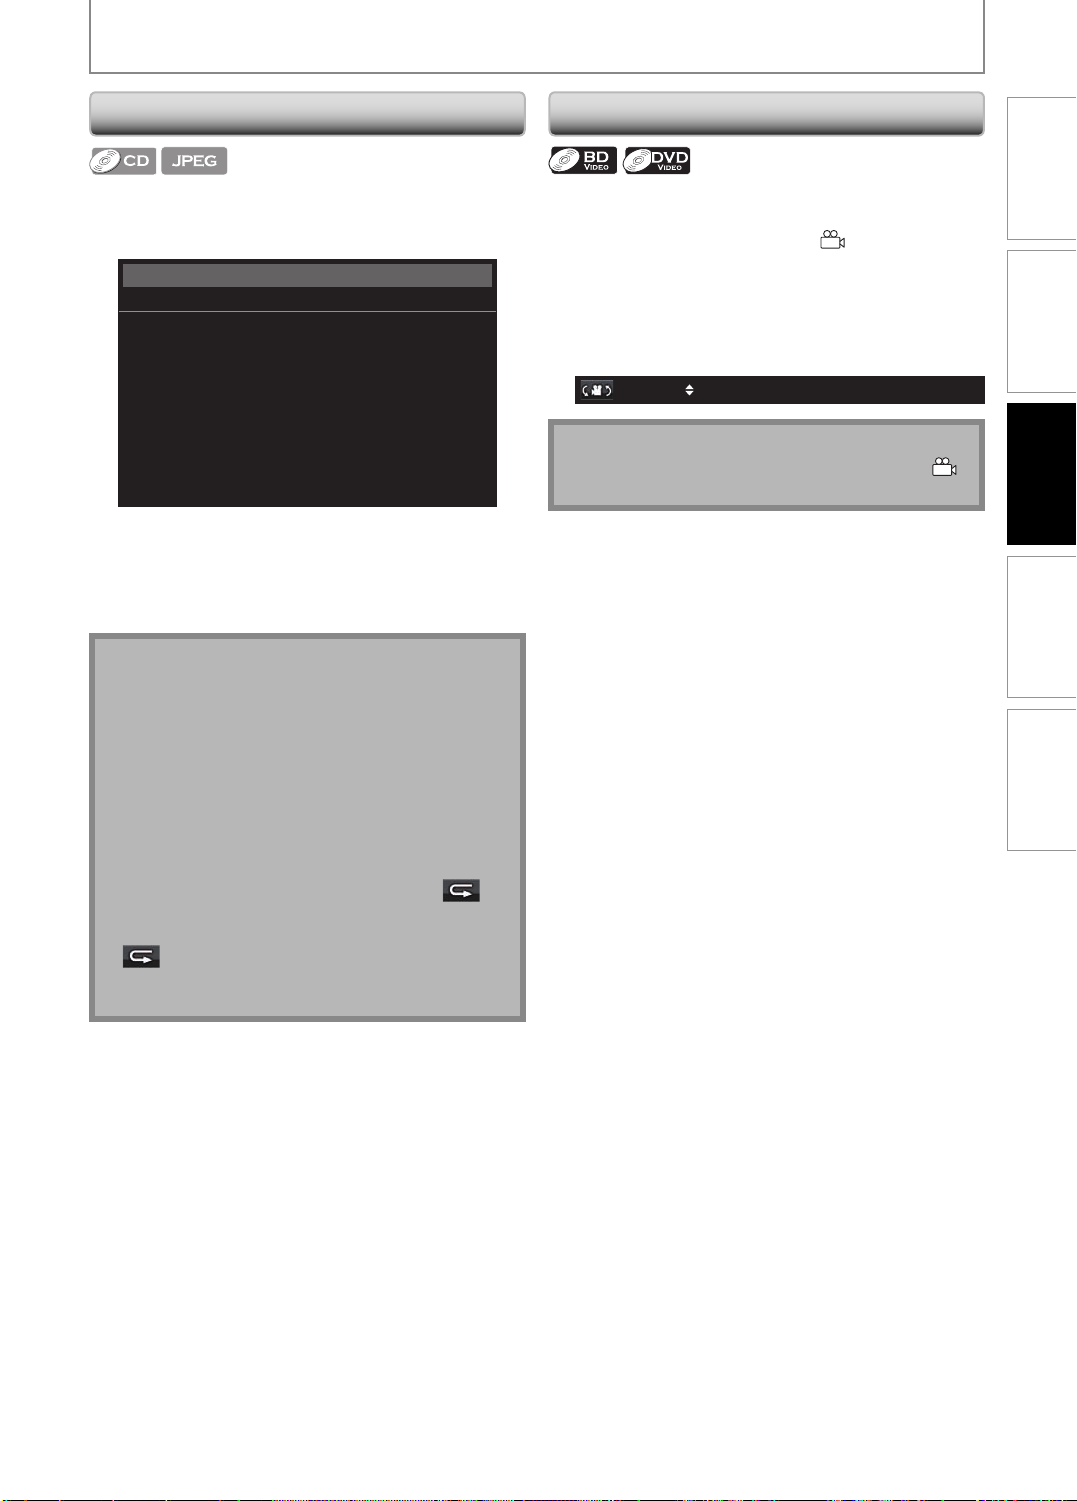
SPECIAL PLAYBACK
Random Playback
This function shuffles the playback order of tracks / files.
1 In stop mode, press [MODE] twice.
The random screen will appear.
•
Random
CD-DA Total 0:41:06
Random Program
-- no indication --
e.g.) audio CD
2 Press [PLAY B ] to start random
playback.
Note
During the random playback, press [STOP C ] once
•
to set the resume point, and then press [PLAY B ] to
resume random playback from where [STOP C ] was
pressed (audio CD) or from beginning of the file
where [STOP C ] was pressed (JPEG).
During random playback, press [STOP C ] twice to
•
display the random playback screen. To cancel the
random playback, press [MODE] when the random
playback screen is displayed.
To repeat the current track / file in the random
•
selection, press [REPEAT] repeatedly until “
Track” appears during playback. To repeat the entire
random selection press [REPEAT] repeatedly until
“
All” appears during playback.
•
You cannot go back to the previous track / file during
random playback.
Camera Angle
Some BD-video and DVD-video contain scenes which
have been shot simultaneously from various angles. You
can change the camera angle when
screen.
appears on the TV
1 During playback, press [ANGLE].
The selected angle will be displayed on the display
•
bar at the top of the TV screen.
2 Use [K / L] to select your desired angle.
1 / 3
Note
If “Angle Icon” setting is “Off” in “Others” menu,
•
will not appear. Refer to page 41.
Introduction
Connections
Playback
Function Setup Others
EN
27
Page 30
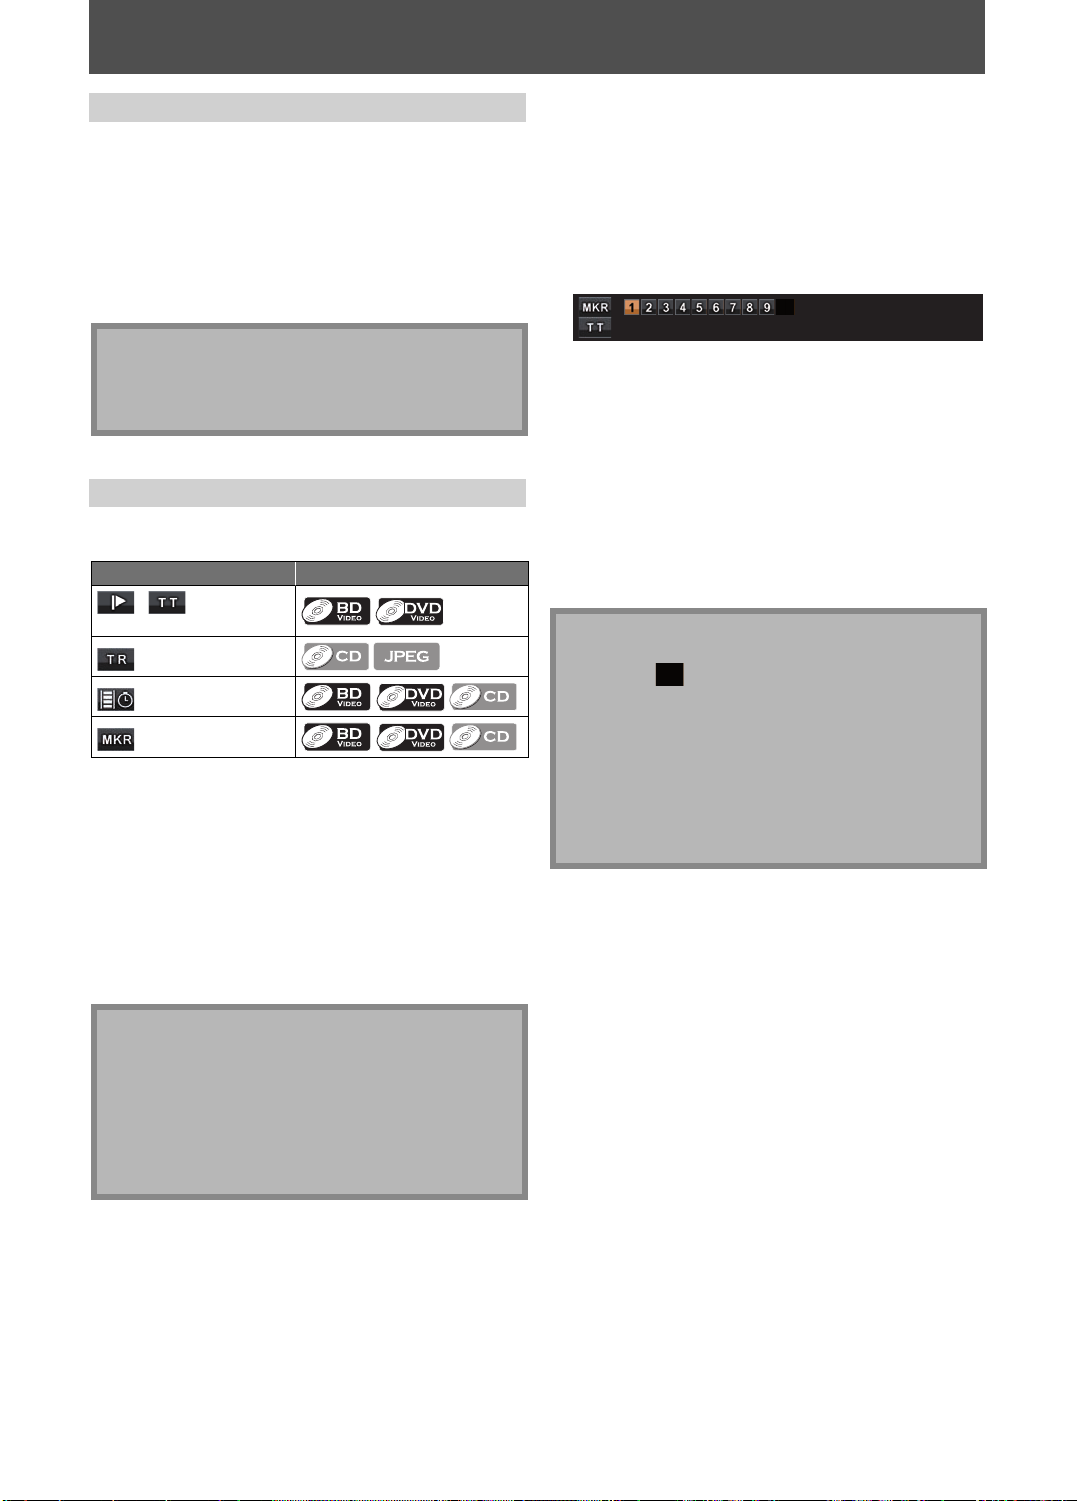
SEARCH
Using [SKIP H / G ]
1 During playback, press [SKIP G] to
move to the next track. Press it
repeatedly to skip to subsequent tracks.
Press [SKIP H ] once to go back to the
beginning of the current track. Press it
repeatedly to go to the previous tracks.
For JPEG files, press [SKIP H ] to go back to the
•
previous file.
Note
For BD and DVD, if title contains no chapters,
•
[SKIP H / G ] changes the title.
For JPEG files, [ s / B ] is also available.
•
Using [SEARCH]
By using [SEARCH], you can select following search
modes.
Search mode Available media
/
Chapter / Title search
Track search
Time search
Marker search
1 During playback, press [SEARCH]
repeatedly until your desired search
mode appears.
2 Enter the desired chapter, title, track, file
number or time to search for using [the
Number buttons].
Chapter, title, track or time search will start.
•
Press [CLEAR] to erase an incorrect input.
•
Marker search
■
This feature allows you to assign a specific point on a title
or track to be called back later.
1 During playback, press [SEARCH]
repeatedly until the marker setting
menu appears.
2 Use [s / B] to select a marker number
(1-9).
___ __ : __ :__
3 When the disc reaches the point at which
you want to set a marker, press [OK].
The title or track and elapsed playback time will
•
appear on the TV screen.
4 Press [SEARCH] or [RETURN] to exit.
5 To return to the marker later, call the
marker setting by pressing [SEARCH]
repeatedly during playback or in stop
mode, and use [s / B] to select a desired
marker, then press [OK].
Note
•
Opening the disc tray, turning off the power or
selecting “
erase all markers.
•
To clear a marker, use [s / B] to select the marker
number to be cleared and press [CLEAR].
•
You can mark up to 9 points.
For BD, marker search between different titles is not
•
available.
For BD, you can return to the maker only during
•
playback.
” at step 2 and pressing [OK] will
Note
During program and random playback, search
•
functions are not available except the search using
[SKIP H / G ].
Time search is available only in the same track, file or
•
title.
For BD, chapter and time search are available only
•
during playback.
28
EN
Page 31

SPECIAL SETTINGS
You can select the format of audio and video as you prefer depending on the contents of the disc you are playing back.
Switching Subtitles
Some BD and DVD may have subtitles in 1 or more
languages. For commercially available discs, the
supported languages can be found on the disc case.
Follow the steps below to switch the subtitle languages
during playback.
Switching Audio Soundtrack
Some BD and DVD contain multiple audio streams. Those
are often in different audio languages or audio formats.
For BD, available audio varies depending on “BD Audio
Mode” setting. Refer to page 36 for more information.
1 During playback, press [AUDIO]
1 During playback, press [SUBTITLE]
repeatedly to display “Primary”,
“Secondary” or “Subtitle Style”.
“Primary”: Sets the subtitle for the primary
”Secondary”: Sets the subtitle for the secondary
“Subtitle Style”: Sets style of the subtitle.
video.
video.
2 Use [K / L] to select your desired subtitle
or style.
Primary / 41JPN
Use [{ / B] to switch between current subtitle
•
setting and “Off”.
3 Press [SUBTITLE] repeatedly to exit.
repeatedly to display “Primary” or
“Secondary”.
“Primary”: Sets the audio for the primary video.
“Secondary”: Sets the audio for the secondary video.
2 Use [K / L] to select your desired audio
stream channel.
Primary / 21 JPN Dolby D 2ch
For “Secondary”, use [{ / B] to switch between
•
current audio setting and “Off”.
3 Press [AUDIO] repeatedly to exit.
1 During playback, press [AUDIO].
2 Use [K / L] to select your desired audio
stream channel.
1 During playback, press [SUBTITLE].
2 Use [K / L] to select your desired
subtitle.
1 ENG / 4
Use [{ / B] to switch between current subtitle
•
setting and “Off”.
3 Press [SUBTITLE] to exit.
1 ENG
e.g.) DVD-video
•
For audio CD, you can select following options.
“Stereo”:
“L-ch”: Only left channel is active.
“R-ch”: Only right channel is active.
Both right and left channels are active (stereo).
3 Press [AUDIO] to exit.
/ 3Dolby D 3/2.1ch 48k
Introduction
Connections
Playback
Function Setup Others
Note
Some discs will only allow you to change the
•
subtitles from the disc menu or pop-up menu. Press
[TOP MENU] or [POP MENU / MENU] to display the
disc menu or pop-up menu.
If 4-digit-language code appears in the subtitle
•
menu, refer to “LANGUAGE CODE” on page 45.
If the disc has no subtitle language or subtitle style,
•
“Not Available” will be displayed on the TV screen.
During playback of the secondary video, the primary
•
subtitle setting is not available except when there is
no subtitle for the secondary video.
Secondary subtitle setting is only available during
•
playback of the secondary video.
If you choose a language that has a 3-letter-language
•
code, the code will be displayed every time you
change the subtitle language setting. If you choose
any other Languages, “---” will be displayed instead
(refer to page 45).
EN
Note
The secondary audio will not be output when the
•
secondary video is not displayed or when “BD Audio
Mode” is set to “HD Audio Output”.(For some BD,
secondary audio will be output even when
secondary video is off.)
•
The sound mode cannot be changed during
playback of discs not recorded in multiple audio.
•
Some discs allow to change audio language setting on
the disc menu. (Operation varies depending on the
discs. Refer to the manual accompanying the disc.)
•
[AUDIO] may not work on some discs with multiple
audio streams or channels (e.g. DVD which allow to
change audio setting on the disc menu).
If you select a language that has a 3-letter-language code,
•
the code will be displayed every time you change the
audio language setting. If you select any other languages,
“---” will be displayed instead (refer to page 45).
If 4-digit-language code appears in the subtitle
•
menu, refer to “LANGUAGE CODE” on page 45.
If the disc has no audio language, “Not Available” will
•
be displayed on the TV screen.
For DTS-CD (5.1 music disc), selecting audio streams
•
or channels is not available.
29
Page 32

SPECIAL SETTINGS
Setting the BD Audio Mode
There are 2 ways to set “BD Audio Mode” setting;
whether to output the secondary and interactive audio
accompanied by the primary audio or only the primary
audio. Depending on the setting of the mode, Dolby
Digital, Dolby Digital Plus, Dolby TrueHD, DTS, or DTS-HD
output changes between multi LPCM and bitstream.
1 In stop mode with BD inserted, press
[MODE].
2 Use [K / L] to select your desired setting.
BD Audio Mode Mix Audio Output
“Mix Audio Output”:
If it is available, BD-video’s secondary and interactive
audio will be output with the primary audio.
•
The secondary audio is the audio for the secondary
video (Director’s comment etc.) and the interactive
audio is the audio for the interactive application
(Button click sounds etc.).
“HD Audio Output”:
Only the primary audio will be output. Set this mode in
order to output Dolby Digital, Dolby Digital Plus, Dolby
TrueHD, DTS or DTS-HD audio of BD through HDMI
connection.
3 Press [RETURN] to exit.
You can also set “BD Audio Mode” from the setup
•
menu. Refer to page 36.
Adjusting the Picture
You can adjust the picture quality.
1 During playback, press [MODE].
2 Use [K / L] to select your desired item,
then use [s / B] to adjust the setting.
Black Level
Noise Reduction
Black level
■
You can adjust the black level setting to make the black
parts of the pictures as bright as you prefer. You can
select “On” or “Off”
“On”: Makes the dark parts brighter.
“Off”: Shows the original picture as recorded.
■
Noise reduction
Reduces the noise of the playback picture.
“1”: Executes MPEG noise reduction which reduces the
block noise and mosquito noise on the subtitle on
movie.
“2”: Executes 3D noise reduction which detects and
deletes the noise by comparing each picture
frames.
“3”: Executes both MPEG noise reduction and 3D noise
reduction.
On
sB
Off
3 Press [RETURN] repeatedly to exit.
Note
In “Mix Audio Output” mode, if there is no secondary
•
and interactive audio, the audio will be output as
“HD Audio Output” mode.
In “Mix Audio Output” mode, even if you set “HDMI
•
Multi(Normal)” in “HDMI Audio Out” setting, multi
LPCM will be output from HDMI OUT jack for BD
audio. Refer to page 14.
In “Mix Audio Output” mode with HDMI audio being
•
output, 2-channel down-mixed LPCM will be output
from DIGITAL OUT jack for BD audio.
In “Mix Audio Output” mode with “HDMI Audio Out”
•
setting set to “Audio Mute” and “Digital Out”setting
set to “Bitstream”, DTS, DTS-HD and LPCM will be
output as Dolby Digital for BD audio. Refer to pages
14, 16.
You can also set “ BD Audio Mode” setting from the
•
setup menu. Refer to page 36.
30
Note
The setting remains even you turn off the unit.
•
For the picture output from HDMI OUT, “Black Level”
•
is not effective.
For BD, noise reduction is not effective.
•
EN
Page 33

FUNCTION SETUP
C
MODE
SU
E
S
CH
EAR
BTITL
DISPLAY
Using the Setup Menu
In the setup menu you can change the setting for audio,
video, language, etc. You cannot change the setting
during playback.
Introduction
Quick
Connections
LEAR
“ Quick” menu contains setting items extracted from
“
Custom” menu which may be used frequently.
A-
In stop mode, press [SETUP].
1
Use [K / L] to select
OK
AUDIO
2
3
[OK].
Use [K / L] to select your desired
setting items.
Quick
, then press
Playback
Function Setup
BD Audio Mode
HDMI Audio Out
HDMI Video Resolution
Component Output
Player Menu
TV Aspect
Follow the procedure below
4
depending on the setting items.
A) If “ B “ does not appear on the right side
of the setting items when you highlight
the items:
Press [OK] repeatedly to change options.
B
B) If “
“ appears on the right side of the
setting
items:
1) Press [OK].
2)
items
when you highlight the
Use [K / L] to select options, then press
[OK].
Use [s] or [RETURN] to go back to the
•
previous screen.
Press [SETUP] to exit.
5
Mix Audio Output
HDMI Multi(Normal)
Auto
480i
English
16:9 Wide
Others
EN
31
Page 34

FUNCTION SETUP
C
MODE
SU
E
S
CH
Custom
“
Custom” menu contains all the setting items.
EAR
BTITL
DISPLAY
In stop mode, press [SETUP].
1
Use [K / L] to select
2
A-
LEAR
3
OK
RETURN
AUDIO
[OK].
Use [K / L] to select your desired
setting category, then press [OK].
: Language
: Video
: Audio
: Parental
: Others
•
Parental” menu, follow the procedure
For “
on page 40.
Use [K / L] to select your desired
4
setting items.
•
The setting items which are not available with
current situation of this unit will be displayed
in gray and you cannot select them.
Follow the procedure below
5
depending on the setting items.
, then press
A) If “ B “ does not appear on the right side
of the setting items when you highlight
the items:
Press [OK] repeatedly to change options.
B
B) If “
“ appears on the right side of the
setting
items:
1) Press [OK].
2) Use [K / L] to select options, then press
items
[OK].
•
Use [s] or [RETURN] to go back to the
previous screen.
Press [SETUP] to exit.
6
when you highlight the
32
EN
Page 35

■
Language
FUNCTION SETUP
Introduction
Language
Audio
Subtitle
Disc Menu
Player Menu
For how to select the setting items and options, refer to “
•
Original
Off
English
English
Custom” on page 32.
Setting items Options
Audio
Sets the language for audio.
Original* / English / French / Spanish / German / Italian / Swedish / Dutch /
Russian / Chinese / Japanese / Korean / Danish / Finnish / Norwegian /
Icelandic / Hungarian / Romanian / Turkish / Greek / Irish / Portuguese /
Polish / Czech / Slovak / Bulgarian / Other
Subtitle
Sets the language for subtitle.
Off* / English / French / Spanish / German / Italian / Swedish / Dutch /
Russian / Chinese / Japanese / Korean / Danish / Finnish / Norwegian /
Icelandic / Hungarian / Romanian / Turkish / Greek / Irish / Portuguese /
Polish / Czech / Slovak / Bulgarian / Other
Disc Menu
Sets the language for disc menu or
pop-up menu.
English* / French / Spanish / German / Italian / Swedish / Dutch / Russian /
Chinese / Japanese / Korean / Danish / Finnish / Norwegian / Icelandic /
Hungarian / Romanian / Turkish / Greek / Irish / Portuguese / Polish / Czech /
Slovak / Bulgarian / Other
Player Menu
English* / Français / Español
Sets the language for OSD
(on-screen display).
•
Settings with (*) are the default.
•
“Quick” menu consists of the setting menus frequently used, and they are accompanied with
If you select “Other”, enter the 4-digit-number code for the desired language (Refer to “LANGUAGE CODE” on
•
.
page 45). Only the languages supported by the disc can be selected.
Connections
Playback
Function Setup
Others
EN
33
Page 36

■
FUNCTION SETUP
Video
Video
TV Aspect
HDMI Video Resolution
HDMI Deep Color
Component Output
Progressive Mode
Still mode
For how to select the setting items and options, refer to “
•
16:9 Wide
Auto
Auto
480i
Auto
Auto
Setting items Options
TV Aspect
Sets the picture size according to
aspect ratio of the connected TV.
16:9 Wide*:
Select this when a wide-screen TV is connected. Discs recorded in wide-
screen format is played back over the entire TV screen.
4:3 Pan & Scan:
Select this to play back the discs recorded in wide-screen format with 4:3 TV
in the pan & scan mode (with the sides of the picture cut off). Discs which are
not specified for pan & scan are played back in the letter box mode.
4:3 Letter Box:
Select this to play back the discs recorded in wide-screen format with 4:3
TV in the letter box mode. (with black strips at the top and bottom).
16:9 Squeeze:
When playing back 4:3 images, the picture is displayed in the center of the
16:9 screen with a 4:3 aspect ratio.
HDMI Video Resolution
Sets the HDMI video resolution.
Auto*:
HDMI video resolution will be selected automatically depending on the
connected HDMI device.
480p
720p
1080i
1080p
1080p24:
Gives a natural and high quality film reproduction of 24-frame film
material. The connected TV has to be compatible with 1080p24 frame
input.
HDMI Deep Color
Sets whether to output the picture
from HDMI OUT jack with Deep
Color or not.
Auto*:
The picture from HDMI OUT jack will be output with Deep Color to the
connected TV which supports HDMI Deep Color.
Off:
The picture from HDMI OUT jack will be output without Deep Color.
Component Output
Sets the video resolution for
component output.
480i*
480p
720p
1080i
Progressive Mode
Sets the optimum progressive
mode for the image material
output from HDMI OUT jack and
COMPONENT VIDEO OUT jacks.
Auto*:
The progressive mode will detect 24-frame film material (movies) and
automatically select appropriate progressive mode.
Video:
Suited for playing back video material discs (TV shows or animation).
Custom” on page 32.
34
EN
Page 37

FUNCTION SETUP
Setting items Options
Still Mode
Adjusts picture resolution and
quality in still mode.
Settings with (*) are the default.
•
“Quick” menu consists of the setting menus frequently used, and they are accompanied with
•
If you set “HDMI Video Resolution” setting to “1080p24” and the contents of the BD are not compatible for
•
1080p24 frame, 1080p60 frame will be output.
An individual picture on the TV screen is called as “Frame” , which consists of two separate images called as
•
“Field”. Some pictures may be blurred at the auto setting in “Still Mode” setting due to their data characteristics.
If the picture is not output properly to the TV because of “HDMI Video Resolution” or “Component Output”
•
setting, press and hold [ B PLAY] on the front panel for more than 5 seconds. Both settings will be reset to the
default automatically.
If an HDMI cable is connected, for video resolution for the component output, you can only select video
•
resolution that currently output from HDMI OUT jack or “480i”.
If the video resolution for the component output and HDMI video resolution do not match, the video resolution
•
for the component output will be switched to “480i”. COMPONENT VIDEO OUT jacks may not output any signals
depending on the disc material.
If you play back copy-protected DVD-video, 480p signal will be output from COMPONENT VIDEO OUT jacks,
•
when “Component Output” setting is set to “720p” or “1080i”.
Auto*:
Automatically selects the best resolution setting (“Frame” or “Field”) based
on the data characteristics of the pictures.
Field:
Stabilizes the pictures, although the picture quality may become coarse
due to the limited amount of data. Select “Field” when the pictures are still
unstable even if “Auto” is selected.
Frame:
Displays relatively motionless pictures in higher resolution. “Frame”
improves the picture quality, although it may unstabilize the pictures due
to alternate output of 2-field data.
.
Introduction
Connections
Playback
Function Setup
Others
EN
35
Page 38

■
FUNCTION SETUP
Audio
Audio
36
BD Audio Mode
HDMI Audio Out
Down Sampling
DRC
Virtual Surround
For how to select the setting items and options, refer to “
•
Mix Audio Output
HDMI Multi (Normal)
On
Auto
Off
Custom” on page 32.
Setting items Options
BD Audio Mode
For BD, selects whether to output
the secondary and interactive
audio with primary audio if it is
available or only the primary
audio. Refer to “Setting the BD
Audio Mode” on page 30.
HDMI Audio Out
Sets the audio format for the
audio output from HDMI OUT jack.
Mix Audio Output*:
Outputs the secondary and interactive audio with primary audio if it is available.
HD Audio Output:
Outputs only the primary audio. Set this mode in order to output Dolby
Digital, Dolby Digital Plus, Dolby TrueHD, DTS or DTS-HD audio of BD
through HDMI connection.
HDMI Multi(Normal)*:
The multi-channel audio signals are output from HDMI OUT jack with
bitstream or LPCM.
HDMI Multi(LPCM):
The multi-channel audio signals are output from HDMI OUT jack with LPCM.
Refer to pages 37-39 for setting options.•
Audio Mute:
Mutes the HDMI audio signal, and set the signal format from DIGITAL OUT jack.
Refer to “Digital out setting” on page 37 for setting options.•
Down Sampling
Sets the digital audio output
when playing back BD or DVD
recorded in LPCM.
On*:
LPCM signals are converted to 48 kHz for output.
Set to “On” when using digital connections to an AV amplifier that is not
•
compatible with sampling frequencies of 96 kHz.
Off:
For BD and DVD recorded in LPCM without copyright protection, 2-channel
audio signals up to 192 kHz are output as LPCM signals with no conversion.
DRC
Sets whether to compress the
range of sound volume (dynamic
range control) when Dolby Digital,
Dolby Digital Plus or Dolby
TrueHD audio is played back.
Virtual Surround
Sets to create a surround effect in
a system with 2 speakers
connected.
Auto*:
When the discs recorded in Dolby TrueHD format are in playback, this unit detects
DRC setting of the disc and set “DRC” setting to “On” or “Off” automatically.
Off
On
Off*:
Virtual surround is set to off.
1:
A natural surround effect in a system with 2 speakers connected.
2:
A stronger surround effect in a system with 2 speakers connected than “1”.
•
Settings with (*) are the default.
•
“Quick” menu consists of the setting menus frequently used, and they are accompanied with
Under following circumstances, “HDMI Multi(Normal)” and “HDMI Multi(LPCM)” are not available.
•
- HDMI cable is not connected to HDMI OUT jack.
- Connected TV is off.
- Connected TV is not compatible with audio output.
Set “Virtual Surround” setting to “Off” or lower the volume if the sound is distorted.
•
For the virtual surround, audio signal will always be 2-channel LPCM.
•
.
EN
Page 39

FUNCTION SETUP
Digital out setting
■
When “Audio Mute” is selected in “HDMI Audio Out” setting, HDMI audio signal will be muted and the audio signals
output from DIGITAL OUT jack changes depending on “Digital Out” setting.
Quick HDMI Audio Out Audio Mute Digital Out
Bitstream*:
When playing back discs recorded in Dolby Digital, Dolby Digital Plus, Dolby TrueHD, DTS or DTS-HD,
the corresponding core stream (Dolby Digital or DTS) are output.
LPCM:
LPCM signal will be output from DIGITAL OUT jack.
•
This setting is not effective when the HDMI audio signal is output.
Speaker setting
■
This unit allows you to enjoy multi-channel surround sound such as 7.1-channel / 5.1-channel surround.
Introduction
Connections
Playback
Front speaker (left) Front speaker (right)
Center speaker
Surround speaker (left) Surround speaker (right)
e.g.) basic layout with 7.1-channel surround system
To make the most of its feature, set up your speakers appropriately by referring to the following table.
Speaker setting options are available at the following locations;
<Speaker setting for the audio signal output from HDMI OUT jack>
(Available when you have HDMI cable connected to HDMI OUT jack)
Quick HDMI Audio Out
Custom
Audio HDMI Audio Out HDMI Multi(LPCM)
HDMI Multi(LPCM)
Subwoofer
Surround back speaker (right)Surround back speaker (left)
Function Setup
Others
EN
37
Page 40

FUNCTION SETUP
How to navigate through “HDMI Multi(LPCM)”.
1 Use [K / L] to select your desired menu item then press [OK].
2 Use [K / L] to select your setting items.
Press [RETURN] to go back to the previous screen.
•
3 Use [s / B] to select desired options. (Except for “Test Tone”, “Default” and setting
options in “Speaker Size” setting.)
For setting options in “Speaker Size” setting:
Press [OK] to select desired options.
For “Test Tone”:
Use [s / B] to select “Off”, “Manual” or “Auto”, then press [OK].
The test tone will be output. If you select “Manual”, use [K / L] to select desired speaker, then use [s / B] to adjust
•
the volume. If you select “Auto”, use [s / B] to adjust the volume of the speaker that outputs the test tone.
•
If you want to stop the test tone, press [RETURN].
For “Default”:
Press [OK] to reset to the default.
4 Press [SETUP] to exit.
Menu Setting items Options Descriptions
Speaker Size
Selects the desired
speaker to set. Then
change the setting
appropriately by
referring to the
descriptions.
Channel Level
Tests or sets the volume
for each speaker.
Front Large* Large:
Small
Center Large*
Small
Subwoofer On
Surround Large*
Small
Surround Back Large*
Small
Default Select “Default”, then press [OK] to reset
Test Tone:
“Test Tone” is the
test tone which
can be output
from the speakers
so that you can
adjust the volume
for each speaker.
Front Lch 0 dB to -12 dB
Center 0 dB to -12 dB
Subwoofer 0 dB to -12 dB
Front Rch 0 dB to -12 dB
Surround Rch 0 dB to -12 dB
Surround Back
Rch
Surround Back
Lch
Surround Lch 0 dB to -12 dB
Default Select “Default”, then press [OK] to reset
Off* Select “Off” to deactivate “Test Tone”.
Manual
Auto
(0 dB*)
(0 dB*)
(0 dB*)
(0 dB*)
(0 dB*)
0 dB to -12 dB
(0 dB*)
0 dB to -12 dB
(0 dB*)
(0 dB*)
For the large speakers with strong low
frequency reproduction capabilities.
Small:
For the small speakers which do not
provide strong bass sound.
You cannot change the setting of
“Subwoofer”. If connected device is not
compatible with subwoofer, “Subwoofer”
will be displayed in gray.
“Speaker Size” setting to the default.
Select “Manual”, then press [OK] to
manually set the volume for the desired
speaker.
Select “Auto”, then press [OK] to
automatically output the test tone from
each speaker.
If you have selected “Manual” in “Test
Tone”, select the desired speaker to set
and adjust the volume for the selected
speaker.
If you select “Auto” in “Test Tone”, test
tone will automatically be output in order.
Adjust the volume of the speaker that
outputs the test tone.
“Channel Level” setting to the default.
38
EN
Page 41

FUNCTION SETUP
Menu Setting items Options Descriptions
Delay Time
This is a parameter for
optimizing the timing at
which the sound is
output from the
speakers according to
their distance from the
listening position.
Settings with (*) are the default.
•
For “Speaker Size” setting, the settings of each speaker size may be adjusted automatically corresponding to
•
each setting. (e.g. If “Front” is set to “Small”, you cannot set “Center”, “Surround”, and “Surround Back” to “Large”.)
For “Delay Time” setting, the difference among the value of the each speaker cannot exceed 15 ft (4.5m).
•
Distance Feet* Set the desired measure system. This
Meters
Front
Center
Surround
Surround Back
Default Select “Default”, then press [OK] to reset
0ft to 60ft (12ft*)
(0m to 18m (3.6m*))
0ft to 60ft (12ft*)
(0m to 18m (3.6m*))
0ft to 60ft (10ft*)
(0m to 18m (3.0m*))
0ft to 60ft (10ft*)
(0m to 18m (3.0m*))
measure system will be used for
“Delay Time” setting. Press [OK] to switch
the settings.
Select the distance from the listening
position to the speaker to get the ideal
delay time.
“Delay Time” setting to the default.
Introduction
Connections
Playback
Function Setup
Others
EN
39
Page 42

FUNCTION SETUP
Parental
■
Ratings control allows you to set a limit, which prevents your children from viewing inappropriate materials. Playback
will be stopped if the ratings exceed the levels you set, and it will require you to enter a password before playing back
the disc.
Parental
BD Rating Level
DVD Rating Level
Password Change
1 Use [K / L] to select
, then press [OK].
All
All
2 Use [the Number buttons] to enter your 4-digit password.
For the first time use: Use [the Number buttons] to enter any 4-digit number (except for 4737), then press [OK].
That number will be used as the password from the second time. Record your password in case you forget it.
•
If you forget the password, enter [4], [7], [3], [7]. The password will be cleared and rating level will be set to “All”.
•
While you input the password, press [CLEAR] to clear the number, then re-enter the password.
3 Proceed to A – C
A) BD Rating Level
1) Use [K / L] to select “BD Rating Level”, then press [OK].
2) Use [K / L] to select your desired option, then press [OK].
“All”: To release the limitation.
“Age Setting”: To set the age limitation.
•
After selecting “Age Setting”, use [the Number buttons] to enter the age from 0 – 254. (e.g. for age 15, press
[0],[1],[5])
3) Press [SETUP] to exit.
B) DVD Rating Level
1) Use [K / L] to select “DVD Rating Level”, then press [OK].
2) Use [K / L] to select your desired level, then press [OK].
3) Press [SETUP] to exit.
RATING EXPLANATIONS
All : Parental control is inactive; all discs can be played back.
•
8 [Adult] : DVD software of any grades (adult/general/children) can be played back.
•
7 [NC-17] : No one under 17 admitted.
•
•
6 [R] : Restricted; under 17 requires accompanying parent or adult guardian.
•
5 [PGR] : Parental guidance recommended.
•
4 [PG-13] : Unsuitable for children under 13.
•
3 [PG] : Parental guidance suggested.
•
2 [G] : General audience.
•
1 [Kid Safe] : Suitable for children.
C) Password Change
1) Use [K / L] to select “Password Change”, then press [OK].
2) Enter a new 4-digit password, then press [OK].
3) Press [SETUP] to exit.
Note
The resume information will be cleared if you change the parental level when the resume information is on.•
40
EN
Page 43

■
Others
FUNCTION SETUP
Introduction
Others
Angle Icon
Auto Power Off
Panel Display
Slide Show
Media Select
For how to select the setting items and options, refer to “
•
On
On
Auto
5sec
Disc
Setting items Options
Angle Icon On*:
The angle icon appears on the TV screen when playing back the scene with
various angle.
Off:
The angle icon disappears on the TV screen.
Auto Power Off On*:
If this unit is left with no activity for more than 30 minutes, this unit turns
off automatically.
Off:
Sets off the auto power off.
Panel Display
Sets the brightness of the front
panel display.
Auto*:
Front panel display gets darker during playback.
Bright:
Front panel display gets brighter.
Dimmer:
Front panel display gets darker.
Slide Show
Sets the display time for the still
picture (in JPEG format) playback
Media Select
Selects the media to playback.
5sec*
10sec
Disc*:
Select this when you play back a disc.
SD Memory:
Select this when you play back an SD Memory Card.
Custom” on page 32.
Connections
Playback
Function Setup
Others
EN
41
Page 44

FUNCTION SETUP
C
MODE
SU
E
S
CH
Initialize
Initialize the setting or SD Memory Card.
EAR
SETUP
BTITL
DISPLAY
In stop mode, press [SETUP].
1
Use [K / L] to select , then press
2
A-
LEAR
3
OK
AUDIO
[OK].
Use [K / L] to select a desired option,
then press [OK].
“No”: Exits without any initialization.
“Setup”: Resets the setup menu to the default.
“Memory Device”:
Initializes the SD Memory Card. After
confirmation message appears, use
[K / L] to select “Yes”, then press [OK].
Initialize
Initialize?
No
Setup
Memory Device
Press [OK]. (For “Setup” and “
4
Memory Device” only)
Press [SETUP] to exit.
5
Note
The setting for “ Parental” will not be reset.
•
If SD Memory Card is not inserted, “Memory Device”
•
will be displayed in gray.
42
EN
Page 45

TROUBLESHOOTING
If the unit does not perform properly when operated as instructed in this manual, check the unit, consulting the
following checklist.
Problem Solution
No power - Check if the AC cord is properly connected.
- Unplug the AC cord once, and wait for 5-10 seconds and then plug it in again.
No sound or picture - Check if the connected TV is turned on.
- Check if the connections are made securely and correctly.
- Check whether the connected TV or other device supports HDCP. (This unit will
not output a video signal unless the other device supports HDCP.)
- Check whether the output format of this unit (HDMI FORMAT) matches the
supported input format of other connected device.
- Set “HDMI Video Resolution” setting other than “Auto” or “1080p24”.
Distorted picture - Sometimes a small amount of picture distortion may appear.
This is not a malfunction.
- Connect this unit directly to the TV. If the RCA audio / video cables are connected
to a VCR, pictures may be distorted due to the copy right protection system.
Completely distorted picture or
black / white picture with BD / DVD
No sound or distorted sound - Adjust the volume.
Picture freezes momentarily
during playback
Disc cannot be played back - Clean the disc.
SD Memory Card cannot be read. - The format of the card does not match to this unit or the card is not compatible.
No return to start-up screen
when disc is removed
The unit does not respond to the
remote control
Buttons do not work or the unit
stops responding
The unit does not respond to
some operating commands
during playback
The unit cannot read BD / DVD / CD- Condensation? (Let sit 1 or 2 hours)
Angle does not switch - The angle cannot be switched for BD / DVD which do not contain multiple
Playback does not start when
the title is selected
The password for rating level has
been forgotten
- Make sure the disc is compatible with this unit.
- Check that the speakers are connected correctly.
- Check the HDMI connections.
- Check the settings in “
- Check the disc for fingerprints / scratches and clean with a soft cloth wiping
from center to edge.
- Clean the disc.
- Ensure the disc label is facing up.
- Check if the disc is defective by trying another disc.
- Cancel the ratings control or change the control level.
- Insert a correct disc that can be played back on this unit.
- Reset this unit by turning it off, then on again.
- Aim the remote control directly at infrared sensor window on the front panel.
- Reduce the distance to infrared sensor window.
- Replace the batteries in the remote control.
- Re-insert the batteries with their polarities (+ / - signs) as indicated.
- To completely reset the unit, unplug the AC cord from the AC outlet for 5-10
seconds.
- Operations may not be permitted by the disc.
Refer to the instructions of the disc.
You are attempting to playback a disc other than one with one of the marks on
-
page 17.
- Wipe the dirt off the disc or replace the disc.
angles. In some cases multiple angles are only recorded for specific scenes.
- Check the settings in “
- Enter the default password “4737”, then your forgotten password will be cleared.
Audio” menu.
Parental” menu.
Introduction
Connections
Playback Function Setup
Others
Note
Some functions are not available in specific modes, but this is not a malfunction. Read the description in this
•
manual for details on correct operations.
Some functions are prohibited on some discs.
•
EN
43
Page 46

GLOSSARY
Analog Audio
An electrical signal that directly represents sound.
Compare this to digital audio which can be an electrical
signal, but is an indirect representation of sound. See also
“Digital Audio”.
Aspect Ratio
The width of a TV screen relative to its height.
Conventional TVs are 4:3 (in other words, the TV screen is
almost square); widescreen models are 16:9 (the TV
screen is almost twice as wide as it is high).
BD-Java
With some BD which support Java applications, you can
enjoy the interactive functions such as games or
interactive menus.
Blu-ray Disc (BD)
Blu-ray Disc is a next generation optical video disc which
is capable of storing much more data than a conventional
DVD is. The large capacity makes it possible to benefit
from the features such as high-definition videos, multichannel surround sounds, interactive menus and so on.
Chapter
Just as a book is split up into several chapters, a title on a
BD-video or DVD-video is usually divided into chapters.
See also “Title”.
Component Video Output
Each signal of luminance (Y) and component (PB/CB, PR/CR)
is independent to output so that you can experience
picture color as it is.
Also, due to compatibility with progressive video
(525p/480p), you can experience higher-density picture
than that in interlace (525i/480i).
Digital Audio
An indirect representation of sound by numbers. During
recording, the sound is measured at discrete intervals
(44,100 times a second for CD audio) by an analog-todigital converter, generating a stream of numbers. On
playback, a digital-to-analog converter generates an
analog signal based on these numbers. See also
“Sampling Frequency” and “Analog Audio”.
Dolby Digital
The system to compress digital sound developed by
Dolby Laboratories. It offers you sound of stereo (2ch) or
multi-channel audio.
Dolby Digital Plus
Dolby Digital Plus is the next generation digital audio
compression technology developed as an extension to
Dolby Digital. Blu-ray Disc supports 7.1 multi-channel
surround sound output.
Dolby TrueHD
Dolby TrueHD is a lossless coding technology developed
for next generation optical discs. Blu-ray Disc supports 7.1
multi-channel surround sound output.
DTS (Digital Theater System):
DTS is a multi-channel surround sound system. By
connecting to DTS decoder, you can enjoy movie dynamic
and realistic sound like movie theater. DTS surround sound
technologies were developed by DTS, Inc.
DTS-HD
DTS-HD is a lossless coding technology developed as an
extension of the original DTS Coherent Acoustics format.
Blu-ray Disc supports 7.1 multi-channel surround sound
output.
HDMI (high-definition multimedia interface)
A digital interface between audio and video source. It can
transmit component video, audio, and control signal with
one cable connection.
JPEG (joint photographic experts group)
JPEG is a method of compressing still picture files. You
can copy JPEG files on CD-RW/-R, DVD or SD Memory
Card from a computer and play back the files in this unit.
PCM (pulse code modulation)
The most common system of encoding digital audio,
found on CD and DAT. Excellent quality, but requires a lot
of data compared to formats such as Dolby Digital and
MPEG audio. For compatibility with digital audio
recorders (CD, MD and DAT) and AV amplifiers with
digital inputs, this unit can convert Dolby Digital and
MPEG audio to PCM. See also “Digital Audio”.
Region Code
Regions associate discs and players with particular areas
of the world. This unit will only play back discs that have
compatible region codes. You can find the region code of
your unit by looking on the rear panel. Some discs are
compatible with more than one region (or all regions).
Sampling Frequency
The rate which sound is measured by a specified interval
to turn into digital audio data. The numbers of sampling
in one second defines as sampling frequency. The higher
the rate, the better the sound quality.
Title
A collection of chapters on BD-video or DVD-video. See
also “Chapter”.
Track
Audio CD use tracks to divide up the content of a disc.
The BD-video or DVD-video equivalent is called a chapter.
See also “Chapter”.
44
EN
Page 47

LANGUAGE CODE
Language Code
A-B
Abkhazian 4748
Afar 4747
Afrikaans 4752
Albanian 6563
Amharic 4759
Arabic
Armenian 5471
Assamese 4765
Aymara 4771
Azerbaijani 4772
Bashkir 4847
Basque 5167
Bengali;Bangla 4860
Bhutani 5072
Bihari 4854
Bislama 4855
Breton 4864
Bulgarian [BUL] 4853
Burmese 5971
Byelorussian 4851
C-E
Cambodian 5759
Catalan 4947
Chinese [CHI] 7254
Corsican 4961
Croatian 5464
Czech [CZE] 4965
Danish [DAN] 5047
Dutch [DUT] 6058
English [ENG] 5160
Esperanto 5161
Estonian 5166
F-H
Faroese 5261
Fiji 5256
Finnish [FIN] 5255
4764
Language Code
French [FRE] 5264
Frisian 5271
Galician 5358
Georgian 5747
German [GER] 5051
Greek [GRE] 5158
Greenlandic 5758
Guarani 5360
Gujarati 5367
Hausa 5447
Hebrew 5569
Hindi 5455
Hungarian [HUN] 5467
I-K
Icelandic [ICE] 5565
Indonesian 5560
Interlingua 5547
Interlingue 5551
Inupiak 5557
Irish [IRI] 5347
Italian [ITA] 5566
Japanese [JPN] 5647
Javanese 5669
Kannada 5760
Kashmiri 5765
Kazakh 5757
Kinyarwanda 6469
Kirghiz 5771
Kirundi 6460
Korean [KOR] 5761
Kurdish 5767
L-N
Laothian 5861
Latin 5847
Latvian;Lettish 5868
Lingala 5860
Lithuanian 5866
Language Code
Macedonian 5957
Malagasy 5953
Malay 5965
Malayalam 5958
Maltese 5966
Maori 5955
Marathi 5964
Moldavian 5961
Mongolian 5960
Nauru 6047
Nepali 6051
Norwegian [NOR] 6061
O-R
Occitan 6149
Oriya 6164
Oromo(Afan) 6159
Panjabi 6247
Pashto;Pushto 6265
Persian 5247
Polish [POL] 6258
Portuguese [POR] 6266
Quechua 6367
Rhaeto-Romance 6459
Romanian [RUM] 6461
Russian [RUS] 6467
S
Samoan 6559
Sangho 6553
Sanskrit 6547
Scots Gaelic 5350
Serbian 6564
Serbo-Croatian 6554
Sesotho 6566
Setswana 6660
Shona 6560
Sindhi 6550
Singhalese 6555
Language Code
Siswat 6565
Slovak [SLO] 6557
Slovenian 6558
Somali 6561
Spanish [SPA] 5165
Sundanese 6567
Swahili 6569
Swedish [SWE] 6568
T
Tagalog 6658
Tajik 6653
Tamil 6647
Tatar 6666
Telugu 6651
Thai 6654
Tibetan 4861
Tigrinya 6655
Tonga 6661
Tsonga 6665
Turkish [TUR] 6664
Turkmen
Twi 6669
U-Z
Ukrainian 6757
Urdu 6764
Uzbek 6772
Vietnamese 6855
Volapuk 6861
Welsh 4971
Wolof 6961
Xhosa 7054
Yiddish 5655
Yoruba 7161
Zulu 7267
6657
Introduction
Connections
Playback Function Setup
Others
Note
If you choose a language that has a 3-letter-language code (written in bracket), the code will be displayed every
•
time you change the audio or subtitle language setting on page 29. If you choose any other languages, ‘---’ will be
displayed instead.
EN
45
Page 48

SPECIFICATIONS
General
Signal system NTSC color
Power requirements 120V AC, 60Hz
Power consumption 30W (standby: 0.8W)
Dimensions (width x height x depth) 17.2 x 2.8 x 13.9 inches (435 x 70 x 351mm)
Weight 9.1 lbs. ( 4.1kg )
Operating temperature 41°F (5°C) to 104°F (40°C)
Operating humidity Less than 80% (no condensation)
Terminals
Audio output (Analog)
RCA jack x 2 L/R: 2Vrms (output impedance: more than 1kΩ)
Video output
RCA jack x 1 1Vp-p (75Ω)
Component video output
Rear
RCA jack x 3 Y: 1Vp-p (75Ω) P
Audio output (Digital)
RCA jack x 1 500mVp-p (75Ω)
HDMI output
HDMI jack x 1 Video: 480p, 720p, 1080i, 1080p, 1080p24 / Audio
Note
The specifications and design of this product are subject to change without notice.•
B/CB: 700mVp-p (75Ω) PR/CR: 700mVp-p (75Ω)
46
EN
Page 49

MEMO
Introduction
Connections
Playback Function Setup
Others
EN
47
Page 50

LIMITED WARRANTY
FUNAI CORP. will repair this product, free of charge in the USA in the event of defect in materials or
workmanship as follows:
DURATION:
PARTS: FUNAI CORP. will provide parts to replace defective parts without charge for one (1) year
from the date of original retail purchase. Certain parts are excluded from this warranty.
LABOR: FUNAI CORP. will provide the labor without charge for a period of ninety (90) days from the
date of original retail purchase.
LIMITS AND EXCLUSIONS:
THIS WARRANTY IS EXTENDED ONLY TO THE ORIGINAL RETAIL PURCHASER. A PURCHASE RECEIPT OR
OTHER PROOF OF ORIGINAL RETAIL PURCHASE WILL BE REQUIRED TOGETHER WITH THE PRODUCT TO
OBTAIN SERVICE UNDER THIS WARRANTY.
This warranty shall not be extended to any other person or transferee.
This warranty is void and of no effect if any serial numbers on the product are altered, replaced, defaced,
missing or if service was attempted by an unauthorized service center. This limited warranty does not
apply to any product not purchased and used in the United States.
This warranty only covers failures due to defects in material or workmanship which occur during
normal use. It does not cover damage which occurs in shipment, or failures which are caused by repairs,
alterations or products not supplied by FUNAI CORP., or damage, which results from accident, misuse,
abuse, mishandling, misapplication, alteration, faulty installation, improper maintenance, commercial use
such as hotel, rental or office use of this product, or damage which results from fire, flood, lightning or
other acts of God.
THIS WARRANTY DOES NOT COVER PACKING MATERIALS, ANY ACCESSORIES (EXCEPT REMOTE CONTROL),
ANY COSMETIC PARTS, COMPLETE ASSEMBLY PARTS, DEMO OR FLOOR MODELS.
FUNAI CORP. AND ITS REPRESENTATIVES OR AGENTS SHALL IN NO EVENT BE LIABLE FOR ANY GENERAL,
INDIRECT OR CONSEQUENTIAL DAMAGES ARISING OUT OF OR OCCASIONED BY THE USE OF OR THE
INABILITY TO USE THIS PRODUCT. THIS WARRANTY IS MADE IN LIEU OF ALL OTHER WARRANTIES, EXPRESS
OR IMPLIED, AND OF ALL OTHER LIABILITIES ON THE PART OF FUNAI, ALL OTHER WARRANTIES INCLUDING
THE WARRANTY OF MERCHANTABILITY AND FITNESS FOR A PARTICULAR PURPOSE, ARE HEREBY
DISCLAIMED BY FUNAI AND ITS REPRESENTATIVES IN THE UNITED STATES.
ALL WARRANTY INSPECTIONS AND REPAIRS MUST BE PERFORMED BY AN AUTHORIZED SERVICE CENTER.
THIS WARRANTY IS ONLY VALID WHEN THE UNIT IS CARRIED-IN TO AN AUTHORIZED SERVICE CENTER.
THE PRODUCT MUST BE ACCOMPANIED BY A COPY OF THE ORIGINAL RETAIL PURCHASE RECEIPT. IF NO
PROOF OF PURCHASE IS ATTACHED, THE WARRANTY WILL NOT BE HONORED AND REPAIR COSTS WILL BE
CHARGED.
IMPORTANT:
THIS LIMITED WARRANTY GIVES YOU SPECIFIC LEGAL RIGHTS. YOU MAY HAVE OTHER RIGHTS THAT VARY
FROM STATE TO STATE. IF, AT ANY TIME DURING THE WARRANTY PERIOD, YOU ARE UNABLE TO OBTAIN
SATISFACTION WITH THE REPAIR OF THIS PRODUCT, PLEASE CONTACT FUNAI CORP.
ATTENTION:
FUNAI CORP. RESERVES THE RIGHT TO MODIFY ANY DESIGN OF THIS PRODUCT
WITHOUT PRIOR NOTICE.
WARRANTY STATEMENT REGARDING NON AUTHORIZED REPAIRS:
To obtain warranty service, you must take the product, or deliver the product freight prepaid, in either its
original packaging or packaging affording an equal degree of protection, to any AUTHORIZED SERVICE
CENTER. FUNAI CORP. will not reimburse you for any service done by unauthorized service providers
without prior written approval.
To locate your nearest AUTHORIZED SERVICE CENTER or for general service inquiries,
please contact us at:
Printed in China
FUNAI CORPORATION
Customer Service
Tel : 1-800-605-8610
www.funai-corp.com
19900 Van Ness Avenue, Torrance, CA 90501
E5H21UD
1VMN25953 ★★★★★
Page 51

AUDIO IN
LR
C
B
MODE
SU
E
S
CH
Reproductor de Discos Blu-ray
1. Conexiones (continuación)
Guía de Arranque RápidoGuía de Arranque RápidoGuía de Arranque Rápido
NB500MS9
1. Conexiones
Al hacer las conexiones, todos los
dispositivos deben estar apagados y
desconectados de la toma de corriente.
Conexión Básica
Haga una de las siguientes conexiones, dependiendo de las capacidades de su aparato existente.
CONEXIÓN DE SONIDO
y
Método 1
VIDEO
IN
cable de
vídeo RCA
VIDEO
OUT
VIDEO OUT
TV
esta unidad
cable de
sonido RCA
AUDIO OUT
SONIDO
ESTÁNDAR
Conexión HDMI
Los cables suministrados utilizados en esta conexión
son como sigue:
Cable de sonido RCA (I/D) x 1
•
Cable de vídeo RCA x 1
•
Cable de alimentación x 1
•
Cable HDMI (cable HDMI de alta velocidad) x 1
•
Por favor, compre el resto de los cables necesarios en su
tienda local.
CONEXIÓN DE VÍDEO
Método 2
(Rojo)
B
(Verde)
(Azul)
(Rojo)
(Azul)
MEJOR
IMAGEN
HDMI-DVI
IMAGEN
ESTÁNDAR
o o
O
COMPONENT
VIDEO IN
PB/CB
PR/CR
cable de vídeo de
componente RCA
(Verde)
COMPONENT
VIDEO OUT
COMPONENT
VIDEO OUT
Y
PR/CRY
PB/C
Método 3
DVI IN
cable
HDMI OUT
LA MEJOR
IMAGEN
Conectar el C able de Alimentación
Después de que haya hecho todas las conexiones necesarias, conecte el cable de alimentación a AC IN. Después, conecte el cable de
alimentación al enchufe de CA.
Introduzca las clavijas de manera segura. Las conexiones incompletas tienen como resultado la generación de ruidos.
esta unidad
Cable de alimentación
Enchufe de
corriente alterna
CA 120 V, 60 Hz
2. Reproducción
1
STANDBY-ON
EAR
BTITL
DISPLAY
OPEN/
CLOSE
A-
LEAR
OK
AUDIO
Pulse [STANDBY-ON y ].
Encienda el televisor y seleccione la entrada apropiada en el
2
televisor al cual está conectada la unidad.
Pulse [OPEN / CLOSE A ] para abrir la bandeja para discos.
3
Sitúe el disco en la bandeja para discos con la etiqueta hacia
4
arriba.
Alinee el disco con la guía de la
bandeja de discos.
CONEXIÓN DE SONIDO / VÍDEO
LA MEJOR
SONIDO /
IMAGEN
Pulse [HDMI] para cambiar la resolución de la señal de vídeo que se da
como salida desde la HDMI OUT. La resolución de vídeo cambia como
sigue cada vez que se pulsa [HDMI].
Nota :
• No puede seleccionar resoluciones de vídeo que no las admita el televisor conectado.
• Para obtener una reproducción natural y de alta calidad de material de película de 24 fotogramas, utilice un cable HDMI (se recomienda el
uso de HDMI de alta velocidad) y seleccione “1080p24” si el televisor conectado es compatible con una entrada de 1080p24 fotogramas.
Imprimido en China
ES ES
Método 4
esta unidad TV
HDMI IN
cable HDMI
480p 720p 1080i 1080p 1080p24
5
Pulse [OPEN / CLOSE A ] para cerrar la bandeja de discos.
Puede que tarde un poco en cargar el disco.
Algunos discos pueden comenzar a reproducirse automáticamente.
6
Pulse [PLAY B] para comenzar la reproducción.
Para muchos BD-vídeo y DVD-vídeo, puede que aparezca una pantalla de menús.
En este caso, utilice [K / L / s / B] para seleccionar a la opción deseada y después pulse [OK].
Para pausar la reproducción:
Pulse [PAUSE F].
Para reanudar la reproducción
normal:
Pulse [PLAY B].
Para detener la reproducción:
Pulse [STOP C].
Para expulsar el disco:
Pulse [OPEN / CLOSE A ] para abrir la bandeja de
discos y después saque el disco antes de apagar
la unidad.
Page 52

C
B
MODE
SU
E
S
CH
Blu-ray Disques Lecteurs
AUDIO IN
LR
1.
Connexions
(suite)
Guide de Démarrage RapideGuide de Démarrage RapideGuide de Démarrage Rapide
Connexion du C ordon d’Alimentation
Une fois que vous aurez fait toutes les connexions nécessaires, branchez le cordon d’alimentation dans AC IN. Branchez ensuite le
NB500MS9
1. Connexions
Éteignez tous les appareils puis
débranchez-les des sources
d’alimentation électrique avant
d’effectuer les connexions.
Connexion de B ase
Effectuer l’une des connexions suivantes, selon les capacités de votre appareil existant.
CONNEXION AUDIO
et
Méthode 1
VIDEO
IN
RCA vidéo
câble
VIDEO
OUT
VIDEO OUT
TV
cet appareil
câble audio
AUDIO OUT
RCA
AUDIO
STANDARD
Connexion HDMI
Les câbles fournis utilisés dans cette connexion sont les
suivants:
1 câble audio RCA (G/D)
•
1 câble vidéo RCA
•
Cordon d’alimentation x 1
•
Câble HDMI (câble HDMI haute vitesse) x 1
•
Veuillez acheter les autres câbles nécessaires dans votre
magasin le plus proche.
IMAGE
STANDARD
Câble de composant
ou ou
(Vert)
OU
CONNEXION VIDÉO
Méthode 2
COMPONENT
VIDEO IN
Y
PB/CB
PR/CR
vidéo RCA
COMPONENT
VIDEO OUT
COMPONENT
VIDEO OUT
MEILLEURE
IMAGE
(Vert)
(Bleu)
(Rouge)
(Rouge)
PR/CRY
(Bleu)
PB/C
B
Méthode 3
câble
HDMI-DVI
HDMI OUT
DVI IN
QUALITÉ
OPTIMALE
cordon d’alimentation dans la prise c.a.
Insérez fermement les fiches. Des connexions mal faites peuvent produire du bruit.
cet appareil
DISPLAY
STANDBY-ON
EAR
OK
BTITL
LEAR
OPEN/
CLOSE
A-
AUDIO
Prise c.a.
c.a. 120V, 60Hz
Cordon d’alimentation
2. Lecture
1
Appuyez sur [STANDBY-ON y ].
Allumez le TV et sélectionnez l’entrée appropriée du TV pour
2
connecter l’appareil.
Appuyez sur [OPEN / CLOSE A ] pour ouvrir le tiroir à disque.
3
Placez le disque sur le tiroir à disque, l’étiquette tournée
4
vers le haut.
Alignez le disque avec le
guide du tiroir.
AUDIO / VIDÉO CONNEXION
OPTIMALE
AUDIO /
IMAGE
Appuyez sur [HDMI] pour changer la résolution du signal vidéo sortant
de HDMI OUT. La résolution de la vidéo change comme suit chaque fois
que l’on appuie sur [HDMI].
Remarque :
• Vous ne pouvez choisir de résolution vidéo non compatible avec le TV connectée.
• Pour obtenir une reproduction de film naturelle et de grande qualité pour tout document filmé à 24 trames, utilisez un câble HDMI (câble
High Speed HDMI recommandé) et sélectionnez “1080p24” si le TV connecté est compatible avec l’entrée de trame 1080p24.
Imprimé en Chine
FR FR
Méthode 4
cet appareil TV
HDMI IN
câble HDMI
480p 720p 1080i 1080p 1080p24
1VMN25956 / ★★★★★
E5H21UD
5
Appuyez sur [OPEN / CLOSE A ] pour fermer le tiroir à disque.
Il faudra peut-être un moment pour télécharger le disque.
La lecture peut commencer automatiquement sur certains disques.
6
Appuyez sur [PLAY B] pour commercer la lecture.
Pour plusieurs disque BD-vidéo et DVD-vidéo, un écran de menu peut apparaître.
Dans ce cas, utilisez [K / L / s / B] pour sélectionner l’item voulu, puis appuyez sur [OK].
Pour mettre la lecture en pause :
Appuyez pour [PAUSE F].
Pour reprendre la lecture
normale :
Appuyez pour [PLAY B].
Pour arrêter la lecture :
Appuyez pour [STOP C].
Pour éjecter le disque :
Appuyez sur [OPEN / CLOSE A ] pour ouvrir le
tiroir à disque, puis retirez le disque avant de
fermer le lecteur.
Page 53

Manual del Usuario
ALTO
NB500MS9
Reproductor de Discos Blu-ray
ALTO
Lea primero el Manual del usuario
para obtener sugerencias rápidas
sobre cómo disfrutar al máximo
del producto Magnavox.
Si necesita ayuda, puede obtener
acceso a nuestra ayuda en línea en
http://www.funai-corp.com
1-800-605-8610
Reproducción
Configuración de
Funciones
OtrosIntroducción Conexiones
© 2008 Funai Electric Co., Ltd.
Page 54

PRECAUCIONES
El modelo y el número de serie de esta unidad se pueden encontrar
Número de modelo:
en la caja. Deberá anotar y guardar el modelo y el número de serie
para consultarlos, si los necesita, en el futuro.
ADVERTENCIA:
PARA REDUCIR EL RIESGO DE QUE SE PRODUZCA UN INCENDIO O SE RECIBA UNA DESCARGA
Número de serie:
ELÉCTRICA, NO EXPONGA ESTE APARATO A LA LLUVIA NI A LA HUMEDAD.
CAUTION
RISK OF ELECTRIC SHOCK
DO NOT OPEN
AVISO:
CA NO QUITE LA CUBIERTA (O EL PANEL POSTERIOR). EN EL INTERIOR DEL
APARATO NO HAY PIEZAS QUE DEBA MANIPULAR EL USUARIO. SOLICITE EL
SERVICIO DE REPARACIONES AL PERSONAL DE SERVICIO CUALIFICADO.
La marca de aviso está situada en la parte inferior o posterior de la caja.
PARA REDUCIR EL RIESGO DE SUFRIR UNA DESCARGA ELÉCTRI-
El símbolo del rayo con punta de flecha, en el interior de un
triángulo equilátero, tiene la finalidad de avisar al usuario
de la presencia de “tensión peligrosa” dentro de la caja del
aparato que podría ser de suficiente intensidad como para
constituir un riesgo para las personas en caso de que éstas
recibiesen una descarga eléctrica.
El signo de exclamación dentro de un triángulo equilátero
tiene la finalidad de avisar al usuario de la presencia de
instrucciones de utilización y mantenimiento (servicio) en el
material impreso que acompaña al aparato.
Importante para su Seguridad
1. LEA LAS INSTRUCCIONES - Deben leerse todas las instrucciones de
seguridad y de funcionamiento antes de utilizar el aparato.
2. CONSERVE LAS INSTRUCCIONES - Las instrucciones de seguridad y de
funcionamiento deben conservarse para futura consulta.
3. HAGA CASO DE LAS ADVERTENCIAS -
en el aparato y en las instrucciones de funcionamiento deben ser tenidas en cuenta.
4. SIGA LAS INSTRUCCIONES - Deben seguirse todas las instrucciones de
funcionamiento y de uso.
5. LIMPIEZA - Desenchufe este aparato de la toma de pared antes de su limpieza.
No utilice limpiadores líquidos ni limpiadores en aerosol. Utilice un paño
húmedo para la limpieza.
EXCEPCIÓN: Un aparato destinado a su servicio interrumpido y que, por
alguna razón específica, por ejemplo la posibilidad de pérdida de un código
de autorización para un convertidor de CATV, no debe ser desenchufado para
su limpieza o cualquier otro fin, puede excluir la referencia a desenchufar el
aparato en la descripción de limpieza requerida en el elemento 5.
6. CONEXIONES - No utilice conexiones no recomendadas por el fabricante
del aparato, dado que podrían provocar riesgos.
7. AGUA Y HUMEDAD - No utilice este aparato cerca de agua, por ejemplo,
cerca de una bañera, un lavabo, un fregadero o una pila de lavado de ropa,
en un suelo húmedo o cerca de una piscina o lugares similares.
8. ACCESORIOS - No coloque este aparato sobre un
mueble con ruedas, un soporte, un trípode, un soporte
vertical o una mesa inestables. El aparato puede caerse,
provocando lesiones graves a alguien y serios daños en
el propio aparato. Utilícelo solamente con un mueble
con ruedas, soporte, trípode, soporte vertical o mesa
recomendados por el fabricante o vendidos junto
con el aparato. Cualquier instalación del aparato debe
seguir las instrucciones del fabricante y debe utilizar un
accesorio de montaje recomendado por el fabricante.
El conjunto de aparato y mueble con ruedas debe
moverse con precaución.
irregulares pueden provocar la caída del conjunto de aparato y mueble con ruedas.
9. VENTILACIÓN - El mueble y la parte trasera o inferior del aparato incluyen ranuras
y aberturas para ventilación; para garantizar un funcionamiento fiable del aparato
y para protegerlo de un posible sobrecalentamiento, dichas aberturas no deben
bloquearse ni taparse. Las aberturas no deben bloquearse nunca colocando el
aparato sobre una cama, un sofá, una alfombra u otra superficie similar. Este aparato
no debe colocarse nunca cerca o encima de un radiador o una rejilla de aire caliente.
Este aparato no debe colocarse en una instalación empotrada, por ejemplo una
librería o estantería, a menos que se facilite la ventilación adecuada o que se hayan
seguido las instrucciones del fabricante.
10. FUENTES DE ALIMENTACIÓN - Este aparato debe utilizarse solamente con
el tipo de fuente de alimentación indicada en la etiqueta de fábrica. Si no
está seguro del tipo de suministro de alimentación eléctrica de su hogar,
consulte con el distribuidor de su aparato o con la empresa eléctrica local.
Para aparatos destinados a funcionar con alimentación por pilas u otras
fuentes, consulte las instrucciones de funcionamiento.
11. PUESTA A TIERRA O POLARIZACIÓN - Este aparato está equipado con
un enchufe de línea de corriente alterna polarizada (un enchufe con un
contacto plano más ancho que el otro). Este enchufe encajará en la toma de
corriente solamente en un sentido. Esto es una característica de seguridad.
Si no puede insertar el enchufe totalmente en la toma, intente invertir la
posición del enchufe. Si el enchufe sigue sin encajar, póngase en contacto
con un electricista para sustituir su toma obsoleta. No subestime la finalidad
de seguridad del enchufe polarizado.
12. PROTECCIÓN DEL CABLE DE ALIMENTACIÓN - Los cables de alimentación
eléctrica deben extenderse de manera que resulte improbable que nadie
los pise o que queden pinzados por elementos colocados encima o contra
ellos, prestando especial atención a enchufes de los cables, sus tomas de
corriente y su punto de salida del aparato.
13. PUESTA A TIERRA DE ANTENA EXTERIOR - Si hay una antena exterior o un
sistema de cable conectado al aparato, asegúrese de que la antena o el sistema
de cable está puesto a tierra de manera que proporcione protección contra las
subidas de tensión y las cargas de electricidad estática acumulada. El artículo 810
del National Electrical Code (Código Eléctrico Nacional), ANSI/NFPA número 70,
proporciona información con respecto a la adecuada puesta a tierra del mástil y
la estructura de soporte, puesta a tierra del cable de entrada de corriente a una
unidad de descarga de antena, tamaño de los conductores de puesta a tierra,
Las paradas bruscas, la fuerza excesiva o las superficies
Todas las advertencias que aparezcan
2
ubicación de la unidad de descarga de antena, conexión a electrodos de puesta a
tierra y requisitos para el electrodo de puesta a tierra. (Fig. A)
EJEMPLO DE PUESTA A TIERRA DE ANTENA
SEGÚN EL CÓDIGO ELÉCTRICO NACIONAL
NEC — CÓDIGO ELÉCTRICO NACIONAL
14. RAYOS - Para protección añadida de este aparato en caso de tormenta
eléctrica, o cuando permanezca desatendido y sin utilizar durante largos
periodos de tiempo, desenchúfelo de la toma de corriente y desconecte la
antena o el sistema de cable. Esto impedirá que se produzcan daños en el
aparato debido a daños provocados por rayos y sobretensiones de la línea
eléctrica.
15. LÍNEAS DE CONDUCCIÓN ELÉCTRICA - Un sistema de antena exterior
no debe colocarse en las proximidades de líneas de conducción eléctrica
aéreas u otras líneas de conducción de circuitos eléctricos, o de manera que
puedan caer sobre dichas líneas o circuitos eléctricos. Cuando se instale un
sistema de antena exterior, debe tenerse el máximo cuidado para no tocar
dichas líneas o circuitos eléctricos, dado que el contacto podría resultar
mortal.
16. SOBRECARGA - No sobrecargue las tomas de pared ni los cables
alargadores, dado que esto puede suponer un riesgo de incendio o
descarga eléctrica.
17. ENTRADA DE OBJETOS Y LÍQUIDOS - No fuerce la entrada de objetos de
ningún tipo en el interior de este aparato a través de sus aberturas, dado
que pueden tocar puntos peligrosos de tensión o provocar un cortocircuito,
lo cual podría dar lugar a incendio o descarga eléctrica.
Nunca derrame líquidos de ningún tipo sobre el aparato.
18. REPARACIÓN - No intente reparar usted mismo este aparato, ya que el
hecho de abrir o extraer las cubiertas puede exponerle a tensión peligrosa
u otros riesgos. Deje toda reparación en manos de personal de servicio
técnico cualificado.
19. DAÑOS QUE EXIGEN UNA REPARACIÓN - Desenchufe este aparato de
la toma de pared y llévelo a un servicio de reparación cualificado en las
situaciones siguientes:
a. Cuando el cable o el enchufe de distribución de corriente esté dañado
o desgastado.
b. Si se ha derramado líquido o han caído objetos en el interior del aparato.
c. Si el aparato ha estado expuesto a lluvia o agua.
d. Si el aparato no funciona normalmente cuando se siguen las
instrucciones de funcionamiento. Ajuste únicamente los controles a
los que se refieran las instrucciones de funcionamiento, dado que el
ajuste inadecuado de otros controles puede provocar daños y a menudo
exigirá una gran cantidad de trabajo por parte de un técnico cualificado
para que el aparato pueda volver a funcionar normalmente.
e. Si el aparato se ha caído o ha sufrido cualquier tipo de daño.
f. Cuando el aparato deje de funcionar con normalidad, esto indica que
necesita una reparación.
20. PIEZAS DE REPUESTO - Cuando se necesiten piezas de repuesto, asegúrese
de que el personal de servicio técnico utiliza piezas de repuesto especificadas
por el fabricante y de las mismas características que la pieza original.
Las sustituciones no autorizadas pueden provocar incendio, descarga
eléctrica, lesiones personales u otros riesgos.
21. COMPROBACIÓN DE SEGURIDAD - Al finalizar cualquier servicio o
reparación de este aparato, pida al personal de servicio técnico que realice
unas comprobaciones de seguridad de rutina para determinar que el
aparato está en condiciones correctas de funcionamiento.
22. CALOR - Este aparato debe situarse lejos de fuentes de calor tales como
radiadores, rejillas de aire caliente, estufas u otros productos (incluidos
amplificadores) emisores de calor.
FIGURA A
ABRAZADERA DE
CONEXIÓN A TIERRA
EQUIPO DE
SERVICIO
ELÉCTRICO
CABLE DE ENTRADA DE
ANTENA
UNIDAD DE DESCARGA DE
ANTENA
(NEC SECCIÓN 810-20)
CONDUCTORES DE CONEXIÓN
A TIERRA (NEC SECCIÓN 810-21)
ABRAZADERAS DE CONEXIÓN A TIERRA
SISTEMA DE CONEXIÓN A TIERRA DEL ELECTRODO
DE SERVICIO ELÉCTRICO
(NEC ART. 250, APARTADO H)
ES
Page 55

PRECAUCIONES
No coloque la unidad sobre un mueble que pueda volcar si algún niño o adulto lo inclina, empuja, se coloca encima
o trepa por él. La caída de la unidad puede provocar lesiones graves e incluso la muerte.
CUIDADO: Para evitar la descarga eléctrica, haga coincidir el contacto ancho del enchufe con la ranura ancha
e inserte firmemente.
ADVERTENCIA DE LA FCC
Este aparato puede generar o utilizar energía radioeléctrica. Los cambios o las modificaciones que se hagan en este aparato
podrán causar interferencias a menos que éstos sean aprobados expresamente en este manual. El usuario podrá perder la
autorización que tiene para utilizar este aparato si hace algún cambio o modificación que no haya sido autorizado.
INTERFERENCIA DE RADIO Y TV
Este aparato ha sido probado y ha demostrado cumplir con los límites existentes para los dispositivos digitales de la
Clase B, de conformidad con el Apartado 15 de las Normas de la FCC. Este aparato genera, utiliza y puede radiar
energía radioeléctrica, y, si no se instala y utiliza de acuerdo con las instrucciones, puede causar interferencias
perjudiciales en las comunicaciones por radio. Sin embargo, no existen garantías de que no se produzcan
interferencias en una instalación particular. Si este aparato causa interferencias perjudiciales en la recepción de la
radio o la televisión, lo que se puede determinar apagando y luego encendiendo el aparato, al usuario se le
recomienda intentar eliminar la interferencia tomando una, o más, de las medidas siguientes:
1) Cambie la orientación y la ubicación de la antena de recepción.
2) Aumente la separación entre el aparato y el receptor.
3) Conecte el aparato en una toma de corriente o circuito que sean diferentes de aquellos a los que está conectado el receptor.
4) Consulte a su concesionario o técnico en radio/TV con experiencia para solicitar su ayuda.
Este aparato digital de la clase B cumple con la norma canadiense ICES-003.
NOTA PARA EL INSTALADOR DEL SISTEMA CATV
Esta recordatorio se facilita para llamar la atención del instalador del sistema CATV sobre el Artículo 820-40 de la NEC,
que proporciona pautas para una apropiada puesta a tierra, y en particular especifica que la toma de tierra del cable
debe estar conectada al sistema de puesta a tierra del edificio lo más cerca posible del punto de entrada del cable.
SEGURIDAD DEL LÁSER
Este aparato usa un láser. Para evitar posibles daños personales, solamente el personal de mantenimiento cualificado
debe quitar la tapa o reparar este aparato.
PRECAUCIÓN: El uso de controles, ajustes o procedimientos diferentes de los especificados en este manual
puede producir una exposición peligrosa a la radiación.
PRECAUCIÓN: Cuando se abre la unidad y se anula el enclavamiento se produce una radiación láser visible e
invisible. evite mirar fijamente al rayo.
UBICACIÓN: En el interior, cerca del mecanismo de la platina.
Introducción
Conexiones
Reproducción
Configuración de
Funciones
Otros
ACERCA DEL COPYRIGHT
La copia, la emisión, la muestra al público y el préstamo de los discos sin la debida autorización están prohibidos.
Este producto incorpora tecnología de protección del copyright que a su vez está protegida por patentes y otros
derechos de la propiedad intelectual de los EE.UU. La utilización de esta tecnología de protección del copyright
deberá contar con la autorización de Macrovision, y ésta se limitará a casas y otros lugares de visión limitada a menos
que Macrovision autorice lo contrario. La inversión de la ingeniería o el desmontaje del aparato están prohibidos.
ES
3
Page 56

PRECAUCIONES
Accesorios Provistos
mando a distancia
con pilas (AAx2)
(NB812UD)
manual del usuario
(EN/ES/FR)
(1VMN25953 / 1VMN25955
/ 1VMN25957)
Manual del Usuario
cables de sonido/
vídeo RCA
(WPZ0102TM015 /
WPZ0102LTE01)
cable HDMI (cable HDMI de alta
velocidad) (WPZ0202AP001)
guía de arranque rápido
(EN/ES/FR)
(1VMN25954 / 1VMN25956)
cable de
alimentación
(WAV0162LW001)
Para Evitar Peligros de Descarga Eléctrica o
Incendio
•
No maneje el cable de alimentación con las manos
mojadas.
•
No tire del propio cable cuando lo desconecte de una
toma de CA. Sujete la clavija y tire de ella.
•
No meta sus dedos ni otros objetos en la unidad.
Emplazamiento de la Instalación
Para la seguridad y el desempeño óptimo de este aparato:
No ponga esta unidad verticalmente. Instale el equipo
•
en una posición horizontal y estable. No coloque nada
directamente encima del equipo. No coloque el aparato
directamente encima del televisor.
•
Aíslela de la luz directa del sol y manténgala lejos de
fuentes de calor intenso. Evite los lugares polvorientos o
húmedos. Para lograr una disipación correcta del calor,
evite los lugares sin suficiente ventilación. No bloquee
los agujeros de ventilación en la parte trasera y en los
costados del aparato. Evite las ubicaciones sujetas a
fuertes vibraciones o campos magnéticos intensos.
•
Asegúrese de sacar el disco y desenchufar el cable de
alimentación de CA antes de transportar la unidad.
Advertencia sobre la Condensación de Humedad
Puede tener lugar condensación de humedad dentro del
aparato cuando éste es trasladado desde un lugar frío a
otro cálido o luego de calefaccionar una habitación fría o
bajo condiciones de alta humedad. No utilice este equipo
al menos durante 2 horas hasta que su interior se seque.
Nota Acerca del Reciclado
Los materiales de embalaje de esta unidad
•
son reciclables y pueden volver a utilizarse.
Disponga de ellos según los reglamentos de
reciclado locales.
Las baterías y las pilas nunca deberán tirarse
•
a la basura ni incinerarse, sino que se deberá disponer
de ellas según los reglamentos locales relacionados con
la basura química.
4
Maintanimiento
Servicio
•
Consulte los temas relevantes de la sección “SOLUCIÓN DE
PROBLEMAS” en la página 43 antes de devolver el producto.
•
Si esta unidad deja de funcionar, no intente solucionar
el problema usted mismo. En el interior no hay piezas
que pueda repara el usuario. Apague el aparato,
desenchufe el cable de alimentación y llame al teléfono
gratuito de nuestro servicio de atención al cliente que
encontrará en la portada de este manual para encontrar
un centro de servicio técnico autorizado.
Limpieza del gabinete
•
Limpie el panel frontal y demás superficies exteriores
del equipo con un paño suave levemente humedecido.
•
Nunca utilice solventes, diluyentes, benceno o alcohol
para limpiar el equipo. No rocíe líquido insecticida cerca
del equipo. Tales productos químicos podrían descolorar
la superficie o dañar el equipo.
Limpiar los discos
•
Cuando se ensucie un disco, límpielo con un paño de
limpieza. Limpie el disco desde el centro afuera. No
limpie en movimiento circulares.
•
No utilice disolventes como bencina, diluyentes, limpiadores
comerciales, detergente, agentes limpiadores abrasivos o
rociadores antiestáticos para registros analógicos
Limpieza de la lente del disco
•
Si este aparato siguiera sin funcionar adecuadamente
aunque usted haya consultado las secciones
correspondientes y el capítulo sobre “SOLUCIÓN DE
PROBLEMAS” de este manual del usuario, puede estar sucio
el equipo de captura por láser óptico. Para la inspección y
limpieza del equipo de captura por láser óptico consulte
con su distribuidor o un centro de servicio autorizado.
Manipulación de los discos
Manipule los discos de tal manera que no se adhieran a
•
las superficies de los mismos huellas digitales y polvo.
Siempre almacene el disco en su estuche protector
•
cuando no lo utilice.
Tenga en cuenta que los discos con formas especiales no
•
pueden ser reproducidos en este reproductor. No intente
reproducir dichos discos ya que pueden dañar a la unidad.
Comprobación de la señal de infrarrojos (IR)
Si el mando a distancia no funciona correctamente,
•
puede utilizar una radio AM o una cámara digital
(incluso un teléfono móvil con cámara incorporada)
para comprobar si está enviando una señal de
infrarrojos.
Con una radio AM:
•
Sintonice la emisora de radio AM en una
frecuencia de no emisión. Apunte con el
mando a distancia hacia ella, presione
cualquier botón y escuche. Si el sonido
de la radio fluctúa, significa que está
recibiendo la señal de infrarrojos del
mando a distancia.
Con una cámara
•
digital (incluidas las cámaras
incorporadas en teléfonos móviles):
Apunte con la cámara digital hacia el
mando a distancia. Presione cualquier
botón del mando a distancia y mire en el
visor de la cámara digital.
Si la luz infrarroja aparece en la cámara, el
mando a distancia funciona.
ES
Page 57

PRECAUCIONES
Información de Marca Registrada
HDMI, el logotipo HDMI y High-Definition Multimedia
Interface (Interface de Multimedios de Alta Definición)
son marcas comerciales o marcas registradas de HDMI
Licensing LLC.
Fabricado bajo licencia de Dolby Laboratories. Dolby y el
símbolo de la doble D son marcas comerciales de Dolby
Laboratories.
Fabricado bajo licencia bajo las patentes de los EE.UU.
números: 5,451,942; 5,956,674; 5,974,380; 5,978,762;
6,487,535 y otras patentes de EE.UU. y mundiales
publicadas y pendientes. DTS y DTS Digital Surround es
una marca registrada y los logotipos y el símbolo DTS son
marcas registradas de DTS, Inc. © 1996-2007 DTS, Inc.
Reservados todos los derechos.
“Blu-ray Disc” y
son marcas registradas.
Java y todas las marcas se logotipos basados en Java son
marcas o marcas registradas de Sun Microsystems en los
Estados Unidos y en otros países.
Los Productos que han conseguido el ENERGY STAR®
están diseñados para proteger el medio ambiente a
través de una mejor eficiencia en el consumo de energía.
es una marca registrada de Eastman Kodak Company.
Introducción
Conexiones
Reproducción
Configuración de
Funciones
es una marca registrada de DVD Format/Logo
Licensing Corporation.
© 2008 Funai Electric Co., Ltd.
Todos los derechos reservados. No se permite la reproducción total o parcial de este manual, ni su copia, transmisión,
difusión, transcripción, descarga o almacenamiento en ningún soporte de almacenamiento, en forma alguna o con fin
alguno sin la autorización expresa y previa por escrito de Funai. Además, toda distribución comercial no autorizada de
este manual o toda revisión del mismo queda estrictamente prohibida.
La información contenida en este documento puede ser objeto de cambios sin previo aviso. Funai se reserva el
derecho de cambiar el contenido de este documento sin la obligación de notificar dichos cambios a ninguna persona
u organización.
con el diseño es una marca comercial registrada de Funai Electric Co., Ltd y no se puede utilizar en modo
alguno sin la autorización expresa por escrito de Funai. Todas las restantes marcas comerciales utilizadas en este
documento siguen siendo propiedad exclusiva de sus respectivos propietarios. Nada de lo contenido en este manual
debe ser entendido como concesión, implícita o de otro tipo, de cualquier licencia o derecho de uso de cualquiera de
las marcas comerciales en él visualizadas. El uso indebido de cualquier marca comercial o de cualquier otro contenido
de este manual queda estrictamente prohibido. Funai hará cumplir enérgicamente sus derechos de propiedad
intelectual dentro de los límites máximos establecidos por la ley.
Otros
ES
5
Page 58

ÍNDICE
Introducción
PRECAUCIONES . . . . . . . . . . . . . . . . . . . . . . . . . . . . . . . . . . 2
FUNCIONES. . . . . . . . . . . . . . . . . . . . . . . . . . . . . . . . . . . . . . 7
Funciones. . . . . . . . . . . . . . . . . . . . . . . . . . . . . . . . . . . . . . . . . . .7
Símbolos Utilizados en este Manual . . . . . . . . . . . . . . . . .7
VISTA GENERAL FUNCIONAL. . . . . . . . . . . . . . . . . . . . . . 8
Panel Delantero . . . . . . . . . . . . . . . . . . . . . . . . . . . . . . . . . . . . .8
Panel Trasero . . . . . . . . . . . . . . . . . . . . . . . . . . . . . . . . . . . . . . .8
Mando a Distancia . . . . . . . . . . . . . . . . . . . . . . . . . . . . . . . . . .9
Pantalla del Panel Delantero. . . . . . . . . . . . . . . . . . . . . . . 11
Conexiones
CONEXIONES . . . . . . . . . . . . . . . . . . . . . . . . . . . . . . . . . . . 12
Conexión al Televisor. . . . . . . . . . . . . . . . . . . . . . . . . . . . . . 12
Conexión a un Sistema de Sonido . . . . . . . . . . . . . . . . . 15
Conectar el Cable de Alimentación . . . . . . . . . . . . . . . . 16
Reproducción
INFORMACIÓN SOBRE LA REPRODUCCIÓN . . . . . . . 17
REPRODUCCIÓN BÁSICA. . . . . . . . . . . . . . . . . . . . . . . . . 20
Reproducción . . . . . . . . . . . . . . . . . . . . . . . . . . . . . . . . . . . . . 20
Funcionamientos Utilizando el Menú de Disco,
el Menú de Títulos y el Menú Desplegable . . . . . . . . . 21
Pausar . . . . . . . . . . . . . . . . . . . . . . . . . . . . . . . . . . . . . . . . . . . . 21
Reproducción de Reanudación . . . . . . . . . . . . . . . . . . . . 21
Reproducir un CD de sonido y un Disco con
Archivos JPEG. . . . . . . . . . . . . . . . . . . . . . . . . . . . . . . . . . . . . 22
Leer la Tarjeta de Memoria SD . . . . . . . . . . . . . . . . . . . . . 23
REPRODUCCIÓN ESPECIAL. . . . . . . . . . . . . . . . . . . . . . . 25
Avance Rápido / Rebobinado Rápido . . . . . . . . . . . . . . 25
Reproducción Avance Lento. . . . . . . . . . . . . . . . . . . . . . . 25
Reproducción Paso a Paso. . . . . . . . . . . . . . . . . . . . . . . . . 25
Reproducción de Repetición. . . . . . . . . . . . . . . . . . . . . . . 25
Repetición de A-B . . . . . . . . . . . . . . . . . . . . . . . . . . . . . . . . . 26
Configuración PIP (Imagen en Imagen) . . . . . . . . . . . . 26
Reproducción de Programa . . . . . . . . . . . . . . . . . . . . . . . 26
Reproducción Aleatoria . . . . . . . . . . . . . . . . . . . . . . . . . . . 27
Ángulo de la Cámara . . . . . . . . . . . . . . . . . . . . . . . . . . . . . . 27
BUSCAR . . . . . . . . . . . . . . . . . . . . . . . . . . . . . . . . . . . . . . . . 28
AJUSTES ESPECIALES. . . . . . . . . . . . . . . . . . . . . . . . . . . . 29
Alternar Subtítulos . . . . . . . . . . . . . . . . . . . . . . . . . . . . . . . . 29
Cambiar la Banda Sonora de Sonido . . . . . . . . . . . . . . . 29
Configurar el Modo de BD de Sonido . . . . . . . . . . . . . . 30
Ajustar la Imagen . . . . . . . . . . . . . . . . . . . . . . . . . . . . . . . . . 30
Configuración de Funciones
CONFIGURACIÓN DE FUNCIONES . . . . . . . . . . . . . . . . 31
Utilizar el Menú Configuración. . . . . . . . . . . . . . . . . . . . . 31
Otros
SOLUCIÓN DE PROBLEMAS . . . . . . . . . . . . . . . . . . . . . . 43
GLOSARIO. . . . . . . . . . . . . . . . . . . . . . . . . . . . . . . . . . . . . . 44
CÓDIGO DE IDIOMA . . . . . . . . . . . . . . . . . . . . . . . . . . . . . 45
ESPECIFICACIONES. . . . . . . . . . . . . . . . . . . . . . . . . . . . . . 46
GARANTÍA LIMITADA . . . . . . . . . . . . . . . . . Tapa Trasera
6
ES
Page 59

FUNCIONES
Funciones
Reproducción de vídeo de alta definición completa
Ver películas con la mayor calidad de imagen disponible
paraa su HDTV. Esta unidad ofrece reproducción de vídeo
de alta definición de una resolución de hasta 1080p para
obtener una apasioannte experiencia de visionado. Una
imagen con gran detalle y una nitidez aumentada oferce
una imagen más realista.
Mejorar el DVD para un calidad de imagen mejorada
Su DVD actual tendrá un aspecto incluso mejor que antes
gracias a la mejora a vídeo. La mejora aumentará la
resolución estándar de DVD de alta definición hasta
1080p por una conexión HDMI. La imagen tendrá menos
imperfecciones y será más realista para disfrutar de una
experiencia cercana a la alta definición.
Disfrute de sus contenidos de distintos tipos de
soportes
La compatibilidad completa hacia atrás con DVD y CD le
asegura que puede seguir disfrutando de su colección
actual de imagen-sonido. Además, puede visualizar JPEG.
Escuchar el rico sonido envolvente multicanal
El sonido envolvente multicanal, que proporciona un
sonido realista y le hace sentir que usted está realmente
allí.
Fácil y sencilla conexión a su HDTV a través de HDMI
Conecte esta unidad a su HDTV con un solo cable HDMI
(Interfaz de multimedia de alta definición, por sus siglas
en inglés). Se recomienda utilizar cable HDMI de alta
velocidad para una mejor compatibilidad. La señal de
salida de alta definición se transfiere a su HDTV sin
conversion a señales analógicas, por lo que conseguirá
una excelente calidad de imagen y sonido, totalmente
libre de ruido.
Gracias a otras salidas multiples, también puede
conectarse fácilmente a su sistema de cine en casa o
amplificador.
Salida HDMI 1080p / fps (sólo BD)
Esta unidad está equipada con una función que le puede
proporcionar un movimiento suave en la reproducción de
material originado de película con una velocidad de 24
fotogramas por segundo con progresivo. (Disponible sólo
cuando el dispositivo de visualización está conectado con
un cable HDMI y compatible con entrada de 1080p24
fotogramas).
Consulte “Resolución de Video HDMI” en
“CONFIGURACIÓN DE FUNCIONES” en la página 34.
Reproducir el contenido de la tarjeta de memoria SD
Puede reproducir los archivos JPEG guardados en tarjetas
de memorias SD.
Puede almacenar comentarios en imágenes, subtítulos u
otros extras para archivos BD-ROM Profile 1 ver.1.1 de una
tarjeta de memoria SD y reproducirlos con el
BD-vídeo.
Símbolos Utilizados en este Manual
Para especificar para qué tipo de medio es cada función,
colocamos los siguientes símbolos al comienzo de cada
elemento descripto.
Símbolo Descripción
La descripción se refiere a BD-vídeo y
BD-RE(ver. 2.1) / BD-R grabado en formato
BDMV
La descripción se refiere a DVD-vídeo
La descripción se refiere a CD de sonido /
DTS-CD
La descripción se refiere a DVD, CD-RW/-R y
tarjeta de memoria SD con archivos JPEG
Si usted no encuentra en el encabezado de la function
ninguno de los símbolos listados más arriba, la operación
es válida para todos los medios.
Introducción
Conexiones
Reproducción
Configuración de
Funciones
Otros
PIP
Algunos BD-vídeo tienen la función PIP (imagen en
imagen) que le permite mostar la imagen secundaria en
la imagen primaria. Puede llamar a la imagen secundaria
pulsando [PIP] siempre que la escena contenga la imagen
secundaria.
Menú desplegable
Algunos BD-vídeo tiene un menú desplegable que es un
menú de navegación que se puede sacar en pantalla sin
interrumpir la reproducción. Puede llamar al menú
desplegable pulsando [POP MENU / MENU]. El contenido
del menú desplegable cambia dependiendo del disco.
Deep Color de HDMI
El Deep Color reduce el efecto de imagen de cartel de la
imagen de reproducción. Consulte “HDMI Deep Color” en
“CONFIGURACIÓN DE FUNCIONES” en la página 34.
ES
7
Page 60

VISTA GENERAL FUNCIONAL
Panel Delantero
12* 43567*8910
La unidad también se puede encender pulsando estos botones.*
1. Bandeja de disco
Sitúe un disco al abrir la bandeja para discos.
•
2. Botón A OPEN / CLOSE*
Púlselo para cerrar o abrir la bandeja para discos.
•
3. Indicador del disco
•
Este indicator se ilumina de color azul cuando hay
un disco dentro de esta unidad.
4. Pantalla
Consulte “Pantalla del Panel Delantero” en la página 11.
•
5. Botón C STOP
Púlselo para detener la reproducción.
•
6. Botón k PAUSE
Púlselo para pausar la reproducción.
•
Panel Trasero
1
2
3 4 5
7. Botón B PLAY*
•
Púlselo para comenzar o reanudar la reproducción.
8. Ranura para SD card
•
Introduzca la tarjeta de memoria SD y reproduzca el
contenido de ella.
9. Ventana del sensor de infrarrojos
•
Recibe las señales de su mando a distancia para que
pueda controlar la unidad desde la distancia.
10. Indicador STANDBY-ON
•
Este indicador se ilumina de color rojo cuando la
alimentación está encendida y se apaga cuando
está apagada.
11. Botón
yy STANDBY-ON
Púlselo para encender y apagar la unidad.
•
11
6
1. Tomas COMPONENT VIDEO OUT
Utilícelas para conectar a un televisor visualización
•
con un tomas de entrada de componente con un
cable de vídeo componente RCA.
2. Toma HDMI OUT
Utilícela para conectar a un televisor con puerto
•
compatible con HDMI con un cable HDMI.
3. Tomas AUDIO OUT
Utilícela para conectar a un televisor, un receptor /
•
amplificador AV u otro dispositivo con un cable de
sonido RCA.
4. Toma DIGITAL OUT (COAXIAL)
Utilícelo para conectar a un receptor / amplificador
•
de AV, descodificador Dolby Digital / DTS o a otro
dispositivo con una toma de entrada coaxial de
sonido digital.
8
5. Terminal AC IN
•
Utilícela para conectar al CA con el cable de
alimentación.
6. Toma VIDEO OUT
•
Utilícela para conectar a un televisor, un receptor/
amplificador AV u otro dispositivo con un cable de
vídeo RCA.
Nota
No toque las clavijas internas de los conectores
•
hembra del panel trasero. La descarga electrostática
puede ocasionar daños permanentes al aparato.
Esta unidad no tiene el modulador de RF.
•
ES
Page 61

VISTA GENERAL FUNCIONAL
Mando a Distancia
1
DISPLAY
STANDBY-ON
2
3
SEARCH
4
5
TOP MENU
6
7
SETUP
8
SUBTITLE
9
10
11*
12
13
*
La unidad también se puede encender pulsando
estos botones.
1. Botón SETUP
•
Púlselo para mostrar el menú de configuración.
2. Botón STANDBY-ON
•
Púlselo para encender y apagar la unidad.
3. Botones numéricos
•
Púlselos para introducir los números de título,
capítulo, pista o archivo.
•
Púlselos para introducir valores en el campo de entrada.
4. Botón SEARCH
•
Púlselo para mostrar el menú de búsqueda.
5. Botón Rojo / Verde / Amarillo / Azul
•
Púlselo para seleccionar opciones en algunos de
los menús de BD.
6. Botón TOP MENU
•
Púlselo para mostrar el menú superior.
7. Botones de cursor K / L / { / B
•
Púlselo para seleccionar elementos o configuraciones.
8. Botón SETUP
•
Púlselo para mostrar el menú de configuración.
9. Botón SUBTITLE
•
Púlselo para mostrar el menú de subtítulos.
10. Botón REW E
•
Durante la reproducción, púlselo para invertir
rápido la reproducción.
11. Botón PLAY B*
•
Púlselo para iniciar la reproducción o reanudar la
ES
reproducción.
yy
OPEN/
CLOSE
HDMI
PIP
ANGLE
REPEAT
A-B
CLEAR
POP MENU/
MENU
OK
RETURN
AUDIO
MODE
14
15*
16
17
18
19
20
21
22
23
24
25
27
28
26
12. Botón SKIP H
•
Durante la reproducción, púlselo una vez para volver
al principio del título, capítulo, pista o archivo actual.
•
Durante la reproducción de JPEG, pulse para volver
al archivo anterior.
•
Durante la reproducción, púlselo dos veces para
volver al título, capítulo o pista anterior.
13. Botón PAUSE F
Púlselo para pausar la reproducción.
•
•
Cuando la reproducción esté en modd pausa, púlselo
repetidamente para avanzar la reproducción paso a paso.
14. Botón HDMI
•
Púlselo para establecer el modo de salida de HDMI.
15. Botón OPEN/CLOSE A*
•
Púlselo para cerrar o abrir la bandeja para discos.
16. Botón PIP
•
Púlselo para encender / apagar la función imagen
en imagen (pertinente sólo a BD-vídeo que admita
la función PIP).
17. Botón ANGLE
•
Púlselo para acceder a distintos ángulos de cámara
del disco.
•
Púlselo para girar los archivos JPEG en sentido
horario 90 grados.
18. Botón REPEAT
•
Púlselo para conmutar entre distintos modo de
repetición.
19. Botón A-B
•
Púlselo para reproducir una sección definida entre
el punto A y el B repetidamente.
20. Botón CLEAR
•
Púlselo para borrar la información una vez que se ha
introducido, para borrar la programación del marcador
o para cancelar la programación del CD de sonido.
21. Botón POP MENU/MENU
•
Púlselo para mostrar el menú desplegable / del disco
/ liste de archivos.
22. Botón OK
•
Púlselo para confirmar o seleccionar elementos de
menú.
23. Botón RETURN
•
Púlselo para volver a la pantalla de menú mostrada
anteriormente.
24. Botón AUDIO
•
Púlselo para mostrar el menú de sonido.
25. Botón FWD D
•
Durante la reproducción, púlselo para avanzar
rápido la reproducción.
•
Cuando la reproducción esté en pausa, púlselo
para avanzar lentamente la reproducción.
26. Botón STOP C
•
Púlselo para detener la reproducción.
27. Botón SKIP G
•
Durante la reproducción, púlselo para saltar al
siguiente título, capítulo, pista o archivo.
28. Botón MODE
•
Durante la reproducción, pulse para mostrar el
menú de ajuste de imagen.
•
Durante la reproducción de JPEG, pulse para mostrar
menús para cambiar el efecto visual para conmutar la
imagen o cambiar el tamaño de la imagen.
•
En modo de detención con BD insertado,
presiónelo para mostrar un menú para establecer
el modo de audio BD.
•
En modo parado con CD de sonido, o un disco con
archivos JPEG introducido, presione para mostrar
menús de programa y reproducción aleatoria.
Introducción
Conexiones
Reproducción
Configuración de
Funciones
Otros
9
Page 62

VISTA GENERAL FUNCIONAL
Instalar las Pilas en el Mando a Distancia
Instale las pilas (AAx2) haciendo coincidir la polaridad que
se indica dentro del compartimento de pilas del mando a
distancia.
1 Abra la tapa.
2 Introduzca las pilas.
Compruebe que hace coincidir las marcas + y - de las
pilas con las marcas indicadas en el compartimento
de las pilas.
3 Cierre la tapa.
Uso del Mando a Distancia
Tenga lo siguiente en cuenta cuando utilice el mando a
distancia:
•
Asegúrese de que no haya obstáculos entre el mando a
distancia y la ventana del sensor de infrarrojos de la
unidad.
•
El funcionamiento a distancia puede ser no fiable si hay
una fuerte luz del sol o luz fluorescente dando en la
ventana del sensor de infrarrojos de la unidad.
•
Los mandos a distancia de distintos dispositivos pueden
interferir los unos con los otros. Evite utilizar el mando a
distancia de otros aparatos situados cerca de la unidad.
•
Cuando advierta una disminución en el rango de
operación del control remoto, reemplace las pilas.
•
Los máximos rangos de operación del equipo son los
siguientes.
-
Línea de visión: aprox. 23 pies (7 m)
-
Hacia cualquier costado respecto del centro:
aprox. 16 pies (5 m) dentro de los 30°
-
Por encima: aprox. 16 pies (5 m) dentro de los 15°
-
Por debajo: aprox. 10 pies (3 m) dentro de los 30°
30˚30˚
16 pies
(5 m)
23 pies
(7 m)
16 pies
(5 m)
Nota
El uso incorrecto de pilas puede tener como resultado
peligros como fugas y explosiones. Por favor, observe
los siguiente:
No mezcle pilas nuevas con antiguas.
•
No mezcle distintos tipos de pilas. Aunque puedan
•
tener un aspecto similar, las pilas distintas pueden
tener distintas tensiones.
Compruebe que los extremos + y - de cada pila
•
coincide con las indicaciones del compartimento de
las pilas.
Quite las pilas del compartimento de pilas si no se va
•
a utilizar durante un mes o más.
Cuando tire las pilas, por favor cumpla con las
•
normas gubernamentales o reglas de instrucción
pública medioambientales que se apliquen en su país
o zona.
No recargue, cortocircuite, desmonte, caliente ni
•
queme las pilas.
10
ES
Page 63

VISTA GENERAL FUNCIONAL
Pantalla del Panel Delantero
1 2
El brillo de la pantalla puede ajustarse. Consulte “Panel Pantalla” en “CONFIGURACIÓN DE FUNCIONES” en la
•
página 41.
1. Muestra el icono de estado de reproducción. Consulte la tabla a continuación.
2. Aparecen distintos tipos de información del disco como el número de título, tiempo transcurrido, modo
repetición, etc.
Icono estado de reproducción
Disco
Tarjeta de
memoria SD
Reproducción en progreso
Modo parada
Modo
Introducción
Conexiones
Reproducción
Configuración de
Funciones
-
-
-
Ejemplo de Mensaje de Pantalla
Modo pausa
Otros
Modo avance rápido
Modo rebobinado rápido
Modo avance lento
Aparece cuando la función repetición
está configurada
El título se reproduce.
Indica el número del título actual y el tiempo transcurrido.
El capítulo actual está en modo repetir capítulo.
Cargando discos
ES
El sonido Dolby Digital se reproduce.
11
Page 64

CONEXIONES
Conexión al Televisor
•
Haga una de las siguientes conexiones, dependiendo de las capacidades de su aparato existente.
CONEXIÓN DE SONIDO CONEXIÓN DE
Método 1
TV
sonido estándar
AUDIO IN
imagen estándar
LR
VIDEO
IN
cable
de
cable de sonido
RCA
y oo o
vídeo
RCA
esta unidad
VIDEO
OUT
CONEXIÓN DE VÍDEO
1
Método 2
*
mejor imagen
COMPONENT
VIDEO IN
Y
(Verde)
PB/CB
(Azul)
PR/CR
(Rojo)
cable de
vídeo de
componente
RCA
COMPONENT
VIDEO OUT
PR/CRY
(Rojo)
(Azul)
(Verde)
Método 3
la mejor imagen
DVI IN
cable
HDMI-DVI
SONIDO/VÍDEO
1
*
Método 4
la mejor sonido/imagen
cable
HDMI
HDMI IN
1, 2
*
PB/C
B
AUDIO OUT HDMI OUTVIDEO OUT COMPONENT
VIDEO OUT
*1 Esta unidad es compatible con el sistema de barrido progresivo. La función le ofrece imágenes de más alta calidad
que el sistema de salida tradicional. Para utilizar esta función, se necesita un componente o una conexión HDMI.
Consulte “Resolución de Video HDMI” o “Salida de components” en la página 34 para configurar la resolución.
2
No se requiere conexión de sonido analógico para esta conexión.
*
Los cables suministrados utilizados en esta conexión son como sigue:
Cable de sonido RCA (I/D) x 1
•
Cable de vídeo RCA x 1
•
Cable HDMI (cable HDMI de alta velocidad) x 1
•
Por favor, compre el resto de los cables necesarios en su tienda local.
Nota
Conecte esta unidad directamente al televisor. Si los cables de sonido / vídeo RCA se conectan a una grabadora de
•
vídeo, las imágenes puede que se distorsionen debido al sistema de protección contra copias.
Si la imagen no se da como salida correctamente al televisor debido a la configuración de “Resolución de Video
•
HDMI” o “Salida de components”, pulse y mantenga [ B PLAY] en el panel delantero durante más de 5 segundos.
La configuración “Resolución de Video HDMI” se cambia automáticamente a su predeterminado. No puede
cambiar la resolución de vídeo durante la reproducción de discos Blu-ray. Para cambiar la resolución, detenga la
reproducción.
Conectar esta unidad a un dispositivo con un toma HDMI (interface de multimedios de alta definición) que utilice
•
un solo cable hace posible la transferencia digital tanto de señales de imagen digital como de señales de sonido
con múltiples canales.
12
ES
Page 65

CONEXIONES
Modo Salida HDMI y Señales de Salida Real
Pulse [HDMI] para cambiar la resolución de la señal de vídeo que se da como salida desde la HDMI OUT. La resolución
de vídeo cambia como sigue cada vez que se pulsa [HDMI].
Pantalla del
Panel Delantero
Pulse [HDMI]
Pulse [HDMI]
Pulse [HDMI]
Pulse [HDMI]
Pulse [HDMI]
Resolución de Vídeo HDMI
480 Progresivo
720 Progresivo
1080 Entrelazado
1080 Progresivo
1080 Progresivo de 24 fotogramas
Conexiones
Reproducción
Sistema de protección de derechos de autor
Para reproducir las imágenes de vídeo digital de un BD/DVD a través de una conexión HDMI, es necesario que tanto
la unidad como el televisor (o amplificador AV) soporten un sistema de protección de derechos de autor llamado
HDCP (sistema de protección de contenidos digitales de alto ancho de banda). HDCP es una tecnología de
protección contra copias que consta de cifrado y autentificación de datos del dispositivo AV conectado. Esta
unidad soporta HDCP. Por favor, lea las instrucciones de funcionamiento de su televisor (o amplificador de AV) para
mayor información.
Nota
Al utilizar un televisor incompatible con HDCP, la imagen no se verá correctamente.
•
Entre los dispositivos que admiten HDMI, algunos dispositivos pueden controlar otros dispositivos a través de la
•
toma HDMI, esta unidad puede ser controlada por otro dispositivo a través de la toma HDMI.
Las señales de sonido de la toma HDMI OUT (incluyendo la frecuencia de muestreo, el número de canales y la
•
longitud de bits) pueden estar limitadas por el dispositivo que está conectado.
Entre los monitores que admiten HDMI, algunos no soportan la salida de sonido (por ejemplo, los proyectores). En las
•
conexiones a dispositivos como esta unidad, las señales de sonido no se dan desde la toma de salida HDMI OUT.
No puede seleccionar resoluciones de vídeo que no las admita el televisor conectado, excepto cuando esté
•
conectada la toma HDMI OUT de esta unidad a un dispositivo de visualización compatible con DVI con un cable
HDMI-DVI.
Para hacer la conexión de la toma HDMI OUT a DVI, después de que seleccione un modo de salida HDMI, se dará
•
como salida la resolución de vídeo HDMI correspondiente. La resolución de vídeo HDMI que seleccione se dará
como salida aunque el televisor conectado no sea compatible con la resolución de vídeo HDMI. Si no se muestra
ninguna imagen en el televisor conectado, por favor seleccione otra resolución de vídeo HDMI.
Las señales de vídeo y sonido pueden distorsionarse temporalmente al cambiar del/al modo de salida HDMI.
•
No puede cambiar la resolución de vídeo durante la reproducción de discos Blu-ray. Para cambiar la resolución,
•
detenga la reproducción.
También puede cambiar el modo de salida HDMI de “Resolución de Video HDMI” en el menú “Video” en el menú
•
de configuración. En este menú usted puede confirmar qué resoluciones de vídeo HDMI se admiten por parte del
televisor conectado. Consulte la página 34.
Para obtener una reproducción natural y de alta calidad de material de película de 24 fotogramas, utilice un cable
•
HDMI (se recomienda el uso de HDMI de alta velocidad) y seleccione “1080p24” si el televisor conectado es
compatible con una entrada de 1080p24 fotogramas.
Si configura “Resolución de Video HDMI” a “1080p24”, cuando el contenido del disco no es compatible con
•
fotograma 1080p24, el fotograma 1080p60 se dará como salida.
No hay ninguna salida desde las tomas VIDEO OUT y COMPONENTE VIDEO OUT cuando reproduce un BD que
•
tiene grabado material fílmico de 24 fotogramas en modo de salida HDMI de 1080p24.
Se recomienda utilizar cable HDMI de alta velocidad (conocido también como cable HDMI de categoría 2) para
•
una mejor compatibilidad.
Configuración de
Funciones
OtrosIntroducción
ES
13
Page 66

CONEXIONES
Configuración de Sonido HDMI
Cuando utilice conexiones HDMI haga la configuración de “Salida audio HDMI” del menú “Audio” del menú de
configuración según las especificaciones del dispositivo o monitor a conectar.
Dispositivo a conectar
Dispositivo compatible con Dolby
Digital, Dolby Digital Plus, Dolby
TrueHD, DTS o DTS-HD descodificación
Configuración de
“Salida audio HDMI”
Salida señal de sonido HDMI
Mult. HDMI(Normal) Se da como salida Dolby Digital, Dolby
Digital Plus, Dolby TrueHD, DTS o
corriente de bits DTS-HD se dan como
salida desde la toma HDMI OUT. Haga
las configuraciones del altavoz en el
amplificador AV conectado, etc.
Dispositivo compatible con 3 canales o
más de entradas de sonido (no
compatible Dolby Digital, Dolby Digital
Plus, Dolby TrueHD, DTS o DTS-HD)
Mult. HDMI (LPCM) Se dan como salida señales de sonido
de multicanales desde la toma HDMI
OUT. Haga las configuraciones del
altavoz con las opciones de
configuración del altavoz que aparecen
después de que seleccione “Mult.
HDMI(LPCM)”. Consulte la página 36.
Conexión HDMI a un televisor y una
conexión de sonido digital (coaxial) a
un amplificador AV.
Audio desactivado El sonido HDMI se silenciará y la
corriente de bits Dolby Digital/DTS o
LPCM se darán como salida desde
DIGITAL OUT dependiendo de la
configuración de “Salida Digital”.
Consulte la página 37.
Las señales de sonido se dan como salida desde la toma HDMI OUT
■
Tipo de discos
BD-vídeo
Formato de
grabación de sonido
Dolby Digital Dolby Digital*
Dolby Digital Plus Dolby Digital Plus*
Dolby TrueHD Dolby TrueHD*
DTS DTS*
DTS-HD DTS-HD*
Configuración de “Salida audio HDMI”
HDMI Multi(Normal) HDMI Multi(LPCM)
1
1
1
1
1
Mult. LPCM
Mult. LPCM*
Mult. LPCM*
Mult. LPCM
Mult. LPCM*
LPCM Mult. LPCM Mult. LPCM
Dolby Digital Dolby Digital Mult. LPCM
DVD-vídeo
DTS DTS Mult. LPCM
LPCM Mult. LPCM Mult. LPCM
CD de sonido 2ch LPCM 2ch LPCM
DTS-CD DTS Mult. LPCM
2
3
4
1
Si la opción “Modo de audio BD” está ajustada a “Salida audio comb.” se dará como salida multi LPCM. Consulte la
*
página 36.
2
*
Da como salida señales de sonido descodificadas desde una subcorriente independiente.
3
*
Da como salida señales de sonido descodificadas desde una corriente Dolby Digital.
*4 Da como salida señales de sonido descodificadas desde una corriente central de DTS.
•
Si el dispositivo conectado no es compatible con HDMI BITSTREAM, el sonido será dado como salida multi LPCM o
LPCM con mezcla reducida a 2 canales dependiendo de la capacidad del dispositivo conectado incluso si selecciona
“Mult. HDMI(Normal)” en la opción “Salida audio HDMI” . Consulte la página 36.
14
ES
Page 67

CONEXIONES
Conexión a un Sistema de Sonido
Cuando cambie las conexiones, se deben apagar todos los dispositivos.
•
Consulte con el manual que acompaña a los dispositivos externos para ver más información.
•
Conexión de Sonido Analógico de 2 Canales
sistema estéreo
sonido
AUDIO IN
LR
Conexiones
esta unidad
Conexión de Sonido Digital
amplificador / receptor de AV
sonido
tomas de entrada coaxiales/
tomas de entrada de
sonido analógico
cable de sonido RCA
ópticas de sonido digital
AUDIO
OUT
L
R
AUDIO OUT
DIGITAL AUDIO INPUT
COAXIAL
cable coaxial de sonido digital
Reproducción
Configuración de
Funciones
OtrosIntroducción
esta unidad
DIGITAL OUT (COAXIAL)
Los cables suministrados utilizados en esta conexión son como sigue:
Cable de sonido RCA (I/D) x 1
•
Por favor, compre el resto de los cables necesarios en su tienda local.
ES
15
Page 68

CONEXIONES
Las señales de sonido se dan como salida desde la toma DIGITAL OUT (COAXIAL)
■
Las señales de sonido que se dan actualmente como salida desde la toma HDMI OUT se dará como salida también
desde la toma DIGITAL OUT, exceptuando que la señal Dolby Digital se dará como salida en vez de Dolby Digital Plus y
la señal Dolby TrueHD, DTS se dará como salida en vez de DTS-HD.
Cuando se selecciona “Audio desactivado” en la opción “Salida audio HDMI”, las señales de sonido que se dan como
salida desde la toma HDMI OUT se silenciará y las señales de sonido que se dan como salida desde la toma DIGITAL
OUT cambia dependiendo de la opción “Salida Digital”.
Para configurar la opción “Salida Digital”, seleccione “Audio desactivado” en la opción “Salida audio HDMI”.
Tipo de discos
BD-vídeo
DVD-vídeo
CD de sonido 2ch LPCM 2ch LPCM
DTS-CD DTS LPCM Downmix de 2 canales
* Para títulos con sonido secundario o interactivo, estos sonidos se darán como salida como Dolby Digital cuando se
cumplan todas las condiciones enumeradas a continuación:
•
Cuando la opción “Modo de audio BD” está ajustada a “Salida audio comb.”.
•
Cuando la opción “Salida audio HDMI” está configurada a “Audio desactivado”.
•
Cuando la opción “Salida Digital” está configurada a “Bitstream”.
Si los títulos BD no tienen sonido secundario ni interactivo, el sonido se dará como salida según se muestra en la tabla.
•
Esta tabla es pertinente sólo cuando el HDMI no está conectado o “Audio desactivado” está seleccionado en la
opción “Salida audio HDMI”.
Formato de grabación
de sonido
Dolby Digital Dolby Digital LPCM Downmix de 2 canales
Dolby Digital Plus Dolby Digital LPCM Downmix de 2 canales
Dolby TrueHD Dolby Digital LPCM Downmix de 2 canales
DTS DTS* LPCM Downmix de 2 canales
DTS-HD DTS* LPCM Downmix de 2 canales
LPCM LPCM Downmix de 2 canales* LPCM Downmix de 2 canales
Dolby Digital Dolby Digital LPCM Downmix de 2 canales
DTS DTS LPCM Downmix de 2 canales
LPCM LPCM Downmix de 2 canales LPCM Downmix de 2 canales
Configuración de “Salida Digital”
Bitstream LPCM
Nota
Para dar como salida una señal LPCM desde la toma DIGITAL OUT mientras se da como salida la señal de sonido
•
HDMI, configure la opción “Modo de audio BD” a “Salida audio comb.” y configure la opción “Salida audio HDMI” a
“Mult. HDMI(LPCM)”.
Conectar el Cable de Alimentación
Después de que haya hecho todas las conexiones necesarias, conecte el cable de alimentación a AC IN. Después,
conecte el cable de alimentación al enchufe de CA.
Introduzca las clavijas de manera segura. Las conexiones incompletas tienen como resultado la generación de
ruidos.
esta unidad
Cable de alimentación
Los cables suministrados utilizados en esta conexión son como sigue:
Cable de alimentación x 1•
Enchufe de
corriente alterna
CA 120 V, 60 Hz
16
ES
Page 69

INFORMACIÓN SOBRE LA REPRODUCCIÓN
Antes de que comience a reproducir un disco, lea la siguiente información.
Discos y Archivos Reproducibles
Este aparato es compatible con la reproducción de los
siguientes discos / archivos.
Para reproducir un disco / archivo, asegúrese de que
cumple los requisitos de códigos de región y sistemas de
colores descritos a continuación. Usted puede reproducir
discos que tengan los siguientes logotipos. No se
garantiza que otros tipos de discos se reproduzcan.
Discos reproducibles Logotipos
Discos Blu-ray
- BD-vídeo (una/doble capa)
- BD-RE (versión 2.1)
(grabado en formato BDMV)
- BD-R (una/doble capa)
(grabado en formato BDMV)
(Los discos no cerrados
pueden no reproducirse.)
DVD-vídeo
DVD+RW (una sola capa)
DVD+R (sencilla/doble capa)
DVD-RW (sólo discos en
modo de video finalizados)
DVD-R (sólo discos en modo
de video finalizados)
Nota Para las Tarjetas de Memorias SD
No extraiga la tarjeta de memoria SD ni apague la
•
unidad mientras se está reproduciendo el contenido
de la tarjeta. Puede tener como resultado un fallo de
funcionamiento o la pérdida de los datos de la
tarjeta.
Por favor guarde las tarjetas de memorias SD en sus
•
estuches cuando no las esté utilizando.
No intente abrir ni modificar la tarjeta.
•
No toque la superficie de terminal con sus dedos ni
•
con ningún metal.
No pegue etiquetas o adhesivos adicionales a las
•
tarjetas.
No quite la etiqueta de las tarjetas de memorias SD.
•
Esta unidad soporta tarjetas de memoria SD con
•
sistema de archivos FAT12/FAT16 y tarjetas de
memoria SDHC con el sistema de archivos FAT32.
Esta unidad podría no ser capaz de leer tarjetas de
•
memoria SD formateadas en ordenador. Si ese es el
caso, por favor vuelva a formatear las tarjetas de
memoria SD en esta unidad e inténtelo de nuevo.
Esta unidad no admite tarjetas de memoria
•
miniSDHC ni microSDHC.
Para las tarjetas miniSD y microSD, es necesario un
•
adaptador.
•
Porciones de este producto están protegidas por la
ley de derechos de autor y se ofrecen bajo licencia de
ARIS/SOLANA/4C.
Adaptador para
tarjeta miniSD
tarjeta
miniSD
Adaptador para
tarjeta microSD
tarjeta
microSD
Introducción
Conexiones
Reproducción
Configuración de
Funciones
Otros
CD-DA (CD de sonido)
CD-RW
CD-R
Kodak Picture CD
DTS-CD
Archivos reproducibles Soportes
DVD, CD-RW/-R,
JPEG
Tarjetas legibles
Tarjeta de memoria SD
(8 MB - 2 GB)
Tarjeta de memoria SDHC (4 GB)
Tarjeta miniSD (8 MB - 2 GB)
Tarjeta microSD (8 MB - 2 GB)
ES
tarjeta de memorias SD
(incluyendo SDHC),
tarjeta miniSD,
tarjeta microSD
Archivos / datos
JPEG, comentario en
imágenes, subtítulos u
otros extras del BD-ROM
Profile 1 ver.1.1
reproducibles
Discos y Archivos No Reproducibles
En este aparato no se podrán reproducir los siguientes
discos.
CD-ROM• CD-I (disco compacto interactivo)•
DVD-RAM• VSD (disco simple de vídeo)•
audio en DVD• BD-RE (ver.1 / ver.3)•
HD DVD• CD de vídeo•
disco sin finalizar• SVCD•
BD-RE/-R grabado en formato BDAV•
el DVD/CD/Tarjeta de memoria SD contiene archivos
•
MP3 y Windows Media™ Audio y DivX®
DVD-RW/-R grabado en modo VR o en formato de
•
grabación no compatible.
CD de súper audio - Sólo se podrá escuchar el sonido
•
de la capa normal del CD. El sonido de la de capa de
alta densidad de un CD de súper audio no podrá ser
escuchado.
La reproducibilidad de los discos duales no está
•
garantizada.
17
Page 70

INFORMACIÓN SOBRE LA REPRODUCCIÓN
Sistemas de Color
Los BD-vídeo y DVD-vídeo de vídeo están grabados en
distintos sistemas de colores en todo el mundo. El
sistema de color más común es el NTSC (que se utiliza
principalmente los Estados Unidos y Canadá).
Esta unidad utiliza el sistema de color NTSC, por lo tanto
el disco que reproduzca tiene que estar grabado en el
sistema NTSC. No puede reproducir discos que estén
grabados en otros sistemas de colores.
Códigos de Región
BD-vídeo
Esta unidad se ha diseñado para reproducir
BD-vídeo con región A y DVD-vídeo con
región “1” o “ALL”. Usted no puede
reproducir BD-vídeo o DVD-vídeo que estén
marcados para otras regiones. Busque los
símbolos a la derecha de su BD-vídeo o
DVD-vídeo. Si estos símbolos de regiones
no aparecen en su BD-vídeo o DVD-vídeo,
no puede reproducir el disco en esta unidad.
El número o letra dentro del globo se refiere
a la región del mundo. Un BD-vídeo
o DVD-vídeo etiquetado para una región
específica solamente puede reproducirse en
unidades que tengan el mismo código de región.
BD-vídeo
DVD-vídeo
DVD-vídeo
Estructura del Disco / Contenido de la Tarjeta
de Memoria SD
El contenido de BD-vídeo / DVD-vídeo está generalmente
dividido en títulos. Los títulos pueden a su vez ser
subdivididos adicionalmente en capítulos.
título 1
capítulo 1
BD-vídeo / DVD-vídeo
título 2
capítulo 2 capítulo 3 capítulo 4 capítulo 5
Visualización en Pantalla
Puede comprobar la información acerca del disco actual
pulsando [DISPLAY].
Para llamar a la visualización en pantalla, pulse [DISPLAY]
durante la reproducción. Cada vez que pulsa [DISPLAY],
cambia la información. Dependiendo del soporte, la
información disponible varía.
apagado A Información de título/capítulo
A Información de título (tiempo transcurrido)
A Información de título (tiempo restante)
A Información de HDMI A apagado
apagado A Información de capítulo (tiempo transcurrido)
A Información de capítulo (tiempo restante)
A Información de título (tiempo transcurrido)
A Información de título (tiempo restante)
A Indicador de velocidad de bits
A Información de HDMI A apagado
apagado A Información de pista (tiempo transcurrido) A
Información de pista (tiempo restante)
A Información de disco* (tiempo transcurrido)
A Información de disco* (tiempo restante)
A Información de HDMI A apagado
(*no disponible durante la reproducción de programa /
aleatoria)
apagado A Información de nombre de archivo
A Información de archivo AInformación de HDMI
A apagado
Los CD de sonido están divididos en pistas.
pista 1 pista 2 pista 3 pista 4 pista 5
Los discos de datos o tarjetas de memoria SD contienen
archivos JPEG que están divididos en carpetas y las
carpetas están subdivididas en archivos.
carpeta (grupo) 1
archivo (pista) 1 archivo (pista) 2 archivo (pista) 3 archivo (pista) 4 archivo (pista) 5
CD de sonido
auds CD
JPEG
carpeta (grupo) 2
group(folder)2
18
Para CD de sonido y JPEG, durante la reproducción de
•
programa o aleatoria, la indicación se mostrará después
de la información de pista / archivo.
ES
Page 71

INFORMACIÓN SOBRE LA REPRODUCCIÓN
Información de capítulo
■
1 3 42
Información de pista/archivo
■
1 3 42
Introducción
3 / 5 0 : 01 : 02
<Información del título y el capítulo para BD>
5 6
1 1 / 10 A B
Número del capítulo actual / Número total de
1
capítulos
Tiempo transcurrido / Tiempo restante del
2
capítulo actual
Indica que hay disponibles imágenes de distintos
3
ángulos de cámara en la escena
Estado actual de reproducción
4
Número del título actual
5
Configuración actual de repetición (Solamente
6
cuando está activa la configuración de repetición)
(C: Repetir capítulo, T: Repetir título,
AB: Repetir A-B)
■
Información de título
1 2
3 / 5 0 : 01 : 02
Número del título actual / Número total de títulos
1
Tiempo transcurrido / Tiempo restante del título
2
actual
F
Número de la pista (archivo) actual /
1
SD1 / 14 0 : 00: 51
T
B
Número total de pistas (archivos)
Tiempo transcurrido / Tiempo restante de la pista
2
actual
B
Indicación de reproducción de tarjeta de memoria
3
Conexiones
SD
Configuración actual de repetición (Solamente
4
cuando está activa la configuración de repetición)
(T: Repetir pista / Archivo, G: Repetir grupo,
A: Repetir todo)
Reproducción
Información del disco
■
1 2
1 / 14 0 : 00: 51
Número de la pista actual / Número total de pistas
1
Tiempo transcurrido / Tiempo restante del disco
2
T
actual
Información de nombre de archivo
■
1
B
Icono de soporte y nombre de archivo
1
Archivo_Nomble_001
: Archivo JPEG
B
Configuración de
Funciones
Otros
Indicador de velocidad de bits
■
21
L1
Velocidad de bits (La cantidad de datos de imagen
1
B
que se está leyendo actualmente)
Número de capa (Sólo para discos de dos capas)
2
(L0: Se reproduce la capa 0. L1: Se reproduce la
capa 1)
Información sobre HDMI
■
1
Info.Video
Info.Audio
Max Nº Canales
Formato de vídeo HDMI
1
Resolución de la imagen de salida HDMI
2
Formato de sonido HDMI
3
El número máximo de canales de sonido que se
4
YCbCr
PCM
:
2 ch
:
2
/ 1080i:
43
pueden aceptar por parte del equipo conectado
Nota
Si no está conectado HDMI, se mostrará “---” para la
•
información de HDMI.
ES
19
Page 72

C
MODE
SU
E
S
CH
Reproducción
REPRODUCCIÓN BÁSICA
Pulse [STANDBY-ON y ].
1
STANDBY-ON
EAR
BTITL
DISPLAY
OPEN/
CLOSE
A-
LEAR
OK
AUDIO
Encienda el televisor y seleccione la
2
entrada apropiada en el televisor al
cual está conectada la unidad.
Pulse [OPEN / CLOSE A ] para abrir la
3
bandeja para discos.
Sitúe el disco en la bandeja para
4
discos con la etiqueta hacia arriba.
Alinee el disco con
la guía de la
bandeja de discos.
Pulse [OPEN / CLOSE A ] para cerrar
5
la bandeja de discos.
Puede que tarde un poco
en cargar el disco.
Algunos discos pueden comenzar a reproducirse
automáticamente.
20
Pulse [PLAY B] para comenzar la
6
reproducción.
Para muchos BD-vídeo y DVD-vídeo, puede que
aparezca una pantalla de menús.
En este caso, utilice [K / L / s / B] para seleccionar
a la opción deseada y después pulse [OK].
Pulse [STOP C ] una vez para detener
7
la reproducción temporalmente.
Consulte “Reproducción de Reanudación” en la
página 21.
Para expulsar el disco:
Pulse [OPEN / CLOSE A ] para abrir la bandeja
de discos y después saque el disco antes de
apagar la unidad.
Nota
puede que aparezca en la esquina superior
•
derecha de la pantalla del TV cuando el
funcionamiento esté prohibido por parte del disco o
de esta unidad.
Durante la reproducción de discos de dos capas, las
•
imágenes puede que se detengan durante un
momento. Esto pasa cuando la primera capa cambia
a la segunda capa. No es un fallo de funcionamiento.
El funcionamiento puede variar cuando reproduzca
•
BD-vídeo and DVD-vídeo con menú de disco.
Consulte con el manual que acompaña al disco para
ver los detalles.
ES
Page 73

REPRODUCCIÓN BÁSICA
Funcionamientos Utilizando el Menú
de Disco, el Menú de Títulos y el
Menú Desplegable
Muchos discos de BD-video y DVD-video contiene un
menú de títulos (BD-video / DVD-video), menú de disco
(DVD-video) o menú desplegable (BD-video) que le guía
por las funciones disponibles del disco. El contenido de
los menús puede variar dependiendo de los discos.
Menú de título (BD-vídeo / DVD-vídeo)
1 Pulse [TOP MENU].
Aparecerá el menú de título.
•
2 Utilice [K / L / s / B] para seleccionar
una opción y después pulse [OK].
3 Pulse [TOP MENU] para salir.
Menú de disco (DVD-vídeo)
1 Pulse [POP MENU / MENU].
•
Aparecerá el menú de disco.
2 Utilice [K / L / s / B] para seleccionar
una opción y después pulse [OK].
3 Pulse [POP MENU / MENU] para salir.
Menú desplegable (BD-vídeo)
•
Esta es una función especial disponible en algunos BD.
•
Cuando pulsa [POP MENU / MENU], aparece un menú
en pantalla mientras que el contenido sigue
reproduciéndose.
1 Durante la reproducción de BD-vídeo,
pulse [POP MENU / MENU].
Aparecerá el menú emergente.
•
2 Utilice [K / L / s / B] para seleccionar
una opción y después pulse [OK].
3 Pulse [POP MENU/MENU] para salir.
Nota
El contenido de los menús y las correspondientes
•
operaciones de menú pueden variar entre los
distintos discos. Consulte con el manual que
acompaña al disco para ver los detalles.
Pausar
1 Durante la reproducción, pulse [PAUSE F ].
La reproducción se pausará.
•
2 Pulse [PLAY B ] para volver a la
reproducción normal.
Nota
Para BD y DVD , configure “Modo Vista fija” a “Imagen”
•
en el menú “Video” si las imágenes en modo de pausa
están borrosas (consulte la página 35).
Reproducción de Reanudación
1 Durante la reproducción, pulse [STOP C ].
El mensaje de reanudación aparecerá en la pantalla
•
del TV.
Reanudación Activada
Presione 'PLAY' para reproducir desde aquí.
Para reproducir desde el inicio, primero presione
'STOP' y luego 'PLAY'.
Ej.) BD
2 Pulse [PLAY B ].
Se reanudará la reproducción desde el momento en el
•
que se paró por última vez. Para cancelar la reproducción
de reanudación y comenzar a reproducir el disco desde
el comienzo, pulse [STOP C ] de nuevo en modo parada.
Nota
La reproducción de reanudación puede no estar
•
disponible para los BD que admitan aplicaciones Java
(BD-Java).
La información de reanudación se guardará incluso
•
cuando se apague la alimentación.
Si abre la bandeja de discos o pulsa [STOP C ] de
•
nuevo mientras se encuentra en el modo de parada,
la información de reanudación se borrará.
Si cambia entre modo “Disco” y modo “Memoria SD”,
•
la información de reanudación se borrará.
Si cambia el parámetro “Nivel clasific. BD” o “Nivel
•
clasific. DVD” en el menú “
de reanudación se borrará.
Para una tarjeta de memoria SD, si abre la bandeja de
•
discos o desconecta la alimentación, la información
de reanudación se borrará.
Paterno”, la información
Introducción
Conexiones
Reproducción
Configuración de
Funciones
Otros
ES
21
Page 74

REPRODUCCIÓN BÁSICA
Reproducir un CD de sonido y un
Disco con Archivos JPEG
Introduzca un CD de sonido o disco
1
2
1
2
JPEG: Lista de los nombres de carpeta /
3
JPEG: Nombre del archivo/carpeta
4
5
con archivos JPEG.
•
La lista de archivos aparece en la pantalla del
TV.
•
Si la lista de archivos no aparece
automáticamente, pulse [POP MENU / MENU].
•
Pulse [POP MENU / MENU] para salir y
reanudar la lista de archivos.
Utilice [K / L] para seleccionar una
carpeta o archivo deseado y después
pulse [OK].
Utilice [ s / B ] para retroceder y
adelantar entre las jerarquías.
•
Si pulsa [OK] sobre el archivo deseado,
comenzará la reproducción.
1
Liste de Archivos
JPEG_DISCO
Carpeta_1
Carpeta_2
Carpeta_3
JPEG_A
JPEG_B
JPEG_C
JPEG_D
Carpeta_1
CD de sonido: Se mostrará “CD-DA”.
JPEG: Nombre actual de carpeta (El disco
CD de sonido: Lista del número de pista y el
CD de sonido: Número de pista seleccionado y el
Página actual / Número total de páginas
Indicación de página anterior / siguiente
•
Utilice [SKIP H / G ] para retroceder y adelantar
entre las páginas.
•
Pulse [TOP MENU] para volver al primer elemento.
2
o nombre de la tarjeta de memoria
SD se mostrará para la superior de
las jerarquías).
tiempo.
archivo en la carpeta/disco actual
tiempo.
seleccionado
3
Ej.) JPEG
4 5
2 / 4
Se recomienda que los archivos a reproducir en esta
unidad se graben según las siguientes especificaciones:
<JPEG>
Límite superior : 2.560 x 1.900 puntos
•
Límite inferior : 32 x 32 puntos
•
Máximo del tamaño de archivo de la imagen :
•
12 MB
(el muestreo secundario es 4:4:4)
5.120 x 3.840 puntos
(el muestreo secundario es hasta 4:2:2)
Nota
El sistema puede reconocer hasta 255 carpetas / 999
•
archivos para los CD, 999 carpetas / 9999 archivos
para DVD y tarjetas de memoria SD.
El nombre del carpeta y del arcihivo se pueden
•
mostrar con hasta 28 caracteres. Los caracteres no
reconocibles se sustituyen con asteriscos.
Las jerarquías novena y posteriores no se pueden
•
mostrar para acceder y las jerarquías décima y
posteriores no puede mostrarse para DVD y tarjeta
de memoria SD.
Los archivos cuya extensión sea distinta de “.jpg / .
•
jpeg(JPEG)” no se enumeran.
Algunas carpetas o archivos que no sean
•
reproducibles puede que se enumeren debido al
estado de grabación.
Los archivos JPEG de alta resolución tardan más en
•
mostrarse.
Los archivos JPEG progresivos (archivos JPEG
•
grabados en formato progresivo) no pueden
reproducirse en esta unidad.
Esta unidad reconoce hasta 8 caracteres de nombre
•
de archivo en la tarjeta de memoria SD. Los
caracteres después del noveno no se mostrarán.
Para reproducción de la tarjeta de memoria SD,
•
consulte “Leer la Tarjeta de Memoria SD” en las
páginas 23-24.
22
Iconos:
: Carpeta
: Pista de CD de sonido
: Archivo JPEG
ES
Page 75

REPRODUCCIÓN BÁSICA
Kodak Picture CD
Esta unidad también puede ejecutar archivos JPEG
guardados en Kodak Picture CD. Puede disfrutar de
imágenes en el televisor reproduciendo el CD de fotos.
Esta unidad cumple con la versión 7.0 de Kodak Picture
CD. Para ver los detalles de Kodak Picture CD, póngase en
contacto con alguna tienda que ofrezca servicios de
revelado de Kodak Inc.
Cuando se introduce un Kodak
1
Picture CD en esta unidad, aparece
automáticamente el menú Kodak
Picture CD en la pantalla del TV.
Imagen A Imagen B Imagen C
Imagen D Imagen E Imagen F
7 / 32HG
12 2
1. Número de la pista actual / Número total de pistas
2. Indicación de página anterior / siguiente
•
En el modo parado, pulse [POP MENU / MENU] para
llamar al menú de Kodak Picture CD.
Utilice [K / L / s / K] para seleccionar
2
una pista deseada a reproducir y
después pulse [PLAY B ] o [OK].
Se reproducirá una imagen desde la vista
•
seleccionada e irá a la siguiente en orden.
Utilice [SKIP H / G ] para retroceder y
•
adelantar entre las páginas.
Leer la Tarjeta de Memoria SD
Puede reproducir los archivos JPEG de tarjetas de memorias
SD. Con la tarjeta memoria SD, también puede disfrutar de
los contenidos adicionales especiales de BD-ROM Profile 1
ver.1.1 que se pueden descargar desde internet. Puede
almacenar el contenido en una tarjeta de memoria SD a
través de un ordenador y reproducirlo con BD-vídeo. Para
mayor información acerca del contenido adicional especial,
por favor consulte el libro de instrucciones que viene con el
disco.
Configurar el modo del soporte
■
En modo parado, pulse [SETUP].
1
Utilice [ K / L ] para seleccionar
2
después pulse [OK].
Persnaliz.
Idioma
Video
Audio
Paterno
Otros
Utilice [ K / L ] para seleccionar
3
después pulse [OK].
y
y
Introducción
Conexiones
Reproducción
Configuración de
Funciones
Otros
Pulse [STOP C] para detener la
3
reproducción.
Consejos para Reproducción de JPEG /
Kodak Picture CD
•
Cada pulsación del [ANGLE] gira la imagen en el sentido
del reloj 90 grados cuando se muestra una imagen.
•
Para cambiar el efecto visual para cambiar a la imagen
de reproducción, pulse [MODE] una vez y después
utilice [s / B] o [OK] para cambiar entre “Insertar /
Cortar” y “Apar./Desap. Gradual”. El modo de cambio de
tamaño puede no tener ningún efecto en algunos
archivos (por ejemplo, archivos con un tamaño
pequeño de imagen).
•
Para cambiar el tamaño de la imagen de
reproducción, durante la reproducción de JPEG /
Kodak Picture CD. Pulse [MODE] dos veces y después
utilice [ s / B] o [OK] para cambiar entre “Normal”
(100 %) y “Pequeño” (95 %). El modo de cambio de
tamaño puede no tener ningún efecto en algunos
archivos (por ejemplo, archivos con un tamaño
pequeño de imagen).
ES
Otros
Icono De Ángulo
Auto Apagato
Panel Pantalla
Vista Mimiat.
Selección de medios
Utilice [ K / L ] para seleccionar la
4
opción “Selección de medios”.
Enc.
Enc.
Auto
5sec
Disco
23
Page 76

REPRODUCCIÓN BÁSICA
Pulse [OK] repetidamente para
5
seleccionar “Memoria SD”.
Otros
Icono De Ángulo
Auto Apagato
Panel Pantalla
Vista Mimiat.
Selección de medios
Esto configura la unidad a modo “Memoria
•
SD”. Para reproducir el contenido de cualquier
disco, salga del modo “Memoria SD”
seleccionando “Disco”.
Pulse [SETUP] para salir.
6
Enc.
Enc.
Auto
5sec
Memoria SD
Introduzca la Tarjeta de Memoria SD y
Reprodúzcala
Introduzca una tarjeta de memoria
1
SD en la ranura para SD card con la
etiqueta hacia arriba.
Aparecerá una lista de archivos.
Siga el paso 2 de “Reproducir un CD
2
de sonido y un Disco con Archivos
JPEG” en la página 22.
Extraer la Tarjeta de Memoria SD
En modo parado, empuje la tarjeta
1
de memoria SD y después quite
lentamente su dedo.
Tarjeta de
memoria SD
Agarre la tarjeta y tire de ella hacia
2
fuera de la ranura para SD card.
Tarjetas Compatibles:
- Tarjeta de memoria SD (8 MB - 2 GB)
- Tarjeta de memoria SDHC (4 GB)
- Tarjeta miniSD (8 MB - 2 GB)
- Tarjeta microSD (8 MB - 2 GB)
•
Para las tarjetas de memoria miniSD y microSD, se
necesita un adaptador.
Nota
No de extraiga la tarjeta durante su reproducción.
•
Esta unidad soporta tarjetas de memoria SD con
•
sistema de archivos FAT12 / FAT16 y tarjetas de
memoria SDHC con el sistema de archivos FAT32.
No elimine las carpetas o archivos de la tarjeta de
•
memorias SD con su ordenador. Esta unidad podría
no leer la tarjeta de memoria SD.
Esta unidad reconoce hasta 8 caracteres de nombre
•
de archivo en la tarjeta de memoria SD. Los
caracteres después del noveno no se mostrarán.
24
ES
Page 77

REPRODUCCIÓN ESPECIAL
Avance Rápido / Rebobinado Rápido
1 Durante la reproducción, pulse [FWD D]
repetidamente para avance rápido.
Durante la reproducción, pulse [REV E] repetidamente
para rebobinado rápido.
Cada vez que pulse [FWD D] o [REV E], la velocidad
de reproducción cambia.
2 Pulse [PLAY B] para volver a la
reproducción normal.
Nota
Para BD y DVD, la velocidad aproximada de la
•
reproducción rápida adelante o inversa es 1 (2x),
2(8x), 3 (20x), 4 (50x) y 5 (100x).
Para CD de sonido, la velocidad aproximada es de 1
•
(2x), 2 (8x) y 3 (30x).
Para CD de sonido, la búsqueda rápida adelante /
•
atrás entre distintas pistas no está disponible durante
la reproducción de programa o aleatoria.
Reproducción Avance Lento
1 Durante la reproducción, pulse [PAUSE F].
Después, pulse [FWD D].
Cada vez que pulse [FWD D], la velocidad de
reproducción cambia.
2 Pulse [PLAY B] para volver a la
reproducción normal.
Nota
La velocidad aproximada para reproducción lenta
•
adelante es de 1(1/16x), 2(1/8x), 3(1/2x).
Sólo está disponible el avance lento.
•
Configure la opción “Modo Vista fija” a “Imagen” en
•
el menú “Video” si las imágenes del modo de
reproducción lenta adelante están borrosas (consulte
la página 35).
Reproducción Paso a Paso
1 En el modo pausa, pulse [PAUSE F]
repetidamente.
Cada vez que pulse [PAUSE F], la reproducción
avanzará paso a paso.
2 Pulse [PLAY B] para volver a la
reproducción normal.
Nota
Sólo está disponible el avance paso a paso.
•
Configure la opción “Modo Vista fija” a “Imagen” en
•
el menú “Video” si las imágenes del modo de
reproducción paso a paso están borrosas (consulte la
página 35).
Reproducción de Repetición
Que la función repetir esté disponible puede variar
dependiendo de los discos.
1 Durante la reproducción, pulse [REPEAT]
repetidamente para seleccionar la
función repetir deseada.
Modo repetición Soportes disponibles
Repetir Capítulo
El capítulo actual se
reproducirá repetidamente.
Repetir Título
El título actual se
reproducirá repetidamente.
Repetir Pista
El archivo o pista actual se
reproducirá repetidamente.
Repetir Grupo
La carpeta actual se
reproducirá repetidamente.
Repetir Todo
Todas las pistas del
soporte se reproducirán
repetidamente.
Introducción
Conexiones
Reproducción
Configuración de
Funciones
Otros
ES
Nota
La configuración de repetición se cancelará cuando
•
detenga la reproducción.
La configuración repetir capítulo, título, pista o grupo
•
se borrará cuando se cambie a otro título, capítulo,
pista/archivo o carpeta.
La reproducción de repetición no funciona durante la
•
reproducción de repetición A-B.
Repetir título y capítulo no están disponible en
•
algunas escenas.
25
Page 78

REPRODUCCIÓN ESPECIAL
Repetición de A-B
Puede reproducir la parte específica (entre el punto A y el B)
repetidamente.
1 Durante la reproducción, pulse [A-B] en
el punto deseado de inicio A.
2 Durante la reproducción, pulse [A-B] en
el punto deseado de final B.
En cuanto configure el punto B, la parte entre el
punto A y el punto B comenzará a reproducirse
repetidamente.
•
Para cancelar la repetición A-B, pulse [A-B] de nuevo.
Nota
El punto B debe establecerse en el mismo título o
•
pista que el punto A.
La repetición A-B no está disponible en algunas
•
escenas.
Para cancelar el punto A configurado, pulse [CLEAR].
•
La reproducción repetir A-B no funciona durante la
•
reproducción de repetición del título, capítulo, pista,
grupo o todo.
Configuración PIP (Imagen en Imagen)
Algunos BD-vídeo tienen la función PIP (imagen en imagen)
que le permite mostar la imagen secundaria en la imagen
primaria. Puede llamar a la imagen secundaria pulsando
[PIP] siempre que la escena contenga la imagen secundaria.
imagen
principal
imagen
secundaria
1 Durante la reproducción, pulse [PIP].
Aparecerá la información de PIP.
2 Utilice [K / L] para seleccionar vídeo
secundaria que desea mostrar.
•
El vídeo secundario se mostrará el audio secundario
se enviará a la salida.
3 Pusle [RETURN] o [PIP] para borrar la
información de PIP.
Nota
El audio secundario no se enviará a la salida cuando el
•
vídeo secundario esté establecido en “Apdo.” o cuando
“Modo de audio BD” se establezca en “Salida audio
HDMI”. Consulte la sección “Cambiar la Banda Sonora de
Sonido” en la página 29 y la sección “Modo de audio BD”
en la página 30.
26
Reproducción de Programa
Puede programar el disco para que se reproduzca en el
orden deseado por usted.
1 En modo parado, pulse [MODE].
•
Aparecerá la pantalla de programa.
2 Utilice [K / L] para seleccionar una pista/
archivo y luego pulse [OK].
Programa
CD-DA Total 0:09:49
1
1
3:40
2
2:33
3
2:22
4
2:28
5
2:45
6
3:41
7
2:58
1 / 3
6 3:41
Ej.) CD de sonido
•
Para archivos JPEG, utilice [K / L] para seleccionar
una carpeta y después pulse [OK] primero y después
utilice [K / L] para seleccionar un archivo y después
pulse [OK].
•
Pulse [CLEAR] para borrar el último archivo del programa.
•
Utilice [K / L] para seleccionar “Borra Todo” de la
parte inferior de la lista para borrar todas las pistas /
archivos del programa.
La pista / archivo programado se muestra en la
•
pantalla de la derecha.
Si no se puede mostrar el programa entero en la
•
pantalla del TV, aparece “L” o “K”.
Utilice [s / B] para ir atrás o adelante entre las
•
jerarquías de carpetas.
Si se han configurado ocho o más pistas / archivos
•
en un programa, utilice [SKIP H / G ] para ver
todas las pistas/archivos.
3:40
4
2:28
6
3:41
1 / 1
3 Pulse [PLAY B ] para comenzar la
reproducción del programa.
•
Comenzara la reproducción de programa.
Nota
•
Durante la reproducción de programa pulse [STOP C ]
una vez para establecer el punto de reanudación y
después pulse [PLAY B ] para reanudar la reproducción
de programa desde donde se pulsó [STOP C ] (CD de
sonido) o desde el comienzo de la pista en donde se
pulsó [STOP C ] (JPEG).
•
Durante la reproducción de programa, pulse [STOP C ]
dos veces para mostrar la pantalla de programa. Para
volver a la reproducción de programa normal, pulse
[RETURN] para salir de la pantalla de programa y
después pulse
•
Si abre la bandeja de discos y quita la tarjeta de
memoria SD o desconecta la alimentación, el
programa se borrará.
Se pueden introducir hasta 99 pistas / archivos.
•
Para repetir la pista / archivo actual del programa, pulse
•
[REPEAT] repetidamente hasta que aparezca
Pista” durante la reproducción. Para repetir el
“
programa completo, pulse [REPEAT] repetidamente
hasta que aparezca “
La reproducción de una pista / archivo deseada y la
•
reproducción aleatoria no están disponibles durante
la reproducción de programa.
[PLAY B ]
.
Todo” durante la reproducción.
ES
Page 79

REPRODUCCIÓN ESPECIAL
Reproducción Aleatoria
Esta función desordena el orden de reproducción de las
pistas / archivos.
1 En modo parado, pulse [MODE] dos
veces.
Aparecerá la pantalla aleatoria.
•
Aleatorio
CD-DA Total 0:41:06
Programa Aleatorio
-- sin indicación --
Ej.) CD de sonido
2 Pulse [PLAY B ] para comenzar la
reproducción aleatoria.
Ángulo de la Cámara
Algunos BD-vídeo y DVD-vídeo contienen escenas que se
han rodado simultáneamente desde distintos ángulos.
Puede cambiar el ángulo de cámara cuando aparece
en pantalla del TV.
1 Pulse [ANGLE] durante la reproducción.
Se mostrará el ángulo seleccionado en la barra de
•
visualización de la parte superior de la pantalla del
TV.
2 Utilice [K / L] para seleccionar su ángulo
deseado.
1 / 3
Nota
Si la configuración “Icono De Ángulo” es “Apdo.” en
•
el menú “Otros”, no aparecerá
página 41.
. Consulte la
Introducción
Conexiones
Reproducción
Configuración de
Funciones
Nota
Durante la reproducción de programa pulse [STOP C ]
•
una vez para establecer el punto de reanudación y
después pulse [PLAY B ] para reanudar la
reproducción aleatoria desde donde se pulsó [STOP C ]
(CD de sonido) o desde el comienzo de la pista en
donde se pulsó [STOP C ] (JPEG).
•
Durante la reproducción aleatoria, pulse [STOP C ]
dos veces para mostrar la pantalla de reproducción
aleatoria. Para cancelar la reproducción aleatoria,
pulse [MODE] cuando se muestre la pantalla de
reproducción aleatoria.
•
Para repetir la pista / archivo actual de la selección
aleatoria, pulse [REPEAT] repetidamente hasta que
aparezca “
repetir la selección aleatoria completa, pulse
repetidamente [REPEAT] hasta que aparezca
“
Todo” durante la reproducción.
No se puede volver a la pista / archivo anterior
•
durante la reproducción aleatoria.
Pista” durante la reproducción. Para
Otros
ES
27
Page 80

BUSCAR
Utilizar [SKIP H / G ]
1 Durante la reproducción, pulse [SKIP G]
para pasar a la pista siguiente. Púlselo
repetidamente para saltarse pistas
siguientes. Pulse [SKIP H ] para regresar
al inicio de la pista actual. Púlselo
repetidamente para ir a las pistas
anteriores.
Para archivos JPEG, pulse [SKIP H ]para volver al
•
archivo anterior.
Búsqueda de marcador
■
Esta función le permite asignar un punto específico de
un título o pista para volver a llamar más tarde.
1 Durante la reproducción, pulse [SEARCH]
repetidamente hasta que aparezca el
menú de configuración de marcadores.
2 Utilice [s / B] para seleccionar un
número marcador (de 1 a 9).
___ __ : __ :__
Nota
Para BD y DVD, si el título no tiene ningún capítulo,
•
[SKIP H / G ] cambia el título.
Para discos con archivos JPEG, también está
•
disponible [ s / B ].
Utilizar [SEARCH]
Utilizando [SEARCH], usted puede seleccionar las
siguientes opciones de búsqueda.
Modo buscar Soportes disponibles
/
Búsqueda de Título /
Capítulo
Búsqueda de Pista
Búsqueda de Hora
Búsqueda de Marcador
1 Durante la reproducción, pulse [SEARCH]
repetidamente hasta que aparezca el
modo de búsqueda que desee.
2 Introduzca el capítulo, título, pista,
archivo, el número de archivo o la hora
deseados a buscar utilizando [los
botones numéricos].
•
Comenzará la búsqueda de capítulo, título, pista u
hora.
•
Pulse [CLEAR] para borrar la entrada incorrecta.
3 Cuando el disco alcance el punto que
desea configurar como marcador, pulse
[OK].
El título o pista y el tiempo de reproducción
•
transcurrido aparecerán en la pantalla del TV.
4 Pulse [SEARCH] o [RETURN] para salir.
5 Para volver después al marcador, llame a
la configuración del marcador pulsando
[SEARCH] repetidamente durante la
reproducción o en modo parada y utilice
[s / B] para elegir un marcador deseado
y después pulse [OK].
Nota
Abrir la bandeja de discos, apagar la alimentación o
•
seleccionar “
todos los marcadores.
Para borrar un marcador, utilice [s / B] para
•
seleccionar el número de marcador a borrar y pulse
[CLEAR].
Puede marcar hasta nueve puntos.
•
Para BD, la búsqueda de marcador entre distintos
•
títulos no está disponible.
Para BD, puede volver al marcador solamente
•
durante la reproducción.
” en el paso 2 y pulsar [OK] borra
Nota
Durante la reproducción de programa y la aleatoria,
•
las funciones de búsqueda no están disponibles
excepto la búsqueda que utiliza [SKIP H / G ].
La función búsqueda de tiempo solamente está
•
disponible en la misma pista, título o archivo.
Para BD, las búsquedas de capítulo y hora están
•
disponibles solamente durante la reproducción.
28
ES
Page 81

AJUSTES ESPECIALES
Usted puede seleccionar el formato de imagen y sonido como prefiera dependiendo del contenido del disco que está
reproduciendo.
Alternar Subtítulos
Ciertos discos BD y DVD pueden tener subtítulos en uno
o más idiomas. Para los discos comerciales, los idiomas
disponibles de subtítulos pueden encontrarse en el
estuche del disco. Siga los pasos a continuación para
cambiar el idioma del subtítulo durante la reproducción.
1 Durante la reproducción, pulse
[SUBTITLE] repetidamente para mostrar
“Principal”, “Secundario” o “Tipo de
subtítulos”.
“Principal”: Configura el subtítulo de la
”Secundario”: Configura el subtítulo de la
“Tipo de subtítulos”:
Configura el estilo de subtítulo.
imagen principal.
imagen secundaria.
2 Utilice [K / L] para seleccionar el
subtítulo o estilo que desee.
Principal / 41JPN
Utilice [{ / B] para alternar entre la opción actual
•
de subtítulo y “Apdo.”.
3 Pulse [SUBTITLE] repetidamente para salir.
1 Durante la reproducción, pulse [SUBTITLE].
2 Utilice [K / L] para seleccionar el
subtítulo deseado.
1 ENG / 4
Utilice [{ / B] para alternar entre la opción actual
•
de subtítulo y “Apdo.”.
Cambiar la Banda Sonora de Sonido
Ciertos discos BD y DVD contienen múltiples corrientes
de sonido. Con frecuencia son distintos idiomas de
sonido o formatos de sonido. Para BD, el sonido
disponible depende de la opción “Modo de audio BD”.
Consulte la página 36 para mayor información.
1 Durante la reproducción, pulse [AUDIO]
repetidamente para mostrar “Principal”
o “Secundario.
“Principal”:
“Secundario”: Configura el sonido de la imagen secundaria.
Configura el sonido de la imagen principal.
2 Utilice [K / L] para seleccionar el canal
de corriente de sonido que desee.
Principal / 21 JPN Dolby D 2ch
Para “Secundario”, utilice [{ / B] para alternar
•
entre la opción actual de sonido y “Apdo.”.
3 Pulse [AUDIO] repetidamente para salir.
1 Durante la reproducción, pulse [AUDIO].
2 Utilice [K / L] para seleccionar el canal
de corriente de sonido que desee.
1 ENG
Ej.) DVD-vídeo
Para los CD de sonido, usted puede seleccionar las
•
siguientes opciones.
“Estéreo”:
“L-ch”: Sólo está activo el canal izquierdo
“R-ch”: Sólo está activo el canal derecho
Tanto el canal derecho como el izquierdo
están activos (estéreo)
3 Pulse [AUDIO] para salir.
3 Pulse [SUBTITLE] para salir.
Nota
El audio secundario no se enviará a la salida cuando el
Nota
Algunos discos le permitirán cambiar solamente el
•
subtítulo desde el menú de disco o el menú
desplegable. Pulse [TOP MENU] o [POP MENU /
MENU] para mostrar el menú desplegable o el
menú del disco.
Si aparece un código de idioma de 4 dígitos en el
•
menú del subtítulo, consulte el “CÓDIGO DE IDIOMA”
en la página 45.
Si el disco no tiene ningún idioma de subtítulo o el
•
estilo de subtítulo, se mostrará “No Disponible” en la
pantalla del TV.
Durante la reproducción de las imágenes secundarias,
•
la opción del subtítulo principal no está disponible
excepto cuando no hay subtítulo para las imágenes
secundarias.
La opción del subtítulo secundario sólo está disponible
•
durante la reproducción de las imágenes secundarias.
Si elige un idioma que tiene código de idioma de 3
•
letras, el código se mostrará cada vez que cambie la
opción del idioma de los subtítulos. Si elige cualquier
otro idioma, se mostrará “---” en cambio (consulte la
página 45).
ES
•
vídeo secundario no se muestre o cuando “Modo de
audio BD” se establezca en “Salida de audio HD”. (Para
ciertos BD, el sonido secundario se dará como salida
incluso cuando la imagen secundaria esté desactivada.)
•
El modo de sonido no se puede cambiar durante la
reproducción de discos que no se hayan grabado en
sonido múltiple.
•
Algunos discos permiten cambiar la configuración de
idioma de sonido en el menú del disco. (El
funcionamiento varía dependiendo de los discos.
Consulte el manual que acompaña al disco).
Pulsar [AUDIO] puede que no funcione en algunos
•
discos con corrientes de sonido o canales múltiples
(por ejemplo, DVD que permiten cambiar la opción
de sonido en el menú del disco).
•
Si elige un idioma que tiene código de idioma de 3 letras,
el código se mostrará cada vez que cambie la opción del
idioma de sonido. Si elige cualquier otro idioma, se
mostrará “---” en cambio (consulte la página 45).
•
Si aparece un código de idioma de 4 dígitos en el menú del
subtítulo, consulte “CÓDIGO DE IDIOMA” en la página 45
•
Si el disco no tiene ningún idioma de sonido, se
mostrará “No Disponible” en la pantalla del TV.
•
Para DTS-CD (disco de música 5,1), no está disponible
la selección de corrientes ni canales de sonido.
Introducción
Conexiones
Reproducción
Configuración de
Funciones
/ 3Dolby D 3/2.1ch 48k
Otros
29
Page 82

AJUSTES ESPECIALES
Configurar el Modo de BD de Sonido
Hay dos maneras de configurar la opción “Modo de
audio BD”: puede dar como salida el sonido secundario e
interactivo acompañado del sonido primario o sólo el
sonido primario. Dependiendo de la configuración del
modo, la salida de Dolby Digital, Dolby Digital Plus,
Dolby TrueHD, DTS o DTS-HD cambia entre multi-LPCM y
corriente de bits.
1 En modo parado con un BD introducido,
pulse [MODE].
2 Utilice [K / L] para seleccionar la
configuración deseada.
Modo de audio BD Salida audio comb.
“Salida audio comb.”:
Si está disponible, el sonido secundario e interactivo del
BD se dará igual que el sonido principal.
•
El sonido secundario es el sonido de la imagen
secundaria (comentarios del director, etc.) y el sonido
interactivo es el sonido de la aplicación interactiva
(sonidos de clic de los botones, etc.).
“Salida de audio HD”:
Se dará como salida el sonido principal. Configure este
modo para dar como salida sonido Dolby Digital, Dolby
Digital Plus, Dolby TrueHD, DTS o DTS-HD de BD por la
conexión HDMI.
Ajustar la Imagen
Usted puede ajustar la calidad de la imagen.
1 Durante la reproducción, pulse [MODE].
2 Utilice [K / L] para seleccionar su opción
deseada y después utilice [s / B] para
ajustar la opción.
Nivel de negro
Reducción de ruido
Nivel de negro
■
Usted puede ajustar la opción de nivel de negro para
hacer que las partes negras de las imágenes tan brillantes
como prefiera. Puede seleccionar “Enc.” o “Apdo.”.
“Enc.”: Hace que las partes oscuras sean más brillantes.
“Apdo.”: Muestra la imagen original según se grabó.
■
Reducción de ruido
Reduce el ruido de la imagen de reproducción.
“1”: Reduce el ruido de la imagen de reproducción.
“2”: Ejecuta la reducción de ruido de 3D que detecta y
eliminar el ruido comparando cada fotograma de
imagen.
“3”: Ejecuta tanto la reducción de ruido de MPEG como
la reducción de ruido de 3D.
Enc.
sB
Apdo.
3 Pulse [RETURN] para salir.
También puede establecer “Modo de audio BD”
•
desde el menú de configuración. Consulte la página
36.
Nota
En modo “Salida audio comb.”, si no hay sonido
•
secundario ni interactivo, el sonido se dará como
salida como modo “Salida de audio HD”.
En el modo “Salida audio comb.”, incluso si configura
•
“Mult. HDMI(Normal)” en la opción “Salida audio
HDMI”, se dará como salida multi LPCM desde la
toma HDMI OUT para BD de sonido. Consulte la
página 14.
En modo “Salida audio comb.” con salida de sonido
•
HDMI, se dará como salida LPCM con mezcla
reducida a 2 canales desde la toma DIGITAL OUT
para sonido BD.
En modo “Salida audio comb.” con la opción “Salida
•
audio HDMI” configurada a “Audio desactivado” y la
opción “Salida Digital” configurada a “Bitstream”,
DTS, DTS-HD y LPCM se darán como salida como
Dolby Digital para sonido BD. Consulte la páginas 14,
16.
También puede configurar la opción “Modo de audio
•
BD” desde el menú de configuración. Consulte la
página 36.
3 Pulse [RETURN] repetidamente para
salir.
Nota
La configuración permanece incluso si apaga la
•
unidad.
Para la salida de imagen desde la HDMI OUT, el valor
•
“Nivel de negro” no es eficaz.
Para BD, la reducción de ruido no es efectiva.
•
30
ES
Page 83

CONFIGURACIÓN DE FUNCIONES
C
MODE
SU
E
S
CH
EAR
BTITL
DISPLAY
Utilizar el Menú Configuración
En el menú configuración, usted puede cambiar la
configuración de sonido, imagen, idioma, etc. No puede
cambiar la configuración durante la reproducción.
Introducción
Rápido
LEAR
El menú “ Rápido” contiene opciones de configuración
extraídas del menú “
con frecuencia.
A-
En modo parado, pulse [SETUP].
Persnaliz.” que pueden utilizarse
Conexiones
1
Utilice [K / L] para seleccionar y
2
OK
después pulse [OK].
Utilice [K / L] para seleccionar las
3
AUDIO
opciones de configuración que desee.
Rápido
Modo de audio BD
Salida audio HDMI
Resolución de Video HDMI
Salida de componentes
Menú Reproduc.
Aspecto de TV
Salida audio comb.
Mult. HDMI (Normal)
Auto
480i
Español
16:9 Wide
Reproducción
Configuración de
Funciones
Siga el procedimiento a continuación
4
dependiendo de las opciones de
configuración.
A) Si no aparece “ B “ a la derecha de las
opciones de configuración cuando
seleccione las opciones:
Pulse [OK] repetidamente para cambiar las
opciones.
B) Si aparece “ B “ a la derecha de las
opciones de configuración cuando
seleccione las opciones:
1) Pulse [OK].
[K / L]
2) Utilice
y después pulse [
•
Utilice [s] o [RETURN] para volver a la
pantalla anterior.
para seleccionar opciones
OK
].
Pulse [SETUP] para salir.
5
Otros
ES
31
Page 84

CONFIGURACIÓN DE FUNCIONES
C
MODE
SU
E
S
CH
Persnaliz.
El menú “
configuración.
DISPLAY
Persnaliz.” contiene todas las opciones de
En modo parado, pulse [SETUP].
1
EAR
BTITL
LEAR
Utilice [K / L] para seleccionar
A-
2
después pulse [OK].
y
Utilice [K / L] para seleccionar la
3
categoría deseada y después pulse
[OK].
: Idioma
OK
RETURN
AUDIO
: Video
: Audio
: Paterno
: Otros
•
Para el menú “
procedimiento de la página 40.
Paterno”, siga el
Utilice [K / L] para seleccionar las
4
opciones de configuración que
desee.
Las opciones de configuración que no están
•
disponibles con la situación actual de esta
unidad se muestran en gris y no puede
seleccionarlas.
Siga el procedimiento a continuación
5
dependiendo de las opciones de
configuración.
A) Si no aparece “ B “ a la derecha de las
opciones de configuración cuando
seleccione las opciones:
Pulse [OK] repetidamente para cambiar las
opciones.
B) Si aparece “ B “ a la derecha de las
opciones de configuración cuando
seleccione las opciones:
1) Pulse [OK].
[K / L]
2) Utilice
y después pulse [
•
Utilice [s] o [RETURN] para volver a la
pantalla anterior.
para seleccionar opciones
OK
].
Pulse [SETUP] para salir.
6
32
ES
Page 85

■
Idioma
CONFIGURACIÓN DE FUNCIONES
Introducción
Idioma
Audio
Subtítulo
Menú de Disco
Menú Reproduc.
Para ver cómo seleccionar los elementos y opciones, consulte “
•
Original
Apdo.
Inglés
Español
Persnaliz.” en la página 32.
Opciones de configuración Opciones
Audio
Configura el idioma de sonido.
Original* / Inglés / Francés / Español / Alemán / Italiano / Sueco / Danés /
Ruso / Chino / Japonés / Coreano / Danés / Finés / Noruego / Islandés /
Húngaro / Rumano / Turco / Griego / Irlandés / Portugués / Polaco / Checo /
Eslovaco / Búlgaro / Otro
Subtítulo
Configura el idioma de subtítulo.
Apdo.* / Inglés / Francés / Español / Alemán / Italiano / Sueco / Danés /
Ruso / Chino / Japonés / Coreano / Danés / Finés / Noruego / Islandés /
Húngaro / Rumano / Turco / Griego / Irlandés / Portugués / Polaco / Checo /
Eslovaco / Búlgaro / Otro
Menú de Disco
Configura el idioma del menú del
disco o del menú emergente.
Inglés* / Francés / Español / Alemán / Italiano / Sueco / Danés / Ruso /
Chino / Japonés / Coreano / Danés / Finés / Noruego / Islandés / Húngaro /
Rumano / Turco / Griego / Irlandés / Portugués / Polaco / Checo / Eslovaco /
Búlgaro / Otro
Menú Reproduc.
English* / Français / Español
Configurar idioma para la
visualización en pantalla.
•
Las configuraciones con (*) son los predeterminados.
•
El menú “Rápido” consta de menús de configuración que se utilizan con frecuencia y se acompañan de la marca
Si selecciona “Otro”, introduzca el código de número de 4 dígitos del idioma deseado (consulte la lista de
•
“CÓDIGO DE IDIOMA” de la página 45). Solamente se pueden seleccionar los idiomas soportados por los discos.
Conexiones
Reproducción
Configuración de
Funciones
Otros
.
ES
33
Page 86

■
CONFIGURACIÓN DE FUNCIONES
Video
Video
Aspecto de TV
Resolución de Video HDMI
HDMI Deep Color
Salida de componentes
Modo Progresivo
Modo Vista fija
Para ver cómo seleccionar los elementos y opciones, consulte “
•
16:9 Wide
Auto
Auto
480i
Auto
Auto
Persnaliz.” en la página 32.
Opciones de configuración Opciones
Aspecto de TV
Configura el tamaño de imagen
según la proporción de aspecto
del televisor conectado.
16:9 Wide*:
Seleccione esto cuando esté conectado a una televisión de pantalla ancha.
Los discos grabados en formato de pantalla ancha se reproducen en toda
la pantalla del TV.
4:3 Pan & Scan:
Seleccione esto para reproducir discos grabados en formato 4:3 pantalla
ancha en el modo panorámico y barrido (con los lados de la imagen
cortados). Los discos en los que la panorámica y barrido no está
especificados se muestran en el modo letter box.
4:3 Letter Box:
Seleccione esto para reproducir el disco grabado en formato 4:3 en el
modo letter box. (con tiras negras arriba y abajo).
16:9 Img. Compr.
Al reproducir imágenes 4:3, la imagen se muestra en el centro de la
pantalla 16:9 con proporción de aspecto 4:3.
Resolución de Video HDMI
Configurar la resolución de vídeo
HDMI.
Auto*:
La resolución de vídeo HDMI se selecciona automáticamente dependiendo
del dispositivo HDMI conectado.
480p
720p
1080i
1080p
1080p24:
Da una reproducción de película natural y de alta calidad de material
filmado de 24 fotogramas. El televisor conectado tiene que ser compatible
con una entrada de fotogramas 1080p24.
HDMI Deep Color
Configura si dar la salida de
imagen de la HDMI OUT con Deep
Color o no.
Auto*:
La imagen de la toma HDMI OUT se dará como salida con
televisor conctado a través de HDMI que admite
Apdo.:
La imagen de la toma HDMI OUT se dará como salida sin
Salida de components
Configura la resolución de vídeo a
salida de componente.
480i*
480p
720p
1080i
Deep Color
Deep Color
Deep Color
.
al
.
34
ES
Page 87

CONFIGURACIÓN DE FUNCIONES
Opciones de configuración Opciones
Modo Progresivo
Configura el modo progresivo
óptimo para el material de imagen
desde la toma HDMI OUT y las
tomas COMPONENT VIDEO OUT.
Modo Vista fija
Ajustar la resolución de la imagen
y la calidad en modo fijo.
Las configuraciones con (*) son los predeterminados.
•
El menú “Rápido” consta de menús de configuración que se utilizan con frecuencia y se acompañan de la marca
•
Si configura “Resolución de Video HDMI” a “1080p24”, cuando el contenido del BD no es compatible con
•
fotograma 1080p24, el fotograma 1080p60 se dará como salida.
Una pantalla del televisor de imagen individual se llama “Cuadro”, que consta de dos imágenes separadas
•
llamadas “Imagen”. Algunas imágenes pueden estar borrosas en la configuración automática de la opción “Modo
Vista fija” debido a sus características de datos.
Si la imagen no se da como salida correctamente al televisor debido a la configuración de “Resolución de Video
•
HDMI” o “Salida de components”, pulse y mantenga [ B PLAY] en el panel delantero durante más de 5
segundos. Ambas configuraciones se cambias automáticamente a su predeterminado.
Si está conectado un cable HDMI, para la salida de componente de resolución de vídeo, sólo puede seleccionar
•
una resolución de vídeo que se dé como salida actualmente desde la tomaHDMI OUT o “480i”.
Si la resolución de vídeo de la salida de componente y la resolución de vídeo HDMI no coincide, la resolución de
•
vídeo de la salida de componente cambiará a “480i”. Las tomas COMPONENT VIDEO OUT no puede dar como
salida ninguna señal dependiendo del material del disco.
•
Si reproduce DVD-vídeo protegido contra copias, se dará como salida una señal de 480p desde las tomas
COMPONENT VIDEO OUT, cuando la opción “Salida de components” esté configurada a “720p” o “1080i”.
Auto*:
El modo progresivo detecta material fílmico de 24 fotogramas (películas) y
selecciona automáticamente el modo progresivo apropiado.
Video:
Apropiado para reproducir discos de material de vídeo (programas de TV o
animaciones).
Auto*:
Selecciona automáticamente la mejor configuración de resolución
(“Cuadro” o “Imagen”) basada en las características de datos de las
imágenes.
Imagen:
Estabiliza las imágenes, aunque la calidad de la imagen puede vulgarizarse
debido a la cantidad limitada de datos. Seleccione “Imagen” cuando las
imágenes sigan siendo inestables incluso si está seleccionado “Auto”.
Cuadro:
Muestra imágenes relativamente sin movimiento en resolución más alta.
“Cuadro” mejora la calidad de imagen aunque pueden desestabilizar las
imágenes debido a las salidas alterna de dos datos de campos.
.
Introducción
Conexiones
Reproducción
Configuración de
Funciones
Otros
ES
35
Page 88

■
CONFIGURACIÓN DE FUNCIONES
Audio
Audio
36
Modo de audio BD
Salida audio HDMI
Sub Muestreo
DRC
Virtual Surround
Para ver cómo seleccionar los elementos y opciones, consulte “
•
Salida audio comb.
Mult. HDMI (Normal)
Enc.
Auto
Apdo.
Persnaliz.” en la página 32.
Opciones de configuración Opciones
Modo de audio BD
Para BD, seleccione si dar como salida
el sonido secundario e interactivo
con el sonido principal si está
disponible o sólo el sonido principal.
Consulte “Configurar el Modo de BD
de Sonido” en la página 30.
Salida audio HDMI
Configura el formato de sonido de
la salida de sonido desde la toma
HDMI OUT
Salida audio comb.*:
Da como salida el sonido secundario e interactivo con sonido principal si
está disponible.
Salida de audio HD:
Da como salida sólo el sonido principal. Configure este modo para dar
como salida sonido Dolby Digital, Dolby Digital Plus, Dolby TrueHD, DTS o
DTS-HD de BD por la conexión HDMI.
Mult. HDMI(Normal)*:
Se dan como salida señales de sonido multicanal desde la toma HDMI OUT
con una corriente de datos o LPCM.
Mult. HDMI(LPCM):
Se dan como salida señales de sonido multicanal desde la toma HDMI OUT
con LPCM.
Consulte las páginas 37-39 para ver las opciones de configuración.•
Audio desactivado:
Silencia la señal de sonido HDMI y configura el formato de señal de la toma
DIGITAL OUT.
Consulte “Configuración de salida digital” en la página 37 para ver las
•
opciones de configuración.
Sub Muestreo
Configure la salida de sonido
digital al reproducir BD o DVD
grabados en LPCM.
Enc.*:
Las señales LPCM se convierten a 48 kHz para su salida.
Configure a “Enc..” cuando utilice conexiones digitales a un amplificador
•
AV que no sea compatible con frecuencias de muestreo de 96 kHz.
Apdo.:
Para BD o DVD grabados en LPCM sin protección de derechos de autor, se
dan como salida señales de sonido de 2 canales de hasta 192 kHz como
señales LPCM sin conversión.
DRC
Configura si comprimir el rango de
volumen de sonido (control de
rango dinámico) cuando se
reproduce sonido Dolby Digital,
Dolby Digital Plus o Dolby TrueHD.
Virtual Surround
Configura para crear un efecto
envolvente en un sistema que
tenga conectados 2 altavoces.
Auto*:
Cuando los discos grabados en formato Dolby TrueHD están siendo
reproducidos, esta unidad detecta la configuración DRC del disco y configura
la opción “DRC” de esta unidad a “Enc.” o “Apdo.” automáticamente.
Apdo.
Enc.
Apdo.*:
El envolvente virtual está ajustado a apagado.
1:
Un efecto envolvente natural en un sistema que tenga conectados 2 altavoces.
2:
Un efecto envolvente más potente en un sistema que tenga conectados 2
altavoces que “1”.
Las configuraciones con (*) son los predeterminados.
•
El menú “Rápido” consta de menús de configuración que se utilizan con frecuencia y se acompañan de la marca
•
•
En las siguientes circunstancias, “Mult. HDMI(Normal)” y “Mult. HDMI(LPCM)” no están disponibles.
- El cable HDMI no está conectado a una toma HDMI OUT.
- El televisor conectado está apagado.
- El televisor conectado no es compatible con la salida de sonido.
•
Configure la opción “Virtual Surround” a “Apdo.” o baje el volumen si se distorsiona el sonido.
•
Para el envolvente virtual, la señal de sonido siempre será LPCM de 2 canales.
.
ES
Page 89

CONFIGURACIÓN DE FUNCIONES
Configuración de salida digital
■
Cuando se selecciona “Audio desactivado” en la in “Salida audio HDMI”, la señal de sonido HDMI se silenciará y las
señales de sonido que se da como salida desde la toma DIGITAL OUT cambia dependiendo de la opción “Salida
Digital”.
Rápido Salida audio HDMI Audio desactivado Salida Digital
Bitstream*:
Cuando se reproducen discos grabados en Dolby Digital, Dolby Digital Plus, Dolby TrueHD, DTS o
DTS-HD, se dan como salida la corriente central correspondiente (Dolby Digital o DTS).
LPCM:
La señal LPCM se dará como salida desde la toma DIGITAL OUT.
•
Esta configuración no es efectiva cuando se da como la salida de sonido de HDMI.
Configuración de Altavoces
■
Esta unidad le permite disfrutar de sonido envolvente multicanal como el envolvente 7.1 / 5.1 c.
Introducción
Conexiones
Reproducción
Altavoz delantero
(izquierdo)
Altavoz central
Altavoz envolvente (izquierdo) Altavoz envolvente (derecho)
ej.) diseño básico de sistema envolvente 7.1c
Para aprovechar lo máximo de esta función, configure sus altavoces correctamente consultando la tabla a
continuación.
Las opciones de configuración de los altavoces están disponibles en las siguientes ubicaciones:
<Configuración de los altavoces para la salida de señal de sonido desde la toma de HDMI OUT>
(Disponible cuando tiene el cable HDMI conectado a la toma HDMI OUT)
Rápido Salida audio HDMI
Persnaliz.
Audio Salida audio HDMI Mult. HDMI(LPCM)
Mult. HDMI(LPCM)
Realzador de graves
Altavoz delantero
(derecho)
Envolvente trasero (derecho)Envolvente trasero (izquierdo)
Configuración de
Funciones
Otros
ES
37
Page 90

CONFIGURACIÓN DE FUNCIONES
Cómo navegar por la configuración de “Mult. HDMI(LPCM)”.
1 Utilice [K / L] para seleccionar las opciones de configuración que desee y después pulse
[OK].
2 Utilice [K / L] para seleccionar las opciones de configuración.
Pulse [RETURN] para volver a la pantalla anterior.
•
3 Utilice [s / B] para seleccionar las opciones deseadas. (Excepto para “Tono Prueba”,
“Por Defecto” y las opciones de ajuste de “Tamaño”.)
Para las opciones de ajuste de “Tamaño”:
Presione [OK] para seleccionar las opciones deseadas.
Para “Tono Prueba”:
Utilice [s / B] para seleccionar “Apdo.”, “Manual” o “Auto” y después pulse [OK].
Se dará como salida el tono de prueba. Si selecciona “Manual”, utilice [K / L] para seleccionar el altavoz deseado
•
y después utilice [s / B] para ajustar el volumen. Si selecciona “Auto” utilice [s / B] para ajustar el volumen
del altavoz que da como salida el tono de prueba.
•
Si desea parar el tono de prueba, pulse [RETURN].
Para “Por Defecto”:
Pulse [OK] para restablecer a lo predeterminado.
4 Pulse [SETUP] para salir.
Menu
Tamaño
Seleccione la
configuración de
altavoces deseada a
configurar. Después
cambie la configuración
correctamente
consultando las
descripciones.
Opciones de
configuración
Frontal Ancha* Ancha:
Central Ancha*
Sub graves Enc.
Surround Ancha*
Envol. trasero Ancha*
Por Defecto Seleccione “Por Defecto” y después pulse
Opciones Descriptions
Estrecha
Estrecha
Estrecha
Estrecha
Para altavoces grandes con potentes
capacidades de reproducción de baja
frecuencia.
Estrecha:
Para altavoces pequeños que no dan un
potente sonido de bajos.
El valor de “Sub graves” no se puede
cambiar. Si el dispositivo conectado no es
compatible con el realzador de graves, el
parámetro “Sub graves” se mostrará
atenuado en color gris.
[OK] para reconfigurar la configuración
de “Tamaño” al predeterminado de
fábrica.
38
ES
Page 91

CONFIGURACIÓN DE FUNCIONES
Menu
Nivel Canales
Prueba o configura el
volumen de cada
altavoz.
Tiempo de Retardo
Este es un parámetro
para optimizar la
temporización en la que
el sonido se da como
salida de los altavoces y
según la distancia a la
posición de escucha.
Las configuraciones con (*) son los predeterminados.
•
Para la “Tamaño”, la configuración del tamaño de cada altavoz se puede ajustar automáticamente
•
correspondiéndose con cada configuración. (p.ej. si “Frontal” se establece en “Estrecha”, no puede establecer
“Central”, “Surround” ni “Envol. trasero” en “Ancha”.)
Para “Tiempo de Retardo”, la diferencia entre el valor de cada altavoz no puede superar los 15 ft (4,5 m).
•
Opciones de
configuración
Tono Prueba:
“Tono Prueba” es el
tono de prueba que
se puede dar como
salida desde los
altavoces para que
pueda ajustar el
volumen de cada
altavoz.
Frontal Lch 0 dB a -12 dB
Central 0 dB a -12 dB
Sub graves 0 dB a -12 dB
Frontal Rch 0 dB a -12 dB
Surround Rch 0 dB a -12 dB
Envol. trasero Rch 0 dB a -12 dB
Envol. trasero Lch 0 dB a -12 dB
Surround Lch 0 dB a -12 dB
Por Defecto Seleccione “Por Defecto” y después pulse
Distancia Pies* Configure el sistema de medida deseado.
Frontal
Central
Surround
Envol. trasero
Por Defecto Seleccione “Por Defecto” y después pulse
Opciones Descriptions
Apdo.* Seleccione “Apdo.” para desactivar “Tono
Manual
Auto
(0 dB*)
(0 dB*)
(0 dB*)
(0 dB*)
(0 dB*)
(0 dB*)
(0 dB*)
(0 dB*)
Metros
0ft a 60ft (12ft*)
(0m a 18m (3,6m*))
0ft a 60ft (12ft*)
(0m a 18m (3,6m*))
0ft a 60ft (10ft*)
(0m a 18m (3,0m*))
0ft a 60ft (10ft*)
(0m a 18m (3,0m*))
Prueba”.
Seleccione “Manual”, y después presione
[OK] para configurar manualmente el
volumen del altavoz deseado.
Seleccione “Auto”, y después presione
[OK] para dar como salida
automáticamente el tono de prueba
desde cada altavoz.
Si ha seleccionado “Manual” en “Tono
Prueba”, seleccione el altavoz deseado a
configurar y ajuste el volumen del altavoz
seleccionado.
Si ha seleccionado “Auto” en “Tono Prueba”,
el tono de pruebas se dará como salida
automáticamente en orden. Ajuste el
volumen del altavoz que dé como salida el
tono de prueba.
[OK] para reconfigurar la configuración
de “Nivel Canales” al predeterminado de
fábrica.
Este sistema de medida será utilizado
para la configuración del “Tiempo de
Retardo”. Pulse [OK] para conmutar la
configuración.
Seleccione la distancia desde el punto de
escucha al altavoz para obtener el tiempo
de retardo ideal.
[OK] para reconfigurar la configuración
de “Tiempo de Retardo” al
predeterminado de fábrica.
Introducción
Conexiones
Reproducción
Configuración de
Funciones
Otros
ES
39
Page 92

CONFIGURACIÓN DE FUNCIONES
Paterno
■
El control de calificaciones le permite establecer un límite que evite que sus hijos vean materiales inapropiados. La
reproducción se detendrá si la calificación excede los niveles que usted ha configurado y requerirá que introduzca una
contraseña antes de que el disco se reproduzca.
Paterno
Nivel clasific. BD
Nivel clasific. DVD
Camb. Contras.
Todo
Todo
1 Utilice [K / L] para seleccionar y después pulse [OK].
2 Utilice [los botones numéricos] para introducir su contraseña de 4 dígitos.
Para el uso por primera vez: Utilice [los botones numéricos] e introduzca una contraseña de 4 dígitos nueva
(excepto 4737) y después pulse [OK].
Ese número se utilizará como contraseña desde la segunda vez. Anote su contraseña por si la olvida.
•
Si ha olvidado la contraseña, introduzca [4], [7], [3], [7]. La contraseña se borrará y el nivel de calificación se
configurará a “Todo”.
•
Mientras introduce la contraseña, pulse [CLEAR] para borrar el número y volver al introducir la contraseña.
3 Pase a A - C
A) Nivel clasific. BD
1) Utilice [K / L] para seleccionar “Nivel clasific. BD” y después presione [OK].
2) Utilice [K / L] para seleccionar su opción deseada y después pulse [OK].
“Todo”: Para liberar la limitación.
“Ajuste de edad”: Para liberar la limitación.
•
Después de seleccionar “Ajuste de edad”, utilice [los botones numéricos] para introducir la edad de desde 0
a 254. (por ejemplo, para una edad de 15 años, pulse [0],[1],[5])
3) Pulse [SETUP] para salir.
B) Nivel clasific. DVD
1) Utilice [K / L] para seleccionar “Nivel clasific. DVD” y después pulse [OK].
2) Utilice [K / L] para seleccionar el nivel que desee y después pulse [OK].
3) Pulse [SETUP] para salir.
EXPLICACIONES DE LA CALIFICACIÓN
Todo : El control paterno está inactivo, se pueden reproducir todos los discos.
•
8 [Adulto] : Software de DVD de cualquier calificación (adulto/general/niños) pueden reproducirse.
•
7 [NC-17] : No se permite a nadie de menos de 17 años.
•
•
6 [R] : Restringido, quienes tengan menos de diecisiete años necesitan ir acompañados de
•
5 [PGR] : Se recomienda orientación paterna.
•
4 [PG-13] : No apropiado para niños de menos de 13 años.
•
3 [PG] : Se sugiere orientación paterna.
•
2 [G] : Público general.
•
1 [Tolerado] : Apropiado para niños.
un padre o tutor.
C) Camb. Contras.
1) Utilice [K / L] para seleccionar “Camb. Contras.” y después pulse [OK].
2) Introduzca una contraseña de cuatro dígitos nueva y después pulse [OK].
3) Pulse [SETUP] para salir.
Nota
La información de reanudación se borrará si cambia el nivel parental cuando la información de reanudación se
•
active.
40
ES
Page 93

■
Otros
CONFIGURACIÓN DE FUNCIONES
Introducción
Otros
Icono De Ángulo
Auto Apagato
Panel Pantalla
Vista Mimiat.
Selección de medios
Para ver cómo seleccionar los elementos y opciones, consulte “
•
Enc.
Enc.
Auto
5sec
Disco
Persnaliz.” en la página 32.
Opciones de configuración Opciones
Icono De Ángulo Enc.*:
El icono ángulo aparece en la pantalla del TV cuando se reproduce una
escena con varios ángulos.
Apdo.:
El icono de ángulo desaparece de la pantalla del TV.
Auto Apagato Enc.*:
Si se deja la unidad sin actividad durante más de 30 minutos, la unidad se
apaga automáticamente.
Apdo.:
Configura el apagado automático.
Panel Pantalla
Configura el brillo de la pantalla
del panel delantero.
Auto*:
La pantalla del panel delantero se oscurece durante la reproducción.
Brillo:
La pantalla del panel delantero se oscurece.
Oscuro:
La pantalla del panel delantero se oscurece.
Vista Mimiat.
Configura el tiempo de
visualización de la reproducción
5sec*
10sec
de foto fija (en formato JPEG)
Selección de medios
Seleccione el soporte a reproducir.
Disco*:
Seleccione esto cuando reproduzca un disco.
Memoria SD:
Seleccione esto cuando reproduzca una tarjeta de memoria SD.
Conexiones
Reproducción
Configuración de
Funciones
Otros
ES
41
Page 94

CONFIGURACIÓN DE FUNCIONES
C
MODE
SU
E
S
CH
Inicializar
Inicializar la configuración o tarjeta de memoria SD.
EAR
SETUP
BTITL
DISPLAY
Pulse [SETUP] en modo parado.
1
Utilice [K / L] para seleccionar y
2
A-
LEAR
3
OK
AUDIO
después pulse [OK].
Utilice [K / L] para seleccionar una
opción deseada y después pulse
[OK].
“No”: Sale sin inicialización.
“Instalación”:
Reconfigura el menú de configuración
al predeterminado de fábrica.
“Dispositivo memoria”:
Inicializa la tarjeta de memoria SD.
Después de que aparezca el mensaje
de confirmación, utilice [K / L] para
seleccionar “Yes” y después pulse [OK].
Inicializar
¿Ejecuta La Inicialización?
No
Instalación
Dispositivo memoria
42
Pulse [OK]. (Sólo para “Instalación” y
4
“Dispositivo memoria”)
Pulse [SETUP] para salir.
5
Nota
La configuración de “ Paterno” no se restablece.
•
Si la tarjeta de memoria SD no está insertada, el
•
parámetro “Dispositivo memoria” se mostrará
atenuado en color gris.
ES
Page 95

SOLUCIÓN DE PROBLEMAS
Si la unidad no funciona correctamente cuando se hace funcionar según este manual, compruebe la unidad
consultando la siguiente lista de comprobación.
Problema Solución
Sin alimentación - Compruebe si el cable de alimentación está conectado correctamente.
Sin sonido o imagen - Compruebe si el televisor conectado está encendido.
Imagen distorsionada - A veces puede que aparezca una pequeña distorsión de la imagen. No es un
Imagen completamente
distorsionada o imagen en blanco
y negro con BD/DVD
Sin sonido o sonido
distorsionado
La imagen se congela
momentáneamente durante la
reproducción
No se puede reproducir el disco - Limpie el disco.
La tarjeta de memoria SD no se
puede leer.
No vuelve a la pantalla de inicio
cuando se quita el disco
La unidad no responde al mando
a distancia
Los botones no funcionan o la
unidad deja de responder
La unidad no responde a algunas
instrucciones de funcionamiento
durante la reproducción
La unidad no puede leer los BD /
DVD / CD
El ángulo no cambia - El ángulo no puede cambiarse para BD/DVD que no contengan múltiples
La reproducción no comienza
cuando se selecciona el título
Se ha olvidado la contraseña
para este nivel de calificación
- Desenchufe el cable de alimentación una vez y espere durante cinco de
segundos y después vuelva a enchufarlo de nuevo.
- Verifique si las conexiones están hechas de manera segura y correcta.
- Compruebe si el televisor conectado u otro equipo soportan HDCP. (Esta unidad
no puede dar como salida señal de vídeo a menos que el otro equipo soporte
HDCP).
- Compruebe si el formato de salida de esta unidad (FORMATO HDMI) coincide
con el formato de entrada soportado del otro equipo conectado.
- Establezca el parámetro “Resolución de Video HDMI” en un valor distinto a
“Auto” o “1080p24”.
fallo de funcionamiento.
- Conecte esta unidad directamente al TV. Si los cables de sonido / vídeo RCA se
conectan a un grabador de vídeo, las imágenes puede que se distorsionen
debido al sistema de protección contra copias.
- Asegúrese de que el disco sea compatible con esta unidad.
- Ajuste el volumen.
- Compruebe que los altavoces están conectados correctamente.
- Compruebe la conexiónes HDMI.
- Compruebe las opciones del menú “
- Compruebe el disco para ver si tiene huellas / rayas y límpielo con un paño
suave desde el centro hasta el extremo.
- Limpie el disco.
- Asegúrese de que la etiqueta del disco está hacia arriba.
- Compruebe si el disco es defectuoso probando otro disco.
- Cancele el control de calificación o cambie el nivel de control.
- Introduzca un disco correcto que se pueda reproducir en esta unidad.
- El formato de la tarjeta no coincide con esta unidad o la tarjeta no es
compatible.
- Restablezca esta unidad apagándola y después encendiéndola de nuevo.
- Dirija el mando a distancia directamente a la ventana del sensor de infrarrojos
del panel delantero.
- Reduzca la distancia hasta la ventana del sensor de infrarrojos.
- Sustituya las pilas del mando a distancia.
- Vuelva a introducir las pilas con su polaridades (signos +/-) según se indican.
- Para restaurar completamente la unidad, desenchufe el cable de alimentación
del enchufe de CA durante 5 a 10 segundos.
- Las operaciones pueden no permitirse por parte del disco. Consulte las
instrucciones del disco.
- ¿Condensación? (Deje la unidad reposar durante 1 o 2 horas)
- Está intentando reproducir un disco distinto de los que tienen las marcas de la
página 17.
- Limpie la suciedad del disco o cámbielo.
ángulos. En algunos casos, los múltiples ángulos están grabados solamente para
escenas específicas.
- Compruebe las opciones del menú “
- Introduzca la contraseña predeterminada “4737” y después su contraseña
olvidada será borrada.
Audio”.
Paterno”.
Introducción
Conexiones
Reproducción
Configuración de
Funciones
Otros
Nota
Algunas funciones no están disponibles en modos específicos, pero esto no es un fallo de funcionamiento. Lea la
•
descripción en este manual para ver los detalles de las operaciones correctas.
Algunas funciones están prohibidas en algunos discos.
•
ES
43
Page 96

GLOSARIO
Audio analógico
Una señal eléctrica que representa directamente al
sonido. Compare esto con el audio digital que puede ser
también una señal eléctrica, pero es una representación
indirecta del sonido. Consulte también “Audio digital”.
Audio digital
Una representación indirecta del sonido mediante números.
Durante la grabación, el sonido es medido a intervalos
discretos (44.100 veces por segundo para un CD de sonido)
por un convertidor de analógico a digital, el cual genera un
flujo de números. Durante la reproducción, un convertidor
de digital a analógico genera una señal analógica en base a
dichos números. Consulte también “Frecuencia de
muestreo” y “Audio analógico”.
BD-Java
Con algunos BD que soportan aplicaciones Java, usted
puede disfrutar de funciones interactivas como juegos o
menús interactivos.
Capítulo
Así como un libro está dividido en varios capítulos, un
título de un BD-vídeo o DVD-vídeo está habitualmente
dividido en capítulos. Consulte también “Título”.
Código de región
Las regiones asocian discos y reproductores con
específicas regiones del mundo. Este aparato reproducirá
únicamente discos que tengan códigos compatibles de
región. Usted puede encontrar el código de región de su
equipo mirando en el panel trasero. Algunos discos son
compatibles con más de una región (o todas las regiones).
Disco Blu-ray (BD)
Los discos Blu-ray son discos de vídeo óptico de siguiente
generación que son capaces de almacenar muchos más
datos que los DVD convencionales. La gran capacidad
hace posible beneficiarse de funciones como vídeos de
alta definición, sonido envolvente de multicanal, menús
interactivos, etc.
DTS (Digital Theater System):
DTS is a multi channel surround sound system. By connecting
to DTS decoder, you can enjoy movie dynamic and realistic
sound like movie theater. DTS surround sound technologies
were developed by DTS, Inc.
DTS-HD
DTS-HD es una tecnología de codificación sin pérdidas
desarrollada como extensión del formato de acústica
coherente DTS original. Blu-ray Disc admite salida de
sonido envolvente multicanal 7.1.
Dolby Digital
El sistema de compresión de sonido digital desarrollado por
Dolby Laboratories. Le ofrece sonido estéreo (2 canales) o
audio multicanal.
Dolby TrueHD
Dolby TrueHD es una tecnología de codificación sin
pérdidas desarrollada para discos ópticos de la siguiente
generación. Blu-ray Disc admite salida de sonido
envolvente multicanal 7.1.
Frecuencia de muestreo
La frecuencia a la cual se toman muestras del sonido para
convertirlo en información de audio digital. El número de
muestras tomadas por segundo se define como
frecuencia de muestreo. Cuanto mayor la frecuencia,
mejor será la calidad de sonido.
HDMI (high-definition multimedia interface)
Interfaz digital entre una fuente de audio y una de vídeo.
Puede transmitir la señal del componente de vídeo, audio
y control con una conexión por cable.
JPEG (joint photographic experts group)
JPEG es un método de compresión de archivos de fotos
fijas. Puede copiar archivos JPEG a CD-RW/-R, DVD desde
o tarjeta de memoria SD un ordenador o reproducir los
archivos de esta unidad.
PCM (pulse code modulation)
PCM es un formato que convierte el audio en datos
digitales. Se utiliza principalmente para CD de sonido y
DAT. Esta unidad puede reproducir sonidos lo más
realista posible al convertir incluso audio Dolby Digital y
MPEG comprimido a PCM.
Pista
Un CD de sonido utiliza pistas para dividir el contenido de
un disco. El equivalente en BD-vídeo o DVD-vídeo se
denomina capítulo. Ver también “Capítulo”.
Relación de aspecto
La relación entre el ancho y la altura de una pantalla de
TV. Los televisores convencionales tienen una relación de
aspecto de 4:3 (en otras palabras, la pantalla del televisor
es casi cuadrada); los modelos de pantalla amplia son de
16:9 (la pantalla del televisor es casi el doble de ancha
respecto de su altura).
Salida de vídeo componente
Cada señal de luminancia (Y) y componente (PB/CB, PR/CR)
es independiente en su salida, de tal manera que usted
pueda disfrutar del color de la imagen tal cual es.
Asimismo, y debido a razones de compatibilidad con el
vídeo progresivo (525p/480p), usted puede experimentar
imágenes de mayor densidad que con el modo
entrelazado (525i/480i).
Título
Una colección de capítulos en un BD-vídeo o DVD-vídeo.
Consulte también “Capítulo”.
Dolby Digital Plus
Dolby Digital Plus es la tecnología de compresión de
audio digital de la siguiente generación desarrollada
como una extensión a Dolby Digital. Blu-ray Disc admite
salida de sonido envolvente multicanal 7.1.
44
ES
Page 97

CÓDIGO DE IDIOMA
Idioma
A-B
abkhazian 4748
afar 4747
afrikaans 4752
aimará 4771
albanés 6563
alemán [GER] 5051
amárico 4759
árabe 4764
armenio 5471
assamés 4765
azerbaiyano 4772
bashkir 4847
bengalí;
bangladesí
bhutani 5072
bielorruso 4851
bihari 4854
birmano 5971
bislama 4855
bretón 4864
búlgaro [BUL] 4853
C-E
cachemir 5765
camboyano 5759
catalán 4947
checo [CZE] 4965
chino [CHI] 7254
coreano [KOR] 5761
corso 4961
croata 5464
danés [DAN] 5047
escocés gaélico 5350
eslovaco [SLO] 6557
esloveno 6558
español [SPA] 5165
esperanto 5161
estonio 5166
Código
4860
Idioma
F-H
faroés 5261
fidjiano 5256
finlandés [FIN] 5255
francés [FRE] 5264
frisio 5271
galés 4971
gallego 5358
georgiano 5747
griego [GRE] 5158
groenlandés 5758
guaraní 5360
gujarati 5367
hausa 5447
hebreo 5569
hindi 5455
holandés [DUT] 6058
húngaro [HUN] 5467
indonesio 5560
inglés [ENG] 5160
interlingua 5547
interlingue 5551
inupiak 5557
irlandés [IRI] 5347
islandés [ICE] 5565
italiano [ITA] 5566
japonés [JPN] 5647
javanés 5669
kannada 5760
kazakh 5757
kinyarwanda 6469
kirguís 5771
kirundi 6460
kurdo 5767
L-N
laosiano 5861
latín 5847
Código
I-K
Idioma
latvio; letón 5868
lingala 5860
lituano 5866
macedonio 5957
malayalam 5958
malayo 5965
malgache 5953
maltés 5966
maorí 5955
marati 5964
moldavo 5961
mongol 5960
naurú 6047
nepalés 6051
noruego [NOR] 6061
O-R
occitano 6149
oriya 6164
oromo(afán) 6159
panjabi 6247
pashtu; pushto 6265
persa 5247
polaco [POL] 6258
portugués [POR] 6266
quichua 6367
raeto-romance 6459
rumano [RUM] 6461
ruso [RUS] 6467
samoano 6559
sangho 6553
sánscrito 6547
senegalés 6555
serbio 6564
serbio-croata 6554
sesotho 6566
setswana 6660
shona 6560
Código
S
Idioma
sindhi 6550
siswat 6565
somalí 6561
sueco [SWE] 6568
sundanés 6567
swahili 6569
tagalog 6658
tailandés 6654
tajik 6653
tamil 6647
tártaro 6666
telugu 6651
tibetano 4861
tigrinya 6655
tonga 6661
tsonga 6665
turco [TUR] 6664
turkmen 6657
twi 6669
U-Z
ucranio 6757
urdu 6764
uzbeco 6772
vasco 5167
vietnamita 6855
volapuk 6861
wolof 6961
xhosa 7054
yiddish 5655
yoruba 7161
zulú 7267
Código
T
Introducción
Conexiones
Reproducción
Configuración de
Funciones
Otros
Nota
Si elige un idioma que tiene código de idioma de 3 letras (escrito entre corchetes), el código se mostrará cada vez
•
que cambie la configuración del idioma de sonido o idioma de subtítulo en las página 29. Si elige cualquier otro
idioma, se mostrará ‘---’ en cambio.
ES
45
Page 98

ESPECIFICACIONES
Generales
Sistema de señales Color NTSC
Requisitos de alimentación CA 120 V, 60 Hz
Consumo de alimentación 30 W (Espera: 0,8 W)
Dimensiones (anchura x altura x
profundidad)
Peso 9,1 libras (4,1 kg)
Temperatura de funcionamiento 41°F (5°C) a 104°F (40°C)
Humedad de funcionamiento Menos del 80% (sin condensación)
Terminales
Salid audio (Analógico)
Toma RCA x 2 L/R: 2 VRMS (impedancia de salida: más de 1kΩ)
Salida de vídeo
Toma RCA x 1 1 Vp-p (75Ω)
Salida de vídeo de componente
Toma RCA x 3 Y: 1 Vp-p (75Ω) P
Trasero
Salid audio (Digital)
Toma RCA x 1 500 mVp-p (75Ω)
Salida HDMI
Toma HDMI x 1 Vídeo: 480p, 720p, 1080i, 1080p, 1080p24/Sonido
17,2 x 2,8 x 13,9 pulgadas (435 x 70 x 351 mm)
B/CB
: 700 mVp-p (75Ω) PR/CR: 700 mVp-p (75Ω)
Nota
Las especificaciones y el diseño del producto están sujetos a cambios sin previo aviso.•
46
ES
Page 99

MEMO
Introducción
Conexiones
Reproducción
Configuración de
Funciones
Otros
ES
47
Page 100

GARANTÍA LIMITADA
FUNAI CORP. reparará este producto, de forma gratuita en Estados Unidos, en caso de defecto de materiales o
fabricación, del modo siguiente:
DURACIÓN:
PIEZAS: FUNAI CORP. suministrará piezas de repuesto de las piezas defectuosas de forma gratuita
durante un (1) año desde la fecha de compra minorista original. Ciertas piezas están
excluidas de esta garantía.
MANO DE OBRA:
LÍMITES Y EXCLUSIONES:
ESTA GARANTÍA SE EXTIENDE SOLAMENTE AL COMPRADOR MINORISTA ORIGINAL. UN RECIBO
DE COMPRA U OTRA PRUEBA DE COMPRA MINORISTA ORIGINAL SERÁ EXIGIDA JUNTO CON EL
PRODUCTO PARA OBTENER SERVICIO BAJO ESTA GARANTÍA.
Esta garantía no se extenderá a ninguna otra persona o beneficiario.
Esta garantía quedará invalidada y sin efecto en caso de alteración, sustitución, borrado o pérdida de
los números de serie del producto o si se intentó una reparación por parte de un centro de servicio no
autorizado. Esta garantía limitada no se aplica a ningún producto no comprado y utilizado en Estados Unidos.
Esta garantía solamente cubre los fallos debidos a defectos de material o fabricación que se produzcan
durante su uso normal. No cubre daños producidos durante el transporte, ni daños ocasionados por
reparaciones, alteraciones o productos no suministrados por FUNAI CORP., o daños resultantes de accidente,
uso indebido, abuso, trato indebido, aplicación indebida, alteración, instalación defectuosa, mantenimiento
inadecuado, uso comercial (por ejemplo, el uso de este producto en hoteles, establecimientos de alquiler u
oficinas)o daños resultantes de incendio, inundación, tormenta eléctrica o catástrofes naturales.
ESTA GARANTÍA NO CUBRE LOS MATERIALES DE EMBALAJE, NINGÚN TIPO DE ACCESORIOS (EXCEPTO EL
MANDO A DISTANCIA), NINGUNA PIEZA DE ADORNO, PIEZAS DE MONTAJE COMPLETAS, MODELOS DE
DEMOSTRACIÓN O DE TALLER.
FUNAI CORP. Y SUS REPRESENTANTES O AGENTES NO SERÁN EN NINGÚN CASO CONSIDERADOS RESPONSABLES
DE DAÑOS GENERALES, INDIRECTOS O CONSECUENCIALES, RESULTANTES DE O PROVOCADOS POR EL USO O
LA IMPOSIBILIDAD DE USO DE ESTE PRODUCTO. ESTA GARANTÍA SUSTITUYE A CUALQUIER OTRA GARANTÍA,
EXPRESA O IMPLÍCITA, Y CUALQUIER OTRA RESPONSABILIDAD CIVIL POR PARTE DE FUNAI, CUALQUIER OTRA
GARANTÍA QUE INCLUYA LA GARANTÍA DE COMERCIABILIDAD E IDONEIDAD PARA UN FIN CONCRETO, QUEDAN
POR LA PRESENTE EXCLUIDAS POR DE FUNAI Y SUS REPRESENTANTES EN ESTADOS UNIDOS.
TODAS LAS INSPECCIONES Y REPARACIONES BAJO GARANTÍA DEBEN SER EFECTUADAS POR UN CENTRO
DE SERVICIO AUTORIZADO.
ESTA GARANTÍA ES VÁLIDA EXCLUSIVAMENTE CUANDO EL APARATO SEA ENTREGADO A UN CENTRO DE
SERVICIO AUTORIZADO.
EL PRODUCTO DEBE IR ACOMPAÑADO POR UNA COPIA DEL RECIBO DE COMPRA MINORISTA ORIGINAL. SI
NO SE ADJUNTA PRUEBA DE COMPRA, LA GARANTÍA NO SE APLICARÁ Y SE COBRARÁN LOS COSTES DE LA
REPARACIÓN.
IMPORTANTE:
ESTA GARANTÍA LIMITADA LE OTORGA DERECHOS LEGALES ESPECÍFICOS. ES POSIBLE QUE SEA USTED
BENEFICIARIO DE OTROS DERECHOS QUE VARÍEN DE UN ESTADO A OTRO. SI, EN CUALQUIER MOMENTO
DURANTE EL PERIODO DE GARANTÍA, NO PUEDE USTED OBTENER SATISFACCIÓN CON RESPECTO A LA
REPARACIÓN DE ESTE PRODUCTO, LE ROGAMOS QUE SE PONGA EN CONTACTO CON FUNAI CORP.
ATENCIÓN:
FUNAI CORP. SE RESERVA EL DERECHO DE MODIFICAR CUALQUIER DISEÑO DE ESTE
PRODUCTO SIN PREVIO AVISO.
DECLARACIÓN DE GARANTÍA CON RESPECTO A REPARACIONES NO AUTORIZADAS:
Para obtener servicio de garantía, debe usted aceptar el producto, o hacer entrega del producto con
portes pagados, ya sea en su embalaje original o en un embalaje que proporcione el mismo grado de
protección, a cualquier CENTRO DE SERVICIO AUTORIZADO. FUNAI CORP. no efectuará reembolso por
ningún servicio realizado por proveedores de servicio no autorizados sin autorización previa por escrito.
Para localizar su CENTRO DE SERVICIO AUTORIZADO más próximo o para solicitudes generales
de servicio, puede ponerse en contacto con nosotros en:
FUNAI CORP. suministrará la mano de obra de forma gratuita durante un periodo de
noventa (90) días desde la fecha de compra minorista original.
FUNAI CORPORATION
Servicio de atención al cliente
Tel : 1-800-605-8610
www.funai-corp.com
19900 Van Ness Avenue, Torrance, CA 90501
Imprimido en China
E5H21UD
1VMN25955 ★★★★★
 Loading...