

Page 1

Instructions for use
3135 015 07470
_VOX
Page 2

Once your PHILIPS MAGNA VOX purchase is registered, you're eligible to receive all the privileges of
owning a PHILIPS MAGNA VOX product. So complete and return the Warranty Registration Card
enclosed with your purchase at once. And take advantage of these important benefits.
Congratulationson your purchase,
and welcome to the "family!"
Dear PHILIPS MAGNAVOX product owner:
Thank you foryourconfidenceinPHILIPS MAGNAVOX.You'veselectedoneof the best-built,best-
backed products
available today. And we'll do everything in our power to keep you happy with your purchase for many
years to come.
As a member ofthe PHILIPS MAGNAVOX "family," you're entitled to protection by one of the most
comprehensive warranties and outstanding service networks in the industry.
What's more, your purchase guarantees you'll receive all the information and special offers forwhich
you qualify, plus easy access to accessories from our convenient home shopping network.
And most importantly you can count on our uncompromising commitment to your total satisfaction.
All of this isour way of saying welcome-and thanks for investing in a PHILIPS MAGNAVOX product.
Sincerely,
Robert Minkhorst
President and Chief Executive Officer
PHILIPS
P.S. Remember, to get the most from your PHILIPS
MAGNAVOX product,you must retum your
Warranty Registration Card within 10 days. So
please mail it to us rightnow!
Know these
safetysymbo/s
_, This '1_o_tof lightning" indicates uniflsulated material within your unit which may cause an
electrical shock. For the safety of everyone in your household, please do not remove product
covering.
_,The "exclamation point" calls attention to features for which you should read the enclosed
literature closely to prevent operating and maintenance problems.
WARNING: TO PREVENT FIRE OR SHOCK HAZARD, DO NOT EXPOSE THiS EQUIPMENT
TO RAIN OR MOISTURE.
CAUTION: To prevent electric shock, match wide blade of plug to wide slot. and tullyinsert.
ATrENTION: Pour (eviter les chocs dlectriques, i_troduire la lame la plus large de la llche dans la
borne correspondante de la prise et pousser jusotu'au fond.
Page 3
SAFETYINSTRUCTIONS- Readbeforeoperatingequipment
Thisproductwasdesignedandmanufacturedto meetstrict qualityand
safetystandards.Thereare,however,someinstallationandoperation
precautionswhichyoushouldbeparticularlyawareof.
1. ReadInstructions- Allthesafetyandoperatinginstructionsshould
bereadbeforetheapplianceisoperated.
2. RetainInstructions- Thesafetyandoperatinginstructionsshould
beretainedforfuturereference.
3. HeedWarnings- Allwarningsontheapplianceandintheoperating
instructionsshouldbeadheredto.
4. FollowInstructions- All operatinganduseinstructionsshouldbe
followed.
5. WaterandMoisture- Theapplianceshouldnotbeusednearwater
- for example,neara bathtub,washbowl,kitchensink,laundrytub,
inawetbasementornearaswimmingpool,etc.
6. CartsandStands- Theapplianceshouldbeusedonlywithacartor
standthatisrecommendedbythemanufacturer.
6A. _ An applianceand cart combinationshould bemoved
withcare.Quick stops,excessiveforce, and uneven
surfacesmaycausetheapplianceandcartcombination
tooverturn.
7. Wallor CeilingMounting- Theapplianceshouldbemountedto a
wallorceilingonlyas recommendedbythemanufacturer.
8. Ventilation- Theapplianceshouldbesituatedsothatitslocationor
positiondoesnotinterferewithits properventilation.Forexample,
theapplianceshouldnotbesituatedonabed,sofa,rug,orsimilar
surfacethatmayblockthe ventilationopenings;or, placedin a
built-ininstallation,suchasa bookcaseor cabinetthatmayimpede
theflowofairthroughtheventilationopenings.
9. Heat- Theapplianceshouldbe situatedawayfromheatsources
suchas radiators,heat registers,stoves,orother appliances
(includingamplifiers)thatproduceheat.
lg. PowerSources- Theapplianceshouldbe connectedtoa power
supplyonlyofthetypedescribedintheoperatinginstructionsoras
markedontheappliance.
11. Power-CordProtection- Powersupplycordsshouldbemutedso
thattheyarenotlikelyto bewalkedonorpinchedbyitemsplaced
uponor against them,payingparticularattentionto cordsand
plugs,conveniencereceptacles,andthepointwheretheyexitfrom
theappliance.
12. Cleaning- Theapplianceshouldbecleanedonlyasrecommended
bythemanufacturer.
13. PowerLines - An outdoorantennashouldbelocatedawayfrom
powerlines.
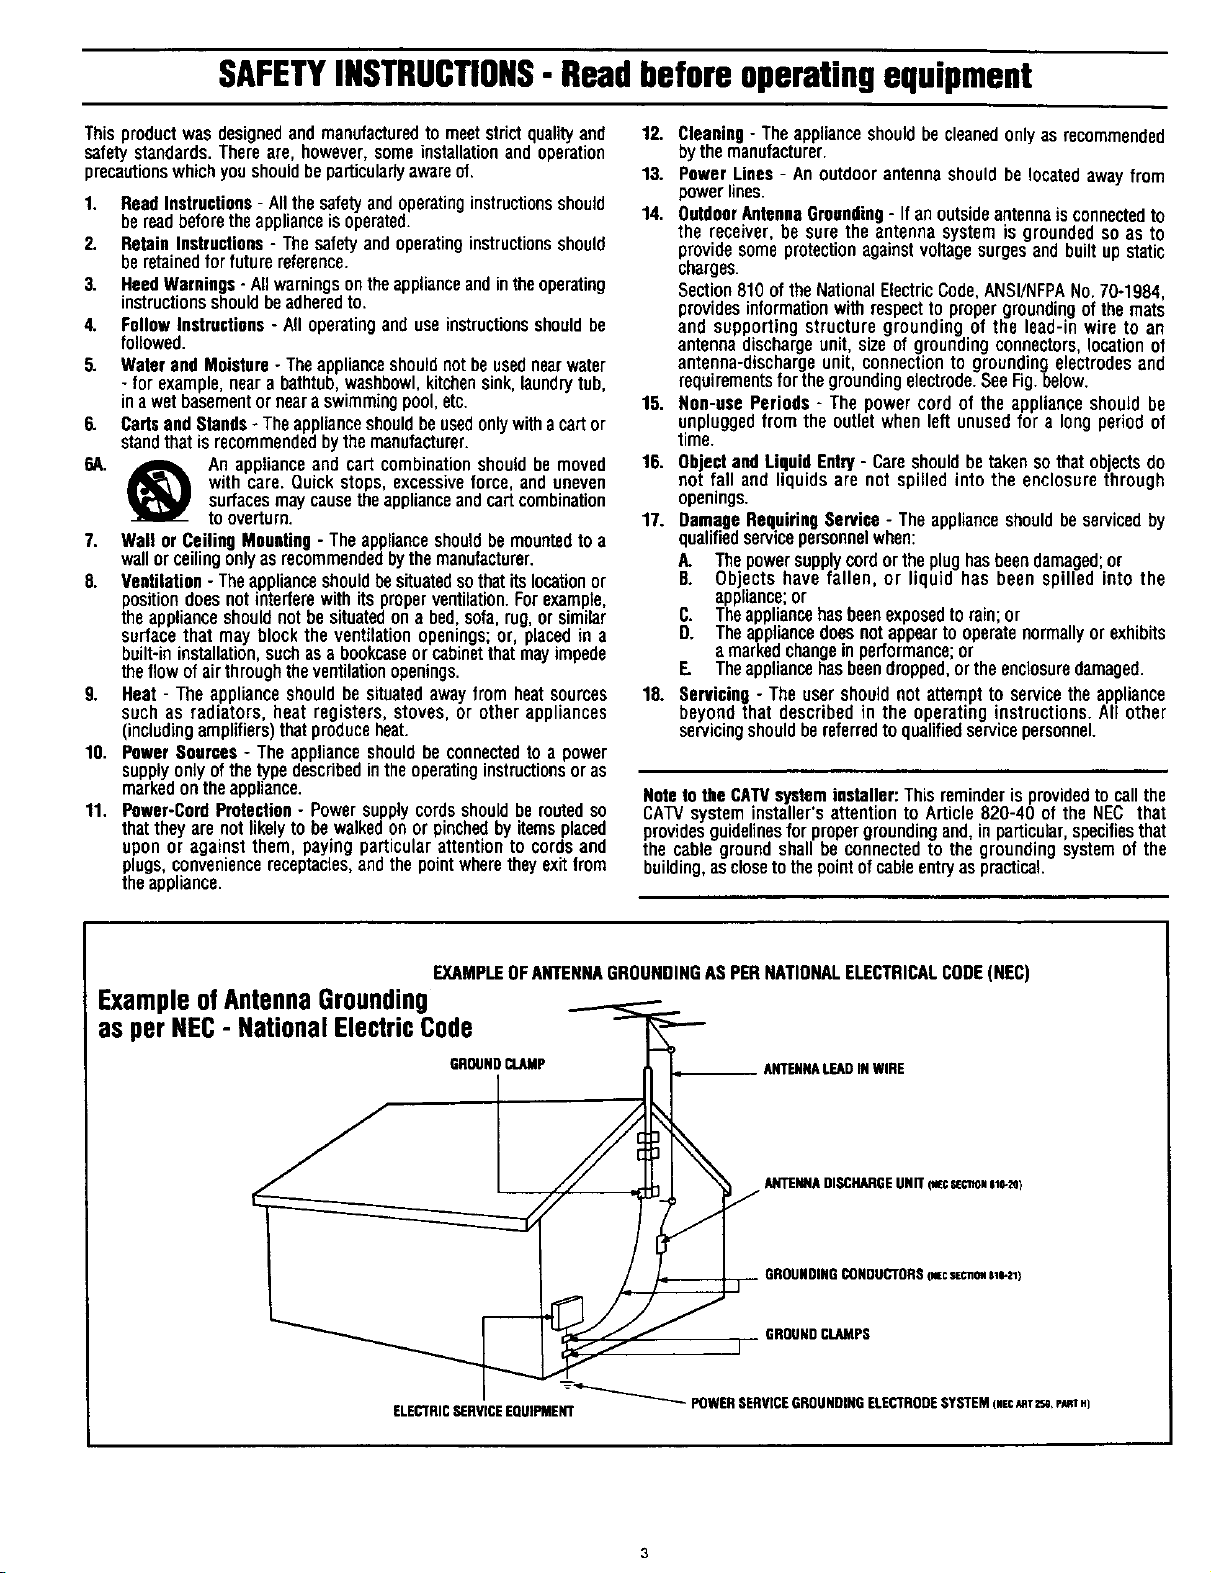
14. OutdoorAntennaGrounding- Ifanoutsideantennais connectedto
the receiver,besuretheantennasystemis groundedso as to
providesomeprotectionagainstvoltagesurgesandbuiltupstatic
charges.
Section810of theNationalElectricCode,ANSI/NFPANo.70-1984,
providesinformationwithrespectto propergroundingofthemats
and supportingstructuregroundingof the lead-inwireto an
antennadischargeunit,sizeofgroundingconnectors,locationof
antenna-dischargeunit,connectionto groundingelectrodesand
requirementsforthegroundingelectrode.SeeFig.below.
15. Non-usePeriods - The powercordofthe applianceshouldbe
unpluggedfromtheoutletwhenleftunusedfor a longperiodof
time.
16. ObjectandLiquid Entry- Careshouldbetakensothatobectsdo
not fall and liquidsare not spilledintothe enclosurethrough
openings.
17. DamageRequiringService- Theapplianceshouldbeservicedby
qualifiedservicepersonnelwhen:
A. Thepowersupplycordortheplughasbeendamaged;or
B. Objectshavefallen, or liquidhas beenspilled intothe
appliance;or
C. Theappliancehasbeenexposedtorain;or
D. Theappliancedoesnotappeartooperatenormallyorexhibits
amarkedchangeinperformance;or
E. Theappliancehasbeendropped,ortheenclosuredamaged.
18. Servicing- Theusershouldnot attemptto servicetheappliance
beyondthat describedin the operatinginstructions.All other
servicingshouldbereferredtoqualifiedservicepersonnel.
Noteto the CATVsysteminstaller: This reminderis providedto call the
CATV system installer's attention to Article 820-40 of the NEC that
providesguidelinesfor propergroundingand,in particular,specifiesthat
the cable ground shall beconnected to the grounding systemof the
building,as closetothe pointof sable entryaspractical.
EXAMPLEOFANTENNAGROUNDINGASPERNATIONALELECTRICALCODE(NEC)
ExampleofAntennaGrounding
as per NEC- NationalElectricCode
GROUNDCLAMP ANTENNALEADINWIRE
ELECTRICSERVICEEQUIPMENT
ANTENNADISCHARGEUNIT (wc S_CTmNslo-_}
GROUNDINGCONDUCTORS(_c secnom81e-zl)
GROUND CLAMPS
-----_"-_ POWERSERVICEGROUNDINGELECTRODESYSTEM(.ec_qTz_,eJmT.)
Page 4
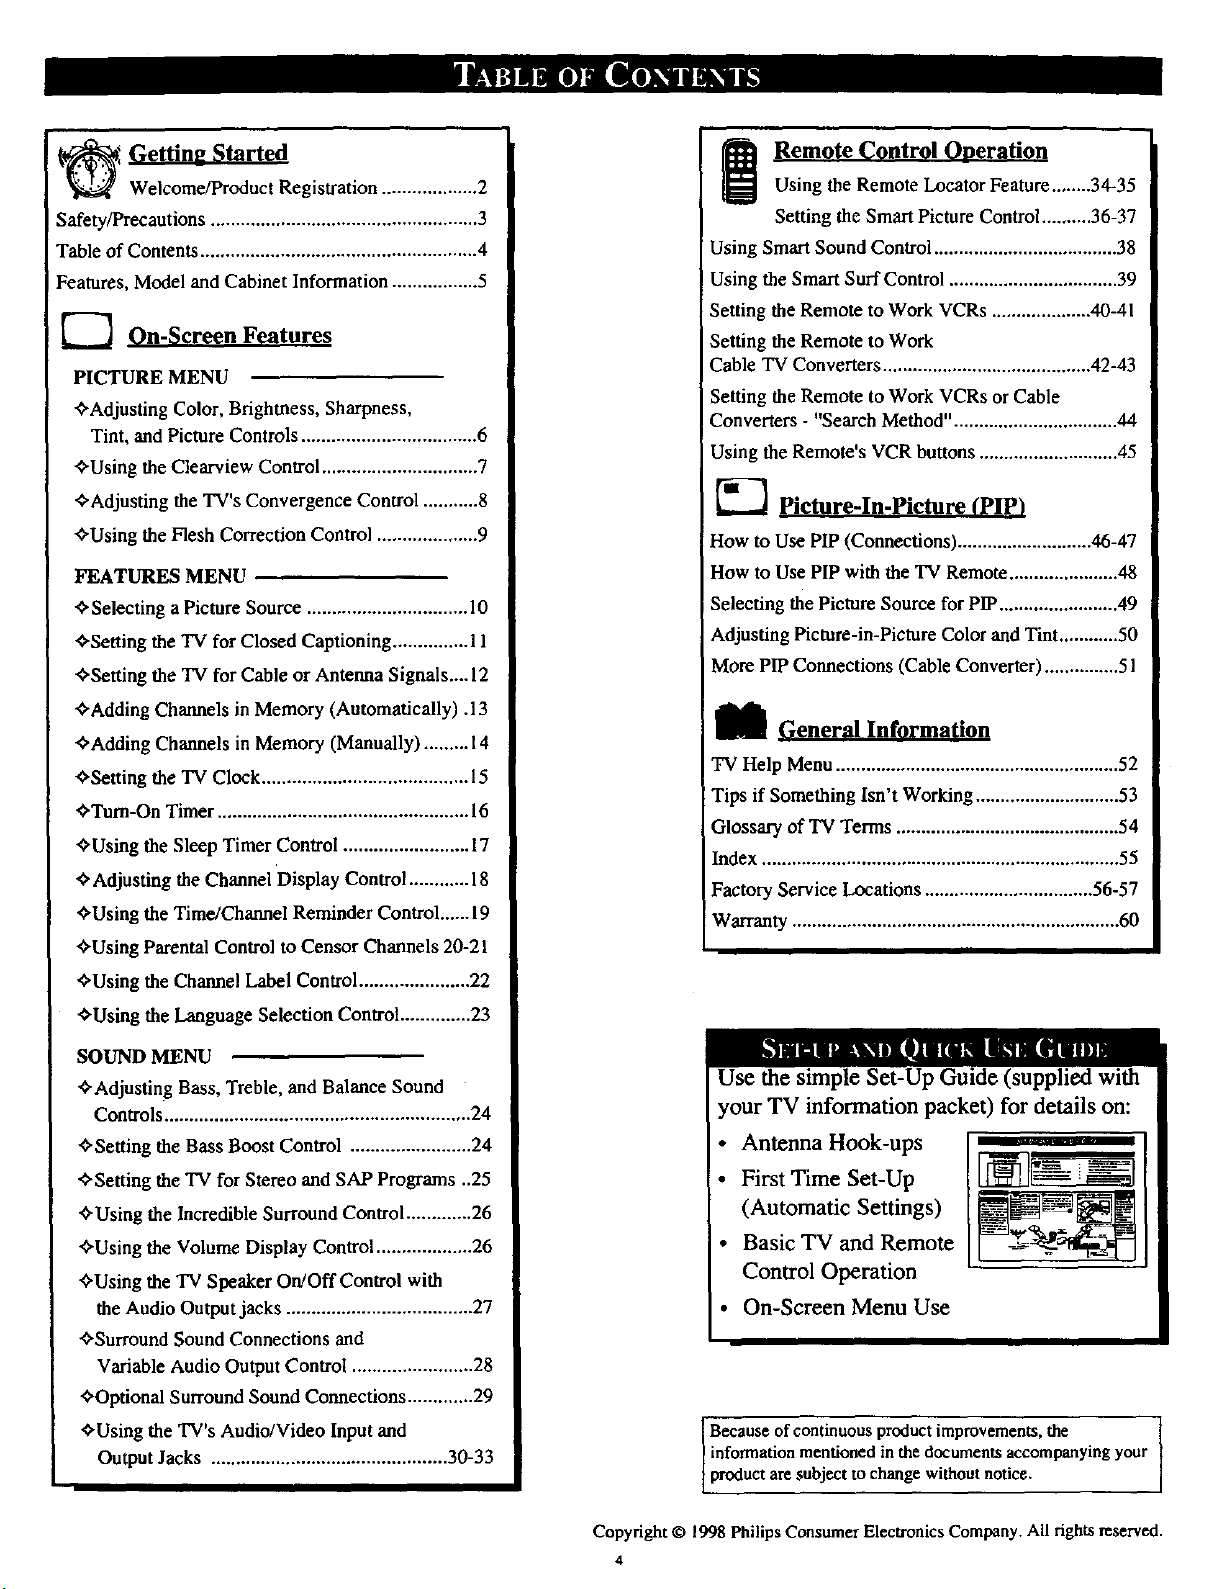
Welcome/Product Registration ................... 2
Safety/Precautions ..................................................... 3
Table of Contents ....................................................... 4
Features, Model and Cabinet Information ................. 5
_ On-Screen Features
PICTURE MENU
<'Adjusting Color, Brightness, Sharpness,
Tint, and Picture Controls ................................... 6
<'Using the Clearview Control............................... 7
Remote Control Ooeration
Using the Remote Locator Feature........34-35
Setting the Smart Picture Control .......... 36-37
Using Smart Sound Control ..................................... 38
Using the Smart Surf Control .................................. 39
Setting the Remote to Work VCRs .................... 40-41
Setting the Remote to Work
Cable TV Converters .......................................... 42-43
Setting the Remote to Work VCRs or Cable
Converters - "Search Method" ................................. 44
Using the Remote's VCR buttons............................ 45
¢'Adjusting the TV's Convergence Control ........... 8
<'Using the Flesh Correction Control .................... 9
FEATURES MENU
<"Selecting a Picture Source ................................ l0
<'Setting the TV for Closed Captioning ............... 11
<'Setting the TV for Cable or Antenna Signals.... 12
<'Adding Channels in Memory (Automatically). 13
<'Adding Channels in Memory (Manually) ......... 14
<'Setting the TV Clock ......................................... 15
<'Turn-On Timer .................................................. 16
<'Using the Sleep Timer Control ......................... 17
<"Adjusting the Channel Display Control ............ 18
<'Using the Time/Channel Reminder Control......19
<'Using Parental Control to Censor Channels 20-21
<'Using the Channel Label Control ...................... 22
<'Using the Language Selection Control .............. 23
SOUND MENU
•_'Adjusting Bass, Treble, and Balance Sound
Controls............................................................. 24
<'Setting the Bass Boost Control ........................ 24
<'Setting the TV for Stereo and SAP Programs ..25
<'Using the Incredible Surround Control ............. 26
<'Using the Volume Display Control ................... 26
<'Using the TV Speaker On!Off Control with
the Audio Outputjacks ..................................... 27
<'Surround Sound Connections and
Variable Audio Output Control ........................ 28
<'Optional Surround Sound Connections ............. 29
<'Using the TV's Audio/Video Input and
Output Jacks ............................................... 30-33
K-'] Picture-In-Pictu re (PIP)
How to Use PIP (Connections) ........................... 46-47
How to Use PIP with the TV Remote ...................... 48
Selecting the Picture Source for PIP ........................ 49
Adjusting Picture-in-Picture Color and Tint ............ 50
More PIP Connections (Cable Converter) ............... 51
_[_ General Information
TV Help Menu ......................................................... 52
Tips if Something Isn't Working ............................. 53
Glossary of TV Terms ............................................. 54
Index ........................................................................ 55
Factory Service Locations .................................. 56-57
Warranty .................................................................. 60
Use the simple Set-Up Guide (supplied with
your TV information packet) for details on:
Antenna Hook-ups
First Time Set-Up
(Automatic Settings)
Basic TV and Remote
Control Operation
• On-Screen Menu Use
Because of continuous product improvements, the
information mentioned in the documents accompanying your
product are subject to change without notice.
Copyright © 1998 Philips Consumer Electronics Company. All rights reserved.
4
Page 5
First Time Set Up - automatically sets the TV for
local channels, the correct picture signal (antenna or
cable), and assists in the setting of TV's Guide Plus+
feature.
Infrared Remote Control - operates your TV set and
a variety of wireless remote control VCRs and Cable
TV Converters. A special "Locator" feature can also
help you find the remote when it has been stuck out of
sight or misplaced.
Standard "IT broadcast (VHF/UHF) or Cable TV
(CATV) channel capability.
Closed Captioning - allows the viewer to read TV
program dialogue or voice conversations as on-screen
text.
Automatic Programming of channels - for quick and
easy selection of favorite stations available in your
area.
As you unpack your TV please note that the
following items have been included with your set:
• Owner's Manual
Safety Tip Information
Factory Service Center Locations
• Warranty Registration Card
Remote Control Transmitter
Batteries for Remote Control Use
Please take a few minutes to complete your
registration card. The serial number for the TV is
on the back of the set.
Refer to the back of this manual for instructions
on the cleaning and care of the TV.
Pictureoln-Pictnre (PIP) - can show a TV program
and the direct video output from anaccessory (VCR,
etc.) onto the "IVscreen at the same time.
Parental Control for "Censoring" - this feature can
block out channels to keep children from watching
undesirable programming.
Stereo-TV - with a built-in audio amplifier and a twin
speaker system, reception of TV programs in both
broadcast stereo sound or (SAP) bilingual broadcast
are available.
Twin Antenna (A/B) Inputs - for easy displaying of
two separate signal sources on the TV. An A/B button
on the remote control swi_:hes the TV's Main screen
between the two Antenna (A & B) Input options.
Audio/Vidou Jacks - for direct connections with
VCRs (and other accessories) for quality TV picture
and sound playback.
Surround Sound - this TV set is equipped for
connections with external audio equipment (such as a
Dolby ProLogic Amplifiers) for more dynamic sound
replay and audio effects.
End-of-Life disposal
Your new projection television and its packaging
contain materials that can be recycled and reused.
Specialized companies can recycle your product
to increase the amount of reusable materials and
minimize the amoums which need to he properly
disposed.
Your product also uses batteries which should not
be thrown away when depleted, but should be
handed in and disposed of as small chemical
waste,
Please find out about the local regulations on how
to dispose of your old television, batteries, and
packaging materials whenever you replace
existing equipment.
Sleep-Timer - automatically turns the TV OFF at
preset time intervals.
Smart Button - for the control of TV Sound and the
Picture levels. Use the Smart Button on the remote to
quickly adjust Smart Sound (to set TV Volume levels
during program changes or commercial breaks); Smart
Picture (for programmed video video level adjustments
on avariety of program sources); and Smart Surf (for
quick one button channel selection of up to 10 of your
favorite channels).
Page 6

picture controls, select a TV
channel and follow the steps shown
below:
<_ Select BRIGHTNESS,
PICTURE, COLOR, TINT, or
SHARPNESS picture control.
With the PICTURE MENU on
screen, move the RED=highlight
with the MENU (M) 4.*_buttons.
Then press the MENU button.
<_ Press the (+) or (-) buttons to
adjust the selected control.
_.' _ Press the STATUS button to
clear the screen.
O
• _ MAIN MEN
is centered, control
settings are at normal mid-range
levels.
BRIG1WI['_SS Press (-) or (+) until
dark parts of the picture show good
detail.
PICTURE Press (-) or (+) until
whitest parts of the picture are as
bright as you prefer.
COLOR Press (-) or (+) to add or
eliminate color.
TINT Press (-) or (+) to obtain
natural skintones. (Also see Flesh
Correction onpage9 for more
information).
Press(-) or (+) to
improvedetail in the pictun_.
(V/ITH BUTTONS ON THE REMOTE)
Press MENU (M)
IOselect RED
highlighted
$elegl and II1=. prl_s I_" ._l¢cl _ then[pl'_s MENU
view an explanation of controls grouped under same
the selected feature, feature heading. For
MENU (M) button to / (M) buttota to view additional
HOW TO SELECT FEATURES
Press MENU (M)
• • to move Up
and Down within
the Menu.
¥
Ex_nple: Tint, Brightness,
Pi¢l ur¢, etc.
Press MENU (M)'ql I_
to move from Slde-to-
Side within the Menu.
,d
Page 7
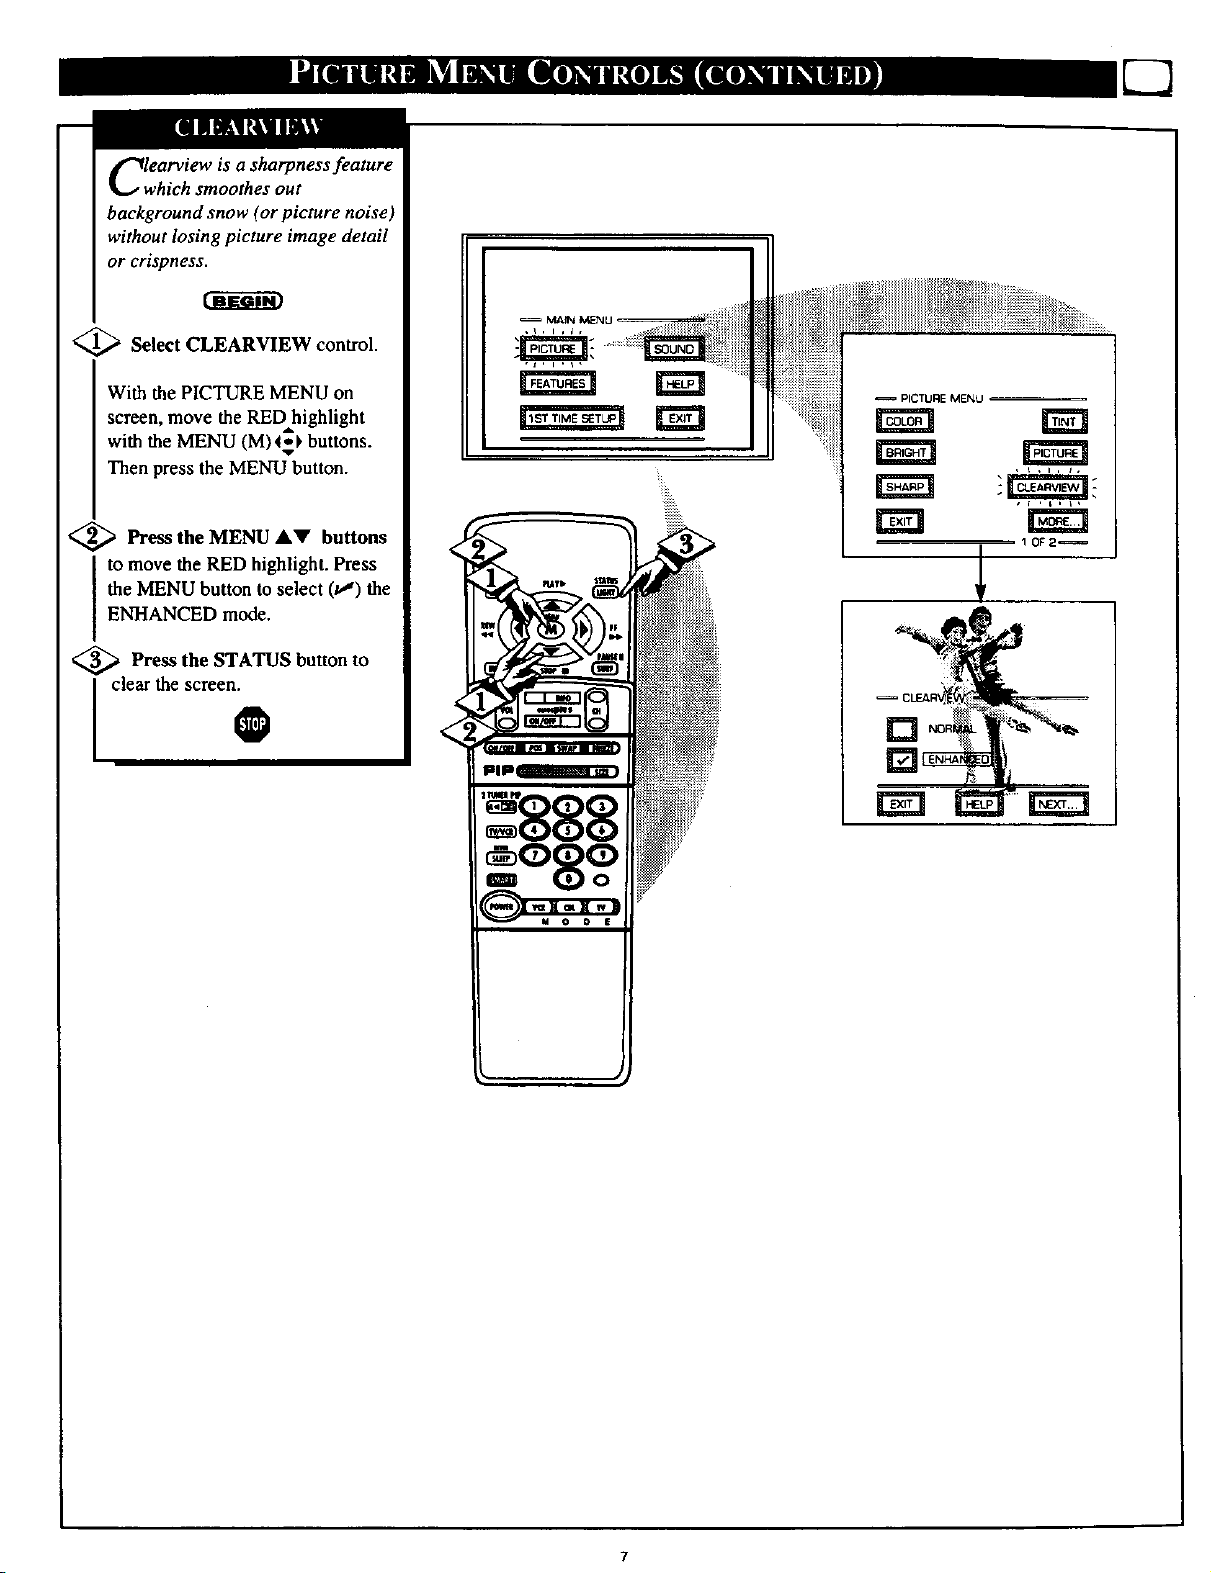
Clwearview is a sharpness feature
hich smoothes out
background snow (or picture noise)
without losing picture image detail
or crispness.
<_ Select CLEARVIEW control.
With the PICTURE MENU on
screen, move the RED highlight
with the MENU (M)40 buttons.
Then press the MENU button.
<_ Press MENU &V buttons
to move the RED highlight. Press
the MENU button to select (t/) the
ENHANCED mode.
<_ Press the STATUS button
clear the screen.
the
to
0
[]
Page 8
C3
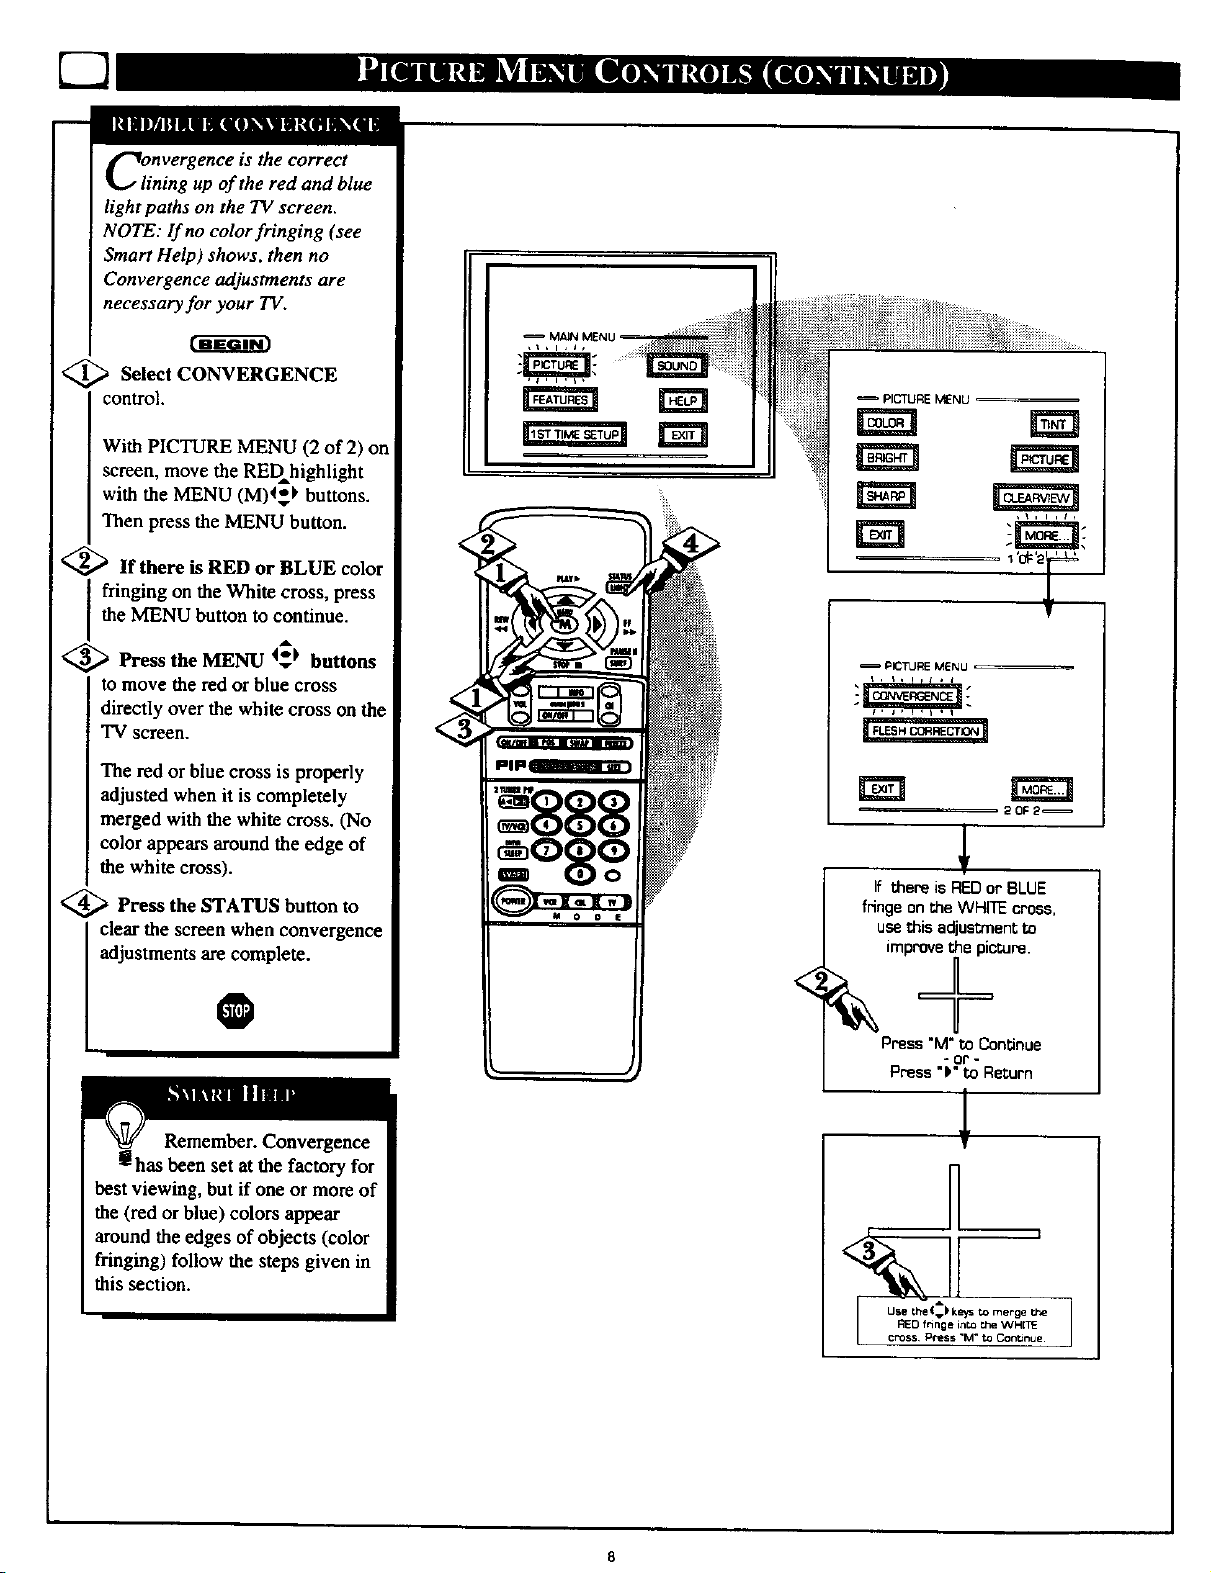
Clnvergence is the correct
ining up of the red and blue
light paths on the TV screen.
NOTE: If no color fringing (see
Smart Help) shows, then no
Convergence adjustments are
necessary for your TV.
<_ Select CONVERGENCE
control.
With PICTURE MENU (2 of 2) on
screen, move the RED highlight
with the MENU (M)4_ buttons.
Then press the MENU button.
<_If there is RED or BLUE color
fringing on the White cross, press
the MENU button to continue.
<_ Press the MENU 4_t buttons
to move the red or blue cross
directly over the white cross on the
TV screen.
The red or blue cross is properly
adjusted when it is completely
merged with the white cross. (No
color appears around the edge of
the white cross).
<_ Press the STATUS button to
clear the screen when convergence
adjustments are complete.
PICTURE MENU
=P_TU_MENU =
_OF2
If there is REDor BLUE
fringe on the WHITE cro6s,
usethis adjusl;rnentto
O
Remember. Convergence
has been set at the factory for
best viewing, but if one or more of
the (red or blue) colors appear
around the edges of objects (color
fringing) fo|]ow the steps given in
this section.
Press "M" to Continue
8
- or -
Press "P"to Return
Page 9
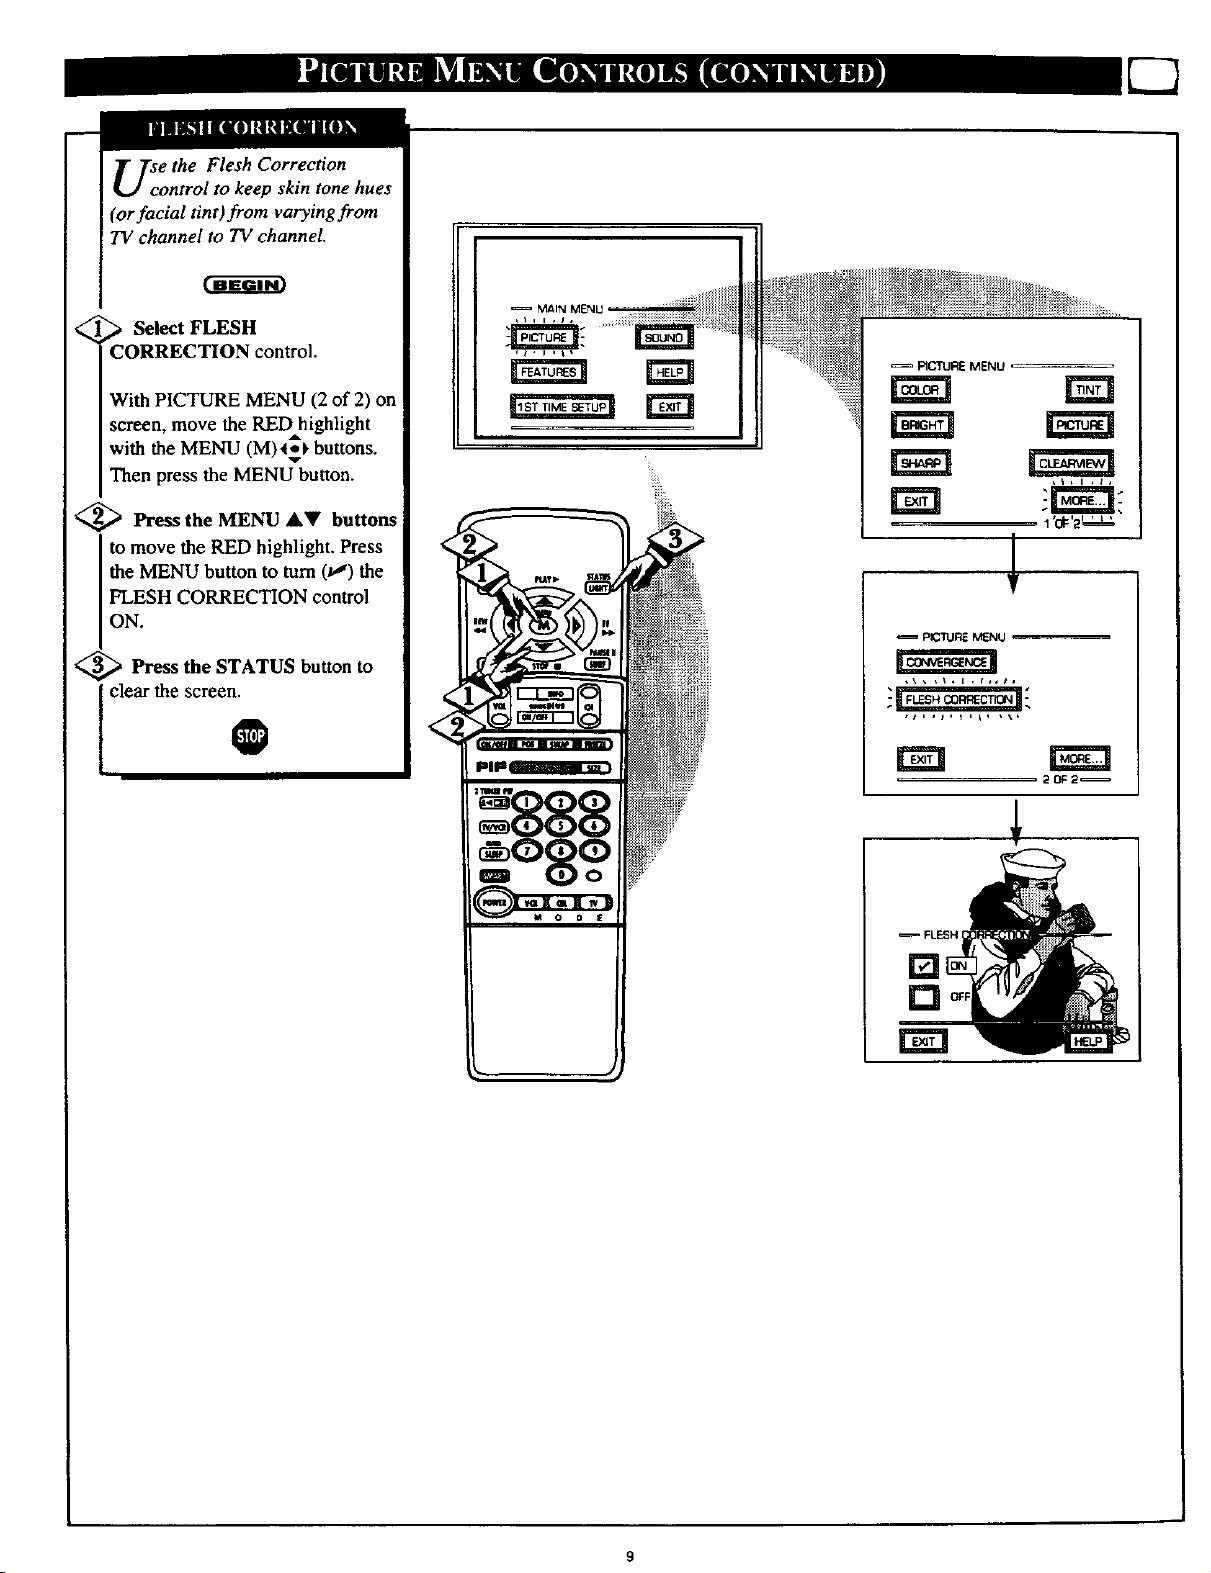
Use the Flesh Correction
ontrol to keep skin tone hues
(or facial tint)from varying from
TV channel to TV channel.
_ Select FLESH
CORRECTION control.
With PICTURE MENU (2 of 2) on
screen, move the RED highlight
with the MENU (M)_**_buttons.
Then press the MENU button.
<_ Press the MENU AV buttons
to move the RED highlight. Press
the MENU button to turn (u,') the
FLESH CORRECTION control
ON.
<_ Press the STATUS button
clear the screen.
to
O
FICTURE MENU
EEl
EE! "-r_--_rt;
1'or'2''L'
<
!
PICTURE MENU
<
<,,
20F2_
[]
[]
rm
FLESH I
Page 10
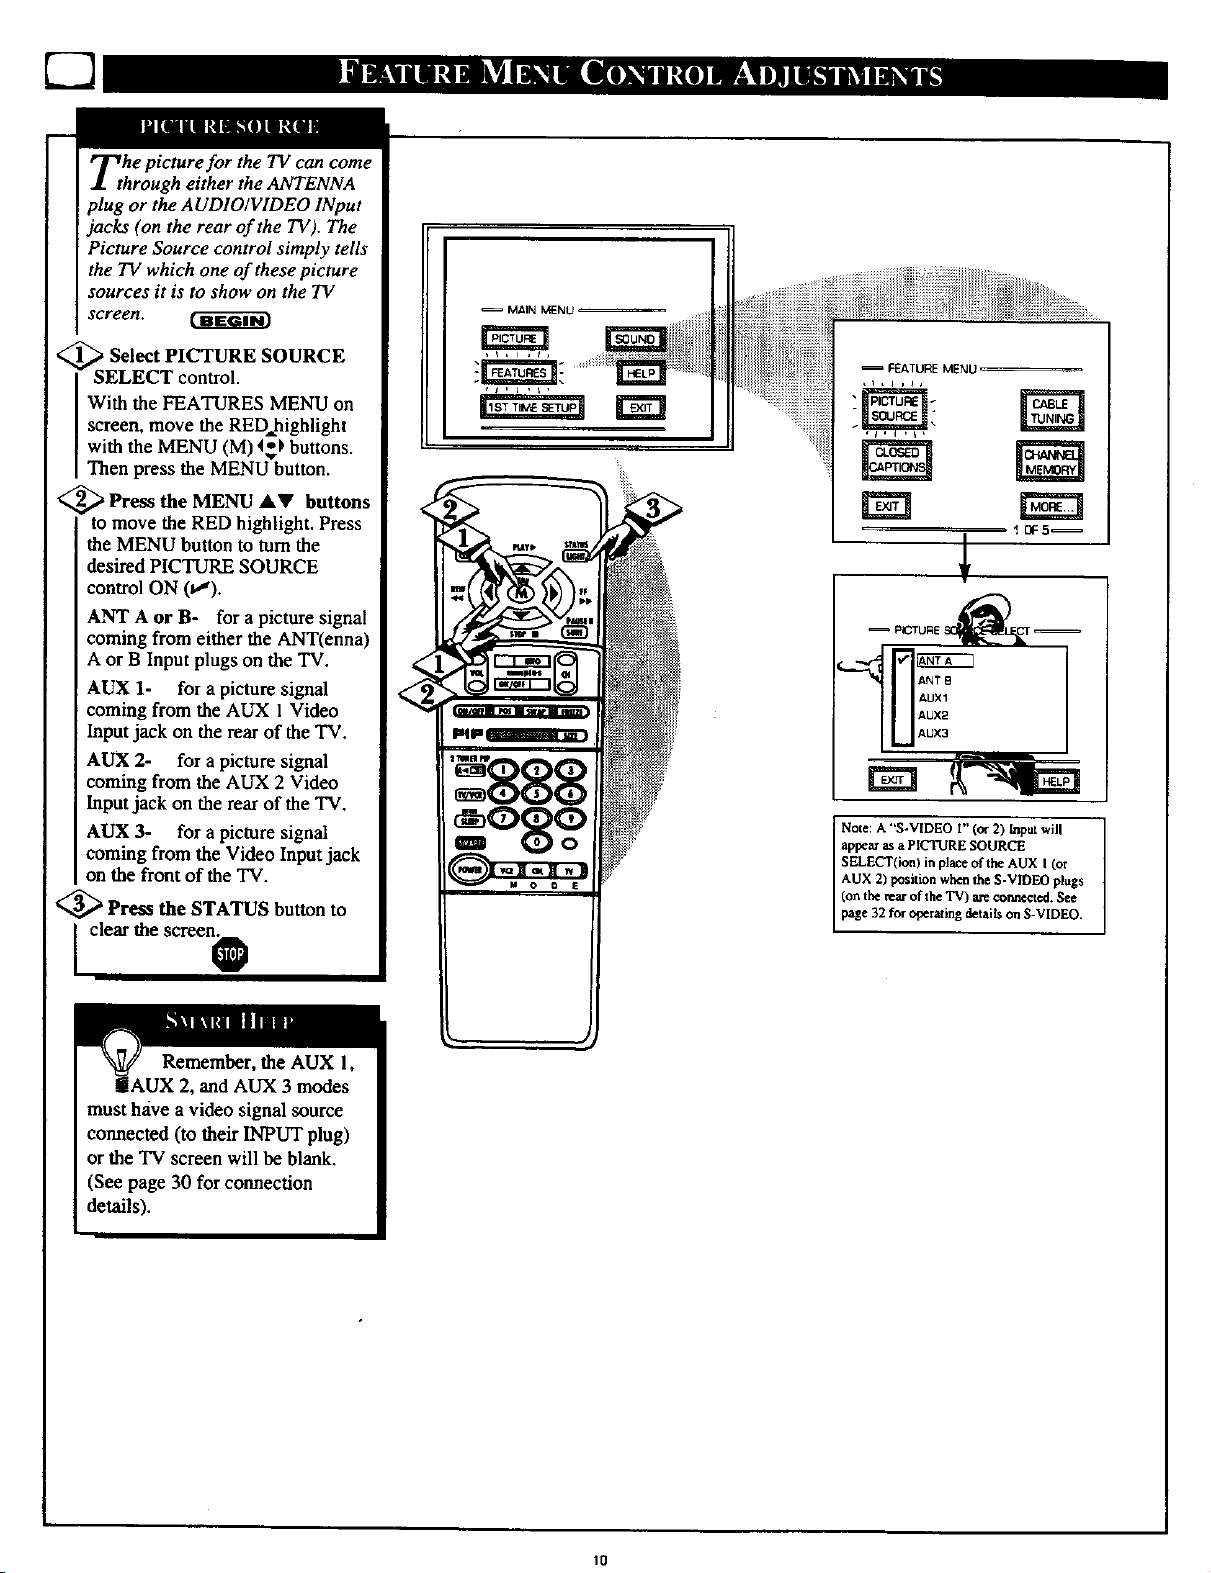
Tthe picture for the TV can come
hrough either the ANTENNA
plug or the AUDIO/VIDEO INput
jacks (on the rear of the TV). The
Picture Source control simply tells
the TV which one of these picture
sources it is to show on the TV
screen.
<_ Select PICTURE SOURCE
SELECT control.
With the FEATURES MENU on
screen, move the REDhighlight
with the MENU (M) 4,*_buttons.
Then press the MENU button.
<_Press the MENU AV buttons
to move the RED highlight. Press
the MENU button to turn the
desired PICTURE SOURCE
control ON (v'r).
ANT A or B- for apicture signal
coming from either the ANT(enna)
A or B Input plugs on the TV.
AUX 1- for a picture signal
coming from the AUX 1Video
Input jack on the rear of the TV.
AUX 2- for a picture signal
coming from the AUX 2 Video
lnput jack on the rear oftbe TV.
AUX 3- for a picture signal
coming from the Video Input jack
on the front of the TV.
<_ Pre_ the STATUS button to
MAIN MENU
AUX1
AUX2
AUX
Note: A "S-VIDEO I" (or 2) Input will
appe_ as a PICTURE SOURCE
SELECT(ion) in place of the AUX I (or
AUX 2) position when the S-VIDEO plugs
(on the rear of the TV) are oarmcct_l. See
page 32 for operating details on S-VIDEO.
[ clear the screonO
Remember, the AUX 1,
iAUX 2, and AUX 3 modes
must have a video signal source
connected (to their INPUT plug)
or the TV screen will be blank.
(See page 30 for connection
details).
10
Page 11
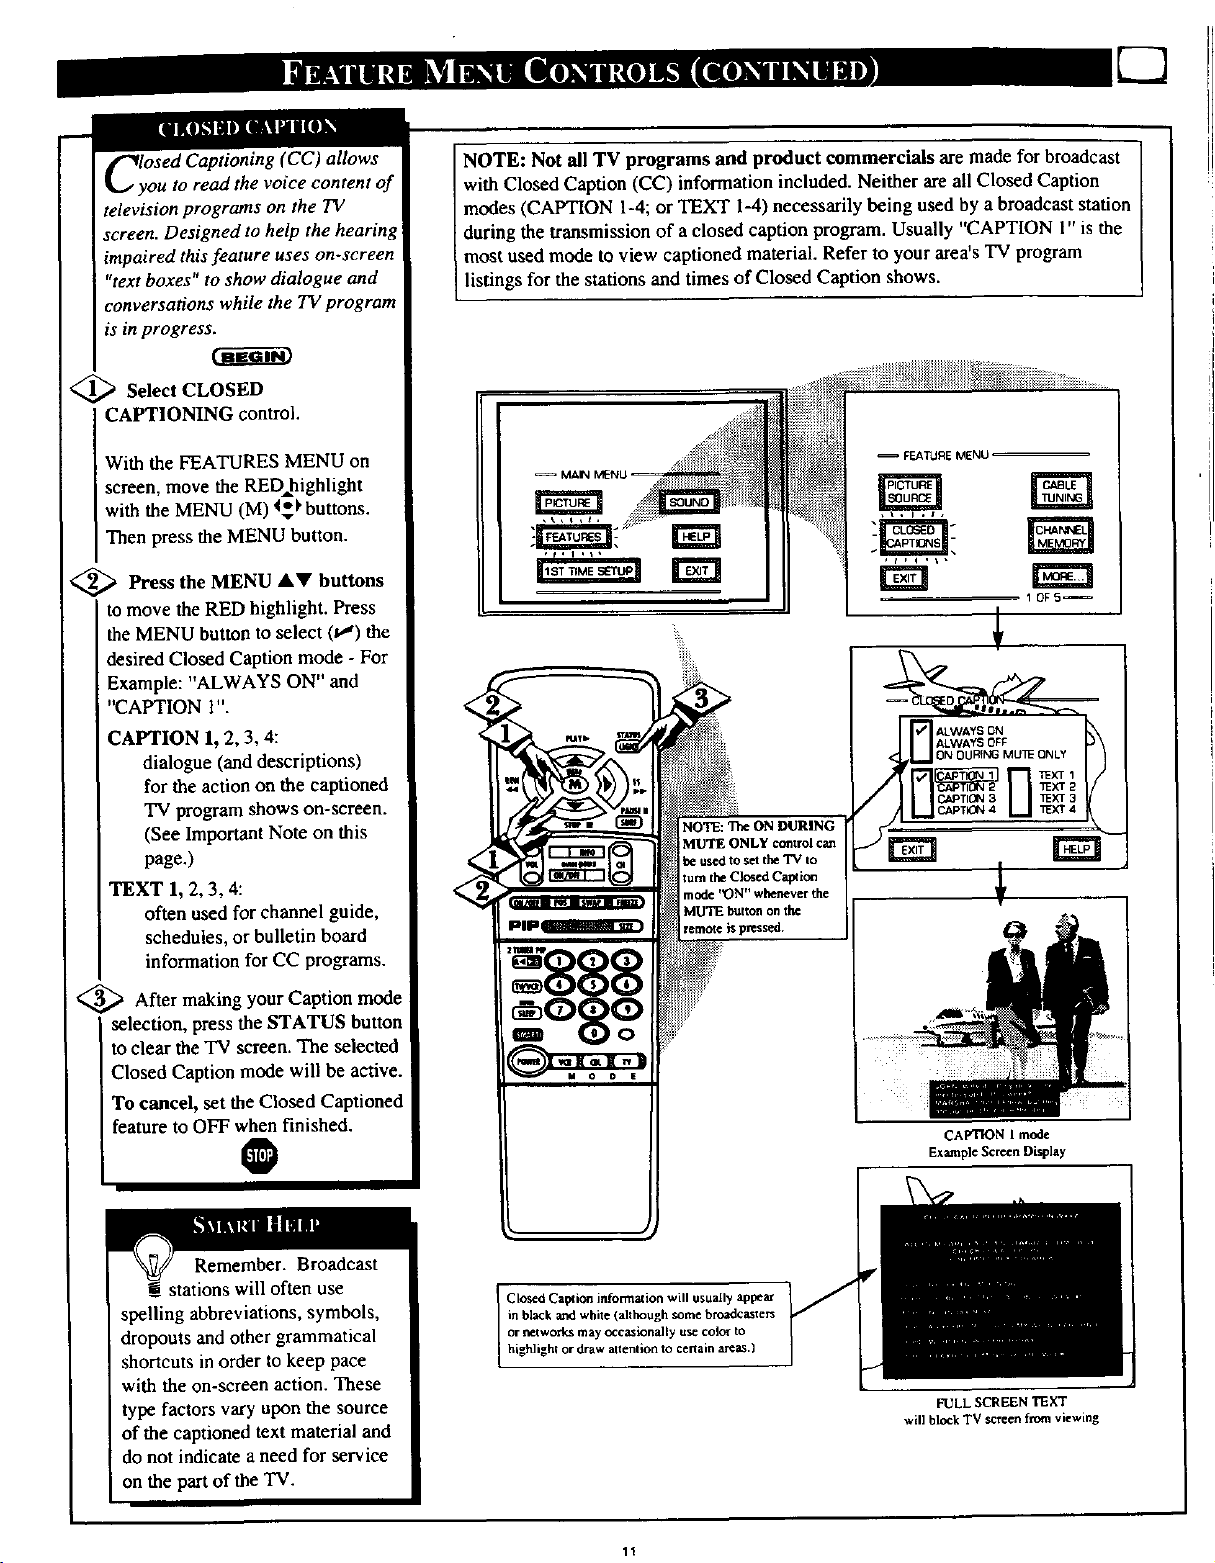
ClyOSed Captioning (CC) allows
ou to read the voice content of
television programs on the TV
screen. Designed to help the hearing
impaired this feature uses on-screen
"text boxes" to show dialogue and
conversations while the TV program
is in progress.
<_ Select CLOSED
CAPTIONING control.
With the FEATURES MENU on
screen, move the RED=highlight
with the MENU (M) _ buttons.
Then press the MENU button.
NOTE: Not all TV programs and product commercials are made for broadcast
with Closed Caption (CC) information included. Neither are all Closed Caption
modes (CAPTION 1-4; or TEXT 1-4) necessarily being used by a broadcast station
during the transmission of aclosed caption program. Usually "CAPTION 1" is the
most used mode to view captioned material. Refer to your area's 'IV program
listings for the stations and times of Closed Caption shows.
,_!_ i_ _i _
=FEATURE MENU
MA_ M_NU
<_ Press the MENU _kV buttons
to move the RED highlight. Press
the MENU button to select 0") the
desired Closed Caption mode - For
Example: "ALWAYS ON" and
"CAPTION l".
CAPTION 1, 2, 3, 4:
dialogue (and descriptions)
for the action on the captioned
TV program shows on-screen.
(See Important Note on this
page.)
TEXT 1, 2, 3, 4:
often used for channel guide,
schedules, or bulletin board
information for CC programs.
<_ After making your Caption mode
selection, press the STATUS button
to clear the TV screen. The selected
Closed Caption mode will be active.
To cancel, set the Closed Captioned
feature to OFF when finished.
O
888
o8o°i
NOTE: The ON DURING
MUTE ONLY control can
be used to set the TV to
turn the Closed CapEon
mode )_)N'--whenever the
MU'IE button on the
remote is pressed.
1 OF5
CAPTION 1 mode
Example Screen Display
Remember. Broadcast
stations will often use
spelling abbreviations, symbols,
dropouts and other grammatical
shortcuts in order to keep pace
with the on-screen action. These
type factors vary upon the source
of the captioned text material and
do not indicate a need for service
on the part of the TV.
in black and white (although some broadcasters
or networks may occasionally use color to
Closed Capt ion information will usually appear
highlighl or draw attention to certain are_.}
FULL SCREEN TEXT
will block TV screen from viewing
Page 12
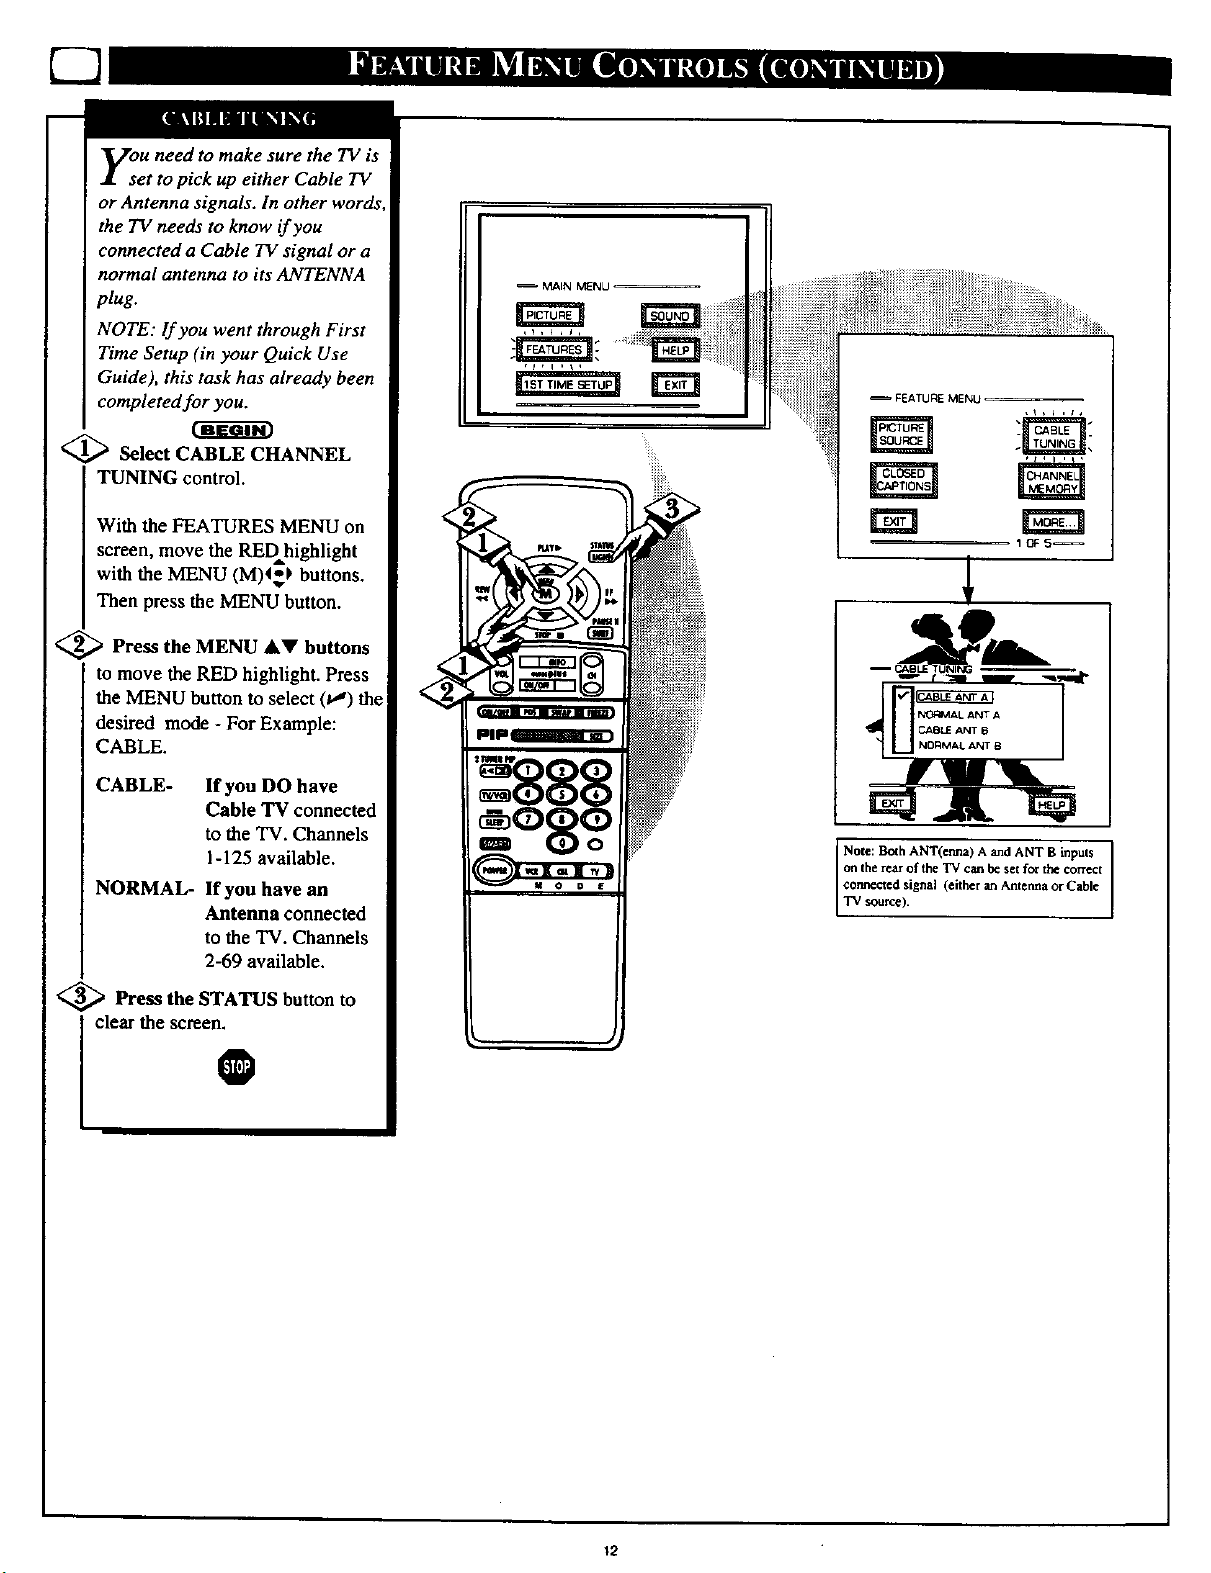
you need to make sure the TV is
et to pick up either Cable TV
or Antenna signals. In other words,
the TV needs to know if you
connected a Cable TV signal or a
normal antenna to its ANTENNA
plug.
NOTE: If you went through First
Time Setup (in your Quick Use
Guide), this task has already been
completed for you.
_ Select CABLE CHANNEL
TUNING control.
MAIN MENU
FEATURE MENU
With the FEATURES MENU on
screen, move the REDhighlight
with the MENU (M)4_I, buttons.
Then press the MENU button.
<_ Press the MENU &V buttons
to move the RED highlight. Press
the MENU button to select (t,") the
desired mode - For Example:
CABLE.
CABLE- If you DO have
Cable TV connected
to the TV. Channels
1-125 available.
NORMAL- If you have an
Antenna connected
to the TV. Channels
2-69 available.
<_ Press the STATUS button to
0
i clear the screen.
EEl
10F5_
I
I Note: Both ANT(enna) A and ANT B inputs
on the rearof lhe TV can be set for the correct
cormec_ed signal (either an Ancerma or Cable
"IV source).
12
Page 13
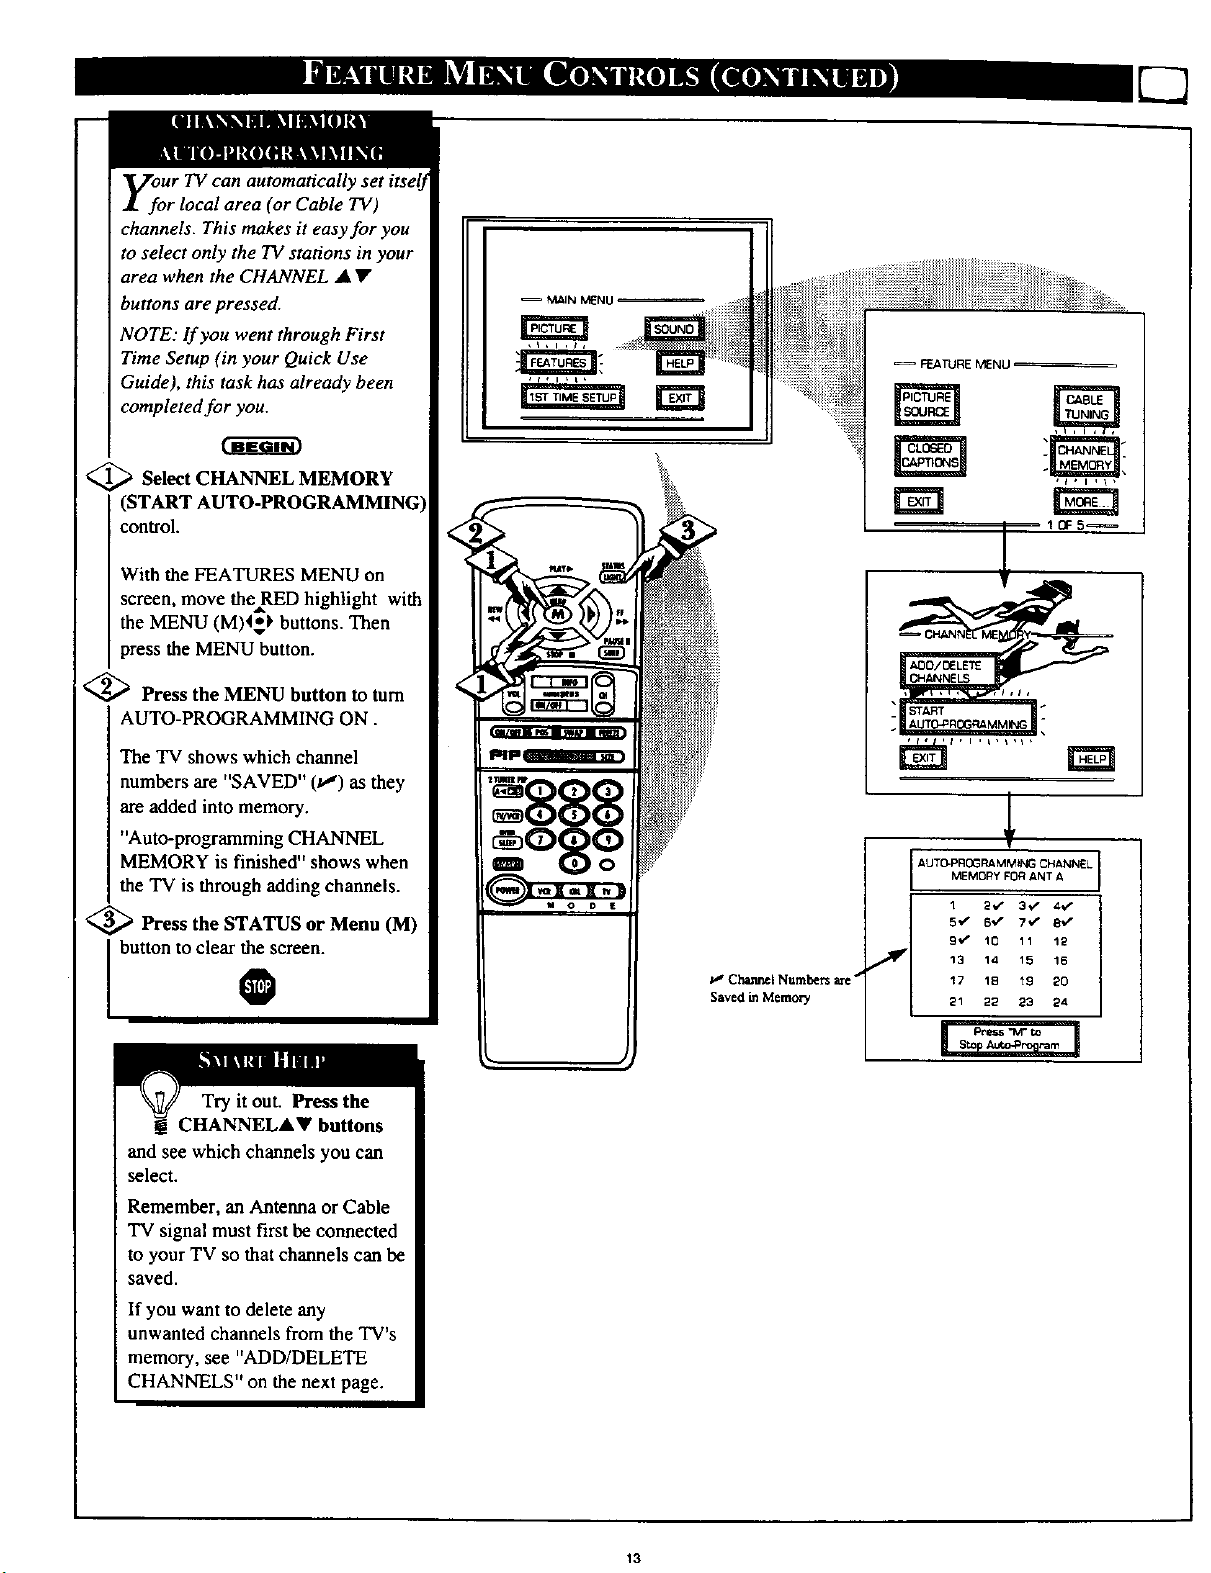
y_oUr TV can automatically set itselJ
r local area (or Cable TV)
channels. This makes it easy for you
to select only the TV stations in your
area when the CHANNEL • •
buttons are pressed.
NOTE: If you went through First
Time Setup (in your Quick Use
Guide), this task has already been
completed for you.
@Select CHANNEL MEMORY
(START AUTO-PROGRAMMING)
control.
With the FEATURES MENU on
screen, move theRED highlight with
the MENU (M)4=*) buttons. Then
press the MENU button.
<_ Press the MENU button to turn
AUTO-PROGRAMMING ON.
The TV shows which channel
numbers are "SAVED" (va) as they
are added into memory.
"Auto-programming CHANNEL
MEMORY is finished" shows when
the TV is through adding channels.
<_ Press the STATUS or Menu (M)
I button to clear the screen.
0
_,GC l_ne I Numl_rs are _"
Saved in Memocy
FEATURE MENU
IOFS_
AUTO-PRGG RAMMtNG CHANNEL
MEMORY FOR ANT A
1 2V' 3"/ 4,/
5'/ 6_ 7V" 8'*/
9V" 10 11 12
_'_ 13 14 15 16
'17 18 19 20
21 22 23 24
Try it out. Press the
CHANNELAV buttons
and see which channels you can
select.
Remember, an Antenna or Cable
TV signal must first be connected
to your TV so that channels can be
saved.
If you want to delete any
unwanted channels from the TV's
memory, see "ADD/DELETE
CHANNELS" on the next page.
13
Page 14
C2
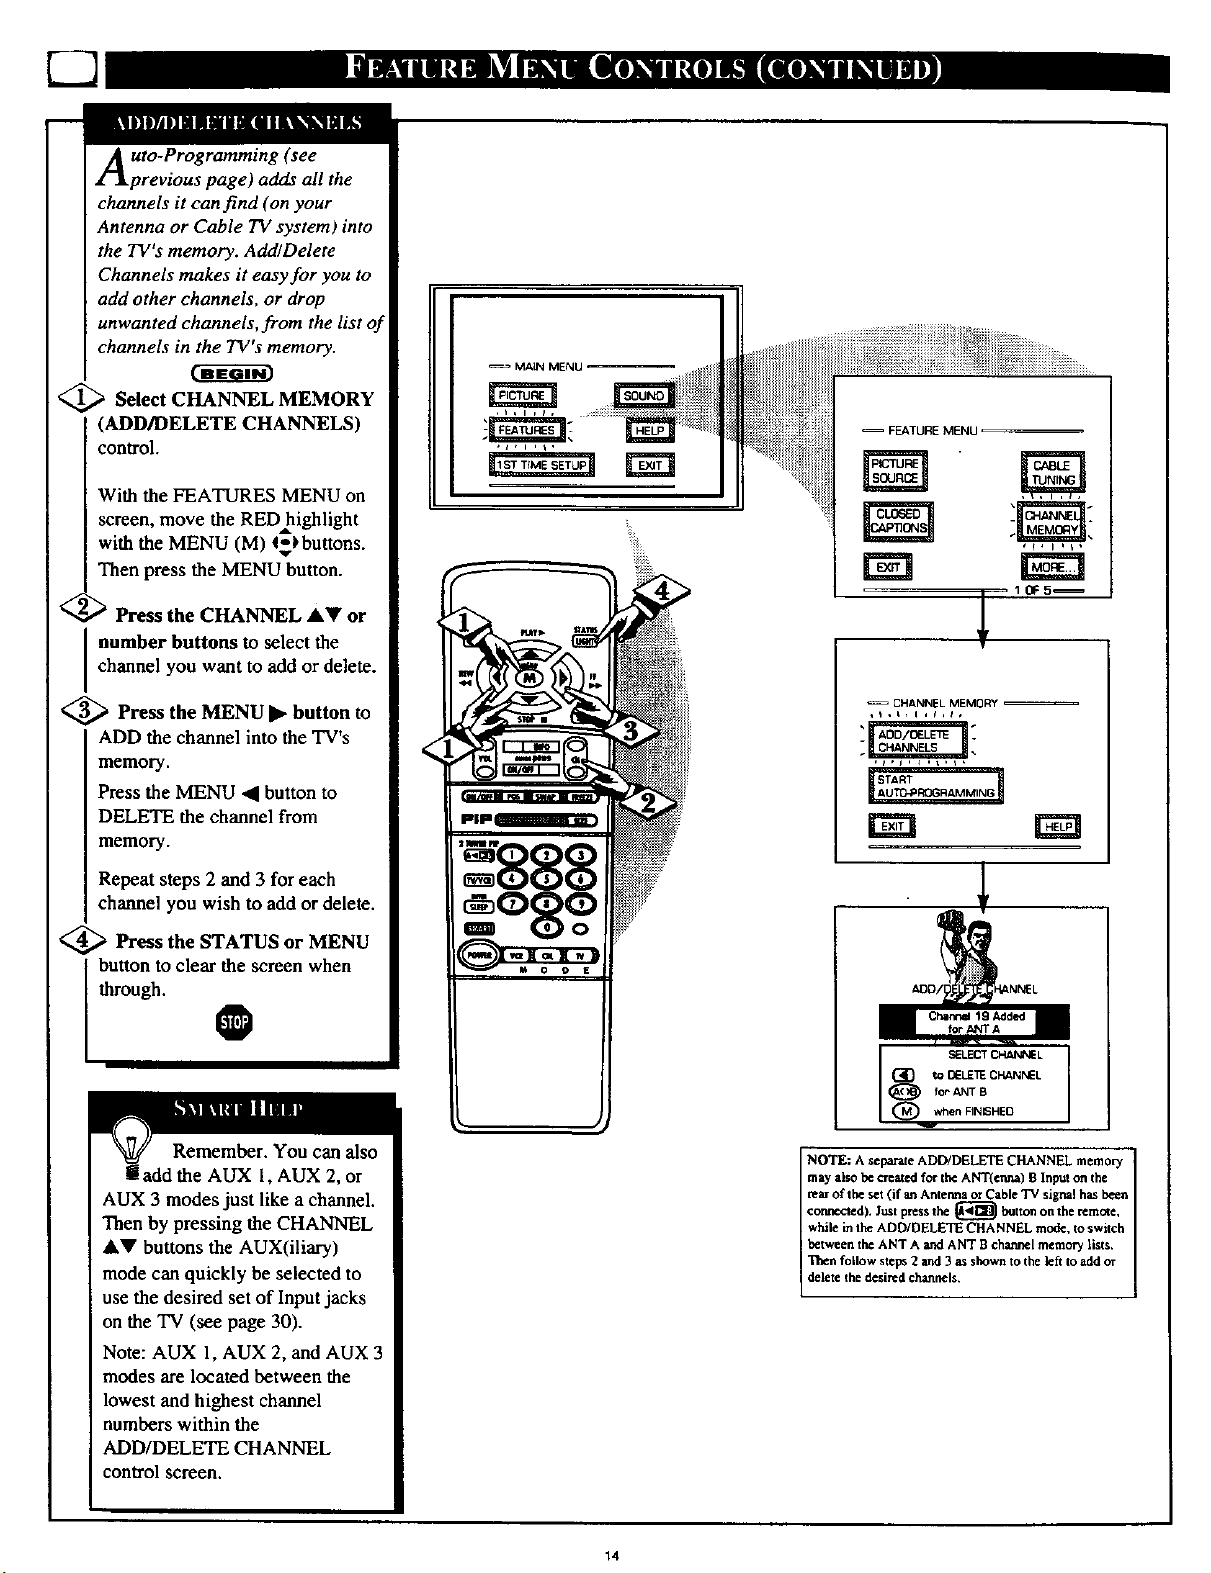
Auto-Programming (see
previous page) adds all the
channels it can find (on your
Antenna or Cable TV system) into
the TV's memory. Add/Delete
Channels makes it easy for you to
add other channels, or drop
unwanted channels,from the list of
channels in the TV's memory.
<_ Select CHANNEL MEMORY
(ADD/DELETE CHANNELS)
control.
With the FEATURES MENU on
screen, move the RED=highlight
with the MENU (M) 4$_buttons.
Then press the MENU button.
_' '_ Press the CHANNEL AV or
number buttons to select the
channel you want to add or delete.
<_ Press the MENU • button to
ADD the channel into the TV's
memory.
Press the MENU '41 button to
DELETE the channel from
memory.
FEATURE MENU
CHANNEL MEMCRY
Repeat steps 2 and 3 for each
channel you wish to add or delete.
_ Pl'ess the STATUS or MENU
through.
I button to clear the screen when
0
Remember. You can also
add the AUX 1, AUX 2, or
AUX 3 modes just like a channel.
Then by pressing the CHANNEL
&V buttons the AUX(iliary)
mode can quickly be selected to
use the desired set of Input jacks
on the TV (see page 30).
Note: AUX 1, AUX 2, and AUX 3
modes are located between the
lowest and highest channel
numbers within the
ADD/DELETE CHANNEL
control screen.
SELECT _L
(_O to OELE'_ CHANNEL
_) for ANT B
(_ when FINISHED
NOTE: A separate ADD/DELETE CHANNEL memo_
maT also be created for the ANT(crma) B Input on the
rearof the set (if _ Anterma or Cable TV signal has been
connected). Just press the _ button on the remote,
while in the ADD/DELETE CHANNEL mode, to switch
between the ANT A and ANT S charnel memory lists.
Then follow steps 2 and 3 as shown to the left to add or
delete the desired channels,
14
Page 15
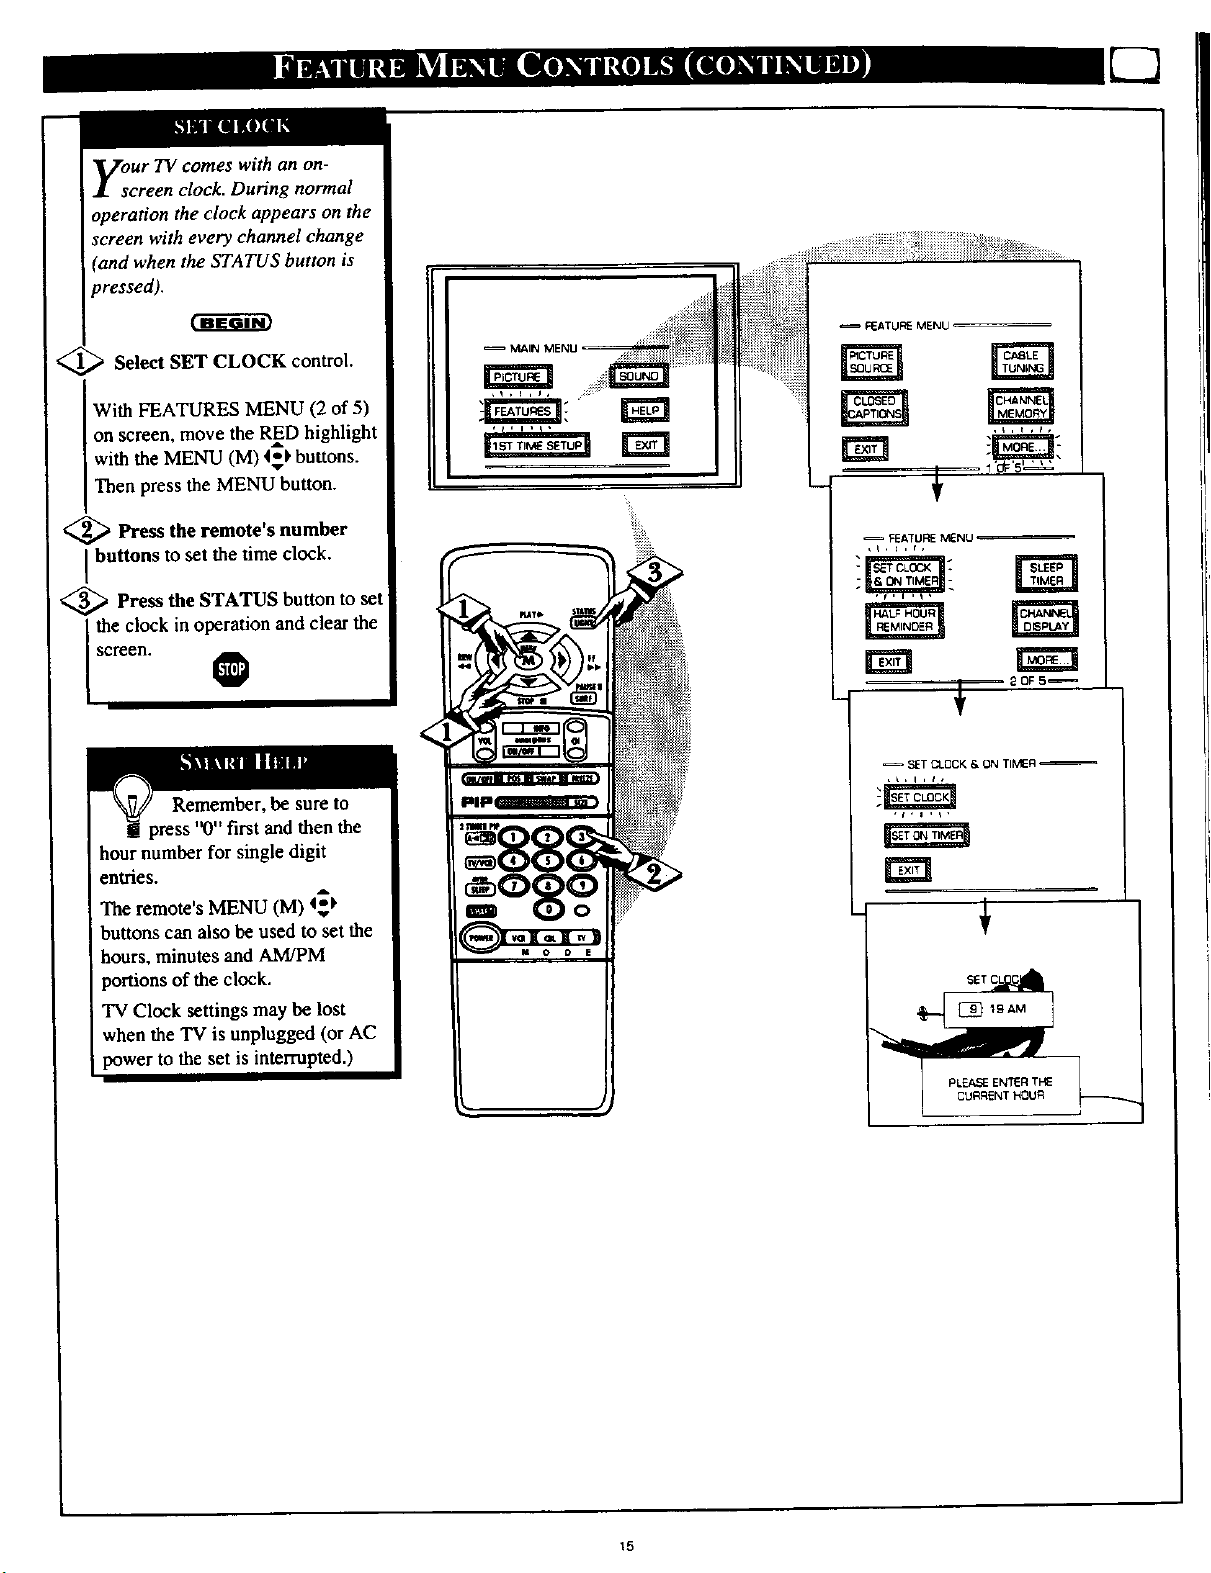
with an on-
screen clock. During normal
operation the clock appears on the
screen with every channel change
(and when the STATUS button is
pressed).
Select SET CLOCK control.
With FEATURES MENU (2 of 5)
on screen, move the RED highlight
with the MENU (M) <_ buttons.
Then press the MENU button.
<_ Press the remote's number
buttons to set the time clock.
<_ Press the STATUS button to set
the clock in operation and clear the
screen. 0
2DFS_
then the
hour number for single digit
entries.
The remote's MENU (M) _1,
buttons can also be used to set the
hours, minutes and A.M/PM
portions of the clock.
TV Clock settings may be lost
when the TV is unplugged (or AC
power to the set is interrupted.)
SET C;LOCK & ON TIMER
15
Page 16
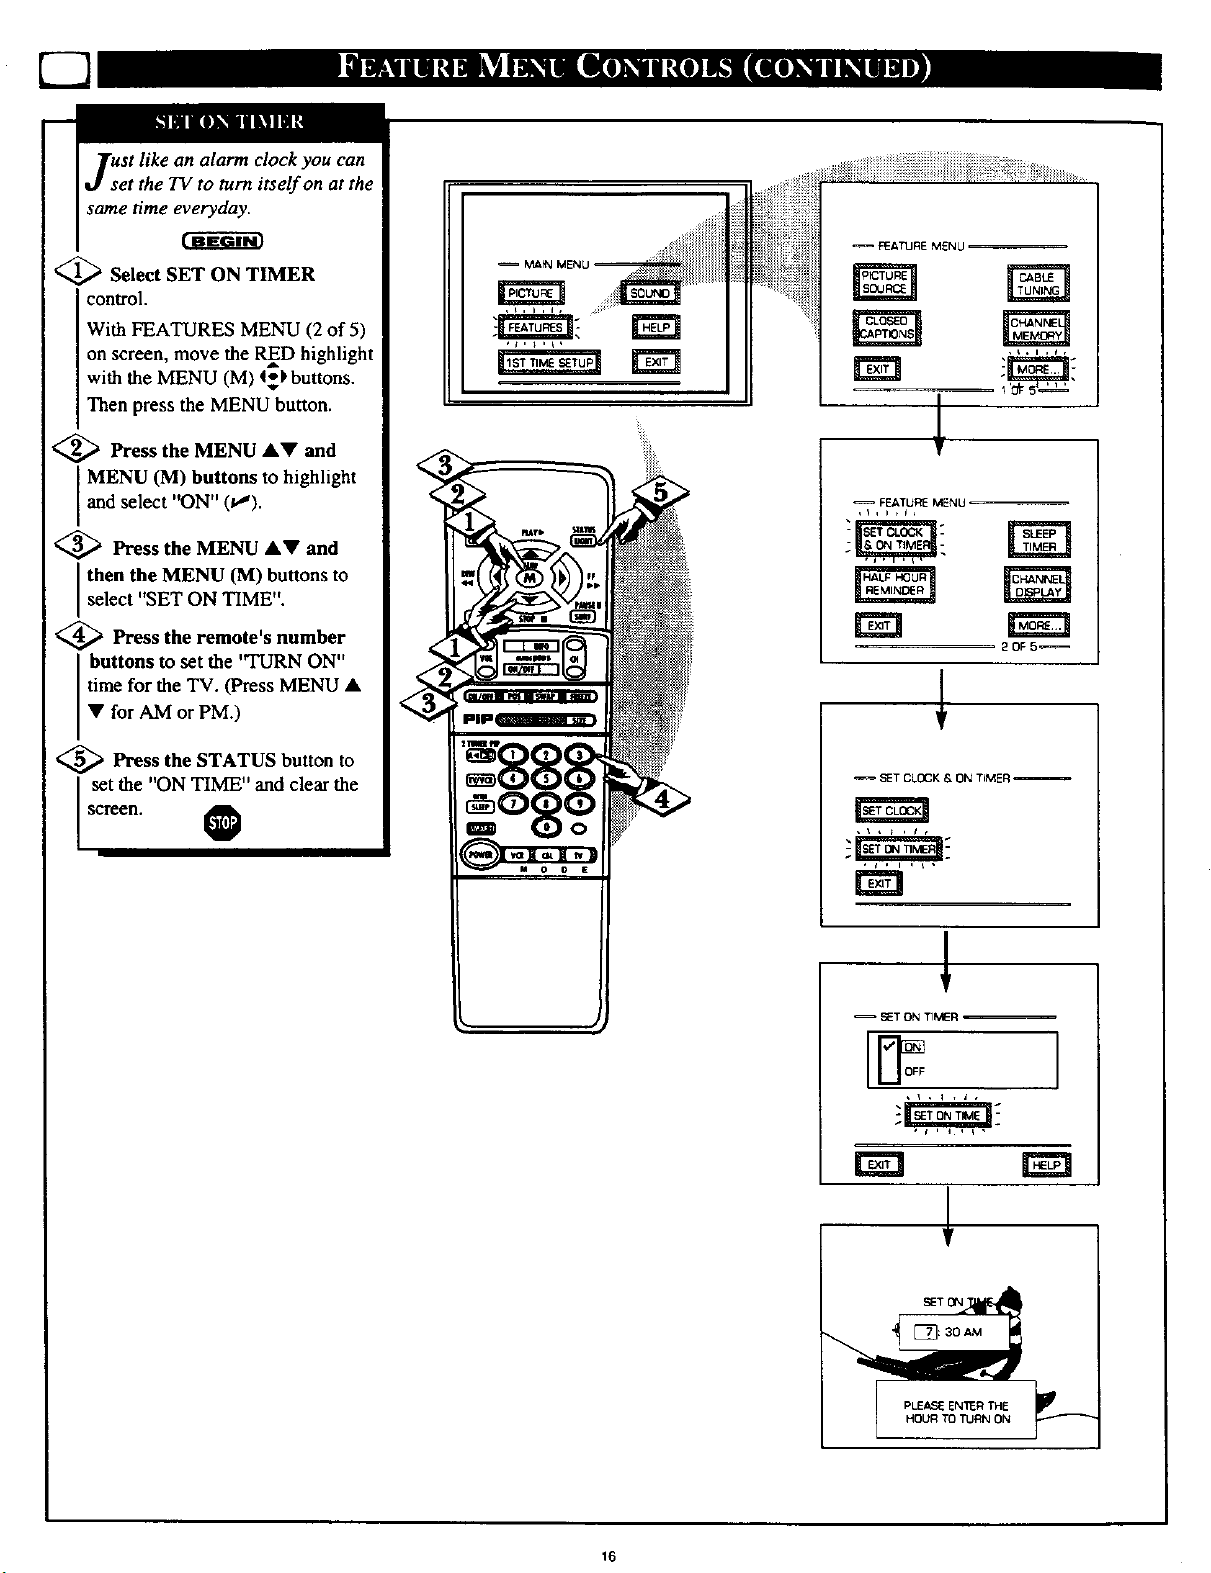
clock you can
t the TV to turn itself on at the
same time everyday.
<_ Select SET ON TIMER
control.
With FEATURES MENU (2 of 5)
on screen, move the RED highlight
with the MENU (M) 4_kbuttons.
Then press the MENU button•
<_ Press the MENU •V and
MENU (M) buttons to highlight
and select "ON" (t,_).
<_ Press the MENU AV and
select "SET ON TIME".
Ithen the MENU (M) buttons to
<_ Press the remote's number
buttons to set the '_RN ON"
time for the TV. (Press MENU •
• for AM or PM.)
i i iiiiiiiiil i;_iiiii i>._i_iii iii......
FEATURE M_NLI
_ Press the STATUS button to
set the "ON TIME" and clear the
screen. O
SET CLOCK & ON TIMER
_ET ON TIMER
rm INI
16
Page 17

n_ve you ever fallen asleep in
ont of the TV only to have it
wake you up at two in the morning
with a test pattern screeching in
your ears? Well, your TV can save
you all that trouble by
automatically turning itself off
<_ Press the SLEEP button on the
remote control.
Note: you can also select the
SLEEP control with the TV's on-
screen FEATURES MENU (2 of 5).
Move the RED highlight with the
MENU (M) 4_buttons. q'hen press
the MENU button.
<_ Press the SLEEP
repeatedly to pick the amount of
time (15 minutes to 2 hours ahead)
before the TV will turn itself off.
The (+), (-) buttons can also be used
to set the amount of time.
_ Press the STATUS or MENU
(M) button to clear the screen after
you have set the time for the TV to
turn off.
button
O
-- FEATURE M_ENU
Remember, to see how
many minutes are left before
the *IV shuts itself off, reselect the
SLEEP TIMER control screen.
To stop a SLEEP TIMER setting,
reset the timer hack to OFF.
(Turning the 'IV off and on, or
pressing a button during the last
minute of a timer setting, will also
cancel a setting.)
A few seconds before the TV is to
shutoff a message will come on the
screen telling you GOOD NIGHT.
17
Page 18
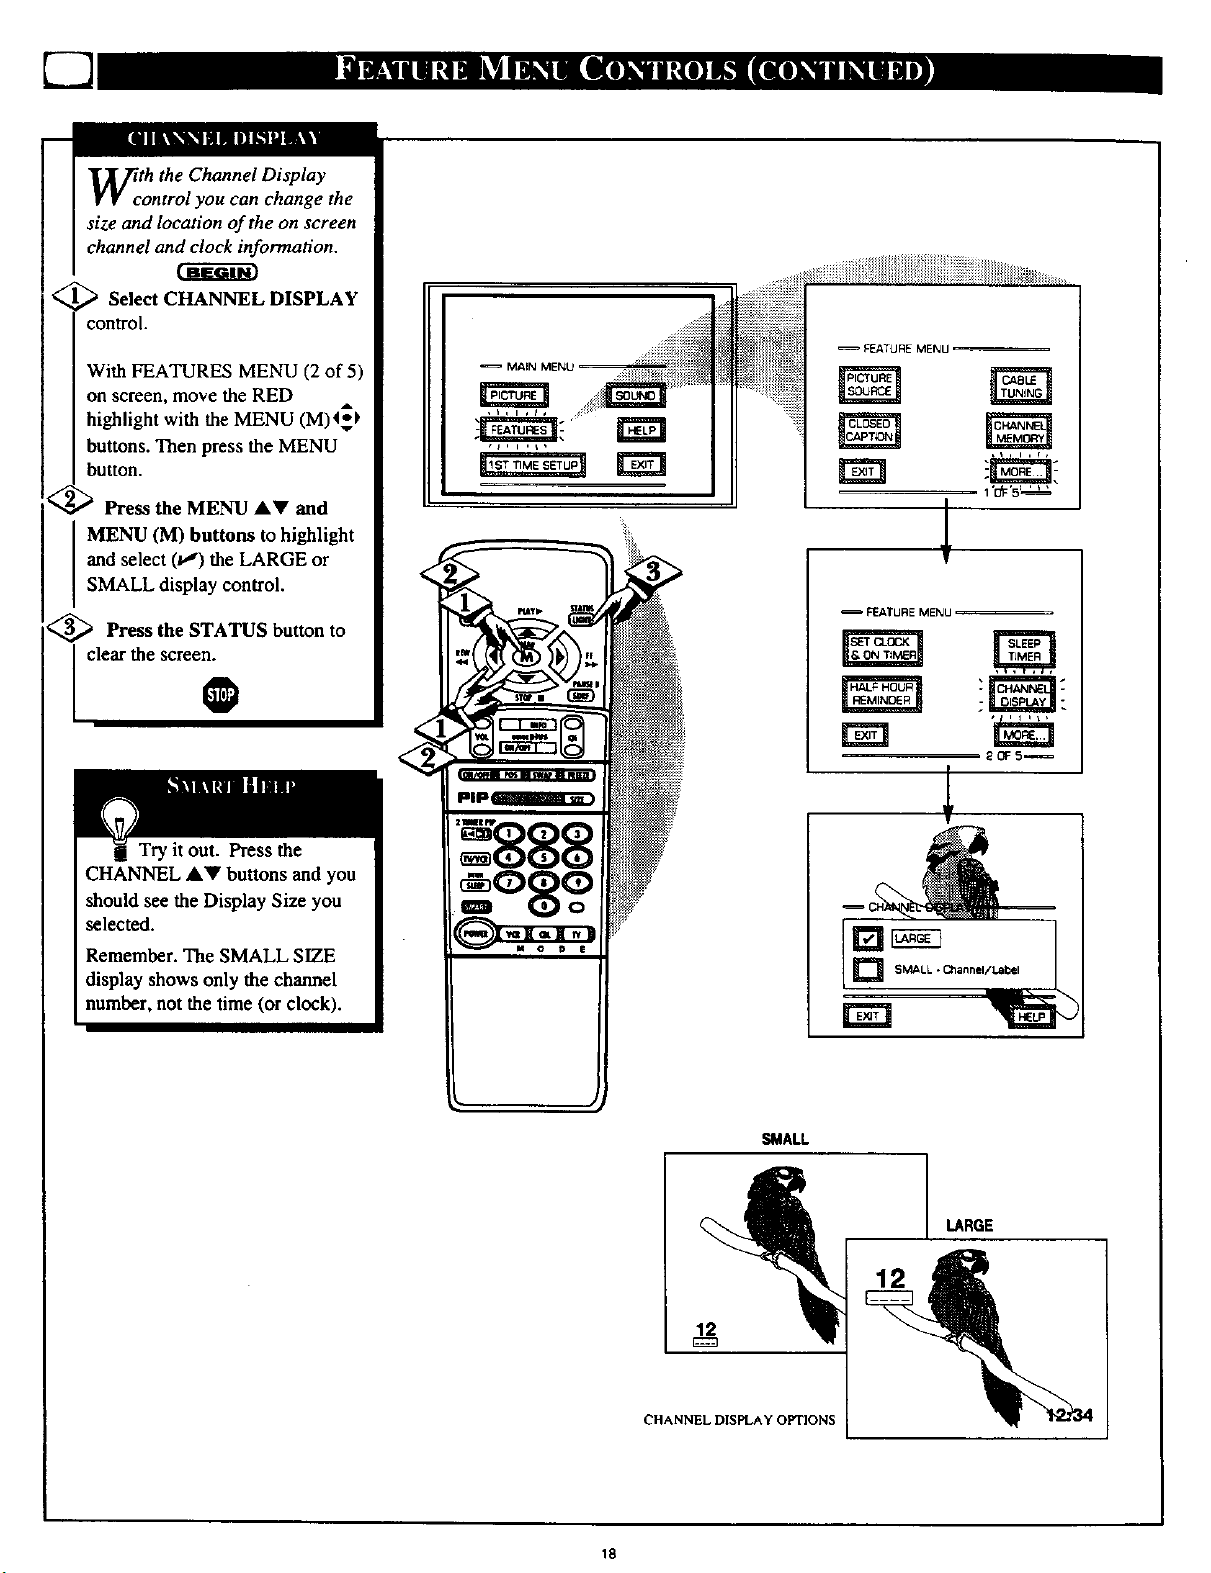
Wcth the Channel Display
ontrol you can change the
size and location of the on screen
channel and clock information.
<_ Select CHANNEL DISPLAY
....!iiiiiii
control.
With FEATURES MENU (2 of 5)
on screen, move the RED ,,
highlight with the MENU (M)4*_
buttons. Then press the MENU
I button.
<_ Press the MENU &Y and
MENU (M) buttons to highlight
and select (t,,")the LARGE or
SMALL display control.
<_ Press the STATUS button to
I clear the scree_
Try it out. Press the
CHANNEL ,4,_r buttons and you
should see the Display Size you
selected.
Remember. The SMALL SIZE
display shows only the channel
number, not the time (or clock).
MAN MENU _ -._i i_
=PF.ATURE MENU
FEATURE MENU
'888
12
CHANNEL DISPLAY OPTIONS
18
SMALL
LARGE
12
Page 19

r
mill PII[Ill ml_ flll_
Wcth the Half Hour Reminder
ontrol the TV automatically
shows you the current time and
channel every thirty minutes.
Select HALF HOUR
REMINDER control.
With FEATURES MENU (2 of 5)
on screen, move the RED
highlight with the MENU (M) _
buttons. Then press the MENU
button.
<_ Press the MENU AV and
MENU (M) buttons to highlight
and select (t,J) the EVERY HALF
HOUR item.
<_ Press the STATUS button to
-- MAIN MENU =
-- FEATURE MENU
= FEATURE MENU
clear the screen_
HALF I-
Page 20

parental Control allows parents
to block out, or "censor", any
channels they think children should
not watch. A channel placed under
Parental Control cannot be viewed
until a correct access code is used to
unlock the channel for viewing.
First let's set your Parental Code:
_ Select the PARENTAL
CONTROL.
With FEATURES MENU (3 of 5)
on screen, move the RED highlight
with the MENU (M)4-_ buttons.
Then press the MENU button.
"BLOCK CHANNELS" and
"SETUP CODE" show on screen.
<_ Press the MENU &V and
MENU (M) buttons to highlight
and select the SETUP CODE item.
<_ Press 0, 7, 1, I on the remote.
"XXXX" shows on the ACCESS
CODE SETUP screen as you press
the number buttons.
NOTE:Your TV left the factory with the ParentalCodesetto "0000". If you are using "1
yourTV and the Parental Control for the first time,and don't want toSETUP a new
Accesscode number, you can usethe "0000"number to blockchannels - see nextpage.
The "071I" ParentalCode (shown onthis page)is given as a default or way to reset the
4
Code when thecurrent Access number is not known.
• - _TklF_ MENU .....
.......... 3 0F 5_--.
............ . ..... . ..... J
•PARE_At CONTR0t.
J
"INCORRECT ACCESS CODE -
TRY AGAIN" will also show on the
screen.
on
4) Press 0, 1 the remote
7, 1,
again.
"Next Enter Your New Access
Code" shows on the screen.
1
> Enter a new four digit number
code using the remote.
"Access. Code Changed" shows on
the screen to let you know the new
code has been set.
Continue to the nlextpage to find
out how to "block" channels from
viewing.
Parents - it isn't possible
unlock or defeat your
Censor Code without changing to
a new code number. So if your
Code number changes, and you
didn't change it yourself, then you
will know that someone has
altered the code and the blanked
out channel has been viewed.
to EXIT
to %lock" channels
Press MENU to return to the
Parental Control Menu screen.
i Press MENU _1_to go on and sta_
Press STATUS to clear the screen.
20
Page 21

fter your personal Parental
number has been set (see
previous page), you are now ready
to select the channels you want to
block out or censor.
_ Select the BLOCK
CHANNELS control.
With FEATURES MENU (3 of 5)
on screen, move the RED highlight
with the MENU (M) 45_ buttons•
Then press the MENU button.
<_ Press the MENU AV and
MENU (M) buttons to highlight
and select the BLOCK
CHANNELS item.
€_ Enter the correct Parental
Code number.
_ Press Channel or
akY Channel
Number buttons to select the
channel you want to block.
T
, ,_ FF_1LeE MENU. --_ .... ,
PARIETAL O_NTROt. _ _
,_ Press the MENU button to
"BLOCK VIEWING" on the
selected channel.
Press the MENU 41 button to
"ALLOW VIEWING" on a
blocked channel.
Repeat steps 3 and 4 for any other
channels you wish to block out.
O
Remember, once set
Parental Control blocks out
the selected channel number on
both the ANT A and ANT B
channel rings. Also, to make TV
viewing easier all channels (for
both ANT A/B and Audio/Video
Input jacks) will be unblocked,
once the correct Parental Code
number has been entered.
When the TV is turned OFF and
then back ON again, is when
Parental Control is back in place
for all blocked out channels.
mFJ_T t_ EXIT
CP;_NEL 19
BLGCKEO BY pARENTAL CONTROL
Pleese ether ACC_S_ Code
fc_ ,*,_w m.g
BLocKED CHANNEL SCREEN MESSAGE
(Appears when an attempt to select a blocked
channel is made and Parental Control is ON.)
No¢e: Yoczcaa also block out the
useof the Audic/Video Inputjacks
on thc TV, This stops the viewing
of VCR programs which can be
shown tIn-ough the A/V IN jacks.
Just select VCR/AUX 1, AUX 2, or
AUX 3 (located between the Inwcst
and highest channel numbers) on
the Channel Blocking screen, and
select %locked".
21
Page 22

Do you ever have trouble
remembering on which
channel a particular station or
network is located? The Channel
Labels Control is a quick way to
view and select channels from a
list of Labelled channels.
A Label is a four letter callout you
can set to appear with the on
screen channel number. Example
Label: WXYZ- for a TV station's
call letters.
To select channels from the
Channel Labels Control:
<_ With the FEATURE MENU
screen (3 of 5) on the TV's screen,
move the REDhighlight using the
MENU (M) 4_ buttons to select
CHANNEL LABLES. Press the
MENU (M) button.
<_ Press the MENU AV and
MENU (M) buttons to highlight
and select either:
"MANUAL" to create your own
label for a channel.
'gRESETS" to choose from a list
of prewritten channel labels.
(See instruction details on this
page.)
_ Press the STATUS button to
clear the screen.
O
v V
MANUAL- To create your
own Channel Label:
Press theChannel A• or
Numberbuttonstoselect
desired station.
A red highlight shows the
active letter space for the
channel label.
Press the MENU • •
buttons to pick any of the
letters orsymbols that are
given foryour use.
Press the MENU _l I_
buttons to move the red
highlight to the other letter
spaces and repeat.
Press the STATUS button
to clear the screen when
finished.
; - 1=_hoose From Li_
I
I
_Return to Guide
PRESETS -To pick a Label
from the "LABEL" list:
Pressthe Channel •• or
Numberbuttons to select
desiredstation.
Press the MENU•_'
buttons to moveup and
down the Channel Label
list.
Just stop onany labelyou
might want touse.
The selected label
automatically appears with
channel changes and when
the STATUS button is
pressed.
Press the STATUS button
to clear the screen when
finished.
22
Page 23

N;ite: lf you went through First
me Setup, This task has
already been completed for you.
For our Spanish and French
speaking TV owners an an-screen
LANGUAGE option is present.
With the LANGUAGE control you
can set the TV's on-screen
features to be shown in either
English, Spanish or French.
_ Select the LANGUAGE
DISPLAY control.
With FEATURES MENU (3 of 5)
on screen, move the RED ,,
highlight with the MENU 4_
buttons. Then press the MENU
(M) button.
_ Press the MENU &Y and
MENU (M) buttons to highlight
and select (t,J) English, Spanish
(ESPANOL), or French
(FRANCAIS) on the display
control.
[]
FEATURE MENU
Text for the on-screen Menu will
change to the selected language.
<_ Press the STATUS button to
clear the screen. 0
Remember, the
Language control only
makes the TV's on-screen
(MENU) items appear in English,
Spanish, or French text. It does not
change the other on-screen text
features such as Closed Captioned
(CC) TV shows.
I
FEATURE MENU _
30F4_
23
Page 24

7-3
or TREBLE, or
BALANCE sound control.
With the SOUND MENU on the
screen, move the RED highlight
with the MENU (M)_ buttons.
Then press the MENU button.
_--_ Press the (+) or (-) buttons to
you prefer.
adjust the sound control to levels
<_ Press the STATUS button to
Ielearthescreen !
_in e BASS BOOST control
creases the low frequency
audio range of the TV. This creates
adeeper, fuller playback sound
which can be heard through the
TV'sspeakers.
<_ Select BASS BOOST sound
control,
With the SOUND MENU on the
screen, move the REDAhighlight
with the MENU (M)q_ buttons.
Then press the MENU button.
<_ Press the MENU air and
MENU (M) buttons to highlight
andturn ON (_") the BASS
BOOST control.
Select and then press MENU
(M) button to view additional
controls grouped under same
feature heading. For
Example: Treble, Balance,
Bass Boost, Stereo. etc.
<_ Press the STATUS button to
clear the screen.
24
Page 25

y:ur TV is able to receive
roadcast stereo TV programs.
The TV is equipped with an
amplifier and twin speaker system
through which the stereo sound
can be heard.
A RED stereo light (on the front of
the TV) will come on when a
stereo broadcast is received
<_ Select STEREO sound control.
With the SOUND MENU on the
screen, move the RED highlight
with the MENU (M) (_)buttons.
Then press the MENU button.
MAI N MENU
Remember.
If a stereo signal is
not available and
the TV is placed in
the STEREO mode,
sound coming from
the TV will remain
monaural (mono).
,1
_ Press the MENU AV and
MENU (M) buttons to highlight
I and turn ON (va) the STEREO
/_,.,mode.
Press the STATUS button to
clear the screen,
0
Second Audio Program (SAP) is
partof the stereo broadcast
system. Sent as a additional
audio channel SAP can be heard
apart from the current TV
program sound. TV stations are
free to use SAP for any number
of purposes, but many experts
believe it will be used for foreign
language translations of TV
shows (or for weather and news
bulletins.)
SOUNO MENU
tt,l,_,l t
] MONO AT ALL TIMES
_11 STE_O IF AVALLABLIEI
SECOND PROGRAM SOUND CAN
ONLY BE SELECTED (_) WHEN
NOTE: If a SAP signal is not
present with a selected program,
the SAP option can not be
selected. "This program does not
comain SAP information" will
show on the TV screen.
25
Page 26

E-q
Zche Incredible Surround control
an be used to add greater
depth and dimension to both _,N _=_u .' . , ,.
monaural (MONO) and STEREO _ :_:
TV sound, _
<_ Seleet the Incredible Surround
control.
WiththeSOUND MENU on the
screen, move the RED highlight
with the MENU (M) <_ buttons.
Then press the MENU button.
2_ Press the MENU
I MENU (M) buttons to highlight
i and turn ON (u,_) the
i INCREDIBLE SURROUND
[ mode.
3_'_ Press the STATUS button to
clear the screen.
Use the DISPLAY VOLUME
ontrol to see the TV's volume
level settings on the TV screen.
Once set the Volume Display will
be seen each time the VOLUME
buttons (on the TV or remote) are
pressed.
<_ Select DISPLAY VOLUME
control.
WithsOuND MENU (2of3)on
[screen,move theRED highlight
withtheMENU (M)<_I.buttons.
Then press the MENU button.
<_ Press the MENU AV and
MENU (M) buttons to highlight
and turn ON (tl) the DISPLAY
VOLUME control.
acre; bl
N'DI_ El' _ " _-..
su,
rATI _Q_Q i_=
n
.._ SOdND M_K_I ...........
means the
volume level
will be on screen
whenever the
Volume buttons
are pressed.
I SEQ3_3 AU_ PROGRAM]
;_OF 3. _,
_ Press the STATUS button to
I clear the scree_
][m]_ I
26
Page 27

WpUld you like to hear TV
rograms through your audio
hi-fi system? The TV's Variable
Audio Output jacks and TV
Speaker On/Off control work
together to offer you this TV sound
option.
Connect the R(ight) and L(eft)
VARIABLE AUDIO OUT jacks
on the TV to the R and L Audio
Input jacks on your amplifier or
sound system.
Set the audio system's volume to
normal listening level.
<_ Turn the "IV and audio system
ON. You can now adjust the sound
level coming from the audio
system with the Volume AV
buttons on the TV or remote.
<_To hear the TV sound from
only
the audio system speakers, select
TV SPEAKERS control.
With SOUND MENU (2 of 3) on
screen, move the REDhighlight
with the MENU (M)4_I, buttons.
Then press the MENU button.
_ Press the MENU AV and
MENU (M) buttons to highlight
and turn OFF (t.,_) the TV
SPEAKERS control.
You should now only hear TV
sound coming from the audio
system speakers.
<_ Press the STATUS button
to
clear the screen.
<
stereo playback options such as wireless transmitter headphone hook-up, or as an
externai amplifier connection source. However, with normal PIP feature
operations (when the ANT A and ANT B Input sources a_ connected for use),
the PIP AUDIO OUTPUTs will switch from stereo to monaural (mesao) sound.
NOTE: The TV's PIP AUDIO OUTPUT jacks can also be used for _ldhionai
Stereo sound will only he available with the TV's Main screen (or ANT A
supplied signal) at that time.
BACK OF TV
AUDIO IN
(RED/WHITE)
_ _ OUTPUT JACKS
®®
®®
AUDIO SYSTEM
VARIABLE
AUDIO
O
Remember, the audio
system may have to be in
AUX(iliary) mode to play sound
from the TV (Outputs).
Note: When the TV SPEAKER
control is set to "NORMAL" (for
TV speaker operation) make sure
the VARIABLE AUDIO OUTPUT
control (see next page) is also set
to "STEREO" in order for the TV's
AUDIO OUTPUT jacks to work
properly.
27
Page 28

TV's sound
system, you can create thefeeling
of reflected sound that surrounds
you at a movie theater or concert
hall.
/q....
Connect both external
speakers to the speaker wire
terminals on the TV.
Recommended speakers: 8ohm, 15
watt minimum. Be sure the (+) and
(-) speaker wires are connected to
the correct R(ight) and L(eft)
speaker terminals on the TV.
_ Place the speakers so the
a_d the rear surround speakers.
I viewing area is between the TV
(,_ee overhead view drawing.)
€_ Turn TV ON and place the
STEREO control to the "STEREO
After setup whenever a stereo
signal is received the audio will be
heard in Surround Sound.
REAR
REAR SURROUND
s . ,
_kers. It ts intended
-'_ground noise eff_
voltrne level than the"
The TV's Variable Audio Output
J- jacks can also be usedfor
Surround Sound. Once they are
connected to an external hi-fi
system its speakers can be used for
the playback of Surround Sound.
<_ Connect the R(ight) and L(efl)
VARIABLE AUDIO OUT jacks
[ on the "IV to the R and L Audio
[ Input jacks on yOur amplifier or
I sOund system.
'_ Turn TV ON and place the
VARIABLE AUDIO OUTPUT on
screen control to the SURROUND
(t,_) position. (Sound Menu 3 of 3).
Note: The Left/Right channel audio
line level signal at the Audio
Output jacks will be the same
information heard as on the TV's
side panel speakers.
28
Page 29

EXbtra speaker connections have
een supplied on the rear of
the TV. These extra connections
are especially important for some
of the optional Amplifier and multi-
speaker arrangements that are
_ossible with Dolby Pro Logic
;urround Sound audio features.
INT["""_ £XX
?or example: With the Surround
mode six speakers are needed to
complete the setup for proper
DOLBY SURROUND sound
playback-
2 Front Left/Right Speakers
1Center Channel Speaker
2 Rear Surround Speakers
The Front Left/Right, Center, and
Rear Surround Speakers have their
signals supplied by the connections
located on the back of the Dolby
ProLogic Audio Receiver.
Note: A CENTER CHANNEL
AMP(plifier) INPUT is also
located on the TV. This input can
be used to connect the external
Audio Receiver's Center Channel
Output in order to play Center
Channel sound through the internal
TV speakers.
When an Audio Receiver is used as
the audio source for the CENTER
CHANNEL AMP INPUT:
• Place the TV's AMP SWITCH
to the EXTERNAL position
i
TV'S INTERNAL SPEAKERS
USED FOR SURROUND SOUND
SURROUND
SPEAKERS
<
<
LEFT FRONT DOLBY PROLOGIC RIGHT FRONT
SPEAKER AUDIO AMPLIFIER SPEAKER
I
®
!
The Electronic Source or ESI-BDS plugs
allow you to seltct c_her Philips brand
products (CD Players, Tape Players. Audio
Receiver, etc.) which are equipped for
intcrconnectiv¢ compatibility and product
CaSe of tl_.l_,
REAR SURROUND
SPEAKERS
29
Page 30

Tjache TV's Audio/Video Input
ks are for direct picture and
sound connections between the TV
and a VCR (or Video Disc Player,
etc.) that has Audio/Video Output
jacks.
To view the playback of a VCR
tape by using the Audio/Video
Input jacks on the TV:
<_ Connect the VIDEO OUT jack
from the VCR to the AUX 1
VIDEO IN jack on the TV.
PICTURE AND SOUND FROM
PLAYBACK OF VCR TAPE
FEATUR E MENU
TV's AUX 2 Audio/Video Input jacks
are the same as for the AUX Ijacks
(except "AUX 2" is selected as the
NOTE: Connections and us_ of the ]
Picture Source in step 3).
_ BACK OF TV
<_ Connect the AUDIO OUT
jacks R(ight) and L(eft) from the
VCR to the AUX 1 AUDIO IN
jacks on the TV.
<_ Select the "VCR/AUX 1
PICTURE SOURCE SELECT
control on the TV.
With the FEATURES MENU on
screen, move the RED highlight
with the MENU (M) 4g)buttons.
Then press the MENU button.
<_ Press the MENU AV and
buttons
(M)
d select (_) the AUX 1 mode.
_anMENU to highlight
"13urnthe VCR ON and press
I PLAY to view the tape on the TV.
0
pnp_
VIDEO IN _ _ AUDIO IN(YELLOW) (RED;WHITE)
AUDIO/VIDEO
OUTPUT JACKS
ON VCR
VCR
If you have a single (monaural)
Audio Output VCR, "Y" coni'utctors
are available to complete your
connection. Contact your dealer, or
our Parts Information Center ( 1-800-
aCCe$$orics.
292-6066) to ot_ter any ol_ional
.Remember, after it is
connected an easy way to
select the AUX 1mode is to press
the VCR button on the front of the
TV (or the TV/VCR button on the
remote.) Channels 3/4, ANT A/B,
AUX 2/3, and the last channel
viewed can also be selected in this
way.
If you have added AUX I to the
TV's channel memory (see page
14), just press the CHANNEL
AY buttons to select the AUX 1
mode.
3O
Page 31

Fopr more convenient Direct
laybaek connections the TV's
Front Audio/Video Input panel can
be used. Located next to the TV's
front control panel (under a small
cover door) these Input jacks allow
for quick and easy connections,
particularly for the playback of
Comcorder tape recordings.
To view the playback of a
Cameorder recording using the
Audio/Video Input jacks on the
front of the TV:
1_ Connect the VIDEO oUT jack
from the Cameorder to the Front
I VIDEO IN jack on the TV.
_ Connect the AUDIO OUT
jacks R(ight) and L(eft) from the
Cameorder to the Front AUDIO IN
jacks on the "IV.
Select the "AUX 3"
PICTURE SOURCE SELECT
control on the TV.
With the FEATURES MENU on
screen, move the RED.highlight
with the MENU (M) (_} buttons.
Then press the MENU button.
€_ Press the MENU A_' and
MENU (M) buttons to htghtight
and select (t,,")the AUX 3 mode.
) Turn the Camcorder ON and
press PLAY to view the tape on
the TV.
0
PICTURE AND SOUND FROM PLAYBACK
\
AUDIO/VIDF_
OUTPUT IACKS
ON CA_OROER
CAMCORDER
ll you have a single (mollaund) ]
Aadio Out_t Camcolder, "Y" |
c_c*ors_ av_lableto_ptc(e |
your connection. Co¢ltacl your /
dealer, or our PartsInfocmation
1_ o_ionalacc_sori_. J
)Cemer (1-800-29'2-6066)to order
select the AUX 3 mode is to press
the VCR button on the front of the
TV (or the TV/VCR button on the
remole). Channels 3/4, ANT A/B,
AUX 2/3, and the last channel
viewed can also be selected in this
way,
If you have added AUX 3 to the
TV's channel memory (see page
14), just press the CHANNEL
,V buttons to select the
VCR/ALrX mode.
31
Page 32

Tthhe S(uper)-Video connection on
e rear of the TV can give you
better picture detail and clarity, for
the playback of S-VHS VCR tapes or
Video Discs, than the normal
antenna picture connections.
Note: The VCR (or Video Disc
Player) must have a SoVIDEO
OUT(put)jack in order for you to
complete the connections shown on
this page.
<_ Connect the S-VIDEO (S-
VHS) OUT jack from the VCR to
the S-VIDEO 1 jack on the TV.
PICTURE AND SOUND FROM PLAYBACK
OF S-VHS VCR TAPE PLAYBACK
FF-AI'dFII__NU
• ,s,
m
ANT B
AUX2
NOTE: Connectiora and useof the
TV's S-VIDEO2 Audio!Video Input
jacks are the same as for the S-VIDEO
Ijacks (except"S-VIDEO 2"is
selected as the PictureSource in step 3).
BACK OF'IV
i S-VIDEO _ _ AUDIO OUT
CABLE (RED/WHITE)
S-VIDEO oLrr
The S-VIDEO connecting cable
will be supplied with the S-VHS
VCR (or Video Disc Player).
_ Connect the AUDIO OUT
jacks R(ight) and L(eft) from the
VCR to the AUDIO AUX IN 1
jacks on the TV.
<_ Select the "S-VIDEO"
PICTURE SOURCE control.
With the FEATURES MENU on
screen, move the RED highlight
with the MENU (M)<,-I, buttons.
Then press the MENU button.
The "S VIDEO" picture source
option appears only when a S-
VIDEO cable has been connected
m the TV.
<_ Turn the VCR ON and place it
in the S-VIDEO (or S-VHS)
playback mode. Insert S-VHS
[ cassette tape and playback in a
O
S-VHS VCR
NOTE: A CD-i(Compact Disc Interactive)
player,Video Game,or otherS-VIDEO
acc'-',_sorycan he hookedup to the"IV using
thistypeofconnection. Please he aware that
suchvideosources, whichshowaconstant
non-movingpatternon theTVscreen, can
cause picturetube damage. Whennot in use
turn your video accessories OFF. Also,
regularlyalternate the useof videosources
withnormalTVviewing.
Inormalma er.O
Remember, after it is
connected an easy way to
select the S-VIDEO mode is to
press the VCR button on the front
of the TV (or the TV/VCR button
on the remote.)
If you have added AUX 1 to the
TV's channel memory, just press
the CHANNEL A'V buttons to
select the S-VIDEO mode.
32
Page 33

jacks
on the TV can be used to
record TV programs on VCRs
which have Audio/Video Input
jacks.
To record TV programs by using
the Audio/Video jacks on the TV."
<_ Connect the VIDEO OUT jack
on the VCR.
from the TV to the VIDEO IN jack
_ Connectthe AUDIO OUT
jacks R(ight) and L(eft) from the
TV to the AUDIO IN jacks on the
VCR.
<_ Select the "ANTENNA"
PICTURE SOURCE control on
the "IV.
With the FEATURES MENU on
screen, move the REDhighlight
with the MENU (M)4_ buttons.
Then press the MENU button.
PICTURE AND SOUND BEING
RECORDED ON VCR.
BACK OF TV
@
(YELLOW)
VIDEO OUT
AUDIO/VIDEO INPUT
JACKS ON VCR
VCR
OUT
_ AUDIO
(RED/
WHITE)
Select the channel on the TV that
you want to record.
_Turn the VCR ON. Put a
cassette tape in the unit and place
the VCR in the RECORD mode.
O
Remember, If the VCR
lhas an INPUT SELECTOR
switch, place it in the LINE or
CAMERA position.
Unattended Timer Recordings
with a VCR are possible, but not
recommended with this
connection since the TV must be
left ON for the VCR to record.
Page 34

!
m
Have you ever played hide and
eek with your remote
control? Are you tired of tearing
the house apart trying to find if
someone has stuffed the remote
under the couch, put it on the
; shelves, or hid it in the desk? Well,
your TV remote can save you all
that looking by automatically
signaling its location to you.
Here's how it works:
Press the POWER button on
_tto turn the TV ON.
you can press any
button on the front of the TV m
tunathe set ON. But for the remote
locator to work you need to be sure
to use the Power button at the "IV.
A "locating remote" message
_howson the TV screen.
Within a few seconds a
; or beeping sound will
begin to come from the remote
control hand unit.
The remote will continue to signal
its location for around 30 seconds.
Normal TV program sound will not
be heard while the remote locator is
working.
Once you fmd the remote just
press any button on the remote and
the beeping sound will stop.
The remote is now ready for
normal TV feature use.
Your "IV is attemptingto locate a lost remote
range is around 30 Feet.
' not properly
receive its 'taoming" signal from
the "IV if it has been placed on a
metal shelf or counter material.
Also, since there's a special type
of radiofrequency '!aoming"
signal receiver inside the remote
we are required to notify you that
any changes or modifications not
expressly approved by Philips
Consumer Electronics Company
could void the user's authority to
operate the remote equipment.
34
Page 35

For most homes this step would
not be needed butforyour
information:
Up to 9 different remote Iocator
address codes can be _et on which the
TV can send out its "homing" signal.
This is done in case there is more than
one TV (with a remote !ocator)
present, and you want only one
specific remote to be signaled when the
TV is turned ON.*
To set a Locator Address Code:
<_ With TV turned ON, press
LOCATOR CODE button on the
remote. (Also be sure the 'IV
SYSTEM button on the remote has
been pressed.)
You will need a pencil or pen to press
the recessed button.
The TV shows the present Remote
Locator Cede.
the
/
_ Press any number button (0-9) on
the remote to set or change the
Loeator Cede.
The remote will beep to let you Imow
it has received the new Locator Code
and then return to its norrnaloperating
mode.
Remember, if batteries are
replaced the Locator Code
will need to be reentered.
When setting the Locator Code if any
button, other than the number buttons,
are pressed the remote will return to
See the above information on [
how to use the Locamr Code
Button for Progrwnming_
i
its normal operation mode.
*Forowners who live inan apartment
l
(townhouse or condominium)
complex, this taskmay be necessary
since theremotelocator'ssignalcan
be sentanddetecteddirectlythrough
adjoining walls.
35
Page 36

m
Regardless of what type of
program your watching, your TV
has automatic video control settings
matched for your current program
source or content. The Smart Picture
feature quickly resets your TV's
video controls far a number of
different types of programs and
viewing conditions you may have in
your home.
_ Press the SMART button on the
remote.
Press the MENU (M) button to
(highlighted in RED).
select the Smart Picture feature
<_ Press the MENU • or •
buttons to choose any of the preset
viewing categories (Example:
Cartoons, Movies, etc.). Then press
the Menu (M) button to select lhe
highlighted control.
<_ Press the STATUS button on the
remoteto clear the screen.
selected you can set a number of
video controls to your own
preference. Use the remote's Smart
but_n to reselect these personally
adjusted Custom settings contained
within the Smart Picture feature.
(See the next page for more detailed
instructions.)
The video control settings for the
Smart Picture categories (except
CUSTOM) arememorized into the
TV at the factory and can only be
reset by field and service
technicians.
o
Page 37

TyO use the Smart Picture settings
ou placed in memory (see
previous page):
<
Press the SMART button on the
remote and then press the MENU
(M) to select the SMART PICTURE
control.
List of "SMART PICTURE"
categories show on the TV screen.
<_ Press the MENU (M) AY
buttons to highlight the "CUSTOM"
Smart Picture category.
<_ Press the MENU (M) button to
I select "CUSTOM."
<_ Press the MENU 4_ buttons to
move the RED highlight to the
control you wish to adjust, then press
the MENU (M).
m
_ Press the STATUS button after
you have finished your
to clear the screen.
adjustments
®
Zche "CHANGE LABEL" control
an be used to change the title of
a SMART PICTURE setting into a
name or label that may be eusier for
you to remember.
<_ With the "SMART PICTURE
LABEL" control on the screen, press
the MENU AY buttons to spell out
a new label or title for the selected
SMART PICTURE.
<_ Press the MENU • I_ buttons to
move the red highlight to each letter
space.
__ • L
< _ Press the STATUS button to
clear the screen when the new label is
finished. O
37
Page 38

l
Are you tired of the sound of
commercials following you
into the next room or all through
the house? Smart Sound allows you
to preset a desired volume level
that the TV sound will not go
above. This makes for an even,
more consistent sound by reducing
the "peaks" and "valleys" that can
occur during program changes or
commercial breaks.
_O|N
<_ Press the SMART button
the remote.
-._ _ With the SMART Menu on
the screen, move the RED A
highlight with the MENU 4._'_
buttons. Then press the MENU (M)
button to select the highlighted
Smart Sound control.
on
rz:a
Press the MENU • or • and
en the MENU (M) button to turn
e Smart Sound control ON (or
€_ Press the STATUS button to
I clear the sereen_en completed.
Remember, Smart Sound
works for sound levels
coming from either the
Antenna/Cable input on the rear of
the TV (RF audio); or the
Auxiliary (VCR/AUX IN) audio
inputs.
Page 39

A "list" or series of previously
viewed channels can be selected
with the SURF button on your remote
control. With this feature you can
easily switch between different TV
programs that currently interest you.
The Smart Surf control allows you to
set up to 10 channels in its quick
viewing "list".
<_ Press the Smart button on the
remote.
<_ With the SMART Menu on
screen, move the RED highlight with
the Menu (M) 4_1,buttons. Press the
MENU button to select the
highlighted Smart Surf control.
<_ Press the Menu • or V, then the
Menu (M) button to select either
Smart Surf or 2-Channel Surf. (See
explanation of Surf options with the
illustration on this page.)
2 CHANNEL SURF- Current and
one previous channel in the ring.
SMART SURF - Current and up to
nine addit ionsl charmels availabk
in the ring. Note: The Channel Surf
ring can he used wlth fewer than ten
channels. In this way, the number
of Surf chammls can match or fit
your pre_ta viewing interests.
m
I
To Use 2-Channel
Surf:
Withthe 2-Channel
Surf control ON,
select thetwo desired
channels forviewing
withthe number
buttons onthe remote
control.
Press the SURF
e" betweenthe
two selectedchannels.
<_ Press STATUS button on the
remote control to clear the screen.
<_ With the Smart
ON (see above), select a desired
channel for viewing. You can use
the number buttons on the remote (or
the Channel AT buttons).
_ Press the SURF button on the
remote. (Some channel numbers
may already appear within the Surf
channel list.)
<_ Press the Menu button to "ADD"
the selected channel to the Surf list.
Surf control
ISelect the next desired channel and
[ repeat steps 2 and 3. Continue until
Iall desired channels areon the Surf
list.
_ Press the SURF button on the
14! _ ._:
No(e: To Deletea channel from the
Surf list just press tbe SURF bettc_
to select the desired channel. Then
press the Menu button and the
channel will be immediately
from the on screen Surf list.
l
$
action on channels contained within
the Surf list.
I remote to quickly review current
O
Page 40

!
your remote control is set to
ork your 73/and many
infrared remote (IR) control
VCRs. However, an easy one-
time step may be necessary
before the remote will work your
VCR.
Try this initial check to see if
going on to the following section
is necessary.
<_ Press the VCR System
I button on the remote.
<_ Point remote toward VCR
and press the POWER button.
<_ Does the remote mm the VCR
ON?
IF YES, • and try the other
VCR buttons on the remote. If
they also work the VCR, then
the remote is ready and no
further steps are needed.
If NO, continue...
I
<_ First look up a TWO-DIGIT
[ remote code number for your
brand VCR before going through
the simple "1,2,3" steps (on the
I following page).
continue to next page
VCR
_VCR REMOTE
BRAr COOENO.
Akai 24, 25, 36
Capehart 33
Conoid 13
Curtis Mathes 42
Daewoo 33
Emerson 20, 31, 34, 40
Fisher 06, 07
Goldstar 23
Go Video 45, 46
Hitachi 03, 51
JVC 14, 47, 48
Magnavox 00,05
Matsushita 01,02
Mitsubishi 16, 17, 38, 39, 50
Mulfitech 27,28
NEC 21
VCR REMOTE
COOENO.
Panasonic 01,02, 52
Philips (30,05
Philips Video CD 37
RCA 04, 32, 42, 43, 44
Samsung 22, 30
Sansui 49
Sanyo 13
Sears 08
Sharp 11, 12
Shintom 35
Sony 09, 10,41
Teknika 26
Toshiba 18, 19
Video Concepts 29
Zenith 15
40
Page 41

N_h w that you have looked up
e two-digit Remote Code
Number for your brand of VCR
(on previous page), you are
ready to follow the four simple
steps below.
Please read through steps 1-4
before beginning.
<_ Press and release the REC
(RECORD) button.
thirty
leasing the REC button, press
nd release the VCR System
_iWithin seconds after
utton.
<_ Within thirty seconds after
releasing the VCR System
button, ENTER THE TWO
DIGIT CODE NUMBER for
the desired VCR. The remote is
now ready to send commands to
the VCR.
VCR
_ Point the remote at the VCR.
remote to turn the VCR ON.
I Press the POWE_button on the
Try it out. The Channel
Land VCR buttons on the
remote should now operate the
VCR.
Remember, if this doesn't work
the first time, repeat steps using
the same remote code number.
If after a second try the remote
does not operal_ your VCR, and
there are more code numbers
listed for your brand VCR, use the
next listed code number.
If after repeated attempts the code
number method does not work
your VCR, try the "VCR
SEARCH" method on page 44.
41
Page 42

|
your remote control is set to
ork your TV and many
infrared remote (IR ) control
Cable Converters. However, an
easy one-time step may be
necessary before the remote will
work your Converter.
Try this initial check to see if
going on to thefollowing section
is necessary.
[_ Press the CBL System
button on the remote.
<_ Pofut remote toward Cable
but_n.
I Converter and press the POWER
I_C Does the remote rum the
onverter ON?
IFYES, O andtrytheCHAV
and CH number buttons on the
I remote. If they also work the
I Converter then the remote is
ready and no further steps are
I needed.
._ If NO, continue...
Cable
Converter
<_ F'n'stlook up a TWO-DIGIT
remote code number for your
brandConverter before going
through the simple "1,2,3" steps
(on the following page).
continue to next page
Remember, if more than
one number is listed, you
may have to try more than the first
two-digit code given in order to
locate your Converter's remote
code.
_CONVERTER REMOTE
BRAND CODENO.
Archer 28
Diamond 23
Drake 37
Gemini 45
Hamlin 14, 15
Hitachi 25
Jerrold 00,01,02,03,04,05,46,55
Macom 29, 38
Magnavox 17, 31
NSC 49
Oak 06, 27, 39
Panasonie 18, 35
Philips 19, 20, 21, 24, 26
Pioneer 09, 32
Regency I0, 11
CONVERTER REMOTE
BRAND CODE NO.
Remhrant 33
Salora 52
Scientific Atlanta 08, 22, 47
Sberitech 34
Starcom 30
Sylvania 16
Texscan 48
Tocom 12,13, 53
Toshiba 43
Uniden Satellite 44
Unika 50
United Satellite 54
Universal 36
Video Tech 40
Video Way 51
Zenith 07, 41, 42z
42
Page 43

Nth w that you have looked up
I
<_ Press and release the REC
I (RECORD) button.
<_ Within thirty seconds after
_-_"_ Within thirty seconds after
e two-digit Remote Code
Number for your brand of Cable
Converter (on previous page),
you are ready to follow the four
simple steps below.
Please read through steps 1-4
before beginning.
releasing the REC button, press
and release the CBL System
button.
releasing the CBL System
button, ENTER THE TWO
DIGIT CODE NUMBER for
the desired Converter. The
remote is now ready to send
commands to the Converter.
k
Cable Con
A| ,_
latla _2_E)
i
,
@Point the remote at the
[ Converter. Press the POWER
button on the remote to turnthe
Converter ON.
@
_:_ Try it out. The C-'_annel
! and POWER buttons on the
remote should now operate the
Converter.
Remember, if this doesn't work
the first time, repeat steps using
the same remote code number.
If after a second try the remote
does not operate your Converter,
and there are more code numbers
for brand
listed your Converter,
use the next listed code number.
If after repeated attempts the code
number method does not work
! your Converter, try the
"CONVERTER SEARCH"
method on page 44.
I
J,
43
Page 44

!
yOwoUrTV remote can be set to
rk your VCR or Cable
Converter by what is called the
SEARCH method.
lf the "REMOTE CODE" number
method shown in the previous
section did not set your remote to
work your VCR or Converter, then
follow the easy steps listed below.
Please read through steps I-4
before beginning.
CABLE CONVERTER
<_ Press the POWER button on
I theVCR or Converter to turn theunit ON.
<_ Stand at least six feet away
from the front of the VCR or
Converter.
Point the remote toward the unit.
HOLD DOWN the SURF and
the desired System (VCR or
CBL-Converter) buttons at the
same time. KEEP HOLDING
BU'ITONS DOWN.
<_ Watch the Channel Indicator
on the unit.
Channel Numbers will SCAN LIP
when the unit has been identified.
This may take upto two minutes.
_,> Release the SURF System
(VCR or CBL) buttons as soon
as channel numbers startto scan
up. The code has been identified
and the remote is ready to operate
with the VCR or Converter.
and
09
T
Six Feet
(minimum)
pnp[
O
Remember, a minute or
two can seem very long, but
the code should be located within
two minutes.
Don't let the VCR or Converter
scan up more than five channels.
The remote may pass up the right
code and another two minute
search cycle will have ro be
repeated.
If no channel change happens
within two minutes, repeat steps 1-
4. Should a channel change still
not occur, the remote will not
work with the desired unit.
Page 45

Whwen using the TV remote
ith a VCR,first make
certain it is set to control your
VCR ( by the REMOTE CODE or
SEARCH method - see earlier
section).
<_ Press the VCR
System
button on the remote.
( .P_ Point the top of the remote
toward the frontof the VCR
(remote sensor window) when
pressing buttons.
O
ecor lear t n
Hold the RECORD button down, and
then press the PLAY button to begin
a VCR recording. Press to Clear or
erase an incorrect VCR button entry
(i.e. Timer Program). Also could be
used to set a VCR Plus+ Timer
Recording.
Rewind Button
Press to rewind tapes. For some
VCRs you may need to press STOP
button first then REWIND. In
playback mode. hold button down to
view picture moving rapidly in
mvers_.
PLAY(, STATUS
•Plav Button
Press to playback a tape. Hold down
after pressing the RECORD button to
start a recording.
Press to stop the _I
- t d Butt n
Press to rapidly advance the tape. For
some VCRsyoumay needto press
STOP first then FF. In Playback
mode hold button down to view the
picture moving rapidly in the forward
direction.
, ann ! n u t
Press to scan up or down through
VCR channel numbers.
Press but_ns for direct VCR channel
selections.
Press to temporarily stop the tape dur-
ing a playback, or recording. Press
again to release Pause.
Press to the VCR position ("VCR"
indicator on the VCR will light) to
view the playback of a tape. Press
again to place in the TV position
("VCR" indicator on the VCR will go
OFF) to view one program while
recording another program.
When used with the TV the TV/VCR
button works as a source button. Each
press cycles the TV between channels
3/4; the last view channel; ANT A/B
inputs, and any AUX(iliary) Input
mode (if it has been connected.) It is a
quick one-button way to select these
channels and modes (without directly
entering the TV's Menu system.)
.. J
Press to send remote commands to
the VCR.
Press to tern the VCR ON and OFF.
Remember, the VCR
!butlons on the remote will
not operate your VCR if those
features are not already found on
your VCR remote control.
Note: All VCR functions
(particularly Search, Rewind, Fast
Forward, etc.) will operate the
same as with the original VCR
remote control provided with the
VCR.
45
Page 46

-- Dicture-in-Picture (PIP) is the
lshowing of two pictures on the
TV screen at the same time. (One
main screen picture and one small
inset picture - or PIP). For your
ease and convenience this TV has
two separate inputs (ANTenna A
andANTenna B) for your home's
Antenna and/or Cable TV system
signal.
The ANT A input is primarily for
the TV' s main screen picture. The
ANT B input is provided as a
second, dedicated source option
for the TV' s PIP "window" and its
feature operations. The signal
connected to the ANT B input can
be either a Split Signal Input (as
described in the section on this
page), or another type of external
signal source (such as a satellite
dish system, additional home
antenna, video accessory, etc.),
See the following steps on how
channels connected to the
ANT(enna) B Input can be shown
and used within the PIP window:
- MAIN SCREEN -
Display signal supplied
primarily th_tgh
ANT A Input on rear
3_0 to 75G Adapter
(483521827003)
Twin Lead
RoundCable
75f_ Ohm
Comblnat_nVHF/Ul_An_nna
\\\\\\ n///
- Outdoor or ledoor Antenna -
receives normal bcoadcast channels
2-13 (VHF) a_d 14-69 (UHFL
- PIP WINDOW -
Display signal supplied
primarily through ANT
B Input on rear of TV.
<_ Connect your Antenna or
Cable 'IV signal to the single 75
ohm INPUT plug on a two-way
Signal Splitter (not supplied).
Connect two lengths of RF
Coaxial Cable (F-type connectors
on both ends) to the two OUTPUT
plugs on the two-way Signal
Splitter.
<_ Connect the twin OUTPUT
plugs on the Signal Splitter to the
A_hITA andANT B Inputs on the
rearof the TV.
continue to next page
For other possible PIP
iconnections see page 49 for
the "More PIP Connections"
section.
Ifyou need any accessolies or
parts to complete the described
PIP connections, contact your
dealer, or our Parts Information
Center at (1-800-292-6066), for
details.
OPTIONAL TWO-
WAY SIGNAL
(single 75otm_ Input to twin 75 ohm Outputs -
optional RF Co_lal cormecthlg cables also
required)
Cable "IV Signal
Round Cable --
7_Q Ohm Cable 'IV
your 'IV set for furtherCable 'IV cot'mection
See the Set-Up Guide also provided with
options and access_ies.
Company
•_ ANT(enna] B
provide an easily cormeaed, dedicated picture
source for PIP feature use. Other signal source
optiom (such as a satellite dish system, additional
external ameruaa,VCR, or Video Game) could also
Note: The purpese of the ANT B inpet is to
be ccenected and displayed on the TV's PIP _-recn
window through the use of the ANT S input.
Input
46
Page 47

the previous page you are ready to
follow the simple steps shown
below.
<_ Turn the TV ON.
Place the TV's PIP SOURCE
SELECT control to "ANT B"-
With FEATURES MENU (4
of 5) on screen, move the RED
highlight with the MENU (M)
4_1, buttons. Then press the
MENU button.
Press the MENU A_' and
MENU (M) buttons to
highlight and select the
ANT B" (t,,") item.
Also place the TV's Main
screen PICTURE SOURCE
SELECT control to "ANT A"-
See the Picture Source option
FEATURES MENU (1 of 5).
Press the STATUS button to
clear the screen when the above
Menu items have been set.
- MAIN SCREEN - - PIP WINDOW -
/¢qTB
AUXl
IZI INI
MAIN PICTURE SOURCE SELECT SET
TO "ANT A"
<_ Press the PIP ON/OFF button
The PIP window should show in
one of the comers of the TV
I n the remote.
screen.
Press the SWAP (or _ )
buttons on the remote to move the
ANT B and ANT A Input pictures
between the PIP window and
Main screen.
Use the Channel Number or CH
AV buttons to select desired
programs for viewing. Program
Sound occurs with the channels
displayed on the Main screen
Remember, if you see the
Jsame picture on the main
screen and in the PIP window,
check to be sure the TV's PIP
Source Select and Main screen
Picture Source select are set for
ANT B and ANT A respectively.
See the following page on how to
operate other PIP features with the
TV's remote control.
BLACK frame amend the PIP window appears
when the ANT A Input is o_ the Main screen.
PRESS
o_ remote then
Main Screen is CH 5 fTomANT A input. I adjust channels
PiP is CH S from ANT B input [ Number buttons
with CHAr or
NOTE: Sound for TV programs
displayed in the PIP window can also
be heard through the use of PIP
AUDIO OUT jacks on the rear of the
TV. Just connect the TV's Left/Right
PIP AUDIO OUTPUTs to the correct
AUX(iliary) Inputs on an external
stereo sound system (through which
the PIP audio will be played).
LZc"%=' L'=?NTBIn"
47
Page 48

-- _y using the PIP buttons on the
lJ remote the PIP picture can be
moved and swapped with the main
screen. The main screen picture
can also be frozen in the PIP
window.
<_ Press the PIP ON/OFF button
PIP appears in a comer of TV
screen. Press PIP ON/OFF again to
tu show the PIP picture.
remove PIP from the main screen.
_ Press the PIP POSITION
button to move the PIP picture
(from comer-to-corner on the TV
screen.)
This feature allows you to move
PIP and avoid blocking off any
main screen action.
<_ With PIP on the TV screen,
press the SWAP button to swap
the main screen picture with the
PIP picture. See "Smart Help"
note on this page.
1. PIPON / OFF
2. PIP POSITION
Remember, if g
the 'IV is showing
"VCR!AUX"
supplied picture on
the main screen
(when the TV and
VCR are turned
OFF), a blank
screen will appear
when the TV is
turned back ON
again.
If this happens, just
i press the CH(annel)
• or • buttons to
select a TV station
for normal viewing.
3. PIP SWAP
@Press FREEZE to hold
the
current MAIN screen picture in
the PIP window (Main picture is
still active).
If PIP is currently OFF, the PIP
window will automatically appear.
Press FRZ repeatedly to update
the frozen PIP with current
pictures from the Main screen.
You cannot reposition a frozen
PIP picture.
Press the PIP ON/OFF button to
drop the frozen PIP picture from
the screen.
<_ Press the PIP SIZE button to
change the size of the PIP window
shown on the 'IV screen.
Press the PIP SIZE button again to
see and compare the large and
small size PIP windows.
You cannot change the size of a
frozen PIP picture.
5. PIP SIZE (Large or SmLll)
O
48
Page 49

Zche picture for the PIP window
an come through either the
ANT(enna) A / B Inputs or the AUX
1/2/3 Inputs (on the front and rear
of the TV). PIP Picture Source
simply tells the TV which one of
these sources it is to show in the
PIP window.
Sdect PIP SOURCE control.
on screen, move the RInD highlight
with the MENU (M) 4_1,buttons.
Iwith FEATURES MENU (4 of 5)
"l'hen press the MENU button.
_ Press the MENU A_' and
;MENU (M) buttons to highlight
and select the desired (t,,€) PIP
Picture Source.
ANT A or B- for a picture signal
coming from either the ANT(enna)
A or B Input plug on the "IV.
Note: The remote control's
button can also be used to quickly
swap between the picture sources
for the TV's Main screen and the
PIP window.
AUX 1- for a picture signal
coming from the AUX IN 1Video
Input jack on the rear of the TV,
AUX 2- for a picture signal
coming from the AUX IN 2 Video
Input jack on the rear of the TV.
AUX 3- for a picture signal coming
from the Video Input jack on the
front of the TV.
MAI_
_FEATUI_EI_EN_J
_TURE MENu
V
_ o87
,1
_ _TURE MENtJ_
_ Press the STATUS button to
clear the screen.
window will be blank unless
a signal is connected to the
selected PIP Picture Source (ANT
B, AUX 1/2/3, etc.) on the rear of
the set.
If you see the same picture on the
main screen and in the PIP
window, you may have the Main
Screen and PIP window set to the
same video input source.
O
Remember, the PIP
a 40F5_
49
Page 50

lull [_ IHlliOi
Tche Picture-ln-Picture (PIP)
olor and Tint controls are
used to make fine tune adjustments
to the color settings for PIP (when
it is shown on the TV screen).
<_ Select PIP COLOR (or PIP
TINT) control.
;:EATUREMENU
With FEATURES MENU (5 of5)
on screen, move the R_D highlight
with the MENU (M)4_ buttons.
Then press the MENU button.
<_ Press the MENU &V buttons
to move the RED highlight. Press
the MENU button to turn (_J) the
PIP COLOR or TINT control ON.
The PIP automatically comes on to
show the PIP window on the TV
screen.
<_ Press the and (-) buttons to
(+)
adjust the PIP for Color (or Tint)
levels you prefer.
<_ Press the STATUS button to
I clear the screeo
_FEATURE MENU
FEATURE MENU
FEATURE MENU
Remember. Although
[ there are separate COLOR
and TINT controls for PIP, the
adjustment levels for these
controls depend on the TV's main
picture. For example: If the main
screen is showing a black and
white picture, PIP would also be
in black and white (even though
tits source is in color).
5O
Page 51

piP hookup with Cable
Converter Box and VCR.
<
First use an optional signal
splitter and connect the original
cable TV signal to both the
CABLE IN on the Cable Converter
and the ANTENNA plug on the
rear of the TV.
<_ Connect the CABLE OUT on
the Converter to the ANT. IN on
the VCR.
<.,
,_ja Connect the VIDEO OUT
ck on the VCR to the VIDEO
IN jack on the TV.
Also connect the AUDIO OUT (R
and L) jacks from the VCR to the
AUDIO IN jacks on the TV.
O
REAR OF TV
Remember
to use the Cable TV
Converter Box to
select channels for
PIP, the VCR must
be set to the same
channel as the
channel selection
switch on the rear of
the Cable Conver_r
(either channel 3 or
4).
SIGNAL
SPLITTER
Conlact the Par_s
Infocmation Center
1800 292-6066
to order any optional
11¢¢€_.$o¢i¢$
AUDIO VIDEO
CABLES SUPPLIED
VCR
CABLE "iVCONVERTER
51
Page 52

m
Toffehe on screen HELP menu
rs both Operating Tips and
a list of Glossary definitions for
different features on your TV.
These items are given to provide
you with more information and
details on a select group of feature
operations.
<_ Select "HELP" on the TV's
Main Menu.
Press the remote's Menu 4_
buttons to move UP/DOWN and
from SIDE-TO-SIDE within the
list of on-screen features.
Press MENU (Mr)to select the
highlighted '_-IELP" item,
<_ Press the MENU AY and
then the MENU (M) buttons to
select either the OPERATING
TIPS or GLOSSARY item.
O
MAIN MENU
= HELP MENU =
OfTV Features
= OPERATING TIPS =
L_NG OPERATING ]]PS I
• Use the • and • keys on
your remo_ to scroll
through the different
help items.
• Use the "M" key on
your remot_ will go back
to the help menu.
FOLLOW THE ON SCREEN
DIRECTIONS TO VIEW
OPERATING TEPS
Prob,em
i
I
52
Page 53

please make these simple
checks before calling for
service. These tips can save you
time and money since charges for
TV installation and adjustment of
customer controls are not
covered under your warranty.
CAUTION: A video source (such as a video game, Compact Disc Interactive - CDI, or
TV information channel) which shows a constant non-moving pattem on the TV screen,
can cause picture tube damage. When your TV is continuously used with such a source
the pattern of the non-moving portion of the game (CDI, etc.) could leave an image
permanently on the picture tube. When not in use, turn the video source OFF. Regularly
alternate the use of such video sources with normal TV viewing.
No Power
No Picture
No Sound
Work
and push POWER button again.
i Check the 'IV power cord. Unplug the 'IV, wait 1minute, then reinsert plug into outlet h
Check to be sure outlet isnot on awall switch.
Check antenna connections on the rear of the 'IV. Are they properly secured to the
antenna plug on the TV?
Check the CABLE TUNING control for correct position.
Check PICTURE SOURCE control for correct position VCR/AUX, AUX 2, AUX 3 or
S-VIDEO position without a signal source will result in a blank screen.
Check the CLOSED CAPTIONS control. Some TEXT modes could block the screen.
Cheek the VOLUME and MUTE buttons on the TV and remote.
Check the TV SPEAKER NORMAL/OFF control for the correct position.
If attempting auxiliary equipment hook-ups, check audio jack connections and that the
auxiliary equipment is on and in the proper operating modes.
Check AMP SWITCH (on rear of TV). Place in INTERNAL position for normal TV
sound (through the TV's internal speaker system). EXTERNAL for optional Dolby
ProLogic Surround Sound connections using the TV's speakers as Center Channel.
Check TV-VCR-CBL "System" buttons on the remote. Press the remote's _ System
button to send commands to the TV; VCR System to sent to VCR; etc.
Check batteries. Replace with A.A Heavy Duty (Zinc Chloride) or Alkaline batteries
if necessary.
Clean the remote and the remote sensor window on the TV.
I
TV Displays Wron
ff,hanacl.o,t.l
Cleanin_ and Care
To avoid possible shock hazard be sure the TV is unplugged from the electrical outlet before cleaning.
When cleaning the TV screen take care not to scratch or damage the screen surface (avoid wearing jewelry or using
anything abrasive- do not use household cleaners). Wipe the front screen with a clean cloth dampened with water. Use
even, easy, vertical strokes when cleaning.
• Specially designed screen cleaning kits are also available which contain anti-static cleaners and cloths designed to get
into the ridges of the TV screen. If interested, ask your dealer about the MAG4600 Projection TV Screen Cleaning Kit or
call our toll-frce Accessory Parts ordering number 1-800-292-6066.
• Gently wipe the cabinet surfaces with a clean cloth or sponge dampened in a solution of cool clear water and a mild soap
or detergent. Use a clean dry cloth to dry the wiped surfaces.
• Occasionally vacuum the ventilation holes or slots in the cabinet back.
• Never use thinners, insecticide sprays, or other chemicals on or near the cabinet, as they might cause permanent marring
of the cabinet finish.
Repeat channel selection.
Add desired channel numbers (ADD/DELETE CHANNELS control) into TV memory.I
Check CABLE TUNING control for correct position. I
This TV is equipped with protective circuitry that shuts the TV off in case of moderate [
power surges. Should this occur turn the "IV back on by pressing the POWER button ]
once or twice, or unplug and then replug the power cord at the AC outlet. I
This feature is NOT designed to prevent damage due to high power surges such as those
caused by lightning, which is not covered by your warranty.
,5,3
Page 54

A/V Inputs * Connector plugs which allow the introduction of
distinct audio and video signals into the TV from accessory
VCRs, camcorders, etc. These plugs bypass the normal tuner or
RF/Antenna signal circuitry.
Pre-Amplifier * The control center of a hi-fi system. Not
only amplifies source inputs, but also allows for source
selection, volume, tone, balance and all other controls that
affect the sound.
Coaxial Cable * A single solid antenna wire normally matched
with a metal plug (F-type) end connector that screws (or pushes)
directly onto a 75 Ohm input found on the Television or VCR.
Display * An on screen message or graphics that help the user
operate and adjust his Television feature controls. See On
Screen Displays (OSD).
Direct Audio/Video Inputs * Located on the rearof the TV
these connectors (RCA phono type plug) are used for the input
of audio and video signals. Designed for use with VCRs (or
other accessories) in order to receive higher picture resolution
and offer sound connection options.
Identify* Method by which a remote coua'ol searches and finds
an operating code for another product (such as a VCR or Cable
Converter). Once the code has been "identified" then the TV
remote can operate and send commands to the other product.
Multichannel Television Sound (MTS) * The broadcast
standardthat allows for stereo sound to be transmitted with the
TV picture.
On Screen Displays (OSD) * Refers to the wording or
messages generated by the television (or VCR) to help the user
with specific feature controls (color adjustment, programming,
etc.).
Menu * An on-screen listing of feature controls shown on the
Television screen that are made available for user adjustments.
Picture -In-Picture (PIP) * Term used when two pictures are
shown on the TV screen at the same time. The smaller PIP
picture is supplied by a VCR (or other tuner/video playback
some). The PIP picture can also be moved and swapped with
the TV's main screen picture.
Programming * The procedure of adding or deleting channel
numbers into the Television's memory circuits. In this way
the Television "remembers" only the locally available or
desired channel numbers and skips over any unwanted
channel numbers.
Remote Sensor Window * A window or opening found on
the Television control panel through which infrared remote
control command signals are received.
Second Audio Program (SAP) * Another or additional audio
channel provided for in the Multichannel Television Sound
(MTS) broadcast standard. The most frequently proposed use
for SAP is the simultaneous bilingual broadcast of TV
program material.
Status * Allows the user to quickly confirm what channel
number is currently being viewed. Status can also be used to
clear the Television of on screen displays or information
(rather than waiting for the displays to "time out" or
automatically disappear from the screen).
S-Video Input * Allows direct connection of high-resolutiou
video sources, such as a Super VHS videocassette recorder,
Laser Disc player, etc. Provides optimum picture resolution,
sharpness, and clarity.
Twin Lead Wire * The more commonly used name for the
two strand 300 Ohm antenna wire used with many indoor and
outdoor antenna systems. In many cases this type of antenna
wire requires an additional adapter (or balun) in order to
connect to the 75 Ohm Inputterminals designed into the more
recent Televisions and VCRs.
Variable Audio Output * An adjustable audio output which
allows for volume variations at the source.
54
Page 55

Accessories/Optional ........ 10, 27, 28, 29, 30-33, 46, 51 *Q/U-I
Adapter Connector .............................................. 46, 51, *Q/U- 1
Add/Delete Channels .......................................... 13-14, *Q/U-2
Advance Buttons ........................................................ *Q/U-2, 4
Audio Controls .................................................................. 24-28
Audio/Video Input ................................... 30-33, 46, 51 *Q/U-2
Automatic Programming .......................................... 13, *Q/U-2
Battery Installation ......................................................... *Q/U-3
Cable TV Connections/Settings ................ 12, 46, 51 *Q/U-I, 2
Channel/Time Display .................................. 18, 19, 22, *Q/U-3
Channel Memory ................................................. 13-14, *Q/U-2
Channel/Time Reminder ......................................................... 19
Clock Setting .......................................................................... 15
Clock Timer ............................................................................ 16
Closed Captioning .................................................................. 11
Color Controls ............................................................. 6,*Q/U-4
Convergence ............................................................................. 8
Controls/TV ............................................................ *Q/U-2, 3, 4
Controls/Remote ................................... 34-45, 48, *Q/U-2, 3, 4
ESI BUS.................................................................................. 29
Exit ................................................................................. *Q/U-4
Features..................................................................................... 5
First Time Set Up ........................................................... *Q/U-2
Glossary/TV Terms ................................................................ 54
Help Menu ............................................................ 52, *Q/U-2, 4
Inputs/Audio and Video ........................................ 30-33, 46, 51
Menu ........................................................................... *Q/U-2, 4
Minns(-)/Plus (+) Buttons ........................................... *Q/U-3, 4
Parental Control ................................................................. 20-21
Picture-In-Picture (PIP) ....................................... 46-51, *Q/U-2
Power Light Indicator ..................................................... *Q/U-3
Precautions/Safety ............................................ 2, 3, 53, *Q/Uq
Programming Channels ............................................ 13, *Q/U-2
Remote Control ..................................... 34-45, 48, *Q/U-2, 3, 4
Remote Locator ................................................................. 34-35
Remote with VCRs ................................................ 40-41, 44-45
Requesting Service ............................................... 53, 56-57, 58
RF Coaxial Cable ............................................... 46, 51, *Q/U- 1
RF Switcher ............................................................................ 10
Reminder/Time and Channel .................................................. 19
Safety/Precautions ............................................ 2, 3, 53, *Q/U-1
Second Audio Program (SAP) ................................................ 25
Sensor Remote ................................................................ *Q/U-3
Sleep Timer ............................................................................. 17
Smart Picture ................................... _................................. 36-37
Smart Sound............................................................................ 38
Status Button .............................................................. *Q/U-3, 4
Surround Sound ........................................................... 26, 28-29
Time/Channel Display ........................................ 19, 22, *Q/U-3
Timer ('rum On) ..................................................................... 16
VCR Button ...................................................................... 30, 45
VCR/TV Connections ............................. 30-33, 46, 51, *Q/U-1
Tips for Service ........................................................... 53, 56-57
TV Speaker Control ................................................................ 27
Variable Audio Output ........................................................... 28
Volume Display ...................................................................... 26
Warranty ................................................................................. 60
* Information contained in Quick-Use (Q/U) Guide - page listed
55
Page 56

Philips Consumer Electronics Company
Factory Service Center Locations
See Reverse Side for More Details.
• Philadelphia/S New Jersey
•k Indicates In-HomeService Only
1-800-242-9225
• Indicate_ In-Home/Carry-In Service
Be_mmont/Ausnn
San Antonio
TampaN/FIo_da
NOTE:IfyouresideinoneofourPhilipsFactoryServiceBranchareas(seedirectoryonback),youcancontactthenearestServiceBranchto
obtainefficientandexpedientrepairforyourproduct.I1yourproductisIn-Warranty,youshouldhaveproof-of-purchasetoensureNoCharge
Service.ForOut-of-Warrantyservice,callthelocationnearestyou.
NOTA:Sivousr_sidezdartsunedesr_gionsdesserviesparunesuccursaledeserviceapr_sventedutabdcantPhilips(voirlisteci-deseous),vous
pourrezcontacterlabranchedeserviceapr_sventelaplus prbsdechezvouspourobtanirunserviceaprt_sventerapideetefficace.Sileproduit
estsousgarantie,ilsuffiradepresenterunepreuved'achatpourbdn_icierd'unservicesansfrais.Pourlesproduitsnoncouvertsparlagarantie,
contactezlecentreleplusprosdechezvous.
NOTA:Si Ud. resideenuna de nuestras zoeas parasucurselasPhilipsde servicioal defdbrica(verdiractoriorodsabajo),Ud. puedecomunicarse
conlasucurseldeservicio rr_s cercanaparaobteneruna reparacidnoportunay eficazdesu producto. Si su productoest_todaviabajogarantia,
Ud.debepresentarcomprobantede compraparano ocasionarningunoscargos porservicio. Paraserviciodespu6sdel vencimientode la
garantia,flameal lugarrodscercanode losabajo indicados.
InCa.da
Howyoucanobtainefficientandexpedientcarry-in,mail-in,orin-homeserviceforyourproduct
PleasecontactPhilipsat 1-800-661-6162(Frenchspeaking)
1-800-363-7278(Englishspeaking)
AnCa.da
Commentobtenirleserviceapr_s-vente_'ourlesproduitsapport_souenvoy_sparlaposte8 notrecentredeserviceoule service_domicile
Veuillezcontacterphilipsd: 1-800-661-6162(Francophone)
1-800-363-7278
COmorecibirservicioefficienteparasuproducto,enpersona,porcorreooa domicillo
FavordecomunicarseconPhilipsal: 1-800-661-6162(francofono)
1-800-363-7278(anglOfono)
56
Page 57

QUALITYSERVICEISASCLOSEASYOURTELEPHONE!SIMPLYLOOKOVER"lifeUST BELOWFORTHE NUMBEROF A FACTORYSERVICEGEaR
NEARYOU. YOUnPROOUCTWiLL RECEIVEEFFICIENTAND EXPEDIENTCARRY-IN, MAIL-IN, OR IN-HOME SERVICE,AND YOU WiLL RECEIVEPEACEOF MIND,
KNOWINGYOURPRODUCT IS BEINGGIVEN THEEXPERTATIENTlou OFPHILIPS' FACTORYSERVICE. AND, IF THEPRONENUMBER USTER FORYOUR AREA
IS LONGOISIARCE,CALL1-_00-242-_'L25 FORFACTORYSERVICE,
COMMENTOBTENIRNOTRESERVICEAPR_ YENTERAPIOEETEFRCACESOITPARCOURRIm,A90MICILE,OUEll_EPR_S61TANTAURCENTREDESERVICEPHIUPS.PLUSDE6N CENTRESDE
RI_GEP11ONDEPRODUITSAR_PARERA TRAVERSLiEPAYS:CONTACTIERLIECENTREDE]k-_'RVICEAJIXCONSOMSIATE'URSLEPLUSPRURHEPOURSAVOIRL'EMPLA_ENTDECESDE'POTSOARS
C0MOOBI1ENERUN$ERVICIOOPORTUNOY EFICIENTEPORCORREO,ENCASAOENPERSONAPARA$UPRURUCTOATRA_SDEUNCENTRePHILIP$9E$ERVICi0.MARDE840$m0$ PeR
TOURELPAlSPARALARECEI_IONDEPROURCTOSNECESITAORSDEREPAR_IURF_:COMUNICARSEiCONELCENTR0DE$ERVICl00EFABRICAMASCERCANOPAPAESTRSLUPARE_DENTR0
URRAYONDE50A75MILES(81KMA121KM)DUCENTREDESERVICELOCAL.
9EURRADIODEN A120I_M(50A75MILL.AS)OELCENTRODE$ERVICIOLOCAL.
Atlanta-Athens-Macon-Chattanooga,
TN-NorthGeorgiaArea
200 NorthCobb Parkway
Building100, Suite 120
Marietta,GA 30062
(770)795-0086
Charlotte--WinstonSalem-
Greensboro
520-GClantonRoad
Charlotte,NC 28217
(704) 529-8330
Chicago-GaryArea
1360W. HamiltonParkway
Itasca,IL 60143
(630) 775-0990
Clevelood-Akren-YoungstownArea
24090 DetroitRoad
Westlake,OH 44145
(216)899-2040
Columbus-Dayton-CincinnaUArea
6333 BuschBlvd.
Columbus,Ohio43229
(614) 781-2605
Dallas-Ft. WorthArea
13375StemmonsFreeway,
Suite200
Dallas,Texas75234
(214) 243-4775
Detroit/ToledoArea
25173 Dequindre
MadisonHeights,MI 48071
(810) 544-2110
Knexville-6reeneville-
Tri Cities-EsstTennesseeArea
6700 D. PapermillRoad
PapermillPlaza
Knoxville,TN 37919
(423) 584-6614
Ft. Myers-Naples-
SouthwestFloridaArea
11601 ClevelandAve.,Suite15
Ft.Myers,FL 33907
(941) 278-4242
Houston--Galveston-Beaumont-Austin-
SanAntonioArea
1110NorthPostOakRoad
Suite100
Houston,IX 77055
(713)682-3990
Miami-SoutheastFloridaArea
2099 W. AtlanticBlvd.
PompanoBeach,FL 33069
(954) 978-0467
NewYorkMetroArea
116 CharlotteAvenue
Hicksviiie,NY 11801
(516) 933-1780 NassauCounty
Orlaedo--Jad(soeville--Norlh
Florida-SoutheastGeorgiaArea
2452 SandLakeRoad
Orlando,FL32809
(407) 857-8998
Philadelphia/S.NewJerseyArea
352 DunksFerryRoad
Beesalem,PA 19020
(215) 638-7500
Pittsburgh,PA-Steubenville,OH-
Wheeling/Morgantown,WV Area
2891 BanksvilleRoad
Pittsburgh, PA15216
(412) 563-8020
SanFrancisco-Oakland-SanJoseArea
3370 MontgomeryDrive
SantaClara,CA95054
(408) 492-9013
Seattle-Tacoma/OlympiaArea
1055AndoverParkEast
Tukwila,WA 98188
(206) 575-6288
Tampa-St.Petersburg-SarasotaArea
CenterPointBusinessPark,BuildingB-l,
Suite100
1911U.S. Hwy.301 North
Tampa,FL 33619
(813) 621-8181
57
Page 58

RR
Page 59

59
Page 60

PROJECTION TELEVISION
One Year Free Labor
One Year Free Serviceon Parts
Two Years Free Serviceon Cathode RayTube Parts/ 30 claysFreeServiceon Projection "IV Screen
Thisproduct can be repaired in-home.
WHO IS COVERED?
Youmusthaveproofofpurchaseto receivewarrantyservic_ A sales
receiptor otherdocumentshowingthatyoupurchasedthe productis
consideredproofofpurchase.
WHAT IS COVERED?
Warcam7 coveragebeginsthe dayyou buyyour product_for oneyear
thereafter(30 daysford_ projection"IV screen),allpartswill be repaired
or replaced,andlabor andtransportationarefree. Fromone to two years
fromthe dayof purchase,youpay forthe replacement or repair of all
partsexceptthe cathode raytubeand the "Clear-Vu" lens,and for all
laborandtranspurtationcharges.After two yearsfrom the day of
purchase,you payfor the reldace'nent or repairof allparts except the
=Clear-Vu" lens(whichisguasanteedagainstmanufacturer'sdefectsfor
thelifeof the product),andfor all laborandtransportationcharges.
All parts, includingrepairedand replaced parts,are covered only for
the originalwarranty period.When the warranty on the product
expires,the warranty on all replaced and repaired partsalsoexpires.
WHAT IS EXCLUDED?
Your warrant),does not cover:.
• laborchargesfor instalbtionor setup of the product, adjustmentof
customercontrols on the product, andinstai_tion or repair of
antennasystemsoutsideof the produc_
• product repair and/or part replacement becauseof misuse,
accident,unauthorizedrepair or other causenot within the control
of Philips ConsumerElectronicsCompany.
reception problemscausedbysignalconditionsor cable or antenna
systemsoutsidethe unit.
• aproduct that requires modir_:ationor adaptationto enable it to
operate inany country other than the countryfor which it was
designed,manufactured,approvedend/or authorized,or repair of
products damagedbythese modifications.
• incidentalor consequentialdamagesresulting from the product.
(Somestatesdo not allow the exclusion of incidentalor
consequentialdamages,sothe above exdusion may not applyto
you.This includes,but isnot limitedto, prerecorded material,
wbe_ copyrightedor oot copyr_gh_l.)
• a product usedfor commercialor institutionalpurposes.
WHERE IS SERVICE AVAILABLE?
Warranty serviceis availableinall countriesw;_erethe product is
officiallydistributedby PhilipsConsumer ElectronicsCompany. In
countrieswhere PhilipsConsumer ElectronicsCompany does not
distributethe product, the localPhilipsserviceorganization will attempt
to provide service(althoughthere maybe adelayif the appropriate
spareparts andtechnicalmanual(s)are not readily available),
MAKE SURE YOU KEEP...
Pleasekeep yoursalesreceipt or other documentshowingproof of
purchase. Attach it to this owner's manualand keepboth nearby. Also
keep the original box andpackingmaterial in caseyou need to return
your product.
BEFORE REQUESTING SERVICE...
Pleasecheckyour owner's manual beforerequestingservice.
Adjustmentsof the controlsdiscussedthere may saveyou a service
call.
TO GET WARRANTY SERVICE...
Repairmustbe performedby an authorizedservicecenter or a factory
servicecenter. If'youdenot/iveneara factoryservicecenter,contactyour
dealer. If your dealer isan authorized servicecenter, hewillarrange
repair. If your dealer is not anauthorizedservicecenter, hewill direct
you to the authorizedservice centerengagedby himto servicethe
productshe sells.
(In U.Sa_.,Puerto Ricoand U.S.Virgin Islands,allimpliedwarranties,
including impliedwarrantiesof merchantabilityand fitnessfor a
particularpurpose,are limited induration to the duration of this
expresswarranty. But, becausesome stetasdo not allow limitationson
how long an impliedwarranty maylast,this limitation maynot applyto
you.)
(In Canada,this warrantyis given in lieu of allother warranties. No
other warranties are expressedor implied,includinganyimplied
warranties of merchantabilityor fitnessfor a particularpurpose. Pldlips
isnot liableunder any circumstancesfor anydirect, indirect,special,
incidentalor consequentialdamages,howsoeverincurred,even if
notified of the possibilityof suchdamages.)
IF YOU HAVE QUESTIONS...
PleasecontactPhilipsat:
1-800-66I-6162(FrenchSpeaking)
1-800-363-7278(EnglishSpeaking)
REMEMBER...
Pleaserecord themodelandserialnumbersfoundontheproduct
below. Also,pleasefilloutandmailyourwarrantyregistrationcard
promptly.Itwillbeeasierfor usto notifyyouifnecessary.
MODEL#
SERIAL#
PhilipsService Company, p.o. Box 555, JeffersonCity, Tennessee37760, (423) 475-8869
3135 015 07470 60
 Loading...