

Magnavox MX3950D, MX3900D Owner’s Manual

Need help? Call us!
Phitips representatlves are ready to help you with
any questions about your new product.We can guide you
through Connections, First-tlme Setup, or any of the Features.
We want you to start enjoying your new product right away!
CALL US BEFORE YOU CONSIDER
RETURNING THE PRODUCT!
1-800-531-0039
or
Visit us on the web at www.philips.com
MX3900D
MX3950D
PHILIPS
pg 001 044 MX39 37 Engl 1 2/25/03, 10:32 AM 3139 115 21993
Canada
English:
This digital apparatus does not exceed
the Class B limits for"radio noise
emissions from digital apparatus as set
out in the Radio Interference
Regulations of the Canadian
CAUTION
Use of controlsor adjustmentsor
performance of procedures other
than herein may result in hazardous
radiation exposure or other unsafe
operation.
Fran_ais:
Get appareil num6nque n'emet pas
de bruits radiodlectdques d6passant
les limites applicables aux appareils
num6nques de Class B prescrites dans
le R6glement sur le Brouillage
Radio61ectr'ique 6dic16 par le Plinist6re
des Communicstions du Canada,
This warning label is located onthe rearside
and inside this laser product.
or
This product incorporates copyright
protection technology that is protected by
method claims of certain U.S. patents and
other intellectual property rights owned by
Macrovision Corporation and other rights
owners. Use of this copyright protection
technology must be authorized by
Macrovision Corporation, and is intended
for home and other limited viewing uses
only unless otherwise authorized by
Macrovision Corporation. Reverse
engineering or disassembly is prohibited.
ATTENTION
L'utilisation des commandes ou
r_glages ou le non-respect des
procedures ci-incluses peuvent se
traduire par une exposition
dangereuse _ I'irradiation.
ATENCION
El uso de mando o ajusteso In
ejecucci6n de m_todos que no sean
los aqu{ descritospuede ocasionar
peligro de exposici6n a radiaci6n.
Manufactured under license from Dolby
Laboratories. "Dolby', "Pro_Logic" and the
double-D symbol are trademarks of
Dolby Laboratories. Confidential
Unpublished Works. © 1992-1997 Dolby
Laboratories, Inc. All rights reserved.
Manufactured under license from Digital
Theater Systems, inc US Pat. No.
5,451,942 and other worldwide patents
issued and pending. "DTS" and "DTS
Digital Surround" are trademarks of
DigitaITheater Systems, Inc 1996 Digital
2
pg 001 044 MX39 37 Engl
2/25/03, 10:32 AM 3"_39 115 21993
_><_ 3 <,_ _> (6 7/8_@ @@ _¢ _ _4 @<16
_(I _.........._(_(_d_
_OC C _0__i
CD (]D _
,T @ _--®
PHILIPS
pg 001 044 Mx3g 37 Engl 3 2/25/03, 10:32 AM 3139 115 219£3

• Once your Philips purchase is registered,
you're eligible to receive all the privileges
of owning a Philips product.
• So complete and return the Warranty
Registration Card enclosed with your
purchase at once, and take advantage
of these important benefits.
Know these
_IL his "bolt of lightning" indi-
cates uninsulated material
within your unit may cause
an electrical shock. For the safety of
everyone in your household, please do
not remove product covering.
_IL he "exclamation point" calls
attention to features for
which you should read the
enclosed literature closely to prevent
operating and maintenance problems.
For Customer Use
Enter below the Serial No. which is locat-
ed on the rear of the cabinet. Retain this
information for future reference.
Model No
Serial No.
WARNING: TO PREVENT
FIREOR SHOCK HAZARD, DO
NOT EXPOSETHIS EQUIPMENTTO
RAIN OR MOISTURE.
CAUTION: Toprevent electric
shock, match wide blade of plug to
wide slot, and fully insert.
#1AC_097
pg 001 044 Mx3g 37 Engl 4 2/25/03, 10:32 AM 3"139 115 21993

PHILIPS
Congratulations on your purchase,
and welcome to the "family!"
Dear Philips product owner:
Thank you for your confidencein Philips.You'veselectedone of the best-built,
best-backedproducts availabletoday.Andwe'll do everything in our power to
keepyou happywith your purchasefor manyyearsto come.
As a member of the Philips"family" you're entitled to protection by one
of the most comprehensive warranties and outstanding service networks
in the industry.
What's more, your purchaseguarantees you'll receiveall the information
and specialoffers for which you qualify,plus easyaccessto accessories
from our convenient home shopping network.
And most importantly you can count on our uncompromising commitment
to your total satisfaction.
All of this is our way of sayingwelcome - and thanks for investingin a
Philips product.
Sincerely,
Lawrence J.glanford
President and Chief Executive Officer
P.S. Remember, to get the most from your Philips product, you
must return your Warranty Registration Card within 10 days.
So please mail it to us right now!
pg 001 044 MX39 37 Engl
5
2/25/o3,_o:34AM313911521993

IMPORTANT SAFETY INSTRUCTIONS
1. Read these instructions.
2. Keep these instructions.
3. Heed all warnings.
4. Follow all instructions.
5. Do not use this apparatus near
water.
6. Clean only with dry cloth.
7. Do not block any ventilation
openings. Install in accordance with
the manufacturer's instructions.
8. Do not install near any heat sources
such as radiators, heat registers, _oves, or
other apparatus (including amplifiers) that
produce heat,
9. Do not defeat the
safety purpose of the
polarized or
grounding type plug, Plug
A polarized plug has two blades with one
wider than the othel: A grounding type plug
has two blades and a third grounding prong.
The wide blade or the third prong are
provided for your safety. If the provided plug
does not Nt into your outlet, consult an
electrician _or replacement of the obsolete
outlet,
J0.Protect the power cord from being
walked on or pinched, particularly at plugs,
convenience receptacles, and the point
where they exit fi*om the apparatus.
J| .Only use attachments/accessories
specified by the manu_acturel:
|2._ Use only with the cart, sland,
tripod, bracket, or table specified
by the manulacturer or sold with
the apparatus,When a cart is
used, use caution when moving
the cart/apparatus combination
to avoid iniury fi*om tip oven
13. Unplug this apparatus during lightning
storms or when unused for long periods of
time.
|4. Refer all servicing to qualified service
personnel, Servicing is required when the
apparatus has been damaged in any way,
such as powersupply cord or plug is
damaged, liquid has been spilled or objects
have fallen into the apparatus, the apparatus
has been exposed to rain or moisture, does
not operate normally, or has been dropped.
15.Battery usage CAUTION To
prevent battery leakage which may result in
bodily injury, property damage, or damage
to the unit:
• Install all batteries correctly, + and - as
marked on the unit,
• Do not mix batteries (old and new or
carbon and alkaline, etc,),
• Remove batteries when the unit is not used
for a long time,
EL 6475-E004:0218
This symbol indicates that the unit has
I Class II equipment symbol r_ ]
pg 001 044 MX39 37 Engl 6 2/25/03, 10:34 AM 3139 11S 21993
a double insulation system

English
Index
Environmental information
All unnecessa_"ypackaginghas been omitted We
havetried to makethe packagingeasyto
separate intothree materials:cardboard (box),
polystyrene foam (buffer) and pol/ethylene (ba£s,
protective foam sheet)¸
Your systemconsistsd materialswhich can be
recycledandreusedif disassembledby a
specializedcompsn_ Pleaseobservethe IocaJ
regulationsregardin£the disposalof packagin£
materials,exhaustedbatteries and old equlpme_
Fran_ais
Espafiol
This system complies with the FCC rules,
Part 15 and with 21 CFR 1040.10.
Operation is subject to the following two
conditions:
- This device may not cause harmful
interference, and
- This device must accept any
interference received, including
interference that may cause undesired
operation.
48
88
pg 001 044 MX39 37 Engl 7 2/25/03, 10:34 AM 3139 115 21993

Contents
General Information
S pplied accessories......................................................I0
Care and safc_yinforrra_ on .....................................10
Connections
Step 1: Pacng the speakurs and subwoofur. 1I
Step 2: Connect ng speakers and subwoofer 1I
Step 3: Connect ngTV ................................................12
Using CompositeVideo jack (CVBS) ............12
Using Component Video jack (Pr Pb Y)12
Using SVdc_ jack ...................................................13
Using an accessory RF modulator- ..................I3
Step 4: Connect ng FM/AM antennas ..................14
Step 5: Connect ng the power cord ....................14
Connections (optional)
Connect ng aVCR or Cable/Satellite Box I 5
View ng and listen ng to the playback ..........I5
Recording DVDs ......................................................15
Connect ng digital adio equipment ....................I 5
Listen ng to the playback .....................................I 5
Recording (digital) ...................................................15
Functional Overview
Main unit ar,d remote control .................................16
Control but*ors available on the
remote ony .................................................................17
Getting Started
Step 1 : b,serting batter es rote the
remote control .................................................................18
Using the remote co_tro} to operate the
system .............................................................................18
Step 2: Setting the clock ..............................................18
Step 3: Sett ng the TV ...................................................19
Chang ng the NTSC/PAL setting via the
remote control ..........................................................19
Selecting the color system tha_
corl-esponds to yourTV .......................................19
Step 4: Selecting speaker layer1 ..............................20
Changng seating control position ..................20
Setting the speakers' channels ..........................21
Step 5: Sett ng language preference .....................21
Disc Operations
Playable discs .....................................................................22
Playing discs ........................................................................22
Turning on/off auto Eco standby mode 23
Using the Disc Menu ....................................................23
Basic playback coPtro s ................................................23
Resuming p}aybscl< fi-um the last stopped
pout (DVD/VCD) ...................................................23
Replacing discs without uterr ptmg
p ayback .........................................................................23
Select ng vanous rnpea: functions .........................24
Repeat play mode ...................................................24
Repeating a sc_t on wthin s
chapter/trscl< ...............................................................24
Program favorite t_-acks
(audio CDs andVCDs) .......................................24 25
Clear ng the program ............................................25
Using the menu bar to program ............................25
Playing NP3/Picture dsc (K_dsk, jPEG) .............26
Program NP3 disc ..........................................................26
DVD Menu Options
Using the menu baT".......................................................27
Using the Setup ]4er, u .................................................28
Set_ ng theTV shape ..............................................28
Set_ ng the video output ......................................29
Screer, saver tun,ir,g on/off .............................29
Set_ ng the analog otp_¢ ....................................29
Set; ng the digital otp_¢ .....................................30
Set_ ng the PC'M output .......................................30
Night mode turning or,/off ...............................31
Restoring tPe or gina] settings ...........................31
Restrictirg playback by parental control 32
Charging the password ........................................33
Tuner Operations
Tunng to radio stations...............................................34
Pmsettirlg rado stations..............................................34
Usingthe Plugand Play........................................34
Automatic presettuyg.............................................35
Manualpresetting.....................................................35
Selectinga preset rado s_ation...............................35
Debting a prs_t radio station ........................35
pg 001 044 MX39 37 Engl 8 2/25/03, 10:35 AM 3139 115 21993

Timer Operations
Set_ ng the tmer ..............................................................36
Activ_ing/Deactiv_ing the timer ...................36
Se_ing the Sleep timer ................................................37
Sound and Volume Controls
Sound Control ..................................................................38
Selectingsurround sound ....................................38
_ming on/off clear voice e_ct ......................38
Changingsubwoofer volume level.................38
Adjusting Bass/Treblelevel..................................38
Selectingdistal sound effects ...........................38
Volume Control ...............................................................38
Other Functions
Switchingon/off ...............................................................39
Switchingto active mode ....................................39
Switchingto %o Powcr standby mode 39
Switchingto standby mode (view clock) 39
Dimming _em's displ_ screen...........................39
Reco_ing to an external device ............................39
Usingthe _m_e to operate _ur television 39
Troubleshooting ...........................................4041
Specifications ..........................................................42
Contents
Glossary .........................................................................43
Limited Warranty ..............................................44
pg001044 MX3937Engl 9 2/25/03,_0:35AM3139 115 21993

General Information
Supplied accessories
Bpeakercables
Subwoofer cab e
Add O cab _
(wh _e, red)
Compos te video cable _ _=_
(ye ow)
c_,besC°rnp°ne%tvide©
Oed/bkJe/green)
FMwre amte,,-_a
AM loop antenna
Remote Control a-_d
_m
two AA batteries
AC power cable
Bracketsandscrews
Care and safety information
Avoid high temperatures, moisture,
water and dust
Do -_ot expose the system, batteries or c!scs
to hhJmidit_4rair, sand or excessive heat (cahJsed
by -_eatirg equJprnerlt or direct sunlight) Aways
keep the disc tray dosed to avoid gett -_gdust
or] the le-_s
Avoid condensation problem
T-_elens may cloud over whe-_the paye is
suddenlymoved rom cold to warm
surroundings,makng it i rpossib e to pay adisc
eave the player in the warrr erwironme_'t LJrltll
the moisture evapo ares
Do not block the vents
Do -_ot operate the DVD syste r n an
enclosed cabinet and allow about 10 cm
(4 inches) of free space all around the plier for
adequate ventilation¸
Care of disc
% clean a CD, wipe it -_ a i0_'_S_)
stralg% Irle rocr the cei-lter
towa ds the edge rising a solt,
lint flee cloth Do not use
clean ng agerKs, as hey may
damage the disc!
VVrte only o-_ the pr _ted
side of a CDR(W) and ony wth a soft felt
t@ped pen
tandle the disc by its edge, do -_ot touch the
sur/ace
Care of the cabinet
Use a soft cloth slightly moiste-_ed with a
mild deterge-¢ solution Do not Lse a sok£ on
co'Ca n ng alcohol, spirits, amrnon]a o abras yes
Finding a suitable location
Place the player on a flat, hard, stable surface
10
pg001-044 MXS9-S7-Eng 10 23/2103,2:09PM3139 115 21993
Connections
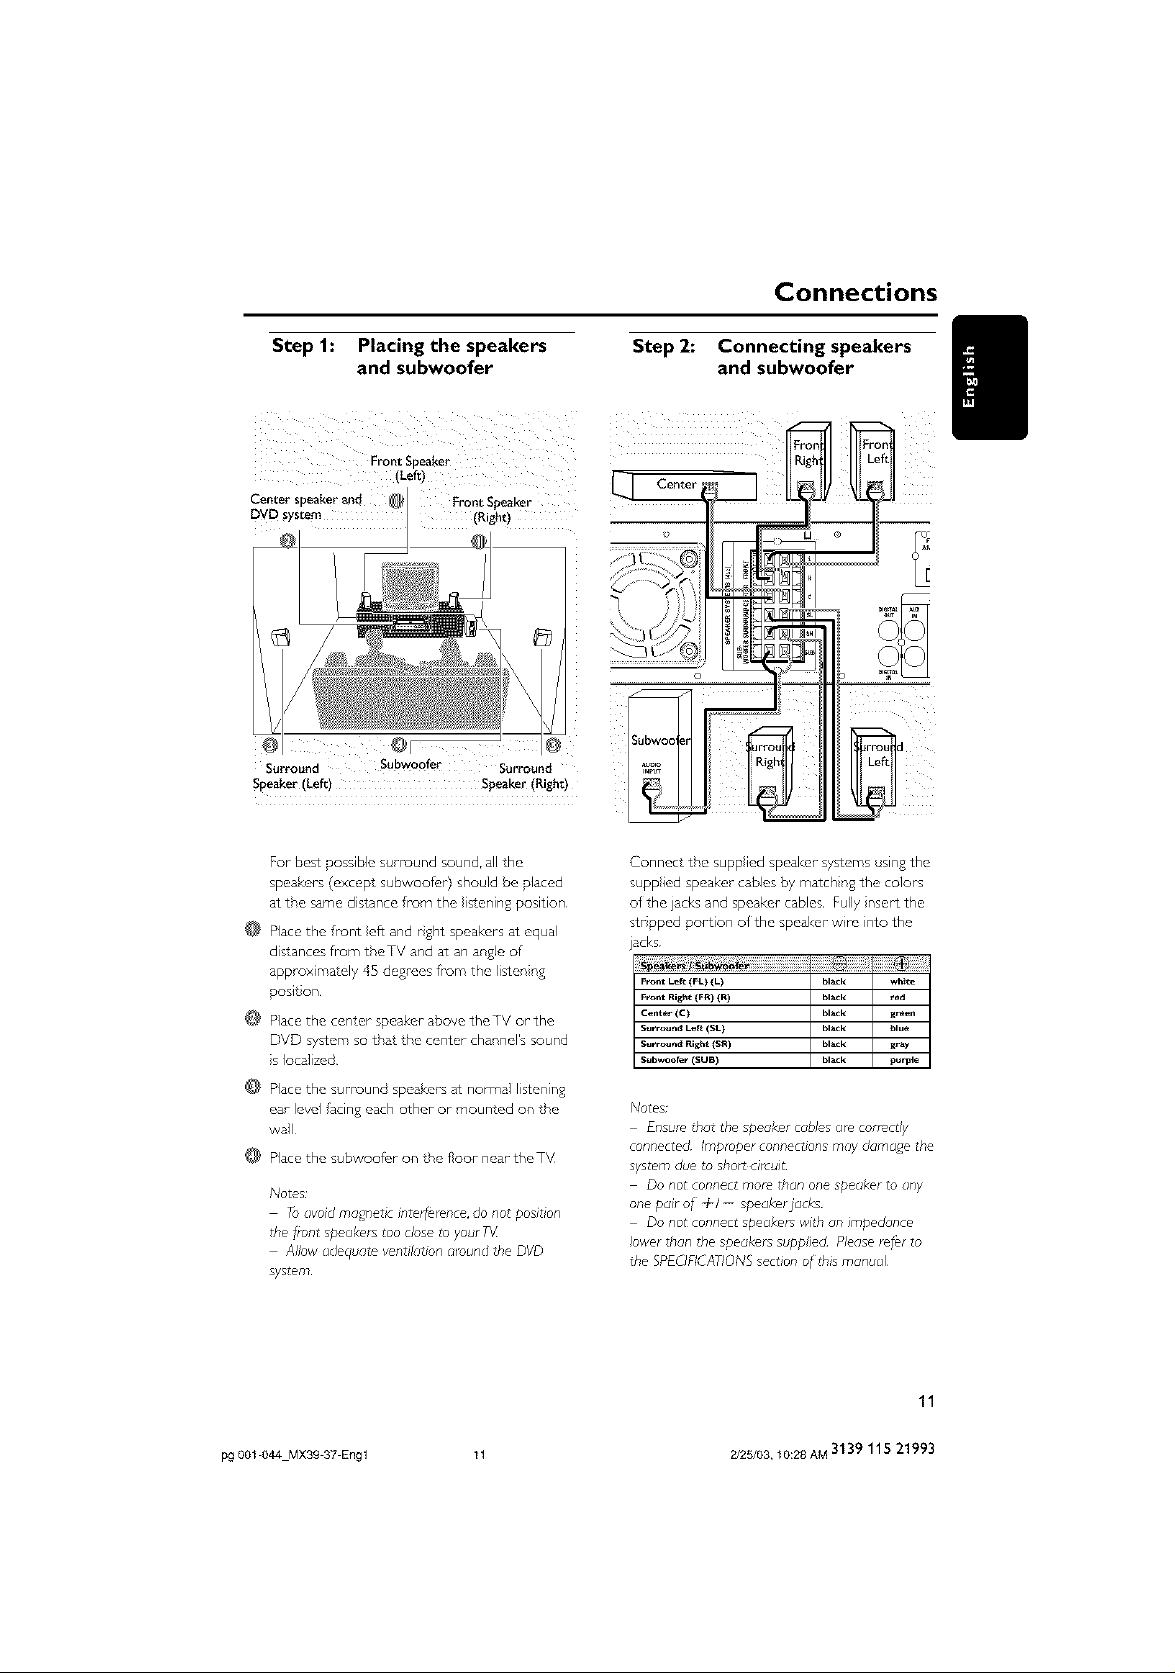
Step 1: Placing the speakers
and subwoofer
Front SDeake_
tLe&l
Center SD_ &rid Fron_ Si)e_Ker
DVD sysoem (Right:)
Surround Subwoofer Surround
Speaker (Left) Speake_(Right)
For bes_ possible sub-round sound, all the
speakers (excep: subwoofer) should be placed
at tP'e same distance f'-um the isTening position
@ Place the front eft and rght speakers at equal
distances frum tP,eTV and at an angle of
approximasely 45 degrees from the listen ng
posit on
@ Place the center speaker above the TV o¢ the
DVD system so tr,a_the center channel's sound
s localized
@ Place the Sl_rround speakers at normal listen ng
ea¢ level facing each other or mounted on the
wall
Place the sl_bwoof_r on the foot neacthe TV
N0te£
Toavoid mc_gnet£ interference, do not position
the front speakers too close to yourTX
Allow adequate ventilation a_ound tFe DVD
system
Step 2: Connecting speakers
and subwoofer
Connect the supp led speaker" systems using the
suppied speaker" cables by match ng the colors
of the jacks and speaker cables Fully nsert the
str pped portion of the speaker wire into the
jacks
Front Left (FL) (L) black white
Front Right (FR) (R) black wed
Center (C) black green
Surr_nd Left (SL) black blue
Surr_nd Right (SR) black gray
Subwoofer (SUB) black purple
Notes;
Ensure that the speaker cables a_e correctly
connected Imptoper connections may damage the
system due to sho_ circuit
Do not connec_ mo_ than one speaker to any
one pair o_ +1 -- speaMrjacks
Do not connect speakets with an impedance
lower than _l,e speaMrs supplied Please _er to
the SPUIFICATIONS section of tl,ls manual
11
pg 001 044 MX39 37 Engl 11 2/25/03, 10:28 AM 3139 115 21993
Connections
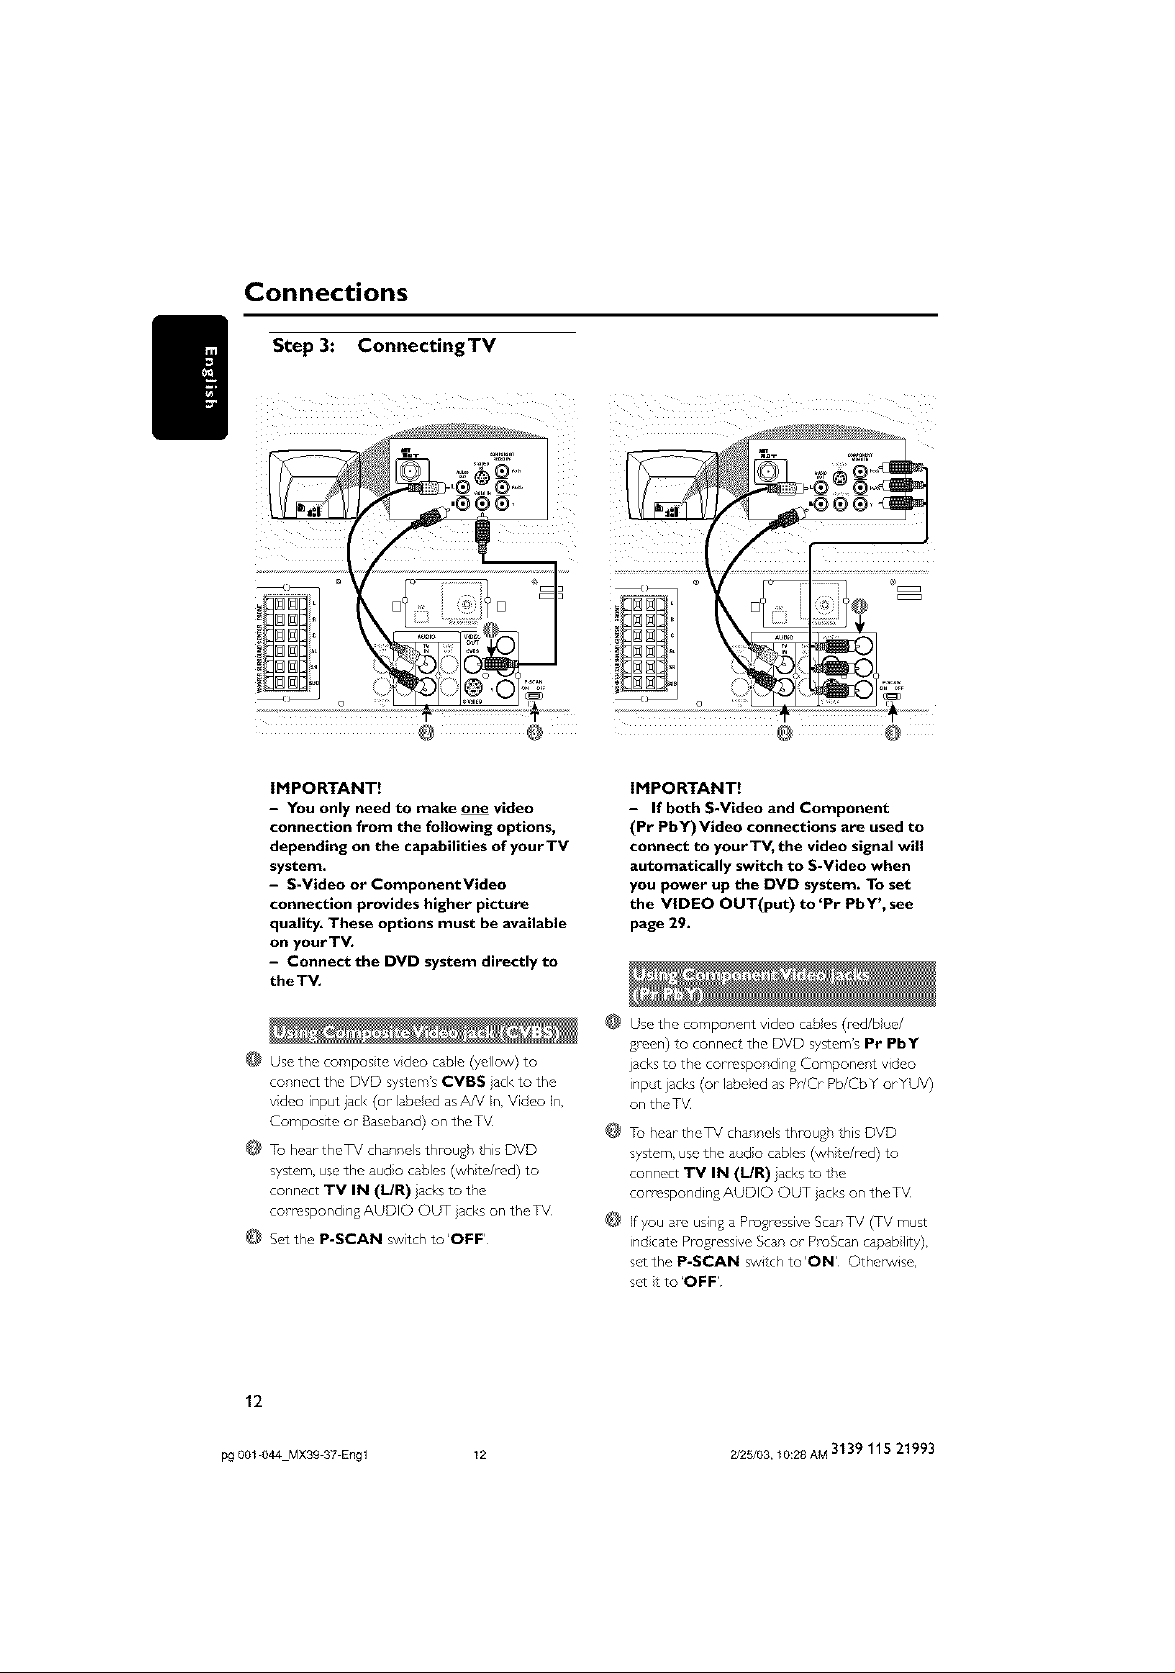
Step 3: ConnectingTV
,®®®,
IMPORTANT!
- You only need to make one video
connection from the following options,
depending on the capabilities of yourTV
system.
- S-Video or ComponentVideo
connection provides higher picture
quality. These options must be available
on your TV.
- Connect the DVD system directly to
theTV.
@ Use the composite video cable (yellow) to
connect the DVD system'sCVBS acl< to the
vdco input jacl<(or labeled asAN In,Video In,
Composite or-Baseband)on theTV
@ Tu heartheTV channelsthrough this DVD
system,usethe audo cables(wh te/red) to
connect iV IN (I/R) lacksto the
corresponding AUDIO OUT ]acl<son the TV
@ Setthe P-SCAN switch to'OFF'
IMPORTANT!
- If both S-Video and Component
(Pr PbY)Video connections are used to
connect to yourTV, the video signal will
automatically switch to S-Video when
you power up the DVD system. To set
the VIDEO OUT(put) to 'Pr PbY', see
page 29.
@
Use the component video cabes (red/blue/
green) to connect the DVD system's Pr PbY
jacks to the correspond ng Component video
inpc¢ jacks (or labeled as Pr/Cr Pb/Cb Y orYUV)
on the TV
@
To hear theTV channels through this DVD
system, use the audo cables (wh re/red) to
connect TV IN (I/R) acks to the
corresponding AUDIO OUT acl<s on the TV
@
If you are using a Pro%essive ScanTV (TV must
ind care Progressive Scan or ProScan capab lity),
setthe P-SCAN switch to'ON' Othel_/ise,
sat t to'OFF'
12
pg 001 044 Mx3g 37 Eng 1 12 2/25/03, 10:28 AM 3139 115 21993

@
Connections
IMPORTANT!
- If the picture is distorted, check the
Video Output setting. Make sure it is set
to 'S-Video', see page 29.
@ Use the S video cable (not supp} ed) to connect
the DVD systerr,'s S-VIDEO OUT jack to the
S Video input jack (or labeled asY/C o¢ SVHS)
on the TV
To hear theTV channels throug_, this DVD
system, use the audo cables (wh te/red) to
connect TV IN (I/R) acks to tff,e
corresponding AUDIO OUT acl<s on theTM
@ Set the P-SCAN switch to'OFF'
IHPORTANT!
- If yourTV only has a single Antenna In
jack (or labeled as 75 ohm or RF in), you
will need an RF modulator in order to
view the DVD playback on theTV. See
your electronics retailer or contact
Philips for details on RF modulator
availability and operations.
@ Use the composite vdeo cable (yellow) to
connect the DVD system's CVBS ack to the
vdcxs input ack on tP'e RF modulator
Use the RF coaxial cabe (no: supplied) to
connect the RF modu ator to yourTV's RF jack.
@ Set the P-SCAN switch to 'OFF'
13
pg 001 044 Mx3g 37 Eng 1 13 2/25/03, 10:28 AM 3139 115 21993

Connections
Step 4: Connecting FM/AM
antennas
@ Connect the supp led AM loop antenna to the
AN jack Pace the Aid loop antenna on a shel
or attach t to a stand or wall
Connect the supplied Fh/ antenna to the FM
jack. E>_end the FI4 antenna and fix its ends to
the wall
For betzer Fid stereo reception, connect an
external Fid antenna (not supp Jc_J)
Step 5: Connecting the power
cord
D
Power- Outlet
After everything is connected
properly, plug in theAC power cord to
the power outlet.
Never-make or changeany connect ons wth the
power switched on
On the DVD system,
"}lbfl, X_,%f_/LL FJkJES5 FJL£_S" may appear
on the display panel¸ Press ,11 on the from
panel to store all available radio stations or
press • to exit (see pade 34 "Tuner
Operations")
\
Adjust the posit_on of the antennas for optimal
r_ception
Posison the antennas as far as possible f, um
your TV,VCR or otl,er radiation source to p_event
unwanted interfelence
14
pg 001 044 MX39 37 Engl 14 2/25/03, 10:28 AM 3139 115 21993

Connections (optional)
Connecting aVCR or
Cable/Satellite Box
.®9®.
VCR or
Cable/Sateflite Box
@0
@ Connect the VCR or CaMe/Satellite Box to the
TV as shown
@ Connect the DVD system's AUX IN (R/L)
Jacks to the AUDIO OUT jacks on theVCR or
cable/sate}lite box
Before starting operation, press AUX/DI on
the remote to select "Ro _" n order to activate
the nput soH-ce
Some DVDs are copy protected _ou canno*
record or dub protected discs Hsing aVCR
Connect the DVD system's CVBS jack to the
VIDEO IN jack on theVCR
Connect the DVD system's LINE OUT (R/L)
jacks to the AUDIO IN jacks on theVCR
This will allow yoH to make analog stereo (two
channel, right and left) recordings
To view DVD playback while recording,
you must connect the DVD system to yourTV
uslnSthe S VIDEO (as shown above) or the
Compo_ ent (Pr PbY) video connect o_
H
Connecting digital audio
equipment
CDRecorder
@
Connect the DVD system's DIGITAL IN ack
to the DIGITAL OUT jack o_ a digital audio
devce
Before starting operation, press AUX/DI on
the remoteto select"_ZG Zr_"in order to
act rate the input so_r-ce
@
Connect the DVD system's DIGITAL OUT
jack to the DIGITAL IN ack on a digital
recording devce (DTS DigitalTheater System
compatible, with a Dolby Digital decoder fur
example)
Before starting operation, set the DIGITAL
OUTPUT accord ngto the aHdio connect on
(See page 30 "Setting the digital output")
Notes;
Some DVDs are copy protected Youcannot
_ecotd the cl_scthrough a VCR or digital recording
device
Always re_.r to the owner's manual of the otl,er
equipment _orcomplete connection and usc_ge
details
15
pg 001 044 MX39 37 Engl 15 2/25/03, 10:28 AM 3139 115 21993
 Loading...