

Philips/Magnavox MX3290 Owner's Manual
0 ,a! _m m,,,_ 9 _ _ A ""ram
Wu .....................................................................
COLOR TELEVISION
AL
P

NO
IMAGE
AVAI
SAFETYINSTRUCTIONS- Readbeforeoperatingequipment
Thisproductwasdesignedandmanufacturedtomeetstrictqualityand
safetystandards.Thereare,however,someinstallationandoperation
precautionswhichyoushouldbeparticularlyawareof.
1. ReadInstructions-Allthesafetyandoperatinginstructionsshould
bereadbeforetheapplianceisoperated.
2. RetainInstructions- Thesafetyandoperatinginstructionsshould
beretainedfor futurereference.
3. HeedWarnings- Allwarningsontheapplianceandintheoperating
instructionsshouldbeadheredto.
4. FollowInstructions- Alloperatinganduseinstructionsshouldbe
followed.
5. WaterandMoisture- Theapplianceshouldnotbeusednearwater
- for example,nearabathtub,washbowl,kitchensink,laundrytub,
ma wetbasementorneara swimmingpool,etc.
6. CartsandStands- Theapplianceshouldbeusedonlywithacartor
standthatisrecommendedbythemanufacturer.
6,4,. _ Anapplianceandcartcombinationshouldbemoved
with care.Quickstops,excessiveforce,and uneven
surfacesmaycausetheapplianceandcart combination
tooverturn.
7. Wallor CeilingMounting- Theapplianceshouldbemountedto a
wallorceilingonlyasrecommendedbythemanufacturer.
8. Ventilation- Theapplianceshouldbesituatedsothatitslocationor
positiondoesnotinterferewithitsproperventilation.Forexample,
theapplianceshouldnotbesituatedona bed,sofa,rug,orsimilar
surfacethat may blocktheventilationopenings;or, placedin a
built-ininstallation,suchasa bookcaseorcabinetthatmayimpede
theflowof airthroughtheventilationopenings.
9. Heat- Theapplianceshouldbesituatedawayfrom heatsources
suchas radiators,heat registers,stoves,or other appliances
(includingamplifiers)thatproduceheat.
10. PowerSources- Theapplianceshouldbeconnectedto a power
supplyonlyofthetypedescribedintheoperatinginstructionsoras
markedontheappliance.
11. Power-CordProtection- Powersupplycordsshouldberoutedso
thattheyarenotlikelyto bewalkedonorpinchedbyitemsplaced
uponor againstthem,paying particularattentionto cordsand
plugs,conveniencereceptacles,andthepointwheretheyexitfrom
theappliance.
12. Cleaning- Theapplianceshouldbecleanedonlyasrecommended
bythemanufacturer.
13. PowerLines- An outdoorantennashouldbelocatedawayfror,
powerlines.
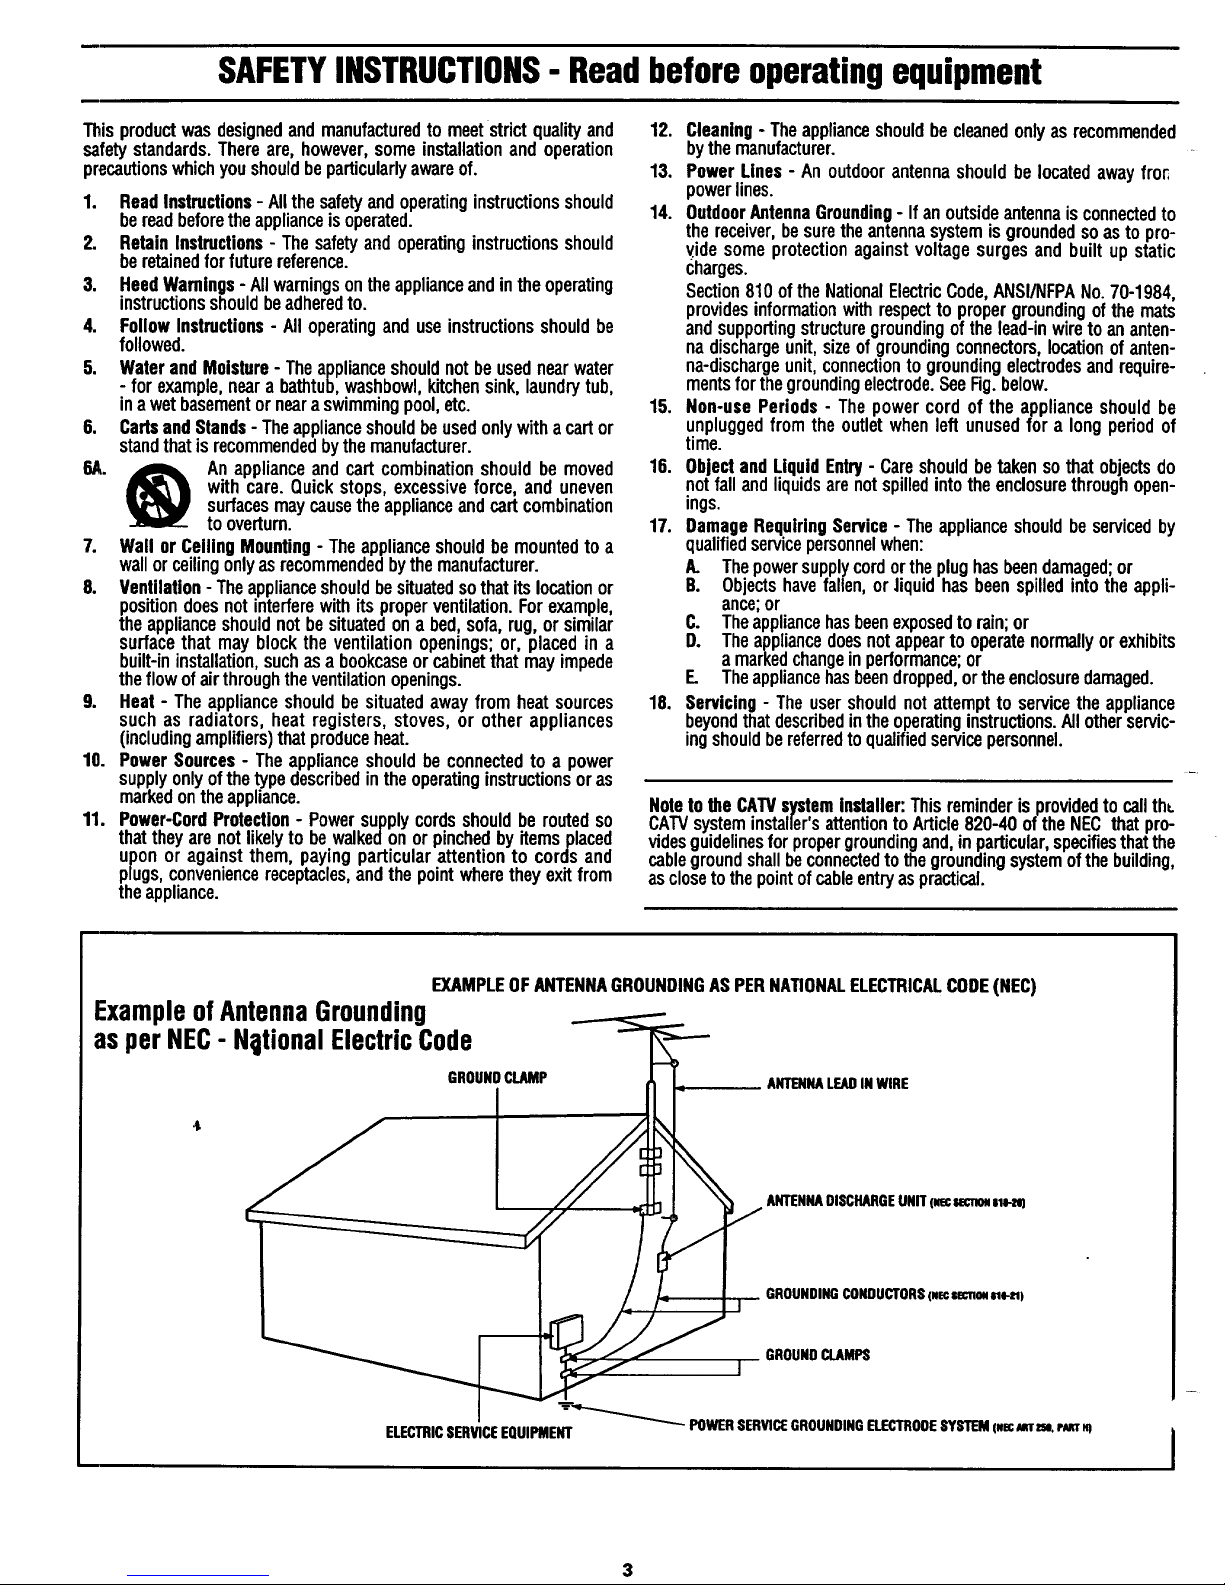
14. OutdoorAntennaGrounding- If anoutsideantennaisconnectedto
thereceiver,besuretheantennasystemisgroundedsoasto pro-
videsomeprotectionagainstvoltagesurgesandbuiltupstatic
charges.
Section810oftheNationalElectricCode,ANSI/NFPANo.70-1984,
providesinformationwithrespectto propergroundingof themats
andsupportingstructuregroundingof thelead-inwiretoananten-
nadischargeunit,sizeofgroundingconnectors,locationof anten-
na-dischargeunit,connectionto groundingelectrodesandrequire-
mentsforthegroundingelectrode.SeeFig.below.
15. Non-usePeriods- Thepowercord ofthe applianceshouldbe
unpluggedfromtheoutletwhenleftunusedfora longperiodof
time.
16. ObjectandLiquidEntry- Careshouldbetakensothatobjectsdo
notfallandliquidsarenotspilledintothe enclosurethroughopen-
ings.
17. DamageRequiringService- Theapplianceshouldbeservicedby
qualifiedservicepersonnelwhen:
A. Thepowersupplycordortheplughasbeendamaged;or
B. Objectshavefallen,orJiquidhasbeenspilledintotheappli-
ance;or
C. Theappliancehasbeenexposedtorain;or
D. Theappliancedoesnotappearto operatenormallyorexhibits
a markedchangeinperformance;or
E. Theappliancehasbeendropped,ortheenclosuredamaged.
18. Servicing- Theusershouldnotattemptto servicetheappliance
beyondthatdescribedintheoperatinginstructions.Allotherservic-
ingshouldbereferredtoqualifiedservicepersonnel.
Notetothe CATVsysteminstaller:Thisreminderisprovidedtocallth_
CAWsysteminstaller'sattentiontoArticle820-40oftheNECthatpro-
videsguidelinesforpropergroundingand,inparticular,specifiesthatthe
cablegroundshallbeconnectedtothegroundingsystemofthebuilding,
asclosetothepointofcableentryaspractical.
EXAMPLEOFANTENNAGROUNDINGASPERNATIONALELECTRICALCODE(NEC)
ExampleofAntennaGrounding
as perNEC- NotionalElectricCode
GROUNDCLAMP
ELECTRICSERVICEEQUIPMENT
ANTENNALEADINWIRE
ANTENNADISCHARGEUNIT(mecSeCT_Z_'O)
GROUNDINGCONDUCTORS(NecsemoNm-_)
GROUNDCLAMPS
POWER SERVICEGROUNDINGELECTROOESYSTEM (#ecMTZSO.Pk'ZTH)
I
_ Gettin_ Started
Welcome/Product Registration ................... 2
Safety/Precautions ..................................................... 3
Table of Contents ....................................................... 4
Features, Model Information ..................................... 5
On-Screen Features
PICTURE MENU
+Adjusting Color, Brightness, Sharpness,
Tint, and Picture Controls ................................... 6
+Using the Magnavue Feature............................... 6
FEATURES MENU
_Selecting aPicture Source .................................. 7
+Setting the TV for Closed Captioning ................. 8
+Setting the TV for Cable or Antenna Signals ......9
_Adding Channels in Memory (Automatically) .10
_Adding Channels in Memory (Manually) ......... 11
_-Setting the "IV Clock ......................................... 12
_Tum-On Timer .................................................. 13
_Using the Sleep Timer Control ......................... 14
_Adjusting the Channel Display Control ............ 15
'_Using the Time/Channel Reminder Control ...... 16
+Using the Language Selection Control .............. 17
SOUND MENU
_-Adjusting Bass, Treble, and Balance Sound
Controls ............................................................. 18
+Setting the TV for Stereo and SAP Programs ..19
_Using the Incre_lible Stereo Control ................. 20
_Using the Volume Display Control ................... 2 l
ffUsing th_ TV Speaker On/Off Control with
the Audio Output Jacks ..................................... 22
+Using Surround Sound External Speakers ........ 23
+Using the TV's Audio/Video Input Jacks ...24-25
Remote Control Operation ....
Using the Remote Locator Feature........ 26-
Setting the Smart Picture Control ..........28-29
Using Smart Sound Control ..................................... 30
Using the Smart Surf Control .................................. 31
Setting the Remote to Work VCRs .................... 32-33
Setting the Remote to Work
Cable TV Converters .......................................... 34-35
Setting the Remote to Work VCRs or Cable
Converters : "Search Method" ................................. 36
Using the Remote's VCR buttons ............................ 37
[i-_ Picture-In-picture (PIP)
How to Use PIP (Connections) ........................... 38-39
How to Use PIP with the TV Remote ...................... 40
Selecting the Picture Source for PIP ........................ 41
Adjusting Picture-in-Picture Color and Tint ............ 42
More PIP Connections (Cable Converter) ............... 43
_l General Information
TV Help Menu ......................................................... 43
Tips if Something Isn't Working ............................
Glossary of TV Terms ............................................. 45
Index ........................................................................ 45
Factory Service Locations .................................. 46-47
Warranty.................................................................. 48
Use the simple Set-Up Guide (supplied with
your TV information packet) for details on:
• Antenna Hook-ups
• First Time Set-Up
(Automatic Settings)
• Basic TV and Remote
Control Operation
• On-Screen Menu Use
Copyright © 1996 Philips Consumer Electronics Company. All fights reserved.
4
FirstTimeSetUp-automatically sets the TV for
lcx:al channels, the correct picture signal (antenna or
cable), and assists in the setting of the 'IV Guide Plus+
feature.
Infrared Remote Control - operates your TV set and
a variety of wireless remote control VCRs and Cable
TV Converters. A special "Locator" feature can also
help you find the remote when it has been stuck out of
sight or misplaced.
Standard TV broadcast (VHF/UHF) or Cable TV
(CATV) channel capability.
C.losed Captioning - allows the viewer to read TV
program dialogue or voice conversations as on-screen
text.
Automatic Programming of channels - for quick and
easy selection of favorite stations available in your
area.
Picture-In-Picture (PIP) - can show a TV program
and the direct video output from an accessory (VCR,
etc.) onto the TV screen at the same time.
Stereo-TV - with a built-in audio amplifier and a twin
speaker system, reception of TV programs in both
broadcast stereo sound or (SAP) bilingual broadcast
are available.
Twin Antenna (A/B) Inputs - for easy displaying of
two separate signal sources on the TV. An A/B button
on the remote control switches the TV's Main screen
l_etween the two Antenna (A & B) Inputoptions.
Audio/Video Jacks - for direct connections with
VCRs (and other accessories) for quality "IV picture
madsound playback.I
Surround Sound - this TV set is equipped for
connections _ith external audio equipment (such as a
Dolby ProLogic Amplifiers) for more dynamic sound
replay and audio effects.
Sleep-Timer - automatically turnsthe TV OFF at
preset time intervals.
Smart Button - for the control of "IV Sound and the
Picture levels. Use the Smart Button on the remote to
quickly adjust Smart Sound (to set TV Volume levels
during program changes or commercial breaks); Smart
P!icture (for programmed video video level adjustments
on a variety of program sources); and Smart Surf (for
quick one button channel selection of up to 10 of your
favorite channels).
As you unpack your TV please note that the
following items have been included with your se
• Owner's Manual
Safety Tip Information
Factory Service Center Locations
• Warranty Registration Card
• Remote Control Transmitter
• Batteries for Remote Control Use
Please take a few minutes to complete your
registration card. The serial number for the TV is
on the back of the set.
Refer to the back of this manual for instructions
on the cleaning and care of the TV.
A
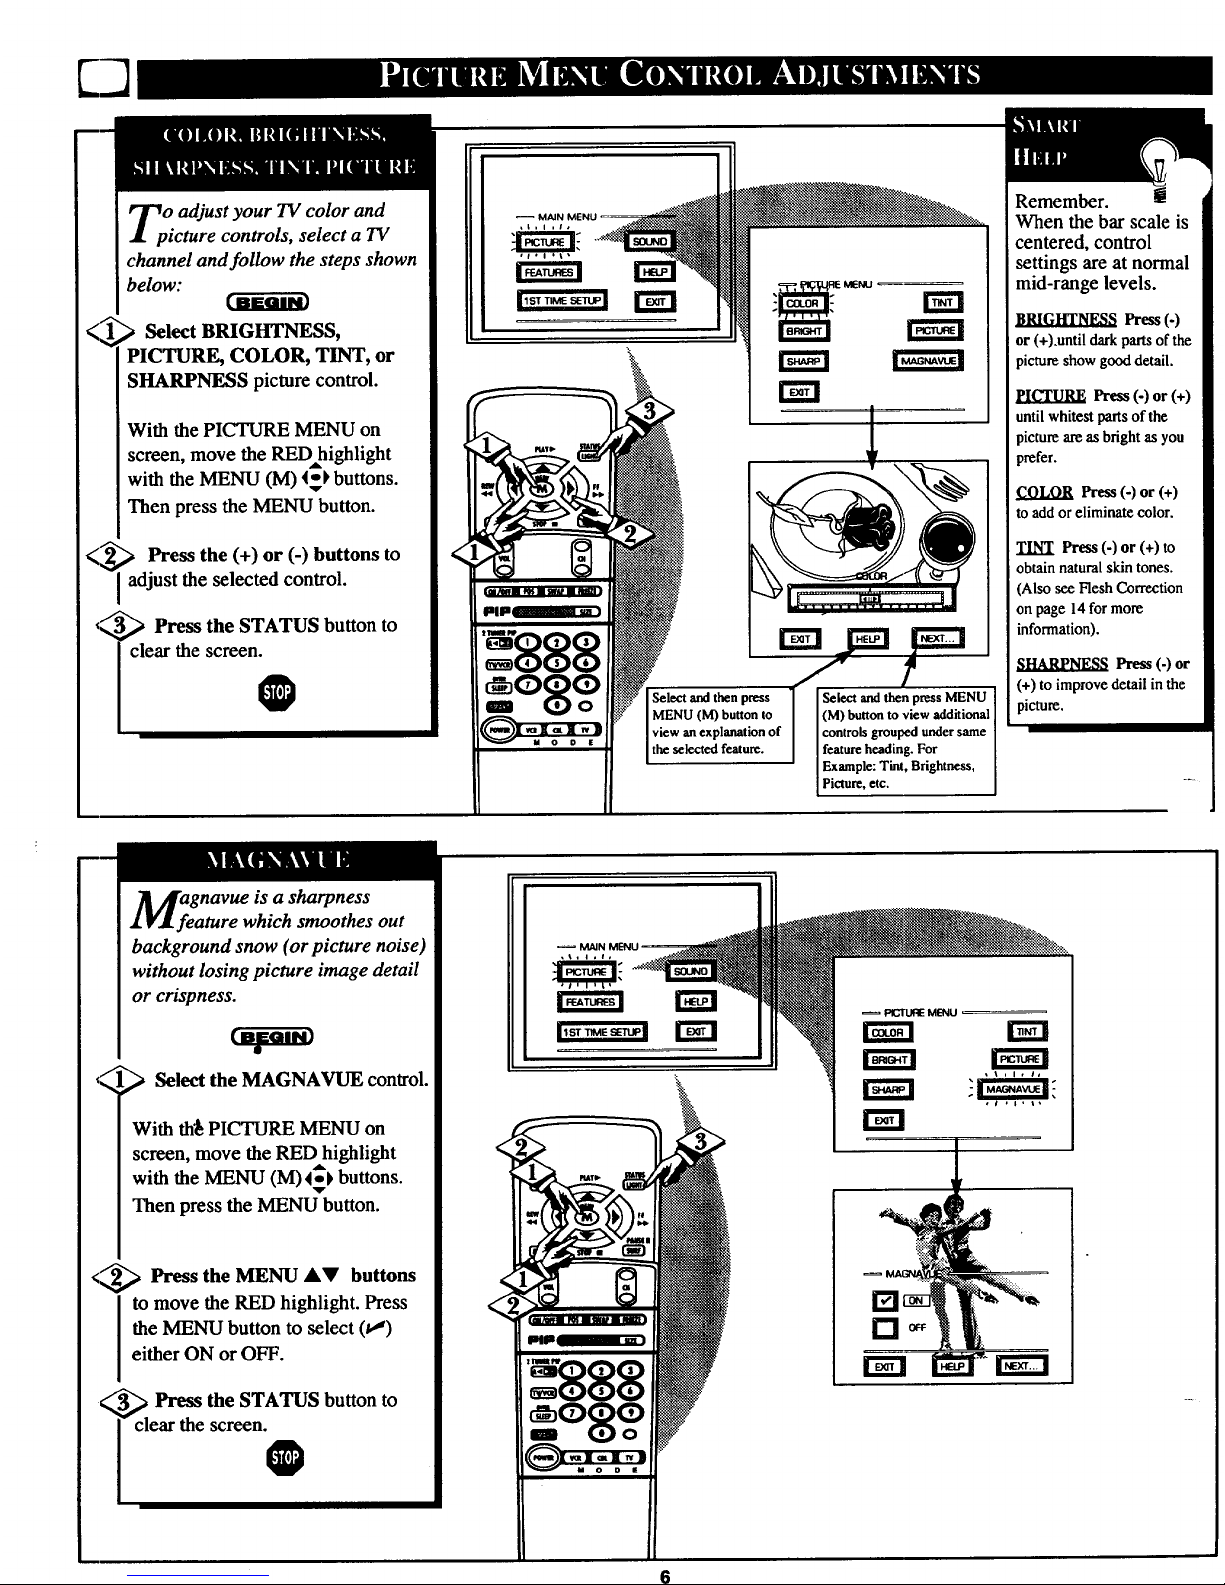
Oadjust your TV color and
icture controls, select a TV
channel and foUow the steps shown
below:
<_ Select BRIGHTNESS,
PICTURE, COLOR, TINT, or
SHARPNESS picture control.
With the PICTURE MENU on
screen, move the RED highlight
with the MENU (M) 45_ buttons.
Then press the MENU button.
<_ Press the (+) or (-) buttons to
adjust the selected control.
,_ _ Press the STATUS button to
clear the screen.
O
f ?
J
Select and then press ] Select and then press MENU
MENU (M) button to / (M) button to view additional
view an explanation of controls grouped under same
the selected feature, feature heading. For
Example: Tint, Brightness,
Picture, etc.
Remember.
When the bar scale is
centered, control
settings are at normal
mid-range levels.
lh-ess(-)
or (+).until dark parts of the
picture show good detail.
figURE Press(-)or(+)
until whitest parts of the
pictureareasbrightasyou
prefer.
COLOR Press (-) or (+)
to addor eliminate color.
TINT Press (-) or (+) to
obtain naturalskin tones.
(Also see Flesh Correction
on page 14 for more
information).
SI-IA_NESS Press (-) or
(+) to improve detail in the
picture.
<
M;egnavue is a sharpness
ature which smoothes out
background snow (or picture noise)
without losing picture image detail
or crispness.
Select the MAGNAVUE control.
With th_ PICTURE MENU on
screen, move the RED highlight
with the MENU (M) 4_t buttons.
Then press the MENU button.
<_---_ Press the MENU AV buttons
to move the RED highlight. Press
the MENU button to select (t,,_)
either ON or OFF.
_. Press the STATUS button to
I clear the screen.
6
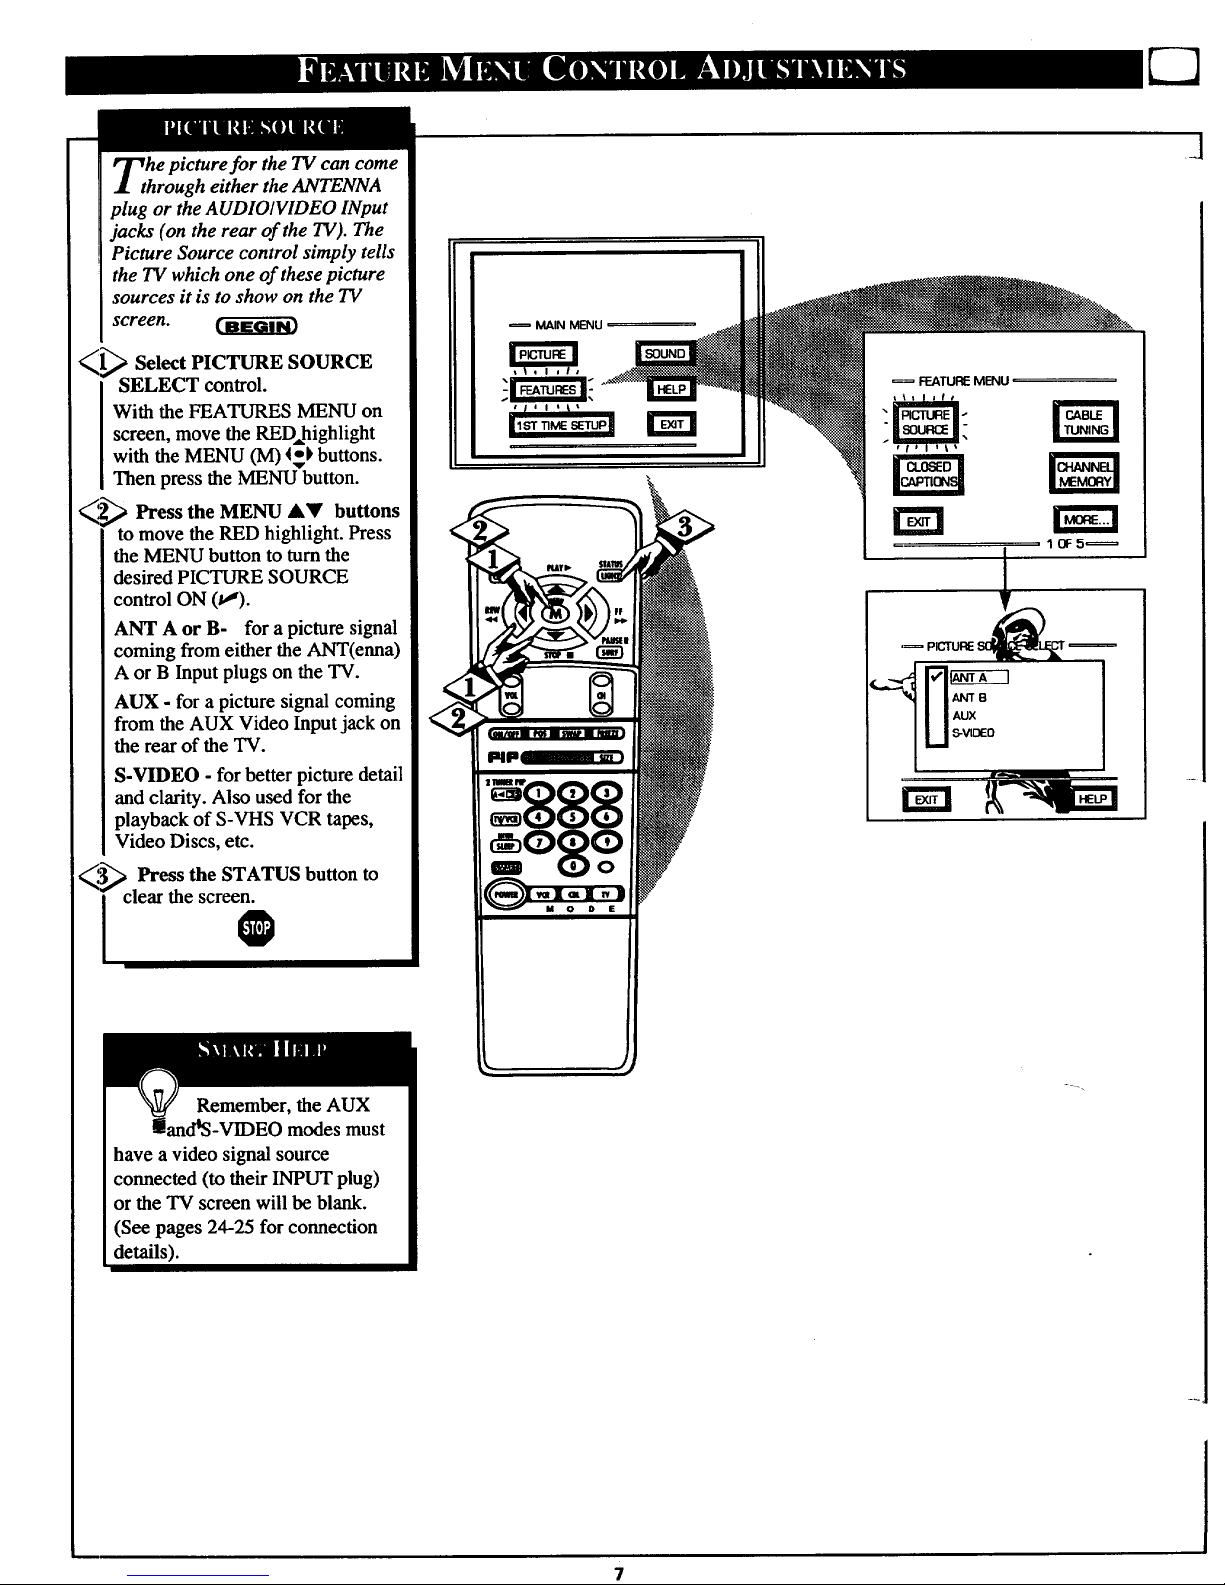
he picture for the TV can come
hrough either the ANTENNA
plug or the AUDIOIVIDEO INput
jacks (on the rear of the TV). The
Picture Source control simply tells
the TV which one of these picture
sources it is to show on the TV
screen.
_1 Select PICTURE SOURCE
_SELECT control.
[ With the FEATURES MENU on
I screen, move the RED,highlight
[ with the MENU (M) 4-_ buttons.
I Then press the MENU button.
_2_ Press the MENU AY buttons
to move the RED highlight. Press
the MENU button to turn the
desired PICTURE SOURCE
control ON (t,_).
ANT A or B- for a picture signal
coming from either the ANT(enna)
A or B Input plugs on the TV.
AUX - for a picture signal coming
from the AUX Video Input jack on
the rear of the TV.
S-VIDEO - for better picture detail
and clarity. Also used for the
playback of S-VHS VCR tapes,
Video Discs, etc.
_.'_ Press the STATUS button
i clear the screen0
to
Remember, the AUX
and*S-VIDEO modes must
have a video signal source
connected (to their INPUT plug)
or the TV screen will be blank.
(See pages 24-25 for connection
details).
MAIN MENU
7
,ANTB
AUX
i S-VIDEO
J
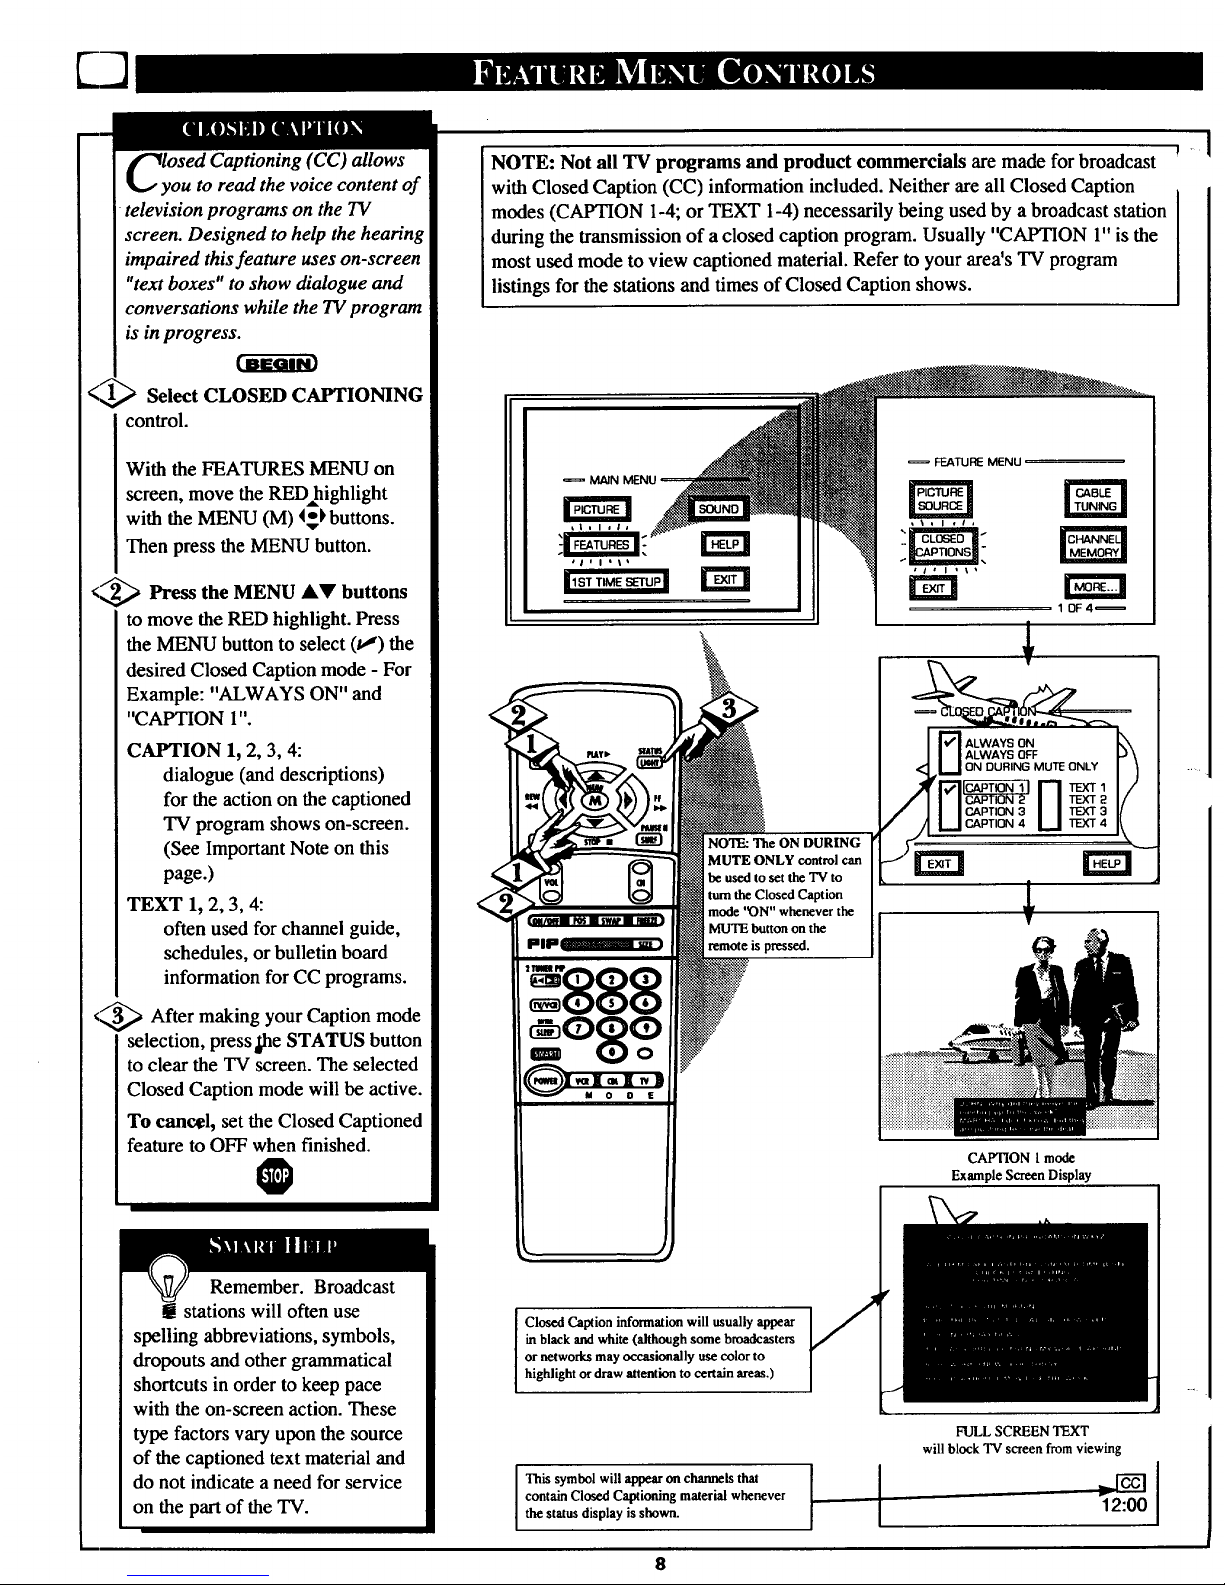
sed Captioning (CC) allows
ou to read the voice content of
television programs on the TV
screen. Designed to help the hearing
impaired this feature uses on-screen
"text boxes" to show dialogue and
conversations while the TV program
is in progress.
Select CLOSED CAPTIONING
control.
With the FEATURES MENU on
screen, move the RED=highlight
with the MENU (M) 4_ buttons.
Then press the MENU button.
<9 Press the MENU AV buttons
to move the RED highlight. Press
the MENU button to select (t,J) the
desired Closed Caption mode - For
Example: "ALWAYS ON" and
"CAPTION 1".
CAPTION 1, 2, 3, 4:
dialogue (and descriptions)
for the action on the captioned
TV program shows on-screen.
(See ImportantNote on this
page.)
TEXT 1, 2, 3, 4:
often used for channel guide,
schedules, or bulletin board
information for CC programs.
<_ After making your Caption
mode
selection, presspe STATUS button
to clear the TV screen. The selected
Closed Caption mode will be active.
To cancel, set the Closed Captioned
feature to OFF when finished.
O
Remember. Broadcast
g stations will often use
spelling abbreviations, symbols,
dropouts and other grammatical
shortcuts in order to keep pace
with the on-screen action. These
type factors vary upon the source
of the captioned text material and
do not indicate a need for service
on the part of the TV.
NOTE: Not all TV programs and product commercials are made for broadcast
with Closed Caption (CC) information included. Neither are all Closed Caption
modes (CAPTION 1-4; or TEXT 1-4) necessarily being used by a broadcast station
during the transmission of a closed caption program. Usually "CAPTION 1" is the
most used mode to view captioned material. Refer to your area's TV program
listings for the stations and times of Closed Caption shows.
MAIN
NO'I_ The ON DURING
MUTE ONLY controlcan
heusedtosettheTV to
tunatheClosed Caption
mode'_)N"wheneverthe
MUTEbuttonon the
FEATURE MENU
1 OF4=
ALWAYS ON
ALWAYS OFF
ON DURING MUTE ONLY
rm
CAPTION I mode
Example Screen Display
Closed Caption information will usually appear
in black and white (although some broadcasters
or networks may occasionally use color to
highlight or draw attention to certain areas.)
This symbol will appearon channelsthat
contain Closed Captioning material whenever
the statusdisplay is shown.
8
FULL SCREEN TEXT
will block TV screen from viewing
1z:00
i
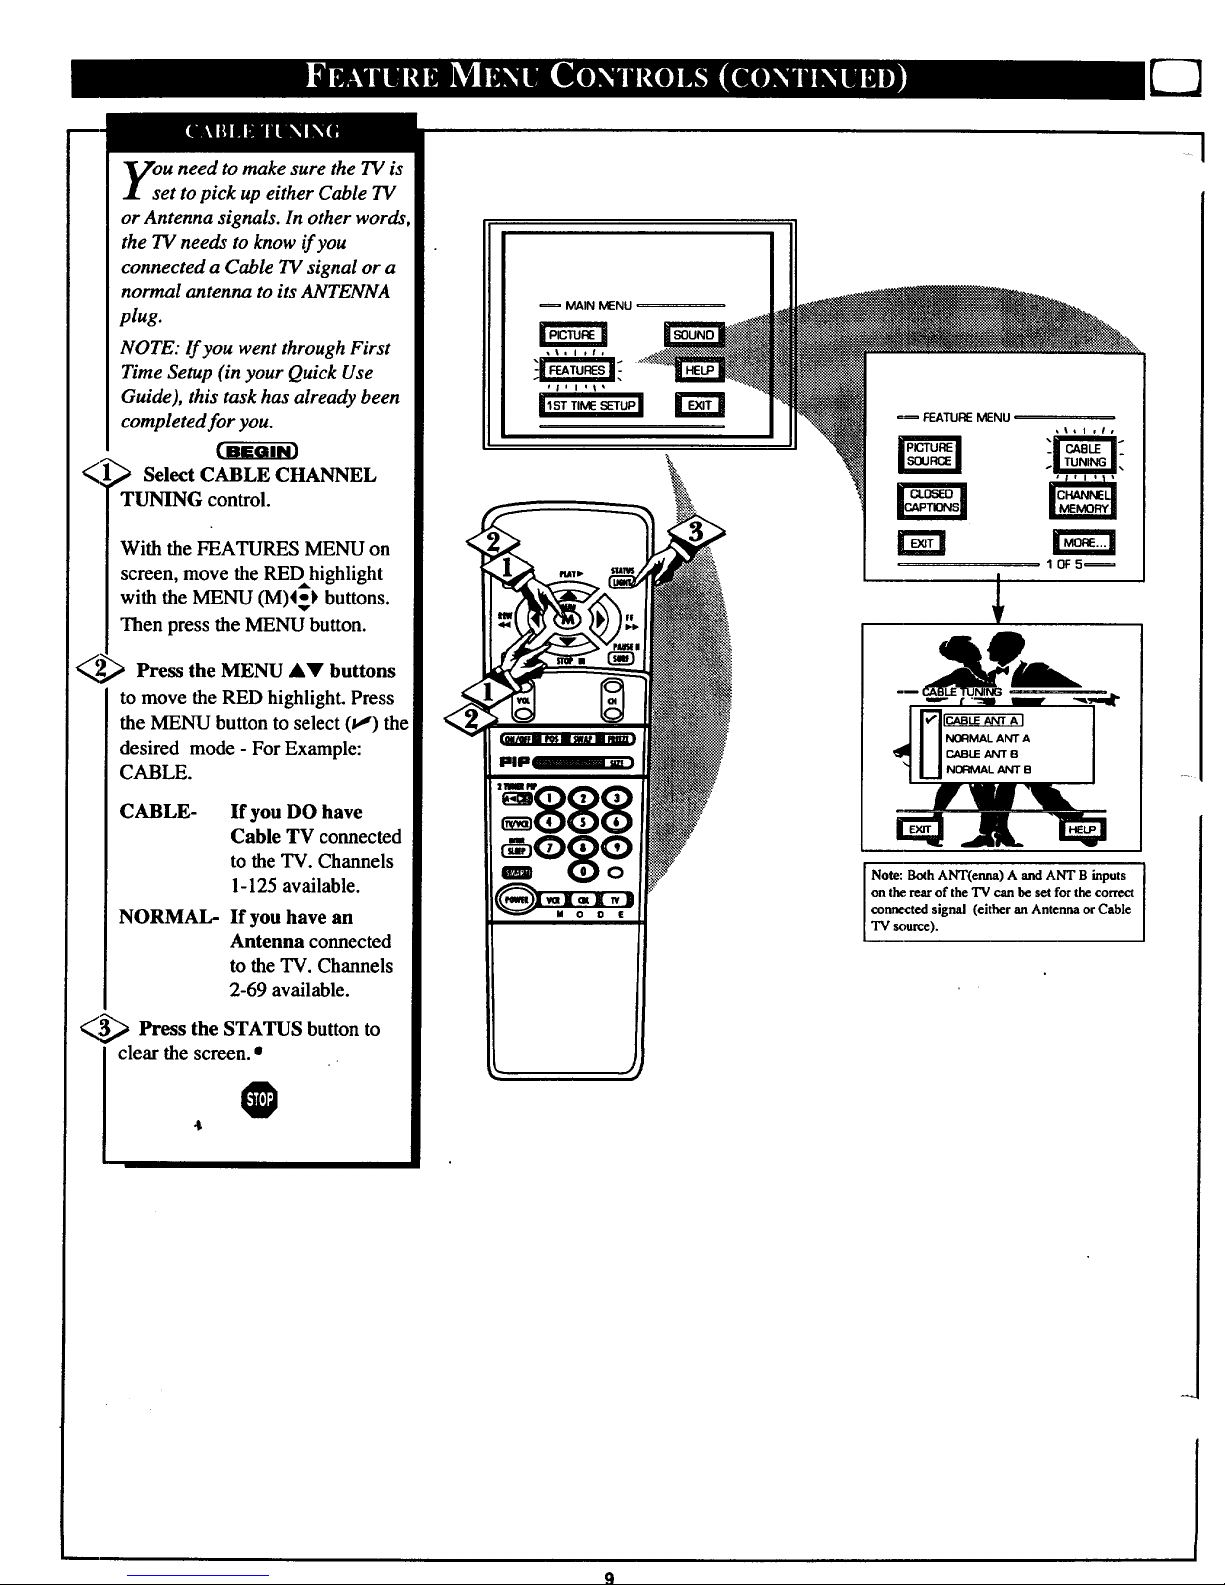
ou need to make sure the TV is
et to pick up either Cable TV
or Antenna signals. In other words
the TV needs to know if you
connected a Cable TV signal or a
normal antenna to its ANTENNA
plug.
NOTE: If you went through First
Time Setup (in your Quick Use
Guide), this task has already been
completed for you.
Select CABLE CHANNEL
TUNING control.
With the FEATURES MENU on
screen, move the REDhighlight
with the MENU (M)4_) buttons.
Then press the MENU button.
Press the MENU &V buttons
to move the RED highlight. Press
the MENU button to select (t,,') the
desired mode - For Example:
CABLE.
CABLE- If you DO have
Cable TV connected
to the "IV. Channels
1-125 available.
NORMAL- If you have an
Antenna connected
to the TV. Channels
2-69 available.
_,,,_ Press the STATUS button
to
clear the screen. •
O
MAIN MENU
' '888
=o8oo
FEATURE MENU
rm
10F5_
Note: Both ANT(enna) A and ANT B inputs
on the rearof the TV can he set for the correct
coanected signal (either an Antenna or Cable
"IVsource).
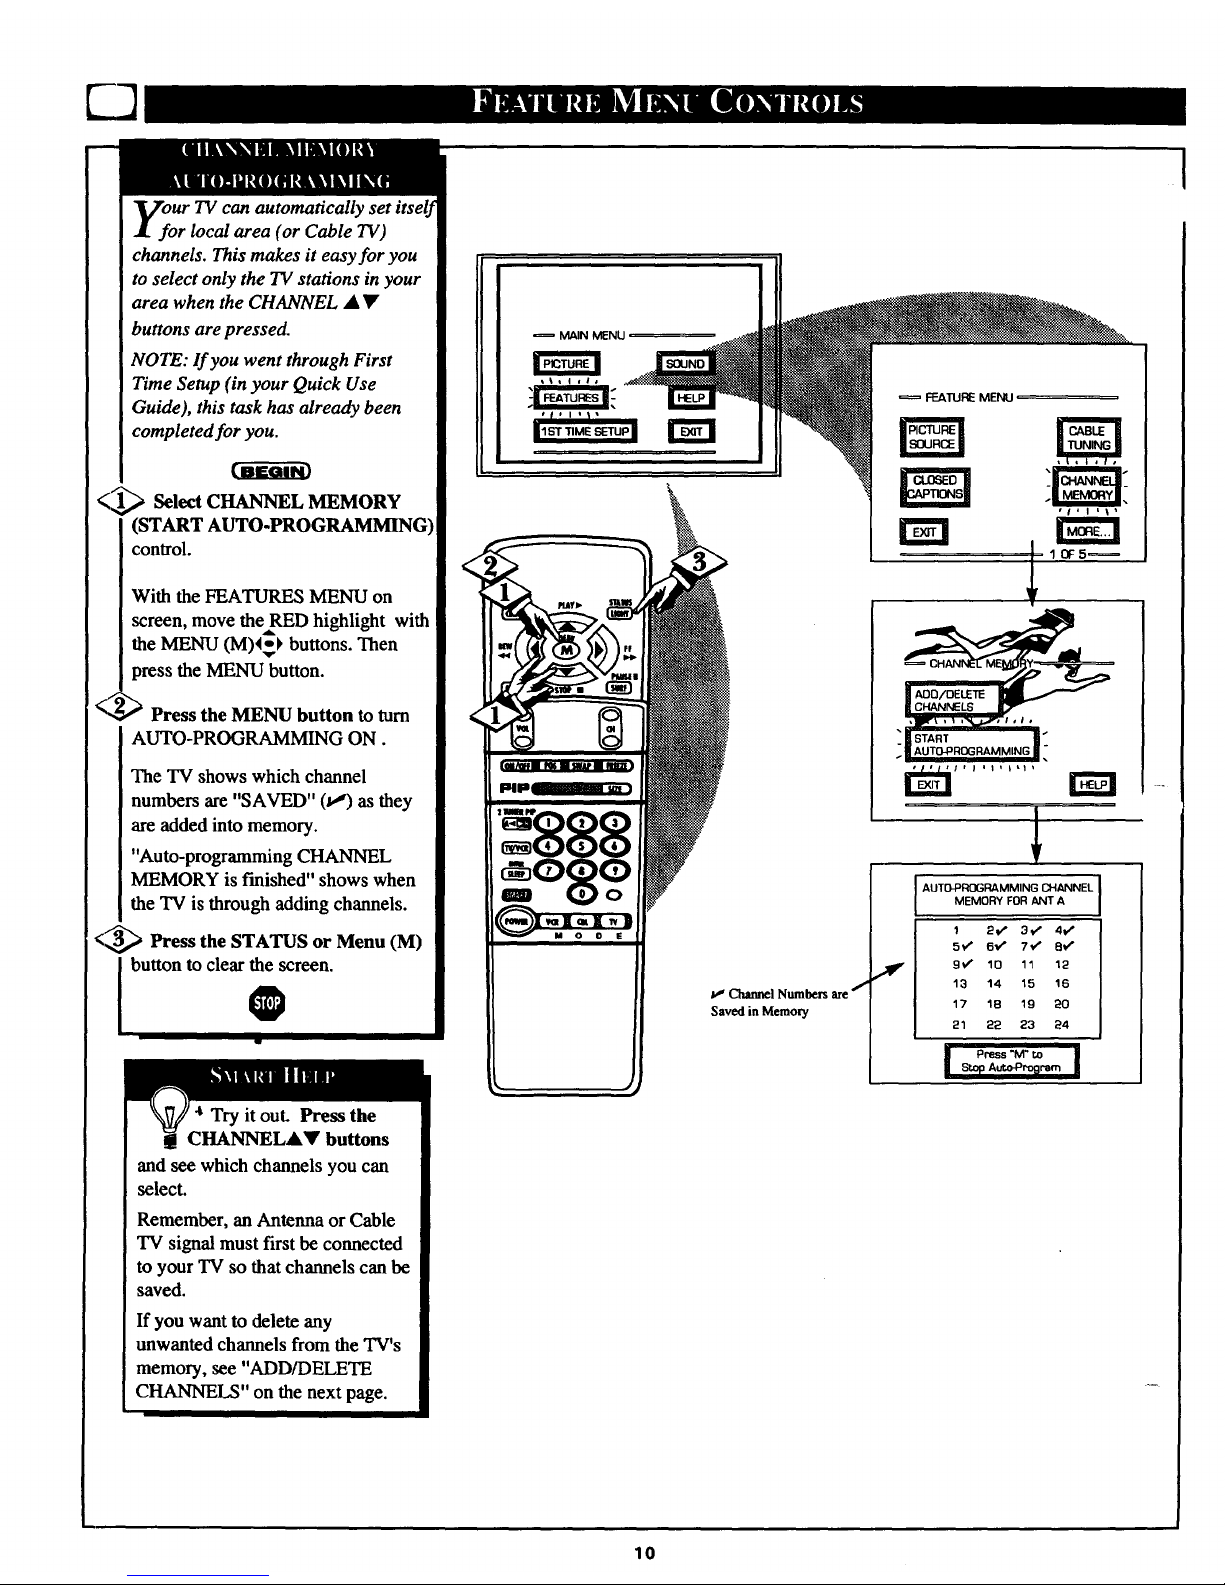
Ur TV can automatically set itself
r local area (or Cable TV)
channels. This makes it easy for you
to select only the TV stations in your
area when the CHANNEL • •
buttons are pressed.
NOTE: If you went through First
Time Setup (in your Quick Use
Guide), this task has already been
completed for you.
<,,_ Select CHANNEL MEMORY
(START AUTO-PROGRAMMING)
conlrol.
With the FEATURES MENU on
screen, move theRED highlight with
the MENU (M)4_ buttons. Then
press the MENU button.
_ Press the MENU button to turn
AUTO-PROGRAMMING ON.
The TV shows which channel
numbers are "SAVED" (t,_) as they
are added into memory.
"Auto-programming CHANNEL
MEMORY is finished" shows when
the TV is through adding channels.
<_ Press the STATUS or Menu (M)
dbutton to clear the screen.
0
Try it out. Press the
CHANNEL&• buttons
and see which channels you can
select.
Remember, an Antenna or Cable
"IV signal must first be connected
to your TV so that channels can be
saved.
If you want to delete any
unwanted channels from the TV's
memory, see "ADD/DELETE
CHANNELS" on the next page.
Mp_
I
Channel Numbers are j
Saved in Memory
I,-
FEATURE MENU
V
,l
AUTO_ROGRAMMING CHANNEL
MEMORY FOR ANT A
2*," 3t/' 4tP
5V" 6€" 7€" 8€"
9v _ 10 11 12
13 14 15 16
17 1B 19 20
21 22 23 24
| Press "M" to |
1
10
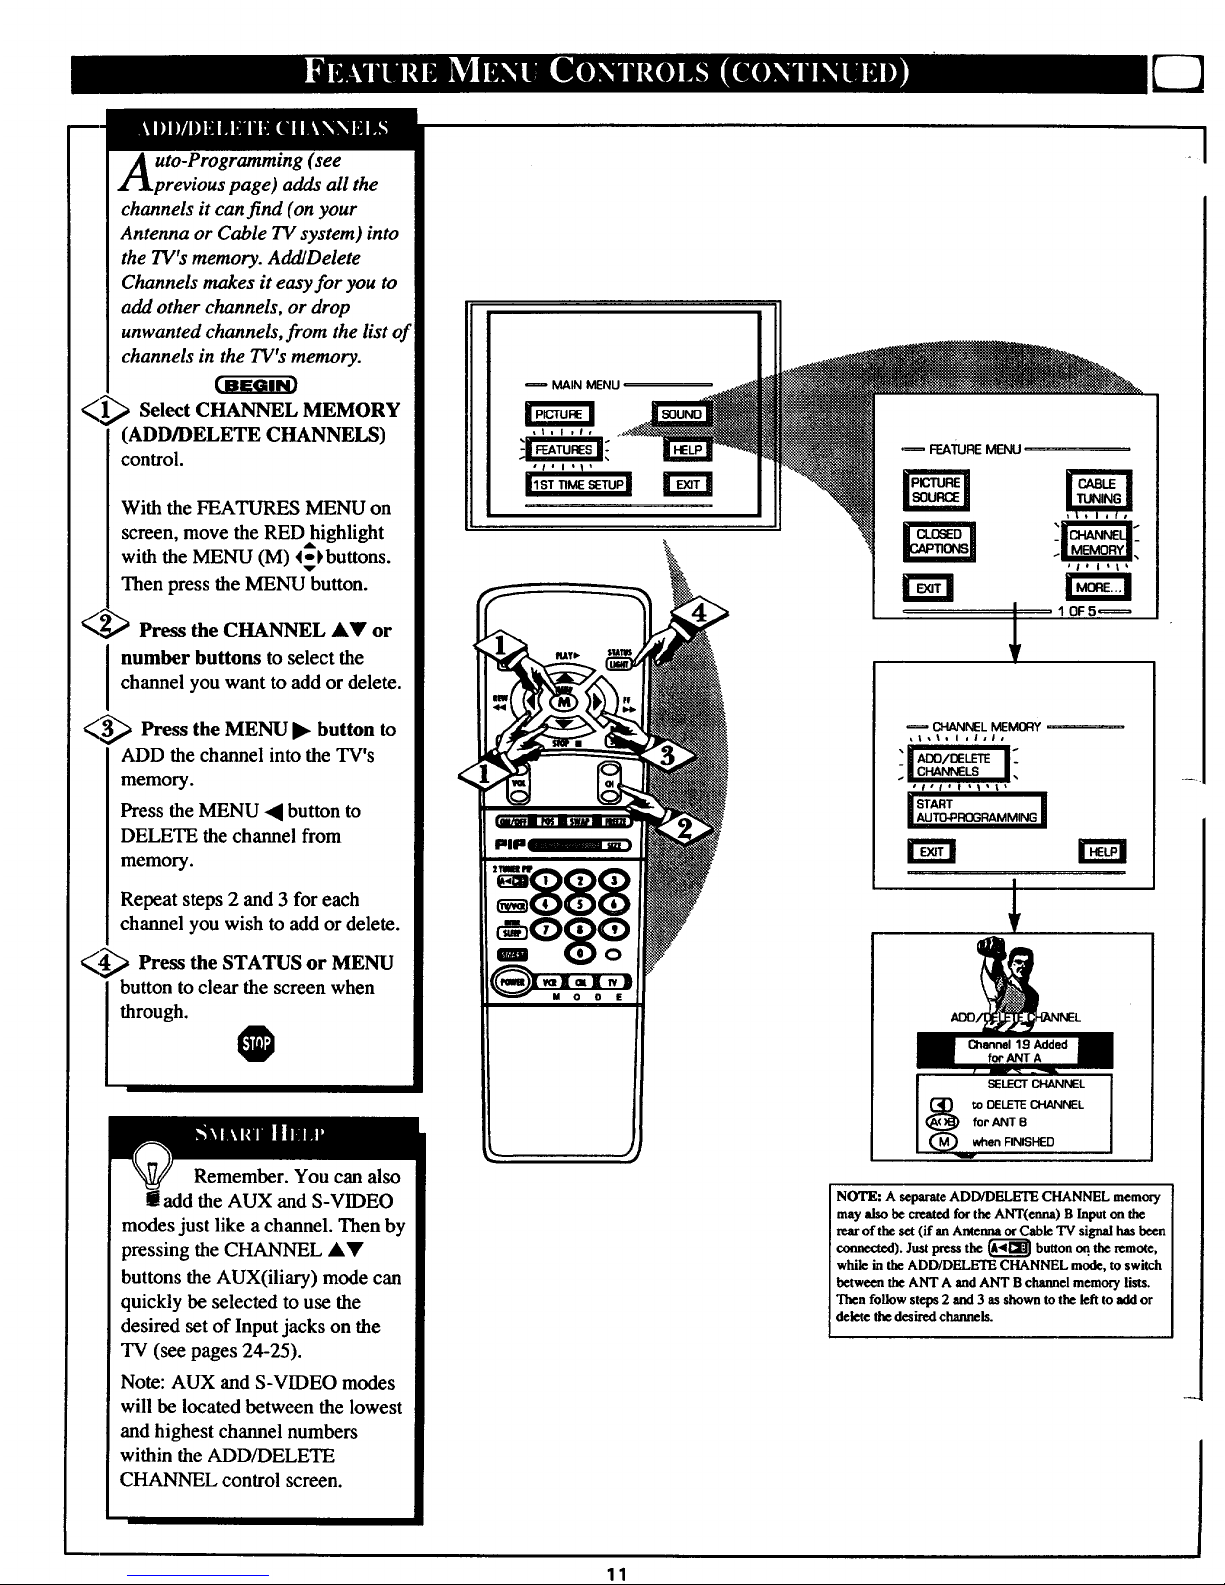
uto-Programming (see
previous page) adds all the
channels it can find (on your
Antenna or Cable TV system) into
the TV's memory. AddlDelete
Channels makes it easy for you to
add other channels, or drop
unwanted channels, from the list of
channels in the TV's memory.
Sel tC r, L MEMORY
(ADD/DELETE CHANNELS)
control.
With the FEATURES MENU on
screen, move the RED highlight
with the MENU (M) <-_buttons.
Then press the MENU button.
_i _ Press the CHANNEL AV or
number buttons toselect the
channel you want to add or delete.
_,,_ Press the MENU button
to
ADD the channel intothe TV's
memory.
Press the MENU • button to
DELETE the channel from
memory.
Repeat steps 2 and 3 for each
channel you wish to add or delete.
_,_ Press the STATUS MENU
or
buttonto clear the screen when
through.
O
Remember. You can also
add the AUX and S-VIDEO
modes just like a channel. Then by
pressing the CHANNEL A,V
buttons the AUX(iliary) mode can
quickly be selected to use the
desired set of Input jacks on the
TV (see pages 24-25).
Note: AUX and S-VIDEO modes
will be located between the lowest
and highest channel numbers
within the ADD/DELETE
CHANNEL control screen.
MAIN MENU
k,, +'
11
(_4.aJ4NELMEMORY i
Llll. i ,lala
il I!
i START I
[IAUTO_ROGRAMMING |
SELECT CI-16NNEL
{_ toDELETE CHANNELfoi".,6J_ITB
(_ when FINISHED
NOTE: A separate ADD/DELETE CHANNEL memory
may also be mated forthe ANT(enna) B Input on the
rearof the set (if an Antenna or Cable TV signal has been
connected). Just press the (_ button oq. the remote,
while in the ADD/DELETE CHANNEL mode, to switch
between the ANT A and ANT B channel memory lists.
Then follow steps 2 and 3 as shown to the left to add or
delete the desired channels.
_1
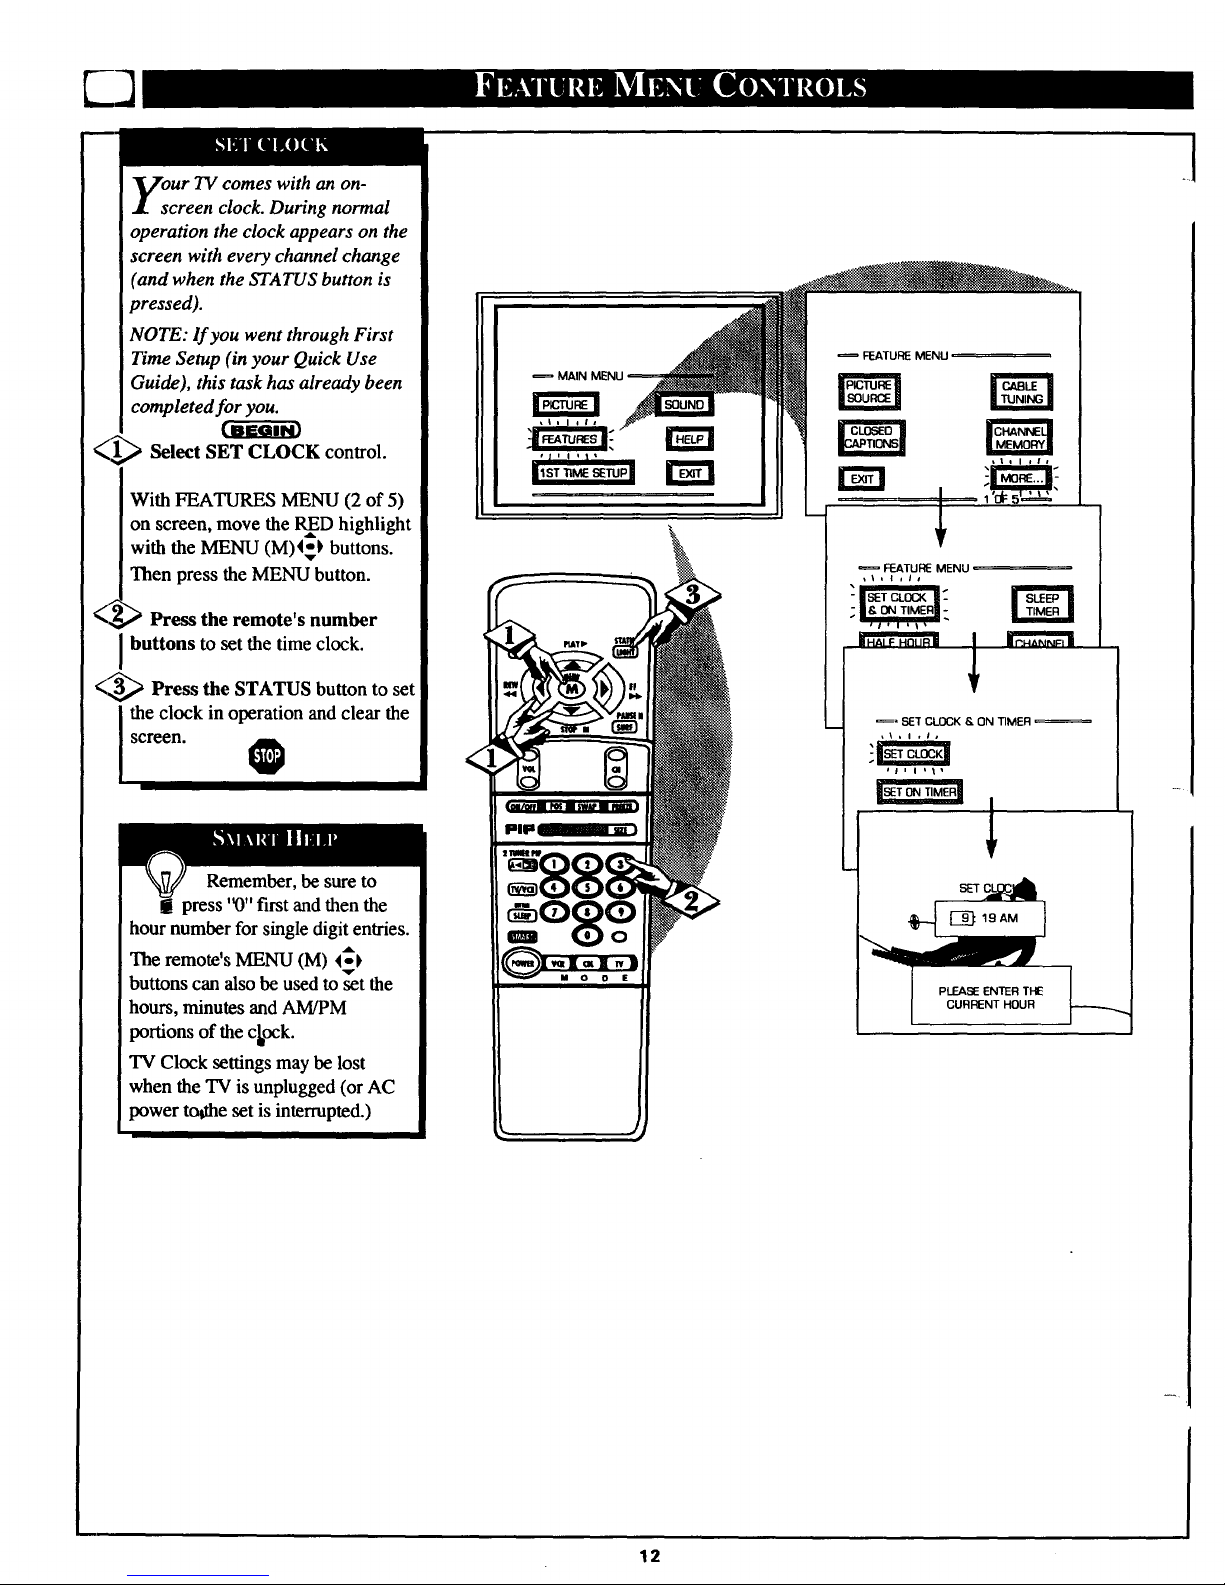
our TV comes with an on-
creen clock. During normal
operation the clock appears on the
screen with every channel change
(and when the STATUS button is
pressed).
NOTE: If you went through First
Time Setup (in your Quick Use
Guide), this task has already been
completed for you.
_1,1_ Select SET CLOCK control.
With FEATURES MENU (2 of 5)
on screen, move the RInD highlight
with the MENU (M)_'_ buttons.
Then press the MENU button.
Press the remote's number
buttons to set the time clock.
<_ Press the STATUS button to set
l the clock in operation and clear thescreen.
Remember, be sure to
g[ press '_" first and then the
hour number for single digit entries.
The remote's MENU (M) ___)
buttons can also be used to set the
hours, minutes and AM/PM
portions of the clock.
TV Clock settings may be lost
when the TV is unplugged (or AC
power todae set is interrupted.)
l
MAIN MENU
FEATURE MENU
FEATURE MENU
== SET CLOCK S. ON TIMER
.!
12
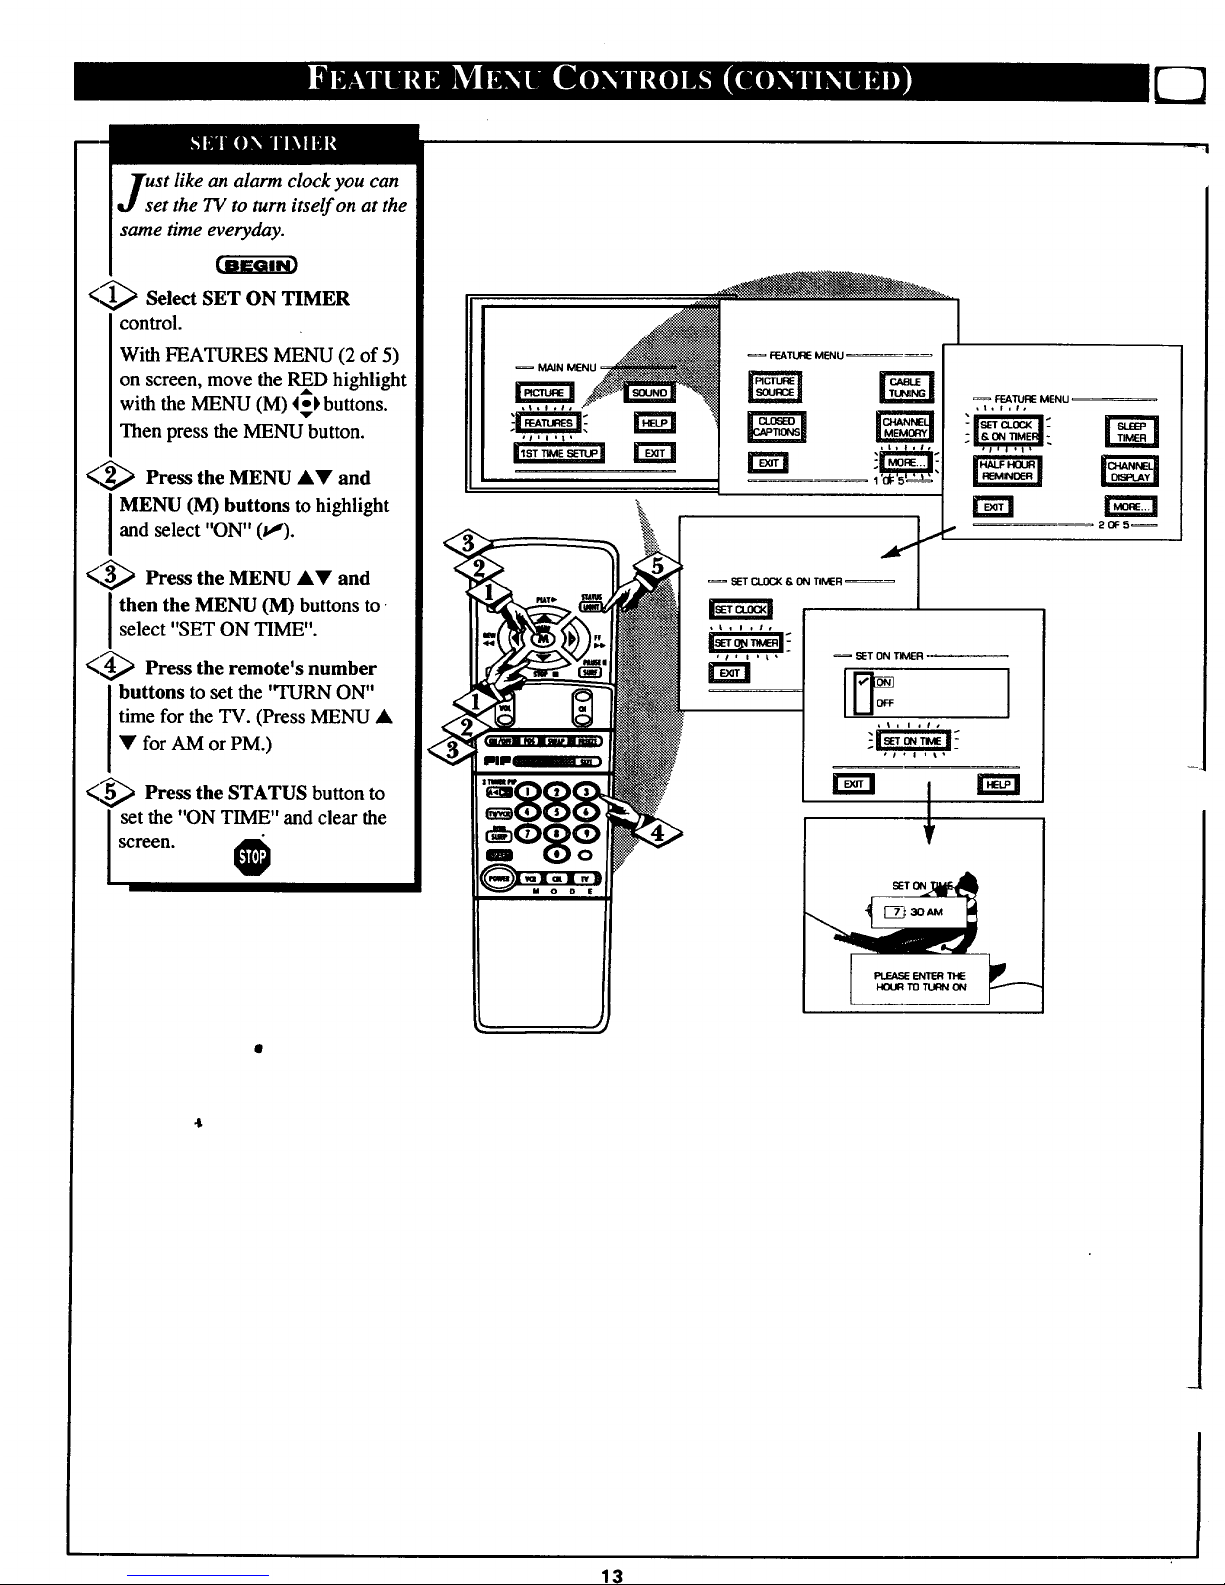
an alarm clock you can
set the TV to turn itself on at the
same time everyday.
<_ Select SET ON TIMER
control.
With FEATURES MENU (2 of 5)
on screen, move the RED highlight
,ak
with the MENU (M) 4-_ buttons.
Then press the MENU button.
<2_ Press the MENU AV and
I MENU (M) buttons to highlight
and select "ON" (tl).
<_ Pl'ess the MENU AV and
then the MENU (M) buttons to
select "SET ON TIME".
<_ Press the remote's number
buttons to set the "TURN ON"
time for the TV. (Press MENU •
• for AM or PM.)
<.5_ Press the STATUS button to
set the "ON TIME" and clear the
screen.
FEATURE MENU
,t,l,i,
20F5_
SETON
Pt._ ENIT=RTHE
HOUR T0 TURN 0N
13
mINNU H mIB
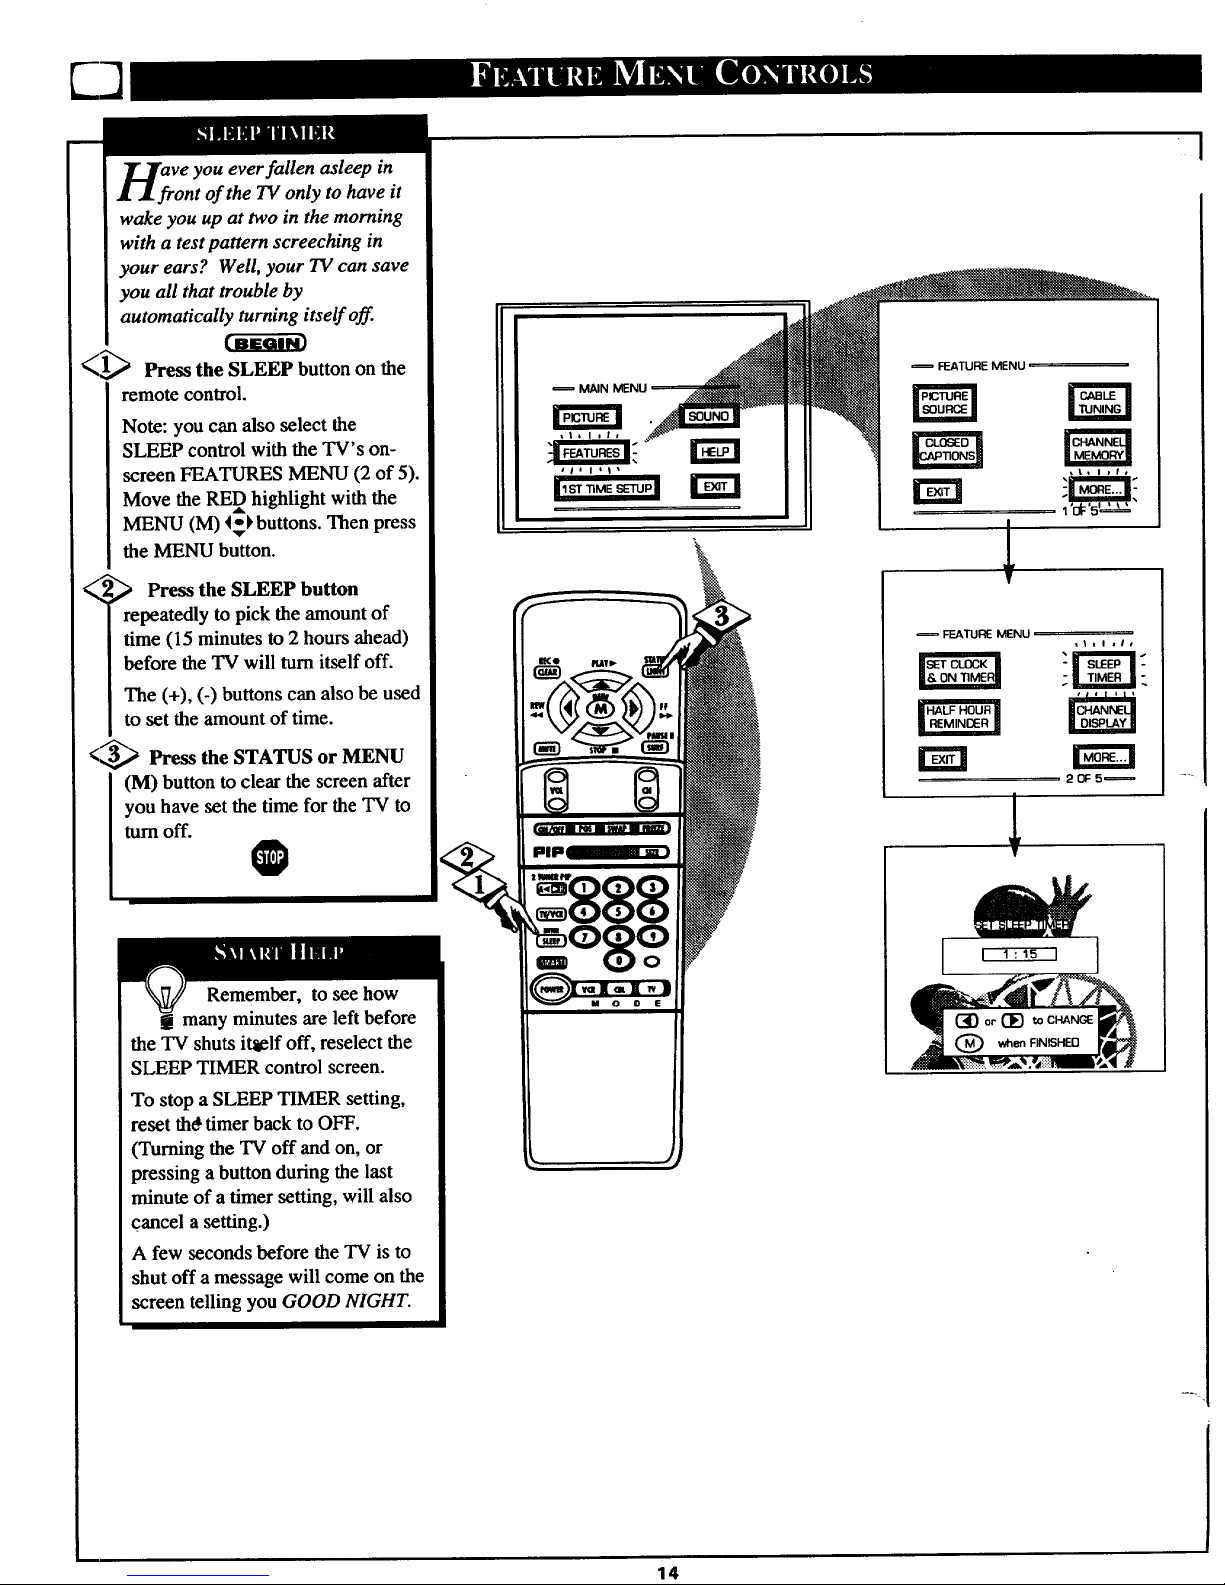
ve you ever fallen asleep in
ont of the TV only to have it
wake you up at two in the morning
with a test pattern screeching in
your ears? Well, your TV can save
you all that trouble by
automatically turning itself off.
_1_ Press the SLEEP button on the
remote control.
Note: you can also select the
SLEEP control with the TV's on-
screen FEATURES MENU (2 of 5).
Move the RED highlight with the
MENU (M) 4_ buttons. Then press
the MENU button.
_,_,._ the SLEEP button
Press
repeatedly to pick the amount of
time (15 minutes to 2 hours ahead)
before the TV will turnitself off.
The (+), (-) buttons can also be used
to set the amount of time.
<_ Press the STATUS or MENU
(M) button to clear the screen after
you have set the time for the TV to
turn off.
plpl
Remember, to see how
many minutes are left before
the TV shuts itaelf off, reselect the
SLEEP TIMER control screen.
To stop a SLEEP TIMER setting,
reset thd timer back to OFF.
(Turning the TV off and on, or
pressing a button during the last
minute of a timer setting, will also
cancel a setting.)
A few seconds before the TV is to
shut off a message will come on the
screen telling you GOOD NIGHT.
FEATURE MENU
FEATLIE MENU
IsErCLOCKI | s_[_ |
1
14
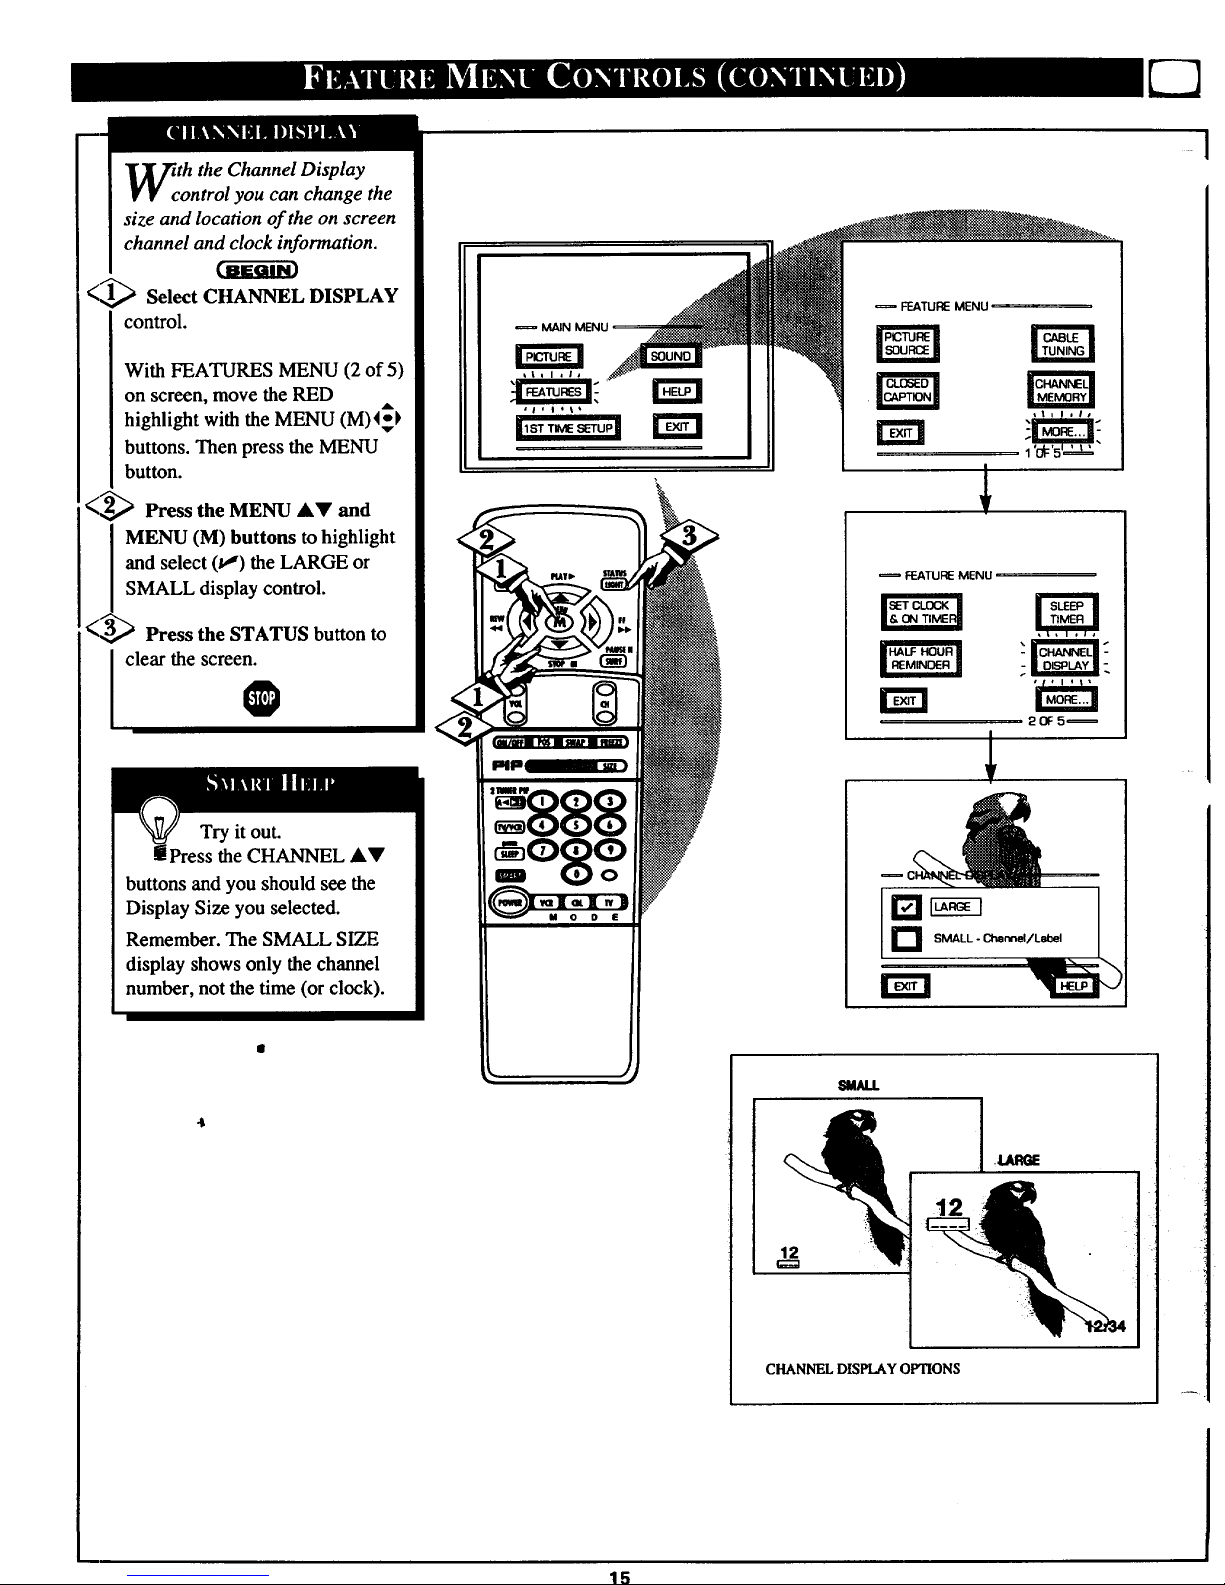
th the Channel Display
ontrol you can change the
size and location of the on screen
channel and clock information.
<'1_ Select CHANNEL DISPLAY
control.
With FEATURES MENU (2 of 5)
on screen, move the RED
highlight with the MENU (M)_k
buttons. Then press the MENU
button.
(_ Press the MENU AV and
MENU (M) buttons to highlight
I and select (tl) the LARGE or
I SMALL display control.
<_3,,_ Press the STATUS button to
clear the screen.
Try it out.
Press the CHANNEL &V
buttons and you should see the
Display Size you selected.
Remember. The SMALL SIZE
display shows only the channel
number, not the time (or clock).
FEATURE MENU
FEATURE MENU
IHALFHOURI
rm
SMALL - Chennel/Label
W._UJ.
12
CHANNEL DISPLAY OPTIONS
I
15
 Loading...