

Magnavox MX2000, MX2500 Owner's Manual
SMARTHOME.COM™
1-800-SMART-HOME
949-221-9200
http://www.smarthome.com
Order #7308KIT
Voice Dialer Instructions
To Set Up Auto Dial:
1. Program Phone Numbers
To have your Central Controller call a friend/neighbor/relative when a break-m occurs, follow the
steps below to program in up to four telephone numbers.
or 9 11; many States and Localities will not allow a recorded message to be sent to the police or 9 11.
FINES AND PENALTIES MAY RESULT.
A
Slide the Slider Switch to SEC.
B.
Press TEL CODE, then number button 3. Controller beeps.
C.
Use the number keypad to enter the phone You may select a number of any length.
D.
Press the ENTER button
E.
Use the number keypad to enter the memory number of the phone number: or 4. The Central
Controller will beep twice.
F. Repeat steps A-E for the other three phone numbers.
2.
Record a Message
A
With the Slider Switch in INSTALL SEC position, press the RECORD button. The RECORD light on
the display panel will appear.
B.
Speak into the microphone for up to fifteen seconds. A message similar to this one is suggested:
Hello.
breached_
household
C. When you are finished, wait until the RECORD light disappears.
This is the Johnsons home security system. The Johnsons home security system has been
Wait until this message stops, then press on your phone to listen in on the Johnson
you
hear anything unusual, please call the police.
DO NOT program in your local police department
STIFF
3. Review Your
A
Attach the supplied earphone to the back of the unit.
B.
Place the earphone earpiece in your ear.
C.
Slide the Slider Switch to RUN 1 or RUN 2 position
D.
Press the RECORD button The RECORD light will appear, and your message will be played back
through the attached earphone.
4.
Testing Your Home Security System Voice Dialer
in up to four different phone numbers, recorded your personal message, and hooked up several lamps to the
Lamp Units.
Note: If you selected the friends/neighbors setting earlier in the setup, let the person who will be receiving
your recorded message know you are testing your system and they will be receiving your distress message.
A
Make sure the Central Controllers Slider Switch is in either the RUN 1 or RUN 2 position.
B.
Press ARM HOME.
does not beep, refer to the Arming and Disarming section of your manual).
C.
Open a monitored door or window.
.
The Siren will sound
.
All lights connected to Lamp Units will flash.
.
After 30 seconds, the system will seize your phone line and automatically call your designated friends/
neighbors.
D. Disarm your system.
l
Enter your 3digit PIN.
l
Press the DISARM button.
Message
To test de system, you should have installed all of the Door/Window Sensors, programmed
All completed? Good! Were ready to test the system.
the
The controller will beep once and the ARM LIGHT will turn on
system
SMARTHOME.COM™
1-800-SMART-HOME
949-221-9200
http://www.smarthome.com
Order #7308KIT
Welcome to Magnavox Home Security!
SMARTHOME.COM™
1-800-SMART-HOME
949-221-9200
http://www.smarthome.com
Order #7308KIT
Congratulations on the purchase of your Magnavox Home Security System. Your new Home Security
Controller and accessories use the latest computer technology to detect and report an intrusion in your
Your Home Security System comes with Door/Window Sensors to protect selected doors or windows from intrusion. It
also comes with a
If
anyone breaks into your home, your home security system will sound a siren and make the lights flash.
program it to automatically call the professional monitoring service when an intrusion is detected. The monitoring service
provides professional security monitoring and technical support 24 hours a day, seven days a week.
Best of all, you can operate your Home Security System from a distance using the Full-Function Remote. You can also
turn lights on and off from a telephone outside your home.
This manual explains everything you need to know to install and operate your Home Security System.
Unit that turns the lights on and off at your command.
home.
You
can also
Table Of
Introduction
Verifying Supplied Parts
Installing the System
Setting Up the Central Controller
Setting Up the Remote
Setting Up the Lamp Unit
Setting Up the Door/Window Sensors
Setting Up a Motion Detector
Setting Up Professional Monitoring Service
Operating the System
Arming and Disarming the System
Turning Lamps On and Off.
Advanced Operations..
Appendices
Expanding Your System (How to Order Additional Accessories) . .
2: Setting Up a Siren
3: Setting Up the Door/Window Sensors with an Extra Magnet Set
4: illustration of Central Controller
Illustration of Full-Function Remote
6: Illustration of Remote
7: Troubleshooting Guide
Technical Information
Important Notices
Specifications
FCC Information
Index
Warranty Information
..............................................
...................................
...........................
2
3
4
6
7
9
.
.
.
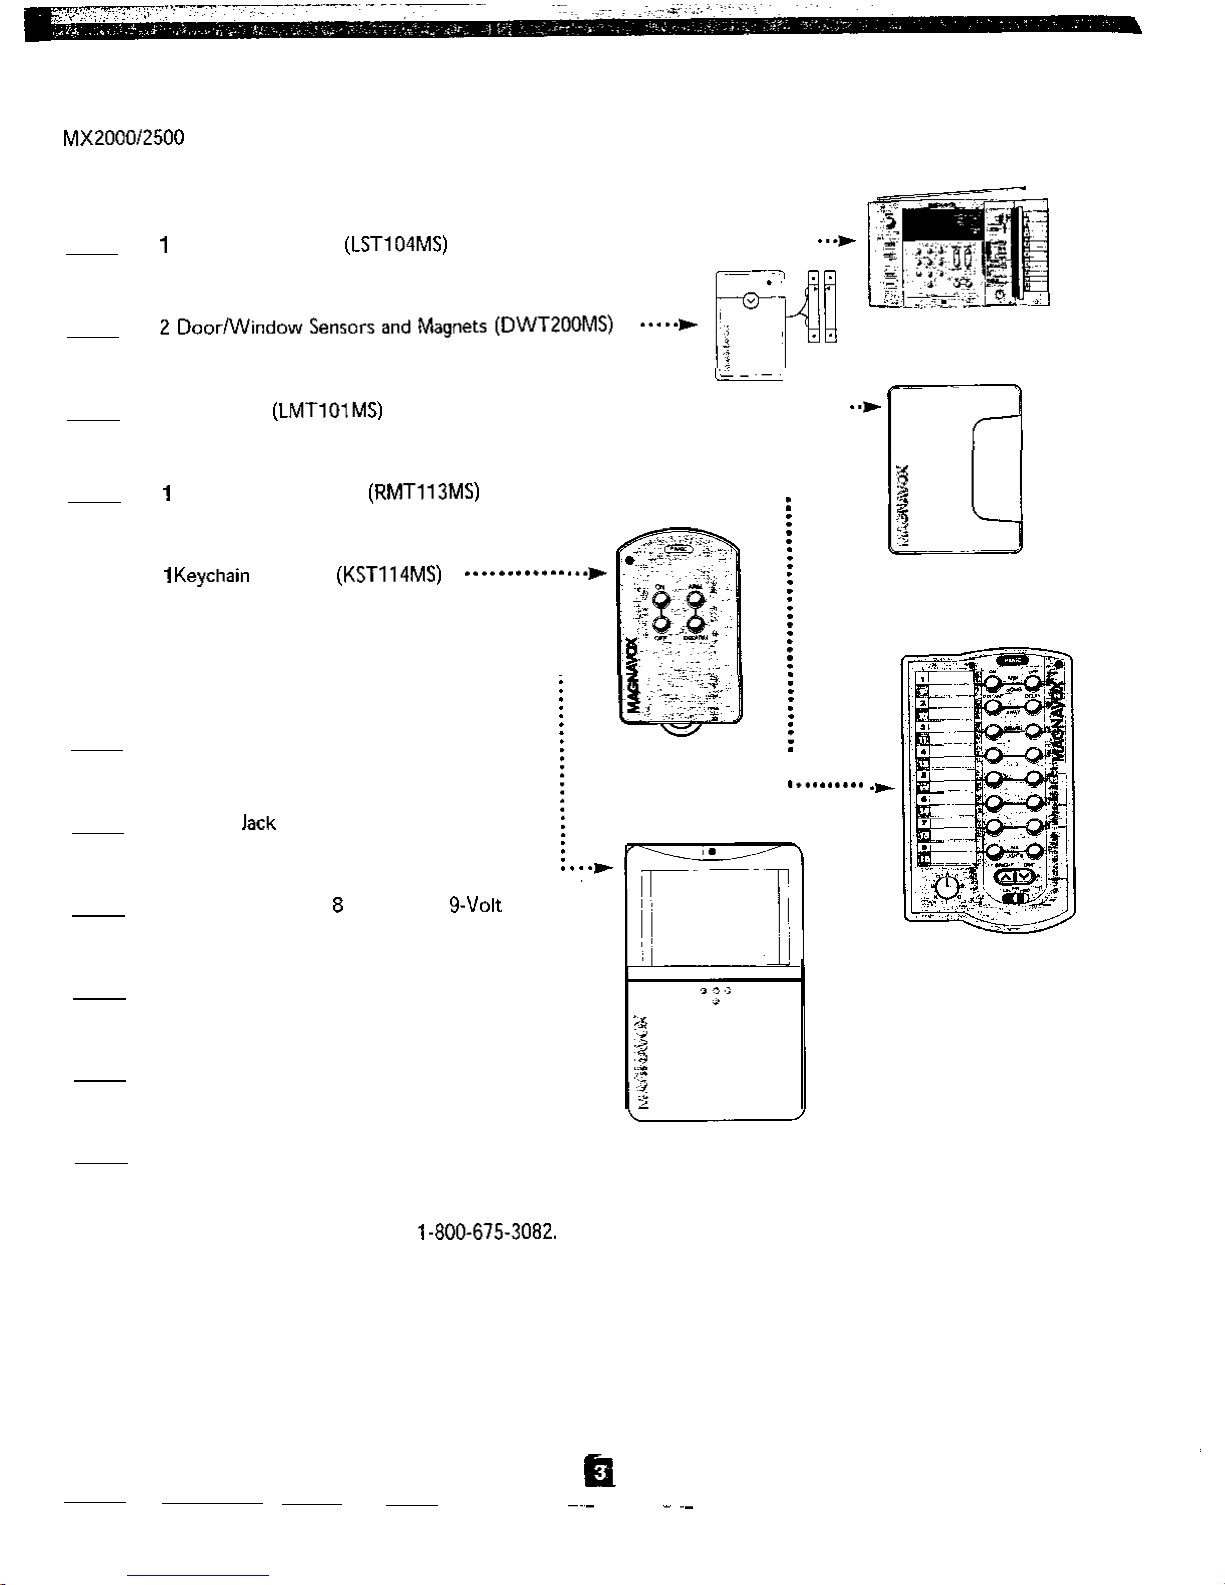
Verifying Supplied Parts
The Home Security System comes with the following parts. Make sure each part is supplied with your system by
checking it off on the list below.
Central Controller
1 Lamp Unit
Full Function Remote
Remote
1 Phone Cord
. . . . . . . . . . . . . . . . . . . . . . . . . . . . . . . . . . . . . . . . .
. . . . . . . . . . . . . . . . . . . . . . . . . . . . . . . . . . . . . . . . . . . . . . . . . . . .
. . . . . . . . . . . . . . . . . . . . . . . . . . . . . . . . . ...*
1 Phone
Alkaline Batteries:
Mounting Screws
Double-Stick Tape
Window Stickers
If you are missing any item listed above, call
Now youre ready to install and program your new Home Security System.
Splitter
AA, 4 AAA,
SMARTHOME.COM™
1-800-SMART-HOME
949-221-9200
http://www.smarthome.com
Order #7308KIT

Setting Up the Central Controller
SMARTHOME.COM™
1-800-SMART-HOME
949-221-9200
http://www.smarthome.com
Order #7308KIT
Before setting up the Central Controller, choose the doors and windows you want to protect from intrusions. Select the
(You
you want to turn on and off automatically.
and Remotes.)
can purchase and install additional accessories such as Motion Detectors,
lamps
Sirens,
Insert a battery.
. . . . . . . . . . . . . . . . . . . .
a. Remove the battery compartment cover from the
back of the Controller (near the antenna).
b. Pull the battery attachment from the battery com-
partment.
c. Connect the supplied battery and sides
aligned as indicated) to the battery attachment.
d. Insert the attached g-volt battery into the battery
compartment.
e. Replace the battery compartment cover.
!.
Connect the Controller to a telephone.
l
. . . . . . . . . . . . . . . . . . . . . . . . . . . . . . . . . . . . . . . . . . .
a.
Plug the phone jack splitter into a wall
phone jack.
b. Plug one end of the supplied phone cord into the
jack on the back of the Controller. Plug the other
end of the cord into one of the jacks on the jack
splitter.
c.
Connect your phone to the jack splitter. if you
have an answering machine, connect the answering
machines phone cord to the splitter.
This setup allows you to turn the lights on and off
using a phone outside your home. (This phone con
also allows you to program your security
system to immediately alert the professional moni-
toring service when an intrusion is detected.)
. . . . . . . . . . . . . . . . . . . . . . . . . . . . . . . . .
. . . . . . . . .
Central Controller
Battery Attachment
Central Controller
3.
Plug the unit into a standard AC outlet,
Extend the Controllers antenna.
. . . . . . . . . . . . . . . . . . . . . . . . . . . . . . . . . . . . . . . . . . . . . . . . . . . . .
(continued on next page)
To Electrical Outlet
Setting Up the Central Controller
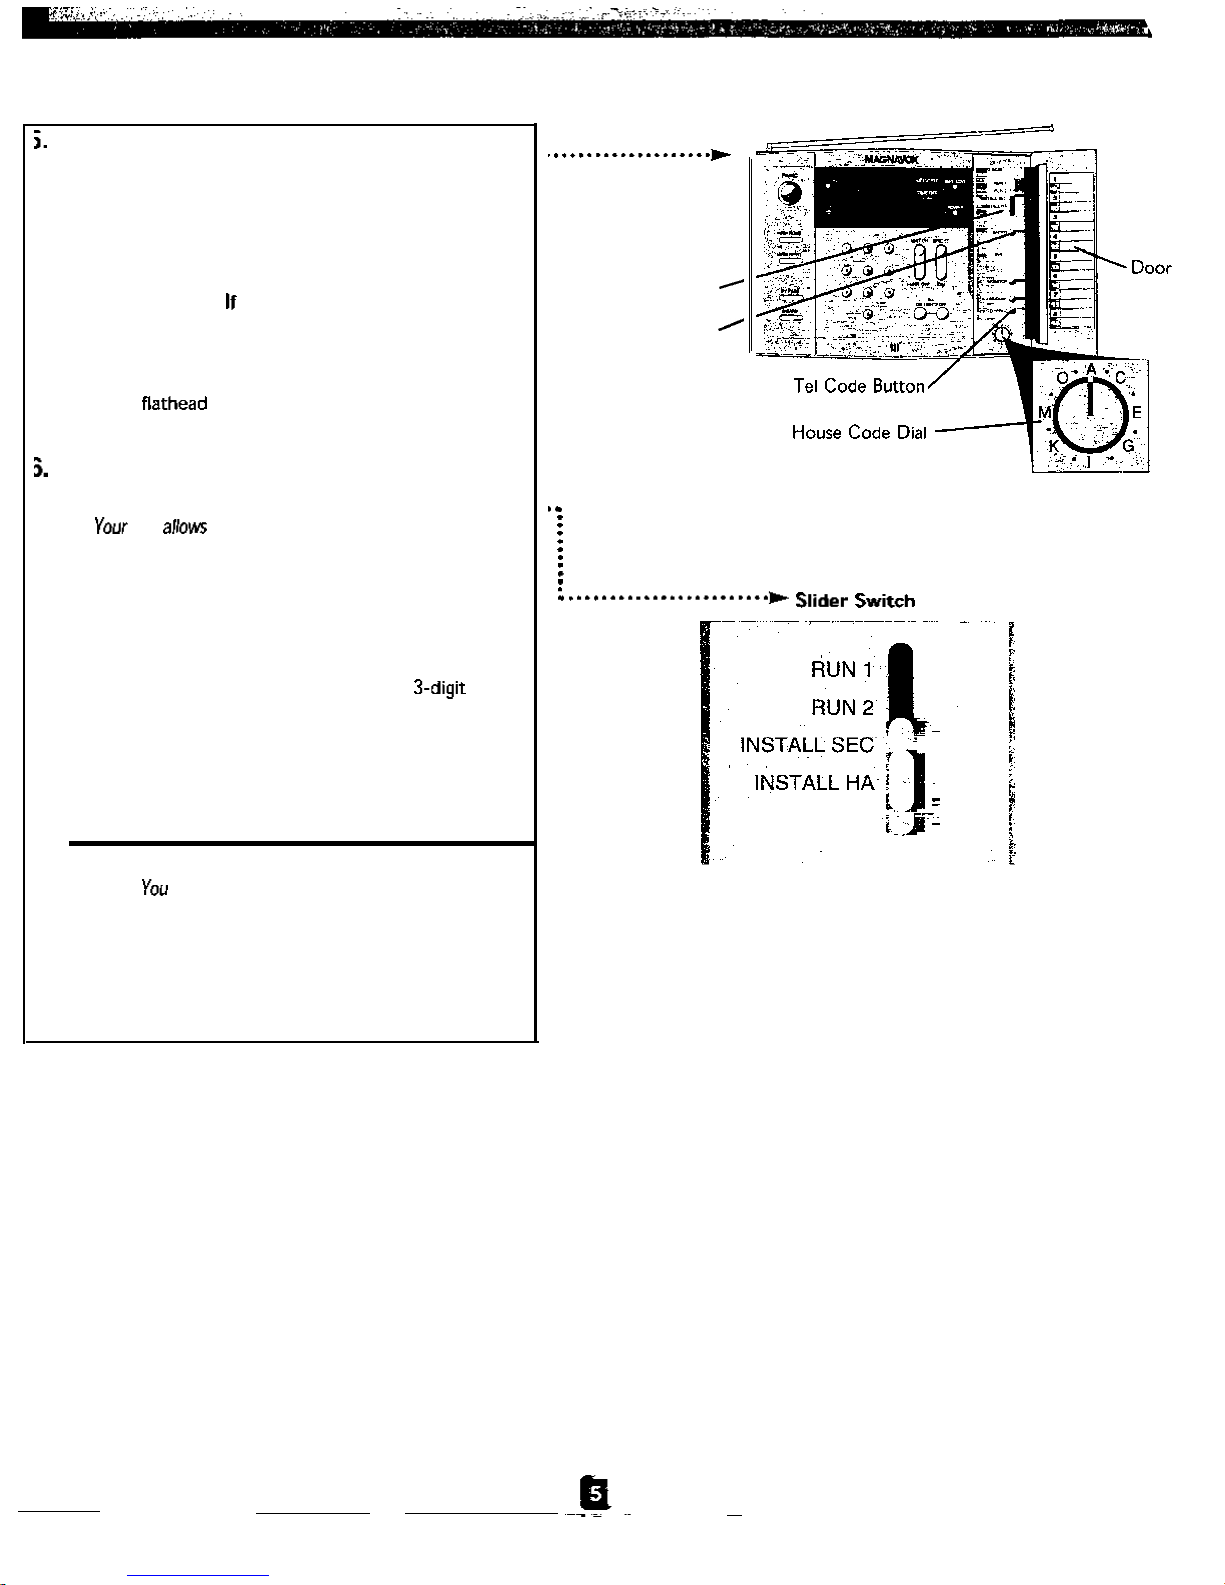
Set the House Code Dial.
. . . . . . . . . . . . . . . . . . . . . . . . . . . . . . . . . . . . . . . . . . . . . . . . . . . . . . .
a. Open the door on the Controller.
b. Locate the lettered House Code Dial on the
Controller.
c. Each of these letters represents different settings
by which your system can operate your AC con-
trolled devices. you live in a house, leave the dial
on A. If you live in an apartment or condominium,
you may want to select another letter to avoid
interference from other systems.
d. Use a screwdriver to change House Code
settings.
Select a Personal Identification
Number (PIN).
. . . . . . . . . . . . . . . . . . . . . . . . . . . . . . . . . . . . . . . . . . . . . . . . . . . . .
PIN you to DISARM your security system
and access your Central Controller from an outside tele-
phone to control your lighting.
a. Set the Controllers Slider Switch, located under
the door, to INSTALL HA (Home Automation).
b. Press the TEL CODE (Telephone Code) button.
c. Use the numbered keypad to enter a
your choice.
d. Press the ENTER button. The Central Controller
will chime twice to confirm it has accepted the PIN,
e. Write your PIN below for future reference.
PIN of
Central Controller
(front view)
Slider Switch
Enter Button
(continued)
Note: cannot select a PIN when your home security
system is armed or when the alarm is triggered (either
by a security breach or by the PANIC button).
Note: Any time a button is pressed on the Central
the
Controller,
RECORD light flashes.
SMARTHOME.COM™
1-800-SMART-HOME
949-221-9200
http://www.smarthome.com
Order #7308KIT
Setting Up the Remotes (Key Chain Remote Optional)
This section explains how to set up the Full-Function and Remotes to control lamps and arm or disarm your Home
Security System.
start by setting up the Full-Function Remote.
I. Insert the batteries.
. . . . . . . . . . . . . . . . . . . . . . . . . . . . . . . . . . . . . . . . . . . . . . . . . . . . . . . . . . . . . . . .
a.
Remove the battery compartment cover on the back of the
Remote.
b. Insert four AAA batteries (+ and sides aligned as indicated).
c. Replace the cover.
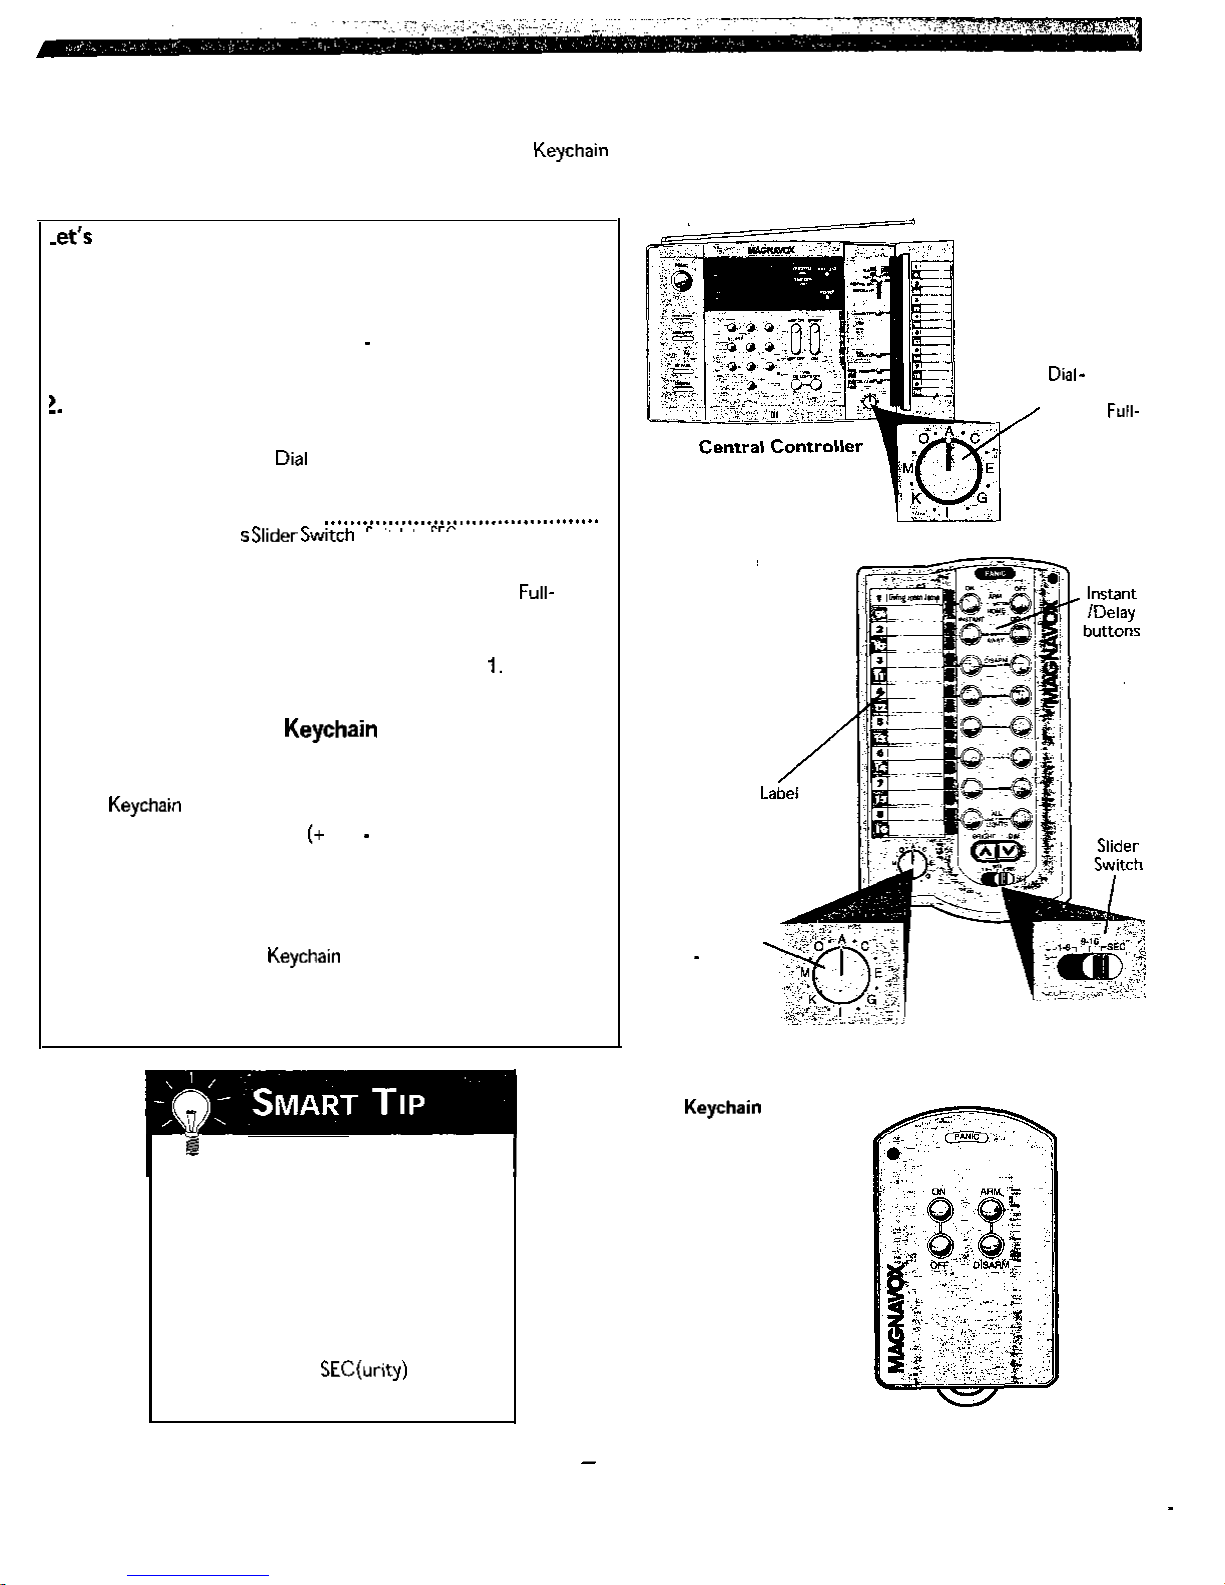
Set the House Code Dial.
. . . . . . . . . . . . . . . . . . . . . . . . . . . . . . . . . . . . . . . . . . . . . . . . . . . . . . . . . . . . . . . .
a. Locate the lettered House Code Dial.
b. Set the House Code
Central Controller.
3. Install the Remote.
. . . . . . . . . . . . . . . . . . . . .
Set the Remote to SEC.
a.
Set the Controllers Slider Switch to INSTALL SEC.
b.
Press and hold the ARM INSTANT button on the
C.
Function Remote. The Remotes green light flashes; the
Controller chimes once.
Return the Controllers Slider Switch to RUN
d.
to the same letter as the dial on the
Full-Function
Remote
House Code
match setting on
Function
Remote
should
lets install the Remote (MX2500).
Now
1. Insert the batteries.
. . . . . . . . . . . . . . . . . . . . . . . . . . . . . . . . . . . . . . . . . . . . . . . . . . . . . . . . . . . . . . . .
a.
Remove the battery compartment cover on the back of the
Remote.
b. Insert two AAA batteries and sides aligned as indicated).
c. Replace the cover.
2. Install the Remote.
. . . . . . . . . . . . . . . . . . . . . . . . . . . . . . . . . . . . . . . . . . . . . . . . . . . . . . . . . . . . . . . .
a. Set the Controllers Slider Switch to INSTALL SEC.
b. Press and hold the
Remotes green light flashes; the Controller chimes once.
c. Return the Controllers Slider Switch to RUN 1.
Remotes ARM button. The
Remote Slider Switch
Your Full-Function Remote has a slider
switch at the bottom which allows it to
control both the lights/appliances of
your home and the security functions of
your system:
LEFT POSITION: Lamps l-8
MIDDLE POSITION: Lamps 9-16
RIGHT POSITION:
(Written in Gray)
Functions
House Code
should
Dial
match setting
on Central
Controller
(MX2500 Only)
Remote
SMARTHOME.COM™ 1-800-SMART-HOME 949-221-9200 http://www.smarthome.com
Order #7308KIT
Setting Up the Lamp Unit
This feature allows you to turn lamps on and off from the Central Controller, the Full-Function Remote, the Remote,
and even
leaving the office, or press a few buttons on the
Your Magnavox Home Security System comes with one Lamp Unit (Additional Lamp Units and other accessories are available,
refer to page 20, Expanding Your System). Refer to the Important Notices section on page 29 before installing your Lamp
Unit.
Caution:
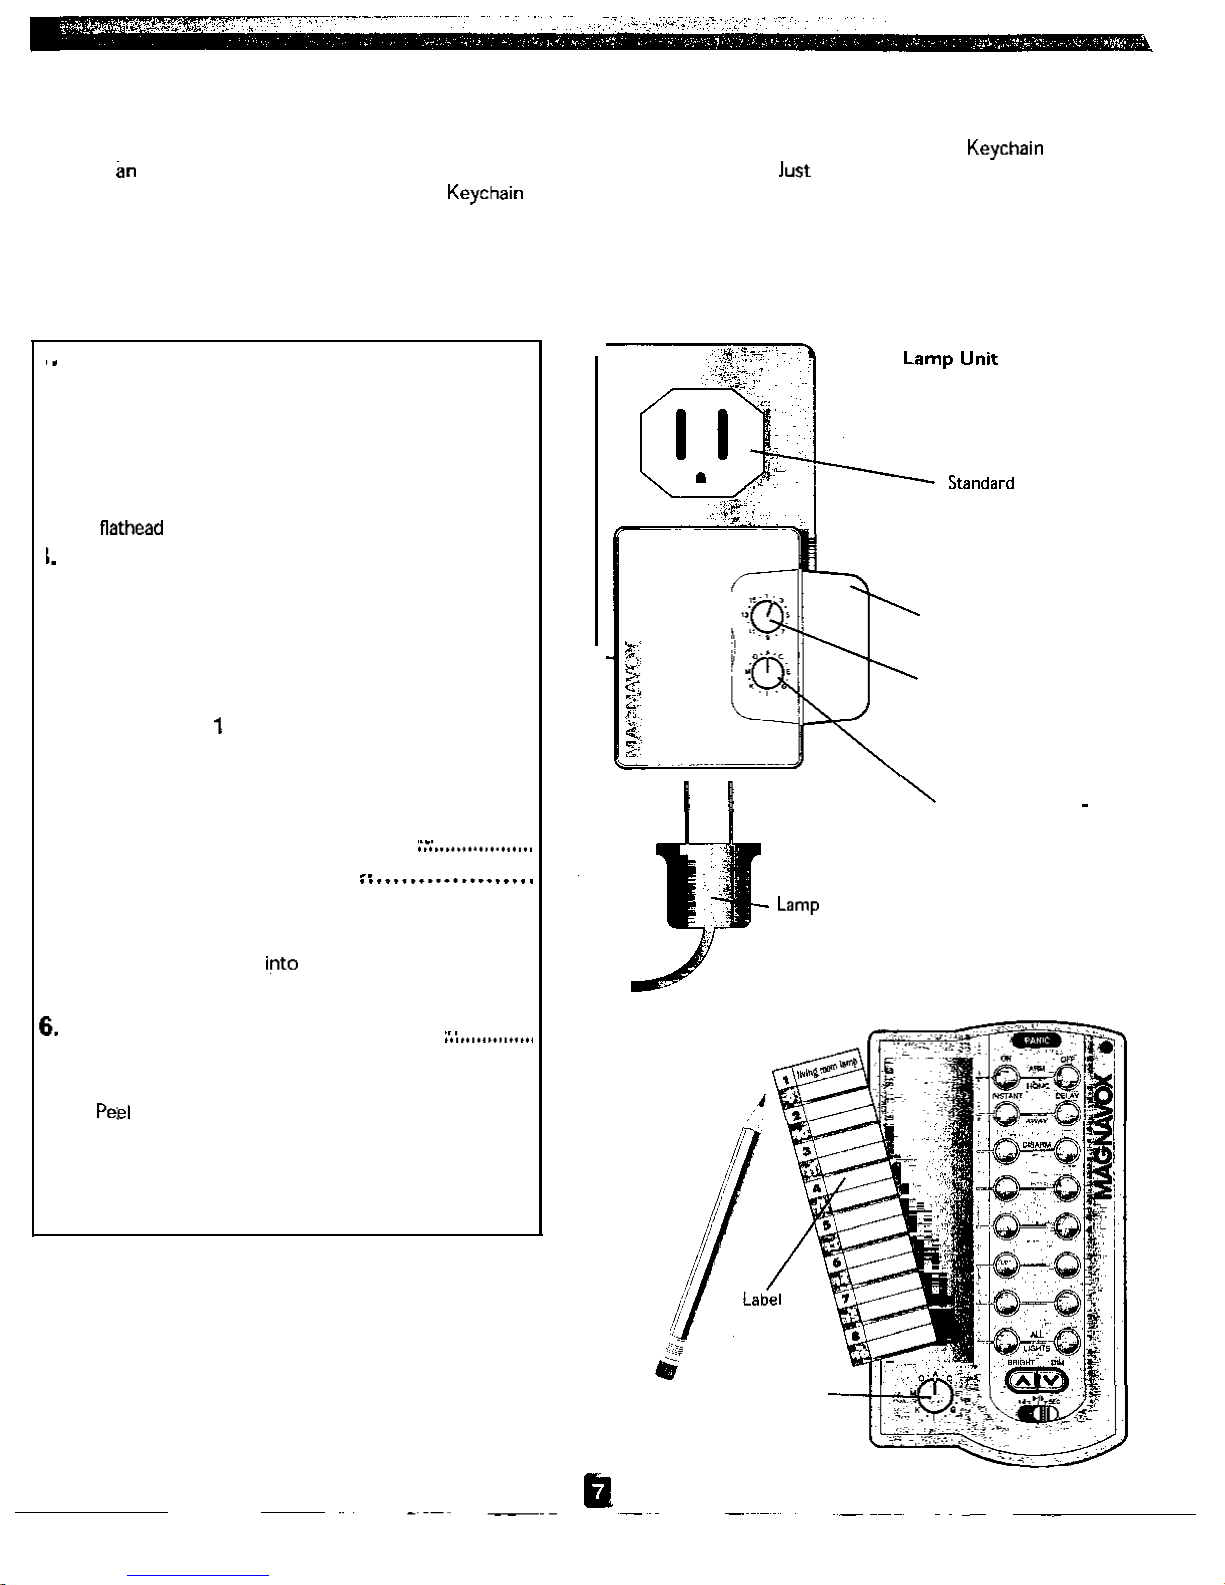
!. Set the House Code Dial.
a. Locate the lettered House Code Dial.
b. Set the House Code Dial to the same letter as the
Set the Unit Code Dial.
I.
Close the door on the unit
i.
Attach the unit to a lamp
outside telephone! Are you worried about coming home to a dark house? call your Home Security System before
Remote as youre driving into the garage.
On/y use incandescent lamps with this system.
Open the door on your
Lamp Unit.
. . . . . . . . . . . . . . . . . . . . . . . . . . . . . . . . . . . . . . . . . . . . . . . .
. . . . . .
. . . . . . . . . . . . . . . . . . . . . . . . . . . . . . . . . . . . . . . . . . . . . . . . . . . . . . .
House Code Dial on the Central Controller using a
screwdriver.
. . . . . . . . . . . . . . . . . . . . . . . . . . . . . . . . . . . . . . . . . . . . . . . . . . . . . . .
a. Locate the numbered Unit Code Dial. Unit num-
bers 1-l 6 can be assigned to control up to 16 different accessories (lamps, appliances, and sirens).
The unit numbers you assign correspond with the
numbers on the Full-Function Remote and the
Central Controller. For example, the unit whose
dial is set to
on the Remote.
b. Select the unit number for the lamp you are
installing.
will be controlled by the number 1
. . . . . . . . . . . . . . . . . . . . . . . . . . . . . . . . . .
Unit
Door
Unit Code Dial
House Code Dial settings should match the
Central Controller
. . . . . . . . . . . . . . . . . . . . . . . . . . . . . . . . .
a.
Unplug the selected lamp.
b. Plug the lamp into the Lamp Unit.
c. Plug the Lamp Unit
d. Turn the lamp on manually.
a standard AC outlet.
Cord
AC
Outlet
Write down the unit number
. . . . . . . . . . . . . . . . . . . . . . . . . . . . . . . . . . . . . .
a.
Remove the plastic that covers the label on the
front of the Remote.
b.
the cellophane from the plastic cover.
c. Write the locations of the installed units next to
the corresponding numbers on the Remote.
d. Replace the label and the plastic cover.
SMARTHOME.COM™
1-800-SMART-HOME
949-221-9200
http://www.smarthome.com
Order #7308KIT
Full-Function
Remote
House Code dial
should match setting
on the Central
Controller
Setting Up the Lamp Unit (continued)
SMARTHOME.COM™
1-800-SMART-HOME
949-221-9200
http://www.smarthome.com
Order #7308KIT
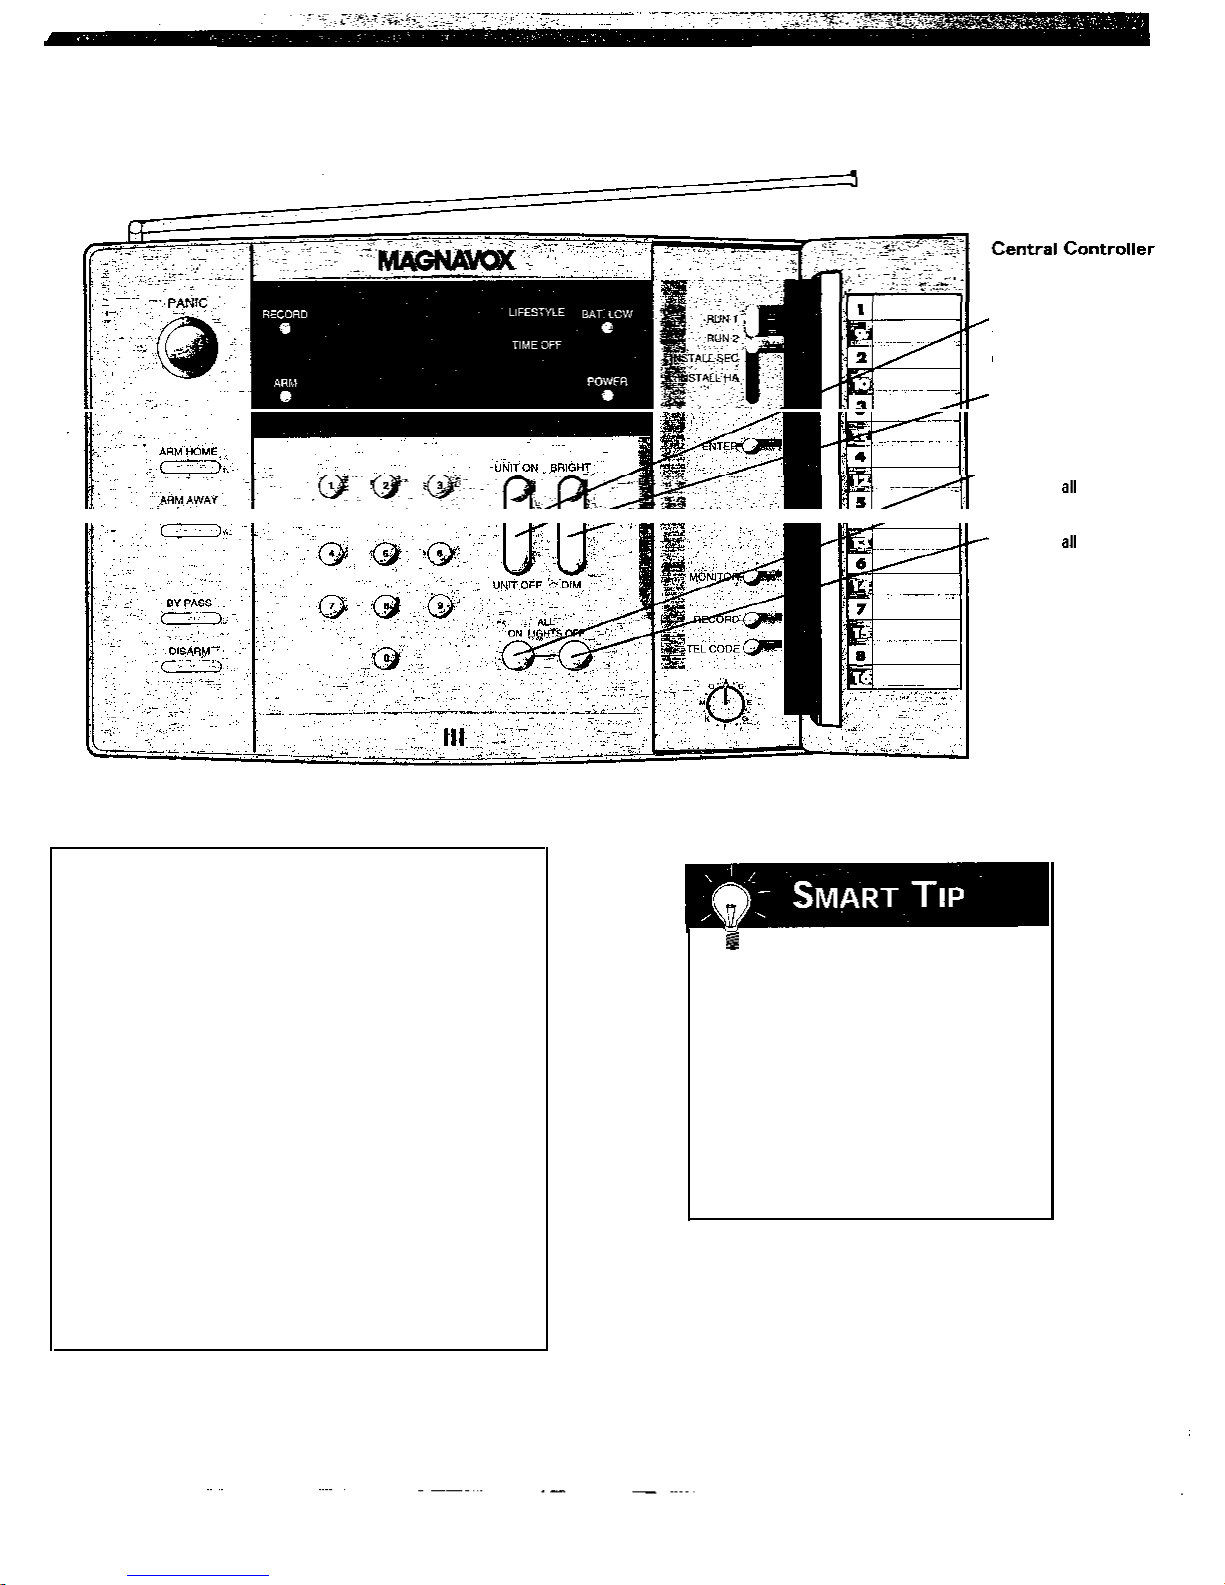
UNIT ON/OFF
Turns selected lamp
on or off
BRIGHT/DIM
Brightens or dims
selected lamp
/ALL LIGHTS ON
Turns on lamps
ALL LIGHTS OFF
Turns off
lamps
3. Test the unit.
. . . . . . . . . . . . . . . . . . . . . . . . . . . . . . . . . . . . . . . . . . . . . . . . . . . . . .
a. Set the Controllers Slider Switch to RUN 1.
b. Use the numbered keypad to select the desired
lamp.
c. Press the UNIT ON button. The selected lamp will
turn on.
d. Use the numbered keypad to select a lamp that is
already on.
e. Press BRIGHT or DIM to brighten or dim the
selected lamp.
f.
Use the numbered keypad to select a lamp that is
already on.
g. Press the UNIT OFF button. The selected lamp will
turn off.
h. Press the ALL LIGHTS ON button. All lamps
attached to the Lamp Units will turn on.
i.
Press the ALL LIGHTS OFF button. All lamps
attached to the Lamp Units will turn off.
Lamp and Appliance
Modules
Your Magnavox Security System can only
control lamps and appliances when the
switches on the lamps and appliances are
in the ON position.
When you want to turn them on or off,
use the Remotes or the Central
Controller, not the switch on the lamp
or appliance.
 Loading...