

Page 1
Owner’s Manual
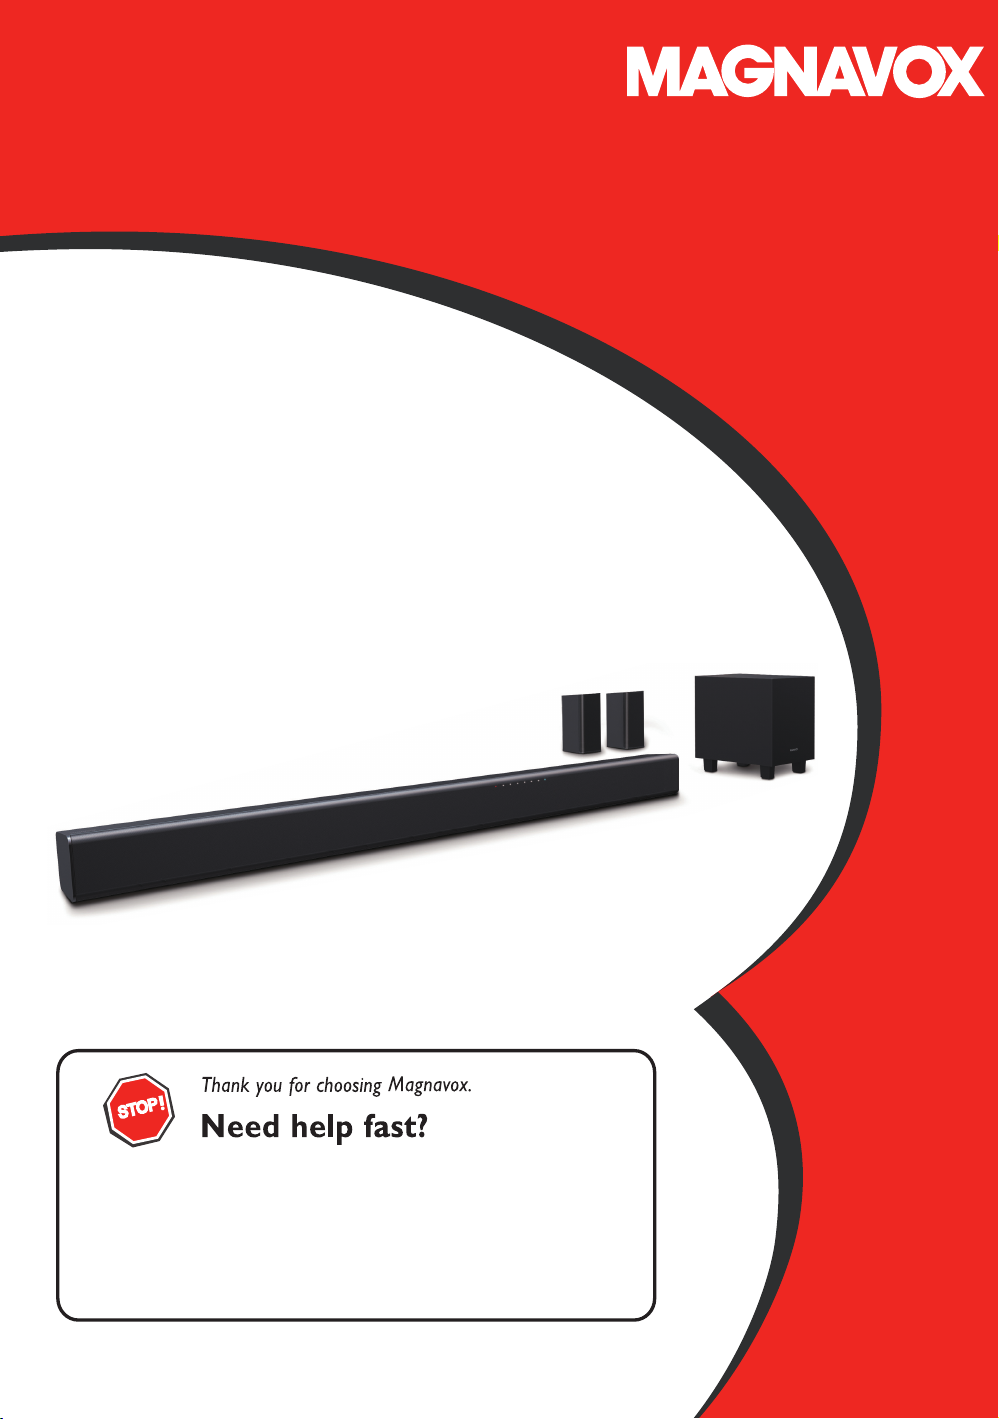
MSB5660
5.1ch Soundbar with Wireless Subwoofer
Read your Quick Start Guide and/or Owner's Manual first for quick tips
that make using your MAGNAVOX product more enjoyable.
If you have read your instructions and still need assistance,
you may access our online help at
www.magnavox.com/support/
or call 1-866-341-3738
© 2016 Funai Electric Co., Ltd.
Page 2
PRECAUTIONS
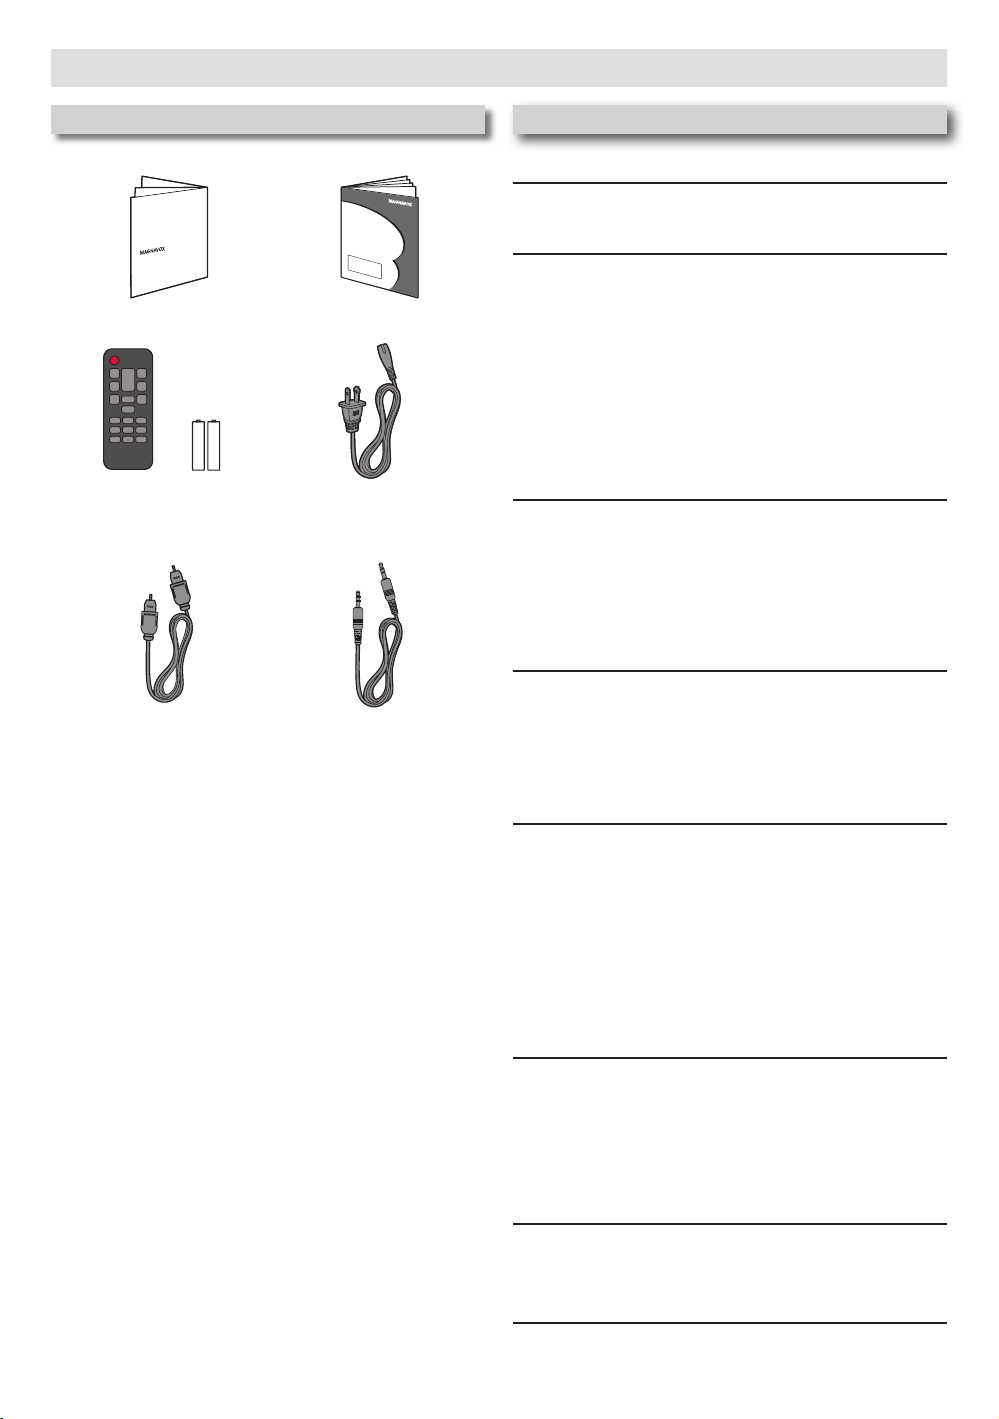
Supplied Accessories
Quick Start Guide
• Quick Start Guide • Owner’s Manual
( AAA x 2 )(NC303UH)
• Remote Control
• AAA battery x 2
5’ (1.5m)
• Optical cable • Line-In cable
• AC Power cord x 2
(For Main unit and Subwoofer)
Owner’s Manual
5’ (1.5m) ×2
5’ (1.5m)
Contents
PRECAUTIONS
IMPORTANT SAFETY INSTRUCTIONS ................................. 3
ABOUT SOUNDBAR
Main unit ....................................................................................... .6
Top/ front/ side panels of Main unit. ...............................................................6
Back connectors of Main unit. ............................................................................. 6
Subwoofer and Satellite speakers .............................................. .7
Back connectors of Subwoofer. ..........................................................................7
Back connectors of Satellite speakers. ............................................................7
Remote Control ........................................................................... .8
Installing the Batteries for the Remote Control. .......................................8
Operating with the Remote Control. .............................................................8
CONNECTIONS
Connect to TV..............................................................................................................9
Connect audio from other Devices. ................................................................9
Connect Main unit’s AC Power cord to AC outlet. ..............................9
Connect Satellite speakers to Subwoofer. ................................................ 10
Connect Subwoofer’s AC Power cord to AC outlet. .......................10
Positioning all Speakers and Subwoofer ................................. .10
USE YOUR SOUNDBAR
Turning On the Soundbar ..........................................................11
Adjusting the Volume (default: level 19) ......................................12
Experiencing the Surround Sound (5.1ch) ............................... .12
Choosing Preset Sound ............................................................. .13
MAKING MORE USE WITH YOUR SOUNDBAR
Confirming the Sound Output from the Speakers ................ .14
Using Bluetooth compatible Device ........................................ .14
Pairing Bluetooth compatible Device with this Unit. .......................... 14
Playing back a music file through Bluetooth. ............................................14
Playing back a music file through USB Memory Stick .......... .15
Preparing for USB Memory Stick playback. .............................................. 15
Playing back a music file. ...................................................................................... 15
Inputting a signal with Dolby Digital ....................................... .15
USEFUL TIPS
Resetting to the factory default ............................................... .16
Upgrading the Software ............................................................ .16
Preparing for the Software Upgrade. ........................................................... 16
Upgrading the Software. ...................................................................................... 16
Installing the Soundbar on a wall (optional) ......................................17
INFORMATION
Troubleshooting Guide ..............................................................18
Specifications .............................................................................. .18
WARRANTY
Limited Warranty ...................................................................... .19
–
–
2
Page 3
Register Online at www.magnavox.com/support/ today to get the most benefits from your purchase.
Registering your model with MAGNAVOX makes you eligible for all of the valuable benefits such as Software upgrades and
important product notifications. Register Online at www.magnavox.com/support/
The Model and Serial Numbers of this Unit may be found on the cabinet.
You should Record and Retain those Letters/Numbers for future reference.
WARNING:
TO REDUCE THE RISK OF FIRE OR ELECTRIC SHOCK, DO NOT EXPOSE THIS
Model No.:
Serial No.:
APPARATUS TO RAIN OR MOISTURE.
APPARATUS SHALL NOT BE EXPOSED TO DRIPPING OR SPLASHING AND NO OBJECTS
FILLED WITH LIQUIDS, SUCH AS VASES, SHALL BE PLACED ON THE APPARATUS.
The lightning flash with arrowhead symbol, within
CAUTION
RISK OF ELECTRIC
SHOCK DO NOT OPEN
CAUTION:
TO REDUCE THE RISK OF ELECTRIC SHOCK, DO NOT
REMOVE COVER (OR BACK). NO USER SERVICEABLE
PARTS INSIDE. REFER SERVICING TO QUALIFIED
SERVICE PERSONNEL.
The important note and rating are located on the rear or bottom
of the cabinet.
The symbol for CLASS ll (Double Insulation)
an equilateral triangle, is intended to alert the
user to the presence of uninsulated “dangerous
voltage” within the product’s enclosure that may
be of sufficient magnitude to constitute a risk of
electric shock to persons.
The exclamation point within an equilateral triangle
is intended to alert the user to the presence of
important operating and maintenance (servicing)
instructions in the literature accompanying the
appliance.
IMPORTANT SAFETY INSTRUCTIONS
1. Read these instructions.
2. Keep these instructions.
3. Heed all warnings.
4. Follow all instructions.
5. Do not use this apparatus near water.
6. Clean only with dry cloth.
7. Do not block any ventilation openings. Install in
accordance with the manufacturer’s instructions.
8. Do not install near any heat sources such as radiators,
heat registers, stoves, or other apparatus (including
amplifiers) that produce heat.
9. Do not defeat the safety purpose of the polarized or
grounding-type plug. A polarized plug has two blades
with one wider than the other. A grounding type plug
has two blades and a third grounding prong. The wide
blade or the third prong are provided for your safety. If
the provided plug does not fit into your outlet, consult an
electrician for replacement of the obsolete outlet.
10. Protect the power cord from being walked on or
pinched particularly at plugs, convenience receptacles,
and the point where they exit from the apparatus.
11. Only use attachments / accessories specified by the
manufacturer.
12. Use only with the cart, stand, tripod,
bracket, or table specified by the
manufacturer, or sold with the apparatus.
When a cart is used, use caution when
moving the cart / apparatus combination
to avoid injury from tip-over.
13. Unplug this apparatus during lightning storms or
when unused for long periods of time.
14. Refer all servicing to qualified service personnel.
Servicing is required when the apparatus has been
damaged in any way, such as power-supply cord or plug is
damaged, liquid has been spilled or objects have fallen into
the apparatus, the apparatus has been exposed to rain or
moisture, does not operate normally, or has been dropped.
FCC WARNING
This equipment may generate or use radio frequency energy. Changes or modifications to this equipment may cause harmful interference unless
the modifications are expressly approved in the manual. The user could lose the authority to operate this equipment if an unauthorized change or
modification is made.
RADIO-TV INTERFERENCE
This equipment has been tested and found to comply with the limits for a Class B digital device, pursuant to Part 15 of the FCC Rules. These
limits are designed to provide reasonable protection against harmful interference in a residential installation. This equipment generates, uses, and
can radiate radio frequency energy and, if not installed and used in accordance with the instructions, may cause harmful interference to radio
communications. However, there is no guarantee that interference will not occur in a particular installation. If this equipment does cause harmful
interference to radio or television reception, which can be determined by turning the equipment off and on, the user is encouraged to try to correct
the interference by one or more of the following measures:
1) Reorient or relocate the receiving antenna.
2) Increase the separation between the equipment and receiver.
3) Connect the equipment into an outlet on a circuit different from that to which the receiver is connected.
4) Consult the dealer or an experienced radio / TV technician for help.
–
–
3
Continued on next page.
Page 4
CAN ICES-3 (B)/NMB-3(B)
Disconnect the mains(AC) plug to shut off when find trouble or not in use.
The mains(AC) plug shall remain readily operable.
CAUTION: Danger of explosion if battery is incorrectly replaced. Replace only with the same or equivalent type.
WARNING: Batteries (Battery pack or battery installed) shall not be exposed to excessive heat such as sunshine, fire or the like.
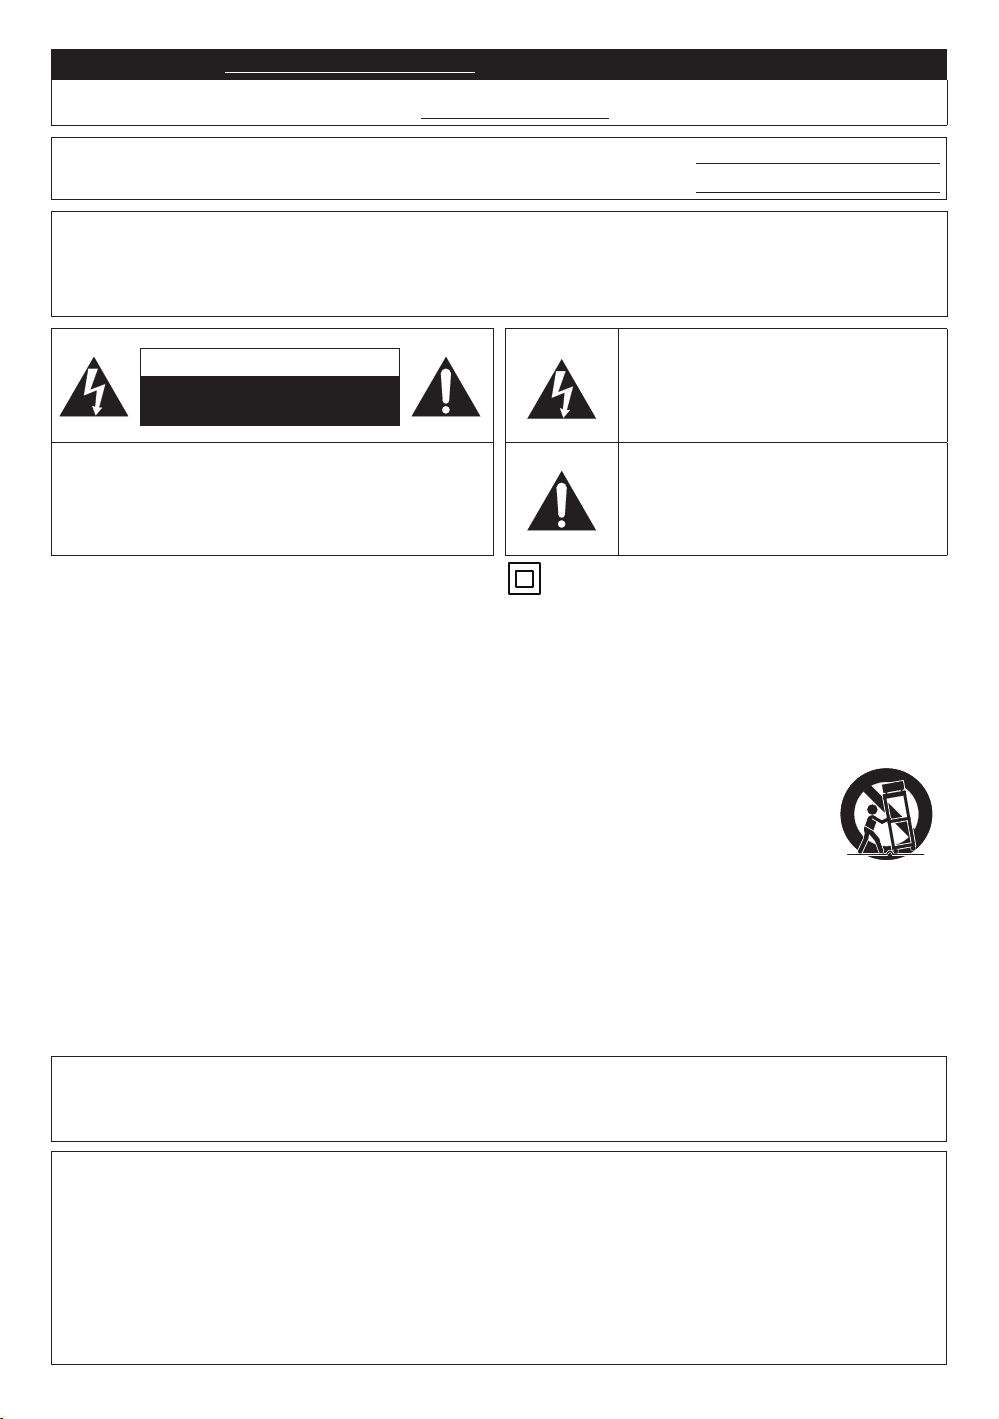
Do not place the unit on the furniture that is capable of being tilted by a child and an adult leaning, pulling, standing
or climbing on it. A falling unit can cause serious injury or even death.
This apparatus should not be placed in a built-in installation such as a bookcase or rack unless proper ventilation is provided. Make
sure to leave a space of 3.9 inches (10cm) or more around this apparatus.
Never use a gas duster on this unit.
The gas trapped inside of this unit may cause ignition and explosion.
This transmitter must not be co-located or operated in conjunction with any other antenna or transmitter.
Wall mount the Soundbar
• The recommended screw (sold separately) allows the mounting of the Soundbar on the wall.
• Funai is not liable for any accident, damage or injury due to any improper installation, lack of strength of installation or improper
use.
• Drill screw holes into the wall. Depending on the wall material, use nut inserts to make sure the screws will not fall off. Although
the Soundbar weighs approximately 3 kg, it is recommended that the wall be able to support 7.5 kg, and Satellite speakers weigh
approximately 1 kg, it is recommended that the wall be able to support 5 kg for extra safety. Recommended measurements are as
follows: Wall thickness of 5 cm or more, Screw diameter of 4 mm, Screw length of 25 mm or more.
• Screw is sold separately and is not supplied. Choose the screw shape and dimension appropriate to the wall structure of your
home. If you are unsure, please consult experts. It is recommended that wall mount the Soundbar is installed by experts.
Funai is not liable for these types kinds of accidents or injury noted below.
• Install two screws on a steady vertical wall.
• If installed onto a ceiling or slanted wall, the Soundbar and screws may fall which could result in a several injury.
• Do not use screws that are longer of shorter than their specifi ed length. If screws too long or short are used this may cause the
Soundbar to fall.
• Do not fasten screws by excessive force, this may damage the wall or cause the Soundbar to fall, leading to an injury.
• Do not mount the Soundbar onto screws while the Soundbar is plugged in or turned on. It may result in an electrical shock injury.
When installing the Soundbar on the wall, allow this much space.
Top: 3.9 inches (10 cm)
Left and right sides: 3.9 inches (10 cm)
Bottom: 3.9 inches (10 cm)
To Avoid the Hazards of Electrical Shock and Fire
• Do not handle the AC Power cord with wet hands.
• Do not pull on the AC Power cord when disconnecting it from an AC outlet. Grasp it by the plug.
• Do not put your fi ngers or objects into the unit.
Location and Handling
• Do not install the unit in direct sunlight, near strong magnetic fi elds, or in a place subject to dust or strong vibration.
• Avoid a place with drastic temperature changes.
• Install the unit in a horizontal and stable position. Do not place anything directly on top or bottom of the unit.
Depending on your external devices, noise or disturbance of the picture and / or sound may be generated if the unit is
placed too close to them. In this case, please ensure enough space between the external devices and the unit.
• Depending on the environment, the temperature of this unit may increase slightly. This is not a malfunction.
• Be sure to Unplug the AC Power cord from the AC outlet before Removing the Unit.
Dew Condensation Warning
• Dew condensation may form inside the unit in the following conditions. If so, do not use this unit at least for a few
hours until its inside gets dry.
– The unit is moved from a cold place to a warm place.
– Under conditions of high humidity.
– After heating a cold room.
Note about Recycling
• This unit’s packaging materials are recyclable and can be reused. Please dispose of any materials in
accordance with your local recycling regulations.
• Batteries should never be thrown away or incinerated but disposed of in accordance with your local
regulations concerning chemical wastes.
• For product recycling information, please visit - www.magnavox.com/support/
–
–
4
Page 5

TRADEMARK INFORMATION
The Bluetooth® word mark and logos are
registered trademarks owned by Bluetooth
SIG, Inc. and any use of such marks by
Funai Electric Co., Ltd. is under license.
Other trademarks and trade names are
those of their respective owners.
Manufactured under license from Dolby
Laboratories. Dolby, Dolby Audio, and the
™
AUDIO
double-D symbol are trademarks of Dolby
Laboratories.
MAINTENANCE
Servicing
• Please refer to relevant topics on the “Troubleshooting Guide” on
page 18. If you cannot fi nd any solution there, our service center is
pleased to assist you.
• If this unit becomes inoperative, do not try to correct the problem by
yourself. There are no User-serviceable Parts inside.
Place the Unit into Standby mode, Unplug the Power plug, and then
please visit: www.magnavox.com/support/
Cleaning the Cabinet
• Wipe the front panel and other exterior surfaces of the unit with a soft
cloth.
• Never use a solvent, thinner, benzene or alcohol to clean the
unit. Do not spray insecticide liquid near the unit.
Such chemicals may discolor the surface or damage the unit.
MAGNAVOX is a registered trademark of Philips North America
Corporation and is used by Funai Electric Co., Ltd. and Funai
Corporation, Inc. under license from Philips North America.
© 2016 Funai Electric Co., Ltd.
All rights reserved. No part of this manual may be reproduced, copied,
transmitted, disseminated or transcribed, in any form or for any purpose
without the express prior written consent of Funai. Furthermore, any
unauthorized commercial distribution of this manual or any revision
hereto is strictly prohibited.
Information in this document is subject to change without notice.
Funai reserves the right to change the content herein without the
obligation to notify any person or organization of such changes.
–
–
5
Page 6
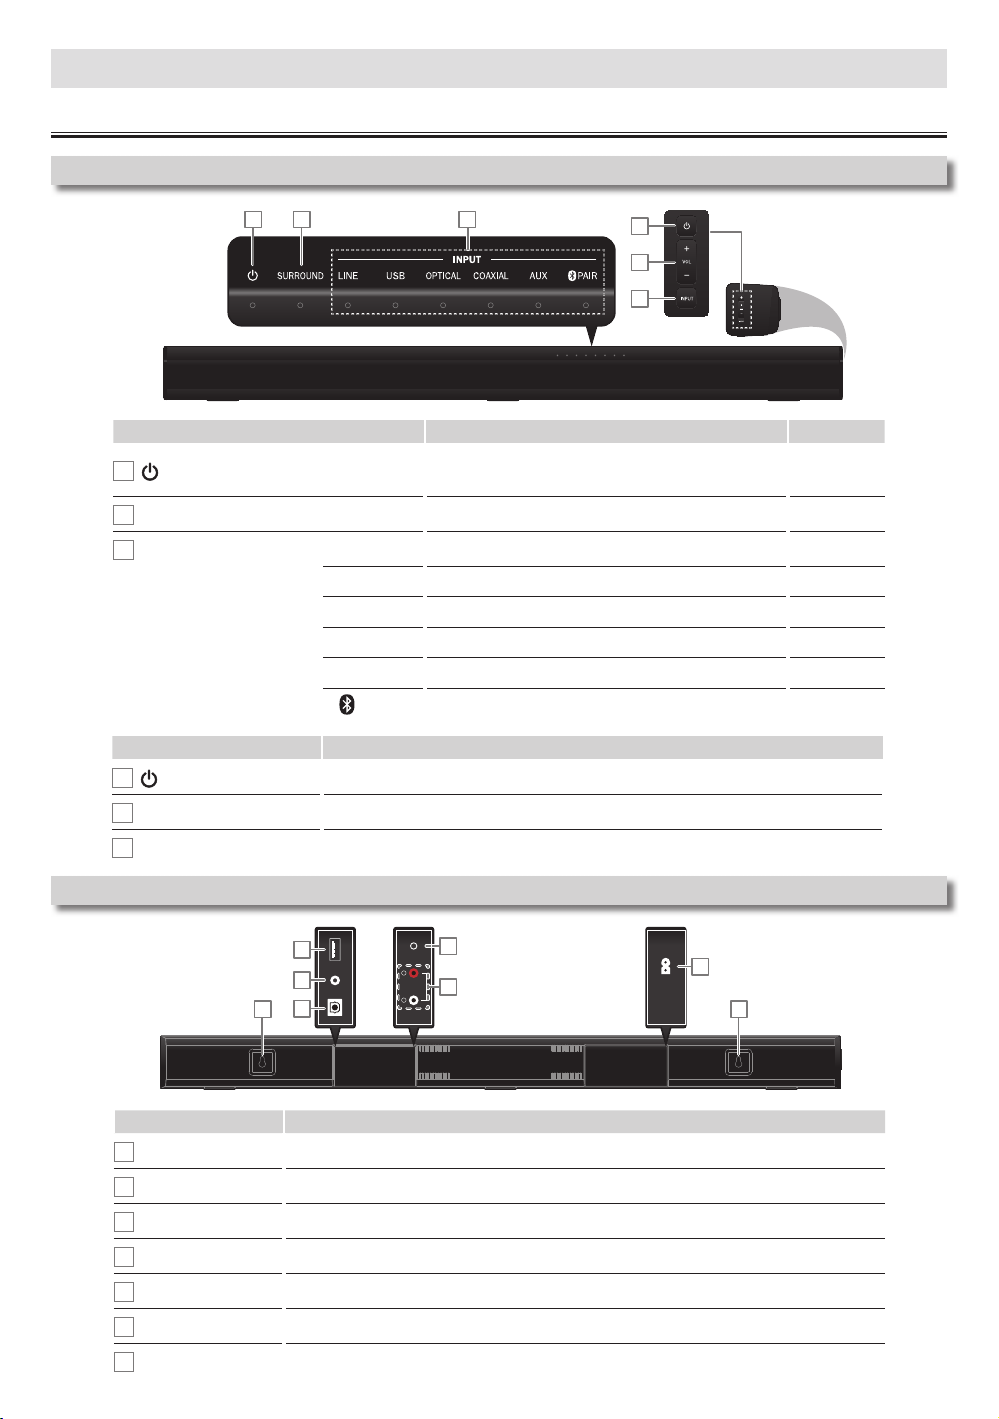
Main unit
Top/ front/ side panels of Main unit
ABOUT SOUNDBAR
LED indicators Description LED color
1
(Power/Standby) indicator
2
SURROUND indicator
3
INPUT source indicators
Buttons Description
4
(Power/Standby) button
31 2
4
5
6
Lights up when Soundbar is turned On.
Lights Off when Soundbar is on Standby.
Lights up when you switch to Surround sound Mode. White
LINE Lights up when you switch to Line-In source (3.5mm jack).
USB Lights up when you switch to USB Input source.
OPTICAL Lights up when you switch to Optical Input source.
COAXIAL Lights up when you switch to Coaxial Input source.
AUX(iliary) Lights up when you switch to Analog Input source.
PAIR(ing)
Lights up when you switch to Bluetooth Mode.
Press to Turn On the Unit, or to switch the Unit into Standbay mode.
Red
White
White
White
White
White
Blue
5
VOL(ume) button
6
INPUT button
Back connectors of Main unit
1 1
Connectors Description
1
Wall mount hook
2
USB (input)
3
COAXIAL IN(put)
4
OPTICAL IN(put)
5
LINE IN(put)
6
AUX(iliary) IN(put)
7
AC IN(put)
Press to adjust Volume Up / Down for Soundbar.
Press to switch the Input source.
2
USB
3
COAXIAL IN
4
OPTICAL IN
5
LINE IN
R
AUX IN
6
L
AC IN
INPUT
120V~, 0.5A, 60Hz
7
Install to a wall if desired.
Connect to a USB Memory Stick.
Connect to a Coaxial audio output on the TV or a Digital device.
Connect to an Optical audio output on the TV or a Digital device.
Connect to a TV or a MP3 player.
Connect to an Analog audio output on the TV or an Analog device.
Connect to an AC inlet using the supplied AC Power cord.
–
–
6
Page 7

Subwoofer and Satellite speakers
Back connectors of Subwoofer
21 3 4
Connectors Description
1
AC IN(put)
2
PAIRING button and indicator
3
LEFT (input)
Connect to an AC inlet using the supplied AC Power cord.
Usually the Subwoofer is connected to the Main unit automatically
when the Unit is turned On. (The indicator will be lit.)
Press this button if the Main unit is not detected the Subwoofer by
accident.
Connect to a Left side of Satellite speaker with Blue connector.
4
RIGHT (input)
Back connectors of Satellite speakers
Connectors Description
1
Wall mount hook
2
LEFT input jack for the Left side of Satellite speaker
3
RIGHT input jack for the Right side of Satellite speaker
Connect to a Right side of Satellite speaker with Gray connector.
1 1
2
Install to a wall if desired.
Connect to the Left input jack (blue) of the Subwoofer.
Connect to the Right input jack (gray) of the Subwoofer.
12.5’ (3.8m)12.5’ (3.8m)
3
–
–
7
Page 8

Remote Control
Installing the Batteries for the Remote Control
Install 2 AAA (1.5V) batteries matching the polarity indicated inside battery compartment of the Remote Control.
1 2 3
NOTE(S)
• Do not mix alkaline, standard (carbon-zinc), or rechargeable (ni-cad, ni-mh, Li-ion, etc) batteries.
• Do not mix old and new batteries.
• Always remove batteries from the Remote Control if they are dead or if the Remote Control is not to be used for an extended period of time.
This will prevent battery acid from leaking into the battery compartment.
• The maximum operable ranges from the Unit are as
follows.
– Line of sight: approx. 23 feet (7m)
– Either side of the center: approx. 16 feet (5m) within 30°
– Above: approx. 16 feet (5m) within 15°
– Below: approx. 10 feet (3m) within 30°
Operating with the Remote Control
1
2
3
4
5
6
7
8
9
Buttons Description
Press to Turn On the Unit, or to switch the Unit into
1
2
3
4
5
Standby mode.
( To completely Turn Off the Unit, you must unplug
the AC Power cord.)
Press to switch the Standard preset sound.
Press to switch the preset sound for Sports scene.
Press to switch the preset sound for a Music.
Press to Mute the Sound and Recover the Sound.
10
11
12
13
14
15
16
17
18
19
Buttons Description
6
7
8
9
10
11
12
13
14
15
16
17
18
19
Press to select Optical or Coaxial input of
connected device to this Soundbar.
Press to select Line input of connected device to
this Soundbar.
Press to select USB input of connected device to
this Soundbar.
Press to select Auxiliary input of connected device
to this Soundbar.
Press to adjust Volume Up / Down for Soundbar.
Press to switch the preset sound for a Movie.
Press to switch the preset sound for News scene.
Press to switch the preset sound for Night mode.
Press to set the Surround Sound.
Press to select Bluetooth signal of connected device
to this Soundbar.
Press to disconnect the currently connected
Bluetooth compatible Device and start pairing mode
to establish a new connection to another Bluetooth
compatible Device.
If no Bluetooth compatible Device is connected
within 2 minutes, press this button to restart pairing
mode. Pairing mode can only be started when
Bluetooth is selected.
Press to Skip Forwards for a music file.
(Bluetooth Mode and USB Mode only)
Press to Play or Pause for a music file.
(Bluetooth Mode and USB Mode only)
Press to Skip Backwards for a music file.
(Bluetooth Mode and USB Mode only)
–
–
8
Page 9

AUX IN
CONNECTIONS
Supplied cables used in this connection are as follows:
• Line-In cable × 1
• Optical cable × 1
• AC Power cord for Main unit × 1
Connect to TV
Rear of Soundbar
USB
COAXIAL IN
OPTICAL IN
LINE IN
R
AUX IN
L
Digital Audio Coaxial cable
Digital Audio Optical cable
supplied
Connect audio from other Devices
Rear of Soundbar
USB
COAXIAL IN
OPTICAL IN
LINE IN
R
AUX IN
L
Line-In cable
supplied
(not supplied)
Line-In cable
supplied
Good
Good
Better
Better
Best
Best
or
or
HEADPHONE
DIGITAL AUDIO
OUT (COAXIAL)
DIGITAL AUDIO
OUT (OPTICAL)
Audio cable
(not supplied)
Rear of TV
e.g.) MP3 player
HEADPHONE
R
AUDIO OUT
L
Digital Audio Optical cable
supplied
DIGITAL AUDIO
OUT (OPTICAL)
e.g.) Video game e.g.) Blu-ray player
NOTE(S)
• Make sure the Unit is Turned Off when connecting.
• Check whether the connection for all cables are connected tightly.
• If you connect with a Line-In cable, make sure the volume for the headphone output is appropriate for the Soundbar input. If the Line-In volume is
too soft, the Soundbar may not output sounds with appropriate volume.
• If a Line-In / Optical connection fails, check the audio settings on the TV.
Connect Main unit’s AC Power cord to AC outlet
Rear of Soundbar
AC IN
INPUT
120V~, 0.5A, 60Hz
–
–
9
Continued on next page.
Page 10

Supplied cable used in this connection is as follows:
approx. 6.5 feet (2m)
approx. 5 feet (1.5m)
approx. 5 feet (1.5m)
Recommended distance from Soundbar to people is 6.5 feet (2m)
and the distance from people to Satellite speaker is 5 feet (1.5m).
• AC Power cord for Subwoofer × 1
• LEFT and RIGHT cables for Satellite speakers x 1 (each)
Connect Satellite speakers to Subwoofer
Rear of Subwoofer
Connect Subwoofer’s AC Power cord to AC outlet
Rear of Subwoofer
Positioning all Speakers and Subwoofer
For the best surround sound experience, position the Sound Bar, Satellite Speakers and Subwoofer as shown below.
Recommended distance from Soundbar to people is 6.5 feet (2m)
and the distance from people to Satellite speaker is 5 feet (1.5m).
approx. 5 feet (1.5m)
Satellite speaker
(Left)
Subwoofer
approx. 6.5 feet (2m)
NOTE(S)
approx. 5 feet (1.5m)
Satellite speaker
(Right)
• If you want to install the Main unit or/ and the Satellite speakers on
a wall, refer to “Installing the Soundbar on a wall” on page 17.
–
–
10
Main unit
Page 11

USE YOUR SOUNDBAR
Turning On the Soundbar
1
Press on the Remote Control or press on the Right side of the Main unit.
or
2
Check PAIRING indicator on the rear of Subwoofer lights up and is solid.
PAIRING indicator
If the Main unit is not detecting the Subwoofer:
1
To activate the Pairing mode with the Subwoofer, press and hold on the Remote Control until all LED indicators flash
flowing side to side.
2 Press and hold PAIRING button on the rear of Subwoofer until PAIRING indicator is blinking rapidly.
3 When pairing is completed, all LED indicators will blink once, then go back to light the current input.
The PAIRING indicator on the Subwoofer stays light on.
• If the PAIRING indicator on the rear of Subwoofer is still blinking even if you have made the procedures above, refer to
“Troubleshooting Guide” on page 18.
• You can also confi rm by “Speaker check” to make sure the sounds are outputting from all speakers properly. (Refer to “Confi rming
the Sound Output from the Speakers” on page 14.)
3
Select INPUT source.
e.g.) When was pressed.
or
• One of the INPUT indicators will light up when you switch to your connected source.
• For Bluetooth connections, refer to “Playing back a music fi le through Bluetooth” on page 14.
–
–
11
Page 12

Adjusting the Volume (default: level 19)
1
To increase or decrease the volume, press VOL+/- on the Remote Control.
Volume levels LED lighting patterns Description
0
1 - 6
(6 levels)
7 - 12
(6 levels)
13 - 18
(6 levels)
19 - 24
(6 levels)
25 - 30
(6 levels)
31 - 35
(5 levels)
• Pressing and holding VOL+ or VOL- will increase or decrease the volume. When the Volume has reached the maximum, all White
indicators fl ash twice. When the Volume has reached “ 0 ” or you pressed , all White indicators blink continuously.
• When the Volume setting is made, the White indicators go back to light the current input.
2
To Mute the sound, press on the Remote Control.
Volume levels LED lighting patterns Description
0 or Mute
All White indicators blink continuously.
The amount of the LED lights will increase or
decrease as follows:
level1 level2 level3 level4 level5 level6
dark bright
All White indicators blink continuously
• While “ Mute ” is On, all White indicators blink continuously.
• When “ Mute ” is Off, the White indicators with the previous Volume setting will fl ash once, then go back to light the current input.
• To unmute or recover the sound, press again or press VOL+/-.
NOTE(S)
• The Volume might be infl uenced by MP3 or Bluetooth player. If the Volume is too low, adjust the Volume on the connected device.
• If the Volume level is set above 19 when the Soundbar is Turned Off, the volume will automatically be reset to 19 when the Soundbar is turned back On.
Experiencing the Surround Sound (5.1ch)
1
Press on the Remote Control to activate the Surround sound.
• The LED lighting pattern will fl ash, then go back to light the current input with the SURROUND indicator.
e.g.) When OPTICAL was selected.
2
If you want to set Surround sound to Off, press on the Remote Control once again.
• The LED lighting pattern will fl ash, then the SURROUND indicator lights Off.
e.g.) When OPTICAL was selected.
–
12
–
Page 13

Choosing Preset Sound
1
Press either , , , , or on the Remote Control to select the desired
preset sound suitable for the Audio that is playing.
2
The following Red indicator ( ( Power/Standby)), White indicators (SURROUND, USB, OPTICAL
and AUX) and Blue indicator ( PAIR) will flash twice.
x2
3
For the third time, the following White indicators will flash for 0.5 seconds which preset sound has been
chosen.
Preset menu LED lighting patterns Description
(Power/Standby) and LINE indicator
flashes for 0.5 seconds
(Power/Standby), SURROUND and USB
indicators flash for 0.5 seconds
(Power/Standby), SURROUND, LINE and
OPTICAL indicators flash for 0.5 seconds
(Power/Standby), SURROUND, LINE, USB
and COAXIAL indicators flash for 0.5 seconds
(Power/Standby), SURROUND, LINE,
USB, OPTICAL and AUX indicators flash for
0.5 seconds
(Power/Standby), SURROUND, LINE, USB,
OPTICAL, COAXIAL and PAIR indicators
flash for 0.5 seconds
4
When the preset sound setting is set, White indicators go back to light the current input.
–
13
–
Page 14

MAKING MORE USE WITH YOUR SOUNDBAR
Confirming the Sound Output from the Speakers
1
Press and hold for more than 5 seconds on the Remote Control to begin the Speaker check.
2
All Speakers and the Subwoofer will emit sound in sequence as follows.
• When Speaker check begins, all LED indicators will fl ash fl owing side to side for a moment.
• “Left-Channel”, “Center”, “Right-Channel” will be heard from the Main unit.
• “Left Surround”, “Right Surround” will be heard from the Satellite speakers and beep sound from the subwoofer.
3
When Left and Right sounds from the Satellite speakers are heard from opposite positions, unplug
the AC Power cord of the Subwoofer and disconnect LEFT and RIGHT cables, then place them in an
appropriate position and reconnect all cables again.
Using Bluetooth compatible Device
Pairing Bluetooth compatible Device with this Unit
1
Press on the Remote Control to switch
the Soundbar to Bluetooth Mode.
2
Turn your Bluetooth compatible Device On and
activate the Bluetooth setting.
3
Press on the Remote Control to prepare
the Soundbar to pairing Bluetooth.
4
On the Bluetooth compatible Device, set the
Bluetooth function On, then search and select
“MAGNAVOX_MSB5660”.
(See the user manual of the Bluetooth compatible
Device on how to enable Bluetooth.)
• If the Soundbar name does not appear on the Bluetooth
compatible Device, press on the Remote Control once again.
*1
This Soundbar’s name is “MAGNAVOX_MSB5660”. If this
Soundbar has already been registered to a Bluetooth compatible
Device and the connection fails, delete it (or deactivate it), then
press and select this Soundbar’s name to connect.
*2
Only one Bluetooth compatible Device can be connected to
this soundbar at a time. To play music from a different Bluetooth
compatible Device please complete the “Pairing a Bluetooth
compatible Device with this unit” with the other device.
5
When the pairing is complete, your Bluetooth
compatible Device may show “Connected” on
the display.
Playing back a music file through Bluetooth
1
Press on the Remote Control to switch
the Soundbar to Bluetooth Mode.
• The PAIR (Bluetooth) indicator will light up.
2
Turn your Bluetooth compatible Device On and
activate the Bluetooth setting.
(See the user manual of the Bluetooth compatible
Device on how to enable Bluetooth.)
• If you have already paired your Bluetooth compatible Device and
the device’s Bluetooth is on then the soundbar should connect to
it automatically.
• If the Soundbar name does not appear on the Bluetooth
compatible Device, press on the Remote Control.
3
Playback a music file on the connected
Bluetooth compatible Device.
• You may use p,
Control once the Bluetooth compatible Device is connected to
this Soundbar properly.
4
To Exit Bluetooth Mode, press one of the other
and on the Soundbar’s Remote
INPUT source buttons on the Remote Control.
NOTE(S)
• If reconnecting the Bluetooth compatible Device to the Soundbar fails, delete the registered profi le of this Soundbar from the Bluetooth compatible
Device, then perform pairing again. This Unit can store up to 8 device profi les.
• The music streaming may be interrupted by obstacles between the device and Soundbar, such as wall, metallic casing that covers the device, or
other devices nearby that operate in the same frequency.
• If you want to connect your Soundbar with another Bluetooth compatible Device, press to disconnect the currently connection.
• Depending on your Bluetooth compatible Device, different behaviors may appear. See your Bluetooth compatible Device’s user manual for details.
• The operational range between the Soundbar and a Bluetooth compatible Device is approximately 30 feet (10m), if there is no interference.
–
–
14
Page 15

Playing back a music file through USB Memory Stick
You can enjoy playback of music files which are stored on a USB Memory Stick with this Unit.
Preparing for USB Memory Stick playback
You require the following equipment:
– A PC with the music player or the related software
– An empty clean FAT32 formatted USB Memory Stick
– A music file which has extension of “WAV”
NOTE(S)
• Only FAT32 formatted portable memory is supported.
• Music fi les must be saved on the fi rst hierarchy (root directory) in the
USB Memory Stick.
• When a music fi le is playing back, do not remove a USB Memory Stick.
This may be caused the corruption of the music fi le or damaged to the
USB Memory Stick.
• If an error occurs after the USB Memory Stick is inserted, retry the
procedure or for further assistance, please contact Call Center.
• Some music fi les stored on some USB Memory Sticks with this unit may
not play back.
Playing back a music file
1 Connect your USB Memory Stick with a music file
to the USB terminal on the rear of the Main unit.
2
Press on the Remote Control to switch the
Soundbar to USB Mode.
• When the Main unit detects the USB Memory Stick, USB
indicator will light up.
If the Main unit cannot detect the USB Memory Stick or the
music fi les are unsupported, USB indicator will blink continuously.
Make sure that the USB Memory Stick has been formatted
(FAT32), or supported music fi les (“.WAV”) are stored correctly.
3
The Unit automatically plays back a music file on
the connected USB Memory Stick.
• Some music fi les stored on some USB Memory Sticks with this
unit may not play back. In that case, press
• Press if you want to pause a playback. To go back to
playback, press again.
• You can also use to skip backward a music fi le, and
to skip forward a music fi le.
• If you press twice, the music fi le will go back to the
previous music fi le. Press it repeatedly to go to the previous
music fi le. The music fi le will move backward one at a time.
4
To Exit USB Mode, press one of the other
INPUT source buttons on the Remote
Control.
Inputting a signal with Dolby Digital
This Unit supports Dolby Digital sound if the sound is inputting the audio source with Dolby Digital signal.
1
When the sound with Dolby Digital signal inputs, the following White indicators will blink twice.
x2
• Then go back to light the current input.
–
–
15
Page 16

USEFUL TIPS
Resetting to the factory default
You can reset each settings, or delete the Bluetooth profiles that stored on the Unit by resetting the factory default.
1
Press to turn the Soundbar On.
2
Press to switch the Unit to LINE input.
3
Press 5 times within 3 seconds.
• All LED indicators will blink during reset. After completion of reset, the Main unit will automatically restart then the settings are reset as follows.
– SURROUND sound resets to On.
– Sound preset resets to MOVIE.
– INPUT source resets to OPTICAL.
– Volume level resets to level 19
• All registered Bluetooth profi les will be deleted. Pairing the Bluetooth setting to this Unit again when you want to play back a music fi le through
the Bluetooth compatible Device.
Upgrading the Software
Magnavox continuously tries to improve its products and we strongly recommend that you Upgrade the Soundbar Software when Upgrades
are available. New Software can be downloaded from our website at www.magnavox.com/support/download_list.php using the model number
of your Soundbar to find information.
Preparing for the Software Upgrade
You require the following equipment:
– A PC with web browsing capability
– An archive utility that supports the ZIP-format (e.g. WinZip for
Windows or StuffIt for Mac OS)
– A Blank empty clean FAT32 formatted USB Memory Stick
NOTE(S)
• Only FAT32 formatted portable memory is supported.
• Use only Software Upgrades that can be found on the Magnavox web site.
• When the Software Upgrade is running, do not press any buttons.
• Do not remove the USB Memory Stick or Turn Off the Soundbar during
the Software Upgrade.
• If an Error occurs during the Upgrade, retry the procedure or for further
assistance, please contact the Call Center.
Upgrading the Software
Find information and Software related to your Soundbar and
Download the Latest Software Upgrade file to your PC.
1
On your PC, open a web browser and go to
www.magnavox.com/support/download_list.php.
2
Enter the model number in the “Type the Model
Number...” field.
3
Click the desired Software to be Downloaded.
• Decompress the ZIP-fi le.
4
Copy the Upgrade file to the Empty root directory
on the clean formatted USB Memory Stick.
5
Unplug the Main unit’s AC Power cord from the
AC outlet.
6
Connect your USB Memory Stick with the
Upgrade file to the USB terminal on the rear of
the Main unit.
7
Plug the AC Power cord to the AC outlet.
• SURROUND indicator will blink while detecting the Upgrade fi le.
–
8
While the Software is Upgrading, LINE, USB,
OPTICAL, COAXIAL and AUX Input
indicators light up.
• When the Software Upgrade is completed, all White indicators
light up for 5 seconds.
9
Unplug the AC Power cord from the AC outlet
and plug it again.
–
16
Page 17

Installing the Soundbar on a wall (optional)
1
Prepare the screws (x 2) as specified length below, then make the screw holes on the anterior wall.
0.14’’ ~ 0.16’’ (3.5~4mm)
0.16’’ (4mm)
27.6’’ (700mm)
>0.98’’ (25mm)
2
Hang the Main unit over the screws.
~0.2’’ (5mm)
~0.35’’
( 9mm)
3
Prepare the screws (x 2) as specified length below, then make the screw holes on the rear wall.
Then, hang the Satellite speakers over the screw.
0.14’’ ~ 0.16’’ (3.5~4mm)
0.16’’ (4mm)
>0.98’’ (25mm)
~0.2’’ (5mm)
~0.35’’
( 9mm)
NOTE(S)
Funai is not liable for these types of accidents or injury noted below.
• Do not mount the Soundbar onto the wall while your Soundbar is plugged in or Turned On. It may result in an electrical shock injury.
• Install the screws on a sturdy vertical wall. If installed onto a ceiling or slanted wall, the Soundbar may fall which could result in a severe injury.
• Make sure that the wall where you are mounting the Soundbar is appropriate. Some mounts are not designed to be mounted to walls with steel
studs or cinder block construction. If you are unsure, contact a professional installer.
• Do not use screws that are longer or shorter than their specifi ed length. If screws too long are used this may cause mechanical or electrical damage
inside the Speaker. If screws too short are used this may cause the Speaker to fall.
• Do not fasten the screws by excessive force. This may damage the product or cause the product to fall, leading to an injury.
• Do not place any objects on the mounted Speakers.
• Never allow children to climb on or play on the Soundbar.
–
17
–
Page 18

INFORMATION
Troubleshooting Guide
If the Unit does not perform properly when operated as instructed in this Owner’s Manual, refer to the following.
Problem Corrective action
No Power (no LED lights will be seen)
No Sound
No Sound from the Subwoofer or
the Satellite speakers
Distorted sound
Abnormal noise is generated. – Be sure each cables are plugged in all the way.
No reaction to the Remote Control.
An external device cannot connect
with the Soundbar via Bluetooth.
Poor sound quality from the
connected Bluetooth compatible
Device.
Unstable connection between the
Bluetooth compatible Device and
the Soundbar.
– Check if the AC Power cord is properly connected.
– Unplug the AC outlet once, and wait for 15-20 seconds and then plug it in again.
– Make sure both the TV or other devices and the Soundbar are Turned On.
– Confirm the connections to the TV or the device are made properly as shown in CONNECTIONS.
(Refer to “CONNECTIONS” on page 9)
– Press the INPUT source buttons on your Soundbar’s Remote Control for the correct audio input.
– Confirm that the Soundbar is not muted. Press VOL +/
(Refer to “Adjusting the Volume” on page 12)
– For optical audio connection, select another audio signal on the connected external device.
(This product supports Dolby Audio and PCM.)
– Depending on the usage and usage environment, chatter sound and distorted sound may be generated.
To reduce such sounds, lower the volume.
– If Input is Optical Sound make sure that the Optical cable Connector is completely inserted into the
Terminal (Click Sound heard when properly inserted).
– Check if PAIRING indicator on the rear of Subwoofer is lit.
– Confirm that all speakers and the Subwoofer is outputting the sound by the Speaker check.
(Refer to “Confirming the Sound Output from the Speakers” on page 14)
– If the Satellite speakers are not emitted the sound, press
surround sound to On. Only select sounds are played from the satellite speakers. This is normal.
– Adjust the sound settings of the connected device.
– Decrease the volume on the connected Bluetooth compatible Device.
– Confirm that the Soundbar AC Power cord is plugged into an AC outlet.
– Check the batteries in the Remote Control, and make sure they are inserted properly by + or - symbols.
– Aim the remote at the center of this Unit.
– If the Remote Control does not work and all LED’s of the Soundbar stay lit for over 30 seconds, there is a
failure in the electrical system. Unplug the AC Power cord and contact the service center.
– Use a Digital or Phone Camera pointing the Remote Control at the Camera Lens and press any Remote
button. If Remote IR LED(s) flash on Camera Display, then the Remote is Transmitting a Signal. Some
Phone Cameras have IR filters in their Lens, therefore you will not see the IR LED(s) flash.
– Confirm that the external device is compatible with the audio signals supported by the Soundbar.
– Confirm that Bluetooth is enabled on the external device.
See the user Manual of the external device on how to enable Bluetooth.
– If reconnecting the Bluetooth compatible Device to the Soundbar fails, delete the registered profile
of this Soundbar from the Bluetooth compatible Device, then perform pairing again. This Unit can
store up to 8 device profiles.
– Another Bluetooth compatible Device is already connected to the Soundbar. Disconnect the
connected device, then try again.
– The Bluetooth reception may be poor. Confirm that there is no obstacle between the Bluetooth
compatible Device and the Soundbar. If this does not improve the sound quality, move the Bluetooth
compatible Device closer to the Soundbar.
– The Bluetooth reception may be poor. Confirm that there is no obstacle between the Bluetooth
compatible Device and the Soundbar. If this does not improve the sound quality, move the Bluetooth
compatible Device closer to the Soundbar.
-
to unmute the sound.
on the Remote Control to set
Specifications
Output Power
Product Dimensions
Product weight (net)
Input
Bluetooth
Optical / Coaxial Input
• Designs and Specifi cations are subject to change without notice.
• If there is a Discrepancy between Languages, the default Language will be English.
Total: 160W (Peak at THD+N <1%)
Main unit: 72W (24W x 3)
Satellite speaker: 24W (12W x 2)
Subwoofer: 64W
Main unit: W: 39.4 inches (999 mm) / H: 3.1 inches (77 mm) / D: 3.1 inches (77 mm)
Satellite speaker: W: 3.1 inches (77 mm) / H: 6.0 inches (150 mm) / D: 3.1 inches (77 mm)
Subwoofer: W: 8.4 inches (211 mm) / H: 10.1 inches (255 mm) / D: 8.4 inches (211 mm)
Main unit: 5.5 lbs. (2.5kg)
Satellite speaker: 2.2 lbs. (1.0kg) [1.1 lbs. (0.5kg) x 2]
Subwoofer: 6.8 lbs. (3.1kg)
USB input (File system: FAT32, File format: WAV)
Coaxial input
Optical input
Line input
Auxiliary input
Profile: A2DP, AVRCP
Version: 2.1+EDR
Dolby Digital / PCM
48kHz 16bit Max.
–
–
18
Page 19

LIMITED WARRANTY
NINETY (90) DAY LABOR / ONE (1) YEAR PARTS
WARRANTY
FUNAI CORP. will repair this product, free of charge in the USA in the
event of defect in materials or workmanship as follows:
Limited Warranty
DURATION:
PA RT S : FUNAI CORP. will provide parts to replace defective
parts without charge for one (1) year from the date of
original retail purchase. Certain parts are excluded from
this warranty.
LABOR: FUNAI CORP. will provide the labor without charge for
a period of ninety (90) days from the date of original
retail purchase.
Note: Any product sold and identified as refurbished or
renewed carries a ninety (90) days labor and parts limited
warranty.
LIMITS AND EXCLUSIONS:
THIS WARRANTY IS EXTENDED ONLY TO THE ORIGINAL
RETAIL PURCHASER. A PURCHASE RECEIPT OR OTHER PROOF
OF ORIGINAL RETAIL PURCHASE WILL BE REQUIRED
TOGETHER WITH THE PRODUCT TO OBTAIN SERVICE UNDER
THIS WARRANTY.
This warranty shall not be extended to any other person or
transferee.
This warranty is void and of no effect if any serial numbers on the
product are altered, replaced, defaced, missing or if service was
attempted by an unauthorized service center. This limited warranty
does not apply to any product not purchased and used in the United
States and Canada.
This warranty only covers failures due to defects in material or
workmanship which occur during normal use. It does not cover
damage which occurs in shipment, or failures which are caused by
repairs, alterations or products not supplied by FUNAI CORP., or
damage, which results from accident, misuse, abuse, mishandling,
misapplication, alteration, faulty installation, improper maintenance,
commercial use such as hotel, rental or office use of this product, or
damage which results from fire, flood, lightning or other acts of God.
THIS WARRANTY DOES NOT COVER PACKING MATERIALS,
ANY ACCESSORIES (EXCEPT REMOTE CONTROL), ANY
COSMETIC PARTS, COMPLETE ASSEMBLY PARTS, DEMO OR
FLOOR MODELS.
FUNAI CORP. AND ITS REPRESENTATIVES OR AGENTS SHALL IN
NO EVENT BE LIABLE FOR ANY GENERAL, INDIRECT OR
CONSEQUENTIAL DAMAGES ARISING OUT OF OR
OCCASIONED BY THE USE OF OR THE INABILITY TO USE THIS
PRODUCT. THIS WARRANTY IS MADE IN LIEU OF ALL OTHER
WARRANTIES, EXPRESS OR IMPLIED, AND OF ALL OTHER
LIABILITIES ON THE PART OF FUNAI, ALL OTHER WARRANTIES
INCLUDING THE WARRANTY OF MERCHANTABILITY AND
FITNESS FOR A PARTICULAR PURPOSE, ARE HEREBY
DISCLAIMED BY FUNAI AND ITS REPRESENTATIVES IN THE
UNITED STATES.
ALL WARRANTY INSPECTIONS AND REPAIRS MUST BE
PERFORMED BY AN AUTHORIZED SERVICE CENTER.
THIS WARRANTY IS ONLY VALID WHEN THE UNIT IS
CARRIED-IN TO AN AUTHORIZED SERVICE CENTER.
THE PRODUCT MUST BE ACCOMPANIED BY A COPY
OF THE ORIGINAL RETAIL PURCHASE RECEIPT. IF NO
PROOF OF PURCHASE IS ATTACHED, THE WARRANTY WILL
NOT BE HONORED AND REPAIR COSTS WILL BE CHARGED.
IMPORTANT:
THIS LIMITED WARRANTY GIVES YOU SPECIFIC LEGAL RIGHTS.
YOU MAY HAVE OTHER RIGHTS THAT VARY FROM STATE TO
STATE. IF, AT ANY TIME DURING THE WARRANTY PERIOD, YOU
ARE UNABLE TO OBTAIN SATISFACTION WITH THE REPAIR OF
THIS PRODUCT, PLEASE CONTACT FUNAI CORP.
ATTENTION:
FUNAI CORP. RESERVES THE RIGHT TO MODIFY ANY DESIGN
OF THIS PRODUCT WITHOUT PRIOR NOTICE.
WARRANTY STATEMENT REGARDING NON
AUTHORIZED REPAIRS:
To obtain warranty service, you must take the product, or deliver the
product freight prepaid, in either its original packaging or packaging
affording an equal degree of protection, to any AUTHORIZED
SERVICE CENTER. FUNAI CORP. will not reimburse you for any
service done by unauthorized service providers without prior written
approval.
To locate your nearest AUTHORIZED SERVICE CENTER or for general service inquiries, please contact us at:
FUNAI CORPORATION Tel: 1-866-341-3738 www.magnavox.com/support/ 19900 Van Ness Ave., Torrance CA 90501
–
–
19
Page 20

FUNAI CORPORATION, Inc.
19900 Van Ness Ave., Torrance CA 90501
Printed in China
MSB5660 ★★★★★
*192513017150*
 Loading...