

Page 1

Owner’s Manual
MRD430B
Blu-ray™ Home Cinema
© 2012 Funai Electric Co., Ltd.
Page 2

CONTENTS
LIMITED WARRANTY ....................back cover
INTRODUCTION ............................................. 3
Safety Instructions.................................................................3
Supplied Accessories............................................................3
FEATURES......................................................... 4
Features...................................................................................4
Product Info ...........................................................................5
Symbols Used in this Owner’s Manual.............................5
FUNCTIONAL OVERVIEW ............................ 6
Front Panel .............................................................................6
Rear Panel...............................................................................6
Remote Control....................................................................7
Guide to On-Screen Display..............................................9
CONNECTIONS............................................. 10
Placing the Speakers.......................................................... 10
Connection to a TV .......................................................... 10
Connecting Speakers and Subwoofer ........................... 11
Connecting Audio from Cable Box / Recorder /
Game Console or TV ....................................................... 12
HDMI Audio¬Output......................................................... 13
BEFORE YOU START.................................... 14
Finding a Viewing Video Source Input on Your TV ... 14
Initial Setup.......................................................................... 14
Noise Reduction.................................................................30
CLEAR+................................................................................31
LIST OF SETTINGS ....................................... 32
SETUPS............................................................ 35
fun-Link (HDMI CEC)........................................................35
Audio Input Mapping ........................................................36
HDMI Video Resolution....................................................36
Parental .................................................................................37
Software Update.................................................................38
Restore Default Settings...................................................39
SOUND SETTINGS........................................ 40
Volume Control..................................................................40
Selecting Surround Mode ................................................. 40
Selecting Sound Effect Mode............................................41
Audio Sync ...........................................................................41
Speaker Setup......................................................................41
OTHER SETTINGS ........................................ 42
Switching Active Source Mode........................................42
Sleep Timer..........................................................................42
TROUBLESHOOTING .................................. 43
LANGUAGE CODE LIST .............................. 46
INFORMATION ON PLAYBACK................. 16
Information on Playback...................................................16
Guide to File List................................................................ 19
How to Insert a Disc ........................................................ 20
BASIC PLAYBACK ......................................... 21
Playing Back a Disc ............................................................ 21
Playing Back Contents from a USB Memory Stick..... 22
Using the Title / Disc / Pop Menu.................................. 23
SPECIAL PLAYBACK..................................... 24
Fast Forward / Fast Reverse............................................ 24
Slow Forward Playback..................................................... 24
Step by Step Playback........................................................24
Repeat Playback.................................................................. 25
Slide Show............................................................................ 25
PiP (BONUSVIEW™) Setting ......................................... 26
Title / Chapter Search ...................................................... 27
Track / File Search............................................................. 27
Time Search......................................................................... 28
Switching Subtitles ............................................................. 28
Switching Audio Soundtrack ........................................... 29
Switching Camera Angles................................................. 30
Black Level........................................................................... 30
SPECIFICATIONS.......................................... 47
MAINTENANCE............................................. 48
TRADEMARK INFORMATION .................... 49
GLOSSARY...................................................... 50
ESPAÑOL ........................................................ 52
Mando a Distancia ..............................................................52
Encontrar el Canal de Video en su Televisor ..............53
Instalacion Inicial .................................................................54
EN - 2
Page 3

EN
1. INTRODUCTION
www.magnavox.com
1.1. Safety Instructions
To Avoid the Hazards of Electrical Shock and Fire
• Do not handle the AC power cord with wet hands.
• Do not pull on the AC power cord when disconnecting it from an AC outlet. Grasp it by the plug.
• Do not put your fingers or objects into the unit.
Location and Handling
• Do not install the unit in direct sunlight, near strong magnetic fields, or in a place subject to dust or strong vibration.
• Avoid a place with drastic temperature changes.
• Install the unit in a horizontal and stable position. Do not place anything directly on top or bottom of the unit.
Depending on your external devices, noise or disturbance in the picture and/or sound may be generated if the unit is
placed too close to them. In this case, please ensure enough space between the external devices and the unit.
• Depending on the environment, the temperature of this unit may increase slightly. This is not a malfunction.
• Be sure to remove the disc and unplug the AC power cord from the outlet before moving the unit.
Dew Condensation Warning
• Dew condensation may form inside the unit in the following conditions. If so, do not use this unit at least for a few
hours until its inside gets dry.
- The unit is moved from a cold place to a warm place.
- Under conditions of high humidity.
- After heating a cold room.
Note about Recycling
• This unit’s packaging materials are recyclable and can be reused. Please dispose of any materials in
accordance with your local recycling regulations.
• Batteries should never be thrown away or incinerated but disposed of in accordance with your local
regulations concerning chemical wastes.
• For product recycling information, please visit Click on
Notice for Progressive Scan Output
• Consumers should note that not all high definition television sets are fully compatible with this product and may cause
artifacts to be displayed in the picture. In case of picture problems with 480 progressive scan output, it is recommended that
the user switch the connection to the ‘standard definition’ output. If there are questions regarding your TV set compatibility
with this 480p Blu-ray Disc™/DVD player, please contact our customer service center.
1.2. Supplied Accessories
• Remote Control (NB992UD)
• Batteries (AAA, 1.5V × 2)
• SETUP MANUAL
• 1 center, 2 front, 2 rear speakers and 1 subwoofer
MAGNAVOX is a registered trademark of Philips Electronics North America Corporation and is used by Funai Electric
Ltd. and Funai Corporation, Inc. under license from Philips Electronics North America.
© 2012 Funai Electric Co., Ltd.
All rights reserved. No part of this manual may be reproduced, copied, transmitted, disseminated, transcribed, downloaded
or stored in any storage medium, in any form or for any purpose without the express prior written consent of Funai.
Furthermore, any unauthorized commercial distribution of this manual or any revision hereto is strictly prohibited.
Information in this document is subject to change without notice. Funai reserves the right to change the content herein
without the obligation to notify any person or organization of such changes.
Co.,
EN - 3
Page 4

2. FEATURES
2.1. Features
Blu-ray Disc™
You can enjoy Blu-ray Disc™ which is capable of storing
five times more data than a conventional DVD.
BD-Java
With some Blu-ray discs which contain Java applications,
you can enjoy interactive functions such as games or
interactive menus.
DVD upscaling for enhanced picture quality
Your current DVD will look even better than before thanks
to video upscaling. Upscaling will increase the resolution of
standard definition DVD to high definition up to 1080p
over an HDMI connection. The picture will be less jagged
and more realistic for a near high definition experience.
Enjoy your content on different kinds of media
Full backwards compatibility with DVD, CD and USB
Memory Stick ensures that you can continue to enjoy your
current audio-video collection. Additionally, you can enjoy
AVCHD (for DVD-RW/-R only) / JPEG files.
Listen to rich multi-channel surround sound
Multi-channel surround sound, which realizes real-to-life
sound and makes you feel that you are really there.
Easy and simple connection to your HDTV via HDMI
Connect this unit to your HDTV with one single HDMI (HighDefinition Multimedia Interface) cable. It is recommended to
use a High Speed HDMI cable for better compatibility. The
high definition video output signal will be transferred to your
HDTV without conversion to analog signals, so you will get
excellent picture and sound quality, completely free from
noise. Thanks to other multiple outputs, you can also easily
connect to your Home Cinema or amplifier.
fun-Link (HDMI CEC)
(Consumer Electronics Control)
This unit supports fun-Link (HDMI CEC), which allows
integrated system control over an HDMI cable and is part
of the HDMI standard. This function may not work
properly on some devices.
PiP (BONUSVIEW™)
Some BD-videos have the PiP function which enables you
to display the Secondary Video in the Primary Video. You
can call up the Secondary Video by pressing [MODE]
whenever the scene contains a Secondary Video.
Pop Menu
Some BD-videos have a Pop Menu which is a navigation
menu that can be called up and be operated on the TV
screen without interrupting playback. You can call up the
Pop Menu by pressing [POP MENU/MENU]. Contents
in the Pop Menu vary depending on the disc.
HDMI Deep Color
Deep Color reduces posterization (color banding) effect of
the playback image.
HDMI 1080p/24 output (Blu-ray Disc™ only)
This unit is equipped with the feature which can provide
smooth movement during playback of film originated
material with the frame rate of 24 frames per second with
progressive. (Available only when the display device is
connected with an HDMI cable.) Refer to “HDMI Video
Resolution” on page 36.
Playing back contents from a USB Memory Stick
You can play back JPEG files stored on a USB Memory
Stick. BD-ROM Profile 1.1 discs sometimes store picturein-picture commentary, Subtitles or other extras on the
USB Memory Stick for use during playback with the BDvideo.
Playing back AVCHD files
This unit supports playback of AVCHD format files (new
format for high definition video camcorders) recorded on a
disc / SD Memory Card using USB card reader / USB hub
(not supplied). Your high definition personal archive is
playable in HD quality.
x.v.Color
This unit supports playback of video contents on discs
recorded with “x.v.Color” technology. To watch this video
content with the “x.v.Color” space, a TV or other display
device supporting both video image reproduction using
“x.v.Color” standard and capability of manual switching of
its color space setting is required. Please refer to the user
manual of your display device for further information.
EN - 4
Page 5
EN
2.2. Product Info
“Product Info” screen provides information about this unit’s software version.
You can also download the latest software from the Magnavox website and update it yourself if it is newer than the version
currently on your unit. The current version of software on your unit can be seen on the “Product Info” screen.
To access “Product Info”, follow the procedure below.
1. Press [HOME].
2. Use [] to select “Settings”, then press [OK].
3. Use [] to select “Others”, then press [OK].
4. Use [] to select “Product Info”, then press [OK].
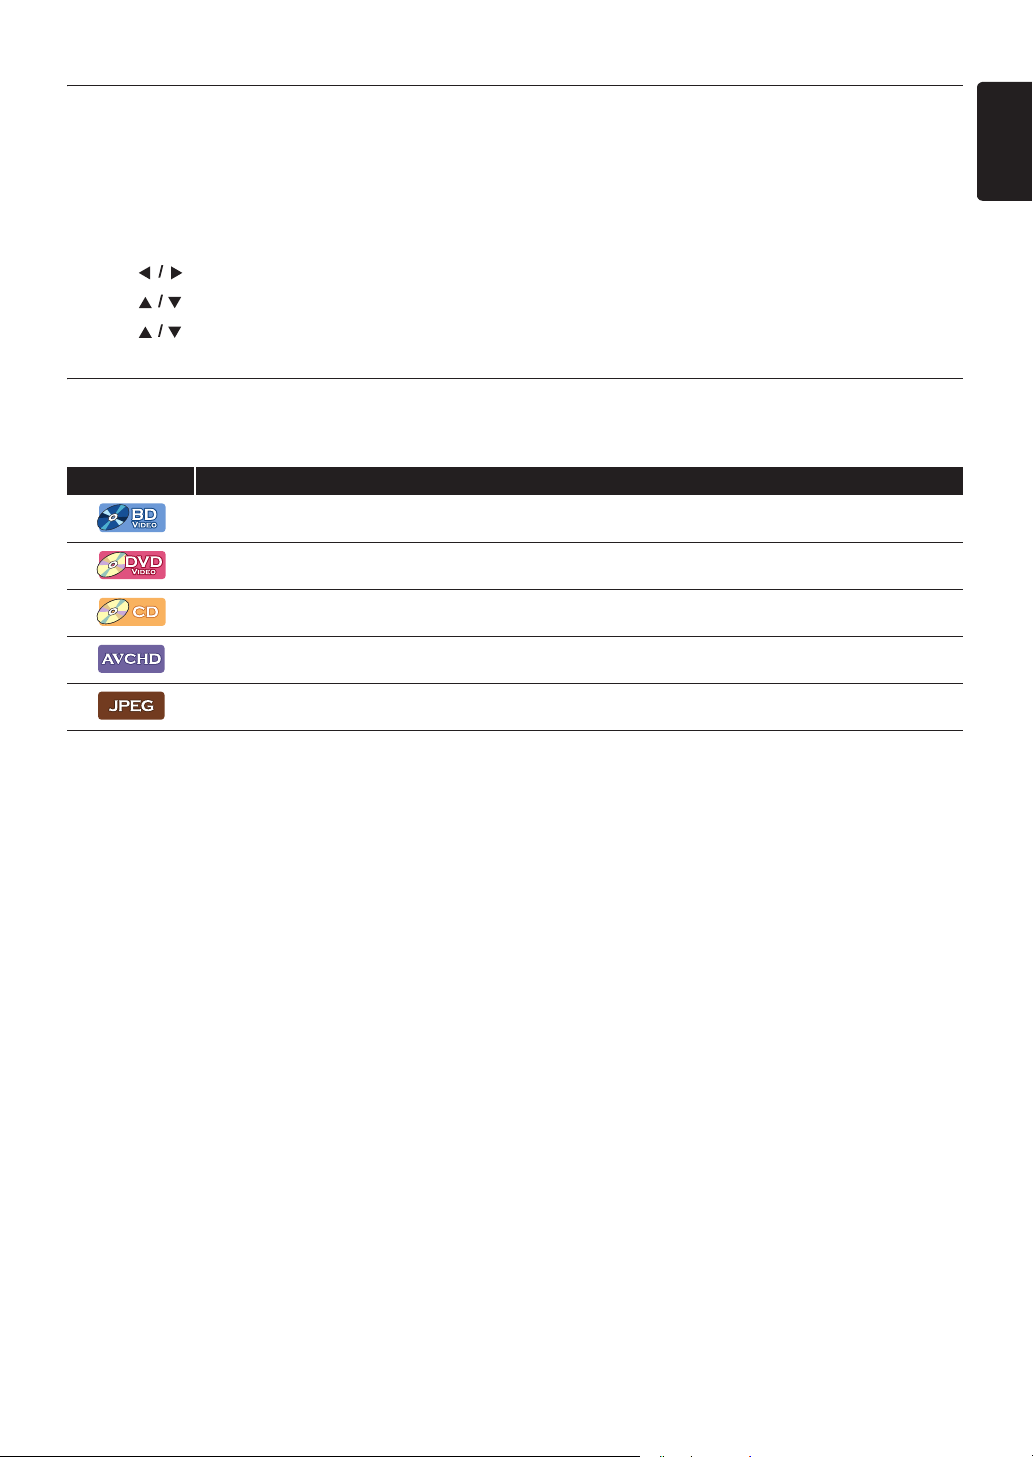
2.3. Symbols Used in this Owner’s Manual
To specify which media type each function is applicable to, the following symbols that are at the beginning of each Symbol type.
Symbol Description
Description refers to BD-video
Description refers to DVD-video
Description refers to audio CD / DTS-CD
Description refers to DVD-RW/-R with AVCHD files
Description refers to BD-RE/-R, DVD-RW/-R, CD-RW/-R and USB Memory Stick with JPEG files
If you do not find any of the symbols listed above under the function heading, the operation is applicable to all media.
EN - 5
Page 6

3. FUNCTIONAL OVERVIEW
3.1. Front Panel
1
2* 3 4 5
76
* The unit can also be turned on by pressing this button.
1. Disc tray
2. (OPEN/CLOSE) button*
3. VOLUME button
4. Power-On indicator
• Flashes while unit is starting up.
• Dims and flickers when IR remote signal is received.
C Caution
• Do not connect any device other than USB Memory Stick or USB card reader into the USB Input. (e.g. PC, external
HDD, MP3 player, digital camera, keyboard, mouse, etc.)
• When connecting a USB Memory Stick, connect it directly to the USB Input. Do not use a USB extension cable.
3.2. Rear Panel
2
1
)
SPEAKERS (3Ω
REAR FRONT
-
SUB
FRONT
R L RL
WOOFER
CENTER
+
-
5. (POWER-ON) button
6. Infrared sensor window
7. USB Input
3
4
VIDEO
AUDIO IN
OUT
AUX
R
DIGITAL
AUDIO IN
L
COAXIAL
HDMI OUT
5
6
1. AC power cord
2. 5.1ch Audio Out (SPEAKERS (3))
3. HDMI OUT jack
4. VIDEO OUT jack
5. DIGITAL AUDIO IN (COAXIAL) jack
6. AUDIO IN (AUX) jacks
C Caution
• Do not touch the inner pins of the jacks on the rear panel. Electrostatic discharge may cause permanent damage to the
unit.
• This unit does not have a TV RF modulator.
EN - 6
Page 7
EN
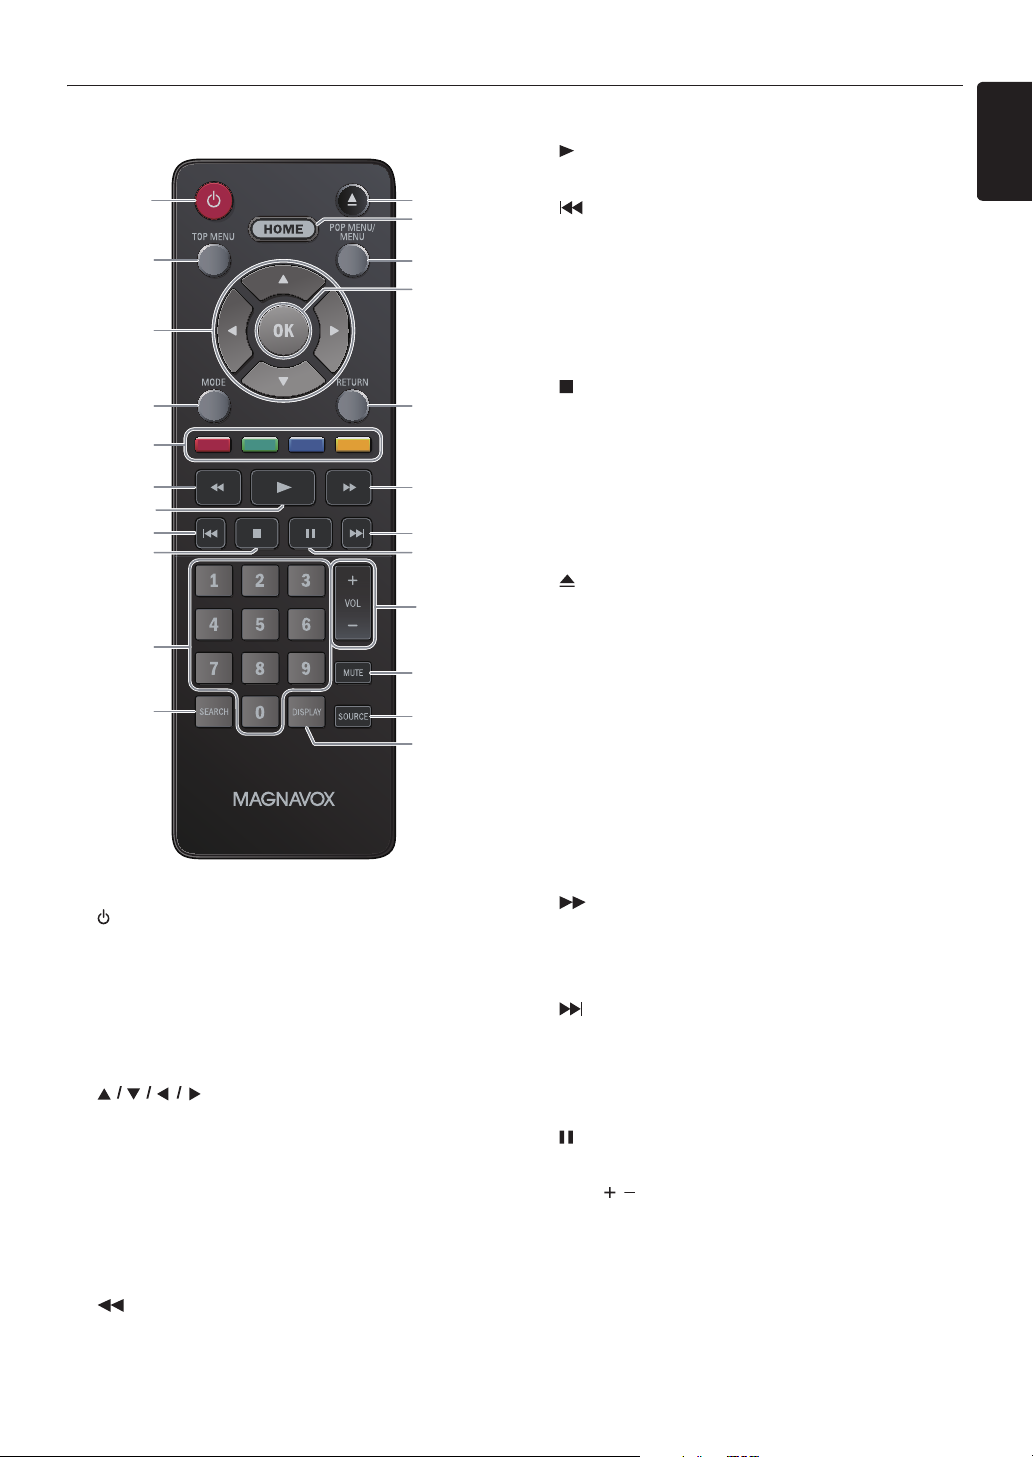
3.3. Remote Control
1
2
3
4
5
6
7*
8
9
10
11
*
The unit can also be turned on by pressing these buttons.
1. (POWER-ON) button
• Press to Turn On the unit, or to switch the unit into
Standby mode. (To completely Turn Off the unit, you
must unplug the AC power cord.)
2. TOP MENU button
Blu-ray Disc™: Press to display the Top Menu.
DVD: Press to display the Title Menu.
3. buttons
• Press to select items or settings.
4. MODE button
• During playback, press to display the Play Menu.
5. RED / GREEN / BLUE / YELLOW buttons
• Press to activate shortcut keys on some BD-video
functions. When a file list is shown, press to switch
between pages.
6. (REVERSE) button
• During playback, press to Fast Reverse the playback.
12*
13
14
15
16
17
18
19
20
21
22
23
7. (PLAY) button*
• Press to start playback or resume playback.
8. (SKIP) button
• During playback, press once to return to the
beginning of the current Title, Chapter, Track or File.
• During playback, press twice to return to the
previous Title, Chapter, Track or File.
• During the JPEG playback, press to return to the
previous File.
9. (STOP) button
• Press to Stop playback.
10. NUMBER buttons
• Press to select a Chapter during playback.
• Press to enter Numbers or letters in the input field.
11. SEARCH button
• Press to display the Search Menu.
12. (OPEN/CLOSE) button*
• Press to Open or Close the disc tray.
13. HOME button
• Press to display the Home Menu.
14. POP MENU/MENU button
Blu-ray Disc™: Press to display the Pop Menu.
DVD: Press to display the Disc Menu.
15. OK button
• Press to confirm or select menu items.
16. RETURN button
• Press to Return to the previously displayed menu or
screen function.
17. (FORWARD) button
• During playback, press to Fast Forward the playback.
• When playback is in pause, press to Slow Forward
the playback.
18. (SKIP) button
• During playback, press to Skip to the next Chapter,
Track or File.
• When playback is in pause mode, press to Forward
the playback picture by picture.
19. (PAUSE) button
• Press to Pause playback.
20. VOL / button
• Press to adjust the volume.
21. MUTE button
• Press to Mute the volume.
continued on next page
EN - 7
Page 8

22. SOURCE button
30˚ 30˚
• Press to switch the active Source mode; Home Menu
(Disc / USB Memory Stick), “Aux” and “Coaxial” .
23. DISPLAY button
• Press to Display the on-screen display menu.
D Note
• The Power-On indicator on the front panel dims and
flickers when it receives the IR signal from the
remote control.
• Use the supplied remote control. Remote-control
operation on any other remote control, such as a
universal remote control, is not guaranteed.
Installing the Batteries in the Remote Control
Install 2 AAA (1.5V) batteries matching the polarity
indicated inside battery compartment of the remote
control.
Using the Remote Control
Remote Control Usage Guidelines:
• Make sure that there are no obstacles between the
remote control and the infrared sensor window on the
unit.
• Remote operation may become unreliable if strong
sunlight or fluorescent light is shining on the infrared
sensor window of the unit.
• Remote controls of different devices can interfere with
each other. Avoid using a remote control from another
device which is located close to the unit.
• Replace the batteries when you notice a fall-off in the
operating range of the remote control.
• The maximum operable ranges from the unit are as
follows.
-Line of sight:
approx. 23 feet (7 m)
- Either side of the center:
approx. 16 feet (5 m) within 30°
-Above:
approx. 16 feet (5 m) within 15°
-Below:
approx. 10 feet (3 m) within 30°
C Caution
Incorrect use of batteries can result in hazards such as
leakage and bursting. Please observe the following:
• Lithium or ni-cad and ni-mh rechargeable batteries are
not recommended to use for remote control.
• Do not mix different types of batteries such as alkaline
and standard (carbon-zinc).
• Do not mix new and old batteries together.
• Do not use different kinds of batteries together.
Although they may look similar, different batteries may
have different voltages.
• Make sure that the + and - ends of each battery match
the indications in the battery compartment.
• Remove batteries from battery compartment, when the
remote is not going to be used for a month or more.
• When disposing of used batteries, please comply with
governmental regulations or environmental public rules
that apply in your country or area.
• Do not recharge, short-circuit, heat, burn or
disassemble batteries.
16 feet (5 m) 16 feet (5 m)23 feet (7 m)
EN - 8
Page 9

EN
3.4. Guide to On-Screen Display
Disc
1 2 3
Home Menu
When you Turn On the unit, Home Menu will appear automatically. Otherwise, press [HOME].
1. “Disc”: Initiates playback of inserted disc, displays a list of Tracks / Files or the Media Filter Menu.
2. “USB Memory Stick”: Displays a list of Tracks / Files on the connected USB Memory Stick or the Media Filter
Menu.
3. “Settings”: To access the Setup Menu.
Setup Menu
Video Out
1
Audio Out
HDMI
Playback
Others
TV Aspect
Progressive Mode
Still Mode
>
16:9 Wide
>
Auto
>
Auto
2
1. Category
2. Menus / Options: Displays options for the highlighted item on the left whenever available
Play Menu
During playback, press [MODE] to display the Play Menu.
e.g.) Blu-ray Disc™
Search
Audio
Subtitle
Repeat
Black Level
Noise Reduction
EN - 9
Page 10

4. CONNECTIONS
FRONT
RIGHT
FRONT
CENTER
REAR
RIGHT
REAR
LEFT
SUBWOOFER
LEFT
HDMI cable
(not supplied)
Your TV
4.1. Placing the Speakers
Make the following connection to ensure an optimum sound experience.
1. Place the main unit near to the TV.
2. Place the speakers system at normal listening ear-level and directly parallel to the listening area.
3. Place the subwoofer at the corner of the room or at least 3.3 feet (1 meter) away from the TV.
D Note
• The placement diagram shown here is only a guideline that provides great system performance. You may find other
placement choices that are more suitable for your room layout that provide the sound experience you enjoy.
• To avoid magnetic interference, never position the front speakers too close to your CRT Picture Tube TV.
• The rear speakers are labeled as REAR LEFT or REAR RIGHT.
• The front speakers are labeled as FRONT LEFT or FRONT RIGHT.
• For speaker setup, refer to “Speaker Setup” on page 32.
4.2. Connection to a TV
HDMI Connection (Supports up to 1080i
)
SPEAKERS (3Ω
REAR FRONT
-
SUB
FRONT
R L RL
CENTER
WOOFER
+
-
HDMI OUT HDMI IN
VIDEO
AUDIO IN
OUT
AUX
R
DIGITAL
AUDIO IN
L
COAXIAL
HDMI OUT
(*1)
, 1080p
No Analog Audio connection is required as Digital Audio is included with HDMI cable signal.
(*1)
1080i:
(*2)
1080p:
(*3)
1080p/24:
Outputs video data with a frame rate of 30 frames per second.
Outputs video data with a frame rate of 60 frames per second.
Outputs video data with a frame rate of 24 frames per second.
• Do not tilt the connector when inserting it into the HDMI jack, and make sure the shapes of the jack and the connector are matched.
• When connected to an HDCP incompatible display device, the picture will not be displayed properly.
• Use an HDMI cable with the HDMI logo (a certified HDMI cable) for this connection. High Speed HDMI cable (also
known as HDMI category 2 cable) is recommended for better compatibility.
D Note
• If the TV receives no Audio / Video signal after properly connecting the unit and the TV with an HDMI cable, it may be
• If the TV receives no Audio signal after properly connecting the unit and the TV with an HDMI cable, make sure the TV
EN - 10
the TV. Please refer to the TV’s user’s manual.
input is not an HDMI-DVI Input terminal.
(*2)
, 1080p/24
(*3)
resolution.)
continued on next page
Page 11

EN
Standard Composite Video Connection (Supports only 480i resolution.)
SPEAKERS (3Ω
)
SUB
-
WOOFER
DIGITAL
AUDIO IN
COAXIAL
AUDIO IN
AUX
FRONT
CENTER
REAR FRONT
R L RL
L
R
SUBWOOFER FRONT
CENTER
REAR
RIGHT
REAR
LEFT
FRONT
RIGHT
FRONT
LEFT
1. Press the clamper
and insert the wire.
2. Release the
clamper.
Video cable
VIDEO
OUT
)
SPEAKERS (3Ω
REAR FRONT
-
SUB
FRONT
R L RL
CENTER
WOOFER
+
-
VIDEO
AUDIO IN
OUT
AUX
R
DIGITAL
AUDIO IN
L
COAXIAL
HDMI OUT
(not supplied)
VIDEO IN
Your TV
• Connect this unit directly to the TV. If a video cable is connected to a VCR then the pictures may be distorted due to
the copyright protection system.
4.3. Connecting Speakers and Subwoofer
VIDEO
OUT
HDMI OUT
-
SUB
WOOFER
FRONT
CENTER
REAR FRONT
R L RL
1. Connect the bare speaker cable wire ends to the matching color terminals on the speakers.
2. Connect all the speakers and subwoofer to the matching terminals at the rear of the main unit.
Make sure that the colors of the cable wires and terminals match.
3. Confirm that the solid colored wire goes to its matching “+” colored terminal and the black wire goes to the “-” black
colored terminal.
4. Press a colored clamper and insert the solid colored wires to their respective colored terminal.
Then release the clamper when the bare wire end is located so the clamper will clamp the bare wire making a positive
connection.
5. Repeat step 4.
D Note
• To prevent unwanted noise, never place the speakers too close to the main unit, subwoofer, AC power adapter, TV or
any other radiation sources.
• When a disc has 7.1 multi-channel surround sound output then this Home Cinema unit will convert it to 5.1 multichannel surround sound output using the Home Cinema speakers.
EN - 11
Page 12

4.4. Connecting Audio from Cable Box / Recorder / Game Console or TV
AUDIO IN
AUX
L
R
AUDIO OUT
L
R
DVD Recorder / VCR
Cable / Satellite Box
Your TV
Digital audio coaxial cable
(not supplied)
Audio cable
(not supplied)
Digital audio connection
Analog audio connection
DVD Recorder / VCR
Your TV
• This unit provides analog and digital audio connection. You can connect the Audio output from an Audio / Video device
(e.g. DVD Recorder, VCR, Cable / Satellite Box, game console or TV) to this Blu-ray™ Home Cinema in order to enjoy
the Multi-channel Surround Sound capabilities.
)
SPEAKERS (3Ω
REAR FRONT
-
SUB
FRONT
R L RL
WOOFER
CENTER
+
-
VIDEO
AUDIO IN
OUT
AUX
R
DIGITAL
AUDIO IN
L
COAXIAL
HDMI OUT
DIGITAL OUT
DIGITAL
AUDIO IN
COAXIAL
COAXIAL
• Use an audio cable (not supplied) to connect the AUDIO IN (AUX) jacks on the main unit to the audio output jacks on
the connected device.
• Use a digital audio coaxial cable (not supplied) to connect the DIGITAL AUDIO IN (COAXIAL) jack on the main unit
to the digital audio coaxial output jack on the connected device.
D Note
• To listen to the audio output from these connections, select “Speakers” in “Audio Output” (refer to page 32) and
change the active Source mode to the connected Input. (Refer to “Switching Active Source Mode” on page 42.)
EN - 12
Page 13
EN
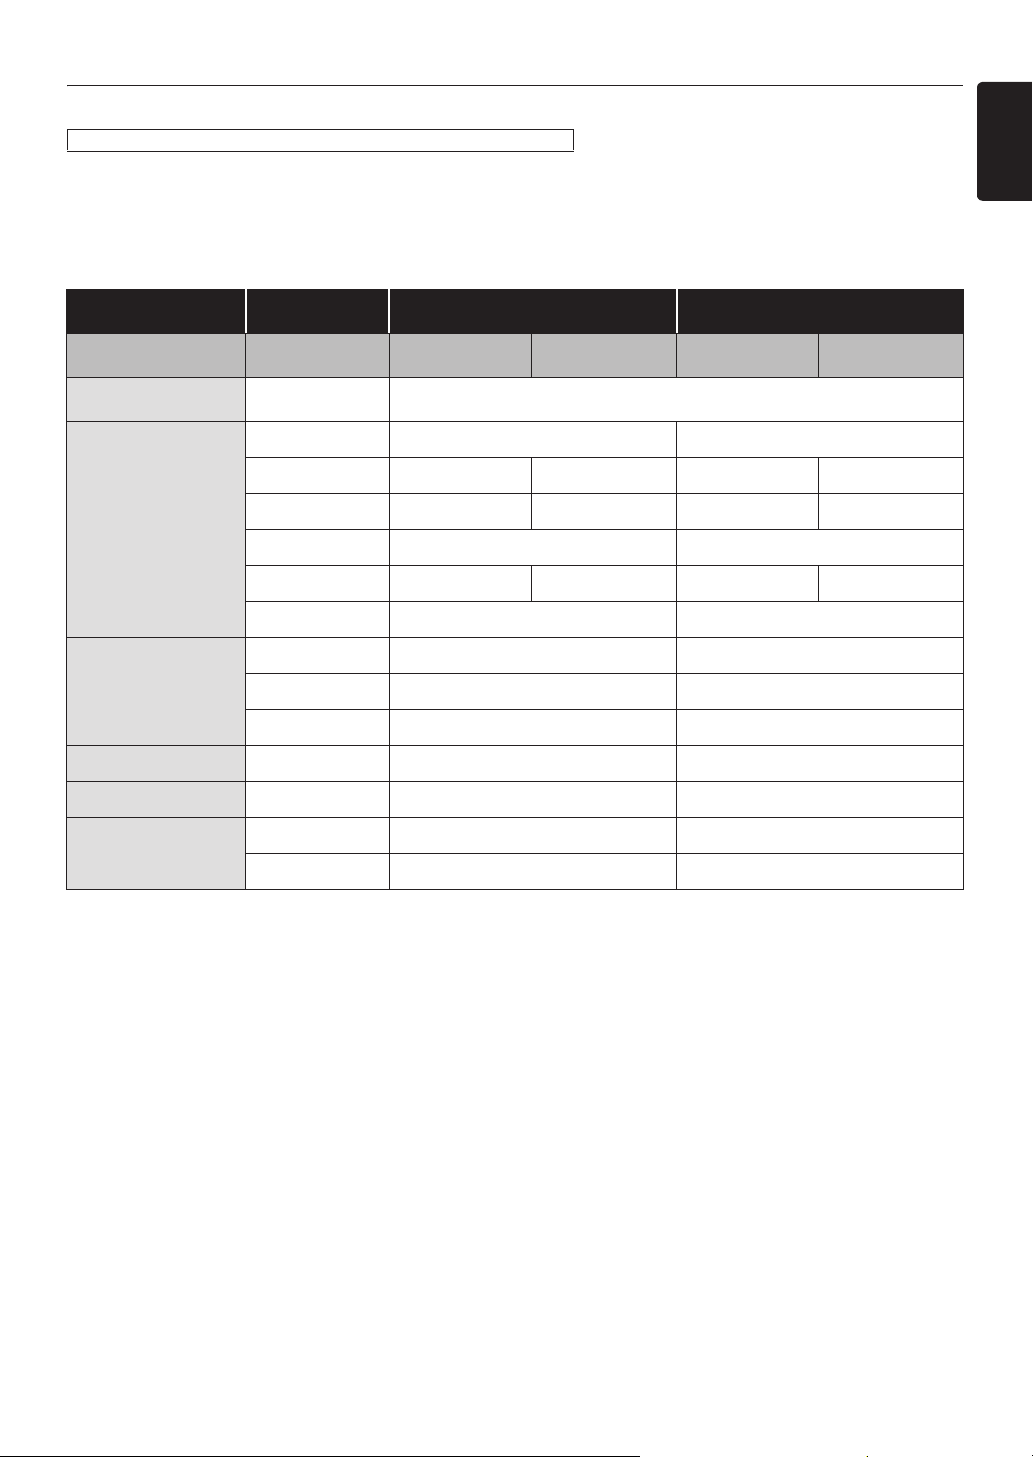
4.5. HDMI Audio Output
HOME A “Settings” A “Audio¬Out” A “Audio Output”
If you set to “Speakers”:
The audio output from the 5.1ch speakers differs depending on the audio source and the setting of surround mode.
(Refer to “Selecting Surround Mode” on page 40.)
If you set to “HDMI Normal” or “HDMI LPCM”:
Refer to the table below for the audio output from HDMI OUT jack.
Media
ª
“Audio Output”
setting A
“BD Audio Mode”
setting A
“HD Audio Output” “Mix Audio Output” “HD Audio Output” “Mix Audio Output”
Audio SourceªWhich audio format can be output depends on the compatibility of the connected
device.
“HDMI Normal” “HDMI LPCM”
Dolby Digital Dolby Digital Multi LPCM
Dolby Digital Plus Dolby Digital Plus Dolby Digital Multi LPCM
Dolby TrueHD Dolby TrueHD Dolby Digital Multi LPCM*3 Multi LPCM
BD-video
®
DTS
DTS-HD
®
DTS
®
DTS-HD
®
DTS
®
Multi LPCM
Multi LPCM
LPCM Multi LPCM Multi LPCM
Dolby Digital Dolby Digital Multi LPCM
DVD-video
DTS
®
DTS
®
Multi LPCM
LPCM 2ch LPCM 2ch LPCM
Audio CD LPCM 2ch LPCM 2ch LPCM
DTS-CD DTS® DTS
®
Multi LPCM
Dolby Digital Dolby Digital Multi LPCM
AVCHD
LPCM Multi LPCM Multi LPCM
*1
) Fully decoded.
*2
) Only the independent substream is decoded.
*3
) Dolby TrueHD stream is decoded.
*4
) Only the Dolby Digital substream is decoded.
*5
) Only the core substream is decoded.
*1
*1
Multi LPCM
Multi LPCM
*2
*4
*5
D Note
• If the connected device is not compatible with HDMI BITSTREAM, audio will be output as multi LPCM or 2-channel
down-mixed LPCM depending on the capability of the connected device even if you select “HDMI Normal” in “Audio
Output” setting.
• When playing back a BD-video which only contains the primary audio, the audio output will be the same case as “HD
Audio Output” even if “BD Audio Mode” is set to “Mix Audio Output”.
• HD Audio will not be output when “BD Audio Mode” is set to “Mix Audio Output” and the Button Sound feature in
the content is enabled. (Button Sound setting may be found in Pop Menu.)
EN - 13
Page 14

5. BEFORE YOU START
Please Wait...
Please select your language for on-screen display.
English
Español
Français
Return
5.1. Finding a Viewing Video Source Input on Your TV
After you have completed all of the connections to your TV, review the steps below.
1. Press [(POWER-ON)] to Turn On the unit.
2. Turn On your TV.
3. Please locate the Source / Input / AUX / Video button on TV's remote control. The button may vary on the TV brand
and model. Once you have located the button, press until you see “Please Wait...” or the Initial Setup Menu on the
Screen.
This is the correct viewing of the video Source Input.
• If the TV is connected by an HDMI cable, it may take a few moments for the opening picture to appear.
• If a certain amount of time has passed since you Turned On the unit, welcome screen only appears the first time you
Turn On the unit.
5.2. Initial Setup
Please follow the instructions below to complete the initial setup.
1. While welcome screen is displayed, use [] to select “Next”, then press [OK].
2. Language setup screen will appear. Use [] to select your language, then press [OK].
Language
3. “Quick Start Mode” screen will appear. Use [] to select the desired mode, then press [OK].
EN - 14
continued on next page
Page 15

EN
How to Reset the OSD Language
You can reset the OSD language if you selected the wrong language.
1. Press [HOME] to display the Home Menu.
2. Use [] to select “ ”, then press [OK].
• This item is “Settings” (English) / “Configuaraciones” (Spanish) / “Paramètres” (French).
• From here on, please select one of the following items you can find on screen:
3. Use [] to select “Playback” (English) / “Reproducción” (Spanish) / “Lecture” (French), then press [OK].
4. Use [] to select “Language” (English) / “Idioma” (Spanish) / “Langue” (French), then press [OK].
5. Use [] to select your desired language, then press [OK].
6. If the items that were set are displayed in your desired language, then press [HOME] to exit.
EN - 15
Page 16

6. INFORMATION ON PLAYBACK
6.1. Information on Playback
Playable Discs and Files
Playable discs Logos
Blu-ray Disc™
- BD-video
- BD-RE* (ver. 2.1)
(Recorded in BDMV format)
- BD-R* (ver. 1.1 / 1.2 / 1.3)
(Recorded in BDMV format)
(Unfinalized disc may not be played back.)
DVD-video
DVD-RW
(finalized video mode discs only)
DVD-R
(finalized video mode discs only)
CD-DA (audio CD)
CD-RW
CD-R
KODAK Picture CD
DTS-CD
-
(*) Due to the intentional progression of the Blu-ray Disc™ format by its standard setting authority, the company cannot
guarantee or warrant the playability of future extensions of the Blu-ray Disc™ format with this product.
Playable files Media
AVCHD
JPEG
SD Memory Card using USB card reader / USB hub (not supplied)
DVD-RW/-R
BD-RE/-R
DVD-RW/-R
CD-RW/-R
USB Memory Stick
Readable device Playable files / data
USB Memory Stick
JPEG, picture-in-picture commentary, Subtitles or other
extras for BD-ROM ver. 2 (Profile 1.1)
D Note
• This unit may not be able to play back discs recorded on PC's or other recorders.
EN - 16
continued on next page
Page 17

EN
Recommended Specifications
AVCHD
This unit cannot play back stand-alone AVCHD files (*.m2ts, *.mts or *.m2t) written to a DVD or copied to an SD
Memory Card. The DVD or SD Memory Card containing AVCHD files must have a proper file and folder structure
meeting AVCHD format specifications. Please use AVCHD compliant device / software to burn or copy AVCHD files to
DVD or SD Memory Card.
(Please refer to user manuals of your device / software for more information.)
JPEG
Resolution
• Upper limit: 2,560 x 1,900 dots (sub sampling is 4:4:4)
5,120 x 3,840 dots (sub sampling is up to 4:2:2)
• Lower limit: 32 x 32 dots
• Maximum file size of a picture: 12MB
Folder / File Number Limitations
Blu-ray Disc™, DVD and USB Memory Stick
• 999 folders (groups) and 9,999 files
CD
• 255 folders (groups) and 999 Tracks / Files
Caution / Note for USB Memory Stick
C Caution
• Do not try to open or modify the USB Memory Stick.
• Do not touch the terminal surface with your fingers or any metals.
D Note
• This unit supports USB Memory Stick with FAT16 / FAT32 file system.
• This unit does not support NTFS file system.
• This unit may not read USB Memory Sticks formatted on a computer. If that is the case, please reformat the USB Memory
Sticks on this unit and try again. Please not that all files stored on the USB Memory Stick will be erased upon format.
• Please keep the USB Memory Sticks in their cases when you are not using them.
• Some USB Memory Sticks may not work with this unit.
• This unit can read SD Memory Cards using a USB card reader (not supplied).
- Readable cards: SD Memory Card (8 MB - 2 GB)
miniSD Memory Card (16 MB - 2 GB)
microSD Memory Card (256 MB - 2 GB)
SDHC Memory Card (4 GB - 32 GB)
miniSDHC Memory Card(4 GB - 8 GB)
microSDHC Memory Card (4 GB - 16 GB)
- Readable files: AVCHD / JPEG
• Depending on a USB card reader or USB hub, connected card or device may not be recognized.
continued on next page
EN - 17
Page 18

Unplayable Media and Files
The following discs will not be played back on this unit.
• CD-ROM • CD-I (compact disc-interactive)
•DVD-RAM •VSD (video single disc)
•DVD-audio •video CD
• HD DVD • SVCD
• SDXC Memory Card • microSDXC Memory Card
• unfinalized disc • BD-RE (ver. 1.0)
• BD-RE (ver. 2.1) (Recorded in BDAV format) • BD-R (ver. 1.1 / 1.2 / 1.3) (Recorded in BDAV format)
•BDXL™
®
• Blu-ray Disc™ / DVD / CD / USB Memory Stick / SD Memory Card containing DivX
/ WMA / MP3 files
• Blu-ray Disc™ / USB Memory Stick that contains AVCHD files
• Blu-ray Disc™ / DVD hybrid disc (played back as a BD-video only)
• DVD-RW/-R recorded in non compatible recording format
• Super Audio CD - Only the sound on the CD layer can be heard. The sound on the high-density Super Audio CD layer cannot be heard.
• Playability of dual discs is not guaranteed.
• This unit cannot play back the disc contents protected by Windows Media™ Digital Rights Management (DRM).
Region Codes
This unit has been designed to play back BD-video with region “A” and DVD-video with region
“1” or “ALL”. You cannot play back BD-video or DVD-video that is labeled for other regions.
Look for the symbols on your BD-video or DVD-video. If these region symbols do not appear on
your BD-video or DVD-video, you cannot play back the disc on this unit. The letter or number
inside the globe refers to region of the world. BD-video or DVD-video discs labeled for a specific
region can only be played back on players with the same region code.
Hint for Disc Playback
The contents of a disc are generally divided into sections or folders (group of titles / files) as shown below.
BD-video, DVD-video, AVCHD
Title 1 Title 2
Chapter 1 Chapter 2 Chapter 1 Chapter 2 Chapter 3
Audio CD
Track 1 Track 2 Track 3 Track 4 Track 5
BD-video
DVD-video
folder (group) 1 folder (group) 2
JPEG
File 1 File 2 File 3 File 4 File 5
EN - 18
continued on next page
Page 19

EN
Description for Icons
1
2
3
4
[] : group (folder) icon
[] : music file icon
[] : photo file icon
- “Folders” refers to the group of files.
- “Tracks” refers to the contents recorded on the audio CD.
- “Files” refers to the contents on a disc which are recorded in AVCHD, JPEG (including KODAK Picture CD) file
format.
D Note
• Unrecognizable characters will be replaced with asterisks.
6.2. Guide to File List
Music File List
23
File List
1
TR
-- / 12 -- : -- : --
CD-DA
Song1
Song2
Song3
Song4
Song5
Song6
Song7
Page Up Page Down
1. Current Track number / Total number of
Tracks
2. Elapsed playing time of the current Track
CD-DA
4
5
3. Playback status symbol
4. Media type
5. File list
Picture File List
Thumbnail
TR
--- / 999
06051_1140
Folder_001 Folder_002
Page Up Page Down Media Mode
1. Current File number / Total number of Files
2. Playback status symbol
CD
DATA
3. Media type
4. Group (folder) / File list (thumbnails)
How to Navigate through the Track / File List
•Use [] to move the highlight up and down in the list.
• To access the files in a Group (folder), select the desired Group (folder), then press [OK].
•Press [] or [RETURN] to go back to the previous hierarchy.
•Press [RED] or [GREEN] to change the page list up or down.
•Press [YELLOW] to go back to the “Media Mode” screen.
•Press [HOME] to Exit.
EN - 19
Page 20

6.3. How to Insert a Disc
Align the Disc to the disc tray guide.
1. Press [(OPEN/CLOSE)] to Open the disc tray.
2. Place the Disc on the disc tray with its label side facing up.
3. Press [(OPEN/CLOSE)] to Close the disc tray.
• It may take a while to load the disc.
EN - 20
Page 21

EN
7. BASIC PLAYBACK
a b
Photo
7.1. Playing Back a Disc
1. Insert a disc (refer to “How to Insert a Disc” on page 20).
• For Blu-ray Disc™ / DVD / audio CD or a disc containing only one type of file, playback will start automatically. If
not, press [(PLAY)].
• Some discs may show a Title or a Disc Menu. In this case, refer to “Using the Title / Disc / Pop Menu” on page 23.
2. Select the type of the file you want to play back, then press [OK].
a. For “Photo”, thumbnail screen will appear.
• Refer to “Picture File List” on page 19 and “How to Navigate through the Track / File List” on page 19.
b. For “AVCHD”, playback will start automatically.
To Skip to the next Track / File:
To Skip to the previous Track / File:
To Pause playback:
To Return to Normal playback:
To Stop playback:
Playback will be in Resume-On-Stop mode.
Resume-On-Stop Mode
Blu-ray Disc™ / DVD / AVCHD
When you press [(PLAY)] next time, the playback will start from the point where it has been stopped.
Audio CD
Playback will start from the point where it is stopped next time you press [(PLAY)]. If you press [OK] instead of
[(PLAY)], playback will start from the beginning of the Track / File instead of resuming from the stop point.
JPEG / KODAK Picture CD
Playback will start from the beginning of the current file next time you press [(PLAY)] or [OK].
D Note
• Playback will also Stop and the Home Menu will appear when you press [HOME].
• For BD-Java application, the Resume-On-Stop may not be available.
• If you press [OK] instead of [(PLAY)], playback can be started from the beginning of the disc even if it was in the
Resume-On-Stop mode.
• Resume-On-Stop mode remains in effect even after Power is Turned Off, but will be cancelled once the disc is ejected.
• With regard to the multi-border BD-RE/-R, additionally recorded sections cannot be recognized.
• With regard to the multi-border DVD-RW/-R, additionally recorded sections may not be recognized.
Press [(SKIP)].
Press [(SKIP)].
Press [(PAUSE)].
Press [(PLAY)].
Press [(STOP)].
continued on next page
EN - 21
Page 22

D Note for JPEG / KODAK Picture CD Playback
• Every press of [] will turn the image by 90 degrees when an image is displayed.
• During playback, press [TOP MENU] to display thumbnail screen.
• This unit conforms to ver. 7.0 of KODAK Picture CD. For details of KODAK Picture CD, contact a shop that provides
developing service for Kodak Inc.
• Some unplayable folders or files may be listed due to the recording status.
• High-resolution JPEG files take longer to be displayed.
• Progressive JPEG files (JPEG files saved in progressive format) cannot be played back on this unit.
7.2. Playing Back Contents from a USB Memory Stick
You can play back JPEG files stored on a USB Memory Stick. With the USB Memory Stick, you can also enjoy the following
functions.
- Special additional contents for BD-ROM Profile 1 ver. 1.0.
(For more information about the special additional contents, refer to the instruction book that came with the disc.)
1. Connect a USB Memory Stick.
2. Press [HOME].
3. Use [] to select “USB Memory Stick”, then press [OK].
4. Follow step 2 in “Playing Back a Disc” on page 21.
C Caution
• Do not disconnect the USB Memory Stick or switch the unit to Standby mode while a content on the USB Memory
Stick is being accessed. It may result in malfunction or loss of the stick's data.
• If you connect a USB Memory Stick or SD Memory Card via a USB card reader or USB hub, BD-ROM data will be
written onto the first connected card or device. Connecting a USB Memory Stick directly to this unit is recommended.
• Occasionally, SD Memory Cards / Micro SD Memory Cards will not be recognized when using certain Adapters. In such
cases, try a different USB Adapter.
D Note
• When connecting more than two USB Memory Sticks to a USB Hub, this unit may fail to recognize them. In such cases,
disconnect the USB Hub from the unit then reconnect it, or use less USB Memory Sticks at a time.
• The resume information will be cleared when;
- [(STOP)] is pressed while in the Resume-On-Stop mode.
- the USB Memory Stick is disconnected.
- the unit is switched to Standby mode.
• Do not delete the folders or files on the USB Memory Stick with your computer. This unit may not read USB Memory
Sticks formatted on a computer.
• If a folder or file name includes one of the following unrecognizable characters, the folder or file name may not be
displayed correctly.
- Unrecognizable characters:
• This unit can read JPEG files and AVCHD in an SD Memory Card by using USB card reader / USB hub (not supplied).
. , " = + [ ] ; / \ : | ¥
EN - 22
Page 23

EN
7.3. Using the Title / Disc / Pop Menu
Some BD-videos, DVD-videos or AVCHD files may contain a Title Menu which describes the contents of the disc, or a
Disc Menu which guides you through the available functions on the disc.
With such discs, a Title Menu or a Disc Menu may appear automatically when you insert the disc. Otherwise, press
[TOP MENU] or [POP MENU/MENU] to call up the menu. Refer to the disc’s manual on how to navigate through
the menu.
D Note
• Menus vary among discs. Refer to the information accompanying the disc for details.
• [TOP MENU] or [POP MENU/MENU] may not work with some discs.
EN - 23
Page 24

8. SPECIAL PLAYBACK
8.1. Fast Forward / Fast Reverse
1. During playback, press [(FORWARD)] repeatedly for Fast Forward.
During playback, press [(REVERSE)] repeatedly for Fast Reverse.
2. Press [(PLAY)] to return to Normal playback.
D Note
• For Blu-ray Disc™, DVD and AVCHD, speed changes at 5 different levels.
• For audio CD, speed changes at 3 different levels.
• For audio CD, Fast Forward / Fast Reverse search between different files are not available.
8.2. Slow Forward Playback
1. During playback, press [(PAUSE)]. Then press [(FORWARD)].
Every time you press [(FORWARD)], the playback speed changes at 3 different levels.
2. Press [(PLAY)] to return to Normal playback.
D Note
• Only Slow Forward is available.
• Set “Still Mode” to “Field” in “Video Out” menu if pictures in the Slow Forward playback mode are blurred.
8.3. Step by Step Playback
1. In pause mode, press [(SKIP)] repeatedly.
Every time you press [(SKIP)], playback will advance one step at a time.
2. Press [(PLAY)] or [(PAUSE)] to return to Normal playback.
D Note
• Only step by step forward is available.
• Set “Still Mode” to “Field” in “Video Out” menu if pictures in the Slow Forward playback mode are blurred.
EN - 24
Page 25

EN
8.4. Repeat Playback
Available repeat function varies depending on the disc.
1. During playback, press [MODE] to display the Play Menu.
2. Use [] to select “Repeat”, then press [OK].
3. Use [] to select the desired repeat mode.
REPEAT MODE AVAILABLE MEDIA
Chapter Repeat
The current Chapter will be played back repeatedly.
Title Repeat
The current Title will be played back repeatedly.
Track Repeat
The current Track or File will be played back repeatedly.
All Repeat
All Tracks in the media will be played back repeatedly.
Group Repeat
The current Group (folder) will be played back repeatedly.
Random Repeat (Audio CD)
Repeats the random playback.
Random Repeat (JPEG)
Repeats the random playback in a folder.
4. Press [RETURN] to Exit.
D Note
• The repeat setting will be cancelled when you stop playback.
• When the repeat setting is set for a JPEG folder (file), the repeat setting will be cancelled if you select another JPEG
folder (file) to play back.
8.5. Slide Show
1. Follow steps 1 and 2 in “Playing Back a Disc” on page 21.
2. Open the folder which contains the desired JPEG files.
3. Use [] to select a desired file to be played back, then press [(PLAY)] or [OK].
• An image will be played back from the selected file and go to the next one in turn every 10 seconds.
4. Press [(STOP)] to Stop playback.
To return to the first item: Press [TOP MENU]
To return to the file played last: Press [POP MENU/MENU]
D Note
• Large-size JPEG files take a few moments to be displayed.
EN - 25
Page 26

8.6. PiP (BONUSVIEW™) Setting
Some BD-videos have the PiP function which enables you to display the Secondary Video in the Primary Video.
PiP 1 / 8
Primary Video
Secondary Video
1. During playback, press [MODE] to display the Play Menu.
2. Use [] to select “PiP” then press [OK].
• PiP information will appear.
3. Use [] to select the Secondary Video you want to show.
• The Secondary Video will be displayed with the Secondary Audio.
•Use [] to switch between current setting and “Off”.
4. Press [RETURN] to Exit.
• How to select the Secondary Audio output, refer to “Switching Audio Soundtrack” on page 29.
D Note
• Not that the secondary video will be displayed at any time during playback. Depending on the scene, the secondary
video may not be available.
EN - 26
Page 27

EN
8.7. Title / Chapter Search
TT
CHP
CHP
TT
Search 1 / 999
TT
TR
TR
Using [(SKIP)] / [(SKIP)]
1. During playback, press [(SKIP)] to Skip the current Title or Chapter and move to the next.
The Title or Chapter will move forward one at a time.
• If there is no Chapter in one Title, the current Title may be Skipped.
To go back to the beginning of the current Title or Chapter, press [(SKIP)].
Press [(SKIP)] repeatedly to go to the previous Title or Chapter. The Title or Chapter may move backward one
at a time.
Using [SEARCH]
1. During playback, press [SEARCH].
2. Use [] to select “ ” or “ ”, then press [OK].
• You can also switch the search items ( / / ) by pressing [SEARCH] repeatedly.
e.g.) Blu-ray Disc™
3. Use [] to select the Title / Chapter number, then press [OK].
Playback will start from the beginning of the Title / Chapter.
4. Press [RETURN] to Exit.
Using [the NUMBER buttons] (Direct Search)
Chapter Search
During playback of a Title, enter the Chapter number you want to search using [the NUMBER buttons].
Playback of the Chapter will start in a few seconds.
D Note
• As for the BD-video, how it performs will be strongly determined by the disc, and may not perform as described.
• You can also perform Title / Chapter Search from the Play Menu. Play Menu can be called up by pressing [MODE].
8.8. Track / File Search
Using
1. During playback, press
Using [SEARCH]
1. During playback, press [SEARCH].
2. Use [] to select “ ”, then press [OK].
3. Use [] to select the Track number, then press [OK].
4. Press [RETURN] to Exit.
[(SKIP)] / [(SKIP)]
[(SKIP)]
The Track / File will move forward one at a time. To go back to the beginning of the current Track / File, press
Press it repeatedly to go to the previous Track / File. The Track / File will move backward one at a time.
For JPEG files, skip to step 3.
• During Audio playback, you can also switch the search items ( / ) by pressing [SEARCH] repeatedly.
Playback will start from the beginning of the Track.
to Skip the current Track or File and move to the next.
[(SKIP)]
.
D Note
• You can also perform Track Search from the Play Menu. Play Menu can be called up by pressing [MODE].
EN - 27
Page 28

8.9. Time Search
CHP
TT
TR
Search 00:12:44 / 11:13:14
Subtitle 1 ENG / 32
1. During playback, press [SEARCH].
2. Use [] to select “ ”, then press [OK].
• You can also switch the search items ( / / ) by pressing [SEARCH] repeatedly.
• For audio CD, you can also switch the search items ( / ) by pressing [SEARCH] repeatedly.
e.g.) Blu-ray Disc™
3. Use [] or [the NUMBER buttons] to enter the time count you want to jump to, then press [OK].
e.g.) Entering 1 hour 45 minutes and 15 seconds.
Press
Playback will start from the desired time entered.
4. Press [RETURN] to Exit.
D Note
• You can also perform Time Search from the Play Menu. Play Menu can be called up by pressing [MODE].
8.10. Switching Subtitles
Some video materials may have subtitles in one or more languages. For commercially available discs, the supported
languages can be found on the disc case. Follow the steps below to switch the Subtitle language during playback.
1. During playback, press [MODE] to display the Play Menu.
2. Use [] to select “Subtitle”, then press [OK].
3. Use [] to select “Primary”, “Secondary” or “Style”, then press [OK].
“Primary”: Sets the Subtitle for the Primary Video.
“Secondary”: Sets the Subtitle for the Secondary Video.
“Style”: Sets Style of the Subtitle.
4. Use [] to select your desired Subtitle or Style.
Subtitle Primary
Secondary
Style
1 ENG / 3
Off
Off
•Use [] to switch between current Subtitle setting and “Off”.
5. Press [RETURN] to Exit.
1. During playback, press [MODE] to display the Play Menu.
2. Use [] to select “Subtitle”, then press [OK].
3. Use [] to select your desired Subtitle.
•Use [] to switch between current Subtitle setting and “Off”.
4. Press [RETURN] to Exit.
EN - 28
continued on next page
Page 29

EN
D Note
• Some discs will only allow you to change the subtitles from the Disc Menu or Pop Menu. Press [TOP MENU] or
[POP MENU/MENU] to display the Disc Menu or Pop Menu.
• If the disc has no Subtitle language or Subtitle Style, “Not Available” will be displayed on the TV screen.
• During playback of the Secondary Video, the Primary Subtitle setting is not available except when there is no Subtitle
for the Secondary Video.
8.11. Switching Audio Soundtrack
When playing back video material recorded with two or more soundtracks (these are often in different audio languages or
audio formats), you can switch them during playback. For Blu-ray Disc™, available audio varies depending on “BD Audio
Mode” setting. Refer to page 32.
1. During playback, press [MODE] to display the Play Menu.
2. Use [] to select “Audio”, then press [OK].
3. Use [] to select “Primary” or “Secondary”, then press [OK].
“Primary”: Sets the audio for the Primary Video.
“Secondary”: Sets the audio for the Secondary Video.
4. Use [] to select your desired audio stream channel.
Audio Primary
Secondary
1 ENG Dolby D Multi-ch /3
1 ENG DTS Multi-ch /3
[Decoding Format] : Dolby D
• For “Secondary”, use [] to switch between current audio setting and “Off”.
5. Press [RETURN] to Exit.
1. During playback, press [MODE] to display the Play Menu.
2. Use [] to select “Audio”, then press [OK].
3. Use [] to select your desired audio stream channel.
Audio 1 ENG Dolby D Multi-ch /3
[Decoding Format] : Dolby D
• For audio CD, you can select following options.
“Stereo”: Both right and left channels are active (stereo).
“L-ch”: Only left channel is active.
“R-ch”: Only right channel is active.
4. Press [RETURN] to Exit.
D Note
• The Secondary Audio will not be output when the Secondary Video is not displayed or when “BD Audio Mode” is set
to “HD Audio Output”. (For some Blu-ray discs, Secondary Audio will be output even when Secondary Video is Off.)
• The sound mode cannot be changed during playback of discs not recorded in multiple audio mode.
• Some discs allow changing the audio language setting from Disc Menu. (Operation varies depending on the discs. Refer
to the manual accompanying the disc.)
• If the disc has no audio language, “Not Available” will be displayed on the TV screen.
• For DTS-CD (5.1 music disc), selecting audio streams or channels is not available.
EN - 29
Page 30

8.12. Switching Camera Angles
Black Level On
Noise Reduction Off
Some BD-videos and DVD-videos contain scenes which have been shot simultaneously from various angles. You can change
the Camera Angle when appears on the TV screen.
1. During playback, press [MODE].
2. Use [] to select ”Angle”, then press [OK].
3. Use [] to select your desired angle.
• The selected Angle will be displayed on the display bar at the top of the TV screen.
4. Press [RETURN] to Exit.
D Note
• If “Angle Icon” setting is set to “Off”, will not appear on the TV screen.
8.13. Black Level
You can adjust the Back Level setting to make the black parts of the pictures as bright as you prefer. You can select “On” or “Off”.
1. During playback, press [MODE] to display the Play Menu.
2. Use [] to select “Black Level”, then press [OK].
3. Use [] to select your desired setting.
e.g.) Blu-ray Disc™
“On”: Makes the dark parts blacker with additional contrast and brightness.
“Off”: Shows the original picture as recorded.
4. Press [RETURN] to Exit.
D Note
• The setting will remain the same even if the unit is switched to Standby mode.
• “Black Level” is not effective under the following conditions.
- When the picture is output from HDMI OUT jack.
8.14. Noise Reduction
Reduces the noise of the playback picture.
1. During playback, press [MODE] to display the Play Menu.
2. Use [] to select “Noise Reduction”, then press [OK].
3. Use [] to select your desired setting.
e.g.) Blu-ray Disc™
“On”: Activates noise reduction.
“Off”: Deactivates noise reduction.
4. Press [RETURN] to Exit.
D Note
• The setting will remain the same even if the unit is switched to Standby mode.
EN - 30
Page 31

EN
8.15. CLEAR+
CLEAR+ Off
CLEAR+ enhances the contrast of the picture and makes edges crisp. It is effective especially for DVD's.
1. During playback, press [MODE] to display the Play Menu.
2. Use [] to select “CLEAR+”, then press [OK].
3. Use [] to select your desired setting.
e.g.) Blu-ray Disc™
“On”: Gives low-definition videos high-definition like picture quality.
“Off”: Shows the original picture as recorded.
4. Press [RETURN] to Exit.
D Note
• This operation is prohibited during Fast Forward, Fast Reverse, Slow Forward playback and pause mode.
• Pictures may appear whiter depending on the material and the connected TV. In this case, turn “CLEAR+” Off.
• “CLEAR+” is not effective under the following conditions.
- When the material is in 1080p24 which is commonly used in Blu-ray discs.
EN - 31
Page 32

9. LIST OF SETTINGS
In “Settings”, you can customize various kinds of settings as you prefer.
Refer to the following instructions to navigate through the Setup Menu.
1. Press [HOME] to access the Home Menu.
2. Use [] to select “Settings”, then press [OK].
3. Use [] to select the desired Category, then press [OK].
4. Use [] to move up and down the list to select Menus / Options.
5. To make a selection or to access options of an item, select the desired item, then press [OK].
• To go back to the previous screen, press [RETURN].
6. Press [HOME] to Exit.
Refer to the following table for the types of settings you can customize.
The item highlighted in gray is the default setting.
Category Menus / Options
Video Out TV Aspect 4:3 Letter Box
4:3 Pan & Scan
16:9 Wide
16:9 Squeeze
Progressive Mode
Still Mode
Audio¬Out DRC
Audio Output
BD Audio Mode
Audio Sync 0 ~ 300ms
Speaker Setup Speaker layout
Auto
Video
Auto
Field
Frame
Auto
On
Off
Speakers
HDMI Normal
HDMI LPCM
Mix Audio Output
HD Audio Output
Surround Effects
Speaker Distance
Speaker Volume
Test Tone
Center Width 0 ~ 7
Dimension -3 ~ 3
Panorama On
Front Feet: 0 ~ 15
Center Feet: 0 ~ 3
Surround Feet: 0 ~ 3
Default
Front Lch -10 ~ +10dB
Center
Subwoofer
Front Rch
Surround Rch
Surround Lch
Default
Off
Meters: 0 ~ 4.5
Meters: 0 ~ 0.9
Meters: 0 ~ 0.9
EN - 32
continued on next page
Page 33

EN
Category Menus / Options
HDMI fun-Link (HDMI CEC) On
Off
System Audio Control On
Off
Audio Input Mapping
Video Resolution
Deep Color
Playback Language Auto
Audio
Subtitle
Auto
480p
Auto
Off
English
Español
Français
Original
Bulgarian Italian
Chinese Japanese
Czech Korean
Danish Norwegian
Dutch Polish
English Portuguese
Finnish Romanian
French Russian
German Slovak
Greek Spanish
Hungarian Swedish
Icelandic Turkish
Irish Other
Off
Bulgarian Italian
Chinese Japanese
Czech Korean
Danish Norwegian
Dutch Polish
English Portuguese
Finnish Romanian
French Russian
German Slovak
Greek Spanish
Hungarian Swedish
Icelandic Turkish
Irish Other
continued on next page
EN - 33
Page 34

Category Menus / Options
Playback Disc Menu Bulgarian Italian
Chinese Japanese
Czech Korean
Danish Norwegian
Dutch Polish
English Portuguese
Finnish Romanian
French Russian
German Slovak
Greek Spanish
Hungarian Swedish
Icelandic Turkish
Irish Other
BD Rating Level
DVD Rating Level
Password Change
Angle Icon
Others Software Update Disc
Quick Start Mode* On
Product Info
Initialize Reset Settings
Off
Age Setting
Off
8 [Adult] 4 [PG-13]
7 [NC-17] 3 [PG]
6 [R] 2 [G]
5 [PGR] 1 [Kid Safe]
On
Off
USB Memory Stick
Off
Format USB Memory Stick
(Unit) Erase Saved BD-ROM Data
(USB Memory Stick) Erase Saved BD-ROM Data
OSS
* When “Quick Start Mode” is set to “On”, power consumption during Standby mode will increase.
EN - 34
Page 35

EN
10. SETUPS
10.1. fun-Link (HDMI CEC)
HOME A “Settings” A “HDMI” A “fun-Link (HDMI CEC)”
fun-Link (HDMI CEC) allows integrated system control over HDMI and is part of the HDMI standard. This function may
not work properly depending on the device connected to the unit. When “fun-Link (HDMI CEC)” setting is set to “On” the
functions listed below will be available.
One Touch Play
When the buttons below on the remote control are pressed then operations are performed on this unit, the TV will
automatically be Turned On and switched to the appropriate video Source Input.
Buttons for one touch play:
- [(PLAY)], [(SKIP)], [(SKIP)], [the NUMBER buttons], [HOME]
- [TOP MENU], or [POP MENU/MENU] (when a disc is inserted in the unit)
One Touch Standby
When you press and hold [(POWER-ON)] for 2 seconds, it Turns Off the power on the TV first and then Turns Off
the power on this unit. When the connected fun-Link (HDMI CEC) compatible display device is Turned Off first, it then
Turns Off the power to this unit.
System Information
Get & Set Menu Language
The unit recognizes the OSD language set on the TV and automatically sets the same language as the Player Menu Language
(OSD menu language) for this unit. “Language” under “Playback” on page 33 for available languages.
• Feature is available only when “Auto” is selected in the Setup Menu “Language” section in “Settings” while connected
via an HDMI cable.
System Audio Control
When you set your TV to output the audio from the 5.1ch speakers through this unit, you can control the volume level or
mute the audio using TV’s remote control. (For more details, refer to the owner’s manual of your TV.)
D Note
• For external input mode, “One Touch Play” is not available.
• Volume level will be displayed on the TV screen.
• If you change the speaker setting on your TV to output the audio from TV's speaker, 5.1ch speakers will be muted. (To
restore the volume, use the remote control of this unit.) Only when connected via HDMI cable to TV.
• When you switch this unit into Standby mode, TV’s speaker will be activated automatically. Only when connected via
HDMI cable to TV.
• Depending on the connected TV, two device names (“MAGNAVOX BD” and “Audio System”) may be displayed in the
device list on the TV’s menu screen. To select this unit, please select “MAGNAVOX BD”. Only when connected via
HDMI cable to TV.
• If the system audio control does not work properly, please restart the unit.
EN - 35
Page 36

10.2. Audio Input Mapping
Use to map a connected HDMI device to the correct Audio Input for automatic Audio Source switching.
If your TV is compatible with HDMI-CEC System Audio Control, this unit will automatically switch to the selected audio
Input to output sound from your TV. “Audio Input Mapping ” is only available when “System Audio Control” is set to “On”.
1. Use [] to select “Settings” in the Home Menu, then press [OK].
2. Use [] to select “HDMI”, then press [OK].
3. Use [] to select “Audio Input Mapping ”, then press [OK].
Video Out
Audio Out
HDMI
Playback
Others
fun-Link (HDMI CEC)
System Audio Control
Audio Input Mapping
Video Resolution
Deep Color
> On
> On
>
> Auto
> Auto
4. Press [HOME] to Exit.
10.3. HDMI Video Resolution
HOME A “Settings” A “HDMI” A “Video Resolution”
Set the resolution of the video signal being output from the HDMI OUT jack.
You can select the desired “Video Resolution” among the settings listed below: “Auto”,“480p”.
Actual Output Resolution:
Setting in the
“
Video Resolution”
Auto
480i/60 720p/60 1080i/60 720p/24 1080p/24
The highest resolution supported by your display device will automatically be in effect.
480p
Composite video output (VIDEO OUT) jack can only output 480i/60.
• For AVCHD, outputting the video in 24 frames per second (1080p/24) is not available.
D Note
• The selected resolution must also be supported by your display device.
• If your TV and the unit are connected by a DVI cable and if “Auto” is selected, “480p” will be automatically in effect.
• Refer also to your TV’s manual.
• When connected to an HDCP incompatible display device, the picture will not be displayed properly.
• The audio signals from the HDMI OUT jack (including the sampling frequency, the number of channels and bit length)
may be limited by the connected device.
• Among the display devices that support HDMI, some do not support audio output (for example, projectors).
While connected to a device such as a projector, audio will not be output from the HDMI OUT jack.
• When this unit’s HDMI OUT jack is connected to a DVI-D compatible display device(s) (HDCP compatible) with an
HDMI-DVI converter cable, the signals are output in digital RGB.
• HDMI video resolution does not work during the playback of a BD-video.
Source
480p/60
Copyright protection system
To play back the digital video images of a BD-video or DVD-video via an HDMI connection, it is necessary that both the player and the
display device (or an AV receiver / amplifier) support a copyright protection system called HDCP (high-bandwidth digital content protection
system). HDCP is copy protection technology that comprises data encryption and authentication of the connected AV device. This unit
supports HDCP. Please read the operating instructions of your display device (or an AV receiver / amplifier) for more information.
EN - 36
Page 37

EN
10.4. Parental
Some BD-videos or DVD-videos feature parental lock levels. Playback will stop if the ratings exceed the levels you set, it
will require you to enter a password before the disc will play back. This feature prevents your children from viewing
inappropriate material.
1. Use [the NUMBER buttons] to enter your 4-digit password.
For the first time use:
Use [the NUMBER buttons] to enter any 4-digit number (except for 4737). That number will be used as the
password. Record your password, in case you forget it.
• If you forget the password, enter [4], [7], [3], [7]. The password will be cleared and rating level will be set to “Off”.
• When you input the password, select “Clear” to clear the number, then re-enter the password.
BD Rating Level
HOME A “Settings” A “Playback” A “BD Rating Level”
1. Use [] to select “Settings” in the Home Menu, then press [OK].
2. Use [] to select “Playback”, then press [OK].
3. Use [] to select “BD Rating Level”, then press [OK].
4. Use [the NUMBER buttons] to enter your 4-digit password.
5. Use [] to select your desired option, then press [OK].
“Off”: To release the limitation.
“Age Setting”: To set the age limitation.
• After selecting “Age Setting”, use [the NUMBER buttons] to enter the age.
(e.g., For age 6, enter [6] + [OK].
For age 15, enter [1] + [5] + [OK].)
6. Press [HOME] to Exit.
DVD Rating Level
HOME A “Settings” A “Playback” A “DVD Rating Level”
1. Use [] to select “Settings” in the Home Menu, then press [OK].
2. Use [] to select “Playback”, then press [OK].
3. Use [] to select “DVD Rating Level”, then press [OK].
4. Use [the NUMBER buttons] to enter your 4-digit password.
5. Use [] to select your desired level, then press [OK].
6. Press [HOME] to Exit.
RATING EXPLANATIONS
Off • Parental is inactive; all discs can be played back.
8 [Adult] • DVD software of any grades (adult / general / children) can be played back.
7 [NC-17] • No one under 17.
6 [R] • Restricted; under 17.
5 [PGR] • Parental Guidance Recommended.
4 [PG-13] • Unsuitable for children under 13.
3 [PG] • Parental Guidance suggested.
2 [G] • General Audience.
1 [Kid Safe] • Suitable for children.
EN - 37
Page 38

Password Change
www.magnavox.com
HOME A “Settings” A “Playback” A “Password Change”
1. Use [] to select “Settings” in the Home Menu, then press [OK].
2. Use [] to select “Playback”, then press [OK].
3. Use [] to select “Password Change”, then press [OK].
4. Use [the NUMBER buttons] to enter your 4-digit password.
5. Use [the NUMBER buttons] to enter a new 4-digit password.
6. Use [the NUMBER buttons] to retype the same new 4-digit password.
7. Use [] to select “OK”, then press [OK].
8. Press [HOME] to Exit.
To temporarily disable parental lock:
Some discs allow you to temporarily disable parental lock. With these discs, the message below will appear when you try to
play them back. “Enter current password.”
Follow the instruction which appears on the TV screen to disable parental lock.
10.5. Software Update
HOME A “Settings” A “Others” A “Software Update”
This unit lets you update the software yourself using a software update disc or USB Memory Stick.
The available discs are below:
- BD-RE/-R
- DVD-RW/-R
- CD-RW/-R
Disc / USB Memory Stick Update
You can update the software by using a disc or USB Memory Stick.
Prepare a blank disc or USB Memory Stick for software update:
Access , and download the latest version software to a blank disc or USB Memory Stick using a PC by
following the directions described on the website.
• Use a blank disc or USB Memory Stick, download one software per disc or USB Memory Stick. Write the software in
the root directory of the disc or USB Memory Stick.
• For more details on how to download the software, please refer to the website.
1. Use [] to select “Settings” in the Home Menu, then press [OK].
2. Use [] to select “Others”, then press [OK].
3. Use [] to select “Software Update”, then press [OK].
4. Use [] to select “Disc” or “USB Memory Stick”, then press [OK].
5. Use [] to select “Yes”, then press [OK].
6. Insert the disc or connect the USB Memory Stick for software update.
7. After loading disc or USB Memory Stick, confirmation message will appear. Select “Yes” and press [OK].
8. The unit will restart automatically, then software update will start.
• It may take a while to complete the updating.
9. After the update finishes, this unit will restart. Remove the disc or the USB Memory Stick from the unit.
C Caution
• Please do not unplug the AC power cord, eject the disc or disconnect the USB Memory Stick or press
[(POWER-ON)] to turn the unit to Standby mode while performing a “Disc / USB Memory Stick Update”.
D Note
• Software update will not change any of the current settings.
EN - 38
Page 39

EN
10.6. Restore Default Settings
HOME A “Settings” A “Others” A “Initialize”
Menus to reset player settings and format a USB Memory Stick.
1. Use [] to select “Settings” in the Home Menu, then press [OK].
2. Use [] to select “Others”, then press [OK].
3. Use [] to select “Initialize”, then press [OK].
4. Use [] to select the desired setting, then press [OK].
“Reset Settings”:
All the settings except for the “Parental” setting will be reset to default.
“Format USB Memory Stick” (Only available when a USB Memory Stick is connected):
Initialize the USB Memory Stick.
“(Unit) Erase Saved BD-ROM Data”:
Clears the data saved for the BD-ROM contents, such as BD-ROM game scores, on this player.
“(USB Memory Stick) Erase Saved BD-ROM Data”
(Only available when a USB Memory Stick is connected):
Clears the supplemental data for the BD-ROM playback, such as Subtitle data, from the USB Memory Stick.
5. Use [] to select “Yes”, then press [OK].
6. Confirmation message will appear. Press [OK] to complete the setting.
7. Press [HOME] to Exit.
C Caution
• Do not remove the USB Memory Stick while executing “Format USB Memory Stick” or “(USB Memory Stick) Erase
Saved BD-ROM Data”. It will damage the USB Memory Stick.
D Note
• “Format USB Memory Stick” and “(USB Memory Stick) Erase Saved BD-ROM Data” are not available when a Blu-ray
Disc™ is in the unit.
EN - 39
Page 40

11. SOUND SETTINGS
11.1. Volume Control
You can control the volume level of the audio output from 5.1ch speakers.
To increase or decrease the volume level:
Press [VOL / ].
• The volume level will increase or decrease, every time you press [VOL ] or [VOL ].
• The volume level will be displayed on the TV screen. (When connected via an HDMI cable.)
To Turn Off the volume temporarily:
Press [MUTE].
• To restore the volume, press [MUTE] again or press [VOL / ].
• will be displayed on the TV screen. (When connected via an HDMI cable.)
D Note
• This function is only available for the audio output from 5.1ch speakers.
• Pressing [VOL / ] does not work while the Setup Menu is displayed.
• If you turn up the volume too much, the audio may get distorted. To enjoy clear sounds, please turn down the volume.
11.2. Selecting Surround Mode
Select the Surround mode for the audio output from 5.1ch speakers.
1. Press [MODE] to display the Play Menu.
2. Use [] to select “Surround”, then press [OK].
3. Use [] to select the desired Surround mode.
“Multi ch Stereo”: Set the Surround mode to “Multi ch Stereo”.
(5.1ch stereo sound from 5.1ch speakers.)
“Dolby Pro Logic II Movie”: Set the Surround mode to “Dolby Pro Logic II Movie”.
(Dolby Pro Logic II 5.1ch surround sound.)
“Dolby Pro Logic II Music”: Set the Surround mode to “Dolby Pro Logic II Music”.
(Dolby Pro Logic II 5.1ch surround sound.)
“Direct”:
“2.1ch Stereo”: Set the Surround mode to “2.1ch Stereo”.
D Note
• This function is effective only for the audio output from 5.1ch speakers.
• Mute will be deactivated when selecting “Surround” in the Play Menu while the audio is muted.
• For multi-channel and mono-channel audio, “
not effective.
Selects the appropriate audio decoder (stereo / multi-channel Dolby, DTS
PCM) based on the input audio stream.
(2.1ch Stereo sound from front left/right speakers.)
Multi ch Stereo
”, “
Dolby Pro Logic II Movie
” or “
Dolby Pro Logic II Music
®
or
” is
EN - 40
Page 41

EN
11.3. Selecting Sound Effect Mode
Select the Sound effect mode for the audio output from 5.1ch speakers to suit your video or music.
1. Press [MODE] to display the Play Menu.
2. Use [] to select “Sound Mode”, then press [OK].
3. Use [] to select the desired Sound effect mode.
Video Music Description
Off Off Turns Off the sound effect mode.
Action Rock Enhanced low and high-range. Ideal for action movies and rock or pop music.
Drama Jazz Clear mid and high-range. Ideal for drama movies and jazz music.
Concert Classic Neutral sound. Ideal for live concerts and classical music.
Sports Sports Moderate mid-range and Surround effects for clear vocals and the atmosphere of a live
sport venue.
D Note
• This function is effective only for the audio output from 5.1ch speakers.
• Mute will be deactivated when selecting “Sound Mode” in the Play Menu while the audio is muted.
11.4. Audio Sync
HOME A “Settings” A “Audio¬Out” A “Audio Sync”
You can select delay between 5.1ch speaker sound and picture (range from 0 - 300 ms, by 50 ms steps).
1. Use [] to select “Settings” in the Home Menu, then press [OK].
2. Use [] to select “Audio¬Out”, then press [OK].
3. Use [] to select “Audio Sync”, then press [OK].
4. Use [] to select the desired setting, then press [OK].
D Note
• This function is effective only for the audio output from 5.1ch speakers.
• When “Audio Output” is set to “HDMI Normal” or “HDMI PCM”, this function can not be set.
11.5. Speaker Setup
HOME A “Settings” A “Audio¬Out” A “Speaker Setup”
1. Use [] to select “Settings” in the Home Menu, then press [OK].
2. Use [] to select “Audio¬Out”, then press [OK].
3. Use [] to select “Speaker Setup”, then press [OK].
4. Use [] to select the desired setting, then press [OK].
You can adjust the following:
“Surround Effects”
“Speaker Distance”
“Speaker Volume”
D Note
• This function is effective only for the audio output from 5.1ch speakers.
• When “Audio Output” is set to “HDMI Normal” or “HDMI PCM”, this function can not be used.
The volume level will automatically increase to “30” in “Speaker Setup” if the current volume is lower than “30” (You also
•
can manually adjust it using
[VOL / ]
). The volume level will be recovered to the original level when exiting “
Settings”.
EN - 41
Page 42

12. OTHER SETTINGS
12.1. Switching Active Source Mode
You can change the active Source mode to the desired external audio Inputs and enjoy audio from the connected device
with the multi-channel surround sound capabilities.
Press [SOURCE] repeatedly to select the desired Source mode.
“Aux”: Set the active Source mode to the AUDIO IN (AUX).
“Coaxial”: Set the active Source mode to the DIGITAL AUDIO IN (COAXIAL).
12.2. Sleep Timer
The sleep timer enables the unit to switch to Standby mode automatically after the selected preset time.
To set the sleep timer:
1. Press [MODE] to display the Play Menu.
2. Use [] to select “Sleep Timer”, then press [OK].
3. Use [] to select the desired preset time.
“Off”: Turns Off the sleep timer.
“15min.” : Sets the preset turn-off time to 15 minutes.
“30min.”: Sets the preset turn-off time to 30 minutes.
“60min.”: Sets the preset turn-off time to 60 minutes.
“90min.”: Sets the preset turn-off time to 90 minutes.
“120min.”: Sets the preset turn-off time to 120 minutes.
“150min.”: Sets the preset turn-off time to 150 minutes.
To check the setting:
1. Press [MODE] to display the Play Menu.
2. Use [] to select “Sleep Timer”, then press [OK].
• The remaining time will be displayed.
To change the setting:
1. Press [MODE] to display the Play Menu.
2. Use [] to select “Sleep Timer”, then press [OK].
3. Use [] to toggle up/down the preset time until your desired preset time is displayed.
To cancel sleep timer:
1. Press [MODE] to display the Play Menu.
2. Use [] to select “Sleep Timer”, then press [OK].
3. Use [] to toggle up/down the preset time until “Off” is displayed.
D Note
• The sleep timer will be activated even if the unit is in operation.
• Sleep timer can only be set in the Play Menu.
EN - 42
Page 43

EN
13. TROUBLESHOOTING
Problem Tip
No power. Check the AC power cord, if it is properly connected.
Try another power outlet.
Unplug the AC power cord, and wait for about 5-10 seconds. Plug it back
in and attempt to power On the unit.
No sound or picture. Make sure both the TV and Blu-ray™ Home Cinema are Turned On.
Confirm the connections to the TV are made properly as shown in the
“CONNECTIONS” on page 10.
Check to see whether the connected TV or another device supports
HDCP. (This unit will not output a video signal unless the other device
supports HDCP.)
No reaction to the remote control. Reduce the distance to infrared sensor window.
Confirm that the player’s AC power cord is plugged into a powered outlet.
Check the batteries in the remote control and make sure they are inserted
properly by + or - symbols.
Aim the remote at the unit’s remote receiver. Then press any arrow key
and confirm the Power-On indicator dims and blinks when a remote button
is pushed. Please check IR signal. Refer to “IR Signal Check” on page 48.
No Audio / Video signal on the display device
via HDMI cable.
No high-definition video signal on the TV
screen.
Distorted picture. Sometimes a small amount of picture distortion may appear. This is not a
Completely distorted picture or black / white
picture with Blu-ray Disc™ / DVD.
No sound or distorted sound. Adjust the volume.
Picture freezes momentarily during disc
playback.
If the unit is connected to a non-certified HDMI device, the Audio / Video
signal will not output to that device.
Make sure the display device is on the correct Input / Video source.
Perform the HDMI hotplug: Disconnecting the HDMI cable from the display
device, Turn On both devices, and replug the HDMI cable back in.
Check with the TV manufacturer, if there are any software updates
available for the TV.
Check to see if the HDMI cable is a certified version.
Does the disc contain high-definition video? High-definition video is only
available when the disc contains it.
Does the TV support high-definition video? High-definition video is only
available when the TV supports it.
malfunction.
Connect this unit directly to the TV. If Audio / Video cables are connected
to a VCR, pictures may be distorted due to the VCR copyright protection
system.
Make sure the disc is compatible with this unit.
Check to see if the speakers are connected correctly.
Check the HDMI, COAXIAL and AUX connections as necessary.
Make sure the HDMI cable is not plugged into an HDMI-DVI adapter or
Projector which does not handle Digital sound.
Check the settings in “Audio¬Out” menu.
Check the disc for fingerprints / scratches and clean with a soft cloth wiping
from the center to the outer edge.
continued on next page
EN - 43
Page 44

Problem Tip
Cannot play back a disc. Make sure that the disc is playable on this unit.
Check the region code of the disc. This unit supports the following region
codes.
- Blu-ray Disc™: “A”
- DVD: “ALL” or “1”
For DVD-RW/-R, make sure that the disc is finalized.
Clean the disc.
Is the disc a newer title? This problem may be solved by software update.
Refer to “Software Update” on page 38.
No return to start-up screen when disc is
removed.
Soft reset this unit by turning it Off for 30 seconds, then On again.
To completely reset the unit, press and hold [(POWER-ON)] on the
front panel for 10 seconds to shut down the unit or unplug the AC power
cord from the AC outlet for 5-10 seconds.
in the upper right hand corner of the TV
The operation is not possible.
screen.
Buttons do not work or the unit stops
responding.
To soft reset the unit, press and hold [(POWER-ON)] on the front
panel for 10 seconds to shut down the unit or to hard reset the unit by
unplugging the AC power cord from the AC outlet for 5-10 seconds.
The unit does not respond to some operating
commands during playback.
The unit cannot read Blu-ray Disc™ / DVD/
CD.
The operations may be prohibited by the disc. Refer to the instructions for
the disc.
Condensation? (Let sit 1 or 2 hours)
Check to see if the disc is compatible with this unit. (Refer to page 16.)
Wipe dirt off the disc from the center to the outside or replace the disc.
Refer to “Cleaning Discs” on page 48.
Scene shooting Angle does not switch. Angles cannot be switched for Blu-ray Disc™ / DVD which do not contain
multiple Angles. In some cases multiple Angles are only recorded for
specific scenes.
Playback does not start when a Title is
Check the settings in “Parental” menu.
selected.
The password for rating level has been
forgotten.
Error message appears when I select “Auto”
in the “Language”.
Enter the default password “4737”, then your forgotten password will be
cleared. Then to change password go to “Password Change” on page 38.
Make sure that the unit is connected to a MAGNAVOX brand fun-Link
(HDMI CEC) TV and the “fun-Link (HDMI CEC)” is set to “On”.
This error message may appear when your TV's OSD language is not
supported by this unit.
Cannot play back AVCHD file. This unit cannot play back stand-alone AVCHD files (*.m2ts, *.mts or
*.m2t) written to a DVD. The DVD containing AVCHD files must have a
proper file and folder structure meeting AVCHD format specifications.
Please use AVCHD compliant device / software to burn or copy AVCHD
files to DVD. (Please refer to user manuals of the device / software for
more information.)
The capacity of the USB Memory Stick
decreased.
Cannot play back a MPEG-2 video and audio
Data may be written on the USB Memory Stick when a BD-video uses the
Virtual Package feature while a USB Memory Stick is connected to the unit.
MPEG-2 is not compatible with this unit.
from the USB Memory Stick.
Cannot read the contents on the USB
Memory Stick.
The USB Memory Stick is not compatible with this unit or the contents may
be damaged.
Try and Turn Off the unit, then turn it back On.
To soft reset the unit, press and hold [(POWER-ON)] on the front
panel for 10 seconds to shut down the unit or to hard reset the unit by
unplugging the AC power cord from the AC outlet for 5-10 seconds.
EN - 44
continued on next page
Page 45

EN
Problem Tip
Cannot load a Blu-ray Disc™ (stuck in
“Loading…” mode) and cannot Open the disc
Unplug unit from AC outlet for 20 seconds. Plug unit back in and press the
[ (OPEN/CLOSE)] on the unit to eject the disc.
tray to eject the disc.
The software update screen appears after
turning On the unit.
Please complete the software update.
When the software update has failed, the software update screen will keep
appearing after turning the unit on. If the software update continues failing,
please try it by using a USB Memory Stick with the update software installed
in its root directory. In this case, please change the file name as below.
“E****UD10000FA1.bin” Ȼ “UPDATE10000FA1.BIN”
Do not change the numbers. The file name is case sensitive.
Cannot read a USB Memory Stick. The format of the USB Memory Stick is not compatible with this unit.
Please try and format it on this unit (All data will be deleted).
Cannot play back JPEG files from a disc. Cannot play back JPEG files from a disc. Make sure that the disc was
recorded in the UDF, ISO9660 or JOLIET format.
Cannot find a JPEG file. Make sure that the selected Group (folder) does not contain more than
9,999 files for Blu-ray Disc™ / DVD / USB Memory Stick and 999 files for
CD.
Make sure that the file extension is .jpg / .JPG / .jpeg / or .JPEG.
No 5.1-channel audio from the speaker
system.
Does the disc contain 5.1-channel audio? The 5.1-channel audio is only
available when the disc contains it.
Set “Audio Output” to “Speakers” in “Settings”.
Press [MODE] then check to see if the surround mode is not set to “2.1ch
Stereo”.
Video and Audio from the supplied speakers
are not synchronized.
Set the audio delay time (0 - 300 ms) in “Audio Sync” under “Audio¬Out” in
“Settings”. “Audio Sync” only functions when the supplied speakers are
connected to the unit using 5.1ch sound audio output.
No Audio from the speaker system. Increase the volume level of the speaker system.
Set “Audio Output” to “Speakers” in “Settings”.
Make sure that audio is not muted.
Make sure you have selected the correct active Source for external audio Input.
D Note
• Do not attempt to repair the Blu-ray™ Home Cinema yourself. This may cause severe injury, irreparable damage to
your Blu-ray™ Home Cinema and void your warranty.
• Please have available your Blu-ray™ Home Cinema model and serial number before contacting us. These numbers are
available on the cabinet, as well as on the packaging.
EN - 45
Page 46

14. LANGUAGE CODE LIST
Language Code Language Code Language Code Language Code
A-B
Abkhazian 4748 Frisian 5271 Malagasy 5953 Slovak [SLO] 6557
Afar 4747 Galician 5358 Malay 5965 Slovenian 6558
Afrikaans 4752 Georgian 5747 Malayalam 5958 Somali 6561
Albanian 6563 German [GER] 5051 Maltese 5966 Spanish [SPA] 5165
Amharic 4759 Greek [GRE] 5158 Maori 5955 Sundanese 6567
Arabic 4764 Greenlandic 5758 Marathi 5964 Swahili 6569
Armenian 5471 Guarani 5360 Moldavian 5961 Swedish [SWE] 6568
Assamese 4765 Gujarati 5367 Mongolian 5960
Aymara 4771 Hausa 5447 Nauru 6047 Tagalog 6658
Azerbaijani 4772 Hebrew 5569 Nepali 6051 Tajik 6653
Bashkir 4847 Hindi 5455 Norwegian [NOR] 6061 Tamil 6647
Basque 5167 Hungarian [HUN] 5467
Bengali;Bangla 4860
Bhutani 5072 Icelandic [ICE] 5565 Oriya 6164 Thai 6654
Bihari 4854 Indonesian 5550 Oromo (Afan) 6159 Tibetan 4861
Bislama 4855 Interlingua 5547 Panjabi 6247 Tigrinya 6655
Breton 4864 Interlingue 5551 Pashto;Pushto 6265 Tonga 6661
Bulgarian [BUL] 4853 Inupiak 5557 Persian 5247 Tsonga 6665
Burmese 5971 Irish [GLE] 5347 Polish [POL] 6258 Turkish [TUR] 6664
Byelorussian 4851 Italian [ITA] 5566 Portuguese [POR] 6266 Turkmen 6657
C-E
Cambodian 5759 Javanese 5668 Rhaeto-Romance 6459
Catalan 4947 Kannada 5760 Romanian [RUM] 6461 Ukrainian 6757
Chinese [CHI] 7254 Kashmiri 5765 Russian [RUS] 6467 Urdu 6764
Corsican 4961 Kazakh 5757
Croatian 5464 Kinyarwanda 6469 Samoan 6559 Vietnamese 6855
Czech [CZE] 4965 Kirghiz 5771 Sangho 6553 Volapuk 6861
Danish [DAN] 5047 Kirundi 6460 Sanskrit 6547 Welsh 4971
Dutch [DUT] 6058 Korean [KOR] 5761 Scots Gaelic 5350 Wolof 6961
English [ENG] 5160 Kurdish 5767 Serbian 6564 Xhosa 7054
Esperanto 5161
Estonian 5166 Laothian 5861 Sesotho 6566 Yoruba 7161
F-H
Faroese 5261 Latvian;Lettish 5868 Shona 6560
Fiji 5256 Lingala 5860 Sindhi 6550
Finnish [FIN] 5255 Lithuanian 5866 Singhalese 6555
French [FRE] 5264 Macedonian 5957 Siswat 6565
T
I-K
O-R
Occitan 6149 Telugu 6651
Tatar 6666
Japanese [JPN] 5647 Quechua 6367 Twi 6669
U-Z
L-N
S
Serbo-Croatian 6554 Yiddish 7155
Uzbek 6772
Latin 5847 Setswana 6660 Zulu 7267
D Note
• If you choose a language that has a 3-letter-language code (written in bracket), the code will be displayed every time
you change the Subtitle language setting on page 28 or audio language setting on page 29. If you choose any other
languages, “---” will be displayed instead.
EN - 46
Page 47

EN
15. SPECIFICATIONS
General
Signal system NTSC Color
Power requirements 120 V AC, 60 Hz
Power consumption 30 W (standby: 0.45 W)
Total Output Power (Amplifier) Home Cinema mode: 300 W
FTC* output power: 160 W
* (Main Ch @ 1 kHz within 1 % THD, Sub Ch 60 Hz within 1 % THD)
Dimensions (width x height x depth) 17.2 x 2.4 x 9.9 inches (435.0 x 59.0 x 250.0 mm)
Weight Total weight: 17.64 lbs. (8.00 kg)
Main unit: 5.52 lbs. (2.50 kg)
Operating temperature 41°F (5°C) to 104°F (40°C)
Operating humidity Less than 80 % (no condensation)
Terminals
USB input
TYPE A
Analog audio output
(SPEAKERS (3Ω))
Front and rear speakers System: Full range satellite
Impedance: 3Ω
Frequency response: 200 Hz ~ 20 kHz
Dimensions: 3.1 x 4.7 x 2.8 inches (76.9 x 118.9 x 70.0 mm)
Speaker cable length: front - 98.5 inches (2500.0 mm)
rear - 295.3 inches (7500.0 mm)
Weight: front - 0.71 lbs. (0.32 kg)
rear - 0.80 lbs. (0.36 kg)
Center speaker System: Full range satellite
Impedance: 3Ω
Frequency response: 200 Hz ~ 20 kHz
Dimensions: 5.6 x 3.4 x 2.8 inches (141.9 x 84.9 x 70.0 mm)
Speaker cable length: 78.8 inches (2000.0 mm)
Weight: 0.95 lbs. (0.43 kg)
Subwoofer Impedance: 3Ω
Speaker drivers: 5.2 inches Full Range (130.0 mm) woofer
Frequency response: 73 Hz ~ 8 kHz
Dimensions: 5.8 x 11.5 x 10.4 inches (145.7 x 291.5 x 264.0 mm)
Speaker cable length: 98.5 inches (2500.0 mm)
Weight: 5.54 lbs. (2.51 kg)
Video output
RCA jack x 1 1 Vp-p (75Ω)
Analog audio input (AUX)
RCA jacks(L / R) x 1 L/R: 2 Vrms (47kΩ)
Digital audio input (COAXIAL)
RCA jack x 1 500 mVp-p (75Ω)
HDMI output
HDMI jack x 1 Digital Video: 480p, 720p, 1080i, 1080p, 1080p24 / Digital Audio
D Note
• The specifications and design of this product are subject to change without notice.
EN - 47
Page 48

16. MAINTENANCE
www.magnavox.com/support
Servicing
• Please refer to relevant topics on “TROUBLESHOOTING” on page 43 before returning the product.
• If this unit becomes inoperative, do not try to correct the problem by yourself. There are no user-serviceable parts
inside. Eject the disc (if possible), disconnect the USB Memory Stick (if connected to the unit), place the unit into
Standby mode, unplug the AC power plug, and please contact: 1-800-605-8610 or visit :
Cleaning the Cabinet
• Wipe the front panel and other exterior surfaces of the unit with a soft cloth.
• Never use a solvent, thinner, benzene or alcohol to clean the unit. Do not spray insecticide liquid near the unit. Such
chemicals may discolor the surface or damage the unit.
Cleaning Discs
• When a disc becomes dirty, clean it with a cleaning cloth. Wipe the disc from the center to outside. Do not wipe in a
circular motion.
• Do not use solvents such as benzine, thinner, commercially available cleaners, detergent, abrasive cleaning agents or
antistatic spray intended for analog records.
Cleaning the Disc Lens
• If this unit still does not perform properly although you refer to the relevant sections and to “TROUBLESHOOTING”
in this user manual, the laser optical pickup unit may be dirty. Consult your dealer or an Authorized Service Center for
inspection and cleaning of the laser optical pickup unit.
Disc Handling
• Handle the discs so that fingerprints and dust do not adhere to the surfaces of the discs.
• Always store the disc in its protective case when it is not used.
• Note that discs with special shapes (heart-shaped discs, octagonal discs, etc.) cannot be played back on this unit. Do not
attempt to play such discs, as they may damage the unit.
IR Signal Check
If the remote control does not work properly, you can test IR signal using a digital camera (including a
cellphone with a built-in camera) to see if the remote control sends out the infrared signal.
1. Turn On the digital camera.
2. Direct a digital camera to the remote control, then press and hold any button on the remote
control.
• If infrared light appears on the digital camera display, the remote control is working.
EN - 48
Page 49

EN
17. TRADEMARK INFORMATION
Manufactured under license from Dolby Laboratories.
Dolby, Pro Logic, and the double-D symbol are
trademarks of Dolby Laboratories.
Manufactured under license under U.S. Patent Nos:
5,956,674; 5,974,380; 6,226,616; 6,487,535; 7,392,195;
7,272,567; 7,333,929; 7,212,872 & other U.S. and
worldwide patents issued & pending. DTS-HD, the
Symbol, & DTS-HD and the Symbol together are
registered trademarks & DTS-HD Master Audio |
Essential is a trademark of DTS, Inc. Product includes
software. © DTS, Inc. All Rights Reserved.
Kodak and KODAK Picture CD Compatible are
trademarks of Kodak used under license.
“AVCHD” and the “AVCHD” logo are trademarks of
Panasonic Corporation and Sony Corporation.
“Blu-ray Disc™”, “Blu-ray™” and “Blu-ray Disc™” logo
are trademarks of the Blu-ray Disc Association.
is a trademark of DVD Format/Logo Licensing Corporation.
The terms HDMI and HDMI High-Definition Multimedia
Interface, and the HDMI Logo are trademarks or
registered trademarks of HDMI Licensing LLC in the
United States and other countries.
“x.v.Color” and “x.v.Color” logo are trademarks of Sony
Corporation.
Java and all Java based trademarks and logos are
trademarks or registered trademarks of Oracle and/or its
affiliates.
“BONUSVIEW™” and “BONUSVIEW™” logo are
trademarks of the Blu-ray Disc Association.
THIS PRODUCT IS LICENSED UNDER THE AVC
PATENT PORTFOLIO LICENSE FOR THE PERSONAL
AND NON-COMMERCIAL USE OF A CONSUMER TO
(i) ENCODE VIDEO IN COMPLIANCE WITH THE AVC
STANDARD (“AVC VIDEO”) AND/OR (ii) DECODE
AVC VIDEO THAT WAS ENCODED BY A CONSUMER
ENGAGED IN A PERSONAL AND NON-COMMERCIAL
ACTIVITY AND/OR WAS OBTAINED FROM A VIDEO
PROVIDER LICENSED TO PROVIDE AVC VIDEO. NO
LICENSE IS GRANTED OR SHALL BE IMPLIED FOR
ANY OTHER USE. ADDITIONAL INFORMATION MAY
BE OBTAINED FROM MPEG LA, L. L. C.
SEE HTTP://WWW.MPEGLA.COM
THIS PRODUCT IS LICENSED UNDER THE VC-1
PATENT PORTFOLIO LICENSE FOR THE PERSONAL
AND NON-COMMERCIAL USE OF A CONSUMER TO
(i) ENCODE VIDEO IN COMPLIANCE WITH THE VC-1
STANDARD ("VC-1 VIDEO") AND/OR (ii) DECODE
VC-1 VIDEO THAT WAS ENCODED BY A CONSUMER
ENGAGED IN A PERSONAL AND NONCOMMERCIAL
ACTIVITY AND/OR WAS OBTAINED FROM A VIDEO
PROVIDER LICENSED TO PROVIDE VC-1 VIDEO. NO
LICENSE IS GRANTED OR SHALL BE IMPLIED FOR
ANY OTHER USE. ADDITIONAL INFORMATION MAY
BE OBTAINED FROM MPEG LA, L.L.C.
SEE HTTP://WWW.MPEGLA.COM
EN - 49
Page 50

18. GLOSSARY
http://www.cinavia.com
AACS
Advanced Access Content System (AACS) is the content
protection scheme used with Blu-ray discs.
Analog Audio
An electrical signal that directly represents sound.
Compare this to digital audio which can be an electrical
signal, but is an indirect representation of sound. See also
“Digital Audio”.
Aspect Ratio
The width of a TV screen relative to its height.
Conventional TVs are 4:3 (in other words, the TV screen is
almost square); widescreen models are 16:9 (the TV screen
is almost twice as wide as its height).
AVCHD
AVCHD is a new format for high definition video
camcorders which can record and play high-resolution HD
images.
Blu-ray Disc™
Blu-ray Disc™ is a next generation optical video disc which
is capable of storing much more data than a conventional
DVD. The large capacity makes it possible to benefit from
the features such as high-definition videos, multi-channel
surround sounds, interactive menus and so on.
Chapter
Just as a book is split up into several chapters, a Title on a
BD-video or DVD-video is usually divided into chapters.
See also “Title”.
Cinavia™
Cinavia Notice
This product uses Cinavia technology to limit the use of
unauthorized copies of some commercially-produced film
and videos and their soundtracks. When a prohibited use of
an unauthorized copy is detected, a message will be
displayed and playback or copying will be interrupted.
More information about Cinavia technology is provided at
the Cinavia Online Consumer Information Center at
To request additional information about Cinavia by mail,
send a postcard with your mailing address to: Cinavia
Consumer Information Center, P.O. Box 86851, San Diego,
CA, 92138, USA.
This product incorporates proprietary technology under
license from Verance Corporation and is protected by U.S.
Patent 7,369,677 and other U.S. and worldwide patents
issued and pending as well as copyright and trade secret
protection for certain aspects of such technology.
Cinavia is a trademark of Verance Corporation. Copyright
2004-2010 Verance Corporation. All rights reserved by
Verance. Reverse engineering or disassembly is prohibited.
Digital Audio
An indirect representation of sound by numbers. During
recording, the sound is measured at discrete intervals
(44,100 times a second for CD audio) by an
analog-to-digital converter, generating a stream of numbers.
On playback, a digital-to-analog converter generates an
analog signal based on these numbers. See also “Sampling
Frequency” and “Analog Audio”.
Dolby Digital
The system to compress digital sound developed by Dolby
Laboratories. It offers you sound of stereo (2ch) or
multi-channel audio.
Dolby Digital Plus
Dolby Digital Plus is the next generation digital audio
compression technology developed as an extension to
Dolby Digital. Blu-ray Disc™ supports 7.1 multi-channel
surround sound output.
Dolby Pro Logic II
Dolby Pro Logic II technology processes any high quality
stereo (two-channel) movie and music audio into five
playback channels of full-bandwidth surround sound.
A matrix surround decoding technology, Dolby Pro Logic II
detects the directional cues that occur naturally in stereo
content and uses these elements to create a five-channel
surround sound playback experience.
Dolby TrueHD
Dolby TrueHD is a lossless coding technology developed
for next generation optical discs. Blu-ray Disc™ supports
7.1 multi-channel surround sound output.
DTS® (Digital Theater System)
DTS® is a multi channel surround sound system. You can
enjoy movie dynamic and realistic sound like movie theater.
DTS surround sound technologies were developed by DTS,
Inc.
DTS-HD
DTS-HD® is a lossless coding technology developed as an
extension of the original DTS Coherent Acoustics format.
Blu-ray Disc™ supports 7.1 multi-channel surround sound
output.
HDMI (High-Definition Multimedia Interface)
A digital interface between an audio and video Source. It
can transmit component video, audio, and control signal
with one cable connection.
JPEG (Joint Photographic Experts Group)
JPEG is a method of compressing still picture files. You can
copy JPEG files on BD-RE/-R, DVD-RW/-R, CD-RW/-R, or
USB Memory Stick from a computer and play back the files
on this unit.
®
EN - 50
continued on next page
Page 51

EN
Local Storage
A storage area of sub contents for playing virtual packages
on BD-video.
PCM (Pulse Code Modulation)
The most common system of encoding digital audio, found
on CD and DAT. Excellent quality, but requires a lot of
data compared to formats such as Dolby Digital and MPEG
audio. For compatibility with digital audio recorders (CD,
MD and DAT) and AV amplifiers with digital Inputs, this
unit can convert Dolby Digital, DTS, and MPEG audio to
PCM. See also “Digital Audio”.
Region Code
Regions associate discs and players with particular areas of
the world. This unit will only play back discs that have
compatible region codes. You can find the region code of
your unit by looking on the rear panel. Some discs are
compatible with more than one region (or all regions).
Sampling Frequency
The rate which sound is measured by a specified interval to
turn into digital audio data. The numbers of sampling in one
second defines as sampling frequency. The higher the rate,
the better the sound quality.
Title
A collection of chapters on BD-video or DVD-video. See
also “Chapter”.
Track
Audio CD uses Tracks to divide up the content of a disc.
The BD-video or DVD-video equivalent is called a Chapter.
See also “Chapter”.
Virtual Package
The function which copies data to other media (local
storage) from the Internet and plays Secondary Video,
Secondary Audio and subtitles at the same time. The
method of the playback varies depending on the disc.
x.v.Color
“x.v.Color” is a promotion name given to the products that
have the capability to realize a wide color space based on
the xvYCC specifications and is a trademark of Sony
Corporation.
EN - 51
Page 52

19. ESPAÑOL
19.1. Mando a Distancia
1
2
3
4
5
6
7*
8
9
10
11
* La unidad también se puede encender pulsando estos
botones.
1. Botón (ENCENDIDO)
• Pulse el botón para encender la unidad, o para pasar la
unidad al modo de espera. (Para apagar completamente
la unidad, debe desconectar el cable de alimentación de
CA.)
2. Botón TOP MENU
Blu-ray Disc™:
DVD: Púlselo para mostrar el menú de títulos.
3. Botones de
• Púlselos para seleccionar elementos o configuraciones.
4. Botón MODE
• Durante la reproducción, púlselo para visualizar el
menú de reproducción.
Púlselo para mostrar el menú superior.
12*
13
14
15
16
17
18
19
20
21
22
23
5. Botones de ROJO / VERDE / AZUL / AMARILLO
• Púlselo para activar las teclas de atajo en algunas
funciones de BD-vídeo. Cuando se despliega la lista
de archivos, presione para cambiar las páginas.
6. Botón (REVERSO)
• Durante la reproducción, púlselo para invertir rápido
la reproducción.
7. Botón (REPRODUCIR)*
• Púlselo para iniciar o reanudar la reproducción.
8. Botón (SALTAR)
• Durante la reproducción, púlselo una vez para volver
al comienzo del título, capítulo, pista o archivo actual.
• Durante la reproducción, pulse dos veces sobre la tecla
para volver al título, capítulo, pista o archivo anterior.
• Durante la reproducción de archivos JPEG, púlselo
para volver al archivo anterior.
9. Botón (DETENER)
• Púlselo para detener la reproducción.
10. Botones NUMÉRICOS
• Púlselos para seleccionar un capítulo durante la
reproducción.
• Púlselos para introducir números en el campo de
entrada.
11. Botón SEARCH
• Púlselo para mostrar el menú de búsqueda.
12. Botón (ABRIR/CERRAR)*
• Púlselo para cerrar o abrir la bandeja para discos.
13. Botón HOME
• Púlselo para mostrar el menú de inicio.
14. Botón POP MENU/MENU
Blu-ray Disc™:
DVD: Púlselo para mostrar el menú del disco.
15. Botón OK
• Púlselo para confirmar o seleccionar elementos de menú.
16. Botón RETURN
• Púlselo para volver a la pantalla de funciones o menú
mostrado anteriormente.
17. Botón (ADELANTAR)
• Durante la reproducción, púlselo para avanzar rápido
la reproducción.
• Cuando la reproducción esté en pausa, púlselo para
avanzar lentamente la reproducción.
Púlselo para mostrar el menú emergente.
ES - 52
Continua en la página siguiente
Page 53

ES
18. Botón (SALTAR)
• Durante la reproducción, púlselo para saltar al siguiente capítulo, pista o archivo.
• Cuando la reproducción esté en modo de pausa, púlselo para avanzar la reproducción imagen a imagen.
19. Botón (PAUSAR)
• Púlselo para pausar la reproducción.
20. Botón VOL /
• Púlselo para ajustar el volumen.
21. Botón MUTE
• Púlselo para silenciar el volumen.
22. Botón SOURCE
• Púlselo para cambiar el modo de fuente activa; menú de inicio (Disco / dispositivo de memoria USB), “Aux” o
“Coaxial” .
23. Botón DISPLAY
• Púlselo para visualizar el menú desplegable en pantalla.
D Nota
• El indicador ENCENDIDO en el panel frontal se atenúa y parpadea cuando se recibe la señal IR del control remoto.
• Use el control remoto suministrado. No se garantiza la operación de control remoto en cualquier otro control
remoto, tal como un control remoto universal.
19.2. Encontrar el Canal de Video en su Televisor
Revise los siguientes pasos después de haber completado todas las conexiones a su TV.
1. Presione [(ENCENDIDO)] para Encender la unidad.
2. Encienda su televisor.
3. Busque el botón Source / Input / AUX / Video en el control remoto del televisor. El boton puede variar en funcion de
la marca y el modelo del televisor. Una vez localizado el boton presione hasta ver “Espere un...” o el menu de
Configuracion Inicial en la pantalla.
Please Wait...
Esta es la visualización correcta de la entrada de la fuente de video.
• Si la TV está conectada por medio de un cable HDMI, puede tomar algunos minutos para que aparezca la imagen de
abertura.
• Cuando pase cierto tiempo sin que haya conectado la unidad aparecera la solo pantalla de bienvenida la primera vez
que conecte la unidad.
ES - 53
Page 54

19.3. Instalacion Inicial
Idioma
Por favor, siga las instrucciones que se exponen a continuacion para completar la configuracion inicial.
1. Utilice [] mientras se presenta la pantalla de bienvenida para seleccionar “Next” y pulse luego [OK].
2. Aparece la pantalla de configuracion del idioma. Utilice [] para seleccionar su idioma y pulse luego [OK].
Por favor, seleccione su idioma para el menú en
pantalla.
English
Español
Français
Retorno
3. Aparece la pantalla de “Modo de Inicio Rápido”. Utilice [] para seleccionar el modo deseado y pulse luego [
Cómo restablecer el Idioma OSD
Puede restablecer el idioma OSD si seleccionó el ajuste de idioma equivocado.
1. Presione [HOME] para desplegar el Menú de Inicio.
2. Utilice [] para seleccionar “ ”, despés presione [OK].
• Esta partida es “Settings” (inglés) / “Configuaraciones” (español) / “Paramètres” (francés).
• A partir de aquí, por favor seleccione una de las siguientes partidas que puede encontrar en la pantalla:
3. Utilice [] para seleccionar “Playback” (inglés) / “Reproducción” (español) / “Lecture” (francés), y después
presione [OK].
4. Utilice [] para seleccionar “Language” (inglés) / “Idioma” (español) / “Langue” (francés), y después presione
[OK].
5. Utilice [] para seleccionar el idioma que desee, después presione [OK].
6. Si las partidas de ajuste se despliegan en el idioma que seleccionó, presione [HOME] para salir.
OK
].
ES - 54
Page 55

LIMITED WARRANTY
FUNAI CORP. will repair this product, free of charge in the USA in the event of defect in materials or
workmanship as follows:
DURATION:
PARTS: FUNAI CORP. will provide parts to replace defective parts without charge for one (1) year from the
date of original retail purchase. Certain parts are excluded from this warranty.
LABOR: FUNAI CORP. will provide the labor without charge for a period of ninety (90) days from the date of
original retail purchase.
Note: Any product sold and identified as refurbished or renewed carries a ninety (90) days labor
and parts limited warranty.
LIMITS AND EXCLUSIONS:
THIS WARRANTY IS EXTENDED ONLY TO THE ORIGINAL RETAIL PURCHASER. A PURCHASE RECEIPT
OR OTHER PROOF OF ORIGINAL RETAIL PURCHASE WILL BE REQUIRED TOGETHER WITH THE
PRODUCT TO OBTAIN SERVICE UNDER THIS WARRANTY.
This warranty shall not be extended to any other person or transferee.
This warranty is void and of no effect if any serial numbers on the product are altered, replaced, defaced, missing
or if service was attempted by an unauthorized service center. This limited warranty does not apply to any
product not purchased and used in the United States.
This warranty only covers failures due to defects in material or workmanship which occur during normal use.
It does not cover damage which occurs in shipment, or failures which are caused by repairs, alterations or
products not supplied by FUNAI CORP., or damage, which results from accident, misuse, abuse, mishandling,
misapplication, alteration, faulty installation, improper maintenance, commercial use such as hotel, rental or
office use of this product, or damage which results from fire, flood, lightning or other acts of God.
THIS WARRANTY DOES NOT COVER PACKING MATERIALS, ANY ACCESSORIES (EXCEPT REMOTE
CONTROL), ANY COSMETIC PARTS, COMPLETE ASSEMBLY PARTS, DEMO OR FLOOR MODELS.
FUNAI CORP. AND ITS REPRESENTATIVES OR AGENTS SHALL IN NO EVENT BE LIABLE FOR ANY GENERAL,
INDIRECT OR CONSEQUENTIAL DAMAGES ARISING OUT OF OR OCCASIONED BY THE USE OF OR
THE INABILITY TO USE THIS PRODUCT. THIS WARRANTY IS MADE IN LIEU OF ALL OTHER WARRANTIES,
EXPRESS OR IMPLIED, AND OF ALL OTHER LIABILITIES ON THE PART OF FUNAI, ALL OTHER WARRANTIES
INCLUDING THE WARRANTY OF MERCHANTABILITY AND FITNESS FOR A PARTICULAR PURPOSE, ARE
HEREBY DISCLAIMED BY FUNAI AND ITS REPRESENTATIVES IN THE UNITED STATES.
ALL WARRANTY INSPECTIONS AND REPAIRS MUST BE PERFORMED BY AN AUTHORIZED SERVICE CENTER.
THIS WARRANTY IS ONLY VALID WHEN THE UNIT IS CARRIED-IN TO AN AUTHORIZED SERVICE CENTER.
THE PRODUCT MUST BE ACCOMPANIED BY A COPY OF THE ORIGINAL RETAIL PURCHASE RECEIPT.
IF NO PROOF OF PURCHASE IS ATTACHED, THE WARRANTY WILL NOT BE HONORED AND REPAIR
COSTS WILL BE CHARGED.
IMPORTANT:
THIS LIMITED WARRANTY GIVES YOU SPECIFIC LEGAL RIGHTS. YOU MAY HAVE OTHER RIGHTS THAT
VARY FROM STATE TO STATE. IF, AT ANY TIME DURING THE WARRANTY PERIOD, YOU ARE UNABLE TO
OBTAIN SATISFACTION WITH THE REPAIR OF THIS PRODUCT, PLEASE CONTACT FUNAI CORP.
ATTENTION:
FUNAI CORP. RESERVES THE RIGHT TO MODIFY ANY DESIGN OF THIS PRODUCT WITHOUT PRIOR NOTICE.
WARRANTY STATEMENT REGARDING NON AUTHORIZED REPAIRS:
To obtain warranty service, you must take the product, or deliver the product freight prepaid, in either its original
packaging or packaging affording an equal degree of protection, to any AUTHORIZED SERVICE CENTER. FUNAI
CORP. will not reimburse you for any service done by unauthorized service providers without prior written approval.
To locate your nearest AUTHORIZED SERVICE CENTER or for general service inquiries, please
contact us at:
FUNAI SERVICE CORPORATION
Tel: 1-800-605-8610
www.magnavox.com/support
2200 Spiegel Drive, Groveport, OH 43125
★★★★★
EDC10UD
 Loading...