

Page 1
OWNER’S MANUAL
THANK YOU FOR CHOOSING MAGNAVOX.
N
EED HELP FAST?
R
EAD YOUR QUICK-USE GUIDE AND/OR OWNER’S MANUAL FIRST FOR
QUICK TIPS THAT MAKE USING YOUR
MAGNAVOX PRODUCT MORE ENJOYABLE.
I
F YOU HAVE READ YOUR INSTRUCTIONS AND STILL NEED ASSISTANCE,
YOU MAY ACCESS OUR ONLINE HELP AT WWW.MAGNAVOX.COM
OR CALL
1-800-705-2000 WHILE WITH YOUR PRODUCT.
MPD820
PORTABLE DVD PLAYER
MPD820_17.qxd 4/2/04 9:10 AM Page 1
Page 2
2
This “bolt of lightning” indicates
uninsulated material within your
unit may cause an electrical shock. For
the safety of everyone in your household,
please do not remove product covering.
The “exclamation point” calls
attention to features for which you
should read the enclosed literature
closely to prevent operating and
maintenance problems.
WARNING:To reduce the risk of fire
or electric shock, this apparatus should
not be exposed to rain or moisture, and
objects filled with liquids, such as vases,
should not be placed on this apparatus.
CAUTION: To prevent electric shock,
match wide blade of plug to wide slot,
fully insert.
ATTENTION: Pour éviter les choc
électriques, introduire la lame la plus large
de la fiche dans la borne correspondante
de la prise et pousser jusqu’au fond.
Registering your model with MAGNAVOX makes you eligible for all of the valuable benefits listed
below, so don't miss out. Complete and return your Product Registration Card at once to ensure:
Return your Product Registration Card today
to get the very most from your purchase.
Know these
safety symbols
*Proof of
Purchase
Returning the enclosed card
guarantees that your date of
purchase will be on file, so no
additional paperwork will be
required from you to obtain
warranty service.
*Product Safety
Notification
By registering your product,
you'll receive notification directly from the manufacturer in the rare case of a product
recall or safety defect.
*Additional
Benefits
of Product
Ownership
Registering your product guarantees that you'll receive all of
the privileges to which you're
entitled, including special
money-saving offers.
Visit our World Wide Web Site at http://www.magnavox.com
Congratulations on your purchase,
and welcome to the “family!”
Dear MAGNAVOX product owner:
Thank you for your confidence in MAGNAVOX.
You’ve selected one of the best-built, best-backed
products available today.We’ll do everything in our
power to keep you happy with your purchase for
many years to come.
As a member of the MAGNAVOX “family,” you’re
entitled to protection by one of the most comprehensive warranties and outstanding service networks
in the industry.What’s more, your purchase guarantees you’ll receive all the information and special
offers for which you qualify, plus easy access to accessories from our convenient home shopping network.
Most importantly, you can count on our uncompromising commitment to your total satisfaction.
All of this is our way of saying welcome - and thanks
for investing in a MAGNAVOX product.
P.S. To get the most from your MAGNAVOX
purchase, be sure to complete and return your
Product Registration Card at once.
For Customer Use
Enter below the Serial No. which is
located on the rear of the cabinet.
Retain this information for future
reference.
Model No. ____________________
Serial No. ____________________
MPD820_17.qxd 4/2/04 9:10 AM Page 2
CAUTION: TO REDUCE THE RISK OF ELECTRIC SHOCK, DO NOT
REMOVE COVER (OR BACK). NO USER-SERVICEABLE PARTS
INSIDE. REFER SERVICING TO QUALIFIED SERVICE PERSONNEL.
CAUTION
RISK OF ELECTRIC SHOCK
DO NOT OPEN
Page 3
3
MPD820_17.qxd 4/2/04 9:10 AM Page 3
IMPORTANT SAFETY INSTRUCTIONS
1. Read these instructions.
2. Keep these instructions.
3. Heed all warnings.
4. Follow all instructions.
5. Do not use this apparatus near
water.
6. Clean only with dry cloth.
7. Do not block any ventilation
openings. Install in accordance with
the manufacturer´s instructions.
8. Do not install near any heat sources
such as radiators, heat registers, stoves, or
other apparatus (including amplifiers) that
produce heat.
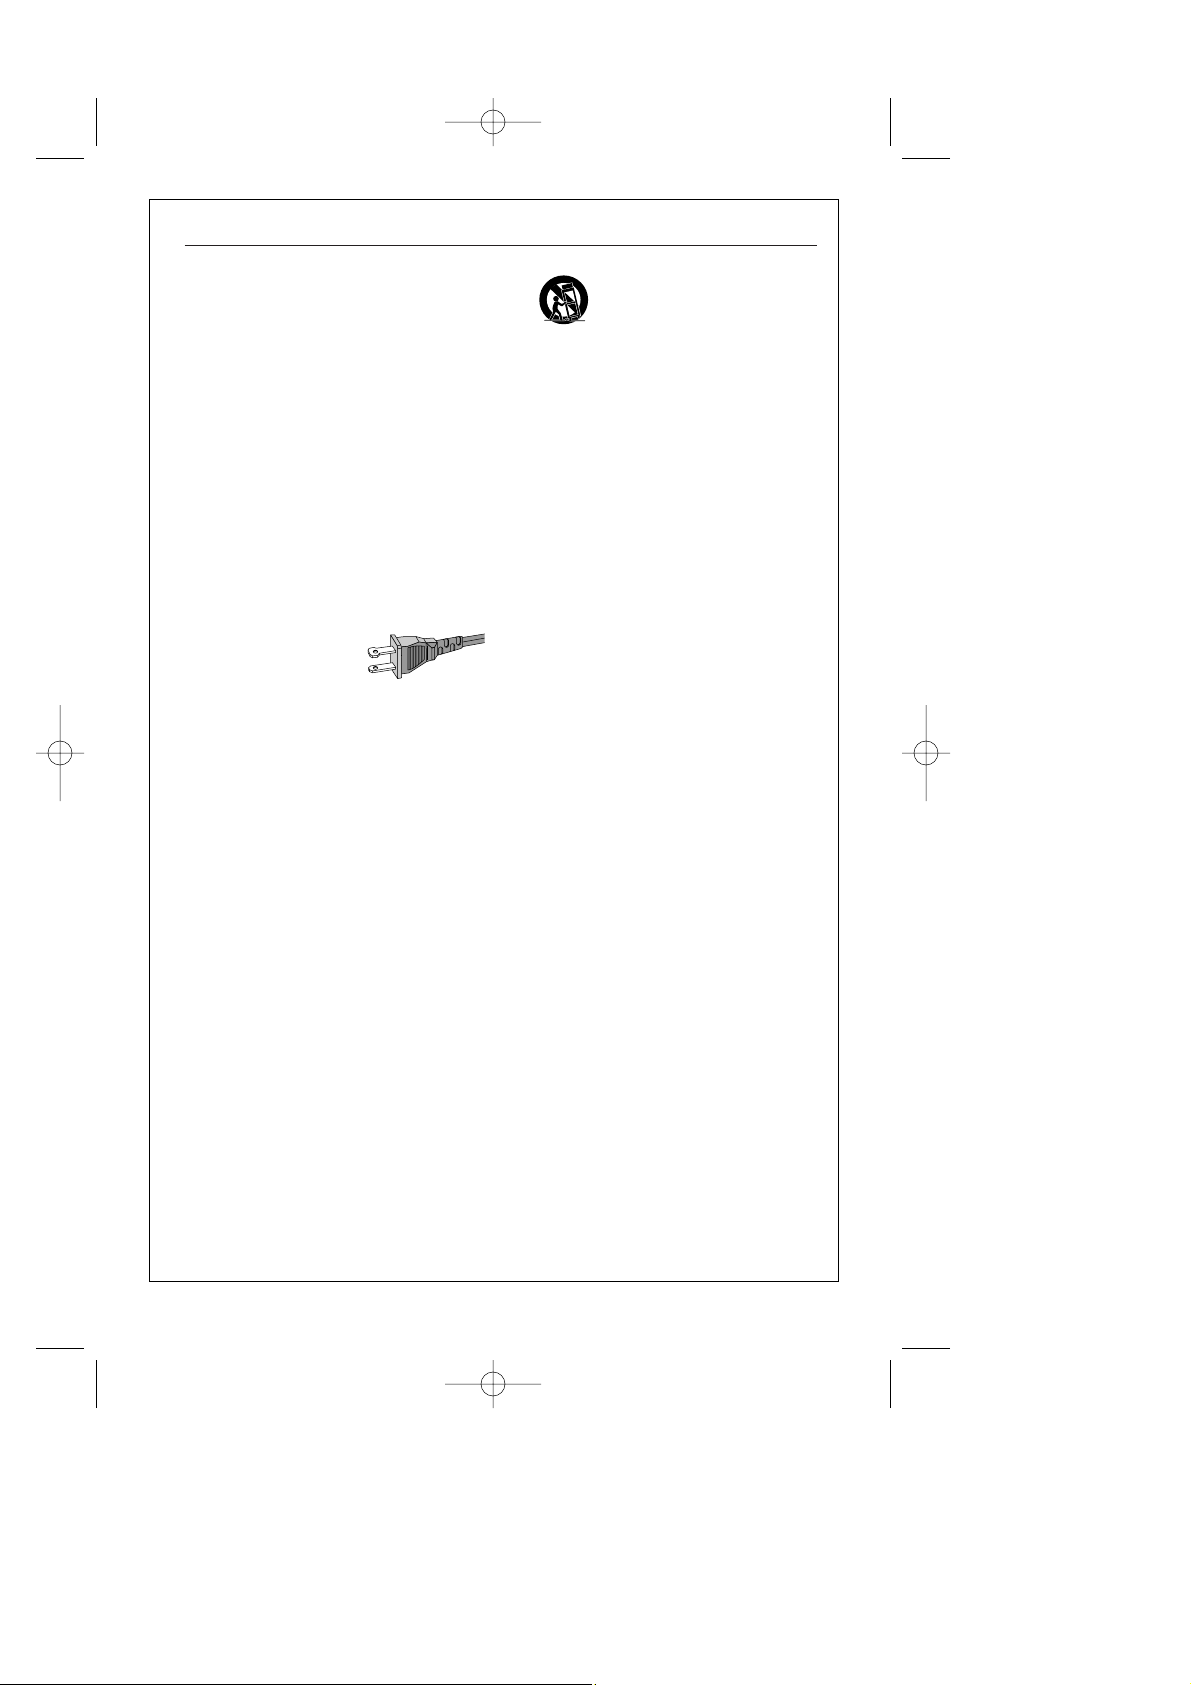
9. Do not defeat the
safety purpose of the
polarized or
grounding-type plug.
A polarized plug has two blades with one
wider than the other. A grounding type plug
has two blades and a third grounding prong.
The wide blade or the third prong are
provided for your safety. If the provided plug
does not fit into your outlet, consult an
electrician for replacement of the obsolete
outlet.
10.
Protect the power cord from being
walked on or pinched, par ticularly at plugs,
convenience receptacles, and the point
where they exit from the apparatus.
11.
Only use attachments/accessories
specified by the manufacturer.
AC Polarized
Plug
12 .
13 .
Unplug this apparatus during lightning
storms or when unused for long periods of
time.
14 .
Refer all servicing to qualified service
personnel. Servicing is required when the
apparatus has been damaged in any way,
such as power-supply cord or plug is
damaged, liquid has been spilled or objects
have fallen into the apparatus, the apparatus
has been exposed to rain or moisture, does
not operate normally, or has been dropped.
15.
Battery usage CAUTION – To
prevent battery leakage which may result in
bodily injury, proper ty damage, or damage
to the unit:
● Install all batteries correctly, + and - as
marked on the unit.
● Do not mix batteries (old and new or
carbon and alkaline, etc.).
● Remove batteries when the unit is not used
for a long time.
Use only with the cart, stand,
tripod, bracket, or table specified
by the manufacturer or sold with
the apparatus. When a cart is
used, use caution when moving
the cart/apparatus combination
to avoid injury from tip-over.
16. Apparatus shall not be exposed to
dripping or splashing.
17. Do not place any sources of danger
on the apparatus (e.g. liquid filled
objects, lighted candles).
18. This product may contain lead and mercury.
Disposal of these materials may be regulated
due to environmental considerations.
For disposal or recycling information,
please contact your local authorities
or the Electronic Industries Alliance :
www.eiae.org.
EL 6475-E005: 04/01
Page 4
4
Safety Precautions
Power Sources
This unit operates on a supplied AC adaptor,
car adaptor, or a rechargeable battery pack.
• Make sure that the input voltage of the AC
adaptor is in line with the local voltage.
Otherwise, the AC adaptor and unit may be
damaged.
• Do not touch the AC adaptor with wet
hands to prevent electric shock.
• When connecting with car power (cigarette
lighter) adaptor, be sure the input voltage of
the adaptor is identical with car voltage.
• Unplug the AC adaptor from the outlet or
remove the battery pack when the unit is
not used for long periods of time.
• Hold the plug to disconnect the AC adaptor.
Do not pull the power cord.
On Placement
Avoid placing the unit in the following places.
• Under direct sunlight or near a source of
heat such as a heater.
• Never leave the unit in a closed automobile,
on a dashboard or an unstable shelf. Excess
heat may deform the cabin or cause malfunction.
• Where it is very dusty or sandy.
• Wet or humid places, such as bathroom.
• Near sources of strong magnetism, such as
a television, speaker, or magnet.
• Where there is a lot of movement or vibration, such as on a car dashboard or an
unstable shelf.
• Where it is extremely hot or cold.
• Where the unit is exposed to rain or water.
For Safety
• Do not disassemble the unit for laser rays
are dangerous to eyes.
Any service should be done by qualified
service personnel.
• Unplug the AC adaptor to cut the power if
liquid or objects get inside the unit.
• Take care not to drop the unit or subject it to
strong shocks, which may cause malfunction.
Note: When the player is in use for a long
period of time, the surface will be heated. This is normal.
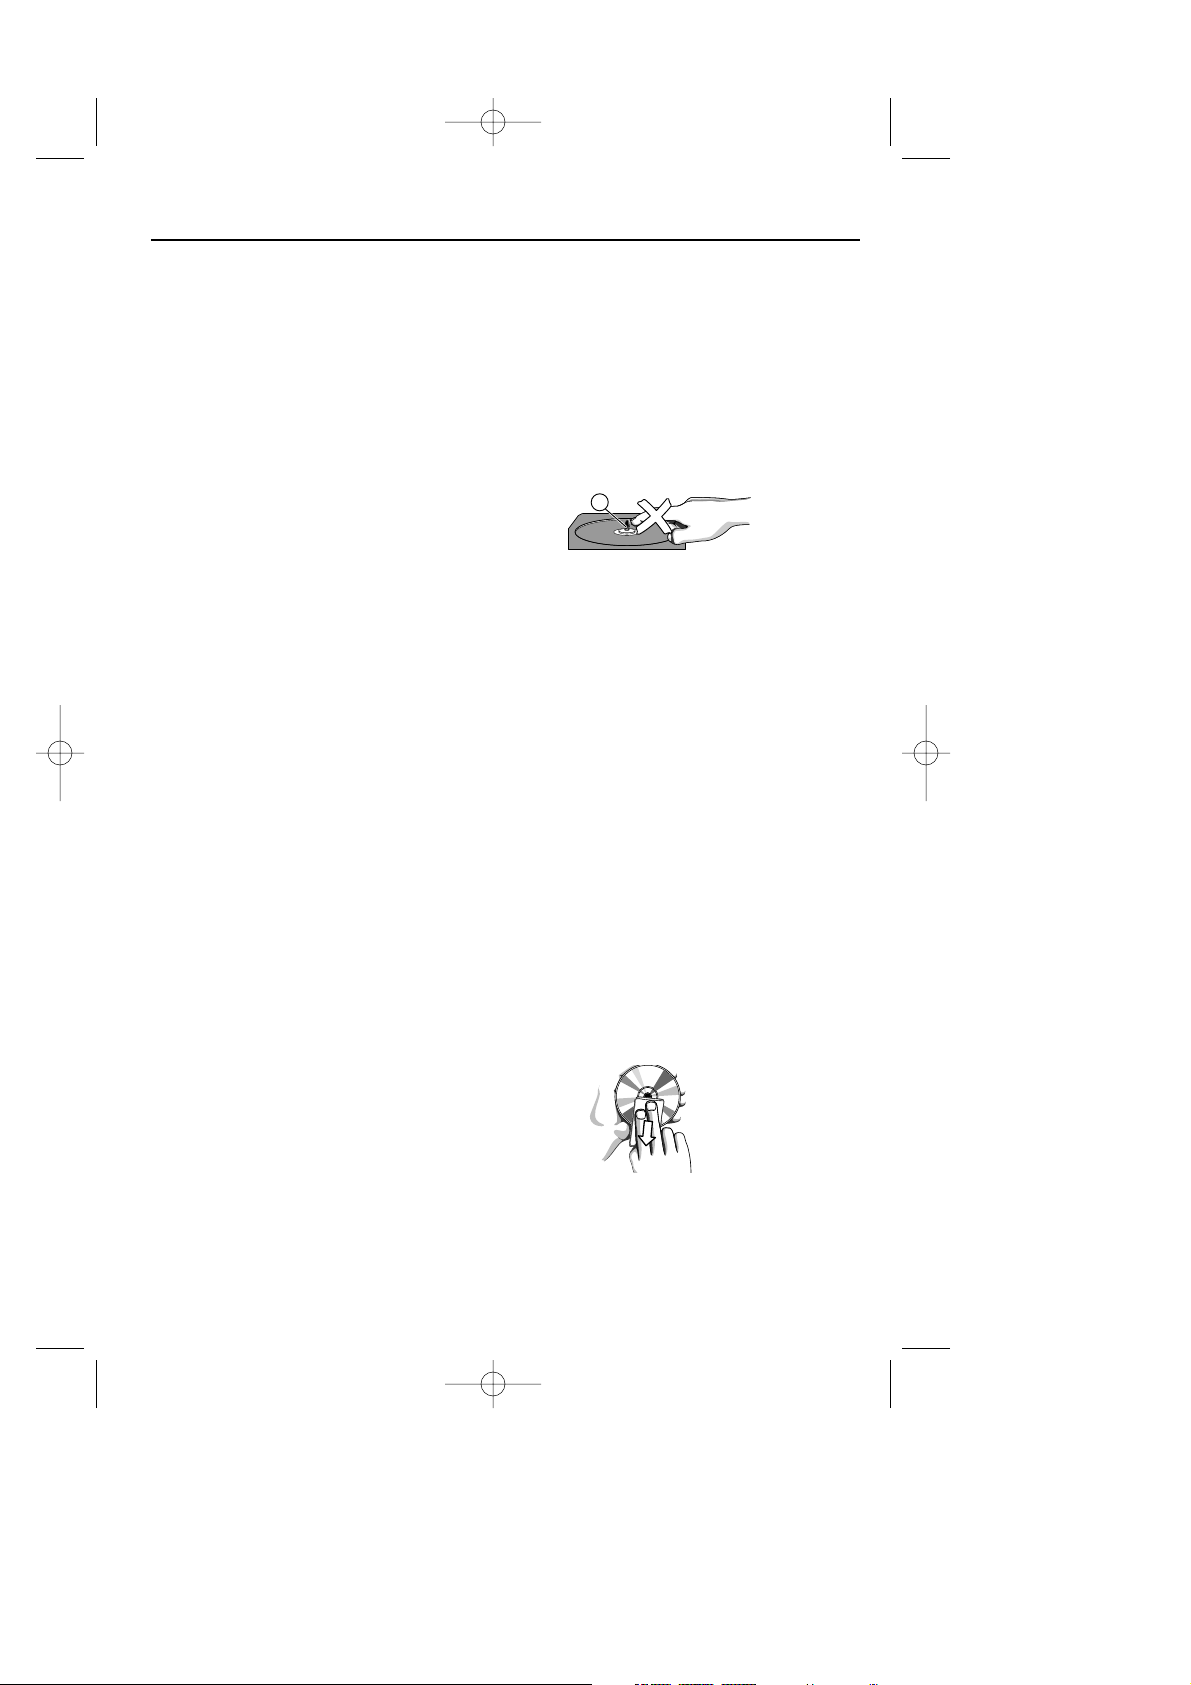
Maintenance
• Do not touch the lens !
• If the player is brought directly from a cold
to a warm location, or is placed in a very
damp room, moisture may condense on the
lens inside the player. If this occurs, the
player will not operate normally. Leave the
power on for about one hour with no disc in
the disc tray until normal playback is
possible.
• Avoid dust. Keep the disc tray closed after
use. If there is dust on the lens, use a
cleaning disc to clean.
Handling discs
• Do not attach paper or tape to the disc.
• Keep the disc away from direct sunlight or
heat sources.
• Store the disc in a disc case after playback.
• To clean, wipe the disc outwards from the
center with a soft, lint-free clean cloth.
MPD820_17.qxd 4/2/04 9:10 AM Page 4
X
Page 5

5
Important Safety Instructions .................................................................. 3
Safety Precautions .................................................................................... 4
About MPD820 ............................................................................................ 6
Controls
Main Unit ..........................................................................................................
7
Remote Control
.................................................................................................... 8
Power Supply
Using the AC power adaptor .................................................................................. 9
Using the battery pack .......................................................................................... 10
Using the remote control
........................................................................................ 12
General disc information, About ...................................................... 13
Basic Operations
Playback ............................................................................................................ 14
Language & channel select, DVD Menu Play, Pause .................................................... 15
Fast Searching, Slow Play ...................................................................................... 16
Repeat .............................................................................................................. 17
Shuffle, Random, Digest
........................................................................................ 18
Bookmark, Zoom, Scanning CDs
.............................................................................. 19
Subtitles, Angles.................................................................................................. 20
Using TIME SEARCH ............................................................................................ 21
Programming DVD and CD tracks ............................................................................ 22
MP3 Operation and Viewing JPEG files ................................................ 23
OSD: On-screen Display features
General OSD Operations, Title, Chapter .................................................................... 24
Language, Subtitles
.............................................................................................. 25
Angle, TT Time, CH Time, Repeat
............................................................................ 26
Time Display, Playing CDs ...................................................................................... 27
Setup Menu functions
General Setup Menu operation................................................................................ 28
General Setup:TV Display ...................................................................................... 29
SPDIF, Captions, Screen Saver, Audio Setup .............................................................. 30
Speaker Setup, Dolby submenus.............................................................................. 31
3D Processing, LCD, Password Setup........................................................................ 32
Preference Page: Default, Parental .......................................................................... 33
Connecting to additional equipment ...................................................... 34
Technical Specifications .......................................................................... 37
Troubleshooting ........................................................................................ 38
Limited Warranty ...................................................................................... 40
Contents
MPD820_17.qxd 4/2/04 9:10 AM Page 5
Page 6

6
High Defintion
The player adopts MPEG2 coding format and
brings the horizontal resolution over 500 lines.
Unique Functions
Mutli-Angle and Multi-Language capability.
Parental lock makes it easy to control the
content of discs.
Zoom
You can enlarge pictures two or three or four
times the original size.
You can also shrink pictures by 25%-50%.
Multi - Functions
Fast forward, fast reverse, slow play, frame
play, repeat play and program play.
Time Search
It can search a specific part on a disc,
especially good for watching action movies.
Audio Output
Analog audio output or optical digital audio
output enables you to connect to an amplifier
to enjoy high quality sound effects.
Supplied accessories
Make sure these items are in the package. If
any item is missing, please contact your dealer.
• 1 x Audio / Video cable
• 1 x Remote control
• 1 x Car adaptor
• 1 x AC power adaptor
• 1 x Rechargeable battery pack
• 1 x Warranty card
• 1 x User guide
About DVDs
• Title, Chapter
To help you skip and search content, the
images or music of a DVD are divided into
units. A title is made up of several
chapters, and each chapter has a number
for search (chapter numbering may not be
available on all DVDs). Some DVDs may be
structured with more than one title.
About MPD820
The set complies with the FCC-Rules,
Part 15 and with 21 CFR 1040.10.
Operation is subject to the following
two conditions:
1. This device may not cause harmful
interference, and
2. This device must accept any inter-
ference received, including interference that may cause undesired
operation.
Canada
English: This digital apparatus does not
exceed the Class B limits for radio noise
emissions from digital apparatus as set out
in the Radio Interference Regulations of
the Canadian Department of
Communications.
CAUTION
Use of controls or adjustments or performance of procedures other than
herein may result in hazardous radiation exposure or other unsafe operation.
MPD820_17.qxd 4/2/04 9:10 AM Page 6
Page 7
7
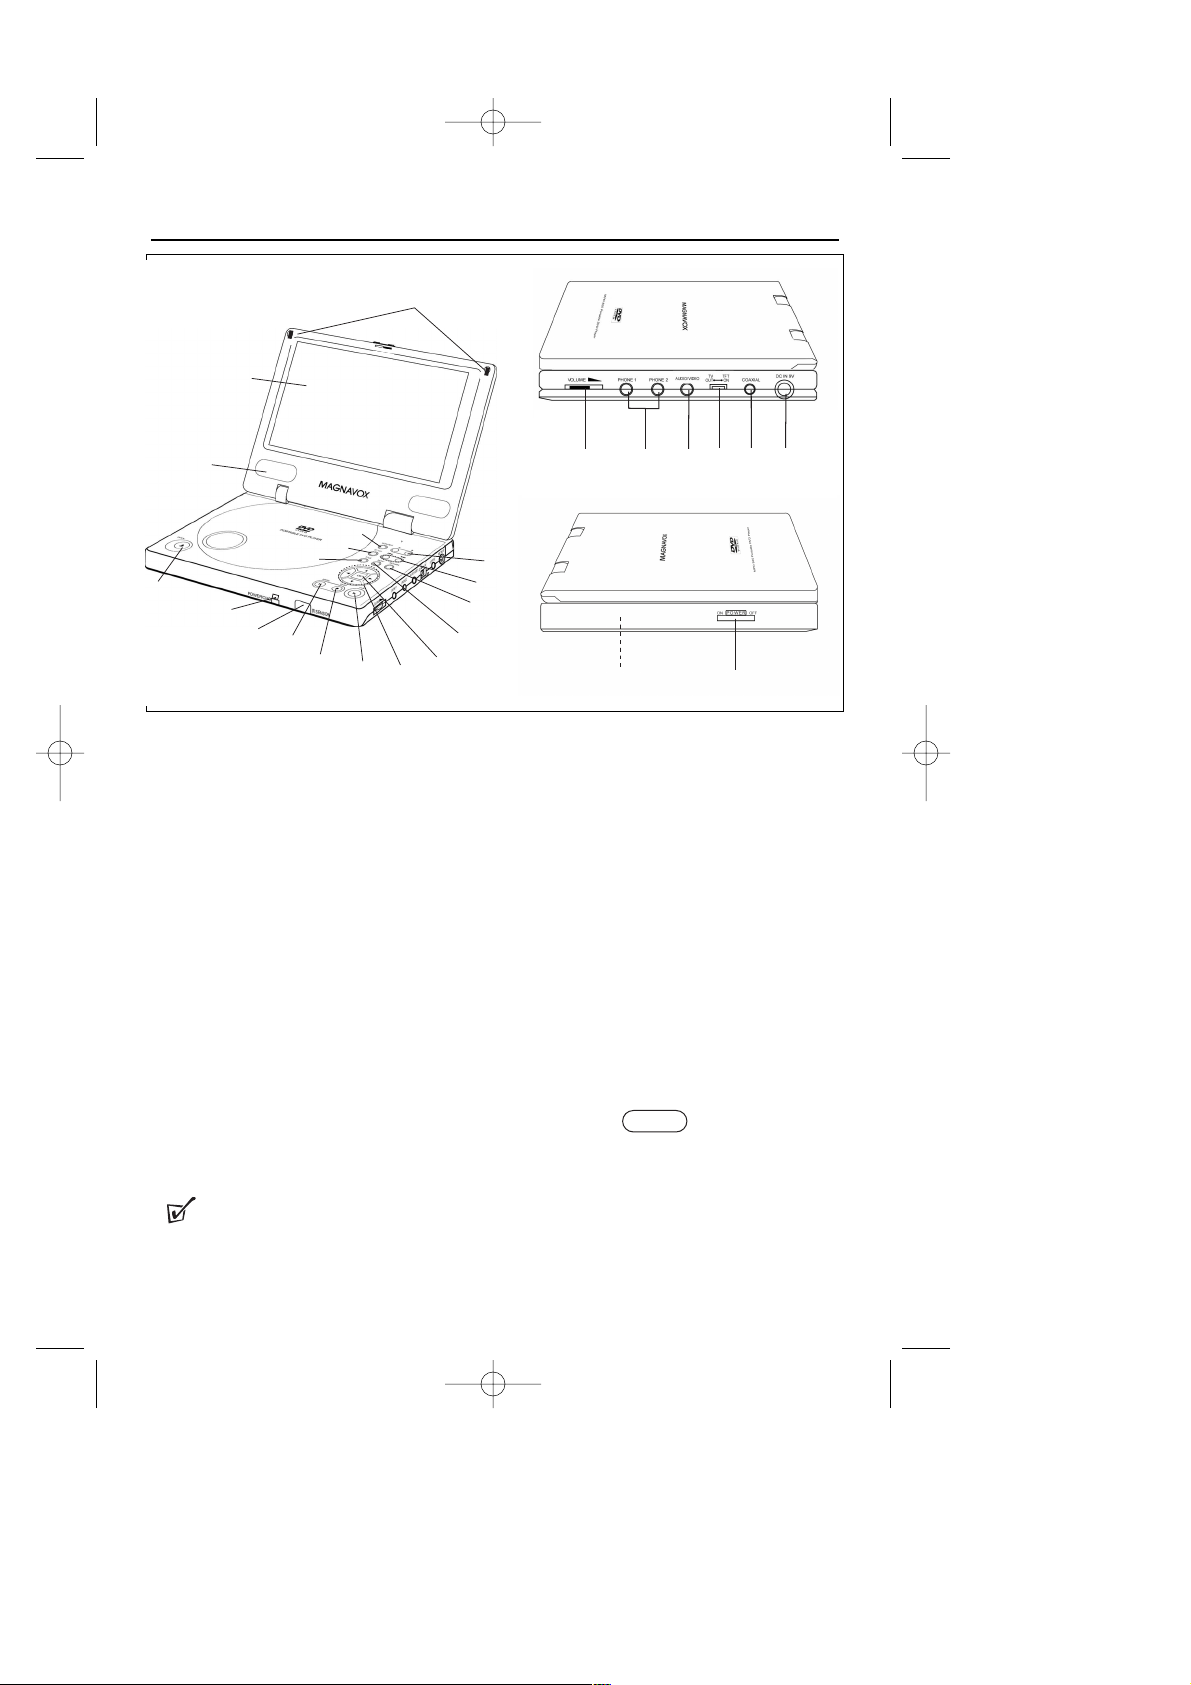
Main Unit
1 Display panel
2 Speaker
3 OPEN
4 CHG - battery charge indicator
POWER -
power indicator
5 Infrared for remote control
6
;
(PAUSE)
7
9
(STOP)
8
B
(PLAY)
9 Direction buttons:
3, 4,2, 1
0 OK
! MENU
@ RETURN
#
∞/§
$
+ /
-
% MONITOR
^ SETUP
& TITLE
* Magnet
( VOLUME
) PHONE 1 & PHONE 2
¡ AUDIO / VIDEO
™ TV OUT / TFT ON
£ COAXIAL (DIGITAL AUDIO
OUTPUT)
≤ DC IN 9V
∞
§ Type plate
Controls
TIP :
* Do not adjust the TV OUT/TFT ON switch at random. Keep the TV OUT/TFT ON switch in
the TFT ON position when the POWER switch is set to ON.
MPD820_17.qxd 4/2/04 9:10 AM Page 7
*
1
3
2
4
5
6
&
7
^
%
8
9
0
!
@
#
$
(
§
)
¡
™
∞
£
≤
ON POWER OFF
Page 8
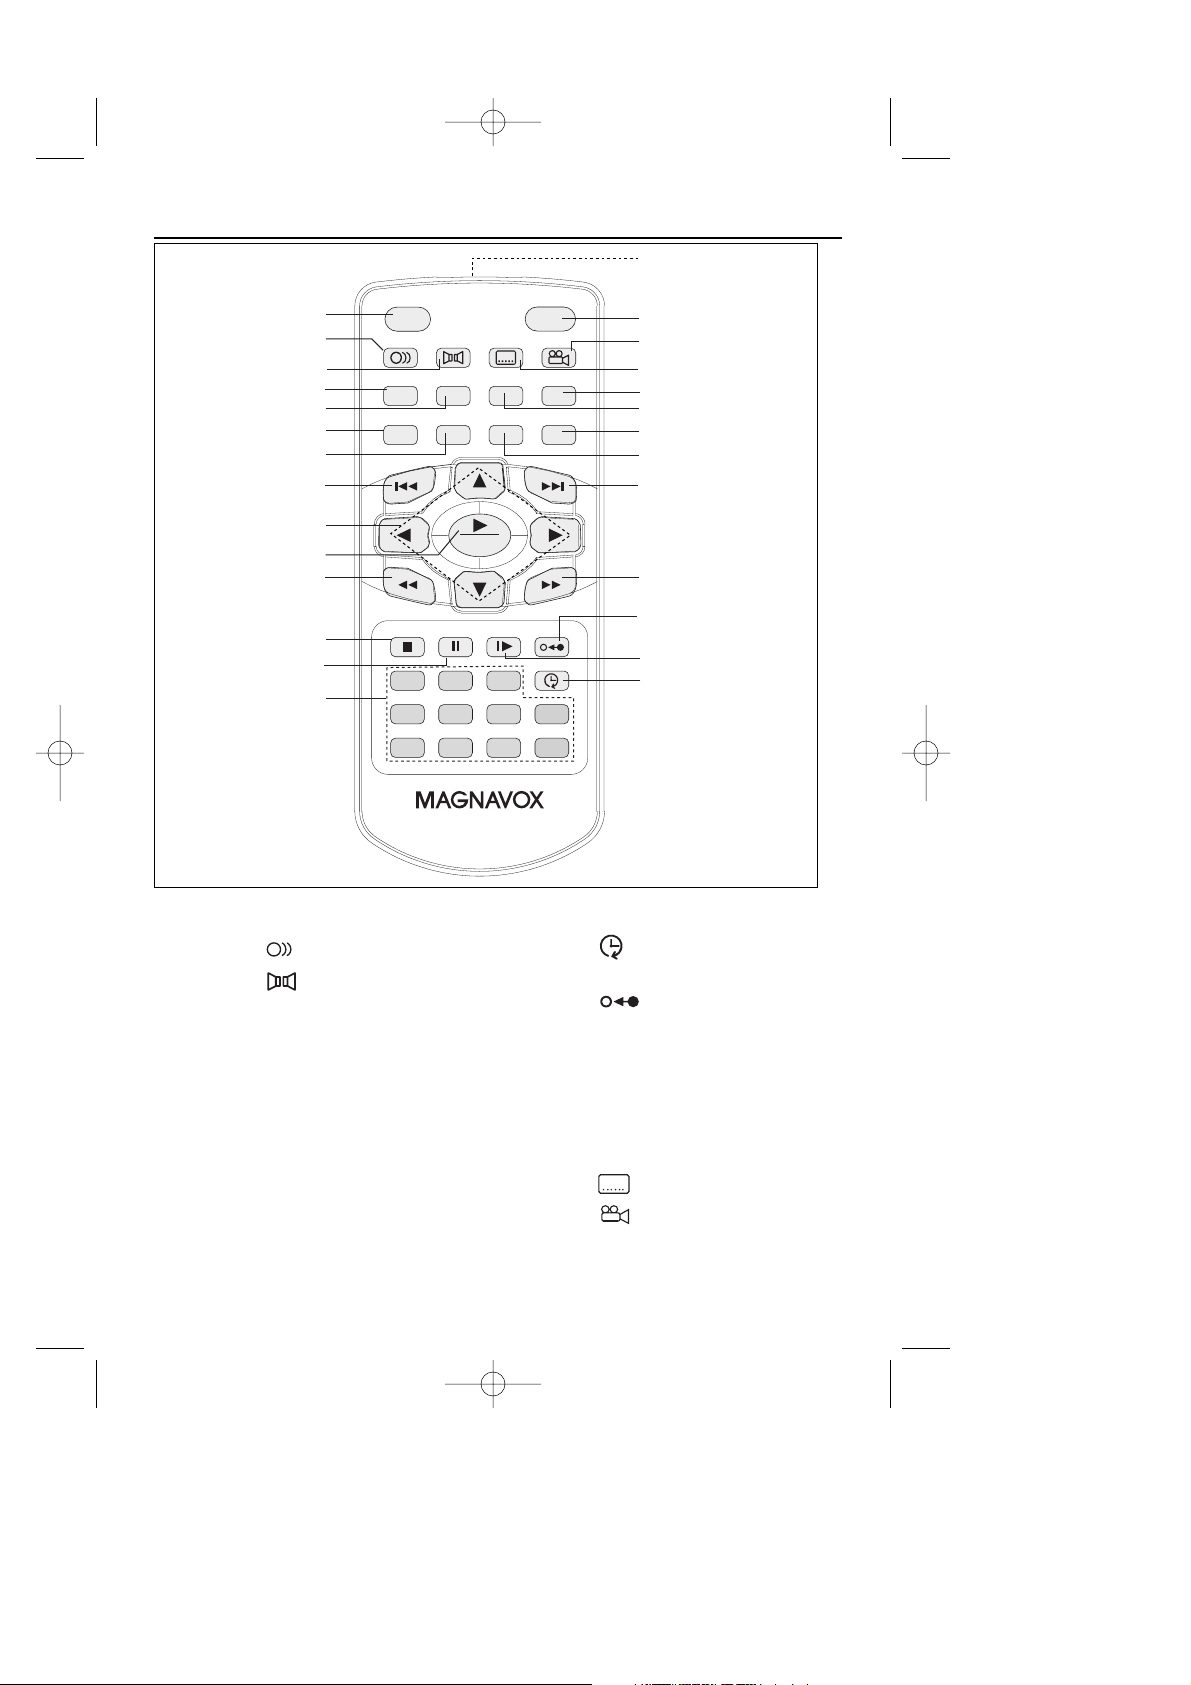
1 OSD (On-Screen Display)
2 LANGUAGE
3 AUDIO
4 DIGEST
5 RESUME
6 MENU
7 TITLE
8
∞
9 Direction buttons: 3, 4,2,
1
0 2 / OK
! 5
@
9
(STOP)
#
;
(PAUSE)
$ Number buttons
% TIME SEARCH
^ . SLOW PLAY
& RETURN
* 6
(
§
) REPEAT
¡ A-B
™ PLAY MODE
£ ZOOM
≤ SUBTITLE
∞ ANGLE
§ SETUP
≥ Remote control sensor
8
Remote Control
MPD820_17.qxd 4/2/04 9:10 AM Page 8
≥
1
2
3
4
5
6
7
8
9
0
!
@
#
$
OSD
LANGUAGE
AUDIO SUBTITLE ANGLE
DIGEST RESUME
MENU TITLE
OK
STOP
PAUSE SLOW PLAY RETURN
123
5
4
8
7
RC-700
PLAY MODE
REPEAT
TIME SEARCH
6
9
SETUP
ZOOM
A - B
+10
10/0
§
∞
≤
£
™
¡
)
(
*
&
^
%
Page 9
9
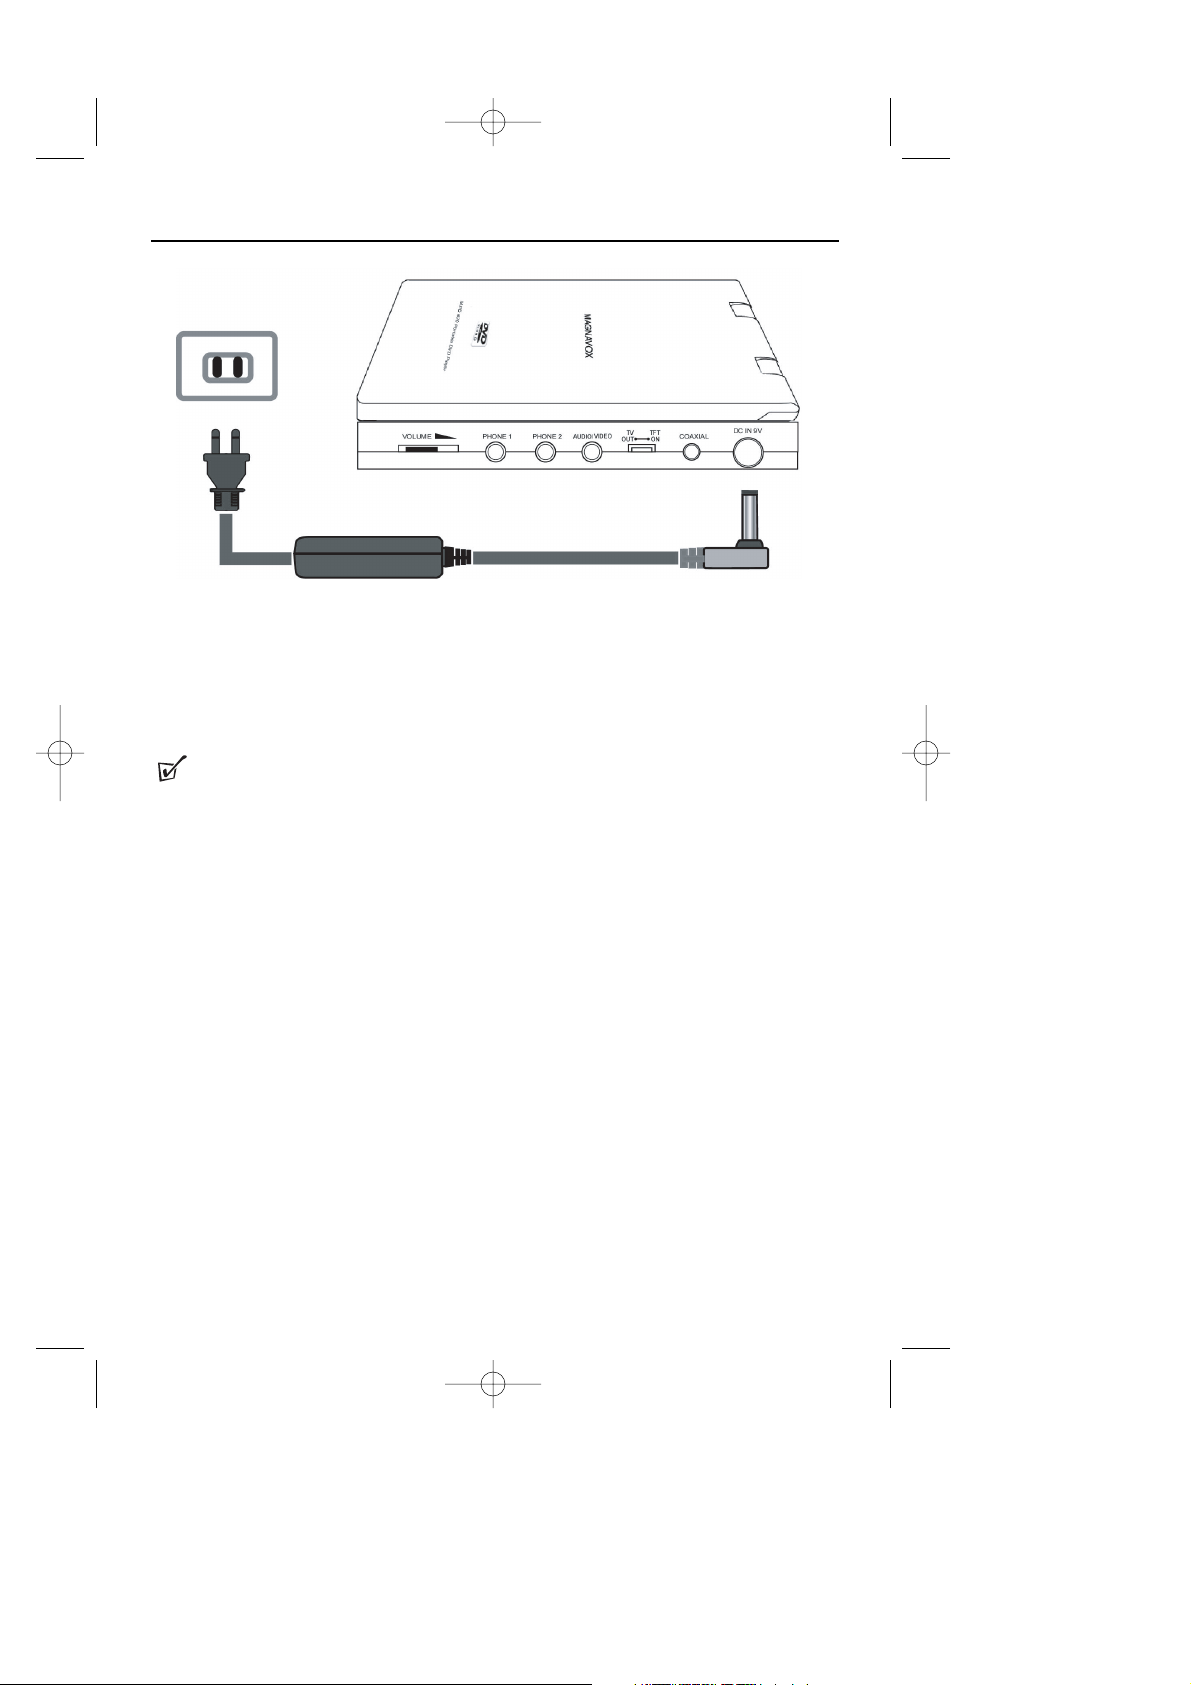
Connect to power
1 Connect the player's AC adaptor to the DC IN jack as shown.
2 Plug the AC adaptor into a power outlet.
TIP :
Turn off the player before unplugging the AC adaptor so as to avoid damage to the player.
The type plate is located on the bottom of the player.
Using the AC power adaptor
MPD820_17.qxd 4/2/04 9:10 AM Page 9
Page 10
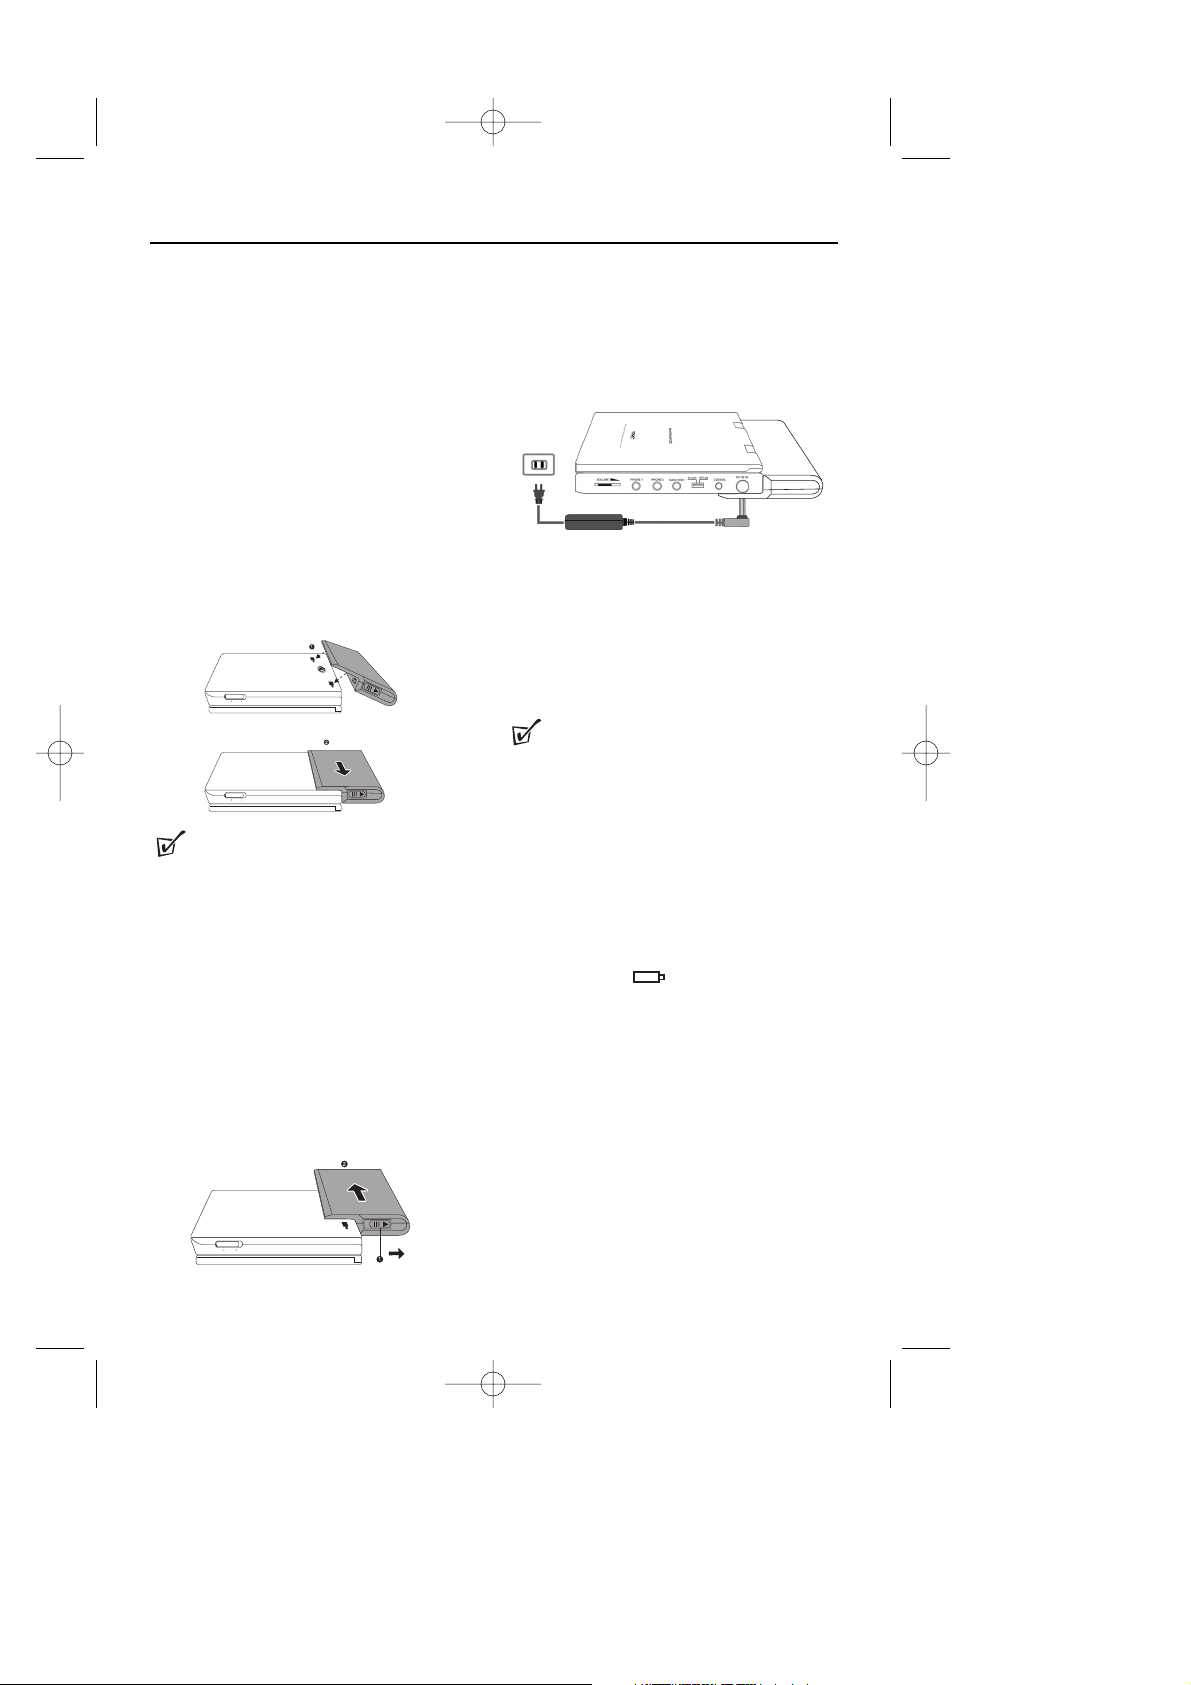
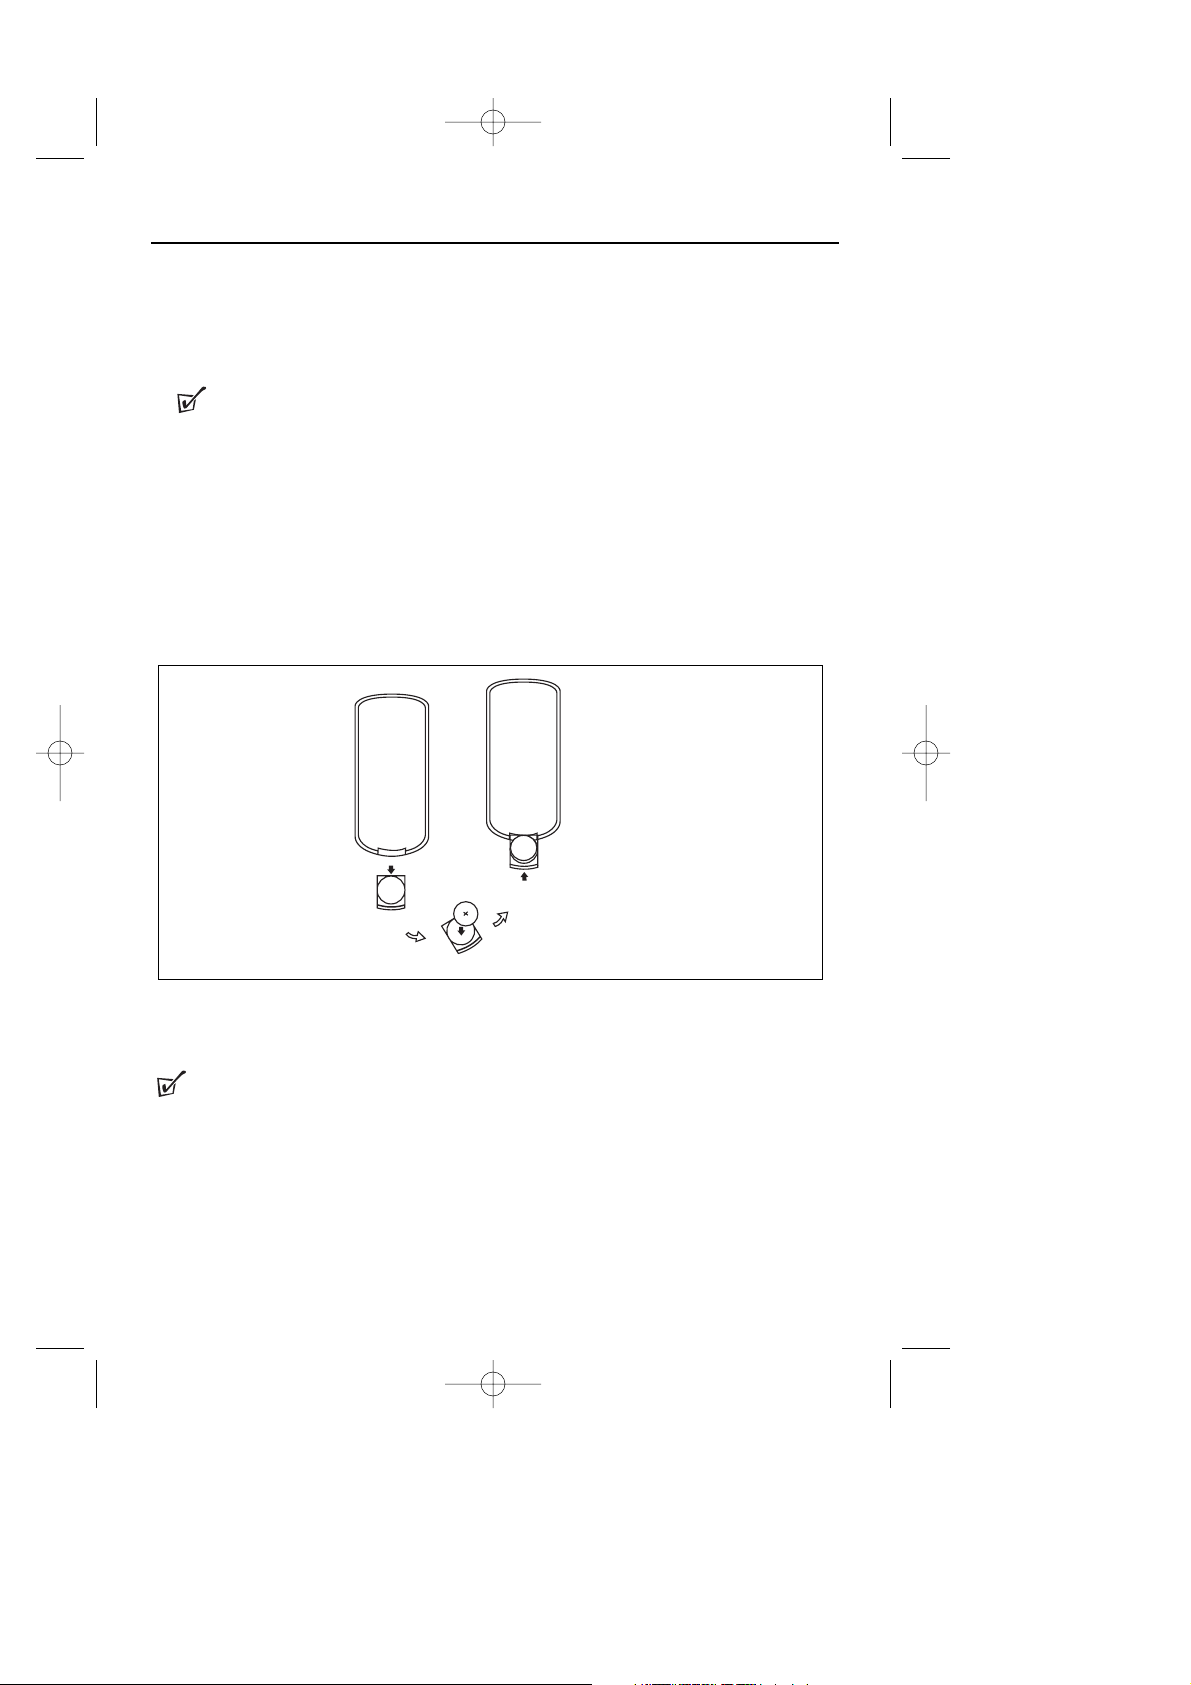
Attach the battery pack properly following
the explanation below. Make sure that the
battery pack is attached firmly to the player
when using it. Otherwise, the battery may
become detached and cause injury or
damage. Charge your battery before using.
Attaching the Battery Pack
Disconnect the AC adaptor and the power cord
from the player, before you attach the battery
pack.
1 Turn the player off.
2 Turn the player upside down.
3 Insert the battery pack's catches into the
player's corresponding holes. Then, slide
the battery pack until it is attached firmly.
TIP :
Remove the battery pack from the player
when not in use.
Detaching the Battery Pack
1 Turn the player off.
2 Disconnect the AC adaptor and the power
cord from the player.
3 Turn the player upside down.
4 Slide the battery pack's lock switch, then
slide off the battery pack as shown.
Charging the Battery Pack
We recommend you charge in room temperature (68°F) conditions. Never dispose of in fire
or water.
1 Turn the player off.
2 Attach the battery pack to the player.
3 Connect the supplied AC adaptor and the
power cord to the player. When charging
starts, the CHG indicator illuminates red.
When charging is completed, the CHG
indicator turns off.
TIP :
When charging is in progress, do not disconnect the AC adaptor and the power cord until
the CHG indicator turns off.
– When the player is turned off, the charging
time is approximately 4.5-6.5 hours
(depending on environmental conditions).
– The attached battery pack may become
warm when you are charging it or operating the player. This is normal.
– A battery icon is shown on the
screen when battery power pack is running
low.
10
Using the Battery Pack
MPD820_17.qxd 4/2/04 9:10 AM Page 10
ON OFF
POWER
ON OFF
POWER
ON OFF
POWER
Page 11

11
Power shutdown mode
The power circuit in your player is designed
with a power shutdown mode. This is
activated only during battery power
operation of the player when the battery
becomes completely drained. When this
happens:
1 Adjust the POWER switch on the player to
the OFF position.
2 Connect your player to the AC power with
the supplied power adaptor.
3 Let the player stand idle for 30 seconds
before switching on again to resume disc
operation on AC power supply.
Playback time
Times shown are approximate. Actual times
depend on operating conditions.
Safety
•
Do not use in high temperature or near
heat sources.
•
Never connect the positive and negative
poles with metal.
•
Do not open the battery, refer servicing only
to qualified service personnel.
BATTERY DISPOSAL CAUTION:
Batteries contain chemical substances,
so they should be disposed of properly.
Dispose in accordance with
applicable local, state/provincial or
federal regulations.
Using the Battery Pack
Player on, LCD display on 2.5 hr.
Player on, LCD display off 4 hr.
MPD820_17.qxd 4/2/04 9:10 AM Page 11
Page 12
12
1 Please remove the protective plastic tab (on top of the battery inside the battery
compartment) if you have just unpacked the remote control and are using for the first time.
2 To use the remote control, point it at the infrared sensor on the player’s front panel avoiding
obstacles.
TIP :
To avoid interference with other electrical equipment, try using the remote control with a minimum distance of 7 inches from the
sensor on the player.
Inserting battery for the remote control
1
Refer to the above diagram to open the battery compartment of the remote control.
Insert 1 x lithium 3V battery, type CR2025, then close the compartment.
2 Remove the battery if the remote control is not used for long periods of time.
Using the remote control
TIP :
Generally, batteries last for about one year. Replace the batteries if the remote control does not
work.
Batteries contain chemical substances, so they should be disposed of properly.
MPD820_17.qxd 4/2/04 9:10 AM Page 12
Page 13
13
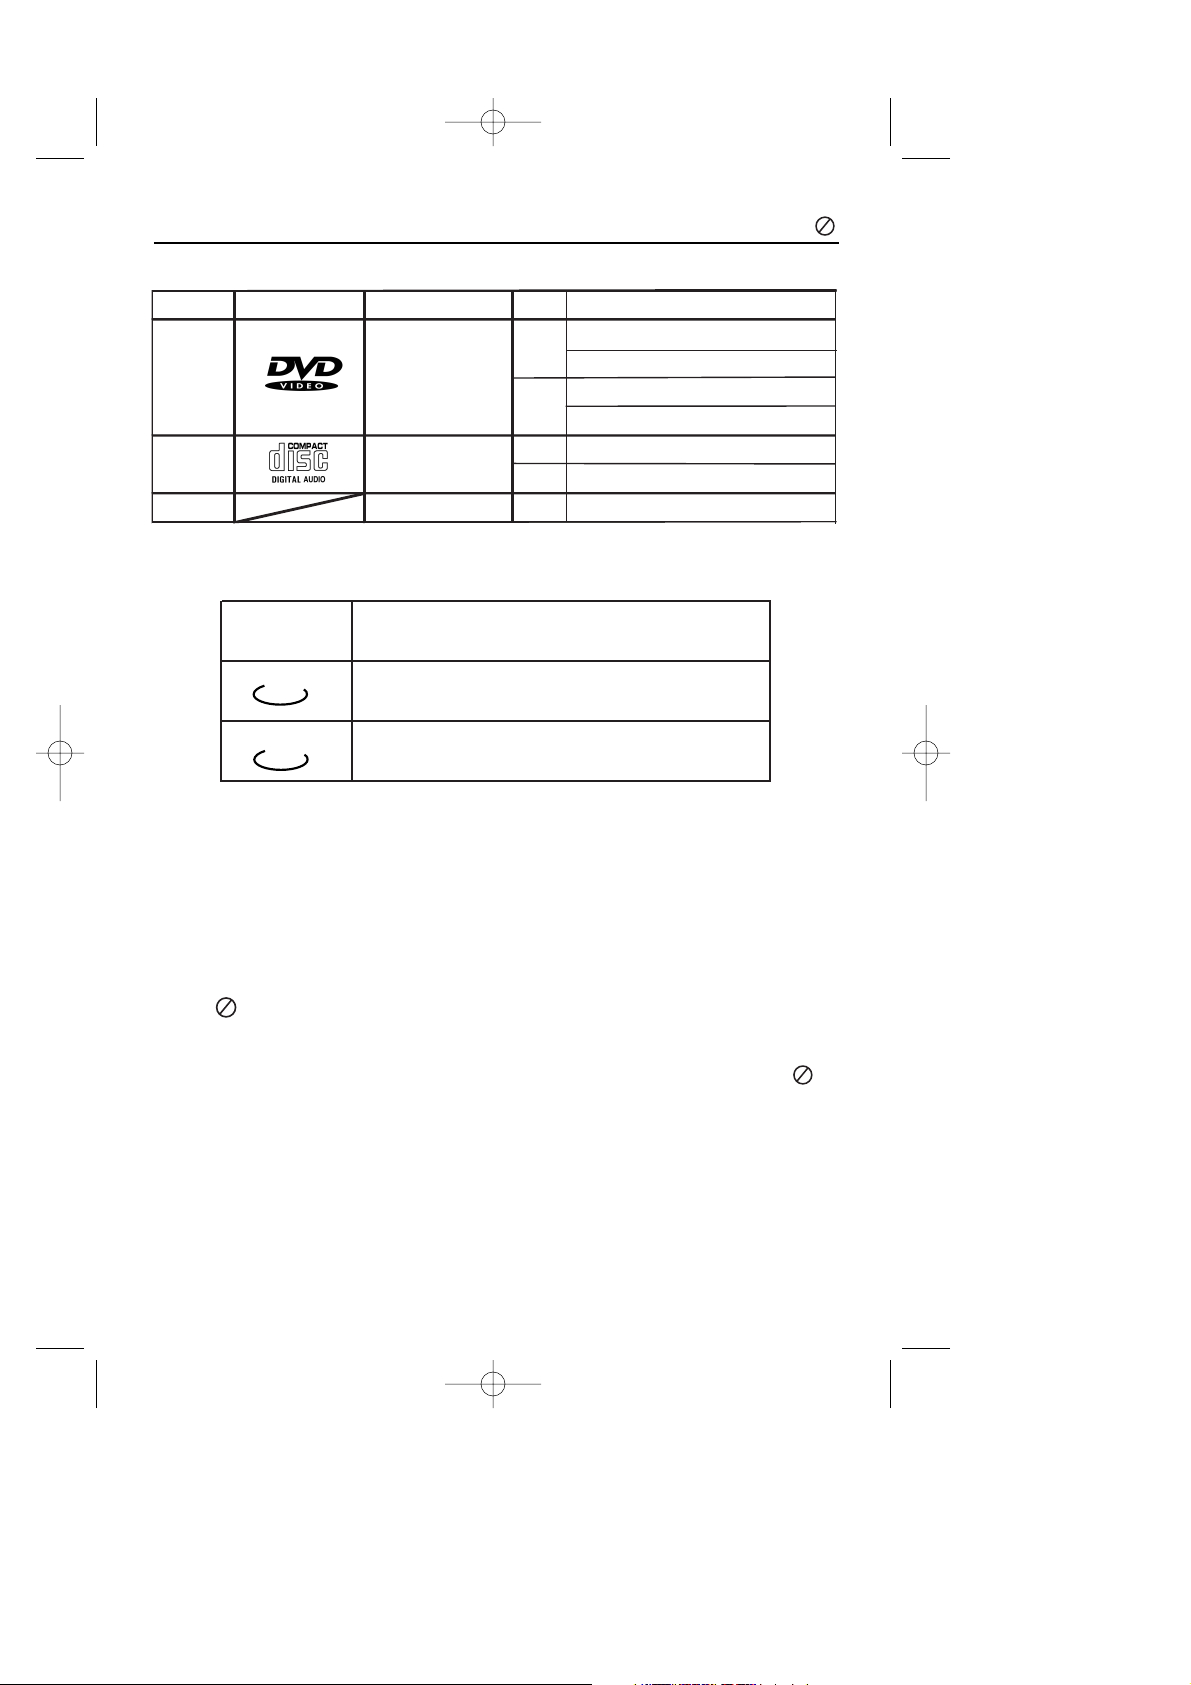
Playable Discs
• The marks shown in the following chart are used in the manual.
When Playing DVDs
Many DVD discs have the following playback features: Title, Chapter, Audio, Subtitle, Angle,
TT (Title) Time, CH (Chapter) Time, Repeat, and Time Display.
About
All the features described in this manual may not be available on every disc. If the feature is not
available on the disc, you will be unable to operate the feature on the player, and the icon
appears on the screen.
This can also happen when you try to play a feature that is not immediately available. For
example, some features are enabled only during disc playback, while others are possible
only if playback is stopped.
• Try stopping or starting playback, then try the feature again.
General disc information, About
TYPE DISC: LOGO CONTENT
PLAYING TIME
about 2hrs (single-side disc)
about 4hrs (double-side disc)
about 80 mins (single-side disc)
about 160 mins (double-side disc)
about 74 mins
about 20 mins
MP3
audio
about 600 mins
DVD
CD
audio
audio video
(motion pictures)
MPD820_17.qxd 4/2/04 9:10 AM Page 13
MARK INDICATIONINDICATION
SIZE
12CM
8CM
12CM
8CM
8CM
DVD
CD
functions of DVDfunctions of DVD
functions of CDfunctions of CD
Page 14

14
Before you begin, turn on the power of your TV, stereo, and any other equipment connected to
the DVD Player. Make sure the TV and the stereo (if applicable) are set to the correct channel.
1 Slide the POWER switch to ON to turn on the player.
2 Press OPEN to open the disc tray.
3 Place a disc into the tray. If the DVD is recorded on only one side, place the disc in the tray
with the label facing up and the shiny side facing down. Some DVDs are recorded on both
sides. Make sure the label of the side you want to play is facing up.
4 Press the tray door down to close the tray.
5 To start playback, press
B
(PLAY) /OK.
- To play MP3 CDs, see page 23.
6 Adjust the volume by using the VOLUME control.
7 To stop playback, press
9
(STOP) once. Pressing 9(STOP) twice stops resume.
8 Slide the POWER switch to OFF to turn off the player.
TIP :
During operation of the player you may hear a mechanical noise. This is normal.
Basic Operations: Playback
MPD820_17.qxd 4/2/04 9:10 AM Page 14
1
2
OPEN
VOLUME
Page 15

15
DVD Language selection
Different discs differ in languages. You can
select a language in a variety of ways:
•
Using the OSD to enter the Audio
submenu to select. If a language is
included from this Audio submenu:
English
French
Spanish
Chinese
Japanese
is recorded on the disc, you can select
sounds, subtitles or disc menu languages.
If not, the language recorded on the disc is
shown.
•
Press LANGUAGE , the screen
shows in sequence
Channel select (for DVDs & CDs)
You may select the right channel or left
channel or stereo from a multi-channel disc.
•
Press AUDIO , the screen shows in
sequence:
Some DVDs have title menus and chapter
menus.
1
Press B(PLAY)/OK
, to start playback
Menu.
2
Press
§ or ∞ ,
to skip the next or
previous title/chapter.
3
Press the
number buttons to select another
title/chapter.
•
Press TITLE/ MENU once or more to return
to the respective menu / resume playback.
Pause and Frame-by-frame
Playback (for DVDs only)
1 During playback, press
;
(PAUSE). Play will
pause and the sound will be mute.
2 When playing a DVD, press
;
(PAUSE)
repeatedly to see the picture advance one
frame at a time. The sound will remain
mute.
• Pressing ;(PAUSE) repeatedly during Audio
CD, MP3, or JPEG playback will have no
effect.
3 Press
B
(PLAY)/OK to resume normal play-
back.
Language & channel select, DVD Menu Play,Pause
MPD820_17.qxd 4/2/04 9:10 AM Page 15
Audio 1/2:AC3 5.1CH
Audio 2/2: AC3 5.1CH
Mono Left
Mono Right
Mix-Mono
Stereo
Page 16

16
Fast Searching
1
Press 6 to play fast forward. Each time
you press the button repeatedly, the screen
shows in sequence:
2
Press 5 to fast reverse the disc. Each time
you press the button repeatedly, the screen
shows in sequence:
3
Press B(PLAY)/OK to resume normal
playback.
SLOW PLAY (
DVDs only)
You can enjoy scenes in slow motion.
1
Press SLOW PLAY repeatedly to select a
slow play option.
The screen shows in sequence.
2
Press B(PLAY)/OK to resume normal
playback.
Fast Searching Slow Play
MPD820_17.qxd 4/2/04 9:10 AM Page 16
1
22
2X
2
22
4X
3
22
8X
4
22
16X
5
22
6
32X
2
|2 1/2
2
1|1/16
SLOW PLAY
.
1| 1/8
|2 1/8
1| 1/4
|2 1/4
|2 1/16
1| 1/2
1
2
3
4
5
6
11
11
11
11
11
2
2X
4X
8X
16X
32X
Page 17

17
Repeat Play
This button can be used to repeat a title,
chapter, track, disc, or a specific portion of a
disc.
DVD and CD repeat options
You may repeat a title or chapter.
1
To repeat a chapter, press REPEAT.
The screen will show
2
To repeat a title, press REPEAT again.
The screen will show
3
Repeat all:
Press REPEAT several times.
The screen shows “ ALL”.
To cancel repeat playback
• Press REPEAT again until “ ALL”
disappears.
Repeating selective segments
You may press A-B to play selective
segments repeatedly.
1
Press B(PLAY)/OK to start disc playback.
2
When the disc reaches the point where you
want repeated playback to begin, press
A-B.
The screen shows:
3 When the disc
reaches
the point where
you want to end the segment, press A-B
again. The segment will begin playing
repeatedly.
• On a DVD, make sure the entire A-B
segment is within a single Chapter. On a
Video CD or Audio CD, the A-B segment
should be within a single track.
The screen shows:
To cancel and resume normal playback
•
Press A-B again until " A B “
disappears.
CD
DVD
Repeat play options
MPD820_17.qxd 4/2/04 9:10 AM Page 17
REPEAT
A
Chapter
Title
AB
Page 18

18
Shuffle or Random Play
`
Both the Shuffle and Random options allow you
to play the contents of your disc in a different
order.
1
In disc stop position, press PLAY MODE
once or more to select shuffle or random play
mode.
The screen shows Shuffle or Random:
2
Press 2 (PLAY)/OK to start shuffle or random
play.
To cancel shuffle or random play
• Press 9 (STOP).
Digest Play
`
Use this function to scan through the title/
chapter content of the track or disc.
Example : Selecting Chapter Digest
1
During playback press DIGEST .
The screen shows:
Use the 4 or 3 buttons to select "Chapter
Digest" and press 2 (PLAY)/OK to confirm.
The player begins to look through the chapters,
and shows the starting picture of each
chapter on the screen.
2
Use the direction buttons to select NEXT
§
on the screen, and press 2 (PLAY)/OK to go
to the next page.
3
To cancel the digest feature, use the
direction buttons to select Exit on the
screen and press 2 (PLAY)/OK to confirm.
TIP :
If you have stored bookmarks on a DVD disc,
there will be one more digest option:
Bookmark Digest.
Shuffle, Random Digest
MPD820_17.qxd 4/2/04 9:10 AM Page 18
DVD
CD
PLAY MODE
DVD
DIGEST
CD
Select Digest Type :
Title Digest
Chapter Digest
Title Interval
Chapter Interval
01
04
Type : Chapter(Title 01)
Select(01-26): __
02
05
Exit Menu Next 6
03
06
Page 19

19
Bookmark
The bookmark feature lets you mark a point on
the disc that you can go to quickly. You can
store up to 12 bookmarks per disc. When you
turn the player off or remove the disc, bookmarks are cleared.
Creating a Bookmark
1 During playback, press RESUME on the
remote.
=The Bookmark Menu appears.
2 When you reach the scene you want to
mark, press 2 (PLAY)/OK.
3 If you want to mark another point, press
2 the button to move the cursor to next
spot. When you reach another scene you
want to mark, press 2 (PLAY)/OK.
=press RESUME to close the Bookmark
Menu and resume to normal playback.
Using a Bookmark
1 During playback, press RESUME.
=The Bookmark Menu appears.
2 Use the direction buttons to highlight the
bookmarked scene you want to play.
3 Press 2 (PLAY)/OK to go to the place you
marked.
Zoom Play
This function can be used to watch a motion or
still picture. The player has 3 zoom in
2X, 3X,
4X
and 3 zoom out views
1/2, 1/3, and 1/4
.
1
Press ZOOM during playback.
The screen shows:
Your picture is enlarged twice the original size.
2
Press ZOOM repeatedly to further enlarge
by 3 times (3X) or 4 times (4X).
3 For zoom out views ony press 1, 3, 4, 2,
to move the enlarged picture.
4 To cancel zooming, press repeatedly
ZOOM until the picture is in normal size.
Scanning CDs
1
In stop mode, press DIGEST
The screen shows:
=
The player scans first ten seconds of each
track.
To cancel Scanning and playback :
• press 9 (STOP)
.
DVD
DVD
Bookmark Zoom, Scanning CDs
MPD820_17.qxd 4/2/04 9:10 AM Page 19
2X
Scan
STOP
Page 20

20
Selecting DVD Subtitles
This operation works only with discs on which
multiple subtitle language are recorded.
1
Press SUBTITLE repeatedly until the
desired language is selected.
The screen shows :
To cancel subtitle :
• Press SUBTITLE repeatedly until the
screen shows "Subtitle Off"
TIP :
• For some discs subtitles cannot be
removed.
• Different discs differ in the language of
subtitles.
Angles
Some discs have images with a number of
different viewing angles. For example, when you
watch a running train, you may watch it from
the front, the left window or the right window
without stopping it.
Example:
If DVD has four viewing angle options.
1
Press
to select ANGLE1.
SCREEN :
2
Press repeatedly to select other
angles, the screen shows respectively:
2/4 (select ANGLE2)
3/4 (select ANGLE3)
4/4 (select ANGLE4)
3
To resume normal playback, press .
Subtitles Angles
MPD820_17.qxd 4/2/04 9:10 AM Page 20
Subtitle 01/03:ENGLISH
1/4
Page 21

21
With this button, you can toggle between 3
TIME SEARCH options. You may directly enter a
time, title or chapter number to fast search on a
disc, and play from that point.
How to
search a DVD title or a
chapter
For example: Searching to chapter 2 in title 6.
1
Press TIME SEARCH.
The screen shows:
2
Press a direction button and move the
cursor to highlight the title number.
The screen shows:
3
Press button 6 to select title 6.
The screen shows:
4
Repeat the steps above, select chapter 2 in
title 6.
Selecting to play your DVD from a
specific elapsed playback time:
1
Press TIME SEARCH repeatedly until the
screen shows :
Track : --/xx,
where xx denotes the total number
of tracks on your CD.
=
CD playback will start from the selected
track number.
Using TIME SEARCH
MPD820_17.qxd 4/2/04 9:10 AM Page 21
Title 03/30 Chapter 01/04
Title 03/30 Chapter 01/04
Title 06/30 Chapter 01/04
Page 22

22
To use the program playback feature, you must
enter the order in which you want the titles (and
chapters) on the DVD or the tracks on the CD to
play by creating a program. Program display
options may vary according to your DVD and
show TT-- (Title) as well as CH-- (Chapter).
DVDs
1 During playback press PLAY MODE once or
more until the screen shows the program
box. For example :
2 Use the number buttons on the remote to
enter the chapter you want to play first.
=
The chapter number you entered appears in
the box. The screen shows:
=
The cursor jumps to the next spot in the
program list section.
3
Make sure the box is highlighted and enter
your next track.
4
Continue adding chapters until your
program is complete.
To playback a DVD/CD program :
You can play your program by highlighting
Start and pressing 2(PLAY)/OK.
TIP :
If the chapters or tracks you want to program
are more than 10, you can highlight NEXT and
press 2(PLAY)/OK to go to the next page.
To cancel a program
• Press 9 (STOP) until Program :Off
appears.
CDs
1 Press PLAY MODE until the screen shows:
2 Use the number buttons on the remote to
enter the track number you want in the box.
The screen shows:
=
The cursor jumps to the next spot in the
program list section.
3 Make sure the box is highlighted and enter
your next track.
Programming DVD and CD tracks
MPD820_17.qxd 4/2/04 9:10 AM Page 22
Program: Chapter (01-35)
01 06
--
02 07
--
03 08
--
04 09
--
05 10
--
Exit
--
--
--
--
--
NEXT
Program: Chapter (01-35)
01 08 06
02 07
--
03 08
--
04 09
--
05 10
--
Exit
Start
--
--
--
--
--
NEXT
Program: Track (01-20)
01 06
--
02 07
--
03 08
--
04 09
--
05 10
--
Exit
--
--
--
--
--
NEXT
Program: Track (01-20)
01 08 06
02 07
--
03 08
--
04 09
--
05 10
--
Exit
Start
--
--
--
--
--
NEXT
Page 23

23
MP3
Select Tracks with Menu
1 Insert a disc, the player reads the disc. The
TV screen displays main menu.
2 Press 4 to select a music folder. Press 2
(PLAY)/OK to confirm selection. Example:
Select CD02 :
3 Use the direction buttons to select a track.
Press 2 (PLAY)/OK to start playback.
4 In stop mode, select the folder icon on the
left side, then press 2 (PLAY)/OK to
return to the main menu.
5 Press
§
or ∞to play a previous or next track.
Programming MP3 tracks
1
In stop mode, press PLAY MODE once or
more to bring up the filelist.
2 Use the direction button 4 to select the
songs which you want to be programmed.
Press RESUME to confirm, and “Add to
Playlist” will be displayed.
3 When your program is complete, press
PLAY MODE again, “Playlist” will be
displayed. Press 2 (PLAY)/OK to start
playback.
To cancel your program
• Your program is to start playback
memorised by the player, and is
deleted/cancelled when you remove your
MP3 disc from the player.
Other MP3 functions
During playback MP3 discs, the unit features
mute, volume control, repeat play and etc.
Operations are the same as CD.
Viewing JPEG files
You can also view JPEG still photos on this
player.
1 Insert a disc, the player reads the disc.
2 Press 4 to select a picture folder. Press 2
(PLAY)/OK to confirm selection.
3 Use the direction buttons to select a track.
Press 2 (PLAY)/OK to view a photo.
=
If your folder contains more than one
photo, the player will then automatically
enter the slide show mode. Using the full
display screen, this shows the rest of the
JPEG files, one-by-one, located in the
selected current folder.
Playing MP3 discs Viewing JPEG files
MPD820_17.qxd 4/2/04 9:10 AM Page 23
00:00 00:00
001/012 Folder
\
CD01
CD02
CD03
CD04
CD05
CD06
00:00 00:00
001/012 Folder
\
--
wave-11
wave-12
wave-13
wave-14
wave-15
3
4
3
4
Page 24

24
OSD operation (for DVDs and
CDs)
The On-Screen Display (OSD) contains many
playback features.
• To see the OSD Menu, press the OSD
button on the remote control while a disc is
playing. During OSD Menu operation, your
picture zooms out.
• Use the direction buttons 3or 4to move
through the different playback features in
the OSD Menu. When a playback feature is
highlighted, press B(PLAY)/OK and the box
to the right will be highlighted.
• Use the direction buttons 3or 4to move
through the choices.
• To return to the normal playback screen,
press the OSD button.
Selecting Title
Some discs contain more than one title. Each
title is divided into chapters. To select a title:
1 While the disc is playing, press OSD on
the remote to bring up the Menu.
2 If "Title" on the Menu isn't highlighted, use
the direction buttons 3or 4to highlight it.
3 Press
B
(PLAY)/OK. The box to the right is
will be highlighted.
4 Use the number buttons on the remote
control to enter a title number that you
want to play.
TIP :
Some discs only have one title.
Selecting a Chapter
You can skip to a specific chapter by using
the Chapter feature in the Menu.
1 While the disc is playing, press OSD on the
remote to bring up the Menu.
2 Press the direction buttons
3
or 4to high-
light "Chapter".
3 Press
B
(PLAY)/OK, the box to the right is
will be highlighted.
4 Use the number buttons on the remote to
enter a chapter number that you want to
play.
TIP :
The Chapter feature won't work if the disc
isn't formatted with separate chapters. You
can also advance to the next chapter by
pressing§on the remote control and go to
the preceding chapter by pressing ∞.
General OSD Operations OSD: Title, Chapter
MPD820_17.qxd 4/2/04 9:10 AM Page 24
Page 25

25
Changing the Audio Language
If the disc was created with different
language tracks (recorded in different
languages), you can use the OSD Menu to
temporarily change the DVD player's Audio
Language setting.
1 While the disc is playing, press OSD on the
remote control to bring up the Menu.
2 Press the direction buttons
3
or 4to
highlight "Audio".
3 Press
B
(PLAY)/OK, the audio languages
appear on the screen.
4 Press the
3
or 4to move through the audio
languages that are available on the disc. Press
the B(PLAY)/OK when the audio language
you want to use is highlighted.
TIP :
T
he Language feature only works if the disc was
created with multiple audio tracks. When you
choose an audio language from the
OSD Menu
,
you only override the audio language setting in
the DVD player's main menu temporarily.
The audio language can also be changed
through the DVD player menu.
Changing the Subtitle language
If the disc was created with different
subtitles, you can use the OSD Menu to
change the Subtitle language.
1 While the disc is playing, press OSD on the
remote to bring up the Menu.
2 Press the
3
or 4to highlight "Subtitle".
3 Press the
B
(PLAY)/OK, the subtitle
languages appears.
4 Press
3
or 4to move through the subtitle
languages that are available on the disc.
Press B(PLAY)/OK when the subtitle
language you want to use is highlighted.
TIP :
–
Changing the subtitle language with OSD
will only affect the disc currently being
played. When the disc is removed or the
player is turned off, the subtitle language
will revert to the language setting specified
through the DVD player main menu.
–
The subtitle language can also be changed
by using the SUBTITLE button (see
page 20, Selecting DVD Subtitles.)
OSD: Language Subtitles
MPD820_17.qxd 4/2/04 9:10 AM Page 25
Page 26

26
Changing the Camera Angle
Some DVDs contain scenes recorded from
different angles. The camera angle will not
change if the DVD does not contain
sequences recorded from different camera
angles.
1 While the disc is playing, press OSD on the
remote control to bring up the Menu.
2 Press
3
or 4to highlight "Angle".
3 Press
B
(PLAY)/OK, the box to the right is
now highlighted.
4 Use the number buttons to enter an angle
number that you want to play.
Setting TT (Title) Time
You can skip to a specific title time by using
the TT (Title) Time feature in the Display.
1 While the disc is playing, press OSD on the
remote control to bring up the Menu.
2 Press
3
or 4to highlight "TT (Title) Time".
3 Press
B
(PLAY)/OK, the box to the right is
now highlighted.
4 Use the number buttons to enter a title time
that you want to play.
Setting CH (Chapter) Time
You can skip to a specific chapter time by
using the CH (Chapter) Time feature in the
Menu.
1 While the disc is playing, press OSD on
the remote control to bring up the Menu.
2 Press
3
or 4to highlight "CH (Chapter)
Time".
3 Press
B
(PLAY)/OK, the box to the right is
now highlighted.
4 Use the number buttons to enter a chapter
time that you want to play.
Repeat
The default mode for the repeat feature is
Off. There are three repeat options:
• Chapter - repeats the chapter that is
playing
• Title - repeats the title that is playing
• All - repeats the disc that is playing
• Off
1 During playback, press OSD on the remote
control to bring up the Menu.
2 Press
3
or 4to highlight "Repeat"
3 Press
B
(PLAY)/OK, the repeat options
appears.
4 Press
3
or 4to move through the repeat
options. Press B(PLAY)/OK when the
repeat option you want to use is
highlighted.
5
To cancel repeat :
• Go to the Repeat feature in the Menu and
select Off.
OSD: Angle,TT Time, CH Time, Repeat
MPD820_17.qxd 4/2/04 9:10 AM Page 26
Page 27

27
Changing the Time Disp(Display)
You can change the time displayed on the
screen: Title Elapsed, Title Remain, Chapter
Elapsed and Chapter Remaining.
1 While the disc is playing, press OSD on the
remote control to bring up the Menu.
2 Press
3
or 4to highlight "Time Disp".
3 Press
B
(PLAY)/OK, the time options
appears.
4 Press
3
or 4to move through the time
options. Press B(PLAY)/OK when the
option you want to use is highlighted.
Changing the Displayed Time
You can changing the time displayed on the
screen : Single (Track) Elapsed Time,
Single (Track) Remain Time, Total (Disc)
Elapsed Time, and Total (Disc) Remain
Time.
1 While the disc is playing, press OSD on the
remote control to bring up the Menu.
2 Press
3
or 4to highlight "Time Disp".
3 Press
B
(PLAY)/OK, the time options
appears.
4 Press
3
or 4to move through the time
options. Press
B (PLAY)/OKwhen the
option you want to use is highlighted.
CD discs have the following playback
features: Track, Disc Time, Track Time,
Repeat, and Time Display.
Selecting a specific track
1 While the disc is playing, press OSD on
the remote control to bring up the Menu.
2 Press
3
or 4to highlight "Track".
3 Press
B
(PLAY)/OK, the box to the right is
now highlighted.
4 Use the number buttons to enter a track
number that you want to play.
Repeat
The default mode for the repeat feature is
Off. There are two repeat options for CDs:
• All - repeats the disc that is playing
• Track - repeats the current track that is
playing
1 While the disc is playing, press OSD on the
remote control to bring up the Menu.
2 Press
3
or 4to highlight "Repeat".
3 Press
B
(PLAY)/OK, the repeat options
appears.
4 Press
3
or 4to move through the repeat
options. Press B(PLAY)/OK when the
repeat option you want to use is
highlighted.
OSD: Time Display Playing CDs
MPD820_17.qxd 4/2/04 9:10 AM Page 27
Page 28

28
Menu Setting
Functions may very according to the Disc
and your additional equipment such as
connecting with speaker sytstem. Set the
following functions for the player to obtain
the best viewing status.
1
Press SETUP to enter the Setup Menu.
The Setup Menu appears on the screen, with
icons across the top of the screen, illustrating General Setup, Audio Setup, LCD Setup
Page, Preference Setup, Password Setup, and
Exit Setup.
The screen shows:
2
Press 4or 3to select your option and
press 2(PLAY)/OK to confirm.
Example: Press
4
to highlight "Audio
Setup", press 2(PLAY)/OK to enter
"Audio Setup Page"
The screen shows:
•
Press 4or 3to highlight "Dolby Digital
Setup", and press 2(PLAY)/OK to enter
"Dolby Digital Setup" page.
The screen shows the submenu:
•
Press 2or 4to select "L - Mono".
The screen shows:
General Setup Menu operations
MPD820_17.qxd 4/2/04 9:10 AM Page 28
DVD
SETUP
-- Audio Setup Page --
Speaker Setup
Dolby Digital Setup
Equalizer
3D Processing
Main Page
-- Setup Menu -- Main Page -General Setup
Audio Setup
Preference Setup
Password Setup
Exit Setup
Go To General Setup Page
Go To Speaker Setup Page
-- Dolby Digital Setup --
Dual Mono STR Stereo
D.R.C.
Audio Setup
Set Stereo Mode
L - Mono
R - Mono
Mix - Mono
-- Dolby Digital Setup --
Dual Mono L Stereo
D.R.C.
Audio Setup
L - Mono
R - Mono
Mix - Mono
Set Left Mono Mode
Page 29

29
•
Press 2(PLAY)/OK to confirm your
selection.
3 To exit the Setup Menu, press
4
to high-
light "Exit Setup" and press 2(PLAY)/OK to
exit Setup Menu completely.
TV Display Page
There are 3 TV display type options which you
can select from the TV Display submenu on
the
General Setup Page.
TV
display type options as follows:
Normal/PS (Pan & Scan)
This is selected when the player is connected
to a standard screen TV. Widescreen images
are shown on the screen, but with some parts
cut automatically.
General Setup: TV Display
MPD820_17.qxd 4/2/04 9:10 AM Page 29
-- General Setup Page --
TV Display Wide Normal/PS
SPDIF Output RAW Normal/LB
Captions On Wide
Screen Saver On
Main Page
Set TV Display Mode
Page 30

30
Normal/LB (letterbox)
This is selected when the player is connected
to a standard screen TV. Widescreen images
are shown on the screen, with a black frame
on the top and bottom.
Wide
This is selected when the player is connected
to a widescreen TV.
TIP :
You can also press the MONITOR button on
the player to change the display mode
between "4:3" and "16:9".
SPDIF Output
• SPDIF OFF: No signal is output from the
digital port.
• SPDIF/RAW: Select this when the DVD player
is connected with a digital amplifier through
digital port. When a Dolby Digital disc or
MPEG disc is played, the digital output will be
optional. The power amplifier to be
connected must have Dolby Digital and MPEG
decoding.
• SPDIF/PCM: Select this when the DVD player
is connected with a 2-channel digital stereo
amplifier. When a Dolby Digital or MPEG disc
is played, the digital port will output in
PCM 2-channel format.
Captions (closed Captioning)
Screen captions are available only on DVDs and
TVs encoded with the caption function. For
DVDs which have captions, you will need to
connect your player to your TV in order to select
and enable the caption on/off option.
• On
The closed
caption
is shown.
• Off
The closed
caption
is turned off.
Screen Saver
When the screen saver is on, the screen saver
image appears when the player stops or the
image is frozen for a few minutes.
•
On: Enables the screen saver.
•
Off: Disables the screen saver.
Audio Setup
The
submenu structure
is:
SPDIF, Captions, Screen Saver, Audio Setup
MPD820_17.qxd 4/2/04 9:10 AM Page 30
Speaker Setup
Dolby Digital Setup
Equalizer
3D Processing
Main Page
Go To Speaker Setup Page
-- Audio Setup Page --
Page 31

31
Speaker Setup Page
The submenu structure is:
• Lt/Rt
The output signal will be incorported to left
and right channel.
• Stereo
The output signal will be incorported to
stereo.
Dolby Digital Setup Page
The submenu structure is:
• Dual Mono
This is the output mode of the L and R
signals of the set audio output. If it is set to
"Mix-Mono", the function only works when
the DVD being played is 5.1-channel.
•
D.R.C
The Dynamic Range Compression (D.R.C.) is
useful for nightime viewing. DRC reduces the
highs and lows by compressing and levelling
out the volume range during disc playback.
Equalizer Page
You can select graphic equalizer options
according to the genre of the music being
played.
The setting structure is:
•
Press 3 or 4 to select your EQ option.
Confirm by pressing 2(PLAY)/OK.
Speaker Setup, Dolby submenus
MPD820_17.qxd 4/2/04 9:10 AM Page 31
-- Speaker Setup Page Downmix STR Lt/Rt
Audio Setup
Stereo
Set Downmix Mode
-- Dolby Digital Setup -Dual Mono STR
D.R.C.
Audio Setup
Set D.R.C. off
Go To Audio Setup Page
-
-
-
-
-
-
-
-
-
-
-
-
-
-
-
-
-
-
FULL
3/4
1/2
1/4
OFF
-- Dolby Digital Page -Dual Mono L Stereo
D.R.C. L-Mono
Audio Setup R-Mono
Mix-Mono
Set Left Mono Mode
-- Equalizer Page --
EQ Type None None
Select Equalizer Type
Rock
Pop
Live
Dance
Techno
Classic
Soft
Page 32

32
3D Processing Page
The submenu structure is:
• V SURR (Virtual Surround)
You can select to turn the Virtual Surround
sound on and off.
• Reverb Mode
Reverb Mode allows you to optimise sound
effects. Select from 8 options, or none (off): Off,
Concert, Living Room, Hall, Bathroom,
Cave, Arena or Church
Monitor Setup Page
Press
Monitor
to change these display
settings:
1
Brightness
You can use the
+ or
-
direction buttons
to adjust the brightness.
2
Color
You can use the
+ or
-
direction buttons
to adjust the color.
3
Display Mode
You can use the
+ or
-
buttons to change
the display mode.
• Normal
The picture is in normal size.
• Full
The picture will fit on full screen.
Password Setup Page
The
submenu structure
is:
Password Mode
• On: password mode activated. "PARENTAL"
is dimmed and cannot be selected.
• Off: The password is swiched off,
"PARENTAL" can be selected.
Changing your Password
Select the Password submenu to change the
code. The screen shows:
Follow the screen instructions to enter your
password.
TIP :
The default password is 99999
3D Processing, LCD, Password Setup
MPD820_17.qxd 4/2/04 9:10 AM Page 32
-- 3D Processing Page -
V SURR Off On
Reverb Mode Off
Audio Setup
Set Virtual Surround
Off
-- Password Setup Page
Password Mode Off Normal
Password
Main Page
Go To Password Setup Page
Old Password
New Password
Confirm PWD
OK
Page 33

33
The submenu structure is:
TIP :
The "Preference Setup" only can be selected when the player is in stop mode.
Default >> Reset
Each function setting returns to the default
setting if you select this option.
Parental
With the parental lock function, you may
select an age control rating for playback of
discs on the player. For example, you can
select and lock onto "PG", whereby you cannot play discs rated higher than PG. The DVD
ratings available on this player are:
1 KID SAF
2 G
3 PG
4 PG 13
5 PGR
6 R
7 NC17
8 ADULT
How to set your Parental Lock
Password
1 When in the disc stop position, press
SETUP on the remote control to enter the
“Setup Menu - Main Page”.
2 Press 4 to highlight Preference Setup.
3 Press the
2
(PLAY)/OK to confirm and enter
the Preference Page.
4 Press 4 to highlight Parental.
5 Use the
2 and the 3
or 4 to select your
DVD rating. Press 2(PLAY)/OK to confirm.
- When a disc that is rated higher than the
parental lock set rating is played, the security
password will be required.
TIP :
- For security, when the Password is set On the
parental lock function cannot be selected. You
will need to switch your Password Off first
(see page 32, Password)
- Some DVDs are not encoded with a rating,
although the movie rating is printed on the
disc case/packaging. The parental lock will
not block viewing of such discs.
- Magnavox cannot guarantee the availability
of parental control with all discs, and therefore denies any liabilty associated with
unintended viewing.
Preference Page: Default , Parental
MPD820_17.qxd 4/2/04 9:10 AM Page 33
-- Preference Page -English
Audio
Subtitle
Disc Menu
Country Region
Parental
Default
Main Page
ENG
ENG
ENG
USA
08
French
Spanish
Chinese
Japanese
Preferred Audio Language
Page 34

34
You can connect the player to a TV or an amplifier to enjoy DVDs or karaoke.
Connecting a TV and a Stereo/Amplifier (see 1)
1
Connect the yellow end of the supplied cable to the VIDEO IN jack of the TV. Connect the
black end to the AUDIO / VIDEO jack on the player.
2 Connect the red end of same cable to the AUDIO IN R jack on the speaker. Connect the
white end to the AUDIO IN L jack on the speaker.
3 Connect the AC adaptor into the DC IN 9V on the player. Connect the other end of the AC
adaptor into a power outlet.
Using Headphones
• Insert headphones into the PHONES jack of the player.
• Turn off the power when inserting or disconnecting headphones.
Take care when using headphones
• Hearing safety: listen at a moderate volume. Using headphones at high volume can
impair your hearing.
• Traffic safety: do not use while driving or cycling as you may cause an accident.
Connecting to additional equipment
1
TV OUT
IMPORTANT!
MAKE SURETV OUT / TFT ON IS AT THE TV OUT POSITION.
OTHERWISE,THERE WILL BE NO DISPLAY ON YOUR TV!
MPD820_17.qxd 4/2/04 9:11 AM Page 34
Page 35

35
Connecting to a TV Only
TV has only a single Antenna In or RF-In jack
Before you begin, make sure you have an RF modulator and extra RF coaxial cables.
These are not supplied with the player, but are available from Magnavox or most
consumer electronics retailers.
1 Connect the black end of the supplied cable to the player’s AUDIO / VIDEO jack.
Connect the other yellow end to the VIDEO IN jack on the RF modulator. The VIDEO IN
jack on the RF modulator is usually yellow and might be labelled VIDEO, CVBS, COMPOSITE,
or BASEBAND.
2 Connect the red end of the same cable to one of the AUDIO IN jacks on the RF
modulator. Audio jacks on the RF modulator usually are red (right) and white (left). Match the
cable color to the jack color.
3 You probably already have an antenna or Cable TV signal connected to the ANTENNA IN jack
on your TV.
Disconnect it now from the TV. Reconnect the antenna or Cable TV signal to the
ANTENNA IN jack on your RF modulator.
Connecting to additional equipment
IMPORTANT!
MAKE SURETV OUT / TFT ON IS AT THE TV OUT POSITION.
OTHERWISE,THERE WILL BE NO DISPLAY ON YOUR TV!
MPD820_17.qxd 4/2/04 9:11 AM Page 35
Page 36

36
Connecting to additional equipment
4 Connect an RF coaxial cable (not supplied) to the RF OUT, ANTENNA OUT, or TO TV
jack on the RF modulator. The RF OUT jack may be labelled differently among different
brands. Refer to the instructions provided with your RF modulator.
Connect the other end of the same RF coaxial cable to the
ANTENNA IN or RF IN jack on your TV.
5 Your RF modulator should have a Channel 3/4 switch.The setting of this switch determines the
TV channel on which you will watch materials playing on the DVD Player.
Set the RF modulator’s Channel 3/4 switch to either 3 or 4, whichever TV channel is
least used in your area. If your RF modulator has a modulator/antenna switch, set it
accordingly. Refer to the instructions that came with the RF modulator.
Turn on your TV and choose channel 3 or 4. Choose the same channel to which you set
the RF modulator’s Channel 3/4 switch.
6 Connect the player’s AC adaptor to a power outlet and turn on the DVD player's
POWER switch to ON. If no disc is in the player, you should see the player's screen
saver on the TV screen.
MPD820_17.qxd 4/2/04 9:11 AM Page 36
Page 37

37
Magnavox reserves the right to make design and specification changes for product
improvement without prior notice.
This product incorporates copyright protection technology that is protected by method claims
of certain U.S. patents and other intellectual property rights owned by Macrovision
Corporation and other rights owners. Use of this copyright protection technology must be
authorized by Macrovision Corporation, and is intended for home and other limited viewing
uses only unless otherwise authorized by Macrovision Corporation. Reverse engineering or
disassembly is prohibited.
Technical Specifications
MPD820_17.qxd 4/2/04 9:11 AM Page 37
Laser
Video system
Frequency response
Signal/noise rat io
Audio distortion + noise
Channel separation
Dynamic range
Audio out Output level: 2V – 10%
Output
Operating
Power Consumption < 20W
(analog audio) Load impedance: 10K‰
Video out
Power supply DC 9V 2.2A
temperat ure
range
Dimensions 8.66 x 6.10 x1.14 (inches)
Weight
wavelength 650mm
NTSC
20Hz ~ 20KHz – 1dB
> 85dB
< -80(1KHz )
> 85dB
> 80dB
Output level: 1Vp - p – 20%
Load impedance: 75‰
32 ~ 122¡F
2.22 (lb)
Page 38

38
If a fault occurs, first check the points listed
below before taking the set for repair.
If you are unable to remedy a problem by
following these hints, consult your dealer or
service center.
WARNING:
Do not open the set as there is a risk of
electric shock. Under no circumstances
should you try to repair the set yourself,
as this will invalidate the warranty.
No sound/power
• Check if the player is connected securely.
• Check volume on the player
• Disconnect headphone when not using
headphone.
• Make sure you operate the TV or amplifier
correctly.
• Make sure you have selected DVD player
position on the amplifier.
• The power circuit in your player is
designed with a power shutdown mode.
This is activated only during battery
power operation of the player when
the battery becomes completely
drained. When this happens:
1 Adjust the POWER switch on the play-
er to the OFF position.
2 Connect your player to AC power with
the supplied power adaptor.
3 Let the player stand idle for 30 seconds
before switching on again to resume
disc operation on AC power supply.
Loud noise when operating the player
• This is normal and due to mechanical
parts. Playback is not affected.
The player feels very warm
•
When the player is in use for a long period
of time, the surface will be heated. This is
normal.
No picture
• Check if the player is connected securely.
• Make sure you operate the TV correctly.
• Make sure you set the color system
correctly.
Bad sound quality
• Make sure the audio output mode is set
correctly.
• Make sure you did not connect any cables
from the DVD player to a Stereo’s
“PHONO IN” jack.
• Make sure you did not connect the play-
er’s COAXIAL digital audio out jack to an
analog jack on the Stereo. (Analog audio
jacks are usually labeled as such and are
usually red and white. Coaxial jacks are
usually black.)
Disc cannot play
• Check you have loaded a disc in the player
if empty.
• Check you have loaded a disc properly
with the label side up.
• Disc dirty/ damaged. Clean the disc.
• Moisture has condensed in the player.
Remove the disc and leave the player to
adjust to the surrounding temperature.
Remote control does not work
• Remove obstacles between the remote
control and the player, and point directly
instead of at a wide angle at the infrared
sensor on the player.
• Battery maybe exhausted. Replace the
battery with a new one.
• To avoid interference with other
electrical equipment, try using the remote
control with a minimum distance of 7 inches from the
sensor on the player.
Troubleshooting
MPD820_17.qxd 4/2/04 9:11 AM Page 38
Page 39

39
Troubleshooting
Image rolls and no color
• The color system of the player doesn't
match your TV. Select the correct TV TYPE
until your TV shows normal color.
An Audio CD will not play.
• Some Audio CDs available on the market
are copy protected.These discs will not
play on this DVD player. See your retailer
for options regarding non-protected Audio
CDs.
The DVD player will not select some
features, such as Angles, Subtitles, or
multi-language Audio.
• The feature may not be available on the
disc. If it is not, the will appear on
the TV screen. Check the disc case to see
if the disc has the feature. If the disc does
not have the feature, the DVD player
cannot create the feature.This is not a
malfunction of the DVD player.
Or, the feature may not be available at the
present time. Some features are only
available during playback, while other
items can be accessed only when play is
stopped.Try stopping or starting playback,
then try the feature again.
Disc play is irregular or DVD disc menu
operation is faulty.
• Due to the inconsistency of disc formats
provided by various disc manufacturers,
your DVD player may require a playability
enhancement or upgrade. As DVD
technology has advanced, these enhancements have become both common and
easy to complete. Please contact
Magnavox at 1-800-705-2000 for
assistance.
Environmental information
We have done our best to reduce the packaging and make it easy to separate into 3 materials: cardboard, styrofoam, and plastic.
Your set consists of materials which can be recycled if disassembled by a
specialized company. Please observe the local regulations regarding the
disposal of packaging, dead batteries and old equipment.
For the latest product information & news visit :
http://www.magnavox.com
MPD820_17.qxd 4/2/04 9:11 AM Page 39
Page 40

40
POR
TABLE DVD PLAYER
90 days Free Product Exchange / 91 days-One year Reduced-Cost Exchange
This product must be carried in for an exchange.
LIMITED WARRANTY
WHO IS COVERED?
You must have proof of the date of purchase to exchange
your product.A sales receipt or other document showing
the date that you purchased the product is considered
such proof.
WHAT IS COVERED?
Warranty coverage begins the day you buy your product.
For 90 days thereafter, you may exchange the defective
product for a free new or renewed product through
Magnavox.
From 91 days to one year from the date of purchase, you will
pay a preset exchange fee to obtain a new or renewed
product. Follow the exchange procedures on the next
page.This exchange opportunity ends one year after the
date of purchase.The replacement product is covered only
for the warranty period of the original product.When the
warranty on the original product expires, the warranty on
all replaced products also expires.
When it is necessary for you to ship the product to Magnavox
for exchange, you will pay the shipping costs for shipment to
Magnavox. Magnavox will pay the shipping costs when
returning a product to you.
WHAT IS EXCLUDED?
Your warranty does not cover:
• shipping charges to return defective product.
• labor charges for installation or setup of the product,
adjustment of customer controls on the product, and
installation or repair of antenna systems outside of
the product.
• product repair and/or part replacement because of
improper installation, abuse, neglect, misuse, accident,
unauthorized repair or other cause not within the
control of Magnavox.
• a product that requires modification or adaptation to
enable it to operate in any country other than the
country for which it was designed, manufactured,
approved and/or authorized, or repair of products
damaged by these modifications.
• incidental or consequential damages resulting from
the product. (Some states do not allow the exclusion
of incidental or consequential damages, so the above
exclusion may not apply to you.This includes, but is
not limited to, prerecorded material, whether copyrighted or not copyrighted.)
• a product used for commercial or institutional purposes
(including but not limited to rental purposes).
WHERE IS EXCHANGE AVAILABLE?
Warranty exchange is available in all countries where the
product is officially distributed by Magnavox. In countries
where Magnavox does not distribute the product, the
local Magnavox service organization will attempt to
exchange the product, although there may be a delay if
the appropriate product is not readily available.
MAKE SURE YOU KEEP...
Please keep your sales receipt or other document showing
proof of date of purchase.Attach it to the owner’s manual
and keep both nearby.Also keep the original box and
packing material in case you need to return your product.
BEFORE EXCHANGING THE PRODUCT...
Please check your owner’s manual before exchanging the
product. Adjustments of the controls discussed there
may save you time and money.
LIMITATION OF LIABILITY AND REMEDY...
MAGNAVOX IS NOT LIABLE UNDER ANY
CIRCUMSTANCES FOR ANY DIRECT, INDIRECT,
SPECIAL, INCIDENTAL, OR CONSEQUENTIAL
DAMAGES,HOWSOEVER INCURRED, EVEN IF
NOTIFIED OF THE POSSIBILITY OF SUCH DAMAGES.
TO THE EXTENT PERMITTED BY LOCAL LAW, THE
REMEDIES PROVIDED IN THIS WARRANTY
STATEMENT ARE YOUR SOLE AND EXCLUSIVE REMEDY.
THIS LIMITED WARRANTY GIVES YOU SPECIFIC
LEGAL RIGHTS,AND YOU MAY ALSO HAVE OTHER
RIGHTS WHICH VARY FROM STATE/PROVINCE TO
STATE/PROVINCE.
TO EXCHANGE YOUR PRODUCT IN THE U.S.A.,
PUERTO RICO,OR U.S.VIRGIN ISLANDS...
FOLLOW THE INSTRUCTIONS STATED PREVIOUSLY
IN THE “WHAT IS COVERED” SECTION, OR REFER TO
THE EXCHANGE INSTRUCTIONS ON THE NEXT
PAGE. IN THE U.S.A., PUERTO RICO,AND U.S.VIRGIN
ISLANDS,ALL IMPLIED WARRANTIES, INCLUDING
THE IMPLIED WARRANTIES OF NON-INFRINGEMENT,
MERCHANTABILITY AND FITNESS FOR A PARTICULAR PURPOSE,ARE SPECIFICALLY DISCLAIMED,AND
TO THE EXTENT INCONSISTENT WITH LAW OF THE
LOCALITY OF THE USER, LIMITED IN DURATION TO
THE DURATION OF THIS EXPRESS WARRANTY.
BECAUSE SOME STATES DO NOT ALLOW LIMITATIONS ON HOW LONG AN IMPLIED WARRANTY
MAY LAST,THIS LIMITATION MAY NOT APPLY TO YOU.
TO EXCHANGE A PRODUCT IN CANADA...
Please contact Magnavox at:
1-800-705-2000
In Canada, this warranty is given in lieu of all other
warranties.There are no other warranties, express or
implied, including any implied warranties of
merchantability or fitness for a particular purpose.
REMEMBER…
Please record below the model and serial numbers found
on the product.Also, please fill out and mail your
warranty registration card promptly. It will be easier for
us to notify you if necessary.
MODEL # __________________________________
SERIAL # __________________________________
EL6505E004 / 11-02
This warranty gives you specific legal rights.You may have other rights which vary from state/province to state/province.
Magnavox, P.O. Box 520890, Miami, FL 33152, USA, (402) 536-4171
MPD820_17.qxd 4/2/04 9:11 AM Page 40
Page 41

41
EXCHANGE INSTRUCTIONS
To exchange your product with Magnavox (per the warranty conditions stated previously), remember:
• If you exchange the product within 90 days of the original purchase, there is no cost to you.*
• If you exchange the product more than 90 days after but less than one year after the day of original purchase,
contact Magnavox at 1-800-705-2000 to determine the preset cost for exchange.
• If you do not have your original sales receipt, or if you have any questions, call Magnavox at 1-800-705-2000.
To obtain a replacement product from Magnavox:
1. Contact Magnavox at 1-800-705-2000 to determine the cost for exchange.
2. Complete the Exchange Form below.
3. Pack the product and its accessories in the original box or a suitable alternative.You will receive replacement
accessories with your replacement product. For packing details, call Magnavox at 1-800-705-2000.
4. Put the completed Exchange Form, a copy of the original sales receipt, and the proper payment amount into an
envelope. DO NOT SEND CASH. Do not staple or clip these items together. Label the envelope “Return
Documents Enclosed.” Place this envelope in the box with the product.
5. Seal the box with packing tape and return the product via United Parcel Service (UPS), insured and freight prepaid,
to the address provided by Magnavox. For details, call 1-800-705-2000. A replacement will be sent to you via UPS
within 48 business hours of Magnavox’ receipt of the product.
*When it is necessary for you to ship the product to Magnavox for exchange, you will pay the shipping costs for shipment to
Magnavox. Magnavox will pay the shipping costs when returning a product to you.
EXCHANGE FORM
Your Address (street address to which replacement should be delivered, no P.O. boxes allowed):
Name:
Street Address: Apt. #:
City: State/Province: Zip Code/Postal Code:
Phone (day): Phone (night):
Exchange Fee: ________________ + Sales Tax: ________________ = Total: __________
Method of Payment: (Check one. Please, no cash or CODs.)
_____ Check/Money order Check/Money order No. _____________________________________
Account number Expiration date
_____ American Express ___________________________ ____________
_____ Visa ___________________________ ____________
_____ Novus/Discover ___________________________ ____________
_____ MasterCard ___________________________ ____________
Signature:________________________________________________________________________________________
Detailed reason for return, use additional paper if necessary: ________________________________________________
__________________________________________________________________________________________________
__________________________________________________________________________________________________
__________________________________________________________________________________________________
Model Number ____________________ Serial Number ______________________________________________
Remember, the return box should include the following:
• The product, • Accessories supplied with the product, and
• Completed Exchange Form and sales receipt, • Payment, if applicable.
MPD820_17.qxd 4/2/04 9:11 AM Page 41
Page 42

MAGNAVOX
A Division of Philips Consumer Electronics North America
Knoxville, Tennessee 37914-1810, U.S.A
Meet Magnavox at the Internet
http://www.magnavox.com
Printed in China BK412
MPD820
IB8486E001
MPD820_17.qxd 4/2/04 9:11 AM Page 42
CLASS 1
LASER PRODUCT
 Loading...