

Page 1

2
1a
1b
4a
4b
3
!
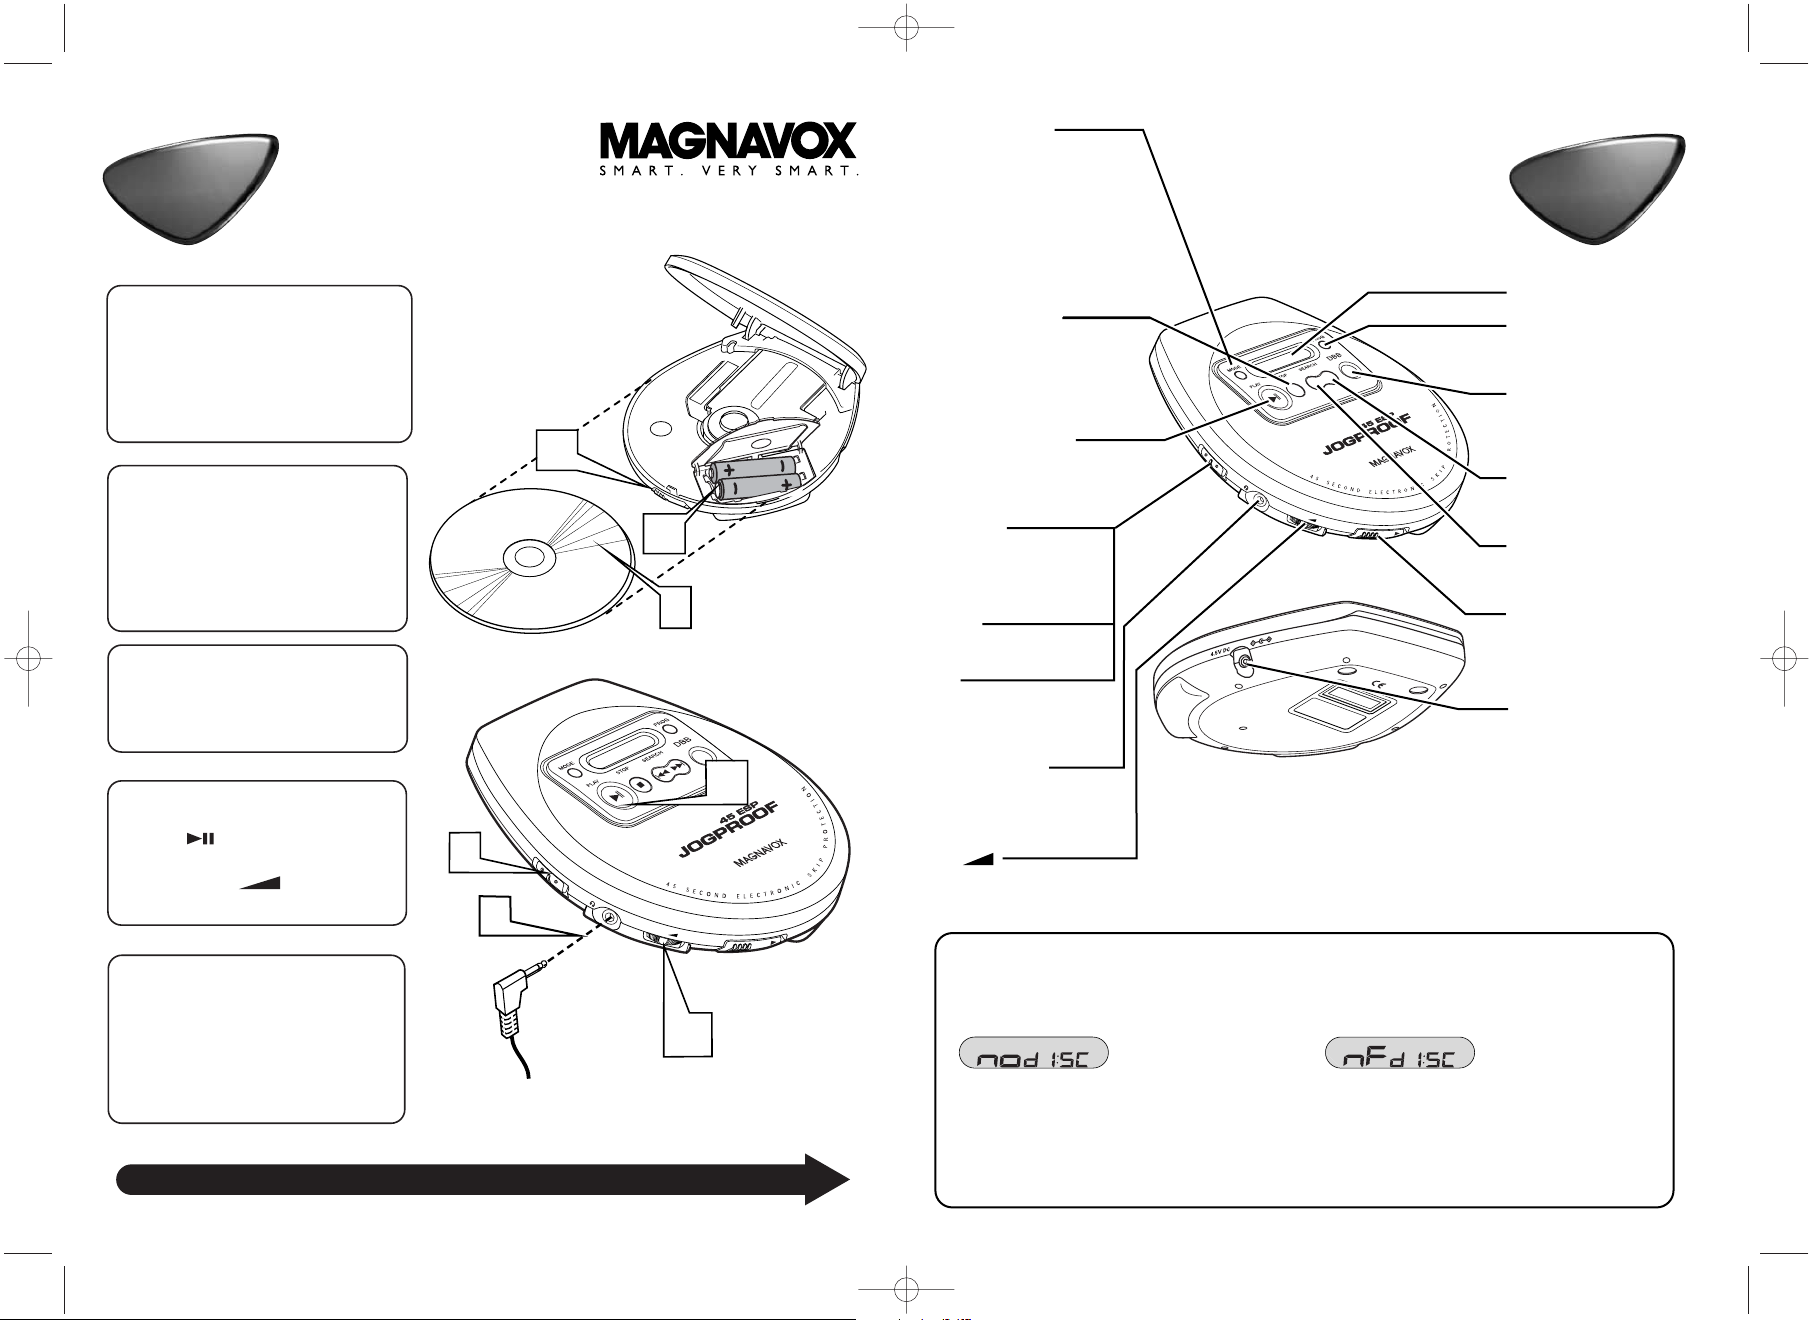
If “NO DISC” is displayed:
1 The CD might be dirty or scratched.
2 The label might be facing down.
3 The lens might be fogged up. Allow sever-
al minutes for it to clear.
If “NF DISC’ is displayed:
1 The disc is not being recognized by the
CD player.
2 The CD-RW (or CD-R) needs to be final-
ized before the player can play it.
Display
PROG
Press to program
tracks
DBB
Press to turn BasEnhancement on and
off.
Search ¢
Press to search and
skip forward.
Search 4
Press to search and
skip backward.
OPEN 3
Slide to open the CD
player lid.
MODE button
Press to select the Play
mode (Shuffle, Shuffle
Repeat, Shuffle Repeat
ALL, Repeat, Repeat, and
Repeat ALL).
STOP 7 Button
Press to stop playback,
clear a program, or
switch the player off.
PLAY 38 Button
Press to switch the play
on or to begin playback.
RESUME
Switch to store the last
position of a CD track
played.
HOLD
Switch to lock the buttons
OFF
Switch to turn off
RESUME and HOLD.
LINE OUT/;
Connect headphones or
another audio device
here.
VOL
Use to adjust the volume.
4.5V DC
Connect jack for external power supply here.
!
If the Disc does not play, there are several possible reasons.
MPC220-QUG 7/18/03 5:28 AM Page 1
Quick Use
Quick Use
Guide
Guide
Insert the batteries.
1
a Press the OPEN3 slider to
open the lid.
b Open the battery compartment
and insert 2 AA batteries.
Insert a CD.
2
Place a CD on the hub and
close the lid. Make sure the
disc is in good condition and
the label is facing up.
Connect the Headphones.
3
Plug the headphones into the
LINE OUT/; jack.
Start playback.
4
a Press PLAY
to start the
CD.
b Use the VOL to adjust the
volume.
NOTE:
!
If the buttons do not respond,
check the RESUME/HOLD/OFF
slider. It should be in RESUME
position to begin with.
Quick Use
Quick Use
Guide
Guide
4
4
O
F
F
•
R
E
S
U
M
E
•
H
O
L
D
L
IN
E
9
O
U
T
/
V
O
L
N
O
P
E
C
L
A
L
A
S
S
E
S
R
1
P
R
O
D
U
C
T
LINE OUT/
VOL
N
E
P
O
See the other side for some important tips.
Page 2
2
1a
1b
4a
4b
3
!
Si se visualiza “NO DISC”:
1 El CD podría estar sucio o rayado.
2 La cara de la etiqueta podría estar hacia
abajo.
3 La lente podría estar empañada. Espere
varios minutos hasta que se aclare.
Si se visualiza “NF DISC”:
1 El reproductor de CD no reconoce el
disco.
2 El CD-RW (o CD-R) debe ser finalizado
antes de que el reproductor pueda reproducirlo.
!
Si no reproduce el Disco, existen varias causas posibles.
Visualización
PROG
Pulse para programar
pistas.
DBB
Pulse para activar y
desactivar el Realce de
Graves.
Search ¢
Pulse para la búsqueda
y saltos de avance.
Search 4
Pulse para la búsqueda
y saltos de retroceso.
OPEN 3
Deslice para abrir la
tapa del reproductor
de CD.
4.5V DC
Conecte aquí la clavija
para el suministro
eléctrico externo.
Botón MODE
Pulse para seleccionar
el modo Reproducir
(Aleatoria, Repetición
Aleatoria, Repetición
COMPLETA Aleatoria,
Repetición, Repetición,
y Repetición COMPLETA).
Botón STOP 7
Pulse para detener la
reproducción, borrar
un programa, o cambiar a reproductor apagado.
Botón PLAY 38
Pulse para activar la
reproducción o para
iniciar la reproducción.
RESUME
Seleccione para memorizar la última posición
de la pista reproducida
de un CD.
HOLD
Seleccione para bloquear el botón.
OFF
Seleccione para desactivar la función
RESUME y HOLD.
LINE OUT/;
Conecte aquí los auriculares u otro aparato
de sonido.
VOL
Utilice para ajustar el
volumen.
MPC220-QUG_Spa 7/20/03 9:21 PM Page 1
Guía Rápida
Guía Rápida
de Uso
de Uso
Introduzca las pilas.
1
a Pulse el interruptor corredizo
OPEN 3 para abrir la tapa.
b Abra el compartimento para las
pilas e introduzca 2 pilas AA.
Introduzca un CD.
2
Coloque un CD en el eje y cierre
la tapa. Compruebe que el disco
está en buenas condiciones y que
la cara de la etiqueta está hacia
arriba.
Conecte los Auriculares.
3
Enchufe los auriculares en la
oma LINE OUT/;.
Inicie la reproducción.
4
a Pulse para iniciar la
reproducción del CD.
b Utilice VOL para ajustar el
volumen.
LINE OUT/
VOL
NOTA:
!
Si los botones no responden,
compruebe el interruptor
corredizo RESUME/HOLD/OFF.
Debería estar en la posición
RESUME para comenzar.
Consulte la otra cara que incluye algunos consejos importantes.
Guía Rápida
Guía Rápida
de Uso
de Uso
4
4
O
F
F
•
R
E
S
U
M
E
•
H
O
L
D
L
IN
E
9
O
U
T
/
V
O
L
N
O
P
E
C
L
A
L
A
S
S
E
S
R
1
P
R
O
D
U
C
T
N
E
P
O
 Loading...