

Page 1
User guide
SMART. VERY SMART.
MME239
Thank you for choosing
STOP
Read your Quick Use Guide and/or
Owner's Manual first for quick tips
that make using your Magnavox product
www.magnavox.com/usasupport
Magnavox.
Need help fast?
more enjoyable.
If you have read your instructions
and still need assistance,
you may access our online help at
or call
1-800-705-2000
while with your product
(and Model / Serial number)
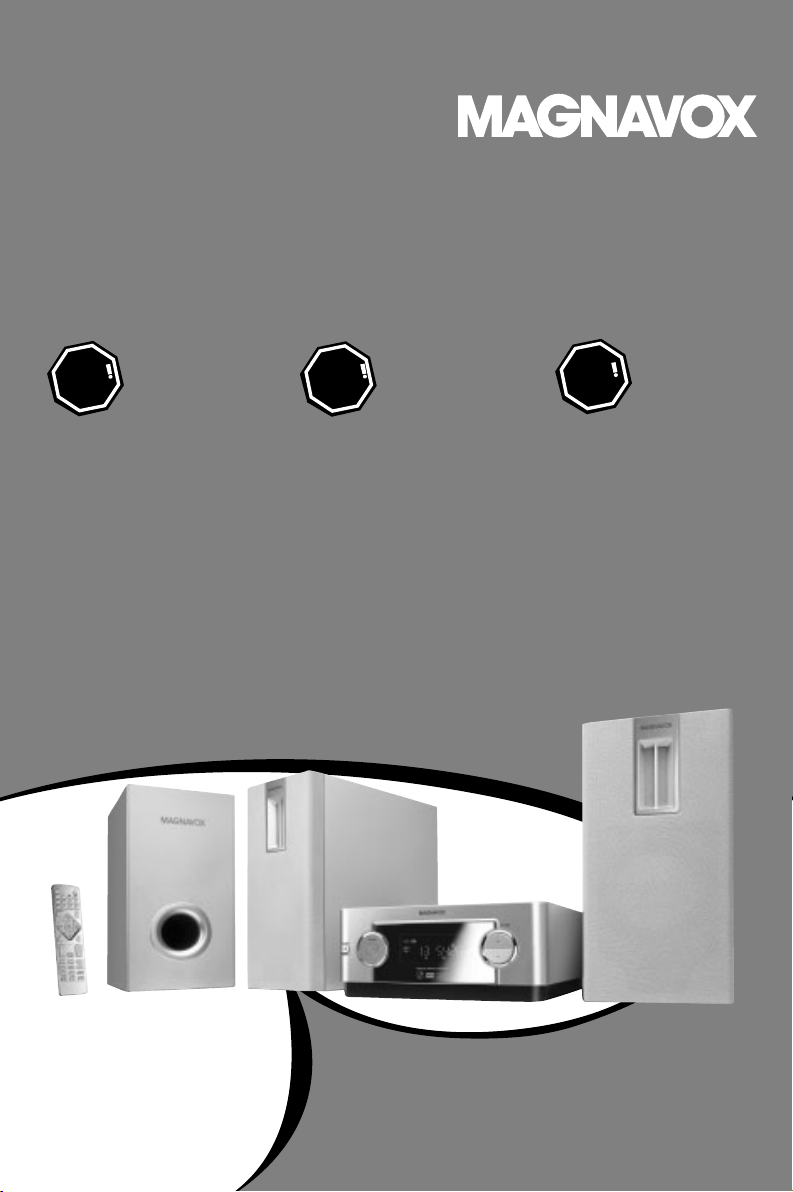
DVD Micro System
Magnavox vous remercie de
ARRÊT
Le Guide d'utilisation rapide et
Manuel de l'utilisateur regorgent
d'astuces destinées à simplifier
l'utilisation de votre produit Magnavox.
Toutefois, si vous ne parvenez
pas à résoudre votre problème,
vous pouvez accéder à
notre aide en ligne à l'adresse
www.magnavox.com/usasupport
Veillez à avoir votre produit à
(et model / serial nombre)
votre confiance.
Besoin d'une aide
rapide?
ou formez le
1-800-705-2000
portée de main
Lea primero la Guía de uso rápido o el
Manual del usuario, en donde encon-
plenamente de su producto Magnavox.
Si después de leerlo aún necesita ayuda,
www.magnavox.com/usasupport
Gracias por escoger Magnavox.
ALTO
Necesita ayuda
inmediata?
consejos que le ayudarán a disfrutar
y tenga a mano el producto
(y número de model / serial)
trará
consulte nuestro servicio de
asistencia en línea en
o llame al teléfono
1-800-705-2000
Page 2

Note : This equipment has been tested and found to comply with the limits for a Class B digital device,
pursuant to part 15 of the FCC Rules. These limits are designed to provide reasonable protection against
harmful interference in a residential installation. This equipment generates, uses, and can radiate radio
frequency energy and, if not installed and used in accordance with the instruction manual, may cause
harmful interference to radio communications. However, there is no guarantee that interference will not
occur in a particular installation. If this equipment does cause harmful interference to radio or television
reception, which can be determined by turning the equipment off and on, the user is encouraged to try to
correct the interference by one or more of the following measures :
– Relocate the receiving antenna.
– Increase the separation between the equipment and receiver
– Connect the equipment into an outlet on a circuit different from that to which the receiver is connected.
– Consult the dealer or an experienced radio/TV technician for help.
IMPORTANT !
modifications not authorized by the manufacturer may void users authority to operate this device.
Remarque : Cet équipement a été testé et a été certifié conforme aux limites imposées pour un
appareil numérique de Classe B, conformément à la partie 15 des réglements FCC. Ces limites sont
définies aux fins d'assurer une protection raisonnable contre les interférences nuisibles dans une
installation résidentielle. Cet équipement génère, utilise et émet des fréquences radio qui, en cas d'une
mauvaise installation ou d'une utilisation non-conforme aux instructions de ce manuel d'utilisation
peuvent causer des interférences nuisibles aux communications radio. Il n'y a toutefois aucune garantie
que des interférences nuisibles ne se produiront pas dans une installation donnée. Si cet équipement
cause des interférences nuisibles avec votre poste radio ou de télévision, ce que vous pouvez déterminer
en éteignant et en rallumant votre équipement, il est conseillé à l'utilisateur d'essayer de pallier à ces
interférences nuisibles en prenant l'une ou l'autre des mesures suivantes:
– Changez la position de l'antenne de réception.
– Augmentez la séparation entre l'équipement et le récepteur.
– Branchez l'équipement sur une source d'alimentation différente de celle sur laquelle le récepteur est
branché.
– Consultez votre distributeur ou un technicien qualifié en la matière pour assistance.
IMPORTANTE !
las modificaciones no autorizadas por el fabricante pueden anular la autoridad de los usuarios para
utilizar este aparato.
Nota : Este aparato ha sido probado y cumple con los límites correspondientes a un aparato digital de Clase
B, según la parte 15 de las Normas FCC. Estos límites han sido diseñados para facilitar suficiente protección
.
frente a interferencias perjudiciales en una instalación residencial. Este aparato genera, utiliza y puede emitir
energía de frecuencias de radio y, si no se instala y utiliza según el manual de instrucciones, puede provocar
interferencias perjudiciales en las comunicaciones de radio. Sin embargo, no existe garantía de que las
interferencias no ocurrirán en una instalación particular. Si este aparato provoca interferencias perjudiciales en
la recepción de radio o television, que se puede identificar encendiendo y apagando el aparato,
recomendamos al usuario que intente solucionar las interferencias siguiendo una o más de las siguientes
medidas:
– Cambie la posición de la antena receptora.
– Aumente la separación entre el aparato y el receptor.
– Conecte el aparato a una toma de un circuito diferente al que está conectado el receptor.
– Consulte con el distribuidor o un técnico de radio/TV con experiencia para que le ayuden.
¡IMPORTANTE!
modificações não autorizadas pelo fabricante, podem causar danos na operação deste aparelho.
2
Page 3
Return your Product Registration Card or register online at
www.magnavox.com/usasupport today to get the very most from your purchase.
Registering your model with MAGNAVOX makes you eligible for all of the valuable benefits listed below,
so don't miss out. Complete and return your Product Registration Card at once, or register online at
www.magnavox.com/usasupport to ensure:
*Proof of Purchase
Returning the enclosed card
guarantees that your date of
purchase will be on file, so no
additional paperwork will be
required from you to obtain warranty service.
*Product Safety
Notification
By registering your product,
you'll receive notification directly from the manufacturer
- in the rare case of a product
recall or safety defect.
Congratulations on your purchase,
and welcome to the “family!”
Dear MAGNAVOX product owner:
Thank you for your confidence in
MAGNAVOX.You’ve selected one of the
best-built, best-backed products available
today.We’ll do everything in our power to
keep you happy with your purchase for many
years to come.
As a member of the MAGNAVOX “family,”
you’re entitled to protection by one of the
most comprehensive warranties and outstanding service networks in the industry.
What’s more, your purchase guarantees
you’ll receive all the information and special
offers for which you qualify, plus easy access
to accessories from our convenient home
shopping network.
Most importantly, you can count on our
uncompromising commitment to your total
satisfaction.
All of this is our way of saying welcome and thanks for investing in a MAGNAVOX
product.
P.S. To get the most from your MAGNAVOX purchase, be sure to complete
and return your Product Registration
Card at once, or register online at:
www.magnavox.com/usasupport
*Additional Benefits
Registering your product guarantees that you'll receive all of
the privileges to which you're
entitled, including special
money-saving offers.
Know these
safety
CAUTION: TO REDUCE THE RISK OF ELECTRIC SHOCK, DO NOT
REMOVE COVER (OR BACK). NO USER-SERVICEABLE PARTS
INSIDE. REFER SERVICING TO QUALIFIED SERVICE PERSONNEL.
This “bolt of lightning” indicates unin-
sulated material within your unit may
cause an electrical shock. For the safety of
everyone in your household, please do not
remove product covering.
The “exclamation point” calls attention
to features for which you should read
the enclosed literature closely to prevent
operating and maintenance problems.
WARNING: To r educe the risk of fire or
electric shock, this apparatus should not be
exposed to rain or moisture and objects
filled with liquids, such as vases, should not
be placed on this apparatus.
CAUTION: To prevent electric shock, match
wide blade of plug to wide slot, fully insert.
ATTENTION:Pour éviter les choc électriques, introduire la lame la plus large de la
fiche dans la borne correspondante de la
prise et pousser jusqu’au fond.
Enter below the Serial No. which is located
on the rear of the cabinet. Retain this
information for future reference.
Model No. __________________________
Serial No. __________________________
For Customer Use
symbols
CAUTION
RISK OF ELECTRIC SHOCK
DO NOT OPEN
Visit our World Wide Web Site at http://www.magnavox.com/usasupport
3
Page 4
IMPORTANT SAFETY INSTRUCTIONS
Clean only with dry cloth.
materials
Class II equipment symbol
This symbol indicates that the unit has
a double insulation system
4
Page 5

Index
Canada
English:
This digital apparatus does not exceed
the Class B limits for radio noise
emissions from digital apparatus as set
out in the Radio Interference
Regulations of the Canadian
Department of Communications.
Français:
Cet appareil numérique n'emet pas de
bruits radioélectriques dépassant les
limites applicables aux appareils
numériques de Class B prescrites dans
le Règlement sur le Brouillage
Radioélectrique édicté par le Ministère
des Communications du Canada.
CAUTION
Use of controls or adjustments or
performance of procedures other
than herein may result in hazardous
radiation exposure or other unsafe
operation.
ATTENTION
L'utilisation des commandes ou
réglages ou le non-respect des
procédures ci-incluses peuvent se
traduire par une exposition
dangereuse à l'irradiation.
ATENCIÓN
El uso de mando o ajustes o la
ejecucción de métodos que no sean
los aquí descritos puede ocasionar
peligro de exposición a radiación.
English ------------------------------------------------ 6
English
Français -------------------------------------------- 40
Français
Español --------------------------------------------- 76
Español
CONSUMERS SHOULD NOTE THAT
NOT ALL HIGH DEFINITION
TELEVSION SETS ARE FULLY
COMPATIBLE WITH THIS PRODUCT
AND MAY CAUSE ARTIFACTS TO BE
DISPLAYED IN THE PICTURE. IN
CASE OF 525 OR 625 PROGRESSIVE
SCAN PICTURE PROBLEMS, IT IS
RECOMMENDED THAT THE USER
SWITCH THE CONNECTIN TO THE
‘STANDARD DEFINITION’ OUTPUT.
IF THERE ARE QUESTIONS REGARDING OUR TV SET COMPATIBILITY
WITH THIS MODEL 525p AND 625p
DVD PLAYER, PLEASE CONTACT
OUR CUSTOMER SERVICE CENTER.
This product incorporates copyright protection technology that is
protected by method claims of
certain U.S. patents and other
intellectual property rights owned
by Macrovision Corporation and
other rights owners. Use of this
copyright protection technology
must be authorized by Macrovision
Corporation, and is intended for
home and other limited viewing
uses only unless otherwise authorized by Macrovision Corporation.
Reserve engineering or disassembly
is prohibited.
5
Page 6

Contents
English
General Information
Features .................................................................. 8
Supplied accessories ............................................ 8
Environment information ................................... 8
Safety information ................................................ 9
Maintenance .......................................................... 9
Connections
Step1: Placing speakers and subwoofer ......... 10
Step2: Connecting speakers and subwoofer...10
Step3: Connecting TV set .......................... 11~12
Using Video in jack (CVBS)
Using Componet Video in jack (Pr Pb Y)
Using S-Video in jack
Using an accessory RF modulator
Step4: Connecting the FM antenna ................ 13
Step5: Connecting the power cord ................ 13
Step6: Connecting a VCR or cable/satellite
box.......................................................................... .13
Step7: Connecting digital audio equipment....14
Functional Overview
Controls on the system .................................... 15
Remote control ........................................... 16~17
Getting Started
Step 1: Using the Remote Control ................. 18
Step 2: Setting up the TV ........................... 18~20
Step 3: Setting language preference ................ 20
Basic Functions
Switching the system on/off ............................. 21
Power saving automatic standby ..................... 21
Volume control ................................................... 21
Sound Control .................................................... 21
Selecting the color system that matches
your TV set
Setting up Progressive Scan feature
To deactivate Progressive manually
Setting the OSD Language
Setting the Audio, Subtitle and Disc Menu
language
DBB (Dynamic Bass Boost)
DSC (Digital Sound Control)
Disc Operations
Playable Discs ...................................................... 22
Region Codes ...................................................... 22
Playing discs ......................................................... 23
Using the Disc Menu.......................................... 23
Using PBC feature (available for 2.0-version
VCD only)
Resuming playback...............................................23
Selecting and searching .............................. 23~24
Selecting a different track/chapter
Fast forwarding/reversing
GOTO
Different play modes:
REPEAT, SHUFFLE and REPEAT A-B .............. 24
REPEAT
SHUFFLE
REPEAT A-B
Programming favourite tracks ......................... 25
Display information............................................ 25
ZOOM .................................................................. 26
AUDIO ................................................................. 26
SUBTITLE ............................................................. 26
Playing a title........................................................ 26
Playing MP3/WMA/JPEG disc .......................... 26
Playing MP3 music and JPEG picture
simultaneously.....................................................27
Playing Kodak Picture disc ................................ 27
DVD MENU Operations
Using the menu bar ........................................... 28
Using setup menu (user preference settings)
........... .............................................................. 29~31
TV Display
Screen Saver
Night Mode
Test Tone
Changing the password
Restricting playback by setting parental level
Rating explanations
OSD language (menu lanuage)
Default
6
Page 7

Tuner
Tuning to radio stations......................................32
Storing preset radio stations.............................32
Manual programming.......................................32
Automatic programming.................................32
Listening to preset radio stations.....................32
Deleting a preset radio station.........................32
Clock/Timer
Viewing clock........................................................33
Setting clock..........................................................33
Setting wake-up timer..........................................33
Setting sleep timer................................................33
Specifications ........................................... 34
Tr oubleshooting ............................. 35~37
Glossary ......................................................... 38
Contents
English
7
Page 8

General Information
English
This set complies with the FCC rules,
Part 15 and with 21 CFR 1040.10.
Operation is subject to the following two
conditions:
– This device may not cause harmful
interference, and
– This device must accept any interference
received, including interference that may
cause undesired operation.
Features
Your DVD MICRO THEATRE System with 2.1channel full analog amplifier creates the same
dynamic sound qualities that you find in full
fledged cinemas and incorporates some of the
best features in home theater technology. Other
features include:
Additional Component Connections
Lets you connect other audio and audio/visual
components to the DVD micro system.
Night Mode
Selects Dynamic ON or OFF cyclically
Parental Control (Rating Level)
Lets you set a ratings level so that your children
cannot watch a DVD that has a rating higher
than you set.
Supplied accessories
– Remote control with one CR2025 batter y
–Two speakers and one subwoofer
– DIN cable
– Composite video cable (yellow)
– FM wire antenna
– User Manual and Quick Star t Guide
If any item is damaged or missing, contact
your retailer or Magnavox.
Environmental information
All unnecessary packaging has been omitted. We
have tried to make the packaging easy to
separate into three materials: cardboard (box),
polystyrene foam (buffer) and polyethylene (bags,
protective foam sheet).
Your system consists of materials which can be
recycled and reused if disassembled by a
specialised company. Please observe the local
regulations regarding the disposal of packaging
materials, exhausted batteries and old equipment.
Parental Control (Rating Level)
Sleep/Wake-up Timer
Enables the system to switch on/off automatically
at a preset time.
Progressive Scan
Provides high quality flicker-free images for film
based sources. When a picture refreshes, its
ver tical resolution can double to 525 lines.
Note:
–To fully enjoy the progressive scan feature, you
need a progressive scan TV.
8
Page 9

General Information
Safety information
● Before operating the system, check that the
operating voltage indicated on the typeplate (or
the voltage indication beside the voltage
selector) of your system is identical with the
voltage of your local power supply. If not, please
consult your dealer.
● Place the system on a flat, hard and stable
surface.
● Place the system in a location with adequate
ventilation to prevent internal heat build-up in
your system. Allow at least 10 cm (4 inches)
clearance from the rear and the top of the unit
and 5 cm (2 inches) from each side.
● The ventilation should not be impeded by
covering the ventilation openings with items,
such as newspapers, table-cloths, curtains, etc.
● Do not expose the system, batteries or discs to
excessive moisture, rain, sand or heat sources
caused by heating equipment or direct sunlight.
● No naked flame sources, such as lighted candles,
should be placed on the apparatus.
● No objects filled with liquids, such as vases, shall
be placed on the apparatus.
● If the system is brought directly from a cold to a
warm location, or is placed in a very damp room,
moisture may condense on the lens of the disc
unit inside the system. Should this occur, the CD
player would not operate normally. Leave the
power on for about one hour with no disc in the
system until normal playback is possible.
● The mechanical parts of the set contain self-
lubricating bearings and must not be oiled or
lubricated.
● When the system is switched to Standby
mode, it is still consuming some power.
To disconnect the system from the
power supply completely, remove the AC
power plug from the wall socket.
Maintenance
● When a disc becomes dirty,
clean it with a cleaning cloth.
Wipe the disc from the center
out, in a straight line.
● Do not expose the player,
batteries or discs to humidity,
rain, sand or excessive heat
(caused by heating equipment or direct sunlight).
Always keep the disc tray closed to avoid dust
on the lens.
● Do not use solvents such as benzene, thinner,
commercially available cleaners, or anti-static
spray intended for colour discs.
● The lens may cloud over when the player is
suddenly moved from cold to warm
surroundings, making it impossible to play a disc.
Leave the player in the warm environment until
the moisture evaporates.
English
9
Page 10
Connections
English
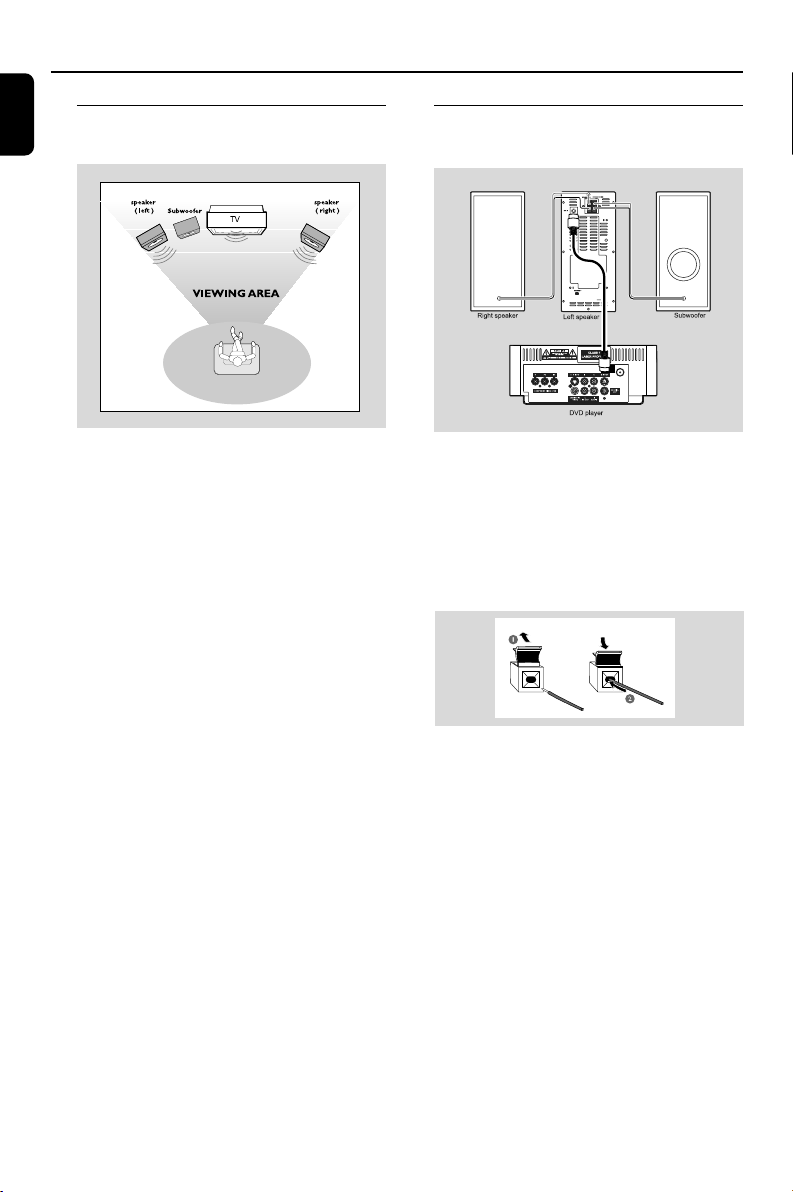
Step 1: Placing speakers and
subwoofer
For best possible surround sound, locate your
speakers and subwoofer as follows:
● Place the left and right speakers at equal
distances from the TV set and at an angle of
approximately 45 degrees from the listening
position.
● Place the subwoofer on the floor.
Notes:
–To avoid magnetic interference, position the
speakers, subwoofer as far as possible from the
main unit, TV set or other radiation source.
– Allow adequate ventilation around the DVD
System.
IMPORTANT!
The type plate is located on the bottom
of the system.
Step 2: Connecting speakers
and subwoofer
ANTENNA
FM
(75Ω)
● Connect the supplied DIN cable to DVD player’s
DIN jack and the left speaker’s DIN jack.
● Connect the supplied speaker wires of the right
speaker to SPEAKER RIGHT on the left speaker,
red wire to red jack ( “+” ), black wire to black
jack ( “-“ ). Fully inser t the stripped portion of
the speaker wire into the terminal as shown.
● Connect the supplied speaker wire of the
subwoofer to SUBWOOFER OUT on the left
speaker, green wire to green jack ( “+” ), white
wire to white jack ( “-” ).
To avoid overheating of the system, a
safety circuit has been built in. Therefore,
your system may switch to Standby
mode automatically under extreme
conditions. If this happens, let the system
cool down before reusing it.
10
Notes:
–For optimal sound performance, use the
supplied speakers.
– Do not connect more than one speaker to any
one pair of +/- speaker terminals.
– Do not connect speakers with an impedance
lower than the speakers supplied. Please refer to
the SPECIFICATIONS section of this manual.
Page 11
Connections
Step 3: Connecting TV set
IMPORTANT!
–You only need to make one video
connection from the following options,
according to the capabilities of your TV
system.
– S-Video or Component Video
connection provides higher picture
quality. These options must be available
on your TV set.
– Connect the system directly to the TV
set.
Using Video In jack (CVBS)
● Use the supplied composite video cable (yellow)
to connect the system’s COMPOSITE
VIDEO jack to the video input jack (or labeled
as A/V In, Video In, Composite or Baseband) on
the TV set.
● To listen to TV channels through this system, use
the audio cables (white/red, not supplied) to
connect AUX IN (L/R) jacks to the
corresponding AUDIO OUT jacks on the TV set.
Or, to listen to disc playback of the system
through your TV, use the audio cables (white/red,
not supplied) to connect LINE OUT (L/R)
jacks to the corresponding AUDIO IN jacks on
the TV set.
ANTENNA
FM
(75Ω)
Using component Video In jack (Pr Pb Y)
● Use the component video cables (red/blue/
green, not supplied) to connect the system’s PR/
PB/ Y jacks to the corresponding Component
video input jacks (or labeled as Pr/Cr Pb/Cb Y or
YUV) on the TV set.
● To listen to TV channels through this system, use
the audio cables (white/red, not supplied) to
connect AUX IN (L/R) jacks to the
corresponding AUDIO OUT jacks on the TV set.
Or, to listen to disc playback of the system
through your TV, use the audio cables (white/red,
not supplied) to connect LINE OUT (L/R)
jacks to the corresponding AUDIO IN jacks on
the TV set.
ANTENNA
FM
(75Ω)
Notes for progressive scan video:
– The progressive scan video quality is only
possible when using Y Pb Pr, and a progressive scan
TV is required.
– If you are using a Progressive Scan TV (TV must
indicate Progressive Scan or ProScan capability), to
activate TV Progressive Scan, please refer to your TV
user manual. For DVD system’s Progressive Scan
function, see “Getting Started - Setting up
Progressive Scan feature’’.
– If your TV does not support Progressive Scan, you
will not be able to view the picture. Turn off
progressive scan in PROGRESSIVE menu of the
system setup menu.
English
11
Page 12
ANTENNA
FM
(75Ω)
Connections
English
Using S-Video In jack
ANTENNA
FM
(75Ω)
● Use the S-Video cable (not supplied) to connect
the system’s S-VIDEO jack to the S-Video
input jack (or labeled as Y/C or S-VHS) on the
TV set.
● To listen to TV channels through this system, use
the audio cables (white/red, not supplied) to
connect AUX IN (L/R) jacks to the
corresponding AUDIO OUT jacks on the TV set.
Or, to listen to disc playback of the system
through the TV, use the audio cables (white/red,
not supplied) to connect LINE OUT (L/R)
jacks to the corresponding AUDIO IN jacks on
the TV set.
Using an accessory RF modulator
IMPORTANT!
– If your TV set only has a single
Antenna In jack (or labeled as 75 ohm or
RF In), you will need a RF modulator in
order to view the DVD playback via TV.
See your electronics retailer or contact
Magnavox for details on RF modulator
availability and operations.
● Use the supplied composite cable (yellow) to
connect the system’s COMPOSITE VIDEO
jack to the video input jack on the RF modulator.
● Use the RF coaxial cable (not supplied) to
connect the RF modulator to your TV’s RF jack.
12
Page 13

Connections
Step 4: Connecting the FM
antenna
● Connect the supplied FM antenna to the FM (75
Ω) jack at the back of the main unit. Extend the
FM antenna and fix its end to the wall.
Step 5: Connecting the power
cord
IMPORTANT!
– Never make or change any
connection with the power switched on.
ANTENNA
FM
(75Ω)
● After everything is connected properly, plug in
the AC power cord to the power socket.
Step 6: Connecting a VCR or
cable/satellite box
Viewing and listening to playback
ANTENNA
FM
(75Ω)
1 Connect the VCR or Cable/Satellite Box to the
TV system as shown.
2 Using the audio cables (red/white, not supplied)
Connect the system’s AUX IN (L/R) jacks to
the AUDIO OUT jacks on the VCR or Cable/
Satellite box.
Before starting operation, press AUX on the
remote control to select “AUX” in order to
activate the input source.
English
Using the VCR for recording DVDs
Some DVDs are copyright-protected. You cannot
record or dub protected discs using a VCR.
3 Connect the system’s COMPOSITE VIDEO
jack to the VIDEO IN jack on the VCR.
4 Connect the system’s LINE OUT (R/L) jacks
to the AUDIO IN jacks on the VCR. This will
allow you to make analog stereo (two channel,
right and left) recording.
To view DVD playback while recording
You must connect the system to your TV system
using the S-VIDEO (as shown above) or the
COMPONENT VIDEO OUT (Pr Pb Y)
video connection.
13
Page 14

Connections
English
Step 7: Connecting digital audio
Digital audio recorder
Recording (digital)
Connect the system’s COAXIAL OUT (digital
out) jack to the DIGITAL IN jack on a digital
recording device (DTS-Digital Theater System
compatible, with a Dolby Digital decoder, for
example).
Before operation, set COAXIAL OUTPUT
according to the audio connection.
equipment
ANTENNA
FM
(75Ω)
DVD player
14
Page 15

Functional Overview
English
1
2
TUNING
3
4
5
6
Controls on the system
1 DBB
– enables or disables bass enhancement.
2 DSC
– selects different types of preset sound equalizer
settings (CLASSIC, ROCK, JAZZ or POP).
3 TUNING à / á
Tuner...............tunes to a radio station
Disc................ fast searches backward/forward in
a disc at different speeds.
Clock.............sets the minutes
4 STANDBY-ON B
– switches the system on or to Eco-power standby
/standby mode.
5 ÉÅ
– starts or interrupts disc playback
SOURCE
– selects the respective sound source: DVD, FM or
AUX.
¡ / ™
Disc................press to skip to the previous/next
chapter/title/track.
Tuner..............selects a preset radio station
Clock..............sets the hours
9
– stops disc playback or erases a program.
7
8
9
0
!
6 iR Sensor
– point the remote control towards this sensor.
7 OPEN/CLOSE
– opens or closes the disc door.
8 PROGRAM
– For VCD/CD only: program the favourite tracks
9 MODE
– selects various repeat play modes (For VCD
with PBC feature, PBC must be turned off.)
0 VOLUME +/-
– adjusts the volume upward/downward.
! Display
– shows the current status of the DVD player.
15
Page 16

Functional Overview
English
Remote control
1 B
–switches the system to Eco-power standby /
standby mode.
2 SOURCE (DISC/AUX/TUNER)
– switches on the system
– selects the respective sound source for disc/FM/
AUX
3 A-B
– repeats playback of a specific section within a
chapter of DVD or a track of VCD/CD.
4 MODE
– selects variations of continuous playback (For
VCD with PBC feature, PBC must be turned off.)
– For VCD/CD only: selects to playback in random
order (For VCD with PBC feature, PBC must be
turned off.)
1
2
3
4
5
6
7
8
9
0
!
@
5 ZOOM
–DVD/VCD/JPEG: enlarges a picture or active
image on the TV screen.
– For JPEG: turns on/off the zooming feature
6 DSC
– selects different types of preset sound equalizer
settings (CLASSIC, ROCK, JAZZ or POP).
7 DISC MENU
–DVD/VCD: enters or exits the disc contents
menu (For VCD with PBC feature, PBC must be
turned on.)
– MP3/WMA/JPEG: switches on or off the album/
picture menu.
8 OK
– confirms a selection.
4 / 3 / 5 / 6
– selects an item in a menu.
–moves an enlarged picture up/down/left/right.
5 / 6
Disc................ fast searches backward/forward in
a disc at different speeds.
#
$
%
^
&
*
(
)
¡
™
£
Tuner...............tunes to a radio station
Clock...............sets the minutes
9 ÉÅ
– starts or interrupts disc playback.
0 ¡ / ™
Tuner...............selects a preset radio station
Disc.................skips to the previous/next chapter/
title/track
Clock..............sets the hours
– For JPEG: selects different zooming rates
! PROGRAM
– For VCD/CD only: program the favourite tracks
@ SUBTITLE
– selects a subtitle language.
# DISPLAY (OSD)
– displays disc playback time during playback
$ CLOCK
– sets and views the clock
% SLEEP/TIMER
– activates/deactivates or selects the sleep timer
– activates/deactivates or sets the wake-up timer
16
Page 17

^ MUTE
– disables or enables sound output.
& AUDIO
for VCD
– sets Left vocal, Right vocal, Mono left, Mono right
or Stereo sound mode.
for DVD
– selects an audio language.
* DBB
– enables or disables bass enhancement.
( SYSTEM MENU
– enters or exits the system menu.
) 9
– stops disc playback or erases a program.
¡ VOL +/-
– adjusts the volume upward/downward.
™ Numeric Keypad (0-9)
– inputs a track/title/chapter number of the disc.
£ GOTO
– fast searches in a disc by entering a time, title or
chapter (For VCD with PBC feature, PBC must
be turned off.)
Functional Overview
English
Notes for remote control:
– First select the source you wish to control
by pressing one of the source select keys on
the remote control (for example CD ,
TUNER).
– Then select the desired function (for
exampleÉ,
í
,
ë
).
17
Page 18

Getting Started
English
Step 1: Using Remote Control
IMPORTANT!
– Before using the remote control,
remove the insulation plastic tab as
shown in the picture below.
– If the remote control does not
function correctly or the operating range
is reduced, replace the battery with a
new (CR2025) battery.
Step 2: Setting up the TV
IMPORTANT!
Make sure you have completed all the
necessary connections. (See
“Connecting TV”).
1 Switch the DVD system on and then select
DISC source. (See “Switching the system
on/off”).
2 Turn on the TV and set to the correct video-in
channel. You should see the blue Magnavox DVD
background screen on the TV.
➜ Usually these channels are between the
lowest and highest channels and may be called
FRONT, A/V IN, or VIDEO. See your TV manual
for more details.
➜ Or, you may go to channel 1 on your TV, then
press the Channel up button repeatedly until
you see the Video In channel.
➜ Or, the TV Remote Control may have a
button or switch that chooses different video
modes.
➜ Or, set the TV to channel 3 or 4 if you are
using an RF modulator.
1 Push to open the battery tray.
2 Replace a new battery according to the
indicated polarity.
3 Push the battery tray back to close it.
Using the Remote Control to operate
the Player
1 Aim the Remote Control directly at the remote
sensor (IR) on the front panel.
2 Select the source you wish to
control by pressing one of the
E
C
R
U
O
S
ECOPOWER
STANDBY-ON
source select buttons on the
remote.
3 Then select the desired
function (for example,
ÉÅ, ¡ or ™).
CAUTION!
– Remove the battery if it is exhausted
or if the Remote Control is not being
used for a long time.
– Batteries contain chemical
substances, so they should be disposed of
properly.
18
Selecting the color system that matches
your TV set
This DVD system is compatible with both NTSC
and PAL. For the playback of a DVD disc on this
DVD system, the color systems of the DVD, TV
set and DVD System should match.
1
32
4
TV DISPLAY
TV TYPE
SCREEN SAVER
SET TO MULTI
MULTI
Page 19

Getting Started
1 In disc mode, stop playback then press
SYSTEM MENU.
➜ The menu bar will appear across the top of
the TV screen.
2 Select icon and press 4.
3 Press à / á / 4 / 3 keys on the remote
control to navigate in the menu.
➜ Move to , and press á.
➜ Move to “TV TYPE” , and press á.
MULTI
– Select this if the connected TV set is
compatible with both NTSC and PAL (multi
system). The output format will be consistent wit
the video signal of the disc.
NTSC
– Select this if the connected TV set is NTSC
system. It will change the video signal of a PAL
video disc and output to NTSC system.
PAL
– Select this if the connected TV set is PAL
system. It will change the video signal of an
NTSC disc and output to PAL format.
4 Select an item and press OK.
➜ The screen messages for fur ther setting
confirmation may appear. Follow the on-screen
instructions to proceed to confirm the setting or
not.
1 Tu rn on your TV.
2 Tu rn off your TV progressive scan mode or turn
on interlaced mode (refer to your TV user
manual).
3 Press STANDBY-ON B to turn on the
DVD player.
4 Select the correct Video Input channel.
5 Press SYSTEM MENU on the remote control.
➜ The menu bar will appear across the top of
the TV screen.
6 Select icon and press 4.
➜ Playback will pause.
TV DISPLAY
TV TYPE
PROGRESSIVE
SCREEN SAVER
OFF
ON
PROGRESSIVE NOW ON
7 Press à / á / 4 / 3 keys on the remote
control to navigate in the menu.
➜ Move to , and press á.
➜ Move to “PROGRESSIVE” , and press á.
➜ Move to “ON”, and press OK.
➜ The screen message below appears on the
TV.
English
To remove the menu
Press SYSTEM MENU.
Setting up Progressive Scan feature (for
Progressive Scan TV only)
The progressive scan display twice the number
of frames per seconds than interlaced scanning
(ordinary normal TV system). With nearly double
the number of lines, progressive scan offers
higher picture resolution and quality.
IMPORTANT!
Before enabling the progressive scan
feature, you must ensure:
1) Your TV can accept progressive signals, a
progressive scan TV is required.
2) You have connected the DVD player to your
TV using Y Pb Pr (see “Connecting TV set”)
ACTIVATING PROGRESSIVE SCAN
1. ENSURE YOUR TV HAS PROGRESSIVE SCAN.
2. CONNECT USING YPRPB(RGB) VIDEO CABLES
3. IF THERE IS A BLANK SCREEN, WAIT FOR 15
SECONDS FOR AUTO RECOVER.
<>-MOVE OK-SELECT
8 Press à / á to highlight OK in the menu and
press OK on the remote to confirm.
➜ The screen message for fur ther progressive
scan setting confirmation will appear.
There will be a distorted picture on your
TV at this state until you turn on the
progressive scan mode on your TV.
9 Tu rn on your TV progressive scan mode (refer to
your TV user manual).
0 In the confirmation menu, press à / á to
highlight OK in the menu and press OK on the
remote to confirm.
19
Page 20

ENGLISH
ENGLISH
ENGLISH
AUDIO
SUBTITLE
DISC MENU
GOTO LANGUAGE SETUP PAGE
Getting Started
English
➜ Progressive scan is now set on. TV screen
comes to the system menu.
➜ If distored picture still appears, it indicates
that your TV doesn’t support progressive scan. In
this case, turn off progressive scan as described
in “To deactivate Progressive manually”.
! Press SYSTEM MENU on the remote to exit
the system menu.
➜ The setup is complete now and you can start
enjoying the high quality picture.
To deactivate Progressive manually
● When the distorted sign still appears on
the TV, it may be because the connected TV
does not accept progressive signals, and
progressive is set by mistake. You must reset the
unit to interlace format.
1 Tu rn off your TV progressive scan mode or turn
on to interlaced mode (refer to your TV user
manual).
2 Tu rn off progressive scan by selecting “OFF”
under PROGRESSIVE menu, then press
SYSTEM MENU on the remote to exit the
system menu.
● To turn off progressive scan, you may also first
open the disc door, then hold down ™ on the
front panel, and press numeric key “ 1” on the
remote.
➜ Progressive scan is turned off.
Step 3: Setting language
preference
You can select your own preferred language
settings. This DVD system will automatically
switch to the selected language whenever you
load a disc. If the language selected is not
available on the disc, the disc’s default language
will be used instead. The OSD language in the
system menu will remain once selected.
Setting the OSD Language
1 Press SYSTEM MENU on the remote control.
➜ The menu bar will appear across the top of
the TV screen.
2 Select icon and press 4.
➜ Playback will pause.
3 Press à / á / 4 / 3 keys on the remote
control to navigate in the menu.
➜ Move to , and press á.
➜ Move to “OSD LANG” , and press á.
4 Select your desired language and press OK.
To remove the menu
● Press SYSTEM MENU on the remote control
again.
Setting the Audio, Subtitle and Disc
Menu language
1 In disc mode, stop playback then press
SYSTEM MENU.
➜ The menu bar will appear across the top of
the TV screen.
2 Select icon and press 4.
3 Press à / á /4 / 3 keys on the remote
control to navigate in the menu.
➜ Move to , and press á.
➜ Move to one of the following and press á.
– “Audio” (disc’s soundtrack)
– “Subtitle” (disc’s subtitles)
– “Disc Menu” (disc’s menu)
4 Press 4 / 3 to select a language and
press OK.
20
To remove the menu
Press SYSTEM MENU.
Page 21

Basic Operations
IMPORTANT!
– Before you operate the system,
complete the connection procedures.
– When the system is switched to Standby
mode, it is still consuming power.To
disconnect the system from the power
supply completely, reomve the AC power
plug from the wall socket.
Switching the system on/off
● In standby/Eco-power standby mode, press
STANDBY ONB/SOURCE on the set, or
DISC/TUNER/AUX on the remote to switch
on the system.
➜ “POWER ON” is displayed briefly.
➜ The system will switch to the selected or last
selected source.
To switch the system to Eco-power
standby mode
● In power-on mode, press briefly STANDBY
ONB (B on the remote).
➜ “ECOPOWER” is displayed briefly.
➜ Eco-power lamp B on the front panel will
light up.
➜ The LCD display will go blank.
To switch the system to standby mode
● In power-on mode, press and hold STANDBY
ONB (B on the remote).
➜ The clock time will be displayed. Or "--:--"
will be displayed if clock time is not set.
Helpful hints:
– Pressing B on the remote can switch
betweeen Eco-power standby and normal standby.
Power saving automatic standby
As a power-saving feature, the system will
automatically switch to Standby mode if you
don’t press any button within 30 minutes in the
stop mode.
Volume control
Press VOLUME (+/-) (or VOL +/- on the
remote) to increase or decrease the volume
level.
➜ The display briefly shows ”VOL” and a volume
value from “01” to “39” ( “MIN” or “MAX ” is
displayed when adjusted to the lowest or highest
volume level).
To switch off the volume temporarily
● Press MUTE on the remote.
➜ Playback will continue without sound and
“MUTE” is displayed briefly.
● To activate sound reproduction, you can:
– press MUTE again;
– adjust the volume controls;
– change source.
Sound Control
DBB (Dynamic Bass Boost)
DBB enhances the bass response.
● Press DBB to enable or disable DBB feature.
➜ If DBB is activated, “DBB” will be shown.
Helpful hints:
– Some discs might be recorded in high
modulation, which causes a distortion at high
volume. If this occurs, switch off DBB or reduce the
volume.
DSC (Digital Sound Control)
DSC provides a different type of preset sound
equalizer setting.
● Press DSC on the remote (or on the system)
repeatedly to select:
CLASSIC, ROCK, JAZZ or POP
➜ The display shows the selected sound setting.
English
21
Page 22

Disc Operations
English
IMPORTANT!
– Depending on the DVD or VIDEO CD,
some operations may be different or
restricted.
– Do not push on the disc tray or put
any objects other than disc on the disc
tray. Doing so may cause the disc player
malfunction.
– If the inhibit icon appears on the TV
screen when a button is pressed, it
means the function is not available on
the current disc or at the current time.
Playable Discs
Your DVD Player will play:
– Digital Versatile Discs (DVDs)
– Video CDs (VCDs)
– Super Video CDs (SVCDs)
– Digital Versatile Discs + Recordable
(DVD+R)
– Digital Versatile Discs + Rewritable
(DVD+RW)
– Compact Discs (CDs)
– MP3 disc on CD-R(W):
– Suppor ted sampling frequencies: 32kHz,
44.1kHz, 48kHz.
– Suppor ted Bit-rates : 32, 64, 96, 128, 192,
256(kbps)
– WMA-CDs (CD-ROMs with WMA tracks)
– Picture (JPEG) files on CD-R(W)
Region Codes
DVDs must be labeled for ALL regions or Region
1 in order to play on this DVD system. You
cannot play discs that are labeled for other
regions.
Note:
– If you are having trouble playing a certain disc,
remove the disc and try a different one. Improper
formatted disc will not play on this DVD Player.
22
Page 23

Disc Operations
Playing discs
1 For DVDs and VCDs, make sure that the system
is properly connected to your TV (See
Connecting a TV), and your TV is turned on
and set to video-in channel (See Setting up
the TV).
2 Press SOURCE on the system once or more
to select DVD mode ( or DISC on the remote
control).
➜ You should see the blue Magnavox DVD
background screen on the TV.
3 Push OPEN/CLOSE on the top of the system
to open the disc tray.
4 Insert a disc with the print side facing up and
close the disc tray.
5 Playback will start automatically (depending on
the disc type).
➜ If a disc menu appears on the TV, see “Using
the Disc Menu”.
➜ If the disc is locked by parental control, you
must enter your four-digit password. (See
“Changing the password”).
To interrupt playback
● PressÉÅ.
➜ “PAUSE” is displayed briefly on the TV screen.
● To resume playback, press ÉÅ again.
To stop playback
● Press 9.
Using the Disc Menu
Depending on the disc, a menu may appear on
the TV screen once you load the disc.
To select a playback feature or item
● Use à / á / 4 / 3 and OK or Numeric
Keypad (0-9) on the remote control, then
pressÉÅ to start playback.
Using PBC feature (available for
2.0-version VCD only)
PBC playback allows you to play Video CDs
interactively, following the menu on the display,
such as allowing you to select favourite songs.
To switch PBC on or off
1 In disc mode, press SYSTEM MENU.
➜ The menu bar will appear across the top of
the TV screen.
2 Press à / á /4 / 3 keys on the remote
control to navigate in the menu.
➜ Press à / á to move to PBC ON/OFF
option, and press 4.
➜ If PBC was ON, it will switch to OFF and
continue playback.
➜ If PBC was OFF, it will switch to ON and
return to menu screen.
➜ When PBC is ON, pressing DISC MENU
will return to menu screen.
Resuming playback
● During playback, press 9 once to stop the
playback in resume mode, then pressÉÅ to
start playback from where you have stopped.
To cancel the resume mode
● In the stop position, press 9 again to fully stop
the playback. Or open the disc door, or switch
the system to standby mode.
Selecting and searching
Selecting a different track/chapter
For DVD/VCD/CD/MP3:
● During playback, briefly press ¡ / ™ once or
more until your desired track/chapter number
appears.
Or,
use the Numeric Keypad (0-9) on the
remote control to directly input your track/
chapter number.
➜ After selecting, playback will automatically
start from the beginning of the selected chapter/
track.
Helpful hints:
– Some VCDs have a single track, so track
selecting or an invalid input value for the current
disc will be ingored.
– If the player has been set to repeat chapter
(track), pressing this button will replay the same
chapter (track) from its beginning.
English
23
Page 24

Disc Operations
English
Fast forwarding/reversing
For DVD/VCD/CD/MP3:
1 During playback, press à / á repeatedly to
select fast search speed in forward (FF) or
reverse (FR) playback.
➜ The disc plays at a high speed with no sound.
2 To resume to normal playback, pressÉÅ.
Or, press à / á repeatedly until “PLAY” is
displayed on the TV screen.
Helpful hints:
– For VCD/CD/MP3, f ast searching
forward/backward is available only
within the same track.
GOTO
1 During playback, press GOTO once or more on
the remote control.
➜ For VCD with PBC feature, PBC must be
turned off first.
➜ TV screen shows various search bars in the
sequence as follows:
For DVDs:
(used to select chapter number, or title field by
using à / á on the remote control)
(used to select playtime within the current title)
For VCDs/CDs:
(used to select playtime within the entire disc)
2 Use the Numeric Keypad (0-9) on the remote
control to input your title/chapter number or
playtime.
3 Press OK on the remote to start playback from
where you have selected.
Helpful hints:
– An invalid input value for the current
disc will be ingored.
Different play modes: REPEAT,
SHUFFLE and REPEAT A-B
REPEAT
For DVDs/VCD/CD/MP3
24
● During playback, press repeatedly MODE on the
system to choose desired repeat play modes.
➜ For VCD with PBC feature, PBC must be
turned off first.
➜ TV screen shows the play modes in the
sequence as follows:
For DVDs
CHAPTER REPEAT ON: Repeats the current
chapter
TITLE REPEAT ON: Repeats the current title
REPEAT OFF: Switchs off play mode
For VCDs/CDs/MP3
REPEAT TRACK: Repeats the current track
REPEAT ALL: Plays all the tracks repeatedly
REPEAT OFF: Switchs off play mode
REPEAT ALBUM (for MP3 only):
Repeats the current album
● To return to normal playback, press MODE
repeatedly until “OFF” is displayed.
SHUFFLE
In this mode, all tracks will be played in random
order.
For VCD/CD
1 During playback, press 9 twice to fully stop the
playback.
2 Press MODE on the remote.
➜ SHUFFLE ON is displayed.
3 PressÉÅ to start shuffle play.
4 To switch off shuffle play, press 9 twice.
Helpful hints:
– Selection of shuffle play is not available for
DVD and MP3.
Repeat A-B
For DVD/VCD/CD/:
1 Press A-B on the remote at your chosen
starting point.
2 Press A-B on the remote again at your chosen
end point.
➜ The section will now repeat continuously.
➜ A-B play is available within a chapter of DVD
or a track.
3 To exit the sequence, press A-B on the remote
again.
➜ “A TO B CANCELLED” is displayed briefly on
the TV screen.
Page 25

Disc Operations
Programming favourite tracks
For VCDs/CDs
You can select and program up to 99 desired
tracks for playback in the desired sequence. If
you like, store any track/chapter/title more than
once.
1 During playback, press 9 twice to fully stop the
playback.
2 Press PROGRAM to activate programming
mode.
➜ On the TV screen, “PROGRAM” and
“P 00:00” are displayed.
➜ On the system’s display, “PRG” flashes, and
P00: 00 is displayed.
3 Use the Numeric Keypad (0-9) on the
remote control to enter your desired track
number.
4 Press OK on the remote to store the track.
➜ P00 is changed to P01 , indicating the first
programmed track is stored and the next
program sequence is available.
5 Repeat steps 3-4 to store other tracks.
➜ If you attempt to program more than 99
tracks, FULL is displayed, and no track can be
stored.
6 PressÉÅ to playback the program.
➜ “PRG” is displayed during playback.
Display information
During playback, press DISPLAY on the
remote control repeatedly to display various disc
playback time on the TV screen ( and the
system’s display).
For DVDs:
TITLE ELAPSED - elapsed playback time of
current title
TITLE REMAIN - remaining time of current
title
CHAPTER ELAPSED - elapsed playback
time of current chapter
CHAPTER REMAIN - remaining time of
current chapter
OFF - turns off the display information
For VCDs/CDs
➜ For VCD with PBC feature, PBC must be
turned off first.
SINGLE ELAPSED - elapsed playback time
of current track
SINGLE REMAIN - remaining time of current
track
TOTAL ELAPSED - elapsed playback time of
disc.
TOTAL REMAIN - remaining playback time of
disc
OFF - turns off the display information
English
To Erase program
You can erase program by doing one of the
following:
● During program playback, press 9 two times.
● Open the disc door.
➜ “PRG” disappears from the display.
Helpful hints:
– Programming is not available for DVD and
MP3 disc.
25
Page 26

Disc Operations
English
ZOOM
For DVDs/VCDs/JPEG
Zooming allows you to enlarge the video/ JPEG
image during playback.
● Press ZOOM repeatedly to zoom in on the
playback video image.
➜ For JPEP picture disc, press ZOOM to
display “ZOOM ON”, then press ¡/ ™ to select
different enlarging rates.
➜ Image size enlarges at different rates.
● To return to normal playback, press ZOOM
repeatedly until “ZOOM OFF “ is displayed.
SUBTITLE (DVD only)
● Press repeatedly SUBTITLE on the remote
control to select different subtitle languages.
➜ The feature is disc dependant.
Playing a Title (DVD only)
1 During playback, press DISC MENU on the
remote control.
➜ The disc title menu appears on the TV screen.
2 Use à / á/4/3 or Numeric Keypad (0-9)
to select a play option.
3 Press OK to confirm.
Helpful hints:
– When zooming in, you may use à / á/4/3
on the remote control to pan a picture across your
TV screen in pause position or during playback.
AUDIO
For DVDs
● On the remote control, press AUDIO
repeatedly to select the desired language for
sound track.
➜ The feature is disc dependant.
For VCDs
● Press AUDIO repeatedly to select the audio
channel for sound output displayed on the TV
screen.
LEFT VOCAL, RIGHT VOCAL, MONO
LEFT, MONO RIGHT and STEREO
Playing MP3/WMA/JPEG picture
disc
IMPORTANT!
– Make sure that the system is properly
connected to your TV (see Connecting a
TV ), and your TV is turned on and set to
video-in channel (Setting up the TV).
–For DRM-protected WMA files, use
windows Media Player 10 (or later) for
CD burning/conversion. Visit
www.microsoft.com for details about
Windows Media Player and WM DRM
(Windows Media Digital Rights
Management).
1 Load a MP3/WMA/Picture (JPEG) disc.
➜ The disc reading time may exceed 30
seconds due to complexity of the directory/file
configuration.
2 Playback will start automatically.
➜ The album/picture menu will appear on the
TV screen. If not, press DISC MENU on the
remote control.
26
Page 27

Disc Operations
1
4
7
2
5
8
3
6
9
3 In the stop position, press à / á / 3 / 4 to
select a desired album, then select a desired title
in the album.
4 Press OK or 2; to star t playback.
● You can also use the numeric keys (0-9) to
enter your choice.
● During playback, you may press ¡ / ™ to select
the previous/next title.
5 To stop playback, press 9.
If the MP3-CD menu is switched off
● You can only play the current title by pressing
2;. While in playback mode, press ¡ / ™ to
select the previous/next title.
➜ The title number will appear.
6 During JPEG or Kodak Picture disc playback,
press PROG repeatedly to select different
slideshow view options. There are 12 options for
selection. The selected option will be displayed
on the TV screen.
Playing MP3 music and JPEG
pictures simultaneously
You can create a musical slide show if the disc
contains both the MP3 music and JPEG picture
files.
1 Insert a MP3 disc that contains music and
pictures.
● Press DISC MENU to display the menu if the
menu is not displayed.
2 In the stop mode, select a MP3 track in the
menu and press AUDIO.
➜ “MP3 is selected” appears on the TV.
3 Use 3 / 4 keys to select a picture file, then
press OK.
4 To stop simultaneous playback, press 9.
➜ The picture and MP3 music playback will
stop.
Playing Kodak picture disc
1 Load a Kodak picture disc.
➜ The disc reading time may exceed 30
seconds due to complexity of the directory/file
configuration.
2 Playback will start automatically.
3 Press 9.
➜ 9 thumbnail pictures will appear on the TV
screen.
(example for the Kodak disc menu)
4 Press ¡ / ™ to view the previous/next page (if
available).
5 Press à / á/ 3 / 4 to move within the
menu and press OK to select the desired
picture to play.
During playback, you can:
● Press ¡ / ™ to select another title/picture in the
current folder.
● Press à / á/ 3 / 4 on the remote control
to rotate or flip the picture files.
● Press 2; to pause/resume playback.
Notes:
– Due to the recording nature of Digital Audio
MP3 (DAM), only digital audio music will play.
– It is normal to experience an occasional “skip”
while you are listening to your MP3 discs.
–For multi-session discs with different formats,
only the first session can be read and played.
– DISC MENU does not function during Kodak
Picture disc playback.
English
27
Page 28

DVD Menu Operations
English
Using the menu bar
You can continue some operations directly via
the multiple menu bars on the TV screen
without interrupting the disc playback. But when
you enter (SETUP MENU), the playback will
pause.
2
1 In disc mode, press SYSTEM MENU.
➜ The menu bar will appear across the top of
the TV set screen.
2 Press à/ á/4/3 on the remote control to
navigate in the menu.
➜ Press à/ á to move through the menu bar.
➜ Press 4 to enter the selection.
3 Press OK to confirm the selection.
➜ Playback will resume or begin automatically.
To remove the menu
Press SYSTEM MENU or OK.
IMPORTANT!
– Some operations may be different or
restricted according to the disc format.
Refer to the jacket or care of the disc you
are playing.
–You can change the Subtitle Language
and Audio Language from the menu bar
only on the current disc. But this
operation cannot change the default
preset.
1
3
Subtitle
i
Press 4 to select a desired language in DVD
mode.
Audio
Press 4 to select a desired audio language on
the SVCD, VCD:
Left Vocal p Right Vocal p Mono Left p
Mono Right p Stereo
x Slow
The slow motion speed will display. Press 4
repeatedly to select a reverse or forward
slow motion speed.
To cancel the slow function, press 2;.
STATUS
In DISC mode, select this icon and press 4 to
view the time, title or chapter information of
the playing disc.
Time Search
A time edit box appears on the display. Use
the numeric keys (0-9) to enter the time
(hours : minutes : seconds) at which you want
to start playback, then press OK to start playback. (This function is not available in the PBC
ON mode.
ZOOM
Press 4 repeatedly to select an enlarged picture ratio: 1.5, 2 or 4. You can press
3 / 4 to move within the enlarged picture
on the TV set.
To resume normal playback, repeat the above
step to select ZOOM OFF.
ANGLE
Press 4 to view the same scene from different
angles if the DVD is recorded with multi-angles.
STEP
Press 4 repeatedly to play forward the disc
step by step (one frame every step). To cancel
the step function, press 2;.
PBC
PBC ON/OFF
Press 4 to select PBC ON or OFF, and then
playback will stop automatically. (This function
is only available for VCD with PBC feature. )
PROGRAM
See “Programming favourite tracks”, Using the
menu bar to program.
à/ á/
28
Page 29

PROGRESSIVE
SCREEN SAVER
ON
OFF
SCREEN SAVER NOW ON
TV DISPLAY
TV TYPE
DVD Menu Operations
Using the setup menu (user
preference settings)
This DVD setup is carried out via your TV set,
enabling you to customize the DVD System to
suit your particular requirements
1
32
4
1 In disc mode, press SYSTEM MENU.
➜ The menu bar will appear across the top of
the TV screen.
2 Select icon and press 4 to enter the setup
menu. Then press 3 4 to select one of the
setup menu options and press á to enter the
submenu.
➜ Playback will pause.
SETUP MENU
Picture Setup
Sound Setup
Language Setup
Feature Setup
TV Display (default: Normal/PS)
IMPORTANT!
– This menu is accessible only in the
stop postion.
Set the aspect ratio of the DVD Player according
to the TV you have connected.
➜ Normal/PS (panscan): If you have a normal
TV and want both sides of the picture to be
trimmed or formatted to fit your TV screen.
➜ Normal/LB (letterbox): If you have a
normal TV. In this case, a wide picture with black
bands on the upper and lower portions of the
TV screen will be displayed.
➜ Wide: If you have a wide-screen TV.
English
3 Press à / á/4/3 on the remote control to
navigate in the menu.
4 Press OK to confirm your setting.
To return to the upper-level menu
● Press à or OK (in cases of value adjustment).
To remove the menu
● Press SYSTEM MENU to exit the menu.
➜ Playback will resume and begin automatically.
Note:
– Some of the features in the System Menu
Options are described in “Getting Started”.
Screen Saver (default: On)
This function is used to turn the screen saver on
or off.
➜ ON: In STOP, PAUSE or No DISC mode, if
no actions are performed about 5 minutes, the
screen saver will be activated.
➜ OFF: Screen saver is disabled.
29
Page 30

DVD Menu Operations
ENTER CODE
PLEASE ENTER NEW PASSWORD
OSD LANG
ENTER CODE
PLEASE ENTER OLD PASSWORD
OSD LANG
English
Night Mode
Changing the password
You can change the four-digit code used as
Password.
NIGHT MODE
TEST TONE
NIGHT MODE SET TO OFF
OFF
ON
OFF
Select this when you want to enjoy the surround
sound with its full dynamic range.
ON
Select this to level out the volume. High volume
output will be softened and low volume output
will be brought upward to an audio level. This
feature is only available for movies with Dolby
Digital mode.
Test Tone
NIGHT MODE
TEST TONE
LEFT.
OFF
ON
ON
After selecting this item, the system will start
testing the speaker from left, right, subwoofer
cyclically until you exit tone test.
- You can adjust speakers level when you are
testing the speaker.
- The availability of the various channels test
depend on the number of speakers connected.
15
2
3
4
1 In disc mode, press SYSTEM MENU.
2 Select icon and press 4.
➜ Playback will pause.
3 Press à / á/4/3 on the remote control to
navigate in the menu.
➜ Move to , and press á.
➜ Move to “PASSWORD” and press á.
4 Use the numeric keys (0-9) to enter your
current four-digit code.
➜ The password supplied by default is 1234.
➜ If you forget the four-digit code, press 9 four
times, the system will change back to the default
password.
5 Then enter your new code. Press the same code
again to confirm.
Notes:
–You can press à to exit test tone mode at any
time.
30
6 Press SYSTEM MENU again to remove the
menu.
Page 31

DVD Menu Operations
5
Restricting playback by setting parental
level
Some DVDs may have a parental level assigned
to the complete disc or to certain scenes on the
disc. This feature lets you set a playback limitation
level. The rating levels are from 1 to 8 and are
country specific. You can prohibit the playing of
certain discs that are not suitable for your
children or have certain discs played with
alternative scenes.
6
1
352
4
1 In disc mode, press SYSTEM MENU.
2 Select icon and press 4.
➜ Playback will pause.
3 Press à / á/4/3 on the remote control to
navigate in the menu.
➜ Move to , and press á.
➜ Move to “PARENTAL” and press á.
ENTER CODE
OSD LANG
5 Press 4/3 to select a rating level between 1-8
and press OK.
➜ DVDs rated above the level you select will
not play unless you enter your four-digit
password or choose a higher level rating. Select
“No Parental” to deactivate Parental level and
have all discs play.
6 Press SYSTEM MENU again to remove the
menu.
Rating explanations
NO PARENTAL - It will play all discs.
8 ADULT - material for adults only; riewed only
by adults due to graphic sexual scenes, violence,
or language.
7 NC-17 - No children under 17; not
recommended for children under 17.
6 PG-R - Parental Guidance - Restricted;
recommended that parents restrict children
under 17 from viewing or allow them to view
only when supervised by a parent or adult
guardian.
4 PG-13 - Material is unsuitable for children
under age 13.
3 PG - Parental Guidance suggested.
1 PG - General Audience; recommended as
acceptable for viewers of all ages.
English
PLEASE ENTER PASSWORD
4 Use the numeric keys (0-9) to enter the
four-digit code.
- OSD LANG (menu language)
To set the screen display language. The default
setting is English.
- Default
If RESET is selected, all the items in the setup
menu will be reset to default setting, except
Parental Setting and Password.
31
Page 32

Tuner
English
Tuning to radio stations
1 Press STANDBY-ON y on the set to switch
on the last selected source.
2 Press repeatedly SOURCE (or TUNER on the
remote) until FM is displayed.
3 Press and hold TUNING à / á on the set
until the frequency in the display starts changing.
➜ Display shows SEARCH during automatic
tuning.
➜ After the system tunes to a station of
sufficient reception, display shows its frequency .
● To tune to a weak station, press briefly and
repeatedly TUNING à / á (or à / á on
the remote) until an optimal reception is found.
4 Repeat Step 3 if necessary until you find the
desired radio station.
Storing preset radio stations
You can preset up to 40 FM stations regardless
of the reception.
Manual programming
1 Tune to your desired radio station (refer to
“Tuning to radio stations”).
2 Press briefly PROGRAM.
➜ ”P0O” and “PRG” are displayed.
3 Press ¡ / ™ (or Numberic keys on the
remote) to select the desired preset number.
4 Press again PROGRAM to store the radio
station.
➜ “PRG” disappears on the display.
● Repeat steps 1-4 to store other radio stations.
Autostore: automatic programming
Autostore automatically starts programming
radio stations from preset 1. Any previous
presets e.g. manually programmed will be erased.
● In tuner mode, press and hold PROGRAM on
the set until AUTOPROG appears.
➜ During automatic progr amming, display shows
AUTOPROG.
➜ Available stations are programmed (40 FM).
➜ After all stations are stored, the first autostore
preset station automatically plays.
Listening to preset radio stations
● In tuner mode, press ¡ / ™ (or Numberic
keys on the remote) to select the desired
preset number.
➜ The preset number, radio frequency, and
waveband are displayed.
Deleting a preset radio station
1 In tuner mode, press ¡ / ™ (or Numberic
keys on the remote) to select the desired
preset number.
➜ The preset number, radio frequency, and
waveband are displayed.
2 Press and holdÇuntil “ DELETED” appears.
➜ The current preset radio station will be
deleted.
➜ All other preset radio stations with higher
numbers are decreased by one.
Helpful hints:
–You can erase a preset station by storing
another frequency in its place.
32
Page 33

Clock/Timer
Viewing clock
The clock (if it is set) will be shown in standby
mode.
To view the clock in any source mode
(DISC or TUNER for example), or Ecopower standby mode
● Press briefly CLOCK on the remote.
● You may press MODE to toggle between 12-
hour and 24-hour display.
➜ The clock is displayed for a few seconds.
➜ If the clock has not been set, "--:--" is
displayed.
Setting clock
1 In standby or power on mode, press and hold
CLOCK on the remote.
➜ The clock digits flash on the display panel.
➜ If the clock has not been set, "--:--" flashes
2 Press ¡ / ™ repeatedly to set the hour.
3 Press à / á repeatedly to set the minute.
4 Press CLOCK agian to store the setting.
➜ The clock star ts working.
Notes:
– The clock setting will be erased when the system
is disconnected from the power supply.
– The system will exit clock setting mode if no
button is pressed within 15 seconds.
Setting wake-up timer
The system can switch on to DISC or TUNER
mode automatically at a preset time, ser ving as
an alarm to wake you up.
IMPORTANT!
– Before setting the timer, ensure that the
clock is set correctly.
–To set a new timer, you need to
deactivate the previously set timer.
1 In standby mode, press and hold SLEEP/
TIMER on the remote for more than five
seconds to enter timer setting mode.
➜ The current source and timer digits flash on
the display panel.
➜ “ NO TIMER “ will be displayed briefly if
wake-up timer is not set.
2 Press DISC or TUNER to select the desired
source.
● Before setting timer, make sure the music source
has been prepared.
DISC – load the disc.
TUNER – tune to the desired radio station.
3 Press ¡ / ™ repeatedly to set the hour.
4 Press à / á repeatedly to set the minute.
5 Press SLEEP/TIMER to store the time.
➜ remains on the display.
● At the preset time, the selected source will play.
To deactivate the wake-up timer
● In standby mode, press and hold SLEEP/
TIMER until “TIMER OFF “ is displayed.
Notes:
– The system will exit timer setting mode if no
button is pressed within 15 seconds.
– Display shows if activated, and disappears if
deactivated.
Setting sleep timer
The sleep timer enables the system to switch off
by itself after a set period of time.
1 Press SLEEP/TIMER on the remote control
repeatedly to select a preset time.
➜ The selections are as follows (time in
minutes):
15 ™ 30 ™ 45 ™ 60 ™ 90 ™120 ™ OFF
2 Press SLEEP/TIMER until you reach the
desired length of time.
To deactivate the sleep timer
● Press SLEEP/TIMER repeatedly until "OFF" is
displayed, or press the STANDBY ON y
button.
English
33
Page 34

Specifications
English
AMPLIFIER
Total output power FTC .......................................75W
Main speakers L/R...................20W x 2 RMS 1
Subwoofer ......................................... 35W RMS 2
Outpurt power
L/R speakers ..................... 25 W /channel RMS
Subwoofer ............................................ 50 W RMS
Speaker channel
Frequency Response .......................................................
............................................ 200 Hz - 18 kHz / ± 3 dB
Signal-to-Noise Ratio ....... > 60dB (A-weighted)
Input Sensitivity
AUX In ................................................................ 500 mV
Output Sensitivity
Line Out(1KHZ 0dB) .................................. 2 + 0.2V
Notes:
1Main speakers:20W FTC x 2 with 8 ohm 1KHZ THD
=/<0.5%
2Subwoofer:35W FTC with 6 ohm 80 HZ THD=/<10%
TUNER
Tuning Range............................FM 87.5 – 108 MHz
Signal-to-Noise Ratio ........................... FM ≥ 50 dB
DVD
Laser Type ........................................... Semiconductor
Disc Diameter .......................................... 12cm / 8cm
Video Decoding ....................... MPEG-2 / MPEG-1
Video DAC .......................................................... 12 Bits
Signal System ........................................... PAL / NTSC
Video Format ................................................ 4:3 / 16:9
Video S/N ...................................... 56 dB (minimum)
Composite Video Output ............. 1.0 Vp-p, 75 Ω
S-Video Output ..................... Y - 0.714 Vp-p, 75 Ω
...................................................... C - 0.286 Vp-p, 75 Ω
Audio DAC ..................................... 24 Bits / 96 kHz
MAIN UNIT
Power Supply Rating ......................... 120 V / 60 Hz
Power Consumption
Active ................................................................... 30 W
Eco-power standby .......................................<1 W
Dimensions (w x h x d)...218 x 90 x 222 (mm)
Weight........................................................................1.24kg
Package Dimension (w x h x d).............................
...................................................550 x 314 x 330 (mm)
Gross weight.............................................................9.7kg
SPEAKERS
System ..............................................1-way, Bass reflex
Impedance .................................................................. 8 Ω
Speaker drivers ......................................... 3’’ fullrange
Frequency response ..................... 80 Hz – 20 kHz
Package Dimension (w x h x d)................................
...................................................125 x 250 x 232 (mm)
We ight ............................................ 2.4 kg/left speaker
....................................................... 1.76 kg/right speaker
SUBWOOOFER
Impedance................................................................... 6 Ω
Speaker driver ................................ 5.25” subwoofer
Frequency response.........................60HZ—1K HZ
Dimensions(w x h x d )................................................
......................................................147 x 250 x 232(mm)
Weight .........................................................................2.4kg
Specifications and external appearance are
subject to change without notice.
34
Page 35

Tr oubleshooting
WARNING
Under no circumstances should you try to repair the system yourself, as this will invalidate the
warranty. Do not open the system as there is a risk of electric shock.
If a fault occurs, first check the points listed below before taking the system for repair. If you
are unable to remedy a problem by following these hints, consult your dealer or Magnavox for
help.
English
Problem
No power.
No picture.
Distorted or poor picture.
Solution
✔ Check if the AC power cord is properly
connected.
✔ Press STANDBY ONB on the DVD System or
B on the remote to turn on the power.
✔ Check if the TV is switched on.
✔ Check the video connection.
✔ Press SOURCE on the DVD player repeatedly
to select “DVD” or press DISC on the remote.
✔ Set your TV to the correct Video In channel. This
channel is usually near channel 00. Or, you may
have a button on the TV remote control that
selects Auxiliary or A/V IN channel. See your TV
owner’s manual for details. Or, change channels
at the TV until you see DVD screen on the TV.
✔ If the progressive scan feature is activated but
the connected TV does not support progressive
signals or the cables are not connected
accordingly, see page 19-20 for proper
progressive scan setup or deactivate the
progressive scan feature as below:
1) Turn off your TV progressive scan mode or
turn on to interlaced mode.
2) Select “OFF” in PROGRESSIVE menu of
system setup menu to turn off progressive, then
press SYSTEM MENU to exit the menu.
✔ Sometimes a small amount of picture distortion
may appear. This is not a malfunction.
✔ Clean the disc.
Completely distorted picture or black/
white picture.
✔ TV has a colour system standard. If the disc’s or
DVD system’s colour system is different than
your TV’s colour system, the picture may be
distorted or colour less.
35
Page 36

Troubleshooting
English
The aspect ratio of the screen cannot be
changed even though you have set the TV
shape.
✔ The aspect ratio is fixed on the DVD disc.
✔ Depending on the TV, it may not be possible to
change the aspect ratio.
No sound or distorted sound.
The micro DVD player does not start
playback.
The DVD micro system does not
respond when the buttons are pressed.
Cannot activate some features, such as
Subtitles, or multi-language Audio.
✔ Adjust the volume.
✔ Check that the speakers are connected
correctly.
✔ Replace the speaker cables.
✔ Disconnect the headphones.
✔ The system is in pause, slow motion or fast
forward/reverse mode, press ÉÅ (or ÉÅ
on the remote) to resume normal play mode.
✔ Insert a readable disc with the playback side
facing down.
✔ Check the disc type, colour system and regional
code. Check for any scratches or smudges on
the disc.
✔ Press SYSTEM MENU to turn off the setup
menu screen.
✔ Cancel the parental control rating function or
change the rating level.
✔ Moisture has condensed inside the system.
Remove the disc and leave the system turned
on for about an hour.
✔ Disconnect the power plug from the outlet and
insert again.
✔ Multi-language sound or subtitle is not
recorded on the DVD.
✔ Changing the language for the sound or subtitle
is prohibited on the DVD.
✔ The features may not be available on the disc.
Radio reception is poor.
36
✔ If the signal is too weak, adjust the antenna or
connect an external antenna for better
reception.
✔ Increase the distance between the Mini HiFi
System and your TV or VCR.
Page 37

Tr oubleshooting
The timer is not working.
The Clock/Timer setting is erased.
The remote control does not function.
Low hum or buzz sound.
Low bass response.
Unable to select Progressive Scan
✔ Set the clock correctly.
English
✔ Power has been interrupted or the power cord
has been disconnected. Reset the clock/timer.
✔ Select the correct source (DISC or AUX for
example) before pressing the function button.
✔ Point the remote control at the remote sensor
of the unit.
✔ Reduce the distance to the player.
✔ Remove any possible obstacles.
✔ Replace the battery with new one.
✔ Check that the battery is loaded correctly.
✔ Place the DVD micro system as far away as
possible from electrical devices (such as
speakers, TV) that may be causing interference.
✔ Check all speakers for correct polarity.
✔ Check that the output of the video signal is
switched to 'Ypbpr'.
37
Page 38

Glossary
English
Analog: Sound that has not been turned into
numbers. Analog sound varies, while digital sound
has specific numerical values. These jacks send
audio through two channels, the left and right.
Aspect ratio: The ratio of vertical and
horizontal sizes of a displayed image. The
horizontal vs. vertical ratio of conventional TVs. is
4:3, and that of wide-screens is 16:9.
AUDIO OUT Jacks: Jacks on the back of the
DVD System that send audio to another system
(TV set, Stereo, etc.).
Bit Rate: The amount of data used to hold a
given length of music; measured in kilobits per
second, or kbps. Or, the speed at which you
record. Generally, the higher the bit rate the
better the sound quality. However, higher bit
rates use more space on a Disc.
Chapter: Sections of a picture or a music
piece on a DVD that are smaller than titles. A
title is composed of several chapters. Each
chapter is assigned a chapter number enabling
you to locate the chapter you want.
Component Video Out Jacks: Jacks on the
back of the DVD System that send high-quality
video to a TV set that has Component Video In
jacks (R/G/B, Y/Pb/Pr, etc.).
Disc menu: A screen display prepared for the
selection of images, sound, subtitles, multi-angles,
etc recorded on a DVD.
Digital: Sound that has been converted into
numerical values. Digital sound is available when
you use the DIGITAL AUDIO OUT COAXIAL
or OPTICAL jacks. These jacks send audio
through multiple channels, instead of just two
channels as analog does.
Dolby Digital: A surround sound system
developed by Dolby Laboratories containing up
to six channels of digital audio (front left and
right, surround left and right and center).
DTS: Digital Theater Systems. This is a surround
sound system, but different from Dolby Digital.
The formats were developed by different
companies.
JPEG: A still-picture data compression system
proposed by the Joint Photographic Expert
Group, which features small decrease in image
quality in spite of its high compression ratio.
MP3: A file format with a sound data
compression system, “MPE” is the abbreviation of
Motion Picture Experts Group 1 (or MPEG-1)
Audio Layer 3. Through the MP3 format, one
CD-R or CD-RW can contain about 10 times as
much data volume as a regular CD can.
Multichannel: DVD is specified to have all
sound tracks constitute one sound field.
Multichannel refers to a structure of sound
tracks having three or more channels.
Parental control: A function of the DVD to
limit playback of the disc by the age of the users
according to the limitation level in each country.
The limitation varies from disc to disc; when it is
activated, playback will be prohibited if the
software’s level is higher than the user-set level.
PCM (Pulse Code Modulation): A system
for converting analog sound signal to digital
signal for later processing without data
compression.
Playback control (PBC): Refers to the signal
recorded on video CDs or SVCDs for
reproduction control. By using screen menus
recorded on a Video CD or SVCD that supports
PBC, you can enjoy interactive-type software as
well as software having a search function.
Progressive Scan (P-Scan): It displays all the
horizontal lines of a picture at one time, as a
signal frame. This system can convert interlaced
video from DVD into progressive format for
connection to a progressive display. It
dramatically increases the vertical resolution. A
progressive scan TV set is needed to receive
progressive scan output from the system.
Region code: A system allowing discs to be
played only in preset regions. This unit will only
play discs that have compatible region codes. You
can find the region code of your unit from the
product label. Some discs are compatible with
more than one region (or ALL regions).
S-Video: Produces a clear picture by sending
separate signals for luminance and the color. You
can use S-Video only if your TV set has S-Video
In jack.
Sampling Frequency: Frequency of data
sampling when analog data is converted to
digital data. Sampling frequency numerically
represents how many times the original analog
signal is sampled per second.
Surround: A system for users to create
realistic three-dimensional sound fields full of
realism by arranging multiple speakers around
the listener.
Title: The longest section of a picture or music
feature on DVD, music, etc., in video software, or
the entire album in audio software. Each title is
assigned a title number enabling you to locate
the title you want.
VIDEO OUT jack: Jack on the back of the
DVD System that sends video to TV.
38
Page 39

MAGNAVOX LIMITED WARRANTY
ONE (1) YEAR
WARRANTY COVERAGE:
MAGNAVOX warranty obligation is limited to the terms set
forth below.
WHO IS COVERED:
Magnavox warrants the product to the original purchaser or
the person receiving the product as a gift against defects in
materials and workmanship as based on the date of original purchase (“Warranty Period”) from an Authorized Dealer. The
original sales receipt showing the product name and the purchase date from an authorized retailer is considered such proof.
WHAT IS COVERED:
The Magnavox warranty covers new products if a defect arises
and a valid claim is received by Magnavox within the Warranty
Period. At its option, Magnavox will either (1) repair the product at no charge, using new or refurbished replacement parts,
or (2) exchange the product with a product that is new or
which has been manufactured from new, or serviceable used
parts and is at least functionally equivalent or most comparable
to the original product in Magnavox current inventory, or (3)
refund the original purchase price of the product.
Magnavox warrants replacement products or parts provided
under this warranty against defects in materials and workmanship from the date of the replacement or repair for ninety (90)
days or for the remaining portion of the original product’s warranty, whichever provides longer coverage for you. When a
product or part is exchanged, any replacement item becomes
your property and the replaced item becomes Magnavox’ property. When a refund is given, your product becomes Magnavox’
property.
Note: Any product sold and identified as refurbished or
renewed carries a ninety (90) day limited warranty.
Replacement product can only be sent if all warranty
requirements are met. Failure to follow all requirements can result in delay.
WHAT IS NOT COVERED - EXCLUSIONS AND LIMITATIONS:
This Limited Warranty applies only to the new products manufactured by or for Magnavox that can be identified by the trademark, trade name, or logo affixed to it. This Limited Warranty
does not apply to any non-Magnavox hardware product or any
software, even if packaged or sold with the product. NonMagnavox manufacturers, suppliers, or publishers may provide a
separate warranty for their own products packaged with the
bundled product.
Magnavox is not liable for any damage to or loss of any programs, data, or other information stored on any media contained within the product, or any non-Magnavox product or
part not covered by this warranty. Recovery or reinstallation of
programs, data or other information is not covered under this
Limited Warranty.
This warranty does not apply (a) to damage caused by accident,
abuse, misuse, misapplication, or non-Magnavox product, (b) to
damage caused by service performed by anyone other than
Magnavox or Magnavox Authorized Service Location, (c) to a
product or a part that has been modified without the written
permission of Magnavox, or (d) if any Magnavox serial number
has been removed or defaced, or (e) product, accessories or
consumables sold “AS IS” without warranty of any kind by
including refurbished Magnavox product sold “AS IS” by some
retailers.
This Limited Warranty does not cover:
• Shipping charges to return defective product to Magnavox.
• Labor charges for installation or setup of the product, adjustment of customer controls on the product, and installation
or repair of antenna systems outside of the product.
• Product repair and/or part replacement because of improper
installation, connections to improper voltage supply, abuse,
neglect, misuse, accident, unauthorized repair or other cause
not within the control of Magnavox.
• Damage or claims for products not being available for use, or
for lost data or lost software.
• Damage occurring to product during shipping.
•A product that requires modification or adaptation to enable
it to operate in any country other than the country for
which it was designed, manufactured, approved and/or
authorized, or repair of products damaged by these modifications.
•A product used for commercial or institutional purposes
(including but not limited to rental purposes).
• Product lost in shipment and no signature verification receipt
can be provided.
• Failure to operate per Owner’s Manual.
TO OBTAIN ASSISTANCE IN THE U.S.A., PUERTO
RICO, OR U.S. VIRGIN ISLANDS…
Contact Magnavox Customer Care Center at:
TO OBTAIN ASSISTANCE IN CANADA…
REPAIR OR REPLACEMENT AS PROVIDED UNDER THIS
WARRANTY IS THE EXCLUSIVE REMEDY FOR THE CONSUMER. MAGNAVOX SHALL NOT BE LIABLE FOR ANY
INCIDENTAL OR CONSEQUENTIAL DAMAGES FOR
BREACH OF ANY EXPRESS OR IMPLIED WARRANTY ON
THIS PRODUCT. EXCEPT TO THE EXTENT PROHIBITED
BY APPLICABLE LAW, ANY IMPLIED WARRANTY OF MERCHANTABILITY OR FITNESS FOR A PARTICULAR PURPOSE
ON THIS PRODUCT IS LIMITED IN DURATION TO THE
DURATION OF THIS WARRANTY.
Some states do not allow the exclusions or limitation of incidental or consequential damages, or allow limitations on how
long an implied warranty lasts, so the above limitations or
exclusions may not apply to you.
1-800-705-2000
1-800-661-6162 (French Speaking)
1-800-705-2000 - (English or Spanish Speaking)
This warranty gives you specific legal rights. You may have other rights which vary from state/province to state/province.
Magnavox, P.O. Box 671539, Marietta, GA. 30006-0026
3121 233 48921
39
 Loading...