

Page 1
1
DVD/VCR
MDVDVCR5
combo
�
�
Page 2

2
Introduction
Congratulations on the purchase of your
Magnavox DVD and VCR player. It is hoped that
you have a lot of enjoyment from your player.
Thank you very much for your purchase of this
product.
To enjoy your player to the full from the very
beginning, read this manual carefully and keep it
handy for ready reference.
Important Safeguards
When using electrical appliances, in
order to reduce the risk of fi re, electric
shock, and /or injury to persons, basic
safety precautions should always be
followed.
For Your Safety
Read all instructions carefully even if you feel
you are quite familiar with the appliance.
•
This appliance is not intended for use by
young children or infi rm persons unless
they have been adequately supervised by a
responsible person to ensure that they can use
the appliance safely
vases, on the appliance. Do not expose
candles, on the appliance.
such as radiators, heaters, air ducts or direct
sunlight.
Ensure that vents are not covered by
newspapers, tablecloths, curtains, etc. Do not
install in a tight fi tting cabinet.
any grill openings.
bathrooms, laundry areas or similar moist
locations. Never locate this appliance in the
immediate surroundings of ,or where it may fall
into, a bath, basin, washtub, shower or
Arrange the supply cord away from traffi c
appliance by the supply cord. Never yank the
supply cord from the power outlet; instead,
supply cord or plug or after the appliance
malfunctions, has been dropped or damaged
other uses other than those specifi ed in this
booklet. This product is intended for household
use only.
while operating other radio devices.
Page 3

Page 4
RISK OF ELECTRIC SHOCK
DO NOT OPEN
within an equilateral triangle
Page 5

Advantages of
player and disc, can be displayed on the TV
Analog audio 2-channels output for DOWNMIX
time in CD
number of audio languages depends on the
Multi Angle function (DVD)
fl ickering of pictures or failure (tape is not
poorly or damage recording.
products in contact with the player for a long
peel-off.
leakage.
Page 6

future. Turn on and use the player
with towel not to be damaged.
a dry cloth to wipe it out.
deterioration or paint peel-off.
Antenna is subject to change in its direction or
Please use the tape after the moisture
After use, store tape vertically in a case to
speaker
Page 7
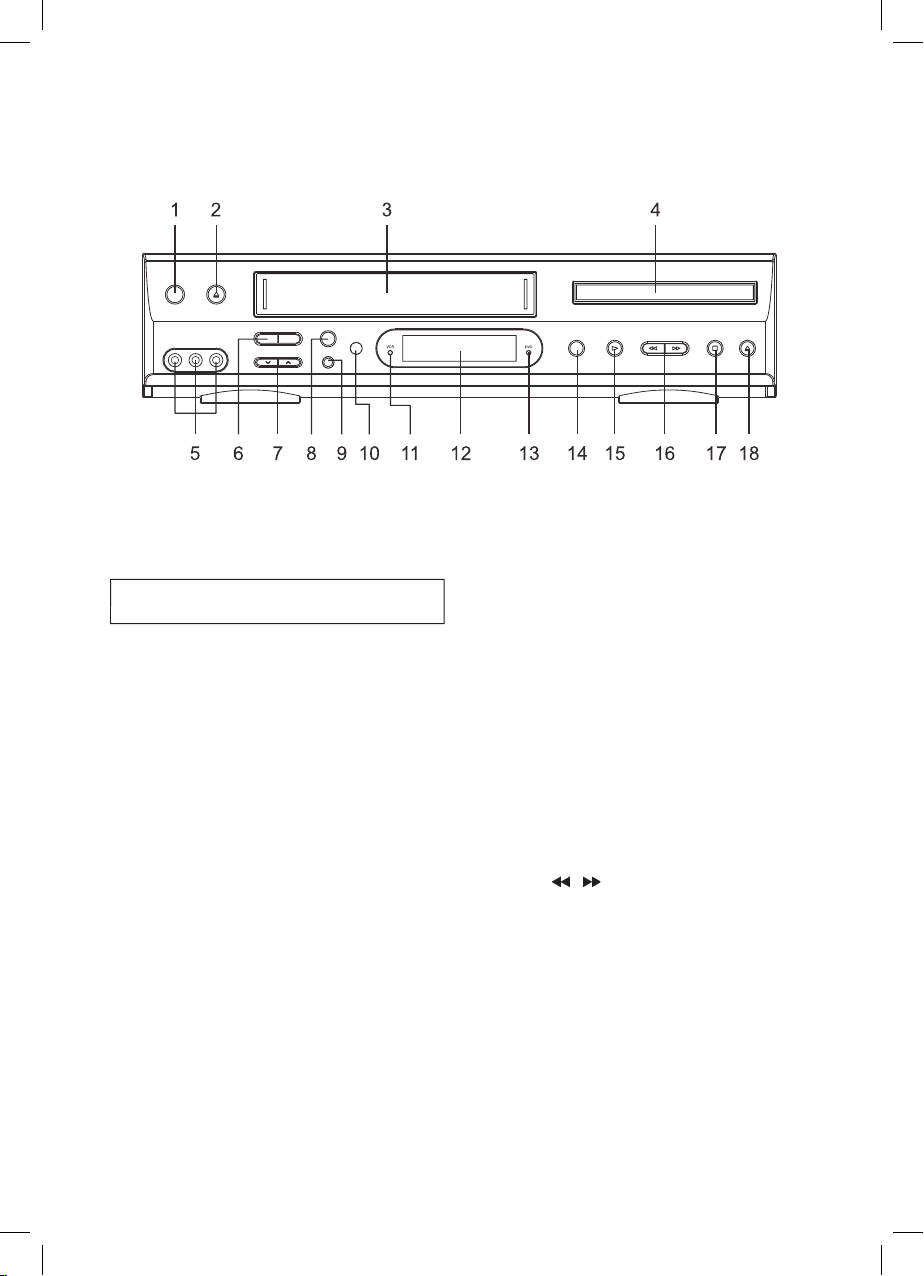
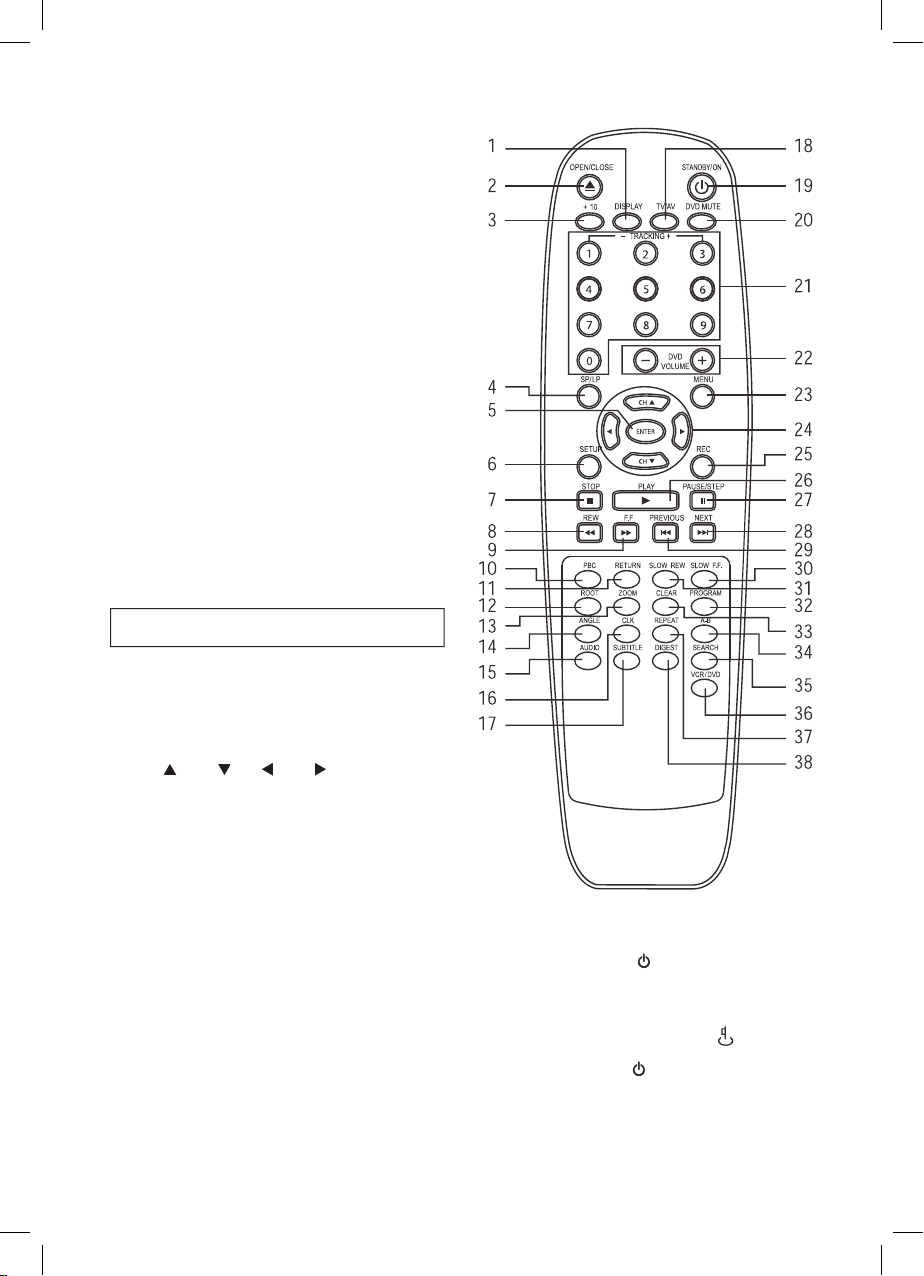
Press to turn the VCR on or off.
Press to stop tape movement and eject
a video cassette.
Insert a video cassette into this slot.
Open or close tray by pushing DVD
open/close button,place a disc on the
disc tray lable side up.
Attach the VCR’s audio & video input
at these terminals.
Press to change the channel.
Press to record the program currently
airing on the channel. Press multiple
times to process one-time-recording
time options.
This receiver receives a signal from
your remote control.
Display system informations
Press to start playback, in VCR mode
start to play VCR tape, in DVD mode
start to play Disc.
Press ( / ) button to search
rewind or forward the tape or DVD
Stop playing the disc and tape.
Use to open or close the tray.
function During OTR and Record mode.
Page 8

In Timer record state - will fl ash on/off
This is displayed in VCD and CD disc.
This is displayed in DVD disc.
POWER: Tray is opened
CLOSE: Tray is closed
LOAD: Disc is loaded
no DISC: There is no disc in tray
Error: Disc has some error
MENU: Menu screen is displayed
SETUP: Setup menu is displayed
ON: Power is ON
OFF: Power is OFF
Use to copy contents of disc into videotape.
Page 9
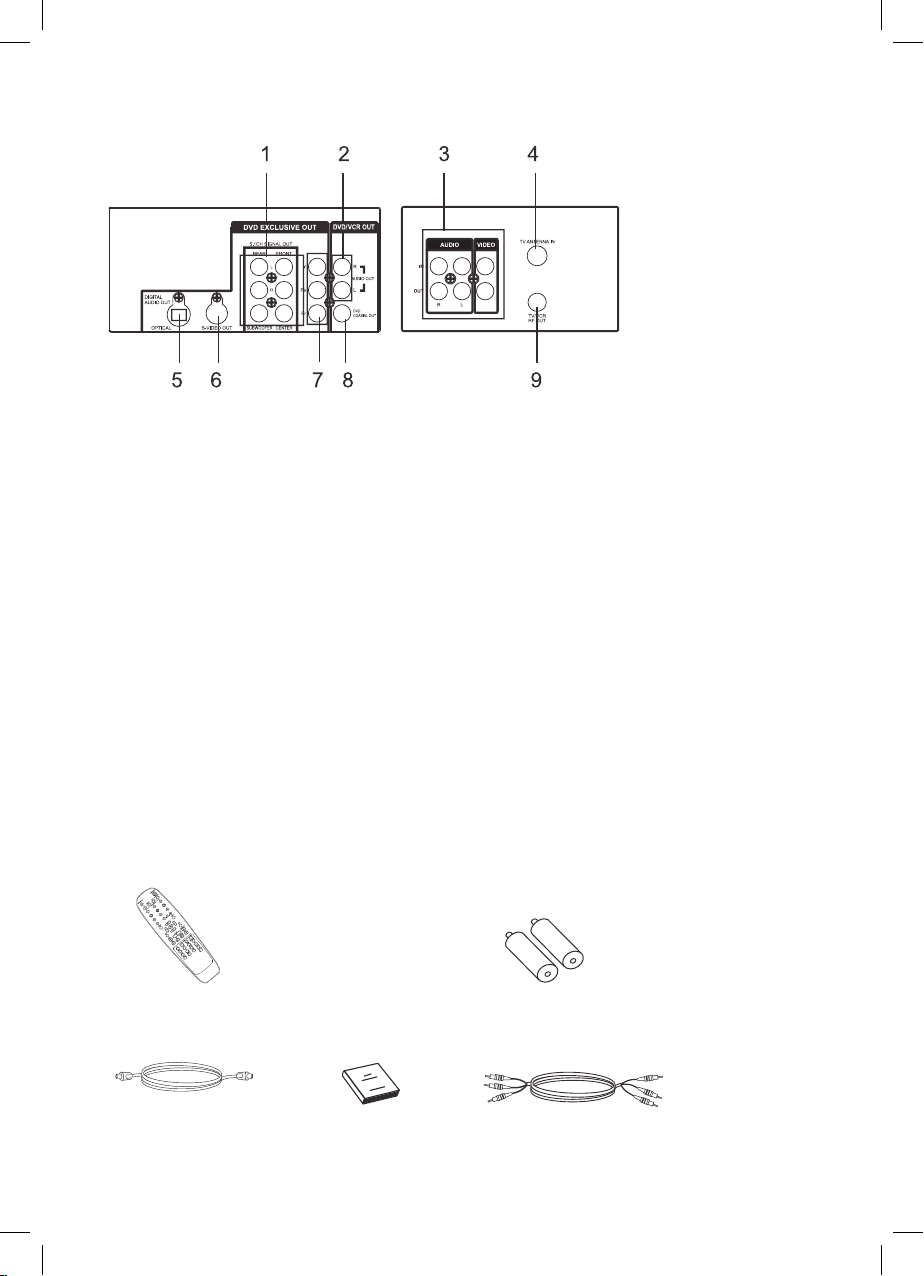
Engineering note: Please check correct
color on sockets. Y=Green(top) Blue(middle)
Accessories
1. Remote 2. Batteries
3. RF wire
4. User manual 5. RCA cable
Page 10
function During OTR and Record mode.
( Up Down Left Right )
] button of the remote
” ) will be
] button of the remote
Page 11

Antenna In”.
Page 12
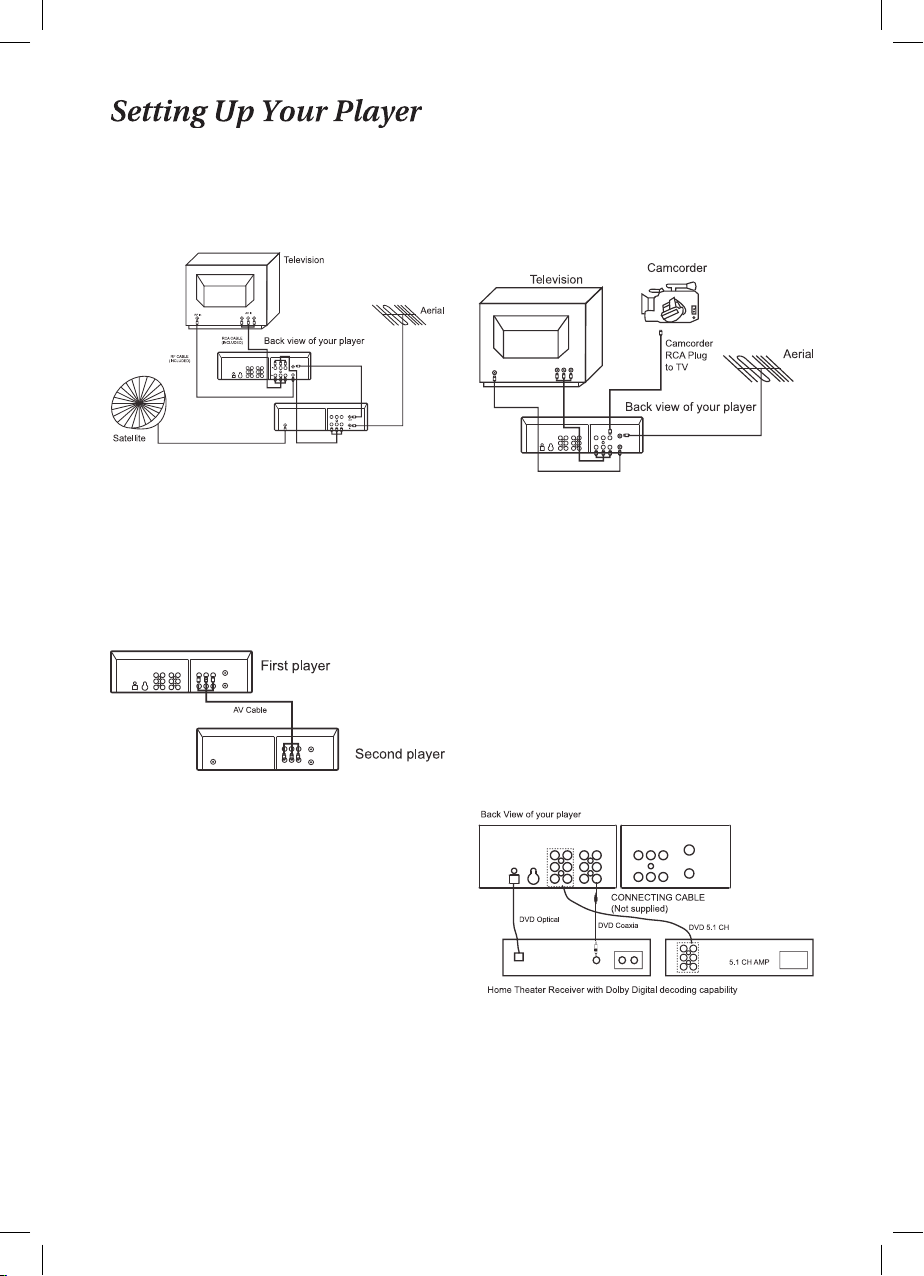
way, you can also connect a RCA lead from “AV”
The player will start recording.
Page 13

AV RCA Connecting
AVF mode.
Page 14

Auto Setting
COUNTRY
Austral
ia
Ne
w zealand
ENTE
R: Confirm SETUP: End
SETUP: End
CLOCK SET
Tim
e --:--
Dat
e -- / -- / - - - -
/
hour -> minute -> day -> month -> year.
At that time, “--/--/----”, this clock input guide
will appear on the TV screen.
[
/
Page 15

All lines have gray background and selected line
[
/
/
hour -> minute -> day -> month -> year.
At that time, “—/—/——”, this clock input guide
/
] buttons to move the cursor
Page 16

SETUP
Clock
set
Record
timer
Installation
Searc
h
Preference
s
ENTER
: Confirm SETUP: End SETUP: End
CLOCK SET
Time
--:--
Date --
/ -- / - - - -
SETUP: End
CLOCK SET
Time 11:--
Date --
/ -- / - - - -
SETUP: End
CLOCK SET
Time 11:11
Date --
/ -- / - - - -
SETUP: End
CLOCK SET
Time 11:11
Date --
/ -- / - - - -
ENTER: Confirm SETUP: End
CLOCK SET
Time 11:11
Da
te 11 / 11 / 2011 (Fri)
SETUP: End
CLOCK SET
Time 11:11
Date --
/ -- / - - - -
---------->
----------
>
--
>
--
>
-------->
>
--
-
--
Page 17

/
/
/
programming will appear.
/
Also, if the day or the month is changed at the
All the procedures of daily (Mon-Fri) recording are
All the procedures of daily (Mon-Sat) recording
All the procedures of daily (Mon-Sun) recording
All the procedures of daily (once a week)
/
/
Page 18

-->
* ONCE
-->
-->
->
-------------->
-------------
-
>
-------------->
ENTER
SETUP: End
TIMER 1
PR -
Startti
me 11:11
Endti
me 12:12
Startda
te 11/11(Wed)
Howoft
en Once
Tapespeed SP
SETUP: End
TIMER 1
PR 11
Startti
me --:- -
Endti
me --:- -
Startda
te 11/11(Wed)
Howoft
en Once
Tapespeed SP
SETUP: End
TIMER 1
PR 11
Startti
me 12:--
Endti
me --:- -
Startda
te 11/11(Wed)
Howoft
en Once
Tapespeed SP
TIMER 1
PR 11
Startti
me 12:20
Endti
me 14:20
Startda
te 11/11(Wed)
Howoft
en Once
Tapespeed SP
ENTE
R: Confirm SETUP: End
Page 19

-->
-->
->
-> -> ->
-->
--
>
----------------------------------------------------------------------->
TIMER 1
PR 11
Startti
me 12:20
Endti
m
e 14:20
Startda
te 11/11(Wed)
Howoft
en Once
Tapespeed SP
Overlap!
Timer 1 Stared
TIMER 1
PR 11
Startti
me 12:20
Endti
me 14:20
Startda
te 11/11(Wed)
Howoft
en Once
Tapespeed SP
ENTE
R: Confirm SETUP: End
TIMER 1
PR 11
Startti
me 12:20
Endti
me 14:20
Startda
te 11/11(Wed)
Howoft
en Once
Tapespeed SP
ENTE
R: Confirm SETUP: End
TIMER 1
PR 11
Startti
me 12:20
Endti
me 14:20
Startda
te 11/11(Wed)
Howoft
en Once
Tapespeed SP
ENTER: Confirm SETUP: End
SETUP: End
TIMER 1
PR 11
Startti
me 12:20
Endti
me --:--
Startda
te 11/11(Wed)
Howoft
en Once
Tapespeed SP
SETUP: End
TIMER 1
PR 11
Startti
me 12:20
Endti
me 14:--
Startda
te 11/11(Wed)
Howoft
en Once
Tapespeed SP
Page 20

button.
/
/
button.
/
/
/
will be changed to the screen of (3).
PROGRAMMING procedures. The next steps
step (4).
Page 21

SETUP
Clock
set
Record
timer
Installation
Searc
h
Preference
s
ENTER: Confirm SETUP: End
SETUP
Clock
set
Record
timer
Installation
Searc
h
Preference
s
ENTER: Confirm SETUP: End
PR Start End Date
01 14:10 16:00 19/11
11 10:00 12:00 24/12
AV 12:00 14:00 25/12
04 10:10 11:30 Mo-Fri
06 11:40 12:00 W/Fri
07 15:00 17:00 Mo-Sa
07 18:00 19:00 Mo-Su
TIMER 2
PR 01
Starttim
e 14:10
Endtim
e 16:00
Startdat
e 18/11(Wed)
Howofte
n Once
Tapespeed SP
->
->
--->
->
->
(1)
(2
)
(2)
GO TO “Installation”
ENTE
R
(1)
GO TO “Clock set”
(3
)
ENTER: Confirm SETUP: End
ENTER
: Confirm SETUP: End
Page 22

[
/
[
/
button to confi rm that.
appears automatically.
And then, press the [ENTER] button to confi rm. If
appears. Whenever a channel is searched and
During channel searching, you can press the
COUNTRY
Australi
a
New
zealand
ENTER
: Confirm SETUP: End
which has the black and white pattern (2 white
/
/
button to confi rm that.
/
written before the channel number. If the user
Page 23

Auto search -The user can either launch
/
/
/
/
to confi rm that.
/
The [SETUP] button is pressed to interrupt
INSTALLATION
Aut
o installation
Manuali
nstallation
Organizer
RF outputset
ENTE
R: Confirm SETUP: End
(2)
ENTER: Confirm SETUP: End
ORGANIZER
PR 01
Na
me --- -
Swa
p with PR --
Del
ete program. 01
(3)
SETUP
Cloc
k set
Recor
d timer
Installation
Search
Preferenc
es
ENTE
R: Confirm SETUP: End
(1)
ENTER: Confirm SETUP: End
ORGANIZER
PR 01
Na
me -- --
Swa
p with PR --
Del
ete program. 01
(4)
Page 24

ENTE
R: Confirm SETUP: End
INSTALLATION
Aut
o installation
Manuali
nstallation
Organizer
RF outputset
ENTE
R: Confirm SETUP: End
PR 01
Name -- -Swa
p with PR --
Del
ete program. 01
ENTE
R: Confirm SETUP: End
PR 01
Na
me -- -Swap with PR -Del
ete program. 01
ENTE
R: Confirm SETUP: End
PR 01
Na
me -- -Swap with PR 02
Del
ete program. 01
ENTE
R: Confirm SETUP: End
PR 02
Na
me -- -Swap with PR -Del
ete program. 02
ENTE
R: Confirm SETUP: End
/
/
to confi rm that.
/ / /
without data change.
SETUP
Cloc
k
set
Recor
d timer
Installation
Sear
c
h
Preferenc
es
ENTE
R: Confirm SETUP: End
INSTALLATION
Aut
o installation
Manuali
nstallation
Organizer
RF outputset
ENTE
R: Confirm SETUP: End
Page 25

[
/
[
/
And the [SETUP] button is pressed to interrupt
SETUP
Cloc
k set
Record timer
Installation
Sear
ch
Preferenc
es
ENTE
R: Confirm SETUP: End
INSTALLATION
Aut
o installation
Manualinstallation
Organizer
RF outputset
ENTE
R: Confirm SETUP: End
RF OUTPUTSET
CH 36
ENTE
R: Confirm SETUP: End
Page 26

Display)
/
select the line of “Preference” and press the
/
[
/
/
SETUP
Clo
ck
set
Reco
rd timer
Installation
Sea
rch
Preferen
ces
ENT
ER: Confirm SETUP: End
SEARCH
Go to zero
Ind
ex +
Index -
ENTER :Confirm SETUP: End
REW SP
GO TO ZERO
0:00
:30
FF SP
GO TO ZERO
-0:00
:30
Super-Imposed
Super-Impo
sed
(3)
or
Page 27

/
/
confi rm that.
And this process will be repeated continuously. If
SETUP
Clo
ck set
Reco
rd
timer
Installation
Sea
rch
Preferen
ce
s
ENT
ER: Confirm SETUP: End
SEARCH
Go to zero
Ind
ex +
Index -
ENT
ER :Confirm SETUP: End
REW SP
IND
EX 00
0:00
:00
Super-Imposed
Real pict
u
re
After
3 Sec
Page 28

/
/
confi rm that.
And this process will be repeated continuously.
SETUP
Clo
ck set
Reco
rd
timer
Installation
Sea
rch
Preferen
ce
s
ENT
ER: Confirm SETUP: End
REW SP
IND
EX 00
0:00
:00
Super-Imposed
Real pict
u
re
After
3 Sec
SEARCH
Go to zero
Index +
Index -
ENTE
R :Confirm SETUP: End
Page 29

(VHS Index Search System)
impossible to record and erase the index
wind(fast forward or rewind) a tape and play
After 5 seconds it will wind (fast forward OR
REW SP
INDE
X -01
-0:00:3
0
PLAY SP
-0:00:45
REW SP
INDE
X -02
-0:00:5
5
PLAY SP
-0:01:3
0
--------->
----------
>
---------
>
FF SP
INDE
X 01
0:00:3
0
PLAY SP
0:00:45
FF SP
INDE
X 02
0:00:5
5
PLAY SP
0:01:3
0
--------->
----------
>
---------
>
VCR:
A mark too close to your location on the
Page 30

And the VCR goes to playback mode
SP (x7), LP (x15)
backward: SP (x3), LP (x5).
playback.
stopped.
Page 31

[
/
(2) In the case of playingback a Hi-Fi tape:
PLAY SP Hi-Fi
OFF
0:30:1
0
------>
-------
>
------
>
--------->
PLAY SP Hi-Fi
R
0:30:10
PLAY SP Hi-Fi
L
0:30:10
PLAY SP Hi-Fi
L+R
0:30:10
PLAY SP
0:30:1
0
Page 32

And if press the [POWER] button for 5 seconds
/
Page 33

] button to power on.
/
After pressing [PAUSE] button, if the pause
button.
] button.
Page 34

time
minutes
more than 8 seconds.
Page 35

After recording, break off the safety tab with a
About VCR
Video Head Cleaning
Page 36

before using it.
troubles of a VCR or videotape.
to turn on DVD.
side facing up.
button.
Page 37

Angle Mark
TV Display PS
Angle
Mark On
OSD
Lang ENG
Captions
On
Screen Saver
Off
On
Of
f
Set
Angle Mark
- GENERAL SETUP PAGE-
TV Display PS
Angle
Mark On
OSD
Lang ENG
Captions
On
Screen Saver
Off
Normal/PS
Normal
/LB
Wid
e
Set
TV Display Mode
- GENERAL SETUP PAGE-
TV Display PS
Angle Mark
On
OSD
Lang ENG
Captions
On
Screen Saver Off
English
French
German
Italia
n
Dutc
h
Se
t OSD Language
- GENERAL SETUP PAGE-
TV Display PS
Angle
Mark On
OSD
Lang ENG
Captions
On
Screen Saver
Off
On
Off
Closed
Caption
- GENERAL SETUP PAGE-
. . General Setup Page . .
TV Display PS
Angle
Mark On
OSD
Lang ENG
Cap
tions On
Screen
Saver Off
Go
To General Setup Page
Page 38

key
A disc recorded multi channel soundtrack,
A disc recorded multi channel soundtrack,
Amp, please turn it to this mode.)
TV Display PS
Angle
Mark On
OSD
Lang ENG
Captions
On
Screen
Saver Off
On
Of
f
Screen
Saver
- GENERAL SETUP PAGE-
. . Audio Setup Page . .
Speaker Setup
Dolby
Digital Setup
Go
To Audio Setup Page
Downmix STR
Front Speaker LRG
Center
Speaker SML
Rear
Speaker SML
Subwoofer
On
- SPEAKER SETUP PAGE-
LT/RT
Stere
o
Of
f
Setup Front Speaker
- SPEAKER SETUP PAGE-
Large
Smal
l
- SPEAKER SETUP PAGE-
Large
Smal
l
Of
f
Set Downmix Mode
Downmix ST
R
Front Speaker LRG
Center
Speaker SML
Rear
Speaker SML
Subwoofer
On
Set up Center Speaker
Downmix ST
R
Front Speaker LRG
Center
Speaker SML
Rear
Speaker SML
Subwoofer
On
Page 39

Dynamic
- Dolby Digital Setup-
Fu ll
6/
8
4/
8
2/
8
Of
f
Dynamic Range Compression
. . Video Setup Page . .
Component
TV Mod
e
Qualit
y
Setup Rear Surround Speaker
- SPEAKER SETUP PAGE-
Large
Smal
l
Of
f
On
Of
f
Set up Subwoofer
- SPEAKER SETUP PAGE-
Downmix STR
Front Speaker LRG
Center
Speaker SML
Rear
Speaker SML
Subwoofer
On
Downmix ST
R
Front Speaker LRG
Center
Speaker SML
Rear
Speaker SML
Subwoofer
On
Go To Video Setup Page
Page 40

High
Mediu
m
Lo
w
- Video Quality Setup-
Sharpness Low
Brign
tness 00
Contra st 00
Sharpness
Sharpness Low
Brigh
tness 00
Contrast
00
Brightnes
s
- Video Quality Setup-
Brightness
IIIIIIIIIII__ 0
. . Video Setup Page . .
Component S-Video
TV Mode
Qualit
y
S-Video
YUV
. . Video Setup Page . .
Component S-Video
TV Mode
Qualit
y
P-SCAN
Interlace
Sharpness Low
Brightness
00
Contr
ast 00
Contras
t
- Video Quality Setup-
Contrast
IIIIIIIIIII__ 0
Set P-SCAN On/Off
Componen
t
Page 41

Audio
Set Preference to English
- Preference Page-
English
French
German
Italia
n
Dutch
Off
TV Type PAL
Audio ENG
Subtitle ENG
Disc
Menu ENG
Parental
Passwor
d
Defaul
t
. . Preference Page . .
TV Type PAL
Audio ENG
Subtitle ENG
Disc
Menu ENG
Parental
Password
Defaul
t
Go
To Preference Page
- Preference Page -
TV Type PAL
Audio ENG
Subtitle ENG
Disc
Menu ENG
Parenta
l
Password
Defaul
t
PAL
Multi
NTSC
- Preference Page -
Set TV Standard
TV Type PAL
Audio ENG
Subtitle ENG
Disc
Menu ENG
Parental
Password
Default
English
French
German
Italia
n
Dutch
- Preference Page -
Preferred Audio Languages
Page 42

Set Parental Control
- Preference Page -
1. KID SAF
2.
G
3.
PG
4. PG
13
5. PG
R
6.
R
7. NC
17
8. Adult
Off
TV Type PAL
Audio ENG
Subtitle ENG
Disc
Menu ENG
Parenta
l
Passwor
d
Defaul
t
Preferred Menu Language
- Preference Page-
English
French
German
Italia
n
Dutc
h
TV Type PAL
Audio ENG
Subtitle ENG
Disc
Menu ENG
Parenta
l
Passwor
d
Defaul
t
Change Password
- Preference Page-
Change
TV Type PAL
Audio ENG
Subtitle ENG
Disc
Menu ENG
Parenta
l
Passwor
d
Defaul
t
Page 43

Exit Setup Menu
Load Factory Setting
- Preference Page-
Reset
TV Type PAL
Audio ENG
Subtitle ENG
Disc Menu ENG
Parenta
l
Passwor
d
Defaul
t
) or input the
Audio
Audio channel.
/
)
will perform quick rolling on the music output.
Page 44

/
)
PREVIOUS playing chapter or track.
A - B
Angle
Page 45

)
Press the DISPLAY Button
Press
the DISPLAY Button
Press
the DISPLAY Button
Press the DISPLAY Button
Press the DISPLAY Button
Title Elapsed
TT
01/04 CH 01/12 0:02:13
Title
Remain
TT
01/04 CH 01/12 1:33:30
Chapter Elapsed
TT
01/04 CH 01/12 0:02:15
Chapter Remai
n
TT
01/04 CH 01/12 0:02:18
Display Of
f
Page 46

Time Interval,Chapter Digest, Title Interval and
Chapter Interval.
Ty pe :Ti tl e
Sel ect (01 -08 ): - Ex
it Men u NEXT
Program : TT(- -)/CH (- -)
01
02
03
04
05
Exit NEXT
06
07
08
09
10
Program : TT(- -)/CH (- -)
01
02
03
04
05
Exit
Start NEXT
06
07
08
09
10
05
03
08
Program : TT(- -)/CH (- -)
06
07
08
09
10
05
03
08
01
02
03
04
05
Exit Start NEX
T
01 02 0 3
04 05 0 6
Page 47

you want call up a title with only one or
few seconds until the cursor skips to the
Blue cursor
Orange cursor
MP3 SONG001
MP
3 SONG002
MP
3 SO NG003
MP3 SONG004
MP
3 SONG005
MP
3 SONG006
Page 48

A disc is playing but
work.
Any MP3 (CD-R) fi le
check a DVD’s region code whether it has the relative region
Some contaminants may be remained in connectin terminal.
A receiver of remote control may be different with a sender.
Also a user can confi rm the support with the “ANGLE”
mark on screen.
Page 49

A videotape is not inputted in.
A videotape is not ejected.
A channel on video and a play
That’s why a safe mode to protect a videotape is operated
Page 50

waves.
A screen is not clear.
A screen at pause is trembling
Are RF cables inputted antenna connection terminal
with cellophane adhesive tape (Scotch tape)
was broken, please scotch-tape it)
You may not memorize channels.
Page 51

Antenna Input/output
AUDIO input
AUDIO output
AUDIO output (DVD only)
430mm x 91mm x 355.5mm
Analogue AUDIO output(5.1CH)
Page 52

Address:
200
 Loading...