

Page 1
Access Point Setting(Auto Scan)
Please input the WEP/WPA Key with software keyboard.
XXXXXXX
Done Cancel Clear a/A/@
Network connection succeeds.
State : Pass
End
SD
SD
Network Setup
Access Point Setting
Please select the setting mode.
2/7
Cancel
Auto Scan
Manual
Easy Connect (WPS)
Access Point Setting
Please select the setting mode.
2/7
Cancel
Auto Scan
Manual
Easy Connect (WPS)
Access Point Setting(Easy Connect)
PIN Code Method
2/7
Cancel
Please input the PIN number into the wireless router
and select ‘PIN Code Method’ button on screen.
PIN Code is : xxxxxxx
Push Button Method
Please push the PBC(push button configuration)
on the wireless router and select ‘Push Button Method’
button on screen.
Please wait for a while.
State : Setting...
Network Settings (Auto)
6/7
Network Settings
Please select the setting mode.
4/7
Cancel
Auto
Manual
Access Point Setting (Auto Scan)
Please confirm the setting.
3/7
Cancel
Retry
Next
SSID : Access 1
Security : XXXXX
WEP/WPA Key : XXXXXXX
Access Point Setting(Auto Scan)
Please input the WEP/WPA Key with software keyboard.
Done Cancel Clear a/A/@
Please wait for a while.
State : Searching...
Access Point Setting (Auto Scan)
2/7
Access Point Setting (Auto Scan)
Please select the access point.
3/7 3/7
Cancel
Retry
Access 1
Access 2
Access 3
Please wait for a while.
State : Connecting...
1234567890
SP
a/A/@
CLR
Done
abcdef ghi j
hl mnop qrs t
uv wxy z . -
←→
1234 5 67 890
SP
a/A/@
CLR
Done
abcdef ghi j
hl mnop qr s t
uv wxy z . -
←→
Network Selection
Please select the connection method.
1/7
Cancel
Wired
Wireless
SD
SD
Network Setup
3/7
AV/SOURCE
A
V/SOURCE
Language
Please select your language for on-screen display.
English
Español
Français
Initialization
Welcome!!
Cancel
Next
This unit is ready for initialization now. Please
follow instructions to make correct settings.
Then the settings are initialized.
Please Wait...
Network Selection
Please select the connection method.
Cancel
Wired
Wireless
Quick Start Mode
Would you like to set on the Quick start mode?
The unit will set on quicker, but will consume
more power in standby mode.
On
Off
Automatically check for latest software
Would you like to set on the Auto software
update feature? When connected to the internet,
the unit will automatically check for the latest
software.
On
Off
STANDBY/ON
1/7
Network Settings
Please select the setting mode.
4/7
Cancel
Auto
Manual
Please wait for a while.
State : Setting...
Network Settings (Auto)
6/7
Network connection succeeds.
State : Pass
Network Settings (Auto)
7/7
End
Please wait for a while.
State : Connecting...
Network Settings (Auto)
6/7
Network Selection
Please select the connection method.
1/7
Cancel
Wired
Wireless
SD
SD
Network Setup
SD
SD
Network Setup
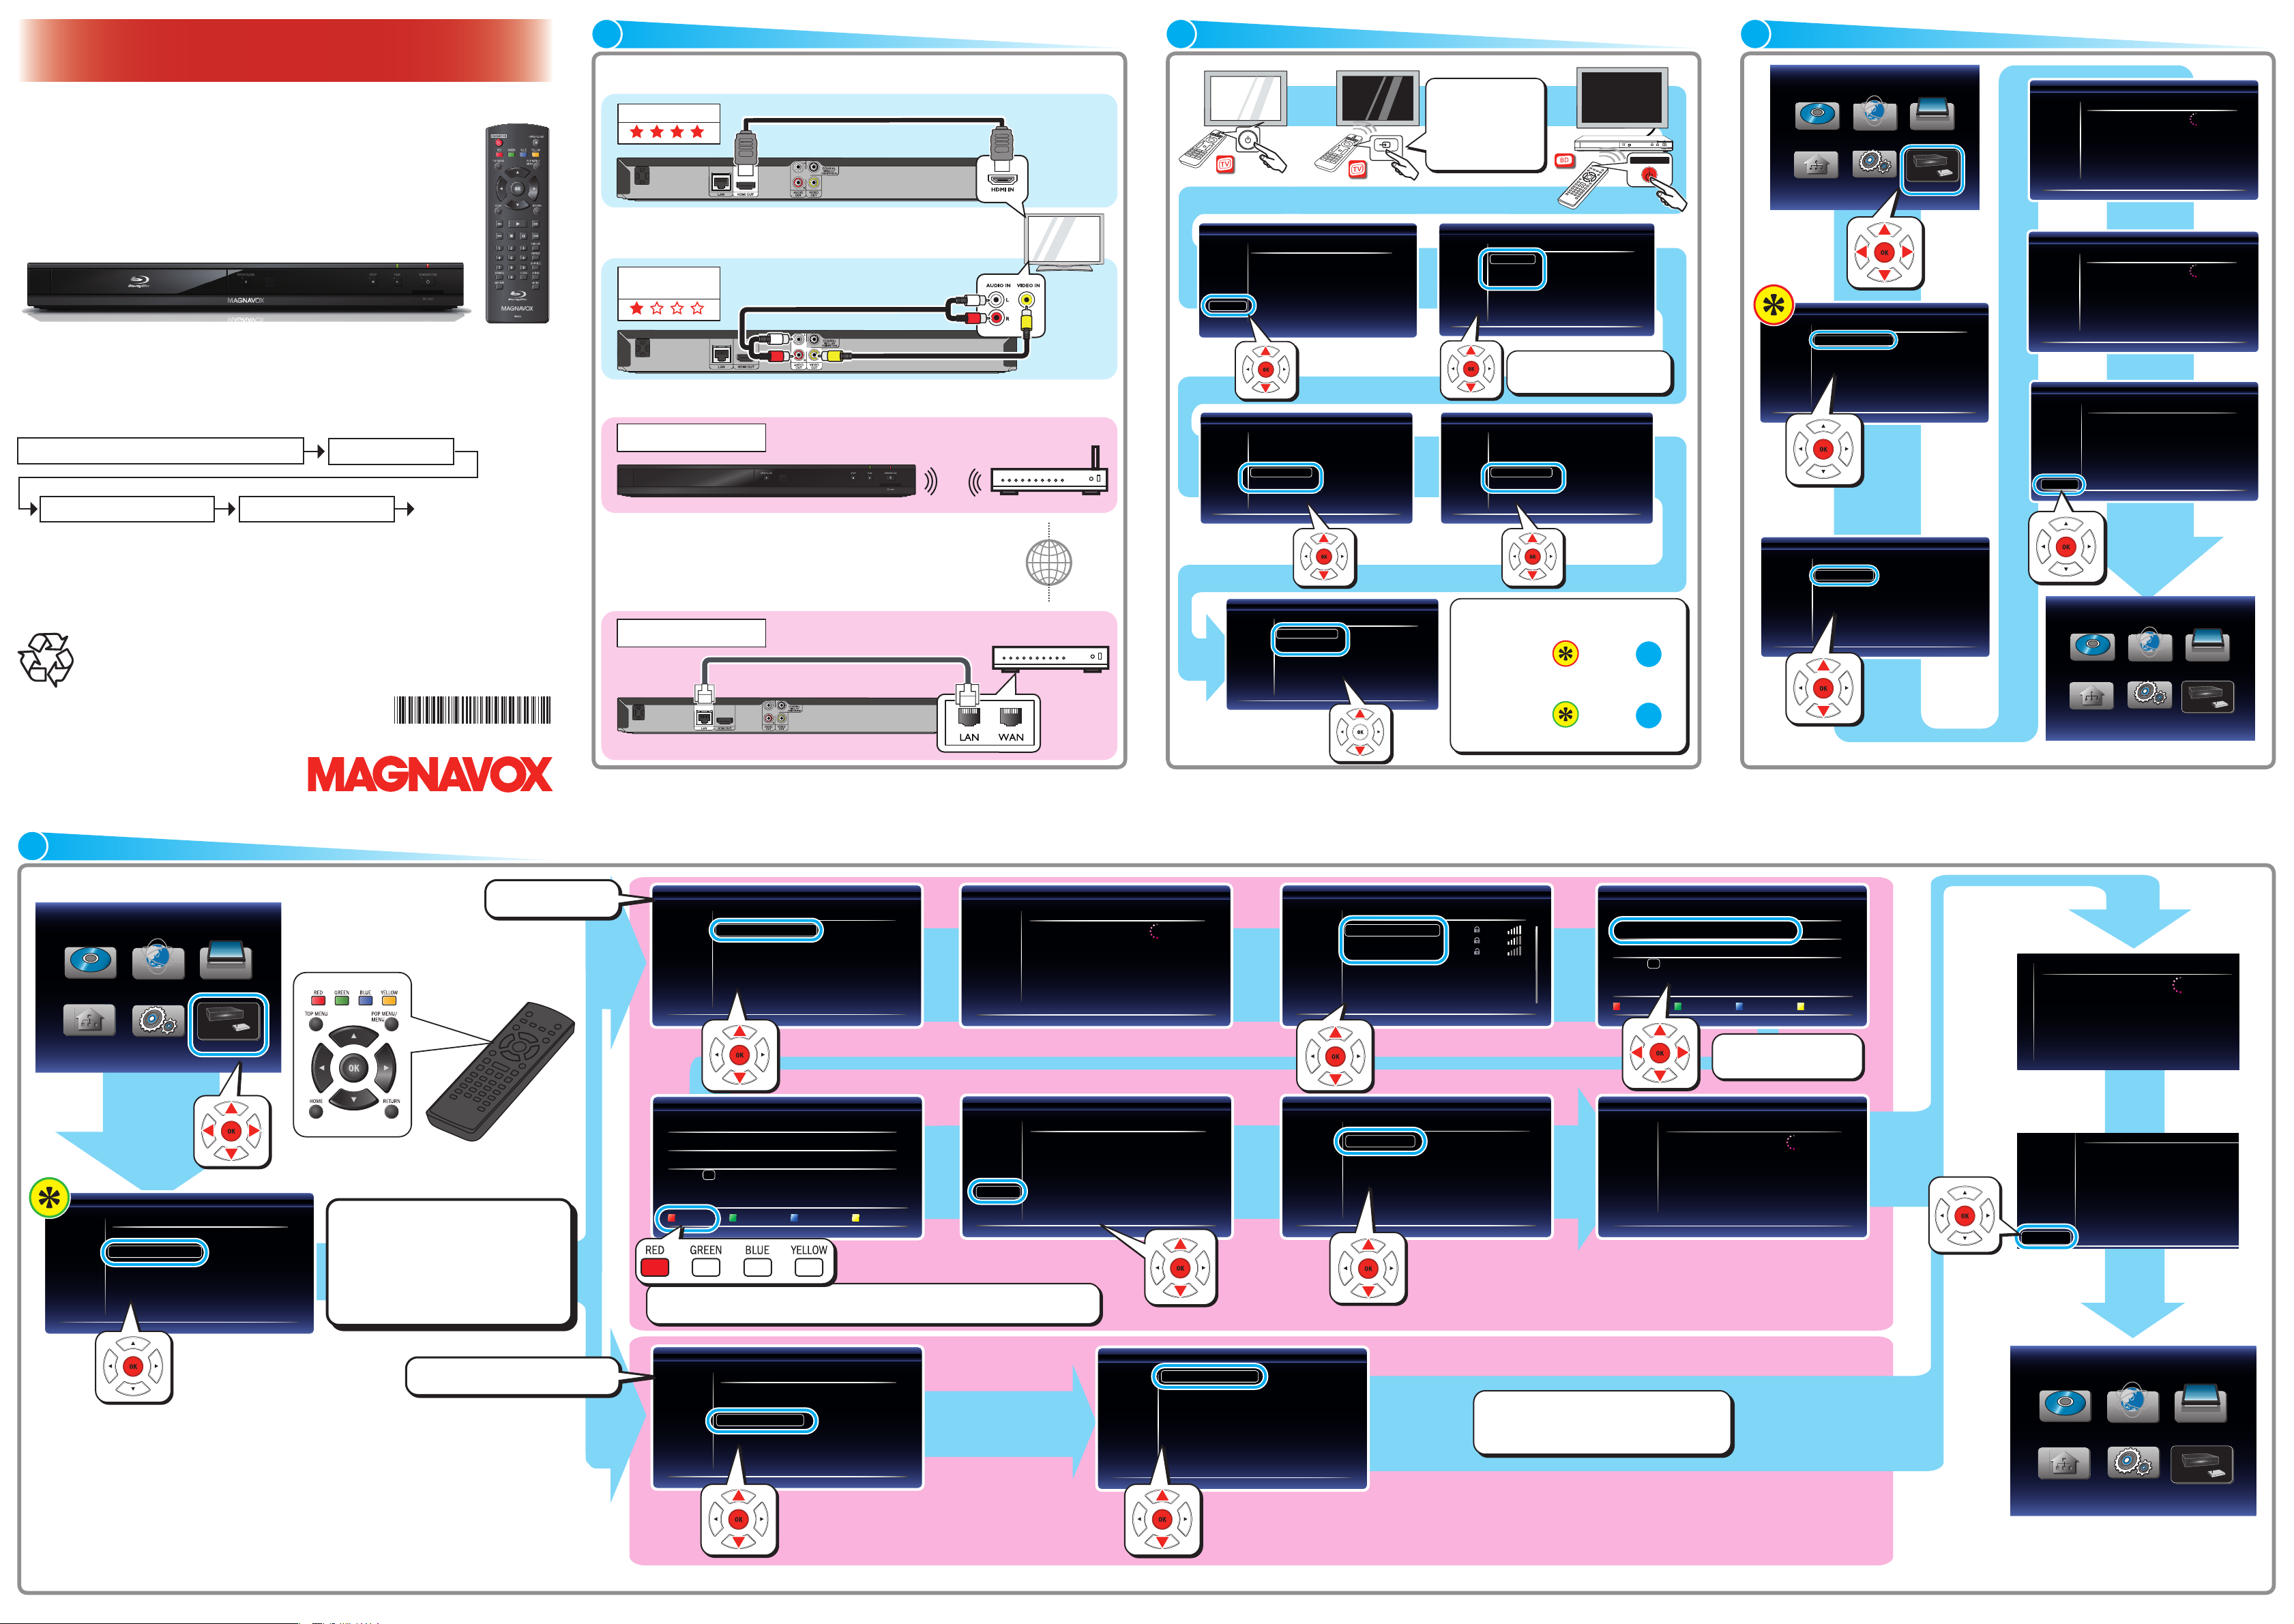
SETUP MANUAL
*1VMN30533*
CONNECTIONS
1
INITIAL SETUP
2
WIRED SETUP
3
MBP5230/F7
See the Online Manual for details: www.MAGNAVOX.com
Funai Electric is now innovating a brand-new solution to our customers.
Our Online Manual is available at: www.MAGNAVOX.com
Access to “www.MAGNAVOX.com”
Select “Player”
Connection to the TV
HDMI OUT
HDMI cable (not supplied)
or
VIDEO OUT &
AUDIO OUT
Wired and Wireless Connections
Wireless Connection
Audio cable (supplied)
Video cable (supplied)
Wireless broadband router
Power Button
Press the button
on the TV’s remote
control that accesses
the external input
channel.
Select your language.
It may take a few minutes.
It may take a few minutes.
Select “MBP5230/F7” Select “Download”
Download Starts!
If you have any questions or issues with the product, please check the Troubleshooting section of the
Manual. Additional support is required please contact Customer Service 1-800-605-8610 or Online
Support visit: www.magnavox.com/support
MAGNAVOX is a registered trademark of Philips Electronics North America Corporation and is used by
Funai Electric Co. Ltd. and Funai Corporation, Inc. under license from Philips Electronics North America.
For product recycling information, please visit - www.magnavox.com
© 2011 Funai Electric Co., Ltd.
Printed in China
E5W00UD
1VMN30533
4
★★★★★
WIRELESS SETUP
“Auto Scan”
Active Internet connection is required to
or
your modem or broadband router. Please
check with your Internet Service Provider
(ISP) for further assistance.
Wired Connection
LAN cable (not supplied)
See the Online Manual for details: www.MAGNAVOX.com
Internet
Modem / Router
If you select “Wired”,
please go to in step
If you select “Wireless”,
please go to in step
.
3
.
4
Enjoy network applications.
See the Online Manual for details: www.MAGNAVOX.comSee the Online Manual for details: www.MAGNAVOX.com
Please confirm your wireless
router has a PBC (Push Button
Configuration) button first.
If it does not have it, set up
with “Auto Scan” above.
It may take a few minutes.
RED : Accept the Pass Key entered. GREEN : Cancel the option.
BLUE : Delete any character entered. YELLOW : Shift to the characters in the menu.
Please enter the security
key of the wireless router.
It may take a few minutes.
It may take a few minutes.
“Easy Connect (WPS)”
Please push the PBC (Push Button
Configuration) on the wireless router.
Enjoy network applications.
If you select “Manual” or “PIN Code Method”, please see the Online Manual for details.
See the Online Manual for details: www.MAGNAVOX.com
Page 2

Netix delivers movie rentals two ways!
One low price - No late fees!
Unlimited
DVDs by mail
Unlimited streaming of
movies instantly to your TV
No late fees - ever! via your BD Player.
Are you Netix member?
See Teams of Use for details
yes - activate instant streaming from Netix
no - start my FREE trial
exit
instant queue 05 | 117
The Red Balloon / White Mane
2 episodes
NR
Watch
Instantly
Browse
DVDs
Your
Queue
Movies
You’ll
Give
Netix
Activate Your Netix Ready Device
Follow the instructions on your device to get an activation code.
Your computer and device must both be connected to the internet to activate.
If you are trying to activate a PS3TM system, you need a free Netix instant streaming disc. Order the disc here.
Enter code ...
Activate
Home New Arrivals Starz Play HelpInstantly to your TVGenres
Movies, TV shows, actors, directors, genres
Search
Buy/Redeem Gift | Tester Partner | Your Account & Help
WATCH INSTANTLY | BROWSE | QUEUE | MOVIES YOU’LL LOVE | FRIENDS | YOUR ACCOUNT & HELP
About Us | Aliates | Blog | Contact Us | Developers | Gifts : Buy / Redeem | Investor Relations
Jobs | Media Center | Netix Prize | RSS | App Gallery | Facebook Connect | Tell a Friend
Watch Instantly on your TV
Netflix
Apps
HD Movies
REMOTE CONTROL (ENGLISH)
(*) The unit can also be turned on by
pressing these buttons.
1
2
3
4
5
6
7*
8
10
11
12
INSERT BATTERIES
Install 2 AAA (1.5V) batteries
13*
14
15
16
17
18
199
20
21
22
23
24
25
1. STANDBY/ON . button
Press to turn on the unit, or to
switch the unit into standby mode.
(To completely turn off the unit,
you must unplug the AC power
cord.)
2. RED / GREEN / BLUE /
YELLOW buttons
Press to activate shortcut keys on
some BD-video functions.
When file list is shown, press to
switch between pages.
3. TOP MENU button
Blu-ray Disc™:
Press to display the top menu.
DVD:
Press to display the title menu.
4. Î / ï / Í / Æ buttons
Press to select items or settings.
5. HOME button
Press to display the home menu.
6. ¢ (reverse) button
During playback, press to fast
reverse the playback.
7. Æ (play) button*
Press to start playback or resume
playback.
TROUBLESHOOTING
H
8.
9. Ê (stop) button
10. Number buttons
11. SEARCH button
12. NET APP button
13. OPEN/CLOSE fl button*
14. POP MENU/MENU button
15. OK button
16. RETURN button
(skip) button
During playback, press once to
return to the beginning of the
current title, chapter, track or file.
During playback, press twice
to return to the previous title,
chapter, track or file.
During the JPEG playback, press to
return to the previous file.
Press to stop playback.
Press to select a chapter during
playback.
Press to enter numbers in the
input field.
Press to display the search menu.
Press to display the network
application menu.
Press to open or close the disc
tray.
Blu-ray Disc™:
Press to display the pop menu.
DVD:
Press to display the disc menu.
Press to confirm or select menu
items.
Press to return to the previously
displayed menu or screen function.
See the Online Manual for details: www.MAGNAVOX.com
17. ∫ (forward) button
During playback, press to fast
forward the playback.
When playback is in pause, press
to slow forward the playback.
G
18.
(skip) button
During playback, press to skip to
the next chapter, track or file.
When playback is in pause mode,
press to forward the playback
picture by picture.
19. Δ (pause) button
Press to pause playback.
20. DISPLAY button
Press to display the on-screen
display menu.
21. REPEAT button
Press to select repeat mode.
22. SUBTITLE button
Press to select subtitles on a disc.
23. AUDIO button
Press to select the audio channel
(such as audio languages) on a disc.
24. MODE button
During playback, press to display
the play menu.
25. CLEAR button
Press to clear the information
once entered.
DNote
• When the unit receives a signal from
the remote control, STANDBY/ON
indicator on the front panel fl ashes.
Problem Tip
No power. • Check if the AC cord is properly connected.
No sound or picture. • Check if the connected TV is turned on.
No reaction to the remote
control.
No audio / video signal on the
display device via HDMI cable.
No high-definition video signal
on the TV screen.
No audio signal from the
loudspeakers of the TV.
No audio signal from the
loudspeakers of the audio
system.
Distorted picture. • Sometimes a small amount of picture distor tion may appear. This is not a malfunction.
Completely distorted picture or
black / white picture with
Blu-ray Disc™ / DVD.
No sound or distorted sound. • Adjust the volume.
Picture freezes momentarily
during playback.
Cannot play back a disc. • Make sure that the product suppor ts the disc.
Cannot connect to the network. • Check if the network connection is properly made.
Cannot use the wireless
connection.
• Unplug the AC cord once, and wait for 5-10 seconds and then plug it in again.
• Check if the connections are made securely and correctly.
• Check whether the connected TV or other device supports HDCP. (This unit will not output
a video signal unless the other device supports HDCP.)
• Check whether the output format of this unit (HDMI FORMAT) matches the supported
input format of the other connected device.
• Press and hold [ PLAY B ] on the front panel for 5 seconds to change the setting back to its default.
• Connect the product to the power outlet.
• Point the remote control at the product.
• Inser t the batteries with the correct polarity.
• Inser t new batteries in the remote control.
• If the unit is connected to an unauthorized display device with an HDMI cable, the audio /
video signal may not be output.
• Perform an HDMI cable hotplug, wherein you disconnect the HDMI cable from the TV and
this unit and then reconnect it to both the devices while they are powered on.
• Ensure that your HDMI cable is cer tified.
• Does the disc contain high-definition video? High-definition video is not available when the
disc does not contain it.
• Does the TV support high-definition video? High-definition video is not available when the TV
does not support it.
• Assign the audio input of the TV to the corresponding video input.
• Ensure that the TV speakers are turned on in the TV menu.
• Ensure that the TV speakers are not muted.
• Turn on the audio system.
• Set the audio system to the correct external audio input.
• Increase the volume level of the audio system.
• Connect this unit directly to the TV. If the audio / video cables are connected to a VCR,
pictures may be distorted due to the VCR copyright protection system.
• Make sure the disc is compatible with this unit.
• Check if speakers are connected correctly.
• Check the HDMI connections.
• Check the settings in “Audio Out” menu.
• Check the disc for fingerprints / scratches and clean with a soft cloth wiping from center to
outer edge.
• Clean the disc.
• Check the region code of the disc. This unit suppor ts the following region codes.
- Blu-ray Disc™ : “A”
- DVD : “ALL” or “1”
• Clean the disc.
• Turn on the modem or router.
• Check the network settings.
• Check if the router and/or modem is correctly connected.
• Check the BD-Live™ setting in “Manual” setup.
• When connecting directly to a modem via a LAN cable, you might need to power cycle the
modem to reset the settings in the modem.
• Once you have activated the wireless connection please wait 30 seconds for the connection
to be established after turning on the unit, before trying to access network features such as
BD-Live™, DLNA home network ser ver, Netflix, Film Fresh, Blockbuster, VUDU and Pandora.
Problem Tip
Cannot connect to the network
while my PC is connected to
the network.
Cannot use the BD-Live™
function or download of data
does not perform properly.
Folder or files stored on DLNA
home media server are not
displayed in the file list or
cannot be played back.
Cannot use Netflix feature.
Cannot add movies or TV
episodes to the instant Queue.
Even though the speed of the
Internet connection improves
during playback, the picture
quality of Netflix streaming
movie does not improve.
The picture quality of streaming
movie (Netflix, Film Fresh or
Blockbuster) is poor.
Streaming movie (Netflix, Film
Fresh or Blockbuster) often stops
or starts buffering during playback.
Cannot use Film Fresh /
Blockbuster feature.
Cannot use the VUDU service. • Check if the network connection is properly made.
Cannot rent or buy movies / TV
shows on VUDU.
The picture quality of VUDU
movie is poor.
VUDU movie often stops or
starts buffering during playback.
Cannot use Pandora feature. • Check if the network connection is properly made.
• Check the content of your Internet ser vice contract to see if your Internet Service Provider
prevents multiple terminals connecting at the same time.
• Inser t an SD Memor y Card before inserting the disc.
• Inser t an SD Memor y Card with enough capacity (1GB or more).
• Check if an SD Memor y Card is correctly inser ted.
• Make sure the write-protect switch on the SD Memory Card is not enabled.
• Check the setting on your home media ser ver.(Refer to the user manual of the home media
server.)
• Check the network connection and settings.
• Netflix is available only in the United States.
• Check if the network connection is properly made.
• Visit netflix.com/magnavox on your PC and become a Netflix member.
• Visit netflix.com on your PC.
• Adding movies or TV episodes may only be done on the PC, not using this unit.
• The picture quality does not change during playback.
• The picture quality differs depending on the speed of Internet connection at the time the
streaming video is loading.
• Check the speed of your Internet connection.
• Contact your Internet ser vice provider. (You may need to improve the broadband speed.)
• Contact your Internet ser vice provider. (You may need to improve the broadband speed.)
• Film Fresh / Blockbuster is available only in the United States.
• Check if the network connection is properly made.
• Visit filmfresh.roxionow.com/Login (Film Fresh) or www.blockbuster.com/auth/login (Blockbuster)
on your PC and create an account.
• VUDU is available only in the United States.
• You need to activate the VUDU account.
• Log into your account at http://my.vudu.com and check your payment information.
• Check the speed of your Internet connection. You need speeds of at least 8 Mbps to this
player for high quality uninterrupted playback.
• Contact your Internet ser vice provider to troubleshoot your Internet connection for speed
and line quality. Consistent line quality and speed are very important for Internet video
playback.
• Pandora is available only in the United States.
• You must create a Pandora account and activate this unit.
SERVICING
• Please refer to relevant topics on “TROUBLESHOOTING” in the Online Manual before returning the
product.
• If this unit becomes inoperative, do not try to correct the problem by yourself. There are no userserviceable parts inside. Eject the disc (if possible), remove the SD Memory Card, place the unit into the
standby mode, unplug the power plug, and please contact:
1-800-605-8610 or visit : www.magnavox.com/support
See the Online Manual for details: www.MAGNAVOX.com
1
2
3
4
5
6
7*
8
10
11
12
INTRODUZCA PILAS
Instale dos pilas AAA (1,5 V)
See the Online Manual for details: www.MAGNAVOX.com See the Online Manual for details: www.MAGNAVOX.com
ESPAÑOL
(*) La unidad también se puede encender
pulsando estos botones.
13*
14
15
16
17
18
199
20
21
22
23
24
25
1. Botón STANDBY/ON
Pulse el botón para encender la
unidad, o para pasar la unidad al
modo de espera. (Para apagar
completamente la unidad, debe
desconectar el cable de alimentación
de CA.)
2. Botones de RED / GREEN / BLUE
/ YELLOW
Púlselo para activar las teclas de atajo
en algunas funciones de
BD-vídeo.
Cuando se despliega la lista de
archivos, presione para cambiar las
páginas.
3. Botón TOP MENU
Blu-ray Disc™: Púlselo para mostrar
el menú superior.
DVD: Púlselo para mostrar el menú
de títulos.
4. Botones de Î / ï / Í /
Púlselos para seleccionar elementos o
configuraciones.
5. Botón HOME
Púlselo para mostrar el menú de
inicio.
6. Botón ¢ (reverso)
Durante la reproducción, púlselo para
invertir rápido la reproducción.
7. Botón Æ (reproducir)*
Púlselo para iniciar o reanudar la
reproducción.
)
.
Æ
ACTIVATING NETWORK FEATURES MANDO A DISTANCIA (
8. Botón
Durante la reproducción, púlselo una
vez para volver al comienzo del título,
capítulo, pista o archivo actual.
Durante la reproducción, pulse dos
veces sobre la tecla para volver al título,
capítulo, pista o archivo anterior.
Durante la reproducción de archivos
JPEG, púlselo para volver al archivo
anterior.
9. Botón Ê (detener)
Púlselo para detener la reproducción.
10. Botones numéricos
Púlselos para seleccionar un capítulo
durante la reproducción.
Púlselos para introducir números en el
campo de entrada.
11. Botón SEARCH
Púlselo para mostrar el menú de
búsqueda.
12. Botón NET APP
Púlselo para visualizar el menú de
aplicación de la red.
13. Botón OPEN/CLOSE fl*
Púlselo para cerrar o abrir la bandeja
para discos.
14. Botón POP MENU/MENU
Blu-ray Disc™: Púlselo para mostrar
el menú emergente.
DVD: Púlselo para mostrar el menú
del disco.
15. Botón OK
Púlselo para confirmar o seleccionar
elementos de menú.
16. Botón RETURN
Púlselo para volver a la pantalla
de funciones o menú mostrado
anteriormente.
H
(saltar)
17. Botón ∫ (adelantar)
Durante la reproducción, púlselo para
avanzar rápido la reproducción.
Cuando la reproducción esté en
pausa, púlselo para avanzar lentamente
la reproducción.
18. Botón G (saltar)
Durante la reproducción, púlselo para
saltar al siguiente capítulo, pista o
archivo.
Cuando la reproducción esté en
modo de pausa, púlselo para avanzar la
reproducción imagen a imagen.
19. Botón Δ (pausar)
Púlselo para pausar la reproducción.
20. Botón DISPLAY
Púlselo para visualizar el menú
desplegable en pantalla.
21. Botón REPEAT
Presione para seleccionar el modo de
repetición.
22. Botón SUBTITLE
Púlselo para seleccionar los subtítulos
de un disco.
23. Botón AUDIO
Púlselo para seleccionar el canal de
sonido (como idiomas de sonido) de
un disco.
24. Botón MODE
Durante la reproducción, púlselo para
visualizar el menú de reproducción.
25. Botón CLEAR
Púlselo para borrar la información
una vez que se ha introducido.
DNota
• Cuando la unidad recibe una señal
del control remoto, Indicador del
STANDBY/ON parpadea en el panel
delantero.
e.g. ) Netflix
Visit netflix.com/MAGNAVOX
Enter the activataion code
which is displayed on the TV
screen.
The image of the menu screen may change without notice.
For other network applications, please see the Online Manuals for details.
Network operations
You are required to set up an account before using the following features. Please visit the links below by PC before use.
Visit www.vudu.com
Visit www.blockbuster.com/auth/login
Visit netflix.com/MAGNAVOX
Visit filmfresh.roxionow.com/Login
Visit www.pandora.com/magnavox
Enjoy Netflix.
Page 3

INFORMATION SHEET
SAFETY INSTRUCTIONS
The model and serial numbers of this unit may be found on the cabinet. You should record and retain those
numbers for future reference.
Model No.:
Serial No.:
WARNING:
TO REDUCE THE RISK OF FIRE OR ELECTRIC SHOCK, DO NOT EXPOSE THIS APPARATUS TO
RAIN OR MOISTURE. APPARATUS SHALL NOT BE EXPOSED TO DRIPPING OR SPLASHING AND
NO OBJECTS FILLED WITH LIQUIDS, SUCH AS VASES, SHALL BE PLACED ON THE APPARATUS.
CAUTION
RISK OF ELECTRIC SHOCK
DO NOT OPEN
CAUTION:
TO REDUCE THE RISK OF ELECTRIC SHOCK, DO NOT REMOVE COVER (OR BACK). NO USER
SERVICEABLE PARTS INSIDE. REFER SERVICING TO QUALIFIED SERVICE PERSONNEL.
The caution marking is located on the rear or bottom of the cabinet.
The lightning fl ash with arrowhead symbol, within an equilateral triangle, is intended to alert
the user to the presence of uninsulated “dangerous voltage” within the product’s enclosure
that may be of suffi cient magnitude to constitute a risk of electric shock to persons.
The exclamation point within an equilateral triangle is intended to alert the user to the
presence of important operating and maintenance (servicing) instructions in the literature
accompanying the appliance.
The symbol for CLASS ll (Double Insulation)
IMPORTANT SAFETY INSTRUCTIONS
1. Read these instructions.
2. Keep these instructions.
3. Heed all warnings.
4. Follow all instructions.
5. Do not use this apparatus near water.
6. Clean only with dry cloth.
7. Do not block any ventilation openings. Install in accordance with the manufacturer’s instructions.
8. Do not install near any heat sources such as radiators, heat registers, stoves, or other apparatus (including
amplifiers) that produce heat.
9. Do not defeat the safety purpose of the polarized or grounding-type plug. A polarized plug has two
blades with one wider than the other. A grounding type plug has two blades and a third grounding
prong. The wide blade or the third prong are provided for your safety. If the provided plug does not fit
into your outlet, consult an electrician for replacement of the obsolete outlet.
10. Protect the power cord from being walked on or pinched particularly at plugs, convenience
receptacles, and the point where they exit from the apparatus.
11. Only use attachments/accessories specified by the manufacturer.
12. Use only with the cart, stand, tripod, bracket, or table specified by the manufacturer, or
sold with the apparatus. When a cart is used, use caution when moving the cart / apparatus
combination to avoid injury from tip-over.
13. Unplug this apparatus during lightning storms or when unused for long periods of time.
14. Refer all servicing to qualified service personnel. Servicing is required when the apparatus has been
damaged in any way, such as power-supply cord or plug is damaged, liquid has been spilled or objects
have fallen into the apparatus, the apparatus has been exposed to rain or moisture, does not operate
normally, or has been dropped.
FCC WARNING
This equipment may generate or use radio frequency energy. Changes or modifications to this equipment
may cause harmful interference unless the modifications are expressly approved in the manual. The user
could lose the authority to operate this equipment if an unauthorized change or modification is made.
This transmitter must be co-located or operated in conjunction with any other antenna or transmitter.
RADIO-TV INTERFERENCE
This equipment has been tested and found to comply with the limits for a Class B digital device, pursuant to Part
15 of the FCC Rules. These limits are designed to provide reasonable protection against harmful interference in a
residential installation. This equipment generates, uses, and can radiate radio
and used in accordance with the instructions, may cause harmful interference to radio communications. However,
there is no guarantee that interference will not occur in a particular installation. If this equipment does cause
harmful interference to radio or television reception, which can be determined by turning the equipment off and
on, the user is encouraged to try to correct the interference by one or more of the following measures:
1. Reorient or relocate the receiving antenna.
2. Increase the separation between the equipment and receiver.
3. Connect the equipment into an outlet on a circuit different from that to which the receiver is connected.
4. Consult the dealer or an experienced radio / TV technician for help.
This Class B digital apparatus complies with Canadian ICES-003.
Cet appareil numérique de la classe B est conforme à la norme NMB-003 du Canada.
Disconnect the mains plug to shut off when find trouble or not in use. The mains plug shall
remain readily operable.
CAUTION: Danger of explosion if battery is incorrectly replaced. Replace only with the same or
equivalent type.
WARNING: Batteries (Battery pack or battery installed) shall not be exposed to excessive heat such
as sunshine, fire or the like.
LASER SAFETY
This apparatus is classified as a CLASS 1 LASER PRODUCT.
This apparatus employs a laser. Only a qualified service person should remove the cover
or attempt to service this apparatus, due to possible eye injury.
CAUTION: Use of controls or adjustments or performance of procedures other than those specified
herein may result in hazardous radiation exposure.
IMPORTANT COPYRIGHT INFORMATION
Unauthorized copying, broadcasting, public performance and lending of discs are prohibited.
This item incorporates copy protection technology that is protected by U.S. patents and other intellectual
property rights of Rovi Corporation. Reverse engineering and disassembly are prohibited.
Do not place the unit on the furniture that is capable of being tilted by a child and an adult leaning, pulling,
standing or climbing on it. A falling unit can cause serious injury or even death.
This apparatus should not be placed in a built-in installation such as a bookcase or rack unless proper
ventilation is provided. Make sure to leave a space of 3.9 inches (10cm) or more around this apparatus.
ENERGY STAR® is a joint program of the U.S. Environmental Protection
Agency and the U.S. Department of Energy helping us all save money and
protect the environment through energy efficient products and practices.
frequency
energy and, if not installed
LIMITED WARRANTY
FUNAI CORP. will repair this product, free of charge in the USA in the event of defect in materials or workmanship as follows:
DURATION:
PARTS: FUNAI CORP. will provide parts to replace defective parts without charge for one (1) year from the date of
LABOR: FUNAI CORP. will provide the labor without charge for a period of ninety (90) days from the date of original
Note: Any product sold and identifi ed as refurbished or renewed carries a ninety (90) days labor and parts limited
warranty.
LIMITS AND EXCLUSIONS:
THIS WARRANTY IS EXTENDED ONLY TO THE ORIGINAL RETAIL PURCHASER. A PURCHASE RECEIPT OR OTHER PROOF
OF ORIGINAL RETAIL PURCHASE WILL BE REQUIRED TOGETHER WITH THE PRODUCT TO OBTAIN SERVICE UNDER THIS
WARRANTY.
This warranty shall not be extended to any other person or transferee.
This warranty is void and of no effect if any serial numbers on the product are altered, replaced, defaced, missing or if service was
attempted by an unauthorized service center. This limited warranty does not apply to any product not purchased and used in the United
States.
This warranty only covers failures due to defects in material or workmanship which occur during normal use. It does not cover damage
which occurs in shipment, or failures which are caused by repairs, alterations or products not supplied by FUNAI CORP., or damage,
which results from accident, misuse, abuse, mishandling, misapplication, alteration, faulty installation, improper maintenance, commercial
use such as hotel, rental or office use of this product, or damage which results from fire, flood, lightning or other acts of God.
THIS WARRANTY DOES NOT COVER PACKING MATERIALS, ANY ACCESSORIES (EXCEPT REMOTE CONTROL), ANY
COSMETIC PARTS, COMPLETE ASSEMBLY PARTS, DEMO OR FLOOR MODELS.
FUNAI CORP. AND ITS REPRESENTATIVES OR AGENTS SHALL IN NO EVENT BE LIABLE FOR ANY GENERAL, INDIRECT
OR CONSEQUENTIAL DAMAGES ARISING OUT OF OR OCCASIONED BY THE USE OF OR THE INABILITY TO USE THIS
PRODUCT. THIS WARRANTY IS MADE IN LIEU OF ALL OTHER WARRANTIES, EXPRESS OR IMPLIED, AND OF ALL OTHER
LIABILITIES ON THE PART OF FUNAI, ALL OTHER WARRANTIES INCLUDING THE WARRANTY OF MERCHANTABILITY AND
FITNESS FOR A PARTICULAR PURPOSE, ARE HEREBY DISCLAIMED BY FUNAI AND ITS REPRESENTATIVES IN THE UNITED
STATES.
ALL WARRANTY INSPECTIONS AND REPAIRS MUST BE PERFORMED BY AN AUTHORIZED SERVICE CENTER.
THIS WARRANTY IS ONLY VALID WHEN THE UNIT IS CARRIED-IN TO AN AUTHORIZED SERVICE CENTER.
THE PRODUCT MUST BE ACCOMPANIED BY A COPY OF THE ORIGINAL RETAIL PURCHASE RECEIPT. IF NO PROOF OF
PURCHASE IS ATTACHED, THE WARRANTY WILL NOT BE HONORED AND REPAIR COSTS WILL BE CHARGED.
IMPORTANT:
THIS LIMITED WARRANTY GIVES YOU SPECIFIC LEGAL RIGHTS. YOU MAY HAVE OTHER RIGHTS THAT VARY FROM STATE TO
STATE. IF, AT ANY TIME DURING THE WARRANTY PERIOD, YOU ARE UNABLE TO OBTAIN SATISFACTION WITH THE REPAIR
OF THIS PRODUCT, PLEASE CONTACT FUNAI CORP.
ATTENTION:
FUNAI CORP. RESERVES THE RIGHT TO MODIFY ANY DESIGN OF THIS PRODUCT WITHOUT
PRIOR NOTICE.
WARRANTY STATEMENT REGARDING NON AUTHORIZED REPAIRS:
To obtain warranty service, you must take the product, or deliver the product freight prepaid, in either its original packaging or
packaging affording an equal degree of protection, to any AUTHORIZED SERVICE CENTER. FUNAI CORP. will not reimburse you for
any service done by unauthorized service providers without prior written approval.
To locate your nearest AUTHORIZED SERVICE CENTER or for general service inquiries, please contact us at:
Printed in China
1VMN30534
original retail purchase. Certain parts are excluded from this warranty.
retail purchase.
FUNAI SERVICE CORPORATION
Tel: 1-800-605-8610
www.magnavox.com/support
2200 Spiegel Drive Groveport, OH 43125
★★★★★
INSTRUCCIONES DE SEGURIDAD
ADVERTENCIA:
PARA REDUCIR EL RIESGO DE QUE SE PRODUZCA UN INCENDIO O SE RECIBA UNA
DESCARGA ELÉCTRICA, NO EXPONGA ESTE APARATO A LA LLUVIA NI A LA HUMEDAD.
NO SE DEBERÁ EXPONER EL APARATO NI A GOTERAS NI A SALPICADURAS, Y NO DEBERÁ
COLOCARSE NINGÚN OBJETO QUE CONTENGA LÍQUIDOS SOBRE EL APARATO, COMO POR
EJEMPLO JARRONES.
CAUTION
RISK OF ELECTRIC SHOCK
DO NOT OPEN
AVISO:
PARA REDUCIR EL RIESGO DE SUFRIR UNA DESCARGA ELÉCTRICA NO QUITE LA CUBIERTA (O
EL PANEL POSTERIOR). EN EL INTERIOR DEL APARATO NO HAY PIEZAS QUE DEBA MANIPULAR EL
USUARIO. SOLICITE EL SERVICIO DE REPARACIONES AL PERSONAL DE SERVICIO CUALIFICADO.
La marca de precaución está ubicada en la parte trasera o debajo del gabinete.
El símbolo del rayo con punta de fl echa, en el interior de un triángulo equilátero, tiene la
fi nalidad de avisar al usuario de la presencia de “tensión peligrosa” dentro de la caja del
aparato que podría ser de suficiente intensidad como para constituir un riesgo para las
personas en caso de que éstas recibiesen una descarga eléctrica.
El signo de exclamación dentro de un triángulo equilátero tiene la fi nalidad de avisar al
usuario de la presencia de instrucciones de utilización y mantenimiento (servicio) en el
material impreso que acompaña al aparato
Símbolo de CLASE ll (doble aislamiento)
IMPORTANTES INSTRUCCIONES DE SEGURIDAD
1. Lea estas instrucciones.
2. Conserve estas instrucciones.
3. Preste atención a las advertencias.
4. Siga todas las instrucciones.
5. No utilice este aparato cerca del agua.
6. Limpie el aparato sólo con un paño seco.
7. No obstruya ninguna de las ranuras de ventilación. Realice la instalación según las instrucciones del
fabricante.
8. No instale el equipo cerca de elementos para calefaccionar tales como radiadores, rejillas de calefacción,
estufas eléctricas u otros aparatos (incluidos amplificadores).
9. No desarme el dispositivo de seguridad del enchufe polarizado o con conexión a tierra. Un enchufe
polarizado contiene dos clavijas, una más ancha que otra. Un enchufe con conexión a tierra contiene
dos clavijas y una tercera clavija con conexión a tierra. La clavija ancha del enchufe polarizado o la clavija
de conexión a tierra representan dispositivos de seguridad. Si el enchufe del aparato no entra en el
tomacorriente, consulte con un electricista para reemplazar sus antiguos tomacorrientes.
10. Asegúrese de proteger el cable de alimentación de las pisadas o torsiones especialmente
en la zona de la clavija, en el receptáculo y en el punto donde el cable sale del aparato.
11. Utilice únicamente los accesorios que especifica el fabricante.
12. Utilice únicamente el carro, atril, trípode,soporte o la mesa que especifica el fabricante o
que se vendió junto con el aparato. Cuando utilice un carro, sea cuidadoso al trasladar el
conjunto carro/aparato para evitar daños por caídas de objetos.
13. Desenchufe este aparato si hay tormentas eléctricas o durante largos períodos de inactividad.
14. Confíe el servicio técnico sólo a personal calificado. El servicio técnico es necesario cuando el aparato
sufre algún tipo de daño, por ejemplo cuando se dañan los cables de suministro eléctrico o la clavija,
cuando se derrama líquido o se caen objetos sobre el aparato, cuando se lo expone a la lluvia o a
humedad, cuando no funciona adecuadamente o cuando se cae.
TRADEMARK INFORMATION
Manufactured under license from Dolby Laboratories.
“Dolby” and the double-D symbol are trademarks of
Dolby Laboratories.
Manufactured under license under U.S. Patent
#’s: 5,451,942; 5,956,674; 5,974,380; 5,978,762;
6,226,616; 6,487,535; 7,392,195; 7,272,567;
7,333,929; 7,212,872 & other U.S. and worldwide
patents issued & pending. DTS and the Symbol are
registered trademarks, & DTS-HD, DTS-HD Master
Audio | Essential and the DTS logos are trademarks
of DTS, Inc. Product includes software. © DTS, Inc.
All Rights Reserved.
HDMI, the HDMI Logo, and High-Defi nition
Multimedia Interface are trademarks or
registered trademarks of HDMI Licensing LLC in
the United States and other countries.
“x.v.Color” and “x.v.Color” logo are trademarks
of Sony Corporation.
Java and all Java based trademarks and logos are
trademarks or registered trademarks of Oracle
and/or its affi liates.
No coloque la unidad sobre un mueble que pueda volcar si algún niño o adulto lo inclina, empuja, se
coloca encima o trepa por él. La caída de la unidad puede provocar lesiones graves e incluso la muerte.
El aparato no debe colocarse en una instalación empotrada (por ejemplo: una biblioteca o un estante) a
menos que cuente con la adecuada ventilación. Asegúrese de dejar un espacio de 3,9 pulgadas (10 cm), o
más, alrededor del aparato.
VUDU™ is a trademark of VUDU, Inc.
Netfl ix and the Netfl ix logo are trademarks or
registered trademarks of Netfl ix, Inc.
BLOCKBUSTER name, design and related marks
are trademarks of Blockbuster Inc.
Film Fresh and the Film Fresh logo are registered
trademarks of Film Fresh Inc.
Pandora is a registered trademark of Pandora
Media, Inc.
DLNA®, the DLNA Logo and DLNA CERTIFIED®
are trademarks, service marks, or certifi cation
marks of the Digital Living Network Alliance.
The Wi-Fi CERTIFIED Logo is a certification
mark of the Wi-Fi Alliance.
SUPPLIED ACCESSORIES
• Remote Control (NB956UD)
• Batteries (AAA, 1.5V x 2)
Audio / video cables
SETUP MANUAL
SETUP MANUAL
INFORMATION SHEET
INFORMATION SHEET
Windows Media and the Windows logo are
trademarks or registered trademarks of Microsoft
Corporation in the United States and/or other
countries.
Kodak and KODAK Picture CD Compatible are
trademarks of Kodak used under license.
“AVCHD” and the “AVCHD” logo are
trademarks of Panasonic Corporation and Sony
Corporation.
“Blu-ray Disc™”, “Blu-ray™” and “Blu-ray
Disc™” logo are trademarks of the Blu-ray Disc
Association.
is a trademark of DVD Format/Logo
Licensing Corporation.
“BD-Live™” and “BD-Live™” logo are
trademarks of the Blu-ray Disc Association.
“BONUSVIEW™” and “BONUSVIEW™” logo are
trademarks of the Blu-ray Disc Association.
SPECIFICATIONS
General
Signal System NTSC Color
Power requirements 120 V AC, 60 Hz
Power consumption 15 W (standby: 0.4 W)
Dimensions (width x height x depth) 14.2 x 1.6 x 8.5 inches (360 x 39 x 215 mm)
Weight 3.53 lbs. (1.60 kg)
Operating temperature 41°F (5°C) to 104°F (40°C)
Operating humidity Less than 80 % (no condensation)
Terminals
SD card slot (slot x 1)
Audio output (Analog) (RCA jack x 2) L/R: 2 Vrms (output impedance: more than 1kΩ)
Video output (RCA jack x 1) 1 Vp-p (75Ω)
Audio output (Digital) (RCA jack x 1) 500 mVp-p (75Ω)
HDMI output (HDMI jack x 1)
LAN terminal 10BASE-T / 100BASE-TX
Wireless LAN (Internal) IEEE 802.11 b/g/n
D Note
• The specifications and design of this product are subject to change without
notice.
Digital video: 480p, 720p, 1080i, 1080p, 1080p24/
Digital audio
Page 4

LICENSE
This section describes software license used for this product.
This product uses some open source software:
GPL software: linux, module-init-tools, mount, nettools, sash, Realtek WiFi driver
LGPL software: directfb, glibc, Qt
BSD: WPA Supplicant
MIT: expat, lua, lua-xmlreader, lua-slncrypto, libxml2
MIT/X: cURL
XML-RPC FOR C/C++ license: xmlrpc
gSOAP Public License: gSOAP
Free Type, LibJPEG, Open SSL, Vera Fonts
GPL
GNU General Public License (GPL)
Version 2, June 1991
Copyright (C) 1989, 1991 Free Software Foundation, Inc. 51 Franklin Street, Fifth Floor, Boston, MA 02110-1301, USA
Everyone is permitted to copy and distribute verbatim copies of this license document, but changing it is not allowed.
Preamble
The licenses for most software are designed to take away your freedom to share and change it. By contrast, the GNU General Public License is
intended to guarantee your freedom to share and change free software--to make sure the software is free for all its users. This General Public
License applies to most of the Free Software Foundation's software and to any other program whose authors commit to using it. (Some other
Free Software Foundation software is covered by the GNU Lesser General Public License instead.) You can apply it to your programs, too.
When we speak of free software, we are referring to freedom, not price. Our General Public Licenses are designed to make sure that you
have the freedom to distribute copies of free software (and charge for this service if you wish), that you receive source code or can get it if
you want it, that you can change the software or use pieces of it in new free programs; and that you know you can do these things.
To protect your rights, we need to make restrictions that forbid anyone to deny you these rights or to ask you to surrender the rights. These
restrictions translate to cer tain responsibilities for you if you distribute copies of the software, or if you modify it.
For example, if you distribute copies of such a program, whether gratis or for a fee, you must give the recipients all the rights that you have. You
must make sure that they, too, receive or can get the source code. And you must show them these terms so they know their rights.
We protect your rights with two steps: (1) copyright the software, and (2) offer you this license which gives you legal permission to copy,
distribute and/or modify the software.
Also, for each author's protection and ours, we want to make certain that everyone understands that there is no warranty for this free software. If the software is modifi ed by someone else and passed on, we want its recipients to know that what they have is not the original, so that
any problems introduced by others will not refl ect on the original authors' reputations.
Finally, any free program is threatened constantly by software patents. We wish to avoid the danger that redistributors of a free program will
individually obtain patent licenses, in effect making the program proprietar y. To prevent this, we have made it clear that any patent must be
licensed for everyone's free use or not licensed at all.
The precise terms and conditions for copying, distribution and modifi cation follow.
TERMS AND CONDITIONS FOR COPYING, DISTRIBUTION AND MODIFICATION
0. This License applies to any program or other work which contains a notice placed by the copyright holder saying it may be distributed under
the terms of this General Public License. The "Program", below, refers to any such program or work, and a "work based on the Program"
means either the Program or any derivative work under copyright law: that is to say, a work containing the Program or a portion of it, either
verbatim or with modifi cations and/or translated into another language. (Hereinafter, translation is included without limitation in the term
"modifi cation".) Each licensee is addressed as "you".
Activities other than copying, distribution and modifi cation are not covered by this License; they are outside its scope. The act of running the
Program is not restricted, and the output from the Program is covered only if its contents constitute a work based on the Program (independent of having been made by running the Program). Whether that is true depends on what the Program does.
1. You may copy and distribute verbatim copies of the Program's source code as you receive it, in any medium, provided that you conspicuously
and appropriately publish on each copy an appropriate copyright notice and disclaimer of warranty; keep intact all the notices that refer to
this License and to the absence of any warranty; and give any other recipients of the Program a copy of this License along with the Program.
You may charge a fee for the physical act of transferring a copy, and you may at your option offer warranty protection in exchange for a fee.
2. You may modify your copy or copies of the Program or any por tion of it, thus forming a work based on the Program, and copy and distribute such modifi cations or work under the terms of Section 1 above, provided that you also meet all of these conditions:
a) You must cause the modifi ed fi les to carry prominent notices stating that you changed the fi les and the date of any change.
b) You must cause any work that you distribute or publish, that in whole or in part contains or is derived from the Program or any part thereof,
to be licensed as a whole at no charge to all third parties under the terms of this License.
c) If the modifi ed program normally reads commands interactively when run, you must cause it, when started running for such interactive use
in the most ordinary way, to print or display an announcement including an appropriate copyright notice and a notice that there is no warranty (or else, saying that you provide a warranty) and that users may redistribute the program under these conditions, and telling the user
how to view a copy of this License. (Exception: if the Program itself is interactive but does not normally print such an announcement, your
work based on the Program is not required to print an announcement.)
These requirements apply to the modifi ed work as a whole. If identifi able sections of that work are not derived from the Program, and can be
reasonably considered independent and separate works in themselves, then this License, and its terms, do not apply to those sections when
you distribute them as separate works. But when you distribute the same sections as part of a whole which is a work based on the Program,
the distribution of the whole must be on the terms of this License, whose permissions for other licensees extend to the entire whole, and thus
to each and every par t regardless of who wrote it.
Thus, it is not the intent of this section to claim rights or contest your rights to work written entirely by you; rather, the intent is to exercise the
right to control the distribution of derivative or collective works based on the Program.
In addition, mere aggregation of another work not based on the Program with the Program (or with a work based on the Program) on a
volume of a storage or distribution medium does not bring the other work under the scope of this License.
3. You may copy and distribute the Program (or a work based on it, under Section 2) in object code or executable form under the terms of
Sections 1 and 2 above provided that you also do one of the following:
a) Accompany it with the complete corresponding machine-readable source code, which must be distributed under the terms of Sections 1
and 2 above on a medium customarily used for software interchange; or,
b) Accompany it with a written offer, valid for at least three years, to give any third party, for a charge no more than your cost of physically
performing source distribution, a complete machine-readable copy of the corresponding source code, to be distributed under the terms of
Sections 1 and 2 above on a medium customarily used for software interchange; or,
c) Accompany it with the information you received as to the offer to distribute corresponding source code. (This alternative is allowed only
for noncommercial distribution and only if you received the program in object code or executable form with such an offer, in accord with
Subsection b above.)
The source code for a work means the preferred form of the work for making modifi cations to it. For an executable work, complete source
code means all the source code for all modules it contains, plus any associated interface defi nition fi les, plus the scripts used to control compi-
lation and installation of the executable. However, as a special exception, the source code distributed need not include anything that is normally
distributed (in either source or binary form) with the major components (compiler, kernel, and so on) of the operating system on which the
executable runs, unless that component itself accompanies the executable.
If distribution of executable or object code is made by offering access to copy from a designated place, then offering equivalent access to copy
the source code from the same place counts as distribution of the source code, even though third parties are not compelled to copy the
source along with the object code.
4. You may not copy, modify, sublicense, or distribute the Program except as expressly provided under this License. Any attempt otherwise to copy,
modify, sublicense or distribute the Program is void, and will automatically terminate your rights under this License. However, parties who have
received copies, or rights, from you under this License will not have their licenses terminated so long as such parties remain in full compliance.
5. You are not required to accept this License, since you have not signed it. However, nothing else grants you permission to modify or distrib-
ute the Program or its derivative works. These actions are prohibited by law if you do not accept this License. Therefore, by modifying or
distributing the Program (or any work based on the Program), you indicate your acceptance of this License to do so, and all its terms and
conditions for copying, distributing or modifying the Program or works based on it.
6. Each time you redistribute the Program (or any work based on the Program), the recipient automatically receives a license from the original
licensor to copy, distribute or modify the Program subject to these terms and conditions. You may not impose any further restrictions on the
recipients' exercise of the rights granted herein. You are not responsible for enforcing compliance by third parties to this License.
7. If, as a consequence of a court judgment or allegation of patent infringement or for any other reason (not limited to patent issues), conditions are imposed on you (whether by court order, agreement or otherwise) that contradict the conditions of this License, they do not excuse
you from the conditions of this License. If you cannot distribute so as to satisfy simultaneously your obligations under this License and any
other pertinent obligations, then as a consequence you may not distribute the Program at all. For example, if a patent license would not permit
royalty-free redistribution of the Program by all those who receive copies directly or indirectly through you, then the only way you could satisfy
both it and this License would be to refrain entirely from distribution of the Program.
If any portion of this section is held invalid or unenforceable under any particular circumstance, the balance of the section is intended to apply
and the section as a whole is intended to apply in other circumstances.
It is not the purpose of this section to induce you to infringe any patents or other property right claims or to contest validity of any such
claims; this section has the sole purpose of protecting the integrity of the free software distribution system, which is implemented by public
license practices. Many people have made generous contributions to the wide range of software distributed through that system in reliance
on consistent application of that system; it is up to the author/donor to decide if he or she is willing to distribute software through any other
system and a licensee cannot impose that choice.
This section is intended to make thoroughly clear what is believed to be a consequence of the rest of this License.
8. If the distribution and/or use of the Program is restricted in certain countries either by patents or by copyrighted interfaces, the original copyright holder
who places the Program under this License may add an explicit geographical distribution limitation excluding those countries, so that distribution is
permitted only in or among countries not thus excluded. In such case, this License incorporates the limitation as if written in the body of this License.
9. The Free Software Foundation may publish revised and/or new versions of the General Public License from time to time. Such new versions
will be similar in spirit to the present version, but may differ in detail to address new problems or concerns.
Each version is given a distinguishing version number. If the Program specifi es a version number of this License which applies to it and "any later ver-
sion", you have the option of following the terms and conditions either of that version or of any later version published by th
tion. If the Program does not specify a version number of this License, you may choose any version ever published by the Free Software Foundation.
10. If you wish to incorporate parts of the Program into other free programs whose distribution conditions are different, write to the author
to ask for permission. For software which is copyrighted by the Free Software Foundation, write to the Free Software Foundation; we
sometimes make exceptions for this. Our decision will be guided by the two goals of preserving the free status of all derivatives of our free
software and of promoting the sharing and reuse of software generally.
NO WARRANTY
11. BECAUSE THE PROGRAM IS LICENSED FREE OF CHARGE, THERE IS NO WARRANTY FOR THE PROGRAM, TO THE EXTENT PER-
MITTED BY APPLICABLE LAW. EXCEPT WHEN OTHERWISE STATED IN WRITING THE COPYRIGHT HOLDERS AND/OR OTHER
PARTIES PROVIDE THE PROGRAM "AS IS" WITHOUT WARRANTY OF ANY KIND, EITHER EXPRESSED OR IMPLIED, INCLUDING,
BUT NOT LIMITED TO, THE IMPLIED WARRANTIES OF MERCHANTABILITY AND FITNESS FOR A PARTICULAR PURPOSE. THE
ENTIRE RISK AS TO THE QUALITY AND PERFORMANCE OF THE PROGRAM IS WITH YOU. SHOULD THE PROGRAM PROVE
DEFECTIVE, YOU ASSUME THE COST OF ALL NECESSARY SERVICING, REPAIR OR CORRECTION.
12. IN NO EVENT UNLESS REQUIRED BY APPLICABLE LAW OR AGREED TO IN WRITING WILL ANY COPYRIGHT HOLDER, OR
ANY OTHER PARTY WHO MAY MODIFY AND/OR REDISTRIBUTE THE PROGRAM AS PERMITTED ABOVE, BE LIABLE TO YOU FOR
DAMAGES, INCLUDING ANY GENERAL, SPECIAL, INCIDENTAL OR CONSEQUENTIAL DAMAGES ARISING OUT OF THE USE OR
INABILITY TO USE THE PROGRAM (INCLUDING BUT NOT LIMITED TO LOSS OF DATA OR DATA BEING RENDERED INACCURATE OR LOSSES SUSTAINED BY YOU OR THIRD PARTIES OR A FAILURE OF THE PROGRAM TO OPERATE WITH ANY OTHER
PROGRAMS), EVEN IF SUCH HOLDER OR OTHER PARTY HAS BEEN ADVISED OF THE POSSIBILITY OF SUCH DAMAGES.
END OF TERMS AND CONDITIONS
How to Apply These Terms to Your New Programs
If you develop a new program, and you want it to be of the greatest possible use to the public, the best way to achieve this is to make it free
software which everyone can redistribute and change under these terms.
To do so, attach the following notices to the program. It is safest to attach them to the start of each source fi le to most effectively convey the
exclusion of warranty; and each fi le should have at least the "copyright" line and a pointer to where the full notice is found.
one line to give the program's name and an idea of what it does.
Copyright (C) yyyy name of author
This program is free software; you can redistribute it and/or modify it under the terms of the GNU General Public License as published by the
Free Software Foundation; either version 2 of the License, or (at your option) any later version.
This program is distributed in the hope that it will be useful, but WITHOUT ANY WARRANTY; without even the implied warranty of MERCHANTABILITY or FITNESS FOR A PARTICULAR PURPOSE. See the GNU General Public License for more details.
e Free Software Founda-
You should have received a copy of the GNU General Public License along with this program; if not, write to the Free Software Foundation,
Inc., 51 Franklin Street, Fifth Floor, Boston, MA 02110-1301, USA. Also add information on how to contact you by electronic and paper mail.
If the program is interactive, make it output a short notice like this when it star ts in an interactive mode:
Gnomovision version 69, Copyright (C) year name of author Gnomovision comes with ABSOLUTELY NO WARRANTY; for details type `show
w'. This is free software, and you are welcome to redistribute it under cer tain conditions; type `show c' for details.
The hypothetical commands `show w' and `show c' should show the appropriate parts of the General Public License. Of course, the commands you
use may be called something other than `show w' and `show c'; they could even be mouse-clicks or menu items--whatever suits your program.
You should also get your employer (if you work as a programmer) or your school, if any, to sign a "copyright disclaimer" for the program, if
necessary. Here is a sample; alter the names:
Yoyodyne, Inc., hereby disclaims all copyright interest in the program `Gnomovision' (which makes passes at compilers) written by James Hacker.
signature of Ty Coon, 1 April 1989
Ty Coon, President of Vice
This General Public License does not permit incorporating your program into proprietary programs. If your program is a subroutine library,
you may consider it more useful to permit linking proprietary applications with the library. If this is what you want to do, use the GNU Lesser
General Public License instead of this License.
If you are interested in obtaining GPL source code used in this product, please contact
FUNAI SERVICE CORPORATION
2200 Spiegel Drive, Groveport, OH 43125
funaioss@funaiservice.com
LGPL
Copyright (C) 1991, 1999 Free Software Foundation, Inc.
51 Franklin Street, Fifth Floor, Boston, MA 02110-1301 USA
Everyone is permitted to copy and distribute verbatim copies of this license document, but changing it is not allowed.
[This is the fi rst released version of the Lesser GPL. It also counts as the successor of the GNU Library Public License, version 2, hence the
version number 2.1.]
The licenses for most software are designed to take away your freedom to share and change it. By contrast, the GNU General Public Licenses
are intended to guarantee your freedom to share and change free software--to make sure the software is free for all its users.
This license, the Lesser General Public License, applies to some specially designated software packages--typically libraries--of the Free Software
Foundation and other authors who decide to use it. You can use it too, but we suggest you fi rst think carefully about whether this license or
the ordinary General Public License is the better strategy to use in any particular case, based on the explanations below.
When we speak of free software, we are referring to freedom of use, not price. Our General Public Licenses are designed to make sure that you
have the freedom to distribute copies of free software (and charge for this service if you wish); that you receive source code or can get it if you
want it; that you can change the software and use pieces of it in new free programs; and that you are informed that you can do these things.
To protect your rights, we need to make restrictions that forbid distributors to deny you these rights or to ask you to surrender these rights.
These restrictions translate to cer tain responsibilities for you if you distribute copies of the library or if you modify it.
For example, if you distribute copies of the library, whether gratis or for a fee, you must give the recipients all the rights that we gave you. You
must make sure that they, too, receive or can get the source code. If you link other code with the librar y, you must provide complete object
fi les to the recipients, so that they can relink them with the library after making changes to the librar y and recompiling it. And you must show
them these terms so they know their rights.
We protect your rights with a two-step method: (1) we copyright the library, and (2) we offer you this license, which gives you legal permission to copy, distribute and/or modify the library.
To protect each distributor, we want to make it very clear that there is no warranty for the free librar y. Also, if the library is modifi ed by
someone else and passed on, the recipients should know that what they have is not the original version, so that the original author's reputation
will not be affected by problems that might be introduced by others.
Finally, software patents pose a constant threat to the existence of any free program. We wish to make sure that a company cannot effectively
restrict the users of a free program by obtaining a restrictive license from a patent holder. Therefore, we insist that any patent license obtained
for a version of the library must be consistent with the full freedom of use specifi ed in this license.
Most GNU software, including some libraries, is covered by the ordinary GNU General Public License. This license , the GNU Lesser General
Public License, applies to certain designated libraries, and is quite different from the ordinary General Public License. We use this license for
certain libraries in order to permit linking those libraries into non-free programs.
When a program is linked with a librar y, whether statically or using a shared library, the combination of the two is legally speaking a combined
work, a derivative of the original library. The ordinary General Public License therefore permits such linking only if the entire combination fi ts
its criteria of freedom. The Lesser General Public License permits more lax criteria for linking other code with the librar y.
We call this license the "Lesser" General Public License because it does Less to protect the user's freedom than the ordinary General Public License.
It also provides other free software developers Less of an advantage over competing non-free programs. These disadvantages are the reason we use
the ordinary General Public License for many libraries. However, the Lesser license provides advantages in certain special circumstances.
For example, on rare occasions, there may be a special need to encourage the widest possible use of a certain library, so that it becomes a
de-facto standard. To achieve this, non-free programs must be allowed to use the library. A more frequent case is that a free library does the
same job as widely used non-free libraries. In this case, there is little to gain by limiting the free librar y to free software only, so we use the
Lesser General Public License.
In other cases, permission to use a particular library in non-free programs enables a greater number of people to use a large body of free
software. For example, permission to use the GNU C Librar y in non-free programs enables many more people to use the whole GNU
operating system, as well as its variant, the GNU/Linux operating system.
Although the Lesser General Public License is Less protective of the users' freedom, it does ensure that the user of a program that is linked
with the Library has the freedom and the wherewithal to r un that program using a modifi ed version of the Library.
The precise terms and conditions for copying, distribution and modifi
based on the library" and a "work that uses the library". The former contains code derived from the library, whereas the latter must be combined with the library in order to r un.
0. This License Agreement applies to any software library or other program which contains a notice placed by the copyright holder or other authorized
party saying it may be distributed under the terms of this Lesser General Public License (also called "this License"). Each licensee is addressed as "you".
A "library" means a collection of software functions and/or data prepared so as to be conveniently linked with application programs (which
use some of those functions and data) to form executables.
The "Library", below, refers to any such software library or work which has been distributed under these terms. A "work based on the
Library" means either the Library or any derivative work under copyright law: that is to say, a work containing the Librar y or a portion of it,
either verbatim or with modifi cations and/or translated straightforwardly into another language. (Hereinafter, translation is included without
limitation in the term "modifi cation".)
"Source code" for a work means the preferred form of the work for making modifi cations to it. For a library, complete source code means
all the source code for all modules it contains, plus any associated interface defi nition fi les, plus the scripts used to control compilation and
installation of the library.
Activities other than copying, distribution and modifi cation are not covered by this License; they are outside its scope. The act of running a
program using the Library is not restricted, and output from such a program is covered only if its contents constitute a work based on the
Library (independent of the use of the Library in a tool for writing it). Whether that is true depends on what the Library does and what the
program that uses the Library does.
1. You may copy and distribute verbatim copies of the Library's complete source code as you receive it, in any medium, provided that you
conspicuously and appropriately publish on each copy an appropriate copyright notice and disclaimer of warranty; keep intact all the notices
that refer to this License and to the absence of any warranty; and distribute a copy of this License along with the Library.
You may charge a fee for the physical act of transferring a copy, and you may at your option offer warranty protection in exchange for a fee.
2. You may modify your copy or copies of the Librar y or any portion of it, thus forming a work based on the Librar y, and copy and distribute
such modifi cations or work under the terms of Section 1 above, provided that you also meet all of these conditions:
a) The modifi ed work must itself be a software librar y.
b) You must cause the fi les modifi ed to carry prominent notices stating that you changed the fi les and the date of any change.
c) You must cause the whole of the work to be licensed at no charge to all third parties under the terms of this License.
d) If a facility in the modifi ed Library refers to a function or a table of data to be supplied by an application program that uses the facility,
other than as an argument passed when the facility is invoked, then you must make a good faith effort to ensure that, in the event an application does not supply such function or table, the facility still operates, and performs whatever part of its purpose remains meaningful.
(For example, a function in a library to compute square roots has a purpose that is entirely well-defi ned independent of the application.
Therefore, Subsection 2d requires that any application-supplied function or table used by this function must be optional: if the application
does not supply it, the square root function must still compute square roots.)
These requirements apply to the modifi ed work as a whole. If identifi able sections of that work are not derived from the Library, and can be
reasonably considered independent and separate works in themselves, then this License, and its terms, do not apply to those sections when
you distribute them as separate works. But when you distribute the same sections as part of a whole which is a work based on the Librar y,
the distribution of the whole must be on the terms of this License, whose permissions for other licensees extend to the entire whole, and thus
to each and every par t regardless of who wrote it.
Thus, it is not the intent of this section to claim rights or contest your rights to work written entirely by you; rather, the intent is to exercise the
right to control the distribution of derivative or collective works based on the Librar y.
In addition, mere aggregation of another work not based on the Library with the Library (or with a work based on the Library) on a volume
of a storage or distribution medium does not bring the other work under the scope of this License.
3. You may opt to apply the terms of the ordinary GNU General Public License instead of this License to a given copy of the Library. To do
this, you must alter all the notices that refer to this License, so that they refer to the ordinary GNU General Public License, version 2, instead
of to this License. (If a newer version than version 2 of the ordinary GNU General Public License has appeared, then you can specify that
version instead if you wish.) Do not make any other change in these notices.
Once this change is made in a given copy, it is irreversible for that copy, so the ordinary GNU General Public License applies to all subsequent
copies and derivative works made from that copy.
This option is useful when you wish to copy part of the code of the Librar y into a program that is not a librar y.
4. You may copy and distribute the Library (or a portion or derivative of it, under Section 2) in object code or executable form u
terms of Sections 1 and 2 above provided that you accompany it with the complete corresponding machine-readable source code, which
must be distributed under the terms of Sections 1 and 2 above on a medium customarily used for software interchange.
If distribution of object code is made by offering access to copy from a designated place, then offering equivalent access to copy the source
code from the same place satisfi es the requirement to distribute the source code, even though third parties are not compelled to copy the
source along with the object code.
5. A program that contains no derivative of any portion of the Library, but is designed to work with the Library by being compiled or linked
with it, is called a "work that uses the Library". Such a work, in isolation, is not a derivative work of the Librar y, and therefore falls outside
the scope of this License.
However, linking a "work that uses the Library" with the Librar y creates an executable that is a derivative of the Library (because it contains
portions of the Library), rather than a "work that uses the librar y". The executable is therefore covered by this License. Section 6 states terms
for distribution of such executables.
When a "work that uses the Librar y" uses material from a header fi le that is part of the Library, the object code for the work may be a deriva-
tive work of the Library even though the source code is not. Whether this is true is especially signifi cant if the work can be linked without the
Library, or if the work is itself a library. The threshold for this to be true is not precisely defi ned by law.
If such an object fi le uses only numerical parameters, data structure layouts and accessors, and small macros and small inline functions (ten
lines or less in length), then the use of the object fi le is unrestricted, regardless of whether it is legally a derivative work. (Executables contain-
ing this object code plus portions of the Library will still fall under Section 6.)
Otherwise, if the work is a derivative of the Library, you may distribute the object code for the work under the terms of Section 6. Any
executables containing that work also fall under Section 6, whether or not they are linked directly with the Librar y itself.
6. As an exception to the Sections above, you may also combine or link a "work that uses the Librar y" with the Librar y to produce a work
containing portions of the Library, and distribute that work under terms of your choice, provided that the terms permit modifi cation of the
work for the customer's own use and reverse engineering for debugging such modifi cations.
You must give prominent notice with each copy of the work that the Library is used in it and that the Librar y and its use are covered by this
License. You must supply a copy of this License. If the work during execution displays copyright notices, you must include the copyright notice
for the Library among them, as well as a reference directing the user to the copy of this License. Also, you must do one of these things:
a) Accompany the work with the complete corresponding machine-readable source code for the Library including whatever changes were
used in the work (which must be distributed under Sections 1 and 2 above); and, if the work is an executable linked with the Library, with
the complete machine-readable "work that uses the Library", as object code and/or source code, so that the user can modify the Library and
then relink to produce a modifi ed executable containing the modifi ed Library. (It is understood that the user who changes the contents of
defi nitions fi les in the Library will not necessarily be able to recompile the application to use the modifi ed defi nitions.)
b) Use a suitable shared library mechanism for linking with the Librar y. A suitable mechanism is one that (1) uses at run time a copy of the
TERMS AND CONDITIONS FOR COPYING, DISTRIBUTION AND MODIFICATION
GNU LESSER GENERAL PUBLIC LICENSE
Version 2.1, Februar y 1999
Preamble
cation follow. Pay close attention to the difference between a "work
GNU LESSER GENERAL PUBLIC LICENSE
nder the
library already present on the user's computer system, rather than copying library functions into the executable, and (2) will operate properly with a modifi ed version of the library, if the user installs one, as long as the modifi ed version is interface-compatible with the version that
the work was made with.
c) Accompany the work with a written offer, valid for at least three years, to give the same user the materials specifi ed in Subsection 6a,
above, for a charge no more than the cost of performing this distribution.
d) If distribution of the work is made by offering access to copy from a designated place, offer equivalent access to copy the above specifi ed
materials from the same place.
e) Verify that the user has already received a copy of these materials or that you have already sent this user a copy.
For an executable, the required form of the "work that uses the Library" must include any data and utility programs needed for reproducing
the executable from it. However, as a special exception, the materials to be distributed need not include anything that is normally distributed
(in either source or binary form) with the major components (compiler, kernel, and so on) of the operating system on which the executable
runs, unless that component itself accompanies the executable.
It may happen that this requirement contradicts the license restrictions of other proprietar y libraries that do not normally accompany the
operating system. Such a contradiction means you cannot use both them and the Library together in an executable that you distribute.
7. You may place library facilities that are a work based on the Librar y side-by-side in a single librar y together with other library facilities not
covered by this License, and distribute such a combined librar y, provided that the separate distribution of the work based on the Librar y and
of the other library facilities is otherwise permitted, and provided that you do these two things:
a) Accompany the combined library with a copy of the same work based on the Library, uncombined with any other library facilities. This
must be distributed under the terms of the Sections above.
b) Give prominent notice with the combined library of the fact that par t of it is a work based on the Library, and explaining where to fi nd
the accompanying uncombined form of the same work.
8. You may not copy, modify, sublicense, link with, or distribute the Library except as expressly provided under this License. Any attempt otherwise to copy, modify, sublicense, link with, or distribute the Library is void, and will automatically terminate your rights under this License.
However, parties who have received copies, or rights, from you under this License will not have their licenses terminated so long as such
parties remain in full compliance.
9. You are not required to accept this License, since you have not signed it. However, nothing else grants you permission to modify or
distribute the Library or its derivative works. These actions are prohibited by law if you do not accept this License. Therefore, by modifying
or distributing the Library (or any work based on the Library), you indicate your acceptance of this License to do so, and all its terms and
conditions for copying, distributing or modifying the Librar y or works based on it.
10. Each time you redistribute the Library (or any work based on the Librar y), the recipient automatically receives a license from the original
licensor to copy, distribute, link with or modify the Library subject to these terms and conditions. You may not impose any further restrictions
on the recipients' exercise of the rights granted herein. You are not responsible for enforcing compliance by third parties with this License.
11. If, as a consequence of a court judgment or allegation of patent infringement or for any other reason (not limited to patent issues), condi-
tions are imposed on you (whether by court order, agreement or otherwise) that contradict the conditions of this License, they do not
excuse you from the conditions of this License. If you cannot distribute so as to satisfy simultaneously your obligations under this License
and any other pertinent obligations, then as a consequence you may not distribute the Library at all. For example, if a patent license would
not permit royalty-free redistribution of the Library by all those who receive copies directly or indirectly through you, then the only way
you could satisfy both it and this License would be to refrain entirely from distribution of the Library.
If any portion of this section is held invalid or unenforceable under any particular circumstance, the balance of the section is intended to apply,
and the section as a whole is intended to apply in other circumstances.
It is not the purpose of this section to induce you to infringe any patents or other property right claims or to contest validity of any such
claims; this section has the sole purpose of protecting the integrity of the free software distribution system which is implemented by public
license practices. Many people have made generous contributions to the wide range of software distributed through that system in reliance
on consistent application of that system; it is up to the author/donor to decide if he or she is willing to distribute software through any other
system and a licensee cannot impose that choice.
This section is intended to make thoroughly clear what is believed to be a consequence of the rest of this License.
12. If the distribution and/or use of the Library is restricted in cer tain countries either by patents or by copyrighted interfaces, the original
copyright holder who places the Library under this License may add an explicit geographical distribution limitation excluding those coun-
tries, so that distribution is permitted only in or among countries not thus excluded. In such case, this License incorporates the limitation
as if written in the body of this License.
13. The Free Software Foundation may publish revised and/or new versions of the Lesser General Public License from time to time. Such new
versions will be similar in spirit to the present version, but may differ in detail to address new problems or concerns.
Each version is given a distinguishing version number. If the Library specifi es a version number of this License which applies to it and "any later
version", you have the option of following the terms and conditions either of that version or of any later version published by the Free Software
Foundation. If the Library does not specify a license version number, you may choose any version ever published by the Free So
14. If you wish to incorporate parts of the Librar y into other free programs whose distribution conditions are incompatible with these, write
to the author to ask for permission. For software which is copyrighted by the Free Software Foundation, write to the Free Software Foundation; we sometimes make exceptions for this. Our decision will be guided by the two goals of preserving the free status of all derivatives
of our free software and of promoting the sharing and reuse of software generally.
15. BECAUSE THE LIBRARY IS LICENSED FREE OF CHARGE, THERE IS NO WARRANTY FOR THE LIBRARY, TO THE EXTENT PERMIT-
TED BY APPLICABLE LAW. EXCEPT WHEN OTHERWISE STATED IN WRITING THE COPYRIGHT HOLDERS AND/OR OTHER PARTIES PROVIDE THE LIBRARY "AS IS" WITHOUT WARRANTY OF ANY KIND, EITHER EXPRESSED OR IMPLIED, INCLUDING, BUT
NOT LIMITED TO, THE IMPLIED WARRANTIES OF MERCHANTABILITY AND FITNESS FOR A PARTICULAR PURPOSE. THE ENTIRE
RISK AS TO THE QUALITY AND PERFORMANCE OF THE LIBRARY IS WITH YOU. SHOULD THE LIBRARY PROVE DEFECTIVE, YOU
ASSUME THE COST OF ALL NECESSARY SERVICING, REPAIR OR CORRECTION.
16. IN NO EVENT UNLESS REQUIRED BY APPLICABLE LAW OR AGREED TO IN WRITING WILL ANY COPYRIGHT HOLDER, OR
ANY OTHER PARTY WHO MAY MODIFY AND/OR REDISTRIBUTE THE LIBRARY AS PERMITTED ABOVE, BE LIABLE TO YOU FOR
DAMAGES, INCLUDING ANY GENERAL, SPECIAL, INCIDENTAL OR CONSEQUENTIAL DAMAGES ARISING OUT OF THE USE OR
INABILITY TO USE THE LIBRARY (INCLUDING BUT NOT LIMITED TO LOSS OF DATA OR DATA BEING RENDERED INACCURATE
OR LOSSES SUSTAINED BY YOU OR THIRD PARTIES OR A FAILURE OF THE LIBRARY TO OPERATE WITH ANY OTHER SOFTWARE), EVEN IF SUCH HOLDER OR OTHER PARTY HAS BEEN ADVISED OF THE POSSIBILITY OF SUCH DAMAGES.
If you develop a new library, and you want it to be of the greatest possible use to the public, we recommend making it free software that
everyone can redistribute and change. You can do so by permitting redistribution under these terms (or, alternatively, under the terms of the
ordinary General Public License).
To apply these terms, attach the following notices to the library. It is safest to attach them to the start of each source fi le to most effectively
convey the exclusion of warranty; and each fi le should have at least the "copyright" line and a pointer to where the full notice is found.
<one line to give the library's name and a brief idea of what it does.>
Copyright (C) <year> <name of author>
This library is free software; you can redistribute it and/or modify it under the terms of the GNU Lesser General Public License as published
by the Free Software Foundation; either version 2.1 of the License, or (at your option) any later version.
This library is distributed in the hope that it will be useful, but WITHOUT ANY WARRANTY; without even the implied warranty of MERCHANTABILITY or FITNESS FOR A PARTICULAR PURPOSE. See the GNU Lesser General Public License for more details.
You should have received a copy of the GNU Lesser General Public License along with this library; if not, write to the Free Software Founda-
tion, Inc., 51 Franklin Street, Fifth Floor, Boston, MA 02110-1301 USA
Also add information on how to contact you by electronic and paper mail.
You should also get your employer (if you work as a programmer) or your school, if any, to sign a "copyright disclaimer" for the library, if necessary. Here is a sample; alter the names:
Yoyodyne, Inc., hereby disclaims all copyright interest in the library `Frob' (a library for tweaking knobs) written by James Random Hacker.
<signature of Ty Coon>, 1 April 1990
Ty Coon, President of Vice
That's all there is to it!
If you are interested in obtaining LGPL source code used in this product, please contact
FUNAI SERVICE CORPORATION
2200 Spiegel Drive, Groveport, OH 43125
funaioss@funaiservice.com
BSD
Copyright (c) 2003-2010, Jouni Malinen <j@w1.fi > and contributors All Rights Reserved.
Redistribution and use in source and binary forms, with or without modifi cation, are permitted provided that the following conditions are met:
1. Redistributions of source code must retain the above copyright notice, this list of conditions and the following disclaimer.
2. Redistributions in binary form must reproduce the above copyright notice, this list of conditions and the following disclaimer in the docu-
mentation and/or other materials provided with the distribution.
3. Neither the name(s) of the above-listed copyright holder(s) nor the names of its contributors may be used to endorse or promote products
derived from this software without specifi c prior written permission.
THIS SOFTWARE IS PROVIDED BY THE COPYRIGHT HOLDERS AND CONTRIBUTORS "AS IS" AND ANY EXPRESS OR IMPLIED WARRANTIES, INCLUDING, BUT NOT LIMITED TO, THE IMPLIED WARRANTIES OF MERCHANTABILITY AND FITNESS FOR A PARTICULAR
PURPOSE ARE DISCLAIMED. IN NO EVENT SHALL THE COPYRIGHT OWNER OR CONTRIBUTORS BE LIABLE FOR ANY DIRECT,
INDIRECT, INCIDENTAL, SPECIAL, EXEMPLARY, OR CONSEQUENTIAL DAMAGES (INCLUDING, BUT NOT LIMITED TO, PROCUREMENT
OF SUBSTITUTE GOODS OR SERVICES; LOSS OF USE, DATA, OR PROFITS; OR BUSINESS INTERRUPTION) HOWEVER CAUSED AND
ON ANY THEORY OF LIABILITY, WHETHER IN CONTRACT, STRICT LIABILITY, OR TORT (INCLUDING NEGLIGENCE OR OTHERWISE)
ARISING IN ANY WAY OUT OF THE USE OF THIS SOFTWARE, EVEN IF ADVISED OF THE POSSIBILITY OF SUCH DAMAGE.
MIT
--------------------------------------------
• expat
Copyright © 1998, 1999, 2000 Thai Open Source Software Center Ltd and Clark Cooper
Copyright © 2001, 2002, 2003, 2004, 2005, 2006 Expat maintainers.
--------------------------------------------
• lua
Copyright © 1994 -2010 Lua.org, PUC-Rio.
--------------------------------------------
• lua-xmlreader
Copyright © 2008 A.S. Bradbury
--------------------------------------------
• lua-slncrypto
Copyright © 2005 Malete Partner, Berlin, partner@malete.org
--------------------------------------------
• libxml2
Copyright © 1998-2003 Daniel Veillard. All Rights Reserved.
-------------------------------------------Permission is hereby granted, free of charge, to any person obtaining a copy of this software and associated documentation fi les (the "Software"),
to deal in the Software without restriction, including without limitation the rights to use, copy, modify, merge, publish, distribute, sublicense, and/or
sell copies of the Software, and to permit persons to whom the Software is furnished to do so, subject to the following conditions:
The above copyright notice and this permission notice shall be included in all copies or substantial portions of the Software.
THE SOFTWARE IS PROVIDED "AS IS", WITHOUT WARRANTY OF ANY KIND, EXPRESS OR IMPLIED, INCLUDING BUT NOT LIMITED
TO THE WARRANTIES OF MERCHANTABILITY, FITNESS FOR A PARTICULAR PURPOSE AND NONINFRINGEMENT. IN NO EVENT
SHALL THE AUTHORS OR COPYRIGHT HOLDERS BE LIABLE FOR ANY CLAIM, DAMAGES OR OTHER LIABILITY, WHETHER IN AN
ACTION OF CONTRACT, TORT OR OTHERWISE, ARISING FROM, OUT OF OR IN CONNECTION WITH THE SOFTWARE OR THE
USE OR OTHER DEALINGS IN THE SOFTWARE.
MIT/X
COPYRIGHT AND PERMISSION NOTICE
Copyright (c) 1996 - 2009, Daniel Stenberg, <daniel@haxx.se>.
All rights reserved.
Permission to use, copy, modify, and distribute this software for any purpose with or without fee is hereby granted, provided that the above
copyright notice and this permission notice appear in all copies.
How to Apply These Terms to Your New Libraries
NO WARRANTY
END OF TERMS AND CONDITIONS
ftware Foundation.
THE SOFTWARE IS PROVIDED "AS IS", WITHOUT WARRANTY OF ANY KIND, EXPRESS OR IMPLIED, INCLUDING BUT NOT LIMITED
TO THE WARRANTIES OF MERCHANTABILITY, FITNESS FOR A PARTICULAR PURPOSE AND NONINFRINGEMENT OF THIRD PARTY
RIGHTS. IN NO EVENT SHALL THE AUTHORS OR COPYRIGHT HOLDERS BE LIABLE FOR ANY CLAIM, DAMAGES OR OTHER LIABILITY, WHETHER IN AN ACTION OF CONTRACT, TORT OR OTHERWISE, ARISING FROM, OUT OF OR IN CONNECTION WITH
THE SOFTWARE OR THE USE OR OTHER DEALINGS IN THE SOFTWARE.
Except as contained in this notice, the name of a copyright holder shall not be used in advertising or otherwise to promote the sale, use or
other dealings in this Software without prior written authorization of the copyright holder.
gSOAP
Part of the software embedded in this product is gSOAP software.
Portions created by gSOAP are Copyright (C) 2001-2009 Robert A. van Engelen, Genivia inc. All Rights Reserved.
THE SOFTWARE IN THIS PRODUCT WAS IN PART PROVIDED BY GENIVIA INC AND ANY EXPRESS OR IMPLIED WARRANTIES, INCLUDING, BUT NOT LIMITED TO, THE IMPLIED WARRANTIES OF MERCHANTABILITY AND FITNESS FOR A PARTICULAR PURPOSE
ARE DISCLAIMED. IN NO EVENT SHALL THE AUTHOR BE LIABLE FOR ANY DIRECT, INDIRECT, INCIDENTAL, SPECIAL, EXEMPLARY,
OR CONSEQUENTIAL DAMAGES (INCLUDING, BUT NOT LIMITED TO, PROCUREMENT OF SUBSTITUTE GOODS OR SERVICES;
LOSS OF USE, DATA, OR PROFITS; OR BUSINESS INTERRUPTION) HOWEVER CAUSED AND ON ANY THEORY OF LIABILITY,
WHETHER IN CONTRACT, STRICT LIABILITY, OR TORT (INCLUDING NEGLIGENCE OR OTHERWISE) ARISING IN ANY WAY OUT
OF THE USE OF THIS SOFTWARE, EVEN IF ADVISED OF THE POSSIBILITY OF SUCH DAMAGE.
Free Type
Portions of this software are copyright (c) 2001, 2002, 2003, 2004, 2006 The FreeType Project (www.freetype.org). All rights reserved.
LibJPEG
This software is based in part on the work of the Independent JPEG Group.
Open SSL
LICENSE ISSUES
==========
The OpenSSL toolkit stays under a dual license, i.e. both the conditions of the OpenSSL License and the original SSLeay license apply to the
toolkit. See below for the actual license texts. Actually both licenses are BSD-style Open Source licenses. In case of any license issues related
to OpenSSL please contact openssl-core@openssl.org.
OpenSSL License
---------------------/*
===============================================
Copyright (c) 1998-2008 The OpenSSL Project. All rights reserved.
*
Redistribution and use in source and binary forms, with or without modifi cation, are permitted provided that the following conditions are
*
met:
*
1. Redistributions of source code must retain the above copyright notice, this list of conditions and the following disclaimer.
*
2. Redistributions in binary form must reproduce the above copyright notice, this list of conditions and the following disclaimer in the docu-
*
mentation and/or other materials provided with the distribution.
*
3. All advertising materials mentioning features or use of this software must display the following acknowledgment: "This product includes
*
software developed by the OpenSSL Project for use in the OpenSSL Toolkit. (http://www.openssl.org/)"
*
4. The names "OpenSSL Toolkit" and "OpenSSL Project" must not be used to endorse or promote products derived from this software
*
without prior written permission. For written permission, please contact openssl-core@openssl.org.
*
5. Products derived from this software may not be called "OpenSSL" nor may "OpenSSL" appear in their names without prior written
*
permission of the OpenSSL Project.
*
6. Redistributions of any form whatsoever must retain the following acknowledgment: "This product includes software developed by the
*
OpenSSL Project for use in the OpenSSL Toolkit (http://www.openssl.org/)"
*
THIS SOFTWARE IS PROVIDED BY THE OpenSSL PROJECT ``AS IS'' AND ANY EXPRESSED OR IMPLIED WARRANTIES, INCLUDING,
*
BUT NOT LIMITED TO, THE IMPLIED WARRANTIES OF MERCHANTABILITY AND FITNESS FOR A PARTICULAR PURPOSE ARE DIS-
*
CLAIMED. IN NO EVENT SHALL THE OpenSSL PROJECT OR ITS CONTRIBUTORS BE LIABLE FOR ANY DIRECT, INDIRECT, INCIDEN-
*
TAL, SPECIAL, EXEMPLARY, OR CONSEQUENTIAL DAMAGES (INCLUDING, BUT NOT LIMITED TO, PROCUREMENT OF SUBSTITUTE
*
GOODS OR SERVICES; LOSS OF USE, DATA, OR PROFITS; OR BUSINESS INTERRUPTION) HOWEVER CAUSED AND ON ANY
*
THEORY OF LIABILITY, WHETHER IN CONTRACT, STRICT LIABILITY, OR TORT (INCLUDING NEGLIGENCE OR OTHERWISE) ARIS-
*
ING IN ANY WAY OUT OF THE USE OF THIS SOFTWARE, EVEN IF ADVISED OF THE POSSIBILITY OF SUCH DAMAGE.
*
===============================================
*
This product includes cryptographic software written by Eric Young (eay@cryptsoft.com). This product includes software written by Tim
*
Hudson (tjh@cryptsoft.com).
*
*/
Original SSLeay License
----------------------------Copyright (C) 1995-1998 Eric Young (eay@cryptsoft.com) All rights reserved.
/*
This package is an SSL implementation written by Eric Young (eay@cryptsoft.com).
*
The implementation was written so as to conform with Netscapes SSL.
*
This library is free for commercial and non-commercial use as long as the following conditions are aheared to. The following conditions
*
apply to all code found in this distribution, be it the RC4, RSA, lhash, DES, etc., code; not just the SSL code. The SSL documentation included
*
with this distribution is covered by the same copyright terms except that the holder is Tim Hudson (tjh@cryptsoft.com).
*
Copyright remains Eric Young's, and as such any Copyright notices in the code are not to be removed.
*
If this package is used in a product, Eric Young should be given attribution as the author of the parts of the librar y used.
*
This can be in the form of a textual message at program startup or in documentation (online or textual) provided with the package.
*
Redistribution and use in source and binary forms, with or without modifi cation, are permitted provided that the following conditions are met:
*
1. Redistributions of source code must retain the copyright notice, this list of conditions and the following disclaimer.
*
2. Redistributions in binary form must reproduce the above copyright notice, this list of conditions and the following disclaimer in the docu-
*
mentation and/or other materials provided with the distribution.
*
3. All advertising materials mentioning features or use of this software must display the following acknowledgement: "This product includes
*
cryptographic software written by Eric Young (eay@cryptsoft.com)" The word 'cryptographic' can be left out if the rouines from the
*
library being used are not cr yptographic related :-).
*
4. If you include any Windows specifi c code (or a derivative thereof) from the apps directory (application code) you must include an
*
acknowledgement: "This product includes software written by Tim Hudson (tjh@cr yptsoft.com)"
*
THIS SOFTWARE IS PROVIDED BY ERIC YOUNG ``AS IS'' AND ANY EXPRESS OR IMPLIED WARRANTIES, INCLUDING, BUT NOT
*
LIMITED TO, THE IMPLIED WARRANTIES OF MERCHANTABILITY AND FITNESS FOR A PARTICULAR PURPOSE ARE DISCLAIMED.
*
IN NO EVENT SHALL THE AUTHOR OR CONTRIBUTORS BE LIABLE FOR ANY DIRECT, INDIRECT, INCIDENTAL, SPECIAL, EXEM-
*
PLARY, OR CONSEQUENTIAL DAMAGES (INCLUDING, BUT NOT LIMITED TO, PROCUREMENT OF SUBSTITUTE GOODS OR
*
SERVICES; LOSS OF USE, DATA, OR PROFITS; OR BUSINESS INTERRUPTION) HOWEVER CAUSED AND ON ANY THEORY OF
*
LIABILITY, WHETHER IN CONTRACT, STRICT LIABILITY, OR TORT (INCLUDING NEGLIGENCE OR OTHERWISE) ARISING IN ANY
*
WAY OUT OF THE USE OF THIS SOFTWARE, EVEN IF ADVISED OF THE POSSIBILITY OF SUCH DAMAGE.
*
The licence and distribution terms for any publically available version or derivative of this code cannot be changed. i.e. this code cannot
*
simply be copied and put under another distribution licence
*
[including the GNU Public Licence.]
*
*/
Vera Fonts
Copyright
Copyright (c) 2003 by Bitstream, Inc. All Rights Reserved. Bitstream Vera is a trademark of Bitstream, Inc.
Permission is hereby granted, free of charge, to any person obtaining a copy of the fonts accompanying this license (“Fonts”) and associated
documentation fi les (the “Font Software”), to reproduce and distribute the Font Software, including without limitation the rights to use, copy,
merge, publish, distribute, and/or sell copies of the Font Software, and to permit persons to whom the Font Software is furnished to do so,
subject to the following conditions:
The above copyright and trademark notices and this permission notice shall be included in all copies of one or more of the Font Software typefaces.
The Font Software may be modifi ed, altered, or added to, and in particular the designs of glyphs or characters in the Fonts may be modifi ed and additional
glyphs or characters may be added to the Fonts, only if the fonts are renamed to names not containing either the words “Bitstream” or the word “Vera”.
This License becomes null and void to the extent applicable to Fonts or Font Software that has been modifi ed and is distributed under the
“Bitstream Vera” names.
The Font Software may be sold as part of a larger software package but no copy of one or more of the Font Software typefaces may be sold by itself.
THE FONT SOFTWARE IS PROVIDED "AS IS", WITHOUT WARRANTY OF ANY KIND, EXPRESS OR IMPLIED, INCLUDING BUT NOT
LIMITED TO ANY WARRANTIES OF MERCHANTABILITY, FITNESS FOR A PARTICULAR PURPOSE AND NONINFRINGEMENT OF
COPYRIGHT, PATENT, TRADEMARK, OR OTHER RIGHT. IN NO EVENT SHALL BITSTREAM OR THE GNOME FOUNDATION BE LIABLE
FOR ANY CLAIM, DAMAGES OR OTHER LIABILITY, INCLUDING ANY GENERAL, SPECIAL, INDIRECT, INCIDENTAL, OR CONSEQUENTIAL DAMAGES, WHETHER IN AN ACTION OF CONTRACT, TORT OR OTHERWISE, ARISING FROM, OUT OF THE USE OR INABILITY
TO USE THE FONT SOFTWARE OR FROM OTHER DEALINGS IN THE FONT SOFTWARE.
Except as contained in this notice, the names of Gnome, the Gnome Foundation, and Bitstream Inc., shall not be used in advertising or
otherwise to promote the sale, use or other dealings in this Font Software without prior written authorization from the Gnome Foundation or
Bitstream Inc., respectively. For further information, contact: fonts at gnome dot org.
xmlprc
XML-RPC For C/C++ License
Copyright (C) 2001 by First Peer, Inc. All rights reserved.
Copyright (C) 2001 by Eric Kidd. All rights reserved.
Redistribution and use in source and binary forms, with or without modifi cation, are permitted provided that the following conditions are met:
1. Redistributions of source code must retain the above copyright notice, this list of conditions and the following disclaimer.
2. Redistributions in binary form must reproduce the above copyright notice, this list of conditions and the following disclaimer in the docu-
mentation and/or other materials provided with the distribution.
3. The name of the author may not be used to endorse or promote products derived from this software without specifi c prior written permission.
THIS SOFTWARE IS PROVIDED BY THE AUTHOR AND CONTRIBUTORS ``AS IS'' AND ANY EXPRESS OR IMPLIED WARRANTIES, INCLUDING, BUT NOT LIMITED TO, THE IMPLIED WARRANTIES OF MERCHANTABILITY AND FITNESS FOR A PARTICULAR PURPOSE
ARE DISCLAIMED. IN NO EVENT SHALL THE AUTHOR OR CONTRIBUTORS BE LIABLE FOR ANY DIRECT, INDIRECT, INCIDENTAL,
SPECIAL, EXEMPLARY, OR CONSEQUENTIAL DAMAGES (INCLUDING, BUT NOT LIMITED TO, PROCUREMENT OF SUBSTITUTE
GOODS OR SERVICES; LOSS OF USE, DATA, OR PROFITS; OR BUSINESS INTERRUPTION) HOWEVER CAUSED AND ON ANY
THEORY OF LIABILITY, WHETHER IN CONTRACT, STRICT LIABILITY, OR TORT (INCLUDING NEGLIGENCE OR OTHERWISE) ARISING
IN ANY WAY OUT OF THE USE OF THIS SOFTWARE, EVEN IF ADVISED OF THE POSSIBILITY OF SUCH DAMAGE.
-------------------------
 Loading...