

Magnavox MBP5120F/F7 Owner's Manual
Owner’s Manual
MBP5120F/F7
Blu-ray Disc / DVD Player
© 2010 Funai Electric Co., Ltd.
INTRODUCTION
Safety Instructions
The model and serial numbers
of this unit may be found on the
cabinet.
You should record and retain
those numbers for future
reference.
Model No.:
Serial No.:
WARNING:
TO REDUCE THE RISK OF FIRE OR ELECTRIC
SHOCK, DO NOT EXPOSE THIS APPARATUS TO
RAIN OR MOISTURE.
APPARATUS SHALL NOT BE EXPOSED TO
DRIPPING OR SPLASHING AND NO OBJECTS
FILLED WITH LIQUIDS, SUCH AS VASES, SHALL BE
PLACED ON THE APPARATUS.
CAUTION
RISK OF ELECTRIC SHOCK
DO NOT OPEN
CAUTION:
TO REDUCE THE RISK OF ELECTRIC SHOCK,
DO NOT REMOVE COVER (OR BACK). NO USER
SERVICEABLE PARTS INSIDE. REFER SERVICING TO
QUALIFIED SERVICE PERSONNEL.
The important note is located on the rear or bottom
of the cabinet.
The lightning flash with arrowhead
symbol, within an equilateral triangle,
is intended to alert the user to the
presence of uninsulated“dangerous
voltage”within the product’s
enclosure that may be of sufficient
magnitude to constitute a risk of
electric shock to persons.
The exclamation point within an
equilateral triangle is intended
to alert the user to the presence
of important operating and
maintenance (servicing) instructions
in the literature accompanying the
appliance.
The symbol for CLASS ll (Double Insulation)
IMPORTANT SAFETY
INSTRUCTIONS
1. Read these instructions.
2. Keep these instructions.
3. Heed all warnings.
4. Follow all instructions.
5. Do not use this apparatus near water.
6. Clean only with dry cloth.
7. Do not block any ventilation openings.
Install in accordance with the manufacturer’s
instructions.
8. Do not install near any heat sources such
as radiators, heat registers, stoves, or other
apparatus (including amplifiers) that produce
heat.
9. Do not defeat the safety purpose of the
polarized or grounding-type plug. A polarized
plug has two blades with one wider than the
other. A grounding type plug has two blades
and a third grounding prong. The wide blade or
the third prong are provided for your safety. If
the provided plug does not fit into your outlet,
consult an electrician for replacement of the
obsolete outlet.
10. Protect the power cord from being walked on
or pinched particularly at plugs, convenience
receptacles, and the point where they exit
from the apparatus.
11. Only use attachments/accessories specified by
the manufacturer.
12. Use only with the cart, stand, tripod, bracket,
or table specified by the
manufacturer, or sold with the
apparatus. When a cart is used, use
caution when moving the cart/
apparatus combination to avoid
injury from tip-over.
13. Unplug this apparatus during lightning storms
or when unused for long periods of time.
14. Refer all servicing to qualified service
personnel. Servicing is required when the
apparatus has been damaged in any way, such
as power-supply cord or plug is damaged,
liquid has been spilled or objects have fallen
into the apparatus, the apparatus has been
exposed to rain or moisture, does not operate
normally, or has been dropped.
FCC WARNING
This equipment may generate or use radio
frequency energy. Changes or modifications to
this equipment may cause harmful interference
unless the modifications are expressly approved
in the manual. The user could lose the authority
to operate this equipment if an unauthorized
change or modification is made.
2

RADIO-TV INTERFERENCE
This equipment has been tested and found to
comply with the limits for a Class B digital device,
pursuant to Part 15 of the FCC Rules. These limits
are designed to provide reasonable protection
against harmful interference in a residential
installation. This equipment generates, uses,
and can radiate radio frequency energy and, if
not installed and used in accordance with the
instructions, may cause harmful interference
to radio communications. However, there is no
guarantee that interference will not occur in a
particular installation. If this equipment does
cause harmful interference to radio or television
reception, which can be determined by turning
the equipment off and on, the user is encouraged
to try to correct the interference by one or more
of the following measures:
1) Reorient or relocate the receiving antenna.
2) Increase the separation between the
equipment and receiver.
3) Connect the equipment into an outlet on
a circuit different from that to which the
receiver is connected.
4) Consult the dealer or an experienced radio/
TV technician for help.
This Class B digital apparatus complies with
Canadian ICES-003.
Cet appareil numérique de la classe B est
conforme à la norme NMB-003 du Canada.
Disconnect the mains plug to shut off when find
trouble or not in use. The mains plug shall remain
readily operable.
CAUTION: Danger of explosion if battery is
incorrectly replaced. Replace only
with the same or equivalent type.
WARNING: Batteries (Battery pack or battery
installed) shall not be exposed to
excessive heat such as sunshine,
fire, or the like.
LASER SAFETY
This apparatus employs a laser. Only a qualified
service person should remove the cover or
attempt to service this apparatus, due to possible
eye injury.
CAUTION: Use of controls or adjustments
or performance of procedures
other than those specified herein
may result in hazardous radiation
exposure.
CAUTION: Laser radiation when open. Do not
stare into beam.
LOCATION: Inside, near the BD mechanism.
IMPORTANT COPYRIGHT INFORMATION
Unauthorized copying, broadcasting, public
performance and lending of discs are prohibited.
This item incorporates copy protection
technology that is protected by U.S. patents
and other intellectual property rights of
Rovi Corporation. Reverse engineering and
disassembly are prohibited.
Do not place the unit on the furniture that is
capable of being tilted by a child and an adult
leaning, pulling, standing or climbing on it. A
falling unit can cause serious injury or even
death.
This apparatus should not be placed in a built-in
installation such as a bookcase or rack unless
proper ventilation is provided.
Make sure to leave a space of 3.9 inches (10cm)
or more around this apparatus.
To Avoid the Hazards of Electrical Shock and
Fire
• Do not handle the AC power cord with wet
hands.
• Do not pull on the AC power cord when
disconnecting it from an AC outlet. Grasp it by
the plug.
• Do not put your fingers or objects into the unit.
Location and Handling
• Do not install the unit in direct sunlight, near
strong magnetic fields, or in a place subject to
dust or strong vibration.
• Avoid a place with drastic temperature changes.
• Install the unit in a horizontal and stable
position. Do not place anything directly on
top or bottom of the unit. Depending on your
external devices, noise or disturbance of the
picture and/or sound may be generated if the
unit is placed too close to them. In this case,
please ensure enough space between the
external devices and the unit.
• Depending on the environment, the
temperature of this unit may increase slightly.
This is not a malfunction.
• Be sure to remove the disc and unplug the AC
power cord from the outlet before carrying the
unit.
Dew Condensation Warning
• Dew condensation may form inside the unit in
the following conditions. If so, do not use this
unit at least for a few hours until its inside gets
dry.
- The unit is moved from a cold place to a warm
place.
- Under conditions of high humidity.
- After heating a cold room.
3
Note about Recycling
• This unit’s packaging materials are recyclable
and can be reused. Please dispose
of any materials in accordance with
your local recycling regulations.
• Batteries should never be thrown
away or incinerated but disposed
of in accordance with your local regulations
concerning chemical wastes.
Notice for Progressive Scan Output
• Consumers should note that not all high
definition television sets are fully compatible
with this product and may cause artifacts to
be displayed in the picture. In case of picture
problems with 480 progressive scan output,
it is recommended that the user switch the
connection to the ‘standard definition’ output.
If there are questions regarding your TV set
compatibility with this 480p BD/DVD player,
please contact our customer service center.
ENERGY STAR® is a joint program of
the U.S. Environmental Protection
Agency and the U.S. Department of
Energy helping us all save money
and protect the environment
through energy efficient products
and practices.
Supplied Accessories
• Remote Control (NB904UD/NB954UD)
• Batteries (AAA, 1.5V × 2)
• Audio / video cables(WPZ1020TM002 /
WPZ102SCP002)
• Quick Start Guide (1VMN29960)
• VUDU sheet (1VMN30133)
© 2010 Funai Electric Co., Ltd.
All rights reserved. No part of this manual may be
reproduced, copied, transmitted, disseminated,
transcribed, downloaded or stored in any storage
medium, in any form or for any purpose without
the express prior written consent of Funai.
Furthermore, any unauthorized commercial
distribution of this manual or any revision hereto
is strictly prohibited.
Information in this document is subject to change
without notice. Funai reserves the right to change
the content herein without the obligation to
notify any person or organization of such changes.
with the design is a registered trademark of
Funai Electric Co., Ltd. and may not be used in any way
without the express written consent of Funai. All other
trademarks used herein remain the exclusive property
of their respective owners. Nothing contained in this
manual should be construed as granting, by implication
or otherwise, any license or right to use any of the
trademarks displayed herein. Misuse of any trademarks
or any other content in this manual is strictly prohibited.
Funai shall aggressively enforce its intellectual property
rights to the fullest extent of the law.
4

CONTENTS
INTRODUCTION................................................................2
Safety Instructions ................................................................... 2
Supplied Accessories .............................................................. 4
Trademark Information .......................................................... 6
Front Panel ................................................................................. 7
Rear Panel ................................................................................... 7
Remote Control ........................................................................8
Installing the Batteries in the Remote Control .............. 9
Opening Screen ........................................................................ 9
CONNECTIONS ...............................................................10
Connection to the TV ............................................................ 10
Connection to an Audio System ....................................... 11
2-Channel Analog Audio Connection .........................11
Digital Audio Connection ................................................11
HDMI Audio Connection ..................................................11
Connection to the Network ...............................................12
Wired Connection ..................................................................12
Wireless Connection ............................................................. 13
Finding the Video Channel on Your TV ........................... 13
PLAYBACK .........................................................................14
Information on Playback ..................................................... 14
Playable Discs and Files ....................................................14
Unplayable Discs and Files ..............................................14
Region Codes ....................................................................... 15
On-Screen Display ..............................................................15
How to Insert a Disc ..............................................................15
Reading the SD Memory Card ...........................................16
Selecting the Media Mode .................................................16
Playing Back (BD / DVD) .......................................................16
Using the Title / Disc / Pop-up Menu ..............................17
Playing Back (Audio CD / JPEG Files) ...............................17
KODAK Picture CD .................................................................18
Fast Forward / Fast Reverse ................................................19
Slow Forward Playback ........................................................19
Step by Step Playback ..........................................................19
Repeat Playback .....................................................................19
Program Playback ..................................................................19
Random Playback ..................................................................20
Rapid Playback ........................................................................21
Adjusting the Picture ............................................................21
Virtual Surround ..................................................................... 21
PIP (BONUSVIEW) Setting ...................................................22
Camera Angle ..........................................................................22
Enjoying BD-Live Discs with Internet .............................22
Search ......................................................................................... 23
Using [the Number buttons] (Direct Search) ...............23
Switching Subtitles................................................................23
Switching Audio Soundtrack .............................................24
Setting the BD Audio Mode ...............................................24
NETWORK OPERATIONS ..............................................25
VUDU Operations ................................................................... 25
Before Activating VUDU ...................................................25
Activating VUDU .................................................................25
Guide to VUDU Menu Screen .........................................25
Renting or Purchasing VUDU Movies /
TV Episodes...........................................................................26
Watching Rented or Purchased VUDU Movies / TV
Episodes .................................................................................26
Using Internet Applications ...............................................26
FUNCTION SETUP ..........................................................26
Quick ......................................................................................26
Custom .................................................................................. 27
Language ..........................................................................27
Video ....................................................................................27
Audio ..................................................................................28
HDMI Audio Out Setting .................................................. 29
Digital Out Setting .............................................................29
Speaker Setting (Available when you have HDMI
cable connected to HDMI OUT jack) ...........................30
Parental ................................................................................32
Others ...............................................................................33
fun-Link (HDMI CEC) .......................................................... 35
Network Connection ............................................................36
Connection Test ..................................................................36
Network Selection ..............................................................36
Software Update .................................................................40
Current Version ....................................................................40
Initialize .....................................................................................41
OTHERS .............................................................................42
Troubleshooting ..................................................................... 42
Language Code List...............................................................44
Servicing ...................................................................................44
Specifications ..........................................................................45
NETWORK SERVICE DISCLAIMER .............................45
Network Service Disclaimer ...............................................45
LIMITED WARRANTY .................................... back cover
5

Trademark Information
HDMI, the HDMI Logo,
and High-Definition
Multimedia Interface
are trademarks or
registered trademarks
of HDMI Licensing LLC
in the United States
and other countries.
“BONUSVIEW” is
trademark of Blu-ray
Disc Association.
"BD-Live" and
"BD-Live" logo are
trademarks of Blu-ray
Disc Association.
Manufactured under
license from Dolby
Laboratories. Dolby and
the double-D symbol
are trademarks of Dolby
Laboratories.
Manufactured under
license under U.S.
Patent #’s:5,451,942;
5,956,674; 5,974,380;
5,978,762; 6,487,535
& other U.S. and
worldwide patents
issued & pending. DTS
and the Symbol are
registered trademarks,
& DTS-HD, DTS-HD
Advanced Digital Out
and the DTS logos are
trademarks of DTS,
Inc. Product includes
software. © DTS, Inc. All
Rights Reserved.
Java and all other Java
trademarks and logos
are trademarks or
registered trademarks
of Sun Microsystems,
Inc. in the United States
and/or other countries.
VUDUTM is a trademark
of VUDU, Inc.
“Blu-ray Disc“ and are trademarks.
is a trademark of DVD Format / Logo Licensing
Corporation.
Kodak and KODAK Picture CD
Compatible are trademarks
of Kodak used under license.
6
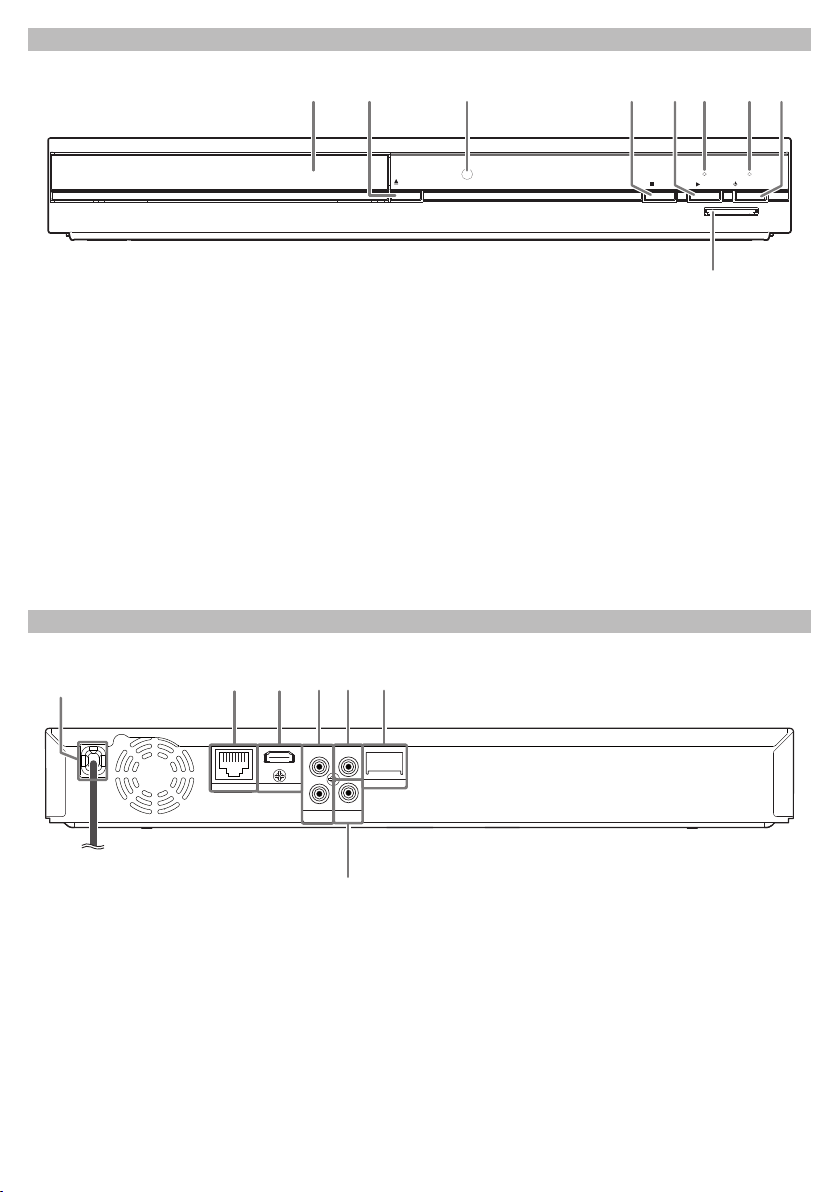
Front Panel
1 3 4 5* 62*
87
(*) The unit can also be turned on by pressing
these buttons.
1. Disc tray
2. A OPEN/CLOSE button*
3. Infrared sensor window
4. C STOP button
5. B PLAY button*
6. PLAY indicator
• This indicator lights up in green when discs or
SD cards play back.
7. STANDBY/ON indicator
• This indicator lights up in red when the power
is in the standby mode.
OPEN/
CLOSE
STOP PLAY
9
8. y STANDBY/ON button
• Press to turn on the unit, or to turn the unit
into the standby mode. (To completely turn
off the unit, you must unplug the AC power
cord.)
• Press and hold for 10 seconds to shut down
the unit.
9. SD card slot
Note
• This unit will be turned into the standby mode
automatically after 25 minutes of no action.
STANDBY/ON
SD card
Rear Panel
1
LAN
1. AC power cord
2. LAN terminal
3. HDMI OUT jack
4. AUDIO OUT jacks
5. DIGITAL OUT (COAXIAL) jack
6. Wireless LAN (Internal)
7. VIDEO OUT jack
4
32
L
HDMIOUT
R
AUDIO
OUT
COAXIAL
VIDEO
7
65
Wireless LAN
OUT
Note
• Do not touch the inner pins of the jacks on the
rear panel. Electrostatic discharge may cause
permanent damage to the unit.
• This unit does not have the RF modulator.
• Do not try to rip the internal wireless LAN from
the unit.
7
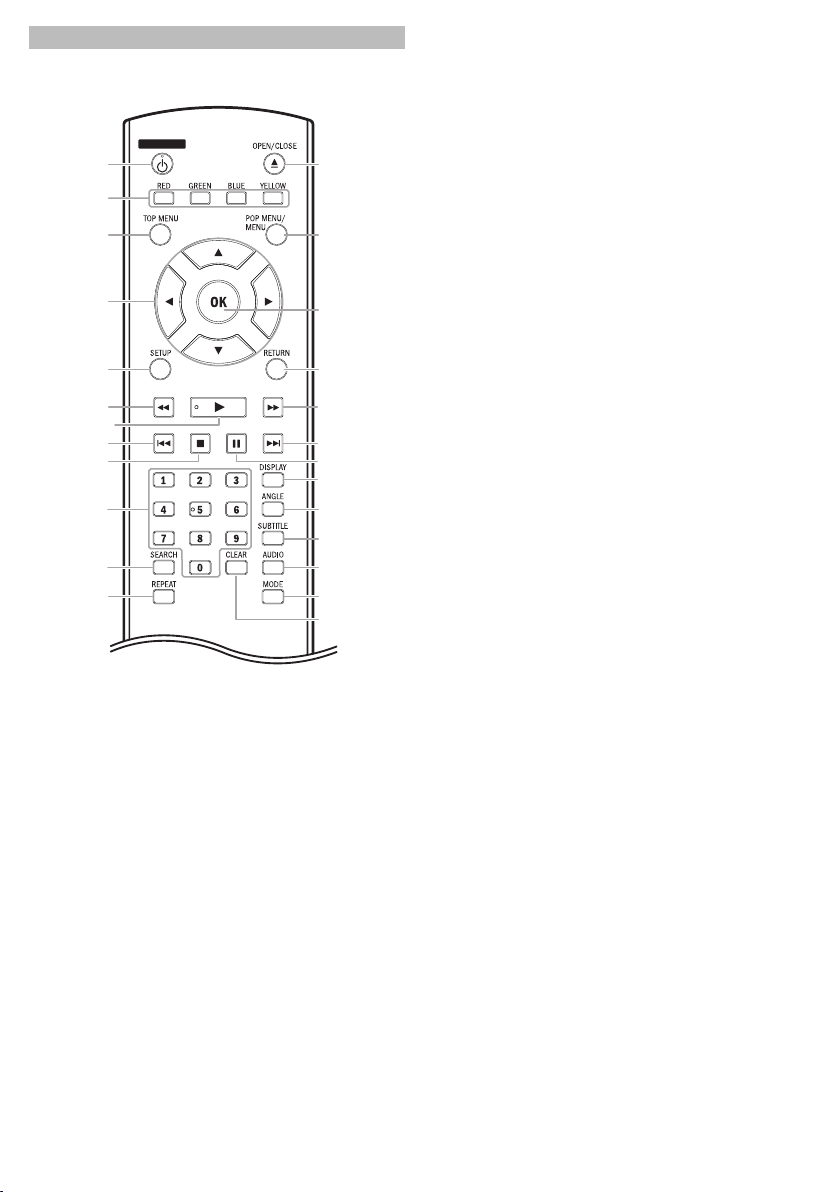
Remote Control
STANDBY/ON
1
13*
2
3
4
5
6
14
15
16
17
7*
8
18
199
20
10
21
22
11
12
23
24
25
(*) The unit can also be turned on by pressing
these buttons.
1. STANDBY/ON y button
• Press to turn on the unit, or to turn the unit
into the standby mode. (To completely turn
off the unit, you must unplug the AC power
cord.)
2. RED / GREEN / BLUE / YELLOW button
• Press to select items on some BD menus.
• When file list / thumbnail list is shown, press
to switch between pages.
3. TOP MENU button
• Press to display the top menu.
4. K/ L/s/B buttons
• Press to select items or settings.
5. SETUP button
• Press to display the setup menu.
6. E (reverse) button
• During playback, press to fast reverse the
playback.
7. B (play) button*
• Press to start playback or resume playback.
8. H (skip) button
• During playback, press once to return to the
beginning of the current title, chapter or
track.
• During playback, press twice to return to the
previous title, chapter or track.
• During the JPEG playback, press to return to
the previous file.
9. C (stop) button
• Press to stop playback.
10. Number buttons
• Press to enter the title, chapter, track or file
number.
• Press to enter values in the input field.
11. SEARCH button
• Press to display the search menu.
12. REPEAT button
• Press to toggle between various repeat
modes.
13. OPEN/CLOSE A button*
• Press to open or close the disc tray.
14. POP MENU / MENU button
• Press to display the pop-up menu / disc
menu.
15. OK button
• Press to confirm or select menu items.
16. RETURN button
• Press to return to the previously displayed
menu screen.
17. D (forward) button
• During playback, press to fast forward the
playback.
• In pause mode, press to slow forward the
playback.
18. G (skip) button
• During playback, press to skip to the next
title, chapter, track or file.
19. F (pause) button
• Press to pause playback.
• When playback is in pause mode, press
repeatedly to forward the playback step by
step.
20. DISPLAY button
• Press to display the on-screen display menu.
21. ANGLE button
• Press to access various camera angles on the
disc.
• Press to rotate the JPEG files clockwise by 90
degrees.
22. SUBTITLE button
• Press to display the subtitle menu.
23. AUDIO button
• Press to display the audio menu.
8
24. MODE button
• During BD or DVD playback, press to display
the setting for the rapid playback and the
picture adjustment.
• During BD, DVD and CD playback, press to
display the setting for the virtual surround.
• During BD playback, press to turn the picturein-picture feature on or off (only applicable to
BD-video which supports the PIP function).
• During the JPEG playback, press to display
menus for changing the visual effect for
switching the image or changing the size of
the image.
• In stop mode with audio CD or JPEG files
inserted, press to display menus for program
and random playback.
• In stop mode with BD inserted, press to
display a menu for setting the BD audio
mode.
25. CLEAR button
• Press to clear the information once entered or
to cancel the programming for audio CD, etc.
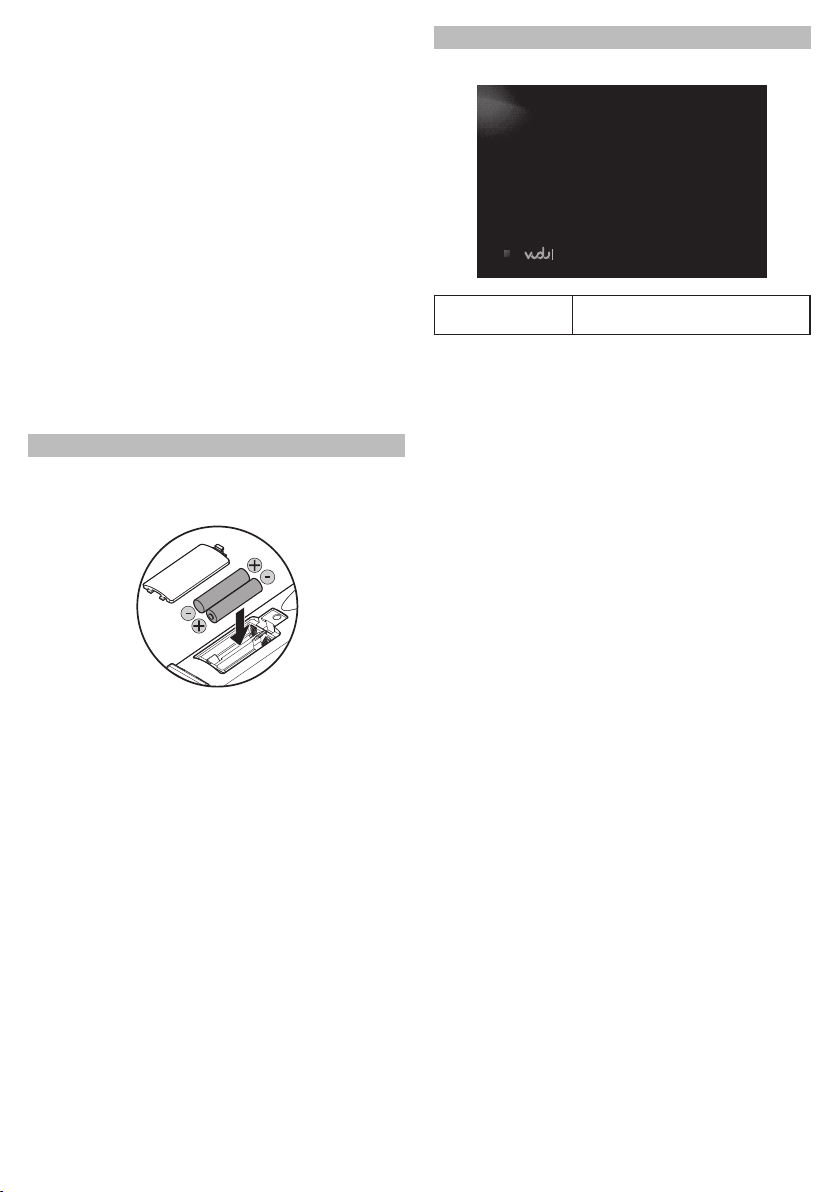
Installing the Batteries in the Remote Control
Install AAA (1.5V) battery × 2 matching the
polarity indicated inside battery compartment of
the remote control.
Opening Screen
In stop mode, opening screen is displayed.
Watch HD movies
“VUDU” : To access the VUDU App Home
screen
Note
Incorrect use of batteries can result in hazards
such as leakage and bursting. Please observe
the following:
• Do not mix alkaline, standard (carbon-zinc), or
rechargeable (ni-cad, ni-mh, etc) batteries.
• Do not mix new and old batteries together.
• Do not use different kinds of batteries together.
Although they may look similar, different
batteries may have different voltages.
• Make sure that the + and - ends of each
battery match the indications in the battery
compartment.
• Remove batteries from battery compartment
that are not going to be used for a month or
more.
• When disposing of used batteries, please
comply with governmental regulations or
environmental public rules that apply in your
country or area.
• Do not recharge, short-circuit, heat, burn or
disassemble batteries.
9
CONNECTIONS
Your TV
Your TV
Connection to the TV
HDMI Video / Audio Connection
(Supports up to 1080i / 1080p, 1080p24 resolution.)
COAXIAL
L
Wireless LAN
HDMIOUT
LAN
R
AUDIO
VIDEO
OUT
OUT
HDMI IN
HDMI cable(not supplied)
HDMIOUT
• No analog audio connection required.
• Use an HDMI cable with the HDMI logo (a certified HDMI cable) for this connection.
• High Speed HDMI cable (also known as HDMI category 2 cable) is recommended for optimal
compatibility.
Picture is not displayed on the TV screen ...
The indicators blink under the following conditions.
• When the connected device does not support HDCP.
• When the connected device is recognized as an HDCP incompatible by HDMI SRM.
• When the connected device supports HDCP but cannot be recognized as an HDCP compatible for
some reason.
The indicators blink as follows for 30 seconds.
STOP PLAY
STANDBY/ON
SD card
Standard Video + Standard Audio Connection
(Supports only 480i resolution.)
COAXIAL
L
Wireless LAN
HDMIOUT
LAN
R
AUDIO
VIDEO
OUT
OUT
L
L
R
AUDIO
VIDEO
OUT
OUT
Video cable(supplied)
VIDEO IN
AUDIO IN
R
Audio cable(supplied)
• Connect this unit directly to the TV. If the audio / video cables are connected to a VCR, pictures may be
distorted due to the copy right protection system.
10

Connection to an Audio System
stereo system
AUDIO OUT DIGITAL OUT (COAXIAL)
AV receiver/amplier
AV receiver/amplier with an HDMI input jack
• When you change the connections, all devices should be turned off.
• Refer to the manual accompanying external devices for more information.
2-Channel Analog Audio Connection Digital Audio Connection
AUDIO IN
LR
DIGITAL AUDIO INPUT
COAXIAL
Analog audio input jacks
L
L
Wireless LAN
HDMIOUT
LAN
R
AUDIO
VIDEO
OUT
OUT
R
AUDIO
OUT
HDMI Audio Connection
HDMI IN
To set up “HDMI Audio Out”, refer to page 28.
Audio cable
(supplied)
To set up “Digital Out”, refer to page 29.
HDMI cable
(not supplied)
Digital audio coaxial
input jack
COAXIAL
L
Wireless LAN
HDMIOUT
LAN
R
AUDIO
VIDEO
OUT
OUT
HDMIOUT
Digital audio cable
(not supplied)
COAXIAL
HDMIOUT
LAN
COAXIAL
L
Wireless LAN
R
AUDIO
VIDEO
OUT
OUT
11
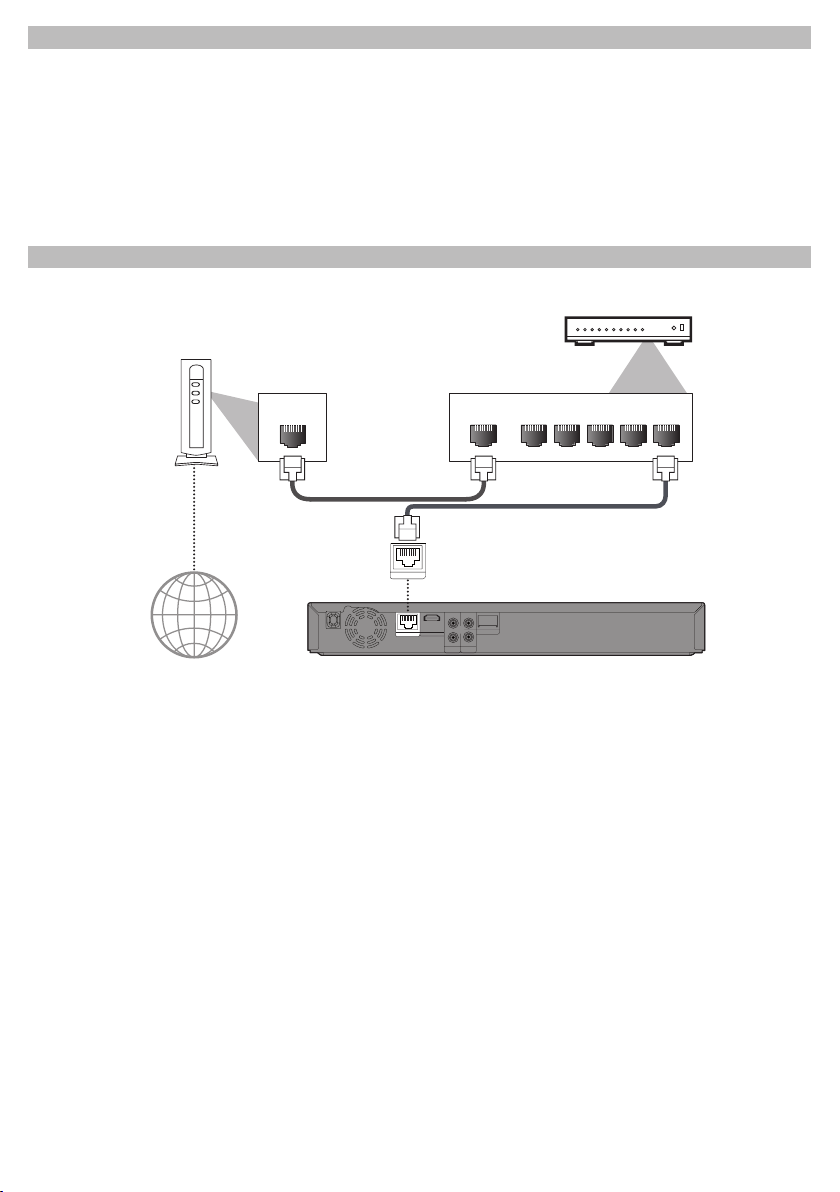
Connection to the Network
Hub or broadband router
By connecting this unit to the Internet, you can access VUDU services and applications, BD-Live features
on a Blu-ray Disc and perform network update.
- For more information about software update, refer to “Network Update” on page 41.
- For more information about BD-Live, refer to “Enjoying BD-Live Discs with Internet” on page 22.
- For more information about VUDU, refer to“VUDU Operations” on page 25.
Note
• Wired connection is recommended when using following features. (Using following features with
wireless connection can be affected by other devices using radio frequencies.)
- Video streaming services (VUDU)
- Network update
Wired Connection
Make the following connection if you are using a wired router.
Networking equipment
(modem,etc.)
LAN
WAN LAN
12345
LAN cable(not supplied)
LAN cable(not supplied)
Internet
LAN
COAXIAL
L
Wireless LAN
HDMIOUT
LAN
R
AUDIO
VIDEO
OUT
OUT
Note
• After you made a wired connection, set up necessary network settings. (For network setting of wired
connection, refer to “Enable (Wired)” on page 36.)
• Do not insert any cable other than a LAN cable to the LAN terminal to avoid damaging the unit.
• If your network equipment (modem, etc.) does not have broadband router functions, connect a wired
broadband router.
• If your network equipment (modem, etc.) has broadband router functions but there is no vacant port,
use a hub.
• For a wired broadband router, use a router which supports 10BASE-T/100BASE-TX.
• Do not connect your PC directly to the LAN terminal of this unit.
• Please purchase shielded LAN cables at your local store and use them when you connect to network
equipment.
12
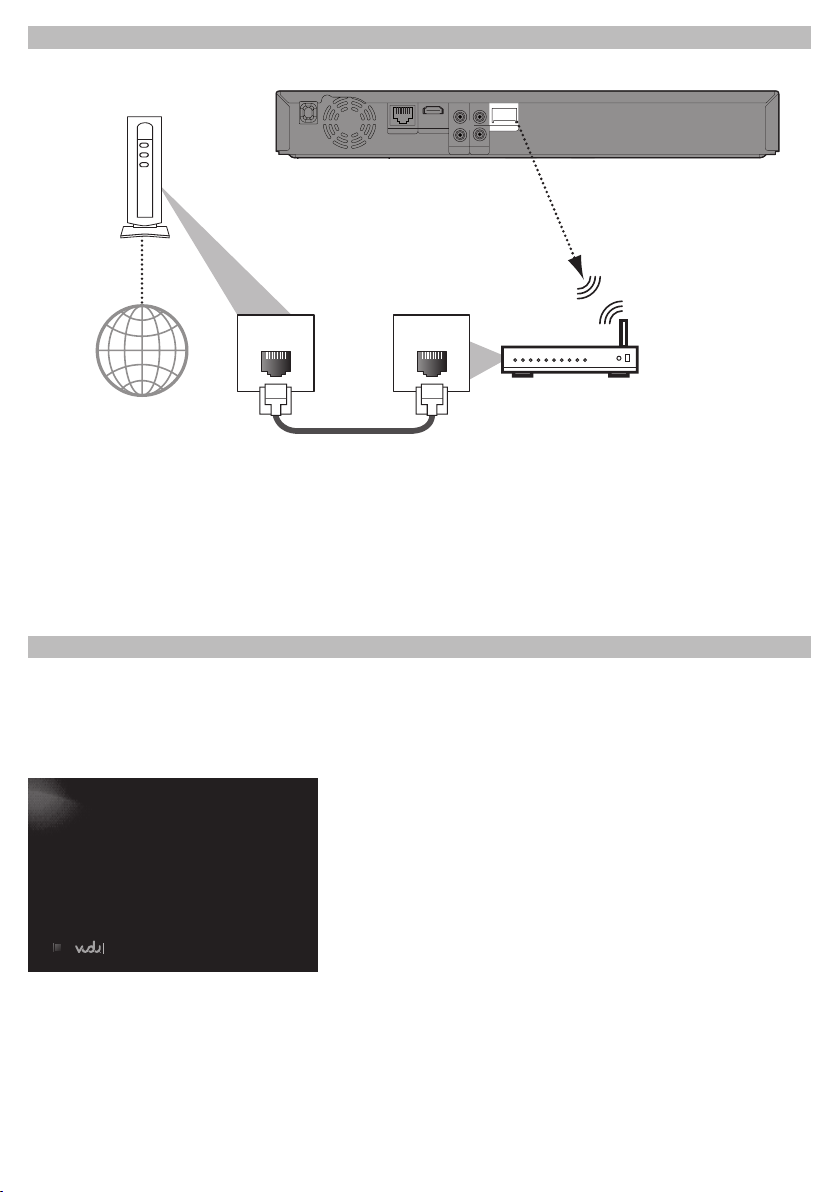
Wireless Connection
Make the following connection if you are using a wired router.
Networking equipment
(modem,etc.)
LAN
COAXIAL
L
HDMIOUT
Wireless LAN
R
AUDIO
VIDEO
OUT
OUT
Internet
LAN WAN
Hub or wireless broadband router
LAN cable(not supplied)
Note
• After you made the wireless connection, set up necessary network settings.
(For network setting of wireless connection, refer to “Enable (Wireless)” on page 38.)
• For a wireless router, use a router which supports IEEE 802.11 b/g/n.
(n is recommended for stable operation of the wireless network.)
• Set the wireless router to Infrastructure mode. This unit does not support Ad-hoc mode.
• Other radio devices or obstacles may cause interference to the wireless network connection.
Finding the Video Channel on Your TV
After you have completed all the connections, you must find the correct video channel (external input
channel) on your TV.
1 After you have made all the necessary connections, press [STANDBY/ON y ] to turn on the unit.
2 Turn on your TV.
3 Press the button on the TV’s remote control that accesses the external input channel. It may be
labeled “SOURCE”, “AV” or “SELECT” (refer to your TV’s user manual).
Watch HD movies
Note
• If the TV is connected by an HDMI cable, it may take a while for the opening picture to come up.
13
PLAYBACK
Information on Playback
Before you start playing back a disc, read the
following information.
Playable Discs and Files
Playable discs
Blu-ray Disc
- BD-video (single / dual layer)
- BD-RE ver. 2.1 (single / dual layer)
(Recorded in BDMV format)
- BD-R ver. 1.1 / 1.2 / 1.3 (single / dual layer)
(Recorded in BDMV format)
(Unclosed discs may not be played back.)
DVD-video
DVD-RW
DVD-R
CD-DA (audio CD)
CD-RW
CD-R
KODAK Picture CD
DTS-CD
Playable files Media
JPEG BD-RW/-R
Readable cards Playable files /
SD Memory Card (8 MB - 2 GB) JPEG, pictureSDHC Memory Card
(4 GB - 8 GB)
miniSD Card (8 MB - 2 GB)
microSD Card (8 MB - 2 GB)
DVD-RW/-R
CD-RW/-R
SD Memory Card
(including SDHC)
miniSD Card
microSD Card
data
in-picture
commentary,
subtitles or other
extras for BD-ROM
ver. 2 (Profile 2.0 /
Profile 1.1)
• Portions of this product are protected under
copyright law and are provided under license
by ARIS / SOLANA / 4C.
• Please keep the SD Memory Cards in their cases
when you are not using them.
• Do not try to open or modify the card.
• Do not touch the terminal surface with your
fingers or any metals.
• Do not attach additional labels or stickers to
cards.
• Do not remove the label of the SD Memory
Cards.
• This unit recognizes up to 8 characters of file
name in the SD Memory Card. Characters after
8th will not be displayed.
Unplayable Discs and Files
• CD-ROM
• CD-I (compact disc-interactive)
• DVD-RAM
• VSD (video single disc)
• DVD-audio
• Video CD
• HD DVD
• SVCD
• Unfinalized disc
• BD-RE (ver.1.0)
• BD-RE (ver.2.1) (Recorded in BDAV format)
• BD-R (ver.1.1 / 1.2 / 1.3) (Recorded in BDAV
format)
• BD / DVD / CD / SD Memory Card contains MP3
/ WMA, and DivX® files
• BD/DVD hybrid disc (played back as a BD-video
only)
• DVD-RW/-R recorded in non compatible
recording format
• Super Audio CD - Only the sound on the CD
layer can be heard. The sound on the highdensity Super Audio CD layer cannot be heard.
• Playability of dual discs are not guaranteed.
Note for SD Memory Cards
• This unit supports SD Memory Card with FAT12/
FAT16 file system, and SDHC Memory Card with
FAT32 file system.
• This unit does not support NTFS file system.
• This unit may not read SD Memory Cards
formatted on a computer. If that is the case,
please reformat the SD Memory Cards in this
unit and try again.
• This unit does not support miniSDHC and
microSDHC Memory Card.
• For miniSD Card and microSD Card, an adapter
is necessary.
14
Region Codes
This unit has been designed to play back BD-video
with region “A” and DVD-video with region “1”
or “ALL”. You cannot play back BD-video or DVDvideo that are labeled for other regions. Look for
the symbols on your BD-video or DVD-video.
If these region symbols do not appear on your BDvideo or DVD-video, you cannot play back the disc
in this unit. The letter or number inside the globe
refers to region of the world. A BD-video or DVDvideo labeled for a specific region can only be
played back in the unit with the same region code.
On-Screen Display
You can check information about the current disc
by pressing [DISPLAY ].
To call the on-screen display menu, press
[DISPLAY] during playback. Every time you press
[DISPLAY], the information changes. Depending
on the media, available information varies.
Chapter information
<Title / Chapter information for BD>
1 32
1 1/10
4 5
T
<Chapter information for DVD>
2 6
3 / 5 0 : 01 : 02
1.Current title number
2. Current chapter number / Total number of
chapters
3. Current repeat setting (Only when repeat
setting is active)
(C: Chapter repeat, T: Title repeat)
4. Indicates that the multi camera angle images
are available on the scene
5.Current playback status
6. Elapsed time (or remaining time) of the
current chapter
Title information
1 2
3 / 5 0 : 01 : 02
1.Current title number / Total number of titles
2. Elapsed time (or remaining time) of the
current title
Track / File information
1 3 42
SD1 / 14 0 : 00: 51
G
1. Current track (file) number / Total number of
track(file)
2. Elapsed time (or remaining time) of the
current track (except for JPEG files)
3. Indication of SD Memory Card playback
4. Current repeat setting
(Only when repeat setting is active)
(T: Track repeat, G: Group repeat,A: All
repeat)
Disc information
1 2
1 / 14 0 : 00: 51
T
1. Current track number / Total number of
tracks
2. Elapsed time (or remaining time) of the
current disc
File name information
1
File_name_001
1.Media icon and file name
: JPEG file
Decoding format information
1
Dolby Digital
1.Decoding format
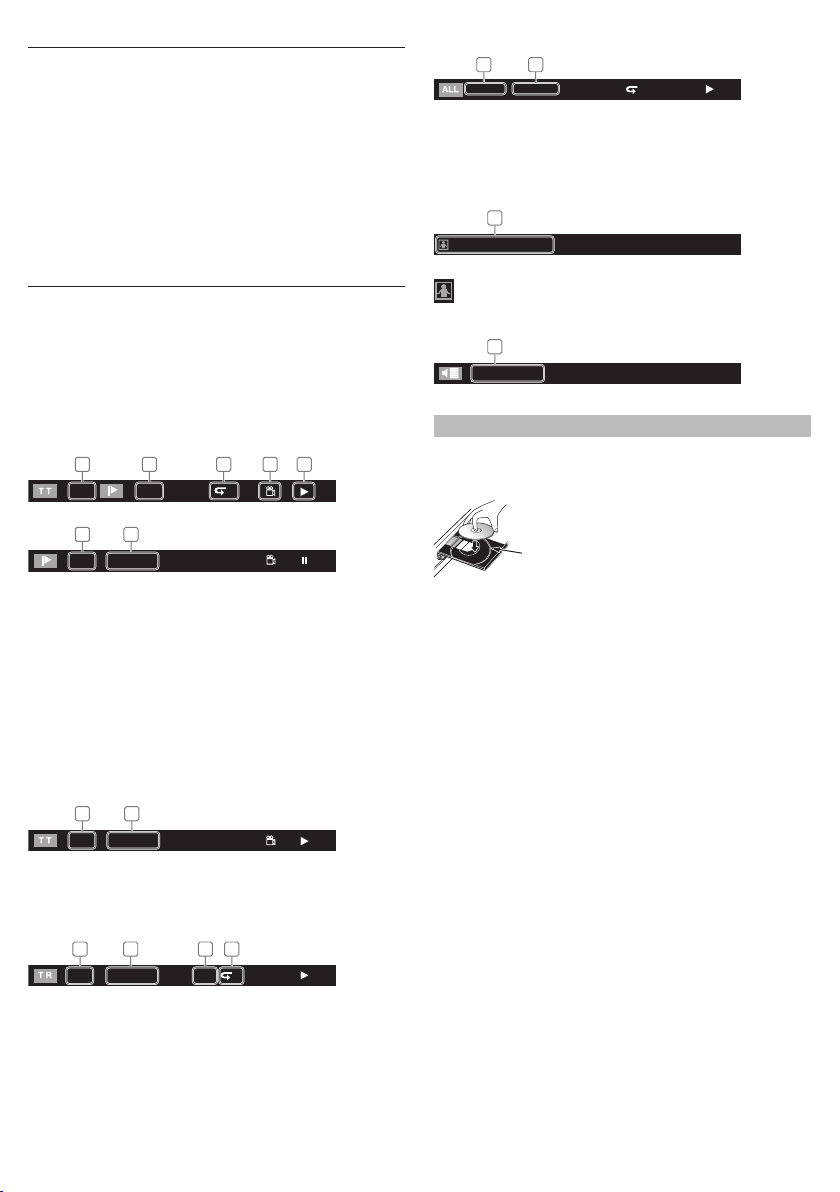
How to Insert a Disc
1. Press [OPEN/CLOSE A] to open the disc tray.
2. Place the disc on the disc tray with its label
side facing up.
Align the disc to the disc tray guide.
• Make sure the disc is compatible with this
unit. (Refer to page 14 for the list of compatible
discs.)
3. Press [OPEN/CLOSE A] to close the disc tray.
It may take a while to load the disc.
To eject the disc:
Press [OPEN/CLOSE A] to open the disc tray.
Remove the disc.
Press [OPEN/CLOSE A] to close the disc tray.
15
 Loading...