

Magnavox MBP1700 Owner's Manual
Owner’s Manual
ES
INSTRUCCIONES SIMPLIFICADAS
INCLUIDOS EN ESPANOL.
MBP1700
Blu-ray Disc™ / DVD Player
© 2017 Funai Electric Co., Ltd.

2
CONTENTS
INTRODUCTION .............................................. 3
Safety instructions .................................................. 3
Included accessories .............................................. 4
FEATURES ...................................................... 5
Features ................................................................ 5
System
information ................................................. 6
Symbols used in this owner’s manual ....................... 6
FUNCTIONAL OVERVIEW ................................. 7
Front panel ............................................................. 7
Rear panel ............................................................. 7
Remote control ....................................................... 8
Guide to on-screen display..................................... 10
CONNECTIONS ............................................. 11
Connection to a TV ............................................... 11
Connection to an
audio system .............................. 12
HDMI audio output ................................................ 13
BEFORE YOU START ..................................... 14
Finding a viewing HDMI input on your TV ................. 14
Initial
setup .......................................................... 14
INFORMATION ON PLAYBACK ....................... 16
Information on playback ........................................ 16
Guide to file list .................................................... 19
How to insert a disc .............................................. 20
BASIC PLAYBACK ......................................... 21
Playing back a disc ............................................... 21
Playing back contents from a USB memory stick ..... 22
Using the title / disc / pop menu .......................... 23
SPECIAL PLAYBACK ..................................... 24
Fast forward / fast reverse .................................... 24
Slow forward playback ........................................... 24
Step by step playback ........................................... 24
Repeat playback ................................................... 25
Shuffle / random playback ....................................25
Slide show ........................................................... 26
PiP (BONUSVIEW™) setting .................................... 27
Title / chapter search ........................................... 28
Track / file Search ................................................28
Time
search ......................................................... 29
Number select search ........................................... 29
Switching subtitles ................................................ 30
Switching audio soundtrack ................................... 31
Switching camera angles ....................................... 32
Noise reduction .................................................... 32
Closed caption ..................................................... 32
LIST OF SETTINGS ........................................ 33
SETUPS........................................................ 37
fun-Link (HDMI CEC) .............................................. 37
HDMI
video resolution ........................................... 38
Parental control .................................................... 40
Software
update ................................................... 42
Voice guide ..........................................................43
Restore default settings ........................................ 43
TROUBLESHOOTING ...................................... 44
SPECIFICATIONS .......................................... 47
MAINTENANCE ............................................. 48
TRADEMARK INFORMATION ......................... 49
GLOSSARY ................................................... 51
LIMITED WARRANTY .................................... 53
ESPAÑOL ..................................................... 54
Mando a distancia ................................................ 54
Encontrar el HDMI en su televisor .......................... 55
Instalacion inicial .................................................. 56
Garantía limitada .................................................. 57

EN 3
Register Online at www.magnavox.com/support/ today to get the most benefits from your purchase.
Registering your model with MAGNAVOX makes you eligible for all of the valuable benefits such as software
upgrades and important product notifications. Register Online at www.magnavox.com/support/
1. INTRODUCTION
1.1. Safety instructions
See “Quick Start Guide” for more details of Safety Instructions.
To avoid the hazards of electrical shock and fire
• Do not handle the AC power cord with wet hands.
• Do not pull on the AC
power cord when disconnecting it from an AC outlet. Grasp it by the plug.
• Do not put your fingers or objects into the unit.
Location and
handling
• Do not install the unit in direct sunlight, near strong magnetic fields, or in a place subject to dust or strong vibration.
• Avoid a place with drastic temperature changes.
• Install the unit in a horizontal and stable position. Do not place anything directly on top or bottom of the unit.
Depending on your external devices, noise or disturbance of picture and/or sound may be generated if the unit is
placed too close to them. In this case, please ensure enough space between external devices and the unit.
• Depending on the environment, the temperature of this unit may increase slightly. This is not a malfunction.
• Be sure to remove the disc and unplug the AC
power cord from the outlet before moving the unit.
• In order to avoid interruption of ventilation, this unit should not be placed in built-in
equipment such as a book cabinet, rack, etc., and the vents of this unit should not be covered with anything such as a
tablecloth, curtain, newspaper, etc. Make sure to leave a space of 5.9 inches (15 cm) or more around this apparatus.
• When installing this unit in a temperate environment, avoid a place with rapid temperature changes.
• This unit should not be used in a tropical environment as it has not been evaluated under such conditions.
• No objects should be placed directly on or under this unit, especially lighted candles or other flaming objects.
Dew
condensation warning
• Dew condensation may form inside the unit in the following conditions. If so, do not use this unit at least for a few
hours until its inside gets dry.
– The unit is moved from a cold place to a warm place.
– Under conditions of high humidity.
– After heating a cold room.
Note about
recycling
• This unit’s packaging materials are recyclable and can be reused. Please dispose of any materials in
accordance with your local recycling regulations.
• Batteries should never be thrown away or incinerated but disposed of in accordance with your local
regulations concerning chemical wastes.
• Please visit http://www.magnavox.com and click Recycling under Information
(or type https://www.magnavox.com/en/content/9-recycling).
Disposal of
used batteries
• In certain localities, disposing batteries with household waste is not permitted. Please ensure you dispose of
batteries according to local regulations.

EN 4
Country code statement
• For product available in the USA market, only channel 1~11 can be operated. Selection of other channels is not
possible.
To maintain compliance with FCC RF exposure requirements, use only belt-clips, holsters or similar accessories that
do not contain metallic components in its assembly. The use of accessories that do not satisfy these requirements
may not comply with FCC RF exposure requirements and should be avoided.
This device complies with Industry Canada license-exempt RSS standard(s).
• Operation is subject to the following two conditions:
(1) this device may not cause interference and (2) this device must accept any interference, including interference
that may cause undesired operation of the device.
1.2. Included accessories
• Remote control (NC093UL)
• Quick Start Guide
MAGNAVOX is a registered trademark of Koninklijke Philips N.V. and is used under license from Koninklijke Philips N.V.
© 2017 Funai Electric Co., Ltd.
All rights reserved. No part of this manual may be reproduced, copied, transmitted, disseminated, transcribed,
downloaded or stored in any storage medium, in any form or for any purpose without the express prior written consent of
Funai.
Furthermore, any unauthorized commercial distribution of this manual or any revision hereto is strictly prohibited.
Information in this document is subject to change without notice. Funai reserves the right to change the content herein
without the obligation to notify any person or organization of such changes.

EN 5
2. FEATURES
2.1. Features
Blu-ray Disc™
You can enjoy Blu-ray Disc™ which is capable of storing
five times more data than a conventional DVD.
BD-Java
With some Blu-ray™ discs which contain Java
applications, you can enjoy interactive functions such as
games or interactive menus.
DVD upscaling for enhanced picture quality
Your current DVD will look even better than before thanks
to video upscaling. Upscaling will increase the resolution
of standard definition DVD to high definition up to 1080p
over an HDMI connection. The picture will be less jagged
and more realistic for a near high definition experience.
Enjoy your content on different kinds of media
Full backwards compatibility with DVD, CD and
USB
memory stick
ensures that you can continue to enjoy your
current audio-video collection. Additionally, you can enjoy
AVCHD (for DVD-RW/-R only) /
photo files / music files.
Listen to rich multi-channel surround sound
Multi-channel surround sound, which realizes real-to-life
sound and makes you feel that you are really there.
Easy and simple connection to your HDTV via HDMI
Connect this unit to your HDTV with one single HDMI
(High-Definition Multimedia Interface) cable. It is
recommended to use a High Speed HDMI cable for better
compatibility. The high definition video output signal will
be transferred to your HDTV without conversion to analog
signals, so you will get excellent picture and sound
quality, completely free from noise.
fun-Link (HDMI CEC)
This unit supports HDMI CEC, which allows integrated
system control over an HDMI cable and is part of the
HDMI standard. This function may not work properly on
some devices.
PiP (BONUSVIEW™)
Some BD-Videos have the PiP function which enables
you to display the
secondary video in the primary video.
You can call up the
secondary video by pressing [MODE]
whenever the scene contains a
secondary video.
Pop
menu
Some BD-Videos have a pop menu which is a navigation
menu that can be called up and be operated on the TV
screen without interrupting playback. You can call up the
pop menu by pressing [DISC MENU]. Contents in the pop
menu
vary depending on the disc.
HDMI 1080p/24 output (Blu-ray Disc™ only)
This unit is equipped with the feature which can provide
smooth movement during playback of film originated
material with a frame rate of 24 frames per second with
progressive. (Available only when the display device is
connected with an HDMI cable.) Refer to “HDMI video
resolution” on page 38.
Playing back contents from a
USB memory stick
You can play back photo files / music files stored on
a
USB memory stick. BD-ROM discs sometimes store
picture-in-picture commentary,
subtitles or other extras
on a
USB memory stick for use during playback with the
BD-Video.
Playing back AVCHD files
This unit supports playback of AVCHD format files (new
format for high definition video camcorders) recorded on
a disc / SD
memory card using USB card reader. Your
high definition personal archive is playable in HD quality.
x.v.Color
This unit supports playback of video contents on discs
recorded with “x.v.Color” technology. To watch this video
content with the “x.v.Color” space, a TV or other display
device supporting both video image reproduction using
“x.v.Color” standard and capability of manual switching
of its color space setting is required. Please refer
to the User Manual of your display device for further
information.

EN 6
2.2. System information
“System Information” screen provides information about this unit’s software version.
You can also download the latest software from the Magnavox website and update it yourself if it is newer than the
version currently on your unit. The current version of software on your unit can be seen on the “System Information”
screen.
To access “System Information”, follow the procedure below.
1. Press [HOME].
2. Use [
] to select “Setup”, then press [OK].
3. Use [
] to select “ ”.
2.3. Symbols used in this owner’s manual
To specify which media type each function is applicable to, a combination of the symbols shown below will be
depicted next to that function's explanation.
Symbol Description
[BD Video]
BD
VIDEOBD VIDEO
Description refers to BD-Video
[DVD Video]
DVD
VIDEO
DVD
VIDEO
Description refers to DVD-Video
[CD]
CDCD
Description refers to Audio CD / DTS-CD
[AVCHD]
AVC HDAVC HD
Description refers to DVD-RW/-R with AVCHD files
[JPEG]
PHOTO
FILE
PHOTO
FILE
Description refers to BD-RE/-R, DVD-RW/-R, CD-RW/-R and USB memory stick with photo files.
[MUSIC]
MUSIC
FILE
MUSIC
FILE
Description refers to BD-RE/-R, DVD-RW/-R, CD-RW/-R and USB memory stick with music files.
If you do not find any of the symbols listed above under the function heading, the operation is applicable to all media
types.
EN 7
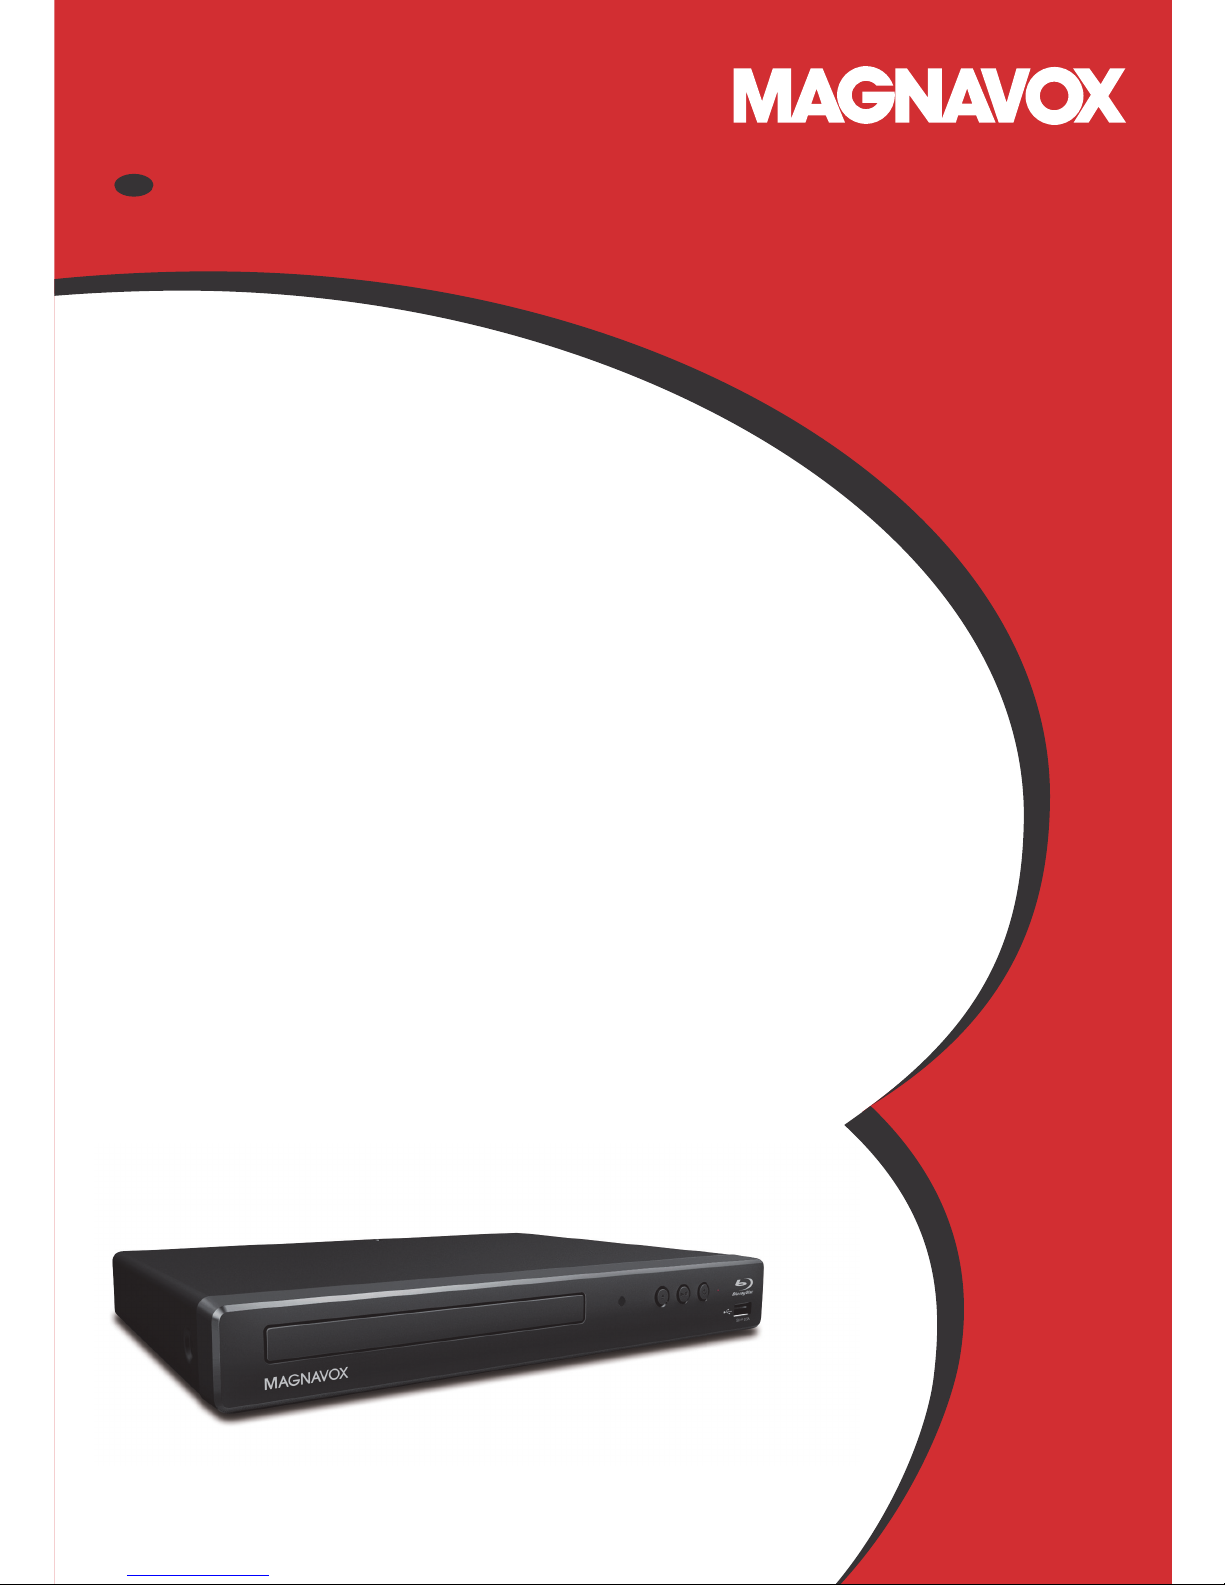
3. FUNCTIONAL OVERVIEW
3.1. Front panel
1 3* 4*2 5* 6 7
* The unit can also be turned on by pressing this button.
1. Disc tray
2. Infrared sensor window
3.
(OPEN/CLOSE) button*
4.
(PLAY/PAUSE) button*
• Press to start playback.
• During playback, press to pause playback.
5.
(POWER) button*
6. Power-
on indicator
7. USB
input
CautionC
• Do not connect any device other than
USB memory stick or USB card reader into the USB input. (e.g. PC, external
HDD, digital camera, keyboard, mouse, USB-
hub, etc.)
• When connecting a
USB memory stick, connect it directly to the USB Input. Do not use a USB extension cable.
NoteD
• Due to new ENERGY STAR
®
requirements, this unit will automatically turn on the screen saver after 5 minutes of
inactivity and enter standby mode after 25 minutes of inactivity.
3.2. Rear panel
12
1. AC power cord
2. HDMI OUT jack
CautionC
• Do not touch the inner pins of the jacks on the rear panel. Electrostatic discharge may cause permanent damage to
the unit.
• This unit does not have a TV RF modulator.
EN 8
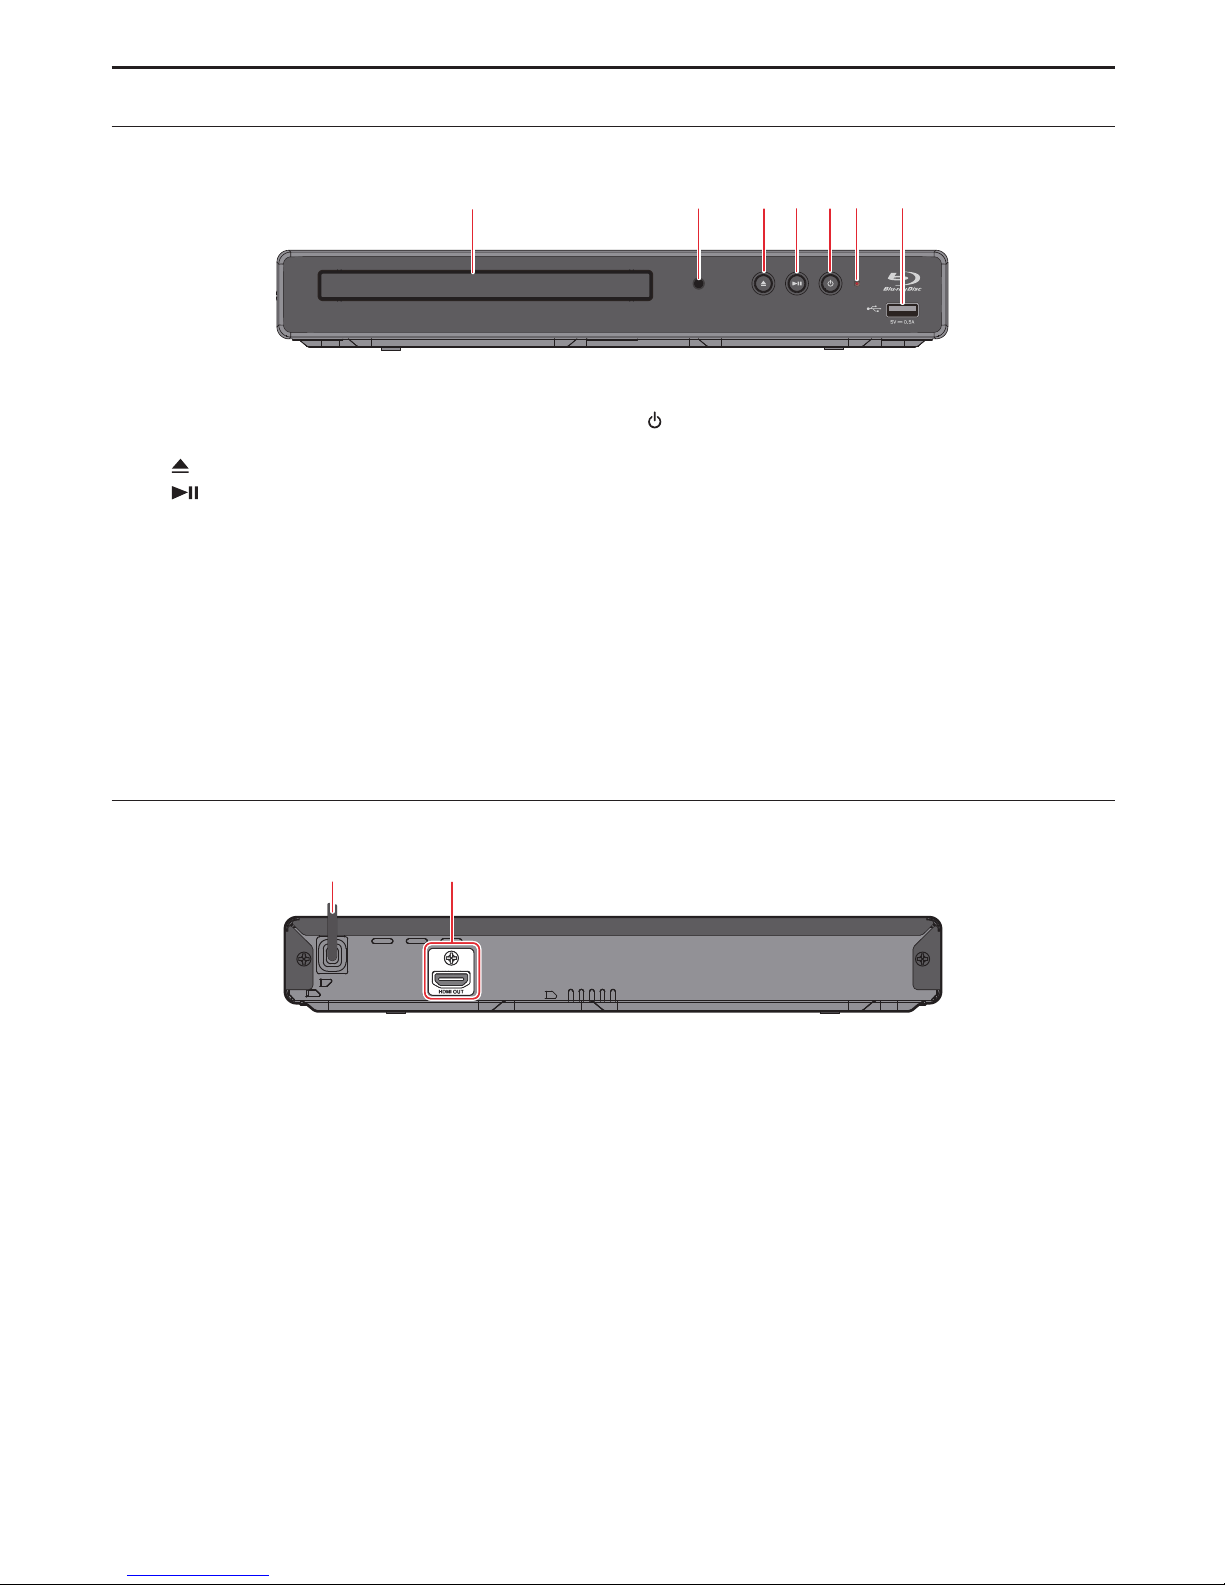
3.3. Remote control
1 12*
13
14
16
17
2
3
4
11
15
18
19
5
6*
7
8
20
21
9
10
* The unit can also be turned on by pressing these
buttons.
1.
(POWER) button
• Press to
turn on the unit, or to switch the unit into
standby mode
. (To completely turn off the unit, you
must unplug the AC power cord.)
2. DISC MENU button
• During
playback (Blu-ray Disc™ or DVD), press to
select the
menu (top menu or pop menu/menu).
3.
buttons
• Press to select items or settings.
4. SEARCH button
• Press to display the
number select menu or the
search menu.
5.
(REVERSE) button
• During playback, press to
fast reverse the playback.
6.
(PLAY) button*
• Press to start playback or resume playback.
7.
(SKIP) button
• During playback, press once to return to the
beginning of the current
title, chapter, track or file.
• During playback, press twice to return to the
previous
title, chapter, track or file.
• During the JPEG playback, press to return to the
previous
file.
8.
(STOP) button
• Press to
stop playback.
9. DISPLAY button
• Press to
display the on-screen display menu.
10. REPEAT button
• Press to select
repeat mode.
11. RED / GREEN / BLUE / YELLOW buttons
• Press to activate shortcut keys on some BD-video
functions. When a file list is shown, press to switch
between pages.
12.
(OPEN/CLOSE) button*
• Press to
open or close the disc tray.
13. HOME button
• Press to display the
home menu.
14. MODE button
• During playback, press to display the
play menu.
15. OK button
• Press to confirm or select menu items.
16. RETURN button
• Press to
return to the previously displayed menu or
screen function.
17.
(FORWARD) button
• During playback, press to
fast forward the playback.
• When playback is in pause, press to
slow forward
the playback.
18.
(SKIP) button
• During playback, press to
skip to the next chapter,
track or file.
• When playback is in pause mode, press to
forward
the playback picture by picture.
19.
(PAUSE) button
• Press to
pause playback.
20. AUDIO button
• Press to select the
audio channel (such as audio
languages) on a disc.
21. SUBTITLE button
• Press to select
subtitles on a disc.
continued on next page
EN 9
NoteD
• Use the included
remote control. Remote-control
operation on any other
remote control, such as a
universal
remote control, is not guaranteed.
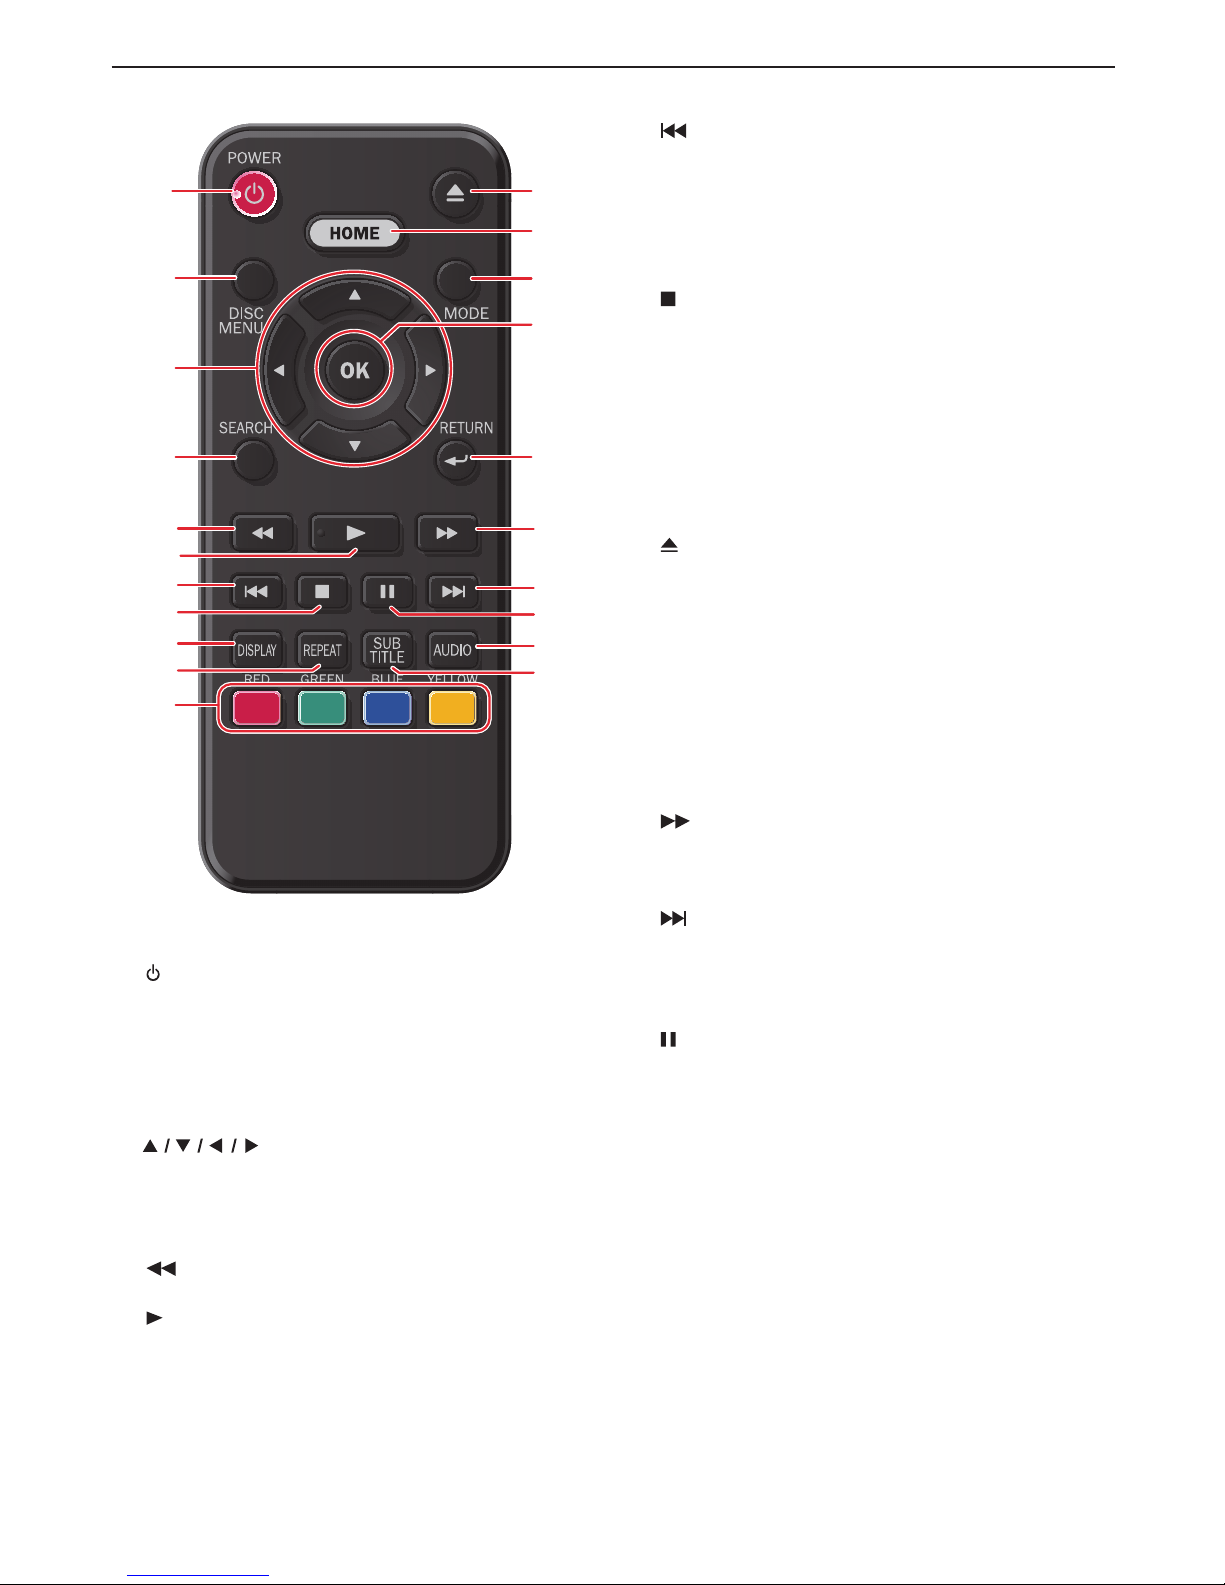
C Installing the batteries in the remote control
Install 2 AAA (1.5V) batteries matching the polarity
indicated inside battery compartment of the
remote
control
.(not included)
1 2 3
CautionC
Incorrect use of batteries can result in hazards such as
leakage and bursting. Please follow the guidelines below:
• Lithium or ni-cad and ni-mh rechargeable batteries are
not recommended to use for
remote control.
• Do not mix different types of batteries such as alkaline
and standard (carbon-zinc).
• Do not mix new and old batteries together.
• Do not use different kinds of batteries together.
Although they may look similar, different batteries may
have different voltages.
• Make sure that the + and - ends of each battery match
the indications in the battery compartment.
• Remove batteries from battery compartment, when the
remote is not going to be used for a month or more.
• When disposing of used batteries, please comply with
governmental regulations or environmental public rules
that apply in your country or area.
• Do not recharge, short-circuit, heat, burn or
disassemble batteries.
C Using the remote control
Remote control usage guidelines:
• Make sure that there are no obstacles between the
remote control
and the infrared sensor window on the
unit.
• Remote operation may become unreliable if strong
sunlight or fluorescent light is shining on the infrared
sensor window of the unit.
• Remote controls of different devices can interfere with
each other. Avoid using a
remote control from another
device which is located close to the unit.
• Replace the batteries when you notice a fall-off in the
operating range of the
remote control.
• The maximum operable ranges from the unit are as
follows.
– Line of sight:
approx. 23 feet (7 m)
– Either side of the center:
approx. 16 feet (5 m) within 30°
– Above:
approx. 16 feet (5 m) within 15°
– Below:
approx. 10 feet (3 m) within 30°
16 feet (5 m) 16 feet (5 m)23 feet (7 m)
30˚ 30˚
EN 10
3.4. Guide to on-screen display
C Home menu
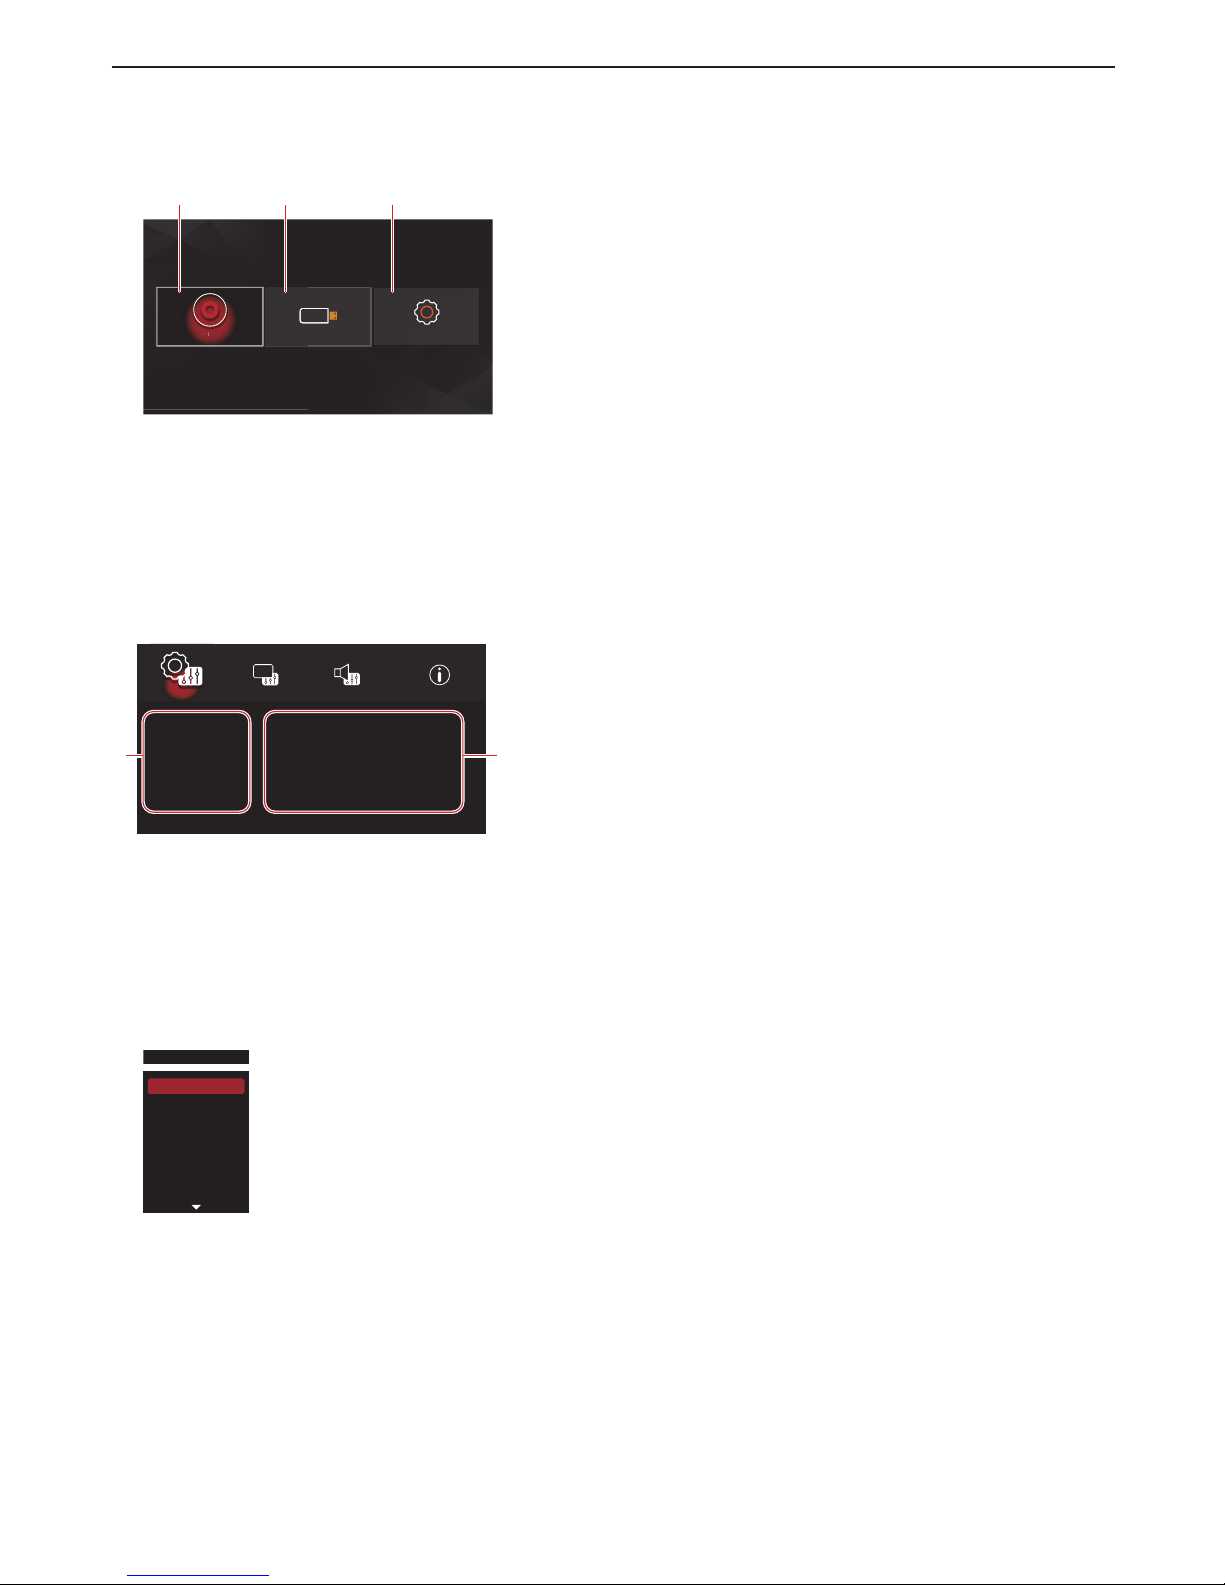
When you turn on the unit, home menu will appear automatically. Otherwise, press [HOME].
Disc USB Setup
USB SetupDisc
D
i
s
c
1
2
3
1. “Disc”: Initiates playback of inserted disc, displays a list of tracks / files.
2. “USB”: Displays a list of
tracks / files on the connected USB memory stick.
3. “Setup”: To access the
setup menu.
C Setup menu
OSD
System
Setup
Menu
Audio
Subtitle
English
English
English
Off
Language
Security
1. Category
2. Menus / Options: Displays options for the highlighted item on the left whenever available
C Play menu
During playback, press [MODE] to display the play menu.
e.g.) Blu-ray Disc™
Search
Audio
Subtitle
Subtitle Style
BDMV
Repeat
Display
EN 11
4. CONNECTIONS
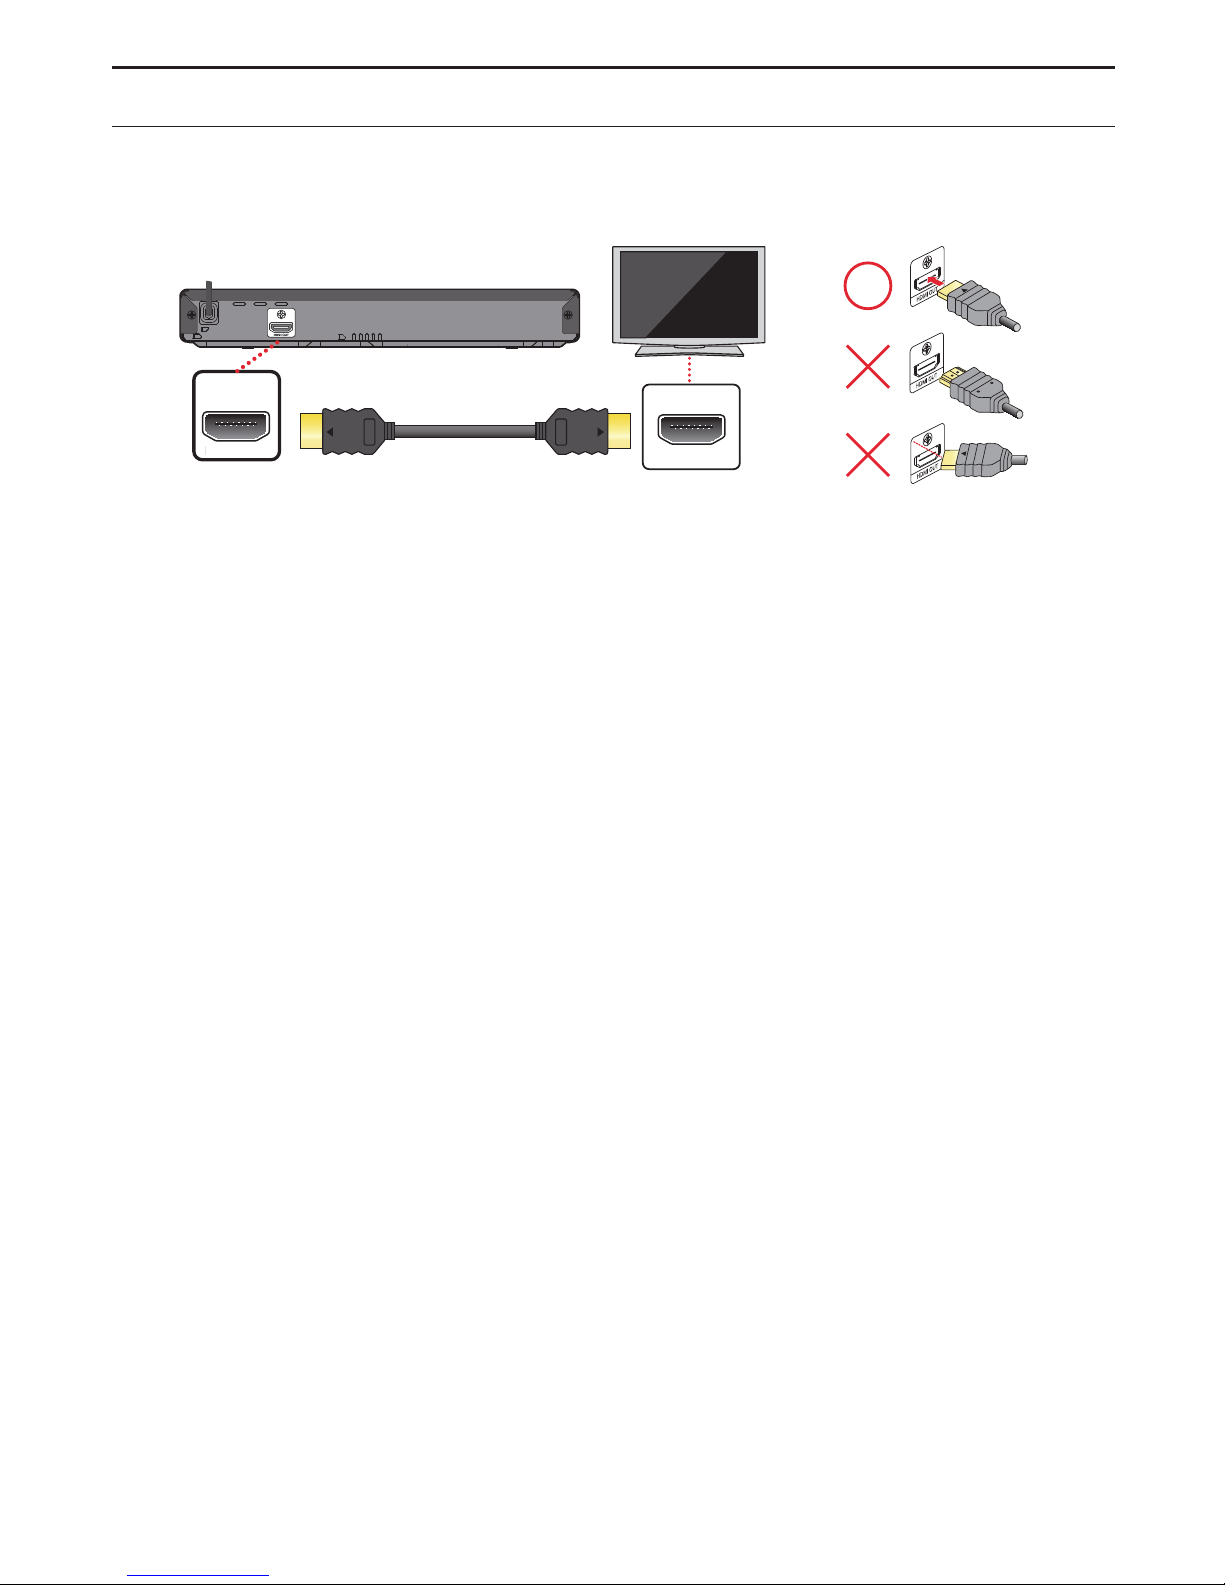
4.1. Connection to a TV
C HDMI connection (supports up to 1080i
(*1)
, 1080p
(*2)
, 1080p/24
(*3)
resolution.)
HDMI IN
HDMI OUT
DMI OUT
Your TV
HDMI cable
(not included)
.
(*1) 1080i: Outputs video data with a frame rate of 30 frames per second.
(*2) 1080p: Outputs video data with a frame rate of 60 frames per second.
(*3) 1080p/24: Outputs video data with a frame rate of 24 frames per second. To enable 1080p/24 output, set
“Resolution” to “Auto” or “1080p”, and set “HDMI1080p 24Hz” to “On”.
• Do not tilt the connector when inserting it into the HDMI jack, and make sure the shapes of the jack and the
connector are matched.
• When connected to an HDCP incompatible display device, the picture will not be displayed properly.
• Use an HDMI cable with the HDMI logo (a certified HDMI cable) for this connection. High Speed HDMI cable (also
known as HDMI category 2 cable) is recommended for better compatibility.
NoteD
• If the TV receives no
audio / video signal after properly connecting the unit and the TV with an HDMI cable, it may be
the TV. Please refer to the TV’s user’s manual.
• If the TV receives no
audio signal after properly connecting the unit and the TV with an HDMI cable, make sure the TV
input is not an HDMI-DVI Input terminal.
EN 12
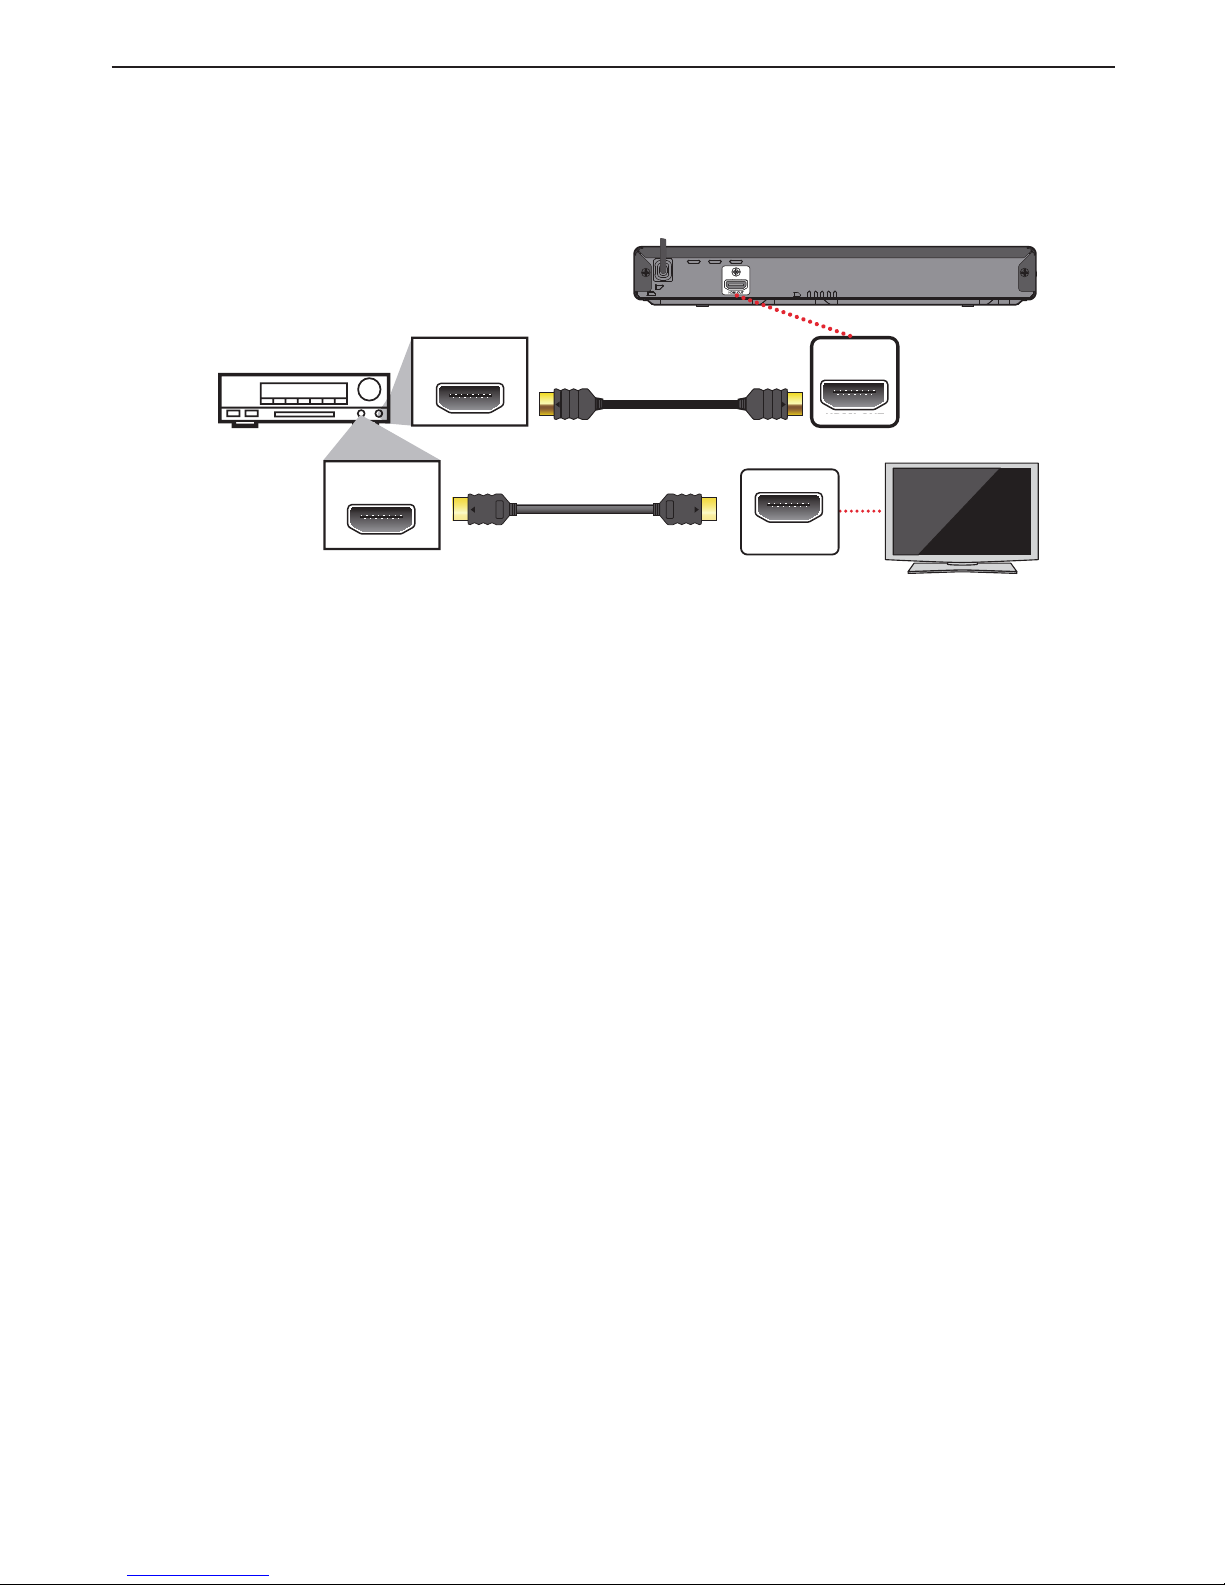
4.2. Connection to an audio system
• When you change the connections, all devices should be turned off.
• When connecting the unit to an external audio system, refer to the
user manual for setup / configuration help.
C HDMI audio connection
HDMI IN
HDMI OUT
HDMI IN
HDMI OUT
HDMI
OUT
Your TV
HDMI cable
(not included)
AV receiver/amplifier with an
HDMI input jack
HDMI cable
(not included)

EN 13
4.3. HDMI audio output
“HDMI” > “HDMI” setting
A
Bitstream PCM Re-encode
Media Source
BD Dolby Digital Dolby Digital 2ch PCM Dolby Digital
Dolby Digital Plus Dolby Digital Plus 2ch PCM Dolby Digital Plus
(*1)
Dolby TrueHD Dolby TrueHD 2ch PCM Dolby TrueHD
(*1)
DTS DTS 2ch PCM DTS
DTS-HD
High Resolution
DTS-HD
High Resolution
2ch PCM
(*2)
DTS-HD
High Resolution
(*3)
DTS-HD
Master Audio
DTS-HD
Master Audio
2ch PCM
(*2)
DTS-HD
Master Audio
(*3)
LPCM Multi LPCM Multi LPCM Multi LPCM
(*1)
DVD Dolby Digital Dolby Digital 2ch PCM Dolby Digital
DTS DTS 2ch PCM DTS
MPEG Multi LPCM Multi LPCM Multi LPCM
PCM Multi LPCM Multi LPCM Multi LPCM
Audio CD LPCM 2ch PCM 2ch PCM 2ch PCM
DTS-CD DTS DTS 2ch PCM DTS
AVCHD Dolby Digital Dolby Digital 2ch PCM Dolby Digital
LPCM Multi PCM Multi PCM Multi PCM
Audio
file FLAC/WAV 2ch PCM 2ch PCM 2ch PCM
*1) If there is
secondary audio or interactive audio, it will be output in Dolby Digital.
*2) Only the
core substream is decoded.
*3) If there is
secondary audio or interactive audio, it will be output in DTS.
NoteD
• If the connected device is not compatible with HDMI BITSTREAM, audio will be output as multi LPCM or 2-channel
down-mixed LPCM depending on the capability of the connected device even if you select “Bitstream” in “HDMI”
setting.
• If “HDMI” is set to “Bitstream” and this unit is connected to a
bitstream compatible device, only primary audio of the
BD-Video will be output. (Secondary
audio and button sounds will not be output.)
• In order to configure “HDMI” settings, the following conditions must be met:
– “Voice Guide” is set to “Off”.
– This unit is not in
resume-on-stop mode. If this unit is in resume-on-stop mode, remove the disc to enable configuration.
EN 14
5. BEFORE YOU START
5.1. Finding a viewing HDMI input on your TV
After you have completed all of the connections to your TV, review the steps below.
1. Press [
y
(POWER)] to turn on the unit.
2.
Turn on your TV.
3. Switch your TV's input to the HDMI port which your unit is connected to.
This is the correct HDMI Input view.
• It may take a few moments for the
menu screen to appear.
• When this unit is
turned on for the first time, the “Initial Setup” screen will appear.
5.2. Initial setup
Please follow the instructions below to complete the initial Setup.
1. While Welcome screen is displayed, press [OK].
2. Language Setup screen will appear. Use [ ] to select your Language, then press [OK].
Next
Español
Please select your language for on-screen
display. If you want to use the Voice Guide
function, please set to "English" or
"Español".
English
Français
Language Setting
Page: 1/3 Easy Setup
3. Voice Guide setup screen will appear. Use [ ] to select “On” or “Off”, then press [OK].
4. The fun-Link (HDMI CEC)
setup screen will appear. Use [ ] to select “On” or “Off”, then press [OK].
5. Software
update setup (automatically checks for the latest software) screen will appear. Use [ ] to select “On”
or “Off”, then press [OK].
continued on next page

EN 15
C How to reset the OSD language
You can reset the OSD language if you selected the wrong Language.
1. Press [HOME] to display the
home menu.
2. Use [
] to select “ ”, then press [OK].
• This item is “Setup” (English) / “Instalación” (Spanish) / “Installation” (French).
• From here on, please select one of the following items you can find on screen:
3. Use [
] to select “ ”, then press [OK].
4. Use [
] to select “Language” (English) / “Idioma” (Spanish) / “Langue” (French), then press [OK].
5. Use [
] to select “OSD”(English) / “OSD”(Spanish) / “Affichage sur l’écran”(French), then press [OK].
6. Use [
] to select your desired language, then press [OK].
7. If the items that were set are displayed in your desired
language, then press [HOME] to exit.
EN 16
6. INFORMATION ON PLAYBACK
6.1. Information on playback
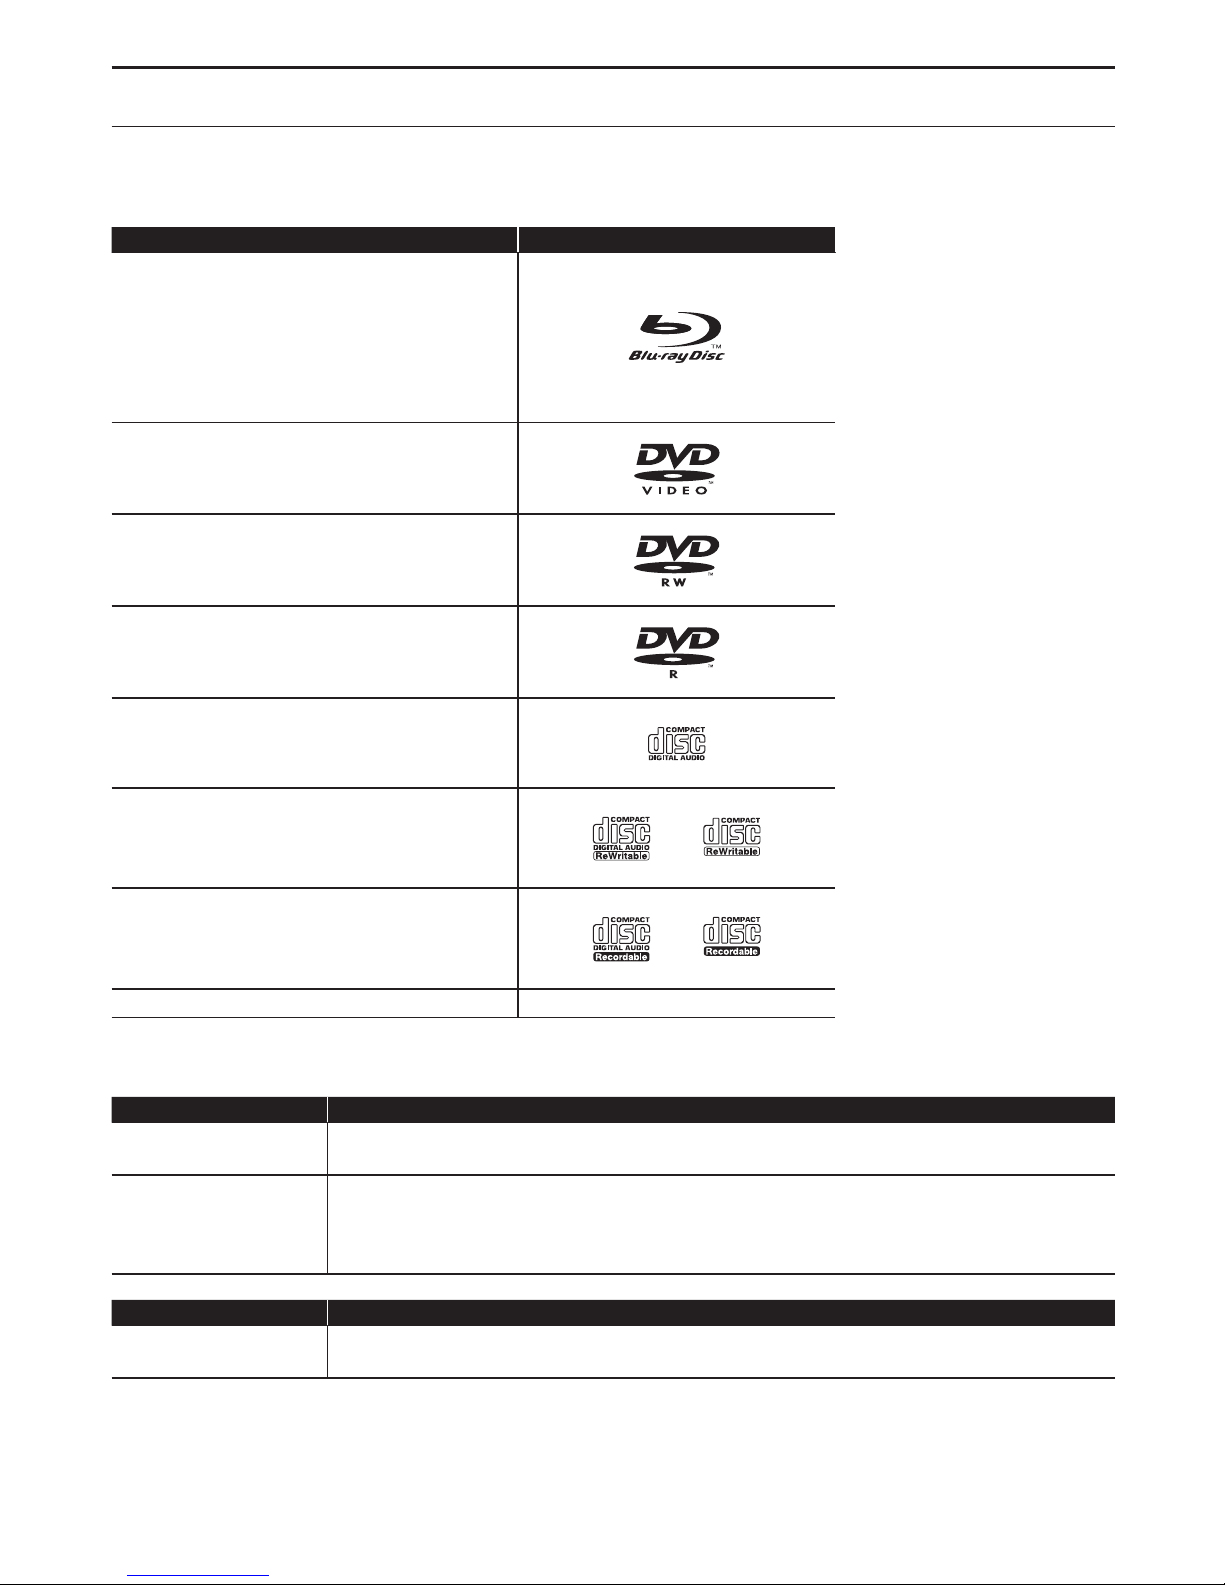
C Playable discs and files
Playable discs Logos
Blu-ray Disc™
- BD-Video
- BD-RE* (ver. 2.1)
(Recorded in BDMV format)
- BD-R* (ver. 1.1 / 1.2 / 1.3)
(Recorded in BDMV format)
(Unfinalized disc may not be played back.)
DVD-Video
DVD-RW
(finalized video mode discs only)
DVD-R
(finalized video mode discs only)
CD-DA (Audio CD)
CD-RW
CD-R
DTS-CD -
(*) Due to the intentional progression of the Blu-ray Disc™ format by its standard setting authority, the company
cannot guarantee or warrant the playability of future extensions of the Blu-ray Disc™ format with this product.
Playable files Media
AVCHD
DVD-RW/-R
SD
memory card using USB card reader
JPEG / PNG /
FLAC / WAV
BD-RE/-R
DVD-RW/-R
CD-RW/-R
USB memory stick
Readable device Playable files / data
USB memory stick
Photo files, music files, Picture-in-Picture commentary, subtitles or other extras for some
BD-ROM.
NoteD
• This unit may not be able to play back discs recorded on PC’s or other recorders.
continued on next page

EN 17
C Recommended specifications
AVCHD
This unit cannot play back stand-alone AVCHD files (*.m2ts, *.mts or *.m2t) written to a DVD or copied to an SD
memory card. The DVD or SD memory card containing AVCHD files must have a proper file and folder structure
meeting AVCHD format specifications. Please use AVCHD compliant
device / software to burn or copy AVCHD files to
DVD or SD
memory card. (Please refer to user manuals of your device / software for more information.)
Music file
FLAC (.flac)
Sampling frequency: up to 192kHz
Number of bits: 8/12/16/20/24bit
WAV (.wav)
Sampling frequency: up to 192kHz
Number of bits: 8/16/20/24bit
Photo file
JPEG(.jpg/.jpeg)
PNG(.png)
NoteD
• Regardless of the file type, some files may be unplayable due to their incompatible file structure.
Caution / Note for
USB memory stick
CautionC
• Do not try to open or modify the
USB memory stick.
• Do not touch the terminal surface with your fingers or any metals.
NoteD
• This unit supports USB memory stick with FAT16 / FAT32 file system.
• This unit does not support NTFS file system.
• Please keep the
USB memory sticks in their cases when you are not using them.
• Some
USB memory sticks may not work with this unit.
• This unit can read SD
memory cards using a USB card reader.
– Readable cards: SD
memory card (8 MB - 2 GB)
miniSD
memory card (16 MB - 2 GB)
microSD
memory card (256 MB - 2 GB)
SDHC
memory card (4 GB - 32 GB)
miniSDHC
memory card (4 GB - 8 GB)
microSDHC
memory card (4 GB - 16 GB)
– Readable files: AVCHD / JPEG / PNG / FLAC / WAV
• Depending on a USB
card reader, connected card or device may not be recognized.
continued on next page

EN 18
C Unplayable media and files
The following discs will not be played back on this unit.
• CD-ROM • CD-I (compact disc-interactive)
• DVD-RAM • VSD (video single disc)
• DVD-audio • video CD
• HD DVD • SVCD
• SDXC
memory card • microSDXC memory card
• unfinalized disc • BD-RE (ver. 1.0)
• BD-RE (ver. 2.1) (
recorded in BDAV format) • BD-R (ver. 1.1 / 1.2 / 1.3) (recorded in BDAV format)
• BDXL™
• Blu-ray Disc™ / DVD / CD /
USB memory stick / SD memory card containing DivX® files
• Blu-ray Disc™ /
USB memory stick that contains AVCHD files
• Blu-ray Disc™ / DVD hybrid disc (played back as a BD-Video only)
• DVD-RW/-R recorded in non compatible recording format
• Super Audio CD - Only the sound on the CD layer can be heard. The sound on the high-density Super Audio CD layer
cannot be heard.
• Playability of dual discs is not guaranteed.
• This unit cannot play back the disc contents protected by Windows Media™ Digital Rights Management (DRM).
C Region codes
This unit has been designed to play back BD-Video with Region “A” and DVD-Video with Region
“1” or “ALL”. You cannot play back BD-Video or DVD-Video that is labeled for other Regions.
Look for the symbols on your BD-Video or DVD-Video. If these Region symbols do not appear
on your BD-Video or DVD-Video, you cannot play back the disc on this unit. The letter or
number inside the globe refers to Region of the world. BD-Video or DVD-Video discs labeled for
a specific Region can only be played back on players with the same Region Code.
BD-Video
DVD-Video
C Hint for disc playback
The contents of a disc are generally divided into sections or folders (group of titles / files) as shown below.
BD-Video, DVD-Video, AVCHD
Audio CD
Photo / music
Title 1
Chapter 1
Track 3Track 1
File 1 File 2 File 3 File 4 File 5
Folder 1 Folder 2
Chapter 1Chapter 2
Track 4Track 2 Track 5
Chapter 2 Chapter 3
Title 2
continued on next page
 Loading...