

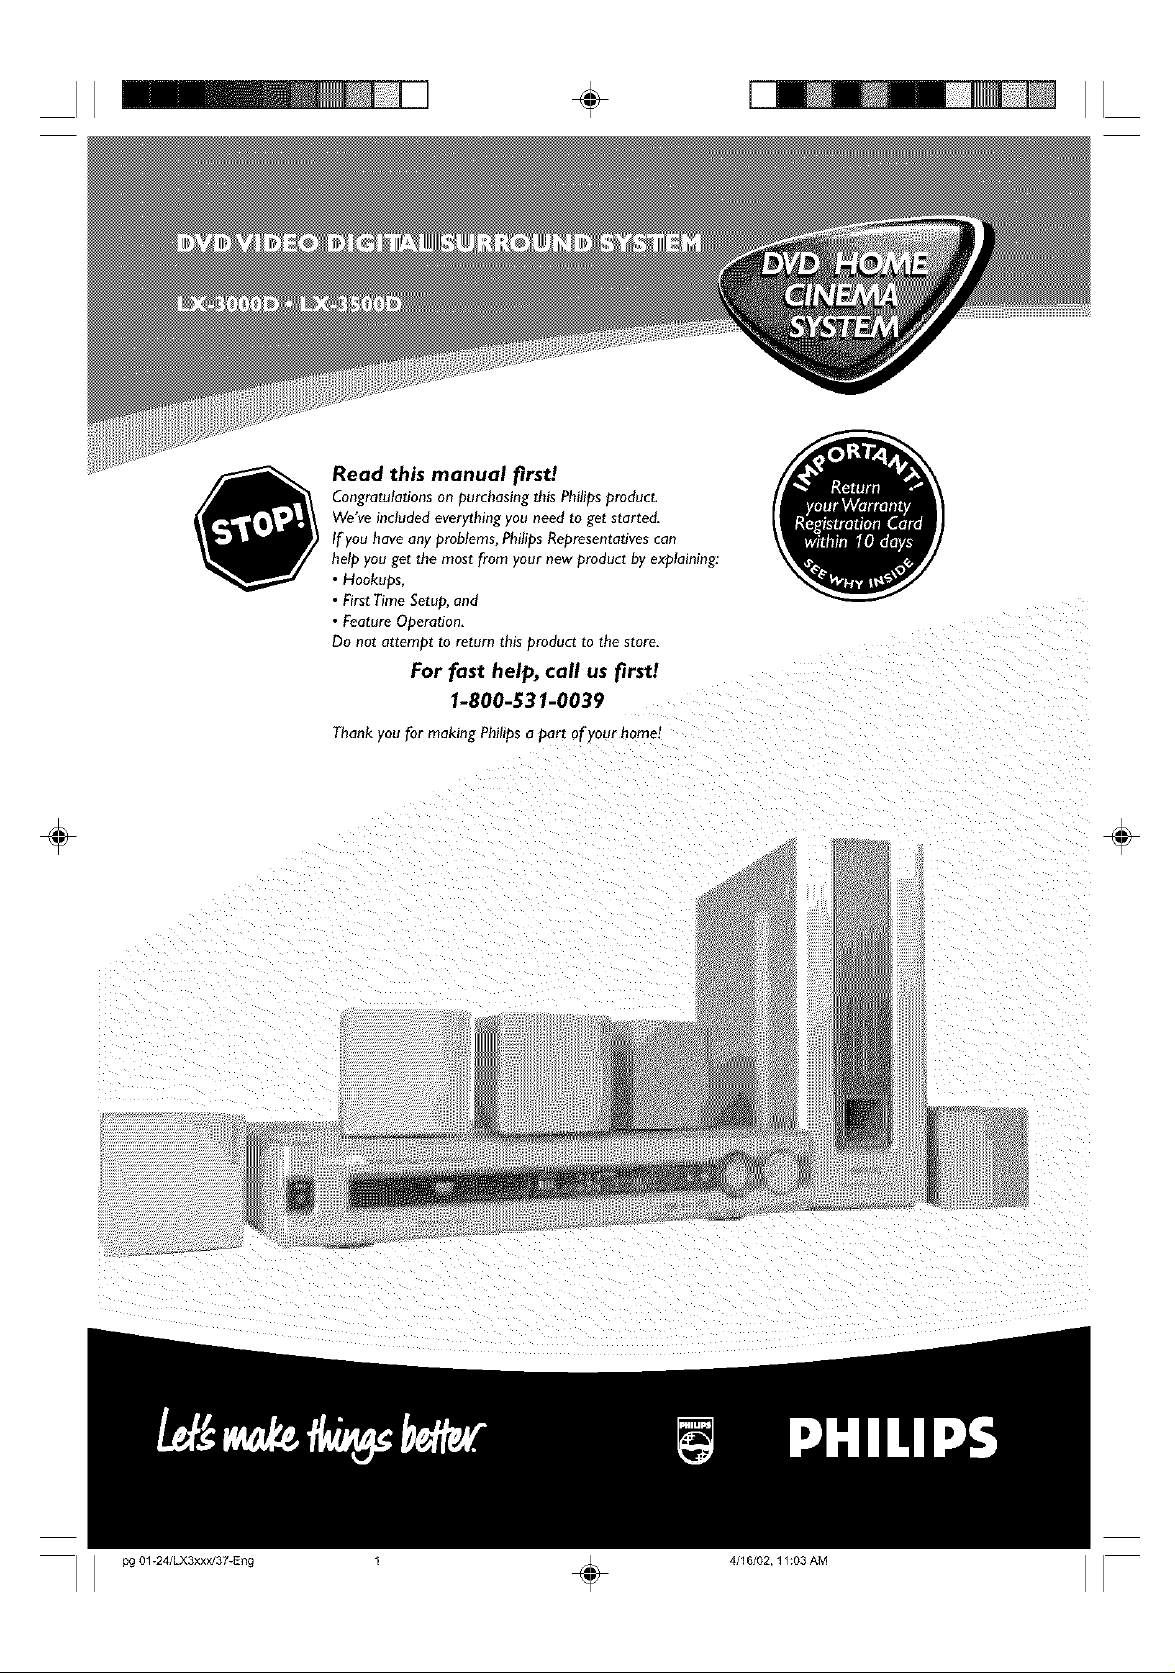
Page 1
II ÷
Read this manual firs!!
Congratulations on purchasing this Philips product.
We've included everything you need to get started,
If you have any problems, Philips Representatives can
help you get the most from your new product by explaining:
• Hookups,
• First Time Setup.ana
• Feature Operazlon,
Do not atteri'lDz [o re_urn _nls proauc_ [o ttle store,
For fast help, call us firs!!
1-800-531-0039
i-hank iou for making Philips a part of your home!
÷ ÷
I I pg 01-24/LX3xxx/37-Eng 1 ÷ 4/16/02, 11:03 AM
Page 2
• Once your Philips purchase is registered, you're eligible to
receive all the privileges of owning a Philips product.
• So complete and return the Warranty Registration Card
enclosed with your purchase at once, and take advantage
of these important benefits.
Know theset.
PHILIPS
Congratulations on your purchase,
and welcome to the "family!"
Dear Philips product owner:
Thank you for your confidence in Philips.You've selected one of the best-bulk,
best-backed products available today.And we'll do everything in our power to
keep you happy with your purchase for many years to come.
As a member of the Philips"family." you're entitled to protection by one of the
most comprehensive warranties and outstanding service networks in the industry.
What's more, your purchase guarantees you'll receive all the information and
special offers for which you qualify, plus easy access to accessories from our
convenient home shopping network.
And most importantly you can count on our uncompromising commitment to
your total satisfaction.
All of this is our way of sayingwelcome - and thanks for investing ina Philips product.
Sincerely,
Lawrence J.Blanford
President and Chief Executive Officer
P.S. Remember, to get the most from your Philips product, you must
return your Warranty Registration Card within | 0 days. So please
mail it to us right now!
_ _7 _ _ T symbo,s
uninsulated material within your unit
Thls "bolt of lightning" indicates
may cause an electrical shock. For
the safety of everyone in your household,
please do not remove product covering.
_1 he "exclamation point" calls attention
prevent operating and maintenance problems.
WARNING: TO PREVENT FIRE OR
SHOCK HAZARD, DO NOT EXPOSETHIS
EQUIPMENTTO RAiN OR MOISTURE.
CAUTION: To prevent electric shock.
match wide blade of plug to wide slot, and
fuHy insert.
For Customer Use
Enter below the Serial No. which islocated
on the rear of the cabinet. Retain this
information for future reference.
Model No,
to features for which you should read
the enclosed literature closely to
Serial No.
Page 3
Canada
English:
This digitalappatatusdosnot xc dtheClass
Blim slot tadionose mssionsfromdigital
appar-atusas sot out inthe Radio Fnt_r_erence
Regulations ofth Canadian Department of
Communications
Fran_ais:
Cet apparel hum rique n'eme{ pas de bruits
tadio61ecttiques d6passan{ les Imites applicables
aux appareiB hum riques de Class Bpreset tea
dartsle R6glement sur le Brouillage
Radio61ectt q_e dot6 par le bdinst6re des
Communications du Canada
Manufactured under license from Dolby
Laboratories, "Dolby" and the double-D symbol are
trademarks of Dolby Laboratories. Confidential
Unpublished Works. © 1992-1997 Dolby
Laboratories, Inc. All rights reserved.
Manufactured under license from Digital Theater
Systems, inc, US Pat. No, 5,451,942 and other
worldwide patents issued and pending. "D TS" and
"DTS Digital Surround" are trademarks of Digital
Theater Systems, Inc, 1996 Digital Theater Systems,
Inc, All rights reserved.
This product incorporates copyright protection
technology that is protected by method claims of
certain U.S, patents and other intellectual property
rights owned by Macrovision Corporation and other
rights owners. Use of this copyright protection
technology must be authorized by Macrovision
Corporation, and is intended for home and other
limited viewing uses only unless otherwise
authorized by Macrovision Corporation. Reverse
engineering or disassembly is prohibited,
English
Franc;ais
Espabol
Laser
Type Semiconductor laserGaAIAs
Wave length 650nm
Output Power 7mW
Beam divergence 60 degree
The set complies with the FCC-Rules, Part 15
and with 21 CFR 1040.1. Operation is subject
to the following two conditions:
I. This device may not cause harmful
interference, and
2. This device must accept any interference
received, including interference that may
cause undesired operation.
Index
27
CAUTION
Use of controls or adjustments or
NOTE:
PICTURES SHOWN MAY BE DIFFERENT BETWEEN
COUNTRIES.
performance of procedures other than
herein may result in hazardous radiation
exposure or other unsafe operation.
NEVER MAKE OR CHANGE CONNECTIONS WITH THE
POWER SWITCHED ON,
ATTENTION
L'utilisation des commandes ou r_glages ou
le non-respect des procedures ci-incluses
peuvent se traduire par une exposition
dangereuse _ I'irradiation.
ATENCI(_N
El uso de mando o ajustes o la ejecucci6n de
m_todos que no sean los aqui descritos
puede ocasionar peligro de exposici6n a
radiaci6n.
pg 01-24/LX3xxx/37-Eng 3 4/16/02, 11:03 AM
INDEX
Page 4
IMPORTANT SAFETY INSTRUCTIONS
|. Read these instructions.
2. Keep these instructions.
3. Heed all warnings.
4. Follow all instructions.
5. Do not use this apparatus near water.
6. Clean only with dry cloth.
7. Do not block any ventilation openings. Install in
accordance with the manufacturer's instructions.
8,
Do not install near any heat sources such as
radiators, heat tegisters, sLovesior other apparatus
(including amp ifiets) that produce heat
9,
Do not defeat the safety
purpose of the polarized ot
grounding-lype pug A po alized plag
hastwo blades with on wider than Plug
the other A grounding type ph_ghastwo bades and a third
grounding prong The wide blade ot the third prong are
provided lot your safe_yIf the provided pug does not fi
nto your o_tlet, consult an electrician for replacemen of
the obsole e outlet
|0.Protect the power cord fi_ombeng walked on or
pinched, particularly at plugs, convenience receptacles, and
the point where ¸theyexit from the apparatus¸
| |. Only use attachments/accessories specified by the
manulactur eR
12. _ Use only with the cart, stand,tr pod,
bracket, or ¸table specified by the manufacturer
or sold with the apparatusWhen a cart isused,
use caution when moving the cardapparatus
combination to avoid injury from tip over
| 3. Unplug this apparatus during lightning storms or when
unused for long periods of ¸time¸
| 4. Refer all servicing to qualif'ed service personnel¸
Servicing is required when ¸tile apparatus has been
damaged inany w_ such as powe_supply cord or plug is
damaged, liquid has been spilled or obje_s have fallen into
the apparatus,the apparatus hasbeen exposed to rain or
moisture, does not operate normall_ or has been dropped¸
| 5. Battery usage CAUTION -fo prevent battery leakage
wbch mayresult in bodily injury or damag LoLh ani:
• install all bat eries correctly, + and - as marked on the unt
• Do not mix ba_et ies(old and new or carbon and
alkaline, ec)
• Remove b_ttedes when tile unit isnot used for a longime
EL 6475-E003:01/6
4
pg 01-241LX3xxx/37-Eng 4 4/16/02, 11:03 AM
Page 5
Contents
Introduction and General
Information
Features............................................................................... 6
Discs for playback ............................................................. 6
Playerzone
Supplied accessories ......................................................... 6
Environmental information .............................................. 6
Installation ........................................................................... 6
Maintenance ........................................................................ 6
Functional Overview
Front and Rear panels ...................................................... 7
Remote Control ................................................................ 8
Connections
Connecting antennas ....................................................... 9
AM Indoor LoopAntenna
FM Indoor Antenna
FM Outdoor Antenna
Connecting the speakers ............................................... 10
Connecting aTV and additional components ........... 10
Preparations
Inserting batteries into the remote control .............. 11
Switching on the system ................................................ 11
Setting up the surround sound system ............... 11-12
Placingthe speakers
Changingthe volume level
Setting up the subwoofer .............................................. 12
Activating progressive scan mode
(for model LX3500D only) ........................................... 12
System Setup (DVD) ............................................... 12-14
General operation
Setting the picture
Setting the sound
Setting the language
Setting the features
Operations
Discs information ........................................................... 16
Basic playback ............................................................ 16-17
Skippingto another traeklchapter
FastSearch
Continue playbackfrom the last stop point
Repeatplay
RepeatA-B
Program favorite tracks
Special DVDIVCD features ..................................... 17-19
Changing subtitlelanguage
Changing soundtrack language
Playingin slowmotion mode
Searchingfor a particular passage
Display the disc information during playback
Moving to another title/chapter
Playbackfrom a selected point
Zooming in
Viewing from another angle
Advancing by frames
Checking the contents of DVD
Special VCD/SVCD features ......................................... 19
PlaybackControl (PBC)
Special MP3-CD features ............................................... 20
MP3-CD menu
Other Functions
Tuning to radio stations ................................................. 21
Presetting radio stations ................................................ 21
Listening to preset radio stations ................................ 21
Sleep timer setting .......................................................... 21
Specifications .............................................22
Troubleshooting ......................................23
Basic Functions
Selecting the surround sound mode ........................... 15
Selecting the digital sound effect ................................. 15
Volume control ................................................................ 15
Dimming the display screen .......................................... 15
pg 01-24/LX3xxx/37-Eng 5 4/16/02, 11:03 AM
CONTENTS 5
Page 6
Introduction and General Information
Features
You_ complete 7 piece 200 Watt DVD Digital Home
Cinema System creates th same dynamic sound qual ies
that you find n full-fledged tin mas and Incorpot _tes some
of the best f_stums in home heater technology
Other leatures include:
Built-in DTS and Dolby :_Digital decoder,
supporting Dolby RProLogic and virtual surround
Lts yoq use the ltorn Cinema Aqdio System 1or a movie
theater surround so_nd experience
Additional Component Connections
Lets you connect other audio and audio/visua components
to ¸tile DVD system so you can usethe system's surround
sound spea_rs
Might Mode
Lets you compress the dynamc range, reducing the
dflerence in loudness between different sounds n Dolby
Digital mode
Parental Contlx_l (Rating Level)
Lets you se a ratings level so that your ch Idren cannot
wach a DVD that has a raing higher than yo_ set.
SleepTimer
Enab}eshe system o swich to standby mode
automatically at a prese time
Progressive Scan (for LX3500D model only)
Provides a flicker free image wth he highest effect on film
based sources It can double the vertical resolu ion of the
picture to 525 Ines every time he picture isrefieshed To
enjoy the full quality potential offered by
progressive scan feature, a progressive scan TV is
required,
Supplied accessories
a remote control wh two AA ba_et es
anAN loop anenna and an FN wire anenna
an audio and PdCr Pb/CbY vdeo came for connection
with theTV
five satellite speakers, irlchding fve speaker cables
an active subwoofer, ncluding a connection cable
and a power cable
this ins ructon booklet
If any item s damaged or m ssing,contact your retailer or
Phiips
Environmental information
AI unnecessary packaginghasbeen omi_ed We havetried
to make the packaging easyo separa e into hree m_terials:
cardboard (box), poyshyrene foam (buffer) and
polyethylene (bags,protective foam sheet)
Yoqt system consists of materials which can be recycled
and reused if disassembled by a specieized compan}4Please
observe he local regulations regarding the dispose} of
packagingms erials,exha_sted ba_et ies and old equipment
Installation
Plac the player on a fl_t,hard, and stable surlace
There must be suffc ent room in front of the player tot the
drawer o open
In a cabirl t, allows abou 10cm (4 inches)of free space all
around the payer for adequate venti st on
Do not expose your payer o extreme terr )eratutes ot
humid LX
Discs for playback
You_ DVD player s abe,to play :
All pre-recorded audio CDs
All finalized audio CDR and audio CDRW discs
AIIVCDs, SuperVCDs and DVDs
MP3-CDs (CD-ROMs with MP3 tracks)
Player zone
DVD discsand players are desgned wth regiona}
restrictions Before playing adisc,make sure the
dsc isthe same zone asyour player
The region code for this DVD player is 1,
6 INTRODUCTION AND GENERAL INFORMATION
@
Maintenance
When adisc becomes dirty, clean it with a
c eanin£ cloth WDe the disc from the
center out, in a sttaght ine
Do not expose the playehbatter es @
discs to humidity, _ain,sand or excessive
heaL(caused by he_ ing equipment or
direct sunligh0 Always keep he dsc trs_ closed to avod
dust on the lens.
Do not use solvents such as benzene, thinn c commercialy
avaiable c}eanets,ot ant static spray intended 1or analog
discs
The lens may cloud over when the pb_er is suddenly
moved from cold to warm surroundings, making it
impossib}eto play a disc Leavethe player in the warm
environment unti the mostum evaporates
pg 01-24/LX3xxx/37-Eng 6 4/16/02, 11:03 AM
Page 7
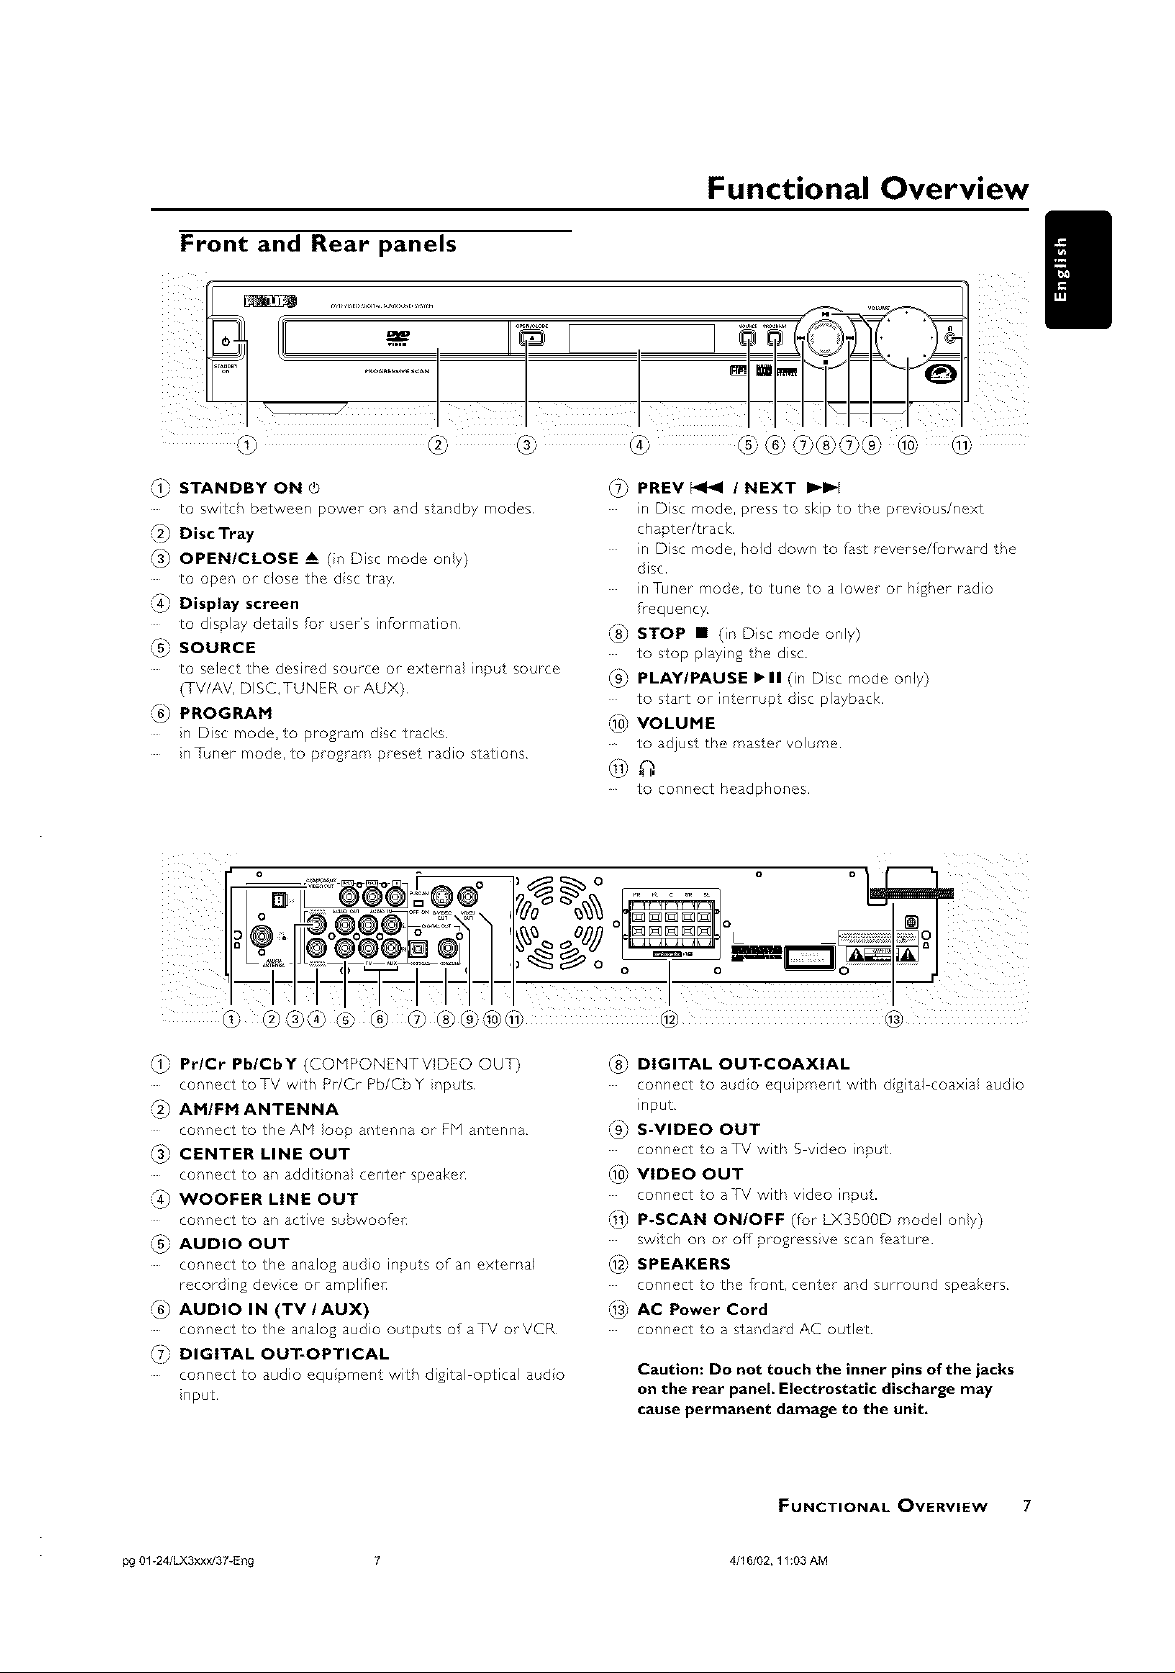
Front and Rear panels
Functional Overview
(1_ STANDBY ON O
to switch between power on and s andby modes
_2_ Disc Tray
(_ OPEN/CLOSE _A (in Disc mode ony)
to open or close the dsc tray
_ Display screen
to disD ay details _o__set's information
_5_ SOURCE
to select the desired source or extetna ir'pu soo_tce
(TV/AV, DISC,TUNER ot AUX)
*(_ PROGRAM
n Disc mode, optograrn dsc tracks
n [bnet mode, to program preset radio stations
(1_ Pr/Cr Pb/CbY (COMPONENTVIDEO OUT)
connect toTVwth Pt/CrPb/CbY nputs
_ AM/FM ANTENNA
connect to the AN loop antenna or FP1antenn_
(_ CENTER LINE OUT
connect roan _dditona cnter sp_,ak r
*_ WOOFER LINE OUT
connect to an _ctive subwoof_'_
_5_ AUDIO OUT
connect to th analog a,dio ir,pu s of _r' extetr'_l
recording devce ot ampli eT"
(6_ AUDIO IN (TV/AUX)
connect to th analoga_diooutp_tsofaTVorVCR
(7_ DIGITAL OUT-OPTICAL
connect to audio equ pment with digital optical audo
input
_ PREV _ / NEXT I_1_1
in Disc mode, press to skip to tile prev ous/next
chapter/track
in Disc mode, hold down to fast _everse/lot_vard he
disc
in Tuner mode, to tune to a lower ot hgher radio
frequency
,FS_STOP • (in Disc mode only)
to stopplaying he disc
,Fg_PLAY/PAUSE IPII (in Disc mode only)
to start ot interrup disc playback
_0_ VOLUME
toadjus ther_,ase_volume
to connect headphones
, o olr-h
oZ/// L_ I
O O O
,_8_DIGITAL OUT-COAXIAL
connect oaudoequ_pmentwith dgtalcoaxia audio
_nput
_ S-VIDEO OUT
connect oaTVwithS videoir'pu
_0} VIDEO OUT
connect oaTVwithvideoir,put.
_1) P-SCAN ON/OFF (for LX3S00D model ony)
sw ch on or off progressve scan feature
_2} SPEAKERS
CO_'inect o t_', _o_'it, cer/tef a_r,d surrour/d spe_k_,rs
_1_ AC Power Cord
connect oastand_dACo_tlet
Caution: Do not touch the inner pins of the jacks
on the rear panel. Electrostatic discharge may
cause permanent damage to the unit.
FUNCTIONAL OVERVIEW 7
pg 01-24/LX3xxx/37-Eng 7 4/16/02, 11:03 AM
Page 8
Remote Control
in disc mode, press to skip to the previous/next
chapter/track
in disc mode, hod down o f4st reverse/_orwa_d the
disc
in -Tuner mode, to tune to a lower ot hgher radio
frequency
to start or Jr' errup disc playback
@-
tostop playing he disc
(S} SURROUND
PHILIPS
Notes for remote control:
- First, select the source you wish to control by
pressing one of the source select keys on the remote
control (DISC or TUNER, for example).
- Then select the desired function ( _, I<F<f,
for example).
(1_ SOURCE
to select the desired source (TV/AV, DISC,TUNER or
AUX)
_ DISC MENU (disc mode only)
to enter or exit the disc contents menu
(_ SYSTEM MENU (disc mode only)
to enter or exit the system menu ban
nFunet mode, to select a preset rado station
number (_1or i_)
to select movement d rection in dsc contents menu /
system menu bat
to adjust the center speaker's level
TVVOL q-l--
to adjust Philips ¸television's volume level¸
_ SLEEP
to set the sleep (auto off) irner unctior'
_ DIM
tosNectdiP_rent brghtnessto_ he dispayscreen
_5_ NIGHT (DVD mode only)
to optimize he dynamics of he sound ou_pu
1_ MUTE
to interrupt ot resume sound reproduct on
RESUME
to continue disc p ayback after an interrup ion
_ OK
toentet o_ con_rm he selecior'
_9_ VOL -l-l--
to adjus he volume level
_ Numeric Keypad (0-9)
to enter a track/tit number of the dsc
toentet anumberofprese radio stations
@®
to switch o standby mode
8 FUNCTIONAL OVERVIEW
pg 01-24/LX3xxx/37-Eng 8 4/16/02, 11:03 AM
Page 9

Connections
[]
IMPORTANT!
- Before connecting theAC power cord to the
wall outlet, ensure that all other connections have
been made.
- Never make or change any connections with
the power switched on.
- The type plate is located at the rear or bottom
of the system.
Connecting antennas
AM Indoor Loop Antenna
Connect the supp ied AM Ioop antenna to beAM
jack¸ Positior_ the loop _nte¢_n_to receive the dearest
sound,
FM Indoor Antenna
Connect the suppied FPI
antenna to the FM jack¸ Move
the antenna in various directions
until the clearest si_r_ai is
received¸
Note:
- Keep the antenna as far away as possible from theTV, VCR
or (_ny rQdiQtion Source to pl*evet}t unwGnted noise,
FM Outdoor Antenna
For better FM reception, use a 75 ohm coaxial cable (not
supplied) to ¢onne_ the s/s_.em to an outdoor FM anter!na
as shown.
pg 01-24/LX3xxx/37-Eng
CONNECTIONS 9
4/16/02, 11:03 AM
Page 10
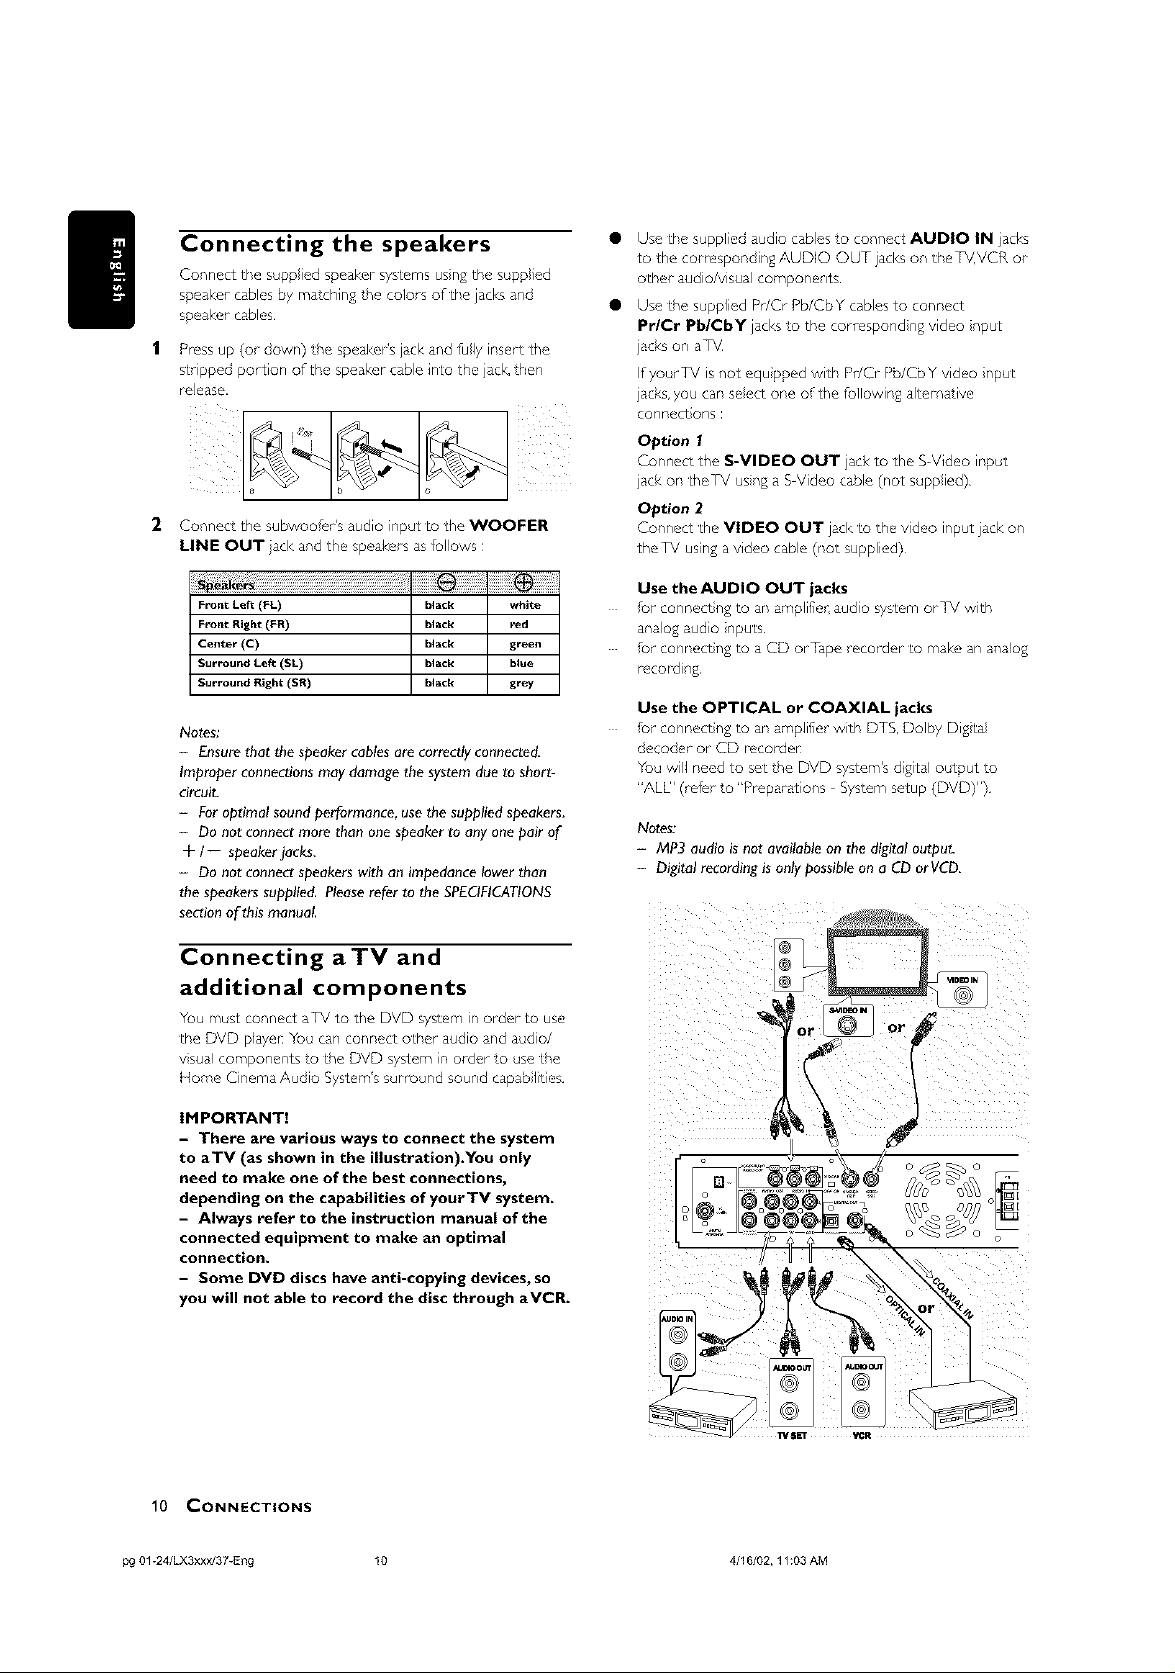
Connecting the speakers
Conn cttllesuppied sp al<et syst msusngtb suppled
speal<etcables by m_ thing he colors of the jacks and
speal<etcables
Pressup (or down) he speal<et'sjack and luly insert the
stripped portion of the speaker cable into the jack, then
fO ease,
Connect LhesubwooleFs audio nput Lothe WOOFER
LINE OUT jack and the speakels as1olows :
Use the suppled audio cablesto connect AUDIO IN jacks
to the corresponding AUDIO OUT jacks on theTV, VCR or
other audio/visual components
Use he supplied Pr/Cr Pb/CbY cablesto connect
Pr/Cr Pb/CbY jacks o the correspond ng video nput
jacks on aTV
IfyourTV is not equ pped with Pr/Cr Pb/CbY video nput
jacks,you can seect one of the following alternative
conP CLOPS :
Option 1
Conn CLthe S-VIDEO OUT jack to the S-Video it,put
jack or, Lhe-r_! us_/ga SVideo cable (not supp ied)
Option 2
Connect the VIDEO OUT jack to the video input jack on
theTV usng avideo cable (not supplied)
Front Le_ (FL) black white
FrontRight(FR) black red
Center (C) black green
Surround Le_ (SL) black blue
SurroundRight(SR) black grey
Notes_
- Ensurethat the speakercables are correctlyconnected.
Improper connections may damage the systemdue to short-
circuit.
- Foroptimal sound performance, use the supplied speakers.
- Do not connectmore than onespeaker to any one pair of
+/-- speakerjacks.
- Do not connectspeakerswith an impedance lower than
the speakers supplied. Pleaserefer to the SPECIFICATIONS
section ofthis manual,
Connecting aTV and
additional components
_u must conne_ a_! to the DVD system in order _ use
tl-,eDVD player You can connct otl-, r audio and aqdio/
vsual tampon nts o he DVD system in older o use he
Home Cinema Audio System's surround sound capablit es
IMPORTANT!
- There are various ways to connect the system
to aTV (as shown in the illustration).You only
need to make one of the best connections,
depending on the capabilities of your TV system.
- Always refer to the instruction manual of the
connected equipment to make an optimal
connection.
- Some DVD discs have anti-copying devices, so
you will not able to record the disc through aVCR.
Use the AUDIO OUT jacks
_or connectn£ to an amplifier; audio system otTV with
analog audio nputs
to_ connect n£to a CD or rape recorder to make an analog
record ng
Use the OPTICAL or COAXIAL jacks
tot connectng to arl amplifer with DTS, Dolby Dig ta}
decoder or CD recorden
You will ned to set the DVD system's digital output to
"ALE' (refer o"Preparations System setup (DVD}")
Notes:
- MP3 audio isnot available on the digital output.
- Digital recording is onlypossibleon a CD orVCD.
/
10 CONNECTIONS
pg 01-24/LX3xxx/37-Eng 10 4/16/02, 11:03 AM
Page 11

Preparations
Inserting batteries
into the
remote control
symbols __
Close he cove_
CAUTION!
- Remove batteries if they are exhausted or will
not be used for a long time.
- Do not use old and new or different types of
batteries in combination.
- Batteries contain chemical substances, so they
should be disposed off properly.
Switching on the system
| Aft_ completing allthe connedLons, connect he AC
power co_d of the player and subwool_r o he power
oust
2 Press STANDP.Y ON to swtch on he ast seec ed
SO_lfC
3 Ad, ust the SOURCE button (or press I"V/AV, DISC,
TUNER or AUX) to select the input source
-_ Th selec ed source will be displayed
• For viewing a DVD orVCD disc, aTV sot needs o be
connected (taler to"Connec ions Connecting aTV and
additional compon nts').
Swihchon theq_! and se ho the correct video in channel
got example, EXTI, EXT2,AVI,AV2) Relet to yourTV
nstruction manual for detals
-_ Th delaqlt screen appears on theTV
• You can connect other external components o he DVD
sysem in o_det house the I IomeTherter Audio System's
s_tround sound capabiities. For example, connect o aTV
and selectTV/AV asthe input so_tce or connect o aVCR
and select AUX asthe input source
Setting up the surround sound
system
Yoq must conr, ct all the sp akets and s_t qp the system
properly in order to enoy the Digital Cinema experience _t
home (refer o "Connections Connect rig the speakers')
¥oq will have Lheleel ng of-being inthe middle of'the action
because sound s coming Pore everywhere around yo_
The subwool_r can enhance the bass pedot mance of yo_r
sysem dtamatica I}/
IMPORTANT!
Please sit at your usual listening position in order
to set up the speaker balance correctly.
Placing the speakers
]o obtain the best surround effect pac the sp akers ss
tollows
| Place the front ell and rght speal<ets at equal distances
from the 1_/and st arl angle of approximate y 45 degrees
from the lis ening position
'_ Place the center speaker above or below he-IV so the
center channel's sound s ocalized
3 Place the surround speakels _ normal listening ear level
tacing each other or mounted on he wall
4 Place the subwoolp_ on the qoor near theTV
Notest
- Toavoid magnetic interference,do not position the front
speakers too close to yourTY
- If the rear surround speakersare installed farther away
from the listening position than the front and center speakers,
it will weaken the surround effect.
- All speakersshould besecurelyinstalled to prevent
accidentsand improve sound quality.
pg 01-24/LX3xxx/37-Eng 11 4/16/02, 11:03 AM
PREPARATIONS 11
Page 12

Changing the volume level
You can changethe speakers' sound d stribut on to suit
your surround sound needs
• Press CENTER Jr-/-- to adjust the level of the center
speaker:
4 "EI',T ¢_',_ _2"isdispayed
• Press REAR Jr/-- to adjust the level of the mar
surround speakers
4 "hE +;_x D_" s dsplayed
Note:
- "x ;_"denotes the volume level between -15db to lOdb.
Setting up the subwoofer
| Use tile suppled subwoofer cable to connec the
subwool_r's audio input jack o the WOOFER LINE
OUT of the DVD system
2 Connect he subwoofer'sAC power cable o he wall
socket and switch on he power
4 It will automatically switch on when receiving an aqdio
signalinput If there s no audio sgnal nput, twll switch off
automatica}ly
3 Seect the phase polar ty at the rear of th subwoofer at
either 0° or 180 ° to determine better bassreproduct on
effect n certain lisening enwronment
4 Press SUBW Jr/-- to adjust the volume level of the
subwoof_r ( 15dB o 10dB)
.u,_ ¢_',{ _2" isdispayed
System Setup (DVD)
The system s qp iscarried ou viaheT_,it nabling you
to customze the DVD system to su your partcular
requirem nt Ifth pr ferred options selected are not
avaiable on a disc,hen the dbc's own prel_rence will be
used
IMPORTANT !
To access the System Setup menu, playback must
be stopped.
General operation
| PressSYSTEM MENU
-_ _ icor' wil b_, highigbted in he mer,u bar on heTV
Screen
2 Press• to activate he System Stup mnu
3 Use < • A• keysto togge through the func ior's and
selct you_ p_ef_r d oplion
4 Press OK o con_rm a hghlghted seector,
5 To exit he System Setqp menu, press SYSTEM MENU
or OK
The folowng terns are avalab e
Setting the picture
Activating progressive scan
mode (for model LX3500D only)
The progr ssivescan disp aypres nts 60 complete frams
per second,rather han he 30 frames per second of
ntedaced scann ng (ordinary normaITV system). Wth
neary double he numbers of ine, progresswe scanoffers
higher p cture reso ution and eiminates bo hersome
motion artilacts those agged dges on movn£ objects
To enjoy the full quality potential offered by
progressive scan feature, a progressive scan TV is
required,
1 Press STANDBY ON to swtch the system off
2 Sip the P-SCAN switch (located at back panel) o"ON"
posit on
3 Press STANDBY ON again o swich the system on
Note:
- Youneed to switchthe systemoff beforechanging the
progressivescanmode.
- TV Shape
Select the aspect rato oftheW to be connected
4:3 PS (delault setting)
If you have a conventionalTV set and your DVD isnot
torma ed for widescreen viewing, usethis sett ng A wide
picur isdisp}ayed on the wholeTV screen wilh a poraon
automat tally cut off
4:3 LB
If you have a cony ntionalTV st and your DVD is
to_ma dto_widescreenviewing, usethssting Wide
bands wil be displayed on the upper and lower pot ions of
the -r_! screen
16:9
Ifyouhaveawd screenTV s , use this setting (you
mus also set your widescreen TV to"full size")
12 PREPARATIONS
pg 01-24/hX3xxx/37-Eng 12 4/16/02, 11:03 AM
Page 13

16:9
(Wide screen)
4:3 LB
(Letter Box)
Setting the sound
4:3 PS
(Pan Scan)
No_e_
- If your DVD is not encoded co allow you to change the
aspect ratio, TV shape cannot be changed,
-TVSystem
Allows youto select the color system matching the
connectedTVset
AUTO (def_ul setting)
If the connectedTV is multi system,select this mode
The output lormat wil be in accordance with he vdeo
signalof the disc
NTSC
If the conn cted TV is NTSC system,select this mode
It will change the video sgnal of a PAL discand ouput m
NTSC forma
PAL
If theconn ctedTV is PALsys m, selectthsmode
It will changethe video sgnal of a NTSC disc and output in
PAL totmat
- Video Out
Video out selection enabes you to choose the lype ol-
vdeo outpu_ su table tot yoqt mcwr:
• Seec PR PBY (defsul se_ing),ifyou have connected he
vdeo output to yoqt TV using the ComponentVideo Out
(Pr/Cr Pb/CbY) jacks
• SCART (this feature s not available for this model)
• Seect S-VIDFO if yo_ have connected he video output
to yourTV usng S Vdeo jack
- Screen Saver
If s to ON, when yoq eave tile system in stop @ paus
mode 1or mole than one minute, the screen savel will be
activated The delault seldn£ isOFP
- Digital Output
Digita output selection enables you to spec fythe type 01-
digital ouput suitab}efor your ampl fer or receive_
• Select ALL (delault settng),ifyou have connected he
digital outpqt (COAXIAL or OPTICAL) to a mul ichanne
dcodr recev R
• Sleet PCM 961(if the xtemal componen iscapab}e 01-
processing digital signal nput with sampling rates of 96 k_lz
• Sleet PCM 481( i1-theexternal componen is incapable 01-
processing 96 kllz digital signa}inpqt hen convert o
standard signa with samp ing rates o1-48 kHz
• Sleet OFF to deactvate the d gital outpu (COAXIAL or
OPTICAL)
- Night Mode
Set night mode to on to eve out tile voume For
example,the disc will play at the same sound level
throughout the movie¸ The default setting is OFR
Night function can also be accessed via the
remote control
- Center Delay
If the istening pos tion s closer to the center speaker than
the flont speakers, you can set the eerier delay time o
improvehe sqrround sound el-fee
Options : 5ms, }ms, 2ms, 1ms or OFF (defaul sel' rig)
- Rear Delay
If the istening position is closer to the rear sutround
speakers than he flon speakers,you can set he rear delay
time to reprove the surround soqnd el-foot
Options : 1Sins, 12ms, 9ms, 6ms (default setting), 3ms ot
OFR
- Test Tone (disc mode only)
If set to ON, the systm will _t the speaker settings The
test signalisgenerated hrough the left, centek rght, and
surround speakersThe delault seldng is OFR
pg 01-24/LX3xxx/37-Eng 13 4/16/02, 11:03 AM
PREPARATIONS 13
Page 14

Setting the language
2 Use Av b, ysto select a rating evel
- Audio
- Subtitle
- Disc Menu
• This is to select the audio language,subtitle anguage and
the anguage used onTV screen menus or DVD men_s that
will always be used for every dsc to be played back.The
defi_ultse_ing is English
• Ifithe languageseec ed isnot available on tile disc,the
original language designated by each dsc wll be selec ed
Setting the features
- Parental
Enab}essetting ofiplayback limitation level Some DVDs may
havea parental level assignedto the compete discor o
cetrain scenes on the disc The rating levels are flora 1 o 8
and are country dependen . You can prohibit the playing ol-
cetrain discs ths are not sGtab}efor }_ourchildren ot have
cet tar_discs p a}_edwith altemative scenes
Enter tile 4 digit code I1-necessaryenter he code a second
time
3 Press OK to confirm
Rating - NO PARENT
If parenta control is not actwted, it will pay al dscs
Rating - 1 to 8
If he payeCspaten a} level isset below 8,only discs wth a
Iowr or equal }eve}wll play For examp e,ifithe player s
set o 5, only discswith ratings of 5, 4, 3,2 and 1 will be
played Hgher rated sceneswil not be played unlessan
alternative that hasthe same raing ot ower s avalabe on
the disc For xampe, considet a disc that genetaly is
sui able for most audiences, and it is rated st evel 21or the
most part However, in he mdde,there are also scenes
rated at S (not sui able for ch Idren)
To play a higher rated disc or scene than the level
set
Ent _ he4dig cordbloretes ttingtheratir'gleveltoa
higher number (go o"Password")
If you forget the 4-digit code
| Press • four timeswhen prompted for the password
and the system will change back to the default password¸
2 Go to"Password" and enter your new code¸
Note:
- SomeDVDsare not encoded with a ratingthough the
mowe rating is printed on the discjacket. The ratinglevel
feature does not work for suchdiscs,
- Password
]o set a new password for he parental control otto
change the password The password suppled as defi_ul is
1234
- Menu Language
Select the languageioron screen display
- Defaults
IFRESETisse ected, all the items in the setup menu wil be
reset to delault setting.
14 PREPARATIONS
pg 01-24/LX3xxx/37-Eng 14 4/16/02, 11:03 AM
Page 15

Basic Functions
Selecting the surround sound
mode
IMPORTANT!
- For proper surround sound, make sure you have
followed the "Connections" and "Preparations"
procedures fully.
- The center and surround speakers only operate
when the system isset to surround sound mode
and the source material being played is recorded
or broadcast in Dolby Digital, DTS or Dolby Pro
Logic surround sound.
- Stereo broadcasts or recordings will produce
some surround channel effects when played in a
surround mode. However, monaural sources will not
produce any sound from the surround speakers.
• Press SURROUND to select sun_ound or stereo mode
-_ Tile availability of the various surround sound modes
depend on the number ofspeakers used and the incoming
sound information available on the discThe available output
modes are shown belo'¢£
Dolby Digital Surround
Dolb/Diga} (also known as AC 3 or Dolb}/51) and
PIPEG ['4ul ichanne delivers a realistic and dynamic sound
similar to theater and cnema It requires connec ion of all
five speakers (flon left/right, center, sutroqnd leEJr ght) and
subwoolet lot correct Do}by Dgital Surround sound
reproduction Eachchannel plays its own unique role in
providing the tigh sound Front left,center and right join
two sun_ound speakersto reproduce high,mid and bass
ftequenaes in fve full range channels of surround Bass
rumble, explosions and low frequency effec s yoq feel are
deivered hrough the subwoofer A large number ofDVD
dscs have been recorded in Dolb/Digi a}Surround
DTS Surround
The DTS Surround is acinema sutround sound format h_t
offars sup _io_digital audio pedo_mance DTS offers mote
clarty and de ni ion especially fo_ higher tones Th better
sound quality is a result of the limi d sound compress on
(3:1 insteadof 1I:1 for Dolby D gital) and the 20 bit
resolu ion
Dolby Pro Logic Surround
The Dolby Pro Logic Surround system s a specialy
encoded two channel anaog forms that wil produce
sound through 1our speaker channe s(front left, center,
fron tght, monauralsutround) wh naDolbyProLogc
Decoder is used It is aso comp_tib}e with stereo systems
but the user will only have two channel (Pont left & righ0
of sound
Matrix
A new surround playback system that de}ivers amaz ngly
rich and convirlc ng f_vechannel surround outputs (front
eft/righ, centec surround leEJr ght)
VSS (Virtual Surround Sound)
The ProLogic bdPEGor Doby D gital sutround channel is
processed by a'vit tualize¢ DSP to add surround effec from
jus he two front speakers
Stereo
AI sound is reproduced and playedthrough the front eft
and rght speal<ets Ths enables standard stereo
reproduct;on
Selecting the digital sound
effect
The digital sound effects aflow you to select flora various
pre set modes that control tile lmquency bands of sound
to optim ze certain mus cal styles It gtearly enhances the
excitement and enjoym nt of your lavoti e muse
PressSOUND repeatedly o select the avalable sound
effect
When playing a DVD/VCD, select :
CONCERT DRAPIA, ACTION or SCI FI
When playing a CD or in Tuner orAux mode,
select :
CLASSIC,jAZZ, P_OCKor DIGITAL
Volume control
AdJust VOLUME button (or pressVOL Jr/--) to
increase or decrease the volume levd
4 "YDL ;_X"is dsplayed "_', "der'otes the voqme level
For PhilipsTVs only
PressTVVOL 4-/-- on the remote control to adjust the
TV's volume level
To listen through the headphones
Connect the headphones pug to the ,_ socket at the
front ofthe p}aye_
-') The speakers will be muted¸
To switch off the volume temporarily
• Press MUTE
-) P aybackwill continqe without sound and ";"UT£" is
displayed
• lo restore he voqme, press MUTE again
Dimming the display screen
• P_essDIM repeatedly to s Ict different eves of
brightness for he disp ayscreen :HIGH, MID or LOW_
pg 01-24/LX3xxx/37-Eng 15 4/16/02, 11:04 AM
BASIC FUNCTIONS 15
Page 16
Operations
Notes:
- Yourplayer will not play discsthat have a region code
different from the regioncode of your playe_
- _ If the inhibit iconappears on the TV screen when a
_ button is pressed,it means the function is not available
on the disc youare playing.
• DVD video discsmay have one or moreTtles, and each
Title may have one or more Chapters
• Payback sops at the end of eachTtle
• Video CDs may have one or moreTrack% and each7_ad<
may have one ol mote ]nd xes
• To make easyand convenient ace ss,you can move
betweenTracks and Indexes
• SomeVideo CDs have Play BackContlol (PBC), whirl/ is a
prede_ned playback sequence stored on the disc (refer to
"SpecialVCD/SVCD l_atures")
DIGIT/U.JUJDIO
• Audio CDs contain onlyTracks
Basic playback
CAUTION!
- Do not move the disc player during playback, as
doing so may damage the DVD system.
- Do not push on the disc tray or put any objects
other than disc on the disc tray. Doing so may
cause the disc player malfunction.
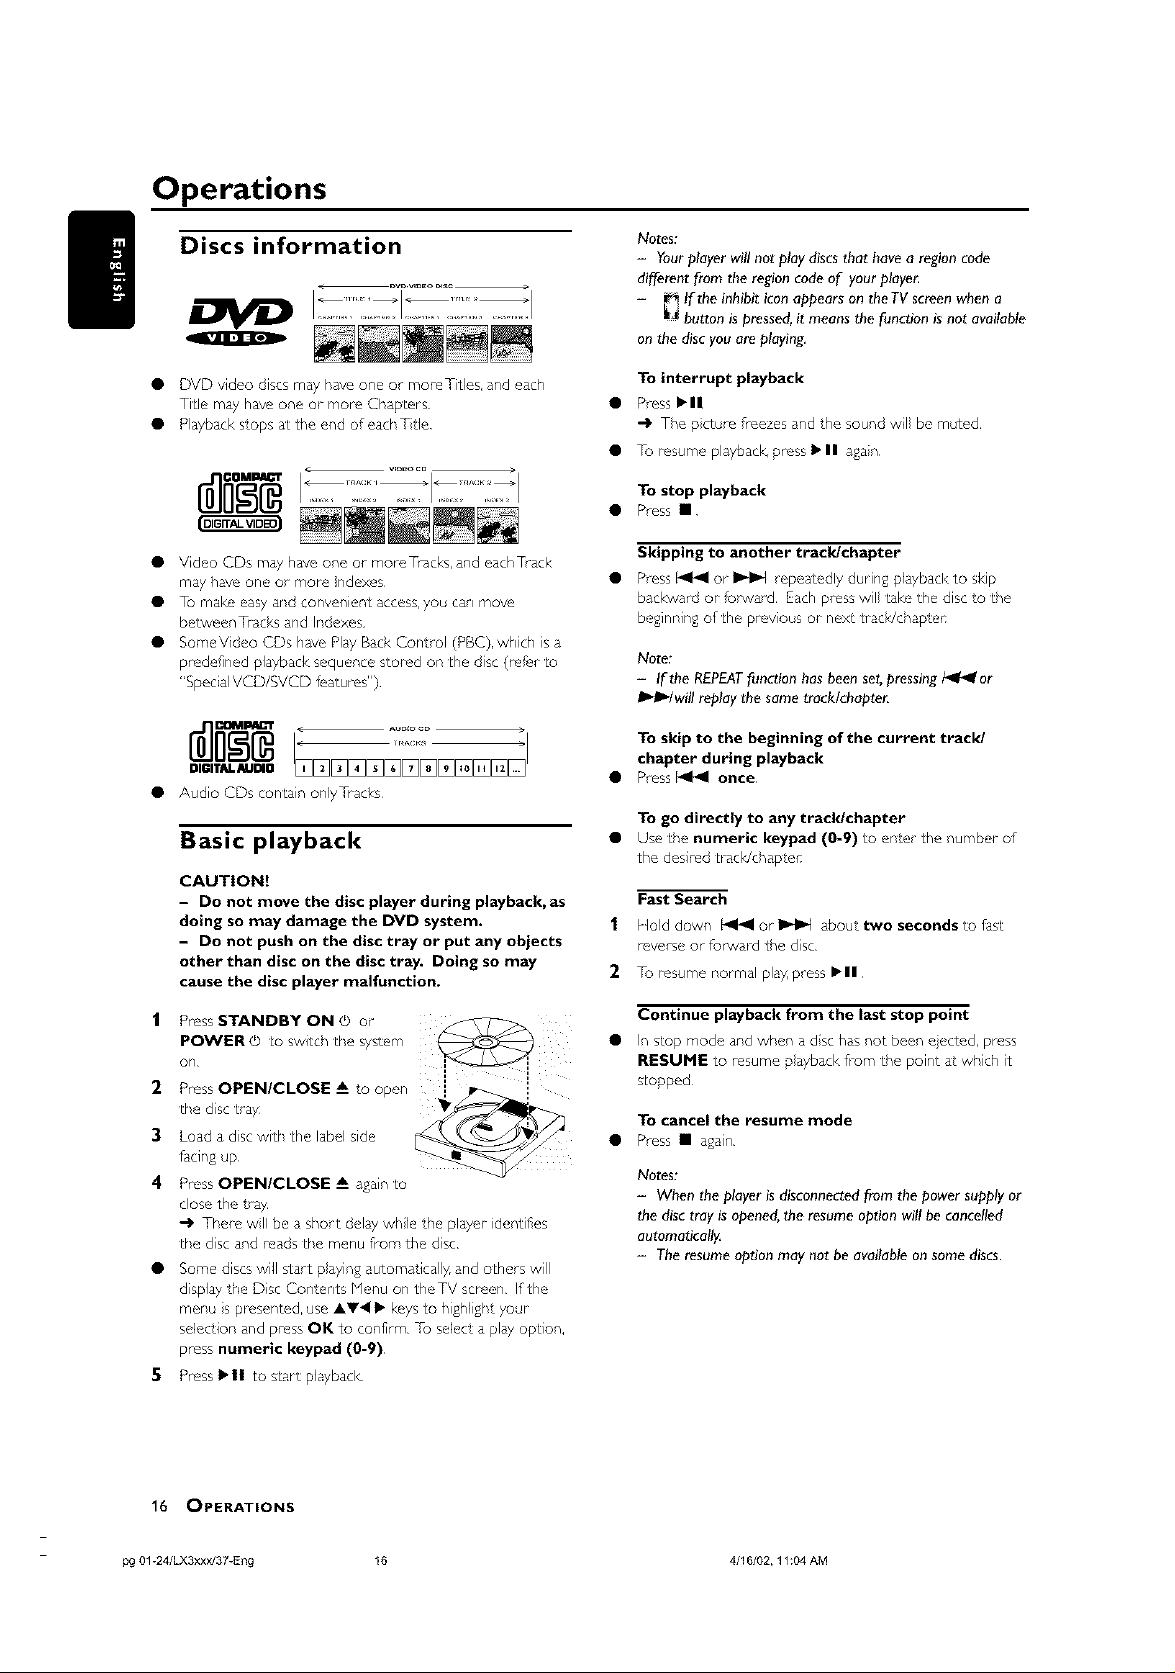
POWER © to swdch tile system
, Presss,A.OB,or, ¸
on
i i
2 Press OPEN/CLOSE A_o open ___ i
the disc ray _s!/_l_,_---_
facing qp
3 Load a disc with the label side
4 Press OPEN/CLOSE A_a2a_n to
close the bay
-_ Thre wll be a short delay whle he player der_tifies
the disc and reads the menu from the disc
• Some discs will start paying automstica}ly, and others will
dsplay he Disc Con ents Menu on theTV screen Ifthe
menu s presented, use A'_'_ I_ keys to highligh your
selection and press OK to confrm Fo selec a playoption,
press numeric keypad (0-9)
5 Press _'11 to start playback
To interrupt playback
• Press I_11
-_ The pcture freezes and he sound wil be muted
• _ _sume playback.,press _"II _ain
To stop playback
Press •
Skipping to another track/chapter
Press1_1,41or I_1_t repeatedly during playbacl<to skip
backward or_o_ward Each presswil take th disc o he
beginning of the prevous or next tracWchaptef
Note:
- If the REPEATfunction has beenset,pressing/_l_for
will replay the sametrack/chapter,
To skip to the beginning of the current track/
chapter during playback
Press_ once
To go directly to any track/chapter
Use he numeric keypad (0-9)to ener the number of
the desired tracWchaptef
Fast Search
1 Hold down _ or _ abou_ two seconds to l_st
_verse or _rwa_ the disc¸
2 To resume normal play press !_11
Continue playback from the last stop point
In stop mode and when a dischas not been %ected, press
RESUME to resume p ayback from he point _t which it
stopped
To cancel the resume mode
Press • again
Notes:
- When the player isdisconnected from the power supply or
the disctray is opened,the resume option will be cancelled
automatically,
- The resume option may not beavailable on somediscs.
16 OPERATIONS
pg 01-24/LX3xxx/37-Eng 16 4/16/02, 11:04 AM
Page 17

Repeat play
You can only select the repeat play mode dutn£ playback
For DVD - Repeat chapter/title/disc
• Press REPEAT repeatedly to select he folowing :
4 "F? 7 repeaLchaphen
4 "h _" repeat itle/disc
Special DVD/VCD features
A numb¢,r of operations can be cart led oqt d_ ctly via
the multiple menu bars on theTV screen without
interrupting dsc playback
For VCDICDIMP3-CD - Repeat traclddisc
• Press REPEAT repeatedly to select he lolowing :
-_ [? I" repeat the current ¸track
-> P N" repeat the entire disc¸
Notes:
- Repeat play might not work correctly with some DVDs,
- ForVCb, repeat play is not possible during PBC playback.
Repeat A-B
You can playa specf'c section n a chapter/track repeatedly
| PressREPEATA-B at }'out chosen starting pont
2 Press REPEATA-B again at_ur chosen end point¸
-) Tile passagewill now reoeat cont}nuously
3 To resume normal play press REPEATA-B again
Note:
- The sectionA and B can be set only within the same
chapter/track,
Program favorite tracks
You can playthe contents ol-the disc n the older you want
by programming he older of the backs o be played Up o
99 backs can be stored
| While playback is_topped, select or press PROGRAM to
enter proglam mode
-> "P O0 08" s dispayed
2 Use tile numeric keypad (0-9) to inpu the track
number n the older you want
-> Fyou attempt to program more han 99 backs,"_LJLL "
s d splayed
3 Press OK to store the track.
• Repeat steps 2-3 o store other t_acks
4 To start program play,press •11
5 To stop playback,press • once
6 To cancel the program, press • again
From the lel',
SETUP MENU -* SUBTITLE-" LANGUAGE-* SLOW
-* FAST REVERSE-" FAST FORWARD -* STATUS
From the eftl
TITLE SEARCI f-* CHAPTER SEARCH -'TIME
SEARCH _ ZOOM _ ANGLE _ STEP
PBC ON/OFF
From the eftl
PROGRAM
IMPORTANT!
Some operations may be different or restricted,
depending on the disc format, Refer to the jacket
or case of the disc you are playing.
1 Press SYSTEM MENU
-'_ The mnu bar wil be d splayed across he op of the
TV semen
9 Press _1ot • o move hrough the menu ba_
3 Press • to select the hghlghted icon and use A• keys
to select your prel_rred option
4 Press OK o confrm a hghlghted seection
5 3o exit, press SYSTEM MENU or OK
Changing subtitle language
Ths operation works only on DVDs with multip e subtitle
languages
Select _ from the menu bar and press • key o select
the desired lang_age
Program function can also be accessed via the
menu bar
|
PressSYSTEM MENU and selec _l'om the menu
ba_
2
R p _ steps 2-6 listedabove to program yo_t lavotie
t_cks
pg 01-24/LX3xxx/37-Eng 17 4/16/02, 11:04 AM
OPERATIONS 17
Page 18

Changing sound track language
This operation works only on DVDs wh multiple
soundtrad< language¸
• Select _ from the menu bar and press • keyto select
the desired language¸
For VCD :
• Press • o select tile desired audio channels for sound :
LEFTVOCAL-÷ RIGHTVOCAL -* MONO LEFT
-* MONO RIGHT-" STEREO _ LEFTVOCAL
3 lo resume normal play press Ipll
Note:
- The sound will be muted during fast reverse or forward
search,
Display the disc information during playback
• Select _ 1,ore Ihe menu ba_ and prss • Icy to select
the fo Iowir'g display ir'formaior,s :
Note:
- When the desired language is not selected evenafter
pressing the button several times,it means the language is not
available on the disc,
Playing in slow motion mode
Seect _ from the menu bat-and press • key o select
tile re@red slow motion speed :
SFx2 -o SFx4 -* SFx8 -" SRx2 _ SRx4 -* SR x8
SLOW OFF
(SF)= slowforward
(SR) = slow reverse
For VCD :
| Press• key to sehc the requited sow moton speed :
(_o_ward) : SFxl -* SF x2 -" SFx3 _ OFF
2 To resume normal pay press I_11
Note:
- The sound will be muted during slow-motion play.
Searching for a particular passage
DVD VCD (PBC ON}
Moving to another title/chapter
Some dscs may contain more hun one tire or chapter IF
the disc has atith or ch@ter menu recorded on it, you can
slart playback from the selected tern
i
Select
2
Use numeric keypad (g-9) o select a desired Iite/
(tiIle) or _ (chap er) h-om he menu
chapte_ number and press OK to slar't playback.
Note:
- Selectinga title or chapter might not be possible on certain
discs.
Playback from a selected point
Ths fundt on allows you to start playng at any choser' time
on Ihe disc
bat
i Select _l'om the menu bar
9 Enter hours, minutes and seconds from eft o right in tile
|
Seec _ or _ flom tl-,e menu bar o select fast
search or fast fowat-d search respectivel_
2
Press• key to selec the required search speed :
(reverse) : FRx2 _ FRx4 _ FRx6 -" FRx8 -* OFF
reverse
time edi box usingthe numeric keypad (0-9)
-) Eachtime an item has been entet-ed,the next item wII
be highlghted
PressI_llto sbrt playback
(lorvvard) : FEx2 _ FF x4 -" FEx6 -* FFx8 _ OFF
For VCD :
Press• key to selec the requited seardl speed :
(reverse) : FRxl _ FR x2 _ FRx3 -" FRx4 -* OFF
(lorward) : FExl _ FF x2 -" FEx3 -* FFx4 _ OFF
18 OPERATIONS
pg 01-24/LX3xxx/37-E% 18 4/16/02, 11:04 AM
Page 19

Zooming in
This 1_nctiona}lows you to enlarg the picture on theYV
screen and to pan through the enlarged mage
|
Seec _ from the menu bar and press •
to select a zoom factor :xl 5 -* x20 -* x40 _ OFP
2
To pan through the enlarged Phage,press OK o confrm
key repeatedly
the zoom selection and use • • AV keys to move the
zoomed picture left, right, up and down¸
To exit ZOOM mode, select zoom factor to
"ZOOM OFF" _om the menu bar
Viewing from another angle
If the disc contains sequences recorded Pom dil_t ent
camera angles,¸thisallows you to view the picture from
di_rent angles The selections of angle a_ depending on
the disc format
$
oo
[Zd_
• Seect _ from the menu bar and press AV keysto seect
th des red angle :I/4, 2/4, 3/4 or 4/4
4 Playback changesto the selected angle
Advancing by frames
Checking the contents of DVD
| PressDISC MENU on the remote control
4 If the cut rerl title has a menq,he menu wll appear on
the screen Otherwise, the disc menu wll be disp ayed
9 Use • • A• keysto select the desired rite or chapter,
followed by •11 orOK.
-_ The selected tile or chapter starts playing
Notesf
- The details of operation might differ depending on the DVD
disc,
- Selectinga title or discmight not be possible on certain
DVD discs,
Special VCD/SVCD features
Playback Control (PBC)
PBC playback a}lows you to playVideo CDs nteractively
following the menu on the display
Select _ in the menu bar and press • key to select
PBC ON or PBC OFE
When playing a disc with PBC function
If"PBC OFF", the system will start playback automatically
IP'PBC ON", the PBC menu (if available)will appear on the
TV sc_en for selection¸Use the numeric keypad (0-9)
to enter your choice¸
Note:
- IfPBC mode is switched on,TIME SEARCHand REPEAT
functions are not available.
|
Seec _ From the menu bar and press • key o pay the
dsc step by step (one fi_ameeach step)
2
To resume normal play press •11
pg 01-24/LX3xxx/37-Eng 19 4/16/02, 11:04 AM
OPERATIONS 19
Page 20

Special MP3-CD features
jPEG lot mat
Nax 12 characters
Nax nested directory is7 levels
The max album number is 32
Suppor_d VBR bibrate
Supported sampling _quencies for P1P3discare :
32 kHz, 441 _z, 48 Idlz
Suppor ted Bit_r_tes of NP3 disc are: 32,64, 96,128,
I92, 256 (ksps)
The disc reading time may exceed 30 seconds due to
the large number of songs compled onto one dsc
MP3-CD menu
| PressDISC MENU to switch on the NP3 CD menu
4 The album menu appears on heTV screen
2 To select a desired album, press AV,• and fo lowed b7
OK or _11 Lo confirm
4 The tire menu appears on the_[h! screen
3 To select a desired tite, p_essAV4 • and lollowed b7 OK
or •11 to start playback
• You can aso usethe numeric keypad (0-9) to ene_
your choice
If the MP3-CD menu is switched off
• You can ony play the exsting selected ttle by pressing
• |1 huron While in playback mode, p_ss bql_l / _ to
select the previous/nexL ¸title¸
-_ The title number will be displayed¸
Only the following functions are poss ble tor P1P3disc
STOP / PLAY/ PAUSE/ OK
REPEAT (TITLE/ALBUM/DISC)
20 OPERATIONS
pg 01-24/LX3xxx/37-Eng 20 4/16/02, 11:04 AM
Page 21

Other Functions
Tuning to radio stations
'l Press STANDBY ON to swtch on he ast seec ed
Souse •
2 Adjust SOURCE (or pressTUNER) to selectTUNER
mode
3 PressTUNER again o seect he desired band :FFdor API
4 Press and hold 1414 or _ unil he fmq_ency indicsion
starts to change,then release
4 Th system automaticaly unes to the r_ext strong radio
slaton
* F %onn°
_ II IU O, UU I
• To tuneoa_eakst_or,,ptess _orI_breyand
rap atedly until an optimal reception s found
5 Repes step 4 if necessary until yo_ find he desired radio
ssion
_4
Presetting radio stations
You can preset qp to 40 stations regardlessof he
reception
| Tune to your desired radio station (refer o"Tuning o radio •
s _ions')
2 Press PROGRAM
-) "Program" appears •
nN
Puu B " .oo
3 Use the numeric keypad (0-9) to select he desired •
preset nurT/b_'K
Listening to preset radio
stations
Intuner mode, press _1or !lbor use the numeric keypad
(0-9) Los ect the sired preset r'umb
--_ The preset numbeh radio frequency, and waveband are
displayed
Sleep timer setting
Thesle primer nablesthesyst mtoswdchtosar'dby
mode automat caly at a preset ime
PressSLEEP repeatedly to select a preset Lime
-_ The selections are as folows (time in minutes):
When you reach the desired length of t me, stop pressing
the SLEEP button
-_ "Sleep" icon appears
To check the remaining length of time after sleep
timer is activated
PressSLEEP once
To change the preset sleep timer
PressSLEEP again while the mma ning sleep timer s
shown¸
-_ The displ_ will show the next sleep ¸timer options¸
To deactivate the sleep timer
PressSLEEP repeatedly unil "07D" isd splayed,or pre
the STANDBY ON bu on
Note_
- If "Program'icon goes offbefore you selectthe desired
preset number,press PROGRAMagain,
4 Press PROGRAM again o store he radio station
• R pe_ steps l-4to store othe radio st_ior's
Notes:
- If youattempt to program more than 40 preset radio
stations, '}UL L"is displayed,
- During programming, if no keyis pressedwithin five
seconds,the system will exit the program mode automatically.
pg 01-24/LX3xxx/37-Eng 21 4/16/02, 11:04 AM
OTHER FUNCTIONS 21
Page 22

Specifications
AMPLIFIER SECTION
Output powm
Sereo mode (DIN) ....................................................................................2 x 28 W
Surround mode (1 kHz) .....................................................1SW RedS/channel
Total Harmonic Distortion ...............................10% _t rated powe_ (1 kHz)
Fr_quen_ Response ..................................................180 Hz 14 kHz / +1 dB
Signal to Noise R_io ......................................................................> 68 dB (CCIR)
Input Sensitivity .....................................................................................................400 mV
TUNER SECTION
Tuning Range .......................................Fed875 108 edHz(100kHzsteps]
.........................................................................Aed 830 1700 kHz (10 kHz steps)
26 dB Qu eting Sensitivity .........................................................................Fed20 dB
2B dB Qu eting Sensitivity ............................................................Aed 31B2 pV/m
Imige Rejection R_do .................................................................................Fed25 dB
..................................................................................................................................Aed 28 dB
IF Rejection Rao ............................................................................................Fed60 dB
..................................................................................................................................Aed 24 dB
Sign_1to Nose R_tio ....................................................................................Fed60 dB
..................................................................................................................................Aed 40 dB
Aed Supprsssion Ratio .................................................................................Fed30 dB
Harmonic Distortion ............................................................................Fededono 3%
.........................................................................................................................FedSter_o 3_
........................................................................................................................................Aed 5%
Frsquency Response .........................................Fed180 Hz 10 kHz / +6 dB
Sterso Sepmstion .........................................................................Fed26 dB (1 kHz)
9tersoThrsshold .........................................................................................Fed235 dB
DVD SECTION
Laser Type ................................................................................................Ser'l conduc ol
Dsc D _rnetm ..............................................................................................12cm / 8cm
Vdeo Decoding ..................................................................................................edPEG 2
Vdeo DAC ................................................................................................................10 Bis
Signal System ...............................................................................................PAL / NTSC
Vdeo Format .....................................................................................................4:3 / 16:9
Vdeo S/N ...........................................................................................$6 dB (minimum)
CompositeVideo Output ................................................................10Vp p, 75 _
S Video Output .............................................................................Y 1OVp p, 75 _
...........................................................................................................C 0286Vp p, 75 _
Audio DAC ...........................................................................................24 Bits / 96 kHz
Frequency Response .................................................4 Hz 20 kHz (441 kHz)
...................................................................................................4 Hz 22 kHz (48 kHz)
...................................................................................................4 Hz 44 kHz (96 kHz)
m Bital Output ..................................................................SPDIFCoaxial & Opticll
HISCELLANEOUS
Power Supply Rating.............................................................................120 V / 60 Hz
Power¸Consumption ...........................................................................................160 W
Dimensions (w x h x d) ...................................435 mmx 78 mmx 360 mm
.....................................................................................................171x31x142(nch)
Weigh ............................................................................................................................71 k4
..........................................................................................................................1562 pounds
IR REMOTE CONTROL
Effective _mge .................................................................................................> 8 edeter
Number ¸of Keys ..............................................................................................................45
B_tery (1 SV) ........................................................................................................AA x 2
SPEAKERS
Front speakers / Center speaker
System ........................................................................................................1 way shieded
Impedance ........................................................................................................................4 _
Speaker¸ drivers ............................................................................................3" full range
Dimensions (w x h x d) ........................................90 mmx 90 mmx 90 mm
...........................................................................................................38 x 3S x 3S (inch)
Weight .............................................................................................................045 kg/each
.................................................................................................................099 pounds/each
Rear (surround) speaker
System ........................................................................................................1 way slniedad
mpedance ........................................................................................................................4 _
Speaker drivers ............................................................................................3" full rm'ge
Dimensions (w x t, x d) ........................................90 mmx 90 turn x 90 mm
...........................................................................................................38 x 3S x 3S (ir'ch)
Weight .............................................................................................................045 kg/each
.................................................................................................................099 pounds/each
SUBWOOFER
Subwoofel (not magneticzly shelded design) ............................................65"
Output power¸¸ .................................................................................75W (4 _;_,DIN)
THD ..............................................................................................................I0%_t 80 Hz
Reprx_duction fl_quency r_sponse ..........................................30 Hz 180 Hz
Phase switch ............................................................................................................0%180°
Input sensitivity (Subwoofe_ In) ..........................................................200 mV_ms
AC power¸¸ ..................................................................................................120 V / 60 Hz
Power¸Consumption ...............................................B3 W (at 1/8 Rated Power)
Dimensions (w x h x d) ................................135 mmx 338 mmx 375 mm
.....................................................................................................53 x 133 x 14 8 (inch)
Weight ...............................................................................................................................7 I<g
.............................................................................................................................154 pounds
Specifications subject to change without prior notice
22 SPECIFICATIONS
pg 01-24/LX3xxx/37-Eng 22 4/16/02, 11:04 AM
Page 23

Troubleshooting
WARNING!
Under no circumstances should you try to repair the system yourself, as this will invalidate the warranty. Do
not open the system as there is a risk of electric shock.
If a fault occurs, first check the points listed below before taking the system for repair. If you are unable to
solve a problem by following these hints, consult your dealer or service center.
Problem Solution
No power. Checl<i the AC powel cord isproperly conf,ected
No picture. Select the appropbate video input mode on tbeTV
Distorted or poor picture. Sometimes a small amoun ofipictu_e disto_ tion may appezr This is not a r'l zfunctior,
The aspect ratio of the screen The aspect _ato s fixed on the DVD disc
cannot be changed even though Dependk,g on theTV, t r'lay n_t allow you to d,a_,ge the aspecl ato
you have set theTY shape.
No sound or distorted sound. Adjust Lhe volume
No sound is heard from the Use he CENTER ÷/- or REAR J¢/ -- lo adjust the volume level
center or rear speakers. Checl<hit the centel ol r_lr sur]ound speakel s ire col,r/ected colrectly
The DVD player does not riser a _adable disc with the pl_tybacl<side facng down
start playback. Check he disc lype, color system and egonal code Check for zny scr _Lchesor smudges on
The DVD system does not respond Disconnect the power plug from the outet _nd insert 1gain
when the buttons are pressed.
The language for the sound or Hulti anguage souf,d o_ subtile isnot _corded on the DVD
subtitle cannot be changed when Ch znging the I_nguzgefor the sound o_ sub it e is p_hibited on the DVD
playing a DVD.
No image is output when a blal<esure the component is connected correct y
function is selected. PTeSSthe collect fanclion button fo_ the input sou¢ce
Considerable noise in radio _ane in the cor_c frequency
broadcasts. Connect the af,_enna
The remote control does not Point the r_mote control at the emote sensor of the unit
function. Reduce the d stance to he plzye_:
The display is dark. Press Olbl agalr/
Low hum or buzz sound. Placethe DVD system asfa_ zway as possible from electric devices with nterFe_nce
Low bass response. Check all spe ll<ers for col rect polz ity
The disc tray cannot open and P_ess_nd bod SOURCE a_,d STOP buttons [or more th_n two seconds
Checl<ifi the TV is switched or"
Checl<the video conf,ection
Cean the disc
Conf,ect the system toTVs S video input
Check hat Lhe speakers are connected coHeclly
Repl zcethe speal<_r cables
Check he spea]<e_seltings
The syslem _sinpause, slow moLion or [4st forward/revel se mode, p_ss PLAY to _sume
nolmll ply mode
Use suHound mode
the disc
Press SYSTEN MENU lo urn of[the seup menu screen
Cancel he pa_nlal conlrol radng fiJnclion or change lhe ratng level
bloistu_ h_s condensed inside the syslem Remove the disc znd leave lhe system Lu_ned on
for about at, bOU:
Roule RF (AC 3) and digffal cables away from the antenna lermin ds and wires
Fuly extend lhe FF/wi_ antenna Posi ion fo_ best r_ceplion and secure Lo awdl
ConnecL an ouldoor F['I crAM ar'tenna
Adjust the direction and posi ion fo best r_ception
_arn offthe equipment causing the noise or move }t away f_om the DVD syster'l
Placethe _nter/na [4 the_ _way fror'l the equipmen czusing the no_se
Remove any possb]e obstacles
Replace the batte_ ieswth new ones
Check lha the b_tleries are Io zded coHecdy
pg 01-24/LX3xxx/37-Eng 23 4/16/02, 11:04 AM
TROUBLESHOOTING 23
Page 24
AUDIO SYSTEM
OneYear Free Labor
OneYear Free Service on Parts
This product must be carried in for repair.
WHO IS COVERED?
YOUmust have proof of purchase to receive warranty service.A sales
receipt or other document showing that you purchased tile product
isconsidered proof of purchase.
WHAT IS COVERED?
Warranty coverage begins tile day you buy your product. For one year
thereafter, all parts will be repaired or rep{aced, and labor is h-ee.
After one year from the day of purchase, you pay for the replacement
or repair of all parts, and for all labor charges.
All parts, including repaired and replaced parts, are covered only for
the original warranty period.When the warranty on the product
expires, the warranty on all replaced and repaired parts aJso expires.
WHAT IS EXCLUDED?
Your warranty does not cover:
• labor charges for installation or setup of the product, adjustment
of customer controls on the product, and instalbdon or repair of
antenna systems outside of the product.
• product repair and/or part replacement because of misuse,
accident, unauthorized repair or other cause not within the
control of Philips Consumer Electronics Company.
• reception problems caused by signal conditions or cable or
antenna systems outside the unit.
• a product that requires modification or adaptation to enable it to
operate in any country other than the country for which it was
designed, manufactured, approved andlor authorized, or repair of
products damaged by these modifications.
• incidental or consequential damages resulting from the product.
(Some states do not allow the exclusion of incidental or
consequential damages, so the above exclusion may not apply to
you.This includes, but is not limited to, prerecorded material,
whether copyrighted or not copyrighted.)
• a product that is used for commercial or institutional purposes.
WHERE IS SERVICE AVAILABLE?
Warranty service is available in all countries where the product is
officially distributed by Philips Consumer Electronics Company. In
counu-ies where PMips Consumer Electronics Company does not
distribute the product, the local PMips service organization will
attempt to provide service (although there may be a dehy if tile
appropriate spare parts and technical manual(s) are not readily
available).
BEFORE REQUESTING SERVICE...
Please check your owner's manual before requesting service.
Adjustments of the controls discussed there may save you a service
call.
TO GET WARRANTY SERVICE IN U.S.A.,
PUERTO RICO OR U.S. VIRGIN ISLANDS...
Take the product to a Philips factory service center (see enclosed
list) or authorized service center for repair.When the product has
been repaired, you must pick up the unit at the centen Centers may
keep defective parts.
(In U.S.A., Puerto Rico and U.S.Virgin Islands, all implied warranties,
including implied warranties of merchantability and fitness for a
particular purpose, are limited in duration to the duration of this
express warranty. But, because some states do not allow limitations
on how fong an implied warranty may last, this limitation may not
apply to you.)
TO GET WARRANTY SERVICE IN CANADA...
Pleasecontact Philipsat:
1-800_661_6162 (French Speaking)
1-800-363 7278 (English Speaking)
(In Canada, this warranty is given in lieu of all other warranties. No
other warranties are expressed or implied, including any implied
warranties of merchantability or fitness for a particular purpose.
Philips is not liable under any ci_umstances for any direct, indirect.
special,incidental or consequential damages, howsoever incurred,
even if notified of the possibility of such damages.)
REMEMBER...
Please record the model and serial numbers found oil the product
below.Also, p{ease fill out and mail your warranty regisu_tion card
promptly. It will be easier for us to notify you if necessary.
MODEL # ........................................................................................................................................................................................
SERIAL# ........................................................................................................................................................................................
MAKE SURE YOU KEER..
Please keep your sales receipt or other document showing proof of
purchase.Attach it to this owner's manual and keep both nearby.Also
keep the original box and packing material in case you need to return
your product.
Phillps Service Solutions Group, RO. Box 2976_ Longview_Texas 75606, USA, (903) 242-4800
EL4965E006/ MAC 4110 / E_98
24
pg 01-24/LX3xxx/37-Eng 24 4/16/02, 11:04 AM
 Loading...