

Page 1
Page 2
IVllA VOX "
Smart.Verysmart:
MAGNAVOX
Smart.Verysmart:
Congratulations on your purchas
-and welcome to the "family!"
Dear MAGNAVOX product owner:
Thank you for your confidence in MAGNAVOX. You've selected one of the
best-built, best-backed products available today. And we'll do everything in
our power to keep you happy with your purchase for many years to come:.
As a member of the MAGNAVOX "family," you're entitled to protection by
one of the most comprehensive warranties and outstanding service
nel_orks in the industry.
What's more, your purchase guarantees you'll receive all the information
and special offers which you qualify for, plus easy access to accessories
from our convenient home shopping network.
And most important of all, you can count on our uncompromising
commitment to your total satisfaction.
All of this is our way of saying welcome-and thanks for investing in a
MAGNAVOX product.
Sincerely,
Robert Minkhorst
President and Chief Executive Officer
P.S. Remember, to get the most from your MAGNAVOX product,
you must return your Warranty Registration
Card within 10 days. So please mail it to us right now!
Page 3
SAFETYINSTRUCTIONS- Readbeforeoperatingequipment
Thisproductwas designedand manufacturedto meetstrict qualityand
safet7standards.Thereare, however,someinstallationand operation
prec_;utionswhichyoushouldbeparticularlyawareof.
1. Read Instructions - All the safetyand operatinginstructions should
be read beforethe appliance is operated.
2. Retain Instructions - The safety and operating instructions should
be retained for future reference.
3. Heed Warnings- All warnings on the applianc_and in the operating
instructions should beadhered to.
4. Follow Instructions - All operating and use instructions should be
followed.
5. Water and Moislure - The applianceshould not be used nearwater
- for example, near a bathtub, washbowl, kitchen sink, laundry tub,
in awet basement or nearaswimming pool, etc.
6. Carts and Stands- The applianceshould be usedonly with a cart or
stand that is recommendedbythe manufacturer.
HA. _ An appliance and cart combination should be moved
with care. Quick stops, excessive force, and uneven
su_'facesmay causethe applianceand cart combination
to overturn.
7. Wall or Ceiling Mounting - The appliance should be mounted to a
wall or ceiling only asrecommended by the manufacturer.
8. Ventilation - The appliance should be situated so that its location or
position does not interfere with its proper ventilation. For example,
the appliance should not be situated on a bed, sofa, rug, or similar
surface that may block the ventilation openings; or, placed in a
built-in installation, such asa bookcaseor cabinetthat may impede
the flow of air through the ventilation openings.
9. Heal - The appliance should be situated away from hear sources
such as radiators, heat registers, stoves, or other appliances
(including amplifiers) that produceheat.
10. Power Sources - The appliance should be connected to a power
supply only of the type described in theoperating instructions or as
markedon the appliance.
11. Power-Cord Protection - Power supply cords should be routed so
that they are not likely to be walked on or pinched by items placed
upon or agair_st them, paying particular attention to cords and
plugs, convenience receptacles, and the point where they exit from
the appliance.
12. Cleaning - The appliance should becleaned only as recommended
bythe manufacturer.
13. Power Lines - An outdoor anterna should be located away from
power lines.
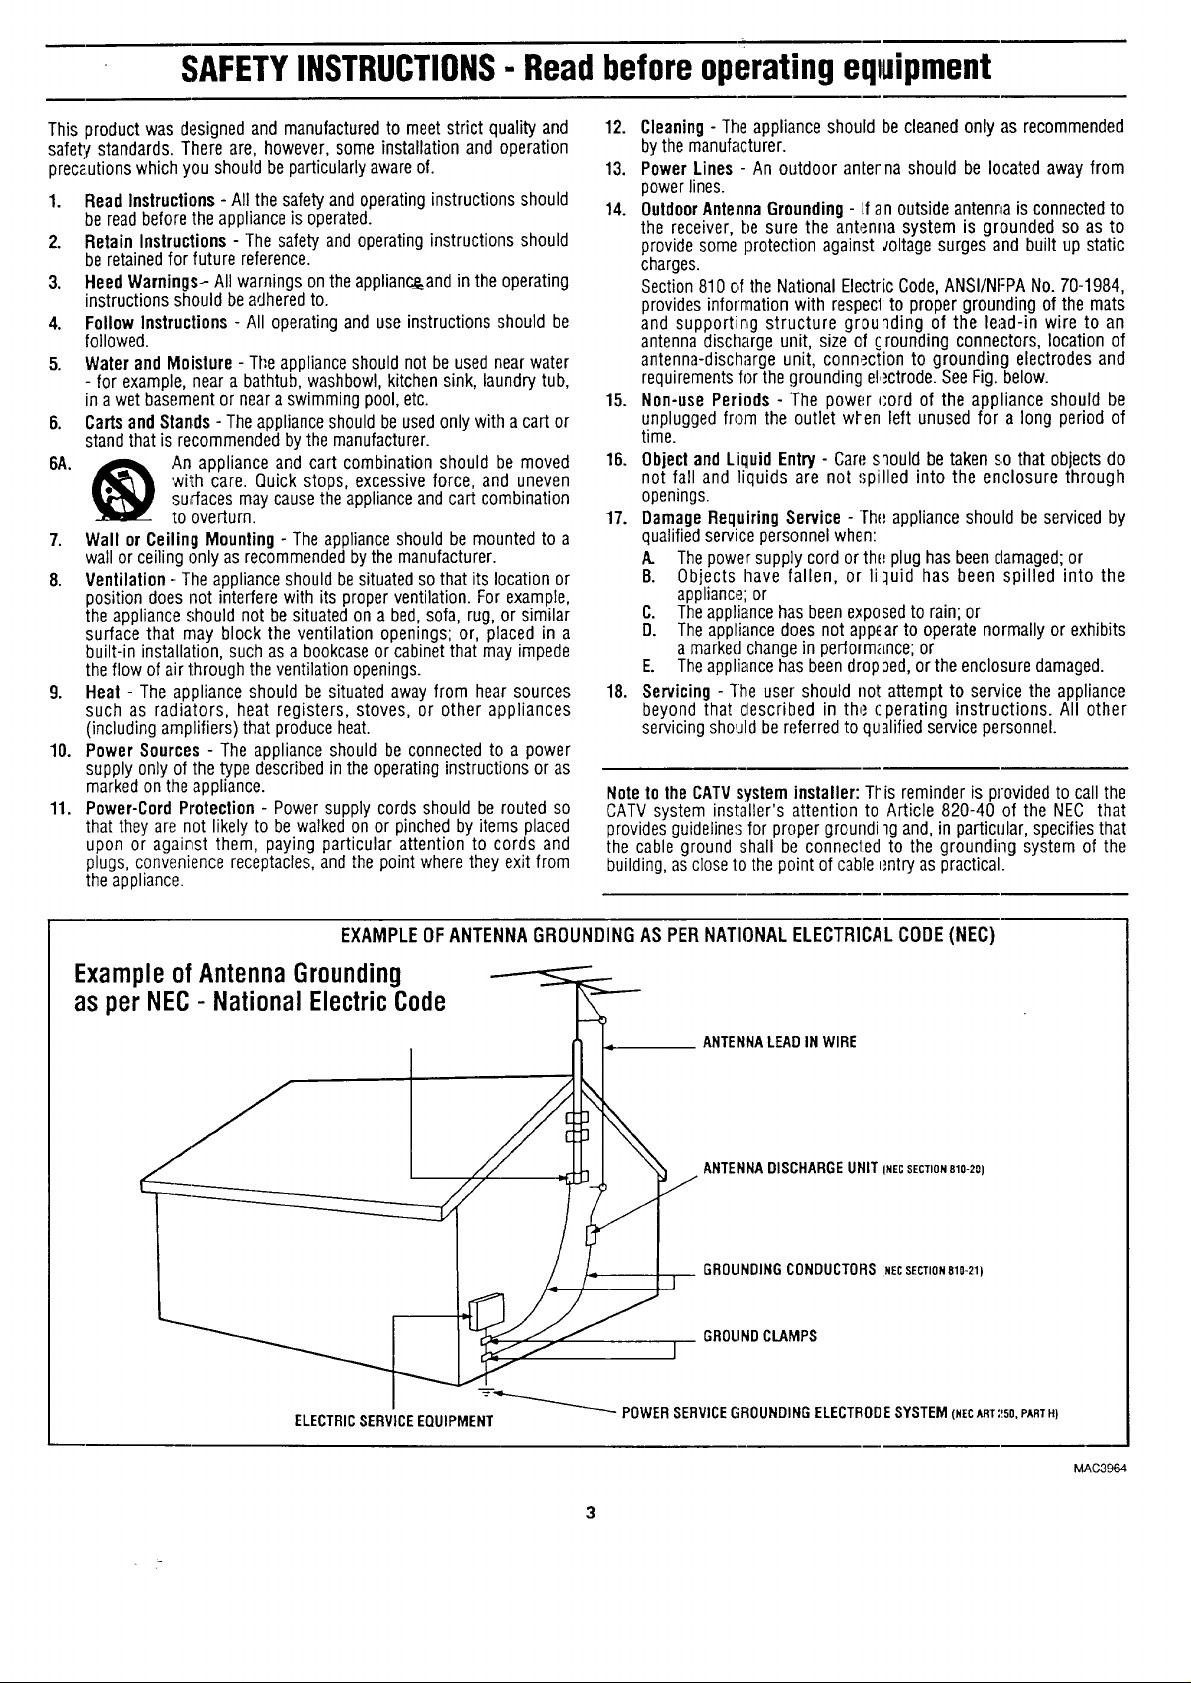
14. OutdoorAntennaGrounding- If anoutsideantenna is connectedto
the receiver, be sure the antenna system is grounded so as to
provide some protection against _oltagesurges and built up static
charges.
Section 810 of the National Electric Code,ANSI/NFPANo. 70-1984,
provides informationwith respecl to proper grounding of the mats
and supportin, g structure grounding of the lead-in wire to an
antenna discharge unit, size of _rounding connectors, location of
antenna-discharge unit, connection to grounding electrodes and
requirementsfor thegrounding el,)ctrode. See Fig.below.
15. Non-use Periods - [he power q,ord of the appliance should be
unplugged from the outlet wlen left unused for a long period of
time.
16. Object and Liquid Entry - Care s_ould be taken so that objects do
not fall and liquids are not spilled into the enclosure through
openings.
17. Damage Requiring Service -rhe_ applianceshould be serviced by
qualified service personnel when:
A. Thepower supply cord or th{_plug has been damaged;or
B. Objects have fallen, or li:luid has been spilled into the
appliance;or
C. Theappliance has beenexposed to rain; or
D. The appliance does not appearto operate normally or exhibits
a marked changein peflorm_Lnce;or
E. Theappliancehas beendropped, or theenclosure damaged.
18. Servicing - The user should not attempt to service the appliance
beyond that clescribed in the cperating instructions. All other
servicing sho!JIdbe referredto qualified service personnel.
Note to the CATVsysteminstaller: Tl'is reminder is provided to callthe
CATVsystem installer's attention to Article 820-40 of the NEC that
provides guideline'.;for proper groundi lg and, in particular, specifiesthat
the cable ground shall be connected to the grounding system of the
building, asclose to the point of cable_;ntryas practical.
EXAMPLE OF ANTENNA GROUNDING AS PER NATIONAL ELECTRICAL CODE (NEC)
Exampleof AntennaGrounding
as perNEC- National ElectricCode
ELECTRICSERVICEEQUIPMENT
ANTENNALEADIN WIRE
ANTENNADISCHARGEUNITINECSECTIONB10-20)
GROUNDINGCONDUCTORSNECSECTION810-21)
GROUNDCLAMPS
J
--_ POWERSERVICEGROUNDINGELECTI_ODESYSTEM(NECART:!50,PARTH)
MAC3964
Page 4
_,_ Getting Started
Safety/Precautions ..................................................... 3
Table of Contents ....................................................... 4
Features and Model Information................................ 5
Welcome/Product Registration ................... 2
__] On-Screen Feat_re_;
PICTURE MENU
+Adjusting Color, Brightness, Sharpness,
Tint, and Picture Controls ................................... 6
+Using the Clearview Control ............................... 7
<>Adjusting the TV's Convergence Control ........... 8
<>Using the Flesh Correction Control .................... 9
+Ghost Cancellation Feature Information ............. 9
FEATURES MENU
+ Selecting a Picture Source ................................ 10
"_Setting the TV for Closed Captioning ............... 11
"<>Settingthe TV for Cable or Antenna Signals....12
'_Adding Channels in Memory (Automatically). 13
+Adding Channels in Memory (Manually) ......... 14
+Setting the TV Clock and Turn-On Timer ........ 15
+.'getting the Alternate Channel Control .............. 16
+Using the Sleep Timer Control ......................... 16
<>Adjusting the Channel Display Control ............ 17
+_Jsing the Time/Channel Reminder Control ...... 17
+Using Parental Control to Censor Channels 18-19
Remote _ontrol Operation
Using the Remo':e Locator Feature ........30-31
Setting the Smalt Picture Control .......... 32-33
Using Smart Sound Control ..................................... 34
Using the Channel Gu.id_ Control ............................ 35
Setting the Remote to Work VCRs .................... 36-37
Setting the Remote to _,'ork
Cable TV Converters ........................................... 38-39
Setting the Remote to Work VCRs or(;able
Converters - "Search Method". ................................. 40
Using the Remote's VCR buttons ............................ 41
___ Picture-In-Picture (PIP)
How to Use PII:'(Connections) ............. 42-43
How to Use PIP with the TV Remote ................ 44-45
Selecting the Picture Source for PIP ........................ 46
Adjusting Picture-in-Picture Color and Tint ............ 47
More PIP Connections (Cable Converter) ............... 48
General Inti_rmation
TV Help Menu ........................................... 49
Accessory RF Switcher Information ........................ 49
Tips if Something Isn't Working ............................. 50
Glossary of TV Terms ............................................. 51
Index ........................................................................ 52
Factory Service Locations .................................. 53-54
Wan'anty .................................................................... 55
Accessories .............................................................. 56
SOUND MENU
+Adjusting Bass, Treble, and Balance Sound
Controls .............................................................. 20
+Setting the Bass Boost Control ........................ 20
+ Setting the TV for Stereo and SAP Programs ..21
+ Using the Stereo Surround Control ................... 22
+Using the Volume Display Control ................... 22
<>Using the TV Speaker On/Off Control with
the Audio Output jacks ..................................... 23
<>SurroundSound Speaker Connections and
Variable AuAio Output Control ................... 24-25
+Using the "lW's Audio/Video Input and
Output Jack.,; ............................................... 26-29
Use the simple Se:-Up Guide (supplied with
your TV information packet) for details on:
• Antenna Hook-aps
• First Time Set:Up
(Automatic Settings)
• Basic TV and Remote
Control Operat] on
• On-Screen Menu Use
Copyright © 1995 Philips Consumer Electronics Company. All rights reserved.
Page 5
First Time Set 12p which automatically sets the TV
for local channel.,; and the correct picture signal
(antenna or cable). It even helps you make the
necessary connections for the Picture-In-Picture (PIP)
feature.
Infrared Remote Control which operates your TV
set and a variety of wireless-remote control V-_Rs and
Cable TV Converters. A special "Locator" feature can
also help you find the remote when it has been stuck
out of sight or misplaced.
Standard TV broadcast (VHF/UHF) or Cable TV
(CATV) channel capability.
As you unpack you:: TV please note that the
following items have been included with your set:
• Owner's Manual
• Warranty Registration Card
• Safety Tip Information
• Factory Service Center Address Listings
• Remote Control Transmitter
• Batteries for Remote Control Use
• Audio/Video Cables for Direct Input and
Output Connections.
Closed Captioning which allows the viewer to read
TV program dialogue or voice conversations as on-
screen text.
Automatic Programming of channels for quick and
easy selection of favorite stations available in your
area.
Picl:ure-In-Picture (PIP) which can show a TV
program and the direct video output from an accessory
(VCR, etc.) onto the "IV screen at the same time.
Parental Control for "Censoring" or blocking out
channels to keep children from watching undesireable
programming
Stereo-Ready TV with built-in audio amplifier and
twin speaker sysr.em. Receives TV programs in both
broadcast stereo sound or (SAP) bilingual broadcast.
On-Screen Features which display helpful
information for the setting of TV controls (such as
help messages, operating tips and glossaries).
Au,rlio/Video jacks for direct connections with VCRs
(and other accessories) for quality TV picture and
sound playback.
Please take a few minutes to complete your
registration card. The serial number for the TV is
on the back of the set.
To ensure that picture screen performance is of
the highest quality, please avoid nabbing any
object or material on the screen that could scratch
or damage its su;face.
Refer to the back of this manual for instructions
cn the cleaning and care of the TV.
Surround Sound external audio speaker connections.
Sleep-Timer which automatically turns the TV OFF at
preset time intervals.
Smart Sound for the control of TV volume levels
during program changes or commercial breaks.
Smart Picture allows you to choose from a list of TV
video control categories set for a variety of viewing
conditions and program sources.
Clock Timer feature which can turn ON the TV at
an)' preset time - just like an alarm clock.
Page 6
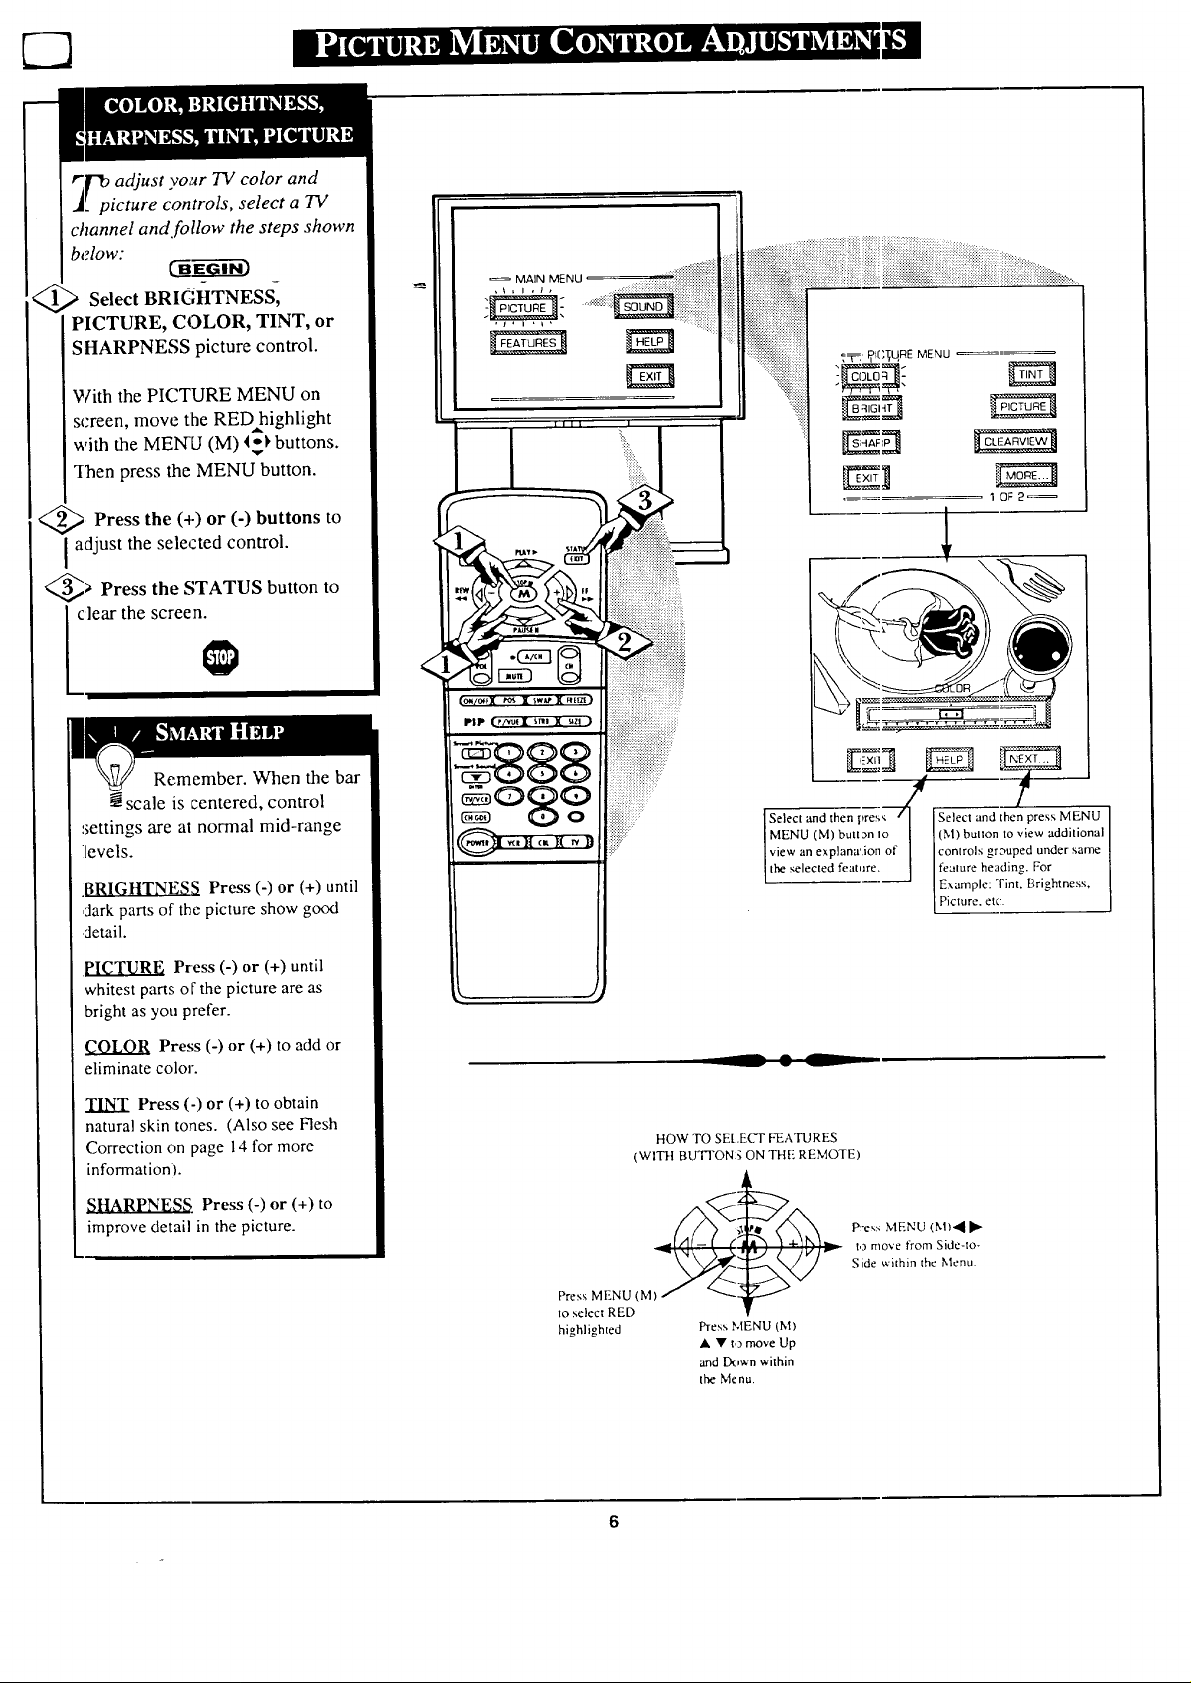
channel and follow the steps shown
below:
Select BRIGHTNESS,
PICTURE, COLOR, TINT, or
SHARPNESS picture control.
With the PICTURE MENU on
screen, move the RED highlight
with the MENU (M) 'IT')'buttons.
q-hen press the MENU button.
<_ Press the (+) or (-) buttons to
adjust the selected control.
_> Press the STATUS button to
clear the screen.
rl
Remember. When the bar
scale is centered, control
settings are at normal mid-range
ilevels.
BRIGHTNES_ Press (-) or (+) until
,:larkparts of the picture show good
detail.
PICTURE Press (-) or (+) until
whitest parts or the picture are as
bright as you prefer.
COLOR Press (-) or (+) to add or
eliminate color.
TINT Press (-) or (+) to obtain
natural skin tones. (Also see Flesh
Correction on page 14 for more
information).
SHARPNE,.g_, Press (-) or (+) to
improve detail in the picture.
[ he selec ed lea ,are. j feature heading. For
-- _k, --
HOW TO SEt.ECT FEATURES
(WITH BUT]'ON gON THE REMOTE)
__ -e'.:_MENU (N1)'4II_
Press N1ENU (M)
to select RED
highlighted Press MENU (M)
• • t,) move Up
and Down within
the Menu.
Select and then pres,; /I Select and then press MENU
MENU (M) butt3n _o _ I (M) buuon to view additional
view an explana'.ion of [ controls gr3uped under same
IExample: Tint. Brightness,
P cture, etc.
t,3move from Side-to-
Side v,.'ithin the Menu.
6
Page 7
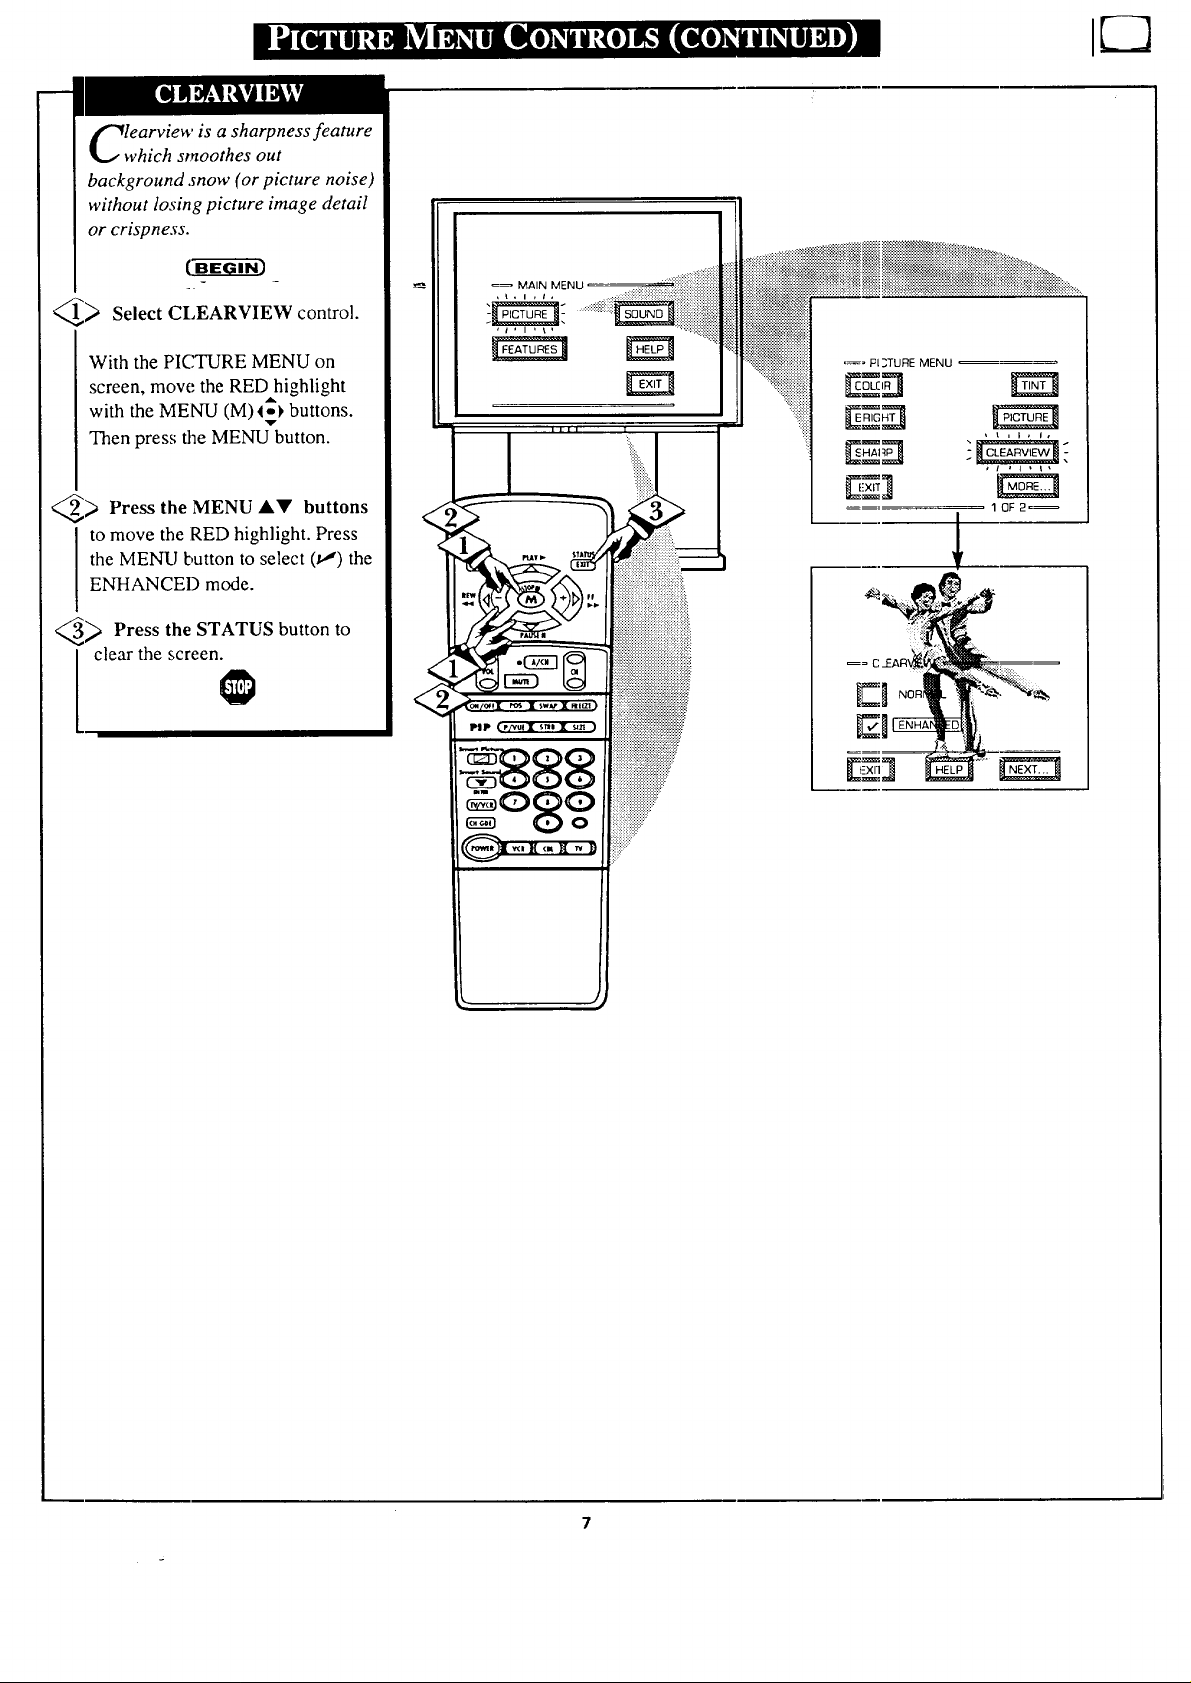
learview is a sharpness feature
which smoothes out
background snow (or picture noise)
without losing picture image detail
or crispness.
€_
Select CLEARVIEW control.
With the PICTURE MENU on
screen, move the RED highlight
with the MENU (M) _ buttons.
Then press the MENU_button.
) Press the MENU AV buttons
to move the RED highlight. Press
the MENU button to select (,_) the
ENHANCED mode.
_ Press the STATUS button to
clear the screen.
MAIN MENU
Page 8
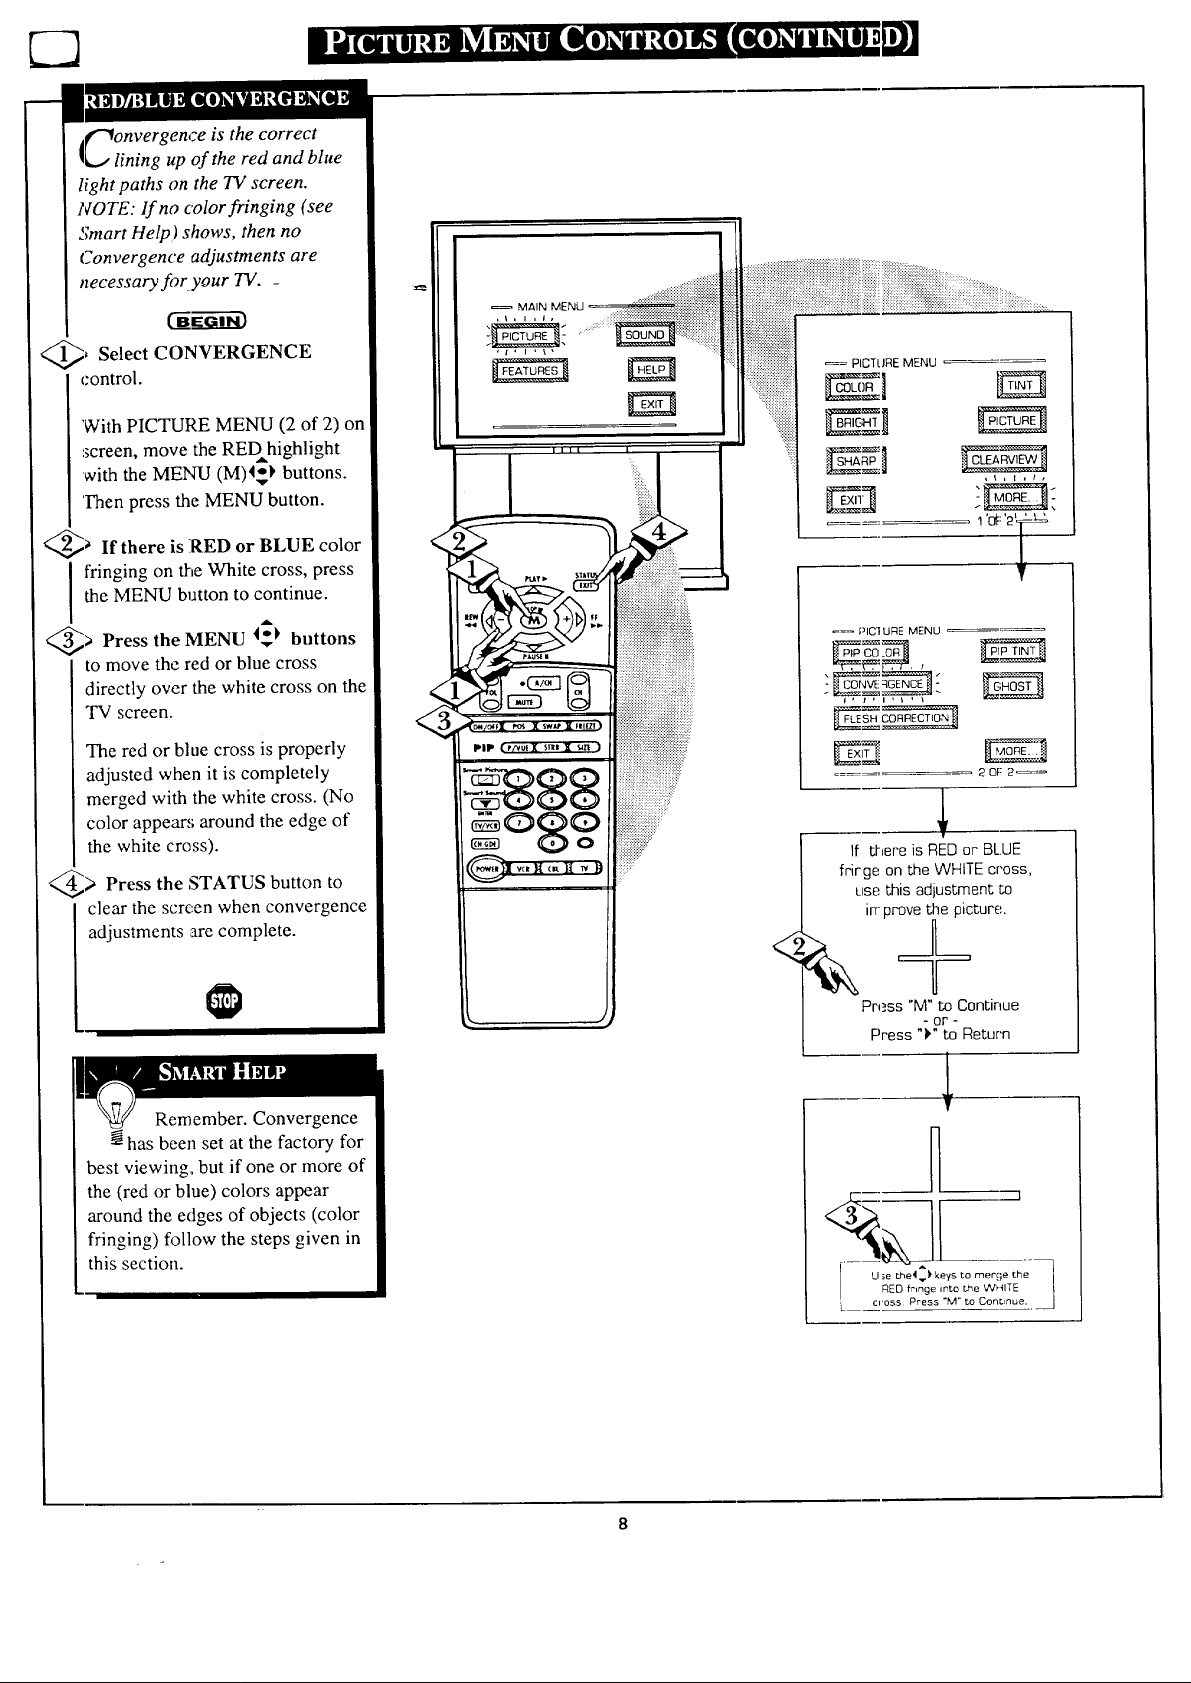
l_€"_onvergence is the correct
L., lining up of the red and blue
light paths on the TV screen.
NOTE: If no color fringing (see
Smart Help) shows, then no
Convergence adjustments are
necessary fi)r your TV. _
@) Select CONVERGENCE
control.
'With PICTURE MENU (2 of 2) on
screen, move the REDhighlight
with the MENU (M)4_I, buttons.
Then press the MENU button.
@a If there is RED or BLUE color
the MENU button to continue.
fringing on the White cross, press
@> Press the MENU I_) buttons
to move the red or blue cross
directly over the white cross on the
TV screen.
The red or blue cross is properly
adjusted when it is completely
merged with the white cross. (No
color appear,; around the edge of
the white cross).
@> Press the STATUS button to
clear the scre,en when convergence
adjustments :arecomplete.
PICTURE MENU
_ PICIURE MENU
9
PiP
If there is RED or BLUE
frirge on the WHITE cross,
use this adjustmen_ to
in-prove the picture.
<
Remember. Convergence
has been set at the factory for
best viewing, but if one or more of
the (red or blue) colors appear
around the edges of objects (color
fringing) follow the steps given in
this section.
. J
Press "M" to Continue
= or -
Press ")" to Return
LI _E_flng?_tSo the Wi_ITE
[ ccoss Press "M" _o Continue.
)
Page 9
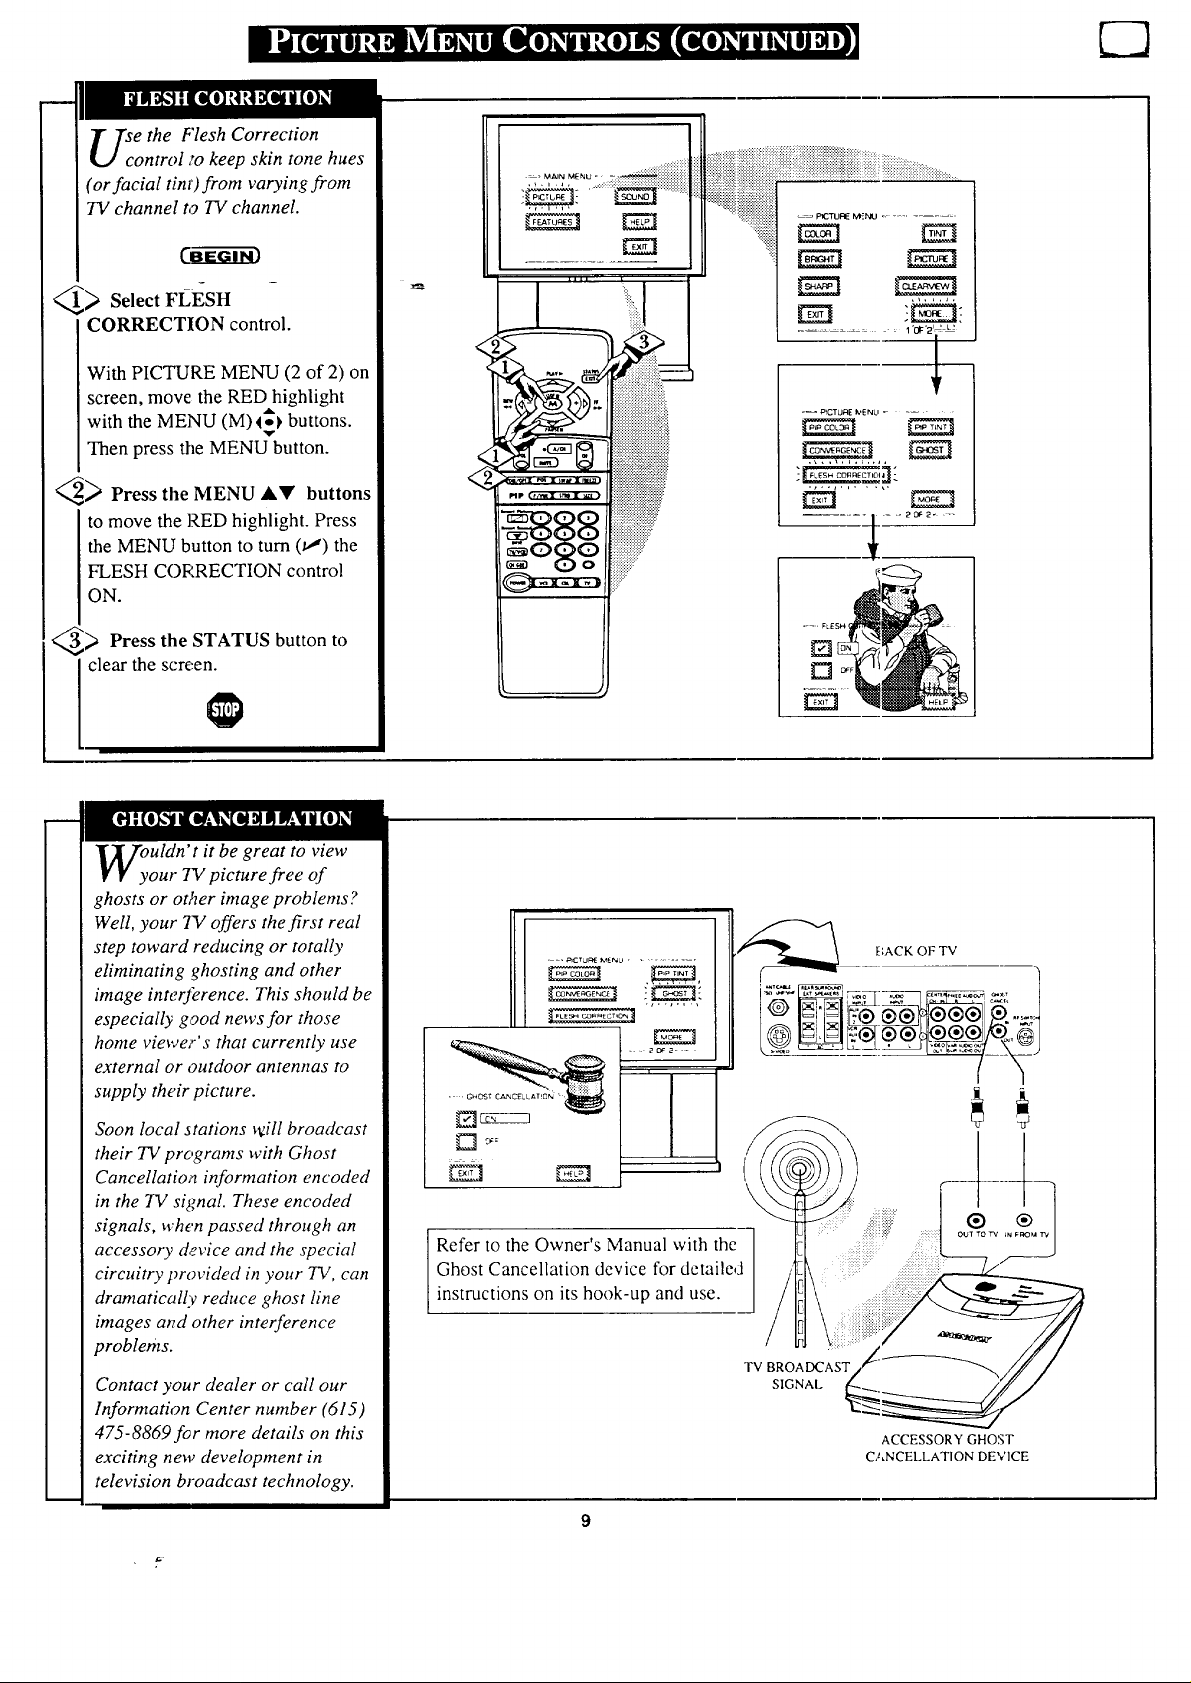
e the Flesh Correction
ontroI ,'o keep skin tone hues
(or facial tint) from varying from
TV channel to TV channel.
_ Select FLESH
CORRECTION control.
....... E..... -_:::,:_:_iiiiiiiiiiiiiiiiiiii_
._,, J,. ======================================================
._. ' _ ::::::::_:_:_
",,. ,i, "
.... ....... I '01:'2'--'l'
With PICTURE MENU (2 of 2) on
screen, move the RED highlight
with the MENU (M) I_) buttons.
Then press the MENU button.
_ Press the MENU AY buttons
to move the RED highlight. Press
the MENU button to turn (v,") the
FLESH CORRECTION control
ON.
_ Press the STATUS button to
clear the screen.
uldn' t it be great to view
our TV picture free of
ghosts or ot,_er image problems?
Well, your 7V offers the first real
step toward reducing or totally
eliminating ghosting and other
image interference. This should be
especially good news for those
home viewer's that currently use
external or outdoor antennas to
supply their picture.
t •
,=-_cruR_ _eNu ..........
!
_-- PICTURE IV,ENLI ....
,,r "_h_._ \ BACK OF TV
Soon local stations _ill broadcast
their TV programs with Ghost
Cancellatio,_ information encoded
in the TV signal. These encoded
signals, when passed through an
accessory device and the special
circuitry provided in your TV, can
dramatically reduce ghost line
images at_d other interference
problems.
Contact your dealer or call our
Information Center number (615)
475-8869 f_r more details on this
exciting new development in
television broadcast technology.
;ZJ
Refer to the Owner's Manual with the
Ghost Cancellation device for detailed
instructions on its hook-up and use.
TV BROADCAST
SIGNAL
ACCESSORY GHOST
CANCELLATION DEVICE
Page 10
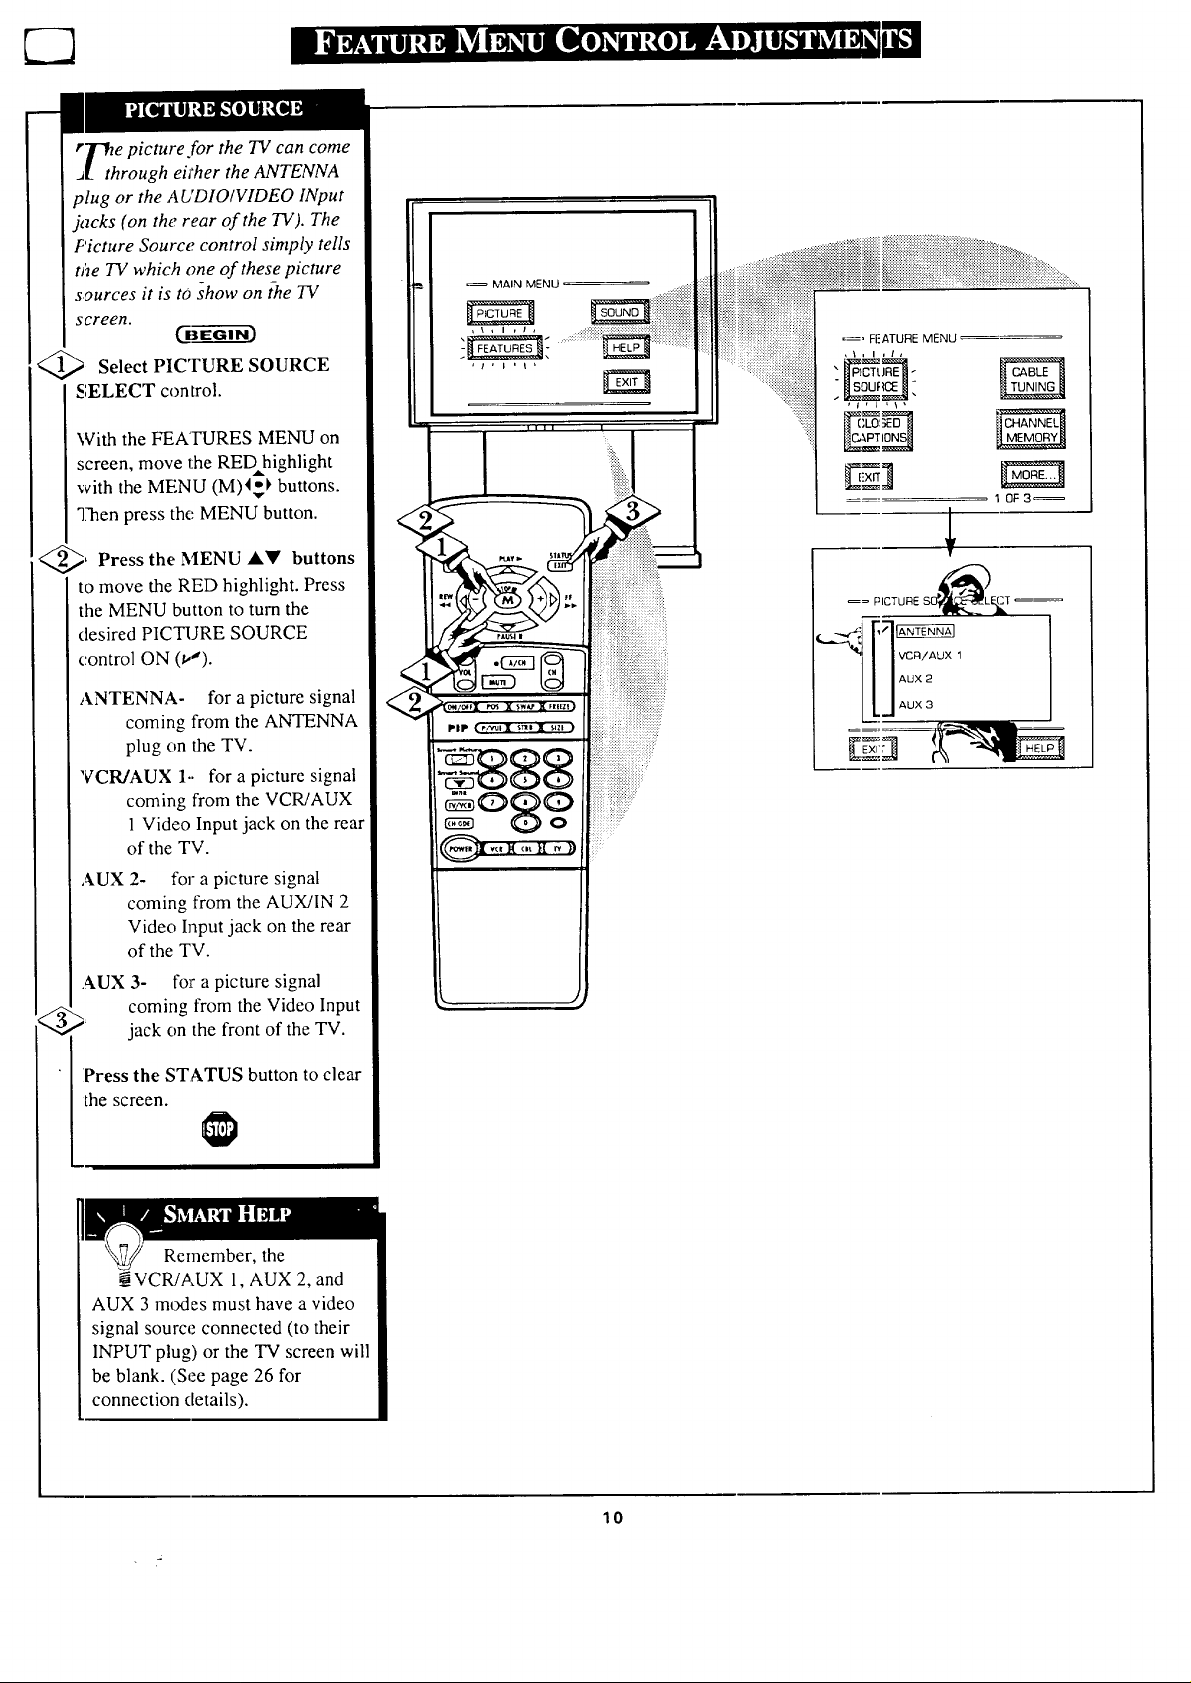
rTfie picture (or the TV can come
J. through eft'her the ANTENNA
plug or the AUDIO/VIDEO INput
jacks (on the rear of the TV). The
Picture Source control simply tells
the TV which one of these picture
sources it is to show on ihe 1V
screen.
,-€t
MAIN MENU
<_ Select PICTURE
SOURCE
SELECT control.
With the FEA'IVRES MENU on
screen, move the RED highlight
with the MENU (M)4_ buttons.
"]7henpress the MENU button.
Press
_, the MENU Al!' buttons
to move the RED highlight. Press
the MENU button to turn the
desired PICTURE SOURCE
control ON (u").
ANTENNA- for a picture signal
coming from the ANTENNA
plug on the TV.
VCR/AUX 1.. for a picture signal
coming from the VCR/AUX
1 Video Input jack on the real
of the TV.
AUX 2- for a picture signal
coming from the AUX/IN 2
Video Input jack on the rear
of the TV.
AUX 3- fo_"a picture signal
till I
10F3_
_,2, _ coming from the Video Input
jack on the front of the TV.
Press the STATUS button to clear
the screen.
Remember, the
__VCR/AUX 1, AUX 2, and
AUX 3 modes must have a video
signal source connected (to their
INPUT plug) or the TV screen will
be blank. (See page 26 for
connection details).
10
Page 11
i QI_;It ill _! Ollk_I _I llLl)I*)_i i "{I) &'l[i[e)_i i l_iO) _ I]J
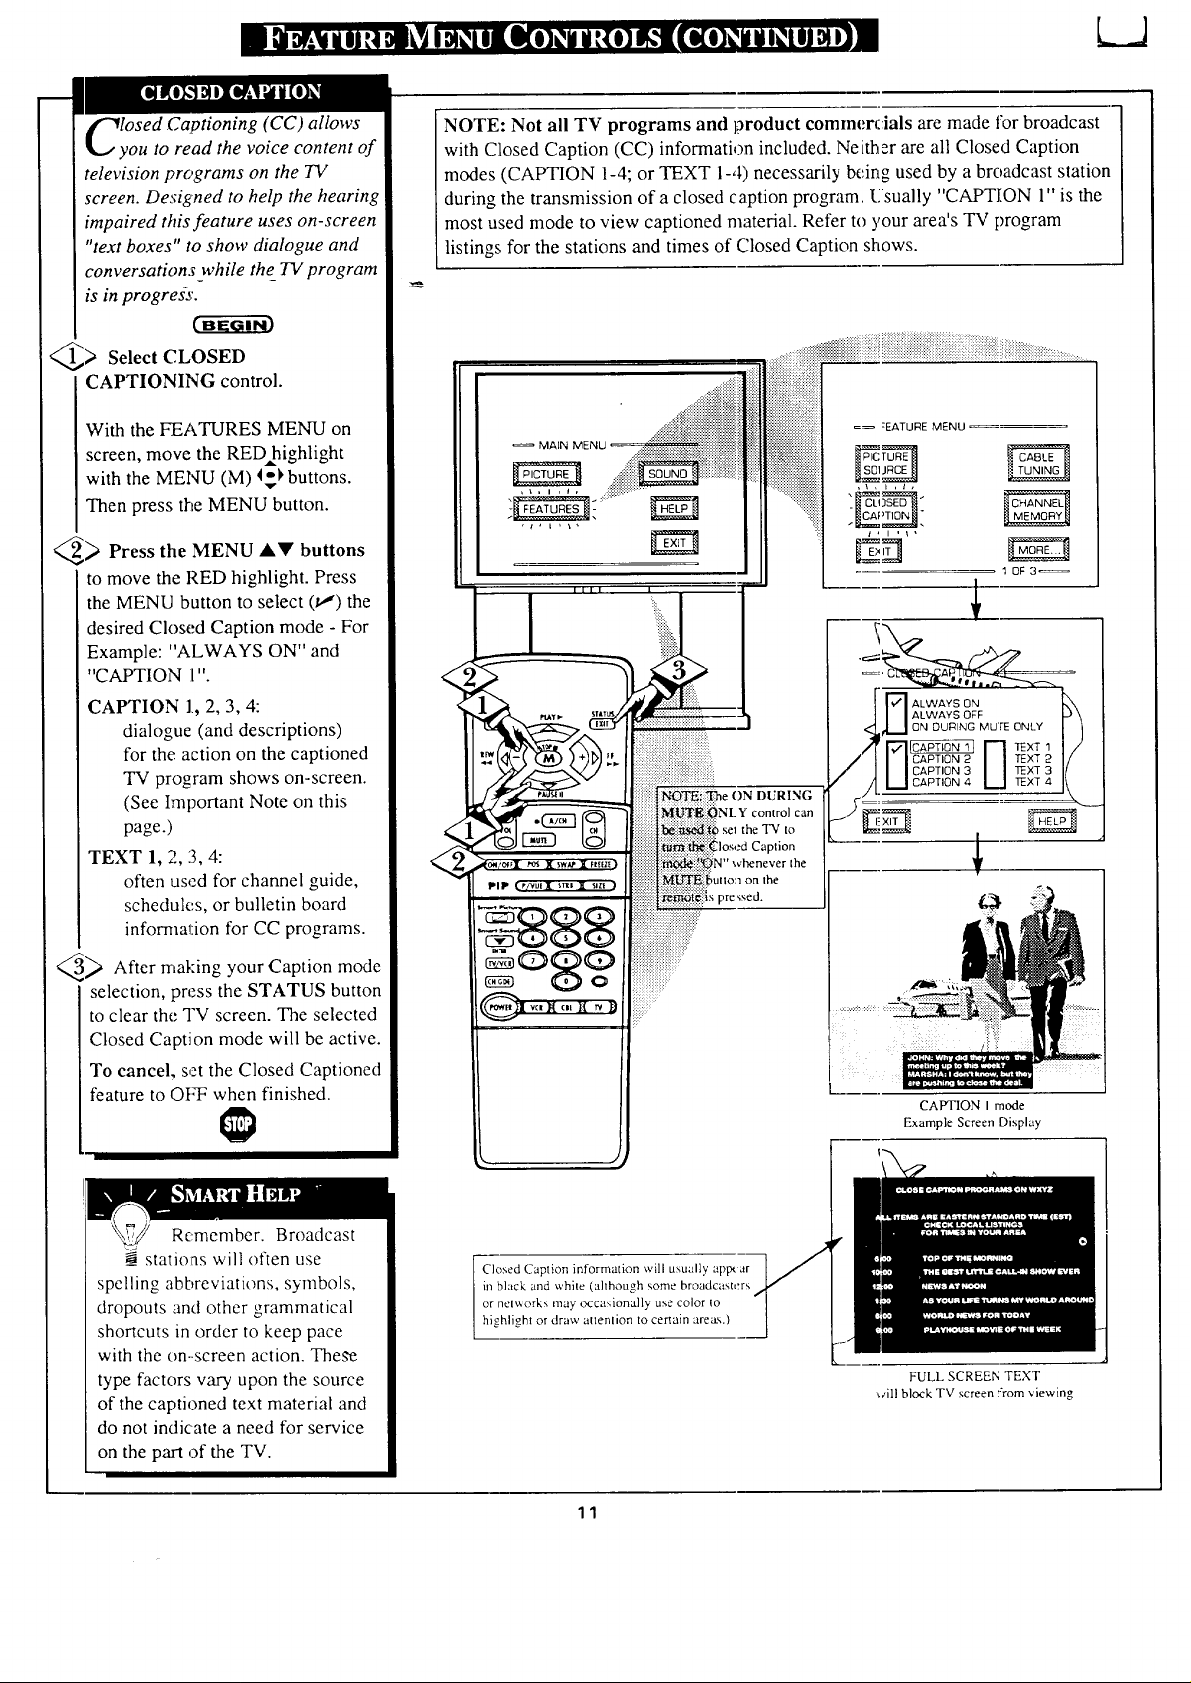
losed Captioning (CC) allows
ou to read the voice content of
television programs on the TV
screen. Designed to help the hearing
impaired this feature uses on-screen
"text boxes" to show dialogue and
conversations while the_TV program
is in progress.
_) Select CLOSED
CAPTIONING control.
With the FEATURES MENU on
screen, move the RED highlight
with the MENU (M) I_ buttons.
Then press the MENU button.
Press
_ the MENU AV buttons
to move the RED highlight. Press
the MENU button to select (_') the
desired Closed Caption mode - For
Example: "ALWAYS ON" and
"CAPTION l ".
CAPTION 1.,2, 3, 4:
dialogue (and descriptions)
for the action on the captioned
TV program shows on-screen.
(See Important Note on this
page.)
TEXT 1, 2, 13,4:
often used for channel guide,
schedules, or bulletin board
information for CC programs.
Q_ After making your Caption
selection, press the STATUS button
to clear the TV screen. The selected
Closed Caption mode will be active.
To cancel, s,zt the Closed Captioned
feature to Ot'T' when finished.
-N--OTE:Not all TV programs and product commerdals are made for broadcast
with Closed Caption (CC) information included. Neither are all Closed Caption
modes (CAPTION 1-4; or TEXT 1-4) necessarily being used by a broadcast station
during the transmission of a closed caption program. E sually "CAPTION 1" is the
most used mode to view captioned material. Refer to 3,our area's TV program
listings for the stations and times of C.losedCaption shows.
=_ :EATURE MENU
MAIN
<
<
mode
CAPTION I mode
Example Screen Display
Remember. Broadcast
stations will often use
spelling abbreviations, symbols,
dropouts and other grammatical
shortcuts in order to keep pace
with the on-.screen action. These
type factors vary upon the source
of the captioned text material and
do not indicate a need for service
on the part of the TV.
Closed Caption information will usually aplx ar
m black and white (ahhough some broadcasters
or networks may occasionally use color to
highlight or draw attention to certain arez,_s.)
FULL SCREEN TEXT
_¢illblock TV screen ::rom viewing
11
Page 12
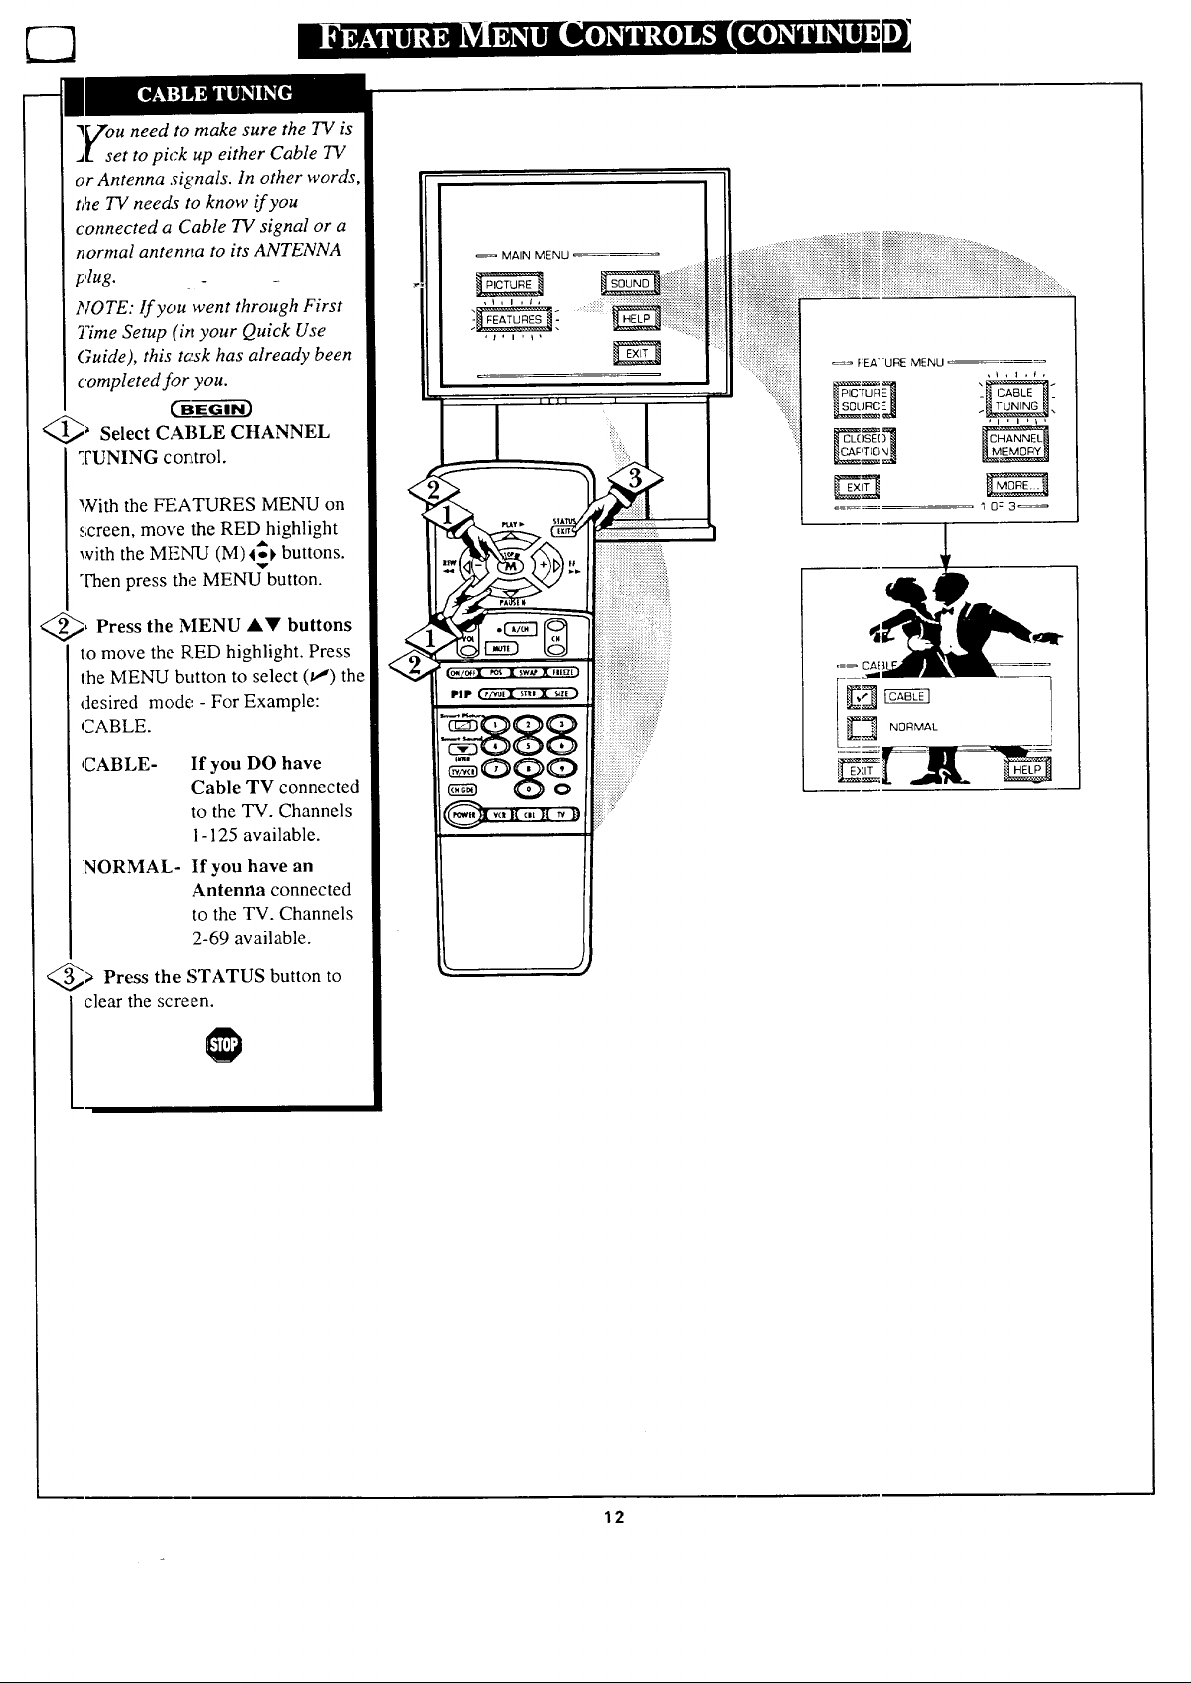
l_/'ou need to make sure the TV is
J_ set to pick up either Cable TV
or Antenna si@nals. In other words
t_e TV needs to know if you
connected a Cable 73/signal or a
normal antent_a to its ANTENNA
plug. _ _
NOTE: If you went through First
77me Setup (in your Quick Use
Guide), this tc_sk has already been
completed for you.
C_EG---ffi-_
_ Select CABLE CHANNEL
TUNING corttrol.
MAIN MENU
_= F:EA"URE MENU
, i i i , _ I
With the FEATURES MENU on
screen, move the RED highlight
with the MENU (M)4_1, buttons.
Then press the MENU button.
_, Press the MENU A_' buttons
to move the RED highlight. Press
1he MENU button to select (m') the
desired mode - For Example:
CABLE.
CABLE- If you DO have
Cable TV connected
to the 'IV. Channels
1-125 available.
NORMAL- If you have an
Antenna connected
to the TV. Channels
2-69 available.
_> Press the STATUS button to
clear the screen.
1 0:3_
<
"4
12
Page 13
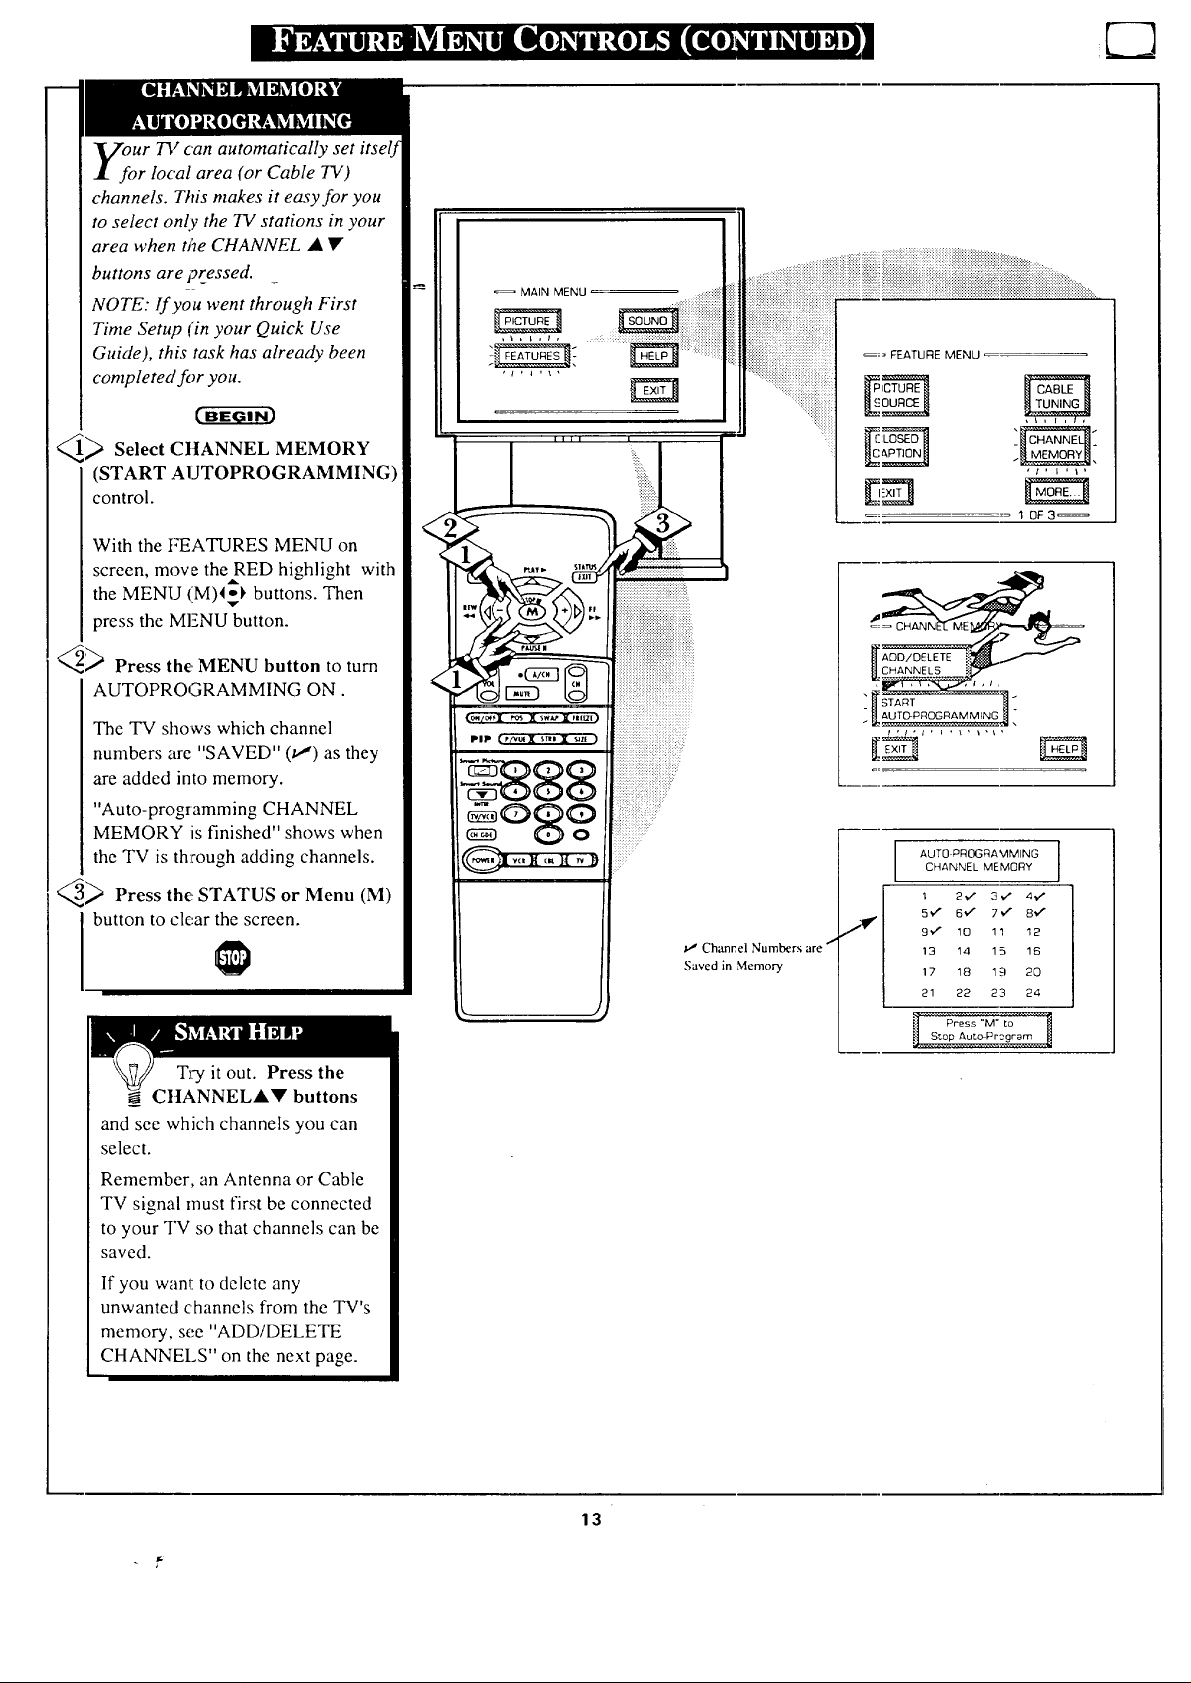
Ur TV can
r local area (or Cable TV)
channels. This makes it easy for you
to select only the TV stations in your
area when the CHANNEL • •
buttons are pressed. _
NOTE: If you went through First
Time Setup (in your Quick Use
Guide), this task has already been
completed for you.
c-ffg_im
_ Select CHANNEL
(START AUTOPROGRAMMING)
control.
With the t_ATURES MENU on
screen, move the RED highlight with
the MENU (M)4-1_ buttons. Then
press the MENU button.
_> Press the MENU button to turn
AUTOPROGRAMMING ON.
The TV shows which channel
numbers are "SAVED" (v,') as they
are added into memory.
"Auto-programming CHANNEL
MEMORY is finished" shows when
the TV is through adding channels.
_ Press the STATUS or Menu (M)
button to clear the screen.
MEMORY
.....
0_1/_ _ ')W ;0' !lt[/[ ' "
PIP r_ut $r_l _z[ ::: :::
:g::ggg .......
og¢'o
{: ......
v" Chancel Numbers are
Saved in Memory
............ !_!_i_::_!:ii_iii::i_}}_i::i:_i:_i:_i:_iiii_,_,i::_:i_:i:::::_;,ii_::;:.i_::i_:_,:_i:_:_i:,i_:_::i:{:_i:!i{i_ ,:,......
..............::i:!::!! .............
"1'['1'
q OF3_
_ f] START _.
AUTO PROGRAMMING
CHANNEL MEMORY
2v _ 3..," 4_,_
5_ 6 _,/ 7_/ 8", /
9', / 10 11 12
13 14 15 16
17 18 19 20
21 22 23 24
ii Press "M" to '
T_;y it out. Press the
CHANNELAV buttons
and see which channels you can
select.
Remember, an Antenna or Cable
TV signal must first be connected
to your TV so that channels can be
saved.
If you want to delete any
unwanted channels from the TV's
memory, see "ADD/DELETE
CHANNELS" on the next page.
13
Page 14
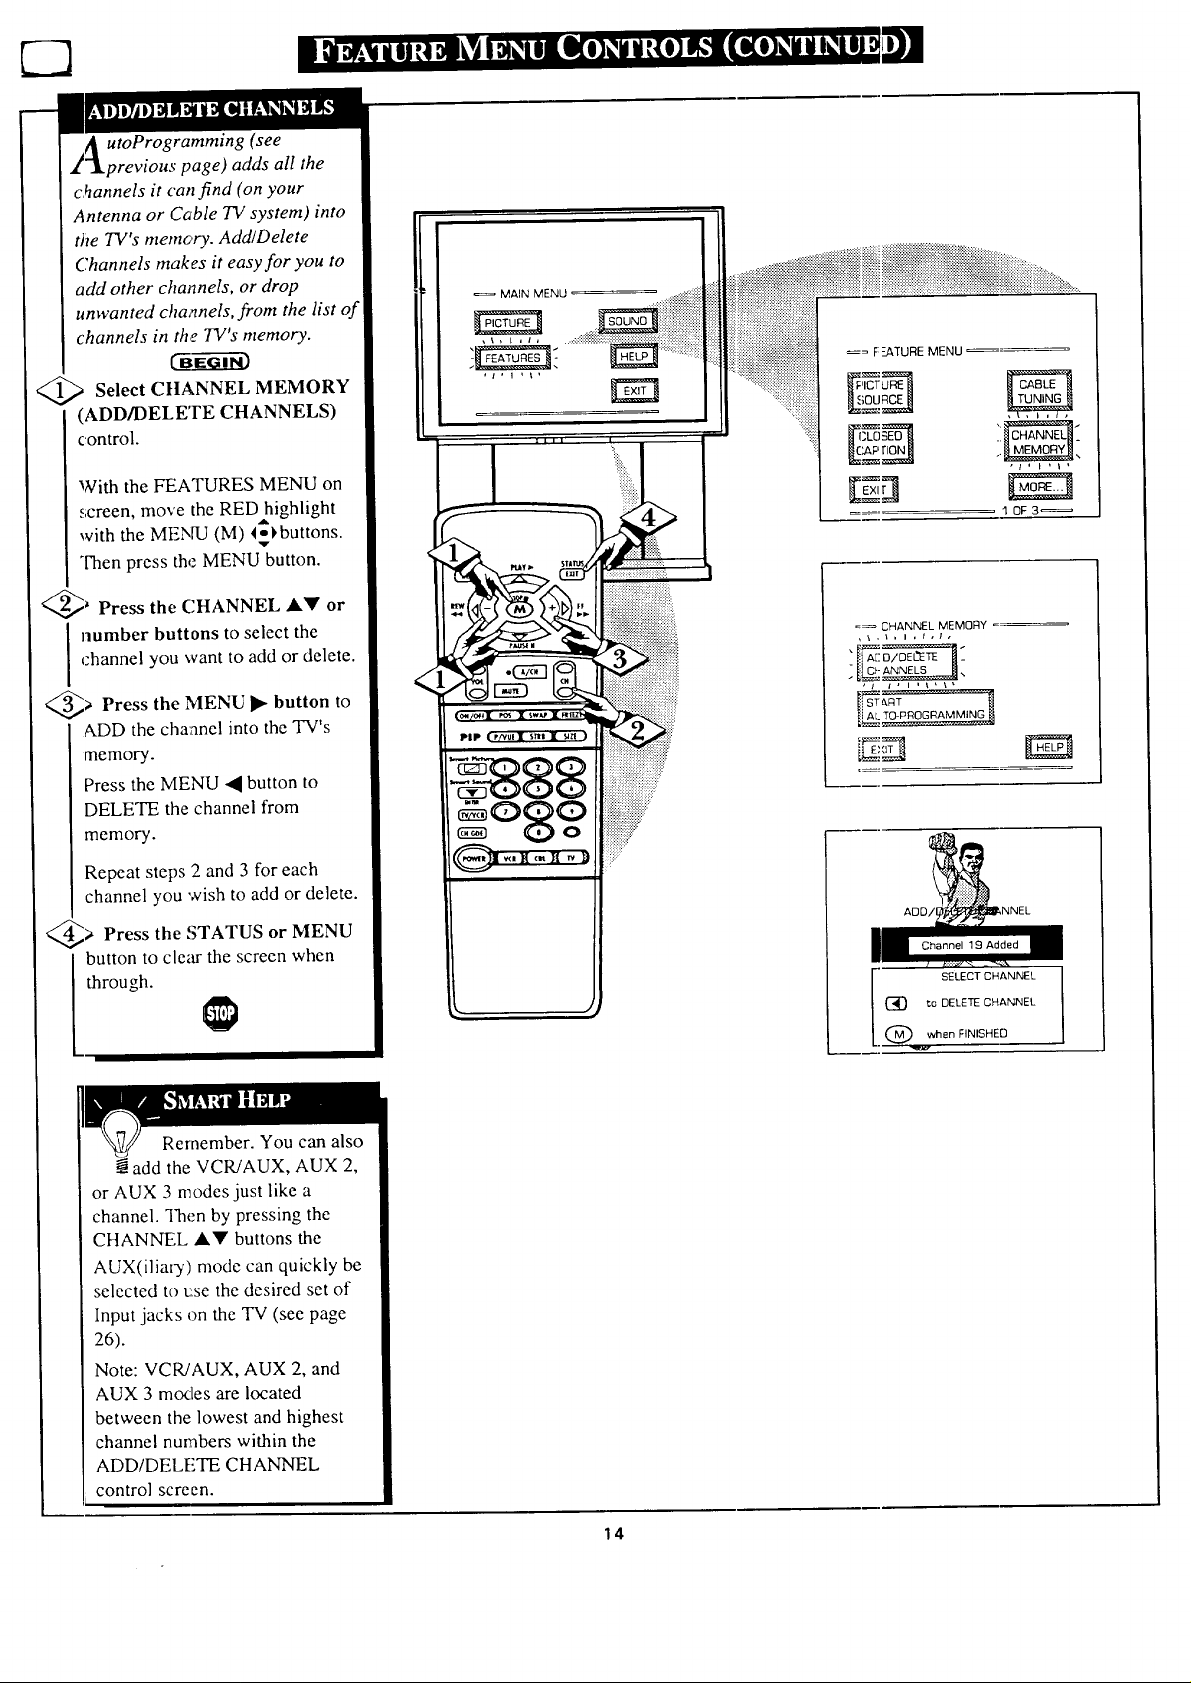
A utoProgramming (see
_"!previous page) adds all the
c._annels it can find (on your
Antenna or Cable TV system) into
the TV's memory. Add/Delete
Channels makes it easy for you to
add other channels, or drop
unwanted cha,_nels,from the list of
channels in the TV's memory.
@>Select C!IANNEL MEMORY
(ADD/DELETE CHANNELS)
control.
With the FEATURES MENU on
screen, move the RED highlight
with the MENU (M) 4ol, buttons.
Then press the MENU button.
@_ Press the CHANNEL A'_' or
channel you want to add or delete.
number buttons to select the
@> Press • to
the MENU button
ADD the channel into the TV's
memory.
Press the MENU • button to
DELETE the channel from
memory.
,v-
MAIN MENU
_= F-2ATURE MENU
....
10F3_
_i_iiiiii_iiiiiiiiiiiii_%iiiiiiiiiiii
=_ CHANNEL MEMORY =_
"=It A[_'__"
, / i , I , I . \ x
Repeat steps 2 and 3 for each
channel you wish to add or delete.
@> Press the or MENU
STATUS
button to clear the screen when
through.
Rernember. You can also
add the VCR/AUX, AUX 2,
or AUX 3 modes just like a
channel. Then by pressing the
CHANNEL A'_' buttons the
AUX(iliary) mode can quickly be
selected to L:se the desired set of
Input jacks on the TV (see page
26).
Note: VCR/AUX, AUX 2, and
AUX 3 modes are located
between the lowest and highest
channel numbers within the
ADD/DELETE CHANNEL
control screen.
Channel 19 Added
(_ ta DELETE CHANNEL
. @ when FINISHED
SELECT CHANNEL
14
Page 15
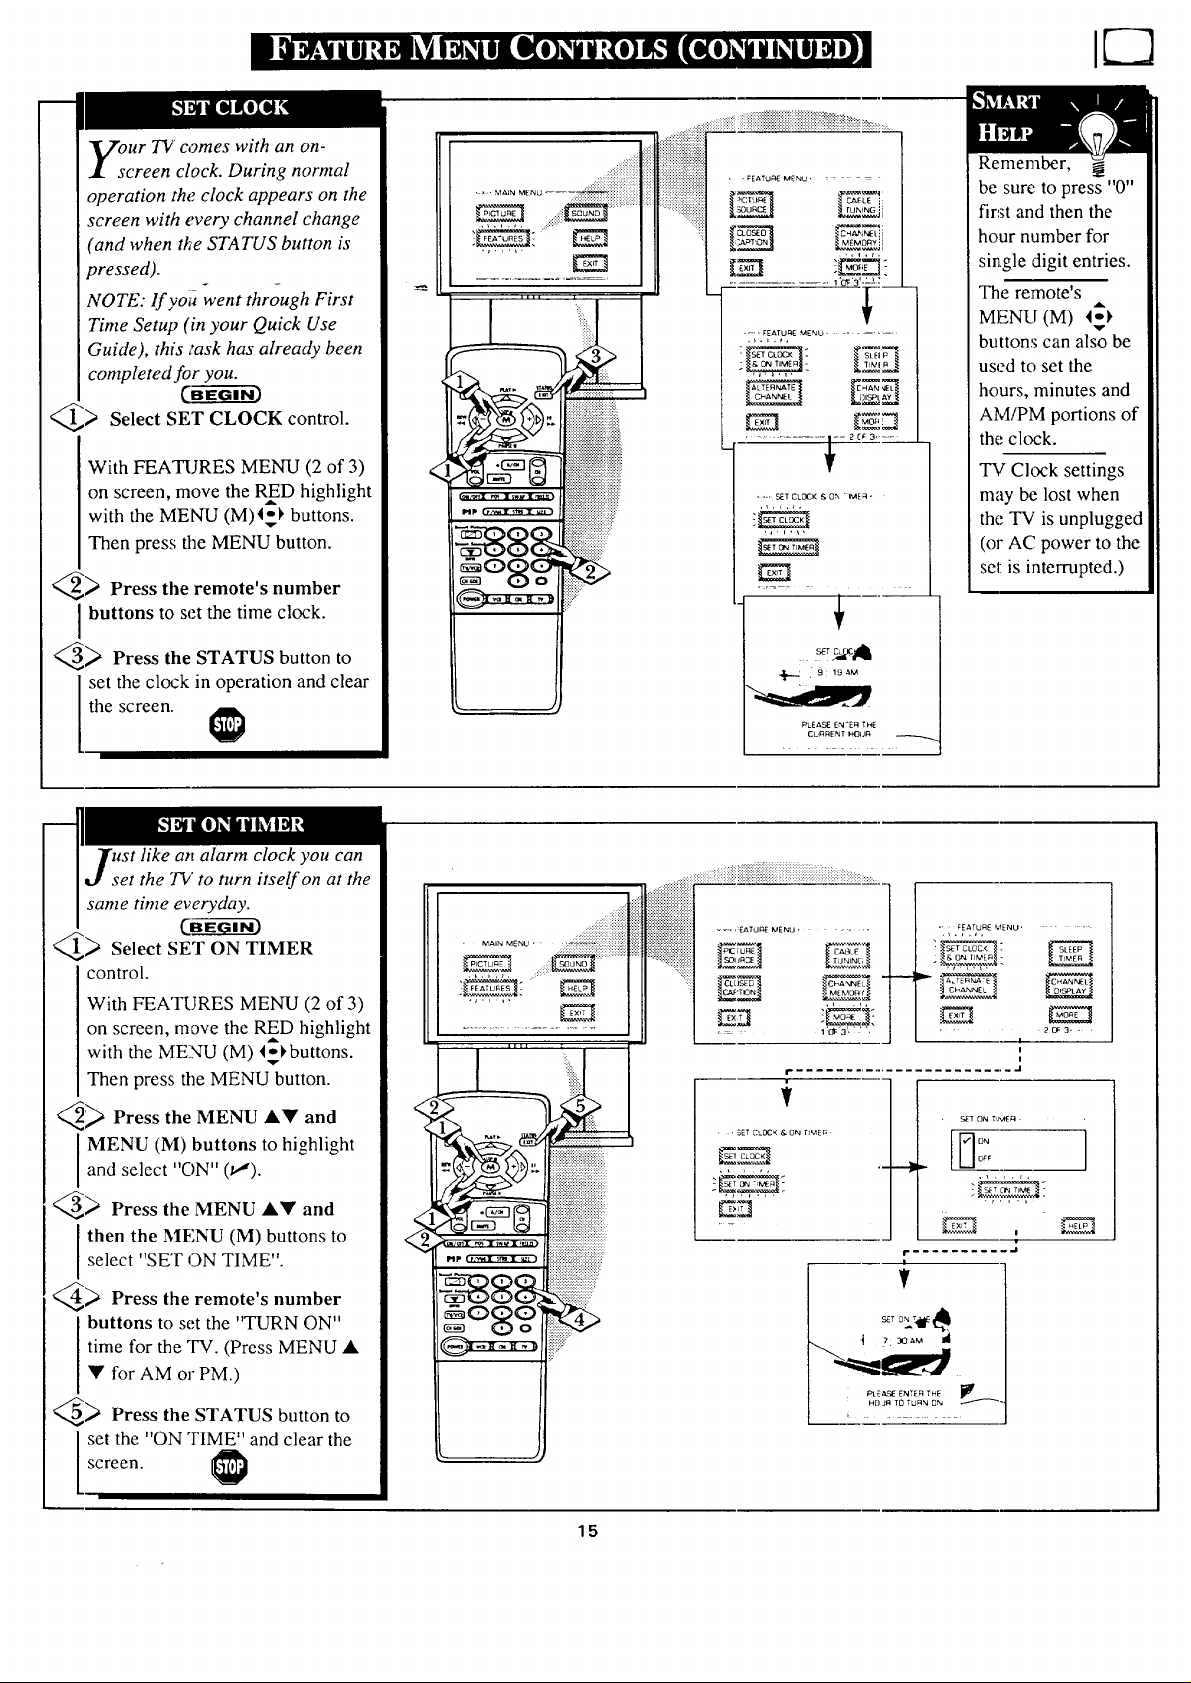
our 7!/comes with an on-
creen clock. During normal
operation the clock appears on the
screen with every channel change
(and when the STATUS button is
pressed).
NOTE: If voi_went through First
Time Setup (in your Quick Use
Guide), this i'ask has already been
completed for you.
CBE-- 3
_) Select SET CLOCK control.
With FEATURES MENU (2 of 3)
on screen, move the RED highlight
with the MENU (M)4_1, buttons.
Then press the MENU button.
_ Press the remote's number
buttons to set the time clock.
_..._ Press the STATUS button to
set the clock in operation and clear
the screen.
A
_IC:IUF_E CAELE i:
.............. i "cy:'3'=L_2
.....FEATU F_[MENU .......
E8
El E_
7:=2_,9.....-.....
+
PLEASE EN'EFI THE
CLFIRENT HOUF_
SLEIP _.
Remember,
be sure to press "0"
first and then the
hour number for
single digit entries.
The remote's
MENU (M) I_
buttons can also be
used to set the
hours, minutes and
AM/PM portions of
the clock.
TV Clock settings
may be lost when
the TV is unplugged
(or AC power to the
set is interrupted.)
ust like an alarm clock you can
et the TV to turn itself on at the
same time everyday.
CB_---_
Q._ Select SET ON TIMER
control.
With FEATURES MENU (2 of 3)
on screen, mave the RED highlight
with the MENU (M) l_l, buttons.
Then press the MENU button.
q_ Press the MENU A• and
I MENU (M) buttons to highlightand select "ON" (.t,,').
_ Press the MENU A• and
select "SET 3N TIME .
Ithen the MF,NU (M) buttons to
_ Press the remote's number
buttons to set the "TURN ON"
time for the TV. (Press MENU •
• for AM or PM.)
_ Press the STATUS button to
' MAIN MENU '
......._;iiiiiiiii!
_,,, ,,.......
:::::::::: :::+:
::::::::::::::::::::::::::::::::::
::::::::::::::::::::::::::::::::::::::::::::::::...... EZm._u_Nu.....
::::::::::::::::::::::::::::::::::::::o,c_ -cXSa_
i-.......................... .i
f
' ' SET CLOCK & 0N T_MEP
• FEATURE MENU'
.,.,.,,
.--q
• 2o=3. =
_ ---111.-
I" .......... .i
i
PL2_ ENTEF_ THE _i_
HOJR To TUR_ ON -_
SET ON T_ME_ -
,,.,,,
!
i
!
!
screen.
set the "ON TIME" and clear the
15
Page 16
73 ,11
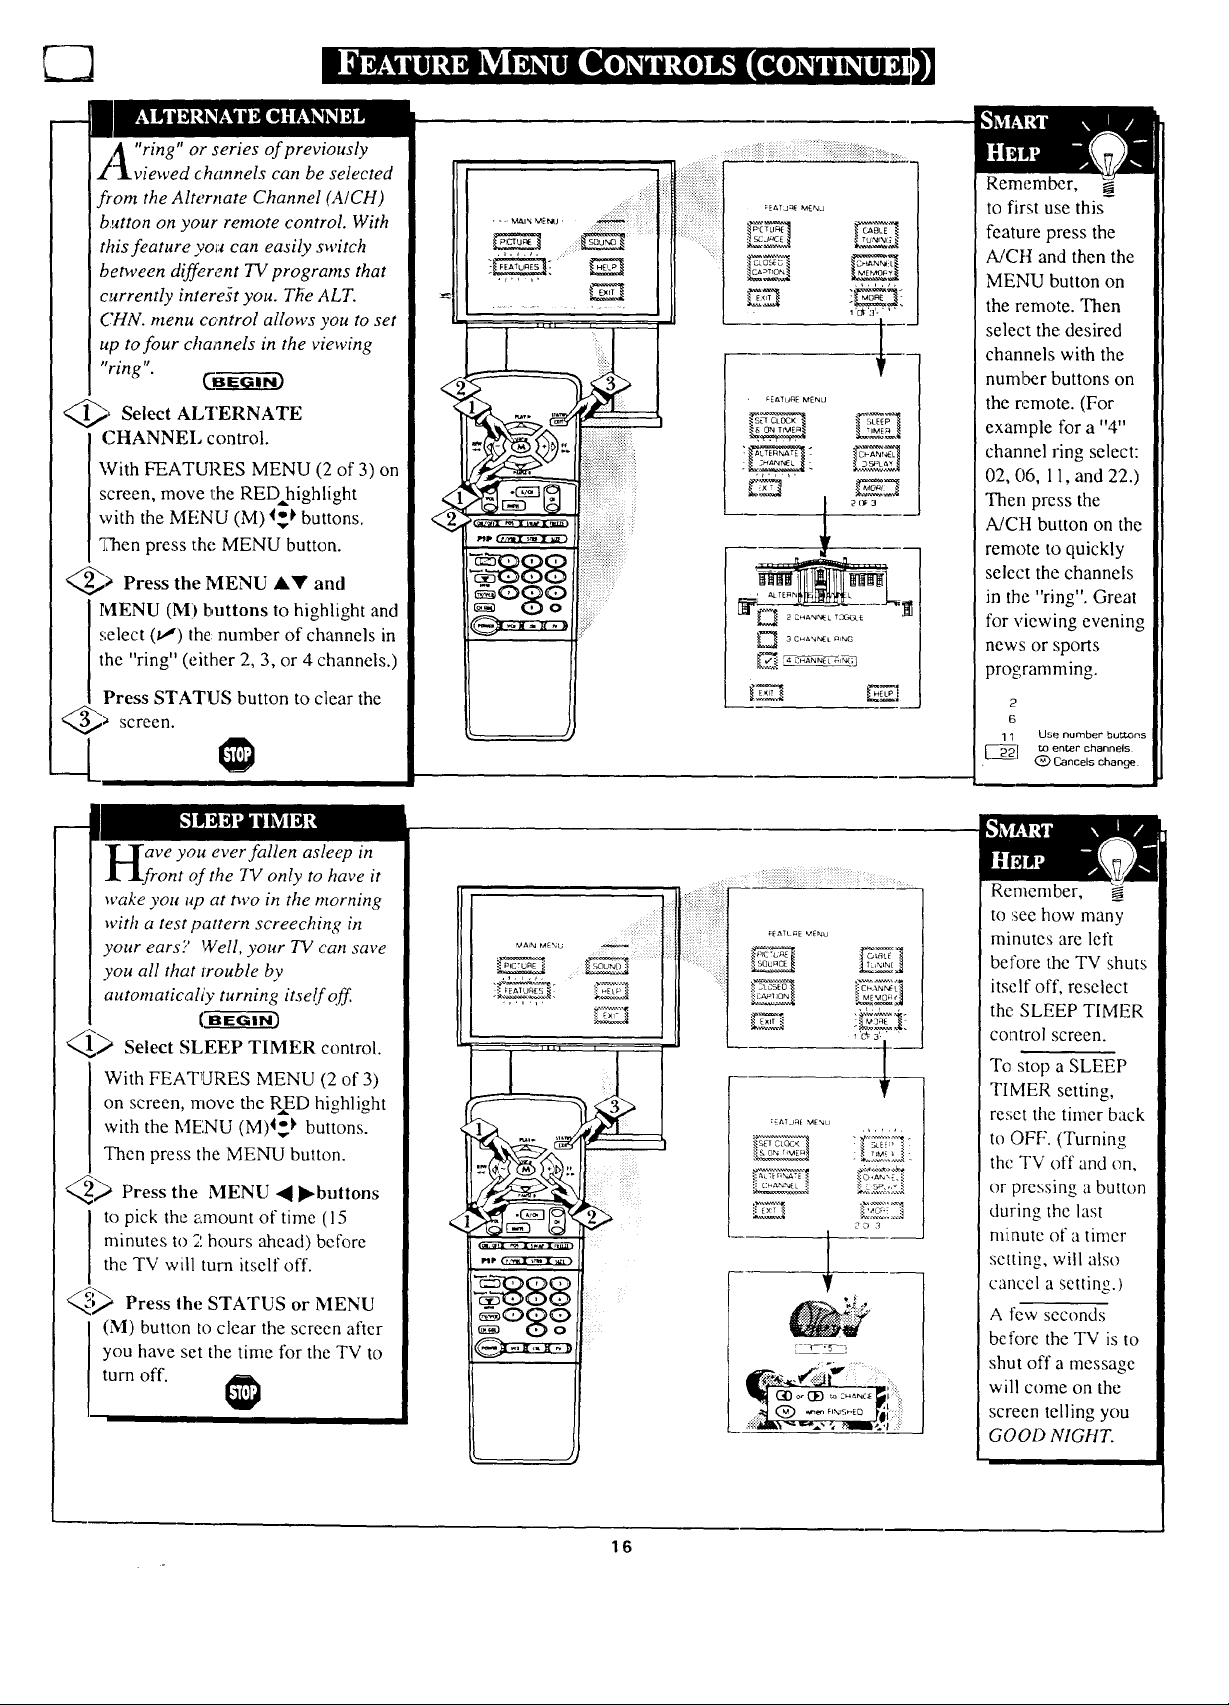
x/_ "ring" or series of previously
1viewed channels can be selected
from the Alternate Channel (A/CH)
b,_non on your remote control. With
this feature you can easily switch
between different TV programs that
currently interest you. Tile ALT.
CHN. menu control allows you to set
up to four channels in the viewing
"ring". C_
, Select ALTERNATE
CHANNEI, control.
With FEATURES MENU (2 of 3) on
screen, move the RED highlight
with the MENU (M) _ buttons.
q_en press the MENU button.
@_ Press the MENU AY and
MENU (M) buttons to highlight and
select (t,-') the number of channels in
the "ring" (either 2, 3, or 4 channels.)
Press STATUS button to clear the
@a screen.
II
• = Mal,_ ME_j • ::::::::::: : i
I,N I
=
<
_;_<_!;ii_ii_ii_i!_!_ii!iiiiiiiiiii_iiii_i!!i_iiiiiiiiiii)ii_iiiiiiiiii_!!!!i!!i!ii1_i_>_......
Remember,
i! ...........
!2;1
_EATU_qE MENU
,t,, ,,
2 CHAN'_EL T3GGtE
3CHA'_NEt n,_G
L_,,,%_
to first use this-
feature press the
A/Ctt and then the
MENU button on
the remote. Then
select the desired
channels with the
number buttons on
the re,mote. (For
example for a "4"
channel ring select:
02, 06, 11, and 22.)
Then press the
A/CH button on the
remote to quickly
select the channels
in the "ring". Great
for viewing evening
news or sports
programming.
2
6
1 1 Use number bul_Ons
_1 to enter channels
.t-_l t_ Cancels change
aVe you ever fallen asleep in
ont of the TV only to have it
wake you up at two in the morning
with a test pattern screeching in
your ears'.; Well, your TV can save
you all that trouble by
automaticaIiy turning itself off
U__ Select SLEEP TIMER control.
With FEATLIRES MENU (2 of 3)
on screen, move the R_ED highlight
with the MENU (M)I_,_ buttons.
Then press the MENU button.
_ Press the MENU .,_ _bnttons
minutes to 2 hours ahead) before
to pick the amount of time (15
the TV will turn itself off.
_;_ Press the STATUS or MENU
(M) button to clear the screen after
you have set the time for the TV to
turn off.
.._.',_a,'.,_. _.L_j. -__'_""_
...._)i!i¸i
....... _!i!iiiiiiiiiiiiiiiiiiiiiii_iiiiiiiiiiiiiii!:ii:!ililiiiiiiiiiiiiii_;i_ ........
_ATL_E MENU
_.,c,_ :'_'_ _
: iiiiiiiiiiiiiiii!iI
_,._
E_ur ._
=EAT jn_ MEnu
• :,+-_,;,_;,,_;
_;,_T[,_] .'. ', '
_TL_ __ ";.,.,_4::,.
® ...... 0 ._lii
__,r
2'b_ 3
Remember,
to see how many
minutes are left
before the TV shuts
itself off, reselect
the SLEEP TIMER
control screen.
To stop a SLEEP
TIMER setting,
reset the timer back
to OFF. (Turning
the TV off and on,
or pressing a button
during the last
minute of a timer
setting, will also
cancel a settino )
A few seconds
before the TV is to
shut off a message
will come on the
screen telling you
GOOD NIGHT.
16
Page 17
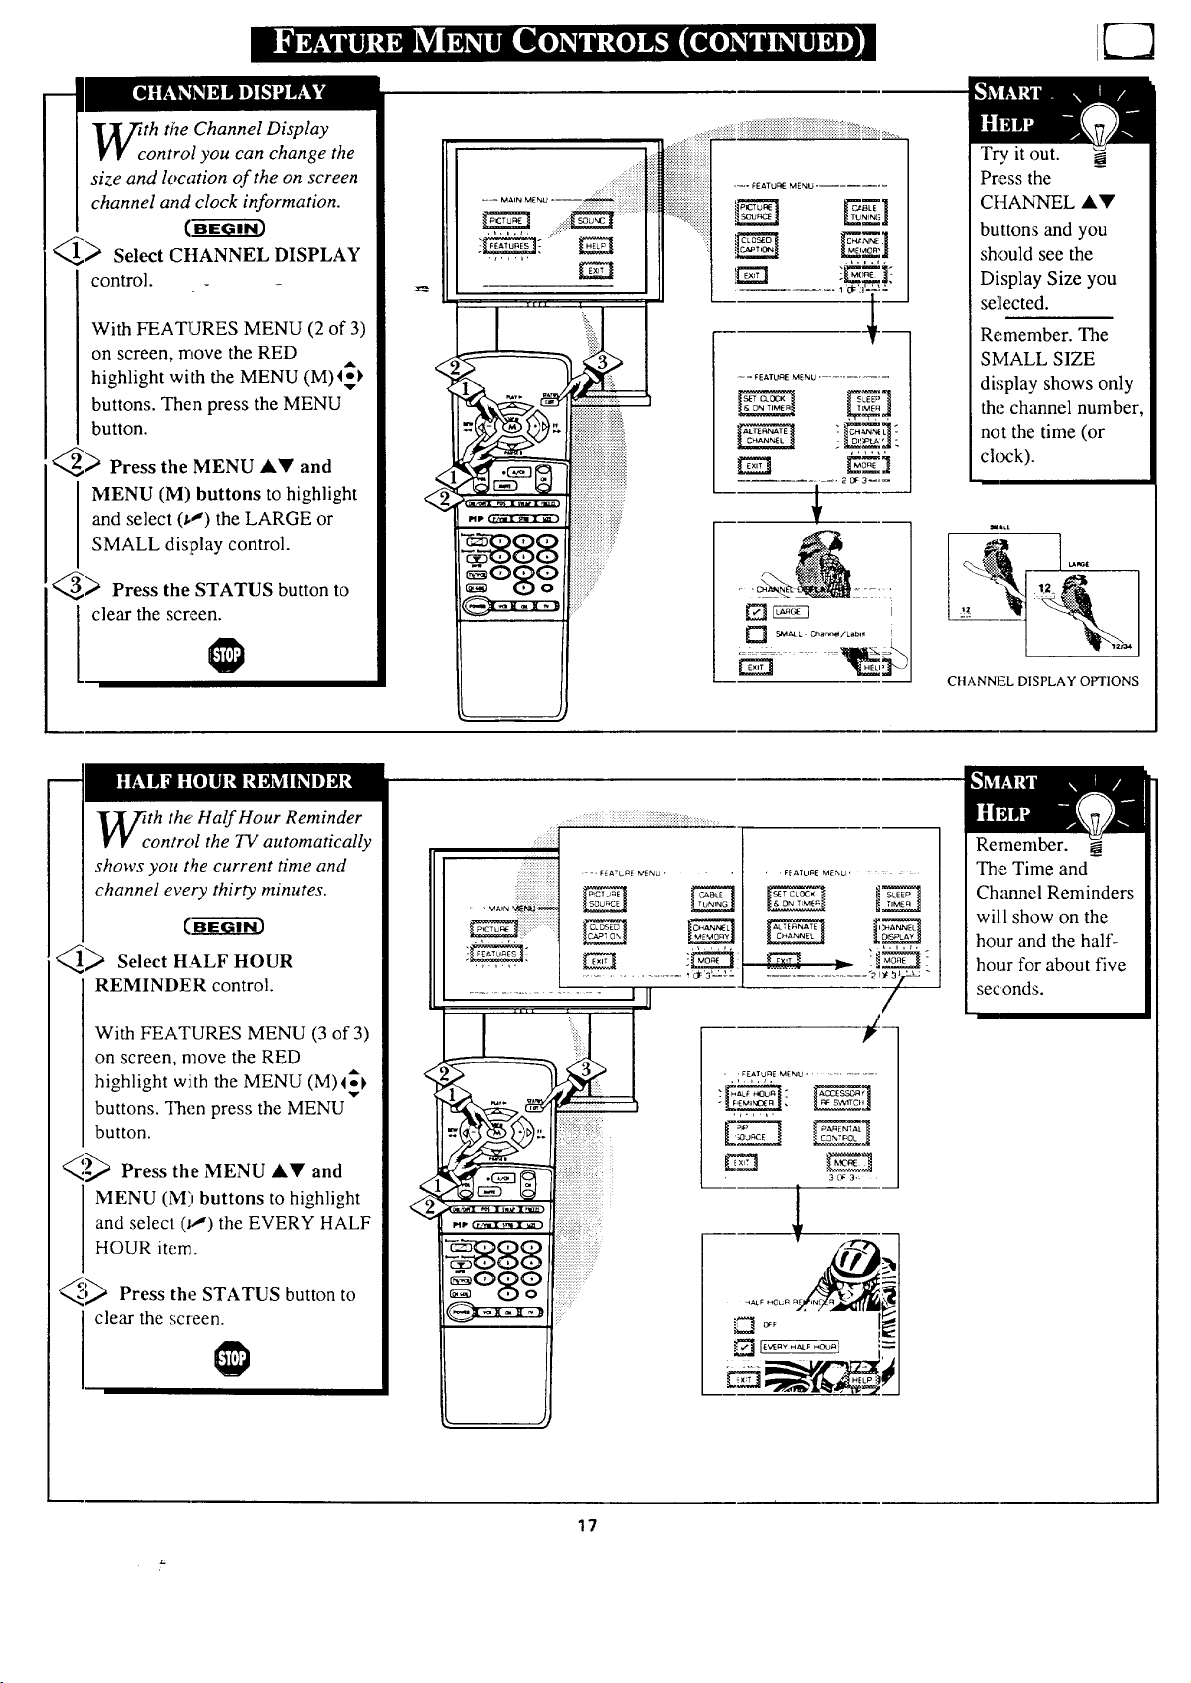
th the Channel Display
ontrol you can change the
size and location of the on screen
channel and clock information.
<,_> Select CttANNEL DISPLAY
control.
With FEA'InJRES MENU (2 of 3)
on screen, move the RED
highlight with the MENU (M)I_
buttons. Then press the MENU
button.
_ Press the MENU &Y and
MENU (M) buttons to highlight
and select (_") the LARGE or
SMALL display control.
_) Press the STATUS button to
clear the screen.
Try it out.
......!iiiiiii_!ii_iiiiiiii))i
,_-_FEtXTUF_ MENU ....... Eg]
Press the
CHANNEL ,A.Y
buttons and you
.,.,.k.
EZ]
should see the
Display Size you
selected.
Remember. The
SMALL SIZE
== _ FEATUAE MENU ............
display shows only
the channel number,
not the time (or
ckxzk).
CHANNEL DISPLAY OPTIONS
th the' Half Hour Reminder
ontrol the TV automatically
shows you t_e current time and
channel every thirty minutes.
_> Select HALF HOUR
REMINDER control.
With FEATURES MENU (3 of 3)
on screen, move the RED
highlight with the MENU (M)_
buttons. Then press the MENU
button.
_,'_ Press the MENU &Y and
MENU (M) buttons to highlight
and select 0_') the EVERY HALF
HOUR item.
_ Press the STATUS button to
clear the screen.
_;i_)iil iiliiiiiiiiiiiiiiiiiiiiiiiiiiiiiiii_i_iiiiiiiii_;i!i:_:_i::::::::
Remember.
=, F_A'C_ E MENU r
• FEATURE MENU ....
The Time and
Channel Reminders
will show on the
.,.,.
,,.,,,,
hour and the half-
hour for about five
seconds.
. , FEAIURE MENU ............
3[3:3,=
17
Page 18

_)arental Comrol allows parents
to block out, or "censor", any
channels they think children should
not watch. A channel placed under
Parental Control cannot be viewed
u_til a correct access code is used to
uMock the channel for viewing.
First let's set your Parental Code:
Select the PARENTAL
CONTROL.
W'ith FEATUF'ES MENU (3 of 3)
on screen, move the RED highlight
with the MENU (M) t_ buttons.
Then press the MENU button.
NOTE:Your TV left the factory with the Parental Code set t_ "0000". If you are using
your TV and the Parental Control for the _rs,l time, and don't want to SE-q'UP a new
Access code number, you can use the ' 00120 number to block channels - see next page.
The "0711" Parental Code (shown on this 19age)is given as a dlffault or way to reset the
Code when the current Access number is r_otknown•
.............:_:_i_::_::i:::::::::::::ii_iiiiiiiiiiiii%:.i:iiiiiiiiiiiiiiiii::?.i:.i?:i::i::i::::::::::::::__::_:_................
.... F=-.A]URE MENU ...........
............. 1 'o_'3 '-L'
i- ........................ .I
.... FEATURE MENU _-- -
.............. "20_ g_ .tL' "-
i
T
I
"BLOCK CHANNELS" and
"SETUP CODE" show on screen.
_, Press the and
and select the SETUP CODE item.
MENU (M) buttons to highlight
IVIENU AY
, Press 0, 7, 1, 1 on the remote.
"XXXX" shows on the ACCESS
CODE SETUP screen as you press
the number buttons.
"INCORRECT ACCESS CODE -
"FRY AGAIN" will also show on the
,;creen.
_> Press 0,7, 1, 1 on the remote
'n.
'Next Enter Your New Access
Code" shows on the screen.
@, Enter a new Four digit number
code using the remote.
"Access Code: Changed" shows on
the screen to let you know the new
code has been set.
• = FEATURE MENU .......
EN
..... 3OF 3_:
r- .................. .i
I
Cur_nt Access Code
PARENTAL C_._NTROL
_-oEXIT
...... .I
Access Code Changed
1_ to Block or
UP.[]lock Channels
to EXIT
I
!
Continue to the next page to find
out how to "block" channels from
viewing.
Parents - it isn't possible
_ to unlock or defeat your
Censor Code without changing to
a new code number. So if your
Code number changes, and you
didn't change it yourself, then you
will know that someone has
altered the code and the blanked
out channel has been viewed.
• t4"ress MENU 1_ to go on and start
to "block" channels
• Press MENU to return to the
Parental Control Menu screen.
• Press STATUS to clear the screen.
18
Page 19

fter your personal Parental
Code number has been set (see
previous page), you are now ready
to select the channels you want to
block out or censor.
Lu'Ng-_-i_3
_ Select the BLOCK
CHANNELS control.
With FEATURES MENU (3 of 3)
on screen, move the RED highlight
with the NIENU (M) I_ buttons.
Then press tlhe MENU button.
<,_ Press the MENU Al!' and
MENU (M) buttons to highlight
and select the BLOCK
CHANNELS item.
:' F_J,TURE MENU '
O-tAN_
....... a'_'3', ' _ ,
• : FE_TURE MENU
FEATURE MI_=NU
PARENTAL CONTROL
_ Enter the, correct Parental
I Code number.
_ Press Channel AY or Channel
channel you want to block.
Number buttons to select the
_ Press the MENU I_ button to
"BLOCK V[EWlNG" on the
selected channel.
Press the MENU 4 button to
"ALLOW VIEWING" on a
blocked channel.
Repeat step.,; 3 and 4 for any other
channels yoa wish to block out.
Remember, to make TV
viewing easier all channels
(and Audio!Video Input jacks)
will be unblocked, once the
correct Parental Code number has
been entered.
When the TV is turned OFF and
then back ON again, Parental
Control is back in place for all
channels.
PARENTAL :
.... 3OF 3
F
V
{3"tANN EL 19
BLOCKED BY PARENTAL C_NTiqOL
PteBse enber Access Code
_F_
S_.'k_ct another Channel
for we_ng
BLOCKED C'HANNEI. SCREEN MESSAGE
(Appears wh,:n an altempt to select a blocked
channel is made and Parental Control i€ ON.)
i
....... J
Note: You can also block out the
use of the Audio/Video Input jacks
on Ihe TV. This stops the viewing
of VCR programs which can be
shown through the AJV IN jacks.
Just select VCRJAUX I, AUX 2, or
AUX 3 (located between the lowest
and highest channel numbers) on
the Channel Blocking screen, and
select "blocked"
i
I
i
J
19
Page 20

€7"our TV also has individual
sound adjustment controls. The
BASS (low frequency), TREBLE
(high frequency), and Speaker
BALANCE may all be used to
adjust the sound playback of 73/
programs. - -
: , MAIN MENU =-
H
,_,),p,
_ Select BASS, or TREBLE, or
BALANCE sound control.
With the SOUND MENU on the
screen, move the RED highlight
with the MENU (M) 4_) buttons.
Then press the MENU button.
<_ Press the (+) or (-) buttons to
you prefer.
I adjust the sound control to levels
<_ Press the STATUS button to
lear the screen.
P_.e BASS BOOST control
,l increases irhe low frequency
_udio range of the TV. This creates
cedeeper, fuller playback sound
which can be _eard through the
TV's speakers,
r_ ))
_P t ,_I;iI I Jill I )'ZI ]
........... 1 OF 3_=
Select _nd then press MENU
(M) button toview additional
conlrob grouped under same
feature heading. For
Example: Treble, Balance,
Bass Boost. Stereo, etc.
_' Select BASS BOOST sound
control.
With the SOUND MENU on the
screen, move the REDhighlight
with the MENU (M) _) buttons.
Then press the MENU button.
_ Press the MENU AV and
MENU (M) buttons to highlight
and turn ON (1,") the BASS
BOOST control.
_ Press the STATUS button to
(ilear the screen.
20
Page 21

ur TV is able to receive
roadcast stereo TV programs.
The TV is equipped with an
amplifier and twin speaker system
through which the stereo sound
can be heard.
A RED stereo -light (on the front of
the TV) will come on when a
stereo broadcast is received.
.
h
MAIN MENU
:::::::::::::::::::::::::
::iliiiiiii_i_ili]i!i_i:::
:.:::.:.:.::::
::::::::::::::::::
':;ili!i!i!i!i_i_
.... ,...::: +:+:+:+:+:+:+:+:+:-- •
'=, SOUND MENU
Remember.
If a stereo signal is
not available and
the TV is placed in
the STEREO mode,
sound coming from
the TV will remain
monaural (mono).
_> Select STEREO sound control.
With the SOUND MENU on the
screen, move the RED highlight
with the MENU (M) l_buttons.
Then press tile MENU button.
_> Press the MENU A!!' and
MENU (M) buttons to highlight
and turn ON (t,,') the STEREO
mode.
_> Press the STATUS button to
clear the screen.
IIlI |
I ' !iiiiiiii
, t
l I ,I
i
p ..... - ,,,,,,,i;iiiii!i!iiiii!iiiiiiiiiiiiiiiiiiiiiiiiiiiii!_
.i!!!i!!!!!!!!!!!!!!!!!!!!!!!;!!!!!!!!!!!!!!!!!!!!!!!!!!
_,_,x _ ,,._x ....., iii!i:iiiiiiiiiiiiiiiiiiiiiiiii!ili!iiiiiiiiiiiiiiiiii_
"'"................................................' iiiiiiiii!!iiiiiiiiiiiiiiiiiiiiiiiii!i!!iiiiiiiiii
L 888
:::::::::::::::::::::::::::::::::::::::::::::::::::
........
i:i:::iiiiiiiii1111111111111:iiii"
o iiiiiiiiiiiiiiT'.....
i:i iiiii::i:
_3 MONO AT ALL T:MES
1 OF3_
//
o Program (
part of the stereo broadcast
system. Sent as a additional
audio channel SAP can be heard
apart from the current TV
program sound. TV stations are
free to use SAP for any number
of purposes, but many experts
believe it will be used for foreign
language translations of TV
shows (or L>rweather and news
bulletins.)
NOTE: If a SAP signal is not
present with a selected program,
the SAP option can not be
selected. "Fhis program does not
contain SAP information" will
show on the TV screen.
_ • L
21
Page 22

_bb e Stereo Surround control can
e used to add greater depth
and dimension to both monaural
(MONO) and STEREO TV sound.
<_ Select STEREO SURROUND
control.
With the SOUND MENU on the
screen, move the REDhighlight
with the MENU (M)45_ buttons.
Then press the MENU button.
<_ Press the MENU AY and
MENU (M) buttons to highlight
a]_d turn ON (_J) the STEREO
SURROUND control.
<_ Press the STATUS button to
clear the screen.
i 2 c_
Remember,
with the Stereo
Surround control
turned ON even
monaural (mono)
audio source
material can be
heard through rear
Surround Sound
speaker connections
(see page 24).
Note: The monaural
version of Surround
Sound may be
louder at the rear set
of speakers than
what is normally
heard with true
stereo signal
Surround Sound,
but this is normal
l'se
i_" the DISPLAY VOLUME
,.J control to see the TV's volume
h;vel settings on the TV screen.
Once set the Volume Display will
be seen each time the VOLUME
buttons (on the. TV or remote) are
pressed• _E_"_-Gi-_
_ Select DISPLAY VOLUME
control.
With SOUND MENU (2 of 3) on
screen, move the REDhighlight
with the MENU (M)4-_ buttons.
Then press tbe MENU button.
_' Press the MENU AV and
MENU (M) buttons to highlight
and turn ON (_) the DISPLAY
VOLUME control.
_, Press the STATUS button to
clear the screen.
......... ,...... :_iiiii¸
* FEATURI:S _ _ H_
PIP ( ,/_i _ x _ll ) _?_?_?_zii_ ¸
:::::::::::::::::::::::::::::::::::
g9 !!!!!!!?
:::i:i_ii_!iiiii{_ili!iiiii{i{iii{iiiiiiiii{{iiiiiii{ii{_i_i+i_ii_!_:_::.....
........_i_iii_ii!_ii:_!iiii_i:i_i!_iii!!_i_iiiiiiiiiiiiiiiiii!iii!iii!iii_i_i_i_!_!i_!_!ii!!!_iiii_iiiiiiiiiiiiii_iiiiii_ii_i_i_:_.......
SOUND MENU
SOUND IV_NU
20_:3
:i _ l'&'_E,q
22
Page 23

U[7ouldyo,,liketohear7V
I' V programs through your audio
,_ifi system? The TV's Variable
Audio Output jacks and TV
.Speaker On/Off control work
together to offer you this TV sound
option. Q_
Connect the R(ight) and L(eft)
VARIABLE AUDIO OUT jacks
on the TV to the R and L Audio
Input jacks on your amplifier or
sound system.
Set the audio system's volume to
normal listening level.
_ Turn the TV and audio system
ON. You can now adjust the sound
level coming from the audio
system with the Volume AY
buttons on the TV or remote.
BACK OF TV
VARIABLE
AUDIO
OUTPUT JACKS
AUDIO IN
(RED/WHITE)
> To hear the TV sound from only
the audio system speakers, select
TV SPEAKERS control.
With SOUND MENU (2 of 3) on
screen, move the REDhighlight
with the MENU (M)I$_ buttons.
Then press the MENU button.
_ Press the MENU J,V and
MENU (M) buttons to highlight
and turn OFF (t.J) the TV
SPEAKERS control.
You should now only hear TV
sound coming from the audio
system speakers.
_) Press the STATUS button to
clear the screen.
Remember, the audio
N_system may have to be in
AUX(iliary) mode to play sound
from the TV (Outputs).
Note: When the TV SPEAKER
control is set to "NORMAL" (for
TV speaker operation) make sure
the VARIABLE AUDIO OUTPUT
control (see next page) is also set
to "STERE()" in order for the TV's
AUDIO OUTPUT jacks to work
properly.
i_iiiiii!iiiiiii!iiiii!iiii!i__¸¸
AUDIO SYSTEM
23
Page 24

)y adding optional external
speakers to the TV's sound
system, you can create the feeling
of reflected sound that surrounds
you at a movie theater or concert
hcIll.
<_ Connect botla external
speakers to the speaker wire
terminals on the TV.
Recommended speakers: 8ohm, 15
watt minimum. Be sure the (+) and
(-) speaker wires are connected to
the correct R(i!ght) and L(eft)
speaker terminals on the TV.
<_ Place the speakers so the
viewing area is, between the TV
and the rear surround speakers.
(See overhead view drawing.)
REAR SURROUND SOUND
SPEAKER TER MINALS
I
BACK OF 'IW
Remember,
Surround Sound
will not work with
only one speaker
connected; or with
monaural audio
material (unless
Stereo Surround
control is turned
ON - see page 22).
<_ Turn TV ON and place
STEREO control to the "STEREO
IF AVAILABLE" (u,") position.
After setup whenever a stereo
signal is received the audio will be
heard in Surround Sound.
tZ'fie TV's Vc_riable Audio Output
J. jacks can also be used for
Surround Souad. Once they are
connected to on external hi-fi
system its speakers can be used for
the playback of Surround Sound.
_,_, Connect the and L(eft)
"VARIABLE AUDIO OUT jacks
on the TV to the R and L Audio
Input jacks on your amplifier or
sound system.
R(ight)
the
BACK OF TV
VARIABLE AUDIO
OUTPUT JACKS
AUDIO
INPUT lACKS
@> Turn TV ON and place the
VARIABLE AUDIO OUTPUT on
._,creen control to the SURROUND
(_') position. (Sound Menu 3 of 3).
Note:This will change the
Left/Right channel audio line level
signal at the Audio Output jacks to
the same signal found at the TV's
Surround Sound Speaker terminals.
AUDIO SYSTEM SPEAKIZ_RS USED AS REAR
SURROUND SOUND SPEAKERS
24
Page 25

th the use of an optional DoIby
urround Prologic Amplifier you
can receive the added sound
dimension found only in Dolby
Surround programs. Dolby Surround
combines wide left-to-right stereo
separation _ith solid center channel
imaging, complemented by a front-to-
back soundfietd effect. The result for
you the listener is to create a movie
theater or ccncert hall "you are there"
sound sensation.
You will need the following to set-up and use the designed
SURROUND SOUND system shown below:
• One set of rear Surround Sound speakers
One Dolby Prologic Audio Amplifier (with Center Pre-Amp
Output and twin speakers)
One DOLBY SURROUND encoded souice (either playback -
VCR, VDP, etc.- or broadcast).
AUDIO
SURROUND
;PEAKERS
CENTER
PRE-AMP
_,_ Connect the FIXED Audio
INPUT jacks on a Dolby Prologic
Output jacks on the TV to the AUX
Audio Amplifier system.
_ Connect the CENTER
the CENTER PRE-AMP jack on the
CHANNEL Input jack on the TV to
Dolby Prologic Amplifier.
_ Connect the rear set of Surround
Sound speakers to the (+,-)
connections on the Dolby Surround
Amplifier.
Place the Audio System's Front and
Rear Surround speakers as shown in
the picture on this page.
_ Turn the "IV ON. Set TV Volume to
normal listening level. Place the TV's
TV SPEAKERS (Sound Menu 2 of 3)
control to "CENTER CHANNEL
INPUT".
Turn the I)olby Prologic Amplifier
ON. Place its SURROUND MODE
control to the Dolby Prologic mode.
_ The full effect of DOLBY
SURROUND programs (either
broadcast, VCR, or VDP) can now be
heard through the TV and Amplifier
system speakers.
Remember. R(ight)/L(efl)
channel stereo sound and rear
Surround sound will be heard from the
external (or Dolby Pro!ogle Amplifier
system) speakers. The TV's front
cabinet speakers are used for true
Ccnter Channel sound necessary to
complete the Dolby Prologic Surround
arrangement.
Dolby Prologic
Audio
Left Front
_Surround Speaker7
R,L REAR
SURROUND
SPEAKERS
_ _ R, LAUOIOINPUT
Amplifier INPUT
LEFT SPEAKER
Right Front
Speaker
R SPEAKER OUTPUT
SPEAKER OUTPUT
CENTER R, L FIXEO
CPANI_ EL UDIO OUTPUT
CENTER CPANh EL
Use Ihe noise sequencer (or suund test signal) on
the I)olby Prologic Amplifier. Adjust the Center
Channel volume level (using Ihe Dolby Prologic
Amp's Center Channel Volunie control) to equal
the left!right and surround speaker volume levels.
If C.'rltcr Channel volume is still too low after
using the Dolby Prologic Amplifier. use the TV's
Volume control buttons to set desired Center
Channel level.
l'vla],e sure the TV's BALANCE control is sel to
the middle position or the Center channel sound
ima..'e will nol be cenlered.
Use the Dolby Prologic A'nplifier's Volume
buttgns to adjust the surro.md syslem sound level.
VIEWING AREA
REAR SURROUND SOJNDSPEAKERS
_NEL li_
jack's volume, bass, and treble
bevels can be adjusted with the
TV's VOLAV buttons orusing
on-screen Menu controls.
RIGHT SPEAKER
25
Page 26

r"he TV's Audio/Video Input
jacks are for direct picture and
sound connections between the TV
arid a VCR (or Video Disc Player,
et,:.) that has Ai_dio/Video Output
jacks.
To view the playback of a-VCR
tape by using the A udio/Video
Input jacks on lhe TV:
PICTURE AND SOUND PROM
PLAYBACK OF VCR TAPE
NOTE: Connections and use of the
TV':¢ A1JX 2 Audio/Video Input jacks
are Ihe Cameas for the VCR/AUX i
jacks (except "AUX 2" is selected as
the Picture Source in step 3).
BACK OF TV
<_a Connect the VIDEO OUT
VIDEO IN jack on the TV.
I rom the VCR _:othe VCR/AUX
_ Connect the AUDIO OUT
jacks R(ight) and L(eft) from the
VCR to the VCR/AUX AUDIO IN
jacks on the '1_1.
<_ Select the "VCR/AUX 1"
PICTURE SOURCE SELECT
control on the 'IV.
With the FEATURES MENU on
screen, move the REDhighligbt
with the MENU (M)4_ buttons.
q-hen press the MENU button.
Press the MENU Ay and
MENU (M) buttons to highlight
and select (u,') the VCR/AUX
mode.
_; Turn the VCR ON and press
PLAY to view the tape on the TV.
jack
VIDEOIN ii _ _ AUDIOIN
--@ ® @,
::: q ::7::::::"
VCR
If you have a single (monaural)
Audio Output VCR. "Y" connectors
are available to complete :€our
connection. Contact your dealer, or
our |'arls Information Center (I-800-
292-5066) to order any optional
accc _sories.
Remember, after it is
-connected an easy way to
select the VCR/AUX mode is to
press the VCR button on the front
of the TV (or the TV/VCR button
on the remote.) Channels 3 and 4
can also be selected in this way.
Or if you have added VCR/AUX
to the TV's channel memory (see
page 14), just press the
CHANNEL ,&Y buttons to select
the VCR/AUX mode.
26
Page 27

_or more convenient Direct
.l " playback connections the TV's
Front Audio!Video Input panel can
be used. Locc_ted next to the TV's
front control panel (under a small
cover door.) t,_ese Input jacks allow
For quick and easy connections,
particularly fo-r the playback of
Camcorder tape recordings.
To view the playback of a
Camcorder recording using the
Audio/Video Input jacks on the
.front of the 7V:
CBE G--_i-63
o_ F_rU_evEuu....
@> Connect the jack
VIDEO OUT
from the Camcorder to the Front
VIDEO IN jack on the TV.
@) Connect the AUDIO OUT
jacks R(ight) and L(eft) from the
Camcorder to the Front AUDIO IN
jacks on the 'IV.
_ Select the "AUX 3"
PICTURE SOURCE SELECT
control on the TV.
With the FEATURES MENU on
screen, move the RED highlight
with the MENU (M) I_ buttons.
Then press the MENU button.
_ Press the MENU &Y and
and select (i,") the AUX 3 mode.
I ENU (M) buttons to highlight
@) Turn the Camcorder ON and
press PLAY to view the tape on
the "IV.
FI;ONT AUDIO/VIDEO JACKS
Li _tUp on Jackpanet Cover Plate
Io expose Input Jacks.
VIDEO 1N
(YELLOW)
\
AUDIOiVID]EO
OUTPUT J ACK5
ON CAMCORDE _,
CAMCORDER
!ryou have a single (monaural) I
Audio Output Camcorder, "Y"
_:onneclors are available to complete
) our conp,ecdon. Comact )'our [
,:ealer, or our Parts Information i
(;enter (1-800-292-6066) to order I
::ny oplional accessories. [
Remember, after it is
-Nconnected an easy way to
select the AUX 3 mode is to press
the VCR button on the front of the
TV (or the TV/VCR button on the
remote.) Channels 3 and 4 can
also be selected in this way.
Or if you have added AUX 3 to
the TV's channel memory (see
page 14), ju:_t press the
CHANNEL A'9' buttons to select
the VCR/AUX mode.
27
Page 28

r'fie S(uper)-Video connection on
the rear o[the TV can giw' you
better picture detail and clarity, for
the playback of S-VHS VCR tapes
or Video Discs, than the normal
a_ tenna picture connections.
Vote: The VCR (-or Video-Disc
Player) must have a S-VIDEO
0 UT(put) jack in order for you to
complete the cennections shown on
this page.
<_ Connect the S-VIDEO (S-
IVHS) OUT jack from the VCR to
the S-VIDEO jack on the TV.
The S-VIDEO ,connecting cable
will be supplied with the S-VHS
VCR (or Video Disc Player).
<_ Connect the AUDIO OUT
jacks R(ight) and L(eft) from the
VCR to the AUX INI jacks on the
TV.
_' Select the "S-VIDEO"
PICTURE SOURCE control.
With the FEAqqSRES MENU on
screen, move the RED highlight
with the MENU (M)4_ buttons.
Then press the MENU button.
The "S VIDEO" picture source
option appears only when a S-
VIDEO cable has been connected
i t¢, the TV.
PICTURE AND SOUND FROM
PLAYBACK OF S-VHS VCR TAPE
• , FEATURE MENU ......
sv_0E6"_
AUX 2
_ NTENNA
AUX 3
BACK OFTV
AUDIO OUT
(RED/WHFFE)
_J S-VIDEO OUT
S-VHS VCR
_ Turn the VCR ON and place
in the S-VIDEO (or S-VHS)
playback mode.. Insert S-VHS
cassette tape and playback in a
normal manner.
Remember, after it is
_connected an easy way to
.';elect the S-VIDEO mode is to
press the VCP, button on the front
of the TV (or the TV/VCR button
on the remote.)
Or if you haw'. added VCR/AUX
IOthe TV's channel memory, just
press the CHANNEL _k_' buttons
to select the S-VIDEO mode.
it
28
Page 29

JZ_re Audio/Video Output jacks
.l on the TV can be used to
record TV programs on VCRs
which have Audio/Video Input
jacks.
To record TV programs by using
the Audio/Videb jacks oh the TV:
c_
_ Connect the VIDEO OUT jack
on the VCR.
from the TV to the VIDEO IN jack
_> Connect tile
jacks R(ight) and L(eft) from the
TV to the AUDIO IN jacks on the
VCR.
AUDIO OUT
PICTURE AND SOUND BEING
RECORDED ON VCR.
ul
f
BA CK OF TV
VCR/AUX 1
AUX 2
AUX 3
_> Select the
"ANTENNA"
PICTURE SOURCE control on
the TV.
With the FEATURES MENU on
screen, move the RED highlight
with the MENU (M)I_I, buttons.
Then press the MENU button.
Select the channel on the TV that
you want to record.
_> Turn the VCR ON: Put
cassette tape in the unit and place
the VCR in the RECORD mode.
Remember, If the VCR
@has an INPUT SELECTOR
switch, place it in the LINE or
CAMERA position.
iiii!iiiii!_
(oN/o_ I _ IsweI_l}
p|P (P/_I sren • _ }
:ggg
a
!i?::
VCR
Unattended Timer Recordings
with a VCR are possible, but not
recommended with this
connection since the TV must be
left ON for the VCR to record.
29
Page 30

__[ave you ever played hide and
. seek with your remote
control? Are you tired of tearing
the house apart trying to find if
someone has stuffed the remote
unaer the couch, put it on the
shelves, or hid it in the desk? Well,
your TV remote can save you all
thai' looking by automatically
signaling its location to you.
Here's how it works:
_ Press the POWER button on
the set to turn the TV ON.
Note: Normally you can press any
but_:on on the front of the TV to
turn the set ON. But for the remote
locator to work you need to be sure
to use the Power button at the "IV.
A "locating remote" message
shows on the TV screen.
|
<_ Within a few seconds a
chirping or beeping sound will
begin to come from the remote
control hand unit:.
The remote will continue to signal
its location for m'ound 30 seconds.
Normal TV program sound will not
be heard while the remote locator is
wo_;king.
_Once you find the remote just
press any button on the remote and
the beeping sound will stop.
The remote is now ready for
normal TV feature use.
Remember, the remote
locator may not properly
receive its ']aoming" signal from
the TV if it has been placed on a
metal shelf or counter material.
Also, since there's a special type
of :radio frequency "homing"
signal receiver inside the remote
we are required to notify you that
any changes or modifications not
expressly approved by Philips
Consumer Elect_'onics Company
could void the user's authority to
operate the remote equipment.
STF_
[]
3O
Page 31

i uToia ai[o)ql e(o) u uo tq Doul
For most homes this step would
not b_'needed but for your
information:
Up to 9 different remote locator
addre,__s codes can be set on which the
73/can send out its "homing" signal.
This is done in case there is more than
one 73_ (with a remote locator)
_reser:t, and you want only one
specific remote to be signaled when the
TV is iurned ON.*
To set a Locator Address Code:
<
With TV turned ON, press the
LOCATOR CODE button on the
remot. =. (Also be sure the TV
SYS'iEM button on the remote has
been pressed.)
You will need a pencil or pen to press
the re,zessed button.
The q?Vshows the present Remote
l_x_zat3r Code.
See Ihe above intormalion on
how to use the Locator Code
Button for Programming.
<_ Press number button (0-9) on
the remote to set or change the Locator
(.'ode,
The rzmote will beep to let you know
it has received the new Locator Code
and then return to its normal operating
mode.
]
I !
any
Remember, if batteries are
replaced the Locator Code
will need to be reentered.
Wh.'n setting the Locator Code if any
button, other than the number buttons,
are pressed the remote will return to
ks normal operation mode.
*Fcr owners who live in an apartment
(to,;¢nhouse or condominium)
complex, this task may be necessary
since the remote locator's signal can
be sent and detected directly through
adjoining walls.
31
Page 32

_'_rnart Picture quickly returns your
k.) TV to preset channel, picture, and
sound level settings that have been
placed in memory. Each Smart
Picture category is preset at the
factory for a different type of
program or viewing condition, but
you have the option to change the
select controls to any levels you
prefer. You can even rename or
change the t_th, of the Smart Picture
category if you want.
CBE --ffg 3
<_ Press the SMART PICTURE
button on the remote.
List of "SMART PICTURE "
categories shows on the TV screen.
SMART
" PICTURE MENU ==
_.BEL
I
SIVAI PICTURE MENU _==
<_ Press SMART PICTURE
the
batton repeatedly (or press the
namber button) to highlight one of
the Smart Picture categories. (For
example: Movies, Games, etc.)
Automatic factory preset levels for
q-V picture and sound controls are
put in use for the selected category.
Press the MENU button to select
the Smart Picture "SETUP" if you
want to change the control settings
fi)r the selected category. (For
example: "CUSTOM").
"SMART PICTURE MENU" shows
on the screen with a list of picture
and sound controls.
) Press the MENU I_ and MENU
(M) buttons to highlight and select
the desired picture or sound control
item.
Adjust any of the listed controls to
the settings you would prefer for the
currently selected Smart Picture
category.
If"you want SMART PICTURE to
select a certain channel number for
you, use the Picture Source Select -
Antenna (u_) control to set the
channel. (Smart Picture Menu 1 of
1).
1
SMA_,, f PICTURE MENU ( T
iU
After all control settings are
l finished, press the STATUS button
32
Page 33

USethe Smart Picture settings
u placed in memory (see
previous page):
_> Press the SMART PICTURE
button on the remote.
List of "SMART PICTURE"
categories sfi0ws on the TV screen.
_ Press the SMART PICTURE
button repew:edly (or press the
number button) to highlight the
Smart Picture category you desire.
For example: press SMART
PICTURE to select "CUSTOM".
(See the "Change Label" section
below on how to write new titles for
the Smart Picturelabels.)
_ The channel, picture and sound
controls will automatical]y change to
the settings you preset for that
SMART PICTURE item.
...........
1- '_PORTS
2- _OVIES
3- REAK SIG
4- GAMES
6- FACTORY SETTINGS
I
P]CTURL: AND SOUND CONTROLS CHANGE
TO PI_ES ET SMART PICTURE SETTINGS FOR
SEI.EC_r[iD CATEGORY.
Remember, the
__"FACTORY SETTINGS"
item can be used at any time to
return the "IV to its factory preset
picture and sound control levels.
Tc m "CHANGE LABEL" control
an be used to change the title of
a SMART PICTURE setting into a
name or label that may be easier for
you to remember.
_D With the "SMART PICTURE
LABEL" control on the screen, press
the MENU AY buttons to spell out
a new label or title for the selected
SMART PICTURE.
<,,,__,,_Press the MENU ._ I_ buttons to
move the red highlight to each letter
space.
w
]
,RT PICTURE LABEL
<'_ Press the STATUS button to
] clear the screen when the new label is
finished.
33
Page 34

re you tired of the sound of
following you
into the next room or all through
t,_e house? Smart Sound allows you
to preset a desired volume level
t,_at the TV sound will not go
above. This makes for an-even,
more consistent sound by reducing
t.he peaks attd valleys that can
occur during program changes or
commercial breaks.
@_ Press the Smart Sound button
on the remote.
"SMART SOUND ON" shows on
the TV screen.
> Press the Smart Sound
Smart Sound ON (or OFF.)
I ]button repeatedly to turn the
> Press the STATUS button to
I SMARTSOUNDONI
clear the screen when completed.
Remember, Smart Sound
works for sound levels
coming from either the
Antenna/Cab!ie input on the rear of
Lhe TV (RF aadio); or the
Auxiliary (VCWAUX IN) audio
inputs.
34
Page 35

T_o you ever have trouble
j[.J remembering on which
channel a particular station or
network is located? The Channel
Guide is a quick way to view and
select channeis from a list of
Labelled channels.
A Label is a four letter callout you
can set to appear with the on
screen channel number. Example
Labeh WXYZ -for a TV station's
(:all letters.
To select channels from the
Channel Guide:
, Press the CH GUIDE button on
the remote.
A "CHANNEL GUIDE" shows on
the screen with channel numbers
and labels.
Keep pressing the CH GUIDE
button to see 'what other labelled
channels can be selected.
v
@_ Press the on
rmmber buttons
::he remote to select the desired
labelled channel.
Remember to press "0" first and
daen the number for single digit
channels.
Press to
@a the MENU button
change a Label for a channel.
Press the MENU AY' and
MENU (M) buttons to highlight
and select either:
"MANUAL" to create your own
label for a channel.
"PRESETS" 1:ochoose from a list
of prewritten channel labels.
(See instruction details on this
page.)
@a Press the STATUS button
clear the screen.
LIIDE LABEL
(_ (_ to SELECT LABEL
I CHOOSE CHANNEL I
(_)to EXIT
MANUAL- To create your I
own Channel Label:
Press the Channel &• or
Number buttons to select
desired station.
A red highlight shows the
active letter space for the
channel lal:x.q.
Press the MENU • •
buttons to pick any of the
letters or symbols that are
given for your use.
to
Press the MENU -_ ]_
buttons to move the red
highlight to tbe other letter
spaces and repeat.
Press the STATUS button
to clear the screen when
finished.
PRESETS -To pick a Label
from the "I2IBEL " list:
Press the Channel •• or
Number buttons to select
desired station.
Press the MENU ••
buttons to move up and
down the Channel Label
list.
Just stop on any label you
might want to use.
The selected label
automatically appears with
channel changes and when
the STATUS. button is
_ressed.
Press the STATUS button
to clear the screen when
finished.
35
Page 36

"_kl'our remote control is set to
l work your TV and many
inf!'ared remote (IR) control
VCRs. Howew'r, an easy one-
time step may be necessary
before the remote will work your
VCR.
Try this initial check to see if
going on to the following section
is necessary.
Press the VCR System
button on the remote.
<_ Point remote toward VCR
I and press the POWER button.
@>Does the reraote turn the VCR
ON?
IF YES, _1 and try the other
VCR buttons on the remote. If
they also work the VCR, then
the remote is ready and no
farther steps are needed.
If NO, continue...
°
!
VCR
@ First look up aTWO-DIGIT
remote code number for your
brand VCR before going through
the simple "l,2,Y' steps (on the
following page).
continu,', to next page
"'1
Remember, if more than
one number is listed, you
may have to try more than the first
two-digit code given in order to
locate your VCR's remote code.
_CR REMOTE
BRAND CODE NO_,
Akai 24, 25, 36
Audio Dynamics 14, 21,29
Broksonic 31
Cannon €,1
Capehart 23
Craig 07, 20
Curtis Mathes 01,32, 42, z;3
Daewoo 53
DBX 14, 21 ,29
Dynatech 27
Emerson 20, 31,34, 40
Fisher 06, 07, (18
Funai 27, 28
GE 0_
Goldstar 23
Go Video 45, 46
Hitachi 03, 5 I
Instant Replay 0 [
JC Penney 01,03, 23, 29
JVC 14, 47, 48
Kenwood 13, 14
Lloyds 27
Magnavox 00, 01,02, 05, 27,128
Magnin .30
Marantz 29
Memorex 01, 07, 23, 2'7
Minolta 03
Mitsubishi 16, 17, 38, 39, 50
Montgomery Ward 12
36
VCR REMOTE_
B_..!_..N1) .CODE NO.
Mull:itcch 27,28
NEC 14, 21,29
Panascnic Ol
Pentax 02, 03
Phih:o 01,02, 05, 27, 28
Phil:ips 00, 01,05, 27, 28
Quasar 01
RCA 03, 04, 32, 42, 43, 44
Reatistic 07,11, 12, 23, 27, 28
Sarnsung 22, 30
Sansui 49
Sanyo 07, 13
Scol:t 19
Sears 03, 08, 23
Sha:_ 11, 12
Shinton 35
Sony 09, 10,41
Sound Design 27
Sylvania 01,02, 05
Symphonic 27
Tatu ng 14
Teac 14, 27
Teknika 26, 27
Thorn as 27
TMK 20
Toshiba 18, 19
Video Concepts 28
Yamaha 14, 29
Zer_ith 15
J
Page 37

m
ow that you have looked up
the two.digit Remote Code
Number for your brand of VCR
(on previous page), you are
ready to follow the four simple
steps below.
Please read through steps 1-4
before beginning.
@_ Press and release the
I (RECORD) button.
@> Within seconds after
releasing the REC button, press
and release the VCR System
button.
thirty
REC
Remote will begin to beep as it
waits on your Code number
entry in step 3.
VCR
PLAYIp. STATUS
@> Within seconds after
thirty
releasing the VCR System
button, ENTER THE TWO
DIGIT CODE NUMBER for
the desired VCR. The remote is
now ready to send commands to
the VCR.
_ Point the remote at the VCR.
Press the POWER button on the
remote to turn the VCR ON.
'Fry it out. The Channel
N.and VCR buttons on the
remote should now operate the
VCR.
Remember, if this doesn't work
the first time, repeat steps using
the same remote code number.
If after a second try the remote
does not operate your VCR, and
there are more code numbers
listed for your brand VCR, use the
next listed code number.
If after repeated attempts the code
number method does not work
your VCR, try the "VCR
SEARCH" method on page 40.
37
Page 38

"_our remote control is set to
.l. work your TV and many
infrared remote (IR ) control
Cable Converters. However, an
easy one-time step may be
necessary before the remote will
work your Converter.
Try this initia{ check to see if
going on to the following section
is necessary.
_' Press the System
I button on the remote.
<_ Point remote toward Cable
Converter and press the POWER
button.
<_ Does the remote turn the
Converter ON?
IF YES, I_ and try the CH • Y
and CH number buttons on the
remote. If the3' also work the
Converter then the remote is
r,.ady_ and no further steps are
needed.
If NO, continue...
CBL
! I
<_ First look up a TWO-DIGIT
remote code number for your
brand Converter before going
through the simple "1,2,3" steps
(on the following page).
continue to next page
Remember, if more than
one number is listed, you
may have to try more than the first
two-digit code given in order to
locate your Converter's remote
code.
_CONVERTER REMOTE
BRAND CODE NQ,
Archer 28
Diamond 23
Drake 37
Gemini 45
Hamlin 14, 15
Hitachi 25
Jerrold 01,02,03,04,05,30,46
Macom 29, 38
Magnavox 17,26, 31
NSC 49
Oak 06, 27, 39
Panasonic 18, 35
Philips 19, 20, 21, 24, 26
Pioneer 0% 32
Regency ! 0, I 1
CONVERTER REMOTE_
_BRAND CODE NO_,
Rembrant 33
Salova 52
Scientific Atlanta 08, 22, 47
Sheritech 34
Sylvania 16
Texscan 16, 48
Tocom 12,13, 53
Toshiba 43
Uniden Satellite 44, 54
Unika 50
Universal 36
Video Tech 40
Video Way 5 l
Viewstar 26
Zenith 07, 41, 42
d
38
Page 39

ow that you have looked up
the two-digit Remote Code
Number for your brand of Cable
Converter (on previous page),
you are ready to follow the four
simple steps below.
Please read through steps 1-4
before beginning.
@_ Press and release
the
REC
Cable Converter
PLAY•
I (RECORD) button.
@_ Within thirty seconds
after
releasing the REC button, press
and release the CBL System
button.
Remote will begin to beep as it
waits on your Code number
entry in step 3.
@_ Within thirty seconds after
releasing the CBL System
button, ENTER THE TWO
DIGIT CODE NUMBER for
the desired Converter. The
remote is now ready to send
command.,; to the Converter.
@a Point the remote at the
Converter. Press the POWER
button on the remote to turn the
Converter ON.
I I
PAUSEII
(ON/OFF_ POS X 5WA-._._.._
Try it out. The Channel
and POWER buttons on the
remote should now operate the
Converter.
Remember, il' this doesn't work
the first time, repeat steps using
the same remote code number.
If after a second try the remote
does not operate your Converter,
and there are more code numbers
listed for your brand Converter,
use the next listed code number.
If after repeated attempts the code
number method does not work
your Converter, try the
"CONVERTER SEARCH"
method on page 40.
39
Page 40

"q_n" our TV remote can be set to
J. work your VCR or Cable
Converter by what is called the
SEARCH method.
If the "REMOTE CODE" number
method shown in the previous
section did not set your remote to
work your I,'C_ or Converter, then
_91low the easy steps listed below.
Please read through steps 1-4
before beginning.
CABLE CONVERTER
Press the on
the VCR orConverter to turn theunit ON.
_' Stand at least six feet away
from the front of the VCR or
Converter.
Point the remote toward the unit.
HOLD DOWN the MCH and
Ihe desired System (VCR or
CBL-Converter) buttons at the
same time. KEEP HOLDING
BUTTONS DOWN.
<_ Watch the Channel Indicator
Channel Numbers will SCAN UP
uhen the unit has been identified.
I n theunit.
This may take up to two minutes.
Release the MCH and System
(VCR or CBL) buttons as soon
as channel numbers start to scan
up. The code has been identified
and the remote is ready to operate
with the VCR or Converter.
POWER
button
09
T
Don't let th_::N_R _eger
Six Feet
(minimum)
Remember, a minute or
two can seem very long, but
the code should be located within
two minutes.
Don't let the VCR or Converter
scan up more than five channels.
The remote may pass up the right
code and another two minute
search cycle will have to be
repeated.
If no channel change happens
within two minutes, repeat steps 1-
4. Should a channel change still
not occur, the remote will not
work with the desired unit.
#
Remote will begin to beep when
the A/CH and VCR or CBL
System buttgns are pressed.
40
Page 41

'[hen using the TV remote
' ¥ with a VCR, first make
certain it is set to control your
VCR ( by the REMOTE CODE or
SEARCH method - see earlier
section).
<_ Press the System
I button on the remote.
VCR
<_ Point the top of the remote
toward the front of the VCR
(remote sensor window) when
pressing buttons.
Record Button
ttold the RECORD button down, and
t:aen press the PLAY button to begin
a VCR recording.
Rewind Button
Press to rewind tapes. For some
VCRs you may need to press STOP
button first then REWIND. In
playback mode. hold button down to
view picture moving rapidly in
reverse.
]Pause Button
Press to temporarily stop the tape dur-
ing a playback, or recording. Press
again to release Pause,
_FV-VCR Button
]_ress to the VCR position ("VCR"
indicator on the VCR will light) to
view the playback of a tape. Press
again to place in the TV position
("VCR" indica':or on the VCR will go
,OFF)to view one program while
recording another program.
When used with the TV the TV/VCR
button work:; as a source button. Each
press cycles the TV between channels
3 and 4; the last view channel; and
any AUX(iliar},) lnput mode (if it has
been connected.) It is a quick one-
button way to select these channels
and modes (without directly entering
the TV's Menu system.)
f
(ON/OFFX POS )( SWAP_i_FREEZE)
PI P (PIQUEX STRB_ SIZE )
ENTER
]i{ Tv))
,... J
,i I
Pres,; to playback a tape. Hold down
I lay Button
after pressing the RECORD button to
start a recording.
St_p Button
Press to stop the tape.
-F'at;t Forward Button
Press to rapidly advance the tape. For
some VCRs you may need to press
STOP first then FF. ][n Playback
mo_!e hold button down to view the
pict_are moving rapidJy in the forward
direztion.
._hannel Scan Button_
Pre: s to scan up or down through
VC1 _.channel numbers.
Ntl mber Buttons
F're_:s buttons for direct VCR channel
sslections.
y__(;R System Button
Pre:;s to send remote, commands to
tae VCR.
Power Button
Pre:;s to turn the VCR ON and OFF.
Remember, the VCR
buttons on the remote will
not operate your VCR if those
features are not already found on
your VCR remote control.
Note: All VCR functions
(particularly Search, Rewind, Fast
Forward, etc.) will operate the
sa "heas with the original VCR
remote control provided with the
VCR.
---ll
41
Page 42

_._icturein Picture (PIP) is the
I showing of two pictures on the
73t' screen at the same time. (One
main screen picture and one small
inset picture- or PIP).
Note: The PIP picture must be
supplied by a VCR (or other
accessory equipped with a VIDEO
OUTPUT jack), lf you already
went through FIRST TIME SETUP
(in the Quick..Use Guide), then the
connections Jor PIP have been
completed.
To see how channels selected on a
VCR can be shown as PIP:
'Connect the VIDEO OUT
jack on the VCR to the
VCR/AUX VIDEO IN jack
(yellow) on the TV.
Also connect the AUDIO OUT (R
and L) jacks from the VCR to the
VCR/AUX AUDIO IN jacks (red
and white) on the TV.
MAIN
SCREEN
I
PIP
B ACK OF TV
AUDIO OUT
(RED/WHITE)
AUDIO/VIDEO
CABLES
SUPPLIED
/ ANT IN
CABLE TV
SIGNAL
Atso be sure the normal antenna
connection between the VCR and
"PCare in place.
<_a Move to the next page after
the VCR to TV PIP connections
e completed.
For other possible PIP
connections see page 48 for
the "More PIP Connedtions"
section.
If you have a single (monaural)
Audio Output VCR, "Y"
connectors are available to
complete your connection.
Contact your dealer, or our Parts
Information Center (1-800-292-
6066), for detaJJs.
VCR
42
Page 43

low that'cou have completed
1 ¥ the required connections on
the previous page you are ready to
follow the simple steps shown
below.
: PICTURE SOURCE SELECT :
@;, Turn the VCR and ON.yv
Place the VCR in the TV mode -
Use the TV/VCR button on
the VCR (or on the TV remote
if it has teen set to work with
your VCR - see page 36.)
Place the TV's PIP INPUT
control to "VCR/AUX"-
With FEATURES MENU (3
of 3) on screen, move the RED
h_hlioht with the MENU (M)
I_ butLons. Then press the
MENU button.
Press the MENU AY and
MENU (M) buttons to
highlight and select the
"VCR/AUX 1" (w") item.
@> Select the channel on the VCR
to view in the PIP window.
Select the channel on the TV to
view on the :main screen.
12:00""
_12:00""
(VCR Indicator Light will go out)
O6
VCR IN "'TV MODE"
12:00 "M
VCR-FORPIPCHANNEL
iiAux 2
U AUX 3
PIP INPUT CONTROL SET TO "VCR/AUX I"
1
8
"IV ..FOR MAIN SCREEN CHANNEL
VCR
SELE(SI'ED
CHANNEL
_> Press tile PIP ON/OFF button
on the remote.
The PIP window should show in
one of the corners of the TV
screen.
Remember, if you see the
__same picture on the main
screen and in the PIP window, you
need to be sure the TV's PIP
Picture Source control (page 46) is
set to "VCR!AUX".
No sound will be heard with the
PIP picture. See page 44 on how
to "SWAP" the PIP picture with
the main screen picture so that
sound can be heard.
Also see the following page on
how to operate other PIP features
with the remote control.
SELECTED
Be sure to point the remote at the
front of the VCR when pressing
VCR function buttons.
TV
CHANNEL
k, ,,
43
Page 44

remote the PIP picture can be
moved and swapped with the main
l _£_y using the PIP buttons on the
scrt?en.
> ]Press PIP ON button to show
the PIP picture. _
PIP screen appears in corner of TV
screen. Press PIP ON again to
remove PIP from the main screen.
_ ]?ress PIP POSITION button
picture (from corner to corner on
the main screen).
on the remote t a move the PIP
4. FREEZE
<_ Press SWAP to the main
screen picture with the PIP picture.
Press SWAP again to return the
main screen and, PIP to their
original positions. See the
important reminder below.
swap
Press FREEZE button to hold
the current Main picture in the PIP
window (Main picture is active).
If PIP is currently OFF the PIP will
be automatically shown.
Press FRZ repeatedly to update the
frozen PIP with current pictures.
The frozen PIP cannot be swapped
with the main screen.
Press the PIP ON/OFF button to
drop the frozen PIP picture from
the screen.
continue to next page
3. PIP SWAP
Remember, if the TV is
showing a "VCR/AUX"
supplied picture on the main
screen (when the TV and VCR are
turned OFF), a blank screen will
appear when the TV is turned
back ON again.
If this happens, just press the
CH(annel) At or • buttons to
select a TV station for normal
viewing.
2. PIP POSITION
1. PiP ON/OFF
44
Page 45

5.PIPSIZE
6.PIPSTROBE
1i
@ Press SIZE button to
change
the size of the PIP window shown
on the TV screen.
Press the PIP SIZE button again to
see and compare the large and
small size PIP windows.
,.,,_
,,_ Press STROBE to see a series
of three frozen scenes from the
cmTently selected channel. Press
STRB again and the series of
pictu ceswill be updated.
<,
_ P_ressPREVIEW button to see
what is showing on three channels.
P/VUE starts with the current
channel and shows the next two
channels in memory'.
--_ Press P/VUE for
12 more channels.
b
' Press PIP ON/OFF
13 to return.
i
7. PIP PREVIEW
Every few seconds each P/VUE
picture will be updated with a
current scene for that channel.
Press P/VUE again to go to the
ne_t three channels in memory and
so or. Just press the number
buttons to select any previewed
channel.
Press PIP ON/OFF button to clear
the screen and retur:n to normal
viewing.
45
Page 46

'hepicture for the PIP window
can come through either the
ANTICABLE or VCR/A UX Inputs
(on the rear of t,_e TV). PIP Picture
Source simply tells the TV which
one of the input sources it is to
show in the PIP _indow. _
Select PIP SOURCE control.
With FEATURES MENU (3 of 3)
on screen, mow; the RED highlight
with the MENU (M) 4_ buttons.
TITenpress the ]VlENU button.
,_ Press the MENU &Y and
MENU (M) buttons to highlight
and select (_,") the desired input
source (either ANTENNA,
VCR/AUX 1, etc.).
ANTENNA- for a picture signal
coming from the
ANT/CABLE Input
on the TV.
V,CR/AUX1-
AUX 2-
AUX 3-
for a picture signal
coming from the
VCR/AUX IN
Video Input jack
on the TV.
for a picture signal
coming from the
AUX 2 Video Input
jack on the TV.
for a picture signal
coming from the
AUX 3 Video Input
jack on the front of
the TV.
=:_ FEAfURE MENU
MAIN
==' FE _,TURE MENU
-_'uv3,T -
<
,_ FF_ATURE MENU
I] SOL RCE _,
. 3 OF 3o_
[
{''_T 7 ANTENNA
1,1
<_ Press the STATUS button to
clear the screen.
Remember. The PIP
Nscreen will be blank unless a
signal is connected to the selected
source (for example: VCWAUX 1
[nput) on the rear of the TV.
LJ Ao×
ZE .j
46
Page 47

_C e Picture-ln-Picture (PIP)
olor and Tint controls are
used to make fine tune adjustments
to the color settings for PIP (when
it is shown on the TV screen).
CB
_) Select PIP COLOR-(or PIP
TINT) control.
With PICTURE MENU (2 of 2) on
screen, move the REDhighlight
with the MENU (M)I-_ buttons.
Then press the MENU button.
_) Press the MENU ,A_!' buttons
to move the liED highlight. Press
the MENU button to turn (v,") the
PIP COLOR or TINT control ON.
The PIP automatically comes on to
show the PIP window on the TV
screen.
_) Press the (+) and (-) buttons to
_=, PICTURE MENU
1'o_ '2'=_
_:y., P_qTp8_ MENU
levels you prefer.
adjust the PIP for Color (or Tint)
_ Press the STATUS button to
l clear the screen.
Remember. Although
@there are separate COLOR
and TINT controls for PIP, the
adjustment levels for these
controls depend on the TV's main
picture. For example: If the main
screen is showing a black and
white picture, PIP would also be
in black and white (even though
its source is :incolor).
J
47
Page 48

• Converter Box and VCR.
_ J_IP hookup with Cable
_ First use an optional signal
I splitter and connect the original
cable TV signal to both the
CABLE IN on the Cable Converter
and the ANTENNA plug on the
rear of the TV.
<_ Connect the CABLE OUT
the Converter Lothe ANT. IN on
the VCR.
_ Connect the VIDEO OUT
jack on the VCR to the VIDEO
IN jack on the TV.
Also connect the AUDIO OUT (R
and L) jacks from the VCR to the
AUDIO IN jacks on the TV.
Remember
to use the Cable TV
Converter Box to
select channels for
PIP, the VCR must
be sel:to the same
channel as the
on
f
ANTIC
75_U
REAR OF TV
channel selection
switch on the rear of
the Cable Converter
(either channel 3 or
4).
%__1
SPLITTER
Corltact the Parts
Information Center
1 800 292-6066
to order any optional
accessories
kNTENNA
®
IN
AUDIO VIDEO
CABLES SUPPLIED
VCR
(:'ABLE TV CONVERTER
48
Page 49

T;ffe e on screen HELP menu
rs both Operating Tips and
a list of Glossary definitions for
different features on your TV.
These items are given to provide
you with more information and
details on a select group of feature
operations_
...q--....
<_.,_I Select "HELP" on the TV's
Main Menu.
Press the remote's Menu 4_
v
buttons to move UP/DOWN and
from SIDE-TO-SIDE within the
list of on-screen features.
Press MENU (M) to select the
highlighted "HELP" item.
</2,_ Press lhe MENU AY and
then the MENU (M) buttons to
select either the OPERATING
TIPS or GLOSSARY item.
_: : MAIN MENU
,L,i,J.
+
......... ........
....;i_:iiiiiiii{iiiiiiii..............."" =: "..........
iiiiiiiiiiiiiiiiiiiiiiiii! HELP MENU ........
:::::::::::::::::::::::::::::::::
+_i:::;:: , \ , : , _ ,
:iii_ , _ , , , _ •
: O=>EF:ATING TIPS ....
USING OP_RATIN 3TIPS
• U!_e I:_e • and • keys on
your i_motA_ to scroll
t/-nou Jh the dnNerent.
help i :eros.
• U_.;eU_e"M" key on
yc_ur]_mot.e w_ll go back
t.c,l:h_ help menu.
FOI+LOW THE ON SCREEN
DIRtiCTIONS TO VIEW
C, _ERAT1NG TIPS
n optional RF Switcher is
availc:ble that will allow an
Antenna/Cable TV signal input
and another video accessory
(VCR, Via'eo Disc Player, etc.) to
be connected to the TV at the same
time.
The accessory RF switcher can be
purchased or ordered from your
dealer. If your dealer does not
carry the accessory, call the toll
free Parts Information Center
number:
1-800-292-6066
_BACK OF rv
ANT/ C,€_I3LE
<m
ANI OUl
AGO1
i
V_DEO DISC PLAYER
VCR
49
Page 50

,lease make these simple
checks befi)r,, calling for
service. These tips can save you
tim.o-and money .since charges for
TV installation and adjustment of
customer contro!s are not
covered under your warranty.
CAUTION: A video source (such as a video game, Compact Disc Interactive - CDI, or
TV information channel) which shows a constant non-moving pattern on the TV screen,
can cause picture tube damage. When your "FVis continuousl 2,used with such a source
the pattern of the non-moving portion of the game (CDI, etc.) could leave an image
permanently on the picture tube. When not in use, turn the vid,_o source OFF.. Regularly
alternate the use of such video sources with normal TV viewirg.
No Power
No Picture
No Sound
Remote Does Not
Work
and push POWER button again.
i Check the TV power cord. Unplug the TV, wait 1 minute, tt:en reinsert plug into outlet
Check to be sure outlet is not on a wall switch.
Check antenna connections on the rear of the TV. Are they properly secured to the
antenna plug on the TV?
Check the CABLE TUNING control for correct position.
Check PICTURE SOURCE control for correct position VCR/AUX, AUX 2, or AUX 3
position without a signal source will result in a blank screen.
Check the CLOSED CAPTIONS control. Some TEXT rhodes could block the screen.
Check the TV SPEAKER NORMAL/OFF control for the correct position.
If attempting auxiliary equipment hook-ups, check audio jack connections and that the
i Check the VOLUME and MUTE buttons on the TV and remote.
auxiliary equipment is on and in the proper operating modes.
Check TV-VCR-CBL "System" buttons on the remote. Press the remote's _ System
button to send commands to the TV: VCR System to sent to VCR; etc.
Check batteries. Replace with AA Heavy Duty (Zinc Chlcride) or Alkaline batteries
if necessary.
Clean the remote and the remote sensor window on the T¥.
i 1
i i
TV Displays Wrong
Channel or No
Channels Above 13
Cleaning and Care
To avoid possible shock hazard be sure the TV is unplugged from the electrical outlet before :leaning.
When cleaning the TV screen take care not to scratch or damage the screen surface (avoid _vearing jewelry or using
anything abrasive- do not use household cleaners). Wipe the front screen with a clean clotl: dampened with water. Use
even, easy, vertical strokes when cleaning.
• Specially designed screen cleaning kits are also available which contain an:ci-static cleane_; and cloths designed to get
into the ridges of the TV screen. If interested, ask your dealer about the lVlAG4600 Projection TV Screen Cleaning Kit or
call our toll-free Accessory Parts ordering number 1-800-292-6066.
• Gently wipe the cabinet surfaces with a clean cloth or sponge dampened in a solution of cool clear water and a mild soap
or detergent. Use a clean dry cloth to dry the wiped surfaces.
• Occasionally vacuum the ventilation holes or slots in the cabinet back.
• New:r use thinners, insecticide sprays, or other chemicals on or near the cabinet, as they might cause permanent marring
of the cabinet finish.
• Repeat channel selection. _1
I• Add desired channel numbers (ADD/DELETE CHANNELS control) into TV memory.
__ Check CABLE TUNING control for correct position.
This TV is equipped with protective circuitry that shuts the "IV off in case of moderate [
power surges. Should this occur turn the TV back on by pressing the POWER button
once or twice, or unplug and then replug the power cord at the AC outlet. ]
This feature is NOT designed to prevent damage due to hil:h power surges such as those ]
caused by lightning, which is not covered by your warranti(,. I
5O
I
Page 51

A/V Inputs * Connector plugs which allow the introduction of
distinct audio and video signals into the TV from accessory
VCRs, camcorders, etc. These plugs bypass the normal tuner or
RFiAntenna signal circuitry.
Pre-Amplifier * The control center of a hi-fi system. Not
only amplifies source inputs, but also allows for source
selection, volume, tone, balanc_ and all other controls that
affect the sound.
Coaxial Cable * A single solid antenna wire normally matched
with a metal plug (F-type) end connector that screws (or pushes)
directly onto a 75 Ohm inprat found on the T_evision or VCR.
Display * An oi_Lscreen message or graphics that help the user
operate and adjust his Television feature controls. See On
Screen Displays (OSD).
Direct Audio/Video Inputs * Located on the rear of the TV
these connectors (RCA phono type plug) are used for the input
of audio and video signals. Designed for use with VCRs (or
other accessorie,s) in order to receive higher picture resolution
and offer sound connection options.
Identify* Method by which a remote control searches and finds
an c_perating code for another product (such as a VCR or Cable
Coaverter). Once the code has been "identified" then the TV
remote can operate and send commands to the other product.
Multichannel Television Sound (MTS) * The broadcast
standard that allows for stereo sound to be transmitted with the
TV picture.
On Screen Displays (OSD) * Refers to the wording or
messages generated by the television (or VCR) to help the user
with specific feature controls (color adjustment, programming,
etc.).
Menu * An on-screen listing of feature controls shown on the
Television screen that are made available for user adjustments.
Picture -In-Picture (PIP) * Term used when two pictures are
shown on the "Pc"screen at the same time. The smaller PIP
picture is supplied by a VCR (or other tuner/video playback
source). The PIP picture can also be moved and swapped with
the TV's main screen picture.
Programming * The procedur: of adding or deleting channel
numbers into the Television's memory circuits. In this way
the Television "remembers" only the locally available or
desired channel numbers and skips over any unwanted
channel numbers.
Remote Sensor Window * A window or opening found on
the Television control panel through which infrared remote
control command signals are received.
Second Audio Program (SAF') * Another or additional audio
channel provided for in the Ml:ltichannel Television Sound
(MTS) broadcast standard. The most frequently proposed use
for SAP is the simultaneous bilingual broadcast of TV
program material.
Status * Allows the user to qu ickly confirm what channel
number is currently being viewed. Status can also be used to
clear the Television of on screen displays or information
(rather than waiting for the displays to "time out" or
automatically disappear frora the screen).
S-Video Input * Allows diroc ,'--nection .,_ i,igiHesolution
video sources, such as a Super VHS videocassette recorder,
Laser Disc player, etc. Provides optimum picture resolution,
sharpness, and clarity.
Twin Lead Wire * The more commonly used name for the
two strand 3130Ohm antenna wire used with many indoor and
outdoor antenna systems. In many cases this type of antenna
wire requires an additional ad:lpter (or balun) in order to
connect to the 75 Ohm Input terminals designed into the more
recent Televisions and VCRs.
Variable Audio Output * An adjustable audio output which
allows for volume variations al the source.
B1
Page 52

Accessories/Optional.........9,24-25,26-29,42,48,49,*Q/U-1
Adapter Connector ........................................ 42, 48, 49, *Q/U-1
Add/Delete Channels .......................................... 13-14, *Q/U-2
Advance Buttons ........................................................ *Q/U-2, 4
Audio Controls ................................................ 20-22, 23-24, 34
Audio/Video Input ................................... 26-28, 42, 48 *Q/U-2
Automatic Programming - _ 13, *Q/U-2
Alternate Channel ................................................................... 16
Batte,_€ Installation ......................................................... *Q/U-3
Cable "IV Connections/Settings ................ 12, 42, 48 *Q!U- 1,2
Channel Guide ......................................................................... 35
Channel/Time Display ........................................ 15, 17, *Q/U-3
Channel Memory ................................................. 13-14, *Q/U-2
Channel/Time Reminder ......................................................... 17
Clock Setting ........................................................................... 15
Clock Timer ............................................................................ 15
Closed Captioning .................................................................. 11
Color Controls ............................................................. 6,*Q/U-4
Convergence ............................................................................. 8
Controls/TV ............................................................ *Q/U-2, 3, 4
Controls!Remote ......................... 30-35, 36, 44-45 *Q/U-2, 3, 4
Exit ................................................................................ *Q!U-4
Feat_ares ..................................................................................... 5
First Time Set UI: ............................................................ *Q/U-2
Ghost Cancellation .................................................................... 9
Glossary/TV Terms ................................................................ 51
Help Menu ............................................................. 49, *Q/U-2, 4
Help Line Information .......................................... I, 50, *Q/U- 1
Inpu_ts/Audio and Video ........................................ 26-28, 42, 48
Mcnu ........................................................................... *Q/U-2, 4
Minus(-)/Plus (+)Buttons ........................................... *Q/U-3, 4
Parental Control ................................................................ 18-19
Picture-In-Picture (PIP) ......................................... 42-48, *Q/U-2
Power Light Indtcator ..................................................... *Q/U-3
Precautions/Safety ...................................... 2, 3, 50, 55, *Q/U-1
Programming Channels ............................................ 13, *Q/U-2
Remote Control .......................... 3(I-35, 41,44-45, *Q/U-2, 3, 4
Remote with VCRs ................................................. 36-37, 40, 41
Requesting Service ............................................... 50, 53-54, 55
RF Coaxial Cable ................................................ 42, 48 *Q/U-I
RF Switcher ............................................................................ 49
Reminder/Time and Channel .................................................. 17
Remote Locatoi. ................................................................. 30-31
Safety/Precautions ...................................... 2, 3, 50, 55, *Q/U-I
Second Audio Program (SAP) ................................................ 21
Sensor Remote ................................................................. *Q/U-3
Sleep Timer ............................................................................... 16
Smart Picture ...................................................................... 32-33
Smart Sound ............................................................................ 34
Status Button ............................................................... *Q/U-3, 4
Stereo Light Indicator ............................................... 21, *Q/U-3
Surround Sound .................................................................. 24-25
Speaker Terminals .................................................................. 24
Time/Channel Display .............................................. 17, *Q/U-3
Timer (Turn O:a) ...................................................................... 15
VCR Button .............................................................................. 26
VCR/TV Connections .............................. 26-29, 42, 48 *Q/U-1
Tips for Service ........................................ 49, 50, 53-54, 55, 43
TV Speaker Control ................................................................ 23
Volume Display. ..................................................................... 22
Warranty ................................................................................. 55
• Information contained in Quick-Use (Q/U) Guide - page listed
t_
B2
Page 53

)ma Area
\,
Philips Consumer Electronics Company
Factory Service Center Locations
See Reverse Side for More Details.
Detroit/Toledo
Rockford
f ii
FranciscolMetro Area Chicago
/
I
LosA geleslS,, Diego
hoenixJMetro Area
;,o,h.
Atlanta/N Georgia
md/N Ohio
Columbus/Dayton/Cincinnati • BostonlS Maine/
_f_New Hampshire
Charlotte
.\/
d_/ _J_'_ t -._Ha_'ford/Rhode Island
_ "_/'_ew YorkJMetro
_, •_ New Jersey
• Phi]ad _lphiaJS New Jersey
_h/WVAq;_
ngtonlBaltimorelRichmond
• Orlando/N FlorideiSE Georgia
\
TampaJW Florida
-_.t. Myers/SW Florida
Miami/SE Florida
NITE: If you resiclein oneof our Philips Factory ServiceBranch areas(seedirectory on back), youcan contact ti-e nearest ServiceBranchto obtain
efficient and expedientrepair for your product. If your product is In-Warranty.you should haveproof-of-purchase to ensureNo ChargeService.
For Out-of-Warranty service,call the location nearestyou.
NOTA:Si vous rdsidezdansunedes regions desservies parune succursale de service apresvente du fabricant Phili3s (voir liste ci-dessous), vous
pourrezcontacter labranchede serviceapr_svente la plus presde chezvous pour obtenir un seHice apr_svente r;!pideet efficace. Sile produit est
soJs garantie, il suffira de prdsenter unepreuve d'achat pour bdn6ficierd'un servicesansfrais. Pour les produits non couverts parla garantie,
co_tactez lecentre le plus presde chezvous.
NOTA:SiUd. resideen una de nuestraszonas parasucursales Philips deservicio al defdbrica (ver directorio mds a_ajo), Ud.puedecomunicarse con
]asucursal de servicio mds cercanapara obteneruna reparaci6noportuna y eficazde su producto. Si su producl:oestdtodavia bajo garantia, Ud.debe
presentarcomprobante de compra para no ocasionarningunos cargospor servicio. Paraservicio despu£sdel vencimiento de la garantia,llame al
lugar mds cercano delos abajoindicados.
Vancouver
MAC29298/95 EL.4482-3 Rev. N
53
Page 54

QUALITYSERVICEIS AS CLOSEASYOUR TELEPHONE!SIMPLY LOOKOVER THELIST BELOW FOR THENUMBEROF:A FACTORYSERVICE CENTER
NEAF;YOU. YOUR PRODUCTWILL RECEIVEEFFICIENTAND EXPEDIENTCARRY-IN, MAIL-IN, OR IN-HOME SERVICE,ANDYOU WILL RECEIVEPEACEOF MIND,
KNOWINGYOUR PRODUCTIS BEINGGIVENTHE EXPERTATfENTIONOF PHILIPS' FACTORYSERVICE. AND, IF THE PHONENUMBERLISTEDFOR YOUR AREA
IS LONG DISTANCE,CALL1-800-242-9225 FORFACTORYSERVICE.
COMI_ENTOBTENIRNOTFtESERVICEAPRi:SVENTERAPIDEETEFFICACESOITPARCOURRIER,/_DOMICILE.OUENSEPRESENTANT._UNCENTREDESERVICEPRILIPS.PLUS.DE600CENTRESDE
R_:CEI_rlONDEPROOUIT,_;_.REPARERATRAVERSLEPAYS:CONTACTERLECENTREDESERVICEAUXCONSOMMATEURSLEPLUSPROCHEPOURS/NOR L'EMPLACEMENTDECESDEPOTSDANS
UNRAYONDE50/_75MILES(80KMA120KM)DUCENTREDESER'_ICELOCAL.
C(_/_PIOOBTENERUNSEFIVICIOOPORTUNOY EFICIENTEPOR CORREO,ENCASA0 ENPERSONAPARASUPROOUCTOATRAil'S DEUNCENTROPRILIPSDE SERVICIO.MASDE 600 SITIOSPOR
TODOELPAlSPARALAFIECEPCIONDE PROOUCTOSNECESITADOSDEREPARACIONES:COMUNICARSECONELCENTRODESERVICIODEFABRICAI'_IASCERCANOPARAESTOSLUGARESDENTRO
DEON RADIODE80 A120 XM(50 A 75 MILLAS)OELCENTRODESERVICIOLOCAL,
Atlar_ta-Athens-.
Macon-Chattanooga,TN-
North GeorgiaArea
1898LelandDrive
Marietta,GA 30067
(404)952-3279
Boston-SouthernMaine-
SouthernNew Hampshire Area
1 NorthAvenue
Burlington,MA 01803
(617) 272-4825
Charlotte-Winston Salem-
Greensboro-ChapelHill-
Raleigh-Spartanburg,SCArea
520--GClantonRoad
Charlotte,NC 28217
(70z.)529-6330
Chi(',ago-GaryArea
1360W. HamiltonParkway
Itas_-a,IL 60143
(708) 775-0990
Cleveland-Akron-
YoungstownArea
24090 DetroitRoad
Westlake,OH 44145
(216) 899-204(3
ColiJmbus-Dayton-
Cin_:innatiArea
5164 BlazerParkway
Dublin, Ohio43017
(614) 792-1495
Connecticut-RhodeIsland-
Springlield,MAArea
1294 BlueHills Avenue
Bloomfield,CT06002
(203) 726-9612
Dallas-Ft. WorthArea
13375 StemmonsFreeway,
Suite200
Dallas,Texas 75234
(214) 243-4775
Detroit/ToledoArea
25173 Dequindre
Madison Heights,MI 48071
(810) 544-2110
Knoxville-Greeneville-
Tri Cities-East TennesseeArea
6700 D. PapermillRoad
PapermillPlaza
Knoxville,TN37919
(423) 584-6614
Ft. Myers-Naples-
SouthwestFloridaArea
11601 ClevelandAve.,Suite15
Ft.Myers,FL 33907
(813) 278-4242
Houston-Galveston-
Beaumont-Austin-
SanAntonioArea
1110NorthPostOakRoad
Suite1O0
Houston,TX 77055
(713)682-3990
LosAngeles-SanDiegoArea
2910 E.LaPalma,Suite E
Anaheim,CA 92806
(714) 238-7250
Miami-SoutheastFloridaArea
2099W. Atlantic Blvd.
PompanoBeach,FL 33069
(305) 978-0467
North NJ-Staten Island-
RocklandCounty,NYArea
140JCommerceWay
Totowa, NJ 07512
(201) 890-7200
NewYorkMetroArea
116 CharlotteAvenue
Hicksville,NY 11801
(516) 933-1780 NassauCounb,
Orlando--Jacksoqville-North
Florida-SoutheastGeorgiaArea
2452 SandLakeRoad
Orlando,FL32809
(407) 857-8998
PhiladelphiaiS.NewJerseyArea
352 DunksFerryRoad
Bensalem,PA lg020
(215) 638-7500
Phoenix-Scottsdale-
Mesa-TempeArea
5032 S.Ash Avenue,Ste.101
Tempe,AZ 85282
(602) 897-7358
Pittsburgh,PA-Steubenville, OH-
Wheeling/Morgantown,WV Area
2891 BanksvilleRoad
Pittsburgh, PA15216
(412) 563-8020
Rocklord-Kenosha-
Beloit-Madison Area
5602 N.Second
LovesPark,IL 61111
(815) 654-7343
San Francisco-Oakland-
SanJoseArea
3370 Montgomery Drive
SantaClara,CA95054
(408) 492-9013
Seattle-Tacoma/01ympia Area
1055 AndoverPark East
Tukwila, WA98188
(206) 575-6288
Tampa-St.Petersburg-
SarasotaArea
CenterPoint BusinessPark,
Building B-l, Suite100
1911 U.S.Hwy.301 North
Tampa,FL 33619
(813) 621-8181
Washington,De-Baltimore-
Richmond, VAArea
6671-JSantaBarbaraRoad
EIkridge,MD 21227
(410) 796-0105
HOWYOU CANOBTAIN EFFICIENTAND EXPEDIENTCARRY-IN, MAIL-IN, OR IN-HOMESERVICEIN CANADAFORYDUR PRODUCTTHROUGHA PHILIPS CONSUMERSERVICE CENTER
COMMENT OBTENIRNOTRE SERVICEAPRES VENTERAPIDEET EFFICACESOITPAR COURRIER, _,DOMICILE, OUENSEPRESENT,_,NT,_UN CENTREDE SERVICEPHILIPS
COMOOEITENERUN SER_ICIO OPORTUNOY EFICIENTEPORCORREO, EN CASA0 ENPERSONAEN ELCANADAPARA SU PHODUCTOATRAVI_SDEIJ_l CENTROPHILIPS DE SERVICIOALCONSUMIDOR
TORONTO
601 Milner Avenue
Scarborough, Ontario
M1B 1M8
(416) 754-6064 (Tel.)
(416) 292-5161 (Tel.)
(416) 754-6290 (Fax)
MONTREAL
4977 Levy Street
St. Laurent, Quebec
H4R2N9
(514) 956-0120 (TEL)
(514) 956-0828 (Fax)
54
VANCOUVER
1741 Boundary Road
Vancouver, B.C.
V5M 3Y7
(604) 294-3441 (Tel.)
(604) 294-3574 (Fax)
MAC2929 8/95
Page 55

PROJECTION TELEVISION
On(" Year I:rc(- IA_b()r
One Year Frcc S(_rvic(" ()1% l)nrls
Two Year,_ Free Service on Cathode Ray-llR)e Pans/30 Days Free Service oll Projeclion Tv Screen
This producl can be repaired in-l_ome.
WHO IS COVERED?
You must have pr6ofofpur-chase to receive wg?rant 3,service. A sales
receipt or other document showing that you purchased the product
is ,:onsidercd proof of purchase.
WI IAT IS COVIgRED?
\Varranty coverage begins the day you buy your product. For one year
thrrcaftcr (30 days fi_r the projection TVscrccn), all parts will bc
repaired or replaced, and labor and transportation are free. From one
to two years from the day tf purchasc, you pay tbr the replacement or
repair of all par:s except the cathode ray tube and the "CIcar-Vtt"
tens, and fbr all labor and transportation charges. After two years
fi'om the day of purchase, you pay R>rthe replacement or repair <)fall
parts except the "Clear Vu" lens (which is guaranteed against lnanu-
i'hcturer's dcfi.'cts tbr the lifetime of the product), and for all labor and
transportation charges.
All parrs, including repaired and replaced parts, are covered only for
the original warran B, period. When the warranty on the product
expires, the warrant).' on all replaced and repaired parts also expires.
WI IA'I" IS I-:XCLt;I)I-:I)?
Your warrant), does not cover:
• labor charges for installati(m or scrap of the product, adjustment
of customer controls on the product, and installation or repair of
antenna systems outside of the product.
• product repair and/or part rcplaccmcm because of misuse, acci-
dent, unauthorized repair or other cause not within the control of
Philips Consttmcr Electronics Compa, W.
• reception problcLns caused by signal conditions or cable or anten-
na systems outside the unit.
• a product that requires modification or adaptation to enable it to
operate its any country other than the cotmtry fbr which it was
designed, rnamd'acttlrcd, approved and/or authorized, or repair
of products damaged by these modifications.
• incidental or consequential damages resulting Irons the product.
(Some states do not allow the exclusioll of incidental or conse-
quential damages_ so the above exclusion may not apply to you.
This includes, but is not limited to, prerecorded material, whether
copyrighted or not copyrighted.)
WHERF. IS SERVICE AVAILABLE?
W;:rranty service is availahle in all countries where the product is offi-
cially distribulcc! by Philips COL_SUmCrElectronics Company. In
countries where Philips Consumer Electronics Company does not
distribute the product, the local Philips service organization will
art:rapt to provide service (ahhough there may bc a delay if the
appropriate spare parts and technical manual(s) are not readily avail-
able).
MAKE SURE YOU KEF.P..,
Please keep your sales receipt or other document showing proof of
purchase. Attach it to this owner"s manual and keep both nearby.
Also keep the original box and packing material in case you need to
return your product.
BI-:FOI/E I:{1-:QUF_S'FING SI-RVICE...
Please check your owner's manual bctbrc rcclucsting service.
Adjustments of lhe controls discus,;cd there may save you a service
call.
TO GET WAI/RANTY NERVICI-2...
Repair must bc performed by an amhorized servioz center or a the-
tory service center. If you live ncar __:factorv service center (see enclosed
list), you may omtact that center to schedule a time for in-home
repair. If you do not live near a factory service center, contact your
dealer, lfvour dealer is an authorized service center, he will arrange
repair. If your dealer is not an authorized service center, hc will
direct you to the authorized service center engaged by him to service
the products he :;ells.
(In U.S.A., Puerto Rico and US. Virgin Islands, all implied war-
rarities, including implied warranties of merchautability and fimcss
tbr a particular purpose, are limited in duration to the duration of this
express warrant T. But, because s.:m,c states do not allow limitations
on how long an implied warranty may last, this limitation may not
apply to you.)
(ln Canada, this warramy is given in lieu of all other warranties. No
other warranties are expressed or implied, including any implied war-
rarities of merchantability or fitness for a particular purpose. Philips
is not liable undc.r any circumstances fi)r any direct, indirect, special,
incidental or coascqucntial damag:s, i'mwsoever incurred, even if
notified of thc po,;sibilit3' of such damages.)
IF YOU HAVI" QtJESTIC)NS...
In U.S.A., I'ucr;o Rico, or the U.5. Virtlin IdandJ, contact Philips
Service Company at the address listed below.
In Canada, contact Philips Electronics Ltd. at:
4977 Levy Street
St. I,aurent, Qu6bec, H4R 2N9
(514) 95(,-0210
I{EMF_MBER...
Please record the model and serial numbers found on the product
below. Also, please fill out and rlail your warranty registration card
promptly. It will bc easier f'or us to notil 5, you if necessary.
MODEL #
SERIAL #
Philips Service Company
401 East Andrew Johnson Highway
(423) 475-8869
EIA9451-:001 / MAC 411)2 / 12-94
55
Jefferson City, Tennessee 37'760
Page 56

optionalAccessories
Prices ,;uh]ect to change _ithcul notice, Availability subject to changeat time o! purchase. Whenordering accessoriesoutside the U.S.A., please refer t_ the accessories material, addn_ss,and prices for thal countzy.
Maximizeyour viewing pleasure
with state-of-the-art accessories
designedspecificaL'y foryour
Pro_,ction Television. The
optional accessories shown in
this booklet may bepurchased
from your local dealer, or may
beordered direct from Philips
ConsumerElectronics
Company.
Cal;toll-free
1-899-292-6066
ElectronicsCo.,
AccessoriesMarketingDept.,
P,O. Box967,
Gr=.enevifle:TN37744.0967
SRG125
"IV/Cable Surge Protector
YourCost$19.95
Electricalfluctuations and
power surges candamage
your valuableelectronic
entertainmentequipment.
Protectyour antenna,cable,
andelectrical lineswith
MagnavoxAudio/Video
Equipment SurgeProtectors.
• Coaxialcable input/output
• Fivegrounded outlets
• Built-in LEDand reset button
ScreenEnhancerCleaning Kit
4835 395 17265
Orderthe Screen Enhancer
CleaningKit to maintain the
quality andperformance of
your screen enhancer.
Your Cost$17.90
LITE4
UniversalNightLiteTM
Audio/VideoRemote
Your Cost$24.95
Replaceyour Iosl or broken
remote control, or consolidate
all your remotes into one.Plus,
makeremote easierto use in
dimly-lit areas,with our Night
LiteTM lighted keypad.
• Preprogrammcd
• Autoscan and manual
code setup
• On-screencapabilities
• Menu prograrrming
• Spanish instructions included
• Toll-freecustomer assistance
number included
MANT300
Smart Amplifier
AmpliliedVHF/UHF/FM
Indoor Antenna
Your Cost$34.95
Drastically improves
VHF/UHF/FMreception onyour
TV or stereo.Simply attach
antennato your TV/stereo and
enjoy crisper, clearer sound and
improved picture quality.
Adjustable UHFloop tilts and
rotatesfor the best possible
reception.
• 39' retractabledipoles
• 6' 75 ohm coax connection
cable
• Matching transformer included
• Soft baseprevents scratching
surfaces
• Activeantenna with amplifier
with up to 20 dB gain
• LEDpower indicator onfront
of antenna:easy to seewhile
watching TV
• Knob ontop of antenna serves
as gain and power switch
• AC/DCpower adapter included
• 90-day warranty
56 IB 7178-E001
 Loading...