

Page 1
OWNER'SMANUAL,
\
Page 2
MAGNAVOX
Smart.Verysmart:
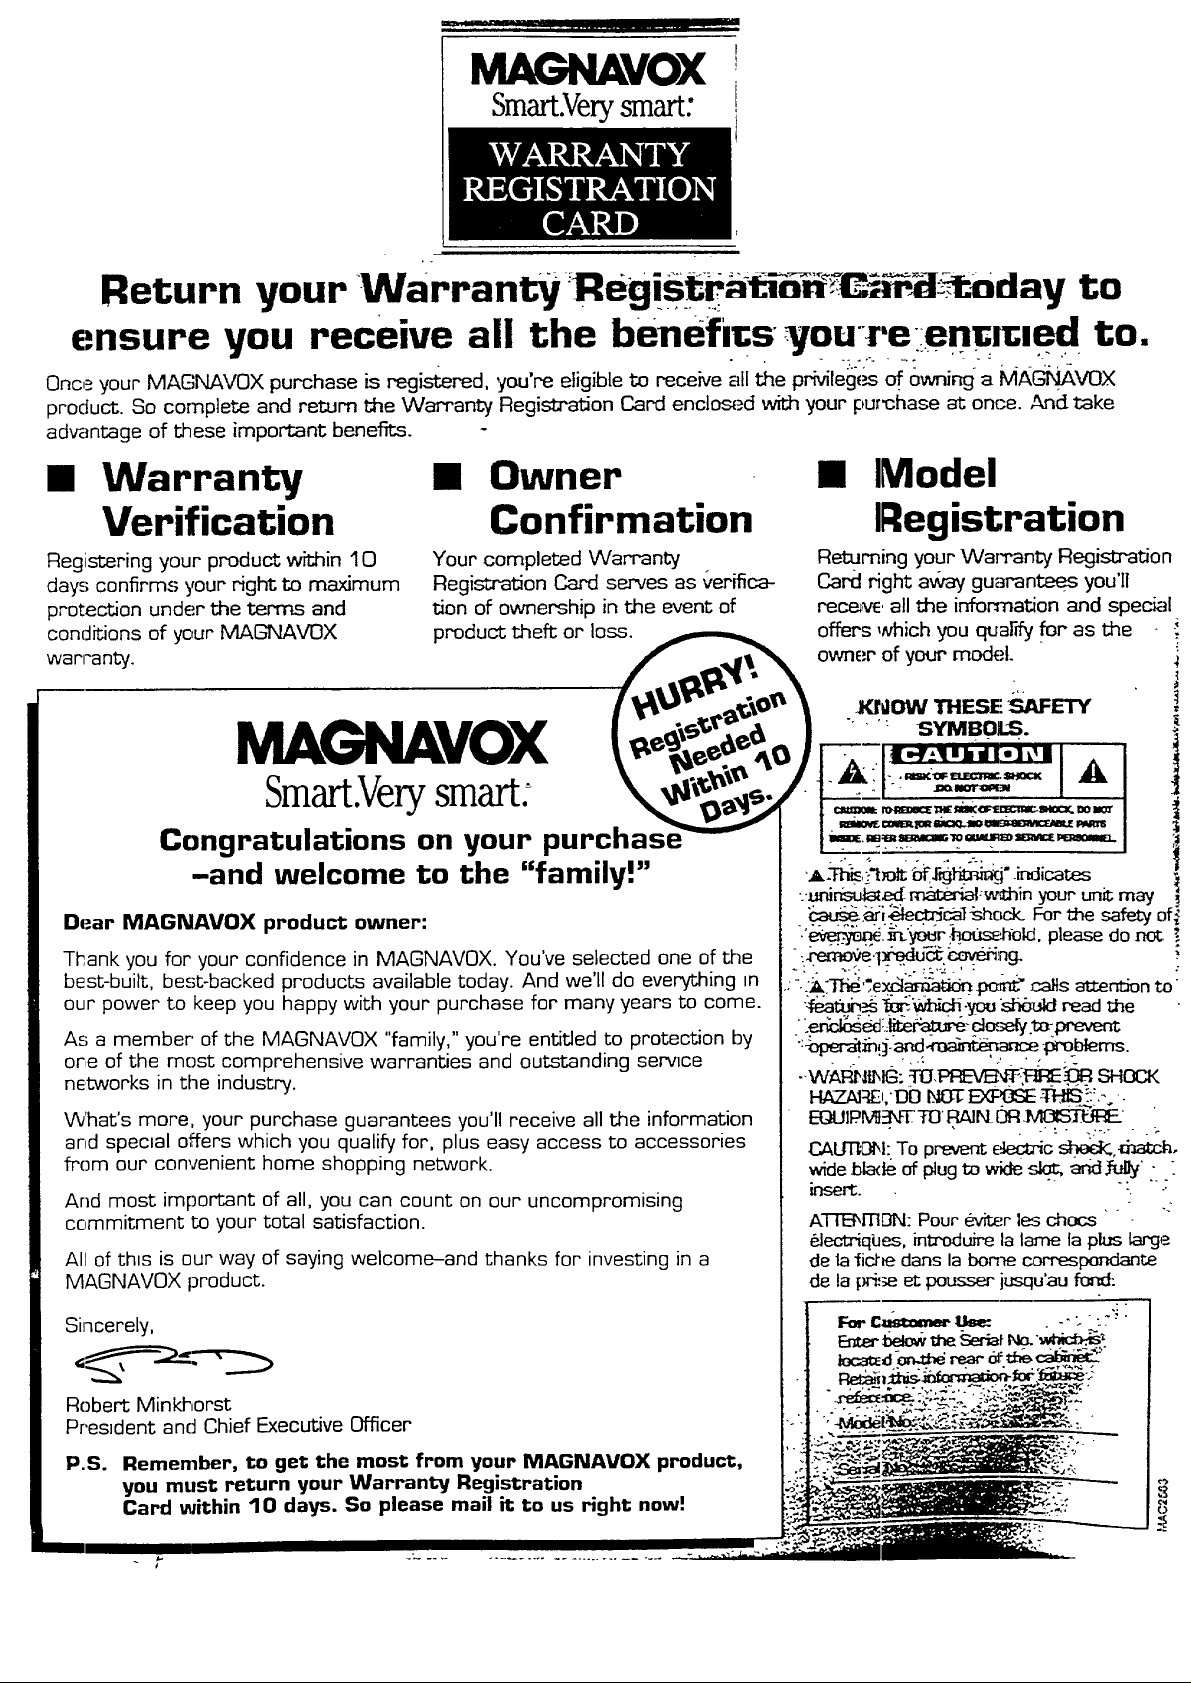
Return your Warranty Regi_tra_-_c_._l_aday to
ensure you receive all the benefits vou reen_lcled to.
Once your MAGNAVOX purchase is regis_red, you're etigib[e to receive all the prMleg,_ _ ownir_ a MA_vox
product. So complete and return the Warranty Registration Card enclosed with your pumhase at onre. And take
advantage of these important benefits.
Warranty
Verification
Registering your product within 10 Your completed Warranty
days confirms your right to maximum Registration Card serves as verifica-
protection under the terms and don of ownership in the event of
conditions of your MAGNAVOX product theft or loss. _ offers which you quarry for as the
warranty. _,_ ,__ owner of YOUr mode k
Owner
Confirmation
I '_"_"" _..,_tO' _ .KNOW THESE "_$:ETY
MA VOX t,,og ; ) ':
,'-, --',, -- _. :.:, _.'_,,- n l. Ar),.:l-.=__--=,=.=.,=,< 141, i
_marLvery smarL _' i_'P,:,' F-__.,__-.== I
"_ " -I'" _r_ I
..... - . _°'_"° ,_ _: ,_ ,. -
Model
Registration
Returning your Wan'anty Registration
Card right away guarantees you'll
rece_, all the information and spec_d
= _--.lI:__,l,=-¢u-l_,ml . I
- . . , _ _ I_=-_,-_=-_ I
Gongratulatmns on your purcnase i.==,.=.._...,=-=_='=_.',_=',,=-=-i
-and welcome to the "family!"
Dear MAGNAVOX product owner:
Thank you for your confidence in MAGNAVOX. You've selected one of the
best-built, best-backed products available today. And we'll do everything in
our power to keep you happy with your purchase for many years to come.
:._mir_d_-_:_hin your unit may
_._i_r_catbhc_._ For the safety of
.'_.__ :._. pl_ do_,
.:-.."a.'TI_"_ex_tar_ti_'__pr_rr_ calls att.errdonto
_a_ __-.you s_ read _e •
As a member' of the MAGNAVOX "family," you're entitled to protection by
or,e of the most comprehensive warranties and outstanding service
networks in the industry.
What's more, your purchase guarantees you'll receive all the information
and special offers which you qualify for, plus easy access to accessories
from our convenient home shopping network.
And most important of all, you can count on our uncompromising
commitment to your total satisfaction.
All of th_s is our way of saying welcome-and thanks for investing in a
MAGNAVOX product.
Sincerely,
Robert Minkhorst
Pr'es_dent and Chief Executive Officer
P.S. Remember, to get the most from your MAGNAVOX product,
you must return your Warranty Registration
Card within 10 days. So please mail it to us Hght now!
-:_,_-___.. ___.
--WA_: TO._:_'v_Y_,_. SHOCK
HAZA:RE_,'DONOTEX]:_:_ -_3_tS:::.-,-•
wide Ioladeof plug to wide<.d_.and _%_y"-_
AI-fENTI[]N: Pour 4-Ater1_ chocs
_lectriqbes, int_oduirela lame la plus largP-
de la fi_ darts la borne correspondante
de la pr_;e et pousser jusqu'au fond:
.-
Page 3
[t_ Getting Started
_ Warnin_Precautions ................................ 2-3
Features and Model Information ................. 4
How to Follow your Easy-to-Use Owner's Guide ..... 5
Antenna and Cable TV Connections ...................... 6-7
VCR to TV Antenna Connections ............................. 7
First Time Set-Up and Use of the TV ............... 8-11
Basic "IV and Remote Control Operation .......... 12-13
E2 On-Screen Features
How to Use the On-Screen Feature Controls ..... 14-15
Remote (7ontrol OperationUsing the Remote (TV/VCR buttons)....38-39
Using Smai_ Sound or Auto-Volume .......... 40
Using the Channel G_ide Control ............................. 41
Setting the Personal Preference Control ............. 42-43
Setting the Remote to Work Your VCR ............. 44-45
Setting the Remote to Work Your
Cable Converter .................................................. 46-47
Setting the Remote to Work a VCR or Cable
Converter - "Search Method". ............................ 48-49
Itow to Select Picture and Sound Controls ...... 16
,>Selecting a Picture Source ................................ 16
,>Adjusting Brightness, Picture, Color,
Tint, and Sharpness Controls ............................ 17
')'Using the Clearview Control ............................. 18
,>Using the Flesh Correction Control .................. 19
,>Adjusting Bass, Treble, and Balance Sound
Controls ............................................................. 20
">Using the Expander Sound Control .................. 20
">Setting the "IV for Stereo Programs ................. 21
How to Select Advanced Controls ..................... 22
,>Setting the "IV Clock ......................................... 22
">Setting the "IV for Closed Captioning ............... 23
"#Using the Sleep Timer Control ......................... 24
"#Using the Time/Channel Reminder Controls ....25
"#Adjusting the Size of Channel/Time Display ...26
"#Setting the "IV for Cable or Antenna Signals....27
"#Adding Channels in Memory (Automatically) .28
"#Adding Channels in Memory (Manually) ......... 29
-#Adjusting tile TV's Convergence Control ......... 30
-_'Using the TV Speaker On!Off Switch with
the Audio Output jacks ..................................... 31
+How to Censor the Viewing of Channels ....32-33
+Using the TV's Audio/Video Input and
Output Jacks ............................................... 34-36
._'Surround Sound Speaker Connections .............. 37
-_ Picture-In-Picture (PIP)
How to Use PIP (Connections) ............ 5%51
How to Use PIP with the TV Remote ................ 52-53
Selecting the Picture Source for PIP .......................... 54
Adjusting Picture-in-Picture Color and Tint ............ 55
More PIP Connections (Cable Converter) ............... 56
]L_]]_ General Information
Tips if Something Isn't Working ............... 57
Glossary of TV Terms .............................................. 58
Index ......................................................................... 59
RF Switcher Info_aation .......................................... 59
Warranty ................................................................... 60
The Model and Serial Numbers are found on the
back of this TV set. Please record these numbers and
purchase date in uhespace below. P,efer to them
whenever you ask your dealer about this TV set.
Model No..
Serial No.
Purchase Date
Please attach your sales receipt to this book and keep
it for future refer_nce.
WARNING: TO PREVENT FIRE OR SHOCK
H,tCZARD DO NOT
EXPOSE THIS UNIT TO RAIN OR EXCESSIVE
MOISTURE.
Copyright © 1994 Philips Consumer ELectronics Company. All rights reserved.
3
Page 4

First"rimeSetLipwhichautomaticallysetstheTV
forlocalchannelsand antenna mode. It even helps you
make the necessary connections for the Picture-In-
Picture (PIP) feature (see page 8.)
Infrared Remote Control which operates your TV
set and a variety of wireless remote control VCRs and
Cable TV Converte,rs.
Standard TV broadcast (VHF/UHF) or Cable TV
(CA'I'V) channel capability.
Closed Captioning which allows the viewer to read
TV program dialogue or voice conversations as on-
;creer, text.
As you unpack your TV please note that the
following items have been included with your set:
Owner's Manual
Warranty Registration Card
Safety Tip Infoimation Broch_Lre
Factory Service Address Directory
Remote Control Transmitter
Batteries for Remote Control Use
Accessory Products Information Brochure
Audio/Video Cables for Direct Input and
Output Connections.
Automatic Programming of channels for quick and
easy selection of favorite stations available in your
irea.
Picture-In-Picture (PIP) which can show a TV
program and the direct video output from an accessory
(VCR, etc.) onto the TV screen at the same time.
Parental Control for "Censoring" or blanking out
chanrels and Audio/Video Input jack connections to
prevent children from watching undesirable
programming.
Stereo-Ready TV with built-in audio amplifier and
twin ,;peaker system. Receives TV programs in both
broadcast stereo sound or (SAP) bilingual broadcast.
On-Screen Features which display helpful
information for setting of TV controls (such as color
adjustment, timer settings and channel programming).
Audio/Video jacks for direct connections with VCRs
(and other accessories) for quality TV picture and
sound playback.
Please take a few rninntes to complete your
registration card. The: serial number for the TV is
on the back of the sel.
Please keep your packing material for any future
use.
To ensure that picture screen performance is of
the highest quality, please avoid robbing any
object or material on the screen that could scratch
or damage its surface.
Refer to the back of this manual for instructions
on the cleaning and care of the TV.
Surround Sound external audio speaker connections.
Sleep-Timer which automatically turns the TV OFF al
preset time intervals.
4
Page 5
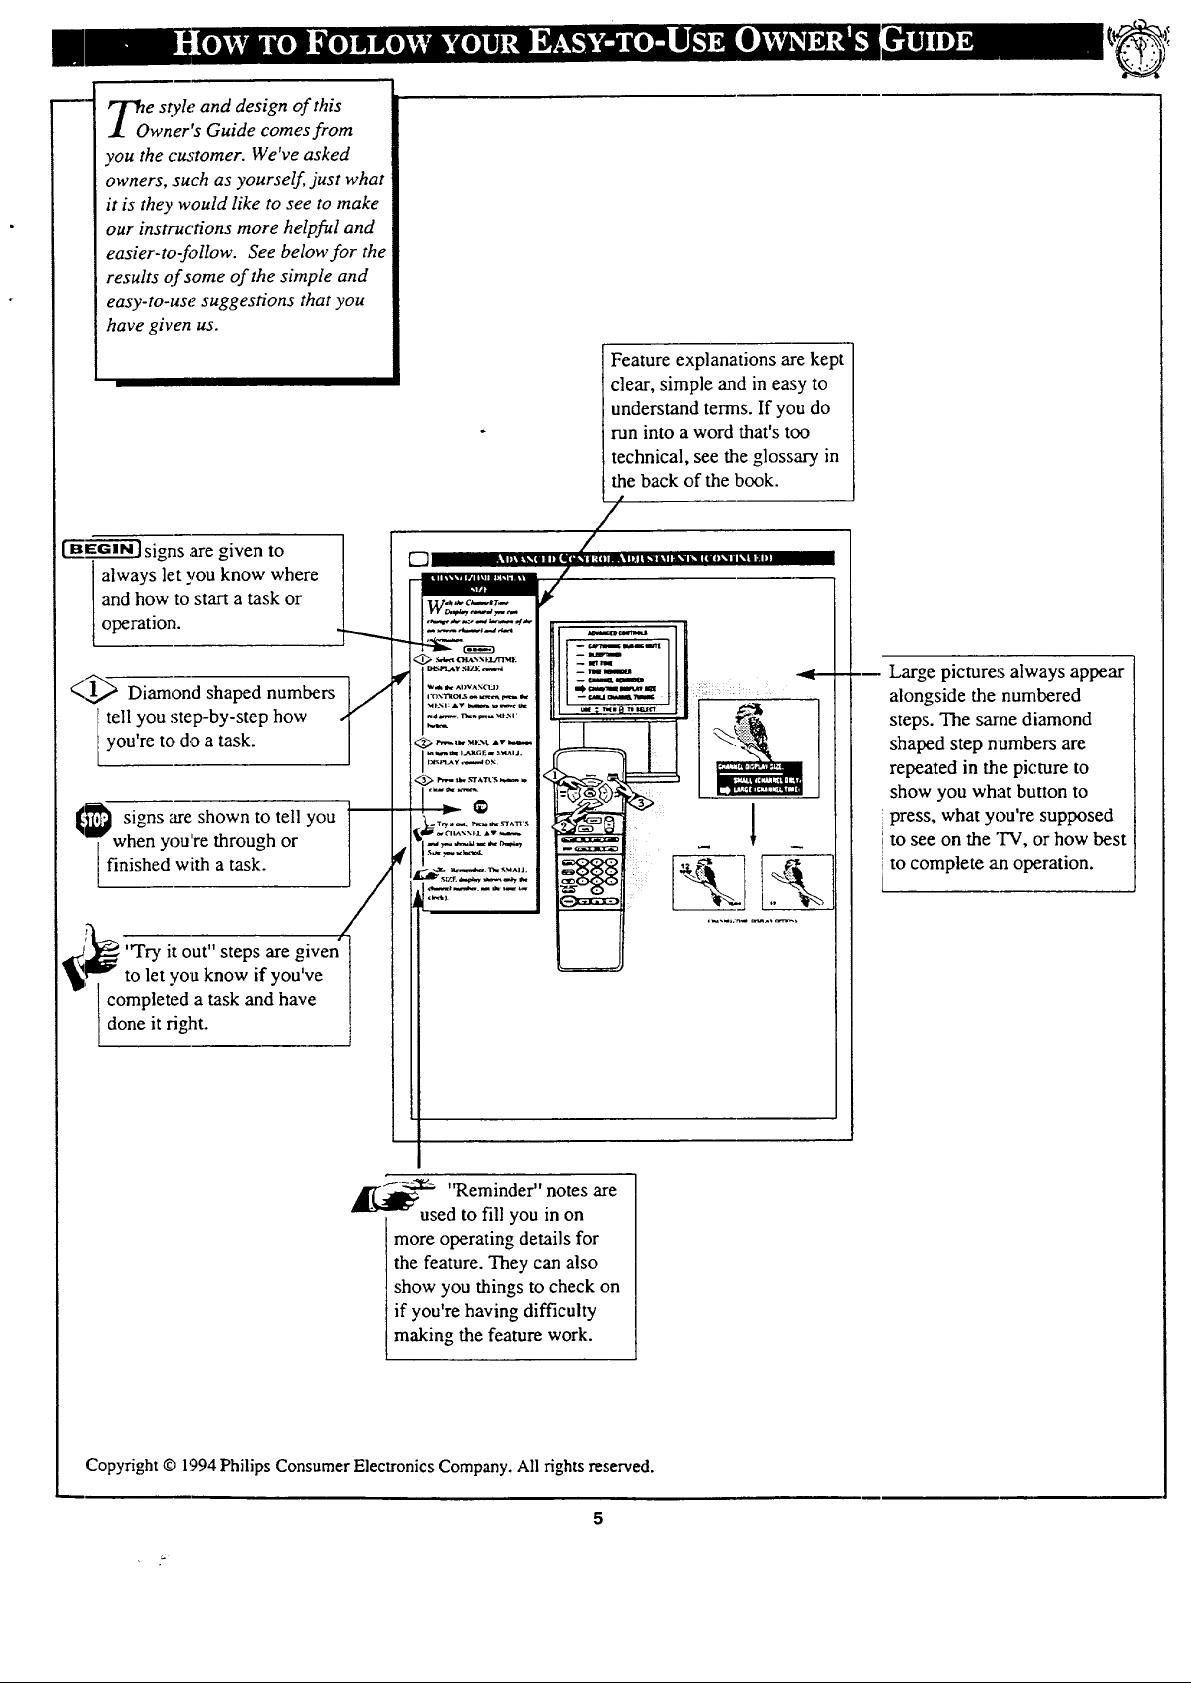
m-
e style and design of this
wner's Guide comes from
you the customer. We've asked
owners, such as yourself just what
it is they would like to see to make
our instructions more helpful and
easier-to-follow. See below for the
results of some of the simple and
easy-to-use suggestions that you
have given us.
I"_'EG----'ffi'ff]signs are given to
always let you know where
and how to start a task or
operation.
Feature explanations are kept
clear, simple and in easy to
understand terms. If you do
-un into a word that's too
technical, see the glossary in
the back of the book.
tell you step-by-step how
you're to do a task.
<1_ Diamond shaped numbers
-"T when you're through or
finished with a task.
[_ signs are shown to tell you J
'Wry it out" steps are given
to let you know if you've
completed a task and have
done it fight.
/
"Reminder" notes are
used to fill you in on
more operating details for
the feature. They can also
show you things to check on
if you're having difficulty
making the feature work.
I III
_m Large pictures always appear
alongside the numbered
steps. The same diamond
shaped step numbers are
repeated in the picture to
show you what button to
press, what you're supposed
to see on the "I'V, or how best
to complete an operation.
Copyright © 1!994Philips Consumer Electronics Company. All rights reserved.
Page 6
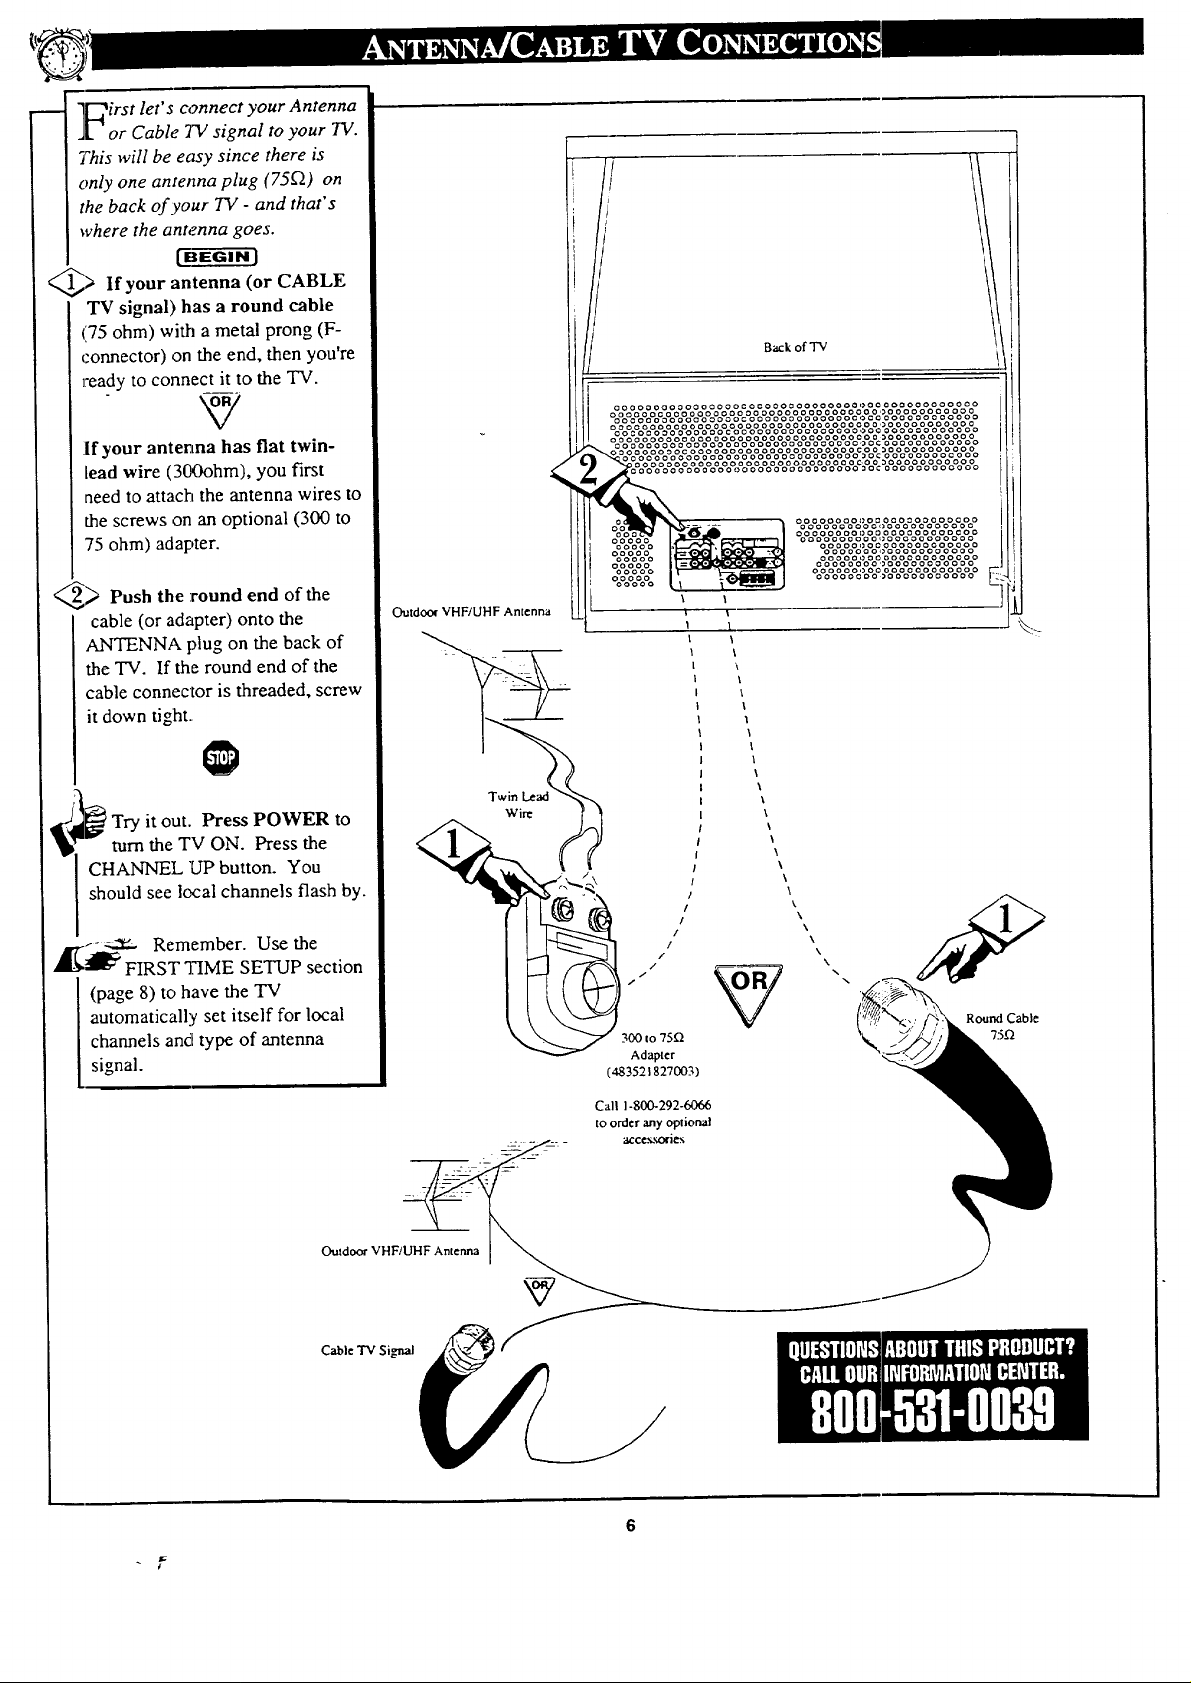
l_irst let's connect your Antenna
l or Cable TV signal to your TV.
This will be easy since there is
only one antenna plug (75_) on
the back of your TV - and that's
where the antenna goes.
[-BEG--gffi-a'l
_ If your antenna (or CABLE
TV signal) has a round cable
'75 ohm) with a metal prong (F-
connector) on the end, then you're
ready to connect it to the "IV.
If your antenna has flat twin-
lead wire (300ohm), you first
need to attach the antenna wires to
the screws on an optional (300 to
75 ohm) adapter.
_ Push the :round end of the
cable (or adapter) onto the
ANTENNA plug on the back of
the TV. If the round end of the
cable connector is threaded, screw
it down tight.
;Try it out. Press POWER to
turn the TV ON. Press the
CHANNEL "UPbutton. You
should see local channels flash by.
_[_-- _ Remember. Use the
FIRST "lIME SETUP section
(page 8) to have the TV
automatically set itself for local
channels and type of antenna
signal.
Outdo_" VHF/UHF Antenna
Wire (_
\
\
I
\
\
I
Back of "IV
I
I
\
\
\
\
\
\
\
/
oooooooooooooooococoooooooooooooocoooooooooooo
oooooooooooooooooooooooooooooooooo,)oooooooooo0
oooooooooooooooocoooooooooooooco_coooooooooooo
oooooooooooooooooooooooooooooooooooooooooooooo
ooeooooooooooocoooooooooooooooooo¢oooooooooooo
1
I
/
/
i
I
to 75Q
Adapter
(483521827003)
Call 1-800-292-6066
to order any oplional
acce._oriex
ooooooooooaoooooooooooo
oooooooooo,)ooooooooooo
oooooooooo,_ooooooooooo
oooooooeoooooooooooo
ooooooooooooooooooo
oooooooooooooooooooo
oooooooooooooooooooo
ooooooooooooooooooooo
oooooooo)ooooooooooo -=_
_ooooooooooooooooooo_oo _I
\
\
t\
\
\
\
\
Rouml Cable
75-q
Outdoor VHF/UHF Antenna
Cable TV Signal
6
Page 7
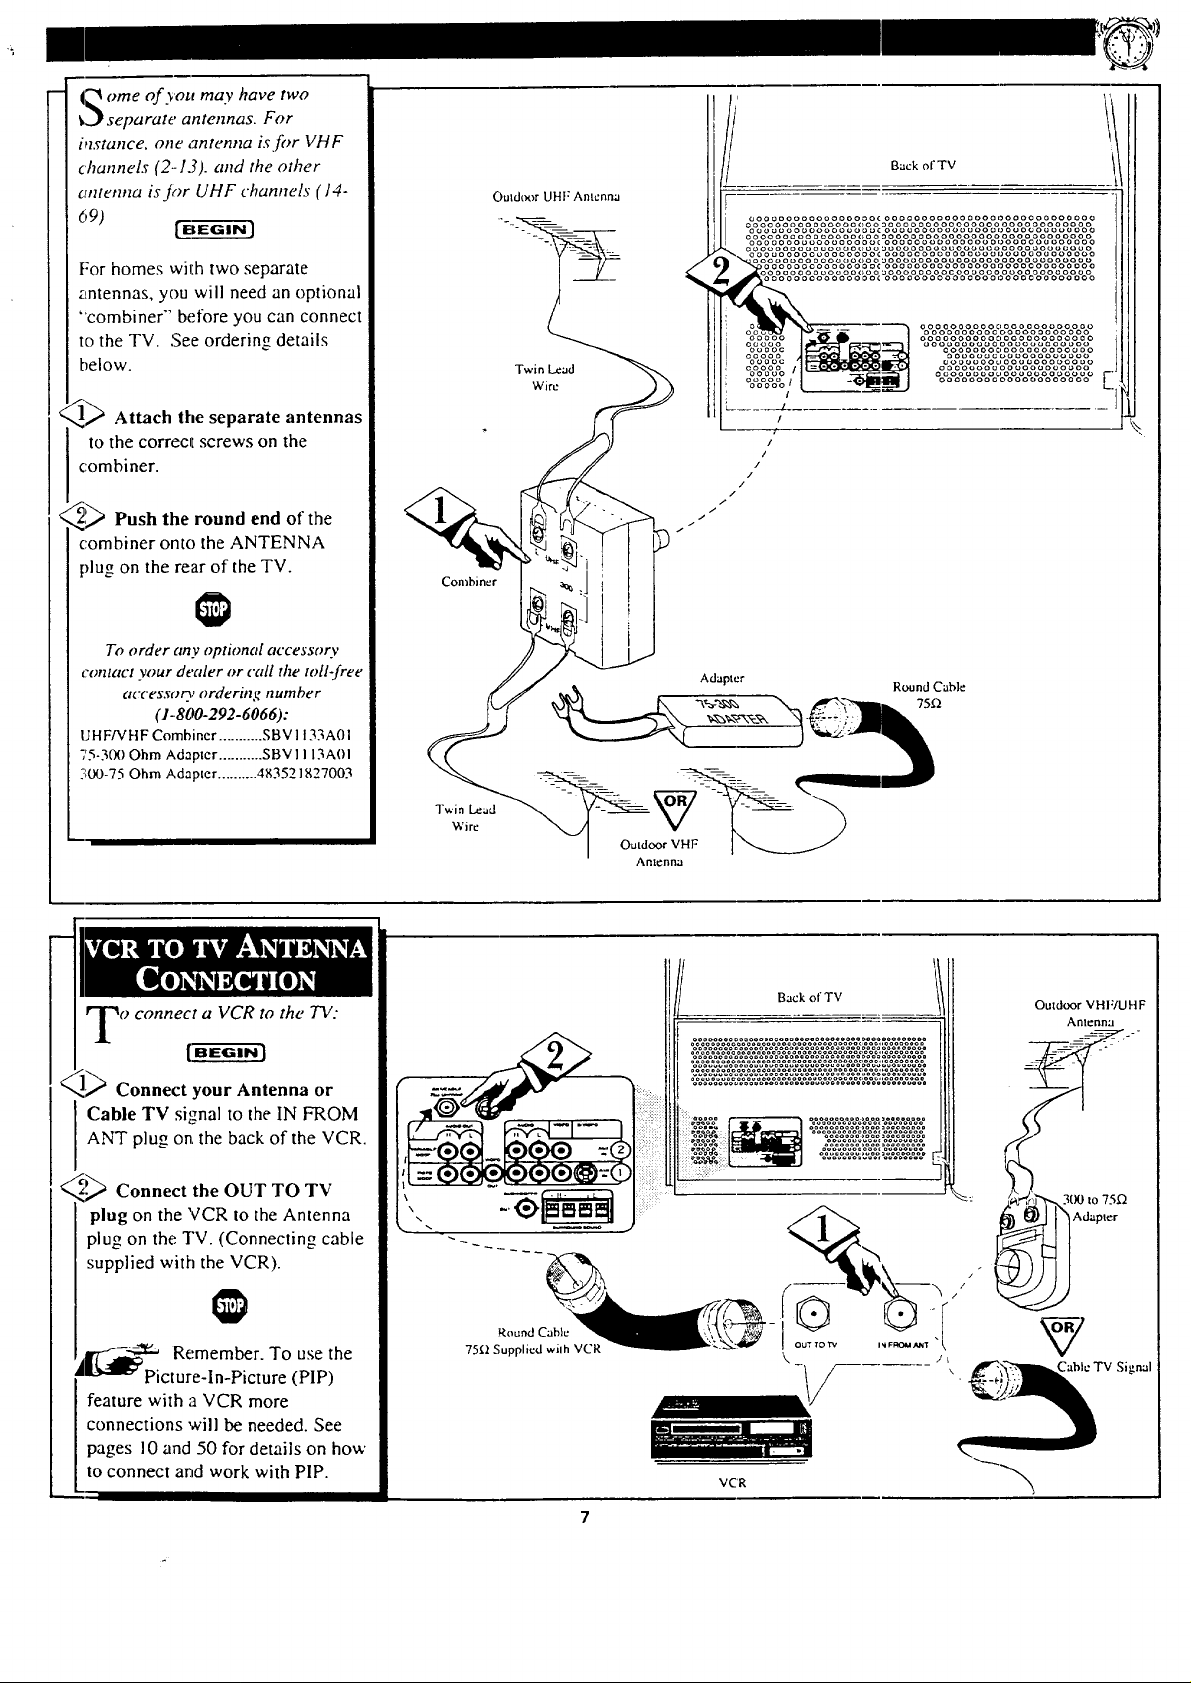
('_ ome of you may have two
_ separate antennas. For
blstance, one antenna is fi_r VHF
channels (2-13). and the other
antenna isjor UHF channels (14-
69) E
For homes wi_Ehtwo separate
antennas, you will need an optional
"combiner" betbre you can connect
to the TV. See ordering details
below.
,_ Attach the separate antennas
to the correc_t screws on the
combiner.
,_,_ Push the round end of the
combiner onto the ANTENNA
[)lug on the rear of the TV.
To order any optional accessory
contact your dealer or call the toll-free
accessory ordering number
(1-800-292-6066):
UHF/VHF Combiner ........... SBV 1133A01
75-300 Ohm Adapter ........... SBV1 113AOI
5;00-75 Ohm Adapter .......... 483521827003
Combiner
Tv,.in Lead
Wire
Outdt_r UHF Antenna
Twin Lead
Wire
ooooooooooooooooocoooooooooooooooooooooooooooo
0ooooooooooooooooo0oooo0oooooooooooooooooooooo
ooouooouooooo_ooucooooooooooouoo_oooo_ououoooo
ooo_oooooooooooooo_oooo0oooooooooooooooooooooo
ooooooouooooooooocoooocooooooooooooooooooooooo
ooo_oooo_ouoooo¢,uouuooooooo_oooo_oooooooouoouo
Adapter
Back of TV
oooo0ooocoooooooooooooooooo
)ooooooooooooooooooooooooooo
ooooo0ooooooooooooooooo
ooooooooooooooo0oooooo
oooooooooooooooooooooao
oooooooooooooooooooo
_o_o_oouooo_ooouoouo
ooooooouoouooooooooo
oooooooooooooooooooo
oooouooo_,oooooooooo_o
Round Cable
75_'/
)
o connect a VCR to the TV:
Connect your Antenna or
ANT plug onLthe back of the VCR.
I Cable TV signal to the IN FROM
<
_._ Connect the OUT TO TV
plug on the VCR to the Antenna
plug on the TV. (Connecting cable
supplied with the VCR).
_r-'-.2.2._ Remember. To use the
_Picture-ln-Picture (PIP)
connections will be needed. See
pages l0 and 50 for details on how
feature with a VCR more
to connect and work with PIP.
Round Cable
7511 Supplied wilh VCR
VC'R
Back of TV
°ooo0°°,o°o_.o00°°0°
°oo_ooo©ooo,°o0o0o°o
Outdoor VHF/UHF
Antenna
Page 8
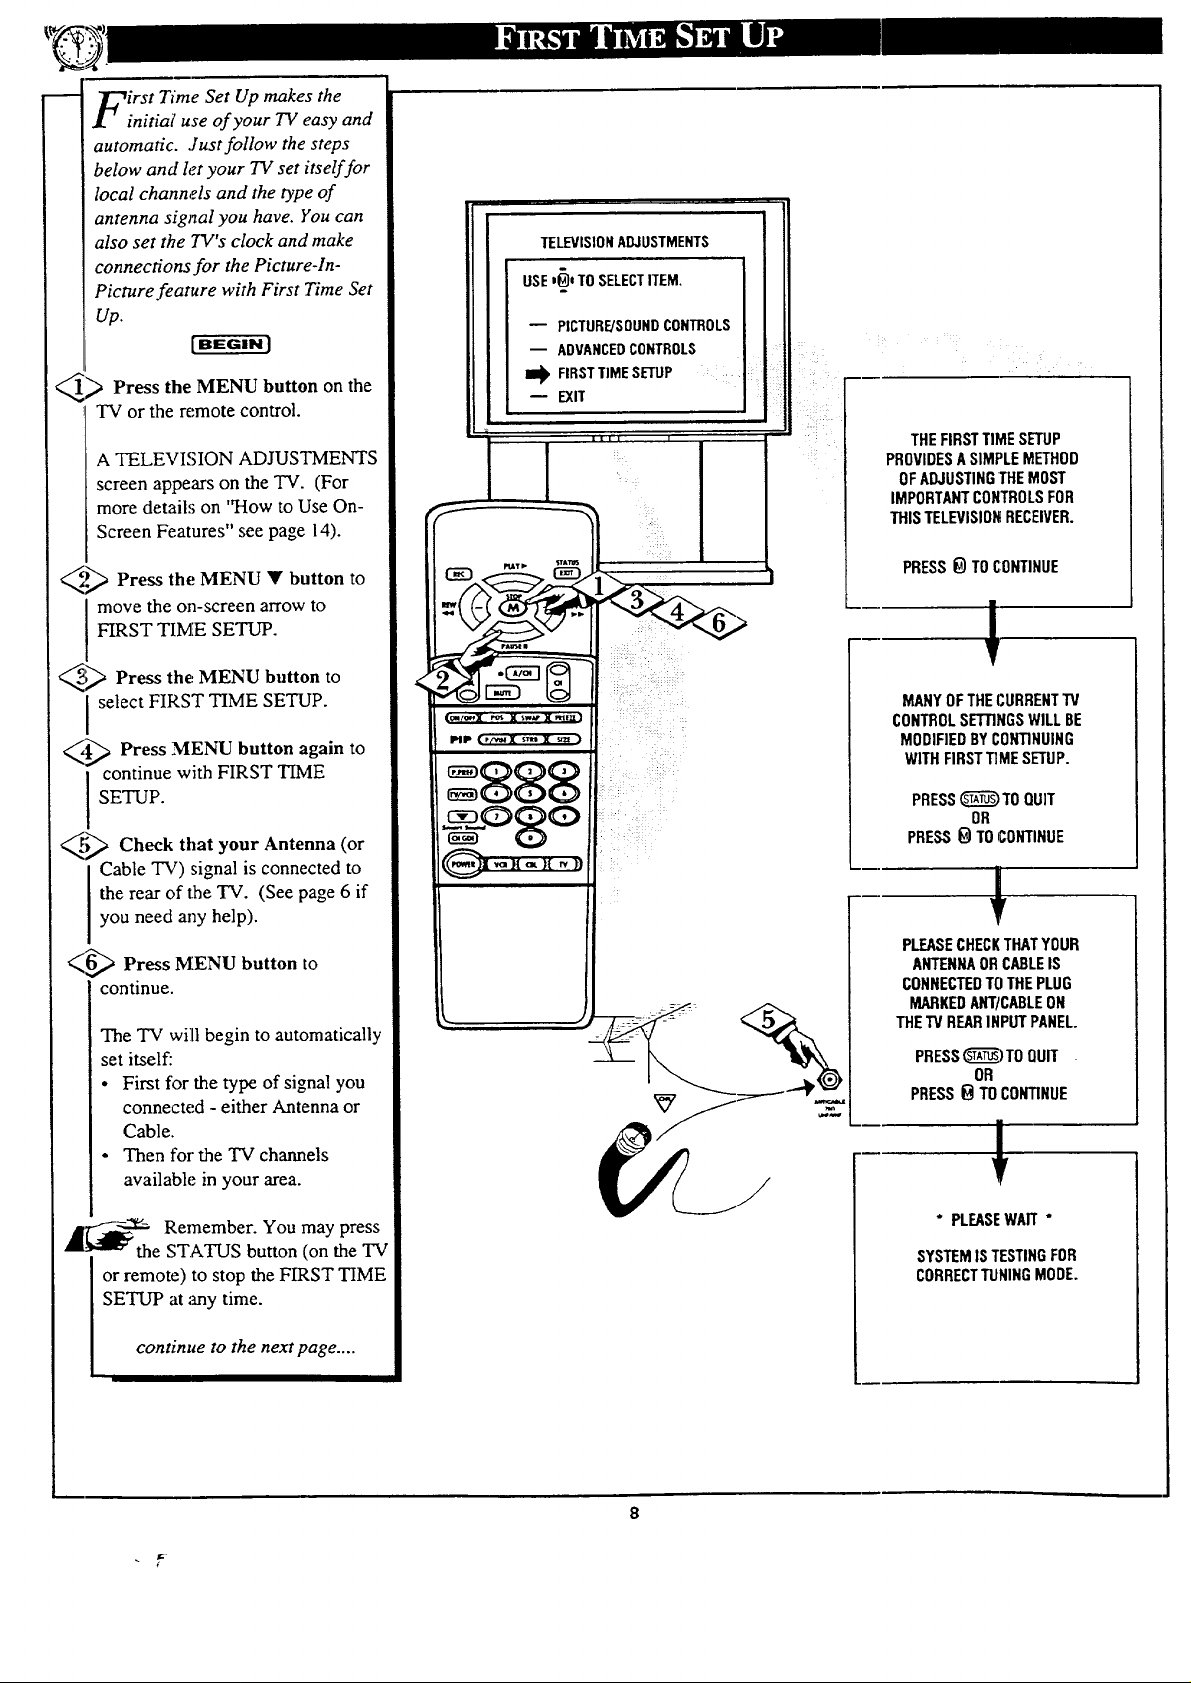
irst Time Set Up makes the
initial use of your TV easy and
automatic. Just follow the steps
below and let your TV set itself for
local channels and the type of
antenna signal you have. You can
also set the TV's clock and make
connections for the Picmre-ln-
Picture feature with First Time Set
Up.
[BEGIN)
_ Press the MENU button on the
"IV or the remote control.
A TELEVISION ADJUSTMENTS
screen appears on the TV. (For
more details on 'q-Iow to Use On-
Screen Features" see page 14).
,'._ Press the MENU • button to
move the on-screen arrow to
FIRST TIME SETUP.
Press to
_;_ the MENU button
select FIRST TIME SETUP.
_t-'_ Press MENU button again to
TELEVISION ADJUSTMENTS
USEl_)eTOSELECTITEM.
-- PICTURE/SOUNDCONTROLS
-- ADVANCEDCONTROLS
I_ FIRSTTIMESETUP
-- EXIT
THEFIRSTTIME SETUP
PROVIDESASIMPLEMETHOD
OFADJUSTINGTHEMOST
IMPORTANTCONTROLSFOR
THIS TELEVISIONRECEIVER.
PRESS_ TO CONTINUE
!
MANYOF THEI,URRENTTV
CONTROLSETRNGSWILL BE
MODIFIEDBYCONTINUING
WITHFIRSTTIME SETUP.
SETUP.
continue with FIRST TIME
_ Check that your Antenna (or
the rear of the TV. (See page 6 if
you need any he]p).
i able TV) signal is connected to
(6_ Press M.ENU button to
continue.
The TV will begin to automatically
set itself:
• First for the type of signal you
connected - either Antenna or
Cable.
• Then fox"the TV channels
available in your area.
_1,_1_ Remember. You may press
_"1"" the STATUS button (on the TV
or remote) to stop the FIRST TIME
SETUP at .+mytime.
continue to the next page ....
PRESS_TO QUIT
OR
PRESS_ TO CONTINUE
+
PLEASECHECKTHATYOUR
ANTENNAORCABLEIS
CONNECTEDTOTHEPLUG
MARKEDANT/CABLEON
THEW REARINPUT PANEL.
PRESS_)TO QUIT
OR
PRESS_ TOCONTINUE
* PLEASEWAIT *
SYSTEMIS TESTINGFOR
CORRECTTUNINGMODE.
8
Page 9
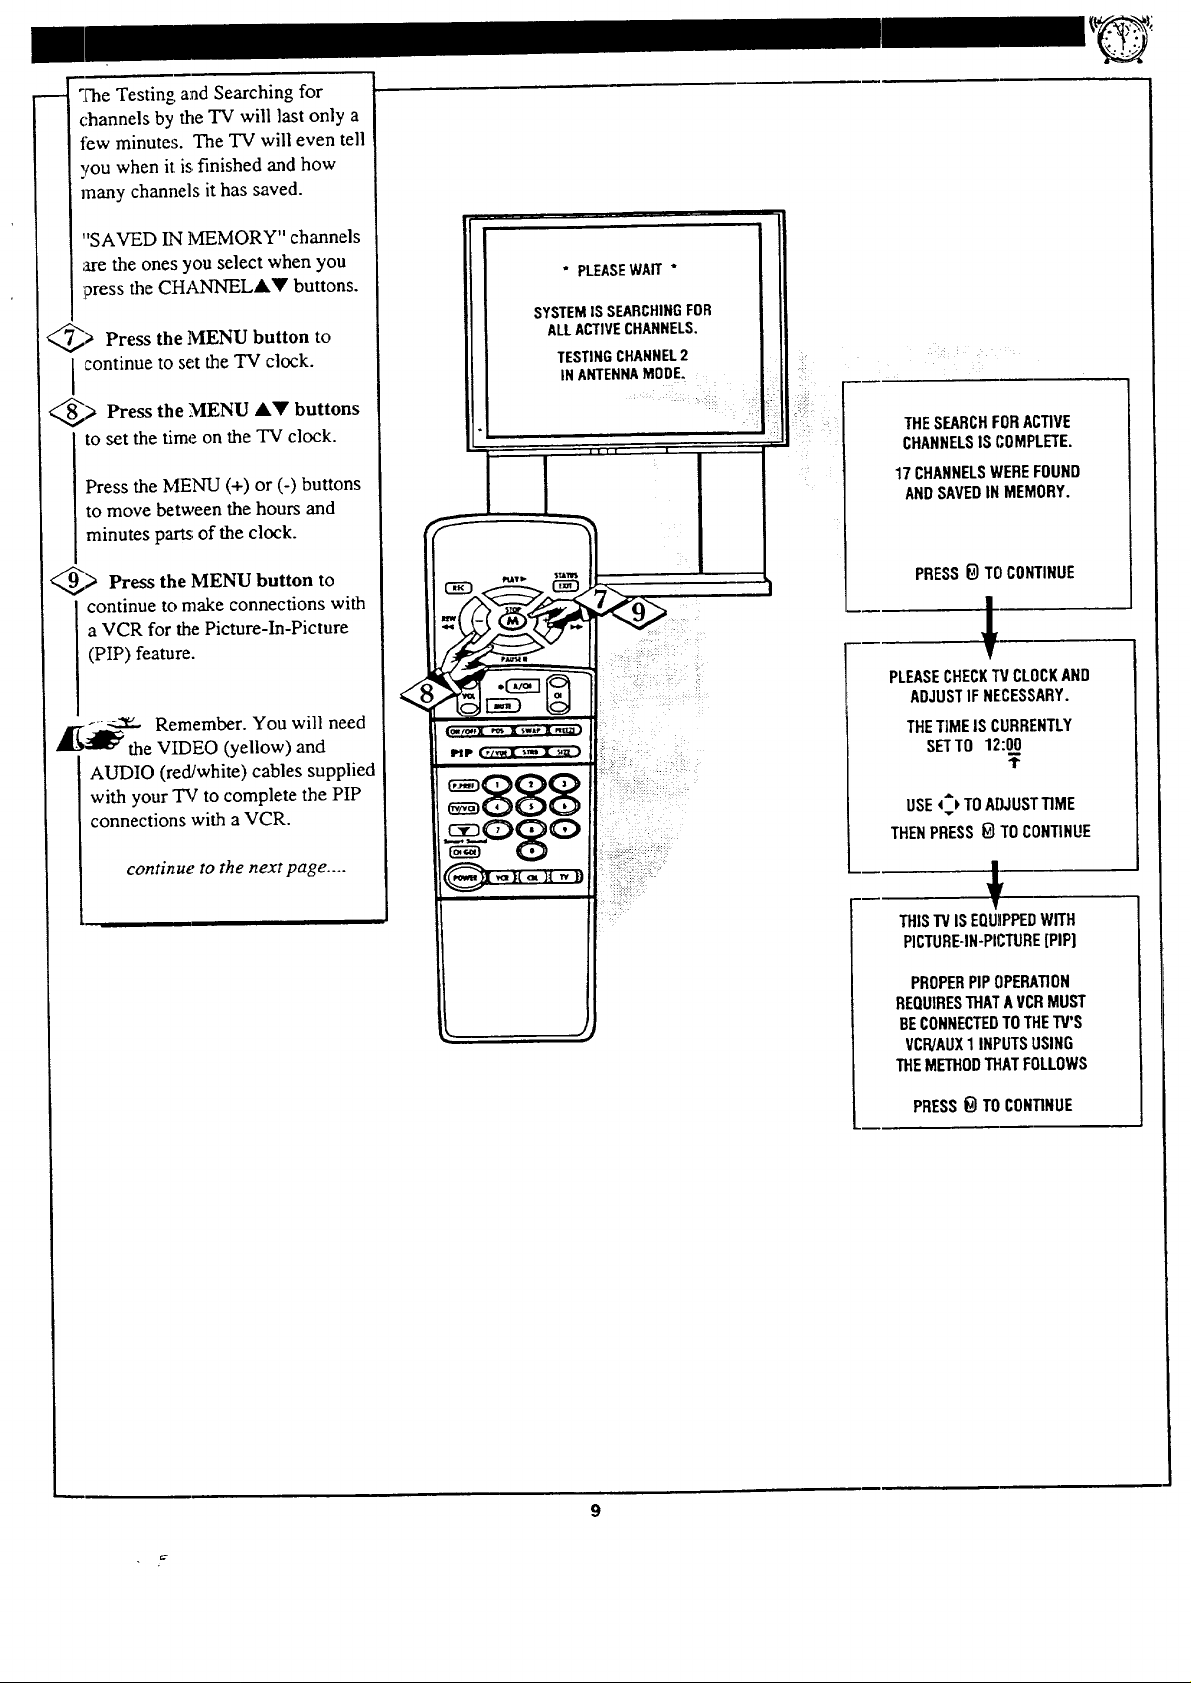
The Testing and Searching for
channels by the TV will last only a
tEw minutes. The TV will even tell
you when it is,finished and how
many channels it has saved.
"SAVED IN MEMORY" channels
are the ones you select when you
'press the CHANNELAV buttons.
_> Press the MENU button to
continue to set the TV clock.
_> Press the MENU A_' buttons
to set the time on the TV clock.
Press the MENU (+) or (-) buttons
to move between the hours and
minutes parts of the clock.
* PLEASE WAft "
SYSTEMIS SEARCHINGFOR
ALLACTIVECHANNELS.
TESTINGCHANNEL2
INANTENNAMODE.
THESEARCHFORACTIVE
i |
r
CHANNELSIS COMPLETE.
17 CHANNELSWEREFOUND
AND SAVEDIN MEMORY.
_> Press the MENU button to
continue to make connections with
a VCR for the Picture-In-Picture
(PIP) feature.
A_-_--:_ Remember. You will need
the VIDEO (yellow) and
AUDIO (red/white) cables supplied
with your Tal to complete the PIP
connections with a VCR.
continue to the next page ....
HP
888
: ::: :: ::
: i
ii!!: ?::: :::
PRESS_ TO CONTINUE
!
PLEASECHECKTV CLOCKAND
ADJUSTIF NECESSARY.
THETIMEISCURRENTLY
SETTO12:00
¥
USE_ TO AIIJUSTTIME
THENPRESS i_ TO CONTINUE
J,
I
THISTVISEQUIPPEDWITH
PICTURE-IN-PICTURE[PIPI
PROPERPIPOPERATION
REQUIRESTHATA I/CR MUST
BECONNECTEDTO THETV'S
VCR/AUX1INPUTS USING
THEMETHODTHATFOLLOWS
PRESS_ TO CONTINUE
Page 10
r
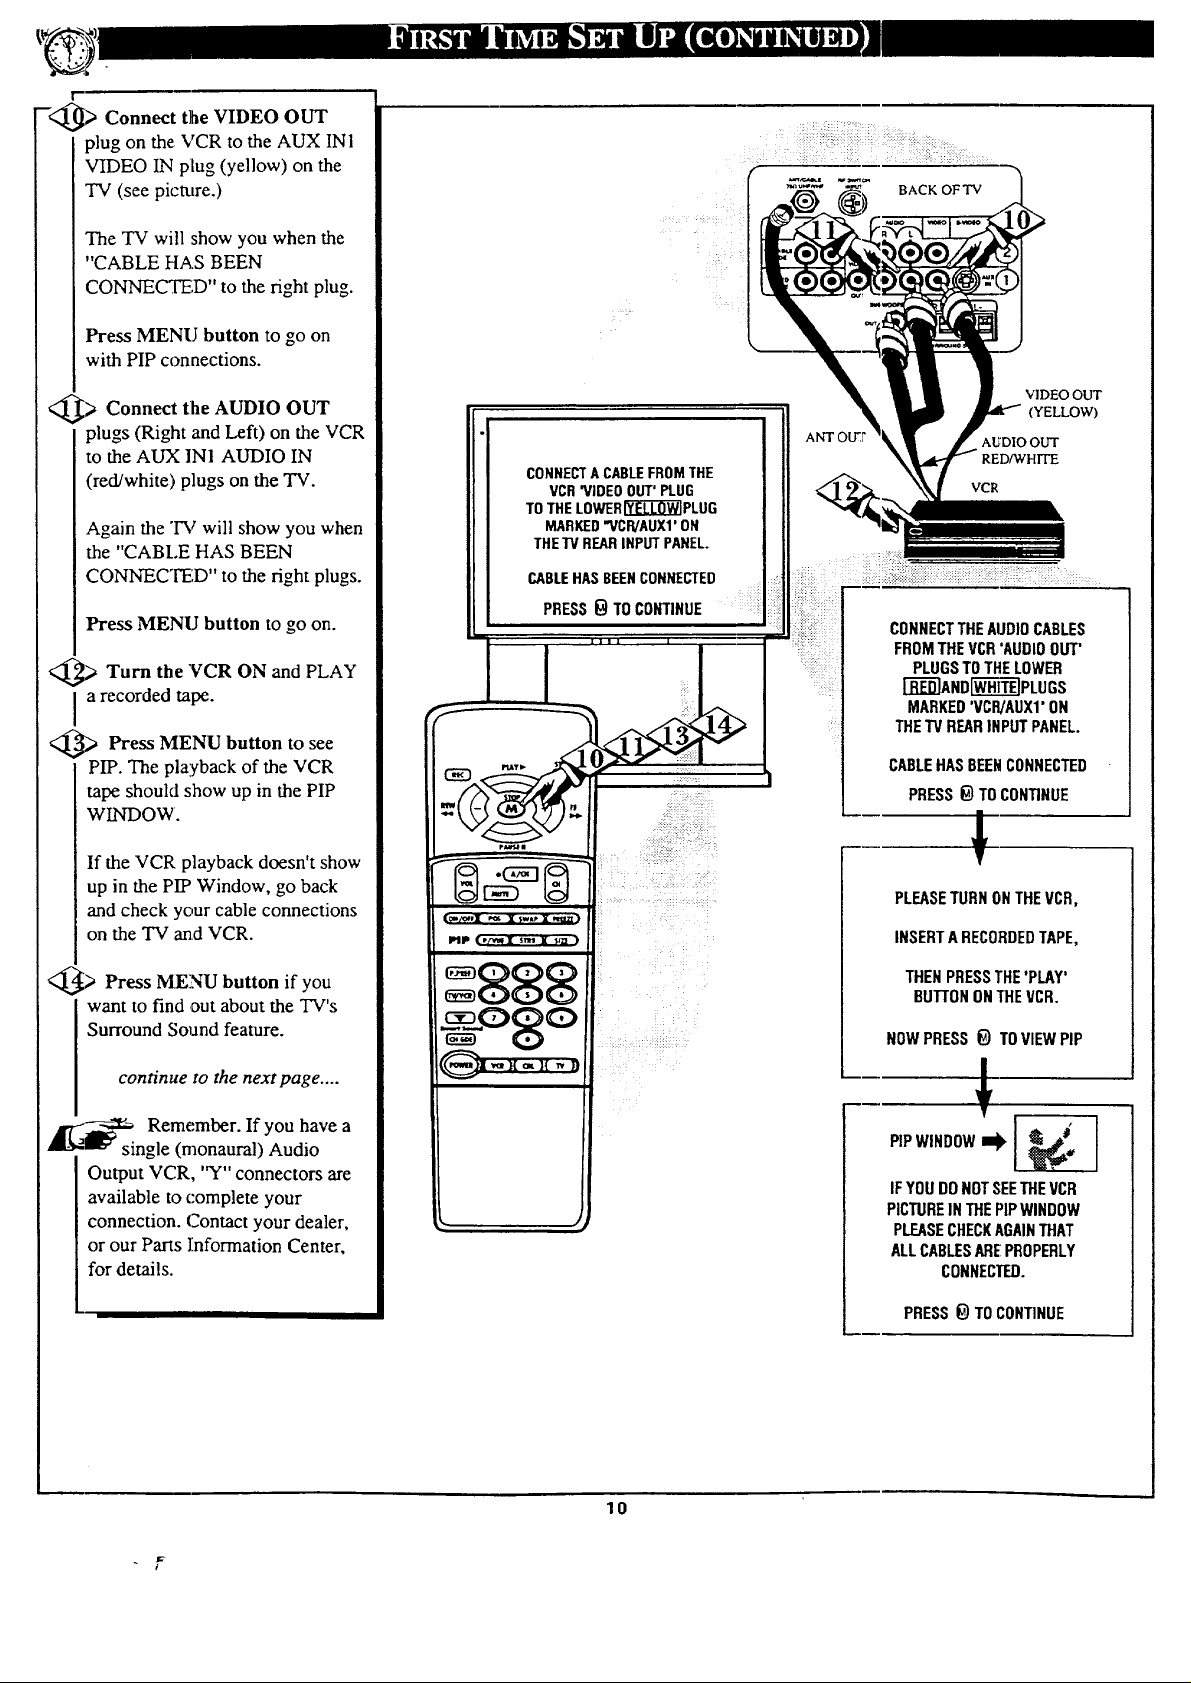
-<_ Connect the VIDEO OUT
plug on the VCR to the AUX INI
VIDEO IN plug (yellow) on the
TV (see picture.)
The TV will show you when the
"CABLE HAS BEEN
CONNECTED" to the right plug.
Press MENU button to go on
with PIP connections.
BACK OF "IV
<_> Connect the AUDIO OUT
plugs (Right and Left) on the VCR
to the AUX INI AUDIO IN
(red/white) plugs on the TV.
Again the "I"Vwill show you when
the "CABLE HAS BEEN
CONNECTED" to the right plugs.
Press MENU button to go on.
,_) Turn the VCR ON and PLAY
l a recorded tape.
<_ Press MENU button to
PIP. The playback of the VCR
tape should show up in the PIP
WINDOW.
If the VCR playback doesn't show
up in the PIP Window, go back
and check your cable connections
on the TV and VCR.
see
CONNECT A CABLE FROM THE
VCR 'VIDEO OUT' PLUG
TO THE LOWER I_'E-CCO-W]PLUG
MARKED "VCP,/AUXI' ON
THETV REAR INPUT PANEL.
CABLEHASBEENCONNECTED
H
•- l _. - wtp ,,-
PIP ,.!v_ Sill _1_
PRESS _ TO CONTINUE
ANTo_r
VCR
iiiiiii
U • :. :.i
::i: FROM THE VCR 'AUDIO OUT'
PLUGSTOTHE LOWER
i-fl"_"]ANDI"W-H'iT"_PLUGS
MARKED'VCR/AUXI'ON
THE'I'VREARINPUTPANEL.
1
CABLEHASBEENCONNECTED
PRESS _) TO CONTINUE
€
PLEASETURNONTHEVCFI,
INSERTARECORDEDTAPE,
VIDEO OUT
(YELLOW)
AUDIO OUT
<_> Press button if you
want to find out about the TV's
Surround Sound feature.
_--_ Remember. If you have a
Output VCR, "Y" connectors are
available to complete your
connection. Contact your dealer,
or our Parts Information Center,
for details.
MENU
continue to the next page ....
single (monaural) Audio
888
- -o8o
10
THENPRESSTHE'PLAY'
BUTTONONTHEVCR.
NOWPRESS_) TOVIEWPIP
PIPWINDOWI_!
I
I
IFYOUDONOTSEETHEVCR
PICTUREINTHEPIPWINDOW
PLEASECHECKAGAINTHAT
ALLCABLESAREPROPERLY
CONNECTED.
PRESS_ TOCONTINUE
Page 11

I
-<_ The TV first tells that for
Surround Sound to work with the
set you will need an additional
pair of external speakers (8 ohm,
]5 watt minimum).
Press the MENU button to go
on.
<_ Then the you to
the Surround Sound section in the
Owner's Guide (page 37) after
you're finished with First Time Set
Up.
Press the MENU button to go
on.
<_,_ Press the MENU button again
to complete the FIRST TIME
SETUP and return to normal TV
viewing.
B_ asks read
you
THIS"13/ISEQUIPPEDWITH
ASURROUND-SOUNDSYSTEM.
SURROUNDSOUNDREQUIRES
THEUSEOFADDITIONAL
SPEAKERSBEINGPLACED
AROUNDYOURROOM.
PRESS_) TO CONTINUE i
IIII I
I{]_D_v_ "- -
PLEASETHOROUGHLYREAD
THESECTIONIN YOUR
OWNERSMANUALWHICH
DETAILSTHE PROPERSETUP
AND OPERATIONOFTHE
SURROUND-SOUNDSYSTEM.
PRESS_} TO CONTINUE
!
THISCOMPLETESTHE
FIRST-TIMESETUP.
Mp (pll sTI_I _ ] " i
_c_3,..,Q_O PRESS 0 TO EXITSETUP
888 " .
I
11
Page 12
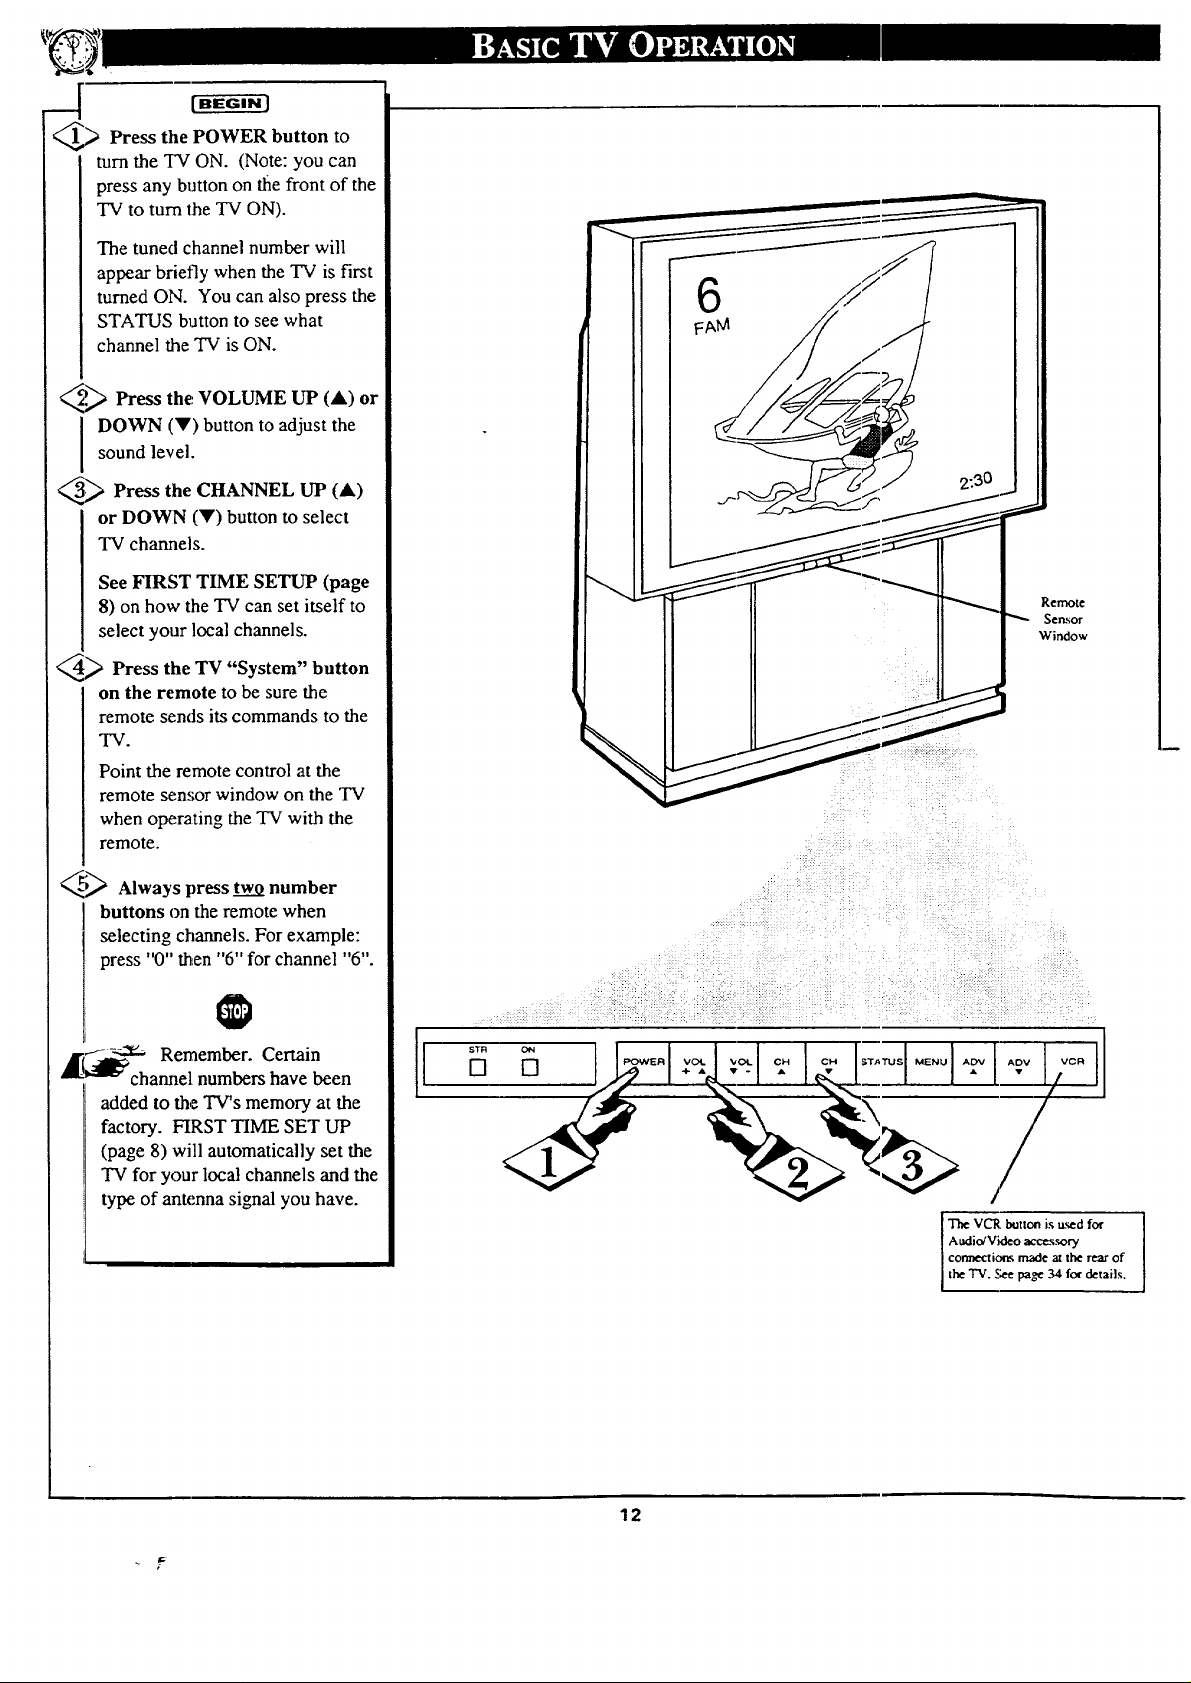
_ Press the to
POWER
button
turn the TV ON. (Note: you can
press any button on tile front of the
TV to turn the TV ON).
The tuned channel number will
appear brietty when the TV is first
turned ON. You can also press the
STATUS button to see what
channel the TV is ON.
VOLUME UP
_.P_ Press (A) or
sound level.
I OWN (V) button to adjust the
the,,
6
_ Press the CHANNEL UP
or DOWN (V) button to select
TV channels.
See FIRST TIME SETUP (page
8) on how the TV can set itself to
select your local channels.
_ Press the TV "System"
button
on the remote to be sure the
remote sends its commands to the
"IV.
Point the remote control at the
remote sen,;or window on the TV
when operating the TV with the
remote.
<_ Always press two number
buttons on the remote when
selecting channels. For example:
press "0" then "6" for channel "6".
A]-_ Remember. Certain
--""_" channel numbers have been
added to the TV's memory at the
factory. FIRST TIME SET UP
(page 8) will automatically set the
TV for your local channels and the
type of antenna signal you have.
(A)
Remote
Sc:_,.;or
Window
STR
[]
j/ x.x, x'_ /
The VCR button is used for
Audio/Video accessory
connections made at the rear of
the TV. See page 34 for deta s.
12
iz
Page 13
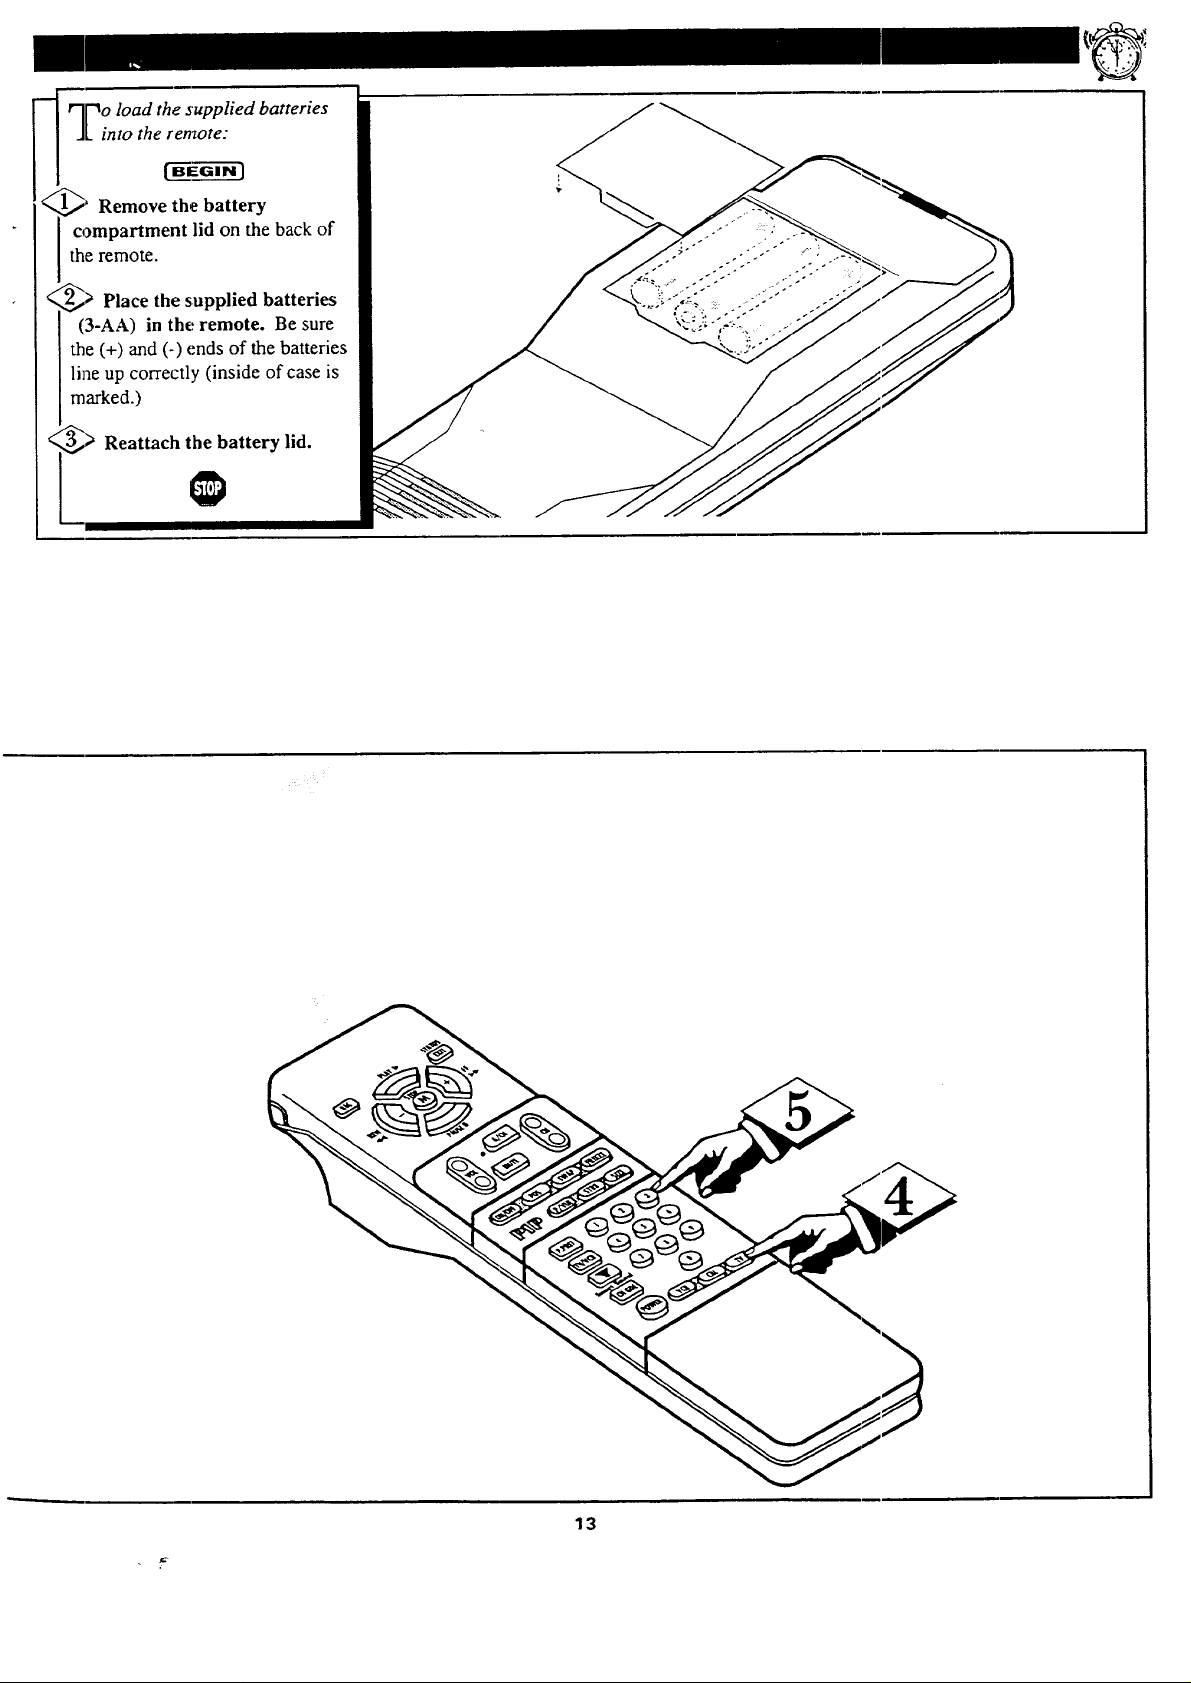
o load the supplied batteries
Linto the remote:
Remove the battery
compartment lid on the back of
the remote.
Place the supplied batteries
(3-AA) in the remote. Be sure
the (+) and (-) ends of the batteries
line up correctly (inside of case is
marked.)
Reattach the battery lid.
13
Page 14
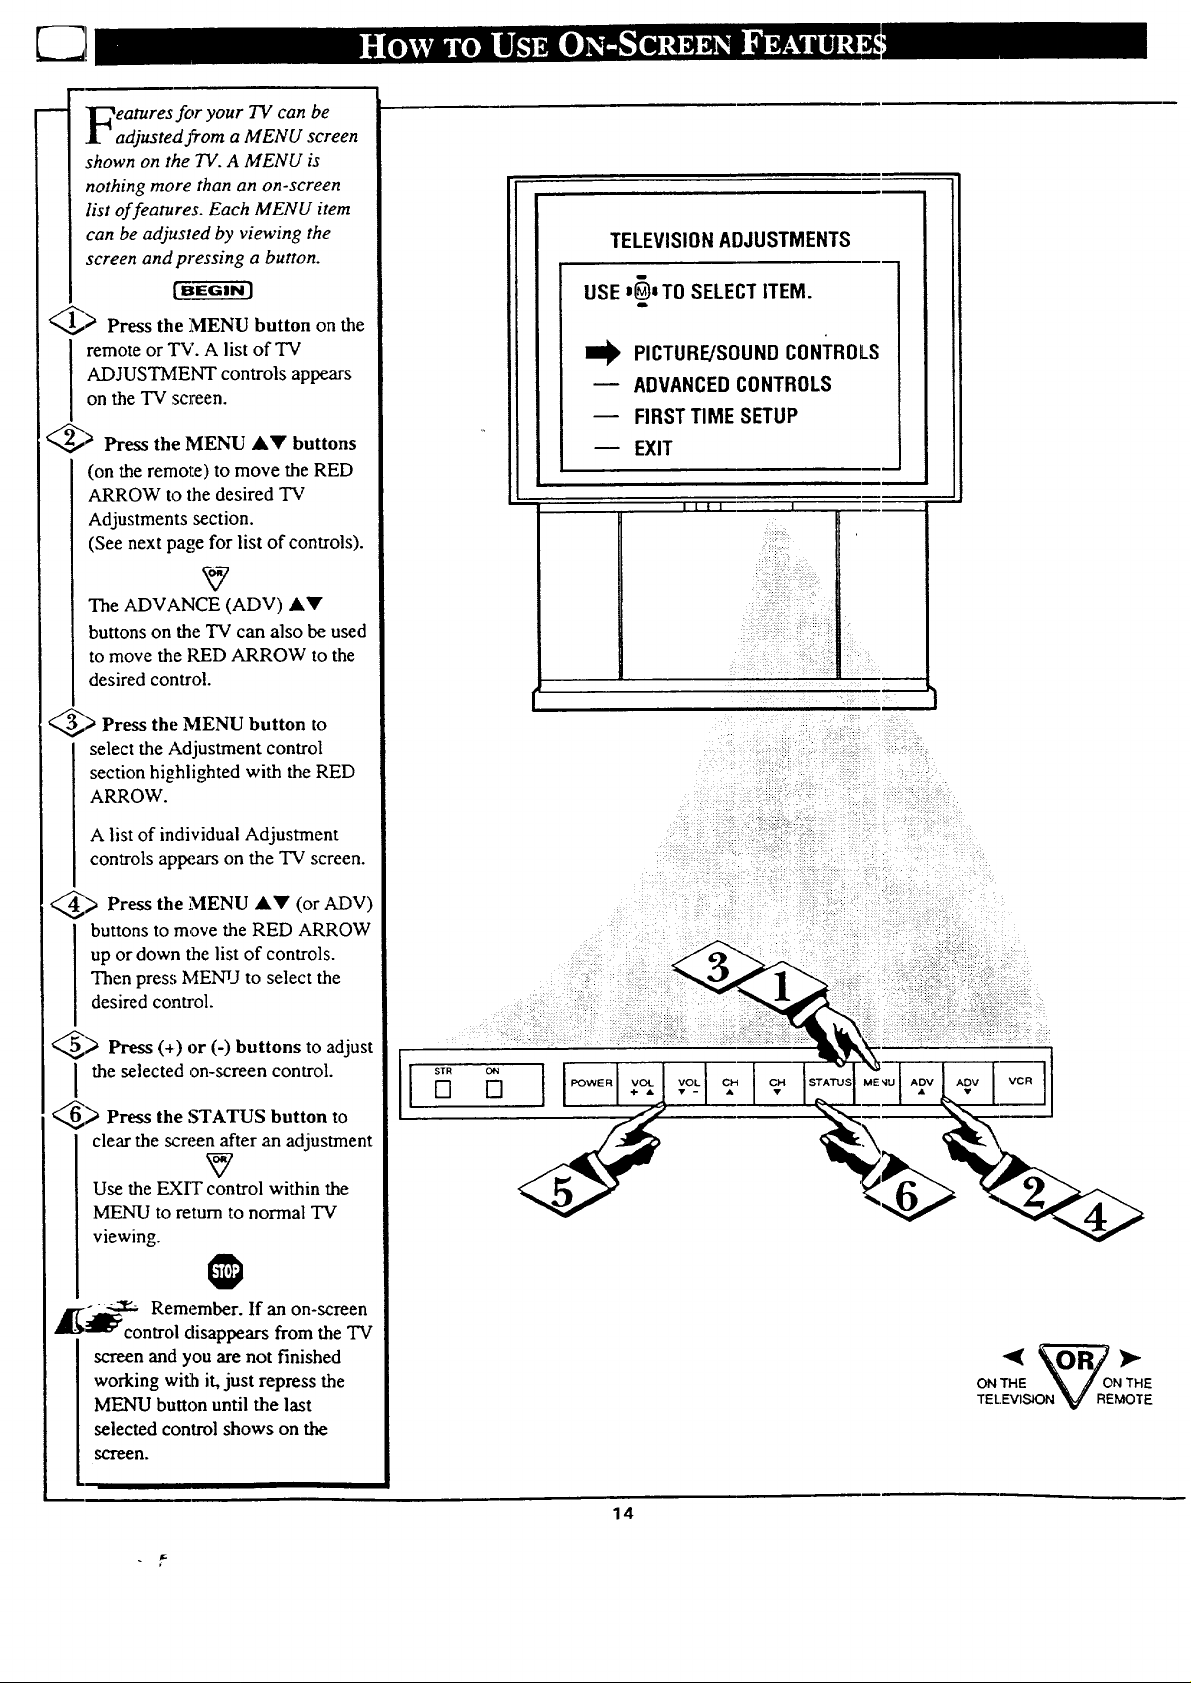
eatures for your TV can be
adjusted j_om a MENU screen
shown on the TV. A MENU is
nothing more than an on-screen
list of features. Each MENU item
can be adjusted by viewing the
screen and pressing a button.
_> Press the :MENU button on the
remote or TV. A list of TV
ADJUSTMENT controls appears
on the TV screen.
_> Press the MENU AV buttons
(on the remote) to move the RED
ARROW to the desired TV
Adjustments section.
(See next t_a,,e for list of controls).
The ADVANCE (ADV) AV
buttons on the TV can also be used
to move the RED ARROW to the
desired control.
TELEVISIONADJUSTMENTS
USE'_)'TO SELECTITEM.
8
PICTURE/SOUNDCONTROLS
m ADVANCEDCONTROLS
FIRST TIME SETUP
-- EXIT
IIII I
.:..:
_> Press the MENU button to
select the Adjustment control
section highlighted with the RED
ARROW.
A list of individual Adjustment
controls aplx'.ars on the TV screen.
> Press the ]MENU AV (or ADV)
buttons to move the RED ARROW
up or down the list of controls.
Then press MENU to select the
desired control.
<,,,_) Press (+) or (-) buttons to adjust
I the selected on-screen control.
_> Press the STATUS button to
clear the screen after an adjustment
Use the EXTT control within the
MENU to return to normal TV
viewing.
$TR
il
-- ___ Remember. If an on-screen
4
_lll_:¢controi disappears from the TV
screen and you are not finished
working with it, just repress the
MENU button until the last
selected control shows on the
SCTeen.
ON THE '_ /ONTHE
TELEVISION _ REMOTE
14
Page 15
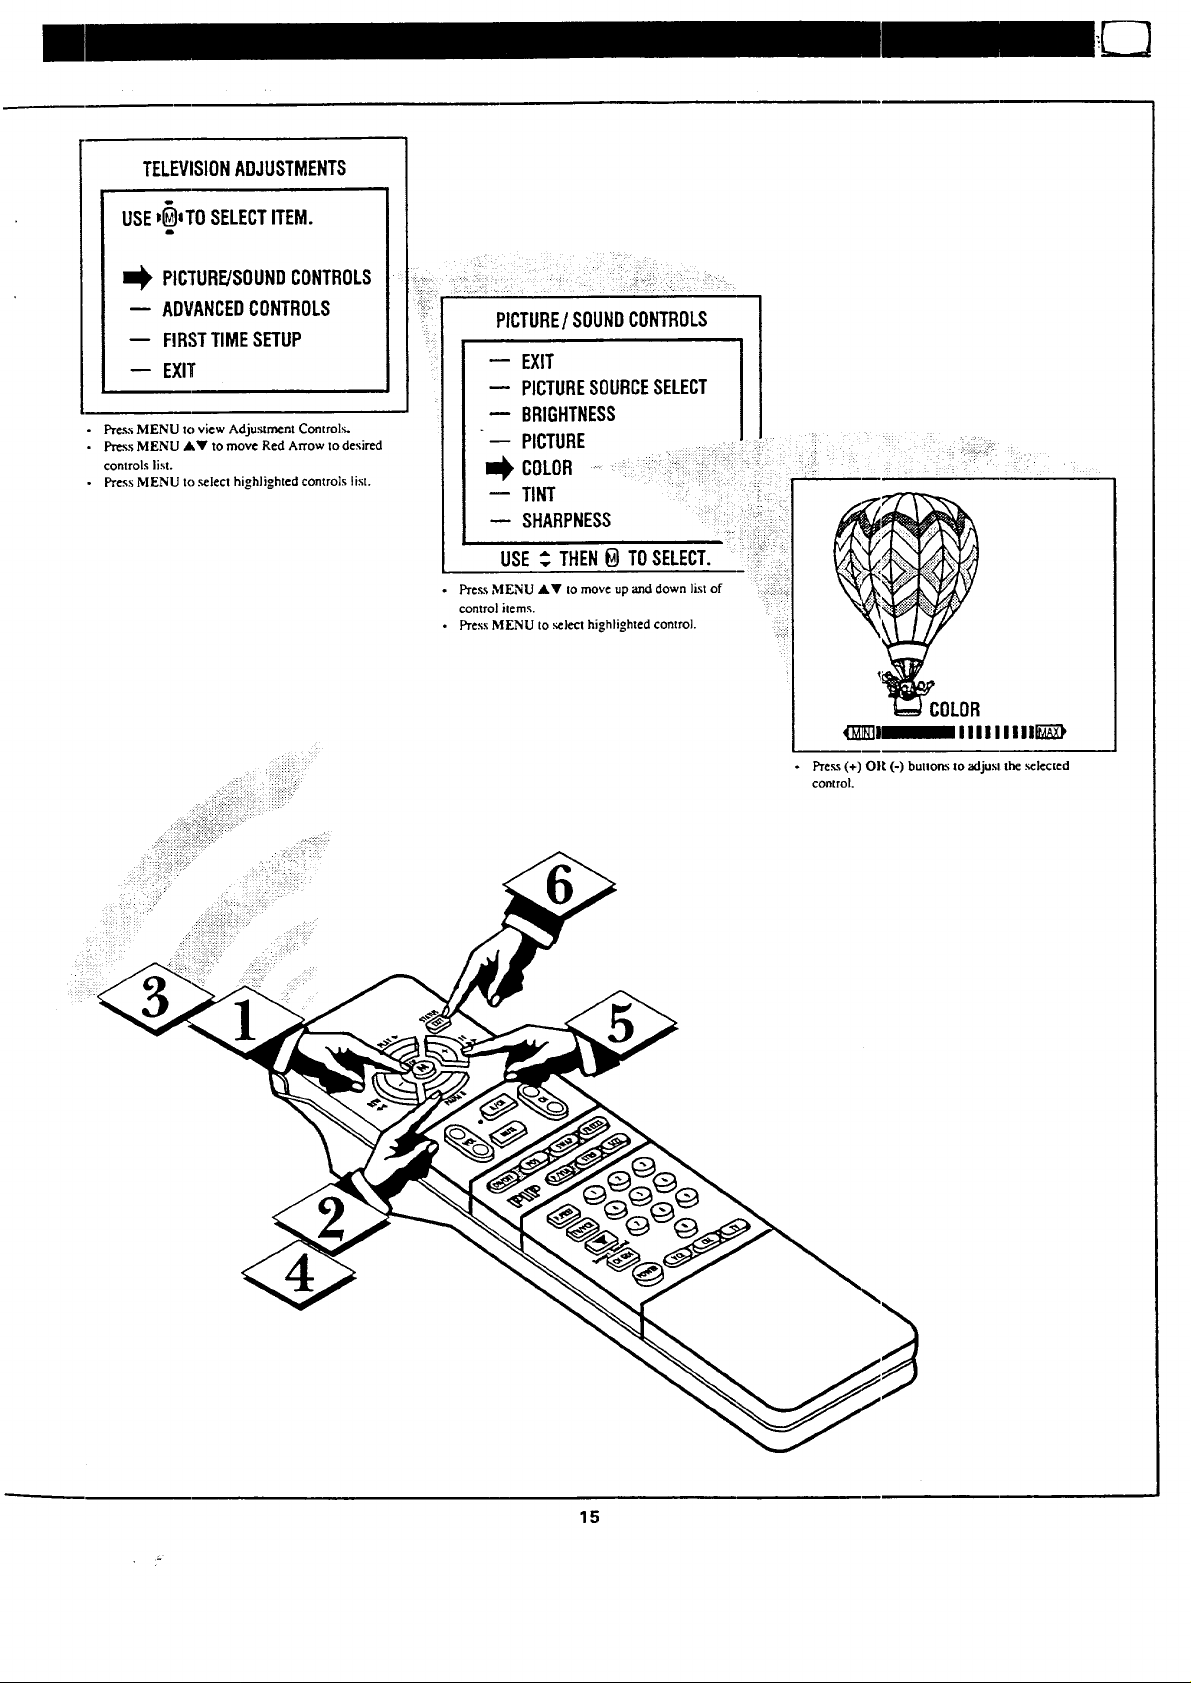
TELEVISIONADJUSTMENTS
USE_)aTOSELECTITEM•
,m.
]_ PICTURE/SOUNDCONTROLS
-- ADVANCEDCONTROLS
-- FIRSTTIMESETUP
-- EXIT
• pros:.;MENU to view Adju.'.amcnt Controls.
• pr,=_,;MENU A_' to move Red Arrow to desired
controls list.
• Pr_.s MENU to._lect highlighted controls list.
PICTURE/SOUNDCONTROLS
-- EXIT
-- PICTURESOURCESELECT
-- BRIGHTNESS
-- PICTURE
I_ COLOR
-- TINT ...... _:_::
-- SHARPNESS
USE_. THENB TOSELECT. i:!i....
• pr0_.MENU.- tomo.oup_,,downli_,o,
control hems;.
•prossMENUto h,gh,,ght0dcoo,to,
: :::.:::::: ;:
COLOR
(:]ZE[]I/I II I I I ! IIE;_I'
Press (+) OR (-) bullorts to adjusl the _]ected
controL.
15
Page 16

_' Press MENU button to see TV
].4_)JUSTMENTS screen.
_' Press MENU • or • button to
move RED ARROW to c
PICTURE/SOUND controls.
_* Press MENU button to select
controls. ,,,
888
WU'_ Remember, the control [I_--_ C)
with the RED ARROW is
Iready to be used. Just press the
,I'ENU button to select it.
;The picture for the TV can come
.! through either the ANTENNA
plug or the A UDIO/VIDEO INput
jacks (on the rear of the TV). The
Picture Source control simply tells
the 73/which one of these picture
sources it is to show on the TV
screen.
_ Select PICTURE SOURCE
SELECT control.
'With the PICTURE/SOUND
CONTROLS on screen, move the
red arrow with the MENU ••
buttons. Then press MENU button.
_ Press the MENU •• buttons
_Ioplace the "f'v"in either:.
ANT/CABLE- for a picture signal
coming from the ANTENNA
plug on the TV.
VCR/AUX1- for a picture signal
coming from the AUX INI
Audio/Video jacks on the TV.
AUX2- for a picture signal
coming from the AUX IN2
Audio/Video jacks on the TV.
_> Press the STATUS button to
clear the screen.
PICTURE f SOUND CONTROLS
_EX_
I_ PICTURESOURCESELECT
BRIGHTNESS
-- PICTURE
COLOR
-- TINT
SHARPNESS
USE ".. THEN _ TO SELECT.
r
Remember. The VCR/AUXI (or
AWX2) TV screen will be blank
lunless a signal source connected to
is
Jthose Audio/Video Input:jacks on the
TV. (See page 34 for details).
16
Page 17
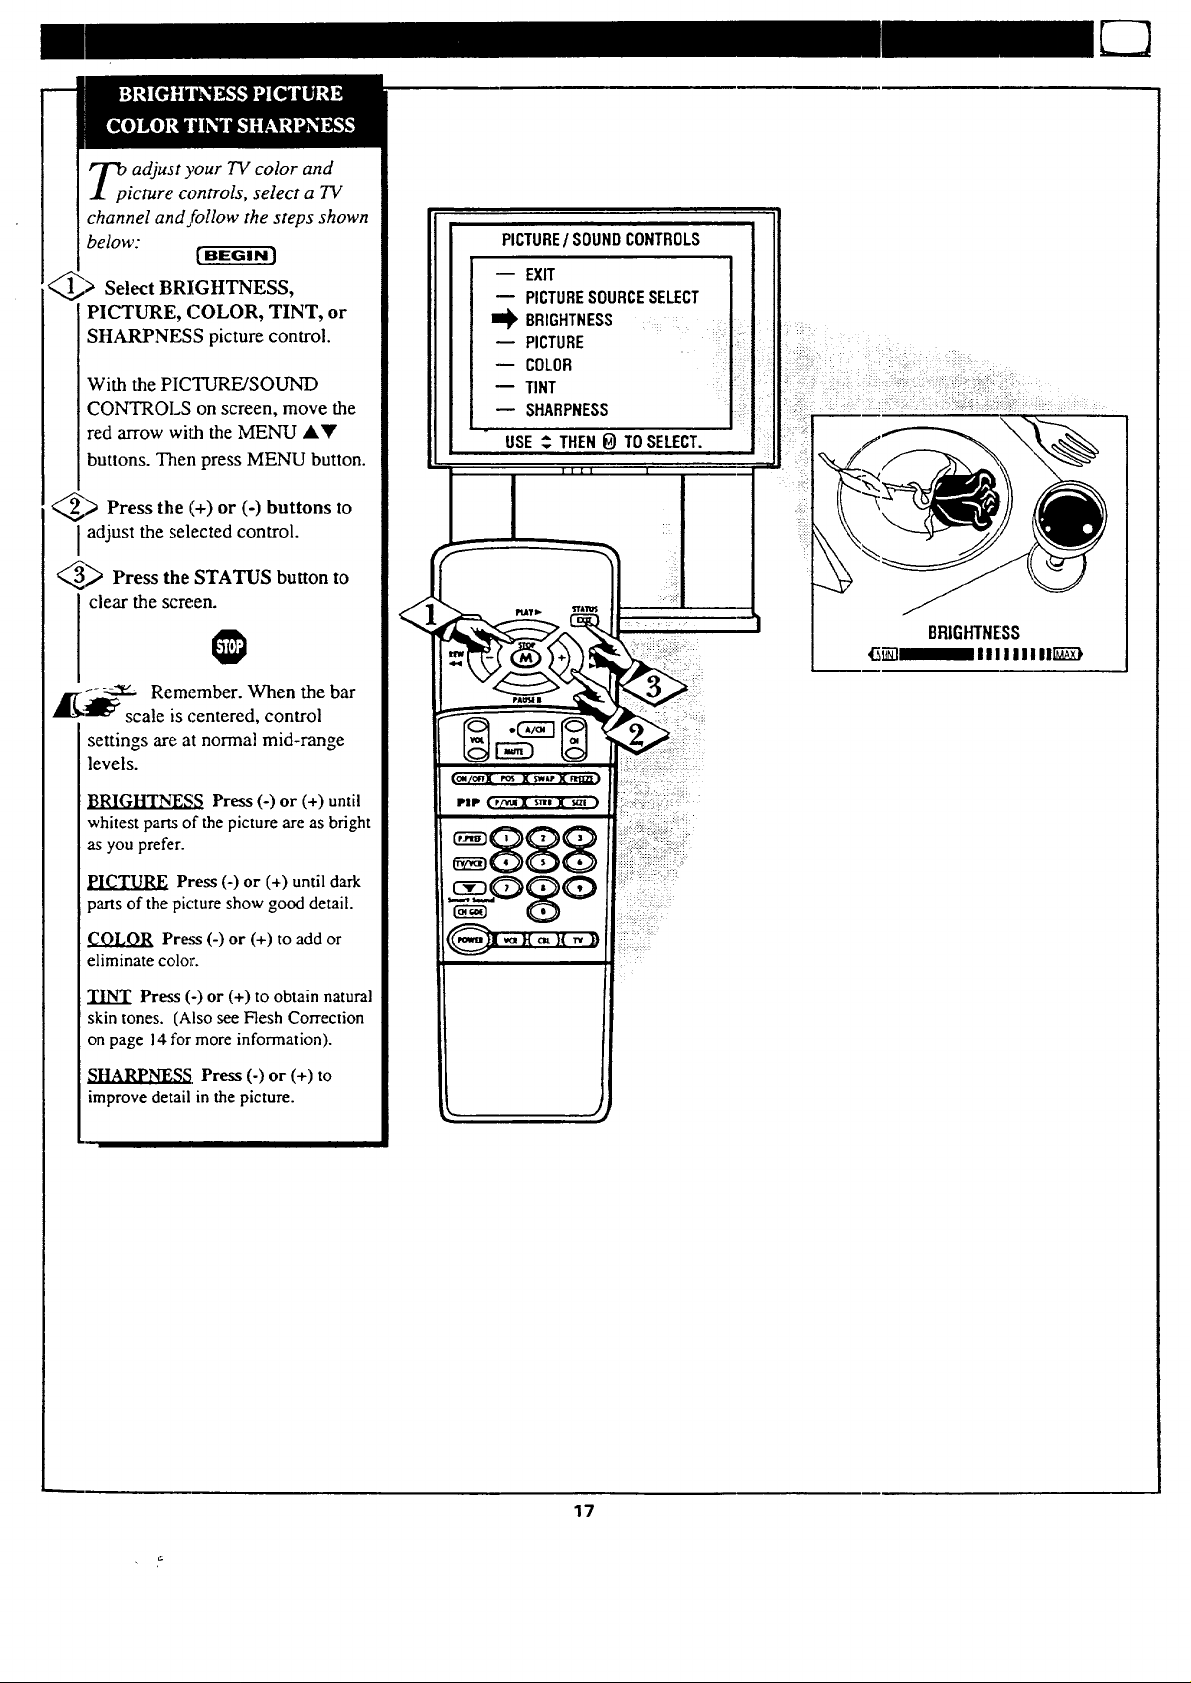
_p adjust ),our TV color and
icture controls, select a TV
channel and follow the steps shown
below:
PICTURE/ SOUNDCONTROLS
Select BRIGHTNESS,
PICTURE, COLOR, TINT, or
SHARPNESS picture control.
With the PICTURE/SOUND
CONTROLS on screen, move the
red arrow with the MENU _kV
buttons. Then press MENU button.
_> Press the (+) or (-) buttons to
adjust the selected control.
_ Press the STATUS button to
clear the screen.
_.t- _ Remember. When the bar
_l_ scale is centered, control
settings are at normal mid-range
levels.
Press (-) or (+) until
whitest parts of the picture are as bright
as you prefer.
PICTURESOURCESELECT
-- EXIT ]
ml_ BRIGHTNESS _
PICTURE :: i
COLOR
TINT
m SHARPNESS
USE _ THEN_) TOSELECT.
BRIGHTNESS
_]_111111111]]_),
PICTURE Press (-) or (+) until dark
parts of the picture show good detail.
COLOR Press (-) or (+) to add or
eliminate color.
TINT Press (-) or (+) to obtain natural
skin tones. (Also see Flesh Correction
on page 14 for more information).
_. Press (-) or (+) to
improve detail in the picture.
17
Page 18
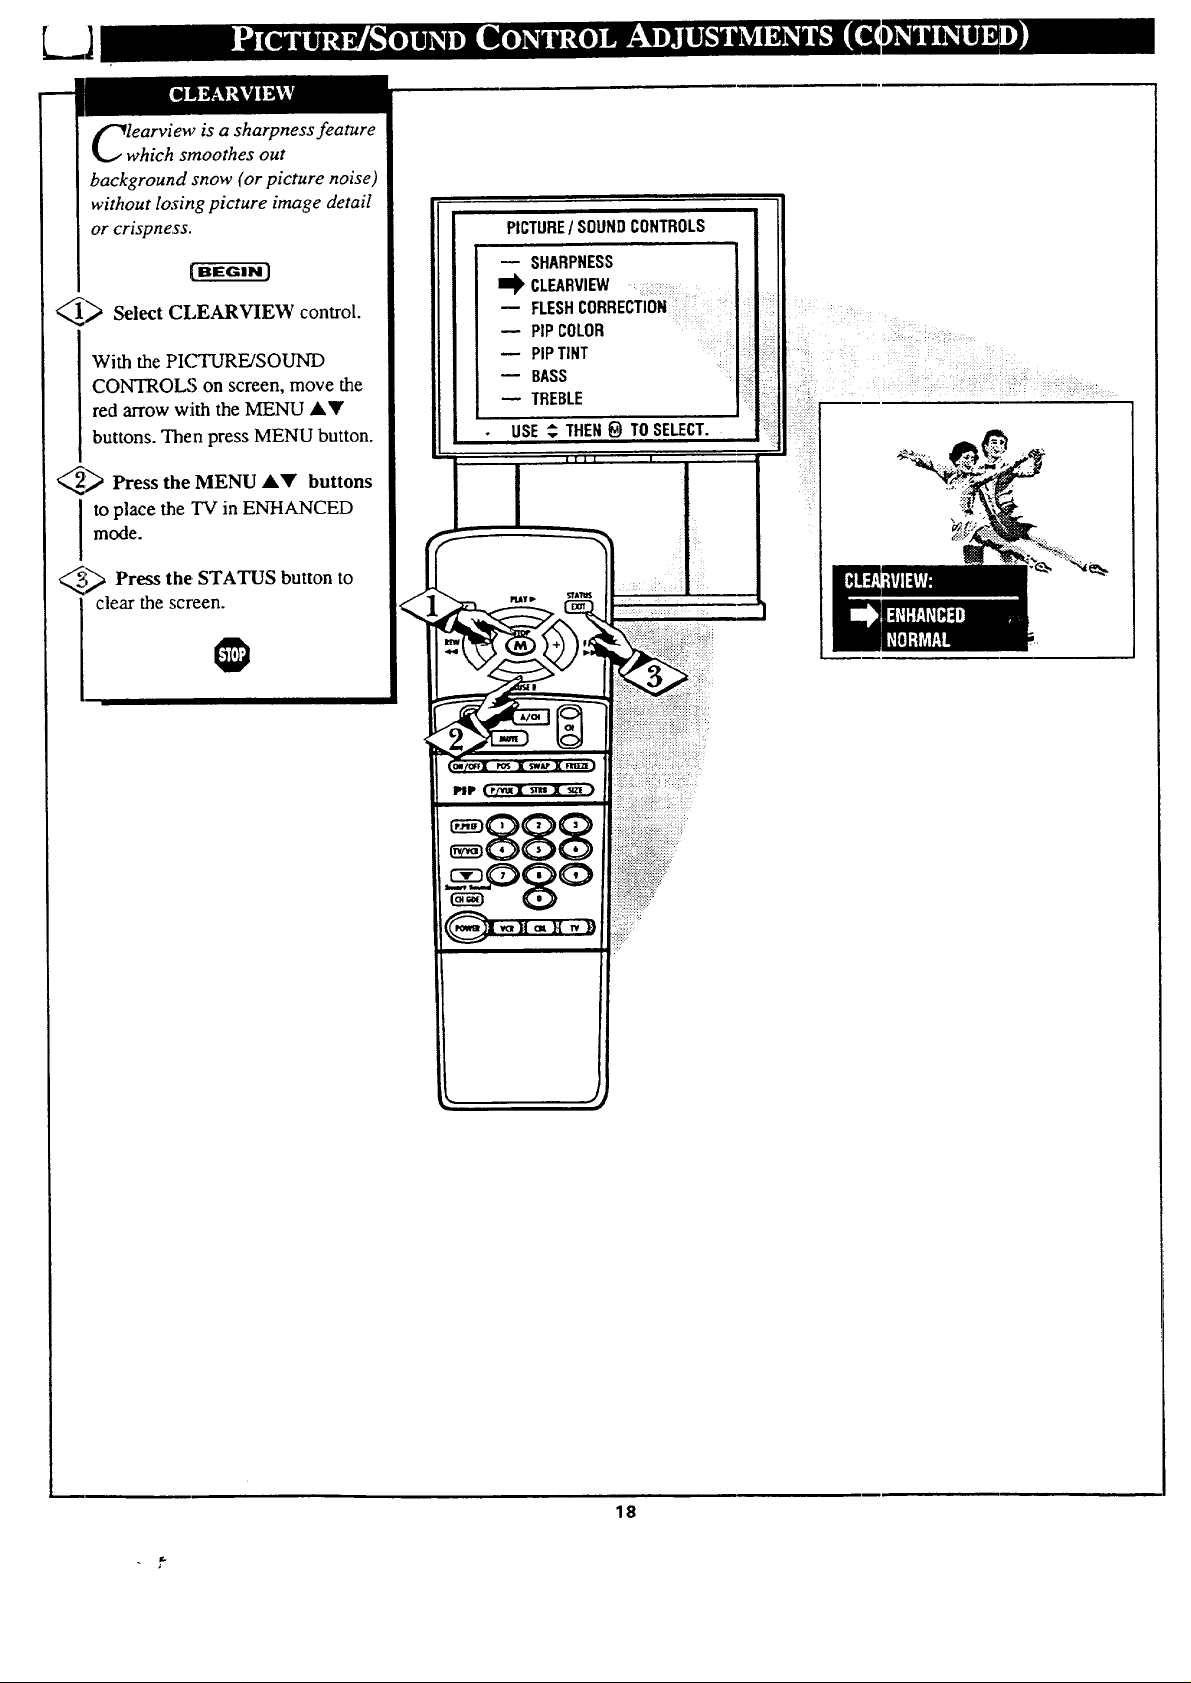
learview is a sharpness feature
which smoothes out
background snow (or picture noise)
without losing picture image detail
or crispness.
PICTURE/ SOUNDCONTROLS
[BEGIN]
_ Select CLEARVIEW control.
With the PIC'TURE/SOUND
CONTROL,'; on screen, move the
red arrow with the MENU AY
buttons. Then press MENU button.
_ Press the MENU AY buttons
mode.
I to place the TV in ENHANCED
_;_ Press the STATUS button to
i clear the screen.
_1, CLEARVIEW ........
-- FLESHCORRECTION
PIPCOLOR
PIPTINT
BASS
TREBLE
USE_ THEN_ TOSELECT.
LL
I1 I I I
18
Page 19

e the Flesh Correction
ontrol to keep skin tone hues
(or facial tint)from varying from
TV channel to TV channel.
PICTURE/SOUNDCONTROLS
(1_ Select FLESH
CORRECTION control.
With the PICTURE/SOUND
CONTROLS on screen, move the
red arrow with the MENU ,ty
buttons. Then press MENU button.
_2_ Press the MENU AV buttons
to turn the FLESH CORRECTION
control ON.
_ Press the STATUS button to
clear the screen.
m CLEARVIEW
I_ FLESHCORRECTION
-- PIPCOLOR
P,PT,NTBAss
TREBLE ....
* USE_..THEN_ TOSELECT.
19
Page 20

L..J
ur TV also has individual
ound adjustment controls. The
BASS (low frequency),
TREBLE(high frequency), and
Speaker BALANCE may all be
used to adjust the sound playback
of TV programs.
Select BASS, or TREBLE, or
BALANCE sound control.
With the PICTURE/SOUND
CONTROLS on screen, move the
red arrow with the MENU AY
buttons. Then press MENU button.
_i > Press the (+) or (-) buttons to
adjust the sound control to levels
you prefer.
_-"_ Press the STATUS button to
clear the screen.
PICTURE/ SOUNDCONTROLS
FLESHCORRECT1DN
PIP COLOR
m PIP TINT
_ BASS
-- TREBLE
-- BALANCE
-- EXPANDER
USE _. THEN _ TO SELECT. " ::
_illlllllli_
]_XPANDED sound can be used
to add greater depth and
dimension to both monaural
(MONO) and STEREO TV sound.
_l,_ Select EXPANDER sound
control.
With the PICTURE/SOUND
CONTROLS on screen, press the
MENU AY buttons to move the
red arrow. Then press MENU
button.
_,_ Press the MENU AY buttons
to place the TV in the
EXPANDED sound mode.
<,,_5,,,> Press the STATUS button to
clear the screen.
PICTURE/ SOUNDCONTROLS
BASS
TREBLE
-- BALANCE
EXPANDER ::::::::
_E_ONO ..
S_2ND AUDIO
-- EXIT :_]
USE _ THEN _ TO SELECT.
2O
Page 21

ur TV is able to receive
roadcast stereo TV programs.
The TV is equipped with an
amplifier and twin speaker system
through which the stereo sound
can be heard.
A RED stereo light (on the front of
the TV) wil,! come on when a
stereo broadcast is received.
[ BEGIN ]
<[_ Select STEREO sound control.
With the PICTURE/SOUND
CONTROLS on screen, press the
MENU AV buttons to move the
red arrow. Then press MENU
button.
_,'._ Press the MENU AY buttons
sound mode.
I o place the TV in the STEREO
_."_ Press the STATUS button to
clear the screen.
PICTURE/ SOUNDCONTROLS
-- BASS
-- TREBLE
-- BALANCE
-- EXPANDER
I_ STEREO/MONO :
- SAP2.,Auo OPROGRAM:
-Extr
USE : THEN _ TO SELECT.
//
/
j_--.._- Remember. Ifastereo
signal is not available and the
TV is placed in the STEREO
mode, sound coming from the TV
will remain monaural (mono).
SECOND (2ND) AUDIO
PROGRAM (SAP) is part of the
stereo broadcast system. Sent as a
third audio channel SAP can be
heard apartfrom the currentTV
program sound. TV stations are
free to use .SAP for any number of
purposes, but many experts believe
it will be used for foreign language
translations of TV shows (or for
weather and news bulletins.)
,_ Remember. If a SAP
_signal is not present with a
selected proof'am, the SAP option
can not be selected. "SAP NOT
AVAILABLE" will appear on the
TV screen.
• L
PICTURE / SOUND CONTROLS
BASS
-- TREBLE
-- BALANCE
-- EXPANDER
STEREO/MONO
II_ SAP2NOAUDIOPROGRAM
B EXIT
USE_ THEN_ TOSELECT.
@
21
Page 22

Press see
_ MENU button to TV
ADJUSTMENTS screen.
_ Press MENU • or • button
ADVANCED controls.
to move RED ARROW to
_'_ Press MENU button to select
l the list of ADVANCED controls.
,_._-,_._ Remember, the control
_1_ with the RED ARROW is
MENU button to select it.
ready to be used. Just press the
TELEVISION ADJUSTMENTS I
- _UR_S0U.DC0_0LSI
I_ ADVANCED CONTROLS
FIRST TIME SETUP ]
-- EXIT J ADVANCEDCONTROLS
--EXIT
I_ PIPPICTURESOURCE
-- CLOSEDCAPTIONING
CAPT]ONINGDURINGMUTE
-- SLEEPTIMER
SETTIME
-- TIMEREMINDER
USE ._ THEN_) TOSELECT.
our TV comes with an on-
creen clock. During normal
operation the clock appears on the
screen with every channel change
(and when the STATUS button is
pressed).
_ Select SET TIME control.
With the ADVANCED
CONTROLS on screen, press the
MENU •• buttons to move the
red arrow. "]hen press MENU
button.
_.*_ Press the MENU •• buttons
clock.
to set the minutes portion of the
_.'-_ Press the M (+) or (-) buttons
hours portion of the clock.
to move the: selection arrow to the
ADVANCEDCONTROLS
PIP PICTURESOURCE
CLOSEDCAPTIONING
CAPTIONINGDURING MUTE
SLEEPTIMER
i_ SETTIME .........
-- TIME REMINDER
-- CHANNELREMINDER
USE _. THEN _ TO SELECT.
_ Press the M •• buttons to set
I the hours portion of the clock.
_ Press the STATUS button to set
the clock in operation and clear the
screen.
R :member. The time may also
be se_:using the number buttons on
Ithe remote. Be sure to press '_)" In'st
[and then the hour number for single
Idigit entries.
22
Page 23

lOSed Captioning (CC ) allows
ou ro read the voice content of
television programs on the TV
screen. Designed to help the hearing
impaired this feature uses on-screen
"text boxes" to show dialogue and
conversations while the TV program
is in progress.
[BEGINJ
_l_ Select CLOSED
CAPTIONING control.
With the ADVANCED
CONTROLS on screen, press the
MENU AV buttons to move the red
arrow. Then press MENU button.
_,_ Press the MENU _kV buttons
to select the desired Closed Caption
mode - For Example: STANDARD.
STANDAI_I) (CC1) :
dialogue (and descriptions)
for the action on the captioned
TV program shows on-screen.
(See important note on this
page.)
SECOND LANGUAGE (CC2) :
foreign language translation of
dialogue (and descriptions)
for the: action on the captioned
TV program shows on-screen.
FULL SCREEN TEXT 1 or 2:
often used for channel guide,
schedules, or bulletin board
information for CC programs.
NOTE: Not all TV programs and product commercials are made for broadcast
with Closed Caption (CC) information included. Neittaer are all Closed Caption
modes (SECOND LANGUAGE, FULL SCREEN 'I_.XT1, etc.) necessarily being
used by a broadcast station during the transmission of a closed caption program.
Refer to your area's TV program listings for the staticns and times of Closed
Caption shows.
ADVANCEDCONTROLS
PIP PICTURESOURCE
k
CLOSEDCAPTIONING
-- CAPTIONINGDURINGMUTE
SLEEPTIMER
SETTIME
TIMEREMINDER
CHANNELREMINDER
USE_. THEN_ TOSELECT.
_3_ After making your Caption mode
selection, press the STATUS button
to clear the TV screen. The selected
Closed Caption mode will be active.
To cancel, set the Closed Captioned
feature to OFF when finished
viewing.
_[[._--_- Remember. Broadcast
stations will often use spelling
abbreviations, symbols, dropouts
and other grammatical shortcuts in
order to keep pace with the on-
screen action. These type factors
vary upon the source of the
captioned text material and do not
indicate a need for service on the
__. part of the TV.
STANDARD mode
_ampMT_ DispMy
Closed Caption information will usually aN:ear
in black and white (although some broadcaqers
or networks may occasionally use color to
highlight or draw attention tocertain are.2_.
FULL SCREEN TEXTI & TEXT 2 modes
will block TV .screen from viewing
23
Page 24

k_.J
ve .you ever fallen asleep in
ont of the TV and then
have it wake you up at two in the
morning with a test pattern
screeching in your ears? Well,
your TV can save you all that
trouble by automatically turning
itself off.
[ BEGIN J
_1_ Select SLEEP TIMER control.
With the ADVANCED
CONTROLS on screen, press the
MENU AY buttons to move the
red arrow. Then press MENU
button.
ADVANCEDCONTROLS
m PIPPICTURESOURCE I
CLOSEDCAPTIONING
-- CAPTIONING DURING MUTE
SLEEPTIMER
-- SET TIME
-- TIME REMINDER :_
-- CHANNELREMINDER
USE _..THEN _) TO SELECT.
I
_._ Press the (+) button
repeatedly to select the amount
of time befiare the TV will turn
OFF.
The TV can be set to cut itself off
anywhere from 15 minutes to 4
hours away.
_ Press the STATUS button to
clear the screen.
_1_'- _ Remember. If you ever
want to see how many minutes
are left before the TV shuts off,
select the SLEEP TIMER control
display.
If you ever want to stop a SLEEP
TIMER setting, reset the timer to
0:00. Turning the TV off and then
back on also cancels a setting.
A few seconds before the TV is to
shut off a message will come on
the screen telling you GOOD
NIGHT.
PRESS
24
Page 25

th the TV Reminder controls
N, the TV automatically
shows you the current time and
channel every thirty minutes.
<_'_ Select TIME or
CHANNEL
REMINDER control.
With the ADVANCED
CONTROLS on screen, press the
MENU A_' buttons to move the
red arrow. Then press MENU
button.
_ Press the MENU AY buttons
to turn the Reminder controls ON.
<_ Press the STATUS button to
clear the screen.
K¢'-'_ Remember. The TIME
_ and CHANNEL Reminders
ADVANCEDCONTROLS
m PIPPICTURESOURCE
CLOSEDCAPTIONING
CAPTIONINGDURINGMUTE
SLEEPTIMER
i_ SETTIME ::TIME REMINDER
-- CHANNELREMINDER
USE _ THEN_)TO SELECT.
hour for about five seconds.
appear on the hour and the half-
14
TIME AND CHANNEL REMINDERS DISPLAYED
i
12:30
25
Page 26

th the Channel/Time
isplay control you can
change the size and location of the
on screen channel and clock
information.
_ Select CHANNEI_/rlME
DISPLAY SIZE control.
With the ADVANCED
CONTROLS; on screen, press the
MENU AV buttons to move the
red an'ow. Then press MENU
button.
_ Press the MENU A_' buttons
to turn the LARGE or SMALL
DISPLAY control ON.
_"_ Press the STATUS button to
clear the screen.
Try it out.. Press the STATUS
or CHANNEL A'V buttons
and you should see the Display
Size you selected.
ADVANCEDCONTROLS
CAPTIONINGDURING MUTE
--SLEEPTIMER
m SETTIME
-- TIME REMINDER
CHANNELREMINDER
I_ CHANi'I'IMEDISPLAYSIZE
-- CABLECHANNELTUNING
"USE _. THEN _) TO SELECT.
-------------------=_-Remember. The SMALL
SIZE display shows only the
channel number, not the time (or
clock).
• i
12
CHANNE:.,FI'IME DISPLAY OPTIONS
J
26
Page 27

flRYOUdidn't go through the
ST TIME SETUP (page 8),
you need to make sure the TV is set
to pick up either Cable TV or
Antenna signals. In other words,
the TV needs to know if you
connected a Cable TV signal or a
normal antenna to its ANTENNA
plug.
_ Select CABLE CHANNEL
TUNING control.
With the ADVANCED
CONTROLS on screen, press the
MENU AV buttons to move the
red arrow. Then press MENU
button.
_,'._ Press the MENU AY buttons
to place the TV in either:.
CABLE- If you DO have
Cable TV connected
to the "IV. Channels
1-125 available.
ANTENNA-If you have an
Antenna connected
to the TV. Channels
2-69 available.
_.'$_ Press the STATUS button to
clear the screen.
ADVANCEDCONTROLS
SLEEPTIMER
-- SETTIME
m TIMEREMINDER
CHANNELREMINDER
CHAN[TIMEDISPLAYSIZE
CABLECHANNELTUNING
AUTO-PROGRAMMING
USE_, THEN_ TOSELECT.
888
-oSo
iiii!ii,i_i_i_ili_i_!_iiiii_!'ii_
_i_ii!i_i_!!_:i!_:i__i_!!i_:I:
__ Remember. The FIRST
TIME SETUP procedure (page
8) does all this for you
automatically.
27
Page 28

A uto-Programming is for adding
,U]klocal area channel numbers into
the memory of the TV. This makes it
easy for you to select only your area
(or Cable TV) channels when the
CHANNEL Ak • buttons are pressed.
If you already went through FIRST
TIME SETUP (page 8), this task has
been completed for you.
[ BEGIN ]
Select
_)> AUTO PROGRAMMING
control.
With the ADVANCED CONTROLS
on screen, press the MENU AY
buttons to move the red arrow. Then
press MENU button.
ADVANCEDCONTROLS
-- CHAN/TIMEDISPLAYSIZE ]
m CABLECHANNELTUNING
AUTO-PROGRAMMING
ADD/DELETECHANNELS
REDCONVERGENCE
BLUECONVERGENCE
"IVSPEAKERSON/OFF
USE_. THEN_ TOSELECT.
i
L i I i ] I
I
_> Press the MENU AV buttons to
turn AUTOPROGRAMMING ON.
The TV shows which channel
numbers are "SAVED" as they are
added into memory.
"AUTO PROGRAMMING
COMPLETED" appears when the TV
is finished adding channels.
_ Press the STATUS button to clear
I the screen.
Try it oust. Press the
CHANNELAV buttons and see
which channels you can select.
_.-:---_-- Remember. An Antenna or
_l_ Cable TV signal must first be
connected to your TV so that channels
can be saved.
If you want to delete any unwanted
channels from the TV's memory, see
"ADD/DELETE CHANNELS" on the
next page.
<
CHANNEL NUMBERS ""
COUNT UPWARD AS
THE TV LOOKS FOR
CHANNELS TO SAVE.
!
!
_11 |,l'a ;tlltl;!:h'dt_llfltli_IIh_d"2!_1i:Ill
28
Page 29

A toProgramming (see
previous page) adds all the
channels it can find (on your
Antenna or ,Cable TV system) into
the TV's memory. Add/Delete
Channels makes it easy for you to
add other channels, or drop
unwanted channels, from the list of
channels in the TV's memory.
_> Select ADD/DELETE
CHANNELS control.
With the ADVANCED
CONTROLS on screen, press the
MENU AY buttons to move the
red arrow. Then press MENU
button.
_> Press the CHANNEL &Y
buttons to select the channel you
want to add or delete.
<
ADVANCEDCONTROLS
-- CHAN/TIMEDISPLAYSIZE
CABLECHANNELTUNING
AUTO-PROGRAMMING
I_ ADD/DELETE
-- BLUE ...... :
-- TVSPEAKERSON/OFF
USE._ THEN_) TO
CHANNELS
CONVERGENCE
' .........
[I I I
You can also use the Channel
number buttons on the remote to
select channels.
_ Press the (+) button to ADD
the channel into the TV's memory.
Press the (-) button to DELETE
the channel from memory.
Repeat steps 2 and 3 for each
channel you wish to add or delete.
_._ Press the STATUS button to
clear the screen when through.
_l_.------._-._Remember. You can also
_1_ add the VCR/AUXI (or
AUX2 mode) just like a channel.
Then by pressing the CHANNEL
&_' buttons the VCRJAUXI (or
AUX2) mode can quickly be
selected to use the Audio/Video
Input jacks on the rear of the TV
(see page 34).
<:
Note: The "VCR!AUX1 and
AUX2 modes are located between
the lowest and highest channel
numbers within the Favorite
Channel Memory control screen.
29
Page 30

"_onvergence is the correct
J lining up of the red and blue
light paths on the TV screen.
NOTE: lf no color fringing (see
sidebar note) shows, then no
Convergence adjustments are
nccessary for your TV.
[-ffg-dr_
Select RED BLUE
CONVERGENCE control.
With the ADVANCED
CONTROLS on screen, press the
MENU AV buttons to move the
red arrow. Then press MENU
button.
<_ Press the MENU AV and (+)
(-) buttons to move the red or
blue cross directly over the white
cross on the TV screen.
"Eaered or blue cross is properly
adjusted when it is completely
merged with the white cross. (No
color appears around the edge of
the white cross).
or
!
IT_7,_z-,.x, Remember. Convergence has I:een set at the
factory for best viewing, but if one, or more of
objects (color fringing) follow the step:_ given in this
I the (red or blue) colors appear around the edges of
section.
ADVANCEDCONTROLS
CHAN/TIMEDISPLAYS_E
CABLECHANNELTUNING
m AUTO-PROGRAMMING
ADD/DELETECHANNELS
n_RED CONVERGENCE......_::_iiii:i
BLUECONVERGENCE
-- TVSPEAKERSOWOFF
USE_ THENO TOSELECT.
_' illl i
ii i(i¸!i¸¸ ii:iii:i
<_ Press the STATUS button to
clear the screen when convergence
adjustments are complete.
"-!
PIP (P/v_X _nl*. X 5_ )
30
Page 31

ould you like to hear TV
€I€ prograrrL_ through your audio
hi-fi system? The TV's Variable
Audio Output jacks and TV
Speaker On/Off control work
together to offer you this TV sound
option.
Connect the R(ight) and L(eft)
VARIABLE MODE Audio Out
jzcks on the TV to the R and L
Audio Input jacks on your
anaplifier or sound system.
Set the audio system's volume to
normal listening level.
<_ Turn the TV and audio system
&N. You can now adjust the sound
level coming from the audio
system with the Volume AV
buttons on the TV or remote.
<_To hear the TV sound from only
the audio system speakers, select
"PCSPEAKERS ON/OFF control.
ADVANCEDCONTROLS
-- CABLECHANNELTUNING
AUTO-PROGRAMMING
m ADD]DELETECHANNELS
REDCONVERGENCE
-- BLUECONVERGENCE
I_ 'IV SPEAKERSON/OFF :
-- CENSORVIEWING
USE _..THEN _) TO SELECT.
BACK OF TV
....................::: ::::::::::_AUDIOSYSTEM
Withthe ADVANCED
CONTROLS on screen, press the
MENU AY buttons to move the
red arrow. Then press MENU
batton.
<_ Press the MENU AY buttons
to turn the TV Speakers OFF.
You should now only hear TV
sound coming from the audio
system speakers.
<_ Press the STATUS button to
clear the screen.
,_1_-,.._ Remember. The audio
system may have to be in
l fiAUX(iliary) mode to play sound
"omthe TV.
31
Page 32

ensor Viewing allows parents to
block out, or "censor", any
channels they think children should
,not watch. A channel placed under
Censor Viewing cannot be viewed
until a correct access code is used to
unlock the channel for viewing.
•First let's set your Censor Code:
( BEGIN J
_> Select the CHANGE CENSOR
CODE control.
With the ADVANCED CONTROLS
on screen, press the MENU A_'
buttons to move the red arrow. Then
press MENU button.
"ENTER CURRENT CODE" shows
on the screen.
Press 1 the remote.
_> O, 7, l, on
"XXX.X" shows on the screen as
you press the: number buttons.
'qNCORRECT ACCESS CODE"
will also show on the screen.
ADVANCEDCONTROLS
AUTO-PROGRAMMING
AD_DELETECHANNELS
REDCONVERGENCE
BLUECONVERGENCE
TVSPEAKERSON/OFF
CENSORVIEWING
.18_ CHANGECENSORCODE
USE_ THEN_ TOSELECT.
_> Press 7. 1 the remote
0, 1, on
again.
"ENTER NEW CODE" shows on
the screen.
> Enter a new four digit number
code using the remote.
"ACCESS CODE REPROGRAMMED"
shows on the screen to let you know
the new code has been set.
_> Press the STATUS button
to
clear the screen.
A['[_'_ Remember. After you set the
_"_ new Censor Code go on to the
next page to see how to place
channels under Censor Viewing
control.
Parents - it isn't possible to unlock or
defeat your Censor Code without
changing to a new code number. So
if your Code number changes, and
you didn't change it yourself, then
you will know that someone has
altered the code and the blanked out
channel has been viewed.
:IllH¿g,l,tH,]d:11;|:1;];lllrl;E!L'rh'd:1
32
Page 33

.#cer your personal Censor
ode number has been set (see
previous page), you are now ready
to select the channels you want to
censor or block out.
k...d_
ADVANCEDCONTROLS
Fa-ggral
_> Select the CENSOR
VIEWING control.
With the ADVA.NCED
CONTROLS on screen, press the
MENU ,IkY buttons to move the
red arrow. Then press MENU
button.
"ENTER CURRENT CODE"
shows on Ll'lescreen.
_',_ Enter the correct Censor Code
I number.
_.'-_> Press Channel AY or Channel
channel to be censored.
Number buttons to select the
_ Press the (+) button to "BLOCK
VIEWING" on the selected
channel.
Press the (-) button to "ALLOW
VIEWING" on a blocked channel.
Repeat steps 4 and 5 for any other
channels you wish to block out.
ADD/DELETECHANNELS
REDCONVERGENCE
BLUECONVERGENCE
-- TV SPEAKERSON]OFF
I_ CENSORVIEWING
I CHANGECENSORCODE
EXIT
i!i::!
"--_ Remember. You can also
l]l_?block out the use of the
Audio/Video Input jacks on the
TV. This stops the viewing of VCR
programs which can be shown
through the A/V IN jacks. Just
select VCR/AUX1 or AUX2
(located between the lowest and
highest channel numbers) on the
Censor Viewing screen, and select
Block Viewing.
Note: To make TV viewing easier
all channels (and Audio/Video
Input jacks) will be unblocked,
once the correct Censor Code
number has been entered for one
blocked out channel.
When the TV is turned OFF and
then back ON again, Censor
Viewing is back in place for all
channels.
33
Page 34

P_"_e TV's Audio/Video Input
.[ jacks are Jbr ch'rect picture and
sound connections between the TV
and a VCR (or Video Disc Player,
etc.) that has Audio/Video Output
jacks.
7"0view the playback of a VCR
tape by using the Audio/Video
Input jacks on the TV:
BACK OF TV
_) Connect the VIDEO OUT
VIDEO IN jack on the TV.
from the VCR to the VCR/AUXI
_> Connect the AUDIO OUT
jacks R(ight) and L(efl) from the
VCR to the VCR/AUXl AUDIO
IN jacks on the TV.
_) Select the VCR/AUX1
PICTURE SOURCE control, on
the TV. Try any of the three
following ways:
An easy way to select VCR/AUXI
is to press the VCR button on the
front of the TV.
If you have addeVdVCR/AUXI to
the TV's channel memory (see
page 29), press the CHANNEL
,1_' buttons to select it.
With the PI_SOUND
L'ONTROLS (see page 16), move
the red arrow with the MENU AY
imttons to PICWURE SOURCE.
Then select VCR/AUX 1.
jack
ANT OUT
VIDEO OUT
(YELLOW)
(RED/WH ITE)
VCR
Contact y)ttr dealer or Parts
]nfommtion Center (I-800-292-6066)
to ord(_ _:ay optional accessories.
OUTDOOR VHF1UHF
ANTENNA
AN'F lbl
CABLE "IV"SIGNAL
_ Turn the VCR ON and press
PLAY to view the tape on the TV.
,__ Remember. Connections
_7 and use of the TV's AUX2
Audio/Video :Inputjacks are the
same as for the AUX 1jacks
(',except "AUX2" is selected as the
Picture Source - step 3).
]Ifyou have a single (monaural)
Audio Output VCR, "y"
connectors are available to
complete your connection. Contact
your dealer, or our Parts
:Information Center, for details.
FICTURE AND SOUND FROM
FLAYBACK OF VCR TAPE
34
Page 35

["fieS(uper)- Video connection on
. the rear of the :IV can give you
better picture detail and clarity, for
the playback of S-VHS VCR tapes
or Video Discs, than the normal
antenna picture connections.
Note: The VCR (or Video Disc
PIayer) must have a S-VIDEO
OUT(put) jack in order for you to
complete the connections shown on
t_rispage.
Connect the S-VIDEO (S-
I VHS) OUT jack from the VCR to
_ke AUX IN 1 S-VIDEO jack on the
TV.
<_ Connect the AUDIO OUT
Ij_cks R(ight) and L(eft) from the
VCR to the AUX IN1 jacks on the
TV.
, Select the S-VIDEO 1
PICTURE SOURCE control. Try
a:ay of the three following ways:
ANT.OUT RED/WHITE)
AUDIO OUT
S-VIDEO OUT
BACK OF TV
OUT1X)OR VHF/UHF
ANTENNA
,am easy way to select S VIDEO 1
i.,',to press the VCR button on the
front of the TV.
If you have added VCR/AUX1 to
the TV's chamml memory (see page
29), press the CHANNEL AV
buttons to select S VIDEO 1.
iW'ith the PICTURE/SOUND
CONTROLS (see page 16), move
the red arrow with the MENU AV'
buttons to PICTURE SOURCE.
Then select S VIDEO 1.
_ Turn the VCR ON and place it
in the S-VIDEO (or S-VHS)
playback mode. Insert S-VHS
cassette tape and playback in a
normal manner.
-,..3_ Remember. The S-VIDEO
connecting cable will be
supplied with the S-VHS VCR (or
Video Disc Player).
The S VIDEO I picture
._ource option appears only
when a S-VIDEO cable hax
been connemed to the "IV.
S-VHS VCR
AN:["I!'r
CABLE TV SIGNAL
PICTURE AND SOUND FROM
PLAYBACK OF S-VHS VCR TAPE
35
Page 36

PT-_e Audio/Video Output jacks
.£ on the TV can be used to
record TV programs on VCRs
which have AudiolVideo Input
jacks.
To record TV programs by using
the Audio/Video jacks on the TV:
@, Connect the VIDEO OUT jack
on the VCR.
ffom the TV to the VIDEO IN jack
@_ Connect the FIXED MODE
AUDIO OUT jacks R(ight) and
L(eft) from the TV to the AUDIO

y adding external speakers to
3 the TV's sound system, you can
c:eate the feeling of reflected
sound that surrounds you at a
movie theater or concert hall.
@. Connect both external
speakers to the speaker wire
terminals on the "IV.
Recommended speakers: 8ohm, 15
watt minimum. Be sure the (+) and
(-) speaker wires are connected to
the correct R(ight) and L(eft)
speaker terminals on the TV.
Note: Surround Sound will not work
with monaural audio material, or
with only one speaker cormc¢led.
r
BACK OF TV
__
1
@, Place the speakers so the
viewing area i:sbetween the TV
and the rear surround speakers.
_) Turn TV ON and place the
STEREO/MONO control to
STEREO position.
After setup whenever a stereo
signal is received the audio will be
heard in Surround Sound.
Note: The rear Surround Sound
speakers will not be heard at the
same volume level as the front TV
speakers. It is intended for the rear
speakers to give a background
noise effect which requires a lower
volume level than the TV's front
speakers.
_[_.X_ Remember. An optional
"_ SUBWOOFER "Amplifier -
Speaker" can .also be connected to
the TV. The Subwoofer jack on the
TV outputs a low level Bass signal.
When this jack is connected to an
,Mnplifier Subwoofer speaker it
complements the sound coming
from the rear Surround speakers.
Contact your dealer for more
information if"you would be
interested in adding such an
accessory to your home audio
system.
For an added dimension of
Surround Sound you may also
want to place the TV in the
]EXPANDED mode (see page 20).
SUBWOOFER AMPLIFIER
SPEAKER (See Reminder Note)
R 'ARSUR.Ot'
SOUND SPEAKERS
OPTIONAL SUBWOOFER
Location is not specific.just
within the listening area.
REAR SPEAKER
i_i._i_i?.-%_i_!ii_'_!|PRIMARY LISTENING AND VIEWING AREA
€
REAR SPEAKER
37
Page 38

|
After installing the batteries into
the remote, press the TV System
button to send remote commands
to the TV. Point the remote toward
the fi'ont of the TV (remote sensor
window) when pressing buttons.
V__.CR Buttons
For use of VCR buttons see the "Using
the Remote With a VCR".
Menu (VA) Buttons
Press the M button to show on-screen
featttre controls. Press • or • buttons
to move forward and backward
through the list of on-screen controls.
Oand (+) Button_
Press to adjust the selected on-screen
feature control.
Volume Button
Press to adjust the TV sound level.
Personal Preference Button
Press to return the TV to specific
picture and sound settings you have
placed in the TV's memory. Also can
be used as an Enter button when
sending channel commands to remote
controlled cable converters or VCRs.
Smart Sound B0ttqn
Press to control TV sound levels. See
"Smart Sound/Auto Volume" section
for details.
Channel Guide Button
Press to show a list of labelled TV
charmels from which to select. See
"CH GUIDE" section for details.
PiP
PAUSE11
_t_tu_tExit Buttgn
Pre.,s to see the current channel
number on the TV screen. Also press
this button to clear the TV screen after
conlrol adjustments.
Alternate Channel Button
Pre.,s to select the previously viewed
channel.
IS'orexample: You are watching
channel 4 and change to channel 10
(usi ag the channel number buttons).
Pre.,s AJCH and you_rTV will return to
channel 4. Press A/CH again and your
"IN will return to channel 10.
Channel _;can Button
Pre.,s to scan up or down through
channel numbers.
Mute Button
Press to turn the sound OFF on the
"IN. Press again to return the sound to
its 1:revious level.
PII? Butt0n_
Pre,;s to operate Picture-In-Picture
fi:atares. See PIP section for details.
_N_u.mber Butt0n_;
Pre,;s the number buttons to select TV
chmmels. Press two number buttons to
select single digit channels. For
example: to select channel 6...press
"0" first and then "6".
T_-VCR-CBL System
B0tt0n_
l:_.,s to send remote controlcommands
to ether the TV, VCRs, oraccessory
Ca'ele Converters. See the "How to
cpe:'ate VCRs and Cable Converters"
section for further details.
The remote's TV-VCR-CBL System
butttons control how certain buttons on the
remote are used.
For example:
With the "TV" System button pressed:
the MENU, (M)AY, and (+,-)
buttons are used to select and
adjust on-screen TV features.
With the "VCR" System button pressed:
the same buttons on the remote
work playback, search, pause,
and other VCR features.
i; .............. [ _,o,,.,_ I
38
Page 39

_ ]'hen using the TV remote
V ¥ with a VCR, firstmake
certain it is set to control your
VCR ( by the REMOTE CODE or
SEARCH method - see following
section).
_, Press the VCR System
button on the remote.
_' Point the top of the remote
(remote sensor window) when
pressing buttons.
l oward the front of the VCR
-"1
]lec0rd Button
Hold the RECORD button down, and
then press the PLAY button to begin
a VCR recording.
Rewind Button
rh-ess to rewind tapes. For some
VCRs you may need to press STOP
button first then REWIND. In
playback mode,, hold button down to
view picture moving rapidly in
reverse.
]_au_e Button
[hess to temporarily stop the tape dur-
ing a playback or recording. Press
again to release Pause.
ZFV-VCR Button
Press to the VCR position ("VCR"
indicator on the VCR will light) to
view the playback of a tape. Press
again to place in the TV position
("VCR" indicator on the VCR will go
OFF) to view one program while
recording another program.
"'Ill
II
P! P ( P/VUEX s_s )( size)
Play Button
Pres:; to playback a tape. Hold down
after pressing the RECORD button to
start a recording.
Stop Button
Pres:; to stop the tape.
Fa_,;t Forward Button
l:h'es:;to rapidly advance the tape. For
some VCRs you may need to press
STOP first then FF. In Playback
mod_ hold button down to view the
pictttre moving rapidly in the forward
direction.
._ih:annel Scan Button_;
Pres:; to scan up or down through
VCI_:channel numbers.
Nulrnber Button_;
Pres:; buttons for direct VCR channel
selections.
Power Button
Pres:; to turn the VCR ON and OFF.
_'CR System Button
Pres:; to send remote commands to
the VCR.
r
,_t_ Remember. The VCR
buttons on the remote will
not operate your VCR if those
feata_res are not already found on
your VCR remote control.
Nou:: All VCR functions
(pa_:icularly Search, Rewind, Fast
Forward, etc.) will operate the
m
same as with the original VCR
remote control provided with the
VCR.
39
Page 40

tired of hearing
blaring at you
even when you've gone into the
kitchen or down the hall? The
,Smart Sound (Auto Volume)
,control enables you to hear a more
consistent, even sound level by
reducing the peaks and valleys
that can occur during program
changes or commercial breaks.
_> Press the Smart Sound button
on the remote.
"SMART SOUND" shows on the
TV screen.
_> Keep pressing the Smart
level control ON (or OFF.)
I Sound button to turn the volume
_> Press the STATUS button to
clear the screen.
SMARTSOUNDON
_.._-.,Z_ Remember. Smart Sound
I._.-i!_ works only with the programs
coming through the Antenna/Cable
input on the rear of the TV. It will
not control the sound levels for the
Auxiliary (VCR/AUX IN) audio
inputs.
4O
Page 41

T'_o you ever have trouble
.LJ remembering on which
channel a particular station or
network is located? The Channel
Guide is a quick way to view and
select channels from a list of
Labelled channels.
A Label is a/bur letter callout you
,can set to appear with the on
screen channel number. Example
,Label: WXYZ - for a TV station's
,call letters.
To select channels from the
,Channel Guide:
_ Press the CH GUIDE button
_aheremote.
A "CHANNEL GUIDE" shows on
l_e screen with channel numbers
:rod labels.
Keep pressing the CH GUIDE
button to see what other labelled
channels can be selected.
_ Press the number buttons on
the remote to select the desired
labelled channel.
Remember to press '_" first and
then the number for single digit
channels.
_' Press the MENU button to pick
a Label for a channel from the
'T.ABEL CHOICE" list, or write a
new label for a channel. (See
sidebar notes).
_' Press the STATUS button to
clear the screen.
Oil
PIP
iii_ii!i
To write your own Label for a
Channel:
With the double arrow pointing to
"CUSTOM", press the MENU
button.
To pick a Label from the
"L4BEL CHOICE" list:
Pr_ss the MENU AY buttons to
move the red arrow through the
Label Choice list.
8
t
A red arrow appears under the
first letter space for the channel
label.
Press the MENU AV buttons to
tick any of the letters or symbols
that are given for your use.
Press the (+) or (-) buttons to
move the red arrow to the other
letter spaces and repeat.
Press the STATUS button to
clear the screen when finished.
41
Yoa can also pick a '"olank"space
(kx:ated above the ABC label) if
Cot don't want any label to appear
wita the channel,
Page 42

_o e Personal Preference button
n the remote instantly returns
the TV to preset channel, picture,
and sound level settings you place
in the TV's memory.
Five different Personal Preferences
can be set so that more than one
person can preset the TV for his
(or her) preference.
To set Personal Preference:
CBEG-- q
_> Press the Personal Preference
(P.PREF.) button on the remote.
"PERSONAL PREFERENCES"
shows on the TV screen.
_> Press the MENU button to
own settings.
EDIT or setup P. PREF. for your
_) Press the number button on
the remote for the P. PREF. you
want to set. For example: press 1
for AUX IN - PREF1.
MODIFY PREF1 appears on the
screen with a list of picture and
sound controls.
_) Press the MENU AY buttons
to move the red arrow up and down
the list of controls. Press the
MENU button to select the control.
:i :l ll_:_to factory set c_alrol leve]s,
Adjust any of the listed controls to
the settings you would prefer for
level PREF1.
If you want to setup P. PREF. to
select a certain channel number for
you, use the Picture Source Select
control to set the channel.
_ After all control settings are
finished, press the STATUS
button to clear the screen.
@
continue to next page
42
Page 43

To use the Personal Preference
settings you placed in memory:
Press the P. PREF
the remote.
"PERSONAL PREFERENCES"
shows on the TV screen.
button
on
@_ Press the number button
the remote to select the P. PREF.
you desire. For example: press 1 to
select "AUX IN".
The channel, picture and sound
settings will change to the levels
you setup for that P. PREF.
on
_]i_-._ Remember. If no settings
_? have been made for the
selected P. PREF., the TV screen
will show "PREFERENCE
NEVER SAVED".
The "CHANGE P. PREF. LABEL"
control can be used to change the
title of a P. PREF. into a name or
label that may be easier for you to
remember.
8
12:30
@, With the CHANGE
LABEL control on the screen,
press the MENU ,V buttons to
spell out a new label or title for the
selected P. PREF.
Press the (+) and (-) buttons to
move the red arrow under each
letter space.
P. PREF.
@_ Press the STATUS button to
cliear the screen when the new label
is finished.
. J
43
Page 44

our remote control is set to
work your TV and many
infrared remote (IR ) control
VCRs. However, an easy one-
time step may be necessary
before the remote will work your
VCR.
Try this initial check to see if
going on to the following section
is necessary.
[ BEGIN I
_> Press theVCR System
button on the remote.
_2_ Point remote toward VCR
and press the POWER button.
_,'_ Does the remote turn the
VCR
ON?
IF YES, !_ and try the other
VCR buttons on the remote. If
they also work the VCR, then
the remote is ready and no
further steps are needed.
If NO, continue...
<: First look up a TWO-DIGIT
remote code number for your
brand VCR before going through
the simple "1,2,3" steps (on the
following [)age).
_[.[_l_,_--_ Remember If more than
one number is'listed, you
may have to try more than the
first two-digit code given in order
to locate your VCR's remote
code.
continue to next page
VCR
_CR REMOTE
BRAND
Akai 24, 25, 36
Audio Dynamics 14, 2_t,29
Broksonic 31
Cannon 01
Capehart 33
Craig 07, 30
Curtis Mathes 01,32, 42, 43
Daewoo 33
DBX 14, 21 ,29
Dynatech 27
Emerson 20, 31,34, 40
Fisher 06, 07, 08
Funai 2"7,28
GE 01
Goldstar 23
Go Video 45, 46
Hitachi 03, 51
Instant Replay 01
JC Penney 01,03,213, 29
JVC 14,4"7,48
Kenwood 1:3,14
Lloyds 27
Magnavox 00, 01, 02, 05, 27, 28
Magnin 30
Marantz 29
Memorex 01, 07, 23, 27
Minolta 03
Mitsubishi 16, 17, 38, 39, 50
Montgomery Ward 12
VCR REMOTE _
BRAND CODE NO.
Multitech 27,28
NEC 14, 21,29
Eanasonic 01
Pen_x 02, 03
Ehitco 01, 02, 05, 27, 28
Philips 00, 01, 02, 05, 27, 28
Quasar 01
RCA 03, 04,. 32, 42, 43, 44
Realistic 07,11, 12, 23, 27, 28
Samsung 22, 30
San;ui 49
San_,o 07, 13
Scott 19
Sez':s 03, 08, 23
Sharp 11, 12
Shinton 35
Sony 09, 10,41
Sound Design 27
Sylvania 00, 01,02, 05, 27, 28
Symphonic 27
Tamng 14
Teac 14, 27
Teknika 26, 27
"Ihc,mas 27
TMK 20
Toshiba 18, 19
Video Concepts 28, 29
Ymnaha 14, 28, 29
ZerAth 15
44
Page 45

w
_Tow that-cou have looked up
1 "Nthe two-digit Remote Code
Number for your brand of VCR
(on previous ,page), you are
ready to follow the four simple
steps below.
Please read through steps 1-4
before beginning.
_ Press and release the REC
(RECORD) button.
_, Within seconds after
thirty
releasing the REC button, press
and release the VCR System
button.
_ Within thirty seconds after
releasing the VCR System
button, ENTER THE TWO
DIGIT CODE NUMBER for
the desired VCR. The remote is
now ready to send commands to
the VCR.
VCR
PLAY• STATUS
PAUS[It
CowofrX_ X sw_
_ Point the remote at the
VCR.
I Press the POWER button on the
remote to turn the VCR ON.
_, _ should now operate the VCR.
Remember. If this doesnt work
52-V_.-'-z_ the first time, repeat steps
__ l_using the same remote code
number.
If after a second try the remote
does not operate your VCR, and
there are more code numbers
listed for your brand VCR, use
the next listed code number.
If after repeated attempts the
code number method does not
work your VCR, try the "VCR
SEARCH" method on page 48.
45
Page 46

our remote control is set to
work your TV and many
infrared remote (IR ) control
Cable Converters. However, an
easy one-time step may be
necessary before the remote will
work your Converter.
Try this initial check to see if
going on to the following section
is necessary.
Cable
Convene
!
_ Press the CBL
System
I button on the remote.
_> Point remote toward Cable
Converter and press the POWER
button.
_ Does the remote turn the
Converter ON?
IF YES, _ and try the CH • •
and CH number buttons on the
remote. If they also work the
Converter then the remote is
ready and no further steps are
needed.
If NO, continue...
_> First look up a TWO-DIGIT
remote code number for your
brand Converter before going
through the simple "1,2,3" steps
(on the following page).
A_._ -_ Remember. If more than
Jm_---_ one number is listed, you
may have to try more than the
fast two-digit code given in
order to locate your Converter's
remote code.
continue to next page
CONVERTER REMOTE
BRAND COOE NO.
Archer 28
Diamond 23
Drake 37
Gemini 45
Hamlin 14, 15
Hitachi 25
Jerrold 01,02,03,04,05,30,46
Macom 29, 38
Magnavox 17,26, 31
NSC 49
Oak 06, 27, 39
Panasonic 18, 35
Philips 19, 20, 21, 24, 26
Pioneer 09, 32
Regency 10, 11
CONVERTER REMOTE
BRAND CODENO.
Rembrant 33
Salora 52
Scientific Atlanta 08, 212,47
Sheritech 34
Sylvania 16
Texscan 16, 48
Tocom 12,13, 53
Toshiba 43
Uniden Sate llite 44, 54
Unika 50
Universal 36
Video Tech 40
Video Way 51
Viewstar 26
Zenith 07, 41,42
46
Page 47

]_ Towthat .you have looked up
IN
the two-digit Remote Code
Number for your brand of Cable
Converter (on previous page),
you are ready to follow the four
simple steps ,below.
Please read through steps 1-4
before beginning.
_ Press and release
(RECORD) button.
_ Within thirty seconds
releasing the REC button, press
and release the CBL System
button.
_a Within thirty
releasing the CBL System
button, ENTER THE TWO
DIGIT CODE NUMBER for
the desired Converter. The
remote is now ready to send
commands to the Converter.
_ Point remote at
Converter. Press the POWER
button on the remote to turn the
Converter ON.
_-_ Try it out. The Channel and
! r POWER buttons on the remote
the
the REC
seconds after
the
Cable Converter
i /
after
Converter.
I should now operate the
_[_- _ Remember. If this doesn't
work the first time, repeat
steps using the same remote
code number.
If after a second try the remote
does not operate your Converter,
and there are more code numbers
listed for your brand Converter,
use the next listed code number.
If after repeated attempts the
code numbe.r method does not
work your Converter, try the
"CONVERTER SEARCH"
method on page 49.
i
47
Page 48

our TV remote can be set to
work your VCR by what is
called the SEARCH method.
If the "REMOTE CODE" number
method shown in the previous
section did not set your remote to
work your VCR, then follow the
five easy steps listed below.
Please read t!hrough steps 1-5
before beginning.
_> Press the POWER button on
I the VCR to turn VCR ON.
_> Stand least six feetataway
from the frontof the VCR.
Point the remote toward the
VCR.
HOLD DOWN the A/CH and
VCR System buttons at the same
time. KEEP HOLDING
BUTTONS DOWN.
_> Watch the Channel Indicator
on the VCR.
Channel Numbers will SCAN UP
when the VCR has been
identified. This may take up to
two minutes.
VCR
09
Don'l let the VCR .scan up
more Ihan five channels
(in Search rmxle}.
T
Six Feet
(minimum)
_> Release the A/CH and VCR
System buttons as soon as
channel numbers start to scan up.
The VCR code has been identified
and the remote is ready to operate
the VCR.
JlT_ Remember. A minute or
two can seem very long, but
the code should be located within
two minutes..
Don't let the VCR scan up more
than five channels. If you do the
remote may pass up the right code
and another two minute search
cycle will have to be repeated.
If no channel change happens
within two minutes, repeat steps
1-5. Should a channel change still
not occur, the remote will not
work with the desired VCR.
48
Page 49

m .Vour TV remote can be set to
&work your Cable Converter by
what is called the SEARCH
method.
If the "REMOTE CODE" number
method shown in the previous
section did not set your remote to
work your Converter, then follow
:hefive easy :rteps listed below.
Please read t,_rough steps 1-5
before beginning.
_> Press the POWER button on
,ON.
]theConverter to turn Converter
_ Stand at least six feet away from
the front of the Converter.
Point the remote toward the
Converter.
HOLD DOWN the A/CH and
CBL System buttons at the same
time. KEEP ttOLDING
BUTI'ONS EK)WN.
_> Watch the Channel Indicator
on the Converter.
Channel Numbers will SCAN UP
when the Converter has been
identified. This may take up to two
minutes.
Cable Converter
09
Don't let the Converter man
up more than five channels
(in Search mode).
Six Feet
(minimum)
,1
_> Release the A/CH and CBL
System buttons as soon as channel
numbers start: to scan up. The
Converter c_'le has been identified
and the remote is ready to operate
the Converter.
_[_f--_.-_ Remember. A minute or
_1_ two can seem very long, but
the code should be located within
two minutes.
Don't let the Converter scan up
more than five channels. If you do
the remote may pass up the right
code and another two minute
search cycle will have to be
repeated.
If no channel change happens
within two minutes, repeat steps 1-
5. Should a channel change still
not occur, the:remote will not work
with the desired Converter.
49
Page 50

-- Dicture in Picture (PIP) is the
1showing of two pictures on the
TV screen a_'the same time. (One
main screen picture and one small
inset picture - or PIP).
Note: The PIP picture must be
supplied by a VCR (or other
accessory equipped with a VIDEO
OUTPUT jack). If you already
went througi_ FIRST TIME SETUP
(page 10), then the connections for
PIP have been completed.
To see how channels selected on a
VCR can be shown as PIP:
_> Connect the VIDEO OUT
jack on the VCR to the AUX INI
VIDEO IN jack on the TV.
Also connect the AUDIO OUT (R
and L) jacks from the VCR to the
AUX IN1 ALrDIO IN jacks on the
TV.
// PIP
MAIN
SCREEN
l-i BACK OF "IV I/'/1
Also ensure the normal antenna
connection between the VCR and
TV are in place.
_) Move to the next page after
the VCR to TV PIP connections
are completed.
,_._ Remember. The AUX
"-'_- IN1 or AUX IN2 jacks can
be used for PIP connections.
Please be sure that the PIP Picture
Source control (page 54) is set for
the correct set of Audio/Video
Inputs that are being used.
No sound will be heard with the
PIP picture. See page 52 on how
to "SWAP" the PIP picture with
the main screen picture so that
:sound can be heard.
If you have a single (monaural)
Audio Output VCR, "Y"
connectors are available to
complete your connection. Contact
your dealer, or our Pans
]information ('enter, for details.
ANT OUT
VIDEO OUT
t?YELLOW)
AUDIO OUT
(RED/WHITE)
VCR
AUDIO/V IDEO
CA BLES SUPPLIED
OUTDOOR UHF/VHF
ANTENNA
ANT I N
CABLE TV
SIGNAL
50
Page 51

N:h w that you have completed
e requ_!red connections on
the previous page you are ready to
follow the simple steps shown
below.
_> Turn the VCR and TV ON.
Place the VCR in the TV mode -
Use the TV/VCR button on
the TV remote (if the remote
has been set to work with
your VCR - see page 44.)
Place the TV in the
ANT/CABLE mode -
Use the MENU (and M akV)
buttons on the remote to set
MAIN PICTURE SOURCE
control to ANT/CABLE.
_> Select the channels on the TV
and VCR to be watched.
_> Press the PIP ON/OFF
button on the remote.
_.-- _ Remember. See the
following page on how to
operate other PIP features with the
remote control.
12:00""
12:00 *"
O6
VCR IN ""IV MODE"
(VCR Indicator Light will go out)
TV IN ANT/CABLE
8
12:34
3"¢ - MAIN SCREEN CHANNEL
VCR
SELECTED
CHANNEL
TV
SELEC'TED
CHANNEL
Be sum to point the remote al the
front of the VCR when pressing
VCR function buttons.
!
51
Page 52

_U remote the PIP picture can be
moved and swapped with the main
I _£_y using the PIP buttons on the
screen.
.,._' > Press PIP ON button to show
the PIP picture.
PIP screen appears in comer of TV
,screen. Press PIP ON again to
remove PIP from the main screen.
,,,_> Press PIP POSITION button
on the remote to move the PIP
]picture (from comer to comer on
tubemain screen).
4. FREEZE
_> Press SWAP to the main
swap
screen picture with the PIP picture.
Press SWAP again to return the
:mainscreen and PIP to their
original positions. See the
important reminder below.
_> Press FREEZE button to hold
the current Main picture in the PIP
window (Main picture is active).
If PIP is currently OFF the PIP will
be automatically shown.
Press FRZ repeatedly to update the
frozen PIP with current pictures.
'l'he frozen PIP cannot be swapped
with the main screen.
Press the PIP ON/OFF button to
drop the frozen PIP picture from
the screen.
continue to next page
3. PIP SWAP
_r
!
_.lr-'---____ Remember. If the PIP
"_lllE;rpicture is on the main screen
when the TV is turned OFF, a
blank screen will appear when the
TV is turned back ON again.
If this happens, you can either:.
Press the CHANNEL • or •
buttons to select a channel for
viewing (if _le AUX1 or AUX2
mode has been added to TV's
channel memory - see page 29).
Use the Picture Source Select
control (see page 16) to return the
TV to the ANT/CABLE mode.
2. PIP POSITION
I. PIP ON / OFF
52
Page 53

5.PIP SIZE 6. PIP STROBE
Press SIZE button to change
the si:;:eof the PIP window shown
on _:h_,.TV screen.
Press the PIP SIZE button again to
see ard compare the large and
small size PIP windows.
7. PIP PREVIEW
<_ Press STROBE to see a
of tbur frozen scene.,; from the
currently selected channel. Press
STRt!; again and the series of
pictures will be updated.
_ Press PREVIEW button to see
what is showing on four channels.
P/VUE starts with the current
chanrel and shows fl_enext three
chanr_els in memory.
Eve D' few seconds each P/VUE
picture will be updated with a
current scene for that channel.
Press P/VUE again to go to the
next four channels in memory and
so on. Just press the number
but:to:as to select any previewed
channel.
sel'ies
53
Page 54

rl_c e picture for the PIP window
an come through either the
ANT/CABLE, VCR/AUXI or AUX
IN2 Inputs (on the rear of the TV).
PIP Picture Source simply tells the
TV which one of these three sources
it is to show in the PIP.
[-aggral
_-_ Select PIP PICTURE
SOURCE control.
With the ADVANCED
CONTROLS on screen, move the
red arrow with the MENU A!r
buttons. Then press MENU button.
_-,_'_ Press the MENU Air buttons
to select the source for the PIP
picture as either:.
VCR/AUXIL- for a picture signal
coming from the
AUX IN1
Audio/Video jacks
on the TV.
AUX2- for a picture signal
coraing from the AUXIN2
Audio/Video jacks on the
TV.
ADVANCEDCONTROLS
-- EXIT
I_ PIP PICTURESOURCE
-- CLOSEDCAPTIONING
-- CAPTIONINGDURINGMUTE
-- SLEEPTIMER
-- SETTIME
-- TIME REMINDER
USE _. THEN _ TO SELECT.
ANT/CABLE- for a picture signal
coming from the
ANT/CABLE Input
on the TV.
_ Press the,.STATUS button to
clear the screen.
A_ Remember. The PIP
screen
_will be blank unless a signal is
connected to the selected source
(either ANT!CABLE, VCR/AUXI
or AUX2 Inputs) on the rear of the
TV.
i,
54
Page 55

P_'_e Picture-In-Picture (PIP)
.i_ Color and Tint controls are
used to adjust the color settings for
PIP when it is shown on the 73/
screen.
_, Select PIP ,COLOR (or TINT)
controI.
With the PICTURE/SOUND
CONTROLS on screen, move the
red arrow with the MENU _kY
buttons. Then press MENU button.
_ The PIP automatically comes
on to show the PIP window on the
"]TVscreen.
PICTURE/ SOUNDCONTROLS
-- CLEARVIEW
-- FLESHCORRECTION
I_ PIPCOLOR
PIPTINT
BASS
TREBLE
BALANCE
I,I_;E _ THEN I_ TO SELECT.
If you used the First Time Setup
(page 10), the TV is ready to show
the playback of a VCR tape in the
PIP window.
If you want to see how channels
selected on the VCR can be
viewed in the PIP window, see
pages 5%51.
_ Press the and buttons
levels you prefer.
I adjust the PIP for Color (or Tint)
_a Press the STATUS button to
clear the screen.
" _ Remember. Although there
_1_ are separate COLOR and
TINT controls; for PIP, the
adjustment levels for these controls
depend on the TV's main picture.
For example: If the main screen is
showing a black and white picture,
PIP would also be in black and
white (even though its source is in
color).
(+) (-)
<
!
(oq/_l m'_ X _.wAP_ FriEr'I}
PIP _,ncu! snl ,,*z_
to
ggSg
v_ 11c= t1 rv 11
-1
55
Page 56

m.
iP hookup with Cable
Converter Box and VCR.
First use an optional signal
<j
splitter and connect the original
cable TV signal to both the
CABLE IN on the Cable Converter
and the ANTENNA plug on the
rear of the TV.
REAR OF TV
_2_ Connect the CABLE OUT
the VCR.
the Converter to the ANT. IN on
<_'_ Connect the VIDEO OUT
jack on the VCR to the VIDEO
IN jack on the TV.
Also connect the AUDIO OUT (R
and L) jacks from the VCR to the
AUDIO IN jacks on the TV.
A_ Remember to use the
Cable TV Converter Box to
select channels for PIP, the VCR
must be set to the same channel as
the channel selection switch on the
rear of the Cable Converter (either
channel 3 or 4).
on
®@
AUDIO VIDEO
CABLES SUPPLIED
Contacl the Parts
Information Center
1 800 292-6066
to order any optional
VCR
CABLE TV CONVERTER
I- I
56
Page 57

Dlease make these simple
. checks before callingfor
service. These tips can save you
time and money since charges for
TV installation and adjustment of
c:_stomer controls are not
covered under your warranty.
CAUTION: A video source (such as a video game, Compact Disc Interactive - CDI, or
TV information channel) which shows a constant non-moving pattern on the TV screen,
can cause picture tube damage. When your TV is continuou_Jy used with such a source
the pattern of the non-moving portion of the game (CDI, e::c.)could leave arl image
permanently on the picture tube. When not in use, turn the video source OFF.
i Regularly alternate the use of such video sources with normal "IV viewing.
No Power
No Picture
No Sound
Remote Does Not
Work
and push POWER button again.
, Check the TV power cord. Unplug the TV, wait 1 minute, then reinsert plug into outlet
Check antenna connections on the rear of the TV. Are they properly secured to the
antenna plug on the "IV?
Check the CABLE CHANNEL TUNING control for correct position.
Check PICTURE SOURCE control for correct position. VCR/AUX1 or AUX2
position without a signal source will result in a blank screen.
Check the VOLUME buttons.
Check the MUTE button on the remote control.
Check the INTERNAL "IV SPEAKER ON/OFF control for the correct position.
If attempting auxiliary equipment hook-ups, check audio jack connections; and that the
auxiliary equipment is on and in the proper operating modes.
Check TV-VCR-CBL "'System" buttons on the remote. Press the remote's T___V.System
button to send commands to the TV.
Check batteries. Replace with 9-Volt Heavy Duty (Zinc Chloride) or Alkaline batteries
if necessary.
Clean the remote and the remote sensor window on the "Ix,'.
I• Check to be sure outlet is not on a wall switch.
TV Displays Wron
Channel or No
• Add desired channel numbers (ADD/DELETE CHANNELS control) into TV memory.
r Repeat channel selection, i
• Check CABLE CHANNEL TUNING control for correct position.
Channels Above 13
This "IV is equipped with protective circuitry that shuts the TV off in case of moderate
power surges. Should this occur turn the:TV back on by pxessing the POWER button
once or twice, or unplug and then replug the power cord at the AC outlet.
This feature is NOT designed to prevent damage due to nigh power surge,';such as those
caused by lightning, which is not covered by your warranty.
Cleanin_ and Care
• To avoid possible shock hazard be sure the TV is unplugged from the electrical outlet before ,.'leaning.
• When cleaning the TV screen take care not to scratch or damage the screen surface (avoid wearing jewelry or using
anything abrasive- do not use household cleaners). Wipe the front screen with a clean cloth dampened with water. Use
even, easy, vertical strokes when cleaning.
• Specially designed screen cleaning kits are also available which contain anti-static cleaners_ and brushes designed to get
into the ridges of the TV screen. If interested, ask your dealer about the SBS4100 Projection "W Screen Cleaning Kit or
call our toll-free Accessory Parts ordering number 1-800-292-6066.
• Gently wipe the cabinet surfaces with a clean cloth or sponge dampened in a solution of cool clear water and a mild soap
or detergent. Use a clean dry cloth to dry the wiped surfaces.
• Occasionally vacuum the ventilation holes or slots in the cabinet back.
• Never use thinners, insecticide sprays, or other chemicals on or near the cabinet, as they might cause permanent marring
of the cabinet finish.
57
Page 58

Coaxial Cable * A single solid antenna wire normally matched
with a metal plug (F-type) end connector that screws (or pushes)
directly onto a 75 Ohm input found on the Television or VCR.
Display * An on screen message or graphics that help the user
operate and adjust his Television feature controls. See On
S:reen Displays (OSD).
Direct Audio/Video Inputs * Located on the rear of the TV
tl_ese connectors (RCA phono type plug) are used for the input
ol_audio and video signals. Designed for use with VCRs (or
olher accessories) in order to receive higher picture resolution
and offer sound connection options.
Identify * Method by which a remote control searches and finds
an operating code for another product (such as a VCR or Cable
Ccmverter.) Once the code has been "identified" then the TV
remote can send commands to and operate the other product.
Multichannel Television Sound (MTS) * The broadcast
standard that allows for stereo sound to be transmitted with the
TV picture.
On Screent Displays (OSD) * Refers to the wording or
messages generated by the television (or VCR) to help the user
with specific feature controls (color adjustment, programming,
etc.).
Picture -In-.Picture (PIP) * Term used when two pictures are
shown on the TV screen at tt:e same time. The smaller PIP
picture is supplied by a VCR (or other tuner/video playback
source). The PIP picture can also be moved and swapped with
the TV's main screen picture.
Programming * The proced Jre of adding or deleting channel
numbers into the Television':; memory circuits. In this way
the Television "remember.,;" only the locally available or
desired channel numbers and skips over any unwanted
channel numbers.
Remote Sensor Window * A window or opening found on
the Television control panel through which infrared remote
control command signals are received.
Second Audio Program (SA P) * An additional audio
channel provided for in the lVluttichannel Television Sound
(MTS) broadcast standard. The most frequently proposed use
for SAP is the simultaneous bilingual broadcast of TV
program material.
Status * Allows the user to quickly confirm what channel
number is currently being viewed. Status can also be used to
clear the Television of on s.creen displays or information
(rather than 'waiting for the displays to "'time out" or
automatically disappear from the screen).
Menu * An on-screen listing of feature controls shown on the
Television screen that are made available for user adjustments.
Twin Lead Wire * The more commonly used name for the
two strand .300 Ohm antenna wire used with many indoor and
outdoor antenna systems. In many cases this type of antenna
wire requires an additional adapter (or balun) in order to
connect to the 75 Ohm lnpat terminals designed into the more
recent Televisions and VCRs
58
Page 59

Accessories!Optional .............................. 6, 7, 31,34, 37, 56, 59
Add!Delete Channe.ls .................................................... 8, 28, 29
Advance Buttons ..................................................................... 12
Audio Controls ............................................................. 20-2 I, 31
Audio/Video Input ................................................ 10, 34, 50, 56
Automatic Programming .................................................... 8, 28
Auto Volume Control ............................................................. 40
Battery Installation ............................................................ 12, 38
Cable TV Connections/Settings .................................. 6, 7, 8, 27
Censor Channels ..................................................................... 32
Charmel Guide ........................................................................ 41
Charmel/Time Display ................................................ 25_ 26, 41
Charmel Memory, .......................................................... 8, 28, 29
Channel/Time Reminder ......................................................... 25
Clock Setting .......................................................................... 22
Closed Captioning .................................................................. 23
Convergence ........................................................................... 30
Controls/TV ........................................................................ 8, 12
Controls/Remote .......................................................... 13, 15, 38
Exit ........................................................................................... 14
Factory Reset ........................................................................... 42
Features ...................................................................................... 4
First Time Set Up ....................................................................... 8
Glossary/TV Terms ................................................................ 58
Inputs/Audio and Video ................................... 10, 34-37, 50, 56
Menu ........................................................................................ 14
Minus(-)/Plus (+) Buttons ........................................................ 14
Picture-In-Picture (PIP) ................................................ 10, 50-56
Power Light Indicator .............................................................. 12
Precautions/Safety ........................................................... 2, 3, 57
Remote Control .......................................... 13, 15, 38-49, 52-53
RF Coaxial Cable ................................................ 6, 7, 34, 50, 56
RF Switcher .............................................................................. 59
Reminder/Time and Channel .................................................. 25
Second Audio Program (SAP) ................................................ 21
Sensor Remote ........................................................................ 12
Sleep Timer ............................................................................... 24
Smart Sound (Auto Volume) ................................................... 40
Status Button ...................................................................... 14, 38
Stereo Light Indicator ............................................................. 21
Surround Sound ....................................................................... 37
Time/Channel Display ........................................... 22, 25, 26, 41
VCR Button ....................................................................... 12, 34
VCR/TV Connections ........................................ 7, 10, 34, 50, 56
Tips for Service ........................................................................ 57
TV Speaker Switch .................................................................. 31
Warranty .................................................................................. 60
n optional AK9232 RF
.Switcher is available that will
allow an Antenna/Cable TV signal
input and another video accessory
(VCR, Video Disc Player, etc.) to
be connected to irhe TV at the same
time.
The accessory RF switcher can be
purchased or ordered from your
dealer. If your dealer does not
carry the accessory, call the toll
free Parts Information Center
number:
RF SWITCHER "_
ANT IN
NT OUT ANT OUT
ACC1
f
59
VIDEO DISC PLAYER
Page 60

PROJECTION TELEVISION
One (1) Year In Home Service Labor Warranty
Thirty (30) Day Exchange Warranty Projection TV Screen
One (1) Year Exchange Warranty Parts
Two (2) Year Exchange Warranty on Cathode Ray Tube
For purchases outside the U.S., see applicable warranty from country of tmrchase.
This warranty gives you specific legal rights and you may also have other rights which vary from state to state.
Parts and Labor
For one year (30 days for the Projection TV screen) after the date
of purchase, an Authorized Service Center will repair any
product defect and replace any defective part, including the
cathode ray tubes and lens without charge to you for parts or
labor.
Replacement Cathode Ray Tubes
Except for return shipping cost, an Authorized Service Center
will, for two (211years after installation of the TV, replace a
defective cathode ray tube without charge for the replacement
tube. If the tube replacement is made after one year, you must
pay for all labor and home service charges to replace it.
Replacement parts and tubes installed during the warranty period
are warranted only for the balance of the original warranty
period.
Replacement "Clear-Vu" Lens
Tke "Clear-Vu" Lens is warranted against manufacturing defects,
to the original purchaser, for the lifetime of the product. If the
lens replacement is made after one year, you must pay for the
labor and home service charges to replace it.
What the Purchaser Must Do
Before you call for service, check your operating instruction
booklet. A slight adjustment of the customer controls discussed
in your instructiion booklet may save you a service call.
If you require service during the warranty period, you must
contact an Authorized Service Center to arrange for repair. The
Service Center :must be allowed to keep defective parts.
Warranty service wilt be performed by an Authorized Service
Center. We suggest that you contact your dealer. If your dealer
does not operate an Authorized Service Center, he will direct you
to the Authorized Service center engaged by him to service the
product he sells.
If you reside in an area where we have a Factory Service Center
(see the Factory Service Center address directory supplied with
your product literature), you can contact them to schedule a
convenient time for an In-Home service call.
YOU MUST PRESENT PROOF OF THE DATE ON
WHICH THE; PROJECTION TV WAS FIRST
PURCHASED (SALES RECEIPT OR OTHER EVIDENCE)
WHEN REQUESTING SERV ICE OR REPLACEMENT
PART WARRANTY PERFOEMANCE.
Warranty Exclusions
Your Warrant)' Does Not Cover:
Labor charges for set installation or set-up, adjustment of
customer or preference controls,and installation or repair of
antenna systems outside the TV :;et.
Product repair and!or part replacement because of misuse,
accident, unamhorized repair or other cause not within the control
of Philips Con,;umer Electronics Company.
Reception problems caused by signal condition:; or cable or
antenna systems outside the TV.
A television purchased, used c.r ,serviced outside the U.S.A.,
Puerto Rico and the Virgin Islands, or used for commercial or
institutional purposes.
Incidental or consequential damages resulting fi'om the product.
Some states do not allow the exclusion of incidental or
consequential damages, so the above exclusion may not apply to
you.
ALL IMPLIED WARRANTIES INCLUDING IMPLIED
WARRANTIES OF MERCItANTABILITY AND FITNESS
FOR A PARTICULAR PURPOSE, ARE LIMITED IN
DURATION TO THE DURATION OF THIS EXPRESS
WARRANTY. Some states do not allow limitations on how
long an implied warranty lasts, so the above limitation may
not apply to you.
IMPORTANT REMINDER
PLEASE FILL OUT AND MAIl. YOUR WARRANTY
REGISTRATION CARD PROIV:PTLY. IT WILL BE EASIER
FOR US TO NC)TIFY YOU IF IT SHOULD EVER BE
REQUIRED. PLEASE ALSO KEEP YOUR SALES RECEIPT
AND ANY OTHER PROOF OF PURCHASE INFORMATION.
Please write your Model and Serial numbers below. The
numbers are located on the back of your unit. Please
remember to have these numbers on hand any time you call.
MODEL NO.
SERIAL NO.
IB 6955-E001
PHILIPS SERVICE COMPANY • P.O. BOX 555 •
JEFFERSON CITY, TENNESSEE 37760 • (615) 475-8869
60
 Loading...