

Page 1
Page 2
MAGNAVOX
Smart.Verysmart:
MAGNAVOX
Smart.Verysmart:
Congratulations on your purchasl
-and welcome to the "family!"
Dear MAGNAVOX product owner:
Thank you for your confidence in MAGNAVOX. You've selected one of the
best-built, best-backed products available today. And we'll do everything in
our power to kee__you happy with your purchase for many years to come.
As a member of the MAGNAVOX "family," you're entitled to protection by
one of the most comprehensive warranties and outstanding service
networks i_ the industry.
What's more, your purchase guarantees you'll receive all the information
and special offers which you qualify for, plus easy access to accessories
from our convenient home shopping network.
And most important of all, you can count on our uncompromising
commitment to your total satisfaction.
All of this is our way of saying welcome-and thanks for investing in a
MAGNAVOX product.
Sincerely,
Robert Minkhorst
President and Chief Executive Officer
P.S. Remember, to get the most from your MAGNAVOX product,
you must return your Warranty Registration
I_r_l within 10 daus. So nlease mail it to us Hght now!
Page 3
{_I Getting Started
Warning/Precautions ............................... 2-3
Antenna andCable TV Connections ...................... 4-5
VCR to TV Antenna Connections ............................. 5
First Time Set-Up and Use of the TV ................. 6-7
Basic TV and Remote Control Operation .............. 8-9
_-_ On-Screen Features
How to Use the On-Screen Feature Controls ..... 10-11
How to Select Picture and Sound Controls ...... 12
'_Selecting a Picture Source ................................ 12
¢,Adjusting Brightness, Picture, Color,
Tint, and Sharpness Controls ............................ 13
<>Using the Clearview Control............................. 14
_-Using the Flesh Correction Control .................. 14
_Adjusting Bass, Treble, and Balance Sound
Controls ............................................................. 15
_,Using Smart Sound or Auto Volume Control... 16
'_Using the Expander Sound Control .................. 16
_,Setting the TV for Stereo Programs ................. 17
How to Select Advanced Controls ..................... 18
_-Setting the TV Clock ......................................... 18
"ffSetting the Sleep Timer ..................................... 19
¢,Setting the TV for Closed Captioning ............... 20
+Using the Time/Channel Reminder Controls....21
_-Adjusting the Size of Channel/Time Display ...22
<>Setting the TV for Cable or Antenna Signals....23
"_Adding Chanr_ls in Memory (Automatically) 24
_'Adding Channels in Memory (Manually) .........25
'ffAdjustiog the TV's Convergence Control .........26
¢,Using the TV Speaker On/Off Switch with
the Audio Output Jacks .................................... 27
'ffUsing the TV's Audio/Video Input Jacks .........28
<>SurroundSound Speaker Connections ............. 29
Remote Control Ooeration
Using the Remote (TV/VCR buttons)...30-31
Setting the Remote to Work Your VCR............. 32-33
Setting the Remote to Work Your
Cable Converter .................................................. 34-35
Setting the Remote to Work a VCR or Cable
Converter - "Search Method". ............................ 36-37
_-"_ picture-In-Picture (PIP)
How to Use PIP (Connections) ............ 38-39
E-Iowto Use PIPwith the TV Remote ................ 40-41
Adjusting Picture-In-Picture Color and Tint ........... 42
Selecting the Picture Source for PIP........................ 43
More PIP Connections (Cable Converter) ............... 44
C eneral Information
Tips if Something Isn't Working .............. 45
Glossary of TV Temls ............................................. 46
Index ........................................................................ 47
Warranty .................................................................. 48
Features
First Time Set Up which automatically sets the TV
for local channels and antenna mode (see page 6).
Infrared Remote Control which operates your TV
and a variety of wireless remote control VCRs and
Cable Converters.
Picture-In-Picture (PIP) which can show a TV
program and the direct video output from an accessory
(VCR, camera, etc.) onto the TV screen at the same
time.
Standard TV broadcast (VHF/UHF) or Cable TV
(CATV) channel capability.
Closed Captioning which allows the viewer to read
TV program dialogue or voice conversations as on-
screen text.
Automatic Programming of channels for easy
selection of favorite stations available in your area.
Stereo-Ready TVwhich receives TV programs in both
broadcast stereo sound or (SAP) bilingual broadcast.
Smart Sound which controls the sound levels of TV
program breaks and commercials.
Audio/Video jacks for direct connections with VCRs
(and other accessories) for quality TV picture and
sound playback.
Sleep-Timer which automatically turns the TV OFF at
preset time intervals.
Page 4

irst let's connect your Antenna
or Cable TV signal to your TV.
This will be easy since there is
only one antenna plug (75_) on
the back of your TV - and that's
where the antenna goes.
_If your antenna (or CABLE
TV signal) has a round cable
(75 ohm) with a metal prong (F-
connector) on the end, then you're
ready to connect it to the TV.
If your antenna has fiat twin-
lead wire (300ohm), you first
need to attach the antenna wires to
the screws on an optional (300 to
75 ohm) adapter.
_Push the round end of the
cable (or adapter) onto the
ANTENNA plug on the back of
the TV. If the round end of the
cable connector is threaded, screw
it down tight.
Try it out. Press POWER to
turn the TV ON. Press the
CHANNEL UP button. You
should see local channels flash by.
Remember. Use the
FIRST TIM.E SETUP section
(page 6) to have the TV
automatically se_itself for local
channels and type of antenna
signal.
To ord_er any optional accessory
contact your dealer or call the toll-
free accessory ordering number
(1-800-292-6066):
UHF/VHF Combiner .................. 705109- I
75-300 Ohm Adapter .................. 704427-6
OutdoorVHF/UHF Antenna
Twin Lead
Wire
Back of TV
oooooooooooooooooooooooooooooooooooooooooooooo
oooooooooooooooooooooooooooooooooooooooooooooo
oooooooooooooooooooooooooooooooooooooooooooooo
ooooooooooooaoaooooooooooooooooooooooooooooooo
oooooooooooooooooooooooooooooooooooooooooooooo
_ooooooooooooooooooooooooooooooooooooooooooooo
ooooooooooooooooooooooooooooooooooooooooooooo
oooooooooooooooooooooooooooooooooooooooooooooo
oooooooooooooooooooooooooooooooooooooooooooooo
/ \
\
\
\
i
i
300 to 75f2
Adapter
(4835 218 27003
not supplied)
°o%%%°_o%%%%%%%%%%%%%°
%%%%%%%°o°o°o°0%%%%%%%%%°
\
\
\
\
\
\
I
\
\
\
\
\
\
\
\
\
\
\
\
\
\
\
Round Cable
75f/
Outdoor VHF/UHF Antenna
Cable TV Sign_
Page 5
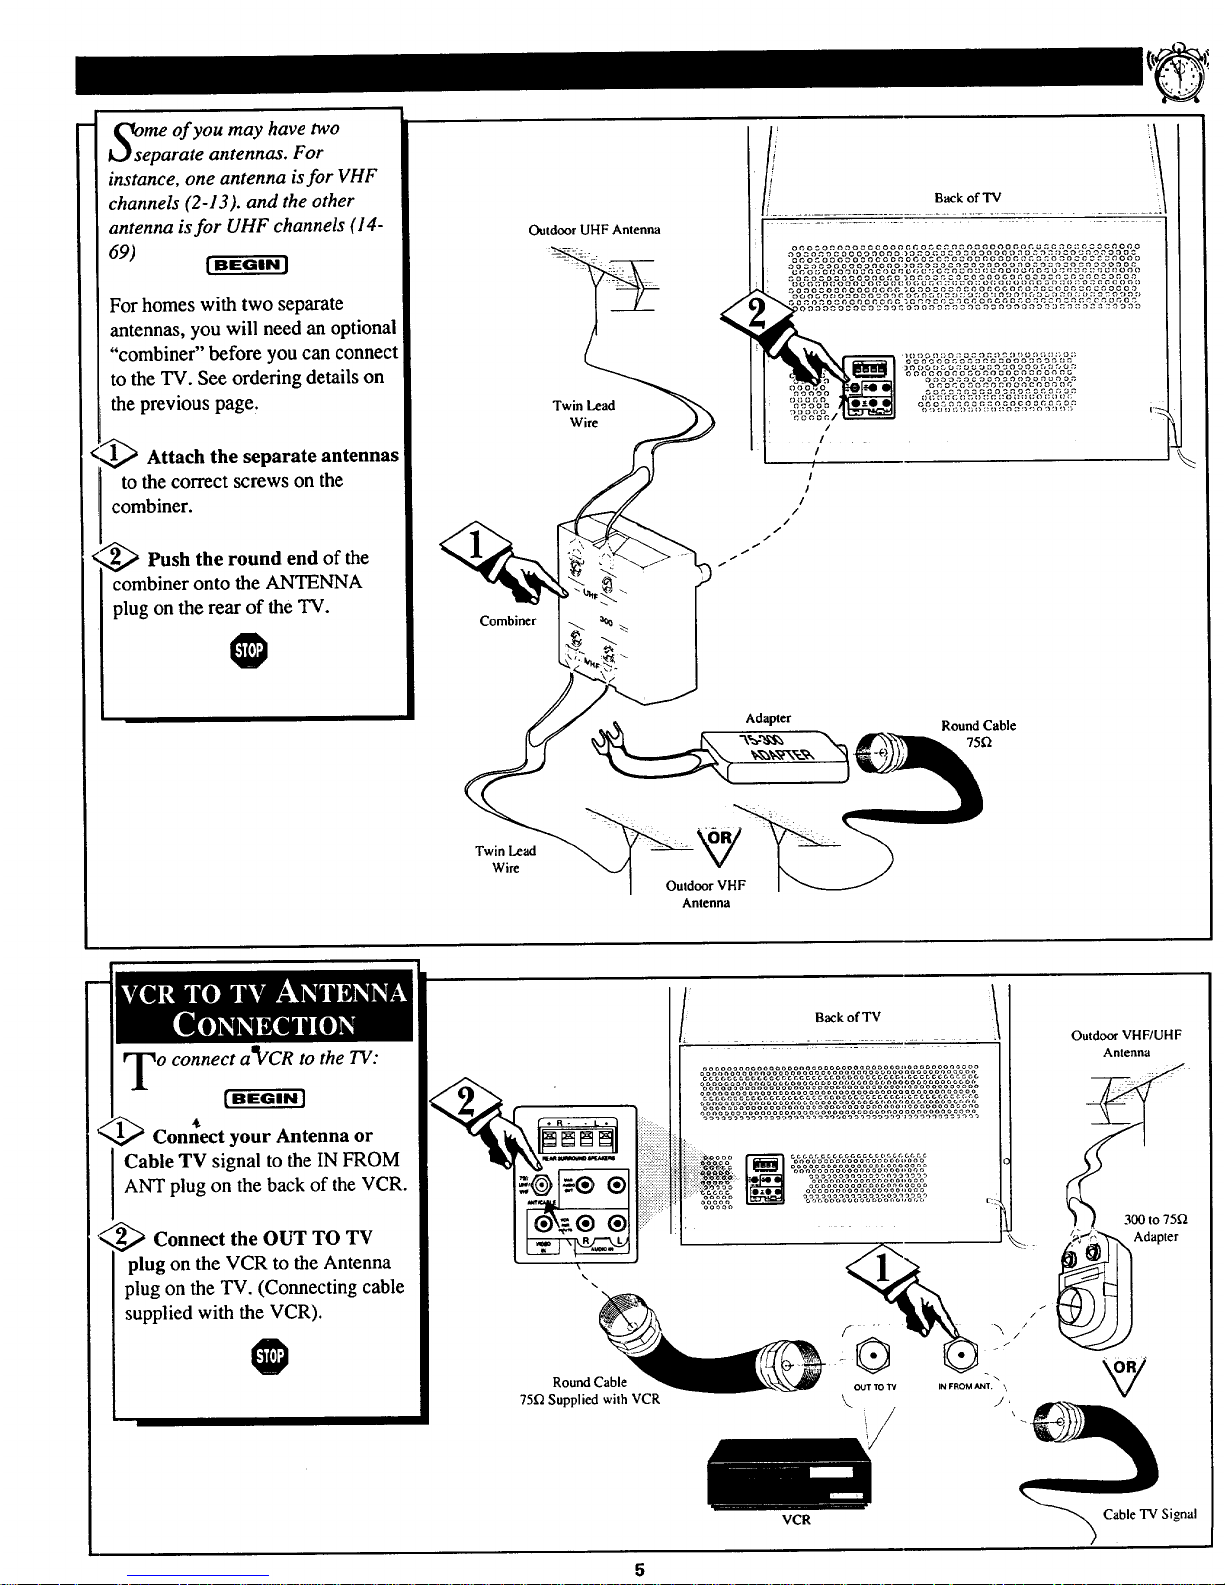
me of you may have two
arate antennas. For
instance, one antenna is for VHF
channels (2-13). and the other
antenna is for UHF channels (14-
69) | BEGIN J
For homes with two separate
antennas, you will need an optional
"combiner" before you can connect
to the TV. See ordering details on
the previous page.
_ Attach the separate antennas
to the correct screws on the
combiner.
_Push the round end of
the
combiner onto the ANTENNA
plug on the rear of the TV.
Combiner
Outdoor UHF Antenna
Twin Lead
Wire
/
I
I
/
/
/
//
TwinLead
Wire
Adapter
Ouldoor VHF
Antenna
Round Cable
75_
<
o connect a_VCR to the TV:
(BEGINJ
Connect your Antenna or
Cable TV signal to the IN FROM
ANT plug on the back of the VCR.
_ Connect the OUT TO TV
plug on the VCR to the Antenna
plug on the TV. (Connecting cable
supplied with the VCR).
® ®
\\
Round Cable
75D Supplied with VCR
BackofTV
VCR
OUT TO W
\
Outdoor VHF/UHF
Cable TV Signal
Page 6
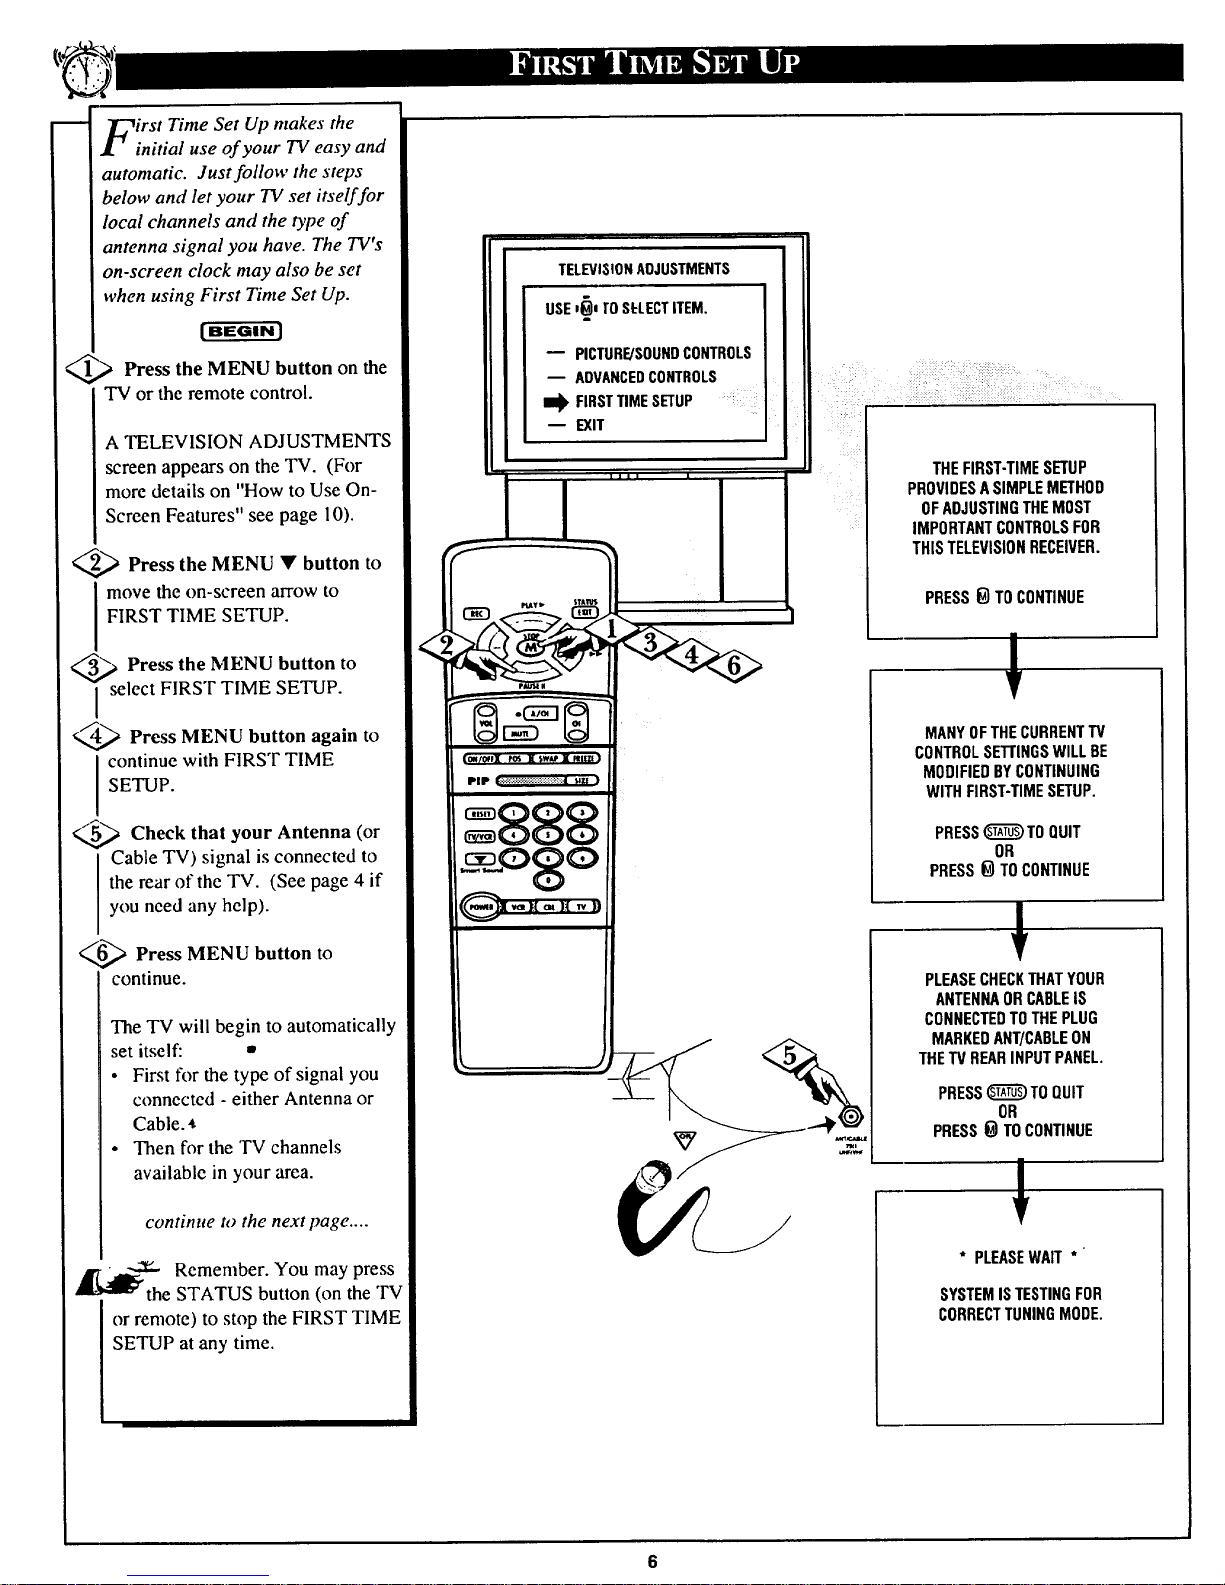
irst Time Set Up makes the
initial use of your TV easy and
automatic. Just follow the steps
below and let your TV set itself for
local channels and the type of
antenna signal you have. The TV's
on-screen clock may also be set
when using First Time Set Up.
| BEGIN J
_,_ Press the MENU button the
on
TV or the remote control.
A TELEVISION ADJUSTMENTS
screen appears on the TV. (For
more details on "How to Use On-
Screen Features" see page 10).
_ Press the MENU to
button
I move the on-screen arrow to
FIRST TIME SETUP.
_s Press the MENU button to
elect FIRST TIME SETUP.
__._ Press MENU button to
again
continue with FIRST TIME
SETUP.
_5<_ Check that Antenna (or
your
Cable TV) signal is connected to
the rear of the TV. (See page 4 if
you need any help).
_._ Press MENU button to
continue.
The TV will begin to automatically
set itself: •
• First for the type of signal you
connected - either Antenna or
Cable.
• Then for the TV channels
available in your area.
continue to the next page ....
• __---5_Remember. You may press
"_l_'the STATUS button (on the TV
or remote) to stop the FIRST TIME
SETUP at any time.
<
TELEVISIONAOJUSTMENTS
USEI_, TO
SELECTITEM.
PICTURE/SOUNDCONTROLS
m ADVANCEDCONTROLS
FIRSTTIMESETUP
EXIT
(O_/_f][ POS I SWe I _Ilt7,1}
PIP ::::::::::::::::::::::::::::::::::::::_,m )
888
_c _,QSQ
THEFIRST-TIMESETUP
PROVIDESASIMPLEMETHOD
OFADJUSTINGTHEMOST
IMPORTANTCONTROLSFOR
THISTELEVISIONRECEIVER.
PRESS_) TO CONTINUE
MANY OFTHECURRENTTV
CONTROLSE'irlNGSWILL BE
MODIFIEDBYCONTINUING
WITH FIRST-TIMESETUP.
PRESS_TO QUIT
OR
PRESS_ TOCONTINUE
PLEASECHECKTHATYOUR
ANTENNAORCABLEIS
CONNECTEDTOTHEPLUG
MARKEDANT/CABLEON
THETVREARINPUTPANEL.
PRESS_TO QUIT
OR
PRESS_ TOCONTINUE
!
* PLEASEWAIT *
SYSTEMISTESTINGFOR
CORRECTTUNINGMODE.
Page 7
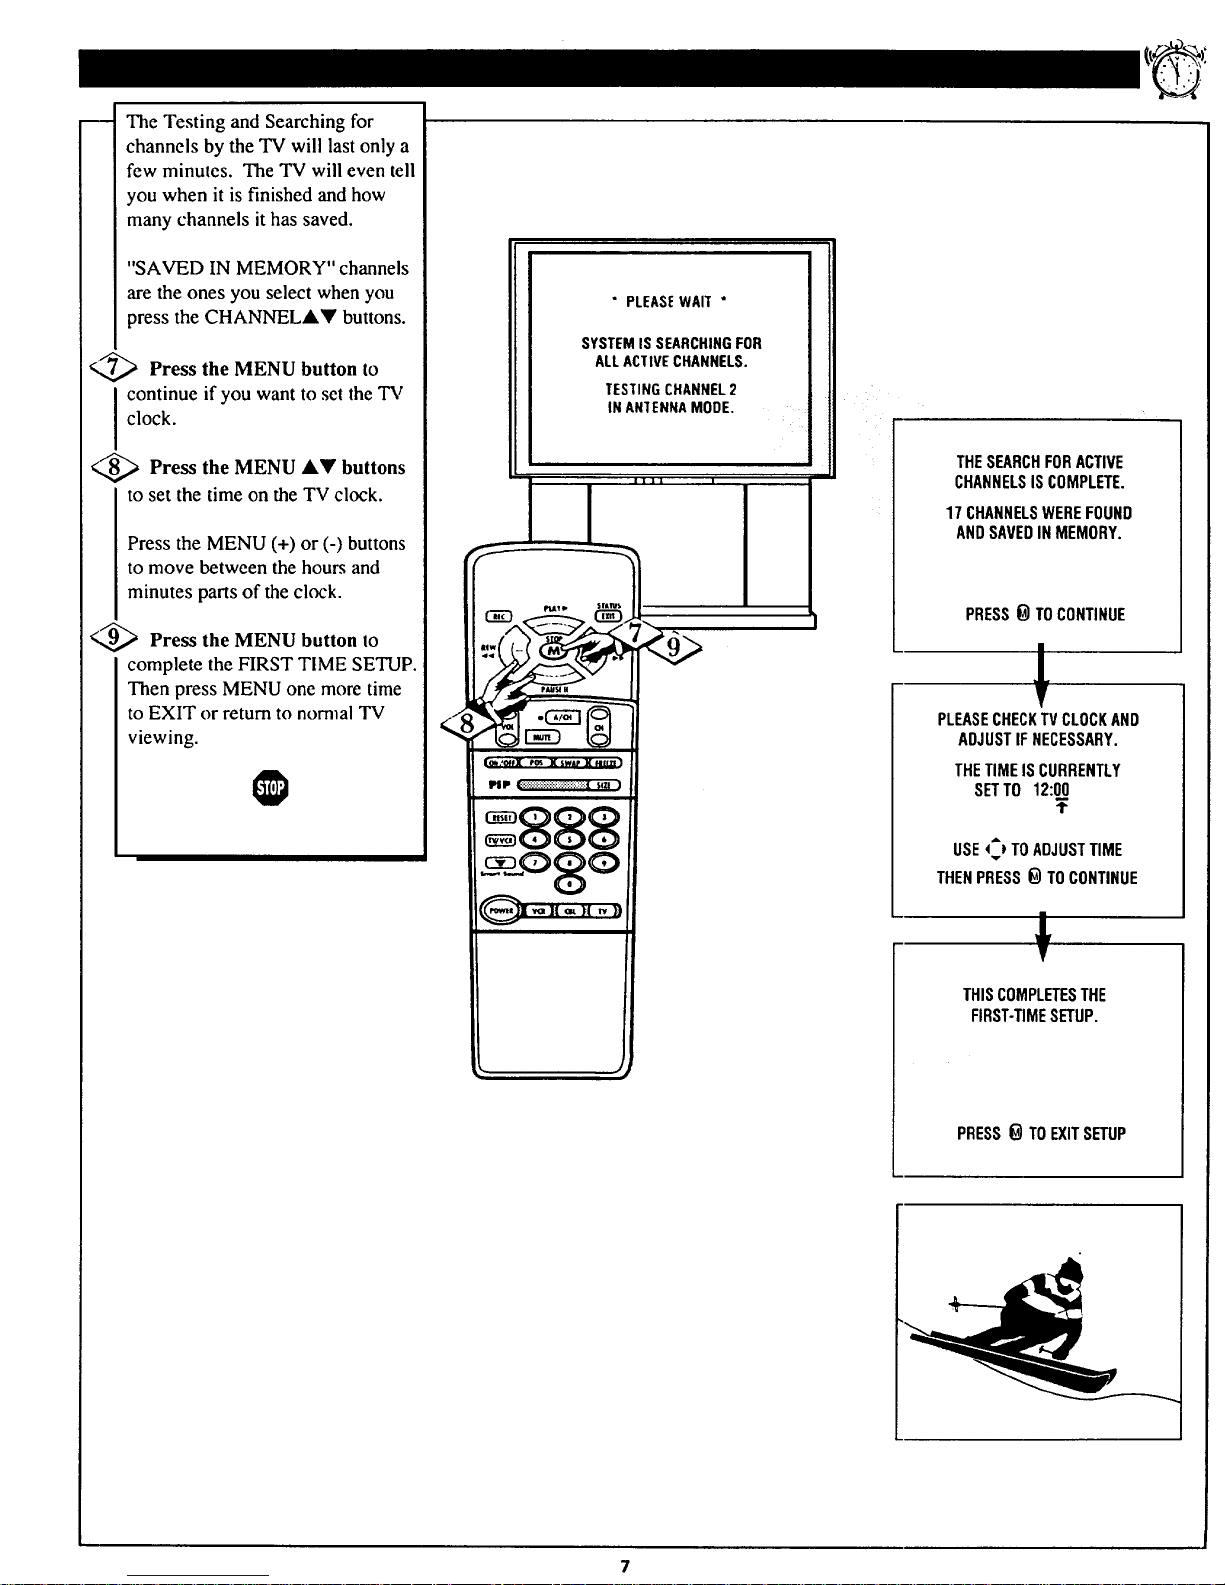
The Testing and Searching for
channels by the TV will last only a
few minutes. The TV will even tell
you when it is finished and how
many channels it has saved.
"SAVED IN MEMORY" channels
are the ones you select when you
press the CHANNELAY buttons.
<,_ Press the MENU button to
I continue if you want to set the TV
clock.
<,,_ Press the MENU A_' buttons
to set the time on the TV clock.
Press the MENU (+) or (-) buttons
to move between the hours and
minutes parts of the clock.
<,_ Press the MENU button to
complete the FIRST TIME SETUP.
Then press MENU one more time
to EXIT or return to nornlal TV
viewing.
" PLEASEWAIT "
SYSTEMIS SEARCHINGFOR
ALLACTIVECHANNELS.
TESTINGCHANNEL2
INAN'IENNAMODE.
888
_c ,_.QSQ
/
THESEARCHFORACTIVE
CHANNELSISCOMPLETE.
17 CHANNELSWEREFOUND
ANDSAVEDIN MEMORY.
PRESS_ TOCONTINUE
PLEASECHECKTVCLOCKAND
ADJUSTIFNECESSARY.
THETIMEISCURRENTLY
SETTO 12:00
T
USE4;_ TO ADJUSTTIME
THENPRESS 0 TO CONTINUE
J;
THISCOMPLETESTHE
FIRST-TIMESETUP.
PRESS0 TOEXITSETUP
Page 8

_-[
Press the POWER button to
turn the TV ON. (Note: you can
press any button on the front of the
TV to turn the TV ON).
The tuned channel number will
appear briefly when the TV is first
turned ON. You can also press the
STATUS button to see what
channel the TV is ON.
_ Press the VOLUME UP
(A) or
DOWN (V) button to adjust the
sound level.
3_,_ Press the CHANNEL UP
(A)
or DOWN (_') button to select
TV channels.
See FIRST TIME SETUP (page
6) on how the TV can set itself to
select your local channels.
4_ Press the "System" button
TV
on the remte to be sure the remote
sends its commands ot the TV.
Point the remote control at the
remote sensor window on the TV
when operating the TV with the
remote.
Always press two number
buttons on the remote when
selecting channels. For example:
press "0" then "6" for channel "6".
@
Remember. Certain
channel numbers have been
added totthe TV's memory at the
factory. FIRST TIME SET UP
(page 6) will automatically set the
TV for your local channels and the
type of antenna signal you have.
6
[I
_] POWER VOL
2:30
_._:_i_ • i:ii : ::,,i!?:..
Remote
Sen_r
Window
The VCR button is u_d for
Audio/Video accessory
connections made atthe rear of
the TV. See page 28 for details.
8
Page 9

lOad supplied batteries into
e remote:
[BEGINI
Remove battery
compartment lid on the back
of the remote.
Place the supplied
(3-AA) in the
remote. Be sure the (+) and (-)
ends of the batteries line up
correctly (inside of case is
marked.)
Reattach the battery lid.
9
Page 10
m
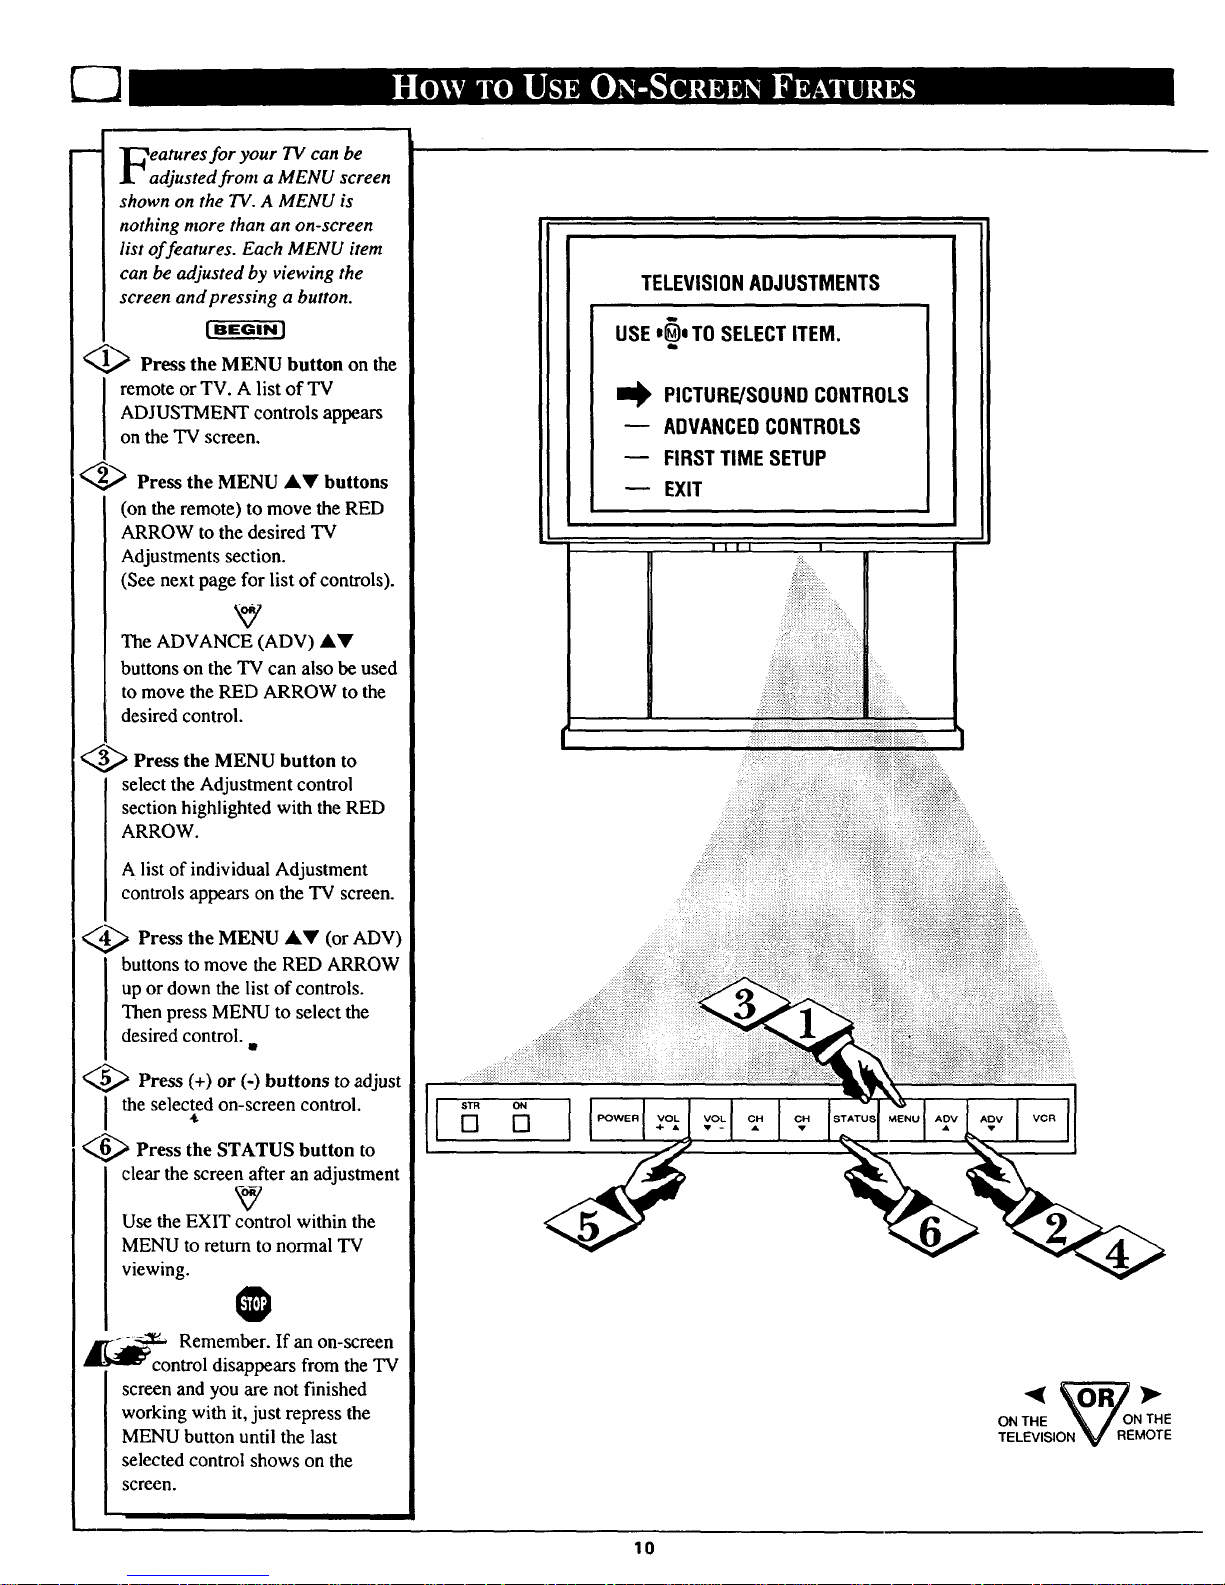
eatures for your 73/can be
adjusted from a MENU screen
shown on the TV. A MENU is
nothing more than an on-screen
list of features. Each MENU item
can be adjusted by viewing the
screen and pressing a button.
1_ Press the MENU button on the
remote or TV. A list of TV
ADJUSTMENT controls appears
on the TV screen.
_ Press the MENU AY buttons
(on the remote) to move the RED
ARROW to the desired TV
Adjustments section.
(See next page for list of controls).
The ADVANCE (ADV) AY
buttons on the TV can also be used
to move the RED ARROW to the
desired control.
3_,_ Press the MENU button to
select the Adjustment control
section highlighted with the RED
ARROW.
A list of individual Adjustment
controls appears on the TV screen.
_,_ Press the MENU AV (or ADV)
buttons to move the RED ARROW
up or down the list of controls.
Then press MENU to select the
desired control.
Press (+) or (-) buttons to adjust
the selected on-screen control.
_,,_ Press the STATUS button to
clear the screen after an adjustment
Use the EXIT control within the
MENU to return to normal TV
viewing.
O
-- 2s:--:_ Remember. If an on-screen
'8 dil_control disappears from the TV
screen and you are not finished
working with it, just repress the
MENU button until the last
selected control shows on the
screen.
TELEVISIONADJUSTMENTS
USE'0* TO SELECTITEM.
I_ PICTURE/SOUNDCONTROLS
ADVANCEDCONTROLS
FIRST TIME SETUP
EXIT
lill I
,:.::.:::::
::::::::::::::::
......
iii;ii;iiiii;i;_iii_i_iii_i!i_!:i;i_iii_iii:_!i_
[] []
ONTHE _ONTHE
TELEVISION' v REMOTE
10
Page 11
TELEVISIONADJUSTMENTS
USE*_lTOSELECTITEM.
i
I_ PICTURE/SOUNDCONTROLS
-- ADVANCEDCONTROLS
m FIRSTTIMESETUP
-- EXIT
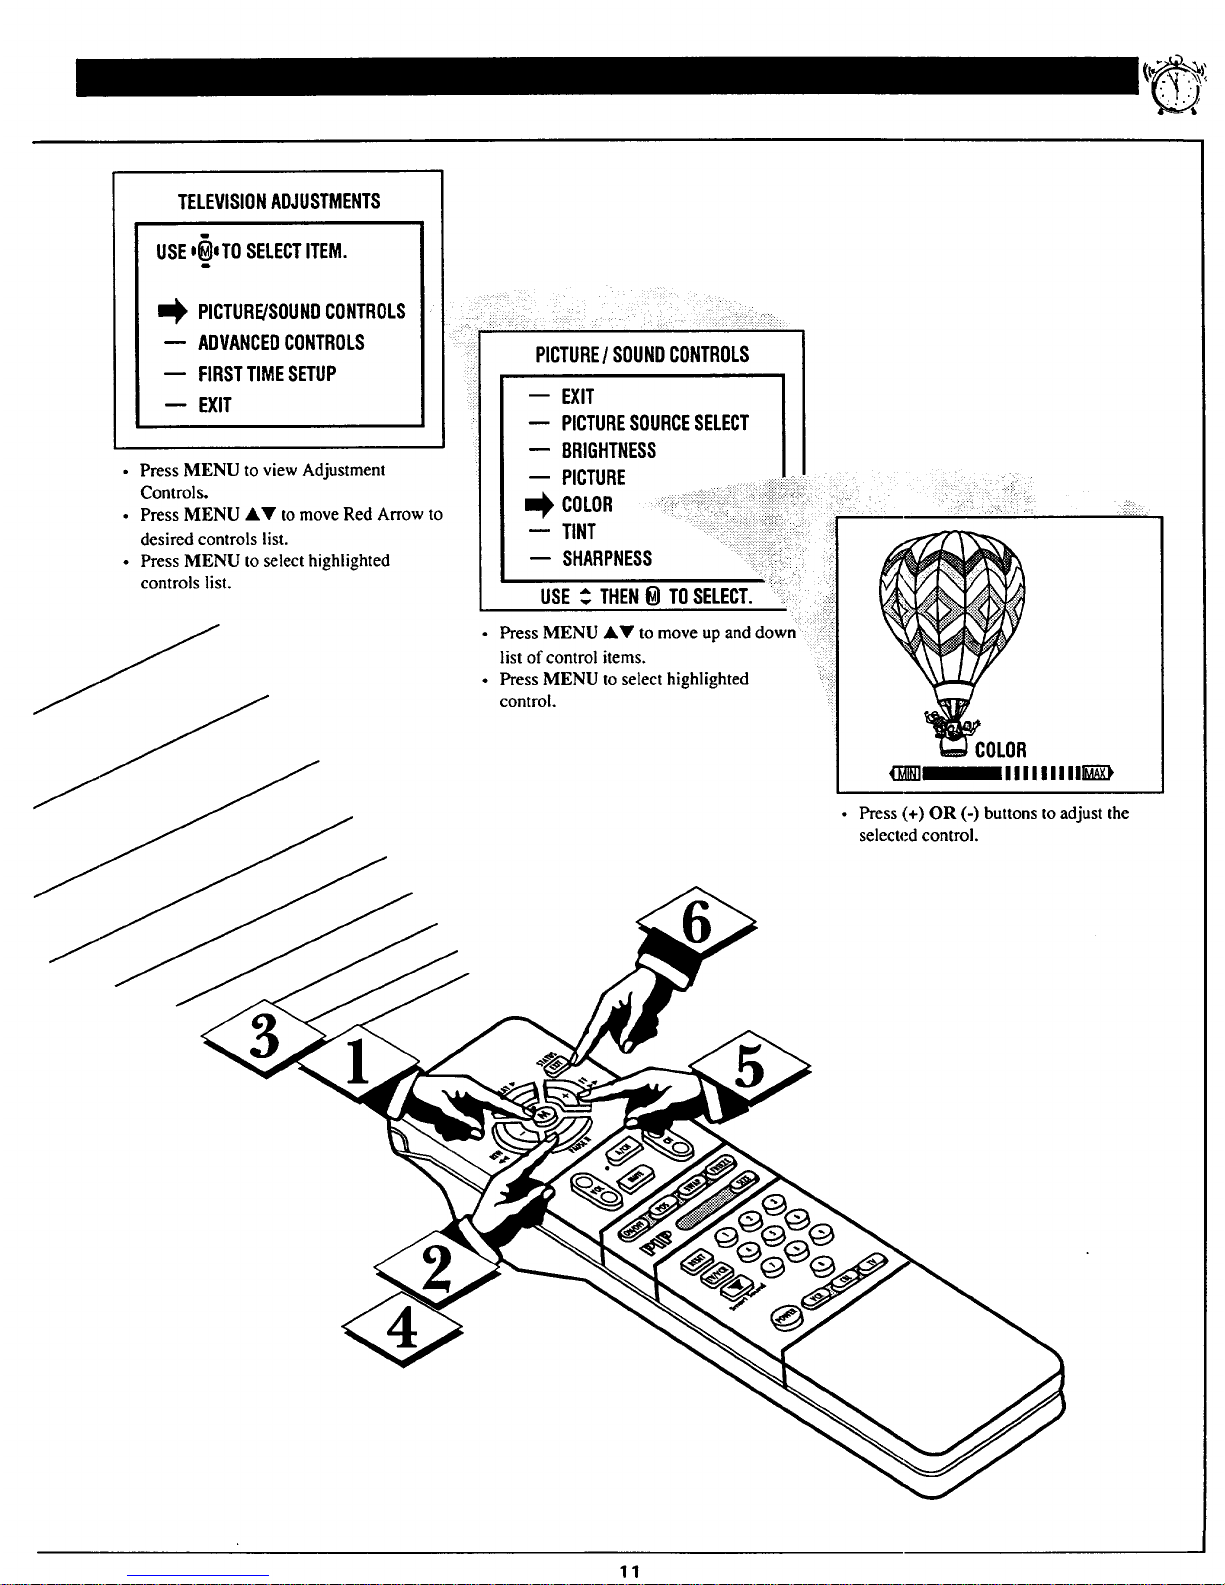
• Press MENU to view Adjustment
Controls.
• Press MENU AV to move Red Arrow to
desired controls list.
• Press MENU to select highlighted
controls list.
PICTURE/ SOUNDCONTROLS
-- EXIT
-- PICTURESOURCESELECT
-- BRIGHTNESS
-- PICTURE
._L COLOR _i-i::i;ii_::_:::ii?:_::_ii:_:i.i .;:.... : ...... _:
-- TINT ............
" i:i i
-- SHARPNESS .....:
USE_. THEN_ TOSELECT. ::
Press MENU .'_' to move up and down :!
list of control items.
• Press MENU to select highlighted
control.
• Press (+) OR (-) buttons to adjust the
selected control.
11
Page 12
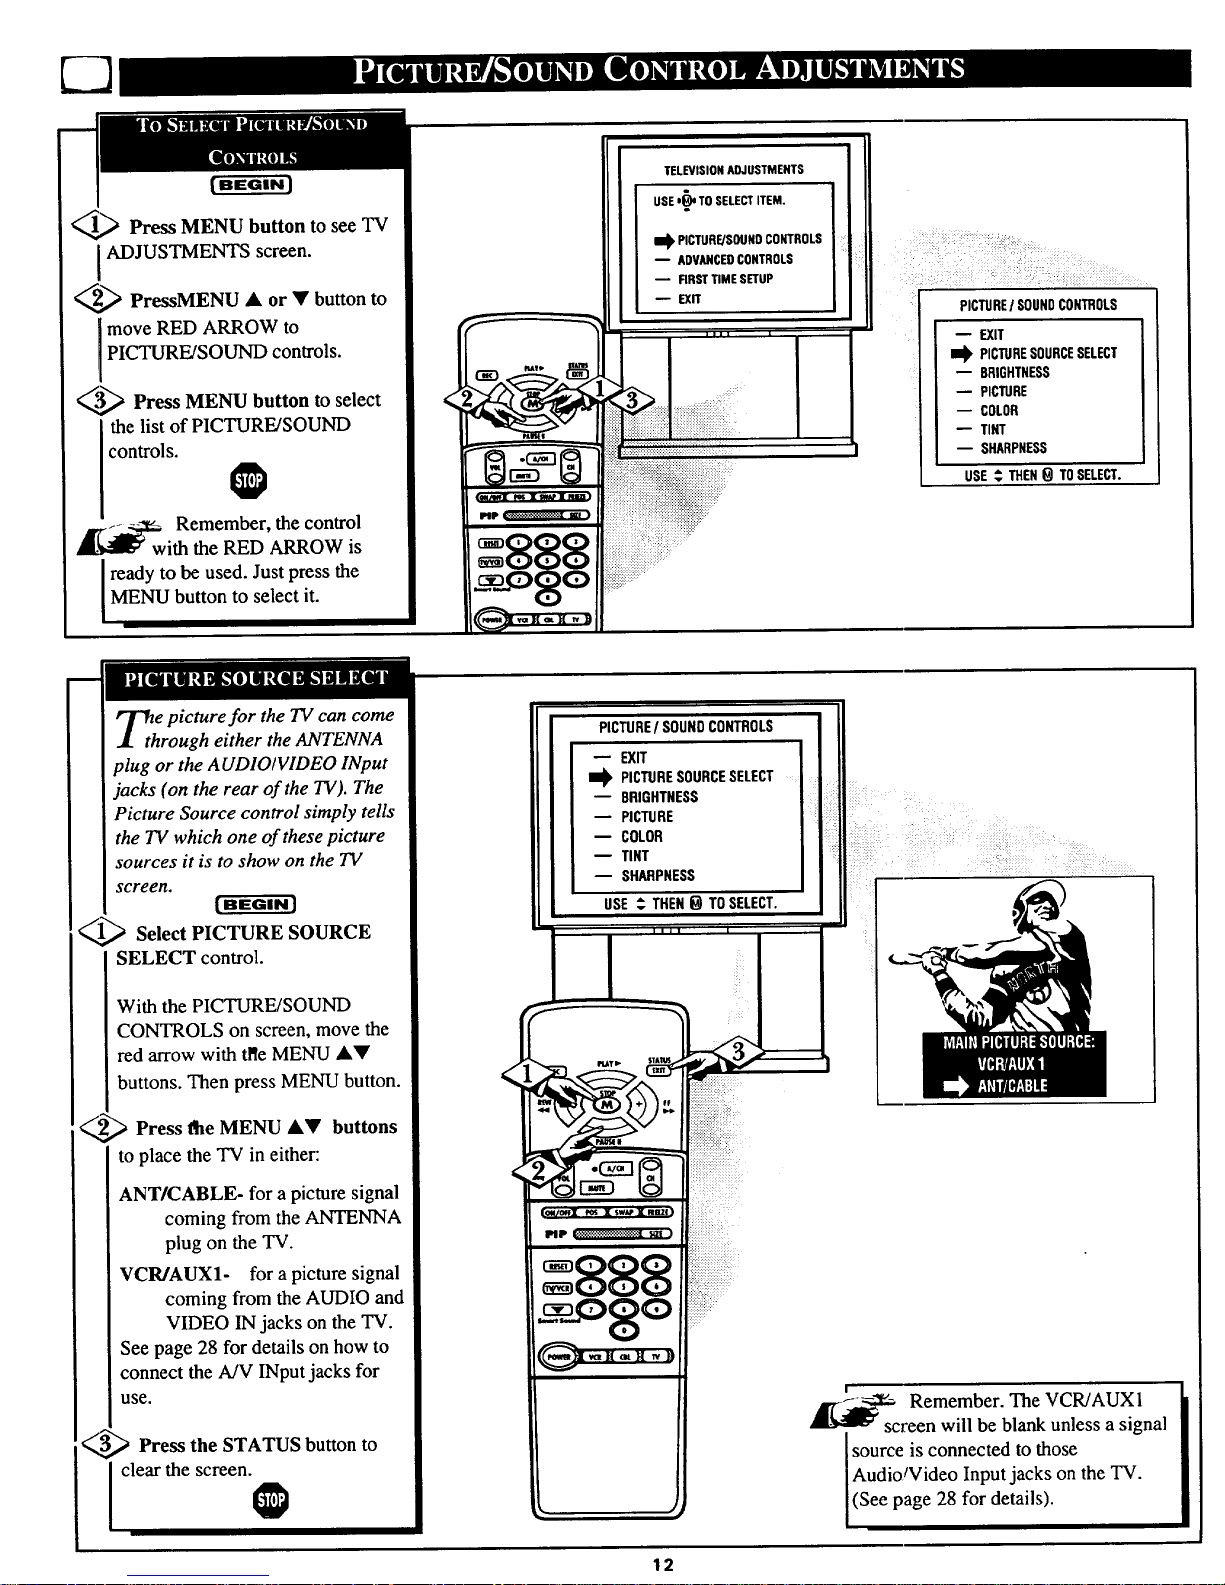
{ BEGIN J
Press MENU button to see TV
ADJUSTMENTS screen.
2_,_ PressMENU • or _' button to
move RED ARROW to
PICTURE/SOUND controls.
3___ Press MENU button to select
the list of PICTURE/SOUND
controls.
@
_w Remember, the control
ith the RED ARROW is
ready to be used. Just press the
MENU button to select it.
TELEVISION ADJUSTMENTS
USE'_)'_ TO SELECT ITEM. L
il_ PICTURE/SOUND CONTROLS
ADVANCED CONTROLS
-- FIRST TiME SETUP
SIT
PICTUREI SOUNDCONTROLS
EXIT
I_ PICTURESOURCESELECT
BRIGHTNESS
PICTURE
COLOR
TINT
SHARPNESS
USE _ THEN0 TOSELECT.
_th e picture for the TV can come
rough either the ANTENNA
plug or the AUDIO/VIDEO INput
jacks (on the rear of the TV). The
Picture Source control simply tells
the TV which one of these picture
sources it is to show on the TV
screen.
_.,_ Select PICTURE SOURCE
SELECT control.
With the PICTURE/SOUND
CONTROLS on screen, move the
red arrow with tl_eMENU •Y
buttons. Then press MENU button.
_ Press MENU buttons
_e •V
to place the "IV in either:
ANT/CABLE- for a picture signal
coming from the ANTENNA
plug on the TV.
VCR/AUX1- for a picture signal
coming from the AUDIO and
VIDEO IN jacks on the TV.
See page 28 for details on how to
connect the A/V INput jacks for
use.
<_ Press the STATUS button to
I clear the screen.@
PICTURE/ SOUNDCONTROLS
EXIT
I_ PICTURESOURCESELECT
8RIGHTNESS
PICTURE
-- COLOR
-- TINT
-- SHARPNESS
USE ,_.THEN_ TOSELECT.
l
I
-c Remember. The VCR/AUXI
reen will be blank unless a signal
source is connected to those
Audio/Video Input jacks on the TV.
(See page 28 for details).
12
Page 13
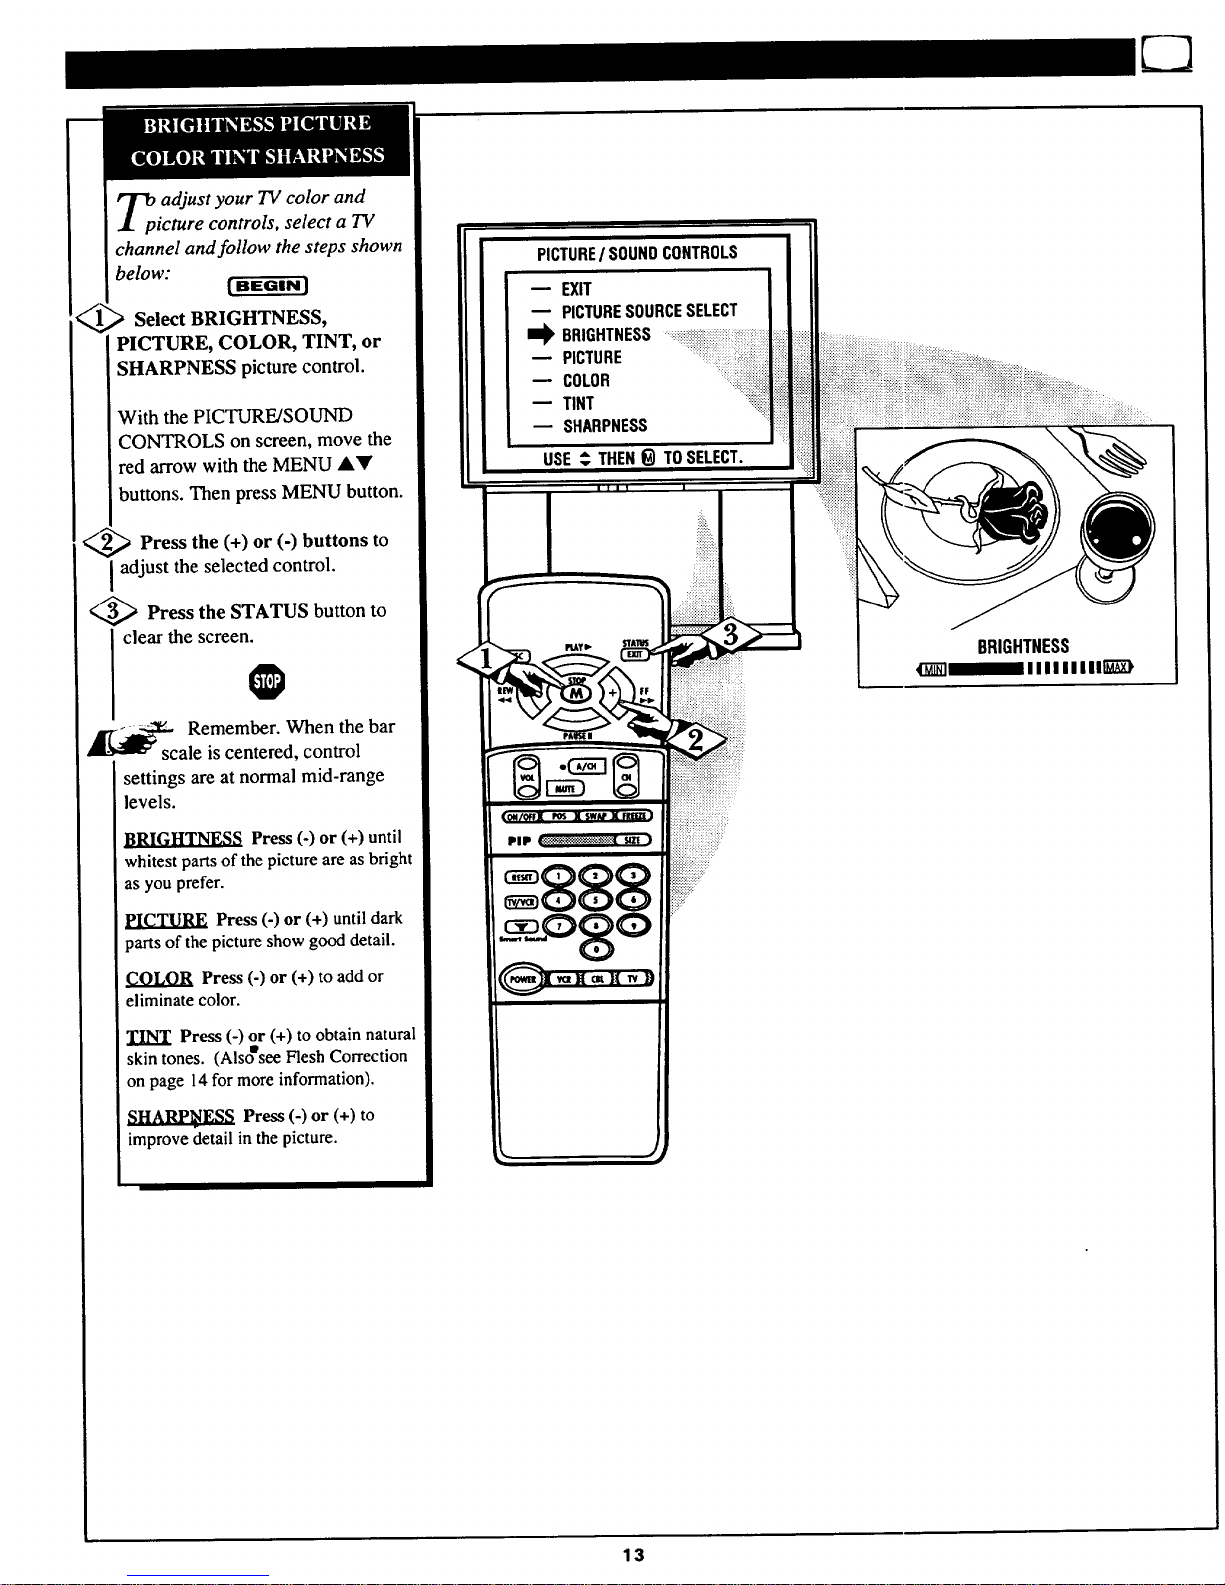
_p adjust your TV color and
icture controls, select a TV
channel and follow the steps shown
below:
Select BRIGHTNESS,
PICTURE, COLOR, TINT, or
SHARPNESS picture control.
With the PICTURE/SOUND
CONTROLS on screen, move the
red arrow with the MENU AY
buttons. Then press MENU button.
<_ Press the (+) or (-) buttons to
adjust the selected control.
<,,_ Press the STATUS button to
clear the screen.
0
_c Remember. When the bar
ale is centered, control
settings are at normal mid-range
levels.
Press(-) or (+) until
whitest parts ofthe picture are as bright
as you prefer.
PICTURE Press (-) or (+) until dark
_arts of the picture show good detail.
COLOR Press (-) or (+) to add or
eliminate color.
TINT Press (-) or (+) to obtain natural
skin tones. (Alsoesee Flesh Correction
on page 14 for more information).
Press (-) or (+) to
improve detail in the picture.
PICTURE/ SOUNDCONTROLS
m EXIT
PICTURESOURCESELECT
I_ BRIGHTNESS
PICTURE
COLOR
TINT
SHARPNESS
USE_ THEN_ TOSELECT.
BRIGHTNESS
13
Page 14
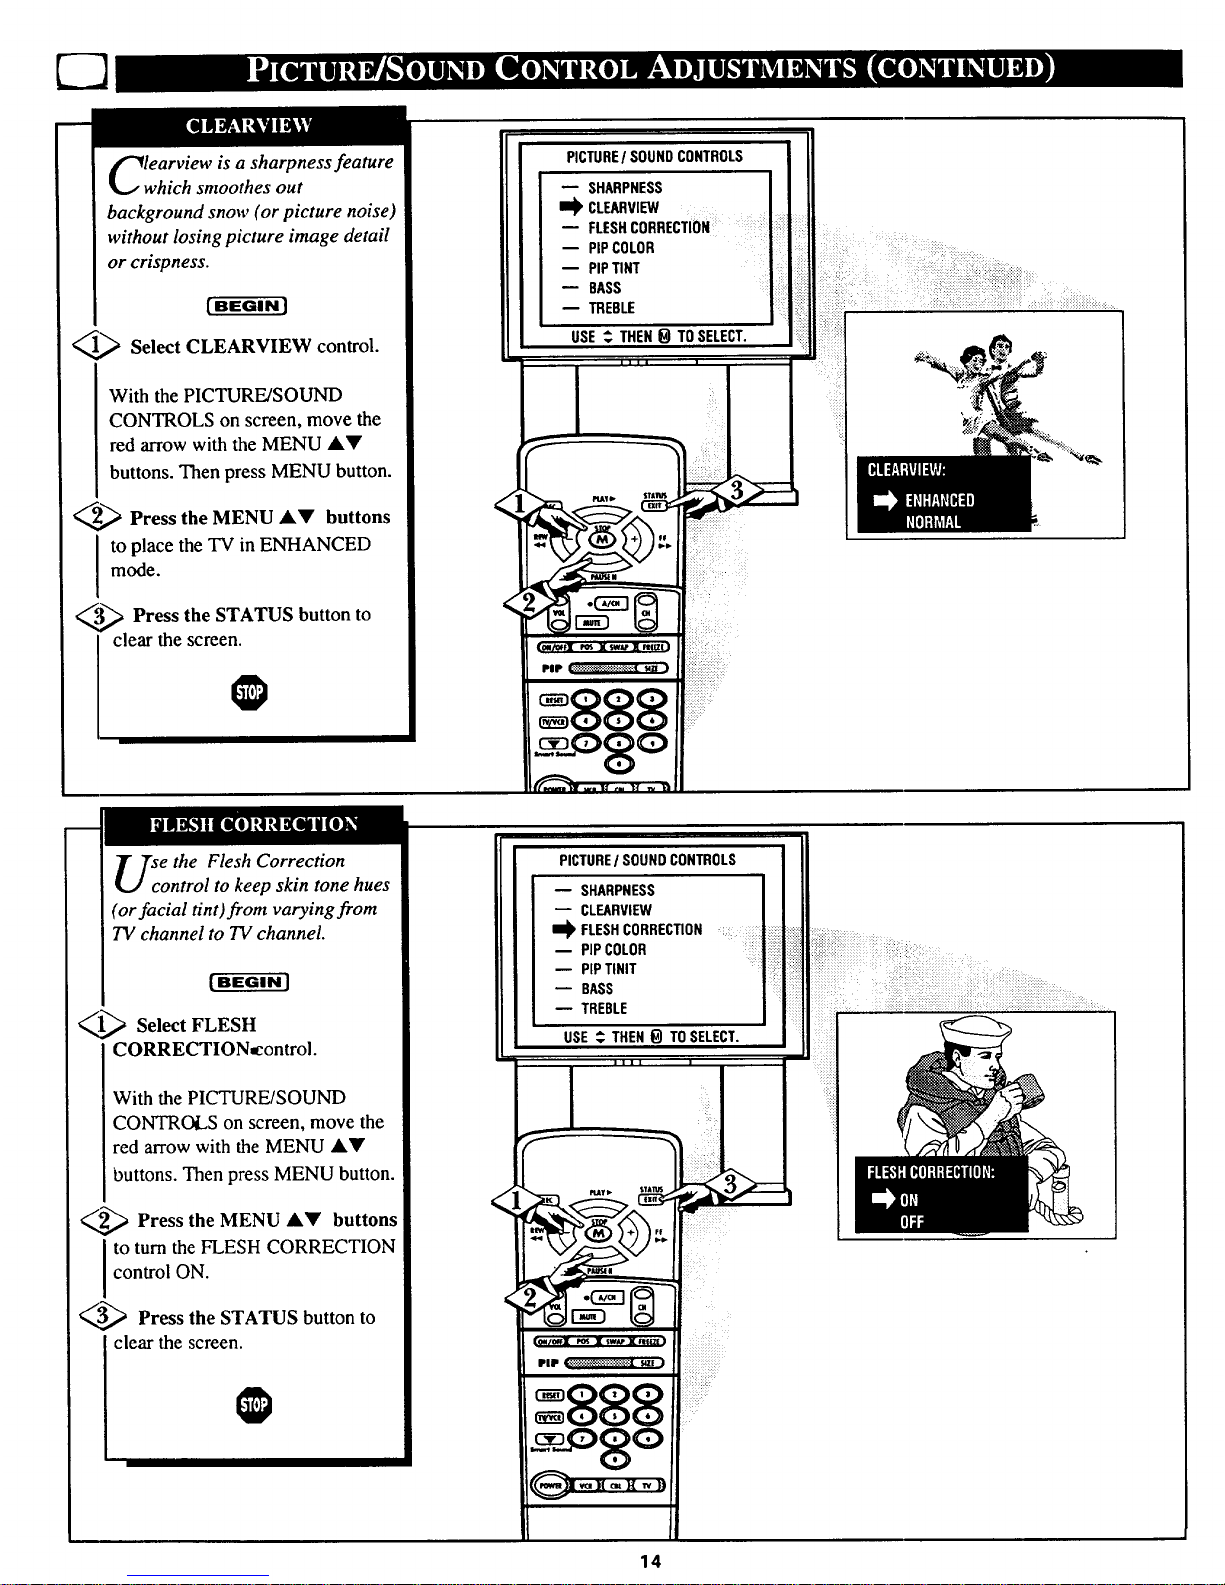
learview is a sharpness feature
which smoothes out
background snow (or picture noise)
without losing picture image detail
or crispness.
[ BEGIN J
_ Select CLEARVIEW control.
With the PICTURE/SOUND
CONTROLS on screen, move the
red arrow with the MENU/kV
buttons. Then press MENU button.
_,_ Press the MENU AV buttons
to place the TV in ENHANCED
mode.
._3,,3_ Press the STATUS button to
clear the screen.
PICTURE/ SOUNDCONTROLS
SHARPNESS
I_ CLE_tVI_q
-- FLESHCORRECTION .....
B PiPCOLOR
PIPTINT
BASS
TREBLE
USE_ THEN_ TOSELECT.
I I I I I
se the Flesh Correction
ontrol to keep skin tone hues
(or facial tint)from varying from
TV channel to TV channel.
(-a_-ffca]
_,,_ Select FLESH
CORRECTION=control.
With the PICTURE/SOUND
CONTROLS on screen, move the
red arrow with the MENU AV
buttons. Then press MENU button.
_x,._ Press the MENU _k_' buttons
to turn the FLESH CORRECTION
control ON.
_,_ Press the STATUS button to
clear the screen.
PICTUREI SOUND CONTROLS
SHARPNESS
CLEARVIEW
I_ FLESHCORRECTION
-- PIPCOLOR
PiPTINIT
-- BASS
TREBLE
USE _ THEN_ TOSELECT.
14
Page 15
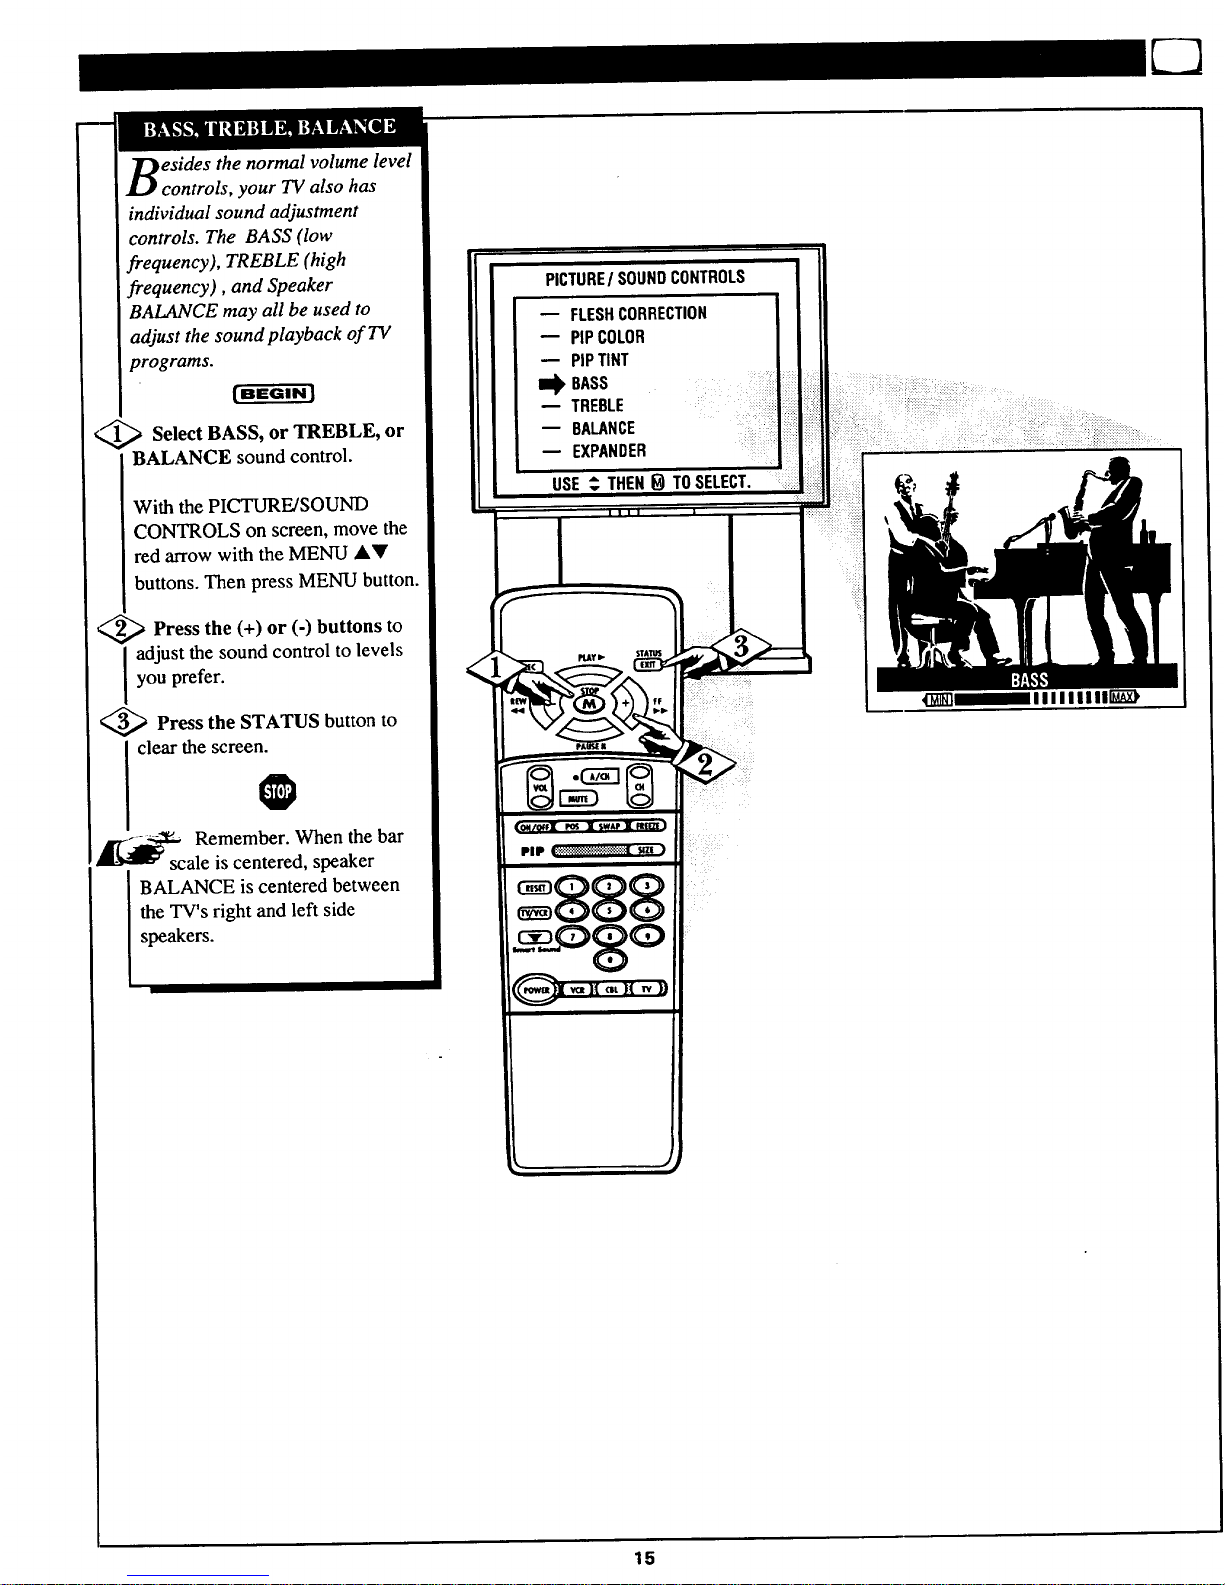
esides the normal volume level
controls, your TV also has
individual sound adjustment
controls. The BASS (low
frequency), TREBLE (high
frequency), and Speaker
BALANCE may all be used to
adjust the sound playback of TV
programs.
_,,_ Select BASS, or TREBLE, or
BALANCE sound control.
With the PICTURE/SOUND
CONTROLS on screen, move the
red arrow with the MENU &V
buttons. Then press MENU button.
<_ Press (+) or (-) to
the buttons
I adjust the sound control to levels
you prefer.
<_ Press the STATUS button to
clear the screen.
O
_c Remember. When the bar
ale is centered, speaker
BALANCE is centered between
the TV's right and left side
speakers.
PICTURE/SOUNDCONTROLS
m FLESHCORRECTION
PIPCOLOR
PIPTINT
ia_ BASS
TREBLE
BALANCE
EXPANDER ....
USE_ THEN_ TOSELECT.
i i
15
Page 16

_XPANDED sound can be used
Jt__ to add greater depth and
dimension to both monaural
(MONO) and STEREO TV sound.
[ BEGIN J
Select EXPANDER sound
control.
With the PICTURE/SOUND
CONTROLS on screen, press the
MENU AkV buttons to move the
red arrow. Then press MENU
button.
_ Press the MENU AY buttons
to place the TV in the
EXPANDED sound mode.
_ Press the STATUS button to
I clear the screen.
@
PICTUREI SOUNDCONTROLS
-- BASS
TREBLE
BALANCE
m_EXPANDER
-- STEREO]MONO
SAP]
EXIT
USE _THEN O TOSELECT.
iiiiiiiiiii_:
re you tired of hearing
commercials blaring at you
even when you've gone into the
kitchen or down the hall? The
Smart Sound (Auto Volume)
control enables you to hear a more
consistent, even sound level by
reducing the pealff and valleys that
can occur during program changes
or commercial breaks.
'L[BEGINJ
Press the Smart Sound button
on the remote.
"SMART SOUND" shows on the
TV screen.
_.g_ Keep pressing the Smart
I Sound button to turn the volume
level control ON (or OFF.)
__,,_ Press the STATUS button to
I clear the screen@
SMARTSOUNDON
=888
Remember. Smart Sound works
only with the programs coming
I through the Antenna/Cable input
I on the rear oflbe TV. It will not
[ control the sound levels for the
I Auxiliary (VCR/AUX IN) audio
I inputs.
16
Page 17

ur 73/is able to receive
roadcast stereo TV programs.
The TV is equipped with an
amplifier and twin speaker system
through which the stereo sound
can be heard.
A RED stereo light (on the front of
the TV) will come on when a
stereo broadcast is received.
[BEGIN]
(.,,_ Select STEREO sound control.
With the PICTURE/SOUND
CONTROLS on screen, press the
MENU AV buttons to move the
red arrow. Then press MENU
button.
<,_ Press the MENU AV buttons
I o place the TV in the STEREO
sound mode.
<_ Press the STATUS button to
clear the screen.
O
Remember. If a stereo
signal is not available and the
TV is placed in the STEREO
mode, sound coming from the TV
will remain monaural (mono).
SECOND (2ND) AUDIO
PROGRAM (SAP) is part of the
stereo b_oadcast system. Sent as a
third audio channel SAP can be
heard apart from the current TV
program sound. TV stations are
free to use SAP for any number of
purposes, but many experts believe
it will be used for foreign language
translations of TV shows (or for
weather and news bulletins.)
Remember. If a SAP
signal is not available, with
the currently selected channel, the
SAP option can not be selected.
"SAP NOT AVAILABLE" will
appear on the TV screen.
PICTUREI SOUNDCONTROLS
BASS
TREBLE
BALANCE
EXPANDER
J_, STEREO/MONO
-- SAP2ND
EXIT
USE_ THEN_TOSELECT.
i
__ • L
PICTURE I SOUND CONTROLS
BASS
TREBLE
BALANCE
m EXPANOER
STEREO/MONO
ii_ SAP2ND AUDIO PROGRAM
m EXIT
USE ,_ THEN _ TO SELECT.
THIS CONTROL SCREEN WILL ONLY
APPEAR IF SAP IS AVAILABLE ON
THE CURRENT CHANNEL
/
/
17
Page 18

_,_ Press MENU button to see TV
I ADJUSTMENTS screen.
_ PressMENU • or button to
move RED ARROW to
ADVANCED controls.
3_,_ Press MENU button to select
the list of ADVANCED controls.
A'/'_ Remember, the control
with the RED ARROW is
I ready to be used. Just press the
MENU button to select it.
TELEVISION ADJUSTMENTS
USE o_ TO SELECT ITEM.
PICTURE/SOUNO CONTROLS
m_ ADVANCED CONTROLS
FIRST TIME SETUP
EXIT
ADVANCEDCONTROLS
EXIT
I_ CLOSEDCAPTIONING
CAPTIONINGDURINGMUTE
SLEEPTIMER
SETTIME
TIMEREMINDER
CHANNELREMINDER
USE _, THEN0 TOSELECT.
our TV comes with an on-
creen clock. During normal
operation the clock appears on the
screen with every channel change
(and when the STATUS button is
pressed).
1_ Select SET TIME control.
With the ADVANCED
CONTROLS on screen, press the
MENU •• buttons to move the
red arrow. Then tress MENU
button.
_2,_ Press the MENU •• buttons
4,.
to set the minutes portion of the
clock.
_.._ Press (+) or (-)
the M
buttons
to move the selection arrow to the
hours portion of the clock.
_,,_ Press the M •• buttons to set
the hours portion of the clock.
_--,._ Press the STATUS button to set
the clock in operation and clear the
screen.
ADVANCEDCONTROLS
CLOSEDCAPTIONING
CAPTIONINGDURINGMUTE
SLEEPTIMER
I_ SETTIME
TIMEREMINDER
CHANNELREMINDER
CHAN]TIMEDISPLAYSIZE
USE _. THEN_ TOSELECT.
_ Remember. The time may also
I be set using the number buttons on
Ithe remote. Be sure to press "0" first
Iand then the hour number for single
digit entries.
18
Page 19

lOSed Captioning (CC) allows
ou to read the voice content of
television programs on the TV
screen. Designed to help the hearing
impaired this feature uses on-screen
"text boxes" to show dialogue and
conversations while the TV program
is in progress.
[BEGIN]
_ Select CLOSED
CAPTIONING control.
With the ADVANCED
CONTROLS on screen, press the
MENU AV' buttons to move the red
arrow. Then press MENU button.
<,,_ Press the MENU &Y buttons
to select the desired Closed Caption
mode - For Example: STANDARD.
STANDARD (CC1) :
dialogue (and descriptions)
for the action on the captioned
TV program shows on-screen.
(See important note on this
page.)
SECOND LANGUAGE (CC2) :
foreign language translation of
dialogue (and descriptions)
for the action on the captioned
TV program shows on-screen.
FULL SCREEN TEXT 1 or 2"
often used for channel guide,
schedules, or bulletin board
information for CC programs.
",,_ After making your Caption mode
selection, press the STATUS button
to clear, the TV screen. The selected
Closed Caption mode will be active.
To cancel, set the Closed Captioned
feature to OFF when finished
viewing.
Remember. Broadcast
ations will often use spelling
abbreviations, symbols, dropouts
and other grammatical shortcuts in
order to keep pace with the on-
screen action. These type factors
vary upon the source of the
captioned text material and do not
indicate a need for service on the
part of the TV.
NOTE: Not all TV programs and product commercials are made for broadcast
with Closed Caption (CC) information included. Neither areall Closed Caption
modes (SECOND LANGUAGE, FULL SCREEN "IEXT1, etc.) necessarily being
used by a broadcast station during the transmission of a closed caption program.
Refer to your area's"IV program listings for the stations and times of Closed
Caption shows.
ADVANCEDCONTROLS
PiPPICTURESOURCE
CLOSEDCAPTIONING :
m CAPTIONINGDURINGMUTE
SLEEPTIMER
w SETTIME
TIMEREMINDER
CHANNELREMINDER
USE_ THEN_ TOSELECT.
NOTE: _ CAPTIONING DURING MUTE
cora'tol:_ be used t6 _t ihe_ to turn the
Closed Cupti_ mode:i_ whez,lever the
i
I
STANDARD mode
Example Type Display
.- O
Cloud Caption information will usually appear
in black and white (although some broadcasters
or networks may occasionally use color to
highlight or draw attention Io certain areas.
Note: Weak signals or interference may cause
poor reception of Closed Caption programming.
FULL SCREEN TEXTI & TEXT 2 modes
"IV screen will be blocked from viewing
19
Page 20

ve you ever fallen asleep in
ont of the TV and then
have it wake you up at two in the
morning with a test pattern
screeching in your ears? Well,
your TV can save you all that
trouble by automatically turning
itself off.
IU[GaN 1
_> Select SLEEP TIMER control.
With the ADVANCED
CONTROLS on screen, press the
MENU &Y buttons to move the
red arrow. Then press MENU
button.
2_ Press the (+) button
repeatedly to select the amount
of time before the TV will turn
OFF.
The TV can be set to turn itself
off anywhere from 15 minutes to
4 hours away.
_ Press the STATUS button to
clear the screen.
J7-_ Remember. If you ever
_want_i_z to see how many minutes
are left before the TV shuts off,
select the SLEEP TIMER control
display.
If you ever want to stop a SLEEP
TIMER setting,_eset the timer to
0:00. Turning the TV off and then
back on also cancels a setting.
A few seconds before the TV is to
shut off a message will come on
the screen telling you GOOD
NIGHT.
ADVANCEDCONTROLS
PIPPICTURESOURCE
m CLOSEDCAPTIONING
CAPTIONINGDURINGMUTE
I_ SLEEPTIMER
SETTIME
TIMEREMINDER
USE_ THENOTO SELECT.
_iiiiiiiiiiiiiiiiiiiiiiiiiiiiiiiiiii!i_:
iiiiiiiii!!i!!ii!iiill.....
.............,
iiiiiiiiii_:
20
Page 21

th the TV Reminder controls
N, the TV automatically
shows you the current time and
channel every thirty minutes.
_ Select TIME or CHANNEL
REMINDER control.
With the ADVANCED
CONTROLS on screen, press the
MENU AV buttons to move the
red arrow. Then press MENU
button.
',,,_ Press the MENU &Y buttons
I to turn the Reminder controls ON.
<,_ Press the STATUS button to
clear the screen.
_an Remember. The TIME
d CHANNEL Reminders
appear on the hour and the half-
hour for about five seconds.
ADVANCEDCONTROLS
-- CLOSEDCAPTIONING
-- CAPTIONING
SLEEPTIMER i
m SETTIME
I_ TIMEREMINDER ....
CHANNELREMINDER
CHAN/TIMEDISPLAYSIZE
USE'_ THEN_) TOSELECT.
PL&¥lb.
u
14 12:30
TIME AND CHANNEL REMINDERS DISPLAYED
21
Page 22

th the ChannellTime
isplay control you can
change the size and location of the
on screen channel and clock
information.
Select CHANNEL/TIME
DISPLAY SIZE control.
With the ADVANCED
CONTROLS on screen, press the
MENU AY buttons to move the
red arrow. Then press MENU
button.
_.,_ Press the MENU AV buttons
to turn the LARGE or SMALL
DISPLAY control ON.
_,,_ Press the STATUS button to
clear the screen.
@
ADVANCEDCONTROLS
CAPTIONINGDURINGMUTE
SLEEPTIMER
SETTIME
TIMEREMINDER
w CHANNELREMINDER
I_ CHAN/TIMEDISPLAYSIZE
CABLECHANNELTUNING
USE_ THEN_ TOSELECT.
• i iiiiii,I__!iiii!iiii!iZiiiiiiiiiiiiiiii_¸ _
SMALL
12
CHANNEL,/TIME DISPLAY OPTIONS
Remember. The SMALL SIZE display n
shows only the channel number, not the time
(or clock ),
22
Page 23

flRYOUdidn't go through the
ST TIME SETUP (page 8),
you need to make sure the 73/is set
to pick up either Cable TV or
Antenna signals. In other words,
the TV needs to know if you
connected a Cable TV signal or a
normal antenna to its ANTENNA
plug.
<,_ Select CABLE CHANNEL
TUNING control.
With the ADVANCED
CONTROLS on screen, press the
MENU &T buttons to move the
red arrow. Then press MENU
button.
<,,_ Press the buttons
MENU AV
to place the TV in either:
CABLE- If you DO have
Cable TV connected
to the TV. Channels
1-125 available.
ANTENNA- If you have an
Antenna connected
to the TV. Channels
2-69 available.
<_ Press the STATUS button to
I clear the screen.
_I Remember. The FIRST
ME SETUP procedure (page
6) does all this=foryou
automatically.
ADVANCEDCONTROLS
B SLEEPTIMER
SETTIME
TIMEREMINDER
CHANNELREMINDER
CHAN/TIMEDISPLAYSIZE
I_ CABLECHANNELTUNING
AUTO-PROGRAMMING
USE_ THEN_ TOSELECT.
23
Page 24

uto-Programming is for adding
local area channel numbers into
the memory of the TV. This makes it
easy for you to select only your area
(or Cable TV) channels when the
CHANNEL • • buttons are pressed.
If you already went through FIRST
TIME SETUP (page 6), this task has
been completed for you.
_._ Select AUTO PROGRAMMING
control.
With the ADVANCED CONTROLS
on screen, press the MENU ,Y
buttons to move the red arrow. Then
press MENU button.
_,_ Press the MENU AT buttons to
turn AUTO PROGRAMMING ON.
The TV shows which channel
numbers are "SAVED" as they are
added into memory.
"AUTO PROGRAMMING
COMPLETED" appears when the TV
is finished adding channels.
_,,_ Press the STATUS button to clear
the screen, i_
Try it out. Press the
CHANNELAY buttons and see
which channels you can select.
_ Rememb.er. An Antenna or
able TV signal must first be
connected to your TV so that channels
can be s_ved.
If you want to delete any unwanted
channels from the TV's memory, see
"ADD/DELETE CHANNELS" on the
next page.
ADVANCEDCONTROLS
CHAN/TIMEDISPLAYSIZE
CABLECHANNELTUNING
I_ AUTO-PROGRAMMING
ADD/DELETECHANNELS
REDCONVERGENCE
BLUECONVERGENCE
TV SPEAKERSON/OFF
USE _ THEN _ TOSELECT.
CHANNEL NUMBERS
COUNT UPWARD AS
THE TV LOOKS FOR
CHANNELS TO SAVE.
:Uilelddolt];lilhl_ll_q_Ieli_itdilaP,l_
24
Page 25

A toProgramming (see
previous page) adds all the
channels it can find (on your
Antenna or Cable TV system) into
the TV's memory. Add/Delete
Channels makes it easy for you to
add other channels, or drop
unwanted channels, from the list of
channels in the TV's memory.
[BEGIN|
_,,,_ Select ADD/DELETE
CHANNELS control.
With the ADVANCED
CONTROLS on screen, press the
MENU A'!r buttons to move the
red arrow. Then press MENU
button.
<,_ Press the CHANNEL AV
buttons to select the channel you
want to add or delete.
You can also use the Channel
number buttons on the remote to
select channels.
<-_ Press the (+) button to ADD
the channel into the TV's memory.
Press (-) button to DELETE the
channel from memory.
Repeat steps 2 and 3 for each
channel you wish to add or delete.
Press the STATUS button to
clear the screen when through.
@
_d Remember. You can also
d the VCR/AUXI just like a
channel. Then by pressing the
CHANNEL AY buttons the
VCR/AUX mode can quickly be
selected to use the Audio/Video
Input jacks on the rear of the TV
(see page 28).
Note: The VCR/AUXI mode is
located between the lowest and
highest channel numbers within
the Favorite Channel Memory
control screen.
ADVANCEDCONTROLS
-- CHAN/TIMEDISPLAYSIZE
-- CABLECHANNELTUNING
-- AUTO-PROGRAMMING
i_ADDJDELETECHANNELS:_iiiiiii_ii!Ji:
-- REDCONVERGENCE =_iii_
-- BLUECONVERGENCE
-- TVSPEAKERSON/OFF
USE_ THEN_ TOSELECT.
25
Page 26

nvergence is the correct
ining up of the red and blue
light paths on the TV screen.
NOTE: If no color fringing (see
sidebar note) shows, then no
Convergence adjustments are
necessary for your TV.
| BEGIN ]
_,,_ Select or BLUE
RED
CONVERGENCE control.
With the ADVANCED
CONTROLS on screen, press the
MENU AV buttons to move the
red arrow. Then press MENU
button.
_-._ Press the MENU &Y and (+)
(-) buttons to move the red or
blue cross directly over the white
cross on the TV screen.
The red or blue cross is properly
adjusted when it is completely
merged with the white cross. (No
color appears around the edge of
the white cross).
_._ Press the STATUS button to
clear the screen when convergence
adjustments are complete.
Remember. Convergence has been set at the
factory for best viewing, but if one or more of
I the (red or blue) colors appear around the edges of
objects (color fringing) follow the steps given in this
section.
<
ADVANCEDCONTROLS
CHAN/TIMEDISPLAYSIZE
CABLECHANNELTUNING
AUTO-PROGRAMMING
--ADD]DELETECHANNELS
_RED CONVERGENCE
m BLUECONVERGENCE
TVSPEAKERSON/OFF
USE_ THEN_)TO SELECT.
26
Page 27

Uld you like to hear TV
rograms through your audio
hi-fi system? The TV's Variable
Audio Output jacks and TV
Speaker On/Off control work
together to offer you this TV sound
option.
[ BEGIN J
Connect the R(ight) and L(eft)
VARIABLE MODE Audio Out
jacks on the TV to the R and L
Audio Inputjacks on your
amplifier or sound system.
Set the audio system's volume to
normal listening level.
_g,_ Turn the TV and audio
system
ON. You can now adjust the sound
level coming from the audio
system with the Volume _kY
buttons on the TV or remote.
_,,_To hear the "IV sound from only
the audio system speakers, select
TV SPEAKERS ON/OFF control.
With the ADVANCED
CONTROLS on screen, press the
MENU AV buttons to move the
red arrow. Then press MENU
button.
_-,_ Press the MENU &Y buttons
to turn the TV Speakers OFF.
You should now only hear TV
sound coming from the audio
system speakers.
_-,_ Press*the STATUS button to
clear the screen.
_y Remember. The audio
stem may have to be in
AUX(iliary) to play
mode sound
from the TV.
ADVANCEDCONTROLS
D CABLECHANNELTUNING
AUTO-PROGRAMMING
ADD/DELETECHANNELS
D REDCONVERGENCE
BLUECONVERGENCE
I_TVSPEAKERS ON/OFF
EXIT
AUDIO IN
) SYSTEM
27
Page 28

_ja e TV's AudiolVideo Input
cks are for direct picture and:
sound connections between the TV
and a VCR (or Video Disc Player,
etc.) that has Audio/Video Output
jacks.
To view the playback of a VCR
tape by using the Audio/Video
Input jacks on the TV:
1_ Connect the VIDEO OUT
jack
from the VCR to the VIDEO IN
jack on the TV.
_,g_ Connect the AUDIO OUT
jacks R(ight) and L(eft) from the
VCR to the AUDIO IN jacks on
the TV.
._ Select the VCR/AUXI
PICTURE SOURCE control, on
the "IV. Try any of the three
following ways:
An easy way to select VCR/AUXI
is to press the VCR button on the
front of the TV.
If you have add_ VCR/AUX1 to
the TV's channel memory (see
page 25), press the CHANNEL
AV buttons to select it.
With the PICTURE/SOUND
CONTROLS (see page 12), move
the red arrow with the MENU A'V
buttons to PICTURE SOURCE.
Then select VCR/AUX1.
<,,_ Turn the VCR ON and press
PLAY to view the tape on the TV.
l/-_-- Remember. If you have a
single (monaural) Audio
Output VCR, "Y" connectors are
available to complete your
connection. Contact your dealer, or
our Parts Information Center, for
details.
REAR SURROUNO SPEAKERS
®
VIDEO I
(YELLOW)
AUDIO OUT
(RED/WHITE)
Contact your dealer or Paris
Information Center (1-800-292-6066)
to order amy optional accessories.
BACK OF TV
OUTDOOR
VHF/UHF
ANTENNA
CABLE TV SIGNAL
PICTUREANDSOUNDFROM
PLAYBACK OF VCR TAPE
28
Page 29

adding external speakers to
the TV's sound system, you can
create the feeling of reflected
sound that surrounds you at a
movie theater or concert hall.
[BEGIN]
<_ Connect both external
speakers to the speaker wire
terminals on the TV.
Recommended optional speakers:
8ohm, 15 watt minimum. Be sure
the (+) and (-) speaker wires are
connected to the correct R(ight)
and L(eft) speaker terminals on the
TV.
<_ Place the speakers so the
Iviewing area is between the "IV
and the rear surround speakers.
<_ Turn TV ON and place the
STEREO/MONO control to
STEREO position.
After setup whenever a stereo
signal is received the audio will be
heard in Surround Sound.
Note: The rearSurround Sound
speakers will not be heard at the
same volume level as the front TV
speakers. It is intended for the rear
speakers to give a background
noise effect which requires a lower
volume level than the TV's front
speakers. •
@
,t
__Su For an added dimension of
rround Sound you may also
want to place the TV in the
EXPANDED mode. See page 16
for details.
i
:i iiii::ii"x_ _:_:::::_
Note: Surround Sound will no! i!i!_!:_: " __:
work with monoaural audio ::::i o_*._._s,.***.*.*** , .
ma,e aLor i,hoolyo.e
J _
OPTIONAL REAR SURROUND SOUND SPEAKFRS
(See your dealer for optional accessories infommti,m)
-- all --
-- w
REAR SPEAKER
REAR SPEAKER
PRIMARY LISTENING AND VIEWING AREA
29
Page 30

After installing the batteries into
the remote, press the TV System -
button to send remote commands
to the TV. Point the remote toward
the front of the TV (remote sensor
window) when pressing buttons.
VCR Buttons
For use of VCR buttons see the "Using
the Remote With a VCR".
Menu (YA) Buttons
Press the M button to show on-screen
feature controls. Press • or • buttons
to move forward and backward
through the list of on-screen controls.
(-) and (+) Buttons
Press to adjust the selected on-screen
feature control.
Volume Button
Press to adjust the TV sound level.
Reset/Enter Button
Press to return the TV to factory preset
levels for picture controls. Also can be
used as an Enter button when sending
channel commands to remote
controlled cable converters or VCRs.
;Smart ;Sound Button
Press to control TV sound levels. See
"Smart Sound" section for details.
Number Buttons
Press the number buttons to select TV
channels. Press two number buttons to
select single digit chan_els. For
example: to select channel 6...press
"0" first and then "6".
4.
f
/
PLAYD,- STATUS
PAUS[II .,__
_X_S )_[SWAP_r'KIItEZt)
_;tatu_ Button
Press to see the current channel
number on the TV screen. Also press
this button to clear the TV screen after
cor_troladjustments.
Alternate Channel Button
Press to select the previously viewed
channel.
For example: You are watching
channel 4 and change to channel 10
(using the channel number buttons).
Press A/CH and your TV will return to
channel 4. Press A/CH again and your
TV will return to channel 10.
Channe! ;Scan Button
Press to scan up or down through
channel numbers.
-Mute Button
Press to turn the sound OFF on the
TV. Press again to returnthe sound to
its previous level.
PIP Buttons
Press to operate Picture-In-Picture
features. See PIP section for details.
TVoVCR-CBL System
Buttons
Presstosendremotecontrolcommands
to either the "IV, VCRs, oraccessory
Cable Converters. See the "How to
operate VCRs and Cable Conveners"
s_ction for further details.
Power Button
Press to turn the TV (VCR or Cable
Converter) ON and OFF.
The remote's TV-VCR-CBL System
buttons control how certain buttons on the
remote are used.
For example:
With the "TV" System button pressed:
the MENU, (M)AT, and (+,-)
buttons are used to select and
adjust on-screen "IV features.
With the "VCR" System button pressed:
the same buttons on the remote work
playback, search, pause, and other
VCR features.
30
Page 31

hen using the TV remote
with a VCR, first make
certain it is set to control your
VCR ( by the REMOTE CODE or
SEARCH method - see following
section).
_ Press theVCR System
I button on the remote•
_,,_ Point the top of the remote
toward the front of the VCR
(remote sensor window) when
pressing buttons.
Record Button
Hold the RECORD button down, and
then press the PLAY button to begin
a VCR recording•
Rewind Button
Press to rewind tapes• For some
VCRs you may need to press STOP
button first then REWIND. In
playback mode. hold button down to
view picture moving rapidly in
reverse.
Pause Button
Press to temporarily stop the tape dur-
ing a playback or recording. Press
again to release Pause.
TV-VCR Button
Press to the VCR position ("VCR"
indicator on the V_R will light) to
view the playback of a tape. Press
again to place in the TV position
("VCR" indicator on the VCR will go
OFF) to v_w one program while
recording another program.
PLAY! STATUS
PAUSEII
L QQQ
/
-Play Button
Press to playback a tape. Hold down
after pressing the RECORD button to
starta recording.
Stop Button
Press to stop the tape.
•Fast Forward Button
Press to rapidly advance the tape. For
some VCRs you may need to press
STOP first then FF. In Playback
mode hold button down to view the
picture moving rapidly in the forward
direction.
-Channel Scan Button_
Press to scan up or down through
VCR channel numbers.
Number Buttons
Press buttons for direct VCR channel
selections.
VCR System Button
Press to send remote commands to
the VCR.
Power Button
Press to turn the VCR ON and OFF.
!
][.[.._-,.a_ Remember. The VCR
buttons on the remote will
riot operate your VCR if those
teatures are not already found on
your VCR remote control.
Note: All VCR functions
(particularly Search, Rewind, Fast
Forward, etc.) will operate the
same as with the original VCR
remote control provided with the
VCR.
31
Page 32

m
our remote control is set to
work your TV and many
infrared remote (IR ) control
VCRs. However, an easy one-
time step may be necessary
before the remote will work your
VCR.
Try this initial check to see if
going on to the following section
is necessary.
[BEGIN]
_ Press the VCR System
button on the remote.
<_ Point remote toward VCR
and press the POWER button.
_,_ Does the remote turn the VCR
ON?
IF YES, • and try the other
VCR buttons on the remote. If
they also work the VCR, then
the remote is ready and no
further steps are needed.
If NO, continue...
VCR
<
First up a
look TWO-DIGIT
remote code number for your
brand VCR before going through
the simple "1,2,3'.' steps (on the
following page).
__on Remember. If more than
e number is listed, you
may have to try more than the
first two-digit c_de given in order
to locate your VCR's remote
code.
continue to next page
_VCR REMOTE VCR REMOTE_
BRAND CODE NO. BRAND CODENO.
Akai 24, 25, 36 Multitech 27,28
Audio Dynamics 14, 21, 29 NEC 14, 21,29
Broksonic 31 Panasonic 01
Cannon 01 Pentax 02, 03
Capehart 33 Philco 01,02, 05, 27, 28
Craig 07, 30 Philips 00, 01,05, 27, 28
Curtis Mathes 01, 32, 42, 43 Quasar 01
Daewoo 33 RCA 03, 04, 32, 42, 43, 44
DBX 14, 21,29 Realistic 07,11, 12, 23, 27, 28
Dynatech 27 Samsung 22, 30
Emerson 20, 31, 34, 40 Sansui 49
Fisher 06, 07, 08 Sanyo 07, 13
Funai 27, 28 Scott 19
GE 01 Sears 03, 08, 23
Goldstar 23 Sharp 11, 12
Go Video 45, 46 Shinton 35
Hitachi 03, 51 Sony 09, 10,41
Instant Replay 01 Sound Design 27
JC Penney 01,03, 23, 29 Sylvania 01,02, 05
JVC 14, 47, 48 Symphonic 27
Kenwood 13, 14 Tal_ng 14
Lloyds 27 Teac 14, 27
Magnavox 00, 01,02, 05, 27, 28 Teknika 26, 27
Magnin 30 Thomas 27
Marantz 29 TMK 20
Memorex 01,07, 23, 27 Toshiba 18, 19
Minolta 03 Video Concepts 28
Mitsubishi 16, 17, 38, 39, 50 Yamaha 14, 29
Montgomery Ward 12 Zenith 15
J
32
Page 33

ow that you have looked up
the two-digit Remote Code
Number for your brand of VCR
(on previous page), you are
ready to follow thefour simple
steps below.
Please read through steps 1-4
before beginning.
1_ Press and release the REC
(RECORD) button.
2_,_ Within thirty seconds after
releasing the REC button, press
and release the VCR System
button.
3_,3,,_ Within thirty seconds after
releasing the VCR System
button, ENTER THE TWO
DIGIT CODE NUMBER for
the desired VCR. The remote is
now ready to send commands to
the VCR.
_4,4_ Point the remote at the VCRo
Press the POWER button on the
remote to turn the VCR ON.
Try it out. The Channel and
VCR buttons on the remote
ould now operate the VCR.
r_ Remember. If this doesn't
_W4 " "" " • "
OrKme rlrst time, repeat
steps using the same remote
code number.
4
Ifafter a second try the remote
does not operate your VCR, and
there are more code numbers
listed for your brand VCR, use
the next listed code number.
If after repeated attempts the
code number method does not
work your VCR, try the "VCR
SEARCH" method on page 36.
VCR
Page 34

<
our remote control is set to
work your TV and many
infrared remote (IR ) control
Cable Converters. However, an
easy one-time step may be
necessary before the remote will
work your Converter.
Try this initial check to see if
going on to the following section
is necessary.
Press the CBL
System
button on the remote.
<_ Point remote toward Cable
i
Converter and press the POWER
button.
,_ Does the remote turn the
Converter ON?
IF YES, I_ and try the CH • •
and CH number buttons on the
remote. If they also work the
Converter then the remote is
ready and no further steps are
needed.
If NO, continue...
Cable
Converter / [
, ,
First look up a TWO-DIGIT
remote code number for your
brand Converter before going
through the simple "1,2,3" steps
(on the following page).
Remember. If than
more
one number is listed, you
may ha_e to try more than the
first two-digit code given in
order to locate your Converter's
remote code.
continue to next page
_CON'VERTER 'REMOTE 'CONVERTER REMOTE
BRAND CODE NO. BRAND CODE NO.
Archer 28 Rembrant 33
Diamond 23 Salora 52
Drake 37 Scientific Atlanta 08, 22, 47
Gemini 45 Sheritech 34
Hamlin 14, 15 Sylvania 16
Hitachi 25 Texscan 16, 48
Jerrold 01,02,03,04,05,30,46 Tocom 12,13, 53
Macom 29, 38 Toshiba 43
Magnavox 17,26, 31 Uniden Satellite 44, 54
NSC 49 Unika 50
Oak 06, 27, 39 Universal 36
Panasonic 18, 35 Video Tech 40
Philips 19, 20, 21,24, 26 Video Way 51
Pioneer 09, 32 Viewstar 26
Regency 10, 11 Zenith 07, 41, 42
34
Page 35

ow that you have looked up
the two-digit Remote Code
Number for your brand of Cable
Converter (on previous page),
you are ready to follow the four
simple steps below.
Please read through steps 1-4
before beginning.
[BEGIN]
_ Press and release the REC
(RECORD) button.
_ Within thirty seconds after
releasing the REC button, press
and release the CBL System
button.
_3,3_ Within thirty seconds
after
releasing the CBL System
button, ENTER THE TWO
DIGIT CODE NUMBER for
the desired Converter. The
remote is now ready to send
commands to the Converter.
4_ Point the remote at
the
Converter. Press the POWER
button on the remote to turn the
Converter ON.
Try it out. The Channel and
POWER buttons on the remote
should now operate the
Convener.
I_ Remember. If this doesn't
4_,t_"_. work the first time, repeat
steps using the same remote
code number.
If after a second try the remote
does not operate your Converter,
and there are more code numbers
listed for your brand Converter,
use the next listed code number.
If after repeated attempts the
code number method does not
work your Converter, try the
"CONVERTER SEARCH"
method on page 37.
Cable Converter
| I
PAI,I_II
(0N/OFFX lOS _ SWAP}{ fl_ltZlt}
PiP __ sizt)
35
Page 36

our TV remote can be set to
work your VCR by what is
called the SEARCH method.
If the "REMOTE CODE" number
method shown in the previous
section did not set your remote to
work your VCR, thenfollow the
five easy steps listed below.
Please read through steps before
beginning.
[BEGIINI
<_ Press the POWER button on
the VCR to turn VCR ON.
<,,_ Stand at least six feet away
from the lront of the VCR.
Point the remote toward the
VCR.
HOLD DOWN the MCH and
VCR System buttons at the same
time. KEEP HOLDING
BUTTONS DOWN.
<,_ Watch the Channel Indicator
on the VCR.
Channel Numbers will SCAN UP
when the VCR has been
identified. This may take up to
two minutes.
Release the AJCH and VCR
System buttons as soon as
channel numbers start to scan up.
The VCR code has been identified
and the remote is ready to operate
the VCR.
@
_w Remember. A minute or
o can seem very long, but
the code should be located within
two minutes.
Don't let the VCR scan up more
than five channels. If you do the
remote may pass up the right code
and another two minute search
cycle will have to be repeated.
If no channel change happens
within two minutes, repeat steps
1-4. Should a channel change still
not occur, the remote will not
work with the desired VCR.
VCR
09
Don't let the VCR .sCan up
more than five channels
(in Search mode).
T
Six Feet
(minimum)
36
Page 37

m Vour TV remote can be set to
&work your Cable Converter by
what is called the SEARCH
method.
If the "REMOTE CODE" number
method shown in the previous
section did not set your remote to
work your Converter, then follow
the five easy steps listed below.
Please read through steps before
beginning.
I BEGIN l
. Press the POWER button on
] the Converter to turn Converter
ON.
_._ Stand at least six feet away from
the front of the Converter.
Point the remote toward the
Converter.
HOLD DOWN the A/CH and
CBL System buttons at the same
time. KEEP HOLDING
BUTTONS DOWN.
_ Watch the Channel Indicator
on the Converter.
Channel Numbers will SCAN UP
when the Converter has been
identified. This may take up to two
minutes.
/4_ Release the AJCH and CBL
System buttons as soon as channel
numbers startto scan up. The
Converter code has been identified
and the remote is ready to operate
the Converter.
"'_ Remember. A minute or
two can seem very long, but the
code should be located within two
minutes.
Don't let the Converter scan up
more than five channels. If you do
the remote may pass up the right
code and another two minute
search cycle will have to be
repeated.
If no channel change happens
within two minutes, repeat steps 1-
4. Should a channel change still
not occur, the remote will not work
with the desired Converter.
Cable Converter
09
Dontt let the Converter _an
up more than five channels
(in Search mode).
:_i!iii_:
_iiii!iiiiiiiiiiiiiiiiiiiiiiiiiiiiiii_
:_iiiii!iiiiiiiiiiiiiiiiiiiiiiiiiiiiiiiiiiiiiiiil
Six Feet
(minimum)
37
Page 38

icture in Picture (PIP) is the
showing of two pictures on the
TV screen at the same time. (One
main screen picture and one small
inset picture - or PIP).
Note: The PIP picture must be
supplied by a VCR , camera (or
other accessory equipped with a
VIDEO OUTPUT jack).
To see how channels selected on a
VCR can be shown as PIP:
Connect the VIDEO OUT
jack on the VCR to the VIDEO
IN jack on the TV.
Also connect the AUDIO OUT (R
and L) jacks from the VCR to the
AUDIO IN jacks on the TV.
Also ensure the normal antenna
connection between the VCR and
TV are in place.
<_ Move to the next page after
the VCR to TV PIP connections
are completed.
- _ Remember. No sound will
A
"liar be heard with the PIP picture.
See page 40 on how to "SWAP"
the PIP picture with the main
screen picture so that sound can be
heard.
If you have a single (monaural)
Audio Output VCR, "Y"
connectqrs are available to
complete your connection. Contact
your dealer, or out Parts
Information Center, for details.
IIII l
11 I
VIDEO OUT
(YELLOW)
AUDIO OUT
(RED/WHITE)
VCR
PIP
MAIN
SCREEN
BACK OF 'IV
CABLE TV
SIGNAL
38
Page 39

I
Nth w that you have completed
e required connections on
the previous page you are ready to
follow the simple steps shown
below.
_,_ Turn the VCR and TV ON.
Place the VCR in the TV mode -
Use the TV/VCR button on
the TV remote (if the remote
has been set to work with
your VCR - see page 32.)
Place the TV in the
ANT/CABLE mode -
Use the MENU (and M AV)
buttons on the remote to set
MAIN PICTURE SOURCE
control to ANT/CABLE.
_,,_ Select the channels on the TV
and VCR to be watched.
<_ Press the PIP ON/OFF
button on the remote.
_o Remember. See the
llowing page on how to
operate other PIP features with the
remote control.
12:00"
12:00""
06
VCR IN TV MODE
"VCR" indicator light will go out.
TV IN ANT/CABLE
VCR - PIP CHANNEL
TV - MAIN SCREEN CHANNEL
VCR
SELECTED
CHANNEL
TV
SELECTED
CHANNEL
t[ ¸.
PIP :::::::::::::::::::::::::::::::::::::_lzt ]
I
Be sure to point the remote at the
front of the VCR when pressing
VCR function butlons.
39
Page 40

_y using the PIP buttons on the
remote the PIP picture can be
moved and swapped with the main
screen. The main screen picture can
also be frozen in the PIP window.
( BEGIN ]
Press the PIP ON button to show
the PIP picture.
PIP appears in a comer of TV screen.
Press PIP ON again to remove PIP
from the main screen.
_ Press the PIP POSITION button
to move the PIP picture (from comer-
to-comer on the TV screen.)
This feature allows you to move PIP
and avoid blocking off any main
screen action.
,_ With PIP on the TV screen, press
the SWAP button to swap the main
screen picture with the PIP picture.
Press SWAP again to return the main
_reen and PIP to their original
positions. See the important
reminder below.
continue to next page...
Remember. If the PIP picture
on the mai_ screen when the
TV is turned OFF, a blank screen will
appear when the TV is turned back ON
again.
If this happens, you can either.
Press the CHANNEL • or Y buttons
to select a channel for viewing (if the
VCR/AUX mode has been added to
TV's channel memory - see page 25).
Use the P_cture Source Select control
(see page 12) to return the TV to the
ANT/CABLE mode.
3. PIP SWAP
2. PIP POSITION
I. PIP ON / OFF
40
Page 41

4. PIP FREEZE
5. PIPSIZE (Large orSmall)
<_ Press FREEZE to hold the current
MAIN screen picture in the PIP
window (Main picture is still active).
If PIP is currently OFF, the PIP
window will automatically appear.
Press FRZ repeatedly to update the
frozen PIP with current pictures from
the Main screen.
You cannot reposition or swap a
frozen PIP picture.
Press the PIP ON button to drop the
frozen PIP picture from the screen.
_,_ _ Press the PIP SIZE button to
change the size of the PIP window
shown on the "IV screen.
Press the PIP SIZE button again to see
and compare the large and small size
PIP windows.
41
Page 42

_C e Picture-In-Picture (PIP)
olor and Tint controls are
used to adjt_st the color settings for
PIP when it is shown on the TV
screen.
"_ Select PIP COLOR (or TINT)
control.
With the PICTURE/SOUND
CONTROI.S on screen, move the
red arrow with the MENU AS'
buttons. "lhcn press MENU button.
_2'_ 1'he PIP automatically comes
on Io show the PIP window on the
TV screen.
If you want to see how channels
selected on the VCR can be
viewed in the PIP window, see
pages 38-39.
_,_ Press the (+) and (-) buttons to
adjust the PIP for Color (or Tint)
levels you prefer.
_--_ Press the STATUS button to
clear the screen.
__aar Remember. Although there
e separate COLOR and
TINT controls for PIP, the
adjustment leve_ for these controls
depend on the TV's main picture.
For example: If the main screen is
showing_a black and white picture,
PIP would also be in black and
white (even though its source is in
color).
PICTUREI SOUNDCONTROLS
CLEARVIEW
FLESHCORRECTION
I_ PIPCOLOR
PIPTINT ......
BASS
TREBLE
BALANCE
USE_ THEN_ TOSELECT.
[ON/OI'FI _'t l[ SWlIP X fIIR! ]l
PIP It:i:!_:_:!*_:_:!:_s!:_:_:t_:;:_s_*_(mt }
888
mllotR nB
i
_f
_]I IIIIIIIII_)
42
Page 43

_c e picture for the PIP window
an come through either the
ANTICABLE or VCR/AUXI Input
(on the rear of the TV). PIP Picture
Source simply tells the TV which
one of these sources it is to show in
the PIP.
_,_ Select PIP PICTURE
SOURCE control.
With the ADVANCED
CONTROLS on screen, move the
red arrow with the MENU &V
buttons. Then press MENU button.
2_'_ Press the MENU &V buttons
to select the source for the PIP
picture as either:
VCR/AUXI- for a picture signal
coming from the
VCR/AUX IN 1
Video Input jack
on the TV.
ANT/CABLE- for a picture signal
coming from the
ANT/CABLE Input
on the TV.
_ Press the STATUS button to
Iclear the screen.
_wi Remember, The PIP screen
I1be blank unless a signal is
connected to the selected source
(either AN,T/CABLE or
VCR/AUX! Input) on the rear of
the TV.
ADVANCEDCONTROLS
-- EXIT
I_ PIPPICTURESOURCE
-- CLOSEDCAPTIONING
-- CAPTIONINGDURINGMUTE
-- SLEEPTIMER
-- SETTIME
-- TIMEREMINDER
USE_,.THEN_ TOSELECT.
++888
- ii
43
Page 44

-_ DIP hookup with Cable
J[ Converter Box and VCR.
_ First use an optional signal
splitter and connect the original
cable TV signal to both the
CABLE IN on the Cable Converter
and the ANTENNA plug on the
rear of the TV.
<_ Connect the CABLE OUT
on
the Converter to the ANT. IN on
the VCR.
_ Connect the VIDEO OUT
jack on the VCR to the VIDEO
IN jack on the TV.
Also connect the AUDIO OUT (R
and L) jacks from the VCR to the
AUDIO IN jacks on the TV.
O
Remember to use the
able TV Converter Box to
select channels for PIP, the VCR
must be set to the same channel as
the channel selection switch on the
rear of the Cable Converter (either
channel 3 or 4).
I SPLITTER
Contact the Parts
Information Center (I-
800-292-6066)
to order any optional
accessories
i
REAR OF TV
VlOEO
AUDIO
®®
OUT
@
VCR
CABLE IN
CABLETV CONVERTER
! I
44
Page 45

lease make these simple
checks before calling for
service. These tips can save you
time and money since charges for
'lV installation and adjustment of
customer controls are not
covered under your warranty.
NO Power,
No pi¢tur¢
NO Sound
Remote Does NOt
Work
TV Displays Wrong
Channel or NO
Channels Above 13
CAUTION: A video source (such as a video game, Compact Disc Interactive - CDI, or
TV information channel) which shows a constant non-moving pattern on the TV screen,
can cause picture tube damage. When your TV is continuously used with such a source
the pattern of the non-moving portion of the game (CDI, etc.) could leave an image
permanently on the picture tube. When not in use, turn the video source OFF.
Regularly alternate the use of such video sources with normal TV viewing.
i Check the TV power cord. Unplug the TV, wait 1 minute, then reinsert plug into outlet
and push POWER button again.
I
Check to be sure outlet is not on a wall switch.
Check antenna connections on the rear of the TV. Are they properly secured to the
antenna plug on the TV?
Check the CABLE CHANNEL TUNING control for correct position.
Check PICTURE SOURCE control for correct position. VCR/AUXI position without
a signal source will result in a blank screen.
Check the VOLUME buttons.
Check the MUTE button on the remote control.
Check the INTERNAL TV SPEAKER ON/OFF control for the correct position.
If attempting auxiliary equipment hook-ups, check audio jack connections and that the
auxiliary equipment is on and in the proper operating modes.
i Check TV/VCR/CBL "System" buttons on the remote. Press the remote's TV System
button to send commands to the TV.
Check batteries. Replace with 3-AA Heavy Duty (Zinc Chloride) or Alkaline batteries
if necessary.
Clean the remote and the remote sensor window on the TV.
- Repeat channel selection. ]
• Add desired channel numbers (ADD/DELETE CHANNELS control) into TV memory.
•. Check CABLE CHANNEL TUNING control for correct position.
Cleaning
This TV is equipped with protective circuitry that shuts the TV off in case of moderate
]power surges. Should this occur turn the TV back on by pressing the POWER button
Ionce or twice, or unplug and then replug the power cord at the AC outlet.
[This feature is NOT designed to prevent damage due to high power surges such as those
caused by lightning, which is not covered by your warranty.
and Care
To avoid possible shock hazard be sure the TV is unplugged from the electrical outlet before cleaning.
When cleaning the TV screen take care not to scratch or damage the screen surface (avoid wearing jewelry or using
anything abrasive- do not use household cleaners). Wipe the front screen with a clean cloth dampened with water. Use
even, easy, vertical strokes when cleaning.
Specially designed screen cleaning kits are also available which contain anti-static cleaners and brushes designed to get
into the ridges of the TV screen. If interested, ask your dealer or call our toll-free Information Center Parts(I-800-292-
6066) for details.
Gently wipe the cabinet surfaces with a clean cloth or sponge dampened in a solution of cool clear water and a mild soap
or detergent. Use a clean dry cloth to dry the wiped surfaces.
Occasionally vacuum the ventilation holes or slots in the cabinet back.
Never use thinners, insecticide sprays, or other chemicals on or near the cabinet, as they might cause permanent marring
45
Page 46

Coaxial Cable * A single solid antenna wire normally matched
with a metal plug (F-type) end connector that screws (or pushes)
directly onto a 75 Ohm input found on the Television or VCR.
Display * An on screen message or graphics that help the user
operate and adjust his Television feature controls. See On
Screen Displays (OSD).
Direct Audio/Video Inputs * Located on the rear of the TV
these connectors (RCA phono type plug) are used for the input
of audio and video signals. Designed for use with VCRs (or
other accessories) in order to receive higher picture resolution
and offer sound connection options.
Identify * Method by which a remote control searches and finds
an operating code for another product (such as a VCR or Cable
Converter.) Once the code has been "identified" then the TV
remote can send commands to and operate the other product.
Multichannel Television Sound (MTS) * The broadcast
standard that allows for stereo sound to be transmitted with the
TV picture.
On Screen Displays (OSD) * Refers to the wording or
messages generated by the television (or VCR) to help the user
with specific feature controls (color adjustment, programming,
etc.).
Menu * An on-screen listing of feature controls shown on the
Television screen that are made available for user adjustments.
Picture -In-Picture (PIP) * Term used when two pictures are
shown on the TV screen at the same time. The smaller PIP
picture is supplied by a VCR (or other tuner/video playback
source). The PIP picture can also be moved and swapped with
the TV's main screen picture.
Programming * The procedure of adding or deleting channel
numbers into the Television's memory circuits. In this way
the Television "remembers" only the locally available or
desired channel numbers and skips over any unwanted
channel numbers.
Remote Sensor Window * A window or opening found on
the Television control panel through which infrared remote
control command signals are received.
Second Audio Program (SAP) * An additional audio
channel provided for in the Multichannel Television Sound
(MTS) broadcast standard. The most frequently proposed use
for SAP is the simultaneous bilingual broadcast of TV
program material.
Status * Allows the user to quickly confirm what channel
number is currently being viewed. Status can also be used to
clear the Television of on screen displays or information
(rather than waiting for the displays to "time out" or
automatically disappear from the screen).
Twin Lead Wire * The more commonly used name for the
two strand 300 Ohm antenna wire used with many indoor and
outdoor antenna systems. In many cases this type of antenna
wire requires an additional adapter (or balun) in order to
connect to the 75 Ohm Input terminals designed into the more
recent Televisions and VCRs.
46
Page 47

Accessories/Optional .............................. 4, 5, 27, 28, 29, 38, 44
Add/Delete Channels .................................................... 6, 24, 25
Advance Buttons ..................................................................... 10
Audio Controls ............................................................ 15-17, 27
Audio/Video Input ...................................................... 28, 38, 44
Automatic Programming ................................................ 6, 7, 24
Battery Installation .................................................................... 9
Cable TV Connections/Settings .................... 6, 7, 23, 28, 38, 44
Channel/Time Display ...................................................... 21, 22
Channel Memory ...................................................... 6, 7, 24, 25
Channel/Time Reminder ......................................................... 21
Clock Setting .......................................................................... 18
Closed Captioning .................................................................. 19
Convergence ........................................................................... 26
Controls/TV ........................................................................ 8, 10
Controls/Remote ..................................................... 9, 11, 30, 40
Exit .................................................................................... 10, 30
Factory Reset .......................................................................... 30
Features ..................................................................................... 3
First Time Set Up ...................................................................... 6
Glossary/TV Terms ................................................................ 46
Inputs/Audio and Video .............................................. 28, 38, 44
Menu ........................ ............................................................... !0
Minus(-)/Plus (+) Buttons ................................................. 10, 30
Picture-In-Picture (PIP) ..................................................... 38-44
Power Light Indicator ............................................................... 8
Precautions/Safety .......................................................... 2, 3, 45
Remote Control ................................................. 9, I 1,30-37, 40
Reminder/Time and Channel .................................................. 21
Second Audio Program (SAP) Light ...................................... 17
Sensor Remote .................................................................... 8, 30
Sleep Timer ............................................................................. 20
Smart Sound ............................................................................ 16
Status Button ..................................................................... 10, 30
Stereo Light Indicator ............................................................. 17
Surround Sound ...................................................................... 29
Time/Channel Display ...................................................... 21,22
VCR Button ........................................................................ 8, 28
VCR/TV Connections ............................................. 7, 28, 38, 44
Tips for Service ....................................................................... 45
TV Speaker Switch ................................................................. 27
Warranty ................................................................................. 48
47
Page 48

PROJECTION TELEVISION
One (1) Year In Home Service Labor Warranty
Thirty (30) Day Exchange Warranty Projection TV Screen
One (1) Year Exchange Warranty Parts
Two (2) Year Exchange Warranty on Cathode Ray Tube
For purchases outside the U.S., see applicable warranty from country of purchase.
This warranty gives you specific legal rights and you may also have other rights which vary from state to state.
Parts and Labor
For one year (30 days for the Projection TV screen) after the date
of purchase, an Authorized Service Center will repair any
product defect and replace any defective part, including the
cathode ray tubes and lens without charge to you for parts or
labor.
Replacement Cathode Ray Tubes
Except for return shipping cost, an Authorized Service Center
will, for two (2) years after installation of the TV, replace a
detective cathode ray tube without charge for the replacement
tube. If the tube replacement is made after one year, you must
pay for all labor and home service charges to replace it.
Replacement parts and tubes installed during the warranty period
are warranted only for the balance of the original warranty
period.
Replacement "Clear-Vu" Lens
The "Clear-Vu" Lens is warranted against manufacturing defects,
to the original purchaser, for the lifetime of the product. If the
lens replacement is made after one year, you must pay for the
labor and home service charges to replace it.
What the Purchaser Must Do
Before you call for service, check your operating instruction
booklet. A slight adjustment of the customer controls discussed
in your instruction booklet may save you a service call.
If you require service during the warranty period, you must
contact an Authorized Service Center to arrange for repair. The
Service Center must be allowed to keep defective parts.
Warranty service will be performed by an Authorized Service
Center. We suggest that you contact your dealer. If your dealer
does not operate an Authorized Service Center, he will direct you
to the Authorized Service center engaged by him to service the
product he sells.
If you reside in an area where we have a Factory Service Center
(see the Factory Service Center address directory supplied with
your product literature), you can contact them to schedule a
convenient time for an In-Home service call.
YOU MUST PRESENT PROOF OF THE DATE ON
WHICH THE PROJECTION TV WAS FIRST
PURCHASED (SALES RECEIPT OR OTHER EVIDENCE)
WHEN REQUESTING SERVICE OR REPLACEMENT
PART WARRANTY PERFORMANCE.
Warranty Exclusions
Your Warranty Does Not Cover.
Labor charges for set installation or set-up, adjustment of
customer or preference controls, and installation or repair of
antenna systems outside the TV set.
Product repair and/or part replacement because of misuse,
accident, unauthorized repair or other cause not within the control
of Philips Consumer Electronics Company.
Reception problems caused by signal conditions or cable or
antenna systems outside the TV.
A television purchased, used or serviced outside the U.S.A.,
Puerto Rico and the Virgin Islands, or used for commercial or
institutional purposes.
Incidental or consequential damages resulting from the product.
Some states do not allow the exclusion of incidental or
consequential damages, so the above exclusion may not apply to
you.
ALL IMPLIED WARRANTIES INCLUDING IMPLIED
WARRANTIES OF MERCHANTABILITY AND FITNESS
FOR A PARTICULAR PURPOSE, ARE LIMITED IN
DURATION TO THE DURATION OF THIS EXPRESS
WARRANTY. Some states do not allow limitations on how
long an implied warranty lasts, so the above limitation may
not apply to you.
IMPQRTANT REMINDER
PLEASE FILL OUT AND MAIL YOUR WARRANTY
REGISTRATION CARD PROMPTLY. IT WILL BE EASIER
FOR US TO NOTIFY YOU IF IT SHOULD EVER BE
REQUIRED. PLEASE ALSO KEEP YOUR SALES RECEIPT
AND ANY OTHER PROOF OF PURCHASE INFORMATION.
Please write your Model and Serial numbers below. The
numbers are located on the back of your unit. Please
remember to have these numbers on hand any time you call.
MODEL NO.
SERIAL NO.
PHILIPS SERVICE COMPANY - P.O. BOX 555 •
JEFFERSON CITY, TENNESSEE 37760 • (615) 475-8869
IB 705_E001 48
 Loading...