

Page 1

Page 2
Smart.Verysmart:
MAGNAVOX
Smart.Verysmart:
Congratulations on your purchas_
-and welcome to the "family!"
Dear MAGNAVOX product owner:
Thank you for your confidence in MAGNAVOX. You've selected one of the
best-built, best-backed products available today. And we'll do everything in
our power to keep you happy with your purchase for many years to come.
As a member of the MAGNAVOX 'fam'ly," you're entitled to protection by
one of the most comprehensive warranties and outstanding service
network._ in the industry.
What's more, your purchase guarantees you'll receive all the information
and special offers which you qualify for, plus easy access to accessories
from our convenient home shopping network.
And most important of all, you can count on our uncompromising
commitment to your total satisfaction.
All of this is our way of saying welcome-and thanks for investing in a
MAGNAVOX product.
Sincerely,
Robert Minkhorst
President and Chief Executive Officer
P.S. Remember, to get the most from your MAGNAVOX product,
you must return your Warranty Registration
Card within 10 days. So please mail it to us right now:
Page 3
SAFETYINSTRUCTIONS- Readbeforeoperatingequipment
Thisproductwasdesignedandmanufacturedtomeetstrictqualityand
safetystandards.Thereare,however,someinstallationandoperation
precautionswhichyoushouldbeparticularlyawareof.
1. ReadInstructions- Allthesafetyandoperatinginstructionsshould
bereadbeforetheapplianceisoperated.
2. RetainInstructions- Thesafetyandoperatinginstructionsshould
beretainedforfuturereference.
3. HeedWarnings- Allwarningsontheapplianceandintheoperating
instructionsshouldbeadheredto.
4. FollowInstructions- Alloperatinganduseinstructionsshouldbe
followed.
5. WaterandMoisture- Theapplianceshouldnotbeusednearwater
- for example,nearabathtub,washbowl,kitchensink,laundrytub,
ina wetbasementornearaswimmingpool,etc.
6. CartsandStands- Theapplianceshouldbeusedonlywithacartor
standthatisrecommendedbythemanufacturer.
6A. _ An applianceandcartcombinationshouldbemoved
with care.Quickstops,excessiveforce, anduneven
surfacesmaycausetheapplianceandcartcombination
tooverturn.
7. Wallor CeilingMounting- Theapplianceshouldbemountedto a
wallorceilingonlyasrecommendedbythemanufacturer.
8. Ventilation- Theapplianceshouldbesituatedsothatitslocationor
positiondoesnotinterferewithitsproperventilation.Forexample,
theapplianceshouldnotbe situatedona bed,sofa,rug,orsimilar
surfacethatmayblocktheventilationopenings;or, placedin a
built-ininstallation,suchasa bookcaseorcabinetthatmayimpede
theflowofairthroughtheventilationopenings.
9. Heat- Theapplianceshouldbesituatedawayfromhearsources
suchas radiators,heatregisters,stoves,or:otherappliances
(includingamplifiers)thatproduceheat.
10. PowerSources- Theapplianceshouldbeconnectedtoa power
supplyonlyofthetypedescribedintheoperatinginstructionsoras
markedontheappliance.
11. Power-CordProtection- Powersupplycordsshouldbe routedso
thattheyarenotlikelytobewalkedonor pinchedbyitemsplaced
uponor againstthem,payingparticularattentionto cordsand
plugs,conveniencereceptacles,andthepointwheretheyexitfrom
theappliance.
12. Cleaning- Theapplianceshouldbecleanedonlyas recommende_'
bythemanufacturer.
13. PowerLines- Anoutdoorantennashouldbelocatedawayfrom
powerlines.
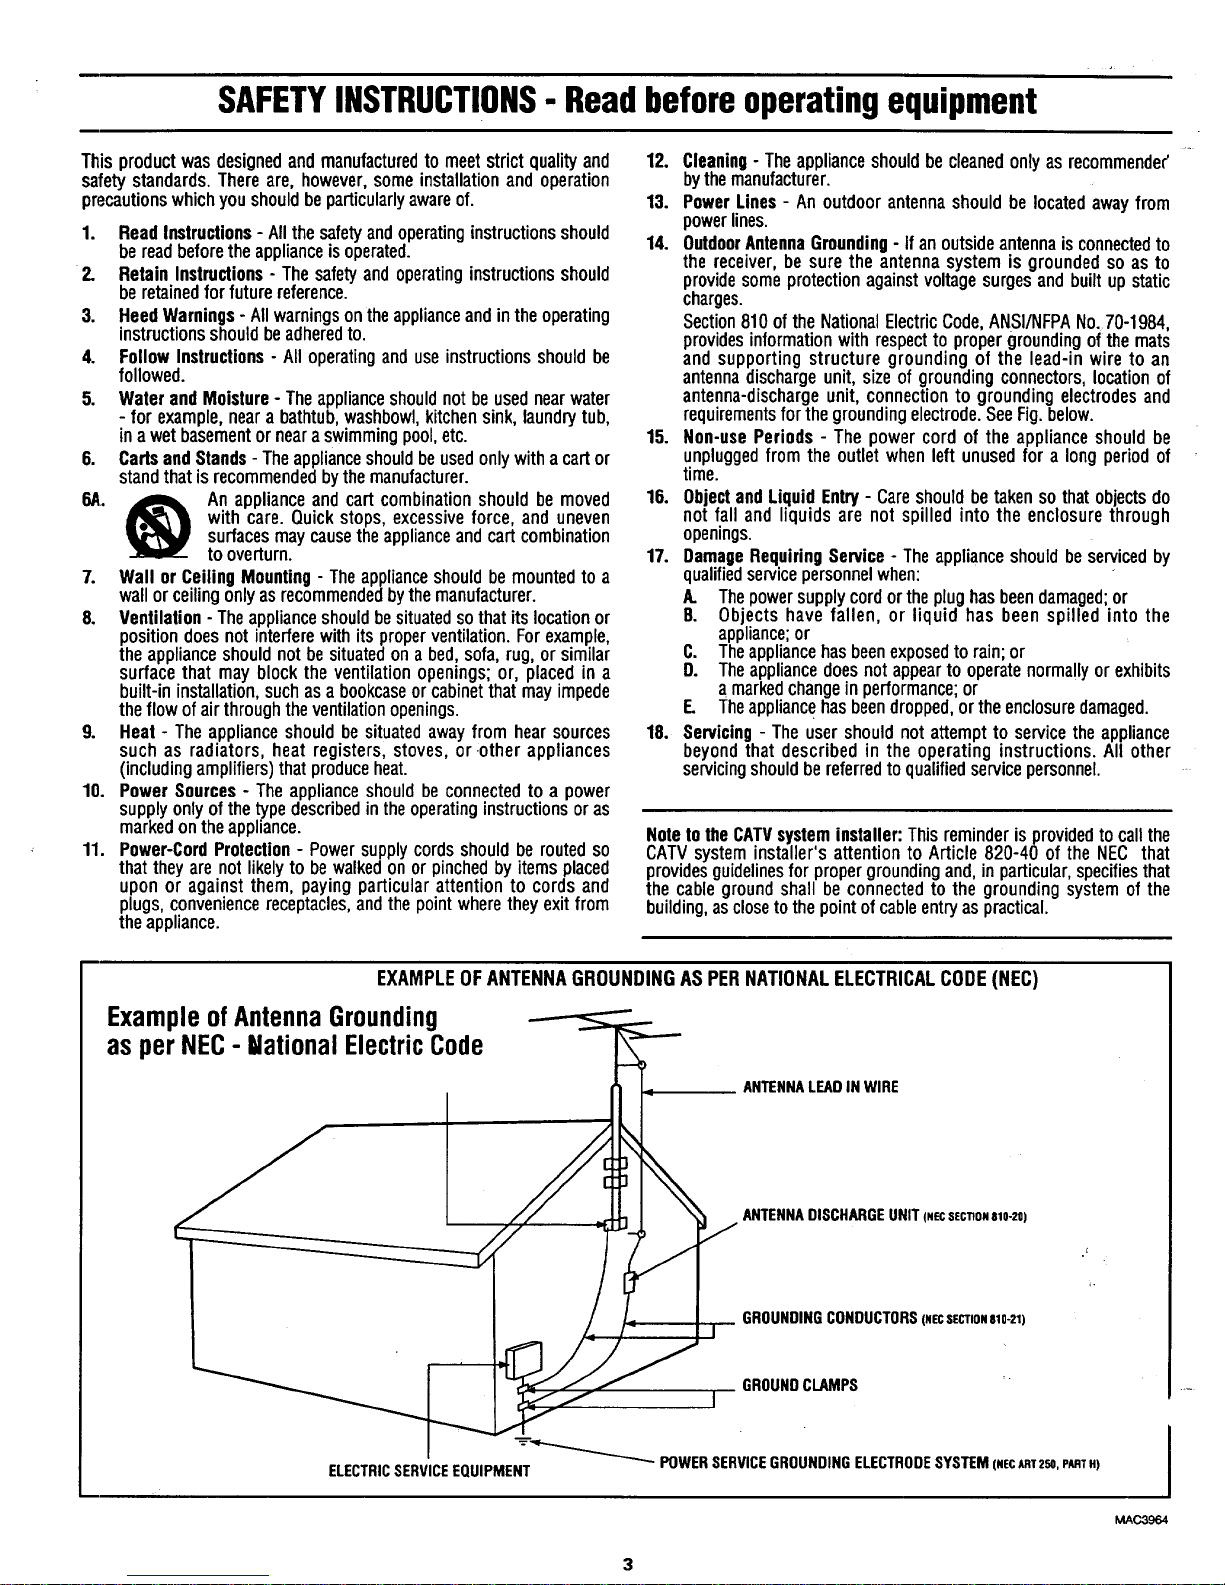
14. OutdoorAntennaGrounding- Ifanoutsideantennaisconnectedto
thereceiver,be surethe antennasystemis groundedsoas to
providesomeprotectionagainstvoltagesurgesandbuiltupstatic
charges.
Section810of theNationalElectricCode,ANSI/NFPANo.70-1984,
providesinformationwithrespectto propergroundingofthe mats
andsupportingstructuregroundingof the lead-inwireto an
antennadischargeunit,sizeofgroundingconnectors,locationof
antenna-dischargeunit,connectionto groundingelectrodesand
requirementsforthegroundingelectrode.SeeFig.below.
15. Non-usePeriods - The powercordof the applianceshouldbe
unpluggedfrom theoutletwhenleftunusedfor a longperiodof
time.
16. ObjectandLiquidEntry- Careshouldbe takensothatobjectsdo
notfall and liquidsarenot spilledintothe enclosurethrough
openings.
17. DamageRequiringService- Theapplianceshouldbeservicedby
qualifiedservicepersonnelwhen:
A. Thepowersupplycordortheplughasbeendamaged;or
B. Objects havefallen, or liquid has been spilled intothe
appliance;or
C. Theappliancehasbeenexposedtorain;or
D. Theappliancedoesnotappeartooperatenormallyor exhibits
a markedchangeinperformance;or
E. Theappliancehasbeendropped,ortheenclosuredamaged.
18. Servicing- Theuser shouldnot attemptto servicetheappliance
beyondthat described in the operatinginstructions.All other
servicingshouldbe referredtoqualifiedservicepersonnel.
Noteto the CATVsysteminstaller: This reminderis provided to call the
CATVsystem installer's attention to Article 820-40 of the NEC that
providesguidelinesfor propergroundingand,in particular,specifiesthat
the cable ground shall be connectedto the grounding systemof the
building, as closeto the pointof cableentryas practical.
EXAMPLEOF ANTENNAGROUNDINGASPERNATIONALELECTRICALCODE(NEC)
ExampleofAntennaGrounding
as per NEC- NationalElectricCode
ANTENNALEADIN WIRE
ANTENNADISCHARGEUNIT(NECSeCTIONa10-20)
GROUNDINGCONDUCTORS(.ecSeCTm.e10-21)
J GROUNDCLAMPS "
"----_'_"_'-_-_'- POWERSERVICEGROUNDINGELECTRODESYSTEM(NECART2se,PARTH)
ELECTRICSERVICEEQUIPMENT
MAC3964
I
Page 4
_ Getting Started
Welcome/Product Registration ................... 2
Safety/Precautions ..................................................... 3
Table of Contents ....................................................... 4
Features and Model Information ................................ 5
_ On-Screen Features
PICTURE MENU
+Adjusting Color, Brightness, Sharpness,
Tint, and Picture Controls ................................... 6
+Using the Clearview Control ............................... 7
+Adjusting the TV's Convergence Control ........... 8
+Using the Flesh Correction Control .................... 9
+Ghost Cancellation Feature Information ............. 9
FEATURES MENU
+Selecting a Picture Source ................................ 10
+Setting the TV for Closed Captioning ............... 11
+Setting the TV for Cable or Antenna Signals....12
+Adding Channels in Memory (Automatically). 13
+Adding Channels in Memory (Manually) ......... 14
+Setting the "IV Clock and Turn-On Timer ........ 15
+Setting the Alternate Channel Control .............. 16
+Using the Sleep Timer Control ......................... 16
+ Adjusting the Channel Display Control ............ 17
+Using the Time/Channel Reminder Control ...... 17
+Using Parental Control to Censor Channels 18-19
SOUND MENU
+Adjusting Bass', lreble, and Balance Sound
Controls ............................................................. 20
+Setting,the Bass Boost Control ........................ 20
+Setting the TV for Stereo and SAP Programs ..21
+Using the Stereo Surround Control ................... 22
+Using the Volume Display Control ................... 22
+Using the TV Speaker On/Off Control with
the Audio Output jacks ..................................... 23
+Surround Sound Speaker Connections and
Variable Audio Output Control ................... 24-25
+Using the TV's Audio/Video Input and
Output Jacks ............................................... 26-29
i Remote Control Operation ._
Using the Remote Locator Feature........30-?
Setting the Smart Picture Control .......... 32-3_
Using Smart Sound Control ..................................... 34
Using the Channel Guide Control ............................ 35
Setting the Remote to Work VCRs .................... 36-37
Setting the Remote to Work
Cable TV Converters .......................................... 38-39
Setting the Remote to Work VCRs or Cable
Converters - "Search Method". ................................ 40
Using the Remote's VCR buttons ............................ 41
--"_ Picture-In-Picture (PIP)
How to Use PIP (Connections) ............. 42-43
How to Use PIP with the TV Remote ................ 44-45
Selecting the Picture Source for PIP ........................ 46
Adjusting Picture-in-Picture Color and Tint ............ 47
More PIP Connections (Cable Converter) ............... 48
[_ C.,eneral Information
TV Help Menu ........................................... 49
Accessory RF Switcher Information ........................
Tips if Something Isn't Working ............................. 5,,
Glossary of TV Terms ............................................. 5 !
Index ........................................................................ 52
Factory Service Locations .................................. 53-54
Warranty .................................................................. 55
Accessories .............................................................. 56
Use the simple Set-Up Guide (supplied with
your TV information packet) for details on:
• Antenna Hook-ups
• First Time Set-Up
(Automatic Settings)
• Basic TV and Remote
Control Operation
• On-Screen Menu Use
Copyright © 1995 Philips Consumer Electronics Company. All rights reserved.
Page 5

First Time Set Up which automatically sets the TV
fi)r local channels and the correct picture signal
(antenna or cable). It even helps you make the
necessary connections for the Picture-In-Picture (PIP)
fi'.ature.
Infrared Remote Control which operates your TV
set and a variety of wireless remote control VCRs and
(:'.ableTV Converters. A special 'q..ocator"feature can
also help you find the remote when it has been stuck
out of sight or misplaced.
Standard TV broadcast (VHFFtJHF) or Cable TV
(CATV) channel capability.
Closed Captioning which allows the viewer to read
I_¢ program dialogue or voice conversations as on-
_:reen text.
Automatic Programming of channels for quick and
easy selection of favorite stations available in your
area.
Picture-In-Picture (PIP) which can show a TV
program and the direct video output from an accessory
(VCR, etc.) onto the TV screen at the same time.
Parental Control for "Censoring" or blocking out
channels to keep children from watching undesirable
programming
Stereo-Ready TV with built-in audio amplifier and
twin speaker system. Receives TV programs in both
broadcast stereo sound or (SAP) bilingual broadcast.
On-Screen Features which display helpful
information for the setting of TV controls (such as
help messages, operating tips and glossaries).
Audio/Video jacks for direct connections with VCRs
(and other accessories) for quality TV picture and
sound playback.
Surround Sound external audio speaker connections.
Sleep-Timer which automatically turnsthe TV OFF
at preset time intervals.
Smart Sound for the control of TV volume levels
during program changes or commercial breaks.
Smart Picture allows you to choose from a list of TV
video control categories set for a variety of viewing
conditions and program sources.
(;lock Timer feature which can turn ON the "IV at
any preset time - just like an alarm clock.
As you unpack your TV please note that the
following items have been included with your se
• Owner's Manual
• Warranty Registration Card
• Safety Tip Information
• Factory Service Center Address Listings
• Remote Control Transmitter
• Batteries for Remote Control Use
• Audio/Video Cables for Direct Input and
Output Connections.
Please take a few minutes to complete your
registration card. The serial number for the TV is
on the back of the set.
To ensure that picture screen performance is of
the highest quality, please avoid rubbing any
object or material on the screen that could scratch
or damage its surface.
Refer to the back of this manual for instructions
on the cleaning and care of the TV.
An accessory storage shelf compartment has been
designed into your TV for the placement of such
items as VCRs, CD-i (Compact Disc Interactive)
Players, or other pieces of audio/video equipment.
Use the connection tunnel (located on the rear wall
of the storage compartment) to route Antenna,
Cable, or other signal supply wires from the
accessories to the TV's rear cabinet jackpanel.
Page 6
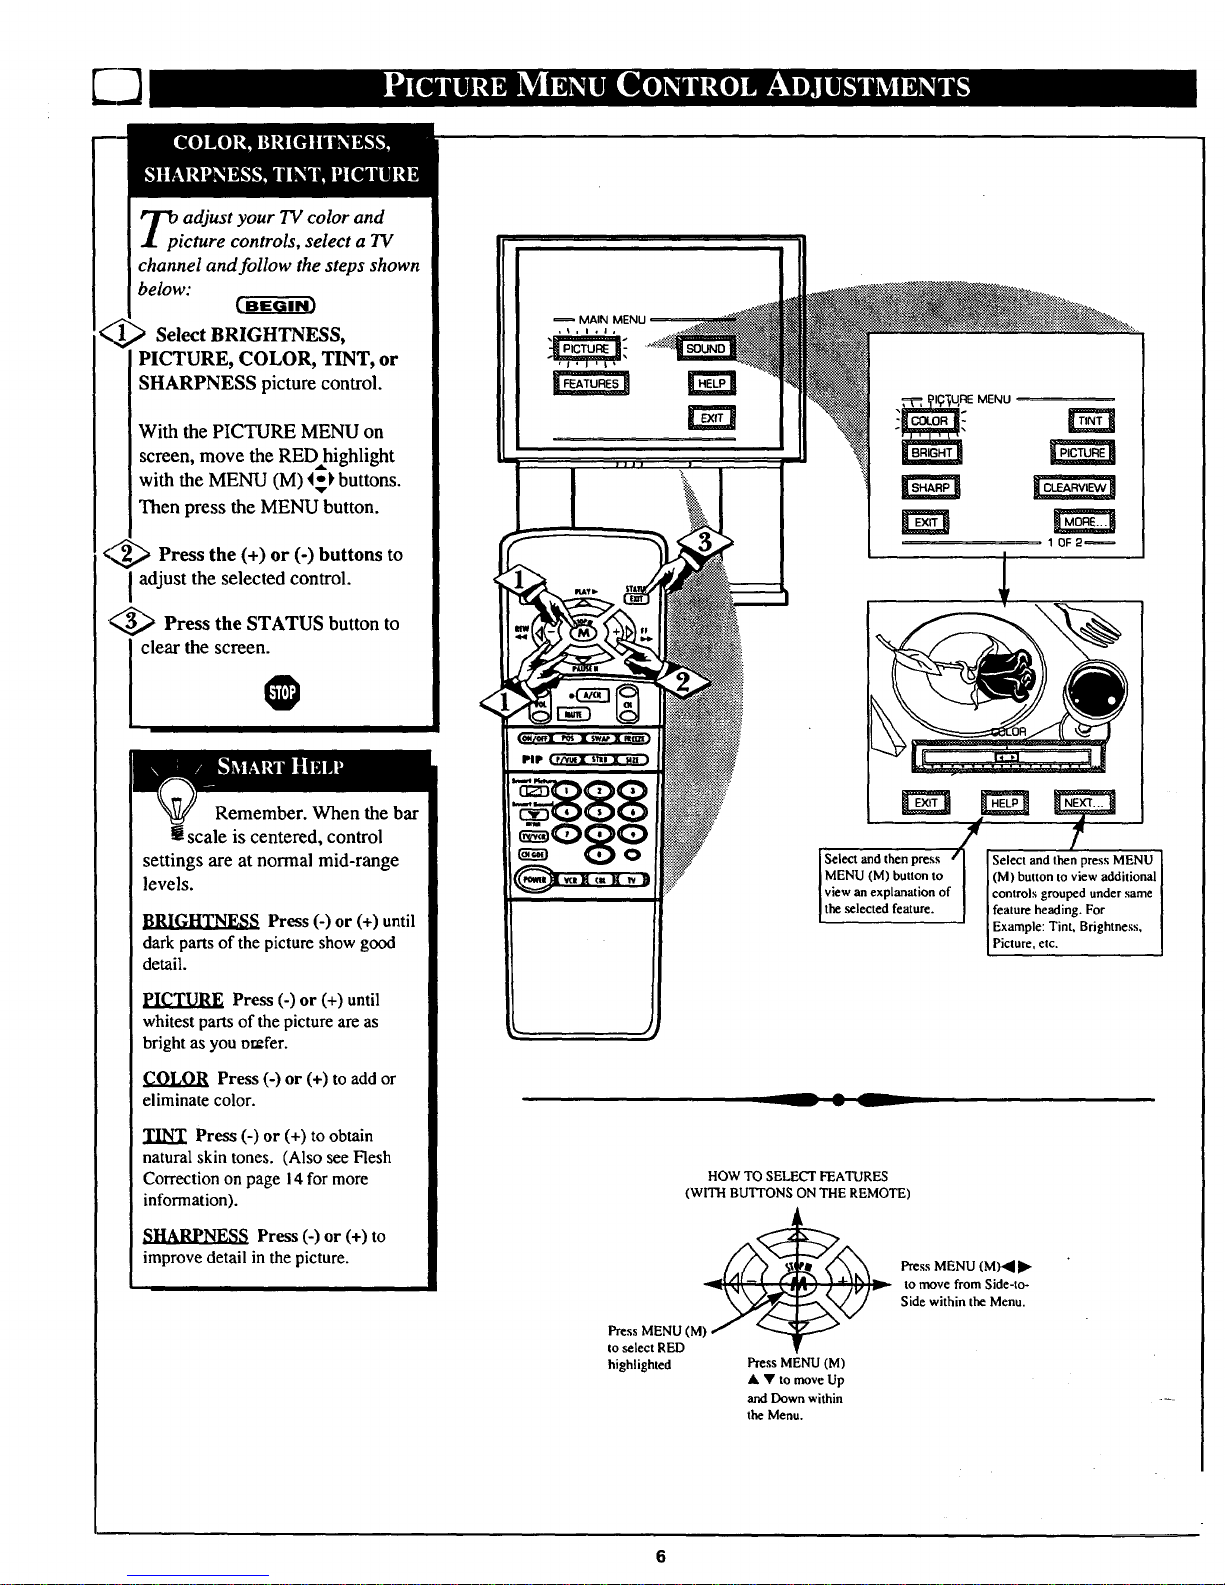
_p adjust your TV color and
icture controls, select a TV
channel and follow the steps shown
below:
Select BRIGHTNESS,
PICTURE, COLOR, TINT, or
SHARPNESS picture control.
With the PICTURE MENU on
screen, move the RED highlight
with the MENU (M) _ buttons.
Then press the MENU button.
<_ Press the (+) or (-) buttons to
adjust the selected control.
<_ Press the STATUS button to
clear the screen.
@
Remember. When the bar
scale is centered, control
settings are at normal mid-range
levels.
_._ Press (-) or (+) until
dark parts of the picture show good
detail.
PICTURE Press (-) or (+) until
whitest parts of the picture are as
bright as you prefer.
COLOR Press (-) or (+) to add or
eliminate color.
TINT Press (-) or (+) to obtain
natural skin tones. (Also see Flesh
Correction on page i4 for more
information).
Press (-) or (+) to
improve detail in the picture.
MAIN MENU
iI , I ¢ I,
Select and then press rl
(M) button to view additional
f controls grouped under same
feature heading. For
Example: Tint, Brightness,
lP cture, etc.
-- • _
HOW TO SELECT FEATURES
(WITH BUTI'ONS ON THE REMOTE)
Press MENU (M)
to select RED
highlighted
Press MENU (M)
A • to move Up
and Down within
the Menu.
Press MENU (M).,_
to move from Side-to-
Side within the Menu.
6
Page 7
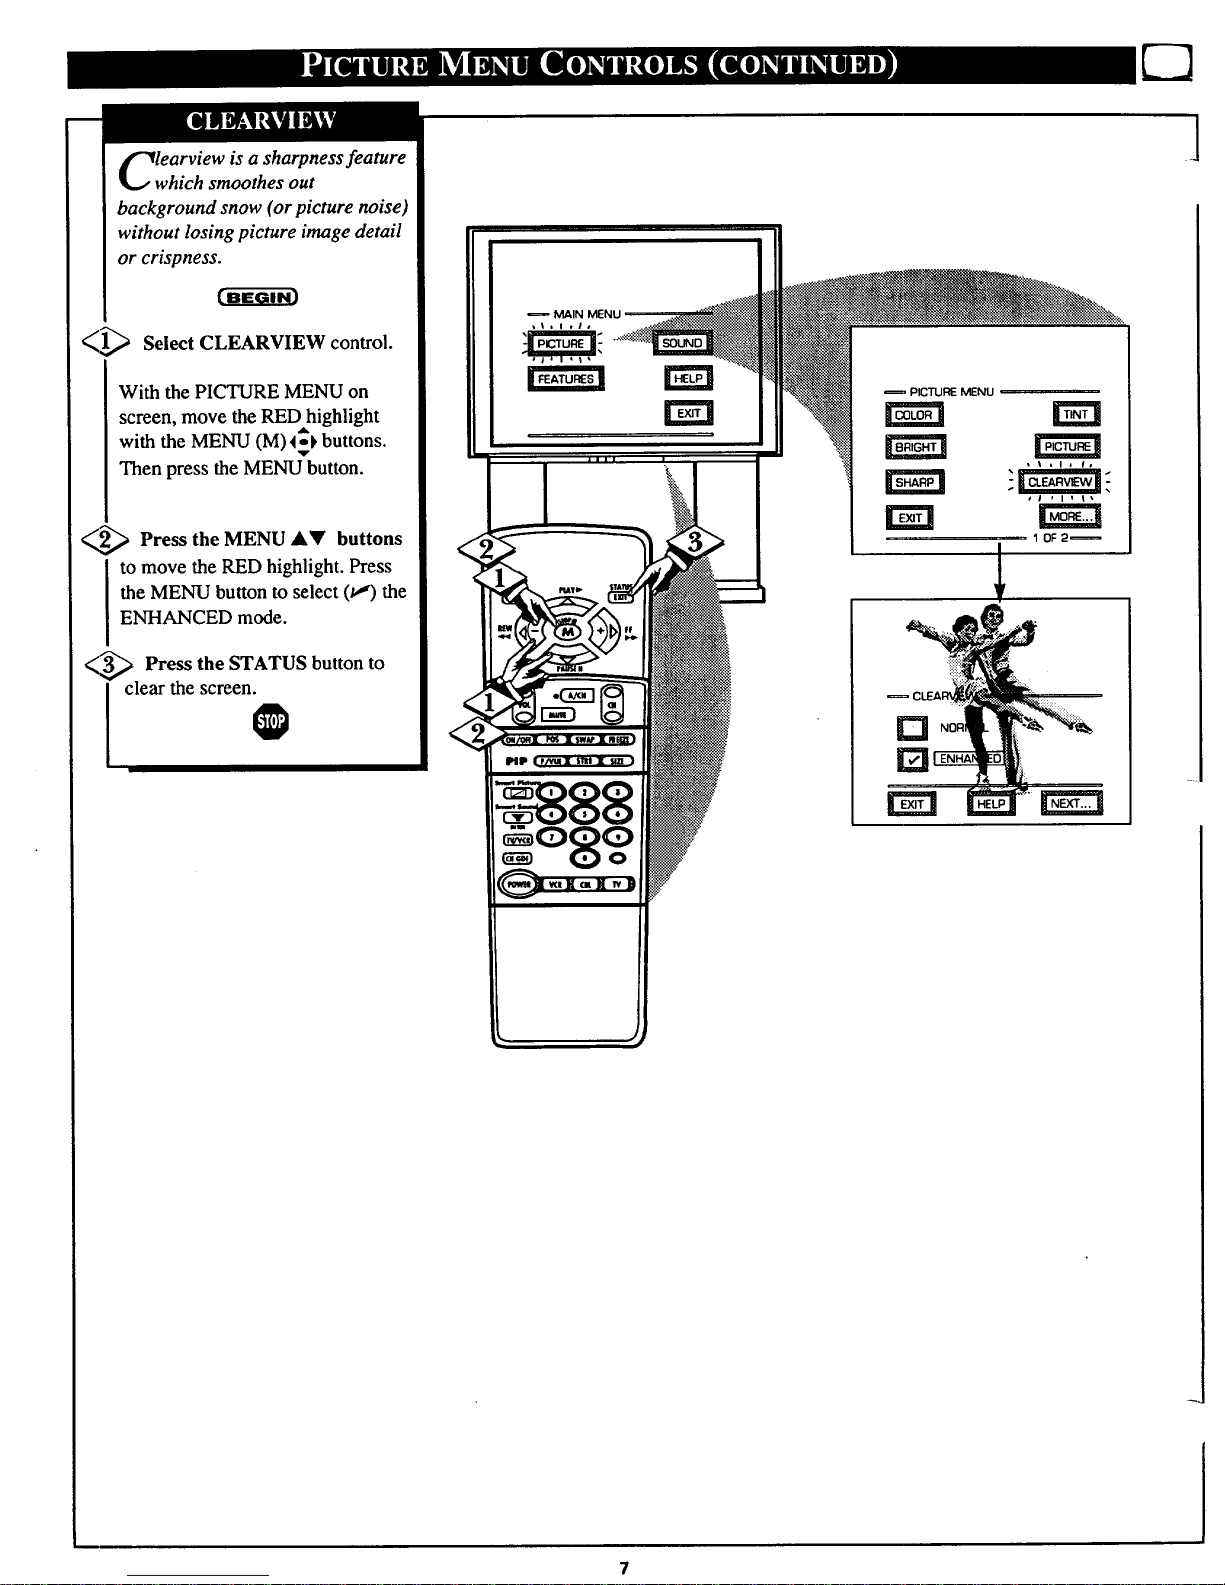
learview is a sharpness feature
which smoothes out
background snow (or picture noise)
without losing picture image detail
or crispness.
_1_ Select CLEARVIEW control.
With the PICTURE MENU on
screen, move the RED highlight
with the MENU (M) 4_ buttons.
Then press the MENU button.
_ Press the MENU A_I' buttons
to move the RED highlight. Press
the MENU button to select (u,")the
ENHANCED mode.
_ Press the STATUS button to
I clear the screen
MAIN
rm ND
]
Page 8
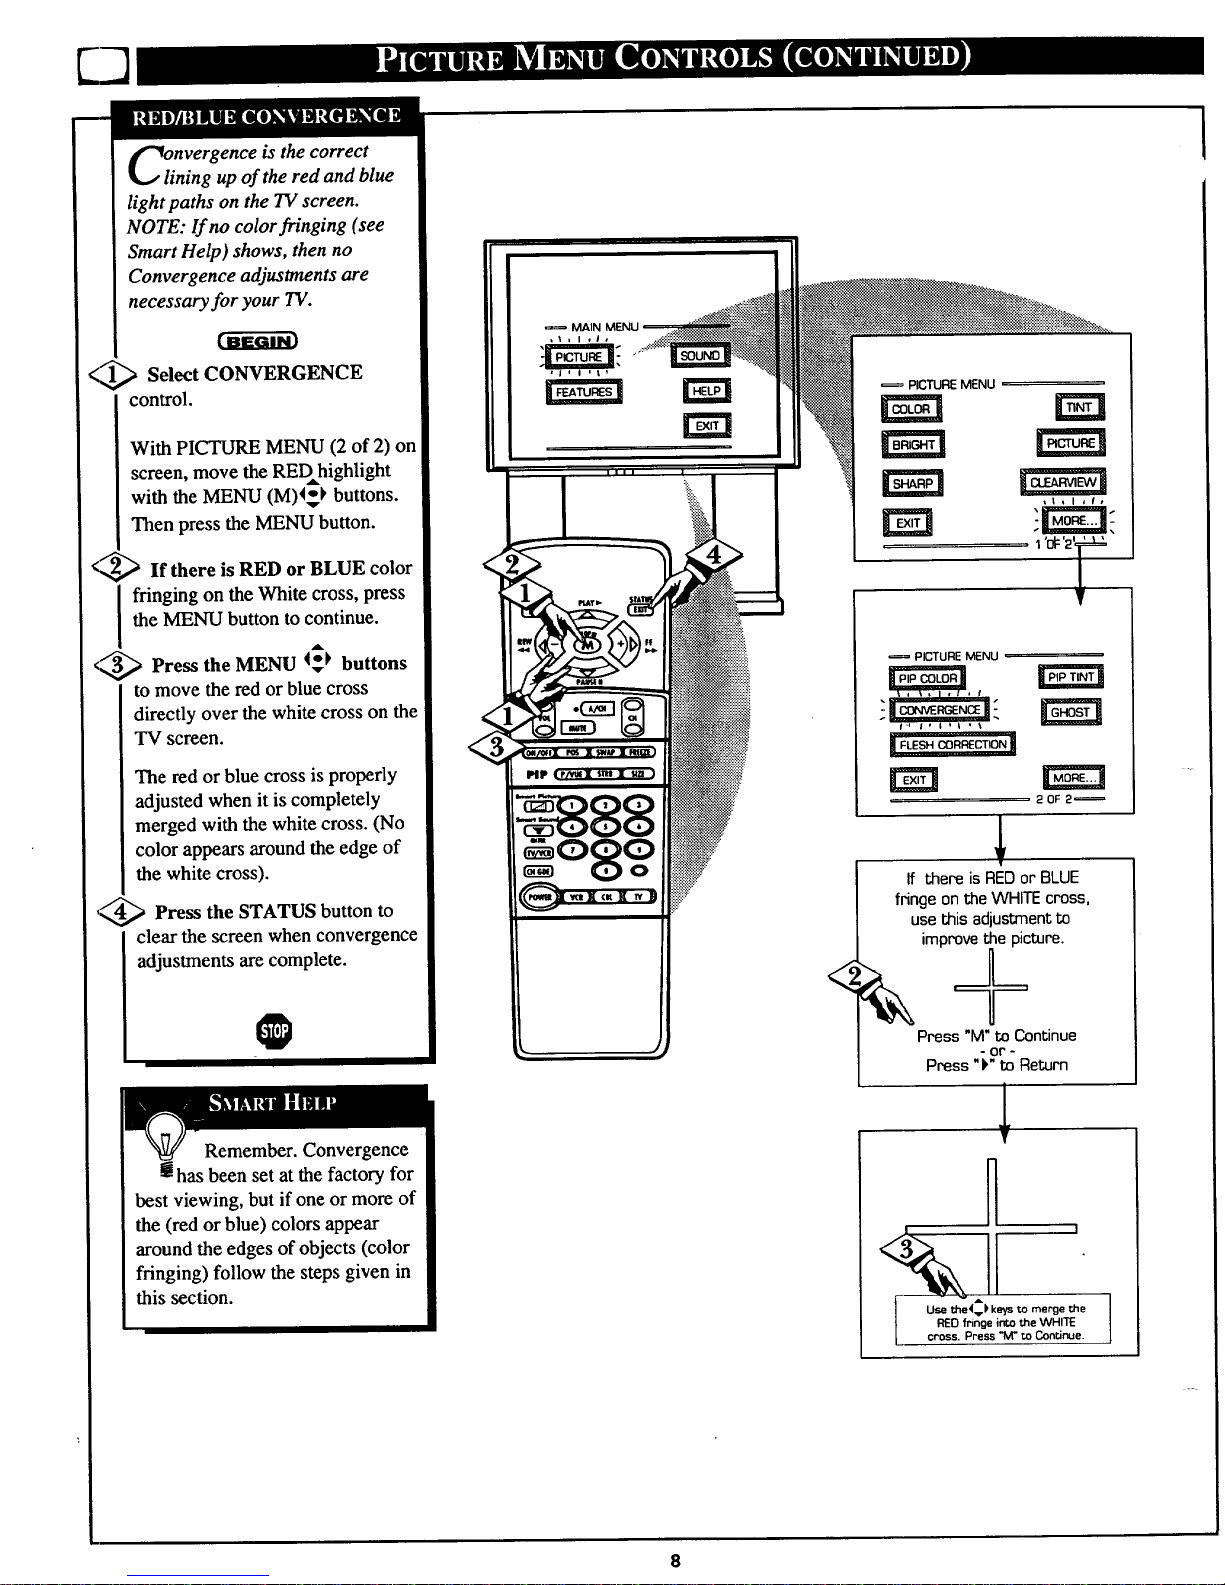
nvergence is the correct
ining up of the red and blue
light paths on the TV screen.
NOTE: If no color fringing (see
Smart Help) shows, then no
Convergence adjustments are
necessary for your TV.
<,_ Select CONVERGENCE
control.
With PICTURE MENU (2 of 2) on
screen, move the REDhighlight
with the MENU (M)4_ buttons.
Then press the MENU button.
<,_If there is RED or BLUE color
I ringing on the White cross, press
the MENU button to continue.
_ Press the MENU 4_ buttons
to move the red or blue cross
directly over the white cross on the
TV screen.
The red or blue cross is properly
adjusted when it is completely
merged with the white cross. (No
color appears around the edge of
the white cross).
'_ Press the STATUS button to
clear the screen when convergence
adjustments are complete.
O
MAIN
,I, I ,Is
PICTURE MENU
Y
20F 2_
<
T
If there is RED or BLUE
fringe on the WHITE cross,
use this adjustment to
improve the picture.
Press "M" to Continue
- Or" -
Press "k" to Return
!
Remember. Convergence
been set at the factory for
best viewing, but if one or more of
the (red or blue) colors appear
around the edges of objects (color
fringing) follow the steps given in
this section.
A
Use the<v) keys to merge the
REO fringe into the WHITE
cross. Press _i" to Con_nue.
Page 9
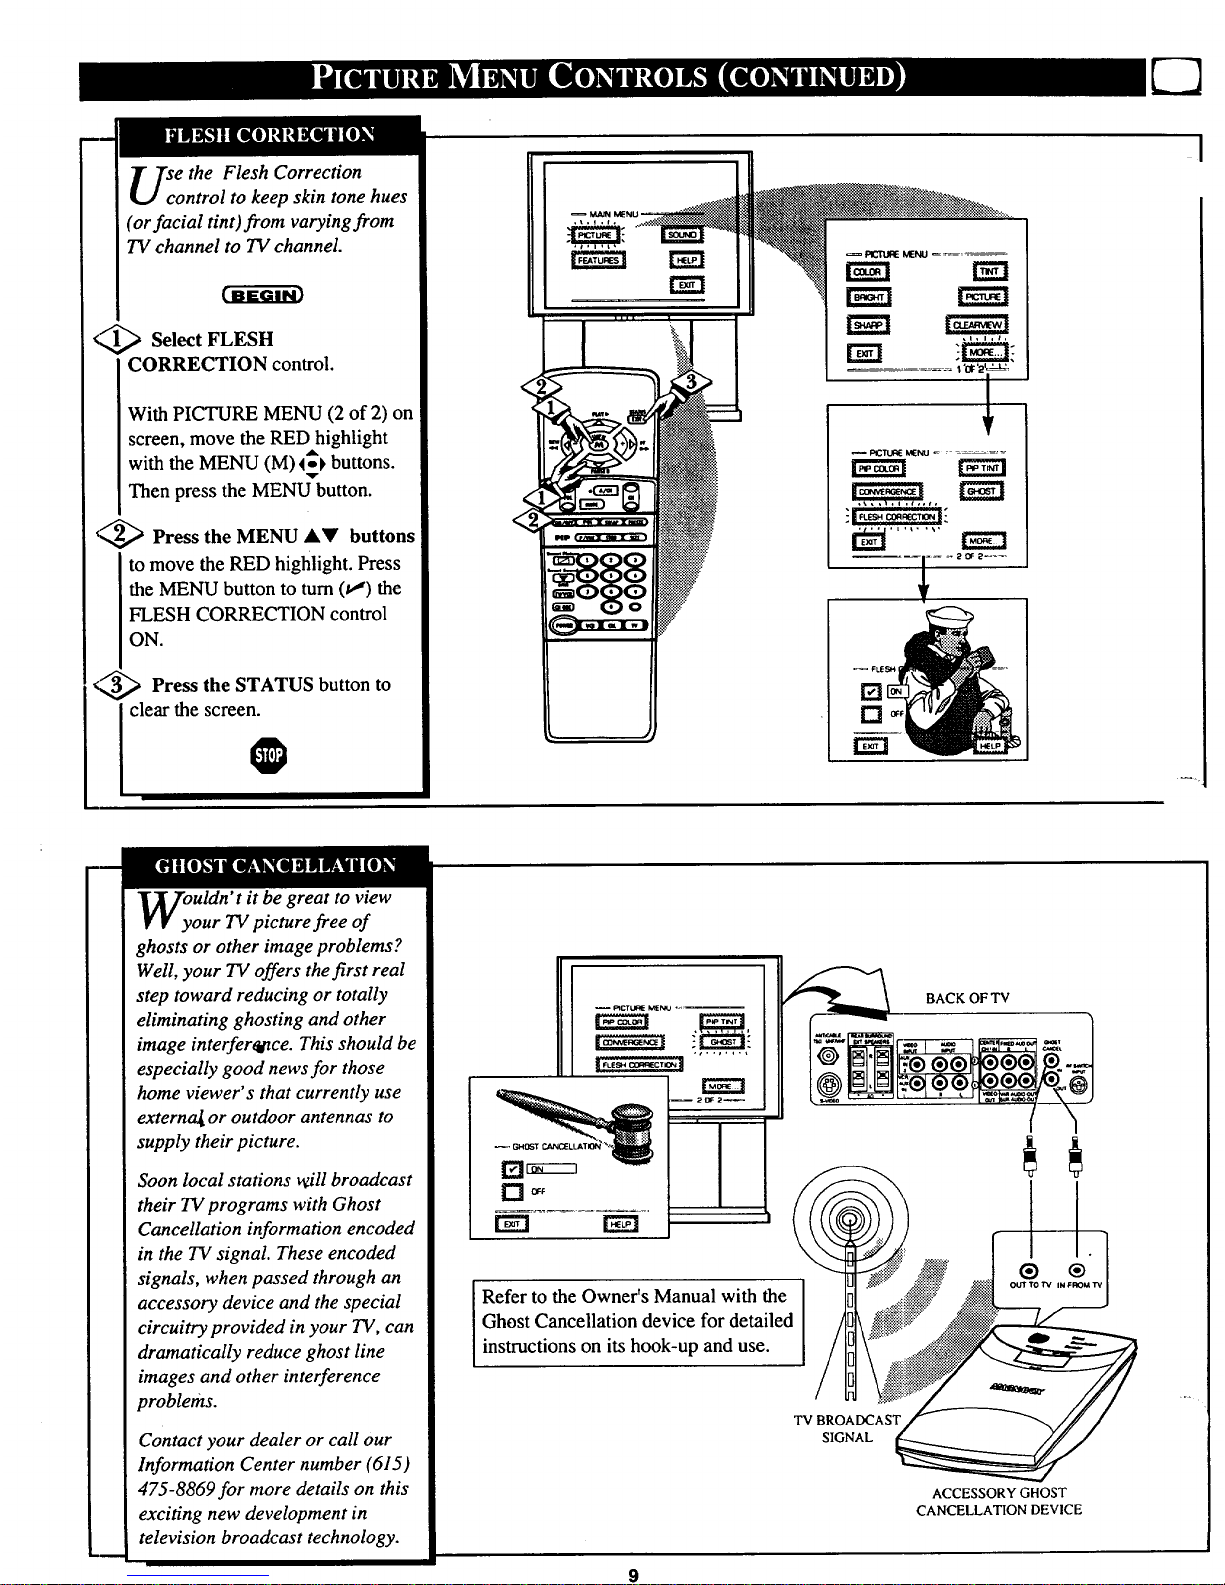
se the Flesh Correction
ontrol to keep skin tone hues
(or facial tint) from varying from
TV channel to TV channel.
Select FLESH
CORRECTION control.
With PICTURE MENU (2 of 2) on
screen, move the RED highlight
with the MENU (M)_ buttons.
Then press the MENU button.
_ Press the MENU AY buttons
to move the RED highlight. Press
the MENU button to turn (tl) the
FLESH CORRECTION control
ON.
<,_ Press the STATUS button to
clear the screen.
_ otC'tt.l_ tc_tc.J ..........
20F 2_--
Uldn' t it be great to view
our TV picture free of
ghosts or other image problems?
Well, your TV offers the first real
step toward reducing or totally
eliminating ghosting and other
image interferad*ce. This should be
especially good news for those
home viewer's that currently use
externa_ or outdoor antennas to
supply their picture.
Soon local stations will broadcast
their TV programs with Ghost
Cancellation information encoded
in the TV signal. These encoded
signals, when passed through an
accessory device and the special
circuitry provided in your TV, can
dramatically reduce ghost line
images and other interference
problems.
Contact your dealer or call our
Information Center number (615)
475-8869for more details on this
exciting new development in
television broadcast technology.
Refer to the Owner's Manual with the
Ghost Cancellation device for detailed /
¢
instructions on its hook-up and use.
BACK OFTV
®
TV BROADCAST
SIGNAL
ACCESSORYGHOST
CANCELLATION DEVICE
Page 10
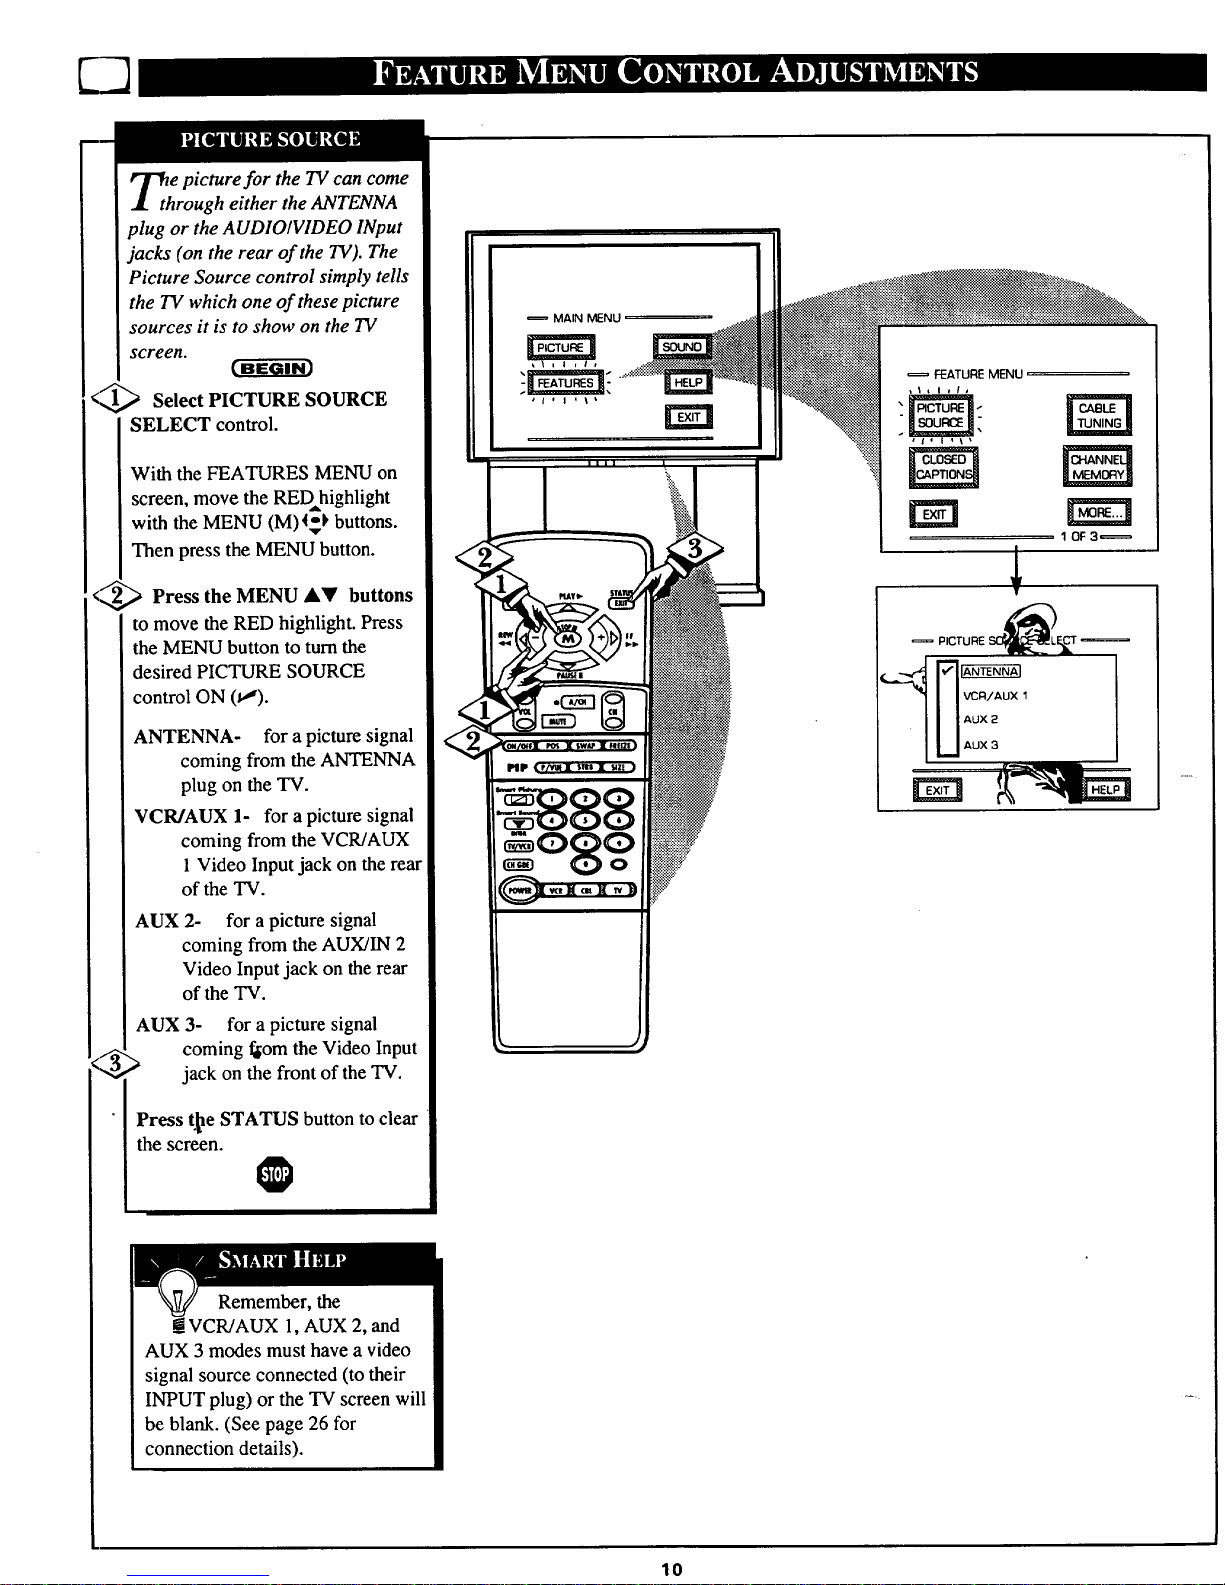
Th e picture for the TV can come
rough either the ANTENNA
plug or the AUDIO/VIDEO INput
jacks (on the rear of the TV). The
Picture Source control simply tells
the TV which one of these picture
sources it is to show on the TV
screen.
<_ Select PICTURE SOURCE
SELECT control.
With the FEATURES MENU on
screen, move the REDhighlight
with the MENU (M)4_ buttons.
Then press the MENU button.
<:_ Press the MENU AY buttons
to move the RED highlight. Press
the MENU button to turnthe
desired PICTURE SOURCE
control ON (_').
ANTENNA- for a picture signal
coming from the ANTENNA
plug on the TV.
VCR/AUX 1- for a picture signal
coming from the VCR/AUX
1Video Input jack on the rear
of the TV.
AUX 2- for a picture signal
coming from the AUX/IN 2
Video Input jack on the rear
of the TV.
AUX 3- for a picture signal
/;, coming f,[om the Video Input
"4 _ jack on the front of the TV.
Press t._e STATUS button to clear
the screen.
O
MAIN MENU
FEATURE MENU
rm
10F3_
Remember, the
__VCR/AUX l, AUX 2, and
AUX 3 modes must have a video
signal source connected (to their
INPUT plug) or the TV screen will
be blank. (See page 26 for
connection details).
10
Page 11
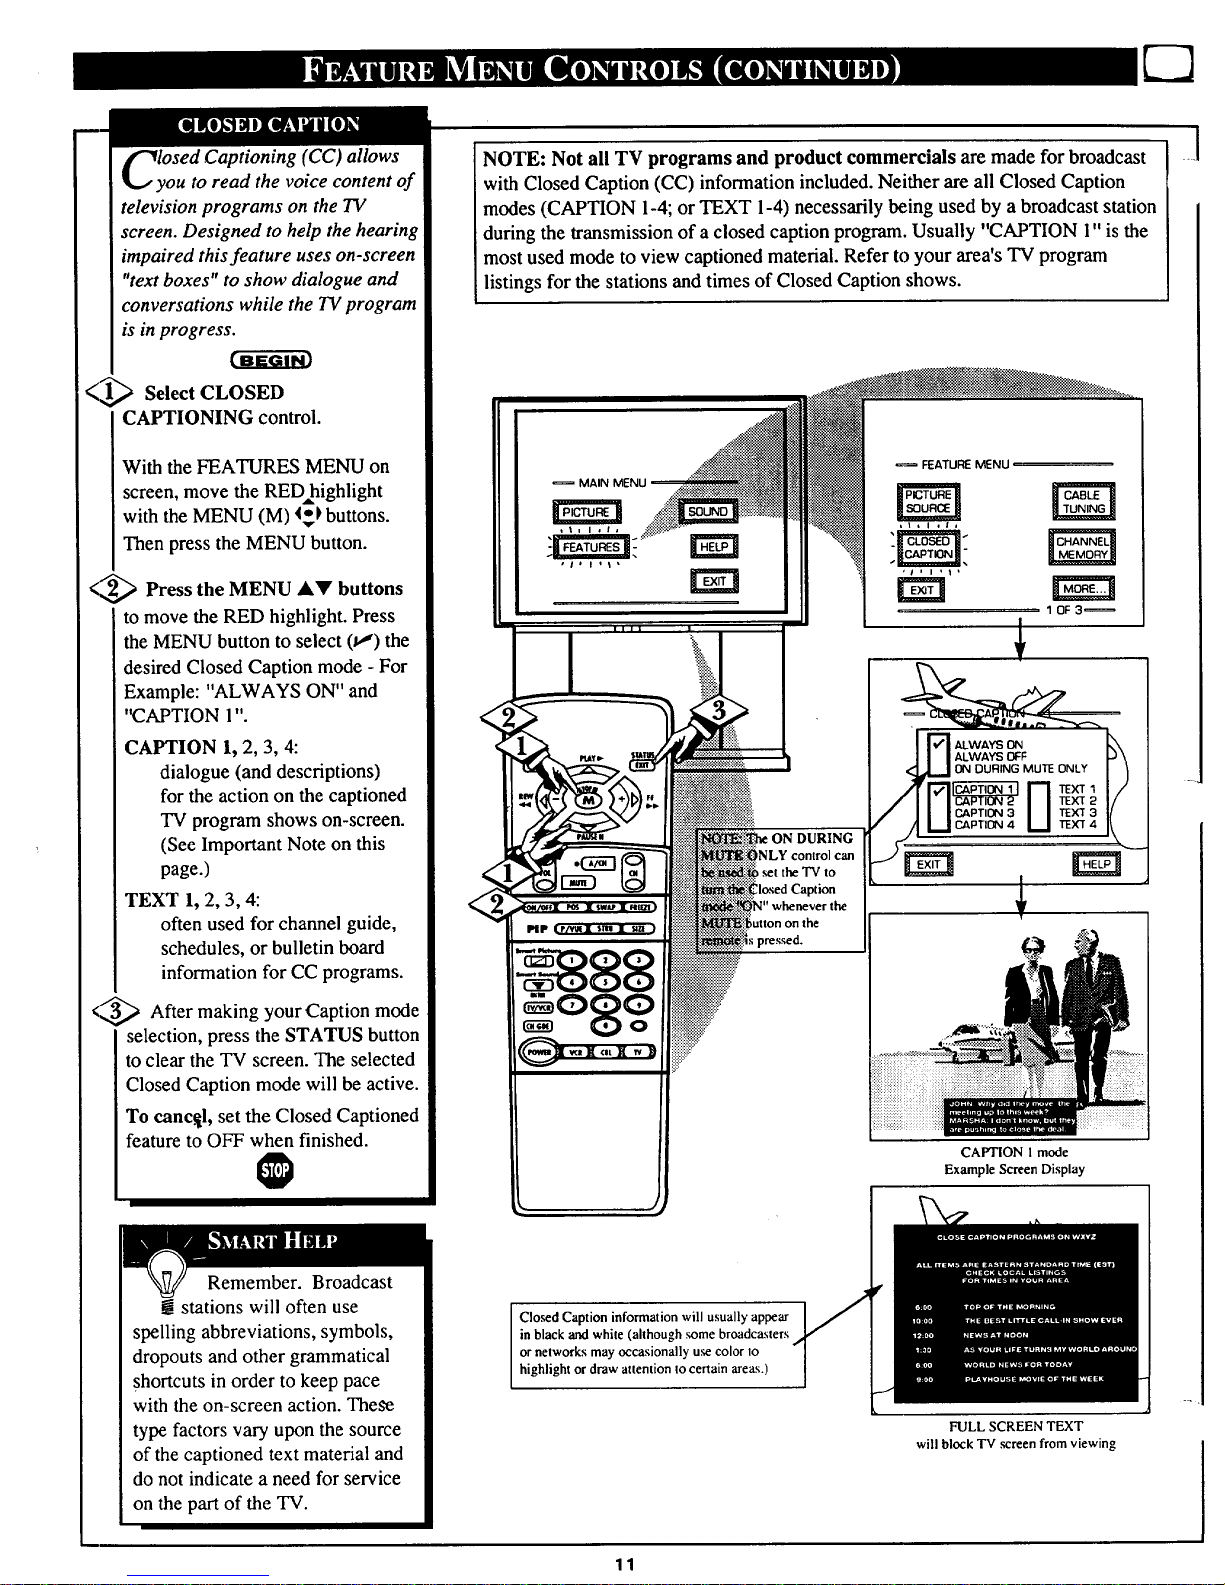
lOSed Captioning (CC) allows
ou to read the voice content of
television programs on the TV
screen. Designed to help the hearing
impaired this feature uses on-screen
"text boxes" to show dialogue and
conversations while the TV program
is in progress.
<_ Select CLOSED
CAPTIONING control.
With the FEATURES MENU on
screen, move the RED highlight
with the MENU (M) 4-) buttons.
Then press the MENU button.
<,_ Press MENU AY buttons
the
to move the RED highlight. Press
the MENU button to select (t,,") the
desired Closed Caption mode - For
Example: "ALWAYS ON" and
"CAPTION 1"
CAPTION 1, 2, 3, 4:
dialogue (and descriptions)
for the action on the captioned
TV program shows on-screen.
(See Important Note on this
page.)
TEXT 1, 2, 3, 4:
often used for channel guide,
schedules, or bulletin board
information for CC programs.
<_ After making your Caption
mode
selection, press the STATUS button
to clear the TV screen. The selected
Closed Caption mode will be active.
To canc._l, set the Closed Captioned
feature to OFF when finished.
Remember. Broadcast
! stations will often use
spelling abbreviations, symbols,
dropouts and other grammatical
shortcuts in order to keep pace
with the on-screen action. These
type factors vary upon the source
of the captioned text material and
do not indicate a need for service
on the part of the TV.
NOTE: Not all TV programs and product commercials are made for broadcast
with Closed Caption (CC) information included. Neither are all Closed Caption
modes (CAPTION 1-4; or TEXT 1-4) necessarily being used by a broadcast station
during the transmission of a closed caption program. Usually "CAPTION 1"is the
most used mode to view captioned material. Refer to your area's TV program
listings for the stations and times of Closed Caption shows.
MAIN MENU
DURING
NLY control can
_t the "IV to
Iosed Caption
_" whenever the
FEATURE MENU
1 OF3=
ALWAYS ON
ALWAYS OFF
ON DURING MUTE ONLY
TEXT1
TEXT 2
TEXT 3
TEXT 4
CAPTION 1mode
Example Screen Display
Cloud Caption information will usually appear
in black "andwhite (although some broadcasters
or networks may occasionally use color to
highlight or draw attention to certain areas.)
FULL SCREEN TEXT
will block TV .screen from viewing
11
Page 12
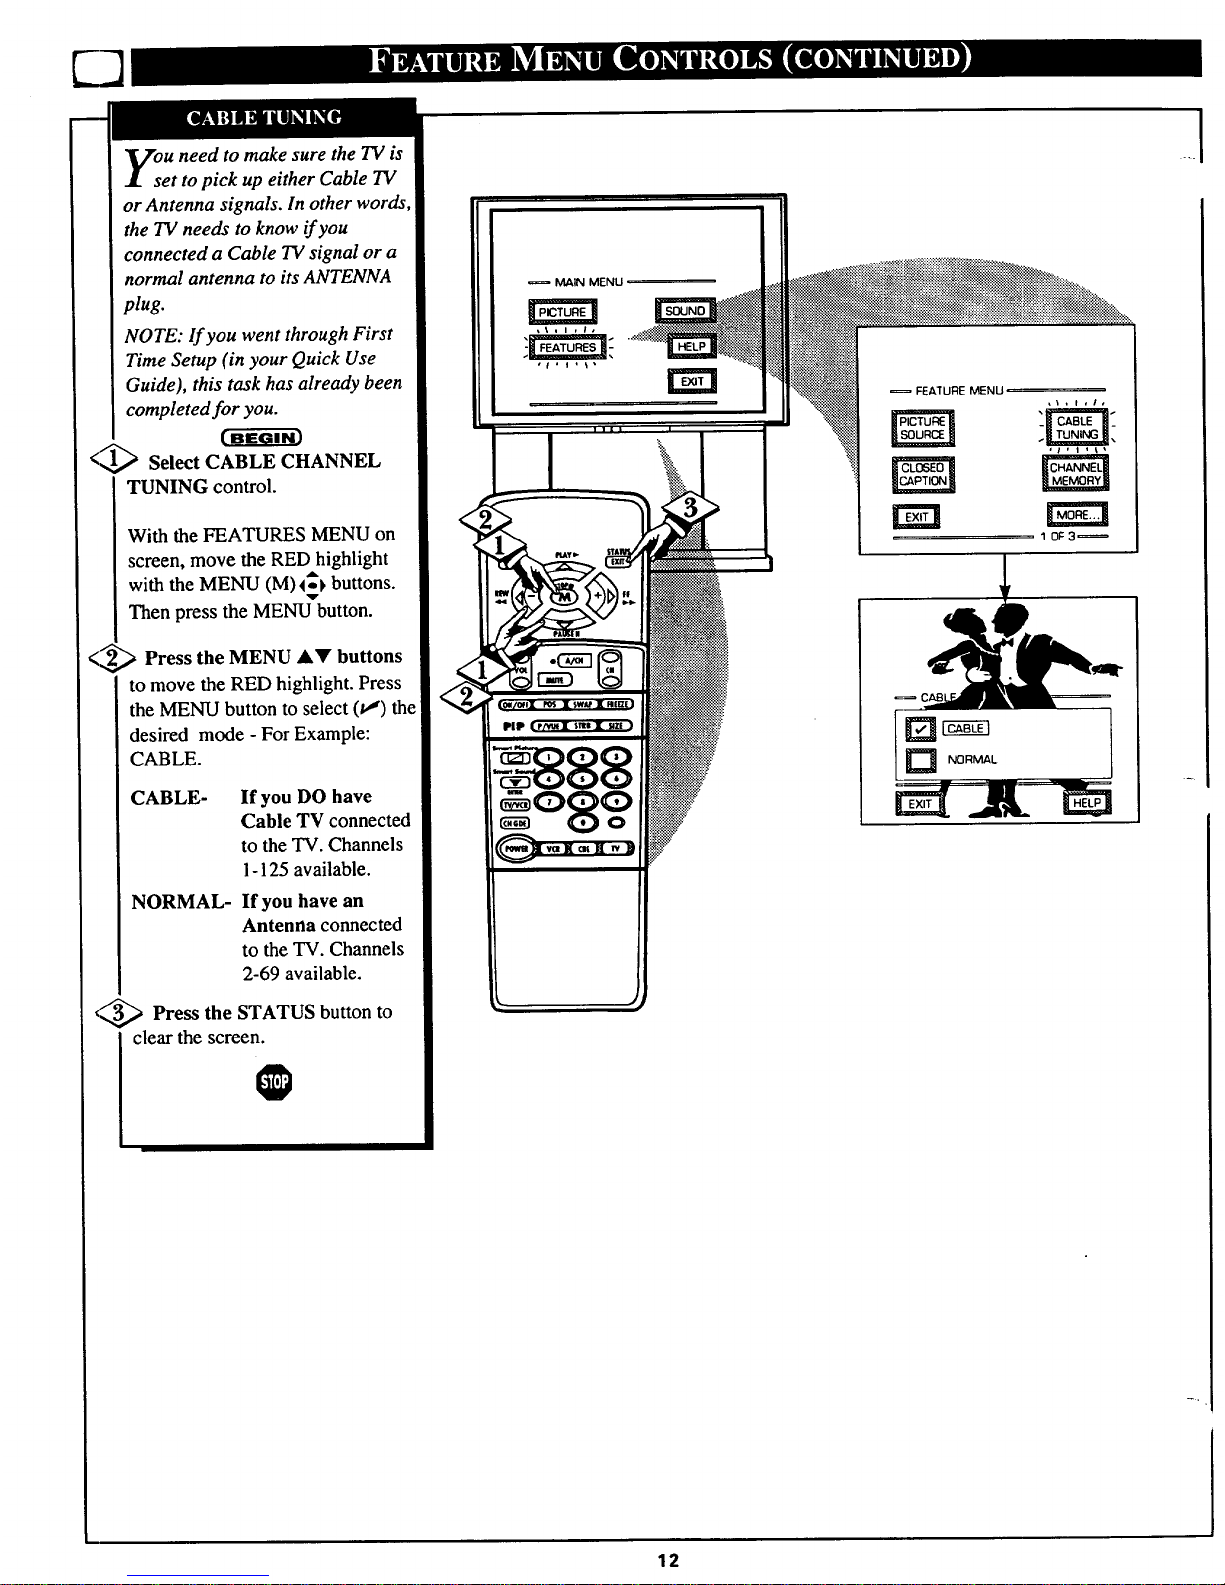
u need to make sure the TV is
et to pick up either Cable TV
or Antenna signals. In other words,
the TV needs to know if you
connected a Cable TV signal or a
normal antenna to its ANTENNA
plug.
NOTE: If you went through First
Time Setup (in your Quick Use
Guide), this task has already been
completed for you.
<'1,_ Select CABLE CHANNEL
TUNING control.
With the FEATURES MENU on
screen, move the RED highlight
with the MENU (M)_ buttons.
Then press the MENU button.
<_-_'_ Press the MENU AV buttons
to move the RED highlight. Press
the MENU button to select (tJ) the
desired mode - For Example:
CABLE.
CABLE- If you DO have
Cable TV connected
to the TV. Channels
1-125 available.
NORMAL- If you have an
Antenna connected
to the TV. Channels
2-69 available.
,_/_ Press the STATUS button to
L clear the screen.
MAIN MENU
= FEATURE MENU
1 0F3=
....
12
Page 13
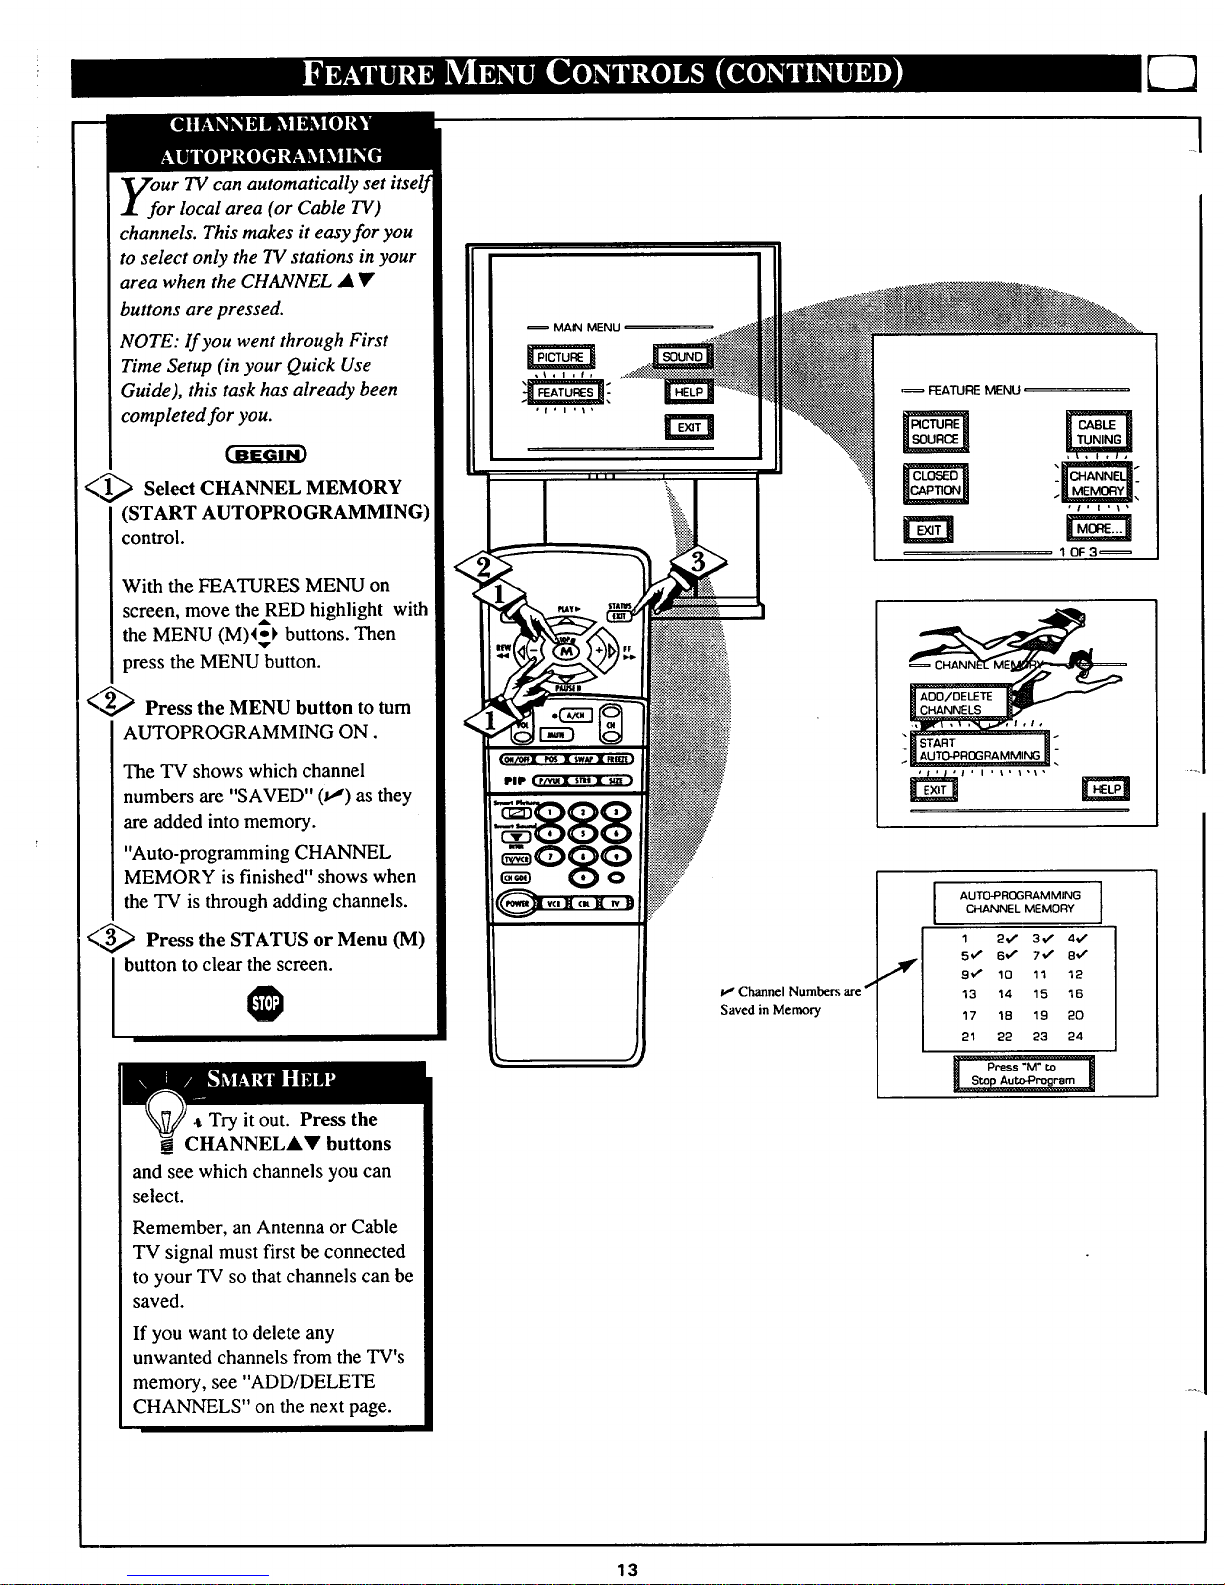
Ur TV can automatically set itself
r local area (or Cable TV)
channels. This makes it easy for you
to select only the TV stations in your
area when the CHANNEL • •
buttons are pressed.
NOTE: If you went through First
Time Setup (in your Quick Use
Guide), this task has already been
completed for you.
<_._'_ Select CHANNEL MEMORY
(START AUTOPROGRAMMING)
control.
With the FEATURES MENU on
screen, move the RED highlight with
A
the MENU (M)4-_ buttons. Then
press the MENU button.
< _,,_," Press the MENU button to turn
AUTOPROGRAMMING ON.
The TV shows which channel
numbers are "SAVED" (t,,") as they
are added into memory.
"Auto-programming CHANNEL
MEMORY is finished" shows when
the TV is through adding channels.
<_ Press the STATUS or Menu (M)
I button to clear the screen.
@
Try it out. Press the
CHANNELAV buttons
and see which channels you can
select.
Remember, an Antenna or Cable
TV signal must first be connected
to your TV so that channels can be
saved.
If you want to delete any
unwanted channels from the TV's
memory, see "ADD/DELETE
CHANNELS" on the next page.
MAIN MENU
II II I
FEATURE MENU
10F3_
PIP
Channel Numbers are ""
Saved in Memory
AUT0-PROGRAMMING
CHANNEL MEMORY
1 2€" 3€" 4,4"
5€" 6€" 7€" 81/'
9_€_ 10 qq 12
13 14 15 16
17 18 19 20
21 22 23 24
13
Page 14
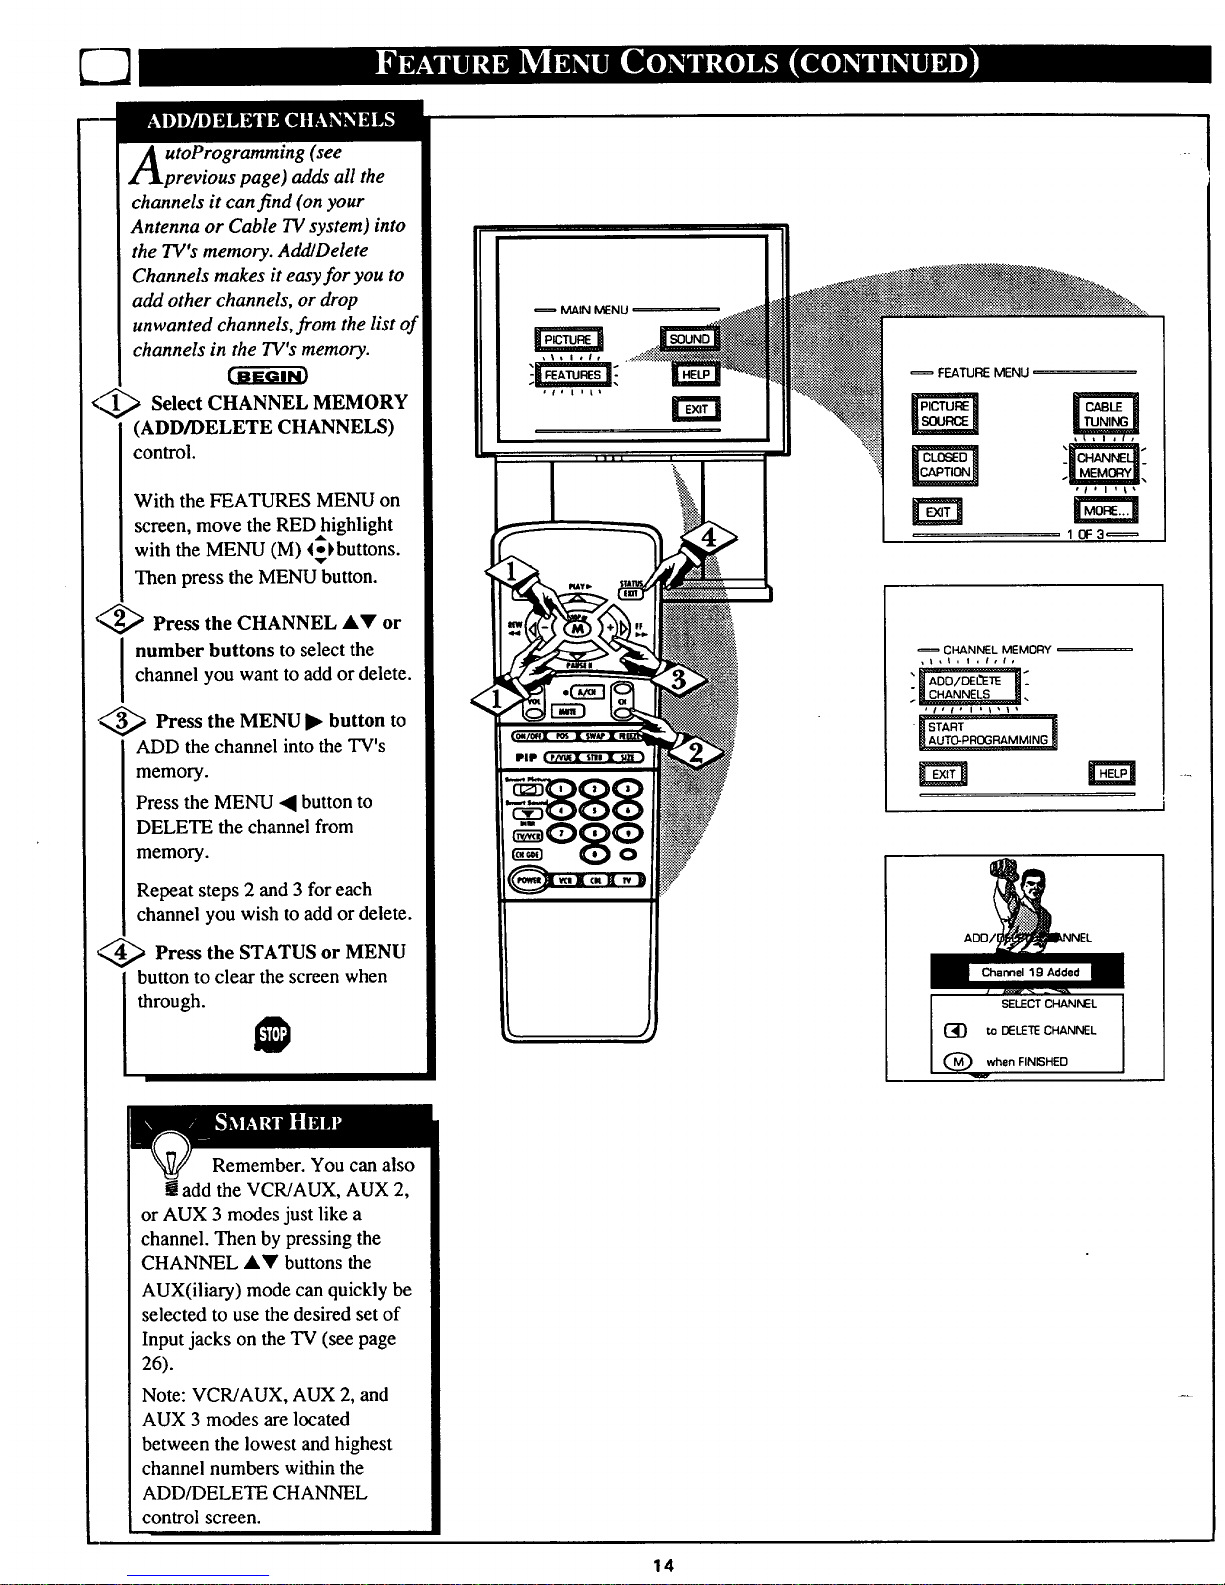
ladds all the
channels it can find (on your
Antenna or Cable TV system) into
the TV's memory. Add/Delete
Channels makes it easy for you to
add other channels, or drop
unwanted channels, from the list of
channels in the TV's memory.
<_ Select CHANNEL MEMORY
(ADD/DELETE CHANNELS)
control.
With the FEATURES MENU on
screen, move the RED=highlight
with the MENU (M) <_)buttons.
Then press the MENU button.
",_ Press the CHANNEL AV or
number buttons to select the
channel you want to add or delete.
._--_ Press the MENU ) button to
ADD the channel into the TV's
memory.
Press the MENU • button to
DELETE the channel from
memory.
Repeat steps 2 and 3 for each
channel you wish to add or delete.
_,,_ Press the STATUS MENU
or
button to clear the screen when
through.
= MAIN MENU
FEATURE MENU
10F3_
CHANNEL MEMORY --
,t,t, i ,/,t,
ADO
Channel 19 Added
(_ DELETE CHANNEL
Q when FINISHED
Remember. You can also
! add the VCR/AUX, AUX 2,
or AUX 3 modes just like a
channel. Then by pressing the
CHANNEL &Y buttons the
AUX(iliary) mode can quickly be
selected to use the desired set of
Input jacks on the TV (see page
26).
Note: VCR/AUX, AUX 2, and
AUX 3 modes are located
between the lowest and highest
channel numbers within the
ADD/DELETE CHANNEL
control screen.
14
Page 15
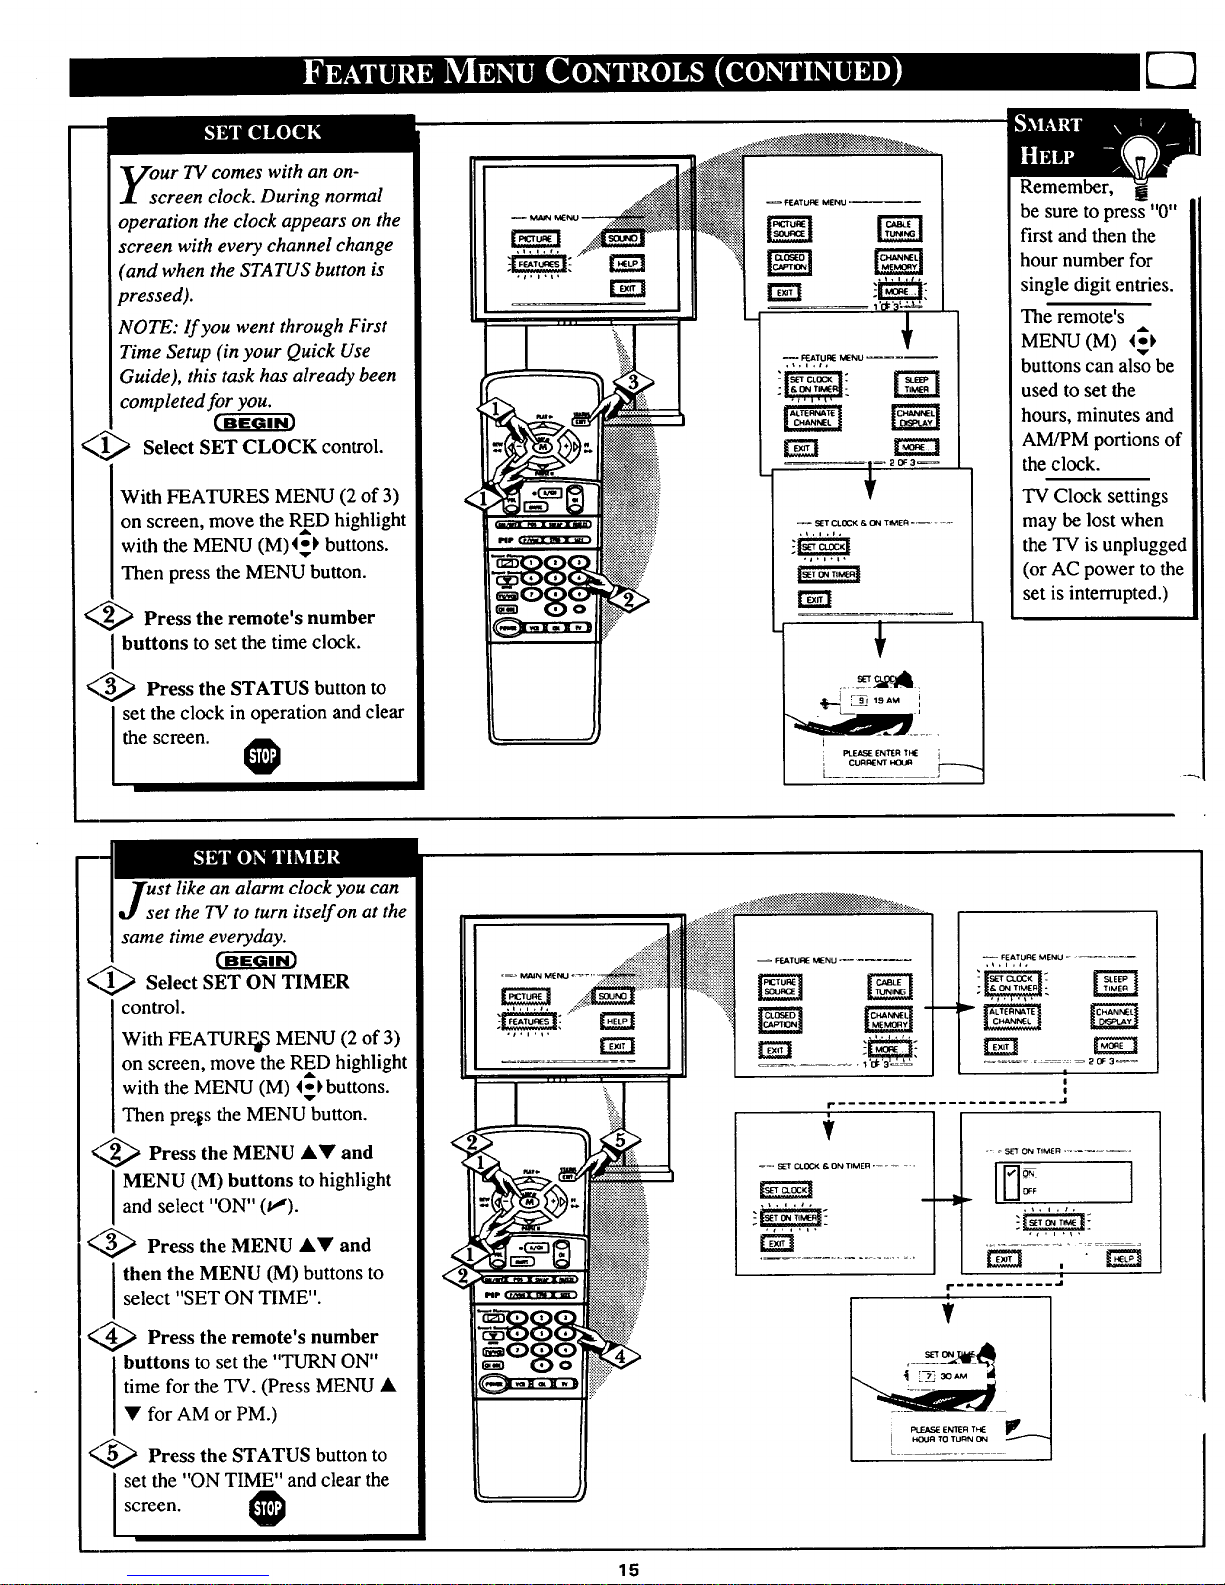
our TV comes with an on-
creen clock. During normal
operation the clock appears on the
screen with every channel change
(and when the STATUS button is
pressed).
NOTE: lf you went through First
Time Setup (in your Quick Use
Guide), this task has already been
completed for you.
(1_ Select SET CLOCK control.
With FEATURES MENU (2 of 3)
on screen, move the RED highlight
with the MENU (M)4_) buttons.
Then press the MENU button.
(-,,_ Press the remote's number
buttons to set the time clock.
_,,,_ Press the STATUS button to
set the clock in operation and clear
the screen.
->4:
-_
FEATU_ MENU _
I '_'3 _,_&_,
+
-- _ATU_ MENU
Remember, a
be sure to press "0"
first and then the
hour number for
single digit entries.
The remote's
MENU (M) 1_)
buttons can also be
used to set the
hours, minutes and
AM/PM portions of
the clock.
TV Clock settings
may be lost when
the TV is unplugged
(or AC power to the
set is interrupted.)
ust like an alarm clock you can
et the TV to turn itself on at the
same time everyday.
A
<'1_ Select SET ON TIMER
control.
With FEATURFoS MENU (2 of 3)
on screen, move the RED highlight
with the MENU (M) 4_)buttons.
Then pre._s the MENU button.
<,,_ Press MENU &Y and
the
I MENU (M) buttons to highlight
and select "ON" (t!).
<,,_ Press the MENU &• and
I then the MENU (M) buttons to
select "SET ON TIME".
<,_ Press the remote's
number
I buttons to set the "TURN ON"
time for the TV. (Press MENU •
• for AM or PM.)
<,,_ Press the STATUS button to
I set the "ON TIME" and clear the
screen.
.+_+::::i!!
...... _.... ++:'>_:_iiiiiiiiiiiiii
•,_ _:_-__ ,
..........
iiii_fliii/ii_i_::_::::!::-- F_TU_MENU.....
++iiiiiii
................. 2 OF 3_
!
I
l
f, ...................... .I
+
_=, SET CLOCK K ON T_MER ......
,+,,,i,
tr_
• - _ SET ON TIMER ,_ _=- ......
|
........... ,J
ENIER THE _1_
HOUR TOTURN ON
15
Page 16
-m
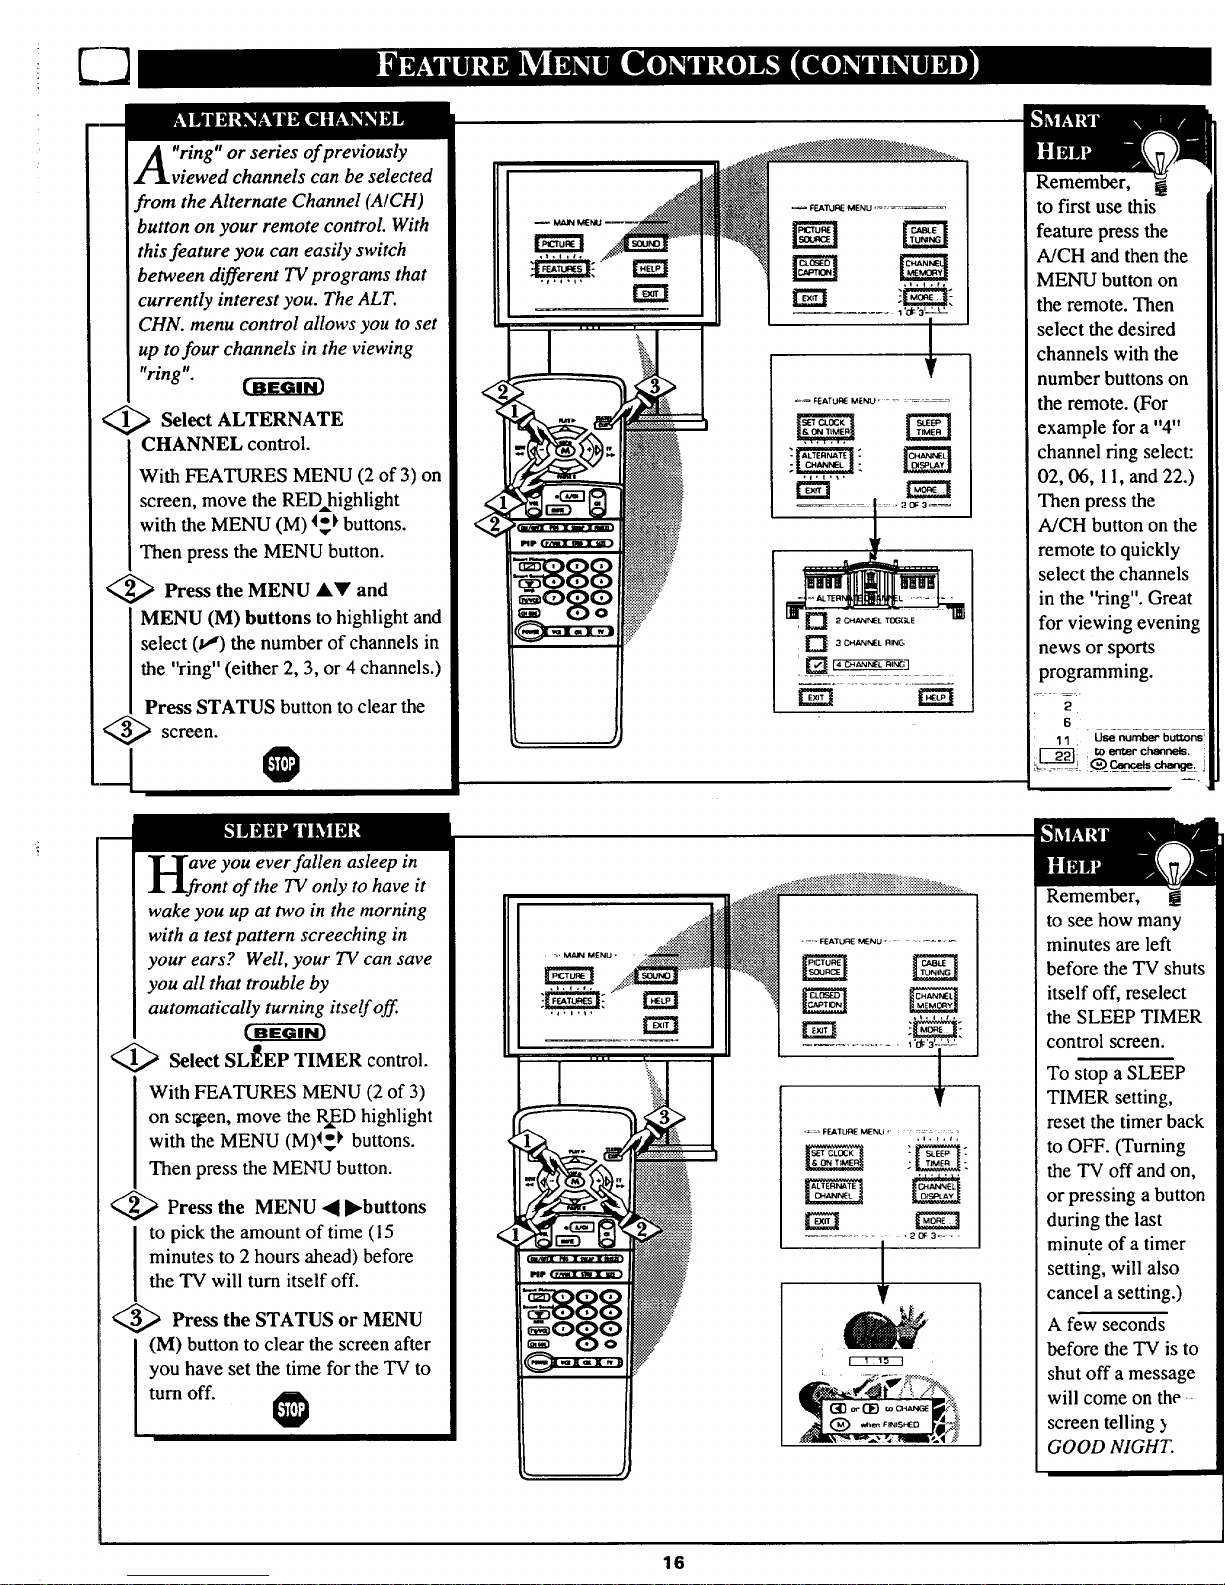
A ring" or series of previously
viewed channels can be selected
from the Alternate Channel (A/CH)
button on your remote control. With
this feature you can easily switch
between different TV programs that
currently interest you. The ALT.
CHN. menu control allows you to set
up to four channels in the viewing
"ring".
_ Select ALTERNATE
CHANNEL control.
With FEATURES MENU (2 of 3) on
screen, move the RED, highlight
with the MENU (M) _ buttons.
Then press the MENU button.
<_ Press the MENU A_' and
MENU (M) buttons to highlight and
select (u,") the number of channels in
the "ring" (either 2, 3, or 4 channels.)
Press STATUS button to clear the
screen.
.J •
_ F_ATU_ MENU ...........
] 3 CHANNEL RI_IG
Remember,
to first use this
feature press the
A/CH and then the
MENU button on
the remote. Then
select the desired
channels with the
number buttons on
the remote. (For
example for a "4"
channel ring select:
02, 06, 11, and 22.)
Then press the
A/CH button on the
remote to quickly
select the channels
in the '_-ing". Great
for viewing evening
news or sports
programming.
B
11 : Use number butt, on_
iL i.
aVe you ever fallen asleep in
ont of the TV only to have it
wake you up at two in the morning
with a test pattern screeching in
your ears? Well, your TV can save
you all that trouble by
automatically turning itself off.
_ Select SLEEP TIMER control.
With FEATURES MENU (2 of 3)
on sc_en, move the RffD highlight
with the MENU (M)_ buttons.
Then press the MENU button.
<_ Press the MENU • I_buttons
I o pick the amount of time (15
minutes to 2 hours ahead) before
the TV will turn itself off.
<_ Press the STATUS or MENU
(M) button to clear the screen after
you have set the time for the TV to
turn off.
..... FEATUAE MENU .........
rm
......... i 1 _3 ....
V
Remember,
to see how many
minutes are left
before the TV shuts
itself off, reselect
the SLEEP TIMER
control screen.
To stop a SLEEP
TIMER setting,
reset the timer back
to OFF. (Turning
the TV off and on,
or pressing a button
during the last
minute of a timer
setting, will also
cancel a setting.)
A few seconds
before the TV is to
shut off a message
will come on the
screen telling )
GOOD NIGHT.
16
Page 17
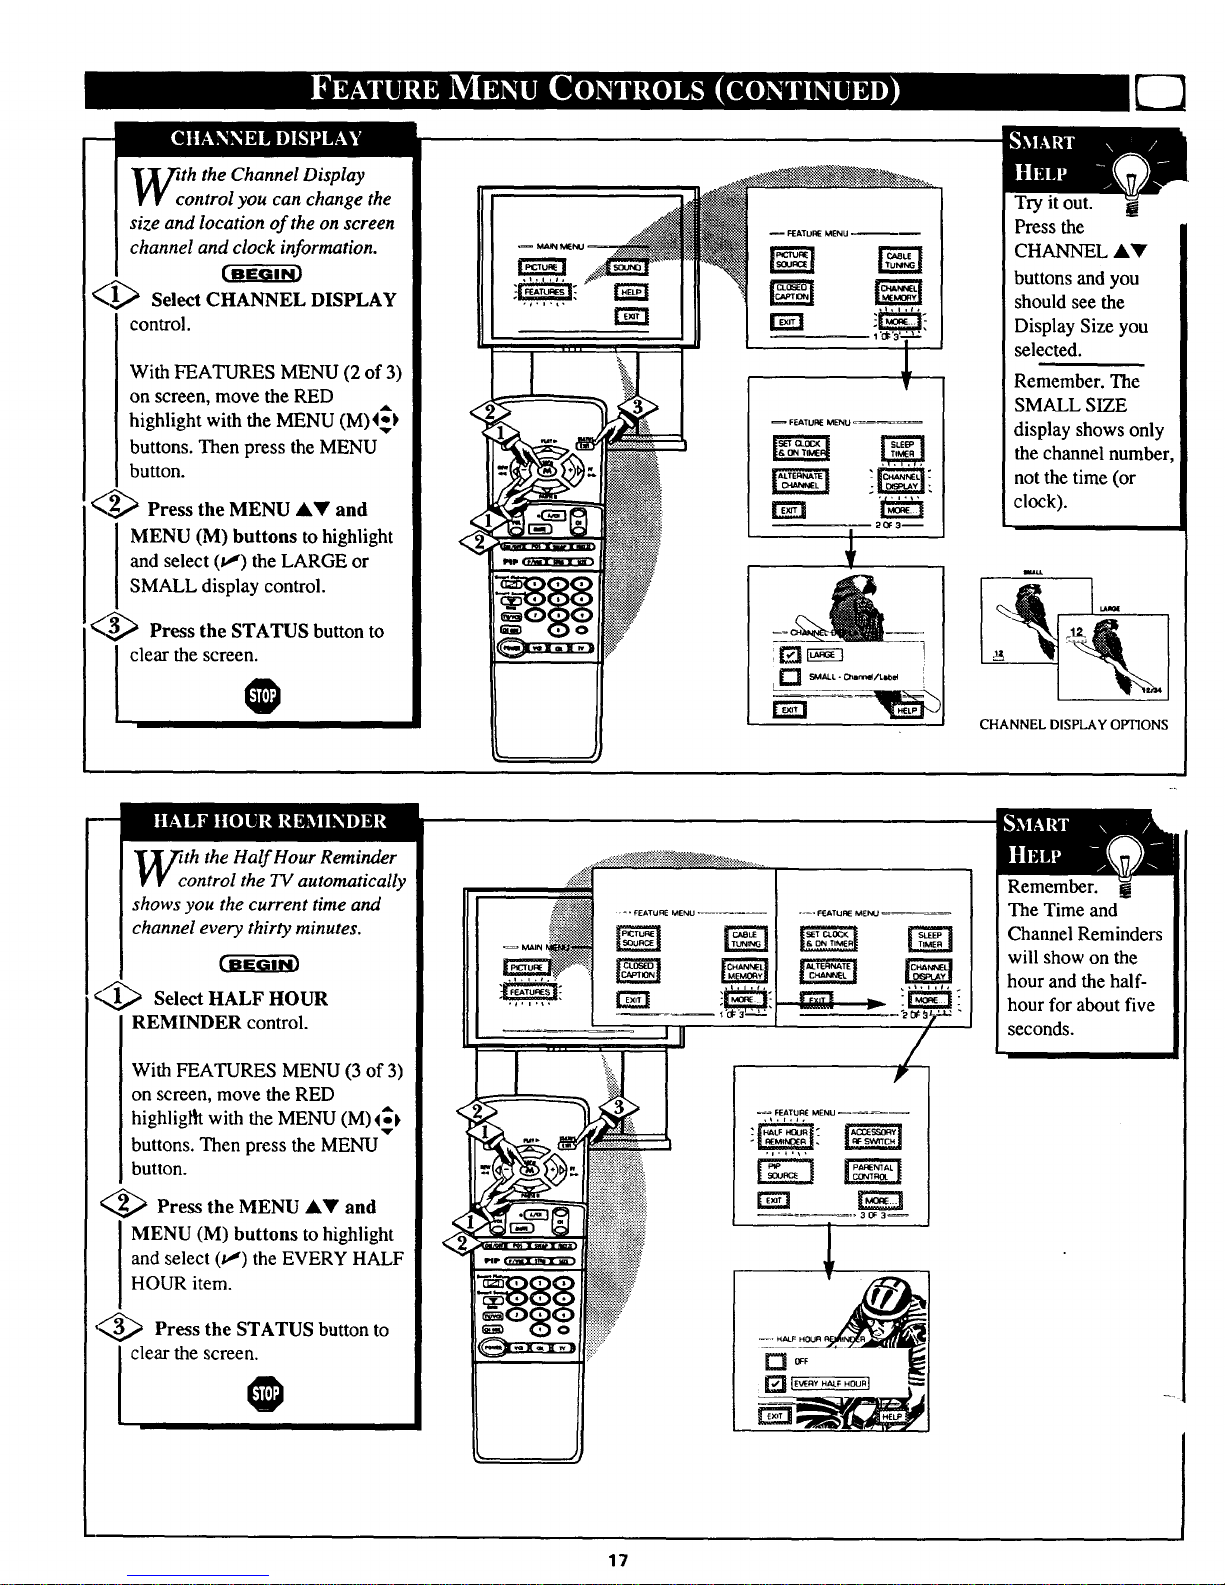
th the Channel Display
ontrol you can change the
size and location of the on screen
channel and clock information.
_1_ Select CHANNEL DISPLAY
control.
With FEATURES MENU (2 of 3)
on screen, move the RED
,aL
highlight with the MENU (M)4_
buttons. Then press the MENU
button.
_ Press the MENU &Y and
I MENU (M) buttons to
highlight
] and select (v") the LARGE or
I SMALL display control.
_ Press the STATUS button to
clear the screen.
I
-- FEATUI_ MENU _--
FEATU_ MENU _--_
20F3--
I [] SMALL - _mnn_/t_b_4
Try it out.
Press the
CHANNEL &V
buttons and you
should see the
Display Size you
selected.
Remember. The
SMALL SIZE
display shows only
the channel number,
not the time (or
clock).
imtt
CHANNEL DISPLAY OPTIONS
th the Half Hour Reminder
ontrol the TV automatically
shows you the current time and
channel every thirty minutes.
q,'_ Select HALF HOUR
REMINDER control.
With FEATURES MENU (3 of 3)
on screen, move the RED
highligltt with the MENU (M) ¢_k
buttons. Then press the MENU
button.
<_ Press the MENU &_' and
MENU (M) buttons to highlight
and select (t,,") the EVERY HALF
HOUR item.
../&--...
,"3,,,_ Press the STATUS button to
clear the screen.
@
...._::i:iilil
.... FEATUnE MENU .......
7
Remember.
The Time and
Channel Reminders
will show on the
hour and the half-
hour for about five
seconds.
17
Page 18

arental Control allows parents
to block out, or "censor", any
channels they think children should
not watch. A channel placed under
Parental Control cannot be viewed
until a correct access code is used to
unlock the channel for viewing.
First let's set your Parental Code:
_1_ Select the PARENTAL
CONTROL.
With FEATURES MENU (3 of 3)
on screen, move the RED highlight
with the MENU (M) 4-_ buttons.
Then press the MENU button.
"BLOCK CHANNELS" and
"SETUP CODE" show on screen.
_ Press MENU AV and
the
I MENU (M) buttons to highlight
and select the SETUP CODE item.
_ Press 0, 7, 1, 1 on the remote.
"XXXX" shows on the ACCESS
CODE SETUP screen as you press
the number buttons.
"INCORRECT ACCESS CODE -
TRY AGAIN" will also show on the
screen.
_--.._ Press 0, 7, 1, 1on the remote
I again.
"Next Enter Your New Access
Code" shows on the screen.
Enter a new four digit number
code using the remote.
"Access Code Changed" shows on
the screeb to let you know the new
code has been set.
Continue to the next page to find
out how to "block" channels from
viewing.
TE:Your TV left the factory with the Parental Code set to "0000". If you are using
r TV and the Parental Control for the first time, and don't want to SETUP a new
ess code number, you can use the "0000" number to block channels - see next page.
"0711" Parental Code (shown on this page) is given as a default or way to reset the
e when the current Access number is not known.
q
T
r_= FEATURE MENU
E;3
3 OF 3_
_= FEATURE MENU
l
!
............. ,=1
,=-_ PARENTAL CONTROl. _-- =
J
to EXIT
to EXIT
i
I
......... J
to EXIT
to "block" channels I
Press MENU to retum to the I
Parental Control Menu screen.
Press STATUS to clear the screen.
Parents - it isn't possible
! tounlock or defeat your
Censor Code without changing to
a new code number. So if your
Code number changes, and you
didn't change it yourself, then you
will know that someone has
altered the code and the blanked
out channel has been viewed.
18
Page 19

f!oeryour personal Parental
de number has been set (see
previous page), you are now ready
to select the channels you want to
block out or censor.
_[_ Select the BLOCK
CHANNELS control.
With FEATURES MENU (3 of 3)
on screen, move the RED highlight
with the MENU (M) _ buttons.
'v"
Then press the MENU button.
_ Press the MENU AV and
MENU (M) buttons to highlight
and select the BLOCK
CHANNELS item.
<,,3_ Enter the correct Parental
I C_le number.
_4_ Press Channel AV or Channel
I Number buttons to select the
channel you want to block.
W.._ Press the MENU button
to
"BLOCK VIEWING" on the
selected channel.
Press the MENU 4 button to
"ALLOW VIEWING" on a
blocked channel.
Repeat steps 3 and 4 for any other
channels you wish to block out.
.LRemember, to make TV
viewing easier all channels
(and Audio/Video Input jacks)
will be unblocked, once the
correct Parental Code number has
been entered.
When the TV is turned OFF and
then back ON again, Parental
Control is back in place for all
channels.
ll
]
' PAR_ENTAL CONTROL
I
CHANNEL 19
BLOCKEO BY PARENTAL CONTROL
I SELECT CHANNEL
a.J . C_ to ALLOW _G
:) tO EXIT
I
T Note: You al_ block out the
can
u_ of the Audio/Video Input jacks
on the TV. This stops the viewing
of VCR programs which can be
shown through the A/V IN jacks,
Please enter Acce_._ Code
.OR-
Select. enorJ_er Channel
lot viewing
Just select VCR/AUX I, AUX 2, or
AUX 3 (located between the lowest
and highest channel numbers) on
the Channel Blocking .screen. and
.select "blocked".
BLOCKED CHANNEL SCREEN MESSAGE
(Appears when an attempt to .select a blocked
channel is made and Parental Control is ON.)
]
19
Page 20

our TV also has individual
ound adjustment controls. The
BASS (low frequency), TREBLE
(high frequency), and Speaker
BALANCE may all be used to
adjust the sound playback of TV
programs.
Select BASS, or TREBLE, or
BALANCE sound control.
With the SOUND MENU on the
screen, move the RED highlight
with the MENU (M) 4_ buttons.
Then press the MENU button.
_! ) Press the (+) or (-) buttons to
adjust the sound control to levels
you prefer.
_,,_ Press the STATUS button to
clear the screen.
<
Select and then press MENU
(M) button to view additional
controls grouped under same
feature heading. For
Example: Treble, Balance,
Bass Boost, Stereo, etc.
1
Tin e BASS BOOST control
creases the low frequency
audio range of the TV. This creates
a deeper, fuller playback sound
which can be heard through the
TV's speakers.
<1_ Select BASS BOOST sound
control.
With the SOUND MENU on the
screen, move the REDhighlight
with the MENU (M) _ buttons.
Then press the MENU button.
_ Press the MENU _kY and
MENU (M) buttons to highlight
and turn ON (v,') the BASS
BOOST control.
<._ Press the STATUS button to
clear the screen.
=_ SOUND MENU
l, i ,to, i 't
10F3_
L_ _F
2O
Page 21

ur TV is able to receive
roadcast stereo TV programs.
The TV is equipped with an
amplifier and twin speaker system
through which the stereo sound
can be heard.
A RED stereo light (on the front of
the TV) will come on when a
stereo broadcast is received.
<_ Select STEREO sound control.
With the SOUND MENU on the
screen, move the RED highlight
with the MENU (M) _buttons.
Then press the MENU button.
<_ Press the MENU AV and
MENU (M) buttons to highlight
and turn ON (t,,") the STEREO
mode.
< _,_,_ Press the STATUS button to
clear the screen.
Remember.
If a stereo signal i_
not available and
the TV is placed in
the STEREO mode,
sound coming from
the TV will remain
monaural (mono).
SOUND MENU
1 OF a_
/
O MONO AT ALL TIMES
part of the stereo broadcast
system. Sent as a additional
audio _hannel SAP can be heard
apart from the current TV
program sound. TV stations are
free to use SAP for any number
of purposes, but many experts
believe it will be used for foreign
language translations of TV
shows (or for weather and news
bulletins.)
NOTE: If a SAP signal is not
present with a selected program,
the SAP option can not be
selected. 'q'his program does not
contain SAP information" will
show on the TV screen.
SECOND PROGRAM SOUND CAN
ONLY BE SELECTED (I.,,")WHEN
IS PRESENT
21
Page 22

_b; Stereo Surround control can
used to add greater depth
and dimension to both monaural
(MONO) and STEREO TV sound.
_ Select STEREO SURROUND
control.
With the SOUND MENU on the
screen, move the REDhighlight
with the MENU (M)4_ buttons.
Then press the MENU button.
_'_ Press the MENU AY and
MENU (M) buttons to highlight
and turn ON (v_) the STEREO
SURROUND control.
-_/.._ Press the STATUS button to
clear the screen.
] ON
Remember,
with the Stereo
Surround control
turned ON even
monaural (mono)
audio source
material can be
heard through rear
Surround Sound
speaker connections
(see page 24).
Note: The monaural
version of Surround
Sound may be
louder at the rear set
of speakers than
what is normally
heard with true
stereo signal
Surround Sound,
but this is normal
se the DISPLAY VOLUME
ontrol to see the TV's volume
level settings on the TV screen.
Once set the Volume Display will
be seen each time the VOLUME
buttons (on the TV or remote) are
pressed.
_,l_ Select DISPLAY VOLUME
control.
With SOUND MENU (2 of 3) on
screen, move the RED highlight
with the MENU (M)4_ buttons.
Then press the MENU button.
g.,_w,,.,a Press the MENU AY and
MENU (M) buttons to highlight
and turn ON (t!) the DISPLAY
VOLUME control.
<',_ Press the STATUS button to
clear the screen.
@
I , i .I
-'_[] NEVER !
D It_Um"__us"_uri
Remember,
"DURING
ADJUSTMENT"
means the volume
level will be on
screen whenever the
Volume buttons are
pressed.
22
Page 23

WOpUld you like to hear TV
rograms through your audio
hi-fi system? The TV's Variable
Audio Output jacks and TV
Speaker On/Off control work
together to offer you this TV sound
option.
Connect the R(ight) and L(eft)
VARIABLE AUDIO OUT jacks
on the TV to the R and L Audio
Input jacks on your amplifier or
sound system.
Set the audio system's volume to
normal listening level.
<:_ Turn the TV and audio system
ON. You can now adjust the sound
level coming from the audio
system with the Volume &Y
buttons on the TV or remote.
<,-'_ To hear the TV sound from
only
the audio system speakers, select
TV SPEAKERS control.
With SOUND MENU (2 of 3) on
screen, move the REDhighlight
with the MENU (M)_ buttons.
Then press the MENU button.
€-,_ Press the MENU AV and
MENU (M) buttons to highlight
and turn OFF (v") the TV
SPEAKERS control.
You should now only hear TV
sound coming from the audio
system speaker.
<_ Press the STATUS button to
clear th_ screen.@
BACK OF TV
AUDIOIN _ _
(RED/WHITE)
VARIABLE
AUDIO
OUTPUT JACKS
AUDIO SYSTEM
Remember, the audio
msystem may have to be in
AUX(iliary) mode to play sound
from the "IV (Outputs).
Note: When the TV SPEAKER
control is set to "NORMAL" (for
TV speaker operation) make sure
the VARIABLE AUDIO OUTPUT
control (see next page) is also set
to "STEREO" in order for the TV's
AUDIO OUTPUT jacks to work
properly.
23
Page 24

Z_Y adding optional external
I,LJ speakers to the TV's sound
system, you can create the feeling
of reflected sound that surrounds
you at a movie theater or concert
hall.
Connect both external
speakers to the speaker wire
terminals on the TV.
Recommended speakers: 8ohm, 15
watt minimum. Be sure the (+) and
(-) speaker wires are connected to
the correct R(ight) and L(eft)
speaker terminals on the TV.
_-._ Place the speakers so the
viewing area is between the TV
and the rear surround speakers.
(See overhead view drawing.)
<_3_ Turn TV ON and place the
STEREO control to the "STEREO
IF AVAILABLE" (v") position.
After setup whenever a stereo
signal is received the audio will be
heard in Surround Sound.
REAR SURROUND SOUND
SPEAKER TERMINALS
®®
BACK OF TV
REAR SURROUND SOUND SPEAKERS
Note: The rear Surround Sound speakers will not
be beard at the same volume level as the front TV
speakers. It is intended for the rear speakers to give
a background noise effect which requires a lower
volume level than the 1N"s front speakers.
Remember,
Surround Sound
will not work with
only one speaker
connected; or with
monaural audio
material (unless
Stereo Surround
control is turned
ON - see page 22).
REAR SPEAKER REAR SPEAY
PRIMARY VIEWING AREA
_ja e TV's Variable Audio Output
cks can also be used for
Surround Sound. Once they are
connected to an external hi-fi
system its speagers can be used for
the playback of Surround Sound.
<_ Connect the R(ight) and L(eft)
VARIABLE AUDIO OUT jacks
on the TV to the R and L Audio
Input jacks on your amplifier or
sound system.
..-G'-.
€_,,,,_ Turn TV ON and place the
VARIABLE AUDIO OUTPUT on
screen control to the SURROUND
(v*') position. (Sound Menu 3 of 3).
Note:This will change the
Left/Right channel audio line level
signal at the Audio Output jacks to
the same signal found at the TV's
Surround Sound Speaker terminals.
@
BACK OF "IV
AUDIO :
INPUT JACKS
VARIABLE AUDIO
OUTPUT JACKS
AUDIO SYSTEM SPEAKERS USED AS REAR
SURROUND SOUND SPEAKERS
24
Page 25

I
th the use of an optional Dolby
urround Prologic Amplifier you
can receive the added sound
dimension found only in Dolby
Surround programs. Dolby Surround
combines wide left-to-right stereo
separation with solid center channel
imaging, complemented by a front-to-
back soundfield effect. The result for
you the listener is to create a movie
theater or concert hall "you are there"
sound sensation.
<_/_ Connect the FIXED Audio
v
Output jacks on the TV to the AUX
INPUT jacks on a Dolby Prologic
Audio Amplifier system.
<_/2"_ Connect the CENTER
v
I HANNEL Input jack on the TV to
the CENTER PRE-AMP jack on the
Dolby Prologic Amplifier.
<_/3"_ Connect the rear set of Surround
V
Sound speakers to the (+,-)
connections on the Dolby Surround
Amplifier.
Place the Audio System's Front and
Rear Surround speakers as shown in
the picture on this page.
<,_ Turn the TV ON. Set TV Volume tc
normal listening level. Place the TV's
TV SPEAKERS (Sound Menu 2 of 3)
control to "CENTER CHANNEL
INPUT".
Turn the Dolby Prologic Amplifier
ON. Place its SURROUND MODE
control to the l_olby Prologic mode.
<,_ The full effect of DOLBY
] SURRQUND programs (either
broadcast, VCR, or VDP) can now be
heard through the TV and Amplifier
system speakers.
Remember. R(ight)/L(eft)
channel stereo sound and rear
Surround sound will be heard from the
external (or Dolby Prologic Amplifier
system) speakers. The TV's front
cabinet speakers are used for true
Center Channel sound necessary to
complete the Dolby Prologic Surround
arrangement.
You will need the following to set-up and use the designed
SURROUND SOUND system shown below:
One set of rear Surround Sound speakers
One Dolby Prologic Audio Amplifier (with Center Pre-Amp
Output and twin speakers)
One DOLBY SURROUND encoded source (either playback -
VCR, VDP, etc.- or broadcast).
_SURROUND CENTER
__ PRE-AMP
AUDIO
Left Front Right Front
Speaker
jack's volume, bass, and treble
levels can be adjusted with the
TV's VOLAV 10ultons of using
the on-screen Menu controls.
_Sunound Speak_
J
R, LREAR
SURROUND
SPEAKERS
R SPEAKER OUTPUT
SPEAKER OUTPUT
R, L AUOIO INPUT
I_1_1 _ t 1 A
Audio CENTER CHANNEL PRE-AMP OUT CENTER R, L FIXED
Amplifier C pAj_N E UDIO OUTPUT
CENTER CHANNEL
I
LEFT SPEAKER
Use the noise _quencer (or .sound test signal) on
the Dolby Prologic Amplifier. Adjust the Center
Channel volume level (using the Dolby Prologic
Amp's Center Channel Volume control) to equ',d
the left/right and surround speaker volume levels.
If Center Channel volume is still too low after
using the Dolby Prologic Amplifier, use the TV's
Volume conlrol buttons to set desired Center
Channel level.
Make sure the TV's BALANCE control is set to
the middle position or the Center channel sound
image will not be centered.
Use the Dolby Prologic Amplifier's Volume
buttons to adjust the surround system sound level.
REAR SURROUND SOUND SPEAKERS
/l
RIGHT SPEAKER
25
.... .[
Page 26

_ja e TV's Audio/Video Input
cks are for direct picture
sound connections between the TV
and a VCR (or Video Disc Player,
etc.) that has AudiolVideo Output
jacks.
To view the playback of a VCR
tape by using the Audio/Video
Input jacks on the TV:
_ Connect the VIDEO OUT jack
I rom the VCR to the VCR/AUX
VIDEO IN jack on the TV.
2_ Connect the AUDIO OUT
jacks R(ight) and L(eft) from the
VCR to the VCR/AUX AUDIO IN
jacks on the TV.
3_,_ Select the "VCR/AUX 1"
PICTURE SOURCE SELECT
control on the "IV.
With the FEATURES MENU on
screen, move the REDhighlight
with the MENU (M)_'_ buttons.
Then press the MENU button.
4_ Press the MENU AY and
I ENU (M) buttons to highlight
and select (u,") the VCR/AUX
mode.
5_ Turn VCR ON and
the
press
PLAY to view the tape on the TV.
@
PICTURE AND SOUND FROM
PLAYBACK OF VCR TAPE
AUX 2
AUX 3
NOTE: Connections and use of the
TV's AUX 2 Audio/Video Input jacks
are the same as for the VCR/AUX I
jacks (except "AUX 2" is selected as
the Picture Source in step 3).
BACK OF TV
VCR
If you have a single (monaural)
Audio Output VCR, "Y" connectors
are available to complete your
Iconnection. Contact your dealer, or
lout_ans Information Center (I-800-
292-6066) to order any optional
[ accessories.
Remember, after it is
conrlected an easy way to
select the VCR/AUX mode is to
press the VCR button on the front
of the TV (or the TV/VCR button
on the remote.) Channels 3 and 4
can also be selected in this way.
Or if you have added VCR/AUX
to the TV's channel memory (see
page 14), just press the
CHANNEL ,iV buttons to select
the VCR/AUX mode.
Remember the accessory storage
compartment (on the front of the
TV) can be used to place VCRs
(or other video equipment) within
the cabinet of the TV.
26
Page 27

r more convenient Direct
layback connections the TV's
Front Audio/Video Input panel can
be used. Located next to the TV's
front control panel (under a small
cover door) these Input jacks allow
for quick and easy connections,
particularly for the playback of
Camcorder tape recordings.
To view the playback of a
Camcorder recording using the
Audio/Video Input jacks on the
front of the TV:
<,_ Connect the VIDEO OUT jack
Ifrom the Camcorder to the Front
I VIDEO IN jack on the TV.
<_ Connect the AUDIO OUT
jacks R(ight) and L(eft) from the
Camcorder to the Front AUDIO IN
jacks on the TV.
_ Select the "AUX 3"
PICTURE SOURCE SELECT
control on the TV.
With the FEATURES MENU on
screen, move the REDAhighlight
with the MENU (M) 4-_ buttons.
Then press the MENU button.
<,,_ Press the MENU AY and
I ENU (M) buttons to highlight
and select (u,") the AUX 3 mode.
_,,_ Turn the Camcorder ON and
press PLAY to view the tape on
the TV.
FEATURE MENU
PICTURE AND SOUND FROM PLAYBACK
PmCTURESOURCEc
QQQ
FRONT AUDIO/VIDEO JACKS
Lift Up on Jackpanal Cover Plate
to expose Input Jacks.
VIDEO IN
(YELLOW)
AUDIO/VIDEO
OUTPUT JACKS
ON CAMCORDER
CAMCORDER
If you have a single (monaural) I
Audio Output Camcorder, "Y" I
connectors are available to complete
your connection. Contact your I
dealer, or our Parts Information I
Center (I-800-292-6066) to order
any optional accessories.
Remember, after it is
connected an easy way to
select the AUX 3 mode is to press
the VCR button on the front of the
TV (or the TV/VCR button on the
remote.) Channels 3 and 4 can
also be selected in this way.
Or if you have added AUX 3 to
the TV's channel memory (see
page 14), just press the
CHANNEL AY buttons to select
the VCR/AUX mode.
27
Page 28

"-.YH_AI Ilk1 UnL__! II] D[O]Ik_lLlUlIk_
rrhe S(uper)-Video connection on
J[ the rear of the TV can give you
better picture detail and clarity, for
the playback of S-VHS VCR tapes
or Video Discs, than the normal
antenna picture connections.
Note: The VCR (or Video Disc
Player) must have a S-VIDEO
OUT(put)jack in order for you to
complete the connections shown on
this page.
l_. Connect the S-VIDEO (S-
VHS) OUT jack from the VCR to
the S-VIDEO jack on the TV.
The S-VIDEO connecting cable
will be supplied with the S-VHS
VCR (or Video Disc Player).
_> Connect the AUDIO OUT
jacks R(ight) and L(efi) from the
xCRto the AUX INl jacks on the
_ Select the "S-VIDEO"
PICTURE SOURCE control.
With the FEATURES MENU on
screen, move the RED highlight
with the MENU (M)4_ buttons.
Then press the MENU button.
The "S VIDEO" picture source
option appears only when a S-
VIDEO cable has been connected
to the TV.
_,_ Turn the VCR ON and place it
in the S-VIDEO (or S-VHS)
playback _ode. Insert S-VHS
cassette tape and playback in a
normal manner.
PICTURE AND SOUND FROM
PLAYBACK OF $-VHS VCR TAPE
I
I_ NTENNA
+::: AUX 3
BACK OF TV
IS-VIDEO _ _ AUDIO OUT
CABLE (RED/WHITE)
PIP fill
S-VHS VCR
J
Remember, after it is
connected an easy way to
select the S-VIDEO mode is to
press the VCR button on the front
of the TV (or the TV/VCR button
on the remote.)
Or if you have added VCR/AUX
to the TV's channel memory, just
press the CHANNEL AY buttons
to select the S-VIDEO mode.
28
Page 29

u]
To e AudiolVideo Output jacks
n the TV can be used to
record TV programs on VCRs
which have Audio/Video Input
jacks.
To record TV programs by using
the Audio/Video jacks on the TV:
<,_ Connect the VIDEO OUT
jack
from the "IV to the VIDEO IN jack
on the VCR.
%_ Connect the AUDIO OUT
jacks R(ight) and L(eft) from the
TV to the AUDIO IN jacks on the
VCR.
'x_ Select the "ANTENNA"
PICTURE SOURCE control on
the TV.
With the FEATURES MENU on
screen, move the RED highlight
with the MENU (M) 4_ buttons.
Then press the MENU button.
Select the channel on the TV that
you want to record.
A
'_,4_ Turn the VCR ON. Put
a
cassette tape in the unit and place
the VCR in the RECORD mode.
PICTURE AND SOUND BEING
RECORDED ON VCR.
BACK OF TV
®®
VCR
Remember, If the VCR
h_s an INPUT SELECTOR
switch, place it in the LINE or
CAMERA position.
Unattended Timer Recordings
with a VCR are possible, but not
recommended with this
connection since the TV must be
left ON for the VCR to record.
29
Page 30

ave you ever played hide and
eek with your remote
control? Are you tired of tearing
tlTehouse apart trying to find if
someone has stuffed the remote
under the couch, put it on the
shelves, or hid it in the desk? Well,
your TV remote can save you all
that looking by automatically
signaling its location to you.
ttere's how it works:
( _. Press the POWER button on
l_the set to turn the TV ON.
Note: Normally you can press any
button on the front of the TV to
turn the set ON. But for the remote
Iocator to work you need to be sure
to use the Power button at the TV.
A "locating remote" message
,.;howson the TV screen.
_,_ Within a few seconds a
chirping or beeping sound will
begin to come from the remote
control hand unit.
The remote will continue to signal
its location for around 30 seconds.
Normal TV program sound will not
be heard while the remote locator is
working.
_,,,_ Once you find the remote just
press any button on the remote and
the beeping sound will stop.
The remote is nowq'eady for
normal TV feature use.
Remember, the remote
Iocator may not properly
receive its 'laoming" signal from
the TV if it has been placed on a
metal shelf or counter material.
Also, since there's a special type
of radio frequency "homing"
signal receiver inside the remote
we are required to notify you that
any changes or modifications not
expressly approved by Philips
Consumer Electronics Company
could void the user's authority to
operate the remote equipment.
Your TV is attempting
to locate a lost remote
Remote Locator "homin
range is around 30 Feet.
STR
[]
30
Page 31

J
31
See the above information on
how to use the Locator Code
Button for Programming.
f
For most homes this step would
not be needed but for your
information:
Up to 9 different remote locator
address codes can be set on which the
TV can send out its "homing" signal.
This is done in case there is more than
one TV (with a remote Iocator)
present, and you want only one
specific remote to be signaled when the
TV is turned ON.*
To set a Locator Address Code:
_With TV turned ON, press the
LOCATOR CODE button on the
remote. (Also be sure the TV
SYSTEM button on the remote has
been pressed.)
You will need a pencil or pen to press
the recessed button.
The TV shows the present Remote
Locator Code.
Press any number button (0-9) on
the remote to set or change the Locat
Code.
The remote will beep to let you know
it has received the new Locator Code
and then return to its normal operating
mode.
Remember, if batteries are
replaced the Locator Code
will need to be reentered.
When setting the Locator Code if any
button, other than the number buttons,
are pressed the remote will return to
its normal operation mode.
*For owners who live in an apartment
(townhouse or condominium)
complex, this task may be necessary
since the remote locator's signal can
be sent and detected directly through
adjoining walls.
Page 32

mart Picture quickly returns your
to preset channel, picture, and
sound level settings that have been
placed in memory. Each Smart
Picture category is preset at the
factory for a different type of
program or viewing condition, but
you have the option to change the
select controls to any levels you
prefer. You can even rename or
change the title of the Smart Picture
category if you want.
_,,_ Press the SMART PICTURE
button on the remote.
[ List of "SMART PICTURE"
I categories shows on the TV screen.
_2_ Press the SMART PICTURE
button repeatedly (or press the
number button) to highlight one of
the Smart Picture categories. (For
example: Movies, Games, etc.)
Automatic factory preset levels for
TV picture and sound controls are
put in use for the selected category.
> Press the MENU button to select
the Smart Picture "SETUP" if you
want to change the control settings
for the selected category. (For
example: "CUSTOM").
"SMART PICTURE MENU" shows
on the screen with a list of picture
and sound controls.
>
Press the MENU 4-_ and MENU
(M) buttons to highlight and select
the desired picture or sound control
item.
Adjust any of the listed controls to
the settings you would prefer for the
currently selected Smart Picture
category.
If you want SMART PICTURE to
select a certain channel number for
you, use the Picture Source Select -
Antenna (t,,') control to set the
channel. (Smart Picture Menu 1 of
1).
<,_ After all control settings are
I finished, press the STATUS button
32
P_TURE MENU=
PICTURE MENU
7
Page 33

USethe Smart Picture settings
uplaced in memory (see
previous page):
,/1,Q_ Press the SMART PICTURE
button on the remote.
List of "SMART PICTURE"
categories shows on the TV screen.
<_ Press the SMART PICTURE
button repeatedly (or press the
number button) to highlight the
Smart Picture category you desire.
For example: press SMART
PICTURE to select "CUSTOM".
(See the "Change Label" section
below on how to write new titles for
the Smart Picture labels.)
<_The channel, picture and
sound
controls will automatically change to
the settings you preset for that
SMART PICTURE item.
Remember, the
[[ "FACTORY SETTINGS"
item can be used at any time to
return the TV to its factory preset
picture and sound control levels.
_c e "CHAN_E LABEL" control
an be used to change the title of
a SMART PICTURE setting into a
name dr label that may be easier for
you to remember.
<_ With the "SMART PICTURE
LABEL" control on the screen, press
the MENU &V buttons to spell out
a new label or title for the selected
SMART PICTURE.
_ Press • I_ to
the MENU buttons
move the red highlight to each letterspace.
<_ Press the STATUS button to
__ clear the screen when the new label is
finished.
1- SPORTS
2- MOVIES
3- WEAKSlG
6- FACTORY SETTINGS
1.SPORTS
2- MOVIES
3-WEAK SIG
6- FACTORY SETTINGS
PICTURE AND SOUND CONTROLS CHANGE
TO PRESET SMART PICTURE SETTINGS FOR
SELECTED CATEGORY.
_ • L
C:_ANGE LABEL
33
1
Page 34

re you tired of the sound of
commercials following you
into the next room or all through
the house? Smart Sound allows you
to preset a desired volume level
that the TV sound will not go
above. This makes for an even,
more consistent sound by reducing
the peaks and valleys that can
occur during program changes or
commercial breaks.
_1_ Press the Smart Sound button
on the remote.
"SMART SOUND ON" shows on
the TV screen.
Press the Smart Sound
button repeatedly to turnthe
Smart Sound ON (or OFF.)
_,_ Press the STATUS button to
I clear the screen when completed.
O
Remember, Smart Sound
B works for sound levels
coming from either the
Antenna/Cable input on the rear of
the TV (RF audio); or the
Auxiliary (VCR/AUX IN) audio
inputs.
I SMARTSOUNDONI
34
Page 35

o you ever have trouble
remembering on which
channel a particular station or
network is located? The Channel
Guide is a quick way to view and
select channels from a list of
Labelled channels.
A Label is a four letter callout you
can set to appear with the on
screen channel number. Example
Label: WXYZ -for a TV station's
call letters.
To select channels from the
Channel Guide:
<_---'_ Press the CH GUIDE button on
V
the remote.
A "CHANNEL GUIDE" shows on
the screen with channel numbers
and labels.
Keep pressing the CH GUIDE
button to see what other labelled
channels can be selected.
'_X-,_ Press the number buttons on
the remote to select the desired
labelled channel.
Remember to press "0" first and
then the number for single digit
channels.
,_.,_S_ Press the MENU button to
change a Label for a channel.
Press the MENU AV and
MENU (M) btlttons to highlight
and select either:.
"MANUAL" to create your own
label for a channel.
'q_RESETS" to choose from a list
of prewritten channel labels.
(See instruction details on this
page.)
,_ Press the STATUS button to
clear the screen@
Create Your Own
Choose From List
i
Return to Guide
GUIDIE LABEL
(_D or _ to SELECT I
(_ o, 09 toCHANCE
I
(_ when FINISHED
MANUAL- To create your
own Channel Label:
Press the Channel AV or
Number buttons to select
desired station.
A red highlight shows the
active letter space for the
channel label.
Press the MENU • •
buttons to pick any of the
letters or symbols that are
given for your use.
Press the MENU ,_ II_
buttons to move the red
highlight to the other letter
spaces and repeat.
Press the STATUS button
to clear the screen when
finished.
PRESETS -To pick a Label
.from the "LABEL" list:
Press the Channel •• or
Number buttons to select
desired station.
Press the MENU ••
buttons to move up and
down the Channel Label
list.
Just stop on any label you
might want to use,
The selected label
automatically appears with
channel changes and when
the STATUS button is
_ressed.
Press the STATUS button
to clear the screen when
finished.
I
35
Page 36

our remote control is set to
work your TV and many
infrared remote (IR ) control
VCRs. However, an easy one-
time step may be necessary
before the remote will work your
VCR.
Try this initial check to see if
going on to thefollowing section
is necessary.
(1_ Press the VCR System
I button on the remote.
<,_ Point remote toward VCR
I and press the POWER button.
_'3_ Does the remote turn
the VCR
ON?
IF YES, • andtry the other
VCR buttons on the remote. If
they also work the VCR, then
the remote is ready and no
further steps are needed.
If NO, continue...
©
VCR
11
First look up a TWO-DIGIT
remote code number for your
brand VCR before going through
the simple "l,2,Y' steps (on the
following page).
continue to next page
Remember, if more than
! one number is listed, you
may have to try more than the first
two-digit code given in order to
locate your VCR's remote code.
¢¢VCR REMOTE
BRAND CODENO.
Akai 24, 25, 36
Audio Dynamics 14, 21,29
Broksonic 31
Cannon 01
Capehart 33
Craig 07, 30
Curtis Mathes 01, 32, 42, 43
Daewoo 33
DBX 14, 21,29
Dynatech 27
Emerson 20, 31, 34, 40
Fisher 06, 07, 08
Funai 27, 28
GE 01
Goldstar 23
Go Video 45, 46
Hitachi 03, 51
Instant Replay 01
JC Penney 01,03, 23, 29
JVC 14, 47, 48
Kenwood !3, 14
Lioyds 27
Magnavox 00, 01, 02, 05, 27, 28
Magnin 30
Marantz 29
Memorex 01,07, 23, 27
Minolta 03
Mitsubishi 16, 17, 38, 39, 50
Montgomery Ward 12
VCR REMOTE
CODE NO.
Multitech 27,28
NEC 14, 21,29
Panasonic 01
Pentax 02, 03
Philco 01,02, 05, 27, 28
Philips 00, 01,05, 27, 28
Quasar 01
RCA 03, 04, 32, 42, 43, 44
Realistic 07,11, 12, 23, 27, 28
Samsung 22, 30
Sansui 49
Sanyo 07, 13
Scott 19
Sears 03, 08, 23
Sharp 1I, 12
Shinton 35
Sony 09, 10,41
Sound Design 27
Sylvania 01,02, 05
Symphonic 27
Tatung 14
Teac 14, 27
Teknika 26, 27
Thomas 27
TMK 20
Toshiba 18,
Video Concepts
Yamaha 14,
Zenith
IJ
28
29
1
Page 37

.m
ow that you have looked up
the two-digit Remote Code
Number for your brand of VCR
(on previous page), you are
ready tofollow the four simple
steps below.
Please read through steps 1-4
before beginning.
€_ Press and release the REC
I (RECORD) button.
_ Within seconds after
thirty
releasing the REC button, press
and release the VCR System
button.
Remote will begin to beep as it
waits on your Code number
entry in step 3.
_,,,_ Within seconds after
thirty
releasing the VCR System
button, ENTER THE TWO
DIGIT CODE NUMBER for
the desired VCR. The remote is
now ready to send commands to
the VCR.
<_ Point the remote at the VCR.
Press the POWER button on the
remote to turn the VCR ON.
VCR
PL4Y• STAlUS
_AUS[n
r
(oa/offl[ rosX swatX ram)
PIP {r/vw][ ST. X sm)
Try it out. The Channel
g .[mdVCR buttons on the
remote should now operate the
VCR.
Remember, if this doesn't work
the first time, repeat steps using
the same remote code number.
If after a second try the remote
does not operate your VCR, and
there are more code numbers
listed for your brand VCR, use the
next listed code number.
If after repeated attempts the code
number method does not work
your VCR, try the "VCR
SEARCH" method on page 40.
37
Page 38

<
our remote control is set to
work your TV and many
infrared remote (IR) control
Cable Converters. However, an
easy one-time step may be
necessary before the remote will
work your Converter.
Try this initial check to see if
going on to the following section
is necessary.
Press the CBL System
button on the remote.
(,,_ Point remote toward Cable
Converter and press the POWER
button.
_Does the remote turn the
Converter ON?
IF YES, I_ and try the CH • Y
and CH number buttons on the
remote. If they also work the
Converter then the remote is
ready and no further steps are
needed.
If NO, continue...
Cable
! I
1
< First look up a TWO-DIGIT
remote code number for your
brand Converter before going
through the simple "1,2,3" steps
(on the followin_ oage).
continue to next page
Remember, if more than
one number is listed, you
may have to try more than the first
two-digit code given in order to
locate your Converter's remote
code.
CONVERTER REMOTE CONVERTER REMOTE
BRAND CODENO. BRAND CODE NO.
Archer 28 Rembrant 33
Diamond 23 Salora 52
Drake 37 Scientific Atlanta 08, 22, 47
Gemini 45 Sheritech 34
Hamlin 14, 15 Sylvania 16
Hitachi 25 Texscan 16, 48
Jerrold 01,02,03,04,05,30,46 Tocom 12,13, 53
Macom 29, 38 Toshiba 43
Magnavox 17,26, 31 Uniden Satellite 44, 54
NSC 49 Unika 50
Oak 06, 27, 39 Universal 36
Panasonic 18, 35 Video Tech 40
Philips 19, 20, 21,24, 26 Video Way 51
Pioneer 09, 32 Viewstar 26
Regency 10, 11 Zenith 07, 41, 42
38
Page 39

ml
ow that you have looked up
the two-digit Remote Code
Number for your brand of Cable
Converter (on previous page),
you are ready to follow the four
simple steps below.
Please read through steps 1-4
before beginning.
<_ Press and release the REC
(RECORD) button.
_ Within thirty seconds after
releasing the REC button, press
and release the CBL System
button.
Remote will begin to beep as it
waits on your Code number
entry in step 3.
<5,,_ Within thirty seconds after
releasing the CBL System
button, ENTER THE TWO
DIGIT CODE NUMBER for
the desired Converter. The
remote is now ready to send
commands to the Converter.
<,_ Point the remote at the
I onverter. Press the POWER
button on the remote to turn the
Converter ON.
Try it out. The Channel
! an_ POWER buttons on the
remote should now operate the
Converter.
Remember, if this doesn't work
the first time, repeat steps using
the same remote code number.
If after a second try the remote
does not operate your Converter,
and there are more code numbers
listed for your brand Converter,
use the next listed code number.
If after repeated attempts the code
number method does not work
your Converter, try the
"CONVERTER SEARCH"
method on page 40.
Cable Converter
PAUSEH
(Oa/OfF][_ X SWAP](ntnzE)
PiP (r/vut][ _e X sazt)
39
Page 40

n
our TV remote can be set to
work your VCR or Cable
Converter by what is called the
SEARCH method.
If the "REMOTE CODE" number
method shown in the previous
section did not set your remote to
work your VCR or Converter, then
follow the easy steps listed below.
Please read through steps 1-4
before beginning.
_.._ Press the POWER button on
l he VCR or Converter to turnthe
unit ON.
<_ Stand at least sixfeet away
from the front of the VCR or
Converter.
Point the remote toward the unit.
HOLD DOWN the A/CH and
the desired System (VCR or
CBL-Converter) buttons at the
same time. KEEP HOLDING
BUTTONS DOWN.
_ Watch the Channel Indicator
on the unit.
Channel Numbers will SCAN UP
when the unit has been identified.
This may take up to two minutes.
_-_ Release the A/CH and System
(VCR or CBL) buttons as soon
as channel numbers start to scan
up. The code has been identified
and the remote is ready to operate
with the VCR _r Converter.
O
Remember, a minute or
two can seem very long, but
the code should be located within
two minutes.
Don't let the VCR or Converter
scan up more than five channels.
The remote may pass up the right
code and another two minute
search cycle will have to be
repeated.
If no channel change happens
within two minutes, repeat steps i-
4. Should a channel change still
not occur, the remote will not
work with the desired unit.
CABLE CONVERTER
Don't let
o91
Six Feet
(minimum)
PIP It/viii llnI 511 )
Remote will begin to beep when
the A/CH and VCR or CBL
System buttons are pressed.
40
J
Page 41

hen using the TV remote
with a VCR, first make
certain it is set to control your
VCR ( by the REMOTE CODE or
SEARCH method - see earlier
section).
._ Press the VCR
System
button on the remote.
,_ Point the top of the remote
toward the front of the VCR
(remote sensor window) when
pressing buttons.
O
Record Button
Hold the RECORD button down, and
then press the PLAY button to begin
a VCR recording.
Rewind Button
Press to rewind tapes. For some
VCRs you may need to press STOP
button first then REWIND. In
playback mode. hold button down to
view picture moving rapidly in
reverse.
Pause Button
Press to temporarily stop the tape dur-
ing a playback, or recording. Press
again to release Pause.
TV-¥CR Button
Press to the VCR position ("VCR"
indicator on the _'CR will light) to
view the playback of a tape. Press
again to place in the TV position
("VCR" indicator on the VCR will go
OFF) to'_,iew one program while
recording another program.
When used with the TV the TV/VCR
button works as a source button. Each
press cycles the TV between channels
3 and 4; the last view channel; and
any AUX(iliary) Input mode (if it has
been connected.) It is a quick one-
button way to select these channels
and modes (without directly entering
the TV's Menu system.)
STATUS
ON3
PAUSEII
(ON/OFFX POS X SWAP_ FREEZE)
PiP (e/vutX STRBX SIZE )
• i
Pl_v Button
Press to playback a tape. Hold down
after pressing the RECORD button to
start a recording.
Press to stop the tape.
-Fast Forward Button
Press to rapidly advance the tape. For
some VCRs you may need to press
STOP first then Fla. In Playback
mode hold button downto view the
picture moving rapidly in the forward
direction.
•Channel Scan Buttons
Press to scan up or down through
VCR channel numbers.
.Number Bu¢(ons
Press buttons for direct VCR channel
selections.
VCR System Button
Press to send remote commands to
the VCR.
Power Button
Press to turn the VCR ON and OFF.
Remember, the VCR
t_ buttons on the remote will
not operate your VCR if those
features are not already found on
your VCR remote control.
Note: All VCR functions
(particularly Search, Rewind, Fast
Forward, etc.) will operate the
same as with the original VCR
"4". •
remote control provided with t'
VCR.
41
Page 42

Dicture in Picture (PIP) is the
l showing of two pictures on the
TV screen at the same time. (One
main screen picture and one small
inset picture - or PIP).
Note: The PIP picture must be
supplied by a VCR (or other
accessory equipped with a VIDEO
OUTPUT jack). If you already
went through FIRST TIME SETUP
(in the Quick-Use Guide), then the
connections for PIP have been
completed.
To see how channels selected on a
VCR can be shown as PIP:
,,,_) Connect the VIDEO OUT
jack on the VCR to the
VCR/AUX VIDEO IN jack
(yellow) on the TV.
Also connect the AUDIO OUT (R
and L) jacks from the VCR to the
VCR/AUX AUDIO IN jacks (red
and white) on the TV.
Also be sure the normal antenna
connection between the VCR and
TV are in place.
_2,2_ Move to the next page after
l the VCR to TV PIP connections
are completed.
the "More PIP ConneCtions"
section.
If you have a single (monaural)
Audio Output VCR, "Y"
connectors are available to
complete your connection.
Contact your dealer, or our Parts
Information Center (1-800-292-
6066), for details.
MAIN
SCREEN
PIP
BACK OFTV
OUTDOOR UH_VHF
ANTENNA
CA BLE TV
SIGNAL
VCR
]
42
Page 43

]_]'ow that you have completed
• ¥ the required connections on
the previous page you are ready to
follow the simple steps shown
below.
<_ Turn the VCR and TV ON.
Place the VCR in the TV mode -
Use the TV/VCR button on
the VCR (or on the TV remote
if it has been set to work with
your VCR - see page 36.)
Place the TV's PIP INPUT
control to "VCR/AUX"-
With FEATURES MENU (3
of 3) on screen, move the RED
h_hlight with the MENU (M)
4_ buttons. Then press the
MENU button.
Press the MENU AV and
MENU (M) buttons to
highlight and select the
"VCR/AUX 1" 0") item.
_ Select the channel on the VCR
to view in the PIP window.
Select the channel on the TV to
view on the main screen.
<_ Press the PIP ON/OFF button
on the remote.
The PIP window should show in
one of the comers of the TV
screen.
Remember, if you see the
g same picture on the main
screen and in the PIP window, you
need to be sure the TV's PIP
Picture Source control (page 46) is
set to "VCR/AUX".
No sound will be heard with the
PIP picture. See page 44 on how
to "SWAP" the PIP picture with
the main screen picture so that
sound can be heard.
Also see the following page on
how to operate other PIP features
with the remote control.
[
12:00 _"
12:00 _-
O6
VCR IN 'q'V MODE"
(VCR Indicator Light will go out)
m PICTURE SOURC_ SELECT
ANTENNA
AUX 2
AUX 3
PIP INPUT CONTROL SET TO "VCR/AUX I"
VCR - FOR PIP CHANNEL
"IV- FOR MAIN SCREEN CHANNEL
VCR
SELECTED
CHANNEL
TV
SELECTED
CHANNEL
Be sure to point the remote at the
front of the VCR when pressing
VCR function buttons.
43
Page 44

lily using the PIP buttons on the
.AJ remote the PIP picture can be
moved and swapped with the main
screen.
<_,,% Press PIP ON button to show
the PIP picture.
PIP screen appears in corner of TV
screen. Press PIP ON again to
remove PIP from the main screen.
,_ Press PIP POSITION button
] ] on the remote to move the PIP
[ I picture (from corner to corner on
I I the main screen).
13_,_ Press SWAP to swap the main
screen picture with the PIP picture.
Press SWAP again to return the
main screen and PIP to their
original positions. See the
important reminder below.
4_--_,,"_Press FREEZE button to hold
the current Main picture in the PIP
window (Main picture is active).
If PIP is currently OFF the PIP will
be automatically shown.
Press FRZ repeatedly to update the
frozen PIP with current pictures.
The frozen PIP cannot be swapped
with the main screen.
Press the PIP ON/OFF button to
drop the frozen PIP picture from
the screen.
continue to next page
Remember, if the TV is
showing a "VCR/AUX"
supplied picture on the main
screen (when the TV and VCR are
turned OFF), a blank screen will
appear when the TV is turned
back ON again.
If this happens, just press the
CH(annel) • or • buttons to
select a TV station for normal
viewing.
3. PIP SWAP
2. PIP POSITION
4. FREEZE
1. PIP ON / OFF
44
Page 45

5.PIPSIZE 6. PIP STROBE
Press P/VUE for
more channels.
Press PiP ON/OFF
to return.
7. PIP PREVIEW
<
Press SIZE button to change
the size of the PIP window showr.
on the TV screen.
Press the PIP SIZE button again to
see and compare the large and
small size PIP windows.
_ Press STROBE to see a series
of three frozen scenes from the
currently selected channel. Press
STRB again and the series of
pictures will be updated.
Press PREVIEW button to see
what is showing on three channels.
P/VUE starts with the current
channel and shows the next two
channels in memory.
Every few seconds each P/VUE
picture will be updated with a
current scene for that channel.
Press P/VUE again to go to the
next three channels in memory and
so on. Just press the number
buttons to select any previewed
channel.
Press PIP ON/OFF button to clear
the screen and return to normal
viewing.
@
45
Page 46

_c e picture for the PIP window
an come through either the
ANT/CABLE or VCR/A UX Inputs
(on the rear of the TV). PIP Picture
Source simply tells the TV which
one of the input sources it is to
show in the PIP window.
(,,,_ SelectPIP SOURCE control.
With FEATURES MENU (3 of 3)
on screen, move the RED highlight
with the MENU (M)4_1_ buttons.
Then press the MENU button.
_.._ Press the MENU AY and
MENU (M) buttons to highlight
and select (t,,') the desired input
source (either ANTENNA,
VCR/AUX 1, etc.).
ANTENNA- for a picture signal
coming from the
ANT/CABLE Input
on the TV.
VCR/AUX1-
AUX 2-
AUX 3-
for a picture signal
coming from the
VCR/AUX IN
Video Input jack
on the TV.
for a picture signal
coming from the
AUX 2 Video Input
jack on the TV.
for a picture signal
coming from the
AUX 3 Video Input
jack on the front of
the TV.
<_ Press the STATUS button to
Jclear the screen.
Remember. The PIP
screen will be blank unless a
signal is connected to the selected
source (for example: VCR/AUX 1
Input) on the rear of the TV.
MAIP
FEATURE MENU
FEATURE MENU.
I_1 ANTENNA
Ir ux2
I I AUX 3
.1
46
Page 47

_Co e Picture-In-Picture (PIP)
lor and Tint controls are
used to make fine tune adjustments
to the color settings for PIP (when
it is shown on the TVscreen).
<1,,,,_ Select PIP COLOR (or PIP
TINT) control.
With PICTURE MENU (2 of 2) on
screen, move the REDhighlight
with the MENU (M)4-_ buttons.
Then press the MENU button.
'-_ Press the MENU AV buttons
to move the RED highlight. Press
the MENU button to turn (u,') the
PIP COLOR or TINT control ON.
The PIP automatically comes on to
show the PIP window on the TV
screen.
<"5,,_ Press the (+) and (-) buttons to
adjust the PIP for Color (or Tint)
levels you prefer.
,,_ Press the STATUS button
to
clear the screen.
Remember. Although
I1 there are separate COLOR
and TINT controls for PIP, the
adjustment levels for these
controls depend on the TV's main
picture. For example: If the main
screen hi showing a black and
white picture, PIP would also be
in black and white (even though
its source is in color).
II
1
<
_._NMENU_J_'i_
,t, I ,Is .."
!
•:_@I,_
= PICTURE MENU
'oi='2,'_'
I
,==_, P_-71JI_ MENU
20F2_
47
Page 48

_ DIP hookup with Cable
I
J[ Converter Box and VCR.
<_ First use an optional signal
splitter and connect the original
cable TV signal to both the
CABLE IN on the Cable Converter
and the ANTENNA plug on the
rear of the TV.
<_ Connect the CABLE OUT on
the Converter to the ANT. IN on
the VCR.
16,
<,,,:._ Connect the VIDEO OUT
jack on the VCR to the VIDEO
IN jack on the TV.
Also connect the AUDIO OUT (R
and L) jacks from the VCR to the
AUDIO IN jacks on the TV.
@
I !-
SIGNAL
-t )
I m
Contact the Parts
Information Center
I 800 292-6066
to order any optional
aC'cessories
iP,$fl gl
K, s-w
REAR OF TV
)
Remember
to use the Cable TV
Converter Box to
select channels for
PIP, the VCR must
be set to the same
channel as the
channel selection
switch on the rear of
the Cable Converter
(either channel 3 or
4).
AUDIO VIDEO
CABLES SUPPLIED
Iu_n'ENNA
IN
®
VIDEO
®
- n AUDIO
®
IN
VCR
CABLE IN
CABLE TV CONVERTER
48
Page 49

_offe e on screen HELP menu
rs both Operating Tips and
a list of Glossary definitions for
different features on your TV.
These items are given to provide
you with more information and
details on a select group of feature
operations.
Ca-gd 3
<_ Select "HELP" on the TV's
Main Menu.
Press the remote's Menu 4_
_r
buttons to move UP/DOWN and
from SIDE-TO-SIDE within the
list of on-screen features.
Press MENU (M) to select the
highlighted "HELP" item.
<_ Press the MENU AY and
then the MENU (M) buttons to
select either the OPERATING
TIPS or GLOSSARY item.
HELP MENU
Installation
• \ , I + I ,
TIPS _-or Problems
\
_' Of TV Features
_ OPERATING TIPS_
U_NG OPERATING TIPS
• Use the • and • keys on
your remote to scroll
through the different
help items.
• Use the "M" key on
your' remote will go back
to the help menu.
FOLLOW THE ON SCREEN
DIRECTIONS TO VIEW
OPERATING TIPS
1
n optional RF Switcher is
available that will allow an
AntennalCable TV signal input
and another video accessory
(VCR, Video Disc Player, etc.) to
be connected to the TV at the same
time.
The a_cessory RF switcher can be
purchased or ordered from your
dealer, lf your dealer does not
carry the accessory, call the toll
free Parts Information Center
number:
1-800-292-6066
i I_
v_
49
Page 50

lease make these simple
checks before calling for
service. These tips can save you
time and money since charges for
TV installation and adjustment of
customer controls are not
covered under your warranty.
NOPower
No Picture
NO Sound
Remote Does Not
Work
TV Displays Wrong
Channel or No
Chann¢[_ Al_0v¢ 13
Cleaning and Care
CAUTION: A video source (such as a video game, Compact Disc Interactive - CDI, or
TV information channel) which shows a constant non-moving pattern on the TV screen,
can cause picture tube damage. When your TV is continuously used with such a source
the pattern of the non-moving portion of the game (CDI, etc.) could leave an image
permanently on the picture tube. When not in use, turn the video source OFF. Regularly
alternate the use of such video sources with normal TV viewing.
Ii heck the TV power cord. Unplug the TV, wait 1 minute, then reinsert plug into outlet
and push POWER button again.
Check to be sure outlet is not on a wall switch.
li heck antenna connections on the rear of the TV. Are they properly secured to the
antenna plug on the TV?
Check the CABLE TUNING control for correct position.
Check PICTURE SOURCE control for correct position VCR/AUX, AUX 2, or AUX 3
position without a signal source will result in a blank screen.
Check the CLOSED CAPTIONS control. Some TEXT modes could block the screen.
Check the VOLUME and MUTE buttons on the TV and remote.
Check the TV SPEAKER NORMAIdOFF control for the correct position.
If attempting auxiliary equipment hook-ups, check audio jack connections and that the
auxiliary equipment is on and in the proper operating modes.
i Check TV-VCR-CBL "System" buttons on the remote. Press the remote's TV System
button to send commands to the TV; VCR System to sent to VCR; etc.
Check batteries. Replace with AA Heavy Duty (Zinc Chloride) or Alkaline batteries
if necessary.
Clean the remote and the remote sensor window on the TV.
I
• Repeat channel selection.
Add desired channel numbers (ADD/DELETE CHANNELS control) into TV memory.
I
_ Check CABLE TUNING control for correct position.
IThis TV is equipped with protective circuitry that shuts the TV off in case of moderate
power surges. Should this occur turn the TV back on by pressing the POWER button
once or twice, or unplug and then replug the power cord at the AC outlet.
This feature is NOT designed to prevent damage due to high power surges such as those
caused by lightning, which is not covered by your warranty.
To avoid possible shock hazard be sure the TV is unplugged from the electrical outlet before cleaning.
When cleaning the TV screen take care not to scratch or damage the screen surface (avoid wearing jewelry or using
anything abrasive- do not use household cleaners). Wipe the front screen with a clean cloth dampened with water. Use
even, easy, vertical strokes when cleaning.
• Specially designed screen cleaning kits are also available which contain anti-static cleaners and cloths designed to get
into the ridges of the TV screen. If interested, ask your dealer about the MAG4600 Projection TV Screen Cleaning Kit or ........
call our toll-free Accessory Parts ordering number 1-800-292-6066.
• Gently wipe the cabinet surfaces with a clean cloth or sponge dampened in a solution of cool clear water and a mild soap
or detergent. Use a clean dry cloth to dry the wiped surfaces.
• Occasionally vacuum the ventilation holes or slots in the cabinet back.
• Never use thinners, insecticide sprays, or other chemicals on or near the cabinet, as they might cause permanent marring
of the cabinet finish.
5O
Page 51

A/V Inputs * Connector plugs which allow the introduction of
distinct audio and video signals into the TV from accessory
VCRs, camcorders, etc. These plugs bypass the normal tuner or
RF/Antenna signal circuitry.
Coaxial Cable * A single solid antenna wire normally matched
with a metal plug (F-type) end connector that screws (or pushes)
directly onto a 75 Ohm input found on the Television or VCR.
Display * An on screen message or graphics that help the user
operate and adjust his Television feature controls. See On
Screen Displays (OSD).
Direct Audio/Video Inputs * Located on the rear of the TV
these connectors (RCA phono type plug) are used for the input
of audio and video signals. Designed for use with VCRs (or
other accessories) in order to receive higher picture resolution
and offer sound connection options.
Identify* Method by which a remote control searches and finds
an operating code for another product (such as a VCR or Cable
Converter). Once the code has been "identified" then the TV
remote can operate and send commands to the other product.
Multichannel Television Sound (MTS) * The broadcast
standard that allows for stereo sound to be transmitted with the
TV picture.
On Screen Displays (OSD) * Refers to the wording or
messages generated by the television (or VCR) to help the user
with specific feature controls (color adjustment, programming,
etc.).
Menu * An on-screen listing of feature controls shown on the
Television screen that are made available for user adjustments.
Picture -In-Picture (PIP) * Term used when two pictures are
shown on the TV screen at the same time. The smaller PIP
picture is supplied'by a VCR (or other tuner/video playback
source). The PIP picture can also be moved and swapped with
the TV's main screen picture.
Pre-Amplifier * The control center of a hi-fi system. Not
only amplifies source inputs, but also allows for source
selection, volume, tone, balance and all other controls that
affect the sound.
Programming * The procedure of adding or deleting channel
numbers into the Television's memory circuits. In this way
the Television "remembers" only the locally available or
desired channel numbers and skips over any unwanted
channel numbers.
Remote Sensor Window * A window or opening found on
the Television control panel through which infrared remote
control command signals are received.
Second Audio Program (SAP) * Another or additional audio
channel provided for in the Multichannel Television Sound
(MTS) broadcast standard. The most frequently proposed use
for SAP is the simultaneous bilingual broadcast of TV
program material.
Status * Allows the user to quickly confirm what: channel
number is currently being viewed. Status can also be used to
clear the Television of on screen displays or information
(ratherthan waiting for the displays to "time out" or
automatically disappear from the screen).
S-Video Input * Allows direct connection of high-resolutic ....
video sources, such as a Super VHS videocassette recorder,
Laser Disc player, etc. Provides optimum picture resolution,
sharpness, and clarity.
Twin Lead Wire * The more commonly used name for the
two strand 300 Ohm antenna wire used with many indoor and
outdoor antenna systems. In many cases this type of antenna
wire requires an additional adapter (or balun) in order to
connect to the 75 Ohm Input terminals designed into the more
recent Televisions and VCRs.
Variable Audio Output * An adjustable audio output which
allows for volume variations at the source.
51
Page 52

Accessories/Optional .........9, 24-25, 26-29, 42, 48, 49, *Q/U-1
Accessory Storage Shelf Compartment .................................... 5
Adapter Connector ........................................ 42, 48, 49, *Q/U- 1
Add/Delete Channels .......................................... 13-14, *Q/U-2
Advance Buttons ........................................................ *Q/U-2, 4
Audio Controls ................................................ 20-22, 23-24, 34
Audio/Video Input ................................... 26-28, 42, 48 *Q/U-2
Automatic Programming .......................................... 13, *Q/U-2
Alternate Channel ................................................................... 16
Battery Installation ......................................................... *Q/U-3
Cable TV Connections/Settings ................ 12, 42, 48 *Q/U-1, 2
Channel Guide ........................................................................ 35
Channel/Time Display ........................................ 15, 17, *Q/U-3
Channel Memory ................................................. 13-14, *Q/U-2
Channel/Time Reminder ......................................................... 17
Clock Setting .......................................................................... 15
Clock Timer ............................................................................ 15
Closed Captioning .................................................................. 11
Color Controls ............................................................. 6,*Q/U-4
Convergence ............................................................................. 8
Controls/TV ............................................................ *Q/U-2, 3, 4
Controls/Remote ......................... 30-35, 36, 44-45 *Q/U-2, 3, 4
Exit ................................................................................. *Q/U-4
Features ..................................................................................... 5
First Time Set Up ........................................................... *Q/U-2
Ghost Cancellation .................................................................... 9
Glossary/TV Terms ................................................................ 51
Help Menu ............................................................ 49, *Q/U-2, 4
Help Line Information .......................................... 1,50, *Q/U-1
Inputs/Audio and X_ideo........................................ 26-28, 42, 48
Menu ........................................................................... *Q/U-2, 4
Minus(-)/Pius (+) Buttons ........................................... *Q/U-3, 4
Parental Control ................................................................. 18-19
Picture-In-Picture (PIP) ....................................... 42-48, *Q/U-2 _
Power Light Indicator ..................................................... *Q/U-
Precautions/Safety ...................................... 2, 3, 50, 55, *Q/U-I
Programming Channels ............................................ 13, *Q/U-2
Remote Control .......................... 30-35, 41, 44-45, *Q/U-2, 3, 4
Remote with VCRs ................................................ 36-37, 40, 41
Requesting Service ............................................... 50, 53-54, 55
RF Coaxial Cable ................................................ 42, 48 *Q/U-1
RF Switcher ............................................................................ 49
Reminder/Time and Channel .................................................. 17
Remote Locator ................................................................. 30-31
Safety/Precautions ...................................... 2, 3, 50, 55, *Q/U-1
Second Audio Program (SAP) ................................................ 21
Sensor Remote ................................................................ *Q/U-3
Sleep Timer ............................................................................. 16
Smart Picture ........................................................... ,......... 32-33
Smart Sound ............................................................................ 34
Status Button .............................................................. *Q/U-3, 4
Stereo Light Indicator ............................................... 21, *Q/U-3
Surround Sound ................................................................. 24-25
Speaker Terminals .................................................................. 2" -
Time/Channel Display .............................................. 17, *Q/U-_
Timer (Turn On) ..................................................................... 15
VCR Button ............................................................................ 26
VCRiTV Connections .............................. 26-29, 42, 48 *Q/U-1
VCR Storage Shelf Compartment ............................................ 5
Tips for Service ......................................... 49, 50, 53-54, 55, 43
TV Speaker Control ................................................................ 23
Volume Display ...................................................................... 22
Warranty ................................................................................. 55
* Information contained in Quick-Use (Q/U) Guide - page listed
52
Page 53

Philips Consumer Electronics Company
Factory Service Center Locations
See Reverse Side for More Details.
San Fmnclsco/Metro Area
Diego
/
• Phoenix/Metro Area
Detroitrroledo
Rockford
f •
Chicago/
Milwaukee
Dallas/Ft. Worth
_ BeaumonUAustin
San Antonio
• Boston/S Maine/
Hampshire
tJ
Charlotte York/Metro
New Jersey
• _ .J "phhiladelphla/S New Jersey
AtlantadNGeorgia
lh_'_,_r_
ngton/Baltimore/Rlchmond
• OriandolN Florida/SE Georgia
smp WFio..o
t. Myers/SW Florida
MiamilSE Fiodda
Over 1100 Drop-Off Sites Nationwide
NOTE:IfyouresideinoneofourPhilipsFactoryServiceBranchareas(seedirectoryonhack),youcancontactthenearestServiceBranchtoobtain
efficientandexpedientrepairforyourproduct.If yourproductisIn-Warranty,youshouldhaveproof-of-purchasetoensureNoChargeService.
ForOut-of-Warrantyservice,callthelocationnearestyou.
NOTA:Sivousr6sidezdansunedesrdgionsdesserviesparunesuccursaledeserviceaprbsventedufabricantPhilips(voirlisteci-dessous),vous
pourrezcontacterlabranchedeserviceapr_sventelaplusprosdechezvouspourobtenirunserviceaprbsventerapideetefficace.Sileproduitest
sousgarantie,Usuffiradeprdsenterunepreuved'achatpourb6n6ficierd'unservicesansfrais. Pourlesproduitsnoncouvertsparlaoarantie,
contactezlecentreleplusprosdechezvous.
NOTA:Si Ud.resideenunadenuestraszonasparasucursalesPhilipsdeservicioaldefdbrica(verdirectoriorodsabajo),Ud.puedecomunicarsecon
lasucursaldeserviciorodscercanaparaobtenerunareparaci(_noportunay eficazdesuproducto.Sisuproductoest,'ftodavfabajogarantia,Ud.debe
presentarcomprobantedecompraparanoocasionarningunoscargosporservicio.Paraserviciodespudsdelvencimientodelagarantia,Ilameal
lugarmdscercanodelosabajoindicados.
Vancouw
MAC29292/95 EL4482-3 Rev. K
53
Page 54

QUALITYSERVICEISASCLOSEASYOURTELEPHONE!SIMPLYLOOKOVERTHELISTBELOWFORTHENUMBEROFAFACTORYSERVICECENTER
NEARYOU.WHENYOUCALL,ASERVICEREPRESENTATIVEWILLGLADLYDIRECTYOUTOONEOFOVER1100DROP-OFFSITESLOCATEDNATIONWIDE.
YOURPRODUCTWILLRECEIVEEFFICIENTANDEXPEDIENTCARRY-IN,MAIL-IN,ORIN-HOMESERVICE,ANDYOUWILLRECEIVEPEACEOFMIND,
KNOWINGYOURPRODUCTIS BEINGGIVENTHEEXPERTA'FI'ENTIONOFPHILIPS'FACTORYSERVICE.AND,IFTHEPHONENUMBERLISTEDFORYOURAREA
ISLONGDISTANCE,CALL1-800-242-9225FORRcxomrSemnce.
COMMENTOBTENIRNOTRESERVICEAPRI:SVENTERAPIOEETEFFICACESOIT PARCOURRIER,A DOMICILE,OU EN SE PR(iSENTANTAUN CENTREDESERVICEPHILIPS. PLUSDE600 CENTRESb_:
RI_CEPTIONDE PRODUITS]t RI_PARERATRAVERSLEPAYS:CONTACTERLECENTREDESERVICEAUXCONSOMMATEURSLEPLUSPROCHEPOURSAVOIRL'EMPLACEMENTDECESDltPOTSDAMS
UNRAYONDE50 A 75 MILES(80 KM _ 120 KM) DU CENTREDESERVICELOCAL.
C(_MOOBTENERUN SERVICIOOPORTUNOY EFICIENTEPORCORREO,ENCASA0 ENPERSONAPARASUPflODUCTOATRAV(:SDEUNCENTROPHILIPSDE SERVICIO.MASDE600 SlTIOS POR
TODOELPAlSPARALA RECEPCIONDEPRODUCTOSNECESlTAOOSDEREPARACIONES:COMUNICARSECONELCENTRODE SERVICIODEFABRICAMASCERCANOPARAESTOSLUGARESDENTRO
DEUNRADIODE80 A120 KM(50 A75 MILLAS)DELCENTRODESERVICIOLOCAL.
Atlanta-Athens-
Macon-Chattanooga,TN-
NorthGeorgiaArea
1898 LelandDrive
Marietta,GA 30067
(404) 952-3279
Over100drop-off locations.
Boston-SouthernMaine-
SouthernNewHampshireArea
1 North Avenue
Burlington, MA 01803
(617) 272-4825
Over60 drop-off locations.
Charlotte-WinstonSalem-
Greensboro-ChapelHill-
Raleigh-Spartanburg,SCArea
520-GClanton Road
Charlotte,NC 28217
(704) 529-6330
Over25 drop-off locations.
Chicago-Milwaukee-
GaryArea
1360W. HamiltonParkway
Itasca,IL 60143
(708) 775-0990
Over80 drop-off locations.
Cleveland-Akron-
YoungstownArea
24090 Detroit Road
Westlake,OH 441_
(216) 899-2040
Over65 drop-off locations.
Columbus_Oayton-
CincinnatiArea
5164 BlazerParkway
Dublin,Ohio43017
(614) 792-1495
Over19drop-off locations.
Connecticut-RhodeIsland-
Springfield,MAArea
1294 BlueHillsAvenue
Bloomfield,CT06002
(203) 726-9612
Over45 drop-off locations.
Dallas-Ft. WorthArea
1901 N.GlenvilleDrive
Richardson,TX 75081
(214) 690-8440
Over25 drop-off locations.
Detroit/ToledoArea
25173 Dequindre
Madison Heights,MI 48071
(810) 544-2110
Over30 drop-off locations.
Knoxville-Greeneville-
Tri Cities--EastTennesseeArea
6700 D. PapermillRoad
PapermillPlaza
Knoxville,TN 37919
(615) 584-6614
Over7 drop-off locations.
Ft. Myers-Naples-
SouthwestFloridaArea
11601ClevelandAve.,Suite15
Ft.Myers, FL 33907
(813) 278-4242
Over30 drop-off locations.
Houston-Galveston-
Beaumont-Austin-
SanAntonioArea
1110NorthPostOakRoad
Suite100
Houston,TX 77055
(713)682-3990
Over40 drop-off locations.
LosAngeles-SanDiegoArea
2910 E. LaPalma,SuiteE
Anaheim,CA 92806
(714) 238-7250
Over70 drop-off locations.
Miami-SoutheastFloridaArea
2099 W. Atlantic Blvd.
PompanoBeach,FL 33069
(305) 978-0467
Over45 drop-off locations.
NorthNJ-StatenIsland-
RocklandCounty,NYArea
140JCommerceWay
Totowa,NJ 07512
(201) 890-7200
Over50 drop-off locations.
NewYorkMetro Area
116 CharlotteAvenue
Hicksville, NY 11801
(516) 933-1780 NassauCounty
Over40 drop-off locations.
Orlando-Jacksonville-North
Florida-SoutheastGeorgiaArea
2452 Sand LakeRoad
Orlando,FL32809
(407) 857-8998
Over30 drop-off locations.
Philadelphia]Lancaster/
S.NewJerseyArea
352 Dunks FerryRoad
Bensalem,PA 19020
(215) 638-7500
Over35 drop-off locations.
Phoenix-Scottsdale-
Mesa-TempeArea
5032 S.AshAvenue,Ste.101
Tempe,AZ 85282
(602) 897-7358
Over20 drop-off locations.
Pittsburgh,PA-Steubenville,OH-
Wheeling/Morgantown,WVArea
2891 BanksvilleRoad
Pittsburgh, PA 15216
(412) 563-8020
Over 11drop-off locations.
Rockford-Kenosha-
Beloit-MadisonArea
5602 N.Second
Loves Park,IL 61111
(815) 654-7343
Over5 drop-off locations.
San Francisco-Oakland-
SanJoseArea
3370 MontgomeryDrive
SantaClara,CA 95054
(408) 492-9013
Over30 drop-off locations.
Seattle-Tacoma]OlympiaA"-
1055 AndoverParkEast
Tukwila,WA98188
(206) 575-6288
Over20 drop-off locations.
Tampa-St.Petersburg-
SarasotaArea
Center PointBusinessPark,
Building B-l, Suite 100
1911 U.S.Hwy.301 North
Tampa,FL 33619
(813) 621-8181
Over75 drop-off locations.
Washington,DC-Baltimore-
Richmond,VAArea
10800 B&D RhodeIslandAve.
Beltsville, MD 20705
(301) 595-5330
Over55 drop-off locations.
HOWYOU CANOBTAINEFFICIENTAND EXPEDIENTCARRY-IN, MAlL-IN, OR IN-HOME SERVICEIN CANADA FORYOUR PRODUCTTHROUGHA PHILIPS CONSUMERSERVICECENTER
COMMENT OBTENIRNOTRESERVICEAPRILSVENTERAPIDEEl"EFFICACESOITPAR COURRIER, J_DOMICILE, OUENSE PRIeSENTANTA UN CENTREDE SERVICEPHILIPS
COMO OBTENERUN SERVICIO OPORTUNOY EFICIENTEPORCORREO, ENCASA 0 ENPERSONAEN EL CANADAPARASU PRODUCTOA TRAVCSDE UN CENTROPHILIPS DE SERVICIOALCONSUMIDOR
TORONTO
601 MilnerAvenue
Scarborouoh, Ontario
M1B 1M8
(416) 754-6064 (Tel.)
(416) 292-5161 (Tel.).
(416) 754-6290 (Fax)
MONTREAL
4977 Levy Street
St. Laurent,Quebec
H4R 2N9
(514) 956-0120 (Tel.)
(514) 956-0828 (Fax)
VANCOUVER
1741BoundaryRoad
Vancouver,B.C.
V5M3Y7
(604)294-3441(Tel.)
(604)2.94-3574(Fax)
54
MAC2929 2/95
Page 55

PROJECTION TELEVISION
()11(_ Y(.',_lr I:f(',(" l__|J)()l"
()11(_ Y(;_i[ Frc(" S(_l-Vi('(" o11 l)_|rls
"I%,v'OYc_Irs l:rcc: S('.rvi(x__ orl (_lihod(_ l-(_ly "1111)("F'_irls / .30 l)_lys l:r(:(; .%('.i\'1(_(: ()11 Projc;clk)rl Tv Scr(;Cll
This |)rc)(lu(:t can b(_ rc;pair(_,d in-horne.
Wl IO IS COVEI-IED?
Yot! must have proofofpurcllase to receive warranty service. A sales
receipt or other docunlent showing that you purchased the product
is considered proof of purchase.
Wl IAT IS C()VF.I_I'_D?
Warranl_, eo\'erage begins the day you buy your product. For oltc year
thcrcaficr (30 daysfiJr ttyc projcction TVscrccn), all parts will be
repaired <)rreplaced, and labor and transportation are f?ce. /:tom 0nc
to two ycars fhnn the day of purchasc, you pay fi)r the replacement or
repair of all parts except the cath()de ra\' tube and the _Clear-Vu"
lens, and fbr all labor and transportation charges. After two years
from thc day of purchase, you pay fi)r the rcplacenlent or repair of all
parts except the "Clear Vtl" lens (which is guaranteed against manu-
fhcturer's dcfizcts fbr the lift:time of the product), and for all labor and
transportation charges.
All parts, induding repaired and replaced parts, are covered only fiw
tile original warrann, period. When the warranty on the product
expires, the warranty (m all replaced and repaired parts also expires.
Wl IAT IS I-_XCI.[_I)I-_I)?
Yotlr warrant' does i1o1 cover:
• labor charges fi)r installation or setup of the product, adjustmcnt
()f Ctlstonlcr c(mt,rols (m tile product, and installation or repair of
antenna sx'stems outside of the product.
• product repair and/or part replacement because of" misuse, acci-
dent, unauthorized repair or other CatLSCIlOtwithin the control of
Philips Constnller Electronics ('ompany.
• reception problems caLnsed by signal conditions or cable or antcn-
na systems outside the unit.
• a product that requires modification or adaptation to enable it to
operate in any country other than the country for which it was
designed, nlallttfactHred, approved arid/or attthorizcd, or repair
of products damaged by thesc modifications.
• incidental or consequential damages resulting from the product.
(Some states do not allow the exclusion of incidental or conse-
quential damages, so the above exclusion may not apply to you.
This inckldes, but is not limited to, prerecorded material, whether
copyrighted or not copyrighted.)
Wl II:.RF. IS SEF(VICI-_ AVAll.ABIA_.?
Warranty service is available in all countries where the product- is offi-
cially distributed by Philips Consunlcr Electronics (:ompany. in
countries where Philips (kmsumcr Electronics Company does not
distribute the product, the local Philips service organization will
attempt to provide service (although there ma\, bca delay if the
appropriate spare parts and technical manual(s) are not rcadily avail-
able).
MAKE SLTRF_ YOU KEEP...
Please keep your sales receipt or other document showing proof of
purchase. Attach it to tiffs owner's manual and keep both nearby.
Also keep the ori_nal box and packing material in case you ileed to
return your product.
BI-I:ORI:. 1_I'2QLTI-S'I'ING SF.llVICI'L..
Please check \,our owner's manual bcfi)rc requesting service. '
Adjt|stments of the controls discussed there may save yof a scr\'icc
call.
"I'O GI'T WAI{RANTY SFI{VI(:F....
Repair must be perlbrmed b\' an authorized service center or a fac-
tory scr\'icc center. If you live near a factory scrvicc ccnter (see enclosed
lisO, you ma\' contact that center to sclacdulc a time fbr in-home
repair, lf you do not live mar a factory service center,_contact wmr
dealer. If your dealer is an authorized service center, he will arrange
repair. If"\,our dealer is not an attthorizcd service center, he will
direct you to the authorized service center engaged by him to service
the products hc sells.
(In U.S.A., Puerto Rico and U.S. Virgin Islands, all implied war-
rarities, inchMing implied warranties of mcrcha,ltability and fitr --
|br apartictdar purpose, arc limited in duration to the duration of,
express wa,'ranta'. But, becatlse sonic states do not allow limitations
on h<m" long an implied warranta.' rnav last, this limitation may not
apply to you.)
(in Canada, this warranty is given in lieu nfall other warranties. No
or,her warranties arc expressed or implied, i,acluding any implied war-
rarities of merchantability or fimcss tbr a particular purpose. Philips
is not liable under any circumstances fi)r any direct, indirect, special,
incidental or consequential damages, howsoever incurred, cvcn if
notified of the possibility of such damages.)
IF YOU l lAVE QtII'_S'I'IONS...
In U.S.A., Puerto Rico, or tht' U.S. Vi_in Islands, contact Philips
Service Conapany at the addrcss listed below.
In Canada, contact Philips Electronics Ltd. at:
4977 l,evy Street
St. l,aurent, Qt,6bec, H4R 2N9
(514) 956-0210
ltI'MEMBI-_I-I...
Please record the model and serial ntmlbers found oil the prodtJct
below. Also, please fill out anad mail your warranty registration card
promptly. It will bc easier tbr us to not|@ you ifncccssary.
MODEl° #
SERIAl. #
Philips Service Company
401 East Andrew Johnson Highway
(615) 475-8869
Jefferson City, Tennessee 37760
I'L49451:.(1(11 / MAC 41(12 / 12-94
55
Page 56

OPUonat- ACc WePies
wtthstate-o#the.artaccessodes
d_d spec/r_ totyour
P_°on TelevisA_n:The
Optionalaccessoriesshownin_
thisbook/atmaybepurc/zas_
fromyourlocaldealer,ormay
beordereddirectfromPttNI_
ConsumerE/ectronlcs
Company.
Calltoll-free
I_00_rJ.6066
Orwrite
PhiiipsConsemer
Eleclroni_Co.,
P.o.next7,
"Gmeneville,TN37744-0967
SRG125
TV/CableSurgeProtector
YourCost$19.95
Electricalfluctuationsand
powersurgescandamage
yourvaluableelectronic
entertainmentequipment.
Protectyourantenna,cable,
andelectdcallineswith
MagnavoxAudioNideo
EquipmentSurgeProtectors.
• Coaxialcableinput/output
• Fivegroundedoutlets
• Built-inLEDandresetbutton
ScreenEnhancerCleaningKit
483539517265
OrdertheScreenEnhancer
CleaningKittomaintainthe
qualityandperformanceof
yourscreenenhancer.
YourCost$17.90
LITE4
UniversalNightLiteTM
Audio/VideoRemote
YourCost$24.95
Replaceyourlostorbroken
remotecontrol,orconsolidate
allyourremotesintoone.Plus,
makeremoteeasiertousein
dimly-litareas,withourNight
LiteTM lightedkeypad.
• Preprogrammed
• Autoscanandmanual
codesetup
• On-screencapabilities
• Menuprogramming
• Spanishinstructionsincluded
• Toll-freecustomerassistance
numberincluded
MANT300
SmartAmplifier
AmplifiedVHF/UHF/FM
IndoorAntenna
YourCost$34.95
Drasticallyimproves
VHF/UHF/FMreceptiononyour
TVor stereo.Simplyattach
antennato yourTV/stereoand
enjoycrisper,clearersoundand
improvedpicturequality.
AdjustableUHFlooptilts and
rotatesforthebestpossible
reception.
• 39"retractabledipoles
• 6' 75ohmcoaxconnection
cable
• Matchingtransformerinclu,
• Softbasepreventsscratching
surfaces
•Activeantennawithamplifier
with upto 20dBgain
• LEDpowerindicatoronfront
ofantenna:easytoseewhile
watchingIV
• Knobontopofantennaserves
asgainandpowerswitch
• AC/DCpoweradapterincluded
• 90-daywarranty
56 IB 7179-E001
 Loading...