

Page 1
Page 2
V(X
Smart.Verysmart"
M .,NAVOX
Smart.Verysmart;
Congratulations on your put
-and welcome to the "family!"
Dear MAGNAVOX product owner:
Thank you for your confidence in MAGNAVOX. You've selected one of the
best-built, best-backed products available today. And we'll do everything in
our power to kse_ you happy with your purchase for many years to come.
As a member of the MAGNAVOX "family," you're entitled to protection by
one of the most comprehensive warranties and outstanding service
networks in the industry.
What's more, your purchase guarantees you'll receive all the information
and special offers which you qualify for, plus easy access to accessories
from our convenient home shopping network.
And most important of all, you can count on our uncompromising
commitment to your total satisfaction.
All of this is our way of saying welcome-and thanks for investing in a
MAGNAVOX product.
Sincerely,
Robert Minkhorst
President and Chief Executive Officer
P.S. Remember, to get the most from your MAGNAVOX product,
you must return your Warranty Registration
Card within 10 days. So please mail it to us right now!
Page 3
Warning/Precautions ................................ 2-3
Features and Model Information ................. 4
How to Follow your Easy-to-Use Owner's Guide .....5
Antenna and Cable TV Connections ...................... 6-7
VCR to TV Antenna Connections ............................. 7
First Time Set-Up and Use of the TV ............... 8- I 1
Basic TV and Remote Control Operation .......... 12-13
_-_ On-Screen Features
How to Use the On-Screen Feature Controls .....14-15
How to Select Picture and Sound Controls......16
¢, Selecting a Picture Source ................................ 16
,0"Adjusting Brighmess, Picture, Color,
Tint, and Sharpness Controls ............................ 17
_'Using the Clearciew Control ............................. 18
¢,Using the Flesh Correction Control .................. 19
_-Adjusting Bass, Treble, and Balance Sound
Controls ............................................................. 20
_'Using the Expander Sound Control .................. 20
¢, Setting the TV for Stereo Pro_'ams ................. 21
How to Select Advanced Controls ..................... 22
,_Setting the TV Clock ......................................... 22
•0-Setting the TV for Closed Captioning ............... 23
'0"Using the Sleep Timer Control ......................... 24
"_'Using the Time/Channel Reminder Controls....25
ffAdjusting the Size of Channel/Time Display ...26
•_-Setting the TV for Cable or Antenna Signals....27
¢,Adding Channels in Memory (Automatically) .28
"0-Adding Channels in Memory (Manually) .........29
_'Adjusting the TV's Convergence Control ......... 30
"O'Usingthe TV Speaker On/Off Switch with
the Audio Output jacks ..................................... 31
+How to Censor the Viewing of Channels ....32-33
•_Using the TV's Audio/Video Input and
Output Jacks ............................................... 34-36
_-Surrouod Sound Speaker Connections .............. 37
i emote Control Oneration
Using the Remote (TV/VCR buttons)....38-39
Using Smart Sound or Auto-Volume .......... 40
Using the Channel Guide Control ............................ 41
Setting the Personal Preference Control ............. 42-43
Setting the Remote to Work Your VCR ............. 44-45
Setting the Remote to Work Your
Cable Converter .................................................. 46-47
Setting the Remote to Work a VCR or Cable
Converter - "Search Method". ............................ 48-49
[] Picture-In-Picture (PIP)
How to Use PIP (Connections) ............ 50-5 I
How to Use PIP with the TV Remote ................ 52-53
Selecting the Picture Source for PIP ........................ 54
Adjusting Picture-in-Picture Color and Tint ............ 55
More PIP Connections (Cable Converter) ............... 56
_1 General Information
Tips if Something Isn't Working ............... 57
Glossary of TV Terms ............................................. 58
Index ........................................................................ 5_.
RF Switcher Information ......................................... 59 I
I
Warranty .................................................................. 60
The Model and Serial Numbers are found on the
back of this TV set. Please record these numbers and
purchase date in the space below. Refer to them
whenever you ask your dealer about this TV set.
Model No..
Serial No.
Purchase Date
Please attach your sales receipt to this book and kee
it for future reference.
/
WARNING: TO PREVENT FIRE OR SHOCK[
HAZARD DO NOT "_
_,XPOSE THIS UNIT TO RAIN OR EXCESSIX
MOISTURE. I
Copyright © 1994 Philips Consumer Electronics Company. All rights reserved.
8
Page 4
First Time Set Up which automatically sets the TV
for local channels and antenna mode. It even helps you
make the necessary connections for the Picture-In-
Picture (PIP) feature (see page 8.)
Infrared Remote Control which operates your TV
set and a variety of wireless remote control VCRs and
Cable 'IV Conveners.
Standard TV broadcast (VHF/UHF) or Cable TV
(CATV) channel capability.
Closed Captioning which allows the viewer to read
'IV program dialogue or voice conversations as on-
screen text.
Automatic Programming of channels for quick and
easy selection of favorite stations available in your
area.
Picture-In-Picture (PIP) which cartshow aTV
program and the direct video output from anaccessory
(VCR, etc.) onto the "IV screen at the same time.
Parental Control for "Censoring" orblanking out
channels and Audio,'Video Inputjack connections to
prevent children from watching undesirable
programming.
Stereo-Ready TV with built-in audio amplifier and
twin speaker system. Receives TV programs in both
broadcast stereo sound or (SAP) bilingual broadcast
On-Screen Features which display helpful
information for setting of TV controls (such as color
adjustment, timer settings and channel programming).
Audio/Video jacks for direct connections with VCRs
(and other accessories) for quality "IV picture and
sound playbaclt.
Surround Sound external audio speaker connections.
Sleep-Timer which automatically tums the "IVOFF at
preset time intervals.
1
As you unpack your TV please note that the b
following items have been included with your set:
It.
Owner's Manual
Wan'amy Registration Card
Safety Tip Information Brochure
Factory Service Address Directory
Remote Control Transmitter
Batteries for Remote Control Use
Accessory Products Information Brochure
Audio/Video Cables for Direct Input and
Output Connections.
Please take a few minutes to complete your
registration card. The serial number for the 'IV is
on the back of the set.
Please keep your packing material for any future
Use.
To ensure that picture screen performance is of
the highest quality, please avoid robbing any
object or material on the screen that could scratch
or damage its surface.
Refer to the back of this manual for instructions
on the cleaning and care of the TV.
I
4
Page 5
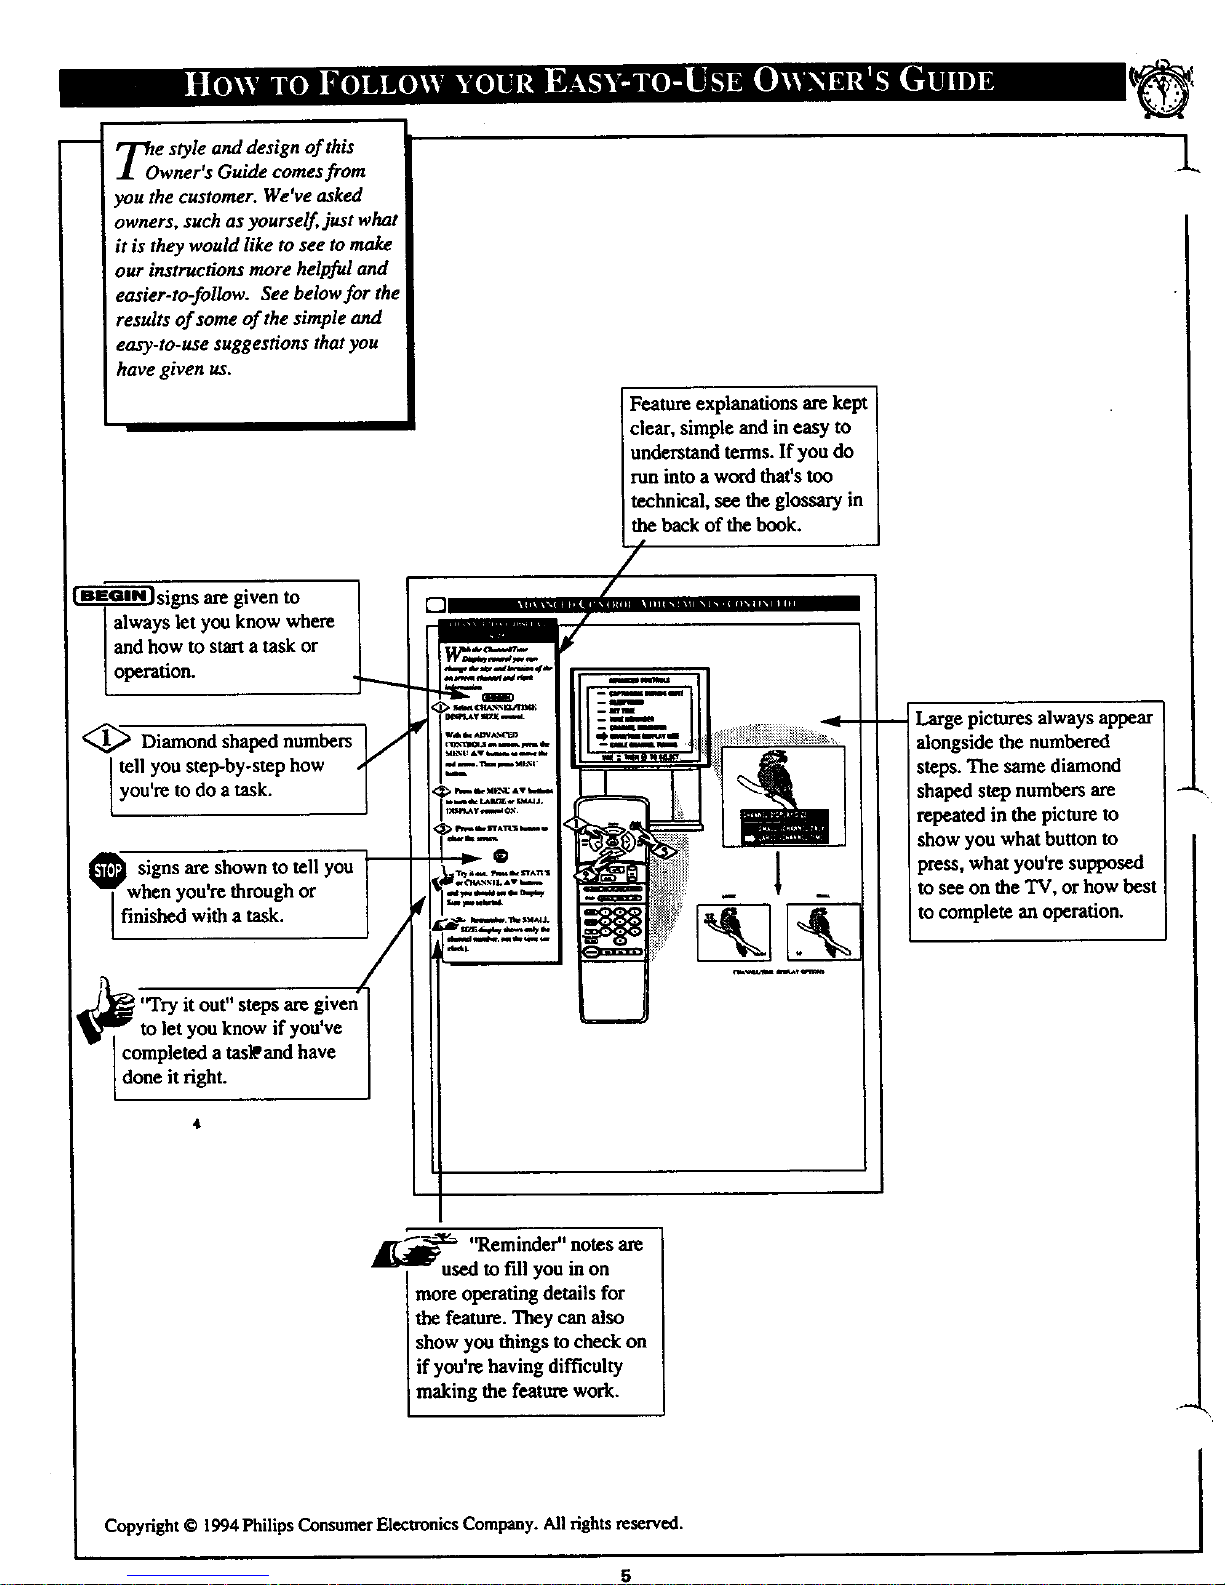
TO e style and design of this
wner°s Guide comes from
you the customer. We've asked
owners, such as yourself, just what
it is they would like to see to make
our instructions more helpful and
easier-to-follow. See below for the
results of some of the simple and
easy-to-use suggestions that you
have given us.
['i-m-Fff] signs are given to
always let you know where
and how to start atask or
operation.
Diamond shaped numbers
tell you step-by-step how
you're to do a task.
_ signs are shown to tell you
when you're through or
finished with a task.
"Try
you've
completed a tas_ and have
done it right.
4
[]
Feature explanations arekept
clear, simple and in easy to
understand terms. If you do
run into a word that'stoo
technical, see the glossary in
the back of the book.
/
Large pictures always appear
alongside the numbered
steps. The same diamond
shaped step numbers are
repeated in the picture to
show you what button to
press, what you're supposed
to sec on the TV, or how best
to complete an operation.
L
_['_'_ "Reminder" notes are
used to fill you in on
more operating details for
the feature. They can also
show you things to check on
if you're having difficulty
making the feature work.
Copyright© 1994Philips ConsumerElectronicsCompany.All rightsreserved.
5
i
Page 6
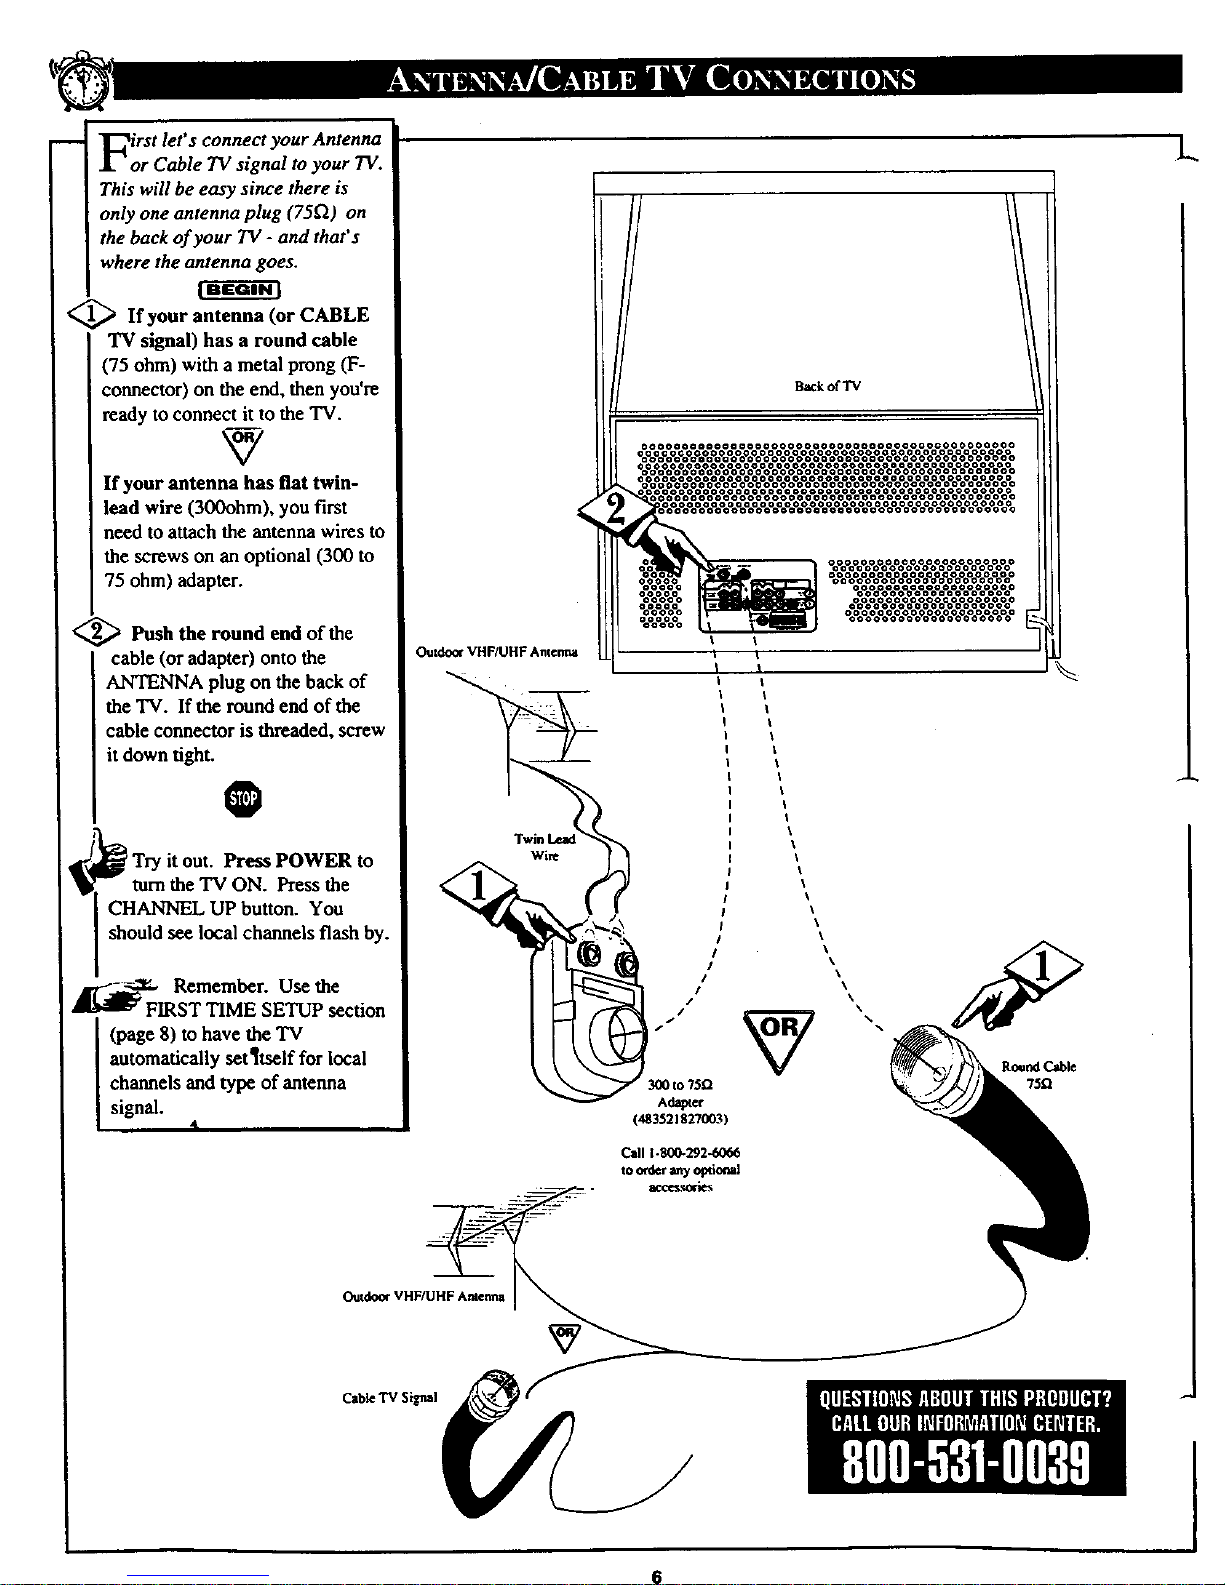
First let's connect your Antenna
or Cable TV signal to your TV.
This will be easy since there is
only one antenna plug (75[2) on
the back of your TV - and that's
where the antenna goes.
<_ If your antenna (or CABLE
"IVsignal) has a round cable
(75 ohm) with a metal prong (F-
connector) on the end, then you're
ready to connect it to the TV.
If your antenna has flat twin-
lead wire (300ohm), you first
need to attachthe antenna wires to
the screws on an optional (300 to
75 ohm) adapter.
<_ Push the round end of the
cable (or adapter) onto the
ANTENNA plug on the back of
the TV. If the round end of the
cable connector is threaded, screw
it down tight.
O
I
lTry it out. Press POWER to
turn the TV ON. Press the
CHANNEL UP button. You
should see local channels flash by.
j_%Remember. Use the
ST TIME SETUP section
(page 8) to have the TV
automatically set¶tself for local
channels and type of antenna
signal.
4
Outdoo¢ VHF/UHF Anterma
Twin
Back of TV
Call 1.800+292,60_6
to order _my _#tional
acct_olies
Outdoor VHF/UHF Ametm
Cable TV Signal
6
L
L
Page 7
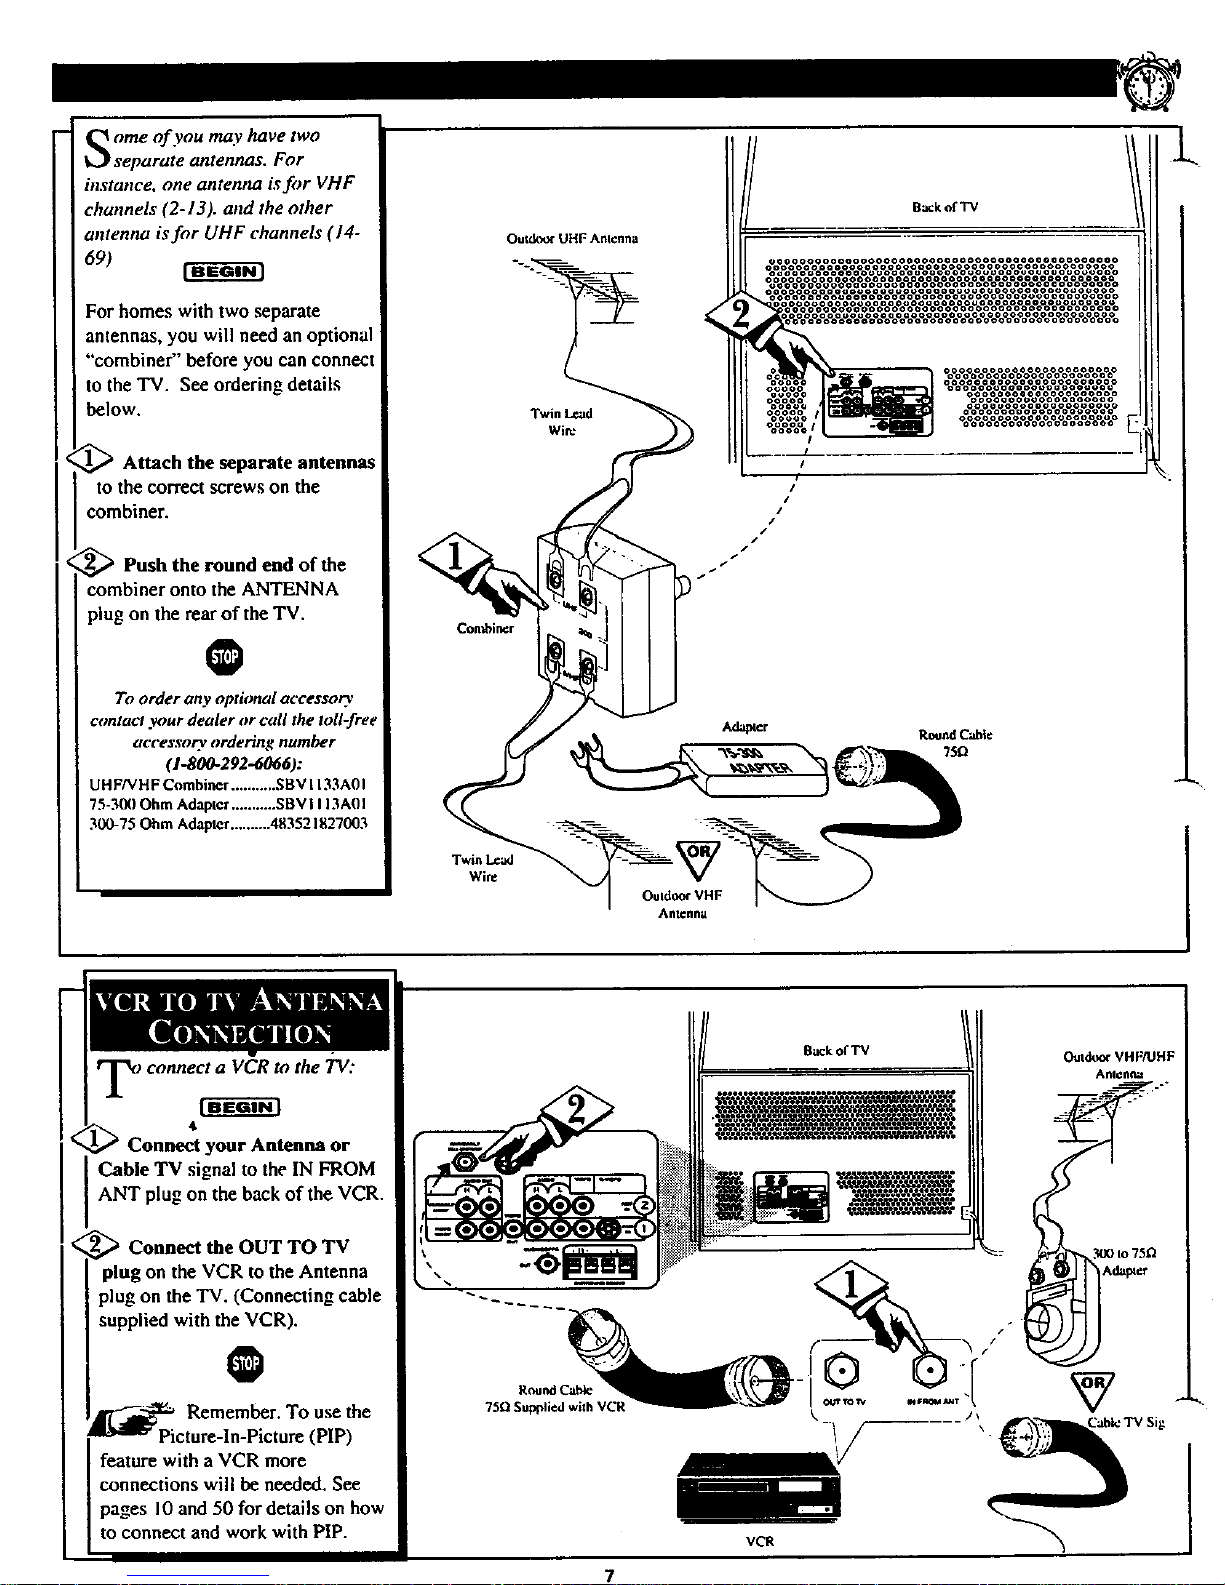
Some of you may have two
separate antennas. For
instance, one antenna isfor VHF
channels (2-13). attd the other
antenna is for UHF channels (14-
69)
For homes with two separate
antennas, you will need an optional
"combiner" before you can connect
to the TV. See ordering details
below.
_ Attach the separate antennas
to the correct screws on the
combiner.
_Push the round end of the
combiner onto the ANTENNA
plug on the rear of the TV.
O
To order any optitmal acces$o O,
contact your dealer or call the toll-free
accesso_ ordering number
(1.800-292-6066):
UHFNHF Combiner ........... SBV1133A01
75-300 Ohm Adapter ........... SBV I 113A01
300-75 Ohm Adapter .......... 483521827003
Twin Lead
Wire
Con_i_r
Twin Lead
Wire
OuldOOr VHF
Antenna
B_k of TV
RoundCable
75D
<
Connect your Antenna or
Cable TV signal to the IN FROM
ANT plug on the back of the VCR.
_ Connect the OUT TO TV
plug on the VCR to the Antenna
plug on the TV. (Connecting cable
supplied with the VCR).
Back of TV
O
_ Remember. To use the
Picture-In-Picture (PIP)
feature with a VCR more
connections will be needed. See
pages I0 and 50 for details on how
to connect and work with PIP.
Round C'_
75£/Supplied whh VCR
VCR
7
I
Page 8
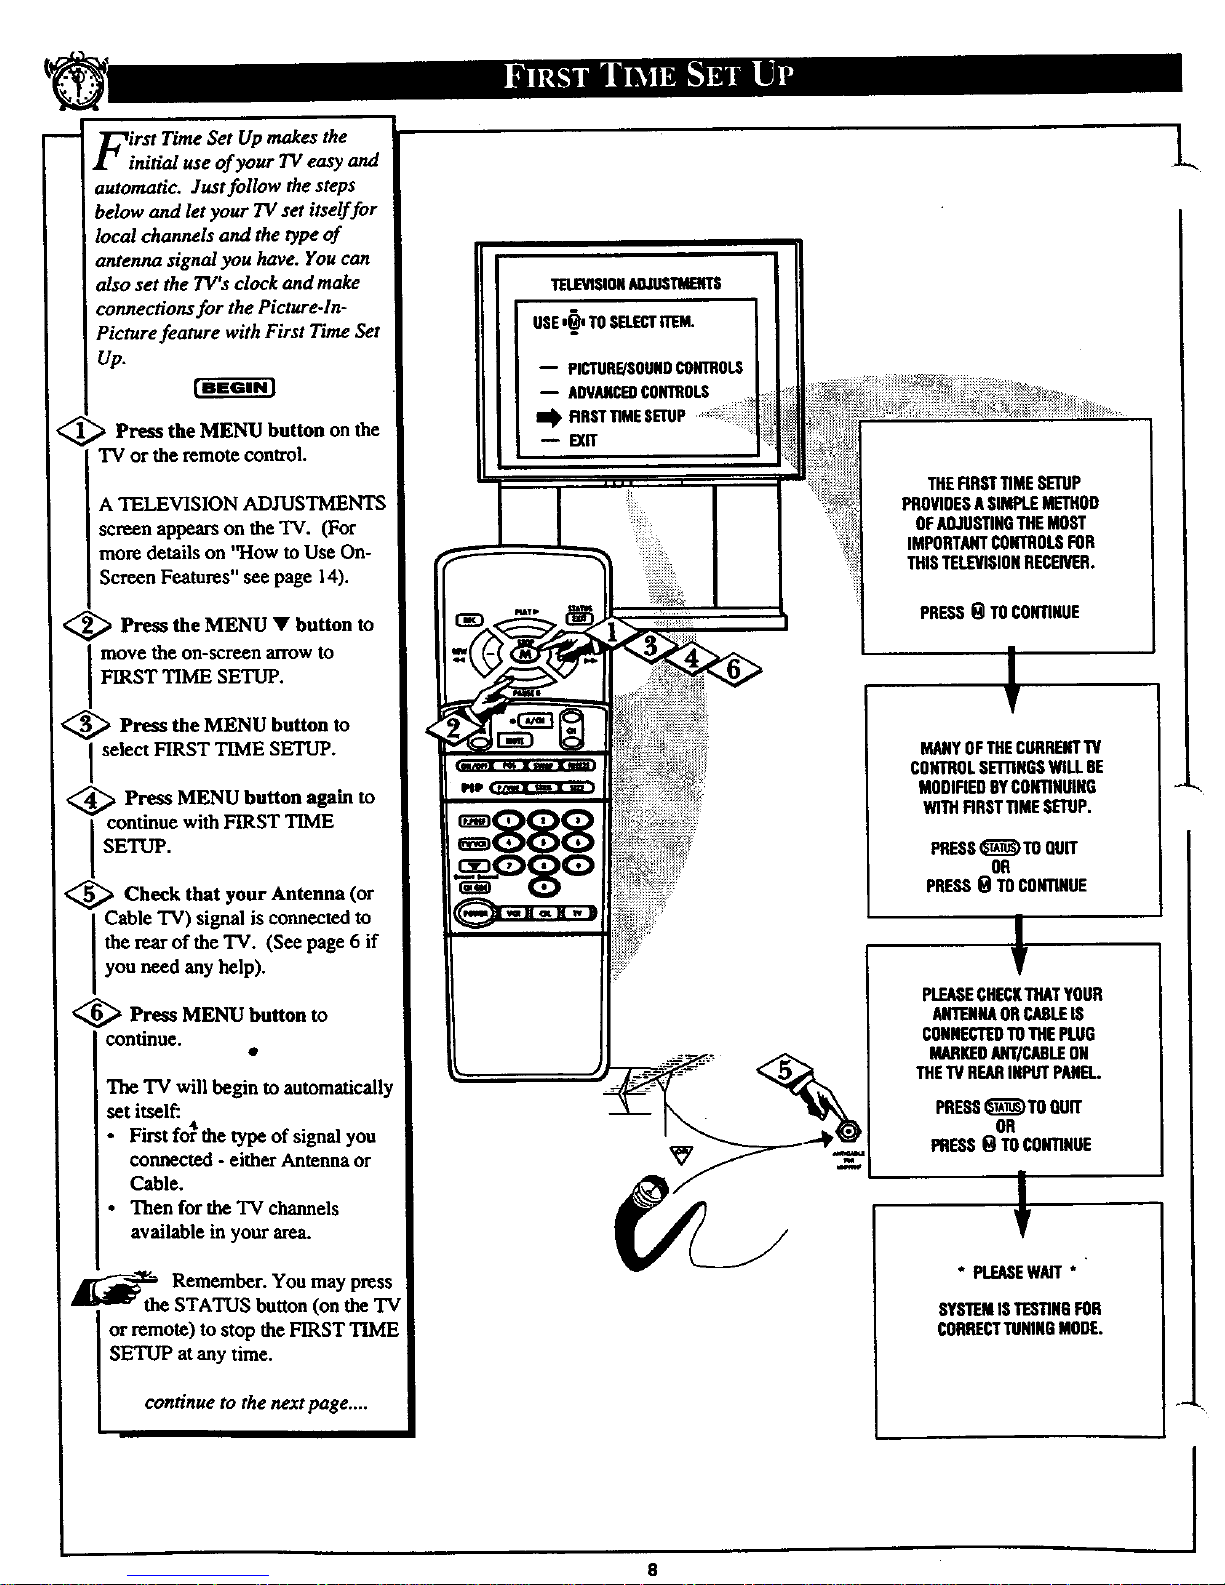
First Time Set Up makes the
initial use of your 7V easy and
automatic. Just follow the steps
below and let your TV set itself foc
local channels and the type of
antenna signal you have. You can
also set the TV'sclock and make
connecKons for the Picture-In-
Picture feature with First Time Set
up.
Press the MENU button on the
TV or the remote control.
A TELEVISION ADJUSTMENTS
screen appears on the TV. (For
more details on "How to Use On-
i
IScreen Features" see page 14).
<_ Press the MENU • button to
move the on-screen arrow to
FIRST TIME SETUP.
<_ Press the MENU button
to
I select FIRST TIME SETUP.
<_ Press MENU button again to
continue with FIRST TIME
SETUP.
_._ _ Check that your Antenna (or
Cable TV) signal is connected to
the rearof the TV. (See page 6 if
you need any help).
_> Press MENU button to
continue.
The TV will begin to automaticall,
set itself:
• 4[
• First for the type of signal you
connected - either Antenna or
Cable.
• Then for the TV channels
available in your area.
Remember. You may press
am _ the STATUS button (on the TV
or remote) to stop the FIRST TIME
SETUP at any time.
continue to the next page ....
-- PICTURE/SOUNDCONTROLS
-- ADVANCEDCONTROLS
i_ RRST TIMESETUP
EXff
8
THERRSTTiMESETUP
PROVIDESASIMPLEMETHOD
OFAOJDSTINGTHEMOST
IMPORTANTCONTROLSFOR
THISTELEVISIONRECEIVER.
PRESS_TO CONTINUE
MANYOFTHECURRENTTV
CONTROLSETI'INGSWILLBE
MODIFIEDBYCONTINUING
WITHRRSTTiMESETUP.
PRESS_TOQUff
OR
PRESSOTOCONTIHUE
PLEASECHECKTHATYOUR
ANTEHAORCANLEIS
CONNECTEDTOTHEPLUG
MANKEOANTICABLEON
THETVREARINPUTPANE]..
PRESS_)TO OUff
OR
PRESS0 TOCONTINUE
* PLEASEWAIT*
SYSTEMI$TESTINGFOR
CORRECTTUNINGMODE.
L.
I
Page 9
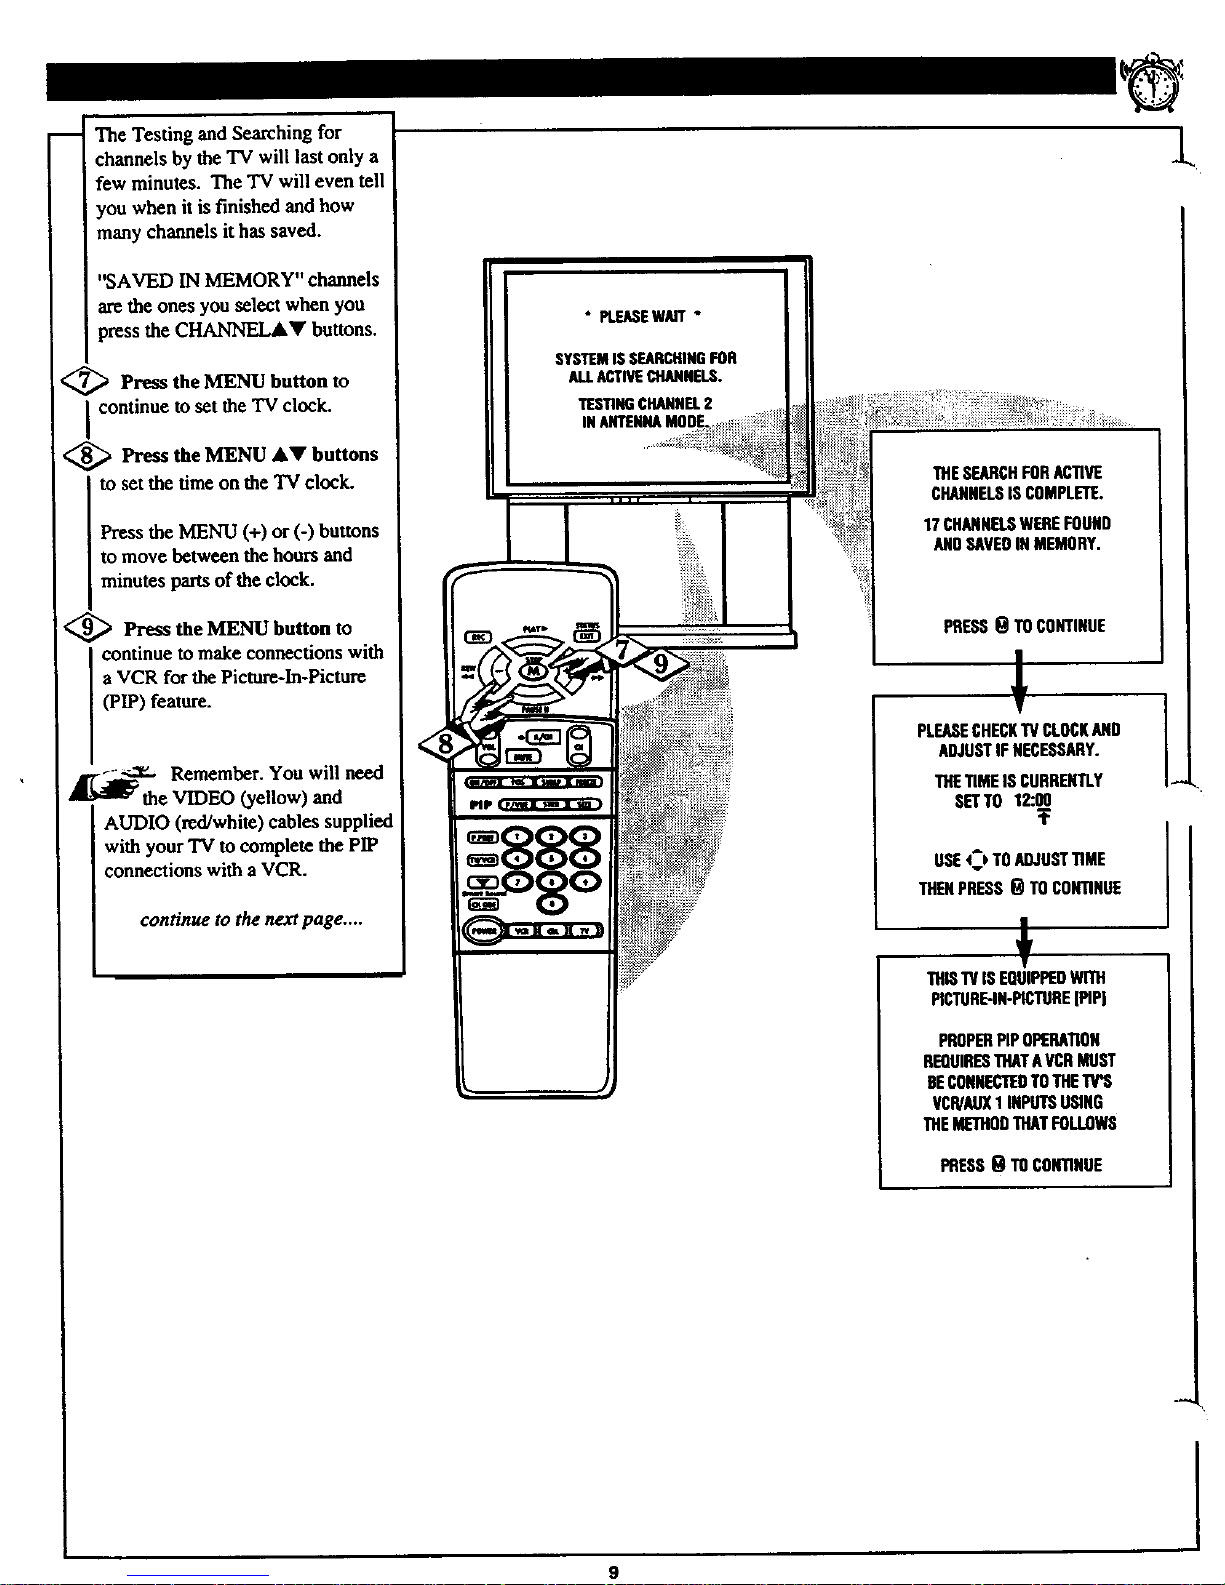
-- The Testing and Searching for
channels by the TV will last only a
few minutes. The TV will even tell
you when it is finished and how
many channels it has saved.
"SAVED IN MEMORY" channels
arethe ones you select when you
press the CHANNELAY buttons.
<_ Press the MENU to
button
I continue to set the 'IV clock.
<_ Press the MENU &V buttons
I tO set the time on the "IVclock.
Press the MENU (+) or (-) buttons
to move between the hours and
minutes parts of the clock.
<_ Press the MENU button to
continue to make connections with
a VCR for the Picture-In-Picture
(PIP) feature.
Remember. You will need
the VIDEO (yellow) and
AUDIO (red/white) cables supplied
with your TV to complete the PIP
connections with a VCR.
con_nuetothenextpage ....
SYSTEMISSEARCHINGFOR
ALLACTIVECHANNELS.
TESTINGCHANNEL2
INANTENNAMOOE_,_:_
_l_!_,
THESEARCHFORACTIVE
CHANNELSIS COMPLETE.
17CHANNELSWEREFOUND
ANOSAVEOINMEMORY.
PRESSOTOCONTINUE
PLEASECHECKTVCLOCKAND
ADJUSTIFNECESSARY.
THETIMEISCURRENTLY
SETTO12:00
:F
USE4_)TOADJUSTTIME
THENPRESSO TOCONTINUE
THIS'WISEQUIPPEDW[TH
PICTURE.IN-PICTURE[PIPI
PROPERPIPOPERATION
REQUIRESTHATAVCRMUST
BECONNECTERTOTHE
VCR/ALIX1INPUTSUSING
THEMETHODTHATFOLLOWS
i PRESSOTOCONTINOE
.L
9
Page 10
_" t _ !_ "_ L
!
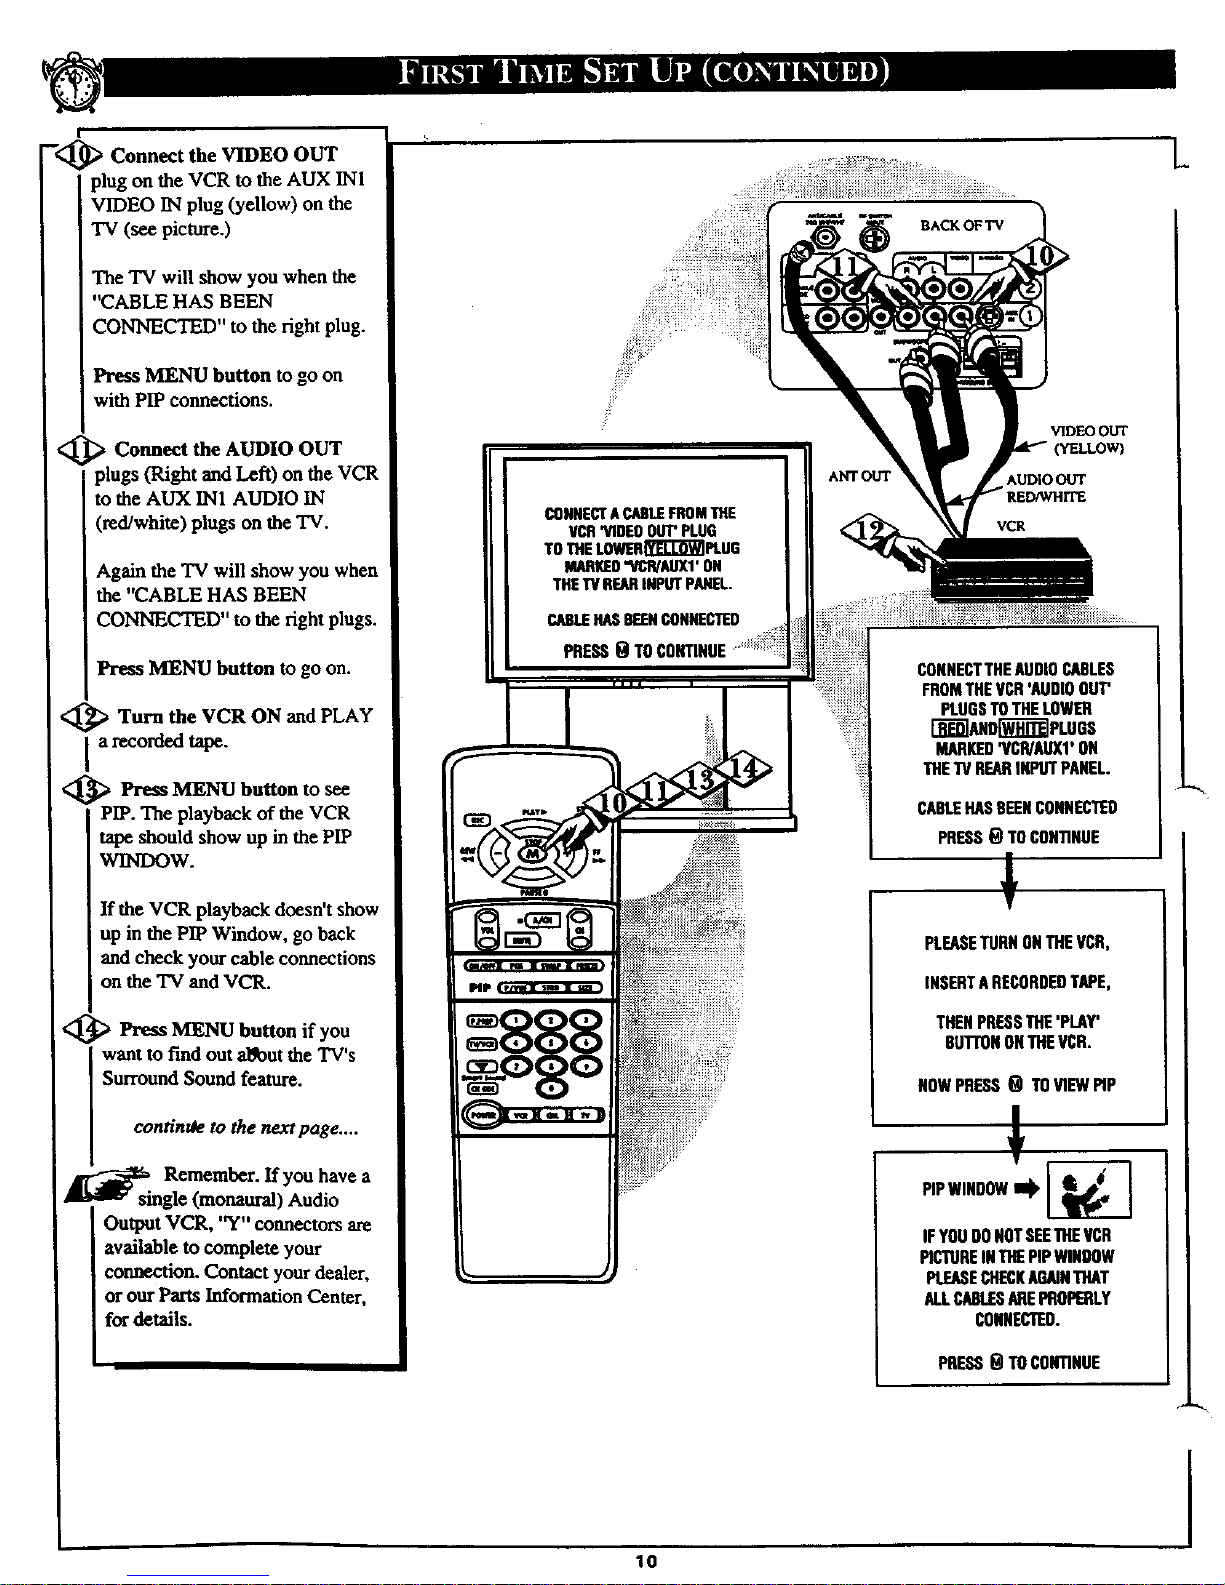
--<_ Connect the
VIDEO OUT
)lug on the VCR to the AUX INI
VIDEO IN plug (yellow) on the
TV (see picture.)
The TV will show you when the
"CABLE HAS BEEN
CONNECTED" to the right plug.
Press MENU button to go on
with PIP connections.
<_ _ Connect the AUDIO OUT
plugs (Right andLeft) on the VCR
to the AUX IN1 AUDIO IN
(red/white) plugs on the TV.
Again the "IV will show you when
the *'CABLE HAS BEEN
CONNECTED" to the right plugs.
Press MENU button to go on.
<_ Turn the VCR ON and PLAY
a recorded tape.
<_ Press to see
MENU button
PIP. The playback of the VCR
tape should show up in the PIP
WINDOW.
If the VCR playback doesn't show
up in the PIP Window, go back
and check your cable connections
on the 'IV and VCR.
<_ _ Press MENU button if you
want to fred out a_out the TV's
Surround Sound feature.
continU_ to the next page ....
Remember. If you have a
_[ _ single (monaural) Audio
Output VCR, "Y" connectors are
available to complete your
connection. Contact your dealer,
or our Parts Information Center,
for details.
:ii_:
CONNECTA CABLEFROMTHE
VCR'VIDEOOUT"PLUG
'TOTHE_I_"L'I--_I PLUG
MARKED"_'R/ALIXI' ON
THE_ REARINPUTPANEL.
CABLEHASBEENCONNECTED
PRESSQ TOC
ANT OUT
VIDEOOUT
YELLOW)
AUDIO OUT
VCR
CONNESTTHEAUDIOCABLES
FROMTHEVCR'AUDIOOUT'
PLUGSTOTHELOWER
Q_]ANO[_PLDOS
MARKED'VCR/AUXl'ON
THETVREARINPUTPANEL.
CABLEHASBEENCONNECTED
PRESSQ TOCONTINUE
PLEASETORNONTHEVCR,
INSERTARECORDEDTAPE,
THENPRESSTHE'PLAY'
BUI-FONONTHEVCR.
NOWPRESS(_ TOVIEWPiP
PIPWINDOW_II_
IFYOUDONOTSEETHEVCR
PICTUREINTHEPIPWINDOW
PL£ASECHECKAGAINTHAT
ALLCABLESAREPROPERLY
CONNECTED.
PRESS_ TOCONTINUE
10
I
Page 11

The "IVfirst tells you that for
Surround Sound to work with the
set you will need an additional
pair of external speakers (8 ohm,
15 watt minimum).
Press the MENU button to go
on.
_Then the TV asks you to read
the Smround Sound section in the
Owner's Guide (page 37) after
you're finished with First Time Set
Up.
Press the MENU button to go
on.
<_ Press the MENU button
again
tocomplete the FIRST TIME
SETUP andreturnto normalTV
viewing.
0
THISTV IS EQUIPPEDWITH
ASURROUND-SOUNDSYSTEM.
SURROUNDSOUNOREQUIRES
THEUSEOFAGOmONAL
SPEAKERSBEINGIq.ACED
AROUNDYOURROOM.
PLEASETHOROUGHLYREAD
THESECTIONIN YOUR
OWNERSMANUALWHICH
DETAILSTHEPROPERSETUP
ANDOPERATIONOFTHE
SURROUND-SOUNDSYSTEM.
PRESS _ TO CONTINUE
i
THISCOMPLETESTHE
FIRST-TIMESETIJP.
PRESS9 TOEXITSETUP
11
Page 12
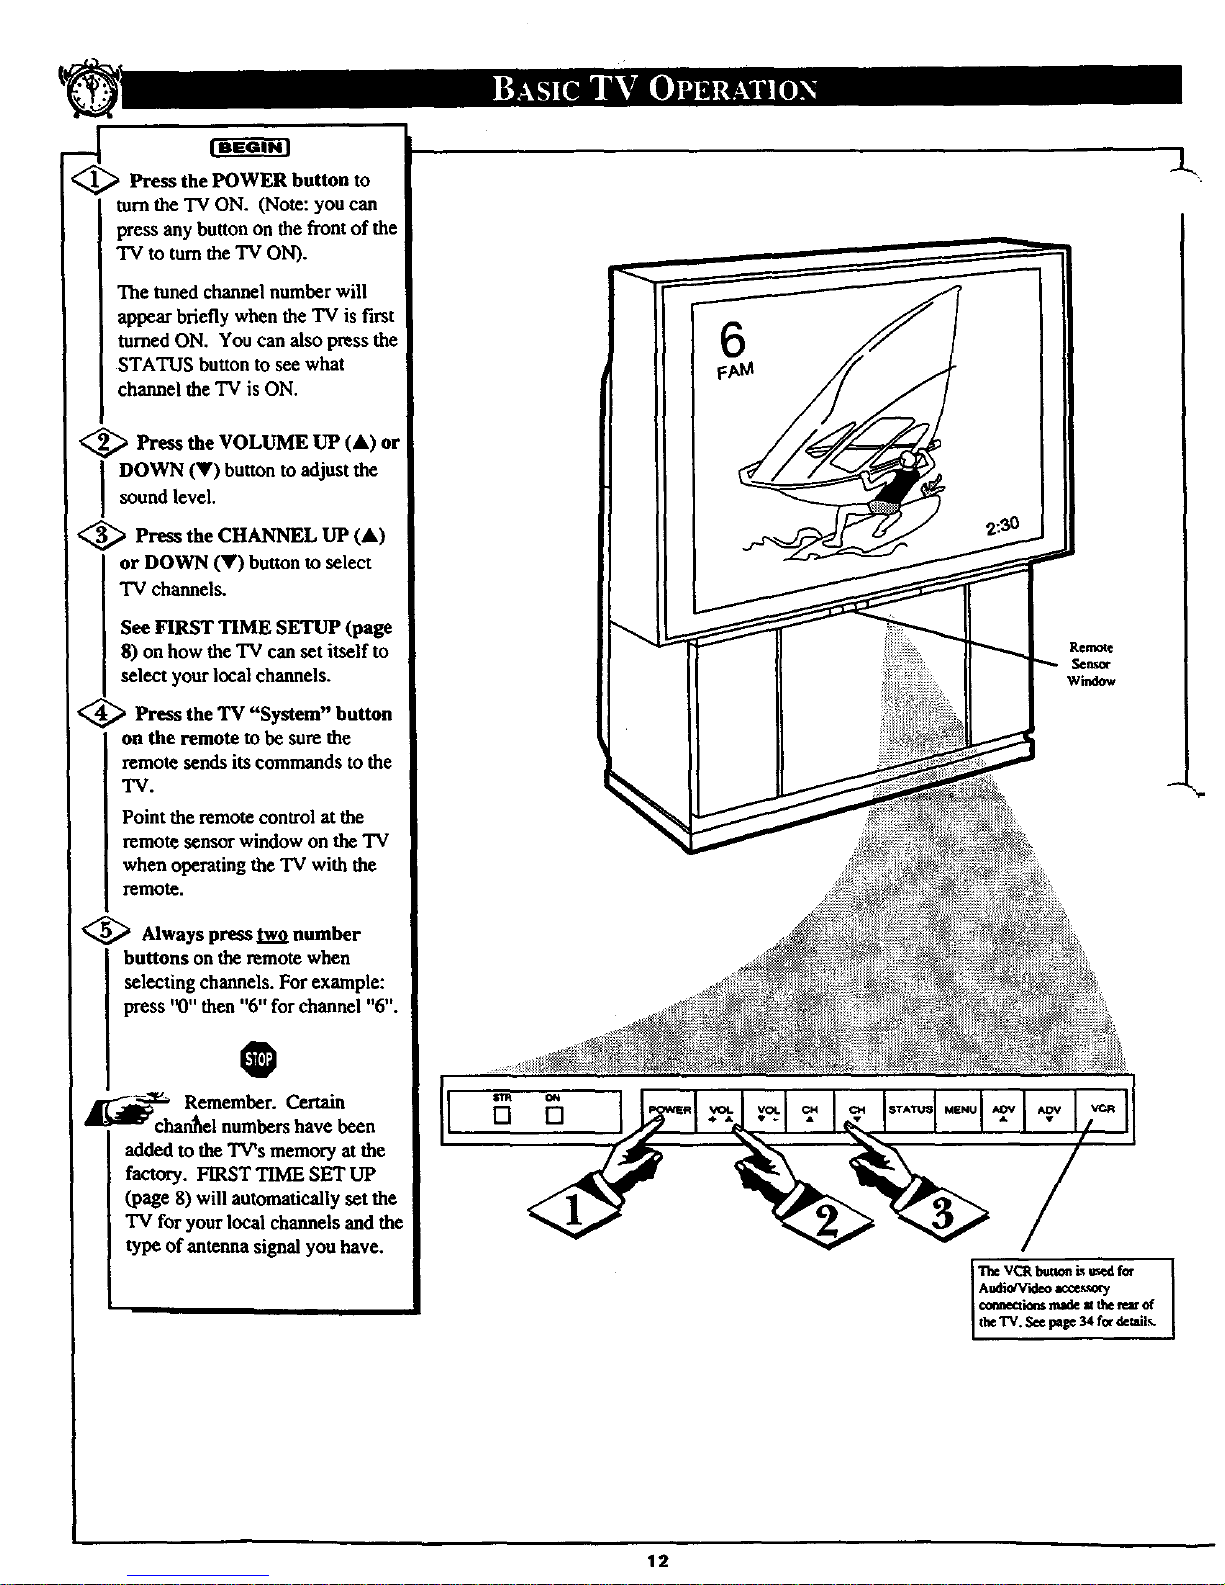
Press the POWER button to
turnthe TV ON. (Note: you can
press any button on the front of the
TV to turn the TV ON).
The tuned channel number will
appear briefly when the TV is first
turned ON. You can also press the
STATUS button to see what
channel the TV is ON.
<_ Press the VOLUME UP
(At)
or
DOWN (V) button to adjust the
sound level.
<_ Press the (At)
CHANNEL UP
or DOWN (V) button to select
TV channels.
See FIRST TIME SETUP (page
8) on how the TV can set itself to
select your local channels.
_ Press the "System"
TV button
on the remote to be sure the
remote sends its commands to the
TV.
Point the remote control at the
remote sensor window on the TV
when operating the TV with the
refilOte.
_ Always press two number
buttons on the remote when
selecting channels. For example:
press "0" then "6" for channel "6".
O
Remember. Certain
_chan_el numbers have been
added to the TV's memory at the
factory. FIRST TIME SET UP
(page 8) will automatically set the
TV for your local channels and the
type of antenna signal you have.
[]
6
Remote
Sensor
window
l_e VCRb_o_ L,_,ed for
€o_ea_ nmle m_ re_ of
theTV._e page 34 for derails.
12
Page 13
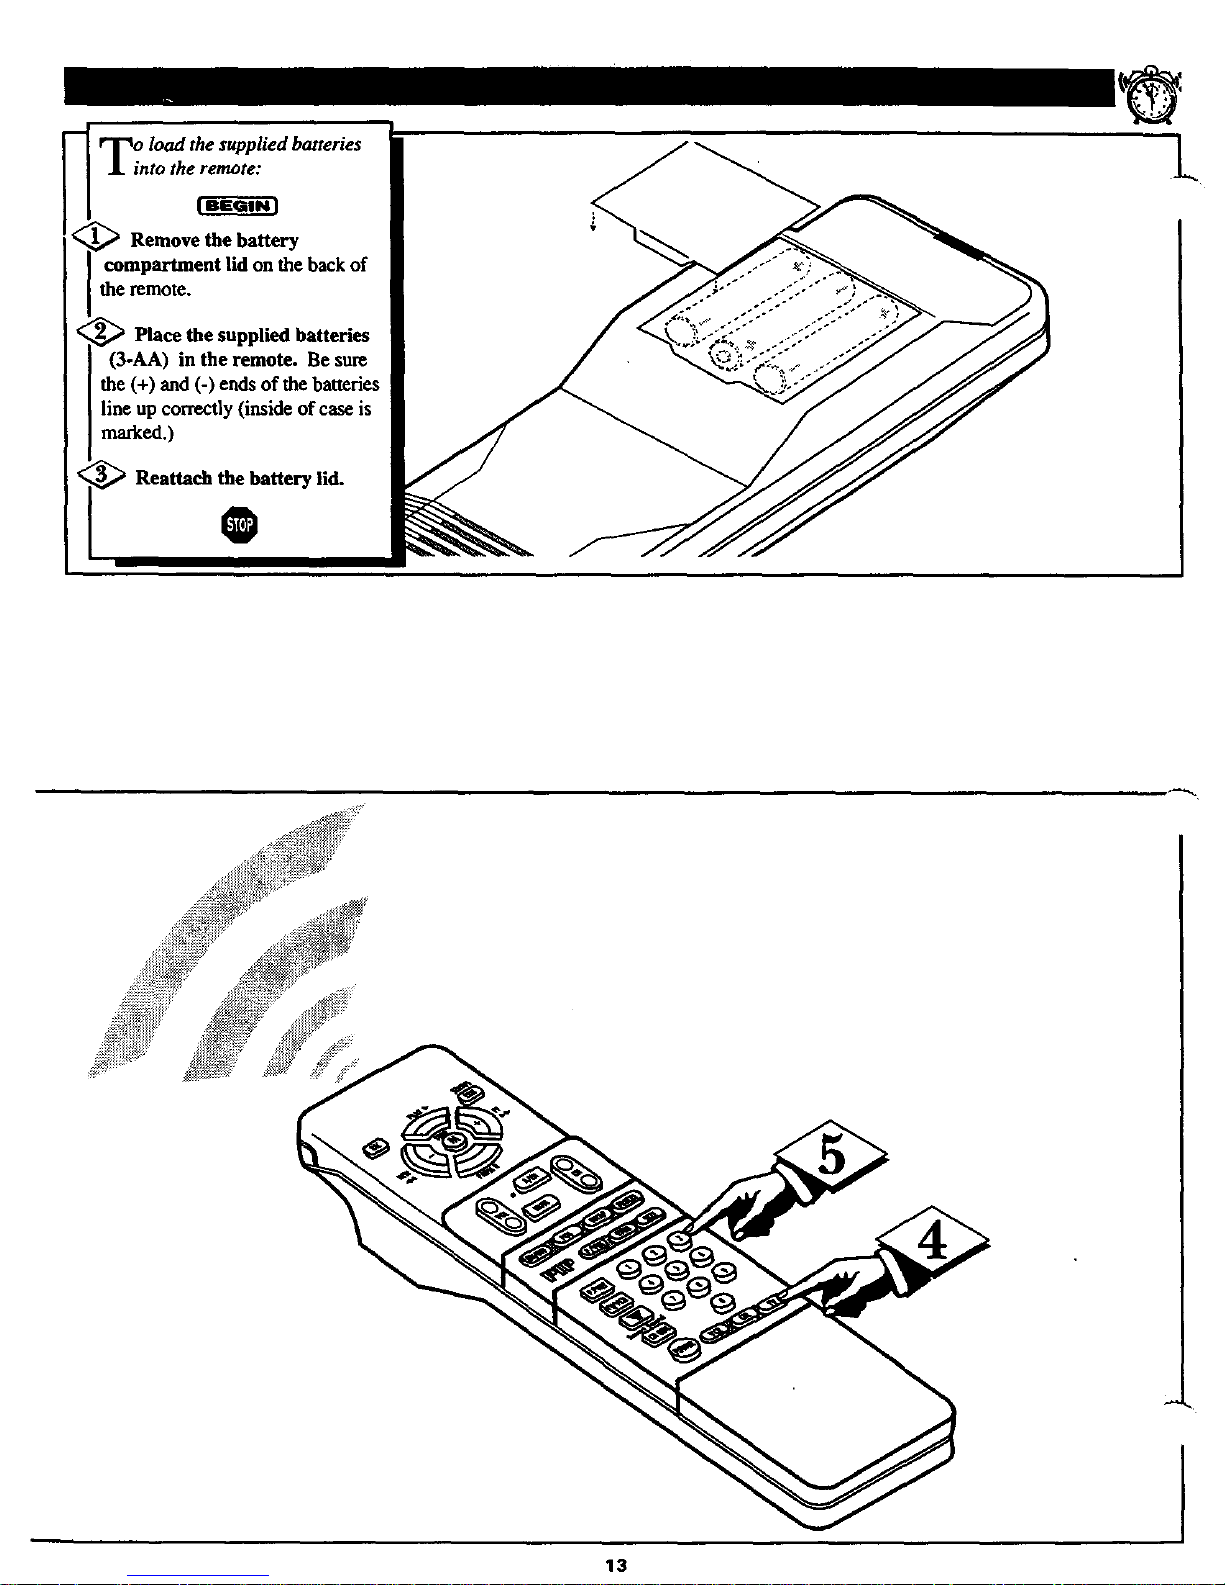
•intotheremote:
Remove thebattery
compartmentlidon thebackof
theremote.
Place the supplied batteries
(3-AA) in the remote. Be sure
the (+) and (-) ends of the batteries
line up correctly (inside of case is
mmked.)
Reattach the battery lid.
L
13
]
Page 14
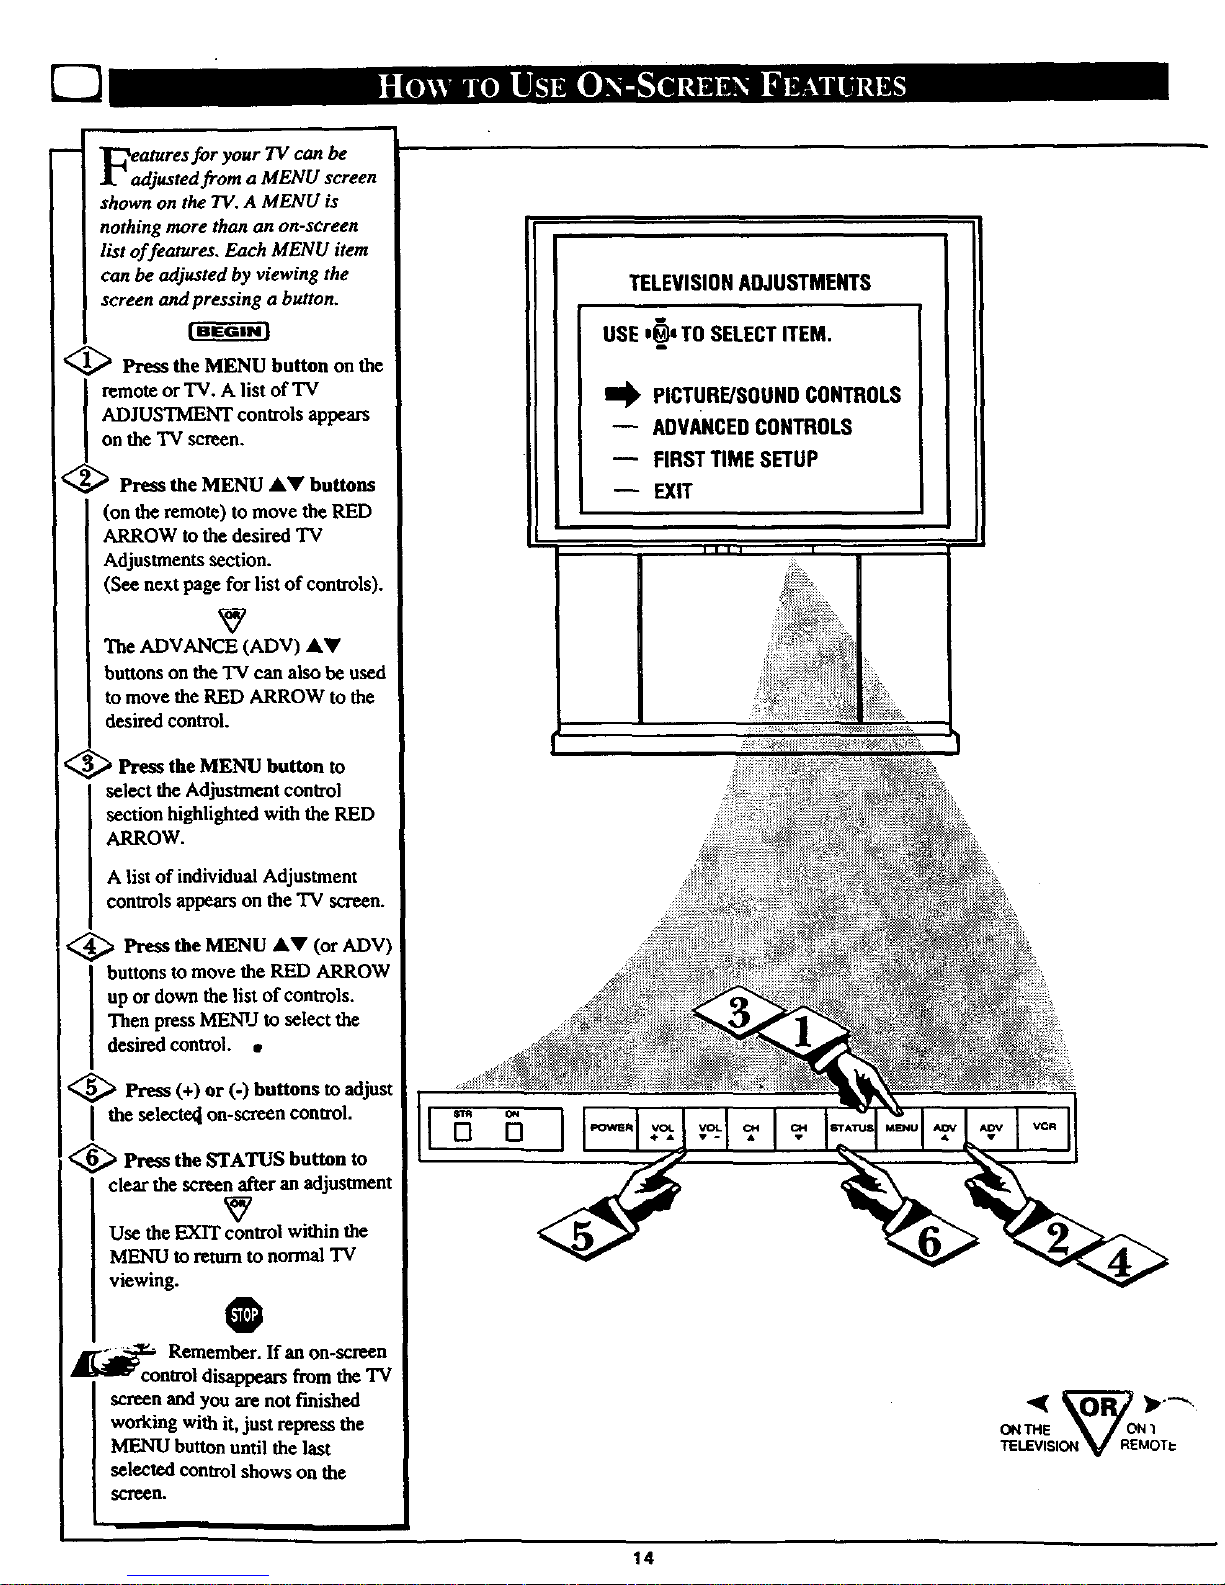
Features for your TV can be
adjusted from a MENU screen
shown on the TV.A MENU is
nothing more than an on-screen
list offeatures. Each MENU item
can be adjusted by viewing the
screen and pressing a button.
<_ Press the MENU button on the
remote or TV. A list of TV
ADJUSTMENT controls appears
on the "IV screen.
<
Press the MENU A_' buttons
(on the remote) to move the RED
ARROW to the desired TV
Adjustments section.
(See next page for list of controls).
The ADVANCE (ADV) AY
buttons on the TV can also be used
to move the RED ARROW to the
desired control.
<_ Press the MENU button to
select the Adjustment control
section highlighted with the RED
ARROW.
A list of individual Adjustment
controls appears on the TV screen.
<_ Press the MENU AV ADV)
(or
buttons to move the RED ARROW
up or down the list of controls.
Then press MENU to select the
desired control. •
<_ Press (+) or (-) buttons to adjust
the selecte_ on-screen control.
<_ Press the STATUS button to
clear the screen after an adjustment
Use the EXIT control within the
MENU to returnto normal TV
viewing.
@
-_ Remember. If an on-screen
• _ control disappears from the TV
screen and you are not finished
working with it, just repress the
MENU butt!onuntil the last
selected cOntrolshows on the
SCreen.
II
TELEVISIONADJUSTMENTS
USE '_' TO SELECTITEM.
PICTURE/SOUNDCONTROLS
-- ADVANCEDCONTROLS
-- FIRST TIME SETUP
-- EXIT
II 11 I
_iii:
[] []
14
Page 15
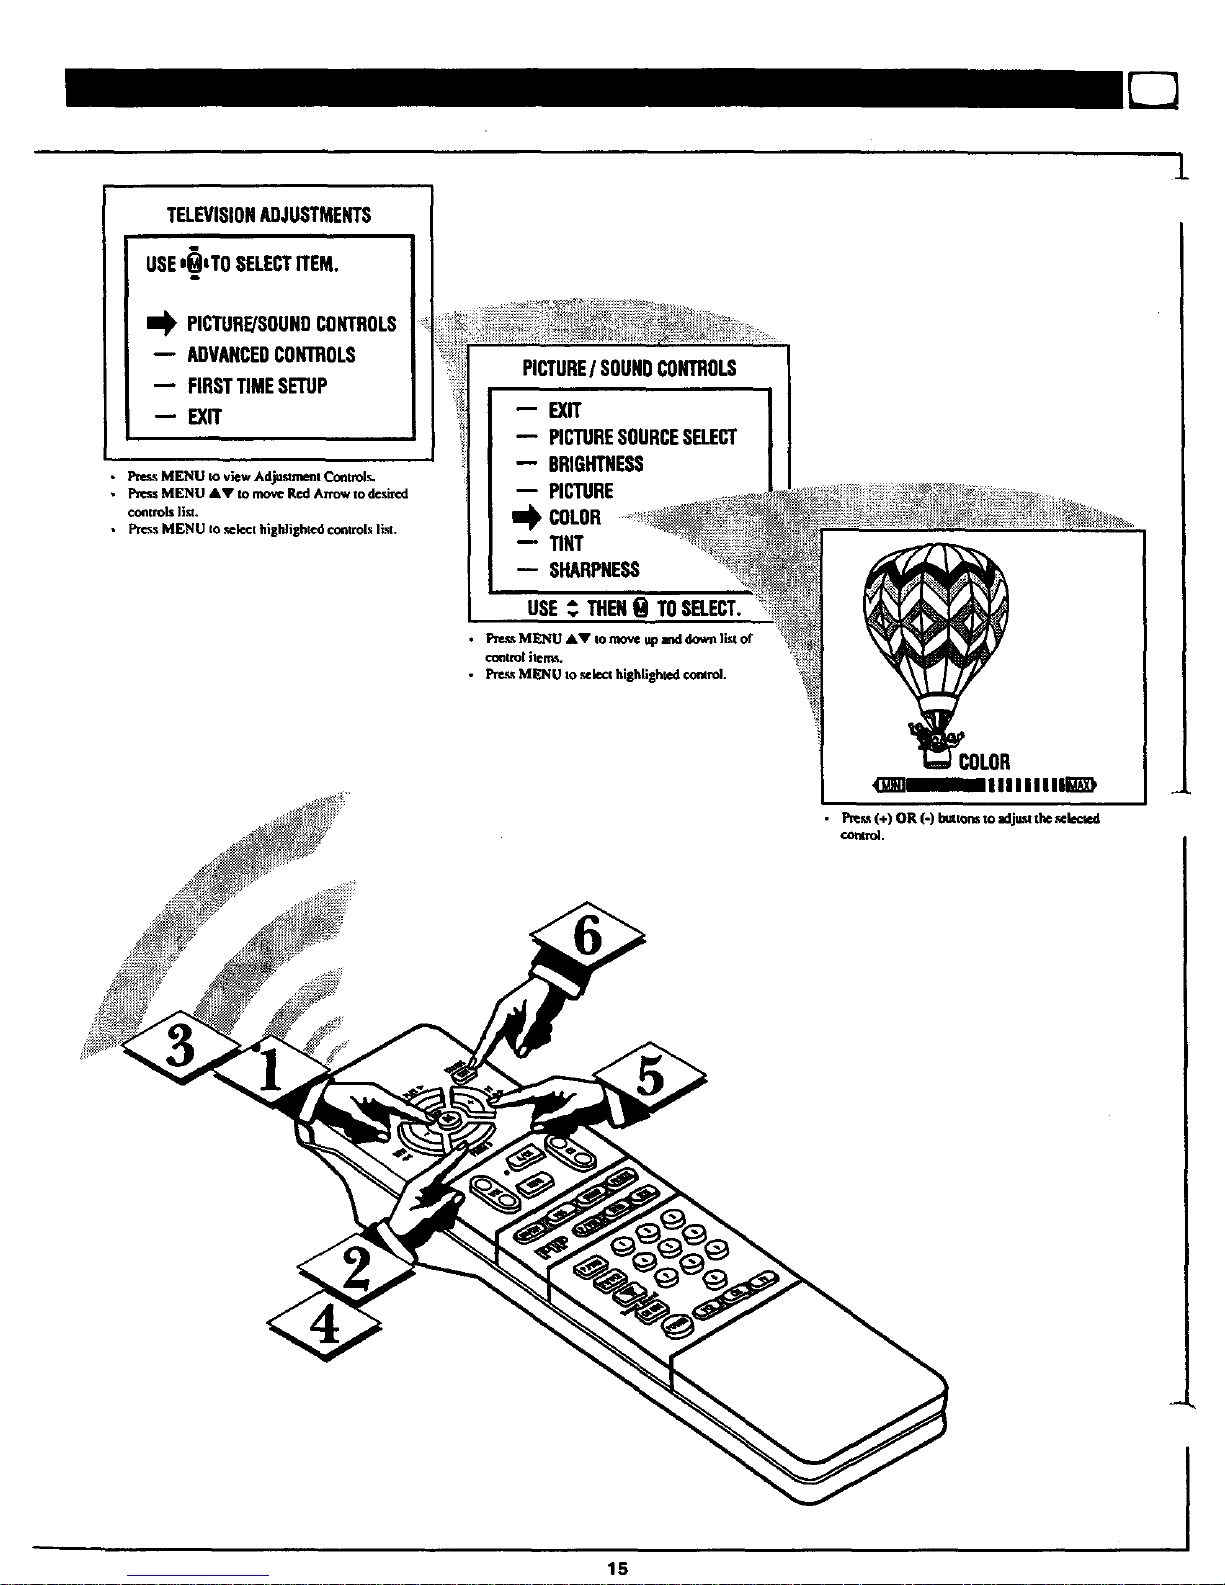
TELEVISIONADJUSTMENTS
USEI_tTO SELECTITEM.
I_ PICTURE/SOUNDCONTROLS
ADVANCEDCONTROLS
FIRSTTIMESETUP
EXIT
• Pres._MK,_ZU Io view Ad_uszmenl C_xltrolr,.
• Pz_e_.sMENU AV to move Red Arrow to d_'slx_l
co_zrols ]]_t.
• _s MENU zo selecz hlgldighzcd co_trol_ li._.
PICTURE/SOUNDCONTROLS
EXIT
PICTURESOURCESELECT
BRIGHTNESS
-- PICTURE
II_ COLOR
TINT
SHARPNESS
1
1,5
Page 16
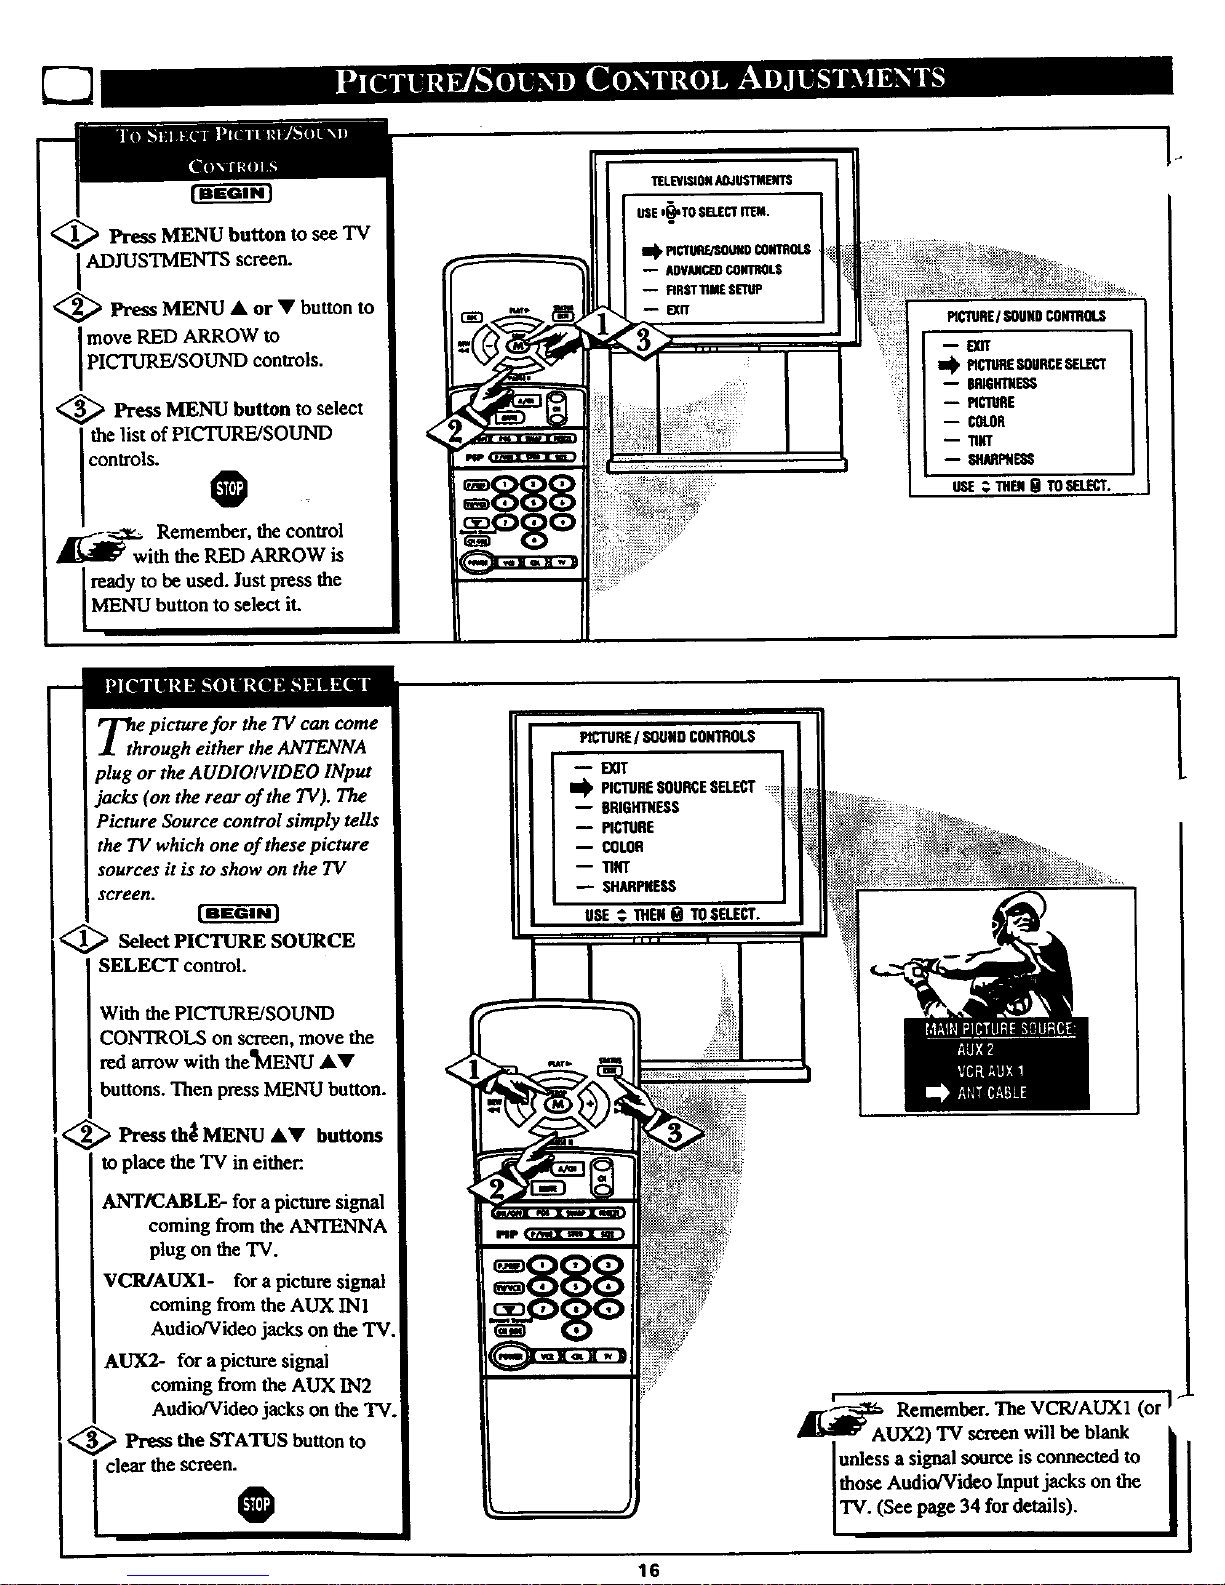
'_ Press MENU button to see TV
ADJUSTMENTS screen.
<_ Press MENU • or • button to
move RED ARROW to
PICTURE/SOUND controls.
<_ Press MENU button to select
the list of PICTURE/SOUND
controls.
0
Remember, the control
h the RED ARROW is
Iready to be used. Just the
press
MENU button to select it.
_th e picture for the TV can come
rough either the ANTENNA
plug or the AUDIOIVIDEO INput
ofthe TV).The
control simply tells
the TV which one of these picture
sources it is to show on the TV
screen.
_ Select PICTURE SOURCE
SELECT control.
With the PICTURE!SOUND
CONTROLS on screen, move the
red arrow with thc_VlENU A•
buttons. Then press MENU button.
_,' ,_ Press th_ MENU A• buttons
to place the TV ineither:.
ANT/CABLE- for a picture signal
coming from the ANTENNA
plug on theTV.
VCR/AUX1- for a picture signal
coming from the AUX INI
Audio/Video jacks on the TV.
AUX2- for a picture signal
coming from the AUX IN2
Audio/Video jacks on the TV
<_ Press the STATUS button
to
t the
I p SHARPNESS
_ Remember. The VCR/AUXI (or !
lunless a signal source is connected to
[those Audio/Video Inputjacks on the
TV. (See page 34 for details).
16
Page 17
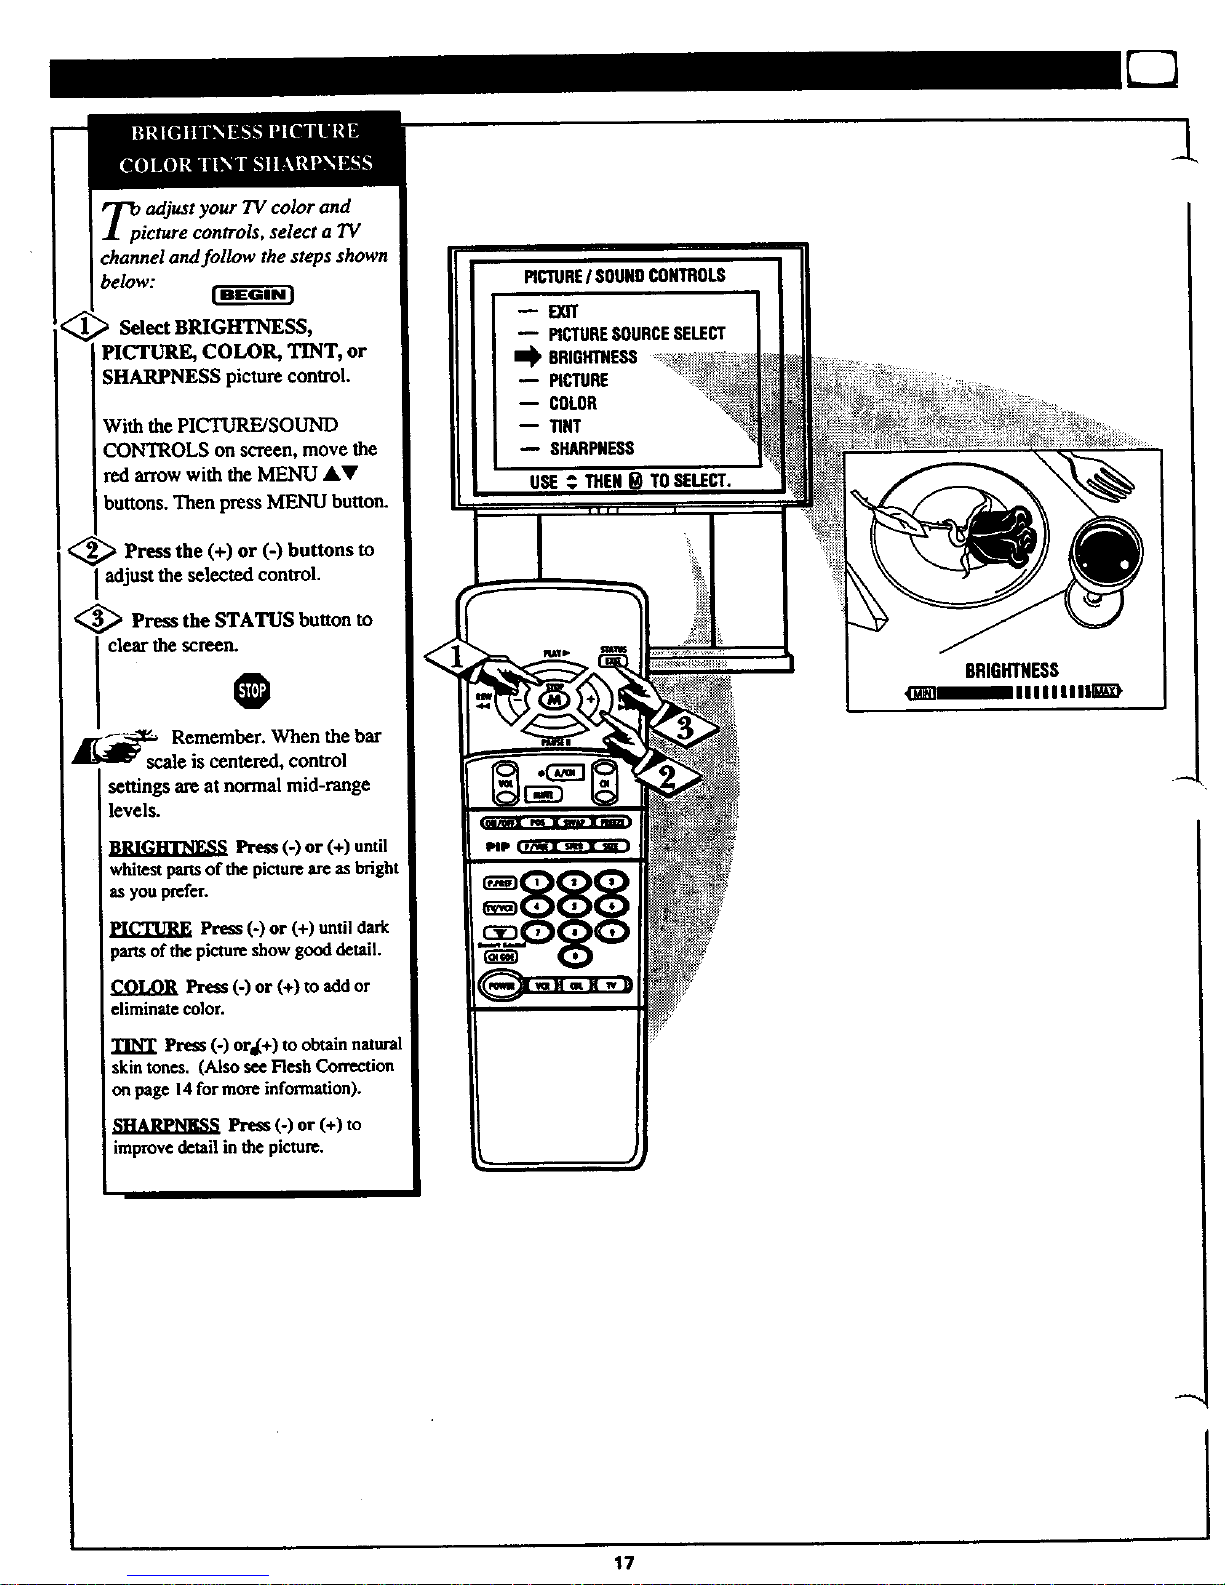
T_p adjust your TV color and
icture controls, select a TV
channel and follow the steps shown
below:
Select BRIGHTNESS,
PICTURE, COLOR, TINT, or
SHARPNESS picture control.
With the PICTURE/SOUND
CONTROLSonscreen, move the
red arrow with the MENU AV
buttons. Then press MENU button.
> Press the (+) or (-) buttons to
adjust the selected control.
<_ Press the STATUS button to
settings are at normal mid-range
levels.
BRIGH'I'NF_S Press (-) or (+) until
whitest pans of the picture are as bright
as you prefer.
PICTURE Press (-) or (+) until dark
parts of the picture show good detail.
COLOR Pre_ (-) or (+) to add or
eliminate color.
TINT Press (-) ors(+) to obtain natural
skin tones. (Also see Flesh Correction
on page 14 for more information).
Press (-) or (+) to
improve detail in the picture.
-- PICTURESOURCESELECT
li_ BRIGHTNESS
BRIGHTNESS
_H]HIIIIIIllI_)
1
17
Page 18
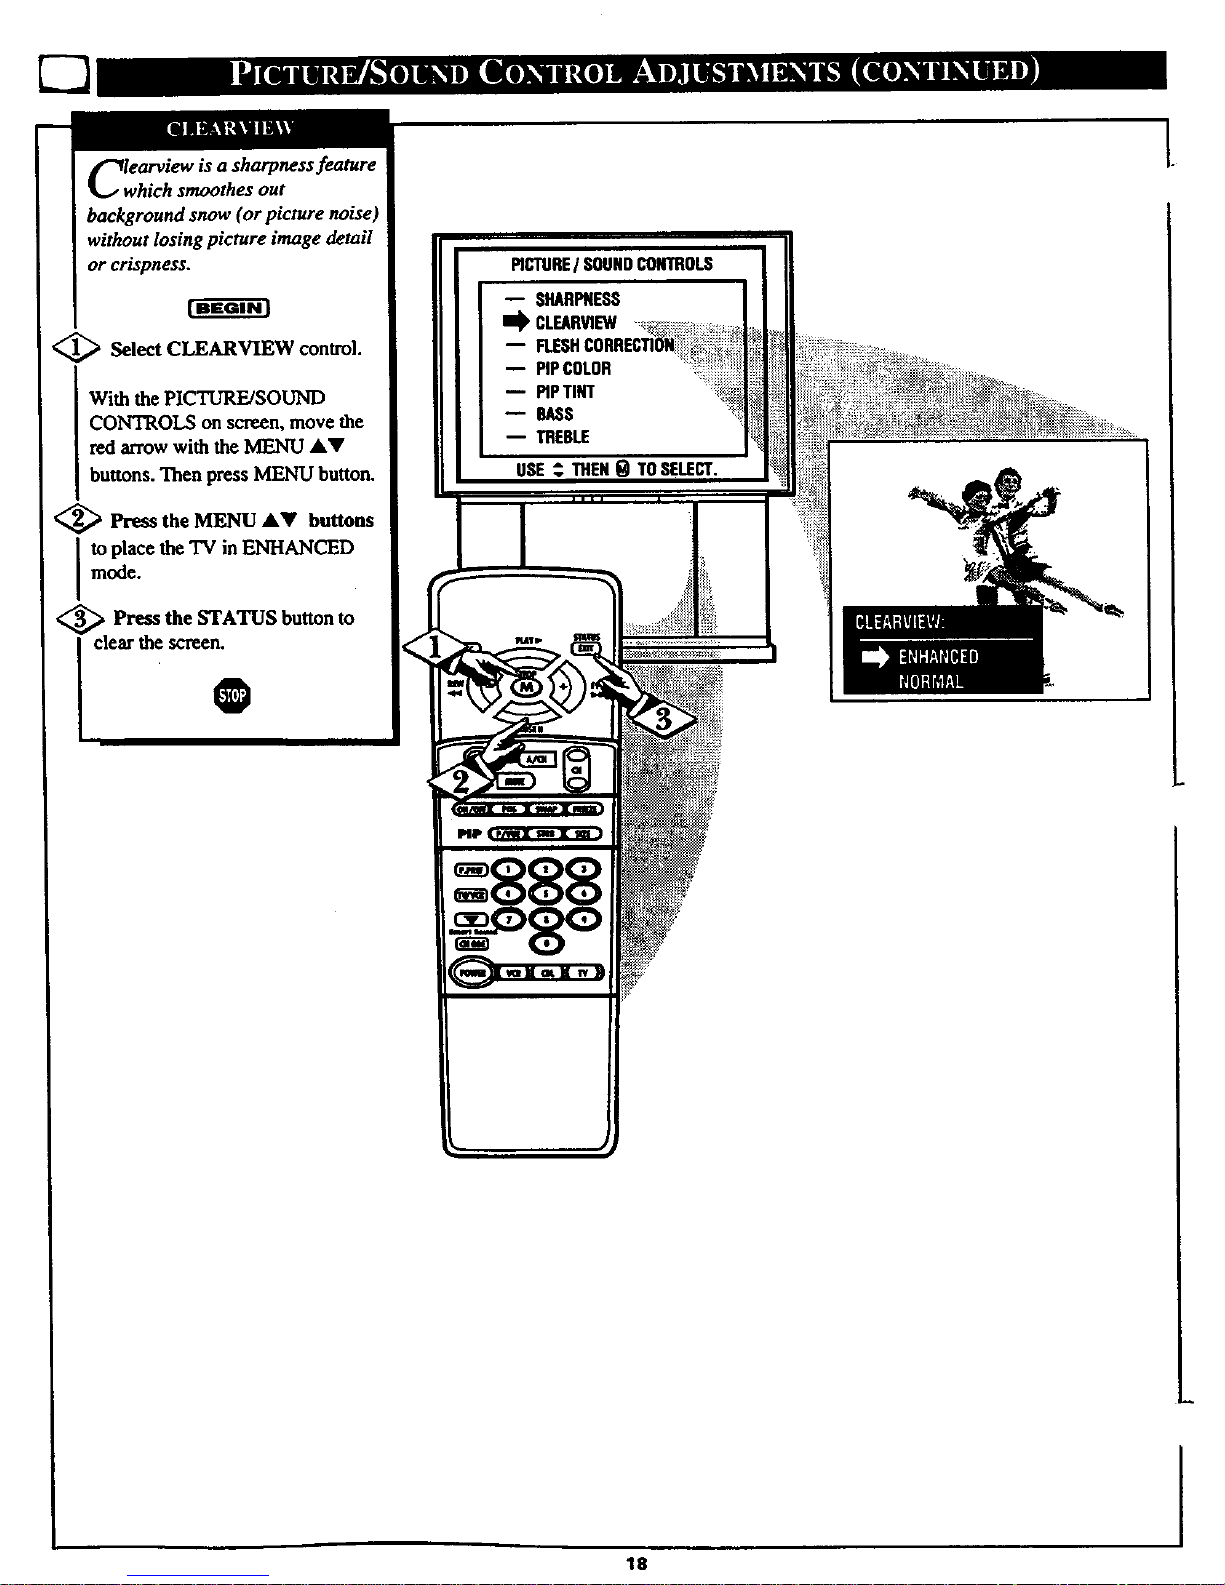
CIwearview is a sharpness feature
hich smoothes out
background snow (or picture noise)
without losing picture image detail
or crispness.
<_ Select CLEARVIEW control.
With the PICTURE/SOUND
CONTROLS on screen, move the
red arrow with the MENU akV
buttons. Then press MENU button.
<_ Press the MENU &V but_ns
to place the TV in ENHANCED
mode.
;_ Press the STATUS but_n to
clear the screen.
O
PICTUREI SOUNDCONTROLS
-- SHARPNESS
I_ CLEARVIEW
B
-- PIPCOLOR
-- PIPTINT
--BASS
-- TREBLE
USE,_THENg TOSELECT.
el • lisa i
18
Page 19

Use the Flesh Correction
ontrol to keep skin tone hues
(or facial tinO from varying from
TV channel to TV channel.
<_ Select FLESH
CORRECTION control.
With the PICTURE/SOUND
CONTROLS on screen, move the
red arrow with the MENU &V
buttons. Then press MENU button.
<_ Press the MENU &V buttons
Ito torn the FLESH CORRECTION
conlrol ON.
<_ Press the STATUS button to
clear the screen.
0
PICTUREI SOUNDCONTROLS
-- SHARPNESS
-- CLEARVIEW
I_ FLESHCORRECTION
-- PIPCOLOR
PIP"r]NT
--BASS
-- TREBLE
USE; THEN9 TOS_LECT.
1
19
I
Page 20

your TV also has individual
ound adjustment controls. The
BASS (low frequency),
TREBLE(high frequency), and
Speaker BALANCE may all be
used to adjust the sound playback
of TV programs.
Select BASS, or TREBLE, or
CONTROLS on screen, move the
red arrow with the MENU &Y
buttons. Then press MENU button.
Press the (+) or (-) buttons to
adjust the sound control to levels
you prefer.
Press the STATUS button to
clear the screen.
0
PIC1QREI SOUNDCONTROLS
-- FLESHCORRECTION
PiPCOLOR
-- _p_NT
m
-- BALANCE
-- EXPANgER
_llllllllllllll
rm0lUL_lJ]N _
EoPa_dDED sound can be used
greater depth and
dimension to both monaural
(MONO) and STEREO TV sound.
Select EXPA_N_ER sound
control.
with the PtCTUR_SOUND
CONTROLS on screen, press the
, MENU" &V buttons to move the
red arrow. Then press MENU
button.
<_ Press the MENU AV buttons
to place the TV in the
EXPANDED sound mode.
<_ Press the STATUS button to
I clear the scree_
2O
I
Page 21

ybur TV is able to receive
roadcost stereo TV programs.
The TV is equipped with an
amplifier and twin speaker system
through which the stereo sound
can be heard.
A RED stereo light (on the front of
the TV) will come on when a
stereo broadcast is received.
[ SelectSTEREOsounacontrol.
With the PICTURE/SOUND
CONTROLS on screen, press the
MENU AV buttons to move the
red arrow, Then press MENU
button.
<_ Preas the MENU AY buttons
I to place the "IV in the STEREO
sound mode.
<_ Press the STATUS button to
clear the scree_
Remember. If a stereo
signal is not available and the
TV is placed in the STEREO
mode, sound coming from the TV
will remain monaural (mono).
sEco < ,mfAUmO
PROGRAM (SAP) is partof the
stereo broadcast system. Sent as a
third audi_ channel SAP can be
heard apart from the currentTV
program sound. TV stations are
free to use SAP for any numberof
pm'I_ses, but many experts believe
it will be used for foreign language
translations of TV shows (or for
weather and news bulletins.)
Remember. Ifa SAP
signal is not present with a
selected program, the SAP option
can not be selected. "SAP NOT
AVAILABLE" will appear on the
TV screen.
@
21
®
Page 22

<_ Press MENU button tosee TV
IADJUSTMENTS screen.
_ Press MENU • or • button
to move RED ARROW to
ADVANCED controls.
<_ Press MENU button to select
the list of ADVANCED controls.
O
f-._._ Remember, the control
with RED ARgOWis
ready to be used. Just press the
MEJqU button to select it.
I
your TV com_s with an on-
creen clock. During normal
operation the clock appears on the
'_creen with every channel change
(arid when the STATUS button is
Select SET TIME control.
With the ADVANCED
CONTROLS on screen, press the
MENU •• buttons to move the
red arrow. Then press MENU ,
button.
<_ Press the MENU •• buttons
I to set the minutes portion of the
clock.
Press the M (+) or (-) buttons
to move the selection arrow to the
hours portion of the clock.
<_ ,Pressthe M •• buttons to se
the hours portion of the clock.
Press the STATUS button to set
the clock in operation and clear the
screen.
O
PIPPICTURESOURCE
CLOP/EOP.APTtONING
CAPTIONINGoURINGMUTE
-- SLEEPTIMER
-- TIMEREMINDER
-- CFIAHNEI.REMINnER
ADVANCEOCONTROLS
I_ pipPIGTURESOURCE
-- CLOSEDp.,AP110111NG
-- cAPnONIN60URINGMUTE
-- SL,I_IMER
-- S_ TIME
-- TIMEREMINDER
USE ,_ THEN_ TOSELECT.
TOSELECT.
22
_ Remember. The time may also
set using the number buttons on
the remote. Be sure to press '_1"fast
and then the hour number for sipgle
digit entries.
Page 23

_ptioning (CC) allows
to read the voice content of
television programs on the TV
screen. Designed to help the hearing
impaired this feature uses on.screen
"text boxes" to show dialogue and
conversations while the TV program
is in progress.
<_ Select CLOSED
CAPTIONING control.
With the ADVANCED
CONTROLS on screen, press the
MENU JkY buttons to move the red
arrow. Then press MENU button.
_ Press the MENU _kY buttons
select the desired Closed Caption
mode - For Example: STANDARD.
STANDARD (CC1) :
dialogue (and descriptions)
for the action on the captioned
TV program shows on-screen.
(See important note on this
page.)
SECOND LANGUAGE (CC2) :
foreign language translation of
dialogue (and descriptions)
for the action on the captioned
TV program shows on-screan.
FULL SCREEN TEXT 1 or 2:
often used for channel guide,
schedules, or bulletin board
information for CC programs.
<_ After making your Caption mode
i
selection, press the STATUS button
to clear the TV screen. The selected
Closed Caption mode will be active.
To cancel, set the Closed Captioned
feature to OFF when finished
viewing.
O
---...21_ Remember. Broadcast
stations will often use spelling
abbreviations, symbols, dropouts
and other grammatical shortcuts in
order to keep pace with the on-
screen action. These type factors
vary upon the source of the
captioned text material and do not
indicate a need for service on the
part of the TV.
NOTE: Not all TV programs and product commercials are made for broadcast
with Closed Caption (CC) information included. Neither are all Closed Caption
modes (SECOND LANGUAGE, FULL SCREEN TEXTI, etc.) necessarily being
used by a broadcast station during the transmission of a closed caption program.
Refer to your arca's TV program listings for the stations and times of Closed
Caption shows.
ADVAHCEDCONTROLS
-- PiPPICTURESOURCE
I_ CLOSEOCAPTIONING
-- CAPTIONING
-- SLEEPTIMEN
-- SETTIME
-- TiMEREMINDER
-- CHANNELREMINOER
USE_ THEN_ TOSELECT.
STANDARD mode
Example Type Oieplay
Closed Captlo_ infornullkm will usually appear
in black and while (ahho_ash same bcottdcasle_
or networks may cccL_ionally use €ole_ to
highlight _ draw attenlion to certain ate_.
FULL SCREEN TEXTI & TEXT 2 modes
will block TV r,creen from viewing
23
Page 24

H_oVe you ever fallen asleep in
roof the TV and then
have it wake you up at two in the
morning with a test pattern
screeching in your ears? Well,
your TV can save you all that
trouble by automatically turning
itself off.
<_ Select SLEEP "rIMER control.
With the ADVANCED
CONTROLS on screen, press the
MENU &Y buttons to move the
red arrow. Then press MENU
button.
<_ Press the (+) button
repeatedly to select the amount
of time before the TV will turn
OFF.
The TV can be set to cut itself off
anywhere from 15 minutes to 4
hours away.
_> Press the STATUS button to
clear the screen.
O
Remember. If you ever
want to see how many minutes
are left before the 'IV shuts off,
select the SLEEP TIMER control
display.
If you ever want to stop a SLEEP
TIMER setting, reset the timer to
0:00. "Fumingthe _'V offand then
back on also cancels a setting.
A few seconds before the TV is to
shut off a message will come on
the screen telling you GOOD
i NIGHT.
ADVANCEOCONTROLS
PIPPICTURESOURCE
-- CLOSEDCAPTIONING
m CAPTIONINGOURIN6MUTE
SLEEPTIMER
-- SETTIME
-- TIMEREMIHOER
CHANNELREMINDER
USE_. THGH0 TOSELECT.
24
I
Page 25

Woth the TV Reminder controls
N, the TV automatically
shows you the current time and
channel every thirty minutes.
Select TIME or CHANNEL
REMINDER control.
With the ADVANCED
CONTROLS on screen, press the
MENU AV buttons to move the
red arrow. Then press MENU
button.
<_ Press the MENU &T buttons
I to turn the Reminder controls ON.
<_ Pre_s the STATUS button to
clear the screen.
0
_[_an Remember. The TIME
d CHANNEL Reminders
appear on the hour and the half-
hour for about five seconds.
ai_ TIMEREMINDER
CHANNELREMINDER
1
14 12:30
TIMEAND CHANNELREMINDERSDISPLAYED
J.
25
Page 26

WiDth the ChannellTime
isplay control you can
change the size and location of the
on screen channel and clock
information.
<_ Select CHANNEL/TIME
DISPLAY SIZE con_ol.
With the ADVANCED
CONTROLS on screen, press the
MENU AV buttons to move the
red arrow. Then press MENU
button.
<_ Press the MENU AY buttons
to tom the LARGE or SMALL
DISPLAY control ON.
_ Press the STATUS button to
clear the screen0
Try it out. Press the STATUS
_rCHANNEL A_ll' buttons
and you should see the Display
Size you selected.
Remember. The SMALL
SIZE display shows only the
] channel number, not the time (or
clock).
CHANNELREMINDER
I_ CHAN/TIMIEDISPLAYSIZE
12
CHANNEL/TIME DISPLAY OPTIONS
26
Page 27

go through the
(page 8),
you need to make sure the TV is set
to pick up either Cable TVor
Antenna signals. In other words,
the TV needs to know if you
connected a Cable TV signal or a
normal antenna to its ANTENNA
plug.
<_ Select CABLE CHANNEL
TUNING control.
With the ADVANCED
CONTROLS on screen, press the
MENU &V buttons to move the
red arrow. Then press MENU
button.
<_ Press the MENU AV buttons
to place the TV in either.
CABLE- If you DO have
Cable TV connected
to the "IV. Channels
1-125 available.
ANTENNA-If you have an
Antenna connected
to the TV. Channels
2-69available.
<_ Press the STATUS button to
clear the screen_
Remember. The FIRST
_[_TIM SETUP procedure(pag_
8) does all this _or you
automatically.
4
CHAN/TIME91SPt.AYSIZE
li_ CABLECHAlmELTUNING
27
Page 28

the memory of the TV. This makes it
easy for you to select only your area
'or Cable TV) channels when the
CHANNEL • • buttons are pressed.
Ifyou already went through FIRST
TIME SETUP (page 8), this task has
been completed for you.
<_ Select AUTO PROGRAMMING
control.
With the ADVANCED CONTROLS
on screen, press the MENU A•
buttons to move the red arrow. Then
press MENU button.
<_ Press the MENU •• buttons to
turn AUTOPROGRAMMING ON.
[ The 'IV shows which channel
numbers are"SAVED" as they are
i added into memory.
"AUTO PROGRAMMING
COMPLETED" appears when the "IV
is finished adding channels.
<_ Press the STATUS button to clear
I the screen-
._ Try it out. Press the
CHANNEL&• buttons and see
which channels you can selecL
Remembe_An Antenna or
'IV signal must first be
ADVANCEDCONTROLS
CHAN/TIMEDISPLAYSiZE
CABLECflANHELTUIONG
REDCONVERGENCE
BLLIECONVERGENCE
TVSPEAKER$OH/OFF
USE_THENI_TOSE_CT.
Illl
CHANNEL NUMBERS _"
COUNT UPWARD AS
THE TV LOOKS FOR
CHANNELS TO SAVE.
i
*.|11IIiil|lll#t!!l _lfiII]ltlltlil_lU I1| IQ
28
I
Page 29

A utoProgramming (see
previoua page) adds all the
channels it can find (on your
Antenna or Cable TV system) into
the TV's memory. AddlDelete
Channels makes it easy for you to
add other channels, or drop
unwanted channels, from the list
channels in the TV's memory.
<_ Select ADD/DELETE
CHANNELS control.
With the ADVANCED
CONTROLS on screen, press the
MENU &Y buttons to move the
red arrow. Then press MENU
button.
<_ Press the CHANNEL AY
buttons to select the channel you
want to add or delete.
You can also use the Channel
number buttons on the remote to
select channels.
<_> Press the (+) button to ADD
the channel into the TV's memory.
Press the (-) button to DELETE
the channel from memory.
Repeat steps 2 and 3 for each
channel you wish to add ordelete.
Press the STATUS button to
clear the screen _hen through.
O
Remember. You can also
_ld the VCPJAUXI (or
AUX2 mode) just like a channel.
Then by pressing the CHANNEL
AV buttons the VCR/AUXI (or
AUX2) mode can quickly be
selected to use the Audio/Video
Inputjacks on the rear of the "IV
(see page 34).
Note: The "VCR/AUXI and
ALVX2modes are located between
the lowest and highest channel
numbers within the Favorite
Channel Memory control screen.
ADVANCEDCONTROLS
-- CHAI//TIMEDISPLAYSIZE
-- CABLECHANNELTUNING
-- AUTO-PROGRAMMING
tl_ ADD/DELETECHANNELS
REDCONVERGEHCE
-- BLUECOHVERGEHCE
-- 'IVSPEAKERSON/OFF
USE_, THEH| TOSELECT.
29
I
Page 30

_linvergence is the correct
ning up of the red and blue
light paths on the TV screen.
NOTE: If no color fringing (see
sidebor note) shows, then no
Convergence adjustments are
necessary for your TV.
<_ Select RED BLUE
or
CONVERGENCE control.
With the ADVANCED
CONTROLS on screen, press the
MENU AT buRons to move the
red arrow. Then press MENU
button.
_.' > Press the MENU AY and (+)
(-) buttons to move the red or
blue cross directly over the white
cross on the TV screen.
The red or blue cross is properly
adjuste_l when it is completely
merged with the white cross. (No
color appears around the edge of
the white cross).
_ Press the STATUS button to
clear the screen when convergence
adjustments are complete.
O
_-.-_acRemember. Convergence has been set at the
tory for best viewing, but if one or more of
the (red or blue) colors appear around the edges of
I
Iobjects (color fringing) follow the steps given in this
section.
ADVANCEDCONTROLS
-- CHAN/TIMEDISPLAYSIZE
-- CABLECHANNELTUNING
-- AIJ10-PROGRAMMING
-- AOD/DELETECHANNELS
REDCONVERGENCE
-- BLUECOHVERGEIICE
TV SPF._ERSON/OFF
USE: THEN( I TOSELECT.
3O
Page 31

WpUld you like to hear TV
rograms through your audio
hi-fi system? The TV's Variable
Audio Output jacks and TV
Speaker Onl Offcontrol work
together to offer you this TV sound
option.
) Connect the R(ight) and L(eft)
VARIABLE MODE Audio Out
jacks on the TV to the R and L
Audio Input jacks on your
amplifier or sound system.
Set the audio system's volume to
normal listening level.
<_ Turn the TV and audio
system
I ON. You can now adjust the sound
Ilevel coming from the audio
[ system with the Volume AV
I buttons on the TV or remote.
<_To hear the TV sound from only
the audio system speakers, select
TV SPEAKERS ON/OFF control.
With the ADVANCED
CONTROLS on screen, press the
MENU A_F buttons to move the
red arrow. Then press MENU
button.
> Pressthe MENU &Y buttons
m mrn the TV Speakers OFF.
You shouldnow 4relyhearTV
soundcomingfromtheaudio
system speakers.
4
_ Press the STATUS button
to
clear the screen.
0
Remember. The audio
system may have to be in
I AUX(iliary) mode to play sound
I from the TV.
BLUECONVERGEHCE
Im_ TVSPEAKERSON/OFF
.!
31
Page 32

C:nsor Viewing allows parents to
lock out, or "censor", any
channels they think children should
not watch. A channel placed under
Censor Viewing cannot be viewed
until a correct access code is used to
unlock the channel for viewing.
First let's set your Censor Code:
CODE control.
With the ADVANCED CONTROLS
on screen, press the MENU &Y
buttons to move the red arrow. Then
press MENU button.
"ENTER CURRENT CODE" shows
on the screen.
<
Press 0, 7, 1, 1 on the remote.
"XXXX" shows on the screen as
you press the number buttons.
"INCORRECT ACCESS CODE"
will also show on the screen.
<_ Press 0, 7, 1, 1 on the remote
again.
"ENTER NEW CODE" shows on
the screen.
<_ Enter a new four digit number
code using the remote.
"ACCESSCODEREPROGRAMMED"
shows on the sore_n to let you know
the new code has been set.
_ Press tile STATUS button tO
clear the screen.
0
_p'_ Remember.Afteryousetthe
w Censor Code go on to the
next page to see how to place
channels under Censor Viewing
control.
Parents - it isn't possible _ unlock or
defeat your Censor Code without
changing to a new code number. So
if your C,__e number changes, and
you didn t change it yourself, then
you will know that someone has
altered the code and the blanked out
channel has been viewed.
ADVANCEDCONTROLS
AUTO-PROGRAMMING
ADD/DELETECHANNELS
REDCONVERGENCE
BLUECONVERGENCE
l _ "IVSPEAKERSON/OFF
CENSORVIEWING
L,'I'CHANGECENSORCODE _:_ !!
USE _ THEN_ TOSELECT.
32
Page 33

SelecttheCENSOR
VIEWINGcontrol.
With the ADVANCED
CONTROLS on screen, press the
MENU AV buttons to move the
red arrow. Then press MENU
button.
'ENTER CURRENT CODE"
shows on the screen.
<_, > Enter the correct Censor Code
number.
<_ Press Channd AV Channel
or
Number buttons to select the
channel to be censored.
A
Press the (+) button to "BLOCK
VIEWING" on the selected
channel.
Press the (-) button to "ALLOW
VIEWING" on a blocked channel.
Repeat steps 4 and 5 for any other
channels you wish to block out.
O
Remember. You can also
out the use of the
Audio/Video Input jacks on the
"IV. This _tops the viewing of VCR
programs which can be shown
through the AN IN jacks. Just
select VCR/AUX 1 orAUX2
(located between the lowest and
highest channel numbers) on the
Censor Viewing screen, and select
Block Viewing.
Note: To make TV viewing easier
all channels (and Audio/Video
Inputjacks) will be unblocked,
once the correct Censor Cede
number has been entered for one
blocked out channel.
When the "IV is turned OFF and
then back ON again, Censor
Viewing is back in place for all
channels.
AOVANCEDCONVROLS
ADD/DELETECHANNELS
REDCONVERGENCE
BLUECONVERGENCE
I'VSPEAKERSOWOFF
33
Page 34

_jacTV'$ AudiolVideo Input
ks are for direct picture and
sound connections between the TV
and a VCR (or Video Disc Player,
etc.) that has Av_io/Video Output
iacks.
TOview the playback of a VCR
tape by u_ing the AudiolVideo
Input jacks on the TV:
<_ Connect the VIDEO OUT jack
from the VCR to the VCR/AUXI
VIDEO IN jack on the TV.
<_ Connect the AUDIO OUT
jacks R(ight) and L(eft) from the
VCR to the VCR/AUXI AUDIO
IN jacks on the "IV.
<_ Select the VCP.JAUX1
PICTURE SOURCE conlxol, on
the TV. Try any of the throe
following ways:
An easy way to select VCR/AUXI
is to press the VCR buRon on the
front of the "IV.
_7
If you have add_VCR/AUXI to
the TV's channelmemory (see
page 29), press the CHANNEL
AY buttons to select it.
With the PICTURE/SOUND
CONTROLS (see page 16), move
the red arrowwith [he MENU J,V
buttons to PICTURE SOURCE.
Then select VCR/AUXI.
<_> Turn th_ VCR ON and press
PLAY to view the tape on the "IV.
@
A_ Remember. Connections
and use of the TV's AUX2
Audio/Video Inputjacks arethe
same as for the AUX1 jacks
(except "AUX2" is selected as the
Picture Source - step 3).
If you have a single (monaural)
Audio Output VCR, "y-
connectors are available to
complete your Connection. Contact
your dealer, or our Parts
Information Center. for details.
AN'rOUT
VIDEOOUT
AUDIOOUT
(Rr_vHrrE)
VGR
34
BACKOFTV
CABLE TV SIGNAL
AND SOUND FROM
PLAYBACKOFVCRTAPE
I
Page 35

-- "--_, tqAli.I ES.'SN II] El! k_ *-"----_-_
Th e S(uper)-Video connection on
e rear of the TV can give you
better picture detail and clarity, for
the playback of S-VHS VCR tapes
or Video Discs, than the normal
antenna picture connections.
Note: The VCR (or Video Disc
Player) must have a S-VIDEO
OUT(puO jack in order for you to
complete the connections shown on
this page.
<_ Connect the S-VIDEO (S-
VHS) OUT jack from the VCR to
S Eojackouthe
<_ Connect the AUDIO OUT
Ijacks R(ight) and L(eft) from the
--_ _ Select the S-VIDEO 1
PICTURE SOURCE control. TI
any of the three following ways:
An easy way to select S VIDEO l
is to press the VCR button on the
front of the TV.
If you have added VCR/AUX1 to
the TV's channel memory (see page
29), press the CHANNEL &V
buttons to select S VIDEO 1.
With the PICTU_SOUND
CONTROLS (see page 16), move
the red arrow with the MENU &Y
buttons to [_ICTURE SOURCE.
Then select S VIDEO 1.
,_ Turn the VCR ON and place it
in the S-VIDEO (or S-VHS)
playback mode. Insert S-VHS
cassette tape and playback in a
normal manner.
0
Remember. The S-VIDEO
connecting cable will be
supplied with the S-VHS VCR (or
Video Disc Player).
ANT.OUT
The S VIDEO Ip'_ure
mu_e elxieaappeano_ly
whea aS.VIDEO atble has
beencorme_:d totheTV.
S-VBS VCR
L
BACK OFTV
CABLE'rV SIGNAL
PICTURE AND SOUND FROM
PLAYBACK OF S-VHS VCR TAPE
3S
Page 36

IN Ik||l I] [|TJ_ll I] |I|O]I lull IK_
To e AudiolVideo Output jacks
n the TV can be used to
record TVprograms on VCRs
which have AudiolVideo Input
jacks.
To record TV programs by using
the AudiolVideo jacks on the TV:
r-a a m
<_ Connect the VIDEO OUT jack
ftom the TV to the VIDEO IN jack
on the VCR.
<_ Connect the FIXED MODE
AUDIO OUT jacks R(ight) and
L(eft) from the TV to the AUDIO
IN jacks on the VCR.
<_ Select the PICTURE
SOURCE control, on the TV.
With the PICTURE/SOUND
CONTROLS on screen, move the
red arrow with the MENU &V
buttons to PICTURE SOURCE.
Then select "ANT/CABLE".
Select the channel on the TV that
you want to record.
<_ Turn the VCR ON. Put a
cassette tape in the unit and place
the VCR in the RECORD mode.
O
_an Remember. If the VCR has
INPUT SELECTOR
switch, plaice it in the LINE or
CAMERA position.
Unattended Timer Recordings with
a VCR are possible, but not
recommended with this
connection, since the TV must be
left ON for the VCR to record.
36
J
/
BACK OF TV
PICTURE AND SOUND BEING
"RECORDED ON VCR.
Page 37

By adding external speaker_ m
the TV's sound system, you can
create the feeling of reflected
sound that surrounds you at a
movie theater or concert hall.
<_ Connect both external
speakers to the speaker wire
terminals on the TV.
Recommended speakers: 8ohm, 15
watt minimum. Be sure the (÷) and
(-) speaker wires are connected to
the correct R(igh0 and L(efi)
speaker terminals on the TV.
( _ Plaee the speakers so the
viewing area is between l_ TV
and the rearsurround speakers.
<_ Turn TV ON and place
the
STEREO/MONO control to
STEREO position.
After setup whenever a stereo
signal is received the audio will be
heard in Surround Sound.
iNote: The rearSurround Sound
speakers will not be heard at the
same volume level _ the float TV
speakers, It is inteuded for the re_¢
speakers to give a background
noise effect which requires a lower
volume level than the TV's front
speakers.
6
_suBRemember. An optional
_OO_R "Amplifier-
Speaker" can also be connected to
the TV. The Subwoofer jack on the
:"IV outputs alow level Bass sisal,
iWhen this jack is connected to an
Amplifier Subwoofer speaker it
complements the sound coming
from the rear Surround speakers.
Contactyour dealer forrno_
information if you wouldbe
interestedin adding such an
accessor_toyourhome audio
system.
For an addeddimension of
Surround Sound you may also
want to place the TV in the
EXPANDED mode (see page 2_),
Not_.Sui'_o_l _ will _
[ withn-.ma,_ "a_tionmeti_ u
BACK OF'IV
,d
Rrv,ARStrRROUIx_.
SOUl, I) S_dCJ_R_
[]
(_I"IONAL £UBWOOI_R
t,acation is mt specit'w,,j_*
wltt_t the_1_ _e_
RF.ARSPEAKER REAR SPFukKER
_ PRI_y l_l_NG AND _l_ AJ_
37
lll,,l
Page 38

After installing the batteries into
the remote, press the TV System
button to send remote commands
to the TV. Point the remote toward
thefront of the TV (remote sensor
window) when pressing buttons.
Foruse of VCRbuttonss_
theRemoteWithavCR".
tima2Y_ALg
Pressthe M button to show on-screen
feature controls. Press • or • bultons
to moveforward andbackward
throughthelist of on-screencontrols.
f=Land.L, LC Ig
Pressto adjustthe selected on-screen
featurecontrol.
Y.elmnglh!tmn
Press toadjusttheTVsouad level.
personal Preference Button
Pressto retta'n theTV to specific
pictureandsoundsoUingsyOUhave
placedinthe TV'smemory.Also can
beusedasanEnterbutton when
sendingchannelcomm_,'_lsto_n'._
controlledcable convertersor VCRs.
Pressto controlTV soundlevels. See
"SmartSound/Auto Volume"section
fordetai|s,
Pressto show a list of lal_elledTV
channelsfromwhichtoselect. See
"CH GUIDE"section fordetails.
I
The remote's TV-VCR-CBL System
buttons control how certain buttons on the
remote areused.
For example:
With the _TV _ System button pressed:
MENU, (M)AV, and(+,-)
buRons are used to select and
adjust on-screen "IV features.
With the "VCR" System button pressed:
the same buttons on the remote
work playback, search, pause,
and other VCR features.
PtP
38
Pressto see thecurrentchannel
numberonthe TV screen. Also press
this button toclear the'IV screen after
controladjustments.
Alternate Channel Button
Pressto select thepreviouslyviewed
chanrteL
Forexample:you arewatching
channel4 andchangeto channell0
(usingthechannelnumberbuttons),
PressA/CHandyour'IV will returnt_
channel4.Press A/CH again andyOUr
TV will return tochannel10.
£hanatLSam. n
Presstoscanupordownthrough
channelnumbers.
ldagJ£v-
Press to turnthe sound OFFonthe
'IV.Press again to returnthesound to
itsprevious level
PAP..l!gtmm
Press tooperate Picture-ln-Picture
featares.SeePIP section fordetails.
Pressthe numberbuttons to selectT'€
channels. Press two number buttons to
select singledigk channels.For
example: toselect cbaonei6...press
"0"firstand then "6".
l_ess to sendremorecontrolcommaads
toeithertheTV,VCRs,or accessory
CableConvenen.Snethe"How to
operateVCRsandCable Converters"
sectionforf_ details.
Page 39

8
_ Press the VCR System
I button on the remote.
Hold the RECORD button down, and
then press the PLAY button to begin
a VCR recording.
Press to rewind tapes. For some
VCRs you may need to press STOP
button first then REWIND, In
playback mode, hold button down to
view picture moving rapidly in
reverse.
Pause Button
Press to temporarily stop the tape dur-
ing a playback or recording. Press
again to release Pause.
Press to the VCR position ("VCR"
indica_r on the VC_ will light) to
view the playback of a tape. Press
again to place in the TV position
('WCR" indicator on the VCR will go
OFF) _ view one program while
recordinganother program.
J
PiP (P/WX STUX size )
Press to playback a tape. Holddown
after pressing the RECORD button w
start a recording.
Pressto stopthe tape.
Press to rapidly advance the tape, For
some VCRs you may need to press
STOP first then FF. InPlayback
mode hold button down to view the
picture moving rapidly in the forward
direction.
Press to scan up or down through
VCR channel numbers.
Press buttons for direct VCR channel
selections.
Power Button
Press to tom the VCR ON and OFF.
Press to send remote commands to
the VCR.
!
A_h Remember. The VCR
buttons on the remote will
not operate your VCR if those
features are not already found on
your VCR remote control.
Note: All VCR functions
(particularly Seurch, Rewind, Fast
Forward, etc.) will operate the
same as with the original VCR
remote control provided with the
VCR.
I
39
Page 40

m
Are you tired of hearing
commercials blaring at you
even when you've gone into the
kitchen or down the hall? The
Smart Sound (Auto Volume)
control enables you to hear a more
consistent, even sound level by
reducing the peaks and valleys
that can occur during program
changes or commercial breaks.
<_ I_ress the Smart Sound button
on the remote.
"SMART SOUND" shows on the
TV screen.
<_ Keep pressing the Smart
Sound button to turn the volume
level control ON (or OFF.)
<_ Press the STATUS button to
clear the screen.
O
Remember. Smart Sound
works only with the programs
coming through the Anteuna/Cable
input on the rearof the TV. Itwill
not control the sound levels for the
Auxiliary (VCR/AUX IN) audio
inputs.
SMARTSOUNDON
iiII I
4O
Page 41

m
[tHl_2121$ | [I_Ul D$
Do you ever have trouble
remembering on which
channel a particular station or
network is located? The Channel
Guide is a quick way to view and
select channels from a list of
Labelled channels.
A Label is afoar letter calloutyou
can set to appear with the on
screen channel number. Example
Label: WXYZ -for a TVstation's
call letters.
To select channels from the
Channel Guide:
<_ Press the CH GUIDE button
on
the remote.
A "CHANNEL GUIDE" shows on
the screen with channel numbers
and labels.
Keep pressing the CH GUIDE
button to see what other labelled
channels can be selected.
<_ Press the number buttons on
the remote to select the desired
labelled channel.
Remember to press 'D"first and
then the number for single digit
channels.
<_ Press the MENU button to pick
a Label for a channel from the
"LABEL CHOIC1P'list, or write a
new label for a channel. (See
sidebar notes).
,t
<_ Press the STATUS button to
clear the screen.
O
!
To write your own Label far a
Channel:
With the double arrow pointing to
"CUSTOM", press the MENU
button.
8
t"
A red arrow appears under the
fn'stletter space for the channel
label.
Press the MENUAY buttonsto
pickanyofthe letmrs or symbols
thatamgiven foryouruse.
Press the (+) or (-) buttons to
move the n_darrew to the other
letter spaces and repeat.
Press the STATUS button to
clear the screenwhen finished.
To pick a Label from the
•LABEL CHOICE" list:
Press the MENUAV buttonsto
movetheredarrowthroughthe
LabelChoicelist.
Just stop the arrow on any labol
you might want to use. The
selected label automatically
moves underthe cun'ent channel
number.
You can also pick a "blank" space
located above the ABC label) if
rou don't want any label to appear
vith the channel.
h
41
Page 42

l
To e Personal Preference button
n the remote instantly returns
the TV to preset channel, picture,
and sound level settings you place
in the TV's memory.
Five different Personal Preference_
can be set so that more than one
_ersan can preset the TVfor his
(or her) preference.
To set Personal Preference:
<_ Press the Personal Preference
OP.PREF.) button on the remote.
"PERSONAL PREFERENCES"
shows on the TV screen.
<_ Press the MENU button to
EDIT or setup P. PREF. for your
own settings.
<_ Press the number button on
the remote for the P. PREF. you
want to set. For example: press l
for AUX IN - PREF1.
MODIFY PREFI appears on the
screen with a list of picture and
sound controls.
<_ Press MENU A_' buttons
the
to move the red arrow up and down
the list of controls. Press the
MENU button to select the control.
Adjust any of the l_sted controls to
the settings you would prefer for
level PREFI.
If you want to setup p. PREF. to
select a ce_dn channel number for
you, use the Picture Source Select
control to set the channel.
g_ After all control settings are
finished, press the STATUS
button w clear the screen.
0
continue to next page
42
L
I
Page 43

To use the Personal Preference
settings you placed in memory:
Press the P. PREF button on
the remote.
"PERSONAL PREFERENCES"
shows on the TV screen.
<_ Press the number button
on
the remote to select the P. PREF.
you desire. Forexample: press I to
select "AUX IN".
The channel, picture and sound
settings will change to the levels
you setup for thatP. PREF.
O
_a Remember. If no settings
ve been made for the
selected P. PREF., the TV screen
will show 'TREFERENCE
NEVER SAVED".
The "CHANGEP. PREF. LABEL"
control can be used to change the
title of a P. PREF. into a name or
label that may be easier for you to
remember.
<_ With CHANGE P. PREF.
the
] LABEL control on_'_e screen,
I press the MENU AY buttons to
[ spell out a new label or title for the
[ se!ected P, I#REF.
A
_,_ Press the (+) and (-) buttons to
move the red arrow undereach
letter space.
_.' > Press the STATUS button to
clear the screen when the new label
is finished.
O
8
12:30
_ • _
8
.
43
Page 44

l
your remotecontrol is set to
work your TV and many
infrared remote (IR) control
VCRs. However, an easy one-
time step may be necessary
before the remote will work your
VCR.
Try this initial check to see if
going on to thefollowing section
is necessary.
<_ Press theVCR System
button on the remote.
<_ Point remote toward VCR
and press the POWER button.
<_ Doos the remote turn the VCR
ON?
IF YES, • and t_ the other
VCR buttons on the remote. If
they also work the VCR, then
the remote is ready and no
further steps areneeded.
If NO, continue...
VCR
l
<_ First look up aTWO-DIGIT
remote code number for your
brand VCR before going through
the simple "1,2,3" steps (on the
following page).
_n Remember.Ifmorethan
e number is listed, you
may have to try more than the
fwst two-digit c&le given in order
to locate your VCR's remote
code.
continue to next page
_VCR REMOTE
CODENO.
Akai 24, 25, 36
Audio Dynamics 14, 21,29
Broksonic 31
Cannon 01
Capehart 33
Craig 07, 30
Curtis Mathes 01, 32, 42, 43
Daewoo 33
DBX 14, 21,29
Dynatech 27
Emerson 20, 31, 34, 40
Fisher 06, 07, 08
Funai 27, 28
GE 01
Goldstar 23
Go Video 45, 46
Hitachi 03, 51
Instant Replay 01
JC Penney 01, 03, 23, 29
JVC 14, 47, 48
Kenwood 13, 14
Lloyds 27
Magnavox 00, 01,02, 05, 27, 28
Magnin 30
Marantz 29
Memorex 01,07, 23, 27
Minolta 03
Mitsubishi 16, 17, 38, 39, 50
Montgomery Ward 12
VCR
imatm
Mulfitech
NEC
Panasonic
Pentax
Philco
Philips
Quasar
RCA
Realistic
Samsang
Sansui
Sanyo
Scott
Sears
Sharp
Shinton
Sony
Sound Design
Sylvania
Symphonic
TaUtog
Teac
Teknika
Thomas
TMK
Toshiba
Video Concepts
Yamaha
Zenith
REMOTE
COD NO.
27,28
14, 21, 29
01
02,03
01,02, 05, 27, 28
00, 01,02, 05, 27, 28
01
03, 04, 32, 42, 43, 44
07,11,12,23,27,28
22, 30
49
07,13
19
03, 08, 23
11, 12
35
09, 10,41
27
00, 01,02, 05, 27, 28
27
14
14,27
26, 27
27 _',
2O
18, 19 ]
28, 29 [
14,28,29 I
AA
Page 45

Now that you have looked up
the two-digit Remote Code
Number for your brand of VCR
(on previous page), you are
ready to follow the four simple
steps below.
Please read through steps 1.4
before beginning.
<_ Press and release the REC
(RECORD) button.
<_ Within seconds after
thirty
releasing the REC button, press
and release the VCR System
button.
<_ Within thirty seconds after
releasing the VCR System
button, ENTER THE TWO
DIGIT CODE NUMBER for
the desired VCR. The remote is
now ready to send commands to
the VCR.
<_ Point the remote at the VCR.
Press the POWER button on the
remote to turn the VCR ON.
, Try it out Th!_e'Chanoeland
Remember. If thili doesn't work
the first time, repeat steps
using the same remote code
number. ,
If after a second try the remote
does not operate your VCR, and
there are more code numbers
lisl_l for your brand VCR, use
the next listed code number.
If after repeated attempts the
code number method does not
work your VCR, try the "VCR
SEARCH" method on page 48.
VCR
PIP (P;Vmx msl[ smtt ]
4S
Page 46

8
<
your remote control is set to
work your TV and many
infrared remote (IR) control
Cable Converters. However, an
easy one-time step may be
necessary before the remote will
work your Converter.
Try this initial check to see if
going on to the following section
is necessary.
_ Press the CBL
System
button on the remote.
<_ Point remote toward Cable
Converter and press the POWER
button.
_:_ Does the remote turn the
Converter ON?
IFYES, O andtrytheCHAV
and CH numberbuttons on the
remote. If they also work the
Converter then the remote is
ready and no further steps are
needed.
If NO, continue...
Cable
.L
<_ First look up a TWO-DIGIT
remote code number for your
brandConverter before going
through the simple "1,2,3" steps
(on the following_age).
Remember. If more than
one n_mber is listad, you
may have to trymore thanthe
first two-digit code given in
orderto locate your Converter's
remote code.
continue to next page
_CONVERTER REMOTE
Archer 28
Diamond 23
Drake 37
Gemini 45
Hamlin 14, 15
Hitachi 25
Jerrold 01,02,03,04,05,30,46
Macom 29, 38
Magnavox 17,26, 31
NSC 49
Oak 06, 27, 39
Panasonic 1g, 35
Philips 19, 20, 21, 24, 26
Pioneer 09, 32
Regency 10, 11
CONVERTER REMOTE
SRANV COD NO.
Rembrant 33
Salora 52
Scientific Atlanta 08, 22, 47
Sheritech 34
Sylvania 16
Texscan 16, 48
Tocom 12,13, 53
Toshiba 43
Uniden Satellite 44, 54
Unika 50
Universal 36
Video Tech 40
Video Way 51
Viewstar 26"
Zenith 07, 41, 42
46
Page 47

Now that you have looked up
the two-digit Remote Code
Number for your brand of Cable
Converter (on previous page),
you are ready to follow thefour
simple steps below.
Please read through steps 1.4
before beginning.
_ Press and release the REC
I (RECORD) button.
@ Within thirty seconds after
releasing the REC button, press
and release the CBL System
button.
_ Within thirty seconds after
releasing the CBL System
button, ENTER THE TWO
DIGIT CODE NUMBER for
the desired Converter. The
remote is now ready to send
commands to the Converter.
<_ Point the remote at the
Converter. Press the POWER
button on the remote to turn the
Converter ON.
o
Try it out. The Channel and
POWER buttons on the remote
hould now operate the
onverter.
_]_ Remember. If this doesn't
• work the first time, repeat
steps using*the same remote
code number.
If after a second try the remote
does not operate your Converter,
and there are more code numbers
listed for your brandConverter,
use the next listed code number.
If after repeated attempts the
code number method does not
work your Converter, try the
"CONVERTER SEARCH"
method on page 49.
Cable Conve_er
Purer i
(ou/_X ms X_XmEH)
pip
!
I
47
Page 48

8
your TV remote can be set to
work your VCR by what is
called the SEARCH method.
If the "REMOTE CODE" number
method shown in the previous
section did not set your remote to
work your VCR, then follow the
five easy steps listed below.
Please read through steps 1-5
before beginning.
<_ Press the POWER button on
I tha VCR to turn VCR ON.
<_ Stand least six feetataway
from the front of the VCR.
Point the remote toward the
VCR.
HOLD DOWN the A/CH and
VCR System buttons at the same
time. KEEP HOLDING
BUTI'ONS DOWN.
<_ Watch the Channel Indicator
on the VCR.
Channel Numbers will SCAN UP
when the VCR has been
identified. This may take up to
two minutes.
<_ Release the A/CH and VCR
System buttons as soon as
channel numbers startto scan up.
The VCR code has been identified
and the remote is ready to operate
the VCR.
O
Remember. A minute or
two can seem very long, but
the code should be located within
two minutes.
Don't let the VCR scan up more
than five channels. If you do the
remote may pass up the right code
and another two minute search
cycle will have to be repeated.
If no channel change happens
within two minutes, repeat steps
I-5. Should a channel change still
not occur, the remote will not
work with the desired VCR.
VCR
Don_ let the VCR scan up
more than five channels
Six Feet
(minimum)
L
Page 49

m Vour Tv remote can be set to
J. workyourCableConverterby
what is called the SEARCH
method.
If the "REMOTECODE" number
method shown in theprevious
section did not set your remote to
work your Converter, thenfollow
thefive easy steps listed below.
Please read through steps 1.5
before beginning.
<_ Press the POWER button on
l the Converter to turn ConverterON.
<_ Stand at least six feet away from
the front of the Converter.
Point the remote t_ward the
Converter.
HOLD DOWN the A/CH and
CBL System buttons at the same
time. KEEP HOLDING
BUTTONS DOWN.
<_ Watch the Channel Indicator
on the Converter.
[ Channel Numbers will SCAN UP
1
I when the Converter has been
identified. This may take up to two
i minutes.
<_ Rdease the A/CH and CBL
System buttons as soon as channel
numbers start to scan up. The
Converter code has been identified
and the remote nsready to operate
the Converter.
"O
Remember. A minute or
two can seem very long, but
the code should be located within
two minutes.
Don't let the Converter scan up
more than five channels. If you do
the remote may pass up the right
code and another two minute
search cycle will have to be
repeated.
If no channel change happens
within two minutes, repeat steps 1-
5. Should a channel change still
not occur, the remote will not work
with the desired Converter.
49
Cable Converter
og
PIATD" SlATm
PIP I. sins
Six Feet
(minimum)
,1
8
I
Page 50

-- Dicture in Picture (PIP) is the
1showing of two pictures on the
TV screen at the same time. (One
main screen picture and one small
inset picture - or PIP).
Note: The PIP picture must be
supplied by a VCR (or other
accessory equipped with a VIDEO
OUTPUT jack). If you already
went through FIRST TIME SETUP
(page 10), then the connections for
PIP have been completed_
To see how channels selected on a
VCR can be shown as PIP:
<_ Connect VIDEO OUT
the
jack on the VCR to the AUX IN1
VIDEO IN jack on the "IV.
Also connect the AUDIO OUT (R
and L) jacks from the VCR to the
AUX INl AUDIO IN jacks on the
TV.
Also ensure the normal antenna
connection between the VCR and
TV arc in place.
<_ Move to the next page after
the VCR to "IV PIP connections
are completed.
_ Remember. The AUX
1 or AUX IN2 jacks can
be used for PIP co_|nections.
Please be sure thatthe PIP Picture
Source control (page 54) is set for
the con'ecl_oet of Audio/Vidco
Inputs that arebeing used.
No sound will be heard with the
PIP picture. See page 52 on how
to "SWAP" the PIP picture with
the main screen picture so that
sound can be heard.
If you have a single (monaural)
Audio Output VCR, "Y"
connectors are available to
complete your connection. Conta¢
your dealer, or our Parts
Information Center, for details.
/
PIP
MAIN
SCREEN
I
BACK OF "IV
AUDIOPClI:f_O
CABLES SUPPLIED
VIDEO OUT
OUTDOOR UHF/VHF
ANTENNA
AUDIOOUT
(_¢WXrre)
VCR
ANT IN
CABLE TV
SIGNAL
Page 51

m
P:2
Nth w that you have completed
e required connections on
the previous page you are ready to
follow the simple steps shown
below.
<_ Turn the VCR and TV ON.
Place the VCR in the TV mode -
Use the TV/VCR button on
the "IVremote (if the remote
has been set to work with
your VCR - see page 44.)
Place the TV in the
ANT/CABLE mode -
Use the MENU (and M AV)
buttons on the remote to set
MAIN PICTURE SOURCE
control to ANT/CABLE.
@ Sdect the channels on the TV
and VCR to be watched.
<_ Press the PIP ON/OFF
button on the remote.
€
RomomberS"tho
llowing page on how to
operate other PIP features with the
remote control.
12:00 _'
12:00"
VCR IN_TV MODE"
(VCR Indicator Light will 8o out)
VCR - PiP CHANNEL
CHANNEL
SELP-_-'fED
CHANNEL
'IV IN ANT/CABLE
8
TV -MAIN SCREEN CHANNEL
_jo
[ Be suxeIOpoiz_ the i_mote I¢the
from of the VCR when i)_---=si_g
VCR fur_ buttons.
51
Page 52

!
--] _y using the PIP buttons on the
I
remote the PIP picture can be
moved and swapped with the main
screen.
,,/ _ Press PIP ON button to show
the PIPpicture.
PIP screen appears in corner of TV
screen. Press PIP ON again to
remove PIP from the main screen.
_ Press PIP POSITION button
on the remote to move the PIP
picture (from comer to comer on
the main screen).
<_ Prnss SWAP to the main
swap
screen picture with the PIP picture.
Press SWAP again to return the
main screen and PIP to their
original positions. See the
important reminder below.
<_ Press FREEZE button to hold
the current Main picture in the PIP
window (Main picture is active).
If PIP is currently OFF the PIP will
be automatically shown.
Press FRZ repeatedly to update the
frozen PIP with current pictures.
The frozen PIP cannot be swapped
with the main screen.
Press the PIP ON/OFF button to
drop the frozen PIP picture from
the scion. •
continue to next page
4
_"---_. Remember. If the PIP
picture is on the main screen
when the TV is turned OFF, a
blank screen will appear when the
TV is turned back ON again.
If this happens, you can either.
Press the CHANNEL A or V
buttons to select a channel for
viewing (if the AUXI or AUX2
mode has been added to TV's
channel memory - see page 29).
Use the Picture Source Select
control (see page 16) to return the
TV to the ANT/CABLE mode.
3. PIP SWAP
2. PIP POSITION
4. FREEZE
I. PIP ON / OFF
52
Page 53

5. PIP SIZE
6. PIP STROBE
7. PIP PREVIEW
Press SIZE button to change
the size of the PIP window shown
on the TV screen.
Press the PIP SIZE button again to
see and compare the large and
small size PIP windows.
<_ Press STROBE to see a series
of four frozen scenes from the
currently selected channel. Press
STRB again and the series of
pictures will be updated.
<_ Press PREVIEW button to see
what is showing on four channels.
P/VUE starts with the current
channel and shows the next three
channels in memory.
Every few seconds each PNUE
picture will be updated with a
current scene for that channel.
Press P/VUE again to go to the
next four channels in memory and
so on. Just press the number
buttons to select any previewed
'.harmel.
0
53
Page 54

_can e picture for the PIP window
come through either the
ANTICABLE, VCRIAUXI or AUX
IN2 Inputs (on the rear of the TV).
PIP Picture Source simply tells the
TV which one of these three sources
it is to show in the PIP.
<_ Select PIP PICTURE
SOURCE control.
With the ADVANCED
CONTROLS on screen, move the
red arrow with the MENU AY
buttons. Then press MENU button.
<_ Press the MENU AV buttons
to select the source for the PIP
picture as either.
VCR/AUX1- for a picture signal
coming from the
AUX INI
Audio/Video jacks
on the TV.
AUX2- for a picture signal
coming from the AUXIN2
Audio/Video jacks on _ae
TV.
ANT/CABLE- for a picture signal
coming from the
ANT/CABLE Input
on the TV.
<_ Press the STATUS button to
clear the scre¢fl. •
, O
The PIP screen
:888
54
J
Page 55

_coe Picrure-ln-Picture (PIP)
lor and Tint controls are
used to adjust the color settings for
PIP when it is shown on the TV
screen.
_ Select PIP COLOR (or TINT)
control.
With the PICTURE/SOUND
CONTROLS on screen, move the
red arrow with the MENU AV
buuons. Then press MENU button.
<_The PIP automatically comes
on to show the PIP window on the
"IV screen.
If you used the First Time Setup
(page 10), the TV is ready to show
the playback of a VCR tape in the
PIP window.
If you want to see how channels
selected on the VCR can be
viewed in the PIP window, see
pages 50-51.
€_ Press (+) (-) to
the and buttons
I adjust the PIP for Color (or Tint)
levels you prefer.
@:>Press the STATUS button to
I clear the screen
Remember. Although there
are septtrate COLOR and
TINT controls for PIP, the
adjustment levels for these controls
depend on the TWs main picture.
For example: If the main screen is
showing a black and white picture,
PIP would also be in black and
white (even though its source is in
color).
PICTURE/SOUNDCONTROLS
-- CLEARVIEW
-- FLESHCORRECTION
I_ PIPCOLOR
-- PiPTINT
-- BASS
TREBLE
-- BALANCE
USE_ THENI_ TOSELECT.
{_1/1111
55
I
Page 56

_lPohOOku p with Cable
nverter Box and VCR.
First use an optional signal
splitter and connect the original
cable TV signal to both the
CABLE IN on the Cable Converter
and the ANTENNA plug on the
rear of the 3"V.
<_ Connect the CABLE OUT
on
the Converter to the ANT. IN on
the VCR.
_ Connect the VIDEO OUT
jack on the VCR to the VIDEO
IN jack on the TV.
Also connect the AUDIO OUT (R
and L) jacks from the VCR to the
AUDIO IN jacks on the "IV.
O
_ Remember to use the
ble TV Converter Box to
select channels for PIP, the VCR
must be set to the same channel as
the channel selection switch on the
rear of the Cable Converter (either
channel 3 or 4).
I
Contactthe Parts
Infcm'aaticaCenter
I 800 292-6066
toordexmffo_ional
accesuxles
®®
REAROFTV
AUDIO VIDEO
CABLES SUPPLIED
VCR
CABLE "IV CONVERTER
_L
SG
Page 57

please make these simple
checks before calling for
service. These tips can save you
rime and money since charges for
TV installation and adjustment of
customer controls are not
covered under your warranty.
NO Power
NOPicture
NO Sound
Remote Does Not
Work
TV Disnlavs Wron
Channel or No
Channels*Above 13
CAUTION: A video source (such as a video game, Compact Disc Interactive - CDI, or
TV information channel) which shows a constant non-moving patternon the "IV screen,
can cause picture tube damage. When your TV is continuously used with such a source
the pattern of the non-moving portion of the game (CDI, etc.) could leave an image
permanently on the picture tube. When not in use, turn the video source OFF.
Regularly alternate the use of such video sources with normal TV viewing.
i Check the TV power cord. Unplug the TV, wait 1minute, then reinsert plug into outlet
and push POWER button again.
I
Check to be sure outlet is not on a wall switch.
Check antenna connections on the mar of the TV. Are they properly secured to the
antenna plug on the TV?
Check the CABLE CHANNEL TUNING control for correct position.
Check PICTURE SOURCE control for correct position. VCR/AUXI or AUX2
position without a signal source will result in a blank screen.
Check the VOLUME buttons. /
Check the MU'I_ button on the remote control.
Check the INTERNAL TV SPEAKER ON/OFF control for the correct position.
If attempting auxiliary equipment hook-ups, check audio jack connections and that the
auxiliary equipment is on and in the proper operating modes.
Check TV-VCR-CBL "System" buttons on the remote. Press the remote's TV System
button to send commands to the TV.
Check batteries. Replace with 9-Volt Heavy Duty (Zinc Chloride) or Alkaline batteries
if necessary.
Clean the remote and the remote sensor window on the TV.
i Repeat channel selection. [
Add desired channel numbers (ADD/DELETE CHANNELS control) into TV memory.
Check CABLE CHANNEL TUNING control for correct position.
This 'IV is equipped with protective circuitry that shuts the TV off in case of moderate
power surges. Should this occur turn the TV back on by pressing the POWER button
once or twice, or unplug and then replug the power cord at the AC outlet.
This feature is NOT designed to prevent damage due to high power surges such as those
caused by lightning, which is not covered by your warranty.
Cleanin__ and Care
• To avoid possible shock hazard be sure the TV is unplugged from the electrical outlet before cleaning.
• When cleaning the TV screen take care not to scratch or damage the screen surface (avoid wearing jewelry or using
anything abrasive- do not use household cleaners). Wipe the front screen with a clean cloth dampened with water. Use
even, easy, vertical strokes when cleaning.
• Specially designed screen cleaning kits are also available which contain anti-static cleaners and brushes designed to get
into the ridges of the TV screen. If interested, ask your dealer about the SBS4100 Projection TV Screen Cleaning Kit or
call our toll-free Accessory Parts ordering number 1-800-292-6066.
• Gently wipe the cabinet surfaces with a clean cloth or sponge dampened in a solution of cool clear water and a mild soap
or detergent. Use a clean dry cloth to dry the wiped surfaces.
• Occasionally vacuum the ventilation holes or slots in the cabinet back.
• Never use thinners, insecticide sprays, or other chemicals on or near the cabinet, as they might cause permanent marring
of the cabinet finish.
57
Page 58

Coaxial Cable * A single solid antenna wire normally matched
with a metal plug (F-type) end connector that screws (or pushes)
directly onto a 75 Ohm input found on the Television or VCR.
Display * An on screen message or graphics that help the user
operate and adjust his Television feature controls. See On
Screen Displays (OSD).
Direct Audio/Video Inputs * Located on the rearof the TV
these connectors (RCA phono type plug) are used for the input
of audio and video signals. Designed for use with VCRs (or
other accessories) in order to receive higher picture resolution
and offer sound connection options.
Identify * Method by which a remote control searches and finds
an operating code for another product (such as a VCR or Cable
Converter.) Once the code has been "identified" then the TV
remote can send commands to and operate the other product.
Multichannel Television Sound (MTS) * The broadcast
standard that allows for stereo sound to be transmitted with the
TV picture.
On Screen Displays (OSD) * Refers to the wording or
messages generated by the television (or VCR) to help the user
with specific feature controls (color adjustment, programming,
etc.).
Menu * An on-screen listing of feature controls shown on the
Television screen that are made available for user adjustments.
Picture -In-Picture (PIP) * Term used when two pictures are
shown on the TV screen at the same time. The smaller PIP
picture is supplied by a VCR (or other tuner/video playback
source). The PiP picture can also be moved and swapped with
the TV's main _reen picture.
Programming * The procedure of adding or deleting channel
numbers into the Television's memory circuits. In this way
the Television "remembers" only the locally available or
desired channel numbers and skips over any unwanted
channel numbers.
Remote Sensor Window * A window or opening found on
the Television control panel through which infrared remote
control command signals are received.
I
Second Audio Program (SAP) * An additional audio
channel provided for in the Multichanne! Television Sound
(MTS) broadcast standard. The most frequently proposed use
for SAP is the simultaneous bilingual broadcast of TV
program material.
Status * Allows the user to quickly confirm what channel
number is currently being viewed. Status can also be used to
clear the Television of on screen displays or information
(rather than waiting for the displays to "time out" or
automatically disappear from the screen).
Twin Lead Wire * The more commonly used name for the
two strand 300 Ohm antenna wire used with many indoor and
outdoor antenna systems. In many cases this type of antenna
wire requires an additional adapter (or balun) in order to
connect to the 75 Ohm Input terminals designed into the more
recent Televisions and VCRs.
58
Page 59

Accessories/Optional .............................. 6, 7, 31,34, 37, 56, 59
Add/Delem Channels .................................................... 8, 28, 29
Advance Buttons ..................................................................... 12
Audio Controls ............................................................ 20-21, 31
Audio/Video Input ................................................ 10, 34, 50, 56
Automatic Programming .................................................... 8, 28
Auto Volume Control ............................................................. 40
Battery Installation ............................................................ 12, 38
Cable TV Connections/Settings .................................. 6, 7, 8, 27
Censor Channels ..................................................................... 32
Channel Guide ........................................................................ 41
Channel/Time Display ................................................ 25, 26, 41
Channel Memory .......................................................... 8, 28, 29
Channel/Time Reminder ......................................................... 25
Clock Setting .......................................................................... 22
Closed Captioning .................................................................. 23
Convergence ........................................................................... 30
Controls/TV ........................................................................ 8, 12
Contxols/Remote ......................................................... 13, 15, 38
Exit .......................................................................................... 14
Factory Reset ........................................... _.............................. 42
Features ..................................................................................... 4
First Time Set Up ...................................................................... 8
Glossary/TV Terms ................................................................ 58
Inputs/Audio and Video .................................. 10, 34-37, 50, 56
Menu ....................................................................................... 14
Minus(-)/Plus (+) Buttons ....................................................... 14
Picture-In-Picture (PIP) ............................................... 10, 50-56
Power Light Indicator ............................................................. 12
Precautions/Safety .......................................................... 2, 3, 57
Remote Control .......................................... 13, 15, 38-49, 52-53
RF Coaxial Cable ................................................ 6, 7, 34, 50, 56
RF Switcher ............................................................................ 59
Reminder/Time and Channel .................................................. 25
Second Audio Program (SAP) ................................................ 21
Sensor Remote ........................................................................ 12
Sleep Timer ............................................................................. 24
Smart Sound (Auto Volume) .................................................. 40
Shams Button ..................................................................... 14, 38
Stereo Light Indicator ............................................................. 21
Surround Sound ...................................................................... 37
Time/Channel Display .......................................... 22, 25, 26, 41
VCR ButCh ...................................................................... 12, 34
VCR/TV Coanections ....................................... 7, 10, 34, 50, 56
Tips for Service ....................................................................... 57
TV Speaker Switch ................................................................. 31
Warranty ................................................................................. 60
An optional AK9232 RF
Switcher is available that will
allow an AntennalCable TV signal
input and another video accessory
(VCR, Video Disc Player, etc.) to
be connected to the TV at the same
time.
The accessory RF switcher can be
purchased or ordered from your
dealer. If your dealer does not
carry the accessory, call the toll
free Parts Information Center
number.
ANT I_
E _roor _rrotn
• I
59
VIOEO Ok._GPLAYER
Page 60

PROJECTION TELEVISION
One (1) Year In Home Service Labor Warranty
Thirty (30) Day Exchange Warranty Projection TV Screen
One (1) Year Exchange Warranty Parts
Two (2) Year Exchange Warranty on Cathode Ray Tube
For purchases outside the U.S., see applicable warranty from country of purchase.
This warranty gives you specific legal rights and you may also have other rights which vary from state to state.
Parts and Labor
For one year (30 days for the Projection TV screen) after the date
of purchase, an Authorized Service Center will repair any
product defect and replace any defective part, including the
cathode ray tubes and lens without charge to you for parts or
labor.
Replacement Cathode Ray Tubes
Except for return shipping cost, an Authorized Service Center
will, for two (2) years after installation of the TV, replace a
defective cathode ray tube without charge for the replacement
tube. If the tube replacement is made after one year, you must
pay for all labor and home service charges to replace it.
Replacement parts and tubes installed during the warranty period
are warranted only for the balance of the original warranty
period.
Replacement "Clear-Vu" Lens
The "Clear-Vu" Lens is warrantedagainst manufacturing defects,
to the original purchaser, for the lifetime of the product. If the
lens replacement is made after one year, you must pay for the
labor and home service charges to replace it.
What the Purchaser Must Do
Before you call for service, check your operating instruction
booklet. A slight adjustment of the customer controls discussed
in your instruction booklet may save you a service call.
If you require service during the warranty period, you must
contact an Authorized Service Center to arrange for repair. The
Service Center must_se allowed to keep defective parts.
Warranty service will be performed by an Authorized Service
Center. We suggest that you contact your dealer. If your dealer
does not ope_te an Authorized Service Center, he will direct you
to the Authorized Service center engaged by him to service the
product he sells.
If you reside in an area where we have a Factory Service Center
(see the Factory Service Center address directory supplied with
your product literature), you can contact them to schedule a
convenient time for an In-Home service call.
YOU MUST PRESENT PROOF OF THE DATE ON
WHICH THE PROJECTION TV WAS FIRST
PURCHASED (SALES RECEIPT OR OTHER EVIDENCE)
WHEN REQUESTING SERVICE OR REPLACEMENT
PART WARRANTY PERFORMANCE.
Warranty Exclusions
Your Warranty Does Not Cover.
Labor charges for set installation or set-up, adjustment of
customer or preference controls, and installation or repair of
antenna systems outside the TV set.
Product repair and/or part replacement because of misuse,
accident, unauthorized repair or other cause not within the control
of Philips Consumer Electronics Company.
Reception problems caused by signal conditions or cable or
antenna systems outside the TV.
A television purchased, used or serviced outside the U.S.A.,
Puerto Rico and the Virgin Islands, or used for commercial or
instimtiona] purposes.
Incidental or consequential damages resulting from the product.
Some states do not allow the exclusion of incidental or
consequential damages, so the above exclusion may not apply to
you.
ALL IMPLIED WARRANTIES INCLUDING IMPLIED
WARRANTIES OF MERCHANTABILITY AND FITNESS
FOR A PARTICULAR PURPOSE, ARE LIMITED IN
DURATION TO THE DURATION OF THIS EXPRESS
WARRANTY. Some states do not allow limitations on how
long an implied warranty lasts, so the above limitation may
not apply to you.
IMPORTANT REMINDER
PLEASE FILL OUT AND MAIL YOUR WARRANTY
REGISTRATION CARD PROMPTLY. IT WILL BE EASIER
FOR US TO NOTIFY YOU IF IT SHOULD EVER BE
REQUIRED. PLEASE ALSO KEEP YOUR SALES RECEIPT
AND ANY OTHER PROOF OF PURCHASE INFORMATION.
Please write your Model and Serial numbers below. The
numbers are located on the back of your unit. Please
remember to have these numbers on hand any time you call.
MODEL NO.
SERIAL NO.
PHILIPS SERVICE COMPANY • P.O. BOX 555 *
JEFFERSON CITY, TENNESSEE 37760 • (615) 475-8869
IB 6955- EO01 60
 Loading...