

Page 1
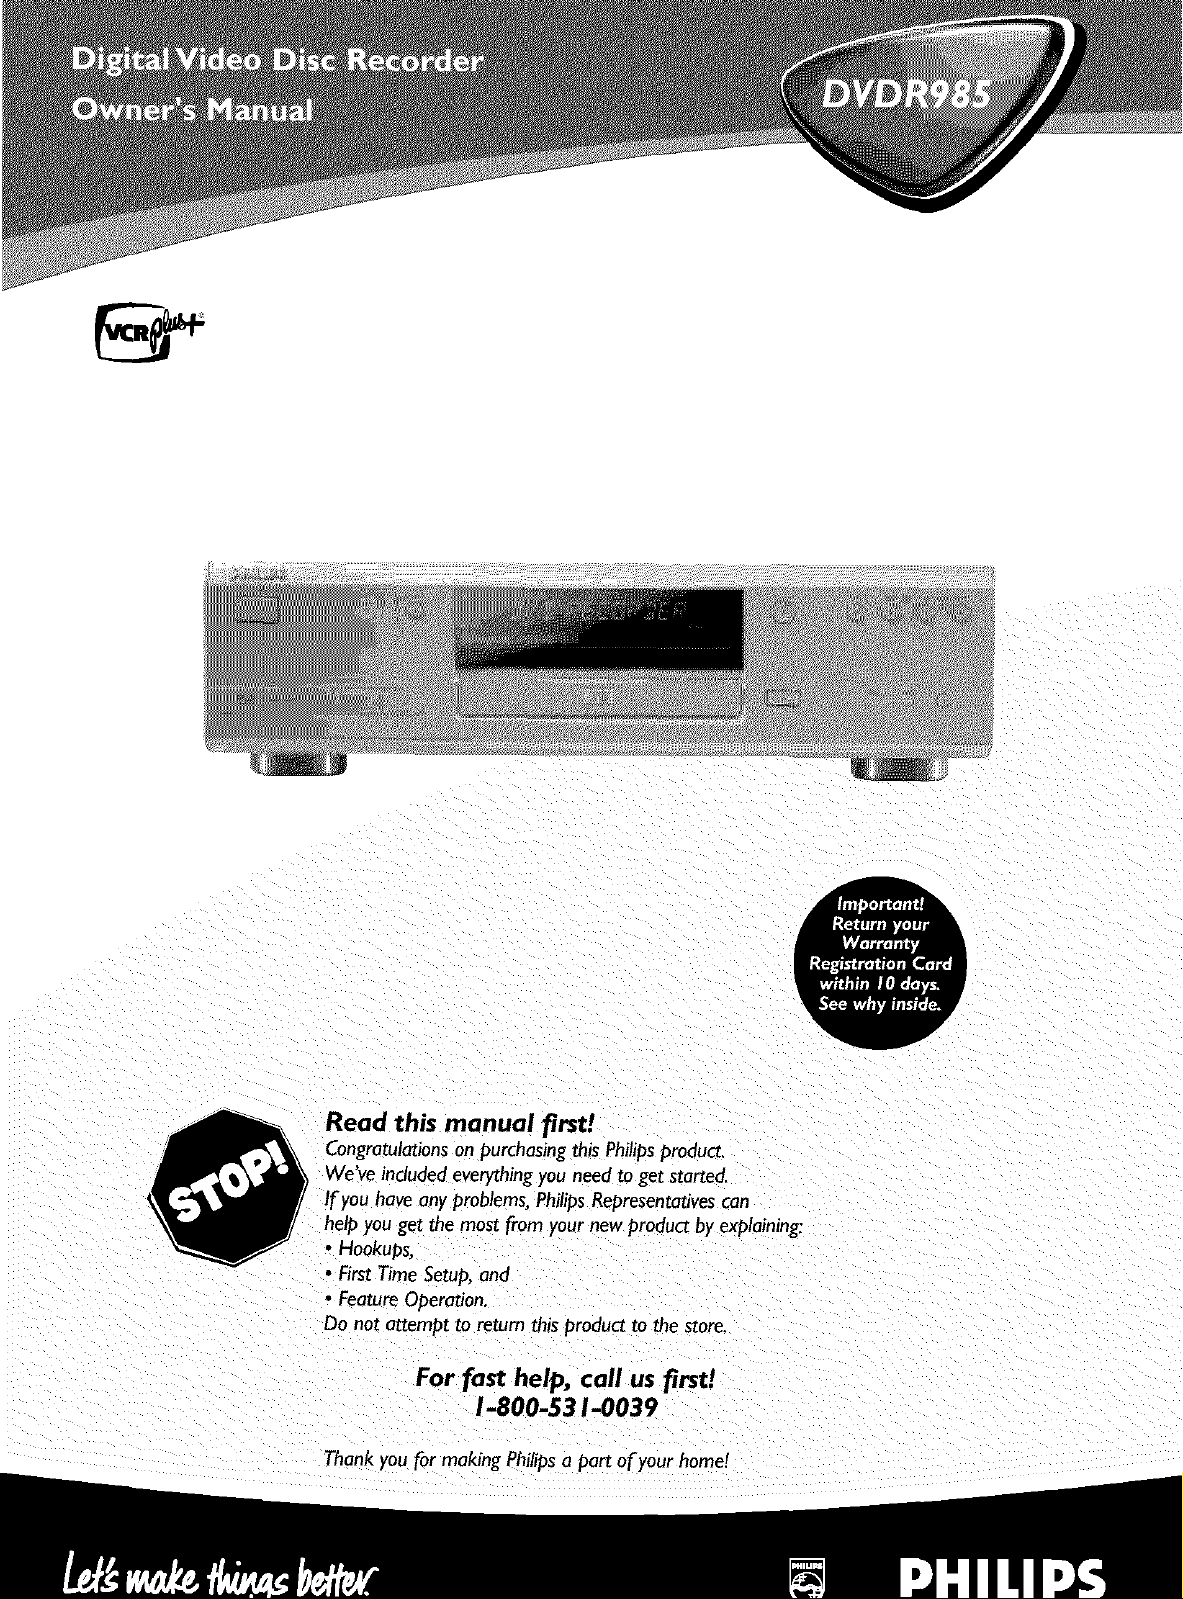
Read this manual firs!!
Congratulations on purchasingthis Philipsproduct_
We've included everythingyou need to get started.
If you have any problems, PhillpsRepresentativescan
help you get the most from your new product by explaining.
• Hookups,
• First Time Setup,and
• Feature Operation_
Do not attempt to return this product to the store.
For fast help, call us firs!!
1-800-531-0039
Thank you for making Phiilpsa part of your home!
Page 2
Once your PHILIPS purchase is registered, you're eligible to receive all the privileges of owning a PHILIPS product.
So complete and return the Warranty Registration Card enclosed with your purchase at once. And take advantage
of these important benefits.
Know these
PHILIPS
Congratulations on your purchase,
and welcome to the "family!"
Dear PHILIPS product owner:
Thank you for your confidence in PHILIPS. You've selected one of the
best-built, best-backed products available today. We'll do everything in
our power to keep you happy with your purchase for many years to
come.
As a member of the PHILIPS "family," you're entitled to protection by
one of the most comprehensive warranties and outstanding service
networks in the industry. What's more, your purchase guarantees you'll
receive all the information and special offers for which you qualify, plus
easy access to accessories from our convenient home shopping
network.
Most importantly, you can count on our uncompromising commitment
to your total satisfaction. All of this is our way of saying welcome - and
thanks for investing in a PHILIPS product.
Sincerely,
Lawrence J. Blanford
President and Chief Executive Officer
safetysymbols
A This "bolt of lightning" indicates
uninsulated material within your
unit may cause an electrical shock. For
the safety of everyone in your house-
hold, please do not remove product
covering.
_The "exclamation point" calls
attention to features for which
you should read the enclosed
literature closely to prevent operating
and maintenance problems.
WARNING: TO PREVENTFIREOR
SHOCK HAZARD, DO NOT
EXPOSETHIS EQUIPMENT TO RAIN
OR MOISTURE.
CAUTION: To prevent electric
shock, match wide blade of plug to
wide slot, fully insert.
ATTENTION: Pour _viter leschoc
_lectriques, introduire la lame laplus
large de la fiche clansla borne corre-
spondante de la prise et pousser
jusqu'au fond.
P.S. Remember, to get the most from your PHILIPS
product, you must return your Warranty
Registration Card within 10 days. So please mail
it to us right now!
For Customer Use
Enter below the Serial No. which is
located on the rear of the cabinet.
Retain this information for future
reference.
Model No.
Serial No.
Page 3

General Information
Contents ....................................................................... 3
Safety Information ............................................................... 4-5
Introduction ..................................................................... 6
Getting Started
PlayableDiscs .................................................................... 7
General Information ............................................................... 8
Hookups ..................................................................... 9-15
InitialSetup .................................................................. 16-17
Basic Disc Playback and Features
Quick Disc Playback.............................................................. 18
Quick Recording ................................................................ 19
DVD Recorder Controls
Remote Control Buttons ....................................................... 20-21
Front Panel..................................................................... 22
Display ........................................................................ 23
Rear Panel ..................................................................... 24
Menu Bars ..................................................................... 25
On-screen Symbols,Status Box ..................................................... 26
Information Boxes ............................................................... 27
Advanced Disc Playback and Features
Title/Disc Menus, Chapter/Track Selection ............................................ 28
Audio Language,Subtitles .......................................................... 29
Zoom, Camera Angle ............................................................. 30
Sound,Still Picture/Frame-by-Frame Playback........................................... 31
Slow Motion, Forward and Reverse Searching .......................................... 32
Time Search, Scan ............................................................... 33
Repeat,Repeat A-B .............................................................. 34
Index Picture Screen ............................................................. 35
Contents 3
Advanced Installation
Installation:Automatic Channel Programming .......................................... 36
Installation: VCR Plus+_ Ch........................................................ 37
Installation: Clock Setting ....................................................... 38-39
Recording Options
One-Touch Recording ............................................................ 40
Timer Recording ................................................................ 4 I
VCR Plus+® Timer Recording ....................................................... 42
Erasing Timer Recordings, Error Messages ............................................. 43
Title Settings Menu ............................................................... 44
Manual Recording Volume, Append Recording .......................................... 45
Record Settings, Chapter Markers ................................................... 46
Editing
Editing:Disc InformationScreen..................................................... 47
Editing ........................................................................ 48
Additional Features and Setup Options
Access Control ............................................................... 49-53
User Preference Settings .......................................................... 54
Picture Settings .................................................................. 55
Digital Output .................................................................. 56
Analog Output .................................................................. 57
Language Settings, Recording Audio .................................................. 58
Night Mode, Remote Control Settings ................................................ 59
Using Your Recorder's Remote Control with Your TV ................................ 60-61
Information You May Need
Helpful Hints ................................................................. 62-63
Glossary ....................................................................... 64
Diagnostic Test ................................................................. 65
Specifications ................................................................... 66
Limited Warranty ................................................................ 67
Information Index ................................................................ 68
Page 4
4 Safety Information
Safety Precautions
Warning: To prevent fire or shock hazard, do not expose this equipment to rain or moisture.
Federal Communications Commission (FCC) Warning: Any unauthorized changesor modifications to this
equipment void the user'sauthorityto operate it.
Laser Safety
This unit employs a laser. Only a qualified service person should remove the cover or attempt to service this device,
due to possible eye injury.
CAUTION: Use of controls or adjustments or performance of procedures other than those specified herein may
result in hazardous radiation exposure. The set complies with the FCC-Rules, Part 15and with 21 CFR 1040.10.
CAUTION: Visible and invisiblelaserradiation when open and interlock defeated. Do not stare into the beam. The
beamis locatedinside,near the deck mechanism.
Special Information for Canadian Users
This digital apparatusdoes not exceed the ClassB limits for radio noise emissions from digital apparatus asset out
inthe Radio Interference Regulationsof the CanadianDepartment of Communications.
CET APPAREIL NUMI_RIQUE N'I_METPASDE BRUITS RADIOI_LECTRIQUESDI_PASSANTLESLIMITESAPPLICA-
BLESDANS LA RI_GLEMENTSUR LE BROUILLAGE RADIOI_LECTRIQUES I_DICTI_PAR LEMINISTI_REDES
COMMUNICATIONS DU CANADA.
Radio/TV Interference
This equipment has beentested and found to complywith the limits for a Class B digital device,pursuant to Part 15
of the FCC Rules.Theselimitsare designedto provide reasonable protection against harmful interferenceina resi-
dential installation.This equipment generates, uses,and can radiate radio frequency energy and, if not installedand
usedin accordance with the instructions,may causeharmful interferenceto radio communications. However, there
isno guarantee that interferencewill not occur in a particular installation.If this equipment does causeharmful inter-
ference to radio or television reception, which canbe determined by turning the equipment off and on, try to cor-
rect the interferenceby one or more of the following measures:
I) Reorient or relocate the receiving antenna.
2) Increase the separation between the equipment and the receiver.
3) Connect the equipment into an outlet on a circuit different from that to which the receiver is connected.
4) Consult the dealer or an experienced radio/TV technician for help.
WARNING:
This device complieswith Part 15of the FCC rules. Operation is subject to the following two conditions:
I) This device may not cause harmful interference.
2) This device must accept any interferencereceived, includinginterferencethat may cause undesired opera-
tion.
IMPORTANT:
This product was FCC verified under test conditionsthat includeduseof shielded cablesand connectorsbetween
system components. Use shielded cablesto reduce the possibility of causinginterferenceto radios,televisions, and
other electronic devices. If you have any problems, contact your supplier.
Copyright Protection
Unauthorized copying,broadcasting, public performance, and lendingof Discs are prohibited. This product incorpo-
rates copyrightprotection technology that isprotected by method claimsof certainU.S. patents and other intellec-
tual property rights owned by Macrovision Corporation and other rights owners. Use of this copyright protection
technology must be authorized by Macrovision Corporation and is intendedfor home and other limited viewing uses
only unlessotherwise authorized by Macrovision Corporation. Reverseengineering or disassemblyis prohibited.
Note to Cable TV Installer
This reminder isprovided to callthe CableTV systeminstaller'sattention to Section820-40 of the National
Electrical Code (NEC), which provides guidelines for proper grounding and, in particular, specifiesthat the cable
ground shall be connected to the grounding system of the building, asclose to the point of cable entry aspractical.
Declaration of Conformity
Model Number: DVDR985
Trade Name: Philips
ResponsibleParty: PhilipsConsumer Electronics
P.O. Box 14810,Knoxville, TN 37914-1810
(865) 521-4316
Page 5
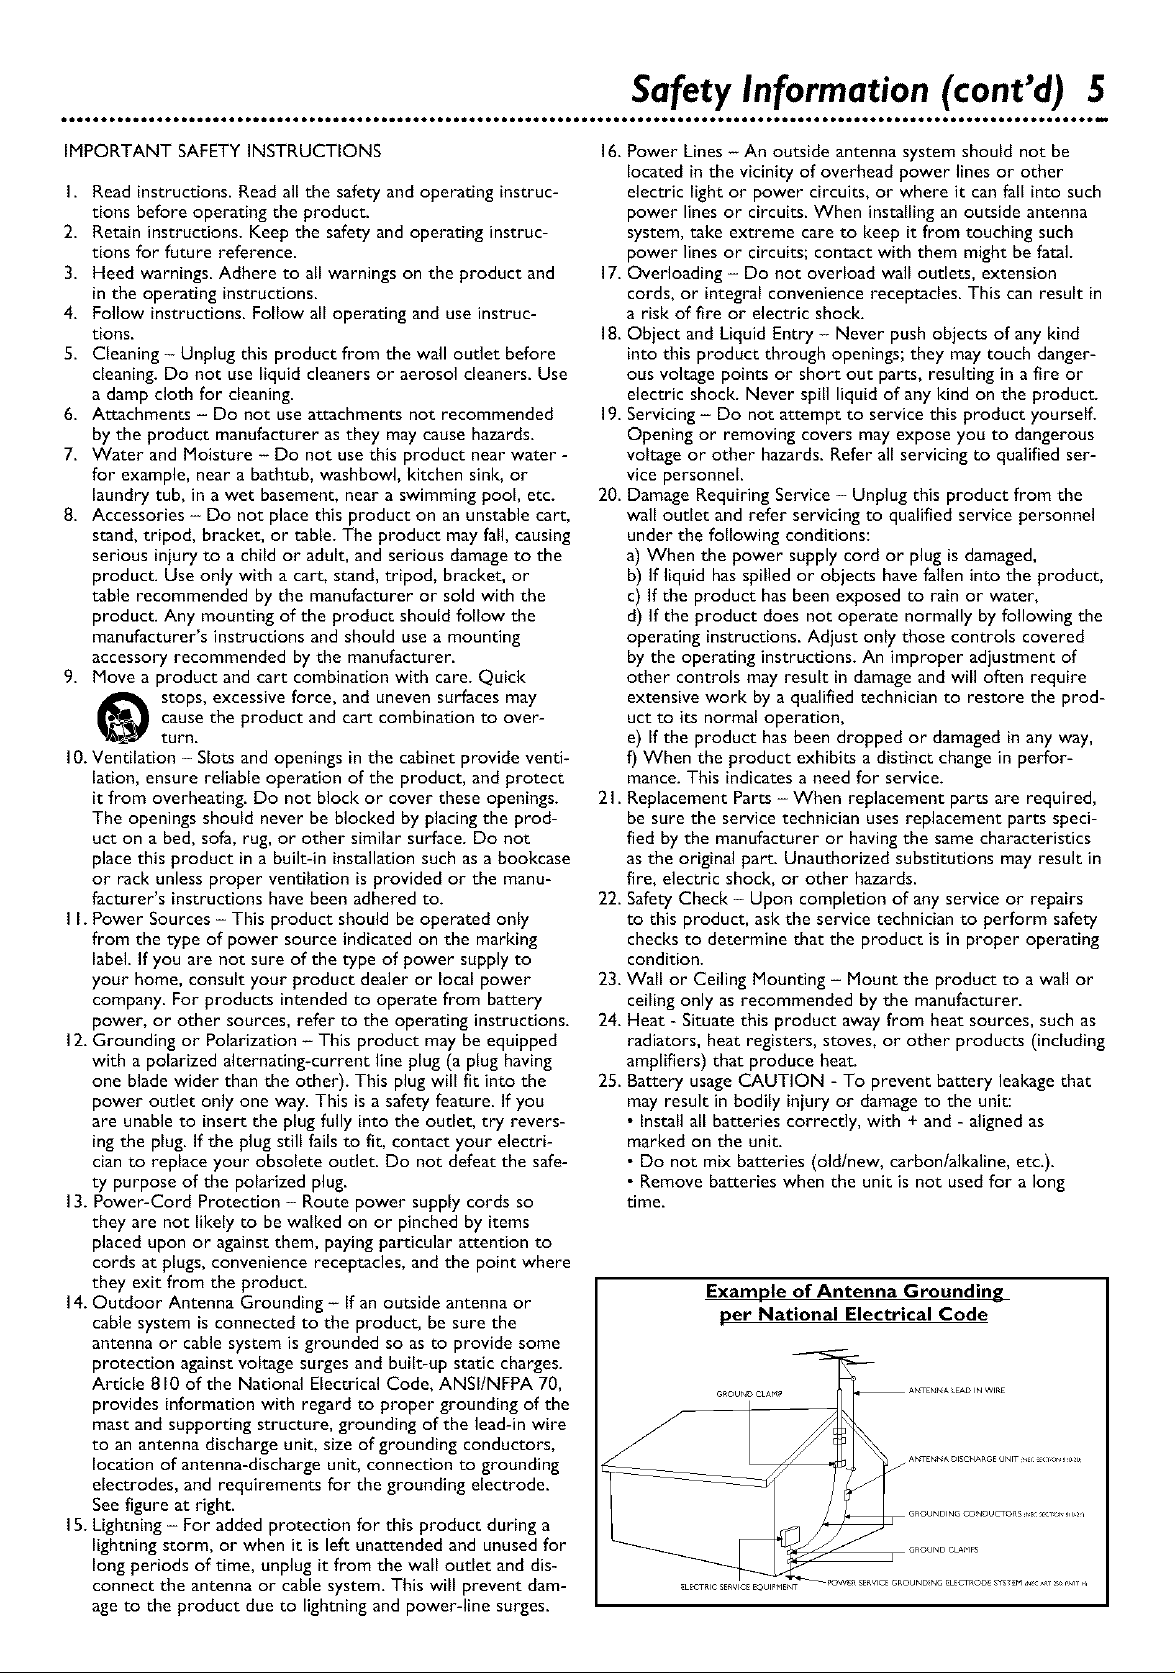
Safety Information (cont'd) 5
IMPORTANT SAFETY INSTRUCTIONS
I. Read instructions. Read all the safety and operating instruc-
tions before operating the product.
2. Retain instructions. Keep the safety and operating instruc-
tions for future reference.
3. Heed warnings. Adhere to all warnings on the product and
in the operating instructions.
4. Follow instructions. Follow all operating and use instruc-
tions.
5. Cleaning - Unplug this product from the wall outlet before
cleaning. Do not use liquid cleaners or aerosol cleaners. Use
a damp cloth for cleaning.
6. Attachments - Do not use attachments not recommended
by the product manufacturer as they may cause hazards.
7. Water and Moisture - Do not use this product near water -
for example, near a bathtub, washbowl, kitchen sink, or
laundry tub, in a wet basement, near a swimming pool etc.
8. Accessories - Do not place this product on an unstable cart,
stand, tripod, bracket, or table. The product may fall, causing
serious injury to a child or adult, and serious damage to the
product. Use only with a cart, stand, tripod, bracket, or
table recommended by the manufacturer or sold with the
product. Any mounting of the product should follow the
manufacturer's instructions and should use a mounting
accessory recommended by the manufacturer.
9. Move a product and cart combination with care. Quick
stops, excessive force, and uneven surfaces may
causethe product and cart combination to over-
turn.
10. Ventilation - Slots and openings in the cabinet provide venti-
lation, ensure reliable operation of the product, and protect
it from overheating. Do not block or cover these openings.
The openings should never be blocked by placing the prod-
uct on a bed, sofa, rug, or other similar surface. Do not
place this product in a built-in installation such as a bookcase
or rack unless proper ventilation is provided or the manu-
facturer's instructions have been adhered to.
I I. Power Sources - This product should be operated only
from the type of power source indicated on the marking
label. If you are not sure of the type of power supply to
your home, consult your product dealer or local power
company. For products intended to operate from battery
power, or other sources, refer to the operating instructions.
12. Grounding or Polarization - This product may be equipped
with a polarized alternating-current line plug (a plug having
one blade wider than the other). This plug will fit into the
power outlet only one way. This is a safety feature. If you
are unable to insert the plug fully into the oudet, try revers-
ing the plug. If the plug still fails to fit, contact your electri-
cian to replace your obsolete outlet. Do not defeat the safe-
ty purpose of the polarized plug.
13. Power-Cord Protection - Route power supply cords so
they are not likely to be walked on or pinched by items
placed upon or against them, paying particular attention to
cords at plugs, convenience receptacles, and the point where
they exit from the product
14. Outdoor Antenna Grounding - If an outside antenna or
cable system is connected to the product, be sure the
antenna or cable system is grounded so as to provide some
protection against voltage surges and built-up static charges.
Article 810 of the National Electrical Code, ANSI/NFPA 70,
provides information with regard to proper grounding of the
mast and supporting structure, grounding of the lead-in wire
to an antenna discharge unit, size of grounding conductors,
location of antenna-discharge unit, connection to grounding
electrodes, and requirements for the grounding electrode.
See figure at right.
15. Lightning - For added protection for this product during a
lightning storm, or when it is left unattended and unused for
long periods of time, unplug it from the wall outlet and dis-
connect the antenna or cable system. This will prevent dam-
ageto the product due to lightning and power-line surges.
16. Power Lines - An outside antenna system should not be
located in the vicinity of overhead power lines or other
electric light or power circuits, or where it can fall into such
power lines or circuits. When installing an outside antenna
system, take extreme care to keep it from touching such
power lines or circuits; contact with them might be fatal.
17. Overloading - Do not overload wall outlets, extension
cords, or integral convenience receptacles. This can result in
a risk of fire or electric shock.
18. Obiect and Liquid Entry - Never push objects of any kind
into this product through openings; they may touch danger-
ous voltage points or short out parts, resulting in a fire or
electric shock. Never spill liquid of any kind on the product.
19. Servicing - Do not attempt to service this product yourself.
Opening or removing covers may expose you to dangerous
voltage or other hazards. Refer all servicing to qualified ser-
vice personnel.
20. Damage Requiring Service - Unplug this product from the
wall outlet and refer servicing to qualified service personnel
under the following conditions:
a) When the power supply cord or plug is damaged,
b) If liquid has spilled or objects have fallen into the product,
c) If the product has been exposed to rain or water,
d) If the product does not operate normally by following the
operating instructions. Adjust only those controls covered
by the operating instructions. An improper adjustment of
other controls may result in damage and will often require
extensive work by a qualified technician to restore the prod-
uct to its normal operation,
e) If the product has been dropped or damaged in any way,
f) When the product exhibits a distinct change in perfor-
mance. This indicates a need for service.
21. Replacement Parts - When replacement parts are required,
be sure the service technician uses replacement parts speci-
fied by the manufacturer or having the same characteristics
as the original part. Unauthorized substitutions may result in
fire, electric shock, or other hazards.
22. Safety Check - Upon completion of any service or repairs
to this product, ask the service technician to perform safety
checks to determine that the product is in proper operating
condition.
23. Wall or Ceiling Mounting - Mount the product to a wall or
ceiling only as recommended by the manufacturer.
24. Heat - Situate this product away from heat sources, such as
radiators, heat registers, stoves, or other products (including
amplifiers) that produce heat-
25. Battery usage CAUTION - To prevent battery leakage that
may result in bodily iniury or damage to the unit:
• Install all batteries correctly, with + and - aligned as
marked on the unit.
• Do not mix batteries (old/new, carbon/alkaline, etc.).
• Remove batteries when the unit is not used for a long
time.
Example of Antenna Grounding
per National Electrical Code
G_OUN_ CtAM_ A_'ENNA LEaD IN _iRe
GR©UNDING C©NDUCT©aS :_EC _c o_ _1o 2 i
Page 6
6 Introduction
Welcome!
Your Philips DVD Recorder both records DVD+RWs/DVD+Rs and plays prerecorded DVDs. You can
record TV programs, edit camcorder recordings, and quickly accessyour recordings in the Index
Picture Screen. Plus,the recordings you make on the Recorder will play on some DVD Playersand
DVD-ROM drives. You'll soon appreciate the digital picture and sound quality of DVD, DVD+RW, and
DVD+R, which will exceed the quality you havehad with video cassette tapes.
Readthis manual carefully to understandthe latest features, then enjoy your new DVD Recorder.
Features
Digital Theater System
÷ Dolby Digital Surround Sound
÷ DVD-Video Compatibility
÷ FastForward/Reverse Search
÷ i.LINK Digital Video (DV) connection
÷ Index Picture Screen
÷ NTSC/PAL compatibility
÷ Paused/Fast/Slow/Step-by-Step/Zoomed
Playback
÷ Progressive Scancompatibility
÷ Repeat and Repeat A-B playback
Time Search
o TruSurround by SRS
VCR Plus+ Programming
Package Contents
÷ DVD Recorder
÷ Remote control with two AA batteries
÷ AC power cord
÷ One blank Philips DVD+RW
÷ One RF coaxial cable (black with silver tip,
with single prong in center of tip)
÷ One S-Video cable (black with silver tip)
One three-strand Component Video Cable
(ends have blue,green, and red stripes)
Two two-strand audio cables (ends havered
and white stripes)
One composite video cable (end hasa yellow
stripe)
This owner's manualand registration materials
Environmental Information
Your system hasmaterials that can be recycled and reused if disassembledby a specializedcompany.
Pleaseobserve the local regulations regarding the disposal of packagingmaterials, exhausted batteries,
and old equipment.
Safety Information
÷ Do not expose the systemto excessive moisture, rain, sand,or heat sources.
Placethe DVD Recorder on afirm, fiat surface.
÷ Keepthe DVD Recorder away from domestic heating equipment and direct sunlight.
When placingthe DVD Recorder in a cabinet, allow about one inch of space all around the DVD
Recorder for ventilation.
Cleaning Discs
@ When a Disc becomes dirty, clean it with a cleaningcloth. Wipe the Disc from the center out, in a
straight line.
Do not usesolvents such as benzine, thinner, commercially availablecleaners, or anti-static spray
intended for analog discs.
Always keepthe tray closed to avoid dust on the lens.
The lensmay cloud over if you suddenly move the DVD Recorder from cold to warm surround-
ings.Playinga Disc is not possible then. Leavethe power on for about one hour with no Disc in the
Recorder until normal playbackis possible.
Manufactured under license from Dolby Laboratories. "Dolby," "Pro Logic," and the double-D symbol are trademarks of Dolby
Laboratories. Confidential unpublished works. Copyright 1992-1999 Dolby Laboratories. All rights reserved.
"DTS" and "DTS DIGITAL SURROUND" are registered trademarks of Digital Theater Systems, Inc.
TRUSURROUND, SRS,and CO)" are trademarks of SRSLabs, Inc.TRUSURROUND technology is manufactured under license
from SRSLabs, Inc.
VCR Plus+ and PlusCode are registered trademarks of the Gemstar Development Corporation. The VCR Plus+ system is manu-
factured under license from Gemstar Development Corporation.
Copyright 2002 Philips Consumer Electronics.
Page 7
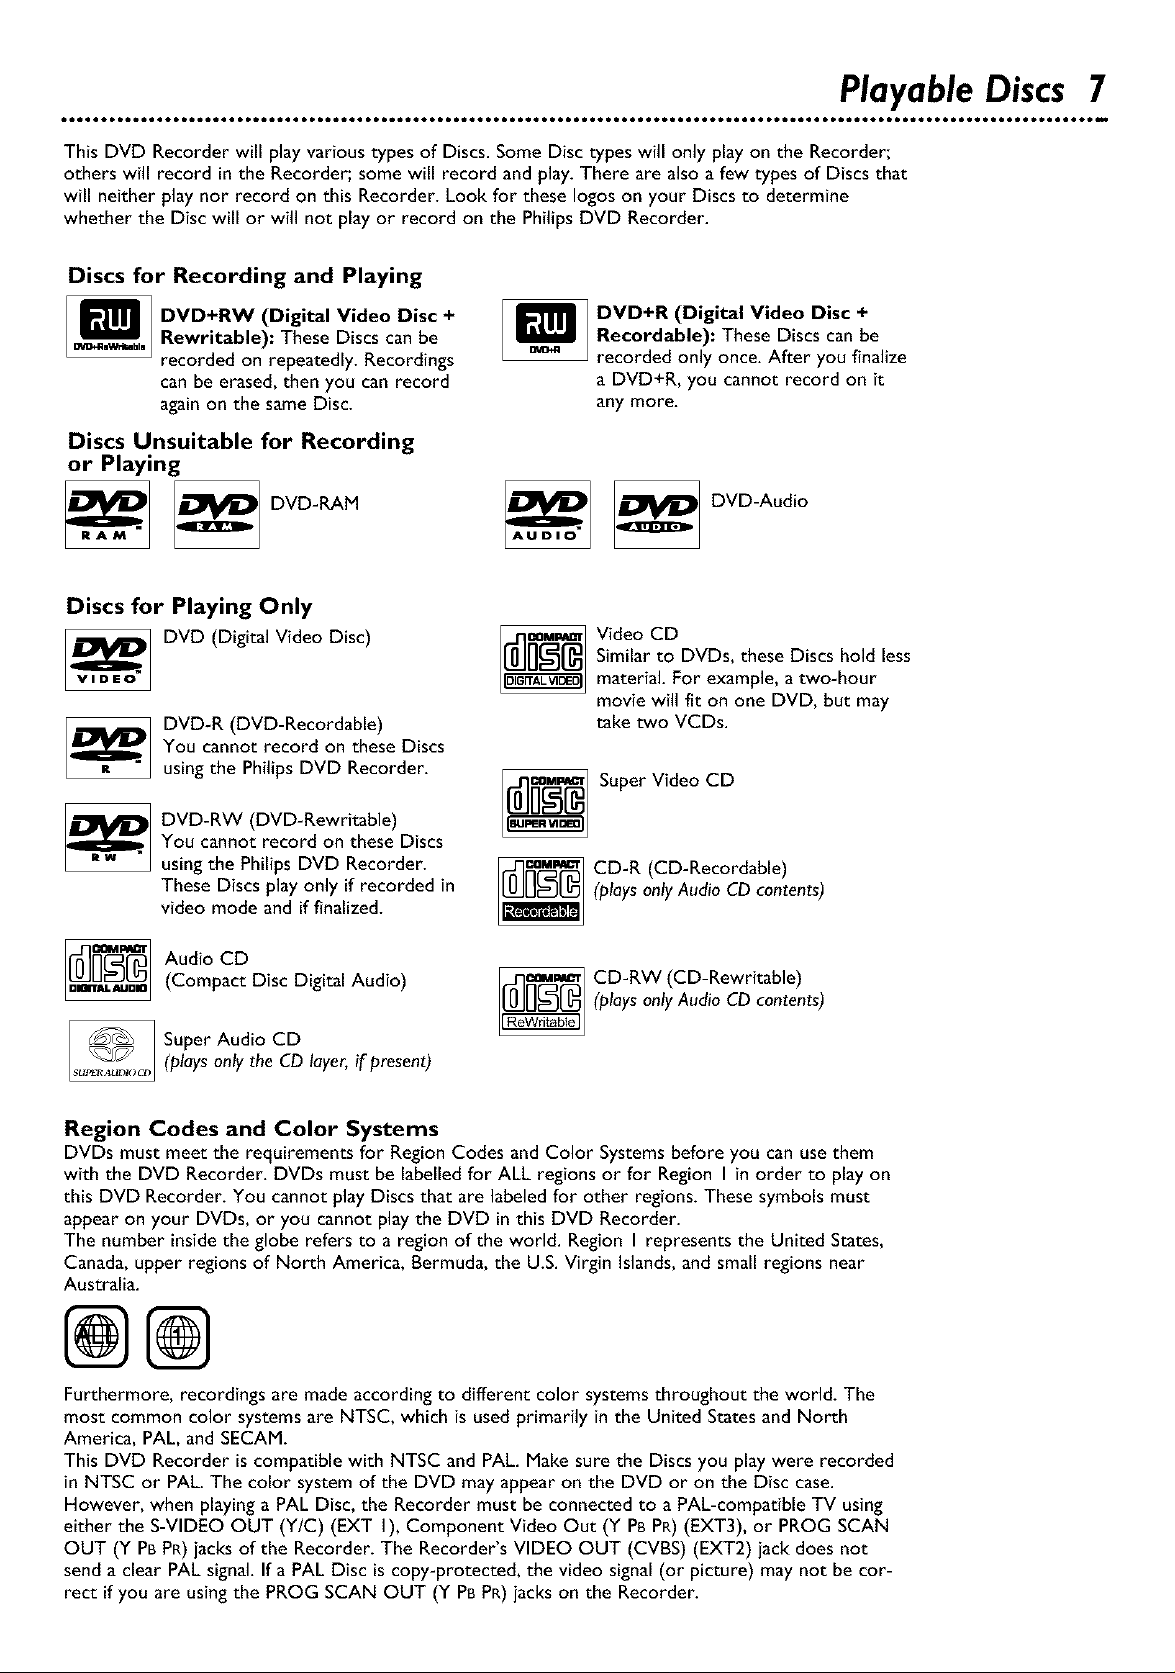
Playable Discs 7
This DVD Recorder will play various types of Discs. Some Disc types wilJ only play on the Recorder;
others wilJ record in the Recorder; some will record and play. There are alsoa few types of Discs that
will neither play nor record on this Recorder. Look for these Iogos on your Discs to determine
whether the Disc will or will not play or record on the Philips DVD Recorder.
Discs for Recording and Playing
_1_ DVD+RW (Digital Video Disc +
_,w_h_, Rewritable): These Discs can be
recorded on repeatedly. Recordings
can be erased, then you can record
againon the sameDisc.
Discs Unsuitable for Recording
or Playing
DVD-RAM
Discs for Playing Only
DVD (Digital Video Disc)
VIDEO
DVD-R (DVD-Recordable)
You cannot record on these Discs
It
using the Philips DVD Recorder.
DVD-RW (DVD-Rewritable)
You cannot record on these Discs
usingthe Philips DVD Recorder.
These Discs playonly if recorded in
video mode and if finalized.
m
ovo_q
AUDIO
DVD+R (Digital Video Disc +
Recordable): These Discscan be
recorded onlyonce.After you finalize
a DVD+R, you cannotrecord on it
any more.
DVD-Audio
Video CD
Similar to DVDs, these Discs hold less
material. For example, a two-hour
movie will fit on one DVD, but may
take two VCDs.
Super Video CD
CD-R (CD-Recordable)
(plays only Audio CD contents)
_j_ Audio CD(Compact Disc Digital Audio)
Super Audio CD
(plays only the CD layer, if present)
Region Codes and Color Systems
DVDs must meet the requirements for Region Codes and Color Systemsbefore you can usethem
with the DVD Recorder. DVDs must be labelled for ALL regions or for Region I in order to play on
this DVD Recorder. You cannot play Discs that are labeled for other regions. These symbols must
appear on your DVDs, or you cannot playthe DVD in this DVD Recorder.
The number inside the globe refers to a region of the world. Region I represents the United States,
Canada,upper regions of North America, Bermuda, the U.S. Virgin Islands,and small regions near
Australia.
CD-RW (CD-Rewritable)
(plays only Audio CD contents)
@@
Furthermore, recordings are made according to different color systemsthroughout the world. The
most common color systemsare NTSC, which is used primarily in the United Statesand North
America, PAL, and SECAM.
This DVD Recorder is compatible with NTSC and PAL. Make sure the Discs you play were recorded
in NTSC or PAL. The color system of the DVD may appear on the DVD or on the Disc case.
However, when playinga PAL Disc,the Recorder must be connected to a PAL-compatible TV using
either the S-VIDEO OUT (Y/C) (EXT I), Component Video Out (Y PBPR)(EXT3), or PROG SCAN
OUT (Y PBPR)jacks of the Recorder. The Recorder's VIDEO OUT (CVBS) (EXT2) jack does not
senda clear PAL signal. If a PAL Disc is copy-protected, the video signal (or picture) may not be cor-
rect if you are using the PROG SCAN OUT (Y PBPR)jacks on the Recorder.
Page 8
8 General Information
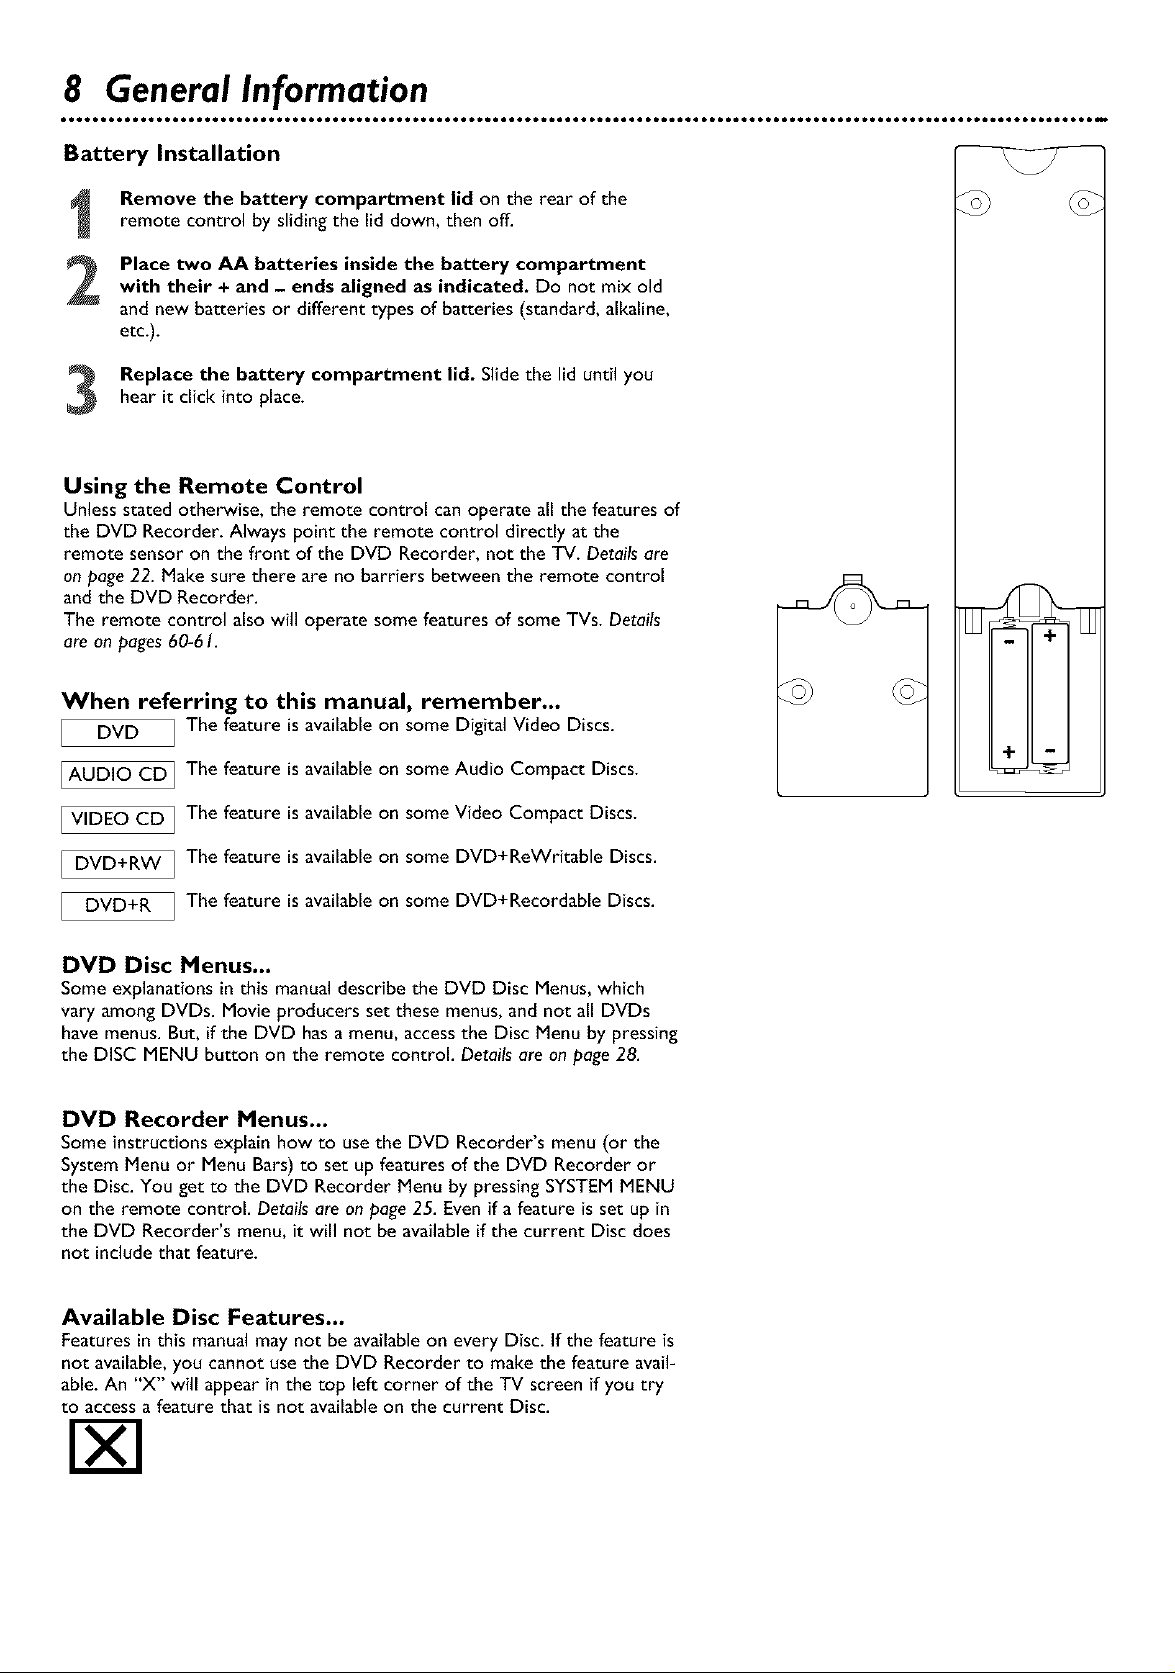
Battery Installation
Remove the battery compartment lid on the rear of the
remote control by sliding the lid down, then off.
Place two AA batteries inside the battery compartmentwith their + and - ends aligned as indicated. Do not mix old
and new batteries or different types of batteries (standard, alkaline,
etc.).
Replace the battery compartment lid. Slide the lid until youhear it click into place.
Using the Remote Control
Unlessstated otherwise, the remote control canoperate all the features of
the DVD Recorder. Always point the remote control directly at the
remote sensor on the front of the DVD Recorder, not the TV. Details are
on page 22. Make sure there are no barriers between the remote control
and the DVD Recorder.
The remote control also will operate some features of some TVs. Details
are on pages60-6I.
When referring to this manual, remember...
DVD
AUDIO CD
VIDEO CD
DVD+RW
DVD+R
I The feature isavailable on some Digital Video Discs.
I The feature isavailable on some Audio Compact Discs.
I The feature isavailable on some Video Compact Discs.
I The feature isavailable on some DVD+ReWritable Discs.
I The feature isavailable on some DVD+Recordable Discs.
DVD Disc Menus...
Some explanations in this manual describethe DVD Disc Menus,which
vary among DVDs. Movie producers set these menus,and not all DVDs
have menus. But, if the DVD hasamenu, accessthe Disc Menu by pressing
the DISC MENU button on the remote control. Details are on page 28.
DVD Recorder Menus...
Some instructionsexplain how to use the DVD Recorder's menu (or the
System Menu or Menu Bars) to set up features of the DVD Recorder or
the Disc. You get to the DVD Recorder Menu by pressingSYSTEMMENU
on the remote control. Detailsare on page25. Evenif a feature is set up in
the DVD Recorder's menu, it will not be availableif the current Disc does
not include that feature.
Available Disc Features...
Features in this manualmay not be available on every Disc. If the feature is
not available,you cannot usethe DVD Recorder to make the feature avail-
able. An "X" will appear in the top left corner of the TV screen if you try
to accessa feature that is not availableon the current Disc.
Page 9

Hookups 9
Determining the best possible connection...
The capabilities of your existing equipment, especially your TV, will determine your connection possibilities. However, the follow-
ing guidelines describe which options provide the best picture and sound quality.
*-k-k* Component Video provides the best picture quality. Progressive Scan Component Video has the highest quality, but
use it only if the TV has Progressive Scan. Details are on page 10.
_r*-k S-Video provides excellent picture quality. Details are on page I I.
_r* Composite Video (a yellow Video jack) provides good picture quality. Details are on page 12.
_r* Your TV may have only an RF-style jack, usually labeled Antenna In or 75 ohm. You will need an RF
Modulator in order to view the DVD Recorder at your TV. Refer to the details below and to the instructions
provided with the RF Modulator. The RF Modulator and necessary cablesare not supplied with the DVD Recorder.
Digital audio connections provide the clearest sound. Connect one of the DVD Recorder's DIGITAL AUDIO OUT
jacks (COAX (coaxial) or OPTICAL) to your Stereo for the best sound quality. Details are on page 14.
If digital audio connections are not possible, connect the DVD Recorder's red and white AUDIO OUT jacks to the
Audio In jacks of your Stereo or TV. Details are on pages 10-13.
Before you begin...
÷ Refer to the manualsof your TV, Stereo, or other equipment asnecessary.Note the style of jacks andconnectors on the
other equipment. Determine how to choose different Audio and Video In channelson your other equipment so you can see
and hear the DVD Recorder on the TV, Stereo, etc.
÷ Disconnect all equipment from the power outlets. Connect the equipment to the power outlets only after you havefinished
hooking up everything. Never makeor changeconnections with equipment connected to the power outlet.
÷ If you need to connect a VCR, Cable Box, or Satellite Receiver to your Recorder, refer to the separate Quick
Start Guide for details.
Remember...
÷ Set the TV to the correct Video In channel. This is not channel 3 or 4 as it might be when usinga VCR (unless you are
using an RF Modulator as detailed below). Video ]n channels may be called AUX or AUXILIARY IN, AUDIO/VIDEO or A/V
IN, EXT] or EXT2 or External In, etc. These channels often are near "IV channel 00. Or, your TV remote control may have a
button or switch that lets you choose the Video In channel directly. See your TV manual for details. Or, go to your lowest TV
channel and change channels down until you see the blue Philips DVD background picture on the "IV screen.
® Connect the DVD Recorder directly to the TV. For example, do not connect the DVD Recorder to a VCR, then connect the
VCR to a TV. This type of connection may distort the picture and sound. Also, your VCR might have the copy protection sys-
tem, which could distort the DVD image.
Set the Stereo to the correct channel or "source" mode.
÷ Do not connect the DVD Recorder's AUDIO OUT jacks to the PHONO IN jack of your Stereo.
® You only need one audio connection and one video connection between the DVD Recorder and your "IV (or "IV and
Stereo). So, you might not use all the jacks on the Recorder.
÷ If you plan to watch your TV with the DVD Recorder off, connect the supplied RF coaxial cable to the Recorder's TV jack
and to the RF IN or ANTENNA IN jack (75 ohm) on your television. This lets you watch channels at the TV normally when
the DVD Recorder is off and will improve the reception at your TV.
Once you determine the option that best fits with your existing equipment, find your choice on
pages 10-15. Follow the steps for the hookup you chose.
Then, when you finish your connections and turn on the DVD Recorder for the first time, complete the Initial
Setup. This sets up TV channels, menu languages, and other features. Go to page 16 to do the Initial Setup.
Using an RF Modulator ...
You may havean Antenna/Cable TV signalconnectedto your TV's ANTENNA IN jack. Remove it from the TV and con-
nect the Antenna/Cable TV signalto the DVD Recorder's ANTENNA jack.
2 Connect the supplied video cable(with yellow ends) to the DVD Recorder's yellow VIDEO OUT (CVBS)(EXT 2) jack and
to the VIDEO IN jack on the RF Modulator.
3 Connect the supplied audio cable(with red/white ends) to the DVD Recorder's AUDIO OUT (EXT I/2) jacksand to the
AUDIO IN jacks on the RFModulator. Match the cable colors to the jack colors.
4 Connect an RFcoaxial cableto the RF OUT/ANTENNA OUT/TO TV jack on the RF Modulator. Connect the other end
of the same RF coaxial cable to the ANTENNA IN/RF IN jack on your TV.
5 Your RFModulator should havea Channel 3/4 switch. This determines the TV channel on which you will watch materials
coming from the DVD Recorder. Setthe RF Modulator's Channel 3/4 switch to either 3 or 4, whichever TV channel is
leastused in your area.
If your RF Modulator has a Modulator/Antenna switch, set it accordingly. Refer to the RFModulator instructions.
6 Turn on your TV. Choose channel 3 or 4 (the same channelto which you set the RFModulator's Channel 3/4 switch).
'7 Connect the DVD Recorder's power cord to a power outlet. Turn on the DVD Recorder by pressing ON/OFF _. You
can set up TV channelsas described on page 36.
Page 10
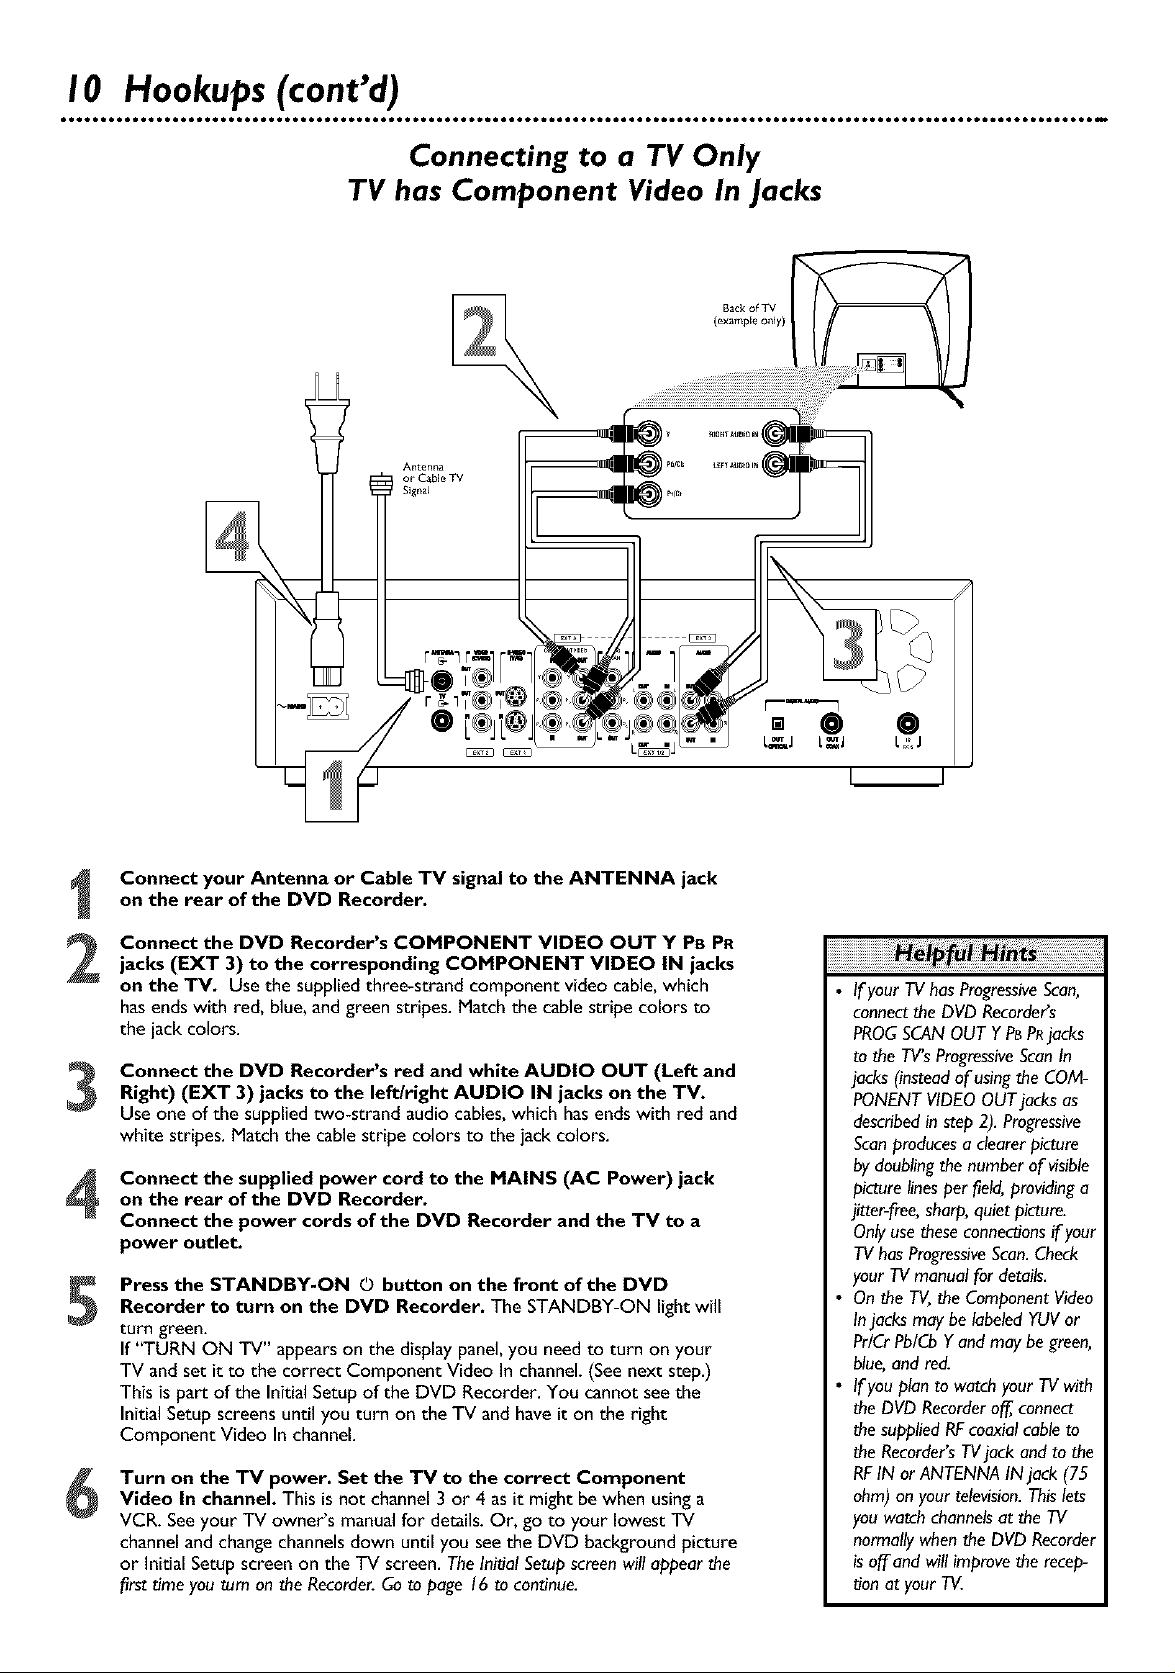
I0 Hookups (cont'd)
TV has Component Video In Jacks
Connecting to a TV Only
Connect your Antenna or Cable TV signal to the ANTENNA jack
on the rear of the DVD Recorder.
Connect the DVD Recorder's COMPONENT VIDEO OUT Y PB PR
2
jacks (EXT 3) to the corresponding COMPONENT VIDEO IN jacks
on the TV. Use the supplied three-strand component video cable, which
has ends with red, blue, and green stripes. Match the cable stripe colors to
the jack colors.
Connect the DVD Recorder's red and white AUDIO OUT (Left and
3
Right) (EXT 3) jacks to the left/right AUDIO IN jacks on the TV.
Use one of the supplied two-strand audio cables, which has ends with red and
white stripes. Match the cable stripe colors to the jack colors.
Connect the supplied power cord to the MAINS (AC Power) jack
on the rear of the DVD Recorder.
4
Connect the power cords of the DVD Recorder and the TV to a
power outlet.
Press the STANDBY-ON © button on the front of the DVD
5
Recorder to turn on the DVD Recorder. The STANDBY-ON light will
turn green.
If "TURN ON TV" appears on the display panel, you need to turn on your
TV and set it to the correct Component Video In channel. (See next step.)
This is part of the Initial Setup of the DVD Recorder. You cannot see the
Initial Setup screens until you turn on the TV and have it on the right
Component Video In channel.
Turn on the TV power. Set the TV to the correct Component
6
Video In channel. This is not channel 3 or 4 as it might be when using a
VCR. See your TV owner's manual for details. Or, go to your lowest TV
channel and change channels down until you see the DVD background picture
or Initial Setup screen on the "IV screen. The Initial Setup screen will appear the
first time you turn on the Recorder.Go to page 16 to cont3nue.
• If your TV has ProgressiveScan,
connect the DVD Recorders
PROGSCAN OUT Y P8PRjacks
to the TV's ProgressiveScanIn
jacks (insteadof using the COM-
PONENT VIDEO OUTjacks as
describedin step 2). Progressive
Scanproduces a clearer picture
by doubling the number of visible
picture linesper field, providing a
jitter-free, sharp, quiet picture.
Only use these connec_onsif your
TV has ProgressiveScan.Check
your TV manual for details.
• On the TV, the Component Video
Injacks may be labeled YUV or
Pr/Cr Pb/Cb Y and may be green,
blue, and red.
• If you plan to watch your TV with
the DVD Recorderoff, connect
the supplied RFcoaxial cable to
the Recorder'sTVjack and to the
RFIN or ANTENNA IN jack (75
ohm) on your television.This lets
you watch channels at the TV
normally when the DVD Recorder
is off,and will improve the recep-
tion at your TV.
Page 11

Connecting to a TV Only
TV has an S-Video In Jack
Back of TV
(example only)
Hookups (cont'd) I I
Connect your Antenna or Cable TV signal to the ANTENNA jack
on the rear of the DVD Recorder.
Connect the supplied S-Video cable to the S-VIDEO OUT (Y/C)
(EXT 1) jack of the DVD Recorder and to the TV's S-VIDEO In
jack.
Connect a supplied two-strand audio cable to the red and white
AUDIO OUT (EXT I/2) left and right jacks on the DVD Recorder
and to the leftJright AUDIO IN jacks on the TV. The suppliedtwo-
strand audio cable hasred and white stripes on the cable ends. Match the
cable stripe colors to the jack colors.
Connect the supplied power cord to the MAINS (AC Power) jack
on the rear of the DVD Recorder.
4
Connect the power cords of the DVD Recorder and the TV to a
power outlet.
Press the STANDBY-ON © button on the front of the DVD
5
Recorder to turn on the DVD Recorder. The STANDBY-ON lightwill
turn green.
If "TURN ON TV" appearson the displaypanel,you need to turn on your
TV and set it to the correct S-Video In channel.(Seenext step.)This ispart
of the Initial Setupof the DVD Recorder. You cannot seethe Initial Setup
screensuntil you turn on the TV and haveit on the right S-VideoIn channel.
Turn on the TV power. Set the TV to the S-Video In channel. This is
6
not channel 3 or 4 as it might be when usinga VCR. See your TV owner's
manual for details. Or, go to your lowest TV channel and change channels
down until you see the DVD background picture or Initial Setup screen on
the TV screen. The Initial Setup screen will appear the first time you turn on the
Recorder. Go to page 16 to continue.
@
L,_J
• On the TV, the S-VideoIn jack
may be labeled Y/C, S-Video,or
S-VHS(super video).
• If you plan to watch your TV
with the DVD Recorder off, con-
nect the supplied RFcoaxial
cable to the Recorders TVjack
and to the RF IN or ANTENNA
IN jack (75 ohm) on your tele-
vision. This lets you watch chan-
nels at the TV normally when
the DVD Recorder is off and
will improve the reception at
your TV.
Page 12
12 Hookups (cont'd)
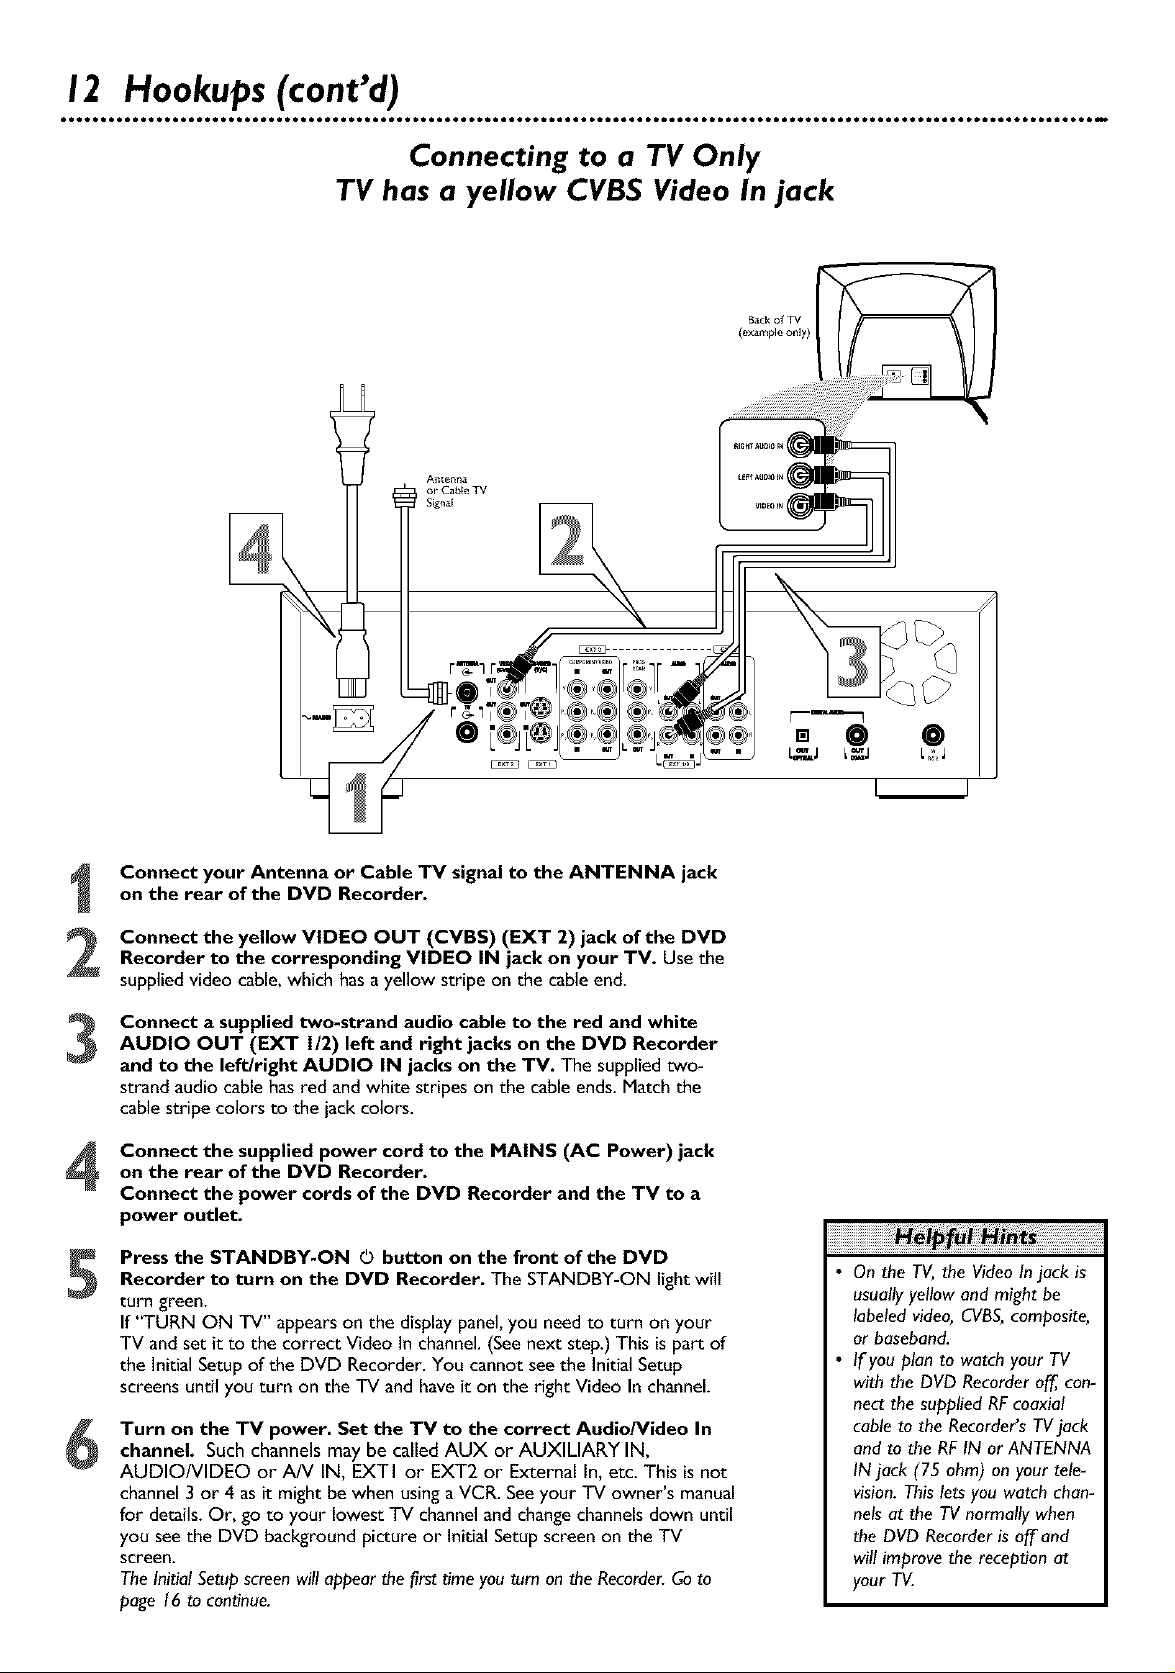
TV has a yellow CVBS Video In jack
Connecting to a TV Only
Antenna
Ot_CabEe TV
Signal
Back of TV -- _ i i
(example only)
Connect your Antenna or Cable TV signal to the ANTENNA jack
on the rear of the DVD Recorder.
Connect the yellow VIDEO OUT (CVBS) (EXT 2) jack of the DVD
Recorder to the corresponding VIDEO IN jack on your TV. Use the
supplied video cable, which has a yellow stripe on the cable end.
Connect a supplied two-strand audio cable to the red and white
AUDIO OUT (EXT 1/2) left and right jacks on the DVD Recorder
and to the left/right AUDIO IN jacks on the TV. The suppliedtwo-
strand audio cable has red and white stripes on the cable ends. Match the
cable stripe colors to the jack colors.
Connect the supplied power cord to the MAINS (AC Power) jack
on the rear of the DVD Recorder.
4
Connect the power cords of the DVD Recorder and the TV to a
power outlet.
Press the STANDBY-ON © button on the front of the DVD
5
Recorder to turn on the DVD Recorder. The STANDBY-ON light will
turn green.
If "TURN ON TV" appears on the display panel, you need to turn on your
TV and set it to the correct Video In channel. (See next step.) This is part of
the Initial Setup of the DVD Recorder. You cannot see the Initial Setup
screens until you turn on the TV and have it on the right Video In channel.
Turn on the TV power. Set the TV to the correct Audio/Video In
6
channel. Such channels may be called AUX or AUXILIARY IN,
AUDIO/VIDEO or A/V IN, EXTI or EXT2 or External In, etc. This is not
channel 3 or 4 as it might be when using a VCR. See your TV owner's manual
for details. Or, go to your lowest TV channel and change channels down until
you see the DVD background picture or Initial Setup screen on the TV
screen.
The Initial Setup screen willappear the first time you turn on the Recorder.Go to
page 16 to continue.
• On the TV, the Video In jack is
usually yellow and might be
labeled video, CVBS,composite,
or baseband.
• If you plan to watch your TV
with the DVD Recorder off, con-
ned the supplied RFcoaxial
cable to the Recorders TV jack
and to the RF IN or ANTENNA
IN jack (75 ohm) on your tele-
vision. This lets you watch chan-
nels at the TV normally when
the DVD Recorder is off and
will improve the reception at
your TV.
Page 13
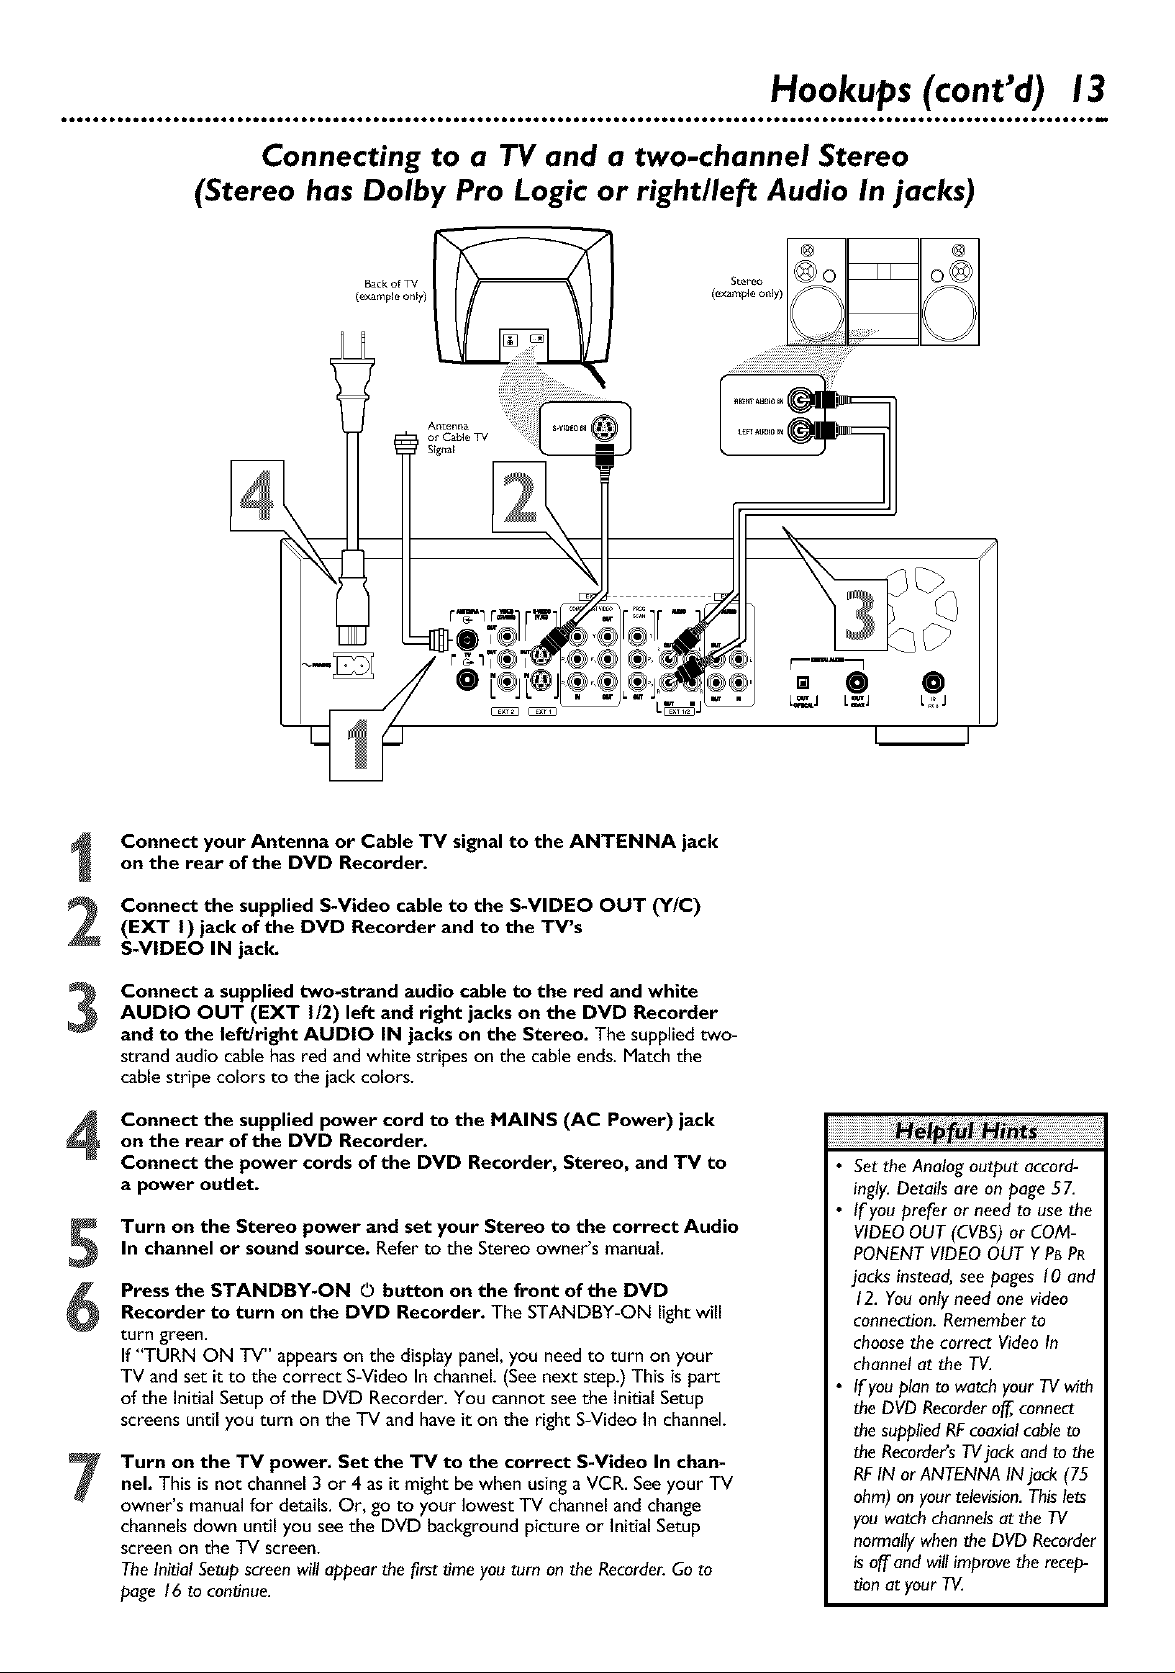
Hookups (cont'd) 13
Connecting to a TV and a two-channel Stereo
(Stereo has Dolby Pro Logic or right/left Audio In jacks)
Back of TV
(example onE)')
Connect your Antenna or Cable TV signal to the ANTENNA jack
on the rear of the DVD Recorder.
Connect the supplied S-Video cable to the S-VIDEO OUT (Y/C)
(EXT I ) jack of the DVD Recorder and to the TV's
S-VIDEO IN jack.
Connect a supplied two-strand audio cable to the red and white
AUDIO OUT (EXT I/2) left and right jacks on the DVD Recorder
and to the leftJright AUDIO IN jacks on the Stereo. The supplied two-
strand audio cable has red and white stripes on the cable ends. Match the
cable stripe colors to the jack colors.
Connect the supplied power cord to the MAINS (AC Power) jack
on the rear of the DVD Recorder.
4
Connect the power cords of the DVD Recorder, Stereo, and TV to
a power outlet.
Turn on the Stereo power and set your Stereo to the correct Audio
In channel or sound source. Refer to the Stereo owner's manual.
5
Press the STANDBY-ON 0 button on the front of the DVD
Recorder to turn on the DVD Recorder. The STANDBY-ON light will
6
turn green.
If "TURN ON TV" appears on the display panel, you need to turn on your
TV and set it to the correct S-Video In channel. (See next step.) This is part
of the Initial Setup of the DVD Recorder. You cannot see the Initial Setup
screens until you turn on the TV and have it on the right S-Video In channel.
Turn on the TV power. Set the TV to the correct S-Video In chan-
7
nel. This is not channel 3 or 4 as it might be when using a VCR. See your TV
owner's manual for details. Or, go to your lowest TV channel and change
channels down until you see the DVD background picture or Initial Setup
screen on the TV screen.
The Initial Setup screenwill appear the first time you tum on the Recorder.Go to
page 16 to con#hue.
L I
• Set the Analog output accord-
ingly. Details are on page 57.
• If you prefer or need to use the
VIDEO OUT (CVBS) or COM-
PONENT VIDEO OUT Y PBPR
jacks instead, see pages 10 and
12. You only need one video
connection. Remember to
choose the correct Video In
channel at the TV.
• If you plan to watch your TV with
the DVD Recorder off,,connect
the supplied RFcoaxial cable to
the Recorders TVjack and to the
RF IN or ANTENNA IN jack (75
ohm) on your television.This lets
you watch channelsat the TV
normally when the DVD Recorder
is off and will improve the recep-
tion at your T_
Page 14
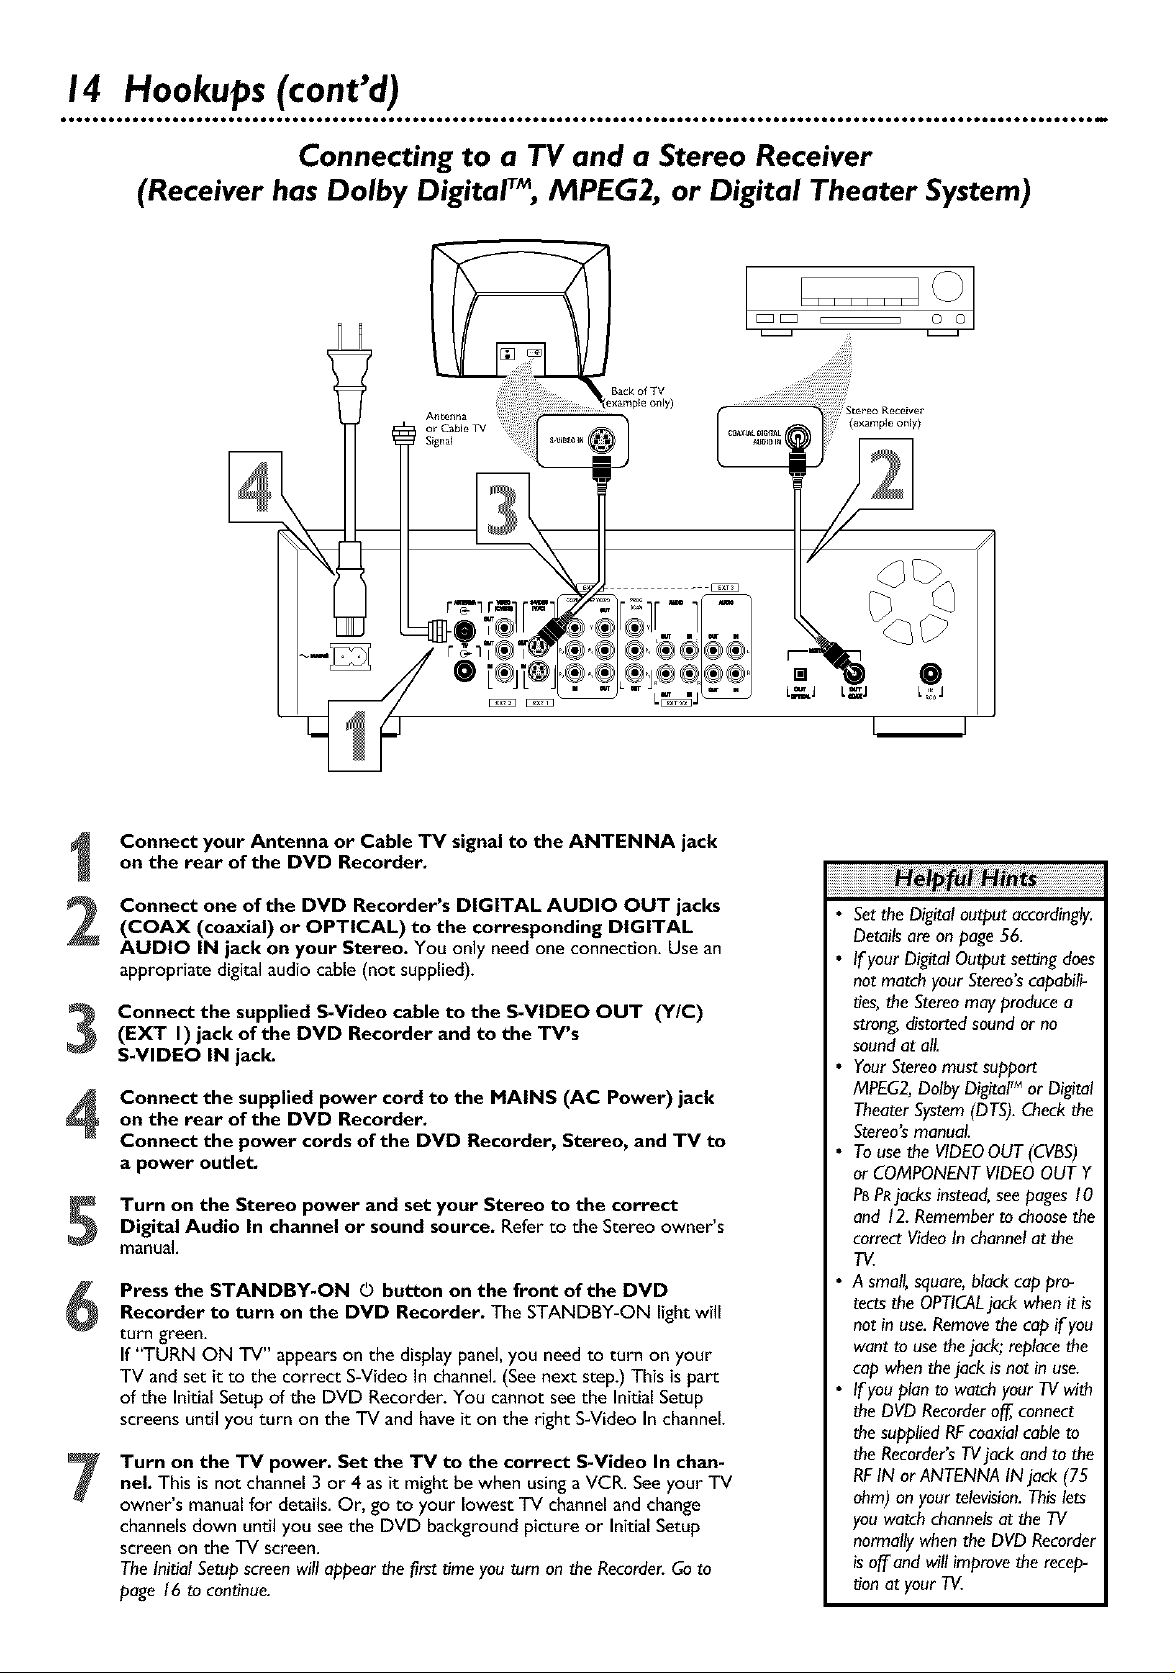
14 Hookups (cont'd)
Connecting to a TV and a Stereo Receiver
(Receiver has Dolby Digital% MPEG2, or Digital Theater System)
__ O0
Backof TV
(example only)
Connect your Antenna or Cable TV signal to the ANTENNA jack
on the rear of the DVD Recorder.
Connect one of the DVD Recorder's DIGITAL AUDIO OUT jacks
2
(COAX (coaxial) or OPTICAL) to the corresponding DIGITAL
AUDIO IN jack on your Stereo. You only need one connection. Use an
appropriate digital audio cable (not supplied).
Connect the supplied S-Video cable to the S-VIDEO OUT (Y/C)
S
(EXT I) jack of the DVD Recorder and to the TV's
S-VIDEO IN jack.
Connect the supplied power cord to the MAINS (AC Power) jack
on the rear of the DVD Recorder.
4
Connect the power cords of the DVD Recorder, Stereo, and TV to
a power outlet.
Turn on the Stereo power and set your Stereo to the correct
5
Digital Audio In channel or sound source. Refer to the Stereo owner's
manual.
Press the STANDBY-ON 0 button on the front of the DVD
6
Recorder to turn on the DVD Recorder. The STANDBY-ON lightwill
turn green.
If "TURN ON TV" appears on the display panel, you need to turn on your
TV and set it to the correct S-Video In channel. (See next step.) This is part
of the Initial Setup of the DVD Recorder. You cannot see the Initial Setup
screens until you turn on the TV and have it on the right S-Video In channel.
Turn on the TV power. Set the TV to the correct S-Video In chan-
7
nel. This is not channel 3 or 4 as it might be when using a VCR. See your TV
owner's manual for details. Or, go to your lowest TV channel and change
channels down until you see the DVD background picture or Initial Setup
screen on the TV screen.
The Initial Setup screen will appear the first time you turn on the Recorder.Go to
page 16 to continue.
• Setthe Digital output accordingly.
Details are on page 56.
• If your Digital Output se_ng does
not match your Stereo'scapabili-
ties, the Stereomay produce a
strong, distorted sound or no
sound at all.
• Your Stereomust support
MPEG2, Dolby DigrtalTM or Digital
Theater System (DTS).Check the
Stereo'smanual
• Touse the VIDEO OUT (CVBS)
or COMPONENT VIDEO OUT Y
P8PRjacks instead, see pages 10
and 12. Remember to choosethe
correct Video In channel at the
TV.
• A small, square, black cap pro-
tects the OPTICALjack when it is
not in use.Removethe cap if you
want to use the jack; replace the
cap when the jack is not in use.
• If you plan to watch your TV with
the DVD Recorderoff, connect
the supplied RFcoaxial cable to
the Recorder'sTVjack and to the
RFIN or ANTENNA IN jack (75
ohm) on your television.This lets
you watch channels at the TV
normally when the DVD Recorder
is off,and will improve the recep-
tion at your TV.
Page 15
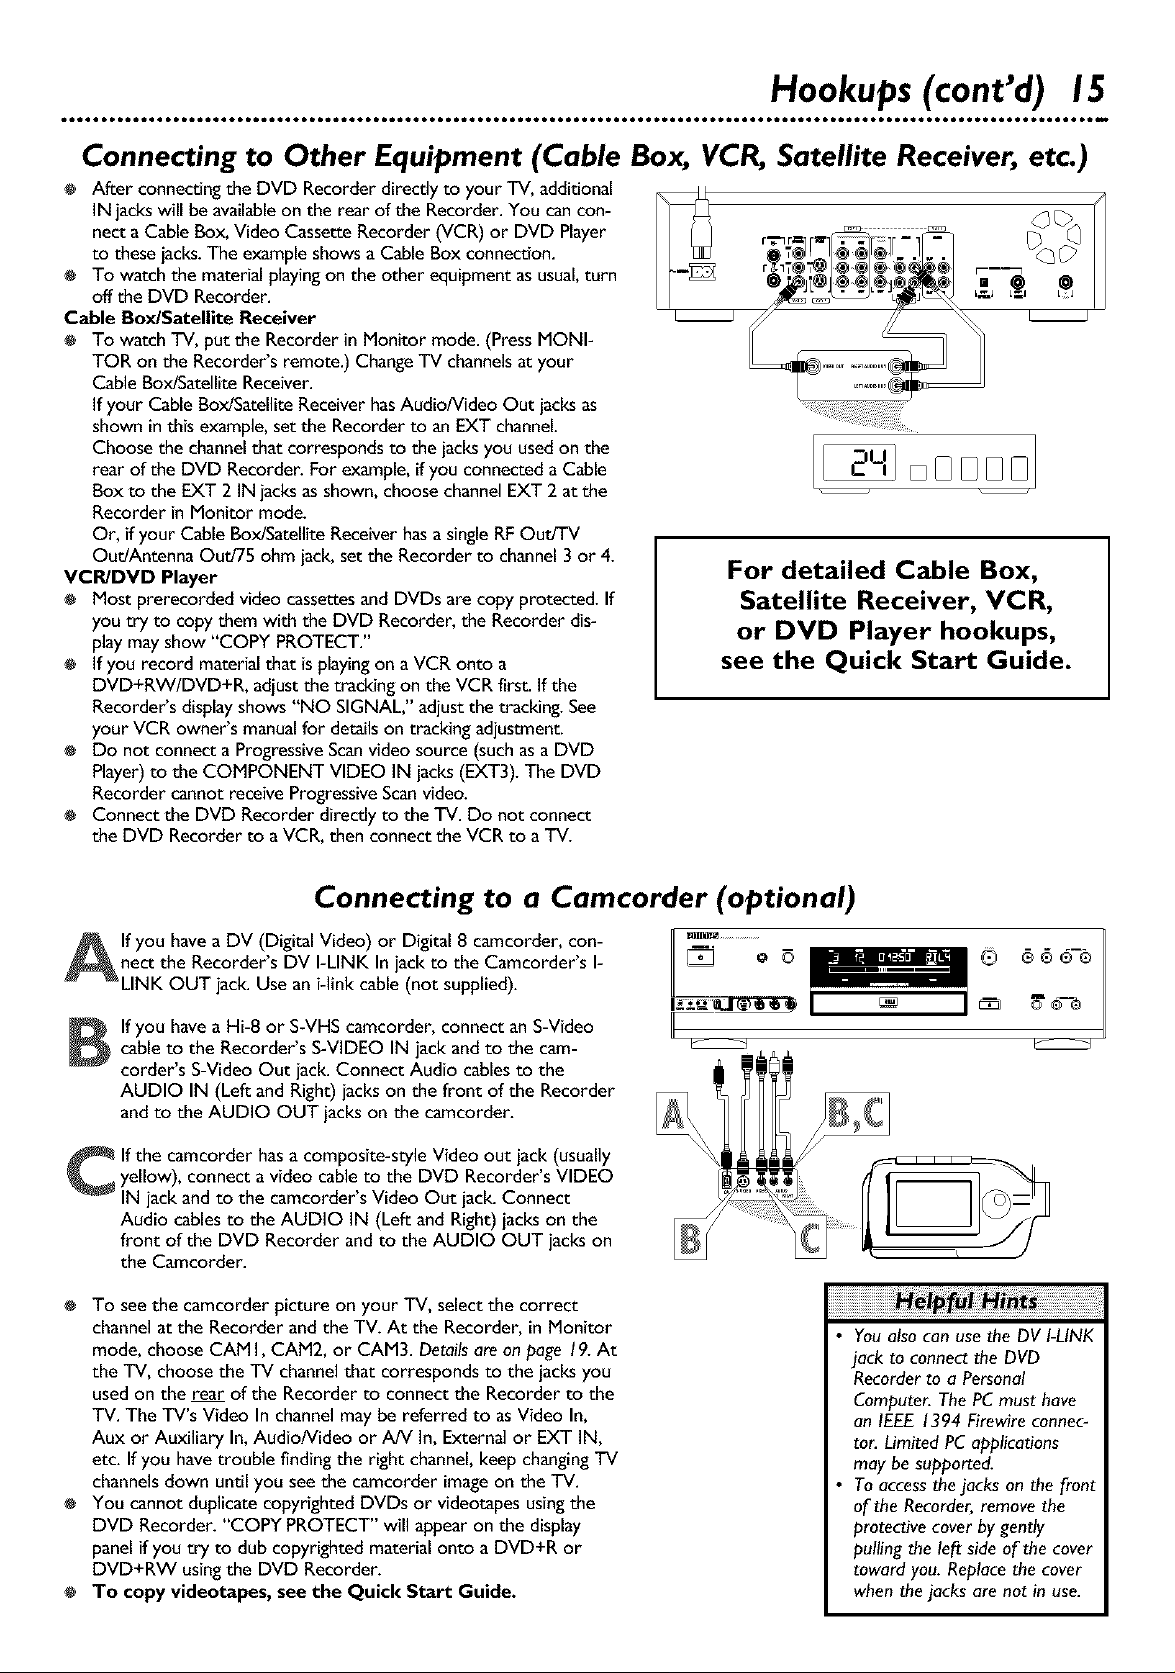
Hookups(cant'd) 15
Connecting to Other Equipment (Cable Box, VCR, Satellite Receiver, etc.)
÷ After connectingthe DVD Recorder directly to your TV, additional
IN jackswill be availableon the rear of the Recorder.You cancon-
nect a CableBox, Video CassetteRecorder (VCR) or DVD Player
to thesejacks.The exampleshowsa Cable Box connection.
÷ To watch the materialplayingon the other equipment asusual,turn
off the DVD Recorder.
Cable Box/Satellite Receiver
÷ To watch TV, put the Recorder in Monitor mode. (PressMONI-
TOR on the Recorder's remote.) ChangeTV channelsatyour
CableBox/SatelliteReceiver.
If your Cable Box/SatelliteReceiverhasAudio/Video Out jacksas
shown inthis example,setthe Recorder to an EXT channel.
Choose the channelthat correspondsto the jacksyou usedon the
rear of the DVD Recorder. For example,ifyou connecteda Cable
Box to the EXT 2 IN jacks asshown,choose channelEXT 2 at the
Recorder in Monitor mode.
Or, if your Cable Box/SatelliteReceiverhasa singleRFOut/TV
Out/Antenna Oud75 ohm jack, setthe Recorder to channel3 or 4.
VCPJDVD Player
÷ Most prerecorded video cassettesand DVDs arecopyprotected. If
you try to copy them with the DVD Recorder,the Recorder dis-
playmayshow "COPY PROTECT."
÷ If you record materialthat is playingon a VCR onto a
DVD+RW/DVD+R, adjustthe trackingonthe VCR first. If the
Recorder'sdisplayshows"NO SIGNAL," adjustthe tracking.See
your VCR owner's manualfor detailson trackingadjustment.
÷ Do not connecta ProgressiveScanvideo source (suchasaDVD
Player)to the COMPONENT VIDEO IN jacks(EXT3).The DVD
Recorder cannot receive ProgressiveScanvideo.
÷ Connect the DVD Recorder directlyto the TV. Do not connect
the DVD Recorder to aVCR,then connectthe VCR to a TV.
For detailed Cable Box,
Satellite Receiver, VCR,
or DVD Player hookups,
see the Quick Start Guide.
oDDD I
Connecting to a Camcorder (optional)
ll you have a DV (Digital Video) or Digital 8 camcorder, con-
nect the Recorder s DV I-LINK In jack to the Camcorder s I-
LINK OUT jack.Use an i-link cable(not supplied).
If you have a Hi-8 or S-VHScamcorder, connect an S-Video
cableto the Recorder's S-VIDEOIN jack andto the cam-
carder's S-Video Out jack. Connect Audio cablesto the
AUDIO IN (Left and Right) jackson the front of the Recorder
and to the AUDIO OUT jackson the camcorder.
C If the camcorder hasacomposite-style Video out jack (usually
yellow), connect a video cableto the DVD Recorder sVIDEO
IN jack and to the camcorder sVideo Out jack. Connect
Audio cablesto the AUDIO IN (Left and Right) jackson the
front of the DVD Recorder and to the AUDIO OUT jackson
the Camcorder.
÷ To seethe camcorder picture on your TV, selectthe correct
channelat the Recorder and the TV. At the Recorder, in Monitor
mode, choose CAM I, CAM2, or CAM3. Detailsareon page 19.At
the TV, choose the TV channelthat corresponds to the jacksyou
usedon the rear of the Recorder to connect the Recorder to the
TV. The TV's Video In channelmaybereferred to asVideo In,
Aux or Auxiliary In,Audio/Video or A/V In, External or EXT IN,
etc. If you havetrouble finding the right channel,keepchangingTV
channelsdown until you seethe camcorder imageon the TV.
÷ You cannot duplicatecopyrighted DVDs or videotapes usingthe
DVD Recorder. "COPY PROTECT"will appearon the display
panelif you try to dub copyrighted materialonto a DVD+R or
DVD+RW usingthe DVD Recorder.
÷ To copy videotapes, see the Quick Start Guide.
®®®®
II
• Youalsocan usethe DV I-LINK
jack to connectthe DVD
Recorderto a Personal
Computer.ThePCmust have
an IEEE1394 Firewireconnec-
tor. LimitedPCapplications
may besupported.
• To accessthejacks on the front
of the Recorder,removethe
protectivecoverbygently
pulling the left side of the cover
toward you. Replacethe cover
whenthejacks are not in use.
Page 16
16 Initial Setup
Initial Setup screens will appear the very first time you turn on the Recorder.
These on-screen messages and menus will help you set up Recorder features
quickly, including TV channels and language options.
During Initial Setup, "TURN ON TV" will appear on the Recorder's
display panel. This appears in addition to the Initial Setup informa-
tion that shows on your TV screen.
"TURN ON TV" indicates you should turn on your television and
set it to the correct Video In channel. Even though your TV may be
on, you must set it to the correct Video In channel to see the Initial
Setup messages. See pages 9-14 to determine the correct Video In
channel for your connection. Or, check your TV owner's manual for
details.
Follow the steps below to set up the Recorder as directed on the TV screen.
You can not turn offthe Recorder until you finish the Initial Setup.
The only way to quit the Initial Setup is to disconnect the power
cord. If you quit, the Initial Setup screens will appear again the next
time you turn on the Recorder. The screens will not go away until
you finish the Initial Setup. Also, you cannot open the Disc tray
while "TURN ON TV" appears.
If the setup screensdo not appear,your Recorder hasbeen set up previously.
You canalwayschangesetup items later. For detailson how to changethese
items later, see the pageslisted at each step below for eachfeature.
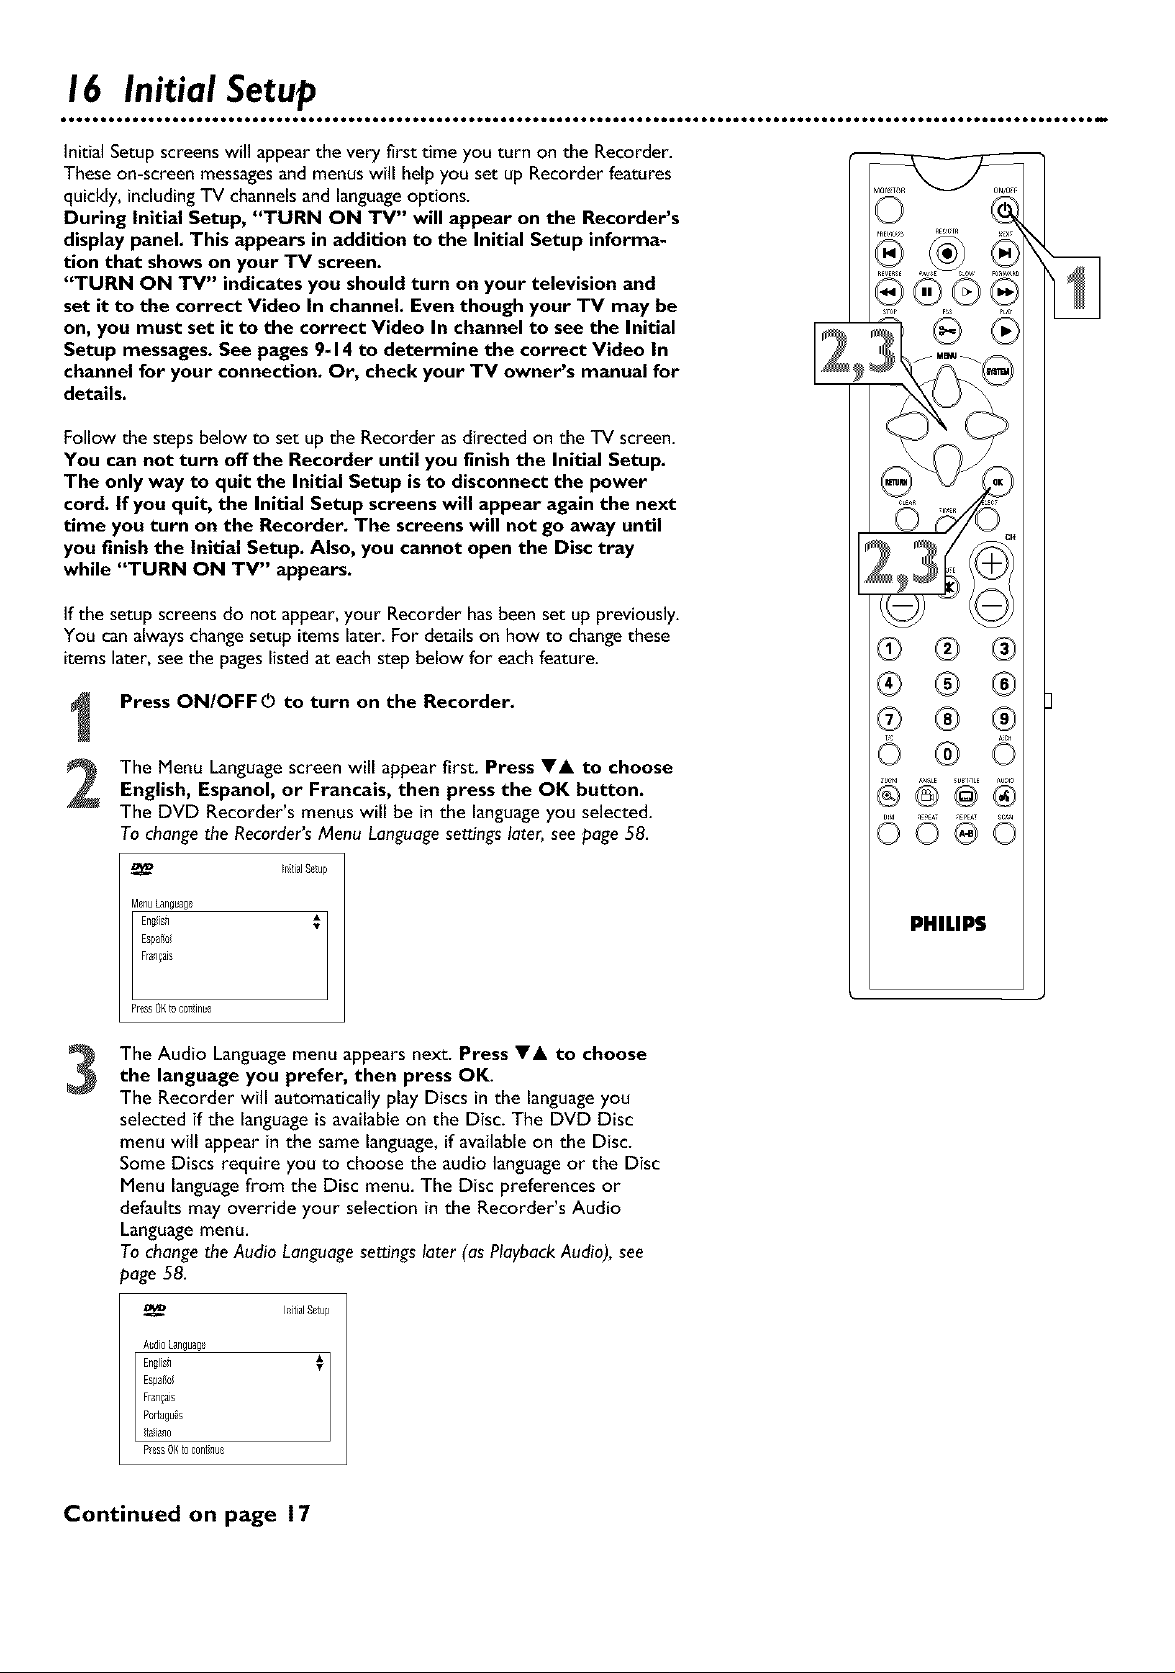
Press ON/OFF O to turn on the Recorder.
®®
®
The Menu Languagescreen will appear first. Press IYA to chooseEnglish, Espanol, or Francais, then press the OK button.
The DVD Recorder's menus will be in the languageyou selected.
Tochangethe Recorder'sMenu Languagesettingslater,seepage58.
Itial Setup
MenuLanguage
English
Espa_ol
Fr_n_ais
PressOKtocor_in_e
The Audio Languagemenu appears next. Press VA, to choose
3
the language you prefer, then press OK.
The Recorder will automatically play Discs in the languageyou
selected if the languageis available on the Disc. The DVD Disc
menu will appear in the same language,if availableon the Disc.
Some Discs require you to choose the audio languageor the Disc
Menu languagefrom the Disc menu. The Disc preferences or
defaults may override your selection in the Recorder's Audio
Languagemenu.
TochangetheAudio Languagesettingslater (asPlaybackAudio),see
page 58.
Itial Seup
A_dioLangu3_
PHILIPS
Esp3_ol
Fran_ais
Portugu_s
PiessOKtocontinue
Continued on page 17
Page 17
Continued from previous page
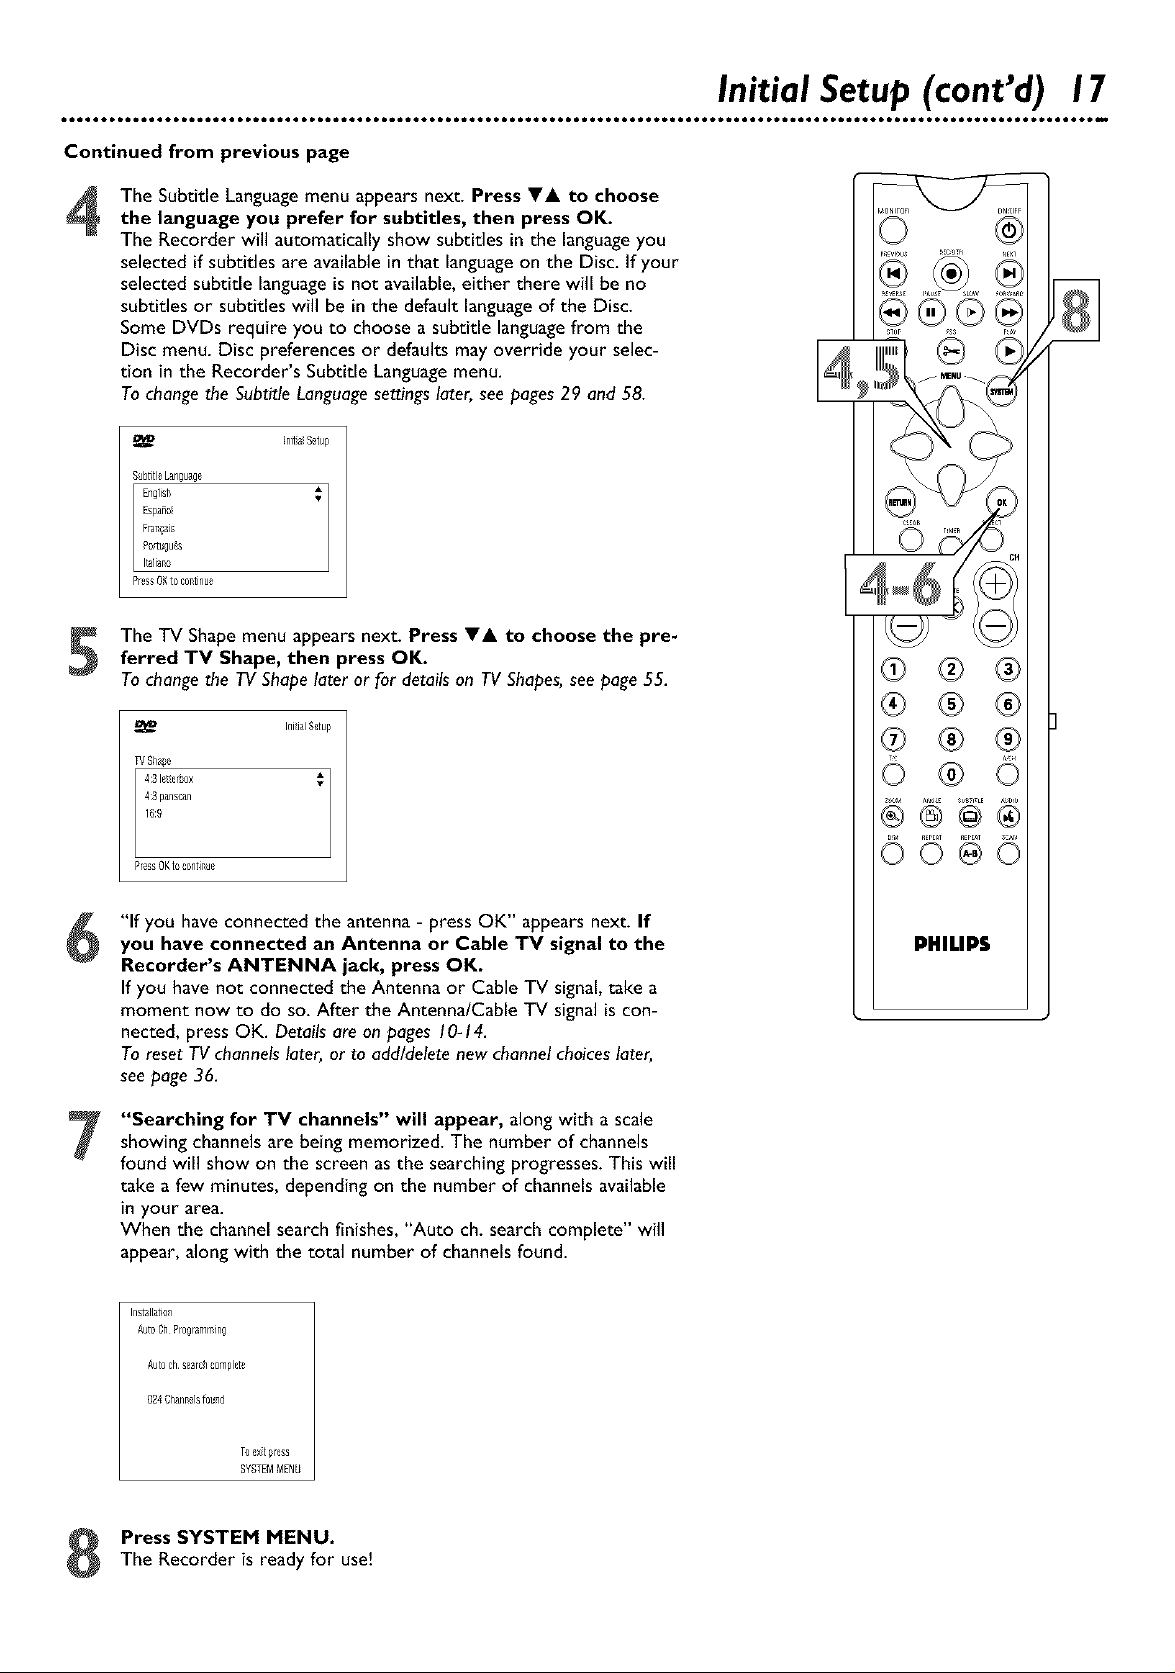
The Subtitle Languagemenu appears next. Press V& to choose
4
the language you prefer for subtitles, then press OK.
The Recorder will automatically show subtitles in the languageyou
selected if subtitles are availablein that languageon the Disc. If your
selected subtitle languageis not available,either there will be no
subtitles or subtitles will be inthe default languageof the Disc.
Some DVDs require you to choose a subtitle languagefrom the
Disc menu. Disc preferences or defaults mayoverride your selec-
tion in the Recorder's Subtitle Languagemenu.
Tochangethe SubtitleLanguagesettingslater,see pages29 and 58.
[ita Setup
S_bt_tl_Language
PressOKto co_inu_
The TV Shape menu appears next. Press V& to choose the pre-ferred TV Shape, then press OK.
To change the TV Shape later or for details on TV Shapes, see page 55.
InitialSetup
TVSha_e
4:316t_erbox
4:3panscan
16:_
Initial Setup (cont'd) 17
®
®
@
PressOKtocontinue
"If you haveconnected the antenna - press OK" appearsnext. If
6
you have connected an Antenna or Cable TV signal to the
Recorder's ANTENNA jack, press OK.
If you have not connected the Antenna or Cable TV signal,take a
moment now to do so. After the Antenna/Cable TV signalis con-
nected, press OK. Details are on pages10-14.
To resetTV channelslater, or to add/deletenew channelchoiceslater,
seepage36.
"Searching for TV channels" will appear, along with a scale
7
showing channelsare being memorized. The number of channels
found will show on the screen asthe searchingprogresses.This will
take a few minutes, depending on the number of channelsavailable
in your area.
When the channelsearch finishes, "Auto ch. search complete" will
appear,along with the total number of channelsfound.
InstsllatJon
AutoOhProgramming
Auo ch s_srchcomplete
024Channe]sfound
PHILIPS
T0exitpTess
SYSTEMMENU
Press SYSTEM MENU.
The Recorder is ready for use!
Page 18
18 Quick Disc Playback
[DVD+RWII DVD+RI I DVDI IAUD_°CDIIWDEOCDI
n.
G 6 6 6-_
There are many playbackfeatures and options available on Discs.After familiariz-
ing yourself with the DVD Recorder as described on pages20-27, see pages28
and following to try additional features.
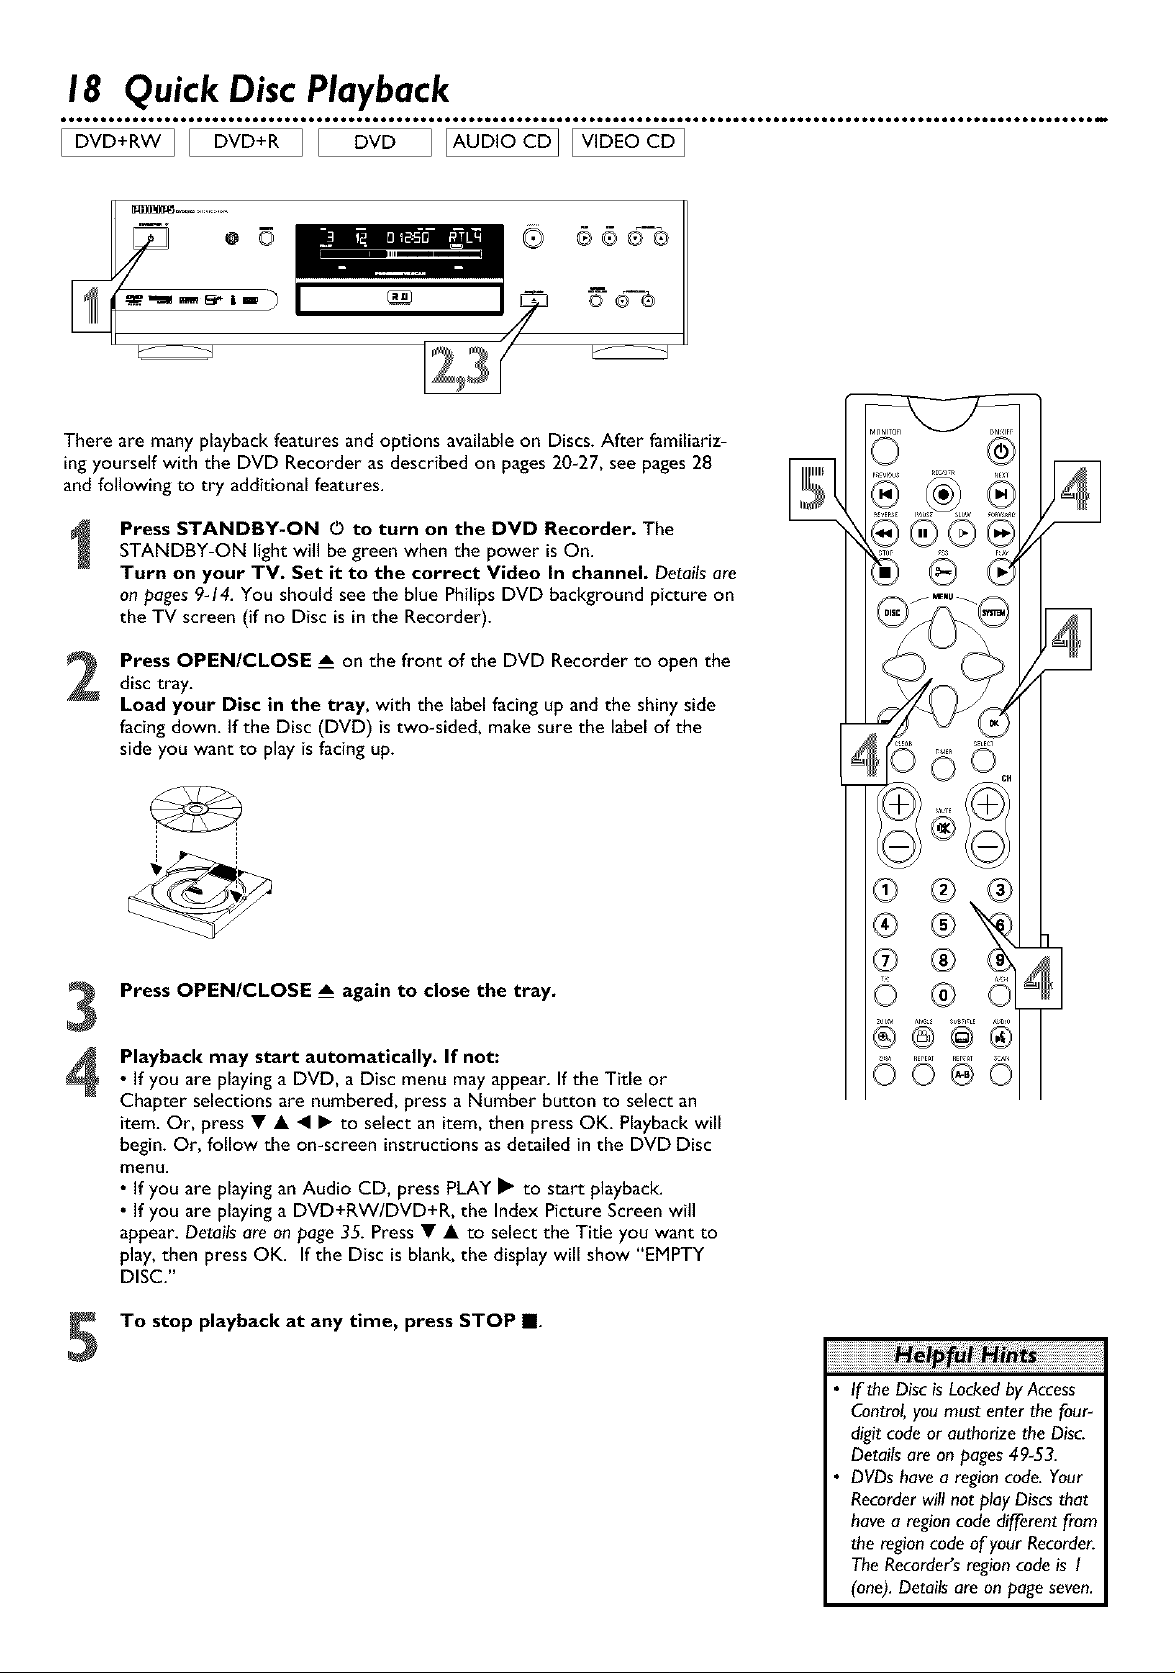
Press STANDBY-ON O to turn on the DVD Recorder. The
STANDBY-ON lightwill be green when the power is On.
Turn on your TV. Set it to the correct Video In channel. Details are
on pages9-14. You should see the blue Philips DVD background picture on
the TV screen (if no Disc is inthe Recorder).
Press OPEN/CLOSE A on the front of the DVD Recorder to open the
2
disc tray.
Load your Disc in the tray, with the label facing up and the shiny side
facing down. If the Disc (DVD) is two-sided, make sure the label of the
sideyou want to playis facingup.
®@®
o©©
i
Press OPEN/CLOSE A again to close the tray.
3
Playback may start automatically. If not:
4
• If you are playing a DVD, a Disc menu may appear. If the Title or
Chapter selections are numbered, press a Number button to select an
item. Or, press • • • • to select an item, then press OK. Playback will
begin. Or, follow the on-screen instructions as detailed in the DVD Disc
menu.
• If you are playing an Audio CD, press PLAY I_ to start playback.
• If you are playing a DVD+RW/DVD+R, the Index Picture Screen will
appear. Details are on page 35. Press • • to select the Title you want to
play, then press OK. If the Disc is blank, the display will show "EMPTY
DISC."
To stop playback at any time, press STOP U.
5
®
®
®
If the Disc is Locked byAccess
Control, you must enter the four-
digit code or authorize the Disc.
Details are on pages 49-53.
DVDs have a region code. Your
Recorder will not play Discs that
have a region code different from
the region code of your Recorder.
The Recorders region code is I
(one). Details are on page seven.
Page 19
IDVD+RW]I DVD+RI
The DVD Recorder canrecord TV programming onto a DVD+RW or DVD+R.
Before you begin,make sure you have installedthe TV channels.Detailsareon pages
16-17and 36.Use an unprotected, unfinalized,recordable DVD+RW or DVD+R.
More recording options are on pages40-46.
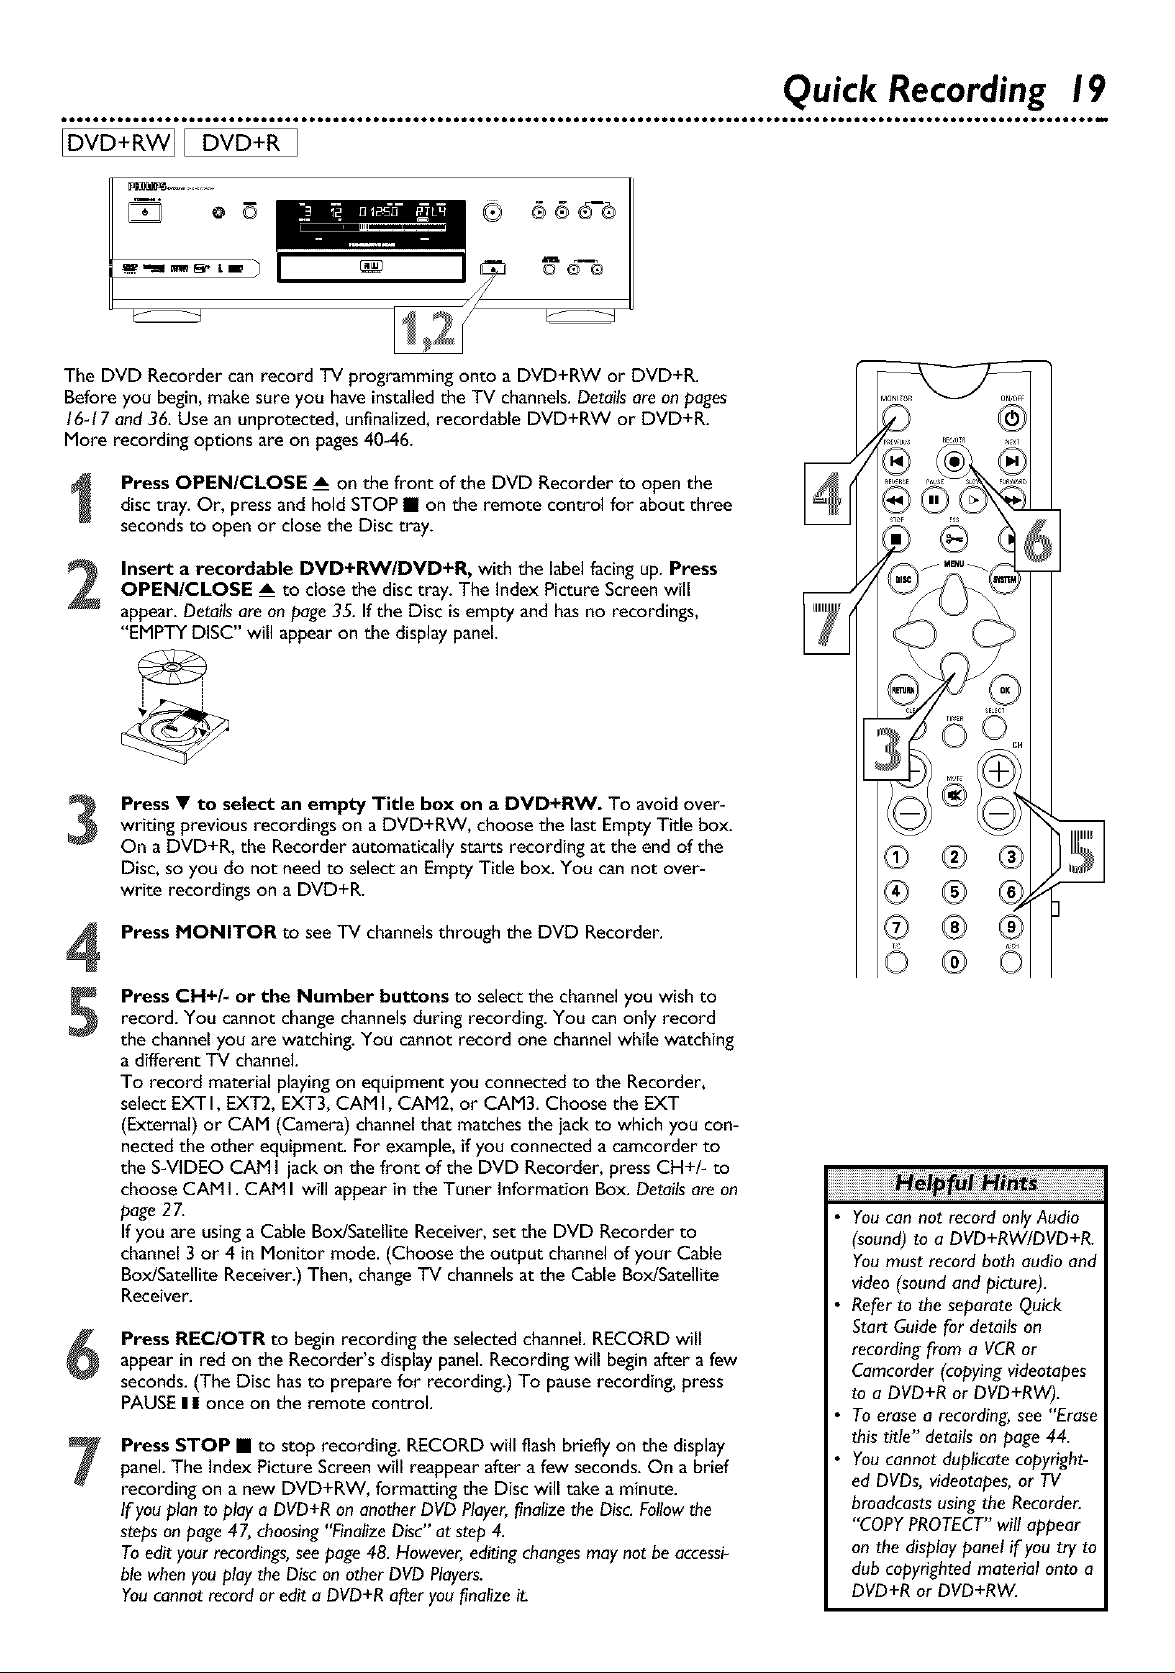
Press OPEN/CLOSE A on the front of the DVD Recorder to open the
disc tray. Or, pressand hold STOP • on the remote control for about three
secondsto open or closethe Disc tray.
Insert a recordable DVD+RW/DVD+R, with the label facing up. Press
2
OPEN/CLOSE A to close the disc tray. The Index Picture Screen will
appear. Details are on page 35. If the Disc is empty and has no recordings,
"EMPTY DISC" will appear on the display panel.
Quick Recording 19
Press • to select an empty Title box on a DVD+RW. To avoid over-
3
writing previous recordings on a DVD+RW, choose the last Empty Tide box.
On a DVD+R, the Recorder automatically starts recording at the end of the
Disc, so you do not need to select an Empty Title box. You can not over-
write recordings on a DVD+R.
Press MONITOR to see TV channels through the DVD Recorder.
4
Press Cl-I+/- or the Number buttons to select the channel you wish to
5
record. You cannot change channelsduring recording. You can only record
the channel you are watching. You cannot record one channel while watching
a different TV channel.
To record mateMal playing on equipment you connected to the Recorder,
select EXT I, EXT2, EXT3, CAM I, CAM2, or CAM3. Choose the EXT
(External) or CAM (Camera) channel that matches the jack to which you con-
netted the other equipment. Por example, if you connected a camcorder to
the S-VIDEO CAM I jack on the front of the DVD Recorder, press CH+/- to
choose CAM I. CAM I will appear in the Tuner Information Box. Details are on
page 27.
If you are using a Cable Box/Satellite Receiver, set the DVD Recorder to
channel 3 or 4 in Monitor mode. (Choose the output channel of your Cable
Box/Satellite Receiver.) Then, changeTV channels at the Cable Box/Satellite
Receiver.
Press REC/OTR to begin recording the selected channel.RECORD willappear in red on the Recorder's displaypanel.Recordingwill beginafter afew
seconds.(The Disc hasto prepare for recording.) To pauserecording, press
PAUSEI I once on the remote control.
Press STOP • to stop recording. RECORD will flash briefly on the display
7
panel. The Index Picture Screen will reappear after a few seconds. On a brief
recording on a new DVD+RW, formatting the Disc will take a minute.
If you plan to play a DVD+R on another DVD Player,finalize the Disc. Followthe
steps on page 47, choosing "Finalize Disc" at step 4.
To edit your recordings,see page 48. However, editing changesmay not be accessi-
ble when you play the Disc on other DVD Players.
You cannot record or edit a DVD+R after you finalize it.
®
You can not record only Audio
(sound) to a DVD+RW/DVD+R.
You must record both audio and
video (sound and picture).
Refer to the separate Quick
Start Guide for details on
recording from a VCR or
Camcorder (copying videotapes
to a DVD+R or DVD+RW).
To erase a recording, see "Erase
this title" details on page 44.
You cannot duplicate copyright-
ed DVDs, videotapes, or TV
broadcasts using the Recorder.
"COPY PROTECT" will appear
on the display panel if you try to
dub copyrighted material onto a
DVD+R or DVD+RW.
Page 20

20 Remote Control Buttons
MONITOR Button
Press to choose Disc mode or
Monitor mode. In Disc mode, use
the Index Picture Screen or view
Disc playback. In Monitor mode,
watch TV channels through the DVD
Recorder or make a recording.
Details are on page 19.
STOP • Button_
Pressto stop Disc playbackor|
recording. Pressand hold the STOP_
• button for three secondsto open
or close the Recorder's disc tray.
Press during playback to access a
DVD's Title or Disc menu.
Details are on page 28.
Or, press to access the Index Picture
Screen of a DVD+RW/DVD+R.
Details are on page 35.
Press to select items.
Details are on pages 25, 28, and 35.
RETURN
Press to go back to a previous menu.
VOL (volume) +/- Buttons
Press to increase or decrease the "IV
volume. Details are on page 60.
MUTE i_ Button
Press to silence the TV volume.
Press again to restore the volume.
Details are on page 60.
ZOOM _. Button
Pressto access_ (Zoom) in the
Menu Bar and enlarge the video
imageduring pausedor regular play-
back of a DVD, DVD+R, or
DVD+RW. Detailsareon page 30.
DIM Button
Press repeatedly to adjust the bright-
nessof or to turn off the display on
the front of the DVD Recorder.
PHILIPS
ON/OFF C) Button
Pressto turn on or off the power of
the DVD Recorder.
The STANDBY-ON lighton the
front of the Recorder is green when
the power is on. The lightis red
when the power isoff.
Detailsare on page22.
REC/OTR Button (Record/One-
Touch Recording)
Pressto record the current TV
channelas seenin Monitor mode.
Or, press to start recording material
that is playingon equipment connect-
ed to the Recorder (after choosing
the correct EXT or CAM channel).
Detailsare on page 19. Pressrepeat-
edly to set up One-Touch
Recordings. Detailsare on page 40.
SYSTEM MENU Button
Press to access or remove the Menu
Bars of the DVD Recorder.
Details are on page 25.
Button
Press to acknowledge or approve a
menu selection.
SELECT Button
Press to select an AM or PM Start or
End time for a timer recording.
Details are on page 4 I.
Press to select a recording mode
(speed). Details are on page 46.
TV Switch
Press and hold while using buttons
on the remote control that operate
your TV. Details are on page 60.
AUDIO ((_ Button
Press to select a different audio lan-
guage or soundtrack during DVD play-
back. Multiple languages or sound-
tracks must be available on the DVD.
Details are on page 29.
SCAN Button
Pressto play the first l0 secondsof
eachTrack or Chapter on a Disc.
Detailsareonpage33.
Page 21
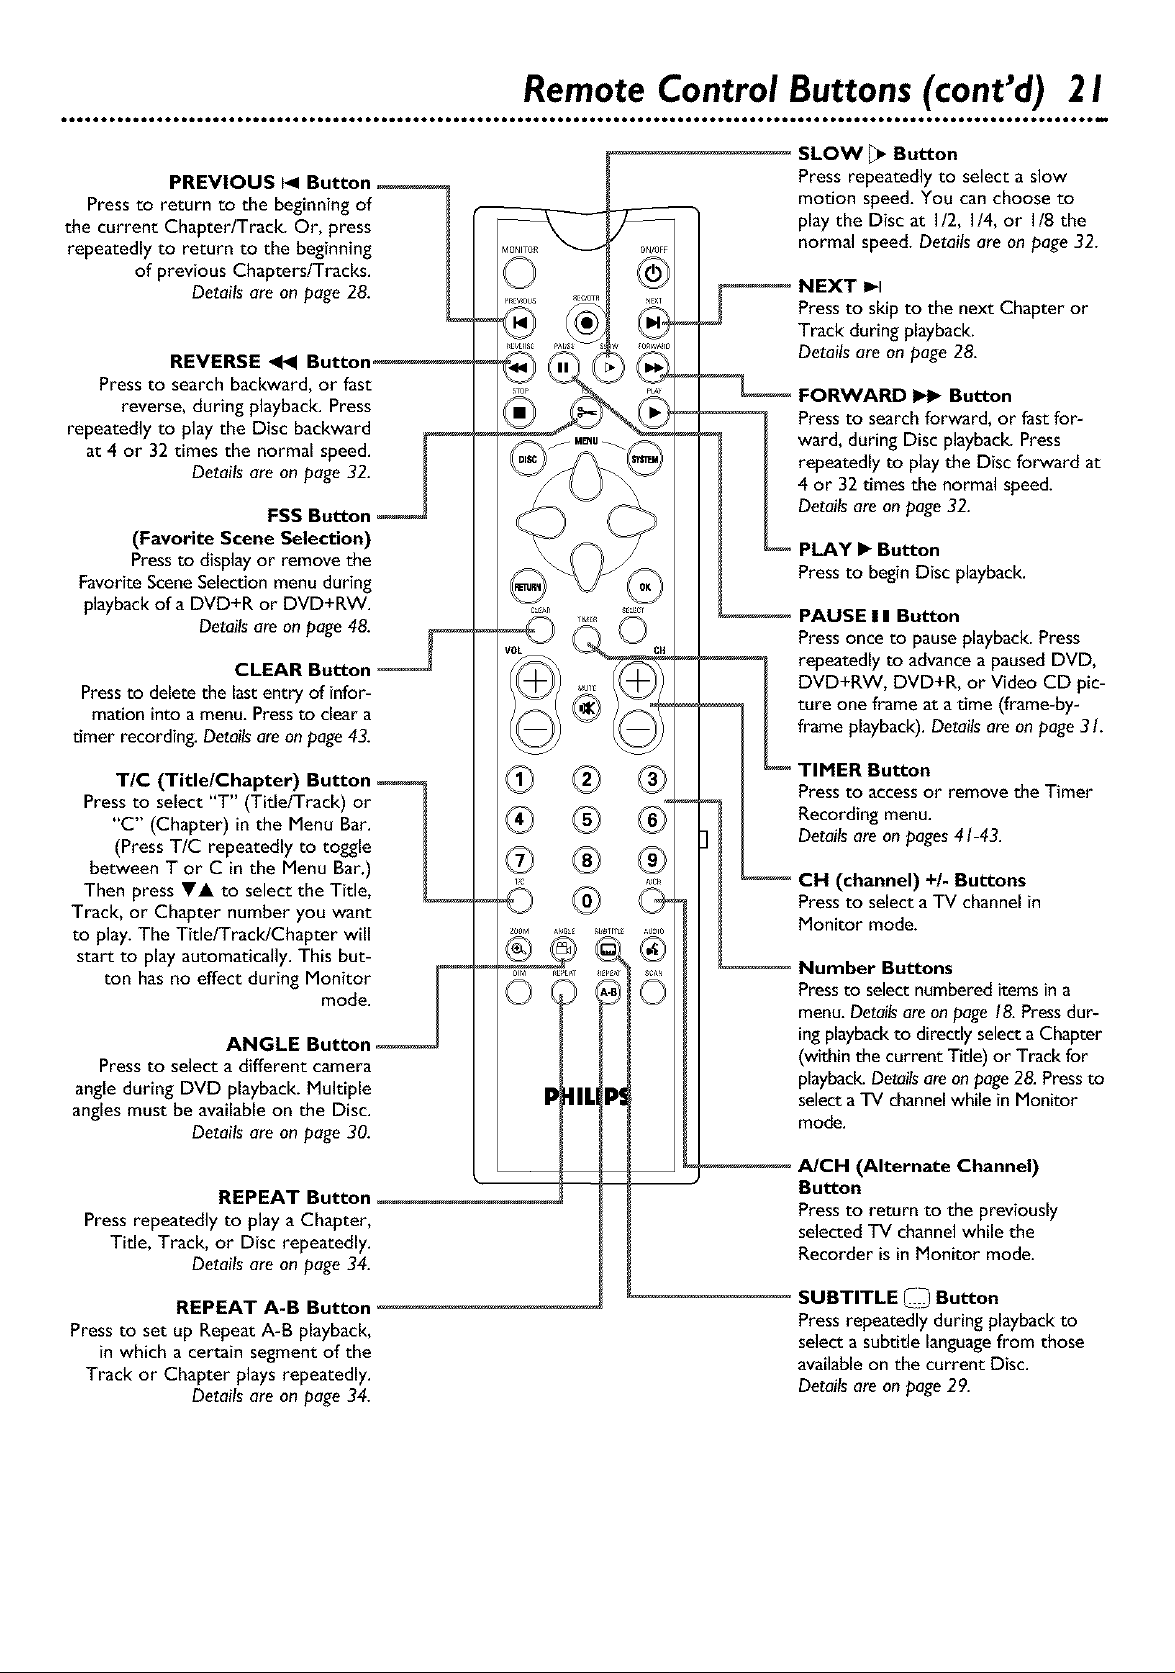
PREVIOUS
Press to return to the beginning of
the current Chapter/Track. Or, press
repeatedly to return to the beginning
of previous Chapters/Tracks.
Details are on page 28.
REVERSE << Button,
Press to search backward, or fast
reverse, during playback. Press
repeatedly to playthe Disc backward
at 4 or 32 times the normal speed.
Detailsare onpage 32.
FSS Button
(Favorite Scene Selection)
Press to display or remove the
Favorite Scene Selection menu during
playback ofa DVD+R or DVD+RW.
Details are on page 48.
CLEAR Button
Press to delete the last entry of infor-
mation into a menu. Press to clear a
timer recording. Details are on page 43.
Remote Control Buttons(cont'd) 21
SLOW _ Button
Press repeatedly to select a slow
motion speed.You canchoose to
playthe Disc at I/2, I/4, or I/8 the
normal speed. Detailsare onpage 32.
Press to skip to the next Chapter or
Track during playback.
Details are on page 28.
FORWARD _ Button
Pressto searchforward, or fastfor-
ward,during Disc playback.Press
repeatedly to playthe Disc forward at
4 or 32 times the normal speed.
Detailsareon page32.
• Button
Press to begin Disc playback.
PAUSE I I Button
Press once to pause playback. Press
repeatedly to advance a paused DVD,
DVD+RW, DVD+R, or Video CD pic-
ture one frame at a time (frame-by-
frame playback). Details are on page 3I.
TIC (Title/Chapter)
Pressto select "T" (Title/Track) or
'%" (Chapter) in the Menu Bar.
(PressT/C repeatedly to toggle
between T or C in the Menu Bar.)
Then press V& to select the Title,
Track, or Chapter number you want
to play. The Title/Track/Chapter will
start to play automatically. This but-
ton hasno effect during Monitor
mode.
ANGLE Button
Press to select a different camera
angle during DVD playback. Multiple
angles must be available on the Disc.
Details are on page 30.
REPEAT Button
Press repeatedly to play a Chapter,
Tide, Track, or Disc repeatedly.
Details are on page 34.
REPEAT A-B Button
Pressto set up RepeatA-B playback,
in which a certain segment of the
Track or Chapter plays repeatedly.
Detailsare onpage 34.
®
P41L
Press to access or remove the Timer
Recording menu.
Details are on pages 41-43.
(channel) +/- Buttons
Press to select a TV channel in
Monitor mode.
Number Buttons
Pressto selectnumbered itemsina
menu.Detailsareonpage 18.Pressdur-
ingplaybackto directly selecta Chapter
(within the current Title) or Track for
playback.Detailsareonpage28.Pressto
selecta TV channelwhile in Monitor
mode.
A/CH (Alternate Channel)
Button
Press to return to the previously
selected TV channel while the
Recorder is in Monitor mode.
SUBTITLE _ Button
Pressrepeatedly during playbackto
selecta subtitle languagefrom those
availableon the current Disc.
Detailsareon page29.
Page 22

22 Front Panel
STANDBY-ON © Button and Light
Press the STANDBY-ON © button to turn on or off the power of the DVD
Recorder. The STANDBY-ON light will be red if the DVD Recorder power is off
(standby). The STANDBY-ON light will be green when the power is on.
IR (infrared) remote sensor
The sensor receives signalsfrom the remote. Point the remote here, not
at your TV, when using the remote control to operate the DVD Recorder.
MONITOR button
Pressto choose disc mode or Monitor mode. In disc mode, use the Index
Picture Screen,view Disc playback,or make recordings. In Monitor mode, watch
or record TV channelsthrough the DVD Recorder. Details are on page 19.
Display
Information about the current status of the
Recorder appears here. Details are on page 23.
CHANNEL _!'Ai, buttons
Press to change TV channels while in Monitor mode.
STOP • button
Press to stop playback or recording.
PLAY • button
Press to begin Disc playback.
Er_D_ON
DV (digital video) i-LINK (CAM3);
S-VIDEO In (CAMI); VIDEO In
(CAM2); and AUDIO In
(CAM 1/2) jacks
To access these jacks, remove the
protective cover by pulling the left side
of the cover toward you. Replace the
cover when the jacks are not in use.
Use these jacks when connecting a
camcorder or other equipment to the
DVD Recorder. Details are on page 15.
When recording material that is play-
ing on the other equipment, choose
the CAM (Camera) channel that cor-
responds to the jack to which the
equipment is connected. Details are on
page 19.
The descriptions/names of each jack
are to the left of the jacks, in order
from left to right.
If your Personal Computer has an lEEk
1394 Firewire connector, you may
connect it to the Recorder's DV i-
LINK jack. Limited applications may be
available.
0®@
RECORD i button
Press to begin recording
the currently selected TV
channel or source.
Details are on page 19.
OPEN/CLOSE __ button
Pressto open or close the Disc tray.
*AUTO MAN REC VOLUME button'
(Automatic/Manual Recording Volume)
Press to adjust the recording volume auto-
matically or manually. Details are on page 45.
REC VOLUME _'A buttons
Press to increase or decrease the volume when manually
adjusting the recording volume. Details are on page 45.
Disc Tray
Insert a Disc here. Load the Disc
with the label facing up.
Details are on page 18.
Page 23

Display 23
DVD+RW DVD+Rewritable inserted
(asshown in example below)
DVD+R DVD+Recordable inserted
DVD DVD inserted
VCD Video CD inserted
CD Audio CD inserted
SVCD Super Video CD inserted
TITLE
Current Title number
TRACK
Current Track number
HQ, SP, LP, or EP
High Quality, StandardPlay,Long Play,or
Extended Play;Current recording mode, or
the recording speedinwhich the current
Chapter was recorded. Detailsareon page46.
CHAPTER
Current Chapter number
_O_
Remote Control command received
TRACK TIME
Elapsedplayingtime of the current
Track in hours, minutes, and seconds;
appearsduring playback.
TOTAL TIME
Total playback or recording time in
hours, minutes, and seconds; appears
when playback is stopped.
TIME REMAIN
Remainingtime of Disc (according to
current recording mode if recording)
CHANNEL
Current TV channelnumber
[RECORD]
Recording in progress
TIMER
A timer recording is scheduled or is
occurring. TIMER flashesjust before a
timer recording is scheduledto begin if
the Recorder power is on.
r
MPEG, DIGITAL, DTS, or PCM ,_
Audio format of the current Disc
MANUAL
Appears when you manually adjust the
recording volume. Detailsare on page45.
STEREO
The current channel is broadcasting
in stereo. Details are on page 58.
I
SAP
The current TV channel is broadcasting
a second Audio Program.
Details are on page 58.
dB scale
Indicates the recording volume when
using the manual recording volume con-
trois. Details are on page 45.
Additional messages or information also will
appear on the display, for example "OPENING"
when the disc tray is opening. These messages
vary according to the current activity of the
Recorder or Disc.
Disc bar
Displays Disc content, recording volume
level, or formatting progress.
Page 24

24 Rear Panel
MAINS (AC Power)
Connect the supplied AC power cord here and to a stan-
dard AC outlet after completing all other connections.
TV jack
Connect the supplied RF coaxial cableto the Recorder's TV jack and to
the RF IN or ANTENNA IN jack (75 ohm) on your television. This lets
'ou watch channelsat the TV normally when the DVD Recorder isoff.
ANTENNA jack
Connect your antenna or Cable TV signal here.
Details are on pages 10-14.
VIDEO IN (CVBS) (EXT2) jack
Use avideo cable to connect this jack to the Video
Out jack of other equipment. Details are on page 15.
VIDEO OUT (CVBS) (EXT2) jacks
Connect the suppliedyellow-striped video cableto one of
the VIDEO OUT (CVBS)jacksandto the TV's Video In
jack. Detailsareon page 12.Use the extra VIDEO OUT
(CVBS)jack to connect the Recorder to other equipment.
IN RC 6 jack
Connect a wired
remote control (not
supplied) to the IN RC
6 jack if you prefer. Ask
your dealer for details
on compatible remotes.
The first signals from
the remote control may
be lost. The remote
control supplied with
the DVD Recorder will
operate all the
recorder's features.
r
D
S-VIDEO IN (Y-C)
Use an S-video cable to connect this
jack to the S-Video Out jack of
optional additional equipment.
Details are on page 15.
S-VIDEO OUT (Y-C) (EXT I) jack
Connect the supplied S-Video cable
here and to a TV's S-Video In jack.
Details are on page I I.
COMPONENT VIDEO IN
(Y PB PR) (EXT3) jacks
Connect these jacks to the Component Video Out
jacks of optional additional video equipment (for
example, a DVD Player). Details are on page 15.
COMPONENT VIDEO OUT
(Y PB PR) (EXT3) jacks
Connect the supplied three-strand component
video cable here and to the Component Video
In jacks of a TV. Details are on page 10.
PROG SCAN OUT (Y PB PR) jacks
(Progressive Scan)
Connect these jacks to a TV's Progressive ScanIn jacksif
the TV has ProgressiveScan.Use the supplied three-strand
component video cable. Match the cablestripe colors to
the jack colors. If your TV does not have ProgressiveScan,
usethe COMPONENT VIDEO OUT jacks instead. Details
are on page 10.Also see your TV manualfor details.
L_ J
DIGITAL AUDIO OUT COAX
(coaxial) jack
Connect a digital audio coaxial cable
here and to the digital audio coaxial In
jack of a Stereo. Details are on page 14.
DIGITAL AUDIO OUT OPTICAL jack
Connect a digital audio optical cable here and to
the digital audio optical In jack of a Stereo. Details
are on page 14.
AUDIO OUT/IN (Left/Right) (EXTI/2 and EXT3) jacks
Use the supplied audio cables (with red and white stripes) to con-
nect the Recorder's AUDIO OUT jacks to the Audio In jacks of a
television or Stereo. Details are on pages 10-13.
Use the AUDIO IN jacks when connecting additional equipment
to the DVD Recorder. Details are on page 15.
Each Audio and Video jack is
labelled EXT I, EXT2, or EXT3.
Use the same EXT (external)
number for the audio and video
connection to the TV. For
example, if you use S-VIDEO
OUT, which is EXT I, use the
EXT I /2 AUDIO OUT jacks.
Do not touch the inner pins of
the jacks on the rear panel
Electrostatic discharge may
damage the unit permanently.
You only need one audio and
one video connection to a TV.
You might not use all the jacks.
Page 25

Menu Bars 25
• • • • • • • • • • • • • • • • • • • • • • • • • • • • • • • • • • • • • • • • • • • • • • • • • • • • • • • • • • • • • • • • • • • • • • • • • • • • • • • • • • • • • • • • • • • • • • • • • • • • • • • • • • • • • • • • • • • • • • • • • • • • • • • • • ml
In addition to usingthe shortcut buttons on the remote control to selectfea-
tures, you can usethe Menu Bars to operate features. You cannot accessthe
Menu Barsduring recording.
When a Menu Bar is on the screen,press the VA • • buttons on the remote
control to selectanitem or to changethe setting of an item.
The V&• • symbols in the Menu Bar mean more items are available.
Menu Bar 1
*Press SYSTEM MENU once to accessMenu Bar I. The following
items are in Menu Bar I. Dependingon the availableDisc features,you may
not be able to accesseachitemat alltimes.Only availablefeatures canbe
selected.
[] User Preference Settings Setyour preferencesfor audio andvideo
quality,dependingon the equipment you connectedto the DVD
Recorder. Also set up Languages,AccessControl, RecordSettings,
Remote Control settings,Installationfeatures,andother DVD Recorder
features.
[] Title Selectto chooseanavailableTitle or Track for playback.Usethe
Number buttons or the AV buttons to selectthe Title you want.
Playbackwill start automatically.
[] Chapter Selectto choose an availableChapter for playback.Use the
Number buttons or the AV buttons to selectthe Chapter you want.
Playbackwill start automatically.
[] Audio Language If the currentDVD hasmultiple audio soundtracks,
choose one here.For example,some DVDs let you playthe movie in
other languagesor heara director's commentary during playback.Check
the Disc casefor details.Detailsare onpage29.
[] Subtitle Language If the current Disc has subtitles, select a language
here. Details are on page 29.
[] Angle Select to choose a different camera angle, if available, during
DVD playback. Details are on page 30.
[] Zoom Select to enlarge the DVD, DVD+R, or DVD+RW picture by
1.33, 2, or 4 times the normal size during playback.
Details are on page 30.
Menu Bar 2
*While in Menu Bar I, press • repeatedly to move to Menu Bar 2.
The following items are in Menu Bar 2.
[] Sound Mode Select to choose a sound mode: Stereo (st), Dolby
Surround compatible (sur), or 3D Sound (3d). Details are on page 31.
[] Frame-by-frame playback Selectfor forward or reverse frame-by-
frame playbackof a DVD, DVD+R, or DVD+RW. Press_', then press
• or • to move the picture backward or forward one frame at atime.
Detailsareon page3 I.
[] Slow motion Select to slow the speed of DVD, DVD+R, or DVD+RW
playback. Details are on page 32.
[] Fast motion Selectto playa DVD, DVD+R, or DVD+RW forward or
backward at four, eight, or 32 times the normal playbackspeed.PressV,
then press • or • to choose a backward (-) or forward speed.
Detailsareon page32.
[] Time Search Select to enter a specifictime within the current Track,
Title, or Chapter at which you want playback to begin.
Details are on page 33.
Page 26

26 On-screenSymbols,Status Box
On-screen Symbols
The following symbols will appear briefly on the TV screen when you activate some Disc features.
_Scan The first 10secondsof each
Chapter/Track will play.
BAngle Multiple angles are available.
Details are on page 30.
Detailsare on page33.
_ Repeat All The entire Disc will play
repeatedly.
Details are on page 34.
_ Repeat Title The current Title will play
repeatedly.
Details are on page 34.
_ Repeat Chapter The current Chapter
will play repeatedly.
Details are on page 34.
_ Repeat A Point A for Repeat A-B play-
back has been entered.
Details are on page 34.
_ Repeat A-B A segment of the Disc will
play repeatedly.
Details are on page 34.
_ Locked The current Disc is Locked and
cannot play.
Details are on pages 49-53.
_Safe The current Disc is authorized for
playback.
Details are on pages 49-53.
_ "X" The feature you just attempted is
not available on the current Disc or at the
current time.
Status Box
The Status Box shows the current status of the Recorder and informationabout the current Disc,
includingDisc type, total playingtime, and elapsed playingtime. Set Status box to On ifyou want to
seethe following icons briefly when you accessa feature. Detailsareon page54.
Disc status icons
_ recording
_stop
_ pause play
_ pause recording
[_ fast forward at four times
I_ fast reverse at four times
_slow motion
the regular speed
the regular speed
Disc type icons
I_1 DVD+R
_ DVD+RW
_ DVD-Video
_ SuperVideo-CD
_ Video-CD
_no Disc
_Disc error
Page 27

Information Boxes 27
Warning box
Appears near the bottom of the screenwhen appropriate. Examplesanddetailsare onpage43.
Tuner Information box
Appears on the left side of the TV screen and identifiesthe current TV channel or Video source in
Monitor mode. For example, ifEXTI appears in the Tuner Information Box, you canview or record
the material that is playing on the equipment that is connected to the EXTI AUDIO and VIDEO IN
jacks on the rear of the Recorder.
Make sure you have connected an Antenna or Cable TV signal to the ANTENNA jack on the
Recorder. Details are on pages 10-14. Press MONITOR to go into Monitor mode and view the TV
channelor playbackfrom other equipment.
Current TV channel
Timer Information box
Displays the start time or date of the next scheduled timer recording and appears in the Index Picture
Screen.You cannot remove it from the Index Picture Screen.
It may appear briefly at the beginning of a timed One-Touch Recording. It does not appear during
recording or Disc playback.
In Monitor mode, the Timer Information box will appear for a few seconds, then disappear.
Timer recording due later today Timer recording set for another day
No signal- Channel is not
receivable or no equipment
is connected to the designatedjack.
within the upcomingyear
Copy-protected signal
The time at which the current Current time; no timer recordings
One-Touch Recording will end. are scheduled.
Page 28

28 Title/DiscMenus, Chapter/Track Selection
[OVO+RwllOVO+RI I OVO
Title/Disc menus
Press DISC MENU during Disc playback.
For a DVD, if the current Title has a menu, the Title menu will
appear on the screen. Otherwise, the Disc menu will appear.The
menu may list languageand subtitle options, Chapters, or other fea-
tures.
For a DVD+RW or DVD+R, the Index Picture Screen will appear.
Details are on page 35.
Press VA • I_ to select items in the menu or Index Picture
Screen, then press OK. Repeat this process until you set up all
the features you want or until playback begins.
[OVO+RWIEOVO+R11 OVO]EAUO'OCOIEV'OEOCOI
Chapter/Track Selection
Press NEXT I_1 during playback to go to the next
Track/Chapter. Press PREVIOUS I_1 once to return to the
beginning of the current Track/Chapter. Press PREVIOUS t_1
repeatedly to step back to previous Tracks/Chapters.
To go directly to any Track/Chapter during playback, press
2
the Number buttons to enter the Track/Chapter number.
If you enter an invalidnumber, an "X" may appear in the top left
corner of the TV screen.The current Track/Chapter will continue
to play. Or, an incorrectTrack/Chapter may begin to play. Make
sure the Track/Chapter number you enter is availableon the Disc.
Make sure the Chapter isavailablewithin the current Title. The
Menu Bar will disappear automatically in a few seconds.
®®G®
MENU
Page 29

Audio Language,Subtitles 29
Audio Language
Some DVDs are recorded in different languages. For example, you may be
able to watch the same movie in French, Spanish, etc. The movie may have
special audio features, such as a director's commentary or music sound-
track. If these are available on the DVD, access the different languages or
featured soundtracks by following these steps.
During DVD playback, press the AUDIO (l_ button.
(i/_Audio will be selected in the Menu Bar.
Within five seconds, press the AUDIO (l_ button repeatedlyto see the different languages available. Or, press • or •
repeatedly to see the different languages. The language you select
will be audible in a few seconds. The Menu Bar will disappear auto-
matically in a few seconds.
The languages or options may be abbreviated. For example, French
may be Fr. See your Disc case for details on available audio features
and explanations.
I 1 2 lane 1 n0 off
©©
V0L
PHILIPS
IDVD+ W]IDVD+ II DVD
Subtitles
Some DVDs include subtitles in different languages. Or, material you
recorded onto a DVD+RW or DVD+R might include subtitles. To choose
subtitles, follow these steps.
During playback, press the SUBTITLE _ button.
(_ (Subtitle) will be selected in the Menu Bar
Within five seconds, press the SUBTITLE [_ button
2
repeatedly to see the different subtitle languages. Or, press
A• to seethe different subtitlelanguages.Subtitles will appear
after a few seconds.The Menu Bar will disappearautomatically in a
few seconds.
You canchoose subtitles only if they are availableon the Disc.
_1_ I 1 2 le_ len¢ no off /
• If you record from a digital cam-
corder using the DV i-UNK jack
on the front of the Recorder, the
Recorder will store the recording
date and time as a subtitle.
Press the SUBTITLE_ button
to see the recording date and
time in the bottom right comer
of the TV screen during play-
back
Page 30

30 Zoom, Camera Angle
[°v°÷RwII 0v0+RI I 0v0 l lw0Eoc01
Zoom '-
Zooming lets you enlarge the video image during playback and pan through
the enlarged image.
Press ZOOM _ during Disc playback. _ Zoom will be select-
ed in the Menu Bar.
Within five seconds, press • or • to choose 1.33, 2
or 4. Playback will pause, and the still picture will appear at
1.33, 2, or 4 times the normal size.
4_ I 1 2 len 1 i_o
To move the enlarged picture around on the TV screen, or
3
"pan," press OK. Then, press • • • I_ to move the pic-
ture.
Press OK again to see the still, zoomed picture without the
Menu Bar.
4
To return to regular playback, press PLAY I_.
5
Press SYSTEM MENU to remove the Menu Bar again.
6
DVD
Camera Angle
Some DVDs include scenesrecorded from different angles.To watch seg-
ments from a different angle,follow these steps.
During DVD playback, press the ANGLE button. Angle will
be selected in the Menu Bar.
Within five seconds, press •• to select a different angle. In
2
a few seconds, playback changes to the selected angle.
• Or, if the Angle symbol appears in the top left corner of the TV
screen during playback, multiple angles are available. Simply press
A• to switch among the different angles.
©
_ITg T C ic_ @ 4_ e,;I
1 2 len 1 112,* off
Page 31

Sound,Still PicturelFrame-by-FramePlayback 31
Sound
Choose a sound setting based on the capabilities of the equipment to
which you connected the DVD Recorder. Details are on pages 9-14 and 57.
Press SYSTEM MENU.
Press • repeatedly to select i_.
Press AV to select st (stereo), sur (Dolby Surround), or 3d.
Select st (stereo) to hear stereo sound. This will work with any
type of equipment that has right and left audio jacks (usually red and
white).
Select sur (Dolby Surround) if your audio equipment is compati-
ble with Dolby Surround. If it is, usually a Dolby Pro Logic logo will
appear on the equipment.
® Select 3d if you want to enjoy surround sound but your equip-
ment isnot Dolby Pro Logic compatible.
Press SYSTEM MENU to remove the Menu Bar.
IDVD÷RW] I DVD÷RII DVDI[V,DEOCDI
Still Picture/Frame-by-frame Playback
To quickly pause playback, press PAUSEI ! on the remote control during
playback.To advancethe still picture one frame at a time, press PAUSEI I
repeatedly. To resume play, press PLAY •.
Or, to freeze the picture during Disc playback using the Menu Bar, follow
the steps below.
Press SYSTEM MENU during playback.
Press • repeatedly to select 4_1_.
Press • to freeze the picture, then press _1• to move the
picture backward or forward one frame at a time.
Do not leave a still picture on your TV more than five minutes. This
may etch the imageonto your screen permanently. Other still visual
elements, such asTV station Iogos or video games, alsowill damage
your TV screen if left too long.
st
[]
Press PLAY • to resume regular playback.
4
Press SYSTEM MENU to remove the Menu Bar.
5
The Recorder also refers to
Sound settingsas Analog output.
This means the sound the
Recorder sends to your audio
equipment (stereo or TV) is ana-
log, or two-channel,left and right.
You know you are usinganalog
sound because you used the red
and white, left and right,Audio
jacks in your connectJons.Details
are on page 57. Whether you
adjust the sound settings here or
as described on page 57, the
results will be the same.
Page 32

32 SlowMotion, Forwardand ReverseSearching
[DVD÷RWII DVD÷RI I DVDI IV'DEOCDI
Slow Motion
Start slow motion playbacksimply by pressingthe SLOW _ button during
playback.PressSLOW _ repeatedly to play the Disc at I/2, I/4, or I/8 the
regular speed. Press PLAY I_ to resume regular playback.
Or, to usethe Menu Bar for slow motion, follow the steps below.
During Disc playback, press SYSTEM MENU.
Press • repeatedly to select _ (Slow motion), then press
V. Playbackwill pause.
Press • • to select the required speed: -1, -I/2, -1/4 or -1/8
(backward), or 1/8, 1/4, 1/2 or I (forward). The Disc will start
to playat the speedyou selected, for example, one-half asfast as
normal (I/2).
Select I to play the Disc at normal speed again.Select 0 or press
PAUSE! ! on the remote control to pausethe picture.
st
©
CH
To return to normal playback, press PLAY I_.
Press SYSTEM MENU to remove the Menu Bar.
[DVD+RWI [ DVD÷RIE DVDI [V'DEOCDI[AUD'OCDI
Forward and Reverse Searching
To search a DVD, Video CD, DVD+R, or DVD+RW at four
times the normal speed, press FORWARD I_1_ or
REVERSE _ during playback. To search at 32 times the nor-
mal speed, pressFORWARD I_1_ or REVERSE_ again.The
sound will be mute.
On an Audio CD, to search the Disc at four times the nor-
mal speed, press FORWARD I_1_ or REVERSE _ during
playback. Sound will be muted partially. To search at eight times
the normal speed,press FORWARD I_1_ or REVERSE_ again.
The sound will be mute.
Eachpress of FORWARD I_1_ or REVERSE_ switches between
the slower and faster search speed.
Press PLAY I_ to resume playback or press STOP • to
stop playback.
Page 33

IDVD÷RW]I DVD÷RII DVDI [WDEOCDI
Time Search
Time Search lets you choose a specific elapsed playing time at which you
want to begin playback.This feature may not be availableon all Discs.
Press SYSTEM MENU during Disc playback.
Press • repeatedly to select _ .
Press V. Playbackwill pause.A time edit box will appear, showing
the elapsed playingtime of the current Chapter or Disc.
st
_time edit box
Status box _._
Press the Number buttons to enter the time at which you _ /_/
want playback to begin. Enter the hour, minutes, and seconds
from left to right in the box.
The time must be within the possible time of the current Chapter or
Disc. If it is not, playwill not beginafter you press OK at step 5.
Instead,a spacein the time edit box will blink. Or, playbackmay begin
at the wrong time. Refer to the Statusbox to seethe time available,
then enter a correct time.
Time Search,Scan 33
_LEC_
C
Press OK.. After a few seconds, playback will resume at the point
you selected.
Press SYSTEM MENU to remove the Menu Bar.
IDVD+RW] I DVD+RII DVDI[V,DEOCDIIAUDI°CDI
Scan
Scanningplaysthe first 10seconds of each Chapter/Track on the Disc.
Press SCAN during playback. Starting at the beginningof the
current Chapter/Track, the first 10 secondsof each Chapter/Track
will play.This will continue until the end of the Disc is reached or
you resume regular playback.
To continue regular playback from a Chapter/Track, pressSCAN again or press PLAY I_.
Page 34

34 Repeat, Repeat A-B
IDVD÷RWII DVD÷RI [ DVDI IV,DEOCDIIAUD_°CDI .......
Repeat
You may play a Chapter, Track, Title or entire Disc repeatedly. All Discs
may not allow all the repeat options. Check your Disc for details.
During Disc playback, press REPEAT repeatedly to choose
a Repeat option. Depending on the type of Disc, you may choose
to play the Chapter, Track, Title, or Disc repeatedly.
During DVD, Video CD, DVD+R, or DVD+RW playback, the
repeat symbols will appear briefly on the TV screen. Details are on
page 26.
On a DVD+RW or DVD+R, the entire Disc will play repeatedly
only if the Disc isfull of recordings.
To cancel repeat playback, repeatedly press REPEAT until
all the repeat symbols or messages disappear from the screen.
® _]
©
PHILIPS
[ DVD+RW ] I DVD+R ] [ DVD ] IVIDEOCDI IAUDIOCDI
Repeat A-B
You also may setthe DVD Recorder to play only a specific portion of a
Title, Chapter, or Track repeatedly. Follow these steps.
Press PLAY • to start Disc playback.
When the Disc reaches the point at which you want repeat-
ed playback to begin, press REPEAT A-B.
When the Disc reaches the point at which you want to endthe segment, press REPEAT A-B again. The segment will begin
playing repeatedly.
To resume regular playback, press REPEAT A-B again.
Regular playback will resume from the current point.
\
Page 35

Index Picture Screen 35
The Index Picture Screenshows your recordings on a DVD+RW or DVD+R. It appearsautomatically
when you insert a DVD+R or DVD+RW or when you stop playback or recording. A DVD+RW or
DVD+R must be in the Recorder and contain recordings.
An Index Picture represents each recording. Next to the Index Picture is the program name, length of
recording, recording mode/spee& and date of recording. If the recording hasno name,the recording
source and time will appear instead (for example,the recorded channeland the time at which you
started recording the channel).
Empty disc areas (erased Titles or blank spaceat the end of the Disc) also appearin the Index Picture
Screen."Empty tide" and the amount of remaining recording time appear besidethe empty Index
Picture box.
The Index Picture Screenwill dim after several minutes of no use.This prevents damageto your TV
screen.To brighten the Index Picture Screen again,use the DVD Recorder or its remote control to
accessthe regular features of the Index Picture Screen.
Titles
A maximum of three Index Picturesappearson the screenat once. PressAV to move to additional
recordings, if available.
PressSTOP • briefly to move directly to the first recording on the Disc. Pressand hold NEXT I_1 for
a couple of secondsto move quicklyto the last recording on the Disc or to the last EmptyTitle.
Disc Bar
The Disc Bar appears at the right of the Index Picture Screen.This overviews all recordings on the
Disc, aswell asany empty spaces.
On the Disc Bar, the Disc Pointer indicatesyour current position on the Disc. Moving through the
recordings by pressing&If moves the Disc Pointer. On a DVD+RW, resume playbackor recording
from this point by pressing OK for playback or REC/OTR for recording. Later recordings will be over-
written. On a DVD+R, resume playbackfrom the Disc Pointer locationby pressing OK. However, on
a DVD+R, recording automatically beginsat the lastempty tide spacewhen you press REC/OTR.
Title Settings Menu
When you select an Index Picture, press I_ to go to the Title Settings menu for that recording. Here,
you canedit the current Title name, play the entire Title, or erase the selected Tide.
Detailsare on page44.
Title description
Includes program name (or channel/source and
time at which it was recorded), length of
recording, the speed in which it was recorded,
and the date of recording (if clock was set).
Cue
Go to ET_n Screenor to Title on
prev_afion Screendetails
are on page4;[ I
Inde T _ ]Picture
recording. An empty box rep-
resentsan area on the Disc
that is empty andavailablefor
An imagerepresentinga 1
recording. Topersonalizethe
C1007:56AM
oo:ol:24 •SP
Wed10/02/200_
IndexPicture,seepage48.
Timer Information Box
Displaysthe current time or
the time/date of the next
scheduled timer recording.
Details are on page 27.
d 10_4
I_- 00:00:22.sP
C0611:20AM
Sun07/28/2002
Current Title
Disc Pointer
Shows the current Title
number and its position
within the Disc.
Disc Bar
Tuner Information Box
Displaysthe currently
selectedTV channelor
video source (if additional
equipment isconnected to
the DVD Recorder).
Detailsareonpage27.
C1012:01AM
00:58:53 sP
Sun01/06/2002
I_ _ Cue
GO tO next screen.
Page 36

36 Installation:AutomaticChannelProgramming
Although the DVD Recorder selects available TV channels during InitiaJ
Setup, you may want to repeat the process later if more channelsbecome
availablein your area. This will erase and replace all previously stored
channels.To update the available channels,follow these steps.
Press SYSTEM MENU. T_, may be selected. If it is not, press •
to select it.
Press • repeatedly to select o/°, then press I_ to enter the
Installation menu.
Installali0n
• Add!D_l_te0hannels
VGRPlus+Ch
Timl/Dat_
_abll!Ant_n_a
T_l×it pless
SYSTEMMENU
•1
Press A• to select Auto Ch. Programming, then press OK.
3
"Searchingfor TV channels"wilJ appear, along with a scaJeshowing
channelsthat are being memorized. The number of channelsfound
will show on the screen as the searching progresses.This will take a
few minutes, depending on the number of channelsavailable.
When the channelsearch finishes, "Auto ch.search complete"will
4
appear,along with the total number of channelsfound.
Press SYSTEM MENU. The Installation menu will reappear.
If you are satisfied with the channels found, press SYSTEM
MENU again to remove the menu. You are finished.
To add or delete additional channels, press &• to select
Add/Delete Channels, then go to step 5.
Inst3113ti0n
• A_t0C_Pi0g_mming
• I_ Agd/Delete0hannels I_|
• VCRPlus+01_
Time/Date
0able/Antenn3
Toe×itpress
SYSTEMMENU
Press I_. A channel list will appear.Beside each channelnumber,you will see"Delete" or "Add."
Installa[io_
Aed/Oele_eChannels
I• Chane 001 • Delete •1
• Chan_e002 Add
Chan_e003 Add
Chan_e004 Add
Chan_e005 Add
Chane 006 Add
Toexitpf6ss
SYSTEMME[_U
Press A• to select the channel number you want to add or
delete, then press • I1_to choose Add or Delete for that
channel. Press OK to store your choice. Repeat step 6 as often
as necessary to add or delete all the channels you want.
Press SYSTEM MENU repeatedly to remove all the menus
when you are finished.
Added channels will be accessi-
ble in Monitor mode when you
press CH +/-. Deleted channels
will be skipped when you press
CH +/-. Delete channels you
rarely watch; this will quicken
channel changing when you
use CH +/-. You still can select
deleted channels with the
Number buttons.
If new channels become avail-
able, or if you receive a chan-
nel the Recorder did not add
during setup, add the channel
The Recorder detects whether
you connected an Antenna or
Cable TV signal If you connect-
ed a Cable TV signal but are
receiving limited channels,
reset your channels. Follow
steps I-2 above. Then, press
or _" tO choose
Cable/Antenna, then press OK.
Press I_ or _1 to choose Cable
or Anten. (antenna) (based on
your connection) or Auto (if
you want the Recorder to keep
detecting the signal). Press OK,
then press SYSTEM MENU.
Press OK again to have the
Recorder reset the channels.
When the channel search
ends, press SYSTEM MENU
repeatedly to clear the screen.
Page 37

Installation:VCRPlus+Ch. 37
If you intendto usethe VCR Plus+ programming system, program the
DVD Recorder with your local channelinformation. This will only take a
few minutes. Sincethe channel numbers of the stations you receive may
not be the sameas the station numbers, and since channel numbers differ
from area to area,you must set up channels in order for the systemto
work efficiently.
Before you begin, make sure you have I) a cableTV channellist, if applica-
ble (you can request one from your cable TV company), and 2) achart that
lists VCR Plus+channel numbers, which you can find in your TV guide or
the TV listings of your local newspaper.
r_vq_sE pou • _
®®G®
s_oP PL_
Press SYSTEM MENU. I '_ may be selected. If it is not, press •
to select it.
£
Installationmenu.
Press • repeatedly to select ,_ , then press • to enter the
Press A• to select VCR Plus+ Ch. (channel), then press •.
3
Installali0n
Aut00h Pr0_ramml_g
• Add/0elete0hannels
• Timl!Bate
0_bll_ntenaa
T0lxit pless
SYSTEMMENU
Press A• to select a VCR Plus+ Ch. number, then press
4
the Number buttons or • • to enter the corresponding
Channel number from your TV guide list. If you usethe
Number buttons, enter the channelnumber asathree-digit number.
For example, for channel 18,press 0,1,8.
Refer to the list from your localnewspaper or TV guide for the
VCR Plus+ channels and corresponding TV channel numbers for
your area.These are the numbers you will enter as the Channel
number asyou complete the chart on the screen.
MENU
Insl_llaSon
VORPlus+gh
VORPlus+Oh Channel
F_ 001 _018 •]
• 002 ....
003 ....
004 ....
005 ....
• Tostore
Press OK to store the Channel number. Repeat steps 4-5 as
often as necessary to complete the chart.
PressOK
When you are finished, press SYSTEM MENU repeatedly to
remove all the menus.
PHILIPS
Page 38

38 Installation:ClockSetting
Time/Date Automatic
The Recorder canset the time and date automaticallyby referring to your
localPBSstation. If the Recorder choosesanincorrectPBSchannelor sets
the time/date incorrectly,you can set the informationmanually.Detailsare on
page39.
Beforeyou begin,makesure TV channelsare set. Detailsareonpage36.
Press SYSTEM MENU. T,[, may be selected. If it is not, press • to
select it.
{a
Installation menu.
Press • repeatedly to select r_, then press • to enter the
Press • repeatedly to select Time/Date, then press •.
3
Press &• to choose Automatic, then press •.
4
With PBS Channel selected, press • •to choose the channel
5
number of your PBS station, then press OK. The menu will
pause while the setting isstored.
If you do not know your PBS channelnumber, choose Auto. The
Recorder will choose the correct PBS station for you and set the time.
If you want to set the clock manually, choose Off. The Recorder will
not update the time automatically according to a PBSstation.
limedate
A_tomai
l_* pB_Channel
• bayl ON_vin9
lim_ Zon8
Press • to choose Daylight Saving. Press • • to choose On,Off, or Auto, then press OK. The menu will pause while the setting
isstored. Choose Auto if you want the clock set according to the PBS
station's Daylight SavingsTime schedule.
Tim_dal_
"_ Autematic
_'B_C_nr_F
Daylighl_avin_
lim_Zo6e
_1610 _1
Off
A_to
Tostore
_re_OK
restore
Pre_OK
o_o
ofr
Aut6
Press • to choose Time Zone. Press • • repeatedly to
7
choose your time zone, then press OK.
If you want the Recorder to usethe time zone from which your PBS
station broadcasts,choose Auto. If your PBSstation broadcastsfrom a
different time zone than the one in which you live, be sure to select
your time zone. The menu will pausewhile the setting is stored.
Time_at_
Autematic
_0
• Dayligh _avino
ofr
[6st#re
Pre_OK
Press SYSTEM MENU repeatedly to remove the menus, then
press ON/OFF O to turn offthe Recorder. After a few minutes,
the correct time willappearon the Recorder's display.
If the Recorder cannot find the time through a PBSchannel,you may
seean error messagewhen you turn on the Recorder. Check the PBS
channeland try again.Or, set the clock manually;detailsare onpage39.
PHILIPS
The Recorder may set the clock
automatically after you com-
plete Initial Setup. If the correct
time appears on the display,
you do not need to set the
clock as described on this page.
The factory default setting of
Daylight Saving is On.
The Recorder can use the PBS
channel to set the dock only if
the PBSchannel is one of the
memorized channels. To set up
or memorize channels, see
page 36.
Page 39

Installation:ClockSetting(cont'd) 39
Time/Date Manual
Ifthe Recorder does not set the time and date correctly using the
Time/Date Automatic feature, set the clock manually by following the steps
below. Manualclock setting overrides Automatic clock setting.
Press SYSTEM MENU. T_ may be selected. If it isnot, press •
to select it.
Press • repeatedly to select r_, then press • to enter the
Installation menu.
Press •repeatedly to select Time/Date, then press •.
Press • to choose Manual, then press •. When you choose
Manual clock setting, PBS Channel changes to Off automatically.
Details are on page 38.
Tin,_Jdat_
"_ Manual
vllvl_us Ilc;0YI
®®G®
• AM!PM
¥e£r
Month
Date
[7_ligbtS_ing
Time will be highlighted. Press • • to choose the correct timein hours and minutes, then press OK. Or, press the Number
buttons to quickly enter the time in hours and minutes, then press
OK. The menu will pause while the setting is stored.
Press • to choose AM/PM, then press • • to choose AM
6
or PM. Press OK. The menu will pause while the setting is stored.
Press • to choose Year, then press • • to choose the cur-
7
rent year. Press OK. The menu will pause while the setting is
stored.
Press • to choose Month, then press • • to choose the
current month. Press OK. The menu will pause while the setting
is stored.
Press • to choose Date, then press • • to choose the cur-rent date. Press OK. The menu will pause while the setting is
stored.
04:24 I_]
?M
2002
02
14
Auto
Ti ixi_prlss
SYSTEMMENU
Press • to choose Daylight Saving, then press • • to
choose On, Off, or Auto. Press OK. The menu will pause
while the setting is stored.
Press SYSTEM MENU repeatedly to remove all menus.
In order for the clockto
remain set as you specified
manually, you may need to
set Daylight Savingto O_
If youset up channelsagain
as describedon page 36, you
may need to reset your clock.
If you change any item manu-
ally (Time, AM/PM, Year,
Month, Date, Daylight
Saving),PBSChannelwill
change to Off automatically.
Details are on page 38.
Page 40

40 One-T0uch Recording
• • • • • • • • • • • • • • • • • • • • • • • • • • • • • • • • • • • • • • • • • • • • • • • • • • • • • • • • • • • • • • • • • • • • • • • • • • • • • • • • • • • • • • • • • • • • • • • • • • • • • • • • • • • • • • • • • • • • • • • • • • • • • • • • • m.
[DVD+RWI DVD+R
Insert a recordable DVD+RW or DVD+R into the
Recorder.
In the Index Picture Screen ofa DVD+RW, press AV to
2
select an Empty Title (or empty Index Picture box) on the Disc
that has enough time for the recording. Or, select the place at
which you want to start the new recording in order to overwrite
other recordings. Details are on page 35.
You may skip this step if you use Safe Record. See step 5.
Or, if you are using a DVD+R, you may skip this step. Recordings
on a DVD+R are made at the end of the Disc automatically.
Previous recordings are not overwritten.
Press MONITOR to see TV channels through the DVD Recorder.
Make sure you have programmed channels. Details are on page 36.
Press CH+, CH-, or the Number buttons to select the chan-
nel you wish to record.
If you are usinga Cable Box/Satellite Receiver that hasa single RF
Out/TV Out/Antenna Out/75 ohm jack, set the DVD Recorder to
channel3 or 4 in Monitor mode. (Choose the output channel of
your Cable Box/Satellite Receiver.)
If your Cable Box/SatelliteReceiverhasAudio/Video Out jacks,set the
Recorder to an EXT channel.Choose the EXT channelthat corre-
spondsto the jacksyou usedonthe rear of the DVD Recorder (the
jacksto which you connectedthe CableBox/SatelliteReceiver).
Then, changeTV channelsat the Cable Box/Satellite Receiver.
You cannot change channelsduring recording. You can only record
the channelyou are watching. You cannot record one channelwhile
watching a different TV channel.
Press REC/OTR twice to start a 30-minute recording. Press
5
REC/OTR repeatedly to record longer timed recordings, up
to four hours long in thirty-minute increments.The length of
recording availabledepends on the current recording mode/speed
and the amount of time availableon the Disc. Recordingmode/speed
detailsare on page46. Recording will begin about 30 seconds after
you press REC/OTR. (The Disc takes this time to prepare for
recording.)
Or, use Safe Record to havethe DVD Recorder automatically
find the empty spaceat the end of a DVD+RW; this prevents over-
writing other recordings. To do so, pressand hold REC/OTR for
about two seconds,or until SAFERECORD appearson the
Recorder's displaypanel. Then, press REC/OTR repeatedly to
choose the time length you want for your recording.
If you press REC/OTR only once, or press and hold REC/OTR one
time and immediatelystart SafeRecord, the Recorder will record
the current channel or source until the end of the Disc is reached.
The Recorder will turn off automatically.
Press STOP • if you need to stop the recording before thedesignated end time. Otherwise, the Recorder will automatically
stop recording at the designated end time and turn itself off.
÷ If you plan to play a DVD+R on another DVD Player, finalize the Disc.
Follow the steps on page 47, choosing "Finalize Disc"at step 4.
÷ To edit your recordings, see page 48. However, editing changes may not be
accessible when you play the Disc on other DVD Players.
÷ To erase a recording, see "Erase this title" details on page 44.
"DISC LOCKED" will appear on
the TV screen if a protected
DVD+RW or DVD+R is in the
Recorder.
If the power fails during record-
ing, the Index Picture Screen
may not match the actual video
content on the Disc. The last
recorded Title may be lost. A
power failure or unit failure/sys-
tem crash also may destroy all
the material recorded on a Disc.
If no free space remains on the
Disc, END OF DISC will appear.
Recording is not possible.
Press SYSTEM MENU during
recording to occess or remove
the Status box, Tuner
Information box, and/or Timer
Information box. Details are on
pages 26-27.
The recommended operating
temperature range for the
Recorder is from 32°F-122°F
(Fahrenheit) for DVD+RW
recording and 32°F-104°F for
DVD+R recording. Exceeding
these ranges may cause unsta-
ble recording results.
Page 41

DVD+RW ] DVD+R
Press TIMER on the remote control.
Press &V to select Timer Programming, then press •.
Date willbe selected.Press &V to enter the month and date you want
3
the recording to start.
Press SELECT repeatedly to choose: the date (timer recording will
occur once on the dayyou choose);Mo-Fr (timer recordingwill occur every
weekdayat the sametime); or a day of the week (for example,Mo for
Monday;timer recordingwill occur every Mondayat the sametime). Press•.
Timer
Timer_roglammi_g
Date Cfi S_rt _d Mode
122 0900AM 093OAM _
Rec
rimer P/ograrrwing
Date Cff S#z_ Ead r_ode
_122 o_ogAr_ @:30AM EP
Time_
TimeiPro#lararain9
Bee
D_le Ch Starl End M0_t
] 122 090_AM o_%Ar_ EP
£ec
TimerRecording41
t_o Fr/t/eek_y To store
PressSELEC[ Pe_ OK
PressSELECTonce PressSELECTagsln PressSELEOTagaln
Recordingwillh_p£ano_6 Recordingwillh_p_nevePjday Recordi5g'_illhappenon[qesame
timeo_thedayyouchose Mo_day-Fridaysta_ingonthe dayeve_'#_eLstartin_thedayyouchose
Ch. (channel) will be selected. Press _,_' to enter the channel you want
4
to record, then press •. If you are using a Cable Box/Satellite Receiver,
enter channel 3 or 4 (the output channel of your Cable Box/Satellite
Receiver) or the D(T channel (that corresponds to the jacks to which you
connected the Cable Box/Satellite Receiver). Set the channel you want to
record at the Cable Box/Satellite Receiver. Leave it on for the recording.
Start will be selected. Press &¥ to enter the time at which you want
S
recording to begin - in hours and minutes. Press SELECT repeatedly
to choose AM or PM. When the start time is correct, press •.
_lo.Ff'We_ly I0 st0_B
PrtssSELEC_ _ressO_
gayyouchose
tec_FrWeekly Tostole
Pe_SELECr PressOK
Endwill be selected.Press AV to enter the time at which you want
6
recording to stop - in hours and minutes. Press SELECT repeatedly
to chooseAM or PM. When the End time is correct, press•.
Rec Mode (Record Mode) will be selected. Press &V to choose the speed
7
at which you want recording to occur: HQ, SP, LP, or EP.
HQ allows a maximum of one hour of recording per Disc; SP,two hours; LP,
three hours; and EP, four hours. The slower the speed, the more recording
time per Disc. EP is the slowest speed. The faster the speed, the better the
picture quality. HQ is the fastest speed. Details are on page 46.
Check your timer information. If something is incorrect, press • • to choose
the incorrect information. Use AV to enter the correct data.
When the information is correct, press OK. Stored will appearat thebottom of the screen,then the Timer menu will reappear.
Press TIMER to remove the menu.
Put a recordable DVD+RW or DVD+R in the Recorder. Press
ON/OFF © to turn off the Recorder a few minutes before the
timer recording is set to begin. The Recorder must be off in order for
the timer recording to begin. For the timer recording, the DVD Recorder
will turn itself on, record, then turn itselfoff when finished.
If you plan to play a DVD+R on another DVD Player, finalize the Disc. Follow
the steps on page 47, choosing "Finalize Disc" at step 4.
Toedit your recordings, see page 48. However, editing changes may not be
accessiblewhen you play the Disc on other DVD Players.
Enter the Date, Channel, Start,
and End information with the
Number buttons. Enter channel
numbers as a three-digit number.
For example, for channel 15,
press 0,1,5.
PressON/OFF _ on the remote
to turn off the Recorder and stop
a timer recording that is in
progress.
Use HQ when recording from
di[r_al sources,such asa digital
camcorder.
If you can not select Timer
Programming at step 2, there are
already six Timer recordings set.
Delete another Timer recording
before you try to set a new one.
Details are on page 43.
Finishsetting a Timer recording
and turn off the DVD Recorder
at least five minutes before the
recording will start.
Set the timer recording one
minute ahead of the program
start time. This helps ensure the
entire program is recorded. The
Disc needs about 30 seconds to
prepare for recording.
More Timer recording details are
on page 43.
You cannot change channels dur-
ing recording or watch one chan-
nel while recording another.
Page 42

42 VCRPlus+®Timer Recording
A PlusCode_ number isa number of up to eight digits, printed in most TV
guides next to the start time of a TV program. You can program a timer
recording quickly by simply entering the code for your program.
Before you begin, complete the VCR Plus+_'channel setup. Detailsare on
page37.
Press TIMER on the remote control.
Press &_' to select VCR Plus+ programming, then press I_.
Timer
• TimerPioglammin_
TimerList
TOexit
PIessTIMER
Press the Number buttons to enter the PlusCode number
3
from your TV guide, then press OK. If you make a mistake,
press CLEAR to erasethe PlusCode number, then enter it again.
Information about the timer will appear. If information is missing or
not available,you may be asked to enter more information. Follow
the instructions given on the screen. You maybe asked to enter a
channelnumber if you havenot set up the VCR Plus+ channelsas
described on page 37.
Tir_er
VC_Plus+programming
?lusCodenumbel
®®G®
®
Mo-FfA_eekll_ Tostore
PTessSELECT PIessOK
If the timer recording information seems correct and com-plete, press OK. Stored will appear at the bottom of the screen
briefly.
Timer
VCRPlus+programmi_
Oat_ Cb Sta_ End r_ode
10/24 _22 09:00AM_SP
Ar_PM Tostole
PressSELECT PressOK
Press TIMER to remove the menu.
Put a recordable DVD+RW or DVD+R in the Recorder.
Press ON/OFF 0 to turn offthe Recorder at least five min-
utes before the timer recording is set to begin. The Recorder
must be off in order for the timer recording to occur.
If you plan to play a DVD+R on another DVD Player,finalize the Disc.
Follow the steps on page 47, choosing "Finalize Disc" at step 4.
To edit your recordings, seepage 48. However, editing changes may not be
accessiblewhenyou play the Disc on other DVD Players.
Rec
PHILIPS
Page 43

• • • • • • • • • • • • • • • • • • • • • • • • • • • • • • • • • • • • • • • • • • • • • • • • • • • • • • • • • • • • • • • • • • • • • • • • • • • • • • • • • • • • • • • • • • • • • • • • • • • • • • • • • • • • • • • • • • • • • • • • • • • • • • • • • m.
IoVO RWI OVO R
ErasingTimer Recordings,ErrorMessages43
Erasing Timer Recordings MONT__--_ _F
Press TIMER.
Press&¥ to choose Timer list, then pressl_. _ _ _
Press AV to highlight the timer recording you want toclear, f M_U
Press CLEAR. The recording you selected will appear alone on
the screen.
Press OK to erase the timer recording. "Timer Cleared" will
appear at the bottom of the screen briefly, then the Timer List will
reappear. (if you decide not to erasethe timer recording, press the
TIMER button. The Timer List will reappear.)
Press TIMER repeatedly to remove the menus.
6
Error Messages
The following messagesmay appear while you set a timer recording.
Collision
The timer recording overlapswith another timer recording. Timer record-
ingsthat overlap or conflictwith another will appear in a red highlight in
the Timer List.
To ignore the message,press TIMER again.The program with the earli-
er start time will record completely, then the remainder of the later
program will record.
Changeone or both timer recordings. Detailsare on page 4 h
Delete one of the timer recordings as described above.
Please enter channel number
The VCR Plus+programming system does not recognize the TV channel.
Press4 I_ to select the required VCR Plus+ channel number, then
press OK. Detailsareonpage37.
PlusCode wrong
You entered an incorrect PlusCode number.
Enter the correct information or press TIMER repeatedly to quit.
Weekend programming not possible
You entered an incorrectdate or chosea daily (Mo-Fr) recording. You can
only use daily programming for recordings that will occur Monday,
Tuesday, Wednesday, Thursday, or Friday.
®
PHILIPS
Clock not set
You can not accessthe Timer menu if the clock is not set. Seepages 38-39
to set the clock.
Data error
Make sure all information for the timer recording is correct and complete.
Insert recordable disc
There is not a DVD+R or DVD+RW in the Recorder. Put a recordable
DVD+R or DVD+RW in the disc tray before turning off the Recorder for
the timer recording.
• You cannot duplicate copyright-
ed DVDs, videotapes, or TV
broadcasts using the DVD
Recorder. "COPY PROTECT" will
appear on the display if you try
to dub or record copyrighted
material onto a DVD+R or
DVD+RW using the Recorder.
Page 44

44 Title SettingsMenu
[DVD+RWI DVD+R
The Title Settings Menu lets you rename a Title or recording on a
DVD+RW/DVD+R. From the same menu, you can play the entire selected
Title or erase the chosen Title from the Disc.
When playback is stopped and a DVD+RW or DVD+R is in the
DVD Recorder, the Index Picture Screen will appear automatically.
Details are on page 35.
0013124 Sp
CI007:56AM
_V_d10,02/2002
CI012:01AM
00:5853 SP
Sail 01,06/2002
F_ q
Press AV to select the Index Picture of the recording you
2
want to name, play, or erase, then press I_. The Title settings
menu will appear.
Press A_!' to select Name, Play full title, or Erase this title,
3
then continue as directed for each option in step 4.
÷ Name
Press I_. The first character of the Title namewill be selected.
4
Press A_!' to change the character.
PressSELECTto switch between upper andlower caseletters.
PressCLEAR to erase a character. To move to the next or previous
character, press •1_.
Repeat this process until you havefinished namingthe Title.
When the Title is complete, press OK. Storing name will
appear while the name is stored.
÷ Play full title
Press OK. The Disc will begin to play from the beginning of the
Title you selected.
÷ Erase this title
Press OK. The DVD Recorder will ask you to confirm that you
really want to erase the entire Title. Press OK again to start
erasing the Title. "Erasing title" will appear during erasure. When
erasing is complete, the Index Picture Screen will reappear.
(If you do not want to erase the Title, press • to return to the
Title Settings menu instead.)
Se_ingsfor[i_exxxxx
PHILIPS
£1a_fulltitl_ •
E_as__histi_le
Press • to return to the Index Picture Screen if necessary.
5
• If you erase a Title from a
DVD+R, you can not reuse the
space for other recordings.
"Deleted title" will appear
beside an empty Index Picture
box. Recordings are made at
the end of a DVD+R
automatically.
Page 45

Manual RecordingVolume,Append Recording 45
DVD+RW ] DVD+R
Manual Recording Volume
You can adjust manuallythe volume level during recording.
During recording of a TV broadcast, press AUTO/MAN
REC VOLUME on the front of the DVD Recorder. The display
will show the current audio level. MANUAL appears on the display.
Press REC VOLUME AV on the front of the DVD Recorderto adjust the volume level.
To return to automatic audio level control, pressAUTO/MAN REC VOLUME again. MANUAL will disappear
from the display.
DVD+RW ]
Append recording
To add a new video recording to an earlier recorded Title, follow these
steps. This feature is not available on DVD+Rs, which always record at the
end of the Disc.
In the Index Picture Screen, press AV to select the Title to
which you want to add a recording.
Press PLAY I_.
2
When you reach the point at which you want to start the
3
new recording, press PAUSE I I.
Press MONITOR, then press CH+/- to select the channel
4
(or other equipment) you want to record.
Press REC/OTR. The new recording will start at the point you
5
selected and overwrite the video material beyond this point, includ-
ing later Titles.
Press STOP • to stop recording.
• You can not adjust the volume
manually when recording from
equipment that is connected to
the DV i-Linkjack on the front
of the Recorder. This feature is
only effective when recording in
Monitor mode.
Page 46

46 RecordSettings,ChapterMarkers
[OVO+RWI OVO+R
Record Settings
Press SYSTEM MENU. ]'_ may be selected. If it is not, press •
to select it.
Press • repeatedly to select _, then press •.
2
Press AV to select Record mode, Auto chapters, or LP/EP
3
rec mode, then proceed as described in step 4.
÷ Record mode
4
Press • • to choose SP, LP, EP, or HQ, then press OK.
"Stored" will appear briefly. Now, recordings will be made inthe
speed,or mode, you selected.
The recording mode defines the picture quality of recordings and
the maximum recording time for a Disc. You can playa Disc only in
the mode in which it was recorded. Seethe chart below for details.
®Auto chapters
Press • • to choose On or Off, then press OK. "Stored" will
appear briefly. If Auto chapters isOn, the Recorder will inserta
Chapter marker automatically every five to six minutes during
recording. To disablethis feature, select Off.
You can manuallyinsertChapter markers after recording. Detailsare
on page48. You also may insert Chapter markers manually during
recording. See Chapter Markers below.
÷ LP/EP rec mode (recording mode)
Press • • to choose Stndrd (Standard) or Sport, then press
OK. "Stored" will appear briefly. Adjust this setting only if you
chose LP or EP at Record mode as described above. (The setting
has no effect when recording in HQ or SP.) When recording in LP
or EP speed, select Sport to improve recording of images that move
quickly. Otherwise, choose Smdrd.
Press SYSTEM MENU repeatedly to remove the menus.
5
Mode Picture quality Recording time
per Disc
HQ (HighQuality) Highest quality;least One (I) hour
recording time per Disc
SP(StandardPlay) Equalsquality of Two (2) hours
a pre-recorded DVD
LP (Long Play) Equalsquality of Three (3) hours
an S-VHStape
EP(Extended Play) ExceedsVHStape Four (4) hours
quality; most recording
time per Disc
DVD+RW ] DVD+R
Chapter Markers
Chapter Markers let you move easily through recordings by pressing
NEXT I_1or PREVIOUS_1 to selectthe next marker during playback. This
allows you to accessspecificpoints on a DVD+RW/DVD+R much asyou
would choose a specific Chapter for playbackon a DVD.
Press FSS during recording to insert a Chapter marker at
the current position. "Inserting chapter marker" will appear.The
maximum number of markers varies per Disc. When the maximum
number is reached, "Too many chapters" will appear. Delete some
Chapter markers before insertingmore. Detailsareonpage48.
• Use HQ when recording from
digital sources, such as a digital
camcorder.
• You may choose a record mode
simply by pressing the SELECT
button while in Monitor mode or
when viewing the Index Picture
Screen. The record mode will
appear at the bottom of the TV
screen.
• You can not change record
modes daring recording.
• If you set Record mode to a low-
quality speed (such as EP in
order to fit more recording on a
Disc), set Record mode to a
high-qaal_ speed (such as SP)
after you finish recording.
Leaving the Recorder set to a
low-quality speed may affect the
picture qual_ when playing
DVDs later.
Page 47

Editing:DiscInformationScreen 47
You can changeDisc settings for a DVD+RW/DVD+R from the Disc
Information Screen.
When in the Index Picture Screen, press STOP • to select
the first Title on the DVD+RW/DVD+R.
Press • to enter the Disc Information Screen.
In the Disc Information Screen, press • to enter theSettings menu.
• Disc name
prot_ctlol}
Erasedisc
Settings fe/×X×XXX
Mak_ _clit_ compatible
DVD+RW example
Press •_' to select Disc name, Protection, Erase disc(DVD+RW only), Make edits compatible (DVD+RW only),
or Finalize disc (DVD+R only). Proceed as follows, depend-
ing on which feature you want to adjust.
e Disc name (DVD+RW and DVD+R)
Press •. Press 41• to choose the character position, then
press •V to enter a character. PressSELECTto alternate
between capital andlower casecharacters.PressCLEAR to erase a
character (the spacewill remain). Repeatthis process until you
enter the complete name. To return to the Settings menu,
press 4, repeatedly if necessary."Storing name" will appear briefly.
¢ Protection (DVD+RW and DVD+R)
Press •. Press •V to select Protected or Unprotected,
then press OK. Ifyou protect the Disc, you cannot makeanyfur-
ther changesto the Disc, including recording. "Disc locked" will
appear on the TV screen briefly if you attempt recording. Choosing
Protected also disablesmost editing features.
To edit or record again,select Unprotected.
Remember, Protecting a DVD+R is not the same as finalizing it.
Finalization can not be undone.
e Erase disc (DVD+RW only)
Press OK. "This will erase all titles Press OK to confirm" will
appear. Press OK again to begin erasing. (If you decide not to
erase the Disc, press _1.) "Erasing disc" appears until erasing is com-
plete. When the Disc is erased, the Index Picture Screen will reap-
pear, showing the free space on the Disc.
e Make edits compatible (DVD+RW only)
Press OK. "This will take XX" and "Press OK to confirm" will
appear to indicate how long the action will take.
Press OK again. "Working .." and a progress percentage bar will
appear until the action is complete. The Index Picture Screenwill
reappear when the process is complete.
¢ Finalize Disc (DVD+R only, if not finalized already)
Press OK. "Finalizing disc" will appear until finalization is complete.
This may take a few minutes. Then, the Index Picture Screen will
reappear. You can not unfinalize a DVD+R, and you cannot
record or edit the DVD+R after you finalize it.
A DVD+R will play on other DVD Players only after the Disc is
finalized.
If necessary, press _1when you are finished and want to
return to the Disc Information Screen.
5
• For information on the Index
Picture Screen, see page 35.
• Make edits compatible appears
when the current DVD+RW is
not compatible with other DVD
Players because you have added
Chapter Markers or made
Chapters invisible. Details are
on page 48.
• Ifa DVD+R was recorded on a
different DVD Recorder, the
settings may not be accessible.
• A disc name may contain a
maximum of 64 characters.
Page 48

48 Editing
DVD÷RIIDVD÷RWI
Although all editing changes may not be accessible when you play the Disc on
other DVD Players, these editing changes are available for the DVD Recorder.
On the Index Picture Screen, press AV to select the Title
you want to edit, then press PLAY • to begin playback.
During DVD+RW or DVD+R playback, press FSS. TheFavorite SceneSelection menu will overlay the currently playing
video image.The current Title and Chapter numbers will appear at
the top of the screen.
Press &V to select Insert chapter marker, Current chap-
ter, Delete chapter marker, Delete all markers, New index
Picture, or Divide title (DVD+RW only), then proceed as
described in step 4.
÷ If you select Insert chapter marker, press OK. "Inserting
chapter marker" will appear briefly. This placesa Chapter marker at
the point you select. Then, you canmove quickly to that point dur-
ing playbackby pressing NEXT I_1 or PREVIOUS141to select the
next Chapter.
÷ If you select Current chapter, press • (or SELECT)repeat-
edly to select Visible or Hidden, then press OK. Initiallyall
Chapters are visible during playback. By hiding chapters or making
them visible, you determine which chapters you want to view. For
example, if you do not want to watch certain scenes(for example,
commercials), insert Chapter markers at the beginning and end of
the scene, then hide that segment by choosing Hidden. Then, watch
your recording without the hidden chapters. The picture may freeze
briefly between scenesduring playback,but you will not see the hid-
den content.
÷ If you select Delete chapter marker, press OK. This deletes
the Chapter marker at the beginningof the current Chapter. (This
option is not always available.)
÷ If you select Delete all markers, press OK. "This will delete
all markers in this title. PressOK to confirm" will appear. Press
OK again. (If you decide not to delete all markers, press _1.)
(This option is not always available.)
÷ If you select New Index Picture, press PAUSE II or
SLOW [_ to accurately choose a frame of picture during
playback. This frame will become the miniature picture that will
appear in the Index Picture Screenfor the current Title.
When you reach the desired picture frame, press OK. "This
will update the index picture Press OK to confirm" will appear.
Press OK again. (If you decide not to select a new Index Picture,
press _1.)"Updating menu" will appear,then the Index Picture
Screenwill reappearwhen the action is complete.
@If you select Divide title (DVD+RW only), press PAUSE II
to accurately choose the point at which you want to start
the new Title. Press OK,. "This will divide this title into two sep-
arate titles. PressOK to confirm"will appear. Press OK again. (If
you decide not to divide the Title, press _1.) "Dividing title" appears
until the actioniscomplete;the Index Picture Screenwill reappear.
Press FSS to remove the Favorite Scene Selection menu if
necessary.
• The maximum number of
Chapters per Trtle varies. When
you reach the maximum num-
ber, "Too many chapters" will
appear on the screen. Delete
Chapters before making more.
• The Favorite SceneSelec_on
menu may disappear after about
five minutes if you do not edit
any information.
• Youcannot undo a Title division.
A new index picture will appear
where you divided the Title. The
Index Picture Screen will show
two Titles insteadof one, but
both will have the same name.
You can change the name in
Title Settings.Details are on
page 44.
• Editing changes on DVD+Rs will
be accessibleonly when playing
the DVD+R on this DVD
Recorder. Youcan not edit a
DVD+R after it is finalized.
• Youcan insert chapter markers
during recording bypressing the
FSSbutton at the point you want
to mark.
Page 49

I ovo lIv'°E°c°l
Access Control limits viewing of Discs that exceed the limits you set. This
feature will not limit viewing if the Disc manufacturer did not code the Disc.
Philipscannot guaranteethe availabilityof AccessControl with all Discs,and
therefore deniesanyliability associatedwith unintended watching of Discs.
Make sureyour Discs playaccording to your AccessControl settings before
you allow children accessto the DVD Recorder.
Change Code
Press SYSTEM MENU. T_L may be selected. If it is not, press •
to select it.
Press • repeatedly to select I_, then press •. Access control
will be selected.
Press • again, then press the Number buttons to enter your
old four-digit code. When doing this the first time, enter any four
numbers you prefer. You will have to enter the same code, exactly,
twice. This will set your code for the first time.
AccessControl 49
I_l T& T C {[_ C2 _ _> I
Press • repeatedly to select Change code, then press •.
I_i T& T c _ o e_ _>I
Press four Number buttons to enter the new four-digit code.
Then, enter it again - exactly - to confirm it.
Press SYSTEM MENU to remove the menu.
1 2 len off no
/]/]l]l]
En_er_odB
1 2 en df no
PHILIPS
• The code may not go into effect
until you activate Child Lock.
(You may have to keep con-
firming the code.) See page 50
to activate Child Lock.
Page 50

50 AccessControl (cont'd)
Child Lock
Press SYSTEM MENU. 1"_, may be selected. If it is not, press •
to select it.
Press • repeatedly to select [_1, then press •. Access control
will be highlighted.
Press • again, then press the Number buttons to enter
your four-digit code. Details are on page 49.
r 1 2 le off o off
Statusbox Entercode
_ ACC,SSCG.tr_I [] I [ [
Child lock will be highlighted. Press •.
Low_owerstandby
Autoresume
4
Press A• to select Locked _ or Unlocked 8, then press
5
OK. If you chose Locked, unauthorized or Locked Discs will not
play unless you enter your four-digit code.
fg T C I_t © I_
[ 1 2 le off o off
Statusbox
_ ACCe,.CG.tr_,
Press SYSTEM MENU to remove the menus.
Low_owerstandby
Autoresume
6
PHILIPS
Page 51

Locking or Unlocking Specific Discs
Not all DVDs are rated or coded by Parental levels.You may choose to
specificallylock or unlock a Disc by choosing Playonce or Playalways.This
way, you can disable viewing regardless of the rating of the DVD. You will
need to know your 4-digit code in order to view the Disc.
Insert a Disc. The Access Control message will appear on the TV
screen. (Child Lock should be Locked. Details are on page 50.)
AccessControl
•w p,ayonc_ 1] 1} [] 1]
Piayai_ays 1} [ [] 1}
ChoosePlay alwaysto insertthed_s__,
thechildsafelist
Press &V to select Play once or Play always. Then, press
2
the Number buttons to enter your four-digit code.
If you select PlayOnce, the Disc will play one time. Ifyou stop play-
back,open the Disc tray, or turn off the Recorder's power, the
Access Control screenwill reappear when you try to play the Disc
again.
If you select PlayAlways, the Disc will play even if you turn off the
DVD Recorder, open the disc tray, or set Child Lock to
(Locked). Details are on page 50.
AccessControl (cont'd) 51
Insert a Disc.
If you later decide to lock the Disc so that it will not play
3
always:
When you insert the Disc, playback beginsautomatically and safe@
appearson the TV screen. Press STOP • while safe @ is on
the TV screen. Locked @ will appear.If the Disc continues play-
ing, press STOP • againto stop playback.You may need to turn off
the DVD Recorder or remove the Disc before the Disc is com-
pletely Locked. The next time you turn on the DVD Recorder or
try to play the Disc, the Access Control screen will appear. The
Disc will not play unlessyou enter the four-digit code.
TheAccessControlscreenwill
appearwhenyou try to play a
LockedDisc.If youdo not know
yourcode,pressSTOP•. Then,
selectAccessControlas
describedin steps I-3 on page
49. When youare askedto
enterthe code,pressSTOP•
fourtimes.PressSYSTEM
MENU, thenpressPLAY• to
start playback.Thisrestoresall
the AccessControlsettingsto
their originalfactorysettings.
Two-sidedDVDsmay havea dif-
ferentID for eachside.To
unlockthe entire Disc,unlock
eachside.
Multi-volumeDiscsetsmay have
a differentID for eachvolume.
Unlockeachvolume.
Page 52

52 AccessControl (cont'd)
Parental Level
DVDs may containalternative scenesthatconform to the ParentalLevel,or
movie rating,that you select.The ParentalLevelmayapplyto the complete
Discor to certain sceneson the Disc.These scenesare ratedfrom I to 8.
Follow the stepsbelow to set the ParentalLevelat which you want Discsto
play.
Press SYSTEM MENU. "r_, may be selected. If it is not, press •
to select it.
Press • repeatedly to select _ , then press •. Access con-
trol will be highlighted.
Press • again, then press the Number buttons to enteryour four-digit code.
I T,_ T C ic{ @ _ e,
I 1 2 en off no off
[11111[]
Entercod_
Press • to select Parental level, then press •.
4
Press AV or the Number buttons to select a rating, then
5
press OK.
Select "0" (- -) to deactivate Parental level. The entire Disc will
play.
Choose a rating between I-8, and scenes with the same rating or
lower will play. Higher rated scenes will not play unless an alterna-
tive scene is available on the Disc. The alternative must have the
same rating or a lower one. If no suitable alternative is found, play-
back will stop. Enter the 4-digit code to play the Disc.
I T,_ T C I_£ 0 _ I
I 2 len of no of
Press SYSTEM MENU to remove the menus.
e,.
I
PHILIPS
The rating numbers compare to
standard U.£ movie ratings as
follows:
7-NC-17
6-R
4 - PG-13
3-PG
I-G
Page 53

Change Country
If a Disc has Parental Level coding, the codings are applicable only for the
country specified on the Disc. The Disc manufacturer sets these codings.
For example, a Disc may be coded at Level 3 for the United States.
So, for some Discs, you may need to choose the Country for which the
Disc is coded in order for the Disc to play at the Parental Level you select.
Details are on page 52. Also refer to your Disc case for more information.
Press SYSTEM MENU. I"_, may be selected. If it is not, press •
to select it.
Press • repeatedly to select I_, then press I_. Access con-
2
trol will be highlighted.
Press I1_again, then press the Number buttons to enter
3
your four-digit code. Child lock will be highlighted.
Press •repeatedly to select Change country, then press I_.
4
I TA T C c_t Q _ O_
_' I 1 2 len Off no off
_ermuda
Oa_ada
_1[Araeriran_am0a •
PuertoRico
AccessControl (cont'd) 53
[2°5
Press A• to select the country for which the Disc is coded,
then press OK.
Press SYSTEM MENU to remove the menus.
PHILIPS
Page 54

54 UserPreferenceSettings
Press SYSTEM MENU. _'_ may be selected. If it is not, press •
to select it.
Press • repeatedly to select (_, then press •.
Press •A to select Status box, Auto resume, Low power
standby, PBC (Video CD only), or Finalize disc (DVD+R
only). Then, press • and follow step 4 according to your
choice.
@If you selected Status box, press VA to choose On or Off,
4
then press OK. The status box displaysthe current Disc type and
status of the Recorder. Select On if you want to seethe Status
boxes. Choose Off ifyou do not want to see the Status boxes.
Detailsare on page26.
If you selected Auto resume, press V& to choose On or
Off, then press OK. Auto resume affects the last 20 pre-recorded
DVDs and Video CDs you played. When Auto resume is On, play
resumes at the point at which it stopped the last time you played
the Disc. If Auto resume isOff, the Recorder starts playingthe Disc
from the beginningof the Disc.
If you selected Low power standby, press V& to choose
On or Off, then press OK. If Low power standby isOn and you
do not usethe Recorder for 20 minutes, the imageon the TV
screenwill dim.
@If you selected PBC (Playback Control) (Video CD only),
press VA to choose On or Off, then press OK. PBCprovides
additionalfeatures on someVideo CDs. Check the Disc casefor
details.The Video CD will show instructions or options on the TV
screen. Use the Recorder's remote buttons as directed by the
Video CD. PBC appears in the menu only if a PBC-compatible Video
CD is inthe Recorder.
If you selected Finalize disc (DVD+FI only), press OK.
"Finalizing" will appear during finalization. The process may take a
few minutes. When finalization iscomplete, the Index picture screen
will reappear. You can not unfinalize a DVD+R, and you can
not record or edit the DVD+P, after you finalize it.
Finalizedisc appearsonly when an unfinalized DVD+R isin the
Recorder.
A DVD+R will play on other DVD Players only after the
Disc isfinalized.
÷ Adapt Disc Format will appear if a DVD+RW recorded on a
different brand of Recorder isin the PhilipsRecorder. The option
only appears when such a Disc isin the Philips Recorder. If the Disc
isunprotected, you can adapt the disc format by selectingAdapt
Disc Format and following the on-screen instructions.This will
enableyou to playthe Disc and accessitsfeatures, such as the
menus or edited versions.
©©0©
r i 2 l_n oil no _fr _
Features
Press SYSTEM MENU repeatedly to remove the menus.
S
If resume appears when you
start playback, you can press
PLAY• while resume appears
on the TV screen. This lets you
resume play from the last
played point, even if Auto
resume is Off;
Page 55

Press SYSTEM MENU. l"J, may be selected. If it is not, press •
to select it.
Press • to select _ , then press •.
Press AV to select TV Shape, Black level shift, Video shift,
or Optimize video output. Then, press • and follow step 4
according to your choice.
e If you selected TV Shape, press A• to select 4:3 letter-
4
box, 4:3 panscan, or 16:9, then press OK..
Select 4:3 letterbox if you have a regular TV and want to see the pic-
ture with black bars at the top and bottom of the screen. This looks
like the picture you see when watching movies in a theater. This set-
ting is possible only if the DVD contains letterbox material
Select 4:3 panscan if you have a regular TV and want both sidesof
the picture to be trimmed, or formatted to fit your TV screen. This
setting is possible onJy if the DVD contains pan & scan material
Select 16:9 if you connected the DVD Recorder to a widescreen TV.
® If you selected Black level shift, press A• to select On or
Off, then press OK. Set Blacklevel shift to On during playbackof
NTSC Discs. This will improve the color contrast during Disc play-
back. Black level shift has no effect on PAL Disc playback.
Picture Settings 55
If you selected Video shift, press • • to center the picture
on your TV screen - or "shift" the video. When you are sat-
isfied with the position of the picture, press OK.
If you selected Optimize video output, press &• to select
Interlaced or Progressive Scan, then press OK. Select
Progressive Scan if you used the PROG SCAN OUT jacks on the
DVD Recorder to connect the Recorder to the TV. Details are on
page I0. Otherwise, choose Interlaced. Choosing Progressive Scan,
when applicable, will sharpen the image of a paused or still picture or
DVD menu.
T 6 d: © _ e,
1 2 en of{ no off
Pcture
4:3pansean
•9 [ 4:3 dIet_gx •
16:9
[ 1 2 le off o off
TVSN@e
Blackeve sM[
[ _ [[[[Videoshilt rm_ll_xm I
_L_L]/ [_0 pt rrlizevdeooutput
L i
Picture
[ 1 2 le off o
[ 1 2 len off no
PHILIPS
Press SYSTEM MENU to remove the menus.
5
• The format you select must be
available on the Disc. If it is
not, the settings for TV Shape
will not affect the picture dur-
ing playback.
• Some widescreenTVs may show
only part of the DVD Recorder's
menu. Adjust the screen mode
on your TV. Seeyour TV owner's
manual for details.
Page 56

56 Digital Output
After connecting the DVD Recorder to your TV and other equipment, you
may need to changethe DVD Recorder's Digital Output setting. Look to
seewhich DVD Recorder audio jacks you connected to your other equip-
ment, then set your Digital Output accordingly. The information in step 4
will help you make your choice.
You only need to adjust the Digital Output if you used the DIGITAL
AUDIO OUT (OPTICAL or COAX) jacks of the Recorder. (If you used
the red and white AUDIO OUT jacks, seepage57 to adjust the sound.)
Press SYSTEM MENU. "F_, may be selected. If it is not, press •
to select it.
Press • repeatedly to select i[], then press I_.
Digital output will be selected. Press I_. If Digital output is notselected, press &• to select it, then pressI_.
Press &V to select Off, PCM only, or All, then press OK.@Select All ifyou used the COAX (coaxial) DIGITAL AUDIO OUT
jack to connect the DVD Recorder to a Stereo Receiver that hasa
built-in multi-channel decoder. Detailsare on page 14.
÷ Select Off if you did not use either the COAX (coaxial) or OPTI-
CAL DIGITAL AUDIO OUT jack. For example, if you used the sup-
plied audio cables to connect the red and white AUDIO OUT jacks
of the DVD Recorder to a TV or Stereo, select Off. See page57 to
adjust your analog sound settings.
÷ Select PCM only if you used the COAX (coaxial) or OPTICAL
DIGITAL AUDIO OUT jack of the DVD Recorder for connections,
but the audio equipment does not include a built-in digital multi-
channeldecoder.
I 2 len off no of
$o_nd
Off
Press SYSTEM MENU to remove the menus. PHILIPS
Page 57

If you connected the DVD Recorder's red and white AUDIO OUT jacks
to a Stereo (or Stereo TV) as shown on pages 10-13,choose a setting for
Analog Output.
You do not need to adjustthis setting if you used the DIGITAL AUDIO
OUT (OPTICAL or COAX) jacks on the DVD Recorder.
Check your Stereo and see if it is compatible with Dolby Surround or
TruSurround. Then follow the steps below to choose the Analog Output
setting that is most compatible with your audio equipment (or TV).
Press SYSTEM MENU. I'_ may be selected. If it is not, press •
to select it.
Press • repeatedly to select al_, then press •.
2
Press • to select Analog output, then press •. Analog output
3
may be selected already. If so, just press • to continue.
Press • or • to select Stereo, Surround, or 3D sound, then
4
press OK.
Select Stereo to hear stereo sound.This will work with any type
of equipment that hasright and left audio jacks (usually red and
white).
O Select Surround if your audio equipment is compatible with Dolby
Surround. If it is, usuallya Dolby Pro Logic logowill appear on the
equipment.
Select 3D sound ifyou want to enjoy surround sound but your
equipment isnot Dolby Pro Logic compatible.
Analog Output 57
I 2 len off no
Press SYSTEM MENU to remove the menus.
PHILIPS
'l'niSurroundTM
snsCe)"
TruSurround and the CO3" symbol are trademarks of SRSLabs, Inc.
TruSurround technology is incorporated under Iicense from SRSLabs, Inc.
Page 58

58 Language Settings, Recording Audio
Language Settings
Select a different languagefor the Disc Menu, Audio soundtrack, or
Subtitles if multiple languagesare availableon the DVD.
Press SYSTEM MENU. "r_, may be selected. If it is not, press •
to select it.
Press • repeatedly to select _, then press I1_.
Press AV to select Playback audio, Subtitle, or Menu, then
press I_.
[ 1 2 1In of no off
_n_uage
Press AV to select the language you want, then press OK.The changeswill be effective only if the language is available on the
Disc. Some DVDs allow you to change languages in the DVD Disc
Menu only.
Press SYSTEM MENU to remove the menus.
[ DVD+RW ] [ DVD+R
Recording Audio
Some TV programs broadcast in stereo or in a second audio program (SAP).
Usually, second audio means the program has a second language available. For
example, the program might be available in English and Spanish, with Spanish
being the SAP (second audio program) option.
To record the stereo or SAP broadcasts with the DVD Recorder, select
Stereo or SAP as your preferred recording audio as described below.
Your selection will only be active if the program is available in stereo or sec-
ond audio. When you play the recording, you can play only in the audio you
recorded. For example, if you recorded in SAP, you can play the recording
only in SAP.
Press SYSTEM MENU. T_1, may be selected. If it is not, press •
to select it.
Press • repeatedly to select _, then press I1_.
Press AV to select Recording Audio, then press I1_.
Press AV to select Stereo or SAP, then press OK.
[ 1 2 len of no of
Language
.]
Press SYSTEM MENU to remove the menus.
• If Recording audio is set to SAP
and you record a TV program
that is available only in Stereo,
the Recorder will record the
program in Stereo.
Page 59

Night Mode, RemoteControlSettings59
Night Mode
Turn on Night Mode to improvethe sound duringlow volume playback.
Press SYSTEM MENU. l'J, may be selected. If it is not, press • to
select it.
Press • repeatedly to select ml_,then press •.
Press • repeatedly to select Night mode, then press •.
I 1 2 len off _o off
Soun_
Press • or • to select On or Off, then press OK.
Press SYSTEM MENU to remove the menus.
Remote Control Settings
Press SYSTEM MENU. 1",[,may be selected. If it is not, press • to
select it.
Press • repeatedly to select _, then press •.
2
Press •• to select Key sound or Remote control used. Then,
3
press • and follow step 4 according to your choice.
® If you selected Key sound, press •• to select On or Off,
4
then press OK.
SelectOn if you want the DVD Recorder to beepeach time you press
a key on the remote control or the Recorder. The factory setting is
On. SelectOff to disablethe sound;the Recorder will be silent when
you press buttons on the remote or the Recorder.
¢ If you selected Remote control used, press AV to select
DVD Player or DVD Recorder, then press OK. The factory set-
ting is DVD Recorder. Byselecting DVD Recorder, you will operate
the DVD Recorder with the remote control suppliedwith the DVD
Recorder (asshown at right andthroughout this book). However, if
you have another PhilipsDVD Playerand want to usethat remote to
alsocontrol the DVD Recorder, you maydo so ifyou select DVD
Player.You may not be ableto accessallthe Recorder'sfeatures
unlessyou use the Recorder's remote control.
_' I 1 2 len off so _ [ 1 2 len off so of
I {_ IIII aert_tesoalrolsetln_sI 1_' K_yso_nd DVDPlayl,;
Reraotecontro used I Oft fieraotec,nlr_lusea_1_
Press SYSTEM MENU to remove the menus.
Page 60

60 UsingYourRecordersRemoteControlwith YourTV
The following buttons on your DVD Recorder's remote control will oper-
ate the TV at any time:
• VOL +/- increases/decreasesTV volume
• MUTE _ mutes/restores the TV sound
The following buttons operate the TV if you press and hold the TV switch
on the right side of the remote while pressing these buttons:
• CH +/- Selects TV channels at the TV (not the Recorder).
• A/CH Selects the TV channel you were viewing just before switching to
the current channel.
• Number buttons 0-9 Press to choose a TV channel quickly.
• ON/OFF I_ Press to turn on or off the TV power.
If these buttons already operate your TV, no further action is necessary.If
they do not, follow the steps for either Automatic Remote Setup or
ManualRemote Setup to make the Recorder's remote control operate
your TV.
There is no guarantee the remote control will work all the features on
your TV, and no guarantee the remote will operate all TV brands. This is
not a defect of the remote.
Automatic Remote Setup
Turn on your television and find the code for your brand of
TV in the list on page 61.
TV switch
®®®
®®®
®
@
PHILIPS
Automatic Remote Setup
Point the remote control at the TV. Press and hold the
2
RETURN and SELECT buttons simultaneously for at least
three seconds, then release.
Within 30 seconds, press the Number buttons to enter the
3
correct three-digit code for your brand of TV.
See if the remote control now works your TV as described
4
above. If it does,you are finished. If it does not, repeat steps I-3,
usinga different code for your brand, if available.
If the remote still will not operate your TV after repeating steps I-3
with allthe codes for your brand, try the ManualRemote Setup
procedure as described below.
Manual Remote Setup
Turn on your television.
Point the remote control at the TV. Press and hold the
RETURN and SELECT buttons simultaneously for at least
three seconds, then release.
®
® ®
® ®
Manual Remote Setup
Within 30 seconds, press and hold the ON/OFF © button
until your TV turns off. Your TV will turn off when the remote
control finds the correct code that will allow the remote to work
your TV. When your TV turns off, immediately release the
ON/OFF O button. This step maytake up to two minutes. If the
TV does not turn off after two minutes, release the ON/OFF _
button. The code for your TV could not be found.
4
Make sure your remote works your TV as described above.
Page 61

UsingYourRecordersRemoteControlwith YourTV(cont'd) 61
A
AOC ......................046,057
Acura .............................036
Admiral ................120,490
Adyson ..........................244
Aiko ...............................119
Akai ................................057
Akura .....................245,291
Alaron ....................206,243
Alba 064,036,245,063,398
AIIorgan ........................32 I
America Action .......... 207
Amplivision ...................244
Amstrad. 198,398,036,064
Anam .....................207,036
Anitech ..........................036
Arcam ....................243,244
Asuka .............................245
Atlantic ..........................233
Audiosonic ...........064,136
Audiovox ._...I 19,207,478
Autovox ........................233
BPL.................................309
BSR.................................321
BTC ...............................245
Bang &Olufsen ...........592 ................................099,206
Basic Line ..............036,245 Firstline .........348,036,243,
Baur ................064,037,581 ................................244,321
Baysonic ........................207 Fisher .............244,181,397
Beaumark ......................205 Flint ................................482
Beko ...............................397 Formenti ...............347,064
Belcor ............................046 Frontech ...............458,291
Bell &Howell ................181 Fujitsu ............206,099,233
Beon ..............................064 Funai ..............32 I, 198,206,
Binatone ........................244 ................................207,291
8laupunkt ......................581 Futuretech ....................207
Blue Sky ........................245 G
Blue Star .......................309 GE ...................048,074,078
Boots .............................244
Bradford ........................207
Brandt ............................136
Britannia ........................243
Brockwood ..................046
Broksonic ..............263,490
Bush.......064,398,245,036,
................063,309,321,401
CCE .......................064,244
C5 Electronics .............243
CXC ..............................207
Candle ...................057,083
Carnivale .......................057
Carrefour .....................063
Carver ...........................08 I
Cascade .........................036
Cathay ...........................064
Celebrity .......................027
Centurion .....................064
Cimline ..........................036
Cineral ...................478,119
Citizen ..................083,057,
........................066,087,119
Clarivox ........................064 ................................245,206
Clatronic .......................397
Concerto ......................083
Condor .................. 347,397
Contec ._036,063,207,243
Craig ..............................207
Crosley ..........................081
Crown ..........397,036,064,
........................066,207,445
Crystal ...........................458
Curtis Mathes_...087,057,
........066,074,078,081,083,
......... 120,172,181,193,478
Cybertron ....................245
la
C
Daewoo -..... l 19,046,40 l, Interfunk .......................064
................478,036,064,066 Intervision ............064,129,
Dainichi .........................245 ................................244,291
Dansa .............................064
Dayton ..........................036
Daytron .........................046
Decca .....................064,099
benon ........................... 172
Dixi ........................036,064
Dual Tec .......................244
Dumont .........044,046,097
Electroband ..................027
Elin .................................064
Elite ........................245,347
Elta .................................036
Emerson .......263,207,205,
.206,490,309,066,046,18 I
Envision.........................057
Erres ......................039,064
Expert ............................233
Ferguson ...............136,064
Fidelity ...........................243
Finlux ............064,132,097,
................205,478,120,309
GEC ...............099,064,244
GPM ...............................245
Geloso ...........................036
Genexxa .......................245
Gibralter ._._.044,046,057
GoldStar _..._.064,046,057
................205,244,083,136
Goodmans _.064,099,206 ................. 177,181,277,490
................398,063,244,401 Midland ..044,066,074,078
Gorenje .........................397 Minerva .................097,581
Gradiente ..............083,080 Minuta ...........................048
Granada .........064,099,244 Mitsubishi.....063,135,177,
Grandin .........................309 ........................205,046,120
Grundig .........097,581,064 Mivar ..............................243
Grunpy ..................206,207 Motorola ....................... 120
HCM ......................036,309 ............................... 243,244
Hallmark .......................205 N
Hanseatic ..............064,347 NAD ..............183,193,205
Harley Davidson .........206 N EC057,063,046,083,482
HarmanlKardon ..........081 NEI .........................064,458
Harvard .........................207 NTC ..............................I 19
Hinari ............036,063,064, Neckermann ......_064,581
Hisawa...................309,482 Netsat............................064
Hitachi _ 136,07I,172,244, Nikk_i._.064,062,245,099,
........................063,083,132 ................................243,291
Huanyu ..................243,40 I
Hypson ..........291,064,309
ICE..................244,291,398
ICeS ...............................245
ITS ..................................398
Imperial .................445,397
Indiana ...........................064
Infinity ............................081 ........................263,347,348
Inno Hit .........................099 Osaki......099,244,245,291
Innova ............................064 Oso ................................245
D Inteq ...............................044
E
F
H Multitech _....036,129,207,
I
Osume ...........................099
Otto Versand .....064,037,
................063,244,347,581
Isukai ..............................245
J
JBL ..................................081
JCB.................................027
JVC .........080,063,398,680
KEC ................................207
KTV ........207,244,057,066
Kaisui ....................245,244,
........................036,243,309
Kamp .............................243
Kapsch ...........................233
Kawasho .......................243
Kendo ............................064
Kenwood ..............057,046
Kingsley .........................243
Korpel ...........................064
Koyoda ..........................036
LG ..................................083
LXI .. 181,074,08 I, 183,205
Leyco......099,064,291,32 I
Liesenk &Tter ..............064
Luma ............................. 233
Luxman .........................083
M Electronic........ 132,244,
................036,064,136,401
MGA....... 177,046,057,205
MTC087,057,046,083,243
Magnadyne .................... 129
Magnafon ...................... 129
Magnavox .............081,057,
................................063,206
Manesth .........347,244,291
Marantz .........064,081,057 .......................205,066,18 l,
Mark ...............................064
Matsui _.036,064,244,398,
................062,063,099,321
Matsushita .............277,677
Mediator ...............039,064
Megatron ..............172,205
Memorex__.205,036,083,
K
L
14
Palladium ...............397,445
Panama ..................244,291
Panasonic ......078,277,677
Pathe Cinema ......347,243
Pausa..............................036
Penney ..074,087,057,048,
205,078,066,046,083,183
Perdio ............................347
Philco ....................172,046,
........................057,081,490
Philips....................064,039,
........................081,401,581
Phonola .................064,039
Pilot ................046,057,066
Pioneer ..................136,193
Portland .........046,066, l 19
Prism ..............................078
Profex ............................036
Proline ...........................348
Proscan .........................074
Protech .........064, J29,036,
................458,244,291,445
Proton ...........................205
Pulsar .....................044,046
Pye..................................039
Quasar._078,277,192,677
Quelle .._064,097,037,58 I
Questa ...........................063
R-Line ............................064
RBM ...............................097
RCA ......................074,046,
........................078,117,120
Radio Shack. 192,207,057,
........................046,074,083
Radiola ...................064,039
Rank Arena ..................063
Reali_ic ........ 192,207,181,
.........057,066,205,046,083
Revox ............................064
Rex .........................233,291
Rhapsody ......................243
Roadstar036,291,245,445
Runco ....................044,057
P
Q
R
$
SBR.........................039,064 ................................291,397
SEG.................244,063,291
SEI...................129,037,321
SKY ................................064
$55..........................046,207
Saba................................136
Saisho .............036,291,458
Sambers ........................129
Sampo ....................057,066
Samsung._._..064,046,205,
...............244,291,397,036,
.........057,066,083,087,117
Nesco............................206
Nikko .............205,057, l 19
Nobliko ......................... 129
Nordmende ................. 136
O
Onwa .............................207
Optimus 277,193,181,677
Optonica ...............120,192
Orion ....321,490,064,206,
Samsux ..........................066
Sandra............................243
Sansei.............................478
Sansui.............................490
Sanyo.............. 181,063,099
Schneider.__.064,245,398
Scimitsu .........................046
Scotch ............................205
Scott263,046,205,206,207
Sears__..181,083,183,074,
................081,198,205,206
Seleco ............................233
Semivox ........................207
Semp ..............................183
Sentra ............................062
Sharp ......120,192,063,066
Shogun ...........................046
Shorai ............................321
Siarem ........................... 129
Siemens .................581,064
Silver ..............................063
Sinudyne__._,129,037,321
Sonoko ..................036,064
Sontec ...........................064
Sony ...............037,063,027
5ou ndesign.._205,206,207
Soundwave ...........064,445
Squareview ...................198
Standard _......244,245,036
Starlite ...........................207
Stern ..............................233
Sunkai ....................321,348
Supra ..............................083
Supreme ........................027
Susumu ..........................245
Sylvania ..................081,057
Symphonic ....................198
5ysline ............................064
TMK .......................083,205
"randy ..-.245,099,244,120
Tashiko ..................063,244
Tatung ............099,244,064
Tec .................................244
Technema .....................347
Technics .._....078,277,677
Technol Ace ................206
Techwood ............078,083
Teknika .081,206,207,046,
.........066, I 19,083,087,177
Telefunken ............ 136,083
Telemeister ................. 347
Teletech ........................036
Teleton ..........233,063,244
Tensai ............245,321,347
Texet .....................243,245
Thomson ...................... 136
Thorn .............064,062,099
Tomashi ........................309
Toshiba .........062,183,063,
........................097,087,181
Totevision ....................066
Uher .......................233,347
Ultravox ........................129
Universum ........... 132,064,
Vector Research .........057
Vestel .............................064
Victor ............................080
Videotechnic ................244
Vidikron ........................081
Vidtech ..........046,063,205
Vision .............................347
Waltham .......................244
Wards._081,192,205,046,
................048,057,083,206
Watson .................347,064
Watt Radio ..................129
Wea ...............................063
White Westinghouse .......
................347,064,243,490
Yamaha ..................046,057
Yoko._._.244,064,291,458
Zanussi ..........................233
Zenith ............044,119,490
T
U
V
W
Y
Z
Page 62

62 Helpful Hints
If you are havingproblems with your product, checkthis list of problems and possiblesolutions before requestingservice.You may
be ableto solvethe problem yourself.
No power
PressSTANDBY-ON d_on the front of the DVD Recorder to turn on the DVD Recorder.
Connect the suppliedpower cord securelyto the MAINS (AC power) jack on the rear of the DVD Recorder. Connect the
power cord firmly to an AC power outlet. Use only the suppliedpower cord.
Make surethe AC outlet haspower by trying another appliancein the sameoutlet.
No picture
Make surethe TV power is on.
Checkthe video cables.Makesure the cable(s)are fastened securelyto the Recorder and the TV.
Setyour TV to the correct Video In channel.Thesechannelsareusuallynearchannel00. Or, you may havea button on the TV
remote control that selectsan Auxiliary or A/V IN channel.Seeyour TV owner's manualfor details. Or, go to your lowest TV
channeland changechannelsdown until you see the Recorder's background picture on the TV screen.
You only need one video connection between the DVD Recorder and the TV. Detailsareonpage9.
The picture is distorted; the picture isblack and white during playback.
TVs havea color systemstandard,usuallyNTSC inthe United States.If the Disc's color systemisdifferent than your TV's
color system,the picture may be distorted or colorless.
The Recorder can not record in color if the TV channelor source is not providing color. In some situations, programs that are
broadcastin blackand white cannot be recorded.
Checkthe Disc for fingerprints. Clean the Disc with a soft cloth, wiping from the center to the edge in a straight line.
Sometimesa smallamount of picture distortion may appear.This is not a malfunction.
If you set Record mode to a low-quality speed(such asEPin order to fit more recording on a Disc), set Record mode to a high-
qualityspeed(suchasSP)after you finish recording. Leavingthe Recorder setto a low-quality speedmayaffectthe picture quality
when playingDVDs later. Detailsareonpage46.
The sound is distorted during Disc playback through a Stereo.
Do not connect any cablesfrom the DVD Recorder to the Stereo's "PHONO IN" jack.
Do not connect a digitaljackon the Recorder (DIGITAL AUDIO OUT - OPTICAL or COAX) to an analogjackon the Stereo.
(Analogaudio jacksare usuallylabeledas suchand are usuallyred and white.)
No sound
Check the audio connections. Details are on pages 9-15. Remember, you only need one audio connection. See page 9 to see
what connection best suits your situation.
Make sure cables are connected firmly to all equipment.
Select another channel, sound source, or Auxiliary station at your Stereo or TV. See your Stereo's manual or TV's manual for
details. Or, just continue selecting the different sound sources or modes on the Stereo or TV until you hear sound from the
Disc that is in the DVD Recorder.
Details are on pages 9-15.
Check your Analog output settings or Digital output settings. Make sure you choose the right setting, based on what equipment
you connected to the DVD Recorder. Details are on pages 56-57.
Make sure your Analog output settings or Digital output settings match the capabilities of your Stereo Receiver or TV. Details
are on pages 56-57.
Change the Audio setting of the DVD in the DVD Disc Menu.
A Disc recorded on this DVD Recorder will not play on a DVD Player.
Make surethe recording isat leastfive minutes longif recorded in HQ; I0 minutes longifrecorded in SP;15minutes long if
recorded in LP;or 20 minutes long if recorded in EP.Detailsare on page46.
In some cases,you canadapt the Disc at the DVD Recorder, then try it againin the Player.Thisprocedure does not solve the
playabilityproblem with all brands of Players.Furthermore, it maymake the Disc incompatiblewith Playerswith which the Disc
was compatible before you modified the Disc.
To modify a Disc, place the Disc in the DVD Recorder's disctray. Do not close the tray. Then, pressand hold the Number 2
button on the remote control until the tray closes.The Disc is now modified. Try it on the other Player.
If the Disc still will not playon the Player,repeat this procedure, but pressand hold the Number 3 button instead until the
Recorder'stray closes.
To return the Disc to its originalversion, repeat this processusingthe Number I button.
To playa DVD+R on another DVD Player,finalizethe Disc first. Follow the stepson page47, choosing"FinalizeDisc" at step4.
Editingchangesmay not be accessiblewhen you play the Disc on other DVD Players.Detailsareonpage48.
An Audio CD will not play on the DVD Recorder.
SomeAudio CDs availableon the market are copy protected. This DVD Recorder maynot play such copy-protected discs.
The DVD Recorder will not select some features, such as Angles, Subtitles, or multi-language Audio.
The feature maynot be availableon the Disc. If it isnot, an"X" will appear on the TV screen.Check the Disc caseto seeif the
Disc hasthe feature. If the Disc does not havethe feature,the DVD Recorder cannot create the feature. This is not a malfunc-
tion of the DVD Recorder.
Page 63

Helpful Hints (cont'd) 63
Disc will not play.
Make sure the Disc label is facing up. If you are playing a two-sided Disc, make sure the label of the side you want to play is
facing up. Details are on page 18.
Check the Access Control settings for the Disc. Details are on pages 49-53.
Check the Region Code of the DVD. The DVD must be coded for All regions or Region I in order to play on this DVD
Recorder. Details are on page 7.
See if the Disc isdefective by trying another Disc. Make sure the Disc is not scratched or warped. Carefully clean the Disc.
Details are on page 6.
A DVD+RW recorded on a different brand of Recorder can play on the Philips DVD Recorder, but all its features may not be
accessible. However, you may be able to adapt the disc format so you can access the Disc's original features. Details are on page
54. If the Disc is protected, you can not adapt the disc format.
The DVD Recorder does not respond to the remote control.
Aim the remote control directly at the IR sensor on the front of the DVD Recorder. Detailsareon page22. Pointthe remote
control toward the DVD Recorder, not your TV.
Removeany obstaclesbetween the DVD Recorder andthe remote control.
Inspect or replacethe batteries inthe remote control. Detailsareonpage8.
The remote control may have been set to operate another DVD Recorder accidentally.Pressand holdthe SELECTand
Number I buttons on the remote control at the sametime to havethe remote control operate the DVD Recorder.
Make sure you selectedDVD Recorder asthe Remote control used.Detailsareonpage59.
Recordings are not occurring as scheduled. New recordings cannot be made.
Seeifthe Disc hasthe maximum number of titles. Delete some recordings (DVD+RW only). Detailsareonpage44.
You canrecord only ifthe Disc is Unprotected. You cannot useawrite-protected Disc. Detailsareonpage47.
You cannot duplicate copyrighted DVDs, videotapes, or TV broadcasts using the Recorder. "COPY PROTECT" may
appear on the display panel if you try to dub or record copyrighted material onto a DVD+R or DVD+RW usingthe
Recorder.
The signalfrom your Antenna/Cable TV system must be strong enough to provide good channel reception. If the signalis
weak, if there isno signal,or if a channel hasgone off the air, a recording will not occur.
Check the Disc. If the Disc is bad (scratched, warped, etc.) or if the Recorder cannot read the Disc, you cannot record.
"NO DISC" may appear on the display.
A timer recording may not occur ifthe power fails during the time the recording was supposed to occur.
If you adjust the clock after you set a timer recording, reset the timer recording.
The Index Picture Screen does not appear, but the Disc still plays.
Clean the Disc. Details are on page 6.
Adapt the disc format if possible. Details are on page 54.
Another DVD player shows the Index Picture Screen but does not react to PLAY I_.
Press STOP • to exit the Index Picture Screen, then press PLAY I_.
You need to access system information for service reasons.
PressSYSTEMMENU. T_.may be selected.If it is not, press • to selectit. Press• repeatedly to
select [_, then pressI_. Press• repeatedly until the systeminformation appears.
The DVD Recorder cloesnot work.
The DVD Recorder will not operate until you complete the Initial Setup.Detailsareonpages16-17.
In all other cases,disconnectthe power cord from the Recorder and the power outlet for a few minutes. Reconnectthe power
cord and try to operate the Recorder againasusual.
If the DVD Recorder still will not operate, disconnectthe power cord from the Recorder again.Then,while pressingand hold-
ingthe STANDBY-ON © button on the front of the Recorder, reconnect the power cord. This resets the DVD Recorder to
the factory mode, or to itsoriginal settingsasthey were when you first received the Recorder. You will haveto complete the
Initial Setupagainand reset any items you haveadjustedduringyour useof the Recorder.
Messages or strange codes appear on the Recorder's display.
Removeand reinsert the Disc.
Cleanthe Disc.
Disconnect the power cord from the power outlet, then reconnect the cord and try playbackasusual.
During Initial Setup,"TURN ON TV" will appearon the Recorder's displaypanel.This appearsinaddition to the Initial Setup
informationthat shows on your TV screen.(InitialSetupinformation ison page16.)"TURN ON TV" indicatesyou shouldturn
on your television and set it to the correct Video In channel.Eventhough your TV may be on, you must set itto the correct
Video In channelto seethe Initial Setupmessages.Seepages9-14 to determine the correct Video Inchannel for your connec-
tion. Or, seeyour TV manualfor details.
There are error messagesthat apply to recording problems. Detailsareonpage43.
All of the DVD Recorder's system menu isnot visible.
Certain televisions may not show the entire system menu on the TV screen. If the upper or top portion of the Recorder's sys-
tem menu does not appearproperly, this is a TV-related issueand is not an improper functioning of the Recorder.
Page 64

64 Glossary
AC-3: Audio Coding 3, also known asDolby Digital; a multi-channel digital audio compression system from
Dolby Labs.
Analog: Sound that has not been turned into numbers. Analog sound varies, while digital sound has specific
numerical values.Analog sound is availablewhen you usethe red and white audio jackson your equipment.
These jacks send audio through two channels,the left and right.
AUDIO OUT Jacks: Jackson the rear of the DVD Recorder that send audio to another system (TV,
Stereo Receiver, etc.).
A/V: Audio/Video.
CD: Compact Disc.
COAX (coaxial) jack: Sends digital audio to a Stereo Receiver, allowing you to adjust the volume at the
Receiver. The Receiver must have a coaxial in jack. This connection provides the 5.1 channel surround sound
as heard in movie theaters.
Color system: There are various systemsfor transmitting television signals,for example PAL, SECAM,and
NTSC. NTSC is the most common color system in the United Statesof America. The TV system is country
dependent. The Recorder automatically selects the right TV system.
COMPONENT VIDEO Jacks: The OUT jacks on the rear of the DVD Recorder send high-quality video
to a TV that hasComponent Video In jacks.The IN jacks allow the Recorder to receive high-quality video
from other equipment, such asa DVD Player.
Sound that has beenconverted into numerical values.Digital sound is available when you use the
COAX (coaxial) or OPTICAL DIGITAL AUDIO OUT jackson the Recorder. These jacks send audio through
multiple channels,instead of just two channelsasanalog does.
Oolby Digital: A surround sound systemthat provides 5.1 channel sound asused in movie theaters.
DTS: Digital Theater Systems.This is a surround sound system, but it is different from Dolby Digital. The
formats were developed by different companies.
DVD: Digital Video Disc.
DVD+R: DVD+Recordable. These Discs canbe recorded and finalized only once.
DVD+RW: DVD+ReWritable. These Discscan be recorded on repeatedly.
i.LINK: Also known as 'FireWire 'and 'IEEE 1394.'A cablefor transfer of high bandwidth digital signalsas
usedby Digital Video camcorders or some Personal Computers.
Index Picture Screen: A screen that gives an overview of a DVD+RW or DVD+R. An Index Picture rep-
resents each recording.
Letterbox: Widescreen format; a TV aspectratio setting (4:3). Displaysthe video in full-width, with black
barsat the top and bottom of the TV screen.This format is similar to seeing a movie in a theater. Ifthe Disc
does not include a letterbox format, selecting 4:3 letterbox may haveno effect. (For example, some DVDs
are two-sided, with one side playing in widescreen format and the other side playing in a normal format.)
MPEG: Motion Picture Experts Group. A collection of compression systems for digital audio andvideo.
OPTICAL Jack: Converts electrical signalsinto optical signalsbefore sending the audio to the Stereo
Receiver. Optical audio is not prone to external electrical influencesand hasless noise, which reduces
adverse effects on external equipment. Be sure to keep the protective cap on the jack when the jack is not in
use.This keeps dust out of the jack.
OTR: One-Touch Recording. Start a timed recording by pushingjust one button; select the switch-off time
in intervals of 30 minutes.
Pan & Scan: A TV aspect ratio setting (4:3). Displays the video with full-height picture, with one or both
sidesof the picture trimmed to fit on your TV screen. Somemovie companies refer to this as"reformatting
the picture to fit your TV screen."
PBC: PlaybackControl. A special feature on a Video CD or Super VCD that enables interactive use.
PBS: Public Broadcast System.The PBSchannel transmits data for Automatic clock setting.
PCM: PulseCode Modulation. A digital audio encoding system.
RGB: Red-Green-Blue. A top-quality video connection where red, green and blue components of a video
signalare carried through separate wires. This also is referred to asthe component video connection.
S-Video: Produces a clearer picture by sending separate signalsfor the luminance and the color. If you con-
nect the supplied S-Video cable,you will not need to usethe supplied yellow video cable. You can useS-
Video only if your TV hasanS-Video In jack.
TruSurrouncl: A system that simulates multi-channel sound via a two-channel connection (audio left and
right). This allows you to enjoy multi-channel sound if your Stereo does not have amulti-channel decoder.
VCD: Video Compact Disc
VCR Plus+ System: Allows you to set a timer recording by entering a PlusCode number found in partici-
patingTV listings.
VIDEO OUT Jack: Jackon the rear of the DVD Recorder that sendsvideo (picture) to a TV.
Widescreen: A TV aspect ratio setting (16:9). Displays the video appropriately when you connect the DVD
Recorder to a widescreen TV.
Page 65

DiagnosticTest 65
If you are still having trouble with the Recorder after checking Helpful Hints and other information in
this manual, you may perform a Diagnostic Test on the Recorder. Follow the steps below.
Disconnect the power cord from the Recorder's MAINS (AC Power) jack on the
rear of the Recorder.
Press and hold the PLAY • button on the front of the Recorder while you recon-
nect the power cord to the Recorder. "BUSY" will appear on the display panel, along with
a counter number. Release PLAY •. The counter will reach zero (0) when the test is finished.
Momentarily, "FAIL" or "PASS" will appear on the display panel.
If "FAIL" appears,your Recorder needs repair. Contact the Philips Customer Care Center for
the Authorized Service Center nearest you.
If "PASS"appears, the Recorder apparently hasno failure. The problem may be incorrect inter-
pretation of the operating instructions, a wrong Disc in use, or incorrect connections. Contact
the Philips Customer Care Center for further assistancein solving the problem.
If there is no failure, disconnect the power cord again,then reconnect it to the Recorder and an
AC power outlet. The DVD Recorder will be ready for regular use.
Page 66

66 Specifications
DISC FORMATS SUPPORTED
Disc type Pla,back
Recording
DVD+RW
DVD+R
DVD-RW (Video format)
DVD-R
DVD-Video
SVCD
Video CD
Audio CD
CD-R
CD-RW
DVD+REWRITABLE DISC FORMAT
Medium Phase-ChangeReWritable
Diameter 12cm
Capacity (singleside) 4.7 Gbyte
Recording time HQ 60 minutes
SP 120minutes
LP 180 minutes
EP 240 minutes
TV STANDARD PAL/SECAM NTSC
Scan Frequency SOHz 60Hz
Number of lines 625 525
Playback
Recording
Internal tuner
VIDEO FORMAT
Digital Compression MPEG2 for DVD
VIDEO RESOLUTION 50Hz 60Hz
DVD-Video/
DVD+RW(HQ/SP)
• Horiz, Resolution 720 pixels I 720 pixels I
• Vertical Resolution 576 lines 480 lines
DVD+RW (LP/EP)
• Horiz, Resolution 360 pixels 2 360 pixels 2
• Vertical Resolution 576 lines 480 lines
VCD
• Horiz, Resolution 352 pixels 352 pixels
• Vertical Resolution 288 lines 240 lines
E equivalent to 500 lines on you_" TV
2 equivalent to 250 lines on you_" TV
VIDEO PERFORMANCE
DA Converter I0-bit
AD Converter 9-bit
Signal handling Components
Video Output I Vpp into 75 Ohm
S-video Output Y: I Vpp into 75 Ohm
Component/
Progressive out Y: I Vpp into 75 Ohm
MPEGI for VCD
C: 0300 Vpp into 75 Ohm
PB: 0,7 Vpp into 75 Ohm
PR:07 Vpp into 75 Ohm
AUDIO FORMAT
Compressed digital Playback
• Dolby Digital (AC-3) Multi-channel
• DTS Multi-channel
• MPEGI 2-channel
• MPEG2 Multi-channel
Uncompressed digital (SPdif)
• PCM 2-channel
16, 20, 24 bit
fs 48, 96 kHz
AUDIO PERFORMANCE
DA Converter
AD Converter
DVD
24 bit
16 bit
fs 96 kHz 4 Hz -44 kHz
fs 48 kHz 4 Hz -22 kHz
Video CD
Audio CD
Signal-Noise (I kHz)
Dynamic Range (IkHz)
Crosstalk (I kHz)
Distortion/Noise (I kHz)
FRONT CONNECTIONS
DV i-LINK In
S-VIDEO IN
VIDEO IN
AUDIO Left/RightIN
REAR CONNECTIONS
Component Video In
Component Video Out
Progressive Scan Out
S-video In
S-video Out
Video In
Video Out (2x)
Audio L/R In (2x)
Audio L/R Out (2x)
Digital Audio Out
fs 44 1 kHz 4 Hz -20 kHz
fs 44 1 kHz 4 Hz -20 kHz
105dB
100dB
II0dB
90 dB
IEEE 1394 4-pin
Hosiden 4-pin*
Cinch (yellow)*
Cinch (white/red)*
Cinch (green/blue/red)*
Cinch (green/blue/red)*
Cinch (green/blue/red)*
Hosiden 4-pin
Hosiden 4-pin
Cinch (yellow)*
Cinch (yellow)*
Cinch (white/red)*
Cinch (white/red)*
I coaxial*,l optical
IEC958 for CDDA/LPCM
IECI937 for MPEG2,
Dolby Digital
RF Antenna In
RF TV Out
Power
* gold_plated
POWER SUPPLY
AC power
Power supply
Coaxial 75 ohms
Coaxial 75 ohms
Standard (IEC type)
polarized (IEC)
100-120V AC
50160Hz
Power consumption
Operation 36 W
Low-power standby 3 W
Recording
2-channel
16 bit,
48 kHz
CABINET
Dimensions (w x h x d): 17 x 43 x 13 inches
Net weight: S.S kg
Page 67

DVD Recorder
One year Free Labor / One year Parts Exchange
This product must be carried in for repair.
WHO IS COVERED?
You must haveproof of purchase to receive warranty ser-
vice. A salesreceipt or other document showing that you
purchased the product is considered proof of purchase.
Limited Warranty 67
BEFORE REQUESTING SERVICE...
Please check your owner's manual before requesting service.
Adjustments of the controJs discussed there may save you a
service caJL
WHAT IS COVERED?
Warranty coverage begins the dayyou buy your product. For
one yearthereafter,all parts will be repaired or replaced, and
labor is free. After oneyear from the day of purchase,you pay
for the replacement or repair of all parts, andfor all labor
charges.
All parts, including repaired and replaced parts, are covered
only for the original warranty period. When the warranty on
the product expires, the warranty on all replaced and
repaired parts also expires.
WHAT IS EXCLUDED?
Your warranty does not cover:
• labor chargesfor installationor setup of the product,
adjustment of customer controls on the product, and
installationor repair of antenna systems outside of the
product.
• product repair and/or part replacement becauseof misuse,
accident, unauthorized repair or other cause not within
the control of Philips.
• reception problems causedby signal conditions or cable or
antenna systemsoutside the unit.
• a product that requires modification or adaptation to
enable it to operate in any country other than the country
for which it was designed,manufactured, approved and/or
authorized, or repair of products damagedby these modi-
fications.
• incidentalor consequentialdamagesresulting from the
product. (Somestates do not allow the exclusion of inci-
dental or consequential damages,so the above exclusion
may not apply to you. This includes,but isnot limited to,
prerecorded material, whether copyrighted or not copy-
righted.)
• a product that is used for commercial or institutionalpur-
poses (including but not limited to rental purposes).
TO GET WARRANTY SERVICE IN U.S.A.,
PUERTO RICO, OR U.S. VIRGIN ISLANDS...
Take the product to a Philipsfactory service center (see
enclosed list) or authorized service center for repair. When
the product hasbeen repaired, you must pick up the unit at
the center. Centers may keep defective parts.
(In U.S.A., Puerto Rico, and U.S.Virgin Islands,all implied
warranties, includingimpliedwarranties of merchantability
and fitness for a particular purpose, are limited in duration to
the duration of this express warranty. Becausesome states
do no allow limitations on how long an impliedwarranty may
last,this limitation may not apply to you.)
TO GET WARRANTY SERVICE IN CANADA...
Please contact Philips at:
1-800-661-6162 (French Speaking)
1-800-531-0039 (English or Spanish Speaking)
(In Canada,this warranty isgiven in lieu of all other war-
ranties. No other warranties are expressed or implied,
includinganyimpliedwarranties of merchantability or fitness
for a particular purpose. Philips isnot liable under any cir-
cumstancesfor anydirect, indirect,special,incidental or con-
sequentiaJdamages,howsoever incurred,even if notified of
the possibility of such damages.)
REMEMBER...
Pleaserecord below the model and serial numbers found on
the product. Also, pleasefill out and mail your warranty reg-
istrationcard promptly. It will be easier for usto notify you if
necessary.
MODEL#
SERIAL#
WHERE IS SERVICE AVAILABLE?
Warranty service isavailablein all countries where the prod-
uct isofficially distributed by Philips. In countries where
Philipsdoes not distribute the product, the local Philipsser-
vice organization will attempt to provide service (aJthough
there may be a delay if the appropriate spare parts and tech-
nical manuaJ(s)are not readily available).
MAKE SURE YOU KEEP...
Pleasekeep your salesreceipt or other document showing
proof of purchase.Attach it to the owner's manual and keep
both nearby. Also keep the original box and packingmaterial
in caseyou need to return your product.
Philips, P.O. Box 520890, Miami, FL 33152 (402) 536-4171
EL6506EO03/ 09-02
Page 68

InformationIndex
alch button ..................................21
ac power cord ..............10-14, 24
access control ......................49-53
adapt disc format .......................54
addldelete channels...................36
analog output .......................3 I, 57
analog sound ........................3 I, 57
angle.......................................26, 30
angle button .........................21, 30
append recording .......................45
arrow buttons....... 18, 20, 25, 28
audio button ........................20, 29
audio in/out iacks..................9-13,
..........................................15,22, 24
audio language.....................16,58
auto chapters ..............................46
auto man rec volume button.22
auto resume ................................54
automatic channel
programming ...............................36
batteries ..........................................8
black level shift ...........................55
cable box ...................................... 15
cam IIcam21cam3 ....................... 22
camcorder ................................... 15
camera angle ........................26, 30
change code ................................49
change country ........................... 53
channel buttons ...................21-22
channel programming ...............36
chapter markers .........................46
chapters ..........................28, 46, 48
child lock ...................................... 50
cleaning discs .................................6
clear button ................................. 21
clock ........................................38-39
code (access control) ...............49
color systems ................................ 7
component video
inlout jacks ....................... 9- I O, 24
connections ............................. 9-15
contents of package ....................6
contents, table of .........................3
controls, remote ................. 20-21
daylight saving .......................38-39
delete all markers ......................48
delete chapter marker .............48
diagnostic test ............................. 65
digital audio .....................9, 14, 56
digital output ............................... 56
digital sound ................................ 56
dim button ................................... 20
disc bar ......................................... 35
disc information screen ...........47
disc lock .................................49-53
disc menu button ...............20, 28
disc menus ................................... 28
disc name ..................................... 47
disc pointer ................................. 35
disc tray ........................................ 18
display ........................................... 23
divide title ....................................48
dolby surround ............ 13, 3 I, 57
dis (digital surround) ................14
dv i-link .........................................22
dvd video........................................7
editing ...........................................48
ep ...................................................46
erase disc .....................................47
erase this title .............................44
error messages...........................43
fast forward searching.......25, 32
fast motion ..................................25
favorite scene selection ...........48
forward button ...................21, 32
frame-by-frame playback..25, 3I
front panel...................................22
fss button .....................................21
glossary.........................................64
helpful hints...........................62-63
hidden chapter ...........................48
hookups ....................................9-15
hq...................................................46
index picture screen.................35
information boxes .....................27
initial setup ............................16-17
insert chapter marker ..............48
installation ..............................36-39
key sound ....................................59
language...........................16-17, 58
let_erbox ...............................55, 64
limited warranty .........................67
lock!unlock ..................................50
low power standby...................54
Iplep rec mode ...........................46
make edits compatible .............47
manual recording volume........45
menu bars .................................... 25
menu language ..................... 16, 58
menus ................................ 8, 25, 28
monitor button ..........................20
mute button ................................20
name .............................................. 44
new index picture .....................48
next button .................................21
night mode ..................................59
ntsc ................................................... 7
number buttons .........................21
ok button .....................................20
on/off button ...............................20
on-screen symbols ....................26
one-touch recording .................40
open/close button .....................22
optical (digital audio out)
jack ..................................14,24, 56
pal ..................................................... 7
panscan.........................................55
parental level ...............................52
password (accesscontrol)......49
pause button ........................2 I, 3 I
pbc .................................................54
pbs channel ...........................38-39
pc connections ...........................15
pcm only ......................................56
picture settings...........................55
play always ...................................5 I
play button .....................18, 21-22
play full title .................................44
play once ......................................5I
playable discs.................................7
playback control .........................54
playing a disc...............................18
PlusCode ......................................42
power cord ....................I0-14, 24
previous button ..........................2I
prog scanout
(Y, Pb, Pr) jacks...................10, 24
progressive scan.........................I 0
protection ....................................47
rear panel.....................................24
rec volume buttons ...........22, 45
rec/otr button ............................20
record button .............................22
record mode...............................46
record settings ...........................46
recording audio ..........................58
region codes..................................7
remote control, buttons ...20-2 I
remote control, settings ..........59
remote control, tv
operation ...............................60-6 [
remote sensor ............................22
repeat a-b .............................26, 34
repeat a-b button ...............2 I, 34
repeat button ......................2I, 34
repeat playback ..........................34
return button ..............................20
reverse button ....................21, 32
reverse searching .......................32
safe..........................................26, 51
safety precautions ....................4-6
sap..................................................58
satellite receiver .........................15
scan ................................20, 26, 33
scan button ..........................20, 33
searching ......................................32
select button ........................20, 41
slow button ..........................2 I, 32
slow motion .........................25, 32
sound mode ..................25, 3I, 57
sp....................................................46
specifications ...............................66
st (stereo) ......................25, 3I, 57
standby-on button .....................22
status box .............................26, 54
stereo .......................25, 3 I, 57-58
still picture ...................................3 I
stop button ....................18-20, 22
subtitle button .....................2I, 29
subtitles ...................17,25, 29, 58
sur (surround) ..............25, 3I, 57
svcd..................................................7
s-video ................9, I I, 15, 22, 24
s-video inlout jacks ............22, 24
system menu button ..........20, 25
T-C button ..................................2I
table of contents ..........................3
3D sound.......................25, 31, 57
time .........................................38-39
time search...........................25, 33
time zone ...............................38-39
timer button ..................21, 41-43
timer information box ......27, 35
timer recordings ..................41-43
title menus ...................................28
title settings menu .....................44
titles ...............................................25
tuner information box ......27,35
'turn on tv' message.................16
tracks .....................................25, 28
tv shape.................................17,55
tv switch ................................20, 60
user preference settings...25, 54
vcr connections/recording...... 15
VCR Plus+ programming.37, 42
video cd ......................................7-8
video (cvbs) in/out jacks...15, 24
video input channel (tv) .............9
video shift ....................................55
visible chapter .............................48
vol(ume) buttons .......................20
warranty .......................................67
widescreen tv .............................55
zoom ......................................25, 30
zoom button ........................20,30
IB8374E002
Thisowner'smanualism_deof r_cydablemateriaEs 3104 125 2455,2
R_memb_rto recyde! Printed in Belgium
 Loading...