

Philips/Magnavox CCZ192AT, CCZ191AT Owner's Manual

Owner's Man,_a!
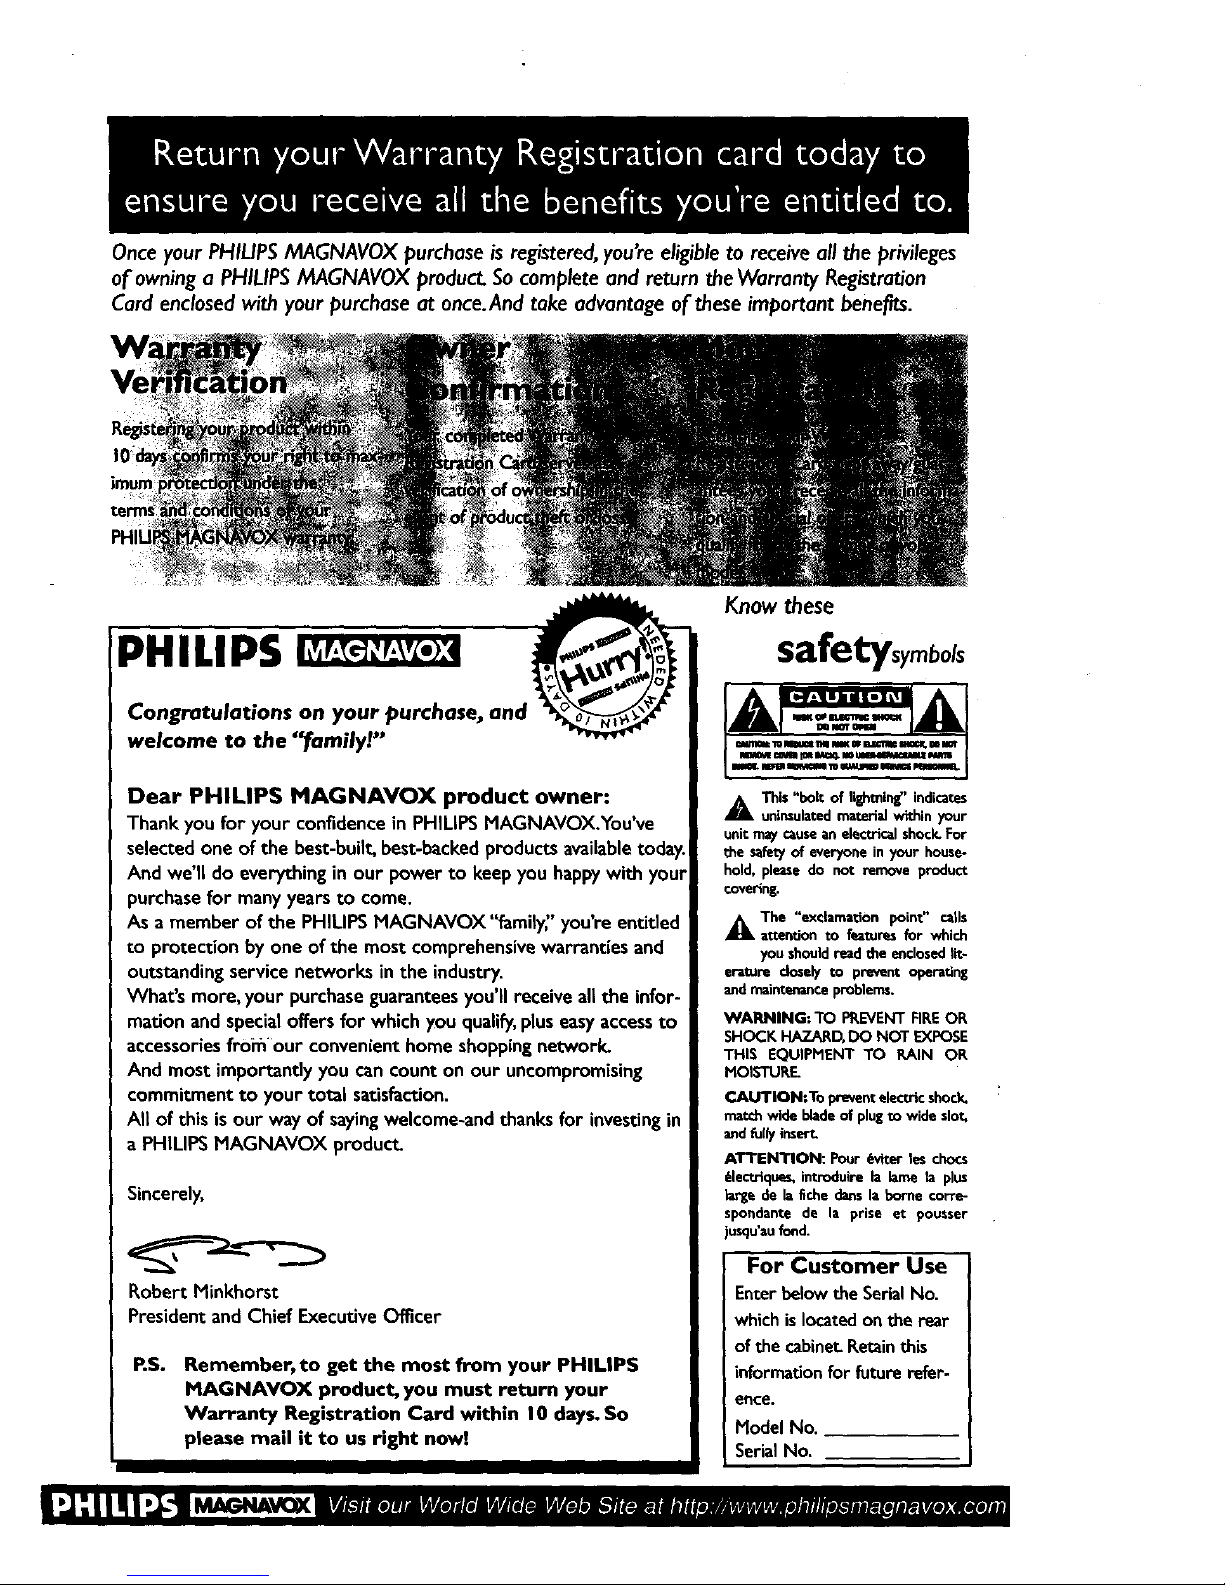
Onceyour PHILIPSMAGNAVOX purchase isregistered,you'reeligible to receive all theprivileges
of owning a PHILIPSMAGNAVOX product Socomplete and return the Warranty Registration
Card enclosedwith your purchase at once.And take advantage of theseimportant benefits.
PHILIPS
Congratulations on your purchase, and
welcome to the "_amilyt. "
Dear PHILIPS MAGNAVOX product owner:
Thank you for your confidence in PHILIPSMAGNAVOX.You've
selected,one of the best-built,best-backedproducts availabletoday.
And we II do everythingin our power to keep you happywith your
purchasefor many years to come.
As a member of the PHILIPSMAGNAVOX "family" you're entided
to protection by one of the most comprehensive warranties and
outstanding service networks in the industry.
What's more, your purchaseguarantees you'll receive all the infor-
mation and special offers for which you qualify,pluseasyaccess to
accessories froifl our convenient home shoppingnetwork.
And most importantly you cancount on our uncompromising
commitment to your total satisfaction.
All of this is our way of sayingwelcome-and thanks for investing in
a PHILIPSMAGNAVOX product.
Sincerely,
Robert Minkhorst
President and Chief Executive Officer
RS. Remember, to get the most from your PHIUPS
MAGNAVOX product, you must return your
Warranty Registration Card within I 0 days.So
please mail it to us right now]
Know these
$afetysymbols
A This "bolt of lighming" indicates
uninsulatedmaterial within your
unitmay causean electricalshock.For
the safetyof everyonein your house-
hold, please do not remove product
€ovedn&
_kThe "exclamation point" calls
attention to fimtures for which
you should read the e_closedtit-
erature closely to prevent operating
andmaintenance problems.
WARNING: TO PREVENT FIREOR
SHOCK HAZARD, DO NOT EXFOSE
THIS EQUIPMENT TO RAIN OR
MOISTURE
CAUTION:To preventelectricshock.
matchwide bladeof plugto wide slot,
andfully insert
ATTENTION: Pour _viter les chocs
61ectdqu_, introduire la lame la plus
de la fiche dartsla borne corre-
_ndante de la prise et pousser
asqu'aufond.
For Customer Use
Enterbelowthe SerialNo.
whichis locatedonthe rear
of the cabinet.Retainthis
informationfor future refer-
ence.
Hodel No.
SerialNo,
Introduction3
Welcome to yourTV/VCR owner's manual,
This manualhassixsections: SettingUpYour"I'V/VCR;Descriptionof Controls;BasicOperations;Recording
Options;PlayingOptions;andInformationYou MayNeed.The instructionsexplainall of theTV/VCR's fea-
tures, which are listedbelow.
Features
A-13 Repeat Play
Automatic Channel Setup
Automatic Operation Features
Automatic Tracking Adjustment
Closed Caption
Daylight-SavingTime
High Quality (HQ) System
On-Screen displays in Englishor Spanish
On-Screen Menu Programming, accessible with remote control
or front panel buttons
One-Touch Recording
Real-Time Counter
Remote Control
Repeat Play
SleepTimer
SmartCIock TM
Special Effects Playback: Forward and Reverse Searching;,Still
Timer Recording
Safety Precautions
Warning.To prevent fire or shock hazard, do not expose this
equipment to rain or moisture.
FCC Warning.Any unauthorized changes or modifications to this
equipment void the user'sauthority to operate it,
ThisTV/VCR, equipped with a High Quality (HQ) system, is com-
patible with existingVideo Home System (VHS) equipment
Philips Consumer Electronics Company recommends that
you use only video cassette tapes that have been tested and
inspected for use in two, four, six, and eight hour VCRs, and which
are labeled with the _ The use of tapes that have not
been inspected for use in _vo, four, six, and eight hourVCRs may
result in poor picture quality and excessive deposits on the video
heads, which may not be covered by the warranty if damage
OCCURS.
Note to the CableTV System Installer:This reminder ispro-
videdto callthe Cable'lV systeminstallersattention to Article
820-40 of the National ElectricalCode, which providesguidelinas
for proper grounding- in particular,specifyingthat the cable
groundshallbe connectedto the groundingsystemof the buildin_
as dose to the point of cableentry aspossible.
SmartCIock TM is a trademark of Philips Consumer Electronics
Company.
Copyright 1998 Philips Consumer Electronics Company. All rights
reserved.
j• Beforedoinganythingelse,record
theT1//VCR'smodel'andserialnum-
bersinthe sDacesprovidedonpage
two.Thesenumberswillhelpus
assistyou ifyouevercallforhelp,
4 TableofContents
Setting UpYour TV/VCR
Introduction .......................................................... 3
Table of Contents ...................................................... 4
Before Using the TV/VCR ................................................ 5
Hooking Up the TV/VCR .............................................. 6 - 7
Turning On the TV/VCR ................................................. 8
LanguageSelection ..................................................... 9
Automatic Channel Setup ........................................... 10 - II
Setting the Clock .................................................. 12 - 17
Daylight-Saving Time ................................................... 18
Time Zone .......................................................... 19
Description of Controls
Front Panel .......................................................... 20
Rear Panel ........................................................... 2 I
Remote Control Buttons ............................................ 22 - 23
Adjusting the Picture Controls ....................................... 24 - 25
On-Screen Status Displays............................................... 26
Reminder ........................................................... 27
Basic Operations
Playing .............................................................. 28
Recording ........................................................... 29
Recording Options
One-Touch Recording .................................................. 30
Rerecording (Tape Duplication) ........................................... 3I
Timer Recording .................................................. 32 - 35
Defeat Recording ..................................................... 36
Playing Options
Setting the SleepTimer ................................................. 37
Closed Caption ................................................... 38 - 39
Volume Bar ........................................................... 40
Repeat Play ...;. ..................................................... 4I
A - B Repeat Play .................................................. 42 - 43
Real-Time Counter Memory ............................................. 44
Automatic Operation Features ........................................... 45
PlaybackOptions ..................................................... 46
InformationYou May Need
Specifications/ Glossary ................................................ 47
Helpful Hints ..................................................... 48 - 49
LimitedWarranty ..................................................... 50
Index ............................................................... 5 I
SuppliedAccessories ................................................... 52
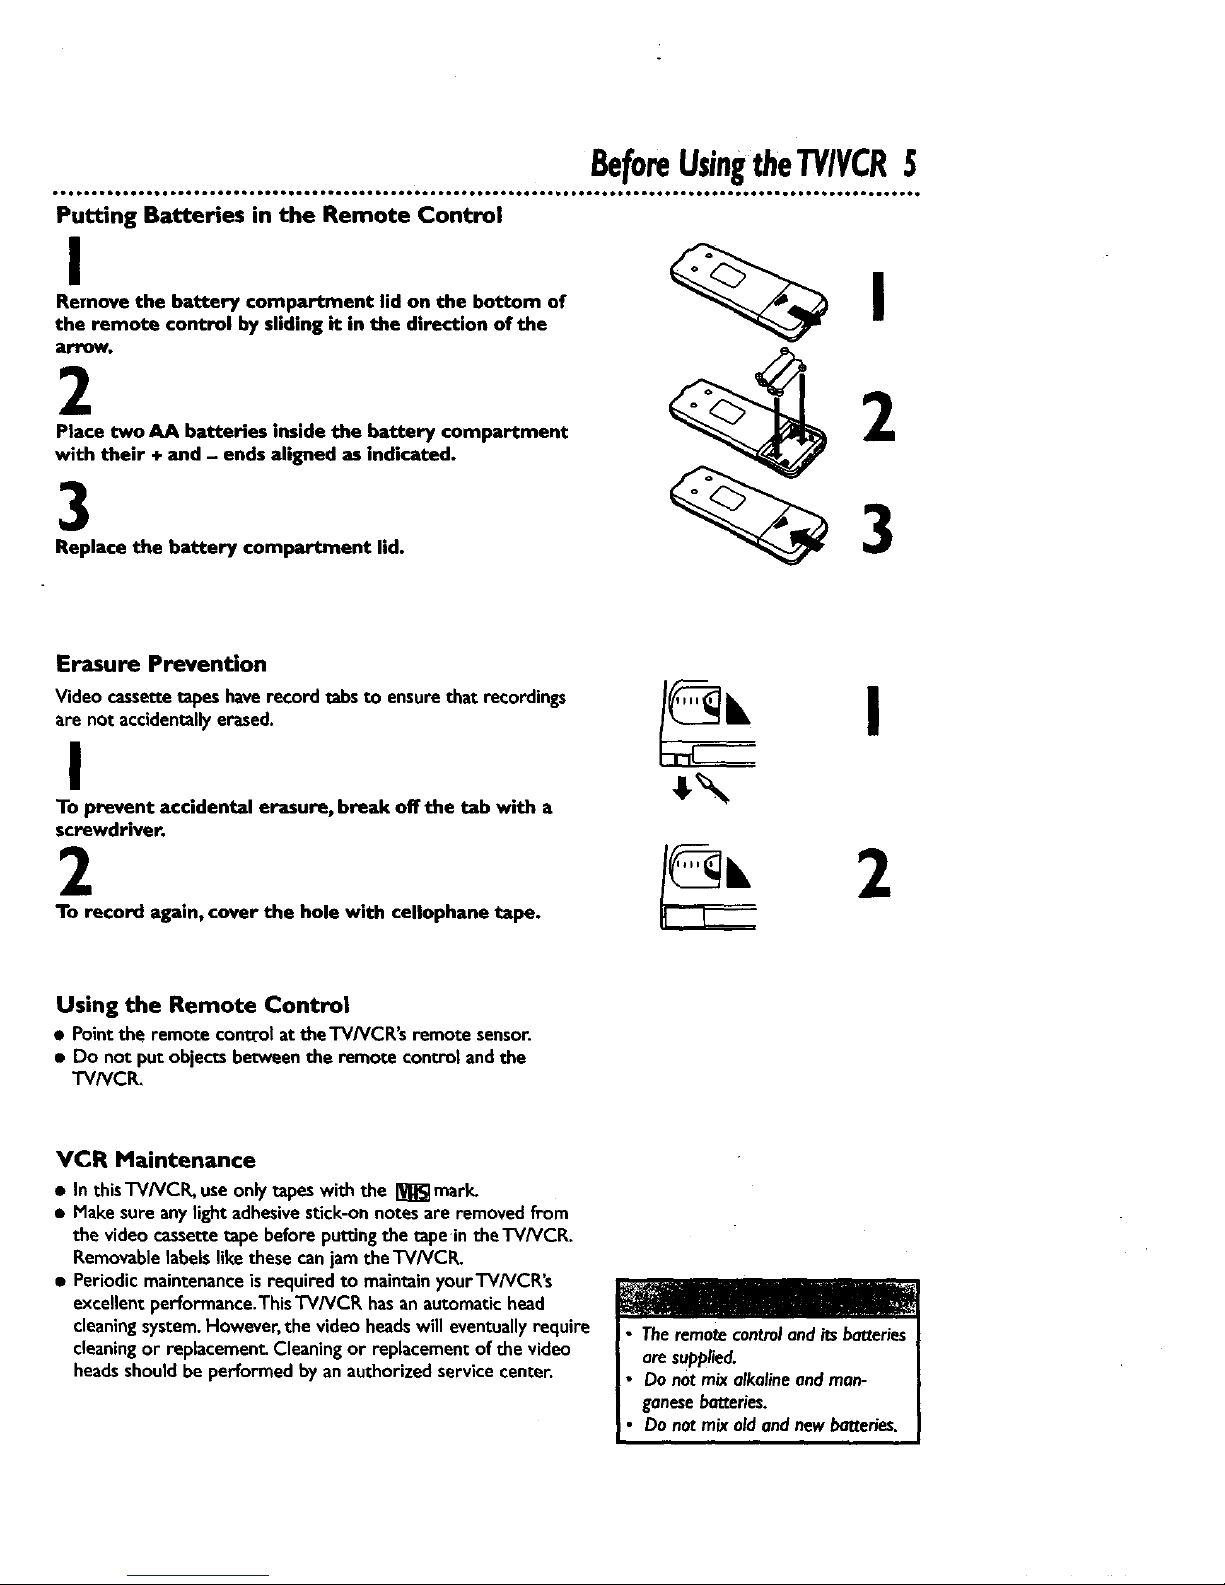
BeforeUsingtheTV/VCR5
Putting Batteries in the Remote Control
Remove the battery compartment lid on the bottom of
the remote control by sliding it in the direction of the
arrow.
2 2
Place two AA batteries inside the battery compartment
with their + and - ends aligned as indicated.
3
Replace the battery compartment lld.
Erasure Prevention
Video cassette tapes have record tabs to ensure that recordings
are not accidentally erased.
I
To prevent accidental erasure, break off the tab with a
screwdriver.
I
2 z
To record again, cover the hole with cellophane tape.
Using the Remote Control
• Pointthe remote control at theTWVCR's remote sensor.
• Do not put objectsbetweenthe remote control andthe
"I'VNCI_
VCR Maintenance
a In thisTV/VCR, useonly tapes with the _ mark.
• Nake sureany lightadhesivesUck-onnotes are removed from
the video cassettetape beforeputtingthe tape intheTV/VCR.
Removablelabelslikethese canjam the TV/VCR.
• Periodicmaintenance is required to maintainyourTV/VCR's
excellentperformance.ThisTV/VCR hasanautomatichead
cleaningsystem.However,the video headswill eventuallyrequire
cleaningor replacement Cleaningor replacementof the video
headsshouldbe performedbyanauthorizedservicecenter.
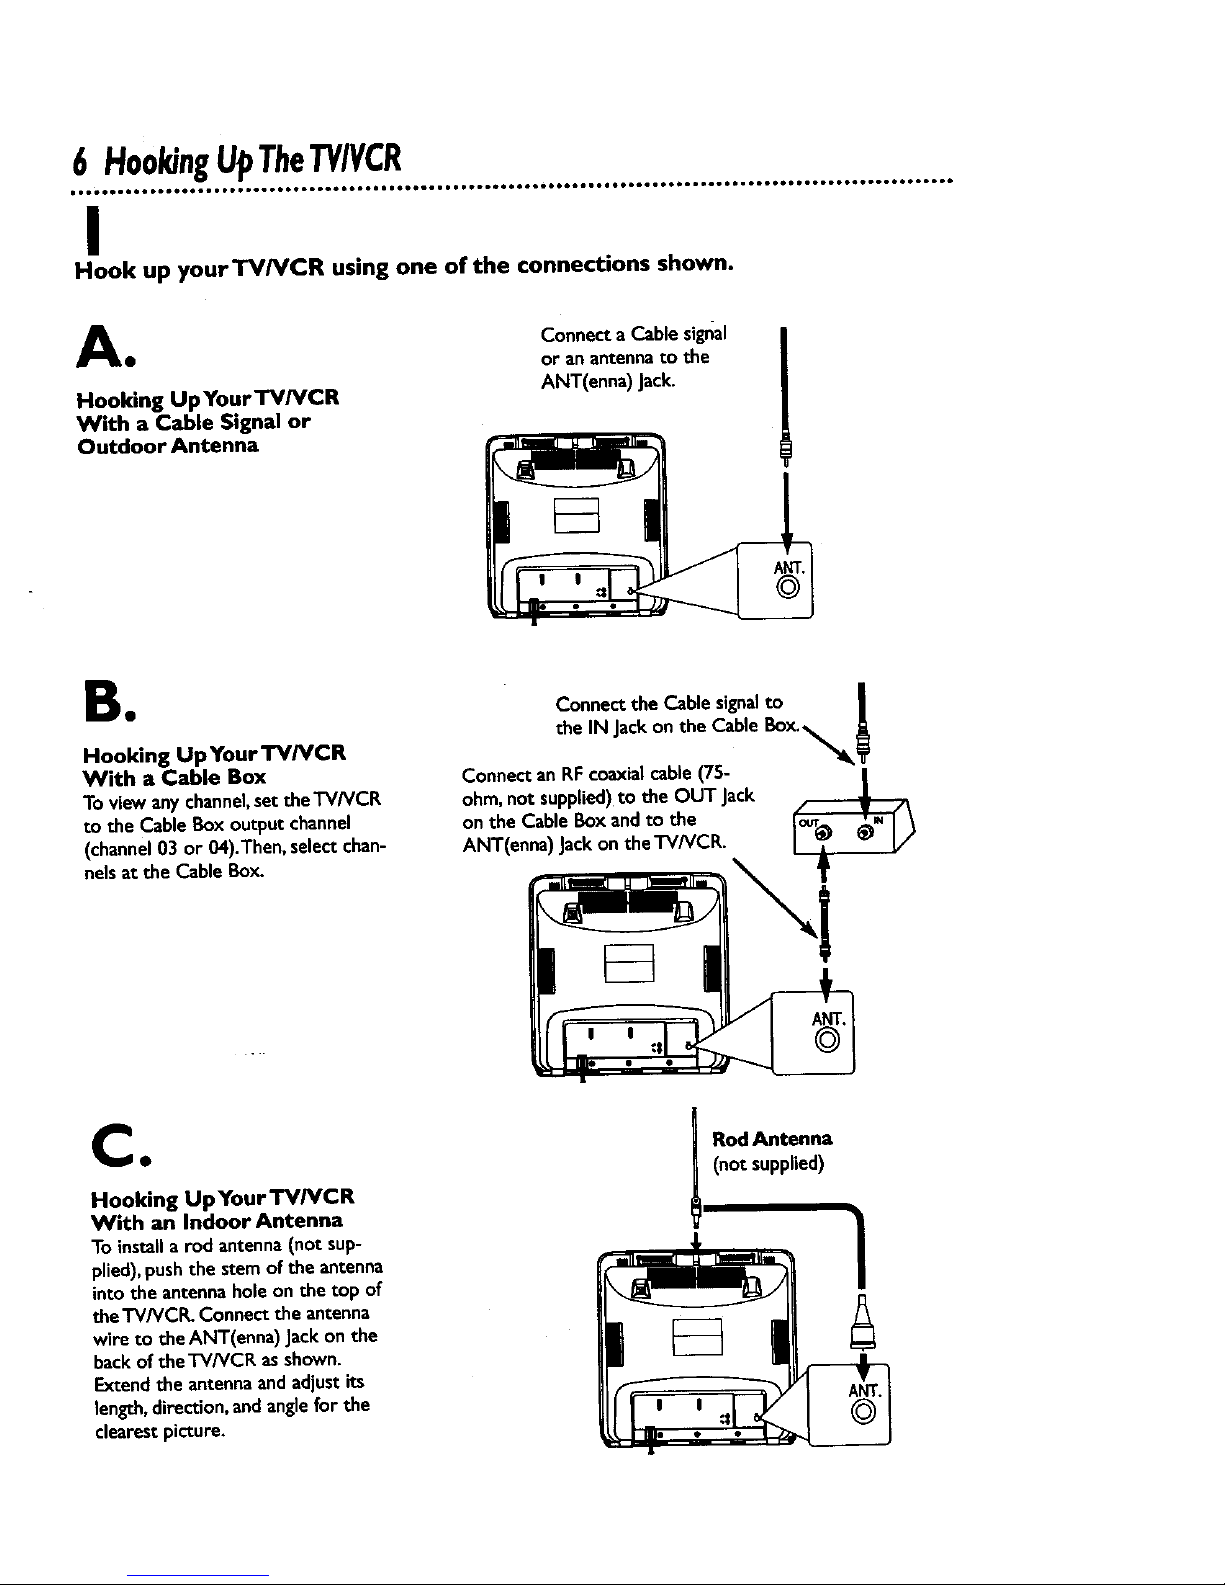
6 H001dngUpTheTV/VCR
I
Hook up yourTV/VCR using one of the connections shown.
A Connecta Cable signal
• or a/1 antenna to the
Hooking UpYourTV/VCR ANT(enna) Jack.
With a Cable Signal or
Outdoor Antenna
B•
Hooking UpYour "FVNCR
With a Cable Box
To viewany channel,settheTV/VCR
to the CableBoxoutput channel
(channel03 or 04).Then, select chan-
ne)sat the CableBox.
|
Connect the Cable signalto , l
the IN Jackon the Cable Box.
Connectan RFcoaxialcable (75-
ohm,not supplied)to the OUT Jack
on the CableBox and to the
ANT(enna) Jackonthe TV/VCR.
CO
Hooking Up Your'I'V/VCR
With an Indoor Antenna
To installa rod antenna(not sup-
plied),pushthe stemof the antenna
into the antennaholeon the top of
the'I'V/VCR. Connect the antenna
wire to the ANT(enna) Jackon the
backof the'l-V/VCK asshown.
Extendthe antennaandadjustits
length,direction,andanglefor the
clearestpicture.
I RodAntenna
(not supplied)
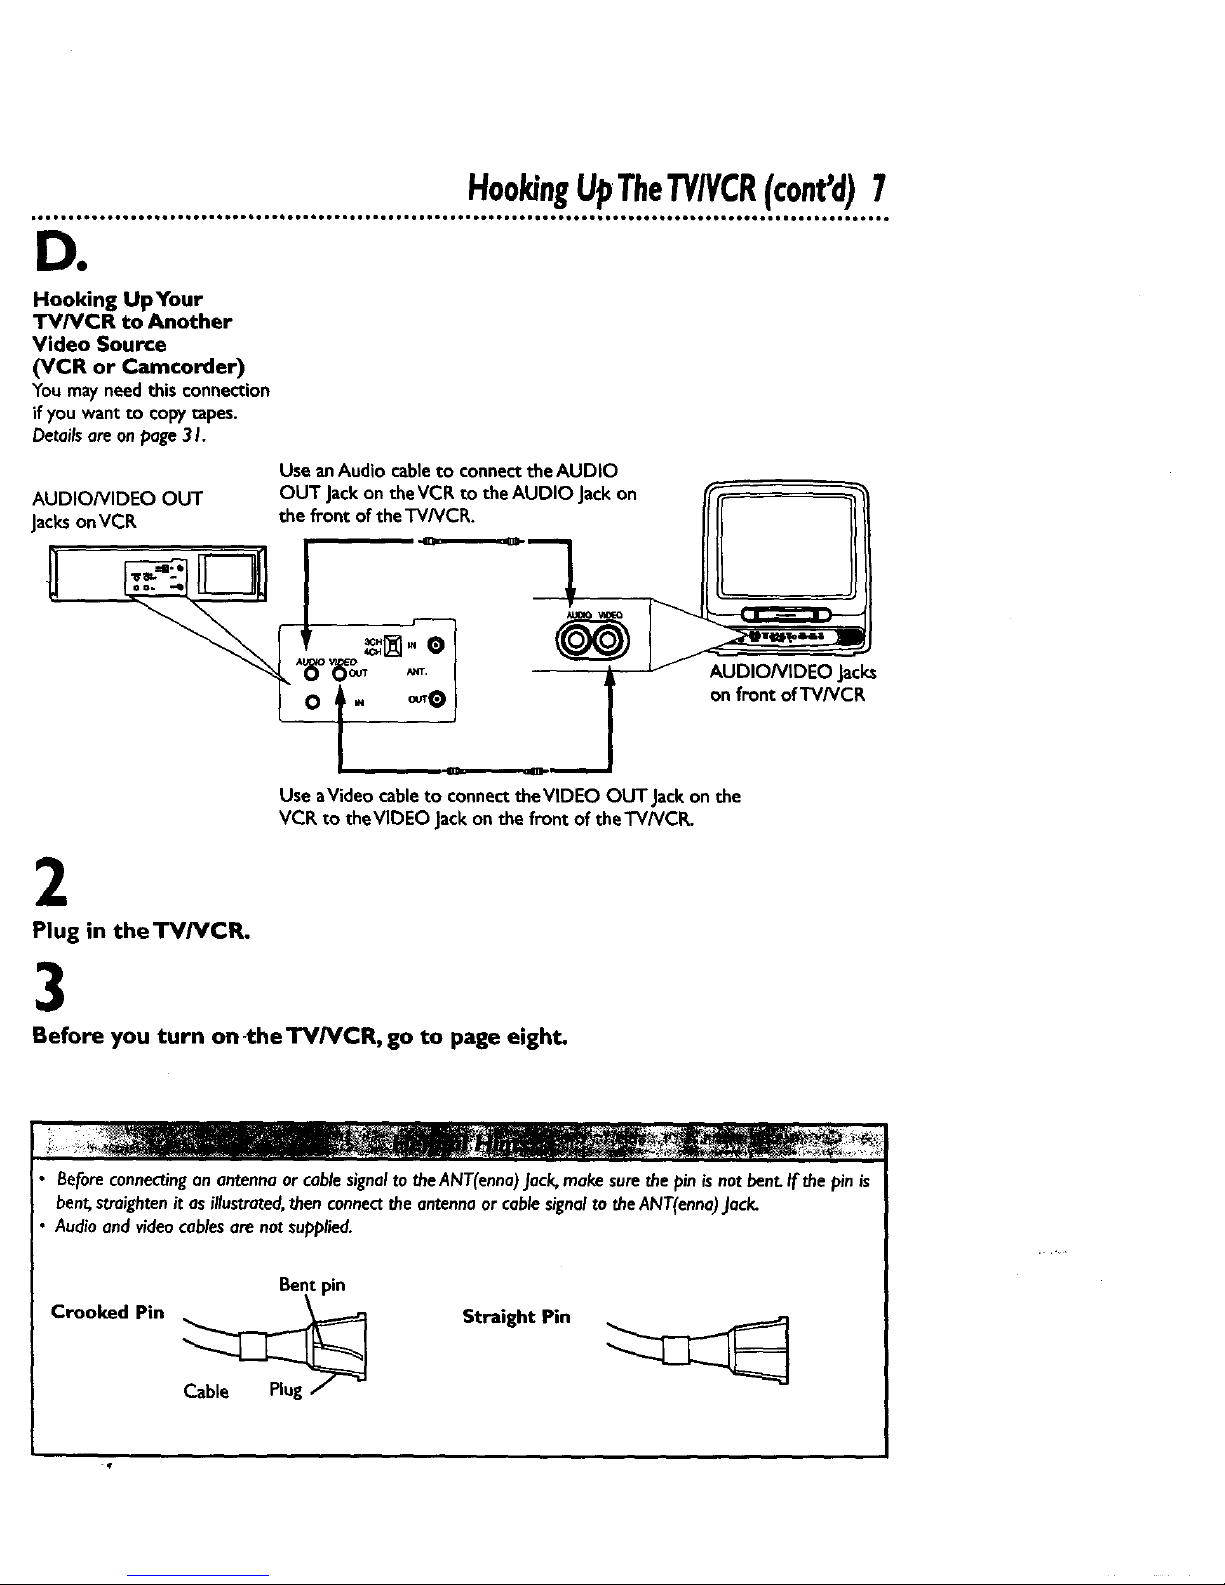
H00kingUpTheTY/VCR(cant'd)7
DO
Hooking UpYour
TV/VCR to Another
Video Source
(VCR or Camcorder)
Youmayneed this connection
if youwant to copytapes.
Detailsareonpage.3I.
AUDIO/VIDEO OUT
JacksonVCR
Use anAudio cable to connect the AUDIO
OUT Jackon the VCR to the AUDIO Jack on
the front of the TV/VCR.
AUDIONIDEO Jacl_
on front of TV/VCR
Use aVideo cableto connecttheVlDEO OUTJack on the
VCR to theVlDEO Jackon the front of the TV/VCR.
2
Plug in the TV/VCR.
3
Before you turn on-the'rV/VCR, go to page eight.
Beforeconnectinganantennaorcablesignalto theANT(enna)Jack,makesurethe pin isnotbent.If the pinis
bent,straightenit as illustrated,thenconnectthe antennaorcablesignalto theANT(enna).lack.
Audioand videocablesarenotsupplied.
Crooked Pin
Bent pin
Straight Pin
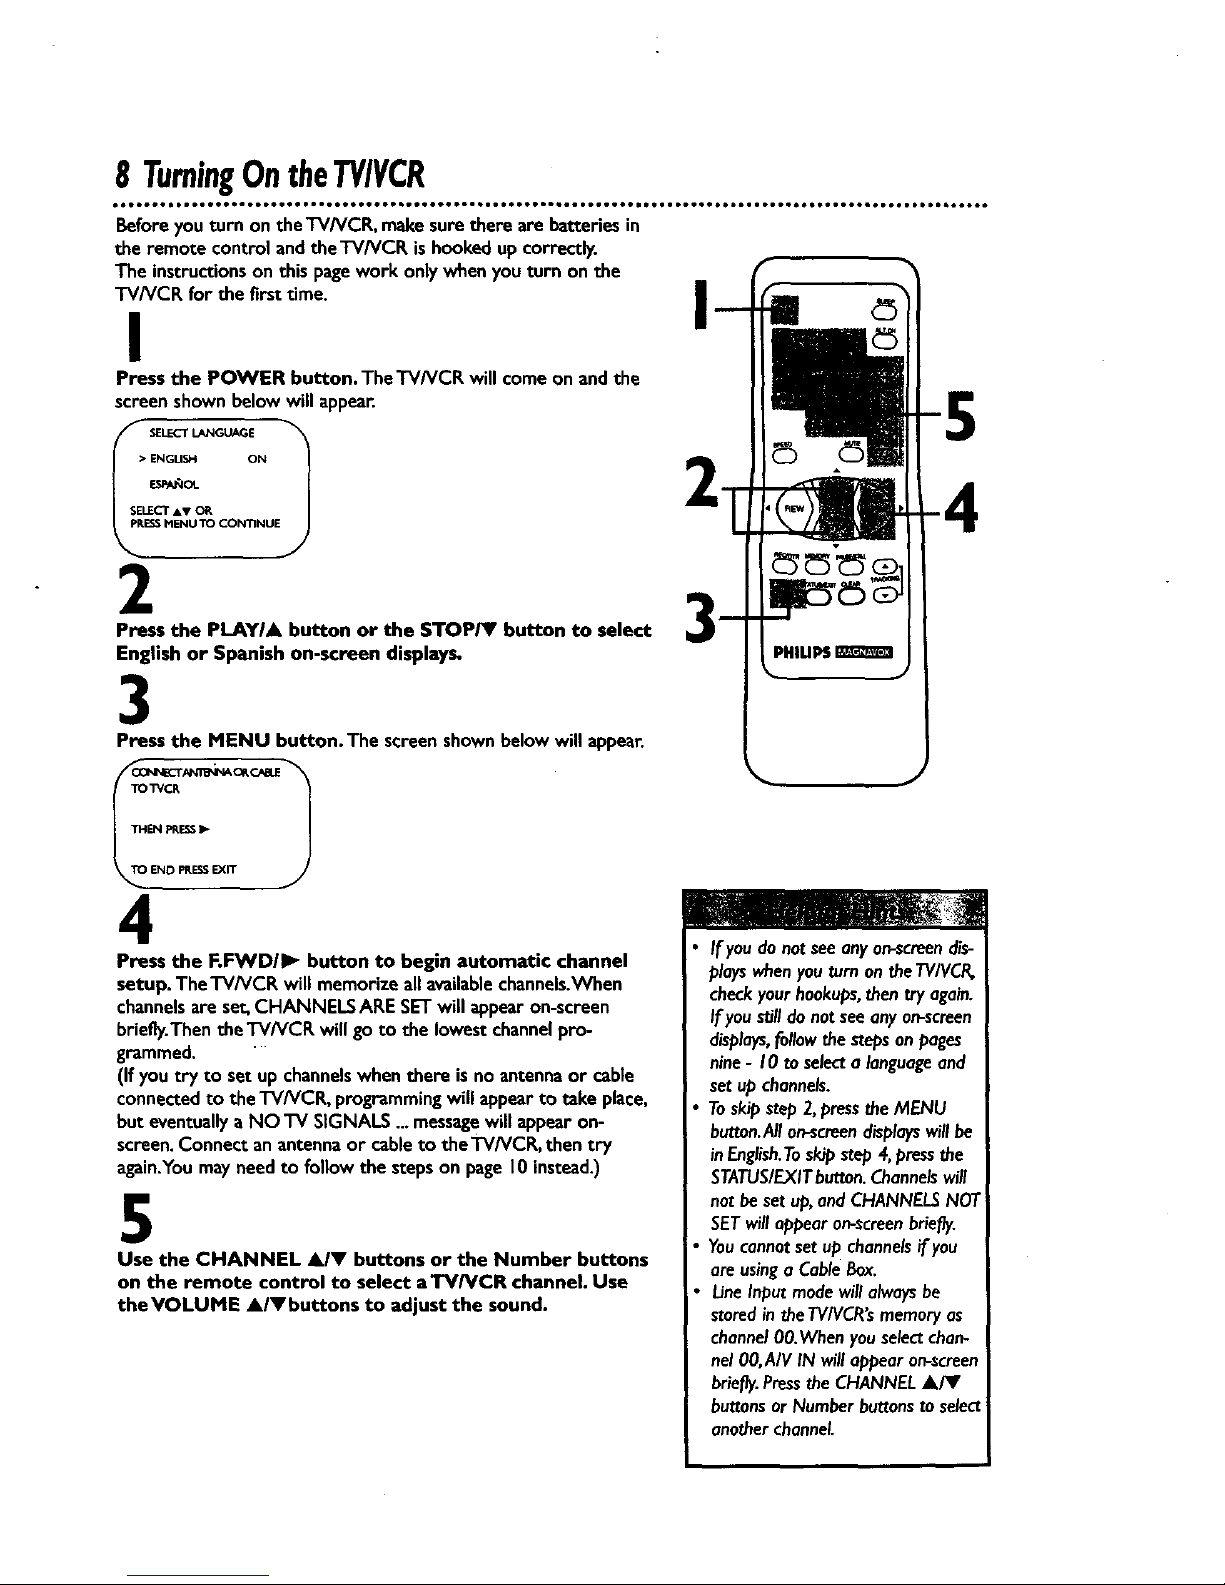
8 TurningOntheTV/VCR
• • • • • • • * • • • • • • • • • • • • • • • • • • • • • • • • • • • • • • • • • o• • • • • • • • • • • • • • • • • • • • • • • • • • • • • • • • • • • • • • • • • • • • • • • • • • • • • • • • • • • • • • • • • • • • •
Beforeyou turn on theTV/VCR, makesurethere are batteriesin
the remote control andtheTV/VCR is hookedup correctly.
The instructionson thispagework only when youturn on the
TV/VCR for the firsttime.
I
Press the POWER button.TheTV/VCR will comeon and the
screenshownbelow will appear.
i-I
• ENGUSH ON
SELECT &V OR
ESSMENU TO CONTINUE
2
Press the PLAYIA button or the STOP/I' button to select
English or Spanish on-screen displays.
3
Press the MENU button. The screenshownbelowwill appear.
TO'_CR
4
Press the F.FWD/I_ button to begin automatic channel
setup. The'I-V/VCP,will memorizeall availablechannels.When
channelsare set,CHANNELS ARESETwill appear on-screen
briefly.Thenthe TV/VCE willgo to the lowestchannelpro-
grammed.
(If youtry to set up channelswhenthere is no antennaor cable
connectedto the TV/VCR, programmingwillappear to take place,
but eventuallyaNO TV SIGNALS...messagewill appear on-
screen.Connectan antennaor cableto theTVh/CR, thentry
again.Youmayneedto followthe steps on page10instead.)
5
Use the CHANNEL AIY buttons or the Number buttons
on the remote control to select aTV/VCR channel. Use
theVOLUME A/Vbuttons to adjust the sound.
If youdo notseeanyon-screendis-
playswhenyouturn on theTV/VCR,
checkyour hookups,then try again.
Ifyou _11do not seeany on-screen
displays,followthe stepsonpages
nine- 10to selecta languageand
set up channels.
Toskipstep 2,pressthe MENU
button.Anon-screendisplayswill be
inEnglish.Toskip step4,pressthe
STATUS/EXITbutton.Channelswill
not beset up,andCHANNELSNOT
SETwill appear on-screenbriefly.
Youcannotsetup channelsif you
are usinga CableBox.
LineInputmodewill alwaysbe
storedintheTVIVCR'smemoryas
channel00.Wbenyou selectchan-
nel 00,AIV IN will eppearon-screen
briefly.Pressthe CHANNELA/Y
buttonsor Number buttonsto select
anotherchannel.

LanguageSelection9
Followthe stepsbelowto changethe languageofthe on-screen
displays.
I
Press the MENU button.
VCRpROGRAM
_E_IINDE_.
2
Press the PLAYI& button or the STOP/Y button to select
PRIM. SETUR Then, press the RIWVDII_ button.
I P_F_RY SETUP -
• SELECTL_I_.JA_
TO END _.r_ _rr
3
Press the PLAYI& button or the STOP/Y button to
choose SELECT LANGUAGE. Then, press the F.FWDII_
button.
• ENGtI._I-I INN
SELECT AV
4
Press the PLAYI& button or the STOPIV button to select
ENGLISH or ESPA_IOL (Spanish).
5
Press the STATUSIEXIT button.
• If youaccidentallyselectSpanish
• or_screendisplaysandneedEnglish
on-screendisplays:
I) Pressthe MENU button,
2) PressthePLAY/&button or the
STOP/_I'buttontoselectPREPARA-
CION,thenpressthe
EFWD/I_ button.
3) PressthePLAY/&button orthe
STOP/_Fbuttonto selectSELEC-
CIONIDIOMA,thenpressthe
EFVVDII_ button.
4) PressthePLAY/& buttonorthe
STOP/Y buttontose/ectENGL/SH.
5) Pressthe STATUS/EXITbutton.
I0 AutomaticChannelSetup
AlthoughtheTV/VCR mayautomaticallymemorize the channels
you receivewhen you turn it on for the first time,you mayset up
channelsagainbyfollowingthe stepsbelow.
I
Press the MENU button.
Wait for theTV/VCR to set up
channels.
2-4
TO ADJUST PRE_ -ql I I_
2
J
Pre_ the PLAYI& button or the STOPTV' button to select
INPUT. Press the REW(ind)/_I button or the F.FWD/I_
button until ANTENNA or CABLE (whichever you have)
appears beside INPUT.
AD_T F_ESS_q/_ "_
_pVCR _IV_ I J
3
Press the STOP/V button repeatedly to select PRIM•
SETUP, then press the F.F_NDII_ button.
I_ PRIMARYsE'nJP
• SELECTLANGUAGE
AUTO_ROG_Mt_NG
CH MEMORYREVIEW
SELECT_sv CHOO_ _-
END PRE_ _.
4
Press the PLAYIA button or the STOP/V button to select
AUTO PROGRAMMING, then press the F.FWDII_ but-
ton. AUTO PROGRAMMING MEMORIZED CH ...will appearon-
screen.The "/'V/VCRwill memorize a/Iavailablechannels.
5
Wait for a few minutes._/hen setupis complete,CHANNELS
ARE SETwill appearon-screen.Thenthe programmingof the low-
est channelnumber placedinthe'l'V/VCR's memorywill appear
on-screen.Now, when you pressthe CHANNEL _ buttons,you
willscanonlythrough channelsyou receive.
LineInputmodewill alwaysbe
storedin theTV/VCR'smemoryas
channel00.Youcannotdeleteit.
Youcannotprogramchannelswhen
theTV/VCRisonchannel00 (A/V
INPUTwillappearbesideINPUTat
step2).SelectANTENNAor CABLE
at step 2.
AutomaticChannelSetup(cant'd)II
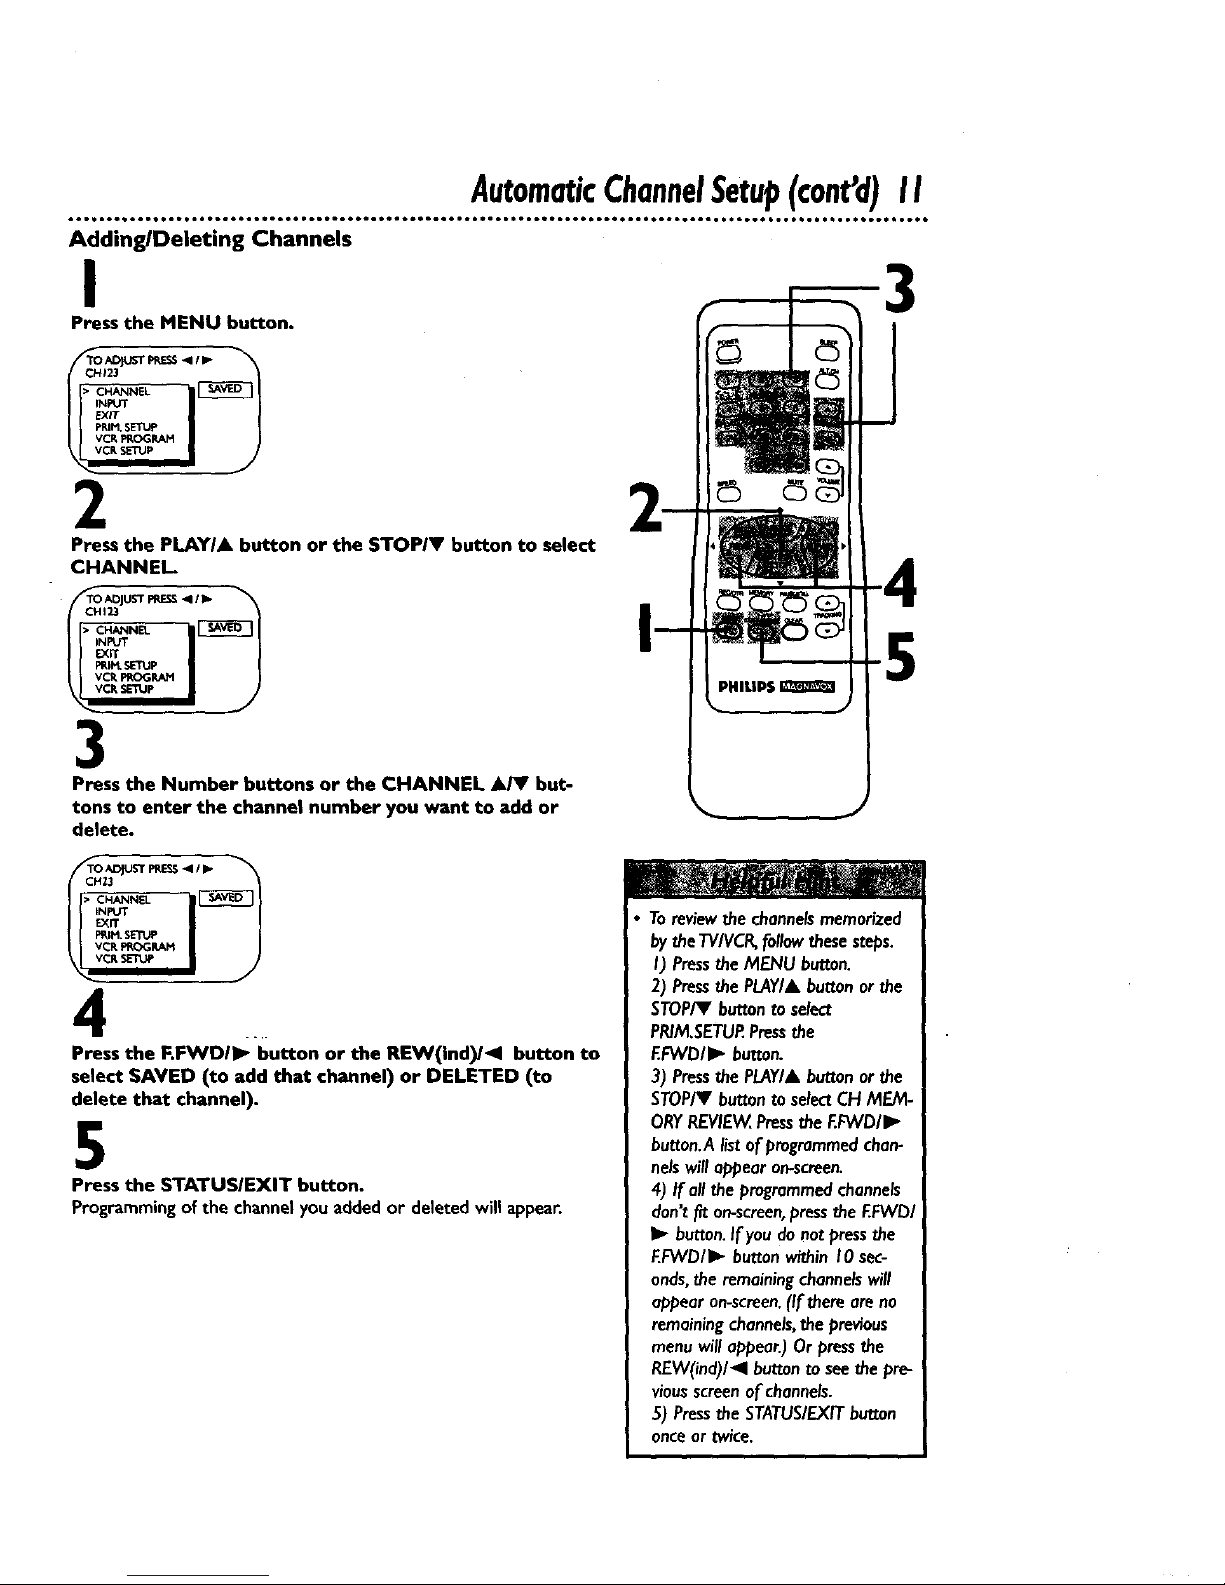
Adding/Deleting Channels
I
Press the MENU button.
2
Press the PLAY/A button or the STOP/V button to select
CHANNEL
TO ADJUST PRE_ _111_
CHI23
• ICN_L_NEL
3
Press the Number buttons or the CHANNEL A/V but-
tons to enter the channel number you want to add or
delete.
5
4 ..
Press the F.FWDII_ button or the REW(ind)/411 button to
select SAVED (to add that channel) or DELETED (to
delete that channel).
5
Press the $TATUSIEXIT button.
Programming of the channel you added or deleted will appear.
Toreviewthe channelsmemorized
bytheTVIVCR,followthesesteps.
I) Pressthe MENU button.
2) PressthePLAY/& buttonorthe
STOP/Y buttonto select
PR/M.SETUP.Pressthe
F.FWDII_ button.
3) Pressthe PLAY/Abuttonorthe
STOP/V buttontoselectCHMEM-
ORYREVIEW,Pressthe EFVVD/I_
hutton.Alistofprogrammedchan-
nelswill appear on-screen.
4) If all theprogrammedchannels
don'tfit on-screen,pressthe EFVVDI
I1_button.If youdonotpressthe
EFWD/I_ buttonwithinI0 sec-
onds,the remainingchannelswill
appear on-screen.(If thereareno
remainingchannels,the previous
menuwill appear.)Orpressthe
REW(ind)/_l buttonto seethe pre-
viousscreenof channels.
5) Pressthe STATUSIEXITbutton
onceor twice.
12SettingtheClock
There arethree waysto set the clock:Manually,withAutomatic
PBSChannelSelection,or with HanualPBSChannelSelection.
With manualclocksettin_youtell the'FV/VCR the current time.
With Automatic or ManualPBSChannelSelection,the'I'V/VCR
getsthe time from your localPBSstation.If you useeither Manual
PBSChannelSelection or Automatic PBSChannelSelection,follow
the stepson page 19 to havethe'i-V/VCR maintain the clock
accordingto yourTime Zone.
To set the clock manually,follow the stepson pages12-13.To set
the clockusingAutomaticPBSChannelSelection,follow the steps
on pages14- 15.Toset the clockusingHanualPBSChannel
Selection,follow the stepson pages16- 17.
Before you begin,makesure:
• TheTV/VCR is hookedup andturned on.
• Channelsare set up.
• You makeeachentry within60 secondsof the previousentry.
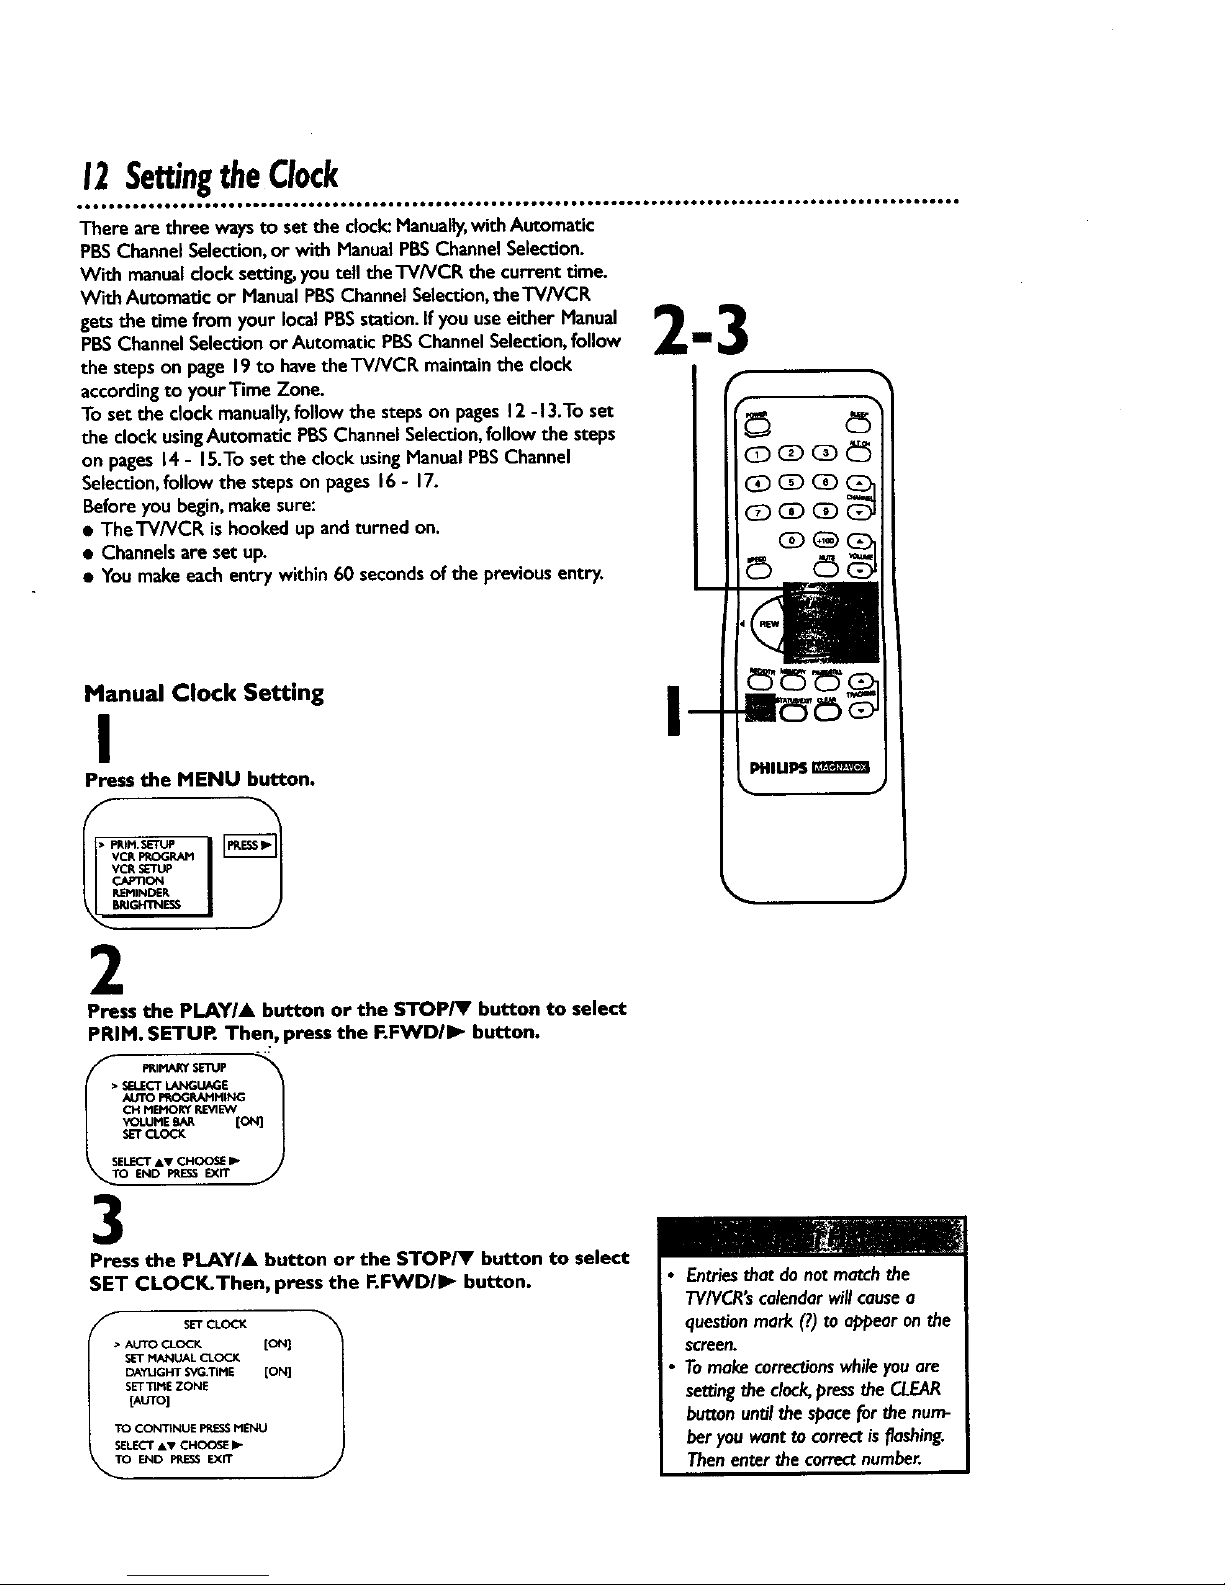
Manual Clock Setting
I
Press the MENU button.
f
VCR_E_.M
REMINDER
_lGiq'rNEr_
2
Press the PLAY/A button or the STOP/V button to select
PRIM, SETUR Then, press the FoFWD/_ button.
..r
VOLUMEEAR [
SELECTAV CH_ I_
3
Press the PLAYIA button or the STOP/T button to select
SET CLOCK.Then, press the F.FWD/I_ button.
SET CLOCK
• AUTO CLOCK [ON]
SET MANUAL CLOCK
DAYIJGHT SVG.TIME [ON]
SET 33ME ZONE
[AUTO]
TO CONTINUE PRESSMENU
SELECT &V CHOO_E
END PRESSExn"
J
I
Entriesthat do notmatchthe
"I'V/VCR'scalendarwillcausea
questionmark (7.)to appearonthe
screen.
Tomake toffee'donswhileyouare
settingthe clock,pressthe CLEAR
buttonuntJIthespacei0r the num-
beryouwanttocorrectisflashing.
Thenenterthe correctnumber.
4
_ IANUAL CLOCK
DATE --/--/--
END PRESSEXIT
SettingtheCIockIcon d) 13
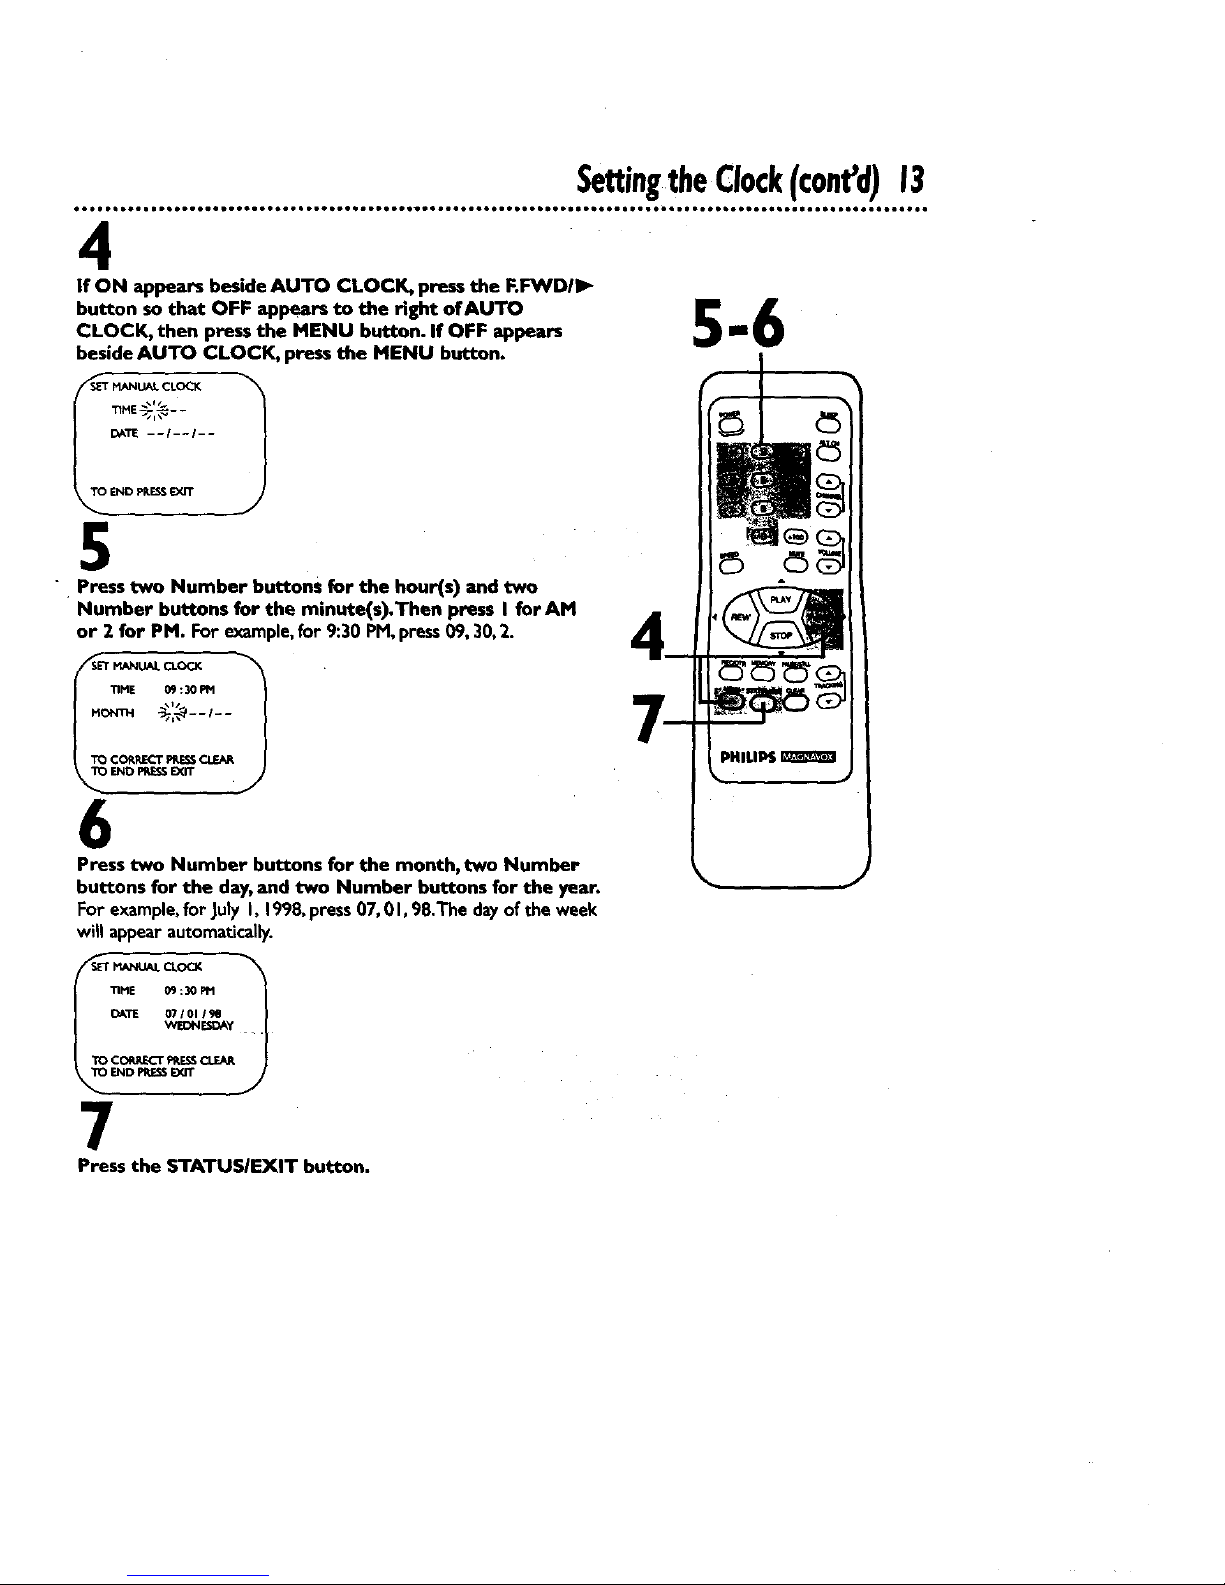
If ON appears beside AUTO CLOCK, press the F.FVYDIII_
button so that OFF appears to the fight of AUTO
CLOCK, then press the MENU button. If OFF appears
beside AUTO CLOCK, press the MENU button.
-]
5
" Press two Number buttons for the hour(s) and two
Number buttons for the minute(s).Then press I forAM
or 2 for PM. For example,for 9:30 PM,press09, 30,2.
J
TIME 09:30 PM
TO CORRECT_J_ CLEAR
_ ENOF_ESSEXIT
6
Press two Number buttons for the month, two Number
buttons for the day,and two Number buttons for the year.
For example,for July I, 199_ press07, 0I, 98.The dayof the week
will appearautomatically.
_ MANUALCLOCK t
11tlE 09:30 Ptl
DATE 07101 19Q
VVEDNESDAy
TO CORRECTFRESSC1_AP.
ENDPMSSEYJT
7
Press the $TATUSIEXIT button.

14Se_ngtheClock(cont'd)
Automatic PBS Channel Selection
I
Press the MENU button.
• PRIM,SETUP
VCR _OG_I
2
Press the PLAYIA button or the STOP/I' button to select
PRIM. SETURThen, press the F.F_fD/I_ button.
_E _ [
r_.LE_r AV _ _
3
Press the PLAYIA button or the STOP/V button to select
SET CLOCK.Then, press the I=.I:_NDII_ button.
SET CLOCK "_
• AUTOCI.OCK [ON]
SET M_'qUAL CLOCK
DAYLIGHTSVC_TIME [ON]
s_-r "i'IME ZONE
[AUTO]
TO CO_TIN_E PRESSMFJqU
SELECTAV CHOOSEI,"
TO END _ EXIT
4
If ON appears beside AUTO CLOCK, press the MENU
button. If OFF appears beside AUTO CLOCK, press the
F.FWDII_ button so that ON appears to the right of
AUTO CLOCK,then press the MENU button.
I
ITO _ CI.OCK 1
AUTO CLOCK IJ_ES
FSSCHANNEL DATA
• S_PBSCH. AUTO
SET PBS CH. MANUAL
SEL.r'cT&,V CHOOSE I_
ENID PRESS EXiT
SettingtheClock(cant'd)15
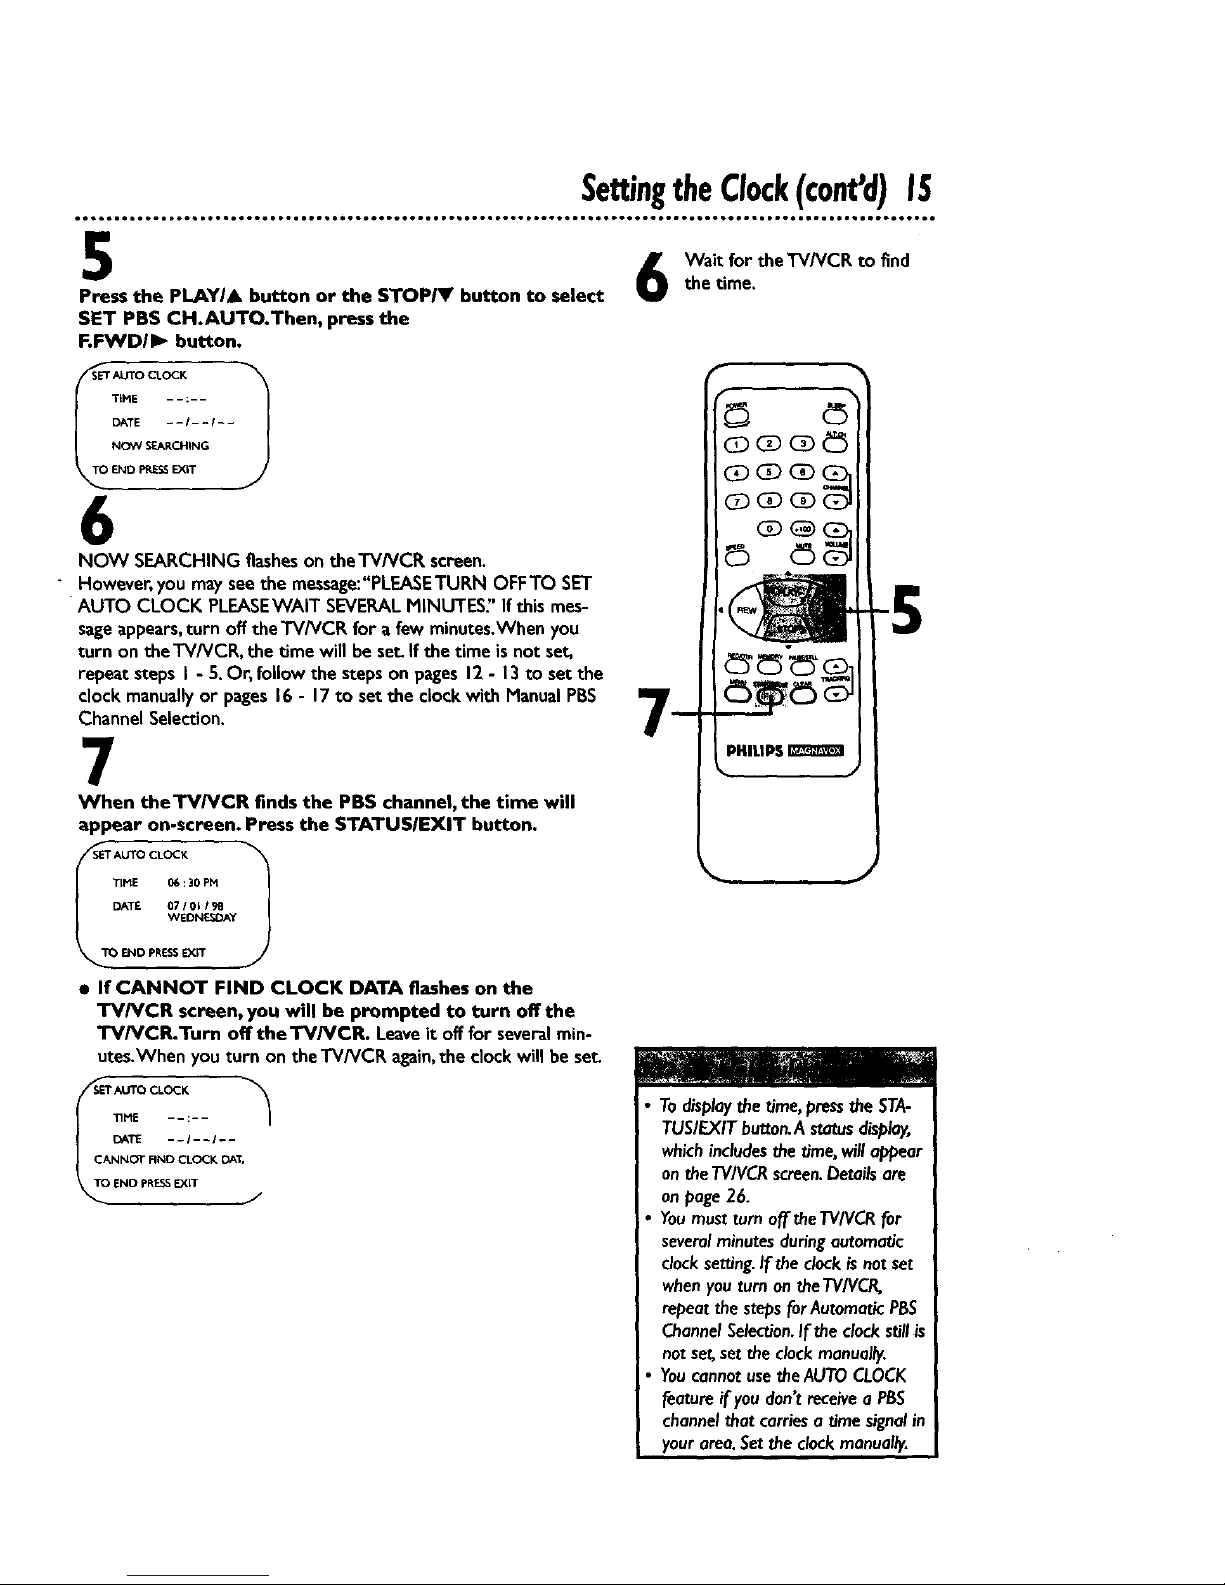
5
Press the PLAYI. button or the STOP_t' button to select
SET PBS CH.AUTO.Then, press the
F.FWD/I_ button.
Wait for theTV/VCR to find
the time.
TiME - - :- -
DATE - - I - - I - -
NO_' SEARCHING
END PRESSEXiT
6
NOW SEARCHING flashes on theTVNCR screen.
However, you may see the message:"PLEASETURN OFFTO SET
AUTO CLOCK PLEASEWAiT SEVERAL MINUTES" If this mes-
sage appears, turn off the TV/VCP, for a few minutes.When you
turn on the TV/VCR, the time will be set. If the time is not set,
repeat steps I - 5. Or, follow the steps on pages 12 - 13 to set the
clock manually or pages 16 - 17 to set the clock with Manual PBS
Channel Selection.
r
mm®
CD C]DC_ _
(Z) CZ)(E)
7
When theTV/VCR finds the PBS channel, the time will
appear on-screen. Press the STATUSIEXIT button.
1
TIME 06:30 PH
DATE 07/01/9B
WEDNE_3AY
ENO PRESSEXiT
• If CANNOT FIND CLOCK DATA flashes on the
TV/VCR screen, you will be prompted to turn offthe
TV/VCR.Turn off the'W/VCR. Leaveit off for severalmin-
utes.Whenyou turn on the TV/VCR again,the clockwill be set.
r AUTO CLOCK
TIMDA :;,
|
CJ ClNNOT FIND CLOCK [3At,
ENO pRESSEXIT J
Todisplaythe time,pressthe STA-
TUSIEXITbutton.A statusdisplay,
which includesthe time,will appear
on theTVIVCRscreen.Detailsare
on page26.
Youmustturn off theTV/VCRfor
severalminutesduringautomatic
clocksetting.If theclockisnotset
whenyou turn on theTV/VCR,
repeatthe stepsforAutomaticPBS
ChannelSelection.If the clockstillis
notset,set the clockmanually.
YoucannotusetheAUTOCLOCK
feature if you don't receivea PBS
channelthatcarriesa time signalin
yourarea.Setthe clockmanually.

16SettingtheClock(cont'd)
Manual PBS Channel Selection
I
Press the MENU button.
REMINDER
B_NIN_I
2
Press the PLAY/A button or the STOP/V button to select
PRIM. SETUR Then, press the F._D/IP. button.
• SELECTL_K_[
AI3TO PROGRAMMING
CH MB<_'_ R_4_
VOLUMEBAR [ON]
SET CLOCK
SELECTAT CI-_OOSlEI_"
END PRESS EXIT
3
Press the PLAYIA button or the STOPIY button to select
SET CLOCK.Then, press the F.FWDII_- button.
f
SETCL<X:K
• AUTO CLOCK
OAYUG_r _ME [ON]
SETTtNE ZONE
[AUTO]
TO CONTINUE PRESSMENU
TO END PRESSEXIT
......
If ON appears beside AUTO CLOCK, press the MENU
button. If OFF appears beside AUTO CLOCK, press the
F.FWD/I_ button so that ON appears to the right of
AUTO CLOCK, then press the MENU button.
ISTO UTO CLOCK 1
._.rro CLOCK LisES
CHANNEL DATA
• SETPI_SCH. AUTO
SET PBS CH. MANUAL
SELECT &V CHOOSE !_
END PPJESSEX,'T
 Loading...