

Magnavox 9P6440C1, 9P6040C102, 9P6040C1, 9P5540C1, 9P5040C1 Owner’s Manual
Instructions for use
9P5040C I
9P5540C I
9P6040CI
9P6440C I
MAGNAVOX

Once your PHILIPS MAGNAVOX purchase is registered, you're eligible to receive all the privileges of
owning a PHILIPS MAGNAVOX product. So complete and return the Warranty Registration Card
enclosed with your purchase at once. And take advantage of these important benefits.
Congratulations on your purchase,
and welcome to the "family!"
Dear PHILIPS MAGNAVOX product owner:
Thank you for your confidence in PHILIPS MAGNAVOX. You've selected one of the best-built, best-
backed products
available today. And we'll do everything in our power to keep you happy with your purchase for many
years to come.
As a member of the PHILIPS MAGNAVOX "family," you're entitled to protection by one of the most
comprehensive warranties and outstanding service networks in the industry.
What's more, your purchase guarantees you'll receive all the information and special offers for which
you qualify, plus easy access to accessories from our convenient home shopping network.
And most importantly you can count on our uncompromising commitment to your total satisfaction.
All of this is our way of saying welcome-and thanks for investing in a PHILIPS MAGNAVOX product.
Sincerely,
Robert Minkhorst
President and Chief Executive Officer
PHILIPS
P.S. Remember, to get the most from your PHILIPS
MAGNAVOX product, you must return your
Warranty Registration Card within 10 days. So
please mail it to us right now!
Know these
safetysymbo/s
_t_, This "boltof lightning" indicatesuninsulatedmaterial withinyour traitwhich may cause an
electricalsh_"k. For the safetyof everyonein your household,please do notremovethe product
covering.
,_, The =exclamationpoint_calls attenSon1ofeaturesfor whichyou shouldread the enclosed
literatureclosely1opreventoperatingand maintenanceproblems.
WARNING: TO PREVENT FIRE OR SHOCK HAZARD, DO NOT EXPOSE THIS EQUIPMENT
TO RAIN OR MOISTURE.
CAUTION: To prevent electric shock, match wide blade of plug to wide slot, and fully insert.
ATTENTION: Pour _,_iter les choca electdques, intToduire la lame la plus large de la fiche darts la
borne correspondante de la prise et pousser jusqu'as fond.
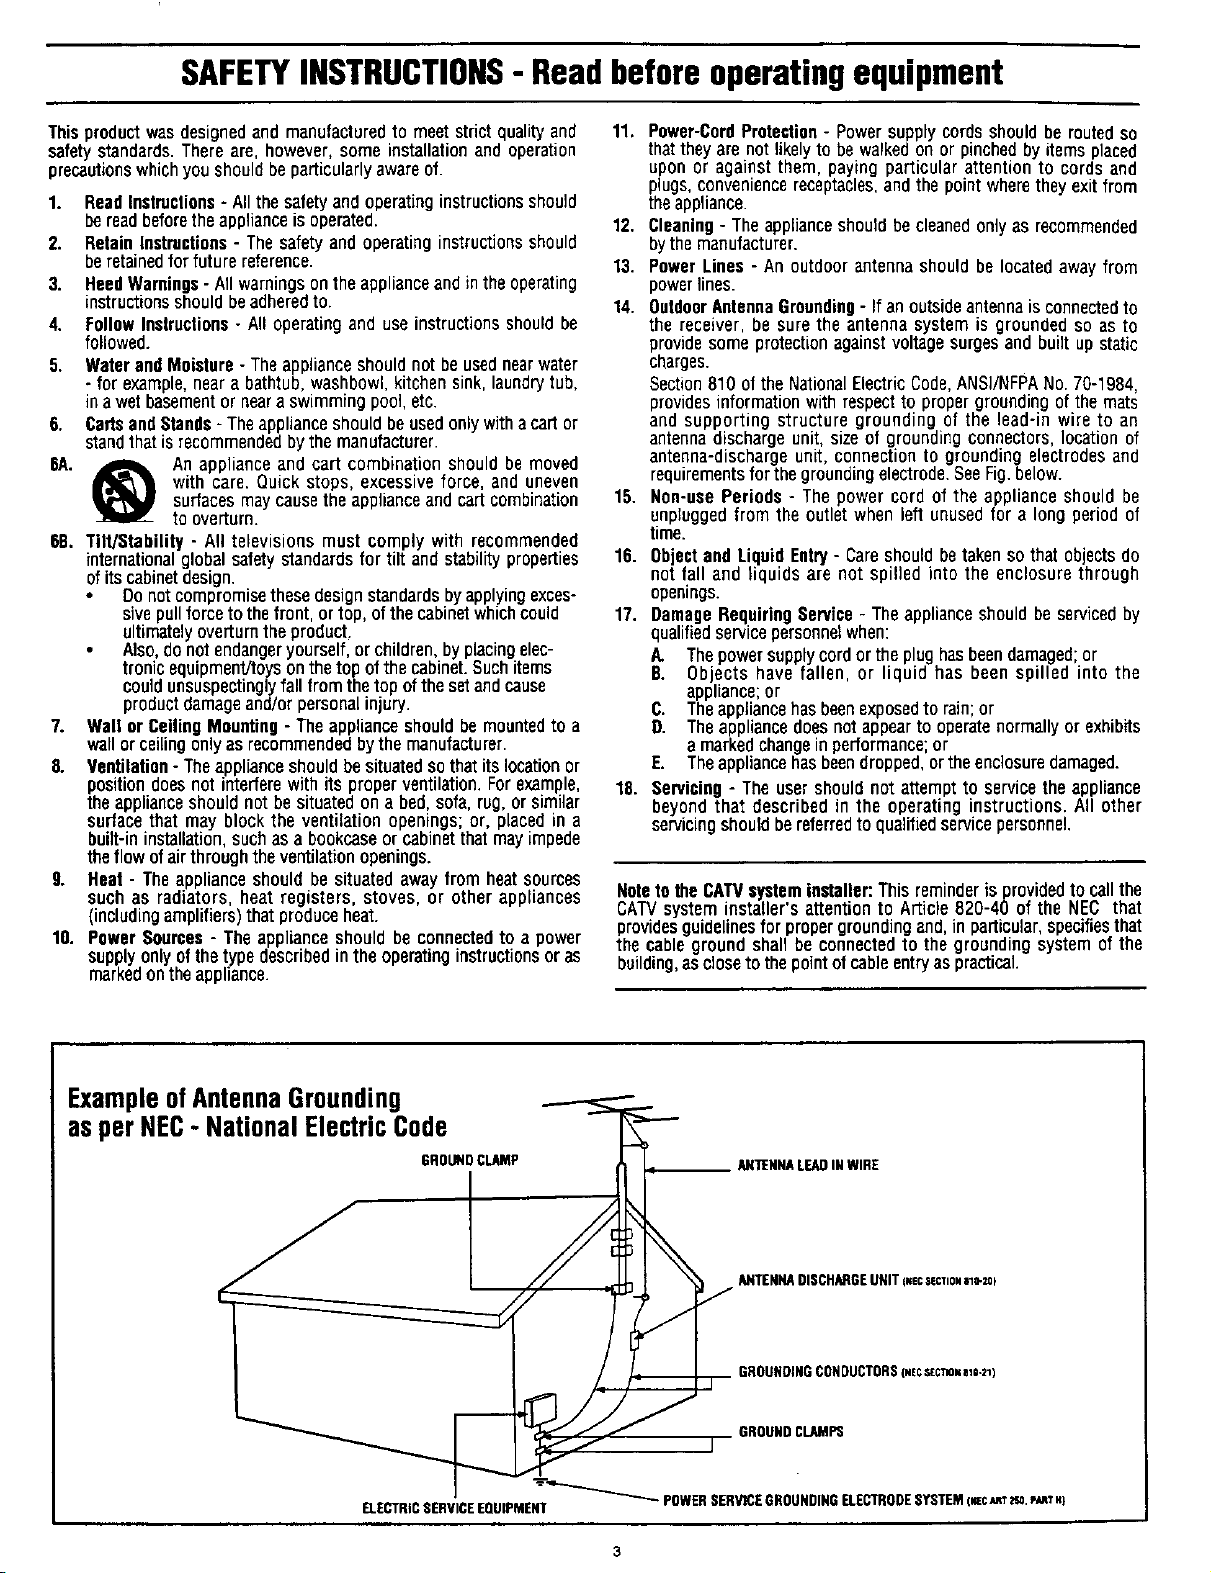
SAFETYINSTRUCTIONS- Readbeforeoperatingequipment
Thisproductwasdesignedandmanufacturedto meetstrict qualityand 11. Power-CordProtection- Powersupplycordsshouldberoutedso
safetystandards.Thereare,however,some installationandoperation thattheyarenotlikelyto bewalkedonor pinchedby itemsplaced
precautionswhichyoushouldbeparticularlyawareof. uponor againstthem,payingparticularattentionto cordsand
1. ReadInstructions- Allthesafetyandoperatinginstructionsshould
bereadbeforetheapplianceisoperated.
2. RetainInstructions- Thesafetyandoperatinginstructionsshould
beretainedforfuturereference.
3. HeedWarnings- Allwarningsontheapplianceandintheoperating
instructionsshouldbeadheredto.
4. FollowInslructions- All operatingand useinstructionsshouldbe
followed.
5. WaterandMoisture- Theapplianceshouldnot beusednearwater
- for example,neara bathtub,washbowl,kitchensink,laundrytub,
in awetbasementornearaswimmingpool,etc.
6. CartsandStands- Theapplianceshouldbeusedonlywitha cartor
standthatis recommendedbythemanufacturer.
8A. _ An applianceandcart combination should be moved
with care. Quick stops, excessiveforce, and uneven
surfacesmaycausetheapplianceandcart combination
to overturn.
6B. Tilt/Stability - All televisions must complywith recommended
internationalglobalsafetystandardsfor tilt and stabilityproperties
ofits cabinetdesign.
Donotcompromisethesedesignstandardsbyapplyingexces-
sivepullforceto thefront, ortop, ofthecabinetwhichcould
ultimatelyoverturntheproduct.
Also,do notendangeryourself,or children,byplacingelec-
tronicequipment]toyson thetop of thecabinet.Suchitems
couldunsuspectinglyfall fromthetop ofthe setandcause
productdamageand/orpersonalinjury.
7. Wallor CeilingMounting- Theapplianceshouldbemountedto a
wallorceilingonlyasrecommendedbythemanufacturer.
8. Ventilation-Theapplianceshouldbesituatedsothat its locationor
positiondoesnot interferewith its properventilation.Forexample,
theapplianceshouldnotbe situatedona bed,sofa,rug, or similar
surfacethat may block the ventilation openings;or, placedin a
built-ininstallation,suchasa bookcaseorcabinetthatmayimpede
theflow ofair throughtheventilationopenings.
9. Heat - Theapplianceshould be situated awayfrom heatsources
such as radiators, heat registers, stoves, or otherappliances
(includingamplifiers)that produceheat.
10. Power Sources- Theapplianceshould be connectedto a power
supplyonlyof thetypedescribedintheoperatinginstructionsor as
markedontheappliance.
plugs,conveniencereceptacles,andthe pointwheretheyexitfrom
theappliance.
12. Cleaning- Theapplianceshouldbecleanedonlyas recommended
bythe manufacturer.
13. Power Lines- An outdoorantennashould be locatedawayfrom
powerlines.
14. OutdoorAntennaGrounding- If anoutsideantennaisconnectedto
thereceiver,be surethe antennasystemis groundedso asto
providesomeprotectionagainstvoltagesurgesand builtupstatic
charges.
Section810oftheNationalElectricCode,ANS]/NFPANo.70-1984,
providesinformationwithrespectto propergroundingofthemats
and supportingstructuregroundingof the lead-inwire to an
antennadischargeunit,sizeof groundingconnectors,locationof
antenna-dischargeunit,connectionto groundingelectrodesand
requirementsforthegroundingelectrode.SeeFig.below.
15. Non-usePeriods- Thepowercordof the applianceshould be
unpluggedfromtheoutletwhenleft unusedfor a longperiodof
time.
16. ObjectandLiquid Entry- Careshouldbetakensothat objectsdo
not fall and liquidsare notspilled intothe enclosurethrough
openings.
17. DamageRequiringService- Theapplianceshouldbe servicedby
qualifiedservicepereonnetwhen:
A. Thepowersupplycordortheplughasbeendamaged;or
B. Objects havefallen, or liquid has been spilled into the
appliance;or
C. Theappliancehasbeenexposedtorain;or
D. Theappliancedoesnotappearto operatenormallyorexhibits
a markedchangein performance;or
E. Theappliancehasbeendropped,ortheenclosuredamaged.
18. Servicing- The user shouldnot attemptto servicethe appliance
beyondthat described in the operating instructions. All other
servicingshouldbereferredtoqualifiedservicepersonnel.
Notetothe CA'iVsysteminstaller:Thisreminderisprovidedto callthe
CATVsysteminstaller'sattentionto A_icle820-40 of the NEC that
providesguidelinesforpropergroundingand,in particular,specifiesthat
the cableground shallbe connectedto the grounding system of the
building,ascloseto thepointof cableentryaspractical.
ExampleofAntennaGrounding
asperNEC- National ElectricCode
GROUND CLAMP ANTENNALEADIN WIRE
ELECTRICSERVICEEQUIPMENT
ANTENNADISCHARGEUNITINECSeCX_0"_e-_O_
GROUNDINGCONDUCTORS(NZCSeC_ke_0-21)
GROUNDCLAMPS
"---"q''"_ POWER SERVICEGROUNDINGELECTRODESYSTEM(Ec MT Z',*0e_H)
Welcome/Product Registration ................... 2
Safety/Precautions ..................................................... 3
Table of Contents ....................................................... 4
Features, Model and Cabinet Information ................. 5
[] On-Screen Features
PICTURE MENU
<'Adjusting Color, Brightness, Sharpness,
Tint, and Picture Controls ................................... 6
<'Using the Clearview Control ............................... 7
<'Adjusting the TV's Convergence Control ........... 8
<'Using the Flesh Correction Control .................... 9
FEATURES MENU
<"Selecting a Picture Source ................................ 10
<'Setting the TV for Closed Captioning ............... 11
<'Setting the TV for Cable or Antenna Signals....12
<'Adding Channels in Memory (Automatically). 13
<'Adding Channels in Memory (Manually) ......... 14
<'Setting the TV Clock ......................................... 15
<'Alarm Timer ...................................................... 16
<'Using the Sleep Timer Control ......................... 17
<"Adjusting the Channel Display Control ............ 18
<'Using the Time/Channel Reminder Control...... 18
j Remote Control Operation
Setting the Smart Picture Control .......... 38-39
Using the Smart Sound Control .................. 40
Using the Smart Surf Control .................................. 41
Setting the TV Remote to Work Optional Accessory
Devices:
Direct Entry/Code Number Method .............. 42-43
Search and Identify Method ................................ 44
Remote Control Direct Entry Code Lists ......45-46
Using the Remota's VCR buttons ............................ 47
[_] Picture-In-Picture (PIP)
How to Use PIP (Connections) ............. 48-49
How to Use PIP with the TV Remote ...................... 50
Selecting the Picture Source for PIP ........................ 51
Adjusting Picture-in-Picture Color and Tint............ 52
More PIP Connections (Cable Converter) ............... 53
I_l General Information
TV Help Menu ........................................... 54
Tips if Something Isn't Working ............................. 55
Glossary of TV Terms ............................................. 56
Index ........................................................................ 57
Factory Service Locations ........ :......................... 58-59
Warranty .................................................................. 60
<'Using Parental Control/Content Advisory:
• Code Setup/Blocking Channels ............... 19-20
• Content Advisory - Movie Ratings .........21-22
• Parental Guidelines ....................................... 23
• Blocking Options/Review Settings ............... 24
<'Using the Channel Label Control ...................... 25
<'Using the Language Selection Control .............. 26
SOUND MENU
<'Adjusting Bass, Treble, and Balance Sound
Controls ............................................................. 27
<'Setting the Bass Boost Control ........................ 27
<'Setting the TV for Stereo and SAP Programs ..28
<'Using the Incredible Stereo Control ................. 29
<'Using the Volume Display Control ................... 30
<'Using the TV Speaker OrdOff Control with
the Audio Output jacks ..................................... 31
<'Surround Sound Speaker Connections and
Variable Audio Output Control ........................ 32
<'Using the TV's Audio/Video Input and
Output Jacks ............................................... 33-37
Use the simple Set-Up Guide (supplied with
Copyright © 1999 Philips Consumer Electronics Company. All rights reserved.

First Time Set Up - automatically sets the TV for
local channels, the correct picture signal (antenna or
cable), and assists in the setting of TV's Smart Clock
feature.
Infrared Remote Control - operates your TV set and
a variety of wireless remote control VCRs, Cable TV
Converters, and other accessory equipment.
Standard TV broadcast (VHF/UHF) or Cable TV
(CATV) channel capability.
Closed Captioning - allows the viewer to read TV
program dialogue or voice conversations as on-screen
text.
Automatic Programming of channels - for quick and
easy selection of favorite stations available in your
area.
Picture-ln-Picture (PIP) - can show a TV program
and the direct video output from an accessory (VCR,
etc.) onto the TV screen at the same time.
Parental Control for "Censoring" - this feature can
block out channels to keep children from watching
undesirable programming. Parental Guideline and
Movie Rating settings can also be used as part of the
new Content Advisory Data system available with TV
programming.
Stereo-TV - with a built-in audio amplifier and a twin
speaker system, reception of TV programs in both
broadcast stereo sound or (SAP) bilingual broadcast
are available.
Twin Antenna (A/B) Inputs - for easy displaying of
two separate signal sources on the 'IV. An A/B button
on the remote control switches the TV's Main screen
between the two Antenna (A & B) Input options.
Audio/Video Jacks - for direct connections with
VCRs (and other accessories) for quality TV picture
and sound playback.Component Video Input
connectors are also available for high fidelity color
and picture resolution when using digital video soume
material, such as DVD.
Surround Sound - this TV set contains external;
audio speaker connections for a more dynamic sound
fffect.
Sleep-Timer - automatically turns the TV OFF at
_reset time intervals.
Smart Button -for the control of TV Sound and the
Picture levels. Use the Smart Button on the remote to
quickly adjust Smart Sound (to select various audio
modes matched to specific types of TV programming);
Smart Picture (for programmed video level
adjustments on a variety of program sources); and
Smart Surf (for quick one button channel selection of
up to 10 of your favorite channels).
Digital Ready - Projection Television capable of
connecting to both the current analog television
signals of today as well as interfacing with new
upcoming digital source playback products and
devices. This TV includes multiple signal connectors
(Component Video, S-Video, Composite Video)
which give you a variety of equipment playback
options for digital set top boxes, satellite receivers,
cable boxes, and other digital devices.
While there may exist some digital devices with
connections not available on this television, you
should be adequately prepared for the vast majority of
product> uoming onto the digital consumer
electromc3 market. Note: You should always use the
connection output on digital devices that gives the
highest lexcl of picture quality possible. As listed
above the Component Video (or Y PB PR) input
delivers the _'st color and picture reproduction;
follox_ cd b3 S-Video; and then Composite Video. In
addition t,, the above listed inputs, your television also
includes the standard 75ohm cable signal connector
for usc s__th antennas or analog cable boxes.
As ._ou unpack your "IV please note that the
follox_tn_ items have been included with your set:
• Or, hers Manual
Satct._ Tip Information
Factory Service Center Locations
• Wa,'rant._ Registration Card
• Remote ControITransmitter
• Batteries for Remote Control Use
Please take a few minutes to complete your
registration card. The serial number for the TV is
on the back of the set.
Refer to the back of this manual for instructions
on the cleaning and care of the TV.
End-of-Life disposal
Your new projection television and its packaging
contain materials that can be recycled and reused.
Specialized companies can recycle your product
to increase the amount of reusable materials and
minimize the amounts which need to be properly
disposed.
Your product also uses batteries which should not
be thrown away when depleted, but should be
handed in and disposed of as small chemical
waste. I
Please find out about the local regulations on how
to dispose of your old television, batteries, and
packaging materials whenever you replace
existing equipment.
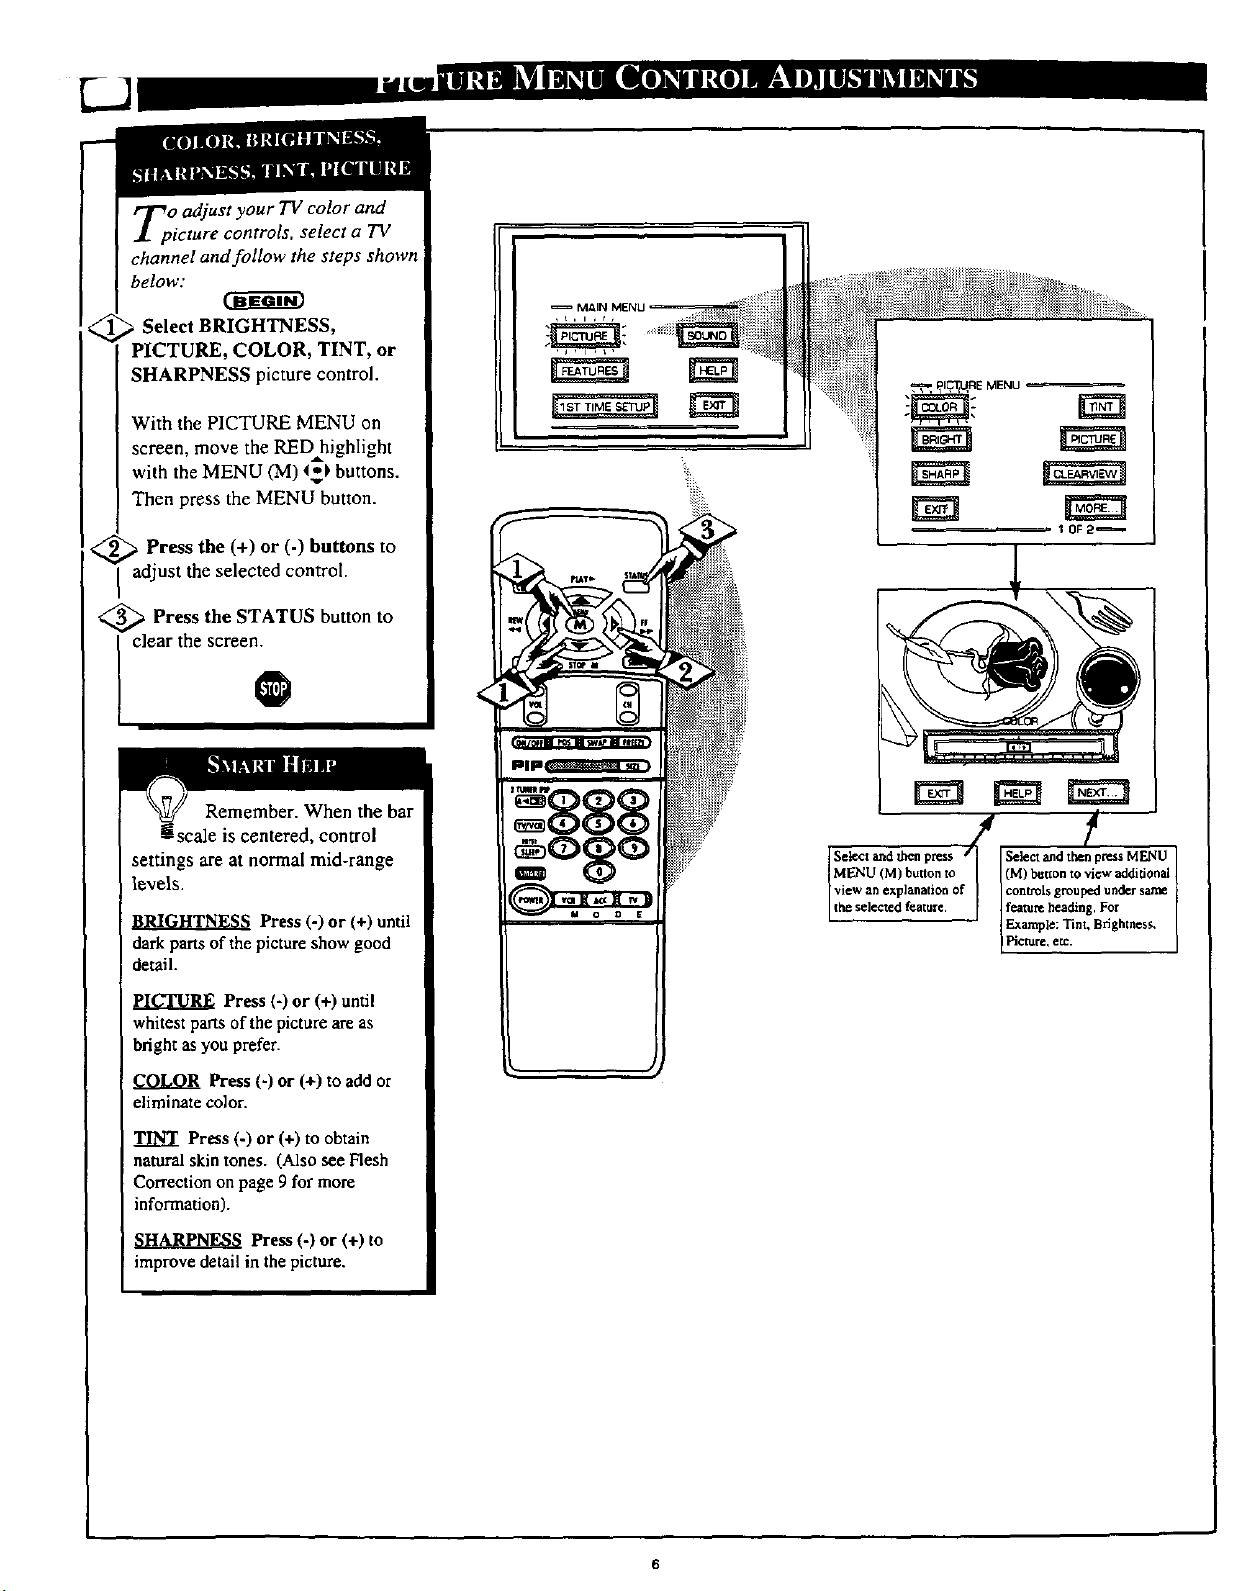
TpO adjust your TV color and
ieture controls, select a TV
channel and follow the steps shown
below:
COLOR, TINT, or
SHARPNESS picture control.
With the PICTURE MENU on
screen, move the REDAhigblight
with the MENU (M) _ buttons.
Then press the MENU button.
Press the (+) or (-) buttons to
ust the selected control.
<_ Press the STATUS button to
clear the screen.
Remember. When the bar
ii scale is centered, control
settings are at normal mid-range
t le'vels.
i
: BRIGHTNESS Press (-) or (+) until
dark parts of the picture show good
detail.
PICTURE Press (-) or (+) until
whitest parts of the picture are as
bright as you prefer.
COLOR Press(-) or (+)to add or
eliminate color.
T.....,!]_Press (-) or (+) to obtain
natural skin tones. (Also see Flesh
Correction on page 9 for more
information).
Press (-) or (+) to
improve detail in the picture.
(M) button to view additional
feature heading. For
Example: Tint, Brightness,
IPicture, etc.
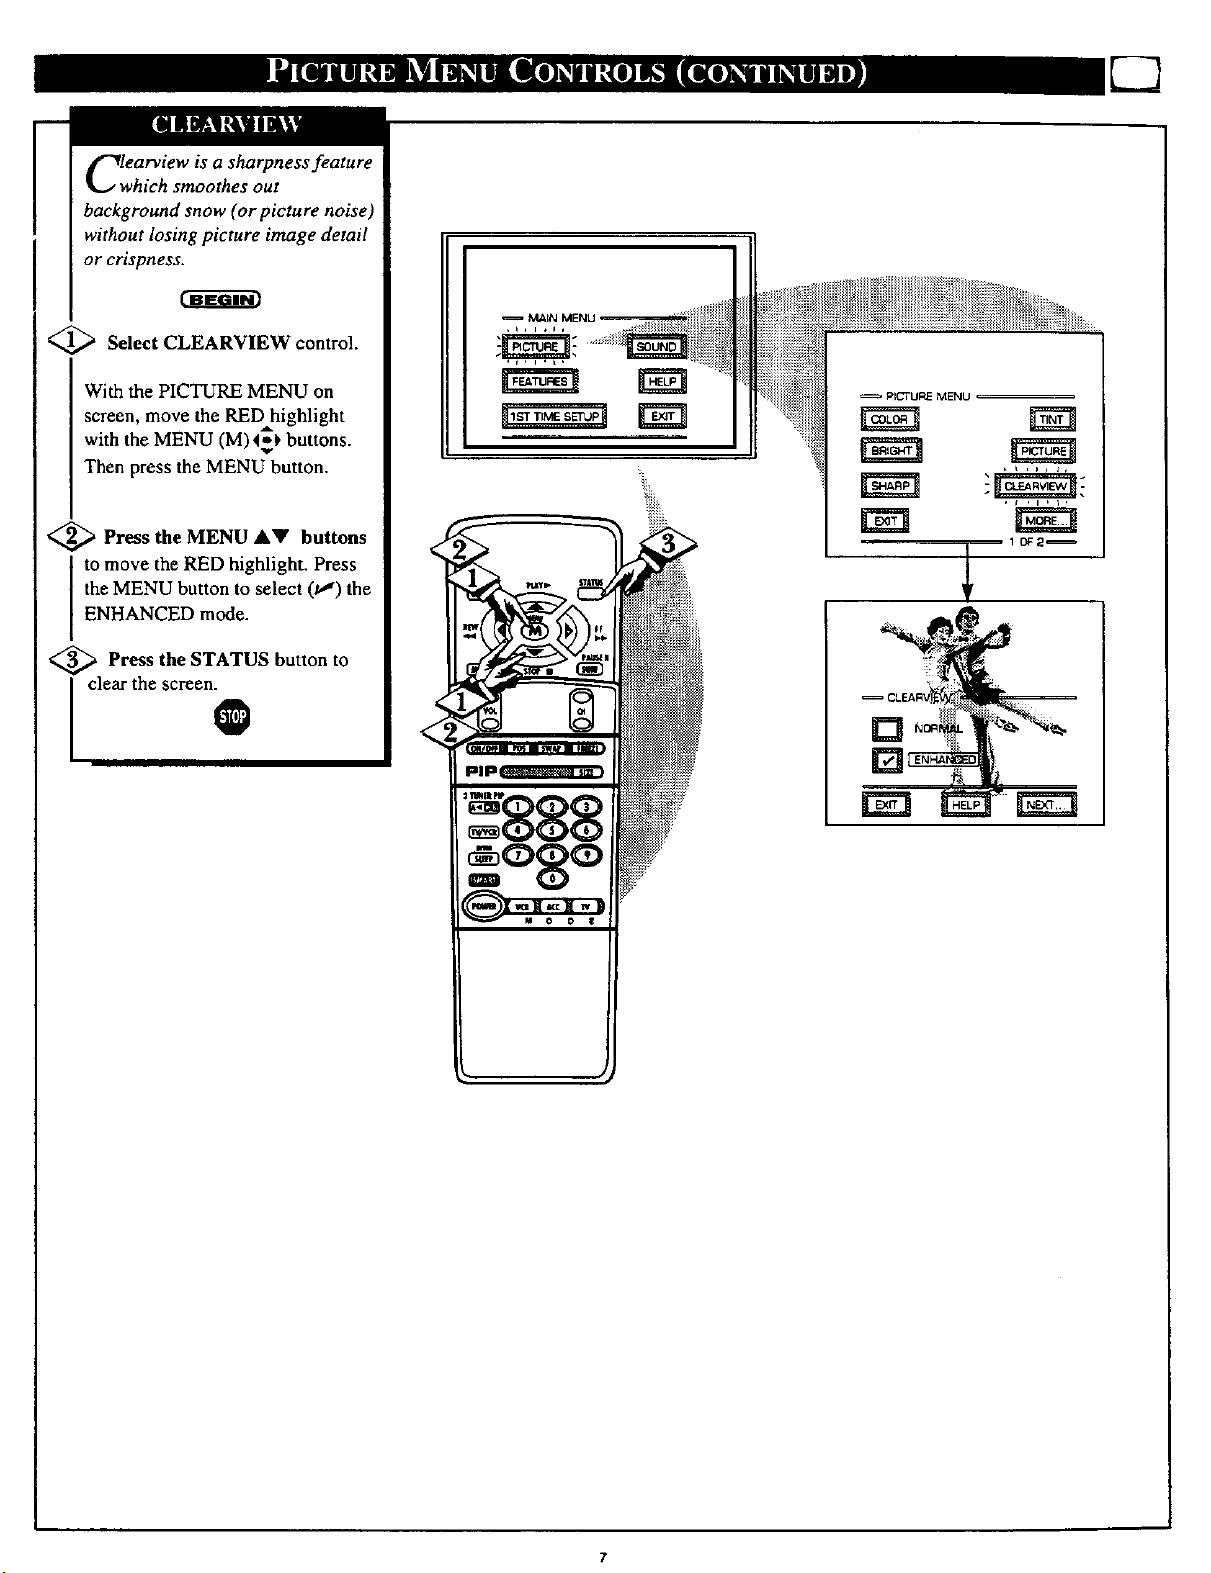
Clwearview is a sharpness feature
hich smoothes out
background snow (or picture noise)
without losing picture image detail
or crispness.
<_ Select CLEARVIEW control.
With the PICTURE MENU on
screen, move the RED highlight
with the MENU (M)ql_ buttons.
Then press the MENU button.
<_ Press the MENU AY buttons
to move the RED highlight. Press
the MENU button to select (t,J) the
ENHANCED mode.
<_ Press the STATUS button
clear the screen.
to
0
PICTURE MENU
[]
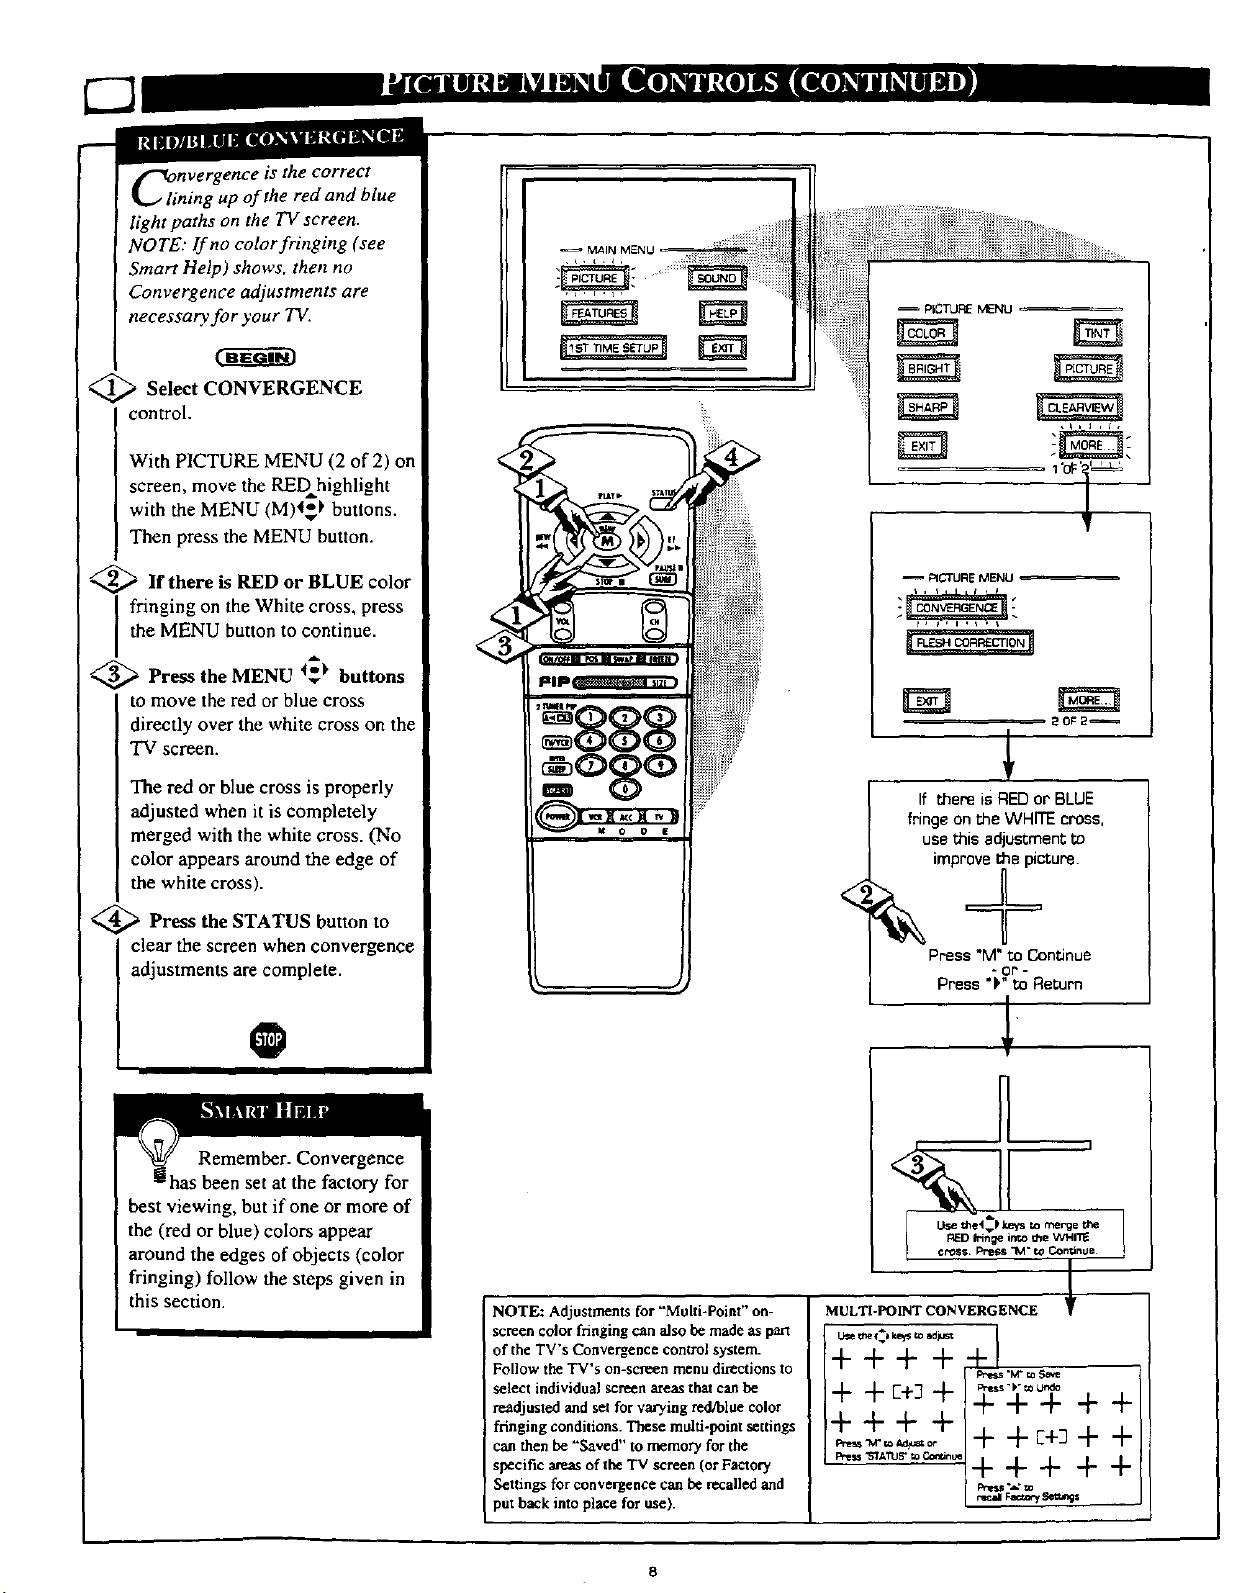
C_linvergence is the correct
sing up of the red and blue
light paths on the TV screen.
NOTE: If no color fringing (see
Smart Help) shows, then no
Convergence adjustments are
necessa_ for your TV.
<_ Select CONVERGENCE
control.
With PICTURE MENU (2 of 2) on
screen, move the REDhighlight
with the MENU (M)4_ buttons.
Then press the MENU button.
_ If there is RED or BLUE color
fringing on the White cross, press
the MENU button to continue.
<_ Press the MENU _1. buttons
to move the red or blue cross
directly over the white cross on the
TV screen.
The red or blue cross is properly
adjusted when it is completely
merged with the white cross. (No
color appears around the edge of
the white cross).
_ Press the STATUS button to
clear the screen when convergence
adjustments are complete.
@
PI_ruRE MENU
i, i , a •
If there is RED or BLUE
fringeontheWHITEcross,
usethisadjustmentto
impr_=_ctura.
press "M"m Continue
- oP-
Press ")" to Return
20_2_
Remember. Convergence
=ihas been set at the factory for
best viewing, but if one or more of
the (red or blue) colors appear
around the edges of objects (color
fringing) follow the steps given in
this section.
NOTE: Adjustments for "Multi-Point" on-
screen color fringing can aJso be made as part
of the TV's Cortvergence control system.
Follow the TV's on-screen menu directions to
select individual screen areas that can be
re.adjusted and sat for varying red/blue color
fringing conditions. These multi-point settings
can then be "Saved" to memory for the
specific areas oftbe TV screen (or Faatory
Settings for convergence can be recalled and
put back into place for use).
MULTI-POINT CONVERGENCE
z777
+ + E+:+
I++++ +++++
+ + c+3+ +
+++++i

Use the Flesh Correction
ontrol to keep skin tone hues
(or facial tint)from varying from
TV channel to TV channel.
_ Select FLESH
CORRECTION control.
With PICTURE MENU (2 of 2) on
screen, move the RED highlight
with the MENU (M)4_ buttons.
Then press the MENU button.
_ Press the MENU AY buttons
to move the RED highlight. Press
the MENU button to turn (/,,") the
FLESH CORRECTION control
ON.
_ Press the STATUS button to
clear the screen.
O
-- PICTUI:_ MENU
_i, ,(, i ,i, ,k,
20F2_
FLESH
[]
[]
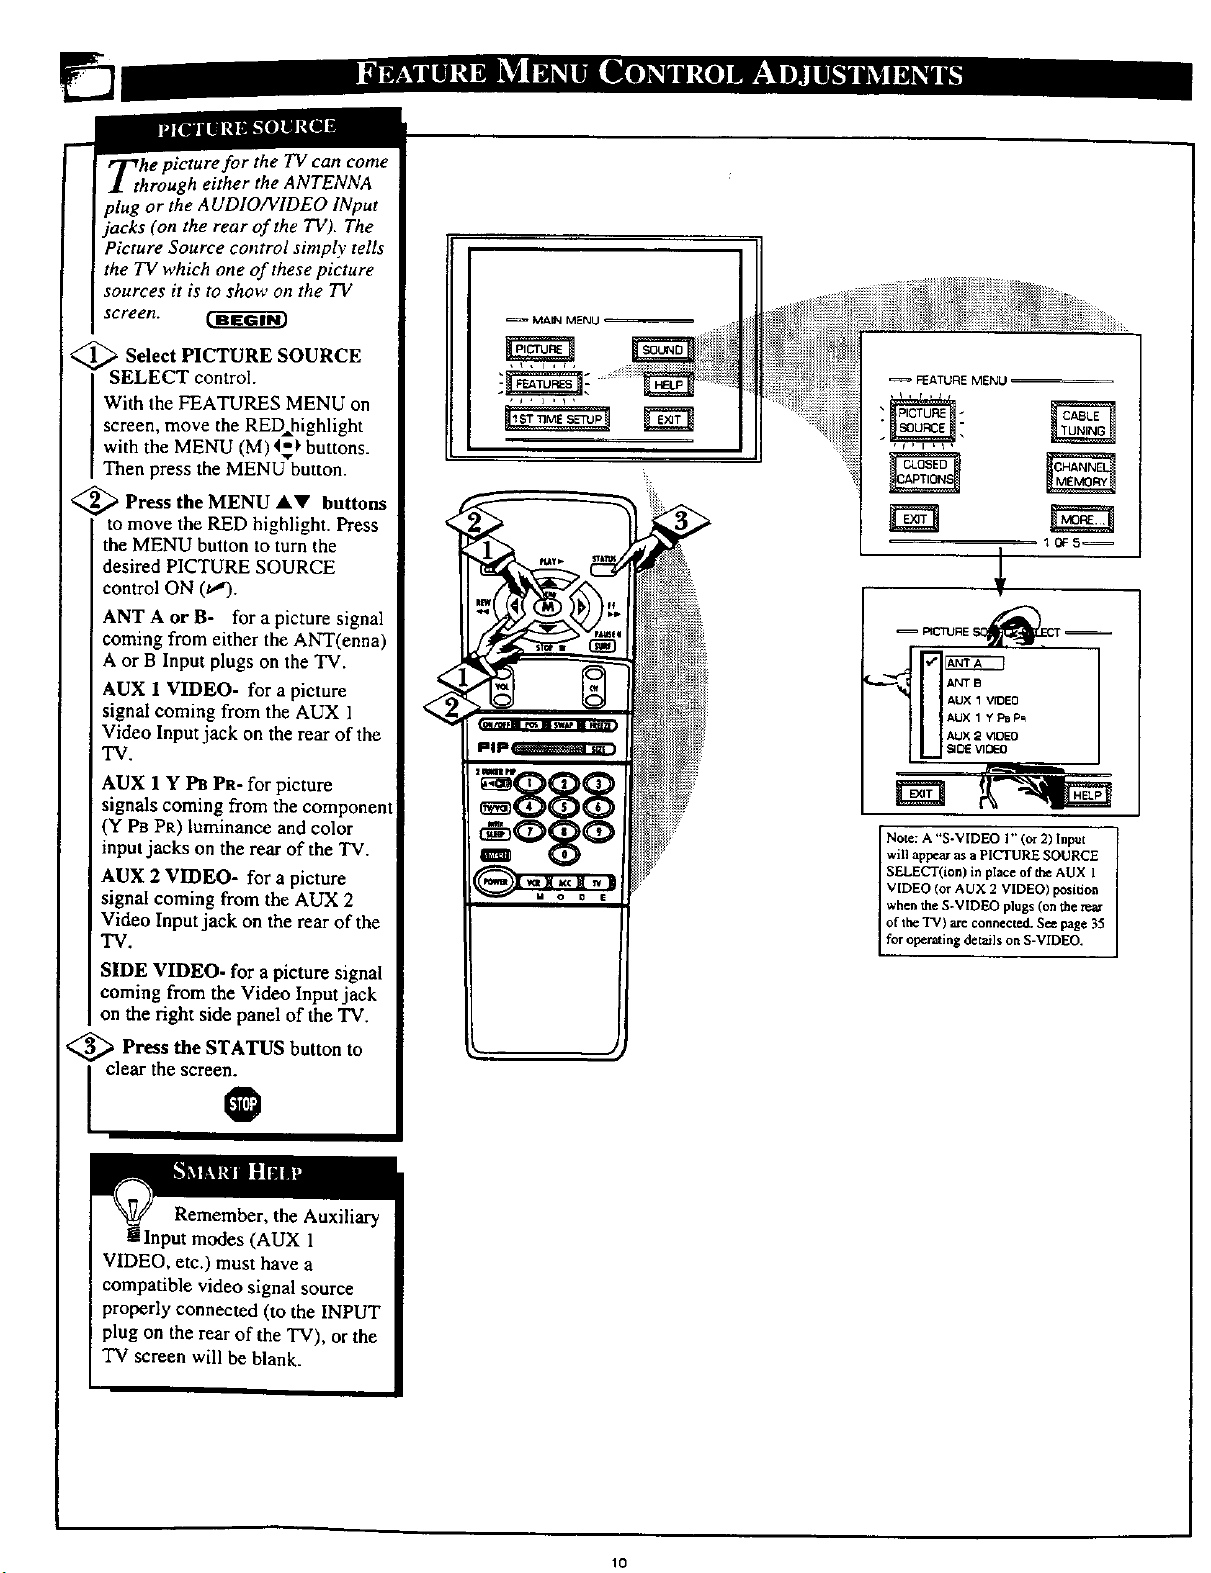
The picture for the TV can come
hrough either the ANTENNA
plug or the AUDIO/VIDEO INput
jacks (on the rear of the TV). The
Picture Source control simply tells
the TV which one of these picture
sources it is to show on the TV
screen.
i<_l s Select PICTURE SOURCEELECT control.
I With the FEATURES MENU on
screen, move the RED.highlight
with the MENU (M) 45_, buttons.
Then press the MENU button.
<_ Press the MENU A.V buttons
to move the RED highlight. Press
the MENU button to turn the
desired PICTURE SOURCE
control ON (_,").
ANT A or B- for a picture signal
coming from either the ANT(enna)
A or B Input plugs on the TV.
AUX 1 VIDEO- for a picture
signal coming from the AUX 1
Video Input jack on the rear of the
TV.
AUX 1 Y 1_ PR- for picture
signals coming from the component
(Y Pa PR) luminance and color
input jacks on the rear of the TV.
AUX 2 VIDEO- for a picture
signal coming from the AUX 2
Video Input jack on the rear of the
TV.
SIDE VIDEO- for a picture signal
coming from the Video Input jack
on the right side panel of the TV.
<_ Press the STATUS button
Note: A "S-VIDEO I" (or 2) Input
will appear as a PICTURE SOURCE
SELECT(ion) in place of the AUX I
V[DEO (or AUX 2 VIDEO) position
when the S-VIDEO plugs(on the rear
of the TV) are connected. Sc_ page 35
for operating details on S-VIDEO.
to
i clear the scree_
Remember, the Auxiliary
Input modes (ALrX 1
VIDEO, etc.) must have a
compatible video signal source
properly connected (to the INPUT
plug on the rear of the TV), or the
TV screen will be blank.
10
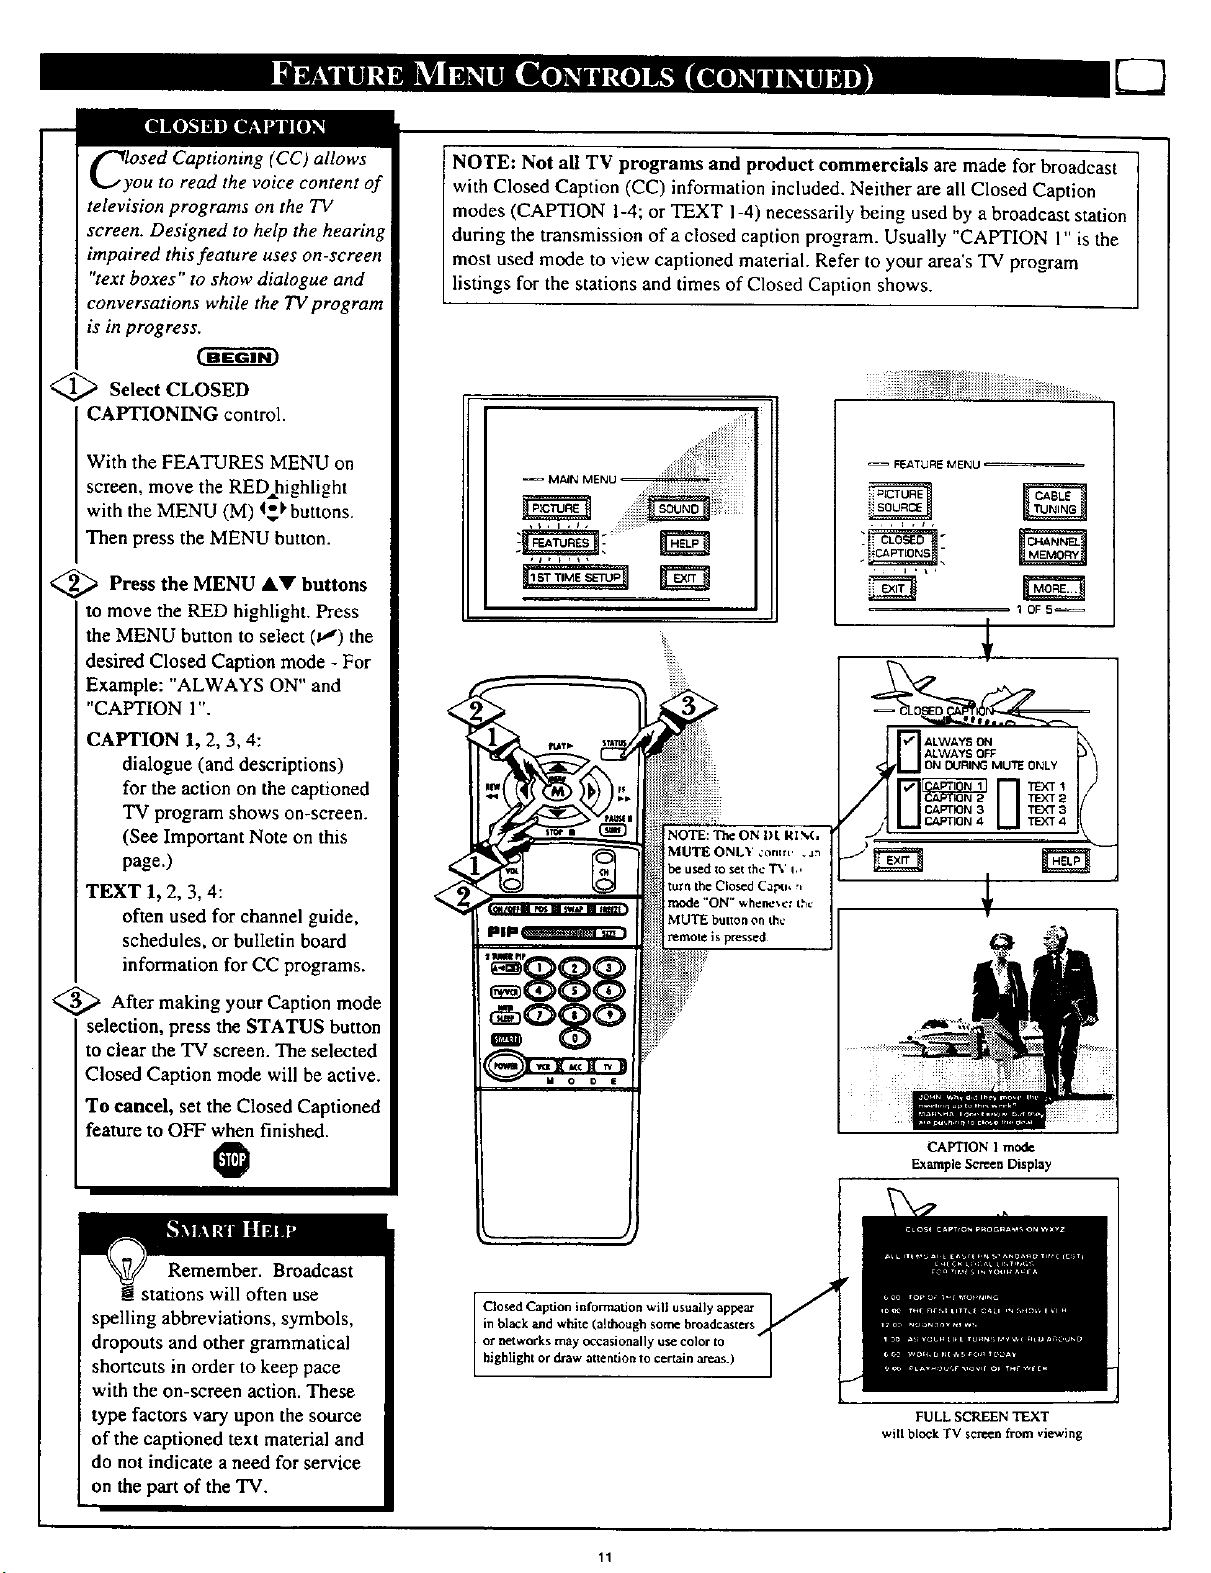
ClyOSed Captioning (CC) allows
ou to read the voice content of
television programs on the TV
screen. Designed to help the hearing
impaired this feature uses on-screen
"text boxes" to show dialogue and
conversations while the TV program
is in progress.
<_ Select CLOSED
CAPTIONING control.
m
! NOTE: Not all TV programs and product commercials are made for broadcast
with C osed Caption (CC) information nc uded. Ne ther are all Closed Caption
modes (CAPTION 1-4; or TEXT 1-4) necessarily being used by a broadcast station
during the transmission of a closed caption program. Usually "CAPTION 1" is the
most used mode to view captioned material. Refer to your area's TV program
listings for the stations and times of Closed Caption shows.
With the FEATURES MENU on
screen, move the RED=highlight
with the MENU (M) _ buttons.
Then press the MENU button.
<_ Press the MENU &.V
buttons
to move the RED highlight. Press
the MENU button to select (_") the
desired Closed Caption mode - For
Example: "ALWAYS ON" and
"CAPTION l".
CAPTION 1, 2, 3, 4:
dialogue (and descriptions)
for the action on the captioned
TV program shows on-screen.
(See Important Note on this
page.)
TEXT 1, 2, 3, 4:
often used for channel guide,
schedules, or bulletin board
information for CC programs.
<_ After making your Caption mode
selection, press the STATUS button
to clear the TV screen. The selected
Closed Caption mode will be active.
To cancel, set the Closed Captioned
feature to OFF when finished.
O
-- FEATURE MENU
CAPTION 1 mode
Example Screen Display
Remember. Broadcast
[stations will often use
spelling abbreviations, symbols,
dropouts and other grammatical
shortcuts in order to keep pace
with the on-screen action. These
type factors vary upon the source
of the captioned text material and
do not indicate aneed for service
on the part of the TV.
in black and white (although some broadcasters
or networks may occasionally use color to
Closed Caption information will usually appear
highlight or draw atlention to certain areas.)
11
FULL SCREEN TEXT
will block TV semen from viewing
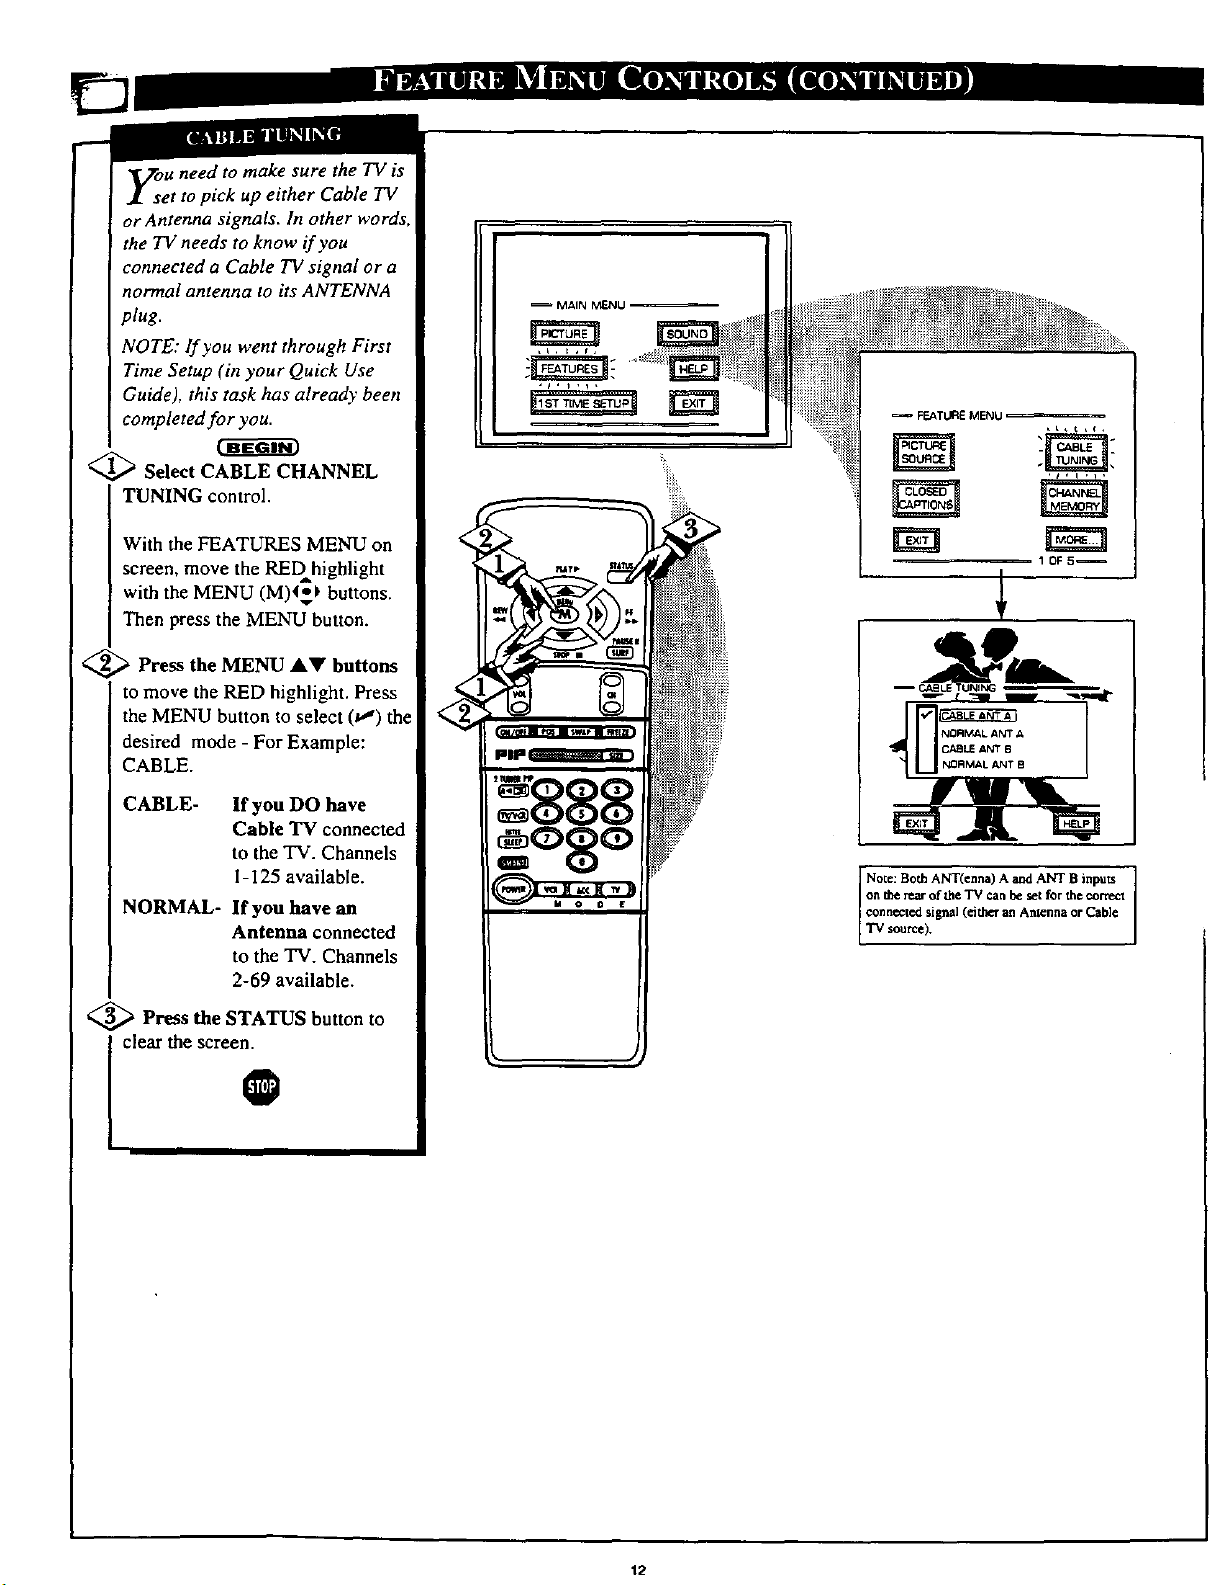
need to make sure the TV is
_ick up either Cable TV
or Antenna signals. In other words,
the TVneeds to know if you
connected a Cable TV signal or a
normal antenna to its ANTENNA
plug.
NOTE,: If you went through First
Time Setup (in your Quick Use
Guide), this rusk has already been
completed for you.
_ Select CABLE CHANNEL
TUNING control.
With the FEATURES MENU on
screen, move the REDhighlight
with the MENU (M)_I_ buttons.
Then press the MENU button.
<_ Press the MENU AV buttons
to move the RED highlight. Press
the MENU button to select (t,w) the
desired mode - For Example:
CABLE.
CABLE- If you DO have
Cable TV connected
to the TV. Channels
I-I25 available.
NORMAL- If you have an
Antenna connected
to the TV. Channels
2-69 available.
<_ Press the STATUS button to
0
i clear the screen.
Note: Both ANT(enna) A and ANT B inputs
a_ th_ rear of the TV can be set for the correct
connected signal (eitlx_ an Antenna or Cable
TV source).
12
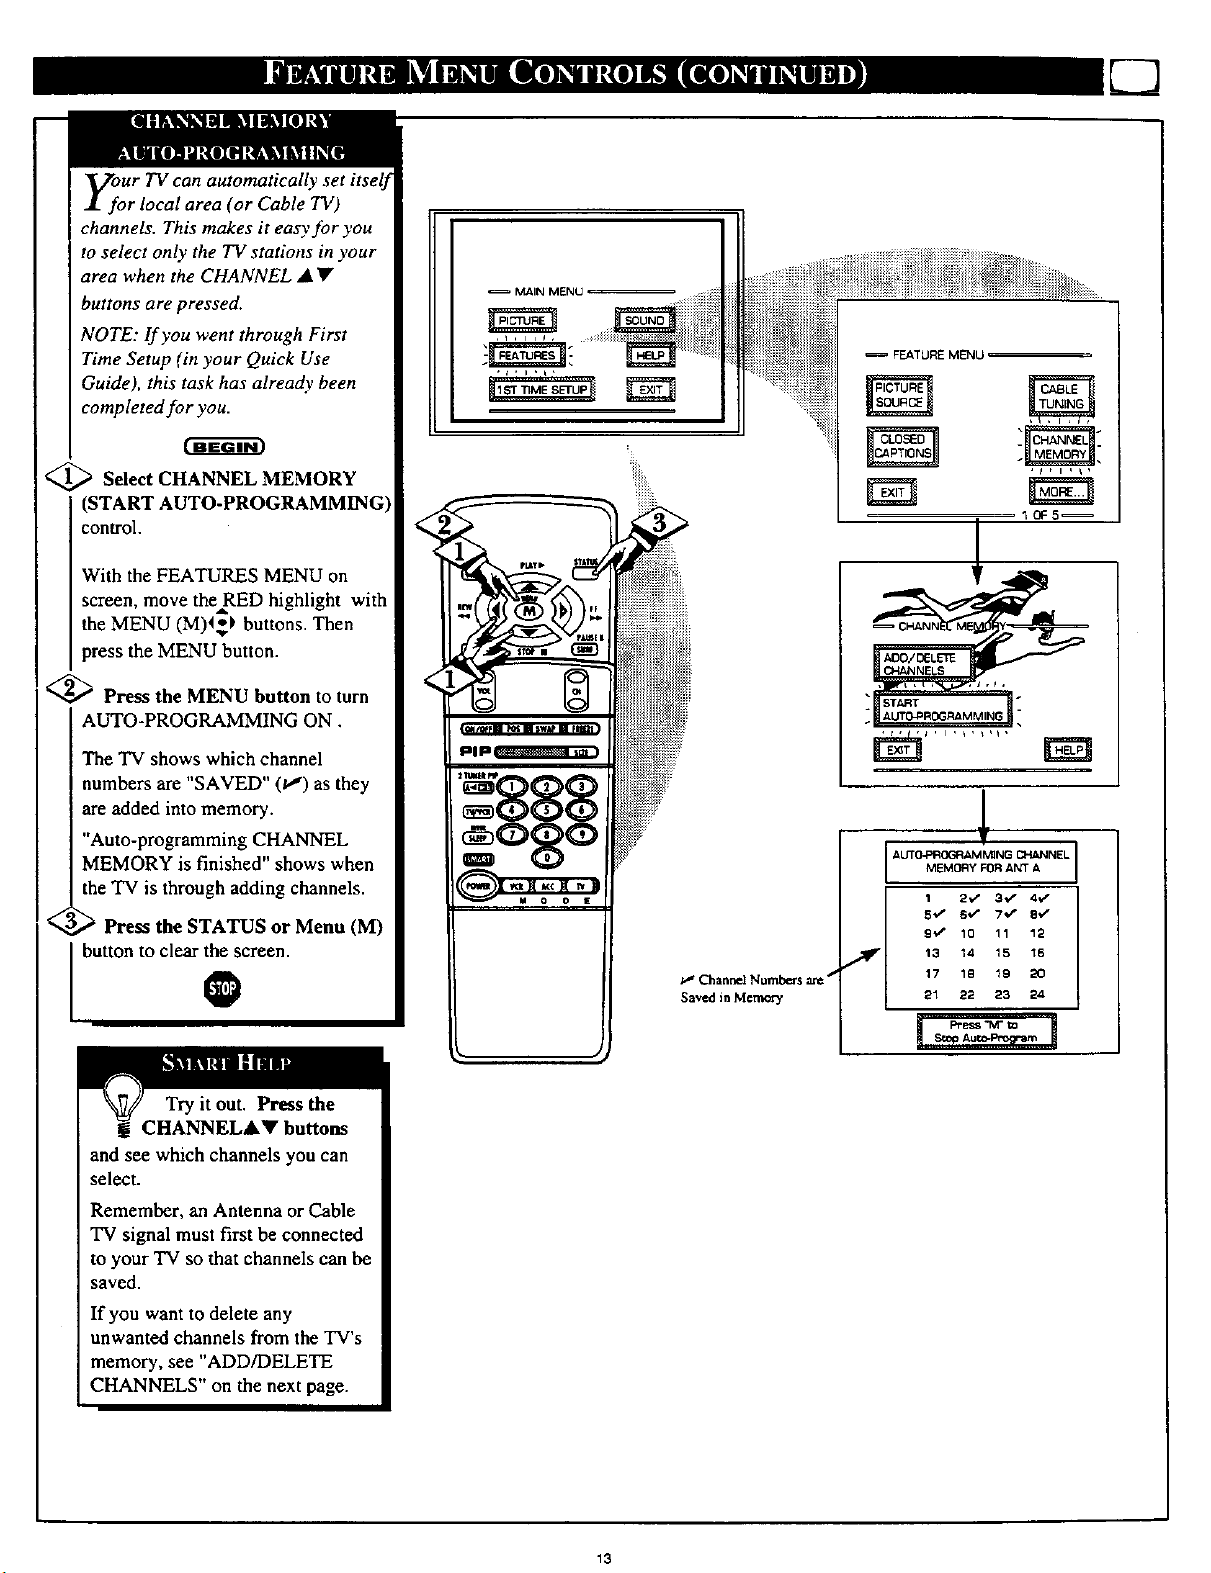
y;oUr TV can automatically set itself
r local area (or Cable TV)
channels. This makes it easy for you
to select only the TV stations in your
area when the CHANNEL • •
buttons are pressed.
NOTE: If you went through First
Time Setup (in your Quick Use
Guide), this task has already been
completed for you.
_ Select CHANNEL MEMORY
(START AUTO-PROGRAMMINGI
control.
With the FEATURES MENU on
screen, move theRED highlight with
the MENU (M)4**_buttons. Then
press the MENU button.
MAI N MENU
FEATURE MENU
'_ Press the MENU button to turn
AUTO-PROGRAMMING ON.
The TV shows which channel
numbers are "SAVED" 0") as they
areadded into memory.
"Auto-programming CHANNEL
MEMORY is finished" shows when
the TV is through adding channels.
'_ Press the STATUS or Menu (M)
button to clear the screen.
0
Try it out. Press the
CHANNELAT buttons
and see which channels you can
select.
Remember, an Antenna or Cable
TV signal must first be connected
to your TV so that channels can be
saved.
If you want to delete any
unwanted channels from the TV's
memory, see "ADD/DELETE
CHANNELS" on the next page.
Channel Numbers are J
Saved in Memory
• START
AUTO-PROGRAMIV_NG CHANNEL
MEMORY FOR ANT A
1 2_' 3",/ 4.,"
9_ 10 11 12
13 14 15 16
17 1G 19 L_]
21 ;t2 23 24
13
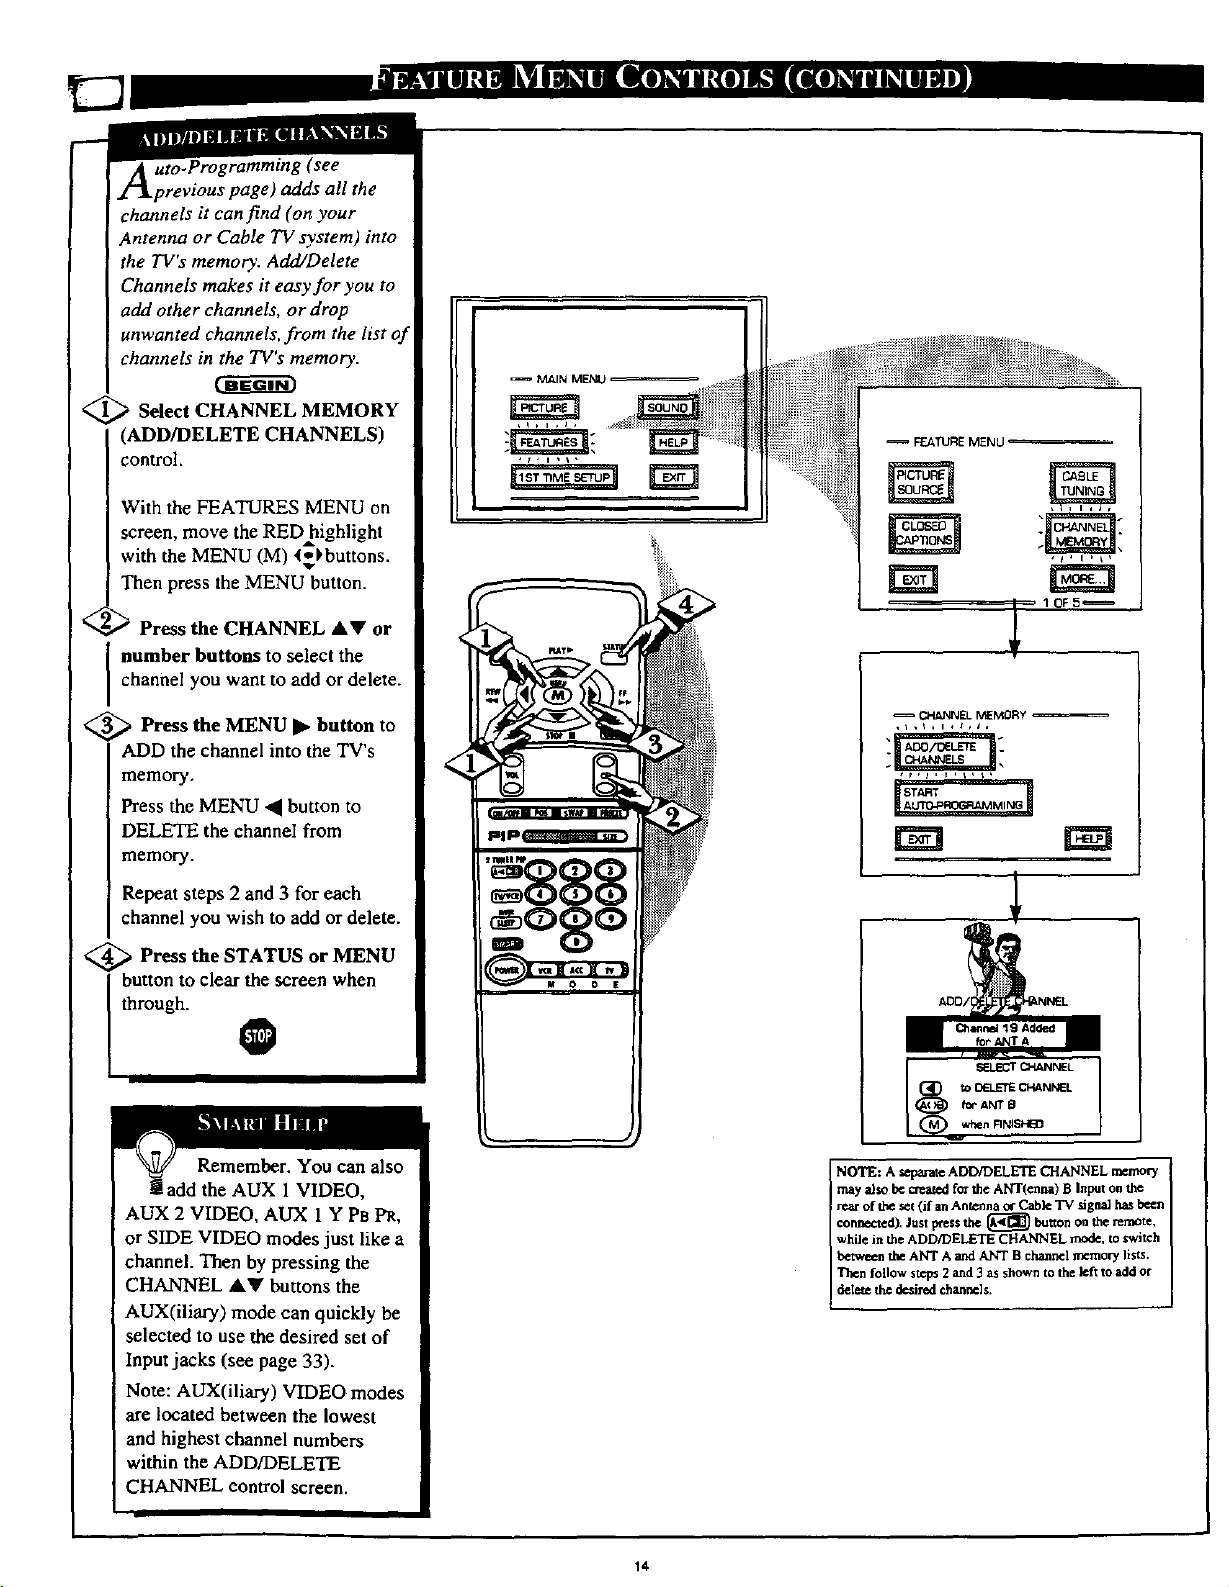
(see
.previous page) adds all the
channels it can find (on your
Antenna or Cable TV system) into
the TV's memory. Add/Delete
Channels makes it easy for you to
add other channels, or drop
unwanted channels, from the list c
channels in the TV's memory.
<_ Sdect CHANNEL MEMORY
(ADD/DELETE CHANNELS)
control.
With the FEATURES MENU on
screen, move the RED highlight
with the MENU (M) _*_buttons.
Then press the MENU button.
FEATURE MENU
_" '_ Press the CHANNEL &V or
number buttons to select the
channel you want to add or delete.
<_ Press the MENU button to
ADD the channel into the TV's
memory,
Press the MENU • button to
DELETE the channel from
memory.
Repeat steps 2 and 3 for each
channel you wish to add or delete.
<_ Press the STATUS MENU
or
through.
I button to clear the screen when
0
Remember. You can also
[add the AUX 1 VIDEO,
AUX 2 VIDEO, AUX 1 Y PB PR,
or SIDE VIDEO modes just like a
channel. Then by pressing the
CHANNEL &._"buttons the
AUX(iliary) mode can quickly be
selected to use the desired set of
Input jacks (see page 33).
Note: AUX(iliary) VIDEO modes
are located between the lowest
and highest channel numbers
within the ADD/DELETE
CHANNEL control screen.
<
10F5_
C_'_NNEL MEMORY
NOTE: A separate ADD/DELETE CHANNEL memory
may also be cr-_tted for the ANT(enna) B Input on the
rear of the set (if an Antenna _ Cabk: "IV signal has be_n
connected). Just press the _ button on the remote,
while in the ADD/DELEIE CHANNEL mode, to switch
bu_ the ANT A and ANT B channel n'_rnory lists.
Then follow steps 2 _d 3 as shown to the kft to add or
delete the desired channels.
14
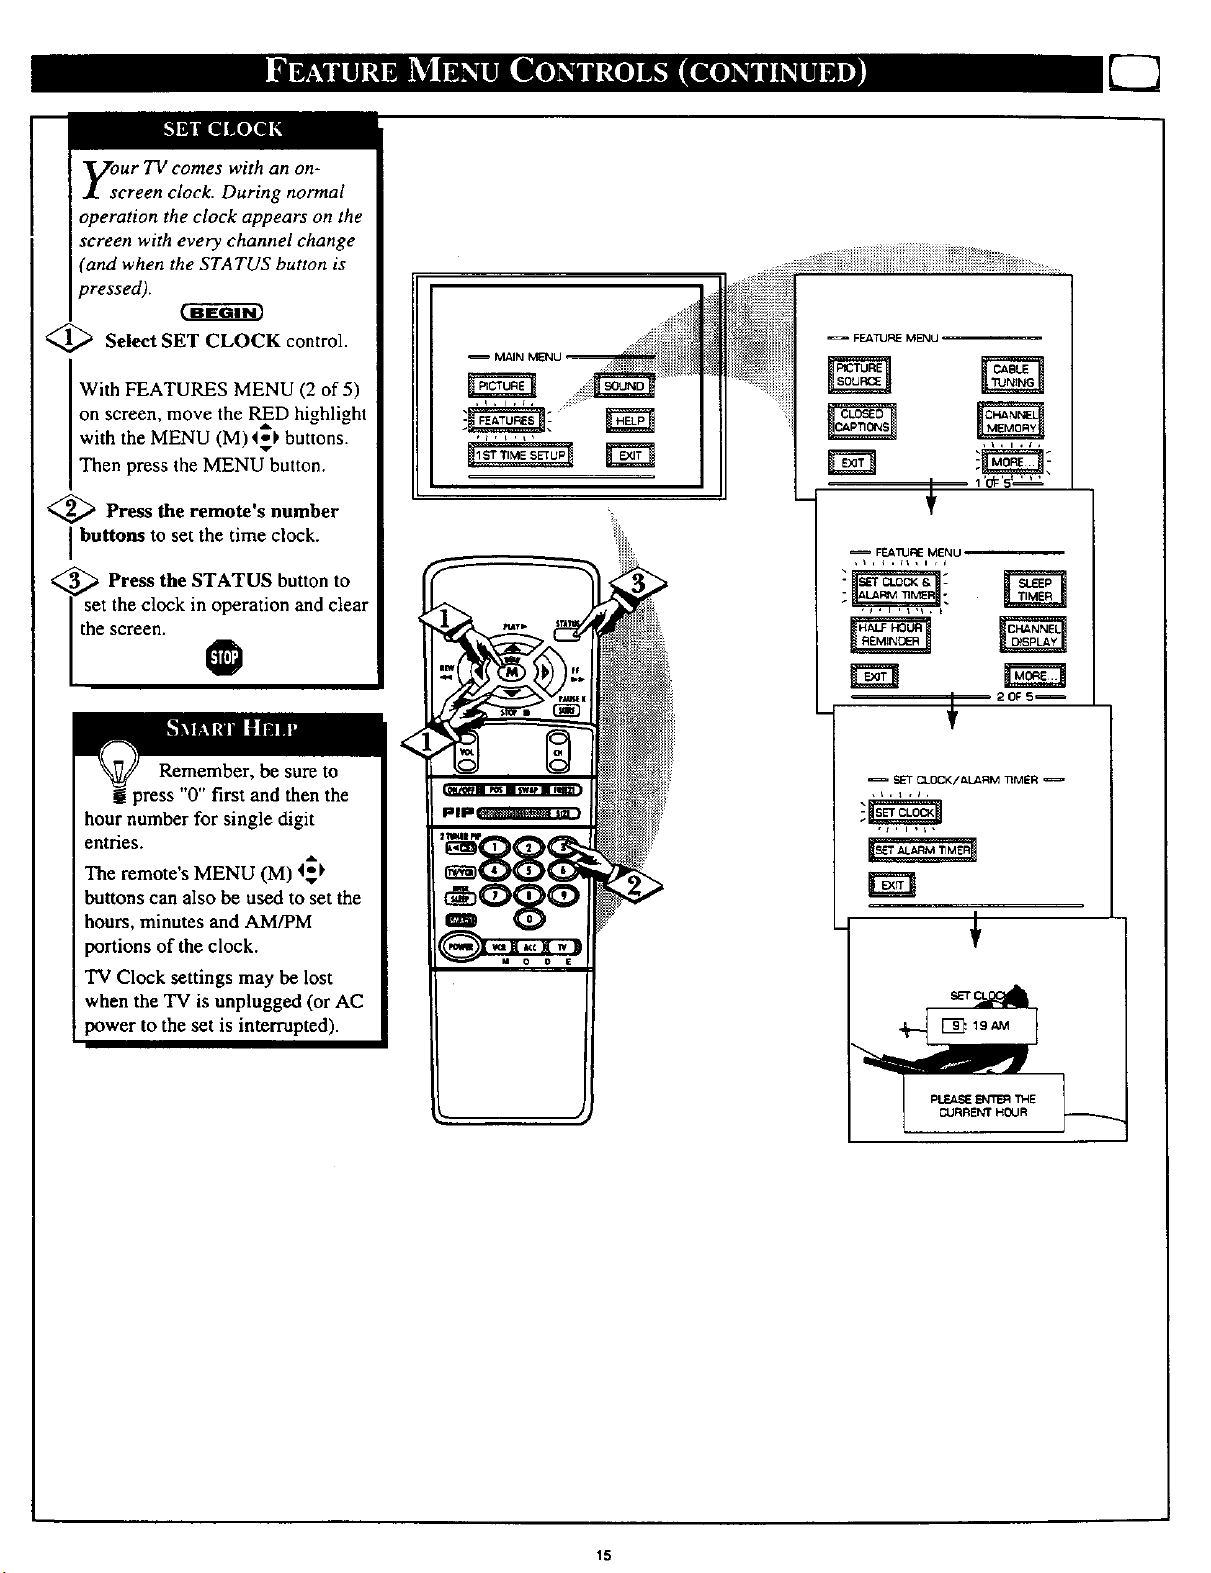
your TV comes with an on-
creen clock. During normal
operation the clock appears on the
screen with every channel change
(and when the STATUS button is
vressed).
<_ Select SET CLOCK control.
With FEATURES MENU (2 of 5)
on screen, move the RED highlight
with the MENU (M)4_ buttons.
Then press the MENU button.
<_ Press the remote's number
buttons to set the time clock.
_ Press the STATUS button to
set the clock in operation and clear
the screen.
O
Remember, be sure to
press "0" first and then the
hour number for single digit
entries.
The remote's MENU (M) 4_1.
buttons can also be used to set the
hours, minutes and AM/PM
portions of the clock.
TV Clock settings may be lost
when the TV is unplugged (or AC
power to the set is interrupted).
FEATURE MENU
.SETC_.OCK/_L&RM _MER
15
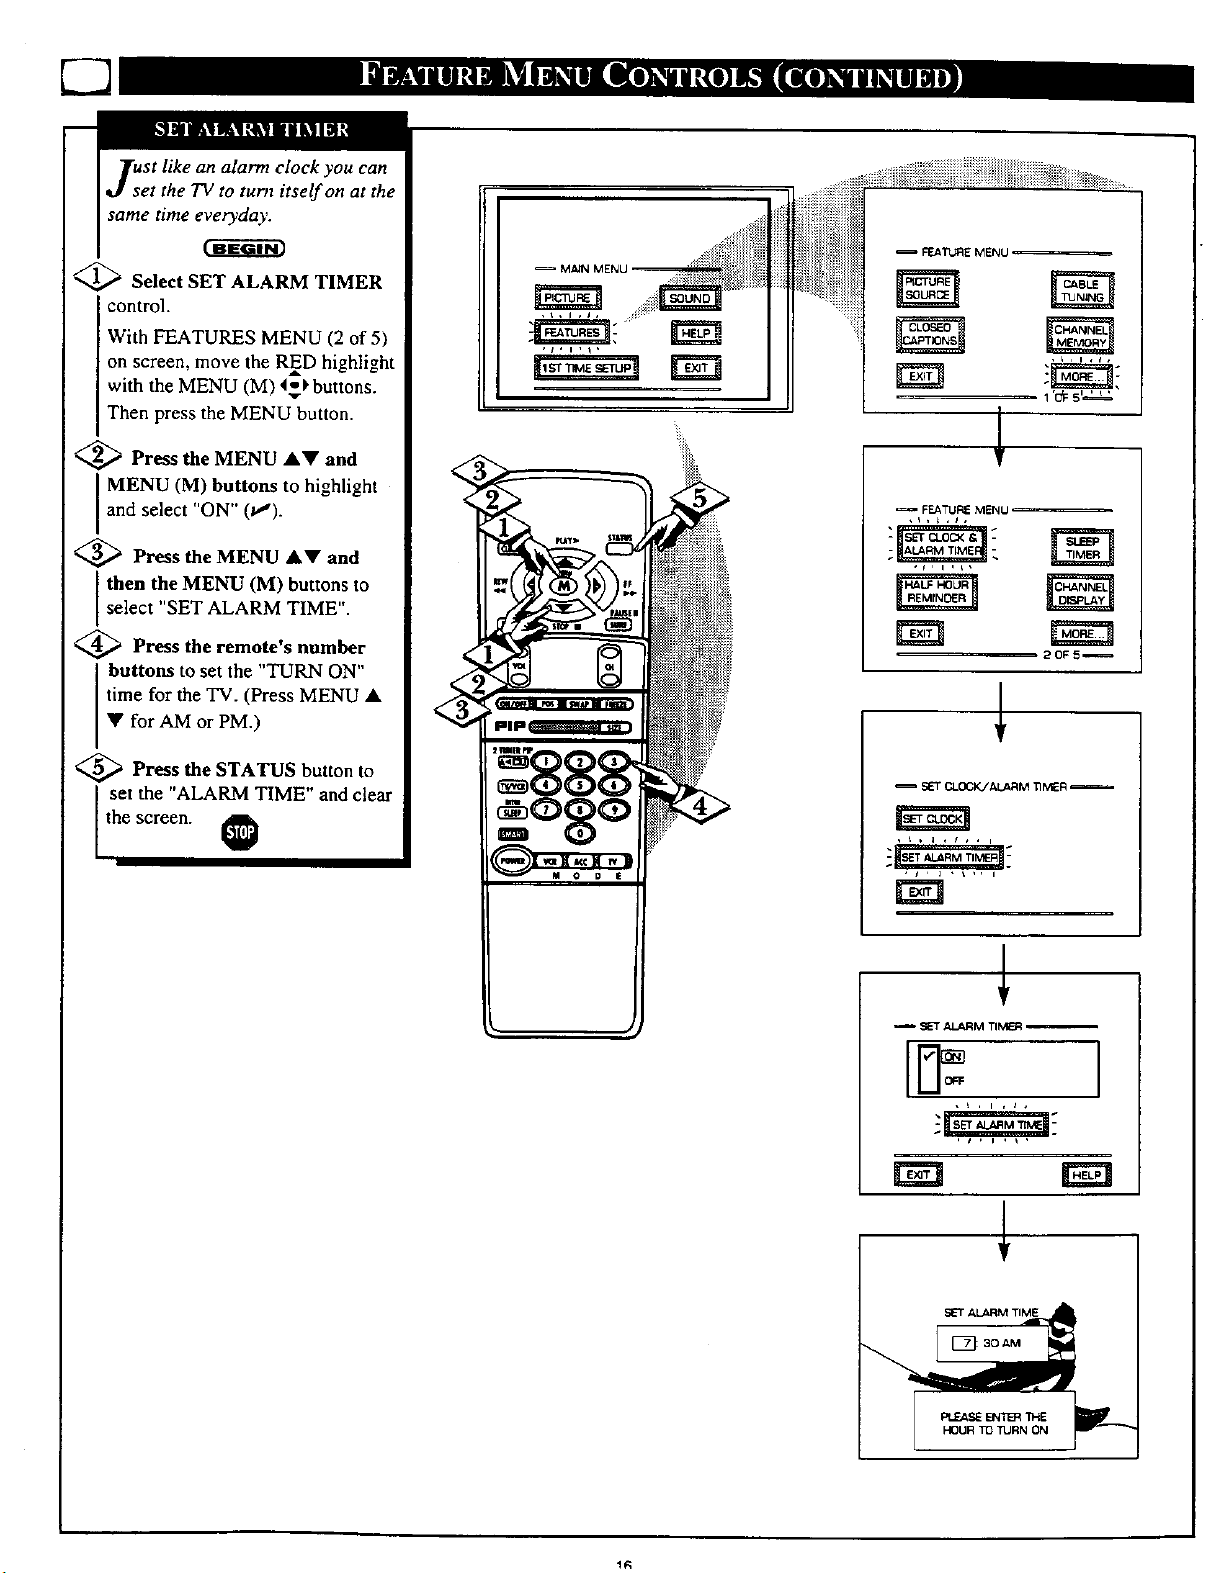
Just like an alarm clock you can
et the TV to turn itself on at the
same time everyday.
c-aa- cm
_ Select SET ALARM TIMER
control.
With FEATURES MENU (2 of 5)
on screen, move the RInD highlight
with the MENU (M) 4_ buttons.
Then press the MENU button.
<_ Press the MENU AW and
MENU (M) buttons to highlight
and se ect 'ON" (t,_).
<_ Press the MENU AV and
then the MENU (M) buttons to
se ect SET ALARM TIME .
_ Press the remote's number
buttons to set the "TURN ON"
time for the TV. (Press MENU •
• for AM or PM.)
@ Press the STATUS button to
set the "ALARM TIME" and clear
the screen. _
= _ CLOCK/ALARM TIMER
S_" ALARM TIME
30 AM
R.,EASEENn_ "i'HE
HOURTDTURN ON
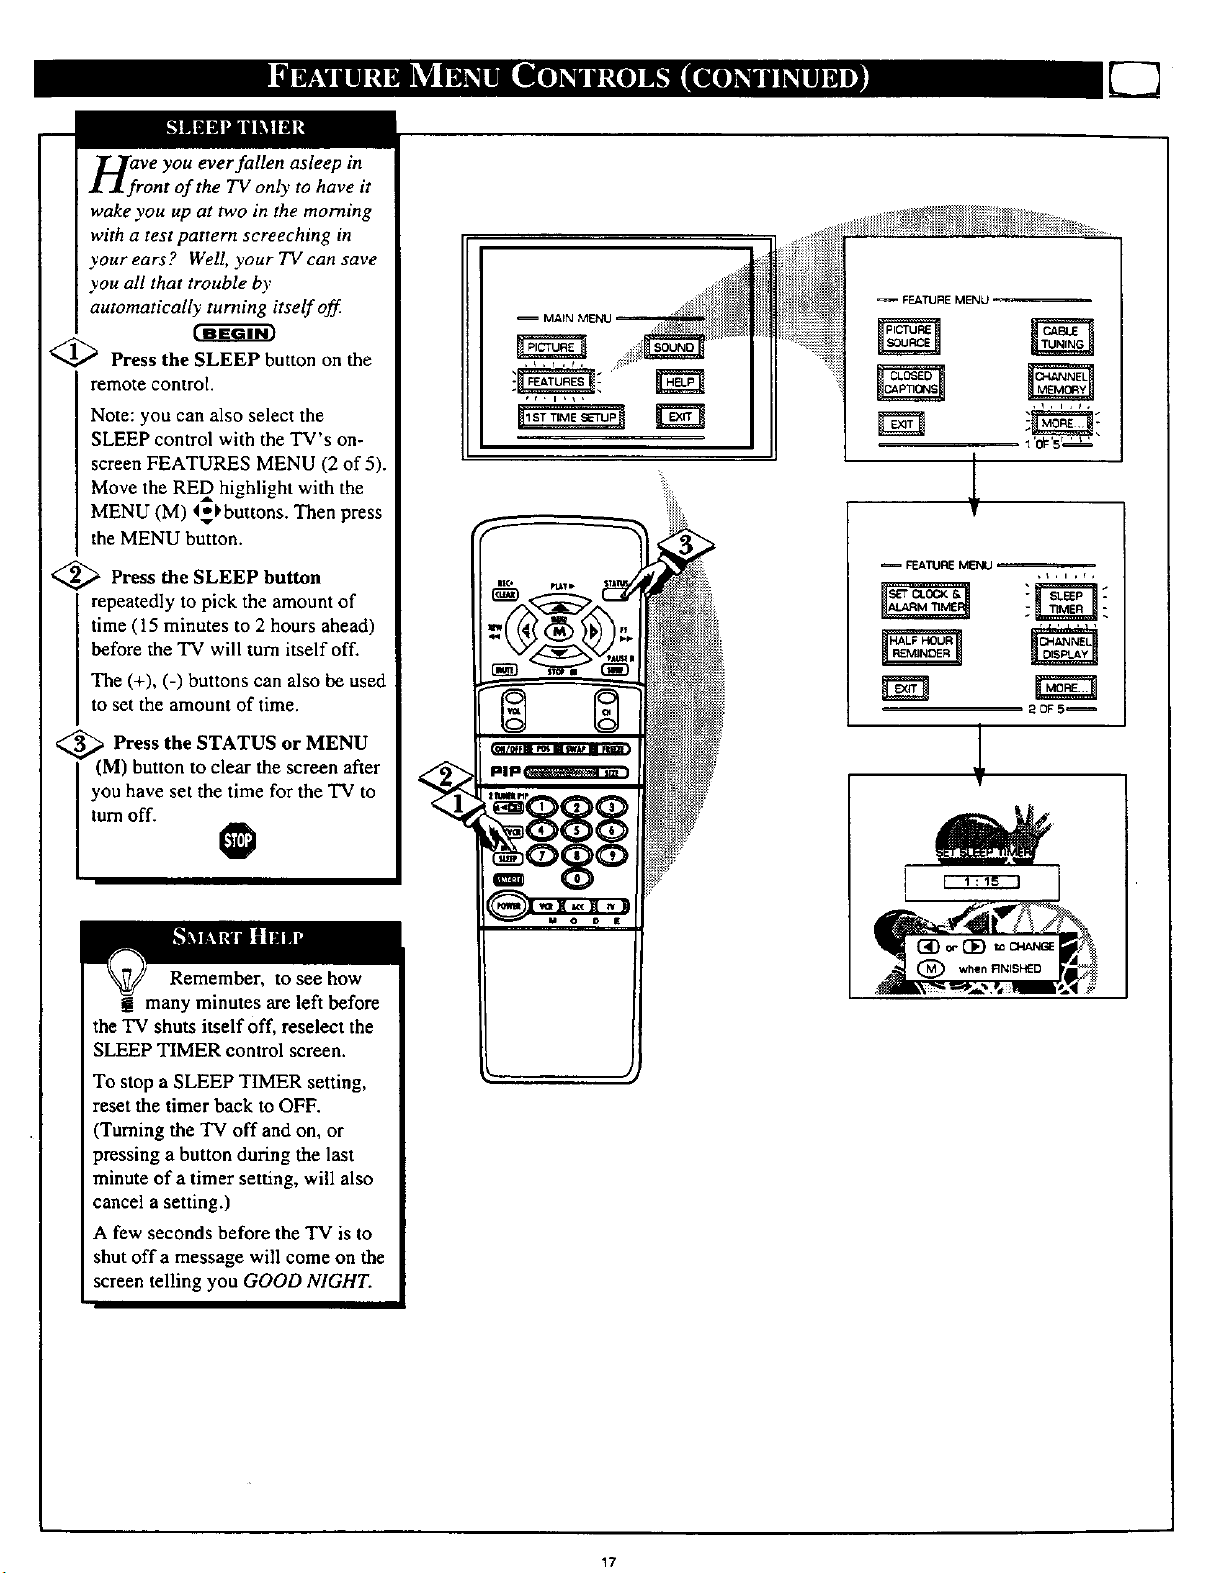
n;rVe you ever fallen asleep in
ont of the TV only to have it
wake you up at two in the morning
with a test pattern screeching in
your ears? Well your TV can save
you all that trouble by
automatically turning itself off
@_ Press the SLEEP button on the
remote control.
Note: you can also select the
SLEEP control with the TV's on-
screen FEATURES MENU (2 of 5).
Move the RED highlight with the
MENU (M) '1_ buttons. Then press
the MENU button.
_ Press the SLEEP button
repeatedly to pick the amount of
time (15 minutes to 2 hours ahead)
before the TV will turn itself off.
The (+), (-) buttons can also be used
to set the amount of time.
_ Press the STATUS or MENU
(M) button to clear the screen after
you have set the time for the "IV to
turn off.
FEATURE MENU
Remember, to see how
! many minutes are left before
the TV shuts itself off, reselect the
SLEEP TIMER control screen.
To stop a SLEEP TIMER setting,
reset the timer back to OFF.
(Turning the TV off and on, or
pressing a button during the last
minute of a timer setting, will also
cancel a setting.)
A few seconds before the TV is to
shut offa message will come on the
screen telling you GOOD NIGHT.
17

V V control you can change the
size and location of the on screen
I I_th the Channel Display
channel and clock information.
Select CHANNEL DISPLAY
control.
With FEATURES MENU (2 of 5)
on screen, move the RED
highlight with the MENU (M)4_
buttons. Then press the MENU
button.
_ Press the MENU AY and
MENU (M) buttons to highlight
and select (v") the LARGE or
SMALL display control.
<_ Press the STATUS button to
V
.... F_TUp$ MENU ....... _ ,_
... ...... 2_5 .--
Try it out.
Press the
CHANNEL AY
buttons and you
should see the
Display Size you
selected.
Remember. The
SMALL SIZE
display shows only
the channel number
not the time (or
clock).
Wcth the Half Hour Reminder
ontrol the TV automatically
shows you the current time and
channel every thirty minutes.
@ Select HALF HOUR
REMINDER control.
With FEATURES MENU (2 of 5)
on screen, move the RED
highlight with the MENU (M) l_k
buttons. Then press the MENU
button.
<_ Press the MENU AV and
MENU (M) buttons to highlight
and select (t,,') the EVERY HALF
HOUR item.
_ Press the STATUS button to
I clear the screen z
Remember.
The Time and
Channel Reminders
will show on the
hour and the half-
hour for about five
seconds.
-- g_ MENU --
rm
18
 Loading...