

Page 1
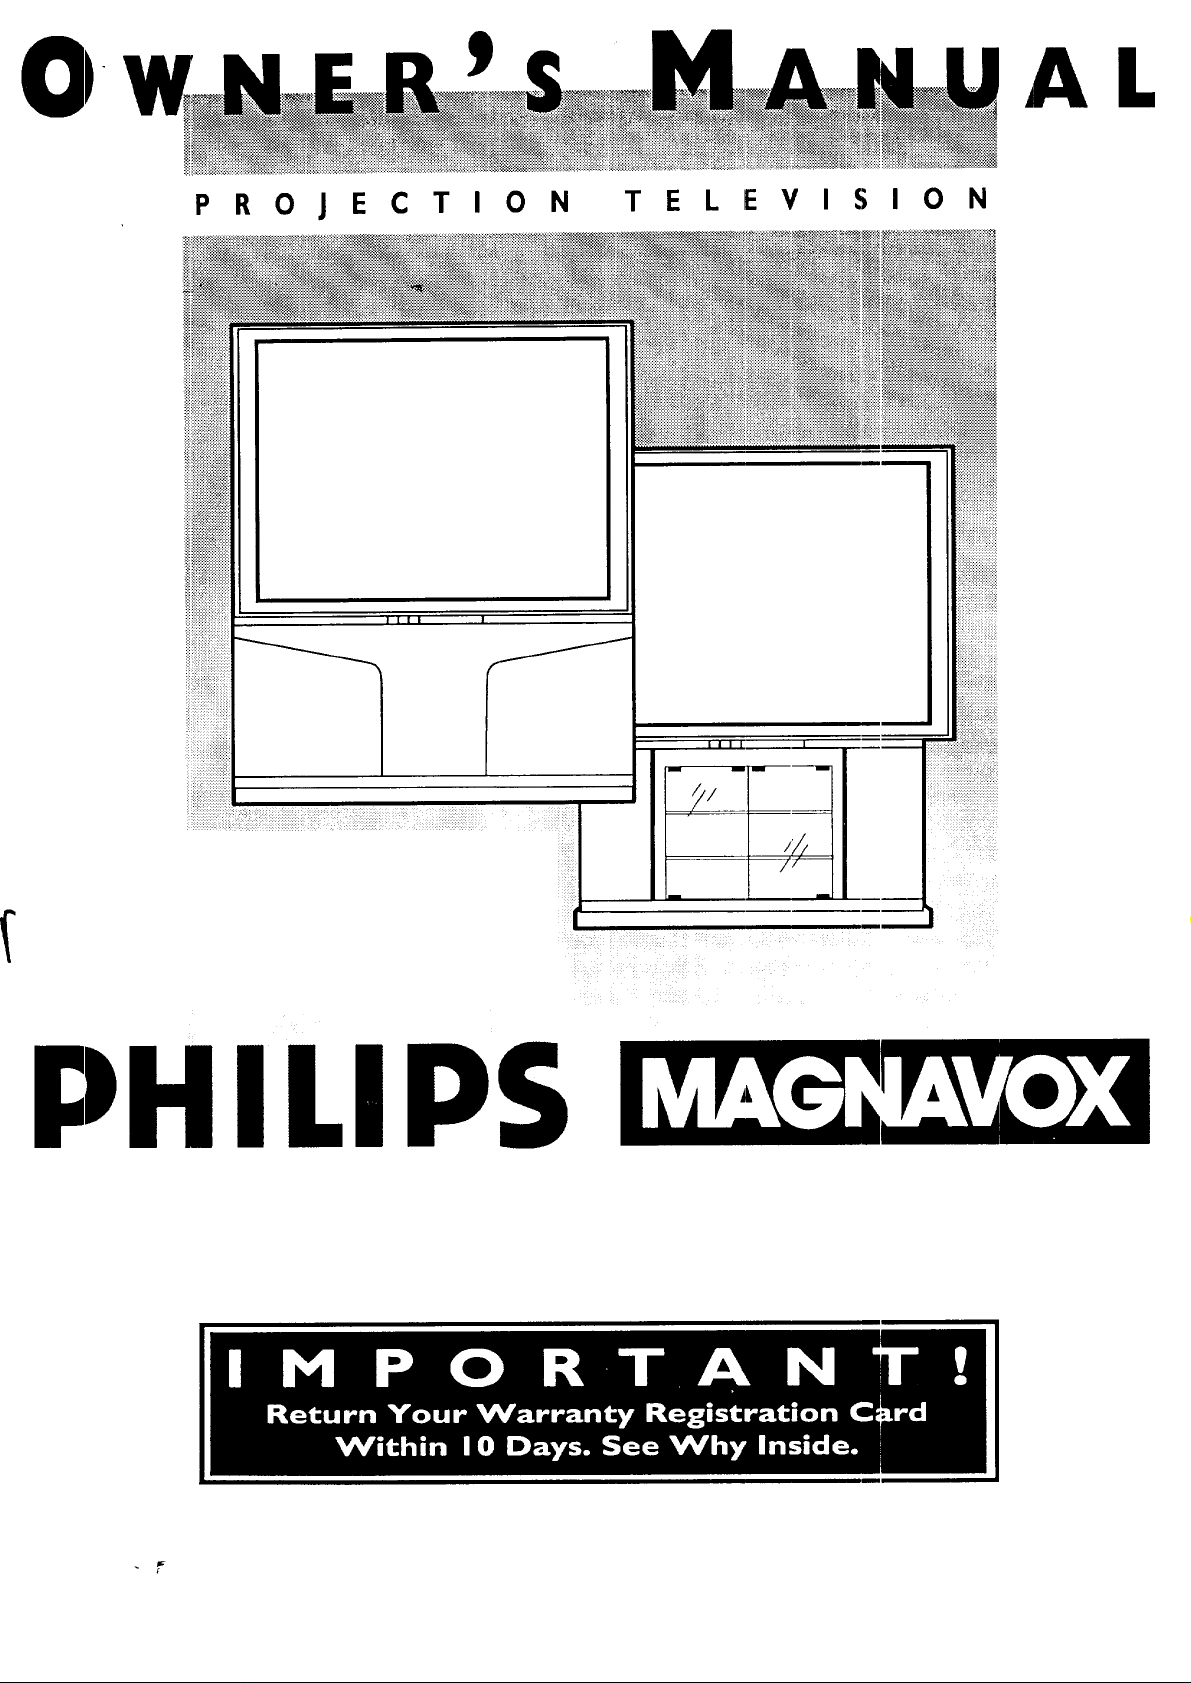
PROJECTION TELEVISION
AL
ILIPS
II I I I
Page 2

Once your PHILIPS MAGNAVOX purchase is registered, you're eligible to receive all the privileges of
owning a PH/LIPS MAGNAVOX product. So complete and return the Warranty Registration Card
enclosed with your purchase at once. And take advantage of these important benefits.
Congratulations on your purchase,
PHILIPS
and welcome to the "family!"
Dear PHILIPS MAGNAVOX product owner:
-[hank you for your confidence in PHILIPS MAGNAVOX. You've selected one of the best-built, best-
backed products
available today. And we'll do everything in our power to keep you happy with your purchase for many
years to come.
As a member of the PHILIPS MAGNAVOX "family," you're entitled to protection by one of the most
comprehensive warranties and outstanding service networks in the industry.
What's more, your purchase guarantees you'll receive all the information and special offers for which
you qualify, plus easy access to accessories from our convenient home shopping network.
And most importantly you can count on our uncompromising commitment to your total satisfaction.
All of this is our way of saying welcome-and thanks for investing in a PHILIPS MAGNAVOX product.
Sincerely,
P.S. Remember, to get the most from your PHILIPS
MAGNAVOX product, you must return your
Robert Minkhorst
President and Chief Executive Officer
Warranty Registration Card within 10 days. So
please mail it to us right now!
Know these
safetysymbo/s
,_ This "bolt of lightning" indicates uninsulated material witl*in ¢our unit may cause an electrical
shock. For the safety of everyone in your household, please do not remove product covering.
,_The "exclamation point" calls attention to features for which you should read the enclosed lit-
erature closely to prevent operating and maintenance problems.
WARNING: TO PREVENT FIRE OR SHOCK HAZARD, DO NOT EXPOSE THIS EQUIPMENT
TO RAIN OR MOISTURE.
CAUTION: To prevent electric shock, match wide blade of plug to wide slot, and fully insert.
A-I-]'ENTION: Pour _viter les chocs 61ectriques, introduire la lame la plus large de la fiche dans la
borne correspondante de la prise et pousser jusqu'au fond.
MAGNAVOX
Page 3
SAFETYINSTRUCTIONS- Readbeforeoperatingequipment
This product was designed and manufactured to meet strict qualityand
safety standards. ]here are, however, some installation and operation
precautionswhich you should be particularly aware of.
1. Read Instructions - All the safetyand operating instructions should
beread beforethe applianceis operated.
2. Retain Instructions - Thesafety and operating instructions should
be retainedfor future reference.
3. Heed Warnings - All warnings on the applianceand in the operating
instructions should be adheredto.
4. Follow Instructions - All operating and use_structions should be
followed.
5. Water and Moisture- The appliance should not be used near water
- for example, near a bathtub, washbowl, kitchen sink, laundry tub,
in a wet basement or neara swimming pool, etc.
6. Carts and Stands - The appliance should beused only with a cart or
stand that is recommended bythe manufacturer.
6A. _ An appliance and cart combination should be moved
7. Wall or Ceiling Mounting - The appliance should be mounted to a
wall or ceiling only as recommended by the manufacturer.
8. Ventilation- The appliance should be situated so that its location or
position does not interfere with its proper ventilation. For example,
the appliance should not be situated on a bed, sofa, rug, or similar
surface that may block the ventilation openings; or, placed in a
built-in installation, such as a bookcase or cabinetthat may impede
the flow of air through the ventilation openings.
9. Heat - The appliance should be situated away from heat sources
such as radiators, heat registers, stoves, or other appliances
(including amplifiers) that produce heat.
10. Power Sources - The appliance should be connected to a power
supply only of the type described in the operating instructions or as
marked on the appliance.
11. Power-Cord Protection - Power supply cords should be routed so
that they are not likely to be walked on or pinched by items placed
upon or against them, paying particular attention to cords and
plugs, converience receptacles, and the point where they exit from
the applian(;e.
with care. Quick stops, excessive force, and uneven
surfaces may causethe appliance and cart combination
to overturn.
12. Cleaning - The appliance should be cleanedonly as recommended
bythe manufacturer.
13. Power Lines .-An outdoor antenna should be located away from
power lines.
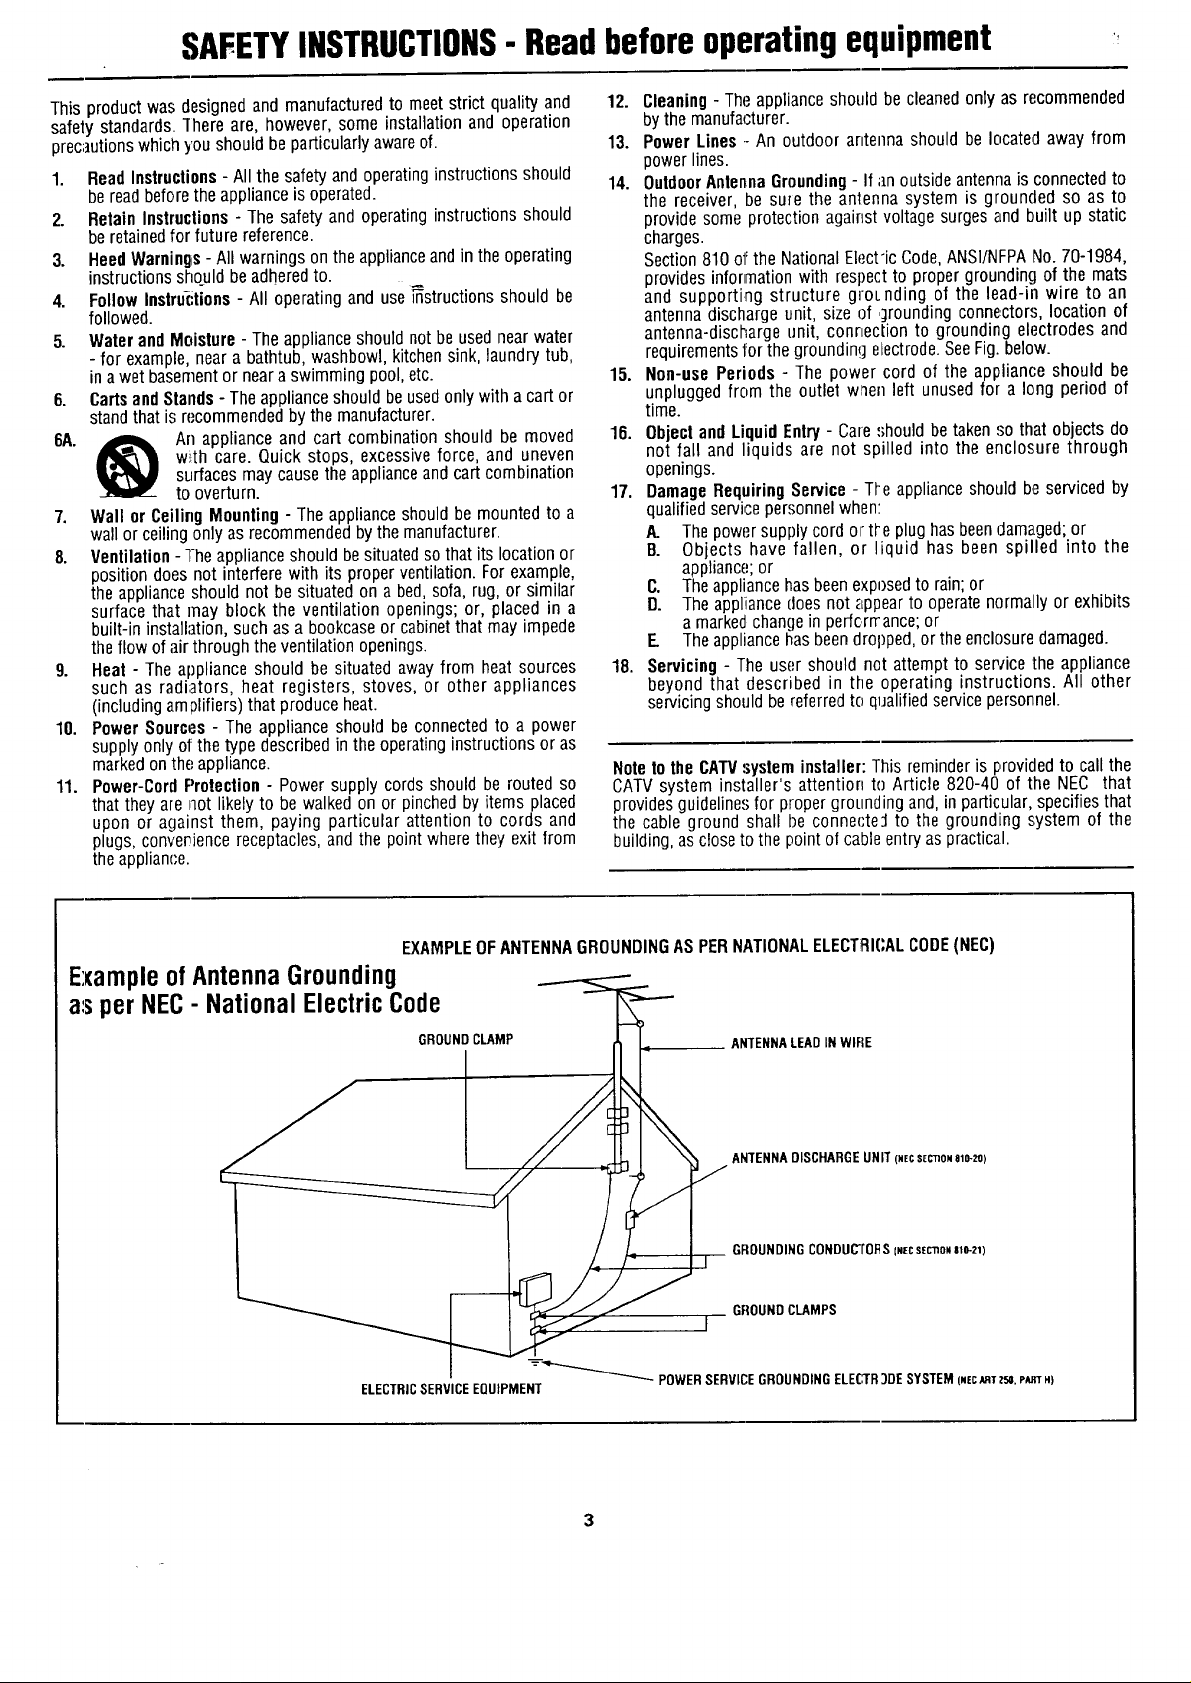
14. Outdoor AntennaGrounding- If an outside antenna is connected to
the receiver, be sure the antenna system is grounded so as to
provide some protection against voltage surges and built up static
charges.
Section 810 of the National Electric Code,ANSI/NFPANo. 70-1984,
provides information with respectto proper grounding of the mats
and supporting structure groLnding of the lead-in wire to an
antenna discharge unit, size of ,;]rounding connectors, location of
antenna-discharge unit, connection to grounding electrodes and
requirementsfor the grounding electrode.SeeFig. below.
15. Non-use Periods - The power cord of the appliance should be
unplugged from the outlet when left unused for a long period of
time.
16. Objecl and Liquid Entry - Care should betaken so that objects do
not fall and liquids are not spilled into the enclosure through
openings.
17. Damage Requiring Service - TI-e appliance should be serviced by
qualified service personnel when:
A. Thepower supply cord or tt_eplug has beendamaged;or
B. Objects have fallen, or liquid has been spilled into the
appliance;or
C. Theappliancehas beenexposedto rain;or
D. The appliiancedoes not appearto operate normally or exhibits
amarked change inperfcrrrance; or
E Theappliancehas beendropped, or the enclosure damaged.
18. Servicing - The user should net attempt to service the appliance
beyond that described in the operating instructions. All other
servicing should be referred to qualifiedservice personnel.
Note to the CAW system installer: This reminder is I:,rovidedto call the
CATVsystem installer's attention to Article 820-40 of the NEC that
provides guideline.,;for proper groLmdingand, in particular, specifies that
the cable ground shall l)e connecte:l to the grounding system of the
building, ascloseto the point of cable entry as practical.
EXAMPLEOFANTENNAGROUNDINGASPERNATIONALELECTRICALCODE(NEC)
ExampleofAntennaGrounding
as per NEC- NationalElectricCode
GROUNDCLAMP
ELECTRICSERVICEEQUIPMENT
ANTENNALEADIN WIFIE
__ ANTENNADISCHARGEUNIT(NECSEC'nONalO-ZO)
GFIOUNDINGCONDUC'/'OI_S(NECs(cno_ste-zq
GROUNDCLAMPS
I
=_ POWER SERVICEGROUNDING ELE(,3R3DE SYSTEM (NEeARTT-_.P_TH)
Page 4
€,t_.,_ Getting Started
_ Welcome/Product Registration ................... 2
Safety/Precautions ..................................................... 3
Table of Contents .................................... i.................. 4
Features, Model and Cabinet Information ................. 5
_-__1 On-Screen Feature_
PICTURE MENU
+Adjusting Color, Brightness, Sharpness,
Tint, and Picture Controls ................................... 6
+Using the Clem'view Control ............................... 7
+Adjusting the TV's Convergence Control ........... 8
+Using the Flesh Correction Control .................... 9
FEATURES MENU
+Selecting a Picture Source/RF Switch .............. 10
+Setting the TV for Closed Captioning ............... 11
+Setting the TV for Cable or Antenna Signals....12
+Adding Channels in Memory (Automatically) .13
+Adding Channels in Memory (Manually) ......... t4
+Setting the TV Clock ......................................... 15
+Turn-On Timer. ................................................. 16
+Using the Sleep Timer Control ......................... 17
+Adjusting the Channel Display Control ............ 18
+Using the Time/Channel Reminder Control ...... 18
+Using Parental Control to Censor Channels 19-20
+Using the Charmel Label Control ...................... 21
+Using the Language Selection Control .............. 22
Remote Control Operation
Using the Remote Locator Feature ........ 32-33
Setting the Smart: Picture Control .......... 34-35
Using Smart Sound Control ..................................... 36
Using the Smart Surf Coatrol .................................. 37
Setting the Remote to Work VCRs .................... 38-39
Setting the Remote to Work
Cable TV Converters .......................................... 40-41
Setting the Remote to Work VCRs or Cable
Converters -"Search Method". ................................ 42
Using the Remote's VCR buttons ............................ 43
[_ Picture-In-Piicture (PIP)
How to Use PIP (Connections) ............. 44-45
How to Use PIP with the TV Remote ....................... 46
Selecting the Picture Sou rce for PIP ......................... 47
Adjusting Picture-in-Piclure Color and Tint ............. 48
More PIP Connection.,; (Cable Converter) ................ 49
U General Information
TV Help Menu ............................................. 50
Tips if Something Isn't Working ............................... 5 l
Glossary of TV Terms ............................................... 52
Index ......................................................................... 53
Factory Service Locations .................................. 54-55
Warranty ................................................................... 56
SOUND MENU
+Adjusting Bass, Treble, and Balance Sound
Controls ............................................................. 23
+Setting the Bass Boost Control ........................ 23
+Setting the TV for Stereo and SAP Programs ..24
+ Using the Incredible Stereo Control ................. 25
+Using the Volume Display Control ................... 25
+Using the TV Speaker On/Off Control with
_e Audio Output jacks ..................................... 26
+Surround Sound Speaker Connections and
Variable Audio Output Control ........................ 27
+Using the TV's Audio/Video Input and
Output Jacks ............................................... 28-31
Use the simple Set-Up Guide (supplied with
your TV information packet) for details on:
• Antenna Hook-ups
• Fir,;t Time Set-Up
(Automatic Settings)
• Basic TV and Remote
Control Operation
• On-Screen Menu Use
Copyright © 1997 Philip,,; Consumer Electrcnics Company. All rights reserved.
4
Page 5

First Time Set Up - automatically sets the TV for
local channels, the correct picture signal (antenna or
cable), and assists in the setting of TV's Smart Clock
feature.
Infrared Remote Control - operates your TV set and
a variety of wireless remote control VCRs and Cable
TV Converters. A special "Locator" feature e-analso
help you find the remote when it has been stuck out of
sight or misplaced.
Standard TV broadcast (VHF/UHF) or Cable TV
(CATV) channel capability.
As you unpack your "IV please note thallthe
following items have been included with your set:
• Owner's Manual
Safety Tip Information
Factory Service Center Locations
• 'Warranty Registration Card
• ]Remote Control q?ransmitter
• ]Batteries for Rernote Control Use
CIo,_ed Captioning - allows the viewer to read TV
program dialogue or voice conversations as on-screen
text.
Automatic Programming of channels - for quick and
easy selection of favorite stations available in your
,:q!e_..
Picture-In-Picture (PIP) - can show a TV program
and the direct video output from an accessory (VCR,
etc. I onto the TV screen at the same time.
Parental Conlrol for "Censoring" - this feature can
block out channels to keep children from watching
undesirable prog:mmming.
Stereo-TV - x_ith a built-in audio amplifier and a twin
speaker system, reception of TV programs in both
broadcast stereo sound or (SAP) bilingual broadcast
zu'eavailable.
Twin Antenna (A/B) Inputs - for easy displaying of
two separate signal sources on the TV. An A/B button
on the remote control switches the TV's Main screen
between the two Antenna (A & B) Input options.
Please take a few minutes to complete 3,our
registration card. The serial number for the TV is
on the back of the set.
Refer to the back of this manual for insllructions
on the cleaning artd care of the TV.
An accessory storage shelf compartment has been
designed into some Projection TV Cabinets for the
placement of such ilems as VCRs, CD-i (Compact
Disc Interactive) Players, or other pieces of
audio/video equipment.
If your Projection TV is so equipped, use the
connection tunnel (located on the rear wall of the
storage compartment) to route Antenna, Cable, or
other signal supply wires from the accessories to the
TV's rear cabinet jackpanel.
Audio/Video ,lacks - for direct connections with
VCRs (and other accessories) for quality TV picture
and sound playback.
Surround Sound - this TV set contains external;
and io speaker connections for a more dynamic sound
effect.
Sleep-Timer - a_atomaticallyturns the TV OFF at
preset time intercals.
Smart Button - for the control of TV Sound and the
Picture levels. Use the Smart Button on the remote to
quickly adjust Smart Sound (to set TV Volume levels
during program changes or commercial breaks); Smart
Picture (for programmed video video level
adjustments on a variety of program sources); and
Smart Surf (for quick one button channel selection of
up to 10 of your favorite channels).
Note: A Projection TV Screen Enhancement Filter
may also be presenl: o:3certain select models. Refer
to the Cleaning and Care Instructions provided for
directions on how to remove the framed filter if it
should ever be necessary.
Page 6

JTo adjust your TV color and
.L picture controls, select a TV
channel and f_llow the steps shown
below:
Select BRIGHTNESS,
PICTURE, COLOR, TINT, or
SHARPNESS picture control.
With the PICTURE MENU on
screen, move flae RED highlight
with the MENU (M) 4_ buttons.
Then press the MENU button.
_ Press the (+) or (-) buttons to
adjust the selected control.
_ Press the STATUS button to
clear the screen.
== MA_N MENU _= ..............:;.:iliiiiiii!iiiiiiiiiiiiiiiiiii
,l, i ,1
:i::
' ].:).))))]:.:E:Z:)E:
FF
============================================
Remember. When the bar
scale is centered, control
_ettings are at normal mid-range
levels.
.BRIGHTNESS Press (-) or (+) until
clark parts of the picture show good
cetail.
]PICTURE Press (-) or (+) until
whitest parts of the picture are as
bright as you prefer.
__,_OLOR Press (-) or (+) to add or
eliminate color.
]'INT Press (-)or (+) to obtain
natural skin tones. (Also see Flesh
Correction on page 9 for more
information).
_SHARPNESS Press (-) or (+) to
improve detail in the picture.
<
(ou/ofF [] _ [] swJ,r M f_[q_)
_iiiiiiiiiiiiiiiii
::::::::::::::::::::::::::::::::::::::::::::::::
i_i_i!ii_iiiiiiiiii!iiiiiiiiiiiiiiii_
[ MENU (M) button t? | (M) button to view additional
I view an e×planalion of ] controls grouped under same
[the selected feature. ] feature heading. For
__ • L
FlOW TO SELFCT FEATURES
(WITH BUTTONS ON THE REMOTE)
_ ress MENU(M)._.
Press MENU (M) _- _'-,-,-.-,_
to select RED
highlighted Press MENU (M)
• • to move Up
and Down within
the Menu.
Select and then pres:; Select and 1hen press MENU
Example: Tint, Brightness,
P cture, etc.
to mo_e from Side-lo-
Side within the Menu.
Page 7
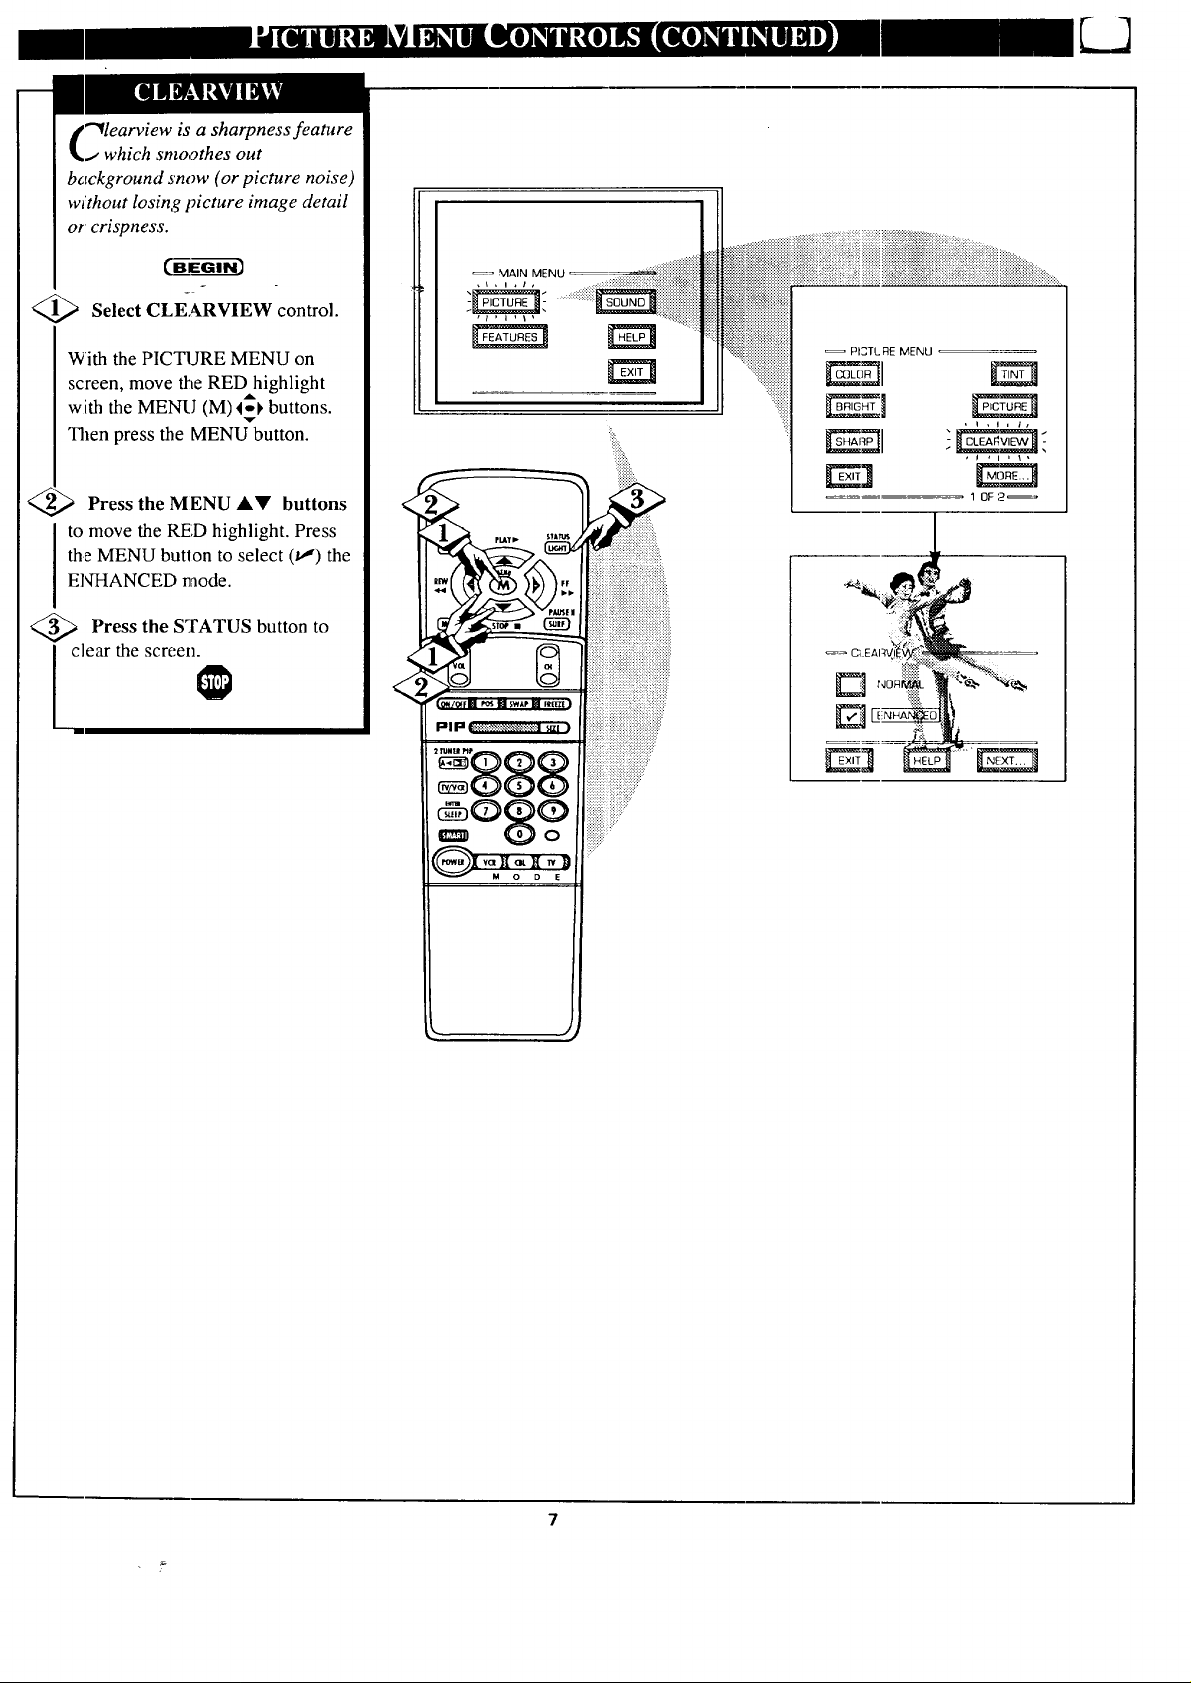
"_learview is a sharpness feature
.i which smoothes out
background snow (or picture noise)
without losing picture image detail
or crispness.
<_ Select CLEARVIEW control.
With the PICTURE MENU on
screen, move the RED highlight
with the MENU (M)l_k buttons.
Then press the MENU button.
q Press the MENU &Y buttons
to move the RED highlight. Press
the MENU butlon to select (tJ) the
ENHANCED mode.
<_ Press the STATUS button to
clear the screen.
iii!iii ....
::::::::::::::::::::::::::::::::::::::::::::::::::::::::::::::_._+_._._:.._..._._........_ Pl3TL FIEMENU _o
....._::::_'_i'_ii_i_i_i_i_i_1 #,Z]
, I , I i Ii
1 OF 2 _
I
Page 8

l("_onvergence is the correct
_J lining up of the red and blue
light paths on the 73/screen.
NOTE: lf no color fringing (see
Smart Help) shows, then no
Convergence adjustments are
necessary for your TV.
@_ Select CONVERGENCE
control.
With PICTURE MENU (2 of 2) on
screen, move the REDhighlight
with the MENU (M)I_I' buttons.
"l-henpress the MENU button.
<_ If there is lIED or BLUE color
fringing on the White cross, press
Ihe MENU button to continue.
A
_ Press the MENU I_ buttons
lo move the red or blue cross
directly over lhe white cross on the
"IV screen.
MAIN MENU
::::i?::::ii:i
°_ PICTURE MENU
\ , _ , I , / , /
i , J , I , I L I
The red or blue cross is properly
adjusted when it is completely
merged with the white cross. (No
color appears around the edge of
the white cross).
@, Press the to
STATUS button
rlear the screen when convergence
adjustments are complete.
Remember. Convergence
has been set at the factory for
best viewing, 1Outif one or more of
the (red or blue) colors appear
_;ound the ed_,es of objects (color
fringing) follow the steps given in
this section.
i )i¸
2 0F 2_
If there is REDor BLUE
fringe on the WHITEcross,
use this adjustment to
irrlprovethe picture.
Press "M"to Continue
- or -
Press "V' to Return
8
Page 9

T ]'se the Flesh Correction
_IJ control to keep skin tone hues
(or facial tint) from varying from
TV channel to TV channel.
_ Select FLESH
,CORRECTION control.
With PICTURE MENU (2 of 2) on
,screen, move the RED highlight
with the MENU (M)4_ buttons.
Then press the MENU button.
_> Press the MENU AV buttons
_:omove the RED highlight. Press
::heMENU button to turn (v,") the
FLESH CORRECTION control
,ON.
_> Press the STATUS button to
:lear the screen.
_= MAIN MENU
.::::::::::::::.
_== PICTURE MENU
,,,,\,l,t,,I,
2OF 2_
Page 10

"_he picture fi_r the TV can come
through either the ANTENNA
plug or the A UDIO/VIDEO INput
jacks (on the rear of the TV). The
Picture Source ¢.ontrol simply tells
the TV which one of these picture
sources it is to _how on the TV
screen. (._._
_Select PICTURE SOURCE
SELECT control.
With the FEATURES MENU on
screen, move the RED highlight
with the MENU (M) I_ buttons.
Then press the MENU button.
<_ Press MENU AV buttons
the
to move the REID highlight. Press
the MENU button to turn the
de:sired PICTURE SOURCE
control ON (tl}.
ANT A or B- for a picture signal
coming from either the ANT(enna)
A or B Input plugs on the TV.
A1JX 1- for a picture signal
coming from the AUX 1 Video
Input jack on the rear of the TV.
AIJX 2- for a picture signal
coming from the AUX 2 Video
Input jack on the rear of the TV.
AUX 3- for a picture signal
coming from the Video Input jack
on the front of tLheTV.
: MAIN MENU _ : ' :::;:i:i:iii::.:.
iiiiiiiiiiiiiiiiiiiiiiii
, i , i , I ,
, 10F5, ,
Remember,
the AUX l, AUX
2, and AUX 3
modes must have a
video signal source
connected (to their
INPUT plug) or the
TV scTeen will be
blank. (See page 28
for connection
details.).
1
_ Press the STATUS button to
I clear the screen.
n optional RF Switcher is available
.that will allow an Antenna/Cable TV
signal and another video accessory
(VCR, Video Disc Player, etc.) to be
connected to the TV at the same time.
Connection instructions are given with
the accessory RF Switcher, but be sure
to turn the TV's power OFF (and
unplug its AC power cord) when
connecting the RF Switcher to the RF
Switch Input jack on the rear of the TV.
Replug the TV's AC Power Cord into
the wall outlet and turn the TV ON. The
TV's Picture Source Menu will now
show an Accessory Signal Source option
available for selection.
The accessory RF Switcher can be
purchased or ordered from your dealer.
If your dealer doe_ not carry the
accessory, call the Information Center
number (listed with your warranty)for
further assistance.
::::::::::::::::
+:_:_+:_!._!+:.:.:.:.:.:++:+:.!+:....
, FEATUI_E_ENU,
lO
__ • L
. F_AI Li _ _NU ....
, • _ATLt_ MENU_ •
.3Dr5
i i'
!:
i
:. _o_:_!_
=, ]
• ...... =.
:'::E:ii_iiiilliiiiiiiill:
Page 11
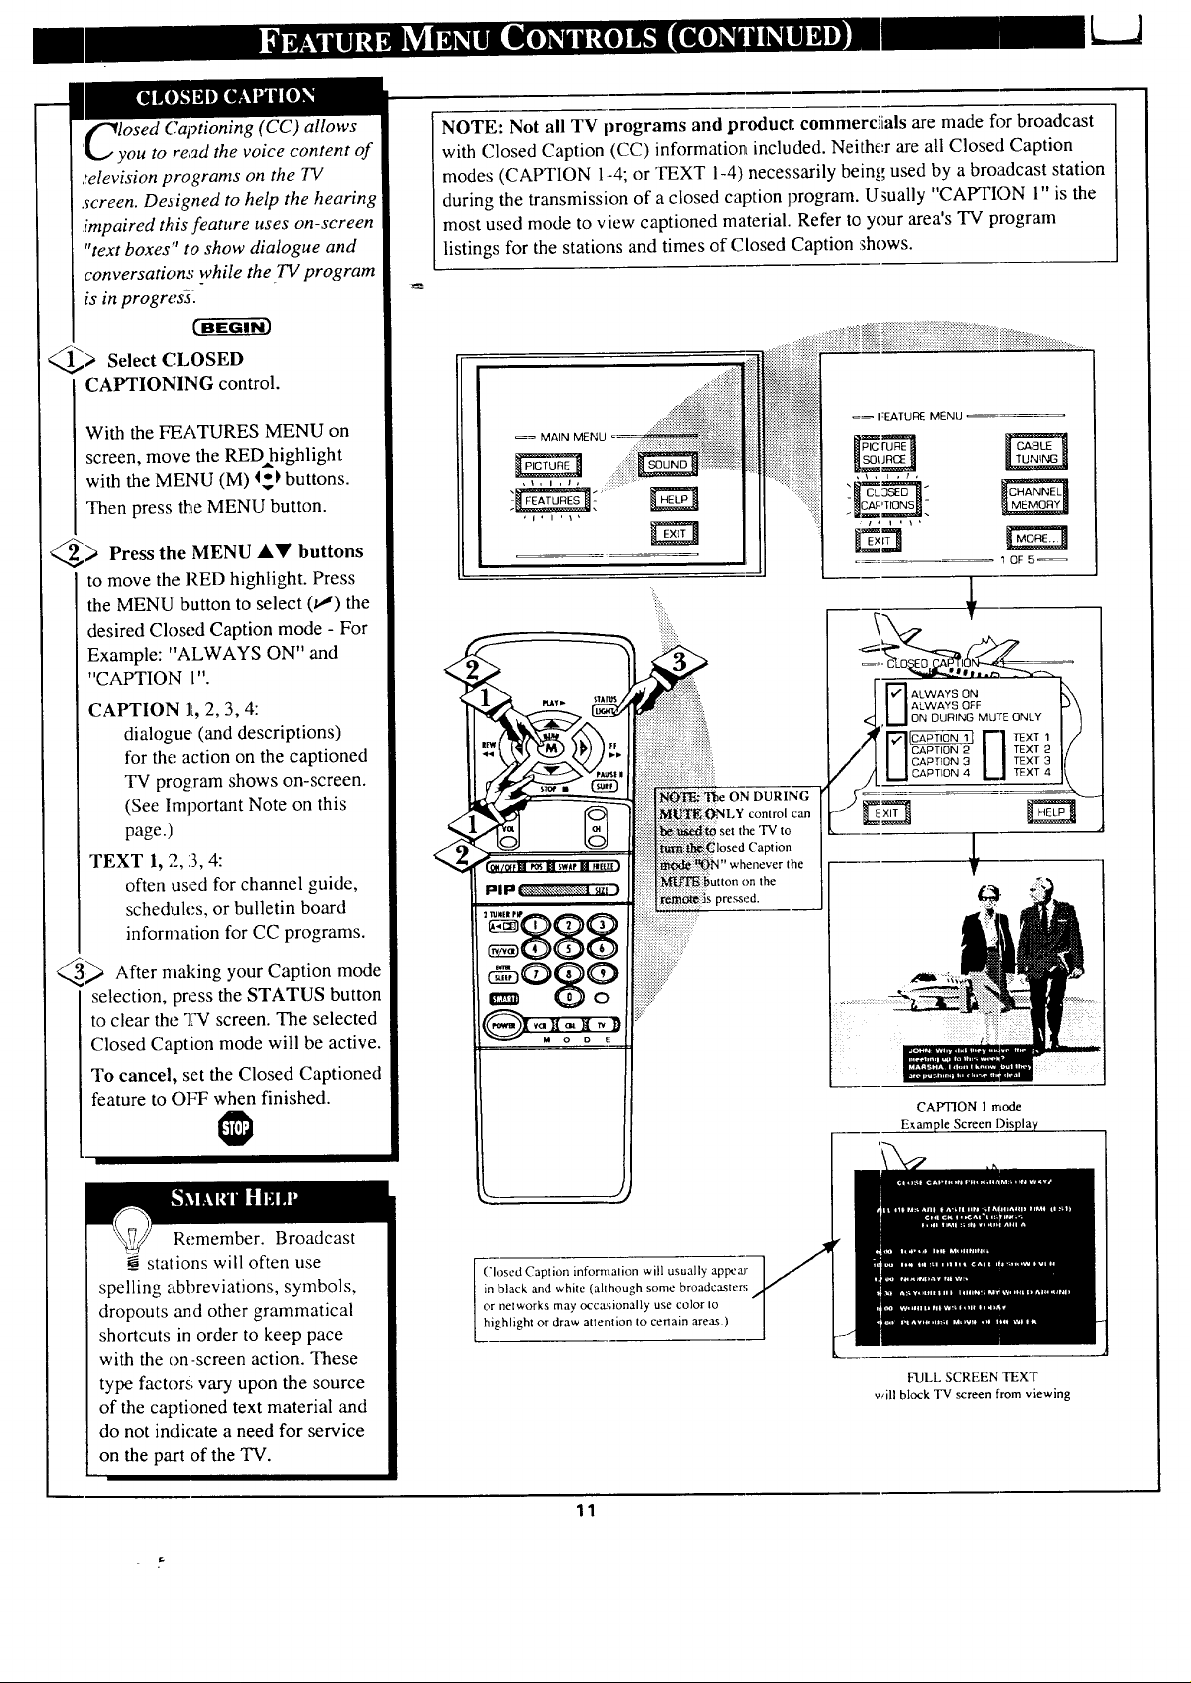
_"_losed Captioning (CC) allows
'q_.,/ you to re,_d the voice content of
._elevisionprograms on the 737
screen. Deaigned to help the hearing
impaired this feature uses on-screen
"text boxes" to show dialogue and
conversation,,: while the TV program
is in progres-a.
_,> Select CLOSED
CAPTIONING control.
NOTE: Not all TV programs and product commerciials are made fi>rbroadcast
with Closed Caption (CC) information included. Neither are all Closed Caption
modes (CAPTION 1-4; or TEXT 1-4) necessarily being used by a broadcast station
during the transmission of a closed caption program. U_ually "CAPTION 1" is the
most used mode to view captioned material. Refer to your area's TV program
listings for the stations and times of Closed Caption shows.
With the FEATURES MENU on
screen, move the REDhighlight
with the MENU (M) 4_k buttons.
Then press the MENU button.
_> Press the MENU buttons
to move the RED highlight. Press
the MENU button to select (t,,") the
desired Closed Caption mode - For
Example: "ALWAYS ON" and
"CAPTION 1"
CAPTION Ik,2, 3, 4:
dialogue (and descriptions)
for the action on the captioned
"IV program shows on-screen.
(See Important Note on this
page.)
TEXT 1, 2, :3,4:
often used for channel guide,
schedules, or bulletin board
information for CC programs.
_ After malting your Caption mode
selection, press the STATUS button
to clear the "IW screen. The selected
Closed Caption mode will be active.
To cancel, set the Closed Captioned
feature to OI_Twhen finished.
_= MAIN MENU
!
r
• _ sw P FIE
I:l|lal IE.-'._,x'.,_-Y<_.-_!*_:.@il",lz!)
, ,.ggg
gog?
:::::::::::..
ON DURING
control carl
_losed Caption
whenever the
on the
pressed.
=_ I:E.ATUR_ MENU
_ ALWAYS ON
I IALWAYS OFF
,_,,1 ON DURING MUTE ONLY
'1"71_ r-I r_x_
I I CAPTION 2 /I TEXT 2
I I CAPTION 3 II TEXT 3
I I CAPTION 4 L I TEXT
CAPTION 1 mode
Exam
4
Remember. Broadcast
__stalions will often use
spelling abbreviations, symbols,
dropouts and other grammatical
shortcuts in order to keep pace
with the on-screen action. These
type factors vary upon the source
of the captioned text material and
do not indicate a need for service
on the part of the TV.
Closcd Caption infom_alion will usually ap_ar
in black and white (although some broadcasters
or rrelworks may occasionally use color Io
highlight or draw attention to certain areas.)
FULL SCREEN TEXT
will block TV screen from viewing
11
Page 12
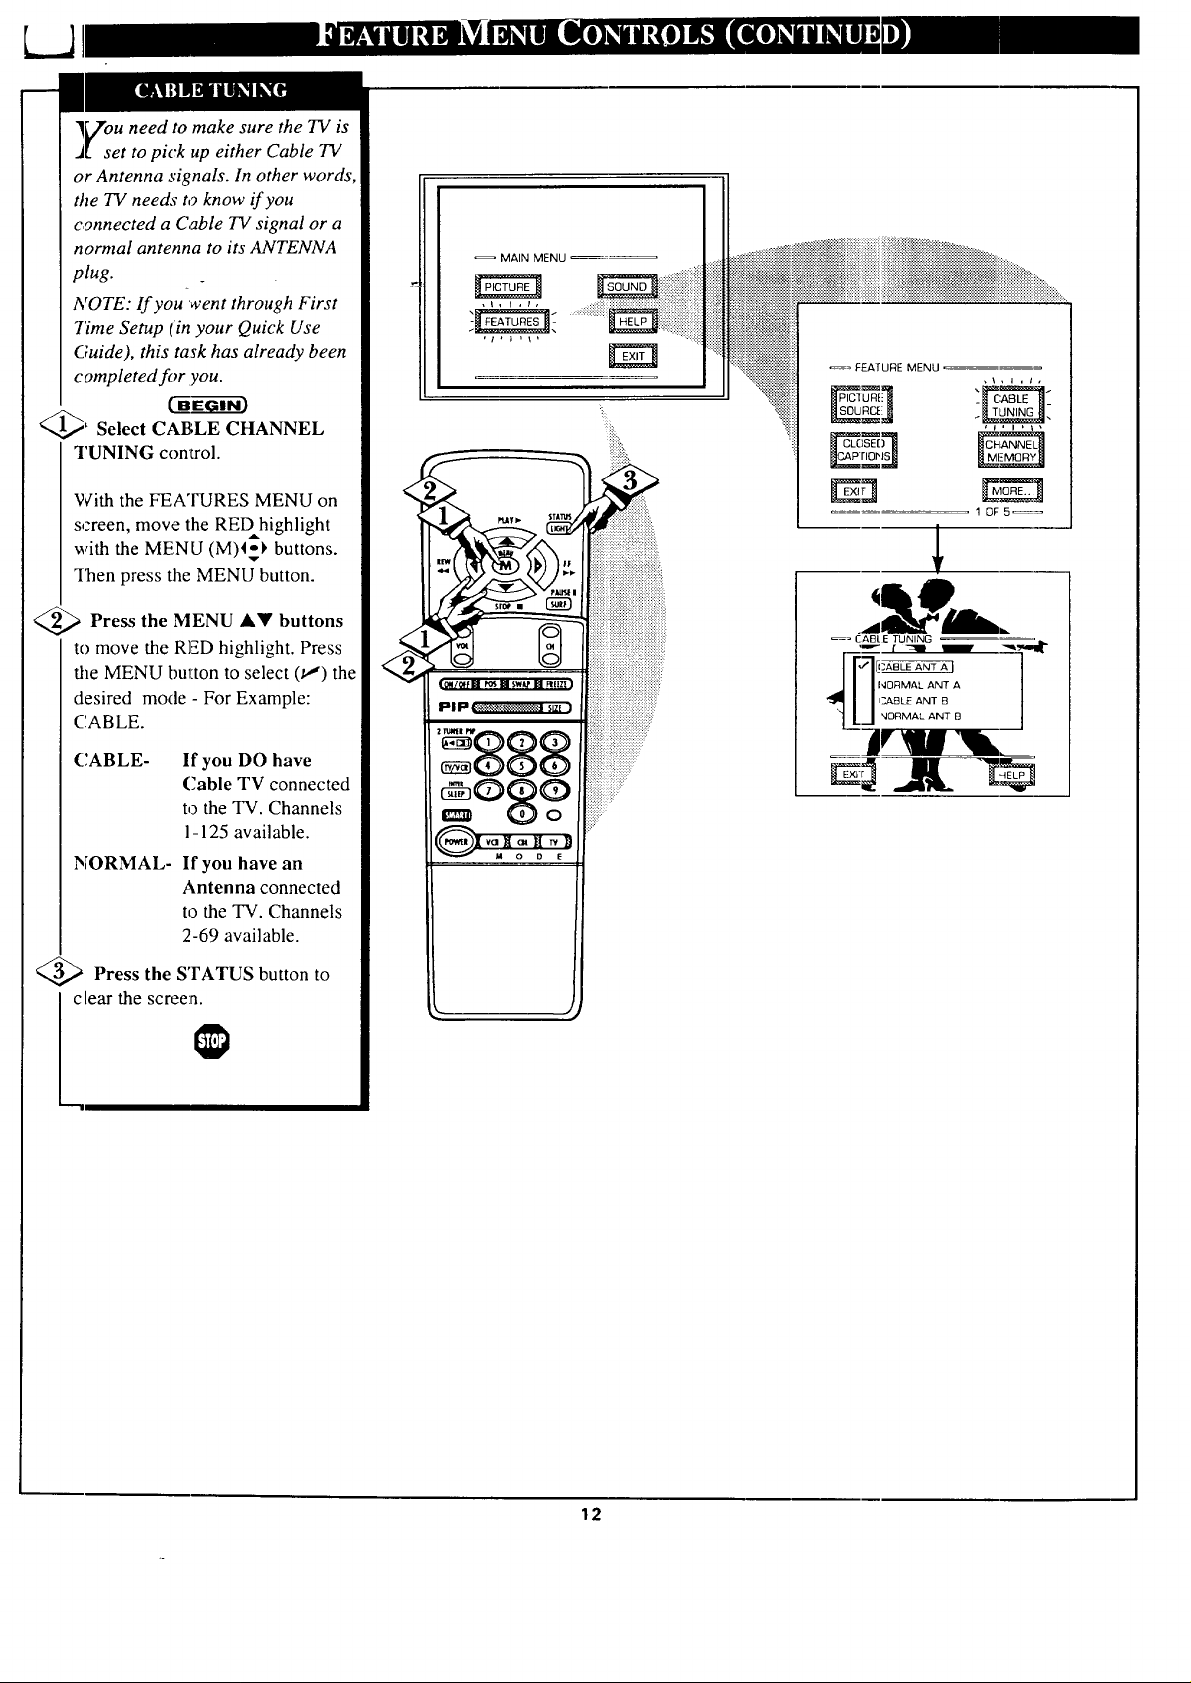
]_Zouneed to make sure the TV is
J[ set to pick up either Cable TV
or Antenna signals. In other words,
the TV needs to know if you
connected a Cable TV signal or a
normal antenna to its ANTENNA
plug.
NOTE: If you went through First
Time Setup (in your Quick Use
Guide), this task has already been
completed for you.
_EG---g_3
_' Select CABLE CHANNEL
TUNING control.
MAIN MENU
• ======================================================================================
i i i iiiiiii{iiiiii i{iiiiiii{{ ii iii iiiiiiiiiiiiii}iiiiiiiiiiii iiiiiiiiiiiiiii iiiii iiiii iiiiiiiiiii{iiiiiiii{iiiiiiiiiii{iiiiiiii i .....
_= FEATURE MENU
,\,l,lt
With the FEATURES MENU on
screen, move the REDhighlight
with the MENU (M)I_ buttons.
ISen press the MENU button.
<_ Press the MENU &'It buttons
to move the RED highlight. Press
the MENU button to select (u,') the
desired mode - For Example:
('.ABLE.
CABLE- If you DO have
(]able TV connected
to the TV. Channels
1-125 available.
NORMAL- If you have an
Antenna connected
to the TV. Channels
2-69 available.
;'Press the STATUS button to
clear the screen.
g,o' q
1 OF5==
!
/
-ggg
:::::u=:u
=og?
12
Page 13
.Vour TV can automatically set itself
.l for local area (or Cable TV)
channels. This makes it easy for you
;o select only the TV stations in your
area when the CHANNEL • •
buttons are pressed.
,VOTE: lf you went through First
Time Setup (in your Quick Use
,Guide), this task has already been
completed for you.
(BE-ffff i--
_> Select CH_kNNEL MEMORY
(START AUTO-PROGRAMMING)
control.
=_FEATURE MENU
With the FEATURES MENU on
screen, move the RED highlight with
the MENU (M)I_ buttons. Then
press the MENU button.
_ Press the MENU button to turn
AUTO-PROGRAMMING ON.
The TV shows which channel
numbers are 'SAVED" (t,,") as they
are added into memory.
"Auto-prograa'nming CHANNEL
MEMORY is finished" shows when
the TV is through adding channels.
_> Press the STATUS or Menu (M)
button to clear the screen.
Try it out. Press the
CHANNELA• buttons
and see which channels you can
select.
Remember, an Antenna or Cable
TV signal must first be connected
to your TV so that channels can be
saved.
If you want to delete any
unwanted channels from the TV's
memory, see "ADD/DELETE
CHANNFiS" on the next page.
°87
, 10F5_
MEMORY FOR ANT A
AUT0-PROGRAMMING CHANNEL ]
1 2¢" 3_" 4_"
5/ 6_" 7_/' 8_'
9v" 10 11 12
tJ Channel Numbers are "
Saved in Memory
J
13 14 !5 16
17 18 19 20
21 22 23 24
p Auto-Proqram
13
Page 14

/i uto-Programming (see
_d'-_previous page) adds all the
channels it can find (on your
Antenna or Cable TV system) into
ttle TV's memory. Add/Delete
Channels makes it easy for you to
add other chann_els, or drop
unwanted cha-nnels, from the list of
channels in the TV's memory.
Select CHANNEL MEMORY
(ADD/DELETE CHANNELS)
control.
MAIN MENU ...........i:i;i;)iii
. ...................
-x.:+:.:.:.:.:.:.:.:.:.:.:.
........ iiiiii!iiiiii!i!!ii!!!i!iii!i
.... ....,................................................,..........-....._._
iiiiiiiuiiiiiiiiii;; iii iiiiii!iiiili!ii ii i!i! il
_=_ FEAIURE MENU
...............
i ii!!i!iiiiiiiiiiii!iiiii!iiiiiiiiiiiiiiiiiiiiiiii
With the FEATURES MENU on
screen, move the RED highlight
with the MENU (M) 4ol, buttons.
v
_Iqaenpress the MENU button.
<_ Press the CHANNEL AV or
channel you want to add or delete.
I number buttons to select the
<_ Press the MENU button
ADD the channel into the TV's
memory.
Press the MENU "41button to
DELETE the channel from
memory.
Repeat steps 2 and 3 for each
clhannel you wish to add or delete.
the STATUS
Press or MENU
button to clear the screen when
through.
"-'m
Remember. You can also
add the AUX 1, AUX 2, or
AUX 3 modes just like a channel.
Then by pressing the CHANNEL
A'_' buttons the AUX(iliary)
mode can quickly be selected to
use the desired set of Input jacks
on the TV (see: page 28).
Note: AUX 1, AUX 2, and AUX 3
modes are located between the
lowest and highest channel
numbers within the
?d)D/DELETE CHANNEL
control screen.
'_iiiiiiiii
1 0F5_
iiiiliiii!iiiiiiiiiiiiiii
=_ CHANNEL MEMORY
to
<
sw Fur
iiiiiiiiii!iiiiiii!iiiiiiiiii!iiiiiiiiiii!iii!iii
,,,_ _ _, _:_:_:_:_:_::_:_?_:_:_:
ii!iii?:
)
NOTE: A sepmate ADD/DELETE CFtANNEL memory
may also be created for the ANT(enna) 13;lnpul on the
rear of the set (if an Antenna or Cable "1_1 signal has been
connected). Jusl press the _ button on the r_mole,
while in the ADD/DEI.ETE CHANNEL mode. to switch
between the ANT ?, and ANT B channel memory lists.
"I'h_n follow steigs 2 and 3 as shown to the left to add or
delete the desired channels.
,_,\, ,t,t,
3/E
A_r_ R?GFIA M MING.]
I SELECT CHANNEL
(_) to DELETE CHANNEl.
_ ,o_ANT
14
Page 15
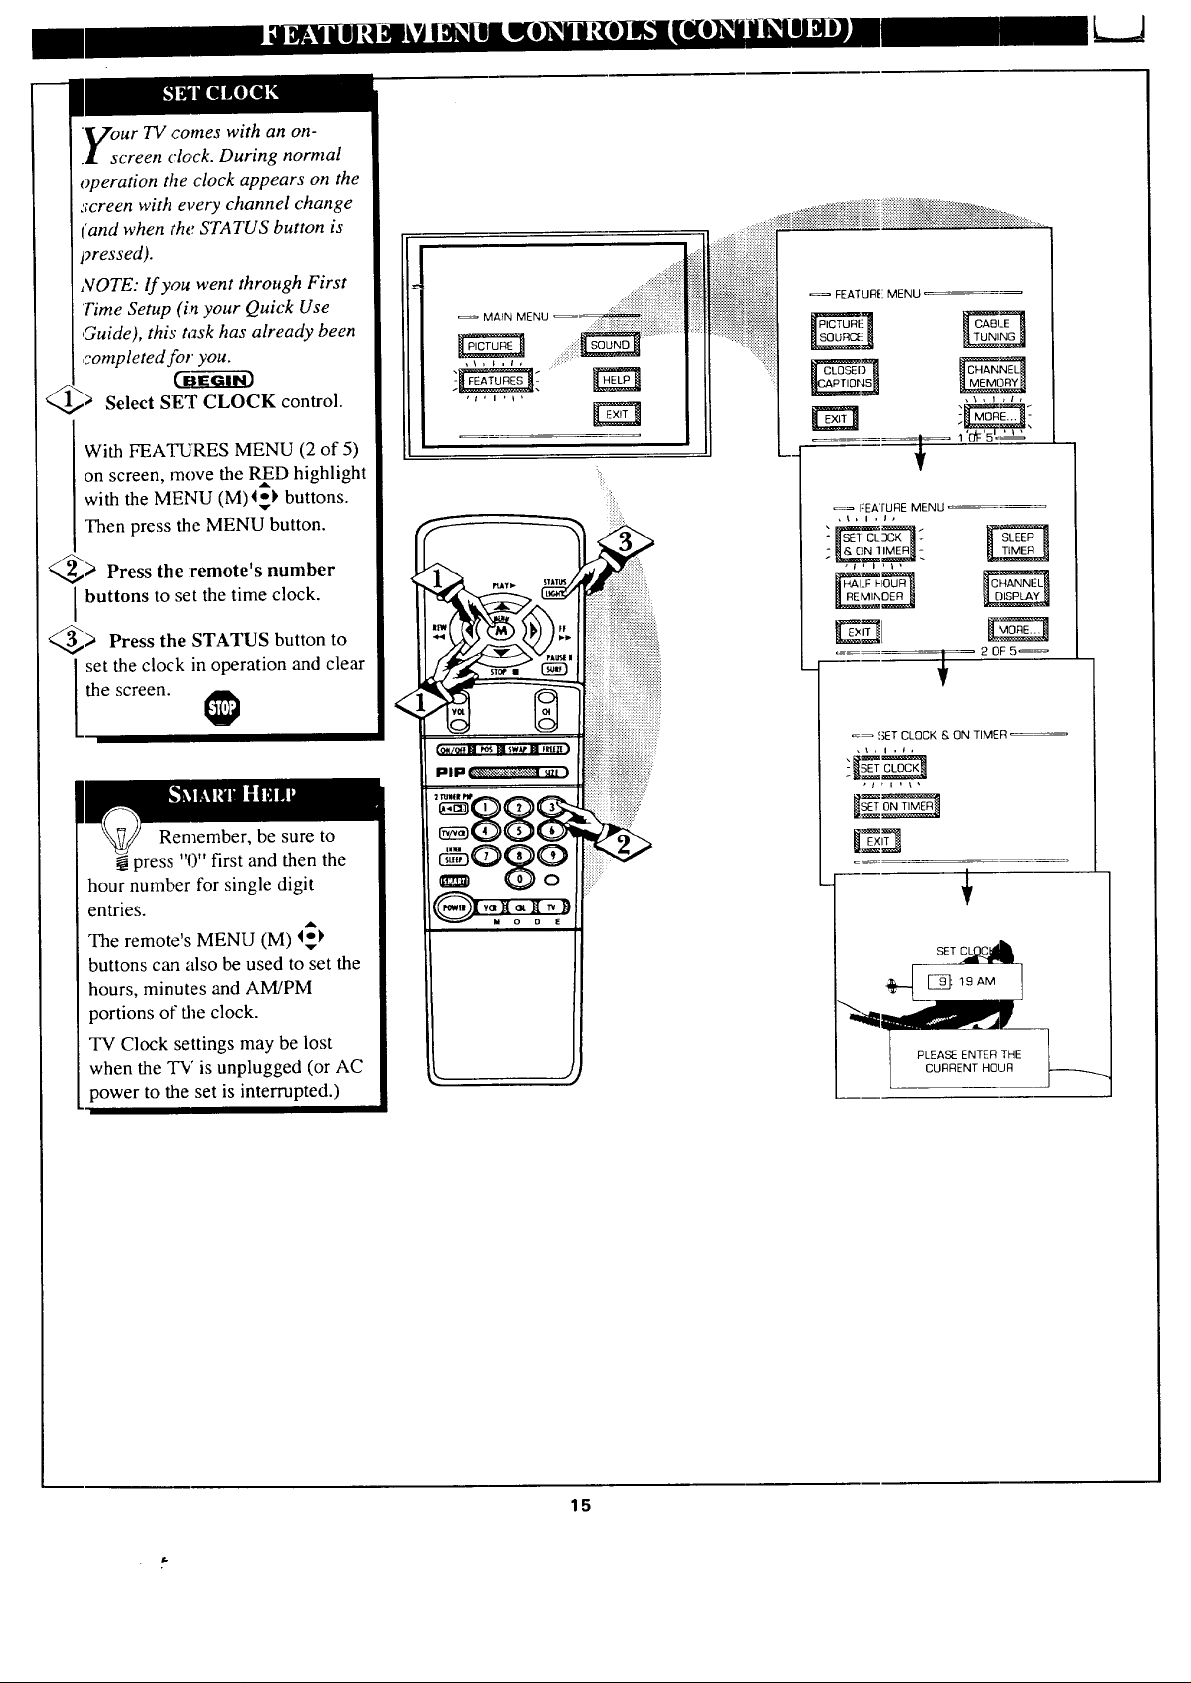
.VourTV comes with an on-
.l screen clock. During normal
operation the clock appears on the
screen with every channel change
['and when the STATUS button is
pressed).
NOTE: If you went through First
'Time Setup (in your Quick Use
,Guide), this task has already been
,rompleted for you.
MA_N MENU _ _!i!!iiiiiii}iii!i;iiiiiiiiiiiii
:-::_:iiiiiiiiiiiiiii_iiiiiiiii_i_i_!ii_iii
............_:_:_#:_::i::!i:i::i:??:ii:,[i?:i::}_:ii::if:ii?:?:i::?:i::i::N_iii::i::iii::i:::;:;::_::__:_..........
iiiiiiiiiiiiiii!ii
FEATUR[! MENU
Select SET CLOCK control.
With FEATURES MENU (2 of 5)
on screen, move the RffD highlight
with the MENU (M)4_ buttons.
Then press the MENU button.
_> Press the remote's number
buttons to set the time clock.
_--.,_> Press the STATUS button to
set the clock in operation and clear
the screen.
Remember, be sure to
press "0" first and then the
hour number for single digit
entries.
The remote's MENU (M) _
buttons can also be used to set the
hours, minutes and AM/PM
portions of the clock.
TV Clock settings may be lost
when the TV is unplugged (or AC
power to the set is interrupted.)
"t'l'l'
'_'dF'5£_
=-= FEATURE MENU
,t, I , J,
. 20F5_
_ SET CLOCK & ON TIMER _
- €
L CURRENT HOUR
15
Page 16

k.JI
'ust like an alarm clock you can
set the TV to turn itself on at the
same time ev_'ryday.
C-ff-eGI--i-_
)Select SET ON TIMER
control.
With FEATUR]ES MENU (2 of 5)
on screen, mow.' the RED highlight
with the MENU (M) I_) buttons.
Then press the MENU button.
...............:i::is_';_::_ii:;:::i:::::::::::::::::::::::::::::::::::::::::::::::::::::::::::::::::::::::::::::::::::::::................
FEATLIRE MENU
MAIN MENU
_c_1 fl,,_'N'_Gi
_1, I ,I ,
A
"1'Of=5t'_"
)'Press the MENU and
•Y
MENU (M) buttons to highlight
and select "ON" (t,,").
;'Press the MENU &• and
se]ect "SET ON TIME".
l then the MENU (M) buttons to
<_ Press the remote's
number
buttons to set the "TURN ON"
time for the "IN'. (Press MENU •
• for AM or PM.)
Press the STATUS button to
set the "ON TIME" and clear the
reen.
FEATURE MENU
SI_=TCLOCK & ON TIMER _:=
, \ , i , i ,
SI.=T ON TIMER =
16
IFF
, i , I , I ,
' I ' I ' I '
_-_pLEASE ENTER THE i,
L FLOUR TO TURN ON __--'-"_"
]
Page 17

ve you ever fallen asleep in
ont of the TV only to have it
wake you up at two in the morning
with a test pattern screeching in
your ears? Well, your TV can save
you all that trouble by
automatically-turning itself off.
_> Select SLEEP TIMER control.
With FEATIJRES MENU (2 of 5)
on screen, mov.e the RED highlight
with the MENU (M) 4;_ buttons.
Then press the MENU button.
_> Press the MENU 4 II_buttons
to pick the amount of time (15
minutes to 2 hours ahead) before
the TV will turn itself off.
_> Press the STATUS or
MENU
you have set the time for the TV to
turn off.
(M) button to clear the screen after
_= F._ATURE MENU
Remember, to see how
many minutes are left before
the TV shuts itself off, reselect the
SLEEP TIMER control screen.
To stop a SLEEP TIMER setting,
reset the timer back to OFF.
(Turning the TV off and on, or
pressing a button during the last
minute of a timer setting, will also
cancel a setting.)
A few seconds before the TV is to
shut off a message will come on the
screen telling you GOOD NIGHT.
[4OF 5
17
Page 18

Tththe Channel Display
]€ control you can change the
size and location of the on screen
channel and clock information.
Select CHANNEL DISPLAY
control.
With FEATURES MENU (2 of 5)
on screen, move the RED
highlight with tile MENU (M)4_
buttons. Then press the MENU
button.
> Press the MENU .V and
MENU (M) buttons to highlight
and select (jl) the LARGE or
SMALL displa_ control.
: .._...............
MAIN MENU
....
G
_ : ::::_:._::_:::::::+:::,
...._i_iiii_iiiiiiiiiiiiiiiii_iiiiii_i!iii!iiiiiiiiiiiiiiii!iiiiiiiiiiiiiiiiiiiiiiiii!iiiiiiiiiiiiiiiiiiiiiiiiiiiii_iiiiiiii_iii__:_..........
:::::::_:_:]:E:_:_]]E_]::::::::::::::::::::::::::::::.:
a-_E
, •FEATURE MENU "
i
2_:5'
Try it out.
Press the
CHANNEL .'_'
buttons and you
should see the
Display Size you
selected.
Remember. The
SMAI_,LSIZE
display shows only
the channel number,
not the,time (or
clock).
Press the STATUS button to
clear the screen.
]Tth the Ha!f Hour Reminder
V control the TV automatically
shows you the current time and
channel every thirty minutes.
Select HALF HOUR
REMINDER control.
Wiith FEATURES MENU (2 of 5)
on screen, move the RED
highlight with the MENU (M) _,'_
buttons. Then press the MENU
button.
: -888ii!iiiiiiiiiiiii;i;!!!
_iiiiiiiiiiiiiiiiiiiiiii::
_O8oO i!!i:!!!!!!!i!!;
i
Remember.
The Time and
Channel Reminders
will show on the
hour and the half-
hour fl)r about five
seconds.
<_ Press the MENU AW and
MENU (M) buttons to highlight
and select (t,,") the EVERY HALF
HOUR item.
<_ Press the STATUS button
clear the screen•
to
18
Page 19

arental Control allows parents
to blo,_.k out, or "censor", any
channels they think children should
not watch. A channel placed under
Parental Control cannot be viewed
until a correct access code is used to
unlock the cha_nnel for yiewing.
First let's set your Parental Code:
NOTE:Your TV left the factory with the Parental Code: set to "0000". If you are using
your TV and the Parental Control for the first time, and don't want to SETUP a new
Access code number, you can use the "(X)00"number to block channels - see next page.
The "0711" Parental Code (shown on this page) is given as a default or way to reset the
Code when the current Access number is not known.
--= FFJtTURE MENU
'=_ FEATURE MENU
QI_ Select the
PARENTAL
CONTROL.
With FEATURES MENU (3 of 4)
on screen_ move the RED highlight
with the MENU (M) 4_ buttons.
Then press the MENU button.
"BLOCK CHANNELS" and
"SETUP _ODE show on screen.
q,_ Press the MENU AV and
[: MENU (M) buttons to highlight
and select tile SETUP CODE item.
_ O, 7, 1, on
Press 1 the remote.
"XXXX" shows on the ACCESS
CODE SETUP screen as you press
the number buttons.
"INCORRECT ACCESS CODE -
TRY AGAIN" will also show on the
screen.
_ Press 0, 7, 1, 1on the remote
again.
"Next Enter Your New Access
Code" shows on the screen.
_,_ Enter a new four digit number
code using _:heremote.
!}}i!::
EN Na oT
'_'5_'?__ '
V
_=_ FI_TURE MENU
" PAREN T=_L -_
-Ed
i j I i , I ,
.......... 30F5 ....
Ez!
p ......................... J
|
r ......................... J
u
..... PARENTAL CONTROL
SETUP :
.... ,J
i
!
J
i
"Access (.'ode Changed" shows on
the screen to let you know the new
code has been set.
Continue to the next page to find
out how to "block" channels from
viewing.
Parents - it isn't possible
to unlock or defeat your
Censor (7ode without changing to
a new code: number. So if your
Code number changes, and you
didn't change it yourself, then you
will know that someone has
altered the code and the blanked
out channel has been viewed.
Press MENU I_ to go on and start
to "block" channels
Press MENU to return to the
Parental Control Menu screen.
Press STATUS to clear the screen.
19
Page 20

I_I _ _ _q I[erO_l_ I
1_) fter your personal Parental
LCode number has been set (see
previous page), you are now ready
to select the channels you want to
block out or censor.
Select the BLOCK
CItANNELS _:mtrol.
With FEATURES MENU (3 of 4)
on screen, mow: the RED highlight
A
with the MENU (M) 4_1,buttons.
Then press the ]vlENU button.
)Press the MENU A,!I' and
MENU (M) buttons to highlight
and select the BLOCK
CtiANNELS item.
_ Enter the correct Parental
Code number.
<_ Press Channel A'_' or Channel
channel you want to block.
I Number buttons to select the
a Press the MENU button to
"BLOCK VIEWING" on the
setected channel.
Press the MENU ,_ button to
"ALLOW VIEWING" on a
blocked channel.
Repeat steps 3 and 4 for any other
channels you wish to block out.
Remember, to make TV
viewing easier all channels
(madAudio/Video Input jacks)
will be unblocked, once the
correct Parental Code number has
been entered.
When the TV is mined OFF and
then back ON again, Parental
Control is back in place for all
channels.
,_ • FEATURE MENU =:
............ 1'_'5L2 kg
ii- ......................... "J
T
, FEATUFQE MENU ": i .-_:_, , I '
...... 30F5,
I.OEXIT
r ......................... J
#
T
CHANNEL 19
BLOCKED BY PARENTAL CONTROL
E_xxx!
Please ente_ Access Code
X3FF
_le=._ another C-nannel
for vlewme
BLOCKED CHANNEL SCREEN MESSAGE
(Appears when an attempt to select a blocked
channel is made and Parental Control is ON.)
• , FEATURE MENU .....
!
!
!
' ' PARENTAL CI]N rROL .....
l
I
CHANN_i
a
Note: You can [dso block out the
use of the Audio/Video Input jacks
on the TV. This stops the viewing
of VCR programs which can be
shown through :he A/V IN jacks.
Just select VCR!AUX I, AUX 2, or
AUX 3 (located between the Lowest
and highest channel numbers) on
the Channel Blocking screen, and
select "blocked".
20
Page 21

o you ever have trouble
remembering on which
channel a particular station or
network is located? The Channel
Labels Control is a quick way to
view and selec_t channels from a
list of Labeli'd channels.
A Label is a [our letter callout you
can set to appear with the on
screen channel number. Example
Label: WXYZ -for a TV station's
call letters.
To select channels from the
Channel lx_bels Control:
_,_ With the FEATURE MENU
screen (3 of 5) on the TV's screen,
move the REDhighlight using the
MENU (M) _:_ buttons to select
CHANNEL LABELS. Press the
MENU (M) button.
_ Press the MENU AV and
MENU (M), buttons to highlight
and select eiither:
"MANUAL" to create your own
label for a channel.
"PRESETS" to choose from a list
of prewritten channel labels.
(See instruction details on this
page.)
_,"_ Press the STATUS button to
clear the screen.
-== FEATURE MENU
3 OF5_
:i!.
iiiiiii_
_iiiii!ii!i
{_ or (_ to SELECT
(_ of" (_ to CHANGE
(_ wqen FINISHED
MANUAL. To create your
own Channel Label:
Press the Channel •• or
Number buttons to select
desired station.
A red highlight shows the
active letter space for the
channel label.
Press the MENU • •
buttons to pick any of the
letters or symbols that are
given for your use.
Press the MENU 41
buttons to move the red
highlight to the other letter
spaces and repeat.
Press the ;STATUS button
to clear the screen when
finished.
n
V
LABEL ]
ABELS
You_Own
Choose From Lis'_
Return to Guide
!
T
I
1_ (3D toSELECTLABEL
PRESETS ,-Topick a Label
from the "LABEL" list:
Press the Channel •• or
Number but:tons to select
desired station.
Press the MENU ••
buttons to move up and
down the Channel Label
list.
Just stop on any label you
might want to use.
The selected label
automatica]ly appears with
channel changes and when
the STATUS button is
_ressed.
Press the STATUS button
to clear the screen when
finished.
C',-IOOS_ CHANNEL 1
)to EXIT
21
Page 22

_ Tote: If you went through First
Time Setup, This task has
already been completed for you.
For our Spanish and French
speaking TV owners an on-screen
LANGUAGE option is present.
With the LANG UAGE control you
can set the TV's on-screen
features to be shown in either
Er,_glish,Spanish or French.
Select the LANGUAGE
DISPLAY co_ttrol.
With FEATURES MENU (3 of 5)
on screen, move the RED A
highlight with the MENU _,'_
buttons. Then press the MENU
(M) button.
= ENU iii !iiiiiii:i;i:i:ii iii
:£::.....
..........ii: !!!:::i::!:i:::i:! SOURC_ _._G_....._i: :.::iiiiii
_= FEAq_JRI E MENU =
,\,1 ,t,
_'dF'5 '='_'
_ Press the MENU AV and
MENU (M) buttons to highlight
and select (tJ) English, Spanish
(ESPANOL), or French
(FRANCAIS) on the display
control.
Text for the on--screen Menu will
change to the selected language.
3_, Press the to
STATUS button
I clear the screecL.
Remember, the
_ Language control only
makes the TV's on-screen
(MENU) items appear in English,
Spanish, or French text. It does not
change the other on-screen text
features such as Closed Captioned
(CC) TV shows.
"""-1
_22_JN_
2'dF'5'o2 _ '
_-- FEATURE MENU _-
3 OF 4,_
22
Page 23

ur TV also has individual
ound adjustment controls. The
BASS (low frequency), TREBLE
(high frequency), and Speaker
BALANCE may all be used to
adjust the sound playback of TV
programs.
_ Select BASS, or TREBLE, or
BALANCE sound control.
With the SOLrND MENU on the
screen, move the RED highlight
with the MENU (M) 4_ buttons.
Then press the MENU button.
_> Press the (+) or (-) buttons to
adjust the sound control to levels
you prefer
_--_ Press the STATUS button to
clear the screen.
, MAIN MENU - '
<
iiiiiiiiiiiii
!_!iiiiiiiiiiiiiiiii_::
iiiili_,
Select and then press MENU
(VI) 9utton to view additional
controls grouped under same
feat_ re heading. For
Exaraple: Treble, Balance,
[lass Boost, Stereo, etc.
_in e BASS BOOST control
creases the low frequency
audio range of the TV. This creates
a deeper, fuller playback sound
which can be heard through the
TV's speakers.
<,.._,> Select BASS BOOST sound
control.
With the SOUND MENU on the
screen, move the REDhighlight
with the MENU (M) 4_ buttons.
Then press the MENU button.
_ Press the MENU AY and
MENU (M) buttons to highlight
and turn ON (u'_) the BASS
BOOST cor_trol.
_ Press the STATUS button to
clear the screen.
MAIN MENU •
...._!iii!iiiiiiiiiiiii
"_:_iiiii!i!i
23
Page 24

"]_7"our TV is able to receive
J[ broadcast stereo TV programs.
Ihe TV is equipped with an
amplifier and 1win speaker system
through which the stereo sound
can be heard.
A RED stereo light (on the front of
the TV) will come on when a
s;ereo broadcast is received.
MAIN MENU
Remember.
If a stereo signal is
not available and
the TV is placed in
the STEREO mode,
_iiiiiiiiiiiiiiii!iiiiiii_iiiiii_iiiiiiiiiii
....ili_i[ii_ii!i_ii:.ii:::._::
"_i:i:i_:i::i:i_:: _ _¢OUND MENI
::_:.i!i::i!i!:.i]i:.i
sound coming from
the TV will remain
monanral (mono).
Select STEREO sound control.
With the SOUND MENU on the
screen, move the RED highlight
with the MENU (M) 4_ buttons.
Then press the MENU button.
<_ Press the MENU AV and
MENU (M) buttons to highlight
and turn ON (_J) the STEREO
mode.
<_ Press the STATUS button to
ciear the screen.
""1
"v
:lw F!
PlP_ mt I
88g
°Ig?
l ,,,t,t l
'o#'_." ' _"
1
T
=== SOUND MENU _=_=_-_,==,
.........
DF3,_
C_ MONO AT ALL TIMI-S
Second Audio Program (SAP) is
part of the stereo broadcast
,;ystem. Sent as a additional
audio channel SAP can be heard
apart from the current TV
program sound. TV stations are
free to use SAP for any number
of purposes, but many experts
believe it will be used for foreign
language translations of TV
shows (or fi)r weather and news
bulletins.)
NOTE: If a S,M_signal is not
present with a selected program,
the SAP option can not be
selected. 'q'his program does not
contain SAP information" will
show on the TV screen.
-- L
24
Page 25

he Incredible Stereo control
an be' used to add greater
depth and dimension to both
monaural (MONO) and STEREO
TV sound.
Select
_ INCREDIBLE STEREO
control.
With the SOUND MENU on the
screen, move the RED highlight
with the MFNU (M) 4_ buttons.
Then press the MENU button.
_,_ Press the MENU •V and
MENU (M) buttons to highlight
and turn ON (t,,_) the
INCREDIBLE STEREO mode.
For Example: "MAXIMUM"
spreads the Incredible Stereo effect
as wide as possible.
_."_ Press the STATUS button to
, MAIN MENU
!if!:.
Remember,
with the Incredible
Stereo ,control
Jartled ON even
monaural (mono)
audio source
material can be
heard through rear
Surround Sound
speaker connections
(see page 27).
Note: The monaural
version of Surround
Sound may be
louder at the rear set
of speakers than
what is normally
heard with true
stereo signal
Surround Sound,
but this is normal.
I clear the screen.
se the DISPLAY VOLUME
ontrol to see the TV s volume
level settings on the TV screen.
Once set the Volume Display will
be seen each time the VOLUME
buttons (on the TV or remote) are
pressed.
_[_ Select DISPLAY VOLUME
control.
With SOUND MENU (2 of 3) on
screen, move the RED highlight
with the MENU (M)4_
Then press the MENU button.
qi_ Press the MENU •• and
MENU (M) buttons to highlight
and turn ON (u,") the DISPLAY
VOLUME control.
buttons.
i
- MAIN MENU
•....::.::::
...._ ii:: , :,SOUNOMENU.....
_C_[O,BLE STEBE0_ _,_,,,,,
, 1 o t _ _t4 %
, EOUND I',_NU ,
t 2ol3, •
Remember,
"DURING
ADJUSTMENT"
means the volume
level will be on
screen whenever the
Volume buttons are
q_ Press the STATUS button to
clear the screen.
25
Page 26

ould you like to hear TV
programs through your audio
hi-fi system? The TV's Variable
Audio Output jacks and TV
Speaker On/Off control work
together to offer you this TV sound
option. B('-eE-I£1--i_
Connect the R(ight) and L(eft)
VARIABLE AUDIO OUT jacks
on the TV to the R and L Audio
Input jacks on your amplifier or
sound system.
Set the audio system's volume to
normal listening level.
<_ ']['urn the TV and system
ON. You can now adjust the sound
level coming from the audio
system with the Volume AV
buttons on the 'I_l or remote.
<_ "1-'ohear the 'I_! sound from only
the audio system speakers, select
TV SPEAKERS control.
audio
With SOUND MENU (2 of 3) on
screen, move the REDhighlight
with the MENU (M)I_I, buttons.
Then press the MENU button.
<
AUDIO IN
(RED/WHITE)
BACK OF TV
VARIABLE
AUDIO
_ OUTPUT JACKS
.........
>Press the MENU Ay and
MENU (M) buttons to highlight
and turn OFF (tl) the TV
SPEAKERS control.
You should now ,only hear TV
sound coming from the audio
system speakers.
Press the STATUS button to
clear the screen.
Remember, the audio
!_ system may have to be in
AUX(iliary) mode to play sound
from the TV (Outputs).
Note: When the TV SPEAKER
control is set to "NORMAL" (for
TV speaker operation) make sure
the VARIABLE AUDIO OUTPUT
control (see next page) is also set
to "STEREO" in order for the TV's
AUDIO OUTPUT jacks to work
properly.
AUDIC SYSTEM
26
Page 27

y adding optional external
speakers to the TV's sound
system, yo_t can create the feeling
of reflected sound that surrounds
you at a movie theater or concert
hall.
Connect
_) b6th external
speakers to the speaker wire
terminals on the TV.
Recommended speakers: 8ohm, 15
watt minimum. Be sure the (+) and
(-) speaker wires are connected to
the correct R(ight) and L(eft)
speaker terminals on the TV.
_,_ Place the speakers so the
viewing area is between the TV
and the rear surround speakers.
(See overhead view drawing.)
Remember,
Surround Sound
will not work with
only one speaker
connected; or with
monaural audio
material (unless
Slereo Surround
control is turned
ON - see Variable
Audio section
_;low).
_,_ Turn TV ON place
and the
STEREO control to the "STEREO
IF AVAILABLE" (u,") position.
After setup whenever a stereo
signal is received the audio will be
heard in Surround Sound.
he TV's Variable Audio Output
acks can also be used for
Surround Sound. Once they are
connected to an external hi-fi
system its speakers can be used for
the playback of Surround Sound.
_[_ Connect the R(ight) and L(eft)
VARIABLE AUDIO OUT jacks
on the TV to the R and L Audio
Input jacks on your amplifier or
sound system.
REAR SURROUND SOUND SPEAKERS
Note: The rear Surround Sound speakers will not
be heard at the same volume level as the front TV
speakers. It is intended for the rear speakers to give
a background noise effect which requires a lower
volume level than the TV's front speakers.
REAP, SPEAKER REAR SPEAKER
PRIMARY VIEW:[NG AREA
BACK OF TV
VARIABLE AUDIO
_ OUTPUT JACKS
ALDIO
¢.._,,,,_ Turn TV ON and place the
VARIABLE AUDIO OUTPUT on
screen control to the SURROUND
(t,,") position. (Sound Menu 3 of 3).
Note:This will change the
Left/Right channel audio line level
signal at the Audio Output jacks to
the same signal found at the TV's
Surround Sound Speaker terminals.
AUDIO SYSTEM SPEAKERS USED AS REAR
SURROUND SOUND SPEAKERS
27
Page 28

k_AI I • "
he TV's Audio/Video Input
_cks are for direct picture and
sound connection'_ between the TV
and a VCR (or Video Disc Player,
etc.) that has Audio/Video Output
jacker.
To view the playback of a VCR
tape by using the-A-udio/Video
Input jacks on the TV:
<_ Connect the VIDEO OUT jack
from the VCR to the AUX 1
VIDEO IN jack on the TV.
<Q_ Connect the AUDIO OUT
jacks R(ight) and L(eft) from the
VCR to the AUX 1 AUDIO IN
jacks on the TV.
<_ Select the "AUX 1"
PICTURE SOURCE SELECT
conlrol on the TV.
With the FEATURES MENU on
screen, move the RED highlight
with the MENU (M) 4_l, buttons.
Then press the MENU button.
_ FYess the MENU &V and
MENU (M) buttons to highlight
and select (_) the AUX 1 mode.
Turn the VCR ON and press
_.._ PLAY to view the tape on the
5
PICTURE AND SOUND FROM
PLAYBACK OF VCR TAPE
FEATURE MENU --
Connections and use of the
TV's AUX 2 Audio/Video Input jacks
the :;ame as for the AUX 1 jacks
(except "AlJ'X 2" is selected as the
Picture Source in step 3).
iii:iiiii_iii_iiiiiiii_i¸
VCR
If yoa h_,ve a single (monaural)
Audio Output VCR, "Y" con_ectors
are available to complete your
connectian. Contact your dealer, or
our l"art!; Information Center 111-800-
292-,506,5) to order any optional
[._e_;sories.
I TV.
Remember, after it is
connected an easy way to
select the AUX 1 mode is to press
the: VCR button on the front of the
TV (or the TV/VCR button on the
remote.) Channels 3/4, ANT A/B,
AUX 2/3, and the last channel
viewed can also be selected in this
way.
If you have added AUX 1 to the
TV's channel memory (see page
14), just press the CHANNEL
A'I? buttons to select the AUX 1
mode.
28
Page 29

T_ormore convenient Direct
€
t playback connections the TVs
Front Audio/Video Input panel can
be used. Located next to the TV's
front control panel (under a small
cover door) these Input jacks allow
for quick and easy connections,
p6_rticularly Jbr the playback of
Camcorder tape recordings.
To view the playback of a
Camcorder recording using the
Audio/Video Input jacks on the
front of the TV:
PICTURE AND S DUND FROM PLAYBACK
_ FF_TURE MENU
1
<_ Connect the VIDEO OUT jack
from the Camcorder to the Front
VIDEO IN jack on the TV.
_ Connect the AUDIO OUT
jacks R(ight) and L(eft) from the
Camcorder to the Front AUDIO IN
jacks on the TV.
<_ Select the "AUX 3"
PICTURE SOURCE SELECT
control on the TV.
With the FEATURES MENU on
screen, move the REDhighlight
with the MENU (M) 4_ buttons.
Then press the MENU button.
<_ Press the MENU &Y and
and select (u,") the AUX 3 mode.
MENU (M) buttons to highlight
_Turn the Camcorder ON and
press PLAY to view the tape on
the TV.
@ @@
\
AUDIO/VIDEO
OU'[ PUT JACKS
ON CAMCORDER
FRONT AUDIO/VIDEO JACKS
Lift Up on Jackpanel Cover Plate
to expose Input Jacks.
VIDEO IN
(YEI_LOW)
CAMCORDER
]f you have a single (monaural) ]
Auc io Output Camcorde_, "Y" /
connectors are available to complete /
you: connection. Contact your
dealer, or our Parts Information ]
Center (1-800-292-6066) to order [
_myoptional accessories. ]
Remember, after it is
connected an easy way to
select the ALrX 3 mode is to press
rite VCR button on the front of the
TV (or the TViVCR button on the
remote). Channels 3/4, ANT A/B,
AUX 2/3, and the last channel
viewed can also be selected in this
way.
If you have added AUX 3 to the
TV's channel memory (see page
14), just press the CHANNEL
_L_' buttons to select the
VCR/AUX mode.
29
Page 30

"'VheS(uper)-Video connection on
the rear of the TV can give you
beJ!terpicture detail and clarity, for
the, playback of S-VHS VCR tapes or
Video Discs, than the normal
antenna picture connections.
Note: The VCR_(or Video Disc
Player) must have a S-VIDEO
OUT(put) jack in order for you to
complete the connections shown on
this page.
C-gEG---_i-_
-'N"_?7-Ccmnections and use of the ]
ITV's S-V [DEO 2 Audio/Video Input /
]jacks are :he same as for the S-VIDEO /
I 1 jacks (except "S-VIDEO 2" is |
_'--""_ _,d__.a_s the Picture Source in step 3). 1
II/ . BACK OF TV //2"[._
I
<_ Connect the (S-
V]RS) OUT jack from the VCR to
the S-VIDEO 1 jack on the TV.
S-VIDEO
Tile S-VIDEO connecting cable
will be supplied with the S-VHS
VCR (or Video Disc Player).
<_ Connect the AUDIO OUT
jacks R(ight) and L(efl) from the
VCR to the AUDIO AUX IN 1
jacks on the T_,.
_ Select the "S-VIDEO"
PICTURE SOURCE control.
With the FEATURES MENU on
screen, move tile RED highlight
with the MENU (M)I_ buttons.
Then press the MENU button.
The "S VIDEO" picture source
option appears only when a S-
VIDEO cable has been connected
to the TV.
Turn the VCR ON and place it
ir_the S-VIDEO (or S-VHS)
p]Laybackmode.,.Insert S-VHS
cassette tape and playback in a
4 S-VIDE(3 OUT
S-VHS VCR
NOTE: A CD-i (Compact Disc Interactive)
player, Video Game, or other S-VIDEO
accessory can be hooked up to Ihe 'I'N using
this type of connection. Please Ix: aware that
such vtdeo sources, which show a constant
non-maving pattern on the TV screen, can
cause pict ire tube damage. When not in use
turn your ¢ideo accessories OEF. Also,
regulaAy alternate the use of video sources
with nornlal TV viewing.
ormal manner.
Remember, after it is
__connected an easy way to
select the S-VIDEO mode is to
press the VCR button on the front
of the TV (or the TV/VCR button
on the remote.)
][fyou have added AUX 1 to the
TV's channel memory, just press
the CHANNFiL J,_' buttons to
select the S-VIDEO mode.
30
Page 31

rr_he Audio/Video Output jacks
J[ on the TV can be used to
record TV programs on VCRs
which have Audio/Video Input
jacks.
To record TV pr_ograms by using
the Audio/Vide;o jacks on the TV:
PICTURE AND SOUND BEING
RECORDED ON VCR.
BACK OF TV
F,EAI O,P.EMENU -- 1
<_ Connect the VIDEO OUT
on the VCR.
I fl'om the TV to the VIDEO IN jack
<_ Connect the AUDIO
OUT
jacks R(ight) and L(eft) from the
TV to the AUDIO IN jacks on the
VCR.
<_ Select the "ANTENNA"
PICTURE SOURCE control on
tile TV.
With the FEATURES MENU on
screen, move the RED highlight
A
with the MENU (M)_-) buttons.
Ilaen press the MENU button.
Select the chatmel on the TV that
you want to record.
<_ Turn the VCR ON. Put
cassette tape in the unit and place
the VCR in the RECORD mode.
jack
rm
PIP ...... , iiiiiiii!iii!iiiiiiiiiiiiiiiiiii:iiiiiiii
'188
a
:::::::
i!iid!i:iiiii:iiii:iiii:i¢:
iiiiiiiiiiiii%!_
VCR
Remember, If the VCR
has an INPUT SELECTOR
switch, place it in the LINE or
CAMERA position.
Unattended Timer Recordings
with a VCR m'e possible, but not
recommended with this
connection since the TV must be
left ON for the VCR to record.
31
Page 32

raveyou ever played hide and
seek with your remote
con;rol? Are you tired of tearing
the _%use apart trying to find if
someone has stuffed the remote
under the couch, put it on the
shelves, or hid it in the desk? Well,
your TV remote can save you all
that looking by automatically
signaling its location to you.
Here's how it works:
1_ Press the POWER button on
the set to turn the TV ON.
Note: Normally you can press any
button on the front of the TV to
turn the set ON. But for the remote
locator to work you need to be sure
to use the Power button at the TV.
A "locating remote" message
shows on the TV screen.
<_ Within a few seconds a
ehiJrping or beeping sound will
begin to come from the remote
control hand unit.
The remote will continue to signal
its ]ocation for around 30 seconds.
No]'mal TV program sound will not
be heard while tile remote locator is
woJTking.
Your TV is attemptirg
to locate a lost remote
Remote Locator "homing"
range is around 30 Feet.
_Once you find the remote just
press any button on the remote and
the beeping soured will stop.
The remote is now ready for
normal TV feature use.
Remember, the remote
locator may not properly
receive its "homing" signal from
the TV if it has been placed on a
metal shelf or counter material.
Al'._o, since there's a special type
of radio frequency "homing"
signal receiver inside the remote
we are required to notify you that
any changes or modifications not
expressly approved by Philips
Censumer Electronics Company
col.lld void the user's authority to
operate the remote equipment.
II
32
Page 33

For most homes this step wouM
not be needed but for your
infl_rmatio n :
Up to 9 different remote locator
address codes can be set on which the
TV can send out its "homing" signal
This is done in case there is more than
one TV (with a remote locator)
_reser, t, and you want only one
specific remote to be signaled when the
TV is turned ON.*
To set a Locator Address Code:
>With TV turned ON, press the
LOCATOR CODE button on the
ren_ote. (Also be sure the TV
SY_TEM button on the remote has
been lZressed.)
You will need a pencil or pen to press
the recessed button.
The:TV shows the present Remote
Lo_ator Code.
J
<.
,_ Press any (0-9) on
the remote to set or change the Locator
Code.
number button
See the above information on
how to use the Locator Code
Button for Programming.
The remote will beep t_3let you know
it has received the new Locator Code
and th_n return to its normal operating
mode.
Remember, if batteries are
replaced the Locator Code
will need to be reentered.
Whe:a setting the Locator Code if any
butten, other than the number buttons,
are pressed the remote will return to
its normal operation mode.
*For owners who liw: in an apartment
(townhouse or condominium)
complex, this task may be necessary
since the remote loca_:or's signal can
be sent and detected directly through
adjoining walls.
33
Page 34

egardless of what type of
"_program your watching, your TV
has automatic video control settings
matched for your current program
source or content. The Smart Picture
feature quickly resets your TV's
video controls for a number of
different types-of programs and
viewing conditions you may have in
your home.
_, Press the SMART button on the
remote.
_' Press the MENU (M) button to
(highlighted in RED).
I select the Smart Picture feature
_ Press the MENU • or •
buttons to choose any of the preset
viewing categories (Example:
Cartoons, Movies, etc.). Then press
the Menu (M) button to select the
highlighted control.
_iiii/iiiiii!iiiii_iiiiii!iii
_a Press the STATUS button on the
remote to clear the screen,
Remember, with Smart
__Picture "Custom" mode
:selected you can set a number of
video controls to your own
preference. Use the remote's Smart
button to reselect these personally
adjusted Custom settings contained
within the Smart Picture feature.
(See the next page for more detailed
instructions.)
The video control settings for the
Smart Picture: categories (except
CUSTOM) rarememorized into the
TV at the factory and can only be
reset by field and service
technicians.
3'4
Page 35

,T ° use the Custom Smart Picture
• settings p/aced in memory (see
the previous page):
_) Press the SMART button on the
remote.
]Listof "SMART PICTURE "
categories shows on the TV screen.
Press or
_ the MENU • •
buttons to highlight the "CUSTOM"Smart Picture category.
_) Press the MENU (M)
I
button.
_) Press the MENU I_ buttons to
move the RED highlight to the
control you wish to adjust, then press
the Menu (M).
_) Press the STATUS button after
you have finished your adjustments
F PICTURE MENU _
:i:
1,
PICTURE MENU _
to clear the screen.
he "CHANGE LABEL" control
an be used to change the title of
a SMART PICTURE setting into a
name or label that may be easier for
you to remember.
_ With the "SMART PICTURE
LABEL" control on the screen, press
the MENU at• buttons to spell out
a new label or title for the selected
SMART PICTURE.
_,_ Press the ._ _. to
I ove the red highlight to each letterspace.
MENU buttons
_ SMA " PICTURE MENU _
I
,RT PICTURE LAiSEL
(_) or (_) to SELECT
(_ or (_ to CHANGE
Q when FINISHED
_ Press the STATUS button to
clear the screen when the new label is
finished.
35
Page 36

re you tired of the sound of
1commercials following you
into the next room or all through
the house? Smart Sound allows you
to preset a desired volume level
that the TV sound will not go
above. This makes for an even,
more consistent sound by reducing
tile "peaks" and "valleys" that can
occur during program changes or
commercial breaks.
_' Press the SMART button on
_te remote.
_, With the SMART Menu on
the screen, move the RED
highlight with the MENU 4_
buttons. Then press the MENU (M)
button to select the highlighted
Smart Sound control.
_, Press the MENU • or • and
then the MENU (M) button to turn
tile Smart Sound control ON (or
OFF).
::::::::::::::::
) Press the STATUS button to
clear the screen when completed.
Remember, Smart Sound
works ff>r sound levels
coming from either the
Antenna/Cable input on the rear of
the TV (RF audio); or the
Auxiliary (VCR/AUX IN) audio
inputs.
. s
36
Page 37

"list" or series of previously
wed chctnnels can be selected
with the SURF button on your remote
control. With this feature you can
easily switch between different TV
programs that currently interest you.
The Smart Surf_control allows you to
set up to 10 channels in its quick
w!ewing "list".
button the
Press the on
Smart
remote.
<_ With the on
SMART Menu
screen, move the RED highlight with
the Menu (M) Iol, buttons. Press the
"v
MENU button to select the
highlighted Smart Surf control.
@ Press the Menu • or V, then the
Menu (M) button to select either
Smart Surf or 2-Channel Surf. (See
explanation of Surf options with the
illustration on this page.)
2 CHANNEl, SURF- Cutter t and
one previous channel in the ring.
SMART SURF - Current and up to
nine additional channels avail able in
the ring. Note: The Channel Surf
ring can be used with few._r than ten
channels. In this way, the nunber of
Surf channels can match or fit your
present viewing interests.
To Use 2-Channel
!
Surf:
With tthe2-Channel
Surf control ON,
select the two desired
channels for viewing
with the number
buttons on the remote
control.
Press the SURF
button on the remote to
"toggle" between the
two se.lected channels.
@' Press STATUS button on the
emote control to clear the screen.
@_ With the Smart Surf control
ON (see above), select a desired
channel for viewing. You can use
t]3enumber buttons on the remote (or
the Channel •Y buttons).
_ Press the SURF button on
the
may already appear within the Surf
I remote. (Some channel numbers
channel list.)
_ Press the Menu button to "ADD"
the selected channel to the Surf list.
Select the next desired channel and
repeat steps 2 and 3. Continue until
all desired channels are on the Surf
list.
6 to bst
:_iil iiiiiiiiiiiii
Note: To Delete a channel from
the Surf list just press the SURf:
button to select the desired
channel. Then press the Menu
] button and the channel will be
] immediately dropped from the
on screen Sarf lisl.
/\
@_ Press the SURF button on the
remote to quickly review current
_ction on channels contained within
he Surf list.
37
Page 38

J
Vour remote control is set to
! work your TV and many
infrared remote (IR ) control
VCRs. However, an easy one-
,rime step may be necessary
before the remote will work your
VCR.
Try this initia_l check to see if
going on to the following section
is necessary.
_ Press the VCR System
I button on the remote.
> Point remote toward VCR
I and press the POWER button.
@> Does the remote turn the VCR
ON?
IF YES, I_ and try the other
VCR buttons on the remote. If
they also work the VCR, then
the remote is ready and no
further steps are needed.
: If NO, continue...
L
First look up a TWO-DIGIT
remote code number for your
brand VCR before going through
the simple "I,2,Y' steps (on the
following page).
continue to next page
Remember, if more than
may have to fry more than the first
two-digit code given in order to
! one number is listed, you I
locate your VCR's remote code.
I
VCR
VCR REMOTE
BRAND CODE NO,
Akai 24, 25, 36
Capehart 33
Conoid 13
Curtis Mathes 42
Daewoo 33
Emerson 20, 31, 34, 40
Fisher 06, 07
Goldstar 23
Go Video 45, 46
Hitachi 03, 5 :[
JVC 14, 47, 48
Magnavox 00, 05
Matsushita 01,02
Mitsubishi 16, 17, 38, 39, 50
Multitech 27,28
NEC 2 [
VCR REMOTE
BRAND :CODE NO.
Panasonic 01,02, 52
Philips 00, 05
Philips Video CD 37
RCA 04, 32, 42, 43, 44
Samsung 22, 30
Sansui 49
Sanyo 13
Sems 08
ShaJrp 11, 12
Shintom 35
Sony 09, 10,41
Teknika 26
Toslaiba 18, 19
Video Concepts 29
Zenith 15
38
Page 39

]_ Tow that you have looked up
./. ¥ the two-digit Remote Code
Number for your brand of VCR
(on previous page), you are
ready to follow the four simple
:;teps below.
Please read through steps 1-4
before beginning.
<_ Press and release the REC
I (RECORD) button.
<_ Within seconds after
thirty
releasing the REC button, press
:andrelease the VCR System
button.
_ Within thirty seconds after
releasing the VCR System
button, ENTER THE TWO
DIGIT CODE NUMBER for
daedesired VCR. The remote is
33owready to send commands to
_:heVCR.
<_ Point the remote at
Press the POWER button on the
Try it out. The Channel
and VCR buttons on the
remote should now operate the
VCR.
Remember, if this doesn't work
the first time, repeat steps using
tee same remote code number.
If after a second try the remote
does not operate your VCR, and
Sere are more code numbers
listed for your brand VCR, use the
next listed code number.
If after repeated attempts the code
number method does not work
your VCR, try the "VCR
SEARCH" method on page 42.
---I
the VCR.
39
Page 40

€Tour remote control is set to
'. work your TV and many
infrared remote (IR ) control
Cable Converters. However, an
easy one-time step may be
n,_.cessarybefore the remote will
work your Converter.
Try this initia[ check to see if
going on to the following section
is necessary.
_ Press the CBL
I button on the remote.
<_ Point remote toward Cable
Converter and press the POWER
button.
Does the remote turn the
Converter ON?
IF YES, _ and try the CH • •
and CH number buttons on the
remote. If they also work the
Converter then the remote is
ready and no further steps are
needed.
If NO, continue...
System
fl
®o, [
mCable
I I
_ First look up a TWO-DIGIT
remote code number for your
brand Converter before going
through the simple "1,2,3" steps
(on the following page).
continue to next page
Remember, if more than
! one number is listed, you
may have to t_ more than the first
two-digit code given in order to
locate your Converter's remote
code.
_CONVERTER REMOTE
BRAND. CODE NO,
Archer 28
Diamond 23
Drake 37
Gemini 45
Hamlin 14, 15
Hitachi 25
Jerrold 00,01,02,03,04,05,46,55
Macom 29, 38
Magnavox 17, 31
NSC 49
Oak 06, 27, 39
Panasonic 18, 35
Philips 19, 20, 21,24, 26
Pioneer 09, 32
Regency t0, 11
CONVERTER REMOTE
BRAND CODE NO.
Rembrant 33
Salora 52
Scientific Atlanta 08, 22, 47
Sheritech 34
Starcom 30
Sylvania 16
Texscan 48
Tocom 12,13, 53
Toshiba 43
Uniden S_teilite 44
Unika 50
United Satellite 54
Universal 36
Video Tech 40
Video Way 51
Zenith 07, 41,42g
40
Page 41

m
Nth w that you have looked up
e two-digit Remote Code
Number for your brand of Cable
Converter (on previous page),
you are ready to follow the four
simple steps below.
Please read through steps 1-4
before beginning.
@_ Press and release the REC
(RECORD) button.
@_ Within thirty seconds after
releasing the REC button, press
and release the CBL System
button.
Within after
<_ thirty seconds
releasing the CBL System
button, ENTER THE TWO
DIGIT CODE NUMBER for
the desired Converter. The
remote is now ready to send
commands to, the Converter.
_ Point the remote at the
Converter. Press the POWER
button on the remote to turn the
Converter ON.
Cable Converter
I I
PLAYI_ STATUS
Tr3 it out. The Channel
and PO_qER buttons on the
remote should now operate the
Converter.
Remember, if this doesn't work
the first time, repeat steps using
file same remote code number.
If after a second try the remote
does not operate your Converter,
and there are more code numbers
listed for your brand Converter,
use the next listed code number.
If after repeated attempts the code
number method does not work
your Converter, try the
"CONVERTER SEARCH"
method on page 42.
"-'11
41
Page 42

'_our Tgrel_JIotecanbesetto
work your VCR or Cable
Converter by what is called the
SEARCH method.
If the "REMOTE CODE" number
method shown in the previous
section did not set your remote to
work your VCR or Converter, then
follow the easy steps listed below.
Please read through steps 1-4
before beginning.
CABLE CONVERTER
<_ Press the on
I he VCR or Converter to turn theunit ON.
<_ Stand at least six feet away
f_om the front of the VCR or
Converter.
Point the remote toward the unit.
HOLD DOWN the SURF and
tlhe desired System (VCR or
CBL-Converter) buttons at the
same time. KEEP HOLDING
13Uqq'ONS DOWN.
<_ Watch the Channel Indicator
I n the unit.
Channel Numbers will SCAN UP
when the unit has been identified.
This may take up to two minutes.
_ Release the SURF and System
(VCR or CBL) buttons as soon
as channel numbers start to scan
up. The code has been identified
zaadthe remote is ready to operate
with the VCR or Converter.
POWER button
0g
T
Six Feet
(minimum)
t I
m
!
code and another two minute II
.,;earcc_ll have to be II
repeated. I
]_n 0 channel change happens |
within two minutes, repeat steps 1- |
4. Should a channel ch .an..gestill |
not .occur, _ _m.ote.wil! not |
work with the desired unit. |
42
Page 43

'hen using the TV remote
' l€ with a VCR,first make
c_'rtain it is set to control your
VCR ( by the REMOTE CODE or
SEARCH method - see earlier
s_ction).
C_Ee--ffi-m
, Press the VC-R System
f ",
I button on the remote.
_' Point the top of the remote
toward the front of the VCR
(remote sensor window) when
pressing buttons.
Record Button
Hold the RECORD button down, and
then press the PLAY button to begin
a VCR recording.
Rewind Button
Press to rewind tapes. For some
VCRs you may need to press STOP
button first then REWIND. In
playback mode. hold button down to
view picture moving rapidly in
n_verse.
Pause Button
Press to temporarily stop the tape dur-
ing a playback, or recording. Press
again to release Pause.
.']TV-V_R Button
Press to the VCR position ("VCR"
indicator on the VCR will light) to
view the playback of a tape. Press
again to place in the TV position
("VCR" indicator on the VCR will go
OFF) to view one program while
recording another program.
When used witl'_the TV the TV/VCR
button works as a source button. Each
press cycles the TV between channels
3/4; the last view channel; ANT A/B
inputs, and any AUX(iliary) Input
mode (if it has been connected.) It is a
quick one-button way to select these
c'nannels and m(xles (without directly
eatering the TVs Menu system.)
PLAL STATUS
(ON/OFF_ POS_ SWAP[] FREEZE)
I"zI I"J__ SIZE)
.
Play Button
Press to playback a tape. Hold down
after pressing the RECORD button to
start a recording.
Stop Button
Press to stop the tape.
L_
-Fast Forward Button
Press to rapidly adva:ace the tape. For
some VCRs you may need to press
STOP first then FF. In Playback
mods hold button down to view the
picture moving rapidly in the forward
direction.
.£_annel _;¢an Button_
Pres:_to scan up or down through
VCI_:channel numbers.
_u:mber Buttons
Press buttons for direct VCR channel
selections.
VCR _;y,tem Button
Pres:; to send remote commands to
the VCR.
P_ver Button
Pres:; to turn the VCP, ON and OFF.
Remember, the VCR
_! buttons on the remote will
not operate your VCR if those
fi._atures are not already found on
your VCR remote control.
biote: All VCR functions
(pm'ticularly Search, Rewind, Fast
For0card, etc.) will operate the
same as with the original VCR
remote control provided with the
VCR.
43
Page 44

,)icture-in-Picture (PIP) is the
showing of lwo pictures on the
TV screen at the same time. (One
main screen picture and one small
inset picture - o,r PIP). For your
ea'.¢e and convenience this TV has
two separate inputs (ANTenna A
and ANTenna B_)for your home's
Antenna and/or Cable TV system
signal.
The ANT A input is primarily for
the TV's main screen picture. The
ANT B input is provided as a
second, dedicated source option
for the TV' s PIP "window" and its
feature operations. The signal
connected to the ANT B input can
be either a Spli/ Signal Input (as
described in the section on this
page), or another type of external
signal source (such as a satellite
dish system, additional home
antenna, video accessory, etc.).
See the followipg steps on how
channels connected to the
ANT(enna) B h_put can be shown
a_d used within the PIP window."
- blAIN SCREEN -
Display signal supplied
primarily through
ANT A Input on rear
of TV.
300 to 75_ Adapter
_ (483521827003)
Round Cable
75_ Ohm
- PIP WINDOW- ]
Display signal :;upplied]
primarily through ANT /
B Input on rear of"l%'. J
Combination VnF/UHF Antenna
- Outdoor or Indoor Antenna-
receives normal broadcast channels
2-13 (VHF) and 14-69 (UI-IF)
<_ your Antenna or
Connect
Cable TV signal to the single 75
ohm INPUT plug on a two-way
Signal Splitter (not supplied).
Connect two lengths of RF
Coaxial Cable (F-type connectors
on both ends) to the two OUTPUT
plugs on the two-way Signal
Splitter.
<_ Connect the twin OUTPUT
plugs on the Signal Splitter to the
ANT A and ANT B Inputs on the
rear of the TV.
continue to next page
For other possible PIP
connections see page 49 for
the "More PIP Connections"
,;ection.
IT you need any accessories or
parts to complete the described
PIP connections, contact your
dealer, or our Parts Information
Center at (I-800-292-6066), for
details.
J OPTIONAL TWO-
WAY SIGNAL
(single 75ohm Input to twin 75 ohm Outputs -
optional RF Coaxial connecting cables also
required)
Cable TV Signal
Round Cable
75xq Ohm
See the Set-Up Guide also provided with
your TV set for further Cable TV connection
options and accessories.
Cable TV
Company
ANT(enna) B
Input
Note::The purpose of the ANT B input is to
provide z.n easily connected, dedicated picture
source for PIP feature use. Other signal source
options (such as a satellite dish system, additional
external mtenna, VCR, or Vie.co Game) could also
be connected and displayed on the TV's PIP screen
window :hrougb the use of the ANT B input.
44
Page 45

.t • the required connections on
the previou_ page you are ready to
follow the simple steps shown
_ _fow that you have completed
below.
@_ Turn the TV ON.
Place the TV's PIP SOURCE
SELECT cont-rol to "ANT B"-
• With FEATURES MENU (4
of 5) on screen, move the RED
highlight with the MENU (M)
I_ buttons. Then press the
MENU button.
• Press the MENU AY and
MENU (M) buttons to
highlight and select the
ANT B" (tl) item.
Also place the TV's Main
screen PICTURE SOURCE
SELECT control to "ANT A"-
• See the Picture Source option
FEATURES MENU (1 of 5).
Press the STATUS button to
clear the screen when the above
Menu items have been set.
- MAIN SCREEN -
MAIN PICTURE SOURCE SELECT SET
TO "ANT A"
- PIP WINDOW -
:::::::::::::::::::::::::::::::::::::::::::::::::::::::::::::::::::::::::
::::::::::::::::::::::::::::::::::::::::::::::::::::::::::::::::::::::::::::
::::::::::::::::::::::::
_= FIP SOURCE SELECT
_.:+=:.:
PIP'SOURCE SELECT SET' TO "ANT B"
ANT A
AUX 1
AUX 2
AUX 3
_ Press the PIP ON/OFF button
on the remote.
the PIP window should show in
one of the comers of the TV
screen.
/'_'<,,_ Press the SWAP (or _ )
ibuttons on the remote to move the
ANT B and ANT A Input pictures
1betweenthe PIP window and
Main screen.
Use the Ch;mnel Number or CH
&V buttons to select desired
programs for viewing. Program
Sound occurs with the channels
displayed on Ihe Main screen
Remember, if you see the
@same picture on the main
screen and in the PIP window,
check to be sure the TV's PIP
Source Selem and Main screen
Picture Source select are set for
ANT B and ANT A respectively.
See the following page on how to
operate other PIP features with the
TV's remote control.
BLACK frame around the PIP window appears
when the ANT A Input is on the Main screen.
PRESS
on remote then
. Main Screen is CH 5 from ANT A input, adjust channels [ • Main ;_creen shows CH 8 fi_m ANT B input.
PIP is CH 8 from ANT B input Number buttons [ • PIP is CH 5 from ANT A input.
with (?H&_ or
NOTE: Sound for TV programs
displayed in the PIP window can also
be heard through the use of PIP
AUDIO OUT jacks on the rear of the
TV. Just connect the TV's Left/Right
PIP AUDIO OUTPUTs to the correct
AUX(iliary) Inputs on an external
stereo sound system (through which
the PIP audio will be played).
WHITE frame around the PIP window appears
when tae ANT B Input is on the Main screen.
PIP AUDIO
OUTPUT will
be monaural
(mono) when
bo:h ANT A and
ANT B are being
used for normal
PIP operation.
See page 26 for
details on other
stereo sound
uses for the PIP
Audio Output
jacks.
45
Page 46

y using the PIP buttons on the
Jremote the PIP picture can be
moved and swapped with the main
screen. The main screen picture
ccm also be frozen in the PIP
window.
Press the PIP-ON/OFF button
to show the PIP picture.
P![P appears in a comer of TV
screen. Press PIP ON/OFF again to
remove PIP from the main screen.
<_ Press the PIP POSITION
button to move the PIP picture
(from comer-to-comer on the TV
screen.)
This feature allows you to move
PIP and avoid blocking off any
main screen action.
)With PIP on the screen,
TV
press the SWAP button to swap
the main screen picture with the
PIP picture. See "Smart Help"
note on this page.
1. PIP ON t OFF
2. PIP POSITION
3. PIP SWAP
Remember,
if the TV is
showing a
"VCR/AUX"
supplied picture on
the main screen
(when the TV and
VCR are turned
OFF), a blank
screen will appear
when the TV is
/
]
turned back ON
again.
If this happens, just
press the CH(annel)
• or • buttons to
select a "IV station
for normal viewing.
Press FREEZE to hold the
c_jrrent MAIN screen picture in
tile PIP window (Main picture is
still active).
If PIP is currently OFF, the PIP
window will automatically appear.
Press FRZ repeatedly to update
tile frozen PIP with current
pictures from the Main screen.
You cannot reposition a frozen
PIP picture.
Press the PIP ON/OFF button to
drop the frozen PIP picture from
the screen.
, Press the PIP SIZE button to
change the size of the PIP window
shown on the TV screen.
F'ress the PIP SIZE button again to
see and compose the large and
small size PIP windows.
You cannot change the size of a
frozen PIP picture.
4. PIP FREEZE
5. PIP SIZE (Large or Small)
46
Page 47

rWhepicture for the PIP window
• can come through either the
ANT(enna) A / B Inputs or the AUX
1/2/3 Inputs (on the front and rear
of the TV). PIP Picture Source
simply tells the TV which one of
these sources ij' is to show in the
PIP window.
Select PIP SOURCE control.
With FEATURES MENU (4 of 5)
on screen, move the RED highlight
with the MENU (M) 4_ buttons.
Then press the MENU button.
the
Press
_, MENU AY and
MENU (M) buttons to highlight
and select the desired (u') PIP
Picture Source,
ANT A or B- l'or a picture signal
coming from either the ANT(enna)
A or B Input p]tug on the TV.
Note: The remote control's
button can also be used to quickly
swap between the picture sources
for the TV's Main screen and the
P[P window.
AUX 1- for a picture signal
coming from tile AUX IN 1 Video
Input jack on the rear of the TV.
AUX 2- for a picture signal
coming from the AUX IN 2 Video
Input jack on the rear of the TV.
AUX 3- for a picture signal coming
from the Video Input jack on the
front of the TV.
,== FEATURE MENU
[Z3
1'dF 5_=_=_,
=_ FEATURE MENU
,_!'dF'5 ,'_' -
== FEAIURE MENU =
!i!ii!iiii!!!ili!iiiiiiiiiiiiiiiii "
=_ FEAIURE MENU
_, Press the to
clear the screen.
a signal is connected to the
selected PIP Picture Source (ANT
13, AUX 1/23/, etc.) on the rear of
the set.
If you see the same picture on the
main screen and in the PIP
window, you may have the Main
Screen and PIP window set to the
same video input source.
STATUS button
Remember, the PIP
window will be blank unless
4 OF 5
_= PiP SOURCE _",,.._ ,__L,E't_I_ _,1_ _:
_.,2_-t7 ANTA 7
II"I I
III Au×_ I
IIIAux_ I
It-JAUx= /
47
Page 48

"_he Picture-In-Picture (PIP)
. Color and Tint controls are
used to make fine tune adjustments
to the color settings for PIP (when
it is shown on the TV screen).
<_ Select PIP COLOR (or PIP
TINT) control.
With FEATURES MENU (5 of5)
on screen, move the RED highlight
A
with the MENU (M)_ buttons.
Then press the MENU button.
<_ Press MENU AV buttons
the
to move the RED highlight. Press
the MENU button to turn (u,") the
PIP COLOR or TINT control ON.
The PIP automatically comes on to
show the PIP window on the TV
screen.
_ Press the (4-) (-)
and buttons to
adjust the PIP for Color (or Tint)
levels you prefer.
_, Press the STATUS button to
clear the screen.
MAIN MENU iii.......................
.' , , , ..iiiil _:_.....
plp_
.... ;iiiiiiiiiiii!!iiiiii!iiiiiiiiiiii
=_ FEATJRE MENU
:i::
_ FEATURE MENU
E UR MENU
$_
,i , I , I,
'_ 5_='_ '
"2'o_'5'-__=_"
,_= FEATURE MENU
ELECTION_
Remember. Although
there are separate COLOR
and TINT controls for PIP, the
adjustment levels for these
controls depend on the TV's main
picture. For example: If the main
screen is showing a black and
white picture, PIP would also be
in black and white (even though
il:ssource is in color).
48
Page 49

ip hookup with Cable
Converter Box and VCR.
i) First use an optional signal
splitter and connect the original
cable TV signal to both the
CABLE IN on the Cable Converter
and the ANTENNA plug on the
rear of the TV.
_) Connect the CABLE OUT on
the Converter to the ANT. IN on
the VCR.
_,',_ Connect the VIDEO OUT
jack on tile VCR to the VIDEO
IN jack on the TV.
Also connect the AUDIO OUT (R
and L) jacks from the VCR to the
AUDIO IN jacks on the TV.
Contact the Parts
I"_°8ootz9;_C6o6't6_ VCR
tOOrda_;eanylop_ional
CABLE TV CONVERTER
49
Page 50

l
_he on screen HELP menu
offers both Operating Tips and
a list of Glossary definitions for
different features on your TV.
These items are given to provide
you with more information and
details on a select group of feature
operations.
<_ Select "HELP" on the TV's
Main Menu.
Press the remote's Menu _
buttons to move UP/DOWN and
from SIDE-TO-SIDE within the
list of on-screen features.
Pr'ess MENU (M) to select the
highlighted "HELP" item.
<_ Press the MENU AY and then
the MENU (M) buttons to select
either the OPERATING TIPS or
GLOSSARY item.
MAIN MENU
<
I[0N/of_ [] _8_ [] Sw_ [] FIt|Z[ ]
B88
! == HELP MENU '
_] Of TV Features
iiiiiiiii!:_,:_
=_ OPERATING TIPS
USING OPERATING TIPS
• Use the • and • keys on
your re'no':e to scroll
through the different
" i!!iiiiiii!!i!ii!!i!iii!!iii
!ii!!iiiiiiiiiiiii!iiili
i!iiiiiiiiiii!iiiiiii_
help items
• Use the "M" key on
your re'no_;e will go back
to the help menu.
FOLLO W "]'HE ON SCREEN
DIRECTIONS TO VIEW
OPER a,TING TIPS
50
Page 51

_._leasemake these simple
][checks before calling for
service. These tips can save you
time and money since charges for
73/installation and adjustment of
customer controls are not
covered under y-our warrant.
CAUTION: A video source (such as a video game, Compac: Disc Interactive - CDI, or
TV information channel) which shows a constan! non-moving pattern on the TV screen,
can cause picture tube damage. When your TV is continuously used with such a source
the pattern of the non-moving portion of the game (CDI, etc) could leave an image
permanently on the picture tube. When not in use, turn the video source OFT. Regularly
alternate the use of such video sources with normal TV viewing.
No Power
No Picture
No Sound
Remote Does Not
Work
and push POWER button again.
i heck the TV power cord. Unplug the "Ia/, wait 1 minute, then reinsert plug into outlet
Check to be sure outlet is not on a wall switch.
Check antenna connections on the rear of the TV. Are they properly secured to the
antenna plug on the TV?
Check the CABLE TUNING control for correct position.
Check PICTURE SOURCE control for correct position ANT A or B, AUX1, AUX 2,
or AUX 3 position without a signal source will result in a blank screen.
Check the CLOSED CAPTIONS control. Some TEXT mcdes could block the screen.
Check the VOLUME and MUTE buttons on the TV and remote.
Check the TV SPEAKER NORMAL/OH' control for the correct position.
If attempting auxiliary equipment hook-ups, check audio jack connections; and that the
auxiliary equipment is on and in the proper operating modes.
Check TV--VCR-CBL "System" buttons on the remote. Press the remote's TV System
button to send commands to the TV; VCIq' System to sent to VCR; etc.
Check batteries. Replace with AA Heavy Duty (Zinc Chic ride) or Alkaline batteries
if necessary.
Clean the remote and the remote sensor window on the TV.
TV Displays Wrong
Channel or No
Channels Above 13
Cleaning and ('are
• To avoid possible shock hazard be sure the TV is unplugged from the electrical outlet before cleaning.
• When cleaning the TV screen take care not to scratch or damage the screen surface (avoid v_earing jewelry or using
anything abrasive- do not use household cleaners). Wipe the front screen with a clean cloth dampened with water. Use
even, easy, vertical strokes when cleaning.
• Specially designed screen cleaning kits are also available which contain anti-static cleaners and cloths designed to get
into the ridges of the TV screen. If interested, ask your dealer about the MAG4600 Projection TV Screen Cleaning Kit or
call our toll-free Accessory Parts ordering number 1-800-292-6066.
• Gently wipe the cabinet surfaces with a clean cloth or sponge dampened in a solution of cool clear water and a mild soap
or detergent. Use a clean dry cloth to dry the wiped surfaces.
• Occasionally vacuum the ventilation holes or slots in the cabinet back.
• Never use thinners, insecticide sprays, or other chemicals on or near the cabinet, as they might cause permanent marring
of the cabinet finish.
Add desired channel numbers (ADD/DELETE CHANNELS control) into TV memory.
i epeat channel selection, i
Check CABLE TUNING control for correct position.
This TV is equipped with protective circuitry that shuts the "IV off in case of moderate
power surges. Should this occur turn the TV back on by pressing the POWER button
once or twice, or unplug _md then replug the power cord at the AC outlet.
This feature is NOT designed to prevent damage due to high power surges such as those
caused by lightning, which is not covered by your warranty.
51
Page 52

A/'V Inputs * Connector plugs which allow the introduction of
distinct audio and video signals into the TV from accessory
VCRs, camcorders, etc. These plugs bypass the normal tuner or
RF/Antenna signal circuitry.
Coaxial Cable * A single solid antenna wire normally matched
wil.h a metal plug (F-type) end connector that screws (or pushes)
directly onto a 75 Ohm input found on the Television or VCR.
Display * An on screen message or graphics that help the user
operate and adjust his Television feature controls. See On
Sc:een Displays (OSD).
DiJrect Audio/Video Inputs * Located on the rear of the TV
these connectors (RCA phono type plug) are used for the input
of audio and video signals. Designed for use with VCRs (or
other accessories) in order to receive higher picture resolution
an(J offer sound connection options.
Identify* Method by which a remote control searches and finds
an operating code for another product (such as a VCR or Cable
Converter). Once the code has been "identified" then the TV
remote can operate and send commands to the other product.
Multichannel Television Sound (MTS) * The broadcast
standard that ;allows for stereo sound to be transmitted with the
TV picture.
Menu * An on-screen listing of feature controls shown on the
Television screen that are made available for user adjustments.
Picture -In-Picture (PIP) * Term used when two pictures are
shown on the TV screen at the same time. The smaller PIP
picture is supplied by a VCR (or other tuner/video playback
source). The PIP picture can also be moved and swapped with
the,TV's main screen picture.
Programming * The procedure of adding or deleting channel
numbers into the Television's memory circuils. In this way
the Television "remembers" only the locally available or
desired channel numbers and skips over any tmwzmted
channel numbers.
Remote Sensor Window * A window or opening found on
the Television control panel through which infrared remote
control command signals are received.
Second Audio Program (SAP) * Another or additional audio
channel provided for in the Multichannel Television Sound
(MTS) broadcast standard. The most frequently proposed use
for SAP is the simultaneous bilingual broadcast of TV
program material.
Status * Allows the user to quickly confirm what channel
number is cmxently being viewed. Status can also be used to
clear the Television of on screen displays or information
(rather than waiting for the displays to "time out" or
automatically disappear from the screen).
S-Video Input * Allows direct connection of high-resolution
video sources, such as a Super _'HS videocassette recorder,
Laser Disc player, etc. Provides optimum pic'Iure resolution,
sharpness, and clarity.
Twin Lead Wire * The more commonly used name for the
two strand 300 Ohm antenna wire used with many indoor and
outdoor antenna systems. In many cases this l:ype of antenna
wire requires an additional ad_tpter (or balun) in order to
connect to the 75 Ohm Input terminals designed into the more
recent Televisions and VCRs.
52
Page 53

Accessories/Optiorml .................. 10, 26, 27, 28, 44, 49, *Q/U-1
Add/Delete Channels .......................................... 13-14, *Q/U-2
Advance Buttons ........................................................ *Q/U-2, 4
Audio Controls .................................................................. 23-27
Audio/Video Input .................................. 28-31,44, 49, *Q/U-2
Automatic Programming .......................................... 13, *Q/U-2
Battery Installation..: .............. •...................................... *Q/U-3
Cable TV Connections/Settings ................ 12, 44, 49 *Q/U- 1,2
Chanl_el/Time Display ........................................ 19, 22, *Q/U-3
Channel Label .......................................................................... 21
Channel Memory ................................................. 13-14, *Q/U-2
Channel/Time Reminder ......................................................... 18
Clock Setting .......................................................................... 15
Clock Timer ............................................................................ 16
Closed Captioning .................................................................. l 1
Color Controls .............................................................. 6,*Q/U-4
Convergence ............................................................................. 8
Controls/TV ............................................................. *Q/U-2, 3, 4
Controls/Remote ................................... 32-43, 46, *Q/U-2, 3, 4
Exit ................................................................................. *Q/U-4
Features ..................................................................................... 5
First rime Set Up ........................................................... *Q/U-2
Help Menu ............................................................ 50, *Q/U-2, 4
Inputs/Audio and Video ........................................ 28-31,44, 49
Menu ........................................................................... *Q/U-2, 4
Minus(-)/Plus (+) Buttons ........................................... *Q/U-3, 4
Parental Control ................................................................. 19-20
Picture-In-Picture (PIP) ...................................... 44, 49, *Q/U-2
Picture Source Control ....................................................... 10, 47
Precautions/Safety ............................................ 2,13, 51, *Q/U- 1
Programming Channels ............................................. 13, *Q/U-2
Remote Control ..................................... 32-43, 46:,*Q/U-2, 3, 4
Remote with VCRs ................................................ 38-39, 42, 45
Requesting Service ......................................... 50, 51, 54-55, 56
RF Coaxial Cable ................................................ 44, 49, *Q/U-I
RF Switcher ............................................................................ 10
Reminder/Time and Channel .................................................. 18
Remote Locator ................................................................... 32-33
Safety/Precautions ............................................. 2, 3, 51, *Q/U- 1
Second Audio Program (SAP) ................................................ 24
Sensor Remote ................................................................ *Q/U-3
Sleep Timer ............................................................................. 17
Smart Picture ..................................................................... 34-35
Smart Sound ............................................................................ 36
Surround Sound ...................................................................... 27
Speaker Terminals .................................................................. 27
Time/Channel Display .............................................. 18, *Q/U-3
Timer (Turn On) ..................................................................... 16
VCR Button ...................................................................... 28, 43
VCR/TV Connections ............................. 28-31,44, 49, *Q/U- 1
Tips for Service ..................................................... 50, 51,54-55
TV Speaker Control ................................................................. 26
Volume Display ....................................................................... 25
Warranty .................................................................................... 56
* Q/U indicates page number reference in the separate Quick Use Guide
B3
Page 54

Philips Consumer Electronics Company
Francisco/Metro Area
\
Factory Service Center Locations
Detroi_
- • Cleveland/N Ohio
Columbus/Dayton/Cincinnati
Charlotte
.\/
Atlanta/N Georgia
• PhiladelphisiS New Jersey
irk/Metro
•
• Dallas/Ft. Worth • Orlando/N Fiorida/SE Georgia
_ _ Houston/Galveston \
"_ _-_ BeaumonUAustin Tampa/W Florida
San Antonio Florida
NOTE:Ifyou reside in one of our Philips Factory ServiceBranchareas (seedirectory on back), you cancontact th._ nearestServiceBranch to
obtainefficient and expedient repairfor your product. Ifyour product is In-Warranty, you should have proof-of-pLrrchaseto ensure No Charge
Service. For Out-of-Warranty service, callthe location nearest you.
NOTA:Si vousrdsidezdans une des rdgions desservies par une succursale de serviceapr_s ventedu fabricant PHlips (voir liste ci-dessous), vous
pourrezcontacter la branche de service apr_svente la plus prbs de chezvous pour obtenir un serviceaprbs ve:_terapideet efficacn. Si le produit
est sous garantie, il suffira de prdsenter une preuved'achat pour b6ndficier d'un service sans frais. Pour les procuits non couver%par la garantie,
contactez le centre le plus prosde chezvous.
NOTA:SiUd. resideen unade nuestras zonas parasucursales Philipsde servicio al defdbrica (ver directorio nl;_Sabajo), Ud.puedecomunicarse
(:onla sucursal de servicio mds cercana para obteneruna reparaci6noportuna y eficazde su producto. Si su pro:lucto est;itodavfabajo garantia,
[Jd.debepre'.;entarcomprobante de compra parano ocasionar ningunos cargospor servicio. Paraservicio despudsdel vencimiento de la
garantia, Ilameal lugar re;is cercano de los abajoindicados.
In Canada
Howyou can obtain efficient and expedientcarry-in, mail-in, or in-home service for your product
Pleasecontact Philips at 1-800-661-6162 (French speaking)
1-800-363-7278 (English speaking)
AuCanada
0ommentobtenirle service apr_s-vente pourles produits appo_6s ou envoy_sparla poste_notre centre de_;enriceoule service _ domicile
Veuillezcontacterphilips _: 1-800-661-6162(Francophone)
1-800-363-7278
En el Canada
C6mo recibir servicio efficiente parasu producto, en persona, pot correo o a domicillo
Favorde comunicarse con Philips al: 1-800-861-6162 (franc6fono)
1-800-363-7278 (angl6fono)
54
Page 55

QUALITY SERVICE IS AS CLOSE AS YOUR TELEPHONE! SIMPLY LOOK OVER THE LIST BELOW FOR THE NUMBER OF A FACTORY SERVICE CENTER
NEAR YOU. YOURPRODUCT WILL RECEIVE EFFICIENT AND EXPEDIENT CARRY-IN, MAIL-IN, OR IN-HOME SERVICE, AND YOU WILL RECEIVE PEACE OF MIND,
KNOWING YOUR PRODUCT IS BEING GIVEN THE EXPERT ATTENTION OF PHILIPS'FACTORY SERVICE. AND,IF THE PHONE NUMBER LISTED FOR YOUR AREA
IS LONG DISTANCE, CALL 1-800-242-9225 FOR FACTORY SERVICE.
COMMI'NTOBTENIRNOTRESERVICEAPRI:SVENTERAPIDEETEFFICACESOITPARCOURRIER,A DOMICILE,OU ENSE pRI_SENTANTA UN CENTREDESERVICEPHILIPS.PLUSDE600 CENTRESDE
R_:CEPrlONDE PRODUITS_.REPAFlEFl_,TRAVERSLEPAYS:CONTACTERLECENTREDESERVICEAUXCONSOMMATEURSLEPLLISPROCHEPOUR SAVOI]_L'EMPLACEMENTDF CESDI_POTSDANS
C(_MOOBTENERUN SERVICIOOPORTUNOY EFICIENTEPOR CORREO,EN CASA0 EN PERSONAPARASU PRODUCTOA TFIAVItSDEUNCENTROPHILIP,; DESERVICIO.MASlIE600 SITIOSPOR
TODOELPAlSPARALA RI-'CEPCIONDEPRODUCTOSNECESITADOSDEREPARACIONES:COMUNICARSECONELCENTFIODESEFIVICIODE FABRICAMASI_ERCANOPARAESTOI_LUGARESDENTRO
UN RAYONDE50 _.75 MILES(80 KMA 120 KM)DU CENTREDESERVICELOCAL.
DEUN RADIODE80 A 120 I(M (50 A75 MILLAS)DELCENTRODESERVICIOLOCAL.
Atlanta-Athens-Macon-Chattanooga,
TN-NorthGeorgiaArea
200 North CobbParkway
Building 100, Suite120
Marietta,GA 30062
(771))795-0085
Charlotte-WinstonSalem-
Greensboro
520-G ClantonRoad
Charlotte,NO 28217
(704) 529-6330
Chicago-GaryArea
1360W. HamiltonParkway
Itasca,IL 60143
(631))775-0990
Clef/Bland-Akron-YoungstownArea
24090 Detroit Road
Westlake,OH 44145
(216) 899-2040
Columbus-Dayton-CincinnatiArea
6333 BuschBlvd.
Columbus, Ohio43229
(614) 781-2605
Dallas-Ft. WorthArea
13375Stemmons Freeway,
Suile 200
Dallas,Texas 75234
(214) 243-4775
Detroit/ToledoArea
25173 Dequindre
MadisonHeights,MI 48071
(810) 544-2110
Knoxville-Greeneville-
Tri Cilies-EastTennesseeArea
6700 D. PapermillRoad
PapermillPlaza
Knoxville,TN37919
(423) 584-6614
Ft. Myers-Naples-
SouthwestFlorida Area
11601 ClevelandAve.,Suite15
Ft.Myers,FL 33907
(941) 278-4242
Houston-Galveston-Beaumont-Austin-
SanAntonioArea
1110NorthPostOakRoad
Suite100
Houston,rx 77055
(713)682-3990
Miami-SoutheastFlorida Area
2099 W. AtlanticBlvd.
PompanoBeach,FL 33069
(954) 978-0467
NewYorkMetroArea
116CharlotteAvenue
Hicksville,NY 11801
(516) 933-1780NassauCounty
Orlando-Jacksonville-North
Florida-SoutheastGeorgiaArea
2452SandLakeRoad
Orlando,FI_32809
(407) 857-8998
Philadelphia/S.NewJerseyArea
352 DunksFerryRoad
Bensalem,PA 19020
(215) 638-7500
Pittsburgh,PA-Steubenville,OH-
Wheeling/M_rgantown,WVArea
2891 BanksvilleRoad
Pittsburgh,P_,15216
(412) 563-8020
SanFrancisco-Oakland-SanJoseArea
3370 Monl:gcmeryDrive
SantaClara,CA95054
(408) 492-9013
Seattle-Tac¢,ma/OlympiaArea
1055AndoverParkEast
Tukwila,WA 98188
(206) 575-6288
Tampa-St.P_.'tersburg-SarasotaArea
CenterPoint BusinessPark,BuildingB-l,
Suite100
1911 U.S.Hwy.301 North
Tampa,FL 33619
(813) 621-8181
55
Page 56

PROJECTION TELEVISION
One Year Free Labor
One Year Free Service on Parts
Two Years Free Service on Cathode Ray Tube Parts / 30 days Free Service on Proiiection TV Screen
This product can be repaired in-home.
WHO IS COVERED?
You must have proof of purchase to receive warranty service. A sales
receipt or other document showing that you purchased the product is
considered proof of purchase.
WHAT IS COVERED?
Warranty coverage begins the day you buy your product, for one year
thereafter (30 days for the projection -IV screen), all parts will be repaired
or replaced, and labor and transportation are free. From one to two years
from the day of purchase, you pay for the replacement or repair of all
parts except the cathode ray tube and the "Clear-Vu" lens, and for all
lal_r and transportation charges. After two years from the day of
purchase, you pay for the replacement or repair of all parts except the
"Cliear-Vu" lens (which is guaranteed against manufacturer's defects for
the life of the product), and for all labor and transportation charges.
All parts, ncudin_repaired and replaced parts, are covered only for
the original warranty period. When the warranty on the product
expires, the warranty on all replaced and repaired parts also expires.
_rHAT IS EXCLUDED?
Your warranty does not cover:.
• labor charges for installation or setup of the product, adjustment of
customer con_:rols on the product, and installation or repair of
antenna systems outside of the product.
• product repair and/or part replacement because of misuse,
accident, unauthorized repair or other cause not within the control
of Philips Consumer Electronics Company.
• reception problems caused by signal conditions or cable or antenna
systems outside the unit.
• a product that: requires modification or adaptation to enable it to
operate in any country other than the country for which it was
designed, manufactured, approved and/or authorized, or repair of
products dam;aged by these modifications.
• incidental or consequential damages resulting from the product.
(Some states do not allow the exclusion of incidental or
consequential damages, so the above exclusion may not apply to
you. This includes, but is not limited to, prerecorded material,
whether copyrighted or not copyrighted.)
• a product used for commercial or institutional purposes.
WHERE IS SERVICE AVAILABLE?
Warranty service is available in all countries where the product is
officially distributed by Philips Consumer Electronics Company. In
countries where Philips Consumer Electronics Company does not
distribute the product, the local Philips service organization will attempt
to provide service (although there may be a delay if the appropriate
spare parts and technical manual(s) are not readily available).
MAKE SURE YOU KEEP...
Please keep your sales receipt or other document showing proof of
purchase. Attach it to this owner's manual and keep both nearby. Also
keep the original box and packing material in case you need to return
your product.
BEFORE REQUESTING SERVICE...
Please check your owner's manual be.fore requesting service.
Adjustments of the controls discu:;sed there may save you a service
call.
TO GET WARRANTY SERVICE...
Repair must be pe_rformed by an authorized service center or a factory
service center. If you do not liveneor a factory service center, contact your
dealer. If your dealer is an authorized se=rvice center, he will arrange
repair. If your dealer is not an authorized service center, he will direct
you to the authorized service center engaged by him to service the
products he sells.
(In U.S.A., Puerto Rico and U.S. Virgin Islands, all implied warranties,
including implied warranties of merchantability and fitness for a
particular purpose, are limited in duration to the duration of this
express warranty. But, because some states do not _.llow limitations on
how long an implied warranty may last, this limitation may not apply to
you.)
(In Canada, this warranty is given ,n lieu of all other warranties. No
other warranties are expressed or" implied, including any implied
warranties of merchantability or flmess for a particular purpose. Philips
is not liable under any circumstances for any direct, indirect, special,
incidental or consequential damages, howsoever incurred_ even if
notified of the possibility of such clamages.)
IF YOU HAVE QUESTIONS...
Please contact Philips at:
1-800-661-616'2. (French Speaking)
1-800-363-727B (Fnglish Speaking)
REMEMBER...
Please record the model and serial numbers found on the product
below. Also, plea.';e fill out and mail your warranty registration card
promptly. It will he easier for us 1:o notify you if necessary.
MODEL#
SERIAL #
IB/'894 EO01
Philips Service Company, P.O. Box 555, Jefferson City, Tennessee 37760, (42311475-8869
56
 Loading...