

Magnavox 6P5430 Owner’s Manual
Projection Television
Owner's Manual

Once your MAGNAVOX purchase is registered, you're eligible to receive all the privileges of owning
a MAGNAVOX product. So complete and return the Warranty Registration Card enclosed with your
purchase at once. And take advantage of these important benefits.
Oongratulations on your purchase,
and welcome to the "family!"
MAGNAVOX
Smart. Very smart."
Dear MAGNAVOX product owner:
Thank you for your confidence in MAGNAVOX. You've selected one of the best-built, best-backed
products available today. And we'll do everything in our power to keep you happy with your purchase
for many years to come.
As a member of the MAGNAVOX "family," you're entitled to protection by one of the most compre-
hensive warranties and outstanding service networks in the industry.
What's more, your purchase guarantees you'll receive all the information and special offers for which
you qualify, plus easy access to accessories from our convenient home shopping network.
And most importantly you can count on our uncompromising commitment to your total satisfaction.
All of this is our way of saying welcome-and thanks for investing in a MAGNAVOX product.
Sincerely,
P.S. Remember, to get the most from your MAGNAVOX
Robert Minkhorst
President and Chief Executive Officer
product, you must return your
Warranty Registration Card within 10 days. So
please mail it to us right now!
71
Know these
safetysymbo/s
¢AUlION: TO IIEOU¢! IIHE RiIK Of El I_CTRICIIHO¢I(_ 00 NOT
EMOW!COVtmI0_IteOq. NO UUR_mnCEMU[ pNml
NIIOI. REFER IRVlCmO TO OIJAlJIq_ IlllVl_ I_IqION_J..
A This 'loolt of lightning" indicates uninsulated material within your unit may cause an electrical
shock. For the safety of everyone in your household, please do not remove product covering.
,_The "exclamation point" calls attention to features for which you should read the enclosed lit-
erature closely to prevent operating and maintenance problems.
WARNING: TO PREVENT FIRE OR SHOCK HAZARD, DO NOT EXPOSE THIS EQUIPMENT
TO RAIN OR MOISTURE.
CAUTION: To prevent electric shock, match wide blade of plug to wide slot, and fully insert.
ATTENTION: Pour eviter les chocs electriques, introduire la lame la plus large de la fiche dons la
borne correspondante de la prise et pousser jusqu'au fond.

SAFETYINSTRUCTIONS- Readbeforeoperatingequipment
Thisproductwasdesignedandmanufacturedto meetstrictqualityand
safetystandards.Thereare,however,someinstallationandoperation
precautionswhichyoushouldbeparticularlyawareof.
1. ReadInstructions- All thesafetyandoperatinginstructionsshould
bereadbeforetheapplianceisoperated.
2. RetainInstructions- Thesafetyandoperatinginstructionsshould
be retainedfor futurereference.
3. HeedWarnings- All warningsontheapplianceandintheoperating
instructionsshouldbeadheredto.
4. FollowInstructions- All operatinganduseinstructionsshouldbe
followed.
5. WaterandMoisture- Tl;eapplianceshouldnotbe usednearwater
- forexample,neara bathtub,washbowl,kitchensink,laundrytub,
ina wetbasementornearaswimmingpool,etc.
6. CartsandStands- Theapplianceshouldbeusedonlywitha cartor
standthatisrecommendedbythemanufacturer.
6A. _ An applianceand cartcombinationshould bemoved
withcare.Quickstops,excessiveforce, anduneven
surfacesmaycausetheapplianceandcartcombination
tooverturn.
7. Wall or CeilingMounting- Theapplianceshouldbe mountedto a
wallorceilingonlyasrecommendedbythemanufacturer.
8. Ventilation- Theapplianceshouldbesituatedsothatitslocationor
positiondoesnotinterferewithitsproperventilation.Forexample,
theapplianceshouldnotbesituatedona bed,sofa,rug,or similar
surfacethatmayblock theventilationopenings;or, placedina
built-ininstallation,suchasa bookcaseor cabinetthatmayimpede
theflowofairthroughtheventilationopenings.
9. Heat- Theapplianceshouldbesituatedawayfrom hearsources
suchas radiators,heatregisters,stoves, or other appliances
(includingamplifiers)thatproduceheat.
10. PowerSources- Theapplianceshouldbe connectedto a power
supplyonlyofthetypedescribedintheoperatinginstructionsoras
markedontheappliance.
11. Power-CordProtection- Powersupplycordsshouldbe routedso
thattheyarenotlikelyto bewalkedonor pinchedby itemsplaced
uponor againstthem,payingparticularattentionto cordsand
plugs,conveniencereceptacles,andthepointwheretheyexitfrom
theappliance.
12. Cleaning- Theapplianceshouldbecleanedonlyas recommended
bythemanufacturer.
13. Power Lines - An outdoorantennashouldbelocatedawayfrom
powerlines.
14. OutdoorAntennaGrounding- Ifanoutsideantennaisconnectedto
thereceiver,besure theantennasystemis groundedsoas to
providesomeprotectionagainstvoltagesurgesandbuilt up static
charges.
Section810 oftheNationalElectricCode,ANSI/NFPANo.70-1984,
providesinformationwithrespectto propergroundingofthe mats
and supportingstructure groundingof the lead-inwire to an
antennadischargeunit,size of groundingconnectors,locationof
antenna-dischargeunit,connectionto groundingelectrodesand
requirementsfor thegroundingelectrode.SeeFig.below.
15. Non-use Periods - Thepower cord of theapplianceshouldbe
unpluggedfrom the outletwhenleftunusedfor a longperiodof
time.
16. ObjectandLiquid Entry- Careshouldbetakensothatobjectsdo
not fall andliquidsare not spilledintotheenclosure through
openings.
17. DamageRequiringService- Theapplianceshouldbe servicedby
qualifiedservicepersonnelwhen:
A. Thepowersupplycordortheplughasbeendamaged;or
B. Objectshave fallen, or liquid has been spilled into the
appliance;or
C. Theappliancehasbeenexposedtorain;or
D. Theappliancedoesnotappearto operatenormallyorexhibits
a markedchangeinperformance;or
E. Theappliancehasbeendropped,ortheenclosuredamaged.
18. Servicing- Theusershouldnotattemptto servicetheappliance
beyondthat describedinthe operatinginstructions.Allother
servicingshouldbereferredtoqualifiedservicepersonnel.
Notelo theCATVsysteminstaller: Thisreminderisprovidedto callthe
CATVsysteminstaller'sattentiontoArticle820-40 of theNEC that
providesguidelinesforpropergroundingand,inparticular,specifiesthat
thecablegroundshall beconnectedtothe groundingsystemof the
building,asclosetothepointofcableentryaspractical.
EXAMPLEOFANTENNAGROUNDINGASPERNATIONALELECTRICALCODE(NEC)
ExampleofAntennaGrounding
as per NEC- National ElectricCode
ELECTRICSERVICEEQUIPMENT
ANTENNALEADIN WIRE
ANTENNADISCHARGEUNIT (NECSECTION810-20)
GROUNDINGCONDUCTORS(NECSECTION810-211
GROUNDCLAMPS
I
"----__ POWERSERVICEGROUNDINGELECTRODESYSTEMINECART250,PANTH)
MAC3964
3

_ Getting Started
Safety/Precautions ..................................................... 3
Table of Contents ....................................................... 4
Features and Model Information................................ 5
Welcome/Product Registration ................... 2
_--_ On-Screen Features
PICTURE MENU
c-Adjusting Color, Brightness, Sharpness,
Tint, and Picture Controls ................................... 6
c-Using the Clearview Control............................... 7
c-Adjusting the TV's Convergence Control ........... 8
c-Using the Flesh Correction Control .................... 9
FEATURES MENU
c-Selecting a Picture Source/RF Switcher ........... l0
c-Setting the TV for Closed Captioning ............... II
c-Setting the TV for Cable or Antenna Signals .... 12
c-Adding Channels in Memory (Automatically). 13
c-Adding Channels in Memory (Manually) ......... 14
c-Setting the TV Clock ......................................... 15
c-Turn-On Timer .................................................. 16
c-Using the Sleep Timer Control ......................... 16
c-Using the Time/Channel Reminder Control...... 17
c-Using the Parental Control........................... 18-19
c-Adjusting the Channel Display Control ............ 20
c-Using the Language Control ............................. 20
_[_ Remote Control Operation
Using the Smart Picture Control ................. 28
Using the Smart Sound Control ............................... 28
Using the Smart Surf Control and the Surf button...29
Setting the Remote to Work VCRs .................... 30-31
Setting the Remote to Work
Cable TV Converters .......................................... 32-33
Setting the Remote to Work VCRs or Cable
Converters - "Search Method". ................................ 34
Using the Remote's VCR buttons ............................ 35
[_ _] Picture-ln-Pieture (PIP)
How to Use PIP (Connections) ........................... 36-37
How to Use PIP with the TV Remote ...................... 38
Selecting the Picture Source for PIP ........................ 39
Adjusting Picture-in-Picture Color and Tint ............ 40
More PIP Connections (Cable Converter) ............... 41
I
General Information
Tips if Something Isn't Working ............................. 42
TV Help Menu ......................................................... 43
Glossary of TV Terms ............................................. 43
Index ........................................................................ 44
Factory Service Locations .................................. 45-46
Warranty .................................................................. 47
Accessories .............................................................. 48
SOUND MENU
c-Adjusting Bass, Treble, and Balance Sound
Controls ............................................................. 2I
,O'Settingthe Bass Boost Control ........................ 21
c-Setting the TV for Stereo and SAP Programs ..22
_'Using the Sound Image Control ........................ 23
c-Using the Volume Display Control ................... 23
C'Using the TV Speaker On/Off Control with
the Audio Outputjacks ..................................... 24
c-Surround Sound Speaker Connections and
Variable Audio Output Control ........................ 25
c-Using the TV's Audio/Video Input and
Output Jacks ............................................... 26-27
Copyright © 1996 Philips Consumer Electronics Company. All rightsreserved.
4
First Time Set Up - automatically sets the TV for
local channels and the correct picture signal (antenna
or cable). It even helps you make the necessary con-
nections for the Picture-In-Picture (PIP) feature. See
your Set-up and Quick Use Guide for details.
Infrared Remote Control - operates your TV set
and a variety of wireless remote control VCRs and
Cable TV Converters. Select remote buttons can also
be backlighted to make them more readable in the
dark.
Standard TV broadcast (VHF/UH10 or Cable TV
(CATV) channel capability.
Closed Captioning - allows the viewer to read TV
program dialogue or voice conversations as on-screen
text.
Automatic Programming of channels - for quick
and easy selection of favorite stations available in
your area.
Picture-In-Picture (PIP) - can show a TV program
and the direct video output from an accessory (VCR,
etc.) onto the TV screen at the same time.
As you unpack your TV please note that the fol-
lowing items have been included with your set:
• Owner's Manual
Safety Tip Information
Factory Service Center Locations
• Warranty Registration Card
• Remote Control Transmitter
• Batteries for Remote Control Use
Please take a few minutes to complete your regis-
tration card. The serial number for the TV is on
the back of the set.
Refer to the back of this manual for instructions
on the cleaning and care of the TV.
Stereo-Ready TV - with a built-in audio amplifier
and a twin speaker system, reception of TV programs
in both broadcast stereo sound or (SAP) bilingual
broadcast are available.
On-Screen Features - display helpful information
for the setting of TV controls (such as help messages,
operating tips and glossary).
Parental Controls - for "censoring" or blocking out
channels to keep children from watching undesirable
programming.
Audio/Video Jacks - for direct connections with
VCRs (and other accessories) for quality TV picture
and sound playback.
Surround Sound - external audio speaker connec-
tions.
Sleep-Timer - automatically turns the TV OFF at
preset time intervals.
Smart Button - for the control of TV Sound and
Picture levels. Use the Smart Button on the remote to
quickly adjust Smart Sound (to set TV Volume levels
during program changes or commercial breaks);
Smart Picture (for programmed video level adjust-
ments on a variety of program sources); and Smart
Surf (for quick one button channel selection of up to
10 of your favorite channels).

Oadjust your TV color and
icture controls, select a TV
channel and follow the steps shown
below:
m- -arm
_ Select BRIGHTNESS, PIC-
TURE, COLOR, TINT, or
SHARPNESS picture control.
With the PICTURE MENU on
screen, move the RED highlight
A
with the MENU 4_) buttons. Then
press the MENU (M) button.
_ Press the (+) or (-) buttons to
adjust the selected control.
<_ Press the STATUS button to
clear the screen.
@
Remember. When the bar
g scale is centered, control set-
tings are at normal mid-range lev-
els.
BRIGHTNESS Press (-) or (+) until
dark parts of the picture show good
detail.
PICTURE Press (-) or (+) until
whitest parts of the picture are as
bright as you prefer.
COLOR Press (-) or (+) to add or
eliminate color.
REMENU
10F2_
l
Select and then press ]] Select and then press MFNU
view an explanation of controls grouped under sanv2
MILNU {M) butlon tO l] {M) button to view additional
the se ected leature, lealure heading. ['or
Example: Tint, Brightness,
P eture, etc.
Press (-) or (+) to obtain natu-
ral skin tones. (Also see Flesh
Correction on page 9 for more infor-
mation).
SHARPNESS Press (-) or (+) to
improve detail in the picture.
HOW TO SELECT FEATURES
(WITH BUTTONS ON THE REMOTE)
Press MENU (M) -'_
to .,.;electRED high-'[
lighted feature, Press MENU (M)
• • to move Up
and Down within
the Menu.
Press MENU (M)_I_'
to move from Side-to-
Side within the Menu•
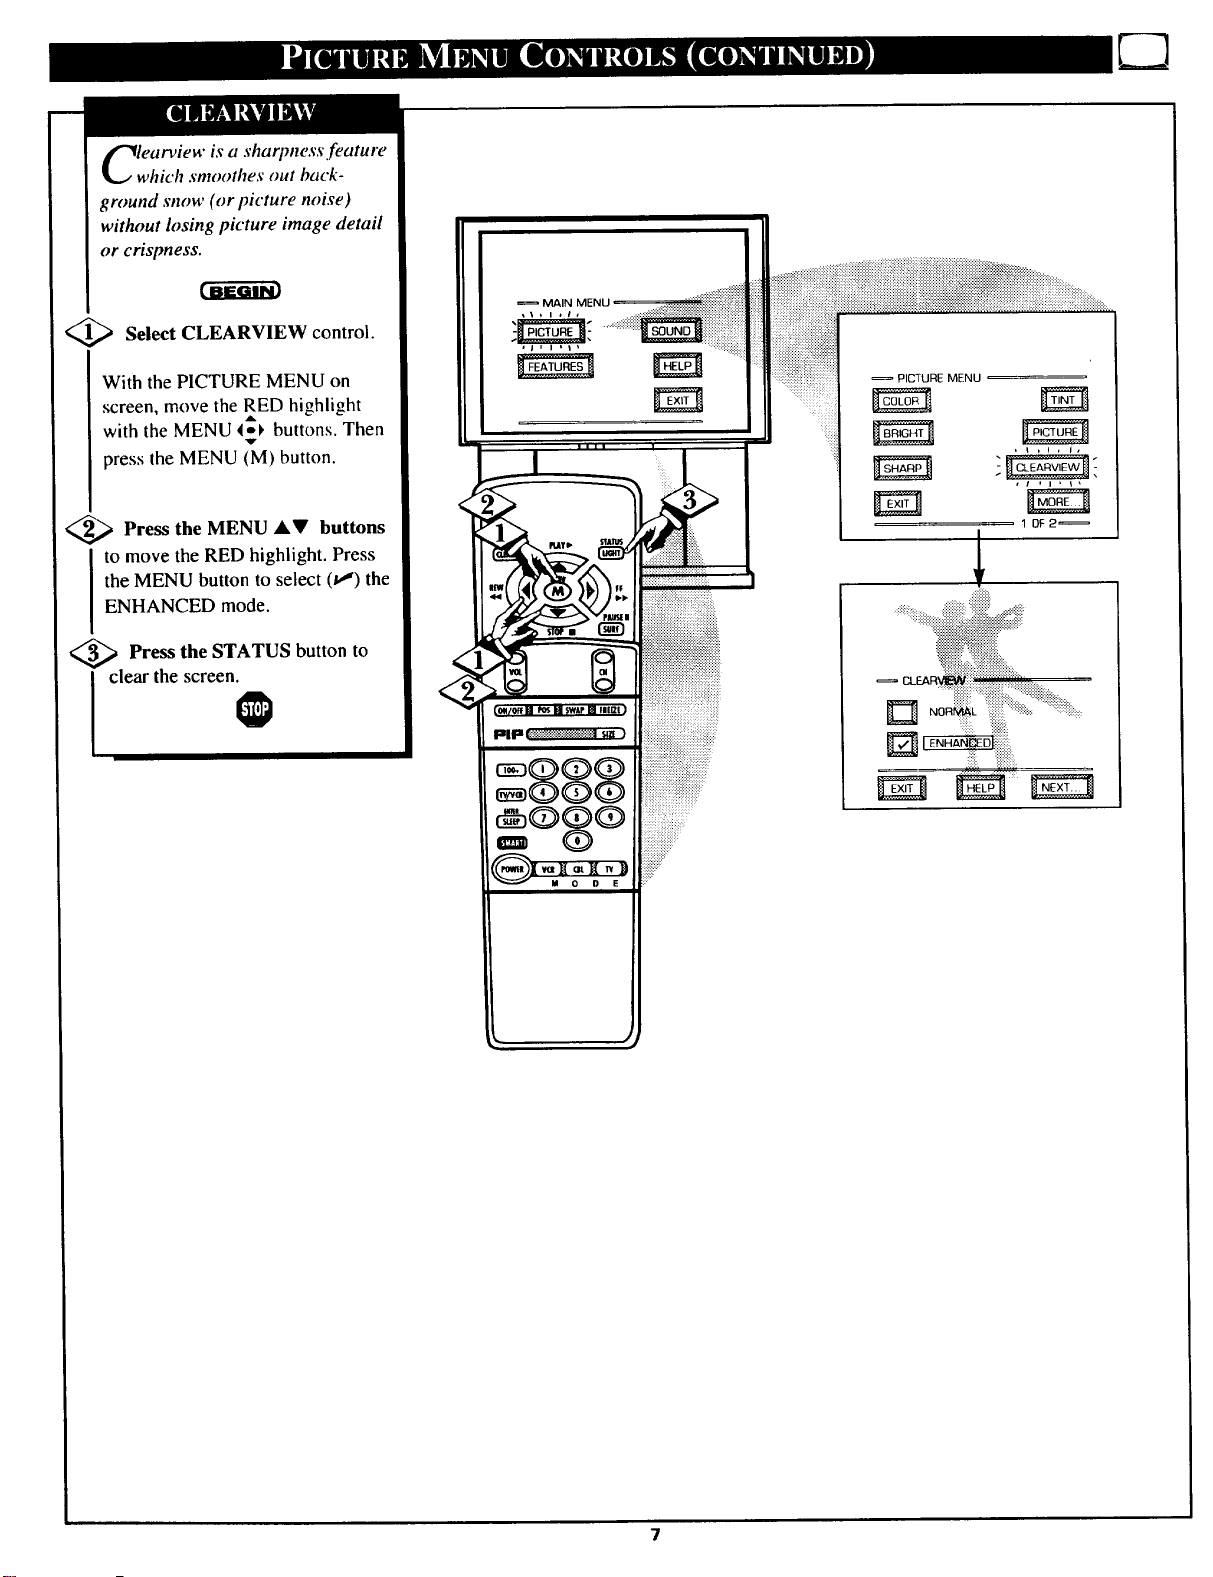
earview is a sharpness feature
which smoothes out back-
ground snow (or picture noise)
without losing picture image detail
or crispness.
<_ Select CLEARVIEW control.
With the PICTURE MENU on
screen, move the RED highlight
A
with the MENU _.-1, buttons. Then
press the MENU (M) button.
_ Press the MENU AV buttons
to move the RED highlight. Press
the MENU button to select (_") the
ENHANCED mode.
<_ Press the STATUS button to
MAIN MENU
I clear the screen.
@
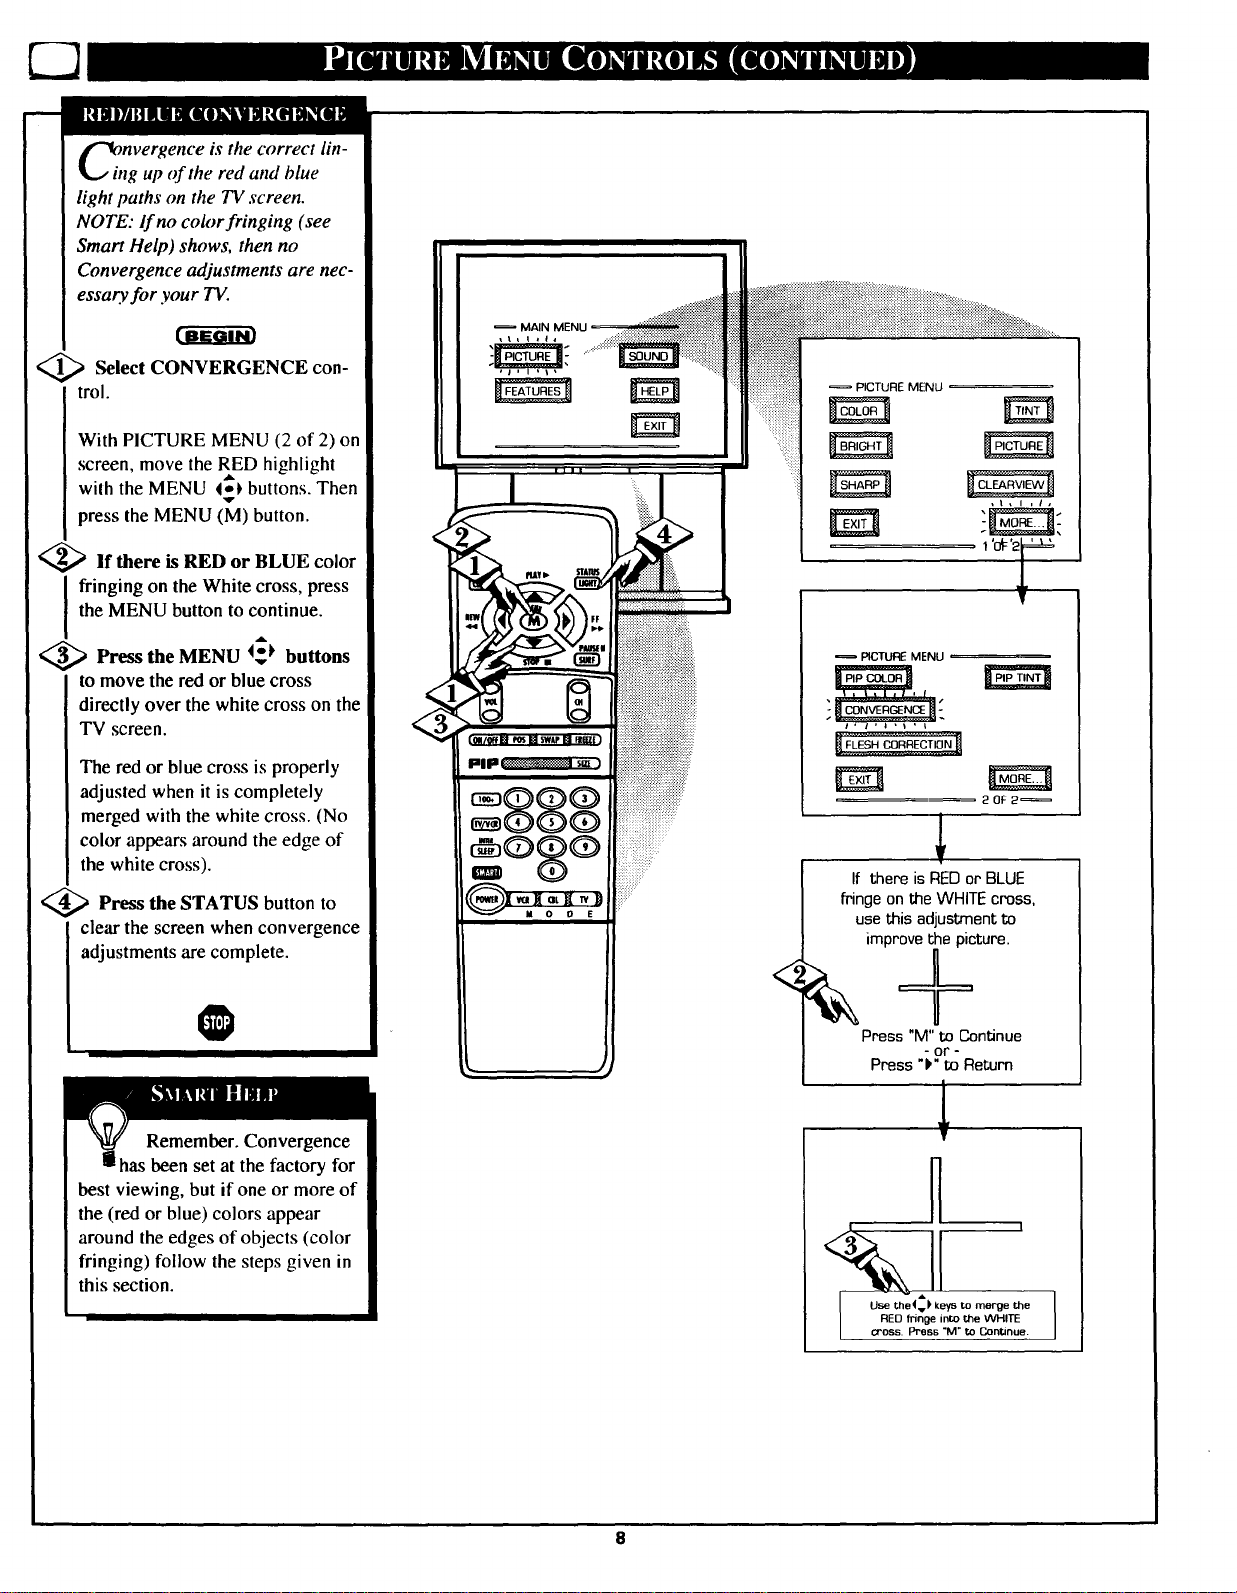
bitnvergence is the correct lin-
tg up of the red and blue
light paths on the TV screen.
NOTE: if no color fringing (see
Smart Help) shows, then no
Convergence adjustments are nec-
essay, for your TV.
MAIN
,_ Select CONVERGENCE con-
trol.
With PICTURE MENU (2 of 2) on
screen, move the RED highlight
with the MENU 4_ buttons. Then
press the MENU (M) button.
<_lf there is RED or BLUE color
the MENU button to continue.
I ringing on the White cross, press
<_ Press the MENU I_ buttons
to move the red or blue cross
directly over the white cross on the
TV screen.
The red or blue cross is properly
adjusted when it is completely
merged with the white cross. (No
color appears around the edge of
the white cross).
,_ Press the STATUS button to
clear the screen when convergence
adjustments are complete.
PICTURE MENU
PICTURE MENU
20F 2_
If there is RED or BLUE
fringe on the WHITE cross,
use this adjustment to
improve the picture.
<
Remember. Convergence
has been set at the factory for
best viewing, but if one or more of
the (red or blue) colors appear
around the edges of objects (color
fringing) follow the steps given in
this section.
Press "M" to Continue
- or -
Press ")" to Return
T
"I
! I
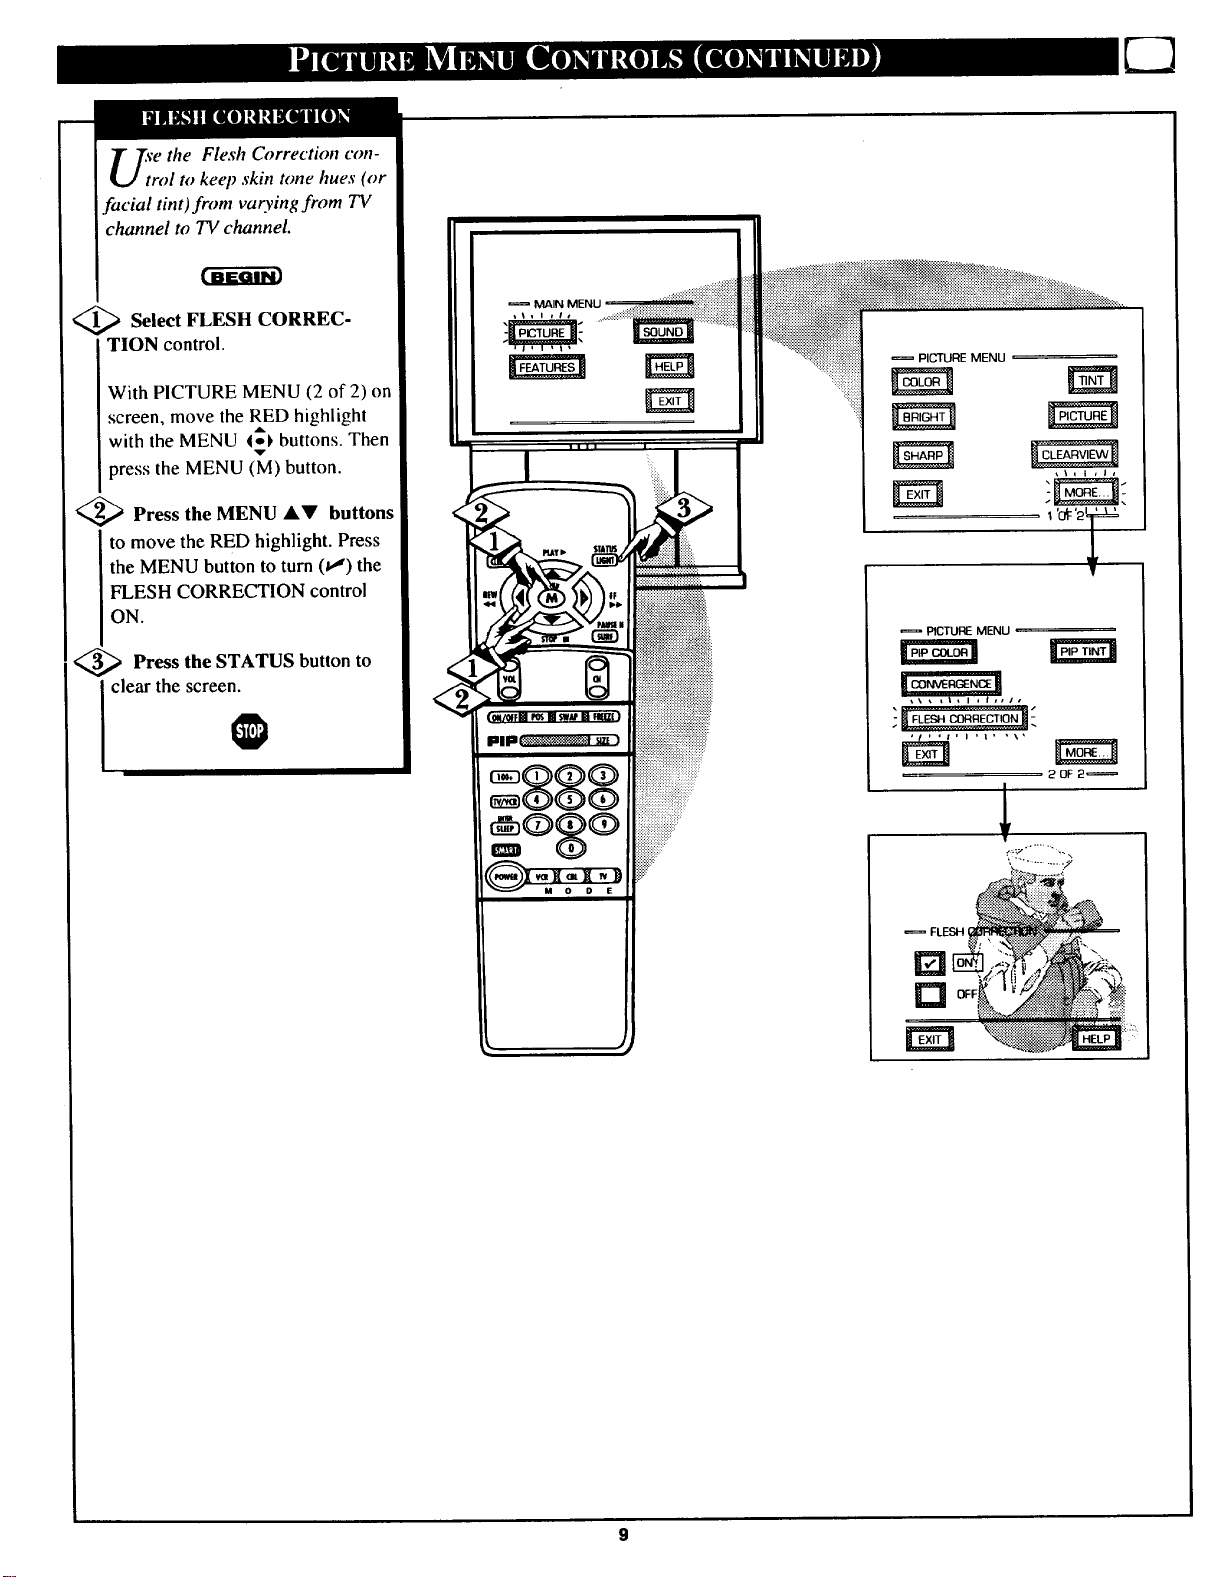
'e the Flesh Correction con-
rol to keep skin tone hues (or
facial tint)from varying from TV
channel to TV channel.
r-a-ffar
1_ Select FLESH CORREC-
TION control.
With PICTURE MENU (2 of 2) on
screen, move the RED highlight
with the MENU 4o_ buttons. Then
press the MENU (M) button.
<_ Press the MENU &V buttons
to move the RED highlight. Press
the MENU button to turn (_) the
FLESH CORRECTION control
ON.
<_ Press the STATUS button to
clear the screen.
v
PICTURE MENU
_I_NVE_3ENlt _
,7": :T: [:'?,,,,
:"H FLESH CORRECTION _
€
k, ,J
20F 2_
= FLESH ) _))::!::)::_ii::.._!:i::I..... __),
"_!ii::iiliiiiiiiiiiii))iii__::::::::::::)]ii)(............ :.i:::...:
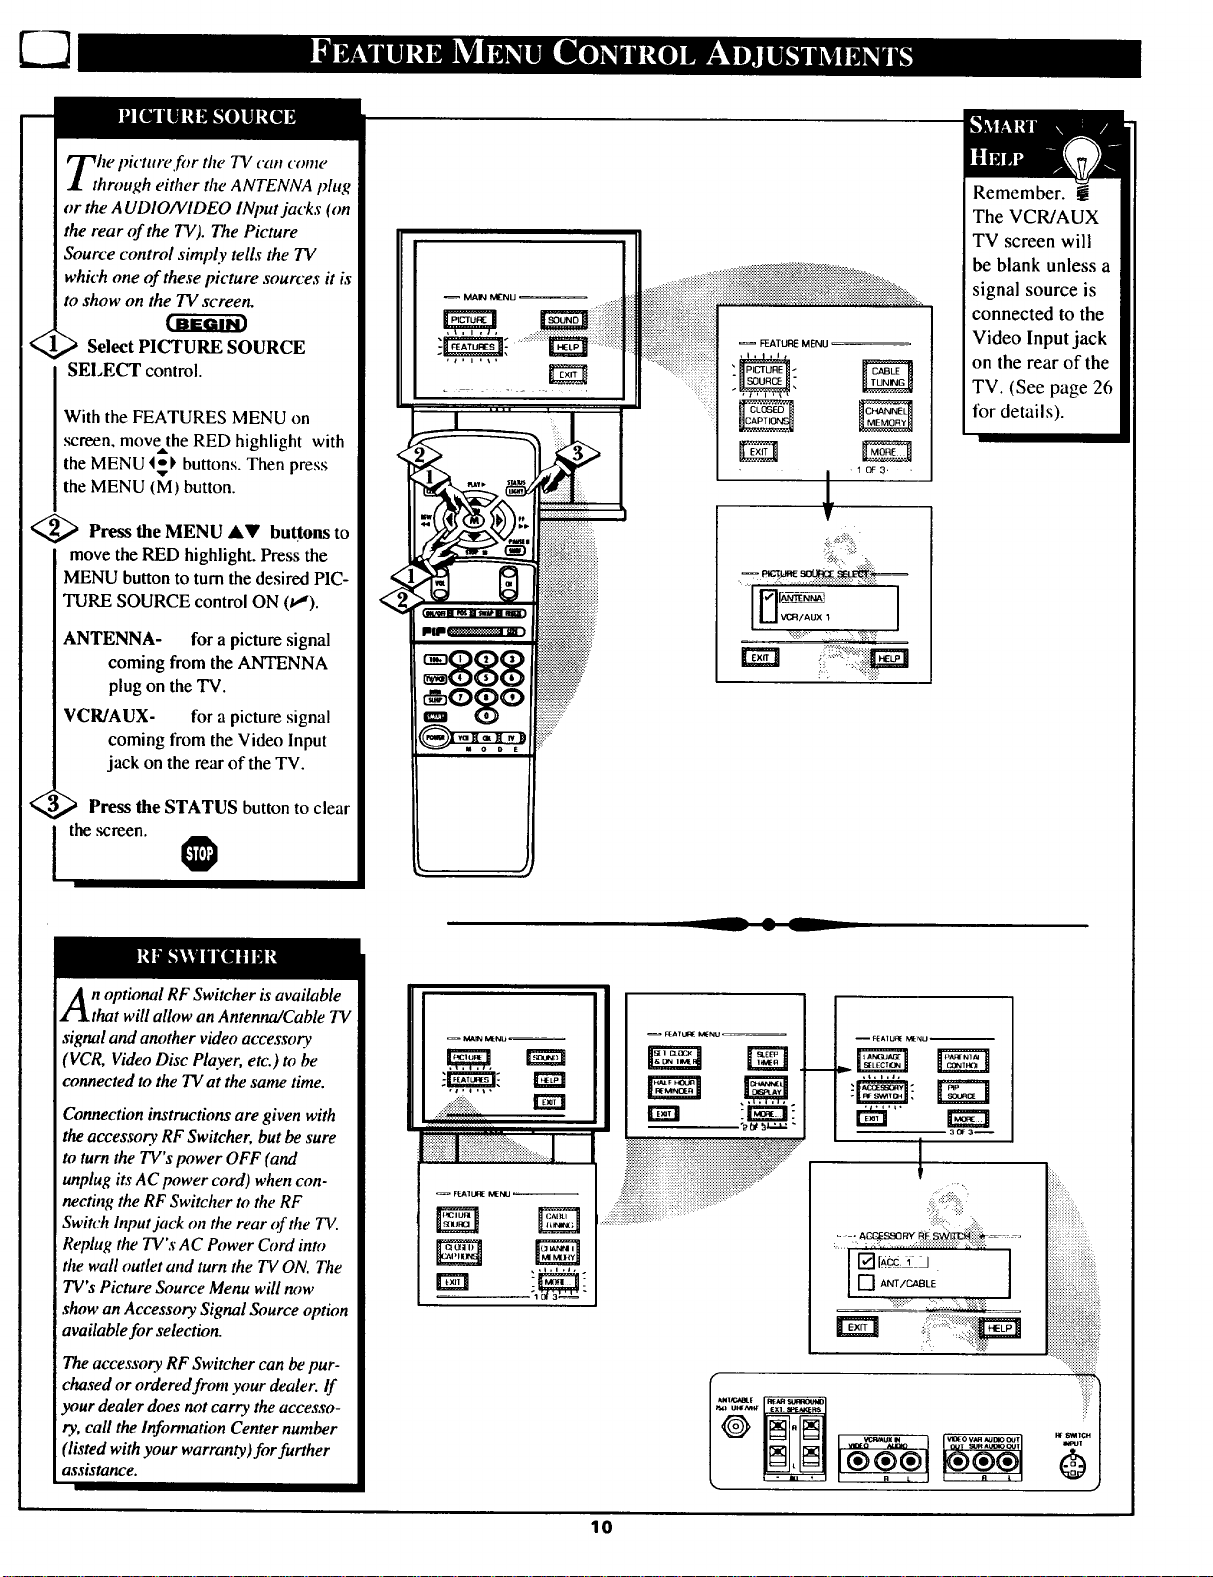
Select PICTURE SOURCE
SELECT control.
With the FEATURES MENU on
screen, move the RED highlight with
the MENU 4_), buttons. Then press
the MENU (M) button.
<_ Press the MENU AV buttons to
move the RED highlight. Press the
MENU button to turn the desired PIC-
TURE SOURCE control ON (t_).
ANTENNA- for a picture signal
coming from the ANTENNA
plug on the TV.
VCR/AUX- for a picture signal
coming from the Video Input
jack on the rear of the TV.
MAIN MENU
FEATURE MENU
Remember.
The VCR/AUX
TV screen will
be blank unless a
signal source is
connected to the
Video Input jack
on the rear of the
TV. (See page 26
for details).
, 10F3,
_.' > Press the STATUS button to clear
the ,screen.
n optional RF Switcher is available
that will allow an Antenna/Cable TV
signal and another video accessory
'VCR, Video Disc Player, etc.) m be
connected to the TV at the same time.
Connection instructions are given with
the accessory RF Switcher, but be sure
to turn the TV's power OFF (and
unplug its AC power cord) when con-
necting the RF Switcher to the RF
Switch Input jack on the rear of the TV.
Replag the TV'sAC Power Cord into
the wall outlet and turn the TV ON. The
TV's Picture Source Menu will now
show an Accessory Signal Source option
available for selection.
The accessory RF Switcher can be pur-
chased or ordered from your dealer. If
your dealer does not carry the accesso-
ry, call the Information Center number
'listed with your warran_. )for further
assistance.
L
-- MA_ MENU
F_A1UI_ MENU
-- F_AIU,q_ h_NU
E:_:_:_:_:_:_:i:i:i:!:!:!:i:_:!:!i_i_!!!_i_:_:!:i:i:i:i:i:i:i:_:_:_:_:_:_:_:_:_:_:_:_:_.,"__i_:i:_i:____
iiiiiiiiiiiiiiii_iii!i_iii_iiii_i_iii!iiiii?iiiiiiiiiiiiiiiiiiiiiiiiiiiiiiiiiiiiiii_iiiii}_i_i_i__:
.:_!!i!i!iiiiiiiiiiiiiiiiiiiiiiiiiiiiiii!ii!iiiiiiiiiiiiiiiiiiiiiiiii::::
:.:::+=.::.:=::
o__ h_=_._ -
i:iiiiiiiiiiiiiiiiiii
iiMUi!!iii!!iii!ii!iiii!iiiiiii
...._:_i_i_i_i_i_i_i_i_i_i_i_i_
=====================
.::::::::::::::
10
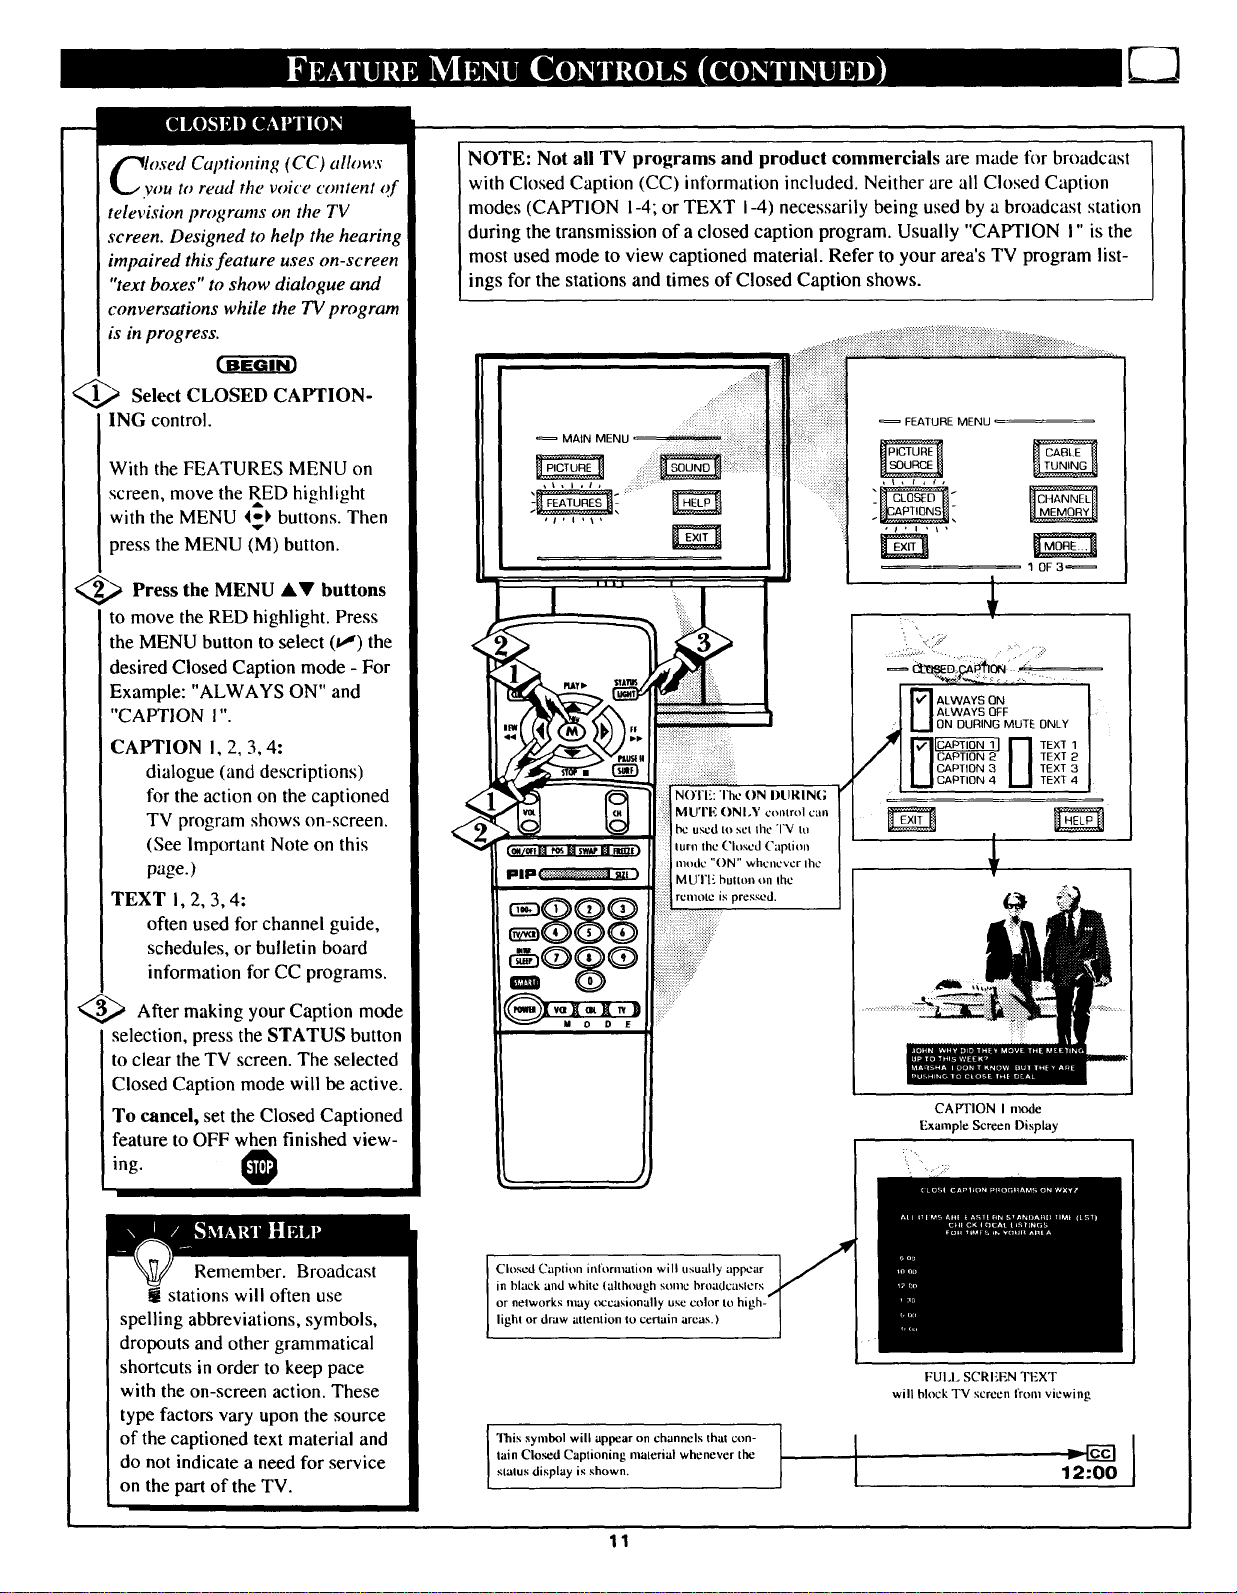
osed Captioning (CC) allows
you to read the voice content of
television programs on the TV
screen. Designed to help the hearing
impaired this feature uses on-screen
"text boxes" to show dialogue and
conversations while the TV program
is in progress.
_,_ Select CLOSED CAPTION-
ING control.
With the FEATURES MENU on
screen, move the RED highlight
with the MENU 4_ buttons. Then
press the MENU (M) button.
,,) Press the MENU AV buttons
to move the RED highlight. Press
the MENU button to select (u,") the
desired Closed Caption mode - For
Example: "ALWAYS ON" and
"CAPTION I"
CAPTION I, 2, 3, 4:
dialogue (and descriptions)
for the action on the captioned
TV program shows on-screen.
(See Important Note on this
page.)
TEXT I, 2, 3, 4:
often used for channel guide,
schedules, or bulletin board
information for CC programs.
_,_ After making your Caption mode
selection, press the STATUS button
to clear the TV screen. The selected
Closed Caption mode will be active.
To cancel, set the Closed Captioned
feature to OFF when finished view-
ing.
NOTE: Not all TV programs and product commercials are made for broadcast
with Closed Caption (CC) information included. Neither are all Closed Caption
modes (CAPTION I-4; or TEXT I-4) necessarily being used by a broadcast station
during the transmission of a closed caption program. Usually "CAPTION I" is the
most used mode to view captioned material. Refer to your area's TV program list-
ings for the stations and times of Closed Caption shows.
MAiN MENU" :!!ilili!!!ii!i!i!i!i!i!!i!!:iii!i!iiiiiiiiiiiiiiiiiil
FEATURE MENU
........!
i !i !!ili iiiii!iiii!iiiiiiiii!iiiiiiii
Illl I
"1_ _ 1 no'n-:'r_ on Dt
I_1 I_1 MUTEOnl,vc,,,,tro,ca,,
! _ _ _ bc used to set thc'l tu
_/_1 _s SWAP ntelZt turn the Closed Caption
llmllll_:!_+++_:.:."m:?__+:_._:!_.:_lml I iiiiiiiiiMUTI- button on It
888 +++
mode "ON" whenc
:::::i:+++:-:i+i+;++++i+;;+
iiiiiiiiiiii!iii!?i!i!ii++"::
:jJjSjJjJ::
0
:. ,:: i..11::
ALWAYS OFF
onouR,nsMute0n_Y
r_l_ !-I text 1
I I cAptiON a I I text
[_] ALWAYS ON [
I IcApTI0n3 I I text3
I I CApTION 4 I I TExt 4
CAFq'ION I mode
Example Screen Display
:....
1 OF 3_
Remember. Broadcast
t stations will often use
spelling abbreviations, symbols,
dropouts and other grammatical
shortcuts in order to keep pace
with the on-screen action. These
type factors vary upon the source
of the captioned text material and
do not indicate a need for service
on the part of the TV.
Closed Captitm inlornmtion will usually appear
in black and white (although some broadcaslers
or networks may t_casionally use color to
light or draw attention to certain areas.)
lain Closed Captioning material whenever the
This symbol will appear on channels that con-
slalus display is shown.
11
FUI.L SCREEN TEXT
will block TV screen from viewing
I
12:00

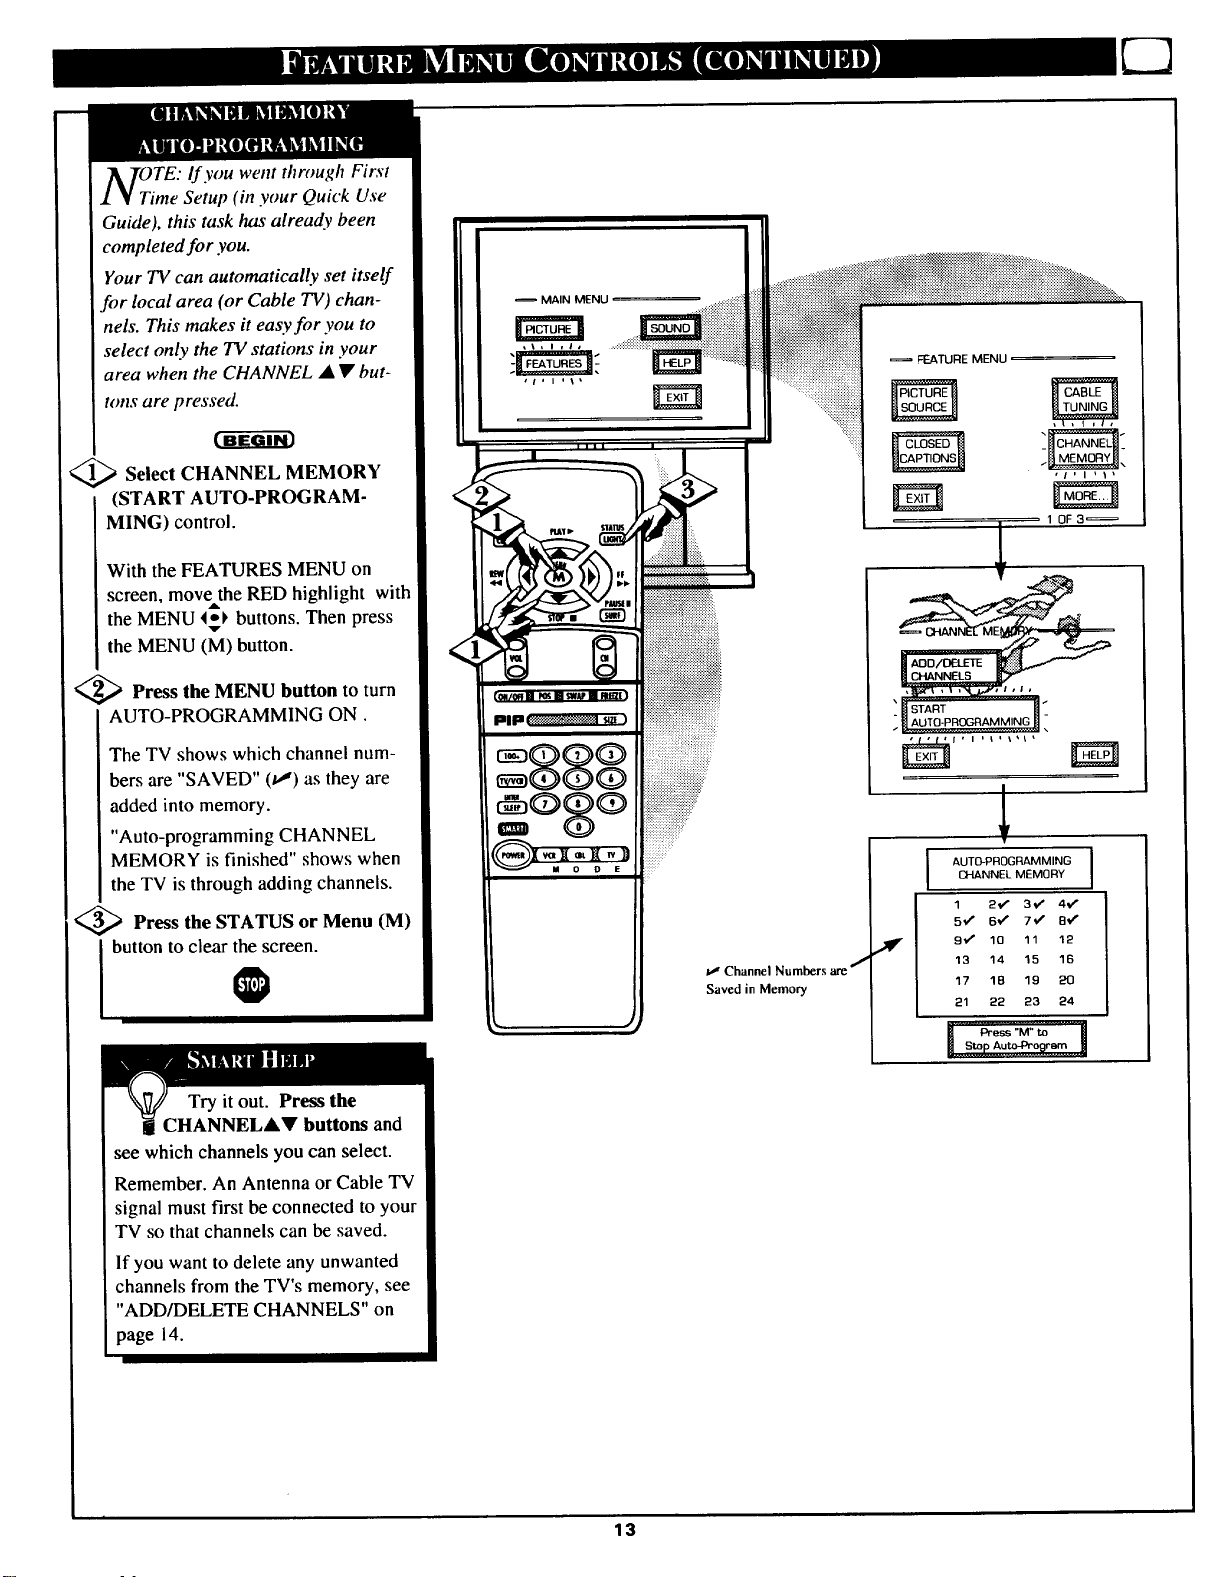
OiTE." If you went through
rst Time Setup (in your
Quick Use Guide), this task has
already been completed for you.
You need to make sure the TV is
set to pick up either Cable TV or
Antenna signals, in other words,
the 77/needs to know if you con-
nected a Cable TV signal or a nor-
mal antenna to its ANTENNA plug.
<_ Select CABLE CHANNEL
TUNING control.
With the FEATURES MENU on
screen, move the RED highlight
with the MENU 4_1_ buttons.
Then press the MENU (M) button.
<_ Press the MENU AV buttons
to move the RED highlight. Press
the MENU button to select (_") the
desired mode - For Example:
CABLE.
MAIN MENU
FEATURE MENU
10F3_
CABLE- If you DO have
Cable TV connected
to the TV. Channels
1-125 are available.
NORMAL- If you have an
Antenna connected
to theTV. Channels
2-69 are available.
<_ Press the STATUS button to
clear the screen.
, o 0 E iiiiii?:
12
OiTE: If you went through First
me Setup (in your Quick Use
Guide), this task has already been
completed for you.
Your TV can automatically set itself
for local area (or Cable TV) chan-
nels. This makes it easy for you to
select only the TV stations in your
area when the CHANNEL • • but-
tons are pressed.
1_ Select CHANNEL MEMORY
(START AUTO-PROGRAM-
MING) control.
With the FEATURES MENU on
screen, movethe RED highlight with
the MENU 4_) buttons. Then press
the MENU (M) button.
_ Press the MENU button to turn
AUTO-PROGRAMMING ON.
The TV shows which channel num-
bers are "SAVED" (t,,') as they are
added into memory.
"Auto-programming CHANNEL
MEMORY is finished" shows when
the TV is through adding channels.
MAIN MENU
FEATURE MENU
_ Press the STATUS or Menu (M)
I button to clear the screen.
@
Try it out. Press the
CHANNEL•• buttons and
see which channels you can select.
Remember. An Antenna orCable TV
signal must first be connected to your
TV so that channels can be saved.
If you want to delete any unwanted
channels from the TV's memory, see
"ADD/DELETE CHANNELS" on
page 14.
13

uto-Programming (see page 13)
adds all the channels it can find
(on your Antenna or Cable TV sys-
tem) into the TV_ memory.
Add/Delete Channels makes it easy
for you to add other channels, or
drop unwanted channels, from the
list of channels in the TV's memory.
MAIN MENU
@;;'Select CHANNEL MEMORY
(ADD/I)ELETE CHANNELS)
control.
With the FEATURES MENU on
screen, move the RED hi!2hlight
with the MENU t_) buttons. Then
press the MENU (M) button.
<_ Press the CHANNEL &V or
nel you want to add or delete.
I umber buttons to ,select the chan-
<_ Press the MENU 1_ button to
ADD the channel into the TV's
memo_.
Press the MENU • button to
DELETE the channel from memory.
Repeat steps 2 and 3 for each chan-
nel you wish to add or delete.
;;,Press the STATUS or MENU
FEATURE MENU
........!_i_!iiiiiiiiiiiiiiiiiiii:iiiiiiiiiiiiiiiiii
10F3_
CHANNEL MEMORY
5_,
I buttontoclear the screen.
Remember. You can also
add the VCR/AUX mode
just like a channel. Then by
pressing the CHANNEL 4,V
buttons the VCR/AUX mode can
quickly be selected to use the
Input jacks on the rear of the TV
(see page 26).
Note: "VCR/AUX" mode is
located between the lowest and
highest channel numbers within
the,ADD/DELETE CHANNEL
control screen.
Channel 19 Added
(_D to D_LE'TECHANNEL
i S_LECI" CHANNEL
(_en FINISHED
14

If you went through
First Time Setup (in your
Quick Use Guide), this task has
already been completed for you.
Your TV comes with an on-screen
clock. During normal operation the
clock appears on the screen with
every channel change (and when
the STATUS button is pressed).
1_ Select SET CLOCK control.
..:_::::_:_:!:...:.
MA,NMENU .....:::::::=:::::i_i_l
,i,i *\_
•:i_::::):::_:_:!:!:_
FEATURE MENU
,\,l,I,
With FEATURES MENU (2 of 3)
on screen, move the RED highlight
with the MENU 4_ buttons. Then
press the MENU (M) button.
<_ Press the remote's number
buttons to set the time clock.
<_ Press the STATUS button to
the screen.
I set the clock in operation and clear
Remember, be sure to
press "0" first and then the
hour number for single digit
entries.
The remote's MENU 4_ buttons
can also be used to set the hours,
minutes and AM/PM portions of
the clock.
PIP
FEATURE MENU,
, Ii I , / _
SET CLOCK & ON TIMER
_S_TON_M_R_
rm
20F 3_
PLEASE ENTER THE
CURRENT HOUR
TV Clock settings may be lost
when the TV is unplugged (or AC
power to the set is interrupted.)
You can also set the TV Clock
automatically if you follow the First
Time Set-up procedure for the
Smart Clock feature.
15
 Loading...