

Page 1
!iiiiii#iiiiii!
Projection Television
Owner's Manual
::_iiiiiiiiiiiiiiiiiiii
:iiiiiiiiiiiiiiiiiiiiii_
::::::::::::::::_:::::::_:
Page 2
Once your MAGNAVOX purchase is registered, you're eligible to receive alt*the privileges of owning a MAGNAVOX
product. So complete and ,return the Warranty Registration Card enclosed with your pun:hose at once. And take
advantage of these important benefits.
. ¥var'r'an
Verification
10 days confirms your rightto
maximum protection under the
terms and conditions of your
MAGNAVOX warranty.
Confirmation
Your completed Warranty
Registration Card serves as
verification of ownership in the
event of product theft or loss.
MOdel j *
Registration
Returning your Warranty Registration
Card righl: away guarantee:; you'll
receive all the information and special
offers which you qualify for'as the
owner of your model.
Congratulations on your purchase, and _[_k_VOX
welcome to the "family!"
[3,ear MAGNAVOX product owner: _mart. _ry smart. ®
Thank you for your confidence in MAGNAVOX. You've selected one of the best-built, best-backed products
available today. And we'll do everything in our power to keep you happy with your purchase for many years to come.
As a member of the MAGNAVOX "family," you're entitled to protection by one of the most comprehensive warranties and outstanding
service networks in the industry.
VVhat's more, your purchase guarantees you'll receive all the information and special offers for which you ,qua if),, plus easy access to
accessories from our convenient home shopping network.
And most importantly you (:an count on our uncompromising commitment to your total satisfaction.
All of this is our way of saying welcome-and thanks for investing in a MAGNAVOX product.
Sincerely,
__._.._..._ P.S. Remember, to get the most from your
_ "---_ --_ MAGNAVOX product, you must return your
Robert Minkhorst Warranty Registratiion Card within I0 days.
President and Chief Executive Officer So please mail it to us right now!
For Customer Use
Enter below the Serial No. which is located on the rear of the cabinet. Retain this information for future reference.
Model No. Serial No.
Know these
safetysymbols
_, This "bolt of lightning" indicates uninsulated material within 'tour unit may cause an electrical shock•
For the safety of everyone in your household, please do not removc product covering.
,_The "exclamation point" calls attention to features for which you should read the enclosed literature
closely to prevent operating and maintenance problems.
WARNING: TO PREVENT FIRE OR SHOCK HAZARD, DO 1'40-I" EXPOSE THIS EQUIPMENT TO RAIN
OR MOISTURE.
CAUTION: To prevent electric shock, match wide blade of plug to wide slot, and fully insert.
ATTENTION: Pour _viter les chocs _lect:riques, introduire la lame la plus large de la fiche clans la borne
correspondante de la prise et pousser jusqu'au fond,
Page 3

SAFETYINSTRUCTIONS- Read before operatingequipment
This product was designed and manufactured to meet strict quality and
safety standards. There are, however, some installation and operation
precautions which you should be particularlyaware of.
1. Read Instructions - All thesafety and operating instructions should
be read beforethe appliance is operated.
2. Retain Instructions - The safety and operating instructions should
be retainedfor future reference.
3. Heed Warnings_-All warnings on theappliance._andin the operating
instructions should be adheredto.
4. ]'ollow Instructions - All operating and use instructions should be
followed.
5. Water and Moisture - The applianceshould not be used near water
•. for example, near a bathtub, washbowl, kitchen sink, laundry tub,
in a wet basementor near a swimming pool,etc.
6. Cads and Stands - The applianceshould be usedonly with acart or
standthat is recommended by the manufacturer.
6A. ,_ An appliance and cart combination should be moved
with care. Quick stops, excessive force, and uneven
surfaces may cause the appliance and cart combination
to overturn.
7. Wall or Ceiling Mounting - The appliance should be mounted to a
wall or ceiling only as recommendedbythe manufacturer.
8. Ventilation - The appliance should besituated so that its location or
];ositiondoes not interfere with its proper ventilation. For example,
the appliance should not be situated on a bed, sofa, rug, or similar
surface that may block the ventilation openings; or, placed in a
built-in installation, such as a bookcaseor cabinet that may impede
the flow of air through the w,_ntilationopenings.
9. Heat - The appliance should be situated away from hear sources
such as radiators, heat registers, stoves, or other appliances
_',includingamplifiers) that produceheat.
10. Power Sources - The appliance should be connected to a power
supply only of the type described in the operating instructions or as
markedon the appliance.
11. Power-Cord Protection - Power supply cords should be routed so
that they are not likely to be walked on or pinched by items placed
upon or against them, paying particular attention to cords and
I_lugs,convenience recepta('les, and the point where they exit from
1:heappliance.
12. Cleaning- The appliance should be cleaned only as recommended
bythe manufacturer.
13. Power Lines - An outdoor antenna should be located away from
power lines.
14. OutdoorAntennaGrounding- Ifan outside antennais connectedto
the receiver, be sure the antenna scstem is grounded so as to
provide some protection against voltage surges and built up static
charges.
Section 810 of the National Electric Code, ANSI/NFPANo.70-1984,
provides information with respect to proper grounding of the mats
and supporting structure grounding of the lead-in wire to an
antenna discharge unit, size of grounding connectors, location of
antenna-discharge unit, connection to grounding electrodes and
requirementsfor thegrounding electrode.See Fig. below.
15. Non-use Periods - The power cord of the appliance should be
unplugged from the outlet when left unused for a long period of
time.
16. Object and Liquid Entry - Care should betaken so that objects do
not fall and liquids are not spilled into the en('losure through
openings.
17. Damage Requiring Service - The applianceshould be serviced by
qualified service personnel when:
A. The power supply cord or the plug has been damaGled;or
B. Objects have fallen, or licluid has been spilled into the
appliance;or
C. Theappliance hasbeenexposed:o rain; or
D. Theappliance does not appearto operate normally or exhibits
amarked rhange in performance; or
E. The appliance hasbeendropped, or the enclosure damaged.
18. Servicing - The user should not attempt to service the appliance
beyond that described in the operating instruc:tions. All other
servicing should be referred to qualified servicepersonnel.
Note to the CATVsysteminstaller: This reminder is provided to call the
CATV system installer's attention :o Article 820-40 of the NEC that
provides guidelines for propergrounding and,in particular, specifies that
the cable ground shall be connected to 1hegrounding system of the
building, as close to the point of cable entr_ as practical.
EXAMPLE OF ANTENNA GROUNDING AS PER NATIONAL ELECTRICAl.CODE (NEC)
Example ofAntenna Grounding
as per NEC- National Electric Code
ANTENNA LEAD IN WIRE
ANTENNADISCHARGEUNIT(_qECSECTIONS10-20)
GROUNDINGCONDUCTORS(.EcSI_CTZONs_o-21)
GROUND CLAMPS
]
_--__ POWERSERVICEGROUNDINGELECTRODESY3TEM(NECAm250,PABrH)
ELECTRICSERVICEEQUIPMENT
3
MAC3964
Page 4
_)_ Getting Started
Welcome/Product Registration ................... 2
Safety/Precautions ...................................................... 3
Table of Contents ........................................................ 4
Features, Model and Cabinet hfformation ................. 5
_-_. On-Screen Features
PICTURE MENU
+Adjusting Color, Brightness, Sharpness,
Tint, and Picture Controls .................................... 6
+Using theClearview Control............................... 7
+Adjusting the TV's Convergence Control ........... 8
+Using the Flesh Correction Control .................... 9
+Ghost Cancellation Feature Information ............. 9
FEATURES MENU
+Selecting a Picture Source!RF Switch .............. 10
+Setting the TV for Closed Captioning ............... 11
+Setting the TV for Cable or Antenna Signals .... 12
+Adding Channels in Memory (Automatically). 13
+Adding Channels in Memory (Manually) ......... 14
+Setting the TV Clock ......................................... 15
+Turn-On Timer .................................................. 16
+Using the Sleep Timer Control ......................... 17
+Adjusting the Channel Display Control ............ 18
+Using the Time/Channel Reminder Control ...... 19
+U:dng Parental Control to Censor Channels 20-21
+Using the Channel Label Control ...................... 22
+Using the Language Selection Control .............. 23
SOUND MENU
+Adjusting Bass, Treble, and Balance Sound
Controls ............................................................. 24
+Setting the Bass Boost Control ........................ 24
+Setting the TV for Stereo and SAP Programs ..25
+Using the Sound Image Control ........................ 26
+Using the Volume Display Control ................... 26
+Using the TV Speaker On/Off Control with
the Audio Output jacks ..................................... 27
+Surround Sound Speaker Connections and
Variable Audio Output Control ................... 28-29
+Using the TV's Audio/Video Input and
Oatput Jacks ............................................... 30-33
Remote !_ontrol Operation
Using the Remote Locator Feature........ 34-35
,Setting the Smarl:Pi :ture Control.......... 36-37
Using Smart Sound Control ..................................... 38
Using the Sm_n-tSurf Control .................................. 39
Setting the Remote to Work VCRs ..................... 40-41
Setting the Remote to Work
Cable TV Converters ........................................... 42-43
Setting the Remote to Work VCRs or Cable
Converters - "Search Me_:hod"................................. 44
Using the Remote's VCR buttons ............................ 45
_--_ Picture-In-Picture (PIP)
How to Use PIP (Connections) .............. 46-47
How to Use PIP with the TV Remote ................. 48-49
Selecting the Picture Source for PIP........................ 50
Adjusting Picture-in-Picture Color and Tint ............ 51
More PIP Connections ((.'able Converter) ............... 52
M General Information
TV Help Menu ........................................... 53
Enhanced Screen Cleaning ....................................... 53
Tips if Something Isn't Working ............................. 54
Glossary of TV Terms ............................................. 55
Index ......................................................................... 56
Factory Service Locations ................................... 57-58
Warranty ................................................................... 59
Accessories ............................................................... 60
Use the simple Set-Up Guide (supplied with
your TV information packet) for details on:
• Antenna Hook-ups
• First Time Set-Up
(Automatic Settings)
• Basic TV and Remote
Control Operatior_L
• On-Screen Menu Use
Copyright © 1996 Philips Consumer Electroaics Company. All rights reserved.
4
Page 5
Fiirst Time Set Up - automatically sets the TV for
local channels and the correct picture signal-(antenna
or cable). It even helps you make the necessary
connections for the Picture-In-Picture (PIP) feature.
Infrared Remote Control - operates your TV set and
a variety of wireless remote control VCRs and Cable
TV Converters. A special "'Locator"feature can also
help you find the-remote when it has been s_.mkout of
sight or misplaced.
Sltandard TV broadcast (VHF/UHF) or Cable TV
(CATV) channel capability.
Closed Captioning - allows the viewer to read TV
program dialogue or voice conversations as on-screen
text.
Automatic Programming of channels - for quick and
easy selection of favorite stations available in your
area.
Picture-In-Picture (PIP) - can show a TV program
and the direct video output from an accessory (VCR,
etc.) onto the TV screen at the same time.
Parental Control for "Censoring" - this feature can
block out channels to keep children from watching
uadesirable programming.
Stereo-Ready TV - with a built-in audio amplifier and
a twin speaker system, reception of TV programs in
both broadcast stereo sound or (SAP) bilingual
b:roadcast are available.
On-Screen Features - display helpful information for
the setting of TV controls (such as help messages,
operating tips and glossary).
Audio/Video Jacks - for direct connections with
VCRs (and other accessoriies) for quality TV picture
a_ad sound playback.
Surround Sound - this TV set contains external;
aadio speaker connections for a more dynamic sound
e fleet.
Sleep-Timer - automatically turns the TV OFF at
preset time intervals.
Smart Button - for the control of TV Sound and the
Picture levels. Use the Smart Button on the remote to
quickly adjust Smart Sound (to set TV Volume levels
during program changes or commercial breaks); Smart
Picture (for programmed video video level
adjustments on a variety of program sources); and
Smart Surf (for quick one button channel selection of
up to 10 of your favorite channels).
As you unpack your TV please note that the
following items have been included with your set:
• Owner's Manual
Safety Tip hfformation
Factory Service Center Locations
• Warranty Registration Card
• Remote Control Transmitter
• Batteries for Remote Control Use
Please take a few rninates to complete your
registration card. The serial number for the TV is
on the back of the set.
Refer to the back of this manual for instructions
on the cleaning and c_Lreof the TV.
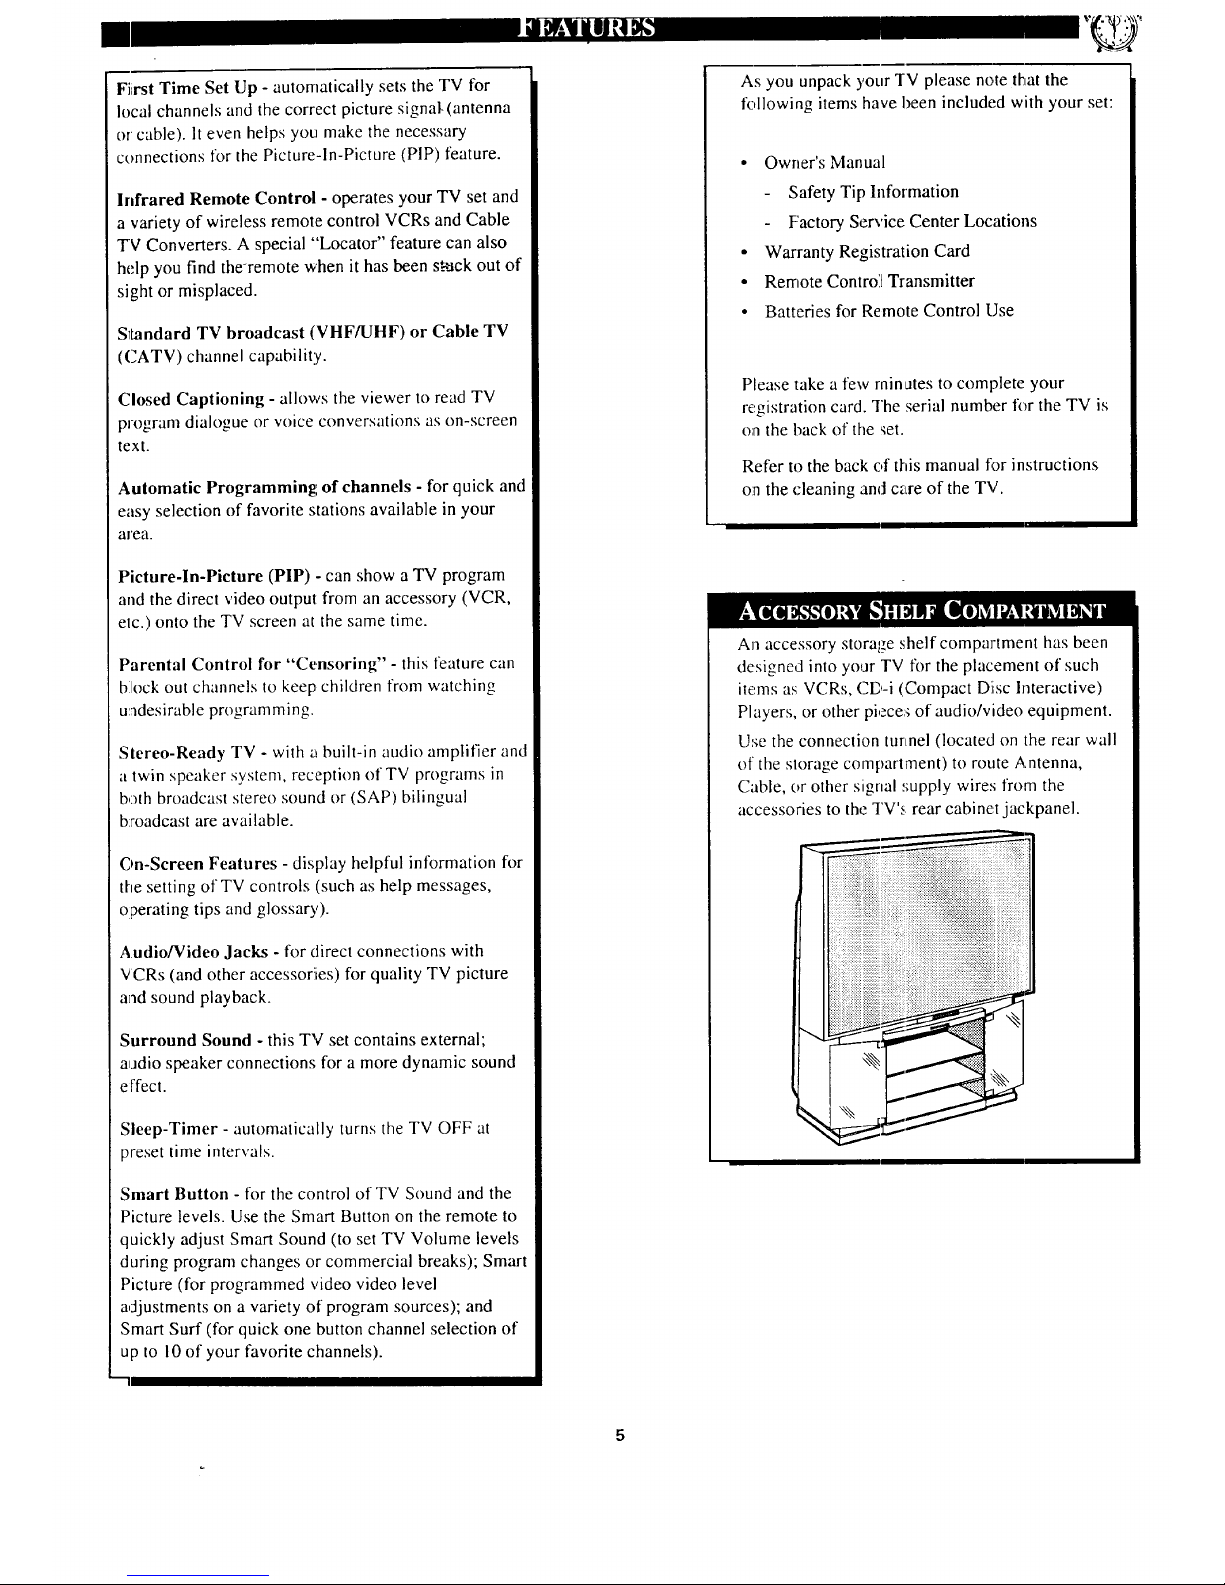
An accessory storage shelf compartment has been
designed into yoLJr TV for the placement of such
items as VCRs, CD-i (Compact Diisc Interactive)
Players, or other piece:; of audio/video equipment.
1.h.;ethe connection tunnel (located on the rear wall
of the storage compartment) to route Antenna,
Cable, or other signal _;upply wires from the
accessories to the q'V's rear cabinet jackpanel.
Page 6
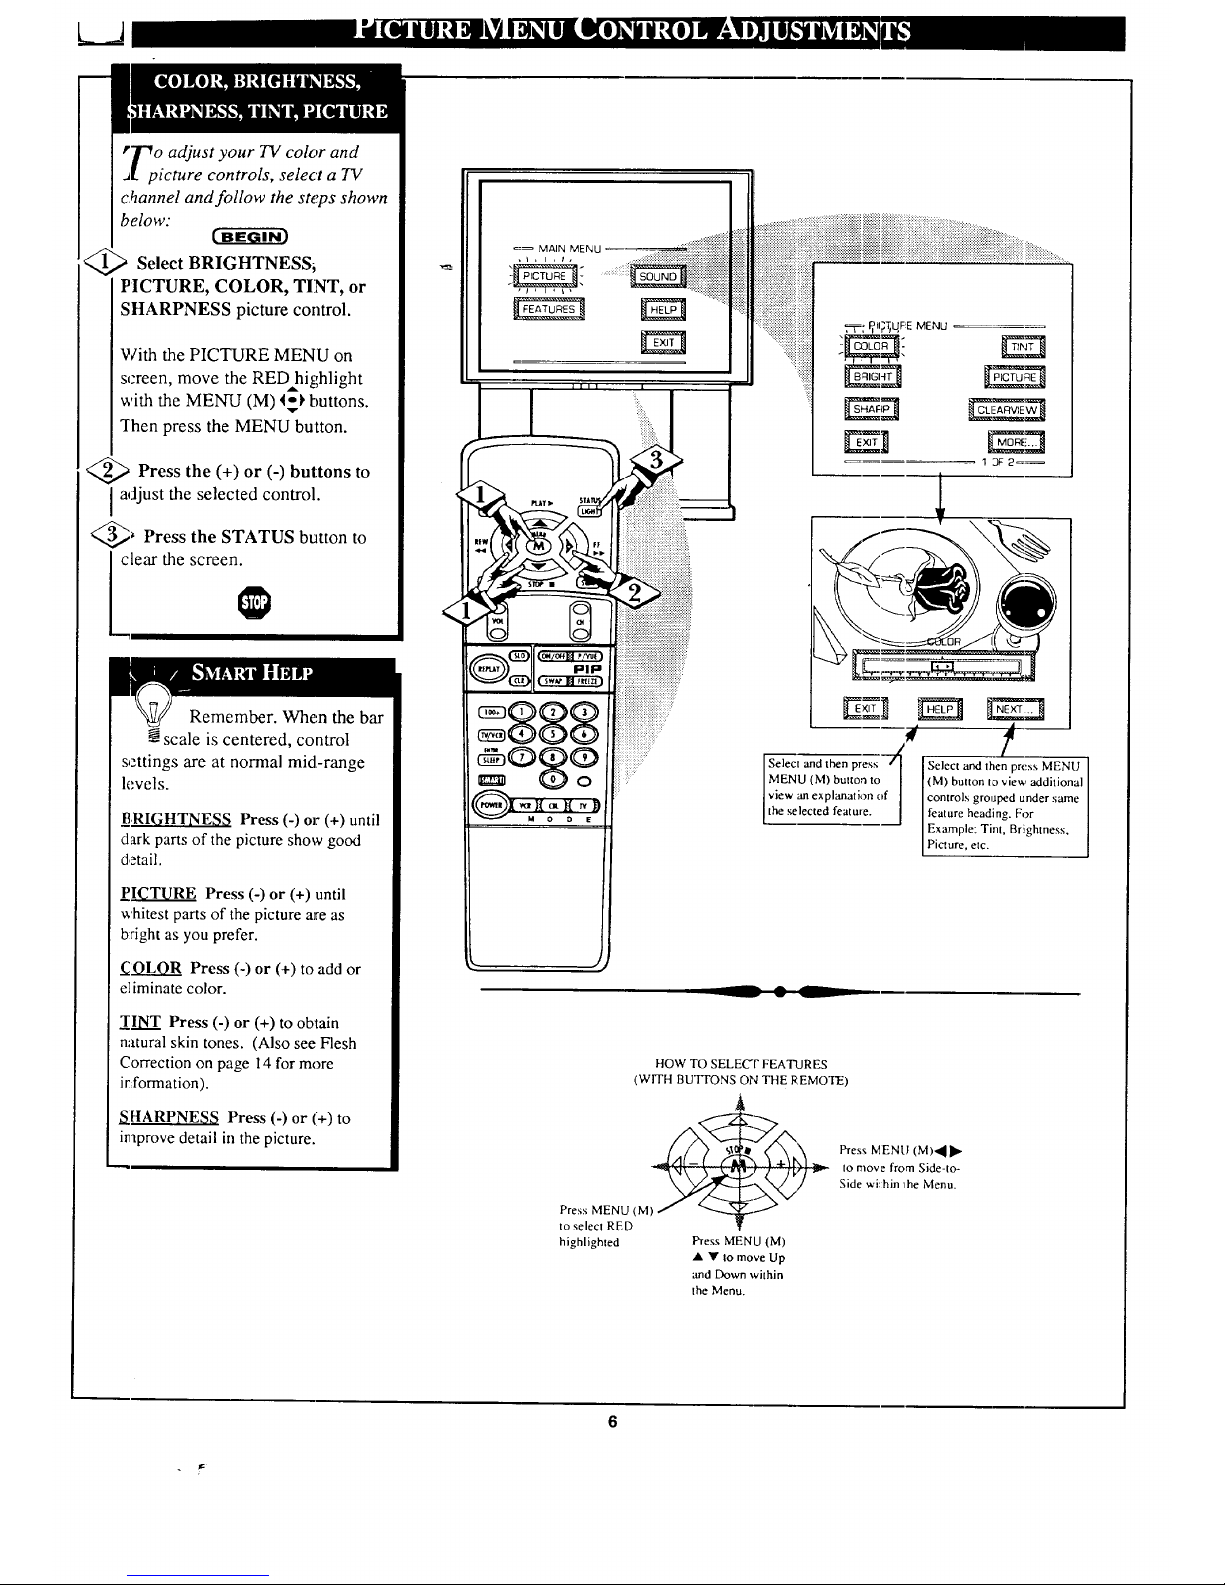
rTVoadjust your TV color and
_t picture controls, select a TV
channel and follow the steps shown
below:
Select BRIGHTNESS_
PICTURE, COLOR, TINT, or
SHARPNESS picture control.
With the PICTURE MENU on
screen, move the RED hiR,hlight
with the MENU (M) 4_ buttons.
q-hen press the MENU button.
<_ Press the (+) or (-) buttons to
i adjust the selected control.
_ Press the STATUS button to
clear the screen.
Remember. When the bar
scale is centered, control
settings are at normal mid-range
levels.
E,RIGHTNESS Press (-) or (+) until
dark parts of the picture show good
detail.
PICTURE Press (-) or (+) until
whitest parts of the picture are as
bright as you prefer.
COLOR Press (-) or (+) to add or
e]iminate color.
TINT Press (-) or (+) to obtain
natural skin tones. (Also see Flesh
Correction on page 14 for more
ir formation).
_HARPNESS Press (-) or (+) to
improve detail in the picture.
=_ MAIN MENU _ ""]]!]_]_:!]_]i]_::!::_]_::_]!]!]
' !
Iview an explanation of] [controls grouped under same
the selected featme, feature headino For
[ l o
Example: Tint, Br!ighmess,
Picture, etc.
-- • _--
HOW TO SELECT FEATURES
(WITH BUTI'ONS 0I'4 THE REMOTE)
Press MENU (M)._ I_
to move from Side-to-
Side wi:hin _he Menu.
Press MENU (MI
to select RED
highlighted Press MENU (M)
• •tomoveUp
and Down within
the Menu,
Page 7

LA
learview is a sharpness feature
which smoothes out
background snow (or picture noise)
without losing picture image detail
or crispness.
.
_ Select CLEARVIEW
control.
With the PICTURE MENU on
screen, move the RED highlight
with the MENU (M)_1, buttons.
Then press the MENU button.
> Press the MENU AY buttons
to move the RED highlight. Press
the MENU button to select (m') the
ENHANCED mode.
_ Press the STATUS button to
clear the screen.
<
MAIN MENU _ :::!:!:!!_iiiiiiiiiiiiiiiiiilTi
_ NN
............................
888
::: :::
°87
10F2_
Page 8
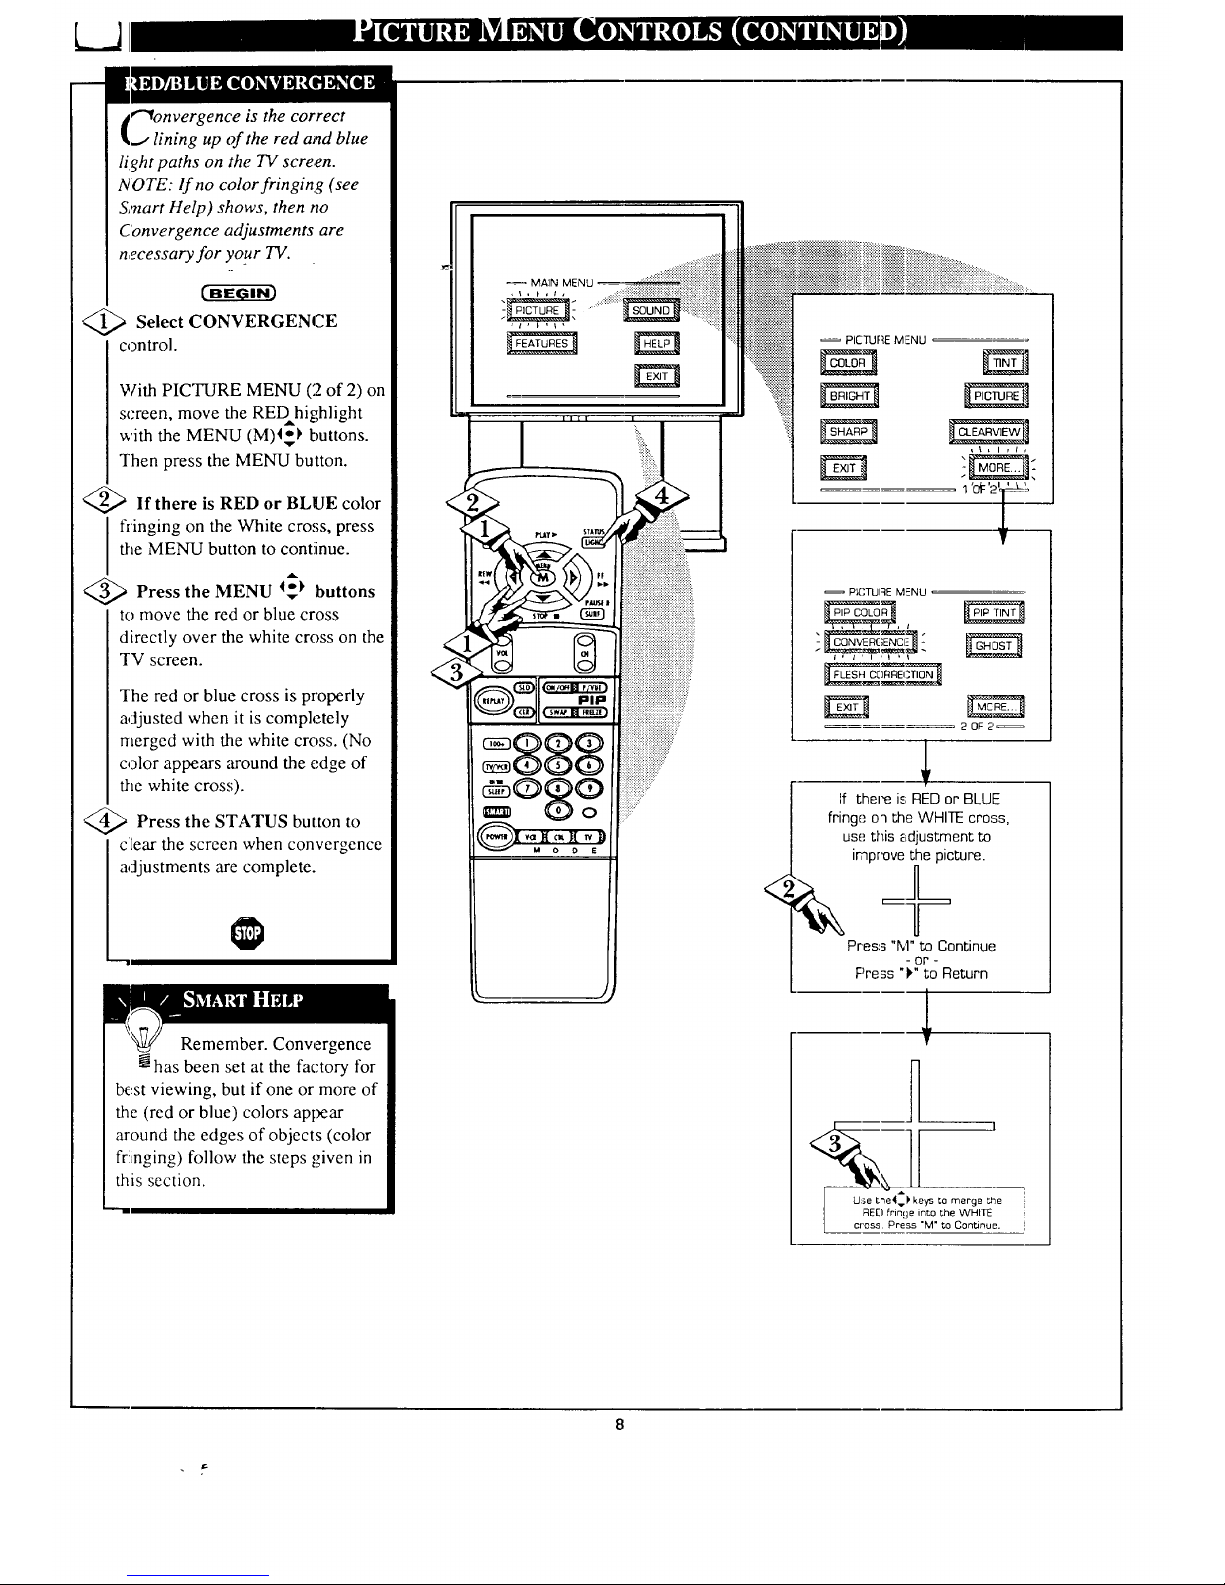
€"_onvergence is the correct
_,, lining up of the red and blue
light paths on the TV screen.
NOTE: lf no color fringing (see
Smart Help) shows, then no
Convergence adjustments are
necessary for your TV.
<_ Select CONVERGENCE
control.
With PICTURE MENU (2 of 2) on
screen, move the REDhighlight
with the MENU (M)4_ buttons.
Then press the MENU button.
<_If there is RED or BLUE color
flinging on the White cro,;s, press
the MENU button to contiinue.
<_ Press the MENU 4_ buttons
to move the red or blue cross
directly over the white cross on the
"IV screen.
The red or blue cross is properly
adjusted when it is completely
merged with the white cross. (No
color appears around the edge of
the white cross).
<_> Press the STATUS button to
ctear the screen when convergence
djustments are complete.
Remember. Convergence
has been set at the factory for
l_:st viewing, but if one or more of
the (red or blue) colors appear
around the edges of objects (color
fringing) follow the steps given in
this section.
MAIN MENU
• J
<
PICTURE MENU
'o_'2_="
PICTUlqE MENU
2 OF 2
If there is:RED or BLUE
fringe o_ the WHITE cross,
use this _djustment to
improve the picture.
Press "M" to Continue
- or -
Pre3s "k" to Return
1
T
Page 9
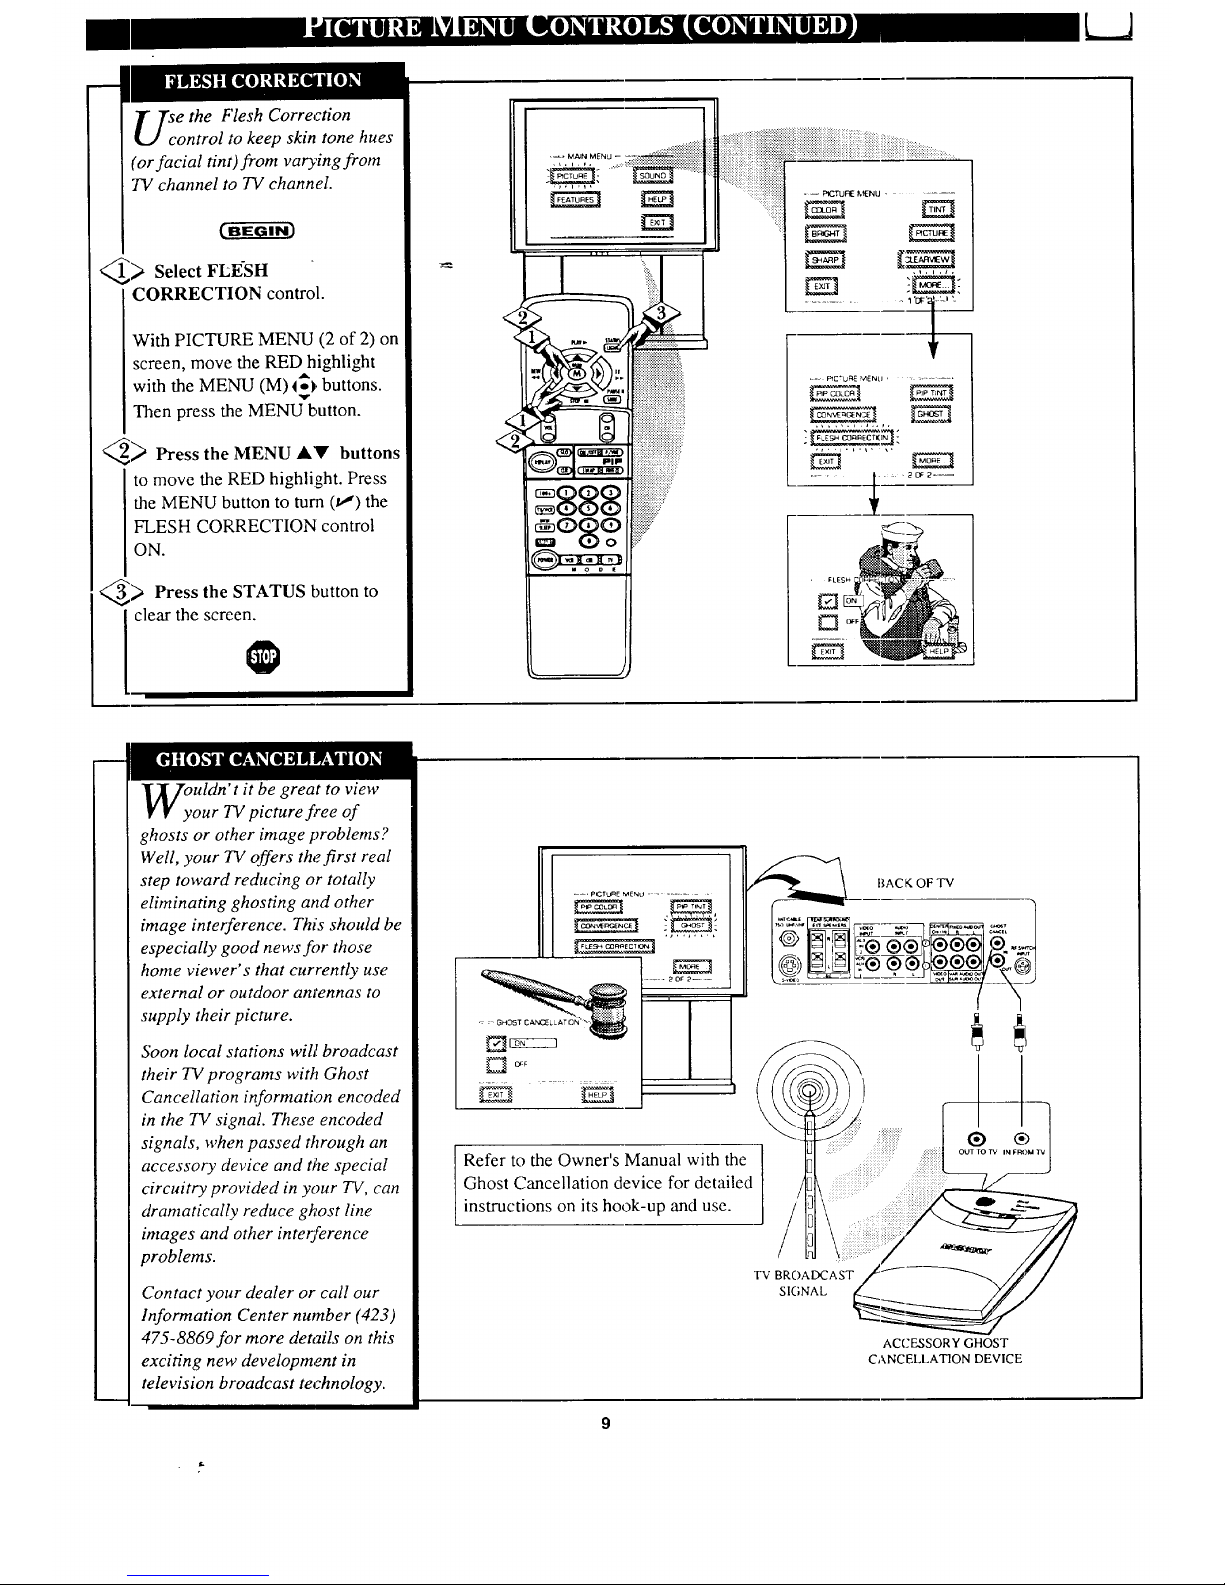
e the Flesh Correction
ontrol to keep skin tone hues
(or facial tint)from varying from
TV channel to TV channel.
_> Select FLESH
CORRECTION control.
With PICTURE MENU (2 of 2) on
screen, move the RED highlight
with the MENU (M) _ _buttons.
Then press the MENU button.
_ Press the MENU &V buttons
to move the RED highlight. Press
the MENU button to turn (t,,")the
FLESH CORRECTION control
ON.
_> Press the STATUS button to
clear the screen.
......:+;
. ...............,.,
, = _CTURE F.AENll .........
uldn' t it be great to view
our TV picture free of
ghosts or other image problems ?
Well, your TV offers the.first real
step toward reducing or totally
eliminating ghosting and other
image interference. This should be
especially good news figr those
home viewer's that currently use
external or outdoor antennas to
supply their picture.
Soon local stations will broadcast
their TV programs with Ghost
Cancellation information encoded
in the TV signal. These encoded
signals, when passed through an
accessory device and #'_e special
circuitry provided in your TV, can
dramatically reduce ghost line
images and other interference
problems.
Contact your dealer or call our
Information Center number (423)
475-8869for more details on this
exciting new development in
television broadcast technology.
:::::::::::::_::
:_ GHOST CA.NCEL LATI{]F_"_-.": :::::::::":
ACCESSORY GHOST
CANCELLATION DEVICE
Page 10
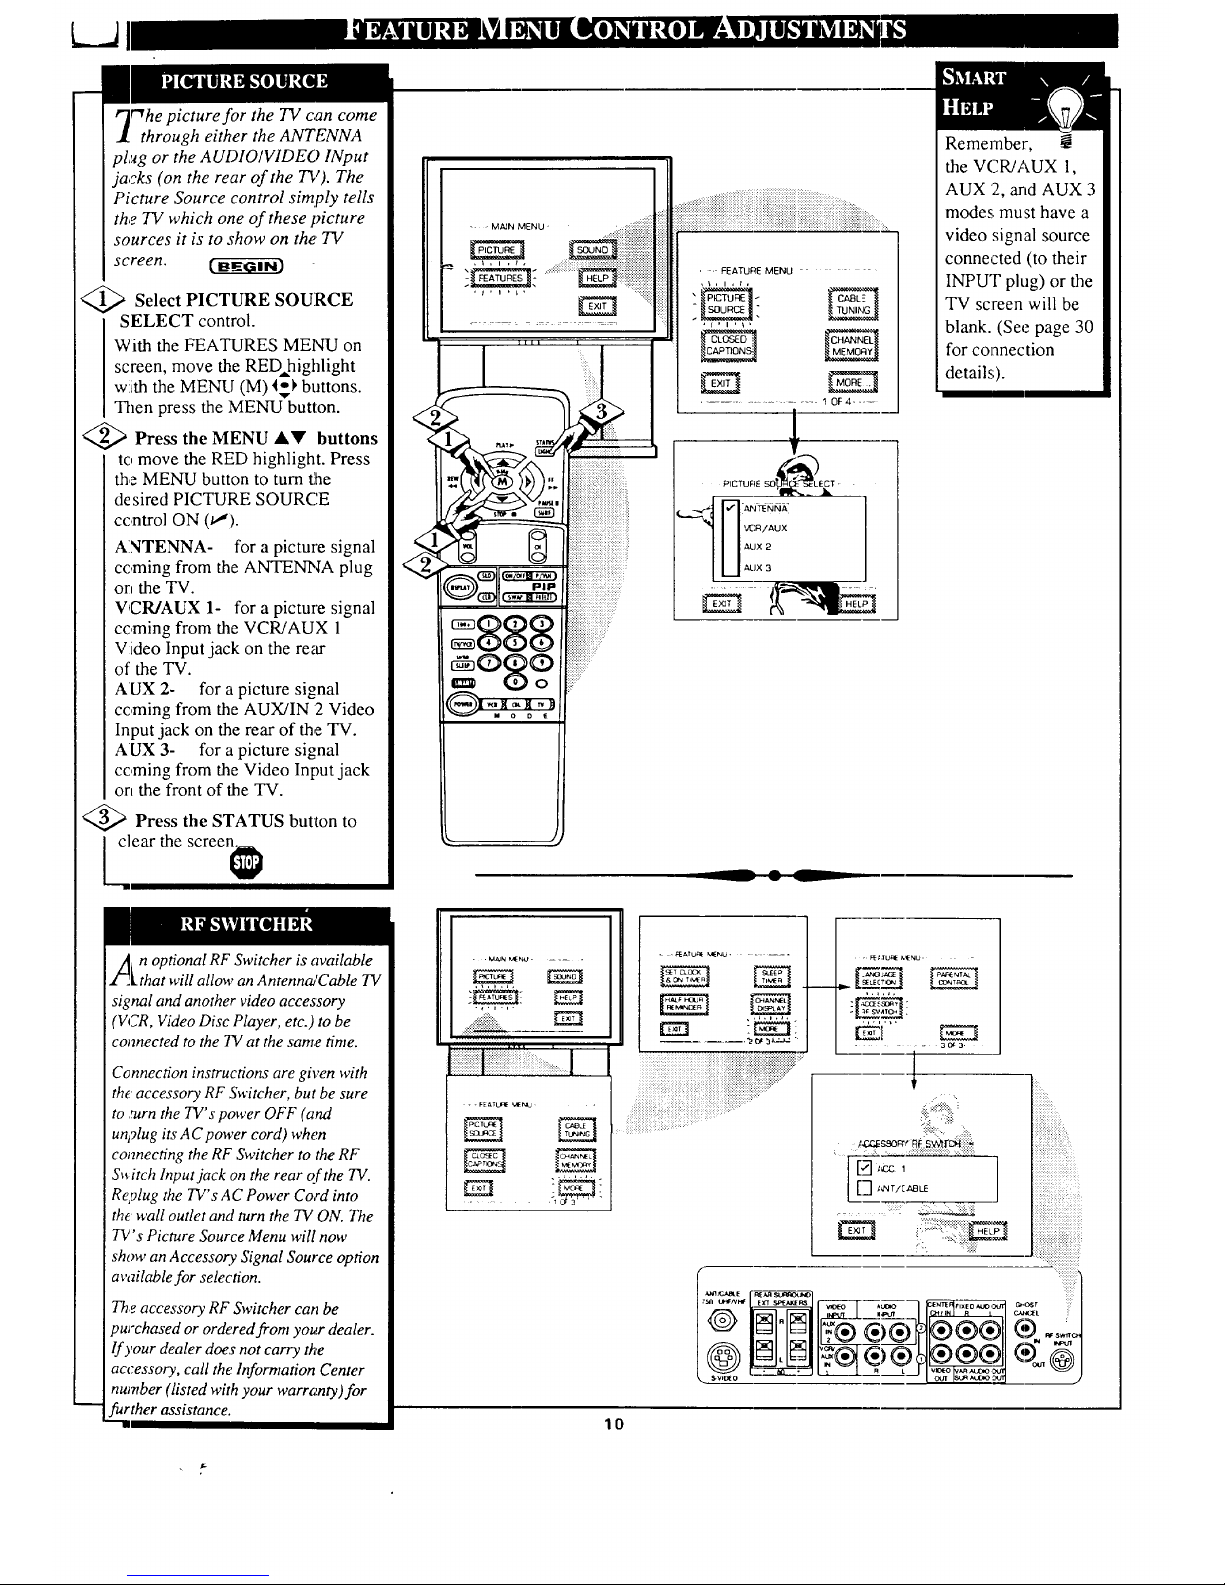
rWhepicture for the TV can come
through either the ANTENNA
plug or the AUDIO/VIDEO INput
jacks (on the rear of the TV). The
Picture Source control simply tells
th,o TV which one of these picture
sources it is to show on the TV
screen.
Select PICTURE SOURCE
SELECT control.
With the FEATURES MENU on
screen, move the REDAhighlight
with the MENU (M) I_ buttons.
Then press the MENU button.
>Press the MENU llkV buttons
to move the RED highlight. Press
the MENU button to turn the
desired PICTURE SOURCE
control ON (t!).
ANTENNA- for a picture signal
coming from the ANTENNA plug
on the TV.
VCR/AUX 1- for a picture signal
coming from the VCR/AUX 1
Video Input jack on the re,u"
of the TV.
AUX 2- for a picture signal
coming from the AUX/IN 2 Video
Input jack on the rear of the TV.
AUX 3- for a picture signal
coming from the Video Input jack
on the front of the TV.
:'Press the STATUS button to
lear the screen
<
, , M_N MENU '
........:.::::::i:i:i:iiiiii::ii ii!ii:i:iii:i:ii:iiii:i:i:!i:i:..........
, FEATUF_ MENU
.......... 10F4 ....
__ • L
Remember,
the VCR/AUX 1,
AUX :2,and AUX 3
modes must have a
video signal source
connected (to their
INPUT plug) or the
TV screen will be
blank. (See page 30
for connection
details;).
2_) n optional RF Switcher is available
[that will allow an Antenna!Cable TV
signal and another video accessory
(VCR, Video Disc Player, etc.) to be
connected to the TV at the same time.
Connection instructions are given with
theaccessory RF Switcher, but be sure
to :urn the TV's power OFF (and
un?lug its A C power cord) when
connecting the RF Switcher to the RF
S_itch Input jack on the rear Qfthe TV.
Replug the TV's A C Power Cord into
the wall outlet and turn the TV ON. The
TV's Picture Source Menu wiU now
show an Accessory Signal Source option
available for selection.
Theaccessory RF Switcher can be
purchased or ordered from your dealer.
If your dealer does not carry the
accessory, call the Information Center
number (listed with your warranty)for
further assistance.
" iiiii'i
O) ....
10
Page 11
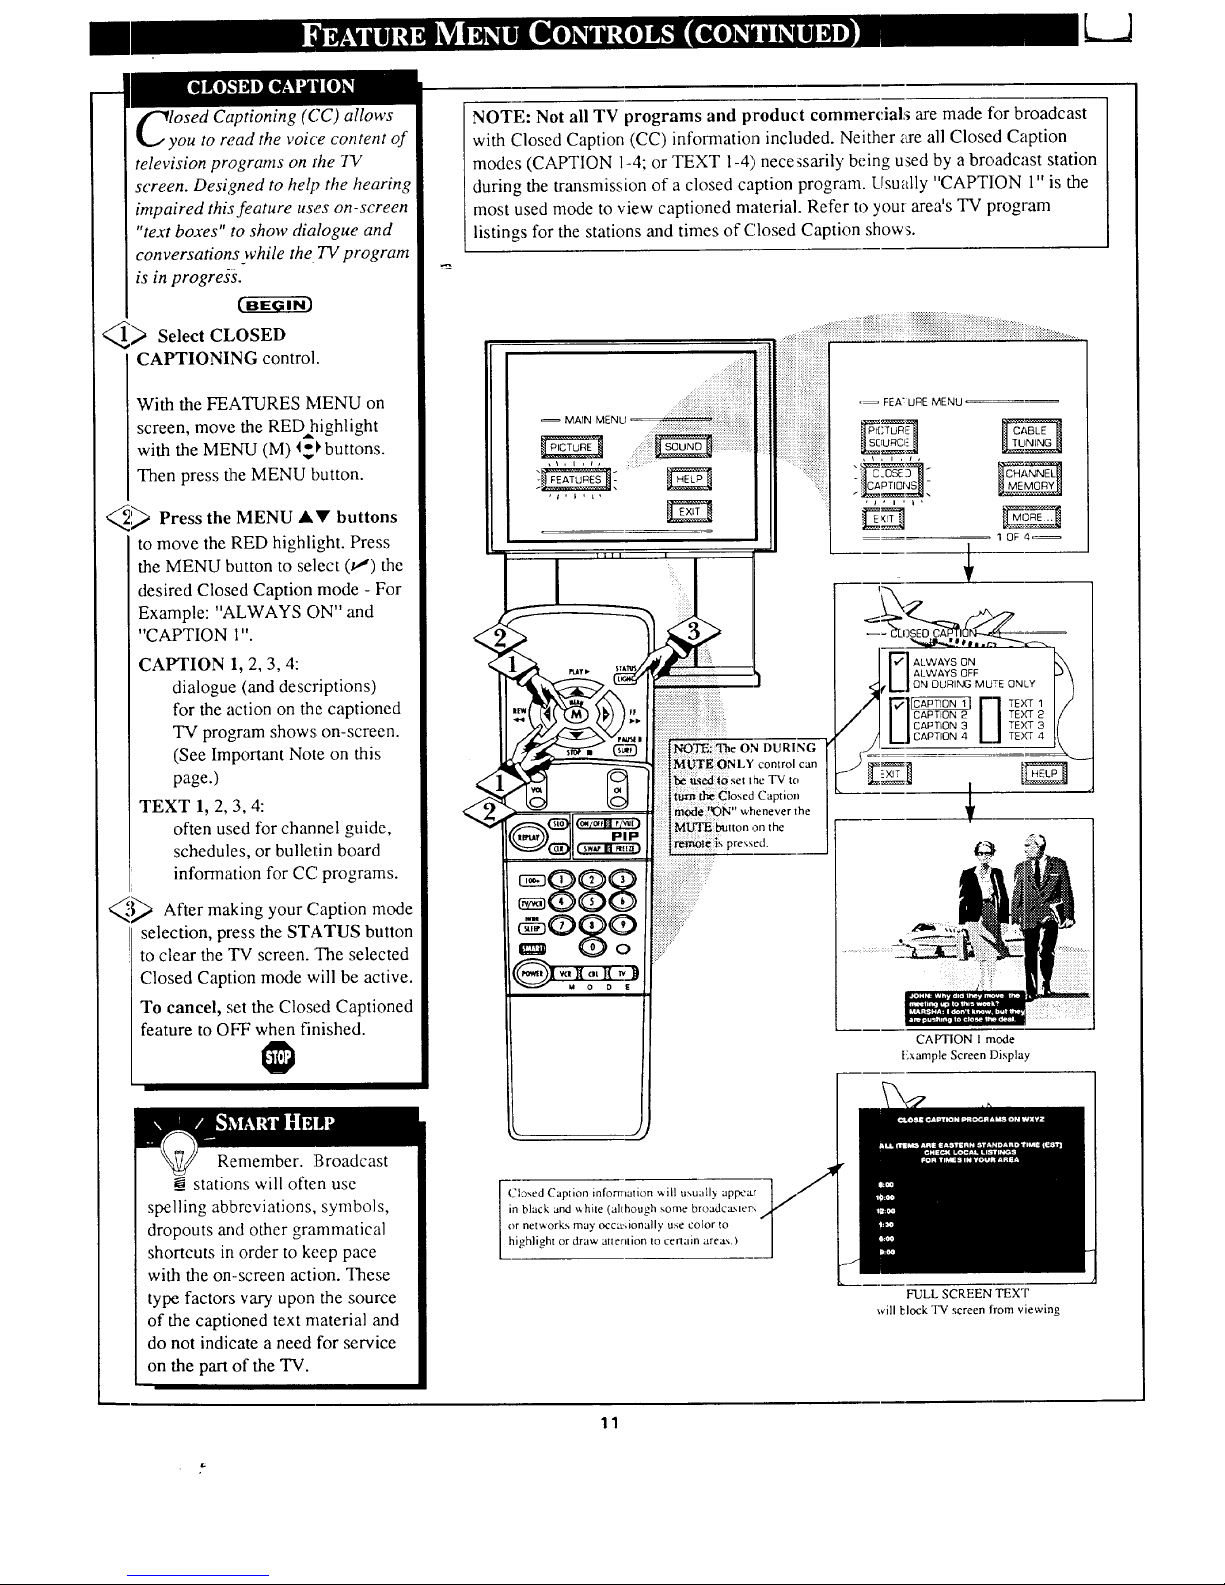
L3
losed Captioning (CC) allows
ou to read the voice content of
television programs on the 73/
screen. Designed to help the hearing
impaired this feature uses on -screen
"text boxes" to show dialogue and
conversations while the TV program
is in progress.
_ Select CLOSED
CAPTIONING control.
With the FEATURES MENU on
screen, move the RED highlight
with the MENU (M) _I, buttons.
Then press the MENU button.
,_ Press the MENU At!' buttons
to move the RED highlight. Press
the MENU button to select (_') the
desired Closed Caption mode - For
Example: "ALWAYS ON" and
"CAPTION 1".
CAPTION 1, 2, 3, 4:
dialogue (and descriptions)
for the action on the captioned
TV program shows on-screen.
(See Important Note on this
page.)
TEXT 1, 2, 3, 4:
often used for channel guide,
schedules, or bulletin board
information for CC programs.
_.'-_ After making your Caption
mode
selection, press the STATUS button
to clear the TV screen. 'The selected
Closed Caption mode will be active.
To cancel, set the Closed Captioned
feature to OFF when finished.
NOTE: Not all TV programs and product commercials are made tbr broadcast
with Closed Caption (CC) information included. Neither za-eall Closed Caption
modes (CAPTION 1-4; or TEXT 1-4) necessarily being used by a broadcast station
during the transmission of a closed caption program. Usually "CAPTION 1" is the
most used mode to view captioned material. Refer to you[ area's TV program
listings for the stations and times of Closed Caption show_.
!!!!iiiiiiiii!iiiiiiiiiii!iiiiiiiiiiiiiiii!iiiiii
MAIN MENU.
,t,ll_,
........
iiiii
•_ FEA t URE MENU
10F4_
ALWAYS ON
ALWAYS OFF
ON DURING MUSE ONLY
CAPTION 2 TEXT
//CAPTION 3 TEXT 3
_,,I CAPTION 4 T_)(T 4
CAPTION 1 mode
t-xample Screen Display
I
Remember. !Broadcast
__ stations will often use
spelling abbreviations, symbols,
dropouts and other grammatical
shortcuts in order to keep pace
with the on-screen action. These
type factors vary upon the source
of the captioned text material and
do not indicate a need for service
on the part of the TV.
Closed Caption information will u_.ua}l_ appca.r
in black and _ hire (although some broadc__,,ler',
or networks may occ_-.ionally use color to
highlight or draw attenlion to certain area'..)
FULL SCREEN TEXT
will block TV screen from viewing
11
Page 12
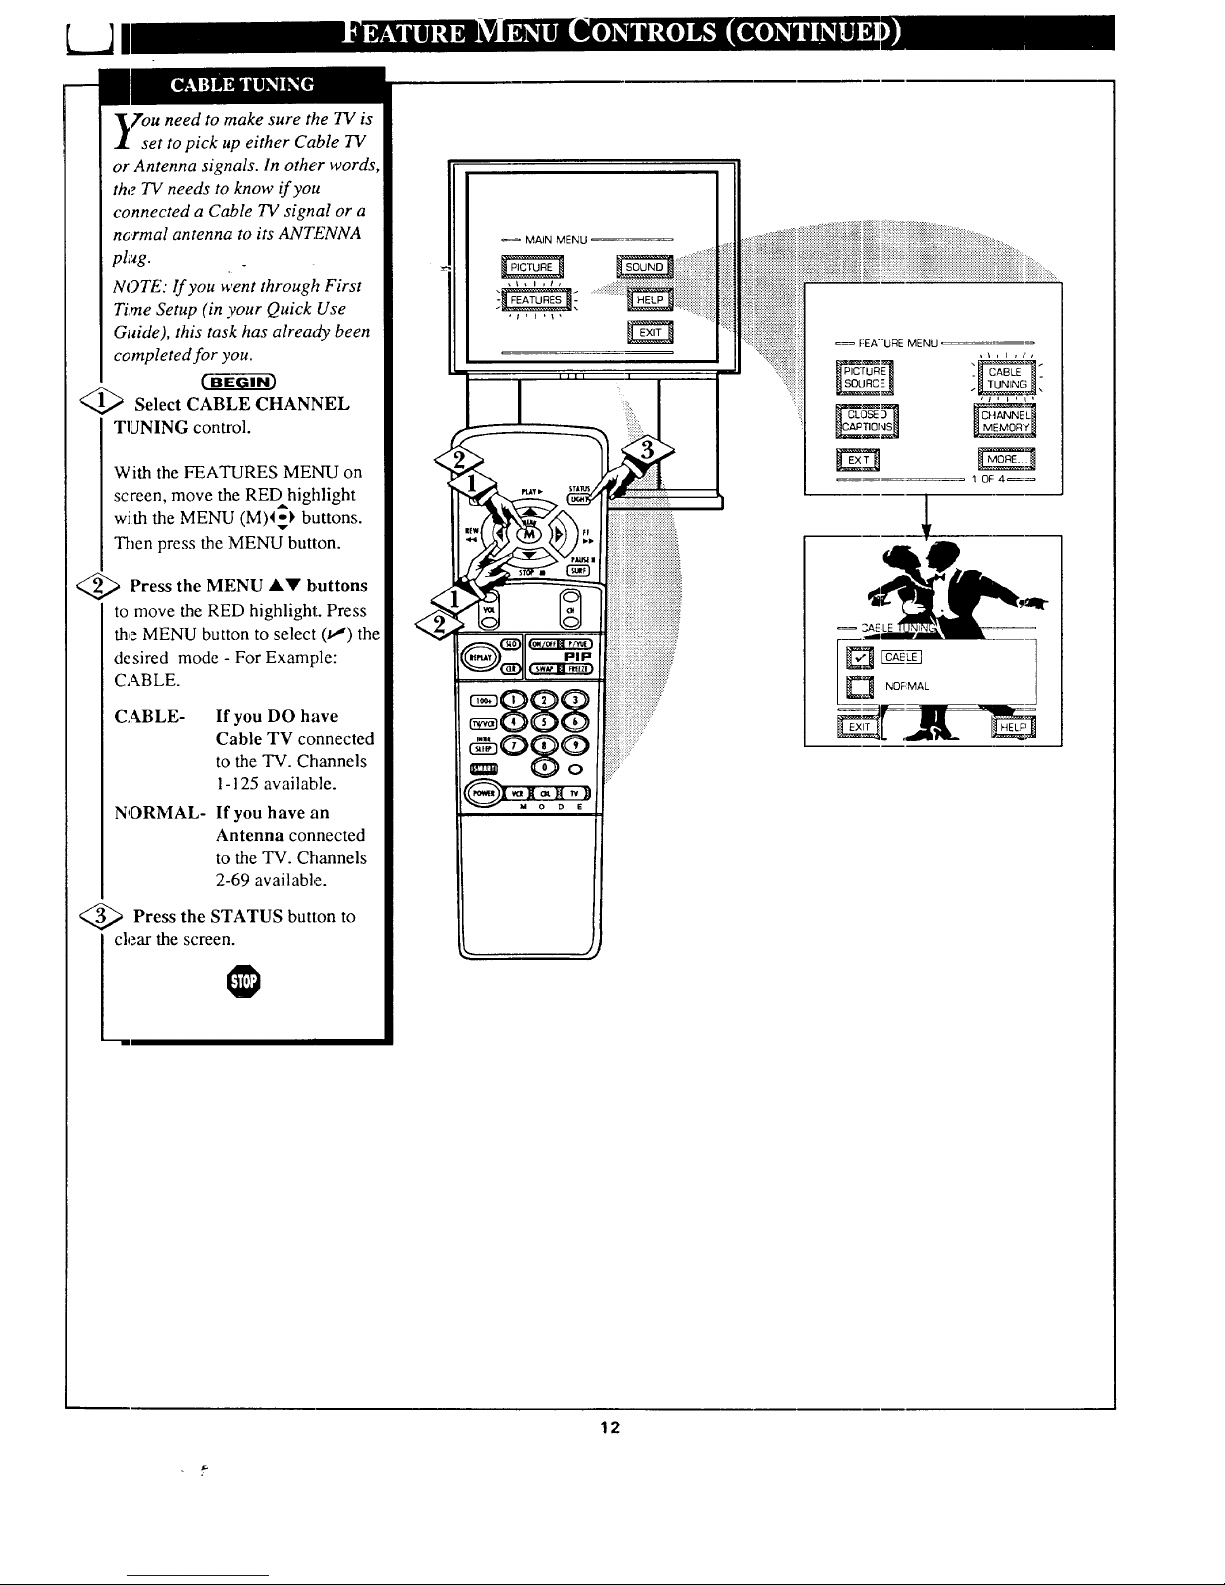
youneed to make sure the TV is
set to pick up either Cable TV
or Antenna signals. In other words,
the TV needs to know if you
connected a Cable TV signal or a
nG.rmal antenna to its ANTENNA
plug.
NOTE: If you went through First
Time Setup (in your Quick Use
Guide), this task has already been
completed for you.
Select CABLE CHANNEL
TUNING control.
With the FEATURES MENU on
screen, move the REDhighlight
with the MENU (M)4-_ buttons.
Then press the MENU button.
<_ Press the MENU &V buttons
to move the RED highlight. Press
the MENU button to select (t,,,") the
desired mode - For Example:
CABLE.
CABLE- If you DO have
Cable TV connected
to the TV. Channels
1-125 available.
NORMAL- If you have an
Antenna connected
to the TV. Channels
2-69 available.
<_ Press the STATUS button
to
clear the screen.
<<
MAiN MENU
iiiiiiiiiiiiiiii!ii!!!iiii!!
:_::::::::::ii.:_iliii _SOu RC-- .[_ UNIN[1UN NG_] -
1 OF: 4_
._ ___I1"
_____ NOFIMAL
12
Page 13
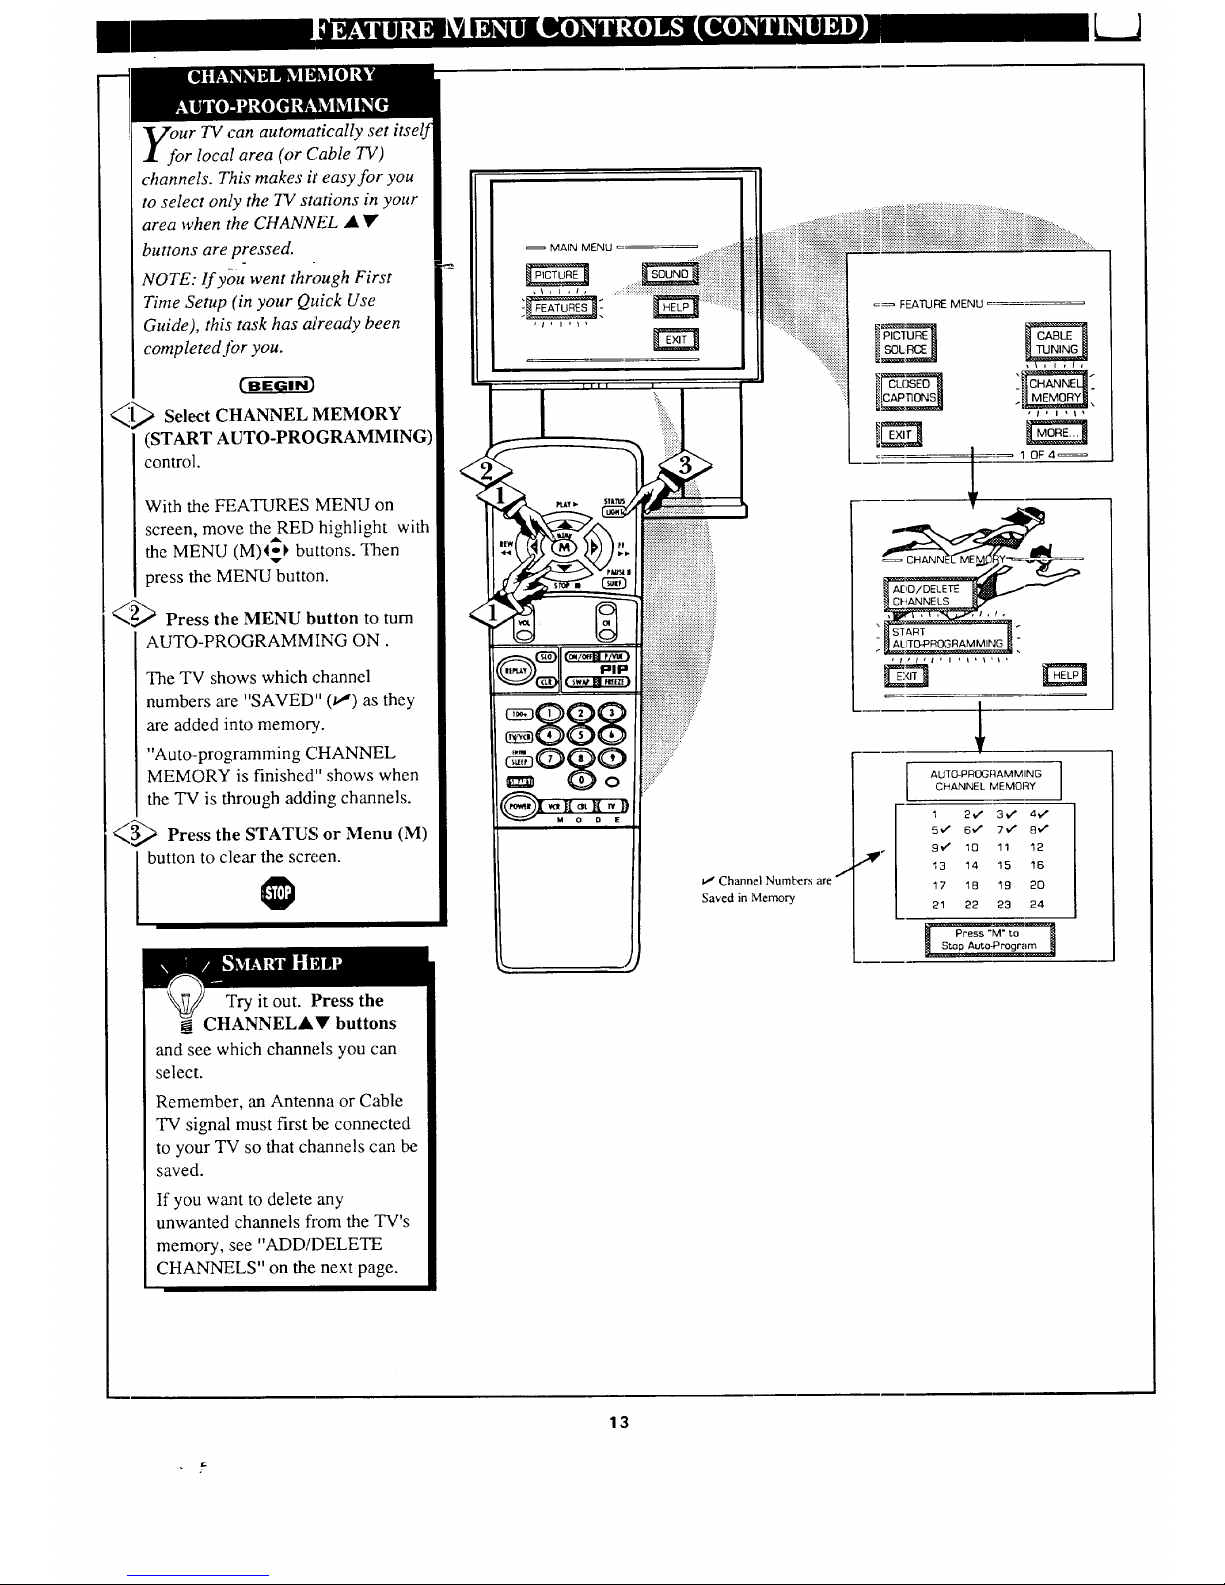
Ur TV can automatically set itself
r local area (or Cable TV)
channels. This makes it' easy for you
to select only the TV stations in your
area when the CHANNEL • •
buttons are pressed.
NOTE: If you went through First
Time Setup (in your Quick Use
Guide), this task has atready been
completed Jbr you.
_l_ Select CHANNEL MEMORY
(START AUTO-PROGRAMMING)
control.
With the FEATURES MENU on
screen, move theRED hiohlighto with
the MENU (M)4_ buttons. Then
press the MENU button.
_,q,1 Press the MENU button to turn
AUTO-PROGRAMMING ON.
The TV shows which channel
numbers are "SAVED" (t/) as they
are added into memory.
"Auto-programming CHANNEL
MEMORY is finished" shows when
the TV is through adding channels.
_3_ Press the STATUS or Menu (M)
button to clear the screen.
Try it out. Press the
CHANNELAV buttons
and see which channels you can
select.
Remember, an Antenna or Cable
TV signal must first be connected
to your TV so that channels can be
saved.
If you want to delete any
unwanted channels fl'om the TV's
memory, see "ADD/DELETE
CHANNELS" on the next page.
MAIN MENU
=_ FEATURE MENU
AUTQ-PROGRAMMING
CHANNEL MEMORY
1 2,,/ 3,_ 4.,/
5'/ 6," 7,+." B_"
9V" 1Q 11 12
13 14 15 16
17 18 19 20
21 22 23 24
13
Page 14
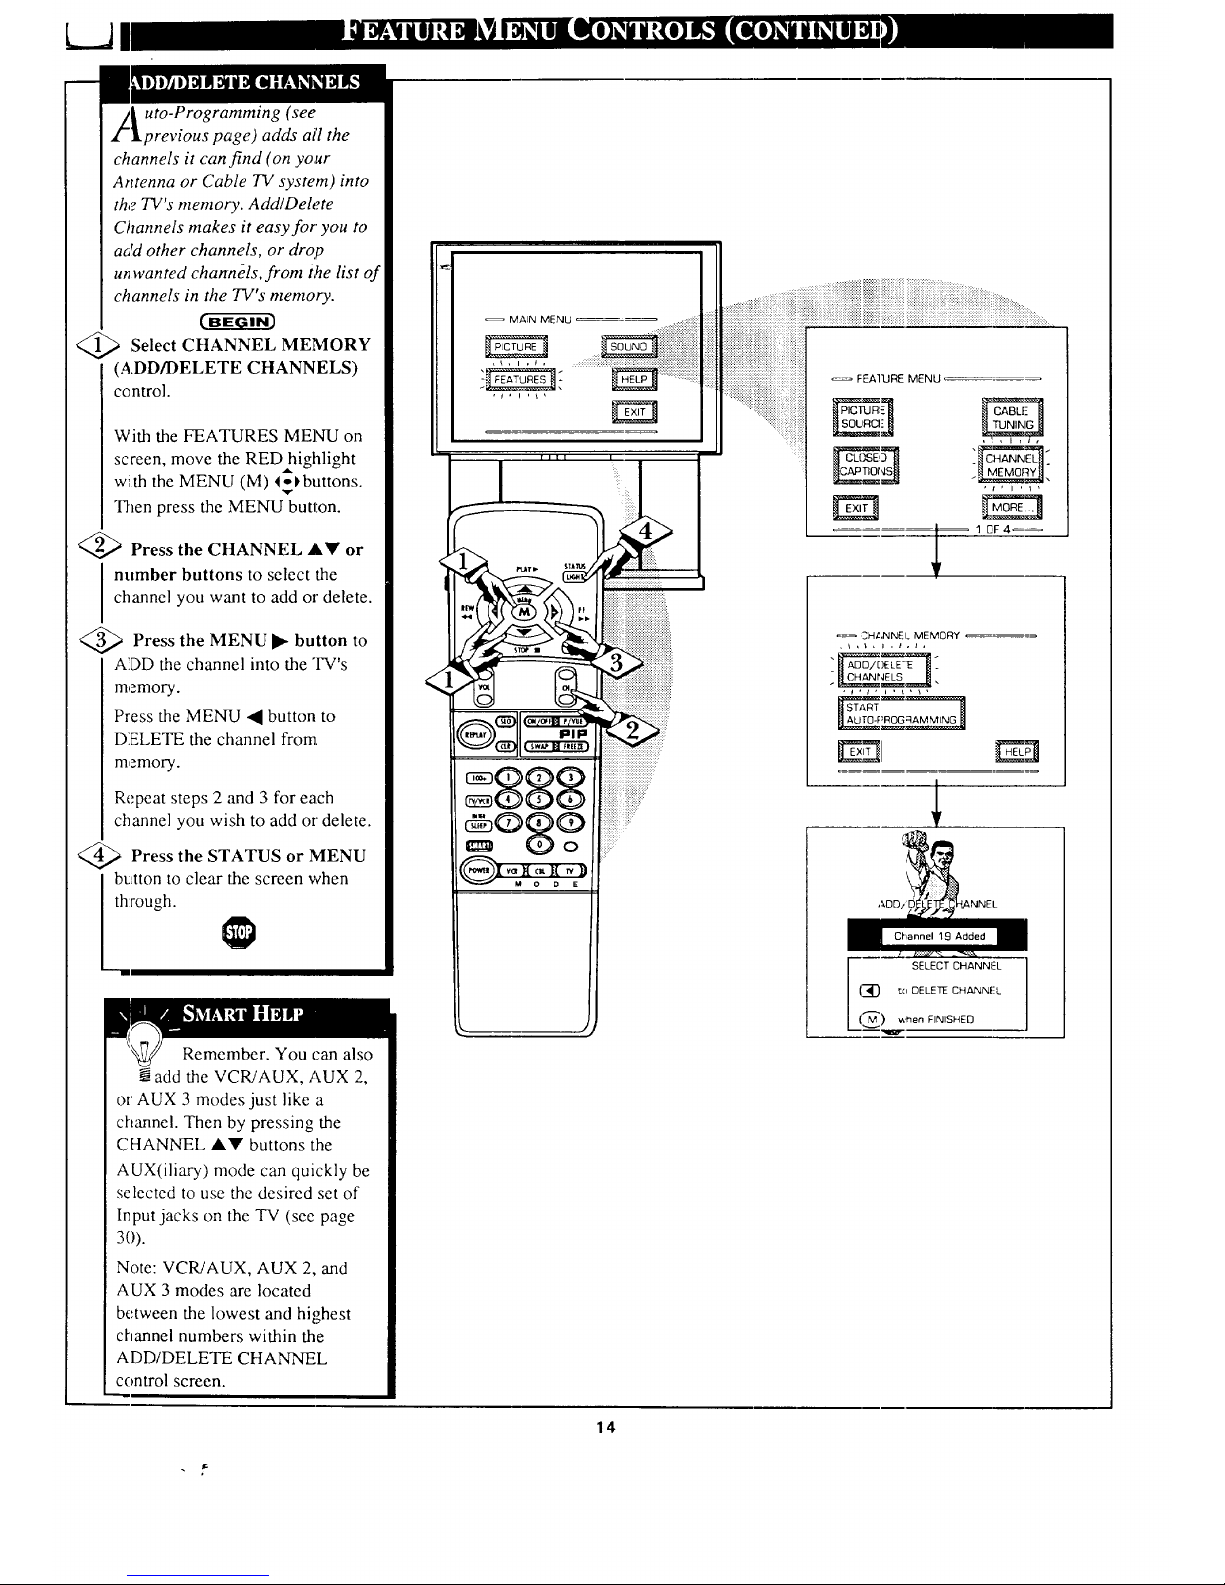
/_ uto-Programming (see
lprevious page) adds ai'l the
channels it can find (on your
Antenna or Cable TV system) into
the TV's memory. Add/Dele.te
Channels makes it easy for you to
add other channels, or drop
u_ wanted channels, from the list of
channels in the TV's memory.
Select CHANNEL MEMORY
(ADD/DELETE CHANNELS)
centrol.
With the FEATURES MEI__I on
screen, move the RED highlight
with the MENU (M) 4of, buttons.
v
Then press the MENU button.
<_ Press the CHANNEL Ay or
I number buttons to select the
channel you want to add oi" delete.
@>Press the MENU button
to
ADD the channel into the TV's
memory.
Press the MENU 41 button to
DELETE the channel from.
memory.
Repeat steps 2 and 3 for each
channel you wish to add or delete.
Press the STATUS MENU
or
button to clear the screen when
through.
Remember. You can also
.Nadd the VCRiAUX, AUX 2,
or AUX 3 modes just like a
channel. Then by pressing the
CHANNEL A'_' buttons the
AUX(iliary) mode can quickly be
selected to use the desired set of
Input jacks on the TV (see page
3O).
Note:VCRiAUX, AUX 2,and
AUX 3 modes are located
between the lowest and highest
channel numbers within the
ADD/DELETE CHANNEL
control screen.
MAIN MENU ..........Thiii:!i!ii
_, ..,.....,......,.
.. ,.,..,....,..,..,.., ..
............++++, ii!i!iii!ii!iiiiiii!!!i!iiiii
.......,...,.........,..,......,,._ _._,.- .-..
.............._:_i_i_iiiiii)_iii_iiiiiiiiiiiiiiiiiiiiiiiiiiiiiii_!i)_!!!!!!_!i!!i!!!_i_iiii!_i!_i!_!_i)_!!i_iiiiiiiiiiiiiiiiiiiiiiiiiiiiiii_i_i_iiiiiiiiiiiiiii_ii!iiiiiii_iiii_i_.........
•.,::::.:::..:..:-..::::x,+:.> .
iiiiiiii::iii:iii:ii_iiiii:iiiiiiii?:::i:::i.:,,
i:iiiii_:ii:ii.:i:ii_:iiiiiii:iiiii::::i::iiihi:
iiiiiiiiiiiiiiiiiiiiiiiiiiiiiiiiiiiiiiiiiiiiiiiiiiiiiiiiiii
.,:.::::::::::::::::::::.::::::::::_:_:_:_::::::::::
..:.:+:+_z:+::.:.:
':$_:K<:_::::::::
...._:_*:iiiii:il
FEAI_RE MENU
==== 1 OF 4_
=_ .CH&NNEI+ MEMORY
._s =_.
ADD/I _,NNEL
Channel 19 Added
I SELECT CHANNE-L
1_ tu DELETE CHANNFL
(_._) '€,hen FINISHED
14
Page 15
I
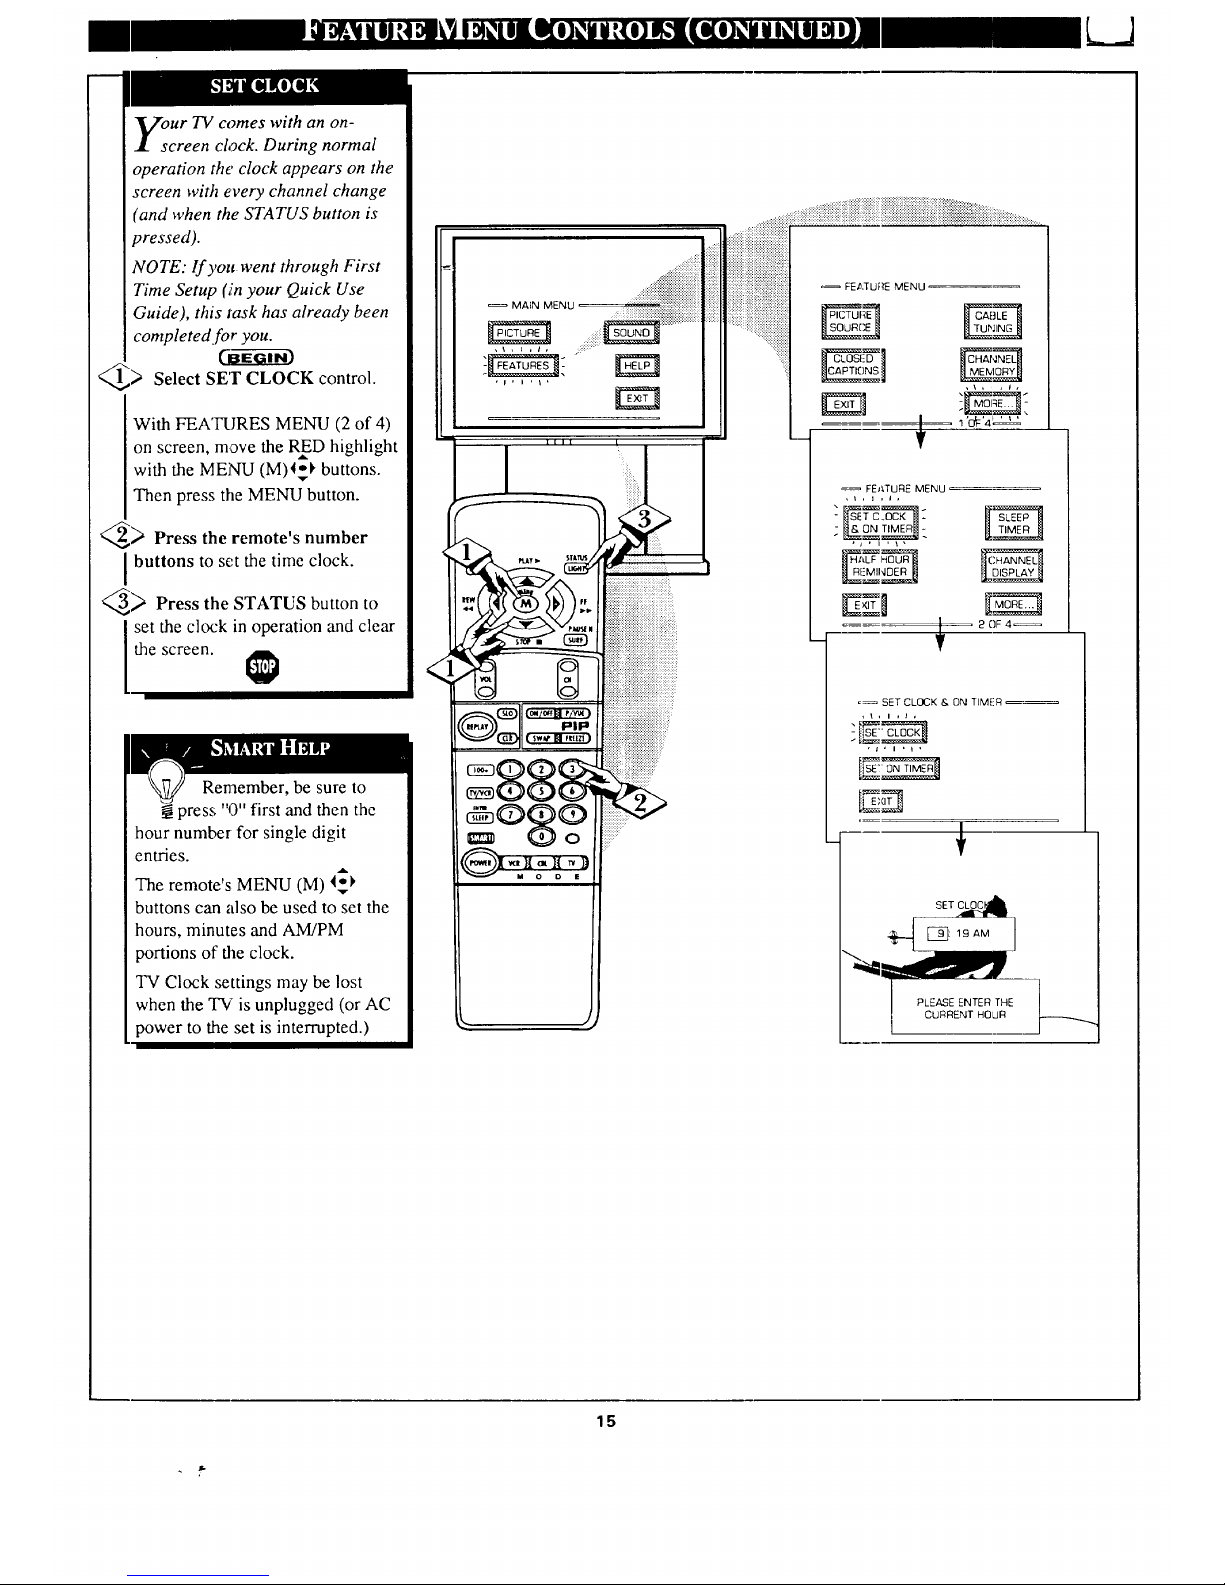
our TV comes with an on-
creen clock. During normal
operation the clock appears on the
screen with every channel change
(and when the STATUS button is
vressed).
NOTE: If you went through First
Time Setup (in your Quick Use
Guide), this task has already been
completed for you.
_ Select SET CLOCK control.
With FEA'IRJRES MENU (2 of 4)
on screen, move the RED highlight
A
with the MENU (M)I_I' buttons.
Then press the MENU button.
_ Press the remote's number
I buttons to set the time clock.
_ Press the STATUS button to
set the clock in operation and clear
the screen.
Remember, be sure to
press "0" first and then the
hour number for single digit
entries.
The remote's MENU (M) 4_
buttons can also be used to set the
hours, minutes and AM/PM
portions of file clock.
TV Clock settings may be lost
when the TV is unplugged (or AC
power to the set is interrupted.)
MAEN MENU
FEATURE MENU
=_! 'dF'4 _ ' I,
FEATURE MENU
- _oN _- _T,_=_,d
. 20F4_
=_ SET CLOCK & ON TIMER
* t , i , t ,
, i a I , l ,
CURRENT HOUR
15
Page 16
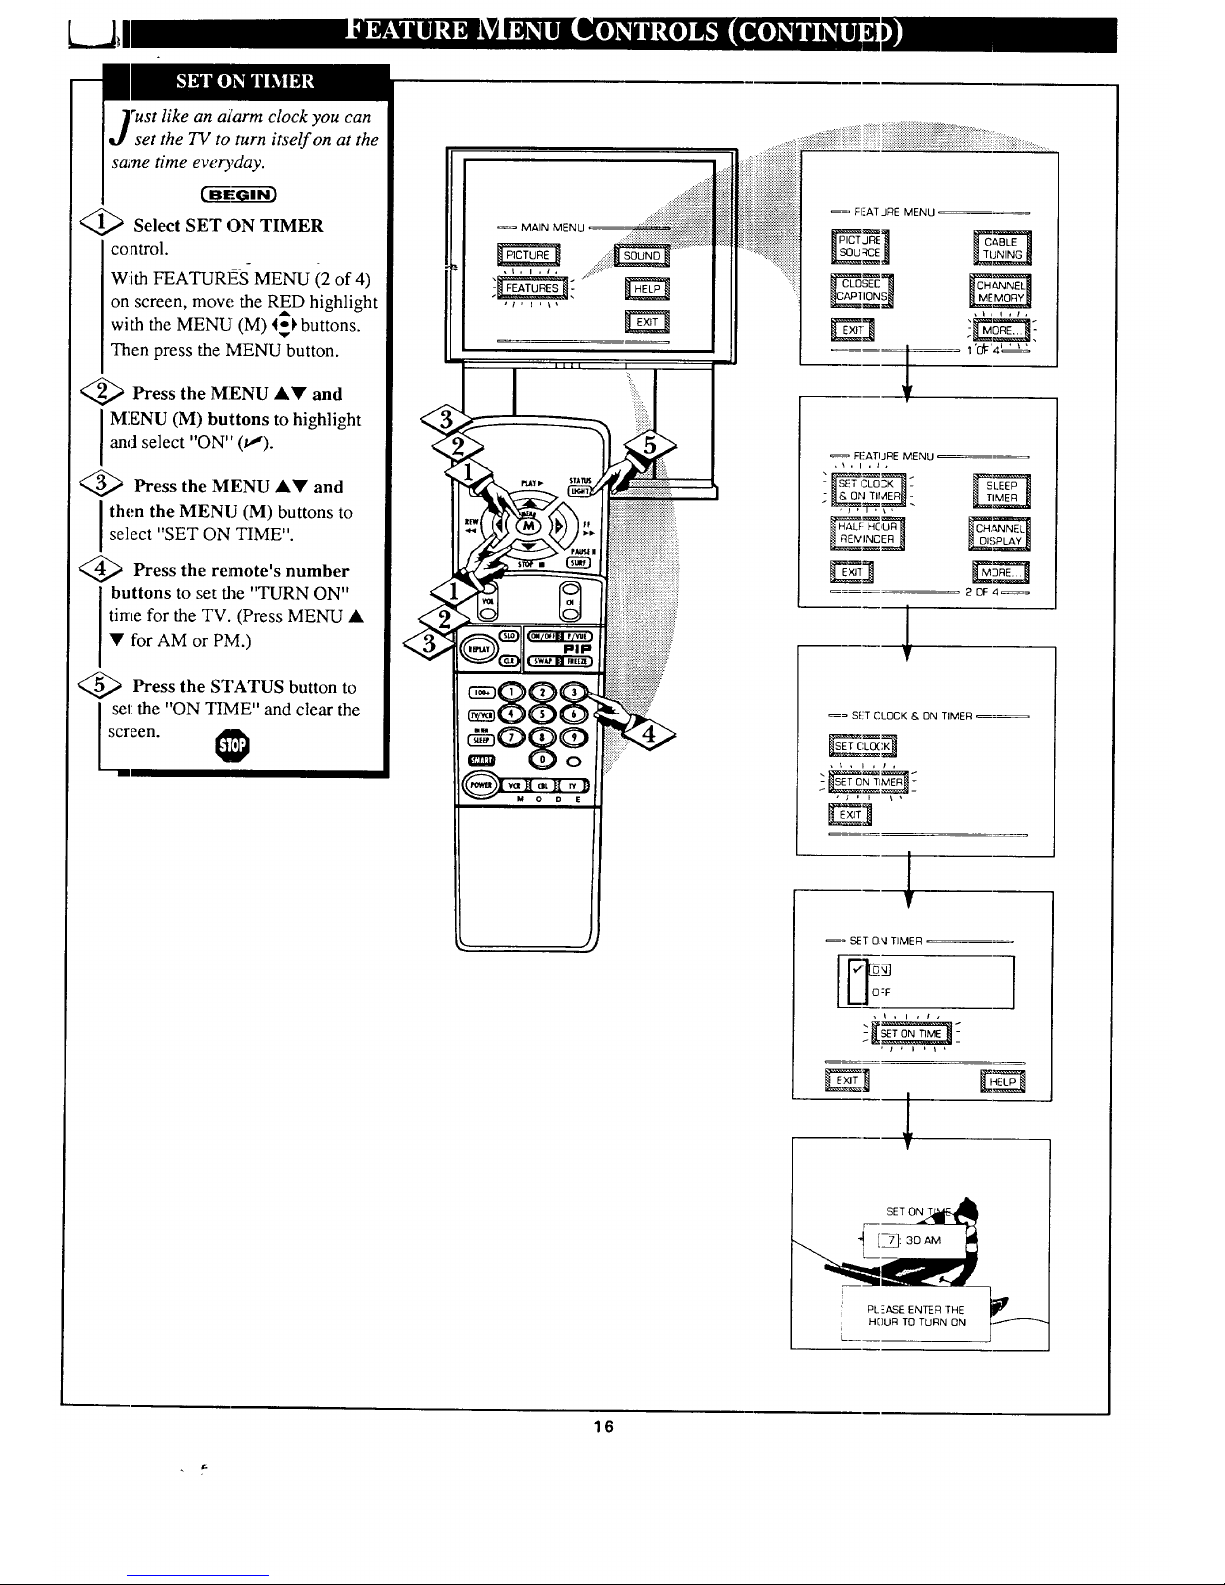
"ust like an alarm clock you can
set the TV to turn itself on at the
same time ew,ryday.
Cff-Eel--_i-_
<_ Select SET ON TIMER
coatrol.
With FEATUR]_S MENU (2 of 4)
on screen, move the RED highlight
with the MENU (M) 4_ buttons.
Then press the MENU button.
<_ Press the MENU &Y and
MENU (M) buttons to highlight
and select "ON" (tl).
<_ Press the MENU •V and
I then the MENU (M) buttons toselect "SET ON TIME".
<_ Press the remote's number
buttons to set the "TURN ON"
time for the TV. (Press MENU •
• for AM or I'M.)
<_ Press the STATUS button to
set: the "ON T/ME" and clear the
screen.
i?:i:?:?:iiii::iii::i::iiiii!i::::ii::ii?:?:i_ El-AT JRE MENU =_
::::::::::::::::::::::::::::::::::::::_i_:;_
:::::::::::::::::::::::::::::;::::::::::::::::::::P_JRE 1 r&BLm_
1 'di:'4 _ ' _'
FI:'ATI J RE MENU
,\,1 ,t,
2 OF 4_=
_= SET CLOCK & ON TIMER _=_
,t , I , t ,
1
SET 0_1 TIMER
O-'F
]
i PLEASE ENTER THE
HDUR TO TURN ON
L
16
Page 17

/ " i LJ
ve you ever fallen asleep in
ont _f the TV only to have it
wake you up at two in the morning
with a test pattern screeching in
your ears? Well, your TV can save
you all that trouble by
automatically turning itself off.
_[,,,,) Select SLEEP TIMER control.
With FEATURES MENU (2 of 4)
on screen, move the RED highlight
with the MENU (M) 4_ buttons.
Then press the MENU button.
_,'_ Press the MENU • l_buttons
I o pick the amount of time (15
minutes to 2 hours ahead) before
the TV will turn itself off.
_3_:;' Press the STATUS or MENU
(M) button to clear the screen after
you have set the time for the TV to
turn off.
Remember, to see how
many minutes are left before
the "IV shuts itself off, reselect the
SLEEP TIMER control screen.
To stop a SLEEP TIMER setting,
reset the timer back to OFF.
(Turning the TV off and on, or
pressing a button during the last
minute of a timer setting, will also
cancel a se_:ting.)
A few seconds before the TV is to
shut off a message will come on the
screen telling you GOOD NIGHT.
l
iii!!
FEATURE MENU
I"Ct:'4_ ' _2_
_= FEATURE MENU
2OF 4_
1
17
Page 18
L..JI
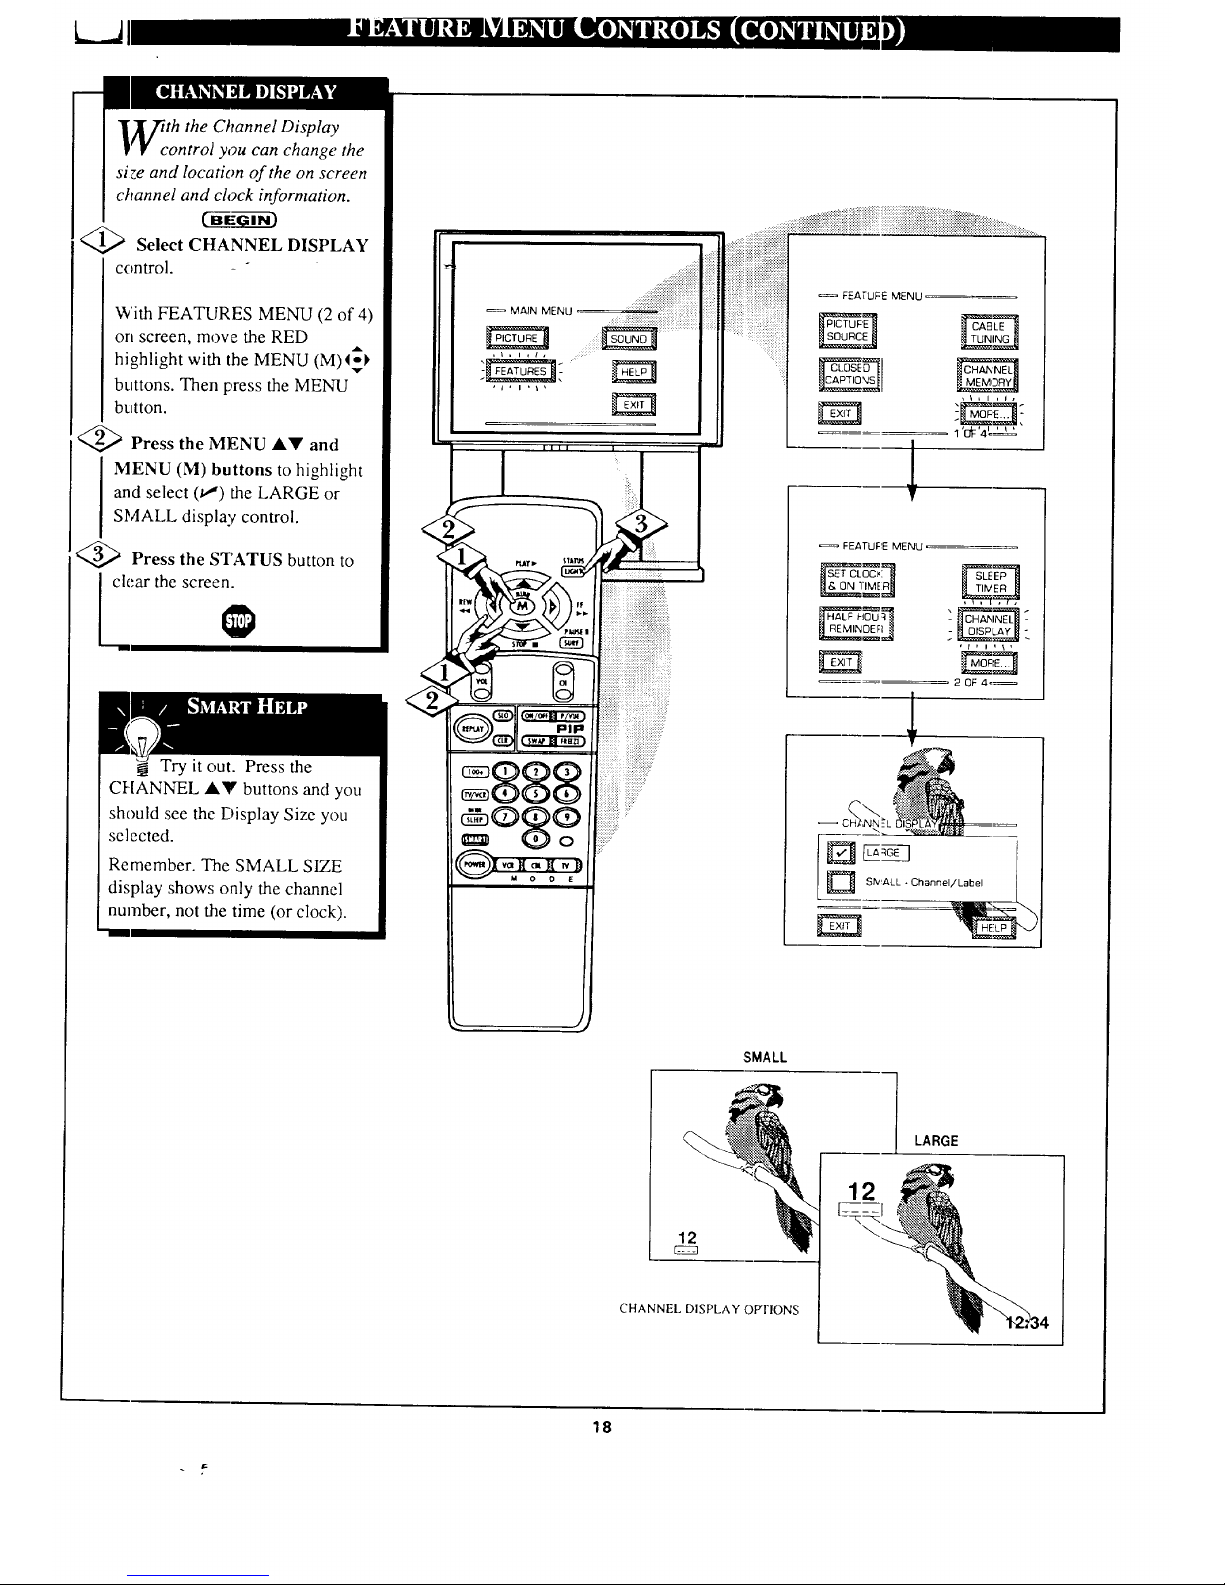
?Tth the Channel Display
• r control you can change the
si_e and location of the on screen
channel and clock information.
Select CHANNEL DISPLAY
control.
With FEATURES MENU (2 of 4)
on screen, move the RED
with the MENU (M)I_
highlight
buttons. Then press the MENU
button.
<_ Press the MENU AT' and
MENU (M) buttons to highlight
and select (_') the LARGE or
SMALL display control.
Press the STATUS button to
clear the screen.
Try it out. Press the
CHANNEL A'IV buttons and you
should see the Display Size you
selected.
Remember. The SMALL SIZE
display shows only the channel
number, not the time (or clock).
<
<
...._iiii_ _..............
IIII I
!iiil;;i!iii iii;iiiiiiiiiii))i!i!!:!!i:
eSoe
:::
'_:'4L '_
I
T
FE_TUFIE MENU
,t,l,\,
2 OF 4,=
SMALL
LARGE
12
CHANNEL DISPLAY OPTIONS
12
18
Page 19

th the Half Hour Reminder
ontroI the TV automatically
shows you the current time and
channel every thirty minutes.
_ Select HAI_F HOUR
REMINDER control.
With FEATURES MENU (2 of 4)
on screen, move the RED
highlight with the MENU (M) _I,
buttons. Then press the MENU
button.
_,:_ Press the MENU A._!' and
MENU (M) buttons to highlight
and select (_,") the EVERY HALF
HOUR item.
_.'_> Press the to
STATUS button
clear the screen.
==>>:+><+:+:.:
.....,,_i_iiiiiiiiiiiiiiiiiiiiiiiiiiiii_i!i!i_i
......_{_iiiiiiiiiiiiiiiiiii_i!!_!iiiiiiiiiii!i!iiiiiiiiiiii
== MAIN MENU• II_:J_ _
,di i!!!ii
J
_= FEATURE MENU
i
..L'_-" ,_E_,,_C_En__ _
2 OF 4,:_
19
Page 20

_)arental Control allows parents
to block out, or "censor", any
ciTannels they think children should
not watch. A channel placed under
Parental Control cannot be viewed
until a correct access code is used to
unlock the channel for viewing.
First let's set yt-_ur Parental Code:
Select the PARENTAL
CONTROL.
With FEATURES MENU (3 of 4)
oil screen, move the RED highlight
with the MENU (M) I_ buttons.
Then press the MENU button.
"lqLOCK CHANNELS" and
"SETUP CODE" show on screen.
<_ Press the MENU A_" and
MENU (M) buttons to highlight
a_d select the SETUP CODE item.
<_ Press 0, 7, 1, 1 on the remote.
10"_ I!
XXXX shows on the ACCESS
CODE SETUP screen as you press
the number buttons.
"INCORRECT ACCESS CODE -
TR.Y AGAIN" will also show on the
screen.
_> Press O,7, I, 1 on the remote
again.
"Next Enter Yo:_r New Access
Code" shows on the screen.
Enter a new four digit number
code using the remote.
"Access Code Changed" shows on
the. screen to let you know the new
code has been set.
Continue to the next page to find
out how to "block" channels from
viewing.
Parent,,; - it isn't possible
to unlock or defeat your
Censor Code without changing to
a new code number. So if your
Code number changes, and you
didn't change it yourself, then you
will know that someone has
altered the code and the blanked
out channel has been viewed.
NOTE:Your TV left the factory with the Parental Code set to "0000". If you are using
your TV and the Parental Control for the first time, and don't want to SETUP a new
Access code number, you can use the "0000" number to blc_,-kzhannels - see next page.
The "071 I" Parental Code (shown on this page) is given as a default or way to reset the
Code when the current Access number is not known.
: 'FEATJ_ MENU,
• _ FEATURE MENU ....
1
|
r ......................... J
T
.... FEATURE MENU '
• * ,L,
....... 30F4 ....
•PAF_ENTAL CI:_TROL r
r J
!
Ne_t Erit_m Your New
Access Code
- Press MENU _,. to go on and slarl
to "block" chanr,els ]
Press MENU to return to the
Parenlal Control Menu screen.
Press STATUS to c ear the screen. J
2O
Page 21

fter your personal Parental
Code number has been set (see
previous page), you are now ready
to select the channels you want to
block out or censor.
_._ Select the BLOCK
CHANNELS _ontrol.
With FEATURES MENU (3 of 4)
on screen, n:tove the RED highlight
with the MENU (M) l_buttons.
Then press the MENU button.
_,p Press the MENU AY and
MENU (M) buttons to highlight
and select the BLOCK
CHANNELS item.
_ Enter the correct
Parental
]Code numbcr.
_ Press Channel AY or Channel
Number buttons to select the
channel you want to block.
_ Press the MENU button to
"BLOCK VIEWING" on the
selected channel.
Press the MENU 4 button to
"ALLOW VIEWING" on a
blocked channel.
Repeat steps 3 and 4 for any other
channels you wish to block out.
XXXX I
Remember, to make TV
viewing easier all channels
(and Audio/Video Input jacks)
will be unblocked, once the
correct Parental Code number has
been enterect.
When the TV is turned OFF and
then back ON again, Parental
Control is back in place for all
channels.
FEA PJFt_ MENU • : :
L_'l*t*
-EE]?
.......... 1 c_'4', ' !2
T
FEATURE MENU '
; PAREN1 AL :
............. 3 OF z_.
, FEATURE TVI_NU
• /2 t3t '4L_ "
i
i
i
_I_L
,i,,,J,
_. BLDOK "
,J,l,i,
n
I
........ J
r
V
CHANNEL 19
BLOCKED BY PARENTAL CONTF_L
F=lease enter Access Code
!3elect Brick.her Chan_el
for _ ew'z,g
SEIJECI CHANNEL
(_) m ALLOVV 'vIEV_NG
to E-XlT
I
!
|
___.1
Note: You can also block out the
use of the Audio!Video Input jacks
on the TV. This stops the viewing
of VCR pr3grams which can be
shown through the AJV IN jacks.
Just select VCR/AUX 1, AUX 2, or
AUX 3 (located between the lowest
and highest channel numbers) on
the Channel Blocking screen, and
select '"olocked".
BLOCKED CHANNEL SCREEN MESSAGE
(Appears when an attempt Io selecl a blocked
channel is made and Parental Control is ON.)
21
Page 22

r_o you ever have trouble
j[._ remembering on which
channel a par,ticular station or
network is located? The Channel
Labels ContrM is a quick way to
view and select channels from a
list of Labelled ehannels.
A Label is a four letter callout you
can set to appear with the on
screen channel number. Example
Label: WXYZ . for a TV station's
call letters.
7"0select channels from the
Channel Labels Control:
CO_G-ggrh3
With the FEATURE MENU
screen (3 of 4) on the TV's screen,
move the RED highlight using the
A
MENU (M) 4_ buttons to select
CHANNEL LABLES. Press the
MENU (M) button.
<_ Press the MENU Al!' and
MENU (M) buttons to highlight
and select either:
"MANUAL" to create your own
label for a channel.
"PRESETS" to choose from a list
of prewritten channel labels.
(See instruction details on this
page.)
Press the STATUS button to
clear the screen.
=_ FEATURE MENU
30F 4_
.S
Create Your Own
Choose Fr3rn List
Return to Guide
GUIDE LABEL
!
C-lOOSE CHANNEL
(_ (_ to SELECT LA£EL
(_t;o EXIT
MANUAL. To create your
own Channel Label:
Press the Channel A• or
Number buttons to select
desired station.
A red highlight shows the
active letter :;pace for the
channel label.
Press the MENU • •
buttons to pick any of the
letters or symbols that are
given for your use.
Press the MENU • I_
buttons to move the red
highlight to the other letter
spaces and repeat.
Press the STATUS button
to clear the screen when
finished.
PRESETS -To pick a Label
_rom the "LABEL" list:
Press the Channel •• or
Number buttons to select
desired station.
Press the MENU ••
buttons to move up and
down the Channel Label
list.
Just stop on any label you
might want to use.
The selected label
automatically appears with
channel changes and when
the STATUS button is
_ressed.
Press the STATUS button
to clear the screen when
finished.
22
Page 23

L_J
te: If you went through First
me Setup, This task has
already been completed for you.
For our Sp_nish and French
speaking IV owners an on-screen
LANGUAGE option is present.
With the LANGUAGE eontrol you
can set the TV' s on-screen
features to be shown in either
English, Spanish or French.
_1_ Select the LANGUAGE
DISPLAY control.
With FEAq-URES MENU (3 of 4)
on screen, raove the RED
highlight with the MENU _,_'_
buttons. Then press the MENU
(M) button.
q._ Press the MENU ll, Y and
MENU (M) buttons to highlight
and select (iu,,')English, Spanish
(ESPANOI_,), or French
(FRANCAIS) on the display
control.
Text for the on-screen Menu will
change to file selected language.
_."_ Press the STATUS button to
clear the screen.
Remember, the
Language control only
makes the TV's on-screen
(MENU) items appear in English,
Spanish, or French text. It does not
change the other on-screen text
features such as Closed Captioned
(CC) TV shows.
siiiiiiiiiiiiiiiiii!!iiiiiii!iii!
_, ?.,_........................,....
MAIN MENU
llll I
888 ..............................
ii:;iiiiiii}:::ii:: :_
:::::::::::::::::::
:::::::::::::::::::::::
::::::::::::::::::::::::
®87 ':??
¸¸¸
.............._:_;i_i_iiiii!iii;i_ii_i!iiiiiiiiiiiiiiiiiiiiiii_!_ii_i_@_i_iiiiii_i_i:i_i_::_..........
ii ii!iiiiii!ilili;i;iiiiii__ iiiiiiiiiiiiiiiiiiiiiiiiiii__ ......
i:iiiii]i_ii_iiiiiiiiiliiiii!il;iiiii!:,i::: == FEATURE MENU .....
_:::::::::::::::::::::::::::::::::::::::::::::::::::::::
:::::::::::::::::::::::::::::::::::::::_:_Z.TU RE_ _
'::_:.i}_:.
F_'@:' 4, ,'
=_, FEATURE MENU
=_, FEATURE MENU
.#_-
: _CT_ON _.
E_
3 OF 4=_
ii¸'¸
== L _,NGUAGE'SELECT_QN;,_'
'rT-_ --
! _ SRANISH /
Lc F. NOH1
LANGUAGE DIS Pb_Y OPTIONS
m
=,
23
Page 24

7ourTV also has individual
sound adjustment controls. The
BASS (low frequency), TREBLE
(high frequency), and Speaker
BALANCE may all be used to
a6_ust the sound playback of TV
Select BASS,, or TREBLE, or
BALANCE sound control.
With the SOUND MENU on the
screen, move the RED highlight
with the MENU (M) 4_ buttons.
v
Then press the MENU button.
@:_ Press the (+) or (-) buttons to
adjust the sound control to levels
you prefer.
'(_ Press the STATUS button to
clear the screen.
MAIN MENU '
..... ...::::
...........................i!
ii:i:
iii:::
Select and then press MENU
(M) bulto'l to view additional
controls grouped under same
feature heading. For
Example: Treble, Balance,
Bass Boo:a, Stereo, etc.
"he BASS BOOST control
increases the low frequency
audio range of the TV. This creates
a deeper, fulh'r playback sound
which can be heard through the
TV's speakers.
Select BASS BOOST sound
control.
With the SOUND MENU on the
screen, move the RED highlight
with the MENRJ (M) <_ buttons.
Then press the MENU button.
)]Press the MENU &,Y and
MENU (M) buttons to highlight
and turn ON (11) the BASS
BOOST control.
@_ Press the STATUS button to
clear the screen.
MAIN MENU ,
I
:iiii_-)?
' SOUND _'IENU
10F3,
_[o_
OFF
24
Page 25

i o , , ,,o ,o o,, , L_J
ur TV is able to receive
roadcast stereo TV programs.
The TV is equipped with an
amplifier and twin speaker system
through which the stereo sound
can be heard.
A RED stereo-light (on the front of
the TV) will come on when a
stereo broadcast is received.
<'_.") Select STEREO sound control.
With the SOUND MENU on the
screen, move the RED highlight
with the MENU (M) _buttons.
v
Then press the MENU button.
_,'._ Press the MENU _LV and
MENU (M) buttons to highlight
and turn ON (tJ) the STEREO
mode.
_;_ Press the STATUS button to
clear the screen.
Second Audio Program (SAP) is
part of the stereo broadcast
system. Sent as a additional
audio ch_anel SAP can be heard
apart from the current TV
program sound. TV stations are
free to use SAP for any number
of purposes, but many experts
believe it will be used for foreign
language _'.ranslations of TV
shows (or for weather and news
bulletins.)
NOTE: If a SAP signal is not
present with a selected program,
the SAP option can not be
selected. 'q'his program does not
contain SAP information" will
show on the TV screen.
Remember.
If a stereo signal is
not available and
the TV is placed in
the STEREO mode,
sound coming from
the TV will remain
monaural (mono).
=_ SOUND MENU
t,i ,_
10F3_
/
/
25
Page 26

PheSound Image control can be
used to add greater depth and
dimension to both monaural
(MONO) and STEREO TV sound.
Cff-F_-ffi-_
>Select SOUND IMAGE
control.
With the SOUND MENU on the
screen, move the REDhighlight
with the MENU (M) I_, buttons.
Then press the MENU button.
<_ Press the MENU &T and
MENU (M) buttons to highlight
and turn ON (v,') the SOUND
IlVlAGE mode.
For Example: "MAXIMUM"
spreads the Sound Image effect as
wide as possible.
<_ Press the STATUS button to
clear the screen,
MAIN MEINU ........ f
.... mum _NU ::
: .,. '_,._7L,.,
| _ , _,_..
NO EXPAN_
Remember,
with the Sound
Image control
turned ON even
monaural (mono)
audio source
material can be
heard through rear
Surround Sound
speaker connections
(see page 28).
Note: 'The monaural
version of Surround
Sound may be
louder at the rear set
of speakers than
what is normally
heard with true
stereo signal
Surround Sound,
but this is normal.
{ Tse the DISPLAY VOLUME
I control to see the TV's volume
level settings on the TV screen.
Once set the Volume Display will
be seen each lin,e the VOLUME
buttons (on the TV or remote) are
pressed. _'GI-Gi-_
_ Select DISPLAY VOLUME
control.
With SOUND MENU (2 of 3) on
screen, move the RED highlight
with the MENU (M)I_ buttons.
Then press the MENU button.
<_ Press the MENU ,ikT and
MENU (M) buttons to highlight
and turn ON (,u_') the DISPLAY
VOLUME control.
<_ Press the STATUS button to
clear the screen.
............. ::::::::::::::::::::::::::: ......
iiiii}iiiiF%ii::_ii::i. _:
iiii::::ii::i}ii}iiii::i:.i:, .:mUNOU_NU-
.... _'_"1 ,_%'_'_'?
*_ MORE. _!-
.... ?;_?._'_"
• S3UND MENU ,
-LS_,,_'._-y._,_-
2D¢3
Remember,
"DURING
ADJUSTMENT"
means the volume
level will be on
screen whenever the
Volume buttons are
pressed.
26
Page 27

II " k__J
Tl/_7ould you like to hear TV
YV programs through your audio
hi-fi system? The TV's Variable
Audio Outpi'tt jacks and TV
Speaker On/Off control work
together to offer you this TV sound
option.
_ Connect the R(ight) and L(eft)
VARIABLE AUDIO OUT jacks
on the TV to the R and L Audio
Input jacks on your amplifier or
sound system.
Set the audio system's volume to
normal listening level.
_2_ Turn the TV and audio system
ON. You can now adjust the sound
level coming from the audio
system with the Volume Al!'
buttons on the TV or remote.
_,'-_ To hear the TV sound from
only
the audio system speakers, select
TV SPEAKERS control.
With SOUND MENU (2 of 3) on
screen, move the RED highlight
with the MENU (M)I_I, buttons.
Then press the MENU button.
_t_ Press the MENU AV and
MENU (M) buttons to highlight
and turn OFF (u,") the TV
SPEAKERS control.
You should now only hear TV
sound coming from the audio
system speakers.
_i_ Press the STATUS button to
clear the screen.
BACK OF TV
AUI)IOIN _ _
(RED/WHITE) .
VARIABLE
AUDIO
OUTPUT JACKS
AUDIO SYSTEM
Remember, the audio
system may have to be in
AUX(iliary) mode to play sound
from the qa/(Outputs).
Note: When the TV SPEAKER
control is set to "NORMAL" (for
TV speaker operation) make sure
the VARIABLE AUDIO OUTPUT
control (see next page) is also set
to "STEREO" in order for the TV's
AUDIO OUTPUT jacks to work
properly.
27
Page 28

)y adding optional external
speakers to the TV's sound
system, you can create the feeling
of reflected sound that surrounds
you at a movie theater or concert
hall.
t'6--_GI--i-_
>Connect external
both
speakers to the speaker wire
terminals on the TV.
Recommended speakers: 8ohm, 15
watt minimum. Be sure the (+) and
(-) speaker wires are connected to
the,,correct R(ight) and L(eft)
speaker termina'Is on the TV.
<_ Place the speakers so the
viewing area is between the TV
and the rear surround speakers.
(Se.e overhead view drawing.)
<_ "l'urn TV ON and place the
STEREO control to the "STEREO
IF AVAILABLFJ' (t,,,') position.
Afl:er setup whenever a stereo
signal is received the audio will be
heard in Surround Sound.
REAR SURROUND SOUND
SPEAKER TERMINALS
BACK OF "IV
REAR SURROUND SOUND SPEAKERS
Note:'The rear Surround Sound speakers will not
be heard at the same volume level ax Ihe front TV
spe',Ners. It is intended for the rear speakers lO give
a background noise effect which requires a lower
volume level than the TV's front speakers.
r,
Remember,
Surround Sound
will not work with
only one speaker
connected; or with
monaural audio
material (unless
Stereo Surround
control is turned
ON - see Variable
Audio section
below).
REAR SPEAKIZ.R REAR SPEAKER
PRIMARY VIEWING AREA
"VheTV's Variable Audio Output
jacks can also be used for
Surround Sound Once they are
connected to an external hi-fi
system its speakers can be used for
the playback of Surround Sound.
8c-ag
Connect R(ight) L(eft)
the and
VARIABLE AUDIO OUT jacks
on the TV to the R and L Audio
Inputjacks on your amplifier or
sound system.
@Turn TV ON and place the
VARIABLE AUDIO OUTPUT on
screen control to the SURROUND
(u,') position. (Sound Menu 3 of 3).
Nole:This will change the
Left!Right channel audio line level
signal at the Audio Output jacks to
the same signal found at the TV's
Surround Sound Speaker terminals.
28
AUDIO SYSTEM SPEAKERS USED AS REAR
SURROUND SOUND SPEAKERS
Page 29

m
Tsththe use of an optional Dolby
urround Prologic Amplifier you
can receiw' the added sound
dimension found only in Dolby
Surround programs. Dolby Surround
combines wide left-to-right stereo
separation with solid center channel
imaging, complemented by a front-to-
back souna_eld effect. The result for
you the listener is to create a movie
theater or concert hall "you are there"
sound sensation.
_1_ Connect the FIXED Audio
Output jacks on the TV to the AUX
INPUT jacks on a Dolby Prologic
Audio Amplifier system.
(,_ Connect the CENTER
CHANNEL Input jack on the TV to
the CENTER PRE-AMP jack on the
Dolby Prologic Amplifier.
_3_ Connect the rear set of Surround
Sound speakers to the (+,-)
connections on the Dolby Surround
Amplifier.
Place the Audio System's Front and
Rear Surround speakers as shown in
the picture on this page.
Q4_ Turn the: TV ON. Set TV Volume
to
normal listening level. Place the TV's
TV SPEAKERS (Sound Menu 2 of 3)
control to "CENTER CHANNEL
INPUT".
Turn the Dolby Prologic Amplifier
ON. Place its SURROUND MODE
control to the Dolby Prologic mode.
_.5_ The full effect of DOLBY
SURROUND programs (either
broadcast, VCR, or VDP) can now be
heard through the TV and Amplifier
system speakers.
Remember. R(ight)!L(eft)
channel stereo sound and rear
Surround sound will be heard from the
external (or Dolby Prologic Amplifier
system) speakers. The TV's front
cabinet SlX:akers are used for true
Center Channel sound necessary to
complete the Dolby Prologic Surround
arrangeme nt.
You will need the following to set-up and use the designed
SURROUND SOUND system shown below:
• One set of rear Surround Sound speakers
• One Dolby Prologic Audio Amplifier (with Cemer Pre-Amp
Output and twin speakers)
• One DOLBY SURROUND encoded source (either playback -
VCR, VDP, etc.- or broadcast).
AUDIO
Audio Amplifiep
Left Fronl Right Front
Speaker
jack's volume, bass, and _eNe
levels can be adjusted with the
TV's VO_,_Y b_Jtlons o_ using
tl_ on-screen Menu controls.
Rear Surround Speakers
J
R, L REAR
SURROUND
SPEAKERS
R SPEAKER OUTPUT
L SPEAKER OUTPUT
C_=NTER R L F_XED
G:-IAN qEL
Amplifier u[_lo OUTPUT
IhPUT
LEFT SPEAKER
CENTER CI'IA N _l_t.
Use the noise sequencer (or _;ound test signal) on
the Dolby Prologic Amplifier. Adjust the Center
Chmmel volume level (using the Dolby Prologic
Amp's Center Channel Volume control) to equal
the left/right and surroun:l si:eaker volume levels.
If Center Channel volume is still too low after
using the Dolby Prologic Amplifier, use the TV's
Volume conlrol buttons to s_t desired Center
Channel level.
Make sure the TV's BALAb'CE control is set to
the middle position or the C_ nter channel sound
image ,,,,'ill not be centered.
Use the Dolby Prologic Amplifier's Volume
buutons to adjust the surroun,:l system .sound level.
VIEWING/,RE/
REAR SURROUND SOUN0 SPEAKERS
I
RIGHT SPEAKER
29
Page 30

"WheTV's Audio/Video Input
jacks are for direct picture and
sound connections between the TV
and a VCR (or Video Disc Player,
etc.) that has Audio/Video Output
jacks.
To view the playback of a VCR
tape by using the Audio/Video
Input jacks on the TV:
Connect the VIDEO OUT jack
from the VCR to the VCR/AUX
VIDEO IN jack on the TV.
<_ Connect the AUDIO OUT
I acks R(ight) ancl L(eft) from the
VCR to the VC[UAUX AUDIO IN
jacks on the TV.
@Select the "¥'CR/AUX 1
I!
PICTURE SOURCE SELECT
control on the TV.
With the FEATURES MENU on
screen, move the RED highlight
with the MENU (M) l_l'buttons.
Then press the MENU button.
>]Press the MENU &'_' and
MENU (M) buttons to highlight
and select (tl) the VCR/AUX
mode.
<_ 'rurn the VCR ON and press
PLAY to view the tape on the TV.
PICTURE AND SOUND FROM
PLAYBACK OF VCR TAPE
<
NOTE: Connections and use of the
T'_/'s AL X 2 Audio/Video InlzUl jacks
the s;_me _.sfor the VCR/AUX I
jacks (except "AUX 2" is selected as
the Picture Source in step 3).
BACIq OF TV
VIDEO IN AUDIO IN
VCR
If you i-ave a single (monaural)
Audio Output VCR, "Y" connectors
are available to complete your
conr_ection. Contact your dealer, or
our Pans Information Center ( 1-800-
292.6(g;6) to order any optional
acc¢ sso Fies.
Remember, after it is
connected an easy way to
select the VCR/A.UX mode is to
pre,ss the VCR button on the front
of the TV (or the TV/VCR button
on the remote.) Channels 3 and 4
can also be selected in this way.
If you have added VCR/AUX to
the TV's channel memory (see
page 14), just press the
CI=[ANNEL lkll' buttons to select
the VCR/AUX mode.
3O
Page 31

l_or more convenient Direct
_1 playback connections the TV's
Front Audio/Video Input panel can
be used. Located next to the TV's
.hont control panel (under a small
cover door) these Input jacks allow
)"or quick and easy connections,
particularly for-the playback of
Camcorder tape recordings.
To view the p,'ayback of a
Camcorder recording using the
Audio/Video Input jacks on the
j_ont of the 77/:
_EG---67_
_ Connect OUT jack
tile VIDEO
from the Camcorder to the Front
VIDEO IN jack on the TV.
_,,_, Connect the AUDIO OUT
jacks R(ight)and L(eft) from the
Camcorder to the Front AUDIO IN
jacks on the TV.
_ Select the "AUX 3"
PICTURE SOURCE SELECT
control on the TV.
With the FEATURES MENU on
screen, move the RED highlight
with the MENU (M) _t buttons.
Then press the MENU button.
_ Press the MENU AT and
]VIENU (M) buttons to highlight
and select (,u,,) the AUX 3 mode.
Turn the Camcorder ON and
press PLAY to view the tape on
the TV.
IN
PICTURE AND SOUND FROM PLAYBACK
FRONT AUDIO/VIDEG, JACKS
Lift Up on Jackpanel Cover Plate
to expose Input Jacks.
VIDEO IN
',YELLOW)
\
AUDIOIVIDEO
OU'I'PUT JACKS
ON CAMCORDER
CAMCORDER
If you have a single (menaural)
At dio Output Camcorder, "Y"
colanectors are available to complete
yoar connection. Contact your
dealer, or our Parts Infol'mation
Center (I-800-292-6066) to order
Iany optional accessories.
Remember, after it is
connected an easy way to
select the AUX 3 mode is to press
the VCR button on the front of the
TV (or the TV/VCR button on the
remote.) Cha_nels 3 and 4 can
also be selected in this way.
If you have added AUX 3 to the
TV's channel memory (see page
14), just press the CHANNEL
_k_' buttons to select the
VCR/AUX mode.
31
Page 32

phe S(uper)-Video connection on
the rear of ttte TV can give you
better picture &_.tail and claH&,for
the playback of S-VHS VCR tapes or
Video Discs, than the normal
antenna picture connections.
Note: The VCR (_ Video Disc
Piayer) must have a S-VIDEO
OUT(put) jack in order for you to
complete the connections shown on
this page.
EG-ffgr
Connect the S-VIDEO (S-
VHS) OUT jack from the VCR to
the S-VIDEO jack on the TV.
The S-VIDEO connecting cable
will be supplied with the S-VHS
VCR (or Video Disc Player).
<_ Connect the AUDIO OUT
jacks R(ight) and L(eft) from the
VCR to the AUX IN1 jacks on the
TV.
@, Select the "S-VIDEO"
PICTURE SOURCE control.
With the FEATURES MENU on
screen, move the RED highlight
with the MENU (M)4_ buttons.
Then press the MENU button.
The "S VIDEO" picture source
_o?tion appears only when a S-
VIDEO cable has been connected
to the TV.
@, Turn the VCR ON and place it
in the S-VIDEO (or S-VHS)
playback mode. Insert S-VHS
cassette tape and playback in a
normal manner.
PICTURE AND SOUND FROM
PLAYBACK OF S-VHS VCR TAPE
FEATURE MENU
BACK OF TV
S-VHS VCR
Remember, after it is
_connected an easy way to
select the S-VIDEO mode is to
press the VCR button on the front
of the TV (or the TV/VCR button
on the remote.)
i[fyou have added VCR/AUX to
l:he TV's channel memory, just
press the CHANNEL A'_' buttons
_:oselect the S-VIDEO mode.
32
Page 33

PT"_heAudio/Video Output jacks
J- on the TV can be used to
record TV programs on VCRs
which have Audio/Video Input
jacks.
7b record TV programs by using
t_e Audio/Vid_io jacks on the TV:
@>Connect the VIDEO OUT
jack
i f:rom the TV to the VIDEO IN jack
an the VCR.
@, Connect the AUDIO OUT
jacks R(ight) and L(eft) from the
TV to the AUDIO IN jacks on the
VCR.
Select the "ANTENNA"
HCTURE SOURCE control on
the TV.
With the FEATURES MENU on
screen, move the RED highlight
with the MENU (M)I_, buttons.
"Ihen press the MENU button.
Select the channel on the TV that
you want to record.
@, the VCR ON. Put a
Turn
cassette tape in the unit and place
the VCR in the RECORD mode.
PICTURE AND SOUND BEING
RECORDED ON VCR.
VCR
Remember, If the VCR
has an INPUT SELECTOR
switch, place it in the LINE or
CAMERA position.
Unattended Timer Recordings
with a VCR are possible, but not
n.'commended with this
connection since the TV must be
left ON for the VCR to record.
33
Page 34

i
rave you ever played hide and
[seek with yc,ur remote
control? Are you tired of tearing
the house apart trying to find if
someone has stuffed the remote
under the couch, put it on the
shelves, or hid it in the desk? Well,
your TV remote can save you all
that looking by automatically
signaling its location to you.
Here's how it works:
1_ Press the POWER button on
the set to turn t_he TV ON.
Note: Normally you can press any
button on the front of the "IV to
tuna the set ON. But for the remote
locator to work you need to be sure
to use the Power button at the TV.
A "locating remote" message
shows on the "IW screen.
>Within a few seconds a
chirping or beeping sound will
begin to come from the remote
control hand unit.
The remote will continue to signal
its location for around 30 seconds.
Ncrmal TV program sound will not
be heard while the remote locator is
wc,rking.
_Once you find the remote just
press any button on the remote and
the:beeping sound will stop.
The remote is now ready for
normal TV feature use.
Remember, the remote
locator may not properly
receive its '%orning" signal from
the TV if it has been placed on a
metal shelf or counter material.
AJiso, since there's a special type
of radio frequency '%oming"
si?nal receiver inside the remote
we are required to notify you that
any changes or modifications not
expressly approved by Philips
Consumer Electronics Company
could void the user's authority to
operate the remote equipment.
IIII I Z
:ii!iiii_..
:.:.:+
:::::::::::..
!i_iiii!iiiiiiiiiii
::::::::::::::::
Remote Locator "homing"
range is around 30 Feet, i
SIR
[]
34
Page 35

<
<
For most homes this step would
not b_ needed but for your
inforr,_ation:
Up ,'o 9 different remote locator
address codes can be set on which the
TV car_ send out its "homing" signal.
This is done in case there is more than
one 73,"(with a remote ,!ocator)
present, and you want only one
specifi: remote to be signaled when the
737 is turned ON.*
To set a Locator Address Code:
>With TV turned ON, press the
LOCATOR CODE button on the
remote. (Also be sure the TV
SYSTEM button on the remote has
been pressed.)
Yo_ will need a pencil or pen to press
the recessed button.
The "DI shows the present Remote
Locatcr Code.
,_ Press any number button (0-9) on
the remote to set or change the Locator
Code.
The remote will beep to let you know
it has received the new Locator Code
and then return to its normal operating
mote.
above information on
how to use the Locator Code
Button for Programming.
Remember, if batteries are
replaced the Locator Code
will need to be reentered.
When setting the Locator Code if any
bu:ton, other than the number buttons,
are pxessed the remote: will return to
its normal operation mode.
*Far 9wners who live in an apartment
(townhouse or condominium)
complex, this task may be necessary
since the remote locator's signal can
be sent and detected directly through
adjoining walls.
35
Page 36

_egardless of what type of
Jt _kprogram your watching, your TV
has automatic video control settings
matched for your current program
source or content. The Smart Picture
J_ature quickly resets your TV's
video control:; for a number of
different type:; of programs and
viewing conditions you may have in
";our home.
c-ffffffra)
_> Press the SMART button on the
remote.
@) Press the (M) to
MENU button
select the Smart Picture feature
(highlighted in RED).
@) Press the MENU • or •
buttons to choose any of the preset
viewing calegories (Example:
Cartoons, Movies, etc.). Then press
Ne Menu (M) button to select the
highlighted control.
_) the STATUS button the
Press on
remote to clear the screen.
Remember, with Smart
_Picture "Custom" mode
selected you can set a number of
video contro]ts to your own
preference. Use the remote's Smart
button to reselect these personally
adjusted Custom settings contained
within the Smart Picture feature.
(See the nex! page for more detailed
instructions.)
The video control settings for the
Smart Picture categories (except
CUSTOM) are memorized into the
"IV at the factory and can only be
reset by field and service
technicians.
36
Page 37

O use the Smart Picture settings
ou placed in mentory (see
9revious page):
_ Press the SMART button the
on
remote.
List of "SMART PICTURE"
categories shows on the "IV screen.
_ Press the SMART button
repeatedly to highlight the Smart
Picture category you desire.
For example: press SMART
PICTURE to select "CUSTOM".
(See the "Change Label" section
below on bow to write new titles for
the Smart Picture labels.)
_) Press the MENU (M) button.
t
_) Press the MENU I_ buttons to
move the RED highlight to the
control your wish to adjust, then
press the Menu (M).
_) Press the STATUS button after
you have finished your adjustments
to clear the screen.
he "CHANGE LABEL" control
an be used to change the title of
a SMART PICTURE setting into a
,_ame or Iabei' that may be easier for
you to remember.
_) the "SMART PICTURE
With
]LABEL" conn-ol on the screen, press
the MENU AV buttons to spell out
a new label or title for the selected
SMART PIC'[qSRE.
_) Press the MENU • • buttons to
move the red highlight to each letter,';pace.
_) Press the STATUS button to
(:lear the screen when the new label is
]nished.
%
ggg
@og?
i?:
L
4,
SMART PICTURE MENU
P
L
I
I
i
!
I
,j
i
J
c...m
SMART PICTURE MENU
URE LABEL
(_) or (_ to SELECT
when FINISHED
37
Page 38

Are you tired of the sound of
1-1 commercials following you
i,_to the next room or all through
t_e house? Smart Sound allows you
tO preset a desired volume level
t,_at the TV sound will not go
c'bove. This makes for an even,
more consiste,at sound by reducing
the "peaks" and "valleys" that can
occur during program changes or
commercial breaks.
_ Press the SMART button on
the remote.
_> With the SMART Menu on
the screen, move the RED
Ab.
highlight with the MENU 4+-_
buttons. Then press the MENU (M)
button to select the highlighted
Smart Sound control.
_> Press the MENU or
and
Jthen the MENU (M) button to turn
the Smart Sound control ON (or
OFF).
_> Press the STATUS button to
clear the screen when completed.
Remember, Smart Sound
works for sound levels
coming from either the
Antenna/Cable input on the rear of
daeTV (RF audio); or the
.Auxiliary (VCR/AUX IN) audio
inputs.
H_P'L"-"'Ho:_ !' _"._,
I ......__...I
]i:ii:ii
: :::'.. :::
:::::::::::::::::::
@ 87
38
Page 39

A ,,list,, or series of previously
.[1 viewed d_annels can be selected
with the SURF button on your remote
control. With this feature you can
easily switch bebveen different TV
programs that currently interest you.
The Smart Surf control allows you to
set up to 10 channels in its quick
viewing "list".
[n
_) Press the Smart button on the
remote.
_> With the SMART Menu on
screen, move the RED highlight with
the Menu (M) _} buttons. Press the
v
MENU button to select the
highlighted Smart Surf control.
_) Press the Menu • then the
V,
or
Menu (M) button to select either
Smart Surf oi"2-Channel Surf. (See
explanation of Surf options with the
illustration all this page.)
_ Press STATUS button the
on
remote control to clear the screen.
--'_ . ,3' _iiiiii:ili:
2 % :::::::::::::::::::::::::::::::::::::::::::::::::::
2 CHANNEL SURF- Current and
one previous channel in the ring.
SMART SURF - Current and up to
nine additional channels available in
the ring. Note: The Channel Surl
ring can be used wilh fewer than ten
channels. In Ibis way. the number of
Surf channels can match or fit your
presenl viewing interests.
To Use 2-Channel
Surf:
With the 2-Channel
Surf control ON,
select the two desired
channels for viewing
with the number
buttons on theremote
control.
Press the SURF
button on the remote to
"toggle" between the
two selected channels.
l
_) With the Smart Surf control
ON (see above), select a desired
channel for viewing. You can use
the number buttons on the remote (or
B 4<_"
.-.-:
5 to L_st
::_iii{!
::.:::=:::::;::::::::::::::;:::::::::::::::::::::::::::::::::::::::::::::::::::::::::::::::.>..
:: :::::::::: ::: :.::::::::::::::::::::::::::::::::::::::::::::::::::::::::::::::::::::::::::_i_:_:::_:_:_:_:_¢.
.....
1_ ".o,
_a
the Channel •Y buttons).
_) Press the SURF button on the
remote. (Some channel numbers
[ may already appear within the Surf
channel list.)
_@) Press the Menu button to "ADD"
the selected channel to the Surf list.
Select the next desired channel and
repeat steps 2 and 3. Continue until
all desired channels are on the Surf
list.
_) Press the SURF button on the
remote to quickly review current
action on channels contained within
the Surf list.
<
ggg
.' /\ _,
\
39
Note: To Delete a channel from
the Surf list just press the SURF
button to select the desired
channel. Then press the Menu
button and the channel will be
immediately dropped from the
on screen Surf list.
Page 40

ur remote control is set to
york your TV and many
infrared remote (IR) control
VCRs. However, an easy one-
6me step may be necessary
,before the remote will work your
VCR.
Try this initial check to see if
going on to tk,,efollowing section
is necessary.
_ Press the VCR System
button on the remote.
_> Point remote toward VCR
I and press the POWER button.
_> Does the remote turn the VCR
ON?
IF YES, I_ and try the other
VCR buttons on the remote. If
they also work the VCR, then
the remote is ready and no
further steps are needed.
If NO, continue...
_ First look up a TWO-DIGIT
l emote code number for your
brand VCR before going through
the simple "1,2,3" steps (on the
following page).
continue to next page
Remember, if more than
l _ one number is listed, you
may have to u-y more than the first
two-digit code given in order to
locate your VCR's remote code.
VCR
ENTER
VCR REMOTE
BRAND CODE NO,
Akai 24, 25, 36
Capehart 33
Conoid 13
Curtis Mathes 42
Daewoo 33
Emerson 20, 31, 34, 40
Fisher 06, 07
Goldstar 23
Go Video 45, 46.
Hitachi 03, 51
JVC 14, 47, 48
Magnavox 00, 05
Matsushita 01,02
Mitsubishi 16, 17, 38, 39, 50
Multitech 27,28
NEC 21
VCR REMOTE'_
BRAND _CODE NO,
Panasonic 01,02, 52
Philips 00, 05
Philips Video CD 37
RCA 04, 32, 42, 43, 44
Samsung 22, 30
Sansui 49
S anyo 13
Sears 08
Sharp 11, 12
Shintom 35
Sony 09, 10,41
Teknika 26
Toshiba 18, 19
Video Concepts 29
Zenith 15
J
40
Page 41

w that you have looked up
• he two-digit Remote Code
Number for your brand of VCR
(on previous page), you are
ready to follow the four simple
steps below.
Please read through steps 1-4
before beginning.
@; Press and release the REC
(RECORD) button.
@, Within seconds after
thirty
releasing the REC button, press
and release the VCR System
button.
@_ Within thirty seconds after
releasing the VCR System
button, ENTER THE TWO
DIGIT CODE NUMBER for
the desired VCR. The remote is
now ready to send commands to
the VCR.
_ Point the remote at the VCR.
_ Press the POWER button on the
Try it out. The Channel
_ and VCR buttons on the
remote should now operate the
VCR.
Remember, if this doesn't work
the first time, repeat steps using
the same remote code number.
If after a second try the remote
does not operate your VCR, and
there are more code numbers
listed for your brand VCR, use the
next listed code number.
If after repeated attempts the code
number method does not work
your VCR, try the "VCR
SEARCH" method on page 44.
VCR
STOP •
8 8
41
Page 42

"]_7"our remote control is set to
J[ work your IV and many
infrared remote (IR) control
Cable Converters. However, an
easy one-time step may be
necessary before the remote will
work your Con verter.
Try this initial-check to see if
going on to the following section
is necessary.
_, Press the CBL
System
button on the remote.
)Point remote toward Cable
Converter and press the POWER
button.
, Does the remote turn the
Converter ON?
I F YES, _1 and try the CH • •
and CH number buttons on the
n;mote. If they also work the
Converter then the remote is
n_'ady and no farther steps are
needed.
It" NO, continue...
_Cable
Convert_
I I
@ First look up a TWO-DIGIT
remote code number for your
brand Converter before going
through the simple "1,2,3" steps
(,an the following page).
continue to next page
Remember, if more than
one number is listed, you
may have to wy more than the first
two-digit code given in order to
loeate your Converter's remote
code.
CONVERTER REMOTE
BRAND (_0DE NO,
Archer 28
Diamond 23
Drake 37
Gemini 45
Hamlin 14, 15
Hitachi 25
Jerrold 00,01,02.03,04,05,46,55
Macom 29, 38
Magnavox 17, 31
NSC 49
Oak 06, 27, 39
Panasonic 18, 35
Philips 19.20, 21,24, 26
Pioneer 09, 32
Regency 10, I 1
%
CONVERTER REMOTE
BRAND CODE NO.
Rembrant 33
Salora 52
Scientific Atlanta 08, 22, 47
Sheritech 34
Starcom 30
Sylvania 16
Texscan 48
Tocom 12,13, 53
Toshiba 43
Uniden Satellite 44
Unika 50
United Satellite 54
Universal 36
Video Tech 40
Video Way 51
Zenith 07, 41, 42
42
Page 43

m
c/w that you have looked up
he two-digit Remote Code
Number for your brand of Cable
Converter (on previous page),
you are ready to follow the four
simple steps below.
Please read through steps 1-4
before beginning.
(--eEG-ff_')
@> Press and release the REC
(RECORD) button.
@> Within thirty seconds after
releasing the REC button, press
and release the CBL System
button.
@_ Within thirty seconds after
releasing the CBL System
button, ENTER THE TWO
DIGIT CODE NUMBER for
the desired Converter. The
remote is now ready to send
commands to the Converter.
@a Point the remote at the
Converter. Press the POWER
button on the remote to turn the
Converter ON.
Try it out. The Channel
and POWER buttons on the
remote should now operate the
Converter.
Remember, if this doesn't work
the first time, :repeat steps using
the same remote code number.
If after a second try the remote
does not operate your Converter,
znd there are more code numbers
listed for your brand Converter,
use the next li,sted code number.
If after repeated attempts the code
r_umber methcd does not work
_our Converter, try the
"CONVERTER SEARCH"
method on page 44.
Cable Convener
I I
STOP •
43
Page 44

our TV remote can be set to
,ork your VCR or Cable
Converter by what is called the
SEARCH mei'hod.
lf the "REMOTE CODE" number
method shown in the previous
section did not-set your remote to
work your VCR or Converter, then
follow the easy steps listed below.
Please read through steps 1-4
before beginning.
_> Press the POWER button on
I he VCR or Converter to turn theunit ON.
_> Stand at least six feet away
from the front of the VCR or
Converter.
Point the remote toward the unit.
HOLD DOWN the SURF and
the desired System (VCR or
CBL-Converter) buttons at the
same time. KEEP HOLDING
BUTI'ONS DOWN.
> Watch the Channel Indicator
on the unit.
Channel Numbers will SCAN UP
when the unit has been identified.
This may take up to two minutes.
_> Release the SURF and System
(VCR or CBL) buttons as soon
as channel numbers start to scan
up. The code has been identified
and the remote is ready to operate
with the VCR or Converter.
Remember, a minute or
__two can seem very long, but
the code should be located within
two minutes.
Don't let the VCR or Converter
scan up more than five channels.
The remote may pass up the right
code and another two minute
search cycle will have to be
repeated.
If no channel change happens
within two minutes, repeat steps 1-
4. Should a channel change still
not occur, the remote will not
work with the desired unit.
CABLE CONVERTER
44
Page 45

the TV remote
with a VCR, first make
certain it is set to control your
VCR ( by the REMOTE CODE or
SEARCH method - see earlier
section).
<_ Press the VCR System
button on the remote.
_ Point the top of the remote
toward the front of the VCR
(remote sensor window) when
pressing buttons.
Record Button
H31d the RECORD button down, and
then press the PLAY button to begin
a VCR recording.
Rewind Button
Press to rewind tapes. For some
VCRs you may need to press STOP
button first then REWIND. In
playback mode. hold button down to
view picture moving rapidly in
reverse.
Pause Button
Press to temporarily stop the tape dur-
ing a playback, or recording. Press
again to release Pause.
J'V-VCR Button
Press to the VCI_: position ("VCR"
indicator on the VCR will light) to
view the playback of a tape. Press
again to place in the TV position
("VCR" indicator on the VCR will go
OFF) to view one program while
recording anolher program.
When used with the TV the TV/VCR
button works as a source button. Each
press cycles the "IV between channels
3 and 4; the last view channel; and
any AUX(iliary) Input mode (if it has
been connected.) It is a quick one-
button way to seect these channels
and modes (without directly entering
the TV's Menu system.)
PiP
/
D E
•Play Button
Press to playback a tape. Hold down
after pressing the RECORD button to
sta_-t a recording.
Sto_l:!Button
Press to stop the tape.
- Fast Forward Button
Press to rapidly advance the tape. For
sorae VCRs you may need to press
STOF first then FF. In Playback
mode hold button down to view the
picture moving rapidly in the forward
direction.
-Channel Scan Buttons
Press to scan up or down through
VCR channel number.,',.
Number Buttons
Press buttons for direct VCR channel
select ions.
V_I System Button
Press to send remote commands to
the VCR.
Po_er Button
Press to turn the VCR ON and OFF.
Remember, the VCR
__ buttons on the remote will
not operate your VCR if those
featt res are not already found on
your VCR remote control.
Note: All VCR functions
(particularly Search, Rewind, Fast
Forward, etc.) will operate the
same as with the original VCR
remote control provided with the
VClq:.
45
Page 46

_icmre in Picture (PIP) is the
showing of two pictures on the
TV screen at the same time. (One
main screen picture and one small
inset picture - or PIP).
Note: The PIP picture must be
supplied by a VCR (or other
accessory equipped with a VIDEO
OUTPUT jack). If you already
went through FIRST TIME SETUP
(in the Quick-Use Guide), then the
connections for PIP have been
completed.
To see how channels selected on a
VCR can be shown as PIP:
Connect the VIDEO OUT
jack on the VCR to the
VCR/AUX VIDEO IN jack
(_ellow) on the TV.
Also connect die AUDIO OUT (R
and L) jacks from the VCR to the
VCR/AUX AUDIO IN jacks (red
and white) on the TV.
Also be sure the normal antenna
connection between the VCR and
TV are in place.
<_ Move to the next page after
file VCR to TV PIP connections
are completed.
MAIN PIP
SCREEN_
\ It, I
J
LllL I
tl
BACK OFTV
OUTDOOR UHFiVHF
ANTENNA
Q
ANT IN
CABLETV
SIGNAL
VCR
AUDIO OUT
(RED/WHITE)
AUDIO/VIDEO
CABLES
SUPPLIED
For ot_herpossible PIP
connections see page 52 for
die "More PIP Connections"
section.
II'you have a single (monaural)
Audio Output VCR, "Y"
connectors are available to
complete your connection.
Contact your dealer, or our Parts
hfformation Center (1-800-292-
6066), for details.
46
Page 47

_tw that you have completed
. he required connections on
:he previous [,age you are ready to
follow the simple steps shown
below.
@, the VCR and TV ON.
Turn
Place the VCR-in the TV mode -
Use the TV/VCR button on
the VCR (or on the TV remote
if ithas been set to work with
your VCR - see page 40.)
Place the TV's PIP INPUT
control to "VCR/AUX"-
With FEATURES MENU (4
of 4) on screen, move the RED
h_hlight with the MENU (M)
,I-), buttons. Then press the
v
MENU button.
Press the MENU Ay and
MENU (M) buttons to
highlight and select the
"VCR/AUX 1" 0!) item.
@' Select the channel on the VCR
Loview in the PIP window.
Select the channel on the TV to
view on the main screen.
@_ Press the PIP ON/OFF button
on the remote.
The PIP window should show in
one of the corners of the TV
screen.
Remember, if you see the
@ same piclure on the main
screen and in the PIP window, you
r_eedto be sure the TV's PIP
Picture Source control (page 50) is
set to "VCR/AUX".
No sound will be heard with the
FqPpicture. See page 48 on how
to "SWAP" the PIP picture with
the main screen picture so that
sound can be heard.
Also see the following page on
how to operate: other PIP features
with the remote control.
VCR IN '"IV MODE"
(VCR Indicator Light will go out)
12:00 *-
1
VCR - FOR PIP CHANNEL
VCR
SELEC'IqSD
CHANNEL
TV
SELECTED
CHANNEL
r
Be sure to point the remote at the
front of the VCR when pressing
VCR function buttons.
PIP SOURCE SELEC3
]
PiP INPUT CONTROL SET TO "VCR/AUX 1"
I'_ - [OR MAIN SCREEN CHANNEL
47
Page 48

]_y using _he PIP buttons on the
l._ remote the PIP picture can be
moved and swapped with the main
screen. The main screen picture
can also be frozen in the PIP
window.
,,_) Press the PIP-ON button to
show the PIP picture.
PIP appears in a corner of TV
screen. Press PIP ON again to
remove PIP fram the main screen.
_, With PIP the TV
on screen,
press the SWAP button to swap
the main screen picture with the
PIP picture. See "Smart Help"
note on this page.
@_ Press FREEZE hold the
to
current MAIN screen picture in
the PIP window (Main picture is
still active).
If PIP is currently OFF, the PIP
window will automatically appear.
Press FRZ repeatedly to update
the frozen PIP with current
pictures from the Main screen.
You cannot reposition or swap a
:2rozen PIP picture.
Press the PIP ON button to drop
:he frozen PIP picture from the
:screen.
> Press PREVIEW (P/rUE)
button to see what is showing on
three channels. P/VUE starts with
the current channel and shows the
next two channels in memory.
Every few seconds each P/VUE
picture will be updated with a
current scene for that channel.
Press P/VUE again to go to the
next three channels in memory
and so on. Just press the number
buttons to select any previewed
channel.
Press PIP ON/OFF button to clear
the screen and return to normal
viewing.
I. PIP ON / OFF
2. PIP SWAP
3. PIP FREEZE
.....
Remember,
if the TV is
showing a
"VCR/AUX"
supplied picture on
the main screen
(when the TV and
VCR are turned
OF[:), a blank
screen will appear
when the TV is
turned back ON
again.
If _tis happens, just
press the CH(annel)
• or • buttons to
select a TV station
for :nornmlviewing.
1 .,mlllmm-
Ji_--_ Press P/rUE for
12 more channels.
_==_ Press PiP ON/OFF
1_113 to return.
4. PIP PREVIEW (P/VUE)
48
Page 49

_hePIP REPLAY buttons on the
remote can be used to store and
then replay live action occurring on
the main TV screen. Two Replay
Mode settings also allow you to
view longer Replay segments (about
8 seconds), or big_her resolution
segments with shorter replay
duration time (about 4 seconds).
You can even watch the stored
Replay in Slow Motion.
<_ Press the CLEAR (CLR)
button on the remote to store the
current TV scene into Replay
memory. "Loading Replay Memory
shows on the TV screen.
<_ Press the REPLAY button to
view the stored TV scene action in
the PIP window.
Replay continues to repeat the TV
scene stored in memory.
<_ Press the SLO(motion) button
to view the Replay scene in slow-
motion.
<_ Press the REPLAY button to
drop the Replay Window from the
TV screen. (Or press the CLR
button to drop the current Replay
and begin to store a new Replay
segment into memory.)
rrrhe Replay Mode settings
.J[ allow you to choose either
h_!gher video resolution segments
(with shorter replay time); or
longer lasting Replay segments
that have less video detail than the
high resolutior, setting.
Select REPLAY MODE
control.
With the FEA3qJRES MENU (4
of 4) on screen, move the RED_'I.
highlight with the MENU (M)
buttons. Then press the MENU
button.
<_ Press the MENU AV buttons
___fftc, move the RED highlight. Press
the MENU button to select (t.J)
_edesired Replay mode.
REPLAY WINDOW
s continue to
PLEASE WAIT
LOADING REPLAY MEMORY
b
LOADING REPLAY MEMORY
Press the CLR button to ]
Load or store new scenes
into memory.
__ • L
FEATURE MENU
I
H, Es;7 1
49
Page 50

rl'Vhe picture for the PIP window
J[ can come through either the
ANT/CABLE or VCR/AUX Inputs
'on the rear of the TV). PIP Picture
Source simply tells the TV which
one of these sources it is to show in
!he PIP window:
_' Select PIP SOURCE
control.
With FEATURES MENU (4 of 4)
on screen, move the RED highlight
with the MENU (M) _ buttons.
Then press the MENU button.
* Press the MENU AY and
MENU (M) buttons to highlight
and select either the ANTENNA or
VCR/AUX (v") item.
VCR/AUX1- for a picture signal
coming from the
VCR/AUX IN
Audio/Video jacks
on the TV.
ANTENNA- for a picture signal
coming from the
ANT/CABLE Input
on the TV.
_a Press the STATUS button to
(:lear the screen.
he PIP Position and Size
ontrols allow you to move
and resize the PIP window on the
TV screen so as not to block any
TV screen action
_ Select PIP POSITION or PIP
SIZE control.
with the FEATURES MENU (4
of 4) on screen, move the RED
highlight with the MENU (M) _
buttons. Then press the MENU
button.
_ Press the MENU AV buttons
to move the RED highlight. Press
the MENU button to select 9")
the desired Position and Size that
you want for your PIP window to
appear.
FE ATLII_ MENU
I'oF'W.-_d.
iii iil
:EATUIR_ MENU
H_J._H ]UR
_J
-- FEAqJRE MENU -
C,:'_ dEL
_3 b#_'.-_
-- FEA"URE MENU
RE_A¢
Y
PIP
PIP
4 0F 4,_
__ • L
I- .........
!
-- p_ gzE
L]s_L
-- FEATUFI_ KA_NLI
!
!
V
-- pip _TION
LCW_n _r
U_ _,_T
L_n _GHT
PIP SIZE (Large or Small)
PIP POSITION
5O
Page 51

he Picture-In-Picture (PIP)
olor and Tint controls are
used to make fine tune adjustments
to the color settings for PIP (when
it is shown on the TV screen).
_ Select PIP COLOR (or PIP
TINT) control.
With PICTURE MENU (2 of 2) on
screen, move the REDhighlight
with the MENU (M)4;J' buttons.
Then press the MENU button.
_ Press the MENU Ay buttons
to move the RED highlight. Press
the MENU button to turn (u,") the
PIP COLOR or TINT control ON.
The PIP automatically comes on to
show the PIP window on the TV
screen.
@> Press the (+) and (-) buttons to
adjust the PIP for Color (or Tint)
levels you prefer.
@> Press the STATUS button to
_lear the screen.
Remember. Although
there are separate COLOR
and TINT controls for PIP, the
adjustment levels for these
controls depend on the TV's main
]picture. For example: If the main
screen is showing a black and
white picture, PIP would also be
Jn black and white (even though
its source is in color).
...... 7 i i iiiii!ii !iii i i iiiii i i iiiiiiii iiii iiiiiii!;iiiiiiiiiiiiiiiiiiiiiiiiiiiiiiiiiiiiiiii !iiiiii iii ! i > ..............
::::::::::::::::::::::::::::::::::::::::::::::::::::::::
_, PICTURE MENU
'o_'2
i_ili
i:iiiiil
_= P!qTp_ MENU
_ .(.&LJ.CL.J.........
20F2_
51
Page 52

_ plP hookup with Cable
J[ Converter Box and VCR.
_> First use an optional signal
splitter and connect the original
cable TV signal to both the
CABLE IN on the Cable Converter
and the ANTENNA plug on the
rear of the TV.
_) Connect tile CABLE OUT on
the Converte; to the ANT. IN on
the VCR.
!_ Connect lhe VIDEO OUT
jack on the VCR to the VIDEO
INjack on the TV.
Also connect the AUDIO OUT (R
and L) jacks from the VCR to the
AUDIO IN jacks on the TV.
F
ANTK
Z5_U
REAR OF TV
Remember
to use the Cable TV
Converter Box to
select channels for
PIP.. the VCR must
be set to the same
chaJmel as the
I chaJmel selection
switch on the rear of
the Cable Converter
(either channel 3 or
4).
Contact the Parts
Informalion Cenler
I 800 292-6066
to order any optional
accessories
OUT
©
VIDEO R AUDIO
IN i
CABLE IN
AUDIO VIDEO
CABLES SUPPLIED
VCR
[i I
(?ABLE TV CONVEP, TER
52
Page 53

he n screen HELP menu
rs both Operating Tips and
a list of Glossary definitions for
different features on your TV.
These items are given to provide
you with more information and
details on a select group of feature
operations. -
c-fi-ffffrm
.......... ,....,....
<x,,3.,i Select "HELP" on the TV's
Main Menu.
Press the remote's Menu I_F
v
buttons to move UP/DOWN and
from SIDE-TO-SIDE within the
list of on-screen features.
Press MENU (M) to select the
highlighted "HELP" item.
<_2,_ Press the MENU AV and
then the MENU (M) buttons to
select either the OPERATING
TIPS or GLOSSARY item.
MA_N MENU
siiiiiiii
iiiiiiiiiiiiiiiiiiiiiiiiiiiiiiill_ FiEL :_ MENU __
iiiiiiiiiiii}iiiiiiiiiiii}iMi_AE_T'IJ'P"i nsta aten
:: iiiiiiiiiiiiiiii, ,'===,'=v7-777
_i_iiiiiil-_?ATIONG TIPS_For Problems
;i_i , / , i , _ ,
G_c_N Of TV Features
rr rl
=== 3PI:RATING TIPS
dE.ING OPERATING TIPS
• Use tile • and • ke_s on
,/ou" remote to scroll
!_rough the different
help items.
• Use the "M" key on
,/our remote will go back
Ix) t_e help menu.
FOLLOW THE ON SCREEN
E IRECTIONS TO VIEW
OPERATING TIPS
To ensure that picture screen
performance is of the highest quality
you have been provided with a
Projection TV Screen Cleaning System.
The Screen Cleaning system consists of
a Magnetic (_'leaning Cloth (designed to
remove dust particles from the screen)
and a special type of Cleaning Fluid
formulated to cut through oily
fingerprints and smudges.
Your Projection screen is made of
thousands of"vertical ridges that help
enhance and define the color television
images you view on the screen. These
ridges can collect airborne dust which
reduces the clarity and brighmess of
your TV picture. The Magnetic
Cleaning Cloth works well enough
alone to remove dust from your screen.
If the screen is very dirty from smudges
and residue, then the Screen Cleaning
Fluid should be used.
Remember,
the supplied
Screen Cleaning
Fluid should
53
never be sprayed
direcdy onto the
Projection TV
screea. It should
be applied
directly to the
Magnetic
Cleaning Cloth
and then wiped
onto _he screen's
vertical ridges
(with a top-.to-
bottom
downward
motion stroke).
Page 54

i_}lease make these simple
checks before calling for
service. These tips can save you
time and money since charges.for
7"9 installation and adjustment of
cuxtomer comrols are not
co'_ered under your warranty.
"'1
Cleaning
No Power
No Picture
No Sound
Remote Does Not
Work
TV Displays Wrong
Channel or No
Channels Above 13
CAUTION: A video source (such as a video game, Compact Disc Interactive - CDI, or
"IV information channel) which shows a cons;taut non-movino pattern on the TV screen,
can cause picture tube damage. When your TV is continuously used with such a source
the pattern of the non-moving portion of the game (CDI, etc.) could leave an image
permanently on the picture tube. When not in use, turn the video source OFF. Regularly
alternate the use of such video sources with normal "IV viewing.
i heck the "IV power cord. Unplug the "Iv', wait 1 minute, then reinsert plug into outlet
and push POWER button again.
Check to be sure outlet is not on a wall switch.
ii
Check antenna connections on the rear of the TV. Are they properly secured to the
antenna plug on the TV?
Check the CABLE TUNING control for correct position
Check PICTURE SOURCE control for correct position VCR/AUX, AUX 2, or AUX 3
position without a signal source will result in a blank screen.
Check the CLOSED CAPTIONS control Some TEXT modes could block the screen.
Check the VOLUME and MUTE buttons on the TV and remote.
Check the TV SPEAKER NORMAL/OFF control for the correct position.
If attempting auxiliary equipment hook-ups, check audio jack connections and that the
auxiliary equipment is on and in the proper operating modes.
i heck TV-VCR-CBL "'System" buttons on the remote. Press the remote's TV System
button to send commands to the "IV; VC__R_System to serLt ta VCR; etc.
Check batteries. Replace with AA Heavy Duty (Zinc Chloride) or Alkaline batteries
if necessary.
Clean the remote and the remote sensor window on the TV.
_ Repeat channel selection. ]
I" Add desired channel numbers (ADD/DELETE CHANiVELS control) into TV memory.
I
_r correct position_ --
This TV is equipped with protective circuitry that shuts the TV off in case of moderate
power surges. Should this occur turn the 'FV back on by pressing the POWER button
once or twice, or unplug and then replug the power cord at the AC outlet.
This feature is NOT des gned to prevent damage due Io high power surges such as those
Icaused by lightning, which is not covered by your wan'ant).
and Care
To avoid possible shock hazard be sure the TV is unplugged from the electrical outlet before cleaning.
When cleaning the TV screen take care not to scratch or damage the screen s_afface (avoid we aring jewelry or using
anything abrasive- do not use household cleaners). Wipe the front screen with a clean cloth dampened with water. Use
even, easy, vertical strokes when cleaning.
Specially designed screen cleaning kits are also available which contain anti-static cleaners and cloths designed to get
into the:ridges of theTV screen. If interested, ask your dealer about the MAG4600 Projection TV Screen Cleaning Kit or
call our toll-free Accessory Parts ordering number 1-800-292-6066.
Gently wipe the cabinet surfaces with a clean cloth or sponge dampened in a solution of coal :'.lear water and a mild soap
or detergent. Use a clean dry cloth to dry the wiped surfaces.
Occasionally vacuum the ventilation holes or slots in the cabinet back.
Never use thinners, insecticide sprays, or other chemicals on or near the cabinet, as they might cause permanent marring
of the cabinet finish.
54
Page 55

A/V Inputs * Connector plugs which allow the introduction of
distinct audio and video signals into the TV from accessory
VC?,s, camcorders, etc. These plugs bypass the normal tuner or
RF/Antenna signal circuitry.
Coaxial Cable * A single solid antenna wire normally matched
with a metal pluG (F-type) end connector that screws (or pushes)
directly onto a 75;Ohm input found on the Te_vision or VCR.
Display * An on screen message or graphics that help the user
operate and adjust his Television feature controls. See On
Screen Displays (OSD).
Direct Audio/Video Inputs * Located on the rear of the TV
these connectors (RCA phono type plug) are used for the input
of audio and video signals. Designed for use with VCRs (or
other accessories) in order to receive higher picture resolution
and offer sound connection options.
Identify* Method by which a remote control searches and finds
an operating code for another product (such as a VCR or Cable
Convener). Once, the code has been "identified" then the TV
remote can operate and send commands to the other product.
Multichannei Television Sound (MTS) * The broadcast
standard that allc,ws for stereo sound to be transmitted with the
TV picture.
On Screen Displays (OSD) * Refers to the wording or
messages generated by the television (or VCR) to help the user
wit31specific feature controls (color adjustment, programming,
etc.).
Menu * An on-screen listing of feature controls shown on the
Television screen that are made available for user adjustments.
Picture -In-Picture (PIP) * Term used when two pictures are
shown on the TV screen at the same time. The smaller PIP
picl:ure issupplied by a VCR (or other tuner/video playback
source). The PIP picture can also be moved and swapped with
the TV's main screen picture.
Pre-Amplifier * The control center of ahi-fi system. Not
only amplifie:; source inputs, but also allows for source
selection, volume, tone, balance and all other controls that
affect the souncl.
Programming * The procedure of adding or deleting channel
numbers into the Television's memory circuits. In this way
the Television "remembers" only the locally available or
desired channel numbers and skips over any unwanted
channel numbers.
Remote Sensor Window * A window or opening found on
the Television control panel through which infrared remote
control command signals are received.
Second Audio Program (SAP) * Another or additional audio
channel provided for in the lVlultichannel Television Sound
(MTS) broadcast standard. "lqaemost frequently proposed use
for SAP is the simultaneous bilingual broadcast of TV
program material.
Status * Allows the user to quickly confirm what channel
number is CU_Tently being viewed. Status can also be used to
clear the Television of on scree_a displays or information
(rather than waiting for the displays to "time out" or
automatically disappear from the screen).
S-Video Input * Allows direct connection of high-resolution
video sources, such as a Super VHS videocassette recorder,
Laser Disc player, etc. Provides optimum picture resolution,
sharpness, and clarity.
Twin Lead Wire * The mon.• commonly used name for the
two strand 3_1 Ohm antenna wire used with many indoor and
outdoor antenrm systems. In ;nany cases this type of antenna
wire requires an additional adapter (or balun) in order to
connect to the 75 Ohm Input terminals designed into the more
recent Televisions and VCRs.
Variable Audio Output * An adjustable audio output which
allows for volume variations at the source.
fib
Page 56

IgO
Accessories/Optiortal ............. 10, 27, 28-29, 46, 52, 60, *Q/U-1
Adapler Connector .............................................. 46, 52, *Q/U-I
Add/Delete Channels .......................................... 13-14, *Q/U-2
Advmlce Buttons ........................................................ *Q/U-2, 4
Audio Controls .................................................................. 24-26
Audio/Video Input ................................... 30-33, 46, 52 *Q/U-2
Automatic Programming .................................. _ ..... 13, *Q/U-2
Battery Installation .......................................................... *Q/U-3
Cable TV Connections/Settings ................ 12, 46, 52 *Q/U-I, 2
Channel/Time Display ........................................ 19, 22, *Q/U-3
Channel Memory ................................................. 13-14, *Q/U-2
Charmel/Time Reminder ......................................................... 19
Clock Setting .......................................................................... 15
Clock Timer ............................................................................ 16
Closed Captioning .................................................................. 1!
Color' Controls .............................................................. 6,*Q/U-4
Convergence .............................................................................. 8
Controls/TV ............................................................ *Q/U-2, 3, 4
Controls/Remote .............................. 34-45, 48-49, *Q/U-2, 3, 4
Exit ................................................................................. *Q/U-4
Features ..................................................................................... 5
First Time Set Up ........................................................... *Q/U-2
Ghost Cancellation .................................................................... 9
Glossary/TV Terms ................................................................ 55
Help Menu ............................................................ 53, *Q/U-2, 4
Help Line Information .......................................... 1,54, *Q/U- 1
Inputs/Audio and Video ........................................ 30-33, 46, 52
Menu ........................................................................... *Q/U-2, 4
Minus(-)/Plus (+) Buttons ........................................... *Q/U-3, 4
Parental Control ................................................................. 20-21
Picture-In-Picture (PIP) ....................................... 46, 52, *Q/U-2
Power Light Indicator ...................................................... *Q/U-3
Precautions/Safety ....................................... 2, 3, 54, 59, *Q/U-I
Programming Channels ............................................ 13, *Q/U-2
Remote Control ................................. 34-45, 48-49, *Q/U-2, 3, 4
Remote with VCRs ................................................ 40, 41, 44-45
Requesting Service ............................................... 54, 57-58, 59
RF Coaxial Cable .............................................. 46, 52, *Q/U-1
RF Switcher ............................................................................ 10
Reminder/Time and Channel .................................................. 19
Remote Locator .................................................................. 34-35
Safety/Precautions ...................................... 2, 3, 54, 59, *Q/U-1
Second Audio Program (SAP) ................................................ 25
Sensor Remote ................................................................ *Q/U-3
Sleep Timer ............................................................................. 17
Smart Picture ..................................................................... 36-37
Smart Sound ............................................................................ 38
Status Button .............................................................. *Q/U-3, 4
Surround Sound ................................................................. 28-29
Speaker Terminals .................................................................. 28
Time/Channel Display ........................................ 19, 22, *Q/U-3
Timer (Turn On) ..................................................................... 16
VCR Button .............................................................................. 45
VCR/TV Connections ............................. 30-33, 46, 52, *Q/U-I
Tips for Service ........................................................... 54, 57-59
TV Speaker Control ................................................................. 28
Volume Display ...................................................................... 26
Warranty ................................................................................. 59
* InfoEmation contained in Quick-Use (Q/U) Guide - page listed
56
Page 57

Philips Consumer Electronics Company
Factory Service Center Locations
icoma Area
See Reverse Side for More Details.
Detroit/Toledo,
Fl'ancisco/Metro Area
ge,e sa0D, o
• PhoenixJMetro Area
f
Rockford
f
Chicago
Dallas/Ft. Worth
_ Houston/Galveston
Beaumont/Austin
San Antonio
• ColumbusiDaytonlCincinnat_i j
Charlotte
• \ /
AtlanteiN Georgia
_f_ Boston/S Maine/
New Hamps]_ire
\_<Ha_ford/Rhode Island
_'_le_v'YorkJMetro
<\ '_1 New Jersey
• P_hila,delphia/S New Jersey
ng':ordBaltimoreiRicl_ mond
• OrlandolN Florida/SE Georgia
\
TampaJW Florida
_,,Fjt.Myers/SW Florida
Miami/SE Florida
NOTE:Ifyou residein one of our Philips FactoryServiceBranch areas (seedirectory onback),you can contact the nearestServiceBranch to obtain
efficient and expedient repair for your product.If your product is In-Warranty, you should haveproof-of-purchase :o =;nsureNo Charg{;Service.
For Out-of-Warranty service, call the location nearest you.
NOT,#`:Si vous r_siclezclansune des r_gions desservies par une succursale de serviceaprOsventedu fabricant Philip,,;(voir listeci-dessous), vous
pourrez contacter 12branchede service apresvente la plus pres de chez vous pourobtenir un service apresvente fapide et efficace. Si le produit est
sous garantie, il suffira depresenter unepreuved'achat pour b_n_ficier d'un service sansfrais. Pourles produits noncouverts par la garantie,
contactez ]e centre le plus prosde chezvous.
NOT#,:Si Ud. resideen una de nuestraszonasparasucursales Philips de servicio al de f_brica (vet directorio rn_sabajo), Ud. puedecomunicarse con
la sucursal de servicio m_s cercanaparaobtener una reparaci6noportuna y eficaz de su producto. Si su producto est_todavia bajo garantia, Ud. debe
presentar comprobante de compra parano ocasionar ningunos cargos por servicio. Para servicio despu_s del vencir_iento de la garantia, Ilameal
luga" m_s cercano delos abajo indicados.
V_
MAC;_J29 8/95
r.-
57
EL4482-3 Rev. 0
Page 58

QUALITY SERVICEIS AS CLOSEAS YOURTELEPHONE!SIMPLY LOOKOVERTHELIST BELOW FOR THE NUMBER OF:AFACTORYSERVICECENTER
NEARYOU. YOUR PRODUCTWILL.RECEIVEEFFICIENTANDEXPEDIENTCARRY'IN, MAIL'IN, OR IN-HOME SERVICE, AND YIJU WILL RECEIVEPEACEOF MIND,
KNOWINGYOURPRODUCTISBEINGGIVENTHEEXPERTA'FFENTIONOFPHILIPS'FACTORYSERVICE.AND,IFTHEPHONENUMBERLISTEDFORYOURAREA
ISLONGDISTANCE,CALL1-800-242-9225 FORFACTORYSERVICE.
COMMENTOBTENIRNOTRESERVICEAPR_:SVENTERAPIOEETEFFICACESOITPARCOURRIER,A DOMICILE,OU ENSEPRItSENTANTP.UN CENTREDESERVICEPHILIPS.PLUSDE600 CENTRESDE
RI_CEPTIONDEPRODUITS_,RItPARER_,TRAVERSLEPAYS:CONTACTERLECENTREDESERVICEAUX CONSOMMATEURSLE PLUSPROCHEPOURSAVOIRL'EMPLACEMENTOl=-CES D_:POTSDANS
UN RAYONDE50/_ 75 MILES (80 I(M A 120 KM)DUCENTREDESERVICELOCAL.
C(_IVIOOBTENERUNSERVICIOOPORTUNOY EFICIENTEPOR CORREO,ENCASA0 ENPERSONAPARASU PRODUCTOATRAV_:SDEUNCENTROPHILIP$ DE SERVICIO.MAS DE600 SITIOS POR
TODOELPAlSPARALARECEPCIONDEPRODUCTOSNECESITADOSDEREPARACIONES:COMUNICARSECONELCENTRODESEFIVICIODE FABRICAlYASCERCANOPARAESTOSLUGARESDENTRO
DEUN RADIODE80 A 120KM (50 A75 MILl.AS)DEL CENTRODESERVICIOLOCAL.
Atlanta-Athens-
Macon-Chattanooga,TN-
NorthGeorgiaArea
1898 LelandDrive
Marietta,GA 30067
(404) 952-3279
Boston-SouthernMaine-
SouthernNew HampshireArea
1 Noi-thAvenue
Burlington, MA 01803
(617) 272-4825
Charlotte-WinstonSalem-
Greensboro-ChapelHill-
Raleigh-Spartanburg,SCArea
520-,3ClantonRoad
Charlotte,NC 28217
(704) 529-6330
Chicago-GaryArea
1360W. HamiltonParkway
Itasca,IL 60143
(708) 775-0990
Cleveland-Akron-
YoungstownArea
24090 Detroit Road
WesIlake,OH 44145
(216) 899-2040
Columbus-Dayton-
CincinnatiArea
6333 BuschBlvd.
Columbus,Ohio43229
(614.)781-2605
Connecticut-RhodeIsland--
Springfield,MAArea
1294BlueHillsAvenue
Bloomfield,CT06002
(860) 726-9612
Dallas-Ft. WorthArea
13375StemmonsFreeway,
Suite200
Dallas,Texas 75234
(214) 243-4775
Detroit/ToledoArea
25173 Dequindre
Madison Heights,MI 48071
(810) 544-2110
Knoxville-Greeneville-
Tri Cities-East TennesseeArea
6700 D. PapermillRoad
PapermillPlaza
Knoxville,TN37919
(423) 584-6614
Ft. Myers-Naples-
SouthwestFloridaArea
11601 ClevelandAve.,Suite 15
Ft.Myers,FL 33907
(813) 278-4242
Houston-Galveston-
Beaumont-Austin-
SanAntonioArea
1110NorthPostOakRoad
Suite1O0
Houston,rx 77055
(713)682-3990
LosAngeles-SanDiegoArea
2910 E.LaPalma,Suite E
Anaheim,CA 92806
(714) 238-7250
Miami-SoutheastFloridaArea
2099W.Atlantic Blvd.
PompanoBeach,FL 33069
(305) 978-0467
NorthNJ-Staten Island-
RocklandCounty,NYArea
140JCommerceWay
Totowa, NJ 07512:
(201) 890-7200
NewYorkMetroArea
116 CharlotteAvenue
Hicksville,NY 118.01
(516) 933-1780 NassauCounty
Orlando-Jacksonville-North
Florida-SoutheastGeorgiaArea,
2452SandLakeRoad
Orlando,FL3280c,
(407) 857-8998
Philadelphia/S.NewJerseyArea
352 DunksFerryFload
Bensalem,PA 19020
(215) 638-7500
Phoenix--Scottsdale-
Mesa-TempeArea
5032 S.AshAvenue,Ste.101
Tempe,AZ 85282
(602) 897-7358
Pittsburgh,PA-_Steubenville,OH-
Wheeling/Morgantown,WVArea
2891 BanksvilleRoad
_ittsburgh,PA15216
1412)563-8020
Rocldord-Kenosha-
Beloit-Madisor=Area
5602N.Second
LovesPark,IL 61111
(815) 654-7343
San Francisco-Oakland-
SanJoseArea
3370 MontgomeryDrive
SantaClara,CA95054
(408) 492-9013
Seattle-Tacoma/Olympia Area
1055AndoverParkEast
Tukwila,WA98.188
(206) 575-6288
Tampa-St.Petersburg-
SarasotaArea
CenterPointBusinessPark,
BuildingB-l, Suite100
1911 U.S.Hwy.301 North
Tampa,FL 33619
(813) 621-8181
Washington,DC-Baltimore-
Richmond,VAArea
6671-JSantaBarbaraRoad
Elkridge,MD 21227
(410) 796-010:5
ltOW YOUCANOB1AINEFFICIENTAND EXPEDIENTCARRY-IN, MAIL-IN, ORIN-HOMESERVICEIN CANADAFORYOUR PRODUCTTHROUGH JkPHILIPSCONSUMERSERVICECENTER
COMMENTOEITENIRNOTRESERVICEAPR_:SVENTERAPIOE ETEFFICACESOITPAR COLIRRIER,A DOMICILE, OU EN SEPRI_SENTAI4Tit UN CENTREDESERVICEPHILIPS
C_MO OB_rENERUN SERVICIOOPORTUNOYEFICIENTEPOR CORREO,EN CASA0 EN PERSONAENELCANADAPARASU PRODUCTOATRAV]_SDE U/_CENTROPHILIPSDESERV/CIO AL CONSUMIDOFI
TORONTO
601 Milner Avenue
Scarborough, Ontario
M1B 1M8
(416) 754-6064 (Tel,)
(416) 292-5161 (Tel,)
(416) 754-6290 (Fax)
MONTREAL
4977 Levy Street
St. Laurent, Qudbec
H4R 2N9
(514) 956-0120 (Tel.)
(514)956-0828(Fax)
VANCOUVER
1741 Boundary Road
Vancouver, B.C.
V5M 3Y7
(604) 294-3441 (Tel.)
(604) 294-3574 (Fax)
58
MAC2929 8/95
Page 59

PROJECTION TELEVISION
One Year Free Labor
One Year Free Service on Parts
Two Years Free Service on Cathode Ray Tube Parrs / 30 days Free Service on Projection TV Screen
This product can be repaired in-home.
WHO IS COVERED?
You rrust have proof of purchase to receive warranty service. A sales
receip_ or other document showing that you purchased the product is
considered proof of purchase.
WHAT IS COVERED?
Warr_.nty coverage begins the day you buy your product, for one year
thereafter (30 days for the projection TV screen), all parts will be
repaired or replaced, and labor and transportation are free. From one
to two years from the day of purchase, you pay for the replacement or
repair of all parts except the cathode ray tube and the "Clear-Vu" lens,
and for all labor and _-ransportation charges. After two years from the
day of purchase, you pay for the replacement or repair of all parts
excep': the "Clear-Vu'" lens (which is guaranteed against manufacturer's
defects for the life of the product), and for all labor and transportation
charges.
All parts, including repaired and replaced parts, are covered only for
the original warranty period. When the warranty on the product
expires, the warranty on all replaced and repaired parts also expires.
WHAT IS EXCLUDED?
Your 'warranty does not cover:
labor charges for installation or setup of the product, adjustment of
cu__;tomercontrol_ on the product, and installation or repair of
antenna systems outside of the product.
product repair and/or part replacement because of misuse, acci-
dent, unauthorized repair or other cause not within the control of
Philips Consumer Electronics Company.
• reception problems caused by signal conditions or cable or antenna
systems outside the unit.
• a product that requires modification or adaptation to enable it to
operate in any country other than the country for which it was
designed, manufactured, approved and/or authorized, or repair of
products damaged by these modifications.
incidental or consequential damages resulting from the product.
(Some states do not allow the exclusion of incidental or consequen-
tial damages, so the above exclusion may not apply to you. This
includes, but is not limited to, prerecorded material, whether copy-
righted or not copyrighted.)
a product used for commercial or institutional purposes.
WHERE IS SERVICE AVAILABLE?
Warranty service is available in all countries where the product isoffi-
cially ,distributed by Philips Consumer Electronics Company. In coun-
tries where Philips Consumer Electronics Company does not distribute
the product, the local Philips service organization will attempt to pro-
vide service (although there may be a delay if the appropriate spare
parts and technical manual(s) are not readily available).
HAKE SURE YOU KEEP...
Please keep your sales receipt or other document showing proof of
purchase. Attach it to this owner's manual and keep both nearby. Also
keep the original box and packing material in case you need to return
your product.
BEFORE REQUESTING SERVICE...
Please check your owner's manual before requesting service.
Adjustments of the controls discussed there may save you a service
call.
TO GET WARRANTY SERVICE...
Repair must be performed by an authoris'_ed service center or a factory
service center. If you do not live near a factory service centel; contact your
dealer. If your dealer is an authorized service center, he will arrange
repair. If your dealer _,snot an author,zerl service center, he will direct
you to the authorized service center engaged by him to service the
products he sells.
(In U.S.A., Puerto Rico and U.S. Virgin Islands, all implied warranties,
including implied warranties of merchantability and fimess for a particu-
lar purpose, are limited in duration to the duration of this express war-
ranty. But, because some states do not allow limitations on how long
an implied warranty may last, this limitation may not apply to you.)
(In Canada, this warranty is given in lieu of all other warranties. No
other warranties are expressed or implied, including any implied war-
ranties of merchantability or fitness for a particular purpose. Philips is
not liable under any circumstances for any direct, indirecc, special, inci-
dental or consequenr.ial damages, howso ever incurred, even if notified
of the possibility of su,rh damages.)
IF YOU HAVE QUESTIONS ....
In U.S.A.,Puerto Rico, or the U.S. VirginIslands, contact Philips Service
Company at the address listed below.
In Canada, contact:
Philips Electronics Ltd.
601 Milner Avenue, Scarborough, Ontario, M IB I M8
(416) 292-5 61
4977 Levy Street, St. Laurent, Qu6bec, H4R 2N9
(514) 956-0 i20
1741 Boundary Road, Vancouver, B.C., V5M 3Y7
(614) 294-3441
REMEMBER...
Please record the model and serial numbers found on the product
below. Also, please fill out and mail your warranty registration card
promptly. It will be easier for us to noti_/you if necessa_'y.
MODEL #
SERIAL #
i ii!iiii iiiiiiilli !!i iiiii!iii iiiiii!ili,iiiiiiii!iiiiiiiiiiiiiiiiiiiiiiii!!!
Philips Service Company, P.O. Box 555, Jefferson City, Tennessee 37760, (423) 475-8869
EL4945E002 / MAC 4102 1 12-95
59
Page 60

tPI6S
Prices subtect to change withoutnotice Availabthtysubject to change at time ofpurchase. Whenordering accessories outside the US.A. please rater Io theaecessories material, address,and prices for that coJntry.
Maximizeyour viewingpleasure
withstate-of-the-artaccessories
designedspecificaL_foryour
ProjectionTelevision.The
optionalaccessoriesshownin
thisbookletmaybepurchased
fromyourlocaldealer,or may
beordereddirecthomPhi/ips
ConsumerElectronics
Company.
Calltoll-free
1-81_-292-6066
Or write
Phi,rips Consumer
ElectronicsCo.,
AccessoriesMarketingDept.,
P.#. Box967,-
SRG125
TV/Cable Surge Protector
YourCost$19.95
Electricalfluctuations and
power surges can damage
your valuableelectronic
entertainment equipment.
Protectyour antenna,cable,
andelectrical lineswith
MagnavoxAudio/Video
Equipment SurgeProtectors.
• Coaxial cable input/output
• Five grounded outlets
• Built-in LEDandreset button
ScreenEnhancersand
Screen EnhancerCleaningKit
Enhancesyour IV picture while
protecting the TV screen. This
easy-to-install tinted, plexiglass
screenvisibly improves picture
sharpness and provides
protection from scratches and
foreign material.Orderthe
Screen EnhancerCleaning Kit
to maintain the quality and
performance ofyour screen
enhancer.
ScreenEnhancerCleaning Kit
4835 395 17265
LITE4
UniversalNight LiteTM
Audio/VideoRemote
Your Cost$24.95
Replaceyour lostor broken
remote control, or consolidate
all your remotes into one. Plus,
makeremote easierto usein
dimly-lit areas,with our Night
LiteTM lighted keypad.
Features:
• Preprogrammed
• Autoscan and rnanual
codesetup
• On-screen capabilities
• Menu programming
• Spanish instruc;tions included
• Toll-free customer assistance
number included
MANT300
SmartAmplilier
AmpliliedVHF/UHF/FM
IndoorAntenna
YourCost$34.95
Drastically improves
VHF/UHF/FMrc:ceptionon your
TV or stereo. Simply attach
antennato your TV/stereo and
enjoy crisper, dearer soundand
improved picture quality.
Adjustable UHF:loop tilts and
rotatesfor the best possible
reception.
• 39" retractabledipoles
• 6' 75 ohm coax connection
cable
• Matching transformer included
• Soft base prevents scratching
surfaces
• Active antennawith amplifier
with upto 20 dB gain
• LED power i_dicatoron front
ofantenna: easyto seewhile
watching TV
• Knob on top of antennaserves
asgain and power switch
• AC/DCpoweradapter included
• 90-day warranty
60 IB 7513-E002
 Loading...