

Page 1

User Manual
Manuel de l'utilisateur
Guía del usuario
47MF439B
EnglishFrench
Español
HIGH-DEFINITION TELEVISION
For Customer Use / Àl’usage du client /
Para Uso del Cliente
Model/Modle/Modelo No.
:
Serial/Srie/Serie No.
:
Page 2
Return your Product Registration Card or register online at
www.magnavox.com/support today to get the very most from your purchase
Registering your model with MAGNAVOX makes you eligible for all of the valuable benefits listed below, so don’t miss out. Complete and
return your Product Registration Card at once, or register online at www.magnavox.com/support to ensure
:
*Proof of Purchase
Returning the enclosed card guarantees that
your date of purchase will be on fi le, so no
additional paperwork will be required from
you to obtain warranty service.
*Product Safety Notifi cation
By registering your product, you'll receive
notifi cation - directly from the manufacturer
- in the rare case of a product recall or safety
defect.
Congratulations on your purchase,
and welcome to the “family!”
Dear MAGNAVOX product owner:
Thank you for your confidence in MAGNAVOX. You’ve selected one of the best-built, best-backed products available today.
We’ll do everything in our power to keep you happy with your
purchase for many years to come.
As a member of the MAGNAVOX “family,” you’re entitled to
protection by one of the most comprehensive warranties
and outstanding service networks in the industry. What’s more,
your purchase guarantees you’ll receive all the information and
special offers for which you qualify, plus easy access to accessories from our convenient home shopping network.
*Additional Benefi ts
Registering your product guarantees that you'll
receive all of the privileges to which you're
entitled, including a special money-saving offers.
Know these
shock. For the safety of everyone in your
household, please do not remove product
covering.
literature closely to prevent operating and
maintenance problems.
WARNING: To reduce the risk of fire or
electric shock, this apparatus should not be
exposed to rain or moisture and objects
filled with liquids, such as vases, should not
be placed on this apparatus.
safety
CAUTION: TO REDUCE THE RISK OF ELECTRIC SHOCK, DO NOT
REMOVE COVER (OR BACK). NO USER-SERVICEABLE PARTS
INSIDE. REFER SERVICING TO QUALIFIED SERVICE PERSONNEL.
This “bolt of lightning” indicates
uninsulated material within your
unit may cause an electrical
The “exclamation point” calls
attention to features for which
you should read the enclosed
symbols
CAUTION
RISK OF ELECTRIC SHOCK
DO NOT OPEN
Most importantly, you can count on our uncompromising commitment to your total satisfaction.
All of this is our way of saying welcome - and thanks for investing in a MAGNAVOX product.
P.S. To get the most from your MAGNAVOX purchase, be
sure to complete and return your Product Registration
Card at once or register online at:
www.magnavox.com/support
Visit our World Wide Web Site at http://www.magnavox.com/support
2 EN
CAUTION: To prevent electric shock,
match wide blade of plug to wide slot, fully
insert.
ATTENTION: Pour éviter les choc
électriques, introduire la lame la plus large
de la fiche dans la borne correspondante de
la prise et pousser jusqu’au fond.
For Customer Use
Enter below the Serial No. which is located
on the rear of the cabinet. Retain this
information for future reference.
Model No._______________________
Serial No. _______________________
Page 3
IMPORTANT SAFETY INSTRUCTIONS
g
Read before operating equipment
1. Read these instructions.
2. Keep these instructions.
3. Heed all warnings.
4. Follow all instructions.
5. Do not use this apparatus near water.
6. Clean only with a dry cloth.
7. Do not block any of the ventilation openings. Install in accordance with
the manufacturers instructions.
8. Do not install near any heat sources such as radiators, heat registers,
stoves, or other apparatus (including amplifiers) that produce heat.
9. Do not defeat the safety purpose of the polarized or grounding-type plug.
A polarized plug has two blades with one wider than the other. A
grounding type plug has two blades and third grounding prong. The wide
blade or third prong are provided for your safety. When the provided
plug does not fit into your outlet, consult an electrician for replacement
of the obsolete outlet.
10. Protect the power cord from being walked on or pinched particularly at
plugs, convenience receptacles, and the point where they exit from the
apparatus.
11. Only use attachments/accessories specified by the manufacturer.
12. Use only with a cart, stand, tripod, bracket, or table specified by
the manufacturer, or sold with the apparatus. When a cart is
used, use caution when moving the cart/apparatus combination
to avoid injury from tip-over.
13. Unplug this apparatus during lightning storms or when unused for long
periods of time.
14. Refer all servicing to qualified service personnel. Servicing is required
when the apparatus has been damaged in any way, such as power-supply
cord or plug is damaged, liquid has been spilled or objects have fallen
into apparatus, the apparatus has been exposed to rain or moisture,
does not operate normally, or has been dropped.
15. This product may contain lead or mercury. Disposal of these materials
may be regulated due to environmental considerations. For disposal or
recycling information, please contact your local authorities or the
Electronic Industries Alliance:www.eiae.org.
16. Damage Requiring Service - The appliance should be serviced by
qualified service personnel when:
A. The power supply cord or the plug has been damaged; or
B. Objects have fallen, or liquid has been spilled into the appliance; or
C. The appliance has been exposed to rain; or
D. The appliance does not appear to operate normally or exhibits a
marked change in performance; or
E. The appliance has been dropped, or the enclosure damaged.
17. Tilt/Stability - All televisions must comply with recommended
international global safety standards for tilt and stability properties of its
cabinets design.
• Do not compromise these design standards by applying excessive pull
force to the front, or top, of the cabinet which could ultimately
overturn the product.
• Also,do not endanger yourself, or children, by placing electronic
equipment/toys on the top of the cabinet. Such items could
unsuspectingly fall from the top of the set and cause product damage
and/or personal injury.
18. Wall or Ceiling Mounting - The appliance should be mounted to a
wall or ceiling only as recommended by the manufacturer.
19. Power Lines - An outdoor antenna should be located away from
power lines.
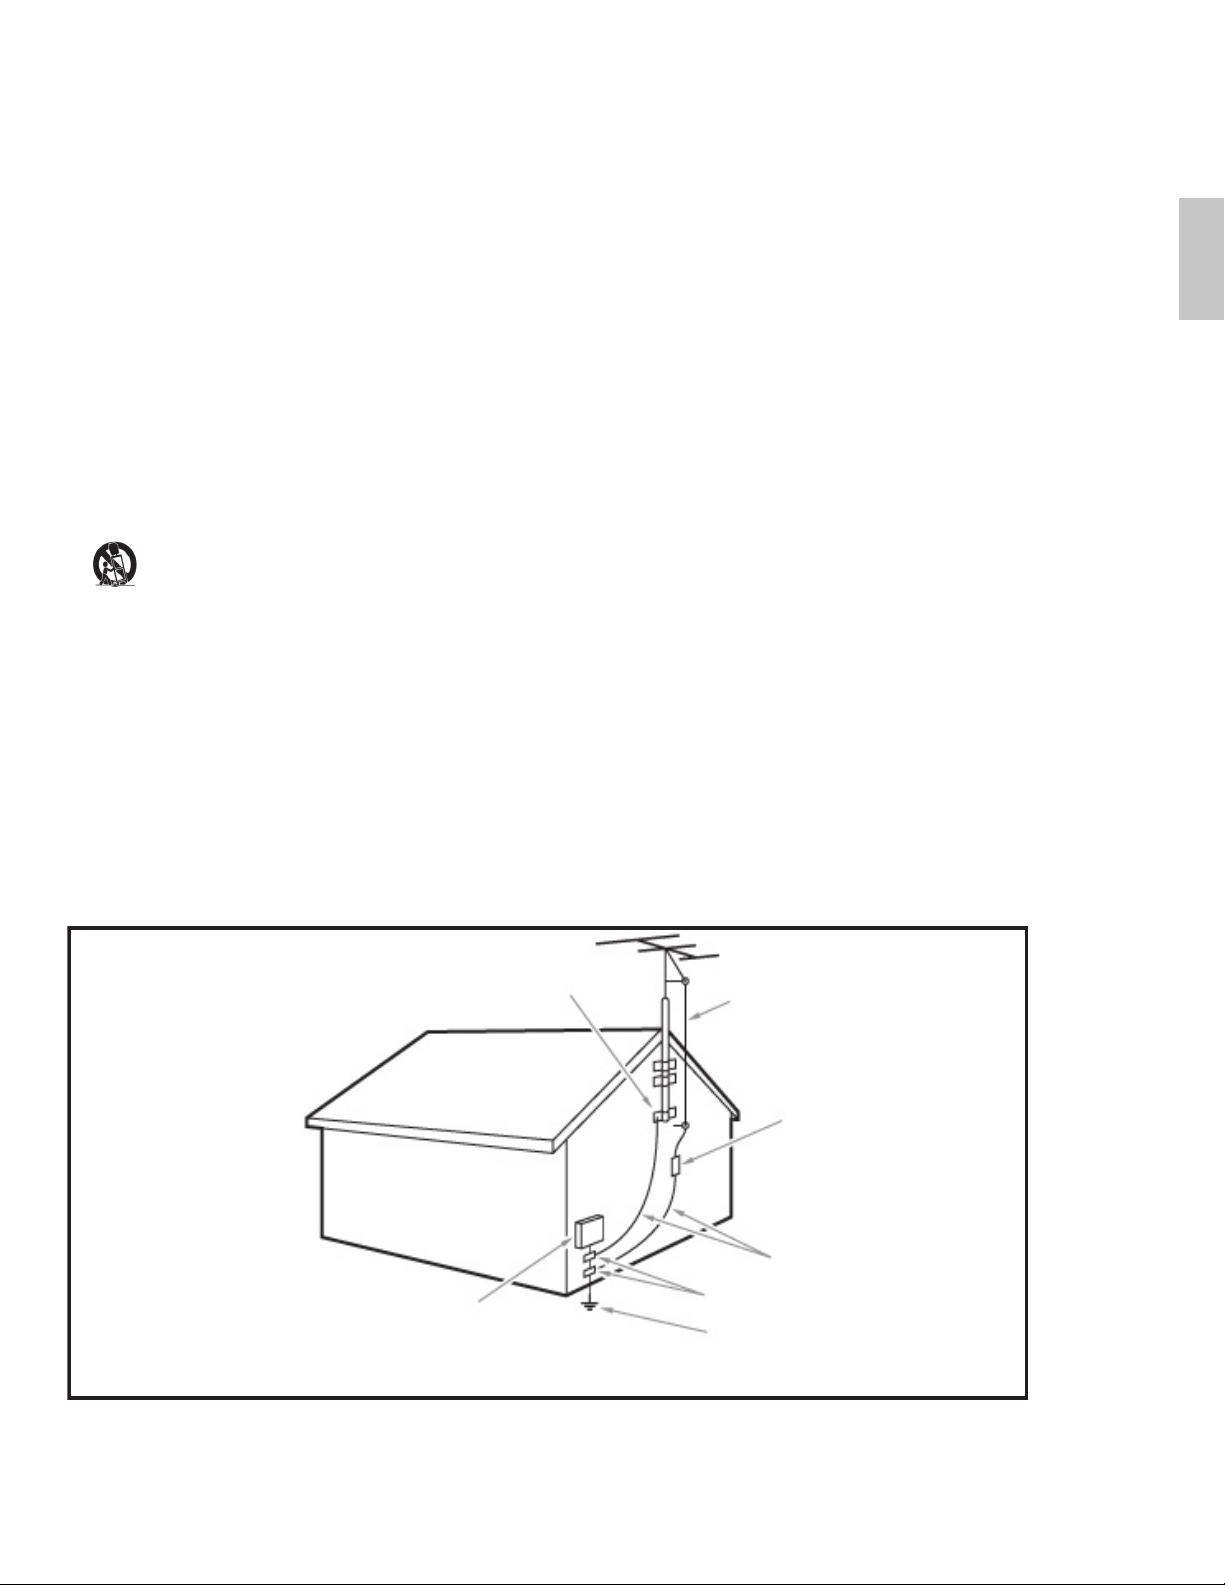
20. Outdoor Antenna Grounding - If an outside antenna is connected to
the receiver, be sure the antenna system is grounded so as to provide
some protection against voltage surges and built up static charges.
Section 810 of the National Electric Code, ANSI/NFPA No. 70-1984,
provides information with respect to proper grounding of the mats and
supporting structure grounding of the lead-in wire to an antenna discharge unit, size of grounding connectors, location of antenna discharge unit, connection to grounding electrodes and requirements for
the grounding electrode. See Figure below.
21. Objects and Liquid Entry - Care should be taken so that objects do
not fall and liquids are not spilled into the enclosure through openings.
a) Warning: To reduce the risk of fire or electric shock, this apparatus
should not be exposed to rain or moisture and objects filled with
liquids, such as vases should not be placed on this apparatus.
22. Battery Usage CAUTION - To prevent battery leakage that may
result in bodily injury, property damage, or damage to the unit:
• Install all batteries correctly, with + and - alignment as marked on the
unit.
• Do not mix batteries (old and new or carbon and alkaline, etc.)
• Remove batteries when the unit is not used for a long time.
English
EXAMPLE OF ANTENNA GROUNDING AS PER
NATIONAL ELECTRICAL CODE (NEC)
GROUND CLAMP
ANTENNA LEAD IN WIRE
ANTENNA DISCHARGE UNIT
NEC SECTION
(
GROUNDING CONDUCTORS
(
GROUND CLAMPS
ELECTRIC SERVICE EQUIPMENT
Note to the CATV system installer: this reminder is provided to call the CATV system installer’s attention to Article 820-40 of
the NEC that provides guidelines for proper grounding and, in particular, specifies that the cable ground shall be connected to the
rounding system of the building, as close to the point of cable entry as practical.
POWER SERVICE GROUNDING
ELECTRODE SYSTEM
(
NEC ART
250,
810-20)
NEC SECTION
PART H
810-21)
)
3
EN
Page 4

1 Notice
2009 © Magnavox. All rights reserved.
Specifi cations are subject to change without notice. Trademarks are the
property of Magnavox. or their respective owners. Magnavox reserves
the right to change products at any time without being obliged to adjust
earlier supplies accordingly.
The material in this manual is believed adequate for the intended use
of the system. If the product, or its individual modules or procedures,
are used for purposes other than those specifi ed herein, confi rmation
of their validity and suitability must be obtained. Magnavox warrants
that the material itself does not infringe any United States patents. No
further warranty is expressed or implied.
Magnavox cannot be held responsible neither for any errors in the
content of this document nor for any problems as a result of the
content in this document. Errors reported to Magnavox will be adapted
and published on the Magnavox support website as soon as possible.
Pixel characteristics
This LCD product has a high number of color pixels. Although it has
effective pixels of 99.999% or more, black dots or bright points of light
(red, green or blue) may appear constantly on the screen. This is a
structural proper ty of the display (within common industry standards)
and is not a malfunction.
Warranty
No components are user serviceable. Do not open or remove covers
to the inside of the product. Repairs may only be done by Magnavox
Service Centres and offi cial repair shops. Failure to do so shall void any
warranty, stated or implied.
Any operation expressly prohibited in this manual, any adjustments, or
assembly procedures not recommended or authorised in this manual
shall void the warranty.
Federal Communications Commission Notice
This equipment has been tested and found to comply with the limits
for a Class B digital device, pursuant to part 15 of the FCC Rules. These
limits are designed to provide reasonable protection against harmful
interference in a residential installation. This equipment generates, uses,
and can radiate radio frequency energy and, if not installed and used
in accordance with the instructions, may cause harmful interference
to radio communications. However, there is no guarantee that
interference will not occur in a particular installation. If this equipment
does cause harmful interference to radio or television reception, which
can be determined by turning the equipment off and on, the user is
encouraged to try to correct the interference by one or more of the
following measures:
• Reorient or relocate the receiving antenna.
• Increase the separation between the equipment and the receiver.
• Connect the equipment into an outlet on a circuit different from
that to which the receiver is connected.
• Consult the dealer or an experienced radio or television technician
for help.
Declaration of Conformity
Trade Name: MAGNAVOX
Responsible Party: FUNAI CORPORATION, INC.
Model: 47MF439B
Address: 201 Route 17 North Suite No. 903
Rutherford, New Jersey 07070 U.S.A.
Telephone Number: 201-727-4560
Modifi cations
The FCC requires the user to be notifi ed that any changes or
modifi cations made to this device that are not expressly approved by
Magnavox may void the user’s authority to operate the equipment.
Cables
Connections to this device must be made with shielded cables with
metallic RFI/EMI connector hoods to maintain compliance with FCC
Rules and Regulations.
Canadian notice
This Class B digital apparatus meets all requirements of the Canadian
Interference-Causing Equipment Regulations.
Copyright
All other registered and unregistered trademarks are the property of
their respective owners.
Manufactured under license from Dolby Laboratories. “Dolby” and the
double-D symbol are trademarks of Dolby Laboratories.
VESA, FDMI and the VESA Mounting Compliant logo are trademarks of
the Video Electronics Standards Association.
® Kensington and Micro Saver are registered US trademarks of ACCO
World corporation with issued registrations and pending applications in
other countries throughout the world.
Portions of this software are copyright © The FreeType Project (www.
freetype.org).
4
EN
Page 5
2 Important
Registering your model with Magnavox makes you eligible for all of the
valuable benefi ts listed below, so don’t miss out.
Complete and return your Product Registration Card at once, or
register online at www.magnavox.com/support to ensure:
• Proof of Purchase
Returning the enclosed card guarantees that your date of purchase
is on fi le, so no additional paperwork is required from you to
obtain warranty service.
• Product Safety Notifi cation
By registering your product you receive notifi cation - directly from
the manufacturer - in the rare case of a product recall or safety
defect.
• Additional Benefi ts of Product Ownership
Registering your product guarantees that you receive all of the privileges
to which you’re entitled, including special money-saving offers.
Product information
This TV consumes minimal energy in standby mode to minimize
environmental impact. The active power consumption is given on the
type plate at the back of the TV. The model and serial number of your
TV can be found on the TV as well as on the packaging.
End of life directives
English
Like all LCD products, this set contains a lamp with mercury; please
dispose of according to all local, state and federal laws.
Magnavox pays a lot of attention to produce environment-friendly
products in green focal areas. Your new TV contains materials which can
be recycled and reused. At the end of its life, specialized companies can
dismantle the discarded TV to concentrate the reusable materials and to
minimize the amount of materials to be disposed of. Please ensure you
dispose of your old TV according to local regulations.
Disposal of used batteries
The batteries supplied do not contain the heavy metals mercury and
cadmium. Nevertheless, in many areas batteries may not be disposed
of with your household waste. Please ensure you dispose of batteries
according to local regulations.
Regulatory notices
Screen care
• Avoid stationary images as much as possible. Stationary images
are images that remain on-screen for extended periods of time.
Examples include: on-screen menus, black bars and time displays.
If you must use stationary images, reduce screen contrast and
brightness to avoid screen damage.
• Unplug the TV before cleaning.
• Clean the TV screen and frame with a soft, damp cloth. Never use
substances such as alcohol, chemicals or household cleaners on the
TV screen.
• Risk of damage to the TV screen! Never touch, push, rub or strike
the screen with any object.
• To avoid deformations and color fading, wipe off water drops as
soon as possible.
Environmental care
Warning
To reduce the risk of fi re or electric shock, this B apparatus should not be exposed to
rain or moisture. Objects fi lled with liquids, such as vases, should not be placed on this
apparatus.
Caution
To prevent electric shock, match the wide blade of the plug to the wide slot, fully inserted.
The packaging of this product is intended to be recycled. Contact your
local authorities for information about how to recycle the packaging.
EN
5
Page 6
3 Your TV
Congratulations on your purchase, and welcome to Magnavox! To fully
benefi t from the support that Magnavox offers, register your product at
www.magnavox.com/support.
Side controls and indicators
VOLUME
5
Remote control
20
19
1
2
3
4
MENU
CHANNEL
POWER
a Standby indicator / remote control sensor
b POWER : Switches the TV on or off. The TV is not powered off
completely unless it is physically unplugged.
c CHANNEL +/ - : Switches to the next or previous channel.
d MENU : Toggles the main menu on or off.
e VOLUME +/- : Increases or decreases volume.
1
18
4
17
3
2
16
15
5
6
7
8
9
10
11
12
14
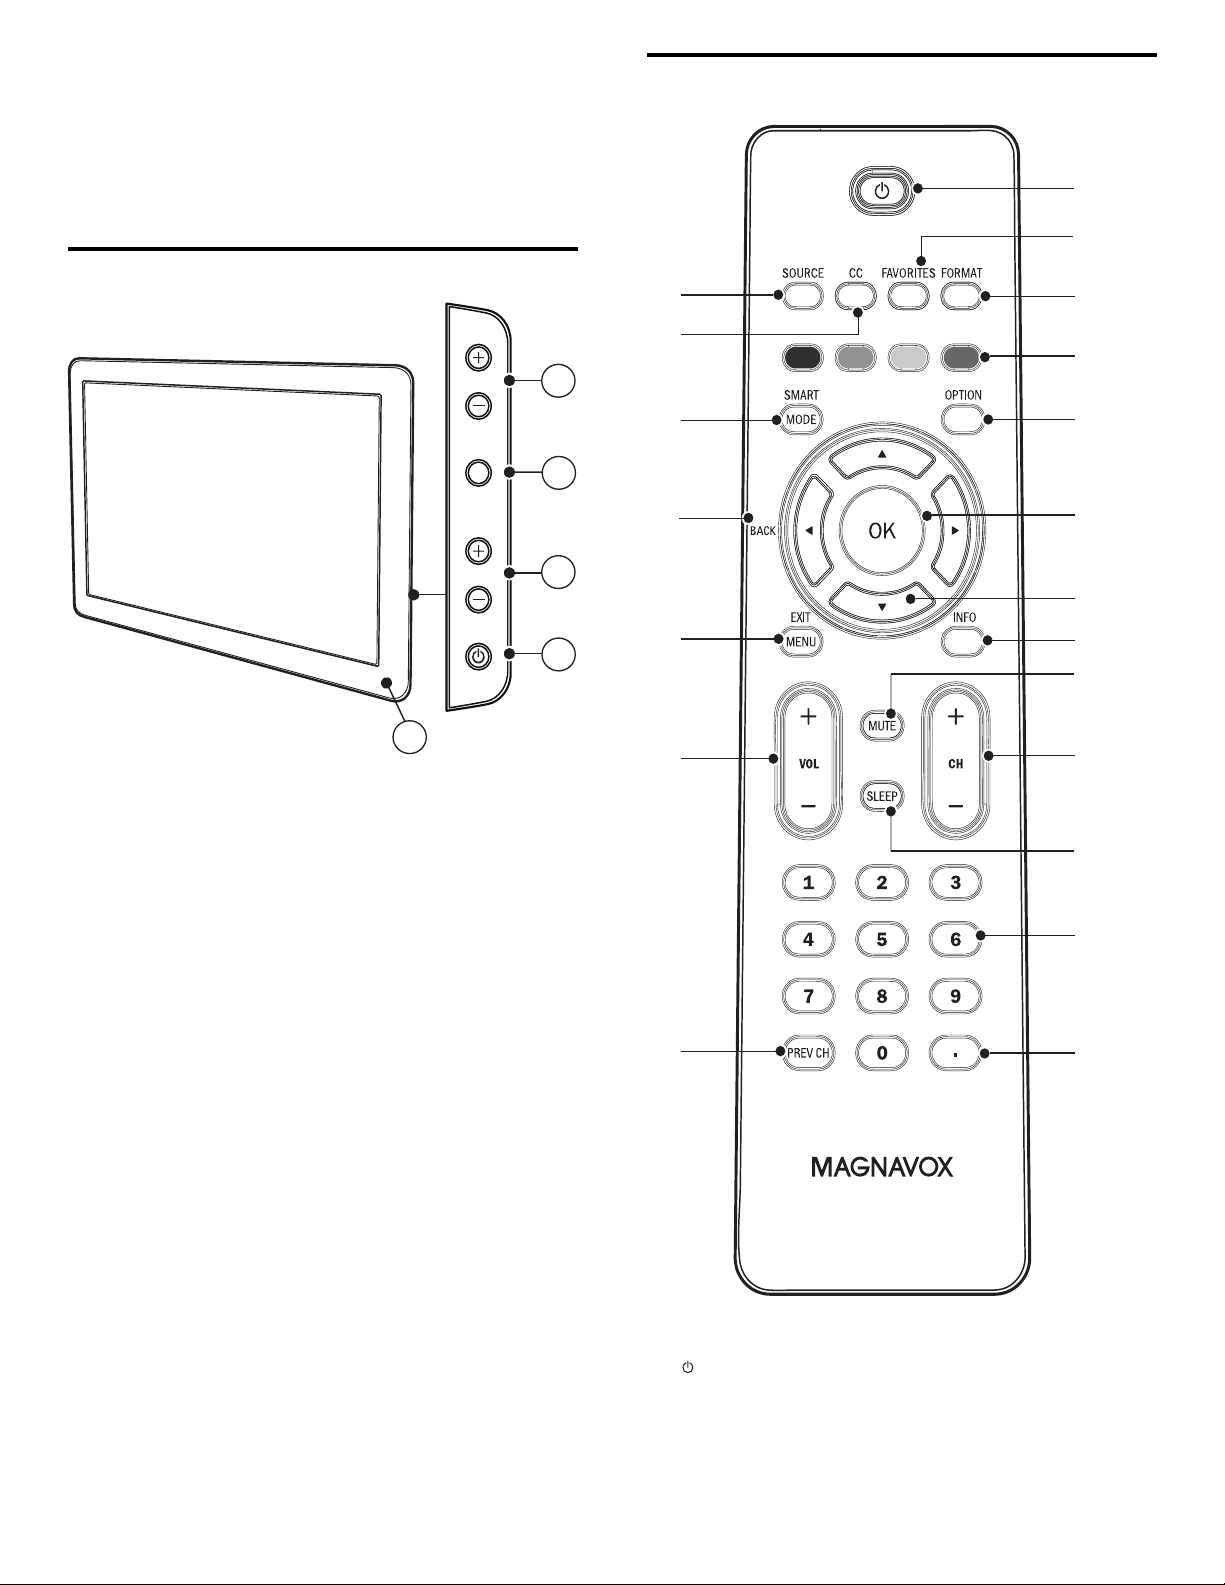
a ( Standby-On )
Switches the TV on or off. The TV is not powered off completely
unless it is physically unplugged.
b FAVORITES
Displays a list of all channels marked as favorite. (Includes
subchannels.)
6
EN
13
Page 7

c FORMAT
Selects a picture format .
d Color buttons
Selects tasks or options.
e OPTION
Activates the quick access menu (see ‘Use the quick access menu’
on page 13 ) .
f OK
Activates a selection or accesses the menu.
g
( Navigation buttons )
Navigates through the menus.
h INFO
Displays information about the TV channel or accessory device.
The quality and accuracy of the information depends on the
broadcaster. You might see a difference in broadcast time if the
broadcast is from a different time zone.
i MUTE
Mutes or restores audio output.
j CH +/-
Switches to the next or previous channel.
k SLEEP
Sets a delay after which the TV switches to standby .
l Number buttons
Select a channel, page or setting.
m . (Dot)
Press the dot (.) for digital channels.
n PREV CH
Returns to the previously viewed channel.
o VOL +/-
Increases or decreases volume.
p MENU/EXIT
Turns the menu on or off.
q BACK
Returns to a previous screen.
r SMART MODE
Toggles between smart picture and sound settings.
s CC
Displays closed captions settings.
t SOURCE
Selects connected devices.
English
EN
7
Page 8
4 Get started
This section supplements information in the Quick Start. For
information about how to mount and install your TV, refer to the Quick
Start.
Position the TV
Insert the remote control batteries
Warning
•
Do not insert the power plug into the wall socket before all the connections are made.
• Large screen TVs are heavy. Two people are required to carry and handle a large screen
TV.
• Before you move the TV, disconnect the cables to prevent breakage.
In addition to reading and understanding the safety instructions ,
consider the following before positioning your TV:
• Ensure that you always have easy access to the power cord or plug
to disconnect the TV from the power.
• If the TV is mounted on a swivel base, ensure that no strain is
placed on the power cord when the TV is swiveled. Strain on the
power cord can loosen connections.
• The ideal viewing distance for watching TV is three times its screen
size.
• Position the TV where light does not fall on the screen.
• Connect your devices before you position the TV.
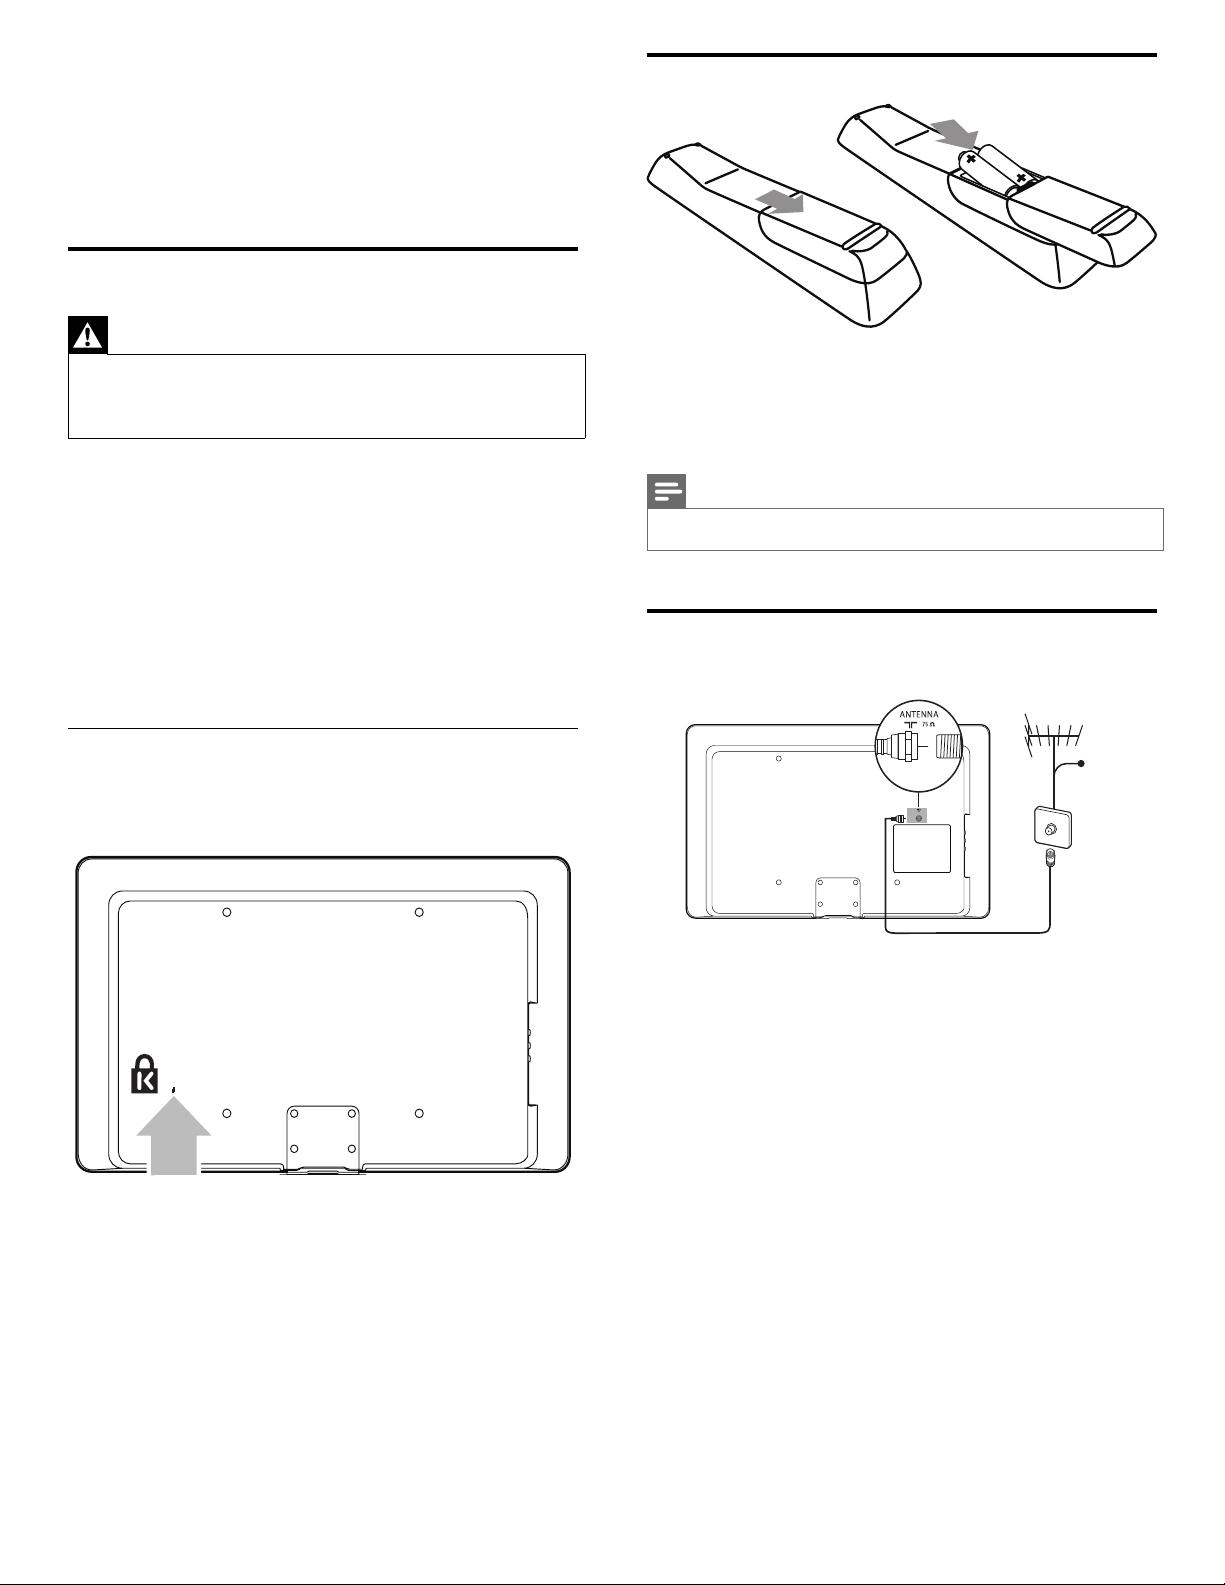
Use a Kensington lock
There is a Kensington security slot at the back of the TV. Prevent theft
by looping a Kensington lock between the slot and a permanent object,
such as a heavy table.
1 Slide the battery cover off the back of the remote control.
2 Insert the 2 supplied batteries (AAA). Be sure the + and - ends of
the batteries line up with the markings inside the case.
3 Slide the cover back into position.
Note
Remove the batteries if not using the remote control for an extended period of time.
•
Connect the antenna or cable
Cable
TV ANTENNA
8
EN
Connect to an antenna
Any DTV programs that are broadcast in your area can be received for
free through an antenna connection.
Contact your local content provider or your local electronics retailer if
you are unsure about what HDTV programs are available in your area.
Broadcasters are transitioning from analog to digital TV. This means that
a given broadcaster can have channels available either in analog or in
digital, or both analog and digital at the same time.
The TV produces stereo sound only if a stereo signal is broadcast.
Connect to a cable
When your TV is connected to the cable socket, you might receive free
digital and high defi nition programs (depending on your cable provider).
The channel number for digital and high defi nition channels includes a
dot “.” For example, 11.1, 46.30, 108.201. Contact your cable provider
for more information.
Connect to a Direct Broadcast Satellite (DBS)
There are two main DBS systems: DirecTV and DishNetwork. These
systems require a separate, proprietary set-top box to decode signals
and send them to the TV. The set-top box contains a digital TV tuner for
receiving off-air digital broadcasts.
Page 9

Contact your local DBS provider for more information about the
SPDIF
O
VIDEO
IO
IN
HDM3HDM
HDM
3
Pb
R
R
L
b
SE
. U
SPDIF
O
D
AU
D
IO
D
AV2
P
L
R
VIDEO
AV3
TV ANTENNA
HDM
I
3
connections and the TV channels.
Connect to a set-top box
A cable box or satellite set-top box can be connected to the TV
through the following connections:
• ANT
• A/V (Composite Video and Audio)
• S-Video
• YPbPr (Component Video Input)
• HDMI
For information about how to connect a set-top box, see the Quick
Start provided.
3 Connect the power cord plug to the power outlet. Ensure that the
cord is tightly secured at both ends.
English
Connect a set-top box through RF IN/OUT
If the TV is connected to a cable box or satellite set-top box via a
coaxial connection, set the TV to channel 3 or 4, or to the channel
specifi ed by the service provider.
TV ANTENNA
R
UT
r
P
S-VIDEO
Y
Y
AU
Connect a set-top box through component video input or HDMI
SERV. U
R
R
LRL
L
SPDIF
OUT
Pr
Pr
Pb
Pb
VIDEO
L
S-VIDEO
Y
Y
R
DVIAU DIO
AV3AV1 AV2
IN
HDMI3HDMI1 HDMI2
TV ANTENNA
SERV. U
R
R
R
L
L
L
SPDIF
UT
OUT
Pr
Pr
Pb
Pb
b
VIDEO
L
-
S-VIDEO
Y
Y
R
DVIAUDIO
AV2
AV3
AV1
IN
HDMI1 HDMI2 HDMI3
Disconnect the TV from the power
Caution
•
Pull the power cord by the plug; do not pull on the power cord.
1 Unplug the power cord from the power outlet.
2 Unplug the power cord from the power connector at the back of
the TV.
Manage cables
Route your power cord, antenna cable and all other cables through the
cable holder at the back of the TV. The holder helps keep your cables
tidy and easily manageable.
Connect the power cord
Warning
•
Verify that your power voltage corresponds with the voltage printed at the back of the
TV. Do not insert the power cord if the voltage is different.
1 Locate the power connector at the back of the TV.
The location of the power connector varies according to TV model.
2 Insert the power cord fully into the power connector.
EN
9
Page 10
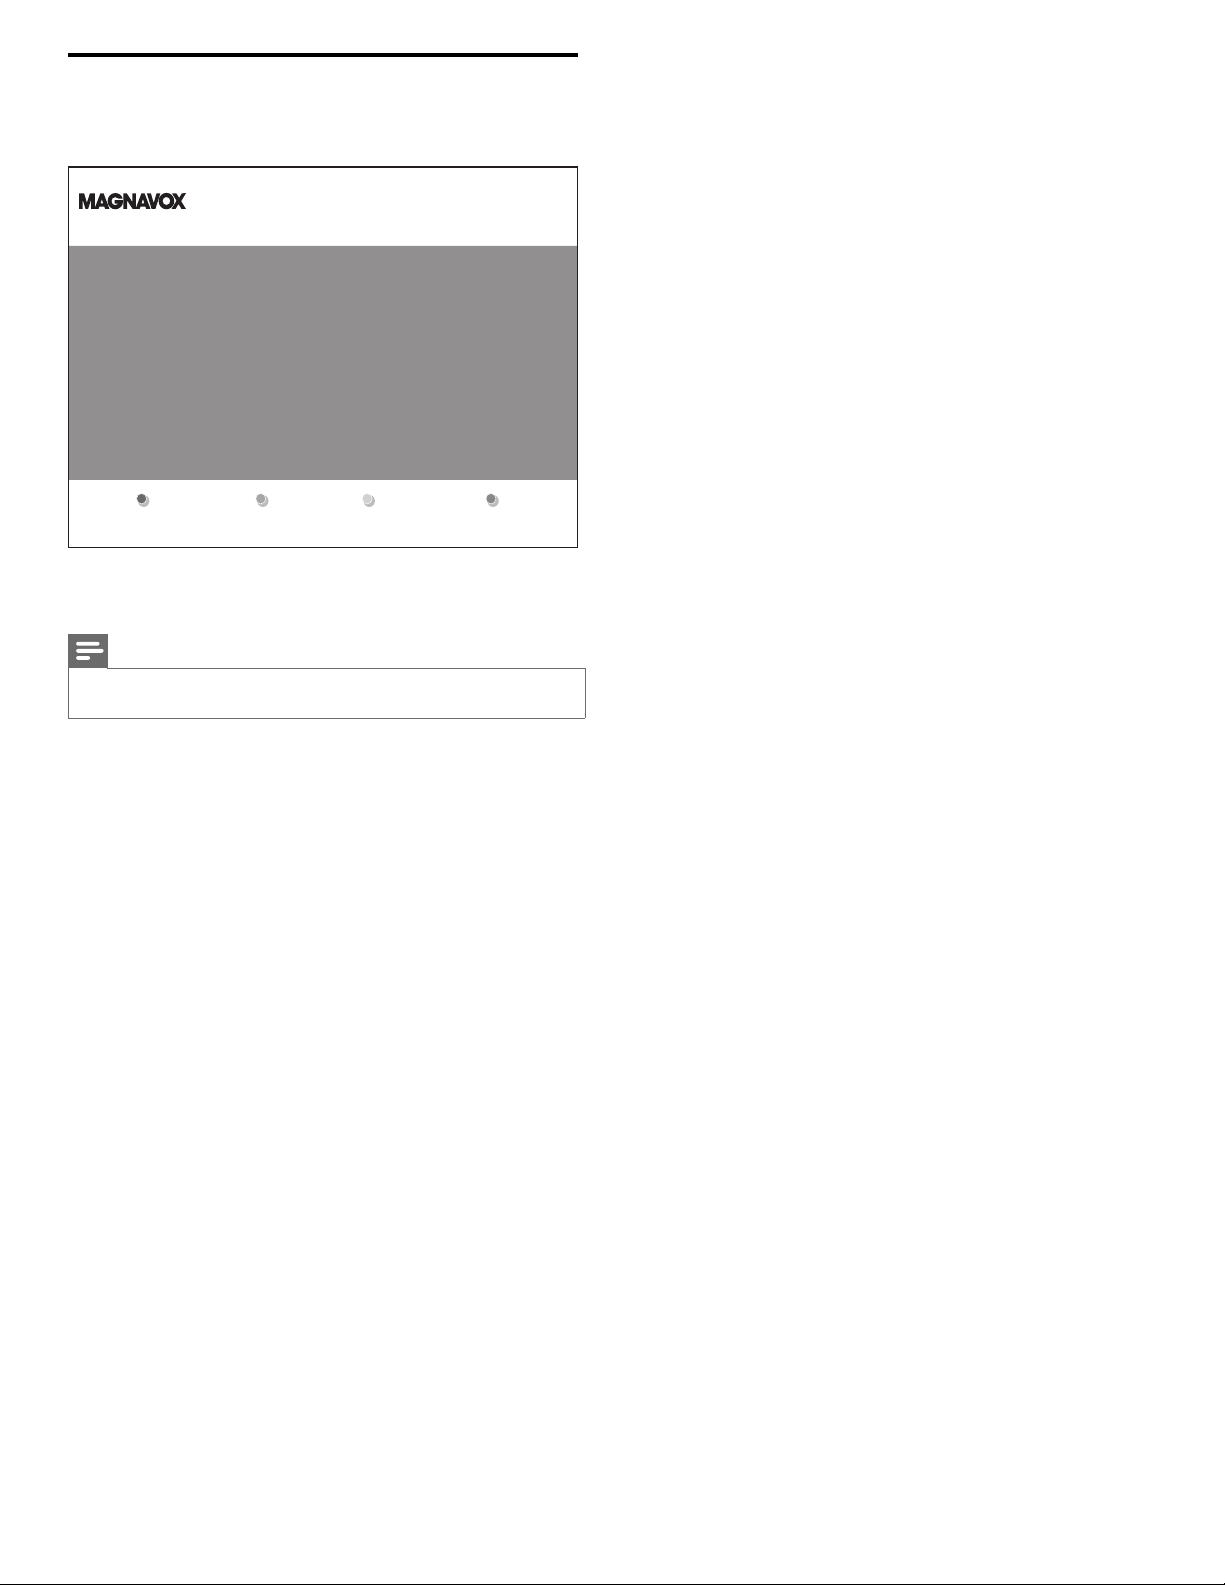
Switch on and set up the TV
The TV turns on automatically after the power cord is inserted into the
power connector. The following screen appears:
Thank you for your purchase of this MAGNAVOX TV.
Please proceed with the following steps to set-up your TV. For the BEST
possible picture performance, contact your local Cable / Satellite signal
provider for High Definition signal options available in your area.
Next
Press the GREEN Next button located on your remote control to proceed.
Follow the on-screen instructions to select your language and complete
your TV setup.
Note
If you connect your TV to a cable box or satellite set-top box, you do not need to install
•
channels. Press the red button on the remote control to exit this stage of the setup.
Finish the setup by selecting your location:
• If you choose [Retail store] your settings are erased each time you
turn off the TV. Use this mode for retail store displays.
• If you choose [Home] you are guided through a choice of display
options. Press the left or right cursor buttons to select your
preferred screen.
10
EN
Page 11
POWER
5 Use your TV
POWER
This section helps you perform basic TV operations.
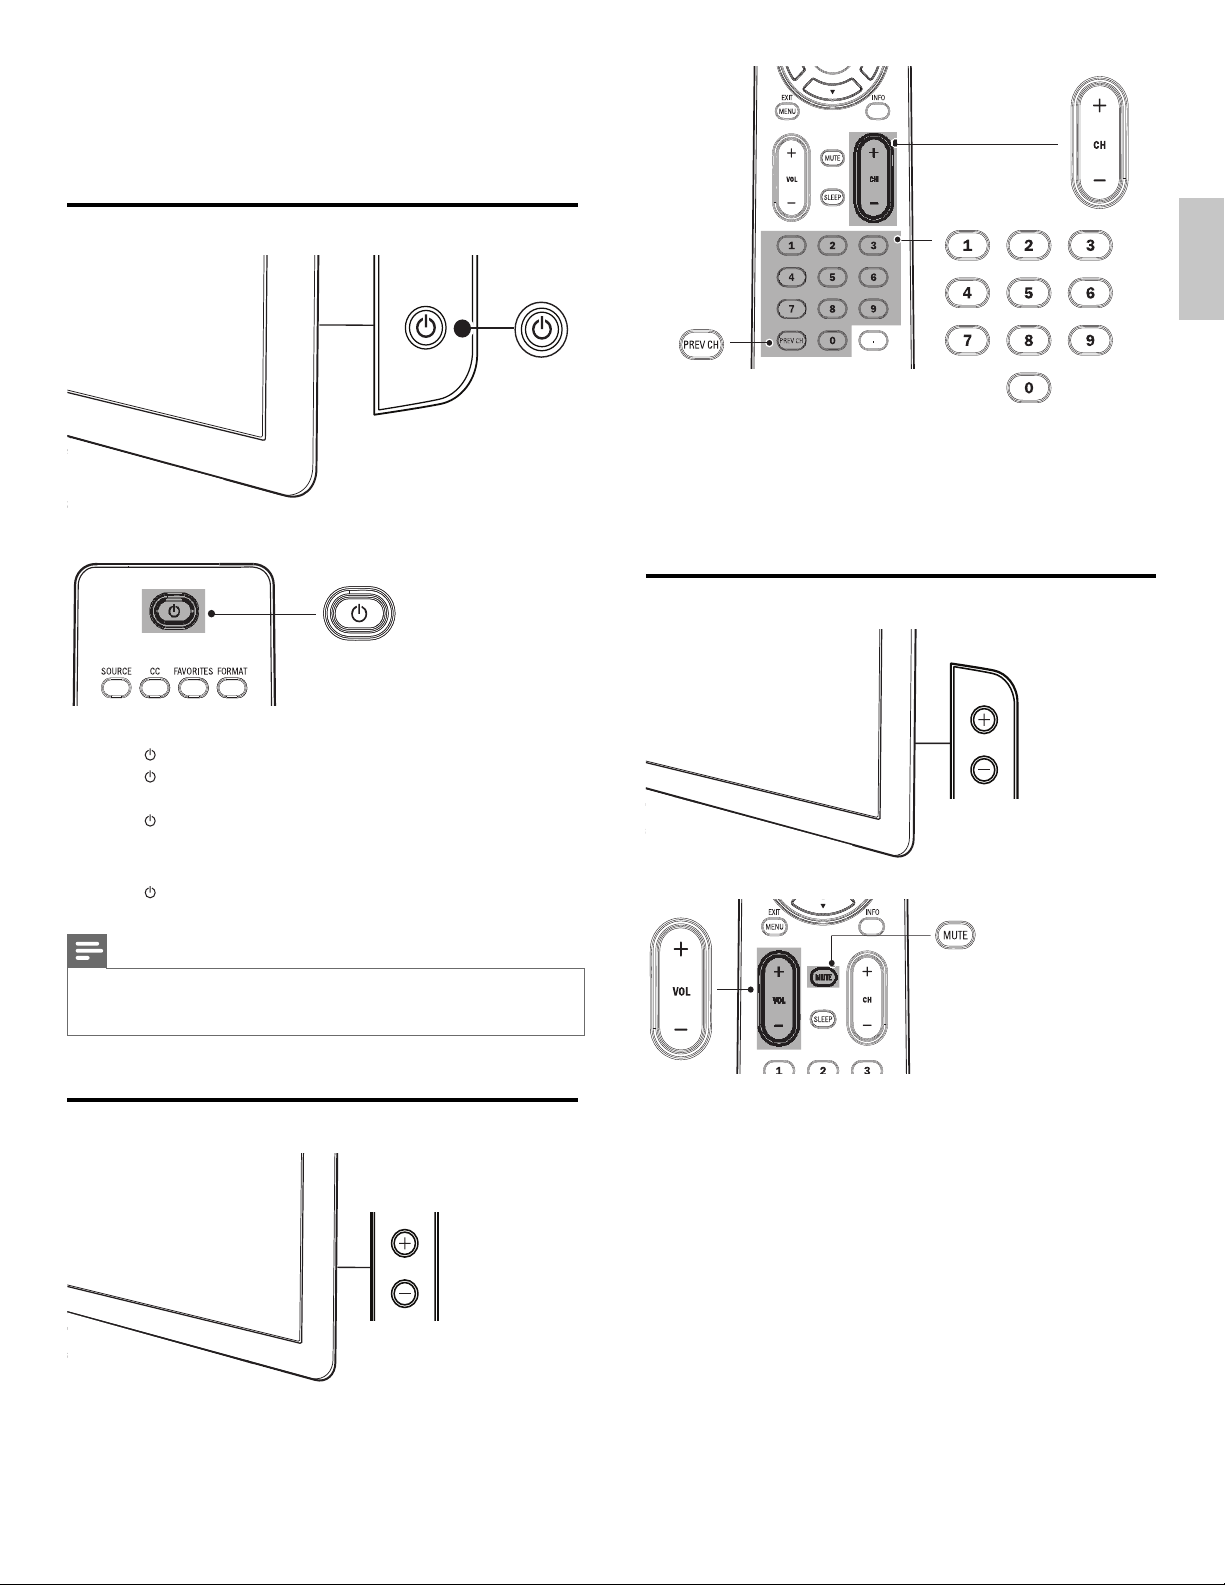
Switch your TV on/off or to standby
POWER
English
• Press CHANNEL +/ - on the side of the TV. For digital channels,
press a number (1 to 999) followed by a dot “.” and then the
corresponding sub channel number (1 to 999). Ex. 108.30.
• Press CH +/- or enter a number on the remote control.
• Press PREV CH to return to the previously viewed channel.
Adjust volume
To switch on
• Press
• Press
To switch to standby
• Press
To switch off
• Press
Energy consumption contributes to air and water pollution. When the power cord
•
is plugged in, your TV consumes energy. Your TV has a very low standby power
consumption.
Switch channels
POWER at the side of the TV.
on the remote control.
on the remote control.
» The indicator switches to red.
POWER at the side of the TV.
Note
CHANNEL
VOLUME
To increase or decrease volume
• Press VOL +/- on the remote control or press VOLUME +/- on
the side of the TV.
To mute or unmute sound
• Press MUTE on the remote control to mute the sound.
• Press MUTE again to restore the sound.
To adjust headphone volume
• Press VOL +/- on the remote control or press VOLUME +/- on
the side of the TV. When headphones are plugged into the TV, the
loud speakers are automatically muted.
EN
11
Page 12
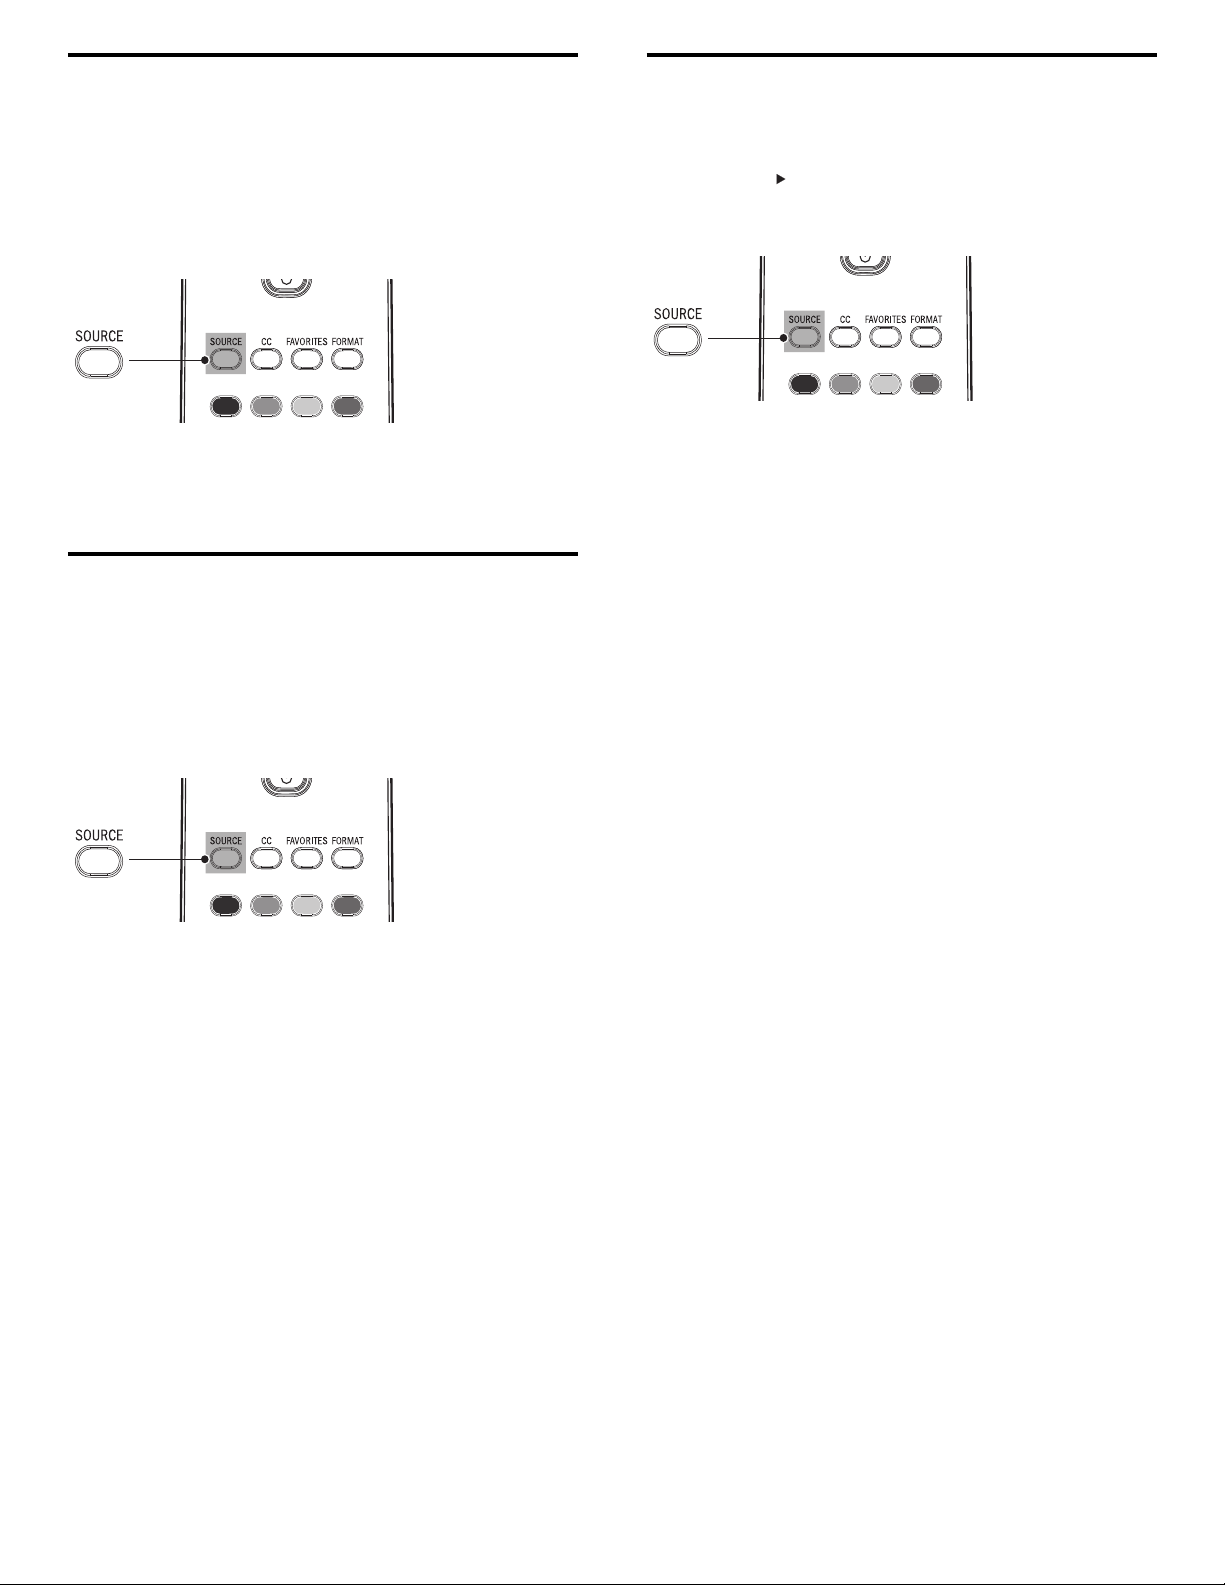
Watch channels from a set-top box
Watch a DVD
To watch channels from a set-top box
1 Switch on the set-top box.
» The picture from your set-top box might appear automatically
on your screen.
2 Use the remote control of your set-top box to select channels.
If the picture does not appear
1 Press SOURCE repeatedly to select the set-top box and wait a
few seconds for the picture to appear.
2 Use the remote control of your set-top box to select channels.
Watch connected devices
To watch connected devices
1 Switch on the connected device.
» The picture from your connected device might appear
automatically on the TV.
2 Use the remote control of the device to select channels.
If the picture does not appear
To watch a DVD
1 Insert a DVD disc into your player.
2 Press PLAY on the remote control of the DVD player.
» The DVD might automatically play on the TV.
If the picture does not appear
1 Press SOURCE repeatedly to select the DVD player and wait a
few seconds for the picture to appear.
2 Use the remote control of the DVD player to play the disk.
1 Press SOURCE repeatedly to select the connected device and wait
a few seconds for the picture to appear.
2 Use the remote control of the device to select channels.
12
EN
Page 13
6 Use more of your TV
Use the quick access menu
The quick access menu gives direct access to some often-needed menu
items.
Note
•
When digital channels are installed and broadcast, the relevant digital options are
displayed in the quick access menu.
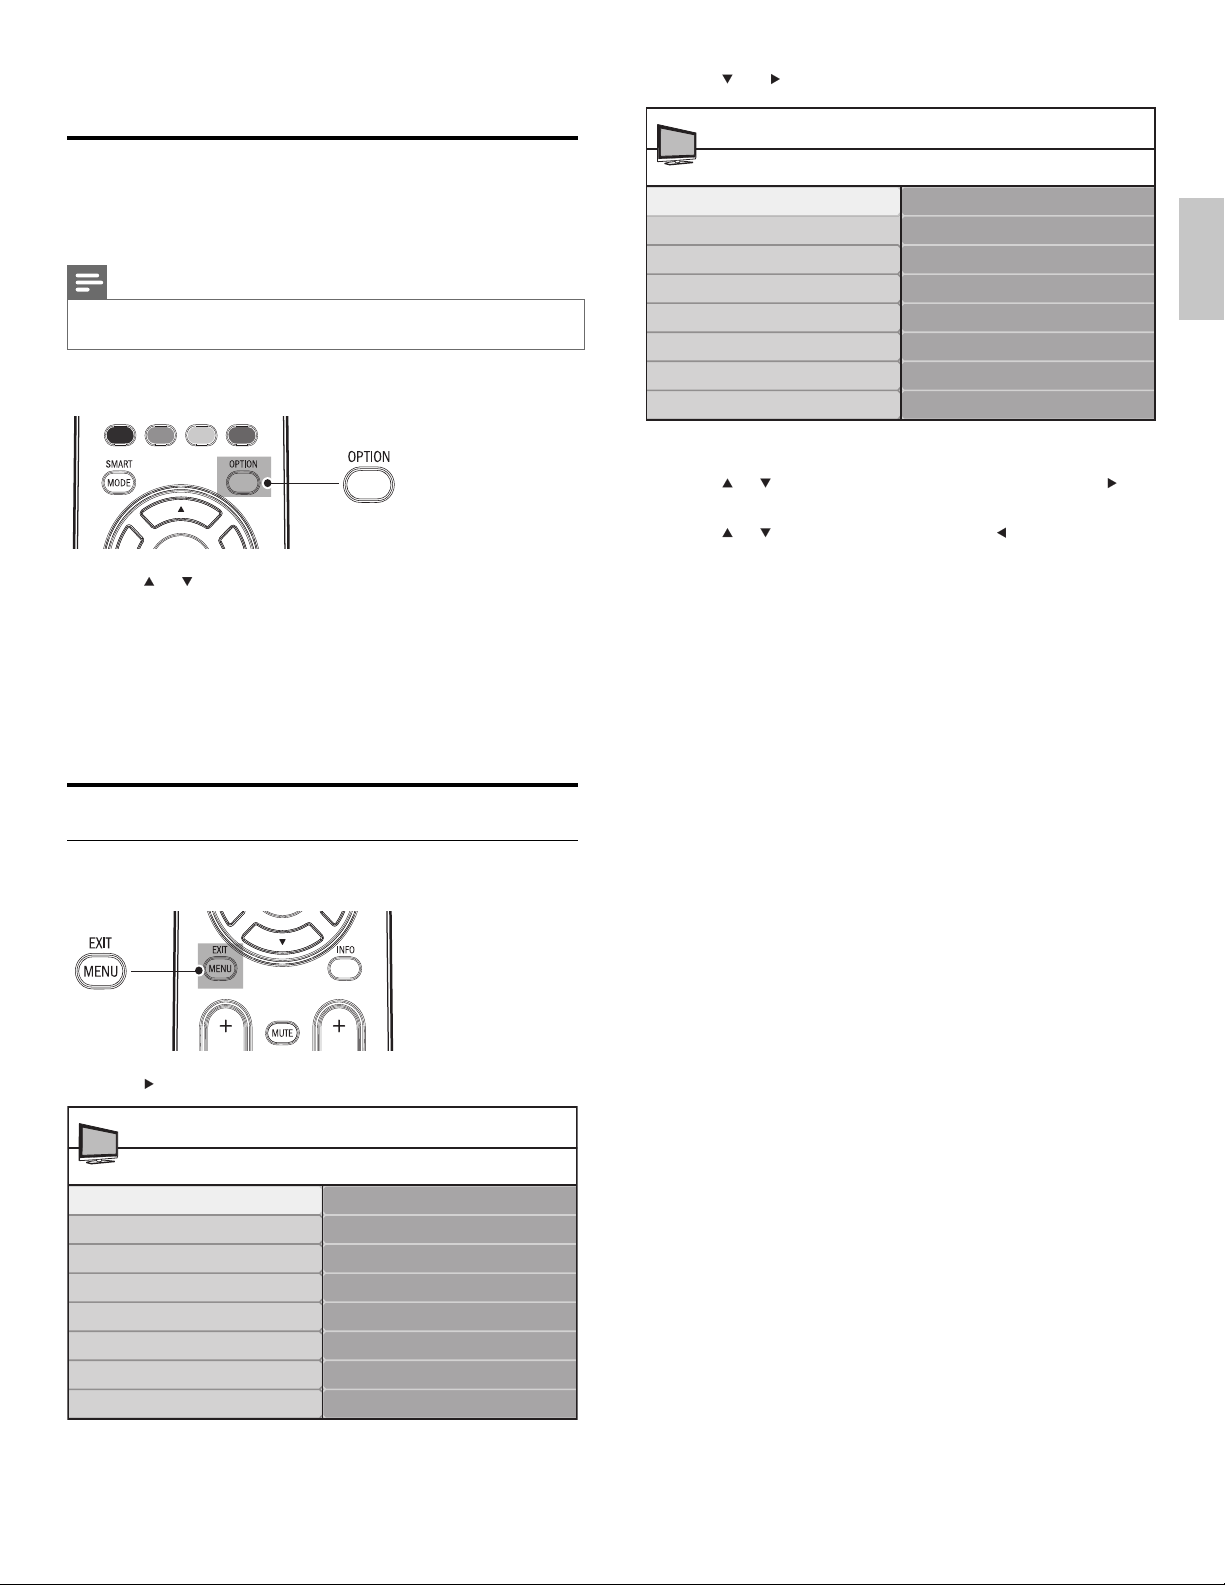
1 Press OPTION on the remote control.
2 Press or and then OK to access one of the following menus:
• Audio language, for digital channels only, where multiple audio
languages are broadcast.
• Closed captions (see ‘View closed captions (subtitles)’ on page
19 ) .
• Picture format .
• Equalizer .
• Clock (see ‘Set the clock’ on page 15 ) .
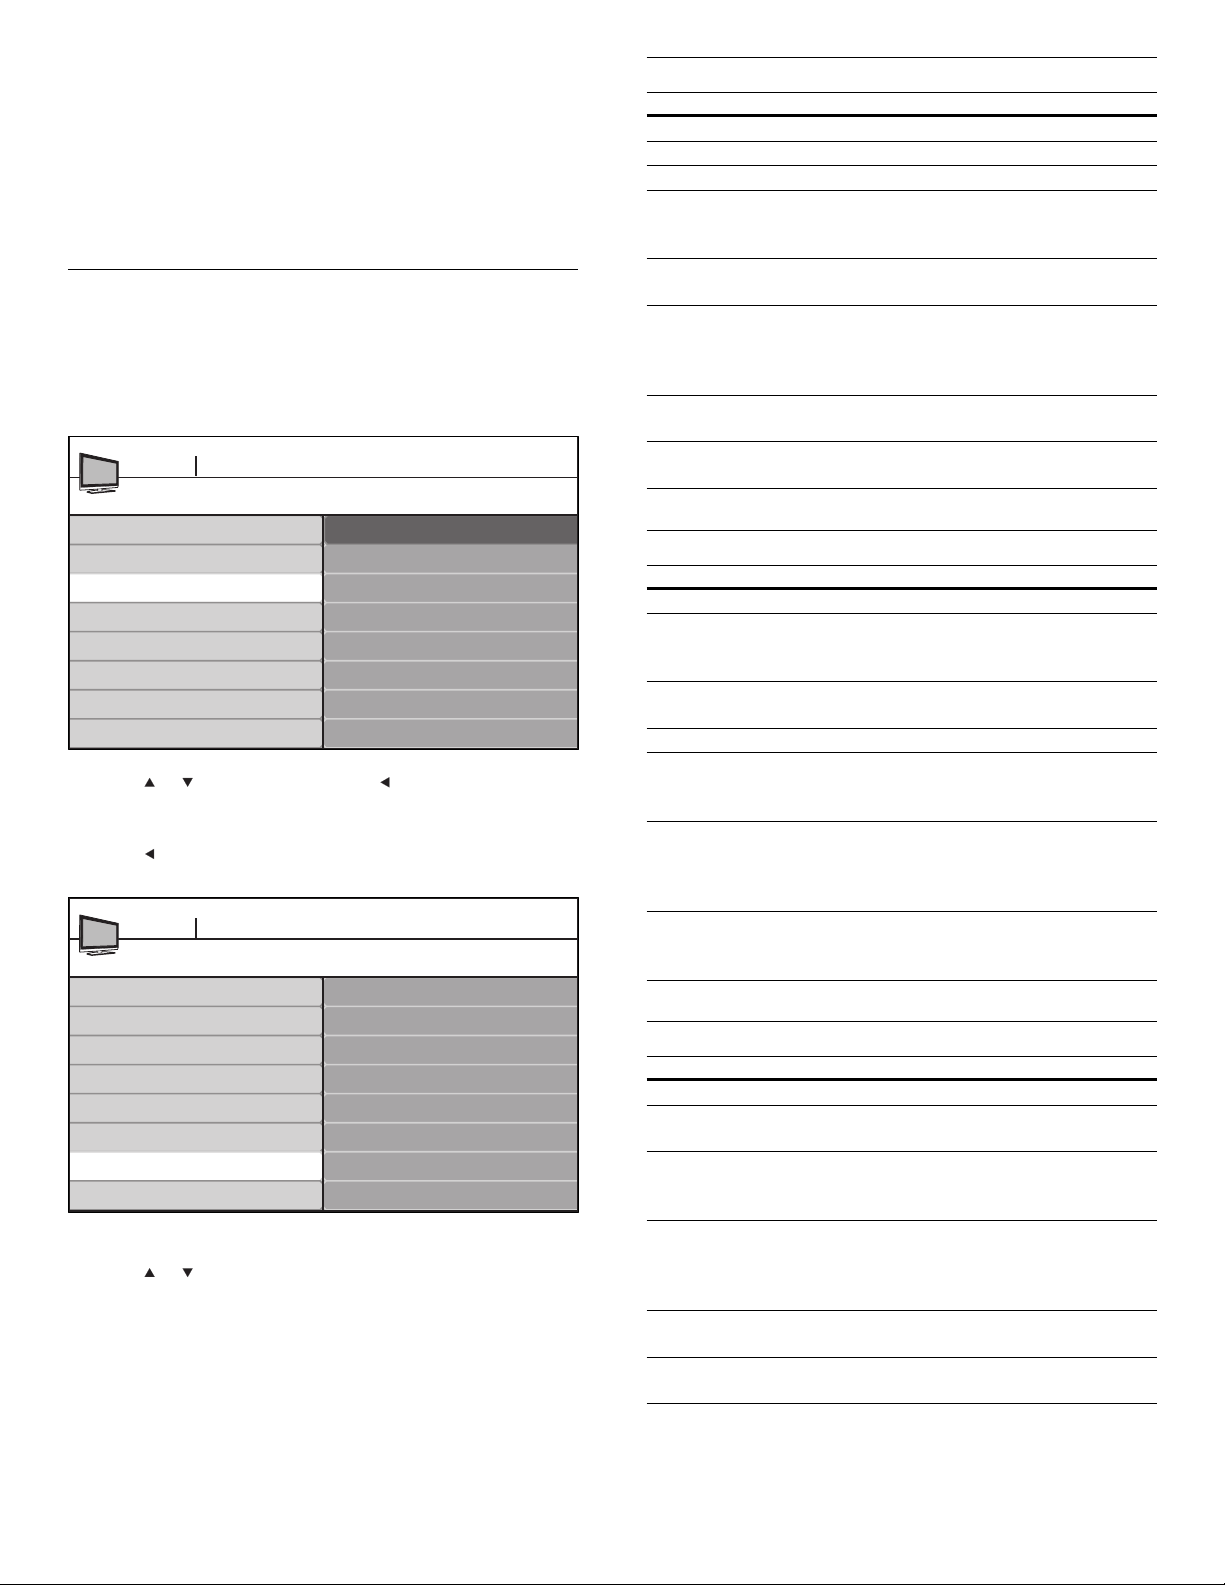
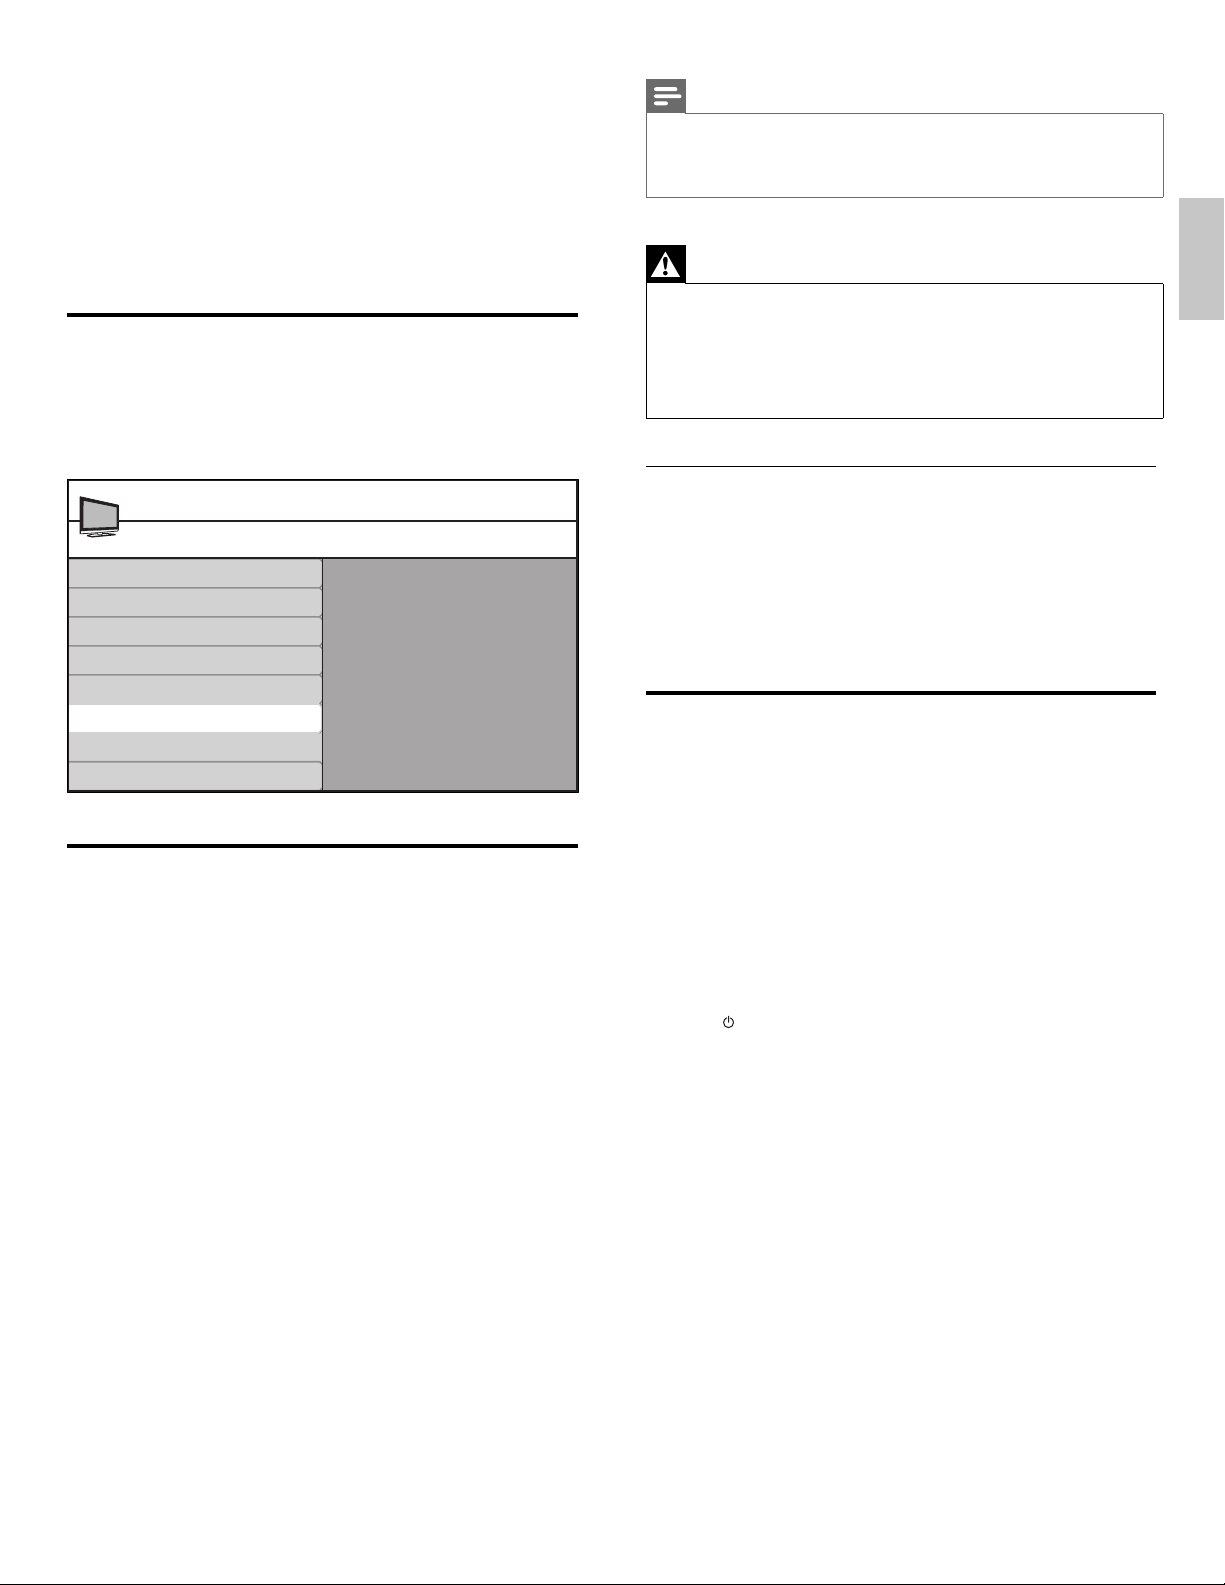
3 Press and to select the [Picture] menu.
TV menu
TV Settings
Picture
Sound
*Available in selected models
4 Press or to select one of the picture settings, and press to
enter the setting.
5 Press or to adjust the setting, and press or OK to confi rm
the change.
6 Press MENU to exit.
Picture
Contrast
Brightness
Color
Tint
Sharpness
Color temperature
Dynamic contrast
Digital Natural Motion*
English
Change picture and sound settings
Change picture settings
1 Press MENU on the remote control.
2 Press to enter the [TV settings] menu.
TV menu
TV settings
Features
Installation
TV settings
Picture
Sound
EN
13
Page 14

Summary of picture settings
The following picture settings can be confi gured. Depending on the
format of the picture source, some picture settings are not available.
• [Contrast] : Adjusts the intensity of bright areas, keeping dark areas
unchanged.
• [Brightness] : Adjusts the intensity and details of dark areas.
• [Color] : Adjusts color saturation.
• [Tint] : Adjusts the color balance in an image.
• [Sharpness] : Adjusts the level of sharpness in image details.
• [Color temperature] : To set the color temperature to [Normal] ,
[Warm] or [Cool] .
• [Dynamic contrast] : Automatically enhances contrast in an image.
• [Noise Reduction] : Automatically fi lters out and reduces image
noise. Improves picture quality for weak video signals. You can
switch DNR on or off.
• [MPEG artifact reduction] : Smooths out transitions on digital
pictures. You can switch this feature on or off.
• [Color enhancement] : Makes colors more vivid and improves the
resolution of details in bright colors. You can switch this feature on
or off.
• [Picture format] : Changes the picture format.
• [Horizontal Shift] / [Vertical Shift] : Adjusts the horizontal and
vertical position of the picture. The availability of this settings
depends on certain signals or sources.
Summary of picture formats
The following picture formats can be selected.
Depending on the format of the picture source, some picture formats
are not available.
[Automatic] : (Not for PC mode.)
Enlarges the picture automatically to best
fi t the screen. The subtitles remain visible.
[Super zoom] : (Not for HD and PC
mode.) Removes the black bars on the
side of 4:3 broadcasts. There is minimal
distortion.
[4:3] : Shows the classic 4:3 format.
[Movie expand 14:9] : (Not for HD and
PC mode.) Scales 4:3 format to 14:9.
Change picture format
1 Press OPTION on the remote control.
2 Select [Picture format] .
3 Press or to select a picture format and press OK to confi rm
your choice.
[Movie expand 16:9] : (Not for HD and
PC mode.) Scales 4:3 format to 16:9.
[Wide screen] : Stretches the classic 4:3
format to 16:9.
[Unscaled] : For HD and PC mode only,
and in selected models only. Allows
maximum sharpness. Some distortion
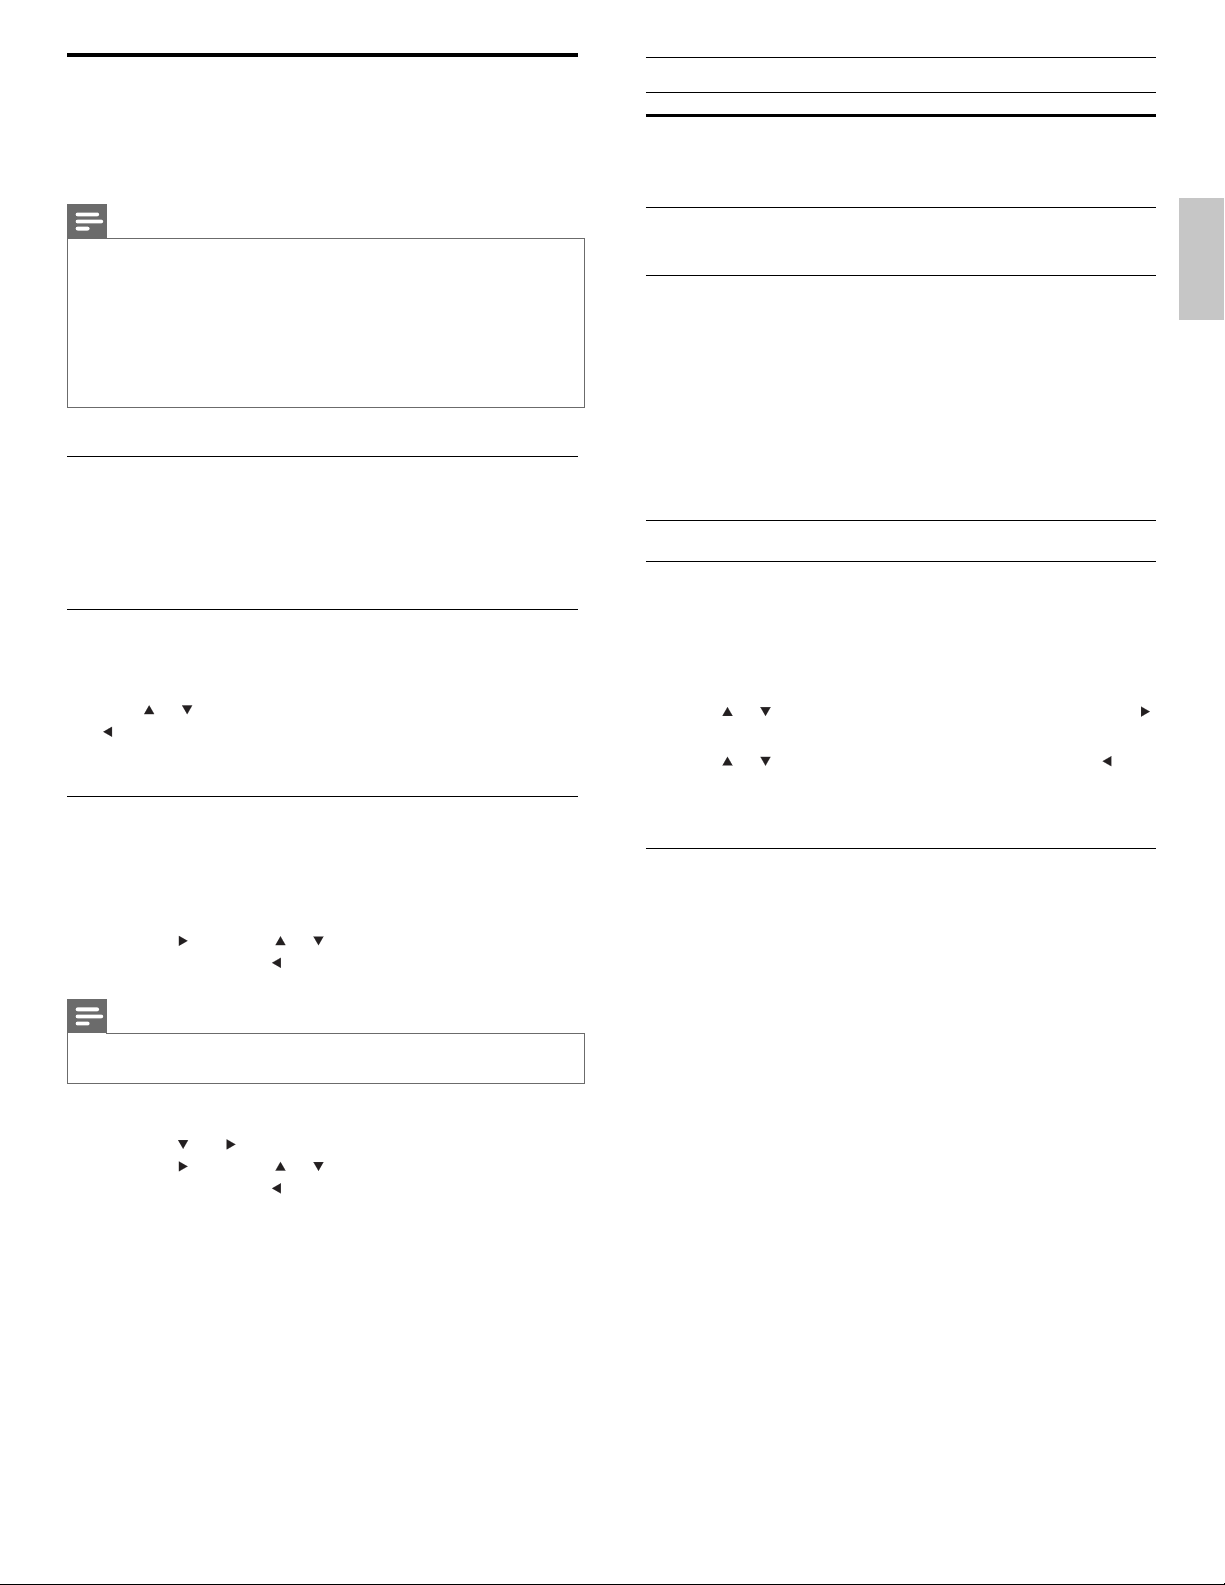
Change sound settings
1 Press MENU on the remote control and select [TV settings] >
[Sound] .
TV menu
TV Settings
Picture
Sound
may be present due to the broadcaster’s
systems. Set your PC resolution to wide
screen mode for best results.
Sound
Equalizer
Balance
Digital audio language
Alternate audio
Mono/Stereo
Incredible surround
AVL
14
EN
Page 15
2 Press or to highlight a sound setting and press to select the
setting.
3 Press or to adjust the setting, and press OK to confi rm the
change.
4 Press MENU to exit.
Summary of sound settings
The following sound settings can be confi gured. Depending on the
sound source, some sound settings are not available.
• [Equalizer] : Adjusts individual sound frequencies.
• [Balance] : Adjusts the balance of the right and left speakers to best
suit your listening position.
• [Digital audio language] : Available for digital channels, when
multiple languages are broadcast. Lists available audio languages.
• [Alternate audio] : Available for analog channels when a main and
second audio program (SAP) is broadcast. Select the main or
second audio program.
• [Mono] / [Stereo] : Select mono or stereo.
• [Incredible Surround] : Selects available modes for surround sound.
• [AVL] ( [Auto volume leveling] ): Reduces sudden changes in
volume, for example, during commecials or when switching
channels. Set on or off.
• [TV Speakers] : Set on or off, or output sound to an EasyLink-
compliant device. [HDMI-CEC] must be activated in the
[Preferences] menu to make the [TV Speakers] menu available.
• [Delta volume] : Levels out volume differences between channels
or connected devices. Switch to the connected device before you
change the delta volume.
Create or edit a list of favorite channels
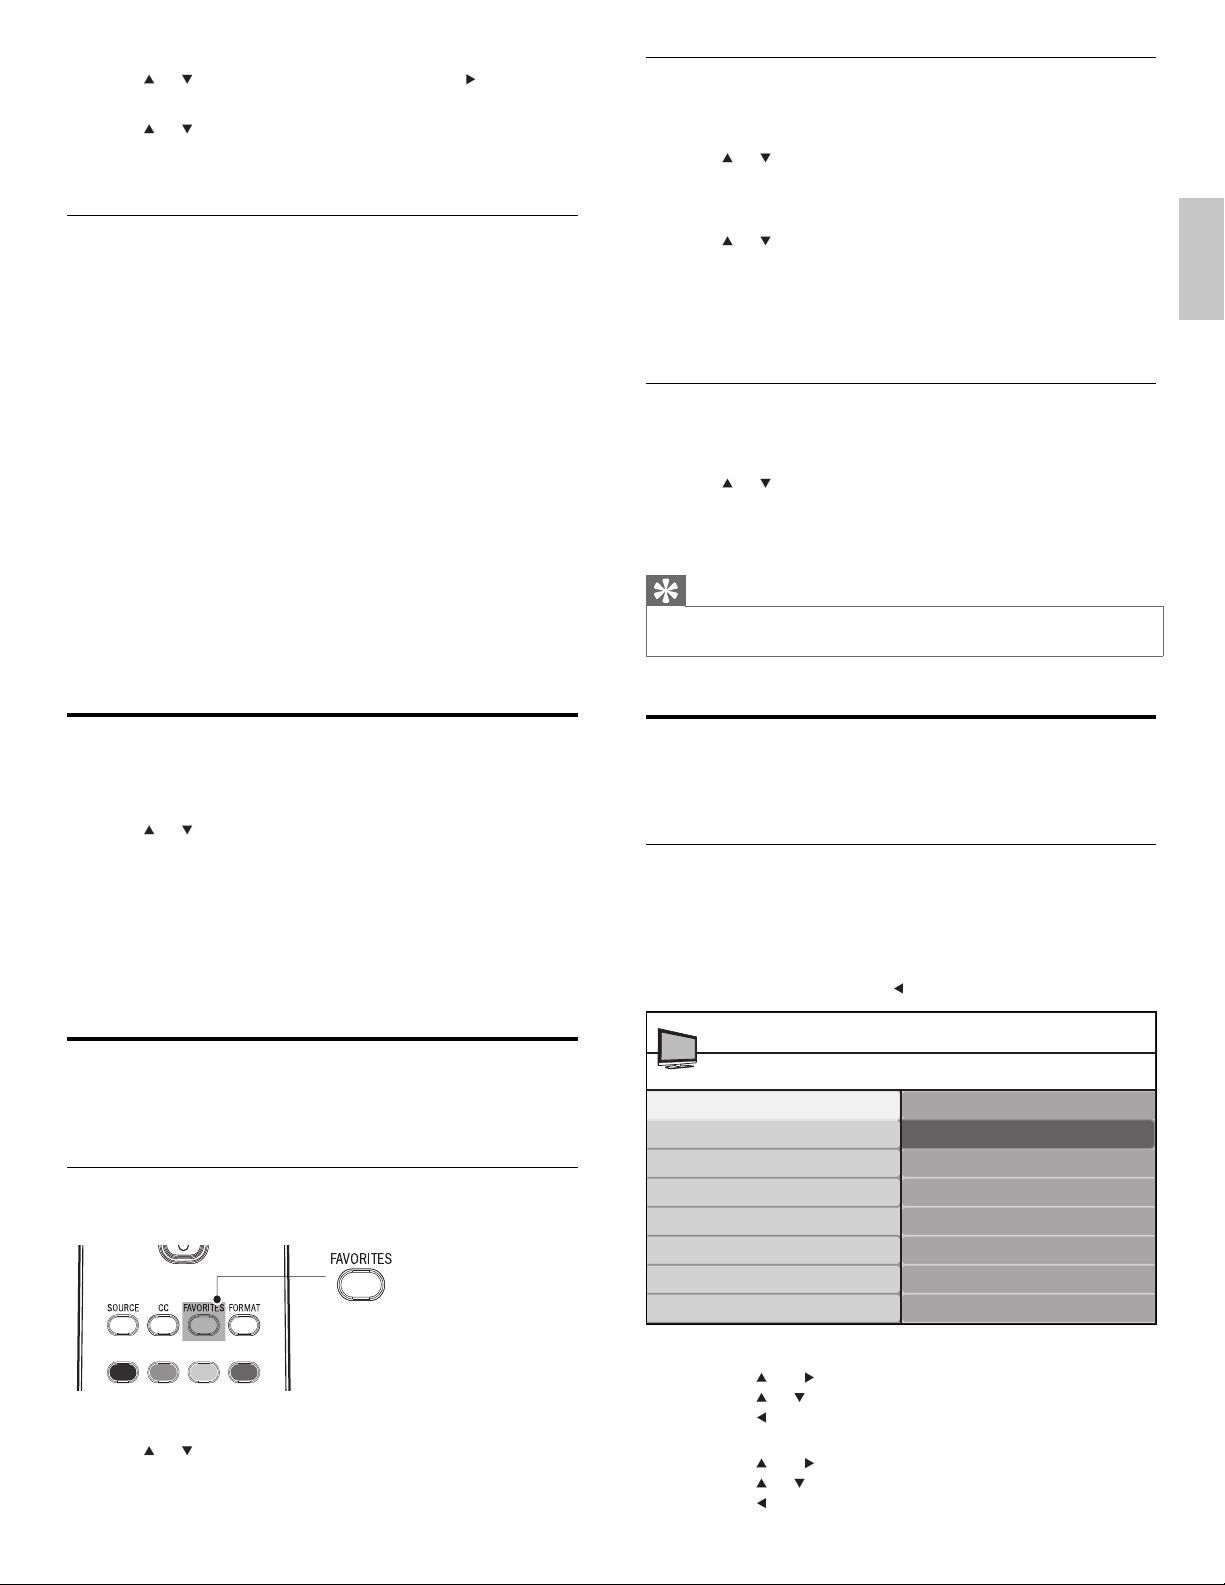
1 Press the FAVORITES key on the remote control to display your
lists of favorite channels.
2 Press or to highlight a list, and press OK to select the list.
3 Press the green key to enter Edit mode.
» A list of channels is shown.
4 Press or to highlight a channel.
5 Press OK to select or deselect the highlighted channel.
» The channel is added to or removed from the list of favorite
channels.
6 Press the green button to exit.
Switch to one of the channels on a list
1 Press OK on the remote control to display the last list that you
selected.
2 Press or to highlight a channel.
3 Press OK to select the channel.
» The TV switches to that channel.
Tip
•
Press CH+/- to select channels in a list or press the numeric keys to select channels
that are not in a list.
English
Use Auto Mode
Press AUTO MODE to set your TV to a predefi ned picture and
1
sound setting.
2 Press or to select one of the following settings:
• [Personal] : The customized settings you defi ned by using the
[Picture] menu.
• [Sports] : Vivid picture settings and clear sound for high action.
• [Standard] : For normal TV viewing.
• [Movie] : Brilliant picture settings for a cinematic experience.
• [Game] : Optimized for PCs, games consoles and playstations.
• [Power Saver] : Eco friendly settings for lower power
consumption.
Create and use lists of favorite channels
You can create lists of your preferred TV channels so that you can fi nd
those channels easily.
Select a list of favourite channels
1 Press the FAVORITES key on the remote control.
Set the clock
You can set the time on your TV and program your TV to switch off at
a specifi c time.
Set the time automatically
Some digital channels transmit the time. For these channels, you can set
the time automatically and choose which channel to read the time from.
1 Press MENU on the remote control and select [Installation] >
[Clock] > [Auto clock mode] .
2 Select [Automatic] and press to confi rm your choice.
TV menu I Installation
Clock
Auto clock mode
Auto clock channel
Time zone
Daylight saving
Auto clock mode
Manual
Automatic
» Your lists of favorite channels are displayed.
2 Press or to highlight a list, and press OK to select the list.
3 (Optional) Select the channel from which the TV reads the time.
• Press and to enter the menu for [Auto clock channel] .
• Press
• Press
or to highlight a channel.
to confi rm your choice.
4 (Optional) Select the time zone.
• Press
• Press
• Press
and to enter the menu for [Time zone] .
or to highlight the time zone.
to confi rm your choice.
EN
15
Page 16
5 (Optional) Set daylight saving.
• Press
• Press
• Press to confi rm your choice.
6 Press MENU to exit.
and to enter the menu for [Daylight saving] .
or to highlight [Automatic] or [Off] .
• You are asked to enter your PIN again.
3 Enter your PIN again to confi rm.
» A message appears to confi rm that your PIN has been
changed.
4 Press MENU to exit.
Set the time manually
1 Press MENU on the remote control and select [Installation] >
[Clock] > [Auto clock mode] .
2 Select [Manual] , and press to confi rm your choice.
TV menu I Installation
Clock
Auto clock mode
Time
Day
Auto clock mode
Manual
Automatic
3 Press to select [Time] and then press to set the time.
Use the format HH:MM. Select [AM] / [PM] for morning or
afternoon.
4 Press OK to confi rm your choice.
5 Press and to enter the menu for [Day] .
6 Press or to select the day.
7 Press OK to confi rm your choice.
8 Press MENU to exit.
Set the sleeptimer
Sleeptimer switches the TV to standby after a pre-defi ned period of time.
You can always switch off your TV earlier or reset the sleeptimer during
the countdown.
Press SLEEP repeatedly to select a value from 0 to 180 minutes. For
example, if you select 90, the TV switches to standby in 90 minutes.
Tip
•
To turn the sleeptimer off, select 0 minutes.
Use child control and rating locks
Lock the TV
This section describes how to lock all channels on the TV. At the
specifi ed time, screen is blanked out and the audio is muted.
1 Ensure that the clock is set with the current time (see ‘Set the
clock’ on page 15 ) .
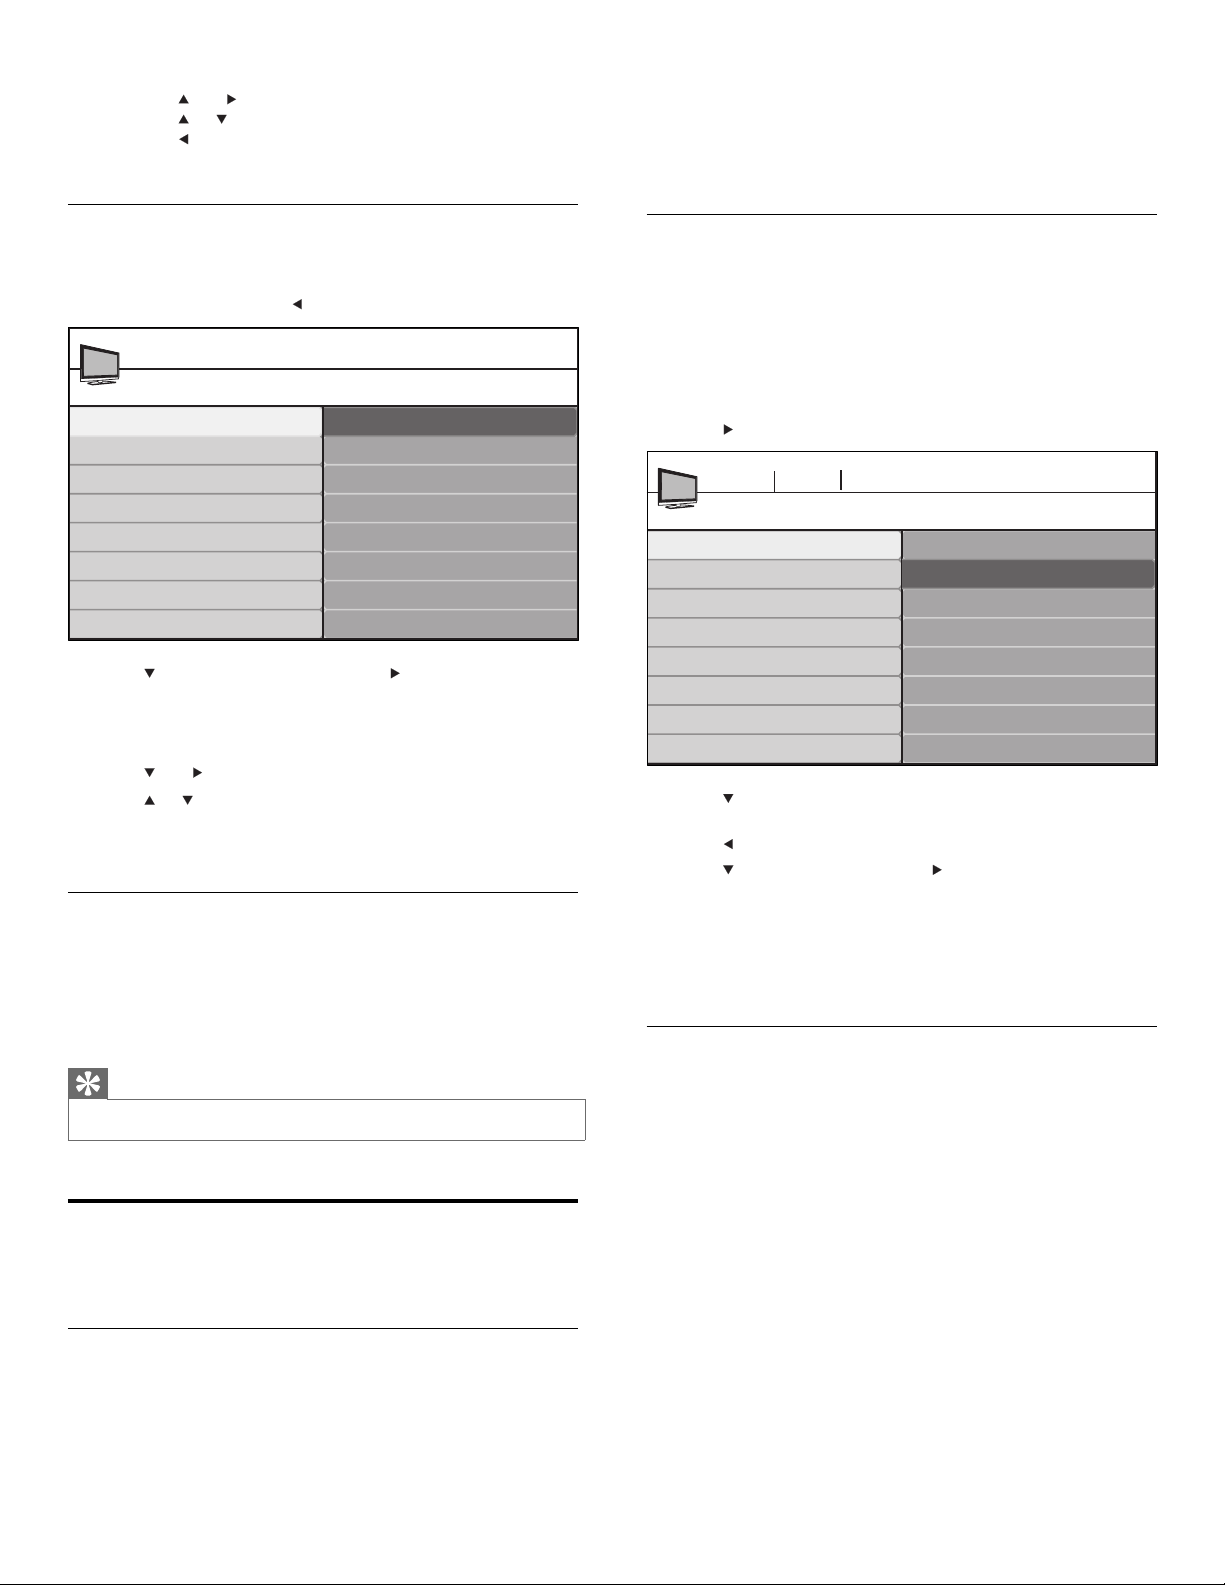
2 Press MENU on the remote control and select [Features] >
[Child lock] > [Lock after] .
3 Enter your PIN (see ‘Set or change your PIN’ on page 16 ) .
4 Press to select [Timer] .
TV menu Features
Lock after
Timer
Time
Child lock
Timer
Off
On
5 Press to select [On] and activate the [Lock after] feature. Select
[Off] to deactivate the feature.
6 Press to confi rm your choice.
7 Press to select [Time] and press to set the time.
Use the format HH:MM, and select [AM] / [PM] for morning or
afternoon.
8 Press OK to confi rm the time.
9 Press MENU to exit.
10 Turn the TV off and on again.
Lock a channel
This section describes how to lock specifi ed channels. The channels can
be selected but the screen is blanked out and the audio is muted.
1 Ensure that the clock is set with the current time (see ‘Set the
clock’ on page 15 ) .
2 Press MENU on the remote control and select [Features] >
[Child lock] > [Channel lock] .
3 Enter your PIN (see ‘Set or change your PIN’ on page 16 ) .
You can prevent your children from watching certain programs or
certain channels by locking the TV controls and by using ratings.
Set or change your PIN
1 Press MENU on the remote control and select [Features] >
[Change PIN] .
2 Enter a 4-digit PIN on the number keys of the remote control.
• If you have a PIN, enter your current PIN.
• If you do not have a PIN or if you have forgotten your PIN,
enter 0711 .
16
EN
Page 17
TV menu Features
Child Lock
Lock after
Channel lock
TV ratings lock
Movie ratings lock
Canada English ratings lock
Canada French ratings lock
Region ratings lock
Channel lock
Channel 1 Sport
Channel 2 News
Channel 3 Movies
Channel 4
Channel 5
Channel 6
Channel 7
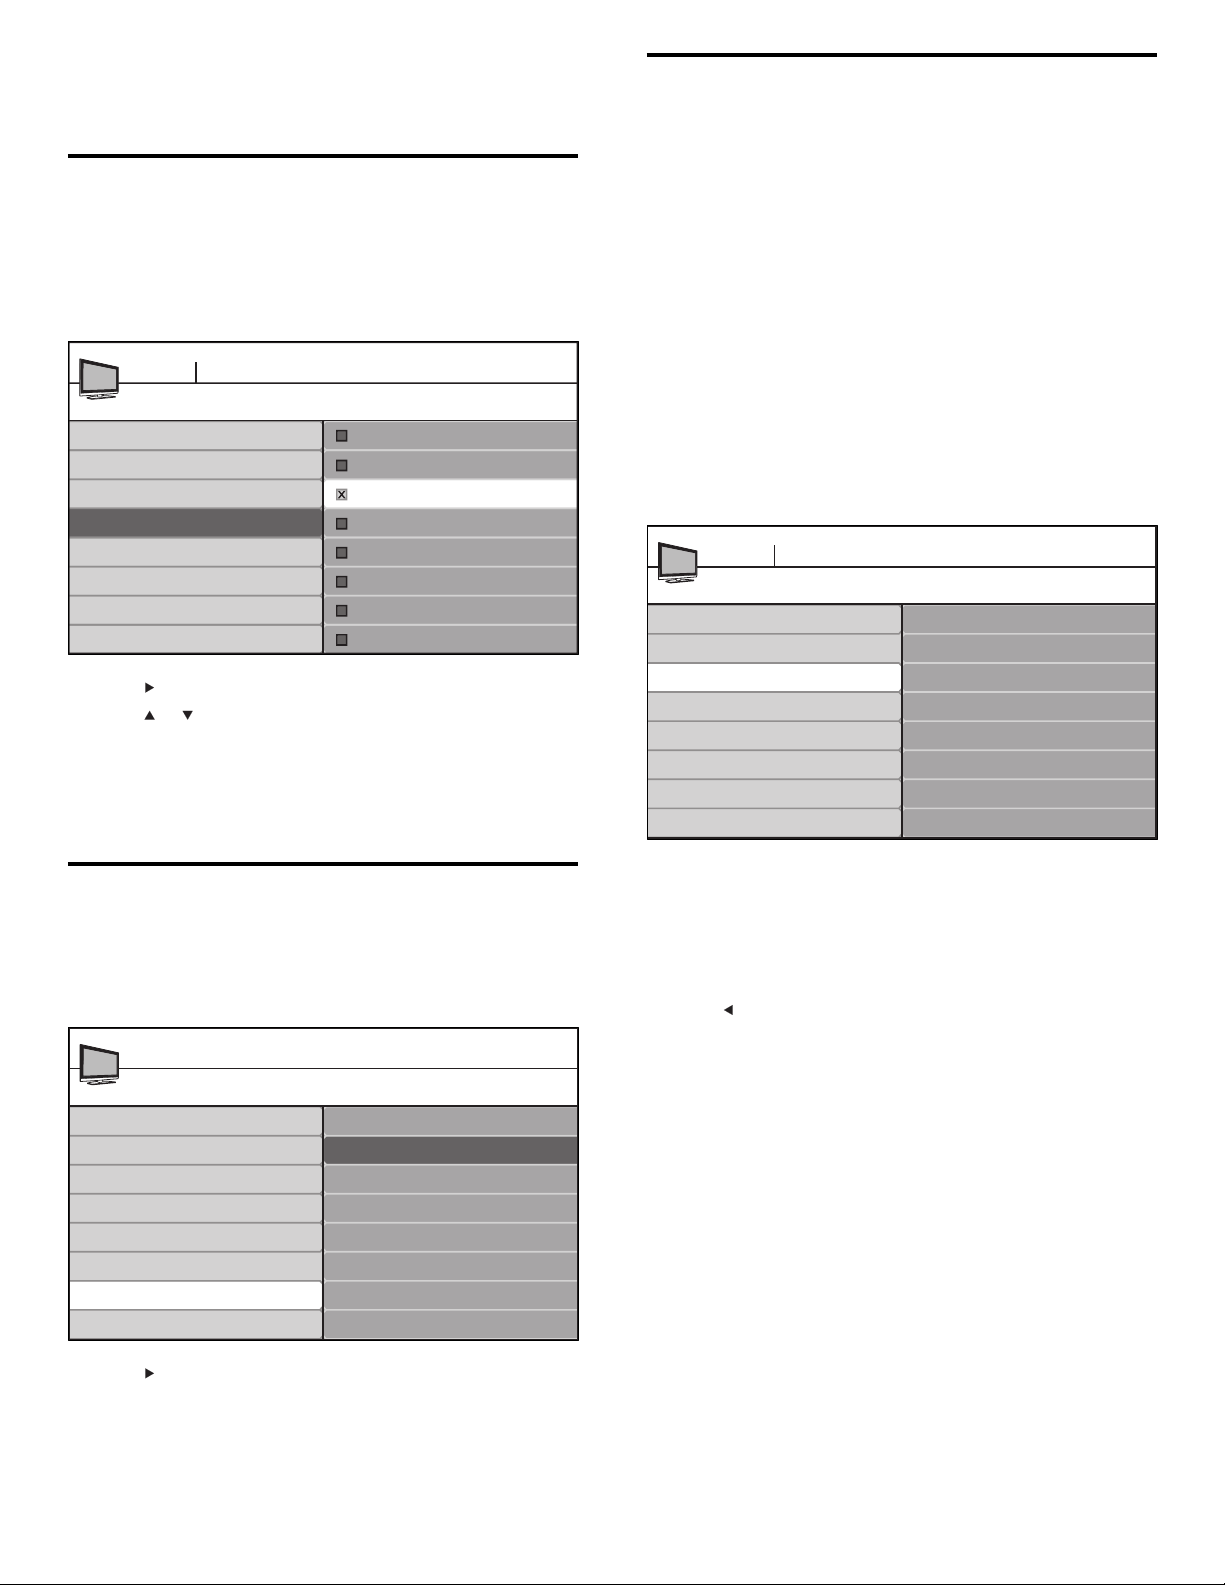
4 Press or and then press OK to lock one or more channels or
external sources.
5 Each channel has a box-graphic in front of it to indicate whether it is locked:
• A box with X indicates that the channel is locked
• An empty box indicates that the channel is not locked
6 Press MENU to exit.
Use the TV ratings lock
Your TV is equipped with a V-chip that allows you to control access to
individual programs based on their age rating and content rating. The
program content advisory data are sent by the broadcaster or by the
program provider.
If you receive channels through a set-top box or cable box connected
by HDMI, you cannot use the TV ratings lock. Your set-top box or cable
box must be connected through RF or AV connectors.
1 Press MENU on the remote control and select [Features] >
[Child lock] > [TV ratings lock] .
2 Enter your PIN (see ‘Set or change your PIN’ on page 16 ) .
3 Press or and then press OK to lock or unlock one or more
ratings.
Each rating has a box-graphic in front of it to indicate whether
programs carrying that rating are locked:
• A box with X indicates that all items in the content ratings list
are locked.
• An empty box indicates that no items in the content ratings
list are locked.
• A box with / indicates that some content ratings are
deselected. For example, for rating TV-14, you can deselect
one or more of the following content ratings: [(D) Dialog] ,
[(L) Language] , [(S) Sex] , or [(V) Violence] .
TV menu Features
TV ratings lock
All
None
TV-Y
TV-Y7
TV-G
TV-PG
TV14
TV-MA
When you select [All] , all items in the ratings list are locked.
When you select [None] , programs with no rating and
programs with a rating of None are locked.
Child Lock
TV-14
(D)Dialog
(L)Language
(S)Sex
(V)Violence
When you lock a rating, all ratings in the younger age
categories are automatically locked.
4 Press MENU to exit.
Summary of TV ratings
Age rating Content rating
All None
None None
TV-Y : Appropriate for children of all ages with
themes and elements suitable for children aged
2-6.
TV-Y7 : Programs designed for children age 7
and older.
TV-G : Programs suitable for all ages. These
programs contain little or no violence, no
strong language and little or no sexual dialog or
situations.
TV-PG : Programs contain elements that some
parents may fi nd unsuitable for younger children
and which may need parental guidance. The
program may contain moderate violence, sexual
dialog and/or situations and some strong language.
TV-14 : Programs contain elements that may
not be suitable for children under 14 years of
age. These programs include one or more of
the following: intense violence, intense sexual
situations, suggestive dialog and strong language.
TV-MA : Programs are designed to be viewed by
adults and may be unsuitable for children under
the age of 17. These programs may contain
graphical violence, explicit sexual activity and/or
crude or indecent language.
Use the movie ratings lock
You can control viewing of movies based on their Motion Picture
Association of America (MPAA) rating.
None
[(FV) Fantasy
Violence]
None
[(D) Dialog]
[(L) Language]
[(S) Sex]
[(V) Violence]
[(D) Dialog]
[(L) Language]
[(S) Sex]
[(V) Violence]
[(L) Language]
[(S) Sex]
[(V) Violence]
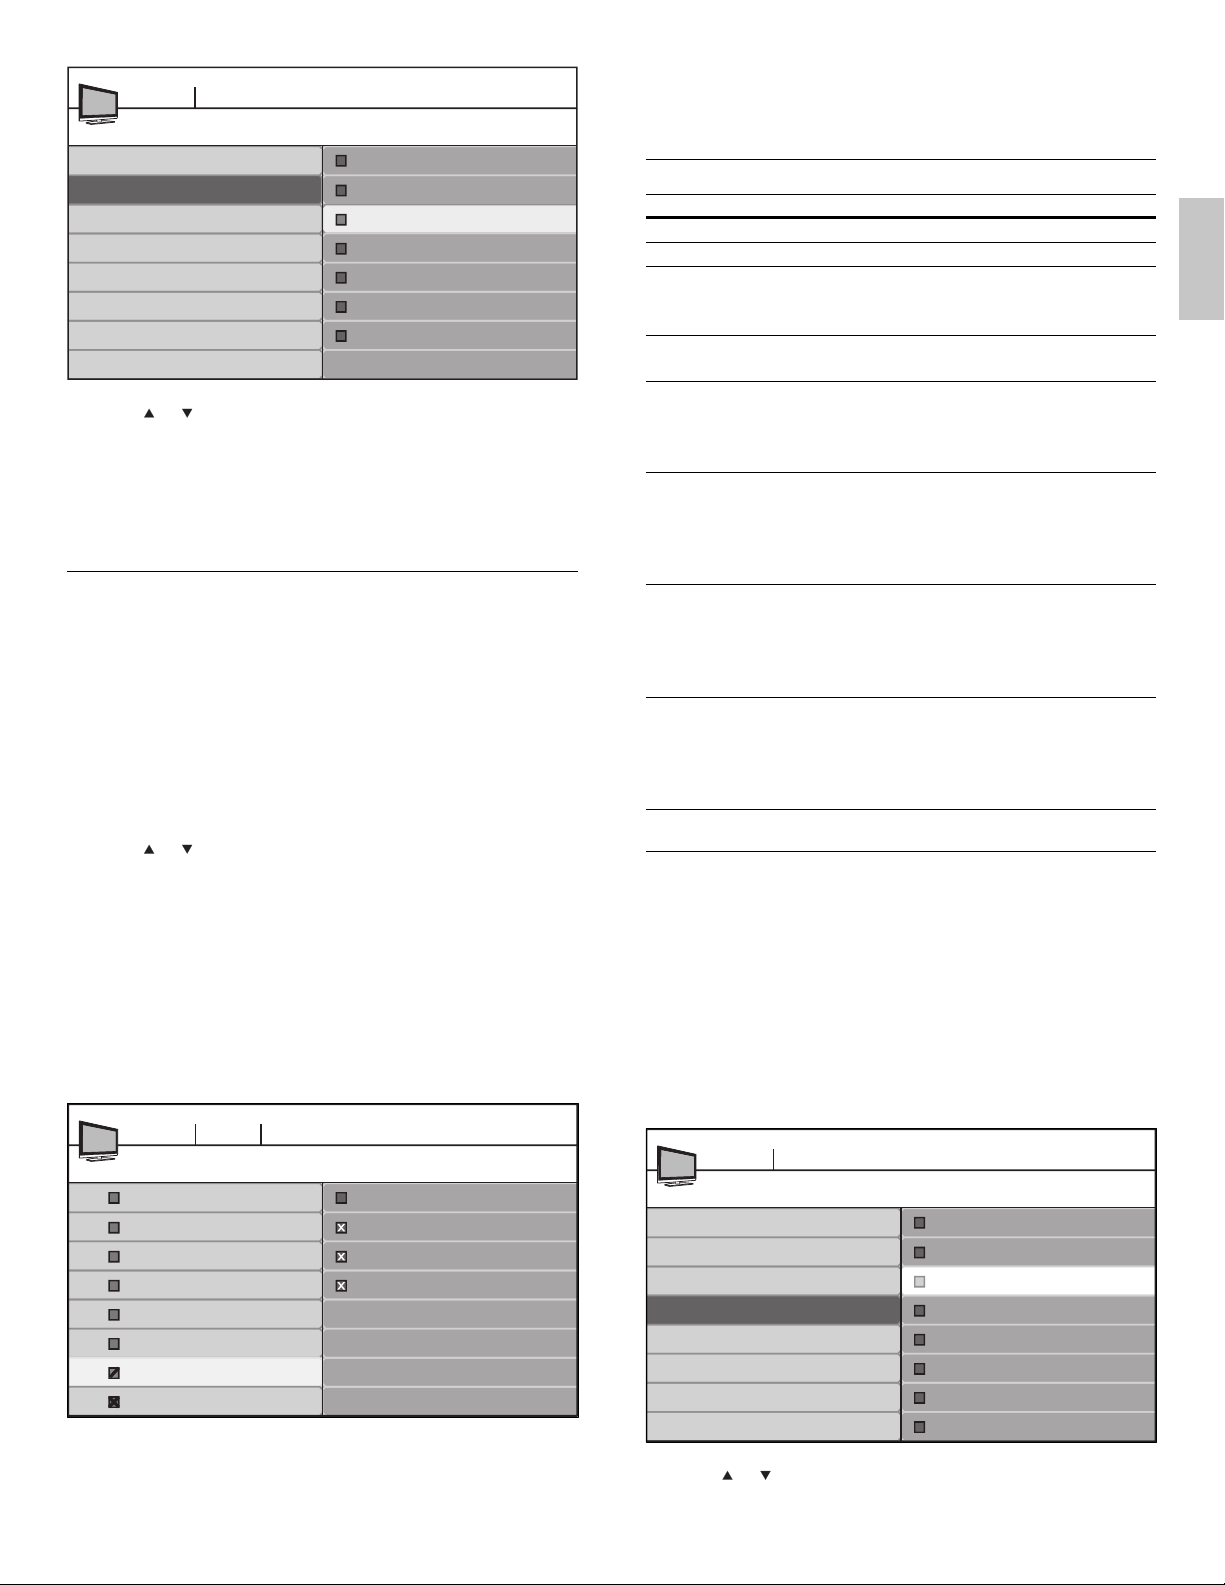
1 Press MENU on the remote control and select [Features] >
[Child lock] .
2 Select one of the menus for movie ratings lock.
• In the USA, select [Movie ratings lock] .
• In Canada, select [Canada English ratings lock] or [Canada
French ratings lock] .
3 Enter your PIN (see ‘Set or change your PIN’ on page 16 ) .
» The following screen shows the ratings in [Movie ratings lock] .
TV menu Features
Child Lock
Lock after
Channel lock
TV ratings lock
Movie ratings lock
Canada English ratings lock
Canada French ratings lock
Region ratings lock
Movie ratings lock
All
NR
G
PG
PG-13
R
NC-17
X
4 Press or and then press OK to lock or unlock one or more
ratings.
English
EN
17
Page 18
Each rating has a box-graphic in front of it to indicate whether
programs carrying that rating are locked:
• A box with X indicates that all items in the rating are locked.
• An empty box indicates that no items in the rating are not
locked.
When you lock a movie rating, all items for ages below that
movie rating are automatically locked.
5 Press MENU to exit.
Use the region ratings lock
You can control access to digital programs based on downloaded region
ratings. Before you download a ratings table, ensure that regional ratings
are broadcast.
1 Press MENU on the remote control and select [Installation] >
[Preferences] > [Downloaded rating table] .
TV menu Installation
Preferences
Location
Show emergency alerts
Downloaded rating table
Downloaded rating table
Off
On
2 Press or to select [On] , and press to confi rm your choice. If
you select Off , you choose not to download the region rating table
and you cannot use the region rating lock.
3 Press to return to the TV menu and select [Features] > [Child
lock] > [Region ratings lock] .
TV menu Features
Child Lock
Lock after
Channel lock
TV ratings lock
Movie ratings lock
Canada English ratings lock
Canada French ratings lock
Region ratings lock
Region ratings lock
Please enter your PIN
4 Enter your PIN (see ‘Set or change your PIN’ on page 16 ) .
5 Press or and then press OK to lock or unlock one or more
ratings.
Each rating has a box-graphic in front of it to indicate whether it is
locked:
• A box with X indicates that the rating locked.
• An empty box indicates that the rating is not locked.
6 Press MENU to exit.
Summary of US movie ratings
Rating Description
All All items in the ratings list are locked.
NR Not rated.
G Movies with a mild content, suitable for all ages.
PG Movies for which parental guidance is recommended.
They may contain a few racy or violent scenes or
maybe some bad language.
PG -13 Movies for which parental guidance may be
recommended if under age 13.
R Restricted. The movies usually contain offensive sex
or bad language and may be unsuitable for children
under the age of 17. Parental guidance or permission
needed.
NC-17 Even with parental permission, forbidden under age
17. More offensive sex, violence or bad language.
X Movies which generally focus on sex, violence and/or
bad language. Also known as pornography.
Summary of Canadian movie ratings
Rating Description
All All items in the ratings list are locked.
C Programming suitable for children under the age of
8 years. No profanity or sexual content of any level
allowed. Minimal comedic violence.
C8+ Suitable for children ages 8 and over. Low intensity
violence and fantasy horror allowed.
G Movies with a mild content, suitable for all ages.
PG Movies for which parental guidance is recommended.
They may contain a few racy or violent scenes or
maybe some bad language.
14+ Programming intended for children ages 14 and
over. May contain intense scenes of violence, strong
profanity, and depictions of sexual activity within the
context of a story.
18+ Programming intended for viewers ages 18 and over.
May contain strong violence, language, and sexual
activity.
Summary of Canadian French movie ratings
Rating Description
All All items in the ratings list are locked.
G Appropriate for all ages with little or no violence and
little to no sexual content.
8 ans+ Appropriate for children 8 and up which may
contain little violence, some foul language and/or
little to no sexual content.
13 ans+ Appropriate for children 13 and up, with moderate
violence, language, and some sexual situations.
Persons under 13 should be accompanied by an
adult.
16 ans+ Appropriate for children 16 and up, with strong
violence, strong language, and strong sexual content.
18 ans+ Only to be viewed by adults and contains extreme
violence and graphic sexual content/pornography.
18
EN
Page 19
View closed captions (subtitles)
The caption service displays transmitted CC-, T-, and CS- text. The
caption text can be displayed permanently or only when the TV is
muted.
Note
This television provides a display of television closed captioning that conforms with the
•
EIA-608 standard and in accordance with Sections 15.119 of the FCCrules.
• If you connect your set-top box via HDMI or component video input, you cannot select
closed caption through the TV. You can select closed caption through the set-top box
only.
• The captions do not always use correct spelling and grammar.
• Not all TV programs and product commercials include closed caption information. Refer to
your area TV program listings for the TV channels and times of closed caption shows. The
captioned programs are usually noted in the TVlistings with service marks such as ‘CC’.
Closed captioning
Closed captioning is an assistive technology that allows persons with
hearing disabilities to access television programming. Closed captioning
displays the audio portion of programming as text superimposed over
the video.
Display captions
1 Press MENU on the remote control and select [Features] >
[Caption settings] > [Closed captions] .
2 Press or to select [On] , [Off] or [On during mute] , and press
to confi rm your choice.
3 Press MENU to exit.
Select caption services
1 Turn captions on (see ‘Display captions’ on page 19 ) .
2 Select a caption service for analog channels:
• Press MENU on the remote control and select [Features] >
[Caption Settings] > [Caption service] .
• Press
Note
Not all caption services are used by a TV channel during the transmission of a closed
•
caption program.
, then press or to select one of the listed caption
services, and press
to confi rm your choice.
3 Select a caption service for digital channels:
• Press
• Press
and to enter the menu for [Digital caption service] .
, then press or to select one of the listed caption
services, and press
to confi rm your choice.
4 Press MENU to exit.
Summary of caption services
Service Description
CC-1, CC-2,
CC-3, and CC-4
T-1, T-2, T-3 and
T- 4
CS-1, CS-2,
CS-3, CS-4, CS-5
and CS-6
Dialog and descriptions for the action on the
captioned TV program show on screen. Usually CC1
is the most used. CC 2 can be used for alternate
languages if they are transmitted.
Often used for channel guide, schedules, bulletin
board information for Closed Captions programs,
news, weather information, or stock market reports.
Service 1 is designated as the Primary Caption
Service. This service contains verbatim, or nearverbatim captions for the primary language being
spoken in the accompanying program audio.
Service 2 is designated as the Secondary Language
Service. This service contains captions in a secondary
language which are translations of the captions in
the Primary Caption Service. The other service
subchannels are not pre-assigned. It is up to the
discretion of the individual caption provider to utilize
the remaining service channels.
Select how digital captions are displayed
You can choose the size, font, color, background and other
characteristics of the caption text.
1 Press MENU on the remote control and select [Features] >
[Caption settings] > [Digital caption options] .
2 Press or to highlight an option for digital captions, and press
to select the option.
3 Press or to highlight a setting for the option, and press to
confi rm your choice.
4 Press MENU to exit.
Diffi culties viewing closed captions on DTV programming
If you have diffi culties viewing closed captions on DTV programming,
including HDTV, received from your subscription television provider, you
should:
• consult any consumer information and manuals/guides on closed
captions for DTV programming provided by your subscription
television provider;
• ensure that the captioning function on your set-top box, if
applicable, is turned on; and,
• ensure that the captioning function on your DTV is turned on.
If you are still unable to view closed captions on DTV programming, you
should contact your subscription television provider for assistance.
English
EN
19
Page 20
Use your TV as a PC monitor
Use an HDMI-DVI cable or an HDMI-DVI adaptor to connect a PC to
your TV. For sound, add an audio cable with a stereo mini jack.
Caution
•
Before you connect your PC, set the PC monitor refresh rate to 60Hz.
Supported screen resolutions
The following screen resolutions are supported in PC mode:
Resolution Refresh rate
640 x 480 60Hz
800 x 600 60Hz
1024 x 768 60Hz
1280 x 768 60Hz
1280 x 1024 60Hz
1360 x 768 60Hz
1920 x 1080* 60Hz
*In selected models only
If necessary, adjust the picture position to the center of the screen with
the cursor buttons.
Activate HDMI-CEC
1
Press MENU on the remote control.
2 Select [Installation] > [Preferences] > [HDMI-CEC] .
3 Press or to select [On] .
Note
•
Select [Off] to disable this function.
[HDMI-CEC] must be activated in the [Preferences] menu to make the
[TV Speakers] menu available.
20
EN
Page 21
7 Install channels
TV menu Installation
The fi rst time you setup your TV, you are prompted to select a menu
language and to install TV and digital radio channels (if available). This
chapter provides instructions on how to reinstall and fi ne-tune channels.
Select your menu language
Press MENU on the remote control and select [Installation] >
1
[Language] .
TV menu
Installation
Language
Channels
Preferences
Source labels
Clock
Current software info
Reset AV settings
Language
English
Francais
Espanol
2 Select a language and press OK to confi rm your choice.
3 Press to return to the [Installation] menu.
4 Press MENU to exit.
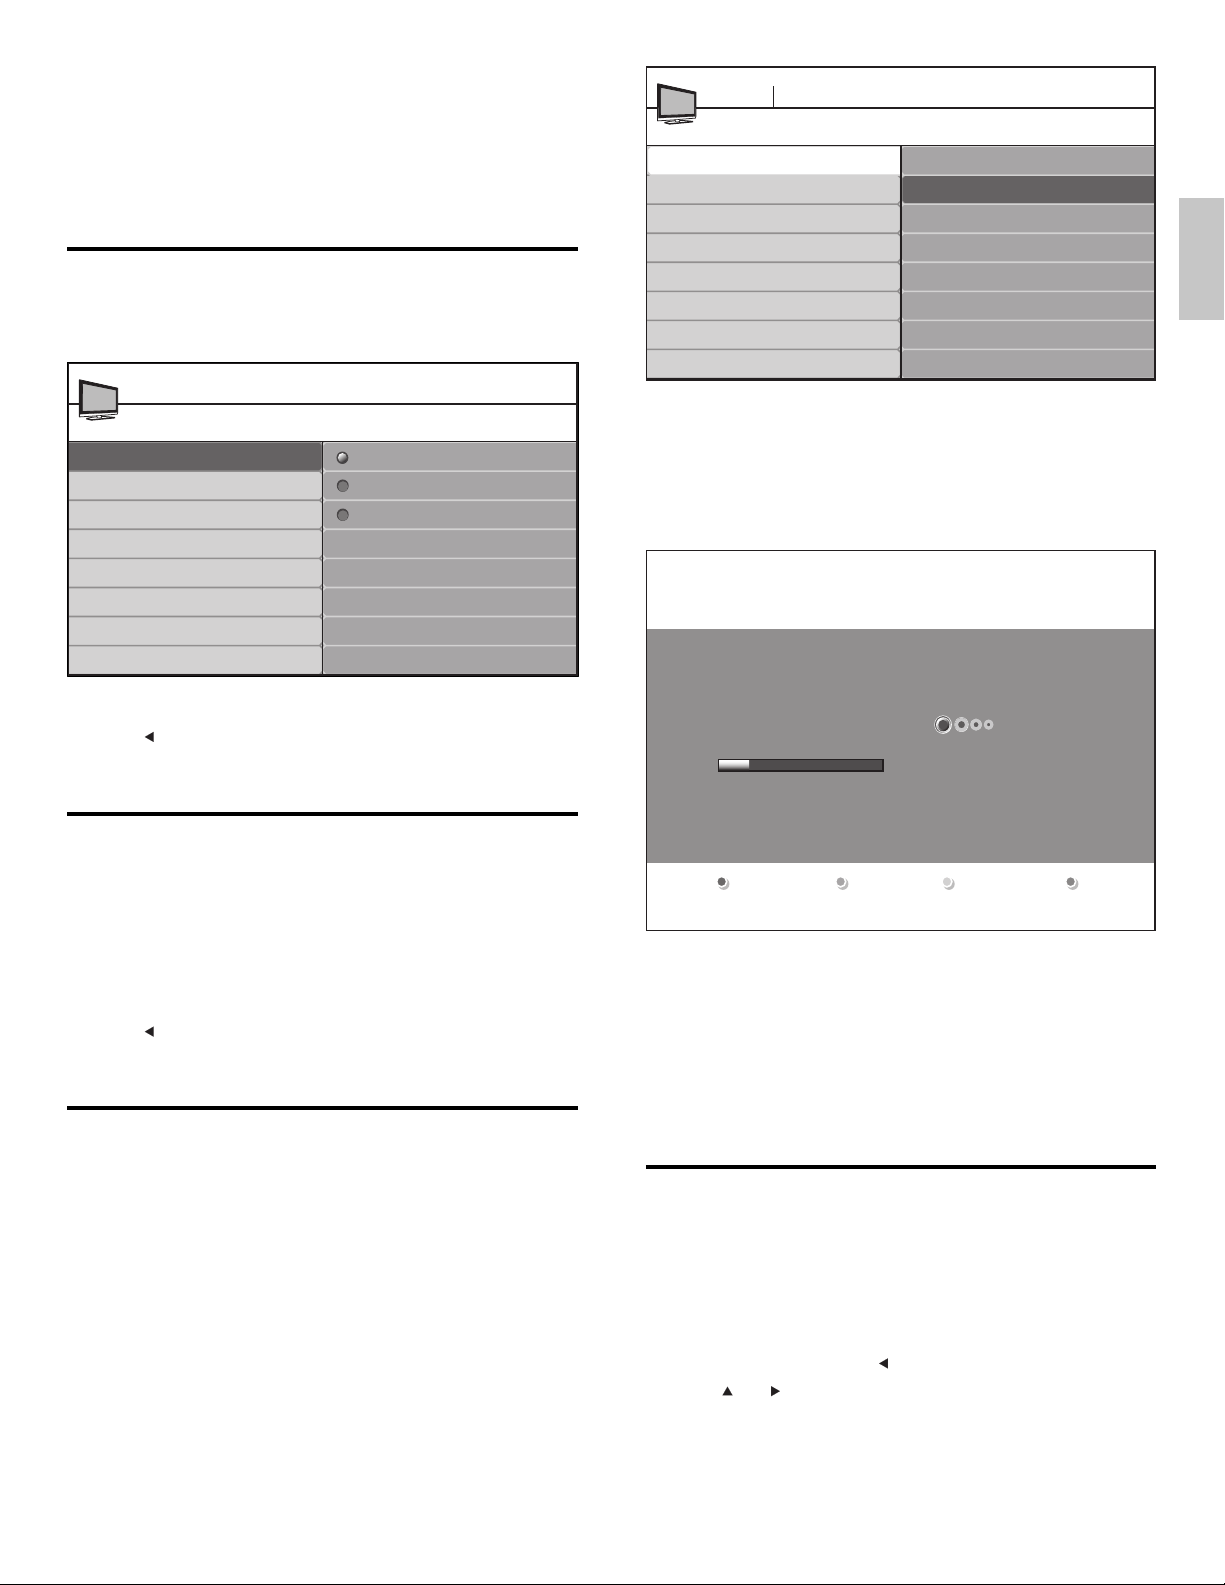
Channels
Autoprogram
Weak channel installation
Installation mode
Uninstall channels
Autoprogram
Start Now
2 Press OK to star t the installation.
• If you run [Autoprogram] on locked channels, you must to
enter your PIN code.
• If you have forgotten your PIN, reset it (see ‘Set or change
your PIN’ on page 16 ) .
3 Select [Cable] or [Antenna] and press OK .
TV installation
System searching. Please wait...
Analog channels found: 0
Digital channels found: 0
English
Set your location to home
You can set the location of your TV to home or retail store. Choose
home so that you can change the predefi ned settings for picture and
sound.
1 Press MENU on the remote control and select [Installation] >
[Preferences] > [Location] .
2 Select [Home] and press OK to confi rm your choice.
3 Press to return to the [Installation] menu.
4 Press MENU to exit.
Automatically install channels
Before you install channels, ensure that you are registered with your
cable TV provider and that your equipment is correctly connected.
1 Press MENU on the remote control and select [Installation] >
[Channels] > [Autoprogram] > [Start now] .
• When [Antenna] is selected, the TV detects antenna signals. It
searches for NTSC and ATSC channels available in your area.
• When [Cable] is selected, the TV detects signals supplied
by cable. It searches for NTSC, ATSC, and QAM modulated
channels available in your area.
• When complete, this message appears [Channel search
completed.] .
4 Follow the on-screen instructions to complete the installation.
Optimize the signal quality from your
antenna
You can optimize your signal quality by tuning in ATSC channels with
weak signals, and adjusting the antenna.
1 Press MENU on the remote control and select [Installation] >
[Channels] > [Installation mode] mode .
2 Select [Antenna] and press to confi rm your choice.
3 Press and to enter [Weak channel installation] .
4 Highlight a channel from the list of TV channels and press the green
color button on the remote control.
» The signal strength for the channel is displayed.
EN
21
Page 22
5 Adjust your antenna to maximize the signal strength.
6 Press MENU to exit.
Uninstall and reinstall channels
When you uninstall a channel, you remove it from the list of stored
channels. Uninstalled channels are not reinstalled during an installation
update.
1 Press MENU on the remote control and select [Installation] >
[Channels] > [Uninstall channels] .
TV menu Installation
Channels
Autoprogram
Weak channel installation
Installation mode
Uninstall channels
2 Press to enter the list of stored channels.
3 Press or to select the channel you want to uninstall, and press
the green key on the remote control.
4 The channel is removed from the channel list. Press the green key
again to reinstall the channel.
5 Press MENU to exit.
Uninstall channels
52
53
54
55
56
57
58
59
Show emergency alerts (EAS)
The SCTE18 standard defi nes an emergency alert signaling method for
use by cable TV systems. EAS can be broadcast to digital devices such as
digital set-top boxes, digital TVs, and digital VCRs.
The EAS scheme allows a cable operator to disseminate information
related to state and local emergencies and warnings.
EAS contain the following information:
• Emergency alert text
• Start time and date
• End time and date
• Priority
EAS with priority maximum or high are always displayed on your TV.
However, you can confi gure your TV not to show EAS messages with
medium or low priority.
EAS is not possible with a USB browser or with analog video sources.
You can always remove the message from the screen. The message
display overlaps menus and other messages on the screen.
1 Press MENU on the remote control and select [Installation] >
[Preferences] > [Show emergency alerts] .
TV menu Installation
Preferences
Location
HDMI-CEC
Show emergency alerts
Downloaded rating table
Show emergency alerts
Always
Skip low priority
Skip medium/low priority
Return your settings to default values
When you return picture and sound settings to their default values the
channel installation settings are not affected.
1 Press MENU on the remote control and select [Installation] >
[Reset AV settings] .
TV menu
Installation
Language
Channels
Preferences
Source labels
Clock
Current software info
Reset AV settings
Reset AV settings
Start now
2 Press to highlight [Start now] , and press OK to reset the picture
and sound settings.
3 Press MENU to exit.
2 Highlight an option:
• [Always] : Displays all emergency alert messages
• [Skip low priority] : Shows all messages except low priority
messages
• [Skip medium/low priority] : Shows maximum and high
priority messages only
3 Press to confi rm your choice.
4 Press MENU to exit.
22
EN
Page 23
8 Update your TV software
Magnavox continuously tries to improve its products and we strongly
recommend that you update the TV software when updates are
available.
New software can be obtained from your dealer or downloaded from
the www.magnavox.com/support website. Use the type number of your
TV (e.g. 47MF439B) to fi nd information.
Check your current software version
Press MENU on the remote control and select [Installation] >
1
[Current software version] .
» The version and a description of the current software is
displayed.
TV menu
Installation
Language
Channels
Preferences
Source labels
Clock
Current software info
Reset AV settings
Release version:
xxxxx
Prepare for the software upgrade
You require the following equipment:
• A PC with web browsing capability.
• An archive utility that supports the ZIP-format (e.g. WinZip for
Windows or StuffIt for Mac OS).
• A USB memory stick.
Note
•
Only FAT/DOS-formatted por table memory is supported.
• New software can be obtained from your dealer or can be downloaded from the www.
magnavox.com/support website.
• Use only software upgrades that can be found on the Magnavox web site.
Warning
•
Do not remove the USB device during the software upgrade.
• If there is a power drop during the upgrade, do not remove the USB device from the
TV. The TV continues the upgrade as soon as the power comes back.
• If you try to upgrade to a software version lower than the current version, a
confi rmation message is displayed. Downgrade to older software only in case of real
necessity.
• If an error occurs during the upgrade, retry the procedure or contact your dealer.
Download the software
1 On your PC, open a web browser and go to www.magnavox.com/
support.
2 Find information and software related to your TV and download
the latest software upgrade fi le to your PC.
3 Decompress the ZIP-fi le.
4 Copy the autorun.upg fi le to the root directory of the USB device.
Upgrade software
Prepare the software upgrade (see ‘Prepare for the software
1
upgrade’ on page 23 ) .
2 Connect your USB device to the USB port on the side of your TV .
» The TV scans the USB device for the updated software and
automatically enters upgrade mode.
3 Read the on-screen instructions and confi rm that you want to
continue with the installation.
4 When the software upgrade is complete, remove the USB device .
5 Disconnect the TV from the power socket outlet.
6 Reconnect the TV to the power socket outlet.
7 Press POWER at the side of the TV to switch on the TV.
» The TV starts up with the new software.
English
EN
23
Page 24
9 Connect devices
This section describes how to connect various devices with different
connectors and supplements examples provided in the Quick Start.
g AV3 S-VIDEO (back): S-Video (back) input connector to be used
with Audio L/R connectors for camcorder, game console, etc.
When you use the S-Video (back) for video signals, do not use
Composite video (back) for video signals.
h HDMI 1/2/3: Digital audio and video input from high-defi nition
digital devices such as Blu-ray players.
Caution
•
Disconnect the power cord before connecting devices.
Note
•
Different types of connectors may be used to connect a device to your TV, depending
on availability and your needs.
Connection overview
Back connectors
TV ANTENNA
1
a Signal input from an antenna, cable or satellite.
b AV1 and AV2 : Video input from analog devices such as DVD,
receiver, game console, etc. This connector is used with audio
input.
c AV3 Composite video (back): Video input for analog devices such
as DVD, camcorder, game console, etc. To be used with audio
input.
d For use by service personnel only.
e Digital audio output to home theaters and other digital audio
systems.
f Audio input for HDMI3.
234
R
R
L
L
Pr
Pr
Pb
Pb
Y
Y
R
L
VIDEO
S-VIDEO
AV 3AV 1 AV 2
SERV. U
SPDIF
OUT
L
R
DVI AUDIO
IN
HDMI 3HDMI 1 HDMI 2
8
5
6
7
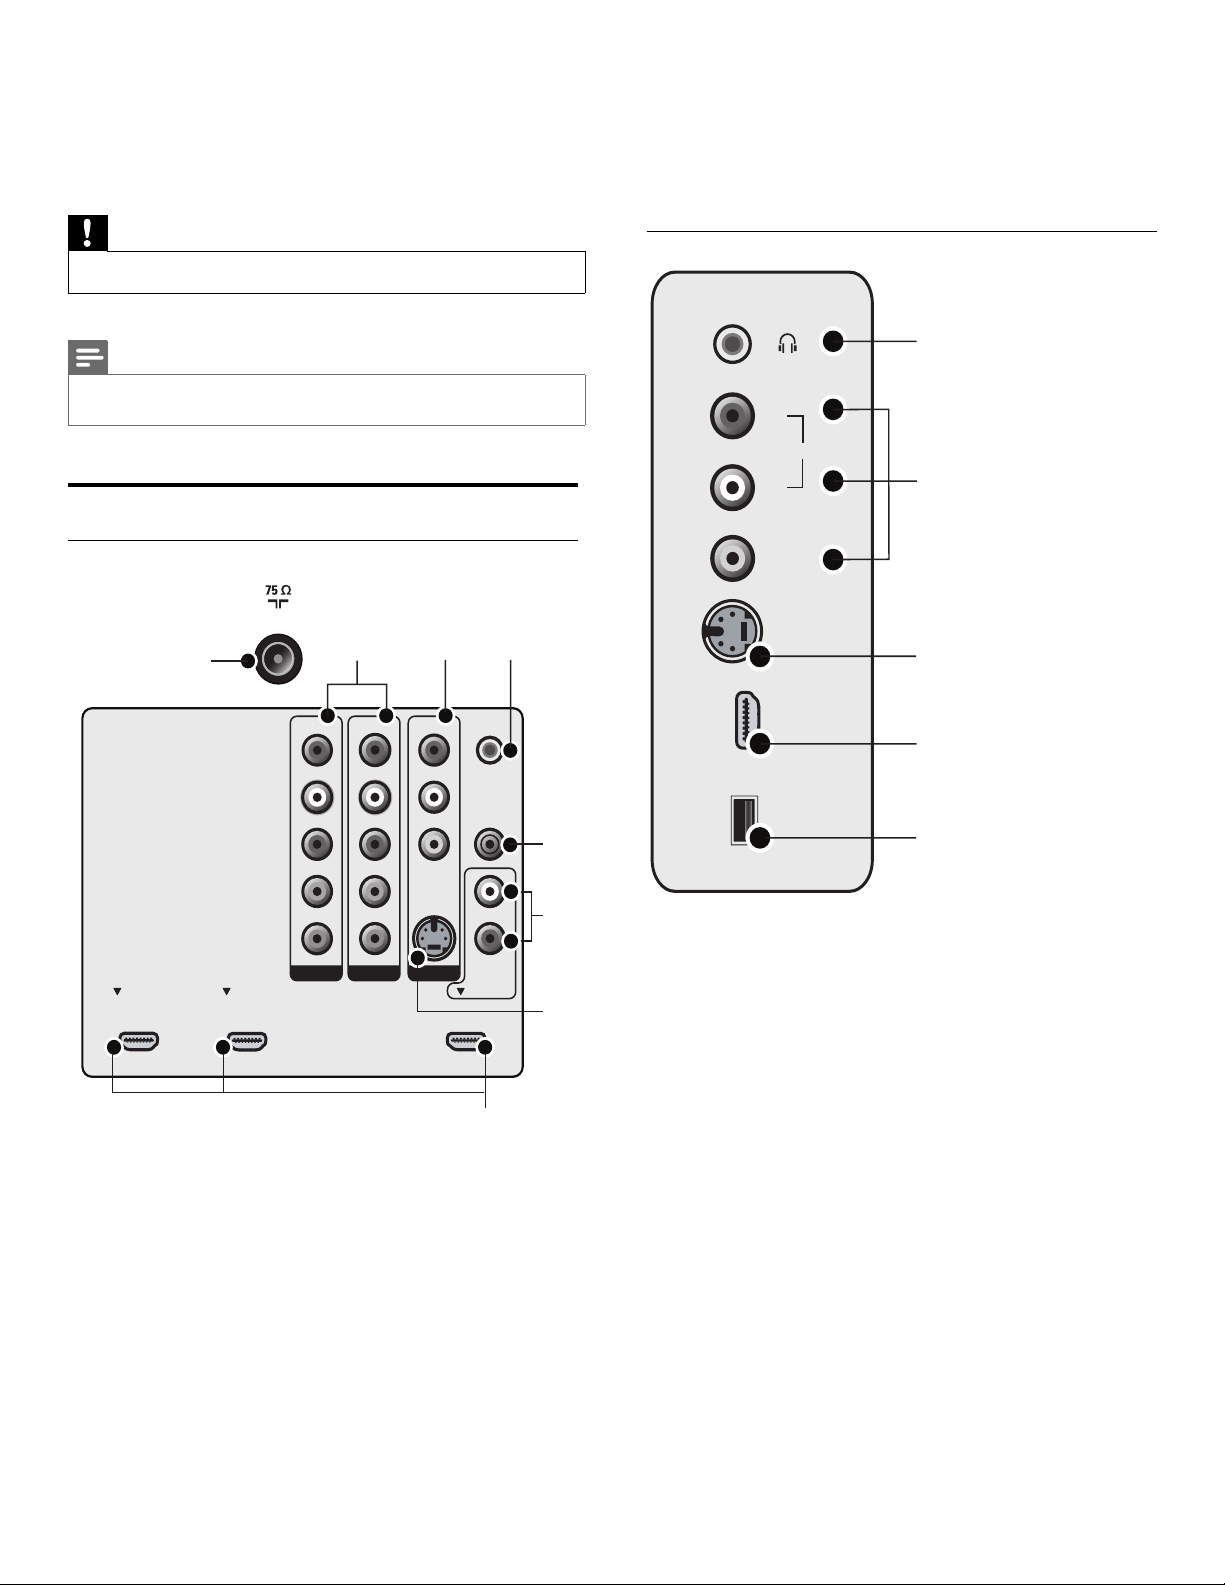
Side connectors
1
R
AUDIO
L
VIDEO
S-VIDEO
2
3
HDMI 4
4
USB
5
a Stereo audio output to headphones or earphones.
b Composite video: Video input for analog devices such as DVD,
camcorder, game console, etc. To be used with audio input.
c S-Video (side) to be used with Audio L/R connectors for
camcorder, game console, etc. When you use the S-Video (side)
for video signals, do not use the Composite video (side) input for
video signals.
d HDMI (side): Digital audio and video input from high-defi nition
digital devices such as Blu-ray players.
e Data input from USB storage devices.
24
EN
Page 25
Select your connection quality
HDMI - Highest quality
Composite - Basic quality
Supports high-defi nition signals and gives highest picture and sound
quality. Video and audio signals are combined in one cable .
Tip
•
To connect to a PC without an HDMI connector, use a DVI-HDMI adaptor and a
separate audio cable.
Note
•
HDMI supports Highbandwidth Digital Contents Protection (HDCP). HDCP is a form
of Digital Rights Management that protects high defi nition content in DVD or Blu-ray
Discs.
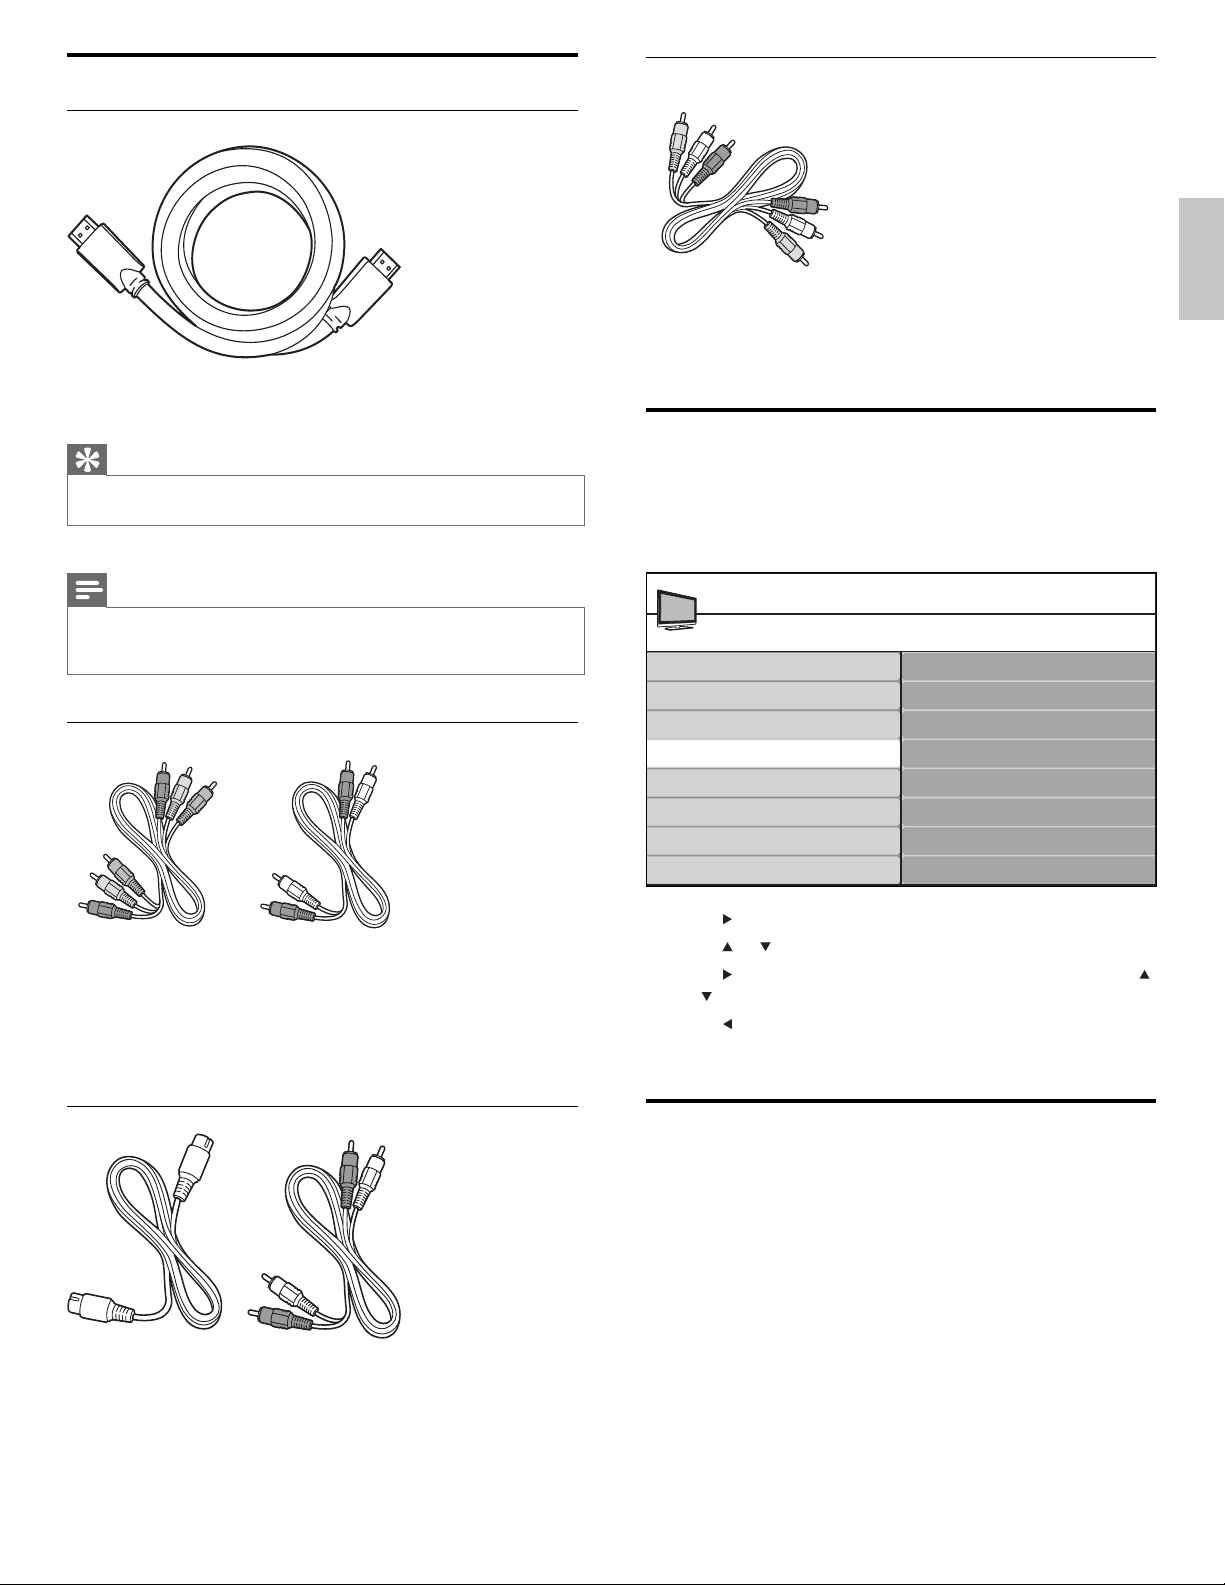
Component (Y Pb Pr) - High quality
Composite video/audio cable (yellow/red/white)
For analog connections. Composite cables usually combine a yellow
video cable with a red/white audio L/R cable. Match the cable colors
when you connect to the TV.
Label your connections
When you connect devices, you can label the connections to help you
to identify where devices are connected.
1 Press MENU on the remote control and select [Installation] >
[Source labels] .
TV menu
Installation
Language
Channels
Preferences
Source labels
Clock
Reset AV settings
Software upgrade
Source labels
AV1
AV2
AV3
HDMI1
HDMI2
HDMI3
Side HDMI
Side AV
English
Component video cable (red/green/blue) and audio L/R cable (red/
white)
Supports high-defi nition signals but gives lower picture quality than
HDMI. Component cables combine a red/green/blue video cable with
a red/white audio L/R cable. Match the cable colors when you connect
to the TV.
S-Video - Good quality
S-Video cable and audio L/R cable (red/white)
For analog connections. Use an S-Video cable together with an audio
L/R cable.
2 Press to enter the list of available connections.
3 Press or to highlight a connection in the list.
4 Press to enter the list of devices for the connection, and press
or
to highlight a device.
5 Press to confi rm your choice.
6 Press MENU to exit.
Connect your devices
This section describes how to connect a selection of devices with
different connectors. Different types of connectors can be used to
connect a device to your TV. The following sections describe examples
only, other confi gurations are possible.
When you connect composite or component cables, match the cable
colors to the connectors on the TV.
EN
25
Page 26
T
N
A
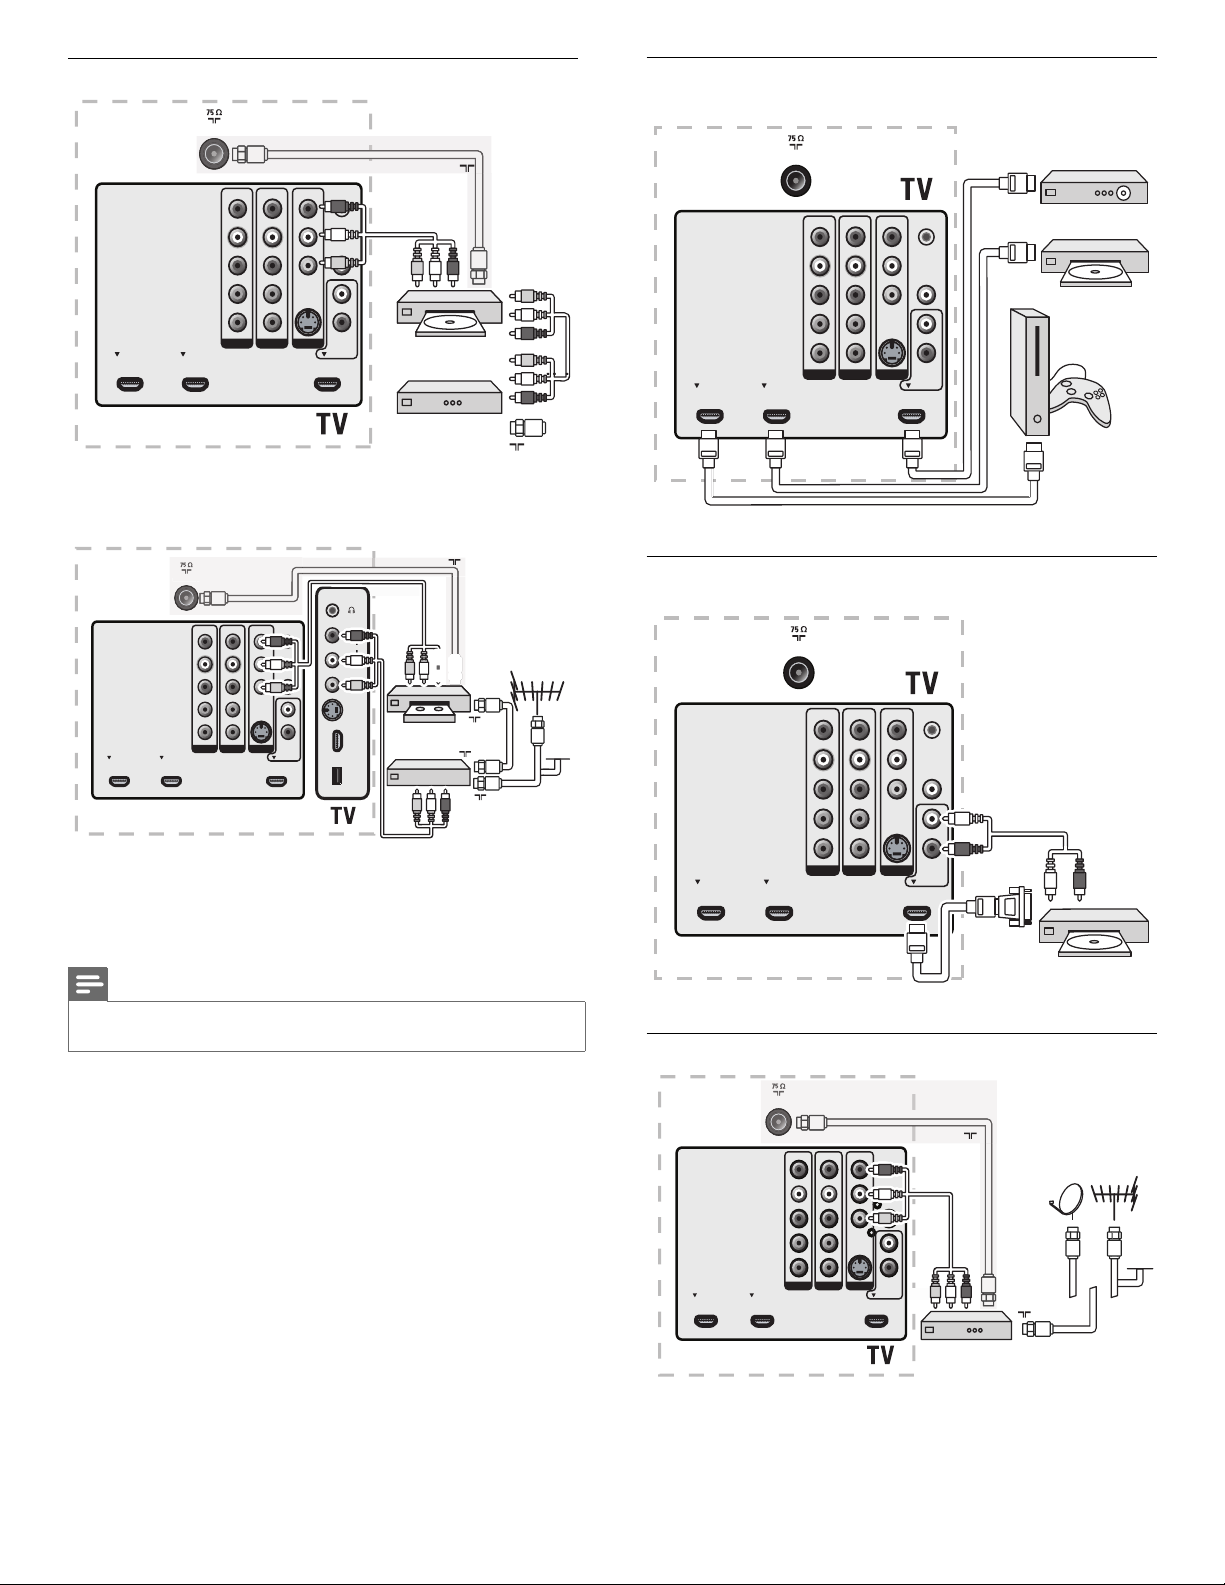
Connect a DVD player/recorder via composite connectors
TV ANTENNA
Or/Ou/O RF OUT
SERV. U
LRL
Pr
Pb
Y
R
VIDEO
S-VIDEO
AV 3AV 1 AV 2
SPDIF
L
R
DVIAUDIO
HDMI 3HDMI 1 HDMI2
OUT
IN
L + R + VIDEO
OUT
RECORDER
Set-top box
IN
OUT
RF IN
R
L
Pr
Pb
Y
Do not place your recorder too close to the screen because some
recorders can be susceptible to signals.
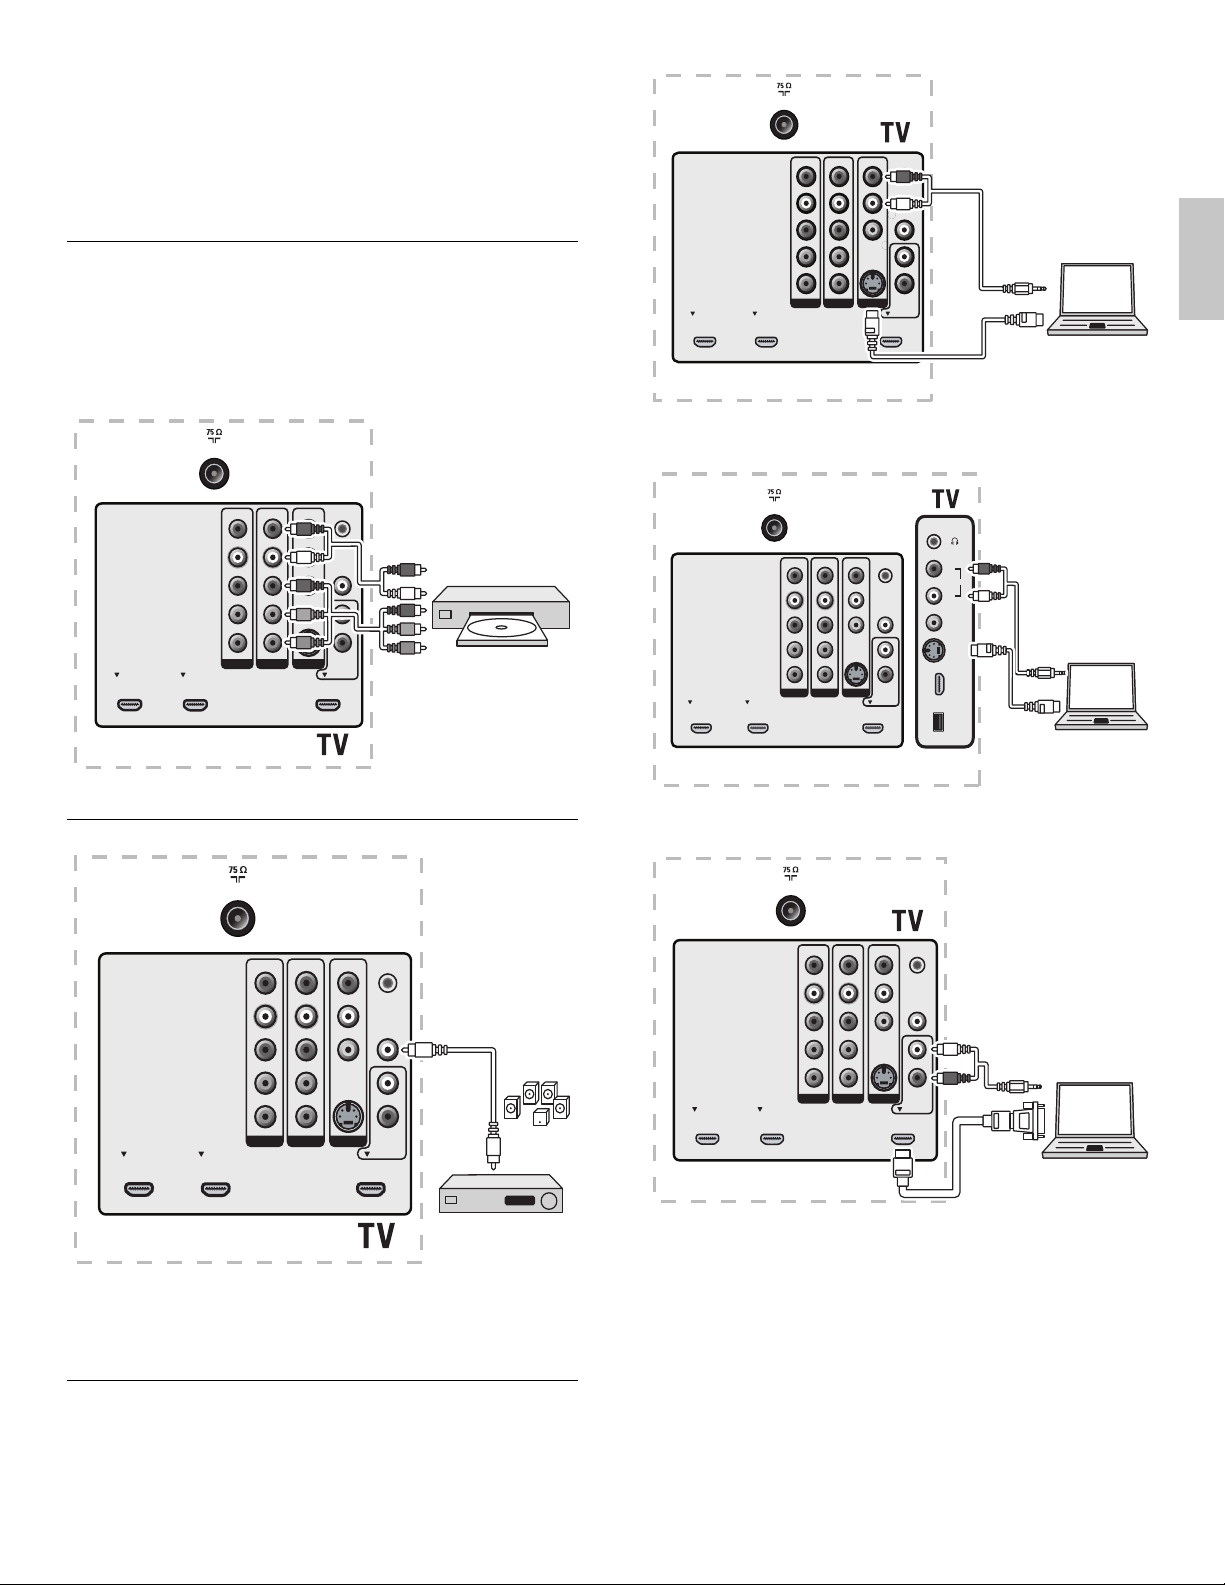
Connect a set-top box, DVD player/recorder and game
console via HDMI
TV ANTENNA
SERV. U
LRL
Pr
Pb
Y
R
S-VIDEO
VIDEO
AV 3AV1 AV 2
SPDIF
L
R
DVI AU DIO
HDMI 3HDMI 1 HDMI 2
OUT
IN
R
L
Pr
Pb
Y
TV ANTENNA
SERV. U
R
R
LRL
L
Pr
Pr
Pb
Pb
Y
Y
S-VIDEO
SPDIF
OUT
VIDEO
L
R
DVIAUDIO
AV 3AV1 AV 2
IN
HDMI 3HDMI1 HDMI 2
If your recorder has an S-VHS video jack: For improved picture quality,
connect an S-Video cable with the S-Video input. Connect the audio
cables to the audio L and R input jacks of AV3/side AV.
Note
•
When you use an S-Video connector, do not connect any device to the AV3/side AV video
jack.
If you use mono equipment, the left loudspeaker reproduces sound
but the right speaker does not. Use a mono to stereo adapter (not
supplied) for sound reproduction via all internal loudspeakers.
L + R + VIDEO
R
AUDIO
L
VIDEO
S-VIDEO
HDMI 4
USB
Or/Ou/O RF OUT
OUT
RECORDER
OUT
L + R + VIDEO
RF IN
RF OUT
CABLE
RF IN
Connect a DVD player/recorder via HDMI-DVI and
DIGITAL AUDIO OUT connectors
TV ANTENNA
SERV. U
LRL
Pr
Pb
Y
R
S-VIDEO
HDMI
VIDEO
AV 3AV 1 AV2
L
R
DVI AU DIO
HDMI 3HDMI 1 HDMI 2
SPDIF
OUT
AUDIO
IN
IN
DVI
R
L
Pr
Pb
Y
Connect a set-top box via a composite connector
TV ANTENNA
V ANTEN
Or/Ou/O RF OUT
SERV. U
LRL
Pr
Pb
Y
R
L + R + VIDEO
SPDIF
OUT
VIDEO
L
S-VIDEO
R
DVI A UDIO
AV 3AV1 AV 2
IN
HDMI 3HDMI 1 HDMI 2
OUT
RF IN
R
L
Pr
Pb
Y
AUDIO
OUT
CABLE
Set-top box
If your device has an S-VHS video jack, improve the picture quality as
follows:
• Connect an S-Video cable to the S-Video input of AV3/side AV
26
EN
Page 27
• Connect the audio cables to the audio L and R input jacks of AV3/
side AV.
When you use the S-Video connector, do not connect any device to
the video jack of AV3 or the side AV.
Only the left loudspeaker reproduces sound for mono equipment. Use
a mono to stereo adapter (not supplied) for sound reproduction via all
internal loudspeakers.
Connect a DVD player/recorder via component video
output connectors (YPbPr) and analog audio
Selected TV models can display 1080i, 1080p, 720p and 480p DTV
signals when connected to a DTV set-top box. Set the output of the
cable box to either 1080i, 1080p, 720p or 480p. A DTV signal must be
available in your area.
TV ANTENNA
TV ANTENNA
SERV. U
LRL
Pr
Pb
Y
R
VIDEO
S-VIDEO
AV 3AV 1 AV 2
L
R
DVIAUDIO
HDMI 3HDMI 1 HDMI 2
SPDIF
OUT
IN
S VIDEO
R
L
Pr
Pb
Y
Connect a PC with an S-Video connector at the side
AUDIO
OUT
English
SERV. U
LRL
Pr
Pb
Y
R
VIDEO
S-VIDEO
AV 3AV 1 AV 2
L
R
DVI A UDIO
HDMI 3HDMI1 HDMI 2
SPDIF
OUT
IN
AV1 / AV2 :
AUDIO L + R
AV1 / AV2 :
YPbPr
R
L
Pr
Pb
Y
Connect a digital home theater amplifi er
TV ANTENNA
SERV. U
LRL
Pr
Pb
Y
R
VIDEO
S-VIDEO
AV 3AV 1 AV 2
SPDIF
OUT
L
R
DVI AUDIO
HDMI 3HDMI 1 HDMI 2
IN
R
L
Pr
Pb
Y
DVD / Set top box
DIGITAL
AUDIO
OUT
DIGITAL
AUDIO
IN
TV ANTENNA
SERV. U
LRL
Pr
Pb
Y
R
VIDEO
S-VIDEO
AV 3AV1 AV2
SPDIF
L
R
DVI A UDIO
HDMI 3HDMI 1 HDMI 2
OUT
IN
R
L
Pr
Pb
Y
Connect a PC with a DVI connector
TV ANTENNA
LRL
Pr
Pb
Y
R
VIDEO
S-VIDEO
AV 3AV 1 AV 2
HDMI
R
L
Pr
Pb
Y
SERV. U
L
R
DVI A UDIO
HDMI 3HDMI 1 HDMI 2
R
AUDIO
L
VIDEO
S-VIDEO
HDMI 4
USB
SPDIF
OUT
AUDIO
IN
IN
S VIDEO
AUDIO
OUT
DVI
AUDIO
OUT
For legal reasons, the digital audio signal can be muted for copyprotected PCM audio qualities on accessory devices connected through
HDMI.
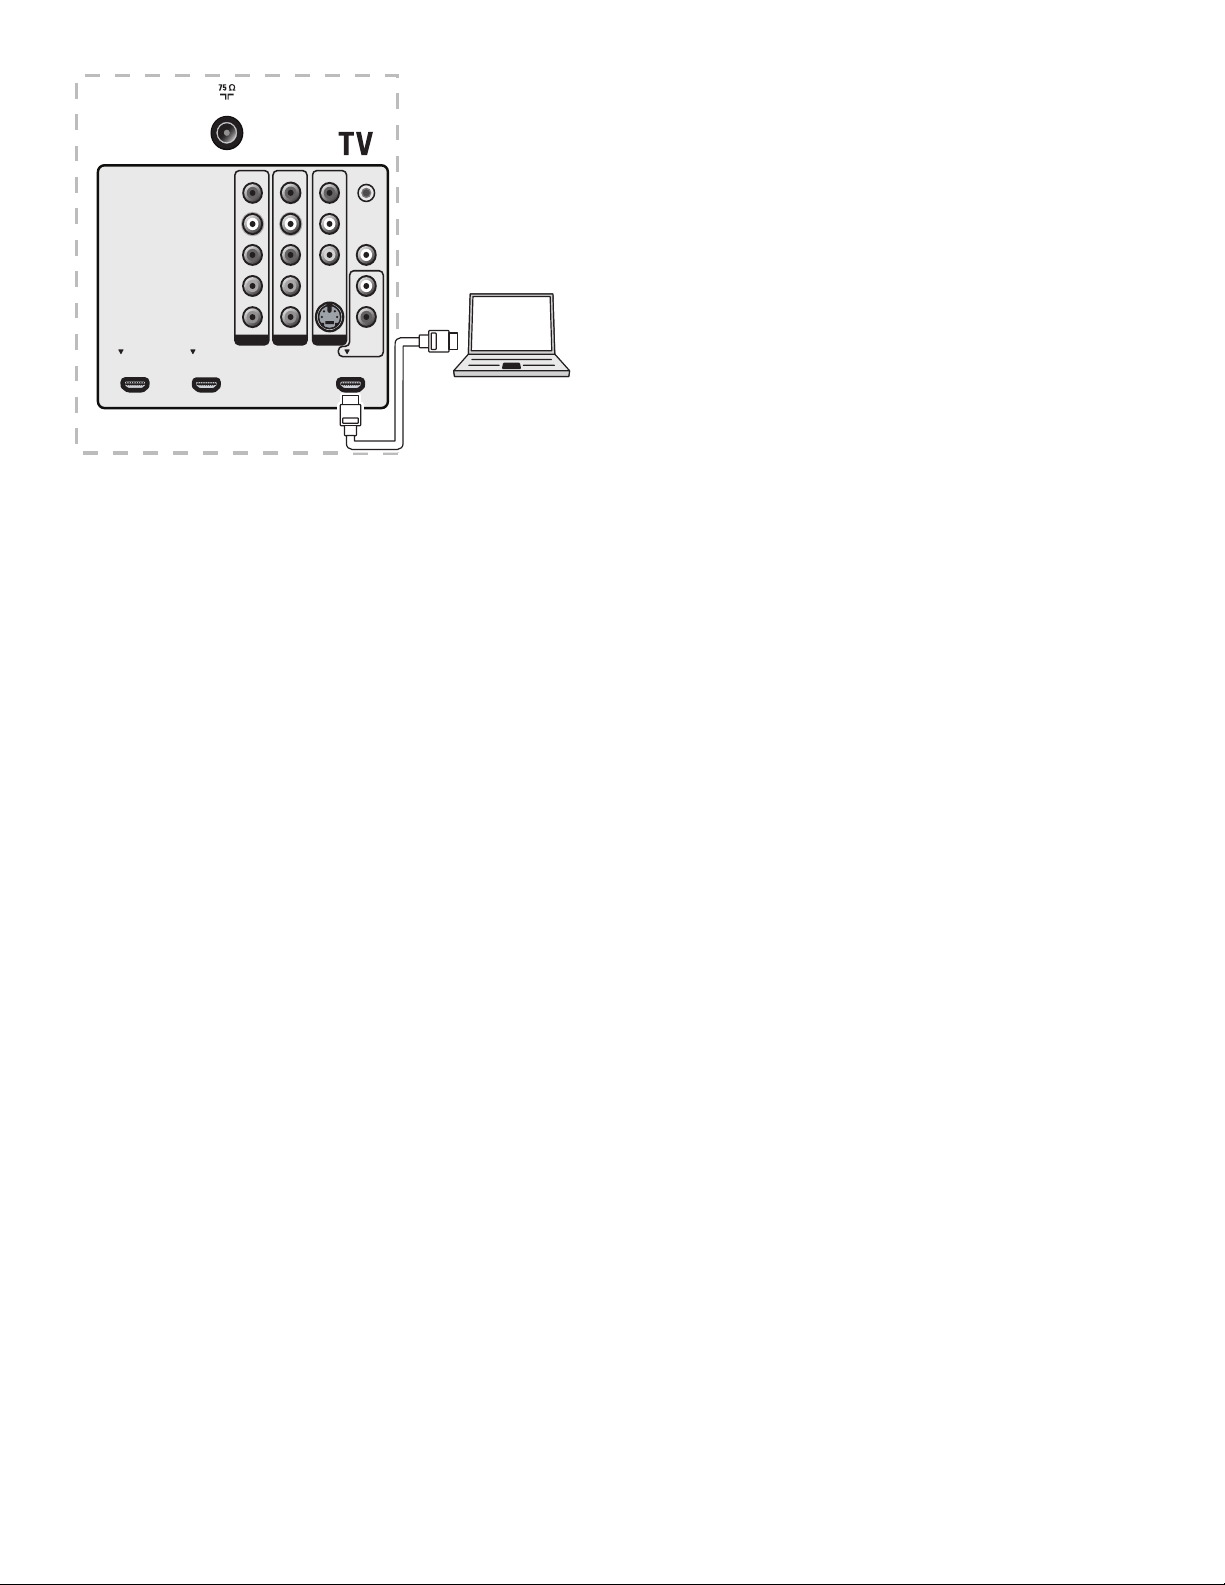
Connect a PC
Connect a PC with an S-Video connector at the back
Connect a PC with an HDMI connector
EN
27
Page 28
TV ANTENNA
SERV. U
LRL
Pr
Pb
Y
R
VIDEO
S-VIDEO
AV 3AV 1 AV 2
SPDIF
L
R
DVI AU DIO
HDMI 3HDMI 1 HDMI 2
OUT
IN
HDMI
R
L
Pr
Pb
Y
28
EN
Page 29
10 Troubleshooting
Problem Possible cause and solution
No power or
indicator light.
Error message
on the screen
with HDMI
connection.
No sound is
detected from
the PC.
TV does not
respond to the
remote control.
The picture
is distorted,
stretched out, or
has black bars
on the side or
top.
The picture is
mostly red and
green, or the
picture misses
red when
connected to an
accessory device
via component
cables.
The TV is not connected to the power.
Press
at the side of the TV or on the remote
control.
Ensure that the power cord is connected tightly to
the TV power connector and to the power socket
outlet.
Remove the power cord from the power socket
outlet, wait 60 seconds and reconnect the power
cord.
Connect the TV to a different power socket outlet.
HDCP authentication fail.
Ensure that your HDMI cable is certifi ed.
Press SOURCE on the remote control to switch to
another source and then switch back to the HDMI
source.
Reset the accessory device and the TV.
Turn on the TV.
Select the HDMI channel.
Turn on the accessory device.
While the TV and the accessory device are powered
on, unplug either end of the HDMI cable and then
reinsert the cable.
An incorrect HDMI port is connected or an audio
cable is not connected.
Connect a DVI-HDM cable to the HDMI 3 port on
the TV.
Connect an audio cable to the DVI AUDIO IN port
on the TV.
Press SOURCE on the remote control, and select
the HDMI 3 source.
Batteries are installed incorrectly, or low battery
power.
Ensure the indicator light on the TV blinks when you
press the remote control buttons.
Ensure that you use the TV remote control.
Ensure that the batteries are inser ted correctly and
do not need to be replaced.
Remove the power cord from the power socket
outlet, wait 60 seconds and reconnect the power
cord.
Broadcast video format.
Press FORMAT on the remote control to select the
best picture format.
For some accessory devices, the picture format must
be set in the accessory device.
Insecure/incorrect connection.
Ensure all the connections are made according to
the color code.
Push the component cables all the way into the
YPbPr sockets on the TV.
No sound
on the TV
loudspeaker.
Bad picture
quality with
a coaxial
connection.
No picture or
sound.
Volume level is set to zero - increase the volume
Sound is muted - press MUTE on the remote
control.
Headphones are connected - ensure that
headphones are not plugged into the TV.
Audio cable is not connected - for AV connection,
ensure that the Audio L/R cable is connected as
described in CD-CnDev-CnDev-HeadInt (Connect
your devices) (see ‘Connect your devices’ on page
25 ) . If you use a component cable, ensure that you
have not crossed the red audio cable with the red
video cable.
Audio output setting for the accessory device is
incorrect. For HDMI connections, some accessory
devices have an HDMI audio output setting that
must be turned on for HDMI to HDMI connections.
Standard defi nition channels are not as clear as
high defi nition channels - connect the devices via
component or HDMI cables.
No picture or sound - ensure you have selected the
correct channel.
Incomplete channel installation
If the TV receives channels via an AV connection, set
the TV to the correct source input.
If the TV is connected directly to the wall via a
coaxial connection, perform the auto-installation
again.
More information on using assistive
technology
For additional information about using assistive technology to browse
the manual, please refer to your assistive or accessibility software’s
documentation.
Contact us
If you cannot resolve your problem, refer to the FAQ for this TV at
www.magnavox.com/support.
If the problem remains unresolved, contact the Customer Support
Center in your country.
Warning
•
Do not attempt to repair the TV yourself. This may cause severe injury, irreparable
damage to your TV or void your warranty.
Note
•
Please have available your TV model and serial number before contacting us. These
numbers are available on the back and side of your TV, as well as on the packaging.
English
EN
29
Page 30

11 Notes for the use of USB
devices
Digital Content Issues
• Only FAT (DOS) formatted (initialized) portable memory is
supported. Errors in this formatting can result in unreadable
content. If such problems appear try to re-format the card. Be
aware that formatting the card will also delete all the content on it
(pictures, music, …).
• The length of a fi lename or directory name is limited to the length
specifi ed by the FAT12/16/32 fi le systems.
• The access and response time of the content on a device can differ
depending on the type or brand of the device.
• The access and response time of the content on a device will
decrease the more unsupported or corrupted fi les are on the
device.
USB Memory Device Issues
• Devices connected to the USB port of your TV must be “Mass
Storage Class” compliant. If your device (digital camera. MP3 player,
portable hard disk, …) is not “Mass Storage Class” compliant it will
not be detected by the content browser of the TV.
• The following subsets of the Mass Storage Class specifi cation are
supported:
• The implementation of the TV is based on the “Universal Serial
Bus Mass Storage Class Specifi cation Overview” (v1.2, June 23,
2003) including all documents referenced by the document. The
document can be found on the USB standardization website
(www.usb.org).
• Full support of the USB Mass Storage Class Bulk-Only Transport
(bInterfaceProtocol = 50h).
• Full support of SubClass Code = 05h; SFF-8070i spec.
• Full support of SubClass Code = 06h; SCSI transparent command
set.
• For large USB memory devices, when you are in the Content
Browser, it may take a long time before you can access your fi les.
• When using a USB portable hard disk: Due to the high power
consumption of the hard disk, it is advised to use the external
power supply of the portable hard disk to guarantee proper
working under all conditions
30
EN
Page 31

12 Product information
Note
•
Product information is subject to change without prior notice.
Picture enhancement
Type: 1080p 60Hz
Brightness: 500 cd/m2
Aspect Ratio: 16:9
Viewing Angles: 178 (V) by 178 (H)
Built-in digital tuner : ATSC/QAM
Dynamic Dimming BL: Ye s
Sound enhancement
Mono/Stereo: Mono, Stereo, Incredible surround
Power output (RMS Watts): 20 W
Equalizer: 5 band
English
Ease of use
Video modes: Automatic, 4:3, Movie Expand 14:9, Movie
Expand 16:9, Super Zoom, Wide Screen,
Unscaled
PC input: via HDMI
Connections
Component video
input with Audio L/R:
Composite video input
with audio L/R and
S-Video:
HDMI: 4
Digital audio out: Yes, supporting AC-3 & PCM
Headphone: 1 (on the side of TV)
USB: 1 (on the side of TV)
2, supporting 480i/p, 576i/p, 720p, 1080i,
1080p @24Hz-60Hz
2
ver1.3a HDMI supporting video: 480i/p, 576i/
p, 720p, 1080i, 1080p @24Hz-60Hz
PC-input: up to WUXGA
Power
Auto multi-voltage 110V-240V~/50-60 Hz
EN
31
Page 32

13 Warranty
LIMITED WARRANTY
NINETY (90) DAY LABOR / ONE (1) YEAR PARTS
WARRANTY COVERAGE:
This warranty obligation is limited to the terms as set forth
below.
WHO IS COVERED:
This product warranty is issued to the original purchaser or the
person receiving the product as a gift against defects in materials
and workmanship as based on the date of original purchase
(“Warranty Period”) from an Authorized Dealer. The original
sales receipt showing the product name and the purchase date
from an authorized retailer is considered such proof.
WHAT IS COVERED:
This warranty covers new products if a defect in material or
workmanship occurs and a valid claim is received by within the
Warranty Period. At its option, the company will either (1)
repair the product at no charge, using new or refurbished
replacement parts, or (2) exchange the product with a product
that is new or which has been manufactured from new, or serviceable used parts and is at least functionally equivalent or most
comparable to the original product in current inventory, or (3)
refund the original purchase price of the product.
Replacement products or parts provided under this warranty are
covered against defects in materials and workmanship from the
date of the replacement or repair for ninety (90) days or for the
remaining portion of the original product’s warranty, whichever
provides longer coverage for you. When a product or part is
exchanged, any replacement item becomes your property and the
replaced item becomes company property. When a refund is
given, your product becomes company property.
Note: Any product sold and identified as refurbished or
renewed carries a ninety (90) day limited warranty.
Replacement product can only be sent if all warranty
requirements are met. Failure to follow all requirements
can result in delay.
WHAT IS NOT COVERED - EXCLUSIONS AND LIMITATIONS:
This Limited Warranty applies only to new company manufactured products that can be identified by the trademark, trade
name, or logo affixed to it. This Limited Warranty does not apply
to any hardware product or any software, even if packaged or
sold with the product, as manufacturers, suppliers, or publishers
may provide a separate warranty for their own products packaged with the bundled product.
or a part that has been modified without written company permission, or (d) if any serial number has been removed or
defaced, or (e) product, accessories or consumables sold “AS IS”
without warranty of any kind by including refurbished product
sold “AS IS” by some retailers.
This Limited Warranty does not cover:
Shipping charges to return defective product.
abor charges for installation or setup of the product, adjustment of customer controls on the product, and installation or
repair of antenna/signal source systems outside of the product.
roduct repair and/or part replacement because of improper
installation or maintenance, connections to improper voltage
supply, power line surge, lightning damage, retained images or
screen markings resulting from viewing fixed stationary content for extended periods, product cosmetic appearance items
due to normal wear and tear, unauthorized repair or other
cause not within the control of the company.
amage or claims for products not being available for use, or
for lost data or lost software.
amage from mishandled shipments or transit accidents when
returning product.
product that requires modification or adaptation to enable
it to operate in any country other than the country for which
it was designed, manufactured, approved and/or authorized, or
repair of products damaged by these modifications.
product used for commercial or institutional purposes
(including but not limited to rental purposes).
roduct lost in shipment and no signature verification receipt
can be provided.
ailure to operate per Owner’s Manual.
TO OBTAIN ASSISTANCE…
Contact the Customer Care Center at:
1-866-341-3738
REPAIR OR REPLACEMENT AS PROVIDED UNDER THIS
WARRANTY IS THE EXCLUSIVE REMEDY FOR THE CONSUMER, WITH THE ISSUING COMPANY NOT LIABLE FOR
ANY INCIDENTAL OR CONSEQUENTIAL DAMAGES FOR
BREACH OF ANY EXPRESS OR IMPLIED WARRANTY ON
THIS PRODUCT. EXCEPT TO THE EXTENT PROHIBITED BY
APPLICABLE LAW, ANY IMPLIED WARRANTY OF MERCHANTABILITY OR FITNESS FOR A PARTICULAR PURPOSE
ON THIS PRODUCT IS LIMITED IN DURATION TO THE
DURATION OF THIS WARRANTY.
The company is not liable for any damage to or loss of any programs, data,
within the product, or other additional product or part not cov-
ered by this warranty. Recovery or reinstallation of programs,
data or other information is not covered under this Limited
Warranty.
This warranty does not apply (a) to damage caused by accident,
abuse, misuse, neglect, misapplication, or non-supplied product,
(b) to damage caused by service performed by anyone other than
company approved Authorized Service Location, (c) to a product
32
EN
or other information stored on any media contained
This warranty gives you specific legal rights. You may have other rights which vary from state/province to state/province.
Some states do not allow the exclusions or limitation of incidental or consequential damages, or allow limitations on how long an
implied warranty lasts, so the above limitations or exclusions may
not apply to you.
011509
Page 33

14 Index
A
Antenna 8
C
Cables
component 25
composite 25
HDMI 25
quality 25
S-video 25
YPbPr 25
Channels
favorite list 15
Child lock
lock channels 16
PIN code 16
ratings lock 17
Clock 15
Closed captions 19
Component cable 25
Composite cable 25
Connections
antenna 8
quality 25
E
Environmental care 5
F
Favorite list 15
H
HDMI cable 25
Home mode 10
L
Location 10
S
Settings assistant 13
Shop mode 10
Sleep timer 16
Software
update 23
version 23
Sound settings 14 , 18
Standby 5 , 14
Subtitles 19
S-video 25
T
Technical specifcations 31
Timer 16
Troubleshooting 29
TV
as PC monitor 20
connections 8 , 27 , 28
controls 6
in High Defi nition 19
menu 13
position 8
remote control 6 , 11
screen care 5
software 23
switch channels 11
switch on 10 , 11
troubleshooting 29
TV ratings 17
V
Volume
adjust 11
automatic leveling 15
delta 15
mute 11
Y
YPbPr 25
English
M
Menu
child lock 16
quick access menu 13
P
Parental control
child lock 16
PC 20
Picture format 14
Picture settings 14 , 18
Power 9
R
Ratings 17 , 18
Remote control
insert batteries 8
overview 6
EN
33
Page 34

34 EN
Page 35

English
35EN
Page 36

Table des matières
1 Avis 4
2 Important
Renseignements sur le produit 5
Entretien de l’écran 5
Protection de l’environnement 5
3 Votre téléviseur 6
Commandes latérales et indicateurs 6
Présentation de la télécommande 6
5
10 Dépannage 31
Renseignements supplémentaires sur l’utilisation de la technologie
d’assistance 31
Contactez-nous 31
11 Remarques liées à l’utilisation des dispositifs USB 32
12 Renseignements sur le produit
13 Garantie 34
14 Index 35
33
4 Guide de démarrage 8
Positionnement du téléviseur 8
Insertion des piles dans la télécommande 8
Connexion de l’antenne ou du câble 8
Raccordement au secteur 9
Acheminement des câbles 9
Mise en marche et confi guration du téléviseur 10
5 Utilisez votre téléviseur 11
Mise en marche, arrêt et veille 11
Changement de chaînes 11
Réglage du volume 11
Visionnage de chaînes depuis un décodeur 12
Utilisation des périphériques branchés 12
Visionnage d’un DVD 12
6 Utilisation avancée de votre téléviseur 13
Utilisation du menu Accès rapide 13
Changer les réglages d’image et de son 13
Utilisation de Auto Mode 15
Création et utilisation de listes de chaînes favorites 15
Réglage de l’horloge 15
Utilisation des fonctions de surveillance
parentale (verrouillage) 16
Visionnage des sous-titres codés 19
Utilisation de votre téléviseur comme écran d’ordinateur 21
Activation de la fonction HDMI-CEC 21
Français
7 Installation des chaînes 22
Sélection de la langue de vos menus 22
Réglage de votre emplacement à Maison 22
Installation automatique des chaînes 22
Optimisation de la qualité du signal de l’antenne 23
Désinstallation et réinstallation des chaînes 23
Réinitialisation de vos réglages à leurs valeurs par défaut 23
Affi chage des alertes d’urgence (EAS) 23
8 Mise à jour du logiciel de votre téléviseur 25
Vérifi cation de la version actuelle de votre logiciel 25
Préparation à la mise à niveau du logiciel 25
Mettre à niveau le logiciel 25
9 Raccordement des périphériques 26
Vue d’ensemble des connexions 26
Sélection de la qualité de la connexion 27
Identifi cation de vos connexions 27
Raccordement de vos appareils 27
FR
1
Page 37

z
Retournez votre carte d'enregistrement de produit ou enregistrez-vous en ligne à
_
_
www.magnavox.com/support le plus tôt possible pour profiter pleinement de
votre achat.
L’enregistrement de votre modèle auprès de MAGNAVOX confirme votre éligibilité à tous les bénéfices me
ci-dessous. Remplissez et retournez votre carte d'enregistrement de produit le plus tôt possible ou enregistre
ligne à www.magnavox.com/support pour assurer :
*Preuve d’achat
Retournez la carte d’enregistrement ciincluse afin de garantir que la date
d’achat de votre produit sera classée
dans nos dossiers et éviter ainsi le besoin
de remplir d’autres formulaires afin
d’obtenir votre service de garantie.
Nous vous félicitons de votre achat et vous souhaitons
la bienvenue dans la “famille”!
Cher propriétaire d’un produit MAGNAVOX :
Merci de votre confiance en MAGNAVOX.Vous avez choisi un
produit de fabrication et de garantie supérieures parmi les meilleurs disponibles sur le marché. Et nous ferons tout en notre
pouvoir pour que vous soyez pleinement satisfait de votre achat
pour des années à venir.
En tant que membre de la famille MAGNAVOX, vous avez droit
à une protection inégalée par l’une des garanties les plus complètes de l’industrie ainsi qu’à des réseaux de service sans pareil.
De plus, votre achat garantit que vous recevrez toutes les informations et offres spéciales auxquelles vous avez droit, ainsi
qu’un accès facile à toute une gamme d’accessoires disponibles
via notre réseau de téléachat.
Mais ce qui est encore plus important, vous pouvez compter sur
notre engagement total quand il s’agit de votre entière satisfaction. C’est notre façon de vous souhaiter la bienvenue et de
vous remercier de votre investissement dans un produit
MAGNAVOX.
*Avis sur la sécurité
des produits
En enregistrant votre produit, vous serez
avisé - directement par le fabriquant - de
toutes défectuosités compromettant la
sécurité ou de tout retrait du produit du
marché.
*Bénéfices additionnels
L’enregistrement de votre produit garantit que vous bénéficierez de tous les privilèges auxquels vous avez droit y compris
des offres-rabais spéciales.
Sachez reconnaître ces symboles de
sécurité
AV IS
RISQUE DE CHOCS ÉLECTRIQUES
Attention: An de prévenir le risque de chocs électriques
Toute réparation devrait être conée à un personnel qualié.
Ce symbole « d’éclair s’applique aux
matériaux non isolés présents dans votre
appareil et pouvant causer un choc électrique.
Pour assurer la sécurité des membres de votre
famille, veuillez ne pas enlever le couvercle de
votre produit.
Les points d’exclamation ont pour
but d’attirer votre attention sur des caractéristiques à propos desquelles vous devez lire
soigneusement la documentation accompagnant
l’appareil afin d’éviter tout problème d’exploitation ou d’entretien.
AVERTISSEMENT : Afin de réduire les risques
d’incendie ou de choc électrique, ne pas exposer
cet appareil à la pluie ou à l’humidité et les objets
remplis de liquide, comme les vases, ne doivent
pas être placés sur le dessus de l’appareil.
CAUTION : To prevent electric shock, match
wide blade of plug to wide slot, fully insert.
ATTENTION : Pour éviter les chocs électriques, introduire la lame la plus large de la fiche
dans la borne correspondante de la prise et
pousser à fond.
NE PAS OUVRIR
ne pas retirer les vis.
P. S . Pour bénéficier au maximum de votre produit
MAGNAVOX, assurez-vous de remplir et de retourner
votre carte d’enregistrement de produit le plus tôt
possible ou enregistrez-vous en ligne à
www.magnavox.com/support
Visitez notre site sur le Web à http://www.magnavox.com/support
2
FR
Entrez ci-dessous le numéro de série qui se trouve à l’arrière du boîtier du dispositif.Conservez
ces informations pour référence ultérieure.
No. de modèle : _______________________
No. de série : _________________________
À l’usage du client
Page 38

CONSIGNES DE SÉCURITÉ IMPORTANTES
Veuillez lire ces consignes avant de faire fonctionner cet appareil
1. Lire ces instructions.
2. Conserver ces instructions.
3. Obéir à tous les avertissements.
4. Suivre toutes les instructions.
5. Éviter d'utiliser cet appareil à proximité de l'eau.
6. Nettoyer à l'aide d'un linge sec seulement.
7. Ne pas boucher les orifices de ventilation. Effectuer
l'installation selon les instructions du fabricant.
8. Ne pas installer l'appareil près d'une source de chaleur comme un
radiateur, un registre de chaleur,une cuisinière ou tout autre
appareil (y compris les amplificateurs) qui dégage de la chaleur.
9. Ne pas contourner la mesure de sécurité de la fiche polarisée ou de
mise à la terre. Une fiche polarisée est dotée de deux lames dont l'une
est plus large que l'autre. Une fiche avec mise à la terre est dotée de
deux lames auxquelles s'ajoute une troisième broche de mise à la terre.
La lame large, la troisième broche, est fournie pour votre sécurité. Si la
fiche fournie ne rentre pas dans votre prise secteur,consultez un
électricien qui changera votre prise murale obsolète.
10.Protéger le cordon d'alimentation pour éviter que l'on marche
dessus ou qu'il soit plié en particulier au niveau de la fiche, des prises
de courant de commodité et à l'endroit où il sort de l'appareil.
11.Utiliser uniquement des équipements/accessoires spécifiés par
le fabricant.
12. L'appareil ne doit être utilisé qu'avec le chariot, socle,
trépied, support ou table spécifié par le fabricant ou
vendu avec l'appareil. Un appareil utilisé en combinaison avec
un chariot doit être déplacé avec soin afin d'éviter les risques
de blessures occasionnées par le renversement de l'appareil.
13.Débrancher cet appareil durant les orages électriques ou lorsqu'il
n'est pas utilisé pour une période de temps prolongée.
14.L'entretien ou la réparation de l'appareil doit être effectué par
du personnel qualifié uniquement. Il faut faire réparer l'appareil
dès que celui-ci est endommagé d'une façon quelconque, qu'il
s'agisse du cordon ou de la fiche d'alimentation, si du liquide a
été renversé ou des objets sont tombés dans l'appareil, s'il a
été exposé à la pluie ou à une humidité excessive, s'il ne
fonctionne pas normalement ou s'il a subi un choc.
15.Ce produit peut contenir du plomb ou du mercure. La mise au
rebut de ces substances peut être réglementée par suite de
considérations environnementales. Pour de plus amples
informations concernant la mise au rebut ou le recyclage de
l'appareil, contacter les autorités locales ou l'Electronic
Industries Alliance : www.eiae.org.
16.Dommages nécessitant des réparations - L'appareil doit
être réparé par du personnel qualifié lorsque :
A. Le cordon ou la fiche d'alimentation est endommagé; ou
B. Des objets sont tombés dans l'appareil ou du liquide a été
renversé à l'intérieur; ou
EXEMPLE DE MISE A LA TERRE D'UNE ANTENNE SUIVANT LES RECOMMANDATIONS DU NATIONAL ELECTRICAL CODE (NEC)
C. L'appareil a été exposé à la pluie; ou
D. L'appareil semble ne pas fonctionner correctement ou
présente un changement de performance marqué; ou
E. L'appareil a subi un choc ou le boîtier est endommagé.
17.Inclinaison/stabilité - Tous les postes de télévision doivent
répondre aux normes de sécurité internationales globales
recommandées, relativement aux propriétés d'inclinaison et de
stabilité du boîtier.
• Il ne faut pas compromettre ces normes de construction en
exerçant une force excessive sur la partie avant ou supérieure,
susceptible d'entraîner le renversement de l'appareil.
• De plus, ne pas mettre vos enfants ni vous-même en danger,
en plaçant des appareils électroniques ou des jouets sur le
dessus du poste. Ces objets pourraient tomber du
téléviseur et entraîner des dommages ou des blessures.
18.Montage mural ou montage au plafond - Si l'appareil doit
être monté au mur ou au plafond, l'installation doit être
effectuée selon les recommandations du fabricant.
19.Lignes électriques - Une antenne extérieure doit être
installée loin des lignes électriques.
20.Mise à la terre d'une antenne extérieure - Si une antenne
extérieure est connectée au récepteur, s'assurer que le
système d'antenne est mis à la terre de façon à fournir une
protection contre les surcharges de courant et les charges
statiques accumulées.
L'article 810 du Code national de l'électricité,ANSI/NFPA No.
70-1984, offre des informations relatives à la mise à la terre
correcte du mât et des structures de support, la mise à la
terre de la descente d'antenne vers un dispositif de décharge,
la taille des connecteurs de mise à la terre, l'emplacement du
dispositif de décharge d'antenne, le raccordement des
conducteurs de terre ainsi qu'aux exigences relatives au
conducteur de terre.Voir la figure ci-dessous.
21.Pénétration d'objets et de liquide - Prendre tous les soins
nécessaires pour éviter que des objets tombent ou que des
liquides coulent dans le boîtier à travers les orifices.
a) Avertissement :Afin de réduire les risques d'incendie ou de
choc électrique, ne pas exposer cet appareil à la pluie ni à
l'humidité et ne pas placer d'objets remplis de liquide, comme
des vases, sur le dessus de l'appareil.
22.MISE en garde concernant les piles - Pour prévenir la
fuite des piles pouvant entraîner des blessures, des dégâts
matériels ou endommager l'appareil :
• Installer toutes les piles de façon à ce qu'elles correspondent
aux bornes + et -, tel qu'indiqué sur le dispositif.
• Ne pas mélanger les piles (neuves et usagées ou carbone et
alcaline, etc.).
• Retirer les piles du boîtier lorsque la télécommande n'est pas
utilisée pendant une période de temps prolongée.
Français
ATTACHE DE TERRE
EQUIPEMENT DE SERVICE ELECTRIQUE
Remarque pour les installateurs de système de câble : Ce rappel s'adresse aux installateurs de système de câble afin d'attirer leur attention sur l'article 820-40 du code NEC
qui indique la marche à suivre pour une mise à la terre adéquate et,en particulier,spécifie que le câble de masse doit être raccordé au système de mise à la terre du bâtiment,aussi
près que possible du point d'entrée du câble.
FIL D'ENTREE DE L'ANTENNE
UNITE DE DECHARGE DE L'ANTENNE
(
SECTION NEC 810-20)
CONDUCTEURS DE MISE A LA
(SECTION NEC 810-21)
TERRE
ATTACHES DE TERRE
SYSTEME ELECTRODE DE TERRE POUR SOURCE
ELECTRIQUE
(NEC ART 250, PART H)
FR
3
Page 39

1 Avis
2009 © Magnavox. Tous droits réservés.
Les caractéristiques sont susceptibles d’être modifi ées sans avis
préalable. Les marques de commerce sont la propriété de Magnavox. ou
de leurs détenteurs respectifs. Magnavox se réserve le droit de modifi er
les produits à tout moment, mais n’est pas contraint de modifi er les
offres précédentes en conséquence.
Le contenu de ce manuel est jugé conforme à l’usage auquel ce système
est destiné. Si le produit ou les modules et procédures correspondants
sont utilisés à d’autres fi ns que celles spécifi ées dans le présent
manuel, vous devrez obtenir la confi rmation de leur validité et de leur
adéquation. Magnavox garantit que le matériel ne constitue pas en
lui-même une contrefaçon de brevet aux États-Unis. Aucune garantie
supplémentaire n’est expresse ou tacite.
Magnavox ne peut être tenue responsable de toute erreur pouvant
s’être glissée dans le contenu de ce document ou pour tout problème
résultant du contenu de ce document. Les erreurs rapportées à
Magnavox seront corrigées et publiées sur le site Web de soutien
technique de Magnavox dès que possible.
Caractéristiques des pixels
L’écran à cristaux liquides de ce téléviseur possède un grand nombre
de pixels couleur. Bien que le taux de pixels effectifs soit de 99,99 % ou
plus, des points noirs ou des points de lumière (rouge, vert ou bleu)
peuvent apparaître constamment à l’écran. Il s’agit d’une propriété
structurelle de l’affi chage (selon les normes industrielles standard), et
non d’un dysfonctionnement.
Garantie
Aucun composant ne peut être réparé par l’utilisateur. N’ouvrez pas ou
n’enlevez pas les couvercles donnant accès à l’intérieur du produit. Seuls
les centres de service agréés de Magnavox et les ateliers de réparation
offi ciels sont autorisés à réparer nos produits. Le non-respect de cette
consigne entraîne l’annulation de toute garantie, expresse ou tacite.
Toute opération expressément interdite dans ce manuel, ou tout
réglage ou toute procédure d’assemblage non recommandé(e) ou
autorisé(e) par le présent manuel entraîne l’annulation de la garantie.
Avis de la commission fédérale des communications (Federal
Communications Commission)
Cet équipement a été testé et jugé compatible avec les limites
s’appliquant aux appareils numériques de la classe B, conformément
à l’article 15 du règlement de la FCC. Ces limites ont été défi nies
pour fournir une protection raisonnable contre les interférences
nuisibles dans le cadre d’une installation résidentielle. Cet équipement
génère, utilise et peut émettre de l’énergie radiofréquence et, s’il
n’est pas installé ni utilisé conformément aux instructions, peut causer
des interférences gênantes pour les communications radio. Rien ne
garantit toutefois que des interférences ne surviendront pas dans une
installation particulière. Si cet équipement cause des interférences
nuisibles pour la réception de la radio ou de la télévision, ce qui peut
être déterminé en mettant l’équipement hors tension puis sous tension,
l’utilisateur devra essayer de corriger ces interférences en effectuant une
ou plusieurs des opérations suivantes :
• Réorientez ou déplacez l’antenne de réception.
• Augmentez la distance entre l’équipement et le récepteur.
• Branchez l’équipement à une prise d’un circuit autre que celui
auquel le récepteur est branché.
• Consultez le détaillant ou un technicien de radiotélévision
expérimenté.
Déclaration de Conformité
Nom Commercial: MAGNAVOX
Personne Responsable: FUNAI CORPORATION, INC.
Modèle: 47MF439B
Adresse: 201 Route 17 North Suite No. 903
Rutherford, New Jersey 07070 U.S.A.
Numéro de Téléphone: 201-727-4560
Modifi cations
La FCC exige que l’utilisateur soit informé que tous les changements
ou modifi cations apportés à cet appareil sans l’autorisation expresse de
Magnavox peuvent annuler le droit de l’utilisateur à utiliser l’équipement.
Câbles
Les connexions à cet appareil doivent être effectuées avec des câbles
blindés munis de boîtiers de connecteur RFI/EMI métalliques afi n de
demeurer conformes aux règles et réglementations de la FCC.
Avis de conformité à la réglementation d’Industrie Canada
Cet appareil numérique de la classe B respecte toutes les exigences du
règlement sur le matériel brouilleur du Canada.
Copyright
Toutes les autres marques, déposées ou non déposées, sont la propriété
de leurs détenteurs respectifs.
Fabriqué sous licence de Dolby Laboratories.
Le terme « Dolby » et le sigle double D sont des marques
commerciales de Dolby Laboratories.
VESA, FDMI et le logo de compatibilité VESA pour un montage mural
sont des marques de commerce de Video Electronics Standards
Association.
® Kensington et Micro Saver sont des marques déposées aux ÉtatsUnis de ACCO World Corporation. Elles sont également déposées ou
font actuellement l’objet de demandes en attente dans d’autres pays du
monde.
Des portions de ce logiciel font l’objet d’un copyright © The FreeType
Project (www.freetype.org).
4
FR
Page 40

2 Important
L’enregistrement de votre modèle auprès de Magnavox confi rme
votre admissibilité à tous les avantages mentionnés ci-dessous, alors ne
l’oubliez pas.
Remplissez et retournez votre carte d’enregistrement de produit le plus
tôt possible, ou enregistrez-vous en ligne à l’adresse www.magnavox.
com/support pour vous assurer des points suivants :
• Preuve d’achat
Retournez la car te ci-jointe pour garantir que la date d’achat
de votre produit est enregistrée dans nos dossiers afi n de vous
éviter de remplir d’autres formulaires pour obtenir le service sous
garantie du produit.
• Avis sur la sécurité des produits
En enregistrant votre produit, vous serez avisé - directement
par le fabricant - de tout rappel de produit ou de défectuosité
compromettant la sécurité, bien qu’il s’agisse d’une éventualité peu
probable.
• Avantages supplémentaires
L’enregistrement de votre produit garantit que vous bénéfi cierez de
tous les privilèges auxquels vous avez droit, y compris des offres rabais
spéciales.
Renseignements sur le produit
Ce téléviseur consomme très peu d’énergie en mode veille pour
minimiser l’impact sur l’environnement. La consommation électrique
en service est indiquée sur la plaque signalétique du produit située à
back du téléviseur. Le modèle et le numéro de série de votre téléviseur
fi gurent sur le téléviseur ainsi que sur l’emballage.
Entretien de l’écran
• Évitez autant que possible d’utiliser des images statiques. Les images
• Débranchez le téléviseur avant de procéder au nettoyage.
• Nettoyez l’écran du téléviseur et le châssis à l’aide d’un chiffon
• Risque de dommage pour l’écran du téléviseur! Évitez de toucher,
• Pour éviter toute déformation et décoloration, essuyez les gouttes
statiques sont des images affi chées à l’écran pendant une période
prolongée. Il s’agit par exemple de menus d’affi chage à l’écran, de
barres noires ou de l’affi chage de l’heure. Si vous devez utiliser des
images statiques, réduisez le contraste et la luminosité de l’écran
afi n d’éviter de l’endommager.
doux et humide. N’utilisez jamais de substances telles que de
l’alcool, des produits chimiques ou d’entretien ménager sur l’écran
du téléviseur.
pousser et frotter l’écran avec un objet quelconque.
d’eau le plus vite possible.
Protection de l’environnement
L’emballage de ce produit est conçu pour être recyclé. Communiquez
avec les autorités locales pour obtenir des renseignements sur la
manière de recycler l’emballage.
Directives de fi n de vie utile
Français
Comme tous les produits avec affi chage à cristaux liquides, cet appareil
contient une lampe dont l’un des composants est le mercure. Veuillez
donc l’éliminer conformément aux lois municipales, provinciales et
fédérales.
Magnavox prête une attention toute particulière à la fabrication de
produits écologiques dans les zones focales vertes. Votre nouveau
téléviseur contient des pièces qui peuvent être recyclées et réutilisées. À
la fi n de sa vie utile, le téléviseur peut être démonté par des entreprises
spécialisées en vue de concentrer les matériaux réutilisables et de
minimiser la quantité de matériel à mettre au rebut. Veuillez vous assurer
de mettre votre ancien téléviseur au rebut selon la réglementation
locale.
Mise au rebut des piles usagées
Les piles fournies ne contiennent pas de métaux lourds comme le
mercure et le cadmium. Néanmoins, dans un grand nombre de localités,
il est interdit de mettre les piles au rebut avec les déchets ménagers.
Veuillez vous assurer de mettre les piles au rebut selon les règlements
locaux.
Avis réglementaires
AVERTISSEMENT
Afi n de réduire les risques d’incendie ou de choc électrique, ne pas exposer cet appareil à
la pluie ou à l’humidité. Les objets remplis de liquides, comme des vases,ne doivent pas être
placés sur le dessus de l’appareil.
ATTENTION
Pour éviter les chocs électriques, introduire la lame la plus large de la fi che dans la borne
correspondante de la prise et pousser à fond.
FR
5
Page 41

3 Votre téléviseur
Félicitations pour votre achat et bienvenue dans le monde de
Magnavox! Pour profi ter pleinement de tous les avantages de l’assistance
Magnavox, enregistrez votre produit à l’adresse www.magnavox.com/
support.
Commandes latérales et indicateurs
VOLUME
MENU
CHANNEL
POWER
1
5
4
3
2
Présentation de la télécommande
20
19
18
17
16
1
2
3
4
5
6
7
8
9
a Indicateur de mode veille / capteur de la télécommande
b POWER : Pour allumer ou éteindre le téléviseur. Le téléviseur
n’est pas complètement hors tension à moins qu’il soit
débranché de la prise murale.
c CHANNEL +/ - : Pour passer à la chaîne suivante ou précédente.
d MENU : Pour accéder au menu ou le quitter.
e VOLUME +/- : Pour augmenter ou diminuer le volume.
Présentation de la télécommande
15
14
10
11
12
13
a ( Veille-Marche )
6
FR
Page 42

Pour allumer ou éteindre le téléviseur. Le téléviseur n’est pas
complètement hors tension à moins qu’il soit débranché de la
prise murale.
b FAVORIS
Pour affi cher une liste des chaînes indiquées comme favorites.
(inclut les sous-chaînes.)
c FORMAT
Pour sélectionner un format d’image .
d Boutons de couleur
Pour sélectionner les tâches ou les options.
e OPTION
Pour activer le menu Accès rapide (see ‘Utilisation du menu Accès
rapide’ on page 13 ) .
f OK
Pour activer une sélection ou accéder au menu.
g
( Boutons de navigation )
Pour naviguer dans les menus.
h INFO
Pour affi cher de l’information sur la chaîne de télévision ou le
périphérique. La qualité et la précision de l’information dépendent
du diffuseur. Les temps d’antenne pourront varier si la diffusion est
effectuée dans un fuseau horaire différent.
i MUTE
Pour mettre le son en sourdine ou le rétablir.
j CH +/-
Pour passer à la chaîne suivante ou précédente.
k SLEEP
Pour défi nir un délai lorsque le téléviseur passe en mode veille .
l Clavier numérique
Pour sélectionner une chaîne, une page ou un réglage.
m . (Point)
Appuyez sur le point (.) pour obtenir les chaînes numériques.
n PREV CH
Pour revenir à la dernière chaîne sélectionnée.
o VOL +/-
Pour augmenter ou diminuer le volume.
p MENU/EXIT
Pour activer ou désactiver le menu.
q BACK
Pour retourner à l’écran précédent.
r SMART MODE
Pour basculer entre les réglages intelligents pour l’image et le son.
s CC
Pour affi cher les paramètres des sous-titres codés.
t SOURCE
Pour sélectionner les périphériques branchés.
Français
FR
7
Page 43

4 Guide de démarrage
Cette section remplace l’information présentée dans le Guide de
démarrage rapide. Pour obtenir des renseignements sur le montage et
l’installation de votre téléviseur, consultez le Guide de démarrage rapide.
Positionnement du téléviseur
Insertion des piles dans la télécommande
Avertissement
•
N’insérez pas la fi che d’alimentation dans la prise murale avant d’avoir effectué toutes
les connexions.
• Les téléviseurs à grand écran sont lourds. Deux personnes sont requises pour soutenir
et manipuler le téléviseur à grand écran.
• Avant de déplacer votre téléviseur, débranchez les câbles pour éviter tout bris.
Après avoir lu et compris les consignes de sécurité, prenez connaissance
des points suivants avant de positionner votre téléviseur :
• Assurez-vous de toujours bénéfi cier d’un accès facile au cordon
d’alimentation ou à la prise murale pour débrancher le téléviseur
de la prise.
• Si le téléviseur est monté sur une base pivotante, assurez-vous
qu’aucune tension ne soit exercée sur le cordon d’alimentation
pendant le pivotement du téléviseur. Un cordon d’alimentation
tendu peut causer un desserrement des connexions.
• Pour obtenir la distance de visionnement idéale, multipliez la taille
de l’écran par trois.
• Positionnez le téléviseur de manière à ne pas exposer l’écran
directement à une source de lumière.
• Branchez les périphériques avant de positionner le téléviseur.
Utilisation d’un verrou Kensington
Votre téléviseur comprend une fente de sécurité Kensington située
derrière le téléviseur. Empêchez le vol de l’appareil en plaçant un verrou
Kensington dans la fente et en l’attachant à un objet fi xe, comme une
table lourde.
1 Faites glisser le couvercle du compartiment des piles au dos de la
télécommande.
2 Insérez les 2 piles (AAA) incluses. Assurez-vous que les pôles +
et - aux extrémités des piles correspondent aux indications à
l’intérieur du compartiment.
3 Faites glisser le couvercle pour le remettre en place.
Remarque
Enlevez les piles de la télécommande si vous ne l’utilisez pas pendant une période
•
prolongée.
Connexion de l’antenne ou du câble
Cable
TV ANTENNA
8
FR
Connexion à une antenne
Tout programme de télévision numérique diffusé dans votre région peut
être capté gratuitement au moyen d’une antenne.
Communiquez avec votre fournisseur de contenu local ou avec votre
détaillant local de produits électroniques si vous ignorez quelles chaînes
en haute défi nition sont disponibles dans votre région.
Les diffuseurs passent maintenant de la télévision analogique à la
télévision numérique. Cela signifi e qu’un diffuseur peut offrir des chaînes
en mode analogique ou en mode numérique, ou les deux en même
temps.
Le téléviseur produit un son stéréo uniquement lorsque la chaîne
syntonisée le diffuse.
Connexion à un câble
Lorsque votre téléviseur est branché à la douille du câble, vous pourriez
pouvoir syntoniser gratuitement certaines émissions numériques et
en haute défi nition (selon votre câblodistributeur). Les numéros des
chaînes de télévision numérique et en haute défi nition incluent un
point « . », par exemple, 11.1, 46.30, 108.201. Communiquez avec votre
câblodistributeur pour obtenir plus d’information.
Page 44

Connexion à un satellite de radiodiffusion directe
SPDIF
O
VIDEO
IO
IN
HDM3HDM
HDM
3
Pb
R
R
L
b
SE
. U
SPDIF
O
D
AU
D
IO
D
D
AV2
P
L
R
VIDEO
AV3
TV ANTENNA
HDM
I
3
Il existe deux principaux systèmes avec satellite de radiodiffusion
directe : DirecTV et DishNetwork. Ces systèmes exigent un décodeur
distinct et exclusif pour décoder les signaux et les transmettre au
téléviseur. Le décodeur contient un syntoniseur numérique pour la
réception d’émissions numériques hors antenne.
Communiquez avec votre fournisseur de signaux satellite pour obtenir
de plus amples renseignements sur les connexions et les chaînes de
télévision.
Connexion à un décodeur
Un boîtier de connexion ou un décodeur peut être raccordé au
téléviseur au moyen des connexions suivantes :
• ANT
• A/V (audio et vidéo composite)
• S-Vidéo
• Entrée vidéo en composante (YPbPr)
• HDMI
Pour obtenir de plus amples renseignements sur le raccordement d’un
décodeur, consultez le Guide de démarrage rapide fourni.
Connexion à un décodeur au moyen de l’entrée ou la sortie RF
Si le téléviseur est raccordé à un boîtier de réception de câble ou à
un décodeur de signaux satellite au moyen d’un câble coaxial, réglez le
téléviseur à la chaîne 3 ou 4 ou à la chaîne indiquée par le fournisseur
de services.
Raccordement au secteur
Avertissement
Assurez-vous que la tension secteur corresponde à la tension indiquée à l’arrière du
•
téléviseur. Si la tension est différente, ne branchez pas le cordon d’alimentation.
1 Repérez la prise d’alimentation à l’arrière du téléviseur.
L’emplacement de la prise d’alimentation varie en fonction du
modèle de téléviseur.
2 Insérez complètement le cordon d’alimentation dans la prise d’alimentation.
3 Branchez la fi che du cordon d’alimentation dans la prise de courant.
Assurez-vous que le cordon est inséré solidement aux deux extrémités.
Français
TV ANTENNA
R
UT
r
P
S-VIDEO
Y
Y
AU
Connexion à un décodeur au moyen de l’entrée vidéo en
composante ou HDMI
SERV. U
R
R
LRL
L
SPDIF
OUT
Pr
Pr
Pb
Pb
VIDEO
L
S-VIDEO
Y
Y
R
DVIAU DIO
AV3AV1 AV2
IN
HDMI3HDMI1 HDMI2
TV ANTENNA
SERV. U
R
R
R
L
L
L
SPDIF
UT
OUT
Pr
Pr
Pb
Pb
b
VIDEO
L
-
S-VIDEO
Y
Y
R
DVIAUDIO
AV2
AV3
AV1
IN
HDMI1 HDMI2 HDMI3
Débranchement du téléviseur
Mise en garde
•
Tirez le cordon d’alimentation par la fi che; évitez de le tirer par le cordon.
1 Débranchez le cordon d’alimentation de la prise de courant.
2 Débranchez le cordon d’alimentation de la prise d’alimentation à
l’arrière du téléviseur.
Acheminement des câbles
Acheminez le cordon d’alimentation, le câble d’antenne et tous les
autres câbles à travers le support de câbles situé à l’arrière du téléviseur.
Le support permet de regrouper vos câbles de façon ordonnée et
facilite leur manipulation.
9
FR
Page 45

Mise en marche et confi guration du
téléviseur
Le téléviseur s’allume automatiquement dès que le cordon
d’alimentation est inséré dans la prise d’alimentation. L’écran suivant
s’affi che :
Thank you for your purchase of this MAGNAVOX TV.
Please proceed with the following steps to set-up your TV. For the BEST
possible picture performance, contact your local Cable / Satellite signal
provider for High Definition signal options available in your area.
Next
Press the GREEN Next button located on your remote control to proceed.
Suivez les instructions apparaissant à l’écran pour sélectionner la langue
et terminer la confi guration de votre téléviseur.
Remarque
Si vous raccordez votre téléviseur à un boîtier de connexion ou à un décodeur de
•
signaux satellite, il n’est pas nécessaire d’installer des chaînes. Appuyez sur la touche
rouge de la télécommande pour quitter cette étape du processus de confi guration.
Terminez la confi guration en sélectionnant votre emplacement.
• Si vous choisissez [Magasin] , vos réglages seront effacés chaque fois
que vous éteindrez le téléviseur. Ce mode ne devrait être utilisé
qu’en magasin.
• Si vous choisissez [Maison] , le système vous guide parmi diverses
options d’affi chage. Utilisez les touches de navigation de gauche ou
de droite pour sélectionner votre affi chage préféré.
10
FR
Page 46

POWER
5 Utilisez votre téléviseur
POWER
Cette section présente les fonctions de base du téléviseur.
Mise en marche, arrêt et veille
POWER
Pour allumer
• Appuyez sur le bouton
• Appuyez sur la touche
Pour passer en mode veille
• Appuyez sur la touche
Pour éteindre
• Appuyez sur le bouton
Remarque
La consommation d’énergie contribue à la pollution de l’air et de l’eau. Tant que le
•
cordon d’alimentation est branché, le téléviseur consommé de l’électricité. En mode
veille, la consommation d’énergie de ce téléviseur est très faible..
POWER situé sur le côté du téléviseur.
de la télécommande.
de la télécommande.
POWER situé sur le côté du téléviseur.
• Appuyez sur le bouton CHANNEL +/ - situé sur le côté du
téléviseur. Pour syntoniser une chaîne numérique, composez un
numéro (1 à 999) suivi d’un point (.); ensuite, composez le numéro
de la sous-chaîne correspondante (1 à 999). Par exemple, 108.30.
• Appuyez sur CH +/- ou entrez un chiffre sur la télécommande.
• Appuyez sur PREV CH pour revenir à la chaîne précédente.
Réglage du volume
VOLUME
Français
Changement de chaînes
CHANNEL
Pour augmenter ou baisser le volume
• Appuyez sur la touche VOL +/- de la télécommande ou appuyez
sur le bouton VOLUME +/- situé sur le côté du téléviseur.
Pour mettre le son en sourdine ou le rétablir
• Appuyez sur la touche MUTE de la télécommande pour mettre le
son en sourdine.
• Appuyez de nouveau sur la touche MUTE pour rétablir le son.
Pour régler le volume du casque d’écoute
• Appuyez sur la touche VOL +/- de la télécommande ou appuyez
sur le bouton VOLUME +/- situé sur le côté du téléviseur.
Lorsqu’un casque d’écoute est raccordé au téléviseur, les hautparleurs sont automatiquement mis en sourdine.
FR
11
Page 47

Visionnage de chaînes depuis un décodeur
Visionnage de chaînes depuis un décodeur
1 Allumez le décodeur.
» L’image provenant de votre décodeur peut apparaître
automatiquement à l’écran.
2 Utilisez la télécommande de votre boîtier décodeur pour
sélectionner les chaînes.
Si l’image ne s’affi che pas
1 Appuyez plusieurs fois sur SOURCE pour sélectionner le décodeur
et attendez quelques secondes pour affi cher l’image.
2 Utilisez la télécommande de votre boîtier décodeur pour
sélectionner les chaînes.
Utilisation des périphériques branchés
Si l’image ne s’affi che pas
1 Appuyez plusieurs fois sur SOURCE pour sélectionner le lecteur
DVD et attendez quelques secondes pour affi cher l’image.
2 Utilisez la télécommande du lecteur DVD pour lancer la lecture du
disque.
Utilisation des périphériques branchés
1 Allumez le périphérique branché.
» L’image provenant de votre périphérique branché peut
apparaître automatiquement sur le téléviseur.
2 Utilisez la télécommande du périphérique pour sélectionner les
chaînes.
Si l’image ne s’affi che pas
1 Appuyez plusieurs fois sur SOURCE pour sélectionner le
périphérique branché et attendez quelques secondes pour affi cher
l’image.
2 Utilisez la télécommande du périphérique pour sélectionner les
chaînes.
Visionnage d’un DVD
Visionnage d’un DVD
1 Insérez un DVD dans votre lecteur.
2 Appuyez sur la touche PLAY de la télécommande du lecteur
DVD.
» La lecture du DVD pourrait démarrer automatiquement à
l’écran du téléviseur.
12
FR
Page 48

6 Utilisation avancée de
votre téléviseur
Utilisation du menu Accès rapide
Le menu Accès rapide vous permet d’accéder directement aux options
de menu que vous utilisez le plus.
Remarque
Si des chaînes numériques sont installées et diffusées sur votre téléviseur, les options
•
numériques correspondantes s’affi cheront dans ce menu.
1 Appuyez sur la touche OPTION de la télécommande.
2 Appuyez sur ou , puis sur OK pour accéder à l’un des menus
suivants :
• Langue audio, pour les chaînes numériques seulement, lorsque
plusieurs langues audio sont diffusées.
• Sous-titres (see ‘Visionnage des sous-titres codés’ on page 19 ) .
• Format d’image .
• Atténuateur .
• Horloge (see ‘Réglage de l’horloge’ on page 15 ) .
Menu TV
Paramètres TV
Options
Installation
Paramètres TV
Image
Son
3 Appuyez sur et pour sélectionner le menu [Image] .
Menu TV
Paramètres TV
Image
Son
Image
Contraste
Lumière
Couleur
Teinte
Définition
Température couleur
Contraste dynam.
Digital Natural Motion*
Français
Changer les réglages d’image et de son
Changer les réglages d’image
1 Appuyez sur la touche MENU de la télécommande.
2 Appuyez sur pour accéder au menu [Paramètres TV] .
*Pour certains modèles seulement
4 Appuyez sur ou pour sélectionner un des réglages d’image,
puis appuyez sur
5 Appuyez sur ou pour effectuer le réglage, puis appuyez sur
ou OK pour confi rmer le changement.
6 Appuyez sur MENU pour quitter.
pour entrer le réglage.
FR
13
Page 49

Sommaire des réglages d’image
Les réglages d’image suivants peuvent être confi gurés. Selon le format
de la source d’image, certains réglages d’image ne sont pas disponibles.
• [Contraste] : Règle l’intensité des zones lumineuses et garde les
zones sombres inchangées.
• [Lumière] : Règle l’intensité et les détails des zones sombres.
• [Couleur] : Règle la saturation de couleur.
• [Teinte] : Règle l’équilibre des couleurs dans une image.
• [Défi nition] : Règle le niveau de défi nition des détails de l’image.
• [Température couleur] : Pour régler la température des couleurs à
[Normal] , [Chaud] ou [Froid] .
• [Contraste dynam.] : Améliore automatiquement le contraste de
l’image.
• [Réduction du bruit] : Filtre et réduit automatiquement les
parasites dans l’image. Améliore la qualité de l’image lorsque la
réception des signaux vidéo est faible. Vous pouvez activer ou
désactiver la fonction DNR.
• [Réduction artefact MPEG] : Adoucit les transitions sur le contenu
numérique. Vous pouvez activer ou désactiver cette fonction.
• [Couleurs renforcées] : Rend les couleurs plus intenses et
améliore la résolution des détails des couleurs vives. Vous pouvez
activer ou désactiver cette fonction.
• [Format d’image] : Permet de changer le format de l’image.
• [Modifi cation Horizontale] / [Modifi cation Verticale] : Permet de
régler la position horizontale et verticale de l’image. La disponibilité
de ce réglage dépend de certains signaux ou sources.
Changer le format d’image
1 Appuyez sur la touche OPTION de la télécommande.
2 Sélectionner [Picture format] .
[Automatique] : (Pas pour le mode PC.)
Élargit automatiquement l’image afi n
qu’elle remplisse tout l’écran. Les soustitres demeurent visibles.
[Super zoom] : (Non disponible pour les
modes HD et PC.) Supprime les barres
noires sur les côtés de l’image en format
4:3. La distorsion est minime.
[4:3] : Affi che le format 4:3 classique.
[Ext. image 14:9] : (Non disponible pour
les modes HD et PC.) Redimensionne
le format classique 4:3 pour obtenir un
format 14:9.
[Ext. image 16:9] : (Non disponible pour
les modes HD et PC.) Redimensionne
le format classique 4:3 pour obtenir un
format 16:9.
[Plein écran 16:9] : Étire le format 4:3
classique pour obtenir un format 16:9.
[Non mis á l’échelle] : Disponible pour
les modes HD et PC seulement, et pour
certains modèles seulement. Permet un
niveau de défi nition maximal. Une certaine
distorsion peut se manifester en raison des
systèmes utilisés par les diffuseurs. Réglez
la résolution PC en mode plein écran pour
obtenir les meilleurs résultats.
3 Appuyez sur ou pour sélectionner un format d’image, puis
appuyez sur OK pour confi rmer votre choix.
Sommaire des formats d’image
Les formats d’image suivants peuvent être sélectionnés.
Selon le format de la source d’image, certains formats d’image ne sont
pas disponibles.
14
FR
Changer les réglages du son
1 Appuyez sur la touche MENU de la télécommande et sélectionnez
[Paramètres TV] > [Son] .
Menu TV
Paramètres TV
Image
Son
2 Appuyez sur ou pour mettre un réglage de son en surbrillance
et appuyez sur
3 Appuyez sur ou pour effectuer le réglage, puis appuyez sur
OK pour confi rmer le changement.
4 Appuyez sur MENU pour quitter.
pour sélectionner le réglage.
Son
Egaliseur
Balance
Langue son numérique
Changer audio
Mono/Stéréo
Incredible surround
AVL
Haut-parleurs du téléviseur
Page 50

Sommaire des réglages du son
Les réglages de son suivants peuvent être confi gurés. Selon la source
sonore, certains réglages du son ne sont pas disponibles.
• [Egaliseur] : Règle les fréquences sonores individuelles.
• [Balance] : Règle l’équilibre des haut-parleurs de droite et de
gauche en fonction de votre position d’écoute.
• [Langue son numérique] : Disponible uniquement pour les chaînes
numériques lorsque plusieurs langues sont diffusées. Dresse la liste
des langues audio disponibles.
• [Changer audio] : Disponible pour les chaînes analogiques lorsque
des programmes audio principal et secondaire sont disponibles
auprès du diffuseur. Sélectionnez le programme audio principal ou
secondaire.
• [Mono] / [Stéréo]
• [Son surround incroyable] : Permet de sélectionner les modes
avec son ambiophonique disponibles.
• [AVL] ( [Ajust. automatique du volume] ) : Atténue les différences
soudaines du volume, par exemple, au début des annonces
publicitaires ou lors du passage d’une chaîne à une autre. Peut être
activé ou désactivé.
• [Haut-parleurs du téléviseur] : Activez ou désactivez la fonction,
ou envoyez le son à un appareil compatible EasyLink. [HDMI-CEC]
doit être activé dans le menu [Préférences] pour activer le menu
[Haut-parleurs du téléviseur] .
• [Delta volume] : Atténue les différences de volume entre les
chaînes ou les périphériques branchés. Passez au périphérique
branché avant de changer le volume delta.
» Vos listes de chaînes favorites s’affi chent.
2 Appuyez sur ou pour mettre en surbrillance une liste, puis
appuyez sur OK pour sélectionner la liste.
Création ou modifi cation d’une liste de chaînes favorites
1 Appuyez sur la touche FAVORITES de la télécommande pour
affi cher vos listes de chaînes favorites.
2 Appuyez sur ou pour mettre en surbrillance une liste, puis
appuyez sur OK pour sélectionner la liste.
3 Appuyez sur la touche verte pour passer en mode Modifi er liste .
» Une liste de chaînes s’affi che à l’écran.
4 Appuyez sur ou pour mettre une chaîne en surbrillance.
5 Appuyez sur OK pour sélectionner ou désélectionner la chaîne en
surbrillance.
» La chaîne est ajoutée à la liste des chaînes favorites, ou
supprimée.
6 Appuyez de nouveau sur la touche verte pour quitter.
Français
Utilisation de Auto Mode
Appuyez sur AUTO MODE pour confi gurer votre téléviseur en
1
fonction d’un réglage d’image et de son prédéfi ni.
2 Appuyez sur ou pour sélectionner l’un des réglages suivants :
• [Préférentiel] : Réglages personnalisés défi nis à l’aide du menu
[Image] .
• [Sports] : Réglages produisant une image vive et un son clair
afi n de relever l’action.
• [Standard] : Pour le visionnement normal de la télévision.
• [Film] : Réglages brillants de l’image pour rehausser
l’expérience cinématique.
• [Jeu] : Optimisé pour les ordinateurs personnels et les
consoles de jeux vidéo.
• [Éparne d’énergie] : Favorise une diminution de la
consommation d’énergie.
Création et utilisation de listes de chaînes
favorites
Vous pouvez créer une liste de vos chaînes de télévision préférées pour
pouvoir retrouver facilement ces chaînes.
Sélection d’une liste de chaînes favorites
1 Appuyez sur la touche FAVORITES de la télécommande.
Sélection d’une chaîne depuis une liste
1 Appuyez sur la touche OK de la télécommande pour affi cher la
dernière liste que vous avez sélectionnée.
2 Appuyez sur ou pour mettre une chaîne en surbrillance.
3 Appuyez sur OK pour sélectionner la chaîne.
» Le téléviseur passe à cette chaîne.
Conseil
•
Appuyez sur CH+/- pour sélectionner les chaînes dans une liste ou appuyez sur les
touches numériques pour sélectionner des chaînes qui ne sont pas dans une liste.
Réglage de l’horloge
Vous pouvez régler l’heure sur votre téléviseur et en programmer l’arrêt
à une heure particulière.
Réglage automatique de l’heure
Certaines chaînes numériques transmettent l’heure. Pour ces chaînes,
vous pouvez régler l’heure automatiquement et choisir la chaîne de
diffusion de l’heure.
1 Appuyez sur la touche MENU de la télécommande et sélectionnez
[Installation] > [Horloge] > [Mode horloge auto] .
2 Sélectionnez [Automatique] et appuyez sur pour confi rmer
votre choix.
FR
15
Page 51

Menu TV I Installation
Horloge
Mode horloge auto
Chaîne horloge auto
Fuseau horaire
Heure d'été
Mode horloge auto
Manuel
Automatique
Réglage de l’arrêt programmé
L’arrêt programmé met le téléviseur en mode veille après une durée
prédéfi nie. Vous pouvez toujours éteindre votre téléviseur plus tôt ou
modifi er de nouveau le réglage du minuteur lors du compte à rebours.
Appuyez plusiers fois sur la touche SLEEP pour sélectionner une
valeur entre 0 et 180 minutes. Par exemple, si vous sélectionnez 90, le
téléviseur passera en mode veille dans 90 minutes.
Conseil
•
Pour désactiver la fonction d’arrêt programmé, sélectionnez 0 minutes.
3 (Facultatif) Sélectionnez la chaîne de diffusion de l’heure.
• Appuyez sur
horloge auto] .
• Appuyez sur
• Appuyez sur
et pour obtenir le menu pour [Chaîne
ou pour mettre une chaîne en surbrillance.
pour confi rmer votre choix.
4 (Facultatif) Sélectionnez le fuseau horaire.
• Appuyez sur
horaire] .
• Appuyez sur
horaire.
• Appuyez sur
et pour obtenir le menu pour [Fuseau
ou pour mettre en surbrillance le fuseau
pour confi rmer votre choix.
5 (Facultatif) Réglez l’heure d’été.
• Appuyez sur
d’été] .
• Appuyez sur
[Automatique] ou [Arrêt] .
• Appuyez sur
et pour obtenir le menu pour [Heure
ou pour mettre en surbrillance
pour confi rmer votre choix.
6 Appuyez sur MENU pour quitter.
Réglage manuel de l’heure
1 Appuyez sur la touche MENU de la télécommande et sélectionnez
[Installation] > [Horloge] > [Mode horloge auto] .
2 Sélectionnez [Manuel] , puis appuyez sur pour confi rmer votre choix.
Menu TV I Installation
Horloge
Mode horloge auto
Heure
Jour
Mode horloge auto
Manuel
Automatique
Utilisation des fonctions de surveillance
parentale (verrouillage)
Vous pouvez empêcher vos enfants de regarder certaines émissions
ou chaînes en verrouillant les contrôles du téléviseur et en utilisant les
qualifi cations.
Créer ou changer votre code
1 Appuyez sur la touche MENU de la télécommande et sélectionnez
[Options] > [Changez code] .
2 Entrez un code à quatre chiffres à l’aide des touches numériques
de la télécommande.
• Si vous avez un code courant, entrez-le.
• Si vous n’avez pas de code ou si vous l’avez oublié, entrez
0711 .
• Vous êtes invité à entrer de nouveau votre code.
3 Entrez de nouveau votre code pour confi rmer.
» Un message apparaît pour confi rmer que votre code a été
changé.
4 Appuyez sur MENU pour quitter.
Verrouillage du téléviseur
Cette section décrit comment verrouiller toutes les chaînes du
téléviseur. À l’heure spécifi ée, l’écran s’éteint et l’audio est mis en
sourdine.
1 Assurez-vous que l’horloge du téléviseur est synchronisée avec
l’heure courante (see ‘Réglage de l’horloge’ on page 15 ) .
2 Appuyez sur la touche MENU de la télécommande et sélectionnez
[Options] > [Verrouillage] > [Verrouiller après] .
3 Entrez votre code (see ‘Créer ou changer votre code’ on page 16 ) .
4 Appuyez sur pour sélectionner [Minuteur] .
3 Appuyez sur pour sélectionner [Heure] , puis appuyez sur
pour régler l’heure.
Utilisez le format HH:MM. Sélectionnez [AM] / [PM] pour le matin
ou l’après-midi.
4 Appuyez sur OK pour confi rmer votre choix.
5 Appuyez sur et pour obtenir le menu pour [Jour] .
6 Appuyez sur ou pour sélectionner le jour.
7 Appuyez sur OK pour confi rmer votre choix.
8 Appuyez sur MENU pour quitter.
16
FR
Page 52

Menu TV Options
Verrouiller après
Minuteur
Heure
Verrouillage
Minuteur
Arrêt
Marche
5 Appuyez sur pour sélectionner [Marche] et activer la fonction
[Verrouiller après] . Sélectionnez [Arrêt] pour désactiver la
fonction.
6 Appuyez sur pour confi rmer votre choix.
7 Appuyez sur pour sélectionner [Heure] , puis appuyez sur
pour régler l’heure.
Utilisez le format HH:MM, puis sélectionnez [AM] / [PM] pour le
matin ou l’après-midi.
8 Appuyez sur OK pour confi rmer l’heure.
9 Appuyez sur MENU pour quitter.
10 Éteignez le téléviseur et allumez-le de nouveau.
6 Appuyez sur MENU pour quitter.
Utilisation de Verrou qualifi cations téléviseur
Votre téléviseur est équipé d’une puce antiviolence (V-chip) vous
permettant de surveiller l’accès aux programmes individuels selon leurs
cotes d’âge et de contenu. Les données sur les cotes de contenu de
programme sont transmises par les diffuseurs ou par le fournisseur du
programme.
Si vous syntonisez des chaînes au moyen d’un décodeur ou d’un boîtier
de connexion relié au téléviseur par câble HDMI, vous ne pourrez
pas utiliser la fonction de verrou des qualifi cations. Votre décodeur ou
boîtier de connexion doit être branché à une entrée RF ou AV.
1 Appuyez sur la touche MENU de la télécommande et sélectionnez
[Options] > [Verrouillage] > [Verrou qualifi cations TV] .
2 Entrez votre code (see ‘Créer ou changer votre code’ on page 16 ) .
3 Appuyez sur ou , puis appuyez sur OK pour verrouiller ou
déverrouiller une ou plusieurs qualifi cations.
Chaque qualifi cation est précédée d’une case pour indiquer si des
programmes associés à cette qualifi cation sont verrouillés :
• Une case qui contient un X indique que tous les éléments
dans la liste des qualifi cations de contenu sont verrouillés.
• Une case vide indique qu’aucun élément dans la liste des
qualifi cations de contenu n’est verrouillé.
• Une case avec / indique que certaines qualifi cations
de contenu sont désélectionnées. Par exemple, pour la
qualifi cation téléviseur-14, vous pouvez désélectionner une
ou plusieurs des qualifi cations suivantes : [(D) Dialogue] , [(L)
Langue] , [(S) Contenu sexuel] , ou [(V) Violence] .
Français
Verrouillage d’une chaîne
Cette section décrit comment verrouiller des chaînes spécifi ques. Les
chaînes peuvent être sélectionnées, mais l’écran demeure vide et le son
est mis en sourdine.
1 Assurez-vous que l’horloge du téléviseur est synchronisée avec
l’heure courante (see ‘Réglage de l’horloge’ on page 15 ) .
2 Appuyez sur la touche MENU de la télécommande et sélectionnez
[Options] > [Verrouillage] > [Verrouillage de chaîne] .
3 Entrez votre code (see ‘Créer ou changer votre code’ on page 16 ) .
Menu TV Options
Verrouillage
Verrouiller après
Verrouillage de chaîne
Verrou qualifications TV
Verrou qualification Ciné
Verrou cotes anglais CA
Verrou cotes français CA
Verrous régionaux
4 Appuyez sur ou , puis appuyez sur OK pour verrouiller une ou
plusieurs chaînes ou des sources externes.
5 Une case servant à indiquer si les chaînes sont verrouillées précède
chacune d’entre elles :
• Si cette case contient un X, c’est que la chaîne est verrouillée.
• Si cette case est vide, c’est que la chaîne n’est pas verrouillée.
Verrouillage de chaîne
Chaîne 1 Sport
Chaîne 2 Actualités
Chaîne 3 Films
Chaîne 4
Chaîne 5
Chaîne 6
Chaîne 7
Menu TV Options
Verrou qualifications TV
Tous
Aucun(e)
TV-Y
TV-Y7
TV-G
TV-PG
TV14
TV-MA
Verrouillage
TV-14
(D)Dialogue
(L)Langue
(S)Contenu sexuel
(V)Violence
Lorsque vous sélectionnez [Tous] , tous les éléments de la liste
de qualifi cations sont verrouillés.
Lorsque vous sélectionnez [Aucun(e)] , les programmes ne
comportant aucune qualifi cation et les programmes portant la
qualifi cation Aucun sont verrouillés.
Lorsque vous verrouillez une qualifi cation, toutes
les qualifi cations des catégories d’âge inférieur sont
automatiquement verrouillées.
4 Appuyez sur MENU pour quitter.
FR
17
Page 53

Sommaire des qualifi cations téléviseur
Qualifi cation selon l’âge Qualifi cation selon le
Tous Aucun
Aucun Aucun
TV-Y : Approprié aux enfants de tout âge avec
des thèmes et des éléments qui conviennent à
des enfants de deux à six ans.
TV-Y7 : Programmes conçus pour les enfants de
sept ans et plus.
TV-G : Programmes appropriés à tous les âges.
Ce type de programmation contient peu ou pas
de violence, de langage grossier ou de scène et
dialogue à teneur sexuelle.
TV-PG : Programmes contenant des éléments
que certains parents jugent inappropriés pour
les enfants plus jeunes et pouvant nécessiter
une surveillance parentale. Le programme
peut contenir des situations de violence et des
dialogues à teneur sexuelle modérée ainsi qu’un
langage offensif.
TV-14 : Programmes contenant des éléments
pouvant ne pas convenir à des enfants de moins
de 14 ans. Ces programmes peuvent inclure un
ou plusieurs des éléments suivants : violence
intense, situations sexuelles intenses, dialogues
suggestifs et langage offensif.
TV-MA : Programmes à l’intention des adultes et
pouvant être inappropriés aux enfants de moins
de 17 ans. Ces programmes peuvent contenir
de la violence graphique, des activités sexuelles
explicites ou un langage indécent ou grossier.
contenu
Aucun
[(FV) Fantaisie
Violence]
Aucun
[(D) Dialogue]
[(L) Langue]
[(S) Contenu
sexuel]
[(V) Violence]
[(D) Dialogue]
[(L) Langue]
[(S) Contenu
sexuel]
[(V) Violence]
[(L) Langue]
[(S) Contenu
sexuel]
[(V) Violence]
4 Appuyez sur ou , puis appuyez sur OK pour verrouiller ou
déverrouiller une ou plusieurs qualifi cations.
Chaque qualifi cation est précédée d’une case pour indiquer si des
programmes associés à cette qualifi cation sont verrouillés :
• Une case qui contient un X indique que tous les éléments de
la liste des qualifi cations sont verrouillés.
• Une case vide indique qu’aucun élément dans la liste des
qualifi cations de contenu n’est verrouillé.
Lorsque vous verrouillez une cote de fi lm, tous les éléments
visant des âges inférieurs à la cote de ce fi lm sont verrouillés
automatiquement.
5 Appuyez sur MENU pour quitter.
Utilisation des verrous régionaux
Vous pouvez contrôler l’accès aux programmes numériques en fonction
des cotes régionales téléchargées. Avant de télécharger une table de
cotes, assurez-vous que les cotes régionales sont diffusées.
1 Appuyez sur la touche MENU de la télécommande et sélectionnez
[Installation] > [Préférences] > [Table cotes téléchargée] .
Menu TV Installation
Préférences
Région
Montrer les alertes d'urgence
Table cotes téléchargée
Table cotes téléchargée
Arrêt
Marche
Utilisation du verrou qualifi cation ciné
Vous pouvez contrôler le visionnement des fi lms en fonction des cotes
qui leur ont été attribuées par la MPAA (Motion Picture Association of
America).
1 Appuyez sur la touche MENU de la télécommande et sélectionnez
[Options] > [Verrouillage] .
2 Sélectionnez l’un des menus de verrou qualifi cation ciné.
• Aux États-Unis, sélectionnez [Verrou qualifi cation Ciné] .
• Au Canada, sélectionnez [Verrou cotes anglais CA] ou
[Verrou cotes français CA] .
3 Entrez votre code (see ‘Créer ou changer votre code’ on page 16 ) .
» L’écran suivant affi che les qualifi cations de [Verrou qualifi cation Ciné] .
Menu TV Options
Verrouillage
Verrouiller après
Verrouillage de chaîne
Verrou qualifications TV
Verrou qualification Ciné
Verrou cotes anglais CA
Verrou cotes français CA
Verrous régionaux
Verrou qualification Ciné
Tous
NR
G
PG
PG-13
R
NC-17
X
2 Appuyez sur ou pour sélectionner [Marche] , puis appuyez
sur
pour confi rmer votre choix. Si vous sélectionnez Arrêt ,
vous indiquez que vous ne voulez pas télécharger la table des
qualifi cations régionales et vous ne pourrez donc pas utiliser le
verrouillage en fonction de ces qualifi cations.
3 Appuyez sur pour retourner au menu du téléviseur et
sélectionnez [Options] > [Verrouillage] > [Verrous régionaux] .
Menu TV Options
Verrouillage
Verrouiller après
Verrouillage de chaîne
Verrou qualifications TV
Verrou qualification Ciné
Verrou cotes anglais CA
Verrou cotes français CA
Verrous régionaux
Verrous régionaux
Veuillez introduire votre code.
4 Entrez votre code (see ‘Créer ou changer votre code’ on page 16 ) .
5 Appuyez sur ou , puis appuyez sur OK pour verrouiller ou
déverrouiller une ou plusieurs qualifi cations.
Une case servant à indiquer si les cotes sont verrouillées précède
chacune d’entre elles :
18
FR
Page 54

• Une case qui contient un X indique que la qualifi cation est
verrouillée.
• Une case vide indique que la qualifi cation n’est pas verrouillée.
6 Appuyez sur MENU pour quitter.
Sommaire des cotes de fi lms américains
Cotes Description
Tous Tous les éléments de la liste de cotes sont
verrouillés.
NR Non coté.
G Films à contenu léger, convenant à tous les groupes
d’âges.
PG Films pour lesquels la présence des parents est
recommandée. Ils peuvent contenir quelques
scènes osées ou violentes ou quelques paroles
inconvenantes.
PG -13 Films pour lesquels la présence des parents est
recommandée si l’enfant est âgé de 13 ans ou moins.
R 18 ans et plus. Ces fi lms contiennent généralement
des scènes de sexe offensantes ou un langage cru
et ne conviennent pas aux enfants de moins de 17
ans. La présence ou la permission des parents est
obligatoire.
NC-17 Même avec la permission des parents, ils sont
interdits aux enfants de moins de 17 ans. Davantage
de scènes de sexe offensantes, de violence ou de
langage cru.
X Films orientés sur le sexe, la violence et/ou le langage
offensif. Connus également sous le nom de fi lms
pornographiques.
Résumé des cotes de fi lms canadiens
Cotes Description
Tous Tous les éléments de la liste de cotes sont
verrouillés.
C Programmation convenant aux enfants de moins
de huit ans. Aucun blasphème ou contenu sexuel
autorisé. Violence minimale de comédie.
C8+ Convient aux enfants de huit ans et plus. Violence
modérée et horreur fantaisiste autorisées.
G Films à contenu léger, convenant à tous les groupes
d’âges.
PG Films pour lesquels la présence des parents est
recommandée. Ils peuvent contenir quelques
scènes osées ou violentes ou quelques paroles
inconvenantes.
14+ Programmation visant les enfants âgés de 14 ans et
plus. Peut contenir des scènes de violence intense,
des propos très blasphématoires et des descriptions
d’activité sexuelle dans le cadre d’une histoire.
18+ Programmation visant un public de 18 ans et plus.
Peut contenir de la violence très intense, du langage
très cru et de l’activité sexuelle explicite.
Résumé des cotes de fi lms canadiens-français
Cotes Description
Tous Tous les éléments de la liste de cotes sont
verrouillés.
G Convient à un public de tous âges et présente
très peu ou pas de violence et très peu ou aucun
contenu sexuel.
8 ans+ Convient aux enfants de huit ans ou plus; présente
peu de violence, quelques propos inconvenants
et/ou très peu ou aucun contenu sexuel.
13 ans+ Convient aux enfants de 13 ans et plus; présente des
scènes de violence modérées, un langage grossier
et un contenu quelque peu sexuel. Les enfants de
moins de 13 ans devraient être accompagnés d’un
adulte.
16 ans+ Convient aux enfants de 16 ans ou plus; présente
des scènes de violence intense, un langage très cru
et un contenu sexuel explicite.
18 ans+ Ne doit être visionné que par des adultes et
contient de la violence extrême, des scènes sexuelles
explicites/de la pornographie.
Visionnage des sous-titres codés
Le service de sous-titres affi che le texte CC, T et CS diffusé. Ce texte
peut être affi ché de façon permanente ou seulement lorsque la mise en
sourdine est activée.
Remarque
•
Ce téléviseur affi che des sous-titres conformément à la norme EIA-608 et en
respectant le paragraphe 15.119 des règlements de la FCC.
• Si vous raccordez votre décodeur au moyen de l’entrée HDMI ou d’une entrée vidéo
en composante, vous ne pourrez pas sélectionner les sous-titres au moyen du téléviseur.
Vous ne pourrez sélectionner les sous-titres qu’au moyen du décodeur.
• Les sous-titres n’emploient pas toujours une grammaire et une orthographe correctes.
• Ce ne sont pas tous les programmes de télévision et les commerciaux publicitaires
qui incluent les informations de sous-titres. Consultez le guide de programmation de
télévision de votre région pour les chaînes de télévision et les heures des émissions
sous-titrées codées. Les programmes sous-codés sont généralement indiqués dans
l’horaire de télévision accompagnés de marques de service telles que « CC » (Closed
Caption).
Affi chage des sous-titres
L’affi chage des sous-titres est une technologie d’assistance qui permet
aux personnes souffrant d’une incapacité auditive de pouvoir écouter
les émissions de télévision. Les sous-titres affi chent la partie audio de
l’émission en texte superposé sur l’image.
Affi chage des sous-titres
1 Appuyez sur la touche MENU de la télécommande et sélectionnez
[Options] > [Réglage des sous-titres] > [Sous-titres codés] .
2 Appuyez sur ou pour sélectionner [Marche] , [Arrêt] ou [Actif
sans son] , puis appuyez sur
pour confi rmer votre choix.
3 Appuyez sur MENU pour quitter.
Français
FR
19
Page 55

Sélection des services de sous-titrage
1 Active les sous-titres (see ‘Affi chage des sous-titres’ on page 19 ) .
2 Sélectionnez un service de sous-titrage pour les chaînes
analogiques :
• Appuyez sur la touche MENU de la télécommande et
sélectionnez [Options] > [Arrangement des Sous-Titres] >
[Service sous-titres] .
• Appuyez sur
l’un des services de sous-titrage répertoriés, puis appuyez sur
pour confi rmer votre choix.
Remarque
•
Les services de sous-titrage ne sont pas tous utilisés par une chaîne de télévision
pendant la présentation d’un programme à sous-titrage codé.
, puis appuyez sur ou pour sélectionner
3 Sélectionnez un service de sous-titrage pour les chaînes
numériques :
• Appuyez sur
sous-titres numériques] .
• Appuyez sur
sous-titrage répertoriés, puis appuyez sur
votre choix.
et pour obtenir le menu pour [Service
ou pour sélectionner l’un des services de
pour confi rmer
4 Appuyez sur MENU pour quitter.
3 Appuyez sur , puis appuyez sur ou pour mettre en
surbrillance un paramètre de l’option, puis appuyez sur
confi rmer votre choix.
pour
4 Appuyez sur MENU pour quitter.
Problèmes de visionnement des sous-titres pour les
émissions numériques
Si vous avez de la diffi culté à voir les sous-titres des émissions
numériques, y compris en format haute défi nition (HDTV), reçus de
votre fournisseur de service de télévision payante, vous devriez :
• consulter les renseignements destinés au consommateur ainsi que
les manuels/guides sur l’affi chage des sous-titres pour les émissions
numériques offerts par votre fournisseur de service de télévision
payante;
• vous assurer que la fonction d’affi chage des sous-titres est activée
sur votre décodeur, le cas échéant; et,
• que la fonction d’affi chage des sous-titres sur votre téléviseur est
activée.
Si vous ne réussissez toujours pas à voir les sous-titres des émissions
numériques, vous devriez communiquer avec votre fournisseur de
service de télévision payante pour obtenir de l’aide.
Sommaire des services de sous-titrage
Service Description
CC-1, CC-2,
CC-3 et CC-4
T-1, T-2, T-3 et T-4 Souvent utilisés pour le guide ou la programmation
CS-1, CS-2, CS3, CS-4, CS-5 et
CS-6
Dialogue et description des actions du programme
de télévision sous-titré apparaissant à l’écran. En
général, le mode CC1 est utilisé le plus souvent. Le
mode CC 2 peut être utilisé pour d’autres langues
diffusées.
des chaînes, l’information des tableaux d’affi chage
des programmes sous-titrés, les nouvelles, la météo
ou les rapports boursiers.
Le service 1 est conçu comme étant le service
principal du sous-titrage. Ce service contient des
sous-titres textuels ou presque textuel de la langue
principale parlée dans le programme audio courant.
Le service 2 est conçu comme étant le sevice de
langue secondaire. Ce service contient les sous-titres
en langue secondaire qui sont la traduction des
sous-titres du service de sous-titrage principal.
Les autres sous-chaînes de service ne sont pas
préattribuées. Les fournisseurs individuels de soustitrage peuvent utiliser les autres chaînes de service
à leur discrétion.
Choix du mode d‘affi chage des sous-titres numériques
Vous pouvez défi nir la taille, la police, la couleur, l’arrière-plan ainsi que
d’autres caractéristiques du texte en sous-titrage.
1 Appuyez sur la touche MENU de la télécommande et sélectionnez
[Options] > [Réglage des sous-titres] > [Options sous-titres
numériques] .
2 Appuyez sur ou pour mettre une option des sous-titres
numériques en surbrillance, puis appuyez sur
cette option.
pour sélectionner
20
FR
Page 56

Utilisation de votre téléviseur comme écran
d’ordinateur
Utilisez un câble HDMI-DVI ou un adaptateur HDMI-DVI pour
raccorder un ordinateur à votre téléviseur. Pour le son, ajoutez un câble
audio doté d’une mini prise stéréo.
Mise en garde
•
Avant de raccorder votre ordinateur, réglez la fréquence de rafraîchissement de son
écran à 60Hz.
Résolutions d’écran prises en charge.
Les résolutions d’écran suivantes sont prises en charge en mode PC :
Résolution Fréquence de rafraîchissement
640 x 480 60 Hz
800 x 600 60 Hz
1 024 x 768 60 Hz
1 280 x 768 60 Hz
1 280 x 1 024 60 Hz
1 360 x 768 60 Hz
1 920 x 1 080* 60 Hz
Français
*Certains modèles seulement
Au besoin, réglez la position de l’image au centre de l’écran à l’aide des
touches de navigation.
Activation de la fonction EasyLink principal
Appuyez sur la touche MENU de la télécommande.
1
2 Sélectionnez [Installation] > [Préférences] > [EasyLink principal] .
3 Appuyez sur ou pour sélectionner [Marche] .
Remarque
Sélectionnez [Arrêt] pour désactiver cette fonction.
•
[EasyLink principal] doit être activé dans le menu [Préférences] pour
activer le menu [Haut-parleurs du téléviseur] .
FR
21
Page 57

7 Installation des chaînes
Lors de la première confi guration du téléviseur, vous êtes invité à
sélectionner la langue appropriée du menu et à installer les chaînes de
télévision ainsi que les chaînes radio numériques (le cas échéant). Ce
chapitre inclut des instructions sur la réinstallation et la syntonisation des
chaînes.
Installation automatique des chaînes
Avant d’installer des chaînes, assurez-vous que vous êtes inscrit auprès
de votre câblodistributeur et que votre équipement est correctement
raccordé.
1 Appuyez sur la touche MENU de la télécommande et sélectionnez
[Installation] > [Chaînes] > [Programmation auto] > [Démarrer] .
Menu TV Installation
Sélection de la langue de vos menus
Appuyez sur la touche MENU de la télécommande et sélectionnez
1
[Installation] > [Langue] .
Menu TV
Installation
Langue
Chaînes
Préférences
Édiquettes des sources
Horloge
Info logiciel actuel
Rétablit réglages AV
Langue
English
Francais
Espanol
2 Sélectionnez une langue, puis appuyez sur OK pour confi rmer
votre choix.
3 Appuyez sur pour revenir au menu [Installation] .
4 Appuyez sur MENU pour quitter.
Réglage de votre emplacement à Maison
Vous pouvez régler l’emplacement de votre téléviseur à maison ou
à magasin. Sélectionnez maison pour pouvoir changer les réglages
prédéfi nis pour l’image et le son.
1 Appuyez sur la touche MENU de la télécommande et sélectionnez
[Installation] > [Préférences] > [Région] .
2 Sélectionnez [Maison] et appuyez sur OK pour confi rmer votre
choix.
3 Appuyez sur pour revenir au menu [Installation] .
4 Appuyez sur MENU pour quitter.
Chaînes
Programmation auto
Installation chaîne faible
Mode installation
Désinstaller chaînes
Programmation auto
Démarrer
2 Appuyez sur OK pour lancer l’installation.
• Si vous utilisez [Programmation auto] avec des chaînes
verrouillées, vous devrez entrer votre code.
• Si vous avez oublié votre code, réinitialisez-le (see ‘Créer ou
changer votre code’ on page 16 ) .
3 Sélectionnez [Câble] ou [Antenne] , puis appuyez sur OK .
Installation TV
Recherche en cours. Veuillez patienter…
Chaînes analog. trouvées: 0
Chaînes numériques trouvées
: 0
• Lorsque vous sélectionnez [Antenne] , le téléviseur détecte les
signaux de l’antenne. Il recherche les chaînes NTSC et ATSC
disponibles dans votre région.
• Lorsque vous sélectionnez [Câble] , le téléviseur détecte les
signaux provenant du câble. Il recherche les chaînes NTSC,
ATSC et QAM modulées disponibles dans votre région.
• Une fois cette étape terminée, le message suivant s’affi che :
[Recherche des chaînes terminée.] .
4 Suivez les directives à l’écran pour terminer l’installation.
22
FR
Page 58

Optimisation de la qualité du signal de
l’antenne
Réinitialisation de vos réglages à leurs
valeurs par défaut
Vous pouvez optimiser la qualité de votre signal en syntonisant des
chaînes ATSC dont les signaux sont faibles et en réglant l’antenne.
1 Appuyez sur la touche MENU de la télécommande et sélectionnez
le mode [Installation] > [Chaînes] > [Mode installation] .
2 Sélectionnez [Antenne] et appuyez sur pour confi rmer votre
choix.
3 Appuyez sur et pour accéder à [Installation chaîne faible] .
4 Mettez une chaîne de la liste des chaîne télévisuelles en
surbrillance, puis appuyez sur la touche verte de la télécommande.
» L’intensité du signal de la chaîne s’affi che.
5 Réglez votre antenne afi n d’optimiser l’intensité du signal.
6 Appuyez sur MENU pour quitter.
Désinstallation et réinstallation des chaînes
Lorsqu’une chaîne est désinstallée, vous devez la retirer de la liste des
chaînes mémorisées. Les chaînes désinstallées ne sont pas réinstallées
pendant une mise à jour de l’installation.
1 Appuyez sur la touche MENU de la télécommande et sélectionnez
[Installation] > [Chaînes] > [Désinstaller chaînes] .
Menu TV Installation
Chaînes
Programmation auto
Installation chaîne faible
Mode installation
Désinstaller chaînes
Désinstaller chaînes
52
53
54
55
56
57
58
59
2 Appuyez sur pour ouvrir la liste des chaînes mémorisées.
3 Appuyez sur ou pour sélectionner la chaîne que vous
souhaitez désinstaller, puis appuyez sur la touche verte de la
télécommande.
4 La chaîne est retirée de la liste des chaînes. Appuyez à nouveau sur
la touche verte pour réinstaller la chaîne.
5 Appuyez sur MENU pour quitter.
Lorsque vous remettez les réglages d’image et de son à leurs valeurs
par défaut, les réglages d’installation des chaînes ne sont pas touchés.
1 Appuyez sur la touche MENU de la télécommande et sélectionnez
[Installation] > [Rétablit réglages AV] .
Menu TV
Installation
Langue
Chaînes
Préférences
Édiquettes des sources
Horloge
Info logiciel actuel
Rétablit réglages AV
Rétablit réglages AV
Démarrer
Français
2 Appuyez sur pour mettre en surbrillance [Démarrer] , puis
appuyez sur OK pour remettre les réglages d’image et de son à
leurs valeurs par défaut.
3 Appuyez sur MENU pour quitter.
Affi chage des alertes d’urgence (EAS)
La norme SCTE18 défi nit une méthode de signalement des alertes
d’urgence qui est utilisée par les systèmes de télédiffusion par câble. Les
EAS peuvent être diffusées sur les appareils numériques, par exemple
les boîtiers décodeurs, les téléviseurs numériques et les magnétoscopes
numériques.
Le schème EAS permet aux câblodistributeurs de diffuser les
renseignements liés aux urgences et aux avertissements provinciaux et
locaux.
Les EAS contiennent les renseignements suivants :
• Texte des alertes d’urgence
• Heure et date de début
• Heure et date de fi n
• Priorité
Les EAS dont la priorité est maximale ou élevée sont toujours affi chées
sur votre téléviseur. Vous pouvez cependant régler votre téléviseur pour
qu’il n’affi che pas les messages EAS dont la priorité est moyenne ou
basse.
Il n’est pas possible d’affi cher les EAS sur les navigateurs multimédias ou
depuis des sources vidéo analogiques.
Vous pouvez toujours effacer les messages de l’écran. Les messages
affi chés se superposent aux menus et autres messages à l’écran.
FR
23
Page 59

1 Appuyez sur la touche MENU de la télécommande et sélectionnez
[Installation] > [Préférences] > [Montrer les alertes d’urgence] .
Menu TV Installation
Préférences
Région
EasyLink principal
Montrer les alertes d'urgence
Table cotes téléchargée
Montrer les alertes d'urgence
Toujours
Sauter priorité faible
Sauter priorité faible/moyenne
2 Mettez en surbrillance une option :
• [Toujours] : Pour affi cher tous les messages d’alerte d’urgence
• [Sauter priorité faible] : Pour affi cher tous les messages, sauf
ceux dont la priorité est faible
• [Sauter priorité faible/moyenne] : Pour n’affi cher que les
messages dont la priorité est maximale ou élevée
3 Appuyez sur pour confi rmer votre choix.
4 Appuyez sur MENU pour quitter.
24
FR
Page 60

8 Mise à jour du logiciel de
votre téléviseur
Magnavox tente constamment d’améliorer ses produits et nous
vous recommandons fortement de mettre à jour le logiciel de votre
téléviseur lorsque des mises à jour sont disponibles.
Vous pouvez vous procurer le nouveau logiciel chez votre détaillant ou
le télécharger depuis le site Web de Magnavox au www.magnavox.com/
support. Utilisez le numéro de type de votre téléviseur (par exemple,
47MF439B) pour obtenir de l’information.
Vérifi cation de la version actuelle de votre
logiciel
Appuyez sur la touche MENU de la télécommande et sélectionnez
1
[Installation] > [Version actuelle du logiciel] .
» La version et une description du logiciel actuel s’affi chent.
Menu TV
Installation
Langue
Chaînes
Préférences
Édiquettes des sources
Horloge
Info logiciel actuel
Rétablit réglages AV
Version :
xxxxx
Téléchargement du logiciel
1 Ouvrez un navigateur Web sur votre ordinateur, puis allez au www.
magnavox.com/support.
2 Recherchez l’information et le logiciel associés à votre téléviseur,
puis téléchargez sur votre ordinateur le fi chier contenant la
dernière mise à niveau du logiciel.
3 Décompressez le fi chier ZIP.
4 Copiez le fi chier « autorun.upg » dans le répertoire racine du
dispositif USB.
Mettre à niveau le logiciel
Préparation à la mise à niveau du logiciel (see ‘Préparation à la mise
1
à niveau du logiciel’ on page 25 ) .
2 Branchez votre dispositif USB dans le port USB situé sur le côté du
téléviseur .
» Le téléviseur recherchera sur le dispositif USB le logiciel mis à
jour, puis entrera automatiquement en mode de mise à niveau.
3 Lisez les directives à l’écran, puis confi rmez que vous voulez
poursuivre l’installation.
4 Une fois la mise à niveau du logiciel terminée, retirez le dispositif
USB .
5 Débranchez le téléviseur de la prise de courant.
6 Rebranchez le téléviseur dans la prise de courant.
7 Allumez le téléviseur en appuyant sur le bouton POWER situé
sur le côté du téléviseur.
» Le téléviseur s’allume et contient le nouveau logiciel.
Français
Préparation à la mise à niveau du logiciel
Vous devrez disposer de l’équipement suivant :
• Un ordinateur doté des fonctions de navigation Web.
• Un utilitaire d’archivage qui prend en charge le format ZIP (par
exemple, WinZip pour Windows ou StuffIt pour Mac OS).
• Une clé USB.
Remarque
Seule la mémoire portable formatée FAT/DOS est prise en charge.
•
• Vous pouvez vous procurer le nouveau logiciel chez votre détaillant ou le télécharger
depuis le site Web www.magnavox.com/support.
• N’utilisez que les mises à jour de logiciel disponibles sur le site Web de Magnavox.
Avertissement
•
Ne retirez pas le dispositif USB pendant la mise à niveau du logiciel.
• S’il se produit une coupure de courant pendant la mise à niveau, ne retirez pas le
dispositif USB du téléviseur. Le téléviseur reprend la mise à niveau dès que le courant
est rétabli.
• Si vous tentez d’effectuer une mise à niveau vers une version antérieure du logiciel, un
message de confi rmation s’affi che. La mise à niveau vers une version antérieure ne doit
être effectuée qu’en cas de nécessité absolue.
• Si une erreur se produit pendant la mise à niveau, recommencez la procédure ou
communiquez avec votre détaillant.
FR
25
Page 61

9 Raccordement des
périphériques
Cette section explique comment brancher divers périphériques aux
différents connecteurs et fournit davantage de détails sur les exemples
présentés dans le Guide de démarrage rapide.
Mise en garde
•
Débranchez les cordons principaux avant de brancher des périphériques.
Remarque
•
Selon les connecteurs dont vous disposez et vos besoins, vous pouvez utiliser différents
types de connecteurs pour brancher un périphérique au téléviseur.
e Sortie SPDIF pour la sortie audio numérique seulement. Pour
brancher l’appareil à un système de cinéma maison.
f Entrée audio pour HDMI3.
g AV3 S-VIDEO (arrière) : Le connecteur d’entrée S-Vidéo
(arrière) à utiliser avec les connecteurs Audio L/R pour un
caméscope, une console de jeu, etc. Lorsque vous utilisez le
connecteur S-Vidéo (arrière) pour les signaux vidéo, n’utilisez pas
l’entrée vidéo composite (arrière) pour les signaux vidéo.
h HDMI 1/2/3 : Prise HDMI pour lecteur de disque Blu-ray,
récepteur numérique HD ou console de jeu HD, etc.
Connecteurs latérales
1
R
Vue d’ensemble des connexions
Connecteurs arrière
TV ANTENNA
1
a Entrée de signaux provenant de l’antenne, du câble ou du
satellite.
b AV1 et AV2 : Entrée vidéo provenant des appareils analogiques
tels que les lecteurs DVD, les récepteurs, les consoles de jeu, etc.
Ce connecteur doit être utilisé avec l’entrée audio.
c AV3 Vidéo composite (à l’arrière) : Entrée vidéo pour les
appareils analogiques tels que les lecteurs DVD, les caméscopes,
les consoles de jeu, etc. Doit être utilisée avec l’entrée audio.
d Ne doit être utilisé que par le personnel de service.
234
R
R
L
L
Pr
Pr
Pb
Pb
Y
Y
R
L
VIDEO
S-VIDEO
AV 3AV 1 AV 2
SERV. U
SPDIF
OUT
L
R
DVI AUDIO
IN
HDMI 3HDMI 1 HDMI 2
8
AUDIO
L
VIDEO
S-VIDEO
2
3
HDMI 4
4
5
USB
5
6
a Sortie audio stéréo vers le casque d’écoute ou les écouteurs.
7
b Vidéo composite: Entrée vidéo pour les appareils analogiques tels
que les lecteurs DVD, les caméscopes, les consoles de jeu, etc.
Doit être utilisée avec l’entrée audio.
c Le connecteur d’entrée S-Vidéo (côté) à utiliser avec les
connecteurs Audio L/R pour un caméscope, une console de jeu,
etc. Lorsque vous utilisez le connecteur S-Vidéo (côté) pour les
signaux vidéo, n’utilisez pas l’entrée vidéo composite (côté) pour
les signaux vidéo.
d HDMI (côté) : Prise HDMI pour lecteur de disque Blu-ray,
récepteur numérique HD ou console de jeu HD, etc.
e Prise USB.
26
FR
Page 62

Sélection de la qualité de la connexion
HDMI - Meilleure qualité
Prend en charge les signaux haute défi nition et offre le niveau le plus
élevé de qualité d’image et de qualité sonore. Les signaux audio et
vidéo sont combinés dans un seul câble.
Conseil
•
Pour raccorder un ordinateur sans connecteur HDMI, utilisez un adaptateur DVI-HDMI
et un câble audio distinct.
Remarque
•
HDMI prend en charge la technologie HDCP (High-bandwidth Digital Contents
Protection) (technologie de protection contre la copie). Cette norme régit en quelque
sorte les droits numériques ser vant à protéger le contenu en haute défi nition des
disques DVD ou Blu-ray.
Composantes (YPbPr) - Excellente qualité
Câble vidéo composite (rouge-vert-bleu) et câble audio L/R (rougeblanc).
Prend en charge les signaux de haute défi nition mais la qualité de
l’image est inférieure à celle offerte par la norme HDMI. Les câbles
composantes combinent un câble vidéo rouge-vert-bleu avec un câble
audio L/R rouge-blanc. Faites correspondre la couleur des câbles à celle
des connecteurs du téléviseur.
Composite - Qualité de base
Câble audio-vidéo composite (jaune-rouge-blanc)
Pour les connexions analogiques. Les câbles composites combinent
généralement un câble vidéo jaune et un câble audio L/R rouge-blanc.
Faites correspondre la couleur des câbles à celle des connecteurs du
téléviseur.
Identifi cation de vos connexions
Lorsque vous raccordez des appareils, vous pouvez apposer des
étiquettes sur les connexions afi n que vous puissiez facilement
déterminer à quel endroit ils sont raccordés.
1 Appuyez sur la touche MENU de la télécommande et sélectionnez
[Installation] > [Édiquettes des sources] .
Menu TV
Installation
Langue
Chaînes
Préférences
Édiquettes des sources
Horloge
Rétablit réglages AV
Mise à niveau logiciel
2 Appuyez sur pour ouvrir la liste des connexions disponibles.
3 Appuyez sur ou pour mettre en surbrillance une connexion
de la liste.
4 Appuyez sur pour ouvrir la liste des appareils disponibles pour
la connexion, puis appuyez sur
surbrillance.
5 Appuyez sur pour confi rmer votre choix.
6 Appuyez sur MENU pour quitter.
Édiquettes des sources
AV1
AV2
AV3
HDMI1
HDMI2
HDMI3
HDMI (côté)
AV (côté)
ou pour mettre un appareil en
Français
S-Vidéo - Bonne qualité
Câble S-Vidéo et câble audio L/R (rouge-blanc)
Pour les connexions analogiques. Utilisez un câble S-Vidéo avec un câble
audio L/R.
Raccordement de vos appareils
La présente section explique comment raccorder une série d’appareils
à différents connecteurs. Différents types de connecteurs sont utilisés
pour raccorder un appareil à votre téléviseur. Les sections suivantes
ne représentent que des exemples; il est possible de créer d’autres
confi gurations.
Lorsque vous branchez un câble vidéo composite ou en composante,
faites correspondre la couleur des câbles à celle des connecteurs du
téléviseur.
FR
27
Page 63

T
N
A
Raccordement d’un lecteur ou enregistreur de DVD au
moyen des connecteurs composites.
TV ANTENNA
Or/Ou/O RF OUT
SERV. U
LRL
Pr
Pb
Y
R
VIDEO
S-VIDEO
AV 3AV 1 AV 2
SPDIF
L
R
DVIAUDIO
HDMI 3HDMI 1 HDMI 2
OUT
IN
L + R + VIDEO
OUT
RECORDER
Set-top box
IN
OUT
RF IN
R
L
Pr
Pb
Y
Ne placez pas votre enregistreur trop près de l’écran; certains
enregistreurs sont en effet sensibles aux signaux.
Raccordement d’un décodeur, d’un lecteur ou
enregistreur de DVD et d’une console de jeu au moyen
de HDMI.
TV ANTENNA
SERV. U
LRL
Pr
Pb
Y
R
S-VIDEO
VIDEO
AV 3AV1 AV 2
SPDIF
L
R
DVI AU DIO
HDMI 3HDMI 1 HDMI 2
OUT
IN
R
L
Pr
Pb
Y
TV ANTENNA
SERV. U
R
R
LRL
L
Pr
Pr
Pb
Pb
Y
Y
S-VIDEO
SPDIF
OUT
VIDEO
L
R
DVIAUDIO
AV 3AV1 AV 2
IN
HDMI 3HDMI1 HDMI 2
Si l’enregistreur comprend une prise vidéo S-VHS : pour améliorer la
qualité de l’image, branchez un câble S-Vidéo dans l’entrée S-Vidéo.
Branchez les câbles audio dans les prises d’entrée audio L et R de la
prise AV3/AV latérale.
Remarque
•
Lorsque vous utilisez un connecteur S-Vidéo, ne branchez aucun appareil dans la prise
vidéo AV3/AV latérale.
Si vous utilisez de l’équipement mono, le son sera retransmis par
le haut-parleur de gauche, mais pas par celui de droite. Utilisez un
adaptateur mono vers stéréo (non fourni) pour que la restitution
sonore provienne de tous les haut-parleurs internes.
L + R + VIDEO
R
AUDIO
L
VIDEO
S-VIDEO
HDMI 4
USB
Or/Ou/O RF OUT
OUT
RECORDER
OUT
L + R + VIDEO
RF IN
RF OUT
RF IN
CABLE
Raccordement d’un lecteur ou enregistreur de DVD
au moyen de HDMI-DVI et des connecteurs DIGITAL
AUDIO OUT.
TV ANTENNA
SERV. U
LRL
Pr
Pb
Y
R
S-VIDEO
HDMI
VIDEO
AV 3AV 1 AV 2
L
R
DVI AU DIO
HDMI 3HDMI 1 HDMI 2
SPDIF
OUT
AUDIO
IN
AUDIO
IN
DVI
OUT
R
L
Pr
Pb
Y
Raccordement d’un décodeur au moyen d’un connecteur
composite
TV ANTENNA
V ANTEN
Or/Ou/O RF OUT
SERV. U
LRL
Pr
Pb
Y
R
L + R + VIDEO
SPDIF
OUT
VIDEO
L
S-VIDEO
R
DVI A UDIO
AV 3AV1 AV 2
IN
HDMI 3HDMI 1 HDMI 2
OUT
RF IN
CABLE
R
L
Pr
Pb
Y
Set-top box
28
FR
Page 64

Si votre appareil comprend une prise vidéo S-VHS, vous pouvez
améliorer la qualité de l’image comme suit :
• Branchez un câble S-Vidéo à la prise S-Vidéo AV3/AV côté.
• Branchez les câbles audio dans les prises d’entrée audio L et R de
l’AV3/AV côté.
Lorsque vous utilisez un connecteur S-Vidéo, ne branchez aucun
appareil dans l’entrée vidéo de l’AV3 ou du AV côté.
Le son est retransmis par le haut-parleur de gauche, mais pas par celui
de droite. Utilisez un adaptateur mono vers stéréo (non fourni) pour
que la restitution sonore provienne de tous les haut-parleurs internes.
Raccordement d’un lecteur/enregistreur de DVD au
moyen des connecteurs (YPbPr) de sortie vidéo en
composantes et de l’audio analogique.
Les modèles de téléviseur sélectionnés peuvent affi cher les signaux
DTV 1080i, 1080p, 720p et 480p DTV lorsqu’ils sont raccordés à un
décodeur DTV. Sélectionnez la sortie du boîtier de connexion à 1080i, à
1080p, à 720p ou à 480p. Un signal DTV doit être disponible dans votre
région.
TV ANTENNA
Raccordement d’un ordinateur
Raccordement d’un ordinateur à l’aide d’un connecteur S-Vidéo situé à
l’arrière
TV ANTENNA
R
L
LRL
Pr
Pr
Pb
Pb
Y
Y
R
VIDEO
S-VIDEO
AV 3AV 1 AV 2
SERV. U
L
R
DVIAUDIO
HDMI 3HDMI 1 HDMI 2
SPDIF
OUT
AUDIO
OUT
IN
S VIDEO
Raccordement d’un ordinateur à l’aide d’un connecteur S-Vidéo situé à
l’arrière
Français
SERV. U
LRL
Pr
Pb
Y
R
VIDEO
S-VIDEO
AV 3AV 1 AV 2
L
R
DVI A UDIO
HDMI 3HDMI1 HDMI 2
SPDIF
OUT
IN
AV1 / AV2 :
AUDIO L + R
AV1 / AV2 :
YPbPr
DVD / Set top box
R
L
Pr
Pb
Y
Raccordement d’un amplifi cateur de cinéma maison
numérique
TV ANTENNA
SERV. U
LRL
Pr
Pb
Y
R
VIDEO
S-VIDEO
AV 3AV 1 AV 2
SPDIF
OUT
L
R
DVI AUDIO
HDMI 3HDMI 1 HDMI 2
DIGITAL
AUDIO
OUT
IN
DIGITAL
AUDIO
IN
R
L
Pr
Pb
Y
TV ANTENNA
SERV. U
LRL
Pr
Pb
Y
R
VIDEO
S-VIDEO
AV 3AV1 AV2
SPDIF
L
R
DVI A UDIO
HDMI 3HDMI 1 HDMI 2
R
AUDIO
OUT
IN
L
VIDEO
S-VIDEO
HDMI 4
USB
S VIDEO
AUDIO
OUT
R
L
Pr
Pb
Y
Raccordement d’un ordinateur à l’aide d’un connecteur DVI
TV ANTENNA
SERV. U
LRL
Pr
Pb
Y
R
S-VIDEO
HDMI
VIDEO
SPDIF
OUT
AUDIO
IN
L
R
DVI A UDIO
AV 3AV 1 AV 2
IN
HDMI 3HDMI 1 HDMI 2
AUDIO
OUT
DVI
R
L
Pr
Pb
Y
En raison d’exigences légales, il se peut qu’avec certaines parties audio
PCM protégées contre la copie d’un périphérique raccordé à l’entrée
HDMI, le signal audio numérique soit mis en sourdine.
FR
29
Page 65

Raccordement d’un ordinateur à l’aide d’un connecteur HDMI
TV ANTENNA
SERV. U
LRL
Pr
Pb
Y
R
VIDEO
S-VIDEO
AV 3AV 1 AV 2
SPDIF
L
R
DVI AU DIO
HDMI 3HDMI 1 HDMI 2
OUT
IN
HDMI
R
L
Pr
Pb
Y
30
FR
Page 66

10 Dépannage
Problème Cause possible et solution
Aucune
alimentation ou
aucun voyant
allumé.
Message
d’erreur à
l’écran avec
une connexion
HDMI.
Aucun son
n’est émis par
l’ordinateur.
Le téléviseur ne
répond pas à la
télécommande.
L’image est
déformée, étirée
ou comporte
des barres
noires sur le
côté ou dans le
haut.
L’image est
surtout rouge
et verte, ou
il manque la
couleur rouge
lorsque le
téléviseur est
raccordé à un
périphérique
au moyen des
câbles de vidéo
en composantes.
Le téléviseur n’est pas raccordé à la source
d’alimentation.
Appuyez sur le bouton
ou sur la touche de la télécommande.
Assurez-vous que le cordon d’alimentation est bien
branché dans la prise d’alimentation du téléviseur et
dans la prise de courant.
Débranchez le cordon d’alimentation de la prise
de courant du secteur, attendez 60 secondes, puis
rebranchez-le.
Branchez le téléviseur dans une autre prise de
courant du secteur.
L’authentifi cation HDCP a échoué.
Assurez-vous que votre câble HDMI est homologué.
Appuyez sur la touche SOURCE de la
télécommande pour changer de source, puis revenez
à la source HDMI.
Réinitialisez le périphérique et le téléviseur.
Allumez le téléviseur.
Sélectionnez la chaîne HDMI.
Mettez le périphérique sous tension.
Lorsque le téléviseur est allumé et le périphérique
est sous tension, débranchez l’une des extrémités du
câble HDMI, puis rebranchez-la.
Un por t HDMI incorrect est raccordé ou aucun
câble audio n’est branché.
Branchez un câble DVI-HDM dans le port HDMI 3
du téléviseur.
Branchez un câble audio dans le port DVI AUDIO
IN du téléviseur.
Appuyez sur la touche SOURCE de la
télécommande, puis sélectionnez la source HDMI 3.
Les piles sont mal installées ou sont faibles.
Assurez-vous que le voyant sur le téléviseur
clignote lorsque vous appuyez sur les touches de la
télécommande.
Assurez-vous que vous utilisez la télécommande.
Assurez-vous que les piles sont insérées
correctement et qu’elles ne doivent pas être
remplacées.
Débranchez le cordon d’alimentation de la prise
de courant du secteur, attendez 60 secondes, puis
rebranchez-le.
Formats vidéo diffusé.
Appuyez sur la touche FORMAT de la
télécommande pour sélectionner le meilleur format
d’image.
Certains périphériques nécessitent que le format de
l’image soit réglé depuis le périphérique.
Connexion non sécuritaire ou incorrecte.
Assurez-vous que toutes les connexions sont
effectuées en fonction des codes de couleur.
Poussez entièrement les câbles de vidéo en
composantes à l’intérieur des prises YPbPr sur le
téléviseur.
sur le côté du téléviseur
Aucun son
provenant des
haut-parleurs du
téléviseur.
Mauvaise qualité
d’image avec
une connexion
coaxiale.
Aucune image
ou aucun son.
Le niveau du volume est réglé à zéro - augmentez le
volume
Le son est en sourdine - appuyez sur la touche
MUTE de la télécommande.
Le casque d’écoute est branché - assurez-vous
que le casque d’écoute n’est pas branché dans le
téléviseur.
Le câble audio n’est pas branché - pour la connexion
AV, assurez-vous que le câble audio L/R est branché
tel qu’indiqué dans la section Raccordement de
CD-CnDev-CnDev-HeadInt (Raccordement de
vos appareils) (see ‘Raccordement de vos appareils’
on page 27 ) . Si vous utilisez un câble de vidéo en
composante, assurez-vous de ne pas confondre le
câble audio rouge avec le câble vidéo rouge.
Le réglage de la sortie audio du périphérique est
incorrect. HDMI. Pour les connexions HDMI à
HDMI, certains périphériques ont un réglage de
sortie audio HDMI qui doit être activé.
Les chaînes à défi nition standard ne sont pas aussi
claires que celles à haute défi nition - raccordez
les périphériques au moyen de câbles de vidéo en
composantes ou HDMI.
Aucune image ou son - assurez-vous d’avoir
sélectionné la chaîne appropriée.
Installation de chaînes incomplète
Si le téléviseur reçoit les chaînes au moyen d’une
connexion AV, réglez-le à la bonne source d’entrée.
Si le téléviseur est branché directement dans le
mur par le biais d’une connexion coaxiale, relancez
l’installation automatique.
Renseignements supplémentaires sur
l’utilisation de la technologie d’assistance
Pour plus de renseignements sur l’utilisation de la technologie
d’assistance pour naviguer dans le guide, veuillez consulter la
documentation sur votre logiciel d’accessibilité ou d’assistance.
Contactez-nous
Si vous ne parvenez pas à résoudre un problème, consultez les
questions fréquentes pour ce téléviseur à l’adresse www.magnavox.
com/support.
Si vous ne parvenez pas à résoudre le problème, communiquez avec le
centre de service à la clientèle de votre pays.
Avertissement
•
Ne tentez pas de réparer vous-même le téléviseur. Vous pourriez gravement vous
blesser, causer des dommages irréparables à votre téléviseur ou entraîner l’annulation
de votre garantie.
Remarque
•
Veillez à disposer du modèle et du numéro de série du téléviseur avant de nous
contacter. Ces numéros fi gurent à l’arrière et sur le côté de votre téléviseur, ainsi que
sur l’emballage.
Français
FR
31
Page 67

11 Remarques liées à
l’utilisation des dispositifs
USB
Questions relatives au contenu numérique
• Seule la mémoire portable formatée (initialisée) FAT (DOS) est
prise en charge. Des erreurs de formatage peuvent empêcher la
lecture du contenu. Dans ce cas, tentez de reformater la clé USB.
Soyez cependant conscient que le formatage supprimera tout le
contenu sauvegardé (images, musique, etc.).
• La longueur des noms de fi chiers et de répertoires est limitée à
celle indiquée par les systèmes de fi chiers FAT12/16/32.
• Le temps d’accès et de réponse au contenu d’un dispositif peut
varier selon le type ou la marque de celui-ci.
• Le temps d’accès et de réponse au contenu d’un dispositif
diminuera en fonction du nombre de fi chiers non pris en charge
ou endommagés présents sur celui-ci.
Questions relatives aux dispositifs USB
• Les dispositifs branchés dans le port USB de votre téléviseur
doivent être conforme à la « Classe mémoire de masse ». Si votre
appareil (caméra numérique, lecteur MP3, disque dur portatif, etc.)
n’est pas conforme à la « Classe mémoire de masse », il ne sera
pas reconnu par le navigateur de contenu de votre téléviseur.
• Les sous-ensembles de la spécifi cation Classe mémoire de masse
suivants sont pris en charge :
• La version du téléviseur est fondée sur le document « Universal
Serial Bus Mass Storage Class Specifi cation Overview » (v1.2, 23
juin 2003), ainsi que sur tous les documents qui s’y rapportent. On
peut trouver ce document sur le site Web de normalisation USB
(www.usb.org).
• Prise en charge complète de l’USB Mass Storage Class Bulk-Only
Transport (bInterfaceProtocol = 50h).
• Prise en charge complète de SubClass Code = 05h; SFF-8070i
spec.
• Prise en charge complète de SubClass Code = 06h; SCSI
transparent command set.
• Pour les dispositifs à grande mémoire USB, le temps d’accès à vos
fi chiers pourrait être très long depuis le navigateur de contenu.
• Lorsque vous utilisez un disque dur portatif USB : en raison de
la grande consommation d’énergie du disque dur, il est conseillé
d’utiliser le bloc d’alimentation externe du disque dur portatif pour
assurer le fonctionnement adéquat dans toutes les conditions.
32
FR
Page 68

12 Renseignements sur le
produit
Remarque
Les renseignements sur le produit sont susceptibles d’être modifi és sans préavis.
•
Amélioration de l’image
Type : 1080p 60 Hz
Luminosité : 500 cd/m2
Format de l’image : 16:9
Angles de visionnement : 178 (V) par 178 (H)
Syntoniseur numérique intégré : ATSC/QAM
Gradation dynamique BL : Oui
Amélioration du son
Mono, Stéréo : Mono, Stéréo, Incredible Surround (son
ambiophonique incroyable)
Puissance de sor tie (Watts
RMS) :
Atténuateur : 5 bandes
20 W
Alimentation
Variation de tension automatique : 110 v à 240 v~/50 à 60 Hz
Français
Convivialité
Modes vidéo : Automatique, 4:3, Extension d’image 14:9,
Extension d’image 16:9, Super Zoom, Écran large,
Non mis à l’échelle
Entrée PC : par HDMI
Connexions
Entrée vidéo en
composantes avec
Audio L/R :
Entrée vidéo
composite avec
audio L/R et SVidéo :
HDMI : 4
Sor tie audio
numérique :
Casque d’écoute : 1 (sur le côté du téléviseur)
USB : 1 (sur le côté du téléviseur)
2, prenant en charge les formats 480i/p, 576i/p,
720p, 1080i, 1080p @ 24Hz-60Hz
2
HDMI ver1.3a prenant en charge les formats
vidéo : 480i/p, 576i/p, 720p, 1080i, 1080p @
24Hz-60Hz
Entrée PC : jusqu’à WUXGA
Oui, prenant en charge les formats AC-3 et PCM
FR
33
Page 69

13 Garantie
GARANTIE LIMITÉE
QUATRE-VINGT-DIX (90) JOURS SUR LA MAIN D’ŒUVRE / UN (1) AN SUR LES PIÈCES
COUVERTURE DE GARANTIE:
La provision pour la garantie se limite aux termes énumérés cidessous.
QUI EST COUVERT?
La compagnie garantit le produit au premier acheteur ou à la personne recevant le produit en cadeau contre tout défaut de matière
ou de main d’œuvre conformément à la date d’achat originale («
Période de garantie ») d’un distributeur agréé. Le reçu de vente
original indiquant le nom du produit ainsi que la date d’achat d’un
détaillant agréé est considéré comme une preuve d'achat.
QU'EST-CE QUI EST COUVERT?
La garantie couvre les nouveaux produits contre tout défaut de
matière ou de main d’œuvre et suivant la réception d’une réclamation valide dans les limites de la garantie. La compagnie s’engage, à
son choix, à (1) réparer le produit gratuitement avec des pièces de
rechange neuves ou remises à neuf, ou à (2) échanger le produit
pour un produit neuf ou ayant été fabriqué à partir de pièces
neuves ou usagées en bon état et au moins fonctionnellement
équivalent ou comparable au produit d’origine dans l’inventaire
actuel de Philips, ou à (3) rembourser le prix d’achat initial du produit.
La compagnie garantit les produits ou pièces de remplacement
prévus sous cette garantie contre tout défaut de matière ou de
main d’œuvre à partir de la date de remplacement ou de réparation pour une période de quatre-vingt-dix (90) jours ou pour la
portion restante de la garantie du produit d’origine, la plus longue
de ces couvertures étant à retenir. Lorsqu’un produit ou une pièce
est échangée, tout article de rechange devient votre propriété et
l’article remplacé devient la propriété de la compagnie. Lorsqu’un
remboursement est effectué, votre produit devient la propriété de
la compagnie.
Remarque : tout produit vendu et identié comme étant
remis à neuf ou rénové porte une garantie limitée de quatre-vingt-dix (90) jours.
Un produit de remplacement ne pourra être envoyé que si
toutes les exigences de la garantie ont été respectées.
Tout manquement de répondre à toutes les exigences
pourra entraîner un délai.
CE QUI N’EST PAS COUVERT - EXCLUSIONS ET LIMITATIONS:
Cette garantie limitée ne s’applique qu’aux nouveaux produits fabriqués par ou pour la compagnie pouvant être identiés par la marque de commerce, le nom commercial ou le logo qui y sont
apposés. Cette garantie limitée ne s’applique à aucun produit
matériel ou logiciel, même si celui-ci est incorporé au produit ou
vendu avec celui-ci. Les fabricants, fournisseurs ou éditeurs peuvent
fournir une garantie séparée pour leurs propres produits intégrés
au produit fourni.
La compagnie ne saurait être tenu responsable de tout dommage
ou perte de programmes, données ou autres informations mis en
mémoire dans tous médias contenus dans le produit, ou autre
additionnel produit ou pièce non couvert par cette garantie. La
récupération ou réinstallation des programmes, données ou autres
informations n’est pas couverte par cette garantie limitée.
Cette garantie ne s’applique pas (a) aux dommages causés par un
Cette garantie vous donne des droits légaux spéciques. Il est possible que vous bénéciiez de droits supplémentaires variant d'un État/Province à l'autre.
FUNAI CORPORATION, Inc. 19900 Van Ness Avenue, Torrance, CA 90507
34
FR
accident, un abus, un mauvais usage, une négligence, une mauvaise
application ou à un produit non fournis, (b) aux dommages causés
par un service réalisé par quiconque autre que la compagnie ou
qu’un centre de service agréé de la compagnie, (c) à un produit ou
pièce ayant été modié sans la permission écrite de la compagnie,
ou (d) si tout numéro de série a été supprimé ou déguré, ou (e) à
un produit, accessoire ou produit non durable vendu « TEL QUEL
» sans garantie de quelque description que ce soit par l’inclusion de
produits remis vendu « TEL QUEL » par certains détaillants.
Cette garantie limitée ne couvre pas:
• les frais d'expédition pour le renvoi du produit défectueux.
• les frais de main-d'œuvre pour l'installation ou la conguration du
produit, le réglage des commandes sur le produit du client ainsi
que l'installation ou la réparation du système d'antenne/source
sonore externe au produit.
• la réparation du produit et/ou le remplacement des pièces à
cause d'une mauvaise installation ou entretien, d'un raccordement à
une alimentation électrique incorrecte, d’une surtension temporaire, de dommages occasionnés par la foudre, d’une rémanence de
l’image ou de marques à l’écran résultant de l’afchage d’un contenu stationnaire xe pour une période de temps prolongée, de
l’aspect esthétique du produit causé par une usure normale, d'une
réparation non autorisée ou de toute autre cause non contrôlable
par la compagnie.
• tout dommage ou réclamation pour des produits non disponibles
à l’utilisation ou pour des données perdues ou logiciel perdu.
• tout dommage causé par un mauvais acheminement du produit
ou par un accident encouru lors du renvoi du produit.
• un produit nécessitant une modication ou adaptation an de
permettre l'utilisation dans tout pays autre que celui pour lequel il
était désigné, fabriqué, approuvé et/ou autorisé ou toute réparation
du produit endommagé par ces modications.
• un produit utilisé à des ns commerciales ou institutionnelles (y
compris mais non de façon limitative les ns de location).
• un produit perdu lors de l’expédition sans preuve signée de la
réception.
• tout manquement d’exploiter le produit selon le manuel de l’utilisateur.
POUR OBTENIR DE L’AIDE… Communiquez avec le centre
de service à la clientèle:
LA RÉPARATION OU LE REMPLACEMENT CONFORMÉMENT
À CETTE GARANTIE CONSTITUE LE SEUL REMÈDE POUR LE
CONSOMMATEUR, AVEC LA COMPAGNIE ÉMETTRICE NON
RESPONSABLE N’EST AUCUNEMENT RESPONSABLE DE TOUT
DOMMAGE ACCESSOIRE OU INDIRECT RÉSULTANT DE LA
VIOLATION DE TOUTE GARANTIE EXPRESSE OU IMPLICITE
SUR CE PRODUIT. SAUF DANS LA MESURE INTERDITE PAR
LES LOIS APPLICABLES, TOUTE GARANTIE IMPLICITE DE
QUALITÉ LOYALE ET MARCHANDE OU D’UTILITÉ PARTICULIÈRE DU PRODUIT EST LIMITÉE DANS LE TEMPS À LA
DURÉE DE CETTE GARANTIE.
Certains états ne reconnaissent pas l'exclusion ou la limitation de la
responsabilité pour dommages indirects ou accessoires, ou
autorisent des limitations sur la durée d’une garantie implicite, il est
donc possible que les limitations ou exclusions mentionnées cidessus soient sans effet dans votre cas.
1-866-341-3738
160109
Page 70

14 Index
Q
Qualifi cations téléviseur 18
A
Alimentation 9
Antenne 8
Assistant confi guration 13
C
Câble composite 27
Câble de composant 27
Câble HDMI 27
Câbles
composant 27
composite 27
HDMI 27
qualité 27
S-Vidéo 27
YPbPr 27
Chaînes
liste des favoris 15
Connexions
antenne 8
qualité 27
Contrôle parental
verrouillage pour enfant 16
Cotes 17 , 19
D
Dépannage 31
E
Emplacement 10
F
Format d’image 14
H
Horloge 15
R
Réglages de l’image 14 , 18
Réglages du son 14 , 18
S
Sous-titres 19
Spécifi cations techniques 33
S-Vidéo 27
T
Télécommande
aperçu 6
insérer les piles 8
Téléviseur
allumer 10 , 11
changement de chaînes 11
commandes 6
comme écran d’ordinateur 21
connexions 8 , 31 , 32
dépannage 31
en haute défi nition 20
entretien de l’écran 5
logiciel 25
menu 13
position 8
télécommande 6 , 11
V
Veille 5 , 14
Verrouillage pour enfant
Code NIP 16
verrouiller les chaînes 17
verrouiller les cotes 17
Volume
ajustement automatique 15
ajuster 11
delta 15
sourdine 11
Français
L
Liste des favoris 15
Logiciel
mettre à jour 25
version 25
M
Menu
menu d’accès rapide 13
verrouillage pour enfant 16
Minuterie 16
Minuterie de mise en veille 16
Mode d’achat 10
Mode Maison 10
P
PC 21
Protection de l’environnement 5
Y
YPbPr 27
35
FR
Page 71

36 FR
Page 72

Français
37FR
Page 73

2
ES
Page 74

INSTRUCCIONES DE SEGURIDAD IMPORTANTES
Léalas antes de operar el equipo
1. Lea estas instrucciones.
2. Guarde estas instrucciones.
3. Preste atención a todas las advertencias.
4. Siga todas las instrucciones.
5. No use este TV cerca del agua.
6. Límpielo solamente con un paño seco.
7. No bloquee ninguno de los orificios de ventilación. Instálelo de
acuerdo con las instrucciones de los fabricantes.
8. No lo instale cerca de fuentes de calor, tales como radiadores,
compuertas de tiro (registros) de calor, estufas u otros aparatos (lo
que incluye amplificadores) que generen calor.
9. No anule el objetivo de seguridad del enchufe polarizado o de
conexión a tierra. Un enchufe polarizado tiene dos paletas, una más
ancha que la otra. Un enchufe de conexión a tierra tiene dos paletas
y una tercera espiga de conexión a tierra. La paleta más ancha o la
tercera espiga se entrega para su seguridad. Si el enchufe que se
proporciona no se ajusta a su tomacorriente, consulte a un electricista
para que reemplace el tomacorriente obsoleto.
10. Evite pisar o apretar el cable de suministro eléctrico, especialmente
en los enchufes, tomacorrientes y en el punto en que salen del
aparato.
11. Sólo use los aditamentos/accesorios que especifique el fabricante.
12. Utilice sólo un carro, soporte, trípode, repisa o mesa que
especifique el fabricante o que se venda junto con el TV. Si
usa un carro, tenga precaución cuando mueva la
combinación carro/TV para evitar lesiones si éste se vuelca.
13. Desenchufe este TV durante las tormentas eléctricas o cuando no se
use durante períodos prolongados.
14. Deje que personal calificado realice todo el servicio. Es necesario que
el TV reciba servicio si se ha dañado de algún modo, como cuando
se daña el cable o enchufe de suministro eléctrico, se ha derramado
líquido o le han caído objetos dentro, cuando el TV ha estado
expuesto a lluvia o humedad, no funciona bien o se ha caído.
15. Es posible que este producto contenga plomo y mercurio. Es posible
que la eliminación de estos materiales esté regulada debido a
consideraciones medioambientales. Para obtener información acerca
de la eliminación o del reciclaje, comuníquese con sus autoridades
locales o con la Asociación de Industrias Electrónicas: www.eiae.org.
16. Daños que requieran servicio: El TV debe recibir el servicio de
personal de servicio calificado cuando:
A. se ha dañado el cable de alimentación o el enchufe;
B. han caído objetos o se ha derramado líquido dentro del TV;
C. el TV ha quedado expuesto a la lluvia;
D. el TV parece no funcionar normalmente o su rendimiento ha
cambiado notoriamente;
E. se ha dejado caer el TV o se ha dañado la caja.
17. Inclinación/Estabilidad: Todos los televisores deben cumplir normas
de seguridad generales que se recomiendan en todo el mundo en
cuanto a las propiedades de inclinación y estabilidad del diseño de su
gabinete.
• No comprometa estas normas de diseño aplicando una fuerza de
tracción excesiva a la parte delantera o superior del gabinete, lo que
finalmente puede hacer que el producto se vuelque.
• Además, no se ponga en peligro usted mismo ni a sus niños
colocando equipos electrónicos o juguetes sobre el gabinete. Dichos
artículos pueden caer inesperadamente desde la parte superior del
aparato y dañarlo y/o causar lesiones personales.
18. Montaje en la pared o cielo raso: El TV se debe montar en una pared
o cielo raso únicamente como lo recomienda el fabricante.
19. Líneas de energía eléctrica: Una antena exterior se debe ubicar lejos
de las líneas de energía.
20. Conexión a tierra de la antena exterior: Si se conecta una antena
exterior al receptor, asegúrese de que el sistema de antena esté
conectado a tierra para proporcionar cierta protección contra
sobrevoltajes y acumulación de cargas electrostáticas.
En la Sección 810 del Código Eléctrico Nacional ANSI/NFPA 70 Nº 70-
1984, se proporciona información sobre la adecuada conexión a tierra
de las esteras y estructuras de apoyo, la conexión a tierra del alambre
de acometida a una unidad de descarga de antena, el tamaño de
los conectores de conexión a tierra, la ubicación de la unidad de
descarga de antena, la conexión a los electrodos y los requisitos
del electrodo de conexión a tierra. Consulte la figura que aparece a
continuación.
21. Entrada de objetos y líquidos: Se debe tener cuidado de que no
caigan objetos dentro de los orificios de la caja ni se derramen
líquidos a través de ellos.
a) Advertencia: Para reducir el riesgo de incendio o descarga eléctrica,
este aparato no se debe exponer a la lluvia ni a la humedad, y no se le
deben colocar encima objetos llenos de líquido como jarrones.
22. PRECAUCIÓN sobre el uso de las baterías: Para evitar escapes de
las baterías que pueden resultar en lesiones corporales, daño a la
propiedad o a la unidad:
• no mezcle las baterías (nuevas con antiguas o de carbono con alcalinas,
etc.)
• retire las baterías cuando no use la unidad durante un período
prolongado.
Español
Nota para el instalador del sistema CATV: Se hace este recordatorio para llamar la atención del instalador del sistema CATV sobre el Artículo 82040 del Código Eléctrico Nacional (NEC, por sus siglas en inglés), en donde se proporcionan instrucciones para la adecuada conexión a tierra y
en donde, en particular, se especifica que la tierra de los cables se debe conectar al sistema de conexión a tierra del edificio, tan cerca del punto
de entrada del cable como sea posible.
Ejemplo de conexión a tierra de la antena según NEC, Código Eléctrico Nacional
ABRAZADERA DE CONEXIÓN A TIERRA
EQUIPO DE SERVICIO ELÉCTRICO
ALAMBRE DE ACOMETIDA DE LA ANTENA
UNIDAD DE DESCARGA
DE ANTENA
(SECCIÓN 810-20 de NEC)
CONDUCTORES DE CONEXIÓN A TIERRA
(SECCIÓN 810-21 de NEC)
ABRAZADERAS DE CONEXIÓN A TIERRA
SISTEMA DE ELECTRODOS DE CONEXIÓN A TIERRA DEL SERVICIO
(ART 250 de NEC, PARTE H)
ELÉCTRICO
ES
3
Page 75

1 Aviso
2009 © Magnavox. Todos los derechos reservados.
Las especifi caciones están sujetas a cambio sin previo aviso. Las
margas registradas son propiedad de Magnavox. o de sus respectivos
propietarios. Magnavox se reserva el derecho de cambiar productos en
cualquier momento sin estar obligada a ajustar suministros anteriores de
acuerdo con dicho cambio.
El material de este manual se considera adecuado para el uso para
el que está destinado el sistema. Si el producto o sus módulos
o procedimientos individuales se usan para fi nes distintos de los
especifi cados en este documento, se debe obtener la confi rmación de
su validez y adecuación. Magnavox garantiza que el material mismo no
infringe ninguna patente de los Estados Unidos. No se ofrece ninguna
garantía adicional expresa ni implícita.
Magnavox no será responsable de ningún error en el contenido de este
documento ni de los problemas que pudieran surgir como resultado
del contenido de este documento. Los errores de los que se informe
a Magnavox se adaptarán y publicarán en el sitio Web de soporte de
Magnavox lo antes posible.
Características de píxeles
Este producto LCD tiene un alto número de píxeles de colores.
Aunque tiene píxeles efectivos de 99,999% o más, pueden aparecer
constantemente en la pantalla puntos negros o puntos brillantes de luz
(rojos, verdes o azules). Ésta es una propiedad estructural de la pantalla
(dentro de estándares comunes de la industria), no una falla.
Garantía
El usuario no puede realizar el servicio de ninguno de los componentes.
No abra el producto ni retire las cubiertas que cubren su interior. Las
reparaciones sólo podrán llevarlas a cabo los centros de servicio y
establecimientos de reparación ofi ciales de Magnavox. De lo contrario,
se anulará la garantía, ya sea expresa o implícita.
Cualquier operación prohibida expresamente en este manual, o
cualquier ajuste o procedimiento de montaje no recomendado o no
autorizado en este manual anulará la garantía.
Aviso de la Comisión Federal de Comunicaciones
Este equipo se ha probado y se ha determinado que cumple con los
límites para un dispositivo digital clase B, de acuerdo con la parte 15
de las normativas de la FCC. Estos límites están destinados a ofrecer
una protección razonable contra interferencia dañina dentro de una
instalación residencial. Este equipo genera energía de radiofrecuencia,
la usa y puede emitirla y, si no se instala y usa de acuerdo con las
instrucciones, puede provocar interferencia dañina a las comunicaciones
radiales. Sin embargo, no existe garantía de que no se producirá
interferencia en una instalación en particular. Si este equipo provoca
interferencia dañina a la recepción de radio o televisión, lo cual se
puede determinar encendiendo y apagando el equipo, se insta al usuario
a intentar corregir la interferencia tomando una o más de las siguientes
medidas:
• Reorientar la antena receptora o cambiarla de lugar.
• Aumentar la separación entre el equipo y el receptor.
• Conectar el equipo a un tomacorriente de un circuito diferente al
que está conectado el receptor.
• Pedir ayuda al distribuidor o a un técnico de radio o televisión
experimentado.
Declaración de Conformidad
Nombre Comercial
Parte Responsable: FUNAI CORPORATION, INC.
Modelo: 47MF439B
Dirección: 201 Route 17 North Suite No. 903
Número Telefónico: 201-727-4560
: MAGNAVOX
Rutherford, New Jersey 07070 U.S.A.
Modifi caciones
La FCC exige que se informe al usuario de que cualquier cambio
o modifi cación que se realice a este dispositivo, que no esté
expresamente aprobado por Philips Consumer Electronics, puede
anular la autoridad del usuario para operar el equipo.
Cables
Las conexiones a este dispositivo se deben hacer con cables
blindados, con conector con caperuza metálica contra interferencia de
radiofrecuencia e interferencia electromagnética, para cumplir con las
normativas de la FCC.
Aviso para Canadá
Este aparato digital clase B cumple con todos los requisitos de las
normativas canadienses para equipos que provocan interferencias.
Copyright
Todas las demás marcas comerciales registradas y no registradas son
propiedad de sus respectivos propietarios.
Fabricado bajo licencia de Dolby Laboratories.
“Dolby” y el símbolo de la doble D son marcas comerciales de Dolby
Laboratories.
VESA, FDMI y el logotipo de cumplimiento de montaje de VESA son
marcas comerciales de Video Electronics Standards Association.
® Kensington y Micro Saver son marcas comerciales registradas de los
Estados Unidos de ACCO World Corporation, con registros emitidos y
solicitudes pendientes en otros países del mundo.
Partes de este software están protegidos por copyright © The FreeType
Project (www.freetype.org).
4
ES
Page 76

2 Importante
El registro de su modelo en Magnavox le permite acceder a todos los
valiosos benefi cios indicados a continuación, no se los pierda.
Llene y envíe la tarjeta de registro de su producto de inmediato, o
regístrelo en línea en www.magnavox.com/support para asegurar :
• El comprobante de la compra
El envío de la tarjeta adjunta garantiza que se archivará la fecha de
compra, lo que le evitará hacer trámites adicionales para obtener el
servicio de la garantía.
• Notifi cación de la seguridad del producto
Si realiza el registro del producto, recibirá una notifi cación
directamente del fabricante en el raro caso de que sea necesario
un retiro de productos o que exista un defecto de seguridad.
• Benefi cios adicionales de la propiedad del producto
El registro del producto garantiza que recibirá todos los privilegios a los
que tiene derecho, incluidas ofertas especiales para ahorrar dinero.
Información del producto
Esta TV consume una energía mínima en el modo en espera para
minimizar el impacto ambiental. El consumo de energía activo aparece
en la placa de tipo en la back de la TV. El modelo y el número de serie
se encuentran en la TV y también en el embalaje.
Directivas para el término de la vida útil
Al igual que todos los productos LCD, este aparato contiene una luz
con mercurio; elimínela de acuerdo con todas las leyes locales, estatales
y federales.
Magnavox está muy atento a fabricar productos que no dañen el medio
ambiente en las áreas principales de preocupación para ecologistas. Su
nueva TV contiene materiales que se pueden reciclar y volver a usar. Al
fi nal de su vida útil, empresas especializadas pueden desmantelar la TV
desechada para concentrar los materiales reutilizables y para minimizar
la cantidad de los que se eliminarán. Asegúrese de eliminar su TV antigua
según las normativas locales.
Eliminación de baterías usadas
Las baterías suministradas no contienen los materiales pesados
mercurio y cadmio. Sin embargo, en muchas áreas no se pueden
eliminar baterías junto con los desechos domésticos. Asegúrese de
eliminar las baterías según las normativas locales.
Español
Cuidado de la pantalla
• Evite las imágenes estáticas en la medida de lo posible. Las
imágenes estáticas son las que permanecen en la pantalla durante
mucho tiempo. Algunos ejemplos son: menús en pantalla, barras
negras y visualizaciones de hora. Si tiene que utilizar imágenes
estáticas, reduzca el contraste y el brillo para evitar daños en la
pantalla.
• Desenchufe la TV antes de limpiarlo.
• Limpie la pantalla de la TV y bastidor con un paño suave húmedo.
Nunca utilice sustancias como alcohol, productos químicos o
detergents domésticos en la pantalla de la TV.
• ¡Riesgo de daños en la pantalla de la TV! Nunca toque, presione,
frote ni golpee la pantalla con ningún objeto.
• Para evitar deformaciones y desvanecimiento del color, limpie de
inmediato las gotas de agua.
Cuidado ambiental
Avisos reglamentarios
ADVERTENCIA
Para reducir el riesgo de incendio o descarga eléctrica, este aparato no se debe exponer a
la lluvia ni a la humedad, y no se le deben colocar encima objetos llenos de líquido como
jarrones.
PRECAUCIÓN
Para prevenir descargas eléctricas, haga coincidir el álabe ancho del enchufe con la ranura
ancha e insértelo completamente.
El empaque de este producto se debe reciclar. Comuníquese con sus
autoridades locales para obtener información acerca de cómo reciclar
el empaque.
5
ES
Page 77

3 Su TV
¡Felicitaciones por su compra y bienvenido a Magnavox! Para
benefi ciarse totalmente de la asistencia que ofrece Magnavox, registre
su producto en www.magnavox.com/support.
Controles e indicadores laterales
VOLUME
Control remoto
1
2
20
19
5
3
4
MENU
CHANNEL
POWER
a Indicador de modo de espera/sensor del control remoto
b POWER : Encienda o apague la TV. La TV no se apaga
completamente hasta que la desconecta físicamente.
c CHANNEL +/ - : Cambia al canal anterior o siguiente.
d MENU : Activa o desactiva el menú principal.
e VOLUME +/- : Aumenta o disminuye el volumen.
1
18
4
17
3
16
2
15
5
6
7
8
9
10
11
12
14
a ( Espera activado )
Encienda o apague la TV. La TV no se apaga completamente hasta
que la desconecta físicamente.
b FAVORITOS
Muestra una lista de los canales marcados como favoritos. (Incluye
subcanales.)
6
ES
13
Page 78

c FORMAT
Selecciona un formato de pantalla .
d Botones de color
Permite seleccionar tareas u opciones.
e OPTION
Activa el menú de acceso rápido. (see ‘Usar el menú de acceso
rápido’ on page 13 )
f OK
Activa una selección o accede al menú.
g
( Botones de navegación )
Permite navegar por los menús.
h INFO
Muestra información sobre el canal de TV o dispositivo accesorio.
La calidad y precisión de la información depende de la empresa de
televisión. Puede ver una diferencia en el tiempo de la transmisión
si la empresa de televisión proviene de un área con un huso
horario diferente.
i MUTE
Desactiva o activa el audio.
j CH +/-
Cambia al canal anterior o siguiente.
k SLEEP
Establece una demora después de la cual la TV entra en modo de
espera.
l Botones de números
Selecciona un canal, una página o un ajuste.
m . (Punto)
Pulse el punto (.) para canales digitales.
n PREV CH
Vuelve al canal que estaba viendo anteriormente.
o VOL +/-
Aumenta o disminuye el volumen.
p MENU/EXIT
Activa o desactiva el menú.
q BACK
Vuelve a la pantalla anterior.
r SMART MODE
Alterna entre los ajustes de imagen y sonido inteligente.
s CC
Muestra los ajustes de los subtítulos ocultos (CC).
t SOURCE
Selecciona los dispositivos conectados.
Español
7
ES
Page 79

4 Para empezar
Esta sección complementa la información proporcionada en Inicio
rápido. Para obtener información sobre cómo montar e instalar su TV,
consulte el Inicio rápido.
Ubicar la TV
Insertar las baterías del control remoto
Advertencia
•
No inserte el enchufe de suministro eléctrico en el tomacorriente hasta que estén
realizadas todas las conexiones.
• Las TV de pantalla grande son pesadas. Es necesario que dos personas las levanten y
manipulen.
• Antes de trasladar la TV, desconecte los cables para evitar daños.
Además de leer y comprender las instrucciones de seguridad, debe
tener en cuenta lo siguiente antes de colocar la TV:
• Asegúrese de que siempre pueda acceder fácilmente al cable de
alimentación o enchufe para desconectar la TV de la corriente.
• Si la TV está montada en una base giratoria, asegúrese de que el
cable de alimentación no se tense al girar el aparato ya que esto
puede soltar las conexiones
• La distancia ideal para ver la TV es tres veces el tamaño de la
pantalla.
• Coloque la TV en un lugar donde la luz no dé en la pantalla.
• Conecte los dispositivos antes de colocar la TV.
Uso de un candado Kensington
En la parte posterior del TV encontrará una ranura de seguridad
Kensington. Evite el robo colocando un seguro Kensington entre la
ranura y un objeto permanente, como una mesa pesada.
1 Retire la tapa de las baterías ubicada en la parte posterior del
control remoto.
2 Inserte las 2 baterías suministradas (AAA). Compruebe que los
extremos + y - de las baterías coincidan con las marcas del interior
del compartimiento.
3 Vuelva a colocar la tapa en su posición original.
Nota
Quite las baterías si no va a utilizar el control remoto durante un período de tiempo
•
prolongado.
Conectar la antena o el cable
Cable
TV ANTENNA
8
ES
Conecte a una antena
Cualquier programa de DTV que se transmita en su área se puede
recibir en forma gratuita mediante la conexión a una antena.
Comuníquese con el proveedor de contenido local o con el vendedor
de equipos electrónicos local si no está seguro de los programas HDTV
disponibles en su área.
Las empresas de televisión están pasando de TV analógica a digital.
Esto signifi ca que una empresa de televisión dada puede tener canales
disponibles ya sea en sistema analógico o digital, o tanto analógico como
digital al mismo tiempo.
La TV genera sonido estéreo sólo si se transmite una señal estéreo.
Conecte a un cable
Cuando la TV se conecta al enchufe hembra del cable, puede que
reciba programación digital y de alta defi nición en forma gratuita
(dependiendo de su proveedor de cable). En número de canal para los
canales digitales y de alta defi nición incluye un punto “.” Por ejemplo,
11.1, 46.30, 108.201. Comuníquese con su proveedor de cable para
obtener más información.
Conecte a radiodifusión directa vía satélite (DBS)
Existen dos sistemas DBS principales: DirecTV y DishNetwork. Estos
sistemas exigen un decodifi cador de señales patentado por separado
Page 80

para decodifi car señales y enviarlas a la TV. El decodifi cador de señales
SPDIF
O
VIDEO
IO
IN
HDM3HDM
HDM
3
Pb
R
R
L
b
SE
. U
SPDIF
O
D
AU
D
IO
D
AV2
P
L
R
VIDEO
AV3
TV ANTENNA
HDM
I
3
contiene un sintonizador digital de TV para recibir transmisiones
digitales terrestres.
Comuníquese con su proveedor local de DBS para obtener más
información acerca de las conexiones y de los canales de TV.
Conecte a un decodifi cador de señales
Un decodifi cador de cable o de señales satelitales se puede conectar a
la TV mediante las siguientes conexiones:
• ANT
• A/V (Video compuesto y audio)
• S-Video
• YPbPr (Entrada de video por componentes)
• HDMI
Para obtener información acerca de cómo conectar un decodifi cador
de señales, consulte el Inicio rápido proporcionado.
Conecte un decodifi cador de señales mediante ENTRADA/SALIDA
DE RADIOFRECUENCIA
Si la TV está conectada a un decodifi cador de cable o de señales
satelitales mediante una conexión coaxial, ajuste el aparato en el canal 3
o 4, o en el canal especifi cado por el proveedor de servicio.
La ubicación del conector de suministro eléctrico varía según el
modelo de TV.
2 Inserte el cable de alimentación completamente en el conector de
alimentación.
3 Conecte el enchufe del cable de alimentación a la toma de
corriente. Asegúrese de que el cable esté conectado fi rmemente
en ambos extremos.
TV ANTENNA
R
UT
r
P
S-VIDEO
Y
Y
AU
Conecte un decodifi cador de señales mediante una entrada de video
componente o HDMI
SERV. U
R
R
LRL
L
SPDIF
OUT
Pr
Pr
Pb
Pb
VIDEO
L
S-VIDEO
Y
Y
R
DVIAU DIO
AV3AV1 AV2
IN
HDMI3HDMI1 HDMI2
TV ANTENNA
SERV. U
R
R
R
L
L
L
SPDIF
UT
OUT
Pr
Pr
Pb
Pb
b
VIDEO
L
-
S-VIDEO
Y
Y
R
DVIAUDIO
AV2
AV3
AV1
IN
HDMI1 HDMI2 HDMI3
Desconecte la TV de la alimentación
Precaución
•
Para desenchufar el cable, jale desde el enchufe, no desde el cable.
1 Desenchufe el cable de alimentación de la toma de corriente.
2 Desenchufe el cable de alimentación del conector de alimentación
ubicado en la parte posterior de la TV.
Administrar los cables
Rutee el cable de suministro eléctrico, el cable de la antena y todos los
demás cables por el soporte para cables de la parte posterior de la
TV. Este soporte ayuda a mantener los cables ordenados y fáciles de
administrar.
Español
Conectar el cable de suministro eléctrico
Advertencia
•
Compruebe que el voltaje de la alimentación corresponda al indicado en la parte
posterior de la TV. Si el voltaje no es el mismo, no inserte el cable de alimentación.
1 Ubique el conector de suministro eléctrico en la parte posterior
de la TV.
9
ES
Page 81

Encender y confi gurar la TV
La TV se enciende automáticamente después de insertar el cable de
suministro eléctrico en el conector de alimentación. Aparece la siguiente
pantalla:
Thank you for your purchase of this MAGNAVOX TV.
Please proceed with the following steps to set-up your TV. For the BEST
possible picture performance, contact your local Cable / Satellite signal
provider for High Definition signal options available in your area.
Next
Press the GREEN Next button located on your remote control to proceed.
Siga las instrucciones en pantalla para seleccionar el idioma y realizar la
confi guración de la TV.
Nota
Si conecta la TV a un decodifi cador de cable o de señales satelitales, no necesita
•
instalar canales. Pulse el botón rojo del control remoto para salir de este estado de la
confi guración.
Finalice la confi guración seleccionando su ubicación:
• Si elige [Tienda] sus ajustes se borrarán cada vez que apague la TV.
Use este modo para las pantallas de las tiendas.
• Si elige [Casa] se le ofrecerán opciones de visualización de
imágenes. Pulse los cursores de la izquierda o derecha para
seleccionar su pantalla preferida.
10
ES
Page 82

POWER
5 Utilice su TV
POWER
Esta sección contiene información que le ayudará a realizar operaciones
básicas con el TV.
Encender o apagar la TV o ponerla en espera
POWER
• Pulse CHANNEL +/ - en el costado de la TV. Para canales
digitales, pulse un número (de 1 a 999) seguido de un punto “.” y,
a continuación, el número del subcanal correspondiente (de 1 a
999). Ej.: 108.30.
• Pulse CH +/- o introduzca un número en el control remoto.
• Pulse PREV CH para volver al canal que estaba viendo
anteriormente.
Ajustar el volumen
Español
Para encender
• Pulse
• Pulse
Para poner la TV en espera
• Pulse
Para apagar la TV
• Pulse
Cuando hay instalados canales digitales y éstos se transmiten, las opciones digitales
•
correspondientes aparecen en el menú de acceso rápido.
.
Cambiar canales
POWER en el costado de la TV.
en el control remoto.
en el control remoto.
POWER en el costado de la TV.
Nota
CHANNEL
VOLUME
Para aumentar o disminuir el volumen
• Pulse VOL +/- en el control remoto o pulse VOLUME +/- en el
costado de la TV.
Para activar o desactivar el sonido
• Pulse MUTE en el control remoto para silenciar el sonido.
• Pulse MUTE nuevamente para restaurar el sonido.
Para ajustar el volumen de los audífonos
• Pulse VOL +/- en el control remoto o pulse VOLUME +/- en el
costado de la TV. Cuando los audífonos están enchufados a la TV,
los altavoces se silencian automáticamente.
11
ES
Page 83

Ver canales desde un decodifi cador de
señales
Para ver canales desde un decodifi cador de señales
1 Encienda el decodifi cador de señales.
» La imagen proveniente del decodifi cador de señales puede
aparecer automáticamente en la pantalla.
2 Use el control remoto del decodifi cador de señales para
seleccionar canales.
Si la imagen no aparece
1 Pulse SOURCE repetidamente para seleccionar el decodifi cador
de señales conectado y espere unos segundos a que aparezca la
imagen.
2 Use el control remoto del decodifi cador de señales para
seleccionar canales.
Si la imagen no aparece
1 Pulse SOURCE repetidamente en el reproductor de DVD y
espere unos segundos a que aparezca la imagen.
2 Use el control remoto del reproductor de DVD para reproducir el
disco.
Ver los dispositivos conectados
Para ver los dispositivos conectados
1 Encienda el dispositivo conectado.
» La imagen proveniente del dispositivo conectado puede
aparecer automáticamente en la TV.
2 Use el control remoto del dispositivo para seleccionar los canales.
Si la imagen no aparece
1 Pulse SOURCE repetidamente para seleccionar el dispositivo
conectado y espere unos segundos a que aparezca la imagen.
2 Use el control remoto del dispositivo para seleccionar los canales.
Ver un DVD
Para ver un DVD
1 Inserte un disco de DVD en el reproductor.
2 Pulse PLAY en el control remoto del reproductor de DVD.
» El DVD podría reproducirse automáticamente en la TV.
12
ES
Page 84

6 Cómo sacar más partido a
3 Pulse y para seleccionar el menú n [Imagen] .
su TV
Usar el menú de acceso rápido
El menú de acceso rápido proporciona acceso directo a algunos
elementos del menú que se necesitan con frecuencia.
Nota
Cuando hay instalados canales digitales y éstos se transmiten, las opciones digitales
•
correspondientes aparecen en el menú de acceso rápido.
1 Pulse OPTION en el control remoto.
2 Pulse o y luego OK para acceder a uno de los siguientes
menús:
• Idioma audio, sólo para canales digitales en los que se
transmite audio en varios idiomas.
• Subtítulos (see ‘Ver subtítulos’ on page 20 ) .
• Formato imagen.
• Ecualizador.
• Reloj. (see ‘Programe el reloj’ on page 15 )
Menú TV
Configuraciones TV
Imagen
Sonido
*Sólo en algunos modelos seleccionados
Imagen
Contraste
Brillo
Color
Tono
Realce
Temperatura color
Contr. dinámico
Digital Natural Motion*
4 Pulse o para seleccionar uno de los ajustes de imagen y luego
para ingresar al ajuste.
5 Pulse o para realizar el ajuste y pulse o OK para confi rmar
el cambio.
6 Pulse MENU para salir.
Español
Cambie los ajustes de imagen y sonido
Cambie los ajustes de imagen
1 Pulse MENU en el control remoto.
2 Pulse para ingresar al menú [Confi guraciones TV] .
Menú TV
Configuraciones TV
Opciones
Instalación
Configuraciones TV
Imagen
Sonido
13
ES
Page 85

Resumen de ajustes de imagen
Los siguientes ajustes de imagen se pueden confi gurar. Dependiendo del
formato de la fuente de la imagen, algunos ajustes de imagen no están
disponibles.
• [Contraste] : Ajusta la intensidad de las áreas brillantes sin modifi car
las áreas oscuras.
• [Brillo] : Ajusta la intensidad y los detalles de las áreas oscuras.
• [Color] : Ajusta la saturación de color.
• [Tono] : Ajusta el balance de color de una imagen.
• [Realce] : Ajusta el nivel de realce en los detalles de la imagen.
• [Temperatura color] : Para ajustar la temperatura del color en
[Normal] , [Cálido] o [Frío] .
• [Contr. dinámico] : Mejora automáticamente el contraste de una
imagen.
• [Reduc. del ruido] : Filtra automáticamente el ruido de la imagen y
lo reduce. Mejora la calidad de la imagen cuando recibe señales de
video débiles. Puede activar o desactivar DNR.
• [Artifacto de reducción MPEG] : Suaviza la transición a imágenes
digitales. Puede activar o desactivar esta función.
• [Realce del color] : Realza los colores y mejora la resolución de
los detalles con colores brillantes. Puede activar o desactivar esta
función.
• [Formato de pantalla] : Cambia el formato de la pantalla.
• [Desfase Horizontal] / [Desfase Vertical] : Ajusta la posición
horizontal y vertical de la imagen. La disponibilidad de este ajuste
depende de ciertas señales o fuentes.
Cambie el formato de pantalla
1 Pulse OPTION en el control remoto.
2 Seleccione [Picture format] .
Resumen de formatos de pantalla
Se pueden seleccionar los siguientes formatos de pantalla.
Dependiendo del formato de la fuente de la imagen, algunos ajustes de
imagen no están disponibles.
[Automático] : (No para modo PC).
Amplía la imagen automáticamente para
que se ajuste mejor a la pantalla. Los
subtítulos permanecen visibles.
[Super zoom] : (No para modo HD
ni PC). Elimina las franjas negras a
los costados de las transmisiones en
proporción 4:3. Se produce mínima
distorsión.
[4:3] : Muestra el formato clásico 4:3.
[Ampliar imág. 14:9] : (No para modo HD
ni PC). Aumenta el formato 4:3 a 14:9.
[Ampliar imág. 16:9] : (No para modo HD
ni PC). Aumenta el formato 4:3 a 16:9.
[Pantalla panorámica] : Amplía el formato
clásico 4:3 a 16:9.
3 Pulse o para seleccionar un formato de pantalla y pulse OK
para confi rmar su opción.
[Sin escala] : Sólo para modo HD y PC, y en
los modos seleccionados solamente. Permite
el máximo realce. Puede presentarse algo
Cambie los ajustes de sonido
1 Pulse MENU en el control remoto y seleccione [Confi guraciones
TV] > [Sonido] .
Menú TV
Configuraciones TV
Imagen
Sonido
de distorsión debido a los sistemas de la
empresa de televisión. Ajuste la resolución
de PC a modo pantalla panorámica para
obtener los mejores resultados.
Sonido
Ecualizador
Balance
Idioma audio Digital
Alternar audio
Mono/Estéreo
Incredible surround
AVL
Altavoces del televisor
14
ES
Page 86

2 Pulse o para resaltar un ajuste de sonido y pulse para
seleccionar el ajuste.
3 Pulse o para realizar el ajuste y pulse OK para confi rmar el
cambio.
4 Pulse MENU para salir.
Resumen de ajustes de sonido
Los siguientes ajustes de sonido se pueden confi gurar. Dependiendo de
la fuente del sonido, algunos ajustes de sonido no están disponibles.
• [Ecualizador] : Ajusta las frecuencias de sonido individuales.
• [Balance] : Ajusta el balance de los altavoces derecho e izquierdo
para adaptarse del mejor modo a la posición de escucha.
• [Idioma audio Digital] : Sólo está disponible para los canales
digitales, cuando se transmite en varios idiomas. Indica los idiomas
de audio disponibles.
• [Alternar audio] : Disponible para canales analógicos cuando se
transmite un programa de audio principal y uno secundario (SAP).
Seleccione el programa de audio principal o secundario.
• [Mono] / [Estéreo]
• [Incredible Surround] : Selecciona los modos disponibles para
sonido surround.
• [AVL] ( [Nivelador automát. de volumen] ): Reduce los cambios
repentinos en el volumen, por ejemplo, durante los avisos
comerciales o al cambiar de canal. Actívelo o desactívelo.
• [Altavoces del televisor] : ajuste en activado o desactivado, o
cambie el sonido a un dispositivo compatible con EasyLink. [HDMI-
CEC] se debe activar en el menú [Preferencias] para que el menú
[Altavoces del televisor] quede disponible.
• [Nivelador de volumen] : Equilibra las diferencias de volumen
entre los canales o dispositivos conectados. Cambie al dispositivo
conectado antes de cambiar el nivelador de volumen.
Usar el modo automático
Seleccione una lista de canales favoritos
1 Pulse la tecla FAVORITOS en el control remoto.
» Aparecen sus listas de canales favoritos.
2 Pulse o para resaltar una lista, y pulse OK para seleccionarla.
Cree o edite una lista de canales favoritos
1 Pulse la tecla FAVORITOS en el control remoto para que
aparezcan sus listas de canales favoritos.
2 Pulse o para resaltar una lista, y pulse OK para seleccionarla.
3 Pulse el botón verde de nuevo para acceder al modo Editar .
» Aparece una lista de canales.
4 Pulse o para resaltar un canal.
5 Pulse OK para seleccionar o anular la selección del canal resaltado.
» Este canal se agrega o se elimina de la lista de canales favoritos.
6 Vuelva a pulsar el botón verde para salir.
Cambiar a uno de los canales de una lista
1 Pulse OK en el control remoto para mostrar la última lista que
seleccionó.
2 Pulse o para resaltar un canal.
3 Pulse OK para seleccionar el canal.
» La TV cambia a ese canal.
Español
Pulse AUTO MODE para defi nir la TV en un ajuste de imagen y de
1
sonido predefi nido.
2 Pulse o para seleccionar uno de los siguientes ajustes:
• [Personal] : los ajustes personalizados que defi nió en el menú
[Imagen] .
• [Sports] : ajustes de imagen vívidos y sonido claro para acción.
• [Estándar] : para ver TV normal.
• [Cine] : ajustes de imagen brillante para una experiencia
cinematográfi ca.
• [Juego] : optimizado para PC, consolas de juegos y
videoconsolas.
• [Ahorro de Energía] : confi guración ecológica para bajo
consumo de energía.
Crear y usar listas de canales favoritos
Puede crear listas de sus canales de TV de modo que pueda encontrar
fácilmente esos canales.
Consejo
•
Pulse CH+/- para seleccionar canales en una lista o presione las teclas numéricas para
seleccionar canales que no estén en una lista.
Programe el reloj
Puede ajustar la hora en la TV y programarla para que se apague a una
hora específi ca.
Programe la hora automáticamente
Algunos canales digitales transmiten la hora. Para estos canales, puede
ajustar la hora automáticamente y elegir el canal desde el cual se
obtendrá la hora.
1 Pulse MENU en el control remoto y seleccione [Instalación] >
[Reloj] > [Modo reloj automático] .
15
ES
Page 87

2 Seleccione [Automático] y pulse para confi rmar su opción.
Menú TV I Instalación
Reloj
Modo reloj automático
Canal reloj automático
Huso horario
Horario de verano
Modo reloj automático
Manual
Automático
Programar el temporizador
El temporizador cambia la TV a modo en espera luego de un período
predefi nido. De todas maneras, puede apagar la TV antes o restablecer
el temporizador durante la cuenta atrás.
Pulse SLEEP repetidamente para seleccionar un valor entre 0 y 180
minutos. Por ejemplo, si selecciona 90 la TV entra al modo de espera en
90 minutos.
Consejo
•
Para desactivar el temporizador, seleccione 0 minutos.
3 (Opcional) Seleccione el canal del cual la TV debe tomar la hora.
• Pulse
• Pulse
• Pulse
y para entrar al menú para [Canal reloj
automático] .
o para resaltar un canal.
para confi rmar su opción.
4 (Opcional) Seleccione el huso horario.
• Pulse
• Pulse
• Pulse
y para entrar al menú para [Huso horario] .
o para resaltar el huso horario.
para confi rmar su opción.
5 (Opcional) Programe el horario de verano.
• Pulse
• Pulse
• Pulse
y para entrar al menú para [Horario de verano] .
o para resaltar [Automático] o [Apagado] .
para confi rmar su opción.
6 Pulse MENU para salir.
Programe la hora manualmente
1 Pulse MENU en el control remoto y seleccione [Instalación] >
[Reloj] > [Modo reloj automático] .
2 Seleccione [Manual] y pulse para confi rmar su opción.
Menú TV I Instalación
Reloj
Modo reloj automático
Hora
Día
Modo reloj automático
Manual
Automático
Usar control infantil y niveles de bloqueo
Puede evitar que los niños vean ciertos programas o canales
bloqueando los controles de la TV y usando clasifi caciones.
Confi gure o cambie el PIN
1 Pulse MENU en el control remoto y seleccione [Opciones] >
[Cambiar código] .
2 Ingrese su PIN de 4 dígitos con las teclas numéricas del control
remoto.
• Si tiene un código, ingréselo.
• Si no lo tiene o si lo ha olvidado, ingrese 0711 .
• Se le solicitará que ingrese nuevamente el PIN.
3 Introduzca nuevamente su PIN para confi rmar.
» Aparece un mensaje para confi rmar que el PIN se ha
cambiado.
4 Pulse MENU para salir.
Bloquee la TV
Esta sección describe cómo bloquear todos los canales de la TV. A la
hora especifi cada, la pantalla se queda en blanco y el audio se silencia.
1 Asegúrese de que el reloj esté ajustado en la hora actual (see
‘Programe el reloj’ on page 15 ) .
2 Pulse MENU en el control remoto y seleccione [Opciones] >
[Bloqueo infantil] > [Bloquear después] .
3 Introduzca su PIN (see ‘Confi gure o cambie el PIN’ on page 16 ) .
4 Pulse para seleccionar [Temporizador] .
3 Pulse para seleccionar [Hora] y luego pulse para ajustar la
hora.
Use el formato HH:MM. Seleccione [AM] / [PM] para mañana o
tarde.
4 Pulse OK para confi rmar su opción.
5 Pulse y para entrar al menú para [Día] .
6 Pulse o para seleccionar el día.
7 Pulse OK para confi rmar su opción.
8 Pulse MENU para salir.
16
ES
Page 88

Menú TV Opciones
Bloquear después
Temporizador
Temporizador
Bloqueo infantil
Temporizador
Apagado
Encendido
5 Pulse para seleccionar [Encendido] y activar la función [Bloquear
después] . Seleccione [Apagado] para desactivar la función.
6 Pulse para confi rmar su opción.
7 Pulse para seleccionar [Hora] y presione para ajustar la hora.
Use el formato HH:MM y seleccione [AM] / [PM] para la mañana o
la tarde.
8 Pulse OK para confi rmar la hora.
9 Pulse MENU para salir.
10 Apague la TV y enciéndala nuevamente.
Bloquee un canal
Esta sección describe cómo bloquear canales específi cos. Los canales se
podrán seleccionar, pero la pantalla quedará en blanco y el audio estará
silenciado.
1 Asegúrese de que el reloj esté ajustado en la hora actual (see
‘Programe el reloj’ on page 15 ) .
2 Pulse MENU en el control remoto y seleccione [Opciones] >
[Bloqueo infantil] > [Bloqueo de canals] .
3 Introduzca su PIN (see ‘Confi gure o cambie el PIN’ on page 16 ) .
Use los niveles de bloqueo de TV
La TV está equipada con un chip antiviolencia que permite controlar
el acceso a programas individuales según su clasifi cación de edad y
de contenido. La empresa de televisión o el proveedor del programa
envían los datos sobre el contenido del programa.
Si recibe canales a través de un codifi cador de señales o de cable
conectado mediante HDMI, no puede usar el bloqueo por clasifi cación
de TV. El decodifi cador de señales o de cable debe estar conectado
mediante conectores de RF o AV.
1 Pulse MENU en el control remoto y seleccione [Opciones] >
[Bloqueo infantil] > [Niveles bloqueo TV] .
2 Introduzca su PIN (see ‘Confi gure o cambie el PIN’ on page 16 ) .
3 Pulse o y luego OK para bloquear o desbloquear una o más
clasifi caciones.
Cada clasifi cación tiene un gráfi co de cuadro que indica si los
programas que poseen dicha clasifi cación están bloqueados:
• Si el cuadro tiene una X indica que todos los elementos de la
lista de clasifi cación de contenido están bloqueados.
• Un cuadro vacío indica que no hay elementos bloqueados en
el contenido de la lista de clasifi caciones.
• Un cuadro con / indica que se ha anulado la selección de
algunas clasifi caciones de contenido. Por ejemplo, para la
clasifi cación TV-14, puede anular la selección de una o más de
las siguientes clasifi caciones de contenido: [(D) Diálogo] , [(L)
Idioma] , [(S) Sexo] o [(V) Violencia] .
Menú TV Opciones
Niveles bloqueo TV
Todos
Ninguno
TV-Y
TV-Y7
TV-G
TV-PG
TV14
TV-MA
Bloqueo infantil
TV-14
(D)Diálogo
(L)Idioma
(S)Sexo
(V)Violencia
Español
Menú TV Opciones
Bloqueo infantil
Bloquear después
Bloqueo de canales
Niveles bloqueo TV
Películas prohibidas
Bloqueo Inglés Canadiense
Bloqueo Francés Canadiense
Clasificación regional
4 Pulse o y luego OK para bloquear uno o más canales o
fuentes externas.
5 Cada canal tiene un gráfi co de cuadro que indica si está bloqueado:
• Si el cuadro tiene una X, indica que el canal está bloqueado
• Si está vacío, indica que el canal no está bloqueado.
6 Pulse MENU para salir.
Bloqueo de canales
Canal 1 Deportes
Canal 2 Noticias
Canal 3 Cine
Canal 4
Canal 5
Canal 6
Canal 7
Cuando selecciona [Todo] , todos los elementos de la lista de
clasifi cación se bloquean.
Cuando seleccione [Ninguno] , quedarán bloqueados
los programas sin clasifi cación y los programas con una
clasifi cación de Ninguno.
Cuando bloquea una clasifi cación, todas las clasifi caciones
de las categorías de edad inferiores se bloquean
automáticamente.
4 Pulse MENU para salir.
17
ES
Page 89

Resumen de niveles de bloqueo de TV
Clasifi cación de edad Clasifi cación de
Todos Ninguno
Ninguno Ninguno
TV-Y : adecuado para niños de todas las edades,
con temas y elementos dirigidos a niños de 2 a
6 años.
TV-Y7 : programas diseñados para niños de 7
años o más.
TV-G : programas aptos para todas las edades.
Estos programas contienen poca violencia o no la
contienen, sin lenguaje subido de tono y pocos o
ningún diálogo o situación de índole sexual.
contenido
Ninguno
[(FV) Fantasía
Violencia]
Ninguno
Menú TV Opciones
Bloqueo infantil
Bloquear después
Bloqueo de canales
Niveles bloqueo TV
Películas prohibidas
Bloqueo Inglés Canadiense
Bloqueo Francés Canadiense
Clasificación regional
Películas prohibidas
Tod o
NR
G
PG
PG-13
R
NC-17
X
TV-PG : programas que contienen elementos que
algunos padres pueden considerar inapropiados
para niños menores y que pueden necesitar de
la orientación de un adulto. Estos programas
pueden contener violencia, diálogos o situaciones
de índole sexual y lenguaje subido de tono en un
nivel moderado.
TV-14 : programas que contienen elementos
que pueden ser inapropiados para menores de
14 años. Estos programas incluyen uno o más
de los siguientes contenidos: violencia intensa,
situaciones sexuales intensas, diálogos sugerentes
y lenguaje ofensivo.
TV-MA : programas dirigidos a adultos que
pueden ser inapropiados para menores de 17
años. Estos programas pueden contener violencia
gráfi ca, actividad sexual explícita y/o lenguaje
obsceno o indecente.
Use el bloqueo de películas prohibidas
Puede controlar la visualización de películas según su clasifi cación de la
Asociación Cinematográfi ca de Estados Unidos (MPAA).
[(D) Diálogo]
[(L) Idioma]
[(S) Sexo]
[(V) Violencia]
[(D) Diálogo]
[(L) Idioma]
[(S) Sexo]
[(V) Violencia]
[(L) Idioma]
[(S) Sexo]
[(V) Violencia]
1 Pulse MENU en el control remoto y seleccione [Opciones] >
[Bloqueo infantil] .
2 Seleccione uno de los menús de bloqueo de películas prohibidas.
• En Estados Unidos, seleccione [Películas prohibidas] .
• En Canadá, seleccione [Bloqueo inglés canadiense] o
[Bloqueo francés canadiense] .
3 Introduzca su PIN (see ‘Confi gure o cambie el PIN’ on page 16 ) .
» La siguiente pantalla muestra la clasifi cación en [Películas
prohibidas] .
4 Pulse o y luego OK para bloquear o desbloquear una o más
clasifi caciones.
Cada clasifi cación tiene un gráfi co de cuadro que indica si los
programas que poseen dicha clasifi cación están bloqueados:
• Un cuadro con una X indica que todos los elementos de la
clasifi cación están bloqueados.
• Un cuadro vacío indica que no hay elementos en la
clasifi cación que estén bloqueados.
Cuando bloquea una clasifi cación de película, todos los
elementos para edades bajo la clasifi cación de películas se
bloquean automáticamente.
5 Pulse MENU para salir.
Use el bloqueo de clasifi cación regional
Puede controlar el acceso a programas digitales según las clasifi caciones
regionales descargadas. Antes de descargar una tabla de clasifi cación,
asegúrese de que se transmitan clasifi caciones regionales.
1 Pulse MENU en el control remoto y seleccione [Instalación] >
[Preferencias] > [Tabla de cuotas descargada] .
Menú TV Instalación
Preferencias
Ubicación
Enseñar alarmas de emergencia
Tabla de cuotas descargada
Tabla de cuotas descargada
Apagado
Encendido
2 Pulse o para seleccionar [Encendido] y presione para
confi rmar su opción. Si selecciona Apagado , elige no descargar
la tabla de clasifi cación regional y no podrá usar el bloqueo de
clasifi cación regional.
18
ES
Page 90

3 Pulse para volver al menú TV y seleccione [Opciones] >
[Bloqueo infantil] > [Clasifi cación regional] .
Menú TV Opciones
Bloqueo infantil
Bloquear después
Bloqueo de canales
Niveles bloqueo TV
Películas prohibidas
Bloqueo Inglés Canadiense
Bloqueo Francés Canadiense
Clasificación regional
Clasificación regional
Introduzca su código.
4 Introduzca su PIN (see ‘Confi gure o cambie el PIN’ on page 16 ) .
5 Pulse o y luego OK para bloquear o desbloquear una o más
clasifi caciones.
Cada clasifi cación tiene un gráfi co de cuadro que indica si está
bloqueada:
• Si el cuadro tiene una X, indica que la clasifi cación está
bloqueada.
• Si está vacío, indica que la clasifi cación no está bloqueada.
6 Pulse MENU para salir.
Resumen de clasifi caciones de películas de EE.UU.
Clasifi cación Descripción
Todos Todos los elementos de la lista de clasifi cación están
bloqueados.
NR Sin clasifi cación.
G Películas con contenido moderado, adecuadas para
todas las edades.
PG Películas para las cuales se sugiere supervisión de los
padres. Pueden contener algunas escenas subidas de
tono o violentas, o algo de lenguaje indecente.
PG -13 Películas para las que se sugiere supervisión de los
padres para niños menores de 13 años.
R Restringidas. Estas películas generalmente contienen
escenas de sexo ofensivas o lenguaje vulgar y
pueden ser inapropiadas para menores de 17 años.
Se requiere del permiso u orientación de los padres.
NC-17 Aún con permiso de los padres, se prohíbe para
menores de 17 años. Sexo, violencia o lenguaje
vulgar más ofensivos.
X Películas centradas generalmente en sexo, violencia
o lenguaje inadecuado. También se las conoce como
pornografía.
Resumen de clasifi caciones de películas de Canadá
Clasifi cación Descripción
Todos Todos los elementos de la lista de clasifi cación están
bloqueados.
C Programación adecuada para niños menores de
8 años. No está permitida la irreverencia o el
contenido sexual de ningún nivel. Mínima violencia
cómica.
C8+ Adecuadas para niños de 8 años y más. Están
permitidos la violencia de baja intensidad y el terror
de fantasía.
G Películas con contenido moderado, adecuadas para
todas las edades.
PG Películas para las cuales se sugiere supervisión de los
padres. Pueden contener algunas escenas subidas de
tono o violentas, o algo de lenguaje indecente.
14+ Programación dirigida a niños de 14 años o más.
Pueden contener escenas de violencia intensa, fuerte
irreverencia y representaciones de actividad sexual
dentro del contexto de una historia.
18+ Programación dirigida a espectadores 18 años o más.
Pueden contener violencia intensa, lenguaje subido
de tono y actividad sexual.
Resumen de clasifi caciones de películas en francés de
Canadá
Clasifi cación Descripción
Todos Todos los elementos de la lista de clasifi cación están
bloqueados.
G Adecuadas para todas las edades, con poca o
ninguna violencia y poco o ningún contenido sexual.
8 ans+ Películas adecuadas para niños de 8 años o más,
que pueden contener un poco de violencia, algo de
lenguaje grosero, o poco o ningún contenido sexual.
13 ans+ Películas adecuadas para niños de 13 años o más,
con violencia, situaciones sexuales y lenguaje subido
de tono en un nivel moderado. A los menores de 13
años debe acompañarlos un adulto.
16 ans+ Películas adecuadas para niños de 16 años o más,
con violencia intensa, lenguaje subido de tono y
fuerte contenido sexual.
18 ans+ Sólo para adultos, con violencia extrema y contenido
sexual gráfi co o pornografía.
Español
19
ES
Page 91

Ver subtítulos
Este servicio de subtítulos muestra el texto CC-, T- y CS- transmitido.
Este texto de los subtítulos podrá visualizar de forma permanente, o
sólo cuando esté activado el silenciador.
Nota
Esta TV proporciona visualización de subtítulos de televisión que cumplen con la norma
•
EIA-608 y la Sección 15.119 de las reglas de la FCC.
• Si conecta su decodifi cador de señales a través de la entrada HDMI o de video
componente, no puede seleccionar los subtítulos a través de la TV. Sólo podrá
seleccionarlos a través del decodifi cador de señales.
• Los subtítulos no siempre usan ortografía y gramática correctas.
• No todos los programas de TV y comerciales de productos incluyen información de
subtítulos. Consulte las listas de programas de TV de su área para conocer los canales
de TV y los horarios en que se transmiten programas con subtítulos. Los programas
con subtítulos por lo general se indican en las listas de TV con marcas de servicio como
“CC”.
Subtítulos
Los subtítulos corresponden a una tecnología de ayuda que permite
a las personas con problemas auditivos acceder a la programación de
televisión. Los subtítulos muestran la parte del audio de la programación
como texto superpuesto sobre el video.
Vea los subtítulos
1 Pulse MENU en el control remoto y seleccione [Opciones] >
[Ajustes Subtít.] > [Subtítulos] .
2 Pulse o para seleccionar [Encendido] , [Apagado] o [Pantalla
sin sonido] y pulse
para confi rmar su opción.
3 Pulse MENU para salir.
Seleccione servicios de subtítulos
1 Active los subtítulos (see ‘Vea los subtítulos’ on page 20 ) .
2 Seleccione un servicio de subtítulos para canales analógicos:
• Pulse MENU en el control remoto y seleccione [Opciones] >
[Ajustes para Subtítulos] > [Servicio de subtítulos] .
• Pulse
Nota
•
No todos los servicios de subtítulos se usan a través de un canal de TV durante la
transmisión de un programa con subtítulos.
, entonces pulse o para seleccionar uno de los
servicios de subtítulos indicados y
para confi rmar su opción.
3 Seleccione un servicio de subtítulos para canales digitales:
• Pulse
• Pulse
y para entrar al menú para [Servicio de Subtítulos
Digitales] .
o para seleccionar uno de los servicios de subtítulos
indicados y
para confi rmar su opción.
4 Pulse MENU para salir.
Resumen de servicios de subtítulos
Servicio Descripción
CC-1, CC-2,
CC-3 y CC-4
T-1, T-2, T-3 y T-4 Se usan a menudo para la guía de canales, horarios,
CS-1, CS-2, CS3, CS-4, CS-5 y
CS-6
En la pantalla aparecen diálogos y descripciones
de las acciones del programa de TV con subtítulos.
Generalmente CC1 es el más utilizado. CC 2 puede
utilizarse para idiomas alternativos si se transmiten.
información de tablero de anuncios para programas
con subtítulos, noticias, información sobre el clima o
informes de la bolsa de valores.
El servicio 1 está designado como servicio de
subtítulos principal. Este servicio contiene subtítulos
textuales o semi textuales del idioma principal que
se habla en el audio del programa anexo.
El servicio 2 está diseñado como el servicio de
idioma secundario. Este servicio contiene subtítulos
en un idioma secundario que son traducciones de
los subtítulos del servicio de subtítulos principal. Los
otros subcanales de servicio no están preasignados.
El uso de los demás canales de servicio queda a
criterio del proveedor individual de subtítulos.
Seleccione cómo aparecen los subtítulos digitales
Puede elegir el tamaño, la fuente, el color, el fondo y otras características
del texto del subtítulo.
1 Pulse MENU en el control remoto y seleccione [Opciones] >
[Ajustes Subtít.] > [Opciones de Subtítulos Digitales] .
2 Pulse o para resaltar una opción para subtítulos digitales, y
pulse
para seleccionar la opción.
3 Pulse , entonces pulse o para resaltar una confi guración
para la opción, y pulse
para confi rmar su opción.
4 Pulse MENU para salir.
Difi cultades al ver subtítulos en la programación de DTV
Si tiene difi cultades al ver los subtítulos en la programación de DTV,
incluido HDTV, recibidos desde el proveedor de televisión suscrito,
debe:
• consultar la información y los manuales/guías de cualquier
consumidor sobre subtítulos electrónicos para programación de
DTV proporcionada por su proveedor de televisión suscrito;
• asegurarse de que la función de subtítulos de su decodifi cador de
señales, si corresponde, esté encendido; y,
• asegurarse de que la función de subtítulos en su DTV esté activada.
Si aún no puede ver los subtítulos en la programación de DTV, debe
ponerse en contacto con el proveedor de televisión para obtener
ayuda.
20
ES
Page 92

Usar la TV como monitor de PC
Use un cable HDMI-DVI o un adaptador HDMI-DVI para conectar
una PC a su TV. Para el sonido, agregue un cable de audio con un mini
enchufe estéreo.
Precaución
•
Antes de conectar el PC, ajuste la frecuencia de actualización del monitor del PC a 60
Hz.
Resoluciones de pantalla admitidas
Las siguientes resoluciones de pantalla se admiten en el modo de PC:
Resolución Tasa de actualización
640 x 480 60 Hz
800 x 600 60 Hz
1024 x 768 60 Hz
1280 x 768 60 Hz
1280 x 1024 60 Hz
1360 x 768 60 Hz
1920 x 1080* 60 Hz
*Sólo en los modelos seleccionados
Si es necesario, ajuste la posición de la imagen en el centro de la
pantalla con los botones de cursor.
Español
Active HDMI-CEC
Pulse MENU en el control remoto.
1
2 Seleccione [Instalación] > [Preferencias] > [HDMI-CEC] .
3 Pulse o para seleccionar [Encendido] .
Nota
Seleccione [Apagado] para desactivar esta función.
•
[HDMI-CEC] se debe activar en el menú [Preferencias] para que el
menú [Altavoces del televisor] quede disponible.
21
ES
Page 93

7 Instalar canales
Menú TV Instalación
La primera vez que confi gura la TV, se le solicita que seleccione un
idioma de menú y que instale los canales de TV y radio digital (si están
disponibles). Este capítulo proporciona instrucciones sobre cómo
reinstalar y sintonizar los canales.
Seleccionar el idioma del menú
Pulse MENU en el control remoto y seleccione [Instalación] >
1
[Idioma] .
Menú TV
Instalación
Idioma
Canales
Preferencias
Definición de Fuente
Reloj
Información actual del software
Borrar ajustes AV
Idioma
English
Francais
Espanol
Canales
Sintonización automática
Instalación de canales débiles
Modo de instalación
Desinstalar canales
Sintonización automática
Iniciar ahora
2 Pulse OK para comenzar la instalación.
• Si ejecuta [Sintonización automática] en canales bloqueados,
deberá ingresar su código PIN.
• Si olvidó su PIN, restablézcalo (see ‘Confi gure o cambie el PIN’
on page 16 ) .
3 Seleccione [Cable] o [Antena] y pulse OK .
4 Pulse MENU para salir.
Instalación TV
2 Seleccione un idioma y pulse OK para confi rmar su opción.
3 Pulse para volver al menú [Instalación] .
4 Pulse MENU para salir.
Confi gurar la ubicación como casa
Puede defi nir la ubicación de la TV en casa o tienda .Elija casa de modo
que pueda cambiar el ajuste predefi nido de imagen y sonido.
1 Pulse MENU en el control remoto y seleccione [Instalación] >
[Preferencias] > [Ubicación] .
2 Seleccione [Casa] y pulse OK para confi rmar su opción.
3 Pulse para volver al menú [Instalación] .
4 Pulse MENU para salir.
Instalar canales automáticamente
Antes de instalar los canales, asegúrese de estar registrado con su
proveedor de TV por cable y de que el equipo esté conectado
correctamente.
1 Pulse MENU en el control remoto y seleccione [Instalación] >
[Canales] > [Sintonización automática] > [Iniciar ahora] .
El sistema está buscando. Por favor, espere…
Canales anal. encontr.: 0
Canales dig. encontrados:
0
• Cuando está seleccionado [Antena] , la TV detecta señales de
la antena. Esto busca canales NTSC y ATSC disponibles en su
área.
• Cuando está seleccionado [Cable] , la TV detecta señales de
cable. Esto busca canales NTSC, ATSC y canales modulados
QAM disponibles en su área.
• Cuando fi nalice, aparecerá este mensaje [Búsqueda de canales
completada.] .
4 Siga las instrucciones en pantalla para terminar la instalación.
Optimice la calidad de la señal de la antena
Puede optimizar la calidad de la señal sintonizando canales ATSC con
señales débiles y ajustando la antena.
1 Pulse MENU en el control remoto y seleccione el
modo [Instalación] > [Canales] > [Modo de instalación] .
2 Seleccione [Antena] y pulse para confi rmar su opción.
3 Pulse y para ingresar [Instalación de canales débiles] .
22
ES
Page 94

4 Resalte un canal de la lista de canales de TV y pulse el botón de
color Verde del control remoto.
» Aparece la intensidad de la señal para el canal.
5 Ajuste la antena para aumentar al máximo la intensidad de la señal.
6 Pulse MENU para salir.
Desinstalar y volver a instalar canales
Cuando desinstale un canal, quítelo de la lista de canales almacenados.
Los canales desinstalados no se vuelven a instalar durante una
actualización de instalación.
1 Pulse MENU en el control remoto y seleccione [Instalación] >
[Canales] > [Desinstalar canales] .
Menú TV Instalación
Canales
Sintonización automática
Instalación de canales débiles
Modo de instalación
Desinstalar canales
Desinstalar canales
52
53
54
55
56
57
58
59
2 Pulse para ingresar a la lista de canales almacenados.
3 Pulse o para seleccionar el canal que desea desinstalar y pulse
la tecla verde del control remoto.
4 El canal está eliminado de la lista de canales. Vuelva a pulsar la tecla
Verde para volver a instalar el canal.
5 Pulse MENU para salir.
3 Pulse MENU para salir.
Enseñar alarmas de emergencia (EAS)
El estándar SCTE18 defi ne un método de señalización de alarma de
emergencia para ser utilizado por sistemas de TV por cable. EAS se
puede transmitir a dispositivos digitales, como decodifi cadores de
señales digitales, TV digitales y VCR digitales.
El esquema EAS permite que un operador de cable difunda información
relacionada con emergencias y advertencias estatales y locales.
EAS contiene la siguiente información:
• El texto de la alarma de emergencia
• Hora y fecha de inicio
• Hora y fecha de término
• Prioridad
Las EAS con prioridad máxima o alta siempre aparecen en la TV. Sin
embargo, puede confi gurar la TV para que no muestre mensajes de EAS
con prioridad media o baja.
Las EAS no son posibles con un explorador USB o con fuentes de
video analógicas.
Siempre puede eliminar el mensaje de la pantalla. La pantalla del
mensaje se sobrepone a menús y otros mensajes de pantalla.
Español
1 Pulse MENU en el control remoto y seleccione [Instalación] >
[Preferencias] > [Enseñar alarmas de emergencia] .
TV menu Instalación
Preferencias
Ubicación
Enseñar alarmas de emergencia
Tabla de cuotas descargada
Enseñar alarmas de emergencia
Siempre
Suprimir baja prioridad
Suprimir prioridad media/baja
Restaurar los ajustes a los valores de fábrica
Cuando vuelve los ajustes de imagen y sonido a sus valores
predeterminados, los ajustes de la instalación del canal no se ven afectados.
1 Pulse MENU en el control remoto y seleccione [Instalación] >
[Borrar ajustes AV] .
Menú TV
Instalación
Idioma
Canales
Preferencias
Definición de Fuente
Reloj
Información actual del software
Borrar ajustes AV
Borrar ajustes AV
Iniciar ahora
2 Pulse para resaltar [Iniciar ahora] y pulse OK para restablecer
los ajustes de imagen y sonido.
2 Resalte una opción:
• [Siempre] : Muestra todos los mensajes de alarmas de
emergencia
• [Suprimir baja prioridad] : Muestra todos los mensajes, salvo
los mensajes de baja prioridad
• [Suprimir prioridad media/baja] : Muestra sólo los mensajes
con prioridad máxima y alta
3 Pulse para confi rmar su opción.
4 Pulse MENU para salir.
23
ES
Page 95

8 Actualizar el software de
la TV
Magnavox continuamente intenta mejorar sus productos, por lo que
recomendamos enfáticamente que actualice el software de la TV
cuando haya actualizaciones disponibles.
Puede obtener nuevo software con el distribuidor o descargarlo del
sitio Web www.magnavox.com/support. Use el número del tipo de la
TV (por ejemplo, 47MF439B) para encontrar información.
Comprobar su versión actual de software
Pulse MENU en el control remoto y seleccione [Instalación] >
1
[Vers. actual software] .
» Aparece la versión y la descripción del software actualmente
instalado en su TV.
Menú TV
Instalación
Idioma
Canales
Preferencias
Definición de Fuente
Reloj
Información actual del software
Borrar ajustes AV
Prepararse para la actualización de software
Necesita el siguiente equipo:
• Un PC que pueda explorar en Internet.
• Una utilidad de archivo que admita formato ZIP (por ejemplo,
WinZip para Windows o StuffIt para Mac OS).
• Un memory stick USB.
Versión:
xxxxx
Nota
•
Sólo se admiten memorias por tátiles formateadas FAT/DOS.
• Puede obtener el nuevo software en el distribuidor o descargarlo del sitio Web www.
magnavox.com/support.
• Use sólo actualizaciones de software que se encuentren en el sitio Web.
Advertencia
•
No retire el dispositivo USB durante la actualización de software.
• Si ocurre una pérdida de potencia durante la actualización, no retire el dispositivo USB
de la TV. La TV continuará la actualización en cuanto vuelva la energía.
• Si intenta actualizar a una versión de software inferior a la actual, aparecerá un mensaje
de confi rmación. Degrade a un software anterior sólo en caso de que sea realmente
necesario.
• Si ocurre un error durante la actualización, vuelva a intentar el procedimiento o
comuníquese con el distribuidor.
Descargue el software
1 En el PC, abra un explorador Web y vaya a www.magnavox.com/
support.
2 Busque información y software relacionado con la TV y descargue
el último archivo de actualización de software a la PC.
3 Descomprima los archivos ZIP.
4 Copie el archivo autorun.upg en el directorio raíz del dispositivo
USB.
Actualizar software
Preparar para la actualización de software (see ‘Prepararse para la
1
actualización de software’ on page 24 ) .
2 Conecte el dispositivo USB al puerto USB al costado de la TV .
» La TV busca el dispositivo USB para el software actualizado e
ingresa automáticamente al modo de actualización.
3 Lea las instrucciones en pantalla y confi rme que desea continuar
con la instalación.
4 Cuando termine la actualización de software, retire el dispositivo
USB .
5 Desconecte la TV de la toma de corriente.
6 Vuelva a conectarla.
7 Pulse POWER en el costado de la TV para encenderla.
» La TV se inicia con el nuevo software.
24
ES
Page 96

9 Conectar dispositivos
En esta sección se describe cómo conectar distintos dispositivos con
diferentes conectores y suplementos; se proporcionan ejemplos en el
Inicio rápido.
g AV3 S-VIDEO (atrás): Conector de entrada de S-Video (lateral)
para uso con conectores de audio izquierdo y derecho para
videocámara, consola de juegos, etc. Cuando usa la entrada de SVideo (lateral) para señales de video, no usa la entrada de Video
compuesto (lateral) para señales de video.
h HDMI 1/2/3: Reproductor de discos Blu-ray, receptor digital de
alta defi nición, consola de juegos de alta defi nición, etc.
Precaución
•
Desconecte el cable que va a la red eléctrica antes de conectar los dispositivos.
Nota
•
Se pueden utilizar distintos tipos de conectores para conectar un dispositivo a la TV,
según la disponibilidad y sus necesidades.
Descripción general de la conexión
Conectores traseros
TV ANTENNA
1
a Entrada de señal proveniente de una antena, cable o satélite.
b AV1 y AV2 : Entrada de video proveniente de dispositivos
analógicos como DVD, receptor, consola de juegos, etc. Este
conector se usa con la entrada de audio.
c AV3 Video compuesto (atrás): Entrada de video para dispositivos
analógicos como DVD, videocámara, consola de juegos, etc. Para
usarse con la entrada de audio.
d Para uso sólo por personal de servicio.
e SPDIF OUT para salida de audio digital. Para conexión a sistemas
de home theatre.
f Entrada de audio para HDMI3.
234
R
R
L
L
Pr
Pr
Pb
Pb
Y
Y
R
L
VIDEO
S-VIDEO
AV 3AV 1 AV 2
L
R
SERV. U
SPDIF
OUT
DVI AUDIO
IN
HDMI 3HDMI 1 HDMI 2
8
5
6
7
Conectores laterales
1
R
AUDIO
L
VIDEO
S-VIDEO
2
3
HDMI 4
4
USB
5
a Salida de audio estéreo para audífonos o auriculares.
b Video compuesto : Entrada de video para dispositivos analógicos
como DVD, videocámara, consola de juegos, etc. Para usarse con
la entrada de audio.
c S-Video (lateral) para uso con conectores de audio izquierdo y
derecho para videocámara, consola de juegos, etc. Cuando usa
la entrada de S-Video (lateral) para señales de video, no usa la
entrada de Video compuesto (lateral) para señales de video.
d HDMI (lateral): Reproductor de discos Blu-ray, receptor digital
de alta defi nición, consola de juegos de alta defi nición, etc.
e Conector USB.
Español
25
ES
Page 97

Seleccionar la calidad de conexión.
HDMI: la más alta calidad
Admite señales de alta defi nición y entrega imágenes y sonido de la más
alta calidad. Las señales de video y de audio se combinan en un cable.
Compuesto: calidad básica
Cable de video/audio compuesto (amarillo/rojo/blanco)
Para conexiones analógicas. Los cables compuestos normalmente
combinan un cable de video amarillo con un cable de audio izquierdo y
derecho rojo/blanco. Haga coincidir los colores de los cables cuando los
conecte a la TV.
Consejo
•
Para conectar una PC sin un conector de HDMI, use un adaptador DVI-HDMI y un
cable de audio separado.
Nota
•
HDMI admite protección de contenido digital de gran ancho de banda (HDCP,
del inglés High-bandwidth Digital Contents Protection). HDCP es una forma de
administración de derechos digitales que protege el contenido de alta defi nición en
discos DVD o Blu-ray.
Componente (YPbPr): alta calidad
Cable de video componente (rojo/verde/azul) y cable de audio
izquierdo y derecho (rojo/blanco)
Admite señales de alta defi nición, pero entrega calidad de imagen
inferior a HDMI. Los cables de componentes combinan un cable de
video rojo/verde/azul con un cable de audio izquierdo y derecho
rojo/blanco. Haga coincidir los colores de los cables cuando los conecte
a la TV.
S-Video: buena calidad
Defi nir las conexiones
Cuando conecte dispositivos, puede etiquetar las conexiones para
identifi car dónde están conectados.
1 Pulse MENU en el control remoto y seleccione [Instalación] >
[Defi nición de Fuente] .
Menú TV
Instalación
Idioma
Canales
Preferencias
Definición de Fuente
Reloj
Borrar ajustes AV
Actualización de software
Definición de Fuente
AV1
AV2
AV3
HDMI1
HDMI2
HDMI3
HDMI later
AV later
2 Pulse para ingresar a la lista de conexiones disponibles.
3 Pulse o para resaltar una conexión de la lista.
4 Pulse para ingresar a la lista de dispositivos para la conexión, y
pulse
o para resaltar un dispositivo.
5 Pulse para confi rmar su opción.
6 Pulse MENU para salir.
Cable de S-Video y cable de Audio izquierdo y derecho (rojo, blanco)
Para conexiones analógicas. Utilice el cable de S-Video junto con el
cable de audio izquierdo y derecho.
26
ES
Conectar los dispositivos
Esta sección describe cómo conectar una selección de dispositivos con
diferentes conectores. Se pueden usar diferentes tipos de conectores
para conectar un dispositivo a la TV. Las siguientes secciones sólo
describen ejemplos; otras confi guraciones también son posibles.
Cuando conecte cables de video compuesto o componente, haga
coincidir los colores de los cables con los de los conectores de la TV.
Page 98

T
N
A
Conectar un reproductor/grabador de DVD a través de
los conectores compuestos
TV ANTENNA
Or/Ou/O RF OUT
SERV. U
LRL
Pr
Pb
Y
R
VIDEO
S-VIDEO
AV 3AV1 AV 2
L
R
DVIAUDIO
HDMI 3HDMI1 HDMI 2
R
L + R + VIDEO
SPDIF
OUT
IN
HDMI 3HDMI 1 HDMI 2
L + R + VIDEO
R
AUDIO
L
VIDEO
S-VIDEO
HDMI 4
USB
OUT
RECORDER
Set-top box
Or/Ou/O RF OUT
OUT
RECORDER
OUT
L + R + VIDEO
RF IN
RF OUT
IN
OUT
RF IN
CABLE
RF IN
VIDEO
L
S-VIDEO
R
DVIAUDIO
AV 3AV 1 AV 2
SERV. U
SPDIF
OUT
IN
R
L
Pr
Pb
Y
No ubique el grabador demasiado cerca de la pantalla, dado que
algunos grabadores son susceptibles a señales.
TV ANTENNA
R
LRL
L
Pr
Pr
Pb
Pb
Y
Y
Si el grabador posee un enchufe de video S-VHS: para obtener una
mejor calidad de imagen, conecte un cable de S-Video con la entrada
de S-Video. Conecte los cables de audio a los enchufes de entrada de
audio izquierda y derecha AV3/AV lateral.
Conecte un decodifi cador de señales, un reproductor
o grabador de DVD o una consola de juegos mediante
HDMI.
TV ANTENNA
SERV. U
LRL
Pr
Pb
Y
R
VIDEO
S-VIDEO
AV 3AV1 AV 2
SPDIF
L
R
DVI AU DIO
HDMI 3HDMI 1 HDMI 2
OUT
IN
R
L
Pr
Pb
Y
Conecte un reproductor o grabador de DVD mediante
conectores HDMI-DVI y conectores de SALIDA DE
AUDIO DIGITAL.
TV ANTENNA
SERV. U
LRL
Pr
Pb
Y
R
S-VIDEO
HDMI
VIDEO
AV 3AV 1 AV 2
SPDIF
OUT
L
R
DVI AU DIO
HDMI 3HDMI 1 HDMI 2
AUDIO
IN
AUDIO
IN
DVI
OUT
R
L
Pr
Pb
Y
Español
Nota
•
Cuando use un conector de S-Video, no conecte ningún dispositivo al enchufe de video
AV3/AV lateral.
Si usa un equipo monofónico, el altavoz izquierdo emite sonido pero el
derecho no. Use un adaptador de mono a estéreo (no incluido) para la
reproducción de sonido a través de todos los altavoces internos.
Conecte un decodifi cador de señales mediante un
conector compuesto.
TV ANTENNA
V ANTEN
Or/Ou/O RF OUT
SERV. U
LRL
Pr
Pb
Y
R
VIDEO
S-VIDEO
AV 3AV1 AV 2
L
R
DVI A UDIO
HDMI 3HDMI 1 HDMI 2
SPDIF
OUT
IN
L + R + VIDEO
OUT
RF IN
Set-top box
R
L
Pr
Pb
Y
CABLE
27
ES
Page 99

Si su dispositivo posee un enchufe de video S-VHS, mejore la calidad de
la imagen de la siguiente manera:
• Conecte un cable de S-Video a la entrada de S-Video de AV3/AV
lateral
• Conecte los cables de audio a los enchufes de entrada de audio
izquierda y derecha AV3/AV lateral.
Cuando use el conector de S-Video no conecte ningún dispositivo al
enchufe de video de AV3 ni a AV lateral.
Si usa un equipo monofónico, sólo el altavoz izquierdo emite
sonido. Use un adaptador de mono a estéreo (no incluido) para la
reproducción de sonido a través de todos los altavoces internos.
Conecte un reproductor o grabador de DVD mediante
conectores de salida de video componente (YPbPr) y de
audio analógico.
Los modelos de TV seleccionados pueden exhibir señales de DTV de
1080i, 1080p, 720p y 480p cuando se conectan a un decodifi cador de
señales de DTV. Defi na la salida de la caja de cable en 1080i, 1080p,
720p o 480p. Debe haber una señal de DTV disponible en el área.
Conectar un PC
Conectar un PC con un conector de S-Video en la parte posterior.
TV ANTENNA
SERV. U
LRL
Pr
Pb
Y
R
VIDEO
S-VIDEO
AV 3AV 1 AV 2
L
R
DVIAUDIO
HDMI 3HDMI 1 HDMI 2
SPDIF
OUT
AUDIO
OUT
IN
S VIDEO
R
L
Pr
Pb
Y
Conectar un PC con un conector de S-Video en la parte lateral.
TV ANTENNA
SERV. U
LRL
Pr
Pb
Y
R
S-VIDEO
VIDEO
AV1 / AV2 :
AUDIO L + R
SPDIF
OUT
L
R
DVI A UDIO
AV 3AV 1 AV 2
IN
AV1 / AV2 :
HDMI 3HDMI1 HDMI 2
YPbPr
DVD / Set top box
R
L
Pr
Pb
Y
Conecte un amplifi cador para sala de cine residencial
digital.
TV ANTENNA
SERV. U
LRL
Pr
Pb
Y
R
S-VIDEO
VIDEO
AV 3AV 1 AV 2
SPDIF
OUT
L
R
DVI AUDIO
HDMI 3HDMI 1 HDMI 2
DIGITAL
AUDIO
OUT
IN
DIGITAL
AUDIO
IN
R
L
Pr
Pb
Y
TV ANTENNA
SERV. U
LRL
Pr
Pb
Y
R
VIDEO
S-VIDEO
SPDIF
OUT
L
R
DVI A UDIO
AV 3AV1 AV2
IN
HDMI 3HDMI 1 HDMI 2
R
L
Pr
Pb
Y
Conectar un PC con un conector DVI.
TV ANTENNA
SERV. U
LRL
Pr
Pb
Y
R
S-VIDEO
HDMI
VIDEO
SPDIF
OUT
L
R
DVI A UDIO
AV 3AV 1 AV 2
IN
HDMI 3HDMI 1 HDMI 2
R
L
Pr
Pb
Y
Conectar un PC con un conector HDMI.
R
AUDIO
L
VIDEO
S-VIDEO
HDMI 4
USB
AUDIO
IN
S VIDEO
AUDIO
OUT
DVI
AUDIO
OUT
Por motivos legales, la señal de audio digital se puede silenciar para
obtener calidades de audio de PCM protegidas de copia en dispositivos
accesorios conectados a través de HDMI.
28
ES
Page 100

TV ANTENNA
SERV. U
LRL
Pr
Pb
Y
R
S-VIDEO
VIDEO
AV 3AV 1 AV 2
L
R
DVI AU DIO
HDMI 3HDMI 1 HDMI 2
SPDIF
OUT
IN
HDMI
Español
R
L
Pr
Pb
Y
29
ES
 Loading...