

Page 1

User manual
Manuel de l’utilisateur
Guía del usuario
37MD350B
32MD350B
LCD TV/DVD
English
1-866-341-3738
Quick Use Guide Inside!
HIGH-DEFINITION TELEVISION
Guide d’usage Rapide Incluse!
®
1-866-341-3738
Guía de Uso Rápido Incluida!
1-866-341-3738
Français
Español
MODEL NUMBER SERIAL NUMBER
Page 2
Need help connecting this LCD TV? Call us at 1-866-341-3738
Se
n
Initiale
cia
l
rations de Base
Avant de Commencer
Antes de Comenzar
TV
DTV
Or ou o
A
.
Initial Setup
Initial Setup
Select the language for setup display.
Elija el idioma de ajuste.
Sélectionner langue écran config.
Español
Français
Select SkipOK
OK
English
MENU
Initial Setup
Initial Setup
Cable
Antenna
Or
Select Skip
BACK
BackOK
OK
Make sure the antenna is connected to ''ANT. IN'' jack.
Select your signal source.
Cable
Skip
Antenna
MENU
ANT.IN
Autoprogram will begin.
Initial Setup
Initial Setup
Now the system is scanning for channels, please wait.
Auto programming will take up to 20 minutes to complete.
Skip
0%
Analog channels 0ch
Digital channels 0ch
MENU
Initial Setup
Initial Setup
Select “Retail” or “Home” for your location.
OK
OK
Retail
Home
Select
!
Vous avez besoin d’aide pour connecter ce téléviseur LCD ? Appelez-nous au 1-866-341-3738
¿Necesita ayuda para conectar esta TV LCD? Llame al número 1-866-341-3738
Quick Start GuideQuick Start Guide
Guide de Démarrage Rapide
FR
Guía de Inicio Rápido
ES
Before You Start
Avant de Commencer
Antes de Comenzar
Before You Start
Avant de Commencer
Antes de Comenzar
Connection
Connexion
Conexiones
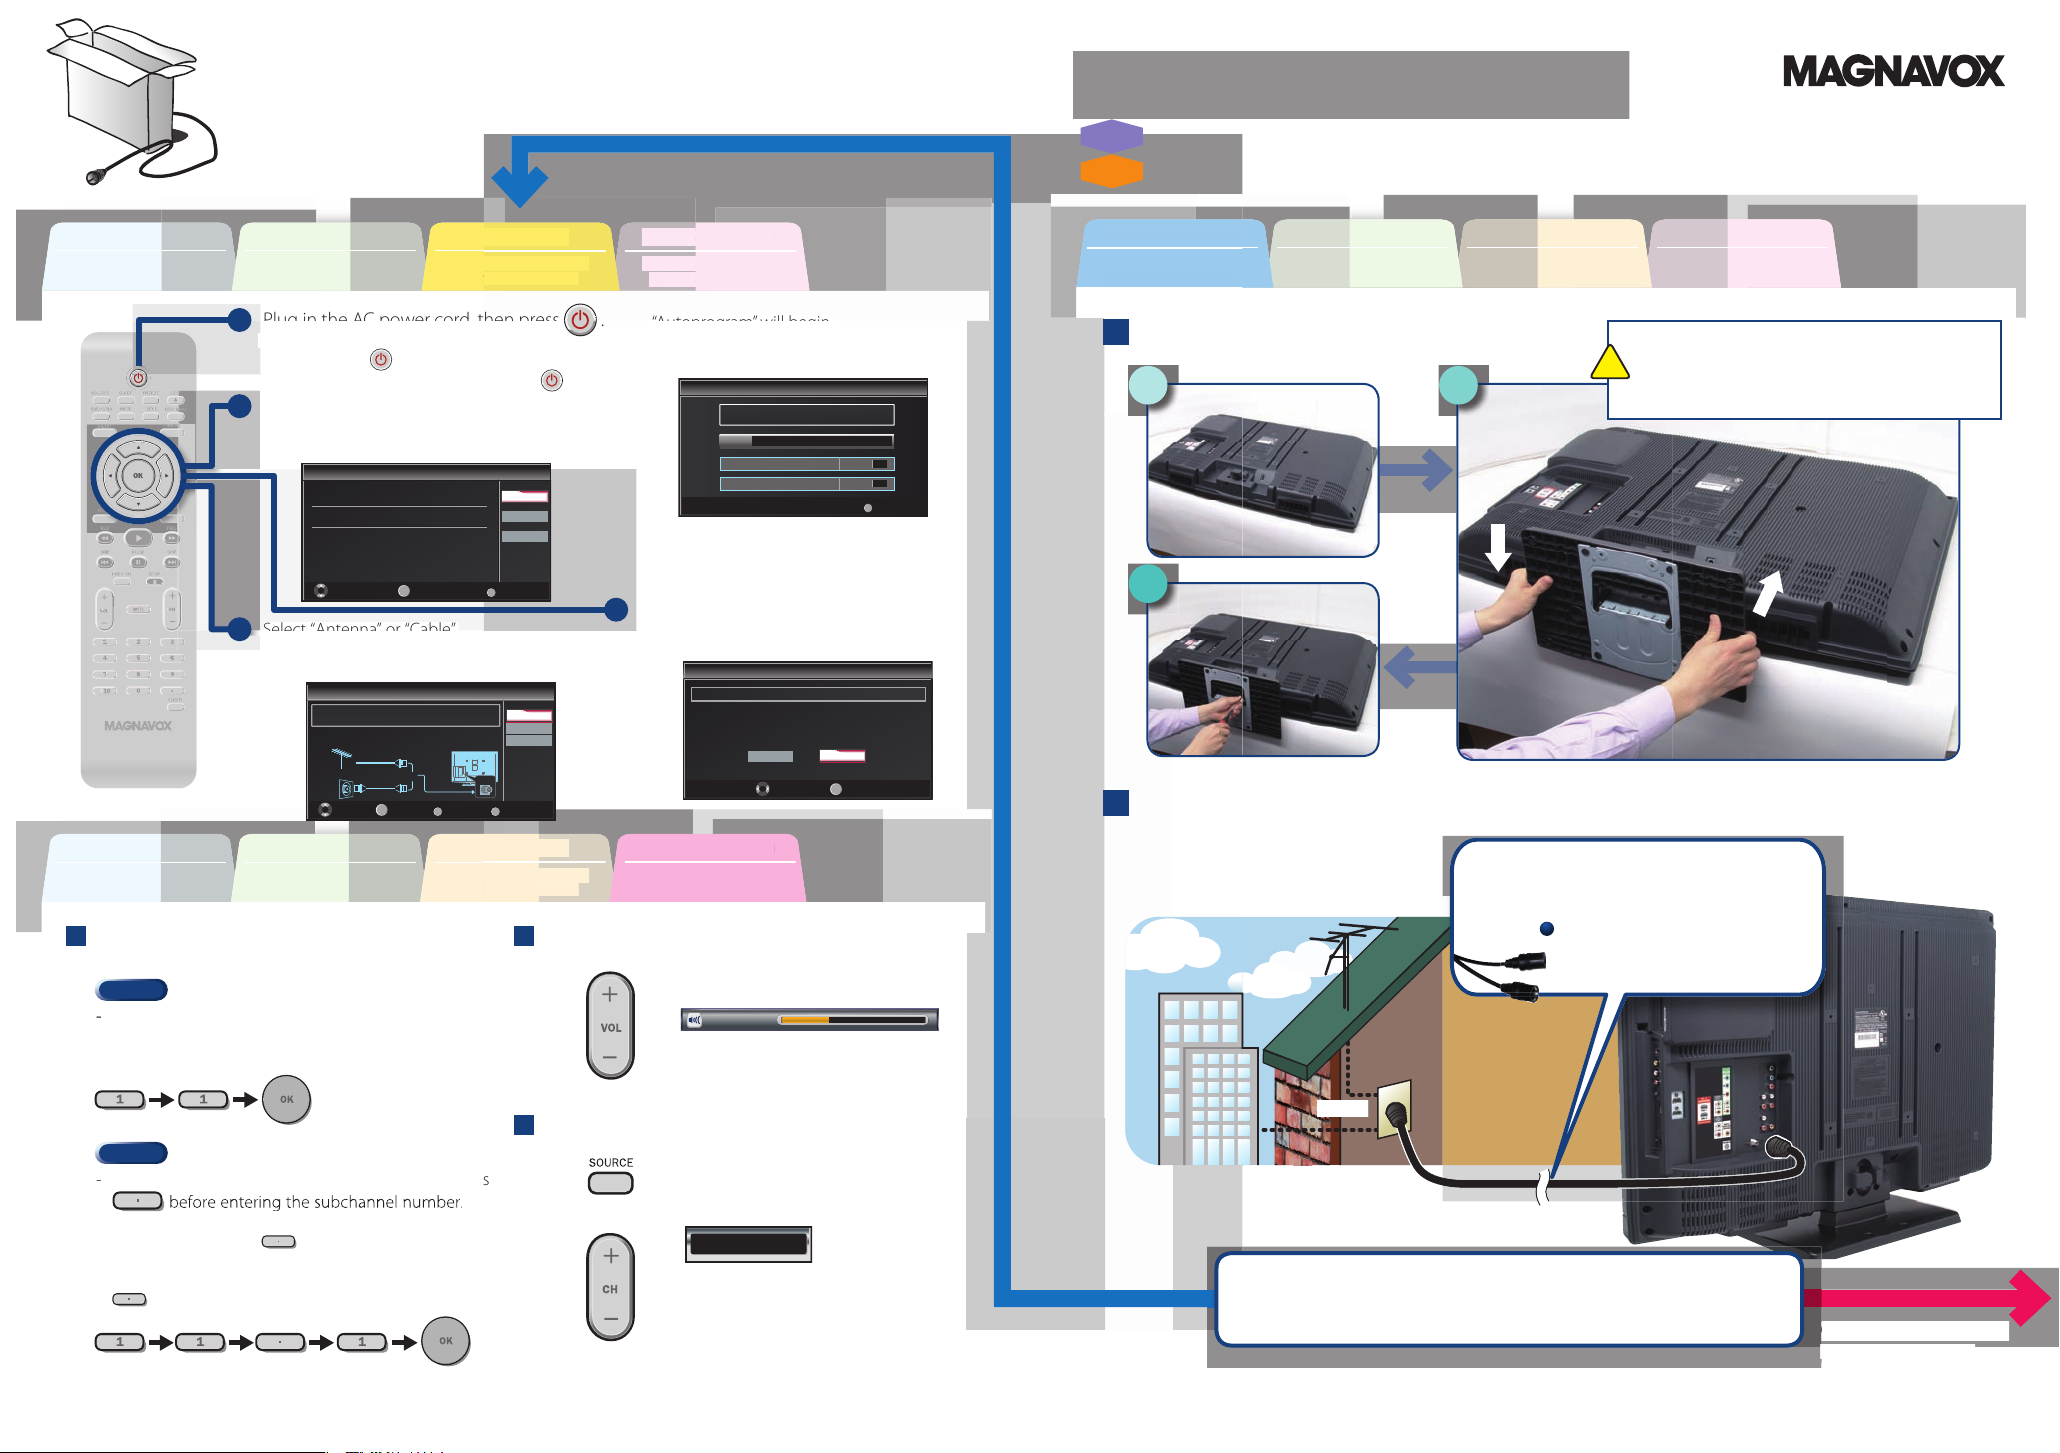
1
Branchez le cordon d’alimentation secteur,
puis appuyez sur
Enchufe el cable alimentador de CA y presione .
2
Sélectionnez votre langue.
Seleccione su idioma.
3
Sélectionnez “Antenne” ou “Câble”.
Seleccione “Antena” o “Cable”.
.
Connection
Connexion
Conexiones
Channel Selection
Sélection de Chaîne Selección de Canal
Confi guration Initiale
Instalación Inicial
Initial Setup
Confi guration Initiale
Instalación Inicial
V olume A djustmen t
Réglage du Volume Ajuste de Vol ume n
Basic Operation
Opérations de Base
Operación Básica
La “Programmation Auto” commence.
Se inicia la función “Sintonización automática”.
4
Sélectionnez “Magasin” ou “Maison”.
Seleccione “Tienda” o “Casa”.
Basic Operation
Opérations de Base
Operación Básica
Avant de Commencer
Antes de Comenzar
Connection
Connexion
Conexiones
Initial Setup
Confi guration Initiale
Instalación Inicial
Attaching the Stand
Fixation du Support Fijación de la Base
1
2
➁
3
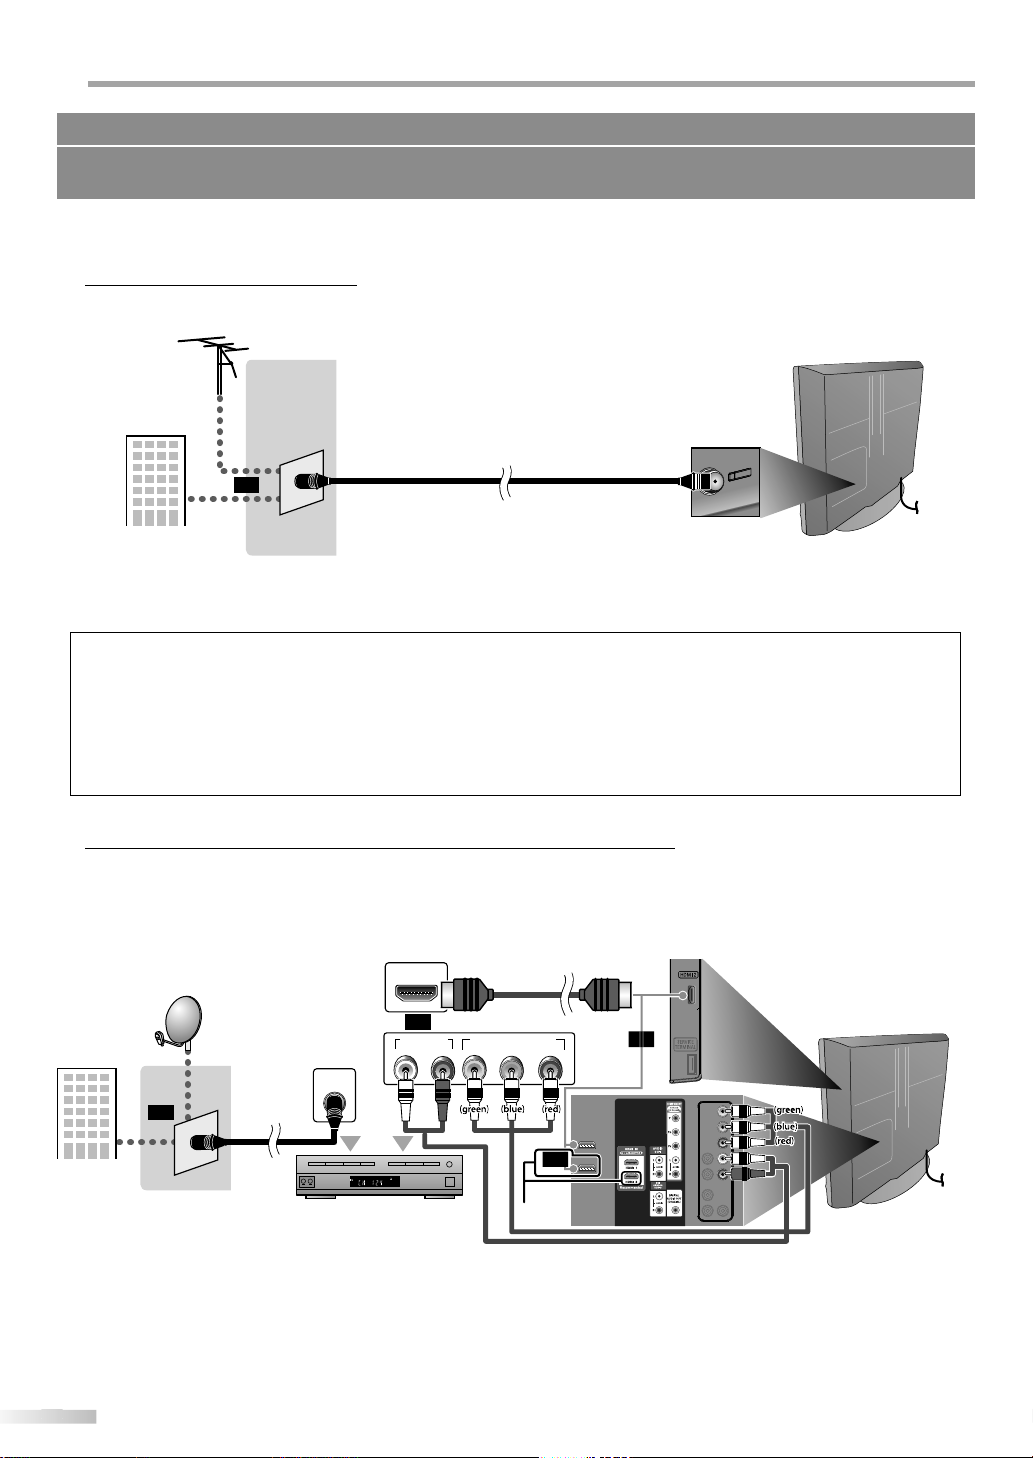
Connecting the Antenna
Connexion de L’antenne Conexión de la Antena
Antenne VHF / UHF Antena VHF / UHF
VHF / UHF antenna
What do I need in this procedure?
De quoi ai-je besoin pour réaliser cette procédure ?
¿Qué necesito para este procedimiento?
An RF coaxial cable (not included)
Câble RF coaxial (non fourni)
Un cable coaxial RF (no incluido)
Basic Operation
Opérations de Base
Operación Básica
Slide the stand onto the TV until the hook snaps.
Faites glisser le socle sur le téléviseur jusqu’à ce que les
crochets s’enclenchent.
Deslice la base de soporte sobre el TV hasta que el gancho
emboque.
➀
Lorsque vous sélectionnez le canal analogique 11.
Cuando seleccione el canal analógico 11.
Lorsque vous sélectionnez le canal numérique 11.1. N’oubliez pas
d’appuyer sur la toucher
sous-canal.
Cuando seleccione el canal digital 11.1 asegúrese de presionar
antes de indicar el número de subcanal.
Volume 30
Switch the Input
Changer D’entrée Cambie la Entrada
avant d’appuyer sur le numéro du
All of us at MAGNAVOX wish you will be very pleased with your unit.
L’ensemble du personnel de MAGNAVOX espère que vous serez satisfait de votre appareil.
Todos en MAGNAVOX deseamos que esté muy complacido(a) con su unidad.
HDMI1
ex.) Lorsque vous sélectionnez HDMI1.
p.ej.) Cuando seleccione HDMI1.
ou o
cable TV company
Société de télévision par câble compañía de TV por cable
Do you have any AV device(s) to connect to this unit?
NoNo NonNon NoNo
Souhaitez-vous connecter d’autres appareils AV à ce téléviseur ?
¿Tiene algún dispositivo AV para conectar a esta unidad?
Yes Yes UiUi SíSí
Go on the next page...
Allez à la page suivante…
Pase a la siguiente página…
© 2010 Funai Electric Co., Ltd.Printed in China 1EMN25960 ★★★★★
Page 3
Connection GuideConnection Guide
V
V
RRR
B
B
B
ESESESEE
E
T
T
TTT
TTT
CTCC
U
/
/
P
P
CCC
UR
R
R
URURURURU
U
EEE
E
/////
D
O
DI
DI
O
OOO
Y
B
B
ESESESESEEE
TTTTT
VE
VE
RY
RY
Y
B
B
B
ES
ES
T
T
T
PPP
CCC
C
UUR
UR
U
R
EEE
E
/
///
PI
CT
CT
UR
E
E
/
/
/
A
A
D
DI
I
O
OOOOOOO
AU
DI
DI
DI
O
O
GGGGOGO
OO
DDDDDDDDDDD
D
PIC
PIC
PIC
PIC
PI
PIC
PI
PIPIPIPPPPPP
R
EEE
E
BE
B
TT
ER
E
PI
CT
C
UR
U
E
BE
BE
PI
CT
CT
UR
UR
E
E
AU
A
Guide de Connexion
FR
Guía de Conexiones
ES
Need help connecting this LCD TV? Call us at 1-866-341-3738
Vous avez besoin d’aide pour connecter ce téléviseur LCD ? Appelez-nous au 1-866-341-3738
¿Necesita ayuda para conectar esta TV LCD? Llame al número 1-866-341-3738
Before You Start
Avant de Commencer
Antes de Comenzar
Connection
Connexion
Conexiones
Initial Setup
Confi guration Initiale
Instalación Inicial
Basic Operation
Opérations de Base
Operación Básica
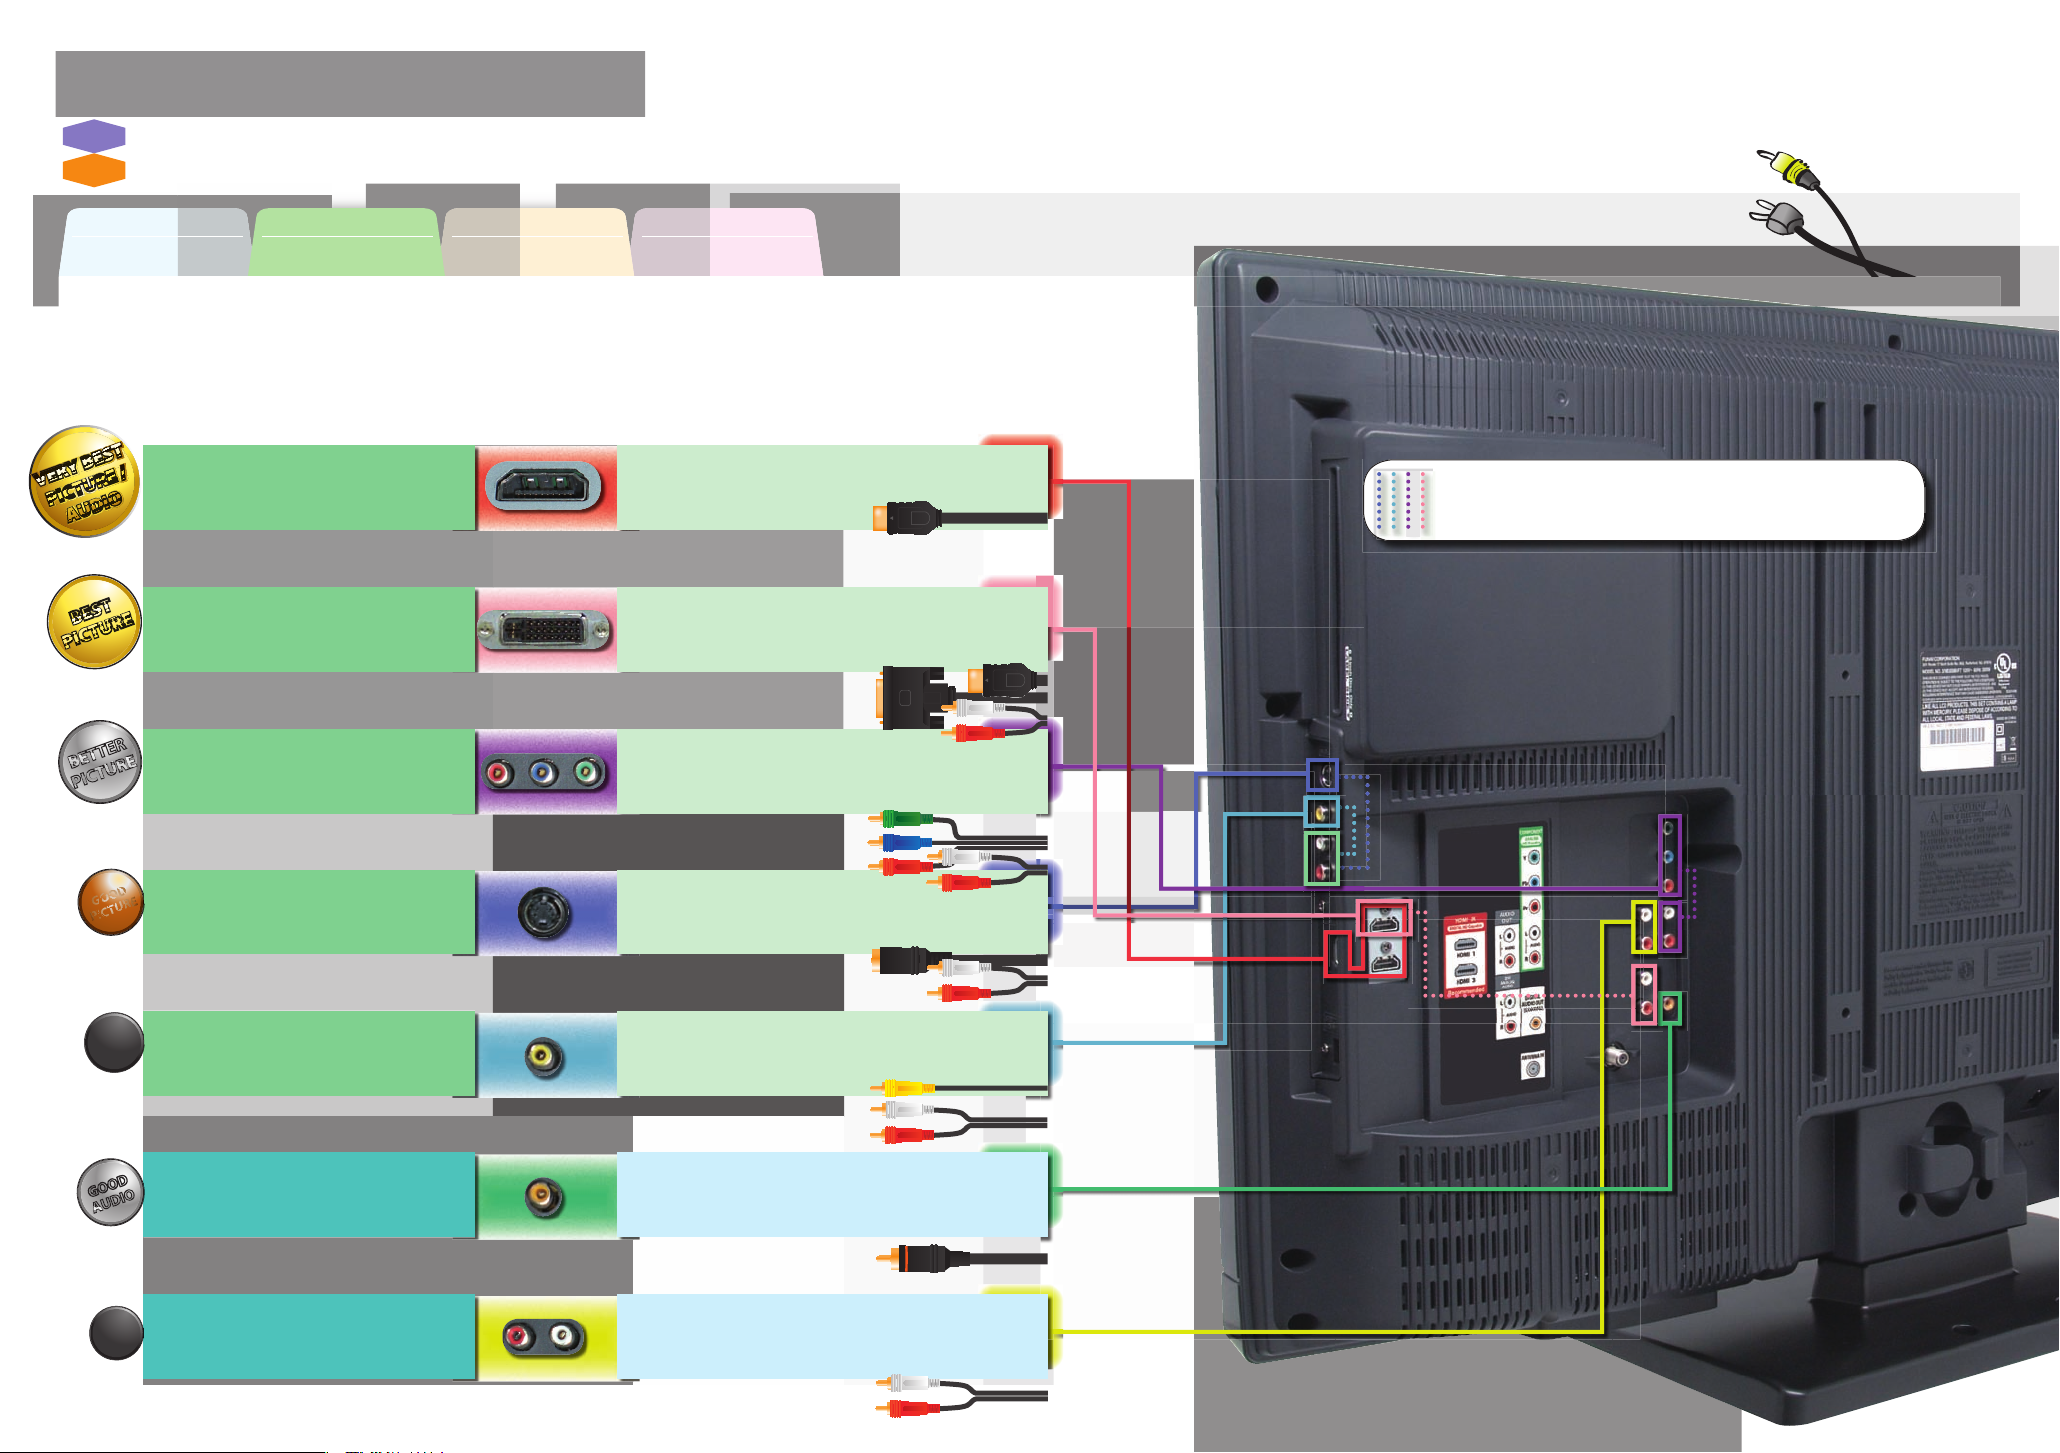
Optimize your HD TV experience by properly connecting your components.
Optimisez votre expérience de la télévision haute défi nition en connectant correctement vos composants.
Optimice su experiencia en TV HD conectando correctamente los componentes.
your device has;
votre appareil possède ;
su dispositivo tiene;
HDMI OUT jack
prise de HDMI OUT
toma de HDMI OUT
Image/Audio de qualité optimale
Máximo imagen e audio
DVI OUT jack (including PC)
prise de DVI OUT (including PC)
toma de DVI OUT (including PC)
Image d’excellente qualité
La mejor imagen
COMPONENT VIDEO OUT jack
prise de COMPONENT VIDEO OUT
toma de COMPONENT VIDEO OUT
Image de très bonne qualité
Mejor imagen
jack type is;
le type de prise est ;
el tipo de toma es;
necessary cable is;
le câble nécessaire est ;
el cable necesario es;
HDMI cable
Câble HDMI
Cable HDMI
DVI-HDMI
Câble de conversion DVI-HDMI + câbles audio
Cable de conversión DVI HDMI + cables de audio
Component
Câbles vidéo composant + câbles audio
Cables de vídeo en componentes + cables de audio
conversion cable + audio cables
video cables + audio cables
Separate analog audio cable(s) is also required for this connection.
Vous aurez également besoin de câble audio analogiques pour e ectuer ce branchement.
Se requieren también cables separados de audio analógico para esta conexión.
Image de bonne qualité
Buena imagen
Image de qualité standard
Imagen estándar
Audio de bonne qualité
Buen audio
Audio de qualité standard
Audio estándar
S-VIDEO OUT jack
GOOD
PICTURE
prise de S-VIDEO OUT
toma de S-VIDEO OUT
VIDEO OUT jack
STANDARD
PICTURE
prise de VIDEO OUT
toma de VIDEO OUT
DIGITAL AUDIO IN jack
GOOD
IO
prise de DIGITAL AUDIO IN
toma de DIGITAL AUDIO IN
ANALOG AUDIO IN jack
STANDARD
AUDIO
prise de ANALOG AUDIO IN
toma de ANALOG AUDIO IN
S-Video cable + audio cables
Câble S-Vidéo + câbles audio
Cable de S-Video + cables de audio
Video cable + audio cables
Câble vidéo + câbles audio
Cable de vídeo + cables de audio
Coaxial Audio cable
Câble audio coaxial (audio numérique)
Cable coaxial de audio (Audio Digital)
Audio cables
Câbles audio (audio analogique)
Cables de audio (Audio Analógico)
Page 4

h
fety
ls
l
fety
t
.
-
d
.
l
j
h l
l
.
h
.
j
.
Customer Use
below the Serial No. which is located
s
future reference.
odel No.
_
_____________________________
to ensure:
e
.
y
n
ll
ufacture
e
y
ll
l
.
,
y!
T
.
he
,
t
k.
sfaction.
.
OX
at:
Return your Product Registration Card or register online at
www.magnavox.com/support today to get the very most from your purchase.
Registering your model with MAGNAVOX makes you eligible for all of the valuable benets listed below, so don’t miss out.
omplete and return your Product Registration Card at once,
Proof of Purchas
Returning the enclosed card
guarantees that your date of
urchase will be on le, so no
additional paperwork will be
required from you to obtain
warranty service
ongratulations on your purchase
and welcome to the “famil
Dear MAGNAVOX product owner:
hank you for your condence in
MAGNAVOX. You’ve selected one of the
est-built, best-backed products available today.
e’ll do everything in our power to keep you happy
with your purchase for many years to come
As a member of the MAGNAVOX “family,” you’re
ntitled to protection by one of the most
omprehensive warranties and outstanding service
networks in the industry. What’s more, your
purchase guarantees you’ll receive all t
information and special oers for which you qualify
plus easy access to accessories from our convenien
ome shopping networ
Most importantly, you can count on our
uncompromising commitment to your total
i
All of this is our way of saying welcome - and
thanks for investing in a MAGNAVOX product
*Product Safet
Noticatio
By registering your product, you’
receive notication directly from
he man
case of a product recall or safet
*Additional Benets
Registering your product
guarantees that you’ll receive a
r - in the rar
Know t
This “bolt of lightning” indicates
uninsu
may cause an electrical shock. For the sa
of everyone in your household, please do no
remove product covering
The “exclamation point” calls attention to
eatures for which you should read the en
closed literature closely to prevent operating
an
maintenance problems
WARNING: To reduce the risk of re or
e
ectric shock, this apparatus should not be
exposed to rain or moisture and ob
wit
iquids, such as vases, should not be
p
aced on this apparatus
AUTION: To prevent electric shock, matc
wide blade of plug to wide slot, fully insert
ATTENTION: Pour éviter les choc électriques,
introduire la lame la plus large de la
a borne correspondante de la prise et pousser
usqu’au fond
of the privileges to which you’re
entitled, including specia
money-saving oers
ese sa
ated material within your unit
symbo
ects lled
che dans
P.S. To get the most from your MAGNAV
purchase, be sure to complete and return your
Product Registration Card at once or register
nline
www.magnavox.com/support
For
Enter
on the rear of the cabinet. Retain thi
information for
M
Serial No.
Visit our World Wide Web Site at www.magnavox.com/support
____________________________
Page 5
ead befo
t
ese
s.
g
llo
.
r
n w
h
.
f
s
i
source
aiator
h
r
(
s
o
hDo not d
s
r
thne
o and t
d
en t
de
ou
sul an eleriia
or
e t
t
her t
anl
e o
c
snd
e
o
ufre
,
or sold
a Wn a c is u
,
u cion
w
e
ppa
plu
r
d
-
e
s
h
bma
w
ppl
as s
bj
ppa
,
t a h b e
p
oistur
d
r
d
n
d
ser
e
:
s
pp
;
n
g
.
-
d.
t
t
y
t
t
l
safet
d stabilit
pro
.
o
et
t
d
y
g
t
/t
h
could un
spec
d
r
d
t
a
or antnn should
oc awa
ennGroundin
o antnn isnn t the recei
o
v
.
aric
Cod
/
pro
fo
pro
su
uctu
groing of t
r
o
unnnn t
ts
fo
bel
ject
y
t
so tha
lo
g
a
y
g
O
-T
bat
a m
iInst all ba
co
as o
i
m
bries
(
d
)
g
e1.9.101315
stalle
ded t t C
V
s
tion to A
cle40 o
th
NE
,
i
t
a conne
close to t
c
cal.
ectric Code
8
9
0
IMPORTANT SAFETY INSTR
UCTIONS
R
th
e
ee all warnin
Fo
Clean onl w a dr
Do not bock an of t
nstall in accordance wit te manu
regirs
ha pr
g
ounding- plug. A polarized plug has two blawi
prong are provided for your
lu does not t into yr
relacemen of t olet ol
w
n
Rer all servicin t qlied seice pernnel.icing i
requir
norm or h b droe
. The powe
Objects have fallen, or liquid has been spilled into the
D. Te appliance does not appear to operate normally or
E
The appliance has been dropped, or the enclosure dam
instrucion
p tese instruc
w all instructions
not u tis appa
not
wider than the other. A groundinge plug has tw
he powe
rticularly at plus convenience receples and
hey exit from t
u ahmes/ssories specied b th
nl
specied by the mn
rt/a
ra combination t avoid injur from
tis appa
ed for long priod of tm
wn t apar
h as powsu
pilled or o
mae Requiri
iced by qied
a
liance
The appliance has been exposed to rai
exhibits a marked chan
age
ons.
ct
e ventilatioopenings
nr any h
ve or oh
t
ird grounding prong. The wide blade or
w a
x
r aa
purose of
f
con
cord from
cord or plug is
h fallen into a
to rn or m
cord or te pug has been damaged
inwalked on or pinched
trip brk
d
uring lighing storms or when un
ic - The alianc shoul
vice prsonn
e in performance;
r’s instruction
su
in
ludin amplier
e polrized or
he provi
r
with the ar
mad,liqid h
hen ming th
oes not ope
n
re operating equipmen
ir
n f
e poin
r
ed in an
us
16
Til
an
• Do not c
Wall or Ceiling Mounting - The alianc shoul
mounte t a wall or ceiling only as recommended b
manuf
1
from pw
1
surges and built up scharges
g
2
object d not fall and liquids are not spilled into the enc
B
• Do not
• Remove brie wn t unit is not used for a lon
ili
commende inerna
ich could ultimatel overturn te prouc
Also, do not en
electronic equipmen
e pro damage and/r prsonal inju
r Line-An
ounded so as to provide some pr
ion
719,
ounding of the m and
ounding connecrs l
e grounding elero Se Figre
re through openin
mag t the un
kaline e.
m
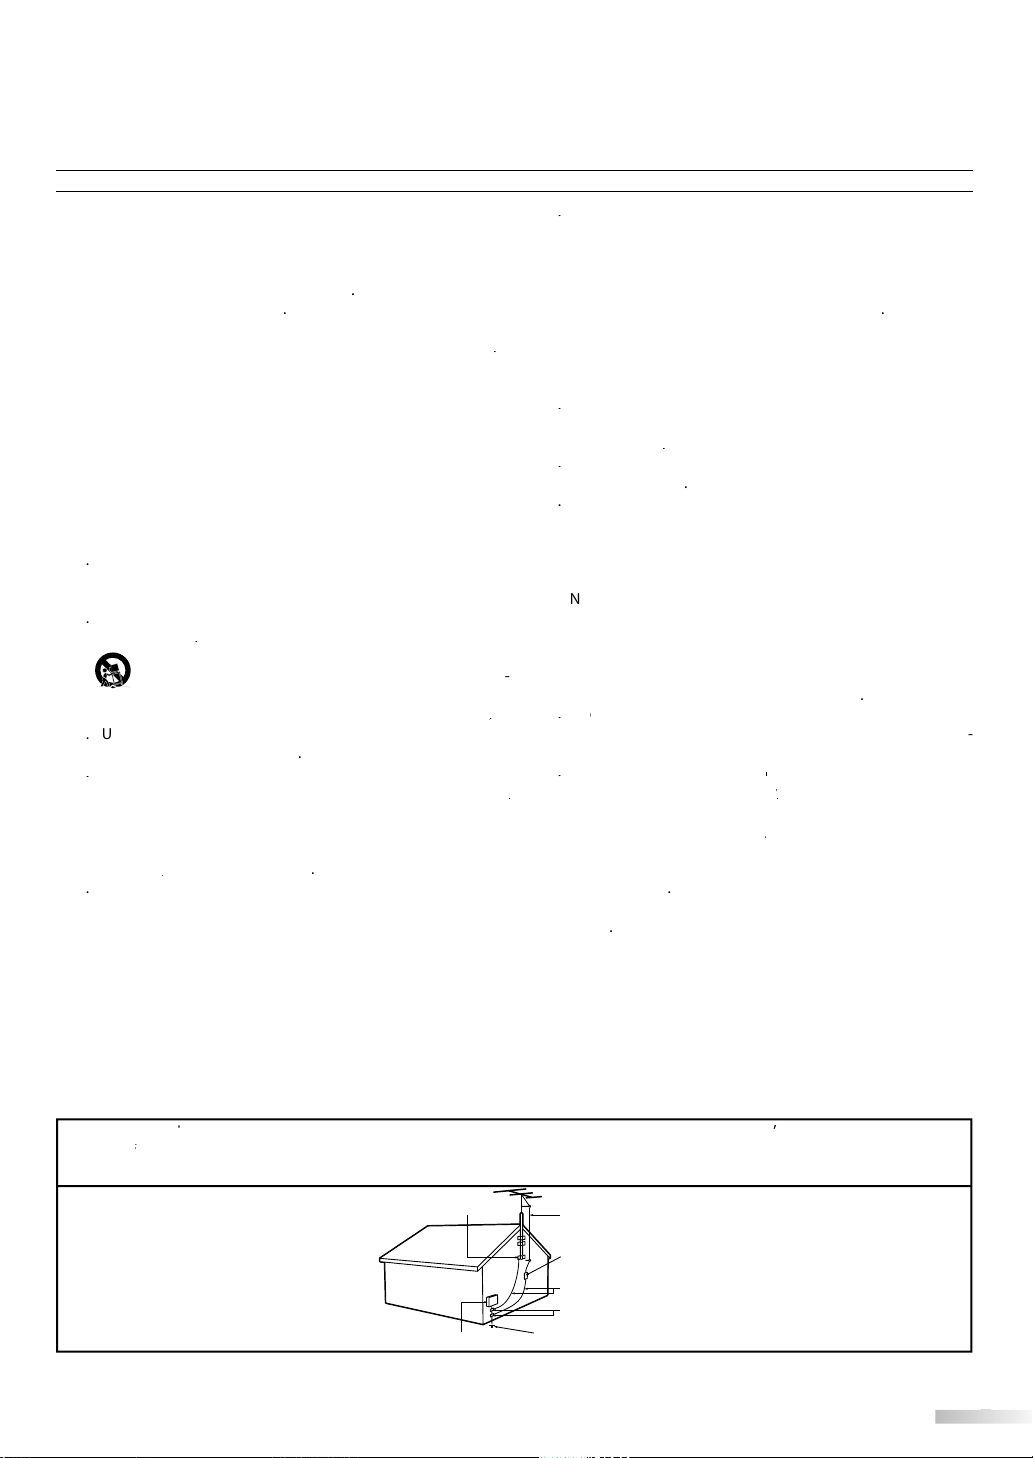
-All televisions must comply wi
y
tiesof icabinet design
mise tese design sndards by applying
e pull force t the front or t of
u
of the Nion
vide in
l-ire to an antenn discharge unit size of
o grondin elero and requirmen
d Liquid
sa
r in bodily inju proper damage or
rie
n
un
globa
s on te t of te cabinetSuc
tingl fll from the top of the set an
ver, b sure the antnn sstem is
-
TI
w + and - aligned
old and new or c
ildren, by pcin
-If an
n wit respect t
sr
n of annna-discharg
should b
nt
y sndards for tilt
l
n anst
ANSI
rbon an
n
,
r
lk
system in
th provides guidelines for proper groundingd
to te grounding system of t buildin a
xample of Antenna Grounding as
r NEC - National El
This reminder is pri
he point of
GROUND CLAMP
ELECTRIC SERVICE EQUIPMENT POWER SERVICE GROUNDING ELECTRODE SYSTEM (NEC ART 250, PART H)
ANTENNA LEAD IN WIRE
ANTENNA DISCHARGE UNIT (NEC SECTION 810-20)
GROUNDING CONDUCTORS (NEC SECTION 810-21)
GROUND CLAMPS
par
system in
atn
species that the cable grnd sh
entr a pri
rti
Page 6
NTRODUCTION
.
.
.
Th
d.
.
To prevent injury, this apparatus must be securely attached to the wall in accordance with the instructions.
g
f
.
Y
T
y.
p
.
.
ecaution
G
T
y
g
.
CE
T
f
T
f
f
ff
f
:
.
.
.
.
Y
ade Name:
odel:
B
ess:
.
866-3
38
Pr
Do not place the unit on the furniture that is capable of being tilted by a child and an adult leaning, pulling, standing or climbing
alling unit can cause serious injury or even death
on it. A
FCC WARNIN
his apparatus may generate or use radio frequency energy. Changes or modifications to this apparatus may cause harmful
interference unless the modifications are expressl
apparatus if an unauthorized chan
RADIO-TV INTERFEREN
his apparatus has been tested and found to comply with the limits for a Class B digital device, pursuant to Part 15 of the FCC
Rules. These limits are designed to provide reasonable protection against harm
his apparatus generates, uses, and can radiate radio frequency energy and, if not installed and used in accordance with the
instructions, may cause harm
not occur in a particular installation. I
can be determined by turning the apparatus o
more o
the following measures
1) Reorient or relocate the receiving antenna
2) Increase the separation between the apparatus and receiver
3) Connect the apparatus into an outlet on a circuit different from that to which the receiver is connected
4) Consult the dealer or an experienced radio/TV technician for help
DECLARATION OF CONFORMIT
Tr
M
his Class B digital apparatus complies with Canadian ICES-003. Standard Television Receiving Apparatus, Canada BETS-7 / NTMR-7
MAGNAVOX
37MD350B / 32MD350
e or modification is made
ul interference to radio communications. However, there is no guarantee that interference will
this apparatus does cause harmful interference to radio or television reception, which
esponsible Party:
Telephone Number:
approved in the manual. The user could lose the authority to operate this
ul interference in a residential installation.
and on, the user is encouraged to try to correct the interference by one or
UNAI CORPORATION, Inc.
r
9900 Van Ness Avenue, Torrance, CA 90501 U.S.A
-
41-37
is apparatus should not be placed in a built-in installation such as a bookcase or rack unless proper ventilation is provide
ake sure to leave a space of 3.2 inches (8cm) or more around this apparatus
Disconnect the mains plug to shut off when find trouble or not in use. The mains plug shall remain readily operable
AUTION: Danger of explosion if battery is incorrectly replaced. Replace only with the same or equivalent type
ARNING: Batteries (battery pack or battery installed) shall not be exposed to excessive heat such as sunshine, fire or the like
Like all LCD products, this set contains a lamp with Mercury, please dispose of according
to all Local, State and Federal laws. For the disposal or recycling information, contact:
www.mygreenelectronics.com or www.eiae.or
ARNING:
LASER SAFET
his unit employs a laser. Only a qualified service person should remove the cover or attempt to service this device, due
to possible eye injur
AUTION: Use of controls or adjustments or performance of procedures other than those specified herein may result in
AUTION: Visible and invisible laser radiation when open and interlock defeated. Do not stare into beam
LOCAT ION: Inside, near the deck mechanism
IMPORTANT COPYRIGHT INFORMATION
Unauthorized copying, broadcasting, public performance and lending of discs are prohibited. This product incorporates
copyright protection technology that is protected by U.S. patents and other intellectual property rights. Use of this
copyright protection technology must be authorized by Macrovision, and is intended for home and other limited
viewing uses only unless otherwise authorized by Macrovision. Reverse engineering or disassembly is prohibited.
hazardous radiation ex
osure.
Page 7
• Do not handle the AC power cord with wet hands.
.
OC
G
.
f
l
.
.
G
.
.
.
O
G
.
.
g
.
T
.
adema
on
ted States and other countries.
.
ce:
T
.
.
The
ca
.
y
T
:
TV
n
DVD
o
DTV
n
CD
D
ppl
h.
ppl
h.
Do not pull on the AC power cord when disconnecting it from an AC outlet. Grasp it by the plug
Do not put your fingers or objects into the unit.
L
ATION AND HANDLIN
Do not install the unit in direct sunlight, near strong magnetic fields, or in a place subject to dust or strong vibration.
Avoid a place with drastic temperature changes
Install the unit in a horizontal and stable position. Do not place anything directly on top or bottom of the unit.
Depending on your external devices, noise or disturbance o
aced too close to them. In this case, please ensure enough space between the external devices and the unit
p
Depending on the environment, the temperature of this unit may increase slightly. This is not a malfunction.
Be sure to unplug the AC power cord from the AC outlet before carrying the unit
DEW CONDENSATION WARNIN
Dew condensation may form inside the unit in the following conditions. If so, do not use this unit at least for a few
ours until its inside gets dry
The unit is moved from a cold place to a warm place
Under conditions of high humidity
After heating a cold room.
N
TE ABOUT RECYCLIN
• This unit’s packaging materials are recyclable and can be reused
Please dispose of any materials in accordance with your local recycling regulations
• Batteries should never be thrown away or incinerated but disposed of in accordance with your local
re
ulations concerning chemical wastes
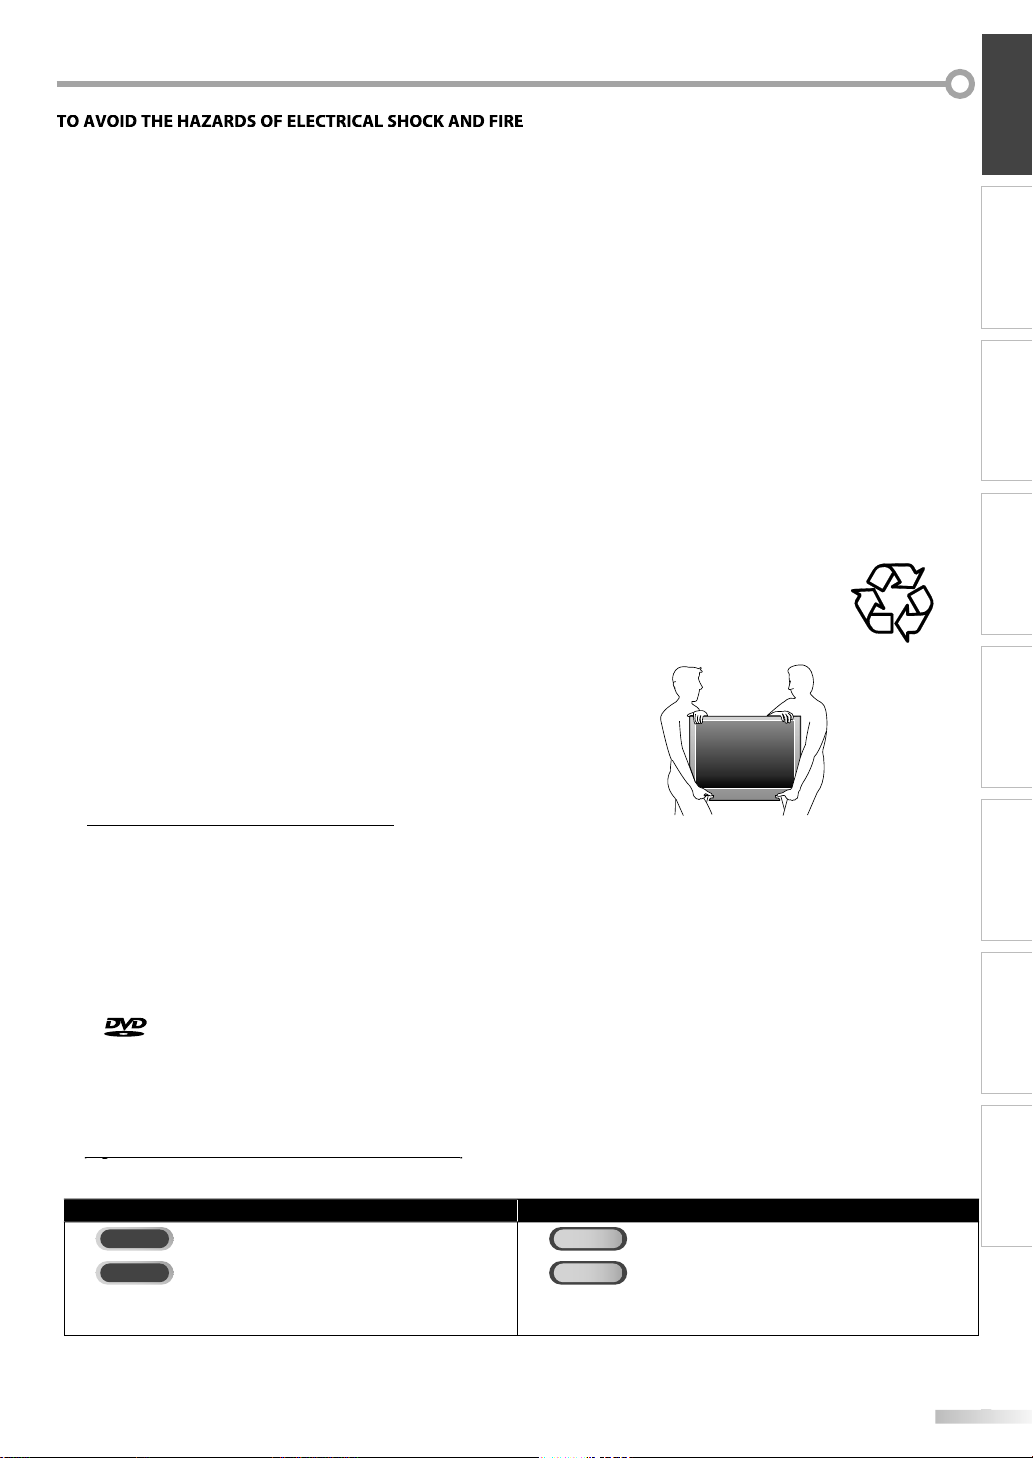
HEN CARRYING THIS UNI
At least 2 people are required when carrying this unit.
Make sure to hold the upper and bottom frames of the TV firmly as illustrated
the picture and/or sound may be generated if the unit is
INTRODUCTION PREPARATION
WATCHING TV
OPTIONAL SETTING OPERATING DVD DVD SETTING TROUBLESHOOTING
Tr
• HDMI, the HDMI Logo, and High-Definition Multimedia Interface are trademarks or registered trademarks of HDMI Licensing
LLC in the Uni
• Manufactured under license from Dolby Laboratories. Dolby and the double-D symbol are trademarks of Dolby Laboratories.
• ENERGY STAR® is a joint program of the U.S. Environmental Protection Agency and the U.S. Department of Energy helping us
all save money and protect the environment through energy efficient products and practices
nsumer Noti
his TV has been set to maximize energy efficiency while delivering the best possible picture using the factory installed home
mode settings. Changing or enabling other features in this TV (e.g. brightened backlighting) will possibly increase energy
onsumption beyond the original ENERGY STAR® qualified limits
• is a trademark of DVD Format/Logo Licensing Corporation
Ameri
he following is the description for the symbols used in this manual. Description refers to
• If neither symbol appears under the function heading,
operation is a
rk Informati
n Academy of Pediatrics discourages television viewing for children younger than two years of age
TV FUNCTIONS DVD FUNCTIONS
: Analog TV operatio
: Digital TV operatio
icable to bot
If neither symbol appears under the function heading,
operation is a
: Playback of DVD-vide
: Playback of audio C
icable to bot
INFORMATION
Page 8
NTRODUCTION
g
.
.
.
pp
sho
below.
ace the ma
ace do
t.
tep.
bottom of the ma
stand
the direction as sho
350
between the stand and the unit.
eaded holes at the bottom of the
stand
t
AAA
AAA
.
front side
d
3 screws
)
4 screws
)
ual
)
D350B
)
B
N
co
r
gi
d
)
d
)
r man
1EMN25919
If you need to replace these accessories, please refer to the part No. with the illustrations and call our toll free
ustomer support line found on the cover of this manual
• For 32MD350B, nonremovable AC power cord is already fixed on the unit
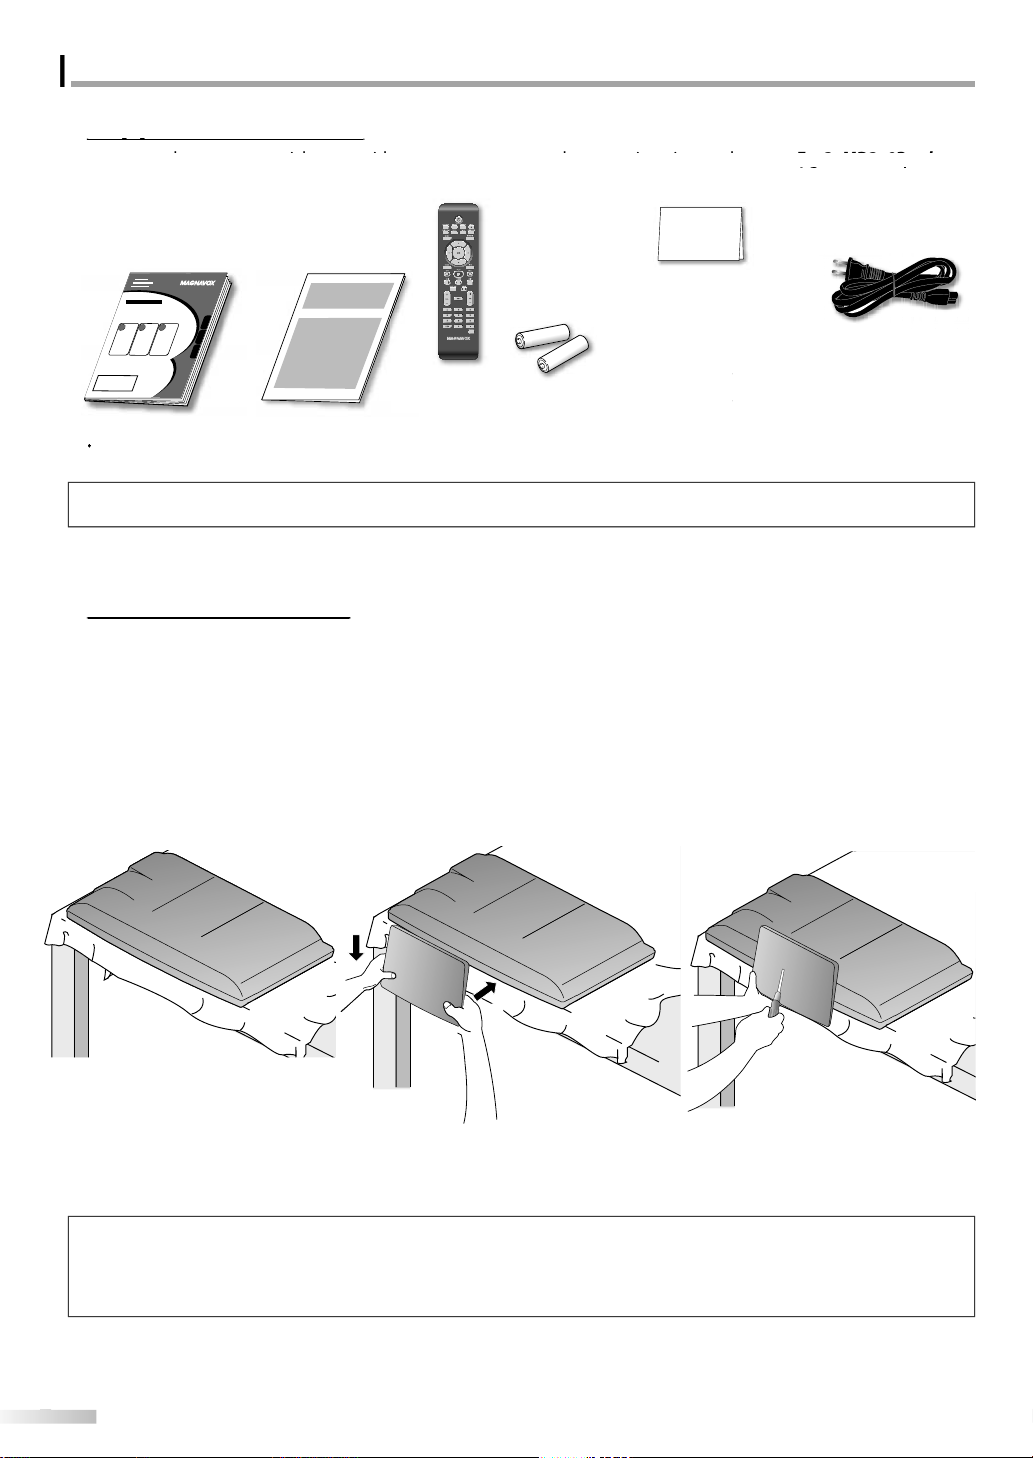
You must attach the stand to the unit to have it as a table top unit. Be sure the front and rear of the stand match the proper direction
Spread a thick and soft cloth over a
1
as
wn
Pl
ake sure not to damage the screen.
t least 2 people are required at this
s
in unit f
r 37M
1EMN25960
or 32MD350
1EM
wn onto i
Align the 2 stand hooks with the two
2
ks under the
nit (shown by arrow
y arrow
ounting holes are aligned.
r 32MD
ake sure not to put the AC power
rd
NF801UD
ies
atte
1.5V x 2)
AAA,
in
until it stops and the
B
re
stration car
1EMN24699
screw kit for attaching the stan
Drive Phillips pan screws in
3
in
then slide
wn
hr
stand until they are tight.
power cor
WAV0162LW001) or
WAV0162LTE03) or
WAV152ZHN001
1ESA20208
1ESA19508
To remove the
Unscrew the Phillips pan screws on step3
After the screws are removed pull the stand up toward the rear of the unit. Be careful not to drop the stand when you remove it.
• When attaching the stand, ensure that all screws are tightly fastened. If the stand is not properly attached, it could cause the unit to fall,
resulting in injuries as well as damage to the unit.
• Make sure to use a table which can support the weight of this unit and is larger than this unit.
• Make sure the table is in a stable location
from this uni
➁
front side
front side
➀
Page 9

V
g
g
access the
cable
s.
y)
.
m
y
p p
.
r
g
.
ected
ote control.
on
p
y
p
r
guag
:
Sound Function
ote control.
d
y
.
t
y
.
t
t
t
t
t
F
eatures
V
V
D
y
.
y
p
es.
ge
deo.
uto Power Off
y.
ock
.
k
t Rate
cation
)
.
n
guag
y
.
e
oom
.
t
tual Surround
Searc
p
arker
back.
t
B
]
b
y
D
.
D
]
button
f
y
INTRODUCTION PREPARATION
DTV/TV/CAT
You can use your remote control to select
channels which are broadcast in di
conventional analo
n
• Information Display (DTV onl
You can display the title, contents and other
nformation of the current DTV program on the TV
reen
•
utoprogra
This unit automatically scans and memorizes
channels available in
rocedures.
setu
hild Lock
•
This feature allows you to block children’s access to
nappropriate programs
• Closed Caption Decode
uilt-in closed caption decoder displays text for
closed caption supported pro
•
TS/SAP Tuner
Audio can be sel
•
Shut Off Functi
f there is no signal input from the antenna terminal
and no o
off automaticall
• Slee
This feature will automatically turn off the power of
he unit at a specific time.
• Choices for On-screen Lan
elect your on-screen language
nglish, Spanish or French.
reo
•
• PLL Frequency Synthesized Tuning
rovides free and easy channel selection and lets
ou tune directly to any channel using the number
• Various Adjustment for Picture and Soun
ustomizes image quality to suitable for your room
and sets the sound as
• HDMI Inpu
hen using HDMI1 Input, you can enjoy this unit
as a PC monitor if
• Component video Inpu
• S-Video Inpu
V Inpu
Digital audio Outpu
•
nalog audio Outpu
eration for 15 minutes, the unit will turn
Time
ns on the rem
format. Also, cable subscribers
ir
TV channel
our area, eliminating difficult
from the rem
.
our preference
our PC has DVI output terminal
ital format and
rams
e
• Dolby Digital Sound
Dolby Digital multi-channel surround sound
- Enjo
hen you connect the unit to your Dolby Digital
• Still / Fast / Slow / Step Playback
- Various pla
• DVD Menus in a Desired Langua
- You can display DVD menus in a desired language, if
• A
- If there is no operation for 20 minutes, the unit will
• Parental L
- Block the viewing of a DVD-video unsuitable for
• Resume Playbac
- Lets you resume playback from the point at which
• Bi
• DRC (dynamic range control
- You can control the range of sound volume
r
back modes are available including still
ictures, fast forward/reverse, slow motion and ste
ram
vailable on a DVD-vi
urn itself off automaticall
hildren
layback was stopped.
Indi
ccessing from [MODE]utto
During playback
• Subtitles in a Desired Lan
- You can select a desired language for displa
ubtitle, if that language is available on a DVD-video
• Selecting a Camera Angl
- You can select the desired camera angle, if a DVD
ontains sequences recorded from different angles.
• Z
- Allows you to enlarge the size of picture image
• Black Level Adjustmen
• Vir
•
h
ter search / title search / track search / time
- cha
rch
• M
- The part on the disc designated by user can be
lled
• Repea
- chapter / title / track / all / A-
ccessing from
In stop mode
• Program Pla
- You can program the order of tracks to play them
ack in designated order
• Random Playback for audio C
- This unit can shuffle the order of tracks to play them
ack in randomly.
MODE
back for audio C
e
ing
utton
WATCHING TV
OPTIONAL SETTING OPERATING DVD DVD SETTING TROUBLESHOOTING
INFORMATION
ccessing from
During playback
• Choices
unction
- Select
our desired languages or stereo sound
unction when different options are available on
our disc.
SAP/AUDIO
or Audio Language and Stereo Sound
Page 10

NTRODUCTION
ts
d.
.
.
.
Safety Instructions
. . . . . . . . . . . . . . . . . . . . . . . . . . .
ecautio
.
Tradema
.
.
.
.
es
. . . . . . . . . . . . . . . . . . . . . . . . . . . . . . . . . . . . . . . . . . . . . . . . .
.
Te
als
.
ote Contro
.
s
. . . . . . . . . . . . . . . . . . . . . . . . . . . . . . . . . .
ection
.
ection to Cable Receiver or Sate
ox
. . . . . . . . . .
ection
.
.
.
ctions
.
ection
.
.
.
ode
.
e
. . . . . . . . . . . . . . . . . . . . . . . . . . . .
.
TV Scree
.
T
e
. . . . . . . . . . . . . . . . . . . . . . . . . . . . . . . .
m
. . . . . . . . . . . . . . . . . . . . . . . . . . . . . . . . . . . . . . . . . .
t
. . . . . . . . . . . . . . . . . . . . . . . . . . . . . . . . . . . . . . . . . . . .
Channels
. . . . . . . . . . . . . . . . . . . . . . . . . . . . . . . . . . . . . . . . . .
.
.
.
.
. . . . . . . . . . . . . . . . . . . . . . . . . . . . . . . . . . . . . . . . . . . . . .
gs
. . . . . . . . . . . . . . . . . . . . . . . . . . . . . . . . . . . . . . . . . . . . .
de
. . . . . . . . . . . . . . . . . . . . . . . . . . . . . . . . . . .
.
6
ctions
a
. . . . . . . . . . . . . . . . . . . . . . . . . . . . . . . . . . . . . .
k
. . . . . . . . . . . . . . . . . . . . . . . . . . . . . . . . . . . . . . . . . . . . . . .
.
k
. . . . . . . . . . . . . . . . . . . . . . . . . . . . . . . . . . . . . .
. . . . . . . . . . . . . . . . . . . . .
e
. . . . . . . . . . . . . . . . . . . . . . . . . . . .
e
. . . . . . . . . . . . . . . . . . . . . . . . . . .
.
.
.
.
. . . . . . . . . . . . . . . . . . . . . . . . . . . . . . . . . . . . . .
. . . . . . . . . . . . . . . . . . . . . . . . . . . . . . . . .
. . . . . . . . . . . . . . . . . . . . . . . . . . . . . . . . . . . . . .
.
g
. . . . . . . . . . . . . . . . . . . . . . . . . . . . . . . . .
g
. . . . . . . . . . . . . . . . . . . . . . . . . . . . . . . . . . . . .
.
.
g
. . . . . . . . . . . . . . . . . . . . . . . . . . . .
t
. . . . . . . . . . . . . . . . . . . . . . . . . . . . . . . . . . . .
0
.
2
. . . . . . . . . . . . . . . . . . . . . . . . . . . . . . . . . . . . . . . . . . . . . . . .
e
. . . . . . . . . . . . . . . . . . . . . . . . . . . . . . . . . . . . . . . . . . .
s
. . . . . . . . . . . . . . . . . . . . . . . . . . . . . . . . . .
n
. . . . . . . . . . . . . . . . . . . . . . . . . . . . . . . . .
s
. . . . . . . . . . . . . . . . . . . . . . . . . . . . . . . . . . . .
. . . . . . . . . . . . . . . . . . . . . . . . . . . . . . . . . . . . . . .
6
nten
INTRODUCTION
r
upplied Accessories . . . . . . . . . . . . . . . . . . . . . . . . . . . . . . . . . . .
Attaching the Stand . . . . . . . . . . . . . . . . . . . . . . . . . . . . . . . . . . . .
nstalling the Batterie
PREPARATION
Antenna Conn
xternal Device Conn
Cable Management . . . . . . . . . . . . . . . . . . . . . . . . . . . . . . . . . . .
lug In the AC Power Cord . . . . . . . . . . . . . . . . . . . . . . . . . . . .
nitial Setup . . . . . . . . . . . . . . . . . . . . . . . . . . . . . . . . . . . . . . . . . . .
WATCHING TV
Volume Adjustment . . . . . . . . . . . . . . . . . . . . . . . . . . . . . . . . . . .
witching Each Input Mod
witching Audio Mode . . . . . . . . . . . . . . . . . . . . . . . . . . . . . . . .
V Screen Display Mod
OPTIONAL SETTING
Channel Lis
Add
Antenna Confirmation. . . . . . . . . . . . . . . . . . . . . . . . . . . . . . . .
anguage Selection . . . . . . . . . . . . . . . . . . . . . . . . . . . . . . . . . . .
icture Adjustment . . . . . . . . . . . . . . . . . . . . . . . . . . . . . . . . . . . .
ound Adjustment. . . . . . . . . . . . . . . . . . . . . . . . . . . . . . . . . . . .
Closed Caption . . . . . . . . . . . . . . . . . . . . . . . . . . . . . . . . . . . . . . . .
n . . . . . . . . . . . . . . . . . . . . . . . . . . . . . . . . . . . . . . . . . . . . .
rk Information
mbols Used in this Manual. . . . . . . . . . . . . . . . . . . . . . . . . . .
r
ntrol Panel. . . . . . . . . . . . . . . . . . . . . . . . . . . . . . . . . . . . . . . . . .
rmin
. . . . . . . . . . . . . . . . . . . . . . . . . . . . . . . . . . . . . . . . . . . . . .
m
nn
. . . . . . . . . . . . . . . . . . . . . . . . . . . . . . . .
l Function . . . . . . . . . . . . . . . . . . . . . . . . . . . . .
. . . . . . . . . . . . . . . . . . . . . . . . . . . . . . . . . .
llite B
. . . . . . . . . . . . . . . . . . . . . . . . . . .
TV Fun
hannel Sel
eep Timer . . . . . . . . . . . . . . . . . . . . . . . . . . . . . . . . . . . . . . . . . . .
ill M
n Information . . . . . . . . . . . . . . . . . . . . . . . . . . . . . . . .
in Menu . . . . . . . . . . . . . . . . . . . . . . . . . . . . . . . . . . . . . . . . . . . . .2
utoprogra
. . . . . . . . . . . . . . . . . . . . . . . . . . . . . . . . . . . . .
. . . . . . . . . . . . . . . . . . . . . . . . . . . . . . . . . . . . . . . . . . . . .
DVD Fun
OPERATING DVD
Playable Media . . . . . . . . . . . . . . . . . . . . . . . . . . . . . . . . . . . . . . . . .7
Unplayable Medi
Playbac
isc Menu . . . . . . . . . . . . . . . . . . . . . . . . . . . . . . . . . . . . . . . . . . . . .
Resume Playbac
Fast Forward / Fast Revers
Slow Forward / Slow Revers
oom . . . . . . . . . . . . . . . . . . . . . . . . . . . . . . . . . . . . . . . . . . . . . . . . .
Search Functions . . . . . . . . . . . . . . . . . . . . . . . . . . . . . . . . . . . . . .
Repeat Playback . . . . . . . . . . . . . . . . . . . . . . . . . . . . . . . . . . . . . .
Repeat A-B Playback . . . . . . . . . . . . . . . . . . . . . . . . . . . . . . . . . .
Special Settings . . . . . . . . . . . . . . . . . . . . . . . . . . . . . . . . . . . . . . .
DVD SETTING
DVD Language Settin
DVD Audio Settin
Parental Setting . . . . . . . . . . . . . . . . . . . . . . . . . . . . . . . . . . . . . . .
Others . . . . . . . . . . . . . . . . . . . . . . . . . . . . . . . . . . . . . . . . . . . . . . . .
Reset to the Default Settin
Language Code Lis
TROUBLESHOOTING
FAQ . . . . . . . . . . . . . . . . . . . . . . . . . . . . . . . . . . . . . . . . . . . . . . . . . . .
Troubleshooting Guide . . . . . . . . . . . . . . . . . . . . . . . . . . . . . . . .5
INFORMATION
Maintenanc
General Specification
Electrical Specificatio
Other Specification
7
5
5
C Settin
nergy Saving Mo
Current Software Info . . . . . . . . . . . . . . . . . . . . . . . . . . . . . . . . . .3
© 2010 Funai Electric Co., Lt
All rights reserved. No part of this manual may be reproduced, copied, transmitted, disseminated, transcribed, downloaded or stored in
any storage medium, in any form or for any purpose without the express prior written consent of Funai
Furthermore, any unauthorized commercial distribution of this manual or any revision hereto is strictly prohibited
Information in this document is subject to change without notice. Funai reserves the right to change the content herein without the
obligation to notify any person or organization of such changes.
consent of Funai. All other trademarks used herein remain the exclusive property of their respective owners. Nothing contained in this
anual should be construed as granting, by implication or otherwise, any license or right to use any of the trademarks displayed herein.
Misuse of any trademarks or any other content in this manual is strictly prohibited. Funai shall aggressively enforce its intellectual property
ights to the fullest extent of the law
. . . . . . . . . . . . . . . . . . . . . . . . . . . . . . . . . . . . . . . . . . . . . .
with the design is a registered trademark of Funai Electric Co., Ltd. and may not be used in any way without the express written
Page 11
)
ess to tu
.
)
.
)
k.
he d
.
/
(
l
.
MENU
(
)
.
/
)
w
ol.
cator
.
cator
.
r
.
l]
)
.
(
)
deo cable connectio
ce.
(
)
deo cable connectio
ce.
(
)
cable connectio
ce.
)
ectio
ce.
)
)
C outlet.
)
holder to bundle the cables.
(
)
ection from an external device.
(
)
cable connection for an external device.
udio cable connection from a
ce.
,
ll.
y)
(
g
eceiver.
(
)
gnal.
(
)
ectio
ce.
.
[
ly]
(
)
ection fro
ce.
als
ntrol Pan
el
y)
.
D350B
y
-
-
VOLUME
VOLUME
+
MENU
CHANNEL
5 16 4 3 27
+
Termin
12
13
14
15
16
*
24
25
7M
nl
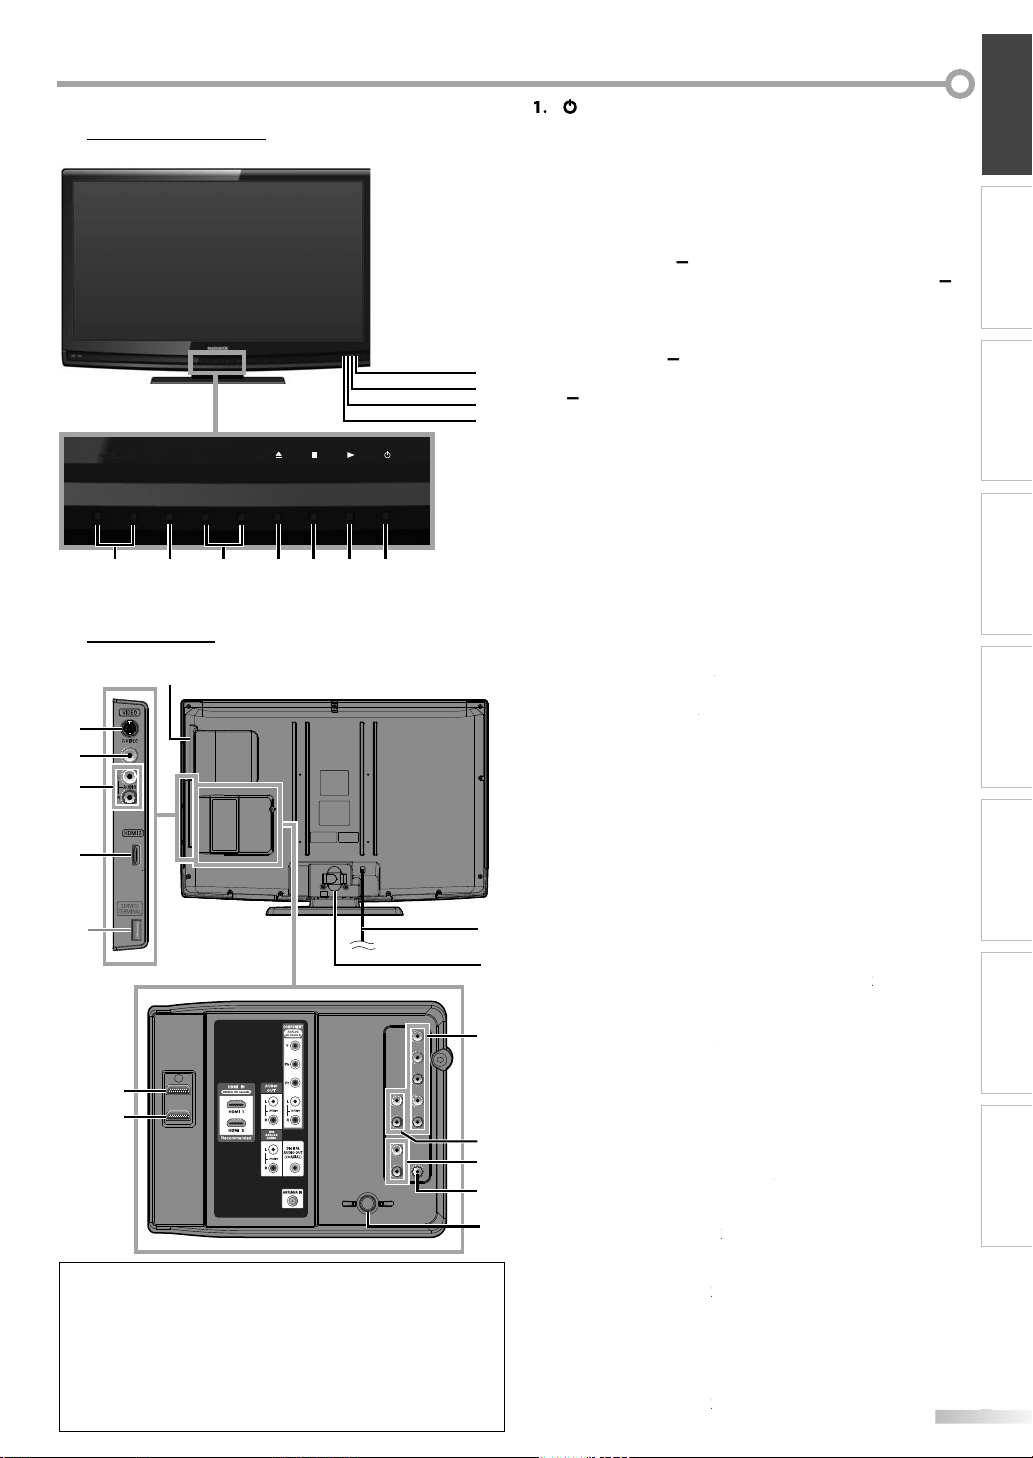
service terminal (service use onl
Use this terminal only when a software update is necessary.
User should not connect any devices to the service terminal such
s digital camera, keyboard, mouse, etc. (because these will not
work).
The software update is, in most cases, handled by an authorized
service person or in some circumstances the user may be asked
to do the software upgrade themselves
INTRODUCTION PREPARATION
POWER (p. 17
Pr
. Bplay). 38
Press to begin the disc playback
Cstop). 38
Press to stop the disc playbac
Aeject). 38)
Press to eject t
CHANNEL
Press to se
through the main menu items
Press to display the main menu
8
9
10
11
POWER
VOLUME
Press to adjust the volume or move right ( / left
. Infrared sensor Windo
Receives infrared rays transmitted from the remote
ntr
POWER ON indi
Lights up green when power is on
STAND BY indi
Lights up red when power is off
1. DVD indicato
Lights up orange when the disc is inserted
Side Pane
2. Disc loading slot (p. 38
Insert the disc with the label side facing forward
-Vi
Vi
Audio
6. HDMI 2 Input jack
HDMI conn
Rear Panel]
7. AC power cord (AC power cord Inlet for 37MD350B
. 16
Connect the supplied AC power cord for a standard
17
18
A
8. Cable management (p. 16
9.
Component video cable and audio cable
19
nn
Audio
1. Audio Input jack for HDMI 1 (. 13 / p. 16)
A
When you connect your PC that has a DVI terminal
20
21
22
23
use a stereo mini plug conversion cable as we
(For HDMI 1 Input jack onl
Coaxial di
TV si
HDMI conn
When you connect your PC that has a DVI terminal,
ou can enjoy this unit as a PC monitor
37MD350B on
HDMI conn
rn the unit on and off
isc
. 18 / p. 19)
ect channels or move up ( / down (
. 17 / p. 46
. 18
through the main menu items.
. 14
n from an external devi
. 15
n from an external devi
. 14 / p. 15
n from an external devi
. 12 / p. 13
n from HDMI devi
this
. 12 / p. 14
. 15
DVI devi
. 15)
ital cable connection for a decoder or an
io r
. 12
coaxial cable connection for your antenna or cable
. 12 / p. 13 / p. 16
n for HDMI or DVI devi
. 12 / p. 13
m HDMI devi
WATCHING TV
OPTIONAL SETTING OPERATING DVD DVD SETTING TROUBLESHOOTING
INFORMATION
Page 12
NTRODUCTION
ote Control Function
l
.
.
)
)
)
9
4
ess
.
ess
select the audio mode.
ode
ess
)
.
tual surround on or off.
.
ess to set the marker.
.
MENU
7
/
s
/
B
/
/
L
)
)
)
0
Rem
1
2
2
3
4
5
6
7
8
9
10
11
12
13
14
15
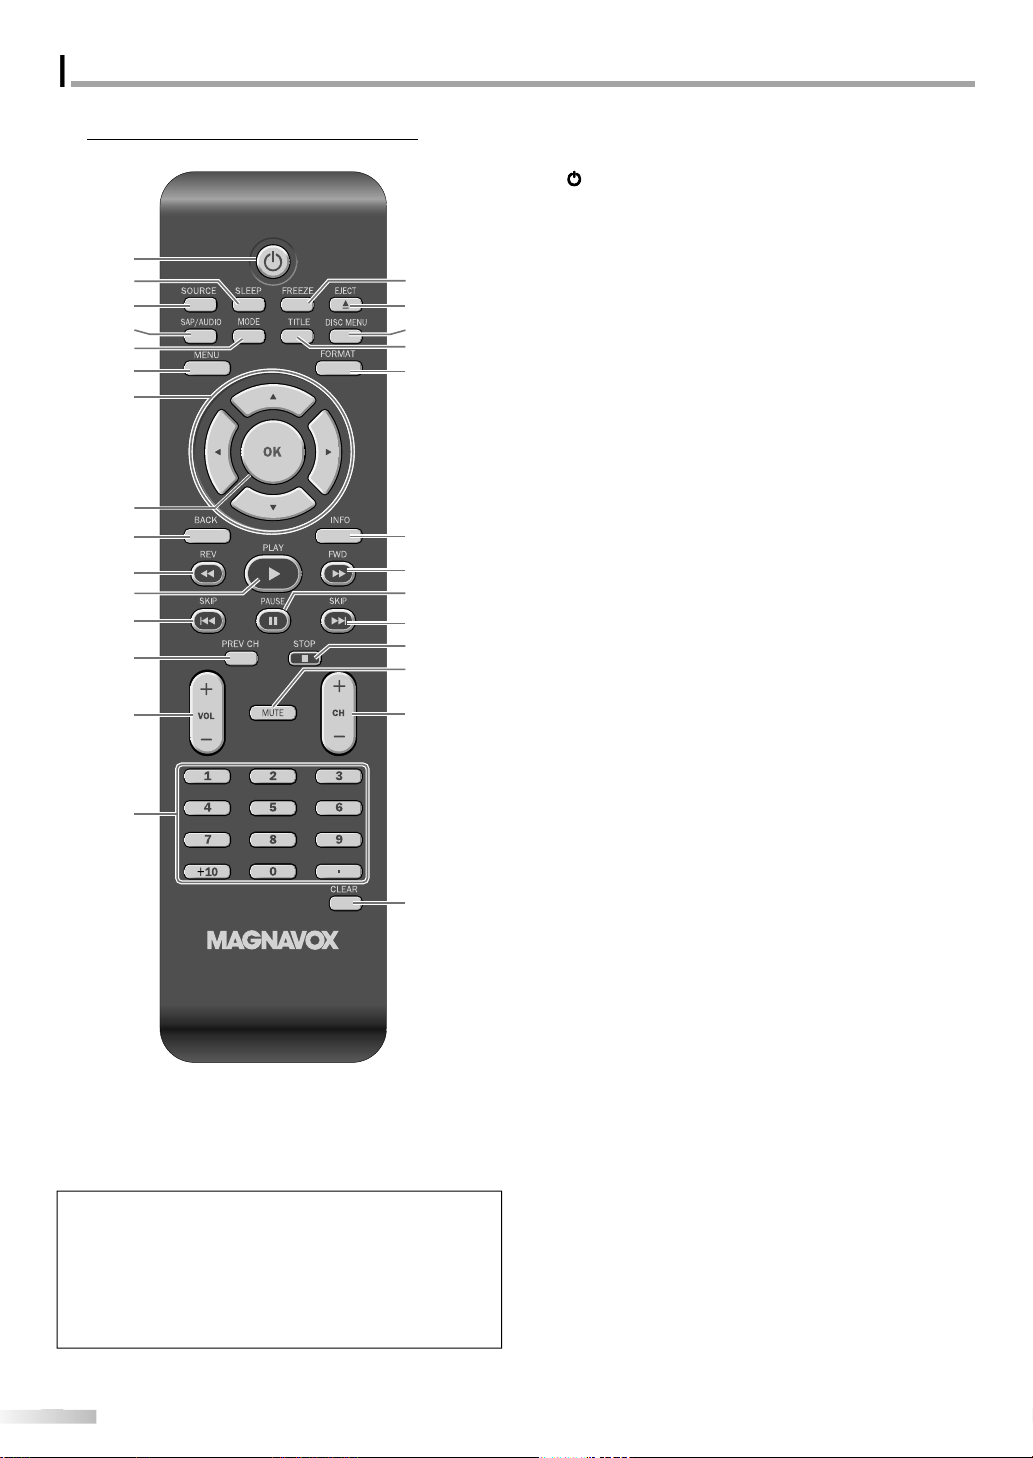
ower). 17
ress to turn the unit on and off.
. SLEEP
16
17
18
19
2
21
10
22
12
23
24
25
26
. SOURCE
. SAP/AUDIO
• Pr
• Pr
• Pr
MODE(p. 7
• Press to arrange the playing order or
• Press to set the black level (DVD) and
• Press to change the camera angle to see the
• Press to search chapter, title (DVD),
• Pr
• Press to repeat playback chapter, title (DVD),
• Press to magnify the part of picture
• Press to select the subtitles on a disc (DVD).
.
.
. OK
BACK
p. 18
ress to activate the sleep timer.
p. 19
ress to access connected external devices
ike a BD/DVD recorder.
p. 7 / p. 1
igital mode (DTV)
to select the audio language
nalog mode (TV)
to
VD m
to select the audio language (DVD), or
sound mode (CD).
playback randomly (CD)
he vir
sequence being played back from different
ngle (DVD)
rack (CD) or time.
rack, disc (CD) repeatedly or between
designated point A and B
2x and 4x : DVD).
p. 1
p. 46
ress to display the main menu.
K
ress to move left / right / up / down through
e items.
p. 17
ress to decide the command of setting when
e main menu is displayed.
p. 20
ress to return to the previous menu operation.
cursor)p. 17
/ p. 4
When using a universal remote contro
to operate this unit
• Make sure the component code on your universal
remote control is set to our brand.
Refer to the manual accompanying your remote
control for more details
Page 13

INTRODUCTION PREPARATION
:
.
g
)
d
)
k.
)
).
)
l.
OL
/
)
buttons
(p
)
ess to select channels.
ly.
(
)
ess to s
subchanne
.
button
.
)
ode
.
)
.
)
.
TITLE
)
.
T
(p. 21)
)
,
.
ess
,
.
ess
,
.
ode
.
)
ode
.
)
ess to tu
sound on and off.
/
ess to select channels and the
)
).
AAA
AAA
10. REV E / FWDD (p. 39
Press to begin slow forward or slow reverse
playback during the pause mode (DVD) an
search forward or backward through a disc.
11. PLAY B (p. 38
Press to begin the disc playbac
12. SKIP H / G (p. 40
Press to skip forward or backward chapters, titles
DVD) or tracks (CD
13. PREV CH
p. 18
Press to return to the previous channe
14. V
+
. 18
Press to adjust the volume.
15. Number
. 18
• Pr
• Press to select chapter, title (DVD), or track (CD)
irect
dot
• Pr
hift the
l from the main
hannel
+10
• Press to select 10 or higher number of chapters
16. FREEZE (p. 19
TV m
• Press to pause screen image
17. EJECTA(p. 38
Press to eject the disc
18. DISC MENU (p. 38
Press to display the menu on a disc
19.
(p. 38
Press to display the title menu (DVD)
FORMA
ress to select aspect ratio available for
e TV screen.
1. INFO
p. 20 / p. 43
igital mode (DTV)
• Press to display the channel information
signal type and TV setting
nalog mode (TV)
• Pr
to display the channel number
signal type and TV setting
xternal input mode
• Pr
to display the external input modes
signal type and TV setting
VD m
•Press to display the current status
2. PAUSE F (p. 38
VD m
• Press to pause the disc playback
STOP C (p. 38
Press to stop the disc playback.
4. MUTE (p. 18)
r
CH +
rn the
. 18 / p. 19)
Pr
xternal input modes.
CLEAR (p. 41
• Press to clear the numbers entered incorrectly.
• Press to cancel the point A for A-B repeat.
• Press to remove the track number in program
nput (CD
WATCHING TV
OPTIONAL SETTING OPERATING DVD DVD SETTING TROUBLESHOOTING
Install the batteries (AAA, 1.5V x 2) matching the polarity indicated inside battery compartment of the remote control.
AAA
AAA
AAA
AAA
Battery Precautions
Be sure to follow the correct polarity as indicated in the battery compartment. Reversed batteries may cause damage to the device.
Do not mix different types of batteries together (e.g., Alkaline and Carbon-Zinc, or rechargeable batteries like ni-cad, ni-mh, etc) or
old batteries with fresh ones.
If the device is not to be used for a long period of time, remove the batteries to prevent damage or injury from possible battery leakage
Do not try to recharge batteries; they can overheat and rupture.
INFORMATION
Page 14
REPARATION
.
ection
.
.
.
.
.
.
x
.
.
37MD350B only
V
a
ble
l
t
)
ll
h
bl
l
cable
p
audio cable
coaxia
e
)
)
reen)
d
)
e)
t
No supplied cables are used in this connection:
Please purchase the necessary cables at your local store.
High Speed HDMI cable (also known as HDMI category 2 cable) is recommended for the better compatibility.
Before you connect..
Be sure your antenna or other device is connected properly before plugging in the AC power cord.
Antenna Conn
Connect the RF coaxial cable on your home outlet to the antenna input jack of this unit
e.g.
HF / UHF
ntenn
RF coaxial ca
or
able TV signa
nce connections are completed, turn on the unit and begin initial setup. Channel scanning is necessary for the unit
to memorize all available channels in your area. Refer to “Initial Setup” on page 17
r of this uni
• If you have any question about the DTV’s antenna, visit www.antennaweb.org for further information.
• Depending on your antenna system, you may need different types of combiners (mixers) or separators (splitters). Contact your local
electronics store for these items
• For your safety and to avoid damage to this unit, please unplug the RF coaxial cable from the antenna input jack before moving the unit
• If you use an antenna to receive analog TV, it should also work for DTV reception. Outdoor or attic antennas will be more effective than
settop versions.
• To switch your reception source easily between antenna and cable, install an antenna selector
• If you are not receiving a signal from your cable service, contact the Cable provider
Connection to Cable Receiver or Satellite Bo
Use an HDMI or an component video cable to connect the HDMI or the Component video Input jack of the unit to the
HDMI or the component video output jack of the cable receiver / satellite box
If you connect to the unit’s Component video Input jack, connect audio cables to the Audio L/R jacks below the
Component video connector
e.g.
ite dis
sate
ca
e TV signa
ncluding PPV
HDMI OUT
or
AUDIO OUT
or
F
l
ANT IN
l
STEREO
PCM
cable receiver / satellite box
HDMI
COMPONENT VIDEO OUT
RL
(green)
Pr/CrPb/CbY
(red)
(blue)
or
37MD350B only
37MD350B only
or
(green)
(blue)
(red)
ide or
r of this uni
com
onent video cable
nd
You can also connect this unit to the cable receiver or satellite box other than the HDMI or the component video
utput jack because they might have different output jacks.
Required cables and connecting methods of the cable receiver / satellite box, or the availability channel for the
lear QAM may differ depending on the cable / satellite provider. For more information, please contact your cable /
satellite provider.
Page 15
ection
]
)
ote:
.
.
]
k.
)
ote:
.
.
No supplied cables are used in this connection:
cable
k
DMI1
ly
ble
k
f
t
Please purchase the necessary cables at your local store.
High Speed HDMI cable (also known as HDMI category 2 cable) is recommended for the better compatibility.
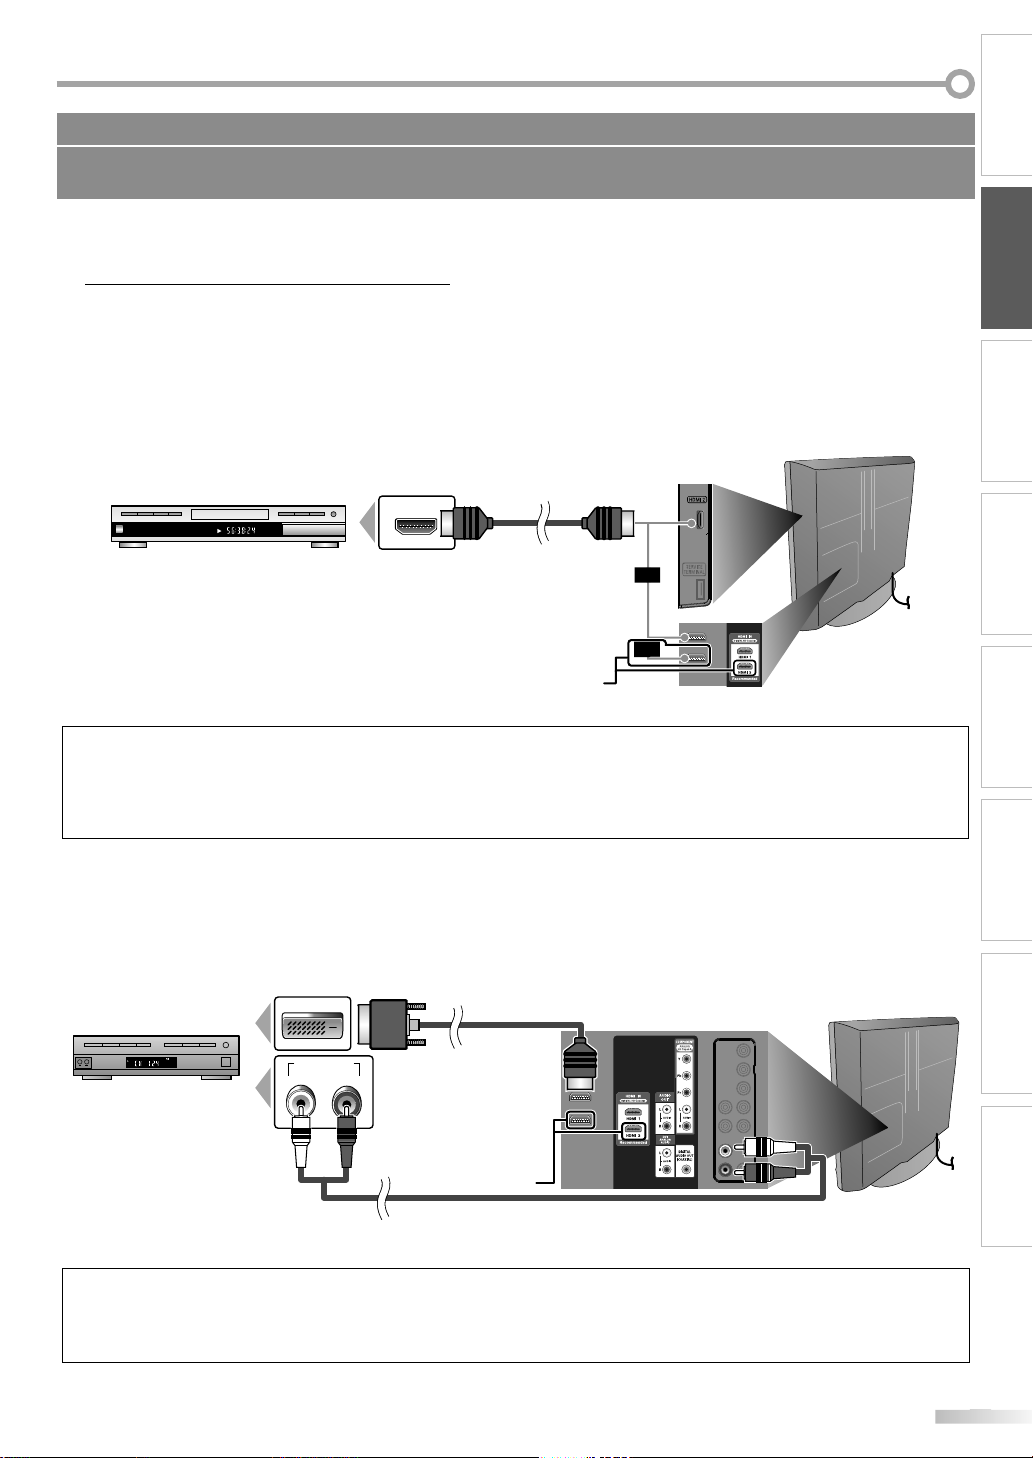
External Device Conn
[HDMI Connection
HDMI connection offers the highest picture quality.
HDMI (High-Definition Multimedia Interface) transports high definition video and multi-channel digital audio
through a single cable.
e.g.
ide or
ear of this unit
INTRODUCTION
PREPARATION
WATCHING TV
HDMI
or
or
37MD350B only
TITLE 5
CHAPTER 15
REPEAT A-B
BD/DVD recorder
with the HDMI output jac
HDMI OUT
N
• This unit accepts 480i / 480p / 720p / 1080i video signals, and 32kHz / 44.1kHz / 48kHz audio signals.
• This unit accepts only 2 channel audio signal (LPCM).
• You need to select “PCM” for the digital audio of the device you connected or check the HDMI audio setting
There may be no audio output if you select “Bitstream”, etc
• This unit only accepts signals in compliance with EIA861.
[HDMI-DVI Connection
Use an HDMI-DVI conversion cable to connect the unit to external video devices equipped with DVI output jac
e.g.
STEREO
PCM
cable receiver or satellite box
with the DVI output jac
DVI OUT
AUDIO OUT
RL
HDMI-DVI
conversion ca
To H
Input jack on
rear o
OPTIONAL SETTING OPERATING DVD DVD SETTING TROUBLESHOOTING
this uni
INFORMATION
37MD350B only
N
This unit accepts 480i / 480p / 720p / 1080i video signals.
HDMI-DVI connection requires separate audio connections as well
Audio signals are converted from digital to analog for this connection
DVI does not display 480i image that is not in compliance with EIA/CEA-861/861B.
udio cable
Page 16
REPARATION
]
.
.
)
COMPONENT VIDEO OUT
Pr/CrPb/CbY
AUDIO OUT
RL
CHAPTER 15
REPEAT A-B
TITLE 5
]
.
.
)
CHAPTER 15
REPEAT A-B
TITLE 5
AUDIO OUT
RL
S-VIDEO
OUT
.
d)ue)
)
h
k
ble
t
)
)
h
k
deo cable
cable
No supplied cables are used in this connection:
Please purchase the necessary cables at your local store.
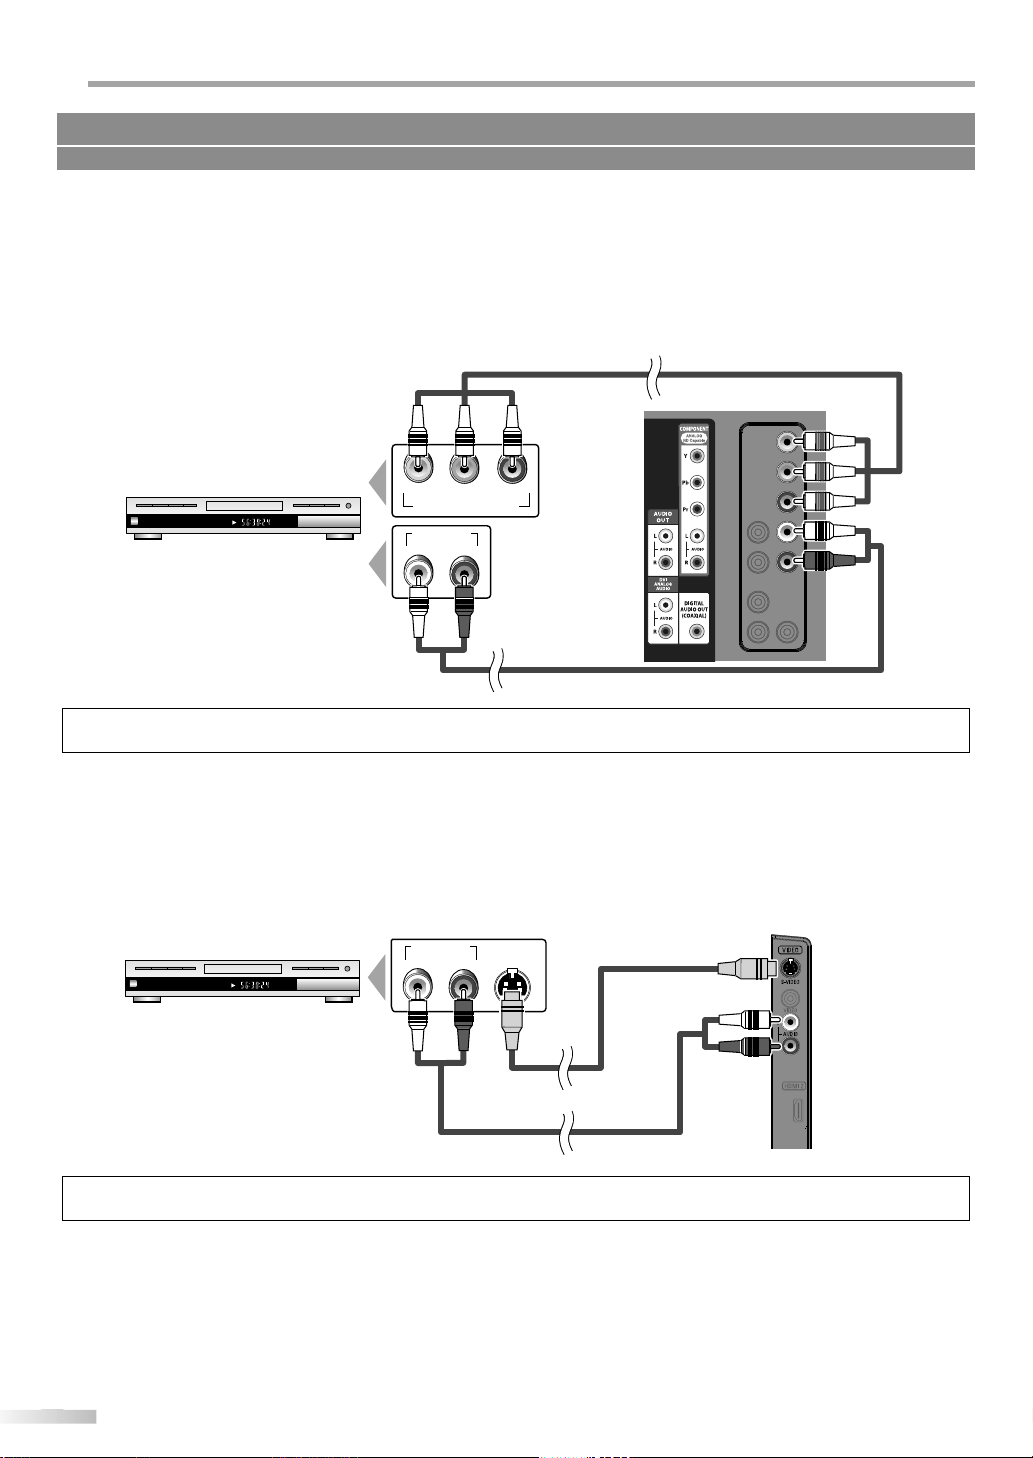
[Component video Connection
Component video connection offers better picture quality for video devices connected to the unit
If you connect to the unit’s Component video Input jack, connect audio cables to the Audio L/R jacks below the
Component video connector
e.g.
component video ca
r of this uni
green
(re
reen)
ue
red
BD/DVD recorder wit
the component video output jac
udio cable
This unit accepts 480i / 480p / 720p / 1080i video signals.
[S-Video Connection
S-Video connection offers good picture quality for video devices connected to the unit
If you connect to the unit’s S-Video Input jack, connect audio cables to the Audio L/R jacks below the Video connector
e.g.
ide of this unit
-Vi
BD/DVD recorder wit
the S-Video output jac
io
If you connect to the S-Video Input jack and the Video Input jack at the same time, the S-Video connection will have priority
Page 17
]
.
.
.
)
AUDIO OUT
RL
VIDEO
OUT
STEREO
STAND-BY
:
y.
]
y)
.
.
.
.
)
DIGITAL AUDIO
COAXIAL IN
AUDIO IN
RL
No supplied cables are used in this connection:
CR
d
t
lby
l
g
e
t
m
cable
Please purchase the necessary cables at your local store.
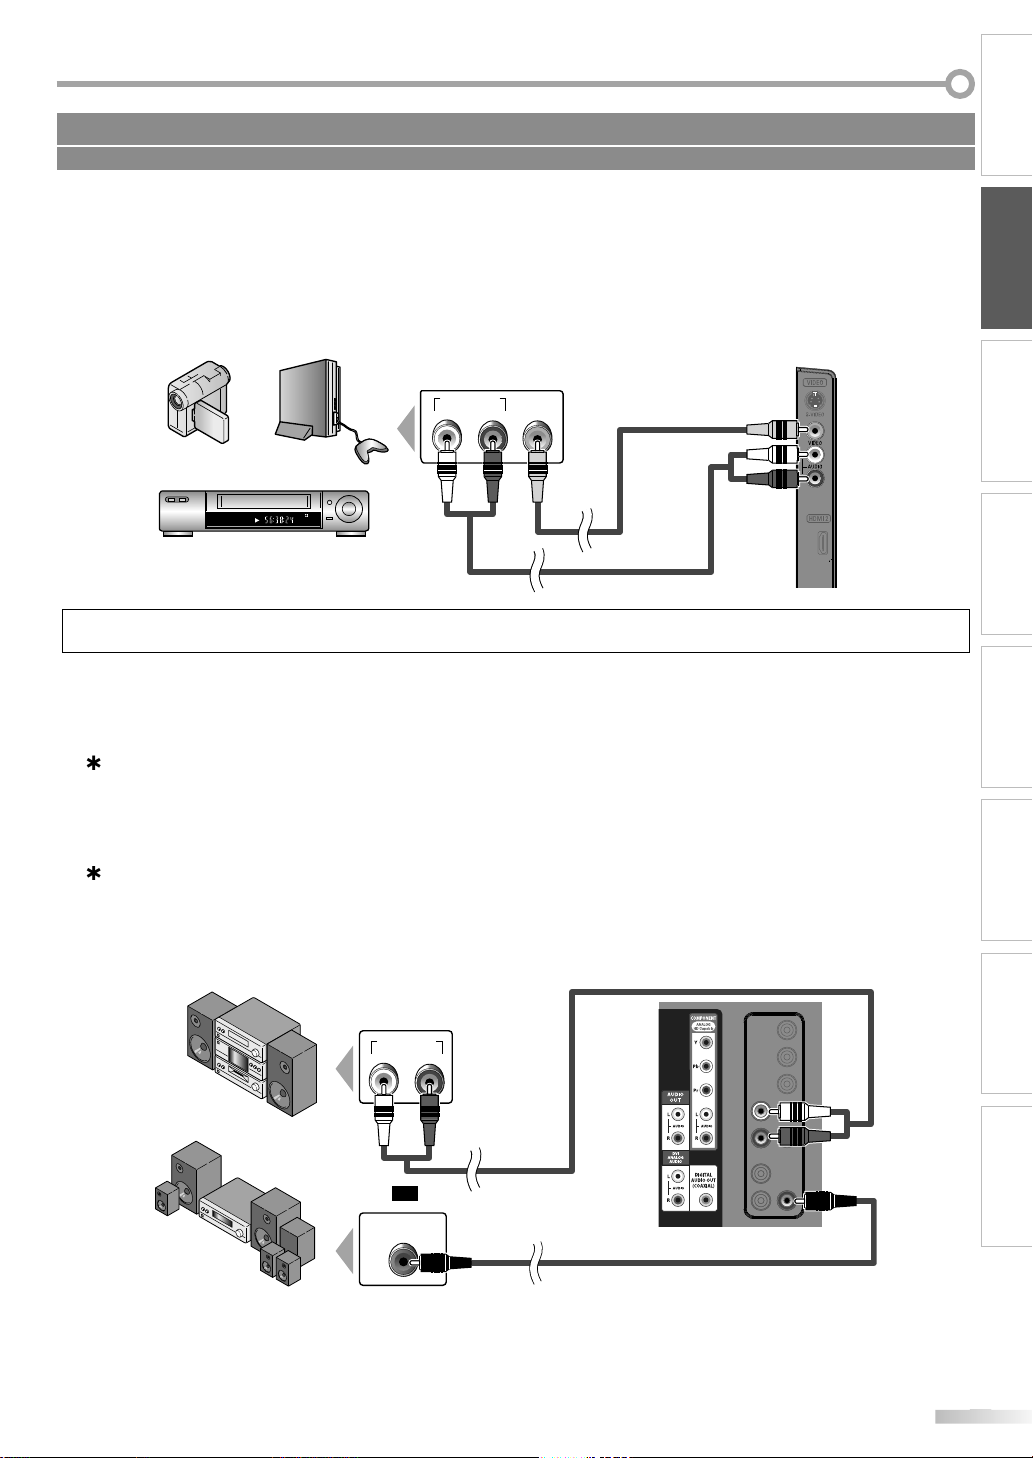
Video Connection
Video connection offers standard picture quality for video devices connected to the unit
If you connect to the unit’s Video Input jack, connect audio cables to the Audio L/R jacks below the Video connector
When the audio jack of the video device is monaural, connect an audio cable to the Audio L Input jack
INTRODUCTION
PREPARATION
e.g.
camcorder
ideo game
V
ideo cable
io cable
au
ide of this uni
ote
If you connect to the S-Video Input jack and the Video Input jack at the same time, the S-Video connection will have priorit
[Audio Output Connection
Digital (for digital broadcasting and DVD functions onl
If you connect this unit to an external digital audio device, you can enjoy multi-channel audio like 5.1ch digital
broadcasting sound
Use a digital audio coaxial cable to connect the unit to external digital audio devices
Analog (for both analog and digital broadcasting)
If you connect this unit to an external analog audio device, you can enjoy stereo (2-channel) audio
Use an audio cable to connect the unit to external analog audio devices
WATCHING TV
OPTIONAL SETTING OPERATING DVD DVD SETTING TROUBLESHOOTING
e.g.
stereo syste
INFORMATION
Do
Digita
r
or
io
di
ital audio coaxial cabl
r of this uni
Page 18
REPARATION
]
T
.
.
T
:
at
esolution
ate
atlution
ate
GA
80
z
,280
8
A 800
600
z
8
GA
8
z
y.
.
.
g
.
:
.
.
t.
3
350B
32MD350B
t
To HDM
To HDMI1
cable
e.
)
f
t
t
No supplied cables are used in this connection:
Please purchase the necessary cables at your local store.
PC Connection
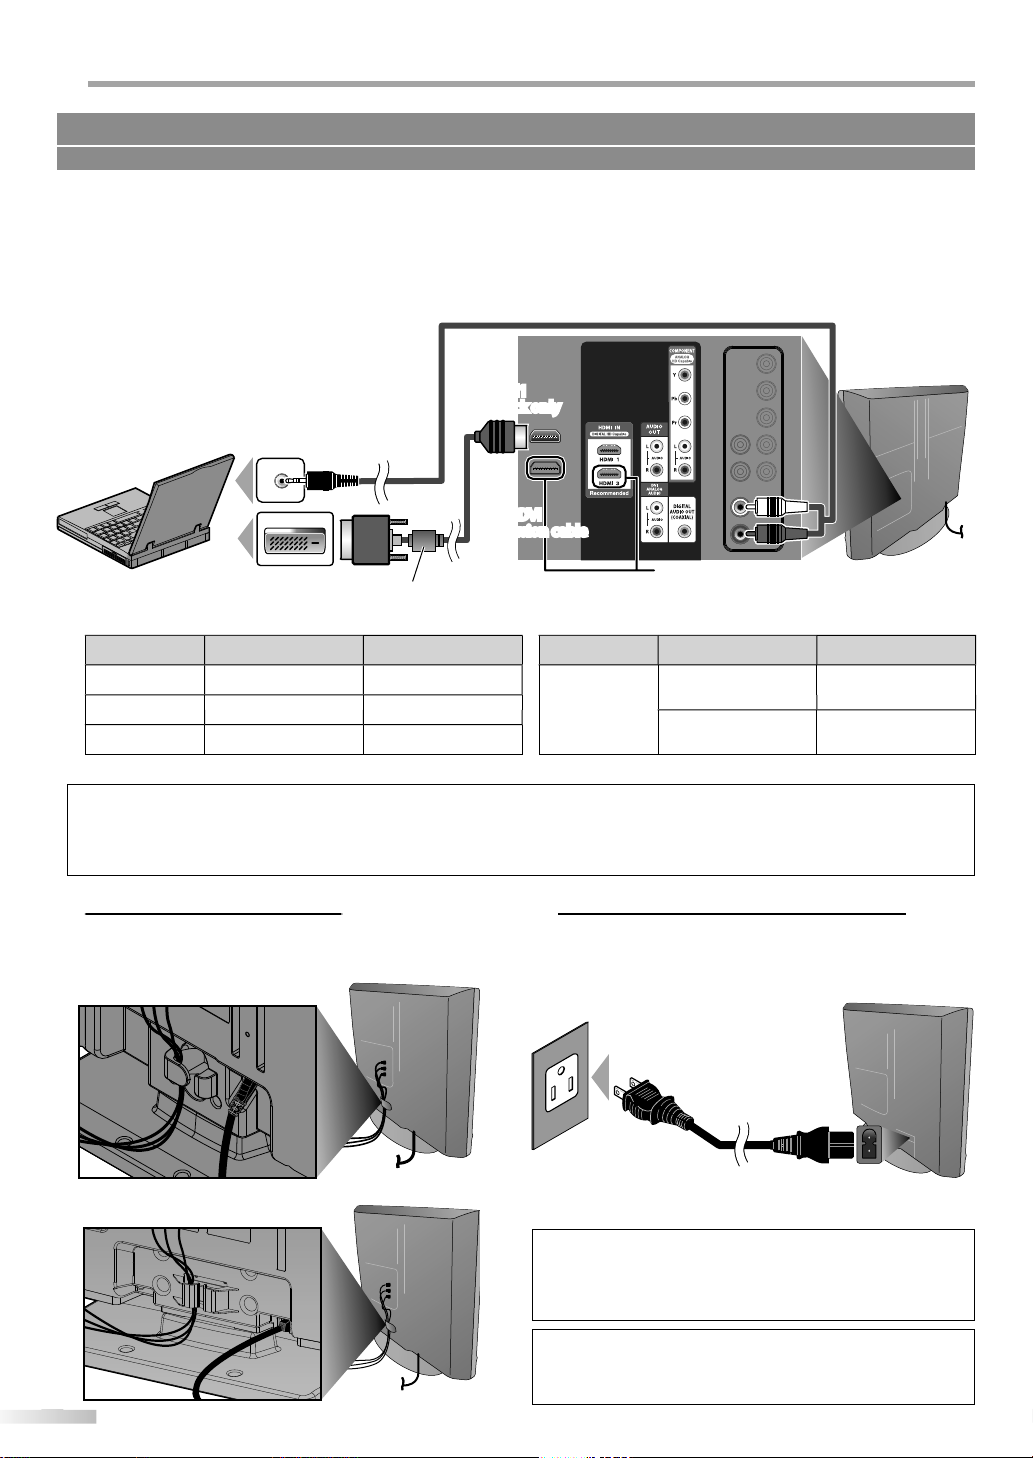
his unit can be connected to your PC that has a DVI terminal
Use an HDMI-DVI conversion cable for this connection and it requires stereo mini plug conversion cable as well.
If you connect this unit to your PC, you can use this unit as a PC monitor
e.g.
tereo mini plug
conversion cable
DVI OUT
rear of this uni
personal computer
HDMI-DVI conversion
hould be with ferrite cor
he following signals can be displayed
rm
V
VG
X
R
640 x 4
024 x 76
fresh r
H
x
H
H
Other formats or non-standard signals will not be displayed correctl
• Please purchase the HDMI-DVI conversion cable that has a ferrite core.
• The following operations may reduce noise
- Attach a ferrite core to the AC power cord of your PC
- Unplug the AC power cord and use the built-in battery of your PC.
Keep the cables through this holder to avoid tangle
them
7MD
ear of this unit
37MD350B only
Form
x 76
1
Refresh r
z
XGA
1,360 x 76
60Hz
Plug In the AC Power Cord
Make sure that the AC power cord must be plugged
to an AC outlet after all the necessary connections are
completed.
rear o
this uni
r of this uni
C outlet
For 32MD350B, nonremovable AC power cord is already
ixed on the uni
C power cord
ion
o not connect the AC power cord to a power supply outside
the indicated voltage of this unit (AC 120V)
nnecting the AC power cord to a power supply outside of
this range may result in fire or electrical shocks.
Each time you plugged in the AC power cord, any operations
will not be performed for a few seconds.
This is not a malfunction
Page 19
p
,
t.
T
.
K
L
)
Initial Setup
Initial Setup
Select the language for setup display.
Elija el idioma de ajuste.
Sélectionner langue écran config.
Español
Français
Select Skip
MENU
OK
OK
English
]
K
L
to select
s
]
Initial Setup
Initial Setup
Select Skip
MENUBACK
BackOK
OK
Make sure the antenna is connected to ''ANT. IN'' jack.
Select your signal source.
Cable
Skip
Antenna
ANT.IN
Cable
Antenna
Or
Initial Setup
Initial Setup
Now the system is scanning for channels, please wait.
Auto programming will take up to 20 minutes to complete.
Skip
MENU
0%
Analog channels 0ch
Digital channels 0ch
s
B
]
Initial Setup
Initial Setup
Select “Retail” or “Home” for your location.
OK
OK
Retail Home
Select
d
.
y
y
.
)
]
o
]
during autoprogram,
d.
.
.
Initial Setup
Initial Setup
Select Skip
MENU
No channel is registered.
Try Autoprogram again?
Verify that you have a cable connected to the "ANT. IN" jack on the
back of the TV, the channel installation process searches this
connection. If you are using a cable or satellite box, please confirm
the input which you have connected the box and press "SOURCE"
key on the remote control to select the appropriate source input.
Later
Retry
OK
OK
.
y
.
.
.
These operations are accessible by remote control. Some may also be accessible by controls on the main unit.
ctions
INTRODUCTION
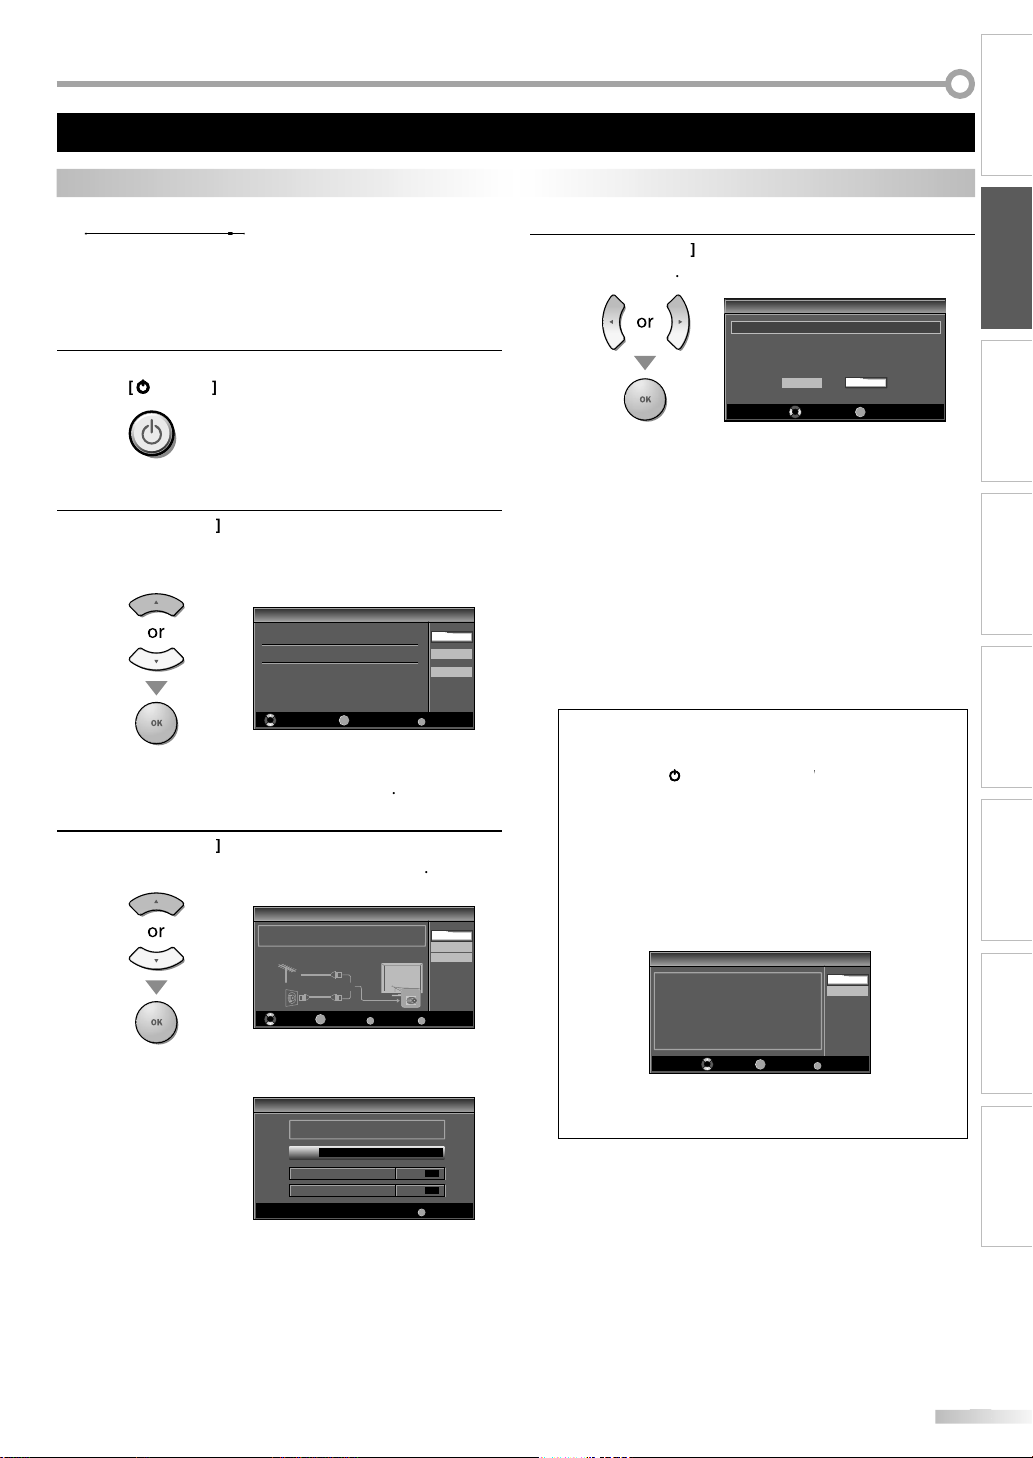
This section will guide you through the unit’s initial setting which includes
selecting a language for your on-screen menu and autoprogram, which
automatically scans and memorizes viewable channels.
Before you begin:
Make sure the unit is connected to antenna or cable.
fter making all the necessary connections
1
ress
se
2
rom the choices on the right side of the TV screen.
(English / Español / Français
Initial Setup” menu on step 3 will be displayed in the
selected language after you press
3
or “Cable” for CATV channels, then press
ower) to turn on the uni
his operation may take a few moments
Cursor
to select the on-screen language
OK
Cursor
“Antenna” for TV channel
OK
n
4
Cursor
then press
Select ”Retail”, the unit will be set up with predefined
setting for retail displays. In this setting, the power
consumption may possibly exceed the limite
requirement of the ENERGY STAR® qualification
• Select ”Home”, the unit is set to maximize the energ
efficiency for home setting and it can be adjusted
through a choice of picture and sound qualit
according to your preference
When the initial setup is completed, the lowest
memorized channel with the confirmation message
of the location setting will be displayed on the TV
• If you are not receiving a signal from your cable service,
ontact the Cable provider.
• If you press [power
is setting will be cancele
• The initial autoprogram function can be executed for
ither “Antenna” or “Cable” only once. When you change
e connection (Antenna / Cable), set autoprogram again
efer to page 22.
• If there is no signal input from the antenna terminal and
o operation for several seconds after you turn on the unit,
Helpful Hints” appears. Follow the instructions listed on
TV screen
to select the desired location setting,
OK
r [MENU
PREPARATION
WATCHING TV
OPTIONAL SETTING OPERATING DVD DVD SETTING TROUBLESHOOTING
•
Autoprogram” will begin.
• You must set ”Home” in step 4. Otherwise, the settings
picture and sound quality you adjusted will not be
emorized after you turn off the unit.
INFORMATION
After an initial setup is completed...
If you want to scan the channels automatically again,
refer to “Autoprogram” on page 22
• You can add the desired channels unmemorized b
“Autoprogram”. Refer to “Add Channels” on page 23
If you want to change to another language, refer to
“Language Selection” on page 24
If you want to change the location setting, refer to
Location” on page 35
Page 20
ATCHING TV
n
]
T
]
]
TV
1
DTV
1
before
.
ess
l.
g
d
h
NTSC
(analog mode)
ATSC
(digital mode)
CH4-1
(Soccer)
CH4-2
(News)
CH4-3
(Tennis)
CH4-1
(Soccer)
CH4
(Soccer)
CH4
(Soccer)
CH4-1
(Soccer)
CH4-2
(News)
CH4
(Soccer)
CH4
(Soccer)
CH4-1
(Soccer)
Air time
subchannelsubchannel
main channel
main channel
main channel
main channel
subchannel
6:00pm
6:30pm
7:00pm
7:30pm
8:00pm
subchannel?
g
y.
T
y
y
.
ote:
oadcast is over.
l.
j
.
.
Volume 30
.
ds.
ess
]
to tu
sound.
Mute
ess
ecover the
.
p
ess
.
Sleep
Off
.
ess
.
Sleep
120min.
).
.
]
the
.
lly d
seconds.
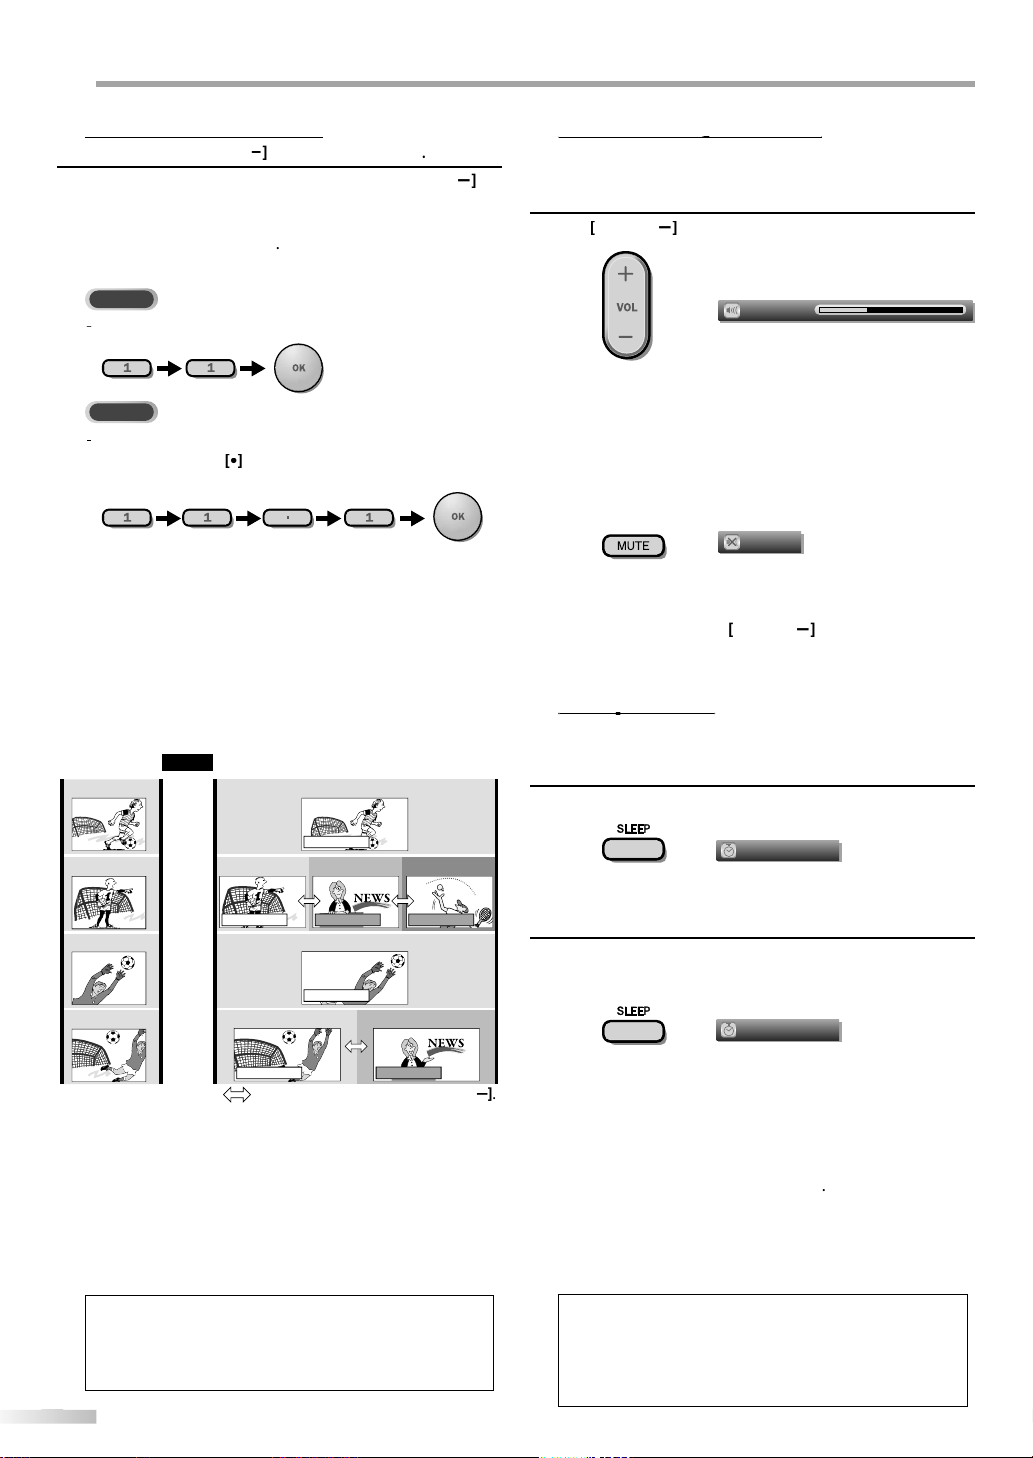
Channel Selectio
elect channels by using
• To select the memorized channels, use
[the Number buttons].
o select the non-memorized channels, use
•
the Number buttons
o Use [the Number buttons
hen selecting analog channel 1
en selecting digital channel 11.
e sure to press
ntering the subchannel number
CH
/
or
the Number buttons
CH /
his section describes how to adjust the volume. The mute function, which
urns the sound off and on, is also described
or
L
/to adjust the audio volume
The volume bar will be displayed at the bottom of the
TV screen when adjusting the volume
The volume bar will automatically disappear in a few
n
Pr
MUTE
rn off and on the
•Pr
PREV CH] to return to the previously viewed
anne
About digital TV broadcasting:
With its high definition broadcast, digital broadcasting
far surpasses analo
sound quality. Not all digital TV broadcasts are hig
an
definition (HD). To confirm whether your watching TV
program is in HD, refer to the program guide, contact
your cable / satellite provider or local TV stations.
What is the
using high compression technology, digital
broadcastin
signals to send simultaneousl
herefore, you can select more than one program per
main channel since digital broadcasting technolog
distinguishes between multiple channels broadcast b
a single network
N
“No Signal” will appear on the TV screen after the
“Audio only program“ message will appear on the TV
screen, when you receive only sound signa
nnel br
broadcasting in both its picture
an be changed by using
offers a service that enables multiple
CH /
“Mute” is displayed on the TV screen for a few seconds.
Pr
MUTE]again or
L
/ to r
original volume
The sleep timer can be set to automatically turn off the unit after an
incremental period of time.
r
1
SLEEP] to set the sleep timer
Sleep timer display appears on the TV screen
Pr
2
SLEEP] repeatedly to change the amount of time
ntil shut off
You can set your unit to turn off after a set period of
time (from 30 to 120 minutes
Each press of
SLEEP]will increase the time by 30
minutes
After setup, the sleep timer display can be called up
or checking by pressing [SLEEP
To cancel the sleep timer
ress
SLEEP] repeatedly until “Sleep Off” is displayed
n
TV screen
• The sleep timer display will automatica
w
• When you disconnect the unit from the AC outlet or when
power failure occurs, the sleep timer setting will be
anceled.
isappear in a
Page 21
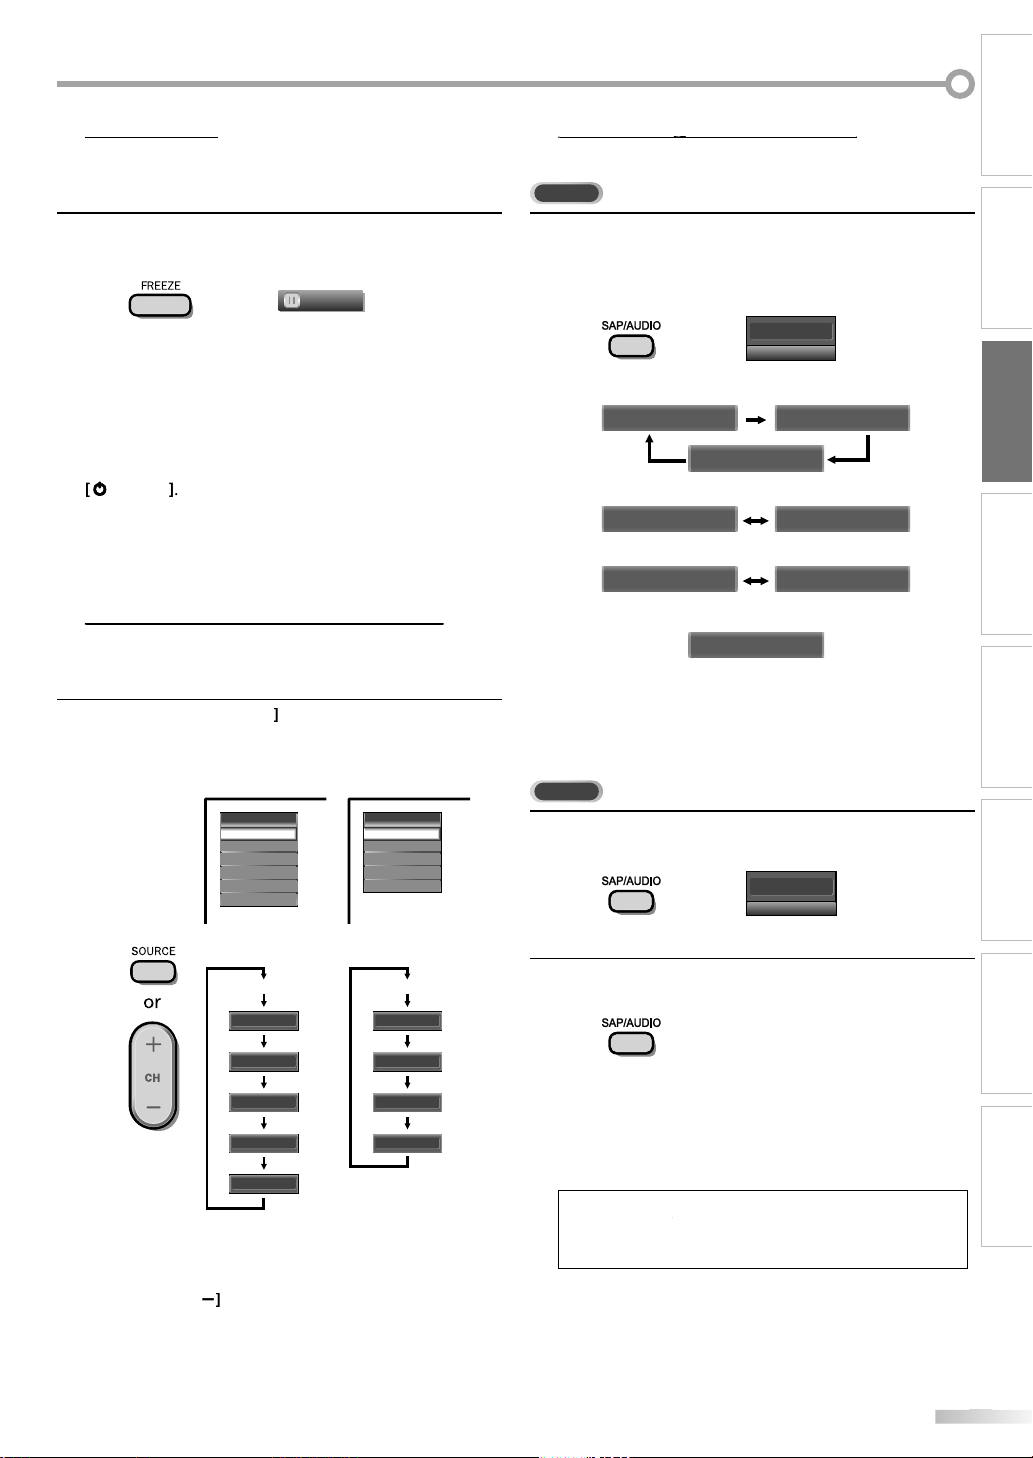
Still Mo
de
Y
.
ess
.
FREEZE
.
.
eased after 5
utes.
T
gp
h
.
Video
Source
TV
Video
Component
HDMI1
HDMI2
HDMI3
Component
HDMI1
HDMI2
HDMI3
l
)
Video
Source
TV
Video
Component
HDMI1
HDMI2
Component
HDMI1
HDMI2
l
)
3
350B
3
350
odes.
g
TV
ess
.
all audio are available
stereo and monaural audio are available
ble
ble
O
o
m
O
o
DTV
d
.
11.1
English 1/3
ess
.
d
.
[SAP/AUDIO]
does not control external audio devices.
seconds.
)
ou can pause the image shown on the TV screen
r
You can easily switch with the remote control between TV (ATSC or NTSC)
and external devices when they are connected to the unit.
FREEZE]to pause the image shown on the TV
reen
The sound output will not be paused
no signal is detected or protected signal is received
uring still mode, the image remains paused and the
sound output will be muted
The still function will be rel
min
o cancel still mode, press any button except
(power)
ress
SOURCE] orCHrepeatedly to cycle throug
the input modes
This section describes how to switch the audio in the analog mode and how
to switch the audio language in the digital mode.
Pr
SAP/AUDIO] to display the currently selected
audio mode. While receiving an MTS broadcast,
press repeatedly to cycle through the available audio
hannel
11
SAP / STEREO
When
SAP / STEREO SAP / MONO
SAP / STEREO
When
MONO / STEREO MONO / STEREO
When SAP and monaural audio are availa
SAP / MONO SAP / MONO
When only monaural audio is availa
MONO
cannot be switched
TERE
AP
MON
Outputs stereo-audi
Outputs second audio progra
Outputs mono-audi
INTRODUCTION
PREPARATION WATCHING TV
OPTIONAL SETTING OPERATING DVD DVD SETTING TROUBLESHOOTING
7MD
DTV/TV channe
or PC input
2MD
TV/TV channe
B
or PC input
ressingCH reverses the direction of the input
m
ress
1
SAP/AUDIO] to display the currently selecte
language and the number of available languages
r
2
SAP/AUDIO] repeatedly to cycle through the
available audio languages
Available languages differ depending on the
broadcast. “Other” is displayed when the audio
anguage cannot be acquired, or the acquire
languages are other than English, Spanish or French
The information display will automatically disappear in a
w
INFORMATION
Page 22

ATCHING TV
on
TV
ess
]
11
SAP / STEREO
TV-PG DLSV
480i
480i
4:3
4:3
SD
SD
CC
CC
T
.
]
DTV
ess
y
.
n
.
11.1
English 1/2
TV: TV-14
Rating
1080i
1080i
16:9
16:9HDHD
CC
CC
A Day of Memories
A Day of Memories
KABC
KABC
A quarter-century ago,which may now qualify as the
good old days of newspapering,run-of-paper sales
accounted for 80 percent of the industry's advertising
revenues.Department stores and supermarket were
1 2
34
5
6, 7, 8
9
10
g
broadcast statio
channe
[
K
/
L
]
to scroll.
.
;
Video
TV-PG DLSV
480i
480iSDSD
CC
CC
TV Screen Informati
You can display the currently selected channel or other information such as
the audio mode on the TV screen.
In the analog mode, the current channel number and the audio mode are
displayed.
Pr
INFO
•The current channel number, audio mode, type of
resolutions for video signal, TV aspect ratio, CC and
V program rating are displayed on the top-right
rner of the TV screen
•To clear the display, press
ress
BACK
INFO]again. You can also
In the digital mode, the detailed broadcasting information for the current
channel such as program title, program guides are displayed.
Pr
INFO] to display the details of the currentl
selected program
Broadcasting informatio
The following information is displayed
program title
program guide
The program guide added to broadcastin
nformation is displayed to a maximum of 4 lines.)
n
l number
audio language
efer to “Switching Audio Mode” on page 19.
effective scanning lines and scan mode
digital TV format
program aspect ratio
CC (not available if closed caption is set to “Off”)
10child lock rating
ote:
• When the program guide consists of more than 4 lines, use
Cursor
• “No description provided.” is displayed when the program
uide is not provided.
• While the program guide is displayed, the closed caption
unction is interrupted
• In external input mode, the following screen is displayed
.g.) When an external device is connected to Video Input
• The information display will automatically disappear in
minute.
jack.
Page 23
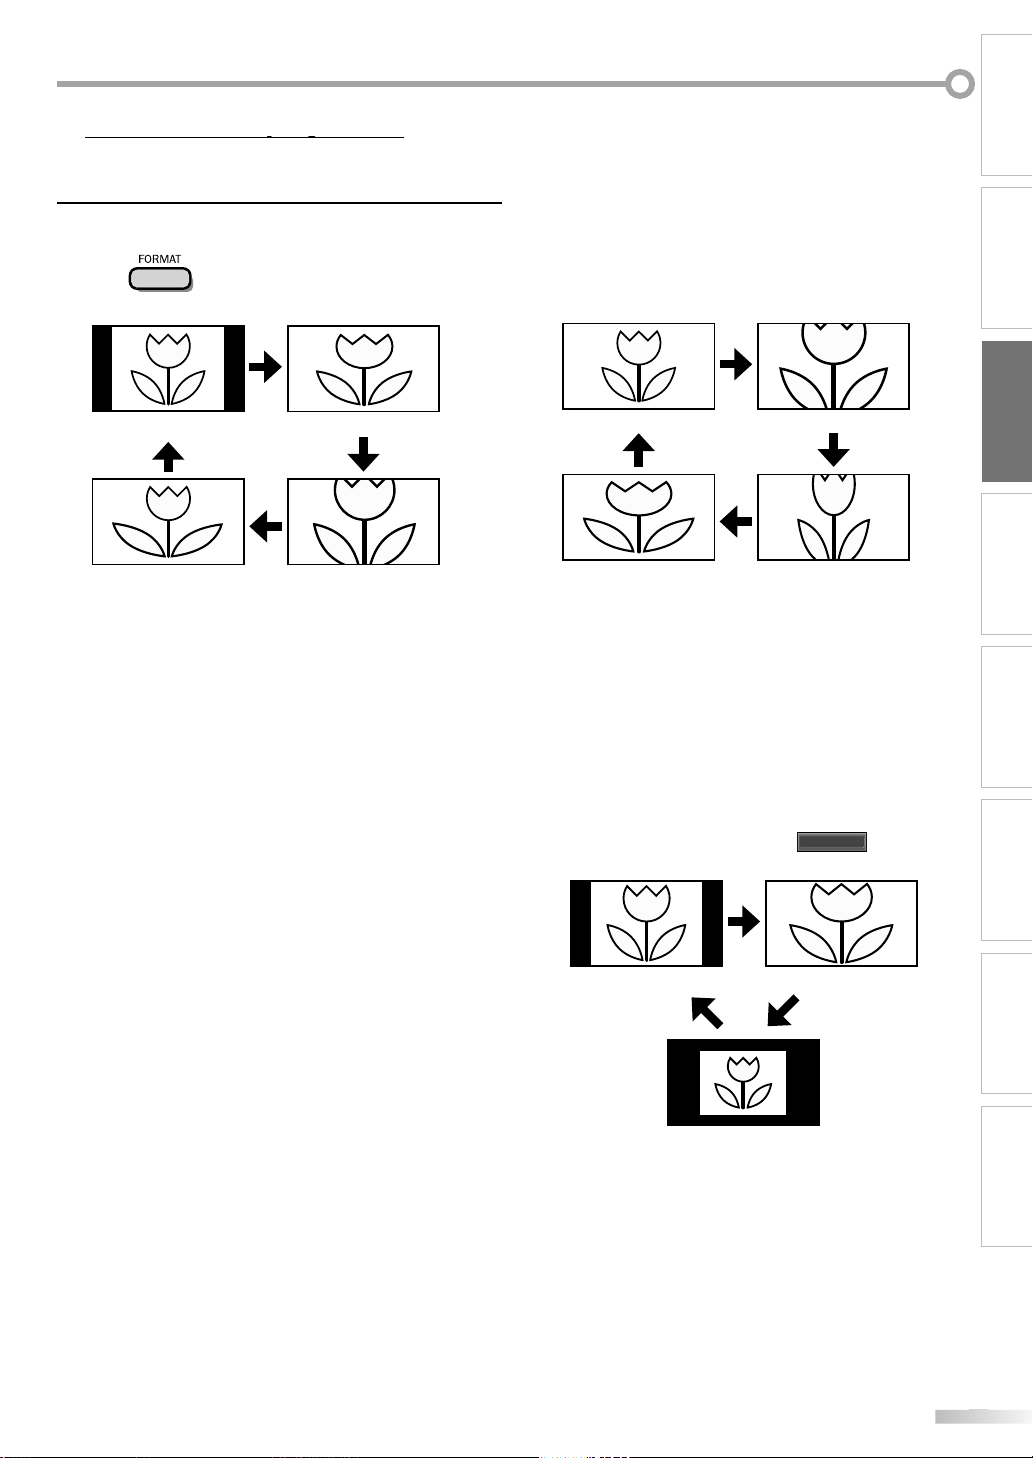
py
4 types of display modes can be selected when the broadcasting station
ess
o.
l
al
.
6:9
.
d
T
.
de
.
l
al
.
.
d
.
de
lly
.
h
de
l
g
.
ull
.
t
.
lull
t
de
alide
d
is sending 4:3 or 16:9 video signal. And 3 types of display modes can be
selected for PC input signal.
Pr
FORMAT] repeatedly to switch the TV aspect
rati
INTRODUCTION
PREPARATION WATCHING TV
For 4:3 video signa
Normal
i
ovie Expand
Norm
Display a 4:3 picture at its original size. Sidebars appear
on both edges of the screen
1
Display a 4:3 picture at a 16:9 size; the picture is
stretched horizontally to fill the screen
Movie Expan
Display a 4:3 picture at a 16:9 size; the picture is
stretched horizontally and vertically to fill the screen.
his crops out the top and bottom of the picture
i
Display the picture with its center at the original size
and the edges stretched horizontally to fill the screen
For 16:9 video signa
rm
Movie Expan
Norm
Display a 16:9 picture at its original size
Display a 16:9 picture at its maximum size without
changing its horizontal and vertical ratio
Movie Expan
Display a vertically stretched picture
Wi
Display a horizonta
For PC input signal throug
stretched picture
HDMI1
Input mo
OPTIONAL SETTING OPERATING DVD DVD SETTING TROUBLESHOOTING
orma
ot By Do
INFORMATION
Norma
Display a proportionately stretched picture. Sidebars
appear on both ed
es of the screen
F
Display a picture that is stretched out of proportion to
ill the screen
ot By Do
Display a picture in its original size
Page 24
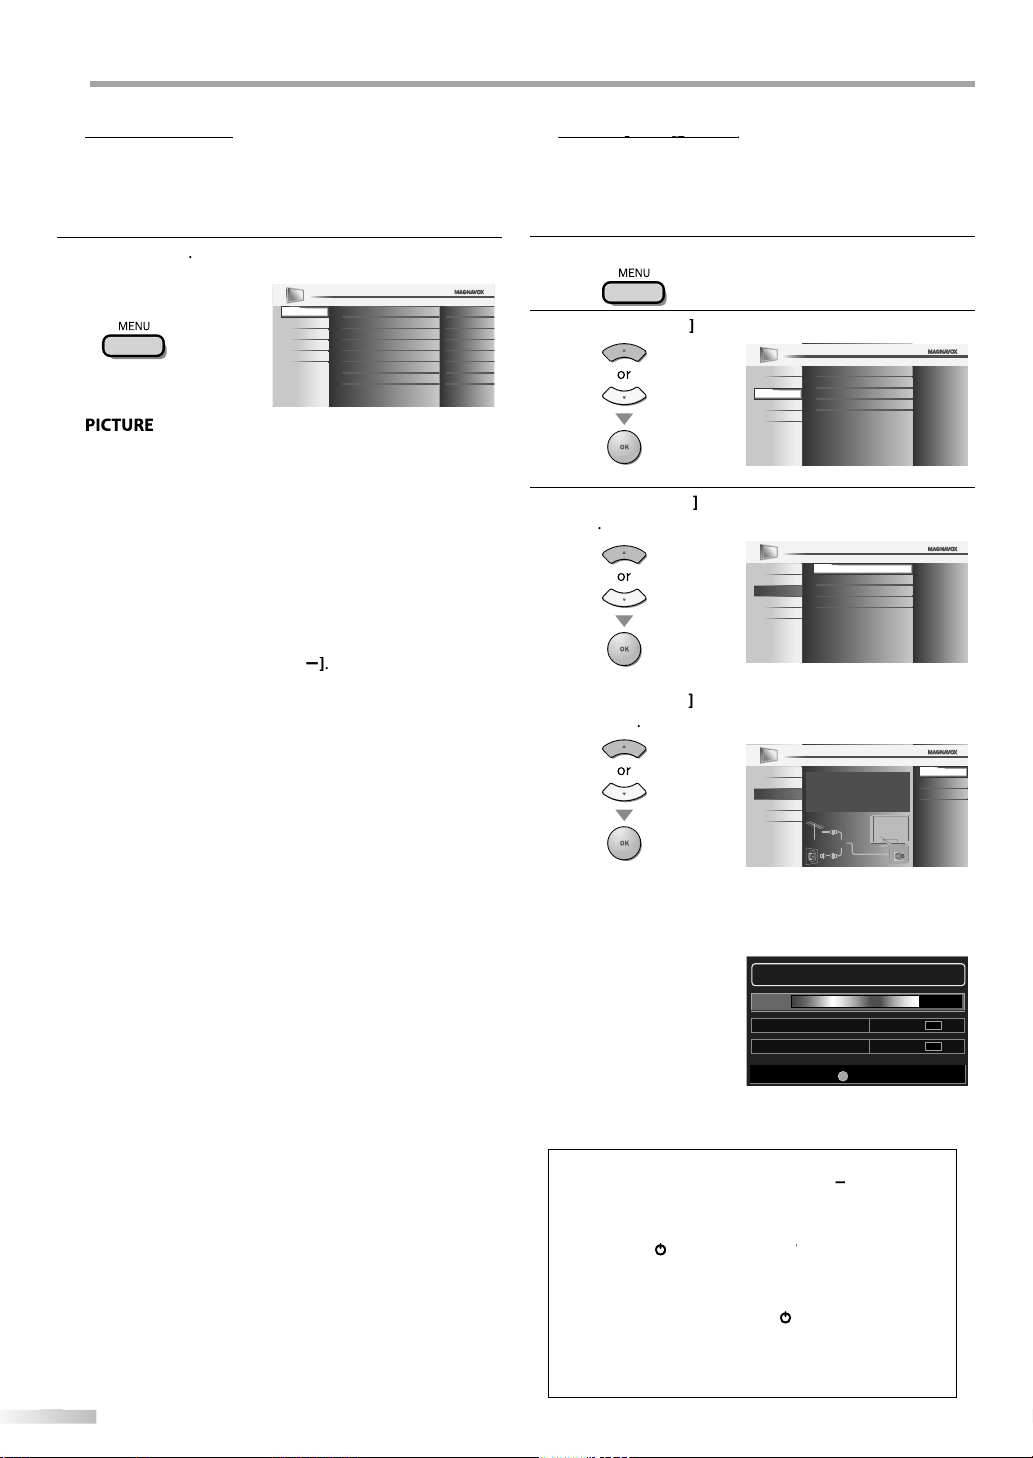
PTIONAL SETTING
u
]
PICTURE
SOUND
SETUP
FEATURES
LANGUAGE
DVD
Tint
Sharpness
Brightness
Contrast
Color
0
0
30
60
36
Color Temperature
Smart Picture
Normal
Personal
y.
.
D
.
.
P
.
.
.
.
.
S
oss the
.
.
.
.
.
.
y
t.
.
E
.
.
D
custo
sc
.
.
pg
ess
Use
K
L
]
Channel List
Add Channels
Antenna
PICTURE
SOUND
FEATURES
LANGUAGE
DVD
SETUP
Autoprogram
Use
K
L
]
Channel List
Add Channels
Antenna
Autoprogram
PICTURE
SOUND
FEATURES
LANGUAGE
DVD
SETUP
K
L
]
.
.
.
.
/
]
ote
y.
.
]
or
]
during autoprogram,
)
]
Exit
MENU
75%
Analog channels 10 ch
6 chDigital channels
Now the system is scanning for channels, please wait.
Auto programming will take up to 20 minutes to complete.
Main Men
This section describes the overview of the main menu displayed when you
press [MENU]. For more details, see the reference page for each item.
The main menu consists of the function setting items below.
ress
MENU
You can adjust the picture qualit
Refer to “Picture Adjustment” on page 25
UN
You can adjust the sound quality
Refer to “Sound Adjustment” on page 26
ETU
You can automatically scan the viewable channels
Refer to “Autoprogram” on page 22
You can skip the undesired channels when selecting
the channels using
CH/
Refer to “Channel List” on page 23
You can add the channels that were not scanned by
the autoprogram
Refer to “Add Channels” on page 23
FEATURE
• You can change the display format for closed
aption, which displays the dialogue of a TV program
r other information acr
TV screen
Refer to “Closed Caption” on page 27
• You can set the viewing limitations.
Refer to ‘‘Child Lock” on page 30.
• You can adjust the position, stability and clarity of the
PC screen
Refer to “PC Settings” on page 34
• You can select the energy saving mode
Refer to “Energy Saving Mode” on page 35.
• When you adjust the desired “PICTURE” and “SOUND”
mode, you must switch the setting from “Retail” to
Home”. Refer to “Location” on page 35
• You can confirm the version of the software currentl
in this uni
Refer to ”Current Software Info” on page 36
LANGUAG
You can change the language (English, Spanish,
French) displayed on the main menu
Refer to “Language Selection” on page 24
V
You can
mize some functions for the di
playback. Make sure the unit is in stop mode
Refer to “DVD SETTING“ section on page 46
If you switch wires (e.g., between antenna and CATV) or if you move the
unit to a different area after the initial setting, or if you restore the DTV
channel you deleted, you will need to perform autoprogram.
Before you begin: Make sure the unit is connected to antenna or cable.
Pr
1
2
3
MENU] to display the main menu.
Cursor
Cursor
to select “SETUP” , then press
to select “Autoprogram”, then press
OK
OK
se
Cursor
to select an appropriate option, then
OK
PICTURE
SOUND
SETUP
FEATURES
LANGUAGE
DVD
Autoprogram will rescan all channels.
Autoprogramming will take up to 20 minutes
to complete.
Select your signal source.
Antenna
Or
Cable
Back
Antenna
Cable
ANT.IN
• When aerial antenna is connected, select “Antenna”
• When connected to CATV, select “Cable”
• “Autoprogram” will begin
• When the scanning and memorizing are completed,
the lowest memorized channel will be displayed
Note:
After setting “Autoprogram”, using [CH
control skips unavailable programs automaticall
If you are not receiving a signal from your cable service,
contact the Cable provider
If you press [ower)
[MENU
the setting will be canceled.
Even if “Autoprogram“ is completed, the channel setting
will be lost if the AC power cord is unplugged before
turning off the unit by pressing[(power
The PIN Code will be required once you set a PIN Code in
the “Child Lock”. Refer to page 30.
If you want to change your PIN Code, follow the instruction
of “Change PIN”. Refer to page 33.
n the rem
Page 25
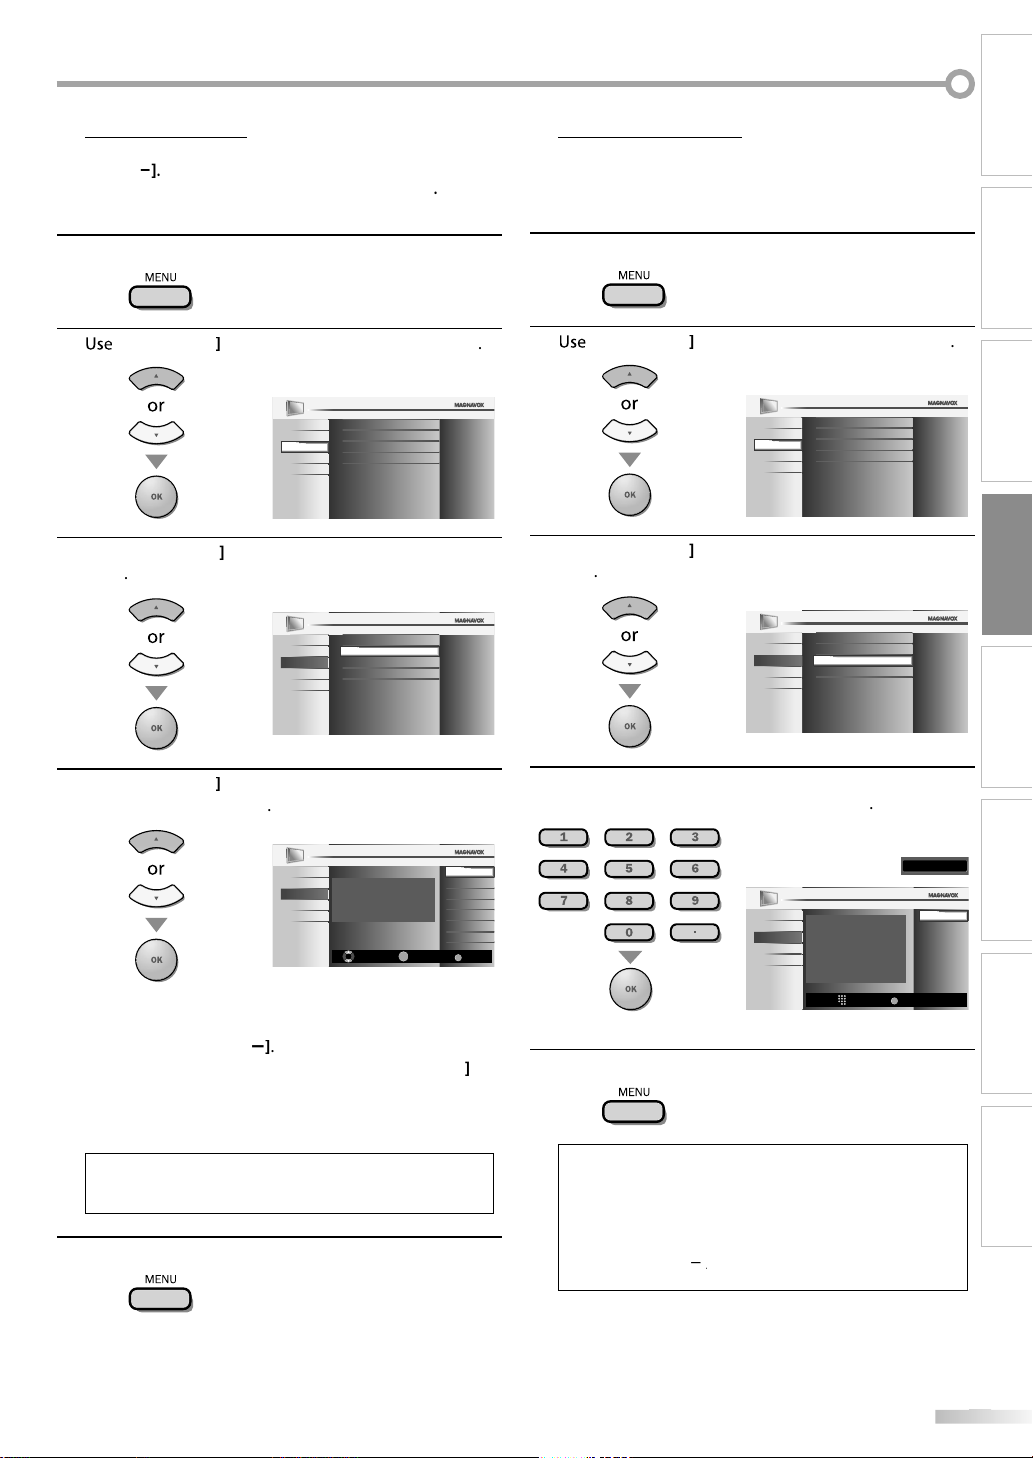
INTRODUCTION
st
]
K
L
]
Use
K
L
]
PICTURE
SOUND
FEATURES
LANGUAGE
DVD
SETUP
Channel List
Add Channels
Antenna
Autoprogram
K
L
]
Ch Select Watch/Skip
Back
BACK
OK
Highlight channels for Ch Up/Down key
selection.
11.2
11.3
DTV
DTV
PICTURE
SOUND
FEATURES
LANGUAGE
DVD
SETUP
DTV 11.1
ect the channe
/
K
L
and
.
.
SC. Othe
SC.
.
Channels
.
K
L
]
K
L
]
Channel List
Add Channels
Antenna
Autoprogram
PICTURE
SOUND
FEATURES
LANGUAGE
DVD
SETUP
]
.
,
reen.
/
]
, you can select the memorized
nnel Li
The channels selected here can be skipped when selecting the channels
sing
CH
Those channels can still be selected with[the Number buttons
1
2
3
/
Press [MENU] to display the main menu.
Cursor
Cursor
to select “SETUP”, then press
PICTURE
Autoprogram
Channel List
SOUND
Add Channels
SETUP
Antenna
FEATURES
LANGUAGE
DVD
to select “Channel List”, then press
OK
OK
Add
his function lets you add the channels that were not added by the
utoprogram due to the receptible condition at the initial setting
Press [MENU] to display the main menu.
1
2
3
Cursor
Cursor
OK
to select “SETUP”, then press
PICTURE
Autoprogram
Channel List
SOUND
Add Channels
SETUP
Antenna
FEATURES
LANGUAGE
DVD
to select “Add Channels”, then press
OK
PREPARATION
WATCHING TV
OPTIONAL SETTING
OPERATING DVD
4
Cursor
remove, then press
•The channel display for the removed channel
rkens. You will not be able to sel
again usingCH
•To reactivate a removed channel, use
ress
OK]. The registered channels are highlighted
• When you remove a main channel, its subchannels
re removed as well
ote:
• The channel with the “DTV” indicated on the display is
AT
ress
5
rwise the channel is NT
MENU]to exit
to select the channel you want to
OK
Cursor
se
4
the Number buttons]to enter the number of the
channel you want to add, then press
PICTURE
SOUND
SETUP
FEATURES
LANGUAGE
DVD
OK
For analog channels, select a channel to be
added using number keys.
For digital channels, you must perform
Autoprogram function.
Ch Change
DVD SETTING TROUBLESHOOTING
11
Add channels
BACK
Back
l
ress
5
MENU] to exit
INFORMATION
• If setup completes successfully
Added to the channel list” is displayed.
• If external input is used, it is not possible to register the
annel and “Unavailable” will be displayed on the TV
c
• By using[CH
annels only.
Page 26
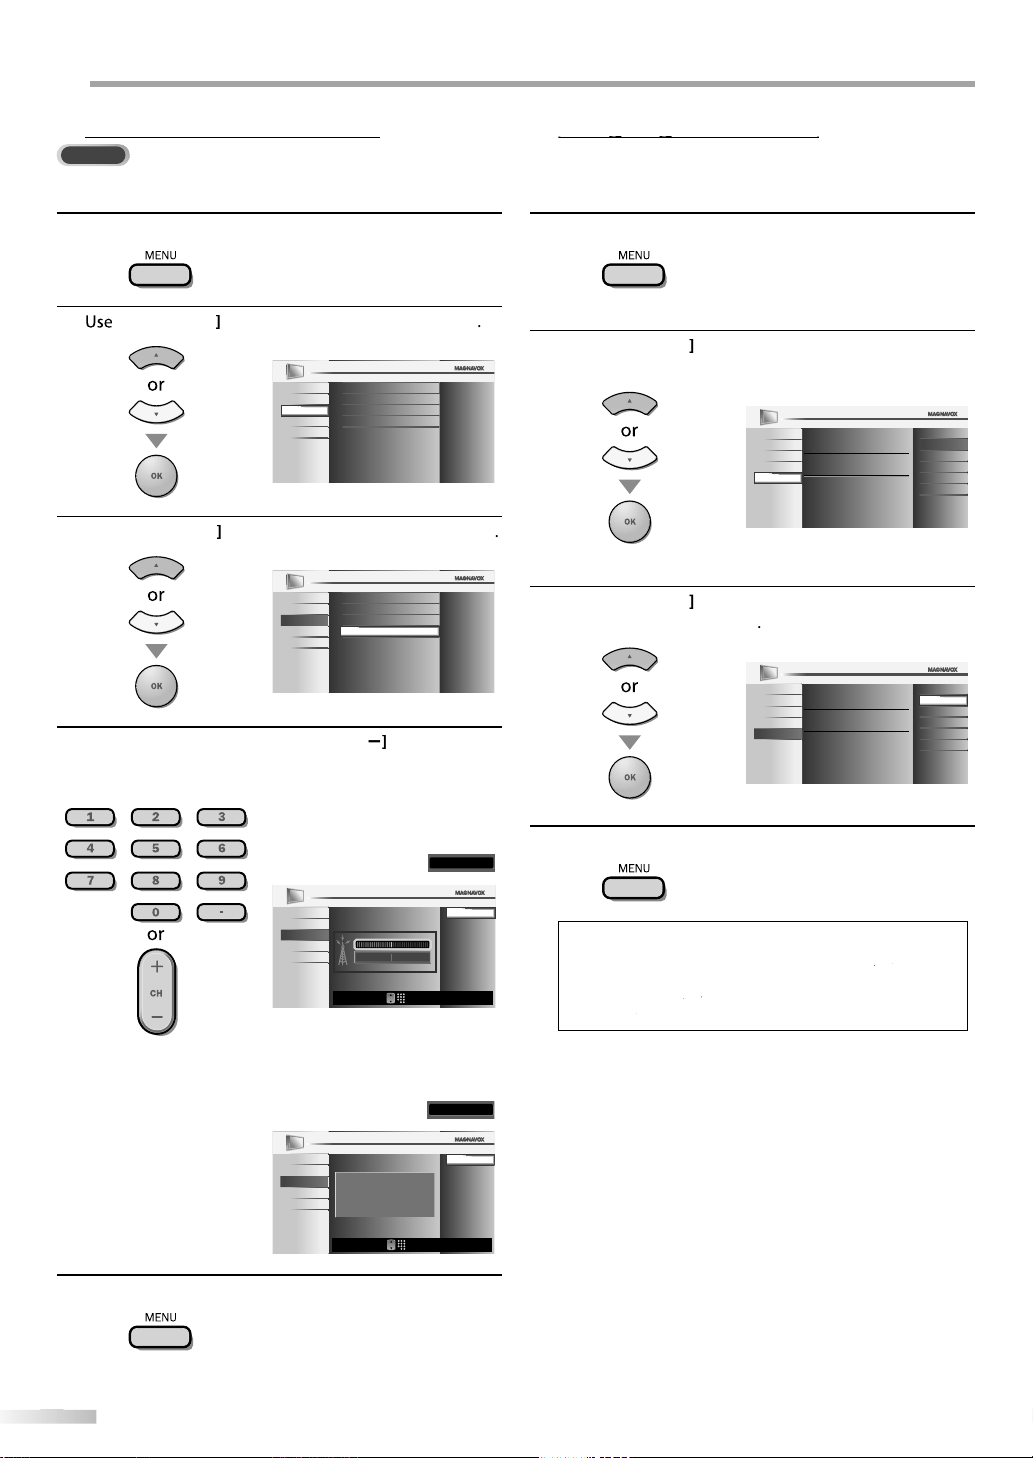
PTIONAL SETTING
on
DTV
.
K
L
]
Channel List
Add Channels
Antenna
PICTURE
SOUND
FEATURES
LANGUAGE
DVD
SETUP
Autoprogram
K L
]
Channel List
Add Channels
Antenna
Autoprogram
PICTURE
SOUND
FEATURES
LANGUAGE
DVD
SETUP
]
o
ect the
.
11.1
Back
Ch Change
CH
Current 50
50 Max
PICTURE
SOUND
FEATURES
LANGUAGE
DVD
SETUP
.
Video
Back
Ch Change
PICTURE
SOUND
FEATURES
LANGUAGE
DVD
SETUP
Indicator is available for digital
broadcasting only.
CH
ess
]
to exit.
gg
ess
.
K
L
Select the language for setup display.
Elija el idioma de ajuste.
Sélectionner langue écran config.
English
Español
Français
SETUP
PICTURE
SOUND
FEATURES
DVD
LANGUAGE
K
L
]
Select the language for setup display.
Elija el idioma de ajuste.
Sélectionner langue écran config.
Español
Français
English
SETUP
PICTURE
SOUND
FEATURES
DVD
LANGUAGE
ess
t.
Use
[
K/L
]
to select
] [
K/L
]
to select “English”, then press
[OK]
ess
[MENU]
to exit the main menu.
Antenna Confirmati
This function lets you check the digital signal strength of each channel
You can choose English, Spanish, or French as your on-screen language.
Press [MENU] to display the main menu.
1
2
3
4
Cursor
Cursor
the Number buttons
to select “SETUP”, then press
to select “Antenna”, then press
r
CH
/ to sel
channel for which you want to check the digital signal
strength
OK
OK
Pr
1
2
MENU] to display the main menu
Cursor
OK]
3
Cursor
“Français”, then press
to select “LANGUAGE”, then press
to select “English”, “Español” or
OK
• If the channel is set to analog channel or external
nput, you cannot confirm the antenna condition
Pr
MENU
5
Pr
4
MENU] to exi
Note:
• If you need the English menus instead of the Spanish or
rench menus, press [MENU]
IDIOMA” or “LANGUE”, then press [OK
Cursor
Cursor
Pr
Page 27

j
You can adjust brightness, contrast, color, tint, sharpness and color
ess
.
K
L
]
PICTURE
SOUND
SETUP
FEATURES
LANGUAGE
DVD
Tint
Sharpness
Brightness
Contrast
Color
0
0
30
60
36
Color Temperature
Smart Picture
Normal
Personal
K
L
]
PICTURE
SOUND
SETUP
FEATURES
LANGUAGE
DVD
Tint
Sharpness
Brightness
Contrast
Color
0
0
30
60
36
Color Temperature
Smart Picture
Normal
Personal
.
e
K
L
]
Color Temperature
PICTURE
SOUND
SETUP
FEATURES
LANGUAGE
Tint
Sharpness
Brightness
Contrast
Color
Sports
Standard
Movie
Game
DVD
Smart Picture
Personal
,
e
K
L
s
B
.
s
B
s
decrease
ease
ast
decrease
ast increase
astlor
decrease
y
ease
y
t
add red
s
softe
l
e
add wa
s add coo
s
ess
t.
]
temperature.
Before you begin: You must set ”Home” in ”Location”. Refer to page 35.
Otherwise, the settings you adjusted will not be
memorized after you turn off the unit.
INTRODUCTION
PREPARATION
Pr
1
2
3
4
MENU]to display the main menu
Cursor
Cursor
then press
to select “PICTURE”, then press
to select the item you want to adjust,
OK
just the picture quality
Smart Pictur
se
Cursor
OK
(‘‘Personal“, ‘‘Standard“, ‘‘Sports“, ‘‘Movie“ and ‘‘Game“)
to select the desired setting, then
OK
Brightness, Contrast, Color, Tint, Sharpness
Color Temperatur
Cursor
Cursor
Brightnes
Brightness
ntr
Contrast
Color
Tin
Tint
Sharpnes
Sharpness
or Temperatur
Co
Color Temp. Normal
30
MoveAdjust OK
60
MoveAdjust
36
MoveAdjust
0
MoveAdjust
0
MoveAdjust
MoveAdjust
to select the desired setting, then
to adjust
rsor
OK
rightness
OK
OK
ntr
OK
OK
OK
OK
OK
OK
olor intensit
OK
OK
incr
rightness
ntr
incr
olor intensit
o add green
n
o sharpen
rm
r
rsor
r
WATCHING TV
OPTIONAL SETTING
OPERATING DVD
DVD SETTING TROUBLESHOOTING
l
Pr
5
MENU] to exi
ote:
To cancel picture adjustment, press [MENU
Only the “Personal” setting can be adjusted.
INFORMATION
Page 28
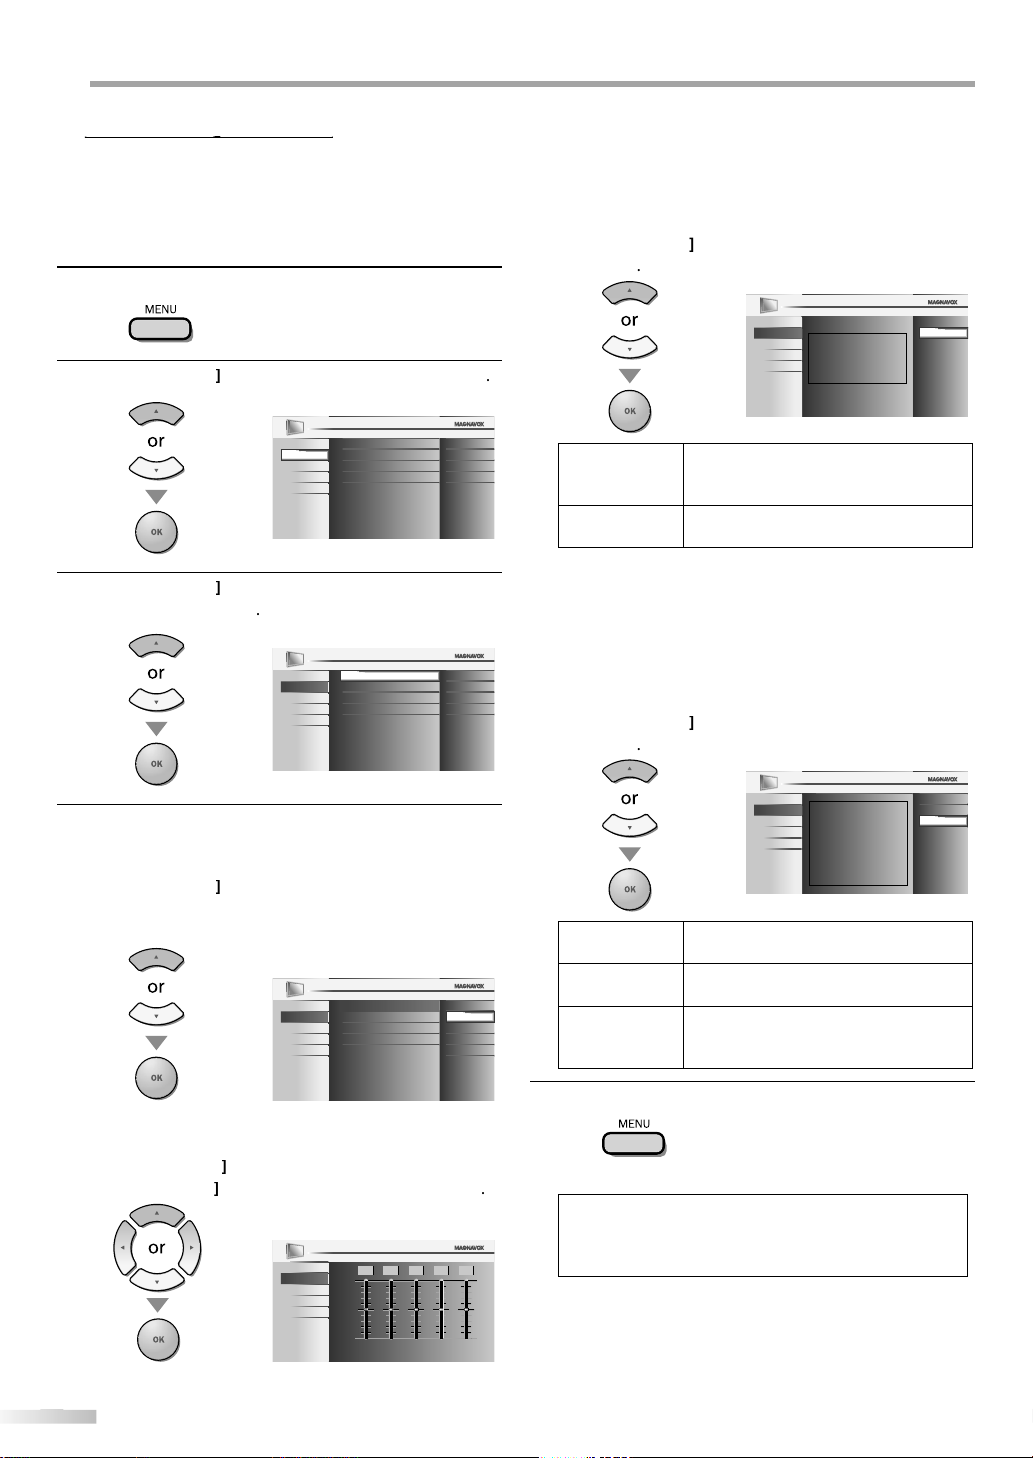
PTIONAL SETTING
j
ess
.
K
L
]
SOUND
SETUP
FEATURES
LANGUAGE
DVD
Equalizer
Auto Volume Leveling
TV Speakers
Off
Ext. Amp
StandardSmar t Sound
PICTURE
K
L
]
SOUND
SETUP
FEATURES
LANGUAGE
DVD
Equalizer
Auto Volume Leveling
TV Speakers
Off
Ext. Amp
Standard
PICTURE
Smart Sound
.
d
K
L
)
.
s
B
K
L
]
g
.
K
L
]
ces between the
.
s
.
l.
K
L
]
T
.
T
p
T
the unit’s remote control.
ess
]
to exit.
]
You can adjust the smart sound, equalizer and some other sound functions.
Before you begin: You must set ”Home” in ”Location”. Refer to page 35.
Otherwise, the settings you adjusted will not be
memorized after you turn off the unit.
r
1
2
3
MENU] to display the main menu
Cursor
Cursor
adjust, then press
to select “SOUND”, then press
to select the sound type you want to
OK
OK
Auto Volume Levelin
This function keeps a constant loudness differential
etween the TV commercials and the programs
Use
press
n
Cursor
OK
to select the desired option, then
PICTURE
SOUND
SETUP
Auto Volume Leveling reduces volume
differences between
FEATURES
channels and programs, providing
LANGUAGE
a consistent audio level.
DVD
elect if you want to reduce volume
ifferen
TV commercials
nd the programs
elect if you want to remove the auto
olume leveling.
On
Off
TV Speaker
Select the audio output from the unit’s speakers, or not
If your amplifier compatible with the CEC function is
connected to this unit using an HDMI cable, some part
of the sound operations such as volume up can access
synchronized by using this unit’s remote contro
[Cursor
OK
to select the desired option, then
Adjust the following items
4
Smart Soun
Use
press
Cursor
OK]
to select the desired setting, then
(“Personal “, “Standard “, “Movie “, “Music “and “News “
PICTURE
Smart Sound
Smart Sound
SOUND
Equalizer
SETUP
Auto Volume Leveling
FEATURES
TV Speakers
LANGUAGE
DVD
Equalizer
Adjust tonal quality for each frequencies
Cursor
Cursor
to select the specific frequency and
to adjust the level, then press
PICTURE
SOUND
SETUP
FEATURES
LANGUAGE
DVD
0
120Hz0500Hz01.5kHz05kHz010kHz
Personal
Standard
Movie
Music
News
OK
PICTURE
SOUND
"On":
SETUP
FEATURES
LANGUAGE
DVD
n
ff
he sound will be output from the unit’s
eakers
he sound will not be output from the
nit’s speakers.
Sound will be output from the TV speakers.
"Off":
Sound will not be output from the TV
speakers.
"Ext. Amp":
Operation is possible by connecting to the
HDMI-CEC compatible amp with a HDMI
cable. For details look in the user manual.
his function allows you to control audio
Ext. Am
utput from CEC-compatible devices
ith
Pr
5
MENU
• To cancel sound adjustment, press[MENU
• We do not guarantee 100% interoperability with other
rands of CEC compliant devices.
On
Off
Ext. Amp
Page 29

p
You can view closed captioning (CC) for TV programs, movies and news.
ess
.
K
L
]
K
L
.
DVD
PICTURE
SOUND
SETUP
LANGUAGE
FEATURES
Digital Caption Service
Caption Style
Off
Off
Caption Service
A
B
C
”
”
”
27
8
8
K
L
]
DVD
PICTURE
SOUND
SETUP
LANGUAGE
FEATURES
Digital Caption Service
Caption Style
Off
Off
Caption Service
K
L
]
Digital Caption Service
Caption Style
CC-1
CC-2
CC-3
CC-4
T-1
T-2
T-3
T-4
Off
Caption Service
DVD
PICTURE
SOUND
SETUP
LANGUAGE
FEATURES
de
;
.
e
f
.
;
.
;
d
.
Th
:
:
.
:
.
:
.
.
Closed caption refers to text of dialogue or descriptions displayed onscreen.
Pr
1
MENU]to display the main menu
4
A. Caption ServiceA. Caption Service
Cursor
OK
to select “Caption Service”, then
INTRODUCTION
PREPARATION
2
Cursor
to select “FEATURES”, then press
OK
Closed Caption
PICTURE
Child Lock
SOUND
PC Settings
SETUP
Energy Saving Mode
FEATURES
Location
LANGUAGE
Current Software Info
DVD
3
Cursor
to select “Closed Caption”, then
[OK]
Closed Caption
PICTURE
Child Lock
SOUND
PC Settings
SETUP
Energy Saving Mode
FEATURES
Location
LANGUAGE
Current Software Info
DVD
See the following description for setting each item
“A. Caption Service
“B. Digital Caption Service
“C. Caption Style
page
page 2
page 2
On
Home
On
Home
5
then press
Cursor
to select the desired closed caption,
OK
Caption mo
CC-1 and T-1
are the primary caption and text services
The captioning or text is displayed in the same
language as the program’s dialogu
(up to 4 lines of script on the TV screen, where it
does not obstruct relevant parts o
the picture)
CC-3 and T-3
serve as the preferred data channels
The captioning or text is often a secondary language.
CC-2, CC-4, T-2 and T-4
are rarely available and broadcasters use them only
in special conditions, such as when “CC-1” an
“CC-3” or “T-1” and “T-3” are not available
ere are 3 display modes according to programs
Paint-on mode
Displays input characters on the TV screen
immediately
Pop-on mode
Once characters are stored in memory, they are
isplayed all at once
Roll-up mode
Displays the characters continuously by scrolling
(max. 4 lines)
WATCHING TV
OPTIONAL SETTING
OPERATING DVD
DVD SETTING TROUBLESHOOTING
INFORMATION
ress
6
MENU]to exit
Page 30
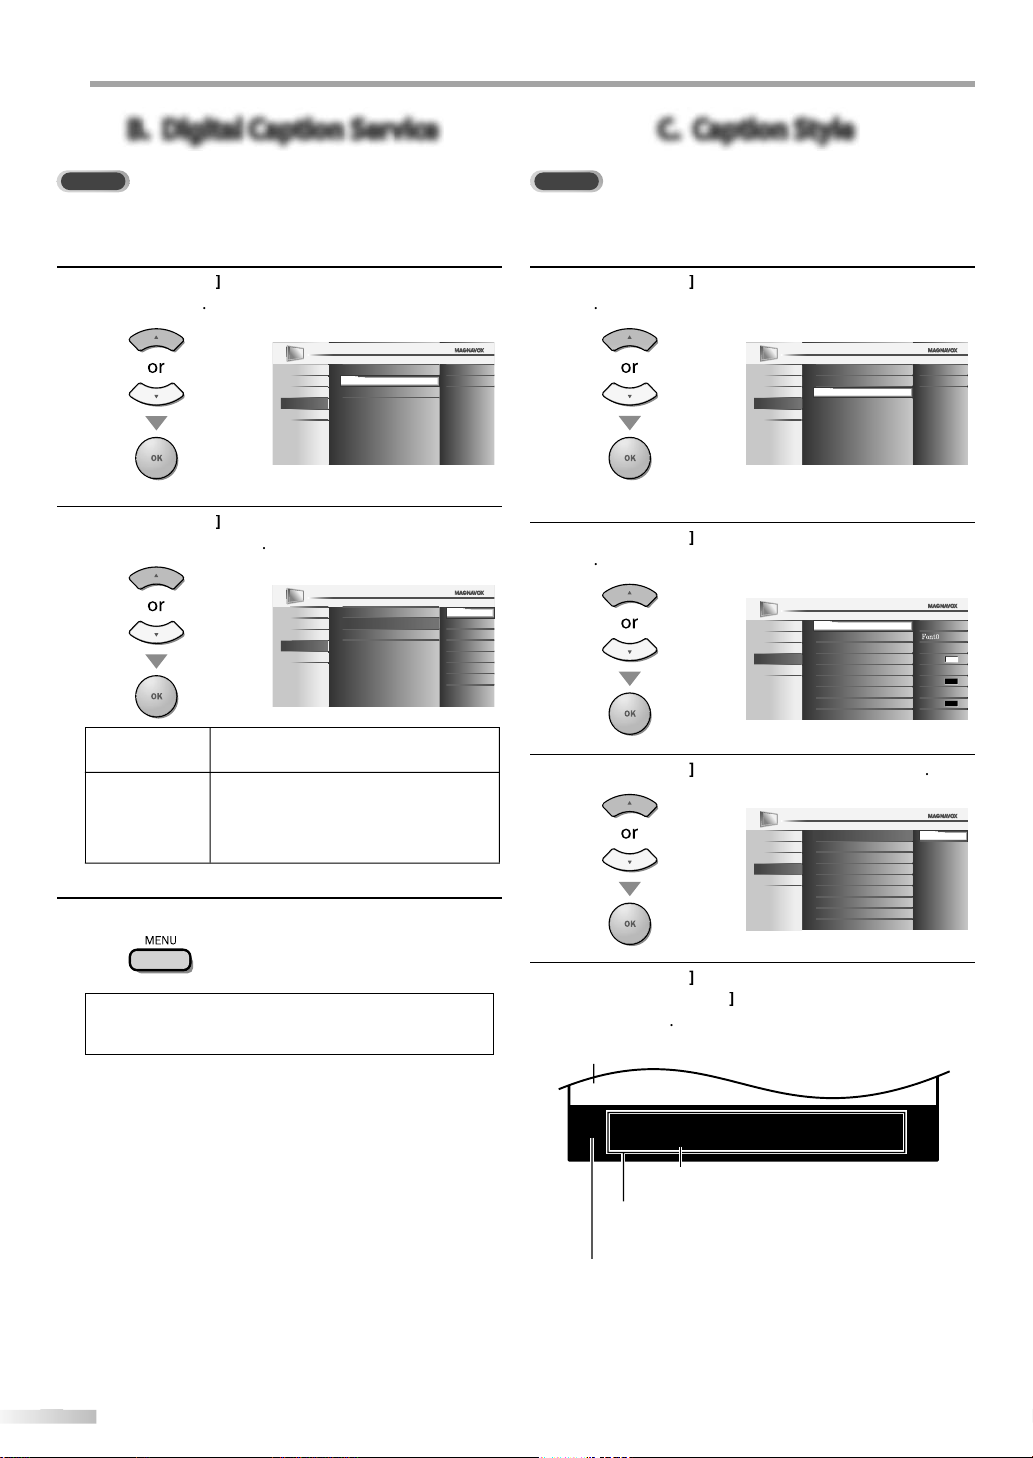
PTIONAL SETTING
DTV
K
L
]
Digital Caption Service
Caption Style
Off
Off
Caption Service
PICTURE
SOUND
SETUP
FEATURES
LANGUAGE
DVD
K
L
]
Digital Caption Service
Caption Style
CS-1
CS-2
CS-3
CS-4
CS-5
CS-6
Off
Caption Service
PICTURE
SOUND
SETUP
FEATURES
LANGUAGE
DVD
ce.
default.
6
g
oose “CS
stances.
ess
t.
DTV
Y
.
K
L
]
Digital Caption Service
Caption Style
Off
Off
Caption Service
PICTURE
SOUND
SETUP
FEATURES
LANGUAGE
DVD
K
L
]
Font Style
Font Size
Middle
Solid
Solid
Font Color
Font Opacity
Background Color
Background Opacity
Edge Color
Edge Type None
Off
User Setting
White
Black
Black
PICTURE
SOUND
SETUP
FEATURES
LANGUAGE
DVD
K
L
]
Font Style
Font Size
Off
Font Color
Font Opacity
On
User Setting
Background Color
Background Opacity
Edge Color
Edge Type
PICTURE
SOUND
SETUP
FEATURES
LANGUAGE
DVD
K
L
]
use
K
L
g
]
ge.
y
g
d
)
y
e
)
t
y)
B. Digital Caption ServiceB. Digital Caption Service
In addition to the basic closed caption described on page 27, DTV has its
own closed caption called digital caption service. Use this menu to change
the settings for digital caption service.
se
4
Cursor
en press
5
Cursor
service, then press
to select “Digital Caption Service”,
OK
to select the desired digital caption
OK
C. Caption StyleC. Caption Style
ou can change the caption style such as font, color or size, etc
se
4
5
Cursor
OK
Cursor
OK
to select “Caption Style”, then press
to select “User Setting”, then press
6
Select if you do not want digital caption
rvi
This is the
Select one of these before changin
-1 to CS-
any other item in “Closed Caption”
menu. Ch
-1” under normal
ircum
r
MENU] to exi
ote:
“Digital Caption Service” that you can switch differs
epending on the broadcast description.
se
6
7
Then
and press
Cursor
Cursor
to select “On”, then press
to select an item, then press
Cursor
to select the desired settin
OK
OK
Picture displa
ABCDEFGHIJKL
ABCDEFGHIJKL
Edg
(Edge Color and Edge Type
n
Font Style, Font Size, Font Color and Font Opacity
or Transparenc
Backgroun
( Background Color and Background Opacity or
Transparency
• The setting description for each item is shown on the
next pa
Review your setting choice made on the next page
b
looking in the upper right corner of the displayed
settin
box (not all selections show the differences
selected).
OK
Page 31

Closed Captioning font style can be changed as below
.
Font Style
Font Size
Font Color
Font Opacity
User Setting
Background Color
Background Opacity
Edge Color
Edge Type
PICTURE
SOUND
SETUP
FEATURES
LANGUAGE
DVD
Closed Caption
e
.
Closed Caption
Font Style
Font Size
Font Color
Font Opacity
User Setting
Large
Small
Background Color
Background Opacity
Edge Color
Edge Type
Middle
PICTURE
SOUND
SETUP
FEATURES
LANGUAGE
DVD
r
.
Font Style
Font Size
Black
White
Red
Green
Blue
Yellow
Font Color
Font Opacity
Magenta
Cyan
User Setting
Background Color
Background Opacity
Edge Color
Edge Type
PICTURE
SOUND
SETUP
FEATURES
LANGUAGE
DVD
Closed Caption
y
.
Font Style
Font Size
Font Color
Font Opacity
User Setting
Translucent
Transparent
Flash
Solid
Background Color
Background Opacity
Edge Color
Edge Type
PICTURE
SOUND
SETUP
FEATURES
LANGUAGE
DVD
Closed Caption
.
Font Style
Font Size
Red
Green
Blue
Yellow
Font Color
Font Opacity
Magenta
Cyan
User Setting
Background Color
Background Opacity
Edge Color
Edge Type
White
PICTURE
SOUND
SETUP
FEATURES
LANGUAGE
DVD
Closed Caption
Black
y
.
Font Style
Font Size
Translucent
Transparent
Flash
Font Color
Font Opacity
Solid
User Setting
Background Color
Background Opacity
Edge Color
Edge Type
PICTURE
SOUND
SETUP
FEATURES
LANGUAGE
DVD
Closed Caption
r
.
Font Style
Font Size
Red
Green
Blue
Yellow
Font Color
Font Opacity
Magenta
Cyan
User Setting
Background Color
Background Opacity
Edge Color
Edge Type
White
PICTURE
SOUND
SETUP
FEATURES
LANGUAGE
DVD
Closed Caption
Black
.
Font Style
Font Size
Font Color
Font Opacity
Background Color
Background Opacity
Edge Color
Edge Type
User Setting
None
Raised
Depressed
Uniform
L. Shadow
R.Shadow
PICTURE
SOUND
SETUP
FEATURES
LANGUAGE
DVD
Closed Caption
ess
]
to exit.
Font Siz
Font size of the displayed caption can be switched as
low
Font Colo
Font color of the displayed caption can be switched as
w
Edge Colo
Edge color of the displayed caption can be switched as
w
Edge Type
Edge type of the displayed caption can be switched as
w
r
8
MENU
INTRODUCTION
PREPARATION
WATCHING TV
OPTIONAL SETTING
Font Opacit
Font opacity of the displayed caption can be switched
below
Background Color
Background color of the displayed caption can be
witched as below
Background Opacit
Background opacity of the displayed caption can be
witched as below
OPERATING DVD
DVD SETTING TROUBLESHOOTING
• To show the closed caption on your TV screen, broadcast
signal must contain the closed caption data.
• Not all TV programs and commercials have the closed
caption or all types of the closed caption.
• Captions and texts may not match the TV voice exactly.
• Changing channels may delay the closed caption for a few
seconds.
• Adjusting or muting the volume may delay the closed
caption for a few seconds.
• Abbreviations, symbols and other grammatical shortcuts
may be used in order to keep pace with the on-screen
action. This is not a malfunction.
• The caption or text characters will not be displayed while
the main menu or functions display is shown.
• If a black box appears on the TV screen, this means that
the closed caption is set to the text mode. To clear the box,
select “CC-1”, “CC-2”, “CC-3”, “CC-4” or “Off”.
• If the unit receives poor quality television signals, the
captions may contain errors, or there might be no captions
at all. Some possible causes of poor quality signals are:
- Automobile ignition noise
- Electric motor noise
- Weak signal reception
- Multiplex signal reception (ghosts or screen flutter)
• The unit retains the closed caption setting if the power
fails.
• Closed caption will not be displayed when you are using
an HDMI connection.
• When the unit receives special effects playback signal (i.e.,
Search, Slow and Still) from a VCR’s video output channel
(CH3 or CH4), the unit may not display the correct caption
or text.
INFORMATION
Page 32

PTIONAL SETTING
k
ess
.
K
L
]
K
L
]
PC Settings
Energy Saving Mode
Location
Current Software Info
On
Home
Closed Caption
DVD
PICTURE
SOUND
SETUP
LANGUAGE
FEATURES
Child Lock
Enter PIN
PIN Code
Back
BACK
_
PICTURE
SOUND
SETUP
FEATURES
LANGUAGE
DVD
]
d.
.
PICTURE
SOUND
SETUP
DVD
FEATURES
LANGUAGE
A
US TV ratings lock
Channel Lock
Canadian English Rating
Canadian French Rating
Region ratings lock
Change PIN
US Movie ratings lock
B
D
C
31
1
2
33
.
oaded since.
Child Loc
Child lock reads the ratings for programs, then denies access to the
programs which exceed the rating level you set. With this function, you
can block certain programs inappropriate for children and any channels or
external input modes can be invisible.
r
1
2
MENU] to display the main menu
Cursor
OK
3
Cursor
OK
4
the Number buttons] to enter the 4-digit
numbers for your PIN Code.
to select “FEATURES”, then press
Closed Caption
PICTURE
Child Lock
SOUND
PC Settings
SETUP
FEATURES
LANGUAGE
DVD
Energy Saving Mode
Location
Current Software Info
On
Home
to select “Child Lock”, then press
See the following description for setting each item
“A. Channel Lock”
“B. US Movie ratings lock”
“C. US TV ratings lock”
“D. Change PIN”
page
page 3
page 3
page
Note:
• When you select a rating and set it to “Block”, the higher
atings will be blocked automatically. The lower ratings
ill be available for viewing.
• When you set the highest rating to “View”, all ratings turn
o “View” automatically.
• To block any inappropriate programs, set your limits in
US Movie ratings lock”, “US TV ratings lock” and
Region ratings lock”.
• The child lock setting will be retained after a power failure
except the access code reverts to 0000).
• If the rating is blocked, will appear
• “Region ratings lock” will be available when the unit
eceives a digital broadcast using the new rating system.
• If the broadcasting signal does not have the region ratings
ock information, “Region ratings lock is currently not
vailable.” will appear.
his message will also appear when you try to access
Region ratings lock” after you have cleared the region
atings lock information, and the new information has not
n downl
• The Canadian rating systems on this unit is based on
EA-766-A and the Canadian Radio-Television and
elecommunications Commission (CRTC) policy.
nter
isplaye
en you have not set up your PIN Code,
0]
0]
0]
0
en the PIN Code is correct, “Child Lock” menu is
Page 33

INTRODUCTION
.
K
L
]
PICTURE
SOUND
SETUP
FEATURES
LANGUAGE
US TV ratings lock
US Movie ratings lock
Canadian English Rating
Canadian French Rating
Region ratings lock
Change PIN
Channel Lock
DVD
K
L
.
Back
BACK
View / Block
Select
OK
DVD
PICTURE
SOUND
SETUP
LANGUAGE
Video
Component
HDMI1
HDMI2
HDMI3
DVD
FEATURES
Back
BACK
View / Block
Select
OK
DVD
PICTURE
SOUND
SETUP
LANGUAGE
Video
Component
HDMI1
HDMI2
DVD
11.1DTV
FEATURES
ess
]
to exit.
K
L
]
K
L
d
.
g
y
y
7No one unde
tted
n
3nsuitable for c
3
d
audience
g
.
37MD350B
3
350B
A. Channel LockA. Channel Lock
Particular channels or external input modes can be invisible in this
function
5
6
Cursor
OK
Cursor
ress
OK] repeatedly to switch between “View” and
Block”
to select “Channel Lock”, then press
to select the desired rating, then
B. US Movie ratings lockB. US Movie ratings lock
US Movie ratings lock is the rating system created by MPAA (Motion Picture
Association of America).
se
5
then press
6
“Block”
Cursor
se
Cursor
OK] repeatedly to switch between “View” an
to select “US Movie ratings lock”,
OK
PICTURE
Channel Lock
US Movie ratings lock
SOUND
US TV ratings lock
SETUP
Canadian English Rating
FEATURES
Canadian French Rating
LANGUAGE
Region ratings lock
DVD
Change PIN
to select the desired rating, then
PICTURE
SOUND
SETUP
FEATURES
LANGUAGE
DVD
Select
X
NC-17
R
PG-13
PG
G
NR
OK
View / Block
BACK
Back
PREPARATION
WATCHING TV
OPTIONAL SETTING
OPERATING DVD
7
2MD
Ratin
Categor
Mature audience onl
-1
Restricted; under 17 requires accompanying
r 17 admi
DVD SETTING TROUBLESHOOTING
parent or adult guardia
G-1
hildren under 1
Parental guidance suggeste
r
MENU
General
No ratin
ress
7
MENU]to exit
INFORMATION
Page 34

PTIONAL SETTING
K
L
]
PICTURE
SOUND
SETUP
FEATURES
LANGUAGE
US TV ratings lock
Canadian English Rating
Canadian French Rating
Region ratings lock
Change PIN
US Movie ratings lock
Channel Lock
DVD
K
L
s
B
dly
.
TV-MA
TV-14
TV-PG
TV-G
TV-Y7
TV-Y
FV
V S L D
Back
BACK
View / Block
Select
OK
DVD
PICTURE
SOUND
SETUP
FEATURES
LANGUAGE
.
.
K
L
s
B
.
Back
BACK
View / Block
Select
FV V S L D
TV-MA
TV-14
TV-PG
TV-G
TV-Y7
TV-Y
OK
DVD
PICTURE
SOUND
SETUP
FEATURES
LANGUAGE
g
y
MA
ly
r
table for c
4
d
G
der
Y
n
er
y
g
e
TV-Y
e
T
G
TV
TV-MA
n
e
T
lly
C. US TV ratings lockC. US TV ratings lock
5
ress
se
6
en press
and “Block”
ress
7
Cursor
OK
Cursor
OK] repeate
MENU] to exit
to select “US TV ratings lock”, then
to select the desired rating,
to switch between “View”
Ratin
-
-14
Mature audience on
nsui
ategor
hildren under 1
V-PG Parental guidance suggeste
V-
-
-
Sub Rating
eneral audience
ropriate for all children 7 and
l
ropriate for all childre
ategor
Fantasy Violenc
Violenc
Sexual Situatio
Ratin
7
V-P
-14
Coarse Languag
Suggestive Dialogue
V-PG, TV-14
Note:
• Blocked sub rating will appear beside the main rating
ategory in “US TV ratings lock” menu.
• You cannot block a sub rating (D, L, S or V) if the main
ating is set to “View”.
• Changing the category to “Block” or “View” automatica
anges all its sub ratings to the same (“Block” or “View”).
ighe
low
To set the sub ratings
As for TV-MA, TV-14, TV-PG, or TV-Y7, you can further
set the sub ratings to block specific elements of
programming. To set the sub ratings, follow the step
w
se
Cursor
en press
and “Block”
OK] repeatedly to switch between “View”
to select the desired rating,
Page 35

D. Change PIND. Change PIN
K
L
]
Cannel Lock
US TV ratings lock
US Movie ratings lock
Canadian English Rating
Canadian French Rating
Region ratings lock
Change PIN
DVD
PICTURE
SOUND
SETUP
FEATURES
LANGUAGE
ess
.
.
Confirm PIN
Enter PIN
PIN Code
Back
BACK
_
DVD
PICTURE
SOUND
SETUP
FEATURES
LANGUAGE
.
:
.
Although the default code (0000) is supplied with the unit, you can set your
own PIN Code.
se
5
Cursor
OK
r
6
the Number buttons]to enter the new 4-digit
PIN Code
nter PIN Code again in “Confirm PIN” entry field
to select “Change PIN”, then press
INTRODUCTION
PREPARATION
WATCHING TV
OPTIONAL SETTING
ress
7
MENU]to exit
Note
• Make sure new PIN Code and confirm PIN Code must be
exactly the same. If they are different, the space is cleared
or reentering
• Your PIN Code will be erased and return to the default
0000) when a power failure occurs.
you forget the PIN Code, unplug the AC power cord for 10
seconds to restore the PIN Code to 0000.
OPERATING DVD
DVD SETTING TROUBLESHOOTING
INFORMATION
Page 36

PTIONAL SETTING
g
k.
ess
.
K
L
]
K
L
]
Child Lock
Energy Saving Mode
Location
Current Software Info
On
Home
Closed Caption
DVD
PICTURE
SOUND
SETUP
LANGUAGE
FEATURES
PC Settings
K
L
]
Vertical Position
Horizontal Position
Position Reset
0
0
DVD
PICTURE
SOUND
SETUP
LANGUAGE
FEATURES
.
eset
K
L
]
Resets the display position of
the picture.
Cancel
Reset
DVD
PICTURE
SOUND
SETUP
LANGUAGE
FEATURES
.
n
s
B
.
s
B
t move PC
t
p
ess
t.
h
lly
This function lets you adjust the PC screen position during PC input through
the HDMI 1 Input jac
Pr
1
MENU]to display the main menu
Adjust the setting
5
Position R
Cursor
to select “Reset”, then press
OK
2
Cursor
OK
3
Cursor
OK
4
Cursor
adjust, then press
to select “FEATURES”, then press
Closed Caption
PICTURE
Child Lock
SOUND
PC Settings
SETUP
FEATURES
LANGUAGE
DVD
Energy Saving Mode
Location
Current Software Info
On
Home
to select “PC Settings”, then press
to select the setting you want to
OK
• The horizontal/vertical position of the PC screen are
automatically adjusted
Horizontal Position, Vertical Positio
Cursor
Horizontal Position
Pr
0
0
MoveAdjust OK
MENU] to exi
H. Position
Vertical Position
V. Position
6
OK
MoveAdjust OK
OK
to adjust
+-
+-
rsor
move PC
reen lef
move PC
reen down
creen righ
move PC
creen u
rsor
• You may not obtain an appropriate screen wit
Position Reset“ for some signals. In this case, adjust the
ettings manua
.
Page 37

gy g
Y
ou can set whether the power consumption is saved or not
.
ess
.
K
L
]
K
L
]
K
L
]
ption.
ff
ess
]
to exit.
ocation
bly
q
.
ess
.
K
L
]
K
L
]
K
L
]
ess
]
to exit.
Pr
1
MENU]to display the main menu
L
When you select ”Retail”, the power consumption may possi
limited re
1
uirement of the ENERGY STAR® qualification
Pr
MENU]to display the main menu
INTRODUCTION
exceed the
PREPARATION
2
3
4
OK
ress
ress
Cursor
Cursor
OK
Cursor
OK
to select “FEATURES”, then press
Closed Caption
PICTURE
Child Lock
SOUND
PC Settings
SETUP
FEATURES
LANGUAGE
DVD
Energy Saving Mode
Location
Current Software Info
On
Home
to select “Energy Saving Mode”, then
Closed Caption
PICTURE
Child Lock
SOUND
PC Settings
SETUP
FEATURES
LANGUAGE
DVD
Energy Saving Mode
Location
Current Software Info
On
Home
to select the desired mode, then
PICTURE
SOUND
SETUP
FEATURES
LANGUAGE
DVD
When set to “On”,power consumption is
reduced by decreasing backlight brightness.
On
Off
2
3
4
OK
ress
Cursor
Cursor
Cursor
OK
to select “FEATURES”, then press
Closed Caption
PICTURE
Child Lock
SOUND
PC Settings
SETUP
Energy Saving Mode
FEATURES
Location
LANGUAGE
Current Software Info
DVD
to select “Location”, then press
Closed Caption
PICTURE
Child Lock
SOUND
PC Settings
SETUP
Energy Saving Mode
FEATURES
Location
LANGUAGE
Current Software Info
DVD
On
Home
On
Home
OK
to select the desired location, then
PICTURE
SOUND
SETUP
FEATURES
LANGUAGE
DVD
Location Home is recommended for
normal home use.
In the Retail Store mode, all settings are
fixed.
Retail
Home
WATCHING TV
OPTIONAL SETTING
OPERATING DVD
DVD SETTING TROUBLESHOOTING
5
Select if you want to reduce the power
consum
The power consumption may possibly
O
exceed the limited requirement of the
5
Pr
MENU
INFORMATION
ENERGY STAR® qualification.
Pr
MENU
Page 38

PTIONAL SETTING
o
.
ess
.
K
L
]
K
L
,
]
Child Lock
PC Settings
Energy Saving Mode
Location
On
Closed Caption
DVD
PICTURE
SOUND
SETUP
LANGUAGE
FEATURES
Current Software Info
Home
ess
]
to exit.
rrent Software Inf
This function shows what version of the software currently used
Pr
1
MENU]to display the main menu
2
Cursor
to select “FEATURES”, then press
OK
Closed Caption
PICTURE
Child Lock
SOUND
PC Settings
SETUP
Energy Saving Mode
FEATURES
Location
LANGUAGE
Current Software Info
DVD
3
Cursor
then press
Confirm the version of the software currently used.
4
to select “Current Software Info”
OK
PICTURE
SOUND
Release Version:
XXXXXX_XX
SETUP
FEATURES
LANGUAGE
DVD
On
Home
Back
5
Pr
MENU
Page 39

PERATING DVD
y
O
R
WD-R
)
o
)
py
!
,
.
s
ote:
scs.
ed.
ctions
Th
f
f
h
f
f
y
.
T
.
g
.
.
Th
.
Media Type
Logo
DVD-VIDE
DVD Fun
VD-RW
VD-
D-DA
INTRODUCTION
PREPARATION
D-R
Recorded
Signal
Media Size 5 inches (12 cm
NEVER play back the following discs. Otherwise, malfunction may result
3 inches (8 cm) disc, DVD-RAM, DVD-audio, CD-i, photo CD, Video CD, DVD with region codes other than 1 or ALL, DTS-CD,
DVD-ROM for personal computers, CD-ROM for personal computers, the discs with labels, scratches, stains, blemishes, etc.
HD DVD, Blu-ray Disc, CD-RW/-R with MP3 files and CD-RW/-R with JPEG files including Kodak Picture CD
On the following disc, the sound MAY NOT be heard.
super audio CD
ny other discs without compatibility indication
igital video (MPEG2
digital audi
N
• Unfinalized discs cannot be played back.
• For DVD-RW/R, discs recorded in the VR (video recording) format cannot be played back. Only the finalized video format discs can be
played back.
• Some discs cannot be played back because of incompatible recording conditions, characteristics of the recorder or special properties of
i
• Only the sound recorded on the normal CD layer can be delivered. The sound recorded on the high density super audio CD layer cannot be
liver
• Do not use a single CD adaptor which makes 3 inches (8 cm) to 5 inches (12 cm) disc.
• You can play back discs with the marks listed in “Playable Media”. If you use non-standardized discs, this unit may not play them back or
the sound and video quality will be compromised.
• If the recorded portion of the disc is too small (less than 2-3/16 inches (55 mm) across), it may not play back properly.
WATCHING TV
OPTIONAL SETTING OPERATING DVD
DVD SETTING
Region Codes
is unit has been designed to play back DVD
with region 1. DVD must be labeled
regions or
t
e unit. You cannot play back DVD that are
labeled
your DVD. I
DVD,
he number inside the globe refers to region of the world
A DVD labeled for a specific region can only be played
back on the unit with the same re
or region 1 in order to play back on
or other regions. Look for the symbols on
these region symbols are not on your
ou cannot play back the DVD in this unit
or ALL
ion code
Color Systems
VD is recorded in different color systems throughout the
orld. The most common color system is NTSC (which is
sed primarily in the United States and Canada)
is unit uses NTSC, so DVD you play back must be
ecorded in the NTSC system. You cannot play back DVD
ecorded in PAL color systems
TROUBLESHOOTING INFORMATION
Page 40

PERATING DVD
y
.
.
The unit switches to the
ode when the unit was
.
)
DVD
ess
Th
B
.
ess
.
“.
ess
.
e
t.
.
ess and hold
A
]
on the unit for more than 5 seconds.
[
A
]
.
u
y
use
K
/
L
/
s
/
B
]
B
u
K
L
s
/
]
B
y
ess
g
.
ess
p
y
ote:
C
]
one more time in the
C
]
will not work while
.
y
.
py p y
ess
.
uted.
B
f
.
B
:
p
.
These operations are accessible by remote control. Some may also be accessible by controls on the main unit.
Disc Men
Before you begin:
Turn on the amplifier and any other equipment which is connected to this unit.
Make sure the external audio receiver (not included) are set to the correct channel.
ress
1
nsert a disc with label facing forward.
2
power) to turn on the unit
DVD
Some discs contain disc menus which describe the contents of the disc or
allow you to customize disc playback, or title menu which lists the titles
available on the DVD.
To displa
Cursor
or
To display the top menu, press
Cursor
or
the DVD menu, press
PLAY
PLAY
DISC MENU] and
to select an item, then press
TITLE] and
Bto select an item, then press
OK
OK
la
be
l
• In case the DVD was recorded on both sides, make
ure the label of the side you want to play back is
facing forward
3
DVD m
in TV mode and detects the type of disc
.g.
DVD
Pr
PLAY B if the unit does not go to the DVD mode.
e unit starts playback.
4
•
playback does not start automatically, press [PLAY
again
r
5
STOPCto stop playback temporarily
•
playback remains stopped for 20 minutes, the unit will
turn itself off automatically when “AUTO POWER OFF“ is
to “ON
r
6
EJECTA to eject the disc
ote:
” may appear at the top-right on the TV
screen when the operation is prohibited by th
isc or this uni
Some DVD may start playback from title 2 or 3 due to
specific programs.
uring the playback of a 2-layered disc, pictures may stop
for a moment. This happens while the 1st layer is being
switched to the 2nd layer. This is not a malfunction.
When you cannot remove the disc, you may try either
following operations
Pr
Unplug the AC power cord and plug it in again, then press
EJECT
It will take about 10 seconds to eject the disc, while that the
unit will not respond to any key commands
[EJECT
enu operations may vary depending on the disc.
efer to the manual accompanying the disc for more details.
Pr
STOPC during playback.
Resume messa
e will appear on
he TV screen
Pr
PLAYB Playback will
resume from the
pla
back was stopped.
oint at which
Resume ON
Press 'PLAY' to play from here.
To play the beginning,
press 'STOP' first and then 'PLAY'.
N
• To cancel resume, press [STOP
stop mode. On some discs,[STOP
the resume message appears. Please wait until the message
isappears
• The resume information will be kept even when the unit is
turned off. However, ejecting the disc will cancel the resume
feature. Playback will start at the beginning the next time
ou insert the disc
r
PAUSE F during playback
•Playback will be paused and sound will be
m
To continue playback, press
DVD
Each time you press
disc goes
orward one frame at a time
To continue playback, press
PLAY
PAUSE F in the pause mode, the
PLAY
Note
Set “STILL MODE” to “FIELD” in the “OTHERS” menu if
ictures in the pause mode are blurred. Refer to page 49
Page 41

Fast Forward / Fast Reverse
ess
D
or
dly
.
T
B
A
.
.
h.
D
or
g
f
.
T
B
ote:
9.
A
oom
l
s
.
ess
”.
/
L
/s/
oss the
.
]
.
z
.
]
]
one more time to recall the position guide when
Z
.
lable on some discs.
Z
r
[FWD
[REVE repeate
during playback to select the desired
orward or reverse speed
o continue playback, press
Set “STILL MODE” to “FIELD” in the “OTHERS” menu if
pictures in the fast playback mode are blurred. Refer to page
49.
Fast forward / fast reverse speed varies with disc.
pproximate speed is 1(2x), 2(8x), 3(20x), 4(50x) and 5(100x)
on DVD and 1(2x), 2(8x) and 3(30x) on audio CD
For DVD, sound will be muted during this function
For audio CD, sound will be intermittent during the searc
PLAY
Slow Forward / Slow Reverse
DVD
ress
FWD
durin
the paused mode to select the
desired
orward or reverse speed
o continue playback, press
N
Set “STILL MODE” to “FIELD” in the “OTHERS” menu if
pictures in the slow playback mode are blurred. Refer to
page 4
• Slow forward / slow reverse speed varies with disc.
pproximate speed is 1(1/16x), 2(1/8x) and 3(1/2x).
he sound will be muted during this function.
REVE repeatedly
PLAY
E
INTRODUCTION
Once a desired zoom factor is set,
3
1
Cursor K
r
TV screen
Bto slide the zoomed picture
PREPARATION
WATCHING TV
4
repeatedly until “OFF“ appears
OK
OPTIONAL SETTING OPERATING DVD
The gray box with an inner blue box that shows during
1
oomed playback is the position guide indicates the position
the zoomed image within the overall image
Position guide stays on the TV screen until you press[OK
Press [OK
isappears.
oom function does not work while the disc menu is
isplayed
x zoom is not avai
oom function is also available during pause mode.
Z
DVD
The zoom function allows you to enlarge the video image and to pan
through the enlarged image.
During playback, press
1
appear
• The picture becomes twice as large
Pr
2
OK] repeatedly to change the zoom factor, “2x”
r “4x
MODE]repeatedly unti
(
)
OFF
ZOOM
(
)
4x
ZOOM
DVD SETTING
TROUBLESHOOTING INFORMATION
N
Page 42

PERATING DVD
s
.
/
L
“
)
DVD
.
T
.
d.
ote:
play
.
playback
H
/
G
H
/
l
d.
d.
ote:
[
H
/
G
]
are not available when playback is stopped.
)
e
)
)
)
Search Function
Chapter / Title / Track SearchChapter / Title / Track Search
You can select chapters, titles or tracks on the disc
uring playback, press
1
/
• If you want to perform the title search, use
Cursor K
2
the Number buttons]to select your desired
chapter, title or track within 60 seconds
o play back a single-digit chapter, title or track when
ere are more than 10 chapters, titles or tracks, press
OK] after entering the chapter, title or track number
MODE]repeatedly until
repeatedly until
.g.
/12
(SEARCH
/12
(SEARCH
sing [SKIP
During playback, press
1
)
a desired chapter, title or track will be selecte
unti
or
SKIP
[SKIP H] [SKIP G]
[SKIP H] [SKIP G]
(If the disc has no chapter.
Grepeatedly
urrent chapter/track
CH
TR
CH/TR 1 CH/TR 2 CH/TR 3 CH/TR 4
rrent titl
TT
TT 1 TT 2 TT 3 TT 4
2
or track you selecte
N
SKIP
)
layback will start automatically from the chapter, title
3
or track you selecte
N
Chapter, title or track search can only be performed during
back or when the unit has kept the resume information.
It cannot be performed in the stop mode.
The total number of chapters / titles / tracks in your disc;
ith less than 10 chapters / titles / tracks, press the chapter /
itle / track number directly. To play a double-digit chapter /
itle / track, press the chapter / title / track number
Track search is not available for programmed or random
.
Page 43

INTRODUCTION
Y
.
/
.
D
dly
ess
.
ected.
ote:
lly
.
]
to erase the incorrect input at step 3.
.
ess
]
first, then enter the double digit
[+10],[2]
and
[6]
py
ess
/
L
.
ess
]
to exit.
)
tle
)
repeat)
)
Time SearchTime Search
ou can select the desired time which the disc is played back from
During playback, press
1
“ appears
2
3
CursorK
r
[the Number buttons] to select your desired
Lrepeate
time lapse within 60 seconds
Playback will start automatically from the time you
4
l
MODE] repeatedly until
.g.)DV
)
/12
(SEARCH
until “ appears.
TOTAL
1:29:00
TOTAL
1:29:00
Direct SearchDirect Search
Pr
the Number buttons] to select your desired
chapter, title or track.
To s elect a single-digit chapter, title or track number, press
he number directly.
To s elect double digit chapter, title or track number:
the disc contains more than 9 and less than 100 chapter,
itle or track, press[+10
apter, title or track number.
e.g., for track 26, press
Repeat function is available only during playback.
During playback, press
1
MODE] repeatedly until “”
(
OFF
REPEAT
PREPARATION
WATCHING TV
OPTIONAL SETTING OPERATING DVD
)
N
When there is no need to enter a number, “0” appears
automatica
search menu if the total time of the title or track is less than
10 minutes
ress[CLEAR
ime search can only be performed during playback or
when the unit has kept the resume information.
It cannot be performed in the stop mode
. For example, “0: 0_: _ _” appears in the time
2
3
Pr
r
DVD
Cursor K
CD
BACK
to change the repeat mode
FF
HAPTER
repeat
current chapter repeat
rrent ti
FF
repeat
RACK
ntire discrepeat
DVD SETTING
repeat
TROUBLESHOOTING INFORMATION
N
Page 44

PERATING DVD
py
ess
ess
.
l
.
T
]
“
ess
:
.
scs.
[CLEAR]
at step 2 in
.
y
appears
ess
.
gy
dly
l
.
K
/
store.
/
L
.
.
.
e
H
/
G
to see a
s.
ess
]
to erase the last track in the program if you
[OK]
at step 2.
C
]
works as
:
C
]
once: The track will be in the resume
B
]
, the playback
k.
C
]
twice: Resume mode will be canceled.
B
]
, playback will restart
C
]
will not work while the resume
program.
[the Number buttons]
P
H
/
G
]
t
.
k.
You can repeat playback between A and B on a disc.
uring playback, press
1
AB
AB
” appears.
r
2
3
OK]at your desired starting point (A).
r
OK]at your desired ending point (B).
MODE]repeatedly until
(
A-B REPEAT
(
A-B REPEAT
(
A-B REPEAT
)
)
)
AB
AB
AB
AB
AB
AB
OFF
A-
A-B
• Point B should be in the same title or track as point A
• Within a few seconds, the section A-B will begin to
p
ay back repeatedly
o cancel repeat A-B playback, press
4
repeatedly until “
r
OK] so “OFF” appears.
AB
AB
appears.
MODE
ote
• Repeat setting (except “ALL”) will be cleared when moving to
another title or chapter, track
•
uring programmed playback, repeat setting will be
effective for the tracks in the program.
• Repeat playback or repeat A-B playback may not available
ith some di
•
epeat A-B playback does not function during other repeat mode.
• To cancel point A, press
“Repeat A-B Playback”.
•
topping playback will cancel repeat A-B playback
CD
This function shuffles the playing order of tracks instead of playback in the sequence.
n stop mode, press
1
u
r
2
PLAY Bto start random playback
MODE]repeatedly until “RANDOM”
.
RANDOM
CD-DA TOTAL 0:45:55
RANDOM PROGRAM
--no indication--
PLAY
ote:
o repeat the current track in the random mode, follow the
TRACK”.
and 2 in “Repeat Playback” on page 41 and select “ ALL”.
CD
You may determine the order in which tracks will play back.
n stop mode, press
1
PROGRAM” menu appears
2
Cursor
OK] to
MODE]repeate
PROGRAM
ENTER/OK
PLAY
CLEAR
unti
CD-DA TOTAL 0:00:00
T 1 3:31
T 2 4:28
T 3 4:19
T 4 3:58
T 5 4:12
T 6 4:02
T 7 3:55
T 1 3:31
1/ 1
1/ 3
Lto select a desired track, then press
• Additional tracks may be on other screens. Use
Cursor K
o go on to the next / previous pages
• Repeat this step until you have selected all the tracks
ou wish to play back in the program
PROGRAM
CD-DA TOTAL 0:08:22
T 4 3:58
T 15 3:18
T 16 4:24
T 16 4:24
ALL CLEAR
ENTER/OK
PLAY
CLEAR
T 16 4:24
1/ 1
3/ 3
•Up to 99 tracks can be ordered
• If 8 or more tracks were in a program, us
SKIP
r
3
ress[CLEAR
make an error.
To erase all programmed tracks at once, select “ALL CLEAR”
and press
While a program is being played back,[STOP
ollows
- Pressing[STOP
will resume from the point where it is stopped in the
programmed playbac
- Pressing[STOP
programmed playback can be restarted when you follow
- On some discs,[STOP
message appears. Please wait until the message disappears.
To repeat the current track in the program, follow the steps 1
and 2 in “Repeat Playback” on page 41 and select “TRACK”.
To repeat the entire program, follow the steps 1 and 2 in
“Repeat Playback” on page 41 and select “ALL”.
Turning off the unit or ejecting the disc will erase the
ou cannot use
track during programmed playback. Use[SKI
select other tracks in the program
You cannot combine random playback with programmed
playback.
You cannot alter a programmed order during playbac
You can start programmed playback only while in
PROGRAM” menu.
ll the track
PLAYBto start programmed playback.
tandby mode. Next time you press[PLAY
ext time you press[PLAY
rom the first track in the original order. However, your
e above steps. (Your programs are still stored until either
he disc is ejected or the unit is turned off.)
to select another
o
Page 45

py
You can check the information about the current disc by pressing [INFO]
:
pg
.
.
.
K
L
t
ate
cation for the amount
d
-
D
TT (
/
acks
k
k
s
e
t
c
on the remote control.
DVD
appears only when multi
ngle is available on the DV
urrent playback status
11/16 0:00:00 - 0:03:30
1
2
1/3 0:00:00 - 1:23:45
emaining time of the current
hapter
lapsed time of the current
apter
H (Chapter):
urrent chapter number /
otal chapters
emaining time of the current title
lapsed time of the current title
Title):
urrent title number / total titles
CD
1
2
4/12 0:03:21 - 0:02:15
4/12 0:13:45 - 0:45:40
current playback statu
T
emaining time of the current
rac
lapsed time of the current trac
TR (Track):
current track number
tr
:
urrent track number /
otal tracks
T
urrent repeat setting appears only
hen the repeat setting is activ
T : Track repea
A : All tracks repeat
: A-B repeat
emaining time of the entire disc
lapsed time of the entire dis
INTRODUCTION
INTRODUCTION
PREPARATION
PREPARATION
WATCHING TV
WATCHING TV
OPTIONAL SETTING OPERATING DVD
OPTIONAL SETTING OPERATING DVD
3
TL1
ayer number, appears only when
laying a 2-layered disc
0 : Layer 0 is playing
1 : Layer 1 is playing
urrent repeat setting appears
nly when the repeat setting is
ctive
C : Chapter repea
T : Title repeat
: A-B repeat
it r
indi
audio and video data currently
eing rea
4
3
ote
en you are playing back an audio CD in program or
andom mode, “ PROGRAM” (or “ RANDOM”) will be
isplayed instead of
2
Subtitle LanguageSubtitle Language
DVD
This unit allows you to select a subtitle language (if available) during DVD
playback.
During playback, press
1
MODE] repeatedly until
DVD SETTING
DVD SETTING
TROUBLESHOOTING INFORMATION
TROUBLESHOOTING INFORMATION
appears
2
Cursor K
L repeatedly until your desired
language appears.
(
)
SUBTITLE
1.ENG / 6
itles can be varied on the
isplayed number
urrent subtitles language
• Each time you press
Cursor
the subtitle
language changes as shown on the next page.
N
Page 46

PERATING DVD
)
G
)
)
ess
t.
.
g
L
]
several times, the disc may not have that
)
subtitle is recorded on the scene.
.
.
l
.
p
ess
.
G
)
]
)
.
.
ess
t.
K
L
.
d.
.
.
.
FF
EN
no subtitles
English subtitles
French subtitles
r
3
[BACK] to exi
o cance
If your language is not shown after pressin
• When “NOT AVAILABLE” appears on the TV screen, it means
If you choose a language that has 3-letter-language code,
Ejecting the disc will cancel your subtitle setting
the subtitle, select “OFF” at step 2
[Cursor K /
language. However, some discs allow you to change subtitle
anguages setting in the disc menu. (Operation varies
depending on the disc, so refer to the manual along with
the disc.
the code will be displayed every time you change the subtitle
language setting. If you choose any other languages, “---”
will be displayed instead. Refer to page 50
Audio LanguageAudio Language
DVD
This unit allows you to select an audio language (if multiple languages are
available) during DVD playback.
During playback, press
the desired language appears
SAP/AUDIO]repeatedly unti
3/2.1ch 48k/3
1.ENG
Dolby D
Camera AnglesCamera Angles
DVD
Some DVD may contain scenes which have been shot
simultaneously from various angles. You can change the
camera angle if “
” appears on the screen. If “ANGLE ICON”
is set to “OFF” in “OTHERS” menu, “ ” will not appear. Refer
to page 49.
During playback, press
1
MODE] repeatedly until
appears
2
Cursor K
L repeatedly until your desired
camera angle appears.
)
1 / 8
(ANGLE
angles can be varied on the
displayed number
Pr
3
BACK] to exi
Black Level Setting Black Level Setting
DVD
Adjust the black level to make the dark areas of the TV picture brighter.
During playback, press
1
appears.
MODE] repeatedly until “ ”
(BLACK LEVEL
)
OFF
• Each time you
r
anguage changes as example below
EN
PA
FRE
Some discs will only allow you to change the audio setting
rom the disc menu. Refer to the manual accompanying the
discs for details.
If your language is not shown after pressing [SAP/AUDIO
everal times, the disc may not have that language.
owever, some discs allow you to change multiple audio
anguages setting in the disc menu. (Operation varies
depending on the disc, so refer to the manual along with
the disc.
When “NOT AVAILABLE” appears on the TV screen, it means
udio language is not available.
English audio)
Spanish audio)
French audio
audio can be varied on the displayed
mber
urrent audio language
SAP/AUDIO] the audio
Press
2
Cursor
to adjust the black level
(
)
BLACK LEVEL
ON
: Makes the dark areas brighter.
FF: Shows the original picture as recorde
ress
3
BACK] to exit
ote:
The setting will be kept even if the unit is turned off.
Page 47

INTRODUCTION
.
)
h
set to eithe
”.
.
ess
select the sound level.
atural effect.
.
ess
t.
.
ect “O
sound is distorted.
set a marke
D
K
L
/
B
ect an available marke
seconds.
].
.
.
etu
ater
s/B
ect the desired marker.
D
.
p
]
s.
ase a
s.
Stereo Sound ModeStereo Sound Mode
CD
This unit allows you to select a sound mode during CD playback.
During playback, press
the desired sound mode appears
ach time you press
anges as example below.
TEREOstereo sound with left and
-ch
-c
SAP/AUDIO]repeatedly until
STEREO
SAP/AUDIO] the sound mode
right channels)
left channel sound only
right channel sound only)
ote:
• Virtual surround cannot be changed when the sound mode
is
r “L-ch” or “R-ch
Virtual Surround Virtual Surround
You can enjoy virtual surround on your 2 channel stereo system.
During playback, press
1
appears
r
2
3
Cursor K
N
: Emphasized effect.
FF
o effects (original sound)
Pr
BACK] to exi
MODE] repeatedly until “ ”
OFF (SURROUND
L to
(
SURROUND
1
)
)
Marker SetupMarker Setup
This feature allows you to assign a specific point on a disc to be called back later.
During playback, press
1
2
3
” / “
se
Cursor
Cursor s
.
r
MODE] repeatedly until
appears.
.g.)DV
_ _ /12 (SEARCH)
repeatedly until marker search menu
12345678910AC
to sel
12345678910AC
r within
4
want to set a marker, press
Marker is now set
ress
5
1
2
BACK] to exit
r
rn to the marker l
Repeat steps 1-2 in “To set a marker”.
sel
OK]at the desired marker to restart playback
rom the specific point which you set
OK
2345678910AC
Cursor
.g.)DV
2345678910AC
2345678910AC
PREPARATION
WATCHING TV
OPTIONAL SETTING OPERATING DVD
DVD SETTING
TROUBLESHOOTING INFORMATION
ote:
•
he setting will be kept even if the unit is turned off.
• For audio CD, virtual surround will not be effective if the
sound mode is set to something other than “STEREO”.
Refer to “Stereo Sound Mode” on page 45
•
rn down the level or sel
•
arker search menu will disappear in about 60 seconds
hen there is no input.
FF” if the
ou can mark up to 10 points.
• To clear a marker, select the marker to be cleared, and then
ress [CLEAR
•Ejecting the disc or turning off the power will erase all
rker
electing “ ” at step 3 in the section “To set a marker” will
lso er
ll marker
N
Page 48

VD SETTING
gg g
ess
.
PICTURE
SOUND
SETUP
FEATURES
LANGUAGE
DVD
Tint
Sharpness
Brightness
Contrast
Color
0
0
30
60
36
Color Temperature
Smart Picture
Normal
Personal
]
PICTURE
SOUND
SETUP
FEATURES
LANGUAGE
DVD
Press “OK” key to move to DVD setup.
/
B
select
”, then press
]
]
]
)
.
.
)
.
.
.
r
d.
.
.
ess
it.
Settings are only effective when the unit is in DVD mode and any discs should not be played back.
You can change the desired language when playing back the disc.
r
1
2
3
MENU]to display the main menu
Cursor K L to select “DVD”, then press
Cursors
to
“
OK
OK
UBTITLE *1, *2 (Default: OFF)
Select the desired subtitle language
LANGUAGE
SUBTITLE
OFF
ENGLISH
FRENCH
SPANISH
ENTER/OK
GERMAN
ITALIAN
SWEDISH
Default: ENGLISH
Select the desired language in DVD menu
LANGUAGE
DISC MENU
ENGLISH
FRENCH
SPANISH
GERMAN
ENTER/OK
ITALIAN
SWEDISH
DUTCH
ENTER/OK
4
Cursor K L to select the desired item, then press
OK
ENTER/OK
5
Cursor K L to select the desired item, then press
OK
AUDIO *1, *2
elect the desired audio language
ENTER/OK
LANGUAGE
AUDIO ORIGINAL
SUBTITLE OFF
DISC MENU ENGLISH
LANGUAGE
AUDIO ORIGINAL
SUBTITLE OFF
DISC MENU ENGLISH
Default: ORIGINAL
LANGUAGE
AUDIO
ORIGINAL
ENGLISH
FRENCH
SPANISH
GERMAN
ITALIAN
SWEDISH
To change the on-screen language, call up “LANGUAGE”
rom the main menu and set the desired language
Refer to “Language Selection” on page 24
Language options are not available with some discs.
If “OTHER” is selected in “AUDIO”, “SUBTITLE” o
“DISC MENU” menu, press 4-digit number to enter the code
or the desired language. Refer to “Language Code List” on
page 50.
Only the languages supported by the disc can be selecte
Language setting for Audio and Subtitle are not available
with some discs
-se [MODE] to select subtitles available on the DVD
-se [SAP/AUDIO]
o select audio available on the DVD.
If the DVD’s default settings for audio and subtitle are the
same language, the subtitles may not show unless you
turn them on.
r
6
MENU] to ex
Page 49

g
Choose the appropriate audio settings for your equipment. It only affects
ess
.
PICTURE
SOUND
SETUP
FEATURES
LANGUAGE
DVD
Tint
Sharpness
Brightness
Contrast
Color
0
0
30
60
36
Color Temperature
Smart Picture
Normal
Personal
K
L
]
PICTURE
SOUND
SETUP
FEATURES
LANGUAGE
DVD
Press “OK” key to move to DVD setup.
s/B
]
K
L
)
T
.
ds.
.
)
ecorded
.
ote:
set to “O
efer to
tual
)
ected to a
.
.
.
)
ess
]
to exit.
during the playback of DVD.
Pr
1
2
3
MENU] to display the main menu
Cursor
Cursor
to select “DVD”, then press
to select “ ”, then press
OK
OK
DOWN SAMPLING
Default: ON
This function is available only on digital outputting of a
isc r
N
FF
in 96kHz
AUDIO
DRC ON
DOWN SAMPLING ON
DOLBY DIGITAL BITSTREAM
ENTER/OK
en outputting in 48kHz.
en outputting the original sound.
N
When playing back a 96 kHz disc with the copyright
protection or when ‘‘Virtual Surround” is set to “1” or
“2”, the sound will be down sampled at 48 kHz even if
he “DOWN SAMPLING” is
Surround” on page 45.
FF”. R
“Vir
INTRODUCTION
PREPARATION
WATCHING TV
OPTIONAL SETTING
AUDIO
DRC ON
DOWN SAMPLING ON
DOLBY DIGITAL BITSTREAM
ENTER/OK
4
Cursor
to select the desired item, then press
[OK]
RC (dynamic range control)
Default: ON
his function is available only on the discs which are
recorded in the Dolby Digital format
AUDIO
DRC ON
DOWN SAMPLING ON
DOLBY DIGITAL BITSTREAM
ENTER/OK
N :ompress the range between soft and loud
n
FF
o effects (original sound)
DOLBY DIGITAL
Default: BITSTREAM
to “BITSTREAM“ when this unit is conn
Dolby Digital decoder
AUDIO
DRC ON
DOWN SAMPLING ON
DOLBY DIGITAL BITSTREAM
ENTER/OK
BITSTREAM :Outputs Dolby Digital signals
PCM : Converts the Dolby Digital into PCM
2 channel
Pr
5
MENU
OPERATING DVD
DVD SETTING
TROUBLESHOOTING
INFORMATION
Page 50

VD SETTING
g
ess
.
PICTURE
SOUND
SETUP
FEATURES
LANGUAGE
DVD
Tint
Sharpness
Brightness
Contrast
Color
0
0
30
60
36
Color Temperature
Smart Picture
Normal
Personal
]
PICTURE
SOUND
SETUP
FEATURES
LANGUAGE
DVD
Press “OK” key to move to DVD setup.
/
B
]
]
d.
D.
]
K
L
]
d.
.
ess
]
to exit.
d
L
to select
]
d.
.
[4],[7], [3],[7]
, then enter
y
A
ess
]
to exit.
Parental setting prevents your children from viewing inappropriate
materials. (password protected.) Playback will stop if the ratings exceed
the levels you set.
r
1
2
3
4
MENU]to display the main menu
Cursor K L to select “DVD”, then press
se
Cursors
the Number buttons] to enter the 4-digit
to select “ ”, then press
PARENTAL
PARENTAL LEVEL ALL
ENTER/OK
numbers for your password, then press
OK
OK
OK
6
Cursor
to select the desired item, then press
[OK
ENTER/OK
: All parental locks are cancelle
[ADULT]
ll ratings (adult / general / children)
an be played back.
[NC-17]-2 [G]
nly DVD intended for general use
and children can be played back
[KID SAFE]
nly DVD intended for children can
e played back.
r
7
MENU
o change the passwor
Follow steps 1 to 4. Use [CursorK
5
“PASSWORD CHANGE”, then press [OK
ENTER/OK
PARENTAL
PARENTAL LEVEL
ALL
8 [ ADULT ]
7 [ NC-17 ]
6 [ R ]
5 [ PGR ]
4 [ PG13 ]
3 [ PG ]
PARENTAL
PARENTAL LEVEL ALL
PASSWORD CHANGE
•If you have set password already, use
the Number buttons]to enter the current 4-digit
passwor
You cannot use the default password (4737) to play back
DV
5
Cursor K L to select the “PARENTAL LEVEL”, then
OK
PARENTAL
Enter current password.
ENTER/OK
6
the Number buttons]to enter the new 4-digit
asswor
PARENTAL
PASSWORD
Please enter a 4-digit password.
0 0 0 0
ENTER/OK
Don’t forget the password.
Press ‘ENTER/OK’ to activate password.
DVD-video may not respond to parental lock settings. Make
ure this function works with your DVD-video.
ecord the password in case you forget it
If you forget the password, press
our new password. Password will be cleared and parental
PARENTAL
PARENTAL LEVEL ALL
PASSWORD CHANGE
ENTER/OK
evels will be set to “ALL”.
power failure will not erase your password.
r
7
MENU
Page 51

r
s
ess
.
PICTURE
SOUND
SETUP
FEATURES
LANGUAGE
DVD
Tint
Sharpness
Brightness
Contrast
Color
0
0
30
60
36
Color Temperature
Smart Picture
Normal
Personal
K
L
]
PICTURE
SOUND
SETUP
FEATURES
LANGUAGE
DVD
Press “OK” key to move to DVD setup.
s/B
”, then press
]
K
L
]
.
)
.
.
e
ed.
hly
ed.
)
utes o
use.
ess
]
to exit.
You can change the other functions.
r
1
2
MENU] to display the main menu
Cursor
to select “DVD”, then press
OK
TILL MODE
Default: AUTO
Set the picture quality in the still mode
If you select “AUTO”, it automatically selects the best
resolution setting (“FRAME” or “FIELD”) based on the
date characteristics of the pictures
IELD: The picture in the still mode will b
iliz
FRAME : The picture in the still mode will be hig
fin
OTHERS
ANGLE ICON ON
STILL MODE AU TO
AUTO POWER OFF ON
ENTER/OK
INTRODUCTION
PREPARATION
WATCHING TV
OPTIONAL SETTING
3
4
Cursor
Cursor
to select “
OTHERS
ANGLE ICON ON
STILL MODE AUTO
AUTO POWER OFF ON
ENTER/OK
to select the desired item, then press
OK
ANGLE ICON
Default: ON)
Set to “ON” to show the angle icon when multiple
camera angles are available during DVD playback
OTHERS
ANGLE ICON ON
STILL MODE AUTO
AUTO POWER OFF ON
ENTER/OK
OK
AUTO POWER OFF
Default: ON
Set to “ON” to turn this unit off automatically after 20
5
min
Pr
f no
MENU
OTHERS
ANGLE ICON ON
STILL MODE AUTO
AUTO POWER OFF ON
ENTER/OK
OPERATING DVD
DVD SETTING
TROUBLESHOOTING
INFORMATION
Page 52

VD SETTING
gg
ess
.
PICTURE
SOUND
SETUP
FEATURES
LANGUAGE
DVD
Tint
Sharpness
Brightness
Contrast
Color
0
0
30
60
36
Color Temperature
Smart Picture
Normal
Personal
]
PICTURE
SOUND
SETUP
FEATURES
LANGUAGE
DVD
Press “OK” key to move to DVD setup.
/
B
]
]
]
g
de
B
8
7
52
3
9
64
1
5
1
2
7
7
0
uta
5072
l
5
eto
864
3
ese
5971
1
E
9
7
4
61
oatia
5464
5
7
8
0
6
H
oese
5261
iji
6
5
4
1
8
7
1
8
5758
5360
7
ausa
5447
5569
5455
7
K
5
0
7
1
7
7
6
7
Javanese
5669
ada
5760
5765
5757
9
1
0
1
5767
N
1
7
8
0
6
7
3
5
8
tese
5966
5955
de
7
1
1
R
5
aeto-Romance
645
7
5350
656
oatia
655
6660
0
6550
5
6565
655
ese
6567
656
T
T
Ta
66
Tat a
6666
Tel
Tha
665
Tib
Tigri
Tong
T
Turkish [
Tu
665
Twi
ZUk
676
6
Vietnamese
6855
V
osa
054
5655
uba
You can reset all the settings except for the parental setting and on-screen
menu language.
r
1
2
3
4
MENU]to display the main menu
Cursor K L to select “DVD”, then press
Cursors
Cursor K L to select “YES”, then press [OK
to select “ ”, then press
INITIALIZE
Initialize?
NO
YES
ENTER/OK
INITIALIZE
Initialize?
NO
YES
ENTER/OK
OK
OK
ote:
When you want to cancel the initialization, select “NO” at
step 4, then press[OK
ress
5
MENU]to exit.
Language Co
Abkhazian 474
Afar 474
Afrikaans 47
Albanian 656
Amharic 475
Arabic 47
Armenian 547
ssamese 476
ymara 477
Azerbaijani 477
Bashkir 484
Basque 516
Bengali;Bangla 486
Bh
ni
Bihari 4854
ama 485
Bis
Br
n 4
Bulgarian 485
rm
Byelorussian 485
Cambodian 575
Catalan 494
Chinese [CHI] 725
rsican 49
r
Czech [CZE] 496
Danish [DAN] 504
Dutch [DUT] 605
English [ENG] 516
Esperanto 5161
Estonian 516
r
F
525
Finnish [FIN] 525
French [FRE] 526
Frisian 527
Galician 535
eorgian 574
German [GER] 505
Greek [GRE] 515
Greenlandic
Guarani
Gujarati 536
H
Hebrew
Hindi
Hungarian [HUN] 546
Icelandic [ICE] 556
Indonesian 556
Interlingua 554
Interlingue 555
Inupiak 555
Irish [IRI] 534
Italian [ITA] 556
Japanese [JPN] 564
Kann
Kashmiri
Kazakh
Kinyarwanda 646
Kirghiz 577
Kirundi 646
Korean [KOR] 576
Kurdish
Laothian 586
Latin 584
Latvian;Lettish 586
Lingala 586
Lithuanian 586
Macedonian 595
Malagasy 595
Malay 596
Malayalam 595
Mal
Maori
-
-
n
-
-
-
Language Co
arathi 5964
oldavian 5961
ongolian 5960
auru 604
epali 605
orwegian [NOR] 606
ccitan 6149
riya 6164
romo(Afan) 6159
anjabi 6247
ashto;Pushto 6265
rsian
olish [POL] 6258
ortuguese [POR] 6266
uechua 6367
h
omanian [RUM] 6461
ussian [RUS] 646
amoan 6559
Sangho 6553
Sanskrit 6547
Gaelic
rbian
rbo-Cr
Sesotho 6566
wana
Shona 656
indhi
Singhalese 655
iswat
lovak
Slovenian 6558
Somali 6561
Spanish [SPA] 5165
ndan
wahili
Swedish [SWE] 6568
agalog 6658
ajik 6653
mil
r
ugu 6651
i
etan 4861
nya 6655
a 6661
songa 6665
rkmen
6669
rainian 6757
rdu
zbek
olapuk 6861
Welsh 4971
Wolof 6961
h
7
Yiddish
Yor
lu 7267
-
247
n
TUR] 6664
-
772
7161
9
4
4
7
9
47
4
7
4
If you choose a language that has a 3-letter abbreviation,
the code will be displayed every time you change the audio
r subtitle language setting above. If you choose any other
anguage, ‘---’ will be displayed instead. (3-letter abbreviation is
written in bracket.)
Page 53

ROUBLESHOOTING
y
.
do?
cable connection to the ma
t.
batteries of the remote control.
obstacle between the
ote control.
T
t.
educe the distance to the unit.
catio
.
t?
y
.
.
.
oadcast.
.
.
ected external devices?
g
cable connection to the unit.
,
y.
.
?
sc.
.
atches or dusts o
ace.
y?
set the clock ?
t.
Q
Q
FA
Question Answer
•
heck the antenna or
•
heck the
•
heck if there is an
m
est the signal output. If OK, then possible infrared sensor trouble.
remote control does not work
M
What should I
ow come the Initial setup appears every
ime I turn on this uni
I cannot watch some TV programs
Wh
ow come there is no image from the
nn
henever I entered channel number
t changes automaticall
My disc cannot be played back.
s there any way I can play my disc
hy are captions not displayed entirel
r, captions are delayed behind the
ialogue.
w can I
Refer to “IR Signal Check” on page 54.
•
im the remote control directly at the infrared sensor window on the
ront of the uni
•R
• Re-insert the batteries with their polarities (+/– signs) as indicated.
•
hen there is an infrared-equipped device such as PC near this unit, it
ay interrupt the remote control signal of this unit.
•
ove the infrared-equipped device away from this unit, change the angle
f the infrared sensor or turn off the infrared communi
•
onnect the RF coaxial cable to the unit directly and run the initial setup.
•
ake sure to complete the channel scan before turning off the unit.
•
ake sure autoprogram has been completed
Refer to “Autoprogram” on page 22
•
utoprogram must be completed when you set up the unit for the first
time or move it to a location where previously unavailable channels are
r
•The selected channel may not be broadcasting.
•
hen autoprogram is interrupted and not completed,
ome channels will not be received. Make sure to complete
Refer to “Autoprogram” on page 22
•The selected channel cannot be viewed by the “Child Lock” setting.
Refer to ‘‘Child Lock” on page 30.
•The unit requires some kind of antenna input. An indoor antenna
VHF /UHF), an external antenna (VHF /UHF) or an RF coaxial cable from
our wall cable/satellite box needs to be plugged into the unit.
•
heck if the right input mode is selected by pressing
[H /]. Refer to “Switching Each Input Mode” on page 19.
•
heck the antenna or
•
hen using the Component Video Connection check that the Green
Y), Blue (Pb/Cb) and Red (Pr/Cr) connectors are connected to their
orresponding colored jacks on the unit.
•
any digital channels have alternate channel numbers. The unit changes
the numbers automatically to the ones signifying the broadcasting
tations. These are the numbers used for analog broadcasts
•
lean the di
• Ensure the disc is correctly inserted.
•
heck if the disc is defective by trying another disc
•
ancel the parental lock or change the control level.
• Insert a correct disc that plays back on this unit.
• Handle a disc with special care so that it does not have fingerprints,
r
•
aptions that are delayed a few seconds behind the actual dialogue are
ommon for live broadcasts. Most captioning production companies can
isplay a dialogue to maximum of 220 words per minute. If a dialogue
xceeds that rate, selective editing is used to insure that the captions
emain up-to date with the current TV screen dialogue.
•There is no clock function on this uni
INTRODUCTION
PREPARATION
in uni
infrared sensor window and the
WATCHING TV
OPTIONAL SETTING OPERATING DVD DVD SETTING
n function
SOURCE]or usin
TROUBLESHOOTING
INFORMATION
n its surf
Page 54

ROUBLESHOOTING
g
gg
pp
g
eset itself.
ime.
,
y
jack
y
y
y
.
f y
V
T
d
d
.
that the sound is not muted.
ess
]
so that the volume bar and
.
/
d
.
V
y.
V
g
V
.
y
y
Try
y.
f
f
V
If the unit does not perform properly when operated as instructed in this manual,
Symptom Remedy
ake sure the AC power cord is plugged in.
•
No power
Control button does not work.
Power is ON but no screen
image.
No picture or sound
No color
Adjusted ‘‘PICTURE” or ‘‘SOUND”
is not effective every time turn
on the unit.
Sound OK, picture poor
Picture OK, sound poor
You see a distorted picture or
hear an unusual sound.
ake sure that the AC outlet supplies the proper voltage, plug another electrical
liance into the AC outlet.
a
• If a power failure occurs, unplu
r
Press only one button at a time. Do NOT press more than one buttons at the same
t
• Check whether the connection of the antenna
connected correctl
• Check whether all the cables to the unit are connected to the correct output
our device like BD/DVD recorder.
of
•
ake sure that the selected input mode is connected to the working input jack.
• Check if
in PC mode. Tap an
Check if the power is on.
Check if the right input mode is selected.
Check whether all the cables to the unit are connected to the correct output jack
o
iew other TV channels. The problem might be limited to the broadcasting station.
urn off the unit and wait for about 1 minute, then turn on the unit again.
Check whether the connection of the antenna, cable receiver or satellite box is
connecte
Check if your computer is NOT in sleep mode when the input mode of this unit is
in PC mo
current volume level will appear on the TV screen
a
iew other TV channels. The problem might be limited to the broadcasting station.
• You must set ”Home” in ”Location”. Refer to page 35.
Otherwise, the settings you adjusted will not be memorized after you turn off the
unit.
Electrical interference from nearby appliances may affect picture qualit
djust “Contrast” and “Brightness” in the main menu.
iew other TV channels. The problem might be limited to the broadcasting station.
For the best picture quality, watch “high definition” wide screen programs.
If the HD content is not available, watch “standard definition” pro
iew other TV channels. The problem might be limited to the broadcasting station.
Check if the audio cable is connected in correctly
• You ma
motorc
•
our computer is NOT in sleep mode when the input mode of this unit is
our device like BD/DVD recorder.
correctly.
ake sure that the selected input mode is connected to the working input jack.
e. Tap any key on the keyboard to wake up your computer
sure
ake sure that the volume is NOT set to “0” or “Mute”. If so, use
just the desired volume
just “Color” in the main menu.
be getting interference from electrical appliances, automobiles,
cles or uorescent lights.
moving the unit to another location to see if this is the cause of the problem.
.
key on the keyboard to wake up your computer
the AC power cord for 1 minute to allow the unit
Pr
cable receiver or satellite box is
MUTE
VOL
rams instead.
Ghosts, lines or streaks in
picture
You see “noise” or “trash” on the
screen.
Different color marks on the TV
screen
Electrical interference from nearby appliances may affect picture qualit
•View other TV channels. The problem might be limited to the broadcasting station.
hen the capabilities of the unit exceed the capabilities of the digital
broadcasting, the signal will be increased to match the capabilities o
the unit. This may cause noise or trash.
o
iew other TV channels. The problem might be limited to the broadcasting station.
the display
Page 55

Symptom Remedy
T
.
ge.
T
.
.
.
.
T
T
y
.
T
.
.
.
the disc.
d.
.
l.
.
face.
T
.
.
T
y
ote:
.
his unit will memorize the volume level from the last time you adjusted it
You switch to a different input
and the volume.
You switch to a different input
and the screen size changes.
The display image does not
cover the entire screen.
Captions are displayed as a
white box.
No caption is displayed in the
Closed Caption-supported
program.
No caption is displayed when
playing back a disc or a cassette
tape containing captions.
Black box is displayed on the TV
screen.
•
• If the volume of the sound from another device is higher or lower, then the
loudness will chan
his unit will memorize the viewing mode from the last time you used the
articular input modes
If you are using the unit as a PC monitor, make sure that “Horizontal Position” and
Vertical Position” in “PC Settings” are set correctly
If you are watching TV or using the Video, S-Video, Component video or HDMI with
480i Input, pressFORMAT]repeatedly to switch various screen modes.
Interference from buildings or weather conditions may cause captioning to be
ncomplete
Broadcasting station may shorten the program to insert advertisement
he closed caption decoder cannot read the information of the shortened
he disc or cassette tape may be illegally copied, or the caption signal might not
•
have been read during cop
he text mode is selected for caption. Select “CC-1”, “CC-2”, “CC-3”, “CC-4” or “Off”
INTRODUCTION
PREPARATION
WATCHING TV
OPTIONAL SETTING OPERATING DVD DVD SETTING
ing
Completely distorted picture or
black/white picture with DVD.
Picture freezes momentarily
during playback.
Disc cannot be played.
Buttons do not work or the unit
stops responding.
The unit does not respond to
some operating commands
during playback.
Angle does not switch.
Playback does not start when
the title is selected.
he password for rating level
has been forgotten.
ake sure the disc is compatible with the unit
•
heck the disc for finger prints/scratches and clean with a soft cloth wiping from
enter to edge
n
Ensure the disc is correctly inserte
heck if the disc is defective by trying another disc
ancel the parental lock or change the control leve
Insert a correct disc that plays on this unit
Handle a disc with special care so that it does not have fingerprints, scratches, or
on its sur
o completely reset the unit, unplug the AC power cord from the power outlet for
5-10 seconds.
•
perations may not be permitted by the disc. Refer to the instructions of the disc
•The angle cannot be switched for DVD which do not contain multiple angles. In
some cases multiple angles are only recorded for specific scenes
eck the “PARENTAL” setting.
• Enter the default password (4737), then
our forgotten password will be cleared.
N
The LCD panel is manufactured to provide many years of useful life. Occasionally a few non active pixels may appear as a fixed point of
blue, green or red. This is not to be considered a defect in the LCD screen
Some functions are not available in specific modes, but this is not a malfunction. Read the description in this manual for more details on
correct operations.
Some functions are prohibited on some discs.
TROUBLESHOOTING
INFORMATION
Page 56

NFORMATION
SC
l
io
ts
.
C
l)
d
between our brand devices
eature and this unit. We do not
.
o
.
l
Th
lby
.
f
)
SC
.
h
.
.
l.
.
P
)
y
audio channel.
audio
g.
V
)
.
deo
.
y
ce
sed
ater and
y.
y
p
.
d.
ff,
.
use a hard cloth since this
the disc.
.
.
.
a
:
f
f
h
f
l
AT
Acronym that stands for Advanced
evision Systems Committee and the
Te
name of the digital broadcasting standards.
Aspect Rat
The width of a TV screen relative to i
height. Conventional TVs are 4:3 (in other
words, the TV screen is almost square);
widescreen models are 16:9 (the TV screen
is almost twice as wide as its height)
E
Consumer Electronics Contro
This allows you to operate the linke
nctions
with CEC f
guarantee 100% interoperability with other
brands of CEC compliant devices
Component vide
This is a video signal format that conveys
each of 3 principal colors of light (red,
blue and green) through different signal
ines. This allows the viewers to experience
picture colors as original as it is. There are
several signal formats, including Y / Pb / Pr
and Y / Cb / Cr
olby Digita
e system developed by Do
aboratories to compress digital sound. It
ers stereo sound (2ch) or multi-channel
udio
MI
High-Definition Multimedia Interface)
nterface that supports all uncompressed,
igital audio/video formats including
et-top box, BD/DVD recorder or digital
elevision, over a single cable.
TV (High De
ltimate digital format that produces high
esolution and high picture quality.
T
cronym that stands for National Television
ystems Committee and the name of the
urrent analog broadcasting standards.
the air NTSC signals will no longer be
ent by broadcasting stations during 2009
assword / PIN Code
stored 4-digit number that allows access
o parental control features.
Maintenan
Cabinet Cleaning
•Wipe the front panel and other exterior surfaces of the
nit with a soft cloth immer
wrung dr
• Never use a solvent or alcohol. Do not spray insecticide
liquid near the unit. Such chemicals ma
and discoloration to the ex
Panel Cleaning
Wipe the panel of the unit with a soft cloth. Before
cleaning the panel, disconnect the AC power cord.
Disc Handling
Handle the discs so that fingerprints and dust do not
adhere to the surfaces of the discs.
Always store the disc in its protective case when it is not
use
To clean-o
Do not
Wipe the disc in a straight line form center to edge
Never wipe with a circular motion
use a soft cloth
in lukewarm w
cause damage
osed surfaces
will mar
Region Code
inition TV
Regions associate discs and players wit
particular areas of the world
This unit will only play back discs that have
compatible region codes
You can find the region code of your unit
y looking on the rear pane
Some discs are compatible with more than
one region (or all regions)
SA
(Secondary Audio Program
Second-audio channel delivered separatel
from mainchannel is used as an alternate in bilingual
broadcastin
DT
(Standard Definition TV
Standard digital format that is similar to the
NTSC picture quality
-Vi
Offers higher quality images by delivering
each signal, color (c) and luminance (y)
independently of each other through a
separate cable
Servicing
Should your unit become inoperative, do not try to correct
the problem yourself. There are no user serviceable parts
inside. Turn off the unit, unplug the AC power cord and call
our toll free customer support line found on the cover of
this manual to locate an authorized service center.
If the Laser Optical Pickup Unit is Dirty
If the unit still does not perform properly when it is
operated, while referring to the relevant sections and to
"Troubleshooting Guide" in this user manual, the laser
optical pickup unit may be dirty. Consult your dealer or an
Authorized Service Center for inspection and cleaning of
the laser optical pickup unit.
IR Signal Check
If the remote control is not working properly, you can use
a digital camera (including a cellular phone with built-in
camera) to see if it is sending out an infrared signal.
With a digital camer
(including built-in cell phone cameras)
Point the Digital Camera towards the
remote control in
the remote control. Press any button on
o
e remote control and look through the
t
camera display. I
ight appears through the camera, the
remote contro
rared diode at the front
the infrared pulsating
is sending out an IR signal.
This
• Do not use detergent or abrasive cleaning agents
Page 57

p
TV format
:
d
:
)
)
:
3
69
W,
),
A
:
m
:
d,
n
:
,
R
:
d):
)
)
:
gnal
:
:
)
otal distortion factor:
D:
)
:
)
p
2
.
.
p
als:
p
p
p
)
)
:
)
)
)
:
[
3
2
:
)
ote control:
g
:
)
:
%
350B
CD:
s
d>
:
)
:
)
:
)
:
g)
350B
CD:
y)
d>
:
)
:
)
:
)
g)
Closed caption system
Channel coverage (ATSC / NTSC)
Terrestrial VHF:
CATV 2~13, A~
Tuning system
Channel access
ATSC / NTSC-M TV standar
§15.122 / FCC (digital CC
§15.119 / FCC (analog CC
~1
W+1~W+94 (analog W+1~W+84
-5~A-1, 5
Channel frequency synthesized tuning syste
Direct access keyboar
Programmable scan, and up / dow
V
Discs (playback compatibility)
DVD-video, DVD-RW/-R
audio CD, CD-RW/-
requency response
DVD (linear soun
CD
Si
-to-noise ratio (S/N ratio)
CD
T
DV
CD
Audio Output: 10W, 8Ω x
20 Hz to 20 kHz (sample rate: 48 kHz
20 Hz to 44 kHz (sample rate: 96 kHz
20 Hz to 20 kHz
90 dB (JEITA
1 KHz 0.007% (JEITA
1 KHz 0.007% (JEITA
: 14~
Termin
Antenna Input:
Audio In
Video In
S-Video In
Component video Input
RCA jack x 3 Y: 1V p-p (75Ω
HDMI Input
Coaxial Digital audio Output
RCA jack x 1 500mV p-p (75Ω
Audio Output:
Rem
Operatin
Power requirements
7MD
Power consumption (maximum):
L
Dimensions:<without stand> <with stan
W
H
D
Weight
HF / UHF / CATV 75Ω unbalanced (F-type)
ut:
CA jack (L/R) x 6 500mV rms
ut:
CA jack x 1 1V p-p (75Ω)
ut:
ini DIN 4-pin jack x 1 Y:1V p-p (75Ω
C:286mV p-p (75Ω
Pb/Cb:
Pr/Cr:
7MD350B]HDMI 19pin x
32MD350B]HDMI 19pin x
CA jack (L/R) x 2 500mV rms
igital encoded infrared light system
temperature
1°F (5°C) to 104°F (40°C
20V~ AC +/- 10%, 60Hz +/- 0.5
W
7 inche
35.9 inches (910.0mm) 35.9 inches (910.0mm
23.7 inches (600.0mm) 25.2 inches (638.0mm
5.1 inches (127.5mm) 10.2 inches257.0mm
27.74 lbs. (12.58kg) 29.92 lbs.(13.57k
00mV p-p (75Ω
00mV p-p (75Ω
INTRODUCTION
PREPARATION
WATCHING TV
OPTIONAL SETTING OPERATING DVD DVD SETTING TROUBLESHOOTING
• Designs and speci cations are subject to change without notice and without
our legal obligation
• If there is a discrepancy between languages, the default language will be
English
2MD
Power consumption (maximum):
L
Dimensions:<without stand> <with stan
W
H
D
Weight: 20.51 lbs. (9.30kg) 21.61 lbs.(9.80k
W
2 inches class (31.5 inches measured diagonall
30.0 inches (760.0mm) 30.0 inches (760.0mm
20.5 inches (519.3mm) 22.2 inches (563.0mm
5.1 inches (127.5mm) 9.4 inches238.0mm
INFORMATION
Page 58

LIMITED WARRANTY
NINETY (90) DAY LABOR / ONE(1)YEAR PARTS
WARRANTY COVERAGE:
This warranty obligation is limited to the terms as set forth
below.
WHO IS COVERED:
This product warranty is issued to the original purchaser or the
person receiving the product as a gift against defects in materials
and workmanship as based on the date of original purchase
(“Warranty Period”) from an Authorized Dealer. The original
sales receipt showing the product name and the purchase date
from an authorized retailer is considered such proof.
WHAT IS COVERED:
This warranty covers new products if a defect in material or
workmanship occurs and a valid claim is received within the
Warranty Period. At its option, the company will either (1)
repair the product at no charge, using new or refurbished
replacement parts, or (2) exchange the product with a product
that is new or which has been manufactured from new, or serviceable used parts and is at least functionally equivalent or most
comparable to the original product in current inventory, or (3)
refund the original purchase price of the product.
Replacement products or parts provided under this warranty are
covered against defects in materials and workmanship from the
date of the replacement or repair for ninety (90) days or for the
remaining portion of the original product’s warranty, whichever
provides longer coverage for you. When a product or part is
exchanged, any replacement item becomes your property and the
replaced item becomes company property. When a refund is
given, your product becomes company property.
Note: Any product sold and identified as refurbished or
renewed
Replacement product can only be sent if all warranty
requirements are met. Failure to follow all requirements
can result in delay.
WHAT IS NOT COVERED - EXCLUSIONS AND LIMITATIONS:
This Limited Warranty applies only to new company manufac-
to any hardware product or any software, even if packaged or
sold with the product, as manufacturers, suppliers, or publishers
may provide a separate warranty for their own products packaged with the bundled product.
carries a ninety (90) day limited warranty.
mission, or (d) if any serial number has been removed or defaced,
or (e) product, accessories or consumables sold “AS IS” without
warranty of any kind by including refurbished product sold “AS
IS” by some retailers.
This Limited Warranty does not cover:
• Shipping charges to return defective product.
• Labor charges for installation or setup of the product, adjustment of customer controls on the product, and installation or
repair of antenna/signal source systems outside of the product.
• Product repair and/or part replacement because of improper
installation or maintenance, connections to improper voltage
supply, power line surge, lightning damage, retained images or
tent for extended periods, product cosmetic appearance items
due to normal wear and tear, unauthorized repair or other
cause not within the control of the company.
• Damage or claims for products not being available for use, or
for lost data or lost software.
• Damage from mishandled shipments or transit accidents when
returning product.
it to operate in any country other than the country for which
it was designed, manufactured, approved and/or authorized, or
• A product used for commercial or institutional purposes
(including but not limited to rental purposes).
can be provided.
• Failure to operate per Owner’s Manual.
TO OBTAIN ASSISTANCE…
Contact the Customer Care Center at:
1-866-341-3738
REPAIR OR REPLACEMENT AS PROVIDED UNDER THIS
WARRANTY IS THE EXCLUSIVE REMEDY FOR THE CONSUMER, WITH THE ISSUING COMPANY NOT LIABLE FOR
ANY INCIDENTAL OR CONSEQUENTIAL DAMAGES FOR
BREACH OF ANY EXPRESS OR IMPLIED WARRANTY ON
THIS PRODUCT. EXCEPT TO THE EXTENT PROHIBITED BY
APPLICABLE LAW, ANY IMPLIED WARRANTY OF MERCHANTABILITY OR FITNESS FOR A PARTICULAR PURPOSE
ON THIS PRODUCT IS LIMITED IN DURATION TO THE
DURATION OF THIS WARRANTY.
The company is not liable for any damage to or loss of any programs, data, or other information stored on any media contained
within the product, or other additional product or part not covered by this warranty. Recovery or reinstallation of programs,
data or other information is not covered under this Limited
Warranty.
This warranty does not apply (a) to damage caused by accident,
abuse, misuse, neglect, misapplication, or non-supplied product,
(b) to damage caused by service performed by anyone other than
company approved Authorized Service Location, (c) to a product
FUNAI CORPORATION, Inc. 19900 Van Ness Avenue, Torrance, CA 90501
Some states do not allow the exclusions or limitation of incidental or consequential damages, or allow limitations on how long an
implied warranty lasts, so the above limitations or exclusions may
not apply to you.
rinted in China
Page 59

Français
Page 60

User manual
Manuel de l’utilisateur
Guía del usuario
37MD350B
32MD350B
LCD TV/DVD
English
1-866-341-3738
Quick Use Guide Inside!
HIGH-DEFINITION TELEVISION
Guide d’usage Rapide Incluse!
®
1-866-341-3738
Guía de Uso Rápido Incluida!
1-866-341-3738
Français
Español
MODEL NUMBER SERIAL NUMBER
Page 61

R
é
.
.
j
core. Conserve
x
ôt
t
,
beso
aucun autre
.
sécurité du
e
:
.
.
.
.
.
Renvoyez votre carte d’enregistrement de produit ou enregistrez-vous en ligne aujourd’hui
sur le site www.magnavox.com/support pour proter au mieux de votre achat.
L’enregistrement de votre modèle auprès de MAGNAVOX vous donne droit à tous les bénéces avantageu
énumérés ci-dessous, alors n’hésitez pas. Remplissez la carte d’enregistrement de votre produit et envoyez-la
aussit
*Preuve d’acha
vis de
pour assurer
des bénéces supplémentaires
roduit
En retournant la che ci-jointe
vous garantirez que votre
ate d’achat sera le X et vous
n’aurez
ocument pour obtenir du
service en matière de garantie
in d’
n inscrivant votre produit, votr
erez directement avisé par notre
abricant en cas de retrait de
roduit ou de défaut compromet-
ant la sécurité, ce qui arrive très
eu souvent.
n inscrivant votre produit, vous
tes assuré de bénécier de tous
es privilèges auxquels vous avez
roit, y compris les ores vous per-
ettant d’économiser.
Félicitations pour votre achat et bienvenue
dans la « famille »!
Cher propriétaire d’un produit MAGNAVOX
erci de faire conance à MAGNAVOX. Vous
avez choisi l’un des produits les mieux fabriqués et
arantis oerts sur le marché actuel
ous ferons tout en notre pouvoir pour que vous
soyez satisfait de votre achat pendant plusieurs
années
n tant que membre de la « famille »
AGNAVOX, vous pouvez proter de l’une des
aranties les plus complètes et de l’un des réseaux
e service les plus exceptionnels de l’industrie
e plus, votre achat vous garantit que vous
recevrez tous les renseignements et les ores
spéciales auxquels vous avez droit tout en ayant
accès à des accessoires par le biais de notre
réseau d’achats à domicile des plus pratiques
e plus important, c’est que vous pouvez vous
er à notre engagement profond à vous satisfaire
pleinement
C’est notre façon de vous souhaiter la bienvenue
t de vous remercier d’investir dans un produit
AGNAVOX.
amiliarisez-vous avez ces symboles de
et « éclair » est associé à des
omposantes non isolées à même
otre produit qui pourraient causer un choc
ectrique. Pour assurer la sécurité de tous les
embres de votre domicile, veuillez ne
as retirer le boîtier du produit
e « point d’exclamation » attire
’attention sur les fonctions pour
esquelles vous devriez lire la documentation
i-jointe an de prévenir les problèmes en
atière d’utilisation et d’entretien
VERTISSEMENT
e feu ou de choc électrique, cet appareil ne
evrait pas être exposé à la pluie ou à l’humidité
t les objets contenant des liquides, tels que des
ases, ne devraient pas être placés sur cet
ppareil.
TTENTION
ntroduire la lame la plus large de la che dans
a borne correspondante de la prise et pousser
usqu’au fond.
Pour réduire les risques
Pour éviter le choc électrique,
curit
.S. Pour proter au mieux de votre achat
AGNAVOX, veillez à remplir la carte
’enregistrement de votre produit et
’envoyer aussitôt ou à vous enregistrer en
igne sur le site :
www.magnavox.com/support
Consultez notre site Web à www.magnavox.com/support
F
l’attention du client
nscrire ci-dessous le numéro de série qui
trouve à l’arrière du
e renseignement pour consultation future.
uméro de modèle _______________________
uméro de série _________________________
r
Page 62

À
satio
ces instructions.
ces
uctions.
Te
tivre t les
uctions.
staller conformément au
uctions du fabricant.
p
i
bouc d’
chaud
autre
a
t
U
d
xl
etne b
son
sécurit
S
s
consu
e
,
sur
p
ocs
.
tili
dus a l
l.
E
satio
p
des blessures dues au
eversmen
p
ser
a
f
e
,
p
ple
g
l
a é
anorlement
ou s
bé.
du
se
.Le cordon d
l
a é
i
S
ormalement ou s
aière de re
S
e
tmbé ou si l
e
T
de
p
com
e
xc
dessus du
e
î
t
d
o
m
d,vo
dessus du co
de b
stallatio
pl
dations du f
t
p
sit
ieure
S
est b
une
sions
e
sion 8 d Code é
al
(
j
de
ucture de
des condu
des élect
ect
Vhé c-dess
é
s
des
t
î
:
e
t
q
té.
p
m
ge
écentes ou au
crbone et alc
de lo
r
.
.10.11.13.14.15.
17.
8.
9.
20.21.
butio
:Cais
à
l
s
q
q
d
y
s
p
à
l
e
pp
eub
aussi près que possible du point
d
de
n
INSTR
UCTIONS
SÉCU
É
IMPORTANTES EN MATIÈRE DE
RIT
re
Gar
4
e pas utiliser cet appareil à prx
.
eto
.
e pas bloquer les orices de ventilation.
.
n
Ne pas contourner le dispositif de sécurité que représente la
9
che polarisée ou la che
’
u
multiprises et du point de sor
répd,le suppor
r
a
Consulter un membre du
ndommagé
prise a été endomma
A
’appareil
n
m
instr
ir compte de tous les a
rs le
areil(y cori l alica
risée possède deux lmes dont l’ne des est plus large que
rUne che a mise à l trre compo
trre
coent pas à vtre pri
l remplace la prise désuèt
otéger le cordon d’alimentn de f
ni
iliser que des accessoires spéciés par le f
er le téléviseur uniqumen ve le criot le m
ancher cet appareil pendant les oes ou lor
uilisé pendant de longues périodes.
mande de
’intérieur de l’areil ou si ’arei
à lmidit s’il foncionn
ommage nécessitant
é par un membre du pennel compétent quand :
Des obj ou d liquides ont pénétré à l’ntérieur de
S’apparei
‘appareilne smbl p fonctionner
appareil
instr
seulement ave un linge s
nsller près de sources de chaleur telles que les
h
de mise à t L l
ricant ou ven
n chariot
rio de lar
ir
prévues pour vre
ni coincé
ou l l r
re
I
f
r exem
éesi un liqide ou un objet a pénétré
’aimenton ou la prise a été endom
té exposé à la plu
’idémontre des changement r
ndemen
men
mité de
x instr
le
cuisinière ou t
mise à l
me large et la bh de mise
rè
i
de l
ntlor dla
pour é
er
onnel compétent pour toute
re r
si le cordn dimentn ou la
’nnte est endommagé
u
c
rs prod
isant de la chaleur
l
un éri
on à ce qu’il ne soit
de hes
il
mmandés par le
ar
i
’ili
iter
rer l
ar
é exposé à la pluie
-Lar
lirevn utili
ia-
e che po-
mes
h
four
bl
u’il n
it être
é
nt
l
le
n
e
n
ien pour
rican
nt du
s’il
’il m
n
lemen
e soume
nternationales recommandées en matière de basculement
liquantune force
r
ui
De plu
n plaçant de l’
r le
ans avertissement du dessus du téléviseur et endommager le
duit et (ou)
n
a xéà un mur ou au pnd à moins de suivre les
nes
1
1
ntenne extérieure
circuit d’
r
e charges élect
l
ise à la terre aéquate d
uppor
’
ntenne d l
xigen
ivn r p pour évit
e pénètrent à l’
tilisation de piles
uites de piles qu
les ou des dommages matériels ou à l
l
+ e le -
n
et (ou)
e aux nor
bilité au sujet de la conception de son co
r
metr
,cr à la limit
.
,ne
v
n
mur ou
n
ectrique
e à prxmité des lignes électriques.
à la rr ’ne antenne extér
ntenne est mis à la terre pour perme
n aduat cont lsur
I/N
) four
ou d cbles de descente au dispositif de décharge
ent du dispositif de décharge d’
rdent
pour m
r
ion d’
bje
ntérieur de l
ler toutes les piles de f
n
’indiqué sur l’
lan
lines
l
pil qn lité n
ues pé
ilit-
es de sécurité d’ne
c nores de conception en ap-
i
à ’v
,il pour
uipemen r
De l acles pour
rican
- U antenne extérieure ne dv
ques.
it des renseignement
lle
re les él
ou de liquid
pour
pile (nciennes ou r
nt ou sur le
t
ner le revrsemen
r
e
essures corporelles
fon
chée au récepteussurer que
riu
’ne str
de mise à la terre e
r que des objet
ceinte par le biais des ou
nt en
on appropriée e
ni
.
u
nique et (ou) des jouet
ner des blessures corpo-
ient tomber
-Lari ne dv
-
n
ion
numé 7-
au su
de mise à trre
ntenne
à la terre
- D pr
ou dliqi
ur préir les
ité
p
uili
e vos
’mun
e pe
n
nfants,
n
nan
nt
4
l
-
e
ali
’instl
le c entre
emarque pour l’installateur
systèmes de câblodistributio
r
icl 2
r
-
r
COLLIER DE MISE À LA TERRE
MATÉRIEL D’ALIMENTATION ÉLECTRIQUE
lodistri
nsil
n
r
ÉLECTRODE DE MISE À LA TERRE DE L’ALIMENTATION ÉLECTRIQUE (ART. 250, PARTIE H DU NEC)
i
elle
rr
m
rr
l
ne
CÂBLE DE DESCENTE D’ANTENNE
DISPOSITIF DE DÉCHARGE D’ANTENNE (SECTION 810-20 DU NEC)
CONDUCTEURS DE MISE À LA TERRE (SECTION 810-21 DU NEC)
COLLIERS DE MISE À LA TERRE
r
ment
Page 63

R
NTRODUCTION
T
.
écautions
d
.
.
f
a fiche d’a
tation doit être facilement accessible.
pprop
.
.
CC
f
ff
.
V
g
g
f
g
y
:
.
.
.
/
.
866-3
38
SÉCU
.
t
.
.
eur
.
Pr
Ne placez pas cet appareil sur un meuble qui pourrait être renversé par un enfant ou un adulte qui pourrait s’y appuyer, le tirer ou
monter
peuvent causer un brouillage nuisible, à l’exception des modi
peut perdre le droit d’utiliser cet appareil s’il e
BROUILLAGE RADIO-T
Rè
une installation résidentielle. Cet appareil
et utilisé con
causera pas de brouilla
peut être vérifié en éteignant et rallumant l’appareil, l’utilisateur est invité à essa
DÉCLARATION DE CONFORMITÉ
Nom Commercial : MAGNAVOX Personne Responsable : FUNAI CORPORATION, Inc.
Modèle : 37MD350B
Numéro de Téléphone : 1-
Cet appareil numérique de la classe B est conforme à la norme NMB-003 du Canada. Appareil de réception télévision ordinaire, Canada BETS-7 / NTMR-7
essus. La chute de l’appareil peut causer des blessures graves ou même la mort
VERTISSEMENT DE LA F
et appareil peut générer ou utiliser de l’énergie de radiofréquence. Des changements ou modifications apportés à cet appareil
ectue un changement ou une modification sans autorisation
et appareil a été testé et jugé conforme aux limites pour appareil numérique de Classe B, conformément à la Partie 15 des
lements de la FCC. Ces limites sont conçues pour assurer une protection raisonnable contre le brouillage nuisible dans
énère, utilise et peut émettre de l’énergie de radiofréquence ; s’il n’est pas installé
ormément aux instructions, il peut brouiller les communications radio. Par ailleurs, il n’est pas garanti qu’il ne
e dans une installation donnée. Si cet appareil brouille la réception de la radio ou du téléviseur, ce qui
usieurs des mesures suivantes
1)Réorientez ou repositionnez l’antenne
2)Augmentez la distance entre l’appareil et le récepteur
3)Branchez l’appareil sur une prise de courant qui se trouve sur un circuit différent de celui auquel le récepteur est branché
Informez-vous auprès du détaillant ou d’un technicien spécialisé en radios/téléviseurs pour obtenir de l’aide.
32MD350B Adresse :
ications explicitement approuvées dans ce manuel. L’utilisateur
er d’annuler le brouillage en prenant l’une ou
9900 Van Ness Avenue, Torrance, CA 90501 U.S.A
41-37
et appareil ne doit pas être placé dans un meuble fermé, par exemple une bibliothèque ou une étagère, sans assurer une
ventilation a
riée. Laissez un espace de 3,2 pouces, ou 8 cm, minimum autour de cet appareil
Débranchez la fiche d’alimentation pour éteindre l’appareil en cas de problème ou lorsque vous ne l’utilisez pas.
L
limen
TTENTION : Il y a danger d’explosion si les piles ne sont pas remplacées correctement. Remplacez-les uniquement avec
es piles du même modèle ou d’un modèle équivalent
VERTISSEMENT : Les piles (emballées ou installées) ne doivent jamais être exposées à une chaleur excessive telle que celle
du soleil, des
lammes ou autre source similaire.
Comme tout produit LCD, cet équipement comporte une lampe contenant du mercure.
liminez-la conformément à la législation en vigueur. Pour toute information concernant
’élimination ou le recyclage, contactez : www.mygreenelectronics.com ou www.eiae.org
AVERTISSEMENT : Pour éviter les risques de blessure, cet appareil doit être fermement fixé au mur conformément aux
nstructions
NSIGNES DE
Cet appareil utilise un laser. Le couvercle de protection de ce dispositif ne doit être retiré que par un technicien de
maintenance qualifié. De même, l’entretien de ce dispositif doit être confié à un technicien qualifié. Le non-respect de ces
consignes peut occasionner des lésions oculaires graves
MISE EN GARDE : L’utilisation de commandes, de réglages ou de procresautres que ceux drits dans le pr
MISE EN GARDE : Prence d’un rayon laser visible et invisible lorsque l’appareil est ouvert et que le dispositif de
EMPLACEMENT :À l’intri
RITÉ RELATIVES AU LECTEUR LASER
manuel risque d’exposer l’utilisateur à un rayonnement dangereux
verrouillage est dsactivé. Ne pas regarder le faisceau du rayon laser
de l’appareil, pr
du mnisme de chargement du disque
n
INFORMATIONS IMPORTANTES RELATIVES AU COPYRIGH
Il est formellement interdit de copier, diffuser, projeter en séance publique et prêter des disques sans autorisation. Ce
produit est équipé d’un dispositif de protection du copyright protégé par des brevets américains et d’autres droits de
propriété intellectuelle. L’utilisation de ce dispositif de protection du copyright doit être autorisée par Macrovision et,
sauf autorisation contraire accordée par Macrovision, est limitée au cercle familial ou privé. Toute ingénierie inverse ou
désassemblage est strictement interdit(e)
F
Page 64

R
POUR ÉVITER LES RISQUES DE CHOC ÉLECTRIQUE ET D’INCENDI
E
.
.
ON
.
.
g
.
y
.
ON
.
.
E
.
l
.
L
.
.
y
TV
e
DVD
o
DTV
e
CD
o
.
q
gg q
.
.
sateur :
e
.
.
.
.
• Ne manipulez jamais le cordon d’alimentation secteur avec les mains mouillées
Ne tirez pas sur le cordon d’alimentation pour le débrancher de la prise murale.
N’introduisez ni vos doigts ni aucun objet dans le téléviseur
EMPLACEMENT ET MANIPULATI
• N’exposez pas le téléviseur à la lumière directe du soleil ; ne le placez pas à proximité de champs magnétiques
mportants, ni à un endroit soumis à de fortes vibrations
• Évitez les emplacements soumis à des changements de température extrêmes
• Installez le téléviseur en position horizontale et stable. Ne placez rien directement sous ou sur le téléviseur. Si le
éléviseur est placé trop près de vos équipements externes, il est possible que ceux-ci (selon leur type) provoquent du
bruit ou des perturbations de l’ima
uipements externes et le téléviseur
• En fonction de l’environnement, la température du téléviseur peut augmenter légèrement. Il ne s‘agit pas d’un
d
sfonctionnement
• Veillez à débrancher le cordon d’alimentation secteur de la prise murale avant de transporter l’appareil.
AVERTISSEMENT CONCERNANT LA CONDENSATI
De la condensation peut se former à l’intérieur de l’appareil dans les conditions suivantes. Dans ce cas, ne pas utiliser
’appareil pendant quelques heures de manière à lui laisser le temps de sécher
L’appareil a été déplacé d’un endroit froid vers un endroit chaud.
L’appareil est situé dans un environnement très humide
L’appareil est situé dans une pièce froide qui vient d’être chauffée.
REMARQUE SUR LE RECYCLAG
Le matériel d’emballage de ce téléviseur est recyclable et peut être réutilisé. Veuillez procéder à la sélection de
e matériel conformément aux réglementations locales de recyclage
Vous ne devez jamais jeter les piles ni les incinérer mais les déposer dans les endroits recommandés par les
rég
ementations concernant les déchets chimiques
LORSQUE VOUS DÉPLACEZ CE APPAREI
• Il faut au moins 2 personnes pour porter ce appareil
• Assurez-vous de tenir fermement les cadres inférieur et supérieur du
éléviseur comme indiqué sur l’illustration
e et/ou du son. Dans ce cas, assurez-vous de laisser suffisamment d’espace entre les
INTRODUCTION PRÉPARATION
REGARDER LA
TÉLÉVISION
CONFIGURATION
OPTIONNELLE
FONCTIONNEMENT DU
LECTEUR DE DVD
abriqué sous licence de Dolby Laboratories. Le terme Dolby et le sigle double D sont des marques commerciales de
olby Laboratories
•
NERGY STAR® est un programme commun à l’Agence de Protection de l’Environnement des États-Unis et au
Ministère Américain de l’Energie, visant à réduire nos dépenses et à protéger l’environnement au moyen de produits
et de pratiques écoénergétiques
vis à l’Utili
Ce téléviseur a été paramétré de manière à développer un rendement énergétique optimal dans le cadre d’un
utilisation domestique, tout en affichant une image de la meilleure qualité possible
a modification des paramètres d’origine ou l’activation de nouvelles fonctions sur ce téléviseur (ex. augmentation
de l’intensité du rétro-éclairage) risque d’augmenter ses besoins en énergie, et donc, de le faire dépasser la
consommation d’énergie maximale prévue pour bénéficier de la norme ENERGY STAR®
• est une marque commerciale de DVD Format/Logo Licensing Corporation
L’Académie Américaine de Pédiatrie déconseille la télévision pour les enfants de moins de deux ans
Les symboles utilisés dans ce manuel sont décrits ci-dessous. La description concerne :
FONCTIONS TV FONCTION DVD
L’utilisation d’un téléviseur analogiqu
L’utilisation d’un téléviseur numériqu
• Si aucun symbole n’apparaît sous l’indication de la
onction, son utilisation s’applique aux deux types de
éléviseur.
Si aucun symbole n’apparaît sous l’indication de la
onction, son utilisation s’applique aux deux types de
téléviseur
: Lecture de DVD vidé
: Lecture de CD audi
RÉGLAGE DU DVD
DÉPANNAGE INFORMATION
F
Page 65

R
NTRODUCTION
cóté avan
t
gpp
ccessoires Fournis
l
AAA
AAA
l
l.
:
l.
.
.
sateur
)
)
B
0
écommande
)
s
,
te
t
EMN24699
)
350
)
socle
3 vis
)
4 vis
)
:
.
P
A
sser le socle dans la directio
tation entre le
I
ous letés situés sous le
A
nuel de l’utili
1EMN25919
Si vous devez remplacer ces accessoires, veuillez prendre comme référence le numéro indiqué sur les illustrations et
contacter
e numéro gratuit de notre service d’aide à la clientèle, indiqué sur la couverture de ce manue
uide de
émarrage rapide
our 37MD350B
1EMN25960
our 32MD350
l
NF801UD
pile
AAA
1,5V x 2)
r
’enregistremen
ensemble de vis pour
ixer le
r 37MD
uniquement
ordon d’alimentation
r
WAV0162LW001) ou
WAV0162LTE03) ou
WAV152ZHN001
1ESA20208
1ESA19508
emarque
• Pour 32MD350B inamovible cordon d’alimentation est déjà fixé sur l’appareil
Vous devez fixer l’appareil sur son socle pour pouvoir le poser sur un meuble. Assurez-vous que l’avant et l’arrière du
support sont dans la bonne position.
assez un chi on épais et doux sur
1
ne table, tel qu’indiqué ci-dessous.
Placez l’appareil face avant sur
e tissu. Assurez-vous de ne pas
endommager l’écran. Il faut au
oins 2 personnes pour réaliser
cette étape.
ignez les 2 crochets du socle avec
2
eux situés sous l’unité principale
indiqués par la èche
i
ndiquée par la èche
point d
arrêt et jusquà ce que les
rous de xation soient alignés.
), puis faites
n
jusqu
nsérez les vis à tête plate Philips
3
ns les tr
socle et vissez-les à fond.
B
Pour Enlever le Support du Apparei
évissez les vis à tête plate Philips indiquées dans le paragraphe 3
’arrière de l’appareil. Attention de ne pas faire tomber le socle en le retirant.
emarque
• Lorsque vous montez le support, vérifiez que toutes les vis sont serrées correctement. Si le support n’est pas fixé correctement, l’appareil
isque de tomber, ce qui peut provoquer des blessures et endommager l’apparei
• Utilisez une table qui puisse supporter le poids du appareil et qui soit plus grande que celui-ci
• Assurez-vous que la table se trouve sur un emplacement stable
F
ssurez-vous de ne pas coincer
cordon d’alimen
upport et l’appareil.
➁
cóté avan
cóté avan
➀
t
t
Après avoir retiré les vis, tirez le socle vers le haut et vers
Page 66

R
INTRODUCTION PRÉPARATION
V
V
D
y
g
g
x
.
e
q
.
ôle Parental
déo
e
été arrêtée.
cation du Débit
e
)
]
g
x
déo
a
.
oom
.
r
tual Surround
e
p
e
t
.
n
B
]
g
)
(
)
.
]
.
q
V
ectionne
usées e
g
g
câblod
.
formations relatives à
seur.
q
g
g
.
ge
pprop
.
écodeur Sous-titres
sous-titrées.
écommande.
e
pp
.inuterie de Somme
q
n
:
.
Stéréo
ectionne
y
q
écommande.
n
g
.
pp
quip
.
s
déo
e
DTV/TV/CAT
Vous pouvez utiliser la télécommande pour
l
numérique ou analo
du câble peuvent é
ffichage d’Informations (uniquement DTV)
Vous pouvez afficher le titre, le contenu et d’autres
in
télévi
Programmation Auto
Cet appareil balaye automatiquement les chaînes
et mémorise celles
votre ré
procédures de confi
Verrouilla
Cette fonction permet de bloquer l’accès des
enfants à des émissions ina
D
Le décodeur de sous-titres intégré affiche le texte
Syntoniseur MTS/SAP
L’audio peut être sélectionnée à l ‘aide de la
l
Fonction de Mise Hors Tension Automatiqu
Si aucun signal n’est reçu par la borne d’antenne et
u’aucune commande n’est exécutée pendant 15
minutes, l’a
nsion
Cette fonction permet d’éteindre l’appareil
automati
Choix de Langue pour l’Affichage sur Écra
Sélectionnez la langue du menu sur écran
Anglais, Espagnol ou Français
Fonction de Son
Syntonisation par Synthétiseur de Fréquences PLL
Permet de sél
les chaînes, ainsi que de les s
directement à l’aide des touches numéri
l
•
ivers Réglages pour l’Image et le So
Permettent d’adapter la qualité de l’image aux
conditions de votre pièce et de ré
onction de vos préférences
Entrée HDMI
Grâce à l’Entrée HDMI1, vous pouvez utiliser ce
a
ce dernier doit être é
Entrée Vidéo à composante
Entrée S-Vi
Entrée AV
Sortie Audio numériqu
Sortie Audio analogique
r les chaînes diff
ique classique. Les abonnés
alement accéder aux chaînes
iffusion
l’émission DTV sur l’écran
ui sont disponibles dans
ion, vous épargnant ainsi les difficiles
uration
émissions
areil se met automatiquement hors
il
uement à l’heure spécifiée.
r librement et facilement
areil comme moniteur pour votre PC (pour cela,
é d’une sortie DVI)
n format
riées
ntoniser
ues de la
ler le son en
• Son Dolby Digital
- Profitez d’un son Surround multicanal Dolb
ranchant l’appareil sur votre décodeur Dolby Digital.
• Ima
e Fixe / Lecture Rapide / Lecture
ente / Lecture Image par Image
et appareil propose différents modes de lecture, et
-
notamment la lecture d’ima
’avance/retour lent(e) et la lecture image par image.
• Des Menus de DVD dans la Langue de Votre Choi
- Vous pouvez afficher les menus du DVD dans la
angue de votre choix, si toutefois celle-ci est prise
n charge par le DVD-vidéo
• Extinction Automatiqu
- Au bout de 20 minutes d’inutilisation, l’appareil
s’éteint automati
• Contr
- Permet d’empêcher les enfants de regarder des
inadaptés à leur âge.
vi
• Reprise de la Lectur
- Vous permet de reprendre la lecture à l’endroit précis
elle a
• Indi
• DRC (contrôle de la plage dynamique
-
ette fonction vous permet de contrôler la plage de volume sonore.
es fixes, l’avance/retour rapide,
uement
Binair
Digital en
ccès grâce à la touche[MODE
Pendant la lecture
• Des Sous-titres dans la Lan
-
Vous pouvez afficher les sous-titres dans la langue de votre choix,
i toutefois cette langue est prise en charge par le
• Sélection d’un Angle de Camér
- Vous pouvez sélectionner l’angle de caméra de votre
hoix, si toutefois le DVD contient des séquences
ournées sous différents angles
• Z
- Vous permet d’agrandir la taille de l’image
• Réglage du Niveau de Noi
• Vir
• Recherch
- recherche de chapitre / recherche de titre / recherche
iste / recherche par durée écoulé
de
• Signe
-
Un signet permet à l’utilisateur d’accéder directement à
a partie du disque qu’il aura préalablement indiquée
• Répétitio
- chapitre / titre / piste / tout / A-
ue de Votre Choi
DVD-vi
ccès grâce à la touche[MODE
En mode Stop
• Lecture Pro
- Vous pouvez programmer l’ordre de lecture des
istes en fonction de vos préférences.
• Lecture Aléatoire
- Cet appareil peut lire les pistes de manière aléatoire
rammée (CD audio
CD audio
TÉLÉVISION
OPTIONNELLE
VD-
LECTEUR DE DVD
RÉGLAGE DU DVD
DÉPANNAGE INFORMATION
REGARDER LA
CONFIGURATION
FONCTIONNEMENT DU
ccès grâce à la touche[SAP/AUDIO
Pendant la lecture
• Choix de la Langue Audio et Fonction Son Stéréo
- Sélectionnez la langue ou le son stéréo de votre
oix parmi ceux proposés sur le disque
F
Page 67

R
NTRODUCTION
u
Importantes en Matière de Sécurité
.
écautions
.
.
.
ccessoires Fou
.
.
.
eau de Commande
. . . . . . . . . . . . . . . . . . . . . . . . . . . . . . . .
es
. . . . . . . . . . . . . . . . . . . . . . . . . . . . . . . . . . . . . . . . . . . . . . . . . .
écommande
. . . . . . . . . . . . . . . . . . . . . . . . . .
es
. . . . . . . . . . . . . . . . . . . . . . . . . . . . . . . . . . . . . . . . .
e
. . . . . . . . . . . . . . . . . . . . . . . . . . . . . . .
e
. . . . . . . . . . . . . . . . . . . . . . . . . . . . . . . . . . . . . . . . .
e
. . . . . . . . . . . . . . . . . . . . . .
estion des Câbles
.
tation Secteur
. . . . . . . . . . . .
TV
stallatio
.
.
uterie de Sommeil
.
.
. . . . . . . . . . . . . . . . . . . . . . . . . .
an
g
. . . . . . . . . . . . . . . . . . . . . . . . . . . . . . . . .
.
.
ste Chaînes
. . . . . . . . . . . . . . . . . . . . . . . . . . . . . . . . . . . . . . . . . . .
.
cation de
.
ge
. . . . . . . . . . . . . . . . . . . . . . . . . . . . . . . . . . . . .
n
. . . . . . . . . . . . . . . . . . . . . . . . . . . . . . . . . . . . . . . .
.
.
C
. . . . . . . . . . . . . . . . . . . . . . . . . . . . . . . . . . . . . . . . . . . .
.
5
.
ctions
D
e
. . . . . . . . . . . . . . . . . . . . . . . . . . . . . . . . . . . . . . . . . . . . . . . . .
.
.
e
. . . . . . . . . . . . .
.
t
. . . . . . . . . . . . . . . . . . . . . . . . . . . . .
.
he
. . . . . . . . . . . . . . . . . . . . . . . . . . . . . . . .
e
. . . . . . . . . . . . . . . . . . . . . . . . . . . . . . . .
.
.
.
g
.
x
. . . . . . . . . . . . . . . . . . . . . . . . . . . . . . . . . . . . .
.
D
. . . . . . . . . . . . . . . . . . .
l
. . . . . . . . . . . . . . . . . . . . . . . . . . . . . . . . . . . . . .
s
. . . . . . . . . . . . . . . . . . . . . . . . . . . . . . . . . . . . . . . . . . . . . . . . . .
t
. . . . . . . . . . . . . . . . . . . . . . . .
e
. . . . . . . . . . . . . . . . . . . . . . . . . . . . .
0
)
. . . . . . . . . . . . . . . . . . . . . . . . . . . . . .
2
lossaire
. . . . . . . . . . . . . . . . . . . . . . . . . . . . . . . . . . . . . . . . . . . . . . .
.
.
p
.
.
6
.
T
ctement
te.
f
f
f
.
nten
INTRODUCTION
r
nformation sur les Marques Commerciales . . . . . . . . . . . .
mboles Utilisés dans ce Manuel . . . . . . . . . . . . . . . . . . . . . .
A
ontage du Support du Téléviseur
Caractéristiques . . . . . . . . . . . . . . . . . . . . . . . . . . . . . . . . . . . . . . . .
nn
rn
nsérer les Pil
PRÉPARATION
nnexion de l’Antenn
Connexion à un Décodeur de Diffusion par
Câble / Satellit
Connexion d’un Appareil Extern
G
ranchez le Cordon d’Alimen
n
REGARDER LA TÉLÉVISION
élection de Chaîne . . . . . . . . . . . . . . . . . . . . . . . . . . . . . . . . . . . .
églage du Volume . . . . . . . . . . . . . . . . . . . . . . . . . . . . . . . . . . .
in
Arrêt sur Image. . . . . . . . . . . . . . . . . . . . . . . . . . . . . . . . . . . . . . . .
arcours des Modes d’Entrée. . . . . . . . . . . . . . . . . . . . . . . . . . .
nformations sur Écr
ode d’Affichage sur Écran de Télévision. . . . . . . . . . . . . .1
CONFIGURATION OPTIONNELLE
enu Principal . . . . . . . . . . . . . . . . . . . . . . . . . . . . . . . . . . . . . . . .
rogrammation Auto . . . . . . . . . . . . . . . . . . . . . . . . . . . . . . . . .
i
Ajouter Chaînes. . . . . . . . . . . . . . . . . . . . . . . . . . . . . . . . . . . . . . .
Vérifi
élection de la Langue. . . . . . . . . . . . . . . . . . . . . . . . . . . . . . . . .
églage de l’Ima
églage du So
ous-titres . . . . . . . . . . . . . . . . . . . . . . . . . . . . . . . . . . . . . . . . . . . . .
Verrouillage . . . . . . . . . . . . . . . . . . . . . . . . . . . . . . . . . . . . . . . . . . .
églages P
ode Economie d’Energie . . . . . . . . . . . . . . . . . . . . . . . . . . . .
nfo Logiciel Actuel . . . . . . . . . . . . . . . . . . . . . . . . . . . . . . . . . . . .
. . . . . . . . . . . . . . . . . . . . . . . . . . . . . . . . . . . . . . . . . . . .
rnis . . . . . . . . . . . . . . . . . . . . . . . . . . . . . . . . . . . .
. . . . . . . . . . . . . . . . . . . .
ns de la Tél
. . . . . . . . . . . . . . . . . . . . . . . . . . . . . . . . . . . .
onctions
n Initiale . . . . . . . . . . . . . . . . . . . . . . . . . . . . . . . . . . . . .
. . . . . . . . . . . . . . . . . . . . . . . . . . . . . . . . .
l’Antenne . . . . . . . . . . . . . . . . . . . . . . . . . . . . . .
ion . . . . . . . . . . . . . . . . . . . . . . . . . . . . . . . . . . . . . . . . . . . . . . . . .3
. . . . . . .
n
DV
FONCTIONNEMENT DU LECTEUR DE DVD
Disques Lisibles . . . . . . . . . . . . . . . . . . . . . . . . . . . . . . . . . . . . . . . .7
Disques Non Lisibles . . . . . . . . . . . . . . . . . . . . . . . . . . . . . . . . . . .7
ectur
Menu Disque . . . . . . . . . . . . . . . . . . . . . . . . . . . . . . . . . . . . . . . . . .
Reprise de la Lecture . . . . . . . . . . . . . . . . . . . . . . . . . . . . . . . . . .
Mise en Pause et Lecture Image par Imag
Avance Rapide / Retour Rapide . . . . . . . . . . . . . . . . . . . . . . . .
Avance Lente / Retour Len
oom . . . . . . . . . . . . . . . . . . . . . . . . . . . . . . . . . . . . . . . . . . . . . . . . .
Fonctions de Recherc
Répétition de la Lectur
Répétition A-B . . . . . . . . . . . . . . . . . . . . . . . . . . . . . . . . . . . . . . . . .
Lecture Aléatoire . . . . . . . . . . . . . . . . . . . . . . . . . . . . . . . . . . . . . .
2
Lecture Programmée . . . . . . . . . . . . . . . . . . . . . . . . . . . . . . . . . .
. . . . . . . . . . . . . . . . . . . . . . . . .
Réglages Spéciau
RÉGLAGE DU DVD
Réglage de la Langue du DVD . . . . . . . . . . . . . . . . . . . . . . . . .
Réglage de la Langue Audio du DV
Contrôle Parenta
utre
Rétablir les Réglages par Défau
Liste des Codes de Langu
DÉPANNAGE
Foire aux Questions (FAQ
Guide de Dépannage . . . . . . . . . . . . . . . . . . . . . . . . . . . . . . . . . .5
INFORMATION
G
Entretien . . . . . . . . . . . . . . . . . . . . . . . . . . . . . . . . . . . . . . . . . . . . . .
Autres Spécifications . . . . . . . . . . . . . . . . . . . . . . . . . . . . . . . . . .
Garantie Limitée . . . . . . . . . . . . . . . . . . . . . . . . . . . . . . . . . . . . . . .5
. . . . . . . . . . . . . . . . . . . . . . . . . . . . . .
. . . . . . . . . . . . . . . . . . . . . . . . . . . . .
5
2010 Funai Electric Co., Ltd
ous droits réservés. Aucune partie du présent manuel ne peut être reproduite, copiée, transmise, di usée, transcrite, téléchargée
u stockée sur un support de stockage quelconque, sous aucune forme ou dans n’importe quel but sans consentement écrit
xprès préalable de Funai. En outre, toute di usion commerciale non autorisée du présent manuel ou de l’une de ses révisions est
ri
Les informations contenues dans ce document sont susceptibles d’être modi ées sans préavis. Funai se réserve le droit de
modi
açon sans consentement écrit exprès de Funai. Toutes les autres marques mentionnées ici sont la propriété exclusive de leurs
détenteurs respecti
d’une licence ou d’un droit quelconque à utiliser l’une de marques commerciales présentées ci-dessus. L’usage abusi
marque commerciale ou de tout autre contenu du présent manuel est strictement interdit. Funai
étermination ses droits de propriété intellectuelle dans toute l’étendue des lois
F
interdi
er son contenu sans obligation d’en informer une personne ou une organisation.
et le dessin forment une marque commerciale déposée de Funai Electric Co., Ltd. et ne peuvent être utilisés en aucune
s. Aucune information contenue dans le présent ne doit être interprétée comme un octroi, implicite ou autre,
era appliquer avec
de toute
Page 68

R
)
.
)
(
)
.
.
)
.
/
(
)
MENU
)
.
)
à
du
e
.
N
.
Y
.
D
.
]
tée vers vous.
déo
déo.4.
déo
déo.
o.
.
n
)
l.
s
(
)
.
)
.
)
.
1
(
)
o.
f
.
)
)
.
e
(
)
.
1
(
)
.
.
[
]
.
es
eau de Co
de
)
uniquement
B
Pann
-
VOLUME
VOLUME
+
MENU
-
CHANNEL
+
mman
POWER
5 16 4 3 27
rn
12
13
14
15
16
*
24
25
37MD350
emarque :
prise de maintenance (usage du service seulement
*
N’utilisez ce port que si une mise à jour du logiciel est nécessaire.
L’utilisateur ne doit raccorder aucun périphérique au prise de
aintenance (appareil photo numérique, clavier, souris, etc.) : ces
derniers ne fonctionneront plus.
Dans la plupart des cas, la mise à jour du logiciel est faite par un
technicien agréé. Toutefois, dans certains cas, l’utilisateur peut
être invité à effectuer la mise à jour du logiciel lui-même.
Appuyez pour allumer ou éteindre l’appareil
Becture
Permet de commencer la lecture du disque
. Cstop)(p. 38)
Permet d’arrêter la lecture du disque
. Aéjecter) (p. 38
Permet d’éjecter le disque
. CHANNEL +
Appuyez pour sélectionner les chaînes ou pour vous
éplacer vers le haut () / bas ( dans les options du
menu principal.
.
Appuyez pour afficher le menu principal
. VOLUME + /p. 18
8
9
10
11
17
18
19
20
21
22
23
Appuyez pour régler le volume ou vous déplacer
roite ( / gauche (
menu principal.
. Fenêtre de capteur infraroug
Capte les signaux de commande infrarouges émis par la
télécommande
. Indicateur POWER O
S’allume en vert lorsque l’appareil est sous tension
0. Indicateur STAND B
S’allume en rouge lorsque l’appareil est éteint
1. Indicateur de DV
S’allume en orange lorsque le disque est inséré
Panneau Latéral
2. Fente de chargement du disque(p. 38)
Insérez le disque en veillant à ce que l’étiquette soit
rien
Prise d’Entrée S-Vi
Raccordement d’un périphérique externe à l’aide d’un câble
-Vi
Prise d’Entrée Vi
Raccordement d’un périphérique externe à l’aide d’un câble
vi
Prise d’Entrée Audio(p. 14 / p. 15)
Raccordement d’un périphérique externe à l’aide d’un câble
i
Prise d’Entrée HDMI 2(p. 12 / p. 13)
Raccordement d’un périphérique HDMI à l’aide d’un câble HDMI
Panneau Arrière]
7. Cordon d’alimentatio
(port du cordon pour d’alimentation 37MD350B)p. 16
Branchez-le sur une prise de courant standard pour
alimenter cet apparei
8. Gestion des câble
Utilisez ce support pour regrouper les câbles
9. Prise d’Entrée Vidéo à composantes
et Audio (. 12 / p. 14
Raccordement d’un périphérique externe à l’aide d’un
câble vidéo composant et d’un câble audio
0. Prise de Sortie Audio (p. 15
Connexion de câble audio pour un appareil externe
1. Prise d’Entrée Audio pour HDMI
Raccordement d’un périphérique DVI à l’aide d’un câble
i
En connectant un PC doté d’un port DVI, utilisez un câble
de conversion à mini(pour prise d’entrée HDMI 1 uniquement
2. Prise de Sortie Audio numérique (p. 15
Connexion par câble coaxial numérique pour un
écodeur ou un récepteur audio
3. Prise d’Antenn
Connexion de câble coaxial RF pour antenne ou décodeur de
diffusion par signal TV par câble
4. Prise d’Entrée HDMI
Connexion HDMI pour appareil HDMI ou DVI
En connectant un PC doté d’un port DVI, vous pouvez
utiliser cet appareil comme moniteur pour votre PC
uniquement 37MD350B
Prise d’Entrée HDMI 3(p. 12 / p. 13)
Raccordement d’un périphérique HDMI à l’aide d’un câble HDMI
WER (p. 17
p. 38
(p. 17 / p. 46
p. 18 / p. 19
en utilisant les options
(p. 14)
(p. 15)
p. 16
iche stéréo
p. 12
p. 12 / p. 13 / p. 16
p. 13 / p. 16
INTRODUCTION PRÉPARATION
REGARDER LA
TÉLÉVISION
CONFIGURATION
OPTIONNELLE
FONCTIONNEMENT DU
LECTEUR DE DVD
RÉGLAGE DU DVD
DÉPANNAGE INFORMATION
F
Page 69

R
NTRODUCTION
outons de la Téléco
de
l.
)
)
)
)
)
).
l
.
.
.
.
MENU
)
s
/
B
/
K
/
L
)
)
)
)
D
(
)
0
B
10
12
13
14
15
1
2
2
3
4
5
6
7
8
9
11
mman
16
17
18
19
2
21
10
22
12
23
24
25
26
Utilisation d’une télécommande
universelle pour commander cet apparei
• Assurez-vous que le code composant de votre
élécommande universelle correspond bien à celui
e notre marque.
Consultez le manuel accompagnant votre
élécommande pour toute information
complémentaire.
marche). 17
ermet d’allumer et d’éteindre l’appareil.
. SLEEP
. SOURCE
. SAP/AUDIO
• Permet de sélectionner la langue audio (DVD)
. MODE(p. 7
• Permet de déterminer l’ordre de lecture des
• Permet de régler le niveau de noir (DVD)
• Permet de changer l’angle de la caméra et de
• Permet de rechercher un chapitre, un titre
• Permet de créer un signet.
• Permet de répéter la lecture d’un chapitre,
• Permet d’agrandir une partie de l’image
• Permet de sélectionner les sous-titres sur un
.
.
. OK
. BACK
0. REV E / FWD
mode pause (DVD) et permet de parcourir un
p. 18
ppuyez pour activer la minuterie de sommeil.
p. 19
ermet d’accéder à des périphériques extérieurs
onnectés au téléviseur (un enregistreur BD/DVD, par
xemple).
p. 7 / p. 19 / p. 44
ode numérique (DTV)
Appuyez pour sélectionner la langue audio.
ode analogique (TV)
Appuyez pour sélectionner le mode audio.
ode DVD
u le mode sonore (CD).
pistes ou de lire des pistes de manière aléatoire
CD
t d’activer ou de désactiver le son Virtua
Surround.
oir la séquence en cours de lecture sous un
ngle différent (DVD)
DVD), une piste (CD) ou time
’un titre (DVD), d’une piste, d’un disque (CD)
u d’une section du disque comprise entre les
points A et B préalablement définis
2x et 4x : DVD).
isque (DVD)
p. 17 / p. 46
ppuyez pour afficher le menu principal.
curseur
ppuyez pour vous déplacer vers la gauche, la
roite, le haut ou le bas dans les options.
p. 17
ppuyez pour valider la commande de
onfiguration lorsque le menu principal s’affiche.
p. 20
ppuyez pour revenir au menu précédent.
ermet une avance lente ou un retour lent en
isque en avant ou en arrière.
p. 17
p. 39
F
Page 70

R
INTRODUCTION PRÉPARATION
)
.
)
.
)
)
.
)
.
)
l.
B
0
)
V
.
A
(
)
.
)
.
TITLE
)
.
T
(
)
.
)
.
)
se.
)
MUTE
)
)
.
)
es
l.
.
AAA
AAA
11. PLAY B (p. 38
Permet de commencer la lecture du disque
12. SKIP H / G (p. 40
Permet d’ignorer le chapitre, le titre (DVD) ou la
piste (CD) précédente ou suivante
13. PREV CH
p. 18
Appuyez pour revenir à la chaîne précédente.
14. VOL + /p. 18
Appuyez pour régler le volume
. Touches numériques(p. 18
• Appuyez pour sélectionner les chaînes
• Permet de sélectionner directement un
chapitre, un titre (DVD) ou une piste (CD).
point
• Appuyez pour passer de la canal principale à la
sous-cana
outon +1
• Permet de sélectionner les chapitres dont le
numéro est supérieur ou égal à 10.
16. FREEZE
p. 19
ode T
Appuyez pour fait une pause d’image sur
’écran
17. EJECT
p. 38
Permet d’éjecter le disque
18. DISC MENU (p. 38
Permet d’accéder au menu principal d’un disque
19.
(p. 38
Permet d’afficher le menu d’un titre (DVD)
20. FORMA
.21
Permet de sélectionner l’une des tailles d’image
isponibles pour l’écran du téléviseur
1. INFO
. 20 / p. 43
ode numérique (DTV)
• Appuyez pour afficher les informations de
aîne, le type de signal et le réglage de
élévision.
ode analogique (TV)
• Appuyez pour afficher le numéro de chaîne, le
ype de signal et le réglage de télévision.
ode d’entrée externe
• Appuyez pour afficher le mode
’entrée externe, le type de signal et le réglage
e télévision
ode DVD
• Permet d’afficher l’état actuel.
2. PAUSE F (p. 38
ode DVD
• Permet de mettre la lecture du disque en
u
3. STOP C (p. 38
Permet d’arrêter la lecture d’un disque.
4.
(p. 18
ppuyez pour activer ou désactiver le son.
5. CH + /
p. 18/ p. 19
ppuyez pour sélectionner les chaînes et le
mode d’entrée externe
6. CLEAR (p. 41
• Permet d’effacer les numéros mal saisis.
• Permet d’annuler le point A d’une répétition A-B.
• Permet d’effacer un numéro de piste en cas
’erreur lors de la création d’un programme (CD).
REGARDER LA
TÉLÉVISION
CONFIGURATION
OPTIONNELLE
FONCTIONNEMENT DU
LECTEUR DE DVD
RÉGLAGE DU DVD
Insérer les Pil
Insérez les piles (AAA, 1,5V x 2) en faisant correspondre leurs pôles avec ceux indiqués dans le logement à piles de la télécommande.
AAA
AAA
AAA
AAA
Précautions Concernant les Piles :
ous devez insérer les piles en plaçant les pôles dans le bon sens, tel qu’indiqué dans le logement à piles. L’inversion des pôles des piles peut
causer des dommages à l’apparei
N’utilisez pas simultanément des piles de types différents (ex., alcalines et carbone/zinc ou piles rechargeables de type Ni-Cd, Ni-Mh, etc.) ou
es piles usagées avec des piles neuves.
Si vous prévoyez de laisser l’appareil inutilisé pour une période prolongée, retirez les piles pour éviter les risques de dommages ou de
blessure causés par une fuite d’électrolyte
N’essayez pas de recharger les piles ; elles risqueraient de surchauffer et d’éclater.
DÉPANNAGE INFORMATION
F
Page 71

R
RÉPARATION
A
.
A
)
.
:
.
l.
.
.
p
.
)
COMPONENT VIDEO OUT
Pr/CrPb/CbY
AUDIO OUT
RL
STEREO
PCM
HDMI OUT
ANT IN
uniquement
uniquement
37MD350B
37MD350B
uniquement
37MD350B
.
I
e
e
V
de
l
p
o
F
)
V
F
coaxia
F
Les câble pour cette connexion ne sont pas fournis :
Procurez-vous les câbles nécessaires chez votre détaillant local.
Le câble High Speed HDMI (connu également comme câble HDMI catégorie 2) est recommandé pour une meilleure compatibilité.
vant toute connexion..
vant de brancher le cordon d’alimentation, assurez-vous que l’antenne ou l’autre appareil est bien connecté.
Connexion de l’Ante nn e
onnectez le câble coaxial RF de la sortie murale à la prise d’entrée d’antenne de l’appareil.
ex.
rrière de l’appareil
ntenne
HF / UH
le
l R
ou
signal TV par câble
Une fois les connexions terminées, allumez l’appareil et exécutez l’installation initiale.
Le balayage des chaînes est nécessaire pour que l’appareil mémorise toutes les chaînes disponibles dans votre région.
Reportez-vous à “Installation Initiale”, page 17
emarque
Visitez le site www.antennaweb.org pour toute question concernant l’antenne de télévision numérique (DTV)
Suivant le type d’antenne, vous aurez peut-être besoin de types différents de combinateurs (mélangeurs) ou séparateurs (diviseurs).
Contactez votre magasin local de produits électroniques pour vous procurer ces articles.
Par mesure de sécurité et pour éviter d’endommager l’appareil, déconnectez le câble coaxial RF de la prise d’entrée d’antenne avant de
éplacer l’apparei
Si vous utilisez une antenne pour capter la télévision analogique, cette antenne devrait également fonctionner pour capter la télévision
numérique (DTV). Les antennes installées à l’extérieur ou au grenier sont plus efficaces que les antennes posées sur le téléviseur
Pour permuter facilement la source entre l’antenne et le câble, installez un sélecteur d’antenne.
Si vous ne recevez pas un signal de votre réseau de câblodiffusion, contactez le câblodistributeur
Utilisez un câble HDMI ou vidéo à composantes pour relier la prise d’Entrée HDMI ou Vidéo à composantes de l’appareil
à la prise de sortie correspondante sur le décodeur de diffusion par câble / satellite.
i vous branchez un périphérique sur la prise d’Entrée Vidéo composant de l’appareil, branchez des câbles audio sur les
prises Audio G/D situées sous le connecteur Vidéo composant
ex.
ntenne
araboliqu
signal TV par
le avec PP
ou
câble
coaxial R
ou
r de diffusion
ar câble / satellit
(bleu)
(vert)
câble video á com
HDM
(rouge)
ou
ou
osantes et câble audi
(vert)
(bleu)
(rouge)
ou arrière
Vous pouvez également connecter cet appareil à une prise de sortie autre que HDMI ou vidéo par composantes si le
décodeur de diffusion par câble / satellite possède des prises de sortie différentes.
F
Les câbles requis et les méthodes de connexion au décodeur, ainsi que le canal de réception des signaux MAQ en
clair varient suivant le fournisseur de diffusion par câble / satellite. Pour de plus amples informations, contactez votre
fournisseur de service de télévision par câble ou par satellite
l’apparei
Page 72

R
pp
]
f
d
)
HDMI OUT
CHAPTER 15
REPEAT A-B
TITLE 5
uniquement 37MD350B
]
.
)
STEREO
PCM
DVI OUT
AUDIO OUT
RL
uniquement
37MD350B
:
.
Les câble pour cette connexion ne sont pas fournis :
g
I
de
I
I
o
Procurez-vous les câbles nécessaires chez votre détaillant local.
Le câble High Speed HDMI (connu également comme câble HDMI catégorie 2) est recommandé pour une meilleure compatibilité.
INTRODUCTION
PRÉPARATION
[Connexion HDMI
La connexion HDMI permet d’obtenir une image de meilleure qualité.
La connexion HDMI (inter
signaux numériques au
ex.
enre
istreur BD/DVD avec prise de
rtie HDM
ace multimédia haute-définition) permet le transfert de signaux vidéo haute-définition et de
io multicanal à l’aide d’un seul câble.
âble HDMI
ou
ou
ou arrière
’appareil
Remarque :
• Ce appareil prend en charge les signaux vidéo 480i / 480p / 720p / 1080i, et les signaux audio 32kHz / 44,1kHz / 48kHz.
• Ce appareil ne prend en charge que le signal audio à 2 chaînes (LPCM).
• Vous devez sélectionner “PCM” pour l’audio numérique de l’appareil connecté ou vérifier le réglage audio HDMI.
Le signal audio risque de ne pas être restitué si vous sélectionnez “Bitstream”, etc.
• Ce appareil ne prend en charge que les signaux conformes EIA861.
Connexion HDMI-DVI
Utilisez un câble de conversion HDMI-DVI pour raccorder l’appareil aux appareils vidéo externes équipés d’une prise de
rtie DVI
ex.
âble de conversion
MI-DV
rrière de l’appareil
REGARDER LA
TÉLÉVISION
CONFIGURATION
OPTIONNELLE
FONCTIONNEMENT DU
LECTEUR DE DVD
RÉGLAGE DU DVD
DÉPANNAGE INFORMATION
décodeur de diffusion par
âble / satellite avec prise de
emarque
• Ce appareil prend en charge les signaux vidéo 480i / 480p / 720p / 1080i
• La connexion HDMI-DVI nécessite également des branchements audio séparés.
• Les signaux audio sont convertis d’analogique en numérique pour cette connexion.
• Le DVI n’affiche pas d’image 480i non conforme à la norme EIA/CEA-861/861B.
rtie DV
ers la prise d’entrée
DMI1 uniquement
câble audi
F
Page 73

R
RÉPARATION
]
.
)
COMPONENT VIDEO OUT
Pr/CrPb/CbY
AUDIO OUT
RL
CHAPTER 15
REPEAT A-B
TITLE 5
:
.
]
.
.
)
CHAPTER 15
REPEAT A-B
TITLE 5
AUDIO OUT
RL
S-VIDEO
OUT
:
)
)
)
s
audio
)
o
déo
o
l
Les câble pour cette connexion ne sont pas fournis :
Procurez-vous les câbles nécessaires chez votre détaillant local.
[Connexion Vidéo à composantes
La connexion vidéo à composantes offre une meilleure qualité d’image pour les appareils vidéo raccordés á l’appareil.
Si vous branchez un périphérique sur la prise d’Entrée Vidéo composant de l’appareil, branchez des câbles audio sur les
prises Audio G/D situées sous le connecteur Vidéo composant
ex.
câble vidéo à composante
rrière de l’appareil
vert
vert
rouge
(bleu
enregistreur BD/DVD avec prise de
sortie vidéo composant
emarque
Cet appareil prend en charge les signaux vidéo 480i / 480p / 720p / 1080i
[Connexion S-Vidéo
La connexion S-Vidéo offre une bonne qualité d’image pour les appareils vidéo raccordés á l’appareil
Si vous branchez un périphérique sur la prise d’Entrée S-Vidéo de l’appareil, branchez des câbles audio sur les prises
udio G/D situées sous le connecteur Vidéo
ex.
côté de l’apparei
le S-Vi
enregistreur BD/DVD avec prise de
sortie S-Vidé
câble audi
emarque
Si vous connectez à la fois la prise d’Entree S-Vidéo et la prise d’Entree Vidéo, la connexion S-Vidéo aura la priorité.
F
Page 74
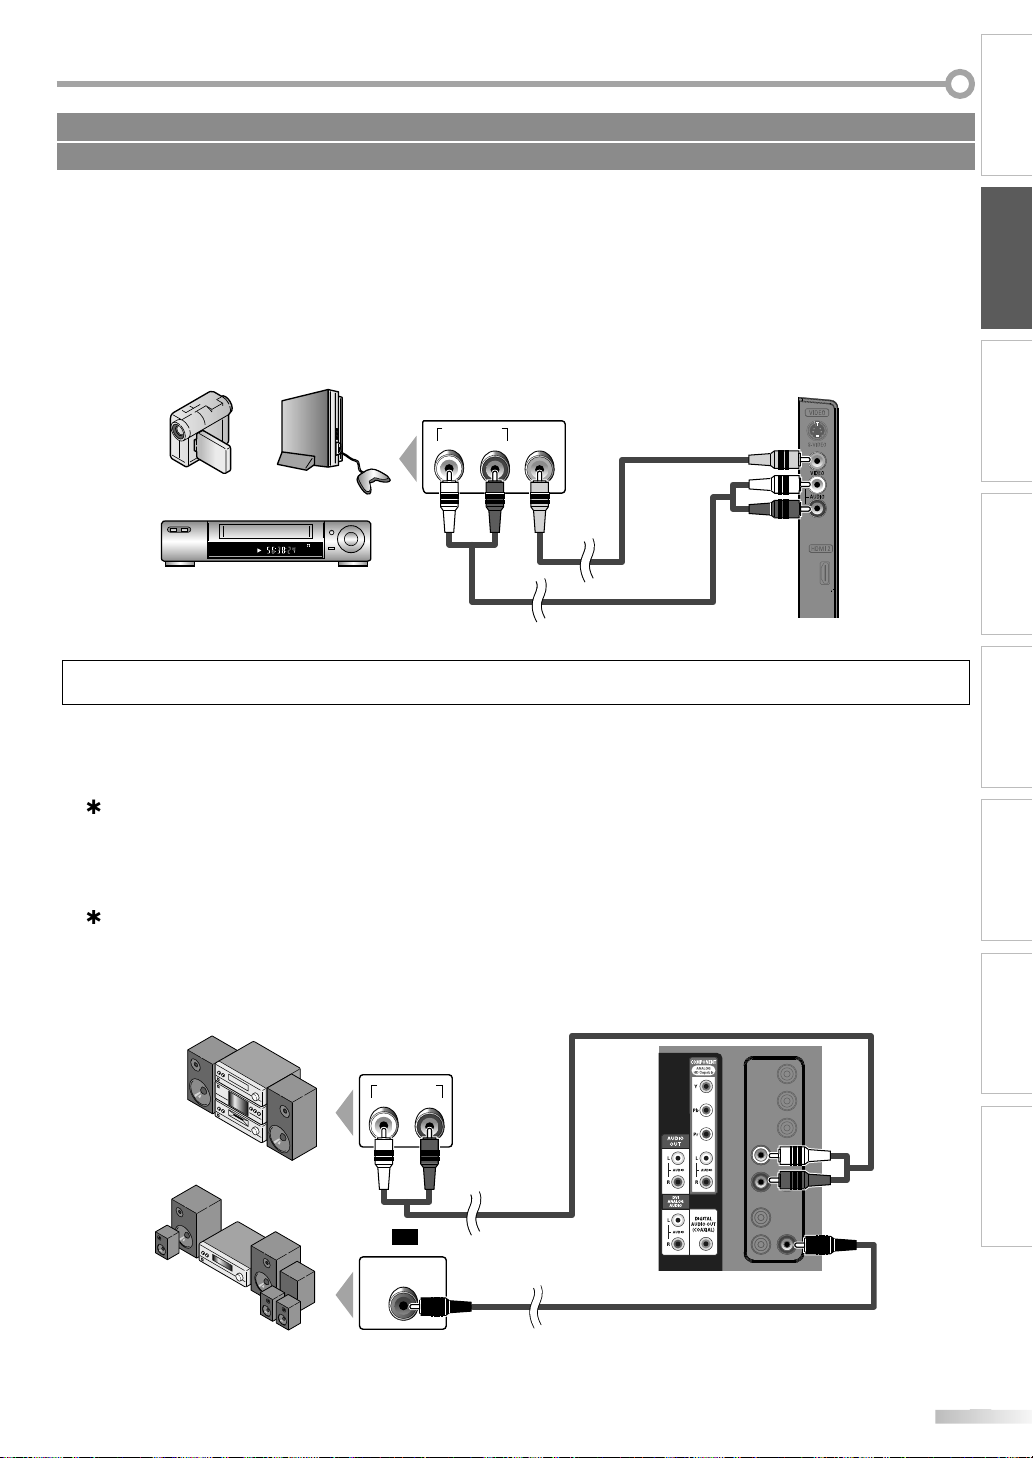
R
]
.
)
AUDIO OUT
RL
VIDEO
OUT
STEREO
STAND-BY
:
]
.
)
.
.
)
DIGITAL AUDIO
COAXIAL IN
AUDIO IN
RL
Les câble pour cette connexion ne sont pas fournis :
l
e
l
o
o
j
bl
o audio
l
Procurez-vous les câbles nécessaires chez votre détaillant local.
[Connexion Vidéo
La connexion vidéo offre une qualité d’image standard pour les appareils vidéo raccordés á l’appareil.
Si vous branchez un périphérique sur la prise d’Entrée Vidéo de l’appareil, branchez des câbles audio sur les prises
Audio G/D situées sous le connecteur Vidéo
Si la prise audio de l’appareil vidéo est monaurale, connectez le câble audio à la prise d’Entrée Audio L (gauche).
ex.
e vidé
câ
côté de l’apparei
INTRODUCTION
PRÉPARATION
REGARDER LA
TÉLÉVISION
caméscope
eu vidéo
agnétoscope
emarque
Si vous connectez à la fois la prise d’Entree S-Vidéo et la prise d’Entree Vidéo, la connexion S-Vidéo aura la priorité.
Connexion de Sortie Audio
Numérique (pour le contenu diffusé en numérique et fonctions DVD uniquement)
Si vous connectez l’appareil à un appareil audio numérique externe, vous pourrez profiter d’un rendu audio
multicanal similaire au son diffusé en mode numérique 5.1 canaux
Utilisez un câble coaxial audio numérique pour raccorder l’appareil aux appareils audio numériques externes.
Analogique(diffusion analogique et numérique
En connectant cet appareil à un appareil audio analogique externe, vous pourrez profiter d’un son stéréo (2 canaux)
Utilisez un câble audio pour connecter l’appareil à des appareils audio analogiques externes
ex.
CONFIGURATION
OPTIONNELLE
FONCTIONNEMENT DU
LECTEUR DE DVD
RÉGLAGE DU DVD
DÉPANNAGE INFORMATION
système stéré
r
Dolby Digita
ou
âble audi
arrière de l’apparei
câble coaxial audio numériqu
F
Page 75

R
RÉPARATION
]
.
.
:
t
n
l
t
n
l
GA
80
Hz
80
68
A 800
00
Hz1 360
68
GA
8
Hz
.
:
.
.
estion des Câbles
.
tation Secteu
.
l
l
le
r
)
p
p
p
3
350B
3
350B de conversion à
stéréo
l
doté d’une âme e
te.
se d’entré
Les câble pour cette connexion ne sont pas fournis :
Procurez-vous les câbles nécessaires chez votre détaillant local.
[Connexion PC
Cet appareil peut être connecté à un PC doté d’un port DVI. Utilisez un câble de conversion HDMI-DVI pour établir cette
connexion. Vous aurez également besoin d’un câble de conversion à mini-fiche stéréo
Si vous connectez l’appareil à votre PC, vous pouvez l’utiliser comme moniteur
ex.
uniquement 37MD350B
it être
mini-fiche
DVI OUT
n ferri
Les signaux suivants peuvent être affichés
orma
V
VG
X
Résolutio
640 x 4
x 6
1 024 x 76
Fréquence du
alayage vertica
0
0
0
orma
XGA
Les autres formats ou les signaux non-standard ne sont pas affichés correctement
emarque
Veuillez acheter un câble de conversion HDMI-DVI avec un noyau en ferrite
Les opérations suivantes peuvent réduire le bruit.
- Placez un tore magnétique sur le cordon d’alimentation de votre PC.
- Débranchez le cordon d’alimentation de votre PC et utilisez la batterie intégrée
ésolutio
1 2
x 7
x 7
arrière de l’apparei
réquence du
alayage vertica
Hz
Hz
G
Regrouper les câbles sur ce support afin qu’ils ne
s’emmêlent pas
7MD
2MD
F
arrière de l’apparei
arrière de l’apparei
ranchez le Cordon d’Alimen
Ne branchez le cordon d’alimentation sur une prise
murale qu’après avoir effectué tous les branchements
nécessaires.
cordon
’alimentation
secteu
prise mura
Pour 32MD350B inamovible cordon d’alimentation est déjà fixé
ur l’appareil
Mise en garde :
• Ne branchez pas le cordon d’alimentation secteur sur une prise
urale alimentée par une tension supérieure à celle préconisée
our cet appareil (120 V c.a.).
En ne respectant pas cette mise en garde, vous risquez de
rovoquer un incendie ou de vous électrocuter.
emarque :
• À chaque fois que vous branchez le cordon d’alimentation,
aucune o
secondes. Il ne s’agit pas d’un dysfonctionnement.
ération ne peut être réalisée pendant quelques
r
rrière de l’appareil
Page 76

R
stallatio
ale
,
)
p
.
.
K L
.
)
Initial Setup
Initial Setup
Select the language for setup display.
Elija el idioma de ajuste.
Sélectionner langue écran config.
Español
Français
Select Skip
MENU
OK
OK
English
]
K L
]
Configuration initiale
Configuration initiale
Câble
Antenne
Ou
Sélectionner Saut
MEMUBACK
RetourOK
OK
Vérifier que l’antenne est connectée à “ANT. IN”.
Sélectionner la source de votre signal.
Câble
Saut
Antenne
ANT.IN
.
Configuration initiale
Configuration initiale
Le système balaie les chaînes. Attendre.
Il faudra jusqu’à 20 minutes pour terminer la programmation auto.
Saut
MENU
0%
Chaînes analogiques 0ch
Chaînes numériques 0ch
s
B
]
Configuration Initiale
Configuration Initiale
Sélectionnez “Magasin” ou “Maison” comme emplacement.
OK
OK
Magasin
Maison
Sélectionner
f
f
.
de l
l
f
.
d
f
ff
)
]ou[
]
pendant le
.
Configuration initiale
Configuration initiale
Sélectionner Saut
MENU
Pas de chaîne enregistrée.
Essayer programmation auto à nouveau?
Vérifiez si un câble est bien connecté à la prise "ANT. IN" à l’arrière
du téléviseur, le procédé d’installation des chaînes recherche cette
connexion. Si vous utilisez un décodeur de diffusion par câble ou
satellite, confirmez l’entrée que vous avez connectée au décodeur
et appuyez sur la touche "SOURCE" de la télécommande
pour sélectionner l’entrée source appropriée.
Plus tard
Recommencer
OK
OK
ous souhaitez effectuer une nouvelle recherche
d
.
g
-
.
l
.
Ces opérations sont accessibles par la télécommande. Certaines peuvent aussi être accessibles par les commandes de l’appareil principal lui-même.
ctions TV
INTRODUCTION
Fon
In
Cette section vous guide à travers les étapes de la configuration initiale
de l’appareil, qui comprennent la sélection de la langue pour le menu sur
écran, et le balayage automatique des chaînes, c’est-à-dire du balayage
automatique et de la mémorisation des chaînes captées.
Avant de commencer :
Assurez-vous que l’appareil est relié à une antenne ou au câble.
Une fois les connexions nécessaires effectuées
1
appuyez sur
ette opération peut prendre un certain temps
Utilisez
2
menu sur écran parmi les choix qui s’affi chent du côté
(English / Español / Français
Utilisez [urseur
3
pour les chaînes de télévision ou “Câble” pour les
chaînes de câblodiff usion, puis appuyez sur
Curseur
roit de l’écran du téléviseur
ou
Le menu “Configuration Initiale”, à l’étape 3, s’affi
hera dans la langue sélectionnée après la pression
urOK
n Initi
marche
our allumer l’appareil
pour sélectionner la langue du
pour sélectionner “Antenne”
OK
Sélectionnez le paramètre région de votre choix à l’aide
4
Curseur
, puis appuyez sur
OK
ou
Si vous sélectionnez “Magasin”, l’appareil est
iguré avec des paramètres d’affichage prédéfinis
con
et sa consommation peut par
ois dépasser les valeurs
imites prévues par la norme ENERGY STAR®
Si vous sélectionnez “Maison”, le rendement
énergétique
isation à domicile et vous pouvez régler la qualité
uti
de l’image et du son en
’appareil est optimisé pour une
onction de vos préférences
Une fois les réglages initiaux effectués, la chaîne
mémorisée
message vous demandant de con
lieu d’utilisation s’a
otée du plus petit numéro ainsi qu’un
irmer le réglage du
ichent sur l’écran du téléviseur.
emarque :
• Si vous ne recevez pas un signal de votre réseau de
âblodiffusion, contactez le câblodistributeur.
i vous appuyez sur [(marche
alayage automatique des chaînes, le paramètre sera annulé.
• La fonction de balayage automatique initiale des chaînes
e peut être exécutée qu’une seule fois, pour “Antenne”
u “Câble”. Lorsque vous changez le branchement
Antenne / Câble), effectuez de nouveau le balayage
utomatique des chaînes. Reportez-vous à la page 22
i aucun signal n’est reçu par la borne d’antenne et qu’aucune
ommande n’est exécutée pendant plusieurs secondes après la
ise sous tension de l’appareil, “Conseils Utiles” apparaît. Suivez
es instructions qui apparaissent sur l’écran du téléviseur.
MENU
PRÉPARATION
REGARDER LA
TÉLÉVISION
CONFIGURATION
OPTIONNELLE
FONCTIONNEMENT DU
LECTEUR DE DVD
RÉGLAGE DU DVD
DÉPANNAGE INFORMATION
ou
• La “Programmation Auto” commence
• Vous devez régler “Maison” dans l’étape 4.
ans le cas contraire, les modifications que vous aurez
pportées aux réglages ne seront pas mémorisées lorsque
ous éteindrez l’appareil.
Une fois la configuration initiale effectuée...
i v
automatique
es chaînes, consultez la section
Programmation Auto” en page 22
• Vous pouvez ajouter les chaînes désirées non
mémorisées par la “Pro
rammation Auto”. Reportez
vous à “Ajouter Chaînes”, page 23
Si vous souhaitez modifier la langue, consultez la
section “Sé
ection de la Langue” en page 24
• Si vous souhaitez modifier l’Emplacement
géographique, consultez la section “Région” en page
35.
F
Page 77
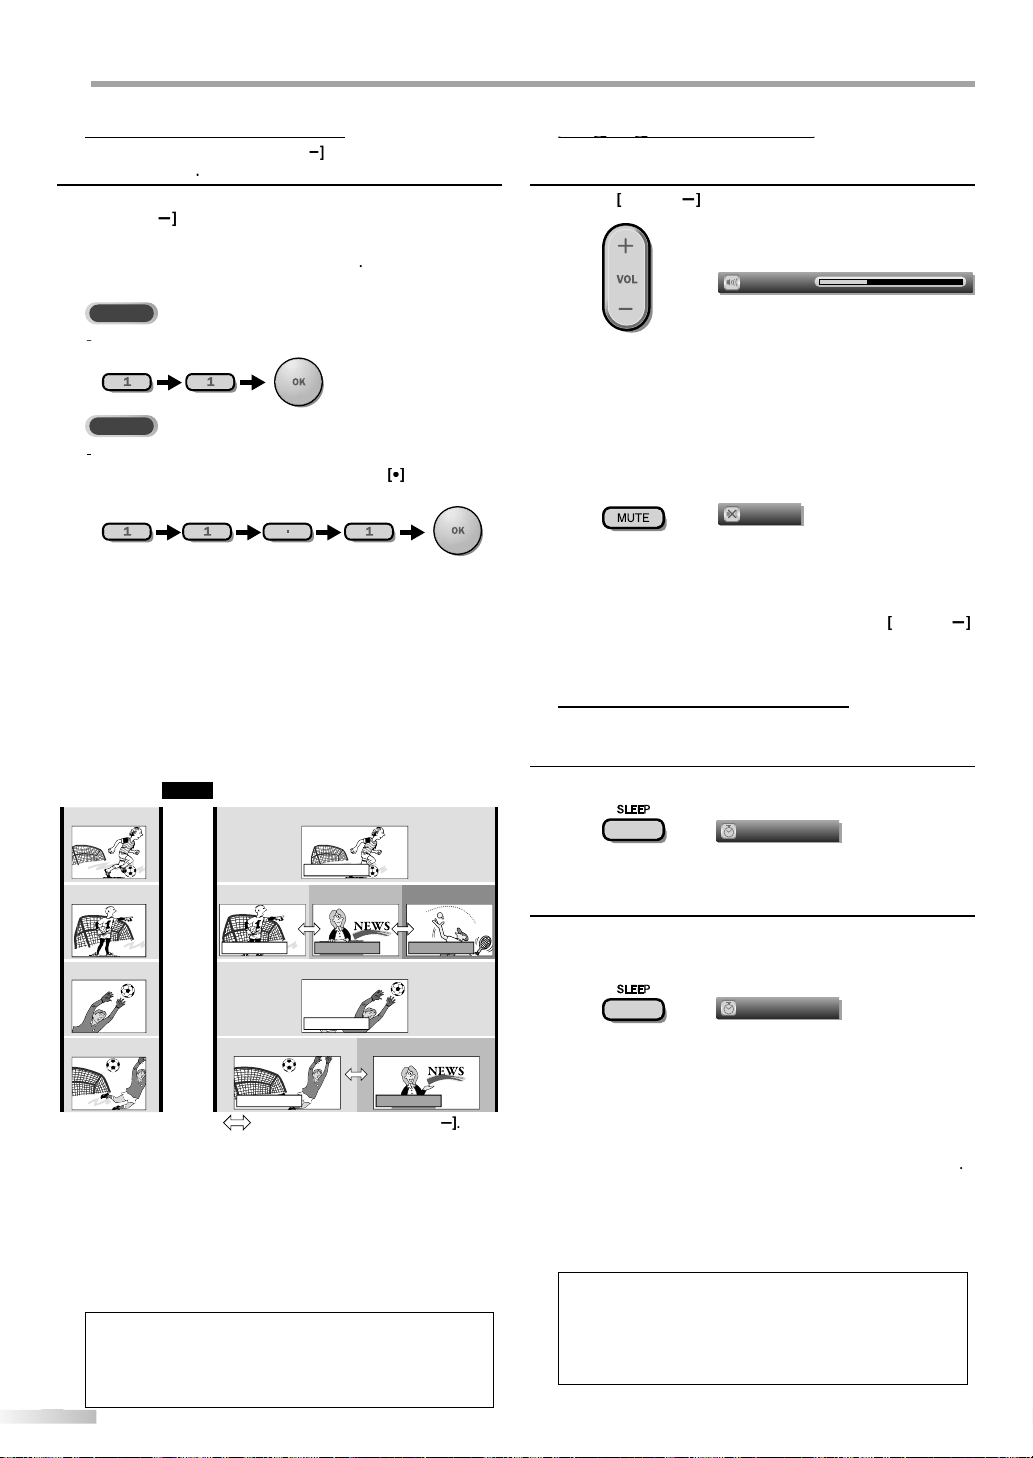
R
EGARDER LA TÉLÉVISION
e
]
/
,
]
]
TV
DTV
t
]
p
e
.
À
g
.
ff
f
.
NTSC
(mode analogique)
ATSC
(mode numérique)
CH4-1
(Football)
CH4-2
(JT)
CH4-3
(Tennis)
CH4-1
(Football)
CH4
(Football)
CH4
(Football)
CH4-1
(Football)
CH4-2
(JT)
CH4
(Football)
CH4
(Football)
CH4-1
(Football)
En Ondes
sous-canalsous-canal
canal principale
canal principale
canal principale
canal principale
sous-canal
6:00pm
6:30pm
7:00pm
7:30pm
8:00pm
?
ffusion de la sous-canal te
ée.
gg
.
Volume 30
bas de
du
.
.
]
p
.
Sourdine
.
OL
/
.
uterie de So
l
Sommeil
Hf
]
p
.
Sommeil
120min.
.
]
seur.
.
uterie de somme
é.
Sélection de Chaîn
Sélectionnez les chaînes en utilisant sur
[les touches numériques
• Pour sélectionner les chaînes mémorisées, utilisez
CH
ou [les touches numériques].
• Pour sélectionner les chaînes non mémorisées
ilisez [les touches numériques
Pour utiliser [les touches numériques
CH + /
ou sur
ette section explique comment régler le volume. La fonction de coupure,
ui permet d’activer et de désactiver le son, y est aussi expliquée.
ilisez
VOL /pour régler le volume audio
Pour sélectionner la chaîne analogique 11
Lorsque vous sélectionnez le canal numérique 11.1
N’oubliez pas d’appuyer sur la touche
avan
’appuyer sur le numéro du sous-canal.
•
ppuyez sur
PREV CH
our revenir à la chaîn
ue vous regardiez
propos de la télédiffusion numérique :
vec sa diffusion à haute définition, la diffusion numérique surpasse
e loin la diffusion analogique, à la fois en termes de qualité d’ima
e
t de qualité sonore
es programmes de télévision numérique ne sont pas tous di
n haute définition (HD). Pour savoir si le programme visionné est en
D, consultez un guide des programmes, contactez le
usés
ournisseur
La minuterie de sommeil peut être réglée pour éteindre automatiquement
l’appareil après l’écoulement d’une période de temps donnée.
âble / satellite du programme ou les stations locales de télévision
1
La barre de volume s’affiche au
l’écran
téléviseur pendant le réglage du volume
La barre de volume disparaît automatiquement après
quelques secondes
Appuyez sur
MUTE
our activer ou désactiver le son
“Sourdine” s’affiche sur l’écran du téléviseur pendant
quelques secondes
Appuyez de nouveau sur
MUTE] ou utilisez
V
our rétablir le niveau de volume initial
Min
ppuyez sur
SLEEP] pour régler la minuterie de sommeil.
mmei
L’affichage de la minuterie de sommeil apparaît sur
l’écran du appareil.
u’est-ce qu’un sous-canal
Grâce à une technologie de compression élevée, la diffusion
numérique offre un service qui permet d’envoyer des
signaux multiples simultanément.
Il s’ensuit que vous pouvez sélectionner plus d’une émission
par chaîne principale, puisque la technologie de diffusion
numérique permet au téléviseur de faire la distinction entre
plusieurs chaînes diffusées par un seul réseau.
Remarque :
“Pas de Signal” apparaît sur l’écran du téléviseur une fois la
i
e message “Prog. audio seulement“ apparaît sur l’écran du
téléviseur lorsque vous recevez uniquement un signal audio.
F
ascule à lt’aide de
rmin
Appuyez plusieurs fois sur
2
SLEEP
our modifi er le temps
qui doit s’écouler avant que le téléviseur ne s’éteigne
Vous pouvez régler votre appareil pour qu’il s’éteigne
après une durée donnée (de 30 à 120 minutes).
CH
• Chaque pression sur
/
e 30 minutes
SLEEP] fait augmenter le temps
Une fois la minuterie de sommeil réglée, il est possible
de l’afficher pour vérification en appuyant sur
Pour annuler la minuterie de sommeil
Appuyez plusieurs fois sur
SLEEP] jusqu’à ce que
SLEEP
“Sommeil Hf” s’affiche sur l’écran du télévi
emarque :
• L’affichage du paramètre de minuterie de sommeil
isparaît automatiquement après quelques secondes
• Si vous débranchez l’appareil de la prise de courant ou
i une panne de courant survient, le paramètre de la
in
il sera annul
Page 78

R
INTRODUCTION
g
.
seur.
Image Fixe
.
.
utes.
)
cours des Modes d
ée
]
o
r
.
Video
Source
TV
Video
Component
HDMI1
HDMI2
HDMI3
Component
HDMI1
HDMI2
HDMI3
V
)
Video
Source
TV
Video
Component
HDMI1
HDMI2
Component
HDMI1
HDMI2
V
)
3
350B
3
350
H
.
g
TV
]
p
.
s
s
ble
o
o
O
o
DTV
.
11
.1
Anglais 1/3
]
p
.
.
]
ne commande pas les
.
)
Vous pouvez figer l’image qui s’affiche à l’écran du téléviseur
ppuyez sur
FREEZE] pour figer l’image qui s’affiche à
’écran du télévi
a sortie audio n’est pas mise en pause
Si aucun signal n’est détecté ou aucun signal protégé
n’est reçu pendant le mode arrêt sur image, l’image
reste en pause et la sortie audio est mise en sourdine
a fonction d’arrêt sur image sera désactivéeau bout
5 min
Pour annuler le mode arrêt sur image, appuyez sur
n’importe quel bouton sauf
Par
marche
’Entr
Vous pouvez facilement passer de la télévision (ATSC ou NTSC) à des
périphériques externes et inversement, lorsque ces derniers sont connectés
à l’appareil.
Appuyez plusieurs fois sur
SOURCE
u
CH pou
parcourir les modes d’entrée
7MD
2MD
B
Cette section explique comment permuter l’audio en mode analogique et
comment changer la langue audio en mode numérique.
Appuyez sur
SAP/AUDIO
our afficher le mode
audio actuellement sélectionnée. Pendant la réception
d’une diffusion des MTS, appuyez plusieurs fois pour
arcourir les canaux audio disponibles
11
SAP / STÉRÉO
Quand tous les modes sont disponible
SAP / STÉRÉO SAP / MONO
SAP / STÉRÉO
uand les modes audio stéréo et monaural sont
isponible
MONO / STÉRÉO MONO / STÉRÉO
Quand les modes audio SAP et monaural sont disponibles
SAP / MONO SAP / MONO
Quand seul le mode audio monaural est disponi
MONO
(commutation impossible
1
STÉRÉO
AP
MON
ppuyez sur
Émet l’audio stéré
Émet le deuxième programme audi
Émet l’audio mon
SAP/AUDIO]pour afficher la langue
actuellement sélectionnée et le nombre de langues
isponibles
PRÉPARATION
REGARDER LA
TÉLÉVISION
CONFIGURATION
OPTIONNELLE
FONCTIONNEMENT DU
LECTEUR DE DVD
RÉGLAGE DU DVD
ppuyer sur
ou
modes d’entrée
aîne DTV/T
ou entrée PC
C
inverse le sens du cycle des
aîne DTV/T
ou entrée PC
Appuyez plusieurs fois sur
2
SAP/AUDIO
les langues audio disponibles
Les langues disponibles varient d’une diffusion à
l’autre. “Autre” s’affiche lorsque la langue audio n’est
pas disponible ou lorsque les langues disponibles
sont autres que l’anglais, l’espagnol ou le français
emarque :
La pression sur [SAP/AUDIO
ppareils audio externes.
L’affichage des informations disparaît automatiquement
rès quelques secondes
DÉPANNAGE INFORMATION
our parcourir
F
Page 79

R
EGARDER LA TÉLÉVISION
an
TV
]
11
SAP / STÉRÉO
TV-PG DLSV
480i
480i
4:3
4:3
SD
SD
CC
CC
-
cote de télévision s’a
.
]
DTV
]
p
.
on
tes s’a
t.
11.1
Anglais 1/2
TV: TV-14
Cote
1080i
1080i
16:9
16:9HDHD
CC
CC
Un jour de souvenirs
Un jour de souvenirs
KABC
KABC
Il y a un quart de siècle, à une époque que l’on peut
qualifier de bon vieux temps de la presse écrite, les ventes
d’espace publicitaire en emplacement indéterminé
représentaient 80 pour cent des revenus de publicité de cette
1 2
34
5
6, 7, 8
9
10
titre d’émissio
g
)
station émettrice
e
.
e
f
f
K
/
L
]
pour faire défiler le texte.
.
;
.
Video
TV-PG DLSV
480i
480iSDSD
CC
CC
.
Informations sur Écr
Vous pouvez affi cher sur l’écran du téléviseur la chaîne actuellement
sélectionnée ou d’autres informations, telles que le mode audio.
En mode analogique, le numéro de canal actuel et le mode audio
s’affichent.
ppuyez sur
INFO
• Le numéro de chaîne actuellement sélectionnée, le
mode audio, le type de résolution du signal vidéo, le
rapport de format du téléviseur, le type de sous
itres et la
ffichent dans le coin
supérieur droit del’écran
• Pour effacer l’affichage, appuyez de nouveau sur
INFO]. Vous pouvez aussi appuyer sur
BACK
En mode numérique, les informations d’émission détaillées pour le canal actuel
telles que titre du programme ou guide des programmes sont affichées.
Appuyez sur
INFO
our afficher les informations du
programme actuel sélectionné
Informations de diffusi
Les informations suivan
n
uide des émissions
Le guide des émissions s’affiche en plus des
nformations de diffusion. Affichage de 4 lignes
maximum.
numéro de chaîn
langue audio
eportez-vous à “Changement du Mode Audio”,
page 19
nombre réel de lignes de balayage et mode de
alayag
ormat de TV numérique
ormat d’image du programme
CC (non disponible si le paramètre Sous-titres
odés est réglé sur “Hf”)
10catégorie de contenu bloquée
chen
F
emarque :
• Lorsque le guide des émissions comporte plus de 4 lignes,
tilisez [Curseur
• “Aucune description fournie.” s’affiche lorsque le guide des
missions n’est pas disponible.
• Lorsque le guide des programmes est affiché, la fonction
e sous-titres est interrompue
• En mode d’entrée externe, l’écran suivant s’affiche
x.) Lorsqu’un appareil externe est connecté à la prise
’Entrée Vidéo
• L’affichage des informations disparaît automatiquement
u bout d’1 minute
Page 80

R
g
T
élévision
e
.
3
al
.
6:9
.
ge
.
ge
.
9
l
.
.
e
.
e
.
ode d
al
al
.
n
.
pt
.
l
e
ge
4 types de mode d’affichage peuvent être sélectionnés lorsque le diffuseur
émet un signal vidéo 4:3 ou 16:9. De même, 3 types de mode d’affichage
peuvent être sélectionnés lorsque le signal d’entrée provient d’un PC.
ppuyez plusieurs fois sur
rapport de format du téléviseur
FORMAT]pour changer l
INTRODUCTION
PRÉPARATION
Pour un signal vidéo 4:
Norma
arge
9
xt. image
Norm
ffiche une image 4:3 à sa taille originale. Des bandes
latérales apparaissent des deux côtés de l’écran
1
ffiche une image 4:3 au format 16:9 ; l’image est étirée
horizontalement pour remplir l’écran
Ext. ima
ffiche une image 4:3 au format 16:9 ; l’image est étirée
horizontalement et verticalement pour remplir l’écran.
Le haut et le bas de l’image sont coupés
Lar
ffiche l’image avec le centre de celle-ci à la taille
originale et les côtés étirés horizontalement pour
remplir l’écran
Pour un signal vidéo 16:
rmal
arg
m
Ext. ima
Norma
Affiche une image 16:9 à sa taille originale
Affiche une image 16:9 à sa taille maximum sans
modifier ses proportions horizontales et verticales
Ext. imag
Affiche une image étirée verticalement
arg
Affiche une image étirée horizontalement
Pour un signal d’entrée PC
via le m
’Entrée
HDMI1
REGARDER LA
TÉLÉVISION
CONFIGURATION
OPTIONNELLE
FONCTIONNEMENT DU
LECTEUR DE DVD
RÉGLAGE DU DVD
DÉPANNAGE INFORMATION
rm
t par pt
Norm
Affiche une image étirée de façon proportionnelle. Des
bandes latérales apparaissent des deux côtés de l’écran
Plei
Affiche une image étirée de façon non proportionnelle
our remplir l’écran
Pt par
Affiche une image à sa taille originale
in
F
Page 81

R
ONFIGURATION OPTIONNELLE
p
]
IMAGE
SON
CONFIGURATION
OPTIONS
LANGUE
DVD
Teinte
Netteté
Luminosité
Contraste
Couleur
0
0
30
60
36
Température couleur
Smart image
Normal
Préférentiel
GE
.
.
.
.
ON
.
.
touche
/
.
.
S
V
.
.
.
.
V
C.
.
.
.
V
GUE
.
D
.
g
K
L
p
]
Liste chaînes
Ajouter chaînes
Antenne
IMAGE
SON
OPTIONS
LANGUE
DVD
CONFIGURATION
Programmation auto
K
L
p
]
Liste chaînes
Ajouter chaînes
Antenne
Programmation auto
IMAGE
SON
OPTIONS
LANGUE
DVD
CONFIGURATION
K
L
]
,
.
,
.
ff
/
]
.
.
)
]ou[
]
pendant le
.
)
]
.
, suivez les instructions
Quitter
MENU
75%
Chaînes analogiques 10 ch
6 chChaînes numériques
Le système balaie les chaînes. Attendre.
Il faudra jusqu’à 20 minutes pour terminer la programmation auto.
C
Cette section présente un aperçu du menu principal qui s’affiche lors de la pression
sur [MENU]. Pour de plus amples informations, reportez-vous à la page de
référence des options respectives.
Le menu principal comprend les options de configuration des fonctions ci-dessous.
ppuyez sur
MENU
IMA
Vous pouvez régler la qualité de l’image
Reportez-vous à “Réglage de l’Image”, page 25
Vous pouvez régler la qualité du son
Reportez-vous à “Réglage du Son”, page 26
NFIGURATI
•Vous pouvez lancer un balayage automatique des
haînes captées et retirer les chaînes indésirables
Reportez-vous à “Programmation Auto”, page 22
•Vous pouvez ignorer les chaînes non désirées à l’aide
la
CH
Reportez-vous à “Liste Chaînes”, page 23
•Vous pouvez ajouter manuellement les chaînes non
détectées lors du balayage automatique des chaînes.
Reportez-vous à “Ajouter Chaînes”, page 23
PTION
ous pouvez changer le format d’affichage des sous-titres,
ui affichent soit le dialogue des émissions de télévision,
soit d’autres informations, sur l’écran du téléviseur
Reportez-vous à “Sous-titres”, page 27
Vous pouvez spécifier des restrictions d’accès au visionnement
Reportez-vous à “Verrouillage”, page 30
ous pouvez régler la position, la stabilité et la clarté
l’écran du P
Reportez-vous à ”Réglages PC”, page 34
Vous pouvez choisir le mode d’économie d’énergie.
Reportez-vous à “Mode Economie d’Energie”, page 35
Lorsque vous réglez les modes “IMAGE” et “SON”
e votre choix, vous devez remplacer le réglage
Magasin” par “Maison”.
Reportez-vous à “Région”, page 35
ous pouvez vérifier le numéro de la version du
ogiciel actuellement utilisée dans cet appareil.
Reportez-vous à “Info Logiciel Actuel”, page 36.
LAN
Vous pouvez changer la langue d’affichage du menu
principal (Anglais, Espagnol ou Français).
Reportez-vous à “Sélection de la Langue”, page 24
V
Vous pouvez personnaliser certaines fonctions de lecture
de disque. Assurez-vous que le lecteur est en mode Stop.
Reportez-vous à “RÉGLAGE DU DVD”, page 46
F
Si vous changez de source de signal de câble (ex., si vous passez de celui de l’antenne
à celui de la câblodiffusion (CATV)), si vous déplacez l’appareil dans une région
différente après le réglage initial, ou si vous restaurez les canaux DTV après les avoir
supprimés, vous devrez effectuer à nouveau le balayage automatique des chaînes.
Avant de commencer :
Assurez-vous que l’appareil est relié à une antenne ou au câble.
Appuyez sur
1
Utilisez
2
“CONFIGURATION”, puis appuyez sur
Utilisez
3
Programmation Auto”, puis appuyez sur
Utilisez
appropriée, puis appuyez sur
• Si une antenne hertzienne est connectée
• Si un décodeur de câblodiffusion est connecté
MENU] pour afficher le menu principal.
Curseur
ou
Curseur
ou
our sélectionner
our sélectionner
pour sélectionner une option
OK
ou
IMAGE
SON
CONFIGURATION
OPTIONS
LANGUE
DVD
Programmation auto balaye à nouveau toutes
les chaînes.
Il faudra jusqu’à 20 minutes pour terminer la
programmation auto.
Sélectionner la source de votre signal.
Antenne
Ou
Câble
sélectionnez “Antenne”
OK
OK
Retour
Antenne
Câble
ANT.IN
sélectionnez “Câble“.
• La “Programmation Auto” commence
Une fois le balayage et la mémorisation terminés, la chaîne
mémorisée dont le numéro est le plus bas s’a
ichera.
Remarque :
Après avoir effectué “Programmation auto”, utiliser [CH
sur la télécommande permet de sauter automatiquement les
programmes indisponibles
Si vous ne recevez pas un signal de votre réseau de
câblodiffusion, contactez le câblodistributeur
Si vous appuyez sur [marche
MENU
balayage automatique des chaînes, le paramètre sera annulé
Même après un “Programmation auto”, le réglage des chaînes
est perdu si vous débranchez le cordon d’alimentation avant
d’éteindre l’appareil en appuyant sur [marche
Le Code NIP sera nécessaire une fois que vous aurez défini un
Code NIP de “Verrouillage”. Reportez-vous à la page 30
Pour modifier votre
fournies dans la section “Changez Code”. Reportez-vous à
la page 33.
Page 82

R
Li
ste Chaînes
la
]
K
L
p
]
K
L
p
]
IMAGE
SON
OPTIONS
LANGUE
DVD
CONFIGURATION
Liste chaînes
Ajouter chaînes
Antenne
Programmation auto
K
L
]
Sélection Ch Visionner/Saut
Retour
BACK
OK
Allume chaînes pour sélection avec touches
Ch Up/Down.
11.2
11.3
DTV
DTV
IMAGE
SON
OPTIONS
LANGUE
DVD
CONFIGURATION
DTV 11.1
K
L
.
:
catio
ode
SC.
.
j
s
de
l.
K
L
p
]
K
L
]
Liste chaînes
Ajouter chaînes
Antenne
Programmation auto
IMAGE
SON
OPTIONS
LANGUE
DVD
CONFIGURATION
]
.
seur.
/
]
, vous pouvez sélectionner les
sées seulement.
Les chaînes sélectionnées ici peuvent être ignorées lors de la sélection de
chaîne via la toucheCH /
Ces chaînes restent accessibles à l’aide des [touches numériques
ette fonction vous permet d’ajouter les chaînes qui n’ont pas été ajoutée
ar le balayage automatique des chaînes en raison des conditions
éception lors du réglage initia
INTRODUCTION
PRÉPARATION
Appuyez sur [MENU] pour quitter le menu principal.
1
2
Curseur
“CONFIGURATION”, puis appuyez sur
ou
Utilisez
3
chaînes”, puis appuyez sur
Curseur
our sélectionner
OK
IMAGE
Programmation auto
Liste chaînes
SON
Ajouter chaînes
CONFIGURATION
Antenne
OPTIONS
LANGUE
DVD
our sélectionner “Liste
OK
ou
Utilisez
4
vous désirer ignorer, puis appuyez sur
Curseur
pour sélectionnez la chaîne que
OK
Appuyez sur [MENU] pour quitter le menu principal.
1
2
Curseur
“CONFIGURATION”, puis appuyez sur
ou
ilisez
3
chaînes”, puis appuyez sur
Curseur
our sélectionner
OK
IMAGE
Programmation auto
Liste chaînes
SON
Ajouter chaînes
CONFIGURATION
Antenne
OPTIONS
LANGUE
DVD
pour sélectionner “Ajouter
OK
ou
Utilisez [les touches numériques]pour entrer le numéro
4
e la chaîne que vous voulez ajouter, puis appuyez sur
OK
REGARDER LA
TÉLÉVISION
CONFIGURATION
OPTIONNELLE
FONCTIONNEMENT DU
LECTEUR DE DVD
RÉGLAGE DU DVD
ou
• L’affichage de la chaîne qui a été supprimée devient
sombre. Vous ne pouvez plus sélectionner cette
haîne en utilisantCH/
• Pour réactiver une chaîne supprimée, utilisez
Curseur
nregistrées sont surlignées.
• Lorsque vous supprimez une canal principale, ses
sous-canal sont supprimées aussi
emarque
• Les chaînes sont en mode ATSC si elles portent
l’indi
ppuyez sur
5
n“DTV ”. Autrement elles sont en m
et appuyez sur
MENU] pour quitter
OK] Les chaînes
NT
11
5
ppuyez sur
IMAGE
SON
CONFIGURATION
OPTIONS
LANGUE
DVD
MENU]pour quitter
Pour les chaînes analogiques, sélectionner
une chaîne à ajouter à l’aide des touches
numériques.
Chaînes numériques, exécuter la fonction
Programmation auto.
Changement Ch
BACK
Retour
Ajouter chaînes
DÉPANNAGE INFORMATION
emarque :
• Si le réglage a été correctement effectué, le message
Ajouté à la liste des chaînes” apparaît.
• Si l’entrée externe est utilisée, il n’est pas possible
’enregistrer la chaîne et “Non disponible” s’affiche sur
’écran du télévi
• En utilisant [CH
haînes mémori
F
Page 83

R
ONFIGURATION OPTIONNELLE
cation de
e
DTV
q
.
K
L
p
]
Liste chaînes
Ajouter chaînes
Antenne
IMAGE
SON
OPTIONS
LANGUE
DVD
CONFIGURATION
Programmation auto
K
L
p
]
Liste chaînes
Ajouter chaînes
Antenne
Programmation auto
IMAGE
SON
OPTIONS
LANGUE
DVD
CONFIGURATION
/
.
11.1
Retour
Changement Ch
Actuel 50
50 Max
IMAGE
SON
OPTIONS
LANGUE
DVD
CONFIGURATION
CH
.
Video
Retour
Changement Ch
IMAGE
SON
OPTIONS
LANGUE
DVD
CONFIGURATION
Indicateur disponible uniquement
pour la transmission numérique.
CH
.
g
]
p
.
K
L
p
Select the language for setup display.
Elija el idioma de ajuste.
Sélectionner langue écran config.
English
Español
Français
CONFIGURATION
IMAGE
SON
OPTIONS
DVD
LANGUE
K
L
]
Select the language for setup display.
Elija el idioma de ajuste.
Sélectionner langue écran config.
Español
Français
English
CONFIGURATION
IMAGE
SON
OPTIONS
DVD
LANGUE
]
p
.
ectionnez
K/L
]
, puis
]
K/L
]
, puis
]
pour quitter le
C
Vérifi
l’Antenn
Cette fonction vous permet de vérifier la force du signal numérique de
ue chaîne
cha
Appuyez sur [MENU] pour quitter le menu principal.
1
2
Curseur
“CONFIGURATION”, puis appuyez sur
our sélectionner
OK
ou
ilisez
3
puis appuyez sur
Curseur
our sélectionner “Antenne”,
OK
ou
Vous avez le choix entre l’anglais, l’espagnol et le français comme langue de
menu sur écran.
Appuyez sur
1
ilisez
2
puis appuyez sur
MENU
Curseur
our quitter le menu principal
our sélectionner “LANGUE”,
OK]
ou
ilisez
3
Curseur
“Español” ou “Français” puis appuyez sur
pour sélectionner “English”,
OK
ou
4
5
F
ilisez [les touches numériques] ouCH
pour
sélectionnez la chaîne pour laquelle vous désirez vérifier
la puissance du signal numérique capté par l’antenne
ou
•
i la chaîne est réglée sur chaîne analogique ou entrée
xterne, vous ne pouvez pas confirmer l’état de l’antenne
Appuyez sur
MENU] pour quitter
Appuyez sur
4
MENU
our quitter
Remarque :
• Si vous souhaitez afficher les menus en français, et non en
nglais ou en espagnol, appuyez sur [MENU] Sél
LANGUAGE” ou “IDIOMA” à l’aide du [Curseur
ppuyez sur [OK
électionnez “Français” à l’aide du [Curseur
ppuyez sur [OK] Appuyez sur [MENU
enu principal.
Page 84

R
gg g
Vous pouvez régler la luminosité, le contraste, la couleur, la teinte, la
.
K
L
p
s
]
IMAGE
SON
CONFIGURATION
OPTIONS
LANGUE
DVD
Teinte
Netteté
Luminosité
Contraste
Couleur
0
0
30
60
36
Température couleur
Smart image
Normal
Préférentiel
K
L
p
]
IMAGE
SON
CONFIGURATION
OPTIONS
LANGUE
DVD
Teinte
Netteté
Luminosité
Contraste
Couleur
0
0
30
60
36
Température couleur
Smart image
Normal
Préférentiel
.
ge
K
L
]
)
Température couleur
IMAGE
SON
CONFIGURATION
OPTIONS
LANGUE
Teinte
Netteté
Luminosité
Contraste
Couleur
Sport
Préférentiel
Standard
Film
Jeu
DVD
Smart image
,
r
K
L
s
B
.
ou
seu
s
seu
B
té
té
té
aste
aste
aste
couleu
tue
te
tuer le
tNetteté
r
leur
couleurs
couleurs
des
]
p
.
netteté et la température couleurs.
Avant de commencer : Vous devez selectionner le paramètre “Maison”
dans “Région”. Reportez-vous à la page 35. Dans
le cas contraire, les modifications que vous aurez
apportées aux réglages ne seront pas mémorisées
lorsque vous éteindrez l’appareil.
ppuyez sur
1
ilisez
2
appuyez sur
MENU] pour quitter le menu principal
Curseur
our sélectionner “IMAGE”, pui
OK
ou
ilisez
3
Curseur
vous désirez régler, puis appuyez sur
our sélectionner l’option que
OK
ou
Luminosité, Contraste, Couleur, Teinte, Netteté
Te mpérature couleu
ilisez
Curseur
votre choix, puis utilisez
au réglage
Luminosi
Luminosité
Contraste
Couleur
Tein
Teinte
30
DéplacerAjuster OK
ntr
60
DéplacerAjuster
36
DéplacerAjuster
0
DéplacerAjuster
pour sélectionner le réglage de
Curseur
r
r
our réduire la
OK
OK
OK
OK
OK
OK
OK
minosi
our réduire le
ntr
our atténuer
r
our accentuer
e rouge
pour procéder
r
our
ugmenter la
minosi
ur
ugmenter le
ntr
our
n
leur
our
n
r
INTRODUCTION
PRÉPARATION
TÉLÉVISION
OPTIONNELLE
r
LECTEUR DE DVD
r la
RÉGLAGE DU DVD
REGARDER LA
CONFIGURATION
FONCTIONNEMENT DU
Régler la qualité de l’image
4
Smart Ima
ilisez
Curseur
souhaité, puis appuyez sur
(“Préférentiel”, “Standard”, “Sport”, “Film” et “Jeu”
ou
i
our rendre
us net
our ajouter
roi
DÉPANNAGE INFORMATION
pour sélectionner le réglage
OK
Netteté
0
Température cou
Temp. Couleur Normal
Appuyez sur
5
DéplacerAjuster
DéplacerAjuster
OK
OK
MENU
OK
OK
our quitter
emarque :
Pour annuler réglage de l’image, appuyez sur [MENU].
Seul le paramètre “Préférentiel” peut être réglé.
F
Page 85

R
ONFIGURATION OPTIONNELLE
gg
.
K
L
p
]
SON
CONFIGURATION
OPTIONS
LANGUE
DVD
Egaliseur
Nivelage auto du volume
Haut-parleurs du téléviseurHfAmp. ext.
StandardSmar t son
IMAGE
K
L
]
SON
CONFIGURATION
OPTIONS
LANGUE
DVD
Egaliseur
Nivelage auto du volume
Haut-parleurs du téléviseurHfAmp. ext.
Standard
IMAGE
Smart son
.
Son
K
L
)
.
s
B
K
L
]
e
stant
ff
.
K
L
]
ces de volume sonore constatées
f
r
.
K
L
]
f
.
]
p
.
]
p
.
C
Vous pouvez régler le smart son, l’équaliseur et un certain nombre d’autres
fonctions sonores.
Avant de commencer : Vous devez selectionner le paramètre “Maison”
dans “Région”. Reportez-vous à la page 35. Dans
le cas contraire, les modifications que vous aurez
apportées aux réglages ne seront pas mémorisées
lorsque vous éteindrez l’appareil.
Appuyez sur
1
ilisez
2
MENU] pour quitter le menu principal
Curseur
our sélectionner “SON”, puis
uyez surOK
ou
Utilisez
3
son que vous voulez régler, puis appuyez sur
Curseur
pour sélectionner le type de
OK
ou
Nivelage auto du volum
La fonction maintient un volume sonore con
en compensant les di
érences de volume sonore
constatées entre les publicités et les programmes
Utilisez
votre choix, puis appuyez sur
Curseur
pour sélectionner l’option de
OK
ou
H
ndiquez si vous souhaitez désactiver le
églage automatique du volume sonore.
IMAGE
SON
Le nivelage auto du volume réduit les
différences de volume entre les
CONFIGURATION
chaînes et les programmes, et offre un
OPTIONS
niveau audio régulier.
LANGUE
DVD
électionnez ce réglage pour réduire les
ifféren
ntre les publicités et les programmes.
Ef
Hf
Haut-parleurs du téléviseu
Permet de déterminer si le son est reproduit par les
aut-parleurs de l’appareil ou non.
Si un amplificateur compatible avec la fonction CEC
est connecté à cet appareil à l’aide d’un câble HDMI,
une partie des opérations effectuées sur le son
(augmentation du volume, par exemple) est accessible
de manière synchronisée à l’aide de la télécommande
églez les paramètres suivants
4
mart
Utilisez
(“Préférentiel”, “Standard”, “Film”, “Musique” et “Nouvelle”
Curseur
otre choix, puis appuyez sur
ou
Égaliseur
Permet de régler la qualité du son pour chaque fréquence
ilisez
Curseur
écifique et utilisez
onore,puis appuyez sur
ou
F
ilisez
pour sélectionner le réglage de
OK]
IMAGE
SON
CONFIGURATION
OPTIONS
LANGUE
DVD
Smart Sound
Smart son
Egaliseur
Nivelage auto du volume
Haut-parleurs du téléviseur
Préférentiel
Standard
Film
Musique
Nouvelle
Curseur
votre choix, puis appuyez sur
ou
H
pour sélectionner l’option de
OK
IMAGE
SON
CONFIGURATION
OPTIONS
LANGUE
DVD
"Ef" :
Son restitué par les haut-parleurs du
téléviseur.
"Hf" :
Son non restitué parles haut-parleurs.
"Amp. ext." :
Utilisation possible de l’amplificateur
compatible HDMI-CEC connecté avec un
câble HDMI. Pour plus d’information, voir le
manuel d’utilisation.
e son sera émis par les haut-parleurs de
’appareil.
e son ne sera pas émis par les haut-
arleurs de l’appareil.
Ef
Hf
Amp.ext.
ette fonction vous permet de contrôler la
mp. ext.
ortie audio des appareils compatibles avec
a fonction CEC à l’aide de la télécommande
pour sélectionner la fréquence
Curseur
pour régler le volume
5
ppuyez sur
MENU
our quitter
OK
IMAGE
SON
CONFIGURATION
OPTIONS
LANGUE
DVD
0
120Hz0500Hz01.5kHz05kHz010kHz
emarque :
• Pour annuler le réglage du son, appuyez sur [MENU
• Nous ne pouvons garantir une interopérabilité à 100 %
vec d’autres marques d’appareils compatibles avec le
rotocole CEC
Page 86

R
INTRODUCTION
s
.
K
L
p
,
]
K
L
p
]
.
DVD
IMAGE
SON
CONFIGURATION
LANGUE
OPTIONS
Service sous-titrage num
Style des sous-titres
Service sous-titrage
A
B
C
Hf
Hf
”
”
27
8
8
K
L
p
]
DVD
IMAGE
SON
CONFIGURATION
LANGUE
OPTIONS
Service sous-titrage num
Style des sous-titres
Hf
Hf
Service sous-titrage
K
L
]
Service sous-titrage num
Style des sous-titres
CC-1
CC-2
CC-3
CC-4
T-1
T-2
T-3
T-4
Hf
Service sous-titrage
DVD
IMAGE
SON
CONFIGURATION
LANGUE
OPTIONS
ode de sous-titres
;
.
sous-titres ou le texte s’a
e
n
.
;
.
e.
;
.
:
ode
:
atement les caractères saisis su
seur.
e.
.
]
p
.
Sous-titre
Vous pouvez affi cher les sous-titres des émissions de télévision, des films
et des nouvelles. Les sous-titres désignent le texte des dialogues ou les
descriptions qui s’affichent à l’écran pour les personnes malentendantes.
Appuyez sur
1
ilisez
2
puis appuyez sur
ilisez
3
puis appuyez sur
Suivez les instructions ci-dessous pour configurer
chacune des options
“A. Service Sous-titrage
“B. Service Sous-titrage Num”
“C. Style des Sous-titres
MENU] pour quitter le menu principal
Curseur
our sélectionner “OPTIONS”
OK
ou
Curseur
our sélectionner “Sous-titre”,
IMAGE
SON
CONFIGURATION
OPTIONS
LANGUE
DVD
Sous-titre
Verrouillage
Configurations du PC
Mode economie d’energie
Région
Info logiciel actuel
OK
ou
IMAGE
SON
CONFIGURATION
OPTIONS
LANGUE
DVD
Sous-titre
Verrouillage
Configurations du PC
Mode economie d’energie
Région
Info logiciel actuel
page
page 2
page 2
Ef
Maison
Ef
Maison
A. Service Sous-titrageA. Service Sous-titrage
ilisez
4
Curseur
Service sous-titrage”, puis appuyez sur
ou
ilisez
5
Curseur
souhaité, puis appuyez sur
ou
M
-1 et T-1
sont les principaux services de sous-titres et de texte
Les
langue que le dialogue de l’émissio
(jusqu’à 4 lignes de texte sur l’écran du téléviseur, là
où le texte ne cache pas les parties importantes de
’image)
-3 et T-3
servent de chaînes de données préférées
Le sous-titrage ou le texte est souvent une langue
ndair
CC-2, CC-4, T-2 et T-4
sont rarement disponibles car les diffuseurs
les utilisent uniquement dans des conditions
articulières, comme par exemple lorsque “CC-1” et
“CC-3” ou “T-1” et “T-3” ne sont pas disponibles
•
modes d’affichage sont disponibles, suivant le
pe d’émission
M
“Paint-on”
Affiche immédi
l’écran du télévi
Mode “Pop-on” :
Affiche tous les caractères en même temps après
leur mise en mémoir
Mode “Roll-up” :
Affiche les caractères de manière continue, par
défilement (max. 4 lignes)
our sélectionner
OK
pour sélectionner le sous-titre
OK
ffichent dans la mêm
PRÉPARATION
REGARDER LA
TÉLÉVISION
CONFIGURATION
OPTIONNELLE
FONCTIONNEMENT DU
LECTEUR DE DVD
RÉGLAGE DU DVD
DÉPANNAGE INFORMATION
r
Appuyez sur
6
MENU
our quitter
F
Page 87

R
ONFIGURATION OPTIONNELLE
DTV
K
L
]
Service sous-titrage num
Style des sous-titres
Hf
Hf
Service sous-titrage
IMAGE
SON
CONFIGURATION
OPTIONS
LANGUE
DVD
K
L
Service sous-titrage num
Style des sous-titres
CS-1
CS-2
CS-3
CS-4
CS-5
CS-6
Hf
Service sous-titrage
IMAGE
SON
CONFIGURATION
OPTIONS
LANGUE
DVD
ectionner s
ous ne souhaite
6ionnez un de ces se
ces avant de
”.
.
.
DTV
.
K
L
]
Service sous-titrage num
Style des sous-titres
Hf
Hf
Service sous-titrage
IMAGE
SON
CONFIGURATION
OPTIONS
LANGUE
DVD
K
L
p
]
Style police
Taille police
Moyenne
Plein
Plein
Couleur police
Opacité police
Couleur l’arrière-plan
Opacité l’arrière-plan
Couleur bord
Type bord Aucun
Hf
Param. utilis
Blanc
Noir
Noir
IMAGE
SON
CONFIGURATION
OPTIONS
LANGUE
DVD
Police0
K
L
]
Style police
Taille police
Hf
Couleur police
Opacité police
Param. utilis
Couleur l’arrière-plan
Opacité l’arrière-plan
Couleur bord
Type bord
IMAGE
SON
CONFIGURATION
OPTIONS
LANGUE
DVD
Ef
K
L
p
K
L
p
]
.
.
n
)
e
d
)
ce
C
B. Service Sous-titrage NumB. Service Sous-titrage Num
Outre les sous-titres codés de base décrits en page 27, le téléviseur
numérique possède ses propres sous-titres codés appelés service de soustitres numériques. Utilisez ce menu pour modi er les réglages du service de
sous-titres numériques.
Utilisez
4
sous-titrage num”, puis appuyez sur
5
Curseur
pour sélectionner “Service
OK
ou
électionnez les sous-titres numériques de votre choix
l’aide du[Curseur
puis appuyez sur [OK]
ou
C. Style des Sous-titresC. Style des Sous-titres
ous pouvez changer le style des sous-titres, comme par exemple la police
e caractères, la couleur, la taille, etc
Utilisez
4
sous-titres”, puis appuyez sur
5
utilis”, puis appuyez sur
ilisez
Curseur
ou
Curseur
ou
pour sélectionner “Style des
OK
our sélectionner “Param.
OK
Appuyez sur
6
Remarque :
F
À sél
i v
z
pas de service sous-titrage num. Il est
sélectionné par défaut.
rvi
-1 - CS-
changer toute autre option dans le menu
“Sous-Titre”. En temps normal, choisissez
-1
MENU] pour quitter
Les “Service sous-titrage num” disponibles varient suivant
les spécifications de diffusion
6
Utilisez
Curseur
pour sélectionner “Ef”, puis
uyez surOK
ou
ilisez
7
Curseur
puis appuyez sur
sélectionner le réglage souhaité, et appuyez sur
Affichage de l’imag
ABCDEFGHIJKL
ABCDEFGHIJKL
Bor
(Couleur bord et Type bord
Poli
Style police, Taille police, Couleur police, Opacité
ou Transparence police)
Arrière-pla
( Couleur de l’arrière-plan, Opacité ou Transparence de
’arrière-plan
Les différents réglages sont décrits sur la page suivante
Consultez les réglages que vous avez effectués dans la
page suivante en vous reportant au coin supérieur droit
de la fenêtre des paramètres affichée (toutes les sélections
n’indiquent pas les différences sélectionnées)
our sélectionner une option,
OK] Puis utilisez
Curseur
our
OK
Page 88

R
INTRODUCTION
e
.
Police5
Police7
Police1
Police0
Police3
Police4
Police
Police2
Style police
Taille police
Couleur police
Opacité police
Param. utilis
Couleur l’arrière-plan
Opacité l’arrière-plan
Couleur bord
Type bord
IMAGE
SON
CONFIGURATION
OPTIONS
LANGUE
DVD
sous-titre
e
.
Style police
Taille police
Couleur police
Opacité police
Param. utilis
Grande
Petite
Couleur l’arrière-plan
Opacité l’arrière-plan
Couleur bord
Type bord
Moyenne
IMAGE
SON
CONFIGURATION
OPTIONS
LANGUE
DVD
sous-titre
e
.
Style police
Taille police
Noir
Blanc
Rouge
Ver t
Bleu
Jaune
Couleur police
Opacité police
Magenta
Cyan
Param. utilis
Couleur l’arrière-plan
Opacité l’arrière-plan
Couleur bord
Type bord
IMAGE
SON
CONFIGURATION
OPTIONS
LANGUE
DVD
sous-titre
e
.
sous-titre
Style police
Taille police
Couleur police
Opacité police
Param. utilis
Translucide
Transparent
Clignotement
Plein
Couleur l’arrière-plan
Opacité l’arrière-plan
Couleur bord
Type bord
IMAGE
SON
CONFIGURATION
OPTIONS
LANGUE
DVD
n
.
sous-titre
Style police
Taille police
Rouge
Ver t
Bleu
Jaune
Couleur police
Opacité police
Magenta
Cyan
Param. utilis
Couleur l’arrière-plan
Opacité l’arrière-plan
Couleur bord
Type bord
Blanc
IMAGE
SON
CONFIGURATION
OPTIONS
LANGUE
DVD
Noir
n
.
Style police
Taille police
Translucide
Transparent
Clignotement
Couleur police
Opacité police
Plein
Param. utilis
Couleur l’arrière-plan
Opacité l’arrière-plan
Couleur bord
Type bord
IMAGE
SON
CONFIGURATION
OPTIONS
LANGUE
DVD
sous-titre
d
des sous-titres a
és.
sous-titre
Style police
Taille police
Rouge
Ver t
Bleu
Jaune
Couleur police
Opacité police
Magenta
Cyan
Param. utilis
Couleur l’arrière-plan
Opacité l’arrière-plan
Couleur bord
Type bord
Blanc
IMAGE
SON
CONFIGURATION
OPTIONS
LANGUE
DVD
Noir
d
de
des sous-titres a
és.
sous-titre
Style police
Taille police
Couleur police
Opacité police
Couleur l’arrière-plan
Opacité l’arrière-plan
Couleur bord
Type bord
Param. utilis
Aucun
Accru
Réduit
Uniforme
Ombre G.
Ombre Dr.
IMAGE
SON
CONFIGURATION
OPTIONS
LANGUE
DVD
]
p
.
tyle polic
Il est possible de changer comme ci-dessous le style de
olice des sous-titres affichés
aille polic
Il est possible de changer comme ci-dessous lataille de
olice des sous-titres affichés
Couleur polic
Il est possible de changer comme ci-dessous la couleur
de police des sous-titres affichés
Couleur bor
Il est possible de changer comme ci-dessous la couleur
bordure
ffich
Type bor
Il est possible de changer comme ci-dessous le type
rdure
Appuyez sur
8
MENU
ffich
our quitter
PRÉPARATION
REGARDER LA
TÉLÉVISION
CONFIGURATION
OPTIONNELLE
FONCTIONNEMENT DU
LECTEUR DE DVD
Opacité polic
Il est possible de changer comme ci-dessous l’opacité
de police des sous-titres affichés
Couleur de l’arrière-pla
Il est possible de changer comme ci-dessous la couleur
d’arrière-plan des sous-titres affichés
Opacité de l’arrière-pla
Il est possible de changer comme ci-dessous l’opacité
d’arrière-plan des sous-titres affichés
emarque :
•
Pour que les sous-titres s’affichent sur l’écran du téléviseur, il
faut que le signal diffusé contienne des données de sous-titres.
• Les émissions de télévision et les annonces télévisées ne
sont pas toutes sous-titrées ou ne possèdent pas tous les
types de sous-titres.
• Il se peut que les sous-titres et le texte ne soient pas
parfaitement synchronisés avec la voix sur le téléviseur.
• Les changements de chaîne peuvent causer le retard des
sous-titres pendant quelques secondes.
• Le réglage du volume ou la coupure du son peuvent causer
le retard des sous-titres pendant quelques secondes.
•
Il se peut que des abréviations, des symboles ou d’autres formes
grammaticales abrégées soient utilisées pour que le texte
n’accuse pas de retard par rapport à l’action qui se déroule sur
l’écran. Il ne s’agit pas d’un dysfonctionnement.
• Les caractères des sous-titres ou du texte ne s’affichent pas
pendant l’affichage du menu principal ou des fonctions.
• Si une case noire apparaît sur l’écran du appareil, cela
signifie que les sous-titres sont réglés sur le mode texte.
Pour enlever la case, sélectionnez “CC-1”, “CC-2”, “CC-3”,
“CC-4” ou “Hf”.
•
Si l’appareil reçoit des signaux de mauvaise qualité, il se
peut que les sous-titres contiennent des erreurs ou
qu’aucun sous-titre ne soit disponible. Les causes possibles
de mauvaise qualité des signaux sont :
-
Le brouillage causé par le démarrage d’un véhicule automobile
- Le brouillage d’un moteur électrique
- La faiblesse du signal capté
- La réception d’un signal multiplex (image fantôme ou
scintillement de l’écran)
• En cas de coupure de courant, l’appareil garde en mémoire
les réglages de sous-titres que vous avez choisis.
• Le sous-titrage codé ne s’affichera pas si vous utilisez
uneconnexion HDMI.
• Lorsque l’appareil reçoit un signal de lecture d’effets
spéciaux (par exemple Recherche, Ralenti et Arrêt sur
image) depuis la chaîne de sortie vidéo du magnétoscope
(CH3 ou CH4), il se peutqu’il n’affiche pas les bons soustitres ou le bon texte.
RÉGLAGE DU DVD
DÉPANNAGE INFORMATION
F
Page 89

R
ONFIGURATION OPTIONNELLE
g
.
K
L
p
]
K
L
p
]
Configurations du PC
Mode economie d’energie
Région
Info logiciel actuel
Ef
Maison
Sous-titre
DVD
IMAGE
SON
CONFIGURATION
LANGUE
OPTIONS
Verrouillage
.
Veuillez introduire votre code
Code NIP
Retour
BACK
_
IMAGE
SON
CONFIGURATION
OPTIONS
LANGUE
DVD
]
.
.
IMAGE
SON
CONFIGURATION
DVD
OPTIONS
LANGUE
A
Verrou qualif. US TV
Verrouillage de chaîne
Classement EN-CA
Classement FR-CA
Taux régional
Changez code
Verrou qualif. US Ciné
B
D
C
31
1
2
33
t.
).
e.
.
C
Le contrôle parental lit les cotes de protection parentale des émissions et
refuse l’accès aux émissions dont la cote est supérieure au niveau que vous
avez spéci é. Grâce à cette fonction, vous pouvez bloquer l’accès à certains
programmes ne convenant pas aux enfants et rendre invisibles certaines
chaînes ou modes d’entrée externe.
Appuyez sur
1
ilisez
2
puis appuyez sur
MENU] pour quitter le menu principal
Curseur
our sélectionner “OPTIONS”,
OK
Suivez les instructions ci-dessous pour configurer
chacune des options
ou
ilisez
3
Curseur
Verrouillage”, puis appuyez sur
our sélectionner
IMAGE
SON
CONFIGURATION
OPTIONS
LANGUE
DVD
Sous-titre
Verrouillage
Configurations du PC
Mode economie d’energie
Région
Info logiciel actuel
OK
ou
ilisez [les touches numériques] pour saisir votre
4
Code NIP à quatre chiffres
Ef
Maison
“A. Verrouillage de Chaîne”
“B. Verrou qualif. US Ciné”
“C. Verrou qualif. US TV”
“D. Changez Code”
page
page 3
page 3
page
Remarque :
• Lorsque vous sélectionnez une cote et la réglez sur “Barré”,
es cotes plus élevées sont automatiquement bloquées.
es émissions à cote plus basse seront disponibles pour le
isionnemen
• Si vous réglez la cote la plus élevée sur “Vision”, toutes les
otes sont automatiquement réglées sur “Vision”.
• Afin de verrouiller l’accès à tout programme inapproprié,
éfinissez vos préférences dans les paramètres “Verrou
ualif. US ciné”, “Verrou qualif. US TV” et “Taux régional”.
• Le réglage de verrouillage est mémorisé en cas de panne
e courant (mais le code d’accès est remis à 0000
• Si la cote est bloquée, s’affich
• “Taux régional” est disponible lorsque l’appareil capte une
iffusion numérique au moyen du nouveau système de
• Si le signal d’émission ne dispose pas des informations
égionales sur le verrouillage des cotes, “La taux régional
’est actuellement pas disponible.” s’affiche.
e message apparaît aussi lorsque vous essayez d’accéder
“Taux régional” après avoir effacé les informations
égionales sur le verrouillage des cotes, et si de nouvelles
nformations n’ont pas été téléchargées depuis
• Le système de cotes canadien sur ce appareil est basé sur
a norme CEA-766-A et la politique du CRTC (Conseil de la
adiodiffusion et des télécommunications canadiennes).
Si vous n’avez pas encore défini votre Code NIP,
z
0]
0]0]
0
Lorsque le Code NIP est correct, le menu
“Verrouillage” s’affiche
F
Page 90

R
INTRODUCTION
K
L
]
IMAGE
SON
CONFIGURATION
OPTIONS
LANGUE
Verrou qualif. US TV
Verrou qualif. US Ciné
Classement EN-CA
Classement FR-CA
Taux régional
Changez code
Verrouillage de chaîne
DVD
K
L
.
Retour
BACK
Vision / Barré
Sélectionner
OK
DVD
IMAGE
SON
CONFIGURATION
OPTIONS
LANGUE
Video
Component
HDMI1
HDMI2
HDMI3
DVD
Retour
BACK
Vision / Barré
Sélectionner
OK
DVD
IMAGE
SON
CONFIGURATION
OPTIONS
LANGUE
Video
Component
HDMI1
HDMI2
DVD
11.1DTV
.
K
L
]
K
L
r
.
e
e
adulte seulement
7
e
e
e
c
assement
.
37MD350B
3
350B
A. Verrouillage de ChaîneA. Verrouillage de Chaîne
Certaines chaînes ou certains modes d’entrée externes spécifiques peuvent
être invisibles lorsque cette fonction est active.
Utilisez
5
6
votre choix, puis appuyez plusieurs fois sur
Curseur
pour sélectionner “Verrouillage
e chaîne”, puis appuyez sur
ou
ilisez
Curseur
pour sélectionner le rating de
r entre “Vision” et “Barré”
ou
OK
OK] pour
B. Verrou qualif. US CinéB. Verrou qualif. US Ciné
Le système américain de classement des films est celui créé par la MPAA
(Motion Picture Association of America).
Utilisez
5
qualif. US Ciné”, puis appuyez sur
Utilisez
6
désirée, puis appuyez plusieurs fois sur
permuter entre “Vision” et “Barré”
Curseur
ou
Curseur
ou
pour sélectionner “Verrou
OK
IMAGE
Verrouillage de chaîne
Verrou qualif. US Ciné
SON
Verrou qualif. US TV
CONFIGURATION
Classement EN-CA
OPTIONS
Classement FR-CA
LANGUE
Taux régional
DVD
Changez code
pour sélectionner la cote
OK] pou
IMAGE
SON
CONFIGURATION
OPTIONS
LANGUE
DVD
Sélectionner
X
NC-17
R
PG-13
PG
G
NR
OK
Vision / Barré
BACK
Retour
PRÉPARATION
REGARDER LA
TÉLÉVISION
CONFIGURATION
OPTIONNELLE
FONCTIONNEMENT DU
LECTEUR DE DVD
Appuyez sur la touche
7
2MD
MENU] pour quitter
7
Caractéristiqu
-1
-13
ppuyez sur
Catégori
Public
Aucune personne de moins de 17 ans admis
Restreint ; les moins de 17 ans doivent être
accompagnés d’un parent ou d’un tuteur
adult
Ne convient pas aux enfants de moins de 13 ans
Supervision parentale recommandé
Tout publi
Pas de cl
MENU]pour quitter
RÉGLAGE DU DVD
DÉPANNAGE INFORMATION
F
Page 91

R
ONFIGURATION OPTIONNELLE
K
L
p
]
IMAGE
SON
CONFIGURATION
OPTIONS
LANGUE
Verrou qualif. US TV
Classement EN-CA
Classement FR-CA
Taux régional
Changez code
Verrou qualif. US Ciné
Verrouillage de chaîne
DVD
K
L
s
B
]
pour
.
TV-MA
TV-14
TV-PG
TV-G
TV-Y7
TV-Y
FV
V S L D
Retour
BACK
Vision / Barré
Sélectionner
OK
DVD
IMAGE
SON
CONFIGURATION
OPTIONS
LANGUE
.
s
.
K
L
s
B
]
pour
.
Retour
BACK
Vision / Barré
Sélectionner
FV V S L D
TV-MA
TV-14
TV-PG
TV-G
TV-Y7
TV-Y
OK
DVD
IMAGE
SON
CONFIGURATION
OPTIONS
LANGUE
e
ie
MA
adulte seulement
s
ée
s
G
ecommandée
Y7
tous les enfants de
s
Y
s
s
e
ce
TV-Y7
ce
T
G
TV
TV-MA
l
fs
T
”.
).
C
C. Verrou qualif. US TVC. Verrou qualif. US TV
ilisez
5
Curseur
qualif. US TV”, puis appuyez sur
our sélectionner “Verrou
OK
ou
Utilisez
6
cote désirée, puis appuyez plusieurs fois sur
permuter entre “Vision” et “Barré”
Curseur
pour sélectionner la
ou
Appuyez sur
7
MENU] pour quitter
our spécifier les cotes secondaire
ans le cas de TV-MA, TV-14, TV-PG et TV-Y7, vous
pouvez aussi spécifier des cotes secondaires pour
bloquer l’accès à des éléments spécifiques des
émissions. Pour spécifier les cotes secondaires, suivez
es étapes ci-dessous
OK
Caractéristiqu
-
-14
V-P
Public
Ne convient pas aux enfants de
moins de 14 an
Supervision parentale
r
Catégor
V-G Tout public
-
-
caractéristiqu
nvient à
ans et plu
onvient à tous les enfant
Catégorie Caractéristique
7
Fantaisie Violen
Violen
Scène à Caractère Sexue
V-P
-14
Langage Vulgaire
Dialogues Suggesti
V-PG, TV-14
Remarque :
• Les cotes secondaires barrées apparaissent à côté de la
atégorie de cote principale dans le menu “Verrou qualif.
TV
• Il n’est pas possible de barrer une cote secondaire (D, L, S
u V) si la cote principale est réglée sur “Vision”.
• Le changement d’une catégorie sur “Barré” ou “Vision”
ègle automatiquement toutes ses cotes secondaires sur la
ême valeur (“Barré” ou “Vision”
lu
lev
plu
F
Utilisez
Curseur
pour sélectionner la
cote désirée, puis appuyez plusieurs fois sur
permuter entre “Vision” et “Barré”
ou
OK
Page 92

R
D. Changez CodeD. Changez Code
K
L
]
Verrouillage de chaîne
Verrou qualif. US TV
Verrou qualif. US Ciné
Classement EN-CA
Classement FR-CA
Taux régional
Changez code
DVD
IMAGE
SON
CONFIGURATION
OPTIONS
LANGUE
.
ssez de nouveau le
.
Confirm PIN
Veuillez introduire votre code
Code NIP
Retour
BACK
_
DVD
IMAGE
SON
CONFIGURATION
OPTIONS
LANGUE
.
.
.
Le code par défaut (0000) est fourni ave l’appareil, mais vous pouvez
spécifier votre propre Code NIP.
Utilisez
5
code”, puis appuyez sur
6
nouveau Code NIP à 4 chiffres
Curseur
pour sélectionner “Changez
OK
ou
ppuyez sur [les touches numériques]pour saisir le
isi
“Confirm PIN”
Code NIP
ans l’espace
INTRODUCTION
PRÉPARATION
REGARDER LA
TÉLÉVISION
CONFIGURATION
OPTIONNELLE
7
ppuyez sur
MENU] pour quitter
emarque :
• Assurez-vous que le nouveau Code NIP et le Code NIP de
confirmation sont identiques. S’ils sont différents, l’espace
e saisie devient vide pour permettre de saisir à nouveau le
ode NIP
• Votre Code NIP sera effacé et remis à la valeur par défaut
0000) si une panne de courant survient.
Si vous oubliez le Code NIP, débranchez le cordon
’alimentation pendant 10 secondes pour remettre le Code
NIP à 0000
FONCTIONNEMENT DU
LECTEUR DE DVD
RÉGLAGE DU DVD
DÉPANNAGE INFORMATION
F
Page 93

R
ONFIGURATION OPTIONNELLE
gg
.
.
K
L
p
]
K
L
p
]
Verrouillage
Mode economie d’energie
Région
Info logiciel actuel
Ef
Magasin
Sous-titre
DVD
IMAGE
SON
CONFIGURATION
LANGUE
OPTIONS
Configurations du PC
K
L
p
]
Position verticale
Position vorizontale
Réinitialisation de la position
0
0
DVD
IMAGE
SON
CONFIGURATION
LANGUE
OPTIONS
.
sation de la Position
K
L
p
]
Réinitialise la position d’affichage
de I’mage.
Annuler
Rétablir
DVD
IMAGE
SON
CONFIGURATION
LANGUE
OPTIONS
.
e
s
B
.
seu
s
seu
B
le
te
le
bas
aut
]
p
.
uellement.
C
Cette fonction vous permet de régler la position de l’écran du PC lorsque le
PC transmet des données via la prise d’Entrée HDMI 1
Appuyez sur
1
ilisez
2
puis appuyez sur
ilisez
3
MENU] pour quitter le menu principal
Curseur
our sélectionner “OPTIONS”,
OK
ou
Curseur
IMAGE
SON
CONFIGURATION
OPTIONS
LANGUE
DVD
our sélectionner
“Configurations du PC”, puis appuyez sur
ou
Sous-titre
Verrouillage
Configurations du PC
Mode economie d’energie
Région
Info logiciel actuel
OK
Ef
Magasin
Régler la configuration
5
Réinitiali
ilisez
Curseur
puis appuyez sur
our sélectionner “Rétablir”,
OK
ou
• La position horizontale/verticale de l’écran du PC est
réglée automatiquement
Position Horizontale, Position Vertical
ilisez
Curseur
Position Horizonta
0
Position H.
Position Vertica
Position V.
DéplacerAjuster OK
0
DéplacerAjuster OK
OK
OK
pour régler
+-
’écran du PC
+-
’écran du PC
r
r
ers la gauche
rs le
our déplacer
’écran du PC
rs la droi
our déplacer
’écran du PC
rs le h
r
r
ilisez
4
Curseur
our sélectionner le paramètre
que vous voulez régler, puis appuyez sur
ou
F
Appuyez sur
6
MENU
our quitter
OK
emarque :
• Vous risquez de ne pas obtenir un écran approprié si
ous utilisez la fonction “Réinitialisation de la position”
vec certains signaux. Dans ce cas, réglez les paramètres
n
Page 94
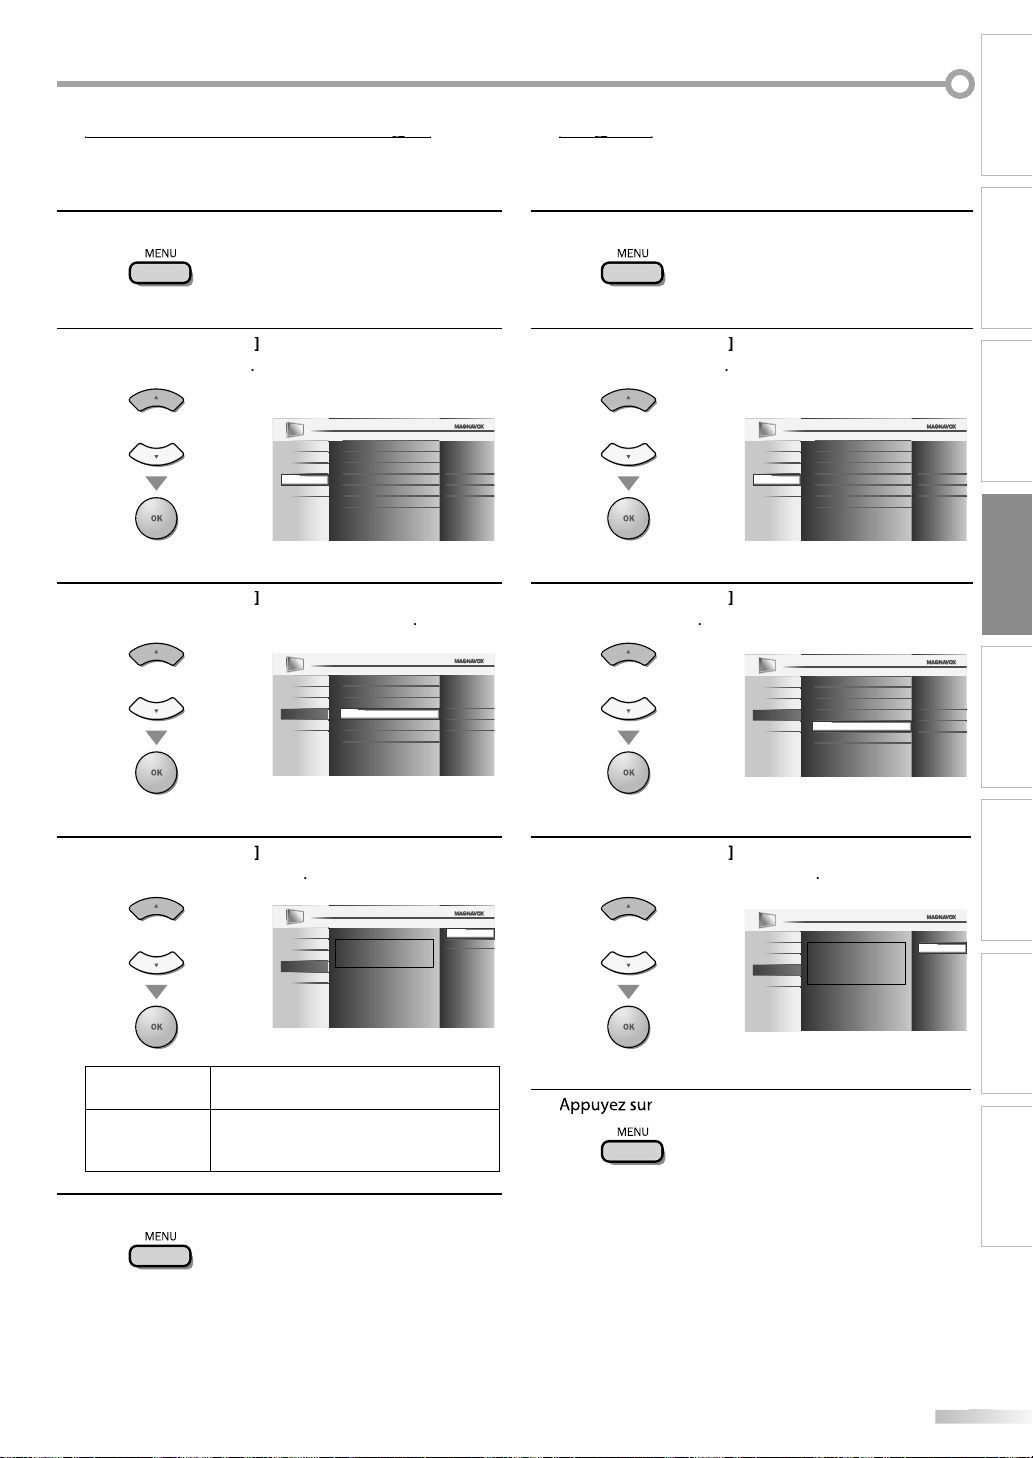
R
INTRODUCTION
g
.
.
K
L
p
]
K
L
p
]
K
L
p
]
que.
.
.
g
.
.
K
L
p
]
K
L
]
K
L
]
.
Vous pouvez choisir de réduire ou non la consommation électrique
Appuyez sur
1
ilisez
2
puis appuyez sur
ilisez
3
economie d’energie”, puis appuyez sur
MENU] pour affi cher le menu principal
Curseur
our sélectionner “OPTIONS”,
OK
ou
Curseur
ou
our sélectionner “Mode
IMAGE
SON
CONFIGURATION
OPTIONS
LANGUE
DVD
IMAGE
SON
CONFIGURATION
OPTIONS
LANGUE
DVD
Sous-titre
Verrouillage
Configurations du PC
Mode economie d’energie
Région
Info logiciel actuel
Sous-titre
Verrouillage
Configurations du PC
Mode economie d’energie
Région
Info logiciel actuel
OK
Ef
Maison
Ef
Maison
Si vous avez sélectionné “Magasin”, il se peut que la consommation
épasse les valeurs limites prévues par la norme ENERGY STAR®
Appuyez sur
1
ilisez
2
puis appuyez sur
ilisez
3
puis appuyez
MENU] pour accéder au menu principal
Curseur
our sélectionner “OPTIONS”,
OK
ou
Curseur
pour sélectionner “Région”,
IMAGE
SON
CONFIGURATION
OPTIONS
LANGUE
DVD
Sous-titre
Verrouillage
Configurations du PC
Mode economie d’energie
Région
Info logiciel actuel
OK
Sous-titre
ou
IMAGE
SON
CONFIGURATION
OPTIONS
LANGUE
DVD
Verrouillage
Configurations du PC
Mode economie d’energie
Région
Info logiciel actuel
Ef
Maison
Ef
Maison
PRÉPARATION
REGARDER LA
TÉLÉVISION
CONFIGURATION
OPTIONNELLE
FONCTIONNEMENT DU
LECTEUR DE DVD
ilisez
4
Curseur
désiré, puis appuyez sur
ou
Appuyez sur
5
MENU] pour quitter
our sélectionner le mode
OK
IMAGE
SON
Quand paramétré sur “Ef”, la conso. est réduite
CONFIGURATION
en diminuant la luminosité du rétro-éclairage.
OPTIONS
LANGUE
DVD
Sélectionnez ce réglage si vous souhaitez
réduire la consommation électri
Il se peut que la consommation de cet
appareil soit supérieure aux valeurs limites
prévues par la norme ENERGY STAR®
Ef
Hf
ilisez
4
Curseur
votre choix, puis appuyez sur
ou
5
MENU] pour quitter
pour sélectionner le région de
OK
IMAGE
SON
CONFIGURATION
OPTIONS
LANGUE
DVD
L’emplacement Maison est
recommandé pour une utilisation
domestique normale.
En mode Magasin de détail, tous les
réglages sont fixes.
Magasin
Maison
RÉGLAGE DU DVD
DÉPANNAGE INFORMATION
F
Page 95

R
ONFIGURATION OPTIONNELLE
g
.
.
K
L
p
]
K
L
]
Verrouillage
Configurations du PC
Mode economie d’energie
Région
Ef
Sous-titre
DVD
IMAGE
SON
CONFIGURATION
LANGUE
OPTIONS
Info logiciel actuel
Maison
sée.
.
C
Cette fonction indique la version du logiciel actuellement utilisée
Appuyez sur
1
ilisez
2
puis appuyez
MENU] pour accéder au menu principal
Curseur
OK
ou
ilisez
3
Curseur
actuel”, puis appuyez sur
ou
our sélectionner “OPTIONS”,
Sous-titre
IMAGE
Verrouillage
SON
Configurations du PC
CONFIGURATION
OPTIONS
LANGUE
DVD
Mode economie d’energie
Région
Info logiciel actuel
Ef
Maison
pour sélectionner “Info logiciel
OK
Permet de connaître le numéro de la version du logiciel
4
5
llement utili
Appuyez sur
IMAGE
SON
CONFIGURATION
OPTIONS
LANGUE
DVD
MENU]our quitter
Release Version:
XXXXXX_XX
F
Retour
Page 96

ONCTIONNEMENT DU LECTEUR DE DVD
q
O
WD-R
d
)
e
q
!
.
.
:
.
.
ctions
D
l
l
f
f
f
le l
l.
g
p
g
.
.
INTRODUCTION
Fon
Type de disque
Logo
Signal
enregistré
Taille du disque
NE JAMAIS lire les disques suivants : cela risquerait d’entraîner un dysfonctionnement de l’appareil
Disques de 3 pouces (8 cm), DVD-RAM, DVD audio, CD-i, CD photo, CD vidéo, DVD dont le code régional est différent de 1
ou TOUS, DTS-CD, DVD-ROM pour PC, CD-ROM pour PC, disques comportant des étiquettes, des rayures, des taches, des
blemishes, etc., HD DVD, disques Blu-ray, CD-RW/-R contenant des fichiers MP3 et CD-RW/-R contenant des fichiers JPEG, y
compris les CD Kodak Picture
Sur le type de disque suivant, IL SE PEUT QUE le son soit inaudible
Super Audio CD
ous les autres disques ne figurant pas dans la liste des supports compatibles
VD-VIDE
vi
VD-RW
éo numérique (MPEG2
DV
VD-R
pouces (12 cm)
D-DA
D-R
udio numériqu
PRÉPARATION
REGARDER LA
TÉLÉVISION
CONFIGURATION
OPTIONNELLE
FONCTIONNEMENT DU
LECTEUR DE DVD
emarque
• Les disques non finalisés ne peuvent pas être lus sur cet appareil.
• S’agissant des DVD-RW/R, les disques enregistrés au format VR (enregistrement vidéo) ne peuvent pas être lus. Seuls les disques vidéo
inalisés peuvent être lus.
• Certains disques ne peuvent pas être lus car ils ont été enregistrés dans des conditions d’enregistrement non prises en charge, sur un
graveur doté de caractéristiques inadaptées ou sur des disques dotés de propriétés spéciales
• Seul le son enregistré sur la couche normale du CD pourra être entendu. Le son enregistré sur la couche haute densité d’un Super Audio CD
e pourra pas être entendu.
• Ne pas utiliser d’adaptateur pour CD permettant de transformer un CD de 3 pouces (8 cm) en CD de 5 pouces (12 cm).
• Vous pouvez lire tous les types de disques figurant dans la liste des “Disques Lisibles”. Si vous utilisez des disques non standard, cet appareil
e pourra pas les lire ou la qualité du son et de l’image risque d’être compromise.
• Si la partie enregistrée du disque est trop petite (inférieure à 2 3/16 pouces (55 mm)), le disque risque de ne pas être lu correctement
Codes Régionaux
Cet appareil a été conçu pour lire les DVD de zone
1. Les DVD doivent être conçus pour TOUTES les
régions ou pour
par cet apparei
conçus pour d’autres régions. Véri
symboles
symboles de région ne
DVD, vous ne pouvez pas
Le numéro indiqué dans le pictogramme en forme de
lobe indique la région du monde dans laquelle le DVD
peut être utilisé. Un DVD prévu pour une ré
ne
eut être lu que par un lecteur comportant le même
code ré
ional
a région 1 pour pouvoir être lus
. Il est impossible de lire des DVD
iez que ces
igurent bien sur votre DVD. Si ces
igurent pas sur votre
ire avec cet apparei
ion spécifique
Systèmes de Couleurs
ivers systèmes de couleurs sont utilisés dans le monde
our enregistrer les DVD. Le plus courant est le système
TSC (essentiellement utilise aux États-Unis et au Canada).
et appareil utilise le système NTSC ; aussi, les DVD que
ous utilisez doivent être enregistrés au format NTSC. Il
ous sera impossible de lire des DVD utilisant le système
AL
RÉGLAGE DU DVD
DÉPANNAGE INFORMATION
Page 97

R
ONCTIONNEMENT DU LECTEUR DE DVD
.
tée vers vous.
.
.
D
.
.
B
C
p
.
pp
.
e
A
.
.
touche
A
]
de l’appareil enfoncée
p
.
A
]
q
y
/L/
s
/
B
p
touche
B
K/L
/
s
/
B
p
y
]
(
B
.
p
C
p
écran du téléviseur.
p
pue.
C
]
en mode Stop. Sur certains disques, la touche
[
C
]
ne fonctionne pas lorsque le message de reprise
.
g
.
F
B
.
e
Ces opérations sont accessibles à partir de la télécommande. Certaines peuvent également être accessibles à partir des commandes situées sur l’appareil.
ecture
Avant de commencer :
Allumez l’amplificateur et les autres équipements connectés à cet appareil.
Assurez-vous que le récepteur audio externe (non fourni) est réglé sur le bon canal.
Appuyez sur la touche
1
(marche)pour mettre
’appareil sous tension
nsérez un disque en veillant à ce que l’étiquette soit
2
rien
tiquett
Si le DVD a été enregistré sur ses deux faces, assurez-vous que
l’étiquette de la face que vous souhaitez lire est orientée vers vous
’appareil quitte automatiquement le mode TV pour
3
passer en mode DVD et détecte le type de disque
x.)DV
DVD
ppuyez sur la touche
PLAYB si l’appareil ne passe
as automatiquement en mode DVD
’appareil commence la lecture du disque
4
i la lecture ne commence pas automatiquement,
appuyez de nouveau sur la touche
Appuyez sur la touche
5
STOP
our interrompre
emporairement la lecture
i la lecture est interrompue pendant plus de 20
DVD
Certains disques contiennent des menus de disque qui décrivent le contenu
du disque ou vous permettent de personnaliser la lecture du disque ou des
menus de titre qui contiennent la liste des titres présents sur le DVD.
Pour afficher le menu du DVD, appu
DISC MENU] et utilisez
CurseurK
sélectionner un élément, puis appuyez sur
la
PLAY
ez sur la touche
our
OK] (ou sur
Pour accéder au menu racine, appuyez sur la touche
TITLE] et utilisez
sélectionner un élément, puis appu
Curseur
our
ez sur
OK
ou
PLAY
Remarque :
es opérations disponibles dans le menu varient en fonction
u disque utilisé.
onsultez le manuel accompagnant le disque pour toute
nformation complémentaire
Appuyez sur la touche
STOP
pendant la lecture. Un message
de re
rise apparaît alors sur
l’
Appuyez sur la touche
La lecture re
rend à l’endroit précis
PLAY B
REPRISE EN COURS ON
Appuyez sur 'PLAY' pour commencer
à partir d’ici. Pour commencer depuis
le début, appuyez d’abord sur 'STOP'
puis sur 'PLAY'.
où elle a été interrom
Remarque :
•
Pour annuler la reprise de la lecture, appuyez de nouveau sur la
touche[STOP
STOP
apparaît. Patientez jusqu’à ce que le message disparaisse
• Les informations de reprise de la lecture seront conservées
même si l’appareil est éteint. Toutefois, elles seront perdues
si le disque est éjecté. La lecture reprendra alors au début
du disque la prochaine fois que vous insérerez ce dernier.
6
ppuyez sur
EJECT Apour éjecter le disque
Remarque :
” peut apparaître dans le coin supérieur droit
de l’écran du téléviseur si une opération est rendu
inaccessible par le disque ou par l’appareil.
vec certains DVD, la lecture peut commencer à partir du
itre 2 ou 3 en raison de programmes spécifiques.
Pendant la lecture d’un disque double couche, les images peuvent
se figer temporairement. Cela se produit lors du passage de la
1ère à la 2nde couche. Il ne s’agit pas d’un dysfonctionnement
Si vous ne parvenez pas à retirer le disque, essayez l’une des
opérations suivantes
Maintenez la
endant plus de 5 secondes
Débranchez le cordon d’alimentation, rebranchez-le, puis
appuyez sur [EJECT
L’éjection du disque nécessite environ 10 secondes pendant
lesquelles l’appareil ne réagit à aucune commande.
F
[EJECT
Appuyez sur la touche
PAUSE F pendant la
lecture du disque.
La lecture est mise en pause et le son est
coupé
Pour reprendre la lecture, appuyez sur la
hePLAYB
DVD
chaque fois que vous appuyez sur la touche
PAUSE
en mode pause, la lecture se poursuit image par image.
Pour reprendre la lecture normale, appuyez sur la touche
PLAY
emarque :
églez le paramètre “ARRÊT SUR IMAGE” du menu “AUTRES”
ur “TRAME” si les images sont floues en mode pause.
eportez-vous à la page 49
Page 98

pp
Appuyez plusieurs fois sur la touche [FWD
D
ou
d
.
B
:
.
.
t
D
B
:
.
.
oom
.
.
]
p
).
,
r
K
/L/
s
/
g
.
.
.
j
]
A
]
pour rappeler le
.
REV E pendant la lecture pour sélectionner la
vitesse
’avance/retour rapide de votre choix
Pour reprendre la lecture normalement,
appuyez sur la touche
PLAY
emarque
Réglez le paramètre “ARRÊT SUR IMAGE” du menu “AUTRES”
sur “TRAME” si les images sont floues en mode lecture
rapide. Reportez-vous à la page 49
a vitesse de l’avance/du retour rapide varie en fonction du disque.
es vitesses approximatives sont 1 (2x), 2 (8x), 3 (20x), 4 (50x) et 5
(100x) pour les DVD et 1 (2x), 2 (8x) et 3 (30x) pour les CD audio
S’agissant des DVD, aucun son n’est émis pendant
l’utilisation de cette fonction.
S’agissant des CD audio, le son est émis de manière
intermittente pendant l’utilisation de cette fonction.
Avance Lente / Retour Len
DVD
Appuyez plusieurs fois sur la touche
REVE en mode Pause pour sélectionner la
vitesse d’avance / retour rapide de votre choix.
Pour reprendre la lecture normalement,
appuyez sur la touche
PLAY
emarque
Réglez le paramètre “ARRÊT SUR IMAGE” du menu “AUTRES”
sur “TRAME” si l’image est floue lors de l’avance / retour
ent(e). Reportez-vous à la page 49
La vitesse d’avance/retour lent(e) varie selon le disque utilisé.
Les vitesses approximatives sont 1 (1/16x), 2 (1/8x) et 3 (1/2x).
Le son est coupé pendant l’utilisation de cette fonction
FWD
E
INTRODUCTION
Une fois le facteur de zoom de votre choix atteint
3
1
ilisez
Curseu
a
randie sur l’écran du téléviseur
B pour déplacer l’image
PRÉPARATION
ou
REGARDER LA
TÉLÉVISION
Pour quitter le mode Zoom, répétez les étapes 1 et
4
2 décrites ci-dessus et appuyez plusieurs fois sur la
touche
1
OK] jusqu’à ce que “HF” apparaisse
emarque :
Le cadre gris renfermant un cadre bleu qui apparaît pendant
a lecture en mode Zoom est un repère de position qui
ndique la section de l’image qui a été agrandie
Le repère de position reste affiché sur l’écran du téléviseur
usqu’à ce que vous appuyiez sur la touche[OK
ppuyez de nouveau sur la touche [OK
epère de position lorsque celui-ci disparaît.
La fonction Zoom n’est pas disponible lorsque le menu du
isque est affiché.
Le facteur de zoom 4x n’est pas disponible sur certains
isques
La fonction Zoom est également disponible en mode Pause.
CONFIGURATION
OPTIONNELLE
FONCTIONNEMENT DU
LECTEUR DE DVD
RÉGLAGE DU DVD
Z
DVD
La fonction Zoom vous permet d’agrandir l’image vidéo et de naviguer dans
l’image agrandie.
Pendant la lecture, appuyez plusieurs fois sur la touche
1
MODE] jusqu’à ce que “ apparaisse
(
)
HF
ZOOM
a taille de l’image est multipliée par deux
Appuyez plusieurs fois sur la touche
2
e facteur de zoom (“2x” ou “4x”
OK
(
)
4x
ZOOM
DÉPANNAGE INFORMATION
our modifier
R
Page 99

R
ONCTIONNEMENT DU LECTEUR DE DVD
.
K
/
)
DVD
r
.
.
.
H
/
G
P
H/G
.
[
G
]
ne sont pas disponibles lorsque la lecture est
êtée
e
)
actuel
)
)
Fonctions de Recherche
Recherche de Chapitre / Titre / PisteRecherche de Chapitre / Titre / Piste
Vous pouvez sélectionner des chapitres, des titres ou des pistes du disque
endant la lecture, appuyez plusieurs fois sur la touche
1
MODE] jusqu’à ce que “ / “ apparaisse.
• Si vous souhaitez rechercher un titre, utilisez plusieurs
ois
Curseur
2
sélectionner le chapitre, le titre ou la piste de votre
choix. Vous disposez de 60 secondes pour le faire.
our lire un chapitre, un titre ou une piste dont le
numéro ne comporte qu’un chiffre lorsque le nombre
otal de chapitres, titres ou pistes est supérieur à 10,
appuyez sur la touche
e chapitre, de titre ou de piste
Ljusqu’à ce que “
apparaisse.
x.
/12
(RECHERCHE
[les touches numérotées]pou
/12
(RECHERCHE
OK]après avoir saisi le numéro
)
)
l’aide de la touche [SKIP
Pendant la lecture, appuyez plusieurs fois sur la touche
1
SKI
jusqu’à ce que le chapitre, le titre ou la
iste de votre choix soit sélectionné(e)
hapitre/piste actuell
CH
TR
CH/TR 1 CH/TR 2 CH/TR 3 CH/TR 4
[SKIP H] [SKIP G]
ou
itre
TT
TT 1 TT 2 TT 3 TT 4
[SKIP H] [SKIP G]
(Si le disque n’est pas chapitré.)
2
u chapitre, du titre ou de la piste que vous avez
sélectionné(e).
Remarque :
SKIP H /
rr
a lecture commence automatiquement à partir du
3
chapitre, du titre ou de la piste sélectionné(e)
Remarque :
La recherche de chapitre, de titre ou de piste ne peut être
effectuée que pendant la lecture ou lorsque l’appareil
a conservé les informations de reprise de la lecture en
mémoire. Elle ne peut être effectuée en mode Stop.
Le nombre total de chapitres / titres / pistes présent sur
votre disque ; si votre disque comporte moins de 10
chapitres / titres / pistes, appuyez directement sur le numéro
e chapitre / titre / piste. Pour lire un chapitre / titre / piste
ont le numéro comporte deux chiffres, appuyez sur la
ouche numérotée correspondant au numéro du chapitre,
u titre ou de la piste de votre choix.
La recherche de pistes n’est pas disponible pendant une
lecture programmée ou une lecture aléatoire
F
Page 100

INTRODUCTION
h
.
.
)
DVD
r
K
L
.
r
:
p
]
pour effacer la donnée
p.
r
.
[+10]
,
[+10], [2]
et
]
p
]
j
r
K
/
.
.
ée
actuel
ée
e
Recherche par DuréeRecherche par Durée
Vous pouvez sélectionner la durée écoulée à partir de laquelle vous
sou
aitez commencer la lecture du disque
Pendant la lecture, appuyez plusieurs fois sur la touche
1
MODE] jusqu’à ce que “ / “ apparaisse
x.
TOTAL
TOTAL
)
1:29:00
1:29:00
/12
(RECHERCHE
2
apparaisse
Curseu
jusqu’à ce que
ou
ppuyez sur [les touches numérotées] pou
3
sélectionner la durée écoulée de votre choix. Vous
disposez de 60 secondes pour le faire.
Recherche DirecteRecherche Directe
Appuyez sur [les touches numérotées]pou
sélectionner le chapitre, le titre ou la piste de votre
ix
emarque :
Pour sélectionner un chapitre, un titre ou une piste dont le
uméro ne comporte qu’un chiffre, appuyez directement sur
a touche numérotée correspondante.
Pour sélectionner un chapitre, un titre ou une piste dont le
uméro comporte deux chiffres :
Si le disque contient plus de 9 et moins de 100 chapitres,
titres ou pistes, appuyez tout d’abord sur la touche
puis saisissez le numéro à deux chiffres du chapitre, du titre
ou de la piste recherché(e).
(ex. : pour atteindre la piste 26, appuyez sur les touches
[6
La fonction Répétition n’est disponible que pendant la lecture.
PRÉPARATION
REGARDER LA
TÉLÉVISION
CONFIGURATION
OPTIONNELLE
FONCTIONNEMENT DU
LECTEUR DE DVD
La lecture commence automatiquement à partir de la
4
durée écoulée que vous avez sélectionnée.
emarque
• Lorsqu’il n’est pas nécessaire de saisir un chiffre, “0” apparaît
automatiquement. Par exemple, “0: 0_: _ _” apparaît dans le
menu recherche par durée si la durée totale du titre ou de la
iste est inférieure à 10 minutes.
• Appuyez sur la touche[CLEAR
incorrecte à l’étape 3.
• La recherche par durée ne peut être effectuée que pendant
la lecture ou lorsque l'appareil a conservé les informations
e reprise de la lecture en mémoire.
Elle ne peut pas être effectuée en mode Sto
Pendant la lecture, appuyez plusieurs fois sur la touche
1
MODE
2
Répétition
Appuyez sur la touche
3
usqu’à ce que “ apparaisse.
ppuyez sur
DVD
CD
Curseu
HAPITRE
ITRE
ISTE
(
)
RÉPÉTITION
HF
Lpour modifier le mode
répétition
répétition
répétition
(répétition
(répétition de la piste actuell
T
(répétition
BACK] pour quitter le menu
u chapitre
titre
u disque entier
RÉGLAGE DU DVD
iv
DÉPANNAGE INFORMATION
iv
R
 Loading...