

Page 1

Directions for Use
00
Page 2
Once your PHILIPS purchase is registered, you're eligible to receive all the privileges
of owning a PHILIPS product. So complete and return the Warranty Registration
Card enclosed with your purchase at once. And take advantage of these important benefits.
Congratulations on your purchase,
and welcome to the "family!"
Dear PHILIPS product owner:
Thank you for your confidence in PHILIPS. You've selected one of the best-built, best-backed I ;avail-
able today. And we'll do everything in our power to keep you happy with your purchase for many years to
come.
As a member of the PHILIPS"family," you're entitled to protection by one of the most comprehensivewar-
rarities and outstanding service networks in the industry.
What's more, your purchase guarantees you'll receive all the information and specialoffers for which
you qualify, plus easyaccessto accessories from our convenient home shopping network.
And most importantly you cancount on our uncompromising commitment to your total satisfaction.
All of this is our way of sayingwelcome-and thanks for investing in a PHILIPSproduct.
Sincerelv.
Lawrence J. Blanford
PHILIPS
P.S. Remember, to get the most from your
PHILIPS product, you must return your
Warranty Registration Card within 10
days. So please mail it to us right now!
Know these
safetysymbols
_, This"boltof lightning" indicatesuniasulatedmaterial within your unit may causean elec-
trical shock. For the safety of everyone inyour household, pleasedo not remove product cov-
_'The "exclamationpoint" calls attention to features for which you should read the
enclosed literature closely to prevent operating and maintenanceproblems.
WARNING: TO PREVENT FiRE OR SHOCK HAZARD, DO NOT EXPOSETHIS EQUIP-
MENT TO RAIN OR MOISTURE.
CAUTION: To prevent electric shock, match wide blade of plug to wide slot, andfully insert.
ATTENTION: Pour _viter leschocs _lectriques, introduire la lamela pluslarge de lafichedarts
la borne correspondante de la prise et pousser iusqu'au fond.
Page 3
IMPORTANT SAFETY INSTRUCTIONS
Read before operating equipment
L Read these instructions.
2. Keep these instructions.
3. Heed all warnings.
4. Follow all instructions.
5. Do not use this apparatus near water.
6. Clean only with a dry cloth. 17.
7. Do not block any of the ventilation openings. Install in accordance
with the manufacturers instructions.
8. Do not install near any heat sources such as radiators, heat regis-
lers, stoves, or other apparatus (including amplifiers) that produce
heat.
9. Do not defeat the safety purpose of the polarized or grounding-
type plug. A polarized plug has two blades with one wider than
the other. A grounding type plug has two blades and third ground-
ing prong. The wide blade or third prong are provided for your
safety. When the provided plug does not fit into your outlet, con- 18.
sult an electrician for replacement of the obsolete outlet.
10. Protect the power cord from being walked on or pinched particu- 19.
laxly at plugs, convenience receptacles, and the point where fhey
exit from the apparatus. 20.
1L On_se attachments/accessories specified by the manufacturer.
12. _ Use only with a cart, stand, tripod, bracket, or table
l_ specified by the manufacturer, or sold with the app-
the_art/apparatus combination to avoid injury from tip-over.
13. Unplug this apparatus during lightning storms or when unused for
long periods of time.
14. Refer all servicing to qualified service personnel. Servicing is
required when the apparatus has been damaged in any way, such
as power-supply cord or plug is damaged, liquid has been spilled 21.
or objects have fallen into apparatus, the apparatus has been
exposed to rain or moisture, does not operate normally, or has
been dropped. 22.
15. This product may contain lead and mercury. Disposal of these
materials may be regulated due to environmental considerations.
For disposal or recycling information, please contact your local
authorities or the Electronic Industries Alliance: www.eiae.org
16. Damage Requiring Service - The appliance should be serviced
by qualified service personnel when:
A. The power supply cord or the plug has been damaged; or
aratus. When a cart is used, use caution when moving
B. Objects have fallen, or liquid has been spilled into the appli-
ance; or
C. The appliance has been exposed to rain; or
D. The appliance does not appear to operate normally or
exhibits a marked change in performance; or
E. The appliance has been dropped, or the enclosure damaged.
Tilt/Stability - All televisions must comply with recommended
international global safety standards for tilt and stability properties
of its cabinet design.
• Do not compromise these design standards by applying exces-
sive pull force to the front, or top, of the cabinet which could ulti-
mately overturn the product.
• Also, do not endanger yourself, or children, by placing eleclron-
ic equipment/toys on the top of the cabinet. Such items could
unsuspectingly fall from the top of the set and cause product dam-
age and/or personal injury.
Wall or Ceiling Mounting - The appliance should be mounted to
a wall or ceiling only as recommended by the manufacturer_
Power Lines - An outdoor antenna should be located away from
power lines.
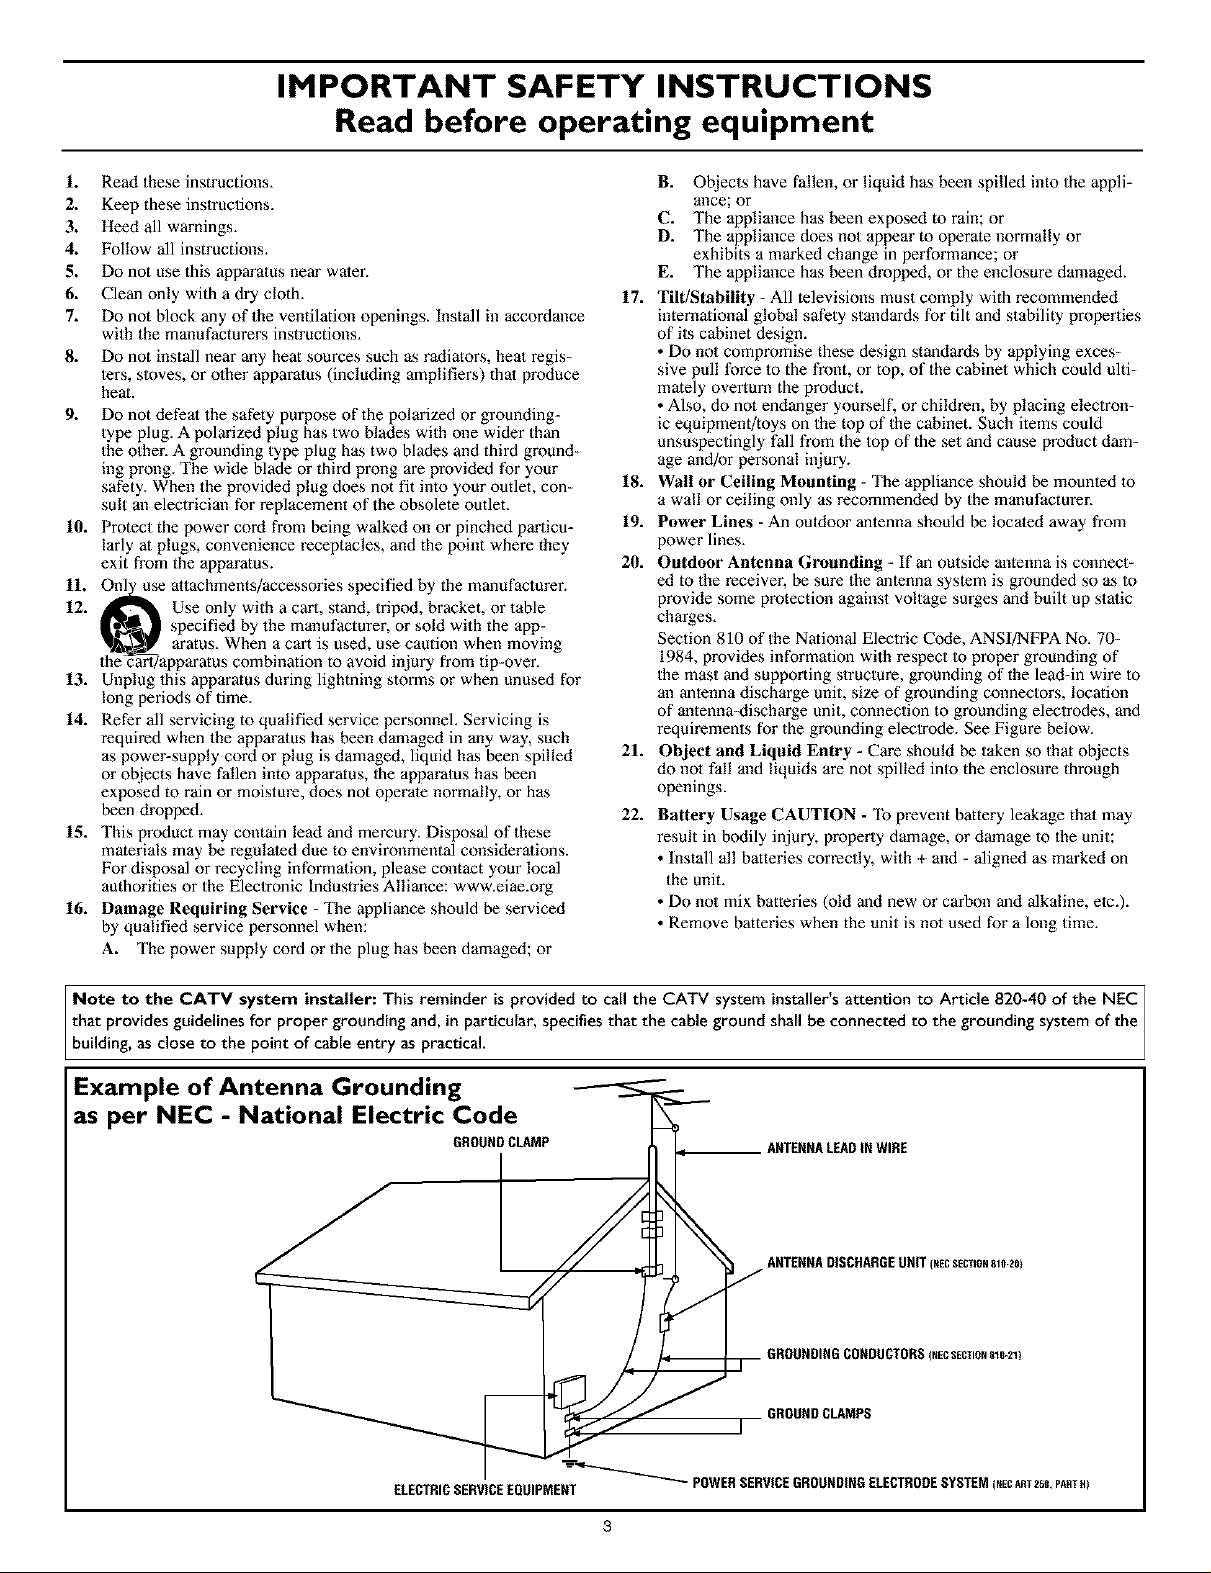
Outdoor Antenna G_unding - If an outside antenna is connect-
ed to the receiver, be sure the antenna system is grounded so as to
provide some protection against voltage surges and built up static
charges.
Section 810 of the National Electric Code, ANSI/N_A No. 70-
1984, provides information with respect to proper grounding of
the mast and supporting structure, grounding of the lead-in wire to
an antenna discharge unit, size of grounding connectors, location
of antenna-discharge unit, connection to grounding electrodes, and
requirements for the grounding electrode. See Figure below.
Object and Liquid Entry - Care should be taken so that objects
do not fall and liquids are not spilled into the enclosure through
openings.
Battery Usage CAUTION - "lb prevent battery leakage that may
result in bodily injury, property damage, or damage to the unit:
• Install all batteries correctly, with + and - aligned as marked on
the unit.
• Do not mix batteries (old and new or carbon and alkaline, etc.).
• Remove batteries when the unit is not used for a long time.
Note to the CATV system installer: This reminder is provided to call the CATV system instal[er's attention to Article 820-40 of the NEC ]
that provides guidelines for proper grounding and, in particu[ar, specifies that the cable ground shall be connected to the grounding system of the/
building, as close to the point of cane entry as practical. ]
Example of Antenna Grounding
as per NEC - National Electric Code
GROUHDCLAMP
I AHTEHHADISCHARGEUNIT(,_ECSECnONSlO-20)
ELECTRICSERVICEEQUIPMENT
--'-_'_ POWERSERVICEGROUNDINGELECTRODESYSTEM(NECART2_, PARTH)
AHTEHHALEADIHWIRE
GROUNDINGCONDUCTORS(,_EcSECTION81G-21}
GROUNDCLAMPS
J
Page 4
INTRODUCTION
Welcome/Registration of Your TV ..................... 2
Safety/Precautions ............................... 2-3
Features .......................................... 5
_ AUDIONIDEO INPUT JACKS
Jack Panel descriptions and required cables ....... 6
Using the AV 1 Input Jacks .......................... 7
Using the AV 2 Input Jacks .......................... 8
Using the Side Input Jacks ........................... 9
Using the AV 3 Input Jacks ......................... 10
Using the AV 4 Input Jacks .......................... 11
Using the Component Video Input Jacks (CVI) .......... 12
Using the S-Video Input Jack ........................ 13
Using the Monitor Output Jacks ...................... 14
Using the Audio Output Jacks ....................... 15
PICTURE MENU CONTROLS
Adjusting the Contrast Control ................ 16
Adjusting the Brightness Control ..................... 16
Adjusting the Color Control ......................... 16
Adjusting the Sharpness Control ..................... 16
Adjusting the Tint Control .......................... 16
How to set the Color Temp Control ................... 16
How to use the Pixel Plus (Digital Processing) Control ,, ,17
How to set the Dynamic Contrast Control .............. 18
How to use the DNR Control ........................ 19
How to use the Color Enhancement Control ............ 20
How to use the Auto Picture Control .................. 21
How to set the Picture Format Control ................ 22
_ SOUND MENU CONTROLS
Adjusting the TV Volume
(and Headphone Volume) ........................... 23
Adjusting the TV Equalizer Control ................... 24
How to use the Sound Mode Control .................. 25
How to use the Alternate Audio Control ............... 26
How to set the TV for Stereo programming ............. 27
How to use the 3D Surround Effect Control ............ 28
How to use the AVL (Automatic Volume Leveler) Control ,29
How to use the Delta Volume Control ................. 30
How to use the Auto Sound Control .................. 31
Using the Lock After Control ........................ 37
How to block programming using the TV Ratings Lock
Controls ......................................... 38
How to block programming using the Movie Ratings
Controls ......................................... 39
Editing channels with the Channel Remove Control ...... 40
Using the Antenna Attenuator Control ................. 41
_ SPEAKER MENU CONTROLS
Using the Test Tone and Speaker Trim Controls ,, ,42
How to turn the Center Mode and Surround Speakers
Controls on ...................................... 43
_ GENERAL MENU CONTROLS
How to use the Menu Background Control ....... 44
Using the Surf Control (Channel Surf) ................ 45
How to use the Dual Screen Format Control ............ 46
How to use the Freeze Control ....................... 47
How to Reset the AV Setting ........................ 48
Using the Tilt Adjust Control ........................ 48
How to Minimize or Maximize the Onscreen Display .... 49
How to set up the Timer Zone and Daylight
Savings Controls .................................. 49
How to change your PIN (Personal Identification Number)
for AutoLock features .............................. 50
How to Label the AV Sources ....................... 51
_ REMOTE CONTROL RELATED FEATURES
Using the Active Control ..................... 52
Using the Remote Control with accessory devices
Mode Selection .................................. 53
Code-Entry Method .............................. 54
Direct-Entry Code list for accessory devices ......... 55_56
Remote Control Accessory Device Specific Buttons ...... 57
IMPORTANT INFORMATION
Troubleshooting ............................ 58
Care and Cleaning ................................ 59
Glossary of terms ................................. 60
Index ........................................... 61
Factory Service Locations ........................ 62-63
Limited Warranty ................................. 64
D FEATURE MENU CONTROLS
How to use the Closed Captions Controls ........ 32
How to use the Sleeptimer Control ................... 33
How to use the On-Timer Control .................... 34
Using the Channel List Control ...................... 35
How to use the Channel Lock Control ................. 36
Refer to the simple Quick Use ond Setup
Guide (supplied with your TV) for details
on Basic Connections, Remote Control
Operation, Language and Auto Program.
4
Page 5
Active ControlTM continuously measures andcorrects all incom-
ing signals to help providethe best picturequality.This feature
monitors andcorrectsboth the sharpness controland noise
reduction control.
Audio/Video Jack Panel allows direct connections with VCRs,
DVDs, High Definition Receivers orotherdevices, providing
quality TV pictureand sound playback.
Audio Volume Leveler (AVL) Control keeps the TV sound at
an even level. Peaks andvalleys that occurduring program
changes or commercial breaks are reduced, making for a more
consistent, comfortable sound.
Channel Lock allows you to block the viewing of certain chan-
nels or programs with certain ratings if you do not want your
children to view inappropriale materials.
Auto Programming scans (when activated) for all available
channels from regular antenna or cable signals and stores only
active broadcast stations in the TV's memory.
AutoPicture TM allows you to change lhe picture settings (color,
tint, conlrast, etc.) for various types of programming, such as
sports, movies, multimedia (games), or weak signals with the
push of one button. Selections include, Personal, Rich, Natural,
Soft, Multimedia, or Eco.
AutoSound TM allows you to change to different factory pre-
defined audio settings and a personal control that you set accord-
ing to your own preferences through the onscreen Sound menu.
The five factory-set controls (Personal, Speech, Music, Movie,
and Multimedia) enable you to tailor the TV sound so as to
enhance the particular programming you are watching.
Channel Remove allows you to delete channels from the list
stored in the TV's memory. Channel Remove makes it easy to
limit the number of channels that are available to you when you
press the Channel (+) or (-) buttons on your remote control.
Closed Captioning allows the viewer to read TV program dia-
logue or voice conversations as onscreen text.
Dynamic Contrast helps to sharpen the picture quality by
improving the contrast between the darkest and brightest parts of
the picture.
Pixel Plus TM (or Digital Processing) gives a choice of two dif-
ferent scanning techniques - Progressive Scan or Pixel Plus.
Progressive Scan doubles the number of picture lines, elimi-
nating line flicker and providing a jitter-free picture,
Pixel Plus TM improves the appearance of onscreen motion.
The number of picture lines are increased along with the
number of pixels per line, giving normal broadcast signals,
DVD reproduction or Digital TV signals, unparalleled sharp-
ness and depth. Gives the viewer near High Definition and
natural looking detail without the High Definition signal.
Infrared Remote Control works your TV and other remote-
controlled devices, such as VCRs, DVD players, cable convert-
ers, satellite receivers, etc.
Onscreen Menu shows helpful messages and instructions for
setting TV feature controls (can be viewed in English, French, or
Spanish).
Sleep Timer automatically turns the TV OFF after a set amount
of time that you choose.
Standard Broadcast (VHF/UHF) or Cable TV (CATV) chan-
nel capability allows for viewing by antenna or cable.
Stereo capability, including a built-in audio amplifier and twin-
speaker system, allows for the reception of TV programs broad-
cast in stereo sound.
Surf Button allows you to easily switch among only the chan-
nels that are of interest to you (the ones that you have pro-
grammed into the TV's Surf control through the onscreen menu).
Surf allows 2 channel surfing or 9 channel surfing.
Timer allows you to set your TV to turn itself ON and OFF
once or daily like an alarm clock.
As you unpack your TV, please note the included items:
Directions for Use manual (contains safety-tip, clean-
ing and Factory Service Center location information)
Warranty Registration Card
Remote Control (with supplied batteries for use)
Quick Use Guide to help you set up your new TV.
Please take a few minutes to complete your registration
card. The serial number for the TV is on the rear of the set.
For your future reference, please write down the serial and
model number of this television in the space provided on the
cover of this manual. (In the unlikely event you should need
to place a service call, these numbers will be needed.)
Your new television and its packing contain materials that
can be recycled and reused. Specialized companies can recy-
cle your product to increase the amount of reusable materials
and minimize the amounts that need to be properly disposed.
Your product also uses batteries that should not be thrown
away when depleted, but should be handed in and disposed of
as small chemical waste.
When you replace your existing equipment, please find out
about the local regulations regarding disposal of your old tel-
evision, batteries, and packing materials.
As an Energy Star® Partner, Philips Consumer
Electronics has determined this product meets
the Energy Star® guidelines for energy efficien-
cy. Energy Star® is a U.S. registered mark. Using products
with the Energy Star® label can save energy. Saving energy
reduces air pollution and lowers utility bills.
Active Control, AutoPicmre, AutoSound, Pixel Plus are
trademarks of Philips Consumer Electronics Company.
Copyright 2002 Philips Consumer Electronics.
5
Page 6
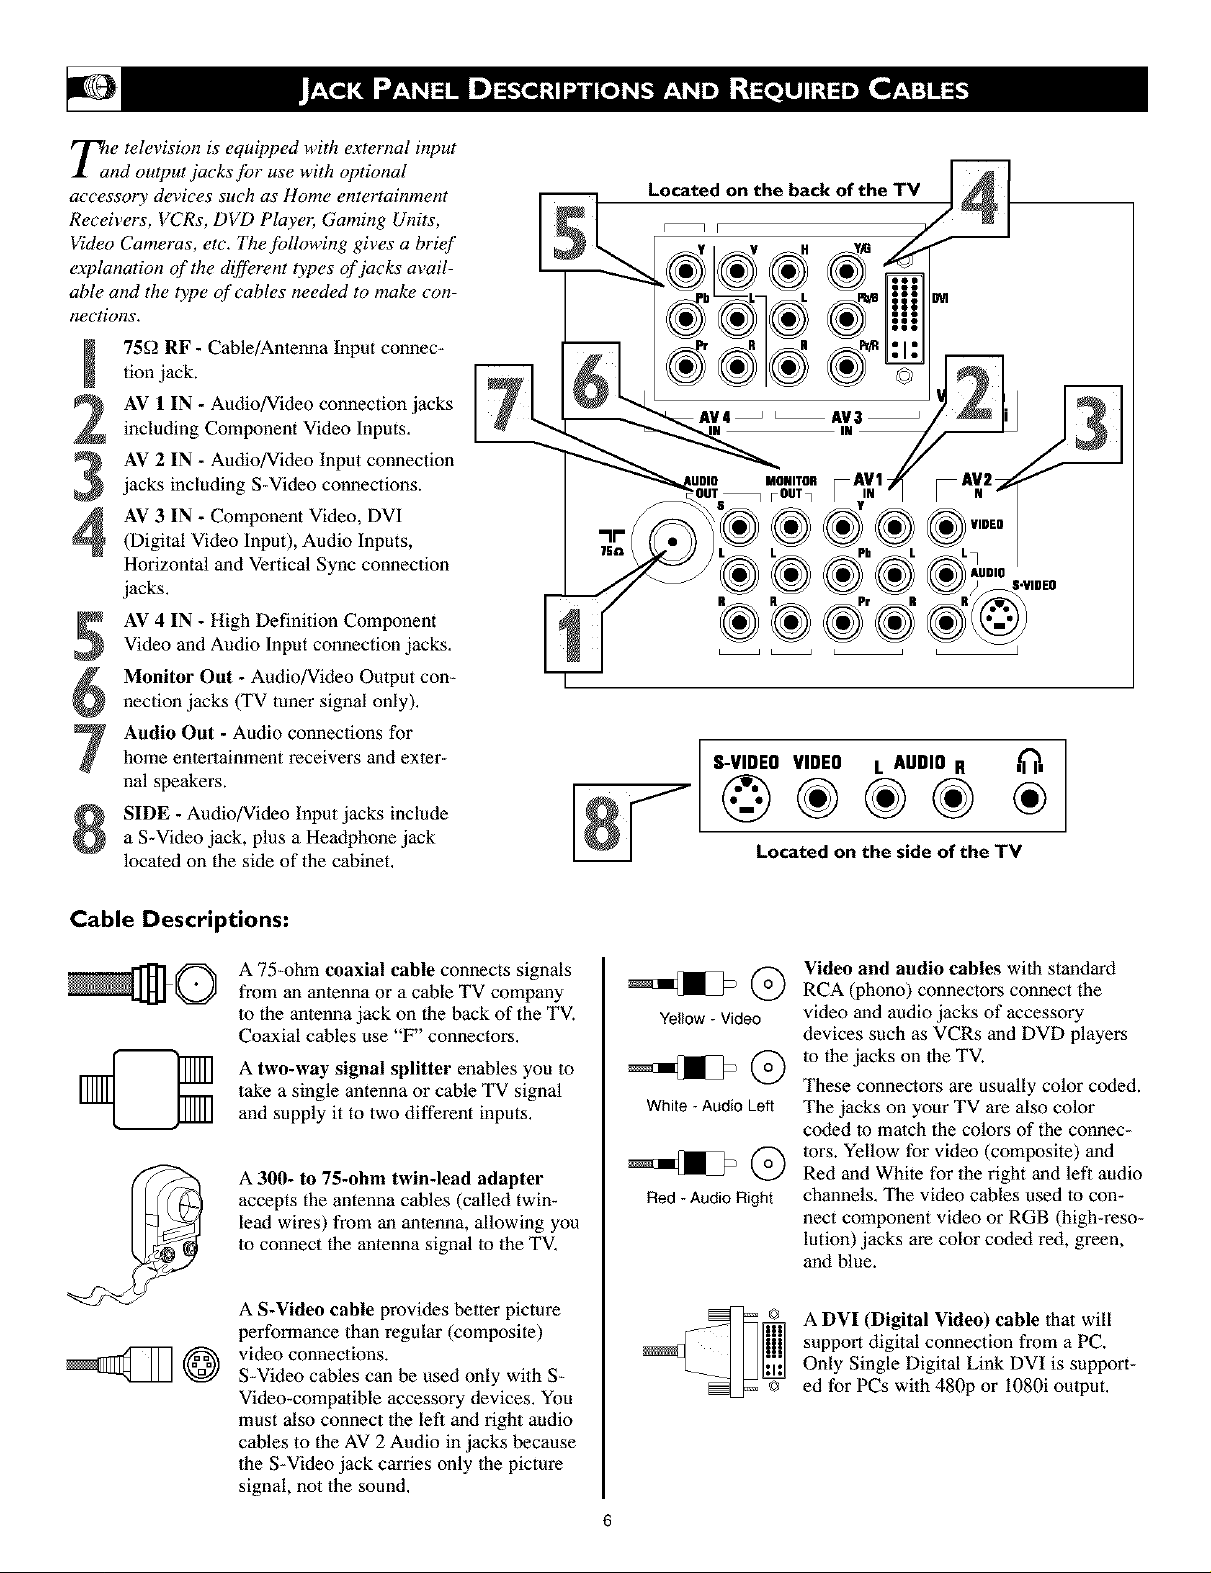
Thae television is equipped with external input
nd output jacks fi)r use with optional
accessory devices such as Home entertainment
Receivers, VCRs, DVD Player, Gaming Units,
Video Cameras, etc. The following gives a brief
explanation of the different types of jacks avail-
able and the type of cables needed to make con-
nections.
75f2 RF - Cable/Antenna Input connec-
tion jack.
AV 1 IN - Audio/Video connection jacks
including Component Video Inputs.
AV 2 IN - Audio/Video Input connection
jacks including S-Video connections.
AV 3 IN - Component Video, DVI
(Digital Video Input), Audio Inputs,
Horizontal and Vertical Sync connection
jacks.
AV 4 IN - High Definition Component
Video and Audio Input connection jacks.
Monitor Out - Audio/Video Output con-
nection jacks (TV tuner signal only).
Audio Out - Audio connections for
home entertainment receivers and exter-
nal speakers.
SIDE - Audio/Video Input jacks include
a S-Video jack, plus a Headphone jack
located on the side of the cabinet.
S-VIDEO VIDEO L AUDIO R
Located on the side of the TV
Cable Descriptions:
@@
A 75-ohm coaxial cable connects signals
from an antenna or a cable TV company
to die antenna jack on the back of the TV.
Coaxial cables use "F" connectors.
A two-way signal splitter enables you to
take a single antenna or cable TV signal
and supply it to two different inputs.
A 300- to 75-ohm twin-lead adapter
accepts the antenna cables (called twin-
lead wires) from an antenna, allowing you
to connect dae antenna signal lo the TV.
A S-Video cable provides better picture
performance than regular (composite)
video connections.
S-Video cables can be used only with S-
Video-compatible accessory devices. You
must also connect the left and right audio
cables to the AV 2 Audio in jacks because
the S-Video jack carries only lhe picture
signal, not the sound.
Yellow- Video
White - Audio Left
Red - Audio Right
Video and audio cables with standard
RCA (phono) connectors connect the
video and audio jacks of accessory
devices such as VCRs and DVD players
to dae jacks on the TV.
These connectors are usually color coded.
The jacks on your TV are also color
coded to match the colors of the connec-
tors. Yellow for video (composite) and
Red and White for the right and left audio
channels, The video cables used to con-
nect component video or RGB (high-reso-
lution) jacks are color coded red, green,
and blue.
A DVI (Digital Video) cable 1hat will
support digital connection from a PC.
Only Single Digital Link DVI is support-
ed for PCs with 480p or i080i output.
Page 7
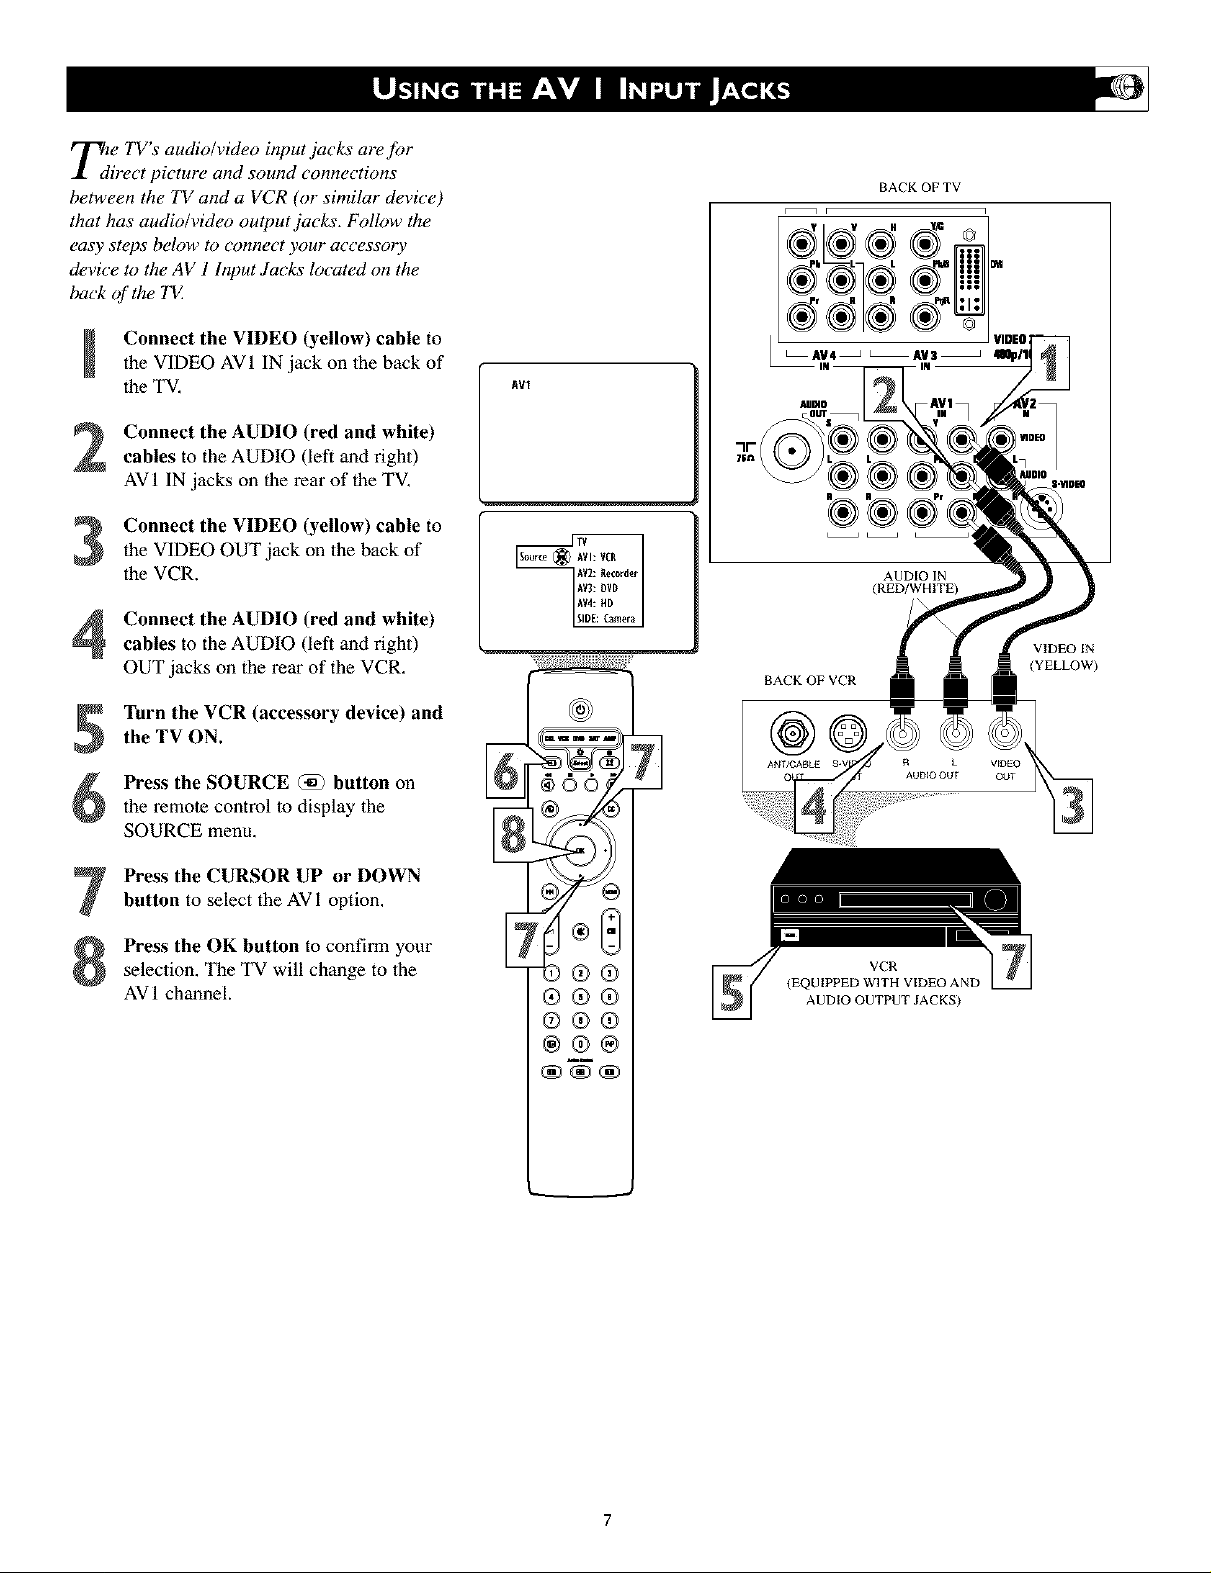
Thde TV's audio/video input jacks at'e for
irect picture and sound connections
between the TV and a VCR (or similar device)
that has audio/video output jacks. Follow the
easy steps below to connect your accessory
device to the AV 1 Input,lacks located on the
back of the 7_
Connect the VIDEO (yellow) cable to
the VIDEO AVI IN jack on the back of
the TV,
Connect the AUDIO (red and white)
2
cables to the AUDIO (left and right)
AVI IN jacks on the rear of the TV,
Connect the VIDEO (yellow) cable to
3
the VIDEO OUT jack on the back of
the VCR.
Connect the AUDIO (red and white)
cables to the AUDIO (left and right)
OUT jacks on the rear of the VCR,
Turn the VCR (accessory device) and
the TV ON.
Press the SOURCE @ button on
the remote control to display the
SOURCE menu,
AV1
BACKOFVCR
AUDIO IN
(RED/WHITE)
R k V_DEO
AUDIO OUT OUT
VIDEO IN
(YELLOW)
Press the CURSOR UP or DOWN
button to select the AV1 option,
Press the OK button to confirm your
selection, The TV will change to the
AV 1 channel.
®®®
®®®
®®®
®®®
®®
(EQUIPPED WITH VIDEO AND
VCR
AUDIO OUTPUT JACKS)
Page 8
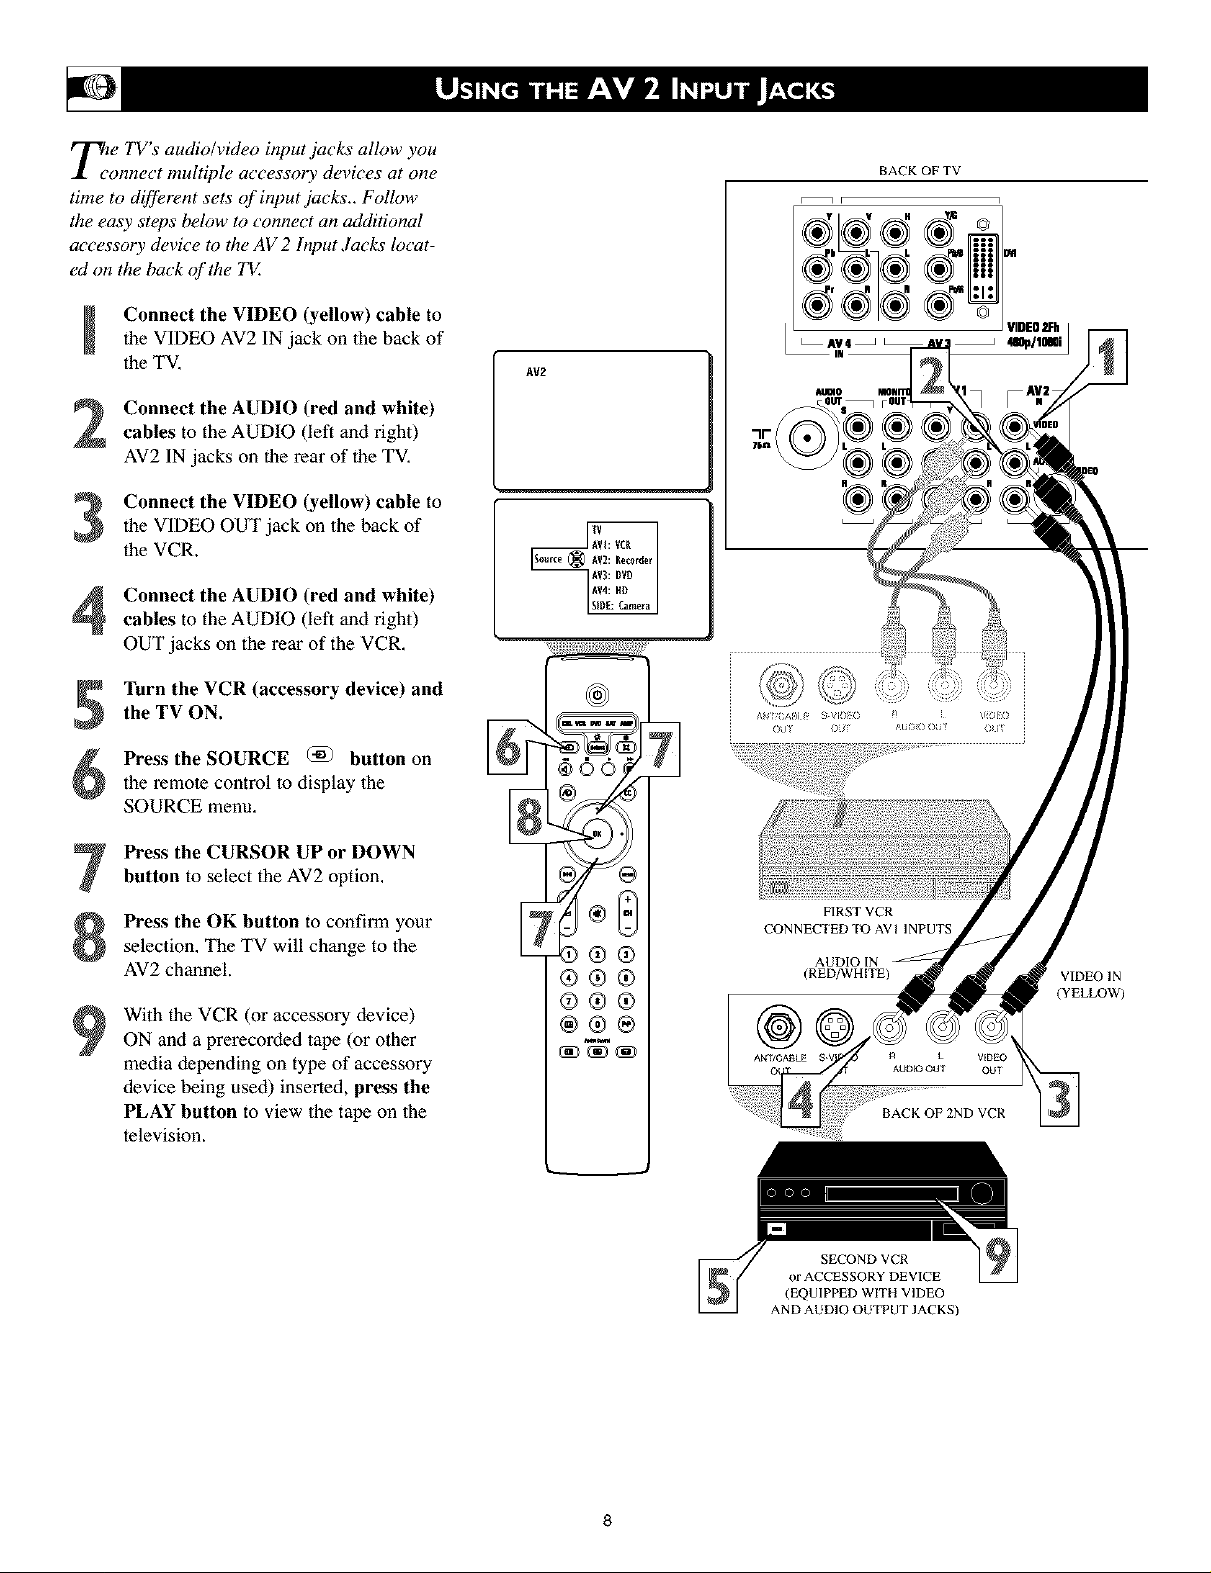
Tie TV's audio/video input jacks allow you
onnect multiple accessory devices at one
time to different sets of input jacks.. Follow
the easy steps below to connect an additional
accessory device to the AV 2 Input,lacks locat-
ed on the back of the "IV.
BACKOFTV
• 1 i i
Connect the VIDEO (yellow) cable to
the VIDEO AV2 IN jack on the back of
the TV,
Connect the AUDIO (red and white)
2
cables to the AUDIO (left and right)
AV2 IN jacks on the rear of the TV,
Connect the VIDEO (yellow) cable to
3
the VIDEO OUT jack on the back of
the VCR.
Connect the AUDIO (red and white)
cables to the AUDIO (left and right)
OUT jacks on the rear of the VCR,
Turn the VCR (accessory device) and
the TV ON.
Press the SOURCE (_) button on
the remote control to display the
SOURCE menu.
Press the CURSOR UP or DOWN
button to select the AV2 option,
Press the OK button to confirm your
selection, The TV will change to the
AV2 channel.
With the VCR (or accessory device)
ON and a prerecorded tape (or other
media depending on type of accessory
device being used) inserted, press the
PLAY button to view the tape on lbe
television.
AV2
®®
®®®
®®®
®®®
_w
AV4 _ 4119p/10O0iJ
AUn40
FIRST VCR
CONNECTED TO AVIINPUTS
AUDIO IN
(RED/WHITE)
BACK OF 2ND VCR
5'IDE0_h
VIDEOIN
(YELLOW)
SECOND VCR
or ACCESSORY DEVICE
(EQUIPPED WITH VIDEO
AND AUDIO OUTPUTJACKS)
8
Page 9
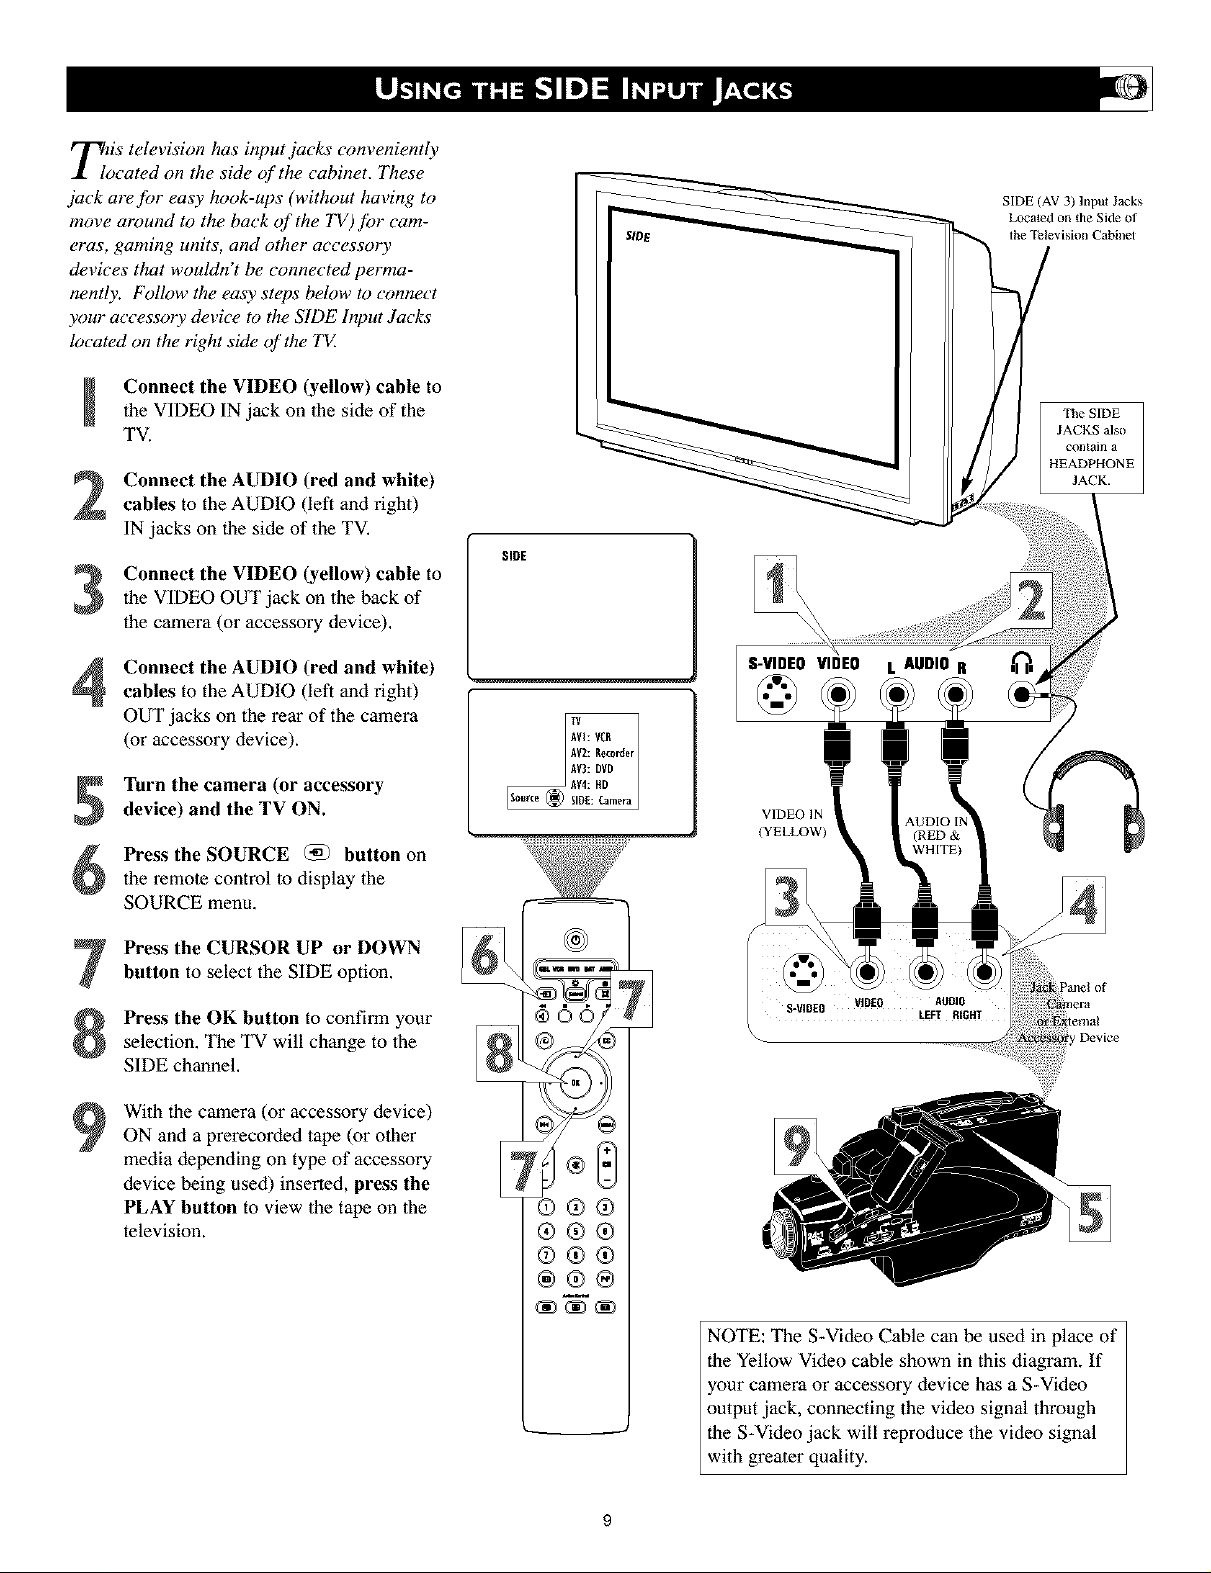
TioiStelevision has input jacks conveniently
cated on the side of the cabinet. These
jack are for easy hook-ups (without having to
move around to the back of the TV) Jbr cam-
eras, gaming units, and other accessory
devices that wouldn't be connected perma-
nently. Follow the ea_v steps beh)w to _nnect
your accessory device to the SIDE Input Jacks
located on the right side of the TX
Connect the VIDEO (yellow) cable to
the VIDEO IN jack on the side of the
TV.
Connect the AUDIO (red and white)
2
cables to the AUDIO (left and right)
IN jacks on the side of the TV.
Connect the VIDEO (yellow) cable to
S
the VIDEO OUT jack on the back of
the camera (or accessory device),
SlOE
SIDE (AV 3) lnput Jacks
Localed ol] the Side of
the Television Cabinel
The SIDE
JACKS also
contain a
HEADPHONE
JACK.
Connect the AUDIO (red and white)
4
cables to the AUDIO (left and right)
OUT jacks on the rear of the camera
(or accessory device).
Turn the camera (or accessory
device) and the TV ON.
Press the SOURCE (_) button on
the remote control to display the
SOURCE menu,
Press the CURSOR UP or DOWN
button to select the SIDE option.
Press the OK button to confirm your
selection, The TV will change to the
SIDE channel,
With the camera (or accessory device)
ON and a prerecorded tape (or other
media depending on type of accessory
device being used) inserted, press the
PLAY button to view the tape on the
television.
S-VIDEO VIDEO L AUDIO R
VIDEO II_
(YELLOW)
Device
®®®
®®®
®®®
®®®
NOTE: The S-Video Cable can be used in place of
the Yellow Video cable shown in this diagram. If
your camera or accessory device has a S-Video
output jack, connecting the video signal through
the S-Video jack will reproduce the video signal
with greater quality.
Page 10
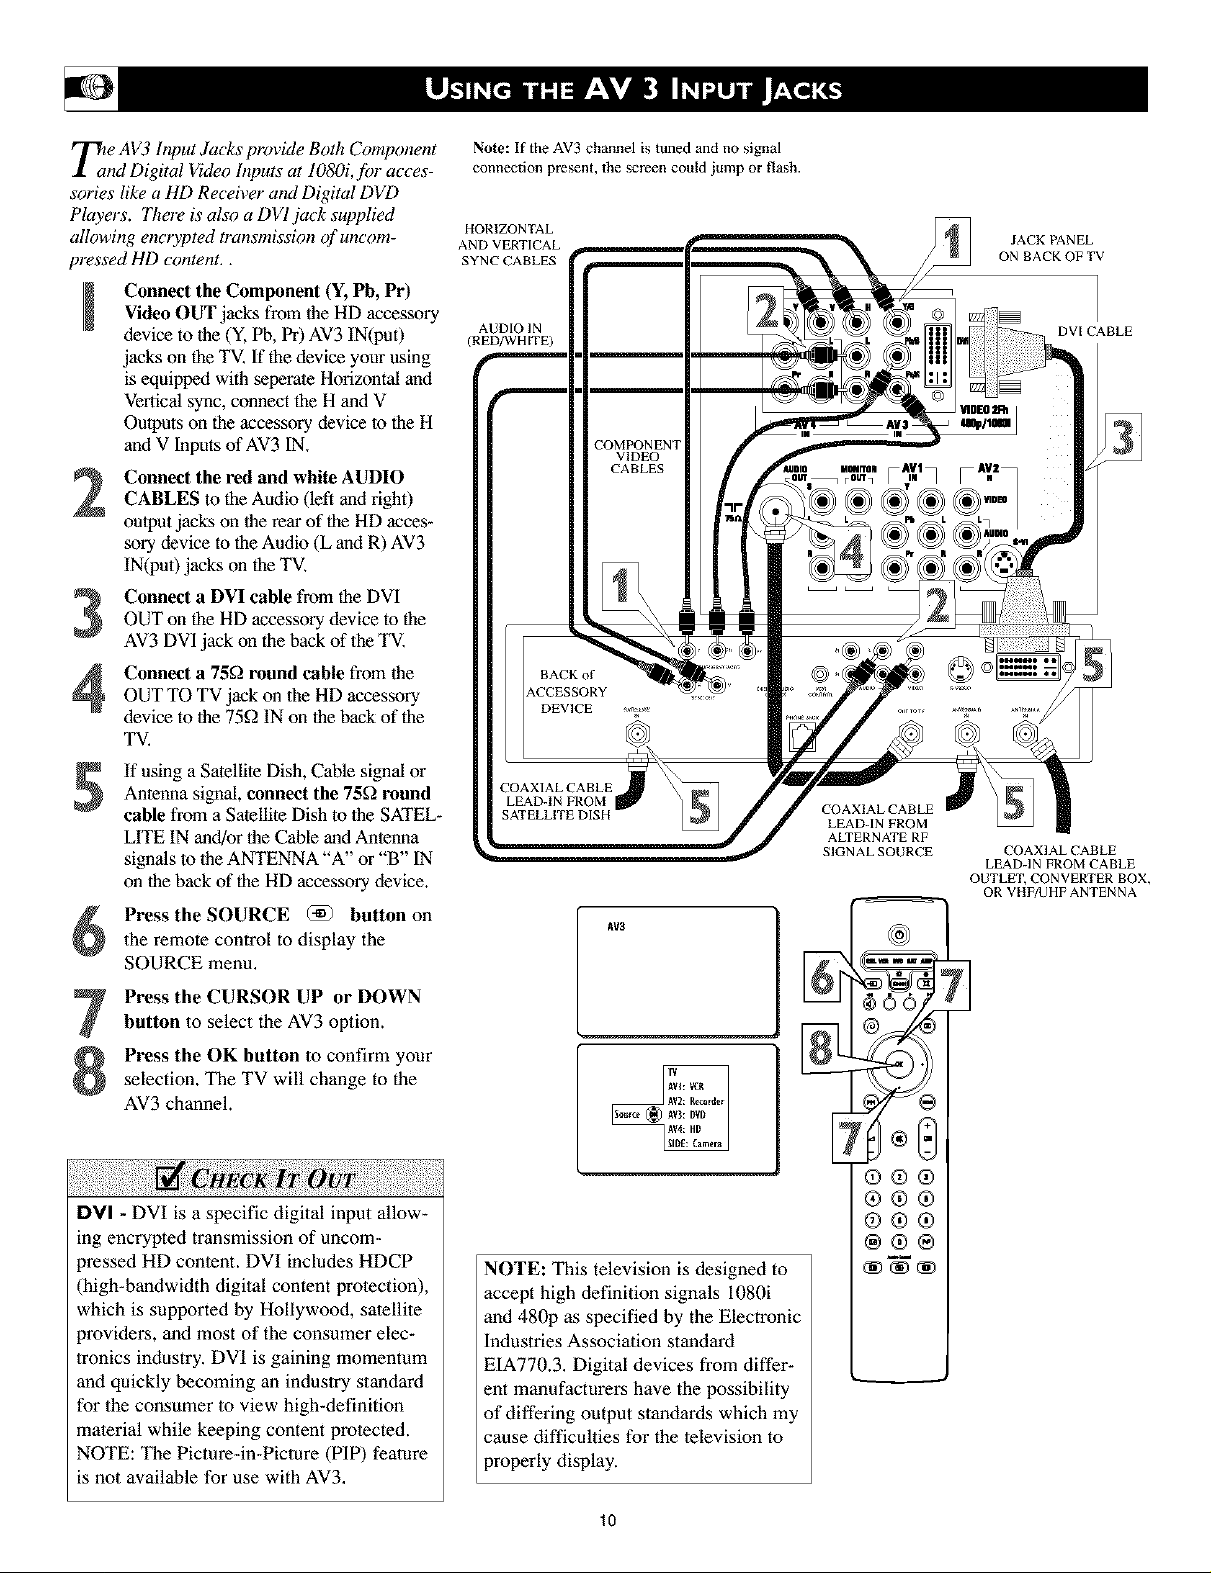
_e AV3 Input Jacks provide Both Component
nd Digital Video Inputs at 1080i,fi)r acces-
sories like a HD Receiver aml Digital DVD
Players. There is also a DVI jack supplied
allowing encrypted transmission of uncom-
pressed HD content..
Connect the Component (Y, Pb, Pr)
I
Video OUT jacks from the HD accessory
device to the (Y, Pb, Pr) AV3 IN(put)
jacks on the TV. If the device your using
is equipped with seperate Horizontal and
Veitical sync, connect the H and V
Outputs on the accessory device lo the H
and V Inputs of AV3 IN,
Connect the red and white AUDIO
CABLES to the Audio (left and right)
output jacks on the rear of the HD acces-
sory device to the Audio (L and R) AV3
IN(pu0 jacks on the TV,
Connect a DVI cable from the DVI
OUT on the HD accessory device to the
AV3 DVI _jackon the back of the TV.
Connect a 75_) round cable from the
OUT TO TV jack on the HD accessory
device to the 75K2IN on the back of the
TV.
If using a Satellite Dish, Cable signal or
Antenna signal, connect the 75£) round
cable from a Satellite Dish to the SATEL-
LITE IN and/or the Cable and Antenna
signals to the ANTENNA "A" or "B" IN
on the back of the HD accessory device.
Pressthe SOURCE @) button on
the remote control to display the
SOURCE menu,
Press the CURSOR UP or DOWN
button to select the AV3 option.
Press the OK button to confirm your
selection. The TV will change to the
AV3 channel.
Note: If the AV3 channel is tuned and no signal
connection present, the screen could jump or flash.
HORIZONTAL
AND VERTICAL
SYNC CABLES
AUDIO IN
(RED/WHITE)
AV3
COAXIAL CABLE
LEAD-IN FROM
ALTERNATE RF
SIGNAL SOURCE
N
_6c
JACK PANEL
ON BACK OF TV
DVICABLE
COAXIAL CABLE
LEAD-IN FROM CABLE
OUTLET, CONVERTER BOX,
OR VHF/UHF ANTENNA
DVI - DVI is a specific digital input allow-
mg encrypted transmission of uncom-
)ressed HD content. DVI includes HDCP
(high-bandwidth digital content protection),
which is supported by Hollywood, satellite
)roviders, and most of the consumer elec-
tronics industry. DVI is gaining momentum
and quickly becoming an industry standard
for the consumer to view high-definition
material while keeping content protected.
NOTE: The Picture-in-Picture (PIP) feature
is not available for use with AV3.
®®®
®®®
(9®®
®®®
NOTE: This television is designed to
accept high definition signals i080i
and 480p as specified by the Electronic
Industries Association standard
EIA770.3. Digital devices from differ-
ent manufacturers have the possibility
of differing output standards which my
cause difficulties for the television to
properly display.
lo
Page 11
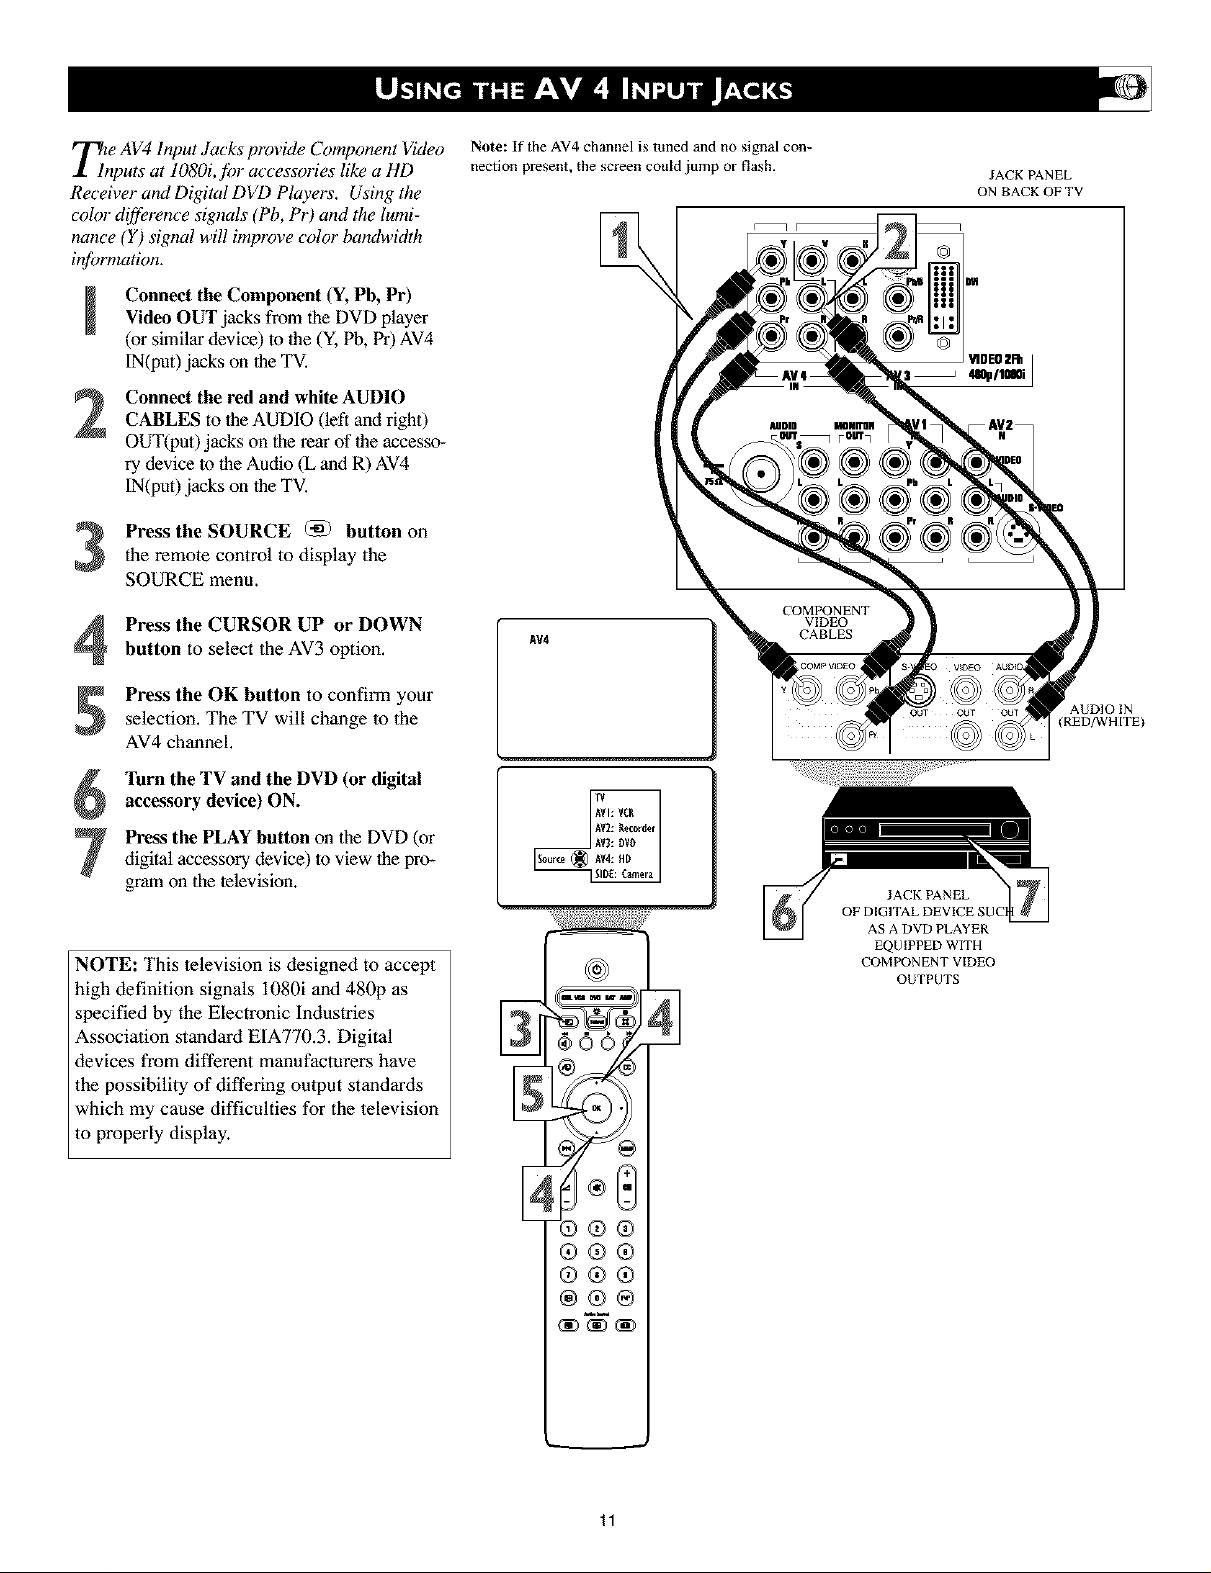
Tze AV4 Input Jacks provide Component Video
nputs at 1080i,jbr accessories like a HD
Receiver and Digital DVD Players. Using the
color difference signals (Pb, Pr) and the lumi-
nance (Y) signal will implvve color bandwidth
information.
Connect the Component (Y, Pb, Pr)
Video OUT jacks from the DVD player
(or similar device) to lhe (Y, Pb, Pr) AV4
IN(put) jacks on lhe TV.
Connect the red and white AUDIO
CABLES to lhe AUDIO (left and right)
OUT(put) jacks on the rear of lhe accesso-
ry device to the Audio (L and R) AV4
IN(put) jacks on lhe TV.
Press the SOURCE (_ button on
the remote control to display the
SOURCE menu.
Note: If the AV4 channel is tuned and no signal con-
nection present, the screen could jump or flash.
JACK PANEL
ON BACK OF TV
Press the CURSOR UP or DOWN
button to select the AV3 option,
Press the OK button to confirm your
selection. The TV will change to the
AV4 channel.
Turn the TV and the DVD (or digital
accessory device) ON.
digital accessory device) to view lhe pro-
Press the PLAY button on the DVD (or
gram on the television.
NOTE: This television is designed to accept
high definition signals i080i and 480p as
specified by the Electronic Industries
Association standard EIA770.3. Digital
devices from different manufacturers have
the possibility of differing output standards
which my cause difficulties for the television
to properly display.
AV4
AS A DVD PLAYER
EQU [PPED WITH
COMPONENT VIDEO
OUTPUTS
AUDIO IN
(RED/WH ITE)
®®
®®®
®®®
®®®
11
Page 12
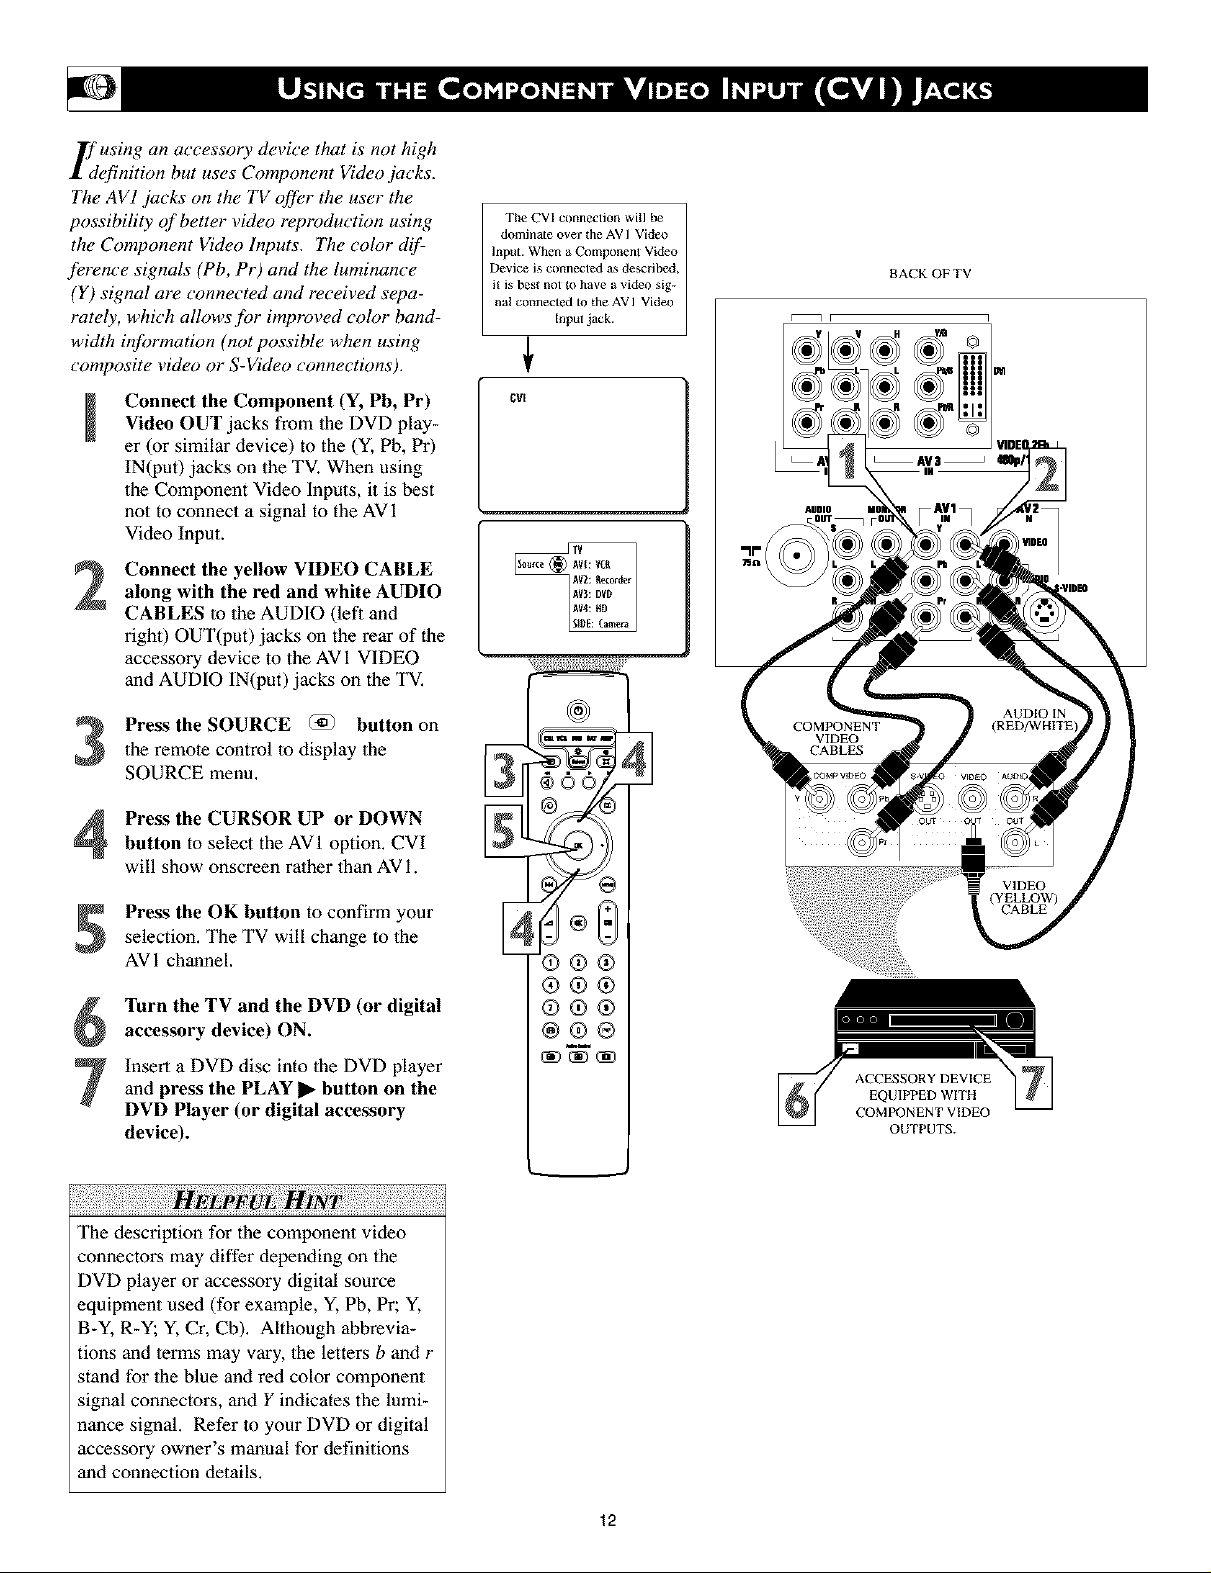
If using an accessory device that is not high
efinition but uses Component Video jacks.
The AV1 .jacks on the TV offer the user the
possibility of better video reproduction using
the Component Video Inputs. The color d_f:
ference signals (Pb, Pr) and the luminance
(Y) signal are connected and received sepa-
rately, which allows for improved color band-
width information (not possible when using
composite video or S-Video connections).
Connect the Component (Y, Pb, Pr)
I
Video OUT jacks from the DVD play-
er (or similar device) to the (Y, Pb, Pr)
IN(put) jacks on the TV. When using
the Component Video Inputs, it is best
not to connect a signal to the AVI
Vkleo Input.
Connect the yellow VIDEO CABLE
along with the red and white AUDIO
CABLES lo the AUDIO (left and
right) OUT(put) jacks on the rear of the
accessory device to the AV 1 VIDEO
and AUDIO IN(put) jacks on the TV.
The CVI cotmection will be
dominate over the AV I Video
Input. When a Component Video
Device is cotmecwd as described,
it is best not to have a video sig-
nal connected to the AVI Video
input jack.
cla
BACKOFTV
Press the SOURCE @ button on
the remote control to display the
SOURCE menu.
Press the CURSOR UP or DOWN
button to select the AVI option. CVI
will show onscreen rather than AVi.
Press the OK button to confirm your
selection, The TV will change to the
AV 1 channel.
Turn the TV and the DVD (or digital
accessory device) ON.
Insert a DVD disc into the DVD playerand press the PLAY II_ button on the
DVD Player (or digital accessory
device).
The description for the component video
connectors may differ depending on the
DVD player or accessory digital source
equipment used (for example, Y, Pb, Pr; Y,
B-Y, R-Y; Y, Cr, Cb), Although abbrevia-
tions and terms may vary, the letters b and r
stand for the blue and red color component
signal connectors, and Y indicates the lumi-
nance signal. Refer to your DVD or digital
accessory owner's manual for definitions
and connection details.
®®®
®®®
®®®
@®®
ACCESSORY DEVICE
EQUIPPED WITH
COMPONENT VIDEO
OUTPUTS.
12
Page 13
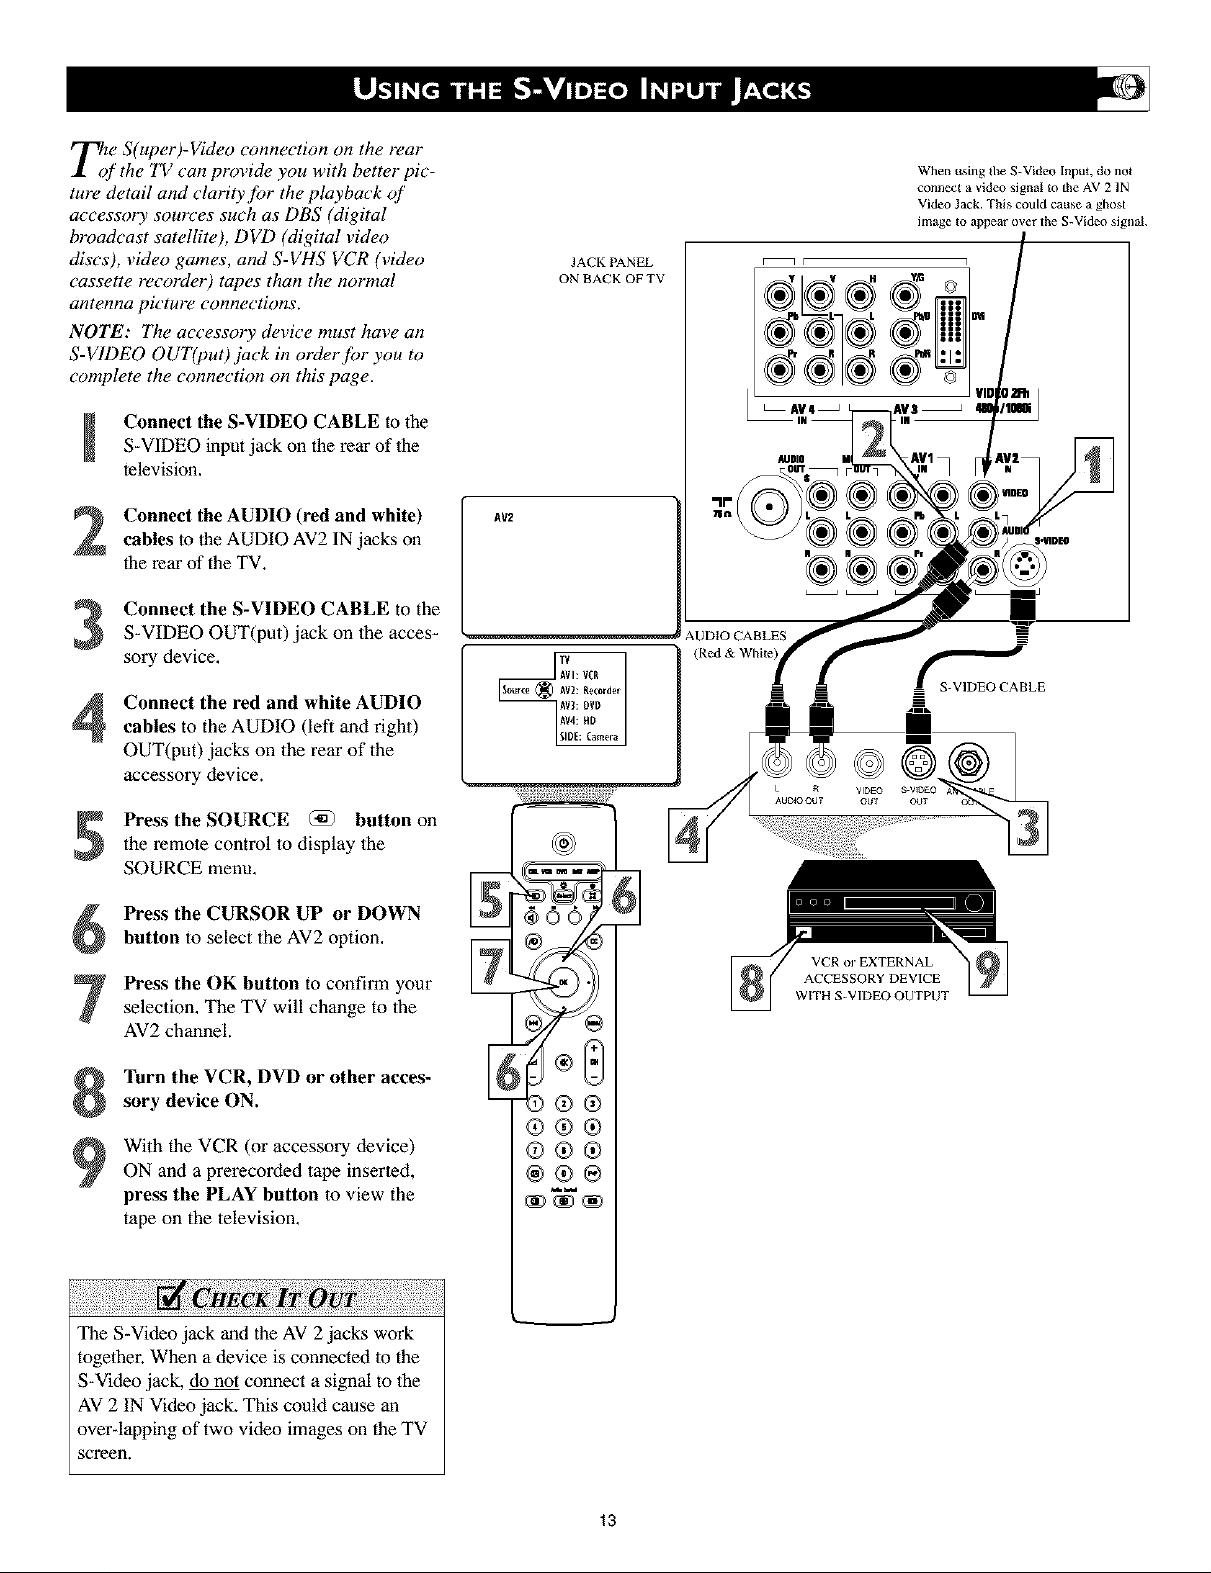
ri_(_/e S(ut}er)-Video connection on the rear
'the TV can provide you with better pic-
ture detail and clarity for the playback of
accessory sources such as DBS (digital
broadcast satellite), DVD (digital video
discs), video games, and S-VHS VCR (video
cassette recorder) tapes than the normal
antetma picture cotmections.
NOTE: The accessory device must have an
S-V1DEO OUT(put)jack in order for you to
complete the connection on this page.
Connect the S-VIDEO CABLE to the
S-VIDEO input jack on the rear of the
television.
Connect the AUDIO (red and white)
cables to the AUDIO AV2 IN jacks on
the rear of the TV.
Connect the S-VIDEO CABLE to the
S-VIDEO OUT(put) jack on the acces-
sory device.
Connect the red and white AUDIO
cables to the AUDIO (left and right)
OUT(put) jacks on the rear of the
accessory device.
When using Ihe S-Video Input, do not
connect a video signal to the AV 21N
Video Jack. This could cause a ghost
image to appear over the S-Video signal
JACK PANEL
ON BACK OF TV
AUDIO
AV2
' AUDIO CABLES
(Red & White)
_BLE
i
Press the SOURCE @ button on
the remote control to display the
SOURCE menu.
Press the CURSOR UP or DOWN
button to select the AV2 option.
Press the OK button to confirm your
selection, The TV will change to the
AV2 channel.
Turn the VCR, DVD or other acces-
sory device ON.
With the VCR (or accessory device)
ON and a prerecorded tape inserted,
press the PLAY button to view the
tape on the television,
The S-Video jack and the AV 2 jacks work
together. When a device is connected to the
S-Video jack, do not connect a signal to the
AV 2 IN Video jack. This could cause an
over-lapping of two video images on the TV
screen.
VCRorEXTERNAL
ACCESSORY DEVICE
WITH S-VIDEO OUTPUT
®®®
®®®
13
Page 14
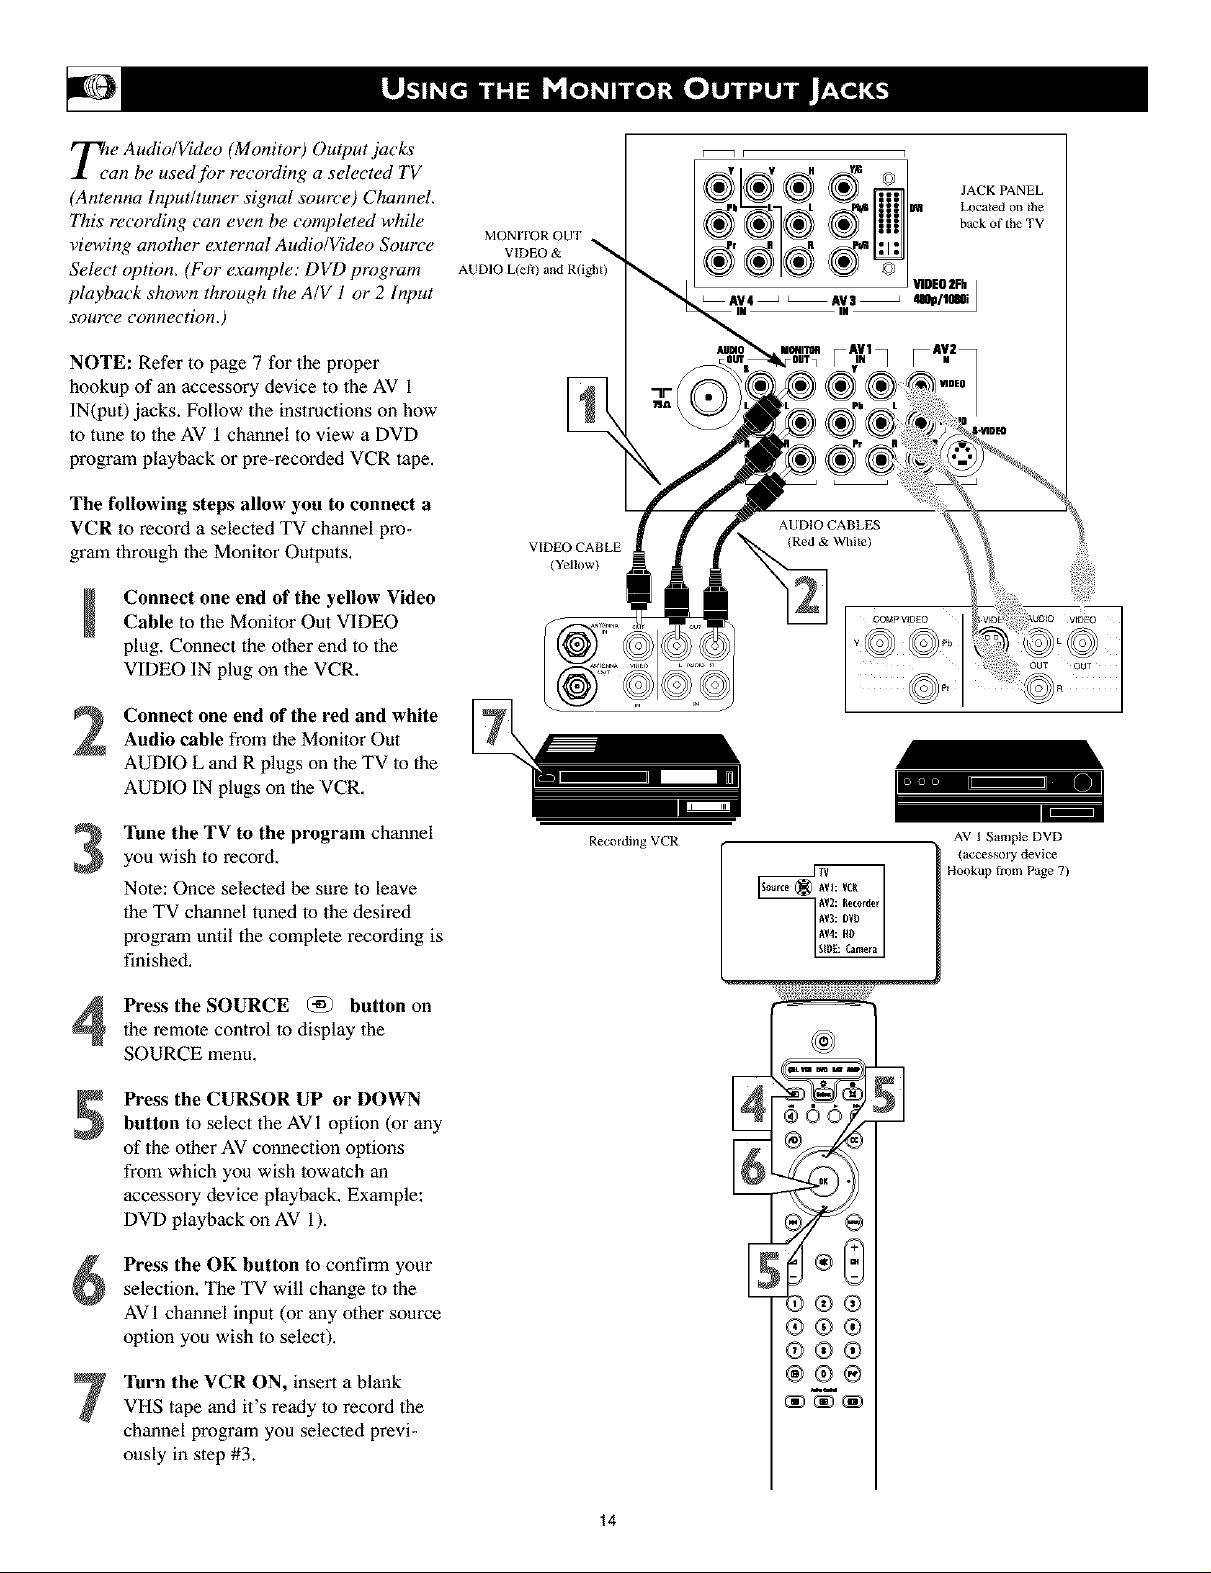
Tie Audio/Video (Monitor) Output jacks
an be used for recording a selected TV
(Antenna Input/tuner signal source) Channel.
This recording can even be completed while
viewing another external Audio/Video Source
Select option. (For example: DVD program
playback shown through the A/V 1 or 2 Input
source comTection.)
NOTE: Refer to page 7 for the proper
hookup of an accessory device to 1he AV 1
IN(pat) jacks. Follow the instructions on how
to tune lo the AV 1 channel to view a DVD
program playback or pre-recorded VCR tape.
The following steps allow you to connect a
VCR to record a selected TV channel pro-
gram through the Monitor Outputs,
Connect one end of the yellow VideoCable to the Monitor Out VIDEO
plug. Connect the other end to the
VIDEO IN plug on the VCR,
MONITOR OUT
VIDEO &
AUDIO L(efl) and R(ight)
VIDEO CABLE
(Yellow)
I
I
1
Y V fl
_ JACK PANEL
back of the TV
_'_1_ Located on the
LAV4 _ _AV3_ 480ptl080i
IN
IDEO2Fh j
Connect one end of the red and whiteAudio cable from the Monitor Out
AUDIO L and R plugs on the TV to the
AUDIO IN plugs on the VCR,
Tune the TV to the program channel
3
you wish to record.
Note: Once selected be sure to leave
the TV channel tuned to the desired
program until the complele recording is
finished.
Press the SOURCE @ button on
the remote control to display the
SOURCE menu.
Press the CURSOR UP or DOWN
button to select the AVI option (or any
of the other AV connection options
from which you wish towatch an
accessory device playback. Example:
DVD playback on AV i).
Press the OK button to confirm your
selection, The TV will change to the
AV 1 channel input (or any other source
option you wish to select).
Turn the VCR ON, insert a blank
VHS tape and it's ready to record the
channel program you selecled previ-
ously in step #3.
Recording VCR
AV I Sample DVD
Hookup fiom Page 7)
_ I (accessory device
9@@
6}@@
®®®
®@®
14
Page 15

Tile Audio Output jacks are great fbr con-
ecting to an external audio system or a
set of' external speakers. This will enhance the
sound coming J?om the television to improve
your viewing and listening e_perience.
For Audio System Connection:
Connect one end of the R(ight) andL(eft) Audio Cables (red and white)
to the AUDIO OUT (Left and Right)
jacks on the television.
Connect the other ends of the R(ight)
2
and L(eft) Audio Cables (red and
white) to the Audio Left and Right
Inputjacks on the external Audio
System,
Turn the Audio System and the TV
on. Adjust the volume coming from
the Audio System to a pleasant listen-
ing level.
You can now adjust the sound level
coming from the audio system by
preying the VOLUME (+) or (-)
button on the TV or remote control.
For External Speaker Connection:
External
Audio System:
AUDIO OUT ._
L(eR) and R(ight)
@00@
®®®
®®®
®®®
@®®
AUDIO CABLES
(Red & White)
EXTERNAL
AUDIO SYSTEM
Connect one end of the R(ight) andL(eft) Audio Cables (red and white)
to each of the external speakers.
Using a Stereo to Mono adapter (not
supplied) connect the other ends of
the Audio Cables to the Stereo end of
the adapter.
Connect the mono end of the Stereo
to Mono Adapter to the AUDIO OUT
S jack.
These speakers can now be adjusted using the
Speaker controls within the Setting section of
the onscreen menu. Please see page 42 for
more details.
External
Speakers:
STEREO TO MONO
ADAPTER
(not supplied)
EXTERNAL SPEAKER
AUDlU
AUD]O CABLES
(Red & White)
EXTERNAL SPEAKER
15
Page 16

r_) adjust your TV picture controls, select a
I channel andfidlow these steps.
Pictme Sound lectures Channels
Press the MENU button on the remotecontrol to show the onscreen menu.
Press the CURSOR RIGHT button to
highlight PICTURE.
Press the CURSOR DOWN button to
3
select one of the pictare ac]justment:
CONTRAST, BRIGHTNESS, COLOR,
SHARPNESS, TINT, OR COLOR TEM-
PERATURE.
NOTE: The menu will show only four items at a
time, so you will need to continue scrolling with
the CURSOR DOWN button to adjust theTINT
and COLOR TEMPERATURE.
Press the CURSOR LEFT or CURSOR
4
RIGHT button to adjust the selected con-
11"ol.OR, if COLOR TEMPERATURE is
chosen, pressthe CURSOR RIGHTto
choose froma submenu of options;NOR-
MAL, COOL, or WARM.
Press the MENU button when finished
to remove the onscreen menu fromthe TV
screen.
Set_ngs
Demo
Install
P/T :
¢555
®®®
®®®
Pictme Sound _eaturoi Channels
ConITaxt
Bng_tnes_
Coior
I
Sh_rpne_i
Remember, when the bar scale is centered
_], the control settings are at nor_
mal, mid-range levels,
NOTE: The SHARPNESS and TINT
Controls will not be available for adjust-
ments when tuned to the AV3/AV4/CVI
Inputs.
BRIGHTNESS - adds or subtracts light
from the darkest part of lhe picture.
COLOR - adds or eliminates color.
PICTURE - improves the detail of lhe light-
est parts of the picture.
SHARPNESS - improves lhe detail in the
picture,
TINT - adjusts the picture to obtain natural
skin tones.
COLOR TEMP offers NORMAL, COOL, or
WARM picture preferences.
NORMAL - keeps whites, white.
COOL - makes whites, bluish.
WARM - makes whiles, reddish.
Pi(_re
Con_r_
Brlg_mess
Color
Sha 40
Picture
Tint
;olor Temperature
0igi_l precesling
D_mic
16
Page 17

Tehe Digital Processing control gives you a
hoice between two dij]_rent picture scan-
ning modes; Progressive Scan or Pixel Plus.
Progressive Scan doubles the number of pic-
ture lines, eliminating line flicker and provid-
ing a jitter-J?ee picture.
Pixel Plus improves the picture quality and
appearance of onscreen images. The number
of picture lines are increased along with the
number of pixels per line, giving normal
broadcast signals, DVD reproduction or
Digital TV signals, unparalleled sharpness
and depth. This gives the viewer near High
Definition and natural looking detail without
the High Definition signal.
Press the MENU button on the
remote to display the onscreen menu.
Press the CURSOR RIGHT button to
highlight PICTURE.
S Press the CURSOR DOWN button
repeatedly until the DIGITAL PRO-
CESSING control is highlighted.
Pic_re Sound features Channeh
IV_lJ_ = = = =
Settings
Demo
t
Install
Pic ure Sound Fea_res Channels
Contrast
Bnghtne_
Color
Sha
Pickle
Contrast 40
Brighmess
Color
Sha
Press the CURSOR RIGHT button
to enter the Digital Processing sub-
menu,
Press the CURSOR UP or DOWN
button to select PROGRESSIVE
SCAN or PIXEL PLUS.
Press the MENU button toremove the
onscreen menu from |he TV screen.
: HELPFUL HIN_ :
With the use of Pixel Plus some DVD players
may display certain screen elements or artb
facts while in playback. The Auto Picture-
SOFF control (see page 21) can also be used
to help reduce the appearance and level of
such a screen playback condition,
Pixei _
®®®
®@®
With Pixel Plus ON, there is a sharper
image with more natural motion. The
picture will appear flicker fi'ee.
Picture
Tint
_olorTempera_l_
Dig_l processing Dog_esive Scan
Dy_a_ c Pixd Plus
Picture
Digital protesting P_ogresiveScan_
Digital pro
Pixd Plus
0R
Picture
Pr0gr_iv_ _¢an
J
Note: The Digital Processing Control is
not available for use with the AV 3 or AV 4
inpul tacks.
17
Page 18

Tthe Dynamic" Contrast control allows you
o sharpen the picture quality by making
dark portions of the picture darker and light
portions of the picture more noticeable.
Normally, you will probably want to select
MEDIUM. In certain circumstances, howevel,
you may prefer MINIMUM or MAXIMUM.
Press the MENU button on the
m
remote to display the onscreen menu,
Press the CURSOR RIGHT button
2
to highlight PICTURE,
Press the CURSOR DOWN button
3
repeatedly until the DYNAMIC CON_
TRAST control is highlighted.
Settings
Demo
Install
Picture Sound Features Channels
Picture Sound Features Channds
Brightness
Co,or
Contrast
Sha
Press the CURSOR RIGHT button
to enter the Dynamic Contrast sub-
menu,
Press the CURSOR UP or DOWN
button to select one of the Dynamic
Contrast options; OFF, MINIMUM,
MEDIUM, or MAXIMUM.
Press the MENU button to remove
the onscreen menu from the TV screen.
®®®
®®®
Picture
Contrast 40
Dri
Color
s2:'::,[
Picture
Tint
:d0¢ Temperatu_*
Digitalpmcening Hinim_m
Dynamic c Hedium
Dyaar_ conuast Medium I
off
Haximum
Picture
off
Minimum
18
Page 19

Due to many reasons, such as poor cable
reception, the picture can sometimes
appear slightly "speckled" (an indication of
signal noise in the picture). The DNR
(Dynamic Noise ReductiorO control can help
eliminate this type of interference and
improve the quality of the picture.
Picture Sound Features Channels
Press the MENU button on the
+
remote to display the onscreen menu,
Press the CURSOR RIGHT button
2
to highlight PICTURE,
Press the CURSOR DOWN button
3
repeatedly until the DNR control is
highlighted.
Press the CURSOR RIGHT buttonto enter the DNR sub-menu,
Press the CURSOR UP or DOWN
button to select one of the DNR
options; OFF, MINIMUM, MEDIUM,
or MAXIMUM.
Press the MENU button to remove
the onscreen menu from the TV screen.
Settings
Demo
Install
®®®
®®®
®®®
Picture Sound Features Channels
IV_ = = =
B_ghtness
Color
Contrastq
Sha
Pictur_
Contrast 40
8ri
Color
$22
Pi_ure
DNR
Auto picture
Picture f
19
Page 20

T_n e Color Enhancement control can dra-
atically improve the picture quality of
pictures with a high saturation of color This
control works in/bur ways;
Dynamic Blue Stretch corrects the white col-
ors toward a more bluish colored white with-
out changing the other colors. Improves the
shalpness of the picture.
Green Enhancement offers a more saturated
green color in case of low green broadc'asts
giving landscapes a fresher and brighter look.
Color Dependent Sharpness improves the
shalpness of the picture through the color
information. Gives the picture more details
especially in red colors.
Skin-tone Correction adjusts fi)r over satura-
tion of red that often appears in skin-tones.
Press the MENU button on the
I
remote to display the onscreen menu,
Press the CURSOR RIGHT button
2
to highlight PICTURE,
Press the CURSOR DOWN button
3
repeatedly until the COLOR
ENHANCEMENT control is highlight-
ed.
Press the CURSOR RIGHT buttonto turn the Color Enhancement control
ON or OFF.
Press the MENU button to remove
the onscreen menu from the TV screen.
Picture Sound Features Channels
IV(_ = = = =
Settings
Demo
Install
@00@
® ®
®®®
®®®
®®®
Pi ure Sound Features Channels
TV t_ _- _- _-
Brighmess
Color
Contrast!illI
Sha
Picture
Contrast 40
Erightness
Color
Sha
pic°LUre
DNR
Color er_ancement On • Of[
Auto picture
Picture f
oR
2O
Picture
DER
Coloren_anceraent Of[ * On
Au_ picture
Picture f
Page 21

W_ether you' re watching a movie or a
ideo game, your TV has automatic"
video control settings that will match with
your current program source or col?tel?t.
AutoPicture TM quickly resets your TV's video
controls for a number of different types of
programs and viewing conditions that you
may have in your home. The Personal
AutoPicture TM settings are the same as the
PICTURE control adjustments made within
the onscreel7 melTu.
Press the MENU button on the
remote to display the onscreen menu.
Press the CURSOR RIGHT button to
hightlight picture,
Press the CURSOR DOWN bullon
repeatedly until the Auto Picture Control
is highlighted,
Press the CURSOR RIGHT bullon toenter the Auto Picture Sub Menu.
IAut9 picture (_ Pcrx0nal I
Rich
8atural
Soft
Ndtimedia
Auto picture _
Eat_ral
Soft
_ultimedia
Press the CURSOR RIGHT button to
select either PERSONAL, RICH, NAT-
URAL, SOFT, MULTIMEDIA or ECO
picture settings,
After your selection is made the
onscreen menu will disappear from the
TV screen within a couple of seconds,
NOTE: The PERSONAL setting and the
PICTURE options within the onscreen menu
are the same. This is the only option in
AutoPicture TM that can be changed, To adjust
these settings, use the PICTURE options
within the onscreen menu. All other settings
are set up at the faclory during production and
cannot be adjusted.
@@®
®®®
®®®
@@@
iTM!i:!_!_!:_!_:_!ii_!i_!::i!!_i!!_ii_:_i!:!i{_i_i_:ii_!J_i_!::i:i!_}i_i_:ii_!J_i_!::i:i!_}i_i_:ii_!J_i_!::i:i!_}i_i_:ii_!J_i_!::i:i!_}i_i_:ii_!J_i_!::i:i!_}i_i_:ii_!J_i_!::i:i!_}i_i_:ii_!J_i_!::i:i!_}i_i_:ii_!J_i_!::i:i!_}i_i_:ii_!J_i_!::i:i!_i:!:ii
PERSONAL - picture settings are based on your personal choice or viewer control prefer-
er_ces.
RICH - emphasizes very vibrant colors. (Good choice for AV mode used in a brightly lit
room.)
NATURAL - sets picture controls at mid-level settings for consistent viewing conditions.
SOFT - emphasizes warm colors. (Good choice for dimly lit room. Gives a cinema-like
effect when the light is switched off.)
Note: Can also be used with Pixel Plus control (see page 17) to soften the appearance of
harsh video replay screen elements that can show with certain types of DVD playback con-
dilions.
MULTIMEDIA - emphasizes soft colors. (Good choice for playing computer games, etc.)
ECO - reduces Brightness and Contrast settings to low levels as a power consumption sav-
ing measure.
21
Page 22

y;tu can change the screen forma, t size to
atch the type of program you re watch-
ing. Select the normal 4.'3 aspect ratio or a
variety for wide screen fin'mats.
Press the MENU button on the
m
remote to display the onscreen menu,
Press the CURSOR RIGHT button
2
to highlight PICTURE.
Press the CURSOR DOWN button
3
repeatedly until the Picture Format
control is highlighted.
Press the CURSOR RIGHT buttonto enter the Picture Format sub-menu
options.
Press the CURSOR DOWN button
to select one of the seven screen for-
mats, Choose from Automatic, Super
Zoom, 4:3, Movie Expand 4:3, Movie
Expand 16:9, 16:9 Subtitle, or Wide
Screen,
4:3
Movie expand 14"P
[Picmr_ Iormat (_ Automatl( 91
Movie expand 161
Super zoom
16:9 Subtitle
Wide screen
41
Picture format (_ Super zeom
Ho_e expand :
Ho_eexpandl_:
fAutomatic _]
16:PSub_e
4:3
Wide ic_een
ISA_p_m_m
IPiclur_ Iormat _ 4:3
_lovie expand 16:9
l&9 Subside
Movie expand 14:9
Wide screen
Press the MENU button to remove
the onscreen menu from the TV screen.
Note: The Picture format onscreen
menu can also be entered by press-
ing the Picture Format button on the
remote control.
4:3 Super Zoom
:........................................................
®®®
®®®
] ._o'¢ie expand '4:P]
IPictur_ [ormat _ Hovieexpand 16:P
[_ovie expand16:P1
IPiclur_Iormat_)16:9 Subtitle /
[Wide m_en J
Movie Expand 14:9
r................................................. %.:....I
Q
Wide Screen
i....'7:::::'_.................................2::::i_....
Movie Expand 16:9
16:9 Subtitle
22
Page 23

Besides the normal volume level control,
your TV also has a headphone volume
control. This control can be adjusted when
using headphones without having to adjust
the main volume control fbr the TV cabinet
speakers.
TELEVISION VOLUME
To control the television volume:
Press the VOL + button on the remotecontrol to increase the television vol-
ume level.
Press the VOL - button on the remotecontrol to decrease the television vol-
ume level.
Note: The Volume Levelcan also be adjusted
within 1heonscreen menu. Select the Sound
menu and cursor down to the Volume control.
Use the Cursor Left and Right to adjust.
To control the Headphone volume:
Press the MENU button on theremote control to display the onscreen
menu,
Press the CURSOR RIGHT button
to highlight SOUND,
Press the CURSOR DOWN button
repeatedly until the Headphone Volume
control is highlighted.
Press the CURSOR RIGHT button
to increase the volume level being
heard through the headphones.
I-_c_'_'_lII II@]4o
HEADPHONE VOLUME
Picture Sound features Channels
hettings
Demo
7
Jnstall
IV= =
flea@hone volume i
1V : : - : :
Headphone volume 40
Sound features Channels
Volume i
Equalizer i
hound mode q
Air Audio i
Hono/Stereo q
Sound features Channels
Equalizer
Sound mode
Air Audio
Volume_
Hono/Stereo
Press the CURSOR LEFT button to
decrease the volume level being heard
through the headphones.
Press the MENU button on the
remote control to remove tile onscreen
menu from the TV screen.
23
Page 24

y;u can change the dynamics of the sound
eing heard through the TV by using the
Equalizer control. The Equalizer control con-
tains slider controls to adjust or change only
the Personal settings. If' any of the other fac-
tory pre-defined settings are changed, they
will become the new Personal settings.
Press the MENU button on the
remote to display the onscreen menu.
Press the CURSOR RIGHT button
repeatedly to highlight SOUND.
Press the CURSOR DOWN button
repeatedly until the Equalizer control is
highlighted.
Press the CURSOR RIGHT button
4
to enter the Equalizer sub-menu
options. Continue to press the CUR-
SOR RIGHT to select one of the
options; Personal, Speech, Music,
Movie, or MuLtimedia.
The Personal setting can be changed,
Once an option has been chosen, press
the CURSOR DOWN button to high-
light one of the settings,
Press the CURSOR LEFT or
RIGHT button to adjust the slider con-
trol to the desired position.
Note: Even if an option other than Personal
has been chosen, changing any of the values
will default it to the new Personal setting,
Settings
Hemo
Install
Picture Sound Fea_res Channas
t
®®®
®®®
41
1V _
Volume
Equalizer
Headphonevolume
Sound mode
,_t Audio
Mono/S_reo
IV = = _ = r.
Equalizer Auto Sound: Personal
Headphonevolume 120 Hz IIIIII1_11
Sound mode S00 Hz IIIIIINIII
AIt Audio I.S kHz IIII1_11111
V°lume I
Mono/S_roo S kHz IIIII1_111
Equaliler _Auto Sound: Per_onat
Feature* Channels
hound Features Channai
IHEHz IIIIII1_11
Sound
t20 Hz IIIIII1_11
SO0 Hz IIIIlIHIII
L5 kHz IIIIl@lllll
S kHz IIIII1_111
10 kHz IIIIII1_11
Press the MENU button when fin-
ished to remove the onscreen menu
from the TV screen.
1V
24
Sound
Equalizer Auto hound: Per*onal
_12HHz III1_11111
50O Hz IIIII1_111
1.5 kHz IIII1+11111
5 kHz IIIII1_111
10 kHz IIIIII1_11
Page 25

e Sound Mode control allows you to
lace the TV sound into one of five modes;
Stereo, 3 Stereo, 3D Surround, Hall, or Pro
Logic.
The following instructions show how to place
the TV into one of these sound modes.
Press the MENU button on the remote
to display the onscreen menu.
Press the CURSOR RIGHT button
repeatedly to highlight SOUND.
S Press the CURSOR DOWN button
repeatedly until the Sound Mode con-
lrol is highlighted.
Press the CURSOR RIGHT button toenter the Sound Mode sub-menu
options,
Press the CURSOR DOWN button to
select one of the five options; Stereo, 3
Stereo, 3D Surround, Hall, or Pro
Logic.
Stereo - Reproduces only left and right
front speaker sound. If you are receiv-
ing a stereo broadcast, you will hear left
and right channel stereo sound.
3 Stereo - Gives stereo sound through
the left, right, and center front speakers.
3D Surround - Gives the experience of
Dolby Surround Pro Logic without hav-
ing rear speakers connected or activat-
ed.
Hall - Creates a "Hall" effect through
the TV left, right, and rear speakers.
Will add simulated surround sound to
any broadcast which is not encoded
with Dolby Surround, or to a mono sig-
nal broadcast.
Pro Logic - For broadcasts encoded
with Dolby Surround, the left, right
center and rear speakers will reproduce
the Dolby Surround Pro Logic audio.
Picture Sound Eeatures Channels
TV_[_ -- -- -- =
SetHngs
Hemo
Install
®OO@
®®®
®®®
S0u_d
Sound mode
_] Stereo _
Stere°
3H Surround
Hail
Pro Logic
TV _
Headphonevolume
IV : -- - = :
Headphone volume
• d
r
S( [ea_u_es Channels
Volume
Equalizer
Sound mode
AIt Audio
Mono/E_eroo
Sound Features Channels
Equalizer
Sound mode
/*It Audio
V0iume_
Hono/Etereo
Sound
Sound
l
I
Press the MENU button when finished
to remove the onscreen menu from the
TV screen,
Pressing the SOUND MODE (_]
button on the remote control will dis-
play a simplified menu for selecting the
proper sound mode.
*Manufhctured under license from Dolby Laboratories.
"Dolby', "Pro Logic", and the double-D symbol are trade-
marks of Dolby Laboratories.
r
i
25
Page 26

For broadcasts that contain SAP
(Secondary Audio Program) b_formation
the Alt Audio ContJvl can be set to ON. SAP is
an additional part of the stereo broadcast sys-
tem. Sent as a third audio channel, SAP can
be heard apart from the current TV program
sound. TV stations are free to use SAP for any
number of purposes.
If a SAP signal is not present with a selected
program, the Aft Audio option cannot be
selected and will appear grayed out in the
onscreen n?enu.
lf SAP is available on the tuned channel:
Press the MENU button on the
remote to display the onscreen menu.
Settings
Demo
Imtal_
Picture Sound Feamres Channels
IV _
Volume
Equalizer
Headphonevolume
Sound mode
hlt Audio
Mono/Ste_eo
Sound Features Channels
Press the CURSOR RIGHT button
repeatedly to highlight SOUND.
S Press the CURSOR DOWN buttonrepeatedly until the Alt Audio control
is highlighted.
Press the CURSOR RIGHT button
to toggle and select either Main or
SAP.
Press the MENU button when fin-
ished to remove the onscreen menu
from the TV screen.
®®®
®®®
®®®
_J
Equalizer
Headphone volume
Sound mode
hit Audio Main ° SAP
V°lumeI
Mono/S_reo
Equalizer
Headphone volume
Sound mode
hI_ Audio SAP • Main
V°lumeI
MonoIStereo
Sound Features Channels
OH
Sound Features Channels
26
Page 27

ucanreceivebroadcaststereoTVpro-
rams.TheTVhasbothanamplifierand
twinspeakersthroughwhichthestereosound
canbeheard.
Press the MENU button on the
remote to display the onscreen menu.
Press the CURSOR RIGHT button
repeatedly to highlight SOUND.
Press the CURSOR DOWN button
repeatedly until the Mono/Stereo con-
trol is highlighted.
Press the CURSOR RIGHT button
to toggle and select either Mono or
Stereo,
Note: If the signal being received is in mono,
it can not be set to Stereo. However, if the
signal being received is in Stereo, the TV can
be placed in the Mono mode. (If set to the
Mono control position, remember to return
the Mono/Stereo Control back to Stereo when
using the TV with stereo programming.)
Press the MENU button when fin-ished to remove the onscreen menu
from the TV screen,
Settings
Demo
Install
Picture Sound Features Channels
®O0@
Sound Features Channels
Volume
Equ_izer
Headphone volume
Sound mode
AIt Audio
Mono/S_o
1V : : -
Headphonevolume
Sound Features Channels
Equalizer
Sound mode
A[t Audio
VolumeI
MonolStereo Mono * Stereo
Sound Features Channels
OR
®®®
®®®
®®®
Equalizer
Headphone volume
Sound mode
Air A_dio
Volumel
Mono/Stereo Stereo * Mono
27
Page 28

The 3D Sunvund Effect Control helps to widen
the effect being heard through the television
speakers. "ITtis contJvl is only available if the
television has been placed in the 3D Surround
mode.
Press the MENU button on the
remote to display the onscreen menu,
Press the CURSOR RIGHT button
repeatedly to highlight SOUND.
S Press the CURSOR DOWN button
repeatedly until the 3D Surround Effect
control is highlighted.
Seadngs
Dcmo
Install
Picture Sound Features Channels
IVI
1V : : : :
Headphonevolume,
Sound FeaturesChannels
Volume
EqualizerI
Soundmode,
hit Audio,
Mono/S_ereo,
Press the CURSOR RIGHT buttonto increase the surround effect, Choose
a value of O, 33, 66, or 100.
Press the MENU button when fin-
ished to remove the onscreen menu
from the TV screen,
®00@
®®®
®@®
®®®
Sound Features Channels
3D surround eflecII_J[m]_!_OAvLDelta volume
Auto sound
1V : : - : :
39 surround ¢Sfect_!_33hVL
1V : : - : ;
3D surround e[fect_ddhVL
Sound Features Channels
Deha volume
Auto sound
Sound Fe3tures Channels
Delta volume
Auto sound
28
Sound [eaturos Channels
h_to iouad
T -
AVh
!
3D surround efiectl_==_ I00
Delta volume
Page 29

}1lmost cases, the volume levels coming
"om broadcast programming or commer-
cials are never the same. With the AVL
(Audio Volume Leveler) control turned ON,
you can have the TV level out sound that is
being heard. This makes fi)r a more consis-
tent sound by reducing the peaks and valleys
that occur during program changes or com-
mercial breaks. To turn the AVL ON,follow
these steps.
Press the MENU button on the
remote control to display the onscreen
menu.
Press the CURSOR RIGHT button
repeatedly to highlight SOUND.
Settings
Demo
Fnstall
Picture Sound Feamtes Channels
Sound Features Channels
TV,---_--_ -----,-----_
Volume q
[qualizer ,
Headphone volume ,
Sound mode ,
hlt Audio ,
Mo_o/Steteo,
S Press the CURSOR DOWN button
repeatedly until AVL is highlighted.
Press the CURSOR RIGHT button
to toggle the control ON or OFF,
Press the MENU button to remove
the menu from the screen.
®@@
®®®
®®®
®®®
Sound Features Channels
3D surround ef[ect_
3D surround e[[ect_
AVL O_ • Off
Delta volume
Auto sound
Sound Features Channels
1V _ _ - ;
AVL OIfo On
Delta volume
A_to sound
OR
29
Page 30

The volume level coming from channel to
•hannel and broadcast to broadcast can
vary widely. The Delta Volume Control will
allow the volume to be increased for channels
with weaker audio signals while allowing
other channels with stronger signals to be
reduced some. When the Delta Volume
Control is adjusted or changed, it will only
effect the currently tuned channel. The TV
will store the setting for that channel within
its memory and remember it when the channel
is tuned again.
Press the CH + or - button on the
remote control to tune a specific chan-
nel.
remote control to show the onscreen
Press the MENU button on the
menu.
Press the CURSOR RIGHT button
once to highlight SOUND.
Press the CURSOR DOWN button
repeatedly until Delta Volume is high-
lighted.
Settings
Demo
Install
Picture Sound Feam_es Channels
c5c5
Sound Features Channels
Volume
Equalizer
Headphonevolume
Sound mode
Aft Audio
Mo_o/Ste_eo
Sound Features Channels
3D surround ef[ect_AVL
Del_a volume O
Auto sound
Press the CURSOR LEFT button to
decrease the overall volume, or press
CURSOR RIGHT button to increase
the overall volume for the tuned chan-
nel.
Repeat steps for other channels you wish to
adjust the Delta Volume,
Press the MENU button to remove
the onscreen menu from the TV screen.
®®®
®®®
®®®
3O
Page 31

A utoSound TM allows you to select from
fbur factory-set controls and a personal
control that you set according to your own
preferences through the onscreen Sound
menu. The J_)ur factory-set controls (Speech,
Music, Movie, or Multimedia) enable you to
tailor the TV sound so as to enhance the par-
ticular program you are watching. Follow
these steps to select any of the options.
Press the MENU button on the rmote
to display the onscreen menu,
Press the CURSOR RIGHT button
to hightlight SOUND,
[Auto sound (_ Personal
Speech
Music
Movie
Multimedia
Auto sound Personal
I_)Speech
Music
Movie
Multimedia
Press the CURSOR DOWN button
repeatedly until the Auto Sound
Control is highlighted.
Press the CURSOR RIGHT buttonto enter the Auto Sound Sub menu,
Press the CURSOR UP or DOWN
button to select the options: Personal,
Speech, Music, Movie, or Multimedia.
Once your selection has been made, the
onscreen menu will disappear from the TV
screen within few seconds.
The Auto Sound options can also be selected
through the SOUND menu options within the
onscreen menu.
PERSONAL - presents the TV's sound
according to the settings you make within
the sound menu.
SPEECH - brings voices to the forefront
and emphasizes them, Moves music to the
background,
Pe_onal
I_utoso..d@Speech
Music
Movie
Multimedia
Pe_onal
Speech
I_uto,o._d_>Mu,i_
Movie
Multimedia
®®
®®®
e.,,.c.r.
Music
Hultime6ia
MUSIC - emphasizes music over voices.
MOVIE - provides a balance between
voices and music.
MULTIMEDIA - provides sound balance
best suited for gaming consoles, or interac-
tive media,
Movie
[Auto sound (_MulMmedia ]
31
Page 32

Closed Captioning (CC) allows you to read
the voice content of television programs
on the TV screen. Designed to help the hear-
ing impaired, this J_ature uses onscreen "text
boxes" to show dialogue and conversations
while the TV program is in progress.
Follow steps 1 through 7 to select a Closed
Caption option:
Press the MENU button on theremote control to display the nnscreen
menu,
Press the CURSOR DOWN button
repeatedly to highlight SETTINGS.
Press the CURSOR RIGHT button
repeatedly to highlight General.
Press the CURSOR DOWN button
4
repeatedly to highlight Caption
Service.
Press the CURSOR RIGHT button
to enter the Closed Captions sub-menu.
Pre_ the CURSOR UP or DOWN
button to highlight one of 1he caption
modes: CC-I, CC-2, CC-3, CC-4, T-l,
T-2, T-3, or T-4.
Note: Text Modes (TI-T4) appear
onscreen as boxes and may block por-
tions of the TV screen.
Press the MENU button to remove
the onscreen menu from the TV screen.
Follow steps 8 through 13 to turn the
Closed Captions Control ON or OFE
Pre_ the CC button on the remote
control.
Pre_ the CURSOR UP or DOWN
button repealedly to select OFF, ON,
or ON wi|h Mute.
OFF - Closed Captioning service will
not be displayed on the TV screen.
ON - Closed Captioning information
(if available) will display on 1he TV
screen.
ON with Mute - Closed Captioning
information will turn On only when the
MUTE button is pressed. Turns 1he
closed captioning informalion OFF
when the TV volume is restored.
Press the MENU button on the
remote to remove the onscreen display
from the TV screen.
Picture Seund [eatures Channek
Set6ng_
[lern0
t
Instant
m Dualscree
_ I Cap,on xe_ice
_ Settingx _
®
01
®
®
Menusto Turn the
ClosedCaptions
Control ONor OFF
off
[Oosed captions(_ On
On with mute
TV_/ Speakers General Source
Settings
Derno
T
_nxtall
General Source
Menu badwound
Settings_
_eset AV settingx
_exet AV setfingx
Caption se_i(e
Settings _
Sud
neral
neral
Freeze format
Oosedcapfions{_) Off
On
On with mute
Off
On
[Close{[ captions(_J On with mute ]
r
32
Page 33

HaTVve you ever/allen asleep in front of the
only to have it wake you up at two in
the morning with a test pattern sound
screeching in your ears? Well, your TV can
enable you to avoid that discomfort by auto-
matically turning itself off With the
Sleeptimer control, you can set a timer to
automatically switch the TV OFF after a peri-
od of time you choose (5-minutes up to 180
minutes in 5-minute increments).
Press the MENU button on the
remote control to display the nnscreen
menu,
Press the CURSOR RIGHT button
repeatedly until FEATURES is high-
lighted.
Settings
Oemo
Install
Picture Sound Features Channels
t
1V Fea res Channels
Closed capdons
Slee_
On timer
Press the CURSOR DOWN button
repeatedly to highlight Sleeptimer,
Press the CURSOR RIGHT button
to set the Sleeptimer in 5-minute incre-
ments starting at 5*minutes up to 180-
minutes,
Press the MENU button to remove
the onscreen menu from the TV screen,
An onscreen countdown will appear during
lhe last minute before the TV shuts itself off,
At this time you may cancel the sleeptimer
setting by pressing the OK button on the
remote control,
To see how many minutes remain before the
TV shuts itself off, press the INFO+ button,
A Sleep Timer setting can be cancelled by
pressing the OK button during the last minute
of 1he operation,
®00@
®®®
®®® }1
@®@
Features
Closed c_ptions
Steeptimcr 5
On
UpTo
Features
Closedcaptions
Sleeptimer 180
On
Duringthe last minute of a Sleeptimersetting
the TV will displaya countdown screen where
the setting can be cancelled
The sleeptimer will switch off the IV in 45
seconds.
Cancel @
83
Page 34

The On-Timer Control allows you to set a
1_ time to power the TV on automatically at
a certain time of day. The On-Timer can be set
to work once, or daily at the same time.
Press the MENU button on the remote
control to display the onscreen menu,
Press the CURSOR RIGHT button
2
repeatedly to highlight FEATURES,
Press the CURSOR DOWN button
3
repeatedly to highlight theOn Timer con-
trol.
Press the CURSOR RIGHT button to
enter the sub-menu.
Press the CURSOR UP or DOWN but-
5
ton to select ON.
Press the CURSOR RIGHT button to
shift the menu to the start channel sub-
menu.
Settings
Demo
Install
Picture Sound features Channels
m
i M IATi
5+, IO
Features Channeis
Closed captions
Sleeptimer
On
Features
Closed captions
Steeptimcr
On
Press the CURSOR UP or CURSORDOWN button to select the channel you
would like the TV to tune towhen it turns
on.
Press the CURSOR RIGHT button to
shift the menu to the Day/Daily sub-
mentL
Press the CURSOR UP or DOWN but-
ton to select the day to turn on or select
Daily.
Press the CURSOR RIGHT button to
enter the AM/PM sub-menu,
button to select AM or PM,
I Press the CURSOR UP or DOWN
!
Press the CURSOR RIGHT button to
enter the start time.
Press the NUMBERED buttons to
enter the time. Use 0 first if entering a
signal digit. (i.e.; 0, i, 3, 0 for 1:30)
Press the OK button to confirm.
Press the MENU button to remove the
onscreen menu from the TV screen.
N
@ Ilu
k7
®®
!
Featu_e_
Features Feature_
On •
34
Page 35

Thae Channel List Control shows all the avail-
ble channels that the Auto Programming
placed in the TV memory. The channels can be
selected/?om this list.
Press the MENU button on the remote
control to display the onscreen menu.
Press the CURSOR RIGHT button
repeatedly to highlight CHANNELS,
Press the CURSOR DOWN button to
highlight the Channel List control,
Press the CURSOR RIGHT button to
enter the Channel List sub-menu,
Press the CURSOR UP or DOWN but-
ton to highlight a specific channel from
the list.
Press the OK button, The television
will tune to the highlighted channel,
Press the MENU button to remove the
onscreen menu from the TV screen,
Pickle Sound Features Channas
Settings
Dcmo
TVT =
_nstall
Channels
Chan_ellist
Channelb&
lock after
_tin
Channels
Chapletlist
Channel_ock
lock after
TV _tin
®®®
®®®
85
Page 36

For various reasons you might want to block
the programming on a specific channel o1"
series of channels. The Channel Lock Control
will allow individual channels to be "locked",
blocking the programming on that channel.
Press the MENU button on the remote
control to display the onscreen menu,
Press the CURSOR RIGHT button
repeatedly to highlight CHANNELS,
Press the CURSOR DOWN buttonrepeatedly to highlight the Channel Lock
Control.
Press the CURSOR RIGHT button toenter the Channel Lock sub-menu.
Press the CURSOR UP or DOWN but-
ton to highlight a specific channel from
the list.
Press the OK button. The "dot" in front
of lhe channel number will change to
yellow showing that the channel is
locked.
Picture Sound Features Channels
IV_ z z z z
Settings
bemo
!
Install
Cbanna list
Channellock
Cock after
TV ratin
Channel lock
Cock after
1V ratin
Chl_Vnnellis_
Channels
Channels
Repeat steps 5 and 6 for other channels you
wish to lock.
Press the MENU button to remove the
onscreen menu from dae TV screen.
Note: To unlock a locked channel, enter your
personal PIN number to clear the channel from
being blocked. Please refer to page 51 for
instructions on setting up a PIN (Personal
Identification Number).
HELPFUL H1N_: :
If you tune to a channel 1hat is locked and you
enter your PIN to unlock the channel, ALL
locked channels will be unlocked until the tel-
evision is shut off. When the television is
turned back on again, previously locked chan-
nels will be locked again.
®®®
®®®
This screen will appear when tuned
to a locked channel. To view the
channel, enter your PIN.
Ibis channel is locked.
To unlock the channel
please enter your PIE.
36
Page 37

T_ere may come a time when you will need to
lock programming after a certain time of
day. This is a great/_ature to limit the time
your children watch TV or to lock all channels
at night when material not suited for children
might be broadcast.
Press the MENU button on the remote
I
control to display the onscreen menu,
Pre_ the CURSOR RIGHT button
2
repeatedly to highlight CHANNELS.
Press the CURSOR DOWN button
3
repeatedly to highlight the Lock After
Control.
Pre_ the CURSOR RIGHT button to
enter the Lock After sub-menu (ON or
OFF).
Press the CURSOR UP or DOWN but-
ton to highlight On from the list. A sub-
menu with AM or PM will appear,
Picture Sound _eatur_s Channels
Set,rigs
Demo
IVl =
lastall
Channas
Channel list
Channel lock
hock after
TV ratin
Channas
Channel list
Channel lock
hock after
IV r_tin
Pre_ the CURSOR RIGHT button to
enter lhe AM, PM sub-menu. A box with
lhe time (or area when the time can be
entered) will appear.
Press the CURSOR UP or DOWN but-
ton to highlight AM or PM,
Pre_ the CURSOR RIGHT button to
enter the lock after time,
Pre_ the NUMBERED button to enter
the time you want the television to lock
all channels.
Press the MENU button to remove the
!
onscreen menu from the TV screen.
Note: To unlock a locked channel, enter your
personal PIN number to clear the channel from
being blocked. Please refer to page 51 for
instructions on setting up a PIN (Personal
Identificalion Number).
Channds
Channels
This channel is locked.
To unlock the channel,
please enter your PIN.
ff you tune to a channel that is locked and you
enter your PIN to unlock the channel, ALL
locked channels will be unlocked until the tel-
evision is shut off. When the television is
turned back on again, previously locked chan-
nels will be locked again.
Once the Lock After setting takes place, all
channels will display this screen. To view
the channels, enter your PIN.
37
Page 38

yb u can select specific TV Ratings to block
roadcast signal with unsuitable informa-
tion.
Press the MENU button on the remote
control to display the onscreen menu.
Press the CURSOR RIGHT button
repeatedly to highlight CHANNELS.
Press the CURSOR DOWN buttonrepeatedly to highlight the TV Ratings
Lock Control.
Settings
Denlo
Inst_tl
Picture Sound Features Channels
Channels
Channel list
Channeltoch
tock afte_
T¢ _atin
Press the CURSOR RIGHT button to
enter the TV Ratings Lock list of options.
Press the CURSOR UP or DOWN but-
ton to highlight one of the ratings.
Press the OK button to activate your
choice, Note: Whenever a rating is turned
On, all higher ratings (with their sub rat-
ings) will also be turned On or blocked.
Note: Some of the TV Rating options contain
specific sub-ratings, TV-Y7 contains sub-rating
of (FV) Fantasy Violence; TV-PG and TV-14
contains sub-ratings of (D) Dialogue, (L)
Language, (S) Sex, and (V) Violence; TV-MA
contains sub-ralings of (L) Language, (S) Sex,
and (V) Violence.
Press the MENU button to remove the
onscreen menu from the TV screen.
®®®
®®®
k
Some TV Ratings have sub-ratings _--
that can be chosen.
]
Chznneh
Ch_nel_t
Channellock
tock_ft¢_
tV _tin
Channels
Channels
TV-Y: (All children -- appropriate for all children.) Designed for a very young audience, including children ages 2-6.
TV-Y7: (Directed to Older Children -- designed]br ehildren ages 7 and above.) For children who have acquired the develop-
ment skills needed to distinguish make-believe from reality. This programming may include mild fantasy and comic violence (FV),
TV-G: (General Audience -- suitablefi)r all ages.) Contains little or no violence, no strong language, and little or no sexual dia-
logue or sexual situations.
TV-PG: (Parental Guidance Suggested -- Contains material unsuitablefi)r younger children.) Contains one or more of the fol-
lowing: Moderate violence (V), some sexual situations (S), infrequent coarse language (L), or some suggestive dialogue (13).
TV-14: (Parents Strongly Cautioned -- Contains some material unsuitable fi)r children under 14 years c_'age.) Contains one or
more of the following: intense violence (V); intense sexual siluations (S); strong, coarse language (L); or intensely suggestive dia-
logue (D),
TV-MA: (Mature Audience Only -- Designed to be viewed by adults and unsuitable]br children under 17.) Contains one or
more of the following: graphic violence (V); explicit sexual situalions (S); or crude, indecent language (L).
38
Page 39

yb u can select specific Movie Ratings to
lock programming signals with unsuitable
#_brmation.
Press the MENU button on the remote
I
control to display the onscreen menu,
Press the CURSOR RIGHT button
2
repeatedly to highlight CHANNELS.
Press the CURSOR DOWN button
3
repeatedly to highlight the Movie Ratings
Lock Control.
Press the CURSOR RIGHT button to
enter the Movie Ratings Lock list of
options.
Press the CURSOR UP or DOWN but-
ton to highlight the rating you wish to
lock.
Press the OK button to activate your
choice. Note: Whenever a rating is turned
on, all higher ratings (and sub-ratings)
will be turned on, (i.e,, If R is selected,
NC-17 and X will automatically turn on
also.)
Picture Sound Features Chaane_s
IV _' z
bemo
Setting_
Install
Channek
Channellist
Ch_nne_lock
Lock _fter
1V ravin
Channels
Hov_eratings _ock
Channel _emove
,_tenna a
Channas
Press the MENU button to remove the
onscreen menu from the TV screen.
®®®
G: GeneralAudience - All ages admitted. Most parents would find this programming suitable for all ages. This type of programming contains little
or no violence, no strong language, and little or no sexual dialogue or sexual situations.
PG: Parental Guidance Suggested - This programming contains material that parents may find unsuitable for younger children. It may contain one or
more of the following: Moderate violence, some sexual situations, infrequent coarse language, or some suggestive dialogue.
PG-13: Parents Strongly Cautioned _ This programming contains material that parents may find unsuitable for children under the age of 13. It contains
one or more of the following: violence, sexual situations, coarse language, or suggestive dialogue.
R: Restricted -This programming is specifically designed for adults. Anyone under the age of 17 should view this programming only wilh an accompany-
ing parent or adult guardian. It contains one or more of the following: intense violence; intense sexual situations; strong coarse language; or intensely sug-
gestive dialogue.
NC-17: No one under the age of 17 will be admitted. _ This type of programming should be viewed by adults only. It contains graphic violence; explicit
sex; or crude, indecent language.
X: Adults Only - This type of programming contains one or more of the following: very graphic violence, very graphic and explicit or indecent sexual
acts, very coarse and intensely suggestive language.
39
Page 40

Quick Use and Setup Guide
Important Notice/Warning ...................... 1
Making Basic TV Connections
Basic Cable TV Connections .................... 1
Basic Antenna TV Connections .................. 1
Basic TV and Onscreen Menu Operation ........... 2
Remote Battery Installation ..................... 3
Remote Control Button Descriptions .............. 3
Using the Language Control ..................... 4
How to Automatically Program Channels .......... 4
NOTE: This owner's manual is used with
several different television models. Not all
features (and drawings) discussed in this
manual will necessarily match those found
with your television set. This is normal and
does not require that you contact your deal-
er or request service.
How to Use the Demo Feature ................... 4
y;ur Cable TV input into your home may be a single (75
hm) cable or a converter box installation. In either
case, the connection to the TV is very easy. Follow the steps
below to connect your cable signal to your new television.
If your cable signal comes directly from a round 75_ coaxial
cable use the following steps:
IMPORTANT
Direct Cable
Connection:
Cable signal coming tYom
Cable Company (Round
75f2 coaxial cable)
WARNING: TO PREVENT FIRE OR SHOCK
HAZARD DO NOT EXPOSE THIS UNIT TO
RAIN OR EXCESSIVE MOISTURE.
for energy efficiency. Energy Star® is a U.S. registered
mark. Using products with the Energy Star_ label can
save energy. Saving energy reduces air pollution and
lowers utility bills.
I i i
As an Energy Star® Partner, Philips
Consumer Electronics has determined this
product meets the Energy Star® guidelines
AC Power
Wall Outlet
Connect the open end of the round Cable Company sup-
plied cable to the 75_ input on the TV. Screw it clown finger
tight.
Plug the television into the wall outlet and turn the TV on.
Refer to the AUTOPROGRAM feature to program all the
available channels on your cable signal.
If your cable signal comes from a cable box, use the following
steps:
Connect the open end of the round Cable Company sup-
plied cable to the cable signal IN(put) plug on the back of
the Cable Box.
Using a separate round coaxial cable, connect one end to the
OUT(put) plug on the back of the Cable Box.
Connect the other end of the round coaxial cable to the
75_2 input on the back of the television. Screw it clown finger
tight.
Plug the television into the wall outlet and turnthe TV on.
Refer to the TUNER and AUTOPROGRAM features on page
4 of this Quick Use Guide. TUNER should be set to the
CABLE option. AUTOPROGRAM can be set to program all
the available channels on your cable signal into the televi-
sion's memory.
Jack Panel
Back of TV
Cable Box Connection:
INPUT
Round75f2
Coaxial Cable
Cable Signal IN fi'om
the Cable Company
OUTPUT
Power Plug
from back of TV
Jack Panel Back
of Cable Box
Cable Box
Power Cord
AC Power
Wall Outlet
IN IN
A combination antenna receives normal broadcast chan-
nels (VHF 2-13 and UHF 14-69). Your connection is
easy because there is only one 75Q (ohm) antenna plug on
the back of you_ TV,, and that s where the antenna goes.
If your antenna has a round cable (75 ohm) on the end,
!
then you're ready to connect it to the TV.
If your antenna has flat, twin-lead wire (300 ohm), you
first need to altach the antenna wires to the screws on a
300- to 75-ohm adapter.
Push the round end of the adapter (or antenna) onto the
75ff2 (ohm) plug on the back of the TV. If the round end of
the antenna wire is threaded, screw it down finger tight.
Plug the television into the wall outlet and turn the TV
3
on, Refer to the TUNER and AUTOPROGRAM features on
page 4 of this Quick Use Guide. TUNER should be set to the
ANTENNA option. AUTOPROGRAM can be set to program
all the available channels on your cable signal into the televi-
sion's memory.
The signal coming
from the box will
be MONO.
Antenna Connection:
Outdoor or Indoor Antenna
(Combination VH F/UHF)
The combination antem_a receives normal
broadcast channels 2-13 (VHF) and 14-69 (UHF).
3(g) to 75-ohm
Twin
Lead Wire
Round 75_ Coaxial i
Cable flora Antenna I
Power Plug
from back of TV
Jack Panel, Back of TV
AUDIO
I
AC Power
Wall Outlet
Power Plug
from back
of TV
Page 41

y_hur television has a set of controls located on the top of
e cabinet for use when the remote control is not needed.
Press the POWER button to turn the TV ON, Located on
the front lower left of the cabinet.
Press the VOLUME (+) button to increase the sound
level or the VOLUME (-) button to lower the sound level,
Or, use to navigate right or left when the onscreen menu is
displayed.
Press the CHANNEL - (down) or + (up) button to select
TV channels. Or, use to navigate up anddown when the
onscreen menu is displayed.
Press the M (Menu) button to display the onscreen menu
controls. If pressed while the onscreen menu is displayed, the
menu will be removed from the television screen.
There is also a set of Audio and Video Input jacks located on the
side of the television cabinet. This jack panel also contains a S-video
and headphone jack. These jacks are great for connecting a video
camcorder or any accessory device that will only be hooked up lem-
porarily. Refer to the Directions for Use for more details.
The TV onscreen menu controls are viewed within a
obile map or track system. This system allows you to
move along linked paths tied to specific Feature Title cate-
gories (TV, Install, etc). Each press of the Cursor buttons on
the remote, or top of the TV,, moves the cull'or control to
balls or dots indicating spec_[i'c controls. Each specific con-
trol may have multiple features that can be adjusted. The
animated onscreen menu structure will expand to view all
available onscreen controls. As it expands, it will display a
series of balls or dots grouped together to show morn con-
trols not displayed.
TRACK lines represent the structure of the onscreen
menu. They tie all the controls together and show the path
you can follow to access the available controls.
BALLS or DOTS indicate the titles of features or controls
2
available on this lelevision, Some of these controls when
highlighted, may show more TRACKS and BALLS, indi-
cating sub-categories or "lists" of controls within the high-
lighted control. These sub controls will also have TRACKS
and BALLS as described with the feature controls.
DIRECTION INDICATOR let's you know which way
3
movement may take place within the onscreen menu. The
arrows on the DIRECTION INDICATOR simulate the
CURSOR buttons on the remote control (UP, DOWN,
RIGHT, or LEFT).
Tracks---,....
@66@
IV(
Settings
Demo
Install
Picture Sound Features
v
Balls or Dots
n Indicator
Channels
SLIDER controls will be displayed on some features,
allowing adjustments to the value of the control. Some
may show a box containing a list of multiple options set-
tings. Others may only have an ON or OFF option.
To navigate the onscreen menu, start by pressing the
MENU button on the remote control. This will display the
onscreen menu in its starting position.
Press the CURSOR DOWN button to select any of the
SETTING, DEMO, or INSTALL controls. Press the CUR-
SOR RIGHT button on the remote control to select any of
the PICTURE, SOUND, FEATURES, or CHANNEL con-
trois,
Refer to page 4 of this Quick Use Guide for details describing the
INSTALL and DEMO controls. Refer to the Directions for Use
manual for all other control descriptions (PICTURE, SOUND,
FEATURES, CHANNELS, or SETTINGS).
®®®
®®®
®®®
®®®
Picture Sound Features
Contrast _ _ 40
Brightness
Color
Sharpness
Channels
v
Page 42

To load the supplied batteries into the remote:
Remove the battery compartment door on the back of
I
the remote.
Place the batteries (2-AA) in the remote. Be sure the (+)
2
and (-) ends of the batteries line up correctly (the inside of
the case is marked).
Reattach the battery compartment door,
Be sure to point the remote at the Remote Sensor window on the
front of the television when using the remote control to operate the
television.
Remote Control
(shown from the bottom)
Battev2¢Compartment Door
Battery Compartment
2 "AA" Batteries
Select (CBL VCR DVD SAT AMP) Button X
Press the Select Button repeatedly to select one of the
system modes in which the remote can be used. Once the
mode is selected, an action must be made for the remote
to remain in the selected mode or it will default back to
the TV mode.
Backlight Button
Press and hold the Select Button for 2 seconds to back-
light the Volume, Channel, Mute and Numbered buttons
on the remote.
Source Button
Press ihis button to select the different signal source
options when in the TV mode. Select the AVI, AV2, AV3,
AV4, SIDE or the current channel source.
Alternate Audio Button
If tuned to a channel lhat is broadcasting SAP (Second
Audio Programming), pressing lhe Altemale Audio but-
ton will toggle between standard or main audio and SAP.
If SAP is not present, effect.
Pixel Plus Button
Press the Pixel Plus button and the TV screen will be
divided in half displaying the Pixel Plus Demo. The left
side will display the picture with Pixel Plus and Digital
Natural Motion switched OFF. The right side of the
screen will display the picture with Pixel Plus and Digital
Natural Motion swilcbed ON. The demo will show the
benefits of Pixel Plus. Press again to turn the demo off.
OK Button
Press the OK button to activate
Freeze Format Button
Pressing the Freeze button will freeze the picture in one
of the various Freeze options. Please note that the Freeze
option must be set within the TV's onscreen menu.
Freeze Mode - The main picture will freeze
onscreen, press again to resume normal viewing.
Sound will continue to be heard.
Replay Mode
video in the PIP window
Photo Finish Mode - Will
of stored video picture.
Volume +, - Button
Press the + side of the button to increase the volume level
volume level of the TV
Mute Button
Press to eliminate the sound comin from the TV's
speakers. Press again to restore the sound.
Display Information Button
Press this button to display information (when available) /
about the current channel, program, source, nmnber or
name, local time, CC availability, SAP availability, pro-
grain ratings, display format, sound mode, and remaining
length of a Sleeptimer setting.
Dual Screen/PIP Button
Press repeatedly to toggle through the PIP options. PIP
settings must be set within the TV's onscreen menu.
\
/
,VCR DVD SAT
I
I
I
A_dw Control
Power Button
Press to turn the TV On or Off.
(Note: The TV is never really powered off completely
unless it physically unplugged from the power source.)
Sound Mode Button
Press this button to display a list of available sound
modes. Choose from Dolby Pro Logic, 3D Surround,
Dolby 3 Stereo, Stereo or Hall settings.
VCR Functions (',_',_, I> I1_>I1_I1_,I) Buttons
When in the VCR Mode, these buttons will control the
Play, Stop, Fast Forward, Rewind, and Record functions.
Time Display Button
Press this button to display the current time on the TV
screen.
CC (Closed Caption) Button
Repeatedly pressing the CC button will turn CC ON,
OFF or ON whenever the MUTE button is pressed.
Cursor Ring Up/Down/Right/Left
Use the Cursor Ring Up, Down, Right, or Left to navi-
gate through the onscreen menu and make selections or
changes within the controls.
Menu Button
Press to display the TV onscreen menu or to turn it off.
Channel +, - Button
Press to scroll through the available channels or sources
stored within the TV's memory. See the Auto Program
section of this manual to learn how to store all available
channel into the TV's memory.
Numbered Buttons
Press to directly access a specific TV channel. For two,
or three digit channel, enter all numbers. Press a single
digit button and hold a bit longer to directly access a sin-
gle digit channel. These buttons also can be used to enter
values in certain onscreen menu controls.
P_IP (Surf) Button
If the SURF setting within the TV's onscreen menu con-
trol is set to 2 channels, pressing this button will act like
an alternate channel button allowing you to toggle
between the current channel and the last viewed channel.
If the SURF setting is set to 9 channels, pressing this
button allows you to add and scroll up to nine of your
favorite channels.
Picture Format Button
Press this button repeatedly to scroll through all the
available picture formats. Choose between, 4:3, Movie
Expand 4:3, Movie Expand 16:9, Super Zoom, Wide
Screen, or 16:9 Subtitle.
_ Active Control Button
Pressing this button will display a demonstration of the
Active Control. Active Control can be set to four differ-
ent levels within the onscreen menu.
OFF - will control the Sharpness and Dynamic
Contrast automatically.
MINIMUM - will control the Sharpness, Dynamic
Contrast and Noise Reduction levels automatically.
MEDIUM - will control the Dynamic Contrast,
Color, Sharpness and Noise Reduction levels auto-
matically.
MAXIMUM - will control the Contrast, Dynamic
Contrast, Color, Sharpness, and Noise Reduction lev-
els automatically.
Page 43

For oar Spanishand French-speaking TV owners, an
onscreen L4NGUAGE option is present. The LAN-
GUAGE control enables you to set the TV's onscreen menu
to be shown in either English, Spanish, or French.
Press the MIEN U button on the remote conm)] to show
the onscqreen TllelIU.
Press the CURSOR DOWN button repeatedly tuttil
INSTALL is highlighted.
Press the CURSOR RIGHT button m shift file menu m
3
the ]eft and highlight LANGUAGE.
Press the CURSOR DOWN button to select ENGLISH,
4
ESPANOL (Spanish), or FRANCAIS (French).
After you have made your language selection, press file
5
OK button to confirm your selection,
Press the MIEN U button to remove the onsoreen menu
6
from the TV screen.
@66@
®®
®®®
®®®
m_
liii
F
I
T
EspaT_o
L_n_ua_ Au_oF_am
Fran_I En_rsh
EspaT_o'I
Fr_n_[_T_ P_ _ _K _/ _n d_ _mt_
your TV can automatically set itself for local area (or
able TV) channels. This makes it easy for you to
select only the TV stations in your area _' pressing the
CHANNEL (+) or (-) bugon.
Press file MENU button on the remote control m show
file OllSC_eii {nellU.
I
Press file CURSOR DOWN button repeatedly ttuti]
2
INSTALL is highlighted.
Press file CURSOR RIGHT button repeatedly to
3
shift rite menu m the left mtd highlight AUTOPRO-
GRAM.
Press file CURSOR DOWN button to tfigh]ight rite
4
INSTALL MODE control.
Press file CURSOR RIGHT button to display a list of
5
Install mode options (Antenna, Automatic, Cable).
Press the CURSOR UP or DOWN button m select
6
one of the options. Select Antenna for nortual Ou_lde or
inside type mttenmL Select Cable tbr a cable company
supplied signal. V_qtenAutomatic is selected fire T%r will
automaficaUy set the mode based on the type of signal it
de_cts coming into the %'.
®®
®®
®®
®®
PT_I_ Sound F_tur_s Glmlnth
S_ings
D*mig
Pl
SettTn_
D_mO
Im_ll
LanguOr
' I
In_tall m_le The ff will _r_ fi_, Snd an_ tr_
Dre_ th_ _r*:_I dt.wl_tO _r*tc_'cd,
0I matt _r _wn
t.r_pr0gra r_
Instil m6.$t
m
I
Press file CURSOR LEFT button after making yottr
InstaU mode selection.
7
Press file CURSOR DO_.I button to highlight
8
INSTALL.
Press file CURSOR RIGHT button m start rite
9
Aut_prog_anming prooess.
I0
Several features of this television can be placed into a demo
mode. Auto Demo will automatically show all the feature
demos in a sequential loop, one afier another except for the
Dealer Demo mode. Specific demo modes can be selected
from the list of"options within the Demo control. (For exam-
ple: Auto demo, Dual screen, PIP, etc.)
The Dealer Demo also has a sub-list of options that
include: Digital options, Lightsensor, and 3D Y/C Comb fil-
er.
Press file MENU button to remove fire onscreen menu
the the p ,cess
has finished. After you've ran Aut_ Pmgratu, check out fire results. Press the CHANNEL (+) or (-) button and see
,l_r_p _gra m
m m
Te _t_toF_ramAnalog_01_I_ F_ rile ITght,tr_:_,
which channels you can select.
®00@
ll_dl m_d_
_$*vd_ing
24 aJ_al*gdm_nels(om_l
i_r_rCgr_m
_Su_t
Aetep_gnunmil_8 is ¢OmFle_*
PiP
h_dl
EltTn Mtl_u
I
i Press the MENU button on the remo_ control to showrite onscreen Tneltu.
Press file CURSOR DotArN button repeatedJly tutti]
DEMO is highlighted.
Press file CURSOR RIGHT buttoll tL_shift the menu t_display rite list of Demo rmxle options. To activate any of
fire Dealer Demo modes, press the OK or CURSOR
RIGHT button.
®®
®®®
®®®
D*mo Dval t_'_tll
F_tzeF*_l_Pb_ _n_h
PiP
Imr_ll
AU_O$¢m*
H_l_ E_nv
D_m_
_lns_dl
E_in H*_nu
Pi_tur_
_t[_ {mteol
Dealerdtlr_
Page 44

34" Digital Widescreen
HDTV Monitor with P_xelPlusTM
• PixelPlus TM resolution enhancement
• Digital Natural Motion TM
• Active Control TM Plus
• 34" Widescreen (16:9) RealFlat TM Picture Tube
• DVI with HDCP
• 3D Y/C Comb Filter
• Double Window, Two Tuner PIP
• 6 Speaker Sound System with Subwoofer
oAutoScreen TM Fit
_0
0_
Page 45

34" Digital Widescreen HDTV
Monitor with Pixel Plus TM
Picture Quality
P;xel Plus TM Re$oftr_ion Enhancement
_perlcn_c bct_cr_ Bc_er dc__iI,bc_cr _€_rc, bet_cr r_solu_on, more h_ghd_nl-
tion llkc h_eg_s even from non-HD sour_s. Pi_el P;usTM w_ll _eke your vlc_g to
new ;cv_;s of e_joymcn_ Pixcl P;usTM is on_f from Phili_s.
Digital Natural Mo_ion TM
FJgni,_e_mo_o_ judder [rom _m basedso_rces suc__ DV_'s for dls_or_o,f_,
W_descreen ReaIFlat TM Picture Tube
rcs_g i_ _ b_ghr_rcrlsp_r_me_. The'vVidcs_ce_form_ f_ _od_s DVD_
a_d HD slg_alswitho_ the need for large _ad_ bars acrossthetop a_d
iii O_lliii
Sound quality
Dolb)_ ProLol_l¢Decoder
Allowsomor_imme_iv__ou_de_per_er_e.
6 SpeakerSoundsystemwi_ subwoo_er
Exci_gacidJifollke_ou¢_d_o foJJJefs-cer_rimeglng_nd_,
* Powerful 4 x t S wa_t _mplifle_ built in
* _ as center channel option
* 3D Surround
* A_Sound TM Control
Rear AV Panel
0 II
II
SideAV Panel
Au_ol_ute TM
_u_Okock TM
Auto Surf TM List
Channel Au Lo-Programming
EnglishiF_enchiS p_ish menu
1SO-minute Sleep Timer
Closed _pUon viewing
Thistelev_io " r_ce v_r _r_id_ displ_" _f_le_ $1_n¢1o_
_nin_ ina_or_an_ w_h 1_.119of_h_FCC rul_.
>-Optional TC34MLO_ television stand (shovm on l_ron0
provides d_e idealsoluUon to l_ble top placemen_w_d_
m_emphasison high design,s_orage,_u_dsaTety,
iii iii
* M_ins: AC 110V ± 10%
* Power consumption: Normal oper_gon: 270 W_cs
Stand by:.<IW
* Produ¢_ dimension (d x w x h): 36.5 x 21.2 x _3,3"
* Produc_weigh_: t76,5 Ibs,
* C_rton dimensions(d x w x h): 41.S x 28.8 x 30"
* Shipping weight:198.#5 Ibs,
* UPC: 0 37849 9338# 8
Universal remote control-RC_043/01B
Universal RC managing"rv and peripherals,
I_ixe 1_.$, D gi'_l N_ur_l _'Ot 0 ", Au_S¢ und TM, Au_r_ _u_T_ AU_U_ TM, Au_Lock TM,
Ma ,._¢t._.dun_r Lc_nsgfro-" Dol:_-[_*._o _i_. "Dolbf' _ndthe doublgD symbol
ar_trademarksof Dol:_/L_rato_i_¢
As _n ENERGY STAR@ r_ner, Phillis h_ d_nnin_ _ha_ this pP¢_. c_ m_J_
the ENERGY" S"AR guidelin _ for _ner_ efficiency
]_rln_d in U_A _0_07
@_003 ]_hili_ Con_ume_ Ele¢'_*oni¢_ CO,
A Di_ $ o " ¢g Philip_ E_r_nic_ h_or_h Amed¢_ C_p,
T_I 1M
www.ph_llps,¢om or AOL keywo_: ph_llps
 Loading...