

Magnavox 20PF7835 Owner’s Manual

Directions for Use
Need help?
Call us!
PhlhpsrepresentatJvesare ready to helpyou with any ques-
tions about your new product. We can guide you through
Connections,First-time Seep, or any of the Fea_res.
We want you to start enjoyingyour new product right away!
FOR FAST HELP PLEASE CALL,
1-800-531-0039
or
Visit us on the web at
www.philips.com
3139 125 31871

Once your PHILIPS purchase isregistered, you're eligible to receive all the privileges
of owning a PHILIPS product. So complete and return the Warranty Registration
Card enclosed with your purchase at once. And take advantage of these important benefits.
Congratulations on your purchase,
and welcome to the "family"
Dear PHILIPS product owner."
Thank you for your confidence in PHILIPS. You've selected one of the best-built, best-backed products available
today. And we'll do everything in our power to keep you happy with your purchase for many years to come.
As a member of the PHILIPS "family," you're entitled to protection by one of the most comprehensive war-
ranties and outstanding service networks in the industry.
What's more, your purchase guarantees you'll receive all the information and special offers for which you quali-
fy, plus easy access to accessories from our convenient home shopping network.
And most importantly you can count on our uncompromising commitment to your total satisfaction.
All of this is our way of saying welcome-and thanks for investing ina PHILIPS produc_
Sincerely.
PHILIPS
Lawrence J. Blanford
President and Chief Executive Officer
Know these
safetysymbols
P.S. Remember, to get the most from your
PHILIPS product, you must return your
Warranty Registration Card within 10
days. So please mail it to us right now!
_L This "bolt of lightning" indicates uninsulated material within your unit may cause an elec-
trical shock. For the safety of everyone in your household, please do not remove product cov-
_'The "exclamation point" calls attention to features for which you should read the
enclosed literature closely to prevent operating and maintenance problems.
WARNING: TO PREVENT FIREOR SHOCK HAZARD, DO NOT EXPOSETHIS EQUIP-
MENT TO RAIN OR MOISTURE.
CAUTION: To prevent electric shock, match wide blade of plug to wide slot, and fully insert.
ATTENTION: Pour 6viter les chocs _lectriques, introduire la lame la plus large de la fiche darts
la borne correspondante de la prise et pousser jusqu'au fond.
2
IMPORTANT SAFETY INSTRUCTIONS
Read before operating equipment
1. Read these instructions.
2. Keep these instructions.
3. Heed all warnings.
4. Follow all instructions.
g. Do not use this appara/us near water.
6. Clean only with a dry cloth. 17.
7. Do not block any of the ventilation openings. Install in accordance
with the manufacturers instructions.
8. Do not install near any heat sources such as radiators, heal regis-
ters, stoves, or other apparatus (including amplifiers) that produce
heat.
9. Do not defeat the safety purpose of the polarized or grounding-
type plug. A polarized plug has two blades with one wider than
the other. A grounding type plug has two blades and third ground-
ing prong. The wide blade or third prong are provided for your
safety. When the provided plug does not fit into your outlet, con- 18.
suit an electrician for replacement of the obsolete outlet.
10. Protect the power cord from being walked on or pinched particu- 19.
lady at plugs, convenience receptacles, and the point where they
exit fiom the apparatus. 20.
If. On_se attachments/accessories specified by the manufacturer.
12. _ Use only with a cart, stand, tripod, bracket, or table
_[_ specified by the manufacturer, or sold with the app-
the cart/apparatus comblnatmn to avozd injury from tip-over.
13. Unplug this apparatus during lightning storms or when unused for
long periods of time.
14. Refer all servicing to qualified service personnel. Servicing is
required when the apparatus has been damaged in any way. such
as power-supply cord or plug is damaged, liquid has been spilled 21.
or objects have fallen into apparatus, the apparatus has been
exposed to rain or moisture, does not operate normally, or has
been dropped. 22.
15. This product may contain lead and mercury. Disposal of these
materials may be regula/ed due to environmental considerations.
For disposal or recycling information, please contact your local
authorities or the Electronic Industries Alliance: www.eiae.org
16. Damage Requiring Service - The appliance should be serviced
by qualified service personnel when:
A. The power supply cord or the plug has been damaged; or
aratus. When a carl is used, use caution when moving
B. Objects have fallen, or liquid has been spilled into the appli-
ance; or
C. The appliance has been exposed to rain; or
D. _le appliance does not appear to operate normally or
exhibits a marked change in performance; or
E. The appliance has been dropped, or the enclosure damaged.
Tilt/Stability - All televisions must comply with recommended
international global safety standards for tilt mid stability properties
of its cabinet design.
• Do not compromise these design atandards by applying exces-
sive pull force to the front, or top, of the cabinet which could ulti-
mately overturn the product.
• Also, do not endanger yourself, or children, by placing electron-
ic equipment/toys on the top of the cabinet. Such items could
unsuspectingly fall fiom the top of the set and cause product dam-
age and/or personal injury.
Wall or Ceiling Mounting - The appliance should be mounted to
a wall or ceiling only as recommended by the manufacturer.
Power Lines - An outdoor antenna should be located away from
power lines.
Outdoor Antenna (]rounding - If an outside antenna is connect-
ed to the receiver, be sure the antenna system is grounded so as to
provide some protection against voltage surges and built up static
charges.
Section 810 of the National Electric Code, ANSI/NFPA No. 70-
1984, provides information with respect to proper grounding of
the mast and supporting structure, grounding of the lead-in wire to
an antenna discharge unit, size of grounding connectors, location
of antenna-discharge unit, connection to grounding electrodes, and
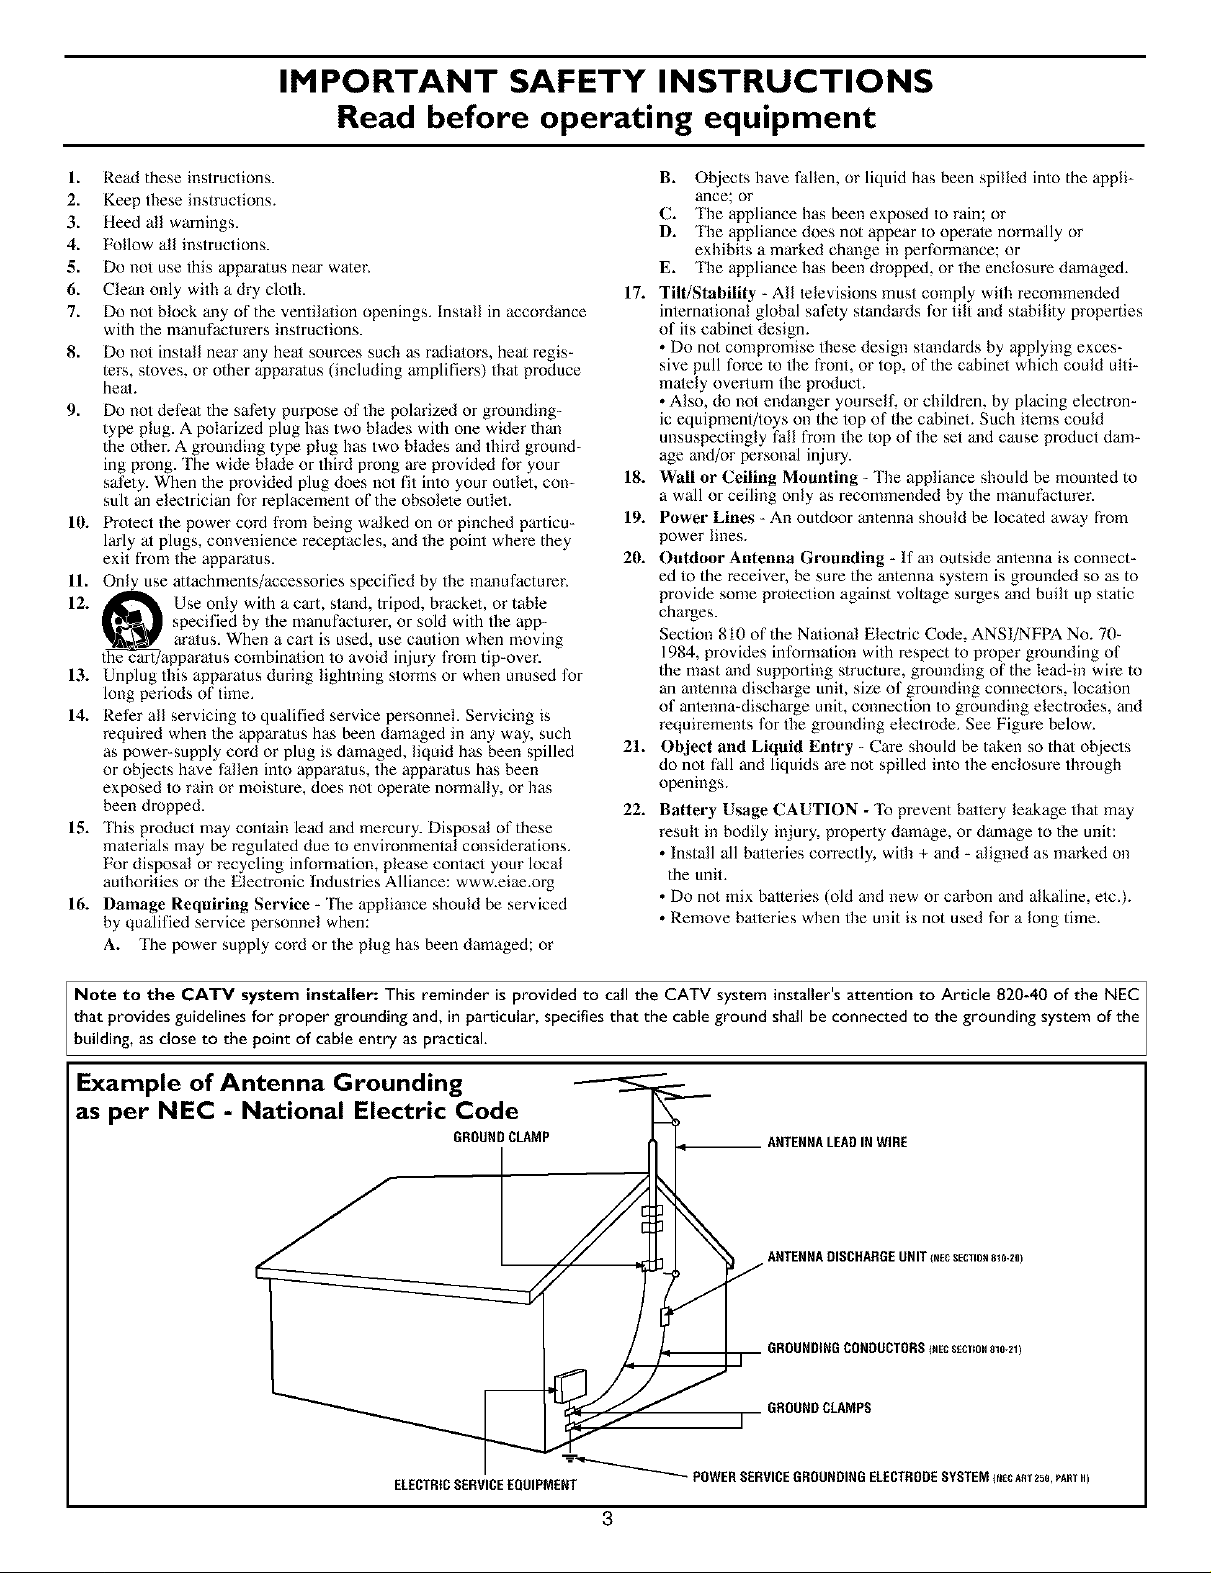
requirements for the grounding electrode. See Figure below.
Object and Liquid Entry - Care should be taken so that objects
do not fall and liquids are not spilled into the enclosure through
openings.
Battery Usage CAUTION - 'Ib prevent battery leakage thai may
result in bodily injury, property damage, or damage to the unit:
• Install all batteries correctly, widl + and - aligned as marked on
the unit.
• Do not mix batteries (old and new or carbon and alkaline, etc.).
• Remove batteries when the unit is not used for a long time.
Note to the CATV system installer: This reminder is provided to call the CATV system installer's attention to Article 820-40 of the NEC
that provides guidelines for proper grounding and, in particular, specifies that the cable ground shall be connected to the grounding system of the
bui ding, as c ose to the point of cab e entry as practica.
Example of Antenna Grounding
as per NEC - National Electric Code
GROUNDCLAMP
ELECTRtCSERVICEEQUIPMENT
POWERSERVICEGROUNDINGELECTRODESYSTEMI_EcART2so,PARTH)
3
ANTENNALEADINWIRE
ANTENNADISCHARGEUNITIHECSECTION8_0-20)
GROUNDINGCONDUCTORSINECSECTmN81o-21)
GROUNDCLAMPS
Additional Safety Precautions:
Do not shift or move the LCD TV around when it is powered on.
Do not connect any AC/DC adapter to your LCD TV that does not originally come with the television. Only use
the recommended part or parts that are approved by Philips Consumer Electronics.
Caution: Do not use any cover or enclose the AC/DC adapter with any objects like a cloth or box which might
shorten the life of the equipment.
Do not touch, push or rub the surface of the LCD screen with any sharp or hard objects.
When the surface of the LCD screen becomes dusty, wipe it gently with an absorbent cotton cloth or other soft
material like chamois. DO NOT use acetone, toluene or alcohol to clean the surface of the screen. These chemi-
cals will cause damage.
Wipe off water, or saliva as soon as possible. Long exposer time to liquids can cause deformation and color fad-
ing of the LCD screen.
Be careful of condensation when temperature changes occur. Condensation can cause damage to the LCD
screen and electrically parts. After condensation fades, spots or blemishes will be present on the LCD screen.
Positioning the LCD Television:
Place the LCD TV on a solid, sturdy base or stand. Be sure the stand is strong enough to handle the weight of
the LCD TV.
Try to leave at least 6" of space around each side of the LCD TV cabinet to allow for proper ventilation.
Do not place the LCD TV near a radiator or other sources of heat.
Do not place the LCD TV where it can be exposed to rain or excessive moisture.
Recycling Procedure/End of Life Disposal:
To minimize harm to the environment, the batteries supplied with the LCD TV do not contain mercury or nickel
cadmium. If possible, when disposing of batteries, use recycling means available in your area.
The LCD TV uses materials that can be recycled. To minimize the amount of waste in the environment, check
your area for companies that will recover used televisions for dismantling and collection of reusable materials, or
contact your dealer for TV recycling tips.
Please dispose of the carton and packing material through the proper waste disposal management in your area.
4

Introduction
Welcome/P, egistration of Your TV .................... 2
Safety Instructions ................................ 3
Precautions ...................................... 4
Table of Conlents ................................. 5
_ Install Menu
How to use the Language Control .............. 6
How to use the Tuner Mode Control .................. 7
How to Auto Program TV Channels ................... 8
How to Add or Delete Channels (Channel Edit) ......... 9
How to use the AutoChron TM Control ................ 10
How to use the Name Control (Channel Label) ......... 11
_ Picture Menu
How to use the Picture Adjustment Controls ..... 12
Sound Menu
How to use the Equalizer Controls ............ 13
How to use the Balance Control ..................... 14
How to use the AVL Control ....................... 15
How to use the Incredible Surround Control ........... 16
Setting the TV to receive Slereo programming ......... 17
Setting the TV to receive SAP (Secondary Audio
Programming) ................................... 18
_ Features Menu
How to use the Timer Controls ............... 19
How to use the Mode Select Control ................. 20
Understanding the AntoLock TM Controls .............. 21
Setting up the AutoLock TM Access Code .............. 22
How to Block Channels ........................... 23
How to Clear All Blocked Channels at the Same Time .. ,24
Blocking Programming Based on Movie Ratings ....... 25
Blocking Programming Based on TV Ratings .......... 26
OIher AutoLock TM Blocking Options ................. 27
Using the AutoLock TM Review Screen ................ 28
_ Remote Control Use
How to use the Closed Captioning Control ...... 29
How to use the Screen Format Control ............... 30
How to use the Program List Feature ................. 31
Setting the Sleeptimer Control ...................... 32
Setting the AntoPicture TM Control ................... 33
Setting the AntoSound TM Control .................... 34
Using the Surf Control ............................ 35
Here are a few of the,features built into your new Television:
Audio/Video Jack Panels allows direct connections with VCRs,
DVDs, PCs or other devices, providing quality TV picture and
sound playback.
Audio Volume Leveler (AVL) Control keeps the TV sound at an
even level. Peaks and valleys that occur during program changes or
commercial breaks are reduced, making for a more consistent, com-
fortable sound.
AutoChron TM automatically sets the right time of day and main-
tains it with digital precision through brownouts, power failures,
and even Daylight Savings Time adjustments.
AutoLock TM allows you to block the viewing of certain channels or
programs with certain ratings if you do not want your children to
view inappropriate materials.
Auto Programming scans (when activated) for all available chan-
nels from regular antenna or cable signals and stores only active
broadcast stations in the TV's memory.
AutoPicture TM allows you to change the picture settings (color,
tint, contrast, etc.) for various types of programming, such as
sports, movies, multimedia (games), or weak signals with the push
of one button.
AutoSound TM allows you to select from three factory-set controls
and a personal control that you set according to your own prefer-
ences through the onscreen Sound menu, "l_e three factory-set con-
trols (Voice, Music, and Theatre) enable you to tailor the TV sound
so as to enhance the parlicalar programming you are watching,
Closed Captioning allows the viewer to read TV program dialogue
or voice conversations as onscreen text.
Infrared Remote Control works your TV and other remote-con-
trolled devices, such as VCRs, DVD players, cable converters, and
satellite receivers.
Surf Button allows you to easily switch among only the channels
that are of interest to you (the ones that you have
programmed into the TV's Surf control through the onscreen
nlenu).
Timer allows you to set your TV to tUlTlitself ON and OFF once or
daily like an alarm clock.
_FM Radio Mode
Using FM Mode Information .............. 36-42
General Information
Troubleshooting Tips ....................... 43
Cleaning and Care ................................ 43
Glossary of Terms ................................ 44
Index .......................................... 45
Factory Service Location ........................ 46-47
Warranty ....................................... 48
Auto Lock, Auto Picture, Auto Sound,
are all registered trademarks of Philips Consumer E[ectronics Company.
Copyright © 2(X)3 All rights resmved.
5
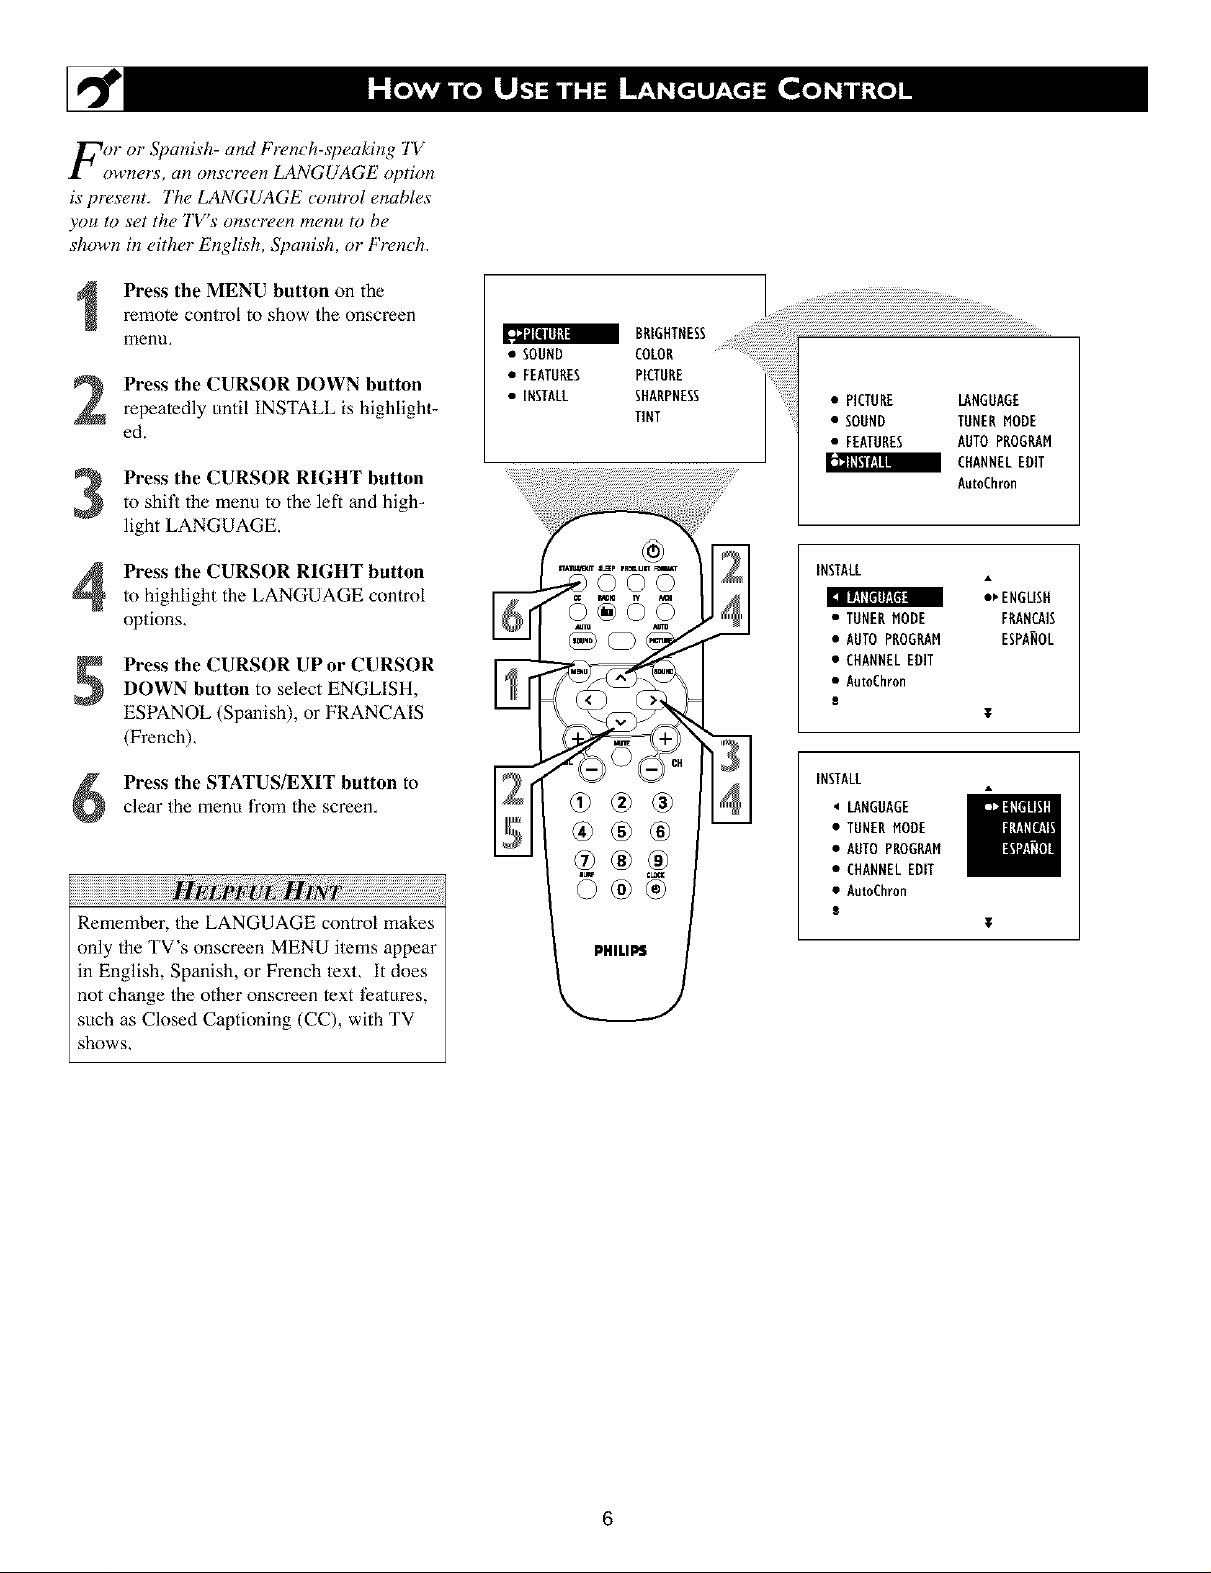
For or Spanish- and French-speaking 1V
owners, an onscreen LANGUAGE option
is present, The LANGUAGE control enables
you to set the TV's onscreen menu to be
shown in either English, Spanish, or French,
Press the MENU button on the
remote control to show the onscreen
menu,
Press the CURSOR DOWN button
repeatedly until INSTALL is highlight-
ed.
Press the CURSOR RIGHT button
to shit_ the menu to the left and high_
light LANGUAGE.
•FEA HRESP,CTHHE
• INSTALL SHARPNESS • PICTURE LANGUAGE
TINT • SOUND TUNERMODE
• FEATURES AUTOPROGRAM
_ CHANNELEDIT
AutoChron
Press the CURSOR RIGHT button
to highlight the LANGUAGE control
options,
Press the CURSOR UP or CURSORDOWN button to select ENGLISH,
ESPANOL (Spanish), or FRANCAIS
(French),
Press the STATUS/EXIT button toclear the menu from the screen,
Remember, the LANGUAGE control makes
only the TV's onscreen MENU items appear
in English, Spanish, or French text, It does
not change the other onscreen text t?atures,
such as Closed Captioning (CC), with TV
shows,
I_Alu,_ s_p rmmum i
INSTALL
_ ENGLISH
• TUNERMODE FRANCAIS
• AUTOPROGRAM ESPANOL
• CHANNELEDIT
• Au_Chron
T
INSTALL
LANGUAGE
• TUNERMODE
• AUTOPROGRAM
• CHANNELEDIT
• AutoChmn
l
6
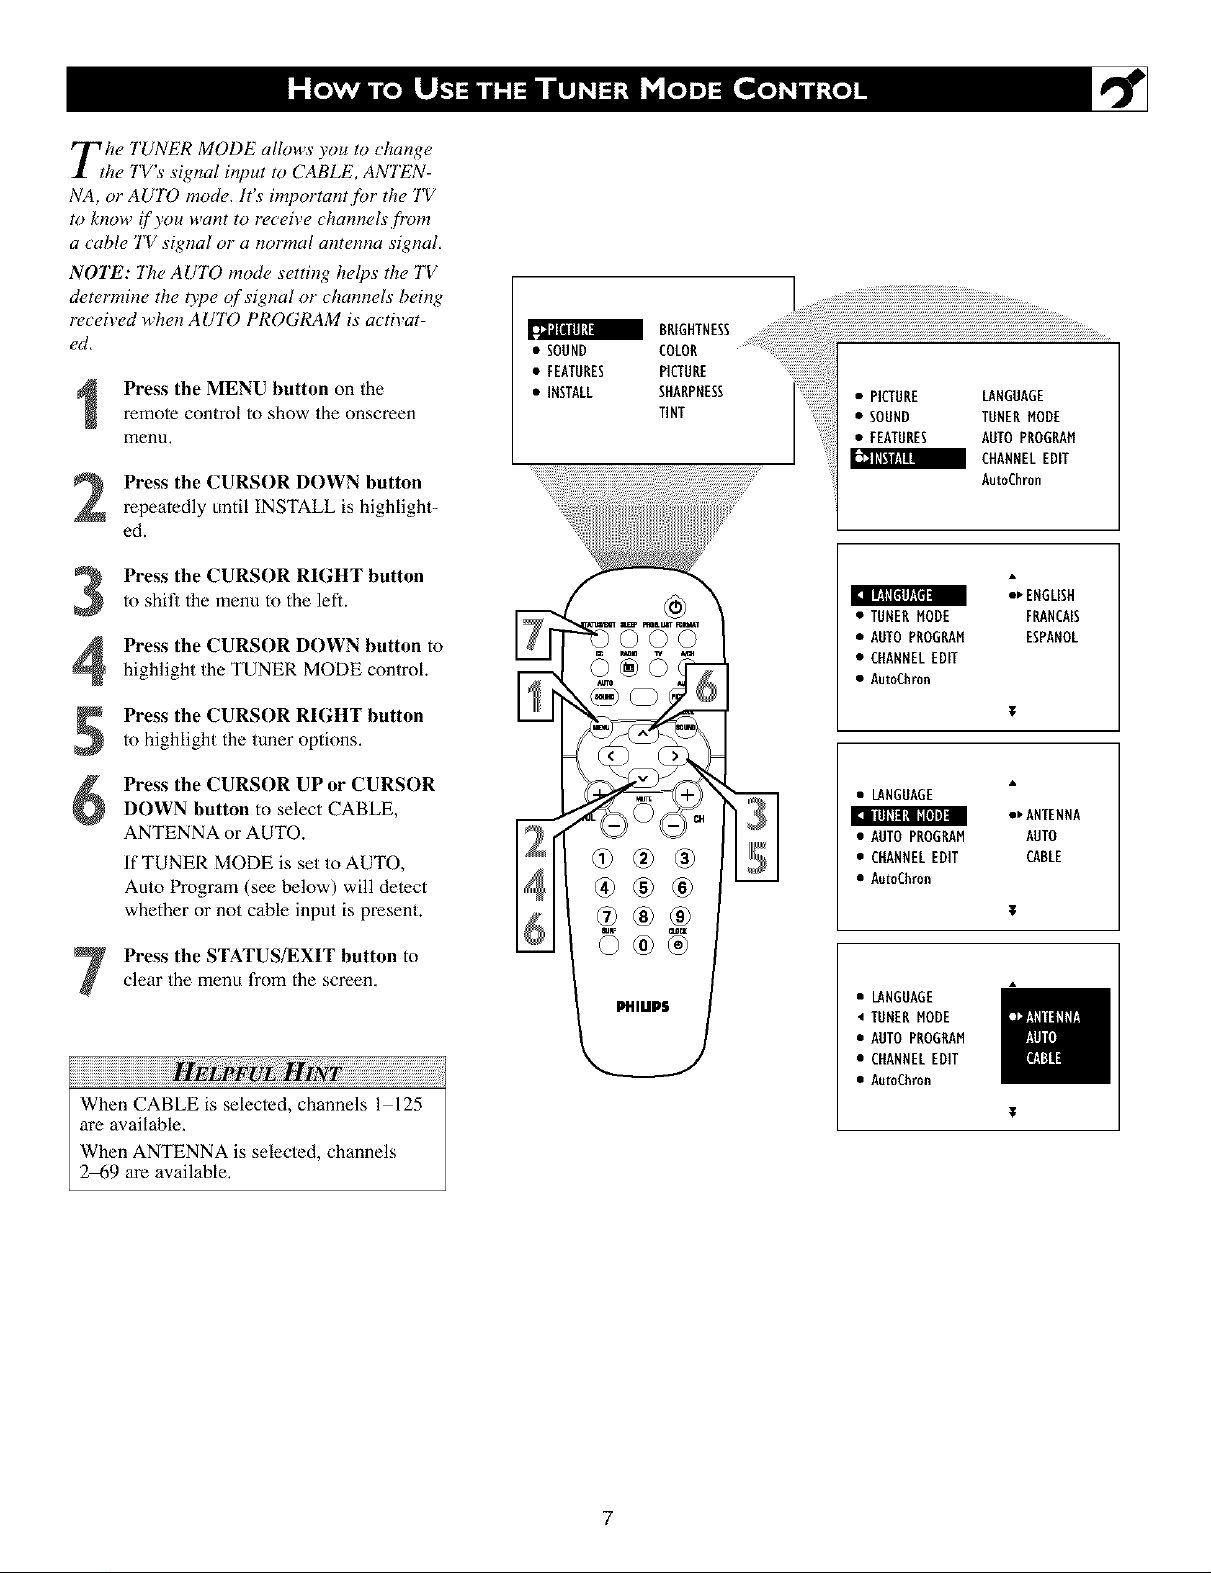
Tthe TUNER MODE allows you to change
he TV s siglzal input to CABLE, ANTEN-
NA, or AUTO mode,. It's" importa!_t for the TV
to know if you want to receive c halmels fr_)m
a cable TV sig!_al or a !_ormal a!_tenna signal,
NOTE: "l'tle AUTO mod¢_ setti!_g helps the TV
cl_,t¢_rmine the type qf signal or' chalmels being
received whe!_ AUTO PROGRAM is activat-
ed,
Press the MENU button on the
remote control to show the onscreen
menu,
Press the CURSOR DOWN button
repeatedly until INSTALL is highlight-
ed.
• FEATURES
• INSTALL
• SOUND #iiiilBEE
i!!i!!i!iiililililili iiiililili................
AutoChron
Press the CURSOR RIGHT buttonto shill the menu to the left.
Press the CURSOR DOWN button to
highlight the TUNER MODE control.
Press the CURSOR RIGHT buttonto highlight the tuner options.
Press the CURSOR UP or CURSOR
6
DOWN button to select CABLE,
ANTENNA or AUTO.
If TUNER MODE is set to AUTO,
Auto Program (see below) will delect
whether or not cable input is present.
clear the menu from the screen,
Press the STATUS/EXIT button to
When CABLE is selected, channels l 125
are available,
When ANTENNA is selected, channels
2_9 are available,
II[:IZE_lY._IrlI
• TUNERMODE FRANCAIS
• AUTOPROGRAM ESPANOL
• CHANNELEDIT
• AutoChron
• LANGUAGE
I_ illllll_l [_'[i]1]II
• AUTOPBOGRAM AUTO
• CHANNELEDIT CABLE
• Au_Chron
• LANGUAGE
• TUHEBMODE
• AUTOPBOGRAM
• CHANNELEDIT
• Au_Chron
_ ENGLISH
•_ANTENNA
7

Bmr TV can automatically set itse!f.f!>r
ocal area (ol- cable TV) channels, This
makes it easy f!)r you to select only the TV
stations in your area by pressing the CHAN-
NEL (+) ol- (-) button,
Press the MENU button on the
remote control to show the onscreen
menu,
Press the CURSOR DOWN button
repeatedly until INSTALL is highlight-
ed.
to shit_ the menu to the left. LAN-
Press the CURSOR RIGHT button
GUAGE will be highlighted.
Press the CURSOR DOWN button
repeatedly until the AUTO PROGf_,AM
control is highlighted.
Press the CURSOR RIGHT button
to start the Auto Program scanning of
channels.
• SOUND COLON
BRIGHTNESS i!i
• FEATURES PICTURE iiiiiiiiiiiiiiiiiiiiiiiiiiiiiiiiiiii;_
• INSTALL SHARPNESS • PICTURE LANGUAGE
TINT • SOUND TUNERMODE
• FEATURES AUTOPROGRAM
CHANNELEDIT
AutoEhron
INSTALL
_ ENGLISH
• TUNER MODE FRANCAIS
• AUTO PROGRAM ESPANOL
• CHANNELEDIT
• AutoCh_n
E
¥
clear the menu from the screen,
Press the STATUS/EXIT button to
Afler you've mn Auto Program, check out
the results. Press the CHANNEL (+) or (-)
button and see which channels you can
select.
Remember, an anlenna or cable TV signal
must first be connecmd to your TV (see
instructions for making connections wiihin
the Qui_k Use and Hookup Guide),
03®®
®®®
INSTALL
• LANGUAGE
• TUNENMODE
I_ !._lll[*! II!*I_l i!,.li
• CHANNEL EDIT
• AutoCh_n
i
INSTALL
• LANGUAGE
• TUNER MODE
AUTO PROGRAM
• CHANNELEDIT
• AutoCh_n
i I
*_SEANCH
T
8
CHANNEL EDIT makes it easy,ibr you to
add o1"delete channels,firm the list qf
channels stored in the TV's memo13,.
Press the MENU button on the remote
control to show the onscreen menu.
Press the CURSOR DOWN button
repeatedly until INSTALL is highlight-
ed.
shift the menu to the left. LANGUAGE
Press the CURSOR RIGHT button to
will be highlighted.
Press the CURSOR DOWN button
repeatedly until the CHANNEL EDIT
control is highlighted.
Press the CURSOR RIGHT button to
access the CHANNEL EDIT menu.
Press the CURSOR UP or CURSOR
DOWN button to scroll lhrough 1helist
of available channels. Or press 1henum-
ber buttons on your remote control to
select a specific channel (for example,
press 0 and then 2 to select channel 2).
With the channel you want lo edit selecl-
7
ed, press the CURSOR RIGHT button
to mark the channel as SKIPPED. "l_e
channel you've marked SKIPPED will
not appear when you are changing from
channel to channel while watching TV.
NOTE: When you want to add a channel that
has been marked SKIPPED, press the CUR-
SOR UP or CURSOR DOWN button to
highlight the channel; then press the CUR-
SOR RIGHT button to remove the word
SKIPPED.
STA_m_C]TSLJEpra_UST i
©©©©
INSTALL
I[1 II,.l[[ftllzId:l
• TUNERMODE FRANCAIS
• AUTOPROGRAM ESPANOL
• CNANNELEDIT
• AutoChron
g
INSTALL
• LANGUAGE
• TUNERMODE 2
• AUTOPROGRAM 3
[Iffz1_l_IIiIOli
• AutoChron 5
g
INSTALL
• LANGUAGE
• TUNERMODE
• AUTOPROGRAM
• CHANNELEDIT
• Au_Chron
I ¥
&
='ENGLISH
l
•_4
¥
The channels available for you to edit are the
ones that the AUTO PROGRAM feature
fimnd through a search of your TV antenna
or cable TV signals, Channels not found dur-
ing the search are marked SKIPPED.
INSTALL
• LANGUAGE
• TUNERMODE
• AUTOPROGRAM
CHANNELEDIT
• Au_Ch_n
I
T
9
A utoChFon _an automatt_ally set the TVs
l_Xonscreen clock, Because the time is
re_eived ti"om a broadcast signal, you must be
surc_that a cable TV o1"antenna signal is prc_s-
ent betbre you attempt to use the AutoChron TM
f_J_IIH1Y_,
Press the MENU button on the remote
to show the onscreen menu.
Press the CURSOR DOWN button
2
repeatedly until INSTALL is highlight-
ed.
Press the CURSOR RIGHT button to
shift the lnenu to the left. LANGUAGE
3
will be highlighted.
Press the CURSOR DOWN button
4
until the AutoChron control is highlight-
ed.
Press the CURSOR RIGHT button to
5
s/art the AutoChron TM feature. Then just
follow the onscreen instructions to set
the clock.
Press the CURSOR RIGHT button toselect AUTO. Within a few seconds, a
menu for choosing your time zone will
appear.
• SOUND COLON
• FEATURES PKTUUE
• INSTALL SUNUPNESS
TINT
@®®
3
• PICTURE LANGUAGE
• SOUND TUNER NODE
• FEATURES NDTO PROGILAN
m CHANNELEDIT
NSTALL
Ilgl|:II[_IF_NI
• TUNER NODE FUANCNIS
• AUTO PUOGI_N ESPANOL
• CNANNELEDIT
• AutoCNron
|
NSTNLL
• LANGUAGE
• TUNER NODE SEI TIME
• AUIO PUOGI_N
• CNANNEL EDIT
II_I_T!T_IIIT?II1
NSTNLL
• LANGUAGE
• TUNER NODE
• AUTO PUOGI_N
• CNANNEL EDIT
• AutoCNron
Nut0Chr0n
_[NGLISH
T
• _NDTO
NANDAL
Press the CURSOR UPor CURSORDOWN button to highlight your correct
time zone.
With your correct time zone high-
lighted, press the CURSOR RIGHT
button. Within a few seconds, you will
be given the option to choose whether
you want to select Daylight Savings
Time. If your time zone uses Daylight
Savings, select YES.
Enter your local PBS channel or any
local channel that transmitthe current
9
time, and press the CURSOR RIGHT
button to start the searching process. If
the AutoChron TM features finds the cur-
rent time you are done. If it doenot find
the current time, re-enter an o/her chan-
nel and search again.
w
When tinned ON, the AutoChron TM feature
can affect the start up of your lelevision,
When the power button is press and the
AutoChron TM feature is set to the AUTO
position, the TV will scan the channels tk)r a
PBS channel to set the clock automatically,
It may take SEVERAL seconds betbre the
TV Ix)wers itself ON,
iNSTALL
• LANGUAGE
• TUNERNODE
• AUTOPROGILAN
• CHANNELEDIT
• NutoCNron
INSTALL
• LANGUAGE
• TUNER NODE
• NUIO PfiOGl_N
• CHANNEL EDIT
• NutoCNron
INSTALL
• LANGDAO[
• TUNEU NODE
• AUTO PUOGNNN
• CHANNELEDIT
• AutoChron
NSTALL
• LANGUAGE
• TUNER NODE
• AUTO PUOGUAN
• CNANNELEDIT
• AutoCNron
INSTALL
• LANOUNGE
• TUNER NODE
• AUTO PNOGRAN
• CHANNEL EDIT
• AutoChro_
INSTALL
• LANGUAGE
• TUNER MODE
• AUTO PU06RNN
• CHANNELEDiT
AutoChro_
lO
T_w channel NAME,fi>ature allows you to list
he "call" letters qf your fin,orite stations
beside their channel numbers when the)"
appear on the screen. 77w TV has its memo O, a
list of the 50 most popular channel names (fi)r
example, ABC, NBC, FOX, etc.). Ybu also can
enter a custom name (up to five characters).
Tune to a specific channel that you want to
add a label to, then;
Press the MENU button on the remote
control to show the onscreen menu+
• SOUND COLOR
• FEATURES PICTURE
• INSTALL SHARPNESS
TINT
=;;;;l;;ii!!ii!!ilI ............;;;;;;;;;;;;;;;;;;;;;;;;;;;;;;;;.............
• PICTURE LANGUAGE
• SOUND TUNER MODE
• FEATURES AUTO PROGRAM
CHANNEL EDIT
AutoChron
Press the CURSOR DOWN button
repeatedly until INSTALL in highlight-
ed.
Press the CURSOR RIGHT button toshift the lnenu to the left. LANGUAGE
will be highlighte&
Press the CURSOR DOWN button
repeatedly until flae NAME conlrol is
highlighted.
Press the CURSOR RIGHT button to
highlight the NAME options area.
Press the CURSOR RIGHT button
again; then press the CURSOR UP or
CURSOR DOWN button to scroll
through a list of options for the first char-
acter (A lhroagh Z, 0 through 9)+ Press
the CURSOR RIGHT button and
repeal for the second, third, fourth, and
fiflh characlers
After you have selected a name for the
channel, press the MENU button to
save the name in the TV's memory+
Press the STATUS/EXIT button to
clear the menu from the screen.
iiiiiiiiiiiiiiiiiiiiiiiiiiiiiiiiiiiiiiiiiiiiiiiiiiiiiiiiiiiiiiiiiiiiiiiiiiiiiiiiiiiiiiiiiiii ! ii i ! iiiiiiiiiiiiiiiiiiiiiiiiiiiiiiiiiiiiiiiiiiiii¸
The five characters that the channel NAME
feature allows you to input can be letters, a
dash character, or the numbers 0 through 9,
®®®
PHItllil ..................
The Channel Label or NAME will appear /
when eve£ a channel ch_llge is n13de oF
when the STATUS/EXIT button is pressed.
INSTALL
[ II,.ll[(tl/zl(11
• TUNERMODE FRANCAIS
• AUTOPROGRAM ESPANOL
• CHANNELEDIT
• AutoChron
g
INSTALL
i
• TUNERMODE
• AUTOPROGRAM
• CHANNELEDIT
• AutoChron
I ill'Jill
INSTALL
• TUNERMODE
• AUTOPROGRAM
NNELEDIT
INSTALL
• TUNER MODE
• AUTO PROGRAM
• CHANNELEDIT
• Au_Chron
• NAME
:_ ENGLISH
¥
e_ PERSONAL
OR
1
11
_r_) a4just your TV picture controls, select a
ham+el and fiJllow these stu)s.
Press the MENU button on the
remote control to show the onscreen
menu, PtCTUP.E will be highlighted,
Press the CURSOR RIGHT and the
2
menu will shift to the left. BRIGHT-
NESS will be highlighted and an
adjustment bar will be shown to the
right.
Use the CURSOR LEFT or RIGHTto adjust the BRIGHTNESS level of
the picture,
After adjusting the BRIGHTNESS
control, press the CURSOR DOWN
to select another picture adjustment:
COLOR, PICTURE, SHARPNESS,
TINT, DNR, or CONTRAST +, Press
tile CURSOR LEFT or RIGHT to
adjust the selected control.
NOTE: The menu will show only five i/ems
at a time, so you will need to continue scroll-
ing with the CURSOR DOWN to adjust the
TINT, DNR, or CONTRAST +,
a BAIGHTNESS
• SOUND COLOR ......
• FEATURES PICTURE
• INSTALL SHARPNESS
TINT
©@©©
PICTURE •
ll|ll[ll[llilil"
• COLOR
• PICTURE
• SHARPNESS
• TINT
PICTURE •
• BRIGHTNESS
llllnl
• PICTURE
• SHARPNESS
R TINT
PICTURE •
• BRIGHTNESS
• COLOR
]lt[lllL
• SHARPNESS
TINT
remove the menu from the screen,
Press the STATUS/EXIT button to
Remember, when the bar scale is centered
, the control settings are at
normal, mid-range levels, Picture adjust-
ments are described here.
NOTE: The SHARPNESS and TINT
Controls will not be available for adjust-
ments when tuned to the CVI Inputs (CVI
Channel),
BRIGHTNESS adds or subtracts light
from the darkest part of the picture.
COLOR adds or eliminates color.
PICTURE improves the detail of the light-
est parts of the picture.
SHARPNESS improves the detail in the
)icture,
TINT adjusts the picture to obtain natural
skin tones.
DNR can help eliminale slightly "speck-
led" picture (an indication of signal noise in
the picture).
CONTRAST + helps to "sharpen" the
picture quality, The black Ix)rtions of the
)icture become richer in darkness and the
whites become brighler.
PICTURE •
• BRIGHTNESS
• COLOR
• PICTURE
• SHARPNESS
Illl
PICTURE i
• PICTURE
• SHARPNESS
• TINT
• DNR
[I[(O[IItTA_II ca N]N
PICTURE •
• BRIGHTNESS
• COLOR
• PICTURE
• TINT
I
PICTURE t
• COLOR
• PICTURE
• SHARPNESS
• TINT
-,+DHd ll][I
12
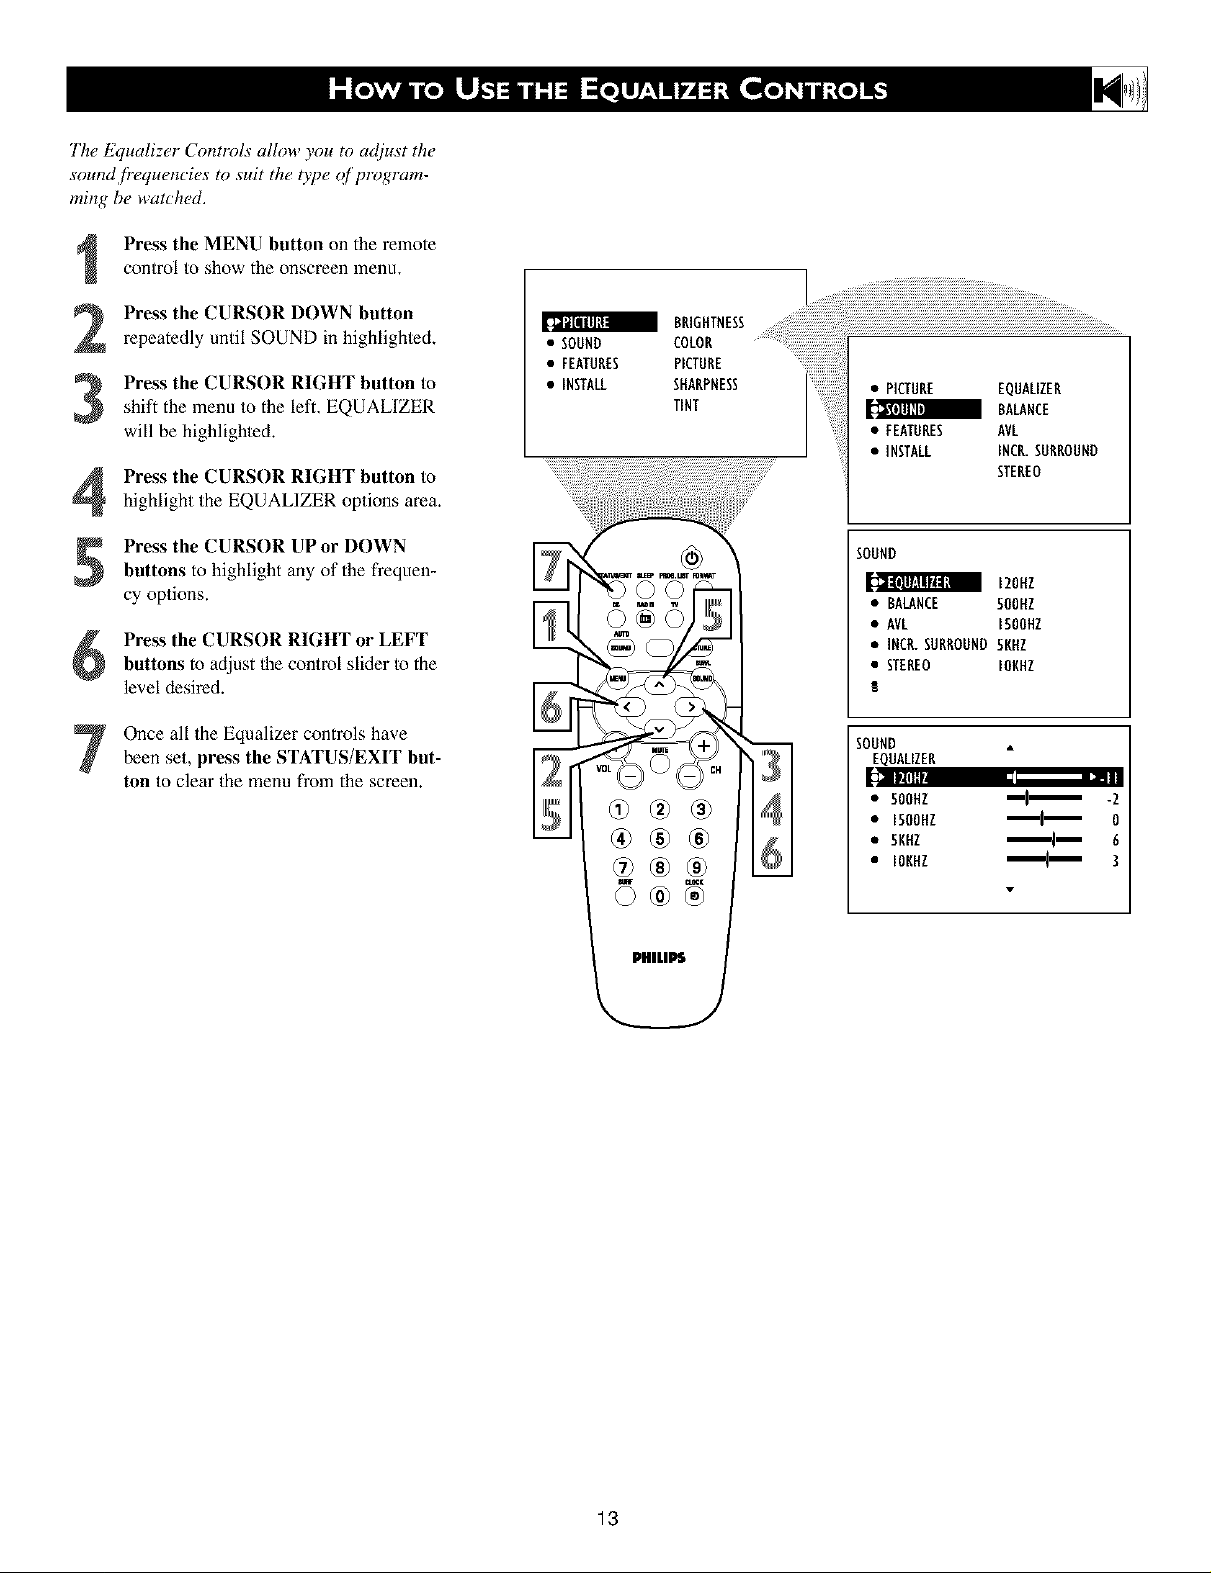
The Equalizer Contlvls allow you to adiust the
sound /?equencies to suit the type _f program-
ming be watched.
Press the MENU button on the remote
control to show the onscreen menu,
Press the CURSOR DOWN button
repeatedly until SOUND in highlighted.
S Press the CURSOR RIGHT button to
shift the menu to the left. EQUALIZER
will be highlighted.
Press the CURSOR RIGHT button to
highlight the EQUALIZER options area.
• SOUND
• FEATURES
• INSTALL
I {i{i{i{i{i{i{i{iillillillillillillillillillillillillillillillillillili{
COLOR
PICTURE
• PICTURE EQUALIZER
BALANCE
• FEATURES AVL
• INSTALL INCR.SURROUND
STEREO
Press the CURSOR UPor DOWN
buttons to highlight any of the frequen-
cy options.
Press the CURSOR RIGHT or LEFT
buttons to adjust the control slider to the
level desired.
Once all the Equalizer controls havebeen set, press the STATUS/EXIT but-
ton to clear the menu from the screen.
SOUND
120Nl
• BALANCE 500NZ
• AVL I50OHZ
• INCR.SURROUND 5NNZ
• STEREO IONHZ
SOUND
EQUALIZER
• 50OHZ _l_ -2
• 1500HZ _1_ 0
• 5KHZ '_i_ 6
• IONNZ 3
13
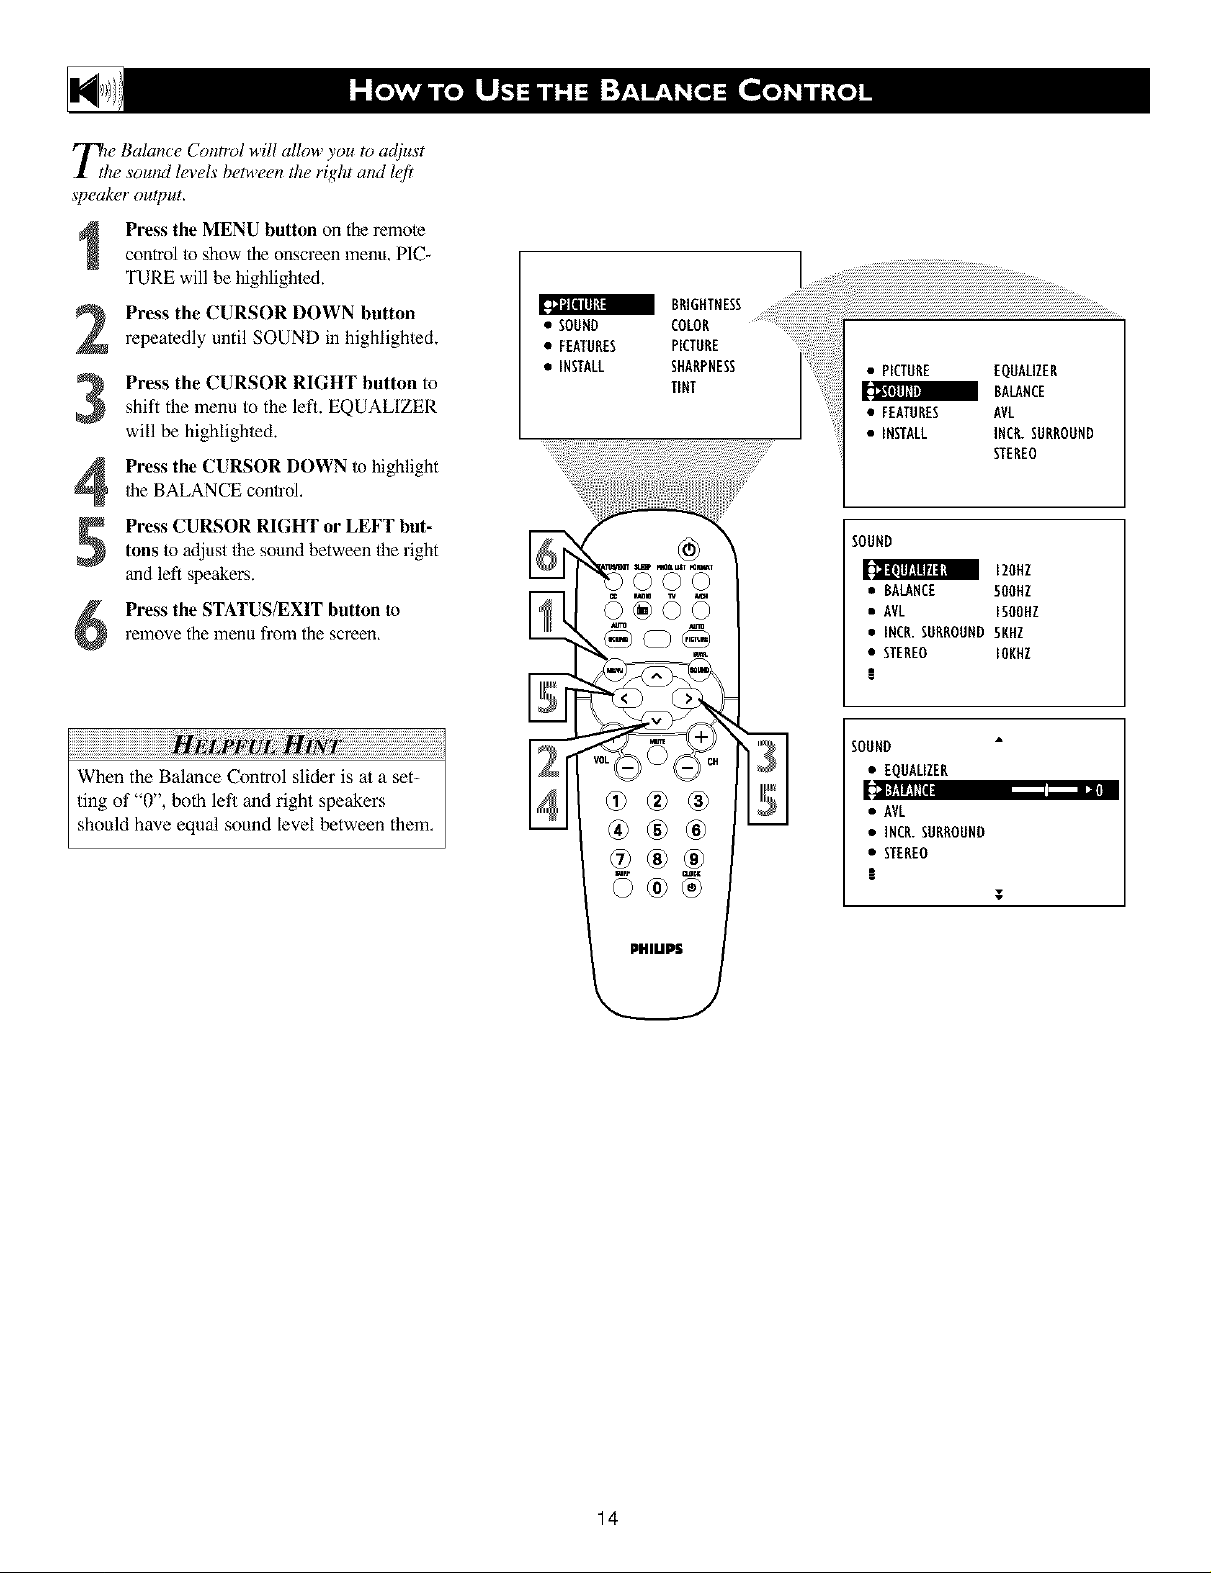
T_/e Balance Control will allow you to adjust
he soumt levels between the right and left
speaker ou&ut.
control to show the onscreen menu, PIC-
Press the MENU button on the remote
TURE will be highlighted.
Press the CURSOR DOWN button
repeatedly until SOUND in highlightecL
Press the CURSOR RIGHT button to
3
shift the menu to the left. EQUALIZER
will be highlighte&
Press the CURSOR DOWN to highlight
Ihe BALANCE control,
4
• SOUND COLOR ............................................
• FEATURES PICTURE
• iNSTALL SHARPNESS
BRIGHTNESS
• PICTURE EQUALIZER
TINT
• FEATURES AVL
• INSTALL INCR.SURROUND
BALANCE
STEREO
Press CURSOR RIGHT or LEFT but-
tons to adjust lhe sound between the right
and left speakers.
<5 <5<5
relnove the menu from the screen,
Press the STATUS/EXIT button to
iiiiiiiiiiiiiiiiiiiiiiiiiiiiiiiiiiiiiiiiiiiiiiiiiiiiiiiiiiiiiiiiiiiiiiiiiiiiiiiiiiiiiiiiiiiii !i !i !i
When the Balance Control slider is at a set-
ting of "0", both left and right speakers
should have equal sound level between them,
®®®
SOUND
120HZ
• RALANCE 500HZ
• AVL ISOOHZ
• INCR.SURROUND 5KHZ
• STEREO IOKHZ
l
SOUND
• EQUALIZER
[cI];fd|dtI8 - •
• AVL
• INCR.SURROUND
• STEREO
!
T
<;
14
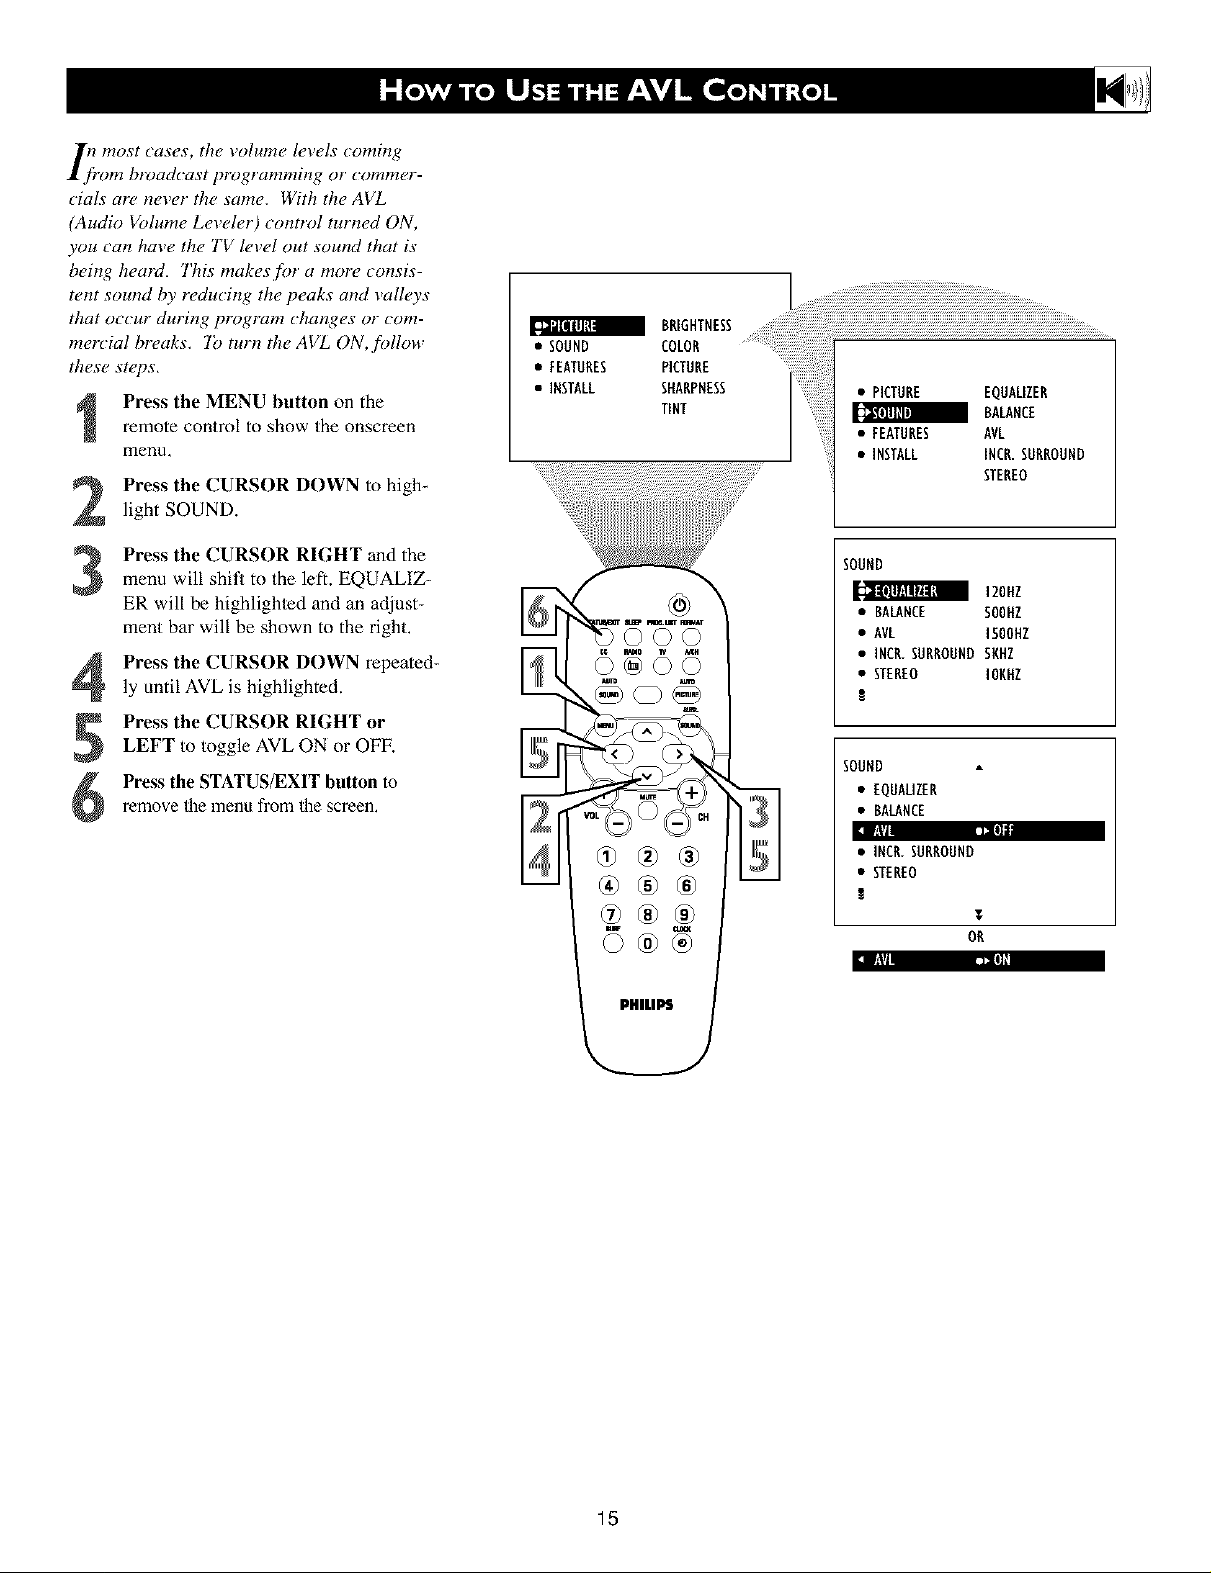
I_i+ most _ases, the volume levels coming
om broadcast programming or commer-
cials arc, never the same, With the AVL
(Audio Volume Le_eh, r) control turned ON,
you can have the TV level out sound that is
being heard, This makes f!)r a more _onsis-
t_mt sound by reducing the peaks and valh, ys
that occur during program _hanges or _om-
inertial breaks. "lb turn the AVL ON, follow
these steps,
Press the MENU button on the
remote control to show the onscreen
menn,
Press the CURSOR DOWN to high+
light SOUND.
• SOUND COLOR
BRIGHTNESS
• FEATURES PICTURE
• INSTALL SHARPNESS
TINT
• PICTURE EQUALIZER
BALANCE
• FEATURES AVL
• iNSTALL INCR.SURROUND
STEREO
Press the CURSOR RIGHT and the
menu will shit_ to the left. EQUALIZ-
ER will be highlighted and an adjust-
ment bar will be shown to the right.
Press the CURSOR DOWN repeated-
ly until AVL is highlighted.
Press the CURSOR RIGHT or
5
LEFT to toggle AVL ON or OFF.
Press the STATUS/EXIT button to
remove the menu fi'om the screen.
6
SOUND
120NZ
• BALANCE SOONZ
• AVL 150OHZ
• INCR.SURROUNDSKHZ
• STEREO IOKNZ
!
SOUND
• EQUALIZER
• BALANCE
:1_ i--->
• INCR.SURROUND
• STEREO
1
T
OR
15

e Incredible Surround feature adds
rearer dapth and dimension to both mon-
aural (MONO) and sterao TV sound, With
the _ontrol set to INCR, SURROUND
(ln_redibh_ Surround), the TV's speak_rs can
add e_en wid_r sound separation to normal
broadcasts.
remote control to show the onscreen
Press the MENU button on the
menu,
Press the CURSOR DOWN to high-
light SOUND.
Press the CURSOR RIGHT and the
menu will shit_ to the left, EQUALIZ-
ER will be highlighted and an adjust-
ment bar will be shown to the right.
Press the CURSOR DOWN repeated-
ly until INCR. SURROUND is high_
lighted. (Incredible Surround)
Press the CURSOR RIGHT or
LEFT to toggle the INCR, SUR-
P,OUND control settings.
If signal is Stereo: Select STEREO, or
INCP,. SURP, OUND,
If signal is MONO: Select MONO, or
SPATIAL.
Press the STATUS/EXIT button to
relnove the menu from the screen.
Yoll can also change the INCR. SUR-
ROUND onscreen menu control set-
tings by pressing the SURR. (sur-
round) SOUND button on the remote
control,
• SOUND COLOR
BRIGHTNESS
• FEATURES PICTURE
• INSTALL SHARPNESS
TINT
©©©
iii
• PICTURE EQUALIZER
BALANCE
• FEATURES AVL
• INSTALL INCR.SURROUND
STEREO
SOUND
IZOHZ
• BALANCE 50OHZ
• AVL 1500UZ
• INCR.SURROUND 5KHZ
• STEREO IONUZ
!
If STEREO:
SOUND
• EQUALIZER
• BALANCE
• AVL
II1111li!ll_ll{lllhllll I:llll_II_ll.11lll_tllll
• STEREO
!
T
OR
IllIl_l 111111_tlllllbi La,lilllLtil
IF MONO:
:i IIIIILI t.IIIIILOIlIIIi _lill
OR
:i IIIIl_l t.11111_{lllllliJ Jii'ii/,.llh
17171717171717171111¸¸
SPATIAL widens the sound, simulating a
broader, fuller sound,
INCR. SURROUND widens the sound,
simulating a broader, fuller sound.
16
 Loading...