

Magnavox 20MF605T/17, 15MF605T/17 Owner’s Manual

NEED HELP?CALL us!
MAGNAVOX REPRESENTATIVES ARE READY TO HELP YOU WITH
ANY QUESTIONS ABOUT YOUR NEW PRODUCT, WE CAN GUIDE
YOU THROUGH CONNECTIONS, FIRST-T{ME SETUP, AND ANY OF
THE FEATURES, WE WANT YOU TO START ENJOYING YOUR NEW
PRODUCT RIGHT AWAY,
CALL US BEFORE YOU CONSIDER RETURNING THE PRODUCT.
t-800-70S-2000
OR VISIT US ON THE WEB AT WWW, MAGNAVOX, COM
3!38 155 23432
Registering your model with MAGNAVOX makes you eligible for all of the valuable benefits listed
below, so don't miss out, Complete and return your Product Registration Card at once to ensure:
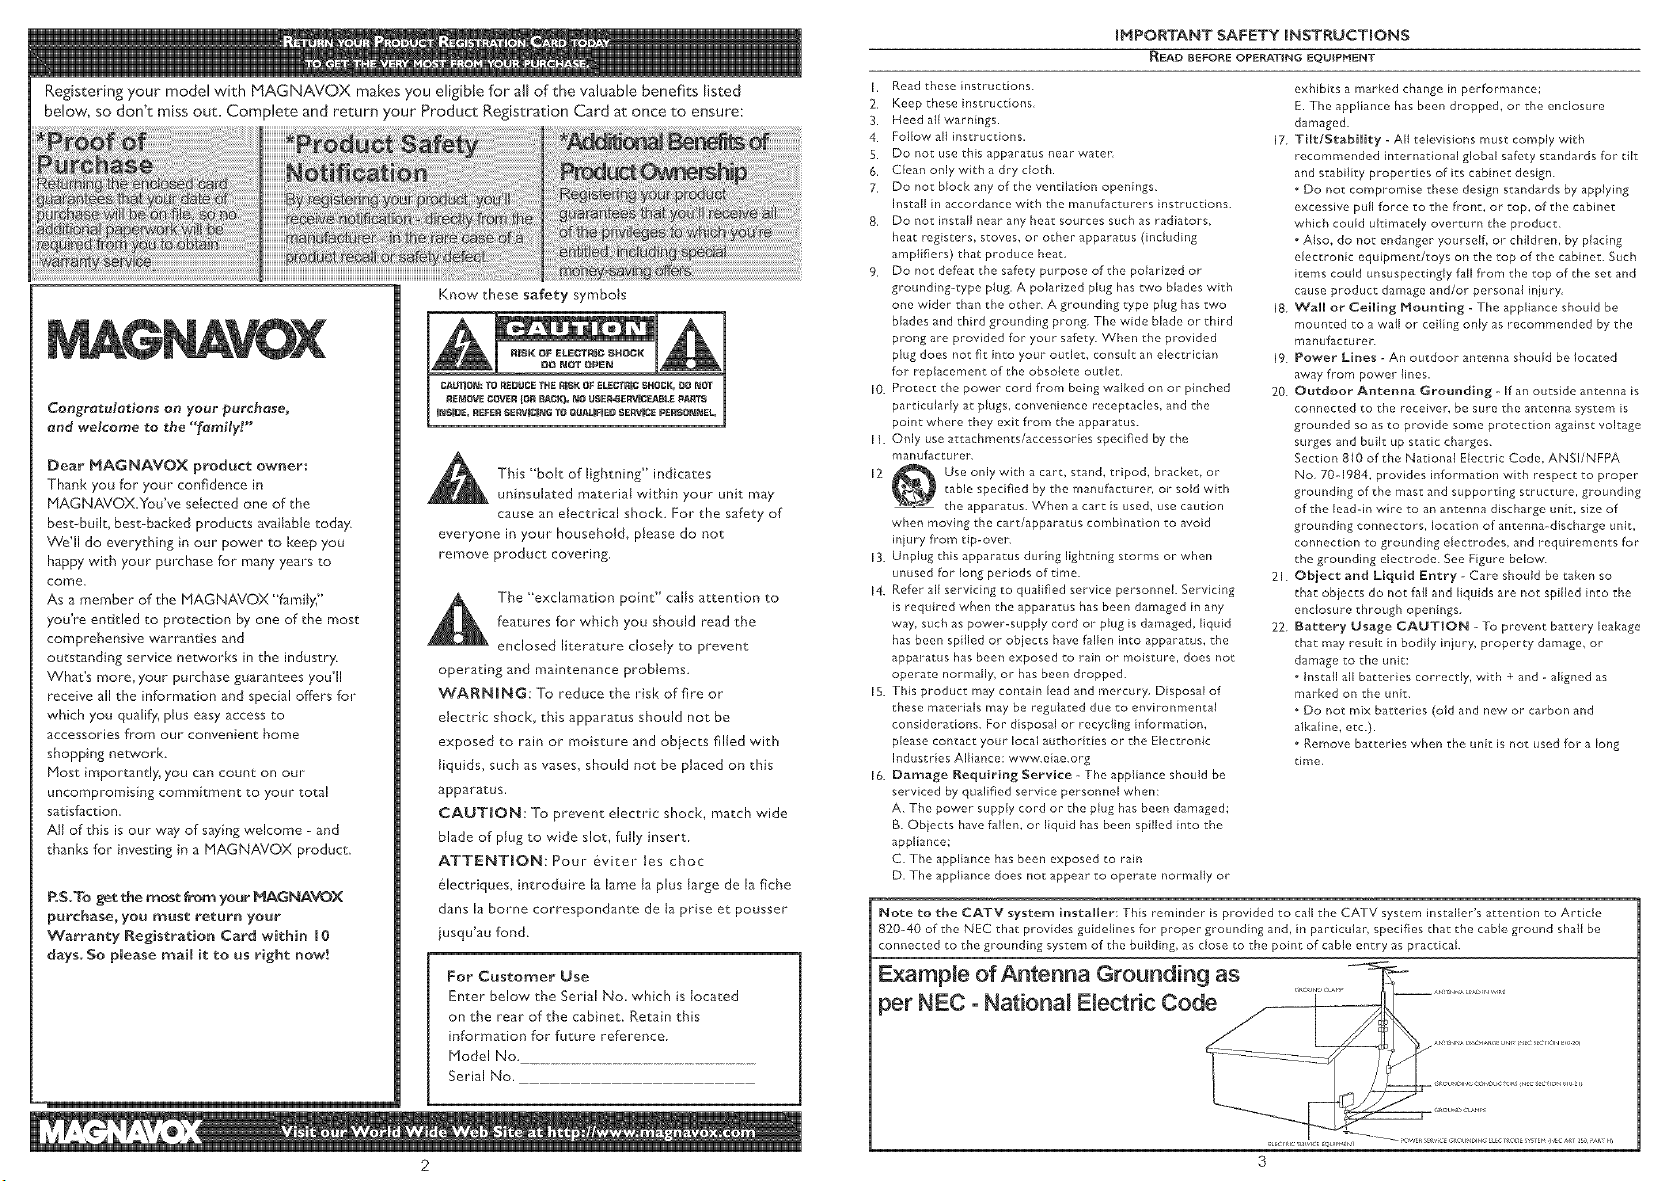
Know these safety symbols
Cengretuletlens on your purchnse,
end welcome to the "fernilyt"
Dear MAGNAVOX product owner:
Thank you for your confidence in
MAGNAVOXJou've selected one of the
best-built, best-backed products available today.
\_/e'll do everything in our power to keep you
happy with your purchase for many years to
come,
As a member of the PfAGNAVOX '%miJy."
you're entided to protection by one of the most
comprehensive warranties and
outstanding service networks in the industry.
\_'/haEs more, your purchase guarantees you'll
receive all the information and special offers for
which you qualify, plus easy access to
accessories from our convenient home
shopping network.
Most importantly, you can count on our
uncompromising commkcment to your total
satisfaction.
All of this is our way of saying welcome - and
thanks for investing in a !'4AGNAVOX product.
P.S.To get the mo_t from your MAGNAVOX
purchase, you must return your
Warranty Registration Card within J0
days. So please mail it to us right now!
_l his "bolt of lightning" indicates
uninsulated material within your unit may
cause an electrical shock. For the safety of
everyone in your household, please do not
remove product covering.
,_The "exclamation point" calls attention to
features for which you should read the
enclosed literature closely to prevent
operating and maintenance problems.
WARNING: To reduce the risk of fire or
electric shock, this apparatus should not be
exposed to rain or moisture and objects filled with
liquids, such as vases, should not be placed on this
apparatus.
CAUTION: To prevent electric shock, match wide
blade of plug to wide slot, fully insert.
ATTENTION: Pour &viter tes choc
&lectriques, introduire la lame ta plus large de la fiche
dans la borne correspondante de ta prise et pousser
iusqu'au fond.
For Customer Use
Enter below the Serial No. which is located
on the rear of the cabinet. Retain this
information for future reference.
Model No.
Serial No.
IMPORTANT SAFETY INSTRUCTmONS
READ BEFORE erECTiNG EQUIPMENT
Read these instructions.
I.
2.
Keep these instructions,
3.
Heed all warnings.
4.
Foiler€ all instructions.
5.
Do not use this apparatus near water
6.
C_ean only with a dry cloth.
7,
Do not block any of the vendhdon openings.
Install in accordance with the manufacturers instructions.
Do not install near any heat sources such as radiators,
heat registers, stoves, or other apparatus (including
amplifiers) that produce heat,
Do not defeat the safety purpose of the polarized or
grounding-type plug. A polarized plug has two blades with
one wider than the other. A grounding type plug has two
blades and third grounding prong. The wide blade or third
prong are provided for your safety. When the provided
plug does not fit into your outlet, consult an electrician
for replacement of the obsolete outlet,
Protect the power cord from being walked on or pinched
particularly at plugs, convenience receptacles, and the
point where they exit from the apparatus.
II.
Only use attachments/accessories specified by the
manufacturer
12
13.
14.
Note to the CATV system installer: This reminder is provided to call the CAI V system installer's attention to Article
820-40 of the NEC that provides guideEines for proper grounding and, in particular, specifies that the cable ground shall be
connected to the grounding system of the building, as Bose to the point of cable entry as practicak
Use only with a cart, stand, tripod, bracket, or
table specified by the manufacturer, or sold with
the apparatus. When a cart is used, use caution
when moving the cart/apparatus combination to avoid
injury frorn tip-over.
Unplug this apparatus during lightning storms or when
unused for long periods of time.
Refer BI servicing to qualified service personnel Servicing
is required when the apparatus has been damaged in any
way, such as power-supply cord or plug is damaged, liquid
has been spilled or objects have fallen into apparatus, the
apparatus has been exposed to rain or moisture, does not
operate normally, or has been dropped.
This product may contain lead and mercury, Disposal of
these materials may be regulated due to envh*onmentB
considerations. For disposal or recycling information,
please contact your local authorities or the Electronic
h_dustries Alfiance: www.eiae.org
Damage Requiring Service - The appliance should be
serviced by qualified service personnel when:
A. The power supply cord or the plug has been damaged;
B. Objects have fallen, or liquid has been spilled into the
appliance;
C. The appliance has been exposed to rain
D, The appliance does not appear to operate normally or
exhibits a marked change in performance;
E. The apphance has been dropped, or the enclosure
damaged.
17. TUtfgtabiUty -AI[ televisions must comply with
recommended international global safToy standards for tilt
and stability properties of its cabinet design.
• Do not compromise these design standards by applying
excessive pull force to the front, or top, of the cabinet
which could ultimately overturn the product.
• Also, do not endanger yourseff, or children, by placing
electronic equipment/toys on the top of the cabinet. Such
items could unsuspecdngly fall from the top of the set and
cause product damage and/or personal iniury,
18. Wall or CeUing Mounting - The appliance should be
mounted to a wall or ceiling on_y as recommended by the
manufacturer
19. Power Lines - An outdoor antenna should be located
away from power {inns.
20. Outdoor Antenna Grounding - If an outside antenna is
connected to the receiver, be sure the antenna systePf] is
grounded so as to provide some protection against voltage
surges and built up static charges.
Section 810 of the National Electric Code, ANSI/NFPA
No, 70-1984, provides information with respect to proper
grounding of the mast and supporting structure, grounding
of the lead-in wire to an antenna discharge unit, size of
grounding connectors, location of antenna discharge unit,
connection to grounding electrodes, and requirements for
the grounding electrode. See Figure below.
21. Object and Liquld Entry _ Care should be taken so
that obiects do not fB[ _nd liquids _re not spilled into the
enclosure through openings.
22. Battery Osage CAUTION - To prevent battery leakage
that may result in bodily in}ury, property damage, or
damage to the unit:
• Install all batteries correctly, with + and - aligned as
marked on the unit.
• Do not mix batteries (old and new, or carbon and
alkaline, etc.).
• Remove batteries when the unit is not used for a long
time,
Example of Antenna Grounding as -_ _-
)er NEC - National Electric Cod ......... *_.......
3
Introduction
VVelcome/Registration of Your TV ............ 2
IMPORTANT SAFETY INSTRUCTIONS ...... 3
Table of Content 4
[] Getting Started
Before h]stallation .......................... 5
Installing LCD TV on the wall ................... 5
Basic TV and Remote Control Operations ...... 6
Remote Control ................................... 7
Antenna Connection 8
Basic Cable TV Connection 8
Cable Box Connections 9
Audio/Video Input Connections ............. 10
S-Video Connections .......................... ! !
Component (YPbPr) Connections .......... 12
PC (Monitor) Connection !3
trista[[ Neriu
Language Settings 14
Tuner Mode Control ..................... IS
Auto Program (Setting Up Channels) ............. 16
Channel Edit Control (To Add or Delete channels) 17
Factory Reset 18
Smart Picture arid Smart Sourid
Smar t Picture Control .............. 19
Srnart Sound Control !9
Picture Neriu
TV Picture Menu Controls 2.0
Sourid Neriu
TV Sound Menu Controls 21
Here are a few of the special features of your new LCD
TV
Audio/Video Iri Jacks: Use to quickly connect other
equipment to your LCD TV.
Automatic Chaririel Programmirig (Auto Program):
Quick and easy setup of available channels.
Closed Captioriing: Allows the viewer to read TV
program dialog or voice conversations as on-screen text.
Ori-screeri Merius: Helpful messages (in English, Spanish,
or French) for setting TV controls.
Remote Control Works your LCD TV features.
Sleep Timer: Turns off the LCD TV within an arnount
of time you specify (15-240 minutes frorn the current
time).
AutoLock: Lets you block viewing of certain TV
channels if you do not want your children viewing
inappropriate material
Staridard broadcast (VHF/UHF) or Cable TV
chaririel
capability
Stereo capability: Includes a built-in amplifier and
twin-speaker system, allowing reception of TV programs
broadcast in stereo
Treble, [Bass, arid Ba[arice: Enhance the LCD TV's
sound.
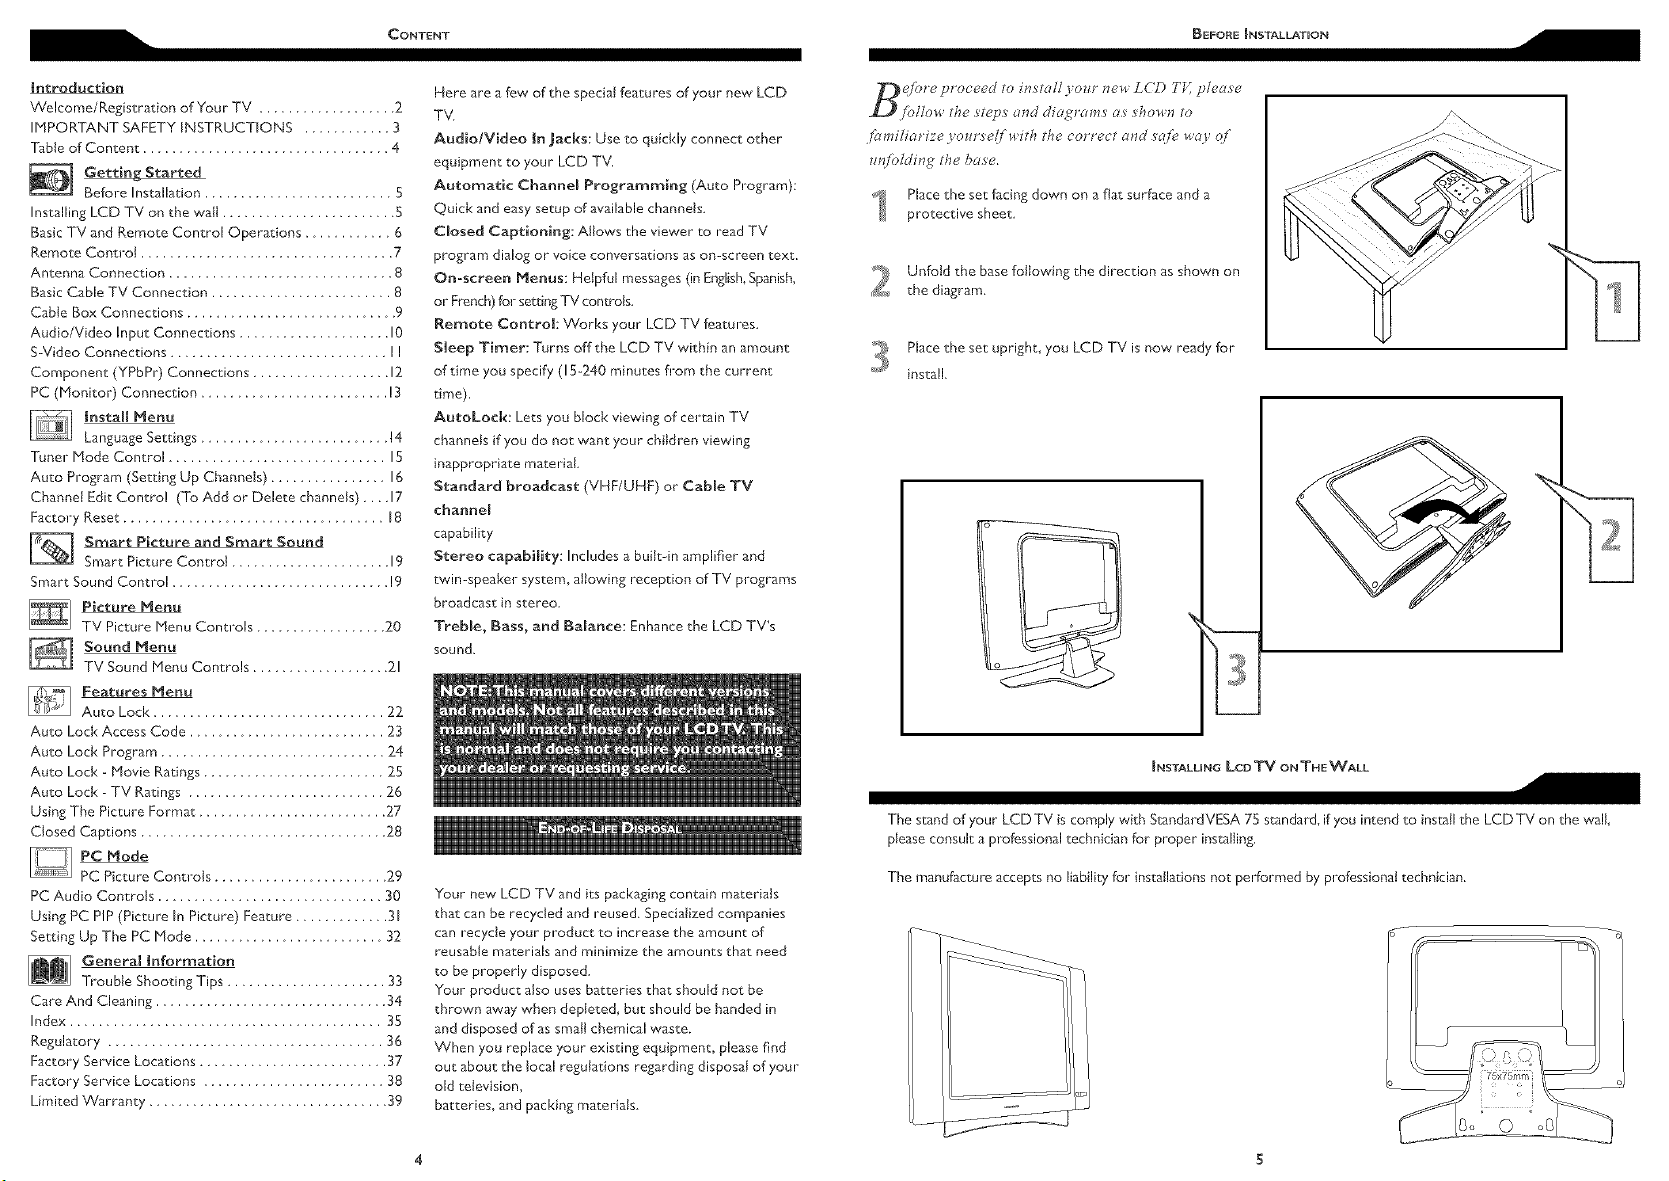
e/ore proceed to inrtall yo_u" new LCD TI [ please
/ollow the s'tepr and diagrums <a_ s'howt7 to
_alriUiat ize youl:YeU ri,ith the correct and _q[e wa) q_
w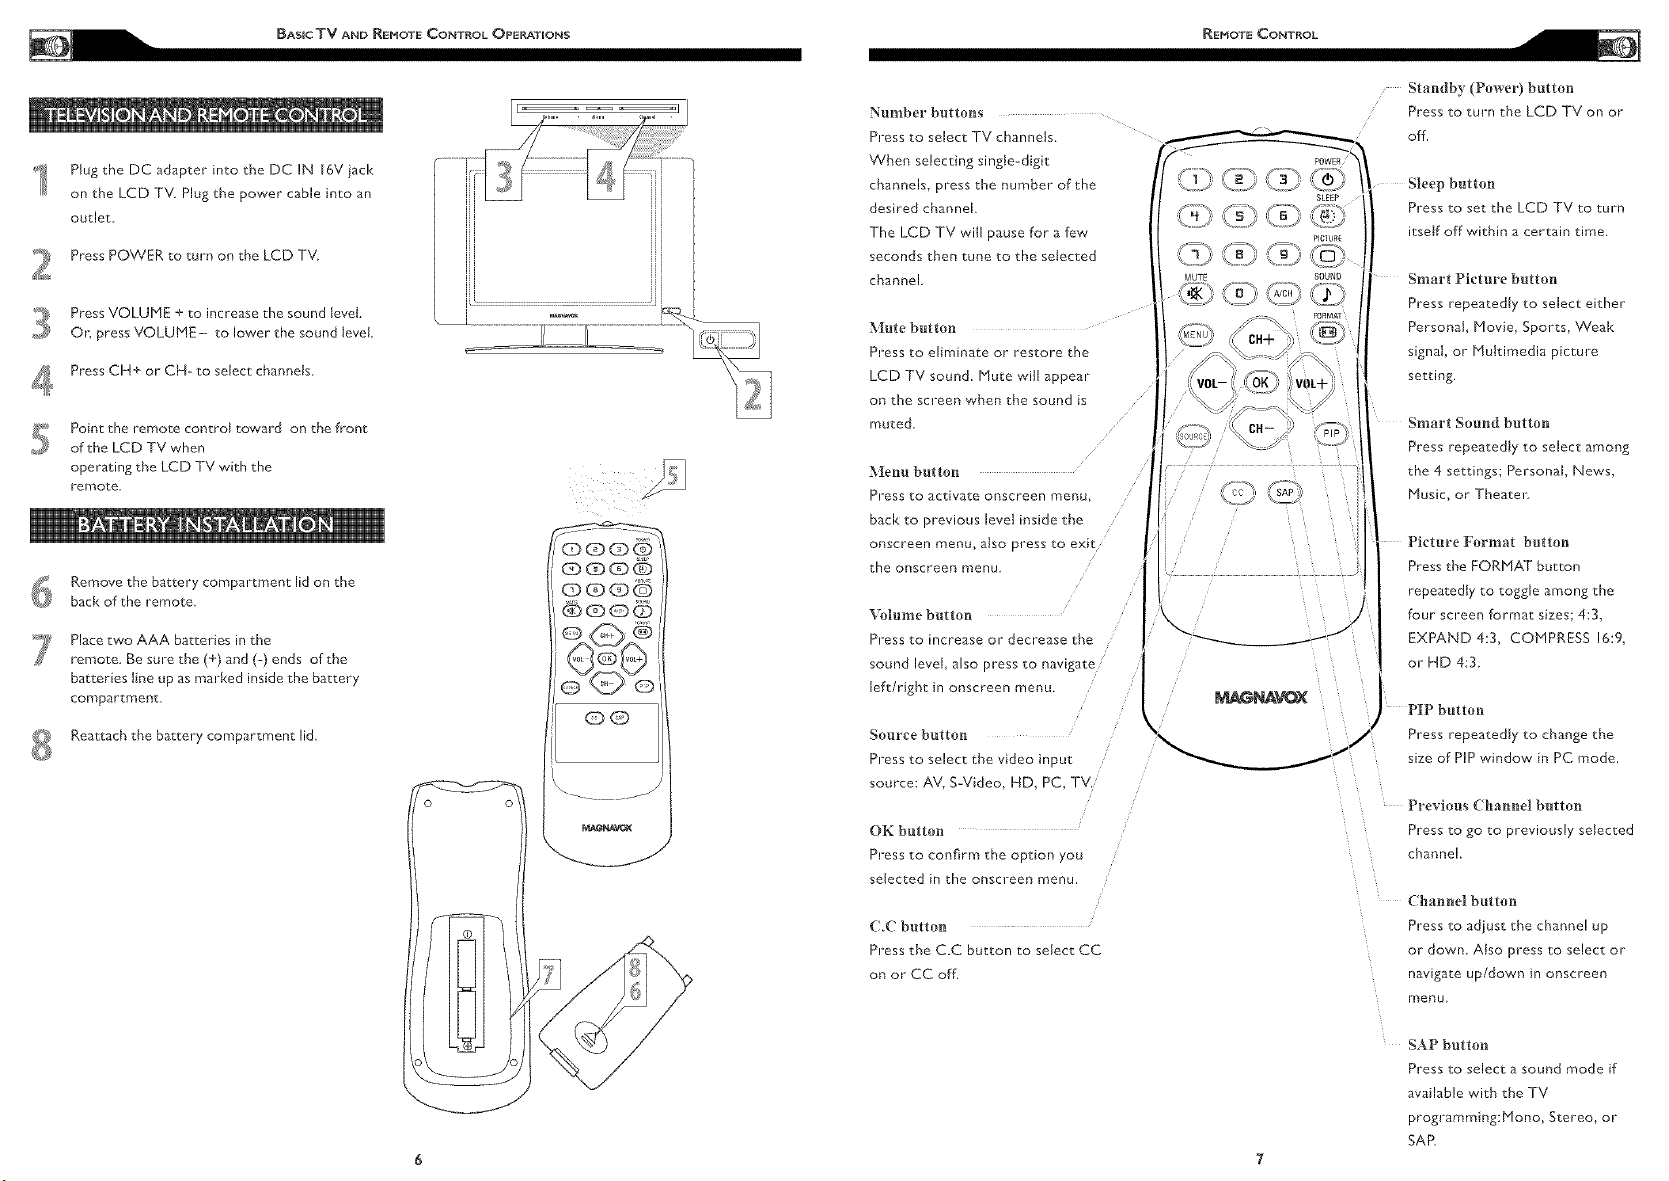
Plug the DC adapter into the DC IN 16Viack
on the LCD TV Plug the power cable into an
outlet
Press POWER to turn on the LCD TV
Press VOLUME + to increase the sound level.
On press VOLUME- to lower the sound level
Press CH+ or CH- to select channels
4
Pointthe remote controltoward on the front
of the LCD TV when
operating the LCD TV with the
rernote
Remove the battery compartment lid on the
6
back of the remote.
Place two AAA batteries in the
7
remote. Be sure the (+) and (-) ends of the
batteries line up as marked inside the battery
compartment,
Reattach the battery compartment lid.
8
.......... ,,_ ZZZZZ Z:::............
@(3::)@@
QQ
0 0
Nuulber buttous
Press to select TV channeis.
"When selecting single-digit
channels, press the number of the
desired channel.
The LCD iV will pause for a few
seconds "then tune to the selected
channel
_ute buttou
Press to eliFninate or restore the
LCD TV sound. Mute will appear
on the screen when the sound is
muted
_euu button
Press to activate onscreen menu,
back to previous level inside the
onscreen menu, also press to exit
the onscreen menu
%_lu_Je buttou
Press to increase or decrease the
sound level also press to navigate
left/right in onscreen menu.
Source butteu
Press to select the video input
source: AV, S-Video, HD, PC, TV.
OK buttou
Press to confirm the option you
selected in the onscreen menu.
C.C button
Press the C.C button to select CC
on or CC off.
Standby (Pov_er) button
Press to turn the LCD TV on or
off.
Sleep buttou
Press to set the LCD TV to turn
itself off within a certain time
Smart Picture butteu
Press repeatedly to select either
Personal, Movie, Sports, Weal<
signaI, or Multimedia picture
setting.
Smart Souud buttou
Press repeatedJy to select among
the 4 settings; Personal News,
Music, or Theatel:
Picture Forruat buttou
Press the FORMAT button
repeatedly to toggle among the
four screen format sizes; 4:3,
EXPAND 4:3, COMPRESS 16:9,
or HD 4:3
/
buttnu
Press repeatedJy to change the
size of PIP window in PC mode.
Previous Chauuel butteu
Press to go to previously seJected
channel.
Chauuel button
Press to adjust the channel up
or down. Rise press to select or
navigate up/down in onscreen
menu
L_J
• j
SAP buttnu
Press to select a sound mode if
available with the TV
programming:Mono, Stereo, or
SAR
}b_n" con_eetion is eas) becalts'e there i_ only o_e 75
(2(obrn) ante_m_ jack on the back qf l'our T_[ and tbat'_
_d_ere the antenna goe_
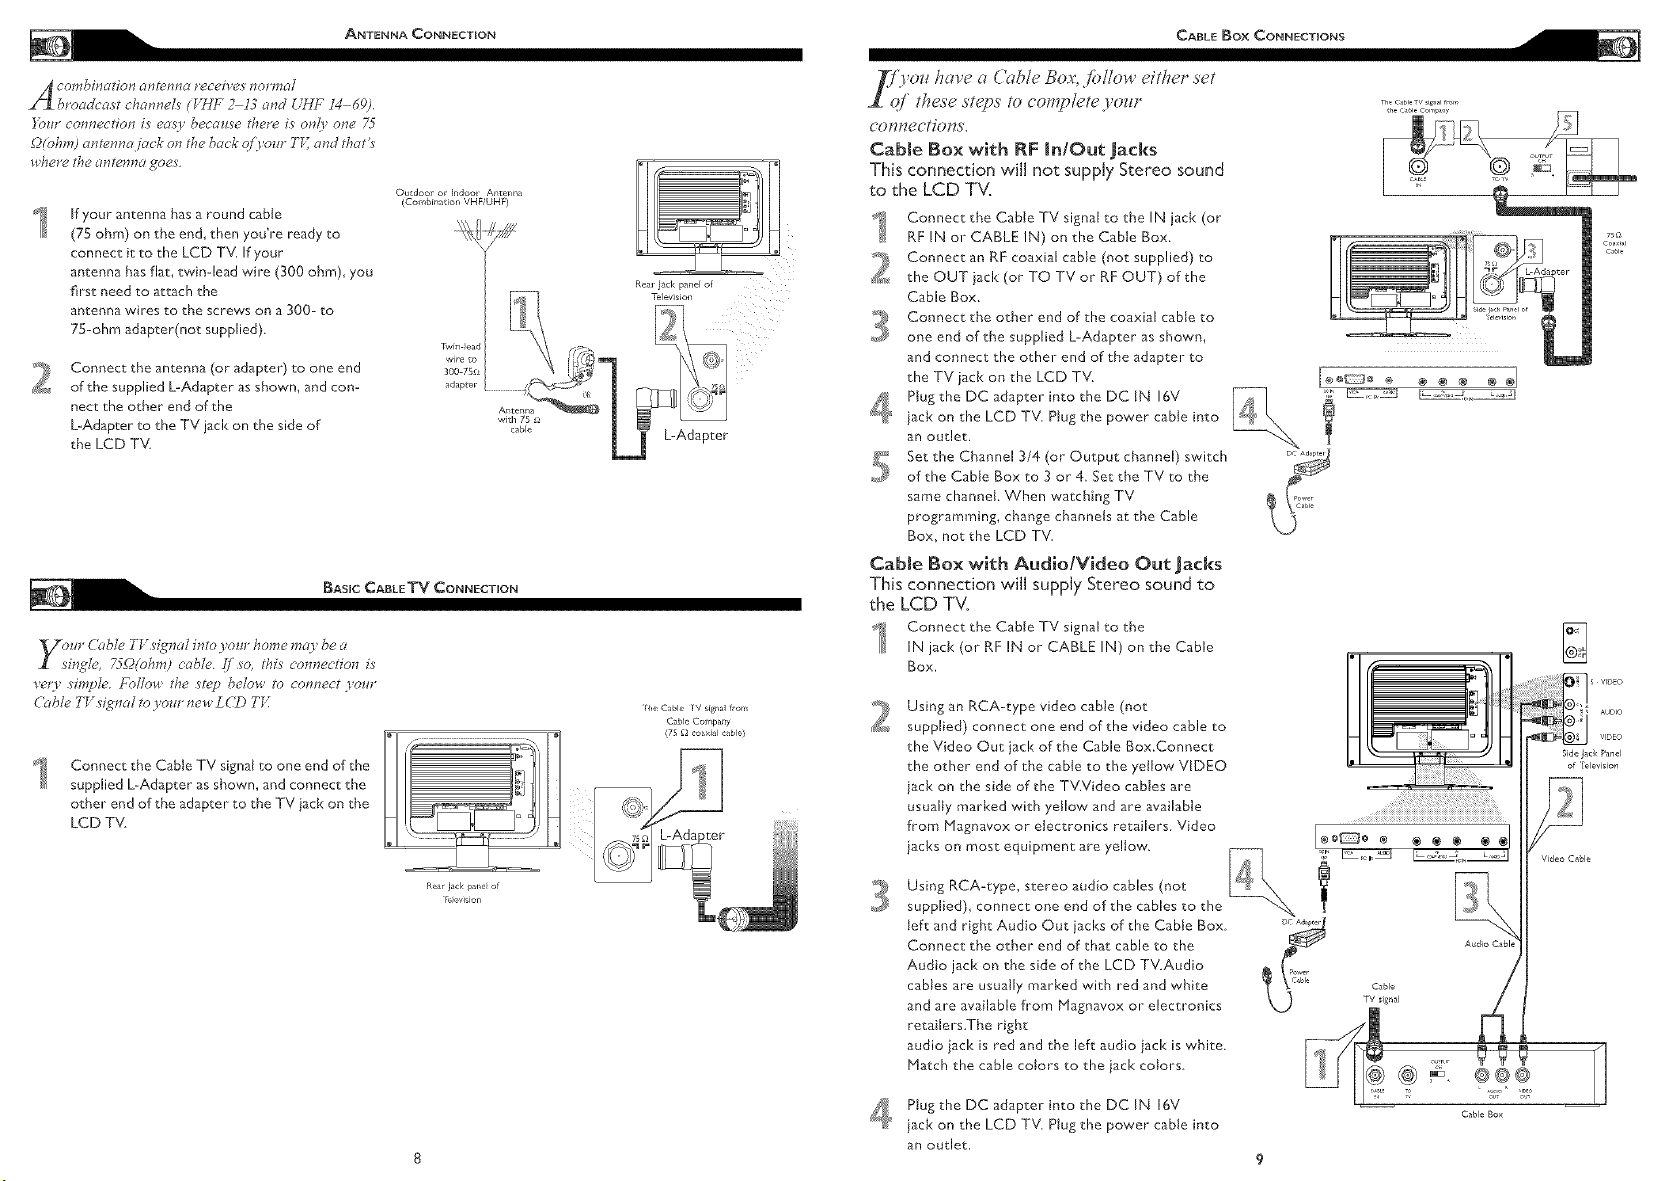
If your antenna has a round cabte
(75 ohm) on the en& then you're ready to
connect it to the LCD TV. If your
antenna has flat, twin-lead wire (300 ohm)_ you
first need to attach the
antenna wires to the screws on a 300- to
7S-ohm adapter(not supplied)
Connect the antenna (or adapter) to one end
of the supplied L-Adapter as shown, and con-
nect the other end of the
L-Adapter to the TV jack on the side of
the LCD TV
mr dk_ble TU dgnal into yoln" home may be a
_ingle', 75_(ohm) cable _S[_o, thi_ connection is
very s'imple b_lloH the s'tep below _o compeer yore"
( 2_ble TU _'igm_l to 3our new L CD Tl f
Connect the Cable TV signal to one end of the
supplied L-Adapter as shown, and connect the
other end of the adapter to the TV iack on the
LCD TV
Outdoor or [ndool Antenn_
(Combination VHFIUHF)
Rear jack p_ne[ of
_bl_ L_ L-Adapter
the C,_ble ]V sfgnal flora
Czble Company
(75 _) coaxial came)
') _ have _ ('able Box, <ibllow either set
• these steps to conLnlete),our
col_tTecHol_s,
Cable Box with RF InlOut jacks
This connection will not supply Stereo sound
to the LCD TV.
Connect the Cable TV signal to the IN jack (or
BF IN or CABLE IN) on the Cable Box.
Connect an RE coaxial cable (not supplied) to
the OUT iack (or TO TV or RE OUT) of the
Cable Box.
Connect the other end of the coaxial cabJe to
one end of the supplied L-Adapter as shown,
and connect the other end dthe adapter to
the TV jack on the LCD TV.
1' Ptug the DC adapter into the DC IN 16V
iack on the LCD TV. Plug the power cable into
an outlet.
Set the Channel 3/4 (or Output channel) switch
of the Cable Box to 3 or 4. Set the TV to the
same channel When watching TV
programming, change channels at the Cable
Box, not the LCD TV
Cable Box with AudiolVideo Out jacks
This connection will supply Stereo sound to
the LCD TV.
Connect the CabJe TV signal to the
IN jack (or RF IN or CABLE IN) on the Cable
Box.
Using an BCA-type video cable (not
2
supplied) connect one end of the video cable to
the Video Out jack of the Cable Box.Connect
the other end of the cabte to the yellow VIDEO
iack on the side of the TV.Video cables are
usually marked with yetlow and are available
from P1agnavox or electronics retailers Video
jacks on most equipment are yellow.
....
SideJackPanel
of/elevision
Rear lad< pane of
7 evi,,ion
Using RCA-type, stereo audio cables (not
supplied), connect one end of the cables to the
left and right Audio Out jacks of the Cable Box
Connect the other end of that cable to the
Audio jack on the side of the LCD TV.Audio
cables are usually marked with red and white
and are available from Magnavox or electronics
retailers.The right
audio iack is red and the left audio iack is white
Match the cable colors to the iack colors
1' Plug the DC adapter into the DC IN 16V
iack on the LCD TV. Plug the power cable into
an outlet.
TV signal
@ @ ®®®
C_ble Box
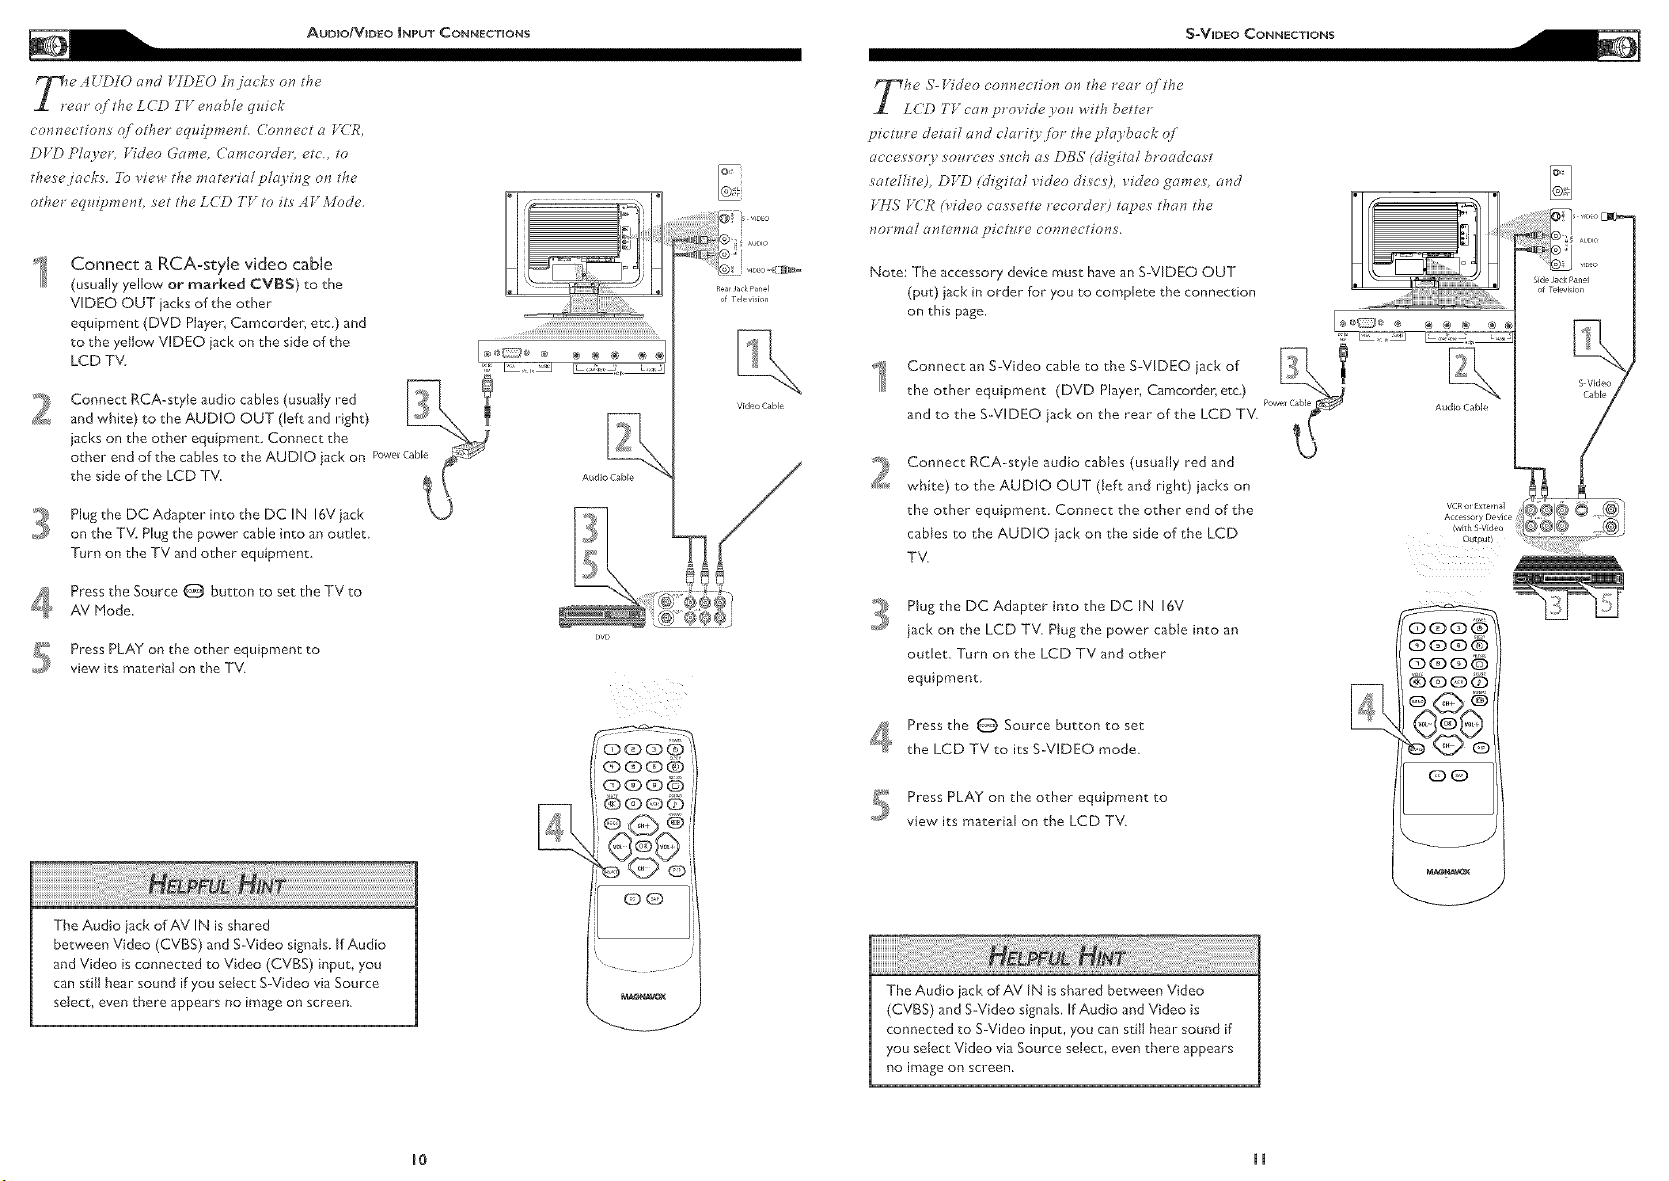
_e 4 <,20]0 and _7[)EO In jack_ on the
ear qf the LCD TV enable quick
connections of oghe_ equipmeng. Connect a N('R,
DIkO Pla) et; _Ydeo Game, Camcotdet; etc., to
these jack_ To _iew the material pla3 ing on the
other equipment, _eg the LCkO TV go its AV Mode,
Connect a RCA-style video cable
(usually yellow or marked CVB$) to the
VIDEO OUT jacks of the other
equipment (DVD Player, Camcorder, etc) and
to the yellow VIDEO jack on the side of the
LCD TV '7 _, ,,_
Connect RCA-style audio cables (usualiy red J_l _
and white) to the AUDIO OUT (left and right)
RearJackPanel
,)f Tele v_sion
Video Cable
picgure derail and clarib for ghe pla3 back qf
acces so<l _ource_ n¢ch a_ DBS (di_ita[ broadcast
satellite), DVD <digital video discs), $ideo games, and
NHS FUR {_ideo cassette recorder) tapes than the
lToFma[ _rltcnrla ])icf_ye eonncetions
Note: The accessorydevice must haveanS-VIDEO OUT
(put) jack in order for you to complete the connection
on this page.
Connect an S-Video cable to the S-VIDEO jack of
!
the other equipment (DVD Player, Camcorder, etc)
and to the S-VIDEO iack on the rear of the LCD TV.
_i_i_ifil;_"_!i;_i_iiiiiliiiiii_',_ .......,_,,,_o,
other end of the cables to the AUDIO jack on powerCaM
the side of the LCD iV.
jacks on the other equipment. Connect the _\_.._]
Plug the DC Adapter into the DC IN 16V jack
on the TV. Plug the power cable into an outlet
Turn on the TV and other equipment
_ Press the Source _ button to set the TV to
AV Mode.
Press PLAY on the other equipment to
view its material on the TV
The Audio jack of AV IN is shared
between Video (CVBS) and S-Video signats. If Audio
and Video is connected to Video (CVBS) input, you
can still hear sound if you select S-Video via Source
select, even there appears no irnage on screen.
Audio Cable
QQOQ
@®®@
OQ
Connect RCA-style audio cabies (usuaily red and
2
white) to the AUDIO OUT (Jeff and right) jacks on
the other equipment. Connect the other end of the
cables to the AUDIO iacl< on the side of the LCD
TV.
Plug the DC Adapter into the DC IN 16V
3
iack on the LCD TV. Plug the power cabte into an
outlet. Turn on the LCD TV and other
equipment
Press the _ Source button to set
4
the LCD TV to its S-VIDEO mode.
Press PLAY on the other equipment to
5
view its material on the LCD TV.
The Audio jack of AV IN is shared between Video
(CVBS) and S-Video signals. If Audio and Video is
connected to S-Video input, you can s'diJ hear sound if
you select Video via Source select, even there appears
no image on screen.
(DCD(D_
C_CD(D®
o®o@
@0®6
o<F>2®
(DO
 Loading...