

Magnavox 20MF, 251W, 20MF251W-37B, 20MF251W-37E User Manual
SMART. VERY SMART.
User Manual
20MF 251W Series
LCD TV
Read your user Manual and /or Quick-
Use Guide fir st for quick tips that
make using your Magnavox product
more enjoyable.
If you have re ad your in st r uc t i ons and
still need assistance,
you may access our online help at
www.usasupport.magnavox.com
or call
1-800-705-20 00
while with your product
(and Model / Se r ial number)
Thank you for choosing Magnavox.
Need help fast ?
Model No:_____________
Serial No:_____________
2
Know these safety symbols
This “bolt of lightnin g” indicates
uninsulated material within your unit may
cause an electrical shock. For the safety of
everyone in your household, please do not remove
product covering.
The “exclamation point” calls attentio n
to features for which you should read the
enclosed literature closely to prevent
operating and m aintenance problems.
WARNING: To reduce the risk of fire or
electric shock, this apparatus should not be
exposed to r ain or moisture and objects filled with
liquids, such as vases , should not be placed on this
apparatu s .
CAUTION: To prevent electric shock , match wide
bladeofplugtowideslot,fullyinsert.
ATTENTION: Pour éviter les choc
électriques, introduire la lame la plus large de la fiche
dans la borne correspondante de la prise et pousser
jusqu’au fond.
For Customer Use
EnterbelowtheSerialNo.whichislocated
on the rear of the cabinet. Retain this
information for future reference.
Model No._______________________
Serial No. _______________________
RETURN YOUR PRODUCT REGISTRATION CARD TODAY
TO GET THE VERY MOST FROM YO UR PURCHASE
.
Registering your model with MAGNAVOX makes you eligible for all of the valuable benefits listed
below, so don’t miss out. Complete and return your Product Registration Card at once to ensure:
*Proof of Purchase
Returning the enclosed card
guarantees that your date of
purchase will be on file, so no
additional paperwork will be
required from you to obtain
warranty ser vice.
*Product Safety
Notification
By registering your product, you’ll
receive notification directly from the
manufacturer - in the rare case of a
product recall or safety defect.
*Additional Benefits of
Product Ownership
Registering your product
guarantees that you’ll receive all of
the privileges to which you’re entitled,
including special money-saving offers.
Congratulations on your purchase,
and welcome to the “family!”
Dear MAGNAVOX product owner:
Thank you for your confidence in
MAGNAVOX.You’ve selected one of the
best-built, best-backed products available today.
We’ll do everything in our power to keep you
happy with your purchase for many years to
come.
As a member of the MAGNAVOX “family,”
you’re entitled to protection by one of the most
comprehensive warranties and
outstanding service networks in the industry.
What’s more, your purchase guarantees you’ll
receive all the information and special offers for
which you qualify, plus easy access to
accessories from our convenient home
shopping network.
Most importantly, you can count on our
uncompromising commitment to your total
satisfaction.
All of this is our way of saying welcome - and
thanks for investing in a MAGNAVOX product.
P.S.To getthemostfromyourMAGNAVOX
purchase, be sure to complete and return
your Warranty Registration Card at once .
Visit our Wo rld Wide Web Site at http://www.usasupport.magnavox.com
IMPORT ANT SAFETY INSTRUCTIONS
R
EAD BEFORE OPERATING EQUIPMENT
Read these instructions.
Keep these instructions.
Heed all warnings.
Follow all instructions.
Do not use this apparatu s near water.
Clean only with a dry cloth.
Do not block any of the ventilation opening s.
Install in accordance with the manufacturers instructions.
Donotinstallnearanyheatsourcessuchasradiators,
heat registers, stoves, or other appar atus (including
amplifiers) that produce he at .
Do not defeat the safety purpose of the polarized or
grounding-type plug.A polarized plug has two blades with
one wider than the other. A grounding t ype plug has two
blades and third grounding prong. The wide blade or third
prong are provided for your safety. When the provided
plug does not fit into your outlet, consult an electrician
for replacement of the obsolete outlet.
Protect the power cord from being walked on or pinched
particularly at plugs, convenience receptacles, and the
point where they exit from the apparatus.
Only use at tachments/accessories specified by t he
manufacturer.
Use only with a cart, stand, tripod, bracket, or
table specified by the manufacturer, or sold w ith
theapparatus.Whenacartisused,usecaution
when moving the cart /ap par atus combination to avoid
injury from tip-over.
Unplug this apparatus during light ning storms or when
unused for long periods of time.
Refer all servicing to qualified service personnel. Servicing
is required when the apparatus has been damaged in any
way, such as power-supply cord or plug is damaged, liquid
has been spilled or objects have fallen into apparatus, the
apparatus has been exposed to r ain or moisture, does not
operate normally, or has been dropped.
This product may contain lead and mercury. Disposal of
these materials may be regulated due to environmental
considerations. For disposal or recycling information,
please contact your local authoritie s or the Electronic
Industries Alliance: www.eiae.org
Damage Requiring Service - The appliance should be
serviced by qualified service personnel when:
A. The power supply cord or the plug has been damaged ;
B. Objects have fallen, or liquid has be en spilled into the
appliance;
C. The appliance has been exposed to r ain;
D. The appliance does not appear to operate normally or
exhibits a marked change in performance;
E. The appliance has been dropped, or the enclosure
damaged.
Tilt/ St abilit y - All televisions must comply with
recommended international global safet y standards for tilt
and stability properties of its cabinet design.
• Do not compromise these design stand ards by applying
excessive pull force to the front , or top, of t he cab inet
which could ultimately overtu rn the produc t.
• Also, do not endanger yourself, or children, by placing
electronic equipment/toys on the top of the cabinet. Such
items could unsuspectingly f all from the top of the set and
cause product d amage and /or personal injur y.
Wa ll or Ceiling M ount ing - The appliance should be
mounted to a wall or ceiling only as recommended by the
manufacturer.
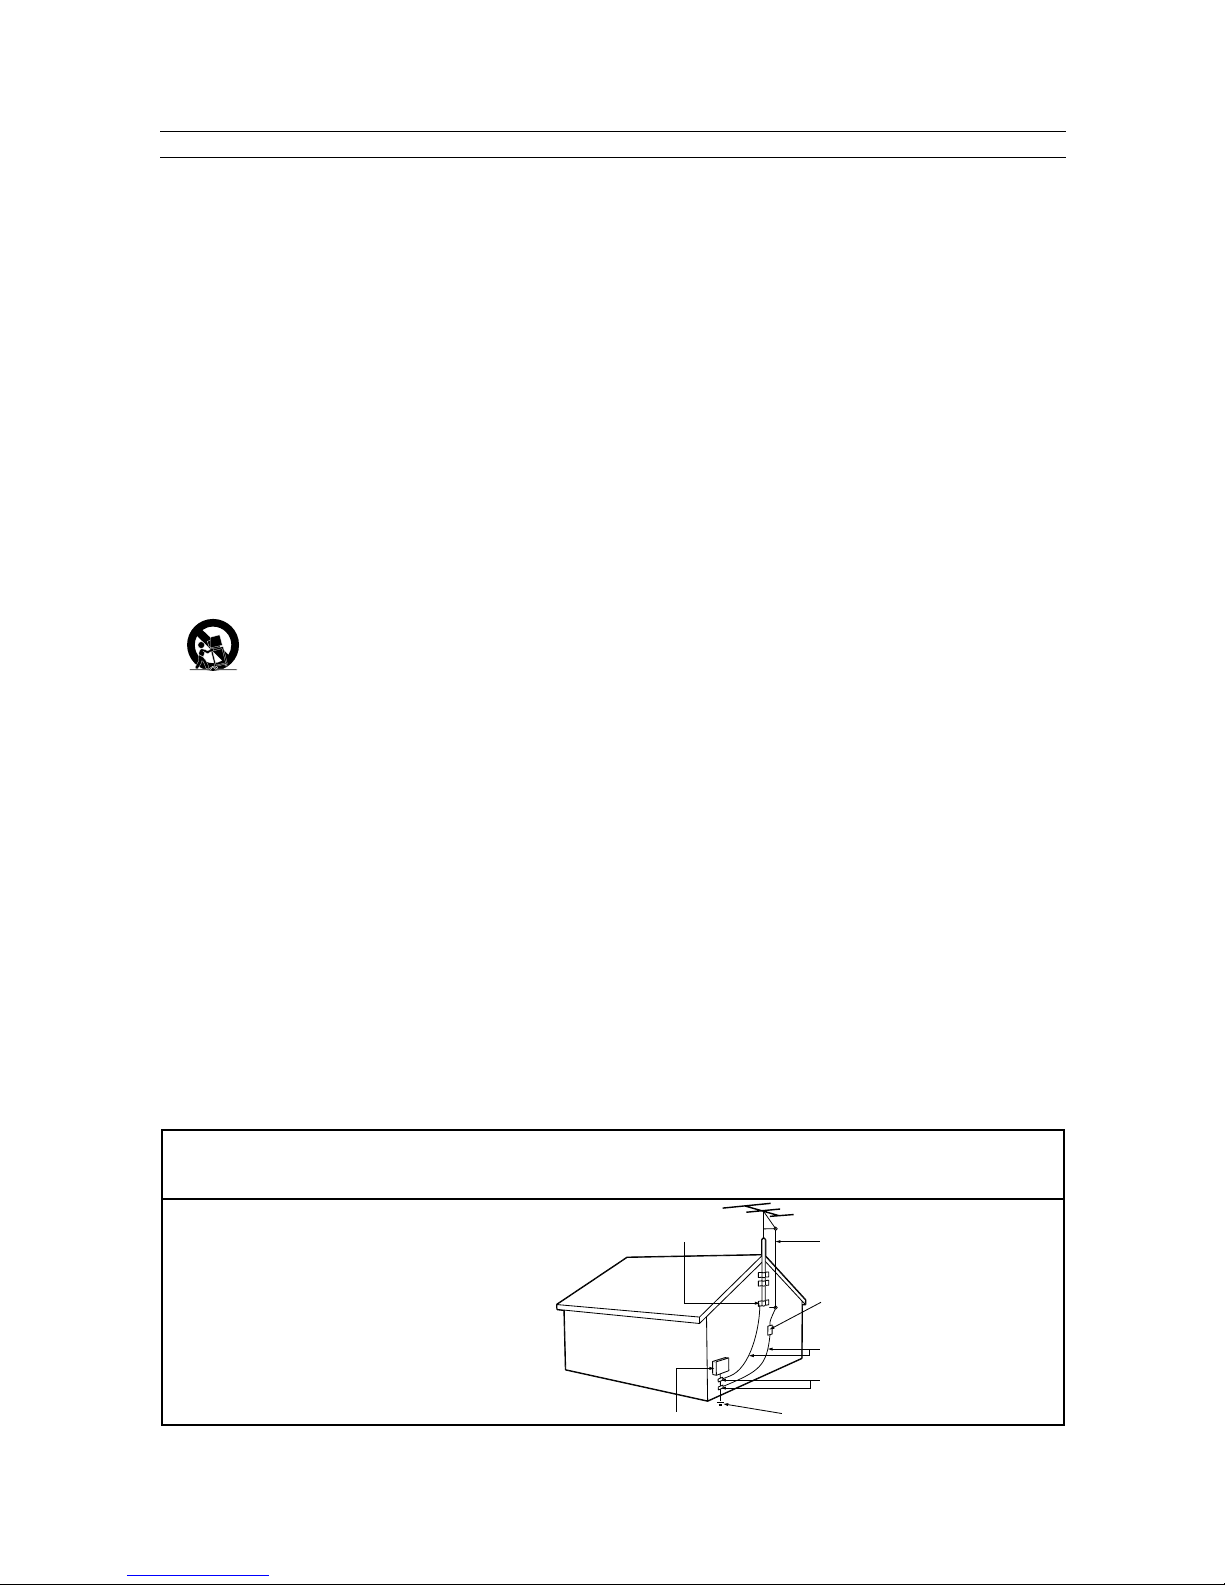
Power Lines - An outdoor antenna should be located
away from power lines .
Outdoor Antenna Grounding -Ifanoutsideantennais
connected t o the receiver, be sure the antenna system is
grounded so as to provide some protection against voltage
surges and built up st atic charges.
Section 810 of the National Electric Code, ANSI/ NF PA
No. 70-1984, provides information with respect to proper
grounding of t he mast and suppor ting structure, grounding
of the lead-in wire to an antenna discharge unit, size of
grounding connectors, location of antenna-discharge unit,
connection to grounding electrodes, and requirements for
the grounding electrode. See Figure below.
Object and Liquid Entry - Care should be taken so
that objects do not fall and liquids are not spilled into the
enclosure t hrough openings.
Battery Usage CAUTION -To preventbatteryleakage
that may result in bodily injury, property damage, or
damage to the unit:
• Install all batteries correctly, with + and - aligned as
marked on t he unit .
• Do not mix batteries (old and new or carbon and
alkaline, etc .).
• Remove batteries when the unit is not used for a long
time.
17.
18.
19.
20.
21.
22.
Note to the CATV s ystem installer: This reminder is provided to call the CATV system installer’s attention to Article
820-4 0 of the NEC that provides guidelines for proper groundingand,inparticular,specifiesthatthecablegroundshallbe
connected to t he grounding system of the building, as close to the point of cable entry as practical.
Example of Antenna Gr ounding as
per NEC - National Electric Code
ANTENNA LEAD IN WIRE
ANTENNA DISCHARGE UNIT (NEC SECTION 810-20)
GROUNDING CONDUCTORS (NEC SECTION 810-21)
GROUND CLAMPS
POWER SERVICE GROUNDING ELECTRODE SYSTE M (NECART 250, PART H)
GROUND CLAM P
ELECTRIC SERVICE EQUIPMENT
3
1.
2.
3.
4.
5.
6.
7.
8.
9.
10.
11.
12
13.
14.
15.
16.

4
ADDITIONAL SAFETY PRECAUTIONS
• ENSURE that LCD TV stand is tightened properly to the set (See Quick Guide) on the right way of tightening of
the screw of the stand to the set. Improper tightening of screw may render the set unsafe.
• If LCD TV is installed on the wall, installation should be carried out by qualified servicemen. Improper or incorrect
installation may render the set unsafe.
• Disconnect main plug when :
— cleaning the TV screen, never use abrasive cleaning agents.
— there is a lightning storm.
— the set is left unattended for a prolonged period of time.
• Do not shift or move the LCD TV around when it is powered on.
• Do not touch, push or rub the surface of the LCD screen with any sharp or hard objects.
•WhenthesurfaceoftheLCDscreenbecomesdusty,wipeitgentlywithanabsorbentcottonclothorothersoft
material like chamois. DO NOT USE acetone, toluene or alcohol to clean the surface of the screen. These chemicals
will cause damage to the surface.
• Wipe off water or saliva as soon as possible. These liquids can cause deformation and color fading of the LCD
screen when left exposed for some time.
• Be careful of condensation when temperature changes occur. Condensation can cause damage to the LCD screen
and electrically parts. After condensation fades, spots or blemishes will be present on the LCD screen.
POSITIONING THE LCD TELEVISION
• Place the LCD TV on a solid, sturdy base or stand. Be sure the stand is strong enough to handle the weight of the
LCD TV .
• Tr y to leave at least 6” of space around each side of the LCD TV cabinet to allow for proper ventilation.
• Do not place the LCD TV near a radiator or other sources of heat.
• Do not place the LCD TV where it can be exposed to rain or excessive moisture.
RECYCLING PROCEDURE/END OF LIFE DISPOSAL
• To minimize harm to the environment, the batteries supplied with the LCD TV do not contain mercury or nickel
cadmium. If possible, when disposing of batteries, use recycling means available in your area.
• The LCD TV uses materials that can be recycled. To minimize th e amount of waste in the environment, check your
area for companies that will recover used televisions for dismantling and collection of reusable materials, or contact
your dealer for TV recycling tips.
• Please dispose of the car ton and packing material through the proper waste disposal management in your area.
PRECAUTION
CONTENTS
Introduction
Welcome/Registration of Your TV ........................2
IMPORTANT SAFETYINSTRUCTIONS................. 3
PRECAUTIONS ............................................4
CONTENTS ...............................................5
Installation
Language Settings .................................. 6
Tuner Mode Control........................................ 7
Auto Program (Setting Up Channels ) .....................8
Channel Edit Control (To Add or Delete channels ) . . . . . 9
Factory Reset .............................................. 10
Basic TV and Remote Control Operations................11
Remote Control-ForTV Operations ....................12
RemoteControl-For DVDOperations ................. 13
Timer Menu Controls ......................................14
Picture Menu
TV Picture Menu Controls........................15
Sound Menu
TV Sound Menu Controls.........................16
Feat ures Menu
Smart Picture Control .............................17
Smart Sound Control ..................................... 17
Lock ................................................18
Lock Password......................................19
Lock Program ......................................20
Lock - Movie Ratings...............................21
Lock - TV Ratings .................................22
Using The Picture Format ................................ ..23
Closed Captions ...........................................
24
PC Mode
PC Picture Controls ............................. .45
PC Audio Controls ........................................46
Setting Up The PC Mode ................................ 47
General Information
Trouble Shooting Tips-TV
.........................
Care And Cleaning .......................................
51
Technical Specifications . . . . . . . . . . . . . . . . . . . . . . ............
50
Trouble ShootingTips-DVD................................
49
Regulatory
.................................................
52
Limited Warranty
........................................
53
DVD Mode Control
DVD Mode Control
..............................25
DVD Mode Control-Play Disc In Various Ways
............29
DVD Menu Setup
......................................... .36
If this instruction manual does not give an answer
or if ‘ Trouble shooting tips’ does not solve your
TV problem, you can call your Local Magnavox
Customer or Service Cent er.
Please, have the Model and Serial number which
you can fi nd at the back of your television set
or on t he packaging, ready, before calling the
Magnavox helpline
1-800-705-2000
Model: 20MF 251W
Serial No:.............................................
CareofthescreenSeeTips,p. 50
Magnavox is paying a lot of attention to producing environmentally-friendly in product.
Yo u r n e w T V c o n t a i n s
materials which can be
recycled and reused.
At the end of its life specialized companies can
dismantle the discarded TV to
concentrate the
reusable materials and to mini mize the amount
of materials to be
disposed of.
Please ensure you dispose of your
old T V
according to local regulations.
Help
5
Smart
Smart
Smart
Smart
Smart
48
6
HELPFUL HINT
F
or English, French, or Spanish -speaking
TV owners, an onscreen L AN GUAGE
option is present. The L ANGUAGE control enables
you to set the TV ’s onscreen menu to be shown in
either English, French, or Spanish.
Press the MENU button on the
remote control to open the onscreen menu.
Press the / button to highlight the
INSTALL menu.
Press the / button to Highlight
LANGUAGE.
Press the / button to select English, French,
or Spanish.
Press the MENU button repeatedly to clear the
menu from the screen.
1
2
3
4
5
6
Remember, the LANGUAGE control makes
only the TV’s onscreen MENU items
appear in English, French, Spanish
text.
It does not change the other onscreen text
features, such as Closed Captioning (CC), with
TV shows.
LANGUAGE SETTINGS
Press the OK button to return to the previous
menu.
1
6
2
5
4
3
LANGUAGE ENGLISH
TUNER MODE ANTENNA
AUTO PR OGR AM
CHANNEL EDIT
FACTORY RESET
MOVE SELECT RETURN EXITOK MENU
INSTALL

7
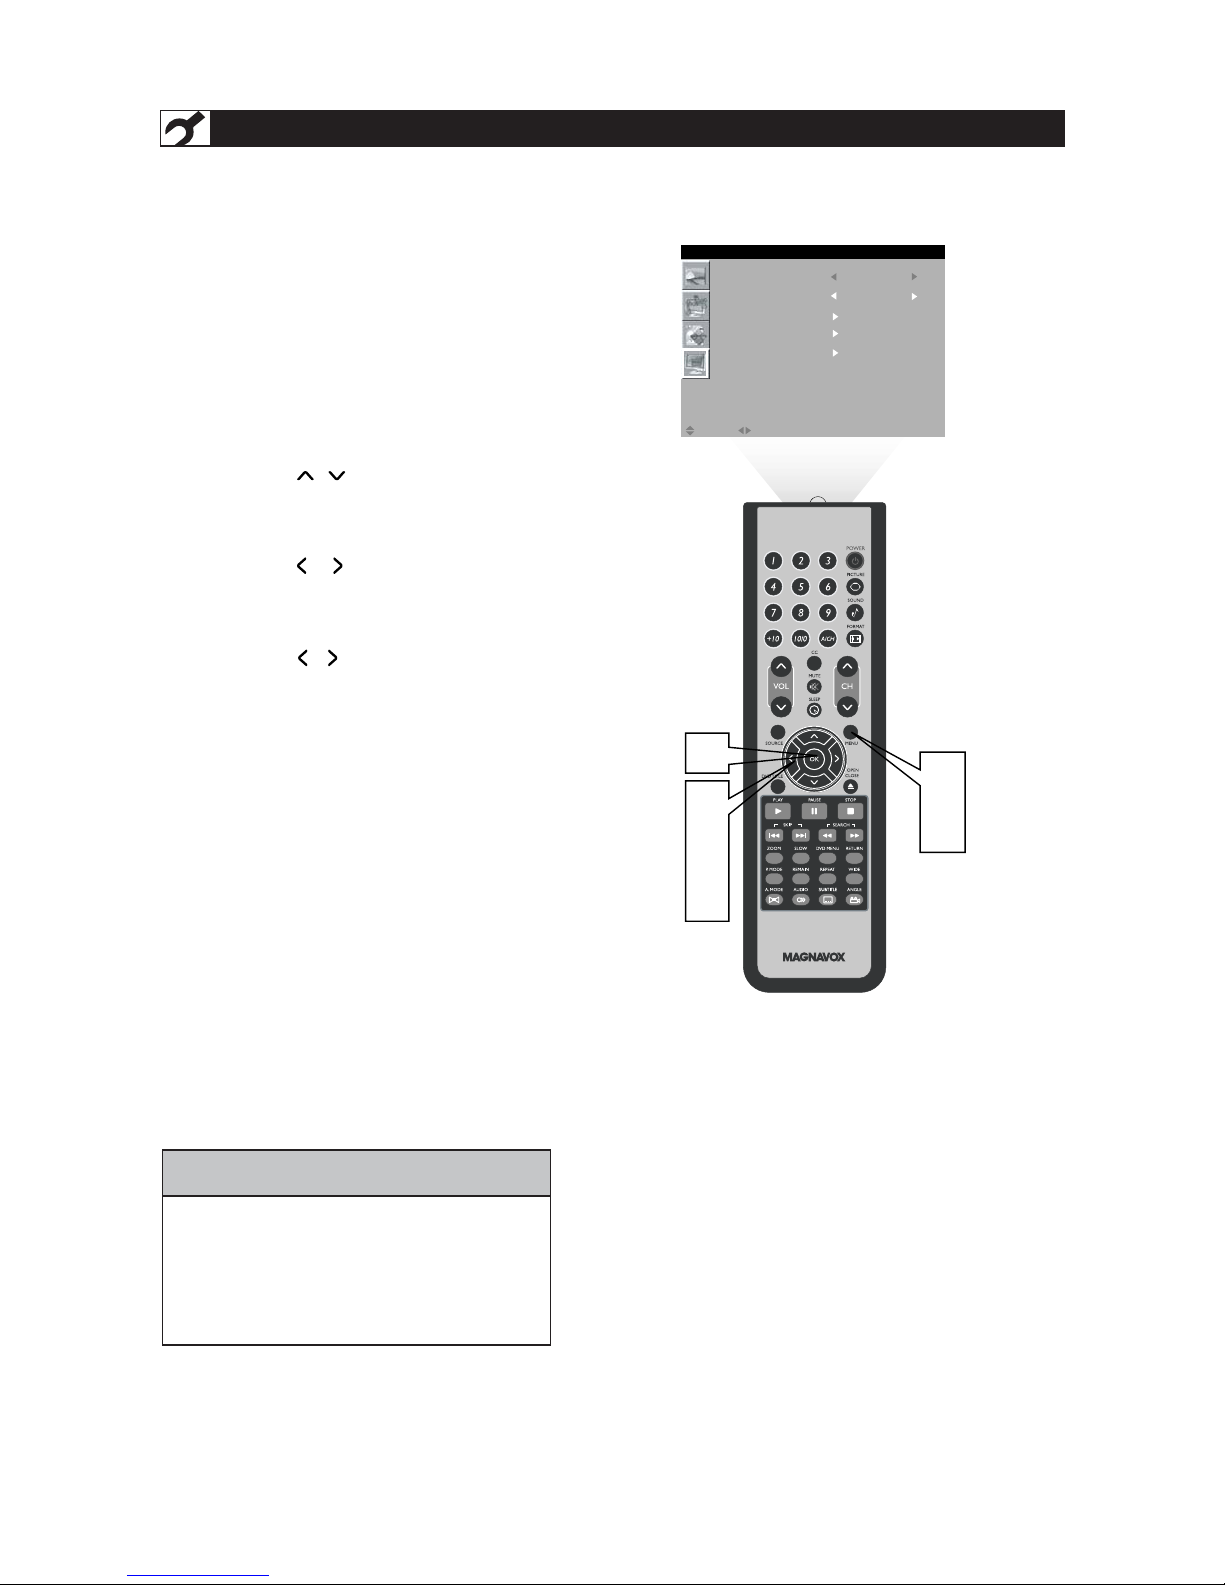
TUNER MODE CONTROL
T
he Tuner Mode allows you to change the LCD
TV’s signal input to Cable or Air (antenna).
It’s important for the LCD TV to know if you want
to receive c hannels from a cable TV signal or an
antenna signal.
Press the MENU button to see the onscreen menu.
Press the / button to highlight the INSTALL
menu.
Press the / button to enter the
INSTALL .
Press the / button to highlight the TUNER
MODE .
Press the / button to select CABLE,
ANTENNA, or AUTO.
Press the MENU button repeatedly to clear the
menu from the screen.
1
2
3
4
5
6
7
• When CABLE is selected, channels 2-125 are available.
• When ANTENNA is selected, channels 2-69 are available.
• When AU TO is selected, your LCD TV will search automatically for antenna
or cable channels.
• Immediately after unpacking and plugging in your new television, run the
AUTO
PROGRAM
function to set up the TV for the broadcast or cable channels
available in your area. If you do not run the auto program function to set up the
channels, your television may not operate properly.
HELPFUL HINT
Press the OK button to return to the previous
menu.
1
7
6
3
5
2
4
LANGUAGE ENGLISH
TUNER MODE ANTENNA
AUTO PR OGR AM
CHANNEL EDIT
FACTORY RESET
MOVE SELECT RETURN EXITOK MENU
INSTALL
8
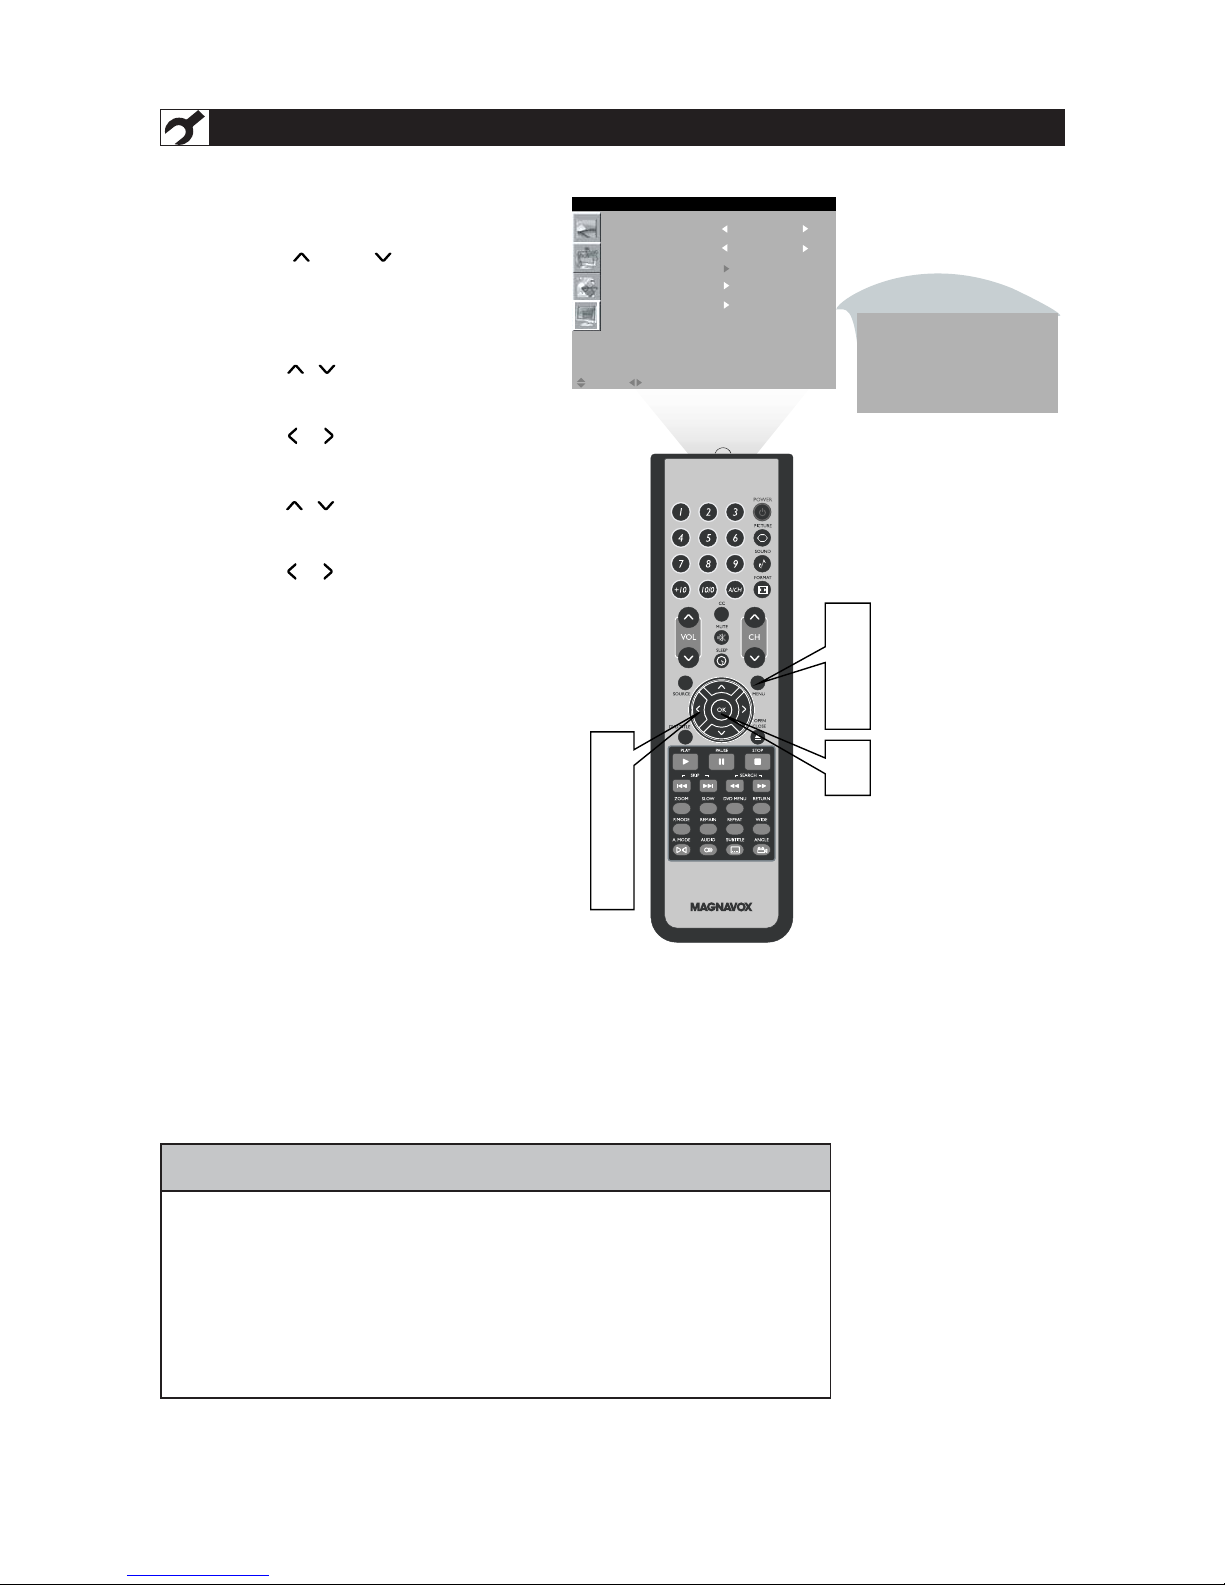
AUTO PROG RAM (SETTING UP CHANNELS)
Y
our LCD TV can automat ically set i tself for local
area (or cable T V ) channels. This makes it easy
for you to select only t he TV stations in your area by
pressing the CH ( ) or CH ( ) button.
Press the MENU button on the remote
control to show the onscreen menu.
Press the / button to
highlight the INSTALL menu.
Press the / button to
enter the INSTALL menu.
Press the / button to
highlight the AUTO PROGRAM control.
Press the / button to
start the AUTO PROGRAM scanning
of channels.
Press the MENU button repeatedly to
clear the menu from the screen, after
AUTO SEARCH has finished .
1
2
3
4
5
6
7
• Immediately after unpacking and plugging in your new television, run the auto
program function to set up the TV for the broadcast or cable channels available in
your area. If you do not run the auto program function to set up the channels ,
your television may not operate properly.
• After you’ve run Auto Program, check out the results. Press the (CH )
button and see
which channels you can select.
• Remember, an antenna or cable TV signal must first be connected to your LCD TV.
HELPFUL HINT
Press the OK/MENU button to return to the
previous menu.
1
7
2
3
4
5
6
6
LANGUAGE ENGLISH
TUNER MODE ANTENNA
AUTO PROGRAM
AUTO SEARCH
AIR 5
OK/MENU: Return
CHANNEL EDIT
FACTORY RESET
MOVE SELECT RETURN EXITOK MENU
INSTALL
Press the MENU button to open the
onscreen menu .
Press the / button to
highlight the INSTALL menu, then
press the to enter.
Press the / button to highlight
th
/ button to enter.
e CHANNEL EDIT
column
, then press
In CURRENT CHANNE L ,
press the / b u t t o n to selec t th e
channel you wish to add or remove.
In SKIPPED column, press the /
button to select ACTIVE (to add) or
SKIPPED (to delete) the channel you
selected.
Press the MENU button repeatedly t o
clear the menu from the screen.
9
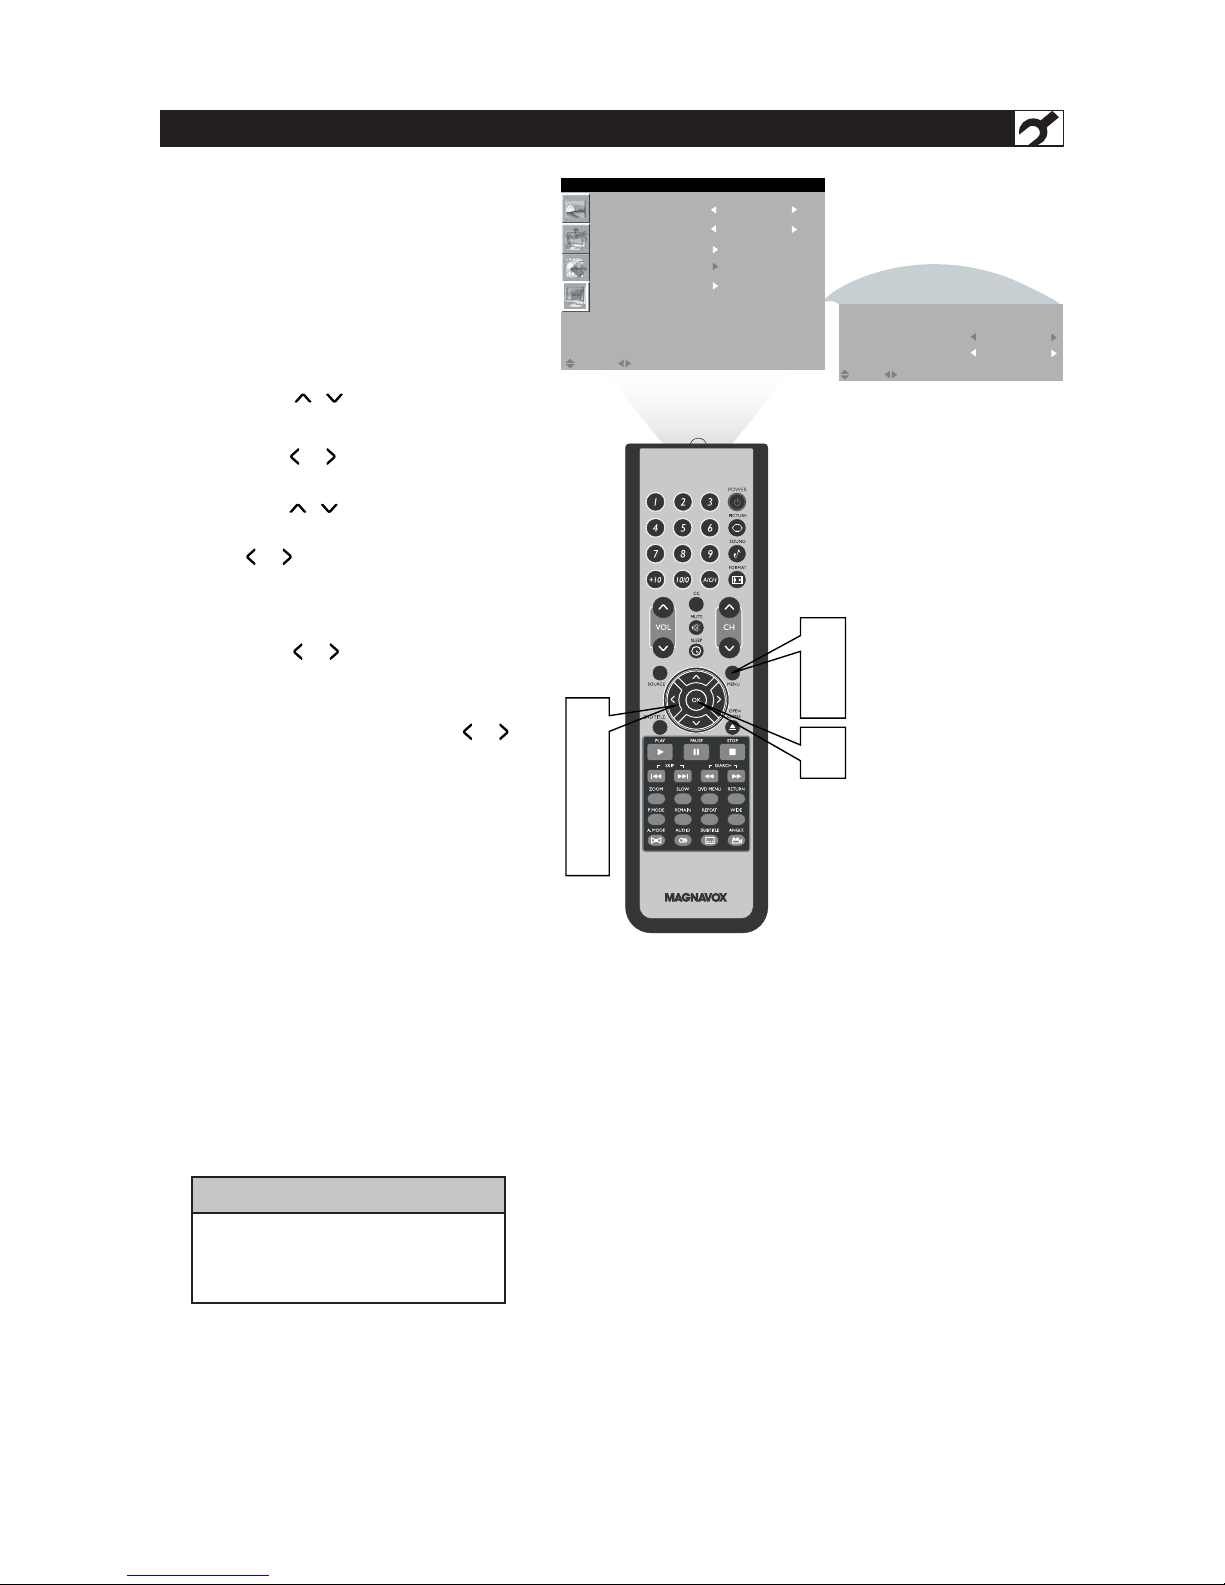
CHANNEL EDIT CONTROL
C
hannel E dit control lets you edit the channel
listing. You can add or remove a channel in the
LCD TV ’s memory.
1
2
3
4
5
6
7
Repeat steps 4– 5 to add or delete
additional channels to or from the
LCD TV ’s memory.
HELPFUL HINT
Press the OK button to return to the
previous menu.
/
1
7
2
6
3
4
5
LANGUAGE ENGLISH
TUNER MODE ANTENNA
AUTO PROGRAM
CHANNEL EDIT
FACTORY RESET
MOVE SELECT RETURN EXITOK MENU
MOVE SELECT RETURN EXITOK MENU
INSTALL
CHANNEL EDIT
CATV 1
ACTIVE
SKIPPED
CURRENT CHANNEL
button
the
10
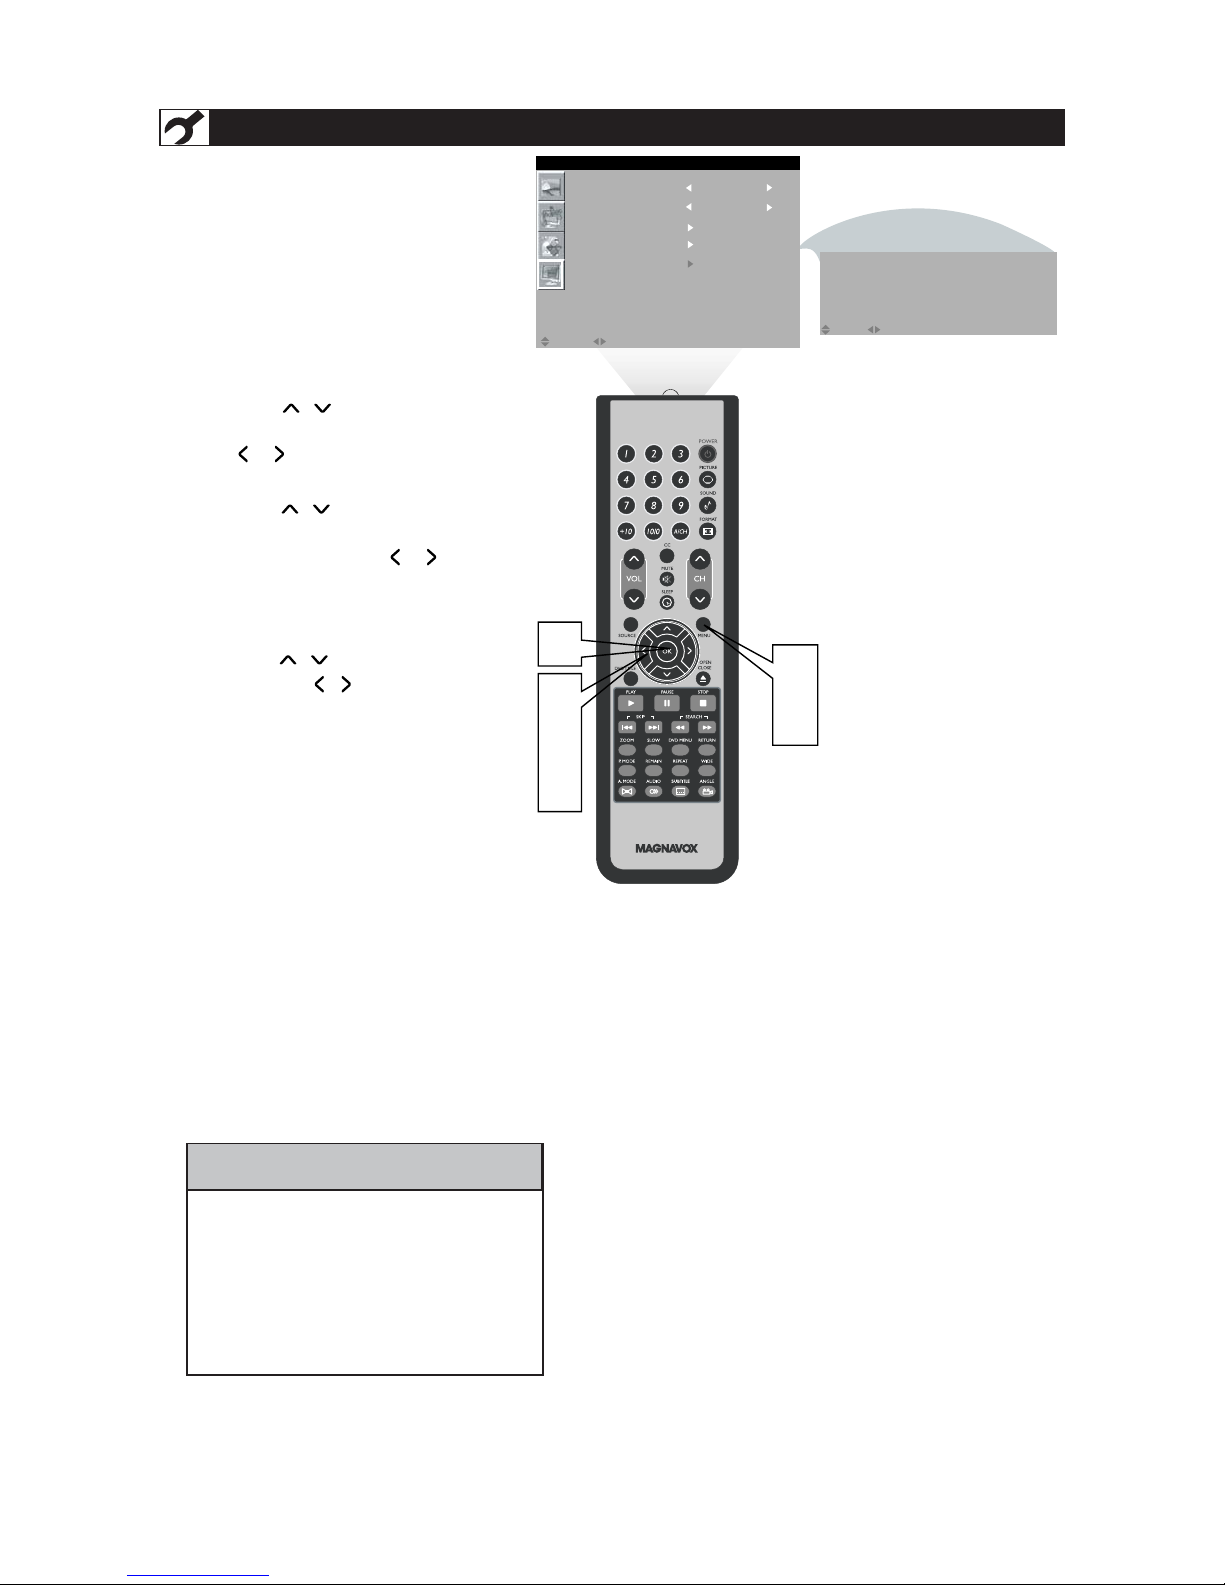
FACT ORY RESET
Y
our T V can be reset to the original
factory setti ngs b y performing the
foll owing ste ps .
Press the MENU button on the
remote control to see the onscreen
menu.
Press the / button to
highlight the INSTALL menu, then press
to enter.
Press the / button
repeatedly
to highlight the FACTORY RESET
control, then press the / button
to enter.
When FACTORY RESET Menu appeared,
press the / button to select "Yes",
and press the / button or the OK
button to reset the original factory
settings.
Press the MENU button repeatedly to
clear the menu from the screen.
1
2
3
4
5
If you reset the TV to the factory settings,
allyourpresentsettingonpicture,audio,
Close Caption and other feature settings
will be eras ed and replaced by the
manufacture’ s default settings. However,
your Smart Lock access code will not be
erased. Please refer to page 19 for details.
HELPFUL HINT
/
1
5
2
3
4
4
LANGUAGE ENGLISH
TUNER MODE ANTENNA
AUTO PROGRAM
CHANNEL EDIT
FACTORY RESET
FACTORY RESET
NO
YES
MOVE SELECT RETURN EXITOK MENU
MOVE SELECT SELECT EXITOK MENU
INSTALL
the button
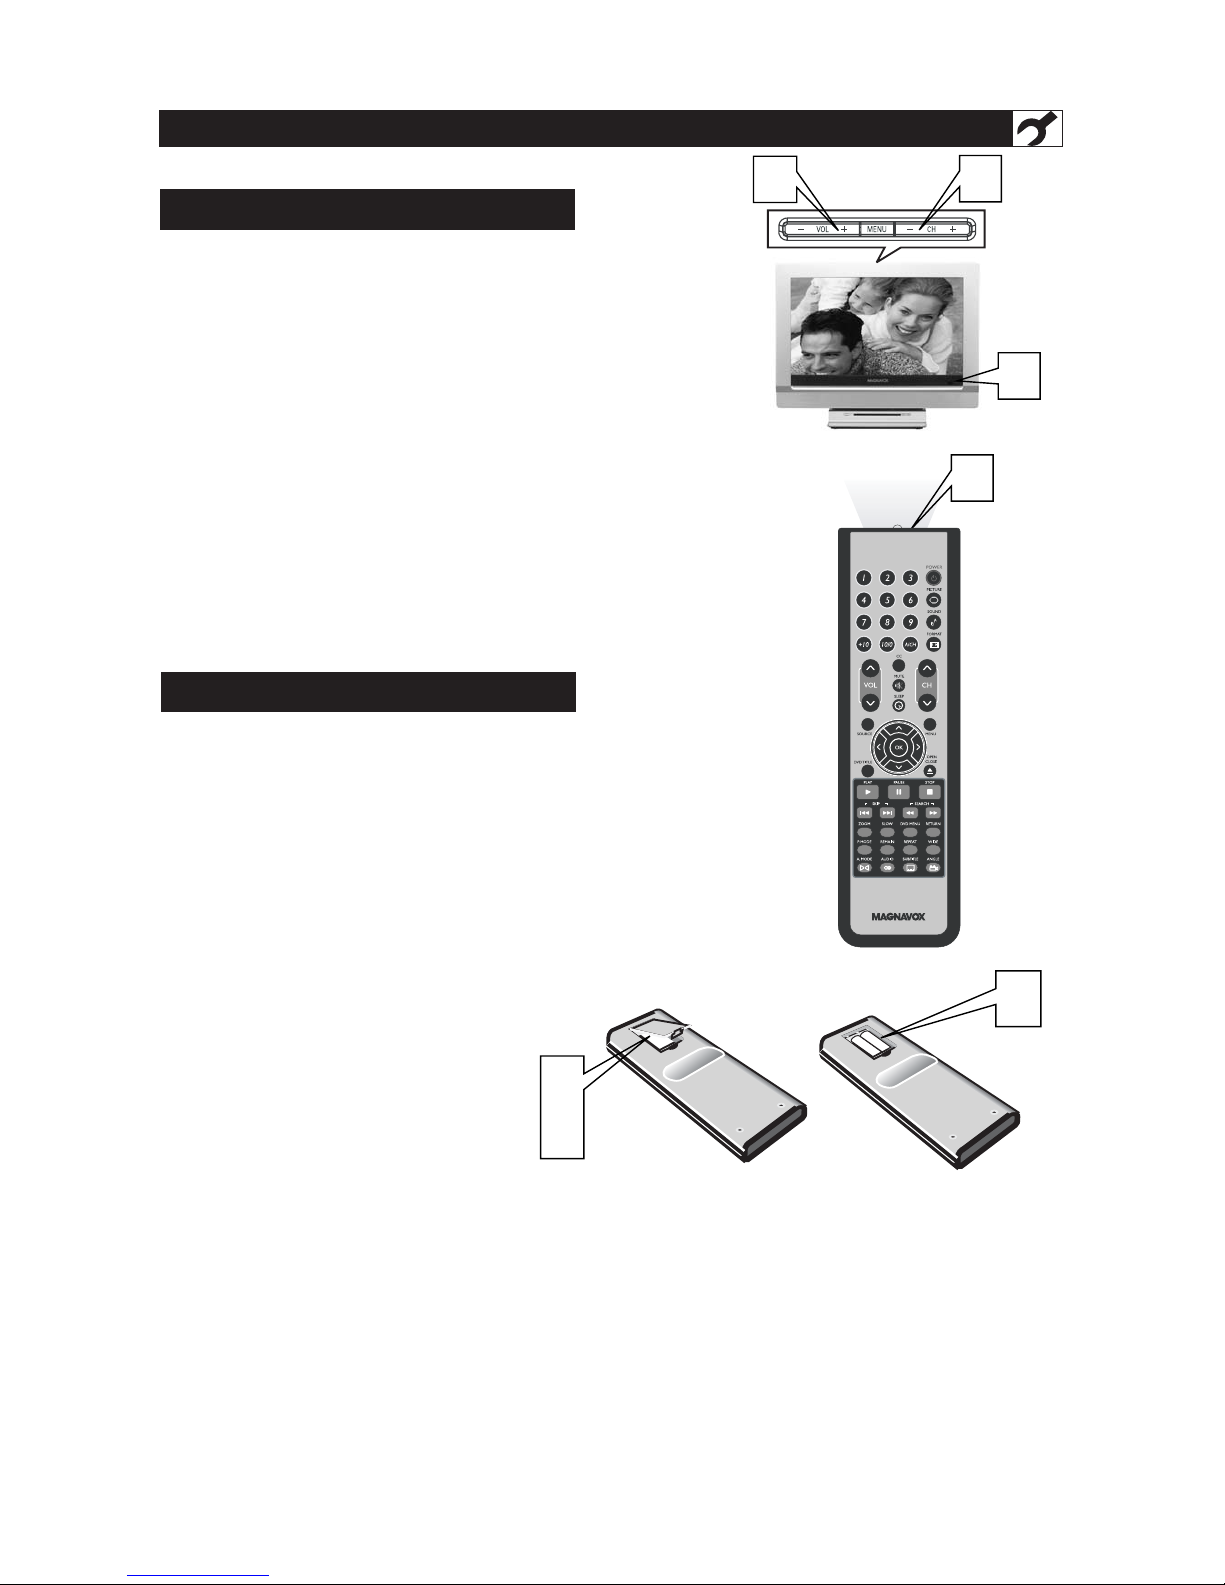
Connect the power plug to the power socket.
Press POWER to turn on the LCD TV.
PressVOL to
+
+
increase the sound level, or
pressVO L to decrease the sound level.
Press CH or CH to select channels.
Point the remote control toward on the front of
the LCD TV to operate.
Open the battery compartment on the
back of the remote control.
Place AAA the remote control. Be sure
the (+) and (-) ends of the batteries line up as
marked inside the battery
compartment.
Clos e the battery compartment.
BASIC TV AND REMOTE CONTROL OPERATIONS
BATTERY INSTALLATION
TELEVISION AND REMOTE CONTROL
11
1
2
3
4
6
7
8
5
5
6
2
3
4
8
-
-
+
+
7
–
–
12
REMOTE CONTROL -FOR TV OPERATIONS
Number buttons
Press to select TV channels.
When selecting single-digit
channels, press the number of the
desired channel.
The LCD T V will pause for a few
seconds then tune to the selected
channel.
Note: +10 button is for DVD use .
Mute button
Press to eliminate or restore the
LCD TV sound. Mute will appear
on the screen when the sound is
muted.
Menu button
Press to activate onscreen menu,
also press to exit
the onscreen
menu.
Volume button
Press to increase or decrease the
sound level.
Source but ton
Press to select the video input
source: AV1,AV2,DVD,
PC,TV.
Direction button
Press to navigate up/down/left/right
OK button
Pres
Press to return to the previous
layout in the OSD screen menu.
s to confirm the option you
selected in the onscreen menu.
CC button
Press the CC but ton to select OFF,
CC1, CC2, CC3, CC4,TEXT1,TEXT2,
TEXT3,TEXT4, CC MUTE, XDS.
Standby (Power) button
Press to turn the LCD TV on or
off.
Sleep button
Press to set the LCD T V to turn
itself off within a certain time.
Picture Format button
Press the FORMAT button
repeatedly to toggle among the
six screen format sizes:
Wide Screen,
4:3, Zoom14:9, Zoom16:9,
Subtitle Zoom, Super Wide .
Previous Channel button
Press to go to previously selected
channel.
Channel button
Press to adjust the channel up
or down.
in onscreen
menu.
Smart Picture button
Press repeatedly to select either
Personal, Movie , Sports, We ak
signal, Multimedia , or Night
picture set t ing.
Smart Sound button
Press repeatedly to select among
the 4 settings; Personal , News,
Music, or Theatre.
13
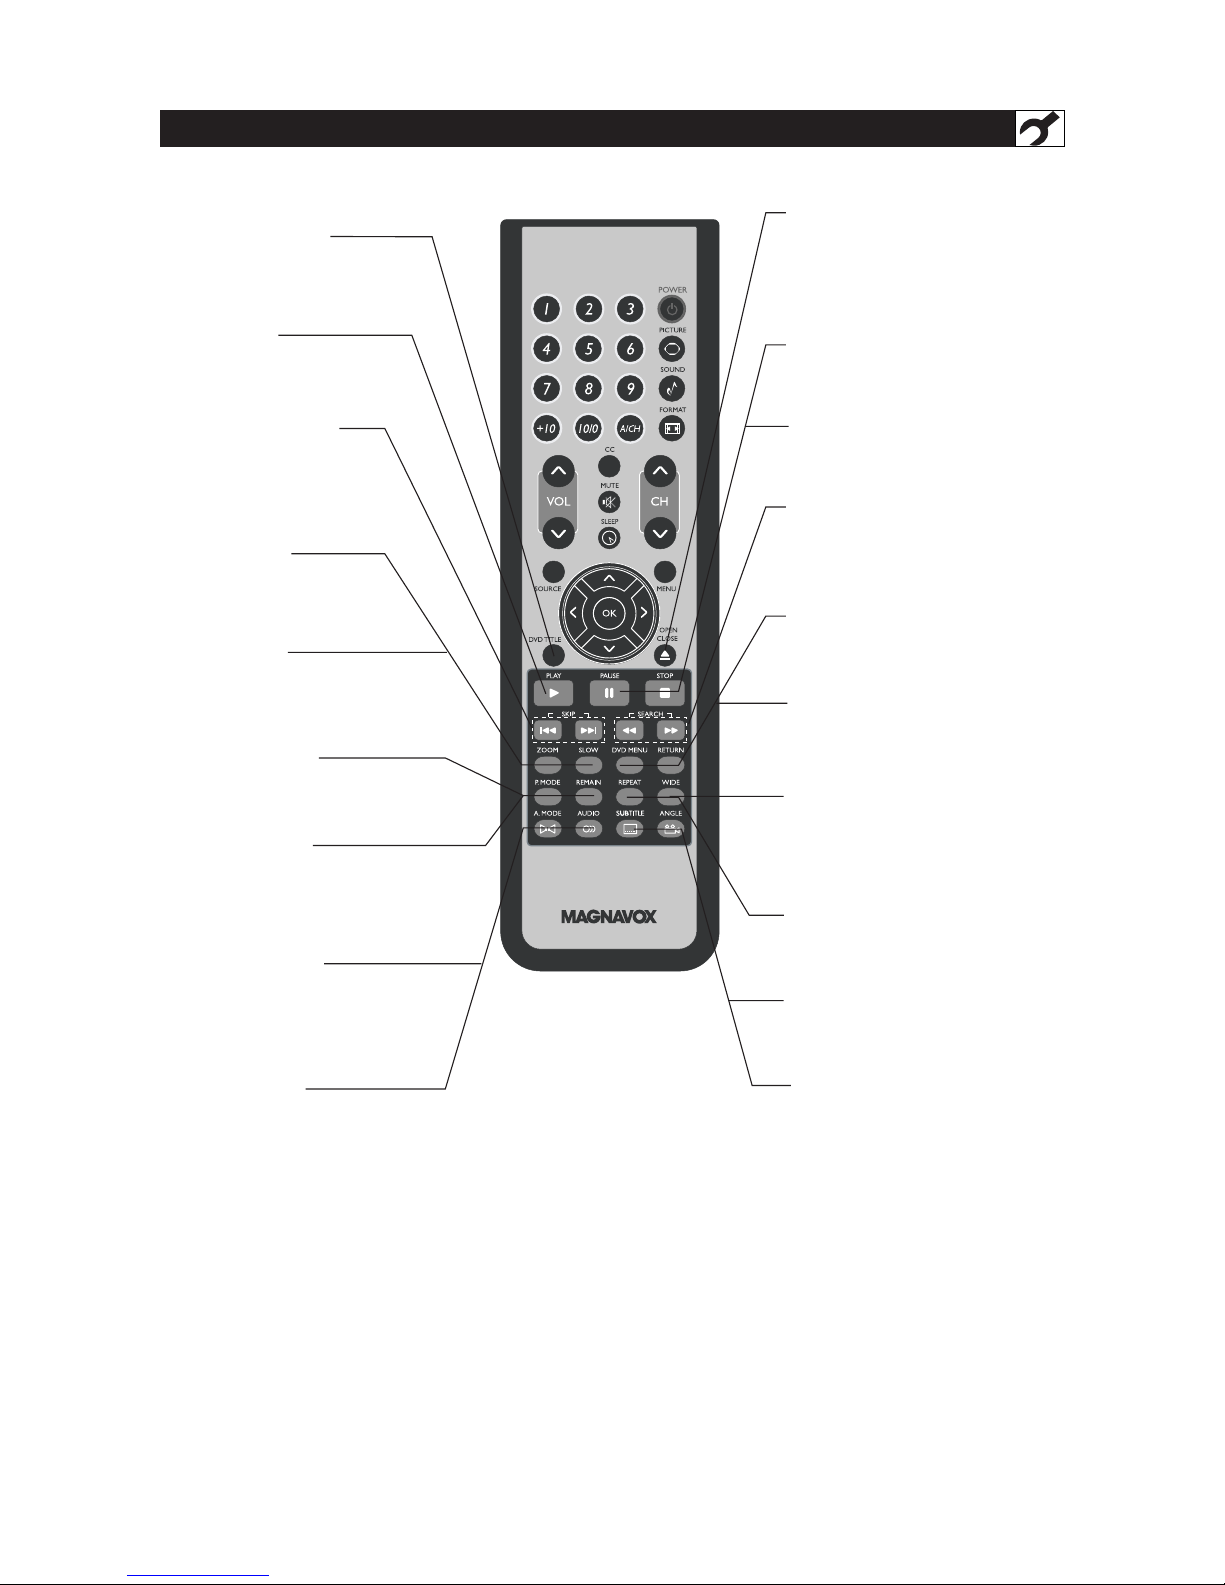
REMOTE CONTROL -FOR DVD OPERATIONS
DVDTITLE button
Use to bring up the DVD title menu.
PLAY button
Use to begin the DVD playback.
PAUSE button
Use to pause the DVD playback.
PREV/NEXT button
Use to skip to the previous or
next
chapter .
ZOOM button
Use to zoom the DVD
playback picture.
SLOW button
Use to slow the DVD
playback speed.
P. MODE button
Use to shift DVD play mode.
REMAIN button
Use to display the time of the DVD
playback.
A. MODE button
Use to shift the DVD playback
audio
mode.
AUDIO button
Use to shift DVD audio language.
OPEN/CLOSE button
Use to eject the disc being played
in the disc slot, the main unit must
be set to DVD status.
STOP button
Use to stop the DVD playback.
FF/FR button
Use to play DVD fast forward/
backward.
RETURN button
Return to the previous menu screen.
DVD MENU button
Use to bring up the DVD root
menu.
REPEAT button
Use to repeat the DVD playback.
WIDE button
In DVD mode, use to set TV display
mode.
SUBTITLE button
Use to shift DVD subtitle language.
ANGLE button
Use to shift DVD viewing angle.
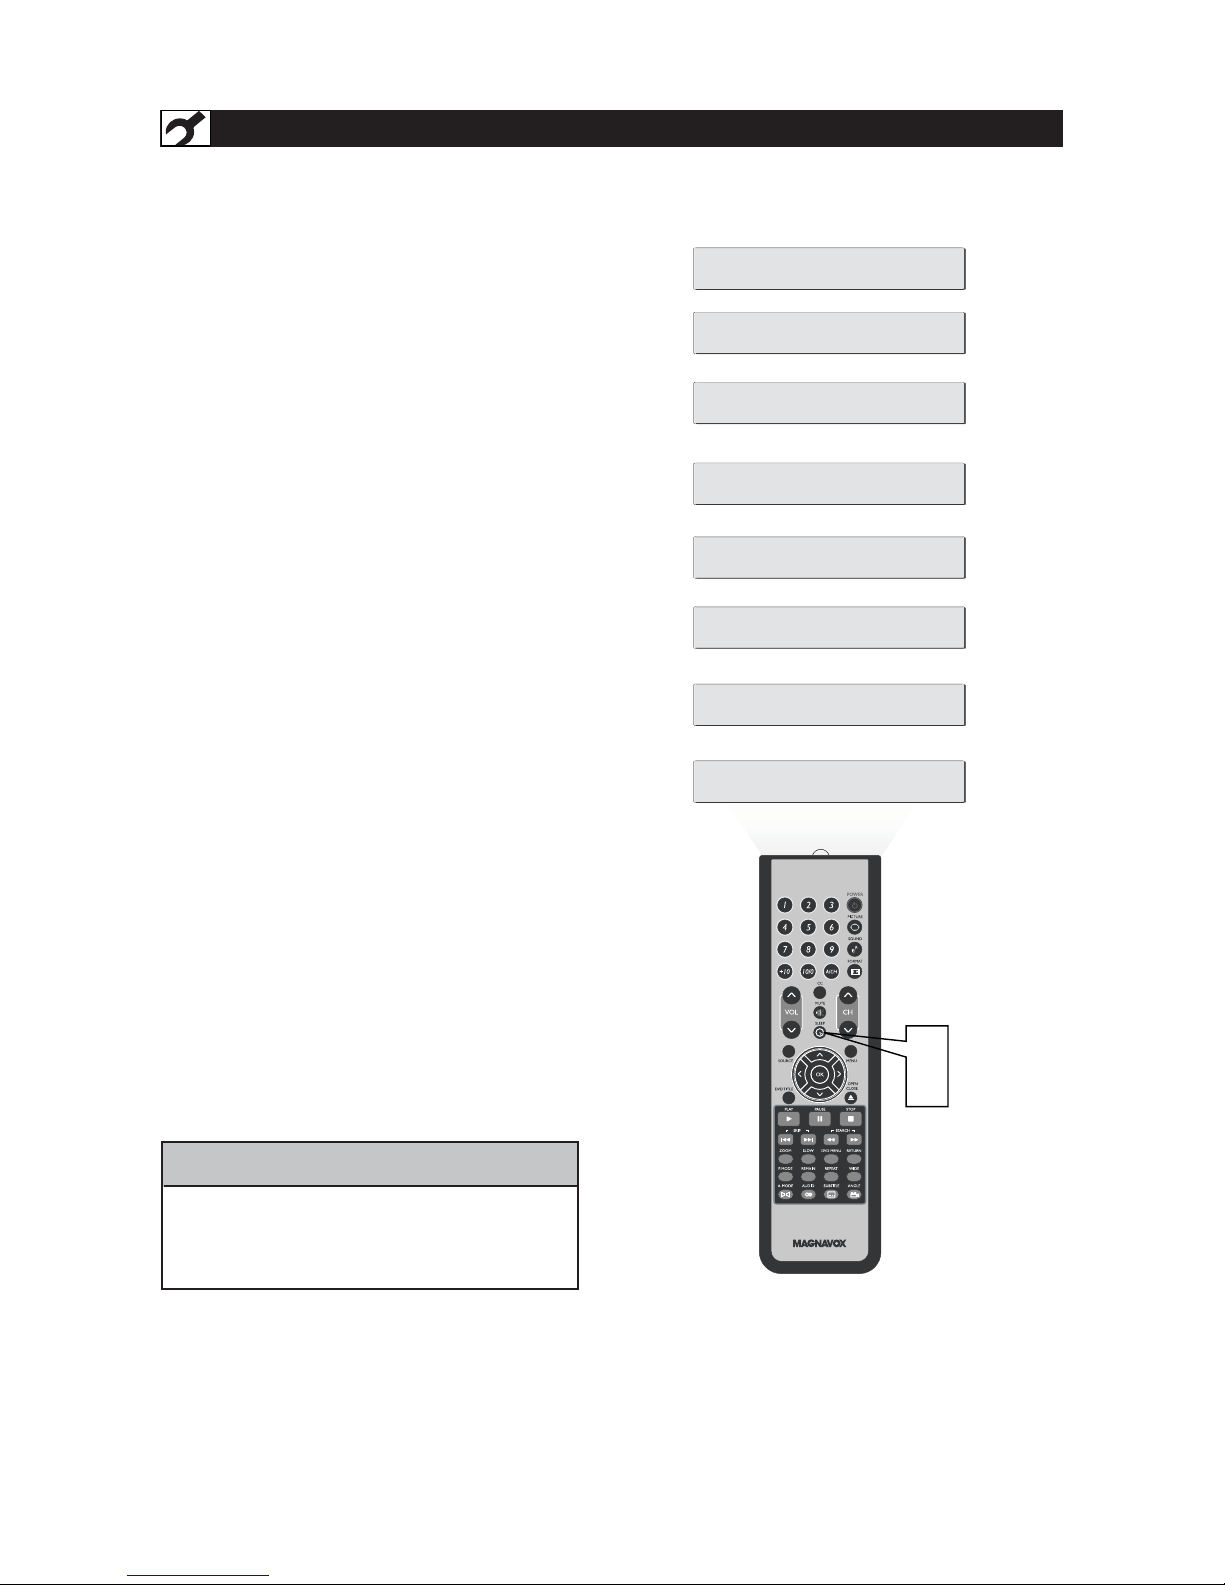
Y
our LCD TV comes with an onscreen clock. The
TVcanalsobesettoturnonoroffataspecific
time and tune to a specif ic channel when it powers
itself on.
Press the SLEEP button on the remote control
to show the onscreen menu..
Press the SLEEP button repeatedly to select your
requiring sleep timing.
1
2
240 Mins
15 Mins
30 Mins
60 Mins
90 Mins
120 Mins
180 Mins
OFF
1
2
IMPORTANT
For the Timer to function, the set must not be
turned off. Once the set is turned off, the Timer
is disabled.
HELPFUL HINT
TIMER MENU CONTROLS
14
15
Press the MENU button to see the
onscreen menu.
When PICTURE menu is highlighted,
press the / button to enter the
PICTURE menu.
Press the / to choose the item
you want to adjust: Smar t Picture,
Brightness, Color, Contr as t,
Sharpness,Tint, Color Temp, Noise Reduction.
Press the / but ton to adjust the item.
Press the / button to select and
adjust other picture controls.
Press MENU repeatedly to remove
th
buttonthe
e menu from the screen.
Smart Picture: Please refer to page
17, for details on Smart Picture
Settings.
Brightness: Adjust to brighten the
dark par ts of the pic ture . This
appears to add white t o the color.
Color:Adjust to add or reduce
color.
Contrast : Adjust to“sharpen” the
Picture quality. The black portions of
the picture become richer in darkness
and the white become brighter.
Shar
Color Temp: Allows you to adjust
Normal, Cool, Warm.
Noise Reduction:Allows you to
adjust Weak,OFF, Strong.
pness:Adjust to improve detail.
Tint:Adjust to obtain natural skin
tones.
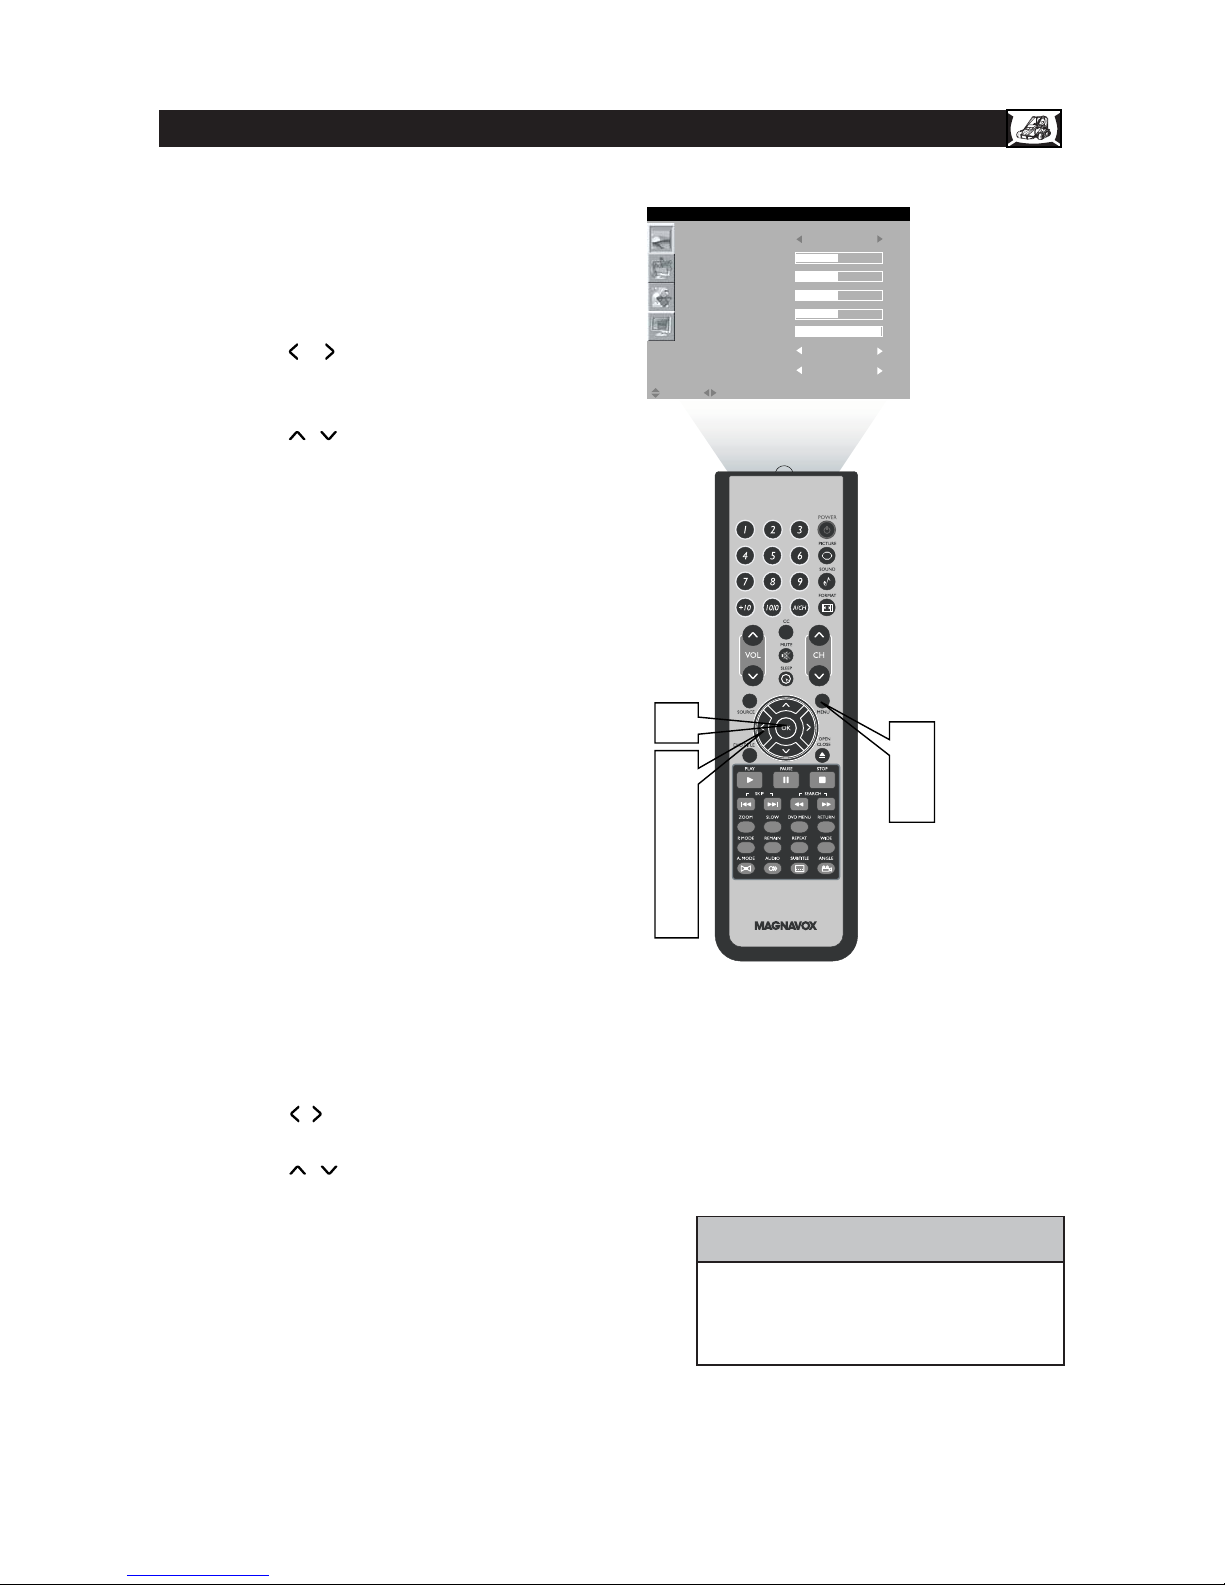
TV PICTURE MENU CONTROLS
T
o ad just your LCD T V picture, select
a c hannel and follow these steps.
1
2
3
4
5
6
7
HELPFUL HINT
Any adjustment of Brightness , Color,
Contrast or Sharpness will be stored into
PERSONAL at Smar t Picture section.
Press the OK button to return to the
previous menu.
1
7
2
6
3
4
5
SMART PICTURE PERSONAL
BRIGHTNESS
COLOR
CONTRA ST
SHARPNESS
TINT
COLOR TEMP NORMAL
NOISE REDUCTION WEAK
MOVE SELECT RETURN EXITOK MENU
PICTURE
button
16
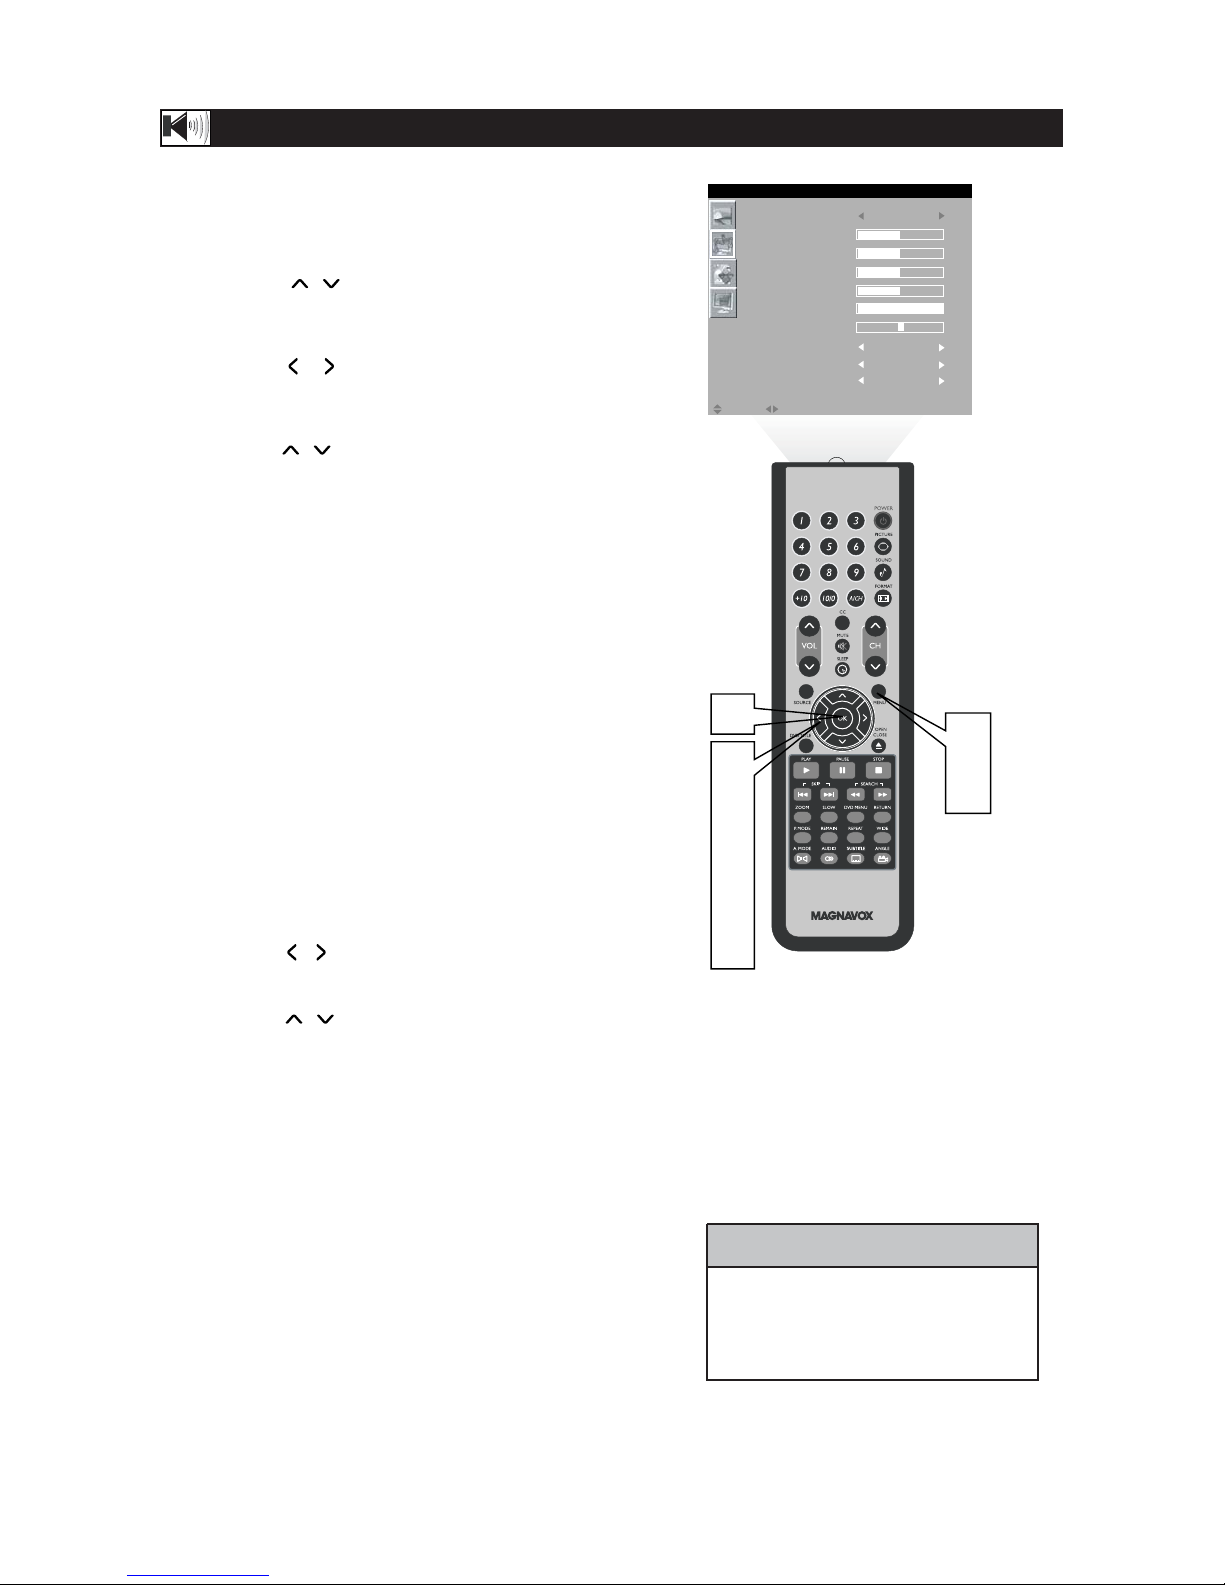
TV SOUND MENU CONTROLS
T
o adjust your LCD TV Sound, select a channel and
foll ow these step s.
Press the MENU button to see the menu.
Press the / button to
highlight the AUDIO menu.
Press the / button to enter the AUDIO
menu.
Press the / button to choose the item you
want to adjust: Smart Sound, 120HZ~10KHZ,
Balance,Stereo,
Virtual Surround, AV L.
Smart Sound: Please refer to page 17 for
details on Smar t Sound Settings.
120HZ~10KHZ:Allows you to adjust
120HZ, 500HZ, 1K5HZ, 5KHZ, 10KHZ.
Balance:Adjust the balance of the sound.
Stereo:Adjust to select between Stereo,
Mono, or SAP.
Virtual Surround:Adds greater depth and
dimension to TV sound. Select from Vir tual
Surround or OFF.
AV L (Auto Vo lume Leveler): When On, AVL
will level out the sound being heard when
sudden changes in volume occur during
commercial breaks or channel changes.
Press the / button to adjust
the item.
Pressthe / buttontoselectandadjust
other sound controls.
Press the MENU button repeatedly to remove
the menu
from the screen.
1
2
3
4
5
6
8
•If Stereo is not presented on a
selected show and the TV is placed in
Stereo mode, the sound coming from
TV will remain in Mono mode.
HELPFUL HINT
7
Press the OK button to return to the
previous menu.
1
7
8
2
6
3
4
5
SMART SOUND PERSONAL
120HZ
500HZ
1K5HZ
5KHZ
10KHZ
BALANCE
VIRTUAL SURROUND
OFF
AVL OF F
STEREO STEREO
MOVE SELECT RETURN EXITOK MENU
AUDIO
 Loading...