

Page 1

Directions for Use
Need help?
Call us!
PhlhpsrepresentatJvesare ready to helpyou with any ques-
tions about your new product. We can guide you through
Connections,First-time Seep, or any of the Fea_res.
We want you to start enjoyingyour new product right away!
FOR FAST HELP PLEASE CALL,
1-800-531-0039
or
Visit us on the web at
www.philips.com
Page 2

Once your PHILIPS purchase isregistered, you're eligible to receive all the privileges
of owning a PHILIPS product. So complete and return the Warranty Registration
Card enclosed with your purchase at once. And take advantage of these important benefits.
Congratulations on your purchase,
and welcome to the "family"
Dear PHILIPS product owner."
Thank you for your confidence in PHILIPS. You've selected one of the best-built, best-backed products available
today. And we'll do everything in our power to keep you happy with your purchase for many years to come.
As a member of the PHILIPS "family," you're entitled to protection by one of the most comprehensive war-
ranties and outstanding service networks in the industry.
What's more, your purchase guarantees you'll receive all the information and special offers for which you quali-
fy, plus easy access to accessories from our convenient home shopping network.
And most importantly you can count on our uncompromising commitment to your total satisfaction.
All of this is our way of saying welcome-and thanks for investing ina PHILIPS produc_
Sincerely.
PHILIPS
Lawrence J. Blanford
President and Chief Executive Officer
Know these
safetysymbols
P.S. Remember, to get the most from your
PHILIPS product, you must return your
Warranty Registration Card within 10
days. So please mail it to us right now!
_L This "bolt of lightning" indicates uninsulated material within your unit may cause an elec-
trical shock. For the safety of everyone in your household, please do not remove product cov-
_'The "exclamation point" calls attention to features for which you should read the
enclosed literature closely to prevent operating and maintenance problems.
WARNING: TO PREVENT FIREOR SHOCK HAZARD, DO NOT EXPOSETHIS EQUIP-
MENT TO RAIN OR MOISTURE.
CAUTION: To prevent electric shock, match wide blade of plug to wide slot, and fully insert.
ATTENTION: Pour 6viter les chocs _lectriques, introduire la lame la plus large de la fiche darts
la borne correspondante de la prise et pousser jusqu'au fond.
2
Page 3
IMPORTANT SAFETY INSTRUCTIONS
Read before operating equipment
1. Read these instructions.
2. Keep these instructions.
3. Heed all warnings.
4. Follow all instructions.
g. Do not use this appara/us near water.
6. Clean only with a dry cloth. 17.
7. Do not block any of the ventilation openings. Install in accordance
with the manufacturers instructions.
8. Do not install near any heat sources such as radiators, heal regis-
ters, stoves, or other apparatus (including amplifiers) that produce
heat.
9. Do not defeat the safety purpose of the polarized or grounding-
type plug. A polarized plug has two blades with one wider than
the other. A grounding type plug has two blades and third ground-
ing prong. The wide blade or third prong are provided for your
safety. When the provided plug does not fit into your outlet, con- 18.
suit an electrician for replacement of the obsolete outlet.
10. Protect the power cord from being walked on or pinched particu- 19.
lady at plugs, convenience receptacles, and the point where they
exit fiom the apparatus. 20.
If. On_se attachments/accessories specified by the manufacturer.
12. _ Use only with a cart, stand, tripod, bracket, or table
_1_1_ specified by the manufacturer, or sold with the app-
the cart/apparatus comblnatmn to avozd injury from tip-over.
13. Unplug this apparatus during lightning storms or when unused for
long periods of time.
14. Refer all servicing to qualified service personnel. Servicing is
required when the apparatus has been damaged in any way. such
as power-supply cord or plug is damaged, liquid has been spilled 21.
or objects have fallen into apparatus, the apparatus has been
exposed to rain or moisture, does not operate normally, or has
been dropped. 22.
15. This product may contain lead and mercury. Disposal of these
materials may be regula/ed due to environmental considerations.
For disposal or recycling information, please contact your local
authorities or the Electronic Industries Alliance: www.eiae.org
16. Damage Requiring Service - The appliance should be serviced
by qualified service personnel when:
A. The power supply cord or the plug has been damaged; or
aratus. When a carl is used, use caution when moving
B. Objects have fallen, or liquid has been spilled into the appli-
ance; or
C. The appliance has been exposed to rain; or
D. _le appliance does not appear to operate normally or
exhibits a marked change in performance; or
E. The appliance has been dropped, or the enclosure damaged.
Tilt/Stability - All televisions must comply with recommended
international global safety standards for tilt mid stability properties
of its cabinet design.
• Do not compromise these design atandards by applying exces-
sive pull force to the front, or top, of the cabinet which could ulti-
mately overturn the product.
• Also, do not endanger yourself, or children, by placing electron-
ic equipment/toys on the top of the cabinet. Such items could
unsuspectingly fall fiom the top of the set and cause product dam-
age and/or personal injury.
Wall or Ceiling Mounting - The appliance should be mounted to
a wall or ceiling only as recommended by the manufacturer.
Power Lines - An outdoor antenna should be located away from
power lines.
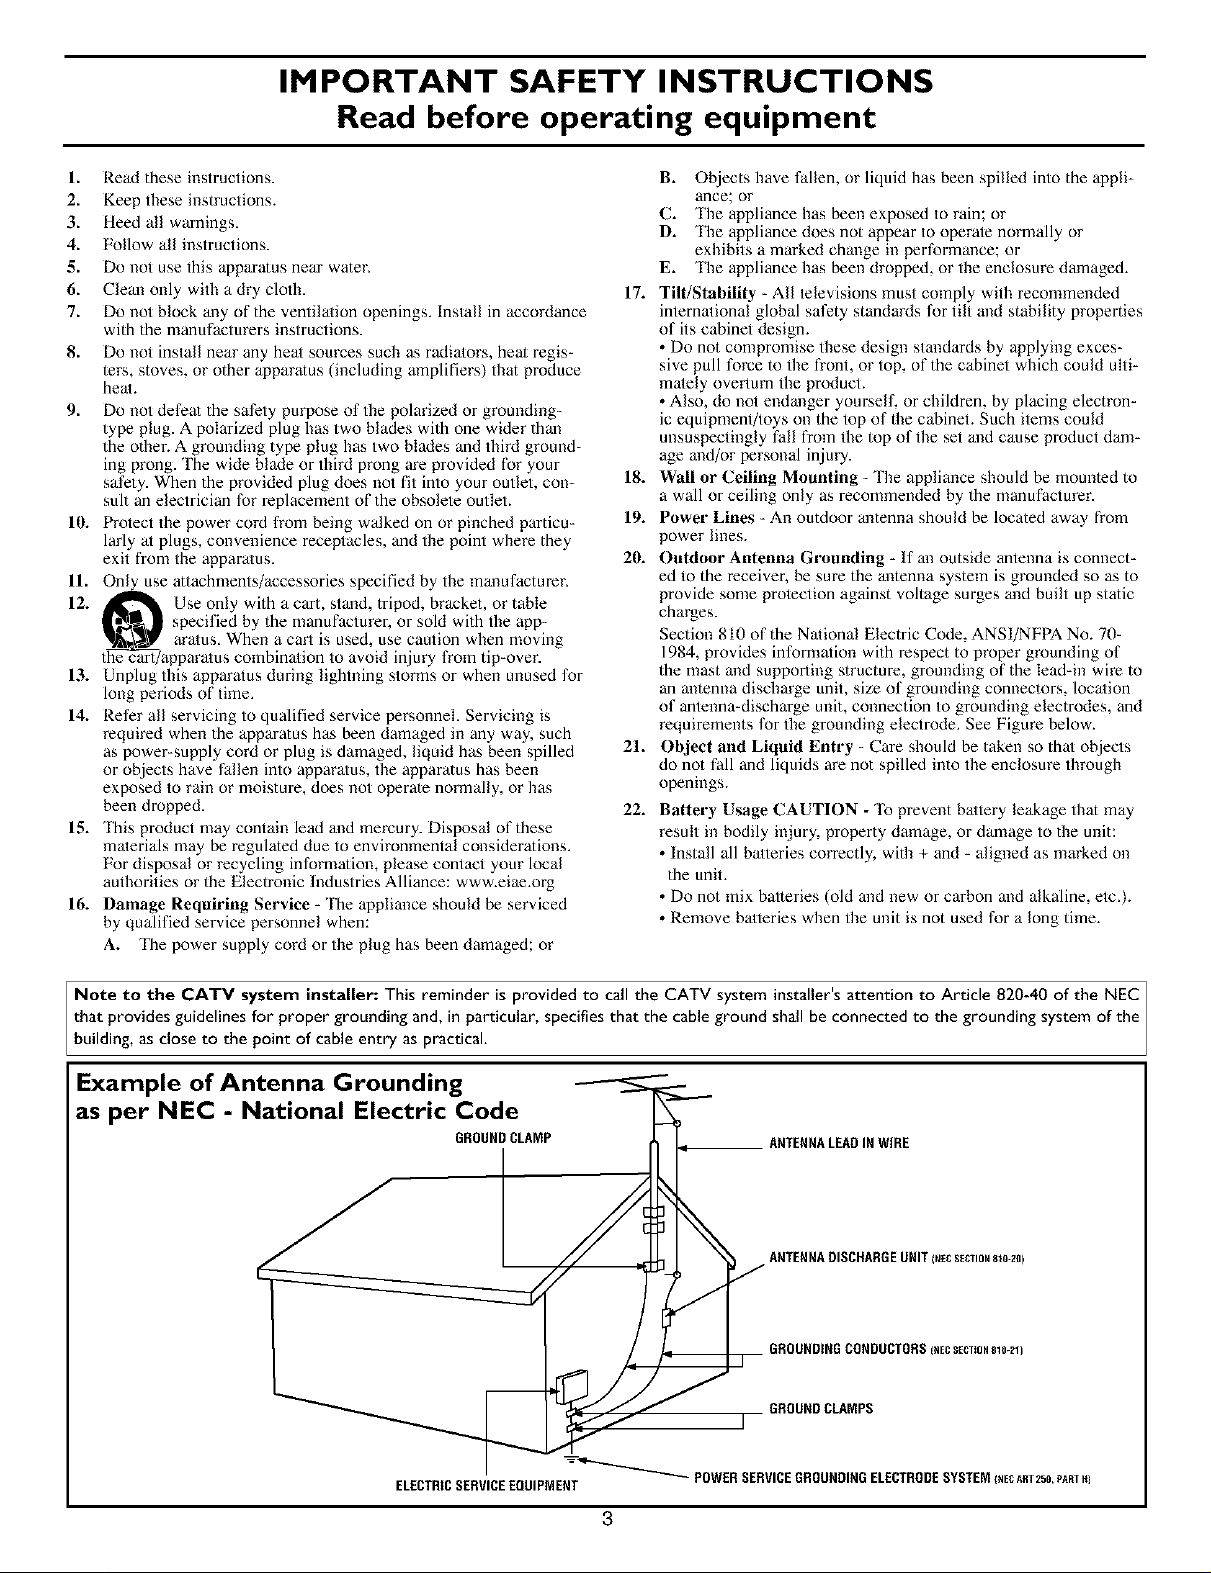
Outdoor Antenna (]rounding - If an outside antenna is connect-
ed to the receiver, be sure the antenna system is grounded so as to
provide some protection against voltage surges and built up static
charges.
Section 810 of the National Electric Code, ANSI/NFPA No. 70-
1984, provides information with respect to proper grounding of
the mast and supporting structure, grounding of the lead-in wire to
an antenna discharge unit, size of grounding connectors, location
of antenna-discharge unit, connection to grounding electrodes, and
requirements for the grounding electrode. See Figure below.
Object and Liquid Entry - Care should be taken so that objects
do not fall and liquids are not spilled into the enclosure through
openings.
Battery Usage CAUTION - 'Ib prevent battery leakage thai may
result in bodily injury, property damage, or damage to the unit:
• Install all batteries correctly, widl + and - aligned as marked on
the unit.
• Do not mix batteries (old and new or carbon and alkaline, etc.).
• Remove batteries when the unit is not used for a long time.
Note to the CATV system installer: This reminder is provided to call the CATV system installer's attention to Article 820-40 of the NEC
that provides guidelines for proper grounding and, in particular, specifies that the cable ground shall be connected to the grounding system of the
bui ding, as c ose to the point of cab e entry as practica.
Example of Antenna Grounding
as per NEC - National Electric Code
GROUNDCLAMP ANTENNALEADINWIRE
ANTENNADISCHARGEUNITI_EcSECTmNs_o-zo)
GROUNDINGCONDUCTORS_NECSECTmN810-21)
GROUNDCLAMPS
ELECTRICSERVICEEQUIPMENT
-_-_'''"_ POWERSERVICEGROUNDINGELECTRODESYSTEM(NECART250PARTI_1
3
Page 4

Additional Safety Precautions:
Do not shift or move the LCD TV around when it is powered on.
Do not connect any AC/DC adapter to your LCD TV that does not originally come with the television. Only use
the recommended part or parts that are approved by Philips Consumer Electronics.
Caution: Do not use any cover or enclose the AC/DC adapter with any objects like a cloth or box which might
shorten the life of the equipment.
Do not touch, push or rub the surface of the LCD screen with any sharp or hard objects.
When the surface of the LCD screen becomes dusty, wipe it gently with an absorbent cotton cloth or other soft
material like chamois. DO NOT use acetone, toluene or alcohol to clean the surface of the screen. These chemi-
cals will cause damage.
Wipe off water, or saliva as soon as possible. Long exposer time to liquids can cause deformation and color fad-
ing of the LCD screen.
Be careful of condensation when temperature changes occur. Condensation can cause damage to the LCD
screen and electrically parts. After condensation fades, spots or blemishes will be present on the LCD screen.
Positioning the LCD Television:
Place the LCD TV on a solid, sturdy base or stand. Be sure the stand is strong enough to handle the weight of
the LCD TV.
Try to leave at least 6" of space around each side of the LCD TV cabinet to allow for proper ventilation.
Do not place the LCD TV near a radiator or other sources of heat.
Do not place the LCD TV where it can be exposed to rain or excessive moisture.
Recycling Procedure/End of Life Disposal:
To minimize harm to the environment, the batteries supplied with the LCD TV do not contain mercury or nickel
cadmium. If possible, when disposing of batteries, use recycling means available in your area.
The LCD TV uses materials that can be recycled. To minimize the amount of waste in the environment, check
your area for companies that will recover used televisions for dismantling and collection of reusable materials, or
contact your dealer for TV recycling tips.
Please dispose of the carton and packing material through the proper waste disposal management in your area.
4
Page 5
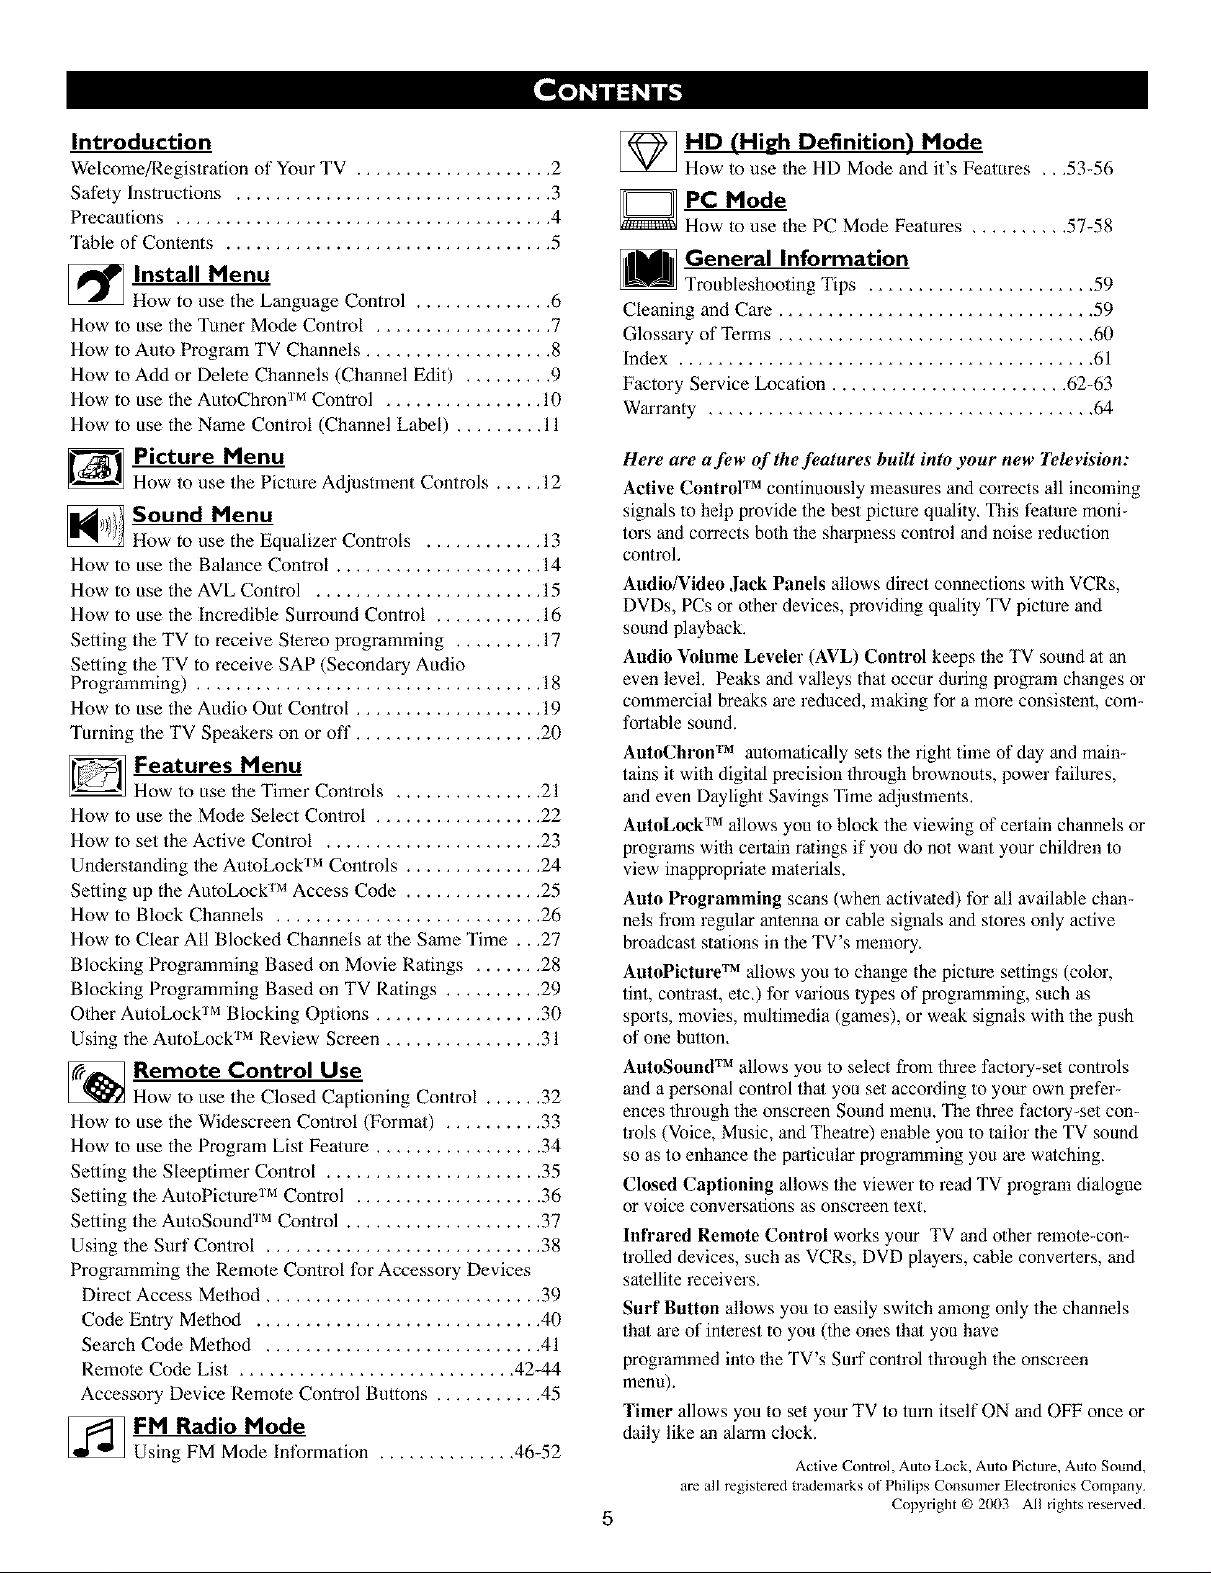
Introduction
Welcome/P, egistration of Your TV .................... 2
Safety Instructions ................................ 3
Precautions ...................................... 4
Table of Conlents ................................. 5
_ Install Menu
How to use the Tuner Mode Control .................. 7
How to Auto Program TV Channels ................... 8
How to Add or Delete Channels (Channel Edit) ......... 9
How to use the AutoChron TM Control ................ 10
How to use the Name Control (Channel Label) ......... 11
_ Picture Menu
How to use the Balance Control ..................... 14
How to use the AVL Control ....................... 15
How to use the Incredible Surround Control ........... 16
Setting the TV to receive Slereo programming ......... 17
Setting the TV to receive SAP (Secondary Audio
Programming) ................................... 18
How to use the Audio Out Control ................... 19
Turning the TV Speakers on or off ................... 20
D Features Menu
How to use the Mode Select Control ................. 22
How to set the Active Control ...................... 23
Understanding the AutoLock TM Controls .............. 24
Setting up the AutoLock TM Access Code .............. 25
How to Block Channels ........................... 26
How to Clear All Blocked Channels at the Same Time .. ,27
Blocking Programming Based on Movie Ratings ....... 28
Blocking Programming Based on TV Ratings .......... 29
OIher AutoLock TM Blocking Options ................. 30
Using the AutoLock TM Review Screen ................ 31
_ Remote Control Use
How to use the Widescreen Control (Formal) .......... 33
How to use the Program List Feature ................. 34
Setting the Sleeptimer Control ...................... 35
Setting the AutoPicture TM Control ................... 36
Setting the AutoSound TM Control .................... 37
Using the Surf Control ............................ 38
Programming the Remote Control for Accessory Devices
_FM Radio Mode
How to use the Language Control .............. 6
How to use the Picture Adjustment Controls ..... 12
Sound Menu
How to use the Equalizer Controls ............ 13
How to use the Timer Controls ............... 21
How to use the Closed Captioning Control ...... 32
Direct Access Method ............................ 39
Code Entry Method ............................. 40
Search Code Method ............................ 41
Remote Code List ............................ 42-44
Accessory Device Remote Control Buttons ........... 45
Using FM Mode information .............. 46-52
_HD (High Definition) Mode
How to use the HD Mode and it s Features ,, ,53-56
_PC Mode
How to use the PC Mode Features .......... 57-58
General Information
Troubleshooting Tips ....................... 59
Cleaning and Care ................................ 59
Glossary of Terms ................................ 60
Index .......................................... 61
Factory Service Location ........................ 62-63
Warranty ....................................... 64
Here are a few of the,features built into your new Television:
Active Control TM continuously measures and corrects all incoming
signals to help provide the best picture quality, q_is feature moni-
tors and corrects both the sharpness control and noise reduction
control.
Audio/Video Jack Panels allows direct connections with VCRs,
DVDs, PCs or other devices, providing quality TV picture and
sound playback.
Audio Volume Leveler (AVL) Control keeps the TV sound at an
even level. Peaks and valleys that occur during program changes or
commercial breaks are reduced, making for a more consistent, com-
fortable sound.
AutoChron TM automatically sets the right time of day and main-
tains it with digital precision through brownouts, power failures,
and even Daylight Savings Time adjustments.
AutoLock TM allows you to block the viewing of certain channels or
programs with certain rulings if you do not want your children to
view inappropriate malerials+
Auto Programming scans (when activaled) for all available chan-
nels from regular antenna or cable signals and stores only active
broadcast stalions in the TV's memory.
AutoPicture TM allows you to change the picture settings (color,
tint, contrast, etc+) for various types of programming, such as
sports, movies, multimedia (games), or weak signals with the push
of one button.
AutoSound TM allows you to select from three factory-set controls
and a personal control that you set according to your own prefer-
ences through the onscreen Sound menu, "l_e three factory-set con-
trols (Voice, Music, and Theatre) enable you to tailor the TV sound
so as to enhance the parlicalar programming you are watching,
Closed Captioning allows the viewer to read TV program dialogue
or voice conversations as onscreen text.
Infrared Remote Control works your TV and other remote-con-
trolled devices, such as VCRs, DVD players, cable converters, and
satellite receivers.
Surf Button allows you to easily switch among only the channels
that are of interest to you (the ones that you have
programmed into the TV's Surf control through the onscreen
menu).
Timer allows you to set your TV to tUlTlitself ON and OFF once or
daily like an alarm clock.
Active Control, Auto Lock, Auto Picture, Auto Sound,
are all registered trademarks of Philips Consumer E[ectronics Company.
5
Copyright © 2(X)3 All rights resmved.
Page 6
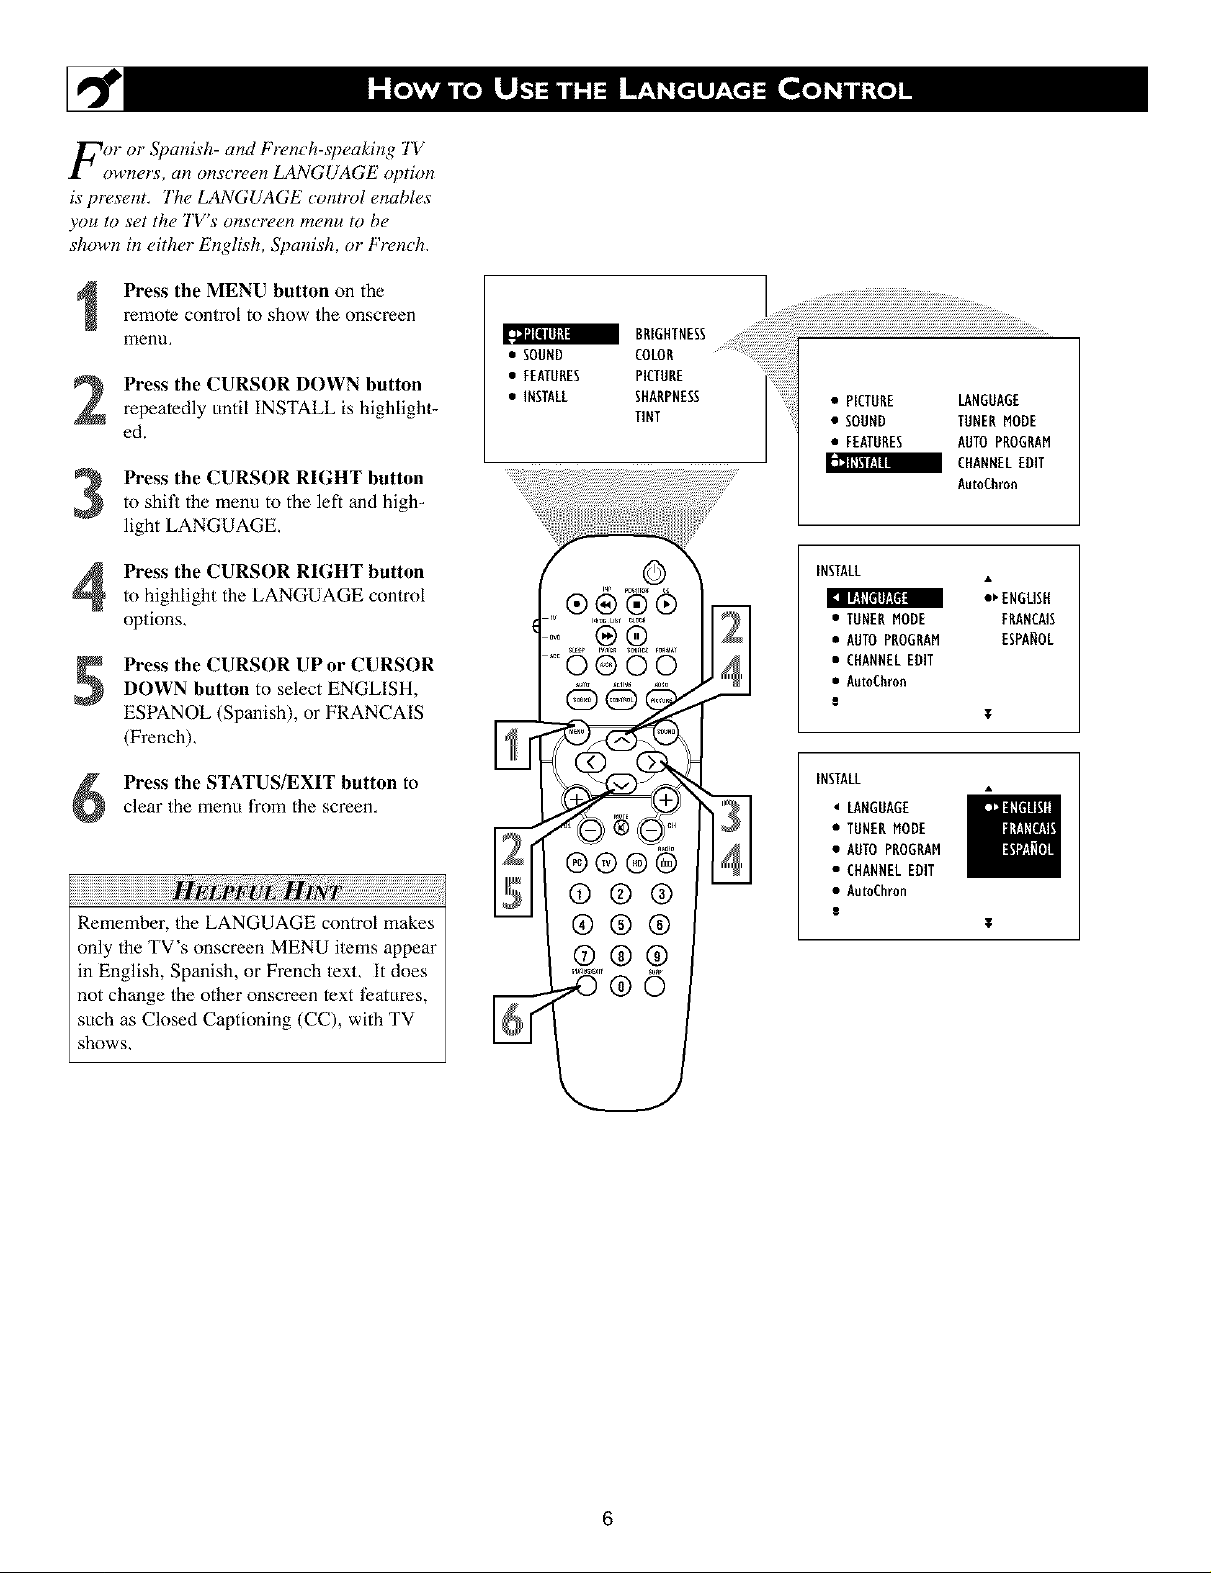
For or Spanish- and French-speaking 1V
owners, an onscreen LANGUAGE option
is present, The LANGUAGE control enables
you to set the TV's onscreen menu to be
shown in either English, Spanish, or French,
Press the MENU button on the
remote control to show the onscreen
menu,
L._iUmJmI BRIGHTNESS .....................
• SOUND COLOR ............
Press the CURSOR DOWN button
repeatedly until INSTALL is highlight-
ed.
Press the CURSOR RIGHT button
to shit_ the menu to the left and high_
light LANGUAGE.
Press the CURSOR RIGHT button
to highlight the LANGUAGE control
options,
Press the CURSOR UP or CURSORDOWN button to select ENGLISH,
ESPANOL (Spanish), or FRANCAIS
(French),
Press the STATUS/EXIT button toclear the menu from the screen,
iiiiiiiiiiiiiiiiiiiiiiiiiiiiiiiiiiiiiiiiiiiiiil ii !i!i!i iiiiiiiiiiiiiiiiiiiiiiiiiiiiiiiiiiiiiiiiiiii¸¸
Remember, the LANGUAGE control makes
only the TV's onscreen MENU items appear
in English, Spanish, or French text, It does
not change the other onscreen text t?atures,
such as Closed Captioning (CC), with TV
shows,
•"EERTHRESINsTRLLSHARPNEssP'CTORE
TINT
• PICTURE LANGUAGE
• SOUND TUNER MODE
• FEATURES AUTO PROGRAM
CHANNEL EDIT
AutoChron
INSTALL
_ ENGLISH
• TUNERMODE FRANCAIS
• AUTOPROGRAM ESPAROL
• CHANNELEDIT
• Au_Chron
¥
INSTALL
LANGUAGE
• TUNERMODE
• AUTOPROGRAM
• CHANNELEDIT
• Au_Ch_n
T
6
Page 7

Tthe TUNER MODE allows you to change
he TV s signal input to CABLE, ANTEN-
NA, or AUTO mode,. It's" important for the TV
to know if you want to receive c hannels fr_)m
a cable TV signal or a normal antenna signal,
NOTE: The AUTO mod¢_ setting helps the TV
ch,t¢_rmine the type of signal or' channels being
received when AUTO PROGRAM is activat-
ed,
Press the MENU button on the
remote control to show the onscreen
menu,
Press the CURSOR DOWN button
repeatedly until INSTALL is highlight-
ed.
• SOUND COLOR
BRIGHTNESS
• FEATURES PICTURE
• INSTALL SHARPNESS
TINT
• PICTURE LANGUAGE
• SOUND TUNER MODE
• FEATURES AUTO PROGBAM
CHANNEL EDIT
AutoChron
Press the CURSOR RIGHT buttonto shill the menu to the left.
Press the CURSOR DOWN button to
highlight the TUNER MODE control.
Press the CURSOR RIGHT buttonto highlight the tuner options.
Press the CURSOR UP or CURSOR
6
DOWN button to select CABLE,
ANTENNA or AUTO.
If TUNER MODE is set to AUTO,
Auto Program (see below) will delect
whether or not cable input is present.
clear the menu from the screen,
Press the STATUS/EXIT button to
iiiiiiiiiiiiiiiiiiiiiiiiiiiiiiiiiiiiiiiiiiii¸¸
When CABLE is selected, channels l 125
are available,
When ANTENNA is selected, channels
2_9 are available,
©
®®
®®®®
®®®
®®®
®®®
_ ENGLISH
• TUNERMODE FRANCAIS
• AUTOPROGRAM ESPANOL
• CHANNELEDIT
• AutoChron
• LANGUAGE
i:' illl[ll_t I+O]l]d
• AUTO PROGRAM AUTO
• CHANNEL EDIT CABLE
• AutoChron
• LANGUAGE
TUNER MODE
• AUTO PROGRAM
• CHANNEL EDIT
• AutoCh_n
-_ANTENNA
7
Page 8

B)ur TV can automatically set itse!f.f!)r
ocal area (ol- cable TV) chalmels. This
makes it easy f!)r you to select only the TV
stations in your area by pressing the CHAN-
NEL (+) ol- (-) button,
Press the MENU button on the
remote control to show the onscreen
menu.
Press the CURSOR DOWN button
repeatedly until INSTALL is highlight-
ed.
to shit_ the menu to the left. LAN-
Press the CURSOR RIGHT button
GUAGE will be highlighted.
Press the CURSOR DOWN button
repeatedly until the AUTO PROGf_,AM
control is highlighted.
Press the CURSOR RIGHT button
to start the Auto Program scanning of
channels.
• SOUND COLOR
BRIGHTNESS
• FEATURES PICTURE
• INSTALL SHARPNESS
TINT
'=0®00
• PICTURE LANGUAGE
• SOUND TUNER MODE
• FEATURES AUTO PROGRAM
CHANNELEDIT
AutoChron
INSTALL
Illll I._lI[rlly._IflIII
• TUNER MODE FRANCAIS
• AUTO PROGRAM ESPANOL
• CHANNELEDIT
• AutoChron
a
e_.ENGLISH
clear the menu from the screen,
Press the STATUS/EXIT button to
Afler you've mn Auto Program, check out
the results. Press the CHANNEL (+) or (-)
button and see which channels you can
select.
Remember, an anlenna or cable TV signal
must first be connecmd to your TV (see
instructions for making connections on page
1 of this guide).
®®@
®@@
@@@
INSTALL
• LANGUAGE
• TUNER MODE
e_SEANCH[ 1.*111111d_l*IM;!,.lt
• CHANNEL EDIT
• AutoCh_n
i
INSTALL
• LANGUAGE
• TUNER MODE
4 AUTO PROGRAM
• CHANNEL EDIT
• AutoChron
8
Page 9
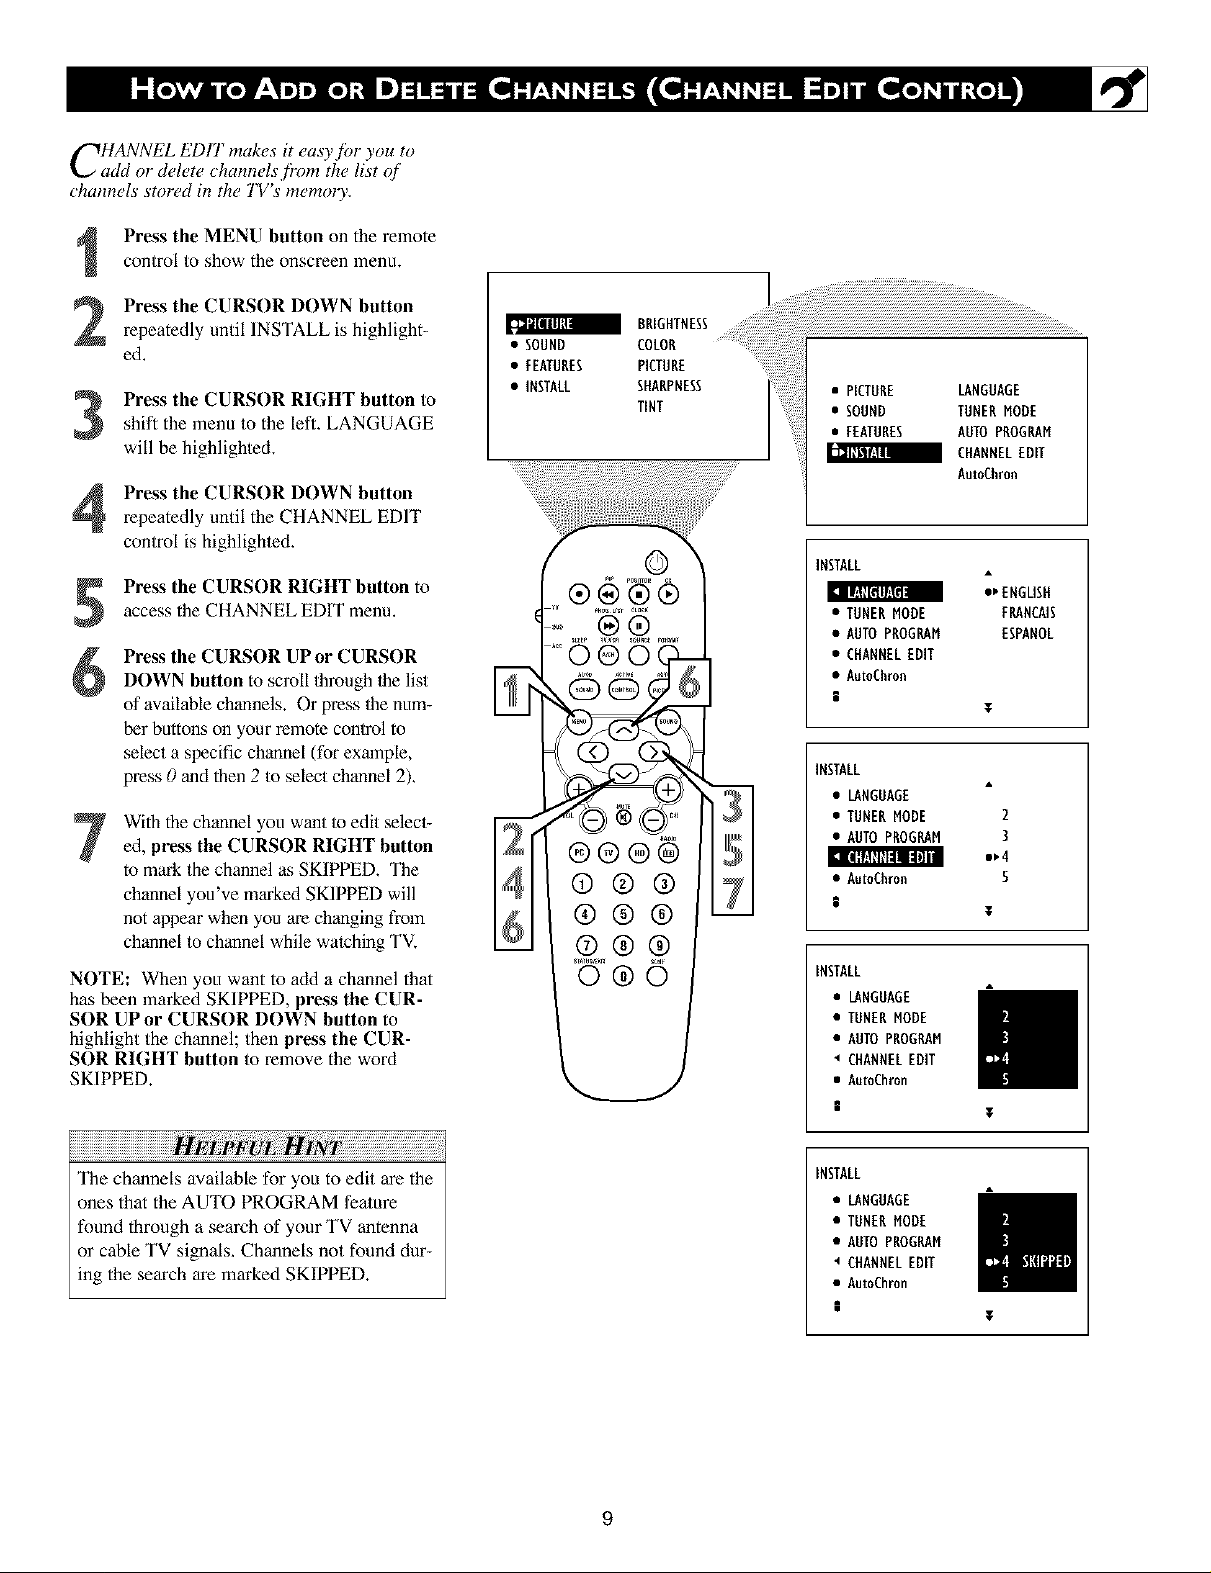
CHANNEL EDIT makes it easy,?br you to
add o1"delete channels,firm the list qf
channels stored in the TV's memo13,.
Press the MENU button on the remote
control to show the onscreen menu.
Press the CURSOR DOWN button
repeatedly until INSTALL is highlight-
ed.
shift the menu to the left. LANGUAGE
Press the CURSOR RIGHT button to
will be highlighted.
Press the CURSOR DOWN button
repeatedly until the CHANNEL EDIT
control is highlighted.
Press the CURSOR RIGHT button to
access the CHANNEL EDIT menu.
Press the CURSOR UP or CURSOR
DOWN button to scroll lhrough 1helist
of available channels. Or press 1henum-
ber buttons on your remote control to
select a specific channel (for example,
press 0 and then 2 to select channel 2).
With the channel you want lo edit selecl-
7
ed, press the CURSOR RIGHT button
to mark the channel as SKIPPED. "l_e
channel you've marked SKIPPED will
not appear when you are changing from
channel to channel while watching TV.
NOTE: When you want to add a channel that
has been marked SKIPPED, press the CUR-
SOR UP or CURSOR DOWN button to
highlight the channel; then press the CUR-
SOR RIGHT button to remove the word
SKIPPED.
• SOUND COLOR
• FEATURES PICTURE
• INSTALL SHARPNESS
BRIGHTNESS.......
TINT
©
_u _0G u_r CLACK
0,0 ®®
®®®®
®®®
®®®
®®®
• PICTURE LANGUAGE
• SOUND TUNER MODE
• FEATURES AUTO PROGRAM
CHANNEL EDIT
AutoChron
INSTALL
I_ IIF.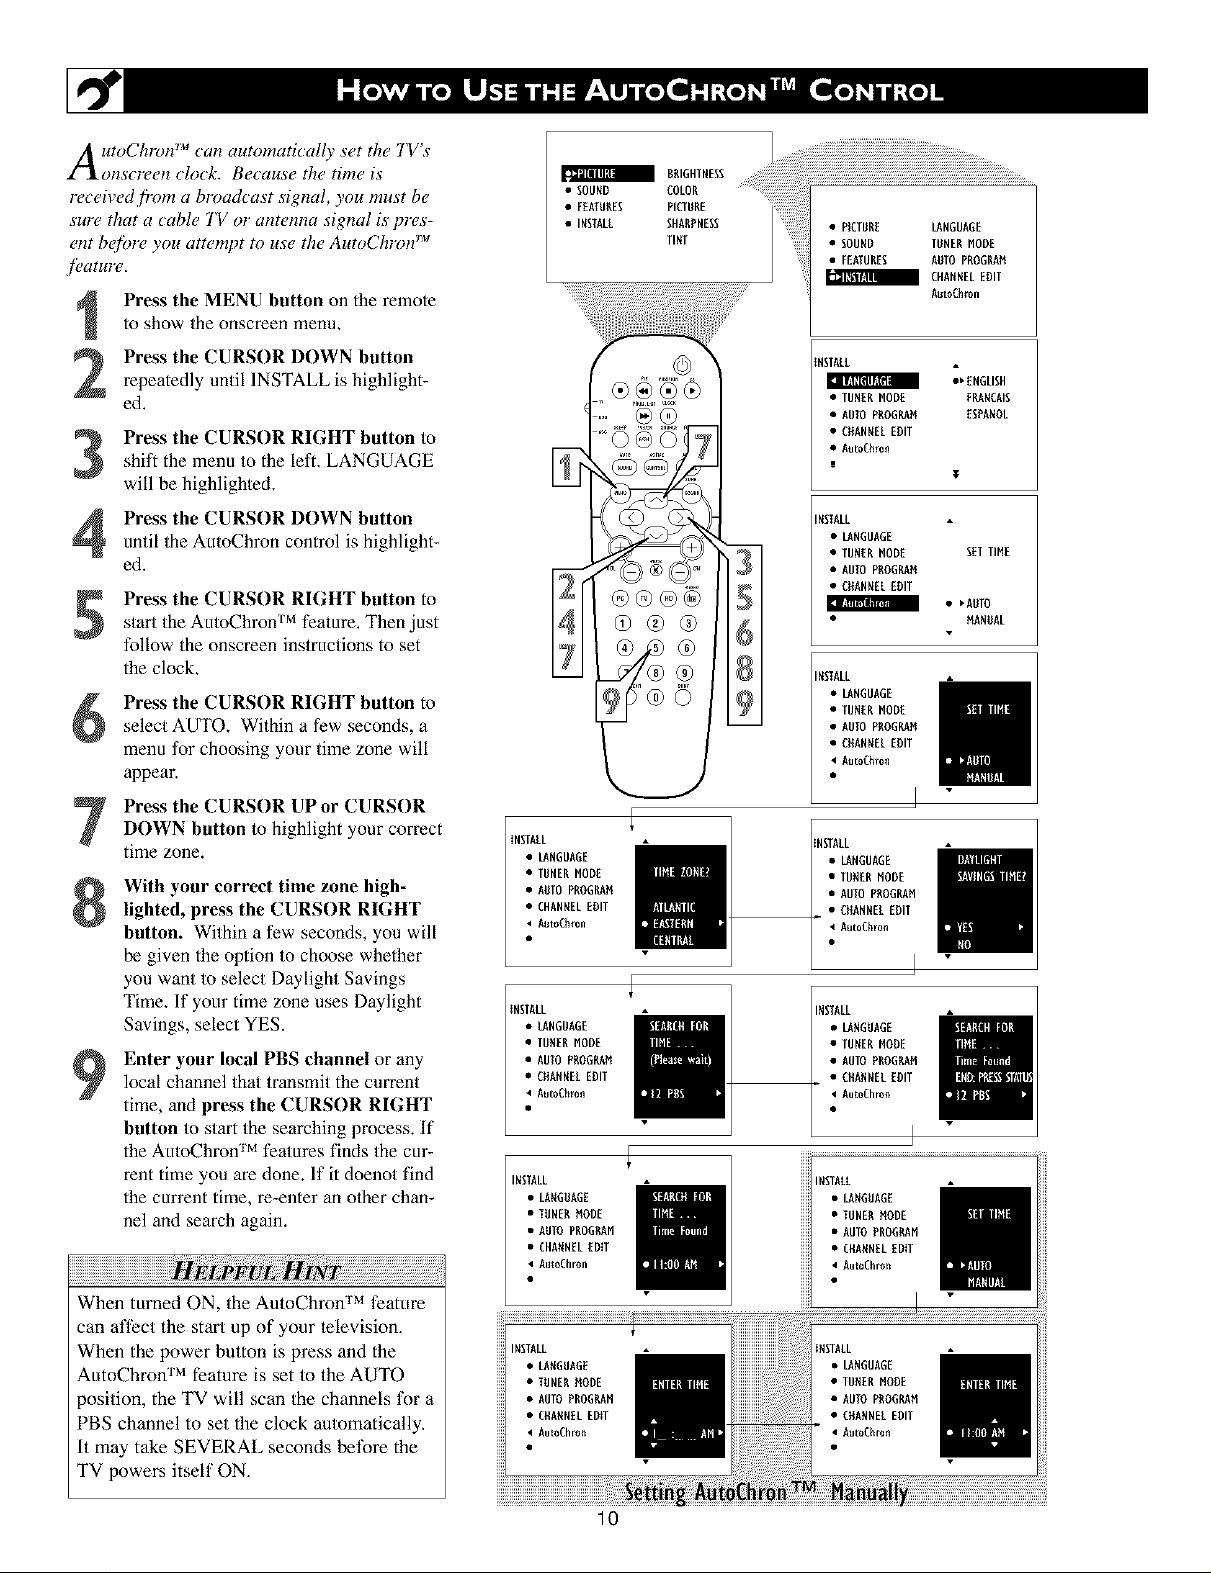
A utoChFon _an automatt_ally set the TVs
l_Xonscreen clock, Because the time is
re_eived ti"om a broadcast signal, you must be
surc_that a cable TV o1"antenna signal is prc_s-
ent betbre you attempt to use the AutoChron TM
f_J£1IH1Y_,
Press the MENU button on the remote
to show the onscreen menu.
Press the CURSOR DOWN button
2
repeatedly until INSTALL is highlight-
ed.
Press the CURSOR RIGHT button to
shift the menu to the left. LANGUAGE
3
will be highlighted.
Press the CURSOR DOWN button
4
until the AutoChron control is highlight-
ed.
Press the CURSOR RIGHT button to
5
s/art the AutoChron TM feature. Then just
follow the onscreen instructions to set
the clock,
Press the CURSOR RIGHT button toselect AUTO, Within a few seconds, a
menu for choosing your time zone will
appear.
SOUNDEOLDRRR'0NTN"E0' " ! i! i!ii!iiiiiiiiiiiiiiiiiiiiii!!!iiiii.....................................
• PICTURE LANGUAGE
• SOUND TUNER NODE
•• INSTALLFERTUHESSHRRPNESETINTPICTURE : [3/ EHRNNELEDIT
.... ...... R.oEh 0.
m
-- • AUTO PROORAN
• FEATURES AUTOPROSIER
tNSTRLR
I_ IllJ[[dl_;[H U
• TUNER MODE F_HCRIE
• AUTO PROGRAM EERANOL
• ENANNEL ENT
• RutoERron
INSTALL
• LANOUROE
• TUNERNODE EElTIME
• RUIOPROORAM
• ENANNELEDIT
E RT!T_$TE_
INSTALL
• LANOUROE
• TUNER NODE
• CNANNEL EDIT
• RutoERron
_ENGLISH
T
• _RUTO
NANDAL
Press the CURSOR UPor CURSORDOWN button to highlight your correct
time zone.
With your correct time zone high-
lighted, press the CURSOR RIGHT
button. Within a few seconds, you will
be given the option to choose whether
you want to select Daylight Savings
Time, If your time zone uses Daylight
Savings, select YES.
Enter your local PBS channel or any
local channel that transmitthe current
9
time, and press the CURSOR RIGHT
button to start the searching process, If
the AutoChron TM features finds the cur-
rent time you are done. If it doenot find
the current time, re-enter an o/her chan-
nel and search again.
w
When tinned ON, the AutoChron TM feature
can affect the start up of your lelevision,
When the power button is press and the
AutoChron TM feature is set to the AUTO
position, the TV will scan the channels tk)r a
PBS channel to set the clock automatically,
It may take SEVERAL seconds betbre the
TV Ix)wers itself ON,
INSTALL
• LANGUAGE
• TUNER MODE
• AUTO PROGILAN
• CHANNELEDIT
• RutoEhron
INSTALL
• LANGUAGE
• TUNER NODE
• AUTO PROGRAN
• CNANNEL EDIT
• RutoERron
INSTALL
• LAHGDAGE
• TUNER_ODE
• AUTO PROGRAN
• CHRHNELEDiT
• AutoChron
INSTALL
• LAHGURGE
• TUNER NODE
• AUTO PROGRAN
• CHRHNELEDiT
AutoChro_
INSTALL
• LANOUROE
• TUNER NODE
• AUTO PRO0_N
• ENANNELENT
• Rut0ERr0n
INSTRLL
• LANGUROE
• TUNER NODE
• AUTO PROGRRN
• CHANNELEDIT
AutoEhro_
lO
Page 11
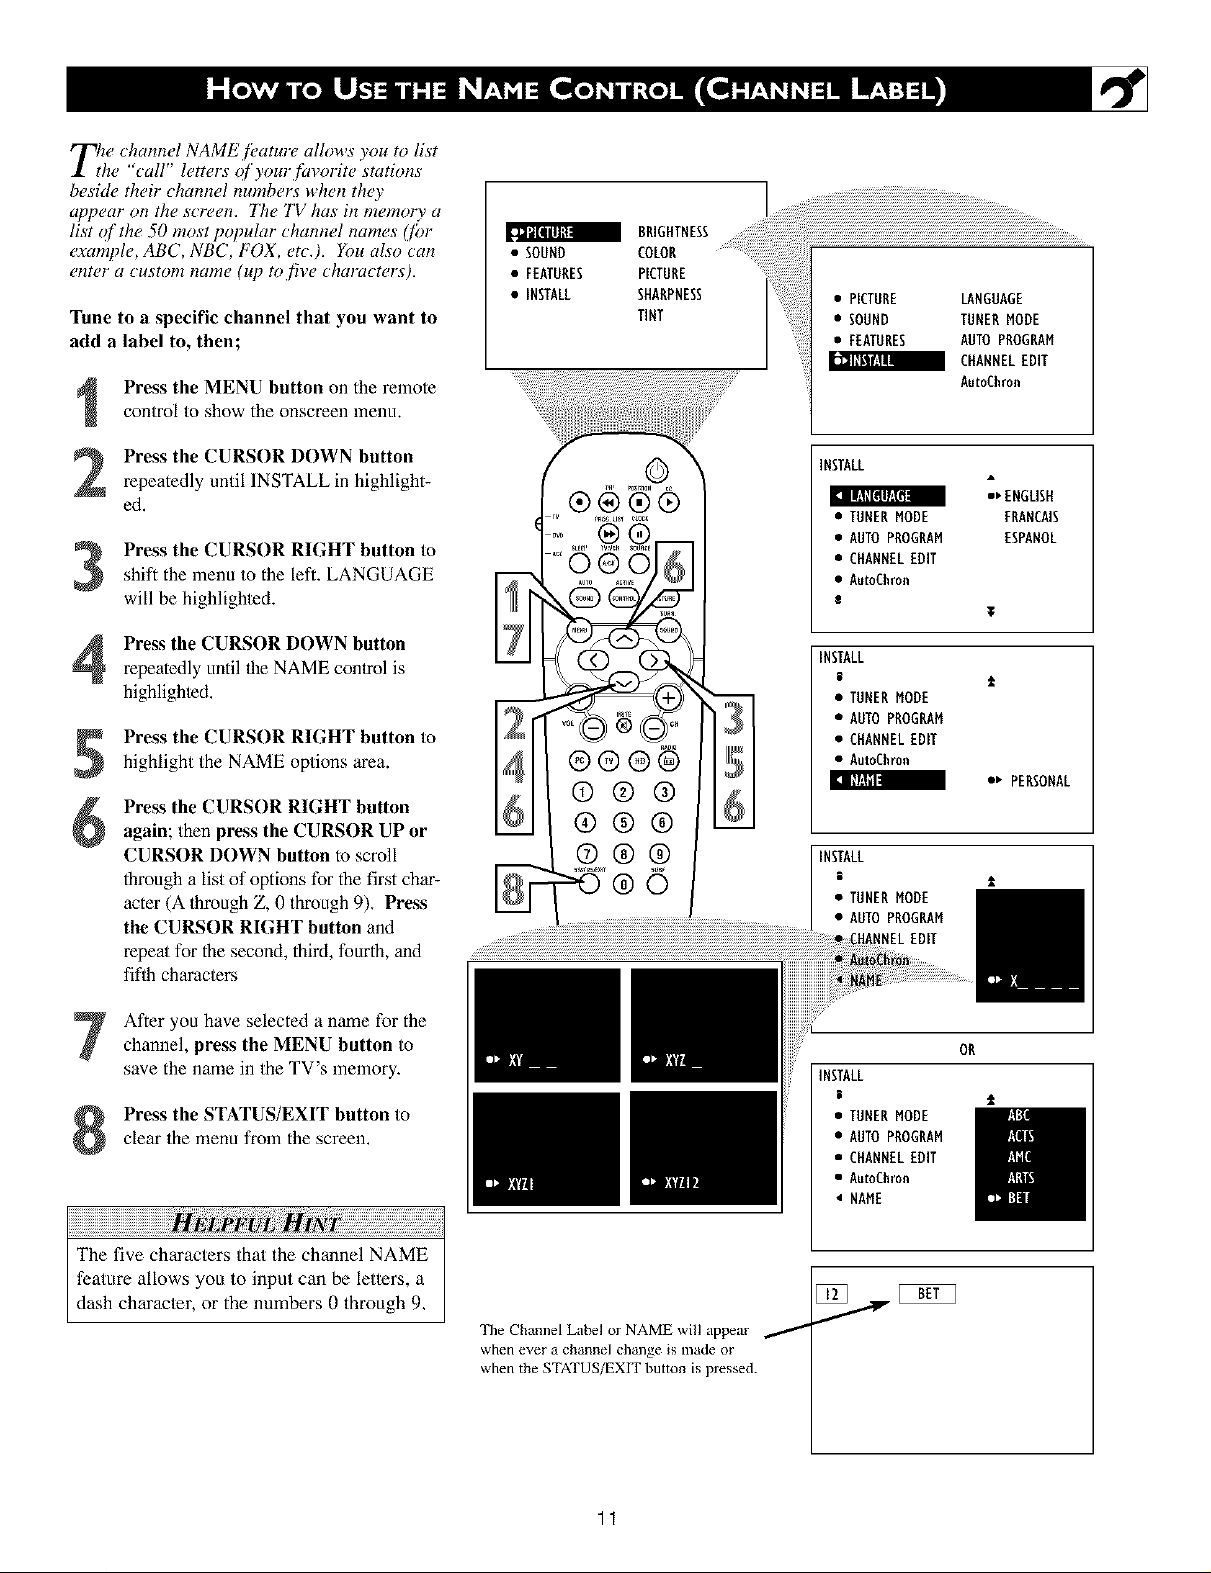
T_w channel NAME.fi, ature allows you to list
he "call" letters qf your fin,orite stations
beside their channel numbers when the)"
appear on the screen. 77w TV has its memo 0, a
list of the 50 most popular channel names (fi)r
example, ABC, NBC, FOX, etc.). Ybu also can
enter a custom name (up to five characters).
Tune to a specific channel that you want to
add a label to, then;
Press the MENU button on the remote
control to show the onscreen menu+
• SOUND COLOR
BRIGHTNESS
• FEATURES PICTURE
• INSTALL SHARPNESS
TINT
• PICTURE LANGUAGE
• SOUND TUNERMODE
• FEATURES AUTOPROGRAM
CHANNELEDIT
AutoChron
Press the CURSOR DOWN button
repeatedly until INSTALL in highlight-
ed.
Press the CURSOR RIGHT button toshift the menu to the left. LANGUAGE
will be highlighte&
Press the CURSOR DOWN button
repeatedly until flae NAME conlrol is
highlighted.
Press the CURSOR RIGHT button to
highlight the NAME options area.
Press the CURSOR RIGHT button
again; then press the CURSOR UP or
CURSOR DOWN button to scroll
through a list of options for the first char-
acter (A lhroagh Z, 0 through 9)+ Press
the CURSOR RIGHT button and
repeal for the second, third, fourth, and
fiflh characlers
After you have selected a name for the
channel, press the MENU button to
save the name in the TV's memory+
Press the STATUS/EXIT button to
clear the menu from the screen.
iiiiiiiiiiiiiiiiiiiiiiiiiiiiiiiiiiiiiiiiiiiiiiiiiiiiiiiiiiiiiiiiiiiiiiiiiiiiiiiiiiiiiiiiiiii ! ii i ! iiiiiiiiiiiiiiiiiiiiiiiiiiiiiiiiiiiiiiiiiiiii¸
The five characters that the channel NAME
feature allows you to input can be letters, a
dash character, or the numbers 0 through 9,
©
®®®®
©®@
®®®
(7)@@
The Channel Label or NAME will appear
when evel a channel change is nlade oi
when the STATUS/EXIT button is pressed.
INSTALL
: I|,.ll[ltl/_lli
• TUNERMODE FRANCAIS
• AUTOPROGRAM ESPANOL
• CHANNELEDIT
• AumChron
8
INSTALL
• TUNERMODE
• AUTOPROGRAM
• CHANNELEDff
• AutoChron
[ Ill:fill
INSTALL
• TUNERMODE
• AUTOPROGRAM
iNNELEDII
INSTALL
• TUNERMODE
• AUTOPROGRAM
• CHANNELEDIT
• AumChron
• NAME
:_ ENGLISH
T
1_ PERSONAL
OR
1
11
Page 12
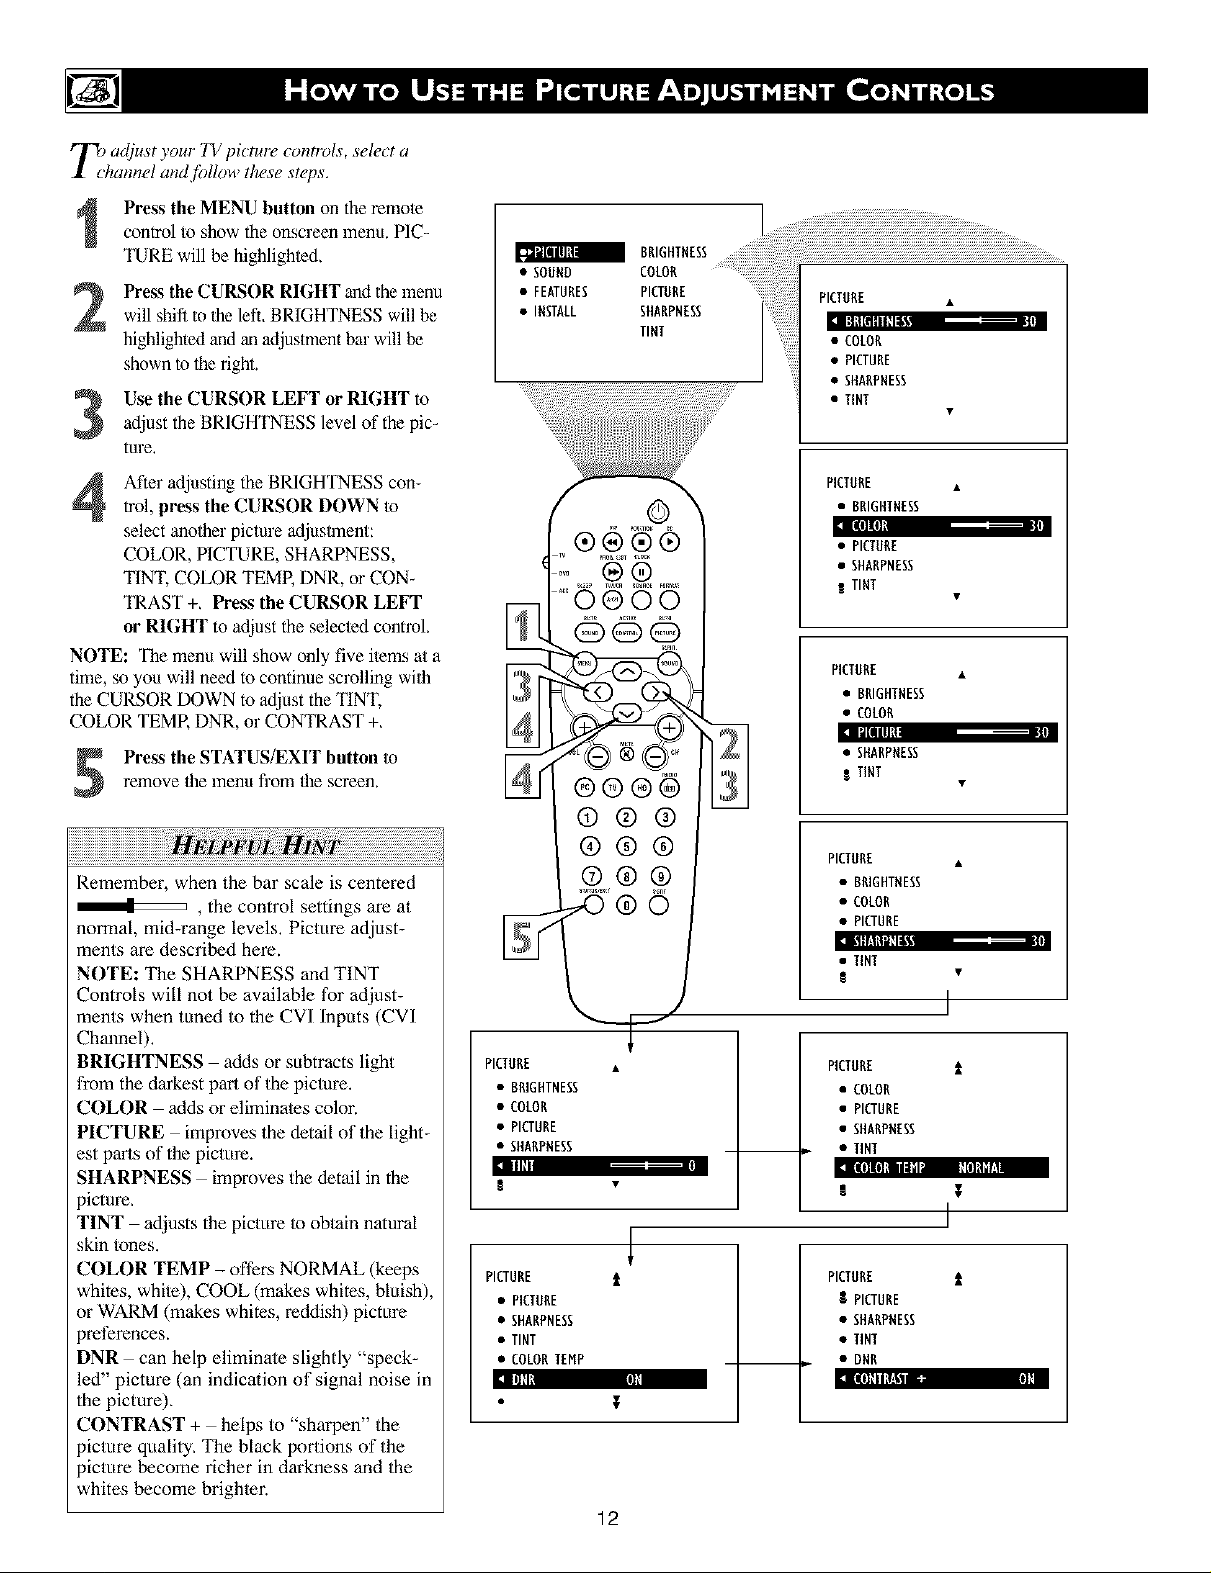
r'_) adiust your TV picture controls, select a
I chamwl andfi_llow these steps,
Press the MENU button on the remote
control to show the onscreen lnena. PIC-
TURE will be highlighted.
Press the CURSOR RIGHT and the menu
2
will shift to the left BRIGHTNESS will be
highlighted and an adjustment bar will be
shown to the fight.
Use the CURSOR LEFT or RIGHT to
3
adjust the BRIGHTNESS level of the pic-
tare.
After adjusting the BRIGHTNESS con-
trol, press the CURSOR DOWN to
select another picture adjasllnent:
COLOR, PICTURE, SHARPNESS,
TINT, COLOR TEMP, DNR, or CON-
TP,AST +, Press the CURSOR LEFT
or RIGHT to adjust the selected control.
NOTE: "l_e menu will show only five ilems a/a
time, so you will need to continue scrolling with
the CURSOR DOWN to adjust the TINT,
COLOR TEMR DNR, or CONTP, AST +,
remove the menu fl'om the screen.
Press the STATUS/EXIT button to
Remember, when the bar scale is centered
, the control settings are at
normal, mid-range levels, Picture adjust-
ments are descried here.
NOTE: The SHARPNESS and TINT
Controls will not be available for adjust-
ments when tuned to the CVI Inputs (CVI
Channel),
BRIGHTNESS adds or subtracts light
from the darkest part of the picture.
COLOR adds or eliminates color.
PICTURE improves the detail of the light-
est parts of the picture.
SHARPNESS improves the detail in the
ictare,
TINT adjusts the picture lo obtain natural
skin tones.
COLOR TEMP - offers NORMAL (keeps
whites, while), COOL (makes whites, bluish),
or WARM (makes whites, reddish) picture
?references.
DNR can help eliminate slightly "speck-
led" picture (an indication of signal noise in
the picture).
CONTRAST + helps to "sharpen" the
picture quality, The black Ix)rtions of the
?icture _come richer in darkness and the
whites become brighler.
• SONND COCOP_
• FEATURES PICTUBE
• INSTALL SHARPNESS
T, 6
"0 oo
©©©
®®®®
®®®
®®®
®®(9
PICTHBE •
• BPdGHTNESS
• COLOR
• PICTURE
• SHARPNESS
IIII1_1
PICTURE t_
• PICTHBE
• SHARPNESS
• TINT
• COLORTEHP
]llll,
12
BRIGHTNESS
TINT
Oj
PICTHBE
II_litlltllllll
• COLOR
• PICTURE
• SHARPNESS
• TINT
PICTHBE
• BRIGHTNESS
iiilllnl
• PICTNBE
• SHARPNESS
I TINT
PICTHBE
• BRIGHTNESS
• COLOB
IIg[llllll
• SHABPNESS
I TINT
PICTHBE
• BRIGHTNESS
• COLOB
• PICTURE
:l kIl_13th
• TINT
I
PICTURE
• COLOR
• PICTURE
• SHABPNESS
• TINT
:n [lllln]illlll_l ,l Ilrl]ll_l
T
J
PICTHBE
g PICTURE
• SHAP,PNESS
• TINT
• DNB
:1 [lul I II[f!vl
Page 13
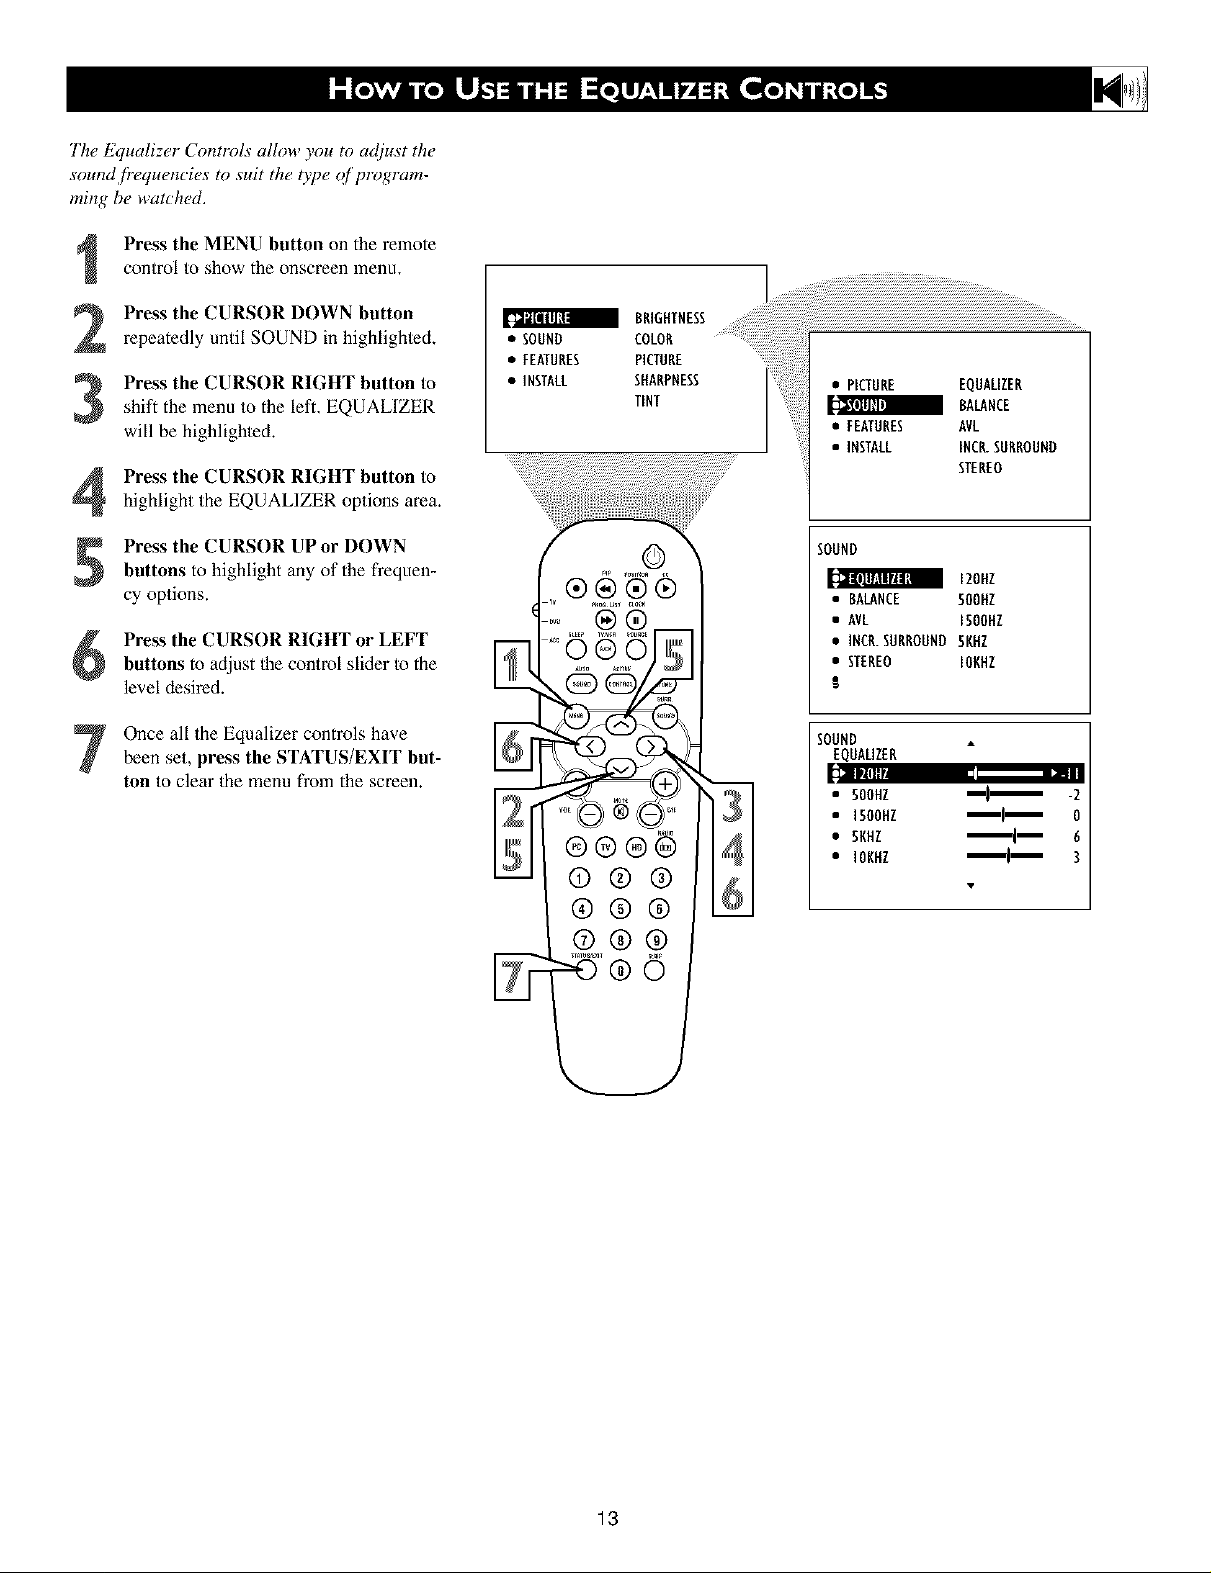
The Equalizer Contlvls allow you to adiust the
sound /?equencies to suit the type _f program-
ming be watched.
Press the MENU button on the remote
control to show the onscreen menu.
Press the CURSOR DOWN button
repeatedly until SOUND in highlighted.
S Press the CURSOR RIGHT button to
shift the menu to the left. EQUALIZER
will be highlighted.
Press the CURSOR RIGHT button to
highlight the EQUALIZER options area.
Press the CURSOR UPor DOWN
buttons to highlight any of the frequen-
cy options.
Press the CURSOR RIGHT or LEFT
buttons to adjust the control slider to the
level desired.
Once all the Equalizer controls havebeen set, press the STATUS/EXIT but-
ton to clear the menu from the screen.
BRIGHTNESS
• SOUND COLOR
• FEATURES PICTURE
• iNSTALL SHARPNESS
TiNT
©
®
• PICTURE EQUAUZEB
BALANCE
• FEATURES AVL
• iNSTALL INC_SURROUND
STEREO
SOUND
120HZ
• BALANCE 500HZ
• AVL ISOOHZ
• IHCR.SHBROHND 5KHZ
• STEREO IOKHZ
!
SOUND
EQHAUZEB
_m1!!'l •
• SOOHZ -2
• i500HZ _1_ 0
• SKHZ _ 6
• IOKHZ _ 3
13
Page 14
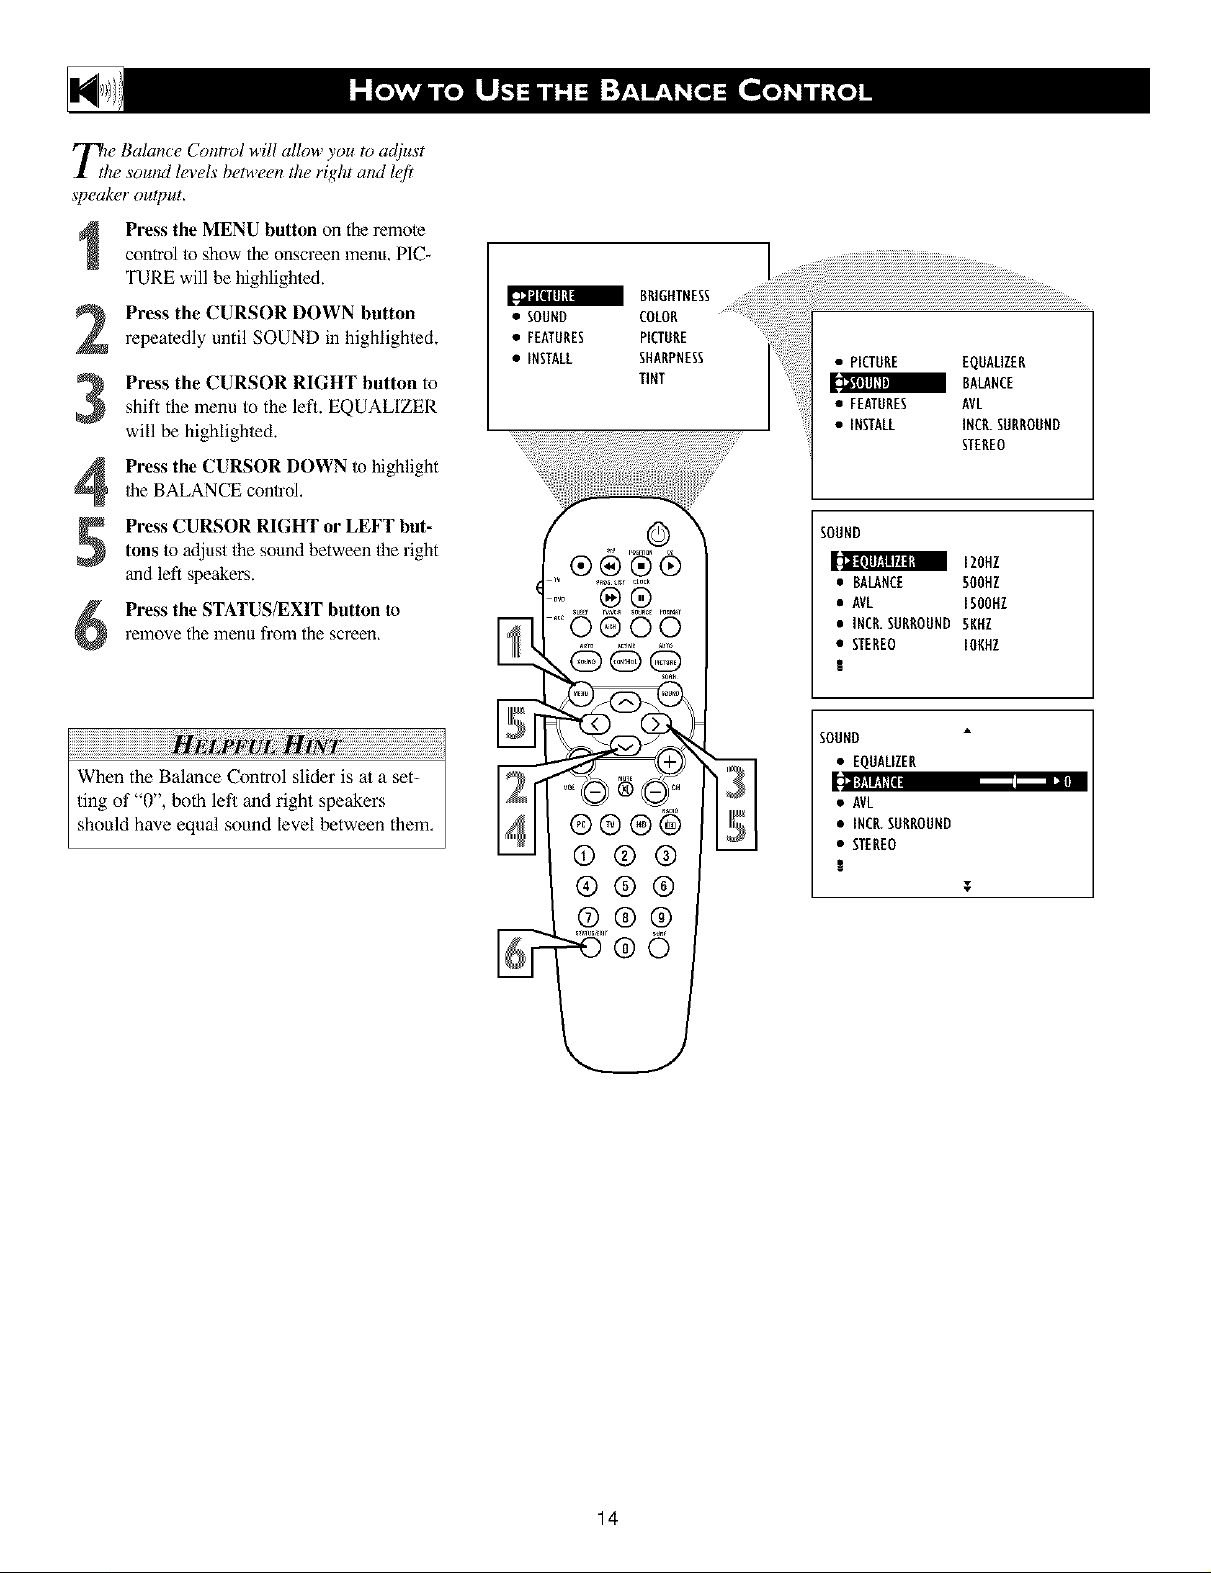
T_/e Balance Control will allow you to at!just
he sound levels between the right and left
speaker ou&ut.
control to show the onscreen menu, PIC-
i Press the MENU button on the remote
TURE will be highlighted.
Press the CURSOR DOWN button
repeatedly until SOUND in highlighted.
Press the CURSOR RIGHT button to
3
shift the menu to the lefL EQUALIZER
will be highlighted.
Press the CURSOR DOWN to highlight
Ihe BALANCE control,
4
Press CURSOR RIGHT or LEFT but-
tons to adjust lhe sound between the right
and left speakers.
relnove the menu from the screen,
Press the STATUS/EXIT button to
•SOUNOEOLOR"IONTNESS
• FEATURES PICTURE
• INSTALL SHARPNESS
TiNT
• PICTURE EQUALIZER
BALANCE
• FEATURES AVL
• INSTALL INCR.SURROUND
STEREO
SOUND
120HZ
• BALANCE 500HZ
• AVL ISOOHZ
•INCR. SURROUND 5NHZ
• STEREO IOKHZ
S
iiiiiiiiiiiiiiiiiiiiiiiiiiiiiiiiiiiiiiiiiiiiiiiiiiiiiiiiiiiiiiiiiiiiiiiiiiiiiiiiiiiiiiiiiiiii !i !i !i
When the Balance Control slider is at a set-
ting of "0", both lef/and right speakers
should have equal sound level between them,
SOUND
• EQUALIZER
Hi_l;fdf:t_r
• AVL
• INC_ SURROUND
• STEREO
t
T
14
Page 15

I_i+ most _ases, the volume levels coming
om broadcast programming or commer-
cials arc, never the same, With the AVL
(Audio Volume Le_eh, r) control turned ON,
you can have the TV level out sound that is
being heard, This makes f!)r a more _onsis-
t_mt sound by reducing the peaks and vallo's
that occur during program _hanges or _om-
inertial breaks. "lb turn the AVL ON, follow
these steps,
Press the MENU button on the
remote control to show the onscreen
menn,
Press the CURSOR DOWN to high+
light SOUND.
_,>>>>>>>>>>>>>>>>>>>>>>>>>>>>>>>>>>>>>>>>>>>>>>>>>>>>>>>>>>>>>>>>>>>>>,,
!i!!i!!i !!i!!i!!
.s00NuCOLoN+TNESS
• FEATURES PICTURE
• INSTALL SHARPNESS
TINT
• PICTURE EQUALIZER
• FEATURES AVL
• INSTALL INCR.SURROUND
BALANCE
STEREO
Press the CURSOR RIGHT and the
menu will shit_ to the left. EQUALIZ-
ER will be highlighted and an adjust-
ment bar will be shown to the right.
Press the CURSOR DOWN repeated-
ly until AVL is highlighted.
Press the CURSOR RIGHT or
5
LEFT to toggle AVL ON or OFF.
Press the STATUS/EXIT button to
remove the menu fi'om the screen.
6
SOUND
120HZ
• BALANCE 500HZ
• AVL ISOOHZ
•INCR. SUNNOUND 5KHZ
• STEREO IOKHZ
!
SOUND
• EQUALIZER
• BALANCE
•INCR. SNRRONND
• STEREO
!
T
OR
15
Page 16
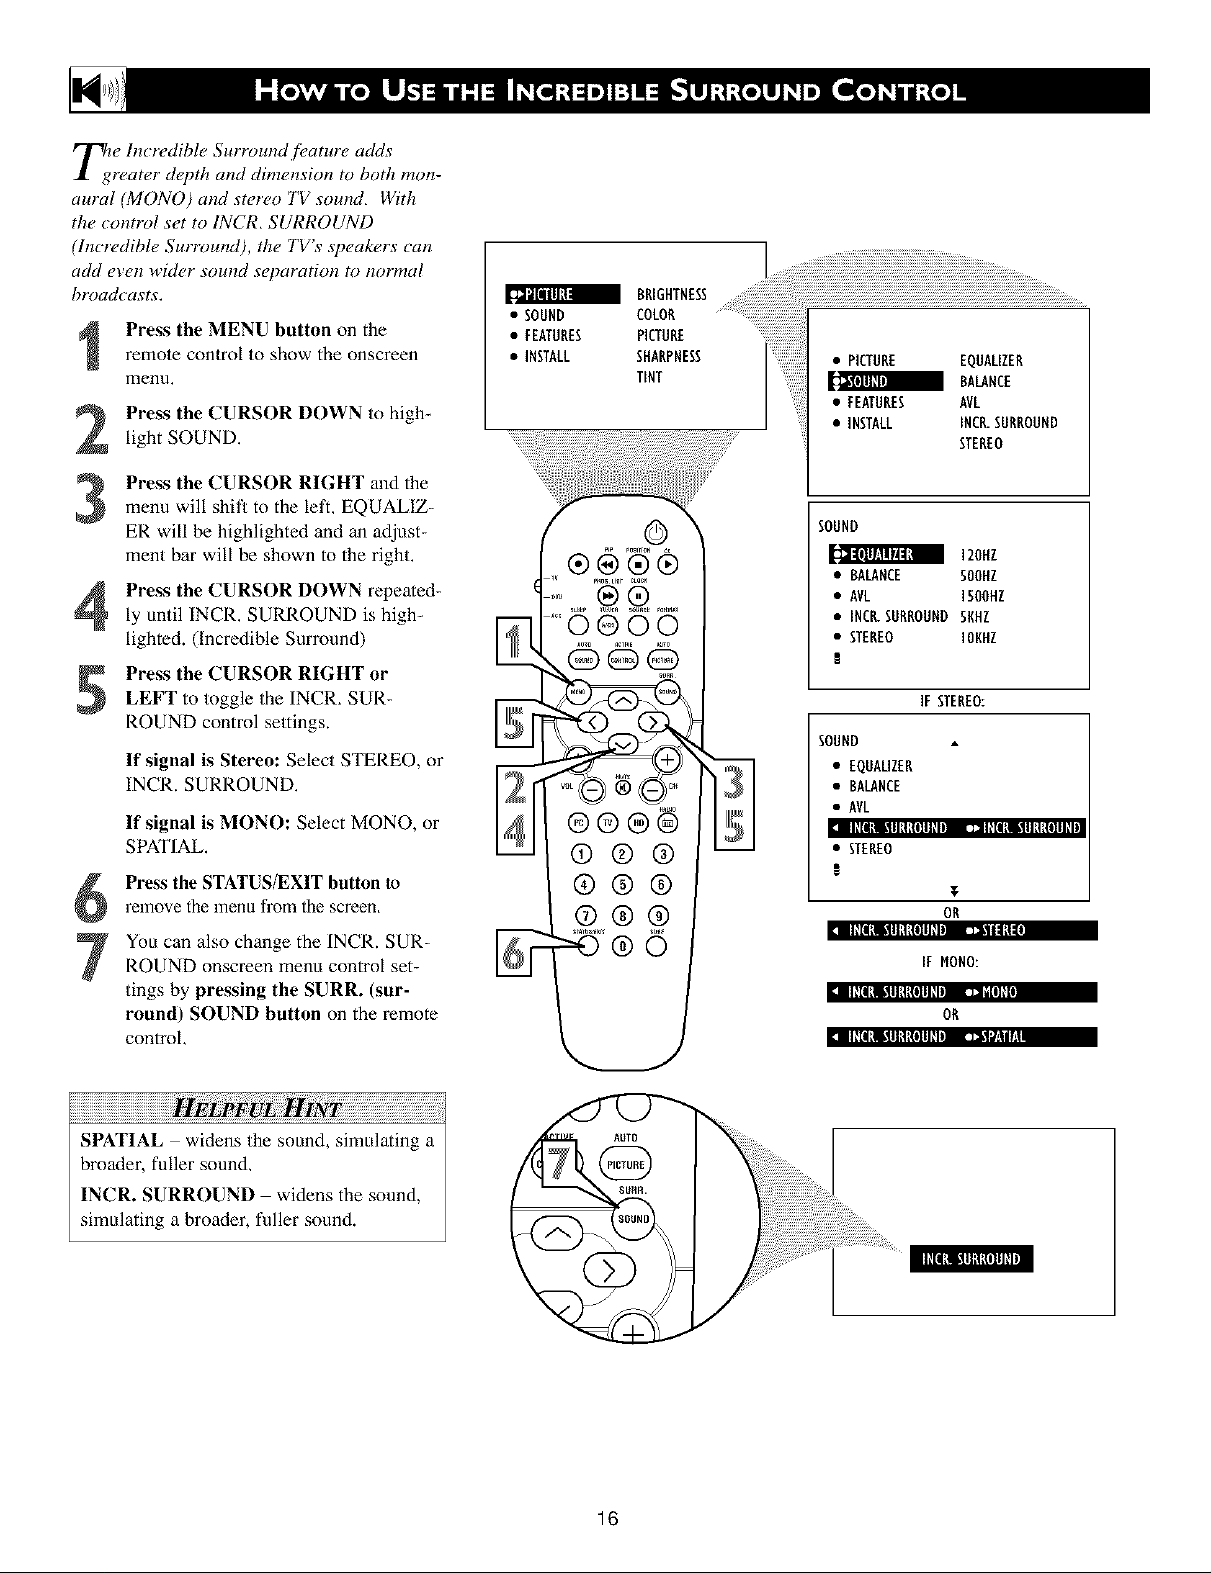
e Incredible Surround feature adds
rearer dapth and dimension to both mon-
aural (MONO) and sterao TV sound, With
the _ontrol set to INCR, SURROUND
(ln_redibl_ Surround), the TV's speak_rs can
add e_en wid_r sound separation to normal
broadcasts.
remote control to show the onscreen
Press the MENU button on the
menu,
Press the CURSOR DOWN to high-
light SOUND.
Press the CURSOR RIGHT and the
menu will shit_ to the left, EQUALIZ-
ER will be highlighted and an adjust-
ment bar will be shown to the right.
Press the CURSOR DOWN repeated-
ly until INCR. SURROUND is high_
lighted. (Incredible Surround)
Press the CURSOR RIGHT or
LEFT to toggle the INCR, SUR-
ROUND control settings.
If signal is Stereo: Select STEREO, or
INCR. SURROUND,
If signal is MONO: Select MONO, or
SPATIAL.
Press the STATUS/EXIT button to
relnove the menu from the screen.
You can also change the INCR. SUR-
ROUND onscreen menu control set-
tings by pressing the SURR. (sur-
round) SOUND button on the remote
control,
• SOUND COLOR ..........................
• FEATURES PICTURE ...................
• INSTALL SHARPNESS
®®(i)
®®®
®®®
U
BRIGHTNESS
TINT
O0
• PICTURE EQUALIZER
BALANCE
• FEATURES AVL
• INSTALL INCR.SURROUND
STEREO
SOUND
120HZ
• BALANCE SOOHZ
• AVL I5UUHZ
• INC_SURROUND SKHZ
• STEREO lOgHZ
IF STEREO:
SOUND
• EQUAUZER
• BALANCE
• AVL
t II+[l_ll.11lIl_{llll+ll_ 1:nl+llti_lllt!talll+l
• STEREO
!
T
OR
I II_IIlli!llLIlalll_lwm u_Hl_.
IF HONO:
t II+I|lli!lll!laIIl+ll: N+[I]+I
OR
I II_IIlli¶llLIlaIIl_l_, tJ_l_,.|n
iiiiiiiiiiiiiiiiiiiiiiiiiiiiiiiiiiiiiiiiiiiiiil i !i!i!i iiiiiiiiiiiiiiiiiiiiiiiiiiiiiiiiiiiiiiiiiiii¸¸
SPATIAL widens the sound, simulating a
broader, fuller sound,
INCR. SURROUND widens the sound,
simulating a broader, fuller sound.
]6
Page 17
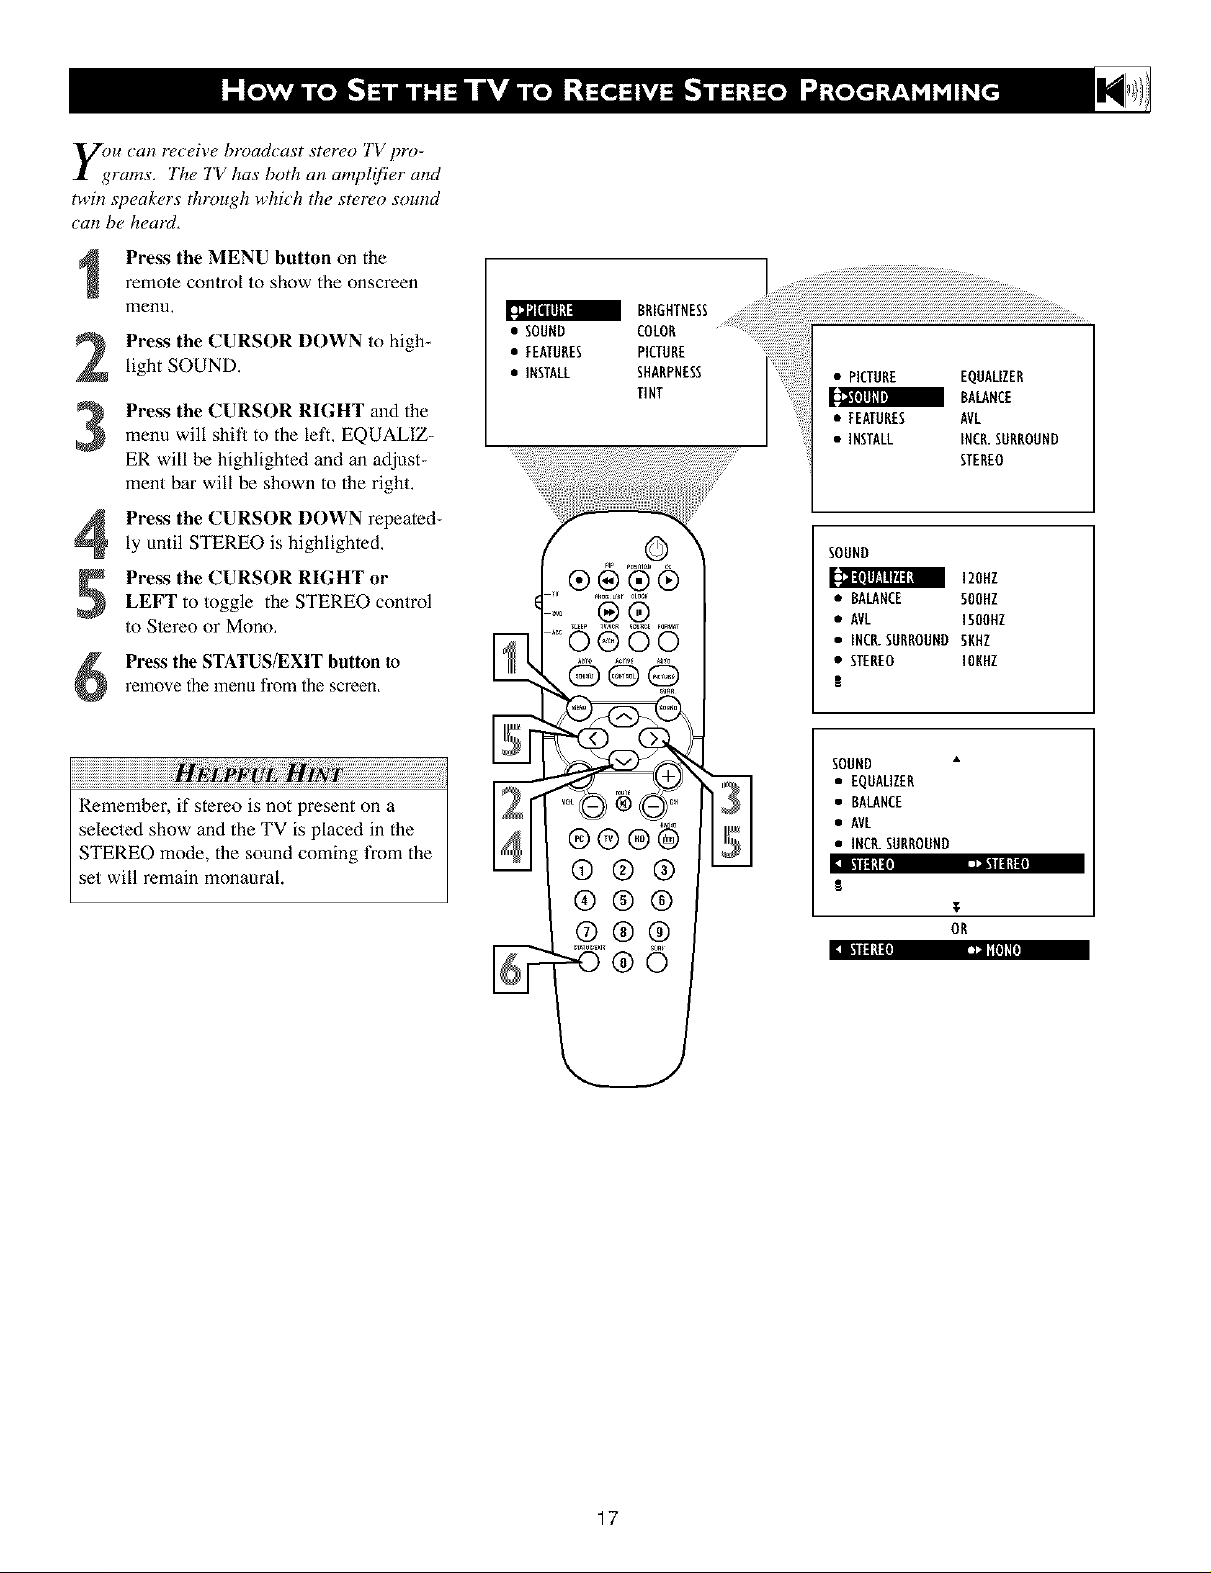
y_u can receive broadcast stereo TV pro-
rams, The TV has both an amplifier and
twin speakers through which the stereo sound
can be heaiJ,
remote control to show the onscreen
i Press the MENU button on the
menu,
Press the CURSOR DOWN to high-
light SOUND.
Press the CURSOR RIGHT and the
menu will shit_ to the left, EQUALIZ-
ER will be highlighted and an adjust-
ment bar will be shown to the right.
Press the CURSOR DOWN repeated-
ly until STEREO is highlighted,
Press the CURSOR RIGHT or
LEFT to toggle the STEREO control
to Stereo or Mono,
relnove the menu from the screen.
Press the STATUS/EXIT button to
• SOUND COLOR
BRIGHTNESS
• FEATURES PICTURE
• INSTALL SHARPNESS
TINT
• PICTURE EQUALIZER
BALANCE
• FEATURES AVL
• INSTALL INCR.SURROUND
STEREO
120HZ
• BALANCE SOOHZ
• AVL 1500HZ
• INC_ SURROUNDSNHZ
• STEREO IONHZ
!
Remember, if stereo is not present on a
selected show and the TV is placed in the
STEREO mode, the sound coming t¥om the
set will remain monaural.
SOUND
• EQUALIZER
• BALANCE
• AVL
•INCR. SURROUND
17
Page 18
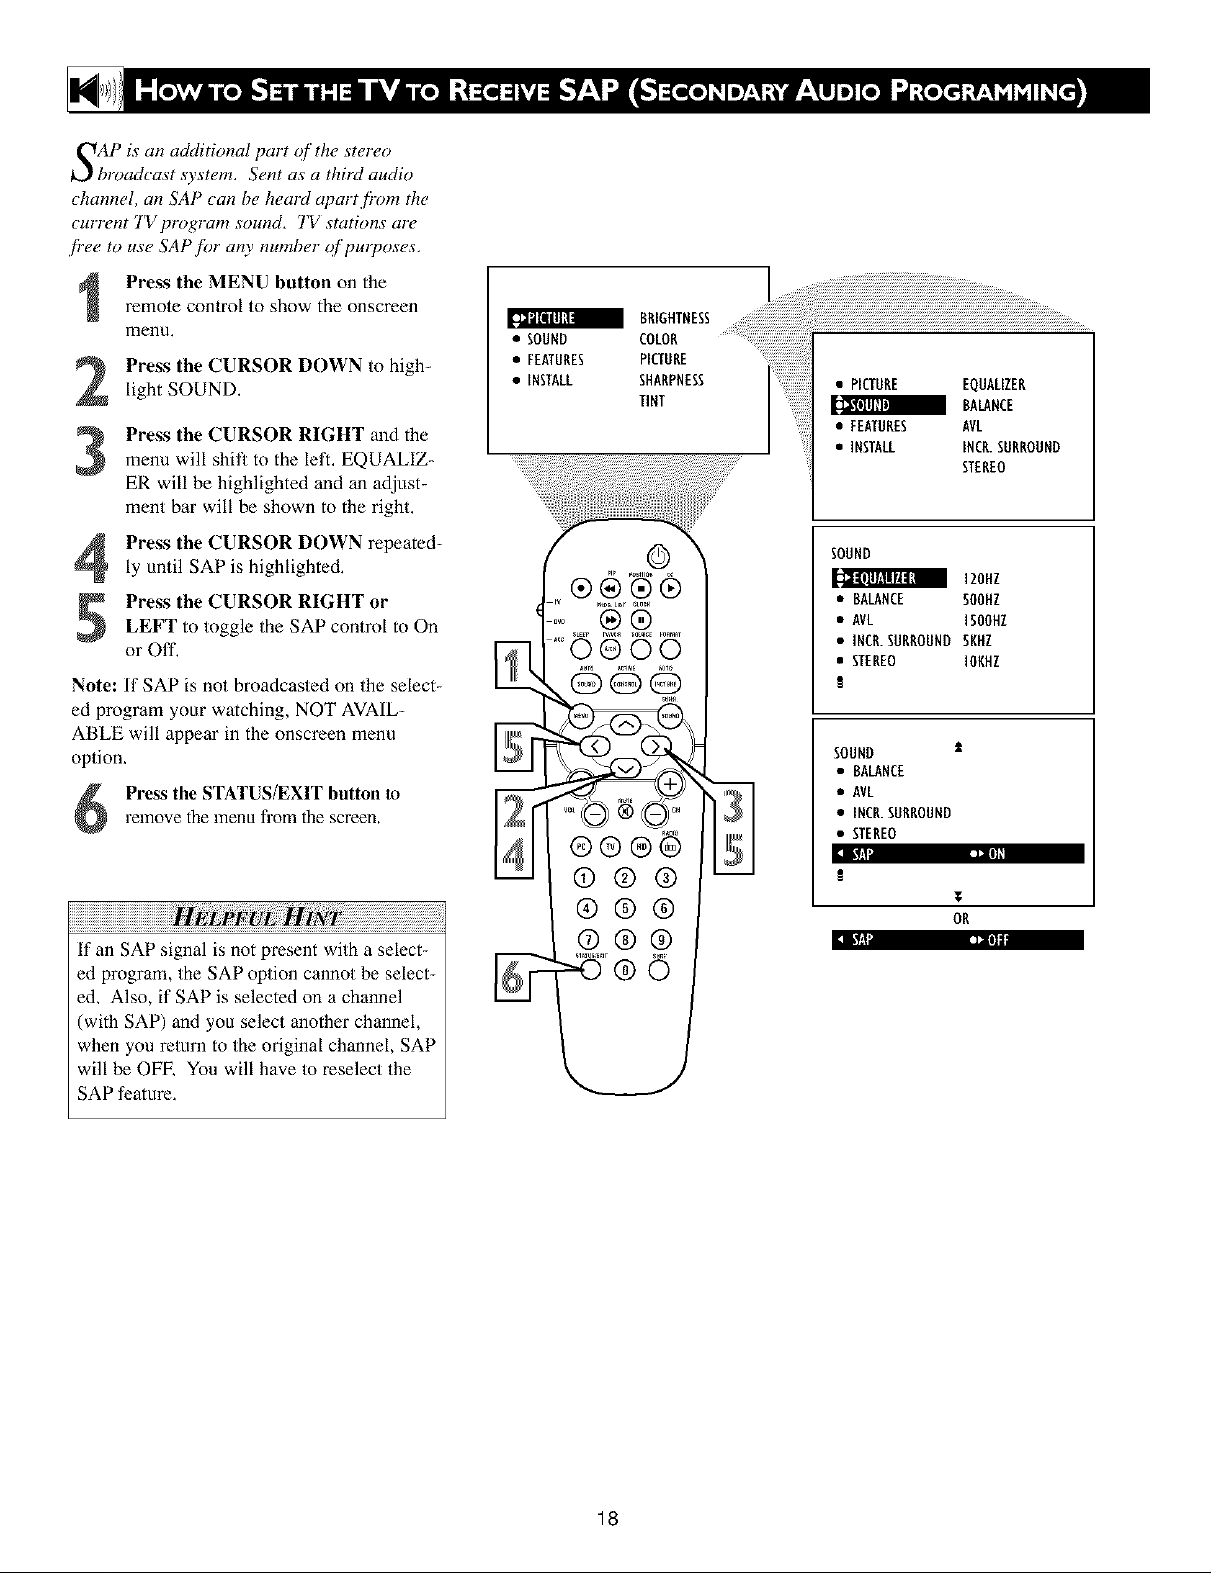
SAP is an additional part qf' the stereo
broadcast system. Sent as a third audio
channel, an SAP can be heard apart fi'om the
current TV program sound. TV stations are
fi"ee to use SAP fi)r an), number c)fpurposes.
remote control to show the onscreen
Press the MENU button on the
menu,
Press the CURSOR DOWN to high-
light SOUND.
Press the CURSOR RIGHT and themenu will shit_ to the left, EQUALIZ-
ER will be highlighted and an adjust-
ment bar will be shown to the right.
• SOUND COLOR
• FEATURES PICTURE
• INSTALL SHARPNESS
TINT
• PICTURE EQUALIZER
BALANCE
• FEAIURES AVL
• INSTALL INCR.SURROUND
STEREO
Press the CURSOR DOWN repeated-
ly until SAP is highlighted,
Press the CURSOR RIGHT or
LEFT to toggle the SAP control to On
or Off,
Note: If SAP is not broadcasted on the seLect-
ed program your watching, NOT AVAIL-
ABLE will appear in the onscreen menu
option,
relnove the menu from the screen.
Press the STATUS/EXIT button to
If an SAP signal is not present with a select-
ed program, the SAP option cannot be select-
ed, Also, if SAP is selected on a channel
(with SAP) and you select another channel,
when you return to the original channel, SAP
will be OFE You will have to reselect the
SAP feature,
®®
31
II1_ I
SOUND
120Hl
• BALANCE SOOHZ
• AVL ISOOHZ
•INCR. SURROUND SKHZ
• STEREO IOKHZ
SOUND
• BALANCE
• AVL
•INCR. SURROUND
• STEREO
!
T
OR
18
Page 19

_/'you have comwcted the TV s AUDIO
I')JUTPUT jacks to the AUDIO INPUT jacks
on a stereo receiver (see the Quick Use GuMe
.fiJr _om_ec tion instructions), set AUDIO OUT
to either VARIABLE or' FIXED to determine
whether you ac(iust the _olume at the stereo
or at the TVI [[you select VARIABLE, _hange
the volume at the TV using the TV's remote
(ontrol. l[you select FIXED, a4iust the _ol-
ume at the stereo using the stereo's controls.
7b select FIXED or VARIABLE, follow these
stu)s.
Press the MENU button on the
remote control to show the onscreen
menu,
Press the CURSOR DOWN to high-
light SOUND.
Press the CURSOR RIGHT and themenu will shit_ to the left. EQUALIZ-
ER will be highlighted and an adjust-
ment bar will be shown to the right.
• SOUND COLOR
BRIGHTNESS
• FEATURES PICTURE
• INSTALL SHARPNESS
TINT
• PICTURE EQUALIZER
_ BALANCE
• FEATURES AVL
• INSTALL INCR.SURROUND
STEREO
SOUND
IZOHZ
• BALANCE 500HZ
• AVL ISOOHZ
•INCR. SURROUND 5KHZ
• STEREO IONHZ
Press the CURSOR DOWN repeated-
ly until AUDIO OUT is highlighted,
Press the CURSOR RIGHT or
LEFT to toggle the AUDIO OUT con-
trol to Fixed or Variable.
remove the menu fl'om the screen.
Press the STATUS/EXIT button to
FIXED If FIXED is selected, the sound
coming from the TV and being heard
through an external audio system is not
adjustable with the television's volume
controls, The volume would have to be
adjusted at the audio system.
VARIABLE If VARIABLE is selected,
the sound coming fi_om the TV and being
heard through an ex/emal audio system can
be adjus/ed at the TV using the Volume +
or buttons on the television or remote
control,
The connection instructions for an external
audio system can be found in the Quick
Use Guide supplied with your TV,
SOUND ±
AVL
•INCR. SURROUND
• STEREO
• SAP
IIRIIII[III]I ]_al._I_l
T
OR
I]llll[( 1111 i=,l!|_!_.1;_i
19
Page 20
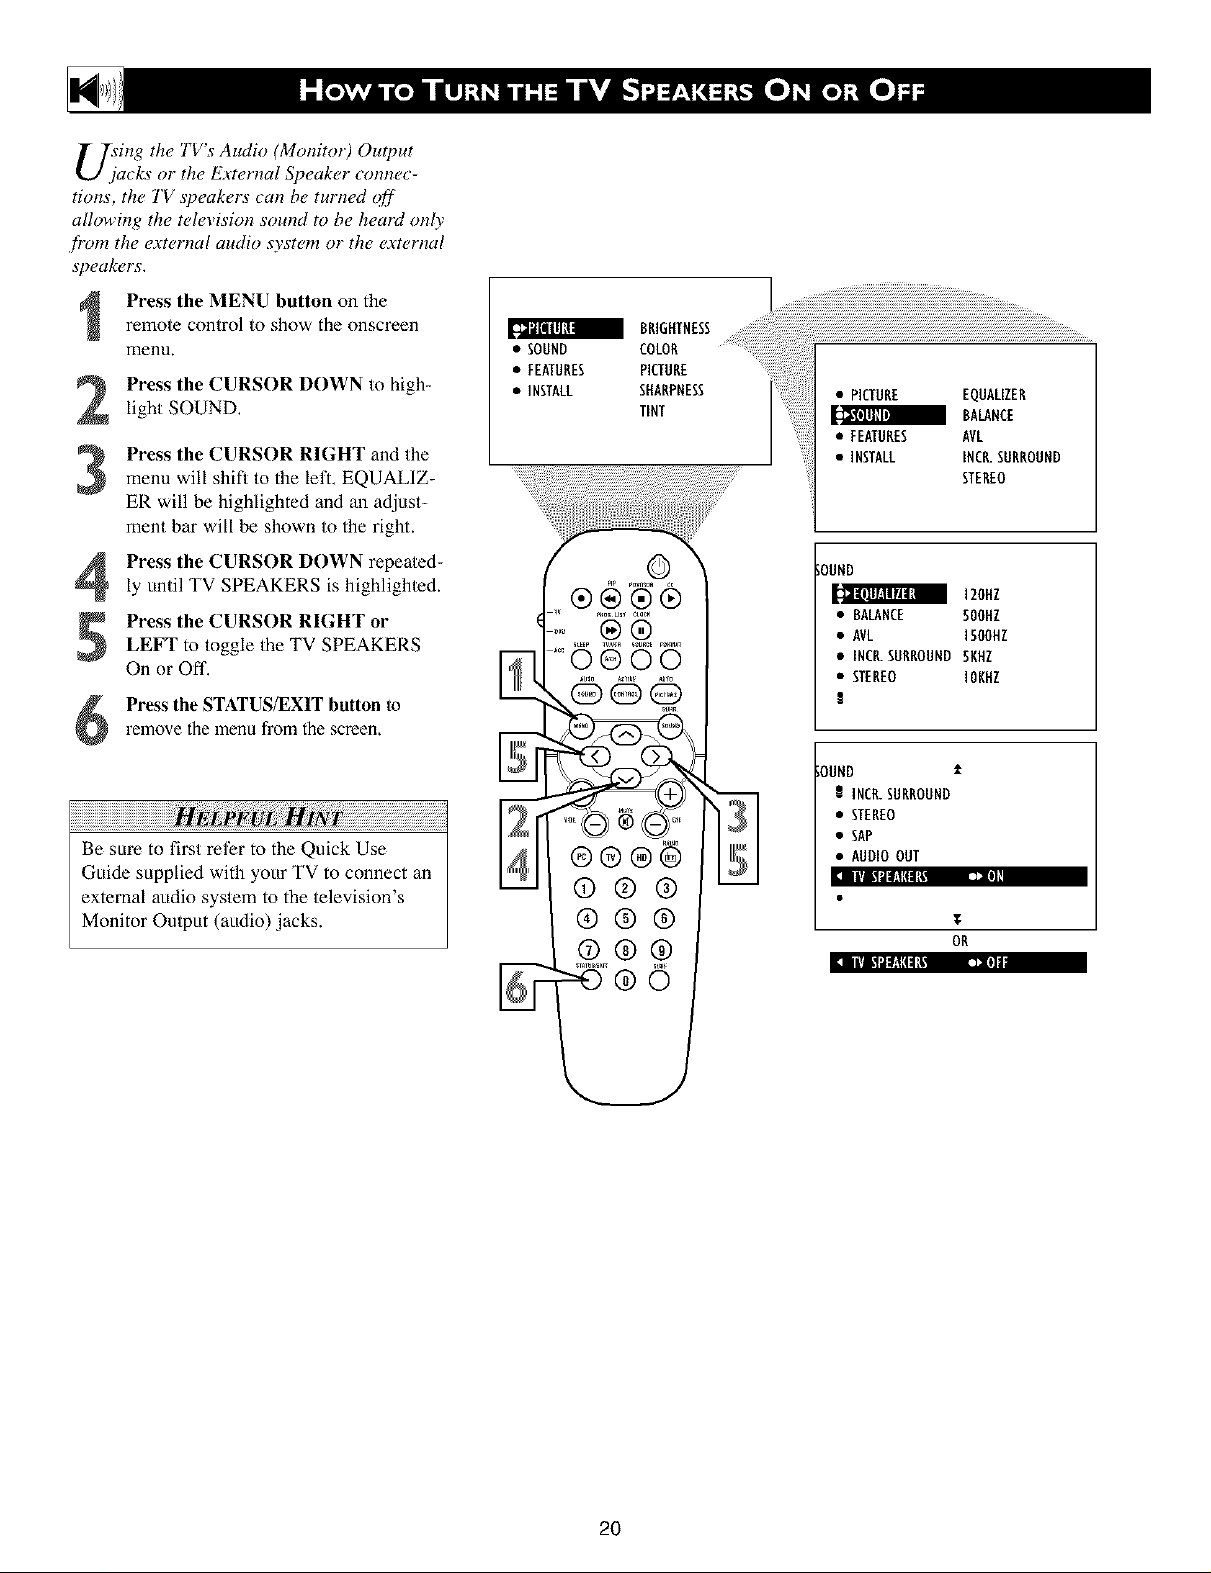
U_;ing the TV's Audio (Monitor) Output
cks or the IZ._ternal Speaker connec-
tions, the TV speakers _an be turned off
allowing the t_d_,vision sound to be heard only
frz_m the ext_,rnal audio system or the ext_,rnal
speakt, rs.
i Press the MENU button on theremote control to show the onscreen
menu,
Press the CURSOR DOWN to high-
Light SOUND,
Press the CURSOR RIGHT and the
3
menu will shift to the left, EQUALIZ-
ER will be highlighted and an adjust-
ment bar will be shown to the right.
Press the CURSOR DOWN repeated-
4
ly until TV SPEAKERS is highlighted.
Press the CURSOR RIGHT or
5
LEFT to toggle the TV SPEAKERS
On or Off.
Press the STATUS/EXIT button torelnove the menu from the screen.
• SOUND COLOR
• FEATURES PICTURE
• INSTALL SHARPNESS
!!!!!!!!!!!!!!!!!!!!!!!!!!!!!!!!!!!!!!!!!!!!i
Be sure to first ret?r to the Quick Use
Guide supplied with your TV to connect an
external attdio system to the television's
Monitor Output (audio) jacks.
0®00
BRIGHTNESS.....
TINT
• PICTURE EQUALIZER
BALANCE
:;;;;• FEATURES AVL
• INSTALL INCR.SURROUND
STEREO
;OUND
12ONE
• BALANCE SOOHZ
• AVL ISOOHZ
• INC_SURROUND SNHZ
• STEREO IONHZ
OUND ±
INCR.SUNROUND
• STEREO
• SAP
• AUDIO OUT
T
OR
_IIIq t_l_lll:l[lll,,]a:_,l'l
2O
Page 21

your television comes with an on-screen
'lock. The TV also can be set to turn on or
q_'at a speo]ic time and tune to a specl]i'c
cham_el when it powers its se!f on,
Press the CLOCK button on the
remote control to show the TfMEP,
onscreen menu.
Press the CURSOR RIGHT button
and the TIMER options will shill to the
left. TIME will be highlighted.
Press the CURSOR UP or DOWN
3
buttons repeatedly to highlight one of
the TIMER controls. These controls are
the TIME, START TIME, STOP
TIME, CHANNEL, ACTIVATE, or
DISPLAYI
FEATURES
TIMER
• STARTTIME
• STOPTIME
_ ACTIVATE
.EUAHHEL]ii!iiiii
7_
** 12:O3AH
T
FEATURES
TIMER
• TIHE
• STOPTIHE
• CHANNEL
• ACTIVATE
T
FEATURES
TIMER
• TIME
• STARTTIME
Press the CURSOR RIGHT or
4
LEFT button to make adjustments or
_t the control options.
TIME: Enter the current time with the
numbered buttons, Use the Cursor
Right button to move to the AM]PM
area and use the Cursor _fl and Right
buttons to toggle AM or PM,
START TIME: Use the Numbered
buttons to enter a startmp time for the
TV to mrn on or tune a specific chan-
nel,
STOP TIME: Use the Numbered but-
tons to enter a time for the TV to shut
itself off.
CHANNEL: Use the Nmnbered but-
tons or the CH + or buttons to select
a specific channel for the TV to tune to
at the specific Start Time,
ACTIVATE: Set the Timer to preform
it's function ONCE or DALLY,
DISPLAY: Set to ON or OFF. When
ON, the time will be displayed ALL
the time the TV is ON. When OFF, the
time will only appear when the STA-
TUS/EXIT button is pressed,
Press the STATUS/EXIT button Io
remove |he menu from |he screen.
5
@0
®®®®
®@@
*URR
• CHANNEL
• ACTIVATE
T
FEATURES
TIMER
• TIME
• STARTTIME
• STOPTIME
• ACTIVATE
T
FEATURES
TIMER
• TIME
• STARTTIHE
• STOPTIME
• CHANNEL
I [J.[| J |1_*_| J--.1,
¥
OR
OR
I [J.[| J |11._| I:1_111
FEATURES
TIMER 2
• STARTTIME
• STOPTIME
• CHANNEL
• ACTIVATE
I It] [II_lll 1111 l
21
OR
I Ill [II_lll JJl|i
Page 22

rl_z_e Mode Select Control will allow you to
tse set the TV into the TV, FM, HD, or PC
Modes, Du)ending on how the TV will be
used, these modes may hme their' own
onscreen menus controls to optimize there use
when used with _omputers, radios, or high-
d_finition receivers.
remote control to show the onscreen
Press the MENU button on the
menu,
Press the CURSOR DOWN to high-
light FEATURES.
• SOUND COLOR ........_iiiiii!!!!i!i!i!i!i!i!i!i!i!i!i!i!i!i!i!i!i!i!i!i!i!ililil
BRIGHTNESS............................
• FEATURES PICTURE .....
• INSTALL SHARPNESS
TINT
• PICTURE TIMER
• SOUND MODE SELECT
a ACTIVECTRL
• INSTALL AutoLock
CLOSEDCAP
Press the CURSOR RIGHT and the
menu will shift to the left. TIMER will
be highlighted,
Press the CURSOR DOWN repeated-
ly until MODE SELECT is highlight-
ed.
to shift the menu to the left. the first
Press the CURSOR RIGHT button
option, FM RADIO will be highlight-
ed.
Press the CURSOR UP or DOWN but-tons to highlight the desired mode option
(FM RADIO, HD, or PC).
Press the CURSOR RIGHT buttonto change the TV to the desired mode.
Please r_f!,r to each specifi_ mode later
in this manual,
Press the STATUS/EXIT button to
remove the menu fi'om the screen.
J, w
Specific information regarding each of the
MODE SELECT options can be found later
in this manual.
FM RADIO - refer to page 46-49,
HD - refer to page 50-53,
PC - rei_r to page 54.
FEATURE
TIME
• MODESELECT STARTTIME
• ACTIVECTRL STOPETIME
• Auto Lock CHANNEL
• CLOSEDCAP ACTIVATE
FEATURE
• TIMER FM RADIO
HD
• ACTIVECTBL PC
• AutoLock
• CLOSEDCAP
FEATURE
MODESELECT
• HD
• PC
FEATURE
MODESELECT
• FM RADIO
• PC
FEATURE
MODE SELECT
• FM RADIO
• HD
22
Page 23

T_lle A_ t{ve Control monitors and acljusts
_commg video signals to hel I) provide the
best picture quality.
When you choose to turn the Active Control
ON, the picture sharpness and noise reduc-
tion arc, controlh, d automatically. Active
Control acliusts these picture settings _ontinu-
ously aM automatically,
Press the MENU button on the
remote control to show the onscreen
menLL
Press the CURSOR DOWN to high-
light FEATURES.
Press the CURSOR RIGHT and themenu will shift to the leh. TIMER will
be highlighted.
Press the CURSOR DOWN repeated-
ly until ACTIVE CTP.L (control) is
highlighted.
Press the CURSOR RIGHT button
repeatedly to toggle the control
options. Choose from: ON, ON + DIS-
PLAY, or OFF
remove the menu from the screen.
Press the STATUS/EXIT button to
You can also press the ACTIVE
CONTROL button on the remote
7
control to toggle the ACTIVE CON-
TROL ON, ON + DISPLAY, or OFF
directly;
®
®®®®
(D®@
®@@
@@@
l_lllill_ll
• MODESELECT STARTIIME
• ACTIVECTR STOPTIME
• AutoLock CNANNEL
• CLOSEDCAP ACTIVATE
FEAIHRES
• TIMER
• MODESELECT
:i l,.lllUltll [11! ,-,_
• Auto Lock
• CLOSEDCAP
:i l,.lilUltl [ill ,a,J
:i I,.IllUltl [ill _:llJII II1l!II!,!
TIME
OR
i_lJ
OR
Toggle the ACTIVE CONTROL to ON +
DISPLAY wiih the remote control and a
screen display will appear showing the Active
Control in work, You will _e the sharpness
and noise reduction settings changing lo pro-
vide the best Ix)ssible picture quality.
23
ACTIVECONTROL
SHARPNESS
NOISEREDIICIION
BLACKEXPANDER
WHITE EXPANDER
When ACTIVE CONTROL is set to ON + DIS-
PLAY, this screen witl be displayed briefly when-
ever a channel change occurs.
ON
OFF
Page 24

he AutoLock TM ,f!_ature receives and
)rocesses data sent by broadcasters or
other program providers that contain pro-
gram content adHsories, When programmed
by the Hewer; a TV with AutoLoc k TM can
resT)ond to the content adHsories and block
program content that may be,found ol_i_c tion-
able (such as offensive language, violence,
sexual situations, etc,), This is a grc_at f!_ature
to censor the type (_{programming children
may watch.
AutoLock
HOVIERATING • •
€][tl
• PG
• PG-13
,,,g
• NCq7
AutoLock
TVIIATIHG • •
IDBI_A'|
• IV-Y7
• TV-G
• TV-PG
• TVq4
In the AutoLock TM section, you'll learn how
to block channels and programming that is
not rated, is unrated, or has no rating. You
will also find out how to turn these blocking
features ON or OFF. Following are brief
explana/ions of some lerms and ratings relat-
ed to the AutoLock TM feature.
AutoLock TM offers various Blocking
Options from which to choose:
BLOCKING: The BLOCKING control is
what can be thought of as the "master switch"
for AutoLock TM, This control affects the set-
tings you have chosen for blocking programs
according to movie ratings or TV ratings, or
for blocking programs thai have no rating or
are unrated. When the BLOCKING control is
OFF, the blocking or censoring of programs is
disabled. When the BLOCKING control is
ON, blocking will occur according to the set-
tings you have chosen.
NO RATING: ALL programming with no
content advisory data can be blocked if NO
RATING is set to ON,
Programming that has No Rating is not
encod_,d with any rating infiJrmation from the
MPAA or the Parental Guidelines, Any pro-
gramming couM fall into this cat_goo,.
You also can block individual channels or
block programming based on ratings of the
MPAA and TV broadcasters, (See a descrip-
tion of the ratings on this page,)
G: GeneralAudience All ages admitted.
Most parents would find tiffs programming
suitable for all ages. This type of program-
ruing contains little or no violence, no
strong language, aud little or no sexual dia-
logue or sexual situations.
PG: Parental Guidance Suggested This
programming contains material that parents
may find unsuitable for younger children. It
may contain one or more of the following:
Moderate violence, some sexual situations,
infrequent coarse language, or some sugges-
tive dialogue.
PG-13: Parents Strongly Cautioned This
programming contains material that parents
may find unsuitable for children under the
age of 13, It contains one or more of/he fol-
lowing: violence, sexual situations, coarse
language, or suggestive dialogue.
R: Restricted This programming is specifi-
cally designed for adults, Anyone under the
age of 17 should view this programming
only with an accompanying parent or adult
guardian. It contains one or more of the fol-
lowing: in/ense violence; intense sexual situ-
ations; strong, coarse language; or in/ensely
suggestive dialogue,
NC-17: No one under the age of 17 will be
admitted. This type of programming should
be viewed by adults only. It contains graphic
violence; explicit sex; or crude, indecent lan-
guage.
X: Adults Only This type of programming
contains one or more of/he following: vel_
graphic violence, very graphic and explicit or
indecent sexual acts, very coarse and intense-
ly suggestive language.
designed to be appropriate fi)r all chil
N V-Y: (All children -- Thisprogram is
dren.) Designed for a very young audi-
ence, including children ages 2-6. This type of
programming is not expected to frighten
younger children.
TV-Y7: (Directed to Older Children --
ThLt program is designed filr children
ages 7 and abol e.) It may be more
appropriate for children who have acquired the
development skills needed/o distinguish
between make-believe and reality. This pro-
gramming may include mild t_ntasy and comic
violence (FV).
TV-G: (General Audience -- Most par
ent_twould.find this program suitabh, for
all ages.) This type of programming
contains little or no violence, no strong lan-
guage, and little or no _,exual dialogue or _,exual
situations.
Suggested -- "l_ffsprogram contains
TV-PG: (Parental Guidance
material that paJ ents may find ttnsuit-
ablefi)r younger children.) This type of pro_
gramming contains one or more of the follow-
ing: Moderate violence (V), some sexual situa-
tions (S), infi'equent coarse language (L), or
some suggestive dialogue (D).
- This program contains some material
TV-14: (Parents Strongly Cautioned -
that many parents would find tmsuitable
[br children under t4 years _f age.) This type
of programming contains one or more of the
following: intense violence (V); in/ense sexual
situations (S); strong, coarse language (L); or
intensely suggestive dialogue (D).
TV-MA: (Mature Audience Only --
This program is specifically designed to
be viewed by aduhs aJ_d ther@)re may
be unsuitable fi)r _hildren under 17.) This type
of programming contains one or more of the
following: graphic violence (V); explicit sexual
situations (S); or chide, indecent language (L).
24
Page 25

Az, t,toLock _ allows parents to block out or
censor' any channels they think chil-
dr_,n should not watch, A channel blocked by
the AutoLock TM control cannot be viewed until
a correct access code is used to unlock the
channel for viewing, First, let's set your
AutoLock access code,
Press the MENU button on the
remote control to show the onscreen
menu,
Press the CURSOR DOWN button
2
to highlight FEATURES.
Press the CURSOR RIGHT button
and the menu will shift to the left.
3
TIMER will he highlighted.
Press the CURSOR DOWN button
repeatedly until AutoLock is highlight-
ed.
/ BNIGNTNESS
• SODND COLON
• FEATURES PICTUNE
• INSTALL SHARPNESS
TINT
@@@
®@®®
....II)_IIIIIIIIIIIIIIIIIIIIIIIIIIIIIIIIIIIIIIIIIIIIIIIIIIIIIIIIIIIIIIIIIIIIIIIIIIIIIIIIIIIIIIIIIIIIIIIIIIIIIIIII;.....
CLOSEDCAP
:EATUAES
llIlllllIl
• NODE SELECT STARTTIN[
• ACTIVECTII STOPTIN[
31 • Autotock CHANNEL
• CLOSEDCAP ACTIVATE
TIN[
51
EATNNES
• TINEN ACCESSCODE
• NODE SELECT ....
• ACTIVECTN
• CLOSEDCAP
Press the CURSOR RIGHT button
to highlight ACCESS CODE.
Press 0,7,1,1 on the remote control,
INCORRECT will appear on the
screen.
Press 0,7,1,1 on the remote control
again, ENTER NEW CODE will
appear on the screen.
Enter a new four-digit code using the
number buttons. CONFIRM CODE
will appear on the screen.
Enter your new four-digit code again.CORRECT will flash on the screen
briefly and the highlight bar goes back
to AntoLock.
Press the STATUS/EXIT button to
1
remove the menu from the screen,
w
Remember that 0711 is the det3ult
AntoLock _ code. If your access code has
been changed by someone other than you (a
child, for example) or you have forgotten the
code, you can always get in by inputting the
default code,
FEATURES
• TINEN
• ACTIVECTEL
_AutoLock
• PIP
• CLOSEDCAF
FERTNNES
• TIHEN
• ACTIVECTN[
_t0L0ck
• PIP
• CLOSEDCAP
FERTNNES
• fiNER
• ACTIVECTNL
RutoLock
• PIP
• CLOSEDCAP
@@
@@@
.___;
FEAIUNES
• TINEN
• ACTIVECTRL
_AutoEock
• FIr
• CLOSED_F
FEATURES
• TINEN
• ACTIVECTN[
_AutoLock
• PIP
• CLOSED CAP
FEATURES
• TINEN
• ACTIVECTNL
i_AutoLock
• PIP
• fLOSED CAP
FERTNRES
• TIMER
• ACTIVECTNL
AutoLock
• PIP
• m[LOSEDCAP
NOTE TO PARENTS: It isn't Ix)ssible for
your child to unblock a channel without know-
ing your access code or changing it to a new
one. If your code has been changed without
your knowledge, then you will become aware
that blocked channels may have been viewed,
FEATURES
• TINEN ACCESSCODE
• ACTIVECTNL ....
• PIP
• CLOSEDCAP
25
Page 26

After your personal a_ cess code has been
set (see the previous page), you are r_,ady
to select the chalmels or inputs you want to
block out or censo_:
Press the MENU button on the
remote control to show the onscreen
menu,
Press the CURSOR DOWN button
to highlight FEATURES,
and the menu will shift to the letL
Press the CURSOR RIGHT button
TIMER will be highlighted,
Press the CURSOR DOWN button
repeatedly until AutoLock is highlight-
ed.
Press the CURSOR RIGHT button
to highlight ACCESS CODE.
Enter your four-digit ACCESSCODE. CORRECT will flash very
briefly and the menu will move to the
lefl with BLOCK CHANNEL high-
lighted.
Press the CURSOR RIGHT buttonto highlight the TV's available chan-
nels.
Press the CURSOR UP or DOWN
button to highlight the channel you
want to block,
Press the CURSOR RIGHT button
to block the channel, A padlock image
appears to the right of the channel
number,
Repeat steps 7 and 8 for any channels you
want to block from viewing,
Press the STATUS/EXIT button to
remove the menu from the screen.
Remember that 0711 is the det_ult
AutoLock _ code. If your access code has
been changed by someone other than you (a
child, for example) or you have forgotten the
code, you can always get in by inputting the
default code,
NOTE: You also can block out the use of the
AiV ex/emal inputs on the rear of life TV. This
stops 1he viewing of VCR, DVD, and other
sources ll]at can be shown through the A/V input
acks,
a BRIGHTNESS
• SOUND COLOR
• FEATURES PICTURE
• INSTALL SHARPNESS
FEATURES
• TIMER
• ACTIVECTRL
_AutoLock
• PIP
• CLOSEDCAP
FEATURES
Autotock •
BLOCRCHANNEL
• SETUPCODE
• CLEARALL
• MOVIERATING
• TVRATING
Channel 12
Blockedby AutoLock
CHANNELRLOCKING
!tee:s_code
®®®
®®®
TINT
@
• PICTURE TIMER
• SOUND MODESELECT
a ACTIVECTRL
• INSTALL Autotock
FEATURES
m
3
1_111111111
• MODESELECT STARTTIME
• ACTIVECTR STOPTIME
• AutoLocR CHARNEL
• CLOSEDCAP ACTIVATE
FEATURES
• TIMER ACCESSCODE
• NODE SELECT ....
• ACTIVECTN
• CLOSEDCAP
FEATURES
• TIMER
• ACTIVECTRL
_AutoLock
• PiP
• CLOSEDCAP
CLOSEDCAP
TIME
I
FEATURES
AutoLock
L Av2
• SETUPCODE AV3
• CLEARALL ALL
• MOVIERATING I
P • TV RATING 2
"1
FEATURES
AutoLock
4 BLOCKCHANNEL
• SETUPCODE
• CLEARALL
• MOVIERATING
• TVRATING
"1
If a channel is blocked by the BLOCK
CHANNEL option, the TV will display
the screen shown to the right, To watch
the channel, enter your access code or
change the BLOCK CHANNEL option
back to off,
26
Page 27

Various m_screen messages will apl)ear
he#_someone tries to view blocked pro-
gramming. The message is determi!_ed by how
the _urrem programmi!_g is blocked, You may
flew be blocked programming and turn OFF
the A utoLo_k TM f!,ature by usi!_g the Clear All
control or by enteri#_g your a_ cess _od_
Press the MENU button on the
remote control to show the onscreen
menu.
Press the CURSOR DOWN button
to highlight FEATURES.
Pre_s the CURSOR RIGHT button
and the menu will shill to the left,
TIMER will be highlighted,
Press the CURSOR DOWN button
repeatedly until AutoLock is highlight-
ed,
Press the CURSOR RIGHT button
to highlight ACCESS CODE.
Enter your four-digit ACCESS
CODE and the menu will move to Ihe
left with BLOCK CHANNEL high-
lighted,
m..SOUNDFEATHBESCOLOBp,CTUBEBNONTNESSii iiiiiii!i!!iii!ii!i!!
• INSTALL SHARPNESS
TINT
©
° 0®00
®®®®
• PICTURE TIMER
• SOUND NODESELECT
• INSTALL AutoLock
FEATURES
1_111111_1
• MODESELECT STABTTIME
• ACTIVECTB STOPTIME
• AutoLock CHANNEL
• CLOSEDCAP ACTIVATE
FRATUBES
• TIMER ACCESSCODE
• HODE SELECT ....
• ACTIVECTN
• CLOSEDCAP
ACTIVECTBL
CLOSEDCAP
TIME
Press the CURSOR DOWN button
until CLEAR ALL is highlighted.
Press the CURSOR RIGHT twice,
The CLEAR ALL option will display
1he word CLEARED. All blocked chan-
nels and programming are now view-
able,
Press the STATUS/EXIT button toremove the menu from the screen,
If you tune to a specific channel that has been
blocked by BLOCK CHANNEL or any of the
AutoLock TM RATING options, simply enter
your four-digit access code to view the chan-
nel.
NOTE: This will unblock ALL channels until
the TV is shut OFF. When powered back ON,
all previously blocked channels will be
blocked again.
FEATURES
• TIHEB
• ACTIVECTBL
_AutoLock
• PIP
• CLOSEDCAP
FRATUFFS
AutoLock
• BLOCKCHANNEL
• SETUPCODE
• MOVIE RATING
• TV BATING
©®®
©®®
._J
FEATUBES
• TIHEN
• ACTIVECTNL
_Aut0L0ck
• PIP
• CLOSEDCAP
I
FEATURES
AutoLock •
1_ AV2
• SETUPCODE AV3
• CLEARALL ALL
• MOVIERATING I
• IV RATING 2
"1
FEATURES
AutoLock •
• BLOCKCHANNEL
• SETUPCODE
ilI ll:l [11! ]1 ill !,1 [t I
• _OVIE BATING
-_ • IV RATING
27
Page 28

After your personal access code has been
set, you can select specifi_ movie ratings
that you want to _ensor:
Press the MENU button on the
remote control to show the onscreen
menu.
Press the CURSOR DOWN button
to highlight FEATURES.
a 0R,0NTNESSiiii!iiiiiiiiiiiiiiiiiiiiiii!iiiii!iiiiiiiiiiiiiiiiiiiiiiilililili
:S?E DBESCp OBBE
• INSTALL SHARPNESS !i!ii!i!i!i!i!iii • PICIUBE TIMER
TINT
_iliiiiiiii• SOUND MODESELECT
::i!ii a ACTIVECTBL
J • INSTALL AutoLock
CLOSEDCAP
Pre_s the CURSOR RIGHT buttonand the menu will shill to the left,
TIMER will be highlighted,
Press the CURSOR DOWN button
repeatedly until Ant•Lock is highlight-
ed,
Press the CURSOR RIGHT buttonto highlight ACCESS CODE.
Enter your four-digit ACCESS
CODE. CORRECT will flash very
briefly and the menu will move to the
let1 with BLOCK CHANNEL high-
lighted,
Press the CURSOR DOWN repeated-
ly until MOVIE RATING is highlight-
ed,
Press the CURSOR RIGHT and the
Rating menu shifts to the left with G
highlighted.
Pre_s the CURSOR UP or DOWN tohighlight each rating you want,
Press the CURSOR RIGHT to mm
the rating ON or OFE Turning the rat-
ing ON will block programs with that
rating t¥om being seen.
FEATURES
• TIMER
• ACTIVECTBL
_*AutoLock
• PIP
• CLOSEDCAP
2
4
oD ®O
ooo®
ooo
OOO
OOO
0
FEATURES
TIME
• MODESELECT STABTTIME
• ACTIVECTB STOPTIME
• AutoLock CHANNEL
• CLOSEDCAP ACTIVATE
FEATUBES
• TIMER ACCESSCODE
• MODESELECT ....
• ACTIVECTR
• CLOSEDCAP
FEATUBES
• TIMEB
• ACTIVECTRL
_Autotock
• PiP
• CLOSEDCAP
I
FEATURES
AutoLock
L
• SETUPCODE AV3
• CLEARALL ALL
• MOVIERATING I
• IV RATING 2
• "l
remove the menu from the screen.
Press the STATUS/EXIT button to
When a rating is turned ON, all higher ratings
FEATUBES
Ant•Lock •
• BLOCK CHANNEL G
• SETUP CODE PG
• CLEARALL PG-13
[ci_llSIglllilElll[rl
• TV RATING NC-17
also will be turned on automatically. For
example, if the R ra/ing is turned on, the NC-
17 and X ratings also will be turned on.
All Movie Ratings can be turned ON or OFF, , Ii=!
Rethr to page 23 for Movie Rating defini-
tions,
Aut0L0ck
MOVIE RATING •
i-
• PG
• PG-13
•R
• NC-17
28
AutoLock
MOVIEBATING
I Ill
• PG
B
• PG-13
oR
• NC-17
"i
Channel 12
Blockedby AutoLock
MOVIERATING
Access code
Page 29

F_u can select specific TV ratings that you
ant to censor by following these steps,
Press the MENU button on the
remote control to show the onscreen
menu,
Press the CURSOR DOWN button
2
to highlight FEATURES.
Press the CURSOR RIGHT button
3
and the menu will shift to the lefl.
TIMER will be highlighted.
Press the CURSOR DOWN button
repeatedly until AutoLock is highlight-
ed.
a BRIGHTNESS
• SOUND COLOR
• FEATUBES PICTURE
• INSTALL SHARPNESS
TINT
@
®®
• PICTURE TIHER
• SOUND HODESELECT
a ACTIVECTBL
• INSTALL AatoLock
CLOSEDCAP
FEATUBES
[_llllll I[t TIME
• HODE SELECT STABTTIHE
• ACTIVECTB STOPTIHE
• AatoLock CHANNEL
• CLOSEDCAP ACTIVATE
Press the CURSOR RIGHT button
to highlight ACCESS CODE.
Enter your four-digit ACCESS
CODE. CORRECT will flash very
briefly and the menu will move to the
left with BLOCK CHANNEL high_
lighted.
Press the CURSOR DOWN repeated-
ly until TV RATING is highlighted.
Press the CURSOR RIGHT and the
menu will shit_ to highlight the TV
RATING options.
Press the CURSOR UP or DOWN to
select a rating.
Press the CURSOR RIGHT to mm
1
the block on the rating ON or OFF.
NOTE: More specific subratings (tbr violence,
sexual content, dialogue, or fantasy violence)
are available for TV-Y7, TV-PG, TV-14, and
TV-MA. (Refer to page 31 for definitions.)
To access these suhratings, wilh the main rating
selected, press the CURSOR RIGHT. Then,
repeat s/eps 9 and 10 to turn the sub-ratings ON
or OFE
Press the STATUS/EXIT button to
1
remove the menu from the screen,
2
4
FEATURES
• TIMER
• ACTIVECTBL
_AatoLock
• PIP
• CLOSEDCAP
FEATUBES
AatoLock
• BLOCK CHANNEL TV-T
• SETUP CODE TV-T7
• CLEAB ALL TV-G
• HOVIE HATING TV-PG
_l'J_lh TV- J
®®®
®®®
81
FEATURES
• TIHER ACCESSCODE
• HODE SELECT ....
• ACTIVECTR
• CLOSEDCAP
FEATUBES
• TIHEB
• ACTIVECTRL
_Autotock
• PIP
• CLOSEDCAP
FEATURES
AutoLock
L
• SETUPCODE AV3
• CLEARALL ALL
• MOVIERATING I
_' • IV BATING 2
• ,i
IV RATING •
[ ip,II ,1 .
• TV-Y7
• TV-G
• TV-PG
• TV-14
L
I
i
When a rating is turned ON, all higher ratings
also will be turned on automa/ically. For
example, if the R rating is turned on, the NC-
17 and X ratings also will be turned on.
AutoLock
IV RATING •
Jll 1141
• TV-Y7
• TV-G
• TV-PG
• TV-14
Channel 12
BlockedbyAutoLock
TV RATING
Access code
29
Page 30

T_e BLOCKING control is w,hat can be
hought qf as the "master switch" ,_)r
AutoLock TM. This control affects the settings
you ha_e chose!z,for blockbzg programs
according to movie ratings or' TV ratings, or
,_)r blocking programs that ha_e no ratbzg.
When the BLOCKING control is OFF, the
blocking or ce!zsorbzg qf t)rograms is dis-
abled. When the BLOCKING control is ON,
blocking w,ill occur ac cordbzg to the settings
you have chose!z. Follow these steps to toggle
BLOCKING OFF or ON.
Press the MENU button on the
remote control to show the onscreen
menu,
Press the CURSOR DOWN button
2
to highlight FEATURES,
Press the CURSOR RIGHT button
and the menu will shift to the lefl.
3
T|MER will be highlighted.
Press the CURSOR DOWN button
repeatedly until AutoLock is highlight-
ed.
Press the CURSOR RIGHT button
5
to highlight ACCESS CODE.
Enter your four-digit ACCESS
6
CODE. CORRECT will flash very
briefly and the menu will move to the
left with BLOCK CHANNEL high-
lighted.
Press the CURSOR DOWN repeated-
ly until BLOCK OPTIONS is high-
lighted.
Press the CURSOR RIGHT to enter
the BLOCK OPTIONS menu.
BLOCKING will he highlighted. Or
choose NO RATING.
Press the CURSOR RIGHT or
LEFT to toggle BLOCKING (or NO
RATING) ON or OFE
Press the STATUS/EXIT button to
i
remove the menu from the screen,
• SOUND COLOR
• FEATURES PICTURE
• INSTALL SHARPNESS
N oo,oo
®®®®
®®®
©®®
EEATUBES
• TIHEB
• ACTIVECTBL
_AatoLock
• PIP
• CLOSEDCAP
FEATURES
AutoLock
• SETUPCODE BLOCBING
• CLEARALL NO RATING
• MOVIE_TING
• TVRATING
BRIGHTNESS
TINT
©
• PICTURE TIMER
• SOUND HOD[ SELECT
• INSTALL Ant•Lock
FEATURES
• MODESELECT STARTTItlE
• ACTIVECTB STOPTItlE
• Ant•Lock CHANNEL
• CLOSEDCAP ACTIVATE
FEATUBES
• TIMER ACCESSCODE
• MODESELECT ....
• ACTIVECTB
• CLOSEDCAP
FEATURES
• TIMER
• ACTIVECTRL
A
_Autotock
• PIP
• CLOSEDCAP
ACTIVECTBL
CLOSEDCAP
TIME
I
FEATURES
AutoLock •
• SETUPCODE AV3
• CLEARALL ALL
• MOVIEBATING I
• TVRATING 2
•_ AV2
"1
AutoLock
BLOCK OPTIONS
11:t Kill[Ill ] _'
• NO RATING
Iw
"1
AutoLock
iiiiiiiiiiiiiiiiiiiiiiiiiiiiiiiiiiiiiiiiiiiiiiiiiiiiiiiiiiiiiiiiiiiiiiiiiiiiiiiiiiiiiiiiiiiiiiiiiii !!!TM 222222111TM
Remember, when the BLOCKING control is
OFF, the blocking or censoring of programs
is disabled. When the BLOCKING control is
ON, blocking will occur according to the set-
tings you have chosen,
BLOCKOPTIONS .
[ll:lllll[ll 11 II"
• NO RATING
30
Page 31

_l_ remind you which ratings you have
locked and which Block Options you
have selected, a review screen is m,ailable to
rt, view your AutoLocU _ settings. 7b access
this screen follow the stu)s below.
Press the STATUS/EXIT button on
your remote control TWICE, Your
AntoLock _ settings will appear on the
screen.
NOTE: If you have blocked specific sabrat-
ings, such as V for Violence in the TV-PG cat-
egory, these blocked subratings will not appear
in the review. The sabratings howeve], are still
blocked according to your selections.
MOVIERATING
BLOCKING
NO BATING
IV RATING{
After a few seconds, the settings will
leave the screen atttomatically, or you
can press tile STATUS/EXIT button
a third time to remove them from the
screen.
_w
®o..................d
G©G
®®®6
@®®
®®®
®©
This display will appear after the step i above
is completed if the AutoLock TM BLOCKING
option is set to ON.
MOVIEBATING/ IV RATING/
BLOCKING
NORATING
31
This display will appear after the step 1 above
is completed if theAutoLock' BLOCKING
option is set to OFF.
AutoLockDISABLED
rM
Page 32

Closed CaptioiHng (CC) allows you to
read the voice content of television pro-
grams o!_ the TV s_rc,en, Designed to hel l) the
hearing inwaired, this f!,ature uses o!_s_reen
"text boxes" to show dialogue a!_d conversa-
tions while the TV program is in progress.
Press the MENU button on the
remote control to show the on-screen
menu,
a BRIGHTNESS
• SOUND COLOR
• FEATURES PICTURE
• INSTALL SHARPNESS
TINT
• PICTURE TIMER
• SOUND MODESELECT
a ACTIVECTRL
• INSTALL Auto Lock
CLOSEDCAP
Press the CURSOR DOWN button
twice to highlight FEATURES.
and the menu will shift to the lefL
Press the CURSOR RIGHT button
Press the CURSOR DOWN button
repeatedly until the CLOSED CAP
control is highlighted.
Press the CURSOR RIGHT button
again. The menu will shit_ to the left
and CAPTION MODE will be high-
lighted.
Press the CURSOR RIGHT button
to highlight CAPTION MODEs,
Press the CURSOR UP or DOWN
button to select a CAPTION MODE:
CCI, CC2, CC3, CC4, CC MUTE,
TXTI, TXT2, TXT3, or TXT4, CC
DISPLAY turns lext OFF or ON if the
TV station broadcasting on the channel
is making CLOSED CAPTIONING
available. With CC DISPLAY high-
lighted, press the CURSOR RIGHT to
toggle Closed Captioning ON or OFF.
NOTE: YOUalso can press the CC
button on the remote control to turn
the CC option ON or OFF.
Press the STATUS/EXIT button toremove the menu from the screen.
®®
®®®®
©®®
®®®
©®®
CAIrI'ION l'¢Iode
Example nisplay
©
MATURES
TIME
• MODE SELECT STARTTIME
• ACTIVECTR STOPTIME
• AutoLock CHANNEL
• CLOSEDCAP ACTIVATE
MATURES
CLOSEDCAP
• TIMER CAPTIONMODE
• MODESELECT CCDISPLAY
• ACTIVECTR
• AutoLock
l_6f_ [fiF_
MATURES
CLOSEDCAP
:,cc,
• CCDISPLAY CC2
CC3
CC4
CCMUTE
MATURES
CLOSEDCAP
ml:,cc,
CCDISPLAY / CC2
CC3
CC4
/
CCMUTE
MATURES
CLOSEDCAP
:,ccl
• CCDISPLAY CC2
CC3
CC4
CCMUTE
Not all TV programs and product commer-
cials are broadcast wilh Closed Captioning
(CC). Nor are all Closed Captioning
MODEs (CAPTION 1_ or TEXT 1_)
necessarily being used by broadcast stations
during the transmission of a program oft?r-
ing Closed Captioning. Refer to your area's
TV program listings for the stations and
times of shows being broadcast wilh Closed
Captioning.
TEXT Mode Examl)le Display -
The TV set.eli will be
blocked fi'om viewing.
32
FEATURES
CLOSEDCAP
• CAPTIONMODE
:, !.,_,]}*_lll_ • .
im
OR
_m i
Page 33

E)nU can change the screen,format size to
atch the 07)e of program you're watch-
ing. Select the normal 4.'3, EXPAND 4.'3, or
COMPRESS 16:9 aspect ratios.
Press the MENU button on the
remote control to show the on-screen
menH,
Press the CURSOR DOWN button
twice to highlight FEATURES.
and the menu will shift to the lefl.
Press the CURSOR RIGHT button
Press the CURSOR DOWN button
repeatedly until the WIDESCREEN
control is highlighted.
Press the CURSOR RIGHT button
repeatedly to toggle among the three
screen format sizes; 4:3, EXPAND 4:3,
or COMPRESS 16:9.
Press the STATUS/EXIT button toremove the menu from the screen,
• SOUND COLOR
BRIGHTNESS
• FEATURES PICTURE
• INSTALL SHARPNESS
TINT
• PICTURE TIMER
• SOUND MODE SELECT
ACTIVECTBL
• INSTALL Auto Lock
CLOSEDCAP
• MODESELECT
• ACTIVECTR
• Auto Lock
• CLOSEDCAP
iiiiiiiiiiiiiiiiiiiiiiiiiiiiiiiiiiiiiiiiiiiiiiiiiiiiiiiiiiiiiiiiiiiiiiiiiiiiiiiiiiiiiiiiiiiiii
When in the TV Mode and no onscreen
menu displayed, pressing the CURSOR
RIGHT and LEFT buttons will toggle the
FORMAT options,
4:3
EXPAND 4:3
COMPRESS 16:9
33
Page 34

Tll w Program List Control will allow you to
uickly overview all the programmed
_hannels that have been plu_ ed into the tele-
visions memorly (see the Auto Programming
section of this manual for more details),
Program List will let you easily select the
desired channels your looking,for: Program
List will display the _hannel number; the
name of the channel if you have given it one,
and whether it hme AutoLo_k turn on or qffl
Press the PROGRAM LIST buttonon the remote control to show the cur-
rent list of installed channels (the cur-
rent channel will be highlighted),
Press the CURSOR UP or DOWNbuttons to scroll the list of channel,
highlighting the one you want to acti-
vate,
....:!i!ii! i!ii!ii!i!i!i!i!i!i! i!ii!ii!ii!ii!ii!i!ii!
!
to activate the channel, The TV will
Press the CURSOR RIGHT button
tune to that channel,
Press the STATUS/EXIT button toremove the menu from the screen.
O0
®®®®
(9@@
®@@
@@@
34
Page 35

mTve you ever fallen aslec 7) in,fivnt o{the
"V,only to have it wake you up at two in
the morning with a t¢,st pattern sound
scrc,e_hing in your ear's? Well, your TV _an
enable you to avoid that discomfort by auto-
matically turning itse!f qff, With the Slec7)
"lTmerf!,ature, you can set a timer to automat-
i_ally switch the TV OFF after a period q["
time you choose (15-minute increments up to
60 minutes, then 30-minute, in_r<_ments up to
90 minutes, then 6()-minute, in_ rc,ments up to
240 minutes).
Press the SLEEP button on theremote control. The SLEEP timer
onscreen display will appear in the
upper part of the screen.
Within five seconds, press the
2
SLEEP button repeatedly to pick the
amount of time (15-minute increments
up to 60 minutes, then 30-minute
increments up to 90 minutes, then 60-
minute increments up to 240 minutes)
before the TV will ruin itself old\
An onscreen countdown will appear during
the last minute betk)re the TV shuts itself off',
To see how many minutes remain before the
TV shuts itself off, press the STATUS/EXIT
button,
A Sleep Timer setting can be cancelled by
pressing any button during the last minute
of the operation.
®®
®®©
@®®
®®®
®®®
@©
Dm'ing the [ast minute of a SLEEP timer setting an
onscreen countdown will be disp[ayed.
35
During the last I0 seconds of a SLEEP timer set-
ting, an onscreen display will read GOOD BYE.
Page 36

Wl_ether you're watching a movie or a
,ideo game, your TV has automatic
video control settings that will match with
your current program sou_ze or CoRtg_Rt.
AutoPi_ture TM quickly resets your TV's video
_ontrols for a number qf di[f_rent types of
programs and _iewing _onditions that you
may ha_e in your home. The Mo_ies, Sports,
Weak Signal, and Multimedia AutoPi_ ture TM
_ontrols have been preset at the factory to
automatically ac/iust the TV's brighmess,
(olo_, picture, sha_7)ness, tint, attd (olor n,m-
perature levels. The PersonalAutoPicture TM
settings are the ones that you mad_ through
the PICTURE options within the ons(reen
Press the PICTURE button on theremote control, The current
AutoPicture _ setting will appear in the
middle of the screen.
Press the PICTURE button repeat-
edly to select either PERSONAL,
MOVIES, SPORTS, WEAK SIGNAL,
or MULTIMEDIA picture settings,
NOTE: The PERSONAL setting and the
PICTURE options wilhin the onscreen menu
are the same. This is the only option in
AutoPicturd _ that can be changed, To adjust
these settings, use the PICTURE options
within the onscreen menu. All other settings
are set up a/the factory during production and
cannot be adjusted.
BRIGHTNESS S8
COLOR S8
PETURE SO
SHARPNESS I
PErSOnAL
©
sgx.
®®®®
Q®®
®®®
oooj
BRIGffTHESS 36
COLOR 34
PICTURE 65
SffARpHESS 3
COLOR 26
pICIURE 65
BRIGffT_ESS_ 34
SffAReHESS E
SPORTS
WEARS]GHAL
U
NOTE: The values shown in the
diagram above are sample values
only. Your television's values may
vary and d sp ay d fferent numbers.
36
MULTIMEDIA
]2
42
80
4
Page 37

A utoSound TM allows you to select from
thr_,e factorly-set controls and a personal
_ontrol that you set according to your own
preferences through the onscreen Sound
menu, The three fa_torly-set _ontrols (Voice,
Music, and Theatre) enabl_ you to tailor the
TV sound so as to enhance the parTi_ ulur pro-
gram you arc_ watching, Follow these steps to
sellout any q[the options,
Press the SOUND button on theremote control. The current
AutoSound _ setting will appear in the
middle of the screen.
Press the SOUND button repeatedly
to toggle among the fnur settings:
PERSONAL, VOICE, MUSIC, or
THEATRE.
Remember, only the PERSONAL control can
be changed by the viewer. This changes the
settings in the main onscreen menu's SOUND
controls
120HZ
500HZ
1500HZ
5KHZ
[2OffZ 26
$OOffZ 6
ISOOHZ 6
_HZ 17
_OEHZ 19
MUSIC
AntoSound TM works only with the programs
coming through the ANTENNA/CABLE
(ANT) input on the rear of the TV (RF
audio), It will not control the sound levels
for the exmmal connections.
120HZ . 5
500HZ -2
5KHZ 6
IO_HZ 3
THEATRE
NOTE: The values shown in the
diagram above are sample values
only. Your television's values may
vary and d sp ay d fferent numbers.
37
Page 38

Alist or series of previously viewed chan-
nels can be selected with the SURF button
on your remote control. With this f(,uture, you
can easily switch between dil_rcmt TV chan-
nels that _urrently int_,rest you. The SURF
control allows you to set up to t_m channels in
its qui_k _iewing list.
Press the CHANNEL(+) or (-) but-
ton (or the numbered buttons) to select
a channel to add to the SUP,F list.
Press the SURF button on the remote
2
control, The onscreen display may
read, "SURF LIST EMPTYI" The num-
ber of the current channel will
shown with "ADD?" to the right.
While the SURF list message or the
3
SURF channel list appears on the
screen, press the CURSOR RIGHT
button to add the present channel to
the SURF list,
If you want to delete the present channel
from ihe SURF list, pre_s the CURSOR
RIGHT button again,
31
Repeat steps l through 3 to add more chan-
nels (up to 10) to the SURF list,
Along wiih regularly programmed chan-
nels, the exlemal video source connections
can be added to the SURF list, This means
that the exlemal A/V Jacks and their chan-
nels can be added to your SURF list. Use
the Source button to tune their channel and
use the same procedure described on this
page.
®®®®
®®®
®®®
©®®
38
Page 39

F;ur remote control is set to work your 7"1/
nd many infrared remote (IR) control
VCRs, Cabl_ Boxes, Satellite Systems, DBS,
DVD, etc, However; an easy onetime step may
be ne_ essao" b@Jre the remot_ will work your
VCR,
Try this initial Direct Access Method to see if
going on to the fidlowing section is necessaly,
Place the TV/DVD/ACC Mode
Switch in the properposition.
Point the remote control at the device
and press the POWER button,
Does the remote turn the device ON?
If YES, stop and try other function buttons on
the remole, If they also work the device, then
the remole is ready and no further steps are
needed,
PIP POSITION CC
®®®®
VCR
I'V
DVD
ACC
PROG.LIST CLOCK
®@
SLEEP TVNCR SOURCE FORMAT
O@OO
AUTO ACTIVE AUTO
@@
\
If NO, continue,,.
First look up a FOUR-DIGIT remote
control number for your brand of
Device before going through the simple
steps on the foliowing page,
Find your Four-Digit Code on pages
42-44.
,vw
If more than one number is listed, you may
have to |ry more than the fi_t Four-Digit code
given in orde" to locate your l_vice s "emote
code.
NOTE: Setting up 1he remote is for use wfih
external accessory devices only and not for use
wfih olher television brands.
II
Satellite Receiver
eo..................d
©©@
_ue_
@@®@
@@@
®@@
39
Page 40

Nd w that you hm,e looked up the three-
igit Remote Code Number for your
brand of device, you are rt,ady to follow the
four simple steps below.
Please read through steps 1-4 bc_fore begin-
ning.
Place the TV/DVD/ACC Mode
i
Switch in the proper position,
Press the • RECORD button on the
2
remote control and release.
Press the AUTO SOUND button on
3
the remote within 30 seconds, then
release,
Enter the FOUR-DIGIT REMOTE
CODE NUMBER (page 42-44) for
your desired device. The remote is now
ready to send commands to the unit,
Point the remote at the Device. Press
the POWER button on the remote to
5
mrn the unit ON. If this works you are
finished, If it d_s not work the first
time, repeat the s/eps using a different
remote code number.
VCR
I
Satellite Receiver
or DBS, DVD
: I
Cable Convener
After a second u'y and the remote does not
operate your device, see if there is another
four-digit code number (pages 42-44) listed
for your device and repeat the s/eps above
using lhe new number.
If after repeated attempts the code number
method does not work you device, try the
SEARCH METHOD on the next page.
NOTE: Setting up the relnole is for use with
external accessory devices only and not for use
with other lelevision brands.
4O
Page 41

y_ur TV remote can be set to work various
_ternal devices such as VCRs, Cable
Boxes, Satellite Receivers, DBS, DVD, etc. by
what is called the search method qf remote
control programming,
If the "Remote Cod_" number method shown
on the previous page did not set your remot_
to work your external dmice, then,f!)llow the
easy stcT)s listed below,
Please r_ad steps l-4 b@Jre beginning,
Press the POWER button on the
device your are attempting to program
to turn it ON,
Place the TV/DVD/ACC Mode
2
Switch in the proper position.
Satellite Receiver
Cable Converter
O9
VCR
O9
Press the • RECORD and the AUTO
3
SOUND buttons simultaneously and
hold them down, The remote will con-
tinue to send programming codes, one
ever 1.5 seconds.
The device will begin to change chan-
4
nels after the remole identifies the cor-
rect code, When the channels start to
change release the • RECORD and
AUTO SOUND buttons, The remote
should be ready to operate the device,
This method can take several minutes to per-
form.
Don't let the device scan up more than five
channels, tf you do the remole may pass up
the right code and another search cycle will
have to be repeated.
If no channel change happens within two
minutes, repeat sleps 1-4, Should a channel
change still not occur, the remote will not
work 1he desired device.
NOTE: Setting up 1he remote is for use wfih
external accessory devices only and not for use
wfih other television brands.
©
O0
®
ooo6
OOO
OOO
OOO
©
41
Page 42

kvLe]_l[e[e] ,,] _
Admiral ................. 2027, 2052
Adventura .................... 2001
Aiko ......................... 2059
Aiwa .... 2001, 2017, 2062, 2070, 2072
Akai ..... 2021, 2029, 2038, 2060, 2063
Akiba ........................ 2034
Alba .............. 2011, 2034, 2052,
................... 2059, 2063, 2072
Ambassador ................... 2011
American Action ............... 2059
American High ................ 2015
Amstrad ....... 2001, 2059, 2067, 2068
Anam ............. 2017, 2042, 2054,
.............. 2057, 2059, 2082, 2084
Anam National ...... 2042, 2054, 2087
Anitech ...................... 2034
Asa ..................... 2017, 2035
Asha ......................... 2057
Asuka ........................ 2017
Audiovox ..................... 2017
Baird ......... 2001, 2021, 2037, 2039
Basic Line .......... 2011, 2034, 2059
Beaumark ..................... 2057
Bell & Howell ................. 2037
Blaupunkt ..... 2003, 2005, 2010, 2014,
.... 2041, 2042, 2048, 2054, 2055, 2075
Brandt ............. 2047, 2064, 2065
Brandt Electronic ............... 2021
Broksonic 2002, 2040, 2046, 2052, 2078
Bush ......... 2034, 2052, 2059, 2072
Calix ........................ 2017
Canon ........................ 2015
Capehart ...................... 2011
Carver ....................... 2035
Catron ....................... 2011
CCE .................... 2034, 2059
CGE ......................... 2001
Cimline ...................... 2034
Cineral ....................... 2059
Citizen .................. 2017, 2059
Clatronic ..................... 2011
Colt ......................... 2034
Combitech .................... 2072
Condor ....................... 2011
Craig .... 2017, 2026, 2034, 2057, 2058
Crown ............. 2011, 2034, 2059
Curtis Mathes . .2015, 2021, 2032, 2042
Cybernex ..................... 2057
Cyrus ........................ 2035
Daewoo . .2011, 2024, 2025, 2059, 2083
Dansai ....................... 2034
Daytron ...................... 2011
De Graaf ................ 2022, 2043
Decca ................... 2001, 2035
Denon ....................... 2022
Dual ......................... 2021
Dumont ............ 2001, 2035, 2037
Dyna/ech ..................... 2001
Elbe ......................... 2018
Elcatech ...................... 2034
Electrohome ................... 2017
Electrophonic .................. 2017
Emerex ....................... 2012
Emerson ...... 2001, 2002, 2017, 2023,
.............. 2040, 2046, 2051, 2052,
................... 2059, 2078, 2083
ESC .................... 2057, 2059
Ferguson ...... 2021, 2039, 2064, 2065
Fidelity ....................... 2001
Finlandia ................ 2035, 2037
Finlux ........ 2001, 2022, 2035, 2037
Firstline . ,2017, 2023, 2024, 2034, 2052
Fisher ......... 2025, 2026, 2030, 2037
Frontech ...................... 2011
Fuji .......................... 2015
Funai ........................ 2001
Garrard ....................... 2001
GE ........... 2015, 2027, 2032, 2057
GEC ......................... 2035
General ...................... 2011
Go Video ................ 2077, 2081
Goldhand ..................... 2034
Goldstar ....... 2017, 2018, 2053, 2079
Goodmans 2001, 2017, 2034, 2059, 2075
Gradiente ................ 2001, 2008
Graetz ........ 2005, 2021, 2037, 2057
Granada ............ 2025, 2035, 2037
Grandin ............ 2001, 2017, 2034
Grundig ...... 2003, 2005, 2007, 2010,
.............. 2034, 2035, 2048, 2050,
.............. 2054, 2069, 2071, 2075
Hanseatic ..................... 2017
Harley Davidson ............... 2001
Harman/Kardon ........... 2018, 2035
Harwood ..................... 2034
HCM ........................ 2034
Headquarter ................... 2025
Hinari ........ 2004, 2034, 2057, 2072
Hi-Q ......................... 2026
Hitachi ............ 2001, 2004, 2021,
................... 2022, 2043, 2057
Hughes Network Systems ........ 2022
Hypson ....................... 2034
Imperial ...................... 2001
Ingersol ...................... 2004
Imerfunk ..................... 2035
ITT .......... 2005, 2021, 2025, 2037,
................... 2038, 2057, 2074
ITV .................... 2017, 2059
Jensen ....................... 2021
JVC .......... 2008, 2021, 2033, 2049,
................... 2050, 2074, 2080
Kaisui ........................ 2034
KEC .................... 2017, 2059
Kendo .................. 2038, 2052
Kenwood ........... 2018, 2021, 2033
KLH ......................... 2034
Kodak .................. 2015, 2017
Korpel ....................... 2034
Layco ........................ 2034
_nco ........................ 2059
LG .......................... 2079
Lloyd's .................. 2001,2051
Loewe ........ 2004, 2005, 2017, 2035
Logik .............. 2004, 2034, 2057
Luxor .... 2023, 2025, 2027, 2037, 2038
LXI ......................... 2017
M Electronic .................. 2001
Magnasonic ................... 2059
Magnavox ..... 2001, 2015, 2019, 2035
Magnin ....................... 2057
Manesth ................. 2024, 2034
Marantz ....... 2003, 2005, 2015, 2035
Marta ........................ 2017
Matsui ............. 2004, 2016, 2036,
................... 2052, 2070, 2072
Matsushita .......... 2015, 2042, 2055
Mei .......................... 2015
Melectronic ................... 2018
Memorex ..... 2001, 2015, 2017, 2019,
......... 2025, 2026, 2027, 2037, 2052,
......... 2057, 2062, 2085, 2087, 2088
Memphis ..................... 2034
Metz .............. 2003, 2005, 2017,
.............. 2042, 2048, 2055, 2069
MGA ................... 2023, 2057
MGN Technology .............. 2057
Mincrva ...................... 2048
Minerva ............ 2005, 2010, 2048
Minolta ...................... 2022
Mitsubishi 2023, 2027, 2033, 2035, 2045
Motorola ................ 2015, 2027
MTC ................... 2001, 2057
Multitech ................ 2001, 2034
Murphy ...................... 2001
NAD ........................ 2031
National ...................... 2054
NEC ..... 2018, 2020, 2021, 2033, 2037
Neckermann ................... 2035
Nesco ........................ 2034
Nikko ........................ 2017
Nikon ........................ 2014
Noblex ....................... 2057
Nokia ......... 2025, 2037, 2038, 2057
Nokia .... 2021, 2025, 2037, 2038, 2057
Nordmende ......... 2021, 2061, 2064,
........................ 2065, 2074
Oceanic ................. 2001, 2021
Okano .................. 2063, 2070
Olympus ................ 2015, 2054
Optimus ....... 2017, 2027, 2031, 2037,
......... 2042, 2077, 2086, 2087, 2088
Orion ........ 2002, 2004, 2016, 2036,
......... 2046, 2052, 2070, 2072, 2078
Osaki .............. 2001, 2017, 2034
Otto Versand .................. 2035
Palladium ..... 2005, 2017, 2021, 2034
Panasonic .......... 2015, 2042, 2053,
................... 2054, 2055, 2087
Pa/he Cinema .................. 2016
Pa/he Marconi ................. 2021
Penny ............. 2015, 2017, 2018,
................... 2020, 2022, 2057
42
Page 43

Pentax ....................... 2022
Perdio ........................ 2001
Philco ........ 2015, 2018, 2052, 2078
Philips . .2015, 2035 (DEFAULT VCR),
........................ 2074, 2075
Phonola ...................... 2035
Pilot ......................... 2017
Pioneer ............. 2031, 2033, 2035
Portland ...................... 2011
Prot?x ....................... 2066
Profitronic .................... 2057
Proline ....................... 2001
Proscan ...................... 2032
Prolec ........................ 2034
Pulsar ........................ 2019
Pye .......................... 2035
Quar/er ....................... 2025
Quartz ....................... 2025
Quasar ............. 2015, 2042, 2087
Quelle ....................... 2035
Radio Shack ............. 2001, 2085
Radiola ....................... 2035
Radix ........................ 2017
RCA 2015, 2022, 2027, 2032, 2038, 2057
Realistic ........... 2001, 2015, 2017,
.............. 2025, 2026, 2027, 2037
REX .................... 2021, 2074
RFT ......................... 2075
Ricoh ........................ 2014
Roadstar ...... 2017, 2034, 2057, 2059
Runco ........................ 2019
Saba ........ 2021, 2049, 2050, 2061, 2
.................... 064, 2065, 2074
Saisho ........ 2004, 2016, 2036, 2052
Salora .............. 2023, 2025, 2038
Samsung ...... 2024, 2057, 2076, 2077
kvLe]_![e[o]m]::1[._][_ !]
Sanky ................... 2019, 2027
Sansui ............. 2001, 2021, 2033,
................... 2052, 2058, 2078
Sanyo ......... 2025, 2026, 2037, 2057
Saville ....................... 2072
SBR 2035
Schaub Lorenz , ,2001, 2005, 2021, 2037
Schneider ........... 2001, 2034, 2035
Scott ......... 2023, 2024, 2040, 2046
Sears .............. 2001, 2015, 2017,
.............. 2022, 2025, 2026, 2037
SEG .................... 2057, 2066
SEI ..................... 2004, 2035
Seleco ....................... 2021
Setup ........................ 2024
Sentra ........................ 2011
Sharp ................... 2027, 2073
Shintom ................. 2034, 2037
Shogun ....................... 2057
Shorai ........................ 2004
Silva ......................... 2017
Singer .................. 2024, 2034
Sinudyne ................ 2004, 2035
Solavox ...................... 2011
Sonolor ...................... 2025
Somec ....................... 2017
Sony .... 2001, 2012, 2013, 2014, 2015
STS ......................... 2022
Sunkai ....................... 2070
Sunstar ....................... 2001
Suntronic ..................... 2001
Sylvania ....... 2001, 2015, 2023, 2035
Symhonic ..................... 2001
Tashiko ...................... 2001
Tatung ............. 2001, 2021, 2035
Teac .................... 2001, 2021
TEC ......................... 2011
Technics ............ 2015, 2042, 2054
Teknika ....... 2001, 2015, 2007, 2017
Teleavia ...................... 2021
Telefunken 2021, 2047, 2058, 2064, 2074
Tenosal ....................... 2034
Tensai ................... 2001, 2066
Thomas ...................... 2001
Thomson ........... 2021, 2064, 2074
Thorn .............. 2016, 2021, 2037
TMK ................... 2051, 2057
Toshiba . ,2021, 2023, 2024, 2035, 2074
Totelevision .............. 2017, 2057
Towada ...................... 2066
Uher ......................... 2057
Unitech ...................... 2057
Universum .... 2001, 2006, 2010, 2017,
......... 2035, 2038, 2048, 2057, 2067
Vector ........................ 2024
Vector Research ........... 2018, 2020
Victor .............. 2008, 2021, 2033
Video Concepts ........... 2020, 2024
Videosonic .................... 2057
Wards ........ 2001, 2015, 2022, 2026,
......... 2027, 2032, 2034, 2035, 2057
White Westinghouse ....... 2052, 2059
XR-1000 ..................... 2001
XR-1001 ..................... 2015
XR-1002 ..................... 2034
Yamaha ...................... 2018
Yamishi ...................... 2034
Yokan ........................ 2034
Yoko .................... 2011, 2057
Zenith .. ,2001, 2014, 2019, 2052, 2078
Akai ......................... 5316
Harman/Kardon ................ 5314
JVC .................... 5311, 5318
Kenwood ..................... 5307
Magnavox .................... 5302
Mitsubishi .................... 5303
Onkyo ............. 5302, 5317, 5319
ABC .... 3002, 3003, 3004, 3006, 3008
Andover ...................... 3037
Bell & HoweLl ................. 3006
Birgmingham Cable Communication ,,,
............................. 3020
British Telecom ........... 3002, 3012
Cabletime ..... 3016, 3019, 3025, 3029
Clyde ........................ 3011
Contec ....................... 3009
Cryptovision .................. 3038
Daehan ....................... 3043
Daerynng ..................... 3003
Im][e']b IV_'1Ikvl Iml:[o]I m]_'_ol [o[ol ml=[,."1
Panasonic ................ 5301, 5322
Philips ., ,5302, 5308 (DEFAULT DVD)
Pioneer ............. 5305, 5312, 5321
Proscan ...................... 5304
RCA ......................... 5304
Samsung ..................... 5313
Sharp ........................ 5320
leT:5:) I ::lie][elm]::[,,"]
Decsat ....................... 3027
Everquesst .................... 3007
Filmnet ....................... 3028
France Telecom ................ 3030
GEC ......................... 3011
Gemini ....................... 3007
General Instrument ........ 3004, 3020,
........................ 3031, 3046
Goldstar ................. 3014, 3047
Grnndig ...................... 3035
Hitachi ....................... 3004
Jasco ........................ 3007
43
Sony ......................... 5306
Technics ...................... 5301
Theta Digital .................. 5312
Thomson ..................... 5310
Toshiba ...................... 5302
Yamaha ................. 5301, 5309
Je_old ........ 3002, 3004, 3005, 3006,
.............. 3007,3020,3031,3046
LG Alps ...................... 3044
Memorex ..................... 3001
Mnet ................... 3009,3028
Now ......................... 3041
Oak ......................... 3009
Pacific ....................... 3039
Panasonic ................ 3001,3013
Paragon ...................... 3001
Pioneer .................. 3014,3036
Pulsar ........................ 3001
Page 44

PVP Slereo Visual Matrix ........ 3002
Quasar ....................... 3001
Radio Shack ................... 3007
Rembrandt .................... 3004
Runco ........................ 3001
Salora ........................ 3026
Samsung ................ 3014, 3040
Satbox ....................... 3024
Scientific ........... 3003, 3032, 3049
Scientific Atlanta ..... 3003, 3008, 3021
Seawoo ...................... 3045
Absat ........................ 4006
Alba .......... 4029, 4034, 4037, 4052
Aides ........................ 4019
Amstrad ........... 4003, 4016, 4025,
................... 4038, 4039, 4042
Ankard ........ 4013, 4019, 4030, 4044
Anttron ................. 4009, 4034
Armstrong .................... 4015
AST ......................... 4027
Astra ........................ 4005
Astro .............. 4008, 4039, 4045
Avalon ....................... 4031
Axis .................... 4030, 4046
Beko ......................... 4010
Best ......................... 4030
Blaupunkt .................... 4008
Boca .................... 4015, 4043
Brain Wave ................... 4022
British Sky Broadcasting ......... 4058
BT .......................... 4053
Bush ......................... 4002
Cambridge .................... 4024
Canal Salellite ................. 4059
Canal+ ....................... 4059
Channel Mas/er ................ 4029
CNT ......................... 4045
Comlink ...................... 4019
Connexions ................... 4031
Crown ....................... 4015
Cyrus ........................ 4011
D-Box ....................... 4054
DDC ......................... 4029
DNT .................... 4011,4031
Echostar ............ 4031, 4036, 4061
Emanon ...................... 4034
Fergnson ...... 4002, 4009, 4010, 4023
Fidelity ....................... 4016
Finlux ........ 4005, 4024, 4032, 4037
Fracarro ...................... 4061
Freecom ...................... 4034
FTE Humax ................... 4060
Fube ............... 4030, 4031, 4034
Galaxis ............. 4019, 4057, 4060
General Instrument ............. 4012
Gold Box ..................... 4059
Gooding ...................... 4048
Goodmans .................... 4010
[__,_;]nil:4[_-] m]:;[,-")I[¢"_?T'_?TP?'_,)]
Signal ........................ 3007
Signature ..................... 3004
Starcom ................. 3002, 3007
Stargate ...................... 3007
Starquest ..................... 3007
STS ......................... 3015
Taihan ....................... 3043
Tele+l ....................... 3028
Teleservice .................... 3022
Tocom ....................... 3005
Tongkook 3 ................ 042, 3048
l,."#_'_id::!ilil bd_ [o][e]m]::;[,,',]
Grundig ............ 4008, 4010, 4048
G-sat ........................ 4009
Hinari ........................ 4009
Hirschimann ........ 4008, 4032, 4039,
........................ 4040, 4049
Hitachi ....................... 4037
Houston ...................... 4053
Huth .......... 4013, 4015, 4019, 4026
Intervision .................... 4050
Invideo ....................... 4061
ITT .......................... 4005
Johansson ..................... 4022
JVC ......................... 4048
Kathrein ........... 4004, 4006, 4008,
................... 4011, 4035, 4041
Kreiselmeyer .................. 4008
Kyostar ...................... 4034
La Sat .................. 4043, 4045
Lenco ........................ 4034
Lennox ....................... 4050
Lupus ........................ 4030
Luxor ................... 4005, 4049
Manha/tan .......... 4037, 4045, 4050
Marantz ...................... 4011
Maspro .................. 4004, 4023
Matsui .................. 4024, 4048
Mediamarkt ................... 4015
Mediasa/ ..................... 4059
Minerva ...................... 4048
Morgan's ................ 4015, 4043
Navex ........................ 4022
Neuhaus ...................... 4039
Neusat ....................... 4057
Newhaus ..................... 4013
Nokia ............. 4005, 4032, 4037,
................... 4049, 4054, 4063
Nordmende ................... 4029
Orbi/ech ...................... 4039
Oxti_rd ....................... 4024
Pace ......... 4002, 4009, 4014, 4023,
................... 4037, 4055, 4058
Palladium ..................... 4048
Palsat ........................ 4039
Panda ........................ 4037
Philips ............. 4007, 4011, 4020,
................... 4037, 4048, 4059
Phonotrend .............. 4019, 4050
Toshiba ...................... 3001
Tudi ......................... 3023
Tusa ......................... 3007
Uni/ed Cable .................. 3002
Videoway ..................... 3017
Visicable+ .................... 3033
Westminster ................... 3012
Wolsey Gene .................. 3037
_nith .................. 3001, 3034
Pioneer .................. 4021, 4059
Planet ........................ 4061
Promax ....................... 4037
Prosat ........................ 4019
Quadral ................. 4029, 4044
Radiola ....................... 4011
Radix ................... 4031, 4064
RFT ............... 4011, 4013, 4019
Saba .................... 4023, 4045
Sabre ........................ 4037
Sagem ....................... 4056
Salora ........................ 4005
SAT .................... 4027, 4038
Satcom .................. 4026, 4051
Satec ........................ 4009
Satmaster ..................... 4026
Satpartner ..... 4022, 4034, 4040, 4045
Schwaiger ............... 4009, 4041
Seemann ................ 4031, 4046
SEG .................... 4030, 4034
Siemens ...................... 4008
Skymaster .......... 4019, 4044, 4051
Sony .................... 4017, 4018
Strong ....................... 4062
Sunstar ....................... 4043
Tantec .................. 4023, 4037
Techniland .................... 4026
Technisat ................ 4001, 4039
Telefunken .................... 4034
Teleka .................. 4015, 4052
Telesat ....................... 4051
Thomson ................ 4037, 4059
Tonna ................... 4026, 4053
TPS ......................... 4056
Triad ........................ 4027
Triasat ....................... 4040
Unitor ........................ 4022
Universum ............... 4008, 4049
Ventana ...................... 4011
Vor/ec ........................ 4034
Vtech ........................ 4027
Winersat ...................... 4022
Wisi .......... 4008, 4027, 4031, 4037
Xcom Multimedia .............. 4065
Xsat .................... 4006, 4065
_hnder ................. 4033, 4045
44
Page 45

W_wn using the TV remote with an acces-
ory device, first make certain it is set
to control your accessorly device (by the
REMOTE CODE or SEARCH method)
Set the TV/DVD/ACC mode switch
to the proper position on the remote,
Point the top of the remote toward
the t¥ont of the accessory device
(remole sensor window) when pressing
the buttons
SYSTEM SWITCH
Set in the proper position to send
PIP POSITION CC
Press to turn the accessory device ON
and OFF,
b"
Press to begin playback of a video
tape, DVD, etc.
STOP BUTTON •
Press to stop the motion of a tape or to
stop the playback of a DVD.
device
RECORD •
Hold the VCR • RECORD button down to
begin a VCR recording
REWIND BUTTON _1_1
Press to rewind tapes, For some VCR's
the STOP button may have to be
pressed first, then REWIND. May be
used to scan back through chap/ers or
titles on DVD movies.
FAST FORWARD BUTTON
Press to rapidly advance
DVD devices, you
may
first
In playback mode hold the button down
to view the " , m
the forward direction.
TV/VCR BUTTON
Press while in 1heVCR mode (VCR indi-
cator on the front of 1heunit will light) to
view 1heplayback of a 1ape, Press again to
place in the TV position (VCR indicator
light will go off) to view one prograrn
while recording another program.
When used in the TV mode, the TV/VCR
button will will have no funOionality,
®
RADIO
@@@@
®@
®@@
@@@
STATUR/_XIT SURF
0@0
BUTTON II
Press to lemporarily stop the taIm dur-
ing a playback or recording or pause
the playback of a DVD, Press again to
release Pause,
HANNEL + & - BUTTONS
Press to scan up or down through the
channel numbers if your accessory
device will change channels,
Press buttons for direct channel selec-
tions. May also be used for direct
number entries in certain onscreen
menu feature settings.
The buttons on the remo|e will not operate your
accessory device if flmse features are not found
on your accessory's remole control.
Note: All functions (parlicularly Search,
Rewind, Fast Forward, etc.) will ol_rate lhe
same as with 111eoriginal remole control pro-
vided wilh your accessory device.
45
Page 46

This TV also provides you with an FM
adio. An FM Radio signal must be con-
!+ected to the FM A!+telma 75_) Jack lo(ated
o!+the bottom of the TV.
To enter the FM Mode, press theRADIO button on the remote control.
The FM Mode has its own onscreen
menu options.
Press the MENU button on the
remote control to display the FM Mode
onscreen men[L
Press the CURSOR UP or DOWN
3
buttons to scroll through the available
FM Mode onscreen options, These
options include: Language, Auto
Program, Manual Store, Sort, or
Name.
LANGUAGE - Choose to view the
onscreen menu in English, French or
Spanish.
AUTO PROGRAM - The Auto
Program control will search the FM
antenna signal and store any FM chan-
nel it finds in the TV's memory;
MANUAL STORE - This control will
allow you to manually tune any avail-
able FM signals.
SORT - The Sort Control will allow
you to rearrange your stored FM sta-
tions in the order you pret?r,
NAME - You can label or apply a
name to your programmed FM radio
stations. Add your own personal name
or choose one from the predefined list.
• FEATURES BALANCE
EQUALIZER
• INSTALL AVL
INC_SURROUND
STEREO
• SOUND LANGUAGE
• FEATURES AUTOPROGRAM
m
INSTALL
I=lII:l_[lll!._I_li
• AUTOPROGRAM FRANCAIS
• MANUALSTORE ESPANOL
• SORT
• NAME
INSTALL
• LANGUAGE
• MANUALSTORE
• SORT
• NAME
INSTALL
• LANGUAGE SEARCH
• AUTOPROGRAM CHANNEL
• SORT
• NAME
INSTALL
• LANGUAGE FROM
• AUTOPROGRAM TO
• MANUALSTORE EXCHANGE
[_lll0lill
• NAME
MANUALSTORE
SORT
NAME
_ ENGLISN
• _ SEARCH
STORE
Press the CURSOR RIGHT button
to adjust or select items within the
highlighted feature sub-menu,
Press the STATUS/EXIT button to
B
remove the onscreen menu from the
TV screen when finished. Or, let the
display time out and the menu will dis-
appear after a few second,
INSTALL
• LANGUAGE
• AUTOPROGRAM
• MANUALSTORE
• SORT
• _"PERSONAL
46
Page 47

rr_2 Ma#_ually searrh, store, and sort FM
I cltam_elsfollow the imtructio#_s below:
button on the remote control to dis-
If in the FM Mode, press the MENU
play the FM Mode onscreen menu.
Press the CURSOR DOWN buttons
to highlight the MANUAL STOP,E
option.
Press the CURSOR RI(;HT buttonto shift the menu to the left. SEARCH
will be highlighted.
Press the CURSOR RIGHT button
to begin the Manual Search of avail-
able FM stations, When a station is
found, the search will end until activat-
ed again.
If the station found is one that youwant to keep, press the CURSOR
DOWN button to highlight CHAN-
NEL.
Press the CURSOR RI(;HT buttonrepeatedly to toggle a list of 40 chan-
nel references (FMI to FM40),
Press the CURSOR DOWN button to
highlight STORE, Then, press the
CURSOR RIGHT button to store the
station to the selected channel refer-
ence. The onscreen menu will changed
to STORED,
Repeat the process for any other FM Stations.
To SORT the channels stored, press
the CURSOR DOWN (while in the
INSTALL menu options) to highlight
the word SORT,
....
_UT _al0E mT_
@®®
®®®
®®®
INSTALL
MANUALSTORE
• SEARCH
:i [III!IIIL -- ,,1
• STORE
@©
INSTALL
• AUTOPROGRAM ERANCAIS
• MANUALSTORE ESPANOL
• SORT
• NAME
3
INSTALL
• LANGUAGE SEARCH
• AUTOPROGRAM CHANNEE
_t!.ll Ill.llil 0|_t|
• SORT
• NAME
MANUAL STORE
! 1 INSTALL
_; .CHANNEL
-- • STORE
ii NURU u_ 885 F
INSTALL
MANUAL STORE
• SEARCH
• CHANNEL
;I ll It;, lliliil'l"
NAME
:' ENGEISN
STORE
!
!!
12
Press the CURSOR RI(;HT to shill
the menu left. FROM will be highlight-
ed.
Press the CURSOR RI(;HT button
repeatedly to select one of the channel
retbrences (FM1 to FM40) you wish to
move.
Press the CURSOR DOWN button
to highlight TO. Press the CURSOR
RIGHT button repea/edly to select one
of the channel references (FMI to
FM40) you want to swap the reference
chosen in the previous step to.
Press the CURSOR DOWN to high-
light EXCHANGE, Press the CUR-
SOR RIGHT to swap the channel ref-
erence.
47
Page 48

_ e!_surv, the best som_d quali O,,fmm the FM
adio,featmw of this "I'V5several Sou!_d
Controls are available for acliustme!_t,
RADIO button on Ihe remote controL.
To enter the FM Mode, press the
The FM Mode has its own onscreen
menu options.
Pre_s tile MENU button on the remotecontrol to display the FM Mode
onscreen menu,
Pre_s the CURSOR DOWN button
until SOUND is highlighted,
3
Press the CURSOR RIGHT button to
4
shift Ihe menu to the left, accessing Ihe
SOUND onscreen menu options, these
option include: EQUALIZER, BAL-
ANCE, STORE, AVL, INCREDIBLE
SURROUND, STERE(), AUDIO
OUT, or SPEAKERS.
EQUALIZER - Allows the listener to
change 1hesound frequencies to 1heir
liking,
BALANCE - This conlrols the sound
level balance between the right and lefl
TV speakers.
STORE - Once Sound controls are
adjusled, activating Ihe STORE control
will save those se/tings in the TV's
memory.
AVL - Automa/ic Volume _veler, when
ON, will keep lhe volume level at a con-
sistent level should there be sudden
peaks and valleys in sound levels dtuing
commercial breaks or channel changes.
INCREDIBLE SURROUND - Allows
the user to select a predefined Incredible
Surround setting or Stereo when the sig-
nal is stereo or Spalial and Mono when
the signal is being received in mono.
STERE() - Select Stereo or Mono. if
the signal is being received in Mono the
control cannot be placed in Stereo.
AUDIO OUT - When using an external
slereo for sound reproduction, 1heAudio
Out control will allow FIXED or VARI-
ABLE output options,
SPEAKERS - When tising an external
speaker syslem, the Speaker control will
allow you lo turn the TV speakers ON
or OFF.
Pre_s the STATUS/EXIT button to
remove the onscreen menu fi'om lhe TV
5
screen when finished, Or, let the display
time out and lhc menu will disappear
afier a few second,
I E UALIZER
• FEATURES BALANCE
• INSTALL AVL .....i
INCR.SURROUND I I EQUALIZER
STEREO • FEATURES BALANCE
0
PF_G LI _L_K
®0
O6GG
ooo&
000
000
OOO
SOUND
• EQUALIZER
• BALANCE
• AVL
:_ II_RllilllWdllll/NI Hlglg! iilliF{*lll_
• STEREO
R
SOUND
• EQUALIZER
• BALANCE
• AVL
• INCR.SURROUND
I T
SOUND
I AVL ±
• INCR,SURROUND
• STEREO
• AUDIO OUT
iltl:l[I I'. ,_..
i
• INSTALL AVL
INCR,SURROUND
STEREO
SOUND
120UZ
• BALANCE 500HZ
• AVL 1500HZ
• INCR.SURROUND 5HZ
• STEREO IOKHZ
$
SOUND
• EQUALIZER
I IlI!l I!l!l
• A_L
• INCR.SURROUND
• STEREO
$ T
SOUND
• EQUALIZER
• BALANCE
• INCR.SURROUND
• STEREO
T
I
SOUND
• EQUALIZER
• BALANCE
• AVL
• STEREO
$ T
I"
SOUND t
I BALANCE
• AVL
• INCR.SURROUND
• STEREO
I [!llllllll [I ilil|l,i iliiilI ll, iii[l_
• T
A
I
48
Page 49

Tie FM Radio within the TV can be set to
urn on a!_zloffal a specific time, or tune to
a sT)ecific chwmel when it powers on. The
Timer conm)ls also allows the FM Display to
be turned on or qff]
To enter the FM Mode, press the
RADIO button on the remote control.
!
The FM Mode has its own onscreen
menu options.
Press the MENU button on the remote
2
control to display the FM Mode
onscreenmenu,
Press the CURSOR DOWN button
3
until TIMER is highlighted.
Press the CURSOR RIGHT button to
4
shift the menu to the left, accessing the
TIMER onscreen menu options, these
option include: TIME, START TIME,
STOP TIME, CHANNEL, ACTI-
VATE, or DISPLAY.
TIME - This is simply the Clock set-
ting, Allows you to enter the current
time,
START TIME - This control allows
you to set a specific time you want the
FM Radio to turn ON,
STOP TIME - This control allows you
to set a specific time you want the FM
Radio to turn OFE
m Q ......idiiiiiii!!@iiiiiili!i!i!i iiiiiiiiiiiiiiiiiiiiiiiiiiiiiiiiiiiiiiiiiiiiiiiiiiiiiiiiiiiiiiiiiiiiiiiiiiiiiiiiiiiiiiiiiiiiiiiiiiiiiiiiiiiiiiiiiiiiiiiiiiiiiiiiiiiiiiiiiiiiiiiiiiiiiiiiiiiiiiiiiiiiiiiiiiiiiiiiiiiiiiiiiii
• FEATNNES BALANCE..... _
• INSTALL AVL .....
INCN.SNNNOUND •SONND TIMEN
STEREO _ MODESELECT
[ • INSTALL SCNEENSAVEN
©
O0
FEATURES
m TIME
• MODESELEUN STARTTIME
• SCNEENSAVEN STOPTIME
CHANNEL
ACTIVATE
@@@
FEAINNES
TIMER
I. ...........
• STARTTIME
• STOPTIME
• CHANNEL
• ACTIVATE
@®®
®®®
©®®
FEATURES
TIMER
• TIME
• STOPTIME
• CHANNEL
• ACTIVATE
I
tw
CHANNEL - This controls allows you
to set a specific channel you want the
FM Radio to tune to when it powers on,
ACTIVATE - Once the Time and chan-
nel controls have been adjusted, set
Activate ro ONCE or DAILY, ONCe
will activate the process one time, while
DAILY will activate the TIMER con-
tmls every week day,
DISPLAY - it"set to ON, the Display
control will display the currant time on
the TV screen when in the FM Mode.
Press the STATUS/EXIT button to
remove the onscreen menu from the TV
5
screen when finished, Or, let the display
time out and the menu will disappear
after a few second,
FEATURES
TIMER
• TIME
• STANTTIME
• CHANNEL
• ACTIVATE
FEAINNES
TIMER
• TIME
• STARTTIME
• STOPTIME
• CHANNEL
:l [!II [|lt:ll Jill
49
I
FEATURES
TIMER
• TIME
• SIAMTIME
*l.
I
T
• STOPTIME
• ACTIVATE
FEATURES
TIMEN
I STARTTIME
• STOPTIME
• CHANNEL
• ACTIVATE
T
Page 50

Tw Mode Select options allow you to move
o other operating modes within he I'V.
When in the FM Mode, choose from "I'V,PC, or
HD Modes.
If in the FM mode, press the MENU
button on the remote control to display
the FM Mode onscreen menu,
Pre_s the CURSOR DOWN button
2
until MODE SELECT is highlighted,
Pre_s tile CURSOR RIGHT button to
S
shift lbe menu to the left, accessing the
Mode Select onscreen menu options,
Pre_s tile CURSOR UP or DOWN
buttons to choose TV, PC, or HD.
TV - This will switch the TV back to the
TV Mode of operation.
PC - This control will switch theTV to
the PC Mode of oImra/ion. Note a PC
signal must be present tbr this to work,
or the TV will go into standby mode.
HD - This con/rol will set the TV to 1he
High Definition Mode,
• FEATURES BALANCE
• I_STALL AVL
INCR.SIIRROIIND
STEREO
_R_ LI_ r_
®®
®®®®
• SOUND TIMER
a HODE SELECT
• INSTALL SCREENSAVER
FEATURES
L_ TIME
• HODE SELECT STARTTIME
• SCREENSAVER STOPTIME
CNAN_EL
ACTIVATE
FEATURES
• TIHER TV
_ ND
• SCREENSAVER PC
Pre_s the CURSOR RIGHT button toactivate the selected conlrol and change
to the highlighted mode.
Pre_s the STATUS/EXIT button to
remove the onscreen menu fi'om 1he TV
5
screen when finished, Or, let the display
time out and 1he menu will disappear
afler a few second,
FEATURES
FIODESELECT
*IV
/ °_
• PC
®@@
®@@
FEATURES
NODE SELECT
• HD
• PC
FEATURES
NODE SELECT
• TV
• HD
I
5O
Page 51

Wsile in the FM Mode, therc_ is a
crwensaver option that can be used. The
Screensaver control, when on, will circulate the
sclY.en station indication around the display.
If in the FM mode, press the MENUbutton on the remote control to display
the FM Mode onscreen menu.
Press the CURSOR DOWN button
2
until FEATURES is highlighted.
Press the CURSOR RIGHT button to
shift the menu to the lefi. TIMEP. will
3
be highlighted.
Press the CURSOR DOWN button
4
until SCP.EENSAVEP. is highlighted.
Press the CURSOR RIGHT or LEFT
5
button to toggle the Screensaver control
ON or OFE
With the Screensaver control set to ON,
the display will shift around the screen
pausing in one place for a brief moment.
Press the STATUS/EXIT button to
remove the onscreen menu from 1he TV
6
screen when finished. Or, let the display
time out and the menu will disappear
after a few _cond.
• FEATURES BALANCE ........
• INSTALL AVL ....
INCR.SURROUND { • SOUND TIMER
STEREO _ MODESELECT
31
Ill_ I
I :::::::: • INSTALL SCREENSAVER
FEATURES
TIME
• MODESELECT STARTTIME
• SCREENSAVER STOPTIME
CHANNEL
ACTIVAIE
FEAIURES
• TIMER
• MODESELECT
[I ill_tilll!fflla • ...,.
FEAIURES
• TIMER
• MODESELECT
[ llll_tillklfflt:_ _lllil
FM2 iii !7ii_!!i
ii) ii 7¸ i;!17
104.5 FM
51
Page 52

A utoSound TM allows you to select from
,four factorT-set controls and a personal
control that you set according to your own
preferences through the onscreen Sound menu
within the FM Mode. The four fa_ tolT-set
controls (Classical, Jazz Pop, or Rock) enable
you to tailor the sound so as to enhance the
particular program you are listening to,
SOUND button on the remote control
If in the FM mode, press the AUTO
to display the firstAutoSoundrMoption
on the screen.
Press the AUTO SOUND button
reI_atedly to toggle through the factory
pre-defined setting tbr the following
musical styles: CLASSICAL, JAZZ,
POE ROCK or PERSONAL (the way
you set the equalizer).
120HZ
500HZ
1500HZ
5EHZ
IOKffl
,,_ ®®
PERSONAL
o
dl
-1
0
6
3
120ffl 4
SOOffl 0
ISOOHZ 0
SRHZ 9
IOKHZ 4
120ffl 9
SOOffl 0
ISOOHZ 12
$RHZ I
IOKHZ 4
CLASSI_L
]AZZ
@®®
(b®®
©®®
O
,_5
120ffl 4
SOOff/ 12
I500Hl 0
S_HZ I
IOKHZ 9
120ffl 13
SOOffl 0
I500HZ 0
$RHZ I
_OKHZ 13
POP
ROCK
52
Page 53

Tie HD Mode offers certain Pictur(., Sound
nd Blocking options within its onscreen
menu. Below is a list qf Pictur(_ Menu options.
Press the HD button on the remotecontrol to place the TV in the HD Mode
(HDI),
Press the MENU button on the remotecontrol to display the HD Mode
onscreen menu. The PICTURE option
will be highlighted,
Press the CURSOR UP or DOWN
3
buttons until PICTURE is highlighted,
Press the CURSOR RIGHT button to
4
shift the menu to the left, accessing the
Picture onscreen menu options,
Press the CURSOR UP or DOWN
buttons to highlight any of the HD
5
Mode Picntre Controls. Choose fi'om:
BRIGHTNESS, COLOR, PICTURE,
SHARPNESS, TINT, COLOR TEMP,
or VIEW FORMAT.
BRIGHTNESS - This control will adds
or subtracts light from 1he darkest part of
the pictare.
COLOR - This control adds or elimi-
nates color intensity from the pictare.
PICTURE - This control improves the
detail of the lighlest parts of the pictare.
SHARPNESS - This control improves
the detail in/he pictare,
TINT - This control adjusts Ihe pictare
to obtain na/aral skin tones.
COLOR TEMP - Choose from NOR-
MAL (keeps whites, white), COOL
(makes whiles, bluish), or WARM
(makes whiles, reddish) picture prefer-
ences,
VIEW FORMAT - Choose between the
FULL SCREEN or WIDE SCREEN
formats.
Press the CURSOR RIGHT or LEFT
buttons to adjust the selected control.
Press the STATUS/EXIT button to
remove the onscreen menu from lhe TV
screen when finished, Or, let the display
time out and the menu will disappear
afler a few second,
_EC_U_E
_EC_U_E
58
Page 54

Tw HD Mode also qffMs certain Sound con-
rol a4justments to fine tune the sound being
hearzl when in the HD Mode,
Pre_s the HD button on the remotecontrol to place the TV in the HD Mode
(HDI).
Pre_s the MENU button on the remotecontrol to display the HD Mode
onscreen menu. The PICTURE option
will be highlighted,
Pre_s the CURSOR UP or DOWN
3
buttons until SOUND is highlighted,
Pre_s the CURSOR RIGHT button to
4
shift the menu to the left, accessing the
SOUND onscreen menu options,
buttons to highlight any of the HD
Pre_s the CURSOR UP or DOWN
Mode Sound Controls. Choose from:
EQUALIZER, BALANCE, or AVL,
EQUALIZER - Allows the listener to
change 1he sound frequencies to lheir
liking,
BALANCE - This conlrols the sound
level balance between the right and left
TV sI_akers.
AVL - Automa/ic Volume _veler, when
ON, will keep the volume level at a con-
sistent level should there be sudden
peaks and valleys in sound levels during
commercial breaks or channel changes.
Pre_s the CURSOR RIGHT or LEFT
6
buttons to adjust the selected control.
Pre_s the STATUS/EXIT button to
remove the onscreen menu from lhe TV
7
screen when finished, Or, let the display
time out and the menu will disappear
afler a few second.
SO_B
BLOCKC_AHHEL
P_AIH
_o_z
_VL
_OUHB
EOU_LIZ[R
I$_HZ
SK_Z
_VL I
_O0_Z
_O0_Z
_K_Z
_HCE
54
Page 55

rl_e HD Select Control will allow you to
uicklv change f!'om the HD Mode <_foper-
ation to the TV, FM Radio, or PC Modes,
If in the HD Mode, press the MENUbutton on/he remote control to display
the HD Mode onscreen menu, The PIC-
TURE option will be highlighted.
Pre_s the CURSOR UP or DOWN
buttons until MODE SELECT is high-
lighted.
Press the CURSOR RIGHT button lo
shift the menu to the left displaying the
MODE SELECT options. Choose from
TV MODE, FM RADIO MODE, or
PC MODE.
Press the CURSOR RIGHT button toactivate the highlighted m_×lecontrol.
Ma_
BLOCKC_A_[ L
MN?__EtECT
O
M_E _EtECT
0000
@6@
ooo®
OOO
ooo
ooo
55
Page 56

7_cte HD Mode ckwmel can be blocked to
"ensor tke viewing qf programming not
suitable f!)r ckildrYm. "lb block the HD Mode
chatmel,,f!)llow tke steps below,
Press the HD button on the remotecontrol to place the TV in ihe HD Mode
(HDI),
Press the MENU button on the remotecontrol to display the HD Mode
onscreen menu. The PICTURE option
will be highlighted,
buttons until BLOCK CHANNEL is
Press the CURSOR UP or DOWN
highlighted.
Press the NUMBERED buttons and
4
enier your tbur digit Access Code lhat
was so/up for lhe TV AuioLock l;ea/ure.
The Block Channel Control will be
available for adjustment
Press the CURSOR RIGHT button to
5
Joggle ihe control ON or OFF. If sei to
ON, ihe HDI channel (mode) will not
allow viewing of programs. This control
would have to be sel to OFF to make the
HDI channel (mode) viewable,
...... ;777777777771'_'_'_'_'_'_'_'_'_'_'_'_'_'_'_'_'_'_'_'_'_'_'_'_'_'_'_'_'_
PI_NR[
_OUND
HMOD_SEL_CT
PI_NR[
_OUND
remove ihe onscreen menu from the TV
Press the STATUS/EXIT button to
screen when finished,
@®
56
Page 57

The TV can be used as a PC Monitol: A PC
dee signal mast be present or the TV will
go into standby mode.
Follow the steps below to access and adjust the
onscreen PC Menu controls.
trol to place the TV in the PC Mode.
Press the MENU button on the remote
Press the PC button on the remote con-
control to display the PC Mode onscreen
menu. The AUDIO SELECTION option
will be highlighted.
buttons to highlight any of lhe listed
S Press the CURSOR UP or DOWN
onscreen menu options.
Choose from:
AUDIO SELECTION - Will allow the
Audio Source to come from the PC, the
TV, or the FM Radio,
BRIGHTNESS & CONTRAST -
Allows you to adjust the Brightness and
Contrast picture levels.
ADJUST COLOR - This control allow
you to set the Color Temperature of the
picture. Choose between the Normal,
Cool or Warm pre-defined sellings.
VIDEO NOISE - Will allow you to
remove any flickering Vertical or
Horizontal bars thai may appear on the
screen,
ADJUST POSITION - This control
will allow you tn move the onscreen pic-
ture horizontally or vertically for better
viewing pleasure.
AUTO ADJUST - The Autn Adjust will
automalically adjust the control based on
the signal being received tn give ihe best
possible picture,
PIP CONTROLS - change the Size and
Position of the PIP window on the
screen when the PIP buiion is used,
MODE SELECT - Enter the TV or FM
Mode using this control.
RESET TO FACTORY SETTINGS -
Will reset all setting to the factory
default values.
VIEW FORMATS - Choose between
the NATIVE (the format that is dictated
by the type of accessory device being
used) and WIDE SCREEN formats,
Press the CURSOR RIGHT button toenter the sub-menu of any of the high-
lighted onscreen menu controls,
@OO
©©®
i
i
©
_t_E
I
I
M_Vl
m._ll
I
t_r,u
I
H_TIV[
i, .....
RIGHT or LEFT buttons to navigate,
Use the CURSOR UP, DOWN,
adjust or activate the specific controls.
remove the onscreen menu fi'om the TV
Press the STATUS/EXIT button to
screen when finished.
57
Page 58

No. Resolution
Ref_sh
Rate
Veffical
Sync
Horizontal
Sync
Horizontal
Polarity
Pixel
Frequency
1 640 x 480
2
3
4
5
6 720 x 400
7 800 x 600
8
9
10
11
12 832 x 624
60 Hz
67 Hz
72 Hz
75 Hz
85 Hz
70 Hz
56 Hz
60 Hz
72 Hz
75 Hz
85 Hz
75 Hz
N
N
N
N
N
P
P
P
P
P
P
P
31,500 kHz
35,000 kHz
37,900 kHz
37,500 kHz
43,300 kHz
31,469 kHz
35,100 kHz
37,900 kHz
48,100 kHz
46,900 kHz
53,700 kHz
49,700 kHz
N
N
N
N
N
N
P
P
P
P
P
P
25,175 I'lHz
30,240 I'lHz
31,500 I'lHz
31,500 I'IH
36,000 I'lHz
28,322 I'lHz
36,000 I'lHz
40,000 I'lHz
50,000 I'lHz
49,500 F1Hz
56,250 I'lHz
57,300 I'lHz
13 1024 x 768
14
15
16
17 1152 x 864
18 1280 x 960
19 1280 x 1024
2O
60 Hz
70 Hz
75 Hz
85 Hz
75 Hz
60 Hz
60 Hz
75 Hz
N
N
P
P
P
P
P
P
48,400 kHz
56,500 kHz
60,000 kHz
68,700 kHz
67,500 kHz
60,000 kHz
64,000 kHz
80,000 kHz
N
N
P
P
P
P
P
P
65,000 I'lHz
75,000 I'lHz
78,750 I'lHz
94,500 F1Hz
108,000 I'lHz
108,000 I'lHz
108,000 I'lHz
135,000 I'lHz
G8
Page 59

No Power
• Check the TV power cord, Unplug the TV, wait 10 seconds
then reinsert the plug into the outlet and push the POWER
button again.
• Check that the outlet is not on a wall switch,
• Be sure the t_se is not blown on the AC power strip, if one :s
being used,
No Picture
• Check antenna/cable connections, Are they properly secured
to the TV's ANT 75_2 plug?
• Check the TUNER MODE control fur the correct tuner set-
ting,
• Try running the Auto Program feature to find all available
channels,
• Press the SOURCE button on the remote to make sure the
correct signal source is selected.
• If using an accessory device, be sure that it is functioning
properly,
• If in PC Mode, a video signal MUST BE present or the TV
will turn off,
No Sound
• Check the VOLUME buttons.
• Check the MUTE button on the remole control.
• If you're attempting to hook up auxiliary equipment, check
the audio jack connections.
TV Only Produces MONO Sound
• If using a cable box with RF only tyIm connections, the signal
coming from the cable box will be produced in MONO only;
• Check Sound control setting, Change setting to Slereo,
Remote Does Not Work
• Check the batteries. If necessary, replace them with AA
Heavy Duty (Zinc Chloride) or Alkaline batteries,
• Clean the remote control and the remote control sensor win-
dow on the TV.
• Check the TV power cord. Unplug the TV, wait 10 seconds,
then reinsert the plug into the outlet and push the POWER
button again,
• Be sure the fuse is not blown on the AC power strip, if one is
being used.
• Check to be sure the TV outlet is not on a wall switch.
• Be sure that the remote is in the correct opera/ing mode.
• Be sure the remole is poinled at the Remote Sensor Window
on the TV, See page 1 of the Quick Use Guide for details,
TV Displays Wrong Channel or No Channels Above 13
• Repeat channel selection.
• Add the desired channel numbers (using the CHANNEL
EDIT control) into the TV's memory,
• Check to be sure the TUNER MODES are set to the CABLE
option and mn the Auto Program feature to find all available
channels.
WARNING Concerning Stationary Images on the TV
Screen:
Do not leave stationary or letterbox images on screen
for extended periods of time. This can cause uneven
display aging.
Normal use of the TV should involve the showing of pictures
that contain constantly moving and changing images that fill the
PLACEMENT OF THE TV
• To avoid cabinet warping, cabinet color changes, and
increased chance of set failure, do not place the TV where
tempera/ures can become excessively hot; fur example, in
direct sunlight or near a heating appliance.
• Be sure to allow a free flow of air to and from the perfnrated
back cover of the set,
screen. Be caret_l not to leave nonmoving images on screen fur
extended periods of time, or to display the same images on CLEANING
screen too frequently, because subtle ghost images can he left
on the picture tubes, Sources of stationary images may be DVD
disks, laser disks, video games, CD-i disks, videotapes, digital
television boxes, broadcast channels, cable channels, satellite
channels, and others, Here are some examples of stationary
images (this is not an all-inclusive list; you may encounter
others in your viewing):
• DVD menus---listings of DVD disk content
• ketterbox black bars--shown at Ihe top and bottom of the
TV screen when a wide screen (16:9) movie is viewed on a
TV with standard (4:3) aspect ratio,
• Video-game images and scoreboards
• Television station Iogos--present a problem if they are
bright and sta/ionary; moving or low-contrast graphics are
less likely to cause uneven aging of the picture tube
• Stock-market tickers--presenled at the bottom of the TV
screen °
• Shopping channel Iogos and pricing displays---.-bright
and shown constantly or repeatedly in the same location on
• To avoid possible shock hazard, be sure the TV is unplugged
from the electrical outlet befnre cleaning,
• Regularly dust the TV wilh a dry, nonscra/ching dus/er to
keep the TV clean.
• When cleaning the TV, take care not to scratch or damage the
screen surface. Avoid wearing jewelry or using anything
abrasive, Do not use household cleaners, Wipe the front
screen with a clean cloth dampened with waler. Use even,
easy, vertical strokes when cleaning.
• Gently wipe the cabinet surt3ces with a clean cloth or sponge
dampened in a solution of cool, clear wa/er and a mild soap
or detergent, Use a clean, dry cloth to dry the wiped surfaces.
Do not use acetone, toluene, or alcohol to clean the screen.
Occasionally vacuum the ventila/ion holes or slots in the back
cover of the set,
Never use Ihinners, insecticide sprays, or other chemicals on
or near the cabinet, as they might cause permanent marring
of the cabinet finish,
the TV screen.
59
Page 60

Active Control • Active Control continuously measures and cor-
rects the incoming signals to provide the best picture possible.
Audio/Video Inputs • Jacks (standard RCA), located on the
back of the TV, used tbr ex/emal accessory devices. These jacks
are designed to receive higher picture resolution and offer
sound-connection options.
Incredible Surround • False acoustic management of the audio
signal thai produces a dramatic expansion of the wail of sound
thai surrounds the listener and heightens overall viewing pieas-
ure.
Menu • An onscreen list of feature controls available for you to
adjust or set.
Auto Programming • When activaled, this thamre scans for all
available channels from reguiar antenna or cane signals and
stores only active broadcast stations in the TV's memory.
Channel Edit °The feature that allows you to add or delete
channels from the list of channels stored in the TV's memory.
Closed Captioning • The broadcast standard feature thai allows
you to read the voice content of wlevision programs on the TV
screen. Designed to help the hearing impaired, Closed
Captioning shows dialogue and conversa/ions while a TV pro-
gram is in progress.
Coaxial Cable ° A single solid wire normally matched with a
metal plug (F-type) end connector that screws (or pushes) direct-
ly onto a 75-ohm input fnund on the television or VCR.
Component Video Inputs • Inputs that allow the separate recep-
tion of blue, red, and luminance signals. These inputs provide
the highest possible color and picture resolution in the playback
of digital signal-source material, such as the kind available from
DVD players.
Composite Video Input • An input in which all the components
required fnr displaying the onscreen image are combined in one
signal.
High-definition Television (HDTV) • High-resolution digital
television.
Onscreen Displays (OSD) • The wording or messages generat-
ed by the television (or VCR) to help you wilh specific feature
controls (color adjustment or programming, fnr example).
Remote Control Sensor Window ° The window or opening
found on the television control panel through which infrared
remote control command signals are received,
Second Audio Program (SAP) • An additional audio channel
provided for in the Muitichannel Television Sound (MTS)
broadcast standard. A monaural soundtrack included within the
recorded or video signal (usually containing a second language
translation for the displayed programming),
Status/Exit Button • The remote control function that allows
you to quickly confirm what channel number you are watching.
Status/Exit can also be used to clear the television of onscreen
displays or infnrmation. You can use Status!Exit ralher than hav-
ing to wait tbr the displays to "time out," or automatically disap-
pear from the screen.
S-Video Input • Signal input that allows direct connection of
high-resolution video sources, such as a sa/eliite receiver, DVD
player, S (Super)-VHS videocassetle recorder, or video games.
Provides improved picture resolution, sharpness, and clarity,
Tint • TV function that allows you to change the general color
balance between cool and warm. Adjust tint according to your
personal preference.
6O
Page 61

Cleaning and Care .................................. 59
Factory Service Locations ......................... 62-63
FM Radio Mode Controls
AutoSound TM Control ............................... 52
Install Menu Controls +
Auto Program Control .............................. 46
Language Control ................................. 46
Manual Store Control ........................... 46-47
Name (FM Channel Label) Control ................... 46
Sort Control ................................... 46-47
Mode Select Control ................................ 50
Sereensaver Control ................................ 51
Sound Adjustment Controls"
Audio Out Control ................................. 48
AVL (Auto Volume Leveler) Control .................. 48
Balance Control ................................... 48
Equalizer Controls ................................. 48
Incredible Surround Control ......................... 48
Speaker Control ................................... 48
Stereo Control .................................... 48
Timer Controls .................................... 49
Glossary of Terms .................................. 60
HD Mode Controls
Block Channel Control ............................. 56
HD Installation Control ............................. 55
Mode Select Control ................................ 55
Picture Adjustment Controls ......................... 53
Sound Adjustment Controls +.......................... 54
Index ............................................. 61
PC Mode Controls ............................... 57-58
Registration Information ............................. 2
Safety/Precautions ................................. 3-4
Table of Contents .................................... 5
Troubleshooting Tips ................................ 55
TV Mode Controls
Active Control ..................................... 23
Audio Out Control ................................. 19
A utoChron TM Control ............................... 10
AutoLock Controls
Access Code ..................................... 25
Block Channels ................................... 26
Blocking Options ................................. 30
Clear All Blocked Channels ......................... 27
Movie Ratings .................................... 28
Review Screen .................................... 31
TV Ratings ...................................... 29
Understanding Ihe AntoLock TM Control ................ 24
AutoSound TM Control ............................... 37
Auto Program Control ............................... 8
AutoPicture TM Control .............................. 36
AVL (Auto Volume Leveler) Control ................... 15
Balance Control ................................... 14
Channel Edit (Add or Delete Channels) Control .......... 9
Closed Captioning Control ........................... 32
Equalizer Control .................................. 13
Incredible Surround Control ......................... 16
Language Control ................................... 6
Mode Select Control ................................ 22
Name (Channel Label) Control ....................... 11
Pieture Adjustment Controls + ......................... 12
Program List Control ............................... 34
Remote Control Programming for Accessory Deviees
Accessory Device Remote Control Buttons ............. 45
Code Entry Method ................................ 40
Code List ..................................... 42-44
Direct Access Method .............................. 39
Search Method ................................... 41
SAP (Secondary Audio Programming) Control .......... 18
Sleeptimer Control ................................. 35
Stereo/M ono Control ............................... 17
Surf Control ...................................... 38
Timer Controls .................................... 21
Tuner Mode Control ................................. 7
TV Speaker Control ................................ 20
Widescreen (Screen Format) Control .................. 33
Warranty- ......................................... 64
61
Page 62

\
L
"kIndicates In-Home Sendce Only _--_
Milwaukee:call Chicago
Cincinnatiand Columbus:callCleveland
NashvJl/eand Chattanooga:call Knoxville
Washir_n/BaJUmore: callPhiladelphia
Charlotte:callAUanta
AllFlorida/ocagons;call Tampa
• Indicates In-Home/Cany-ln Sendce
Toll-freenumbersprovidedon the nextpage
Atlanta/N Georgia _ash/IBalt
Tampa/W Flodda
_tRM. Myers/SW Florida
immi/SEFlodda
• Phlladelphla/8 New Jersey
NOTE:If you reside in one of our Philips FactoryService Branch areas (seedirectory on back), you can contact the nearest Service Branch to obtain
efficient and expedient repairfor your product, if your product is In-Warranty, you should have proof-of-purchase to ensureNo ChargeService. For
Out-of-Warranty service, call the location nearest you.
NOTA:Sivous r_sidez dartsune des r6gions desservies par une succursale de service apr_svente du fabricant Philips (voir Iisteci-dessous), vous
pourrez contacter la branche deservice apr_s vente laplus pros dechezvous pour obtenir un service apr_s vente rapide et efficace. Si le produit est
sous garantie, il suffira de pr6senter une preuved'achat pour b6n_ficier d'un service sansfrais. Pour les produits non couverts par la garantie, con-
tactezle centre le plus pros de chezvous.
NOTA:Si Ud.reside en una de nuestraszonas para sucursales Philips de servicio al de f_brica (vet directorio rodsabajo), Ud. puede comunicarse con
la sucursal de servicio m_s cercanapara obtener una reparaci6n oportuna y eficaz de su producto. Si su producto estdtodavia bajo garantfa, Ud.
debe presentar comprobante de compra para no ocasionar ningunos cargos por servicio. Paraservicio despu6s del vencimiento de la garantia, Ilame
al lugar m_s cercano de los abajo indicados.
I_anada
How you can obtain efficient and expedient carry-in, mail-in, or in-home service for your product
Pleasecontact Philips at 1-800-661-6162 (French speaking)
1-800-531-0039 (English or Spanish speaking)
Au Canada
Comment obtenir le service apr_s-vente pour les produits apport6s ou envoy_s par la poste _ notre centre de serviceou le service _domicile
Veuillezcontacter philips i: 1-800-661-6162 (Francophone)
1-800-531-0039 (Anglais ou Espagnol)
Enel Canada1
C6mo recibir servicio efficiente para su producto, en persona, por correo o a domicillo
Favorde comunicarse con Philips ah 1-800-661-6162 (franc6fono)
1-800-531-0039 (Ingles o EspaSol))
Rev GG _ 11/20/2002
62
Page 63

QUALITYSERVICEIS ASCLOSEASYOURTELEPHONE!SIMPLYLOOKOVERTHELISTBELOWFORTHENUMBEROFA FACTORYSERVICECENTER
NEARYOU.YOURPRODUCTWILLRECEIVEEFFICIENTANDEXPEDIENTCARRY-IN_MAIL-IN_ORIN-HOMESERVICE,ANDYOUWILLRECEIVEPEACEOFMIND,
KNOWINGYOURPRODUCTIS BEINGGIVENTHEEXPERTAITENTIONOFPHELPS'FACTORYSERVICE.
COMMENTORTENIRNOTRESERVICEAPRESVENTERAPIDEETEFFICACESOIT PARCOURRER,,_DOMICILE, OUEN SE PRESENTANT,_ON CENTREDESERVICEPNIUPS PLUSDE600 CENTRESDE
RECEPTIONOE PRODOITSA REPARERA TRAVERSLE PAYS:CONTACTERLE CENTREDESERVICEAUXCONSOMMATEURSLEPLUSPROCHEPOURSAVOIRUEMPLACEMENTDECESDEPOTSOANS
UN RAYONDES0 A75 MILES(80 RM ,_120 KM)DU CENTREDESERVICELOCAL,
COMOOBTENERUN SERV[CIOOPORTUNOY EFICIENTEPOR CORREO,ENCASAO ENPERSONAPARASU PRODUCTOA TRAVESDE UNCENTROPNILIPSDESERVICIO MAS DE600 MTIOSPOR
TODOELPAlSPARALARECEPCIONDEPROOUCTOSNECEMTADOSDEREPARACIONES:COMUNICARSECONEL CENTRODE SERVICIODEFABRICAMASCERCANOPARAESTOSLUGARESOENTRO
DE[IN RADIODE 80 A 120 KM {50A 75 MILLAS)DELCENTRODESERVICIOLOCAL
ATLANTA
Philips FactoryService
550 FranklinRoad.,SuiteF
Marietta,GA30067
800-273-1501
TAMPA
Philips FactoryService
1911 US Highway 301 North, Suite100
Tampa,FL 33619
800-442-2027
SANFRANCISCO
Philips FactoryService
681 EastBrokaw Rd.
SanJose,CA95112
800-300-9013
HOUSTON
Philips FactoryService
1110 N. Post Oak Rd.,Suite 100
HDUStDn,TX77055
800-952-3254
CLEVELAND
Philips FactoryService
950 KeynoteCircle
Brooklyn Heights,OH44131
800-331-7037
DETROIT
Philips FactoryService
25173 Dequindre
Madison Heights,MI 48071
800-438-1398
DALLAS
Philips FactoryService
415 N. Main Street,#107
Euless,TX76040
800-952-3254
LOSANGELES
Philips FactoryService
20930 Bonita, Ste.V
Carson,CA 90746
800-300-9013
CHICAGO
Philips FactoryService
1279W. HamiltonPkwy.
Itasca,lL 60143
800-531-2922
KNOXVILLE
Philips FactoryService
OnePhilips Drive
Knoxville,TN37914
800-821-1767
PHILADELPHIA
Philips FactoryService
352 Dunks FerryRd.
Bensalem,PA19020
800-847-9320
63
Page 64

LCD COLOR TELEVISION
One Year Free Labor
One Year Free Replacement of Parts
This product must be carried in for service.
WHO IS COVERED?
You must have proof of purchase to receive warranty service. A sales
receipt or other document showing that you purchased the product is
considered proof of purchase.
WHAT IS COVERED?
Warranty coverage begins the day you buy your product. For one year
thereafter, all parts will be repaired or replaced free, and labor is free.
From one year from the day of purchase, all parts will be repaired or
replaced free, and for all labor charges. After one year from the day of
purchase, you pay for the replacement or repair of all parts, and for
all labor charges.
All parts, including repaired and replaced parts, are covered only for
the original warranty period. When the warranty on the product
expires, the warranty on all replaced and repaired parts also expires.
WHAT IS EXCLUDED?
Your warranty does not cover:
labor charges for installation or setup of the product, adjustment of
customer controls on the product, and installation or repair of
antenna systems outside of the product.
product repair and/or part replacement because of misuse, acci-
dent, unauthorized repair or other cause not within the control of
Philips Consumer Electronics Company
reception problems caused by signal conditions or cable or antenna
systems outside the unit.
a product that requires modification or adaptation to enable it to
operate in any country other than the country for which it was
designed, manufactured, approved and/or authorized, or repair of
products damaged by these modifications.
incidental or consequential damages resulting from the product.
(Some states do not allow the exclusion of incidental or consequen-
tial damages, so the above exclusion may not apply to you. This
includes, but is not limited to, prerecorded material, whether copy-
righted or not copyrighted.)
• a product used for commercial or institutional purposes.
WHERE IS SERVICE AVAILABLE?
Warranty service isavailable in all countries where the product isoffi-
cially distributed by Philips Consumer Electronics Company in coun-
tries where Philips Consumer Electronics Company does not distribute
the product, the local Philips service organization will attempt to pro-
vide service (although there maybe a delay if the appropriate spare
parts and technical manual(s) are not readily available).
HAKE SURE YOU KEEP...
Please keep your sales receipt or other document showing proof of
purchase. Attach it to this owner's manual and keep both nearby
Also keep the original box and packing material in case you need to
returnyour producL
BEFORE REQUESTING SERVICE...
Please check your owner's manual before requesting service.
Adjustments of the controls discussed there may save you a service
call
TO GET WARRANTY SERVICE IN U.S.A.,
PUERTO RICO OR U.S. VIRGIN ISLANDS...
Contact a Philips factory service center (see enclosed list) or author-
ized service center to arrange repair.
(In U.S.A. Puerto Rico and U.S. Virgin islands, all implied warranties,
including implied warranties of merchantability and fitness for a partic-
ular purpose, are limited in duration to the duration of this express
warranty. But, because some states do not allow limitations on how
long an implied warranty may last, this limitation may not apply to
you.)
TO GET WARRANTY SERVICE IN CANADA...
Pleasecontact Philips at:
1-800-661-6162 if callingfrom Canada (French speaking)
1-800-531-0039 (Englishor Spanishspeaking)
(In Canada,this warranty isgiven in lieu of all other warranties. No
other warranties are expressedor implied, including any impliedwar-
ranties of merchantability or fitness for aparticular purpose. Philips is
not liableunder any circumstances for any direct, indirect, special, inci-
dental or consequential damages,howsoever incurred, even if notified
of the possibility of such damages.)
REHEHBER...
Pleaserecord the model and serial numbers found on the product
below. Also, pleasefill out and mail your warranty registration card
promptly It will be easier for usto notify you if necessary.
MODEL#
Printed in China.
SERIAL#
Philips Consumer Electronics, P.O. Box 520890, Miami, FL 33152, (402) 536-4171
64
Page 65

PHILIPS
uick Use and Hookup Guide
Important Notice/Warning ..................... 1
Basic TV Operation .......................... 1
Remote Battery Installation ................... 1
Remote Control Button Descriptions ............ 1
Hooking up the Television
Basic Cable/Cable Box TV Connections ......... 2
Basic Antenna TV Connections ................ 2
AV1 Input Connections ...................... 3
Component Video Input Connections ........... 3
High Definition Input Connections ............. 3
Headphone/Sub-woofer/Data Jacks ............. 3
PC (Monitor) Connection .................... 4
AV2 Input Connections ...................... 4
AV3 Input Connection ....................... 4
Monitor Output Connections .................. 4
IMPORTANT
NOTE: This owner's manual is used with several
different television models. Not all features (and
drawings) discussed in this manual will necessarily
match those found with your television set. This is
normal and does not require that you contact your
dealer or request service.
WARNING: TO PREVENT FIRE OR SHOCK
HAZARD DO NOT EXPOSE THIS UNIT TO
RAIN OR EXCESSIVE MOISTURE.
LCD television has a set of controls located on the top of
Tt 1is
he
cabinet for use when the remote control is not needed.
;7;
Press the POWER button on the fiont of the TV cabinet to
turn the TV ON.
Note: With AutoChron ON, the TV will search for a PBS chan-
nel to set the clock before powering itself on. This can take a
few seconds.
Press the VOLUME + button to increase the sound level or
the VOLUME - button to lower the sound level.
Pressing both buttons at the same time will display the
onscreen menu. After you are in the menu, use these buttons to
make adjustments or selections.
Press the CHANNEL + or - button to select TV channels.
Use these buttons to make adjustments or selections in the
onscreen menu.
There is also a set of Audio and Video Input ,jacks located on both sides
and the bottom of the television cabinet. Refer to the Audio/Video
Hookup sections within this Guide.
o load the stq_plied hatteries into the remote"
, .E.o
Remote Sensor \\redo\\ on the
tront ot the television \\ hen u_lng
the remote control to operate the
television
Remote Control
(sho\\ 11 frolll the bottom)
Volume and Channel buttons are located
on the top of the television cabinet.
Sen_of _,Vl ndo \\
Remote
DC Input located on the
bottom jack panel of the TV
,,_ ',,_,,' _,
Po\\ el" Cord and Adapter
J
Remove the battery compartment door on the back of the
remote.
Place the batteries (2-AA) in the remote. Be sure the I+) and
( ) ends of the batteries line up COtTectly(the inside of the case
is marked).
Reattach the battery compartment door.
PIP Button - When in the PC Mode, pressing the PIP button will bring ug
smaller second screen window to view prognamming while using tt_eTV as a com-
puter monitor.
Accessory Device alal, l, I_, I_l_, It Buttons- Pre_ to rewind,
fasfforward, or pause/freeze a videotape, or DVD.
TV/DVD/ACC Mode S_vitch - Slide to the TV position to control TV func-
tiom to the DVD position to control DVD Player functions, or to the ACC position
to control the functions of accessory devices (a cable converter, DBS, or VCR, for
example).
Program List Button - Pre_ to display a list of channel numbers and their
names. Each channel will appear as a selectable menu item. Refer to the ProgTam
Li,,t section within the Dtmtrtons.lo_ Use manual ,,upplied with the TV for detailed
in,,truction,,.
Sleep Button - Press to set the TV to automatically turn if,elf OFF at a given
amount of time.
TV/VCR (A/CH) Button - TV/VCR Press while in the VCR mode I
indicator on the flont of the VCR will light) to view the playback of a tape. Press
again to place in the TV position (the VCR indicator light will go off) to view one
progTam while recording another progTam. A/CH Press to toggle between the cur-
rently viewed channel and the previou,,ly viewed channel.
Auto Sound Button - Pm,,s to ,,elect an AutoSound zxzcontrol. Choo,,e from
throe factoDr-,,et control,, (VOICE, MUSIC, and THEATRE) and a PERSONAL to
tailor the TV sound to enhance the particular type of progrmn you are watching.
Menu (Select) Button - Pres_ for the on,,creen menu to appear Pms,,ing the
menu button alter menu selection,, are made will eliminate the menu flom the dis-
play.
Active Control Button - Pres,, repeatedly to toggle the Active Control to ON or
OFF. When ON, the sharpness and noise reduction will be continuou,,ly monitored.
Cursor Buttons CLeft,Right, Up, Dmvn) - Pre,, these button_tohighlight,
,,elect, and adju,,t items on tim TV's on,,creen menu.
Volume {+) or {-) Buttons - Pre,,,, to adju,,t the TV ,,ound level.
Mute Button - Pre,s to tuna the TV ,,ound OFF. Pre,,,, again to return tim ,,ound
it,, previous level.
Status/Exit Button - Pres, to ,,ee timcunent channel number on tim TV ,,creen.
Al,,opre,,,, to clear the TV ,,creen after control adju,,nnent,,.
2 "'AA'" Batteries
I...,=1 PROG LIST CLOCK r- - ,.i
TV,VCR SOURCE FORMAT
@®@
q)®@
®®0,,,
STATUS,EXIT SURF
@
Battery Compal'tmer_t Door
\
Battery Compamnent
Button - Press to turn the TV ON and OFF.
Position Button - When using the PC Mode and the PIP window is present
on the screen, press the PoMtion button to move the PIP window to any of the
four corners.
CC Button - Press to select Closed Captioning options wnhin the menu.
(See the DirectionL/or Use manual for details.)
Clock Button - Press the CLOCK bunon to access the onscreen Clock
menu.
Format Button - Press to toggle the different screen format options.
Source Button - Press to toggle between the different AiV Input jack con-
nections and the currently tuned channel.
Picture Button - Press to select an AutoPicture control. Choose
fiom tour factory-set controls (MOVIES, SPORTS, WEAK SIGNAL, and
MULTI MEDIAl and a PERSONAL control that you set according to your
own preferences through the onscreen PICTURE menu. The four factory-set
controls will tailor tl_e TV picture so as to enhance the particular type of pro-
gram you are watching, or to maprove the p_cture of a progranl that has a weak
signal.
TM
Surf. Sound button - Press to set various factory Incredible Surround
Sound hstening modes. (Refer to tl_e Incredible Surround section within tlae
Directions'Jot Use for detailed lnstructions.)
Channel (+) or (-) Buttons - Press to change the tuned channel.
Mode buttons - Press to directly enter a N_ecific mode, use the PC bunon to
place the TV m the PC (computer monitor) mode, press the HD button to
place the TV m the HD (high definition) mode, press the Radio button to place
the TV m the FM Radio mode, or the TV bunon to place the TV back to ns
normal TV mode.
Number Buttons - Press tlae llunlber buttons 1o select TV channels. When
selecting single-digH channels, press the number of the desired channel. The
TV will pause for a few seconds and then tune to the selected channel. (Note:
You can press 0, then the number also.) For channels 100 and above, first
press 1 then the nex:t two numbers of tl_e desired channel.
Surf Button - Press to select previously viewed channels. You can place up
to 10 channels in memory. Then by pressing the SURF burton you can quickly
view the select channels. (See the "'Using the Channel Surf Control" section m
your hwrt_ctionL/or Us'e manual to see how to select a series of channels
tlSi]lg the Surf button.)
Page 66

Direct Cable Connection:
our Cable TV input into your home may be a single (75 ohm)
able or use a cable box decoder. In either case the connec-
tion is very simple. Follow the steps below to connect your cable
signal to your new television.
Direct Cable Connections:
This connection will supply Stereo sound to the TV.
Connect the open end of the round Cable Company sup-
plied cable to the 75f2 input on the bottom of the TV. Screw
it down finger tight.
Cable Box (w/RF In/Outputs):
This connection will NOT supply Stereo sound to the TV. The sound
from the cable box will be mono.
Connect the open end of the round Cable Company sup-
plied cable to the cable signal IN(put) plug on the back of
the Cable Box.
Using a separate round coaxial cable, connect one end to the
OUT(put) (TO TV) plug on the back of the Cable Box.
Cable signal
coming trom
Cable Company
(Round 75ff2
coaxial cable)
Jack Panel Bottom of TV
oo.
F
Cable Box with RF Inputs and Outputs Connection:
Output Channel Switch
1N from the
Cable
Cable Signal
Company
CABLE
IN
TO 'T'V
OUTPUT
CH
3 4
II II
L_J
.+o
Jack Panel Back
of Cable Box
Connect the other end of the round coaxial cable to the
75f2 input on the bottom of the television. Screw it down fin-
ger tight.
NOTE: Be sure to set the OUTPUT CHANNEL SWITCH on the
back of the cable box to CH 3 or 4, then tune the cable box on the
TV to the corresponding channel. Once tuned, change channels at
the cable box, not the television.
Cable Box (w/Audio/Video Outputs):
This connection will supply Stereo sound to the TV.
Connect the open end of the round Cable Company sup-
plied cable to the cable signal IN(put) plug on the back of
the Cable Box.
Using a RCA type Video Cable, connect one end of the
cable to the Video (yellow) (or ANT, your cable box may be
labeled differently) Out jack on the cable box madthe other
end to the Video Input on the bottom of the TV.
Round 75
Coaxial Cable
oo+
Jack Panel Bottom of TV
Cable Box with Audio/Video Outputs Connection:
Cable Signal IN
from the Cable
Company
/
0trOUT
@ ° @@@
CABLE
3 4
TO VIDEO
OUT
HDinput 75 g2r COMP
of Cable Box with A/V Outputs
VmEO
Jack Panel Back
Using a RCA type Audio Left mad Right Cable, connect one
end to the left and right Audio Out L & R jacks (red &
white) on the cable box. Connect the other end to the Audio
L & R Input jacks on the bottom of the TV.
NOTE: Use the SOURCE button on the TV remote control to tune to
the AV1 channel for the cable box signal. Once tuned, change chan-
nels at the cable box, not the television. Pressing the SOURCE button
repeatedly will scroll all the AV Input channels, including the present-
ly tuned chmmel.
A ombination antenna receives normal broadcast chan-
nels (VHF 2-13 and UHF 14-69). Your connection is
easy because there is only one 75Q (ohm) antenna plug on
the back of your TV, and that's where the antenna goes.
If your antenna has a round cable (75 ohm) on the end,
then you're ready to connect it to the TV.
If your antenna has fiat, twin-lead wire (300 ohm), you
first need to attach the antenna wires to the screws on a
300- to 75-ohm adapter.
Video Cable,
Jack Panel Bottom of TV
Antenna Connection:
Outdoor or Indoor Antenna
(Combination VHF/UHF)
The combination antenna receives normal
broadcast channels 2-13 (VHF) and 14-69 (UHF).
\_X_//_/'/////_///_ 300_d7p5t;oh m
Audio Cables
L & R (Red, White)
Jack Panel
Bottom of TV
Push the round end of the adapter (or antenna) onto the
75ff2 (ohm) plug on the bottom of the TV. If the round end
of the antenna wire is threaded, screw it down finger tight.
Twin _XII __ _
Lead Wire I K,j¢@_' I
t I
Round 75_
Coaxial Cable
from Antenna
Page 67

e audio/video input jacks on the bottom panel of the TV am
r direct picture and sound connections between the TV and
a VCR (or similar device) that has audio/video output jacks.
AVl
Connect the VIDEO (yellow) cable to the VIDEO AV1 injack on the bottom of the TV.
Connect the AUDIO (red and white) cables to the
AUDIO (left and right) AV1 in jacks on the bottom of the
TV.
Connect the VIDEO (yellow) cable to the VIDEO OUTjack on the back of the VCR or accessory device being
used.
Connect the AUDIO (red and white) cables to the
AUDIO (left and right) OUT jacks on the rear of the VCR
or accessory device being used.
Turn the VCR or accessory device and the TV ON.
Press the SOURCE button on the remote control to select
the AV1 channel for the accessory device. AV1 will appear
in the upper left corner on the TV screen when tuned prop-
erly.
With the VCR (or accessory device) ON and a prerecorded
7
tape (CD, DVD, etc.) inserted, press the PLAY button to
view the tape on the television.
omponent Video inputs provide the highest possible color and
ictum resolution in the playback of digital signal source
material, such as with DVD players.
Connect the Component (Y, Pb, Pr) Video OUT jacks
from the DVD player (or similar device) to the
COMP(onent) VIDEO Input (Y green, Pb blue, Pr red)
jacks on the bottom of the TV. When using the Component
Video Inputs, it is best not to connect a signal to the AV1 in
Video Jack.
Connect the red and white AUDIO CABLES to theAudio (left and right) output jacks on the rear of the acces-
sory device to the Audio (L and R) AV 1 in Input Jacks on
the TV.
Turn the TV and the DVD (or digital accessory device)
ON.
3
Press the SOURCE button to scroll the available chan-
nels until CVI appears in the upper left corner of the TV
screen.
CVl
I
®®®@
I
ooo6
0@@
@@@
@@@
'©*'®©
]
AUDIO CABLES
(RED/%VH1TE)
S VIDEO VIDEO
@@
OUT OUT
@
AUDIO IN
ANT/CABLE 8-VIDEO R VIDEO
OUT OUT AUDIO OUT OUT
VIDEO IN (YELLOW)
BACK OF VCR
(o1" Accessory device)
VCR (or accessory device)
(EQUIPPED WITH VIDEO AND
AUDIO OUTPUT JACKS)
The CVI connection
will be dominate over
the AV 1 in Video Input.
When a Component
Video Device is con-
nected as described, it is
best not to have a video
signal connected to the
AV 1 in Video Input
jack.
ACCESSORY DEVICE
EQUIPPED WITH COMPO-
NENT VIDEO OUTPUTS.
Insert a DVD disc into the DVD player and press thePLAY ml_button on the DVD Player.
your using a High Definition receiver that can transmit high
efinition programming, the TV can except those signals
through the HD Inputs located on the bottom of the TV.
Connect the Component (Y, Pb, Pr) Video OUT jacks
from the HD Receiver (or similar device) to the HD (Y, Pb,
Pr)input jacks on the bottom of the TV.
Connect the red and white AUDIO CABLES to theAudio (left and right) output jacks on the rear of the HD
Receiver to the Audio In (PC/HD) Input Jacks on the bot-
tom of the TV.
Turn the TV and the HD Receiver ON.
Press the HD Mode button to set the TV into the HD
Mode and tune to the HD signal.
Note: The Audio/Video cables needed for this connection are not
supplied with your TV. Please contact your dealer or Philips at
800-531-0039 for information about purchasing the needed
cables.
ital accessory owner's manual for definitions and connection details.
HD 1
AUDIO _,,t_ Satellite
CABLES
1 \ i • I
0_o ®®
®®@1
RF PR_ _ _T _2 .... _,N
Rear of HD Receiver Coaxial Cable Lead-in
(Illustration is for reference only. from Cable Outlet,
Your HD Receiver's jack panel will Cable Converter Box,
look and be labelled different.) or VHF/UHF Antenna
BO_fTOM OF TV
Coaxial Cable
Lead-in
from
"'e'v Dish Antenna
HD RECEIVER
EQUIPPED WITH COMPONENT
VIDEO OUTPUTS.
e left side ,lack Panel contains three.jacks that can be used
r your convenience. They include a Headphone ,lack, a Sub-
Woofer ,lack, and a Data ,lack.
HEAD PHONE JACK - Used for headphone listening in
any of the available modes. When headphones are connect-
ed to this jack the TV speakers will be muted.
SUB-WOOFER JACK - An external Sub-woofer speakercan be connected to the TV at this jack. This would pro-
vide for a deeper bass sound.
DATA JACK - This jack is used in service applicationsand should not be used by the customer.
TV VIEWED FROM THE BACK
Page 68

iS TV can be used as a PC Monitor. Your computer will have
be equipped with a VGA type video output and VGA cable.
Connect one end of the VGA Video cable to the Monitor
(video) output on the computer to the PC Input (VGA) jack
on the bottom of the TV.
Although audio connections are not required, the TV can
reproduce the computers audio out by an AUDIO
ADAPTER to the Audio output jack on the computer (if
available) while connecting the other ends of the Audio
cables to the Audio In left and right (PC/HD) Input Jacks
on the bottom of the TV.
Turn the TV and the Computer ON.
Press the PC Mode button to set the TV into the HD
Mode and tune to the computer's signal.
VGA CABLE
BOTTOM OF TV
AUDIO
ADAPTER_
Audio Out /
VGA/FtGB ]
PC with VIDEO VGA OUT
Note: Please contact your dealer or Philips at 800-531-0039 for
information about purchasing the needed cables.
ere are Audio/Video Input.lacks located on both sides of the TV
cated under removable panels. These.jack allow for extra acces-
sory device connections for items such as cameras or gaming stations.
Connect the VIDEO (yellow) cable to the VIDEO AV2 injack on the left rear of the TV. Connect the other end of the
VIDEO (yellow) cable to the VIDEO OUT jack on the back of
the accessory device being used. Note: An S-Video cable can
be used in place of the yellow Video cable if your device is
equiped with an S-Video Output. S-Video provides better video
playback.
Connect the AUDIO (red and white) cables to the AUDIO(left and right) AV2 in jacks on the left rear of the TV. Connect
the other ends of the AUDIO (red and white) cables to the
AUDIO (left and righ0 OUT jacks on the rear of the accessory
device being used.
Turn the accessory device and the TV ON.
Press the SOURCE button on the remote control repeatedly
to select the AV2 channel for the accessory device, AV2 will
appear in the upper left comer on the TV screen when tuned
properly,
With the accessory device ON, press the PLAY button to acti-
5
vate the playback on the television,
®®
®®®
®®
_°°0®
®®@@
@®®
®®®
@®@
©
AN S-VIDEO CABLE CAN BE
USED IN PLACE OF THE
YELLOW VIDEO CABLE IF
BACK LEFT OF TV
DESIRED.
JACK PANEL
out
VlOEOout Vl_nE0
Monitor AV2
out in
AUDIO CABLES
(Left and Right)
ACCESSORY DEVICE
(Camera., DVD, VCR, etc.)
VIDEO CABLE
AUDIO VIDEO
RIGHT LEFT S-VIDEO
ACCESSORY DEVICE
JACK PANEL
Ch like the AV2 jacks', the AV3.jacks" allow _br extra accessory
vice connections for items such as cameras or gaming stations.
The AV3 Input Jacks am located on the right mar of the TE.
Connect the VIDEO (yellow) cable to the VIDEO AV3 in jackon the fight rear of the TV. Connect the other end of the
VIDEO (yellow) cable to the VIDEO OUT jack on the back of
the accessory device being used. Note: An S-Video cable can be
used in place of the yellow Video cable if your device is equiped
with an S-Video Output. S-Video provides better video playback.
Connect the AUDIO (red and white) cables to the AUDIO
(left and right) AV2 in jacks on the right rear of the TV. Connect
the other ends of the AUDIO (red and white) cables to the
AUDIO (left and right) OUT jacks on the rear of the accessory
device being used.
Turn the accessory device and the TV ON.
Press the SOURCE button on the remote control repeatedly to
select the AV3 channel for the accessory device. AV3 will appear
in the upper left corner on the TV screen when tuned properly.
With the accessory device ON, press the PLAY button to acti-vate the accessory device (DVD, VCR, CAMERA, etc.) and
view the playback on the television.
TVCRe Monitor Mudio/Video) out jacks are groat for recording with a
or used to connect an external audio system for better audio.
For Audio System Connection:
Audio System
Connection:
®®®
@®@
@©
AN S-VIDEO CABLE CAN BE
USEDIN PLACE OFTHE
YELLOW VIDEO CABLEIF
DESIRED.
AUDIO
CABLES
(Left and
Right)
ACCESSORY DEVICE
(Camera., DVD, VCR, etc.)
VIDEO CABLE
ACCESSORY DEVICE
JACK PANEL
AUDIO CABLES
(Red & White)
Connect one end of the R(ight) and L(eft) AUDIO (MonitorOut) jacks located on the right rear of the TV to the R and L
audio input jacks on your sound system. Refer to the AUDIO
OUT control within the Directions for Use for FIXED or VARI-
ABLE settings.
Turn the TV and audio system ON. TV sound can be heardthrough the audio system
For Second VCR Connection/Recorder:
The following steps allow you to connect a VCR to record the pro-
gram while your watching it.
out VIDEO OUT plug on the left rear of the TV. Connect the
Connect one end of the yellow Video Cable to the Monitor
other end to the VIDEO IN plug on the second VCR.
Connect one end of the red and white Audio cable from theMonitor out L and R plugs on the left rear of the TV to the
AUDIO IN plugs on the VCR.
S Turn the VCR ON, insert a black VHS tape and it's ready torecord what's being viewed on the TV screen.
AV OUT
AUDIO L(eft) and R(ight)
Second VCR
Connection/Recorder:
AUDIO SYSTEM
with AUDIO INPUTS
Monitor OUT
VIDEO &AUDIO
L(eft) and R(ight)
VIDEO CABLE
(Yellow)
JACK PANEL
Located on the back left of the
TV
SECOND VCR
AUDIO CABLES (Red & White)
4
Page 69

15" LCD FlatTV_
HDTV Monitor
• Active Control TM
• High Definition Monitor (I080i, 720p) displayed as 720p
• 3 Line Digital Comb Filter
• Digital Crystal Clear III TM
• NTSC Tuner
• Built-in speakers with 6 watts RMS
• Flexible inputs: HD Component and VGA (WXGA Resolution)
• Built-in FM Radio with 40 presets
Page 70

15" LCD FlatTV TMHDTV Monitor
Picture Quality
High Definition Capable
The high resolution of this LCD FlatTVTM [2.4 million pixels - 1024 x 768 (x3)] means that
all of today's highest quality signals will 100k their best when displayed on this set. Sim#_
connect to any HDTV decoder (DBS, Cable, or off air) to experience HDTV at it's best.
3 Line Digital Comb Filter
For the highest possible picture quality from R/F or Composite connections. Virtually
eliminates horizontal and vertical hanging dots as well as dot crawl.
Sound Quality
6 watt RMS Stereo Speakers
Exciting and lifelike sound
Digital Crystal Clear III TM
A powerful package of picture innovations including Dynamic Contrast and advanced
10 bit processing, DCC III offers 30% more contrast, more natural colors, and higher
levels of detaiL
• Response Time: LCD: 25ms
• Brightness: 450 cd/m 3 (nits)
• Contrast Ratio: 350:1
• Viewing Angle: 176h/176V
Ease of Use
Active Control TM
By continually adjusting picture settings over 60 times per second, Active
Control Plus ensures that the viewing experience is always optimal.
VESA Standard mounting pattern
VESA pattern guarantees compatibility with hundreds of innovative
mounting solutions.
16:9 Compress Widescreen Mode
Built in NTSC Tuner
Picture in Graphic
100 preset television channels/40 Preset radio channels
Direct access to HD/VGA/Video Inputs.
Top Controls
Universal Remote (VCR/DVD/SAT/Audio/CD-R)
Auto Surf TM List
Channel Auto-Programming
English/French/Spanish menu
240-minute Sleep Timer
Closed Caption viewing
This television receiver provides display of television closed captioning in
accordance with 15.119 of the FCC rules.
RCAU_39
FM Radio Built In
A radio is included capable of storing 40 FM presets. On-Screen naming
makes navigation simple and a handy Clock Screensaver is also included
for use while listening.
Auto Volume Leveler
Connectivity
1 Set of HD Component Video Inputs
1 set of SD Component Video Inputs
Stereo AV inputs and outputs
VGA Input (up to XGA 1280 x 768 60-75 Hz)
Subwoofer output
Side S-Video and stereo AV inputs
Headphone out (3.5ram)
rear jack panel
,_ right jack
....................... panel
left jack
panel
UPC:
Product Dimensions:
Product Weight:
Carton Dimensions:
Carton Weight:
Carton contains:
• Country of Origin:
0 37849 93413 5
18.9"W x 12.1"H x 2.6"D
13.7 Ibs.
23.1"W x 16.7"H x 9.49"D
17.6 Ibs.
Remote Control w/batteries, operating
instructions, warranty information
China
AutoSound TM, AutoPicture TM, AutoMute TM, AutoLock TM,
ActiveControl TM, FlatTV TM,and Digital Crystal Clear III TMare
trademarks of Philips Consumer Electronics Company
Printed in the U.S.A.
@2003 Philips Consumer Electronics Company
Specifications subject to change without notice.
www.philips.com or AOL keyword: philips
 Loading...